

Operating Instructions
Printer Reference
Getting Started
Preparing the Machine
Setting Up the Printer Driver
Other Print Operations
Printer Features
Using the Document Server
The Functions and Settings of the Machine
Appendix
Read this manual carefully before you use this machine and keep it handy for future reference. For safe and correct use, be sure to read the Safety
Information in the "General Settings Guide" before using the machine.

Introduction
This manual contains detailed instructions and notes on the operation and use of this machine. For your
safety and benefit, read this manual carefully before using the machine. Keep this manual in a handy
place for quick reference.
Important
Contents of this manual are subject to change without prior notice. In no event will the company be liable for direct, indirect, special, incidental, or consequential damages as a result of handling or operating the machine.
Do not copy or print any item for which reproduction is prohibited by law.
Copying or printing the following items is generally prohibited by local law:
bank notes, revenue stamps, bonds, stock certificates, bank drafts, checks, passports, driver's licenses.
The preceding list is meant as a guide only and is not inclusive. We assume no responsibility for its
completeness or accuracy. If you have any questions concerning the legality of copying or printing certain items, consult with your legal advisor.
Warning
Use of controls or adjustment or performance of procedures other than those specified in this manual
might result in hazardous radiation exposure.
Two kinds of size notation are employed in this manual. With this machine refer to the inch version.
Trademarks
®
Microsoft
, Windows® and Windows NT® are registered trademarks of Microsoft Corporation in the
United States and/or other countries.
®
, PostScript®, Acrobat®, PageMaker® and Adobe Type Manager are registered trademarks of
Adobe
Adobe Systems Incorporated.
®
PCL
is a registered trademark of Hewlett-Packard Company.
AppleTalk, Apple, Macintosh and Mac OS are registered trademarks of Apple Computer, Incorporated.
IPS-PRINT™ Printer Language Emulation Copyright© 2000, Oak Technology, Inc., All Rights Reserved.
UNIX is a registered trademark in the United States and other countries, licensed exclusively through
X/Open Company Limited.
®
Bluetooth
is a registered trademark of Bluetooth-SIG Inc. worldwide.
Other product names used herein are for identification purposes only and might be trademarks of their
respective companies. We disclaim any and all rights to those marks.
The proper names of the Windows operating systems are as follows:
• The product name of Windows® 95 is Microsoft® Windows® 95
• The product name of Windows
• The product name of Windows
• The product name of Windows
• The product name of Windows
• The product names of Windows Server™ 2003 are as follows:
Microsoft
Microsoft
Microsoft
Microsoft
Microsoft
Microsoft
Microsoft
®
Windows® 2000 Professional
®
Windows® 2000 Server
®
Windows® 2000 Advanced Server
®
Windows® XP Home Edition
®
Windows® XP Professional
®
Windows Server™ 2003 Standard Edition
®
Windows Server™ 2003 Enterprise Edition
®
98 is Microsoft® Windows® 98
®
Me is Microsoft® Windows® Millennium Edition (Windows Me)
®
2000 are as follows:
®
XP are as follows:
Microsoft® Windows Server™ 2003 Web Edition
®
• The product name of Windows NT
Microsoft
®
Windows NT® Workstation 4.0
4.0 are as follows:
Microsoft® Windows NT® Server 4.0
Notes
Some illustrations in this manual might be slightly different from the machine.
Certain options might not be available in some countries. For details, please contact your local dealer.

TABLE OF CONTENTS
Manuals for This Machine.....................................................................................1
How to Read This Manual .....................................................................................3
1. Getting Started
Control Panel..........................................................................................................5
Display Panel .............................................................................................................7
User Authentication...............................................................................................9
User Code Authentication (Using the Control Panel).................................................9
User Code Authentication (Using a Printer Driver) ....................................................9
Login (Using the Control Panel).................................................................................9
Logoff (Using the Control Panel)..............................................................................10
Login (Using a Printer Driver)...................................................................................10
Connecting the Machine .....................................................................................11
Requirements...........................................................................................................11
Connecting the machine to the host using a USB cable ..........................................11
Connecting the Machine to the host using the parallel cable/IEEE 1394 (SCSI print) cable ... 12
Connecting to the Ethernet Interface .......................................................................13
Setting Paper on the Bypass Tray......................................................................14
Setting custom size paper........................................................................................16
Setting thick paper or OHP transparencies..............................................................17
2. Preparing the Machine
Quick Install..........................................................................................................19
Confirming the Connection Method...................................................................21
Network Connection.................................................................................................21
Local Connection .....................................................................................................24
Using the SmartDeviceMonitor for Client Port..................................................25
Installing SmartDeviceMonitor for Client..................................................................25
Installing the PCL or RPCS Printer Driver (TCP/IP).................................................26
Installing the PCL or RPCS Printer Driver (NetBEUI) ..............................................28
Installing the PCL or RPCS Printer Driver (IPP) ......................................................30
Changing the Port Settings for SmartDeviceMonitor for Client................................32
Using the Standard TCP/IP Port .........................................................................34
Installing the PCL or RPCS Printer Driver................................................................34
Using the LPR Port..............................................................................................36
Installing the PCL or RPCS Printer Driver................................................................36
Using as the Windows Network Printer.............................................................38
Installing the PCL or RPCS Printer Driver................................................................38
Using as the NetWare Print Server/Remote Printer..........................................40
Form Feed................................................................................................................42
Banner Page ............................................................................................................42
Printing after Resetting the Printer ...........................................................................42
i

Installing the Printer Driver Using USB .............................................................43
Windows 98 SE/Me - USB .......................................................................................43
Windows 2000 - USB...............................................................................................45
Windows XP, Windows Server 2003 - USB.............................................................46
Troubleshooting USB...............................................................................................47
Printing with Parallel Connection.......................................................................48
Installing the PCL or RPCS Printer Driver................................................................48
Installing the Printer Driver Using IEEE 1394 (SCSI print)...............................50
Windows 2000..........................................................................................................50
Windows XP, Windows Server 2003........................................................................52
Printing with Bluetooth Connection...................................................................54
Supported Profiles....................................................................................................54
Printing with Bluetooth Connection ..........................................................................54
If a Message Appears during Installation..........................................................57
Making Option Settings for the Printer..............................................................58
Conditions for Bidirectional Communication ............................................................58
If Bidirectional Communication is Disabled ..............................................................60
Installing Font Manager 2000..............................................................................61
Using Adobe PageMaker Version 6.0, 6.5, or 7.0 .............................................. 62
3. Setting Up the Printer Driver
PCL - Accessing the Printer Properties ............................................................. 63
Windows 95/98/Me - Accessing the Printer Properties ............................................63
Windows 2000 - Accessing the Printer Properties ...................................................64
Windows XP, Windows Server 2003 - Accessing the Printer Properties .................66
Windows NT 4.0 - Accessing the Printer Properties ................................................68
RPCS - Accessing the Printer Properties..........................................................70
Windows 95/98/Me - Accessing the Printer Properties ............................................70
Windows 2000 - Accessing the Printer Properties ...................................................72
Windows XP, Windows Server 2003 - Accessing the Printer Properties .................74
Windows NT 4.0 - Accessing the Printer Properties ................................................76
ii

4. Other Print Operations
Printing a PDF File Directly.................................................................................79
Printing Method........................................................................................................79
Using Locked & Sample Print Job List ..............................................................80
Sample Print.........................................................................................................82
Printing a Sample Print File......................................................................................82
Deleting a Sample Print File.....................................................................................84
Checking the Error Log ............................................................................................84
Locked Print .........................................................................................................86
Printing a Locked Print File ......................................................................................86
Deleting Locked Print Files ......................................................................................87
Checking the Error Log ............................................................................................88
Collate...................................................................................................................89
Printing with the Finisher....................................................................................91
Staple .......................................................................................................................92
Punch .......................................................................................................................96
Spool Printing ......................................................................................................98
Covers...................................................................................................................99
Slip Sheet............................................................................................................103
User Defined Pages ...........................................................................................104
Form Feed...........................................................................................................105
Print Using a Selected Tray ...................................................................................105
Canceling Form Feed.............................................................................................106
Canceling a Print Job ........................................................................................107
Windows - Canceling a Print Job ...........................................................................107
5. Printer Features
Printer Features Menu.......................................................................................109
Adjusting Printer Features................................................................................112
Printer Features Parameters.............................................................................113
List / Test Print .......................................................................................................113
Maintenance...........................................................................................................115
System ...................................................................................................................115
Host Interface.........................................................................................................118
PCL Menu ..............................................................................................................119
PS Menu ................................................................................................................120
PDF Menu ..............................................................................................................121
6. Using the Document Server
Accessing the Document Server......................................................................123
iii

7. The Functions and Settings of the Machine
Mainframe...........................................................................................................125
Functions................................................................................................................125
Interface .................................................................................................................125
List of the Setting Items ....................................................................................126
Web Image Monitor................................................................................................126
telnet ......................................................................................................................128
UNIX.......................................................................................................................128
Settings that can be used with PostScript 3...........................................................129
8. Appendix
Software and Utilities Included on the CD-ROM.............................................131
Printer Drivers for This Printer................................................................................132
SmartDeviceMonitor for Admin ..............................................................................134
SmartDeviceMonitor for Client ...............................................................................135
Troubleshooting.................................................................................................137
Error & Status Messages on the Display Panel .....................................................137
Checking the Error Log ..........................................................................................141
The Machine Does Not Print ..................................................................................142
Other Printing Problems.........................................................................................145
System Settings (Parallel Connection)............................................................150
Precautions when using Windows Server 2003.............................................. 151
Precautions when using the Terminal Server mode ..............................................151
Specifications.....................................................................................................152
Options...................................................................................................................154
INDEX....................................................................................................... 156
iv

Manuals for This Machine
The following manuals describe the operational procedures of this machine. For
particular functions, see the relevant parts of the manual.
Note
❒ Manuals provided are specific to machine type.
❒ Adobe Acrobat Reader/Adobe Reader is necessary to view the manuals as a
PDF file.
❒ Two CD-ROMs are provided:
• CD-ROM 1“Operating Instructions”
• CD-ROM 2“Scanner Driver and Document Management Utility”
❖❖❖❖ General Settings Guide
Provides an overview of the machine and describes System Settings(such as
Tray Paper Settings), Document Server functions and troubleshooting.
Refer to this manual for Address Book procedures such as registering fax
numbers, e-mail addresses, and user codes.
❖❖❖❖ Security Reference
This manual is for administrators of this machine. It describes security functions that the administrators can use to protect data from being tampered, or
prevent the machine from unauthorized use. Also refer to this manual for the
procedures for registering administrators, as well as setting user and administrator authentication.
❖❖❖❖ Network Guide (PDF file - CD-ROM1)
Provides information about configuring and operating the printer in a network environment or using software. This manual covers all models, and
therefore contains functions and settings that may not be available for your
model.
Images, illustrations, functions, and supported operating systems may differ
from those of your model.
❖❖❖❖ Copy Reference
Describes operations, functions, and troubleshooting for the machine’s copier
function.
❖❖❖❖ Facsimile Reference <Basic Features>
Describes operations, functions, and troubleshooting for the machine's facsimile function.
❖❖❖❖ Facsimile Reference <Advanced Features>
Describes advanced facsimile functions such as line settings and procedures
for registering IDs.
❖❖❖❖ Printer Reference (this manual)
Describes system settings, operations, functions, and troubleshooting for the
machine’s printer function.
1

❖❖❖❖ Scanner Reference (PDF file - CD-ROM1)
Describes operations, functions, and troubleshooting for the machine’s scanner function.
❖❖❖❖ Manuals for DeskTopBinder Lite
DeskTopBinder Lite is a utility included on the CD-ROM labeled “Scanner
Driver and Document Management Utility”.
• DeskTopBinder Lite Setup Guide (PDF file - CD-ROM2)
Describes installation of, and the operating environment for DeskTopBinder Lite in detail. This guide can be displayed from the [Setup] dialog
box when DeskTopBinder Lite is installed.
• DeskTopBinder Introduction Guide (PDF file - CD-ROM2)
Describes operations of DeskTopBinder Lite and provides an overview of
its functions. This guide is added to the [Start] menu when DeskTopBinder
Lite is installed.
• Auto Document Link Guide (PDF file - CD-ROM2)
Describes operations and functions of Auto Document Link installed with
DeskTopBinder Lite. This guide is added to the [Start] menu when DeskTopBinder Lite is installed.
❖❖❖❖ Other manuals
• PostScript 3 Supplement (PDF file - CD-ROM1)
• UNIX Supplement (available from an authorized dealer, or as a PDF file on
our Web site)
2

How to Read This Manual
R
R
Symbols
In this manual, the following symbols are used:
WARNING:
This symbol indicates a potentially hazardous situation which, if instructions
are not followed, could result in death or serious injury.
CAUTION:
This symbol indicates a potentially hazardous situation which, if instructions are
not followed, may result in minor or moderate injury, or damage to property.
* The statements above are notes for your safety.
Important
If this instruction is not followed, paper might misfeed, originals might be damaged, or data might be lost. Be sure to read this.
Preparation
This symbol indicates prior knowledge or preparation is required before operation.
Note
This symbol indicates precautions for operation, or actions to take after mal-operation.
Limitation
This symbol indicates numerical limits, functions that cannot be used together,
or conditions in which a particular function cannot be used.
Reference
This symbol indicates a reference.
[]
Keys and buttons that appear on the computer's display.
Keys that appear on the machine's display panel.
{}
Keys built into the machine's control panel.
Keys on the computer's keyboard.
3

4
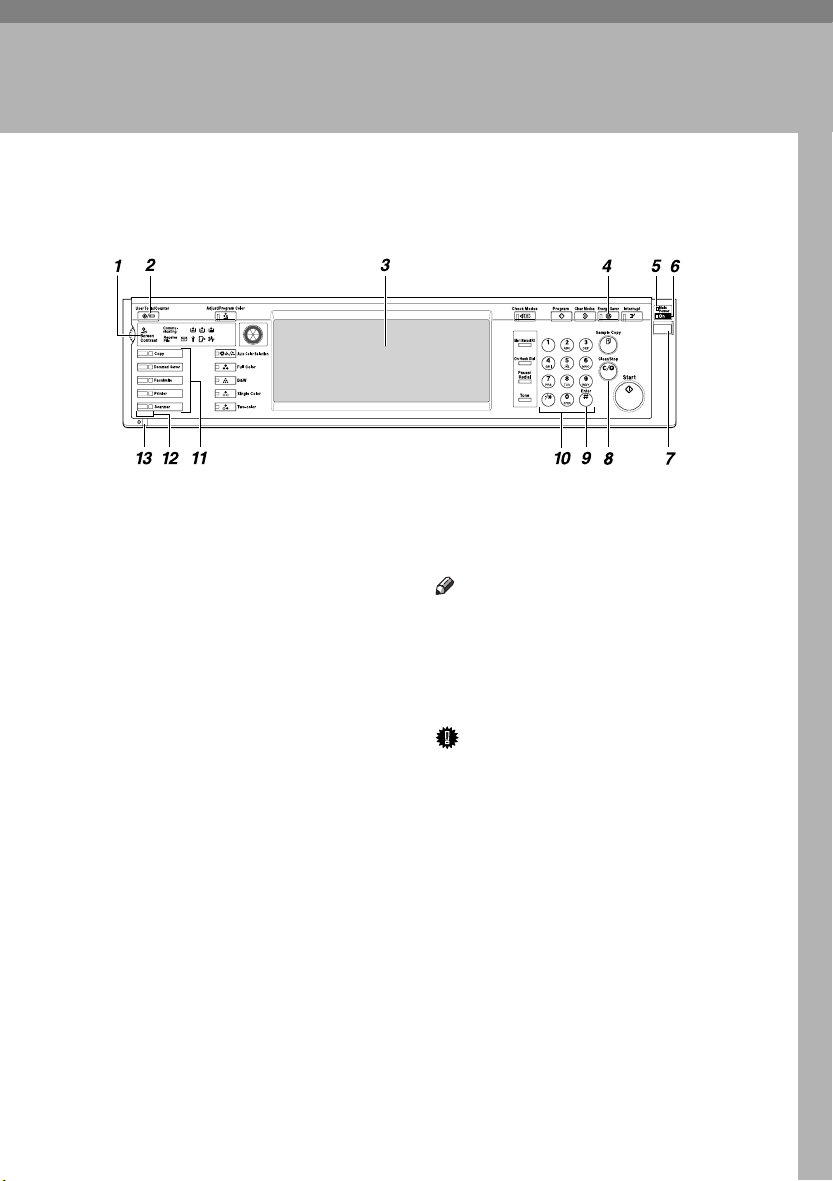
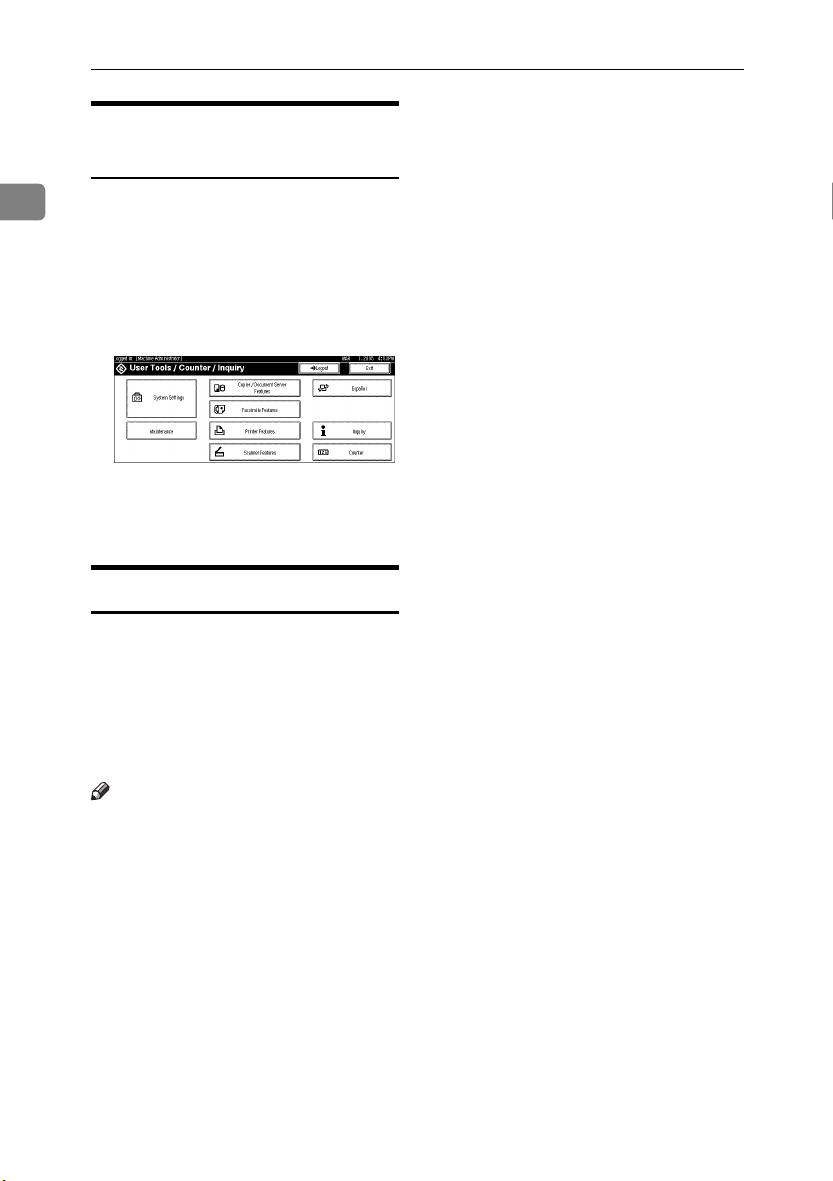
Control Panel
1. Getting Started
AEU041S
1.
Indicators
Displays errors and machine status.
d: Add Staples indicator
D: Add Toner indicator
B: Load Paper indicator
L: Service Call indicator
M: Open Cover indicator
x: Misfeed indicator
See "Control Panel", General Settings
Guide.
2. {
{User Tools/Counter}}}} key
{{
• User Tools
Press to change default settings and
conditions to your requirements.
• Counter
Press to display or print the total
number of copies made.
3.
Display panel
Displays operation status, error messages, and function menus. See p.7 “Display
Panel”.
4.
{{{{Energy Saver}}}} key
Press to switch to and from Energy Saver
Mode.
Note
❒ This key is ineffective during System
Settings (User Tools) operations.
5.
Main power indicator
This indicator lights when the main power switch is turned on.
Important
❒ Do not turn off the main power
switch while the On indicator is lit
or blinking. Doing so may damage
the hard disk.
6.
On indicator
This indicator lights when the operation
switch is turned on.
7.
Operation switch
Press this switch to turn the power on
(the On indicator goes on). To turn the
power off, press this switch again (the On
indicator goes off).
5

Getting Started
8.
{{{{Clear/Stop}}}} key
Press to cancel the entered data.
9.
{{{{#}}}} key
Press after entering a value.
1
10.
Number keys
Press to enter a value for various settings.
11.
Function keys
Press to switch between the “Copy” ,
“Document Server”, “Fax”, Printer”, and
“Scanner” screens.
The indicator for the selected function
lights.
12.
Function status indicators
These show the status of the above functions:
• Green: the function is active.
• Red: the function has been interrupt-
ed.
13.
mmmm: Data In indicator
The Data In indicator shows the status of
data reception from a computer.
• This indicator blinks when data is being received.
• This indicator lights when there is
data remaining to be printed.
6
Control Panel
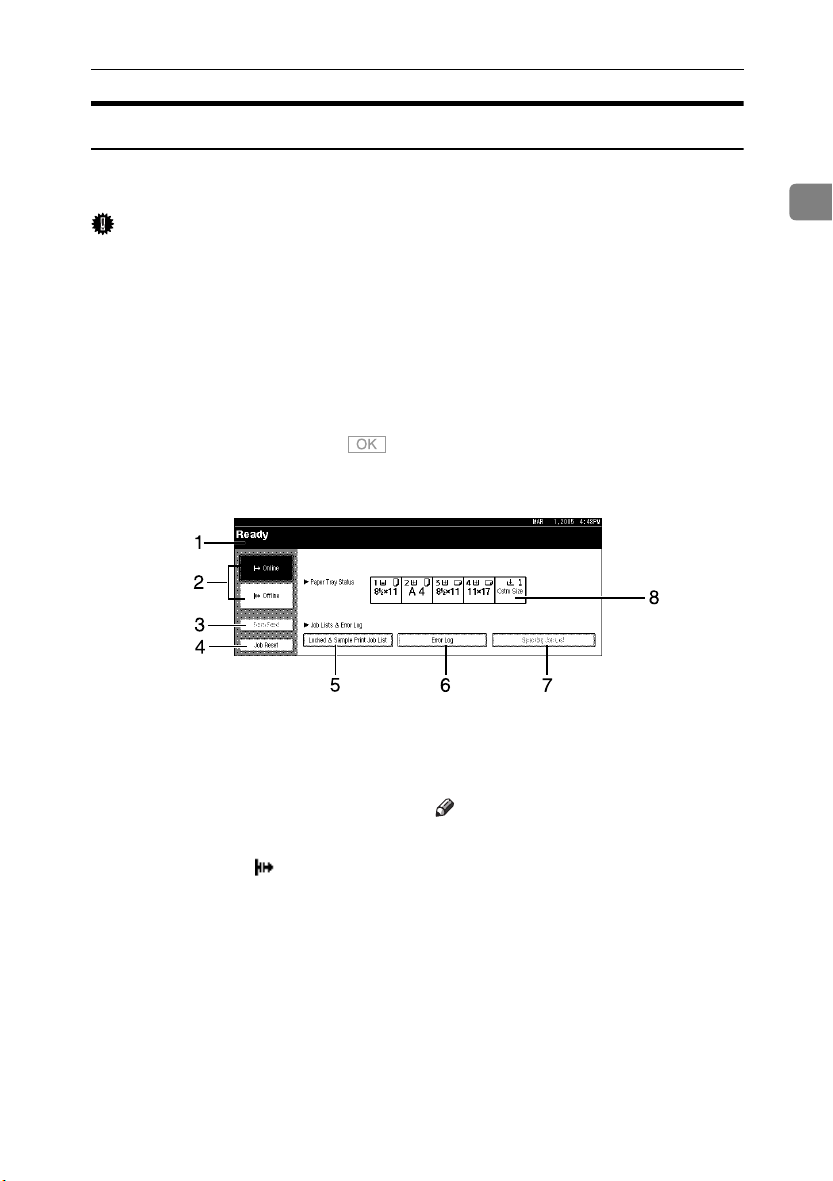
Display Panel
This section describes configuration using the display panel when the printer
function is selected.
Important
❒ The machine switches to offline when you make settings when the machine
is online. After you complete the setting, the machine switches to online automatically.
❒ If you make a setting when the machine is offline, it will stay offline after-
ward.
❒ The function items displayed serve as selector keys. You can select or specify
an item by pressing it lightly.
❒ When you select or specify an item on the display panel, it becomes highlighted.
❒ Keys dimmed (for example, ) cannot be used.
1
1.
Operational status or messages
Displays current machine status, such as
"Ready", "Offline", and "Printing...". Information about the print job (user ID
and document name) appears in this section.
2.
[ffff Online] key / [ Offline] key
When you press these keys, the machine
switches between online and offline.
When the machine is online, it can receive data from the computer.
When the machine is offline, it cannot receive data from the computer.
AEU042S
3.
[Form Feed] key
Press to print all the data left in the machine's input buffer.
Note
❒ When the machine is online, the status
appears dimly.
❒ This function is not available with the
RPCS printer language.
4.
[Job Reset] key
Press to cancel the current print job.
If you press it when the machine is offline
and Hex Dump is selected, Hex Dump is
canceled.
7

Getting Started
5. [Locked & Sample Print Job List]
Press to display Locked/Sample Print
jobs sent from a computer.
6. [Error Log]
1
Press to display the error logs, such as
Locked/Sample Print jobs sent from a
computer.
Note
❒ When the power is turned on, the copier display is shown. This is a factory
default. This initial setting can be changed. See “User Tools (System Settings)”, General Settings Guide.
7. [Spooling Job List]
Press to display spooled jobs.
8. [Paper Tray Status] key
The paper tray settings appear.
8
User Authentication
When user authentication (User Code
Authentication, Basic Authentication,
Windows Authentication, or LDAP
Authentication) is set, the authentication screen is displayed. Unless a valid user name and password are
entered, operations are not possible
with the machine. Log on to operate
the machine, and log off when you
are finished operations. Be sure to log
off to prevent unauthorized users
from using the machine.
Note
❒ Consult the User Administrator
about your login user name, password, and user code. For details
about the various types of user authentication, consult the appropriate administrators.
❒ For user code authentication, enter
a number that is registered in the
Address Book as a login user name
as the user code.
User Authentication
User Code Authentication
(Using a Printer Driver)
When user authentication is set, specify the user code in the printer properties of a printer driver. For details,
see the printer driver Help.
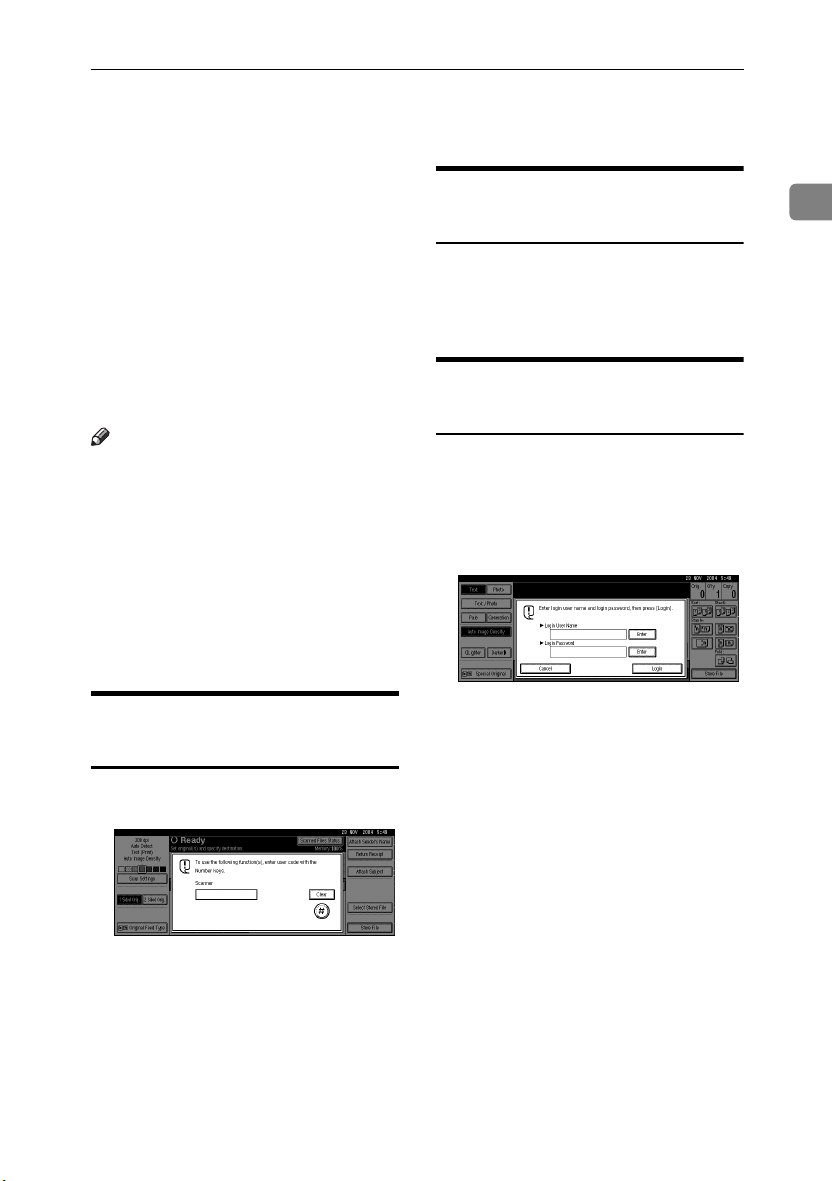
Login (Using the Control
Panel)
Follow the procedure below to log in
when Basic Authentication, Windows
Authentication, or LDAP Authentication is set.
Press [Enter] for [Login User Name].
AAAA
1
User Code Authentication
(Using the Control Panel)
When user authentication is set, the
following screen appears.
Enter a user code (eight digit), and
then press [#].
Enter a login user name, and then
BBBB
press [OK].
Press [Enter] for [Login Password].
CCCC
Enter a login password, and then
DDDD
press [OK].
Press [Login].
EEEE
When the user is authenticated, the
screen for the function you are using appears.
9
Getting Started
Logoff (Using the Control
Panel)
1
Follow the procedure below to log off
when Basic Authentication, Windows
Authentication, or LDAP Authentication is set.
Press {{{{User Tools/Counter}}}} key.
AAAA
Press [→→→→ Logout].
BBBB
Press [Yes].
CCCC
Press {{{{User Tools/Counter}}}} key.
DDDD
Login (Using a Printer Driver)
When Basic Authentication, Windows Authentication, or LDAP Authentication is set, make encryption
settings in the printer properties of a
printer driver, and then specify a
login user name and password. For
details, see the printer driver Help.
Note
❒ When logged on using a printer
driver, logging off is not required.
10
Connecting the Machine
Connecting the Machine
Reference
For information about connection
using Ethernet and wireless LAN,
see "Confirming the Connection",
Network Guide.
For information about connection
using Bluetooth, see the manual
that comes with the optional Bluetooth interface unit.
Requirements
Before using this machine, make sure
all environmental and electrical requirements are met. Connect the machine to the host computer using the
parallel port, network interface unit,
or both.
Make sure all cables, connectors, and
electrical outlets necessary to attach
the machine to the host computer or
network are at hand.
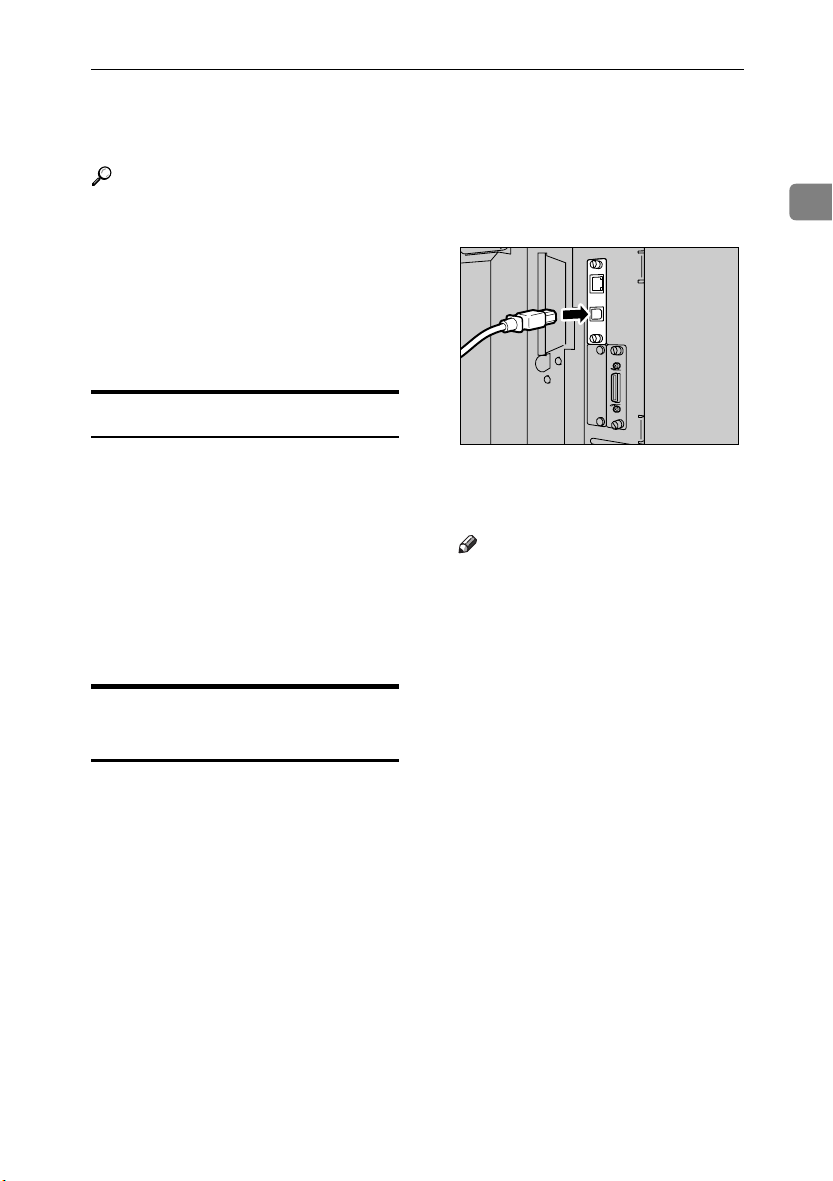
Connecting the machine to the
host using a USB cable
You can connect the machine to the
host computer using a USB interface
cable.
This machine does not come with a
USB interface cable. Make sure you
purchase the appropriate cable for the
machine and your computer.
Follow the procedure below to connect the machine to the host computer
using a USB interface cable.
Connect the USB 2.0 interface ca-
AAAA
ble to the USB port on the right
side of the machine.
Connect the other end to the USB
BBBB
port on the host computer.
Note
❒ The USB 2.0 interface board is
supported by Windows 98
SE/Me/2000/XP, Windows
Server 2003, Mac OS X or higher.
• For Windows 98 SE/Me:
Make sure to install “USB
Printing Support”. If USB 2.0
is used with Windows 98
SE/Me, only a speed equal to
that of USB 1.1 is possible.
• For Mac OS:
Mac OS supports only the
standard USB port. If USB 2.0
is used with a Mac OS, only a
speed equal to that of USB 1.1
is possible.
1
AEU001S
11
Getting Started
Turn off the main power switches
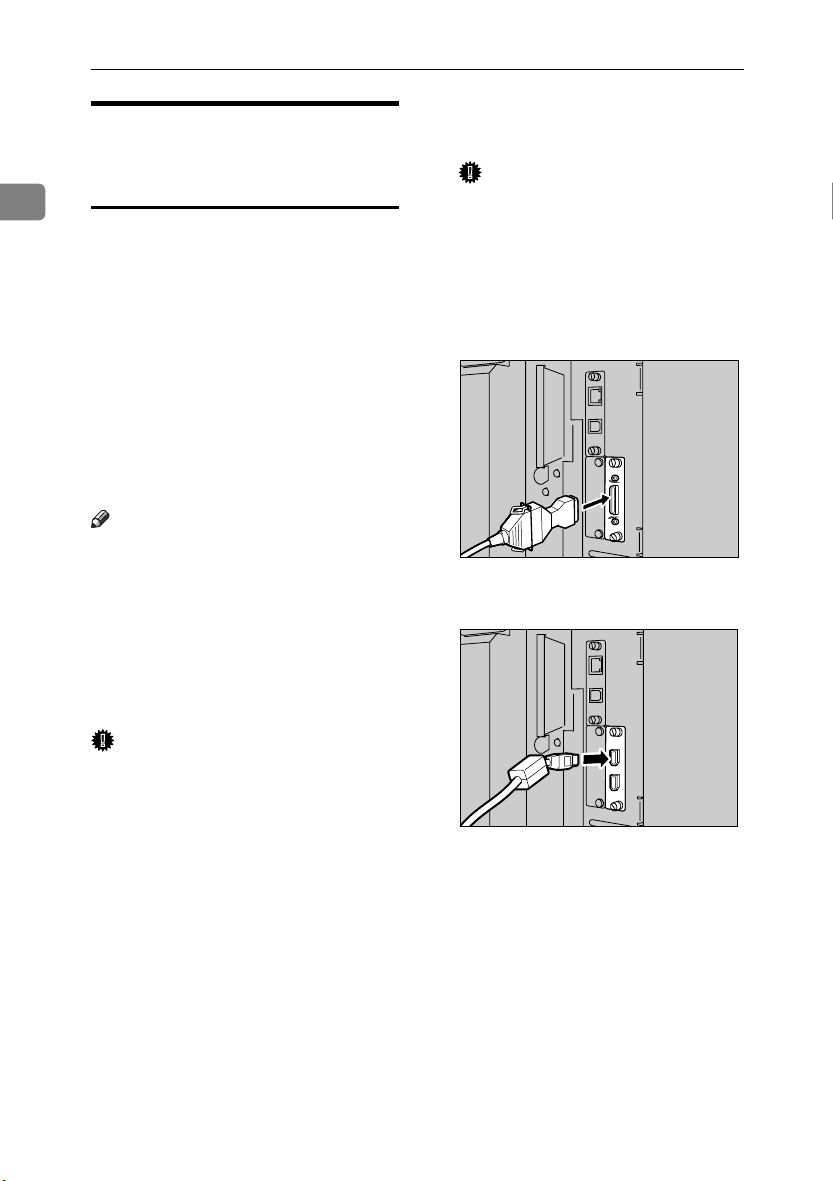
Connecting the Machine to the
host using the parallel cable/IEEE
1394 (SCSI print) cable
1
Connect the machine to the host computer using the optional parallel
board or optional IEEE 1394 interface
board. This machine does not come
with a parallel cable to connect the
machine to the host computer.
The machine's parallel interface is a
standard bidirectional interface. It requires a standard IEEE 1284 compliant 36-pin parallel cable and a parallel
port on the host computer. Make sure
you purchase the appropriate cable
for the machine and your computer.
Note
❒ Do not use a parallel cable that is
longer than 3 meters (10 feet).
❒ Rating voltage of the interface con-
nector: Max. DC 5V
Follow the procedure below to connect the machine to the host computer
using a parallel cable or IEEE 1394 interface cable.
AAAA
of the machine and computer.
Important
❒ Before turning off the main pow-
er switch, see “Turning Off the
Power”, General Settings Guide.
Plug the cable into the connector
BBBB
on the machine’s interface.
❖❖❖❖ Parallel Connection
❖❖❖❖ IEEE 1394 (SCSI print) Connection
AEU002S
Important
❒ Before connecting the machine and
a computer using an interface cable, make sure the machine is not
operating, and then turn off the
main power switches of the machine and computer.
❒ Be sure to use a specified interface
cable. Other cables may cause radio interference.
12
Plug the other end of the cable
CCCC
into the connector on the computer’s interface.
Turn on the machine's main pow-
DDDD
er switch.
AEU003S
Connecting the Machine
Turn on the computer.
EEEE
Note
❒ When using Windows 95/98/
Me/2000/XP and Windows
Server 2003, a printer driver installation screen might appear
when the computer is turned
on. If this happens, click [Cancel]
on the screen. For more information, see p.19 “Preparing the
Machine”.
The machine and computer are
now connected. The printer driver
must be installed next. For information about how to install the
printer driver, see p.19 “Preparing
the Machine”.
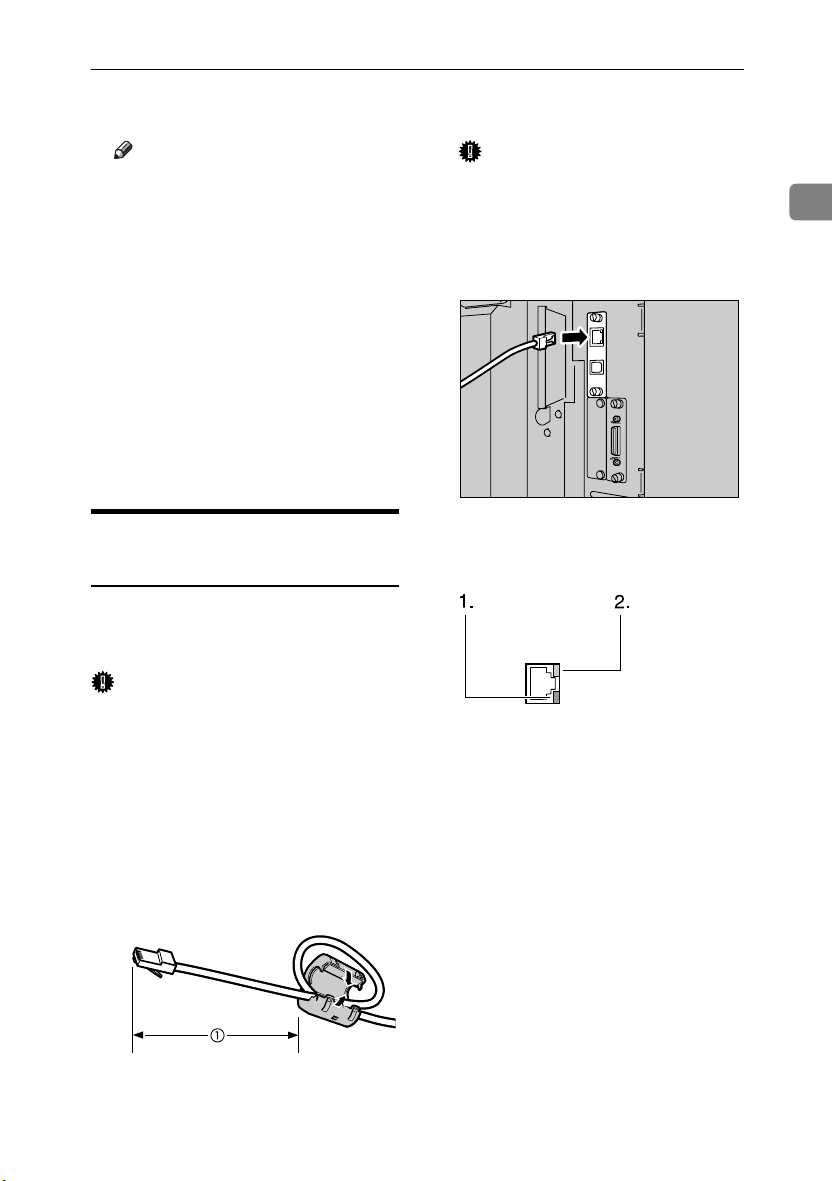
Connecting to the Ethernet
Interface
The network interface board supports
10 BASE-T or 100 BASE-TX connections.
Important
❒ Before making the connection,
touch the metallic part to ground
yourself.
A core for the Ethernet cable is
AAAA
supplied with this machine. The
Ethernet cable loop should be
about 15 cm (6 in.) (AAAA) from the
machine end of the cable.
Turn off the main power switch.
BBBB
Important
❒ Make sure the main power is
off. See "Turning On the Power", General Settings Guide.
Connect the Ethernet cable to the
CCCC
10 BASE-T / 100 BASE-TX port.
Turn on the main power switch.
DDDD
ZKRH050E
1.
Indicator (green)
Remains green when the machine is
properly connected to the network.
2.
Indicator (yellow)
Turns yellow when 100 BASE-TX is
operating. Turns off when 10 BASE-T
is operating.
1
AEU040S
AEV047S
13
Getting Started
Setting Paper on the Bypass Tray
This section gives instructions for set-
1
ting paper on the bypass tray. Use the
bypass tray to print onto OHP transparencies, labels, thick paper, and envelopes that cannot be loaded in the
paper tray.
Reference
For details about setting paper in
the regular paper tray, see General
Settings Guide.
Note
❒ When loading letterhead paper,
pay attention to its orientation. See
“Orientation-Fixed Paper or TwoSided Paper” , General Settings
Guide.
❒ Paper within the following dimen-
sions can be set in the bypass tray:
• Vertical: 90 - 305 mm (3.6 - 12 in.)
• Horizontal: 148 - 600 mm (5.9 -
23.6 in.)
❒ Be sure to set the paper with the
side you want to print facing down
in the bypass tray.
❒ When loading OHP transparencies
or thick paper in the bypass tray,
make the paper setting using the
control panel or printer driver.
❒ The number of sheets that can be
loaded in the bypass tray depends
on the paper type.
❒ Paper sizes fed from the bypass
tray are output first sheet down,
print side-up.
Limitation
❒ The following functions are disa-
bled when printing from the bypass tray:
• Duplex printing
• Auto Tray Select
• Auto Tray Switching
• Rotating Collate
• Staple (when the optional unit is
installed)
• Punch (when the optional unit
is installed)
Important
❒ When printing using the printer
function, original images are always rotated by 180 degrees (the
orientation of images to be printed
is opposite to that of the copier
function). When printing onto paper with specific orientation requirements, such as envelopes and
letterheads, make sure to rotate the
paper feed orientation to 180 degrees.
❒ Be sure to set the paper size using
the printer driver when printing
data from the computer. The paper
size set using the printer driver has
priority over the one set using the
display panel.
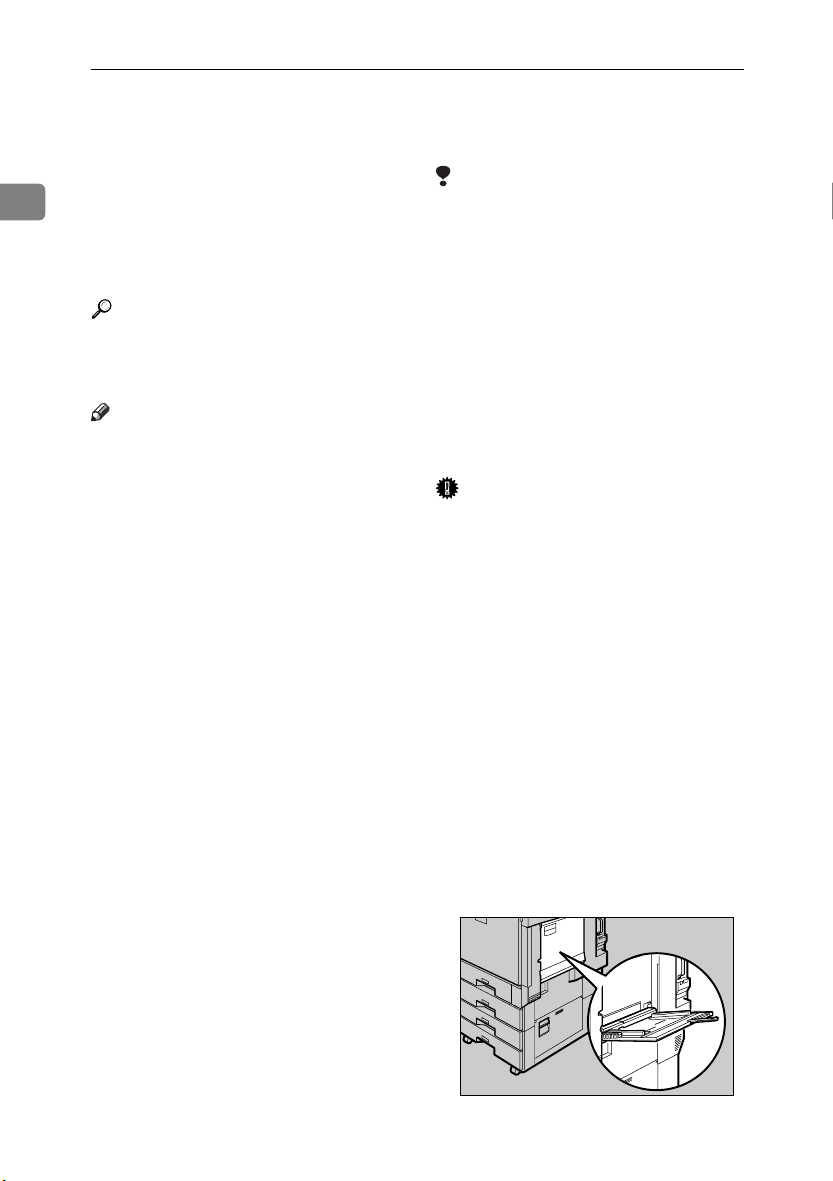
Open the bypass tray.
AAAA
14
AEU004S
Setting Paper on the Bypass Tray
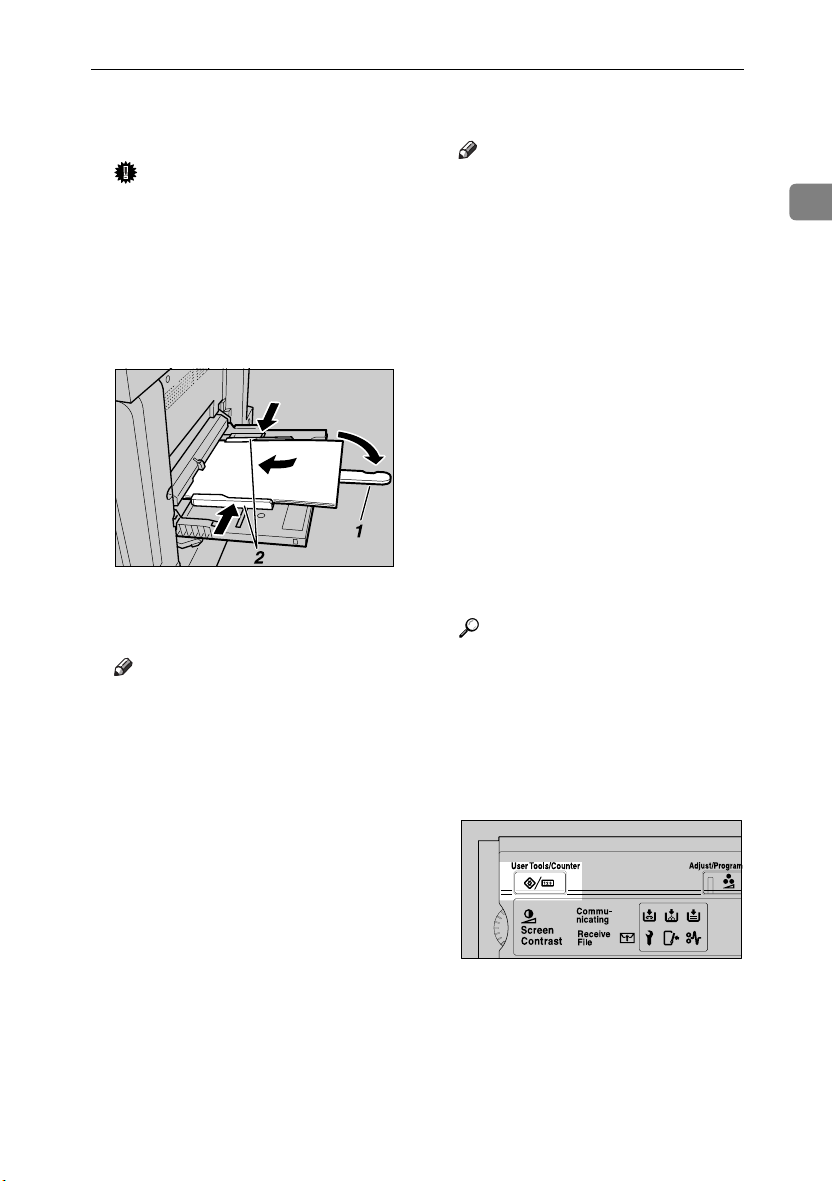
Adjust the paper guides to the pa-
BBBB
per size.
Important
❒ If the paper guides are not flush
against the paper, skewing and
misfeeds might occur.
Gently insert paper face up into
CCCC
the bypass tray until the beeper
sounds.
1.
Extender
2.
Paper guides
Note
❒ The beeper will not sound if it is
turned off. Gently insert paper
until it stops.
❒ Do not stack paper over the lim-
it mark, otherwise a skewed image or misfeeds might occur.
❒ Open out the extender to support
paper sizes larger than A4 L,
1
/2"×11" L.
8
❒ Fan the paper to get air between
the sheets to avoid a multi-sheet
feed.
❒ When setting an OHP transpar-
ency, make sure that its front
and back sides are properly positioned.
❒ Select paper type when printing
onto OHP transparencies or thick
paper (over 127.9 g/m
tails, see p.17 “Setting thick paper or OHP transparencies”.
2
). For de-
AEU011S
Select the paper size.
DDDD
Note
❒ You can set paper size using the
printer driver. The following
procedures are not necessary
when setting paper size using
the printer driver.
❒ The paper size set using the
printer driver has priority over
that set using the display panel.
❒ When the printer driver is not
used, make settings using the
display panel.
❒ Thick paper and OHP transpar-
encies are delivered face up on
the top of the preceding page;
therefore, the prints need to be
rearranged into the correct order. To avoid this, select [Reverse
order print] in the RPCS printer
driver settings to deliver the
prints in the correct page order.
Reference
For printer driver settings, see
the printer driver Help.
For details about setting custom
sizes, see p.16 “Setting custom
size paper”.
A Press the {{{{User Tools/Counter}}}}
key on the control panel.
B Press [System Settings].
1
AEU043S
15
Getting Started
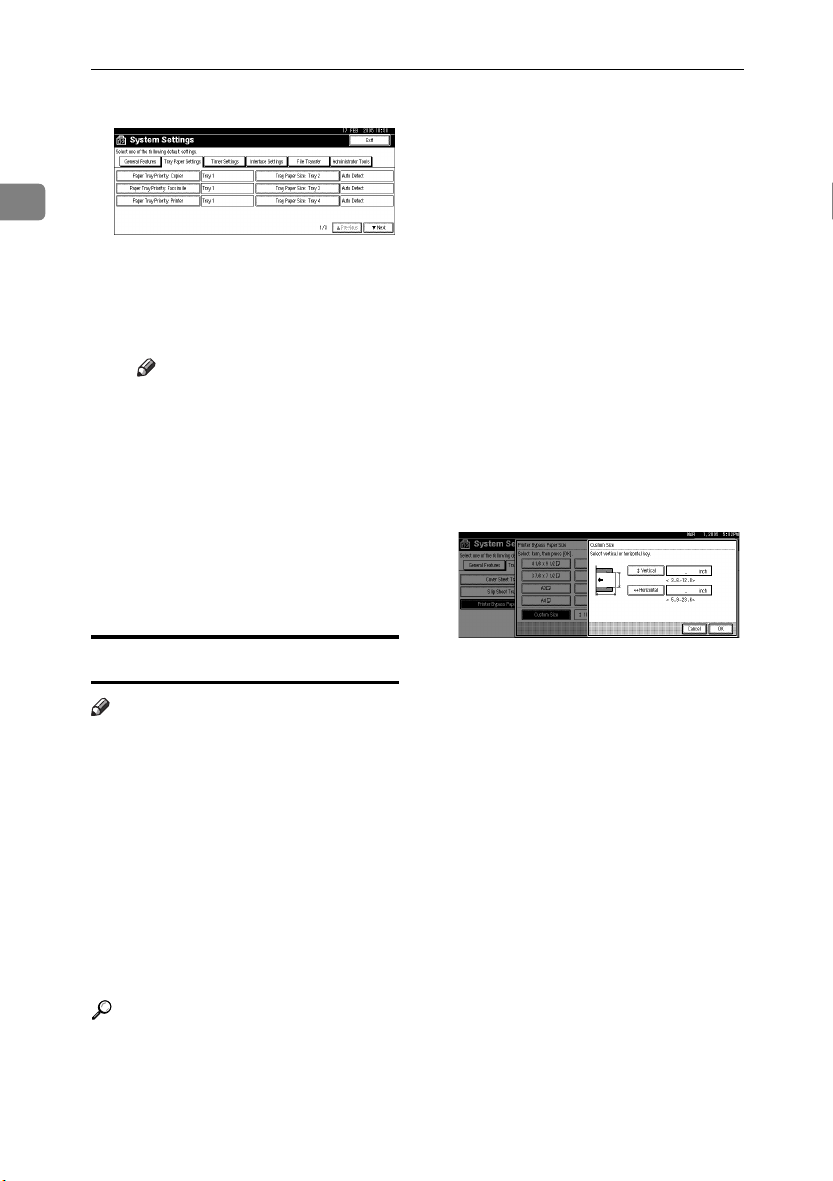
C Press the [Tray Paper Settings] tab.
1
D Press [TTTTNext
the list.
E Press [Printer Bypass Paper Size].
F Select the paper size.
Note
❒ Press [UUUUPrevious] or [TTTTNext]
to scroll through the list.
❒ When printing onto thick pa-
per or OHP transparencies,
select paper type. For details,
see p.17 “Setting thick paper
or OHP transparencies”.
G Press [OK].
H Press the {{{{User Tools/Counter}}}}
key.
Setting custom size paper
] to scroll through
Press the {{{{User Tools/Counter}}}} key
AAAA
on the control panel.
Press [System Settings].
BBBB
Press the [Tray Paper Settings] tab.
CCCC
Press [TTTTNext] to scroll through the
DDDD
list.
Press [Printer Bypass Paper Size].
EEEE
Press [
FFFF
GGGG
HHHH
IIII
Custom Size
If a custom size is already set, press
[Change Size] .
Press [Vertical].
Enter the vertical size of the paper
using the number keys, and then
press [#].
Press [Horizontal].
].
Note
❒ Custom sizes can also be set using
the printer driver. The following
procedures are not necessary
when setting custom sizes using
the printer driver.
❒ Custom size settings set using the
printer driver have priority over
those set using the machine's display panel.
❒ When the printer driver is not used,
make settings using the display
panel.
Reference
For printer driver settings, see the
printer driver Help.
16
Enter the horizontal size of the
JJJJ
paper using the number keys, and
then press [#].
Press [OK].
KKKK
The paper sizes entered are displayed.
Press [OK].
LLLL
Press the {{{{User Tools/Counter}}}} key.
MMMM
Setting thick paper or OHP
transparencies
Note
❒ Paper settings can also be set using
the printer driver. The following
procedures are not necessary
when setting paper sizes using the
printer driver.
❒ Paper size settings set using the
printer driver have priority over
those set using the machine's display panel.
❒ When the printer driver is not
used, make settings using the display panel.
Reference
For printer driver settings, see the
printer driver Help.
Setting Paper on the Bypass Tray
Press the {{{{User Tools/Counter}}}} key
AAAA
on the control panel.
Press [System Settings].
BBBB
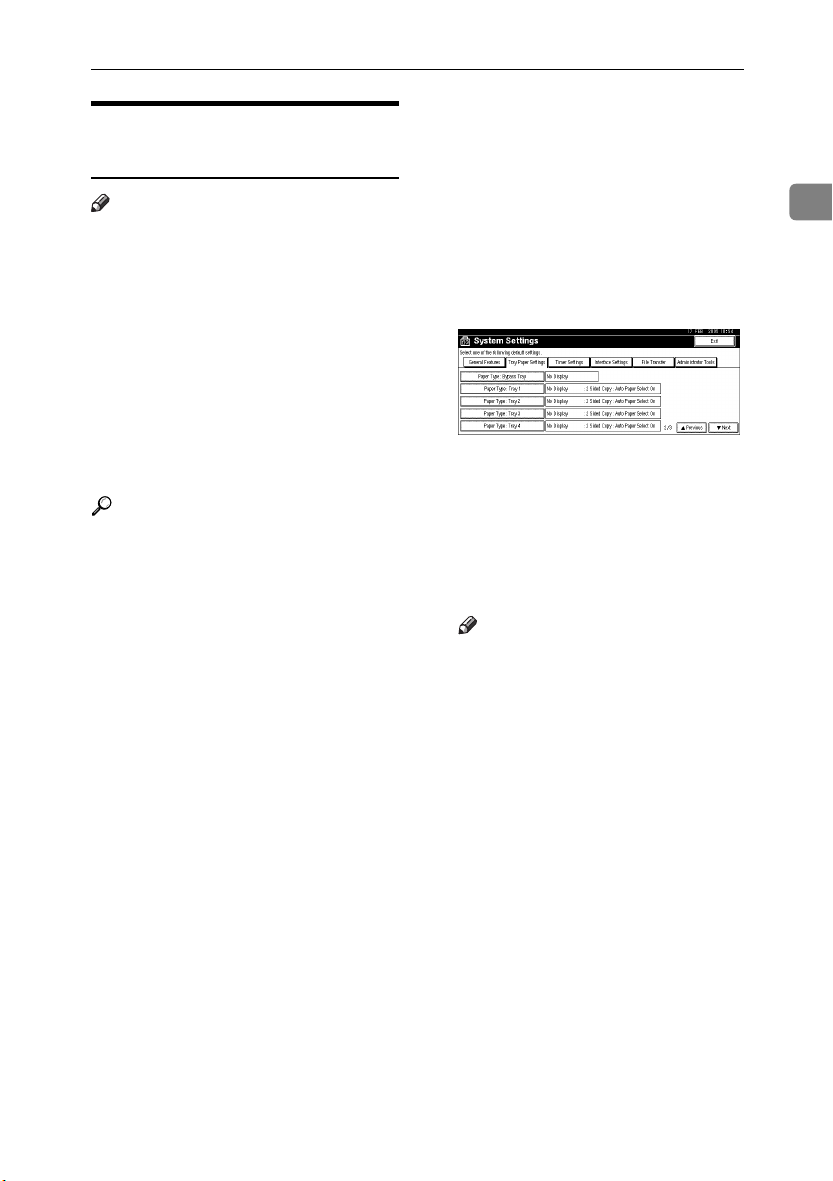
Press the [Tray Paper Settings] tab.
CCCC
Press [TTTTNext] to scroll through the
DDDD
list.
Press [Paper Type: Bypass tray].
EEEE
Select [OHP] or [Thick Paper]
FFFF
Press [OK].
GGGG
The paper type selected is displayed.
Press the {{{{User Tools/Counter}}}} key.
HHHH
Note
❒ The settings made will remain
valid until they are reset again.
After printing on OHP transparencies or thick paper, make
sure to clear settings for the next
user.
1
17

Getting Started
1
18

2. Preparing the Machine
Quick Install
Windows 95/98/Me/2000/XP, Windows Server 2003, and Windows NT 4.0 users can easily install this software using the CD-ROM provided.
Using Quick Install, the PCL printer driver and/or RPCS printer driver and
SmartDeviceMonitor for Client is installed under network environment, and
TCP/IP port will be set.
Important
❒ To install printer driver under Windows 2000/XP Professional, Windows
Server 2003, and Windows NT 4.0, you must have an account that has Manage Printers permission. Log on as an Administrator.
❒ The Quick Install is not available when using this printer under USB connec-
tion. If you connect using USB, refer to p.43 “Installing the Printer Driver Using USB”.
Quit all applications currently running.
AAAA
Insert the CD-ROM into the CD-ROM drive.
BBBB
The installer starts.
Auto Run may not work with certain operating system settings. If this happens, launch “Setup.exe” on the CD-ROM root directory.
Select an interface language, and then click [OK].
CCCC
The default interface language is English.
Click [Quick Install].
DDDD
The software license agreement appears in the [
After reading the agreement, click [
EEEE
[Next >].
Select the machine model you want to use in the [Select Printer] dialog box.
FFFF
For network connection via TCP/IP, select the machine whose IP address is
displayed in [Connect To].
For parallel connection, select the machine whose printer port is displayed in
[Connect To].
Click [Install].
GGGG
The printer driver installation starts.
I accept the agreement
License Agreement
] , and then click
] dialog box.
19

Preparing the Machine
Click [Finish]
HHHH
A message about restarting the computer may appear. Restart the computer
to complete installation.
Click [Exit] in the first dialog box of the installer, and then take out the CD-
IIII
ROM.
2
Note
❒ To stop installation of the selected software, click [Cancel] before installa-
tion is complete.
❒ Auto Run may not work with certain operating system settings. If this hap-
pens, launch “Setup.exe” on the CD-ROM root directory.
❒ Select a machine to whose IP address is displayed in [Connect To] to install
SmartDeviceMonitor for Client when using TCP/IP.
Reference
Quick Install is not available unless bidirectional communication between
the machine and computer is enabled via parallel connection. See p.60 “If
Bidirectional Communication is Disabled” for details about bidirectional
communication between machine and computer.
20
Confirming the Connection Method
Confirming the Connection Method
This machine supports network and local connection.
Before installing the printer driver, check how the machine is connected. Follow
the driver installation procedure that is appropriate to the connection method.
Network Connection
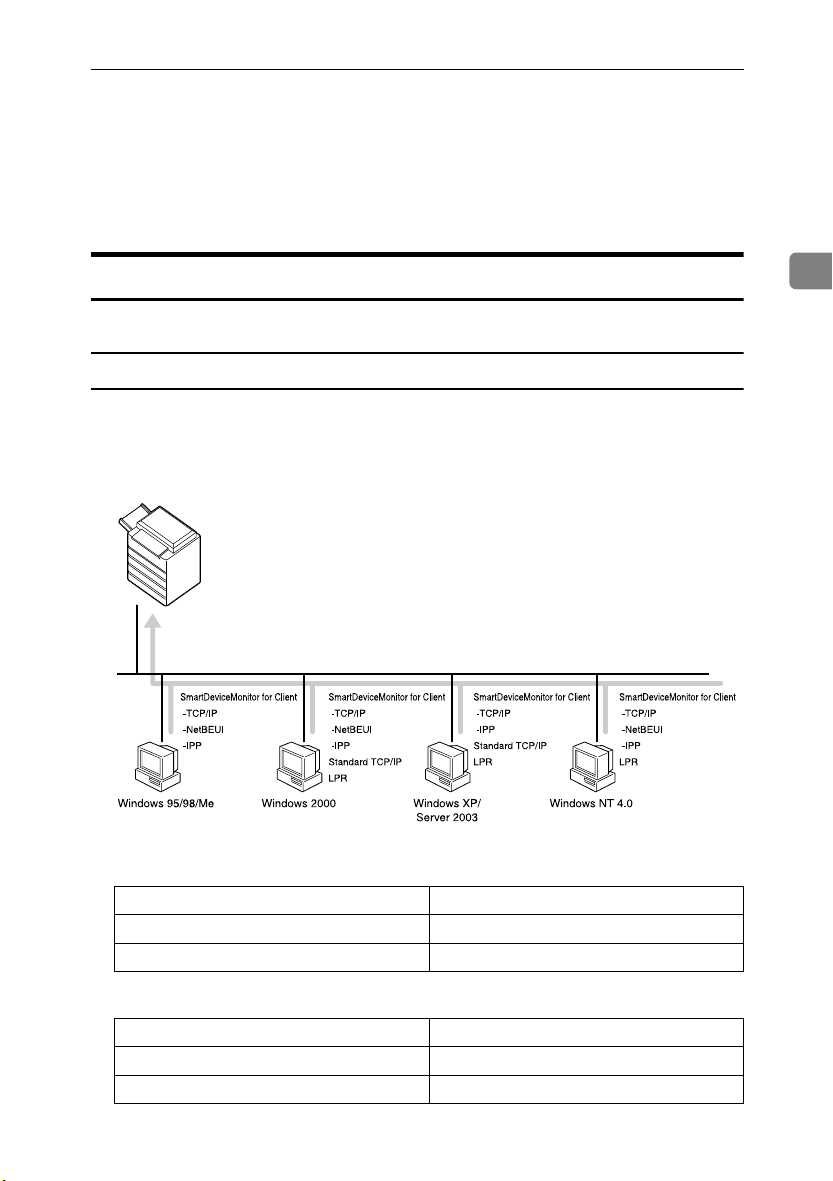
This machine can be used as a Windows printing port or network printer.
Using this machine as the Windows printing port
Network connections can be established through Ethernet, IEEE 802.11b, and
IEEE 1394 (IP over 1394).
Available ports are determined based on the combination of Windows operating
system version and connection method used.
ZZZ004S
2
❖❖❖❖ Windows 95/98
Connection Method Available Ports
Ethernet/ IEEE 802.11b SmartDeviceMonitor for Client port
IEEE 1394 (IP over 1394) None
❖❖❖❖ Windows Me
Connection Method Available Ports
Ethernet/ IEEE 802.11b SmartDeviceMonitor for Client port
IEEE 1394 (IP over 1394) SmartDeviceMonitor for Client port
21
Preparing the Machine
❖❖❖❖ Windows 2000
Connection Method Available Ports
Ethernet/ IEEE 802.11b SmartDeviceMonitor for Client port
Standard TCP/IP
LPR port
IEEE 1394 (IP over 1394) None
2
❖❖❖❖ Windows XP
Connection Method Available Ports
Ethernet/ IEEE 802.11b SmartDeviceMonitor for Client port
Standard TCP/IP
LPR port
IEEE 1394 (IP over 1394) SmartDeviceMonitor for Client port
Standard TCP/IP
❖❖❖❖ Windows Server 2003
Connection Method Available Ports
Ethernet/ IEEE 802.11b SmartDeviceMonitor for Client port
Standard TCP/IP
LPR port
IEEE 1394 (IP over 1394) SmartDeviceMonitor for Client port
Standard TCP/IP
❖❖❖❖ Windows NT 4.0
Connection Method Available Ports
Ethernet/ IEEE 802.11b SmartDeviceMonitor for Client port
IEEE 1394 (IP over 1394) None
Reference
See the explanation of how to install the printer driver for each type of port.
For the SmartDeviceMonitor for Client port, see p.25 “Using the SmartDeviceMonitor for Client Port”.
For the Standard TCP/IP port, see p.34 “Using the Standard TCP/IP Port”.
For the LPR port, see p.36 “Using the LPR Port”.
22
LPR port
Confirming the Connection Method
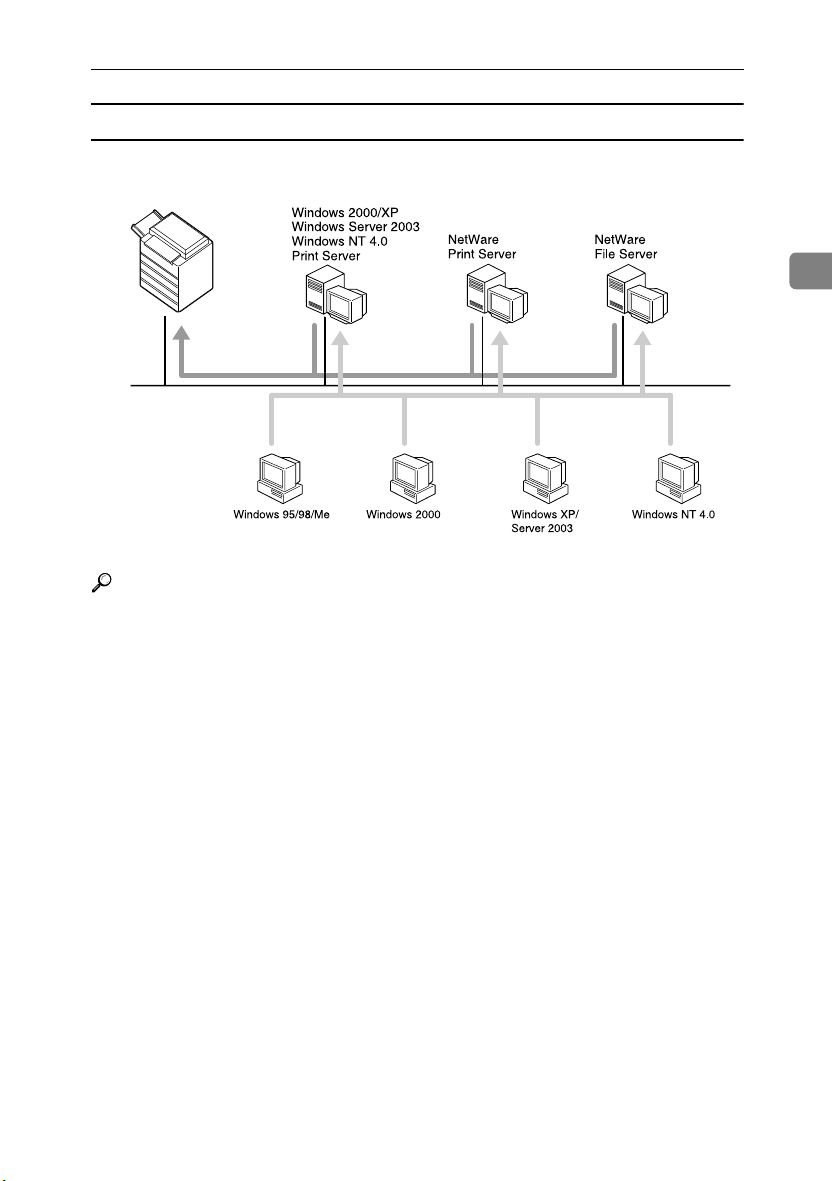
Using as a network printer
This machine can be used as the Windows network printer, the NetWare print
server, or the NetWare remote printer.
ZZZ003S
Reference
See the explanation of how to install the printer driver for each type of network printer.
For the Windows network printer, see p.38 “Using as the Windows Network
Printer”.
For the NetWare print server and remote printer, see p.40 “Using as the NetWare Print Server/Remote Printer”.
2
23

Preparing the Machine
Local Connection
Local connections can be established via parallel, USB, IEEE 1394 (SCSI print),
and Bluetooth connections.
Windows operating system version determines the available connection methods.
• Windows 95:
2
• Parallel connections
• Windows 98:
• Parallel connections
• Windows 98 SE/Me:
• USB, Parallel, and Bluetooth connections
• Windows 2000:
• USB, Parallel, IEEE 1394 (SCSI print), and Bluetooth connections
• Windows XP:
• USB, Parallel, IEEE 1394 (SCSI print), and Bluetooth connections
• Windows Server 2003:
• USB, Parallel, IEEE 1394 (SCSI print), and Bluetooth connections
• Windows NT 4.0:
• Parallel connections
24
Reference
See the explanation of how to install the printer driver for each method of
connection.
For the USB connection, see p.43 “Installing the Printer Driver Using USB”.
For the parallel connection, see p.48 “Printing with Parallel Connection”.
For the IEEE 1394 (SCSI print) connection, see p.50 “Installing the Printer
Driver Using IEEE 1394 (SCSI print)”.
For the Bluetooth connection, see p.54 “Printing with Bluetooth Connection”.

Using the SmartDeviceMonitor for Client Port
Using the SmartDeviceMonitor for Client Port
Installing SmartDeviceMonitor for Client
Important
❒ To install SmartDeviceMonitor for Client under Windows 2000/XP Profes-
sional, Windows Server 2003, and Windows NT 4.0, you must have an account that has Manage Printers permission. Log on as an Administrator.
❒ Install SmartDeviceMonitor for Client before installing the printer driver
when using the SmartDeviceMonitor for Client port.
Quit all applications currently running.
AAAA
Insert the CD-ROM into the CD-ROM drive.
BBBB
The installer starts.
Auto Run may not work with certain operating system settings. If this happens, launch “Setup.exe” on the CD-ROM root directory.
Select an interface language, and then click [OK].
CCCC
The default interface language is English.
Click [SmartDeviceMonitor for Client/Admin].
DDDD
2
The SmartDeviceMonitor for Client installer starts.
EEEE
The software license agreement appears in the [License Agreement] dialog box.
FFFF
After reading through its contents, click [I accept the agreement], and then click
[Next >].
Click [SmartDeviceMonitor for Client], and then click [Next >].
GGGG
The SmartDeviceMonitor for Client installer starts.
Follow the instructions on the display to install SmartDeviceMonitor for
HHHH
Client.
Click [Finish].
IIII
If you are required to restart the computer after installing SmartDeviceMonitor for Client, restart the computer.
Note
❒ To stop installation of the selected software, click [Cancel] before installa-
tion is complete.
25

Preparing the Machine
Installing the PCL or RPCS Printer Driver (TCP/IP)
Important
❒ To install this printer driver under Windows 2000/XP Professional, Windows
Server 2003, and Windows NT 4.0, you must have an account that has Manage Printers permission. Log on as an Administrators or Power Users group
2
member.
Quit all applications currently running.
AAAA
Insert the CD-ROM into the CD-ROM drive.
BBBB
The installer starts.
Auto Run may not work with certain operating system settings. If this happens, launch “Setup.exe” on the CD-ROM root directory.
Select an interface language, and then click [OK].
CCCC
The default interface language is English.
Click [PCL/RPCS Printer Drivers].
DDDD
The software license agreement appears in the [License Agreement] dialog
EEEE
box.
After reading the agreement, click [I accept the agreement], and then click [Next].
26
Select the printer driver you want to use in the [Select Program] dialog box.
FFFF
You can select several printer drivers.
Select the machine model you want to use.
GGGG
The printer name can be changed in the [Change settings for 'Printer Name'] box.
Double-click the printer name to display the printer settings.
HHHH
Note
❒ The details shown in [Comment:], [Driver:], and [Port:] vary depending on
the operating system, printer model, and port.
Click [Port:], and then click [Add].
IIII
Click [SmartDeviceMonitor], and then click [New Port...].
JJJJ
Click [TCP/IP], and then click [Search].
KKKK
A list of printers using TCP/IP appears.

Using the SmartDeviceMonitor for Client Port
Select the printer you want to use, and then click [OK].
LLLL
Only printers that respond to a broadcast from the computer appear. To use
a machine not listed here, click [Specify Address], and then enter the IP address
or host name of the machine.
Under Windows 95/98/Me, you cannot add an IP address partially similar to
the one already used. For example, if “192.168.0.2” is in use, “192.168.0.2xx”
cannot be used. Similarly, if “192.168.0.20” is in use, “192.168.0.2” cannot be
used.
Check that the port of the selected printer is displayed in [Port:].
MMMM
Set a user code, if necessary.
NNNN
This allows a SmartDeviceMonitor for Admin user to display and check statistics about the number of sheets which each user prints. For details, see
SmartDeviceMonitor for Admin Help.
Up to 8 numeric characters can be entered. Neither alphabetic characters nor
symbols are available.
2
Select the [
OOOO
Click [Finish].
PPPP
Installation starts.
Click [
QQQQ
A message about restarting the computer may appear. Restart the computer
to complete installation
Reference
A message appears if there is a newer version of the printer driver already
installed. If there is, you cannot install the printer driver using Auto Run.
If you still want to install the printer driver, install use [Add Printer]. See p.57
“If a Message Appears during Installation”.
Default Printer
] in the installation completion dialog box.
Finish
] check box to configure the printer as default.
27

Preparing the Machine
Installing the PCL or RPCS Printer Driver (NetBEUI)
Important
❒ To install this printer driver under Windows 2000, and Windows NT 4.0, you
must have an account that has Manage Printers permission. Log on as an Administrators or Power Users group member.
2
❒ Windows XP and Windows Server 2003 do not support NetBEUI.
❒ You cannot print using printers beyond routers.
Quit all applications currently running.
AAAA
Insert the CD-ROM into the CD-ROM drive.
BBBB
The installer starts.
Auto Run may not work with certain operating system settings. If this happens, launch “Setup.exe”on the CD-ROM root directory.
Select an interface language, and then click [OK].
CCCC
The default interface language is English.
Click [PCL/RPCS Printer Drivers].
DDDD
The software license agreement appears in the [License Agreement] dialog
EEEE
box.
After reading the agreement, click [I accept the agreement] , and then click
[Next].
28
Select the printer driver you want to use in the [Select Program] dialog box.
FFFF
You can select several printer drivers.
Select the machine model you want to use.
GGGG
The printer name can be changed in the [Change settings for 'Printer Name'] box.
Double-click the printer name to display the printer settings.
HHHH
Note
❒ The details shown in [Comment:], [Driver:], and [Port:] vary depending on
the operating system, printer model, and port.
Click [Port:], and then click [Add].
IIII
Click [SmartDeviceMonitor], and then click [New Port...].
JJJJ
Click [NetBEUI], and then click [Search].
KKKK
A list of printers using NetBEUI appears.

Using the SmartDeviceMonitor for Client Port
Select the printer you want to use, and then click [OK].
LLLL
Only printers that respond to a broadcast from the computer appear. To use
a machine not listed here, click [Specify Address], and then enter the NetBEUI
address. The NetBEUI address can be checked with the configuration page.
For information about printing a configuration page, see p.113 “Printing the
configuration page”. The NetBEUI address appears in the format of
“\\RNPxxxx\xxx” on the configuration page. Enter the machine's network
path in the format of “%%Computer name\Share name”. Use “\\” instead of
“%%” at the beginning.
Check that the port of the selected printer is displayed in [Port:].
MMMM
Set a user code, if necessary.
NNNN
This allows a SmartDeviceMonitor for Admin user to display and check statistics about the number of sheets which each user prints. For details, see
SmartDeviceMonitor for Admin Help.
Up to 8 numeric characters can be entered. Neither alphabetic characters nor
symbols are available.
Select the [Default Printer] check box to configure the printer as default.
OOOO
Click [Finish].
PPPP
The printer driver installation starts.
Click [Finish] in the installation completion dialog box.
QQQQ
A message about restarting the computer may appear. Restart the computer
to complete installation.
2
Note
❒ The protocol is set to inactive as default. Enable it using Web Image Mon-
itor or Telnet
❒ To stop installation of the selected software, click [Cancel] before installa-
tion is complete.
Reference
A message appears if there is a newer version of the printer driver already
installed. If there is, you cannot install the printer driver using Auto Run.
If you still want to install the printer driver, use [Add Printer]. See p.57 “If a
Message Appears during Installation”.
29

Preparing the Machine
Installing the PCL or RPCS Printer Driver (IPP)
Important
❒ To install printer driver under Windows 2000/XP Professional, Windows
Server 2003, and Windows NT 4.0, you must have an account that has Manage Printers permission. For this, log on as an Administrators or Power Users
2
group member.
Quit all applications currently running.
AAAA
Insert the CD-ROM into the CD-ROM drive.
BBBB
The installer starts.
Auto Run may not work with certain operating system settings. If this happens, launch “Setup.exe” on the CD-ROM root directory.
Select an interface language, and then click [OK].
CCCC
The default interface language is English.
Click [PCL/RPCS Printer Drivers].
DDDD
The software license agreement appears in the [License Agreement] dialog
EEEE
box.
After reading the agreement, click [I accept the agreement] , and then click
[Next].
30
Select a printer driver you want to use in the [Select Program] dialog box.
FFFF
You can select several printer drivers.
Select the machine model you want to use.
GGGG
The printer name can be changed in the [Change settings for 'Printer Name'] box.
Double-click the printer name to display the printer settings.
HHHH
Note
❒ The details shown in [Comment:], [Driver:], and [Port:] vary depending on
the operating system, printer model, and port.
Click [Port:], and then click [Add].
IIII
Click [SmartDeviceMonitor], and then click [New Port...].
JJJJ
Click [IPP].
KKKK

Using the SmartDeviceMonitor for Client Port
In the [Printer URL] box, enter “http://printer's address/printer” as the print-
LLLL
er's address.
If the server authentification is issued, to enable SSL (a protocol for encrypted
communication), enter “https://printer's address/printer” (Internet Explorer 5.01, or a higher version must be installed).
(example IP address: 192.168.15.16)
http://192.168.15.16/printer
https://192.168.15.16/printer
You can enter "http://printer's address/ipp" as the printer's address.
2
Enter a name for identifying the printer in [
MMMM
ferent from the one of any existing port.
If a name is not specified here, the address entered in the [Printer URL] box becomes the IPP port name.
Click [Detailed Settings] to make necessary settings.
NNNN
For information about the settings, see SmartDeviceMonitor for Client Help.
Check that the port of the selected printer is displayed in [Port:].
OOOO
Set a user code, if necessary.
PPPP
This allows a SmartDeviceMonitor for Admin user to display and check the
number of sheets each user prints. For details, see SmartDeviceMonitor for
Admin Help.
Up to 8 numeric characters can be entered. No alphabetic characters or symbols can be entered.
Select the [
QQQQ
Click [
RRRR
Installation starts.
Click [Finish] in the installation completion dialog box.
SSSS
A message about restarting the computer may appear. Restart the computer
to complete installation
Note
❒ To stop installation of the selected software, click [
tion is complete.
Default Printer
].
Finish
] check box to configure the printer as default.
IPP Port Name
]. Use a name dif-
] before installa-
Cancel
Reference
A message appears if there is a newer version of the printer driver already
installed. If there is, you cannot install the printer driver using Auto Run.
If you still want to install the printer driver, use[
Message Appears during Installation”.
Add Printer
]. See p.57 “If a
31

Preparing the Machine
Changing the Port Settings for SmartDeviceMonitor for Client
Follow the procedure below to change the SmartDeviceMonitor for Client settings, such as TCP/IP timeout, recovery/parallel printing, and printer groups.
Note
❒ There are no settings for NetBEUI protocol.
2
Windows 95/98:
Open [Printers] window from [Start] menu. .
AAAA
In the [Printers] window, click the icon of the printer you want to use. On
BBBB
the [File] menu, click [Properties].
Click the [Details] tab, and then click [Configure Port].
CCCC
The [Port Settings] dialog box appears.
Windows 2000 / Windows NT 4.0:
Open [Printers] window from [Start] menu. .
AAAA
In the [Printers] window, click the icon of the printer you want to use. On
BBBB
the [File] menu, click [Properties].
32
On the [Ports] tab, click [Configure Port].
CCCC
The [Port Settings] dialog box appears.

Using the SmartDeviceMonitor for Client Port
Windows XP, Windows Server 2003:
Open the [Printers and Faxes] window from the [Start] menu.
AAAA
The [Printers and Faxes] window appears.
Click the icon of the machine you want to use. On the [
BBBB
[Properties]. The printer properties appear.
Click the [Ports] tab, and then click [Configure Port].
CCCC
The [Port Configuration] dialog box appears.
• For TCP/IP, timeout setting can be configured.
Note
❒ If no settings on the [Recovery/Parallel Printing] tab are available, follow
the procedure below.
A Click [Cancel] to close the [Port Configuration:] dialog box.
B Start SmartDeviceMonitor for Client, and then right-click the Smart-
DeviceMonitor for Client icon on the taskbar.
Click [Extended Features Settings], and then select the [Set Recovery/Par-
C
allel Printing for each port] check box.
D Click [
• User, proxy, and timeout settings can be configured for IPP.
Reference
For information about these settings, see“Using SmartDeviceMonitor for
Client”, Network Guide, or SmartDeviceMonitor for Client Help.
] to close the [
OK
Extended Features Settings
] menu, click
File
] dialog box
2
33

Preparing the Machine
Using the Standard TCP/IP Port
Installing the PCL or RPCS Printer Driver
Important
2
❒ To install printer driver under Windows 2000/XP Professional, and Win-
dows Server 2003, you must have an account that has Manage Printers permission. Log on as an Administrators or Power Users group member.
Quit all applications currently running.
AAAA
Insert the CD-ROM into the CD-ROM drive.
BBBB
The installer starts.
Auto Run may not work with certain operating system settings. If this happens, launch “Setup.exe” on the CD-ROM root directory.
Select an interface language, and then click [OK].
CCCC
The default interface language is English.
Click [PCL/RPCS Printer Drivers].
DDDD
The software license agreement appears in the [License Agreement] dialog
EEEE
box.
After reading the agreement, click [I accept the agreement], and then click [Next].
34
Select a printer driver you want to use in the [Select Program] dialog box.
FFFF
You can select several printer drivers.
Select the machine model you want to use.
GGGG
The printer name can be changed in the [Change settings for 'Printer Name'] box.
Double-click the printer name to display the printer settings.
HHHH
Note
❒ The details shown in [Comment:], [Driver:], and [Port:] vary depending on
the operating system, printer model, and port.
Click [Port:], and then click [Add].
IIII
Click [Standard TCP/IP], and then click [New Port...].
JJJJ
Configure the Standard TCP/IP port settings, and then see Windows Help if
[Standard TCP/IP Port] does not appear.
Click [Next] in the [Add Standard TCP/IP Printer Port Wizard] dialog box.
KKKK

Using the Standard TCP/IP Port
Enter the printer name or IP address in the [Printer Name or IP Address] box.
LLLL
The [
Port Name
if necessary.
When screen for Device selection appears, select "RICOH NetworkPrinter
Driver C Model".
Click [Finish] in the [Add Standard TCP/IP Printer Port Wizard] dialog box.
MMMM
The installation start dialog box reappears.
Check that the port of the selected printer is displayed in [Port:].
NNNN
Configure the default printer as necessary.
OOOO
Click [Finish].
PPPP
The printer driver installation starts.
Click [Finish] in the installation completion dialog box.
QQQQ
A message about restarting the computer may appear. Restart the computer
to complete installation.
Note
❒ To stop installation of the selected software, click [Cancel] before installa-
tion is complete.
Reference
A message appears if there is a newer version of the printer driver already
installed. If there is, you cannot install the printer driver using Auto Run.
If you still want to install the printer driver, use [Add Printer]. See p.57 “If a
Message Appears during Installation”.
] text box automatically obtains a port name. Change this name
2
35

Preparing the Machine
Using the LPR Port
Installing the PCL or RPCS Printer Driver
Important
2
❒ To install this printer driver under Windows 2000/XP Professional, Windows
Server 2003, and Windows NT 4.0, you must have an account that has Manage Printers permission. Log on as an Administrators or Power Users group
member.
Quit all applications currently running.
AAAA
Insert the CD-ROM into the CD-ROM drive.
BBBB
The installer starts.
Auto Run may not work with certain operating system settings. If this happens, launch “Setup.exe” on the CD-ROM root directory.
Select an interface language, and then click [OK].
CCCC
The default interface language is English.
Click [PCL/RPCS Printer Drivers].
DDDD
The software license agreement appears in the [License Agreement] dialog
EEEE
box.
After reading the agreement, click [I accept the agreement], and then click [Next].
36
Select a printer driver you want to use in the [Select Program] dialog box.
FFFF
You can select several printer drivers.
Select the machine model you want to use.
GGGG
The printer name can be changed in the [Change settings for 'Printer Name'] box.
Double-click the printer name to display the printer settings.
HHHH
Note
❒ The details shown in [Comment:], [Driver:], and [Port:] vary depending on
the operating system, printer model, and port.
Click [Port:], and then click [Add].
IIII
Click [LPR Port], and then click [New Port...].
JJJJ
If [LPR Port] does not appear, see Windows Help and install it.
Enter the printer's IP address in the [Name or address of server providing lpd]
KKKK
box.

Using the LPR Port
Enter “lp” in the [Name of printer or print queue on that server] box, and then click
LLLL
[OK].
The port is added.
Check that the port of the selected printer is displayed in [Port:].
MMMM
Configure the default printer as necessary.
NNNN
Click [Finish].
OOOO
The printer driver installation starts
Click [Finish] in the installation completion dialog box.
PPPP
A message about restarting the computer may appear. Restart the computer
to complete installation.
Reference
A message appears if there is a newer version of the printer driver already
installed. If there is, you cannot install the printer driver using Auto Run.
If you still want to install the printer driver, use [
Message Appears during Installation”.
Add Printer
]. See p.57 “If a
2
37

Preparing the Machine
Using as the Windows Network Printer
Installing the PCL or RPCS Printer Driver
To use the print server, install the printer driver by selecting "Network printer
server", and then select the Windows 2000/XP, Windows Server 2003, or Win-
2
dows NT 4.0 shared printer.
This section assumes that the client has already been configured to communicate
with a Windows 2000/XP, Windows Server 2003, or Windows NT 4.0 print server. Do not begin the following procedure before the client is set up and configured correctly.
Important
❒ To install printer driver under Windows 2000/XP Professional, Windows
Server 2003, and Windows NT 4.0, you must have an account that has Manage Printers permission. For this, log on as an Administrators or Power Users
group member.
❒ If you print with a print server connected to the printer using the SmartDe-
viceMonitor port, Recovery Printing and Parallel Printing cannot be used
from the client.
❒ If you print with a Windows XP or Windows Server 2003 print server, notifi-
cation functions of SmartDeviceMonitor may not be used with the client.
❒ If you print with a Windows NT 4.0 print server, install the printer driver be-
fore you connect the print server to the printer.
38
Quit all applications currently running.
AAAA
Insert the CD-ROM into the CD-ROM drive.
BBBB
The installer starts.
Auto Run may not work with certain operating system settings. If this happens, launch “Setup.exe” on the CD-ROM root directory.
Select an interface language, and then click [OK].
CCCC
The default interface language is English.
Click [PCL/RPCS Printer Drivers].
DDDD
The software license agreement appears in the [License Agreement] dialog
EEEE
box.
After reading the agreement, click [I accept the agreement], and then click [Next].
Select a printer driver you want to use in the [Select Program] dialog box.
FFFF
You can select several printer drivers.

Using as the Windows Network Printer
Select the [Printer Name] check box to select the printer models you want to
GGGG
use.
The printer name can be changed in the [Change settings for 'Printer Name'] box.
Double-click the printer name to display the printer settings.
HHHH
The details shown in [Comment:], [Driver:], and [Port:] vary depending on the
operating system, printer model, and port.
Click [
IIII
Click [Network Printer], and then click [OK].
JJJJ
Double-click the computer name you want to use as a print server in the
KKKK
[Browse for Printer] window.
Select the printer you want to use, and then click [OK].
LLLL
Check that the port of the selected printer is displayed in [Port:].
MMMM
Configure the user code as necessary.
NNNN
For an RPCS printer driver, a user code can be set after the printer driver installation. For information about user code, see the printer driver Help.
Select the [Default Printer] check box to configure the printer as default.
OOOO
Click [Finish].
PPPP
The printer driver installation starts.
], and then click [
Port:
Add
].
2
Click [Finish] in the installation completion dialog box.
QQQQ
A message about restarting the computer may appear. Restart the computer
to complete installation.
Reference
A message appears if there is a newer version of the printer driver already
installed. If there is, you cannot install the printer driver using Auto Run.
If you still want to install the printer driver, use [
Message Appears during Installation”.
Add Printer
]. See p.57 “If a
39

Preparing the Machine
Using as the NetWare Print Server/Remote
Printer
This explains how to set up the Windows computer used as the NetWare client.
Important
2
❒ To install this printer driver under Windows 2000/XP Professional, Windows
Server 2003, and Windows NT 4.0, you must have an account that has Manage Printers permission. Log on as an Administrators or Power Users group
member.
The following explanation assumes NetWare Client is installed on the client
computer and the NetWare server environment is correctly set up. Install all necessary client applications before following this procedure.
Set up the printer driver while logging on to the NetWare file server.
The following values are used in the example:
• Operating system: Windows 98
• NetWare version: 4.1
• File server name: CAREE
• Queue name: R-QUEUE
Insert the CD-ROM into the CD-ROM drive.
AAAA
The installer starts.
Auto Run may not work with certain operating system settings. If this happens, launch “Setup.exe” on the CD-ROM root directory
40
Select an interface language, and then click [OK].
BBBB
The default interface language is English.
Click [PCL/RPCS Printer Drivers].
CCCC
The software license agreement appears in the [License Agreement] dialog
DDDD
box.
After reading the agreement, click [I accept the agreement], and then click [Next].
Select the printer driver you want to use in the [Select Program] dialog box.
EEEE
You can select several printer drivers.
Select the [Printer Name] check box to select the printer models you want to
FFFF
use.
The printer name can be changed in the [Change settings for 'Printer Name'] box.
Double-click the printer name to display the printer settings.
GGGG
The details shown in [Comment:], [Driver:], and [Port:] vary depending on the
operating system, printer model, and port.

Using as the NetWare Print Server/Remote Printer
Click [Port:], and then click [Add].
HHHH
Click [Network Printer], and then click [OK].
IIII
Double-click the name of the NetWare file server on the network tree.
JJJJ
The created queue is displayed.
Select the print queue, and then click [OK].
KKKK
Check that the port of the selected printer is displayed in [Port:].
LLLL
2
Click [
MMMM
The printer driver installation starts.
Click [Finish] in the [Component selection] dialog box.
NNNN
Click [Finish] in the [Introduction complete] dialog box.
OOOO
In the [Printers] window, open the printer properties.
PPPP
Under Windows XP or Windows Server 2003, open the printer properties
from the [Printers and Faxes] window.
On the [Printer Settings] tab, clear the [Form Feed] and [Enable Banner] check
QQQQ
boxes.
Under Windows 2000/XP, Windows Server 2003, or Windows NT 4.0, click
the [NetWare setting] tab.
Do not select these check boxes since they are automatically selected by the
printer driver. If you select the check boxes, the printer may not print correctly.
Click [OK] to close the printer properties dialog box.
RRRR
Note
❒ The protocol is set to inactive as default. Enable it using Web Image Mon-
itor or Telnet
Finish
].
41

Preparing the Machine
Form Feed
Do not use NetWare to configure form feed. Form feed is controlled by the printer driver on Windows. If NetWare form feed is configured, the printer may not
print properly.
Follow the procedure below to disable form feed according to the operating sys-
2
tem used:
• Under Windows 95/98/Me, clear the [Form feed] check box on the [Printer Set-
tings] tab in the printer properties dialog box.
• Under Windows 2000/XP, Windows Server 2003, or Windows NT 4.0, clear
the [Form feed] check box on the [NetWare Settings] tab in the printer properties
dialog box.
Banner Page
Do not use NetWare to configure a banner page.
Follow the procedure below to disable banner pages according to the operating
system used:
• Under Windows 95/98/Me, clear the [Enable banner] check box on the [Printer
Settings] tab in the printer properties dialog box.
• Under Windows 2000/XP, Windows Server 2003, or Windows NT 4.0, clear
the [
Enable banner
erties dialog box.
] check box on the [
NetWare Settings
] tab in the printer prop-
Printing after Resetting the Printer
Printer to print server connection requires 30 - 40 seconds to resume after the
printer is reset. During this period, jobs may be accepted (depending on NetWare specifications) but not printed.
To print after resetting the printer as the remote printer, check on the print server
that the remote printer is disconnected, or wait for two minutes before trying to
print.
42

Installing the Printer Driver Using USB
Installing the Printer Driver Using USB
This section explains how to install printer drivers using USB.
Before installing, check that only the operating system is running on the computer and no print jobs are in progress.
The printer drivers can be installed from the CD-ROM provided with this machine.
Windows 98 SE/Me - USB
Important
❒ Installation via USB is not possible under Windows 95/98. Upgrade to Win-
dows 98 SE/Me.
When USB is first used, the plug and play function starts and the [New Hardware
Found], [Device Driver Wizard], or [Add New Hardware Wizard] dialog box appears, de-
pending on the operating system.
If the printer driver has already been installed, plug and play is enabled, and the
icon of the printer connected to the "USB" port is added to the [Printers] window.
Turn off the power of the machine.
AAAA
Connect the machine with the computer via USB cable.
BBBB
Connect the USB cable firmly.
Turn on the power of the computer.
CCCC
Click [Next>].
DDDD
Click [Search for the best driver for your device. {Recommended}.], and then click
EEEE
[Next>].
Select the [Specify a location:] check box, and then click [Browse...].
FFFF
The [Browse for Folder] dialog box appears.
Insert the CD-ROM into the CD-ROM drive.
GGGG
Note
❒ When Auto Run starts, click [Exit].
❒ To disable Auto Run, press the {{{{Shift}}}} key when inserting the CD-ROM
into the drive and keep it pressed until the computer finishes reading from
the CD-ROM.
2
Specify the location where USB Printing Support is located, and then click
HHHH
[Next>].
If the CD-ROM drive is D, the source files of USB Printing Support are stored
in the following location:
D:\DRIVERS\USBPRINT\WIN98ME
Check the location, and then click [Next].
IIII
USB Printing Support is installed.
43

Preparing the Machine
Click [Finish].
JJJJ
If the printer driver has already been installed, plug and play is enabled, and
the icon of the printer connected to the "USB001" port is added to the [Printers]
window.
Click [Next>].
KKKK
Click [Search for the best driver for your device. {Recommended}.], and then click
2
LLLL
[
].
Next>
Select the [Specify a location:], check box, and then click [Browse...].
MMMM
The [Browse for Folder] dialog box appears.
Insert the CD-ROM into the CD-ROM drive.
NNNN
Note
❒ When Auto Run starts, click [Exit].
❒ To disable Auto Run, press the {{{{Shift}}}} key when inserting the CD-ROM
into the drive and keep it pressed until the computer finishes reading from
the CD-ROM.
Specify the location where the source files of the printer driver is stored,
OOOO
and then click [
If the CD-ROM drive is D, the source files of the printer driver are stored in
the following location:
• RPCS
D:\DRIVERS\RPCS\WIN9X_ME\(Language)\DISK1
• PCL 5c
D:\DRIVERS\PCL5C\WIN9X_ME\(Language)\DISK1
• PCL 6
D:\DRIVERS\PCL6\WIN9X_ME\(Language)\DISK1
• PostScript 3
D:\DRIVERS\PS3\WIN9X_ME\(Language)\DISK1
Next>
].
44
Check the location, and then click [
PPPP
Add Printer Wizard starts.
Click [Finish].
QQQQ
Installation is complete. If installation is successful, the icon of the printer
connected to the "USB001" port is added to the [Printers] window.
Note
❒ The number after "USB" varies depending on the number of printers connected.
❒ It is not necessary to reinstall USB Printing Support when connecting a dif-
ferent machine via USB interface when USB Printing Support is installed.
❒ After installing USB Printing Support, if the printer driver is not installed,
follow the plug-and-play instructions of the printer.
Next
].

Installing the Printer Driver Using USB
Windows 2000 - USB
Important
❒ Installing a printer driver requires Administrators permission. Log on using
an account that has Administrators permission.
When USB is first used, Found New Hardware Wizard starts, and USB Printing
Support is installed automatically.
If the printer driver has already been installed, plug and play is enabled, and the
icon of the printer connected to the "USB" port is added to the [Printers] window.
If the printer driver is not installed, follow the plug-and-play instructions of the
printer to install it from the CD-ROM provided.
Turn off the power of the machine.
AAAA
Connect the machine with the computer via USB cable.
BBBB
Connect the USB cable firmly.
Turn on the power of the computer.
CCCC
Click [Next] in the [Found New Hardware Wizard] dialog box.
DDDD
"Select the [Search for a suitable driver for my device (recommended)] check box,
EEEE
and then click [Next]."
2
Select the [Specify location] check box, and then click [Next].
FFFF
Insert the CD-ROM into the CD-ROM drive.
GGGG
Note
❒ When Auto Run starts, click [Exit].
❒ To disable Auto Run, press the left {{{{Shift}}}} key when inserting the CD-ROM
into the drive and keep it pressed until the computer finishes reading from
the CD-ROM.
Specify the location where the source files of the printer driver is stored.
HHHH
If the CD-ROM drive is D, the source files of the printer driver are stored in
the following location:
• RPCS
D:\DRIVERS\RPCS\WIN2K_XP\(Language)\DISK1
• PCL 5c
D:\DRIVERS\PCL5C\WIN2K_XP\(Language)\DISK1
• PCL 6
D:\DRIVERS\PCL6\WIN2K_XP\(Language)\DISK1
• PostScript 3
D:\DRIVERS\PS3\WIN2K_XP\(Language)\DISK1
Check the printer driver location, and then click [OK].
IIII
45

Preparing the Machine
Click [Next].
JJJJ
Click [Finish].
KKKK
If the printer driver has already been installed, plug and play is enabled, and
the icon of the printer connected to the "USB001" port is added to the [Printers]
window.
2
Note
❒ The number after “USB” varies depending on the number of printers con-
nected.
Windows XP, Windows Server 2003 - USB
Important
❒ Installing a printer driver requires Administrators permission. Log on using
an account that has Administrators permission.
When USB is first used, Found New Hardware Wizard starts, and USB Printing
Support is installed automatically.
If the printer driver has already been installed, plug and play is enabled, and the
icon of the printer connected to the "USB" port is added to the [Printers] window.
The printer drivers can be installed from the CD-ROM provided with this machine.
If the printer driver is not installed, follow the plug-and-play instructions of the
printer to install it from the CD-ROM provided.
Turn off the power of the printer.
AAAA
Connect the machine with the computer via USB cable.
BBBB
Connect the USB cable firmly.
Turn on the power of the computer.
CCCC
In the Found New Hardware Wizard display, click [
DDDD
for my device [recommended] ], and then click [Next>].
Search for a suitable driver
46
Insert the CD-ROM into the CD-ROM drive.
EEEE
Note
❒ If Auto Run starts, click [
❒ To disable Auto Run, press the left {{{{SHIFT}}}} key when inserting the CD-
ROM into the drive and keep it pressed until the computer finishes reading
from the CD-ROM.
Cancel
], and then [
Exit
].

Installing the Printer Driver Using USB
Select the [Include this location in the search] check box under [Search for the best
FFFF
driver in these location
], and then click [
] to select the printer driver lo-
Browse
cation.
If the CD-ROM drive is D, the source files of the printer driver are stored in
the following location:
• RPCS
D:\DRIVERS\RPCS\WIN2K_XP\(Language)\DISK1
• PCL 5c
D:\DRIVERS\PCL5C\WIN2K_XP\(Language)\DISK1
• PCL 6
D:\DRIVERS\PCL6\WIN2K_XP\(Language)\DISK1
• PostScript 3
D:\DRIVERS\PS3\WIN2K_XP\(Language)\DISK1
Check the printer driver location, and then click [Next].
GGGG
Click [Continue].
HHHH
Click [Finish].
IIII
If installation is successful, the icon of the printer connected to the "USB001"
port is added to the [Printers] window.
Note
❒ The number after “USB” varies depending on the number of printers con-
nected.
2
Troubleshooting USB
Problems Solutions
The machine is not automatically recognized. Turn off the power of the machine, reconnect
Windows has already configured the USB settings.
the USB cable, and then turn it on again.
Open Windows' Device Manager, and then,
[Universal Serial Bus controllers]
under
any conflicting devices. Conflicting devices
have a yellow
not to accidentally remove required devices.
For details, see Windows Help.
Note
❒
When using Windows 2000/XP or Windows Server 2003, an erroneous device is
displayed under
vice Manager]
[!]
[?]
or
icon by the m. Ta ke care
[USB Controller]
dialog box.
, remove
in the
[De-
47

Preparing the Machine
Printing with Parallel Connection
To use a machine connected using a parallel interface, click [LPT1] when installing the printer driver.
Installing the PCL or RPCS Printer Driver
2
Important
❒ To install this printer driver under Windows 2000/XP Professional, Windows
Server 2003, and Windows NT 4.0, you must have an account that has Manage Printers permission. Log on as an Administrators or Power Users group
member.
Quit all applications currently running.
AAAA
Insert the CD-ROM into the CD-ROM drive.
BBBB
The installer starts.
Auto Run may not work with certain operating system settings. If this happens, launch “Setup.exe” on the CD-ROM root directory.
Select an interface language, and then click [OK].
CCCC
The default interface language is English.
48
Click [
DDDD
EEEE
FFFF
GGGG
HHHH
IIII
JJJJ
PCL/RPCS Printer Drivers
The software license agreement appears in the [
box.
After reading the agreement, click [I accept the agreement], and then click [Next].
Select a printer driver you want to use in the [Select Program] dialog box.
You can select several printer drivers.
Select the [Printer Name] check box to select the printer models you want to
use.
The printer name can be changed in the [
Double-click the printer name to display the printer settings.
The details shown in [Comment:], [Driver:], and [Port:] vary depending on the
operating system, printer model, and port.
Check that [
Select the [
] is shown in [
LPT1:
Default Printer
].
License Agreement
Change settings for 'Printer Name'
].
Port:
] check box to configure the printer as default.
] dialog
] box.

Printing with Parallel Connection
Click [Finish].
KKKK
The printer driver installation starts.
Click [Finish] in the installation completion dialog box.
LLLL
Note
❒ To stop installation of the selected software, click [Cancel] before installa-
tion is complete.
Reference
A message appears if there is a newer version of the printer driver already
installed. If there is, you cannot install the printer driver using Auto Run.
If you still want to install the printer driver, use [Add Printer]. See p.57 “If a
Message Appears during Installation”.
2
49

Preparing the Machine
Installing the Printer Driver Using IEEE 1394
(SCSI print)
The printer drivers can be installed from the CD-ROM provided with this machine.
2
Important
❒ Quit all applications currently running, and do not print during installation.
❒ Do not connect IEEE 1394 or USB devices to the computer or turn on another
printers during installation.
❒ Before uninstalling the printer driver, check that the IEEE 1394 interface cable
is disconnected from the computer.
❒ SCSI print must be set to "active" from the control panel. For details, see Net-
work Guide.
❒ This machine can receive print data from one computer at a time only. An
message may appear if jobs from different computers collide.
❒ If jobs collide, the first received is printed first.
❒ When the printer driver is properly installed, connecting or disconnecting the
optional IEEE 1394 cable causes the printer icon to change.
Windows 2000
Note
❒ If [Found New Hardware Wizard] appears every time the computer is started or
the cable is connected, disable the device. To install another printer driver after setting the "1394_00n" port, click [1394_00] as a port during the printer
driver installation.
❒ Installing this printer driver requires Administrators permission. Log on us-
ing an account that has Administrators permission.
❒ The optional 1394 interface unit can be used only with Service Pack 1 (SP1) or
higher.
50
Connect the machine and computer using the IEEE 1394 interface cable.
AAAA
Click [Next] in the [Found New Hardware Wizard] dialog box.
BBBB
When the message "This wizard will complete the installation for this De-
CCCC
vice: Unknown" appears, click [Specify a location], and then click [Next>].
When the message "Locate Driver Files" appears, select the [Optional search
DDDD
locations.] check box, and then click [Specify a location], and then click [Next>].

Installing the Printer Driver Using IEEE 1394 (SCSI print)
Insert the CD-ROM into the CD-ROM drive.
EEEE
Note
❒ If Auto Run starts, click [Cancel], and then [Exit].
❒ To disable Auto Run, press the left {{{{SHIFT}}}} key when inserting the CD-
ROM into the drive and keep it pressed until the computer finishes reading
from the CD-ROM.
Click [Browse].
FFFF
Select the printer driver you want to use.
GGGG
If the CD-ROM drive is D, the source files of the printer driver are stored in
the following location:
• RPCS
D:\DRIVERS\RPCS\WIN2K_XP\(Language)\DISK1
• PCL 5c
D:\DRIVERS\PCL5C\WIN2K_XP\(Language)\DISK1
• PCL 6
D:\DRIVERS\PCL6\WIN2K_XP\(Language)\DISK1
• PostScript 3
D:\DRIVERS\PS3\WIN2K_XP\(Language)\DISK1
Click [Open].
HHHH
Click [OK].
IIII
Follow the instructions.
JJJJ
When installation is complete, the printer connected to "1394_00n" appears in
the [Printers] window. ("n" shows the number of printers connected.)
Note
❒ If the printer driver has already been installed, the printer icon is added to
the [Printers] window. In this case, printer driver installation is not necessary.
❒ If printing does not work properly after the installation, delete the port and re-
install the printer driver. For details, see p.142 “The Machine Does Not Print”.
❒ If you do not want to install the printer when Found New Hardware Wiz-
ard starts under an operating system that supports SCSI print, disable the
device by following the procedure below.
A When the [Found New Hardware Wizard] dialog box appears, click [Next>].
B When the message "This wizard will complete the installation for this
Device: Unknown" appears, select the [Search for a suitable driver for my de-
vice recommended] check box, and then click [Next>].
C When the message "Please choose your search and installation option."
appears, clear all check boxes from [Search for the best driver in these loca-
tions.], and then click [Next>].
D When the message "Driver Files Search Results" appears, select the [Dis-
able the device. The Add/Remove Hardware Wizard in the control Panel can be
able to complete the driver installations.] check box, and then click [Finish]."
2
51

Preparing the Machine
Windows XP, Windows Server 2003
Important
❒ SCSI print must be set to "active" from the control panel. For details, see Net-
work Guide.
❒ Installing this printer driver requires Administrators permission. Log on us-
2
ing an account that has Administrators permission.
Note
❒ This machine can receive print data from one computer at a time only. If a job
from a computer collides with other data, a message may appear on the computer.
❒ To install another printer driver after setting the "1394_00n" port, click
[1394_00] as a port during the printer driver installation.
❒ When the printer driver is properly installed, connecting or disconnecting the
optional IEEE 1394 cable causes the printer icon to change.
Connect the machine and computer using the IEEE 1394 interface cable.
AAAA
When the [Found New Hardware Wizard] dialog box appears, check that [This wiz-
ard helps you install software for: (Unknown)] is displayed.
Select the [Install from a list on specific location (Advanced)] check box, and then
BBBB
click [Next>].
52
When the message "Please choose your search and installation option." ap-
CCCC
pears, select the [Search for the best driver in these locations.] check box, select
the [Include this location in the search:] check box, and then select the [Include
this location in the search:] check box.
Insert the CD-ROM into the CD-ROM drive.
DDDD
Note
❒ If Auto Run starts, click [Cancel], and then [Exit].
❒ To disable Auto Run, press the left {{{{SHIFT}}}} key when inserting the CD-
ROM into the drive and keep it pressed until the computer finishes reading
from the CD-ROM.

Installing the Printer Driver Using IEEE 1394 (SCSI print)
Specify the location where the source files of the printer driver is stored,
EEEE
and then click [
If the CD-ROM drive is D, the source files of the printer driver are stored in
the following location:
• RPCS
D:\DRIVERS\RPCS\WIN2K_XP\(Language)\DISK1
• PCL 5c
D:\DRIVERS\PCL5C\WIN2K_XP\(Language)\DISK1
• PCL 6
D:\DRIVERS\PCL6\WIN2K_XP\(Language)\DISK1
• PostScript 3
D:\DRIVERS\PS3\WIN2K_XP\(Language)\DISK1
When installation is complete, the printer connected to "1394_00n" appears in
the [Printers and Faxes] window. ("n" shows the number of printers connected.)
Follow the instructions.
FFFF
Note
❒ If the printer driver has already been installed, the printer icon is added to
the [Printers and Faxes] window. In this case, printer driver installation is
not necessary.
❒ Even if the printer driver is already installed, the message " Found New
Hardware Wizard" may appear when the machine and the computer are
connected using the IEEE 1394 interface cable for the first time. If it does,
install the printer driver.
❒ If printing does not work properly after the installation, delete the port and
reinstall the printer driver. For details, see p.142 “The Machine Does Not
Print”.
❒ If you do not want to install the printer when Found New Hardware Wiz-
ard starts under an operating system that supports SCSI print, disable the
device by following the procedure below
When the [Found New Hardware Wizard] dialog box appears, check that
A
[This wizard helps you install software for: Unknown] displayed, select [Install
from a list on specific location (Advanced)] check box, and then click [Next>].
B When the message "Please choose your search and installation option."
appears, clear all check boxes from [Search for the best driver in these loca-
tions.], and then click [Next>].
C When the message "The wizard could not find the software on your
computer for.." appears, click [OK].
When the message "Cannot Install this Hardware" appears, select the
D
[
Don't prompt again to install the software
Next
].
] check box, and then click [
Finish
2
].
53

Preparing the Machine
Printing with Bluetooth Connection
Supported Profiles
❖❖❖❖ SPP, HCRP
2
• A maximum of two Bluetooth adaptor or Bluetooth-equipped computers
can be connected at the same time using the Bluetooth interface: one by
SPP, one by HCRP.
• When connecting more than one Bluetooth adaptor or Bluetooth-equipped
computer at the same time, the first device that establishes connection is selected. When selecting the connection between the other devices, cancel
the first established connection.
• Conditions for bidirectional communications
• SPP connection does not support bidirectional communications.
• HCRP connection supports bidirectional communications.
❖❖❖❖ BIP
• For BIP connection, a module including PostScript 3 must be installed in
the machine.
• Only one Bluetooth adaptor or Bluetooth-equipped computer can be con-
nected via BIP.
• Only JPEG images that can be printed using BIP.
• User codes are disabled for BIP.
You cannot print if print functions are restricted.
• Some printers do not support BIP.
Printing with Bluetooth Connection
To install the printer driver, follow the procedure used to install parallel interface.
Important
❒ To install the printer driver under Windows 2000/XP Professional or Win-
dows Server 2003, you must have an account that has Manage Printers permission. Log on as an Administrators or Power Users group member.
Note
❒ System requirements vary depending on the Bluetooth standard and specifi-
cations. For details, see the manuals provided with each product.
❒ For information about setting up Bluetooth under other operating systems or
using it with different utilities, see the manuals provided with those operating systems or utilities.
54

Printing with Bluetooth Connection
Start 3Com Bluetooth Connection Manager.
AAAA
Check that the printer you want to use appears in 3Com Bluetooth Connec-
BBBB
tion Manager.
On the [Tool] menu, click [COM port].
CCCC
Check that the message "Bluetooth Serial Client (COMx) " appears under
DDDD
Client Ports. (X indicates the COM port number used by Bluetooth.)
Click [Close].
EEEE
2
On the [
FFFF
The [Printers] window appears.
Click the icon of the printer you want to use.
GGGG
On the [File] menu, click [Properties].
HHHH
Click the [Ports] tab.
IIII
Under [Port], select the [COMx:] check box. X indicates the COM port
JJJJ
number used by Bluetooth.
Click [OK].
KKKK
Close the [Printers] window.
❖❖❖❖ If a dialog box appears while transmitting a print job, reestablish network connec-
tion as follows:
A
B
❒ To always use the same printer, select the [Always use for this connection]
] menu, point to [
Start
Select the printer you want to use in the [Printers and Faxes] box.
Click [Connect].
Note
check box.
Reference
For details, see the manuals provided with the Bluetooth adaptor or
computer equipped with Bluetooth.
], and then click [
Settings
Printers
].
55

Preparing the Machine
Configuring Security Mode Settings
Start 3Com Bluetooth Connection Manager.
AAAA
On the [Tools] menu, click [Security Mode].
BBBB
The [
Security Mode
Select the security mode in the [Security Mode:] list.
2
CCCC
If you click [High], or [Custom], and specify [Link] in the [Custom Settings] dialog
box, enter the Bluetooth password. For information about entering the password, see p.56 “Printing in the Security Mode”.
For all other security modes and custom settings, no password is required.
Note
❒ For information about each mode, see the manuals provided with the util-
ity.
Click [OK].
DDDD
Close the [Security Mode] dialog box.
Reference
For details about the security mode, see 3Com Bluetooth Connection Manager Help. For details about the password entry which is required to transmit print jobs, see p.56 “Printing in the Security Mode”.
] dialog box appears.
Printing in the Security Mode
Send the print job to the printer in use.
AAAA
Depending on the computer configuration, the [Connect] dialog box may appear. If it does, use it to establish the network connection.
The [Authentication] dialog box appears.
BBBB
Enter the Bluetooth password, and then click [OK].
CCCC
As the Bluetooth password, enter the last four digits of the machine's serial
number. You can find the serial number on the label on the back of the machine. For example, if the serial number is 00A0-001234, the Bluetooth password is 1234.
The print job is sent.
DDDD
Note
❒ The Bluetooth password differs for each machine and cannot be changed.
56

If a Message Appears during Installation
If a Message Appears during Installation
Message number 58 or 34 indicates the printer driver cannot be installed using
Auto Run. Install the printer driver using [
For Windows 95/98/Me, Windows 2000 and Windows NT 4.0:
On the [Start] menu, point to [Settings], and then click [Printers].
AAAA
Double-click the Add Printer icon.
BBBB
Follow the instructions in Add Printer Wizard.
CCCC
Note
❒ If the printer driver is on a CD-ROM, the location of the RPCS printer driver
is either \DRIVERS\RPCS\WIN9X_ME, \DRIVERS\RPCS\WIN2K_XP,
or \DRIVERS\RPCS\NT4. If the installer starts, click [Cancel] to quit.
For Windows XP Professional and Windows Server 2003:
Add Printer
] or [
>Install Printer
].
2
On the [
AAAA
Click [
BBBB
Follow the instructions in Add Printer Wizard.
CCCC
Note
❒ If the printer driver is on a CD-ROM, the location of the RPCS printer driv-
er is \DRIVERS\RPCS\WIN2K_XP. If the installer starts, click [Cancel] to
quit.
For Windows XP Home Editions:
On the [Start] menu, click [Control Panel].
AAAA
Click [
BBBB
Click [Printers and Faxes].
CCCC
Click [Install Printer].
DDDD
Follow the instructions in Add Printer Wizard.
EEEE
Note
❒ If the printer driver is on a CD-ROM, the location of the RPCS printer driv-
er is \DRIVERS\RPCS\WIN2K_XP. If the installer starts, click [Cancel] to
quit.
] menu, click [
Start
Add a printer
Printers and Other Hardware
].
Printers and Faxes
].
].
57

Preparing the Machine
Making Option Settings for the Printer
Make option settings for the machine using the printer driver when bidirectional
communication is disabled.
Reference
For details about making option settings for the printer, see p.60 “If Bidirec-
2
tional Communication is Disabled”.
Conditions for Bidirectional Communication
Bidirectional communication allows information about paper size and feed direction settings to be automatically sent to the printer. You can check machine
status from your computer.
• Bidirectional communication is supported by Windows 95/98/Me/2000/XP,
Windows Server 2003, and Windows NT 4.0.
• If you use the RPCS printer driver and bidirectional communication is enabled under Windows 2000, the [Change Accessories] tab is unavailable.
Note
❒ The RPCS printer driver supports bidirectional communications and updates
the machine status automatically.
❒ The PCL printer driver supports bidirectional communications. You can up-
date machine status manually.
❒ The PostScript 3 printer driver does not support bidirectional communica-
tions.
To support bidirectional communication, the following conditions must be met:
❖❖❖❖ When connected with parallel cables
• The computer must support bidirectional communication.
• The machine must support bidirectional communication.
• The interface cable must support bidirectional communication.
• The machine must be connected to the computer using the standard paral-
lel cables and parallel connectors.
• Under Windows 2000, [Enable bidirectional support] must be selected, and
[Enable printer pooling] must not be selected on the [port] tab with the RPCS
printer driver.
58

Making Option Settings for the Printer
❖❖❖❖ When connected with the network
• The machine must support bidirectional communication.
• SmartDeviceMonitor for Client included on the CD-ROM must be in-
stalled, and TCP/IP must be used.
• Under Windows 2000, [Enable bidirectional support] must be selected, and
[Enable printer pooling] must not be selected on the [port] tab with the RPCS
printer driver.
• In addition to the above, one of the following conditions must also be met:
• The SmartDeviceMonitor for Client port and the TCP/IP protocol must
be used.
• The standard TCP/IP port must be used without changing the default
port name (for Windows 2000/XP and Windows Server 2003).
• Microsoft TCP/IP print IP address must be specified for use (for Windows NT 4.0).
• IPP port name must include the IP address when using the IPP protocol.
❖❖❖❖ When connected with IEEE 1394
• The computer must support bidirectional communication.
• The machine must be connected to the IEEE 1394 connector of a computer
using the IEEE 1394 interface cable.
• [Activate] must be selected in the SCSI print of IEEE 1394 and [Activate] must
be selected in the Bidi-SCSI print.
• Under Windows 2000/XP or Windows Server 2003, [Enable bidirectional
support] must be selected, and [Enable printer pooling] must not be selected
on the [
] tab with RPCS printer driver.
port
2
❖❖❖❖ When connected with USB
The machine must be connected to the computer's USB port using the USB interface cable.
The computer must support bidirectional communication.
Note
❒ Install SmartDeviceMonitor for Client from the CD-ROM provided.
59

Preparing the Machine
If Bidirectional Communication is Disabled
Set up option settings when bidirectional communications are disabled.
Limitation
❒ Under Windows 2000/XP and Windows Server 2003, Manage Printers per-
mission is required to change the printer properties in the [Printers] folder.
2
Log on as an Administrators or Power Users group member.
❒ Under Windows NT 4.0, Full Control permission is required to change the
printer properties in the [Printers] folder. Log on as an Administrators or Power Users group member.
On the [Start] menu, point to [Settings], and then click [Printers].
AAAA
The [Printers] window appears.
Click the icon of the printer you want to use.
BBBB
On the [File] menu, click [Properties].
CCCC
Click the [Accessories] tab.
DDDD
If options in the [Change Accessories] tab are disabled, bidirectional connection
is enabled. In this case, no change is necessary for option settings.
Note
❒ If you are using the RPCS printer driver, click the [Change Accessories] tab.
❒ If you are using the PS printer driver, click the [Device Settings] tab.
60
Select options installed from the [Option] area, and then make the necessary
EEEE
settings.
Select the total amount of the memory in [Total Memory:], when the optional
FFFF
SDRAM module is added.
Under [Paper source tray settings], click and highlight the tray to be used, and
GGGG
then select the appropriate size, position, and type for the tray. Select the
[Tray locking] check box to exclude the tray from the targets of automatic tray
selection.
Click [OK] to close the printer properties dialog box. Click the [Defaults] tab,
HHHH
and then click [Change Accessories] to display the option selection.
Click [OK] to close the printer properties dialog box. Click the [Defaults] tab,
and then click [Change Accessories] to display the option selection.

Installing Font Manager 2000
Installing Font Manager 2000
Limitation
❒ Under Windows 2000/XP, Windows Server 2003, or Windows NT 4.0, install-
ing applications by Auto Run requires administrator permission. To install a
printer driver by Auto Run, log on using an account that has administrator
permission.
Quit all applications currently running.
AAAA
Insert the CD-ROM into the CD-ROM drive.
BBBB
The installer starts.
Click [Font Manager 2000].
CCCC
Follow the instructions on the screen.
DDDD
2
61

Preparing the Machine
Using Adobe PageMaker Version 6.0, 6.5,
or 7.0
Under Windows 95/98/Me/2000/XP, Windows Server 2003, or Windows NT
4.0 with Adobe PageMaker, you need to copy PPD files to the PageMaker folder.
2
PPD files have the .ppd extension in the folder “DRIVERS\PS\WIN9X_ME\(Lan-
guage)\DISK1\” on the CD-ROM.
The “WIN9X_ME” folder inside the “PS” folder is for Windows 95/98/Me. Use
the folder at this level that is appropriate for the operating system you are currently using.
The third folder “(Language)” may be substituted by an appropriate language
name.
Copy the .ppd file to the PageMaker folder.
• For PageMaker 6.0 default installation
The directory is “C:\PM6\RSRC\PPD4”.
• For PageMaker 6.5 default installation
The directory is “C:\PM65\RSRC\USENGLISH\PPD4”.
The “USENGLISH” may vary depending on your language selection.
• For PageMaker 7.0 default installation
The directory is “C:\PM7\RSRC\USENGLISH\PPD4”.
The “USENGLISH” may vary depending on your language selection.
Note
❒ If the driver is not set correctly after copying the ”.ppd” file, printing may not
be performed properly.
❒ When using PageMaker, the optional features that can be selected by the
printer driver will not be active. The following procedure describes how to
activate the optional printer features.
On the [File] menu, click [Print].
A
The [Print Document] dialog box appears.
B Make the necessary settings in the [Features] box.
62

3. Setting Up the Printer Driver
PCL - Accessing the Printer Properties
Windows 95/98/Me - Accessing the Printer Properties
There are two methods to open the printer properties dialog box.
Making printer default settings
To make the printer default settings, open the printer properties dialog box from
the [
Important
❒ You cannot change the printer default settings for each user. Settings made in
the printer properties dialog box are applied to all users.
On the [Start] menu, point to [Settings], and then click [Printers].
AAAA
The [
Click the icon of the printer you want to use.
BBBB
On the [File] menu, click [Properties].
CCCC
Printers
Printers
] window.
] window appears.
Make the necessary settings, and then click [OK].
DDDD
Note
❒ With some applications, the printer driver settings are not used, and the
application's own default settings are applied.
Reference
For details, see Printer Driver Help.
Making printer settings from an application
You can make printer settings for a specific application.
To make printer settings for a specific application, open the printer properties
dialog box from that application. The following explains how to make settings
for the WordPad application provided with Windows 95/98/Me.
On the [File] menu, click [Print].
AAAA
The [Print] dialog box appears.
Select the printer you want to use in the [
BBBB
ties].
The printer properties dialog box appears.
] list, and then click [
Name
Proper-
63

Setting Up the Printer Driver
Make the necessary settings, and then click [OK].
CCCC
Click [OK] to start printing.
DDDD
Note
❒ The procedure to open the printer properties dialog box may vary depend-
ing on the application. For details, see the manuals provided with the application you use.
❒ With some applications, the printer driver settings are not used, and the
application's own default settings are applied.
3
❒ Any settings you make in the following procedure are valid for the current
application only.
❒ General users can change the properties displayed in the [Print] dialog box
of an application. Settings made here are used as defaults when printing
from this application.
Reference
For details, see Printer Driver Help.
Windows 2000 - Accessing the Printer Properties
Making printer default settings - the printer properties
Important
❒ To change the printer default settings including option configuration settings, log
on using an account that has Manage Printers permission. Members of the Administrators and Power Users groups have Manage Printers permission by default.
❒ You cannot change the printer default settings for each user. Settings made in
the printer properties dialog box are applied to all users.
On the [Start] menu, point to [Settings], and then click [Printers].
AAAA
The [Printers] window appears.
Click the icon of the printer you want to use.
BBBB
On the [File] menu, click [Properties].
CCCC
The printer properties dialog box appears.
Make the necessary settings, and then click [OK].
DDDD
Note
❒ Settings you make here are used as the default settings for all applications.
64
❒ Do not make a setting for [
Reference
For details, see Printer Driver Help.
Form to Tray Assignment
].

PCL - Accessing the Printer Properties
Making printer default settings - Printing Preferences
Important
❒ You cannot change the printer default settings for each user. Settings made in
the printer properties dialog box are applied to all users.
On the [Start] menu, point to [Settings], and then click [Printers].
AAAA
The [Printers] window appears.
Click the icon of the printer you want to use.
BBBB
On the [File] menu, click [Printing Preferences...].
CCCC
The [Printing Preferences] dialog box appears.
Make the necessary settings, and then click [OK].
DDDD
Note
❒ Settings you make here are used as the default settings for all applications.
Reference
For details, see Printer Driver Help.
Making printer settings from an application
You can make printer settings for a specific application.
To make printer settings for a specific application, open the [Printing Preferences]
dialog box from that application. The following explains how to make settings
for the WordPad application provided with Windows 2000.
3
Note
❒ The procedure to open the [Printing Preferences] dialog box may vary depend-
ing on the application. For details, see the manuals provided with the application you use.
❒ Any settings you make in the following procedure are valid for the current
application only.
❒ General users can change the properties displayed in the [Print] dialog box of
an application. Settings made here are used as defaults when printing from
this application.
On the [File] menu, click [Print...].
AAAA
The [Print] dialog box appears.
Select the printer you want to use in the [Select Printer] list.
BBBB
Make the necessary settings, and then click [Apply] to start printing.
CCCC
Reference
For details, see Printer Driver Help.
65

Setting Up the Printer Driver
Windows XP, Windows Server 2003 - Accessing the Printer Properties
Making printer default settings - the printer properties
Important
❒ To change the printer default settings including option configuration settings, log
on using an account that has Manage Printers permission. Members of the Administrators and Power Users groups have Manage Printers permission by default.
❒ You cannot change the printer default settings for each user. Settings made in
3
the printer properties dialog box are applied to all users.
On the [Start] menu, click [Printers and Faxes].
AAAA
The [Printers and Faxes] window appears.
Click the icon of the printer you want to use.
BBBB
On the [File] menu, click [Properties].
CCCC
The printer properties dialog box appears.
Make the necessary settings, and then click [OK].
DDDD
Note
❒ Settings you make here are used as the default settings for all applications.
❒ Do not make a setting for [Form to Tray Assignment].
Reference
For details, see Printer Driver Help.
Making printer default settings - Printing Preferences
Important
❒ You cannot change the printer default settings for each user. Settings made in
the printer properties dialog box are applied to all users.
On the [Start] menu, click [Printers and Faxes].
AAAA
The [Printers and Faxes] window appears.
Click the icon of the printer you want to use.
BBBB
On the [File] menu, click [Printing Preferences...].
CCCC
The [Printing Preferences] dialog box appears.
Make the necessary settings, and then click [OK].
DDDD
Note
❒ Settings you make here are used as the default settings for all applications.
Reference
66
For details, see Printer Driver Help.

PCL - Accessing the Printer Properties
Making printer settings from an application
You can make printer settings for a specific application.
To make printer settings for a specific application, open the [Printing Preferences]
dialog box from that application. The following explains how to make settings
for the WordPad application provided with Windows XP.
Note
❒ The procedure to open the [Printing Preferences] dialog box may vary depend-
ing on the application. For details, see the manuals provided with the application you use.
❒ Any settings you make in the following procedure are valid for the current
application only.
❒ General users can change the properties displayed in the [Print] dialog box of
an application. Settings made here are used as defaults when printing from
this application.
On the [File] menu, click [Print...].
AAAA
The [Print] dialog box appears.
Select the printer you want to use in the [Select Printer] list.
BBBB
Make the necessary settings, and then click [Apply] to start printing.
CCCC
Reference
For details, see Printer Driver Help.
3
67

Setting Up the Printer Driver
Windows NT 4.0 - Accessing the Printer Properties
Making printer default settings - the printer properties
Important
❒ To change the printer default settings including option configuration settings,
log on using an account that has Full Control permission. Members of the Administrators, Server Operators, Print Operators, and Power Users groups
3
have Full Control permission by default.
❒ You cannot change the printer default settings for each user. Settings made in
the printer properties dialog box are applied to all users.
On the [Start] menu, point to [Settings], and then click [Printers].
AAAA
The [Printers] window appears.
Click the icon of the printer you want to use.
BBBB
On the [File] menu, click [Properties].
CCCC
The printer properties dialog box appears.
Make the necessary settings, and then click [OK].
DDDD
Note
❒ Settings you make here are used as the default settings for all applications.
❒ Do not make a setting for [Form to Tray Assignment].
Reference
For details, see Printer Driver Help.
Making printer default settings - Default
Important
❒ To change the printer default settings including option configuration settings,
log on using an account that has Full Control permission. Members of the Administrators, Server Operators, Print Operators, and Power Users groups
have Full Control permission by default.
❒ You cannot change the printer default settings for each user. Settings made in
the printer properties dialog box are applied to all users.
On the [Start] menu, point to [Settings], and then click [Printers].
AAAA
The [Printers] window appears.
Click the icon of the printer you want to use.
BBBB
On the [File] menu, click [Document Defaults].
CCCC
68
The [Default] dialog box appears.

PCL - Accessing the Printer Properties
Make the necessary settings, and then click [OK].
DDDD
Note
❒ Settings you make here are used as the default settings for all applications.
Reference
For details, see Printer Driver Help.
Making printer settings from an application
You can make printer settings for a specific application.
To make printer settings for a specific application, open the printer properties
dialog box from that application. The following explains how to make settings
for the WordPad application provided with Windows NT 4.0.
Note
❒ The procedure to open the printer properties dialog box may vary depending
on the application. For details, see the manuals provided with the application
you use.
❒ With some applications, the printer driver settings are not used, and the ap-
plication's own default settings are applied.
❒ Any settings you make in the following procedure are valid for the current
application only.
❒ General users can change the properties displayed in the [Print] dialog box of
an application. Settings made here are used as defaults when printing from
this application.
On the [File] menu, click [Print].
AAAA
The [Print] dialog box appears.
Select the printer you want to use in the [
BBBB
ties].
The printer properties dialog box appears.
Make the necessary settings, and then click [OK].
CCCC
Click [OK] to start printing.
DDDD
] list, and then click [
Name
Proper-
3
Reference
For details, see Printer Driver Help.
69

Setting Up the Printer Driver
RPCS - Accessing the Printer Properties
Windows 95/98/Me - Accessing the Printer Properties
There are two dialog box types of the printer properties dialog box.
"Multi-tab" is used as an example in this manual. For details about changing the
dialog box types, see the printer driver Help.
❖❖❖❖ Multi-tab
3
This dialog box type is designed for users who often change print settings to
perform various printing operations.
❖❖❖❖ Custom Setting
This dialog box type is designed for users who rarely change print settings.
This type of dialog box may vary depending on the installed options.
Making printer default settings
To make the printer default settings, open the printer properties dialog box from
the [Printers] window.
Important
❒ You cannot change the printer default settings for each user. Settings made in
the printer properties dialog box are applied to all users.
Note
❒ With some applications, the printer driver settings are not used, and the ap-
plication's own default settings are applied.
On the [Start] menu, point to [Settings], and then click [Printers].
AAAA
The [Printers] window appears.
Click the icon of the printer you want to use.
BBBB
On the [File] menu, click [Properties].
CCCC
Note
❒ When you open the printer properties dialog box initially after installing
the RPCS printer driver, a confirmation message appears. After clicking
[OK], the printer properties dialog box appears.
Make the necessary settings, and then click [OK].
DDDD
Reference
For details, see Printer Driver Help.
70

RPCS - Accessing the Printer Properties
Making printer settings from an application
You can make printer settings for a specific application.
To make printer settings for a specific application, open the printer properties
dialog box from that application. The following explains how to make settings
for the WordPad application provided with Windows 95/98/Me.
Note
❒ The procedure to open the printer properties dialog box may vary depending
on the application. For details, see the manuals provided with the application
you use.
❒ With some applications, the printer driver settings are not used, and the ap-
plication's own default settings are applied.
❒ Any settings you make in the following procedure are valid for the current
application only.
❒ General users can change the properties displayed in the [Print] dialog box of
an application. Settings made here are used as defaults when printing from
this application.
On the [File] menu, click [Print].
AAAA
The [Print] dialog box appears.
Select the printer you want to use in the [Name] list, and then click [Proper-
BBBB
ties].
The printer properties dialog box appears.
3
Make the necessary settings, and then click [OK].
CCCC
Click [OK] to start printing.
DDDD
Reference
For details, see Printer Driver Help.
71

Setting Up the Printer Driver
Windows 2000 - Accessing the Printer Properties
Making printer default settings - the printer properties
Important
❒ To change the printer default settings including option configuration settings,
log on using an account that has Manage Printers permission. Members of the
Administrators and Power Users groups have Manage Printers permission
3
by default.
❒ You cannot change the printer default settings for each user. Settings made in
the printer properties dialog box are applied to all users.
On the [Start] menu, point to [Settings], and then click [Printers].
AAAA
The [Printers] window appears.
Click the icon of the printer you want to use.
BBBB
On the [File] menu, click [Properties].
CCCC
The printer properties dialog box appears.
Note
❒ When you open the printer properties dialog box initially after installing
the RPCS printer driver, a confirmation message appears. After clicking
[OK], the printer properties dialog box appears.
72
Make the necessary settings, and then click [OK].
DDDD
Note
❒ Settings you make here are used as the default settings for all applications.
❒ Do not make a setting for [Form to Tray Assignment].
Reference
For details, see Printer Driver Help.

RPCS - Accessing the Printer Properties
Making printer default settings - Printing Preferences
Important
❒ You cannot change the printer default settings for each user. Settings made in
the printer properties dialog box are applied to all users.
On the [Start] menu, point to [Settings], and then click [Printers].
AAAA
The [Printers] window appears.
Click the icon of the printer you want to use.
BBBB
On the [File] menu, click [Printing Preferences...].
CCCC
The [Printing Preferences] dialog box appears.
Make the necessary settings, and then click [OK].
DDDD
Note
❒ Settings you make here are used as the default settings for all applications.
Reference
For details, see Printer Driver Help.
Making printer settings from an application
You can make printer settings for a specific application.
To make printer settings for a specific application, open the [Printing Preferences]
dialog box from that application. The following explains how to make settings
for the WordPad application provided with Windows 2000.
3
Note
❒ The procedure to open the [Printing Preferences] dialog box may vary depend-
ing on the application. For details, see the manuals provided with the application you use.
❒ Any settings you make in the following procedure are valid for the current
application only.
❒ General users can change the properties displayed in the [Print] dialog box of
an application. Settings made here are used as defaults when printing from
this application.
On the [File] menu, click [Print...].
AAAA
The [Print] dialog box appears.
Select the printer you want to use in the [Select Printer] list.
BBBB
Make the necessary settings, and then click [Apply] to start printing.
CCCC
Reference
For details, see Printer Driver Help.
73

Setting Up the Printer Driver
Windows XP, Windows Server 2003 - Accessing the Printer Properties
Making printer default settings - the printer properties
Important
❒ To change the printer default settings including option configuration settings,
log on using an account that has Manage Printers permission. Members of the
Administrators and Power Users groups have Manage Printers permission
3
by default.
❒ You cannot change the printer default settings for each user. Settings made in
the printer properties dialog box are applied to all users.
On the [Start] menu, click [Printers and Faxes].
AAAA
The [Printers and Faxes] window appears.
Click the icon of the printer you want to use.
BBBB
On the [File] menu, click [Properties].
CCCC
The printer properties dialog box appears.
Note
❒ When you open the printer properties dialog box initially after installing
the RPCS printer driver, a confirmation message appears. After clicking
[OK], the printer properties dialog box appears.
74
Make the necessary settings, and then click [OK].
DDDD
Note
❒ Settings you make here are used as the default settings for all applications.
❒ Do not make a setting for [Form to Tray Assignment].
Reference
For details, see Printer Driver Help.

RPCS - Accessing the Printer Properties
Making printer default settings - Printing Preferences
Important
❒ You cannot change the printer default settings for each user. Settings made in
the printer properties dialog box are applied to all users.
On the [Start] menu, click [Printers and Faxes].
AAAA
The [Printers and Faxes] window appears.
Click the icon of the printer you want to use.
BBBB
On the [File] menu, click [Printing Preferences...].
CCCC
The [Printing Preferences] dialog box appears.
Make the necessary settings, and then click [OK].
DDDD
Note
❒ Settings you make here are used as the default settings for all applications.
Reference
For details, see Printer Driver Help.
Making printer settings from an application
You can make printer settings for a specific application.
To make printer settings for a specific application, open the [Printing Preferences]
dialog box from that application. The following explains how to make settings
for the WordPad application provided with Windows XP.
3
Note
❒ The procedure to open the [Printing Preferences] dialog box may vary depend-
ing on the application. For details, see the manuals provided with the application you use.
❒ Any settings you make in the following procedure are valid for the current
application only.
❒ General users can change the properties displayed in the [Print] dialog box of
an application. Settings made here are used as defaults when printing from
this application.
On the [File] menu, click [Print...].
AAAA
The [Print] dialog box appears.
Select the printer you want to use in the [Select Printer] list.
BBBB
Make the necessary settings, and then click [Apply] to start printing.
CCCC
Reference
For details, see Printer Driver Help.
75

Setting Up the Printer Driver
Windows NT 4.0 - Accessing the Printer Properties
Making printer default settings - the printer properties
Important
❒ To change the printer default settings including option configuration settings,
log on using an account that has Full Control permission. Members of the Administrators, Server Operators, Print Operators, and Power Users groups
3
have Full Control permission by default.
❒ You cannot change the printer default settings for each user. Settings made in
the printer properties dialog box are applied to all users.
On the [Start] menu, point to [Settings], and then click [Printers].
AAAA
The [Printers] window appears.
Click the icon of the printer you want to use.
BBBB
On the [File] menu, click [Properties].
CCCC
The printer properties dialog box appears.
Note
❒ When you open the printer properties dialog box initially after installing
the RPCS printer driver, a confirmation message appears. After clicking
[OK], the printer properties dialog box appears.
76
Make the necessary settings, and then click [OK].
DDDD
Note
❒ Settings you make here are used as the default settings for all applications.
❒ Do not make a setting for [Form to Tray Assignment].
Reference
For details, see Printer Driver Help.

RPCS - Accessing the Printer Properties
Making printer default settings - Default
Important
❒ To change the printer default settings including option configuration settings,
log on using an account that has Full Control permission. Members of the Administrators, Server Operators, Print Operators, and Power Users groups
have Full Control permission by default.
❒ You cannot change the printer default settings for each user. Settings made in
the printer properties dialog box are applied to all users.
On the [Start] menu, point to [Settings], and then click [Printers].
AAAA
The [Printers] window appears.
Click the icon of the printer you want to use.
BBBB
On the [File] menu, click [Document Defaults...].
CCCC
The [Default] dialog box appears.
Make the necessary settings, and then click [OK].
DDDD
Note
❒ Settings you make here are used as the default settings for all applications.
Reference
For details, see Printer Driver Help.
3
77

Setting Up the Printer Driver
Making printer settings from an application
You can make printer settings for a specific application.
To make printer settings for a specific application, open the printer properties
dialog box from that application. The following explains how to make settings
for the WordPad application provided with Windows NT 4.0.
Note
❒ The procedure to open the printer properties dialog box may vary depending
on the application. For details, see the manuals provided with the application
3
you use.
❒ With some applications, the printer driver settings are not used, and the ap-
plication's own default settings are applied.
❒ Any settings you make in the following procedure are valid for the current
application only.
❒ General users can change the properties displayed in the [Print] dialog box of
an application. Settings made here are used as defaults when printing from
this application.
On the [File] menu, click [Print].
AAAA
The [Print] dialog box appears.
Select the printer you want to use in the [Name] list, and then click [Proper-
BBBB
ties].
The printer properties dialog box appears.
78
Make the necessary settings, and then click [Apply].
CCCC
Click [OK] to start printing.
DDDD
Reference
For details, see Printer Driver Help.

4. Other Print Operations
Printing a PDF File Directly
You can send PDF files directly to the
machine for printing, without having
to open a PDF application.
Limitation
❒ This function is possible only when
the optional PostScript 3 unit is installed.
❒ This function is possible for genu-
ine Adobe PDF files only.
❒ Version 1.3, 1.4, and 1.5 PDF files
are compatible.
❒ Transparency and JBIG2 (functions
of PDF version 1.4) are not compatible.
❒ PDF version 1.5 exclusive functions
are not compatible.
Note
❒ Paper size errors may occur when
printing on custom size paper.
Printing Method
❖❖❖❖ Using DeskTopBinder Lite
PDF files registered with DeskTopBinder Lite can be sent directly
to the machine for printing.
❒ Use DeskTopBinder Lite on the
❒ PDF Direct Print settings can be
❒ When printing PDF files for which
❒ When a group password is set
Limitation
provided CD-ROM.
Note
made from PDF Direct Print
properties.
a password is set, one of the following settings is required:
• Enter the PDF password from
PDF Direct Print properties.
The RPCS printer driver must
be installed.
• To set the PDF password, select [Change PDF Password] on
the [PDF Menu] in Printer Features.
with DeskTopBinder Lite, set a
group password using [PDF
Group Password] on the [PDF
Menu] in Printer Features.
Reference
For details, see DeskTopBinder
Lite Help.
❖❖❖❖ Using commands
From UNIX, you can print PDF
files directly, using commands
such as “ftp” and “lpr”.
79

Other Print Operations
Using Locked & Sample Print Job List
A list of files stored in the machine can be viewed on the display panel.
Press the {{{{Printer}}}} key.
AAAA
4
AEU044S
The Printer screen appears.
Press [Locked & Sample Print Job List].
BBBB
80

A list of files stored in the machine appears.
AEV046S
Using Locked & Sample Print Job List
1. [Complete List]
Displays all files stored in the machine.
2. [Locked Print Job List]
Displays only locked print files stored
in the machine. See p.86 “Locked
Print”.
3. [Sample Print Job List]
Displays only sample print files
stored in the machine. See p.82 “Sam-
ple Print”.
4.
User ID, Date/Time, and Qty. dis-
play
Displays the time when the instruction to print the stored files was entered, User ID, and the remaining
number of copies.
Note
❒ The display is not updated if a new file is stored while the list of stored files
is displayed. To update the display, press [Exit] to return to the Printer
screen, and then press [Locked & Sample Print Job List] again.
5. [U
UPrev.] / [TTTTNext]
UU
If the list of files does not fit on the
screen, scroll down to view the list.
6. [Exit]
Returns to the Printer screen.
7. [Details]
Displays details about the selected
file.
8. [Print]
Prints the selected file.
9. [Delete]
Deletes the selected file.
4
81

Other Print Operations
Sample Print
Use this function to print only the first
set of a multiple-set print job. After
you have checked the result, remaining sets can be printed or canceled using the machine's control panel. This
can reduce misprints due to mistakes
in content or settings.
Note
❒ If the application has a collate op-
tion, make sure it is not selected
4
before sending a print job. By default, sample print jobs are automatically collated by the printer
driver. If a collate option is selected from the application's [Print] dialog box, more prints than
intended may be produced.
❒ You can identify the file you want
to print by user ID and date and
time when the job was stored.
❒ The number of pages the machine
can save depends on the contents
of the print image. For example,
the machine can save up to 30 jobs
or 1,000 pages, including locked
print files, depending on data volume.
❒ If the first set of the sample print
files is not as you expected and you
do not want to print remaining
sets, delete the sample print file using the display panel. If you print
the remaining sets of the sample
print file, the job in the machine is
deleted automatically.
❒ Turning off the machine's main
power switch deletes sample print
files.
Printing a Sample Print File
The following procedure describes
how to print a sample print file with
the PCL 6 / 5c and the RPCS printer
driver. For information about how to
print a sample print file with the PostScript 3 printer driver, see PostScript 3
Supplement included as a PDF file on
the CD-ROM.
Limitation
❒ Applications with their own driv-
ers, such as PageMaker, do not
support this function.
❒ If you are using Mac OS X, you
need Mac OS X v10.2 or higher to
use this function.
Configure the sample print in the
AAAA
printer driver's properties.
Reference
For details about configuring
the printer drivers, see the relevant Help files.
Start printing from the applica-
BBBB
tion's [Print] dialog box.
Note
❒ Make sure to set more than two
copies.
The sample print job is sent to the
machine, and the first set is printed.
82

Sample Print
On the machine's control panel,
CCCC
press the {{{{Printer}}}} key to display
the Printer screen.
Press [Locked & Sample Print Job List].
DDDD
A list of the print files stored in the
machine appears.
Press [
EEEE
Sample Print Job List
A list of the sample print files
stored in the machine appears.
].
AEU044S
Select the file you want to print
FFFF
by pressing it.
Note
❒ Press [UUUUPrev.] or [TTTTNext] to scroll
through the list.
❒ Only one file can be selected at a
time.
Press [Print] to change the number
GGGG
of sets to be printed.
Enter the new number of sets us-
HHHH
ing the number keys.
If you do not want to change the
set quantity, proceed to step
Note
❒ You can enter up to 999 sets.
❒ Press {{{{Clear/Stop}}}} to correct any
entry mistakes.
Press [Yes].
IIII
The remaining sets are printed.
4
.
I
The following items also appear:
• User ID: The user ID set up by
the printer driver.
• Date / Time: The date and time
when the job was sent from the
computer.
• Qty.: The number of remaining
sets.
Note
❒ Depending on the security set-
tings, certain print jobs may not
be displayed.
Note
❒ Press [No] to cancel printing.
❒ When printing is completed, the
stored file will be deleted.
❒ To cancel printing, press [
After that, press [Job Reset]. After it has started, the file will be
deleted.
❒ Remaining print jobs are print-
ed before the sample print job.
Exit
].
83

Other Print Operations
Deleting a Sample Print File
If you are not satisfied with the sample printout, you can delete the sample print file, revise it and print it
again until the settings are suitable.
Press the {{{{Printer}}}} key to display
AAAA
the Printer screen.
Press [Locked & Sample Print Job List].
BBBB
4
A list of the print files stored in the
machine appears.
Press [Sample Print Job List].
CCCC
A list of sample print files stored in
the machine appears.
Note
❒ Depending on the security set-
tings, certain print jobs may not
be displayed.
Checking the Error Log
If a file could not be stored, you can
check the error log on the control panel.
Limitation
❒ The latest 30 error files are stored
in the error log. If a new error file is
added when there are 30 error files
already stored, the oldest file is deleted. However, if the oldest error
file is a sample print file, it is not
deleted, but stored instead in the
sample print error log until the
number of sample print error files
reaches 20.
❒ If the main power switch is turned
off, the log is deleted.
Press the {{{{Printer}}}} key to display
AAAA
the Printer screen.
Press [Error Log].
BBBB
84
Select the file you want to delete
DDDD
by pressing it.
Note
❒ Press [UUUUPrev.] or [TTTTNext] to scroll
through the list.
❒ Only one file can be selected at a
time.
Press [Delete].
EEEE
The delete confirmation screen
will appear.
Press [
FFFF
After the file has been deleted, the
file list screen will return.
❒ If you do not want to delete the
] to delete the file.
Yes
Note
file, press [No].
Press [Sample Print Job List].
CCCC
Note
❒ Depending on the security set-
tings, certain print jobs may not
be displayed.

Press [Details].
DDDD
An error log list appears.
Sample Print
Note
❒ Press [UUUUPrev.] or [TTTTNext] to scroll
through the error files.
❒ Press [Exit] after checking the
log.
❒ To print files that appear in the
error log, resend them after
stored files have been printed or
deleted.
4
85

Other Print Operations
Locked Print
Use this function to maintain privacy
when printing confidential documents on the machine over a shared
network. Usually, it is possible to
print data using the display panel
once it is stored in this machine.
When using Locked Print, it is not
possible to print unless a password is
entered on the machine's display panel. Your confidential documents will
be safe from being viewed by other
4
people.
Note
❒ If the application has a collate op-
tion, make sure it is not selected
before sending a print job. Locked
print jobs are automatically collated by the printer driver as default.
If a collate option is selected in the
application print dialog box, more
sets than intended may be printed.
❒ You can identify the file you want
to print by User ID, and date and
time when the job was stored.
❒ The number of pages the machine
can save depends on print image
content. For example, the machine
can save up to 30 jobs or 1,000 pages including sample print files, depending on data volume.
❒ After the locked print file is print-
ed, the job is automatically deleted.
❒ Turning off the machine's main
power switch deletes locked print
files.
Printing a Locked Print File
The following procedure describes
how to print a locked print file with
the PCL 6 / 5c and the RPCS printer
driver. For information about how to
print a locked print file with the PostScript 3 printer driver, see PostScript 3
Supplement included as a PDF file on
the CD-ROM.
Limitation
❒ Applications with their own driv-
ers, such as PageMaker, do not
support this function.
❒ If you are using Mac OS X, you
need Mac OS X v10.2 and higher to
use this function.
Configure the locked print in the
AAAA
printer driver's properties.
Reference
For details about configuring
the printer drivers, see the corresponding Help files.
Start printing from the applica-
BBBB
tion's [Print] dialog box.
The locked print job is sent to the
machine.
On the machine's control panel,
CCCC
press the {{{{Printer}}}} key to display
the Printer screen.
Press [Locked & Sample Print Job List].
DDDD
86
A list of the print files stored in the
machine appears.

Locked Print
Press [Locked Print Job List].
EEEE
A list of the locked print files
stored in the machine appears.
The following items also appear:
• User ID: The user ID set up by
the printer driver.
• Date / Time: The date and time
when the job was sent from the
computer.
Note
❒ Depending on the security set-
tings, certain print jobs may not
be displayed.
Select the file you want to print
FFFF
by pressing it.
Note
❒ Press [UUUUPrev.] or [TTTTNext] to scroll
through the list.
❒ Only one file can be selected at a
time.
Press [Print].
GGGG
The password screen appears.
Press [Yes].
IIII
The locked file is printed.
Note
❒ Press [No] to cancel printing.
❒ To cancel printing, press [Exit].
After that, press [
ter it has started, the file will be
deleted.
Job Reset
Deleting Locked Print Files
Press the {{{{Printer}}}} key to display
AAAA
the Printer screen.
Press [
BBBB
CCCC
Locked & Sample Print Job List
A list of the print files stored in the
machine appears.
Press [
Locked Print Job List
A list of the locked print files
stored appears.
Note
❒ Depending on the security set-
tings, certain print jobs may not
be displayed.
].
]. Af-
4
].
Enter the password using the
HHHH
number keys, and then press [OK].
The print confirmation screen appears.
Note
❒ A confirmation screen will ap-
pear if the password is not entered correctly. Press [OK] to
enter the password again.
Select the file you want to delete
DDDD
by pressing it.
Note
❒ Press [UUUUPrev.
through the list.
❒ Only one file can be selected at a
time.
Press [
EEEE
Delete
The password screen is displayed.
] or [TTTTNext
].
] to scroll
87

Other Print Operations
Enter the password using the
FFFF
number keys, and then press [OK].
The delete confirmation screen appears.
Note
❒ A confirmation screen will ap-
pear if the password is not entered correctly. Press [OK] to
enter the password again.
Press [Yes].
GGGG
After the file has been deleted, the
file list screen returns.
4
Note
❒ If you do not want to delete the
file, press [No].
Press the {{{{Printer}}}} key to display
AAAA
the Printer screen.
Press [Error Log].
BBBB
Select [Locked Print Job List].
CCCC
Note
❒ Depending on the security set-
tings, certain print jobs may not
be displayed.
Press [Details].
DDDD
An error log list appears.
Checking the Error Log
If a file could not be stored in this machine, you can check the error log on
the display panel.
Limitation
❒ The latest 30 error files are stored
in the error log. If a new error file is
added when there are 30 error files
already stored, the oldest file is deleted. However, if the oldest error
file is a locked print file, it is not deleted, but stored instead in the
locked print error log until the
number of locked print error files
reaches 20.
❒ If the main power switch is turned
off, the log will be deleted.
Note
❒ Press [UUUUPrev.] or [TTTTNext] to scroll
through the error files.
❒ Press [Exit] after checking the
log.
❒ To print files that appear in the
error log, resend them after
stored files have been printed or
deleted.
88

Collate
Collate
When printing multiple documents such as handouts for meetings, you can separate sets into order. This function is known as “Collate”. Collate stores data
transmitted from a computer in memory. The following are the three types of
collate:
❖❖❖❖ Collate
Printed output is assembled as sets in sequential order.
AEU016S
❖❖❖❖ Rotating Collate
Every other print set is rotated by 90 degrees K.
4
AEU017S
❖❖❖❖ Shift Collate
(The optional finisher is required for this function.)
The finisher shift tray moves backward or forward when a job or set is output,
causing the next to shift, so you can separate them.
AEU018S
Limitation
❒ The optional finisher is required for Shift Collate.
❒ Rotating Collate is not possible when feeding paper from the bypass tray.
❒ Shift Collate is not possible when printing on 8
1
/2 × 51/
2
L.
❒ If jobs containing pages of various sizes are set, Rotating Collate will not
work.
❒ Rotating Collate, Staple, and Punch functions cannot be combined.
89

Other Print Operations
Note
❒ You can set Collate in the RPCS printer driver.
• If you cannot make Shift Collate even with the optional finisher installed,
options may not be set up correctly in the printer driver. Correct the printer
driver's option settings. For details, see the printer driver Help.
❒ If Auto Continue occurs on the first set, Collate will be canceled.
❒ If forced printing occurs on the first set, Collate will be canceled.
❒ If a document with mixed paper sizes or sizes larger than A4, 8
set, it can only be collated, even if Rotating Collate has been selected.
❒ If the following functions are selected, Collate or Shift Collate will be applied
even if Rotating Collate is selected:
• Covers
4
• Slip Sheet
❒ When Rotating Collate has been selected, printing speed will be slower than
with other collate functions.
❒ When setting Collate in the printer driver settings, make sure that a collate
option is not selected in the application's print settings. If a collate option is
selected, printing will not be as intended.
❒ The Rotating Collate function requires two paper trays containing same size
paper but in different orientations.
Reference
For information about paper sizes and the number of sets you can use Collate,
Rotating Collate, and Shift Collate with in every option, see Copy Reference.
For printing methods, see the printer driver Help.
1
/2 “× 11” is
90

Printing with the Finisher
Printing with the Finisher
You can collate, staple or punch holes in printed paper by installing the optional
finisher. Make sure you read the following precautions when using the optional
finisher:
Reference
For information about optional finishers, see General Settings Guide.
To use the staple function, see p.92 “Staple”.
To use the punch function, see p.96 “Punch”.
❖❖❖❖ Be sure to make settings for options installed on the machine in the printer drivers.
Reference
To make settings for options in the printer drivers, see p.58 “Making Option Settings for the Printer”.
❖❖❖❖ Be sure to set the paper size and paper orientation in the printer driver when using
duplex printing, booklet, combine (layout), staple and punch functions.
Reference
For information about duplex printing, booklet, and layout, see the printer
driver Help.
To use the staple function, see p.92 “Staple” and the printer driver Help.
To use the punch function, see p.96 “Punch” and the printer driver Help.
Note
❒ Depending on the application, print settings may not be enabled and printed
output may not be as expected.
❖❖❖❖ When setting staple or collate in the printer driver, make sure that the Collate check
box is cleared in the application's [Print] dialog box.
If Collate is enabled in the application, printing will not be as intended.
4
91

Other Print Operations
Staple
With the optional finisher installed, sets can be stapled individually when printing multiple sets.
Staple Position
The specified staple position varies depending on paper size, type, quantity and
feed orientation. The following table shows staple positions:
4
92
AEU037S

Printing with the Finisher
4
AEU038S
Reference
• For paper sizes and maximum numbers of sheets available for stapling, see
“Specifications”, General Settings Guide.
• For printing methods, see the printer driver Help.
• The staple position will vary when using the PostScript 3 printer driver.
For more information, see the PostScript 3 printer driver Help.
93

Other Print Operations
Stapling Precautions
Limitation
❒ Stapling can be done only with the optional finisher installed.
❒ Stapling cannot be done when paper is fed from the bypass tray.
❒ You cannot interrupt the current job with a job for another function requiring
stapling or collating.
❒ When printing on letterhead, stapling may not be at the specified position.
❒ When the optional booklet finisher is installed, and PostScript 3 is used, you
cannot specify [2 at Center].
Note
4
❒ Wh en the f inisher is installed, and when an o utput t ray tha t canno t output us-
ing the staple function has been selected, the paper will be output according
to System Settings.
❒ If you cannot make staple settings even with the finisher installed, options
may not be set correctly in the printer driver. Correct option settings in the
printer driver. For details, see the printer driver Help.
❒ When duplex printing is selected, adjust staple positions to the binding orien-
tation.
❒ When the finisher is being used for another function's job (for example, a copy
job), printing will start after that job ends.
❒ When setting Staple in the printer driver settings, make sure that a collate op-
tion is not selected in the print settings of the application. If a collate option is
selected in the application, printing will not be as intended.
❒ Be sure to set paper size and orientation in the printer driver when stapling.
• Depending on the software you are using, print settings may not be saved
and the printed result may not be as expected.
❒ When printing restarts after removing jammed paper, the printing position
may be different, depending on the location of the jam.
• If the paper jam occurred in the optional finisher, printing will restart from
the top page of the data currently being printed, or from the page where
the paper jam occurred.
• If the paper jam occurred in the machine, printing will restart from the
page where the paper jam occurred.
❒ Even if the paper jam occurred in the machine, the error will not be cleared
unless the cover of the finisher is opened and closed.
94
 Loading...