

Ricoh LD220F, 920, 920SPF, LD220SPF, Aficio MP 201F Operating Instructions Manual
...
Operating Instructions
Network and System Settings Guide
System Settings
1
Connecting the Machine
2
Using a Printer Server
3
Monitoring and Configuring the Printer
4
Registering Addresses and Users for Facsimile / Scanner Functions
5
6
Special Operations under Windows
Appendix
7
Read this manual carefully before you use this machine and keep it handy for future reference. For safe and correct use, be sure to read the Safety Information
in "About This Machine" before using the machine.


TABLE OF CONTENTS
Manuals for This Machine...............................................................................................................................10
Notice................................................................................................................................................................12
Important......................................................................................................................................................12
How to Read This Manual...............................................................................................................................13
Symbols........................................................................................................................................................13
Names of Major Items.................................................................................................................................13
Note..............................................................................................................................................................13
About IP Address.........................................................................................................................................14
Laws and Regulations......................................................................................................................................15
Legal Prohibition..........................................................................................................................................15
Display Panel....................................................................................................................................................16
Reading the Display and Using Keys.........................................................................................................16
Accessing User Tools.......................................................................................................................................18
Changing Default Settings...........................................................................................................................18
Exiting User Tools.........................................................................................................................................19
1. System Settings
General Features..............................................................................................................................................21
Tray Paper Settings..........................................................................................................................................24
Timer Settings....................................................................................................................................................26
Interface Settings..............................................................................................................................................28
Network........................................................................................................................................................28
Parallel Interface..........................................................................................................................................32
Wireless LAN...............................................................................................................................................33
Print I/F Settings List.....................................................................................................................................34
File Transfer.......................................................................................................................................................36
Administrator Tools...........................................................................................................................................40
Programming the LDAP server.........................................................................................................................46
Programming the LDAP server....................................................................................................................46
Changing the LDAP server..........................................................................................................................53
Deleting the LDAP server.............................................................................................................................54
Programming the Realm...................................................................................................................................56
Programming the Realm..............................................................................................................................56
Changing the Realm....................................................................................................................................58
1

Deleting the Realm.......................................................................................................................................58
2. Connecting the Machine
Connecting to the Interfaces............................................................................................................................61
Connecting to the Ethernet Interface..........................................................................................................62
Connecting to the Gigabit Ethernet Interface............................................................................................63
Connecting to the USB Interface................................................................................................................65
Connecting to the IEEE 1284 Interface.....................................................................................................66
Connecting to the Wireless LAN Interface.................................................................................................66
Network Settings Required to Use the Printer/LAN-Fax...............................................................................69
Ethernet.........................................................................................................................................................69
Wireless LAN...............................................................................................................................................70
Network Settings Required to Use Internet Fax.............................................................................................72
Ethernet.........................................................................................................................................................72
Wireless LAN...............................................................................................................................................74
Network Settings Required to Use E-mail Function.......................................................................................76
Ethernet.........................................................................................................................................................76
Wireless LAN...............................................................................................................................................77
Network Settings Required to Use Scan to Folder Function.........................................................................80
Ethernet.........................................................................................................................................................80
Wireless LAN...............................................................................................................................................81
Network Settings Required to Use the Network Delivery Scanner..............................................................83
Ethernet.........................................................................................................................................................83
Wireless LAN...............................................................................................................................................84
Network Settings Required to Use WSD Scanner.........................................................................................86
Ethernet.........................................................................................................................................................86
Wireless LAN...............................................................................................................................................87
Network Settings Required to Use Network TWAIN Scanner.....................................................................89
Ethernet.........................................................................................................................................................89
Wireless LAN...............................................................................................................................................90
Using Utilities to Make Network Settings.......................................................................................................92
Interface Settings..........................................................................................................................................92
File Transfer..................................................................................................................................................98
Connecting the Machine to a Telephone Line and Telephone..................................................................101
2

Connecting the Telephone Line................................................................................................................101
Selecting the Line Type..............................................................................................................................101
Connecting the Optional Handset or an External Telephone................................................................101
3. Using a Printer Server
Preparing Printer Server................................................................................................................................105
Using NetWare..............................................................................................................................................106
Setting Up as a Print Server (NetWare 3.x)............................................................................................107
Setting Up as a Print Server (NetWare 4.x, 5/5.1, 6/6.5).................................................................108
Using Pure IP in the NetWare 5/5.1 or 6/6.5 Environment................................................................109
Setting Up as a Remote Printer (NetWare 3.x).......................................................................................111
Setting Up as a Remote Printer (NetWare 4.x, 5/5.1, 6/6.5)............................................................113
4. Monitoring and Configuring the Printer
Using Web Image Monitor...........................................................................................................................117
Displaying Top Page.................................................................................................................................118
When User Authentication is Set..............................................................................................................120
About Menu and Mode............................................................................................................................120
Access in the Administrator Mode...........................................................................................................122
List of Setting Items.....................................................................................................................................123
Displaying Web Image Monitor Help.....................................................................................................129
Using SmartDeviceMonitor for Admin.........................................................................................................131
Installing SmartDeviceMonitor for Admin...............................................................................................132
Changing the Network Interface Board Configuration..........................................................................133
Locking the Menus on the Machine's Control Panel..............................................................................134
Changing the Paper Type.........................................................................................................................135
Managing User Information.....................................................................................................................135
Configuring Energy Save Mode..............................................................................................................141
Setting a Password....................................................................................................................................141
Checking the Machine Status...................................................................................................................142
Changing Name and Comment...............................................................................................................143
Load Fax Journal.......................................................................................................................................144
Viewing and Deleting Spool Print Jobs....................................................................................................145
Managing Address Information...............................................................................................................145
Using SmartDeviceMonitor for Client..........................................................................................................147
3

Monitoring Printers....................................................................................................................................147
Checking the Machine Status...................................................................................................................148
When Using IPP with SmartDeviceMonitor for Client............................................................................148
Printer Status Notification by E-Mail............................................................................................................150
Setting the Account for E-mail Notification.............................................................................................151
Mail Authentication...................................................................................................................................152
Auto E-mail Notification............................................................................................................................153
On-demand E-mail Notification...............................................................................................................154
Format of On-demand E-mail Messages................................................................................................154
Remote Maintenance by telnet.....................................................................................................................156
Using telnet................................................................................................................................................156
8021x........................................................................................................................................................157
access.........................................................................................................................................................158
appletalk....................................................................................................................................................159
authfree......................................................................................................................................................160
autonet........................................................................................................................................................160
bonjour.......................................................................................................................................................161
devicename...............................................................................................................................................163
dhcp............................................................................................................................................................163
dhcp6.........................................................................................................................................................164
diprint.........................................................................................................................................................165
dns..............................................................................................................................................................165
domainname..............................................................................................................................................167
etherauth....................................................................................................................................................168
etherconfig.................................................................................................................................................168
help.............................................................................................................................................................168
hostname....................................................................................................................................................169
ifconfig........................................................................................................................................................169
info..............................................................................................................................................................170
ipp...............................................................................................................................................................171
ipsec...........................................................................................................................................................171
ipv6.............................................................................................................................................................172
logout.........................................................................................................................................................172
4

lpr................................................................................................................................................................172
netware......................................................................................................................................................173
pathmtu.......................................................................................................................................................174
prnlog.........................................................................................................................................................175
rhpp............................................................................................................................................................175
route............................................................................................................................................................175
set................................................................................................................................................................177
show...........................................................................................................................................................180
slp...............................................................................................................................................................180
smb.............................................................................................................................................................180
snmp...........................................................................................................................................................181
sntp.............................................................................................................................................................184
spoolsw......................................................................................................................................................185
ssdp............................................................................................................................................................186
ssh...............................................................................................................................................................186
status...........................................................................................................................................................187
syslog..........................................................................................................................................................187
upnp...........................................................................................................................................................187
web.............................................................................................................................................................188
wiconfig......................................................................................................................................................189
wins.............................................................................................................................................................192
wsmfp.........................................................................................................................................................194
SNMP.............................................................................................................................................................195
Getting Printer Information over the Network.............................................................................................196
Current Printer Status.................................................................................................................................196
Printer configuration..................................................................................................................................202
Understanding the Displayed Information...................................................................................................204
Print Job Information..................................................................................................................................204
Print Log Information.................................................................................................................................204
Configuring the Network Interface Board...............................................................................................205
Message List...................................................................................................................................................216
System Log Information.............................................................................................................................216
5

5. Registering Addresses and Users for Facsimile/Scanner Functions
Address Book.................................................................................................................................................225
Managing Names in the Address Book..................................................................................................227
Sending fax by Quick Dial.......................................................................................................................227
Sending e-mail by Quick Dial..................................................................................................................228
Sending received fax documents or scanned files to a shared folder directly.....................................228
Preventing unauthorized user access to shared folders from the machine...........................................228
Managing users and machine usage......................................................................................................228
Registering Names.........................................................................................................................................230
Registering Names....................................................................................................................................230
Changing a Registered Name.................................................................................................................231
Deleting a Registered Name....................................................................................................................233
Authentication Information............................................................................................................................235
Registering a User Code...........................................................................................................................235
Changing a User Code.............................................................................................................................238
Deleting a User Code...............................................................................................................................241
Displaying the Counter for Each User......................................................................................................244
Printing the Counter for Each User...........................................................................................................245
Printing the Counter for All Users.............................................................................................................247
Clearing the Number of Prints..................................................................................................................248
Fax Destination..............................................................................................................................................251
Registering a Fax Destination...................................................................................................................252
Changing a Fax Destination.....................................................................................................................254
Deleting a Fax Destination........................................................................................................................261
Registering an IP-Fax Destination.............................................................................................................264
Changing a Registered IP-Fax Destination..............................................................................................266
Deleting a Registered IP-Fax Destination................................................................................................271
E-mail Destination..........................................................................................................................................274
Registering an E-mail Destination.............................................................................................................274
Changing an E-mail Destination..............................................................................................................277
Deleting an E-mail Destination.................................................................................................................279
Registering Folders........................................................................................................................................282
Registering an SMB Folder.......................................................................................................................282
6

Changing an SMB Folder.........................................................................................................................289
Deleting an SMB Folder...........................................................................................................................293
Registering an FTP Folder.........................................................................................................................295
Changing an FTP Folder...........................................................................................................................300
Deleting an FTP Folder..............................................................................................................................304
Registering an NCP Folder.......................................................................................................................306
Changing an NCP Folder.........................................................................................................................312
Deleting an NCP Folder............................................................................................................................316
Registering Names to a Group.....................................................................................................................319
Registering a Group..................................................................................................................................319
Registering Names to a Group................................................................................................................320
Adding a Group to Another Group.........................................................................................................322
Displaying Names Registered in a Group..............................................................................................324
Removing a Name from a Group............................................................................................................326
Deleting a Group within Another Group.................................................................................................328
Changing a Group Name........................................................................................................................330
Deleting a Group......................................................................................................................................332
Registering a Protection Code......................................................................................................................334
Registering a Protection Code to a Single User......................................................................................334
Registering a Protection Code to a Group User.....................................................................................337
Registering SMTP and LDAP Authentication................................................................................................341
SMTP Authentication.................................................................................................................................341
LDAP Authentication..................................................................................................................................344
Searching.......................................................................................................................................................348
Searching by Name..................................................................................................................................348
Searching from the Display List................................................................................................................349
Searching by Registration Number..........................................................................................................350
Searching by User Code..........................................................................................................................351
Searching by Fax Number.......................................................................................................................351
Searching by E-mail Address...................................................................................................................352
Searching by Destination Folder Name..................................................................................................353
6. Special Operations under Windows
Printing Files Directly from Windows............................................................................................................355
7

Setup...........................................................................................................................................................355
Using a Host Name Instead of an IPv4 Address....................................................................................355
Printing Commands...................................................................................................................................356
7. Appendix
When Using Windows Terminal Service/Citrix Presentation Server/Citrix XenApp..............................361
Operating Environment.............................................................................................................................361
Supported Printer Drivers..........................................................................................................................361
Limitations...................................................................................................................................................361
Using DHCP...................................................................................................................................................363
Using AutoNet...........................................................................................................................................363
Configuring the WINS Server......................................................................................................................364
Using Web Image Monitor......................................................................................................................364
Using telnet................................................................................................................................................364
Using the Dynamic DNS Function................................................................................................................366
Updating....................................................................................................................................................366
DNS Servers Targeted for Operation......................................................................................................367
DHCP Servers Targeted for Operation....................................................................................................367
Setting the Dynamic DNS Function..........................................................................................................367
Precautions.....................................................................................................................................................369
Connecting a Dial-Up Router to a Network............................................................................................369
NetWare Printing......................................................................................................................................370
When the IEEE 802.11 Interface Unit is Installed.......................................................................................372
Configuring IEEE 802.1X..............................................................................................................................373
Installing a Site Certificate........................................................................................................................373
Installing Device Certificate......................................................................................................................374
Setting Items of IEEE 802.1X for Ethernet................................................................................................375
Setting Items of IEEE 802.1X for Wireless LAN......................................................................................376
Specifications.................................................................................................................................................378
Copyrights......................................................................................................................................................380
expat...........................................................................................................................................................380
NetBSD......................................................................................................................................................380
Sablotron....................................................................................................................................................382
JPEG LIBRARY............................................................................................................................................383
8

SASL...........................................................................................................................................................383
MD4...........................................................................................................................................................384
MD5...........................................................................................................................................................384
Samba(Ver 3.0.4).....................................................................................................................................384
RSA BSAFE®..............................................................................................................................................385
Open SSL...................................................................................................................................................385
Open SSH..................................................................................................................................................387
Open LDAP................................................................................................................................................391
Heimdal......................................................................................................................................................392
IPSTM print language emulations.............................................................................................................392
Trademarks.....................................................................................................................................................393
INDEX...........................................................................................................................................................395
9

Manuals for This Machine
Read this manual carefully before you use this machine.
Refer to the manuals that are relevant to what you want to do with the machine.
• Media differ according to manual.
• The printed and electronic versions of a manual have the same contents.
• Adobe Acrobat Reader/Adobe Reader must be installed in order to view the manuals as PDF files.
• A Web browser must be installed in order to view the html manuals.
About This Machine
Before using the machine, be sure to read the section of this manual entitled Safety Information.
This manual introduces the machine's various functions. It also explains the control panel, preparation
procedures for using the machine, how to enter text, how to install the CD-ROMs provided, and how
to replace paper, toner, staples, and other consumables.
Troubleshooting
Provides a guide for resolving common usage-related problems.
Copy Reference
Explains Copier functions and operations. Also refer to this manual for explanations on how to place
originals.
Facsimile Reference
Explains Facsimile functions and operations.
Printer Reference
Explains Printer functions and operations.
Scanner Reference
Explains Scanner functions and operations.
Network and System Settings Guide
Explains how to connect the machine to a network, configure and operate the machine in a network
environment, and use the software provided. Also explains how to change User Tools settings and
how to register information in the Address Book.
Security Reference
This manual is for administrators of the machine. It explains security functions that you can use to
prevent unauthorized use of the machine, data tampering, or information leakage. For enhanced
security, we recommend that you first make the following settings:
• Install the Device Certificate.
• Enable SSL (Secure Sockets Layer) Encryption.
10

• Change the user name and password of the administrator using Web Image Monitor.
For details, see "Setting Up the Machine", Security Reference.
Be sure to read this manual when setting the enhanced security functions, or user and administrator
authentication.
PostScript 3 Supplement
Explains how to set up and use PostScript 3.
Other manuals
• UNIX Supplement
• Quick Reference Copy Guide
• Quick Reference Printer Guide
• Quick Reference Fax Guide
• Quick Reference Scanner Guide
• Manuals for DeskTopBinder Lite
• DeskTopBinder Lite Setup Guide
• DeskTopBinder Introduction Guide
• Auto Document Link Guide
• Manuals provided are specific to machine types.
• For "UNIX Supplement", please visit our Web site or consult an authorized dealer. This manual
includes descriptions of functions and settings that might not be available on this machine.
• The following software products are referred to using general names:
Product Name General name
DeskTopBinder Lite and DeskTopBinder Professional*1 DeskTopBinder
ScanRouter EX Professional*1 and ScanRouter EX Enterprise*1 the ScanRouter delivery software
*1 Optional
11

Notice
Important
In no event will the company be liable for direct, indirect, special, incidental, or consequential damages
as a result of handling or operating the machine.
For good copy quality, the manufacturer recommends that you use genuine toner from the manufacturer.
The manufacturer shall not be responsible for any damage or expense that might result from the use of
parts other than genuine parts from the manufacturer with your office products.
12

How to Read This Manual
Symbols
This manual uses the following symbols:
Indicates important safety notes.
Ignoring these notes could result in moderate or minor injury, or damage to the machine or to property. Be
sure to read these notes. They can be found in the "Safety Information" section of About This machine.
Indicates points to pay attention to when using the machine, and explanations of likely causes of paper
misfeeds, damage to originals, or loss of data. Be sure to read these explanations.
Indicates supplementary explanations of the machine's functions, and instructions on resolving user errors.
This symbol is located at the end of sections. It indicates where you can find further relevant information.
[ ]
Indicates the names of keys that appear on the machine's display panel.
[ ]
Indicates the names of keys on the machine's control panel.
Names of Major Items
Major options of this machine are referred to as follows in this manual:
• Auto Document Feeder ADF
Note
Contents of this manual are subject to change without prior notice.
Two kinds of size notation are employed in this manual. With this machine refer to the inch version.
Some illustrations in this manual might be slightly different from the machine.
Certain options might not be available in some countries. For details, please contact your local dealer.
13

Depending on which country you are in, certain units may be optional. For details, please contact your
local dealer.
This machine comes in two models which vary in copy/print speed. To ascertain which model you have,
see “Machine Types”, About This Machine.
About IP Address
In this manual, “IP address” covers both IPv4 and IPv6 environments. Read the instructions that are relevant
to the environment you are using.
14

Laws and Regulations
Legal Prohibition
Do not copy or print any item for which reproduction is prohibited by law.
Copying or printing the following items is generally prohibited by local law:
bank notes, revenue stamps, bonds, stock certificates, bank drafts, checks, passports, driver's licenses.
The preceding list is meant as a guide only and is not inclusive. We assume no responsibility for its
completeness or accuracy. If you have any questions concerning the legality of copying or printing certain
items, consult with your legal advisor.
This machine is equipped with a function that prevents making counterfeit bank bills. Due to this function
the original images similar to bank bills may not be copied properly.
15
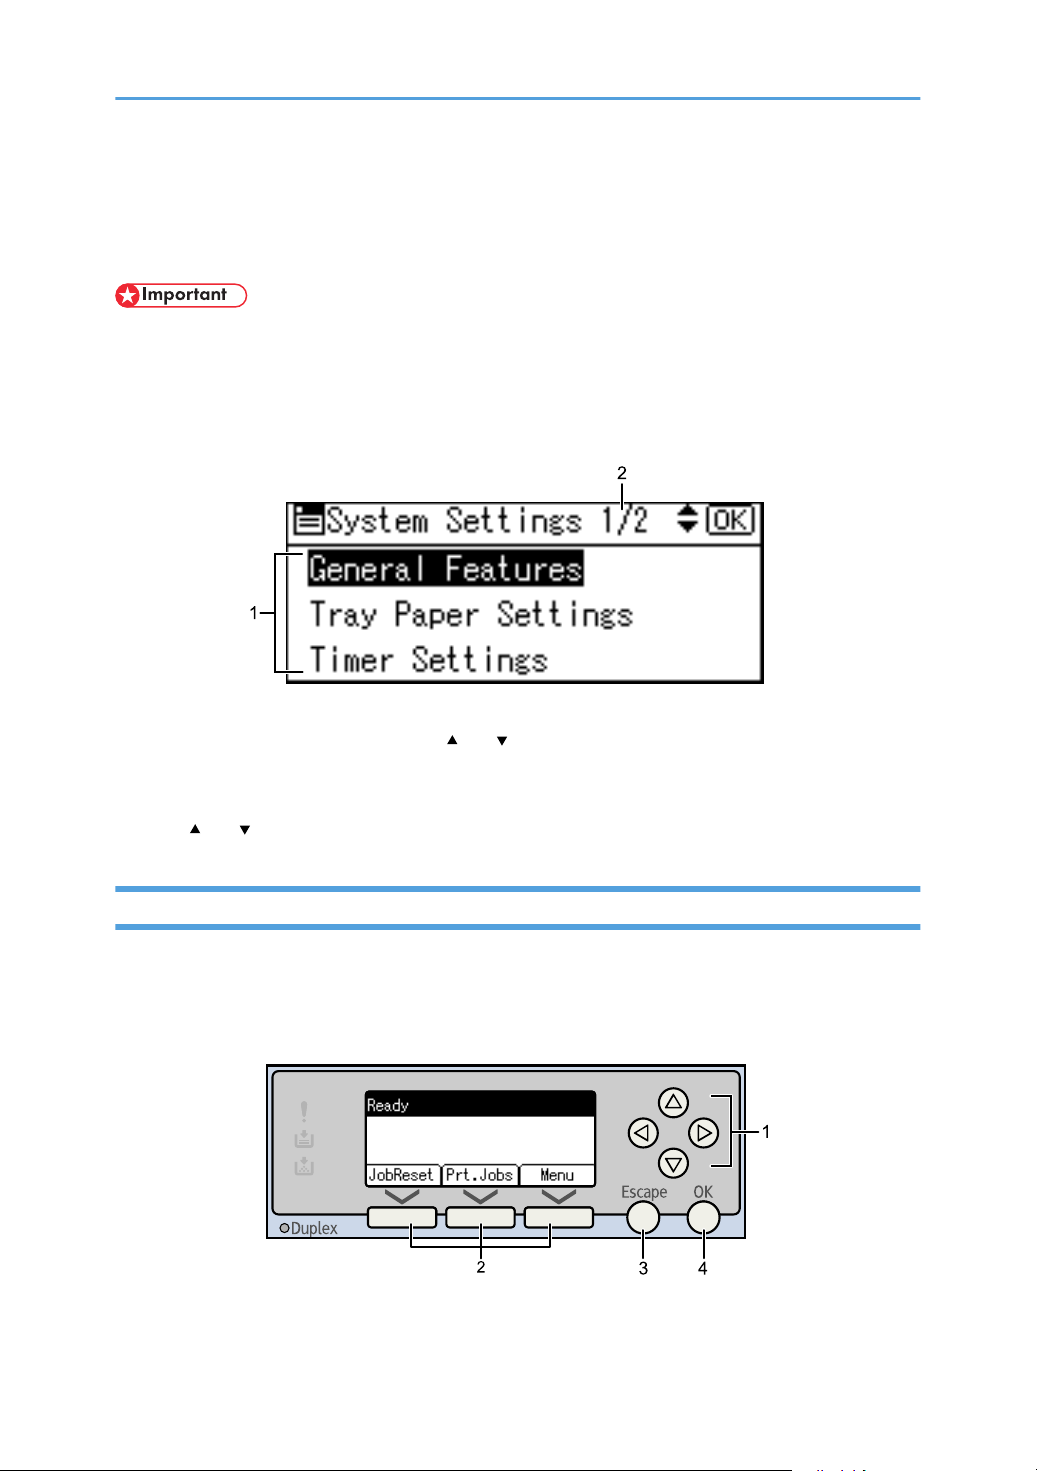
Display Panel
BKR002S
BKR003S
The display panel shows machine status, error messages, and function menus.
• A force or impact of more than 30 N (about 3 kgf) will damage the display panel.
If you press the [User Tools/Counter] key, the User Tools menu screen appears.
Using the System Settings menu screen as an example, this section explains how to use the machine's
display panel.
1. The settings menu appears. Press the [ ] or [ ] key to scroll to the setting you want to specify or
change, and then press the [OK] key to display the screen for specifying that setting.
2. The number of pages in the displayed settings menu appears. If you cannot see the entire menu, press
the [ ] or [ ] key to scroll the screen.
Reading the Display and Using Keys
This section explains how to read the display and use the Selection keys.
If you press the [Copy] key, the initial copy screen appears.
Using the initial copy screen menu as an example, this sections how to use the machine's control panel.
1. Scroll keys
16

Press to move the cursor in each direction, step by step.
When the [ ], [ ], [ ], or [ ] key appears in this manual, press the scroll key of the same direction.
2. Selection keys
Correspond to items at the bottom line on the display.
Example: The Printer display
• When the instruction “press [JobReset]” appears in this manual, press the left selection key.
• When the instruction “press [Prt.Jobs]” appears in this manual, press the center selection key.
• When the instruction “press [Menu]” appears in this manual, press the right selection key.
3. [Escape] key
Press to cancel an operation or return to the previous display.
4. [OK] key
Press to set a selected item or an entered numeric value.
17
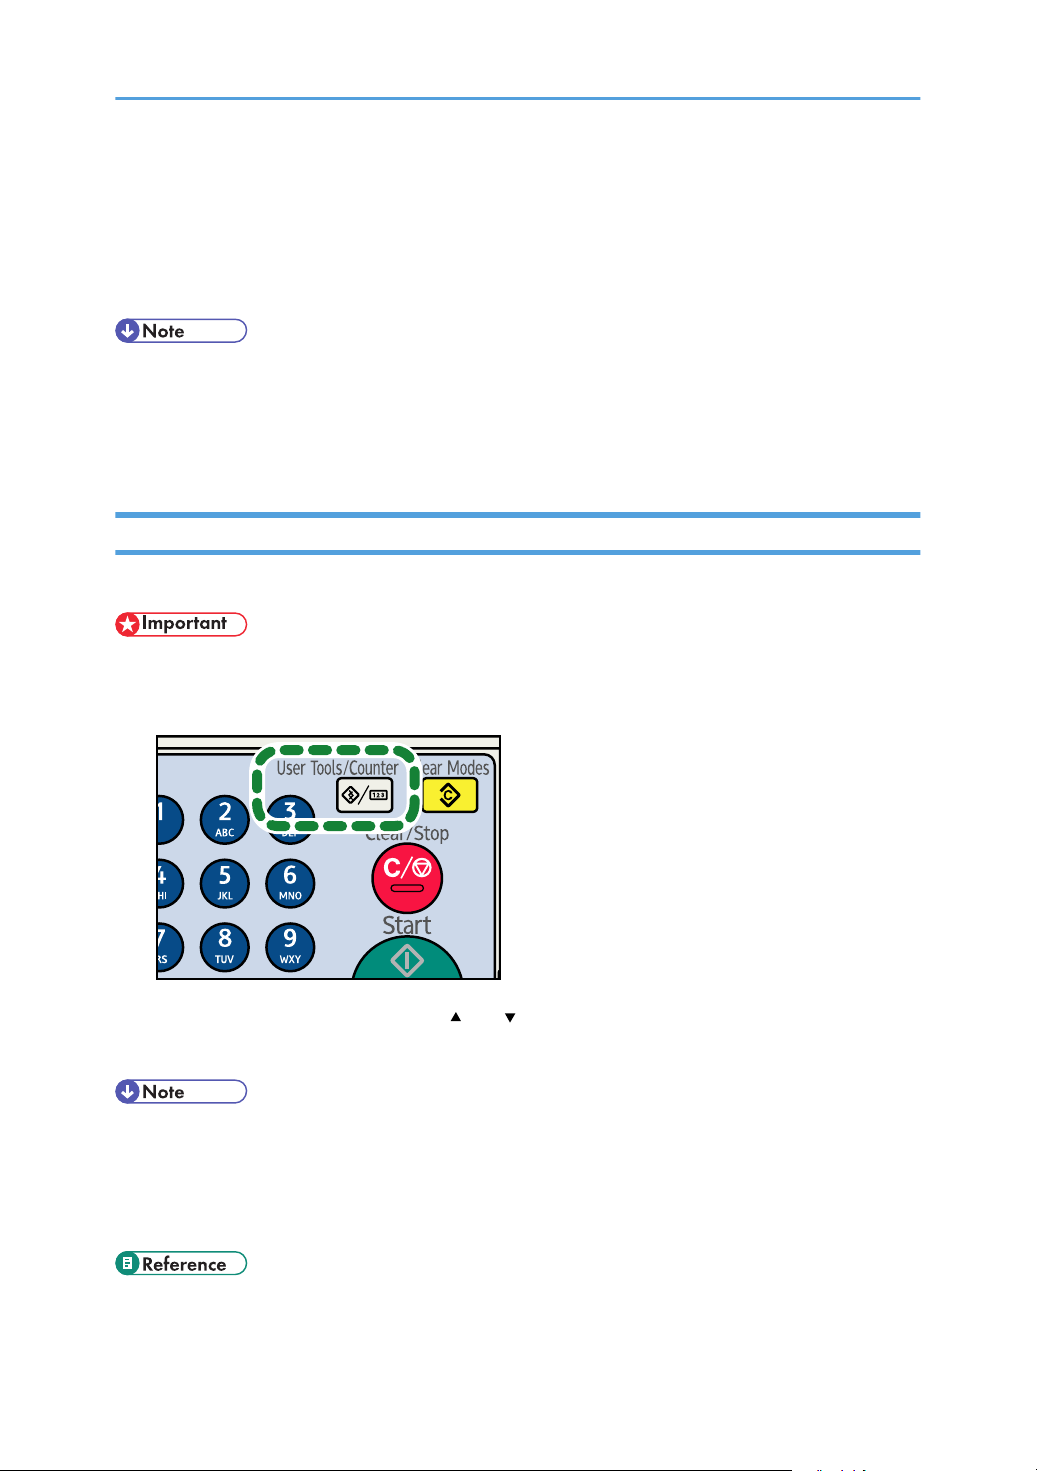
Accessing User Tools
BKR020S
This section describes how to access User Tools menu.
User Tools allow you to change or set defaults.
• Operations for system settings differ from normal operations. Always quit User Tools when you have
finished.
• Any changes you make with User Tools remain in effect even if the main power switch or operation
switch is turned off, or the [Clear Modes] key is pressed.
Changing Default Settings
This section describes how to change the settings of User Tools.
• If Administrator Authentication Management is specified, contact your administrator.
1. Press the [User Tools/Counter] key.
18
2. Select [System Settings] using the [ ] or [ ], and then press the [OK] key.
3. Change settings by following instructions on the display, and then press the [OK] key.
• Press the [Escape] key to return to the previous display.
• To cancel changes made to settings and return to the initial display, press the [User Tools/Counter]
key.
• For details about specifying System Settings, see "System Settings".
• p.21 "System Settings"
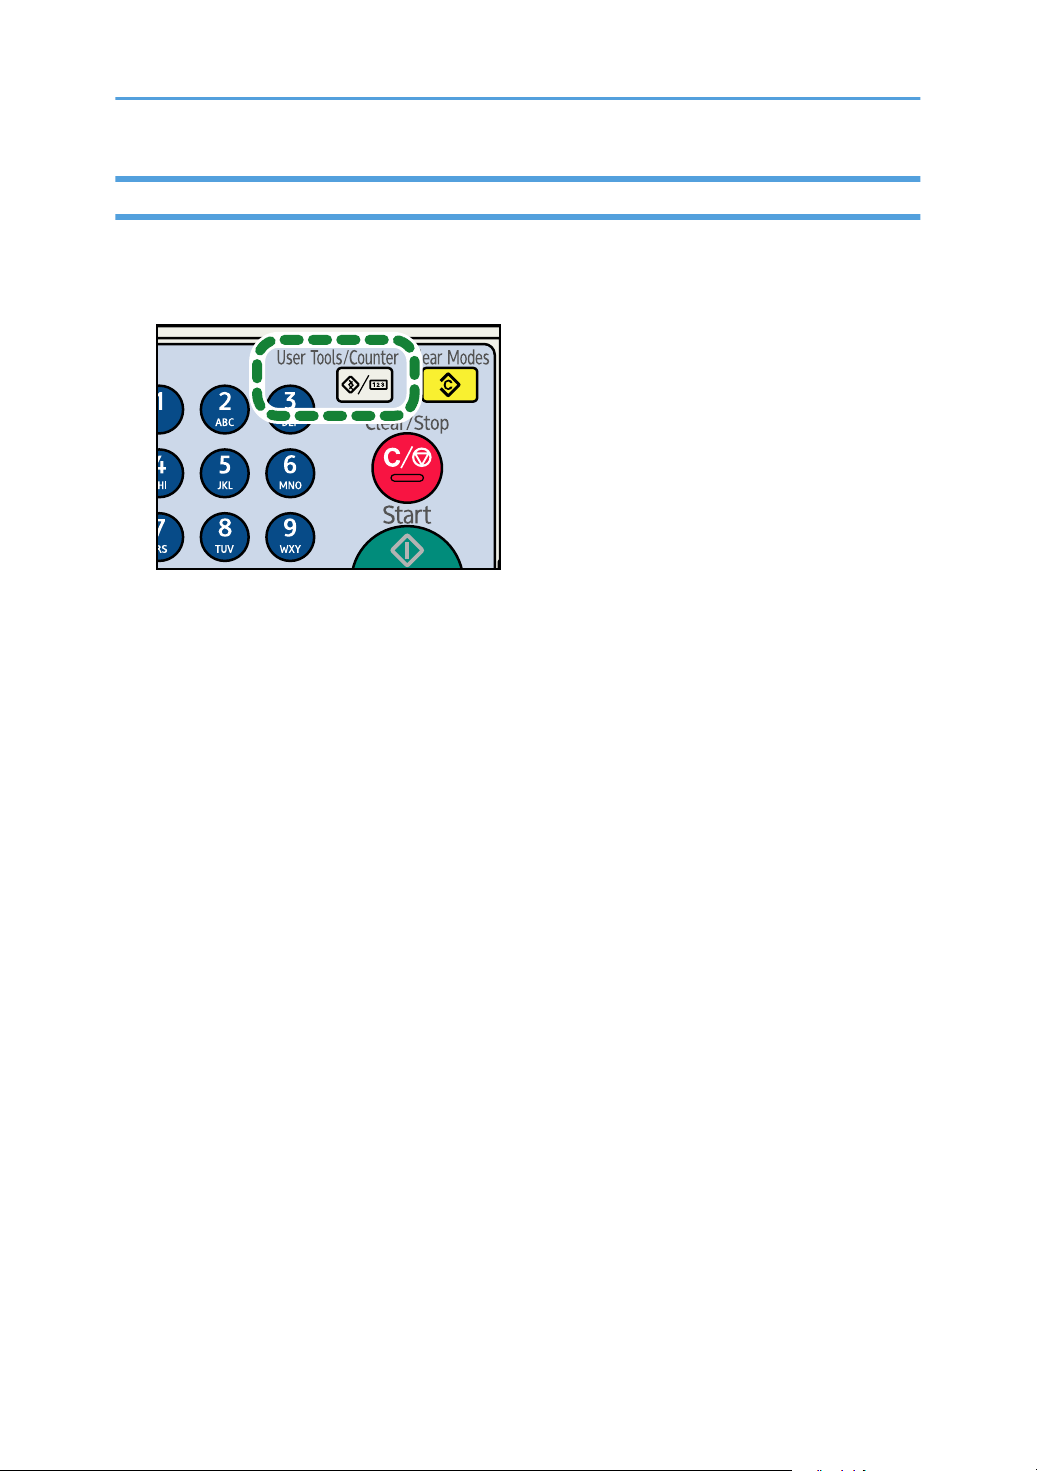
Exiting User Tools
BKR020S
This section describes how to end User Tools.
1. Press the [User Tools/Counter] key.
19

20

1. System Settings
1
This chapter describes user tools in the System Settings menu. For details on how to access System Settings,
see "Accessing User Tools".
General Features
This section describes the User Tools in the General Features menu under System Settings.
Prog/Change/Del User Text
You can register text phrases you often use when specifying settings, such as ".com" and "Regards".
You can register up to 40 entries.
• Program/Change
1. Press the [User Tools/Counter] key.
2. Select [System Settings] using [ ] or [ ], and then press the [OK] key.
3. Select [General Features] using [ ] or [ ], and then press the [OK] key.
4. Select [Prog/Change/Del User Text] using [ ] or [ ], and then press the [OK] key.
5. Select [Program/Change] to program/Change text phrases using [ ] or [ ], and then
press the [OK] key.
6. Select [*Not Programmed] using [ ] or [ ], and then press the [OK] key.
To change programmed text phrases, select the text phrases you want to change.
7. Enter the text phrases you want to program, and then press the [OK] key.
Enter the user text using up to 80 characters.
8. Press the [User Tools/Counter] key.
• Delete
1. Press the [User Tools/Counter] key.
2. Select [System Settings] using [ ] or [ ], and then press the [OK] key.
3. Select [General Features] using [ ] or [ ], and then press the [OK] key.
4. Select [Prog/Change/Del User Text] using [ ] or [ ], and then press the [OK] key.
5. Select [Delete] using [ ] or [ ], and then press the [OK] key.
6. Select the text phrases you want to delete using [ ] or [ ], and then press the [OK] key.
7. Press [Yes].
To cancel deleting a text phrase, press [No].
8. Press the [Escape] key.
9. Press the [User Tools/Counter] key.
21

1. System Settings
1
Panel Key Sound
The beeper (key tone) sounds when a key is pressed.
The default setting is [On].
Warm-up Beeper (copier)
You can have the beeper sound when the machine becomes ready to copy after leaving Energy Saver
mode, or when the power is turned on.
The default setting is [On].
If the Panel Tone setting is [Off], the beeper does not sound, whatever the Warm Up Notice setting.
Copy Count Display (copier)
The copy counter can be set to show the number of copies made (count up) or the number of copies
yet to be made (count down).
The default setting is [Up].
Function Priority
Specify the mode to be displayed immediately after the operation switch is turned on, or when System
Reset mode is turned on.
The default setting is [Copier].
Print Priority
Gives print priority to the mode displayed.
The default setting is [Display mode].
When [Interleave] is selected, the current print job will be interrupted after a maximum of five sheets.
Function Reset Timer
You can set the length of time the machine waits before changing modes when using the multi-access
function.
This is useful if you are making many copies and have to change settings for each copy. If you set a
longer reset period, you can prevent interruption from other functions.
The Function Reset Timer setting is ignored if [Interleave] is set for Print Priority.
The default setting is [Set Time].
When you select [Set Time], enter the time (3-30 seconds, in 1 second increments) using the number
keys.
The default setting for Set Time is 3 seconds.
Display Contrast
You can adjust the brightness of the display.
The default brightness setting is “4” (the halfway/medium setting).
22

General Features
1
Key Repeat
Set whether or not to repeat the functions of the [ ], [ ], [Lighter], and [Darker] keys when those keys
are pressed and held down.
The default setting is [Normal].
Measurement Unit
You can switch the measurement between [mm] and [inch].
The default setting is [inch].
• p.18 "Accessing User Tools"
23

1. System Settings
1
Tray Paper Settings
This section describes the User Tools in the Tray Paper Settings menu under System Settings.
• If the specified paper size differs from the actual size of the paper loaded in the paper tray, a misfeed
might occur because the correct paper size was not detected.
Tray Paper Size: Tray 1 - 3
Select the size of the paper loaded in the paper tray.
The paper sizes you can set for tray 1 are as follows:
• 81/2×11 , 51/2×81/2, A4 , A5 , B5 JIS , 16K
The paper sizes you can set for tray 2, 3 are as follows:
• 81/2×14 , 81/2×13 , 81/2×11 , 81/4×14 , 81/4×13 , A4
The default setting is A4 / 81/2×11 .
Printer Bypass Paper Size
Specify the size of the paper in the bypass tray when printing data from the computer.
The paper sizes you can set for bypass tray are as follows:
• 81/2×14 , 81/2×13 , 81/2×11 , 81/4×13 , 8×13 , 71/4×101/2, 51/2×81/2,
51/2×81/2, 41/8×91/2, 37/8×71/2, A4 , A5 , A5 , B5 JIS , C5 Env ,
C6 Env , DL Env , 16K , [Custom Size]
The default setting is A4 / 81/2×11 .
You can specify a custom size of between 90.0 - 216.0 mm (3.55 - 8.50 in) vertically, and between
139.0 - 600.0 mm (5.48 - 23.62 in) horizontally.
Paper Type: Bypass Tray
Sets the display so you can see what type of paper is loaded in the bypass tray.
The paper types you can set for the bypass tray are as follows:
• [No Display (Plain Paper)], [Recycled Paper], [Color Paper], [Letterhead], [Label Paper],
[Preprinted Paper], [Bond Paper], [Cardstock], [Prepunched Paper], [OHP (Transparency)],
[Thick Paper], [Special Paper]
The default setting is [No Display (Plain Paper)].
Paper types you can set in the bypass tray for machines with the copy function only are plain paper,
thick paper and OHP.
For details about the relations between possible paper sizes and thickness, see "Recommended Paper
Sizes and Types", About This Machine.
For details about the recommended conditions for using thick paper, see "Thick Paper", About This
Machine.
24

Tray Paper Settings
1
Paper Type: Tray 1 - 3
Sets the display so you can see what type of paper is loaded in the paper tray 1 - 3.
The print function uses this information to automatically select the paper tray.
The paper types you can set for the paper tray 1 - 3 are as follows:
• [No Display (Plain Paper)], [Recycled Paper], [Color Paper], [Letterhead], [Preprinted Paper],
[Bond Paper], [Cardstock], [Prepunched Paper], [Special Paper]
The default setting is [No Display (Plain Paper)].
The default setting for [APS] (Auto Paper Select) is “On”.
The default setting for [Duplex] is “On”.
[APS] (Auto Paper Select) can only be selected for the copier function if [No Display (Plain Paper)]
and [Recycled Paper] are selected. If [Off] is selected, Auto Paper Select is not valid.
For details about the relations between possible paper sizes and thickness, see "Recommended Paper
Sizes and Types", About This Machine.
Ppr Tray Priority: Copier (copier)
Specify the tray to supply paper for output.
The default setting is [Tray 1].
Ppr Tray Priority: Fax (facsimile)
Specify the tray to supply paper for output.
The default setting is [Tray 1].
Ppr Tray Priority: Printer (printer)
Specify the tray to supply paper for output.
The default setting is [Tray 1].
• p.18 "Accessing User Tools"
25

1. System Settings
1
Timer Settings
This section describes the user tools in the Timer Settings menu under System Settings.
Auto Off Timer
After a specified period has passed, following job completion, the machine automatically turns off,
in order to conserve energy. This function is called "Auto Off".
The machine status after the Auto Off operation is referred to as "Off mode", or "Sleep mode".
For the Auto Off Timer, specify the time to elapse before Auto Off.
The time can be set from 1 to 240 minutes, using the number keys.
The default setting is “1” min.
Auto Off may not work when error messages appear.
Energy Saver Timer
The machine automatically enters Low Power mode automatically after a job is finished, and the
selected time elapsed.
The time can be set from 1 to 240 minutes, using the number keys.
The default setting is “15” min.
Energy Saver may not work when error messages appear.
The machine automatically prints any fax or printer data received while in Energy Saver mode.
System Auto Reset Timer
The System Reset setting automatically switches the screen to that of the function set in Function Priority
when no operations are in progress, or when an interrupted job is cleared. This setting determines the
system reset interval.
The time can be set from 10 to 999 seconds, using the number keys.
The default setting is [On], “60” sec.
Copier Auto Reset Timer (copier)
Specifies the time to elapse before copier modes reset.
If [Off] is selected, the machine does not automatically switch to the user code entry screen.
The time can be set from 10 to 999 seconds, using the number keys.
The default setting is [On], “60” sec.
Facsimile Auto Reset Timer (facsimile)
Specify the time to elapse before the facsimile mode resets.
The time can be set from 30 to 999 seconds, using the number keys.
The default setting is “30” sec.
26

Printer Auto Reset Timer (printer)
1
Specify the time to elapse before the printer function resets.
The time can be set from 10 to 999 seconds, using the number keys.
The default setting is [On], “60” sec.
Scanner Auto Reset Timer (scanner)
Specify the time to elapse before the scanner function resets.
If [Off] is selected, the machine will not automatically switch to the user code entry screen.
The time can be set from 10 to 999 seconds, using the number keys.
The default setting is [On], “60” sec.
Set Date
Set the date for the copier's internal clock using the number keys.
To change between year, month, and day, press [ ] and [ ] key.
Set Time
Set the time for the copier's internal clock using the number keys.
Enter the time using the 12-hour format (in 1 second increments).
Timer Settings
To change between hours, minutes and seconds, press [ ] and [ ] key.
Auto Logout Timer
Specify whether or not to automatically log out a user when the user does not operate the machine
for a specified period of time after logging in.
The time can be set from 60 to 999 seconds, in one second increments, using the number keys.
The default setting is [On], “180” sec.
• p.18 "Accessing User Tools"
27

1. System Settings
1
Interface Settings
This section describes the user tools in the Interface Settings menu under System Settings.
Network
This section describes the user tools in the Network menu under Interface Settings.
Machine IPv4 Address
Specify the machine's IPv4 network address.
The default setting is [Auto-Obtain (DHCP)].
When you select [Specify], enter the IPv4 address and subnet mask as "xxx.xxx.xxx.xxx" ("x" indicates
a number).
When you select [Specify], make sure that IPv4 address is different from that of other machines on
the network.
To set the "IPv4 address", press [IP Add.].
To set the "subnet mask", press [Subnet M].
When the physical address (MAC address) appears, press [Mac Add.].
IPv4 Gateway Address
A gateway is a connection or interchange point between two networks.
Specify the gateway address for the router or host computer used as a gateway.
The default setting is “0.0.0.0”.
Machine IPv6 Address
Displays the machine's IPv6 network address.
• [Link-local Address]
The machine's specified link-local address appears.
• [Manual Config. Address]
The machine's manually configured address appears.
• [Stateless Address:] 1-5
The specified stateless address appears.
IPv6 Gateway Address
Displays the machine's IPv6 gateway address.
IPv6 Stateless Setting
Specify IPv6 Stateless Address Auto configuration.
The default setting is [Inactive].
28
 Loading...