

Page 1
TABLE OF CONTENTS
TABLE OF CONTENTS
INTRODUCTION............................................................................................i
SAFETY INFORMATION ............................................................................ i
Safety During Operation...............................................................................i
Example Symbols .......................................................................................i
WHERE IS IT & WHAT IS IT
COPIER EXTERIOR ......................................................................................2
COPIER INTERIOR ......................................................................................4
OPTIONS ...................................................................................................... 5
OPERATION UNIT ....................................................................................... 6
Guide to keys ..............................................................................................6
Touch panel display ....................................................................................8
WHAT YOU CAN DO WITH THIS COPIER
FUNCTIONS .................................................................................................10
SETTING ORIGINALS
ORIGINALS ................................................................................................... 22
Notes When Setting Originals ......................................................................22
Recommended Original Types .....................................................................23
DF INDICATORS ..........................................................................................26
SETTING ORIGINALS IN THE
RECIRCULATING DOCUMENT HANDLER ..............................................27
SETTING ORIGINALS IN THE DOCUMENT FEEDER ...............................31
Setting A Stack Of Originals........................................................................31
Setting One Original At A Time....................................................................33
SETTING ORIGINALS ON THE EXPOSURE GLASS ................................ 35
v
Page 2

TABLE OF CONTENTS
MAKING A SAMPLE COPY ......................................................................... 36
LOADING PAPER
COPYING PAPER.........................................................................................38
Notes For Paper.......................................................................................... 38
Paper Storage ............................................................................................38
Recommended Paper
Non-recommended Paper ...........................................................................39
.................................................................................. 39
WHEN PAPER RUNS OUT ..........................................................................40
Loading Paper In The 1st, 2nd, Or 3rd Paper Tray.................................... 41
Loading Paper In The Optional Large Capacity Tray................................. 43
Loading Tab Sheets In The 3rd Tray For Tab Sheet Mode ....................... 45
CHANGING PAPER SIZE .............................................................................47
1st, 2nd, And 3rd Paper Tray...................................................................... 47
ADDING TONER, STAPLES, AND OIL
ADDING TONER ........................................................................................... 50
ADDING STAPLES ....................................................................................... 53
ADDING OIL.................................................................................................. 54
COPYING
BASIC OPERATIONS...................................................................................56
Using The Touch Panel Display.................................................................. 56
Starting The Copier .....................................................................................58
Seeking Guidance About Functions (Guidance) ........................................ 60
Choosing The Paper Size ...........................................................................61
Adjusting Copy Image Density.................................................................... 63
GROUP COPIES (FINISHING) .....................................................................64
Sorting Into Sets (123, 123, 123) ............................................................... 64
Stacking All Copies Of A Page Together (111, 222, 333) ......................... 66
Stapling Copies (Staple) .............................................................................67
vi
Page 3

TABLE OF CONTENTS
COVER/PAPER DESIGNATE ......................................................................69
Copying The Front Or Back Cover Of The Originals (Cover) ....................70
Copying Designated Pages Of Originals Onto Slip Or Tab Sheets (Paper
Designate) ...................................................................................................73
Separating 1 Sided Originals Into Chapters Of
2 Sided Copies (Chapters) .........................................................................82
ADDING MARGINS FOR BINDING (MARGIN ADJUSTMENT) ................. 83
Margin For One-sided Copying ...................................................................83
Margins For Two-sided Copying .................................................................84
ERASING PARTS OF THE COPY IMAGE (ERASE) .................................. 85
Erasing The Surrounding Area Of The Original Image (Erase Border) .....85
Erasing The Center Margin Of The Original Image (Erase Center) ...........85
MAKING TWO-SIDED OR ONE-SIDED COPIES (DUPLE X) .....................87
Making 2 Sided Copies From 1 Sided Originals
(1 Sided Originals To 2 Sided Copy) ..........................................................88
Making 2 Sided Copies From 2 Sided Originals
(2 Sided Original To 2 Sided Copy) ............................................................89
Making 1 Sided Copies From 2 Sided Originals
(2 Sided Original To 1 Sided Copies) .........................................................90
REDUCING AND ENLARGING....................................................................91
Reducing And Enlarging With Preset Ratios (Preset R/E) .........................91
Having The Copier Choose The Reproduction Ratios (Auto
Reduce/Enlarge) .........................................................................................93
Reducing And Enlarging With The Zoom Up (+) And Zoom Down (-) Keys
(+-Zoom) ......................................................................................................94
Reducing And Enlarging With The Number Keys (Number Key Zoom) .....95
Fitting The Original To A Copy Of A Different Size (Size Magnification) ...96
SETTING SPECIAL FUNCTIONS (SPECIAL FEATURES).........................97
3 Side Full Image.........................................................................................97
Finisher Face Up Output..............................................................................98
ADF 2-up Mode ............................................................................................98
ADF Thin Paper Mode .................................................................................99
TEMPORARILY STOPPING ONE JOB TO COPY SOMETHING ELSE
(INTERRUPT) ...............................................................................................100
PRESET COPYING....................................................................................... 102
vii
Page 4
TABLE OF CONTENTS
ENTERING COPY JOB SETTINGS DURING THE WARM-UP PERIOD
(AUTO START).............................................................................................. 104
STORING YOUR COPY SETTINGS IN MEMORY (PROGRAM) ............... 105
Storing your settings ...................................................................................106
Recalling your settings ................................................................................106
Deleting your settings..................................................................................107
SAVING ENERGY .........................................................................................108
COPYING ON VARIOUS KINDS OF PAPER ..............................................109
Notes When You Load Special Paper........................................................ 109
Recommended Use Of Special Paper Tray Mode......................................109
COMBINATION CHART................................................................................110
CHANGING THE COPIER SETTINGS
USER TOOLS ............................................................................................... 114
How To Access The User Tools ................................................................. 114
User Tool Menu ........................................................................................... 115
SERVICE REPRESENTATIVE SETTINGS ..................................................141
MAINTAINING YOUR COPIER
CLEARING PAPER AND ORIGINAL MISFEEDS
MAINTAINING YOUR COPIER.....................................................................146
Exposure Glass .......................................................................................... 146
Recirculating Document Handler................................................................. 146
Document Feeder........................................................................................147
CLEARING COPY PAPER MISFEEDS........................................................ 148
Clearing Misfed Paper.................................................................................148
Movement Of Paper ....................................................................................149
After Clearing Misfed Paper........................................................................ 151
Details About Each Misfeed Position.......................................................... 156
Clearing Two-sided Copy Double-feeds...................................................... 171
CLEARING ORIGINAL MISFEEDS..............................................................172
viii
Page 5
TABLE OF CONTENTS
Clearing Misfed Originals ............................................................................172
Clearing Original Double-feeds....................................................................174
REMOVING JAMMED STAPLES.................................................................175
WHAT TO DO IF SOMETHING GOES WRONG
IF YOUR COPIER DOES NOT OPERATE AS YOU WANT ....................... 178
IF YOU CANNOT MAKE COPIES AS YOU WANT .................................... 182
SPECIFICATIONS
WHERE TO PUT YOUR COPIER
COPIER .........................................................................................................184
Recirculating Document Handler..................................................................187
Document Feeder.........................................................................................187
LARGE CAPACITY TRAY ........................................................................... 188
FINISHER .....................................................................................................188
WHERE TO PUT YOUR COPIER.................................................................190
Copier Environment......................................................................................190
Power Connection........................................................................................190
DO’S & DON’TS
REMARKS
USE AND STORAGE OF SUPPLIES
DO’S & DON’TS ............................................................................................192
Copier...........................................................................................................192
STORAGE OF SUPPLIES............................................................................193
ix
Page 6
INTRODUCTION
INTRODUCTION
This manual contains detailed instructions on the operation and maintenance of this copier. To get maximum versatility from this copier, all
operators should carefully read and follow the instructions in this manual.
Please keep this manual in a handy place near the machine.
Please read the next section before using this copier. It contains important
information related to USER SAFETY and PREVENTING EQUIPMENT
PROBLEMS.
SAFETY INFORMATION
When using your copier, the following safety precautions should always be
followed.
Safety During Operation
In this manual, the following important symbols are used:
$
WARNING:
Ignoring this warning could cause serious injury or
even death.
$
Caution:
Ignoring this caution could cause injury or damage to
property.
Example Symbols
$
B
•• The
care.
•• Do NOT carry out the operation represented by the
symbol. This example means "Do not take apart".
•• The
This example means "You must remove the wall plug".
Symbol means a situation that requires you take
$
●
Symbol means you MUST perform this operation.
C
>
i
Page 7
SAFETY INFORMATION
$
WARNINGS:
•• Only connect the copier to the power source described
>
B
on page 185 of this manual. Avoid multi-wiring as it
could cause an electric shock or a fire.
•• Avoid using an extension cord. Make sure the wall out-
let is near the copier and freely accessible so that in
event of an emergency it can be unplugged easily.
•• Do not damage, break or make any modifications to the
power cord. Do not place heavy objects on it, pull it
hard or bend it more than necessary. These actions
could cause and electric shock or fire.
•• Do not plug or unplug the power cord wi th wet hands or
an electric shock might occur.
•• Do not remove any covers or screws other than those
specified in this manual. Some parts of the copier are at
a high voltage and could give you an electric shock.
Also, if the machine has laser systems, direct (or indirect) reflected eye contact with the laser beam may
cause serious eyes damage. When the copier needs to
be checked, adjusted or repaired, contact your service
representative.
C
>
D
ii
•• Do not take apart or attempt any modifications to this
copier. There is a risk of fire, electric shock, explosion
or loss of sight.
•• If the copier looks damaged or breaks down, smoke is
coming out, there is a strange smell or anything looks
unusual, immediately turn off the main power switch
then unplug the power cord from the wall. Do not continue using the copier in this condition. Contact your
service representative.
•• Do not put any metal objects or containers holding
water (e.g. vases, flowerpots, glasses) on the copier. If
the contents fall inside the copier, a fire or electric
shock could occur.
•• Do not incinerate used toner or toner containers. Toner
dust might ignite when exposed to open flame. Dispose
of the used toner containers according to local regulations for plastics.
Page 8
•• If any metal, liquid or foreign matter falls into the copier,
C
$
Cautions:
•• When you move the copier, unplug the power cord from
C
•• When the copier will not be used for a long time, unplug
E
•• Keep the copier away from humidity and dust. A fire or
>
•• Do not place the copier on an unstable or tilted surface.
•• Do not reuse stapled paper. Do not use aluminum foil,
SAFETY INFORMATION
turn off the main switch and unplug the main power
cord. Contact your service representative. Do not keep
using the copier with a fault or defect.
the wall outlet to avoid fire or electric shock.
the power cord.
•• When you pull out the plug from the socket, grip
the plug to avoid damaging the cord and causing
fire or electric shock.
an electric shock might occur.
If it topples over it could cause injury.
carbon-containing paper or other conductive paper. Otherwise, a fire might occur.
?
$
•• When removing misfed paper, do not touch the fusing
section because it could be very hot.
•• This copier has been tested for safety using this sup-
plier’s parts and consumable. We recommend you only
use these specified supplies.
•• Do not eat or swallow toner.
•• Keep toner or toner containers out of reach of children.
•• This equipment is only to be installed by a qualified
service personnel.
•• Deliver to collection point for waste products. Do not be
disposed of via domestic refuse collection.
iii
Page 9

SAFETY INFORMATION
•• After you move the copier, fix it with the caster fixture.
@
Otherwise, the copier might move or come down to
cause a personal injury.
•• If you use this copier in a confined space, make sure
there is a continuous air turnover.
•• When clearing misfed originals in the document feeder,
do not insert your hands between feed rollers.
F
iv
Page 10

WHERE IS IT
& WHAT IS IT
1
Page 11
COPIER EXTERIOR
COPIER EXTERIOR
15
14
16
2
1
3
4
5
6
13
7
8
9
10
11
12
2
Page 12

COPIER EXTERIOR
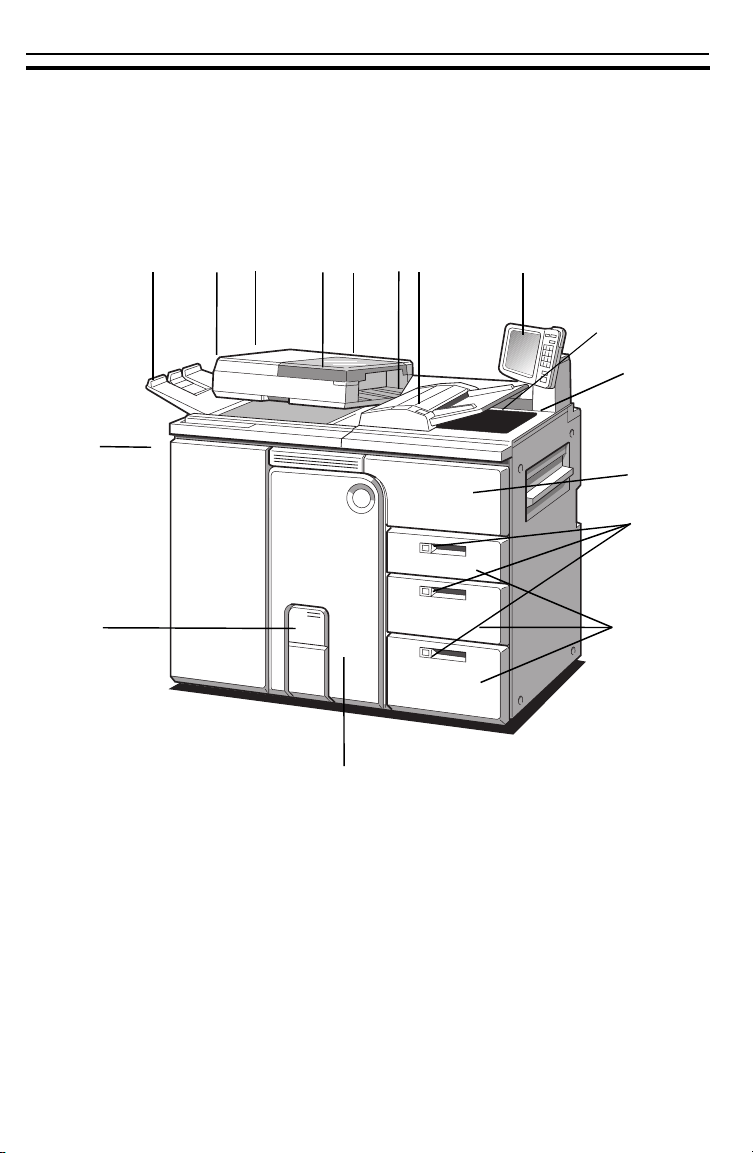
1. Recirculating
document handler
(RDH)
2. Original feed-out unit
cover
3. DF indicator screen
4. Original feed-in unit
cover
5. Document feeder
(DF)
6. One-to-one copy
start key
7. Operation unit
8. Copy tray
9. Upper cover
10. Right front cover
11. Down key
Originals inserted into the RDH are individually
and automatically fed onto and removed from the
exposure glass. ☛ See page 27.
Open to remove misfed originals.
Ready conditions for automatic feed are indicated. ☛ See page 26.
Open to set originals in the recirculating document handler. ☛ See page 27.
Originals inserted into the DF are individually and
automatically fed onto and removed from the exposure glass. ☛ See page 31.
Press to make one set of copies when you set
originals in the document feeder.
Operator controls and indicators are located here.
Copies are delivered here.
Open to access the inside of the copier.
Open to access the inside of the copier.
Press to load paper into the paper tray or
change paper. The key stops blinking and stays
lit when the paper tray is ready to be pulled out.
12. Paper tray
13. Front cover
14. Toner replenishing
cover
15. Main switch
16. Original stacker
Paper is stored here. The 1st tray can hold up to
500 sheets of plain paper. The 2nd tray and 3rd
tray can hold up to 1,000 sheets of plain paper.
Open to access the inside of the copier.
Open to supply toner.
Switches the copier between on and stand-by
conditions. ("stand-by" means that the anticondensation heaters and cooling fans are on.)
Originals are fed out and stacked here when setting originals in the document feeder. If you use
the Preset Copying function, the originals for the
current copy job set in the recirculating document
handler are fed out and stacked here.
3
Page 13
COPIER INTERIOR
COPIER INTERIOR
1
2
3
4
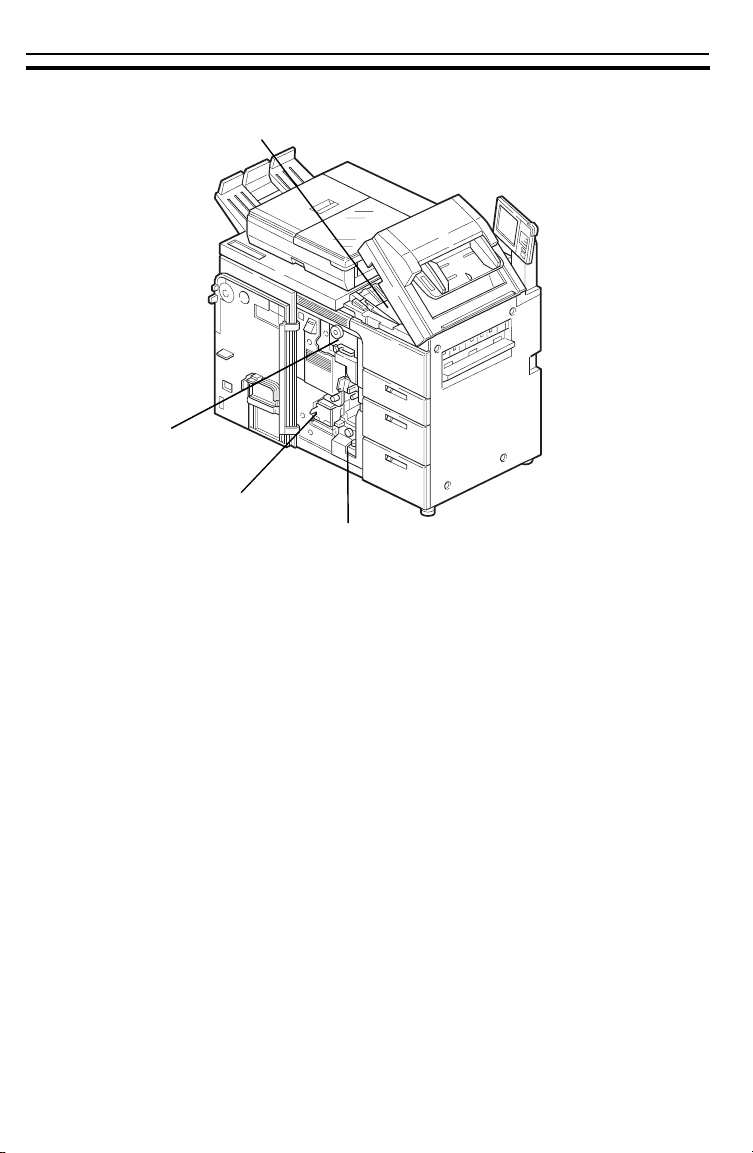
1. Duplex tray
2. Fusing unit
3. Toner cartridge
4. Fuser oil tank
4
This tray is used to make two-sided copies.
Toner which has been transferred onto the paper
is fused here. Pull out when a misfeed occurs in
the fusing section. When accessing the inside of
the copier, use caution. This unit may be very
hot.
Replace the toner cartridge when the copier instructs you to add toner.
Pour in fuser oil here when the display instructs
you to add oil.
Page 14
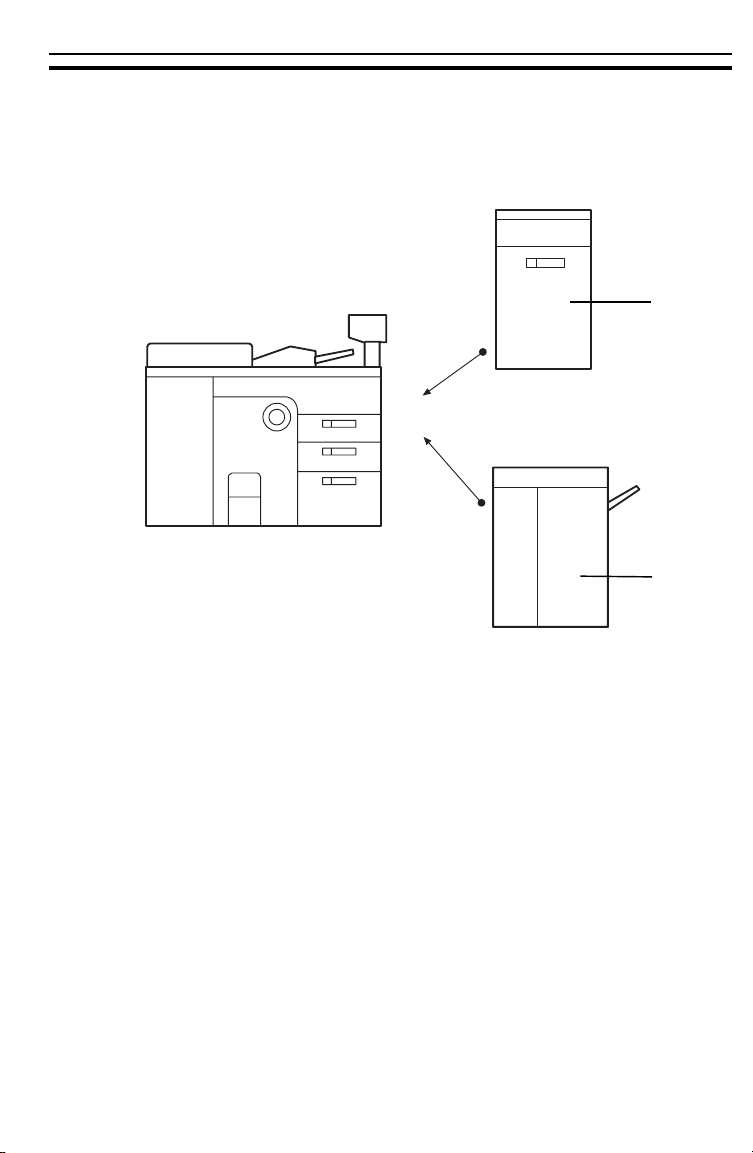
This copier can be provided with the following options:
OPTIONS
OPTIONS
1
2
1. Large capacity tray
(LCT)
2. Finisher
*Other option: key counter
You can store up to 4,500 sheets of plain paper
here.
Copies will be sorted, stacked, or stapled here.
5
Page 15
OPERATION UNIT
Guide to keys
OPERATION UNIT
12
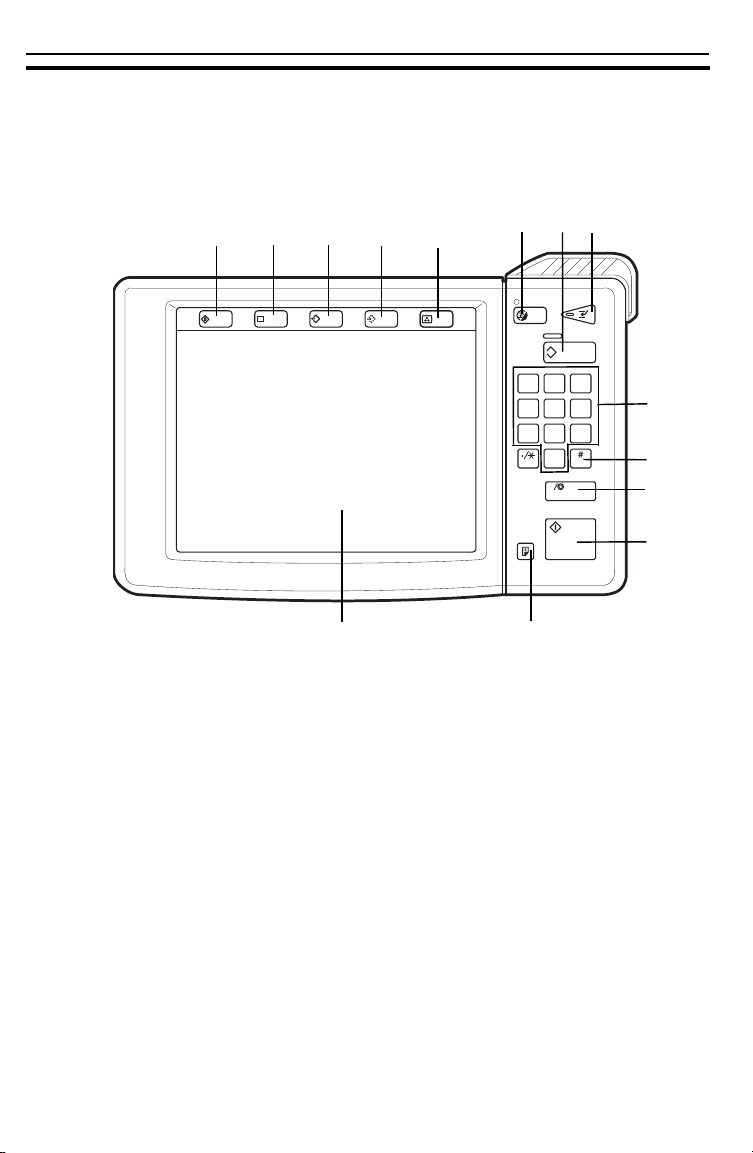
1. Interrupt key
2. Clear Modes key
14
2
C
1 2 3
4 5 6
7 8 9
0
C
7
?
11
10
13
9
8
Press to make interrupt copies during a copy run.
☛ See page 100.
When the
Clear Modes
indicator is orange,
press to clear previously entered settings and
modes. When the copier is in its initial condition,
the
Clear Modes
indicator is green.
1
3
4
5
6
3. Number keys
4. Enter key
6
Use to enter the desired number of copies or
data for the Size Magnification, Number Key
Zoom, Paper Designate, Chapters, or the user
tools. Up to 9999 copies can be entered as the
copy set number.
Press to input and store data for the Size Magnification, Number Keys Zoom, Paper Designate,
Chapters, or the user tools.
Page 16

OPERATION UNIT
5. Clear/Stop key
6. Start key
7. Sample Copy key
8. Display Color key
9. Preset key
10. Program key
11. Guidance key
12. Special Features
key
13. Operation display
14. Energy Saver key
Press to cancel the copy number entered or the
data that you have input by pressing the
keys. While copying, press to stop copying.
ber
Press to start copying. This key turns green from
red when copying is possible.
Press to make a sample copy. ☛ See page 36.
Touch to change the display color. ☛ See page
57.
Touch to use the Preset Copying. ☛ See page
102.
Touch to store, recall, or delete programs. ☛
See page 105.
Touch for help on basic operations. ☛ See page
60.
Touch to use the 3 Side Full Image, Finisher
Face Up Output, ADF 2-up, or ADF Thin Paper
function.
Shows all the modes of the copier and messages that indicate copier’s status. ☛ See page
56.
Press this key to enter/exit Energy Saver mode.
☛ See page 108.
Num-
7
Page 17
OPERATION UNIT
Touch panel display
To operate the copier, touch the key you want to use. Then, the display
instructs what to do next.
❐
Regarding detailed information about each key and function, ☛ see page 10.
❐
For how to use the to uch panel di splay, ☛ see page 56.
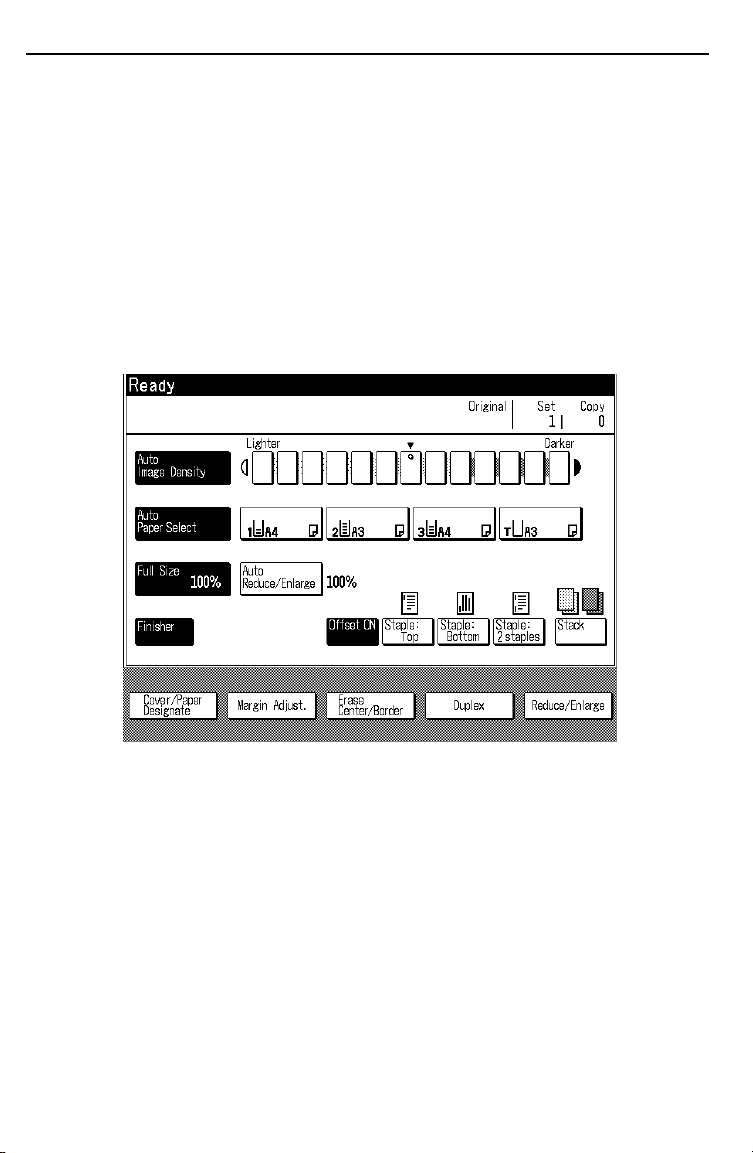
Initial Display
8
Page 18

WHAT YOU CAN DO
WITH THIS COPIER
9
Page 19

FUNCTIONS
FUNCTIONS
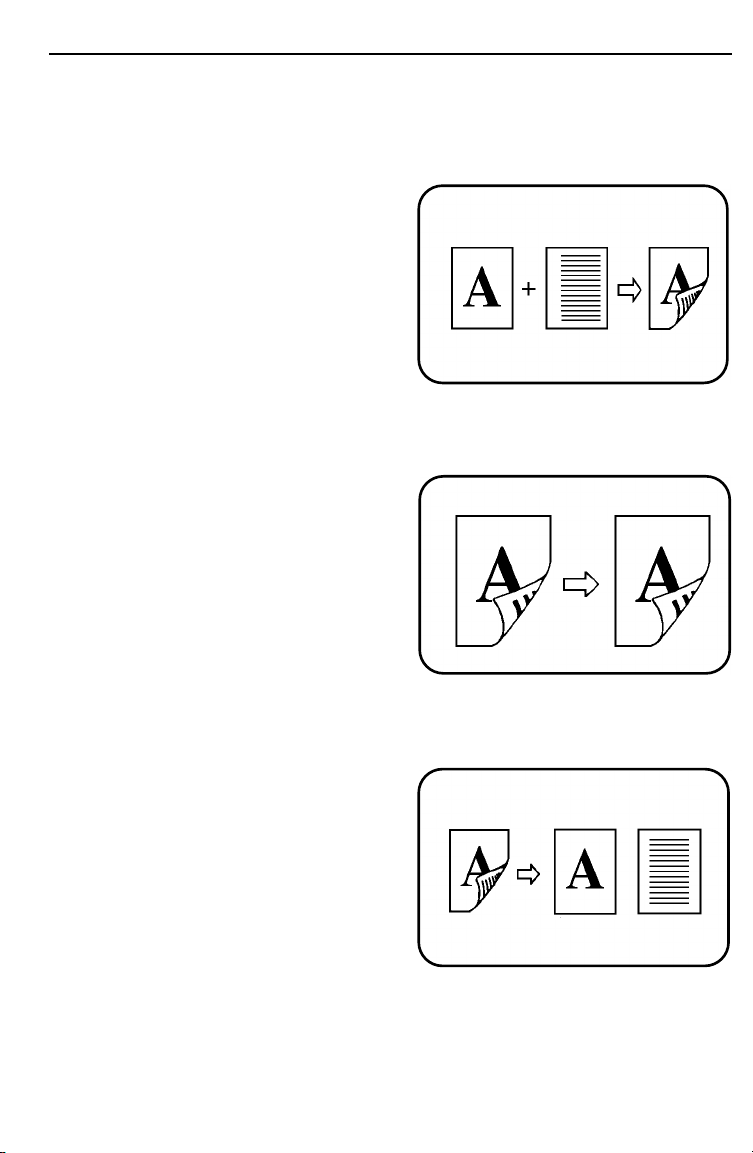
Full size copying
(Making copies of the same size as the original)
Originals of the same size
Set a stack of originals in the
recirculating document handler or
document feeder. Then make
your copies. ☛ See pages 27
and 31.
Originals of mixed sizes
Set one original at a time in the
document feeder and copy them.
☛
See page 33.
10
Page 20
FUNCTIONS
Finishing
❐
This function can be used only when your copier is equipped with the optional
finisher.
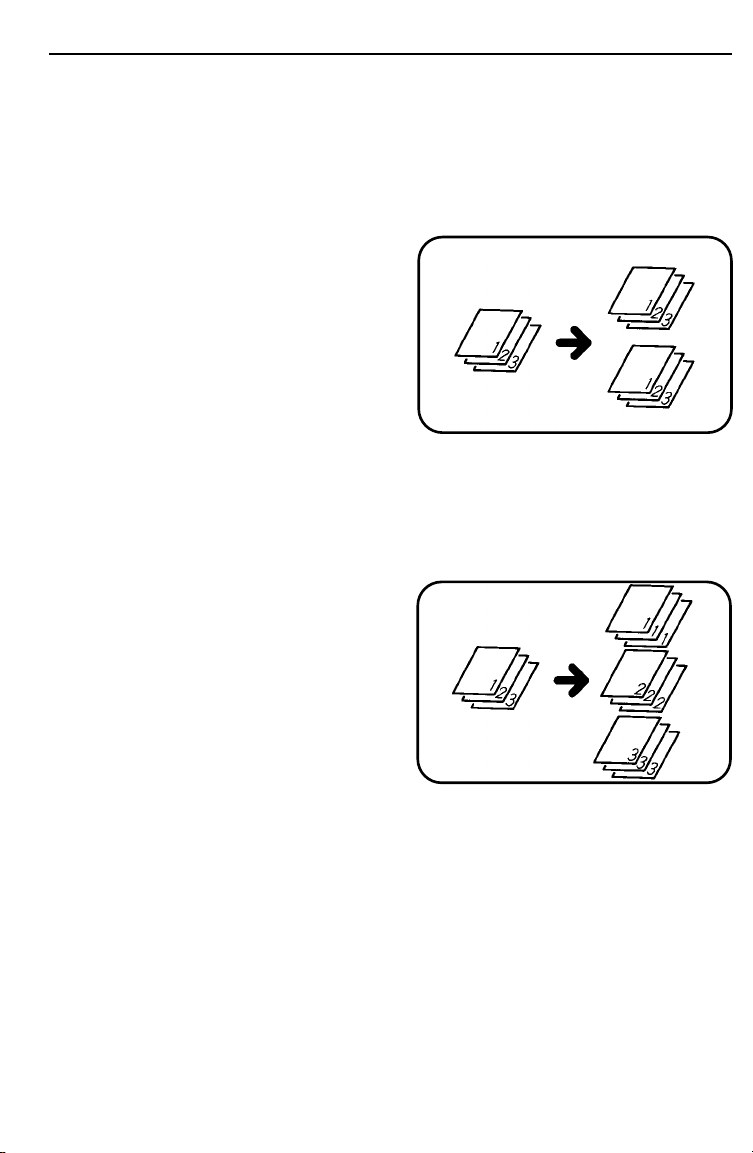
Sorting into sets (123, 123, 123)
Select Offset ON or Offset OFF
mode. ☛ See page 64.
Stacking all copies of a page together (111, 222, 333)
Touch the
lect Offset ON or Offset OFF
mode. ☛ See page 66.
[Stack]
key. Then, se-
11
Page 21
FUNCTIONS
Stapling the top left corner of copies
Touch the
[Staple: Top]
key.
☛
See page 67.
Stapling the bottom left corner of copies
Touch the
☛
See page 68.
[Staple: Bottom]
key.
Stapling the left side of copies
Touch the
[Staple: 2 staples]
key. ☛ See page 68.
12
Page 22
FUNCTIONS
Cover/paper designate
❐
When using this fu nction, se t the origi nals in the r ecircul ating docume nt handler .
Copying the front cover of the originals
Select the
nate]
[Front]
Copying the back cover of the originals
Select the
nate]
[Back]
[Cover/Paper Desig-
key. Then, touch the
key. ☛ See page 70.
[Cover/Paper Desig-
key. Then, touch the
key. ☛ See page 71.
Copying designated pages of originals onto slip or tab sheets
Select the
nate]
per Designate/Chapters]
[Cover/Paper Desig-
key. Then, touch the
key.
[Pa-
☛
See page 73.
13
Page 23

FUNCTIONS
Separating 1 sided originals into chapters of 2 sided copies
Select 1 Sided Originals To 2
Sided Copy mode and Paper
Designate mode. Then, touch the
[Paper Designate/Chapters]
[Chapters]
key. ☛ See page 82.
and
14
Page 24
Adding margins for binding
Margin for one-sided copying
Select the
Then, adjust the margin. ☛ See
page 83.
Margins for two-sided copying
Select one of Duplex modes.
Then, touch the
key and adjust the margin.
See page 84.
[Margin Adjust.]
[Margin Adjust.]
key.
FUNCTIONS
☛
15
Page 25
FUNCTIONS
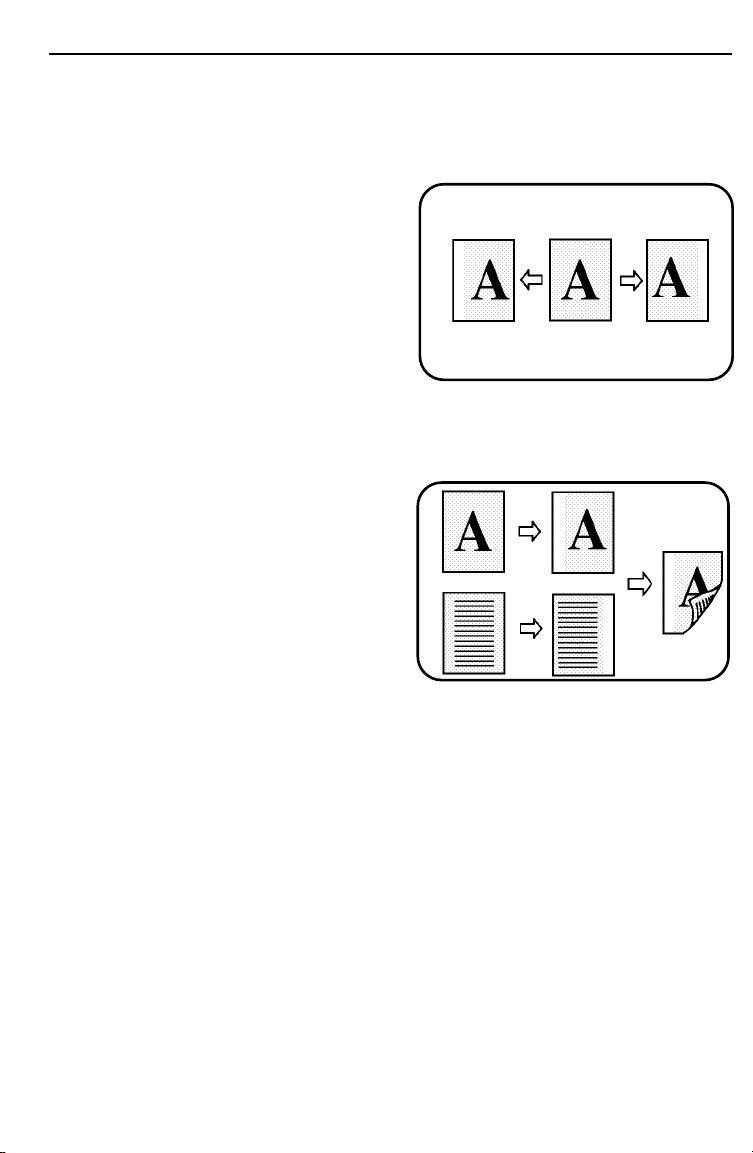
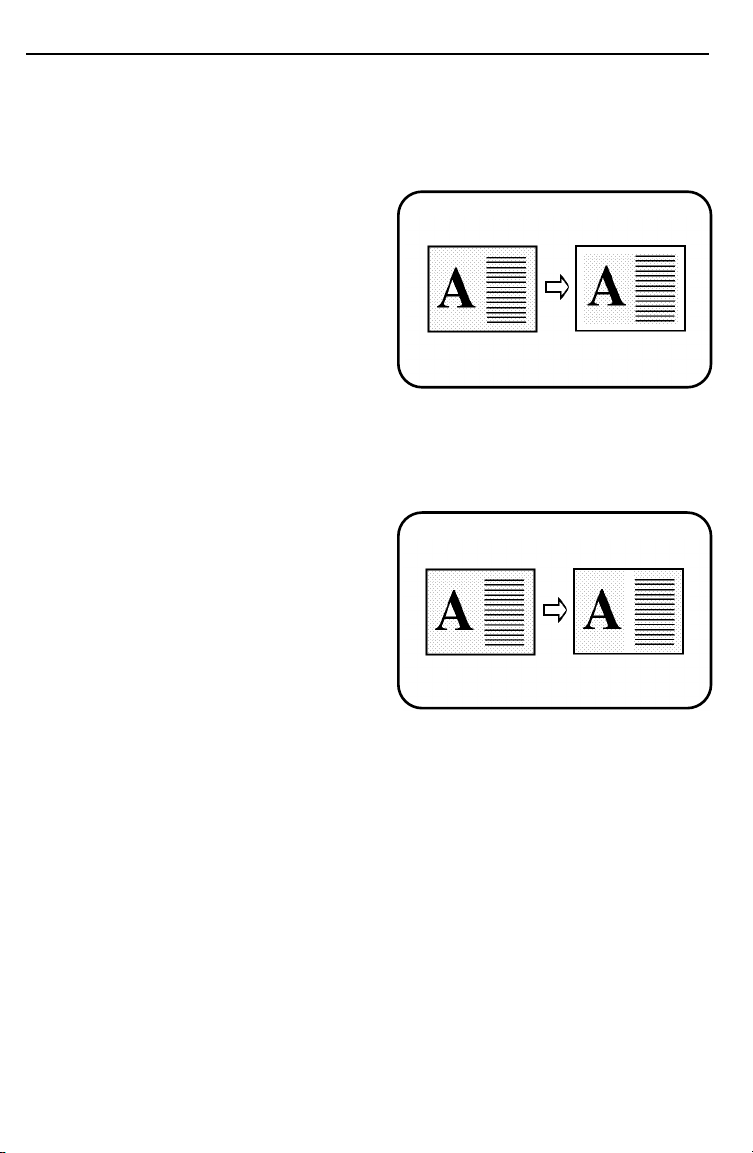
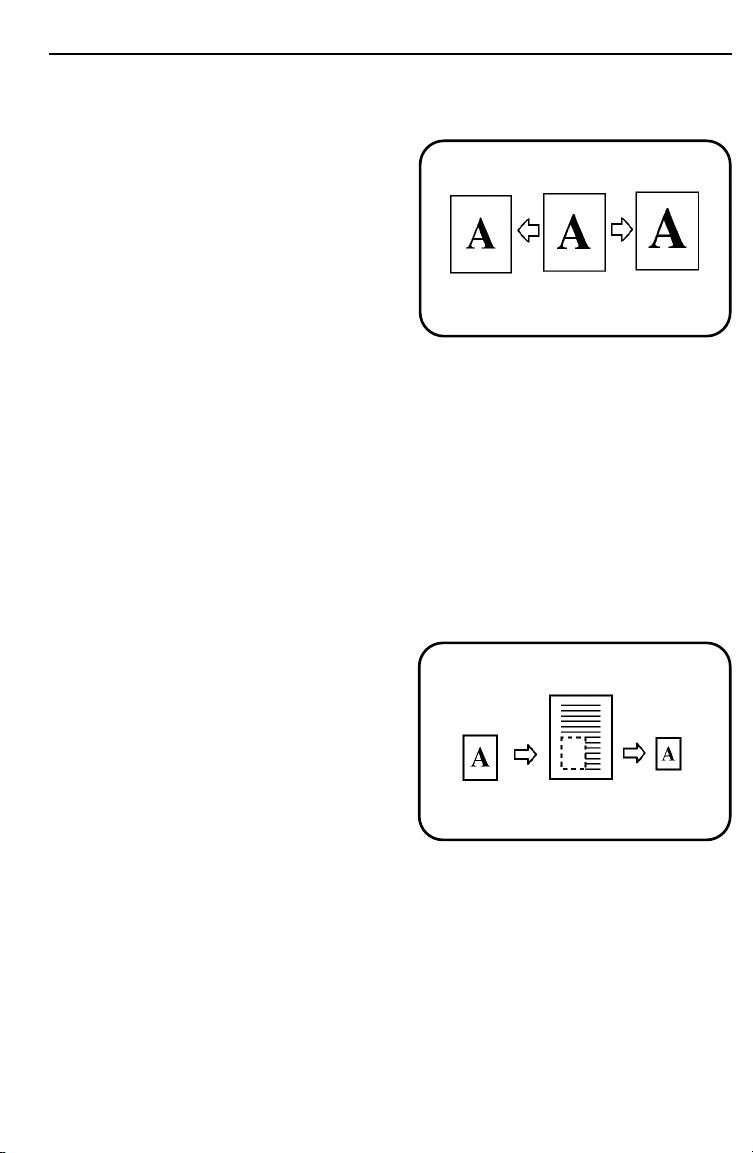
Erasing parts of the copy image
Erasing the surrounding area of the original image
Select the
der]
key. Then, adjust the margin
width. ☛ See page 85.
Erasing the center margin of the original image
Select the
der]
key. Then, adjust the margin
width. ☛ See page 85.
[Erase Center/Bor-
[Erase Center/Bor-
16
Page 26
Making two-sided or one-sided copies
1 sided originals to 2 sided copy
Select the
make sure that the
Sided]
page 88.
2 sided original to 2 sided copy
Select the
touch the
key. ☛ See page 89.
[Duplex]
key. Then,
[1 Sided → 2
key is selected. ☛ See
[Duplex]
key. Then,
[2 Sided → 2 Sided]
FUNCTIONS
2 sided original to 1 sided copies
Select the
touch the
[Duplex]
key. Then,
[2 Sided → 1 Sided]
key. ☛ See page 90.
17
Page 27
FUNCTIONS
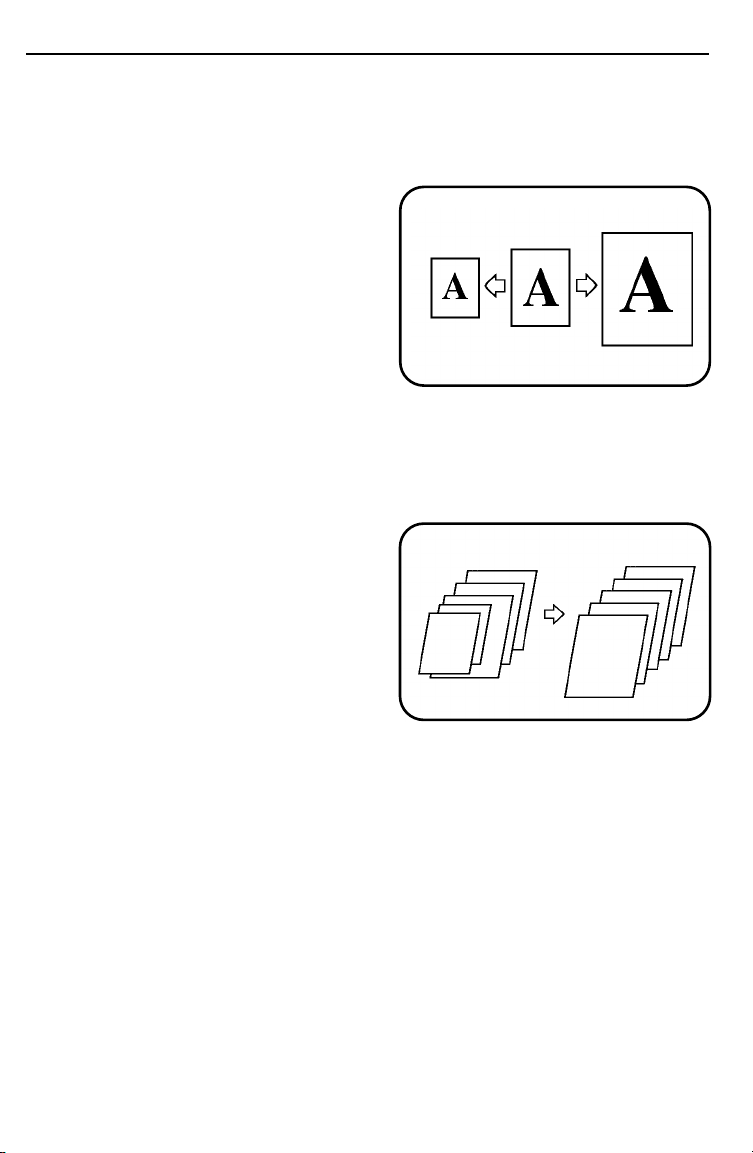
Reducing and enlarging
Reducing and enlarging with preset ratios
Select the
Then, select the desired preset
ratio. ☛ See page 91.
Having the copier choose the reproduction ratios
Set one original at a time in the
document feeder and select the
Paper size in Auto Reduce/Enlarge mode. ☛ See page 93.
[Reduce/Enlarge]
key.
18
Page 28
FUNCTIONS
Reducing and enlarging with the Zoom Up [+], Zoom Down [-], or
Number keys
Select the
Then, touch the
[Reduce/Enlarge]
[Zoom]
key and
key.
adjust your desired ratio using
the
[+]
or
[-]
key. ☛ See page
94.
or
Select the
Then, touch the
make sure that the
Keys]
desired ratio using the
[Reduce/Enlarge]
[Zoom]
key.
key and
[Number
key is selected. Enter your
Number
keys. ☛ See page 95.
Fitting the original to a copy of a different size
Select the
Then, touch the
[Reduce/Enlarge]
[Size Mag.]
key.
key
and input the original and copy
width using the
Number
keys.
☛
See page 96.
19
Page 29

FUNCTIONS
Other functions
Adjusting copy image density
Adjust the image density using the
manually using the
[Manual Image Density]
Storing your copy settings in memory
Frequently used copying functions can be stored using the
See page 105.
Temporarily stopping one job to copy something else
Make urgently needed copies using the
Choosing the paper size
The copier selects a suitable size of copy paper when you use the
Paper Select]
Tray Selector]
key. When you select paper size manually, use the
key. ☛ See page 61.
Entering copy job settings during the warm-up period
☛
See page 104.
[Auto Image Density]
key. ☛ See page 63.
Interrupt
key. ☛ See page 100.
key or adjust it
Program
key.
☛
[Auto
[Paper
Making a sample copy
☛
See page 36.
Preset copying
☛
See page 102.
20
Page 30

SETTING ORIGINALS
21
Page 31

ORIGINALS
There are four ways to set originals.
❐
Set originals in the recir culatin g document handler. ☛ See page 27.
❐
Set originals in the docume nt feeder . ☛ See page 31.
❐
Set one origina l at a time in the document fe eder. ☛ See page 33.
❐
Set one original on the exposure glass. ☛ See page 35.
Notes When Setting Originals
❐
Always set the original face down
with the top of the original towards
the back of the mach ine.
ORIGINALS
❐
Paper and original sizes that can be used are set with the user tools (☛ see
page 117). Check the paper and original sizes that you use.
❐
Narrow margins on all four sides will
not be copied as shown in the illustration. If you want to copy these
margins, adjust the margins or
change the reproduction ratio. You
can also make copies without blank
side (b and c) and trailing (d) margins using the
☛
See page 97.
❐
When there is a so lid image area ne ar the leading ed ge of the original, make a 4
mm or more margin using the
Special Featu res
[Margin Adjust.]
key.
key or move the original 4 mm or
a= 4 ± 3 mm
0.3 mm ≤ b ≤ 5 mm
0.3 mm ≤ c ≤ 5 mm
2 mm ≤ b + c ≤ 7 mm
d ≤ 5 mm
more to the l eft. Othe rwise, p aper misfeeds might occur.
❐
Set the original after correction fluid and ink have completely dried. Not taking
this precaution could mark the exposure glass causing marks to be copied.
22
Page 32

ORIGINALS
Recommended Original Types
When you set a stack of originals in the recirculating
document handler
❐
Original weig ht: 64 ~ 120 g/m2, 17 ~ 32 lb
❐
Original size (: only):
Metric vers ion: A3 ~ B5
Inch version: 11" x 17" ~ 8
* When you change original size from A3 to 11" x 17" (or vice versa), the user tools must be used.
See page 117.
❐
The maximum number of originals you can set depends on the paper size and
weight.
1/2
" x 11"
☛
Original Weigh t
A3 or 11" x 17" B4 or 8
Original Size
" x 14" A4 or 8
1/2
" x 11" B5
1/2
120 g/m2, 32 lb 20 originals 20 originals 50 originals 50 originals
105 g/m
80 g/m
64 g/m
❐
2
, 28 lb 30 originals 40 originals 60 originals 60 originals
2
, 20 lb 40 originals 60 originals 80 originals 80 originals
2
, 17 lb 50 originals 100 originals 100 original s 100 ori ginals
If the numbe r of originals that you s et exceeds the amount shown in the above
table, original misfeeds might occur. Even if misfeeds do not occur, the "Too
many originals" message appears on the display after the maximum number of
originals has been copied. Y ou must remove all the originals and r eset the originals that were no t copied.
❐
When you make copies in 2 Sided Copy mode, the original set capacity also
varies according to the weight and size of copy paper you use because of the
duplex tray capacity. For details, ☛ see page 87.
❐
When you use 5 or less B5, 8" x 10" originals, set originals in the document
feeder.
23
Page 33

ORIGINALS
When you set a stack of originals in the document
feeder
❐
Original weigh t: 5 2 ~ 128 g/m2, 14 ~ 34 lb
❐
Original size (: only):
Metric version: A3 ~ B5
Inch versio n: 11" x 17" ~ 8
* When you change original size from A3 to 11" x 17" (or vice versa), the user tools must be used.
See page 117.
❐
The maximum number of originals you can set depends on the paper size and
weight.
1/2
" x 11"
☛
Original weig ht
A3 or 11" x 17" A4 or 8
Original Size
" x 11" B5
1/2
128 g/m2, 34 lb 18 origin als 29 original s 29 originals
2
105 g/m
80 g/m
64 g/m
, 28 lb 21 origin als 36 original s 36 originals
2
, 20 lb 27 original s 45 originals 45 originals
2
, 17 lb 30 original s 50 originals 30 originals
52 g/m2, 14 lb 30 original s 30 originals 30 originals
When you set one original at a time in the document
feeder
❐
Original weight: 41 ~ 157 g/m2, 11 ~ 43 lb or 90 lb Inde x
❐
Original size (: only):
Metric version: A3 ~ B5
Inch versio n: 11" x 17" ~ 8
* When you change original size from A3 to 11" x 17" (or vice versa), the user tools must be used.
See page 117.
1/2
" x 11"
☛
24
Page 34

ORIGINALS
Types of originals that you should place on the exposure
glass
❐
Originals th at weigh less th an 41 g/m2, 11 lb or more than 157 g/m2, 43 lb or 90
lb Index.
❐
Originals smalle r than B5, 8" x 10" an d larger tha n A3, 11" x 17".
❐
Paste-up originals. With paste-up originals, shadows might appear around the
pasted-on part on copies as dark lines.
❐
Glued or taped originals.
❐
Perforated originals with more than 7 perforations greater than 8 mm, 0.3" in
diameter.
❐
Bound originals.
❐
Any kinds of coated paper. (carbon paper, thermal paper, etc.)
❐
Folded, cre ased, curled, or damage d
originals.
If a curl is bigger tha n the illu strations
as shown, set the original on the exposure glass.
❐
Stapled or clipped originals.
❐
Damp paper.
❐
Originals th at are not ma de from paper .
❐
OHP transparencies or translucent paper. When you use OHP transparencies,
3 mm
10 mm
the copied imag e might appe ar doubled.
❐
Originals writte n in pencil on bot h sides.
60 mm
25
Page 35

DF INDICATORS
DF INDICATORS
1.
2.
1. Auto feed indicator
2. Insert original
indicator
If an original is set in the document feeder, it will
be automatically fed and copied while this indicator is lit.
Shows that the recirculating document handler is
ready for use.
26
Page 36

SETTING ORIGINALS IN THE RECIRCULATING DOCUMENT HANDLER
SETTING ORIGINALS IN THE RECIRCULATING
DOCUMENT HANDLER
Note: Set originals with your left hand, and make the right side of the stack is
flush with the end plate. This aligns the leading edge of the originals and
prevents original misfeeds.
❐
To prevent origi nal misfeeds, do not open the original feed-in unit cover, lift the
recirculating document handler or touch originals during the copy run.
❐
Do not set originals on the recirculating document handler when you are not
using it.
❐
To prevent original misf eeds, do not mix differen t sizes of ori ginals in the r ecirculating document handler.
❐
To prevent original misfeeds, correct the curl of originals when setting originals in
the recirculating document handler.
Remove any staples or clips from
1
your originals and straighten
them if they are curled. Then
square the stack of originals
Note: Fan through originals that have had
staples or clips removed. Otherwise,
original misfeeds might occur.
27
Page 37

SETTING ORIGINALS IN THE RECIRCULATING DOCUMENT HANDLER
Open the original feed-in unit
2
cover.
Slide the lock lever to the rear
3
and adjust the end plate to the
original width.
Hold originals in your left hand
4
and set the originals face down
against the end plate.
Note: If you set perforated originals, the per-
forated side of the originals should be
against the end plate.
2
1
B4
A4
B5
Note: When you set many originals at once,
follow the table provided on page 23 to
find out the maximum set number. If
too many originals are set in the recirculating document handler, original
misfeeds might occur.
Adjust the front and rear guides
5
to length of the original. Make
sure you adjust the front and rear
guides to match the size marks
on the recirculating document
handler.
Note: If you do not set originals correctly,
original misfeeds might occur.
6
28
Page 38

SETTING ORIGINALS IN THE RECIRCULATING DOCUMENT HANDLER
Make sure that the originals are
on the original separator.
❐
When you press the
original separator (a green feeler)
clamps down on the stack of originals automatically. The copied originals are fed out on the original separator. The copier distinguishes between the copied originals and the
originals th at have not yet been copied by detecting the original separator’s positi on.
Start
Close the original feed-in unit
7
cover.
❐
If you do not close the original feedin unit cover, original misfeeds might
occur.
key, the
Select your desired modes and
8
press the
❐
The
to red.
❐
The numbers of copy sets and originals are indicated on the display.
❐
Original feeding will start from the
first page of the originals. Copied
originals will be fed out on the stack
of originals.
Start
key.
Start
key will chan ge from gr een
C
29
Page 39

SETTING ORIGINALS IN THE RECIRCULATING DOCUMENT HANDLER
The copies are delivered to the
copy tray or shift tray.
❐
The copy tray can hold up to 200
sheets of pape r. When 200 sheets of
paper are deli vered to the copy tray,
the copier will stop copying. Remove
the copies and press the
You can change this number with the
user tools. ☛ See page 115.
Start
key.
After a copy run is completed,
9
remove the originals as shown.
30
Page 40

SETTING ORIGINALS IN THE DOCUMENT FEEDER
SETTING ORIGINALS IN THE DOCUMENT
FEEDER
Setting A Stack Of Originals
❐
While making copies using the recircul ating document handler, you ca n set originals for the next copy job in the document feeder. ☛ See page 102 .
❐
To prevent original misfeeds, do not lift the recirculating document handler or
touch original s during th e copy run.
❐
To prevent original misfeeds, do not m ix different sizes of orig inals in the document feeder.
❐
To prevent origi nal misfeeds, correct the cu rl of originals before setting or iginals
in the document feeder.
❐
When you make copies in Sort mode, the copy set number wil l become "1" automatically.
❐
When you use or iginals that are not suitable for the recirculating docu ment handler and you want to make 2 or more sets of copies in Sort mode, make 1 set of
copies sett ing originals in the docume nt feeder. Then , set the copies i n the recirculating document handler and make copies.
❐
If you use paper in the optional large capacity tray, the copying speed when you
make 1 set of co pies using originals set in the document feeder will be re duced
by half.
.
Remove any staples or clips from
1
your originals and straighten
them if they are curled. Then
square the stack of originals.
Note: Fan through originals that have had
staples or clips removed. Otherwise,
original misfeeds might occur.
Adjust the original front and rear
2
guides to the original length.
Note: If you do not set the original correctly,
original misfeeds might occur because
the original front and rear guides
check the original size.
3
31
Page 41

SETTING ORIGINALS IN THE DOCUMENT FEEDER
Set the originals face down and
select your desired modes.
Note: When you set many originals at once,
follow the table provided on page 24 to
find out the maximum set number. If
too many originals are set in the document feeder, original misfeeds might
occur.
Select your desired modes and press the
Start
key.
3
You can also make one set of copies by pres sing the
start
key.
The
Start
key will change from green to red.
❐
The copied originals will be delivered to the original stacker and
the copies are delivered to the
copy tray or shift tray.
❐
The copy tray can hold up to 200
sheets of pape r. When 200 sheets of
paper are deli vered to the copy tray,
the copier will stop copying. Remove
the copies and press the
You can change this number with the
user tools. ☛ See page 115.
❐
Copies of th e same orig inal ar e deli vered t o the copy tr ay or shift t ray i n turn.
Start
key.
One-to-one c opy
32
Page 42

SETTING ORIGINALS IN THE DOCUMENT FEEDER
Setting One Original At A Time
❐
To prevent original misfeeds, do not lift the recirculating document handler or
touch original s during th e copy run.
.
Adjust the original front and rear
1
guides to the original length.
Note: If you do not set the original correctly,
original misfeed might occur because
the original front and rear guides
check the original size.
Set the first original face down,
2
and select your desired modes.
Then press the
❐
After the original is fed, the auto feed
indicator lights.
Start
key.
.
While the auto feed indicator
3
is lit after an original is fed, set
the next original.
❐
The originals are automatically fed
and copied.
❐
After the au to feed indi cator is turne d
off, the original is not fed until you
press the
Start
key.
33
Page 43

SETTING ORIGINALS IN THE DOCUMENT FEEDER
The copied originals will be delivered to the original stacker and
the copies are delivered to the
copy tray or shift tray.
❐
The copy tray can hold up to 200
sheets of pape r. When 200 sheets of
paper are deli vered to the copy tray,
the copier stops copying. Remove
copies and p ress the
can change this number with the
user tools. ☛ See page 115.
❐
Copies of th e same orig inal ar e deli vered t o the copy tr ay or shift t ray i n turn.
.
Repeat step 3 until copying is completed. If you use different sized
4
originals, adjust the original front and rear guides to the each original
length.
Start
key. You
34
Page 44

SETTING ORIGINALS ON THE EXPOSURE
.
Lift the recirculating document
1
handler.
.
Set the original face down on the
2
exposure glass. The original
should be centered according to
the paper size marks on the right
scale.
❐
When you set an original on the exposure glass, Auto Paper Select
mode cannot be used. You should
select the paper size.
SETTING ORIGINALS ON THE EXPOSURE GLASS
GLASS
.
Lower the recirculating document
3
handler.
❐
When you set a book original on the
exposure glass, do not force down
the recirculating document handler.
Select your desired modes and
4
press the
❐
Copies of the same or iginal are deli vered to the copy tray or shift tray in
turn.
Start
key.
35
Page 45

MAKING A SAMPLE COPY
MAKING A SAMPLE COPY
You can make one sample copy using the
the copy image appears as you wish.
Set your originals and press the
1
Sample Copy
❐
The first original will be copied.
❐
If you cannot get the prop er copy, try
changing the copy settings .
❐
Even if you ha ve selected a Finisher
mode, the sample copy will delivered
to the copy tray.
If the copy looks OK, press the
2
Start
key to begin the copy run.
key.
Sample Copy
key to check that
36
Page 46

LOADING PAPER
37
Page 47

COPYING PAPER
COPYING PAPER
Notes For Paper
❐
When you use translucent paper, note the following:
•
Fan paper to get air between the sh eets befor e loading .
•
Do not make 2 sided copies.
•
Do not load more tha n 200 sheets of paper in the pa per tray .
•
Set the copier to deliver the paper to the copy tray. If paper will be delivered to
the shift tray, paper misfeeds might occur.
❐
Correct curls in copy pap er before lo ading.
❐
Do not use c opy pape r that has be en alre ady copi ed on.
Paper Storage
Paper should always be stored properly to avoid damage, absorption of
moisture and curling, as poor conditions will result in poor image reproduction, creased copies and paper misfeeds.
❐
Avoid storing paper in humid areas.
❐
Never store pa per where i t will be expos ed to heat.
❐
Avoid stori ng pap er whe re it w ill b e expo sed to direct sunli ght.
❐
Store on a flat sur face.
❐
Use older stock firs t.
❐
Keep open reams of paper in the package, and store as you would unopened
paper.
38
Page 48

COPYING PAPER
Recommended Paper
❐
Paper weight: 60 ~ 163 g/m2, 16 ~ 43 lb or 90 lb Ind ex for 1 side d copy ing
64 ~ 120 g/m
❐
Paper size (: only):
2
, 17 ~ 32 lb for 2 sided copy ing
1st, 2nd, or 3rd paper t ray:
A3, B4, A4, B5, 11" x 17", 8
" x 14", 8
1/2
" x 11", 8
1/2
1/2
" x 13"
Optional lar ge capa city tray:
B4, A4, B5, 8
* When you change paper size from A3 to 11" x 17" (or vice versa) or from A4 to 8
versa), the user tools must be used. ☛ See page 117.
* When you want to change the paper size of the optional large capacity tray, contact your service representative.
" x 14", 8
1/2
1/2
" x 11"
1/2
" x 13" (or vice
Non-recommended Paper
Avoid using the following paper, because these kinds of paper cause paper
misfeeds or poor copy image.
❐
Curled, folded , creased , or damaged pa per.
❐
Paper of different th icknesse s or sizes in the same stack.
❐
Top sheet and bott om sheet of ne w packs of pape r.
❐
Paper with high acid content.
❐
Short grained paper.
❐
OHP transpare ncies.
❐
Labels.
❐
Torn paper.
❐
Perforated paper with more than 7 perforations greater than 8 mm, 0.3" in diameter.
❐
Thin paper th at has low stiffnes s.
❐
Thermal paper, art paper.
❐
Paper with conductive or low electrical resistance coating such as carbon or silver
coating.
39
Page 49

WHEN PAPER RUNS OUT
WHEN PAPER RUNS OUT
❐
If you want to chang e the paper size, ☛ see page 47.
When the following display appears:
Unless you load paper into the
paper tray or select another paper tray, you will be unable to
make copies. Pull out the paper
tray which has run out of paper.
Down
(Its
❐
About 50 sh eets of paper remains in
the 2nd or 3r d paper tray after paper
runs out. Thi s is normal operation for
this machine , not a failur e.
When the following display appears:
You can still make copies. However, it is better to load paper into
the paper tray at this time.
❐
You can disable this message with
the user tools. ☛ See page 123.
❐
When this message appears while
you are using the 1st or optional
large capacity tray, the copying
speed will be reduce d.
key is lit red.)
Confirm your desired paper size and amount
Check the paper size and the amount of paper by referring to the
Tray Selector]
40
keys.
Amount of paper
Paper size and direction
Number of paper tray
[Paper
Page 50

WHEN PAPER RUNS OUT
Loading Paper In The 1st, 2nd, Or 3rd Paper Tray
.
Press the
1
❐
The Down key wi ll start bl inking. Thi s
means that the tray is moving down
into position .
.
After the
2
blinking, pull the tray all the way
out.
Down
key.
Down
key has stopped
41
Page 51

WHEN PAPER RUNS OUT
.
Load paper into the tray.
3
❐
The paper stack must be flush with
the left side fenc e.
❐
Do not stack paper over the limit
mark. If you load too much, the top of
the paper stack may hit the feed-in
unit inside the paper tray and damage it when t he pap er tra y is s et.
❐
Stack paper evenly and make sure
that the front and rear side guides
and the end plate securely hold the
paper. If they are loose, paper misfeeds might occu r.
❐
If paper misfeeds in the duplex tray or finisher occur due to curled paper, load
paper upside do wn.
❐
If there is sti ll some paper remaining in the tray when you pul l it out, add it to the
stack of new paper before you l oad it into th e tra y.
❐
Shuffle th e pape r befo re loa ding it.
.
Push the tray in until it stops.
4
42
Page 52

WHEN PAPER RUNS OUT
Loading Paper In The Optional Large Capacity
Tray
Press the
1
❐
The Down key wi ll start bl inking. Thi s
means that the tray is moving down
into position .
.
After the
2
blinking, pull the tray all the way
out.
Down
key.
Down
key has stopped
43
Page 53

WHEN PAPER RUNS OUT
.
Load paper into the tray.
3
❐
The paper stack must be flush with
the left side fenc e.
❐
Do not stack paper over the limit
mark. If you load too much, the top of
the paper stack may hit the feed-in
unit inside th e large capacit y tray and
damage it when the pa per tray i s set.
❐
Stack paper eve nly.
❐
If paper misfeeds in the duplex tray or finisher occur due to curled paper, load
paper upside do wn.
❐
If there is sti ll some paper remaining in the tray when you pul l it out, add it to the
stack of new paper before you l oad it into th e tra y.
❐
Shuffle th e pape r befo re loa ding it.
.
Push the tray in until it stops.
4
44
Page 54

WHEN PAPER RUNS OUT
Loading Tab Sheets In The 3rd Tray For Tab Sheet
Mode
❐
Before loading, you must designate the 3rd tray as a tab sheet tray with the user
tools. ☛ See page 117 .
❐
For how to make co pies in Ta b Sheet mod e, ☛ see page 75.
❐
Before loading, remove any bent or damaged tab sheets.
❐
The original im age and tab sh eet set order should be as shown below :
Originals
1
2
3
1
2
3
4
5
3
2
1
Press the
1
❐
The Down key wi ll start bl inking. Thi s
Down
key.
means that the tray is moving down
into position .
Tab sheets
Copies
set order
1
2
3
4
5
5
4
4
5
5
4
3
2
1
.
After the
2
blinking, pull the tray all the way
Down
key has stopped
out.
45
Page 55

WHEN PAPER RUNS OUT
Slide out the end plate com-
3
pletely.
Load tab sheets in the tray.
4
❐
The edge oppos ite the tabs must be
flush with the le ft fence.
❐
Do not stack paper over the limit
mark.
Adjust the end plate to touch the
5
tabs.
Push the tray in until it stops.
6
46
Page 56

CHANGING PAPER SIZE
CHANGING PAPER SIZE
1st, 2nd, And 3rd Paper Tray
❐
When you want to change the paper size of the optional large capacity tray,
contact your service representative.
❐
When you use only one size of paper, your service representative can lock the
front and rea r guides.
Press the
Down
key.
1
After the
2
ing, pull the tray all the way out.
While pressing the release lever
3
on the rear side guide, slide the
front and rear guides completely
away from each other. Then,
slide out end plate completely.
Load the paper.
4
❐
Align the paper with the corresponding size graduations on the bottom
plate.
❐
The paper stack must be flush with
the left side fence.
❐
Do not stack paper over the limit
mark.
❐
Stack paper evenly.
Down
key stops blink-
47
Page 57

CHANGING PAPER SIZE
While pressing the release lever
5
on the rear side guide, slide the
front and rear guides until they
securely hold the paper.
Slide the end plate until the paper
6
is flush with the paper tray fence.
❐
Make sure that the front and rear
side guides and the end plate securely hold the paper. If they are
loose, paper misfeeds might occur.
Push the tray in until it stops.
7
48
Page 58

ADDING TONER,
STAPLES, AND OIL
49
Page 59

ADDING TONER
ADDING TONER
The " f Add toner" message appears when it is time to replace the toner
cartridge.
❐
You can change the toner cartridg e during a copy run.
When the following display appears:
There is no toner left in the copier. You should change the toner
cartridge.
When the following display appears:
You can still make about 2,000
copies. However, it is better to
change the toner cartridge.
WARNING:
$
Caution:
$
Caution:
$
50
Do not incinerate the used toner or toner containers.
Toner dust might ignite when exposed to open flame.
Dispose of the used toner containers according to local
regulations for plastics.
Do not eat or swallow toner.
Keep toner or toner containers out of reach of children.
Page 60

ADDING TONER
Note: There is used toner in the used toner cartridge, therefore put it into the vinyl
bag that is in the toner cartridge box and tie the mouth of the vinyl bag
tightly.
Note: Never pull the cartridge shutter after the cartridge has been set. If the shutter
is pulled, the used toner will be used again. This will damage the copier.
Note: Shake a new toner cartridge well, at least 5 ~ 10 times.
Note:
Pull the green seal until you can see the red line. If you do not pull it out
enough, only part of the toner in the cartridge will be used. This may cause
damage to the copier.
Note: When adding toner, do not turn off the main switch. If you do, your copy
settings are cleared.
51
Page 61

ADDING TONER
Push lightly and open the toner
1
replenishing cover.
❐
To prevent toner spillage when you
change the toner cartridge, stick the
vinyl bag that is in the toner car tridge
box on the edge of the toner replenishing cov er.
.
Follow the instructions on the
2
sticker inside the toner replenishing cover.
.
Close the toner replenishing cover.
3
52
Page 62

ADDING STAPLES
ADDING STAPLES
The display will indicate that the staples have run out when you touch the
[Staple: To p], [S taple: Bottom ]
❐
The stapling function requires the optional finisher.
❐
Before setti ng a refill for st aples in the staple cartridge, do not remove ribbon of
staples.
The sticker inside the front door
of the finisher has instructions for
staple cartridge replacement.
[Staple: 2 staples]
, or
key.
53
Page 63

ADDING OIL
ADDING OIL
The display will instruct you to add oil when the oil bottle is empty.
Open the front door.
1
Remove the oil tank cap.
2
Pour oil into the oil tank.
3
❐
Do not exceed the maximum oil level
indicated in the illustration. If any oil
is spilled, be sur e to wipe it up.
Reinstall the oil tank cap and
4
close the front door.
54
Page 64

COPYING
55
Page 65

BASIC OPERATIONS
BASIC OPERATIONS
Using The Touch Panel Display
On the touch panel display, you can find keys, instructions and messages.
By touching keys on the display, you can select or deselect functions, and
enter data for the selected modes. The keys are displayed as follows:
Keys that have been
selected.
Keys you cannot select.
1. Message area
2. [Check Modes] key
3. Original counter
12
The machine condition is displayed here. If copying is disabled, see the message area table on
pages 178 to 180 and take actions according to
the procedure described.
When you set 2 or more copy settings, touch to
see all modes that you have selected at a glance.
The number of originals you have been copied
so far.
34
5
Keys you can select.
4. Sets to copy
5. Copy counter
56
The number of sets that will be copied.
The number of completed copy sets for the cur-
rent job.
Page 66

In this manual, keys on the display are indic ated as follows:
Example: Key on the display:
BASIC OPERATIONS
In the manual:
[Auto Paper Sel ect]
key
Note: Do not press the touch panel display w ith any hard or sha rp object (pen,
pencil, etc.). Always use your fingers or something with a soft tip .
Display color adjustment
To change the display color,
touch the
switch through the 6 available
color schemes.
❐
Each time touching the Display
Color key, the display color is
changed.
Display Color
key to
57
Page 67

BASIC OPERATIONS
Starting The Copier
When the main switch is in the stand-by position
Turn on the main switch.
1
on
stand b
Wait for the copier to warm-up.
2
During the warm-up period (less
than 7 minutes), the
red.
After warm-up, the copier goes
3
into the Ready condition and the
Start
key turns green.
Start
key is
C
When the Energy Saver r indicator is lit and the display is
off
The copier is in Energy Saver
mode. Press the
key to return to the Ready condition.
❐
For details about Energy Saver,
see page 108 .
❐
Opening or clos ing the doors or covers will also wake up the machine.
❐
It takes a fe w minutes t o return t o the
Ready condition.
Energy Saver
☛
C
58
Page 68

BASIC OPERATIONS
When the touch panel display is off
The copier has been turned off by the weekly timer. For how to turn on the
copier, ☛ see page 136.
When the copier is in Accounting mode
Input your user code (8 digits) using the
Number
keys then set any features
you require and make copies.
To prevent others from making copies using your user code, press the
❐
Clear/Stop and Clear/Modes key simultaneously a fter copy ing.
Regarding user co des, ☛ see page 125.
❐
If you input the wrong user code, press the Clear/Stop key and input the code
❐
again.
To set Acco unting mode, c ontact your serv ice r epresen tative .
❐
59
Page 69

BASIC OPERATIONS
Seeking Guidance About Functions (Guidance)
Touch the
Guidance
key when you need detailed information about func-
tions and operation.
You cannot see the guidance display while the copier is in the following condi-
❐
tions:
•
While copying
•
While the Program indicator is lit
•
While a copy job is interrupting another
•
While preset co pying
If the copi er indicates the guidanc e display for 1 minute, the operatio n display w ill
❐
appear automa tically. You can change this time usi ng the user tools. (Th e available settings ar e 1 minute or 3 mi nutes. ☛ See page 118.)
While the guidance display is shown, the Start key is red and you cannot make
❐
copies.
Touch the
1
❐
The display shows how to replenish
supplies.
❐
When you touch the [Cover/Paper
Designate], [Margin Adjust.],
[Erase Center/Border], [Duplex], or
[Reduce/Enlarge] key before touch-
ing the Guidance key, the display
shows information about the operation of each key.
Guidance
key.
?
To get information about each function, touch the
2
key. Then, touch the desired function.
Touch the
[Exit]
key.
3
60
[Features Guidance]
Page 70

BASIC OPERATIONS
Choosing The Paper Size
When you want the copier to automatically detect the
paper size
Select Auto Paper Select mode by touching the
[Auto Paper Sel ect]
key. In
this mode, the copier will select the suitable paper size for the original size
and reproduction ratio.
You can use Auto Paper Se lect mode only when you set originals in th e recircu-
❐
lating document handler or docu ment feeder .
When you select Auto Paper Select mod e, you can see the [Paper Tray Selec-
❐
tor] keys. However, you can cancel this setting so that you cannot see the [Pa-
per Tray Selector] keys in Auto Paper Select mode with the user tools. ☛ See
page 123.
When you make copies in Auto Paper Select and Preset R/E modes, the paper
❐
size will be selected as shown in the following tables. If there is no paper size
that is suita ble for original size and r eproduction ratio, you sho uld load the right
paper. If you do not load right paper and start copying, the "Check paper size"
message appears. If you press the Start key again, the copier will select another
paper size.
Metric version
Original
size
A3 A4 — A3 — — —
B4 B5 A4 B4 A3 — —
A4 — — A4 — B4 A3
B5 — — B5 A4 — B4
71% 82% 100% 115% 122% 141%
Reproduction rati o and paper s ize
Inch version
Original size
11" x 17" 81/2
8
" x 14" — — 8
1/2
" x 11" — — 8
8
1/2
65% 77% 100% 121% 129%
" x 11" 8
1/2
Reproduction rati o and paper s ize
" x 14" 11" x 17" — —
" x 14" 11" x 17" —
1/2
" x 11" — 11" x 17"
1/2
61
Page 71

BASIC OPERATIONS
The following paper trays are not selected by the Auto Paper Select and Auto
❐
Tray Switchin g. ☛ See page 121 for more about Auto Tray Switching.
•
A special tray designated with the user tools. ☛ See page 116.
•
Cover, slip, or tab sheet tray selected with the user tools. ☛ See page 116.
When you want to select paper size manually
If you cancel Auto Paper Select mode, you can select your desired paper
size using the
[Paper Tray Selector]
keys.
Confirm your desired paper size and amount
Check the paper size and the amount of paper by referring to the
Tray Selector]
keys.
amount of paper
paper size and direction
number of paper tray
[Paper
62
Page 72

BASIC OPERATIONS
Adjusting Copy Image Density
Image density is chosen automatically in Auto Image Density mode. You
need not adjust image density manually. However, if you want to make
copies darker or lighter, use the
When you want the copier to automatically select image
density
[Manual Image Density]
key.
Select the
You can select three image density levels in Auto Image Density mode with the
❐
user tools. ☛ See page 117 .
The [Manual Image Density] keys appear even when Auto Image Density is
❐
selected. However, you can cancel this setting so that you cannot see the [Manual Image Density] keys in Auto Image Density mode with the user tools. ☛ See
page 123.
In Auto Image Density mode, the copier adjusts image density according to the
❐
color of the orig inal.
[Auto Image Density]
key.
When you want to adjust image density manually
If you cancel Auto Image Density mode, you can adjust the image density
manually. To get a lighter image, touch the left keys and to get a darker
image, touch the right keys.
63
Page 73

GROUP COPIES (FINISHING)
GROUP COPIES (FINISHING)
Note: This function requires the optional finisher.
Note: Set originals in the recirculating document handler or document feeder.
For sorting and stacking, the following limitations apply:
❐
A4, 8
Maximum capacity of shift tray
Paper weight
" x 11" or smaller B4, 8
1/2
2,000 sheets 1,000 sheets
52 ~ 163 g/m2, 14 ~ 43 lb or 90 lb index
" x 14" or larger
1/2
Sorting Into Sets (123, 123, 123)
When you set originals in the document feeder, the copy set number will become
❐
"1" automaticall y.
When you use originals that are not suitable for the recirculating document han-
❐
dler and you want to make 2 or more set s of copies in So rt mode, make 1 set of
copies setti ng originals in the documen t feeder. Then, se t the copies in th e recirculating doc ument handle r and m ake co pies.
Copies are collated into sets on the
shift tray. You can select Offs et ON or
Offset OFF mode. ☛ See "Examples
1 and 2" on page 65.
64
Page 74

GROUP COPIES (FINISHING)
Example 1
1
2
3
❐
❐
Example 2
1
: Separating sets of copies (Offset ON)
Set originals in the recirculating
document handler.
Make sure that the
key is selected.
Enter the copy set number and
press the
Copies are assembled as sets in sequential order by sliding the shift tray
from side to side.
When you select Offset ON mode,
copying pa uses for on e of two cycl es
while the shift tray moves in 1 sided
original to 1 side d copy mod e.
Set originals in the recirculating
document handler.
Start
: Not separating sets of copies (Offset O FF)
[Offset ON]
key.
Touch the
2
cancel Offset ON and select the
Offset OFF.
Enter the copy set number and
3
press the
❐
The shift tray does not slide from
side to side every time a set of copies is delivered. Copying is not
paused to mov e the shift tr ay.
[Offset ON]
Start
key.
key to
65
Page 75

GROUP COPIES (FINISHING)
Stacking All Copies Of A Page Together (111,
222, 333)
This mode groups copies from different copy runs into individual stack s.
❐
You can set t he copier t o deliver c opies face up (ima ge side up) in Stack
mode with the user tools. ☛ See
page 115.
Set originals in the recirculating
1
document handler or document
feeder.
Touch the
[Stack]
key.
2
Select Offset ON or Offset OFF
3
mode using the
☛ See page 65.
[Offset ON]
key.
66
Page 76

Stapling Copies (Staple)
For staplin g, the f ollowin g limi tation s appl y:
❐
GROUP COPIES (FINISHING)
B4, 8
Staple capacity 2 ~ 50 sheets
Paper weight 64 ~ 80 g/m2, 17 ~ 20 lb
*1 If you use thicker paper or a special kind of paper, your service representative might
have to reduce the maximum staple capacity.
*2 In Cover/Paper Designate mode, the maximum paper weight is 163 g/m
index for the cover or slip sheets.
Copies of differen t sizes cannot be stapled.
❐
When you select Staple mode, Sort mode will be selected automatically. You can
❐
" x 14", or smalle r A3 or 11" x 17"
1/2
*1
2 ~ 30 sheets
*2
2
*1
, 43 lb or 90 lb
also selec t Stapling in the Stack ing with the user tools (☛ See page 1 15). However, when you make 1 set of copies in Stack mode, you cannot use the Stapling.
You can adjust th e staple pos ition usin g the user tool s. ☛ See page 124.
❐
For how to add staples when staples have run out, ☛ see page 53.
❐
You cannot use Stapling in Tab Sheet mode.
❐
Stapling the top left corner of each set (1 Staple Top)
Select the
you set a stack of originals in the
recirculating document handler or
document feeder, groups of copies
are delivered to the finisher and automatically stapled. Select this mode
when you copy originals oriented
sideways (:).
[Staple: Top]
key. When
67
Page 77

GROUP COPIES (FINISHING)
Stapling the bottom left corner of each set (1 Staple Bottom)
Select the
When you set a stack of originals in
the recirculating document handler or
document feeder, groups of copies
are delivered to the finisher and automatically stapled. Select this mode
when you copy originals oriented
lengthwise (;).
[Staple: Bottom]
key.
Stapling the top and bottom left side of each set (2 Staples)
Select the
When you set a stack of originals in
the recirculating document handler or
document feeder, groups of copies
are delivered to the finisher and automatically stapled.
[Staple: 2 Staples]
key.
68
Page 78

COVER/PAPER DESIGNATE
COVER/PAPER DESIGNATE
Note: When you use these functions with 2 Sided Copy mode, it is recommended
to set 2 Sided Copy mode first.
Note: These functions can be used only when you set a stack of originals in the
recirculating document handler.
Note: You cannot use this function with 2 Sided Original To 1 Sided Copies
mode.
Note: You should load plain paper that is the same size as the cover, slip, or tab
sheets (except for the width of the margin) into the paper tra y other than
the cover, slip, and tab sheet trays.
Note: When you use these functions with Program mode, make sure that the
cover, slip, or tab sheet is set in the proper paper tra y. For details, ☛ see
page 105.
You can set special paper for cover and slip sheets into the 1st tray.
❐
When you set tab sheets, you s hould designate th e 3rd tray as a tab shee t tray
❐
with the user tools. ☛ See page 117 .
You can use the 1st tray as a plain paper tray when Cover or Paper Designate
❐
mode is not se lected. However , it is not selec ted by the Auto Tra y Switching. (
See page 121 for th e Auto Tray S witching. )
When you always use cover or slip sheets, you can designate the cover or slip
❐
sheet tray with the user tools. ☛ See page 116 .
☛
Cover sheet tray: 1st tray
Slip sheet tray: 1s t, 2nd , or 3r d tray
If you designa te the cov er, slip, a nd tab shee t trays, yo u can always see "Cover s"
❐
in the tray for cover sheet (1st tray), "Slip sheet" in the tray for slip sheet, and
"Tabs" in the tray for tab sheet (3rd tray) keys. It prevents you from making
mis-copies.
69
Page 79

COVER/PAPER DESIGNATE
Copying The Front Or Back Cover Of The
Originals (Cover)
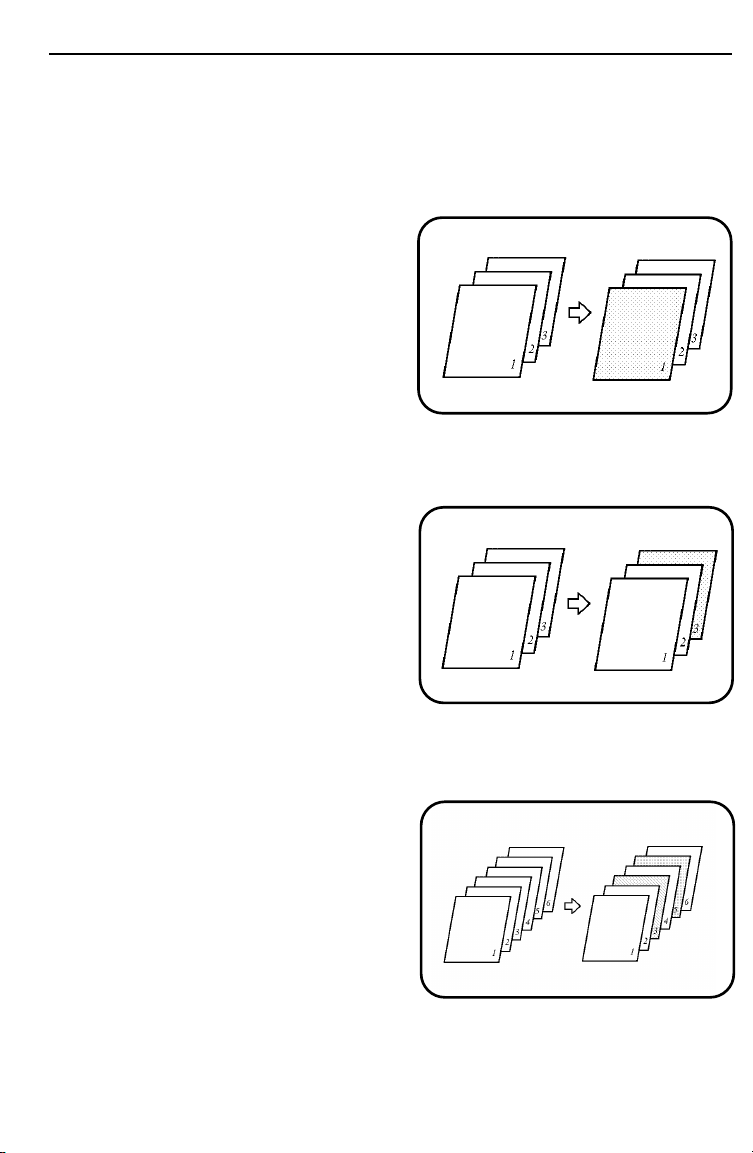
Note: When you select Cover with 2 Sided Copy mode, the original image is cop-
ied onto only 1 side of cover sheets and the other side of cover sheets will
be blank (☛ See page 72). You can change this setting with the user tools
to facilitate copying onto both sides of the cover sheets. ☛ See page 116.
❐
You can select both front and back
cover mode.
Front cover
Touch the
1
nate]
Select the
2
❐
The first original will be copied onto
special paper as the front cover
sheet.
70
[Cover/Paper Desig-
key.
[Front]
key.
Page 80

COVER/PAPER DESIGNATE
Back cover
When you select the [Back] key and copies are delivered to the shift tray, the
❐
image is co pied on the reverse side of the back cover . (The image of the back
cover faces outside of the copy set.) To select this function, your copier should
be equipped with t he opt ional fi nisher .
You can cancel this function with the user tools (☛ see page 116) and get the
back covers delivered as other copies.
The copying speed will be slow only for the first original feed cycle when using
❐
Back Cover mode.
Touch the
1
nate]
Select the
2
❐
The last original will be copied onto
special paper as the back cover
sheet.
[Cover/Paper Desig-
key.
[Back]
key.
71
Page 81

COVER/PAPER DESIGNATE
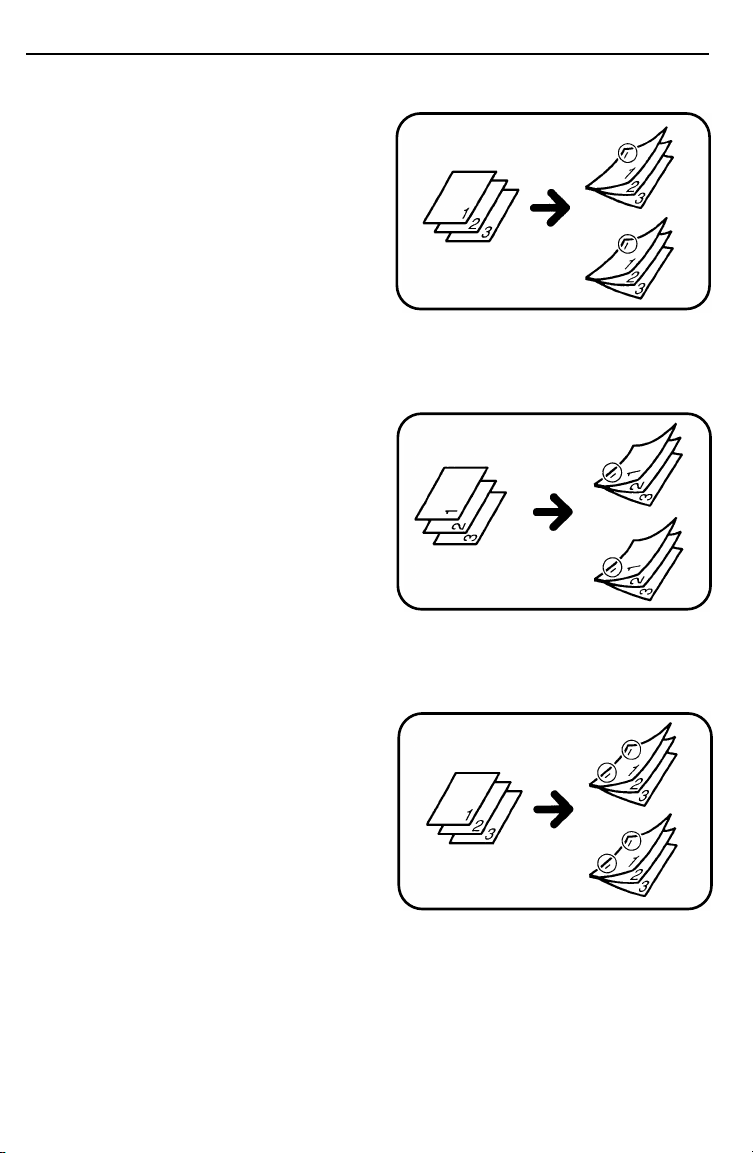
Cover mode with 2 Sided Original To 2 Sided Copy mode
Original images "2" and "8" are not copied onto the cover sheets in this
case. Therefore, the originals to be designated as the front and back cover
sheets should have no image on the reverse side. You can change this
setting with the user tools to facilitate copy ing onto both sides of the cover
sheets. ☛ See page 116.
originals
Front Cover
Back Cover
copies
Front Cover
Back Cover
Cover mode with 1 Sided Originals To 2 Sided Copy mode
The front and back cover sheets have only the images of the first and last
originals and have no image on the other sides. You can change this setting
with the user tools to facilitate copying onto both sides of the cover sheets.
☛ See page 116.
When you use an od d number of originals in 1 Sided Originals To 2 Sided C opy
❐
and Back Cov er modes, the reverse si de of the copy in front of the back cover
will be blank and the last original will be copied on the back cover.
originals
Front Cover
copies
Front Cover
72
Back Cover
Back Cover
Page 82

COVER/PAPER DESIGNATE
Copying Designated Pages Of Originals Onto Slip
Or Tab Sheets (Paper Designate)
This function is useful when you want
to separate a set of originals into
chapters (up to 15).
In the default setting, the designated original image will be copied onto special
❐
paper (slip or tab sheet). Howeve r, you can cancel this setting with th e user tools
(☛ see page 117) and the designated original image will not be copied onto
special pap er. You w ill get bl ank sheets of special paper sepa rating each c hapter
instead.
How to set Paper Designate mode using slip sheets (Slip
Sheet)
Note: When you select Slip Sheet mode with 2 Sided Copy mode, the original im-
age is copied onto only 1 side of slip sheets and the other side of slip sheets
will be blank. ( For how to set Paper Designate with 2 Sided Copy mode,
see page 78.) You can change this setting with the user tools to facilitate
☛
copying onto both sides of the slip sheets. ☛ See page 116.
Touch the
1
nate]
key.
Select the
2
nate/Chapters]
[Cover/Paper Desig-
[Paper Desig-
key.
73
Page 83

COVER/PAPER DESIGNATE
Input the position (page number)
3
of the originals you want to copy
onto slip sheets, according to the
guidance displayed.
❐
To change the number entered,
touch the [Clear] key and enter the
new number.
When you want to designate continuous pages, follow the steps below:
❐
Designate th e fir st pag e of or iginal to be c opied on the slip sheet.
❶
Touch the [~] key.
❷
Designate the last page of the original to be copied on the slip sheet and
❸
touch the [#] key.
Touch the
[Exit]
key.
4
Set your originals face down in the recirculating document handler and
5
press the
74
Start
key.
Page 84

COVER/PAPER DESIGNATE
How to set Paper Designate mode using tab sheets (Tab
Sheet)
Note: When you select Tab Sheet mode with 2 Sided Copy mode, the original im-
age is copied onto only 1 side of tab sheets a nd the other sid e of tab sheets
will be blank. ☛ See page 78.
Regarding load ing tab shee ts in the pape r tray, ☛ see page 45.
❐
When you use Tab Sheet mode with Margin Adjustment mode, the margin does
❐
not apply to tab sheets.
When you use Tab Sheet mode with Erase Center/Border mode, the erase mar-
❐
gin does not apply to tab sheets.
Before using t his functio n, you should se t the number of tab s (☛ see step 3) with
❐
the user tools. ☛ See page 120 .
The copying speed in Tab S heet mode wi ll be reduc ed.
❐
You can use A4, 8
❐
In this mode, as the default setting, the original image is shifted by 13 mm and
❐
copied on t he tab she ets as sho wn in the ill ustration . You can chan ge this sett ing
with the user tools. ☛ See page 120 .
You cannot use Stapling in Tab Sheet mode.
❐
When you use Sort mode in Tab Sheet mode, the copies delivered to the shift
❐
tray might not be stacked well.
" x 11" tab sheets.
1/2
13 mm
8 mm
ABC
5 mm
a a
13 mm
ABC
ABC
Prepare the same size copy paper (except for the width of the margin)
1
as the tab sheets.
75
Page 85

COVER/PAPER DESIGNATE
The image area of the tab is as
2
shown in the illustration.
8 mm
image
area of
the tab
Prepare separate originals for each tab.
3
The original image and tab sheet set order should be as shown below:
❐
Originals
Tab sheet
set order
1
2
3
1
2
3
4
5
1
4
5
5
4
3
2
a
5 mm
a ≤ 5 mm
b ≤ 5 mm
a + b ≤ 7 mm
b
Copy
1
2
3
4
5
5
4
3
2
1
Example: Nu mber of tabs is 5 = 5 set s
❐
Touch the
4
nate]
per Designate/Chapters]
Select the
[Cover/Paper Desig-
key. Then, select the
key.
[Tabs]
key.
5
76
[Pa-
Page 86

Input the position (page number)
6
of the originals you want to copy
onto tab sheets, according to the
guidance displayed.
❐
To change the number entered,
touch the [Clear] key and enter the
new number.
❐
When you wa nt to designat e continuous pages, foll ow the steps be low:
Designate the first page of original
❶
to be copied on th e slip s heet.
Touch the [~] key.
❷
Designate the last page of the
❸
original to be copied on the slip
sheet and touch th e [#] key.
COVER/PAPER DESIGNATE
Touch the
[Exit]
key.
7
Set your originals face down in
8
the recirculating document handler and press the
❐
The side having the image for a tab
should be at the leading edge as
shown.
Start
key.
image for tab
77
Page 87

COVER/PAPER DESIGNATE
Paper Designate mode with 2 Sided Original To 2 Sided
Copy mode
Original image "4" is not copied in this case. Therefore, the designated
originals should have no image on the reverse side. In Slip Sheet mode,
you can change this setting with the user tools to facilitate copying onto both
sides of the slip sheets. ☛ See pages 116 and 132.
Slip Sheet mode Tab Sheet mode
originals
Designated
page
Designated page
copies
originals
copies
Designated
page
Designated page
How to set Paper Designate and 2 Sided Original To 2 Sided Copy
modes
Touch the
1
[2 Sided → 2 Sided]
[Duplex]
key and the
key.
78
Page 88

COVER/PAPER DESIGNATE
Touch the
2
nate]
Designate/Chapters]
Make sure that the
[Cover/Paper Desig-
key, then touch the
key.
[Paper Designate]
3
Select the
[Slip Sheet]
or
4
Input the position (page number)
5
of the originals you want to copy
onto tab sheets, according to the
guidance displayed.
❐
To change the number entered,
touch the [Clear] key and enter the
new number.
❐
When you wa nt to designat e continuous pages, follow the steps on page
74.
[Paper
[Tabs]
key is selected.
key.
Touch the
[Exit]
key.
6
Set your originals face down in the recirculating document handler and
7
press the
Start
key.
79
Page 89

COVER/PAPER DESIGNATE
Paper Designate mode with 1 Sided Originals To 2 Sided
Copy mode
The designated original image is copied onto the front side of the slip sheet.
The following page will be copied onto the front side of plain paper that will
be delivered after the slip sheet. In Slip Sheet mode, you can change this
setting with user tools to facilitate copying onto both sides of the slip sheets.
☛ See pages 116 and 132.
Slip Sheet mode Tab Sheet mode
originals
Designated
page
copies
Designated
page
originals
copies
Designated
page
Designated
page
How to set Paper Designate and 1 Sided Originals To 2 Sided Copy
modes
Touch the
1
make sure that the
Sided]
[Duplex]
key and
[1 Sided → 2
key is selected.
80
Page 90

COVER/PAPER DESIGNATE
Touch the
2
nate]
Designate/Chapters]
Make sure that the
[Cover/Paper Desig-
key, then touch the
key.
[Paper Designate]
3
Select the
[Slip sheet]
or
4
Input the position (page number)
5
of the originals you want to copy
onto tab sheets, according to the
guidance displayed.
❐
To change the number entered,
touch the [Clear] key and enter the
new number.
❐
When you wa nt to designat e continuous pages, follow the steps on page
74. However, if you select the 2
sided slip sheet setting with th e user
tools, you cannot designate continuous pages. For details, ☛ see page
133.
[Paper
[Tabs]
key is selected.
key.
Touch the
[Exit]
key.
6
Set your original face down in the recirculating document handler and
7
press the
Start
key.
81
Page 91

COVER/PAPER DESIGNATE
Separating 1 Sided Originals Into Chapters Of 2
Sided Copies (Chapters)
The designated original image will be
copied onto the front side of 2 sided
copies and the copier separates each
chapter automatically. You can designate up to 15 originals.
Touch the
1
make sure that the
Sided]
Touch the
2
nate]
Designate/Chapters]
Touch the
[Duplex]
key is selected.
[Cover/Paper Desig-
key, then touch the
[Chapters]
key and
[1 Sided → 2
key.
key.
3
Input the position (page number)
4
of the originals you want as the
first page of a chapter, according
to the guidance displayed.
❐
To change the number entered,
touch the [Clear] key and enter the
new number.
[Paper
82
Page 92

ADDING MARGINS FOR BINDING (MARGIN ADJUSTMENT)
ADDING MARGINS FOR BINDING (MARGIN
ADJUSTMENT)
You can make a margin by shifting the image to the left or right. This
function is convenient when punching holes, stapling, or binding the copies.
Maximum margin width: 21 mm, 7/8" to the right or left side of the paper.
❐
A right margin of 5 mm, 1/4" is automatically made on the reverse of copies in 1
❐
Sided Originals To 2 Sided Copy mode. You can adjust this margin using the
user tools. ☛ See page 120 .
When you make a 20 mm, 7/8" margin, the copying speed will be reduced.
❐
Margin For One-sided Copying
Making a left margin Making a right margin
Touch the
[Margin Adjust.]
1
Adjust the margin by touching the
2
[→]
or
[←]
key.
key.
83
Page 93

ADDING MARGINS FOR BINDING (MARGIN ADJUSTMENT)
Margins For Two-sided Copying
Set a left margin on the front side and
a right margin on the back side.
Select one of Duplex modes (
1
Sided → 2 Sided], [2 Sided → 2
Sided]
key).
Touch the
[2 Sided → 1 Sided]
, or
[Margin Adjust.]
2
Adjust the front and back side
3
margins by touching the
[←]
key.
key.
[→]
[1
or
84
Page 94

ERASING PARTS OF THE COPY IMAGE (ERASE)
ERASING PARTS OF THE COPY IMAGE
(ERASE)
Erasing The Surrounding Area Of The Original
Image (Erase Border)
Erasing The Center Margin Of The Original Image
(Erase Center)
You can change default center and margin widths selected by the [Erase Cen-
❐
ter/Border] key with the user tools. ☛ See page 120 .
The width of the margin to be erased can be set as follows:
❐
Erase Borde r Metric versi on: 2.5 ~ 20 mm in 2.5 mm step s
Inch versio n: 0.1" ~ 0.8" in 0.1 " steps
Erase Center Metric version:
0 ~ 32 mm in 5 mm steps fro m 7 ~ 32 mm
Inch versio n:
0 ~ 1.2" in 0.2" steps
85
Page 95

ERASING PARTS OF THE COPY IMAGE (ERASE)
Touch the
1
der]
key.
Adjust the margin using the
2
[-]
keys.
[Erase Center/Bor-
[+]
or
86
Page 96

MAKING TWO-SIDED OR ONE-SIDED COPIES (DUPLEX)
MAKING TWO-SIDED OR ONE-SIDED COPIES
(DUPLEX)
Remove the copies before the number of copies on the copy tray or shift tray
❐
exceeds 80 sheets. Other wise, the co pies may s tick to each other because t oner
on the copies is st ill hot.
You can use 64 to 120 g/m2, 17 to 32 l b copy paper for 2 Si ded Original To 2
❐
Sided Copy and 1 S ided Origi nals To 2 Sided Copy modes .
The number of sh eets that can be stored in the dupl ex tray is limi ted accordi ng to
weight and s ize of the c opy pa per.
When you set one original at a time on the exposure glass or in the document
feeder, the maxi mum number of copie s that can be set in 1 Side d Originals To 2
Sided Copy mo de or 2 Sided Ori ginal To 2 Side d Copy mode var ies for each kind
of copy paper, as shown in the ta ble below.
When you se t a stack of origina ls in the recircu lating document hand ler or document feeder, the numbers in the table below show the maximum numbers of
originals that can be set in 2 Sided Original To 2 Sided Copy mode and the
maximum numbers of copies that can be set in 1 Sided Originals To 2 Sided
Copy mode for each kind of copy paper.
(The original s et capacity also varies accordin g to weight and size of ori ginals as
shown in page 23. If the numbers indicated in the tables below and in page 23
are differe nt for weight and size of th e copy paper an d original you u se, you can
set original s up to the smal ler number .)
A3, B4, 11" x 17",
" x 14"
8
1/2
A4, B5, 8
8
1/2
" x 11"
1/2
" x 13",
2
64 g/m2, 17 lb 80 g/m2, 20 lb 90 g/m2, 24 lb
50 40 35 30 26
80 80 70 61 53
105 g/m
28 lb
,
120 g/m2,
32 lb
87
Page 97

MAKING TWO-SIDED OR ONE-SIDED COPIES (DUPLEX)
Making 2 Sided Copies From 1 Sided Originals
(1 Sided Originals To 2 Sided Copy)
❐
When you set different sized originals
in 1 Sided Originals To 2 Sided Copy
mode, set one original at a time in
the document feeder and set Auto
Reduce/Enlarge mode. You cannot
set a stack of o riginals in the rec irculating docume nt handler or doc ument
feeder.
❐
In 1 Sided Originals To 2 Sided Copy
mode, if the last original is an odd
page, the last copy will be automatically delivered with the reverse side
blank.
A right marg in of 5 mm, 1/4" is set on the back side au tomatically and you can
❐
adjust this margi n using the us er tools. ☛ See page 120.
When the originals are :
Set originals as shown in the illustration.
When the originals are ;
Set originals as shown in the illustration.
88
Page 98

MAKING TWO-SIDED OR ONE-SIDED COPIES (DUPLEX)
Touch the
[Duplex]
key.
1
Make sure that the
2
Sided]
key is selected.
Making 2 Sided Copies From 2 Sided Originals
(2 Sided Original To 2 Sided Copy)
[1 Sided → 2
Touch the
1
Touch the
2
key.
[Duplex]
[2 Sided → 2 Sided]
key.
89
Page 99

MAKING TWO-SIDED OR ONE-SIDED COPIES (DUPLEX)
Making 1 Sided Copies From 2 Sided Originals
(2 Sided Original To 1 Sided Copies)
Touch the
1
Touch the
2
key.
[Duplex]
[2 Sided → 1 Sided]
key.
90
Page 100

REDUCING AND ENLARGING
REDUCING AND ENLARGING
Reducing And Enlarging With Preset Ratios
(Preset R/E)
Select the
[Reduce/Enlarge]
key.
You can select one of seven preset
ratios to make reduced or enlarged
copies. Three enlargement ratios, four
reduction ratios, and the full size ratio
are available.
❐
Your service representative can
change both the number of and values of the prese t reprod uction ra tios.
You can change default reproduction ratio selected by the [Reduce/Enlarge] key
❐
with the user tools. ☛ See page 120 .
The followin g ratios are the fa ctory setting. S elect the ratio tha t is suitable for the
❐
original and paper sizes.
Metric version
Paper size
Original size
A3 – – 71% –
B4 115% – 82% 71%
A4 141% 122% – –
B5 – 1 41% 115% –
A5 – – – 122%
There are al so 65 % and 93 % ra tios.
❐
A3 B4 A4 B5
Inch version
Original size
There are also 74 %, 93 % and 141 % ratio s.
❐
Paper size
11" x 17" – 77% 65%
8
" x 14" 121% – –
1/2
" x 11" 129% – –
8
1/2
11" x 17" 8
" x 14" 8
1/2
" x 11"
1/2
91
 Loading...