

Page 1
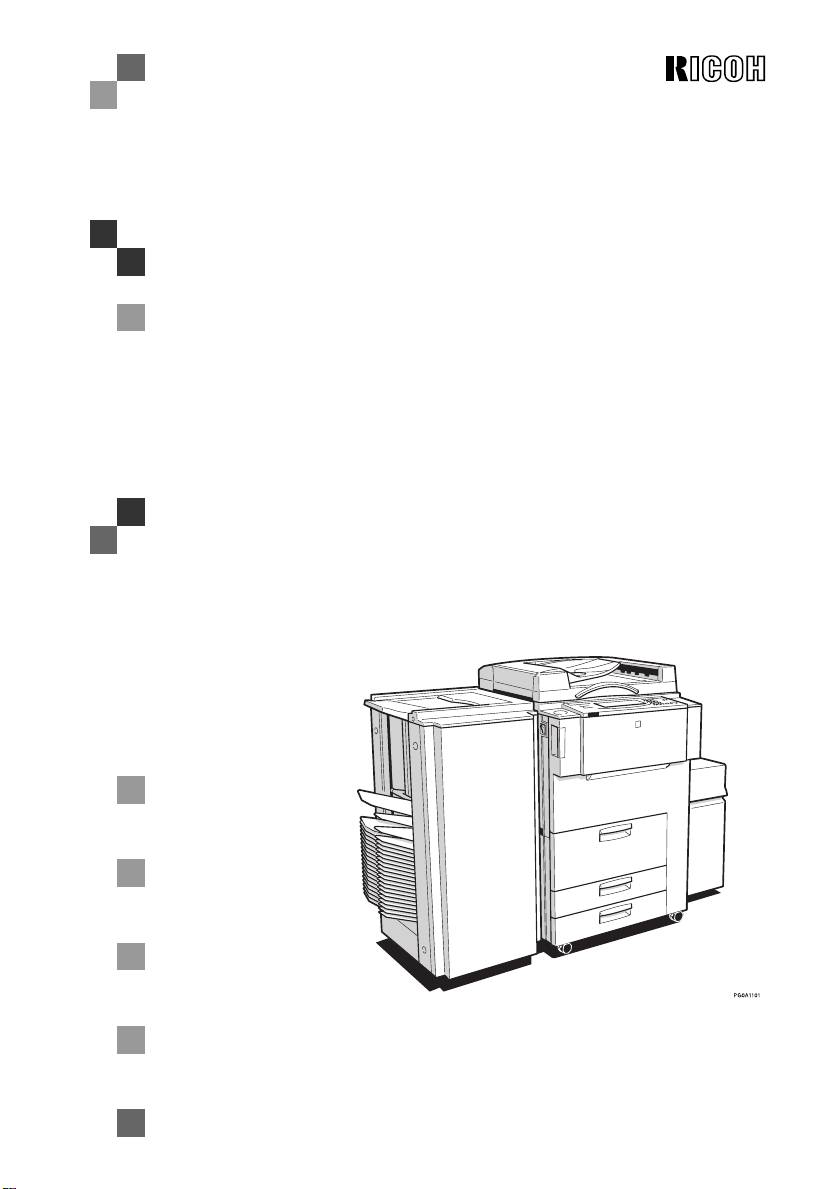
FT7950/7960/7970
OPERATING INSTRUCTIONS
Read this manual carefully before you use this product and keep it handy for future
reference.
For safety, please follow the instructions in this manual.
Page 2

Introduction
This manual contains detailed instructions on the operation and maintenance of this machine. To get
maximum versatility from this machine all operators should carefully read and follow the instructions
in this manual. Please keep this manual in a handy place near the machine.
Please read the Safety Information before using this machine. It contains important information related to USER SAFETY and PREVENTING EQUIPMENT PROBLEMS.
Notes:
Some illustrations may be slightly different from your machine.
The model names of the machines do not appear in the following pages.
Check the model of your machine before reading this manual.(For details, see pages 1)
Certain options may not be available in some countries. For details, please contact your local dealer.
Warning:
Use of controls or adjustment or performance of procedures other than those specified in this manual
mighit result in hazardous radiation exposure.
Two kinds of size notation are employed in this manual. With this machine refer to the lnch version.
For good copy quality, Ricoh recommends that you use genuine Ricoh toner.
Ricoh shall not be responsible for any damage or expense that might result from the use of part s
other than genuine Ricoh parts in your Ricoh office product.
Type 1: FT7950
Type 2: FT7960
Type 3: FT7970
Power Source
220V, 50/60Hz, 10A or more
Please be sure to connect the power cord to a power source as adove. For details about power
source, see P.107 "Power Connection”.
Page 3
SAFETY INFORMATION
When using your machine, the following safety precautions should be always be followed.
Safety During Operation
In this manual, the following important symbols are used:
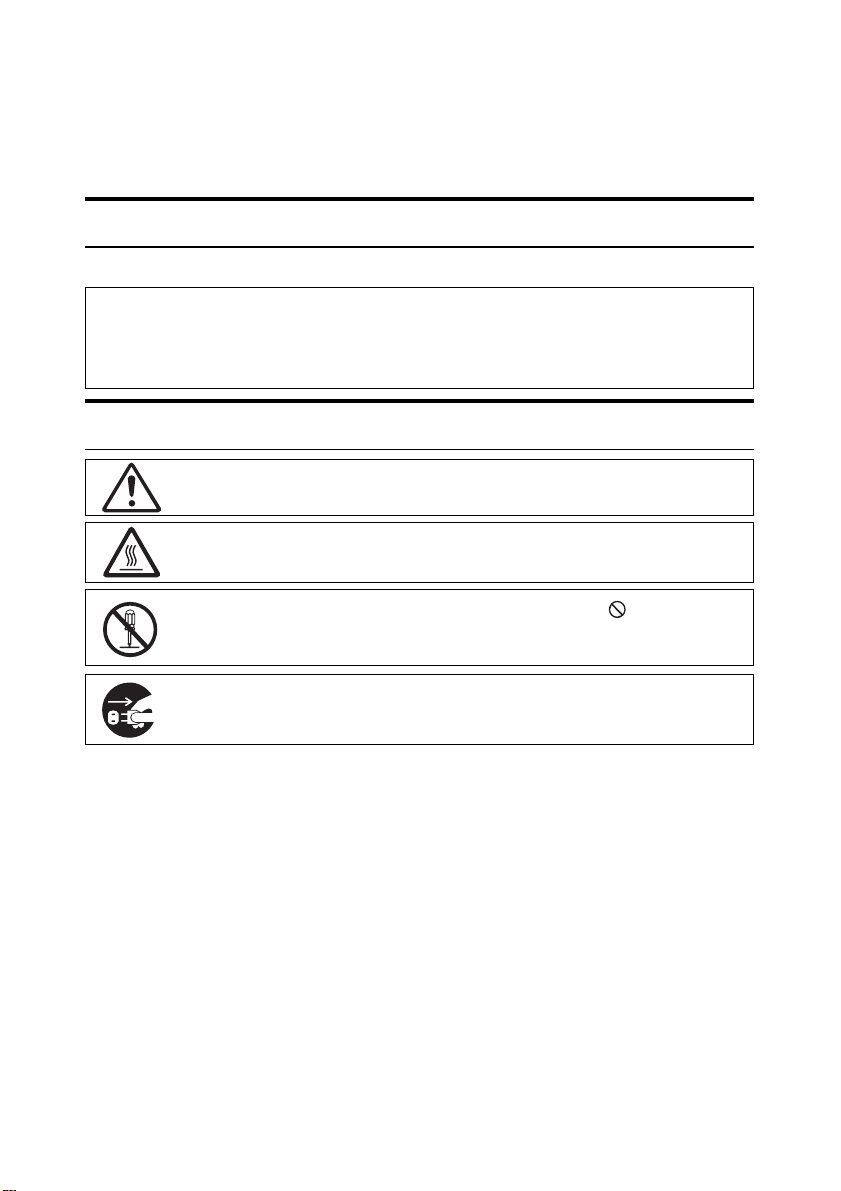
WARNING:
R
Ignoring this warning could cause serious injury or even death.
R
CAUTION:
Ignoring this caution could cause injury or damage to property.
Examples Of Indications
Symbol R mean a situation that requires you take care.
Symbol v mean “Hot surface”.
Do NOT carry out the operation represented by this symbol
This example means “Do not take apart”.
Symbols ● mean you MUST perform this operation.
This example means “You must remove the wall plug”.
.
i
Page 4
R
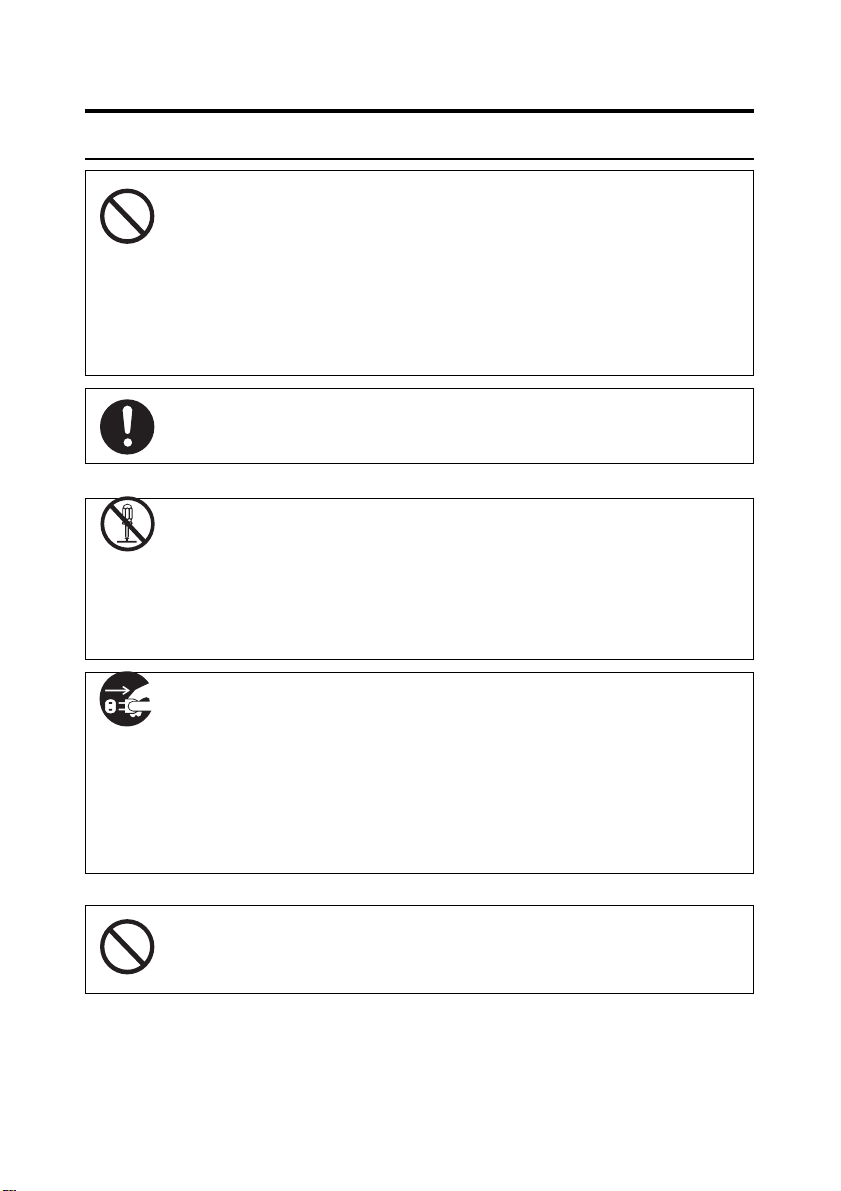
WARNING:
•
Only connect the machine to the power source described on the
inside front cover of this manual.
•
Avoid multi-wiring.
•
Do not damage, break or make any modifications to the power
cord. Do not place hea vy objects on it, pull it har d or bend it more
than necessary. These actions could cause an electric shock or
fire.
•
Do not plug or unplug the power cord with your hands wet. Otherwise, an electric shock might occur.
•
Make sure the wall outlet is near the machine and freely accessible so that in event of an emergency it can be unplugged easily.
•
Do not remove any covers or screws other than those specified
in this manual. Some parts of the machine are at a high voltage
and could give you an electric shock. When the machine needs
to be checked, adjusted, or repaired, contact your service representatives.
•
Do not take apart or attempt any modifications to this machine.
There is a risk of fire, electric shock, explosion or loss of sight.
•
If the machine looks damaged or breaks down, smoke is coming
out, there is a strange smell or anything looks unusual, immediately turn off the main switch then unplug the power cord from
the wall. Do not continue using the machine in this condition.
Contact your service representative.
•
If metal, liquid, or foreign matter falls into the machine, turn off
the main switch, and unplug the main po wer cord. Contact your
service representative. Do not keep using the machine with a
fault or defect.
•
Do not put any metal objects or containers holding water(e.g.
vases, flowerpots, glasses) on the machine. If the contents fall
inside the machine, a fire or electric shock could occur.
ii
Page 5

•
Do not incinerate used toner or toner containers. T oner dust might
ignite when exposed to an open flame. Dispose of the used toner
containers according to local regulations for plastics.
iii
Page 6
R
CA UTION:
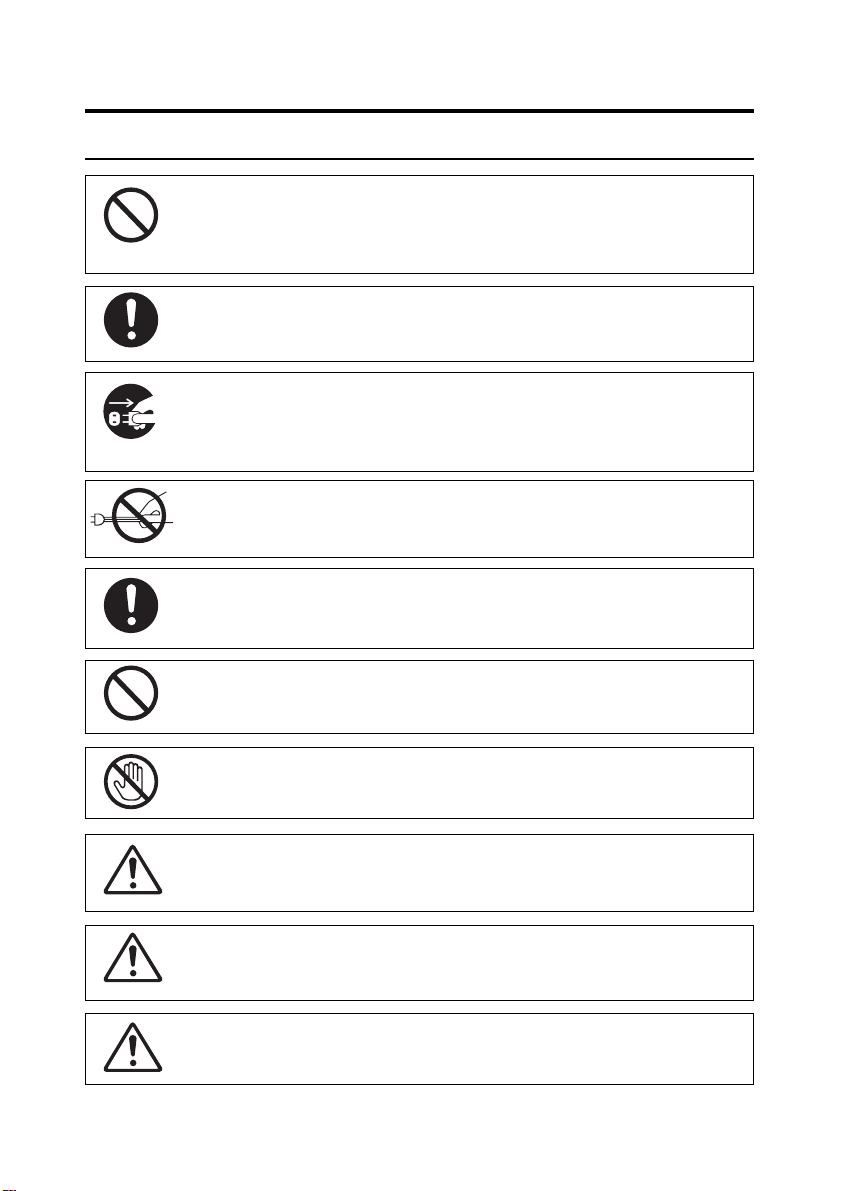
•
Keep the machine away fr om humidity and dust. A fire or an electric shock might occur.
•
Do not place the machine on an unstable or tilted surface. If it
topples over, it could cause injury .
•
After you move the machine, fix it with the caster fixture. Otherwise, the machine might move or come down to cause a personal injury.
•
When you move the machine, unplug the power cord from the
wall outlet to avoid fire or electric shock.
•
When the machine will not be used for a long time, unplug the
power cord.
•
When you pull out the plug from the soc ket, grip the plug to av oid
damaging the cord and causing fire or electric shock.
•
If you use the machine in a confined space, make sure there is a
continuous air turnover.
•
Do not reuse stapled paper. Do not use aluminium foil, carbon
containing paper or other conductive paper. Otherwise, a fire
might occur.
•
When removing misfed paper, do not touch the fusing section
because it could be very hot.
•
This machine has been tested for safety using this supplier’s
parts and consumables. We recommend you onl y use these specified supplies.
•
Do not eat or swallow toner.
•
Keep toner(used or unused) and toner containers out of reach of
children.
•
This equipment is only to be installed by a qualified service personnel.
iv
Page 7

•
Deliver to collection point for waste products. Do not be disposed
of via domestic refuse collection.
v
Page 8
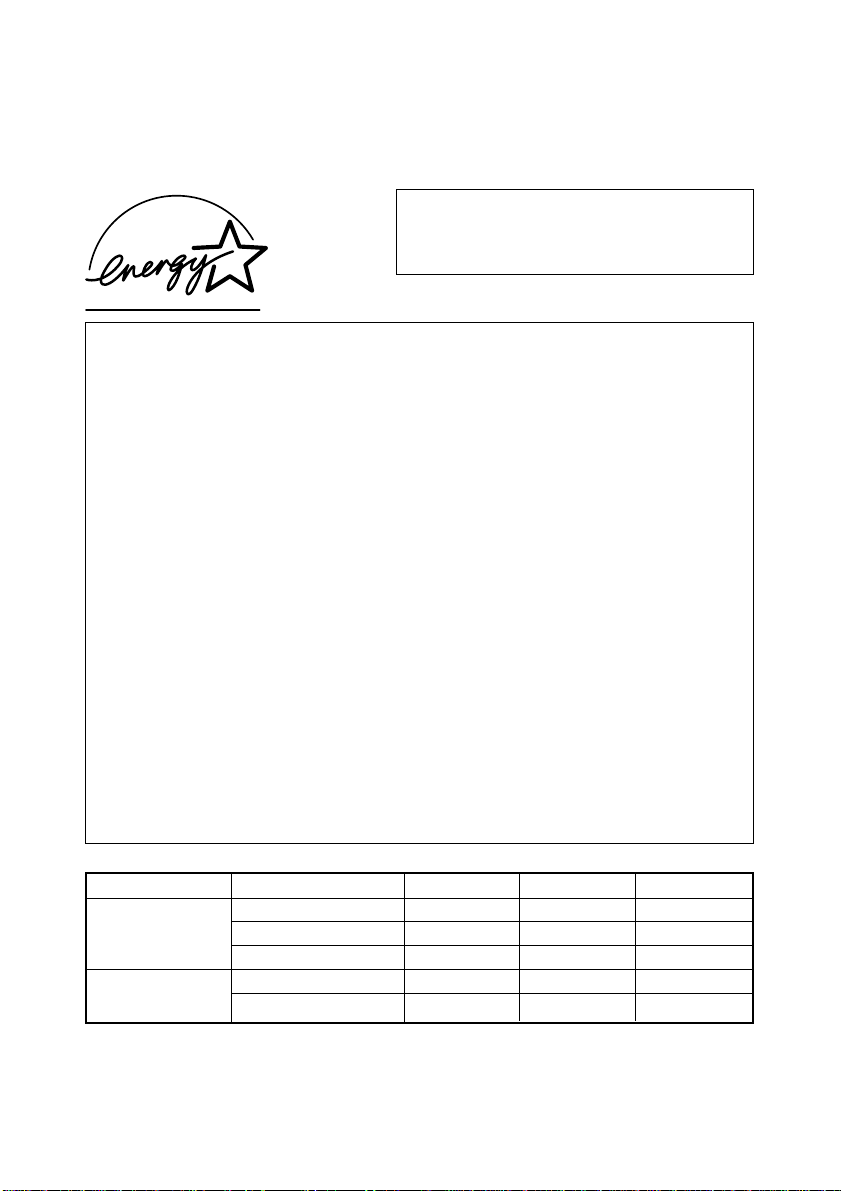
Energy Star program
Energy Star
The Energy Star Guidelines intend to establish an international energy-saving system for
developing and introducing energy-efficient office equipment to deal with environmental issues, such as global warming.
This products was designed to reduce the environment impact associated with copying
equipment by means of energy-saving features, such as Low Power mode, Auto Off mode,
and Duplex Priority.
• Low Power Mode
This copier automatically lowers its power consumption 1 minute after the last copying job
has been completed. To exit the Low Power mode, press the {Clear Modes/Energy Saver}
key . The copier returns to the ready condition in about 30 seconds. (T ype 2 and T ype 3 return
immediately .) To change the Low Power delay, see pag e 97 “Low Power Timer”.
• Auto Off Mode
T o conserve ener gy, this copier automatically turns off 90 minutes after the last cop ying job
has been completed. T o exit the Auto Off mode, turn on the main switch. To change the Auto
Off delay, see page 97 “Auto off”.
• Duplex Priority
T o conserve paper r esources, the Duple x function (1-Sided → 2-Sided) can select preferentially when you turn on the main switch, when you press the {Clear Modes/Energy Saver}
key , or when the copier resets itself automatically. To change the Duplex Priority mode, see
page 96 “Default Setting”.
®
As an Energy Star partner, we have determined
that this machine model meets the Energy Star
Guidelines for energy efficienc y.
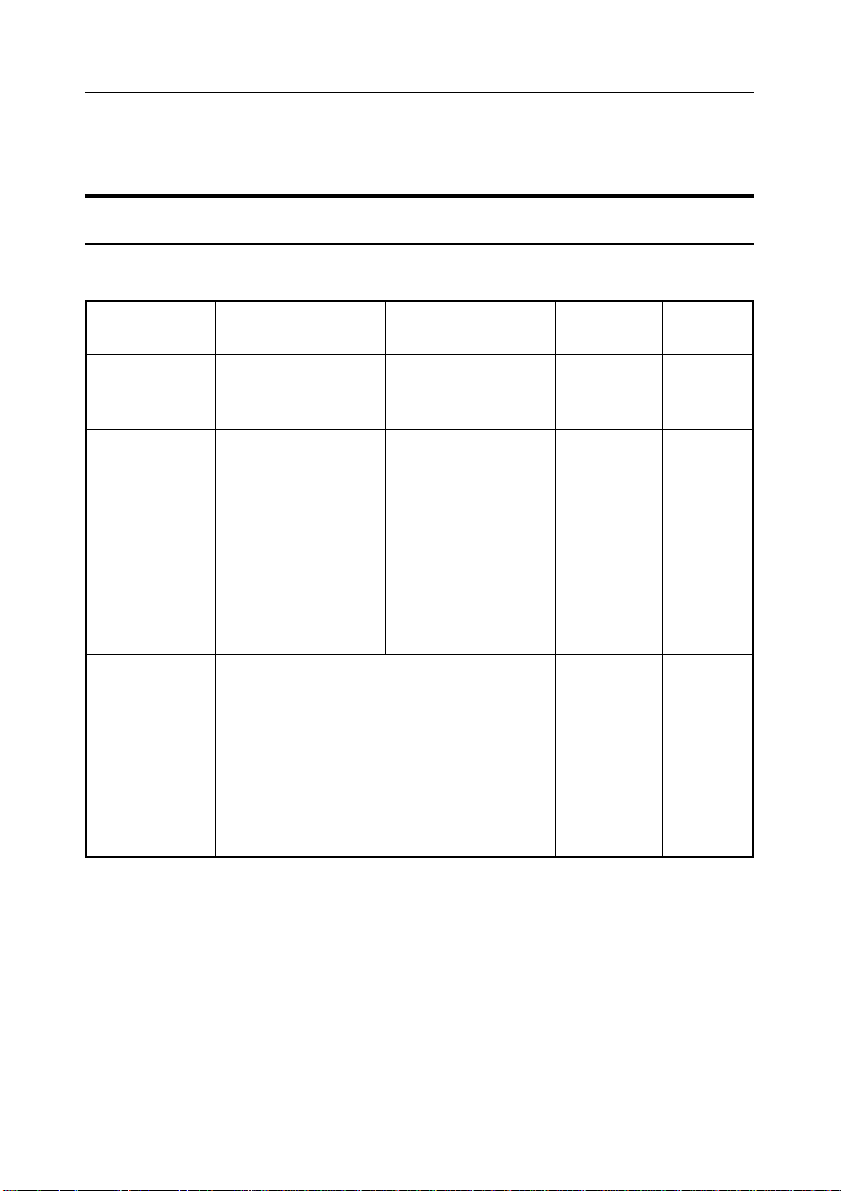
Specification
Type1 Type2 Type3
Power consumption 185W 210W 210W
Low Power Mode Default delay 15 min. 15 min. 15 min.
Recovery Time 30 sec. Immediate Immediate
Auto Off Mode
Power consumption 1W 1W 1W
Default delay 90 min. 90 min. 90 min.
Recycled paper:
Please contact your sales or service representative for recommended recycled paper types that
may be used in this copier.
vi
Page 9

HOW TO READ THIS MANUAL
Symbols
In this manual, the following symbols are used:
WARNING:
R
This symbol indicates a potentially hazardous situation that might result in death or serious injury
when you misuse the machine without following the instructions under this symbol. Be sure to
read the instructions, all of which are described in the Safety Information section.
CAUTION:
R
This symbol indicates a potentially hazardous situation that might result in minor or moderate
injury or property damage that does not involve personal injury when you misuse the machine
without following the instructions under this symbol. Be sure to read the instructions, all of
which are described in the Safety Information section.
* The statements above are notes for your safety.
Important
If this instruction is not followed, paper might be misfed, originals might be damaged, or data
might be lost. Be sure to read this.
Preparation
This symbol indicates the prior knowledge or preparations required before operating.
Note
This symbol indicates precautions for operation, or action to take after misoperation.
Limitation
This symbol indicates numerical limits, functions that cannot be used together, or conditions in
which a particular function cannot be used.
Reference
This symbol indicates a reference.
[
]
Keys that appear on the machine’s panel display.
{ }
Keys built into the machine’s operation panel.
vii
Page 10

viii
This page is intentionally blank.
Page 11

TABLE OF CONTENTS
MACHINE TYPES...................................................................................... 1
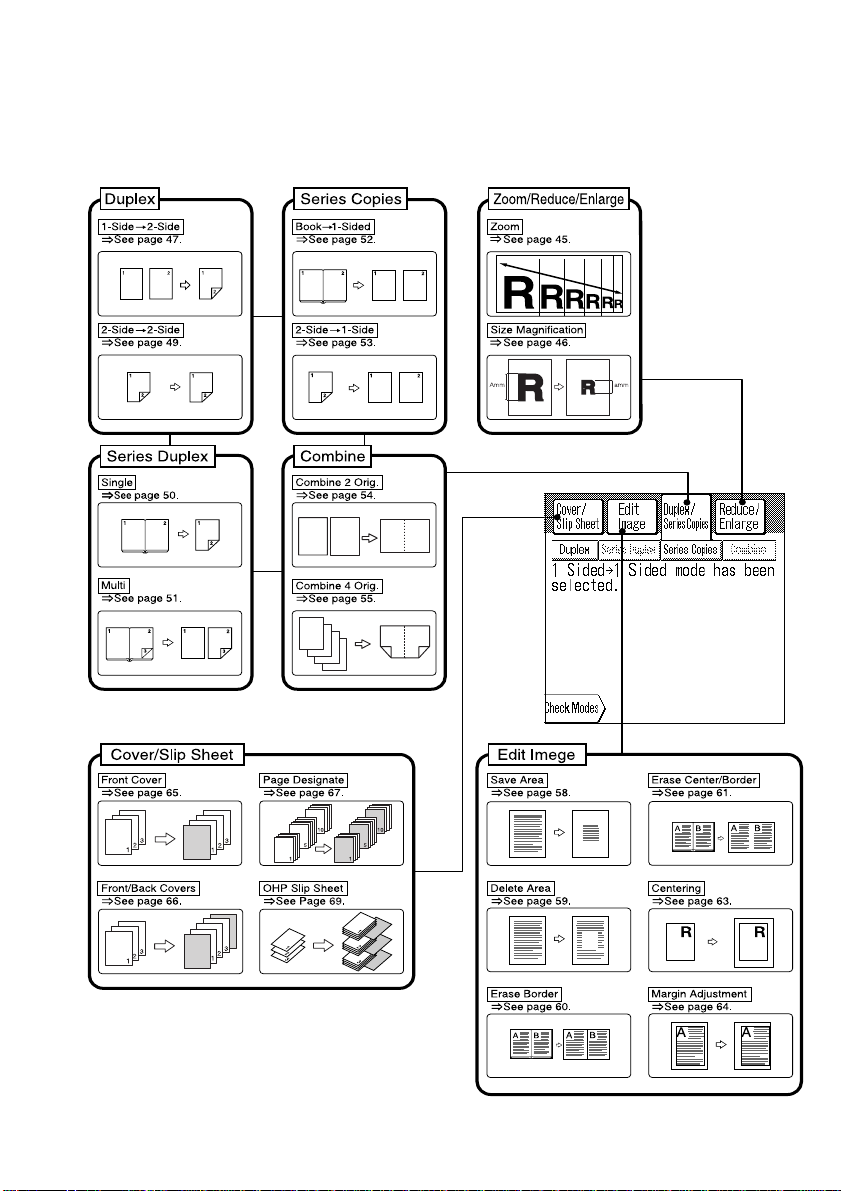
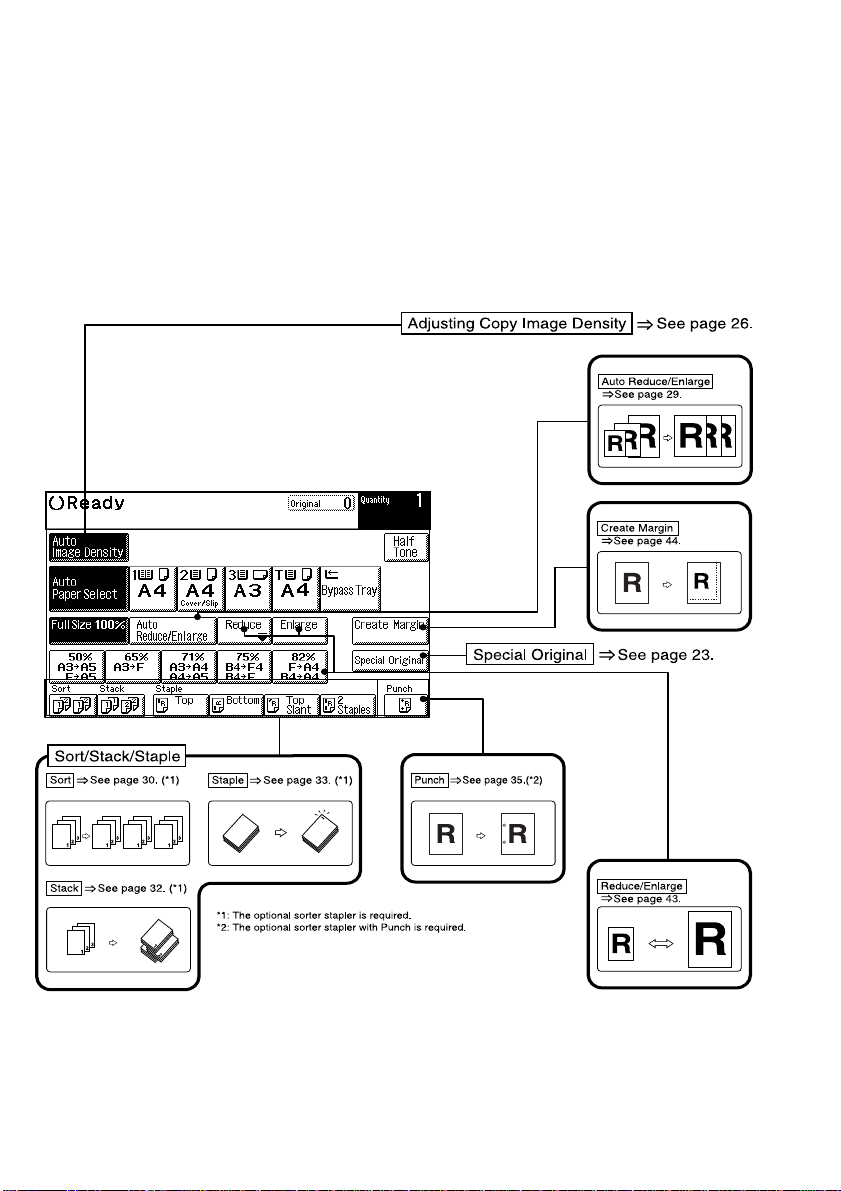
WHA T YOU CAN DO WITH THIS MA CHINE ............................................. 2
GUIDE TO COMPONENTS ....................................................................... 4
OPTIONS (EXTERNAL OPTIONS) ........................................................... 6
OPERA TION PANEL ................................................................................. 7
PANEL DISPLAY....................................................................................... 8
GUIDANCE ............................................................................................. 10
1. BASICS
ORIGINALS............................................................................................. 11
COPY P APER ......................................................................................... 14
TONER.................................................................................................... 18
2. COPYING
BASIC PROCEDURE..............................................................................19
SETTING ORIGINALS ............................................................................ 21
Special Original .................................................................................... 23
BASIC FUNCTIONS................................................................................ 26
Adjusting Copy Image Density .............................................................. 26
Selecting Copy Paper ........................................................................... 28
Auto Reduce/Enlarge............................................................................ 29
SORT/STACK/STAPLE ........................................................................... 30
Sort....................................................................................................... 30
Stack .................................................................................................... 32
Staple ................................................................................................... 33
PUNCH ................................................................................................... 35
COPYING FROM THE BYP ASS TRA Y .................................................... 36
PROGRAM.............................................................................................. 38
OTHER FUNCTIONS .............................................................................. 40
Energy Saver Mode .............................................................................. 40
Interrupt ................................................................................................ 40
User Codes........................................................................................... 41
Original Beeper..................................................................................... 41
Presetting Copy Job.............................................................................. 41
Sample Copy ........................................................................................ 42
REDUCE/ENLARGE ............................................................................... 43
ix
Page 12

ZOOM ..................................................................................................... 45
SIZE MAGNIFICATION ........................................................................... 46
DUPLEX .................................................................................................. 47
1-Sided → 2-Sided ............................................................................... 47
2-Sided → 2-Sided ............................................................................... 49
SERIES DUPLEX .................................................................................... 50
Single (Left/Right Pages → 2-Sided)..................................................... 50
Multi (Front/Back Pages → 2-Sided) ..................................................... 51
SERIES COPIES ..................................................................................... 52
Book → 1-Sided.................................................................................... 52
2-Sided → 1-Sided ............................................................................... 53
COMBINE ............................................................................................... 54
Combine 2 Orig. (1-Sided × 2 → Book) ................................................. 54
Combine 4 Orig. (1-Sided × 4 → 2-Sided Book)....................................55
SAVE/DELETE AREA............................................................................. 57
Save Area.............................................................................................58
Delete Area........................................................................................... 59
ERASE BORDER....................................................................................60
ERASE CENTER/BORDER .................................................................... 61
CENTERING ........................................................................................... 63
MARGIN ADJUSTMENT......................................................................... 64
COVER.................................................................................................... 65
Front Cover ........................................................................................... 65
Front/Back Covers ................................................................................ 66
SLIP SHEET............................................................................................ 67
Page Designate .................................................................................... 67
OHP Slip Sheet..................................................................................... 69
COMBINA TION CHART..........................................................................70
3. WHAT TO DO IF SOMETHING GOES WRONG
IF YOU CANNOT START COPYING ........................................................ 71
IF YOU CANNOT MAKE CLEAR COPIES .............................................. 73
IF YOU CANNOT MAKE COPIES AS YOU WANT................................... 74
IF COPY P APER RUNS OUT .................................................................. 75
IF TONER RUNS OUT ............................................................................. 79
IF COPY P APER OR AN ORIGINAL IS MISFED .................................... 81
CHANGING A PAPER SIZE .................................................................... 86
IF STAPLES RUN OUT ........................................................................... 88
IF A ST APLE IS JAMMED ...................................................................... 90
IF THE PUNCH WASTED BOX IS FILLED .............................................. 92
x
Page 13

4. USER TOOLS
ACCESSING THE USER TOOL............................................................... 93
USER TOOLS MENU .............................................................................. 94
SETTINGS YOU CAN CHANGE WITH THE USER TOOLS ..................... 96
1 Set operation modes........................................................................ 96
Screen Saver .................................................................................. 96
Default Setting................................................................................. 96
Touch Panel in Waiting Mode .......................................................... 96
Panel beeper................................................................................... 96
Job End Call.................................................................................... 96
2 Auto reset/Auto off........................................................................... 97
Auto reset........................................................................................ 97
Low Power Timer............................................................................. 97
Auto off............................................................................................ 97
User Code Mode Set....................................................................... 97
SADF Auto reset ............................................................................. 97
3 Basic Functions ............................................................................... 98
Auto Paper Select Priority ............................................................... 98
Auto Paper Select ........................................................................... 98
Paper Tray Display in APS mode ..................................................... 98
4 Reproduction Priority ...................................................................... 98
Reproduction ratio priority setting .................................................... 98
Preset R/E key display .................................................................... 98
Shrink & Centre setting ................................................................... 98
5 Select special tray............................................................................ 99
6 Features............................................................................................ 99
Select feature display & priority setting............................................99
Duplex mode priority setting ............................................................ 99
Erase centre width priority setting.................................................... 99
Margin Auto shift ............................................................................. 99
Erase border width priority setting ................................................... 99
7 Image Quality ................................................................................. 100
Image Density Level...................................................................... 100
3 Side Full Image .......................................................................... 100
8 Tray ................................................................................................. 100
Paper Tray Priority ......................................................................... 100
Auto Tray Switching ....................................................................... 100
9 Management setting ....................................................................... 100
Set User Code(s) .......................................................................... 100
Check/Reset copy count ............................................................... 101
xi
Page 14

Reset data for User Codes............................................................ 101
Reset User Codes/Counters ......................................................... 101
Maximum copy input number ........................................................ 101
10 Peripherals Attachment ................................................................. 102
Special original mode priority setting ............................................. 102
Staple Selection ............................................................................ 102
Auto Sort ....................................................................................... 102
TO TAL COUNTER ................................................................................ 103
5. REMARKS
DO’S AND DON’TS............................................................................... 105
WHERE TO PUT YOUR MACHINE........................................................ 106
CLEANING YOUR MACHINE ................................................................ 109
6. SPECIFICATIONS
COPIER................................................................................................. 111
OPTIONS .............................................................................................. 117
INDEX ................................................................................................... 120
xii
Page 15

MACHINE TYPES
There are three models of this machine. The main differences between them is copy speed. To
make sure which model you have, see the inside front cover.
Copy speed
Type1: Metric version: 51 copies/minute (A4K)
50 copies/minute in France (A4K)
Inch version: 51 copies/minute (8
Type2: 60 copies/minute
Type3: 70 copies/minute
1
/
" × 11"K)
2
1
Page 16
WHAT Y OU CAN DO WITH THIS MACHINE
1 2
1
2
4
3
2
1
3
21
4
2
Page 17
3
Page 18
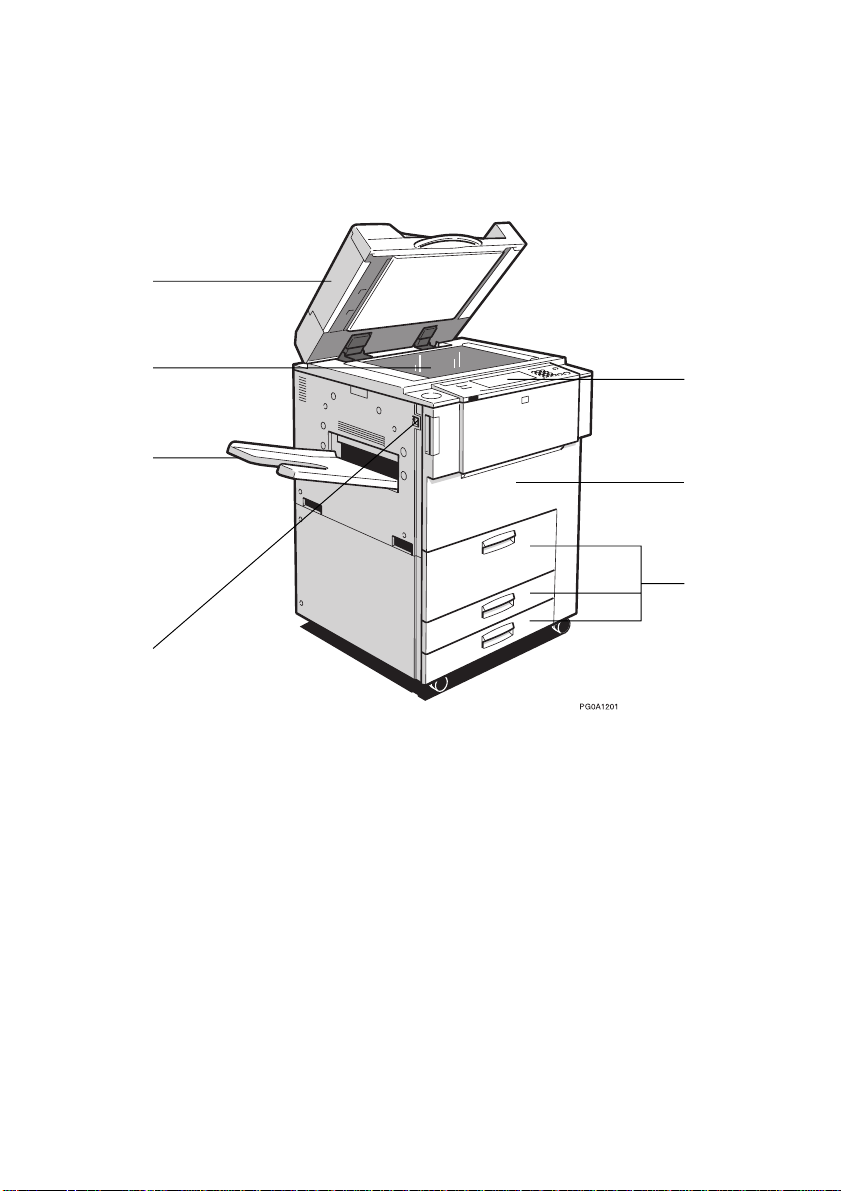
GUIDE TO COMPONENTS
1
2
3
4
1.
Document Feeder (optional)
The document feeder automatically feeds a
stack of originals one by one.
2.
Exposure glass
Position originals here face down for copying. ⇒ See page 11 “ORIGINALS.”
3. External tray (optional)
Delivers copied paper with its face up.
4.
Main switch
5.
Operation panel
⇒ See page 7 “OPERATION PANEL.”
5
6
7
6.
Front cover
Open to access the inside of the machine.
7.
Paper trays
Set paper here. Tray 1 is a tandem tray in
which paper on the left side is automatically
supplied when the paper on the right side is
used up.
⇒ See page 75 “IF COPY PAPER RUNS
OUT.”
4
Page 19
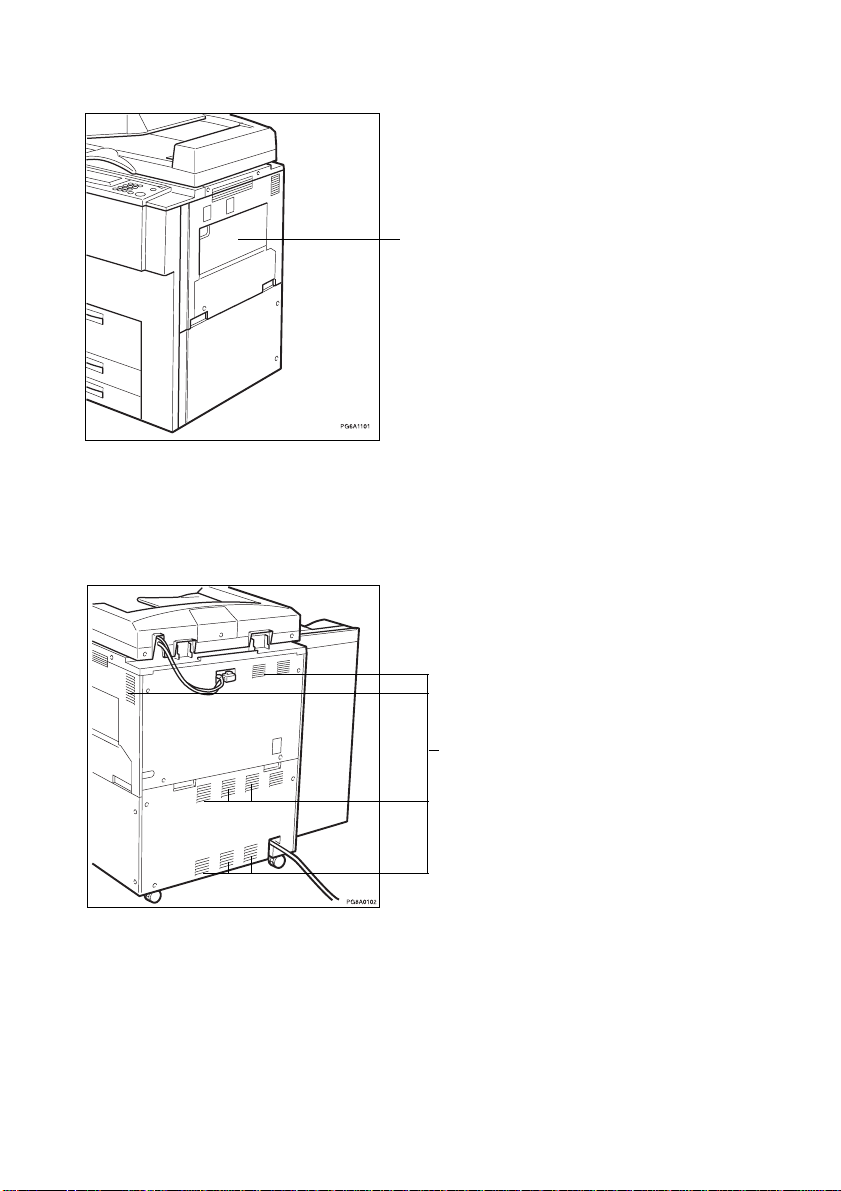
1.
Bypass tray
Used to copy onto OHP transparencies, adhesive labels, translucent paper , post cards,
and non-standard size paper. ⇒ See page
36 “COPYING FROM THE BYPASS
TRAY.”
1
1.
Ventilation holes
Used to prevent the interior temperature
from increasing. Do not obstruct the ventilation hole by placing or leaning an object
near it. If the machine overheats, a fault
might occur.
1
5
Page 20
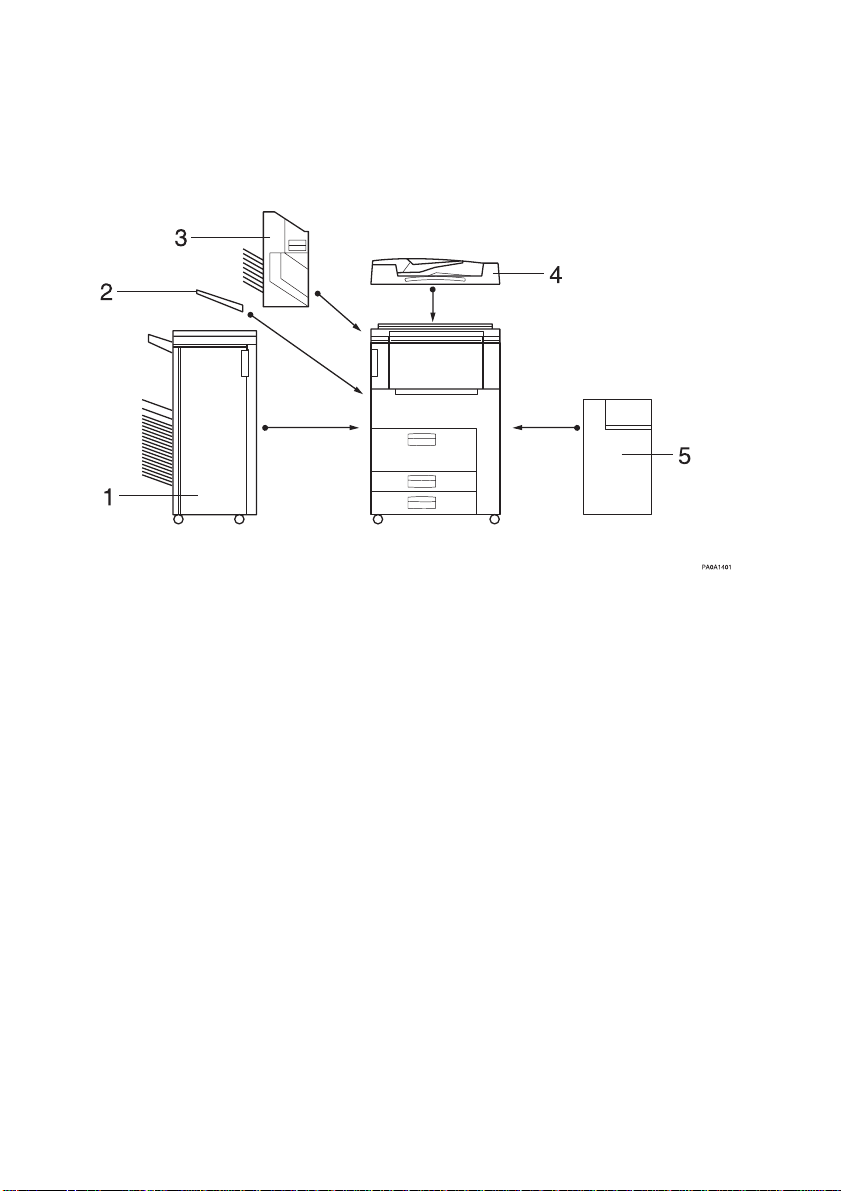
OPTIONS
1.
Sorter stapler console type/Sorter
stapler console type with punch
20-bin multi-position sorter stapler.
2.
External tray
(Can be installed when the sorter
stapler is not installed.)
Delivers copied paper face up.
3.
Sorter stapler hanging-on type
20-bin sorter stapler.
4.
Document Feeder
Feeds originals automatically, one sheet at
a time.
5.
Large Capacity T ray (LCT)
Holds a maximum of 3,500 sheets of paper.
6
Page 21
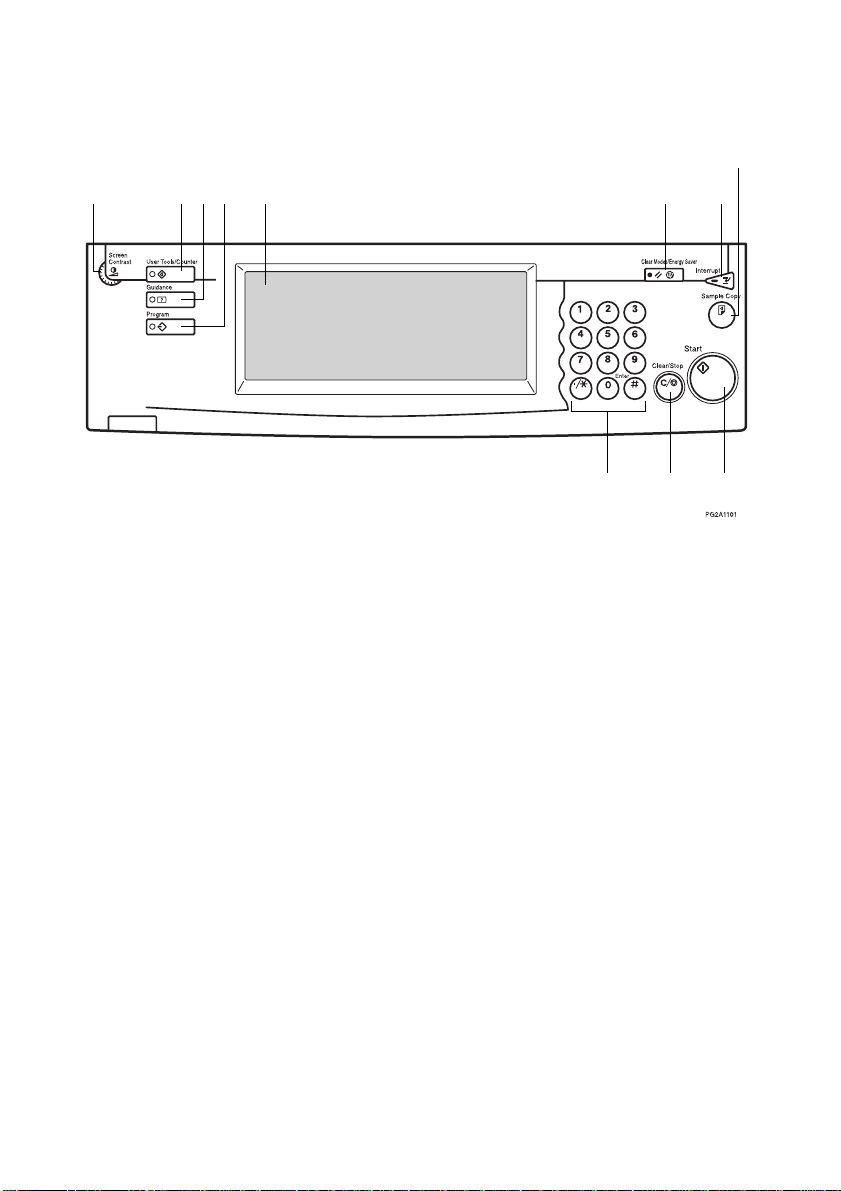
OPERATION PANEL
8
12
1.
Screen Contrast Knob
Adjusts the brightness of the panel display.
2.
{User T ools/Counter} key
User T ools
Press to change the default settings and conditions according to meet your requirements.
⇒ See page 93 “USER TOOLS”.
Counter
Press to check the total number of copies
made. ⇒ See page 103
3.
{Guidance} key
Press for help on functions. ⇒ See page 10
“GUIDANCE.”
4.
{Program} key
Press to select the program mode. ⇒ See
page 38 “PROGRAM.”
5.
Panel display
Shows operation status, error messages, and
function menus. ⇒ See page 8 “PANEL
DISPLAY.”
6.
{Clear Modes/Energy Saver} key
Press to clear the previously entered copy
job settings. Also use to switch to and from
Energy Saver Mode. ⇒ See page 40 “Energy Saver Mode.”
3
45
"TOT AL COUNTER”
67
9
10 11
7.
{Interrupt} key
Press to make interrupt copies during a copy
run. ⇒ See page 40 “Interrupt.”
8.
{Sample Copy} key
Press to copy a sheet to check the set density, reduce/enlar ge settings, margin adjustment, erase settings, and centering settings
and to check the format of the copy.
⇒ See page 42 “Sample Copy.”
.
9.
{Number}/{# (Enter)} keys
{Number} keys ... Used to enter the desired
number of copies and data for salected
modes.
{# (Enter)} key ... Press to sa ve the numeric
data you entered into the copier.
10.
{Clear/Stop} key
While entering numbers, press to cancel a
number to have entered. While copying,
press to stop copying.
11.
{Start} key
Press to start copying.
7
Page 22
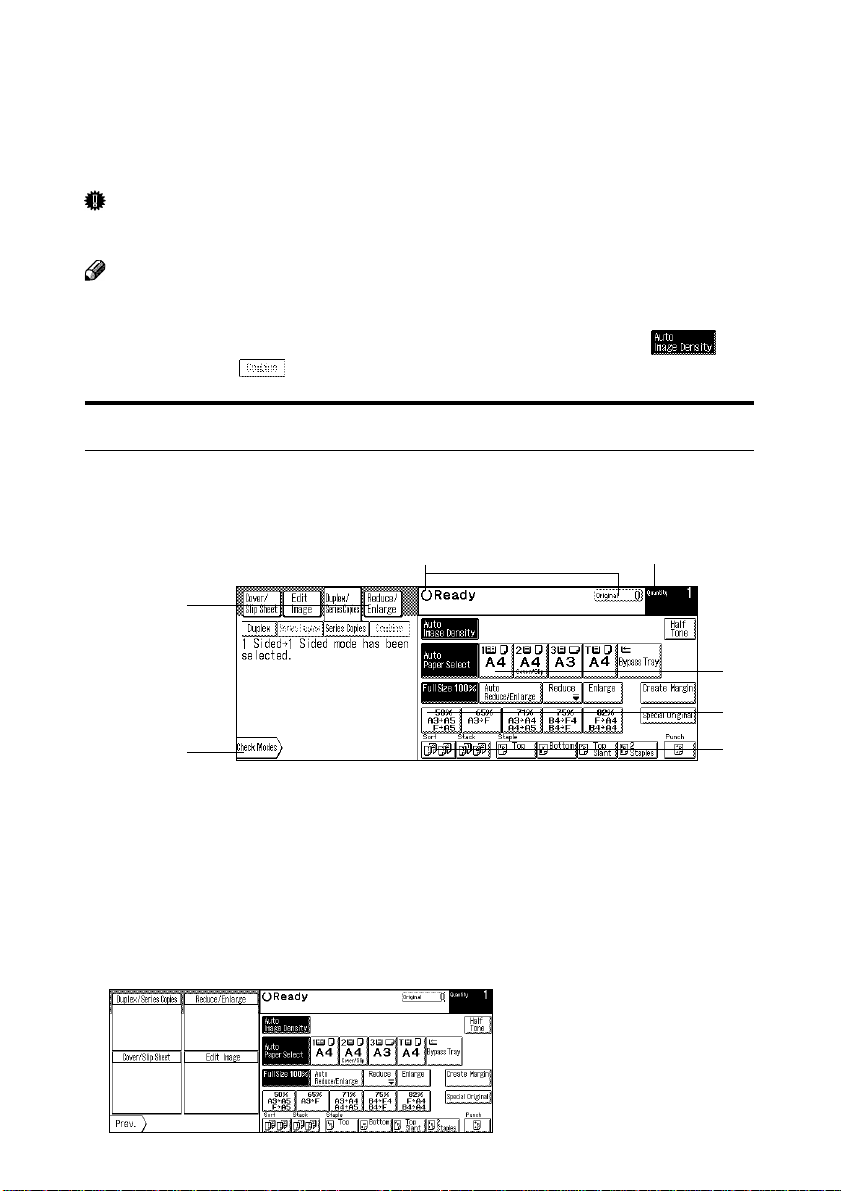
PANEL DISPLAY
The panel display shows operational status, error messages, and function menus.
Important
❏ Do not apply a strong stock or force of about 30 N (about 3 kgf) or more to the panel display.
Otherwise, the display might be damaged.
Note
❏ The function items displayed serve as selector keys. You can select or specify an item by
lightly pressing it.
❏ When you select or specify an item on the panel display, it is highlighted like .
❏ Keys appearing as
Displays And Key Operations
This machine has two types of initial display. “Normal” and “prog ram 10”. “Normal” is enabled
at the factory.
■■
■ Initial display (1 Side
■■
1
cannot be used.
→→
→1 Sided is selected whenever the copier is reset)
→→
2 3
4
5
7
1.
Display function items. When you select an item, the next screen appears under these keys.
2.
Displays operational status or messages. It also displays the number of originals the copier
has scanned.
3.
The number of originals set and the number of copied sheets are displayed.
4.
The types (paper size and orientation) of the paper set in the paper trays are displayed.
5.
The preset reduce/enlarge ratios are displayed.
6.
The options that can be selected in the sort/stack/staple/punch functions are displayed.
7.
[Check Modes] appears when you set a function. To check a set of items you set up, press
[Check Modes]. The settings you made will then appear.
6
8
Page 23
Note
❏ The illustrations here are examples for the machine with the optional sorter stapler unit and
large capacity tray (LCT) installed.
❏ You can display only the function items you are going to use or commonly used function items
with higher priorities (initially selected). ⇒ See page 99 “Select feature display & priority
setting.”
❏ You can have paper type displayed on the panel display when you set a special type of paper
such as cover, slip sheet, or recycled paper. For the cover and slip sheet, you can select the
mode in which the paper type is always displayed or the mode in which the paper type is
displayed only when “Cover/Slip Sheet” is selected. ⇒ See page 99 “Select Special tray.”
■■
■ Initial display of “Program 10”
■■
When “Program 10” is selected in “Default setting” ⇒ See page 96.
9
Page 24
GUIDANCE
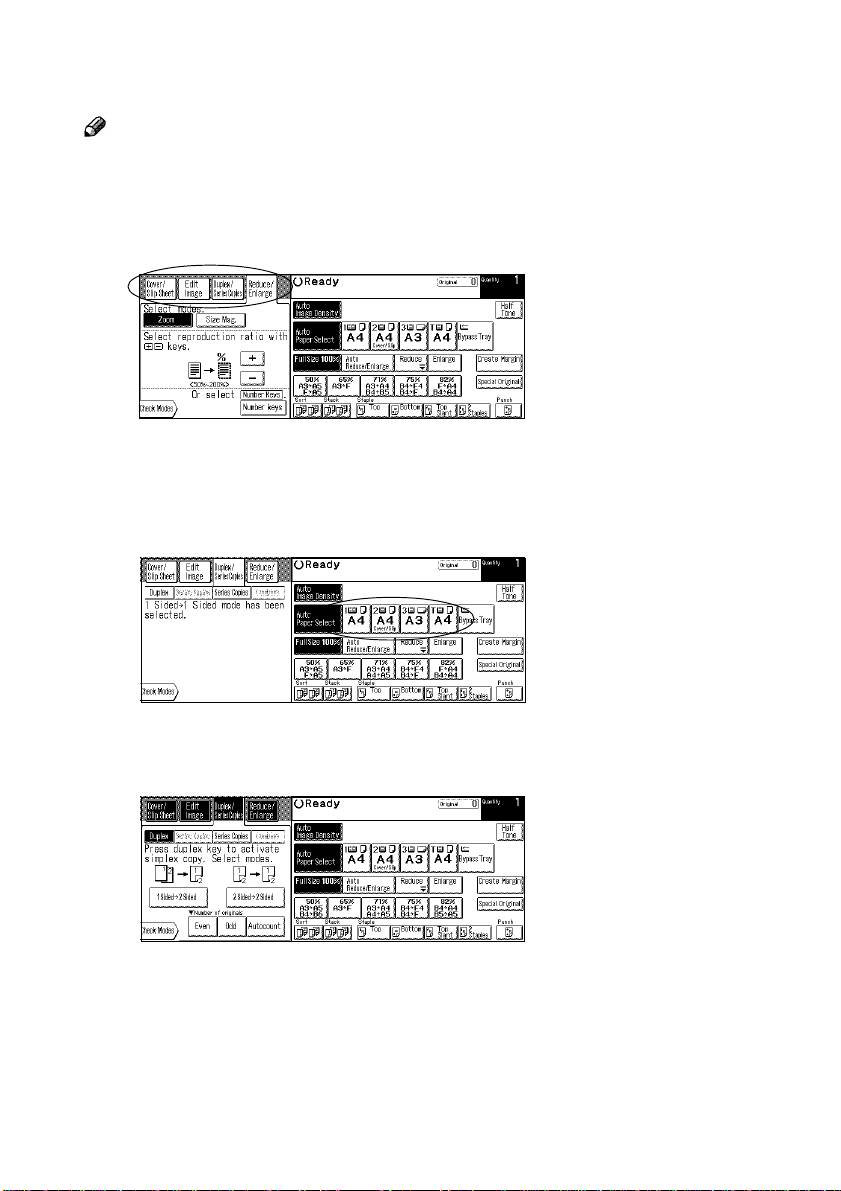
Press the {Guidance} key to get a description
of a function or its operating procedure. You
can make use of the guidance in two ways. In
one way, you press the {Guidance} key on
the Copy mode panel display to open the guidance menu and select the desired description.
In the other way, you press the {Guidance}
key while performing an operation and review
the associated operating procedure.
Viewing the Guidance on
the Copy Mode Display
Panel
Press the {Clear Modes/Energy Saver}
1
key to return to the initial display.
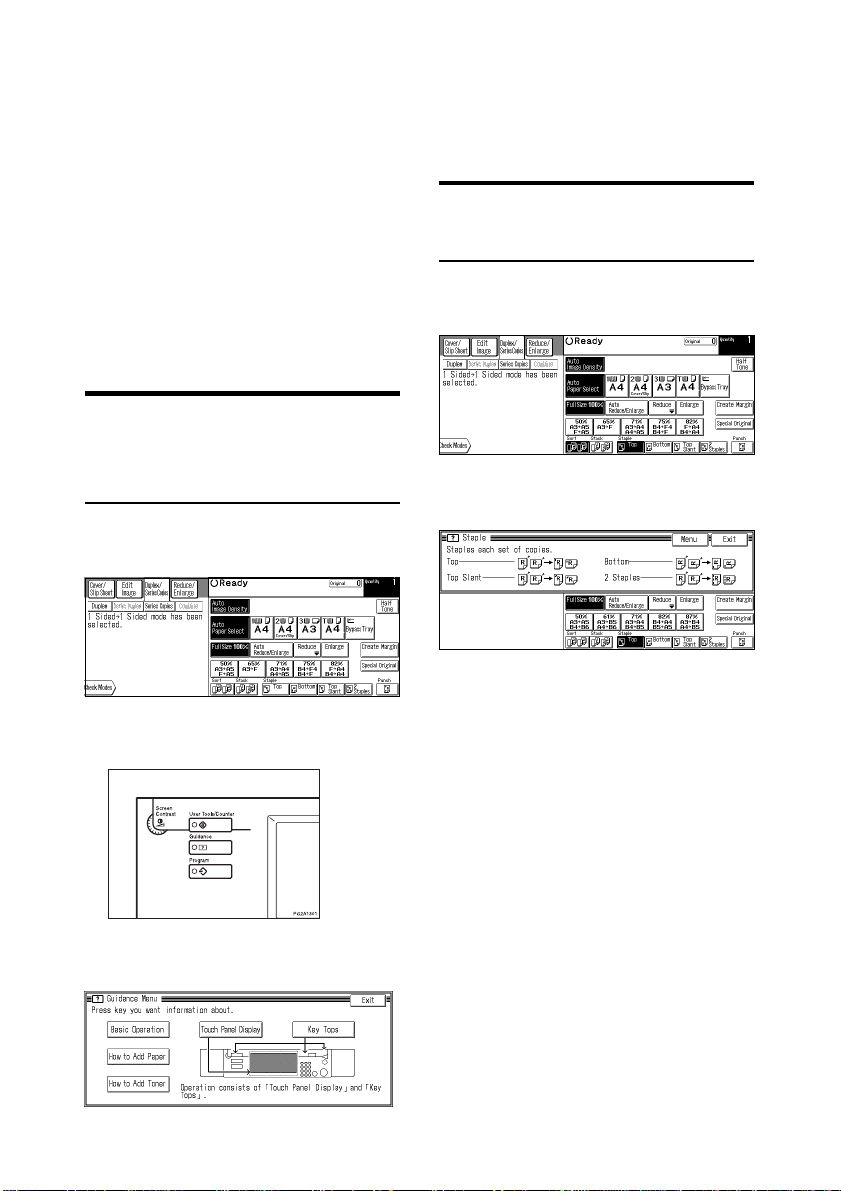
Viewing the Guidance While
Performing an Operation
Set a function.
1
Select [Staple Top], for example.
2 Press the {Guidance} key.
A description of the staple will appear.
2 Press the {Guidance} key .
The guidance menu will appear.
3 Press the function key associated with
the function you want to know about.
10
Page 25
1. BASICS
ORIGINALS
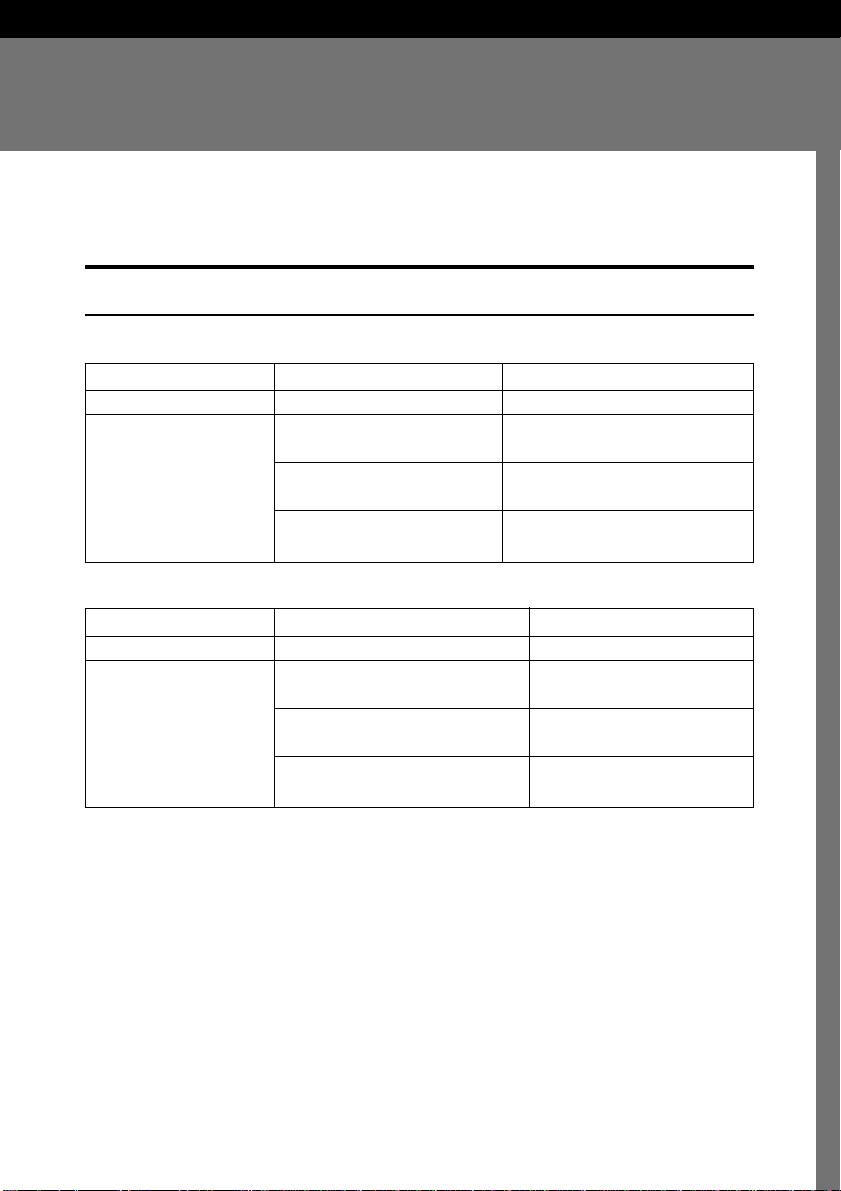
Sizes and W eights of Recommended Originals
Metric version
Where original is set Original Size Original Weight
Exposure glass Up to A3 -Document feeder 1-sided originals: 52-128 g/m
A3L- B6
2-sided originals: 52-105 g/m
A3L- B6
Thin Paper mode: 41-128 g/m
A3L- B6
KL
L
L
Inch version
Where original is set Original Size Original Weight
Exposure glass Up to 11" × 17" -Document feeder 1-sided originals: 14 - 34 lb
1
11" × 17"L- 5
2-sided originals: 14 - 28 lb
11" × 17"L- 5
Thin Paper mode: 11 - 34 lb
11" × 17"L- 5
1
/
" × 8
/
"
" × 8
" × 8
KL
2
1
/
"
2
L
1
/
"
KL
2
2
1
/
2
1
/
2
2
2
2
11
Page 26

BASICS
Non-recommended originals for the document feeder
Setting the following originals in the document feeder might cause paper misfeeds or
damage to the originals. Set these originals on the exposure glass.
• Originals other than those specified in ⇒ P.11 “Sizes and Weights of Recommended Origi-
nals.”
• Stapled or clipped originals
• Perforated or torn originals
• Curled, folded, or creased originals
• Pasted originals
• Originals with any kind of coating, such as thermal fax paper, art paper , aluminum foil, carbon
paper, or conductive paper
• Originals with perforated lines.
• Originals with indexes, tags, or other projecting parts
• Sticky originals such as translucent paper
• Thin originals that has low stiffness
• Originals of inappropriate weight ⇒ P.11 “Sizes and Weights of Recommended Originals”
• Bound originals such as books
• Transparent originals such as OHP transparencies or translucent paper
Sizes Difficult to Detect
It is difficult for the machine to detect the sizes of the following originals, so select the
paper size manually .
• Originals with indexes, tags, or other projecting parts
• Transparent originals such as OHP transparencies or translucent paper
• Dark originals with many letters and drawings
• Originals which partially contain solid images
• Originals which have solid images at their edges
• Originals other than those (with o) in the table next page (when set on the exposure glass)
12
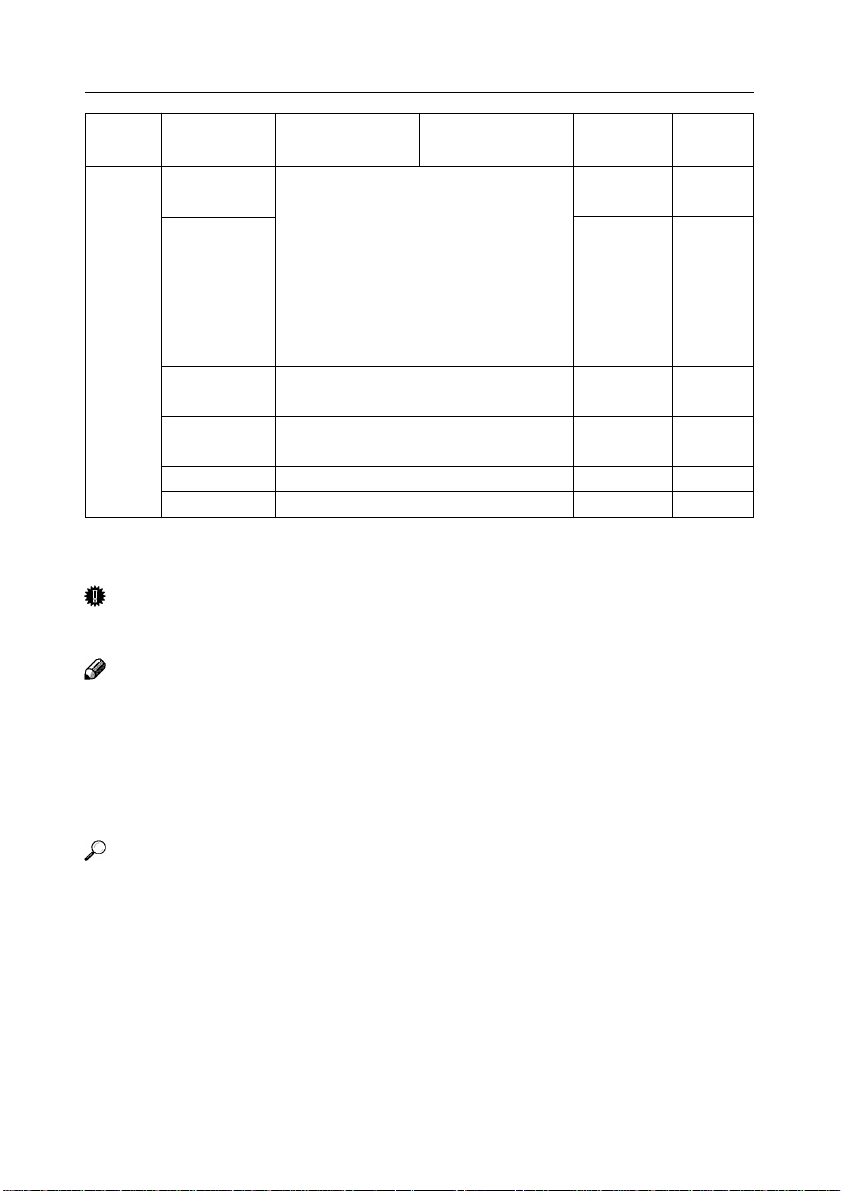
Page 27
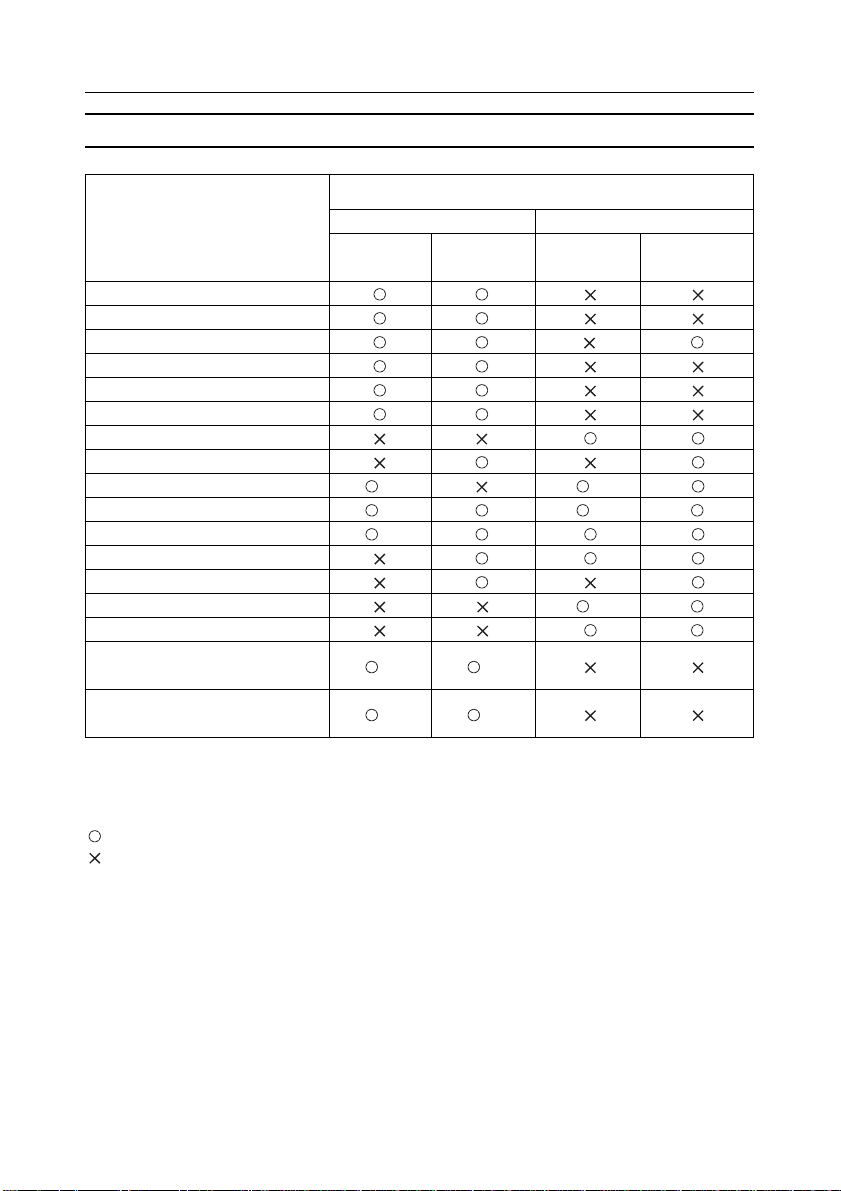
Sizes detectable by the Auto P aper select
Place of original
size Metric version Inch version
Exposure Document Exposure Document
glass feeder glass feeder
A3
L
B4
L
A4
KL
B5
KL
A5
KL
B6
KL
11" × 17"(DLT)
11" × 15"
1
8
/
" × 14"
2
1
8
/
" × 13"(F4)
2
1
8
/
" × 11"(LT)
2
1
8
/
" × 11"(LT)
2
8" × 13"(F)
10" × 8"
1
5
/
" × 8
2
Ba-Kai
(267 × 390mm)
Shi-Lui-Kai
(195 × 267mm)
*1 Your service representative can select one of these size (Default: F4).
*2 Your service representative can select this size (Default: NO).
*3 Your service representative can select this size (Default: NO).
No detectable 11" × 15"L, B5KL from the document feeder.
: Y es
: No
L
L
L
L
L
1
/
2
KL
L
L
L
K
"(HL T)
KL
*1
*1
*1
*3 *3
*3 *3
*1
*1
*2
ORIGINALS
13
Page 28
BASICS
COPY PAPER
Recommended Paper Sizes And Types
The following limitations apply to each tray:
Metric version Inch version
Tray 1 *1 A4
Tray 2 A3L, A4KL, 11" × 17"L, 52-128g/m2550
Tray 3 *1 A3L, B4L, A4
K
A5
K
1
8
/
" × 13"
L
2
1
8
/
" × 13"
L
4
KL
A5
KL
11" × 17"L, 8
81/2" × 13"L,8
8" × 10
8" × 13"L, 8
10" × 14"L, 11" × 15"L,
51/2" × 8
1
/
" × 14"L,
2
1
/
1
/
2
"L, 8" × 10"L,
2
1
/
" × 13"L,
4
1
/
KL
2
1
8
/
" × 11"
K
2
1
8
/
" × 14"L, 14-34lb sheets*2
2
1
8
/
" × 11"KL,
2
1
8" × 10
/
"L,
2
8" × 10"L,
8" × 13"L,
10" × 14"L,
11" × 15"L,
1
/
" × 8
2
1
/
"
K
2
5
, B5KL, 52-128g/m2550
" × 11"KL,
Paper Paper
weight capacity
52-128g/m21550+1550
14-34lb sheets
14-34lb sheets
*1: The paper tray fence is fixed. If you wish to change the size of paper set in this tray, please
contact your service representative.
*2: This number assumes that 100 sheets makes 10-mm height, and represents a reference.
14
Page 29
COPY PAPER
Metric version Inch version
Bypass Bond paper A3L, B4L, A4KL, B5
tray A5KL, B6KL, A6
Thick paper 11" × 17"L, 8
1
8
/
" × 13"L, 8
2
1
8" × 10
/
"KL, 8" × 10"KL,
2
8" × 13"L, 8
10" × 14"L, 11" × 15"L,
1
5
/
" × 8
2
Translucent
paper
OHP transparencies
Post cards 1 sheet
adhesive labels 1 sheet
*2: Make sure that any upper limit value is not exceeded when setting copy paper. The number of sheets
you can set will vary depending on the paper type and condition.
A3L, A4KL, A5
A4L
1
1
/
"KL *2
2
L
1
/
" × 14"L, 105-200g/m2--
2
1
/
" × 11"KL, 28-53lb
2
/
" × 13"L,
4
KL
, 52-157g/m250 sheets
KL
Paper Paper
weight capacity
14-42lb
10 sheets
20 sheets
Important
❏ If you use damp or curled paper, a misfeed might occur. In such a case, try turning over the
paper stack in the paper tray. If there is no impro vement, change to copy pa per with less curl.
Note
❏ If you load paper of the same size and in the same orientation in two or more trays, the
machine automatically shifts to another tray when the tray in use runs out of paper. This
function is called Auto Tr ay Switch. (If you put recycled paper or special paper in paper trays
using the Select Special tray menu, this function is not available to these trays unless their
settings are identical.) This saves interrupting a copy run to replenish paper even when you
make a large number of copies. You can cancel this setting. ⇒ See page 98 “Paper Tray
Display in APS mode”, page 100 “Auto tray Switching”, and page 99 “Select Special tray”.
Reference
❏ If you want to add paper, see ⇒ P.75 “IF COPY PAPER RUNS OUT.”
❏ If you want to change a paper size, see ⇒ P.86 “CHANGING A PAPER SIZE.”
15
Page 30
BASICS
Non-recommended Paper
R
CAUTION:
• Do not reuse stapled paper. Do not use aluminum foil, carboncontaining paper, or other conductive paper. Otherwise, a fire
might occur.
Important
❏ Do not use paper with any kind of coating as follows. Otherwise, a fault might occur.
• Thermal fax paper
• Art paper
• Aluminum foil
• Carbon paper
• Conductive paper
• Color OHP transparencies
• Paper with perforated kines
• Hammed paper
❏ Do not use copy paper that has been already copied on. Otherwise, a fault might occur.
Note
❏ Do not use the following type of paper because a paper misfeed might occur.
• Bent, folded, or creased paper
• Torn paper
• Slippery paper
• Perforated paper
• Rough paper
• Thin paper that has low stiffness
• Paper with much paper dust on its surface
❏ If you make a copy on rough grain paper, the copy image might be blurred.
❏ Do not use paper which has been copied or printed on.
16
Page 31

COPY PAPER
Paper Storage
Note
❏ When storing paper, the following precautions should be followed:
• Do not store paper where it will be exposed to direct sunlight.
• Avoid storing paper in humid areas (humidity: 70% or less).
• Store on a flat surface.
❏ Once you take paper out of a package, store the remaining paper in a vinyl bag to prevent it
from being moistened.
17
Page 32

BASICS
TONER
Handling T oner
R
WARNING:
• Do not incinerate toner or toner containers. Toner dust might
ignite, when exposed to an open flames.Dispose of the used toner
containers according to local regulations for plastics..
R
CAUTION:
• Do not eat or swallow toner.
• Keep toner (used or unused) and toner containers out of reach
of children.
R
CAUTION:
• This machine has been tested for safety using this supplier’s
parts and consumables. We recommend you only use these
specified supplies.
Important
❏ If you use toner other than that recommended, a fault might occur.
Reference
❏ If you want to add toner, see ⇒ P.79 “IF TONER RUNS OUT.”
T oner Stora ge
Note
❏ When storing toner, the following precautions should always be followed:
• Store toner containers in a cool, dry place free from direct sunlight.
• Do not store toner where it will be exposed to heat.
• Do not eat or swallow toner, and keep it out of reach of children.
• Store on a flat surface.
Used T oner
Note
❏ Used toner cannot be re-used.
18
Page 33

BASIC PR OCEDURE
2. COPYING
1 Make sure that the message “Ready” is
present on the panel display.
2 When the machine is set for user code,
enter the user code (8 digits maximum)
with the {Number} keys and then press
the {#} key.
The machine gets ready for copy processing.
Reference
❏ See ⇒ P.100 “Set User Code(s).”
3 Make sure that there are no pr evious set-
tings remaining.
Note
❏ To clear settings, press the {Clear Modes/
Energy Save r} key and re-enter.
4 Set your originals.
Reference
❏ See ⇒ P. 21 “SETTING ORIGINALS.”
5 Set your desired settings.
Reference
❏ See the individual functional descriptions.
6 Enter the number of copies required
with the {Number} keys.
Note
❏ The maximum copy quantity can be set be-
tween 1 and 999.
❏ Y ou can change the maximum copy quan-
tity. See ⇒ P.101 “Maximum copy input
number.”
❏ To change the number entered, press the
{Clear/Stop} key and re-enter.
7 Press the {Start} key.
The machine starts copying.
Note
❏ To stop copying, press the {Clear/Stop}
key.
❏ To return the machine to the initial condi-
tion after copying, press the {Clear Modes/
Energy Saver} key.
❏ You can suppress the generation of beep
which would otherwise be heard whenever
you press a key . See ⇒ P .96 “Panel beeper . ”
❏ You can mak e the beeper sound short beeps
when a copy job has been completed. See
⇒ P.96 “Job End Call.”
❏ You can have animations to be displayed
when you press the main switch or during
copy processing. See ⇒ P .96 “T ouch Panel
in W aiting Mode.”
19
Page 34

COPYING
Auto Start
You can make copy settings and press the
{Start} key when the message “Please Wait”
is on (The {Start} key flashes in red and green
alternately). This function is called “Auto
Start.”
Note
❏ The machine gets ready for copying ap-
proximately in 5 minutes after power is
turned on.
Auto Reset
The machine returns to its initial condition
automatically after your job is finished, after
a certain period of time. This function is called
“Auto Reset.”
Note
❏ You can change the Auto Reset time. See
⇒ P.97 “Auto reset.”
❏ The machine might not reset itself auto-
matically in the following cases:
• Originals are left uncopied.
• The machine senses the presence of a
human body.
Low P ower Timer
The machine enters the energy saver mode
when you take no action for a certain period
after your job is finished. This function is
called “Low Power T imer.”
Note
❏ You can set the time after which the en-
ergy saver mode is entered. See ⇒ P.97
“Low Power Timer.”
❏ The machine exits the energy saver mode
and gets ready for copy processing when a
human moves on before the front of the
machine (Auto Response Sensor).
Auto Off
The machine turns itself off automatically after your job is finished, after a certain period
of time. This function is called “Auto off.”
Note
❏ Y ou can set the Auto off time. See ⇒ P.97
“Auto off.”
Screen Saver
The machine automatically clears the panel
display after your job is finished, after a certain period of time. This function is called
“Screen Saver.”
Note
❏ You can change the Screen Sa ver time. See
⇒ P.96 “Screen Saver.”
20
Page 35

SETTING ORIGINALS
SETTING ORIGINALS
Limitation
❏ Set the original after correction fluid and
ink have completely dried. Not taking this
precaution could mark the exposure glass
and cause marks to be copied.
❏ The maximum load that the (optional)
original tray can carry is 4 kg (8.8lb). Set
the originals gently.
Note
❏ Basically the originals should be aligned
to the rear left corner. Ho wever , some copy
functions may produce different results
depending on the orientation of the originals. For details, see the individual functional descriptions.
Note
❏ See ⇒ P.11 “ORIGINALS.”
Setting Originals On The
Exposure Glass
1
Lift the platen cover or the document
feeder.
Note
❏ Be sure to open the platen cover or the
document feeder by more than 30°, otherwise the original size might not be detected
correctly.
2 Set the original face down on the expo-
sure glass. The original should be
aligned to the rear left corner.
A : Reference mark
B : Scale
3 Lower the platen cover or the document
feeder .
Note
❏ Be sure to close the platen cover or the
document feeder when setting the original
on the exposure glass. The machine might
fail to sense the correct original size if your
hand, arm, or sleeve is placed on the exposure glass.
21
Page 36

COPYING
Setting Originals In the
Document Feeder
Note
❏ The last page should be on the bottom.
❏ If there are more originals than that can be
set at a time, divide the originals into several blocks and set the blocks sequentially
starting at the last block.
❏ Do not stack originals beyond the limit
mark on the side fence of the document
feeder.
❏ When copying thin originals (41 - 52 g/
2
m
, 11-14lb), set one original at a time in
the document feeder or exposure glass. See
⇒ P.25 “Thin Paper.”
❏ The original might become dirty if it is writ-
ten with a pencil or similar tools.
Reference
Regarding originals that the document feeder
can handle, see ⇒ P.11 “ORIGINALS.”
Setting a stack of originals in the
document feeder
Note
❏ To avoid a multi-sheet feed, shuffle the
originals before setting them in the document feeder.
Setting One Original At A Time
(SADF)mode
1 Set one original and press the {Start}
key.
2 Set the next original while the Feed in-
dicator is lit.
The second and subsequent originals can
be fed automatically without pressing the
{Start} key.
1 Adjust the guide to the original size.
2 Set the aligned originals face up into the
document feeder.
22
Note
❏ Y ou can adjust the time the machine waits
before being ready for the next original.
See ⇒ P.97 “SADF Auto reset.”
Page 37

SETTING ORIGINALS
Special Originals
You must select the Mixed Sizes, Pasted Original, and Thin Paper function when setting
originals of different sizes, pasted originals,
and originals made up of thin paper, respectively. You can also lower the volume of the
noise that the document feeder generates during paper feed by selecting the Quiet Feed
function at the same time.
Note
❏You can define the function that is selected
by default when you select the Special
Original function. See ⇒ P.102 “Special
original mode priority setting.”
Mixed Sizes
The machine automatically reads the size of
the originals of different sizes you set in the
document feeder .
Limitation
❏You can use the following sizes:
Metric version:A3
Inch version:
❏The machine may fail to copy parts of im-
age if you set originals of different sizes in
the document feeder without selecting the
Mixed Sized function.
❏The weight of originals that can be set with
this function is 52 to 80 g/m
❏For smaller originals, the copy image might
be slanted since the originals might not be
correctly aligned with the original guide.
❏You cannot select both the Mixed Sizes and
Pasted Original functions at the same time.
❏You cannot select the following function
once you selected the Mixed Sized function:
•Combine
•Cover/Slip sheet
•Preset
11"×17"L, 8
8
, B4L,
L
A4KL, B5KL,
1
/
2
"×14"
1
/
" × 11"KL,
2
L
2
(14-21lb).
1Press the [Special Original] key.
2Press the [Mixed Sizes] key.
3Press the [OK] key.
The function you selected appears below
the [Special Original] key.
23
Page 38

COPYING
4 Align the left and rear edges the origi-
nals in the document feeder.
Important
❏ If the originals are of different vertical sizes,
put the lower originals on the Backward.
5 Adjust the guide to the widest original
size.
6 Set the aligned originals face up into the
document feeder and press the {Start}
key.
Pasted Original
Important
❏ Make sure that the originals are pasted se-
curely. Improperly pasted originals may
result in peeloff or feed failures.
Limitation
❏ Set one original at a time, then press the
{Start} key. If you set two or more originals at a time, they will be fed at once.
❏ You cannot select both the Mix ed Sizes and
Pasted Original functions at the same time.
❏ You cannot select the following functions
once you selected the Pasted Original function:
• 2-Sided→ 2-Sided
• 2-Sided→1-Sided
• Combine
•Cover
• Slip sheet
• Preset
1 Press the [Special Original] key.
2 Press the [Pasted Original] key.
3 Press the [OK] key. The function you
selected appears below the [Special
Original] key.
4 Set your originals in the document feeder
and press the {Start} key.
24
Page 39

SETTING ORIGINALS
Thin Paper
Important
❏ Set to Thin Paper function when you place
thin paper into the document feeder; otherwise your originals may be damaged.
1 Press the [Special Original] key.
2 Press the [Thin Paper] key.
Quiet Feed
Selecting the Quiet Feed function allows you
to lower the volume of the noise that the
document feeder generates during paper feed.
Limitation
❏ The rate at which originals are fed is made
lower than normal when the Quiet Feed
function is selected.
1 Press the [Special Original] key.
2 Press the [Quiet Feed] key.
3 Press the [OK] key. The function you
selected appears below the [Special
Original] key.
4 Set your originals in the document feeder
and press the {Start} key.
3 Press the [OK] key. The function you
selected appears below the [Special
Original] key.
4 Set your originals in the document feeder
and press the {Start} key.
25
Page 40

COPYING
BASIC FUNCTIONS
The basic functions include the following:
◆ Adjusting Copy Image Density
Adjusts the copy image density.
◆ Selecting Copy Paper
Selects the paper to be copied.
◆ Auto Reduce/Enlarge
Automatically reduces or enlarges the originals to be copied according to the specified original size.
◆ Sort/Stack/Staple (requires the sorter
stapler.)
Sorts, stacks, and staples the copied sheets.
◆ Punch (requires the sorter stapler with
the punch.)
Punches holes in the copied sheets.
Adjusting Copy Image Density
You can adjust the copy image density to
match your originals. There are three types
in this function.
◆◆
◆ Auto Image Density
◆◆
The machine reads the density of the original and adjusts sets up an appropriate image density. It copies originals with a dense
background, such as newspaper or regenerated paper, so that the background does
not show itself.
◆◆
◆ Manual Image Density
◆◆
Adjusts the overall density of the originals
in 9 levels.
◆◆
◆ Half T one
◆◆
Select Half Tone when copying photographs.
Note
❏ Adjust the density manually in the Manual
Image Density mode. You can set the density level lower/higher with Image Density
Level if the density is higher/lower throughout the original. See ⇒ P .100 “Image Density Level”
26
Page 41

BASIC FUNCTIONS
1 Select one of the image density modes.
Auto Image Density
A Make sure that the Auto Image Density
indicator is lit.
Note
❏ If not, press the [Auto Image Density] key.
Manual Image Density
A Press the [Auto Image Density] key to
cancel it if the A uto Image Density mode
is on.
B Press the image density keys to adjust
the image density. The density marker
[] moves.
Half T one
A Press the [Half Tone] key.
B Press the image density keys according
to the density of the original.
2 Set your original and press the {Start}
key.
2 Set your original and press the {Start}
key.
27
Page 42

COPYING
Selecting Copy Paper
There are two ways to select copy paper:
◆ Auto Paper Select
The machine selects a suitable size of copy
paper automatically based on the original
size and the reproduction ratio.
◆ Manual Paper Select
You can select either Paper Tray, Bypass
Tray, or Large Capacity Tray (LCT).
Reference
❏ See ⇒ P .36 “COPYING FR OM THE BY-
P ASS TRAY.”
❏ See ⇒ P .13 “Sizes detectable by the Auto
Paper select. ”
Note
❏ The machine does not automatically select
paper in a tray or the bypass tray for which
you selected Cover, Paper Designate,
Translucent, or Special Paper in Select special tray. See ⇒ P .99 “Select Special tray . ”
❏ For some originals, the original size might
not be detected correctly. See ⇒ P.12
“Sizes Difficult to Detect”
❏ Be sure to close the platen cover or the
document feeder when setting original on
the exposure glass. The machine might fail
to sense the correct original size if your
hand, arm, or sleeve is placed on the exposure glass.
❏ You can specify from the initial display
whether Auto Paper Select is to be given
higher priority. See ⇒ P.98 “Auto Paper
Select Priority.”
❏ You can select w hether the Paper T ray key
is to be displayed when Auto P aper Select
is selected. See ⇒ P.98 “Paper Tray Display in APS mode.”
❏ You can define the tray that is to be se-
lected by default when you turn on the display of the Paper Tray key or select Auto
Paper Select. See ⇒ P.100 “Paper Tray
Priority.”
❏ You can set up an option so that Auto Pa-
per Select is selected by default when originals are set in the document feeder. See ⇒
28
P.98 “Auto Paper Select.”
Copying in the Auto Paper Select mode
A Make sure that Auto Paper Select indi-
cator is lit.
Note
❏ If not, press the [Auto Paper Select] key.
Selecting the paper type
A Select the paper type from Paper Tr ay,
Bypass Tray, or Large Capacity Tray
(LCT).
2 Set your original and press the {Start}
key.
Page 43

BASIC FUNCTIONS
Auto Reduce/Enlarge
The machine can choose an appropriate reproduction ratio based on the paper and original sizes you selected.
Limitation
❏ You cannot select the bypass tray mode.
Note
❏ When you use Auto Reduce/Enlarge, refer
to “Sizes detectable by the Auto P aper select.” for possible or iginal sizes and directions. ⇒ P .13 “Sizes detectable by the Auto
Paper select. ”:
❏ The reproduction ratios that the machine
will select are 50 to 200%.
❏ For some originals, the original size might
not be detected correctly. See ⇒ P.12
“Sizes Difficult to Detect.”
❏ You can set originals of different sizes in
the document feeder at a time. See ⇒
P.23 “Mixed Sizes.”
1 Press the [Auto Reduce/Enlarge] key.
2 Select the paper tray.
3 Set your original and press the {Start}
key.
29
Page 44

COPYING
SORT/STACK/STAPLE
The optional sorter stapler is required to perform sort, stack, and staple functions.
◆ Sort
The machine sorts the copied sheets in page
order for each copy.
◆ Stack
The machine stacks the copied sheets arranged by page.
◆ Staple
The machine staples each copy of sheets.
There are two staple modes: the auto staple
mode in which each copy is stapled automatically at the end of copy processing and
the manual staple mode in which sheets are
stapled on each press of a key .
In the Sorter Stapler console type, the copied sheets can be stapled at the following
four locations:
•Top
• Bottom
• Top Slant
• 2 Staples
Another Sorter Stapler hanging-on type has
one staple positions.
Limitation
❏ You cannot use the bypass tray mode.
❏ You cannot select both the stack and staple
modes at the same time.
❏ Do not use translucent paper, adhesive la-
bels, post cards, OHP transparencies.
Sort
This function sorts the copied sheets in page
order for each copy.
Note
• For sorting, the following limitations apply:
Paper size
Console type & Hanging-on type
Metric version: A3L, ~ A5
Inch version: 11" × 17"L~ 5
1
8
/
" × 11"
2
Paper weight
Console type & Hanging-on type
Metric version: 52 - 157g/m
Inch version: 14 - 42lb
Paper capacity
Console type: Simplex: 50 sheets/bin, Du-
plex: 40 sheets/bin(80g/m
Hanging-on type: A4
smaller: 30 sheets/bin larger: 25 sheets/
bin
❏ You can set an option so that Sort is se-
lected by default when two or more originals are set in the document feeder and enter
the number of more than 2 copies. See ⇒
P.102 “Auto Sort.”
K
K
(8
KL
1
/
" × 8
2
2
2
, 20lb)
1
/
" × 11"K) or
2
1
/
"L,
2
30
Page 45

1 Press the [Sort] key.
2 Enter the number of copies with the
{Number} keys.
Limitation
❏ The maximum number of copies you can
set is 999.
❏ Y ou can set a maximum number of 20 cop-
ies when setting originals on the exposure
glass, when setting, one original at a time
on the document feeder (SADF), or when
you selected Pasted Original.
3 Set your originals and press the {Start }
key.
Limitation
❏ The number of sheets that can be stored in
a bin is 50 sheets in the S/S console type or
20 sheets in the S/S hanging-on type.
Note
❏ When the number of copies is set to 21 or
greater, the machine sorts for up to 20 copies and displays a prompting message on
the display panel. Take out the copies according to the message, reset the originals,
and press the {Start} key.
❏ When the number of copied sheets in a bin
exceeds 50 sheets in the S/S console type
or 20 sheets in the S/S hanging-on type,
the machine displays a prompting message
on the display panel. Take out the copied
sheets according to the message and press
the {Start} key.
SORT/STACK/STAPLE
31
Page 46

COPYING
Stack
This function stacks the copied sheets arranged
by page.
Note
❏ For stacking, the following limitations ap-
ply:
Paper size
Console type & Hanging-on type
Metric version: A3
Inch version: 11" × 17"L~ 5
Paper weight
Console type & Hanging-on type
Metric version: 52 - 157g/m
Inch version: 14 - 42lb
Paper capacity
Console type: Simplex: 50 sheets/bin, Du-
plex: 40 sheets/bin(80g/m
Hanging-on type: A4
smaller: 25 sheets/bin larger: 20 sheets/
bin
8
1
/
2
, ~ A5
L
" × 11"
K
KL
1
/
2
K
2
2
, 20lb)
1
(8
/
" × 11"K)or
2
" × 8
1
/
"L,
2
2 Enter the number of copies per original
with the {Number} keys.
3 Set your originals and press the {Start}
key.
Note
❏ Once the number of copied sheets in a bin
exceeds 50 sheets in the S/S console type
or 20/25 sheets in the S/S hanging-on type,
the subsequent copied sheets are stacked
in the next bin.
❏ When the number of stacked bins exceeds
20, take out the copied sheets according to
the messages displayed on the display
panel.
1 Press the [Stack] key.
32
Page 47

Staple
This function staples each copy of sheets.
There are two staple modes: the auto staple
mode in which each copy is stapled automatically at the end of copy processing and the
manual staple mode in which sheets are stapled
on each press of a key.
Limitation
❏ For stacking, the following limitations ap-
ply:
Paper size
Console type & Hanging-on type
Metric version: A3
Inch version: 11" × 17"L~ 8
❏ The number of originals that can be stapled
is 2 to 50 sheets in S/S console type or 2 to
20 sheets in S/S hanging-on type. The auto
staple mode is disabled when the upper
limit value is exceeded.
❏ Set the originals in the document feeder.
When setting originals on the exposure
glass or copying in Special Original function (Pasted Original) or SADF mode, do
not specify the staple function before starting copy processing but select the manual
staple mode later.
Note
❏ The Sort function is automatically selected
when you select the Staple function.
❏ You can selected one of tw o stapling posi-
tions by changing the position of the stapler in the Sorter Stapler hanging-on type.
See ⇒ P.89
L
, ~ B5
KL
1
/
" × 11"
2
K
SORT/STACK/STAPLE
❏ You can change the 2 staples mode to 3
staples mode on the Sorter Stapler Console type . See ⇒ P.102 “Staple Selection”
Reference
❏ If you want to add stapes, see ⇒ P.88 “IF
STAPLES RUN OUT.”
❏ If a staple is jammed, see ⇒ P.90 “IF A
STAPLE IS JAMMED.”
Original Orientations and Stapling Positions on Console type
Note
❏ You cannot change the stapling position
during copy processing.
33
Page 48

COPYING
Auto Staple
1 Select either the stapling position from
[Top], [Bottom], [Top Slant], and [2
Staples] if your machine is equipped
with the Sorter Stapler Console type.
Press the [Staple] key if your machine is
equipped with the S/S hanging-on type.
2 Enter the number of copies with the
{Number} keys.
3 Set the originals and press the {Start}
key.
Manual Staple
You specify the staple function after sorting
the originals.
1 Press the [Sort] key.
2 Enter the number of copies with the
{Number} keys.
3 Set the originals and press the {Start}
key.
The machine starts copying.
4 After sorting is completed, select the sta-
pling position from [T op], [Bottom], [T op
Slant], and [2 Staples] if your machine
is equipped with the Sorter Stapler Console type.
The copied sheets are stapled together. Or
press the [Staple] key with the S/S hanging-on type.
34
Note
❏ If the maximum number of copies that can
be stapled is exceeded, the copied sheets
delivered to the bins but you can no longer
select the manual staple mode.
Page 49

PUNCH
PUNCHING
This function makes punch holes in copied
sheets when your machine is equipped with
the sorter stapler with punch (console type).
Original orientations and punch
hole positions
Limitation
❏ For punching, the following limitations ap-
ply:
Paper size
Metric version: A3
Inch version: 11" × 17"L~ 51/2" × 81/2"L,
Paper weight
Metric version: 52 - 128g/m
Inch version: 14 - 28 lb
Paper capacity
Simplex: 40 sheets/bin
Duplex: 30 sheets/bin(80g/m
, ~ A5
L
81/2" × 11"
K
KL
2
2
, 20lb)
❏ You cannot use Staple mode and Punch
mode together for B5 (8" × 10")L.
❏ Since each copied sheet is punched, the
punching position may vary slightly from
copy to copy.
Reference
❏ If the punch waste box is full, see ⇒ P.92
“IF THE TRASH BOX IS FILLED WITH
PUNCHED PAPER PIECES.”
1 Press the [Punch] key.
Note
❏ When stapling, you must also select the sta-
pling position. See ⇒ P.33 “Staple.”
2 Set your originals and press the {Start}
key.
Note
❏ After copying is completed, press the
{Clear Modes/Energy Saver} key to exit
Punch function.
35
Page 50

COPYING
COPYING FROM THE BYP ASS TRA Y
Use the bypass tray to copy onto OHP transparencies, adhesive labels, translucent
paper, post cards, and copy paper that cannot
be set in the paper tray.
Note
❏ For details about the size, maximum sheet
count, and orientation of the paper that can
be set in the bypass tray, see ⇒ P .21 “Copy
Paper . ”
❏ The number of sheets that can be set in the
bypass tray varies with the type of paper.
Make sure that the maximum sheet count
is not exceeded. See ⇒ P.21 “Copy Paper.”
❏ You cannot select the following functions
for the bypass tray:
• Auto Paper Select
• Auto Reduce/Enlarge
• Sort/Stack/Staple
• Punch
• Duplex/Combine/Series Copies
• Erase Border, Erase Center/Border
• Centering
• Margin Adjustment
1 Open the bypass tray.
[Bypass Tray] is selected.
PG6A1101
2 Adjust the guides to copy paper size.
Important
❏ If the guides are not flush with the copy
paper, a skew image or paper misfeeds
might occur.
36
3 Lightly insert the copy paper face up.
The indicator on the display is automatically illuminated.
Page 51

COPYING FROM THE BYPASS TRAY
Note
❏ Do not stack paper over the limit mark; oth-
erwise a skew image or paper misfeeds
might occur.
❏ Draw out the paper support plate when set-
ting paper of a size not smaller than A 4
(81/2" × 11"L).
❏ To avoid a multi-sheet feed, shuffle the
originals before setting them.
❏ Take out any curls or cor rect any warpage
of the paper before setting.
L
3 Set your originals and press the {Start }
key.
When copying onto Thick P aper
Use the Cardboard mode when copying on
paper sizes of 105 - 200 g/m
A Press the [Bypass Tray] key.
[Thick Paper] appears in[Bypass Tray].
Important
❏ Copy post cards in the normal bypass copy
mode (you need not use the Thick Paper
mode).
Note
❏ The copy image is copied on the top face
of the paper.
❏ You cannot select following functions for
the Thick Paper mode:
• Interrupt
• Slip Sheet
• Sample Copy
❏ You can select the Thick Paper mode and
Staple together when you select the Bypass tray for the Cover.
❏ When bypass tray mode copying is com-
pleted, remove the paper out of the bypass
tray and store it in a vinyl bag.
2
(28 - 53 lb).
37
Page 52

COPYING
PROGRAM
You can store frequently used copy job settings in machine memory and recall them for
future use.
The following program functions are available:
◆◆
◆
Store Program
◆◆
Adds a job you want to run repeatedly and
delete the program.
◆◆
◆Recall Program
◆◆
Invokes a stored program.
Limitation
❏ You cannot run neither Store Program nor
Recall Program functions in the Interrupt
mode.
Note
❏This copier is already set the Duplex mode
[1 Sided → 2 Sided] to the “Program 10”
at the factory.
❏ You can store a maximum of 10 programs.
❏ You can add the following functions as pro-
grams:
•Special Original
•Auto Image Density/Manual Image
Density/Half Tone
•Auto Paper Select
•Paper Tray/Bypass Tray
•Sort/Stack/Staple
•Punch
•Preset Reduce/Enlarge/Auto Reduce/Enlarge/Create Margin/Zoom
•Duplex/Series Copies/Combine
•Save/Delete Area/Erase Border/Erase
Center/Border
•Centering/Margin Adjustment
•Cover/Slip Sheet
•Copy Quantity
❏Programs are not cleared by turning the
power off or by pressing the {Clear Modes/
Energy Saver} key. They are canceled only
when you delete or store the other program.
Storing a Program
Use this function to add a program you want
to use repeatedly.
1Edit the copy settings.
2Press the {Program} key.
The Program indicator appears.
3Press the [Store program] key.
4Press the number of the program you
want to store.
appears when the storage of the pro-
gram is completed.
Note
❏Program numbers for which the in-
dicator is illuminated are already assigned
a program.
38
Page 53

PROGRAM
Delete the program
1 Identify and verify the stored prog ram.
Note
❏ To examine a stored program, call that pro-
gram. See ⇒ P.39 “Recalling a Program.”
2 Press the [Store Program] key.
3 Press the number of the program you
want to delete.
4 Press [Yes] , when you want to delete.
Important
❏ The deleted program cannot revival.
Recalling a Program
This function invokes a stored program.
1 Press the {Program} key.
The Program indicator appears.
2 Press the number of the program you
want to recall.
The contents of the stored program appear.
Note
❏ Programs Nos. for which the indica-
tor is not illuminated are assigned no program.
3 Set your originals and press the {Start}
key.
Note
❏ A message may be displayed when you re-
call a program if you changed the paper
size of the stored paper tray after storing
that program.
❏ When you store a program “Create Mar-
gin,” the magnification that is set through
Create Margin setting is recalled. See ⇒
P.98 “Create Margin setting.”
39
Page 54

COPYING
O THER FUNCTIONS
Energy Saver Mode
If you do not operate the machine for a certain
period after copying, or when you press and
hold the {Clear Modes/Energy Save r} key for
more than one second, the display disappears
and the machine enters Energy Saver mode.
When you press the {Clear Modes/Energy
Saver} key again, the machine returns to the
ready condition immediately or in about 30
min. on type 1. In Energy Save mode, the
machine uses less electricity.
Note
❏ If you press the {Clear Modes/Energy
Saver} key during the operation, the current settings will be cleared.
Reference
See ⇒ P. 97 “Low Power Timer.”
Interrupt
You can make urgently needed copies during
a multi-copy run.
Note
❏ Y ou can specify the following functions af-
ter pressing the [Interrupt] key:
• Special Original
• Auto Image Density/Manual Image
Density/Half T one
• Paper Tray/Bypass Tray
• Preset Reduce/Enlarge/Auto Reduce/Enlarge/Create Margin/Zoom
• Series Copies
• Save/Delete Area/Erase Border/Erase
Center/Border
• Centering/Margin Adjustment
• Copy Quantity
1 Press the {Interrupt} key.
The key indicator lights.
2 Remove the originals currently set for
copying, and set your originals for interrupt coping. Make your copies.
3 After interrupt copying, remove the
originals for interrupt copying and the
copies.
40
4 Press the {Interrupt} key again.
The key indicator goes off.
5 Reset the previous originals. Then, pr ess
the {Start} key.
Page 55

OTHER FUNCTIONS
User Codes
The administrator of this machine can take the
following actions once he or she set user
codes:
Examples:
• Administrators the machine so that it is
available only to specific users.
• Controls the copy quantity for each user
code (500 types maximum). (The administrator can keep track of the change
in the copies consumed on a weekly or
monthly basis by resetting the copy
counter to 0.)
Note
❏ When the machine is set for user codes,
the machine will prompt you for your user
code after the operation switch is on or the
Auto Reset comes into effect.
❏ The machine will prompt you for your user
code if you take no action for a predefined
period of time after entering a user code or
completing copy processing. You can set
this period. See ⇒ P .97 “User Code Mode
Set. ”
❏ To force into the user code entry mode,
press the {Clear/Stop} key while holding
down the {Clear Modes/Energy Saver}
key.
Reference
For setting user codes, see ⇒ P . 100 “Set User
Code(s).”
Original Beeper
Preset
Y ou can def ine the contents of a copy job during a copy operation. The execution of the
defined copy job automatically starts when the
current copy operation is completed.
Limitation
❏ You cannot define the functions listed be-
low in a Preset or you cannot use the interrupt function once a job is defined.
• Automatic counting based on the document feeder in Slip Sheet/2-Sided
• Mixed Sizes and Pasted Original of the
Special Original function
1 Press the [Preset] key while “Ready” and
“Y ou can pr eset a job with [Preset]” are
being displayed.
Note
❏ A message will be displayed if a Preset-
ting Copy Job is already defined at this moment. Press the [Change] key to change
the definition or the [Reset Preset Copy] to
cancel the Presetting Copy Job.
The beeper sounds and an error message is
displayed when you leave your originals on
the exposure glass for about two seconds after
copying.
41
Page 56

COPYING
2 Define the contents of a Presetting Copy
Job.
Note
❏ Press the [Cancel] key to cancel the con-
tents of the Presetting Copy Job being edited.
3 Set your originals in the document feeder
and press the [OK] key.
Processing of the Presetting Copy Job automatically starts after the current copy processing is completed.
Sample Copy
You can make a test copy and check the finishing before or during a copy session to
verify the density, reproduction ratio, margin
adjustment, save/delete area, and centering status.
Note
❏ A copy sheet is generated during a test
copy according to the current settings, regardless of the current number of copies
setting.
1 Select the functions you want to use and
enter the number of copies.
2 Set your originals.
Note
❏ Press the {Clear/Stop} key to make a test
copy in the middle of a copy session.
3 Press the {Sample Copy} key.
The machine copies and generates one
sheet.
Note
❏ Press the {#} key to suppress the genera-
tion of the copy.
4 After examining the finishing, press the
{Start} key if the test copy proves normal.
Note
❏ To change a setting after examining the f in-
ishing, select and reset the corresponding
function.
❏ 2-Sided is selected, the machine performs
a 2-sided copy for the original that is set in
the document feeder or on the exposure
glass and generates a sheet with both sides
copied.
❏ Sort or Stack functions cannot select the
Sample Copy together when your copier
is equipped with the S/S hanging-on type.
❏ The Thick Paper mode cannot select the
Sample Copy together when your copier
is equipped with the S/S console type.
❏ The Sample Copy cannot select when the
Duplex mode is interrupted.
42
Page 57

REDUCE/ENLARGE
REDUCE/ENLARGE
You can select a preset ratio for copying.
Note
❏ You can select one of 9 preset ratios (4 en-
largement ratios and 5 reduction ratios).
❏ For the Reduce/Enlarge function, you can
select the options to show or hide the Preset Reduce/Enlarge key and to specify
which of the preset reduce/enlarge ratios is
to be shown, [Enlarge] or [Reduce]. See
⇒ P.98 “Preset R/E key display.”
❏ You can change the preset reduce/enlarge
ratio within the range of 50 to 200%. You
can also change the default preset reduce/
enlarge ratio. See ⇒ P.98 “Reproduction
ratio priority setting.”
❏ You can select a ratio re gardless of the size
of an original or copy paper. With some
ratios, parts of the image might not be copied or margins will appear on copies.
❏ Copies can be reduced or enlarged as fol-
lows:
Metric version
Ratio (%)
200 (enlarge area by 4)
141 (enlarge area by 2)
122
115
82
75
71 (reduce area by
1
/
2
65
50 (reduce area by
1
/
4
)
)
→→
Original
→Copy paper size
→→
A5 → A3
A4 → A3, A5→ A4
F → A3, A4 → B4
B4 → A3
F → A4, B4 → A4
B4 → F4, B4→ F
A3 → A4, A4 →A5
A3 → F
A3 → A5, F → A5
Inch version
Ratio(%)
200 (enlarge area by 4)
155 (enlarge area by 2) 5
129 8
121 8
85 F4 → 8
77 8
74 11" × 15" → 8
65 11" × 17" → 8
50 (reduce area by
1
/
)
4
→→
Original
→Copy paper size
→→
1
1
5
/
" × 8
/
" → 11" × 17"
2
2
1
1
/
" × 8
/
" → 8
2
2
1
/
" × 11" → 11" × 17"
2
1
/
" × 14" → 11" × 17"
2
1
/
" × 11"
2
1
/
" × 14" → 8
2
11" × 17" → 5
1
1
/
1
/
2
1
/
2
1
/
2
/
" × 14"
2
" × 11"
2
" × 11"
" × 11"
1
" × 8
/
2
1 Press the [Reduce] or [Enlarge] key.
2 Select a magnification ratio.
3 Set your originals and press the {Start}
key
"
43
Page 58

COPYING
Create Margin
“Create Margin” produce a reduced copy with
a magnification ratio of 93%.
Note
❏ When you select “Create Margin,” the ma-
chine applies 93% reduction to the 100%,
reduce/enlarge, zoom, length-specified reduce/enlarge, and auto reduce/enlarge ratios.
❏ You can change the magnif ication ratio for
“Create Margin” See ⇒ P .98 “Cre ate Margin setting.”
1 Press the [Create Margin] key.
2 When not combining ratios such as Re-
duce/Enlarge, set your originals and
press the {Start} key .
44
Page 59

ZOOM
You can change the reproduction ratio in 1%
steps.
Note
❏ You can specify the reproduction ratio
within the range of 50 to 200%.
❏ You can select a ration regardless of the
size of an original or copy parameter . W ith
some ratios, parts of the image might not
be copied or margins will appear on copies.
❏ You can select a preset ratio which is near
the desired ratio, then press the [Zoom] key
and adjust the ratio with the [+] or [-] key .
1 Press the [Reduce/Enlarge] key.
ZOOM
When using the [+] or [-] key
A Select the desired reproduction ratio
with [Reduce/Enlarge] and other keys.
B Adjust the reproduction ratio using the
[+] or [-] key.
Note
❏ Each press of the [+] and [-] keys incre-
ments and decrements the ratio by 1%, respectively .
❏ Use the [+] and [-] keys to correct any set-
ting.
When using the {Number} keys
A Press the {Number} Keys.
2 Press the [Zoom] key.
B Enter the desired ratio with the {Num-
ber} keys.
Note
❏ If you make a mistake, Press the [Clear]
key and reenter the correct value.
C Press the {#} key.
3 Set your originals and press the {Start}
key.
45
Page 60

COPYING
SIZE MAGNIFICATION
You can reduce or enlarge the originals by
computing the magnification ratio from the
lengths of both the original and copy paper.
Preparation
❏ Measure and specify the lengths A and a
of both original and copy as shown in the
above figure.
Note
❏ You can select the magnification ratio
within the range of 50 to 200%.
❏ If the computed ratio is smaller than the
minimum ratio or greater than the maximum ratio, it is calibrated to the maximum
and minimum ratios, respectively. With
some ratios, parts of the image might not
be copied or margins will appear on copies.
1 Press the [Reduce/Enlarge] key.
2 Press the [Size Mag.] key.
3 Enter the length of the original using the
{Number} keys, then press the {#} key.
Note
❏ Note You can enter a length value from 1
to 999 mm (in 1 mm increments),or from
0.1 to 99.9"(in 0.1" increments).
❏ If you make a mistake, press the {Clear/
Stop} key or press the [Clear] key, and reenter the correct value.
4 Enter the length of the copy using the
{Number} keys, then press the {#} key.
Note
❏ If you make a mistake, press the {Clear/
Stop} key or press the [Clear] key, and reenter the correct value.
❏ To change the length after pressing the {#}
key , select [Original][Copy], the reenter the
correct value.
46
5 Set your originals, then start the {Start}
key.
Page 61

DUPLEX
This function copies originals on both sides
of paper.
You can run the Duplex function in the following two modes:
◆ 1 Sided
◆ 2 Sided
Limitation
❏ You cannot use the following copy paper
❏ You cannot use the bypass tray.
Note
❏ You can copy on both sides of paper with
❏ Y ou can specify whether 1 Sided→2 Sided
❏ Pressing [Duplex/Series Copies] once
1 Sided
This mode makes two-sided copies from onesided originals.
→→
→2 Sided
→→
This mode makes two-sided copies from
one-sided originals.
→→
→2 Sided
→→
This mode makes two-sided copies from
two-sided originals.
in this function:
• Paper smaller than A5
both sides of A5 paper), or 5
" in inch version(you can copy both
2
sides of 5
• Translucent paper
• Adhesive labels
• OHP transparencies
• Post cards
sizes of 64 - 104 g/m
or 2 Sided→2 Sided is to be selected by
default when you select Duplex. See ⇒
P.99 “Duplex mode priority setting.”
when 1-Sided→2-Sided is selected turns
on 1 Sided→1 Sided.
1
/
" × 8
2
→→
→2 Sided
→→
(you can copy
K
1
/
"Kpaper)
2
2
(17 - 27 lb).
1
/
2
" × 8
Note
❏ Specify the odd or even number of origi-
nals when using the 1-Sided
mode. If you do not know the number of
1
/
originals, select [Autocount] and have the
document feeder count the number of originals.
❏ A right margin of 5 mm(0.2") is set on the
backside automatically. Y ou can change this
margin. See ⇒ P.99 “Margin Auto shift.”
❏ When Front Cover and Front/Back Covers
are selected, the front and back covers are
copied on one side of paper, respectively.
Orientations of originals and
copy results
Set portrait originals in theK(portrait) direction and landscape originals in
the
(landscape) direction. The up-down re-
L
lationship will be reversed on the front and
back pages of 2-sided paper if a portrait original is set in the landscape orientation or a landscape original is set in the portrait orientation.
Original orientation
KK
KL
LL
LK
Orientation Result
DUPLEX
→→
→2-Sided
→→
47
Page 62

COPYING
Note
❏ If there is no paper set in the same orienta-
tion in the paper tray as the original, change
the paper size (orientation) of the second
tray. See ⇒ P age 86 “CHANGING A P A PER SIZE.”
❏ Set A3 and B4(11" × 17" and 81/2" × 14")
portrait originals with the top side facing
left. In this case, set the even pages (pages
to be copied on the back side of paper) up
side down.
1 Press the [Duplex/Series Copies] key.
When the number of originals is
known
A Press [Even] or [Odd] key.
B Set your originals and press the {Start}
key.
Note
❏ Set the originals sequentially starting at the
last page when setting them on the exposure glass.
When the number of originals is
unknown
A Press [Autocount] key.
B Set your originals in the document feeder
and press the [Start Count] key.
The number of originals is shown when
counting is completed.
2 Make sure that 1 Sided
lected.
Note
❏ If 1 Sided→2 Sided is not selected, press
the [1 Sided→2 Sided] key.
→→
→2 Sided is se-
→→
48
C Press the [OK] key.
D Reset your originals in the document
feeder and press the {Start} key.
Note
❏ Set the originals sequentially starting at the
last page when setting them on the exposure glass.
Page 63

DUPLEX
2 Sided
This mode makes two-sided copies from twosided originals.
→→
→2 Sided
→→
1 Press the [Duplex/Series Copies] key.
3 Set your originals and press the {Start}
key.
Note
❏ Set the originals sequentially starting at the
last page when setting them on the exposure glass.
2 Press the [2 Sided
→→
→2 Sided] key.
→→
49
Page 64

COPYING
BOOK
You can make two-sided copies from facing
pages.
You can run the Book→2 Sided function in
the following two modes:
◆Single (Left/Right Pages
This mode makes two-sided copies from
facing pages.
◆Multi (Front/Back Pages
This mode makes two-sided copies so that
the same state as the facing originals is
maintained.
Limitation
❏You cannot select Book→2-Sided when
Auto Paper Select is selected.
❏You cannot use the following copy paper
in this function:
•Paper smaller than A5
both sides of A5 paper.),or 5
2
sides of 5
•Translucent paper
•Adhesive labels
•OHP transparencies
•Post cards
❏You cannot use the bypass tray.
❏You cannot mix originals of different sizes
or orientations.
Note
❏Select the K(portrait) orientation for the
copy paper.
❏Set the originals sequentially starting at the
last page when setting them on the exposure glass.
❏The scale side page is copied on the back
side of paper.
❏Be sure to close the document feeder when
setting original on the exposure glass. The
machine might fail to sense the correct
original size if your hand, arm, or sleeve is
placed on the exposure glass.
→→
→ 2 SIDED
→→
→→
→ 2 Sided)
→→
→→
→ 2 Sided)
→→
(you can copy
K
1
/
" × 8
" in inch version(you can copy both
1
1
/
" × 8
/
2
"Kpaper)
2
2
Single (Left/Right Pages
Sided)
Select paper.
1
1
/
2Press the [Duplex/Series Copies] key.
3Press the [Series Duplex] key.
4Make sure that [Single] is selected.
→→
→2
→→
50
5Set your originals starting at the last
page and press the {Start} key.
Page 65

BOOK → 2 SIDED
Multi (Front/Back P ages
→→
→2
→→
Sided)
1
Select paper.
2 Press the [Duplex/Series Copies] key.
4 Press the [Multi] key.
5 Set your originals starting at the last
page and press the {Start} key.
Note
❏ When copying of all originals is completed,
press the {Clear/Stop} key. The copy paper left in the 2 sided tray will be discharged.
3 Press the [Series Duplex] key.
51
Page 66
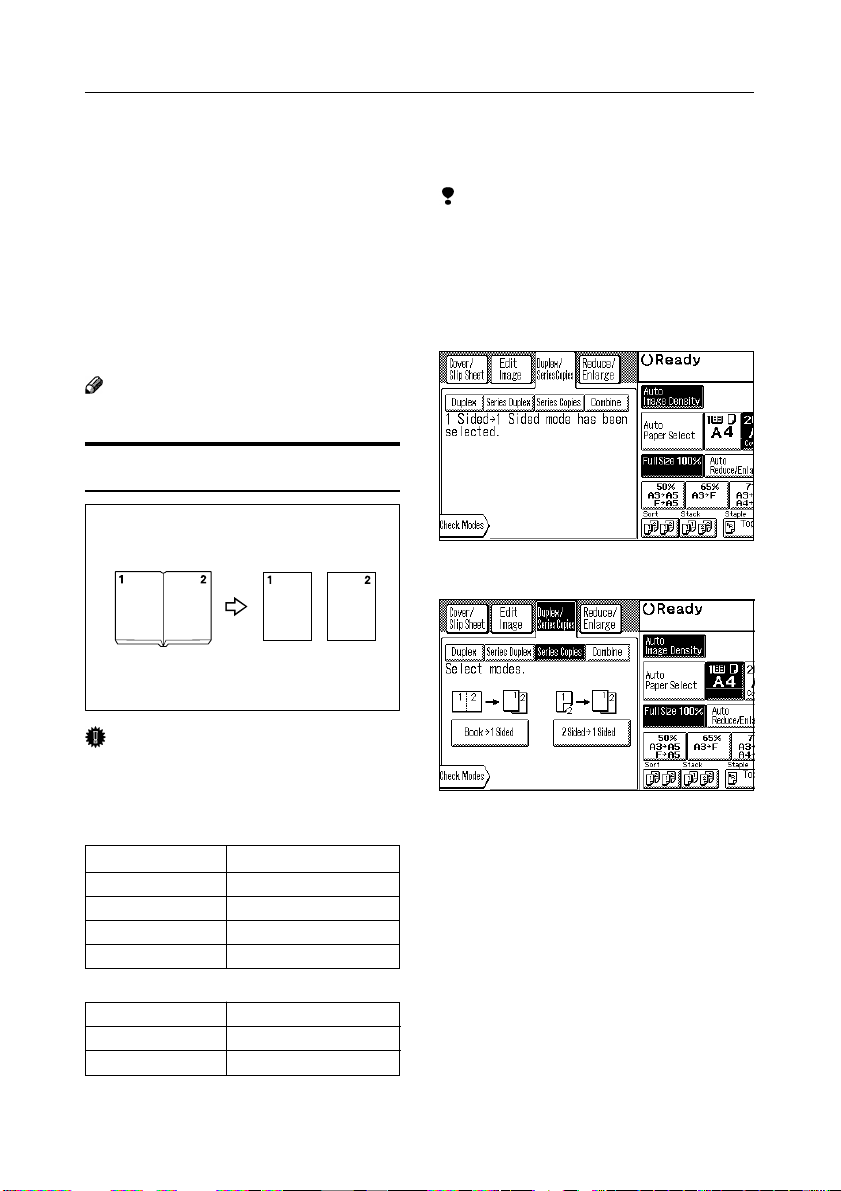
COPYING
SERIES COPIES
Y ou can make tw o one-sided copies from two
facing pages of a bound (book) original and
front/back sides of a 2 sided original.
◆ Book
◆ 2 Sided
❏ You cannot use the bypass tray.
Book
❏ Refer to the following table when you se-
Metric version
Inch version
→→
→1 Sided
→→
You can make one-sided copies from two
facing pages of a bound original (book)
→→
→1 Sided
→→
Y ou can mak e one-sided copies from twosided originals.
Note
→→
→1 Sided
→→
Important
lect original and copy paper sizes with
100% ratio:
Original Copy paper
A3
L
B4
L
A4
L
B5
L
Original Copy paper
11" × 17"
1
8
/
" × 11"
2
L
L
A4K× 2
B5K× 2
A5K× 2
B6K× 2
1
8
/
" × 11"K × 2
2
1
5
/
" × 8
2
1
/
2
"K × 2
Limitation
❏ You cannot use the Book→1 Sided func-
tion when Auto Paper Select is selected.
1 Select paper.
2 Press the [Duplex/Series Copy] key.
3 Press the [Series Copy] key.
4 Make sure that [Book
lected.
→→
→1 Sided] is se-
→→
5 Set your originals and press the {Start}
key.
52
Page 67

SERIES COPIES
2 Sided
Note
❏ The originals must be set in the document
feeder.
→→
→1 Sided
→→
1 Press the [Duplex/Series Copy] key.
3 Make sure that [2-Sided
lected.
→→
→1-Sided] is se-
→→
4 Set your originals in the document feeder
and press the {Start} key.
2 Press the [Series Copy] key.
53
Page 68

COPYING
COMBINE
Y ou can make one sheet of copies from two or
more one-sided originals.
××
◆ Combine 2 Origs.(1 Sided
This mode copies two one-sided originals
onto left/right facing pages.
◆ Combine 4 Origs.(1 Sided
Book)
This mode copies 4 one-sided originals
onto 1 two-sided sheet, 2 original images
on each side.
Limitation
❏ You cannot use the Combine function when
Auto Paper Select is selected.
❏ The originals must be set in the document
feeder.
❏ You cannot use the bypass tray.
❏ You cannot mix or iginals of different sizes
or orientations.
❏ Select the landmark orientation for the copy
paper.
Note
❏ You must specify the odd or even number
of sheets in the 1 Sided × 2→Book mode.
You must enter the number of originals
with the {Number} keys in the 1 Sided ×
4→2 Sided Book mode.
× 2
→ Book)
××
××
→→
× 4
→ 2 Sided
××
→→
→→
→→
Combine 2 Origs.(1 Sided
→→
2
→ Book)
→→
Select paper.
1
2 Press the [Duplex/Series Copy] key.
××
×
××
Orientations of originals and
copy results
Landscape originals so that their bottom edge
rests on the rear side of the document feeder.
Landscape original Set on the document feeder
54
3 Press the [Combine] key.
4 Make sure that [Combine 2 Origs.] is se-
lected.
Page 69

COMBINE
When the number of originals is
known
A Press [Even] or [Odd] key.
B Set your originals and press the {Start}
key.
When the number of originals is
unknown
A Press [Autocount] key.
B Set your originals in the document feeder
and press the [Start Count] key.
The number of originals is shown when
counting is completed.
C Press the [OK] key .
D Reset your originals in the document
feeder and press the {Start} key.
Combine 4 Originals (1
××
Sided
Select paper.
1
→→
× 4
→ Sided Book)
××
→→
2 Press the [Duplex/Series Copy] key.
3 Press the [Combine] key.
55
Page 70

COPYING
4 Press the [Combine 4 Origs.] key.
5 Enter the number of originals using the
{Number} keys, then press the {#} key.
6 Set your originals and press the {Start }
key.
56
Page 71

SAVE/DELETE AREA
SAVE/DELETE AREA
This function erases the image on the outside
or inside of a specified area when copying.
◆ Save Area(Erase Outside)
This mode erases the image on the outside
of a specified area when coping.
◆ Delete Area(Erase Inside)
This mode erases the image on the inside
of a specified area when copying.
Limitation
❏ You cannot select both Erase Outside and
Erase Inside functions at the same time or
with the Erase Center or Border function
at the same time.
❏ Several millimeters around the specified
area are not copied.
Portion not copied
Note
❏ To specify the area to be erased, measure
and enter the four dimensions X1, X2, Y1,
and Y2 (in mm) from the upper right corner of the original.
❏ Set originals whose erase area is specified
as shown in the above figure as are when
setting in the document feeder and up side
down when setting on the exposure glass.
• When setting originals in the document
feeder
• When setting originals on the exposure
glass
❏ The area once defined remains valid until
the [Cancel] key is pressed, when a new
area is defined, or when Auto Reset or Crear
Modes is effected.
57
Page 72

COPYING
Save Area
Note
❏ You can combine both Erase Outside and
Centering functions. The image is centered
with respect to the direction in which the
paper is fed.
1 Press the [Edit Image] key.
3 Enter X1[#], X2[#], Y1[#], and Y2[#] in
that order.
4 Press the [OK] key.
Note
❏ Press the [Clear] key to cancel the number.
❏ To stop setting the value to return the pre-
vious screen, press the [Cancel] key .
5 Set your originals and press the {Start}
key.
2 Press the [Save Area] key.
58
Page 73

SAVE/DELETE AREA
Delete Area
Press the [Edit Image] key.
1
2 Press the [Delete Area] key.
3 Enter X1[#], X2[#], Y1[#], and Y2[#] in
that order.
4 Press the [OK] key on the confirmation
area.
Note
❏ Press the [Clear] key to cancel the number.
❏ To stop setting the value to return the pre-
vious screen, press the [Cancel] key .
5 Set your originals and press the {Start}
key.
This function erases all four sides of the
original image.
59
Page 74

COPYING
ERASE BORDER
Note
❏ You can specify the wide of the border to
be erased within the range of 0 - 20 mm in
2.5 mm steps (0 - 0.8" in 0.1" steps.)
❏ The initial erasure width is 5 mm(0.2" ).
You can change this initial value. See ⇒
P .99 “Erase Border W idth priority setting. ”
❏ Use the Erase Center/Border function to
specify the width of the top, bottom, left,
and right borders individually . See ⇒ P .61
“ERASE CENTER/BORDER. ”
❏ You can combine both the Erase Border
and Centering function.
1 Press the [Edit Image] key.
2 Press the [Erase Border] key.
3 Set the dimensions of the border width
using the [+] and [-] keys and press the
[OK] key.
60
4 Set your originals and press the {Start}
key.
Page 75

ERASE CENTER/BORDER
ERASE CENTER/BORDER
This function erases the center and/or all four
sides of the original image.
◆ Erase Center
Erases the image at the center of the original.
◆ Erase Border
Erases the four sides of the original image.
Note
❏ You can specify the wide of the border to
be erased within the range of 0 - 20 mm in
2.5 mm steps (0 - 0.8" in 0.1" steps.)
❏ You can specify the width of the center im-
age to be erased within the range of 0 - 40
mm in 5 mm step(0 - 1.6" in 0.2" steps.)s.
❏ The initial erasure width of the border is 5
mm(0.2".) Y ou can change this initial value.
See ⇒ P.99 “Erase Border Width priority
setting.”
❏ The initial erasure width of the center is 10
mm(0.4".) Y ou can change this initial value.
See ⇒ P.99 “Erase Center Width priority
setting.”
❏ You can specify the width of the top, bot-
tom, left, and right borders individually.
❏ You can combine both the Erase Border
and Centering function.
1 Press the [Edit Image] key.
2 Press the [Cent./Bord.] key.
3 When changing the erasure width, se-
lect either Center or Border and set the
dimensions of the border width using the
[+] and [-] keys.
61
Page 76

COPYING
When specifying the individual
sides of the border
A Press the [Set each width] key
B Select the side you want to set and en-
ter the dimension of the border side using the [+] and [-] keys.
4 When you entered the dimensions of all
border sides, press the [OK] key.
5 Set your originals and press the {Start }
key.
62
Page 77

CENTERING
CENTERING
This function moves the image on the original
at the center of the copy paper when
copying.
Limitation
❏ You cannot use the bypass tray.
❏ The machine cannot center the image prop-
erly if it fails to read the size of the original.
❏ The machine cannot center the image if the
sizes of the original and copy paper are the
same or if they are set in the same orientation.
Note
❏ You can combine the Centering function
with the Erase Outside, Erase Inside, Erase
Border, and Erase Center/Border functions.
The image is centered with respect to the
direction in which the paper is fed.
3 Press the [Centering] key.
4 Set your original and press the {Start}
key.
1 Select the copy paper.
2 Press the [Edit Image] key.
63
Page 78

COPYING
MARGIN ADJUSTMENT
You can shift the image either left or right to
make a binding margin.
Limitation
❏ If you set too wide a margin, areas you do
not want to delete might be erased.
Note
❏ The binding margin is automatically de-
fined on the back surface of the copy paper
in the 1 Sided→2 Sided mode. See ⇒ P .47
“1 Sided→2 Sided.”
❏ You can specify the width of the top and
bottom margins within the range of 0 - 15
mm in 2.5 mm steps (0 - 0.6" in 0.1" steps)
and that of the left and right margins within
the range of 0 - 16 mm in 1 mm steps (0 -
0.6" in 0.1" steps.)
1 Press the [Edit Image] key.
2 Press the [Margin Adj.] key.
3 Press the [Front] or [Back] key to select
the surface on which the binding margin is to be provided.
4 Specify the width of the binding margin
←←
using the [
][
↑↑
↓↓
↑
↓
↑↑
↓↓
] keys or [
→→
←
][
→
] keys.
←←
→→
64
5 After setting all margins, press the [OK]
key.
6 Set your original and press the {Start}
key.
Page 79

CO VER
This function copies the first or the first and
last pages of the original onto the cover
paper. Ther e are two modes for this function.
◆ Front Cover
The first page of your originals is copied on a
specific paper sheet for covers or a cover
paper is inserted before the first page.
◆ Front/Back Covers
The first and last pages of your originals are
copied on specific paper sheets for covers or
cover sheets are inserted before the first page
and after the last page.
Note
❏ Select the tray for storing cover paper be-
fore selecting this function. See ⇒ P.99
“Select Special tray.”
❏ The cover or slip sheets must be identical
in size and direction with the copy paper.
❏ The originals must be set in the document
feeder.
❏ You can select the Front Co ver and Front/
Back Covers functions with the Slip Sheet
function at the same time.
COVER
■ When not copying
1 Press the [Cover/Slip Sheet] key.
2 Press the [Front Cover] key.
Front Cover
The first page of your originals is copied on a
specific paper sheet for covers or a cover
paper is inserted before the first page.
Note
❏ You can select the option to specify whether
the image is to be copied on the cover paper. If you select Copy, the first page is
copied on the cover paper. If you select
“Don’t copy”, a cover sheet is inserted before the first page.
■ When copying
3 Select either [Copy] or [Don’t copy].
4 Set your originals in the document feeder
and press the {Start} key.
65
Page 80

COPYING
Front/Back Covers
The first and last pages of your originals are
copied on specific paper sheets for covers or
cover sheets are inserted before the first page
and after the last page.
Note
❏ You can select the option to specify whether
the image is to be copied on the Front or
Back cover paper. If you select Copy, the
first and Last page is copied on the Front
and Back cover paper . If you select “Don’t
copy”, a cover sheets are inserted before
the first page and after the last page.
■ When copying
2 Press the [Front/Back] key.
■ When not copying
1 Press the [Cover/Slip Sheet] key.
66
3 Select either [Copy] or [Don’t copy].
4 Set your originals in the document feeder
and press the {Start} key.
This function copies specified pages or page
Page 81
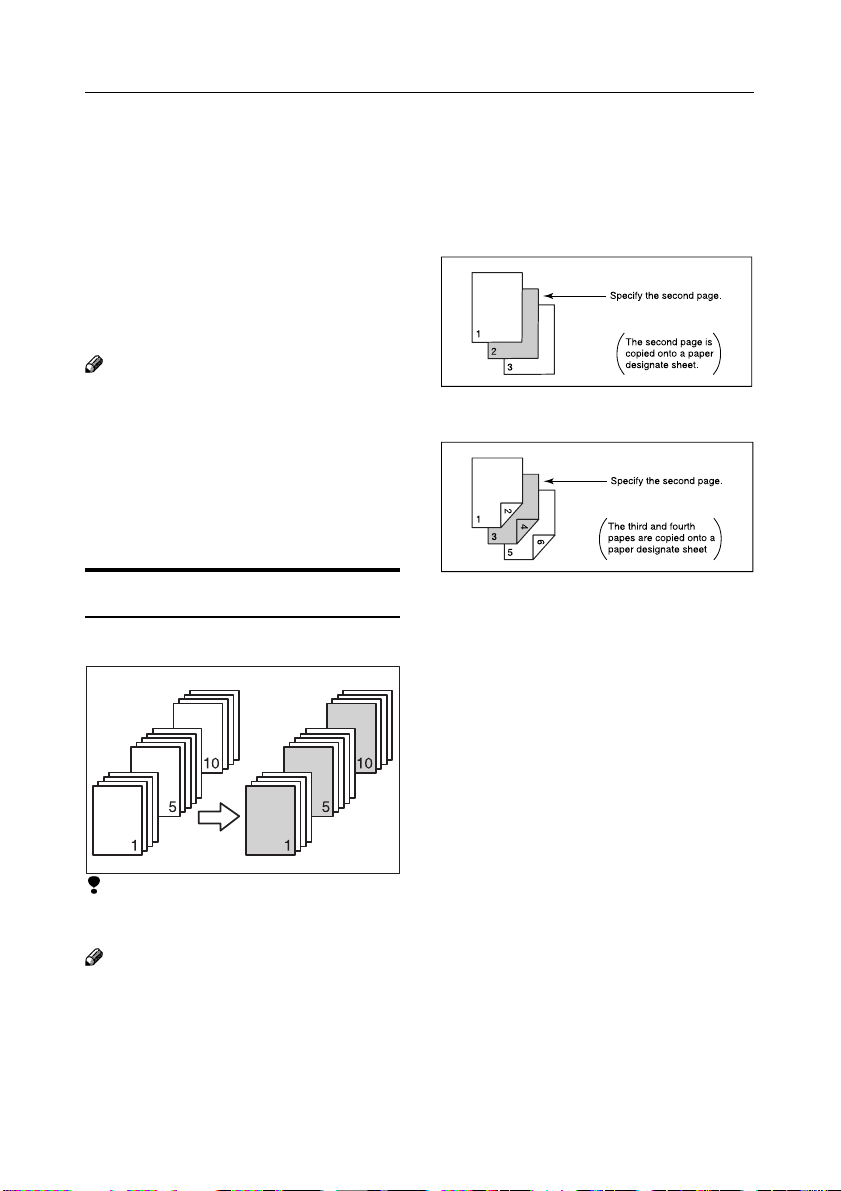
SLIP SHEET
SLIP SHEET
designate pages onto paper designate sheet.
◆ Paper Designate
The specified pages are copied onto paper
designate sheet.
◆ OHP Slip Sheet
Y ou can hav e a page inserted for each OHP
transparency or paper designate pages as
the stack function.
Note
❏ Select the tray for storing paper designate
sheet before selecting this function. See
⇒ P.99 “Select Special tray.”
❏ The paper designate sheets must be identi-
cal in size and direction with the copy paper.
❏ The originals must be set in the document
feeder .
Page Designate
page to be copied onto a paper designate
sheet.
■ 1 Sided copy
■ 2 Sided
❏ You can specify a maximum of 20 page
designate pages.
❏ You can select the Paper Designate, Front
Cover, and Front/Back Cov ers functions at
the same time.
→→
→2 Sided copy
→→
Limitation
❏ You cannot combine the Paper Designate
function with the OHP Slip Sheet.
Note
❏ When making 1 Sided copy, specify the
number of pages at which a page designate is to be inserted. For 2 sided→2 sided
copy, specify the ordinal number of the
67
Page 82

COPYING
1 Press the [Cover/Slip Sheet] key.
2 Press the [Paper Designate] key.
3 Enter the number of the page to be cop-
ied onto paper designate sheets using the
{Number} keys, then press the {#} key.
Repeat this step to specify all page designates.
4 When specifying all designate pages,
press the [OK] key.
When the number of originals is
known
A Enter the number of originals with the
{Number} keys, then press the {#} key.
B Press the [OK] key.
C Set your originals in the document feeder
and press the•{Start} key.
When the number of originals is
unknown
A Press [Autocount] key.
B Set your originals in the document feeder
and press the [Start Count] key. The
number of originals is shown when
counting is completed.
Note
❏ If you make a mistake, press the corre-
sponding designate number and press either [Clear] key or reenter the correct number.
68
C Press the [OK] key.
D Reset your originals in the document
feeder and press the {Start} key.
Page 83

SLIP SHEET
OHP Slip Sheet
You can have a page inserted for each OHP
transparency or paper designate pages as
the stack function.
Limitation
❏ You cannot combine this function with the
Paper Designate function.
Note
❏ You can specify whether to be copied or
not onto OHP slip sheets.
1 Press the [Cover/Slip Sheet] key.
2 Press the [OHP Slip Sheet] key.
3 Select either [Copy] or [Don’t copy].
4 Set your originals in the document feeder
and press the {Start} key.
69
Page 84

COPYING
COMBINA TION CHAR T
The combination chart given below sho ws the pairs of functions that cannot be used in combination. For the functions that are not listed in the table, see the limitations given in the individual
functional descriptions.
No mark : Allowed
: Disallowed (The function specified first takes precedence.)
: Disallowed (The function specified later takes precedence.)
:
Disallowed (Both functions must not be selected at the same time.)
70
Page 85

3. WHAT TO DO IF SOMETHING
GOES WRONG
IF YOU CANNOT ST ART COPYING
In Case Messages Appear
This chapter explains the major messages that this copier machine can display while
performing its copy processing. If a message appears, take actions according to the
instructions given in the message.
Message
Please wait.
Connot detect
original size.
Please select paper
size.
Problem/Cause
Displayed when the main
switch is turned on, when
toner is replenished, or
when paper is being
switched when a tandem
tray is selected.
An original of which size is
difficult to sense is set. See
⇒ P.12 “Sizes Difficult to
Detect.”
No original is set.
An original not detectable
by the Auto Paper Select is
set.
Action
W ait for a moment.
Note
❏ It takes approximately 5 minutes till the machine
warms up after the main switch is turned on.
❏ It takes approximately 3 minutes till the machine
warms up after toner is replenished.
Reference
❏ You can define copy contents and press the
{Start} key when the message “Select a key and
press the Start key . ” or “W ill automatically start
after warmup.” is displayed. Copying automatically starts when the machine gets ready for copy
processing. See ⇒ P.20 “Auto Start. ”
For an original of which size is difficult to sense,
select the paper type using not Auto Paper Select
but Select Copy Paper and use a function other than
Auto Reduce/Enlarge to copy in the regular reduce/
enlarge mode.
Set originals.
Press the {Start} ke y, and the original is copied onto
the selected paper.
71
Page 86

WHAT TO DO IF SOMETHING GOES WRONG
Message
Stapling canceled.
The following
paper sizes cannot
be stapled.
The following
paper sizes cannot
be duplexed.
Copy capacity is
over the limit
→xxx.
Display Off
Problem
The panel display
is off.
Problem/Cause
The paper size was
changed during stapling.
You selected a type of copy
paper that did not allow 2sided copy.
The upper limit number of
copies was exceeded.
Cause
The display brightness
knob is set to the darkest
position.
The machine is in Energy
Saver mode.
The operation switch is
turned off.
The main switch is turned
off.
Action
You can staple only forms of the same size. Select
forms of the same size.
The types of paper you can staple are A3
, B5KL, 11" × 17"(DLT)L, 8-
A4
KL
1
, and 8-
/
14"(LG)
L
" × 11"(LT)KL. Select one
2
L
, B4L,
1
/
" ×
2
of these paper sizes.
The types of paper you can copy on its sides are
, B4L, A4KL, B5KL, A5K, 11" ×
A3
L
17"(DLT)
11"(LT)
L
KL
1
, 8-
/
" × 14"(LG)L, and 8-
2
.
1
/
" ×
2
You can set the upper limit number of copies you
can copy at a time. See ⇒ P.101 “Maximum copy
input number.”
Action
Adjust the brightness knob to a position that is
enough to show the display. See ⇒ P.7 “OPERATION PANEL.”
Press the {Clear Modes/Energy Saver} key to cancel Energy Saver mode.
Press the {Clear Modes/Energy Saver} key to reset
the display off state.
Turn on the main switch.
72
Page 87

IF YOU CANNOT MAKE CLEAR COPIES
IF YOU CANNOT MAKE CLEAR COPIES
Problem
Copies appear dirty.
The reverse side of
an original image is
copied.
A shadow appears
on copies when you
use the pasted originals.
The same copy area
is dirty whenever
making copies.
Copies are too light.
Parts of the image
are not copied.
Copies are blank.
Cause
The image density is too
dark.
Auto Image Density is not
selected.
The image density is too
dark.
Auto Image Density is not
selected.
The image density is too
dark.
The exposure glass, platen
cover, or auto document
feeder wbelt is dirty.
The image density is too
light.
Improper paper is set.
Toner cartridge is almost
empty.
The original is not set correctly.
An improper paper size is
selected.
The original is not set correctly.
Action
Adjust the image density. See ⇒ P.26 “Adjusting
Copy Image Density.”
Select Auto Image Density . See ⇒ P.26“Adjusting
Copy Image Density.”
Adjust the image density. See ⇒ P.26“Adjusting
Copy Image Density.”
Select Auto Image Density. See ⇒ P.26 “Adjusting Copy Image Density.”
Adjust the image density. See ⇒ P.26 “Adjusting
Copy Image Density.”
Change the direction of the original.
Put mending tape on the pasted part.
Clean the exposure glass or auto document feeder.
See ⇒ P.109 “CLEANING YOUR MACHINE.”
Adjust the image density. See ⇒ P.26 “Adjusting
Copy Image Density.”
Use recommended paper. See ⇒ P.14 “Copy
paper”
Note
❏ If you make a copy on r ough-grain, coated, or
damp paper, the copy image might be blurred.
Add toner. See ⇒ P.79 “IF TONER RUNS OUT.”
Set originals correctly. See ⇒ P.21 “SETTING
ORIGINALS.”
Select the proper paper size.
Set the original face down when setting on the exposure glass and face up when setting in the auto
document feeder. See ⇒ P .21 “SETTING ORIGI-
NALS. ”
73
Page 88

WHAT TO DO IF SOMETHING GOES WRONG
IF Y OU CANNO T MAKE COPIES AS Y OU W ANT
This section explains the causes and user actions you should take when you cannot
make copies as you want.
Problem
Copies are not
stapled.
Staples are wrongly
positioned.
Misfeeds occur
frequently.
Y ou cannot combine
several functions.
Pages are split
when they are
sorted.
A void image occurred during the
Erase Border or
Erase Center/Border function.
A void image is
found.
Cause
There are jammed staples
in the stapler.
Originals are not set correctly.
Copy paper size setting is
not correct.
Selected functions cannot
be used together.
The number of originals
exceeded 50 pages.
The erase width is too large.
Failed to read the correct
original size.
The originals are not set
properly.
The margin is too large.
Too narro w a margin on the
side opposite to the binding side.
Action
Remove jammed staples. See ⇒ P.90 “IF A
STAPLE IS JAMMED.”
Set originals so that the top of the originals is aligned
with the original guide. See ⇒ P.30 “SORT/
STACK/STAPLE.”
Set the proper paper size. See ⇒ P.86 “CHANGING A PAPER SIZE.”
Refer to the combination chart and reselect. See ⇒
P.70 “COMBINATION CHART.”
The number of copy sheets you can store in a bin is
50. If the number of copies to be generated is 9 or
less and each copy contains more than 50 pages, the
pages are split into two bins and the extra pages are
stored in the lower bin.
Reset the erase width to a smaller value. See ⇒
P .60 “ERASE BORDER” and P .61 “ERASE CENTER/BORDER.”
Set the originals correctly.
Set the originals so that the binding part is located at
the center of the paper.
Reset the binding margin to a smaller value. See ⇒
P.64 “MARGIN ADJUSTMENT.”
74
Page 89

IF COPY PAPER RUNS OUT
IF COPY PAPER RUNS OUT
Note
❏ You can change the paper size of tray 2.
See ⇒ P.86 “CHANGING A PAPER
SIZE.”
Reference
❏ Regarding paper types and sizes that can
be set, see ⇒ P.14 “COPY PAPER.
Replenishing Paper in Tray
1 (Tandem Tray)
Important
❏ When the paper on the right side of paper
tray 1 runs out, the paper on the left side is
automatically moved onto the right side.
The message “moving paper onto the right
side” is shown while the paper is moving
from left to right. Do not attempt to draw
the tray while this message is being displayed.
Note
❏ Y ou can replenish paper while the machine
is copying using paper on paper tray 1. Y ou
can draw left part of the paper tray while
copying is in progress.
❏ Load the left side of paper tray with paper
of the same size as the paper on the right
side.
1 Pull out the specified paper tray until it
stops.
2 Square the paper and set it in the tray.
When the entire paper tray can
be pulled out (normal time)
R
CAUTION:
• Tak e care not to get your hand caught
between the right and left trays.
A Set paper on the right tray.
B Return the right tray into the original
position.
C Set paper on the left tray.
Important
❏ Align the right side paper at the right and
the left side paper at the left.
75
Page 90

WHAT TO DO IF SOMETHING GOES WRONG
When the left half part of the
paper tray can be pulled out
(copy mode)
Important
❏ Do not stack paper over the limit mark.
❏ Make sure that the paper is aligned at the
left.
Note
❏ Take out any curls or correct any warpage
of the paper before setting.
3 Return the paper tray into the original
position.
Replenishing Paper in T ra y 2
1 Pull out the specified paper tray until it
stops.
PG6A1201
2 Square the paper and set it in the tray.
76
PG6A1301
Important
❏ Do not stack paper over the limit mark.
❏ Make sure that the paper is aligned at the
right.
Note
❏ Take out any curls or correct any warpage
of the paper before setting.
3 Return the paper tray into the original
position.
Page 91

Replenishing Paper in Trays 3
1 Pull out the specified paper tray until it
stops.
PG6A1401
2 Square the paper and set it in the tray.
IF COPY PAPER RUNS OUT
PG6A1501
Important
❏ Do not stack paper over the limit mark.
❏ Make sure that the paper is aligned at the
right.
Note
❏ Take out any curls or cor rect any w arpage
of the paper before setting.
2 Return the paper tray into the original
position.
77
Page 92

WHAT TO DO IF SOMETHING GOES WRONG
Loading Paper in the Large
Capacity T ray
1
Open the top cover.
PG6A1601
2 Place the paper in the tray along the edge
on the left.
3 Lower the [Down] key.
The key blinks while the bottom plate is
moving down.
PG6A0502
4 Repeat steps 2 and 3.
Note
❏ The tray can accommodate a maximum of
3,500 sheets of paper.
5 Close the top cover.
Note
❏ The tray can accommodate up to 500 sheets
of paper.
78
PG6A1701
Page 93

IF TONER RUNS OUT
IF TONER RUNS OUT
R
WARNING:
• Do not incinerate used toner or toner containers. Toner dust
might ignite when exposed to open flame. Dispose of the used
toner containers according to local regulations for plastics..
R
CAUTION:
• Do not eat or swallow toner.
• Keep all toner (used or unused) and toner containers out of reach
of children.
R
CAUTION:
• This machine has been tested for safety using this supplier’s
parts and consumables. We recommend you only use these
specified supplies.
Important
❏ If you use toner other than that recommended, a fault might occur.
❏ When adding toner, do not turn off the operation switch. If you do, your settings are cleared.
❏ Always add toner after the machine instructs you to add toner.
❏ Do not use used toner. This will damaged the machine.
Note
❏ You can still make about 50 copies after the D appears, but replace the toner early to prevent
poor copy quality.
❏ When toner runs out, the message “Replenish toner” appears on the display and the machine
can no longer copy.
Reference
Regarding toner storage, see => P.18 “TONER.”
79
Page 94

WHAT TO DO IF SOMETHING GOES WRONG
R
CAUTION:
• To pull out the toner bottle, be sure to hold
the holder and turn it 90 degrees.
AOpen the front cover of the
machine.
BPull the holder beneath the
toner bottle 90 degrees
backward.
ERemove the cap.
Note
• Do not remove the inner
cap.
80
CPull the green holder and
slowly pull out the toner
bottle.
FPlace the toner bottle in
position, then push it in
until the green lever clic ks.
Note
• If you can’t get it to click
in, pull out the toner
bottle a little, slightly rotate it to the left or right,
then try again`.
DHold a new bottle horizon-
tally and shake it 5 or 6
times.
GReturn the holder beneath
the toner bottle into its original position.
HClose the front cover of the
machine.
Page 95

IF COPY PAPER OR AN ORIGINAL IS MISFED
IF COPY PAPER OR AN ORIGINAL IS MISFED
R
CAUTION:
• Since some parts of the copier are supplied with high electrical
voltage, touch only the parts specified in this manual, otherwise
a burn might occur.
Important
❏ When clearing misfeeds, do not turn off the operation switch. If you do, your copy settings
are cleared.
❏ To prevent misfeeds, do not leave any torn scraps of paper within the machine.
❏ If paper misfeeds occur repeatedly, contact your service representative .
Note
❏ More than one misfed areas may be indicated. In this case, check every applicable area.
• A, B, C, D, E, T ⇒ P.82.
• P1, P2, U, R⇒ P.84.
❏ You can f ind a sticker explaining ho w to remove misfed paper inside of the front co ver, and the
back side of the front cover of the sorter stapler.
81
Page 96

WHAT TO DO IF SOMETHING GOES WRONG
When D is lit
A Open the front cover.
B Turn the C1 lever coun-
terclockwise.
When E is lit
A Open the front cover.
B Lift the E2 lever and re-
move the misfed paper .
When T is lit
A Open the front cover.
B Pull up the T1 lever to
fully pull out the duplex
unit.
C Turn the D1 knob clock-
wise and remove misfed
paper.
C Turn the E1 knob coun-
terclockwise.
C Press the T2 lever, then
turn it counterclockwise
to open the cover.
D While pressing the D2 le-
ver, grasp the D3 handle
and pull the fixing unit.
D
Remove the misfed paper from the external tray side (if a
sorter stapler is installed, open the front cover and remove
the misfed paper. See => P.88 “When R is lit”).
D Remove the misfed pa-
per.
E Return the T2 lever into
its original position.
82
F Open the T3 lever.
G Remove the misfed pa-
per.
Page 97

IF COPY PAPER OR AN ORIGINAL IS MISFED
When C is lit
E Push down the D4 lever
and remove the misfed
paper.
F Retur n the DC4 lever
into its original position.
G Close the front cover.
When A is lit
A Open the front cover.
B Turn the C1 lever counter-
clockwise.
When B is lit
A Open the front cover.
B Turn the B1 knob and re-
move the misfed paper .
C
Turn the C2 knob counterclockwise
and remove the misfed paper .
D
Close the front cover.
C Return the B2 lever into
its original position.
D Close the front cover.
A Open the front cover.
B Press the A1 button and
open the guide plate.
C Turn the A2 knob coun-
terclockwise.
D Remove the misfed pa-
per.
E Close the front cover.
83
Page 98

WHAT TO DO IF SOMETHING GOES WRONG
When R is lit on S/S
hanging-on type
A Open the cover.
84
B Turn left the S/S
C Remove t misfed paper.
D Raise the cover and re-
move the misfed paper .
E Close the S/S.
When R is lit on S/S
console type
When R1 is lit
AOpen the front cover.
BRaise the R1 lever and re-
move the misfed paper .
CReturn the R1 lever into the
original position and close the
front cover.
When R2 is lit
AOpen the front cover.
BLowe the R2 lever and remo ve
the misfed paper.
If you cannot remove the misfed
C
paper, hold up the R1 lever and
remove the misfed paper.
D
Return the R1 and R2 levers into
their original position and close
the front cover.
Page 99

IF COPY PAPER OR AN ORIGINAL IS MISFED
When P1 is lit
A Open the auto docu-
ment feeder (ADF)
cover.
B Remove the misfed pa-
per.
C Close the auto docu-
ment feeder (ADF)
cover.
When P2 is lit
A Open the auto document
feeder (ADF) cover and
remove the misfed paper .
B Close the auto document
feeder (ADF) cover .
When U is lit
A Open the top cover and
remove the misfed paper.
B Close the top cover.
85
Page 100
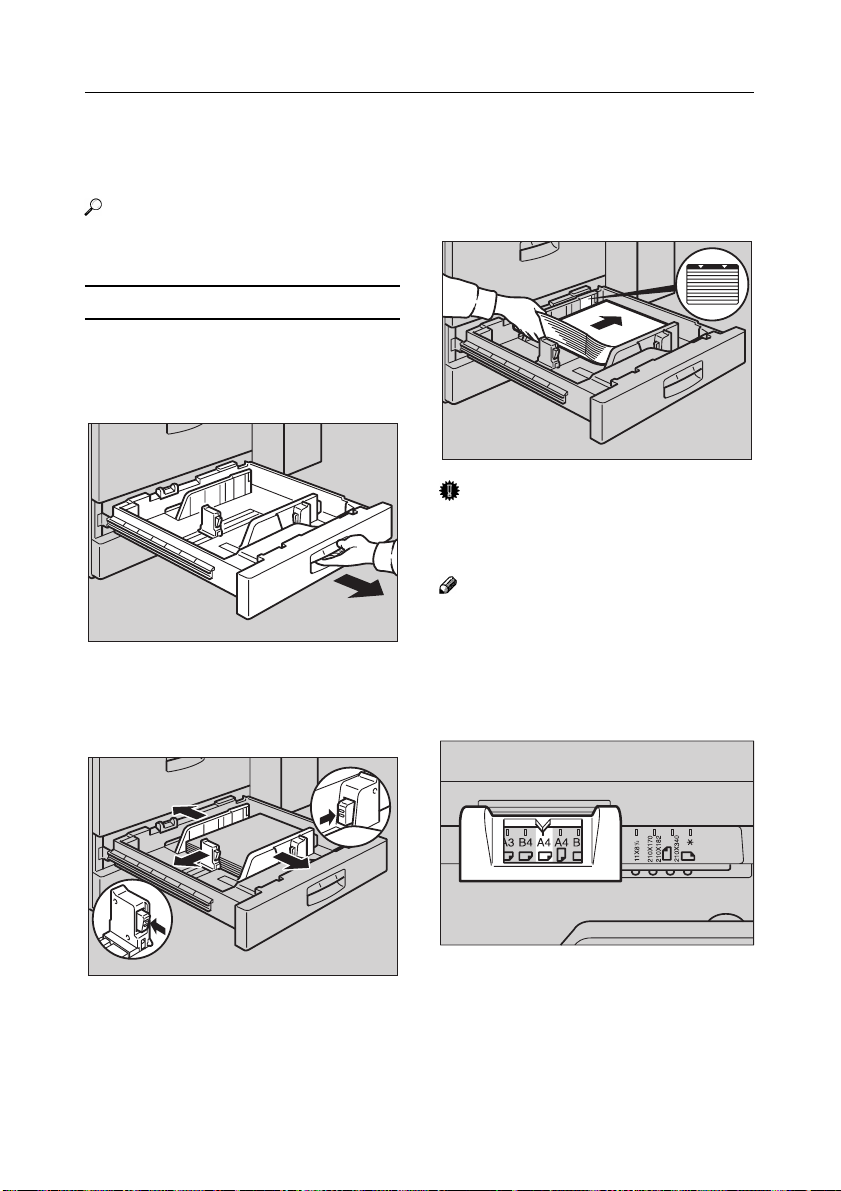
WHAT TO DO IF SOMETHING GOES WRONG
CHANGING PAPER SIZE
Reference
❏For paper sizes and types that can be set in
each tray, see ⇒ P.14 “COPY PAPER.”
Changing the paper size for tray 2
1Make sure that the paper tray is not be-
ing used and pull the paper tray until it
stops.
PG6A1201
2While pressing the release lever, adjust
the side and back fences to the size of
paper to be set.
3Square the paper and set it in the tray.
PG6A2001
Important
❏Do not stack paper over the limit mark.
❏Make sure that the paper is aligned at the
right.
Note
❏Take out any curls or correct any warpage
of the paper before setting.
4Set the paper size selector knob on the
rear part of the paper tray to the new
paper size and orientation.
86
PG6A1901
 Loading...