

Page 1
FT6350
Operating Instructions
Page 2
card-eeg-1-1
INTRODUCTION
INTRODUCTION
This manual contains detailed instructions on the operation and maintenance of this copier. To get maximum versatility from this copier, all
operators should carefully read and follow the instructions in this manual.
Please keep this manual in a handy place near the machine.
Please read the next section before using this copier. It contains important
information related to USER SAFETY and PREVENTING EQUIPMENT
PROBLEMS.
SAFETY INFORMATION
When using yo ur copier, the following safety precautions sh ould always be
followed.
Safety During Operation
In this manual, the following important symbols are used:
R
WARNING: Ignoring this warning could cause serious injury
or even death.
R
Caution: Ignoring thi s caution co uld cause in jury or damag e
to property.
Examples Of Indications
R
Symbol R means a situation that requires you take care.
q
Do NOT carry out the operation represented by the symbol m.
This example means "Do not take apart".
r
Symbols ● means you MUST perform this operation. This
example means "You must remove the wall plug".
i
Page 3

SAFETY INFORMATION
WARNINGS:
R
Only connect the machine to the power source described
•
on the inside front cover of this manual.
m
o
Avoid multi-wiring.
•
Do not damage, break or make any modifications to the
•
power cord. Do not place heavy objects on it, pull it hard or
bend it more than necessary. These actions could cause an
electric shock or fire.
Do not plug or unpl ug the power cord wi th your hands wet.
•
Otherwise, an electric shock might occur.
Make sure the wall outlet is near the machine and freely
•
accessible so that in event of an emergency it can be unplugged eas ily.
card-eeg-1-1
q
r
m
ii
Do not remove any covers or screws other than those
•
specified in this manual. Some parts of the machine are at
a high voltage and could give you an electric shock. When
the machine needs to be checked, adjusted, or repaired,
contact your service representative.
Do not take apart or attempt any modifications to this ma-
•
chine. There is a risk of fire, electric shock, explosion or
loss of sight.
If the machine looks damaged or breaks down, smoke is
•
coming out, there is a strange smell or anything looks unusual, immediately turn off the main switch then unplug the
power cord from the wall. Do not continue using the machine in this condition. Contact your service representative.
If metal, liquid or foreign matter falls into the machine, turn
•
off the main switch and unplug the main power cord. Contact your service representative. Do not keep using the machine with a fault or defect.
Do not put any metal objects or containers holding water (e.g.
•
vases, flowerpots, glasses) on the machine. If the contents
fall inside the machine, a fire or el ectric shock coul d occur.
Page 4

•
s
R
CAUTIONS:
•
m
r
•
•
•
card-eeg-1-1
SAFETY INFORMATION
Do not incinerate used toner or toner containers. Toner
dust might ignite when exposed to an open flame. Dispose
of the used toner containers according to local regulations
for plastics.
Keep the machine away from humidity and dust. A fire or
an electric shock might occur.
Do not place the machine on an unstable or tilted surface.
If it topples over, it could cause injury.
When you move the machine, unplug the power cord from
the wall outlet to avoid fire or electric shock.
When the machine will not be used for a long time, unplug
the power cord.
t
o
m
n
R
R
•
When you pull out the plug from the socket, grip the plug
to avoid damaging the cord and causing fire or electric
shock.
•
If you use the machine in a confined space, make sure
there is a continuous air turnover.
•
Do not use stapled paper. Do not use aluminum foil, carbon-containing paper or other conductive paper. Otherwise,
a fire might occur.
•
When removing misfed paper, do not touch the fusing section because it could be very hot.
•
This machine has been tested for safety using this supplier’s parts and consumable. We recommend you only use
these specified supplies.
•
Do not eat or swallow toner.
•
Keep toner or toner containers out of reach of children.
iii
Page 5

SAFETY INFORMATION
•
This equipment is only to be installed by a qualified service
R
R
personnel.
•
Deliver to collection point for waste products. Do not be
disposed of via domestic refuse collection.
card-eeg-1-1
iv
Page 6

TABLE OF CONTENTS
TABLE OF CONTENTS
WHERE IT IS & WHAT IT IS........................................................................1
Copier Type ..................................................................................................1
Copier Exterior ............................................................................................2
Copier Interior .............................................................................................4
Options.........................................................................................................6
OPERATION UNIT .......................................................................................8
Touch Panel Display ....................................................................................9
WHAT YOU CAN DO WITH THIS COPIER................................................. 10
BASICS
STARTING THE COPIER ............................................................................. 24
When The Main Switch Is In The Stand-by Position...................................24
When The Touch Panel Display Is Off........................................................25
When The Copier Is Set For User Codes....................................................25
When The Copier Has Been Turned Off By The Weekly Timer ................26
USING THE TOUCH PANEL DISPLAY .......................................................27
Selecting Functions......................................................................................27
Checking The Functions You Have Selected..............................................28
Entering Numbers ........................................................................................29
Regular Screen and Casual Screen ...........................................................30
GETTING HELP ON THE DISPLAY............................................................. 31
Seeking Guidance In The Stand-by Condition ............................................31
Seeking Guidance While Entering Copy Job Settings.................................32
COPY PAPER AND TONER
COPY PAPER ..............................................................................................34
Available Paper Sizes ..................................................................................34
Non-recommended Copy Paper...................................................................35
Notes For Copy Paper.................................................................................35
Paper Storage ..............................................................................................36
v
Page 7

TABLE OF CONTENTS
TONER...........................................................................................................37
Notes For Toner .......................................................................................... 37
Toner Storage .............................................................................................. 37
ORIGINALS
RECOMMENDED ORIGINALS AND NON-RECOMMENDED
ORIGINALS ...................................................................................................40
Recommended Originals.............................................................................40
Non-recommended Originals ....................................................................... 40
Notes For Originals...................................................................................... 41
SETTING ORIGINALS ON THE EXPOSURE GLASS................................. 42
SETTING ORIGINALS IN THE DUAL JOB FEEDER.................................. 43
Setting A Stack Of Originals (ADF mode/ARDF mode) .............................. 43
Setting One Original At A Time (SADF mode)............................................44
Setting Special Originals .............................................................................46
SETTING ORIGINALS IN THE RECIRCULATING DOCUMENT
HANDLER ......................................................................................................51
Setting Originals .......................................................................................... 51
COPYING
BASIC COPYING ..........................................................................................54
BASIC FUNCTIONS......................................................................................56
Adjusting Copy Image Density.................................................................... 56
Copying Half-tone Originals .......................................................................56
Selecting The Copy Paper Size..................................................................57
Having The Copier Choose The Reproduction Ratios
(Auto Reduce/Enlarge)................................................................................60
Copying From The Bypass Tray .................................................................61
Storing Your Copy Settings In Memory (Program) ..................................... 63
Other Functions...........................................................................................65
REDUCING AND ENLARGING .................................................................... 68
Reducing And Enlarging Using Preset Ratios (Preset R/E) ...................... 68
vi
Page 8

TABLE OF CONTENTS
Reducing And Enlarging In 1% Steps (Zoom).............................................69
Fitting The Original To A Copy Of A Different Size
(Size Magnification) ......................................................................................71
WORKING WITH BOTH SIDES OF ORIGINALS AND COPIES
(Duplex/Series Copies) ................................................................................72
Making Two-sided Copies From One-sided Originals
(Duplex, 1 Sided Originals → 2 Sided Copy) .............................................72
Making Two-sided Copies From Two-sided Originals
(Duplex, 2 Sided Original → 2 Sided Copy) ..............................................76
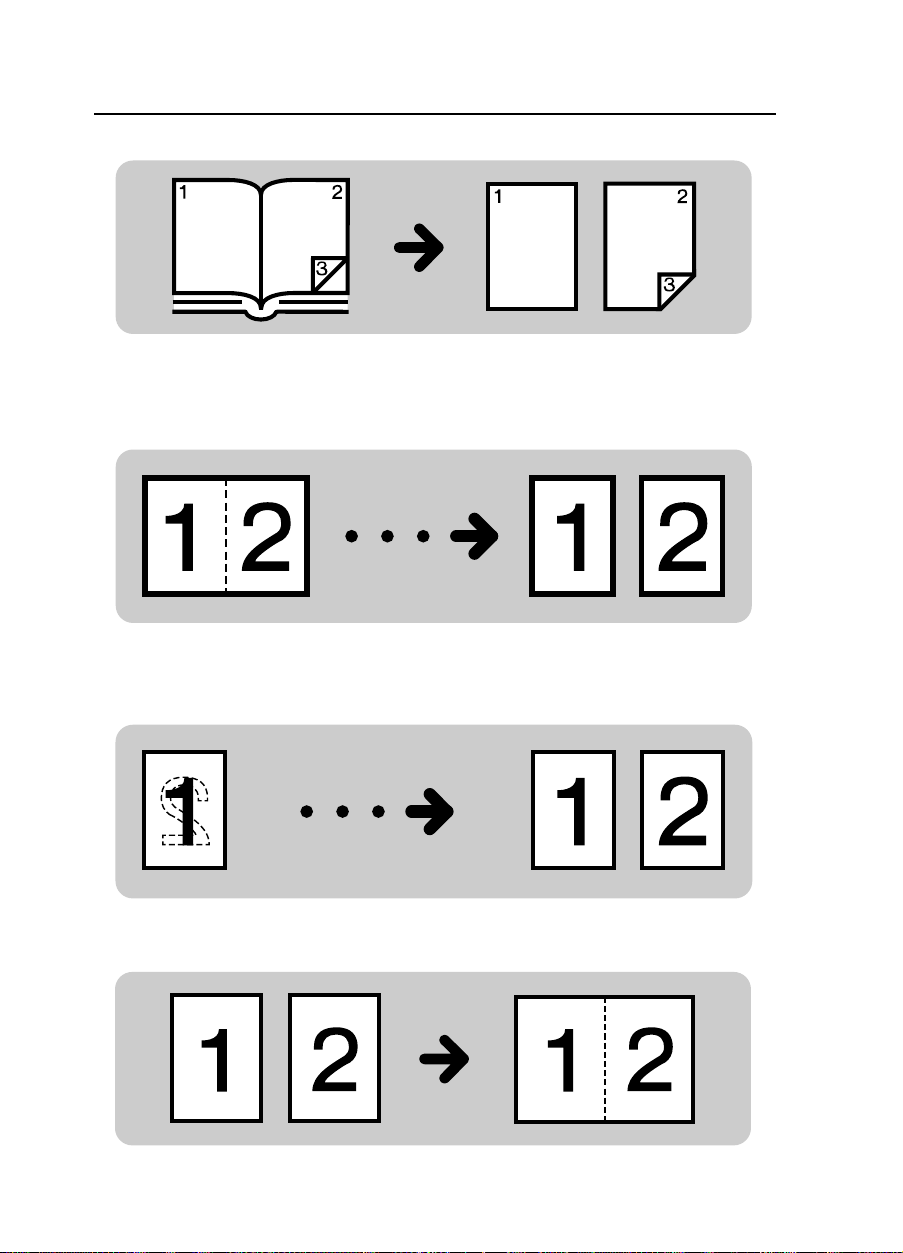
Making Two-sided Copies From Facing Pages (Series Duplex, Single) ...77
Making Two-sided Copies From A Book (Series Duplex, Multi) ................79
Making One-sided Copies From Facing Pages
(Series Copies, Book → 1 Sided Copies) ..................................................81
Making One-sided Copies From Two-sided Originals
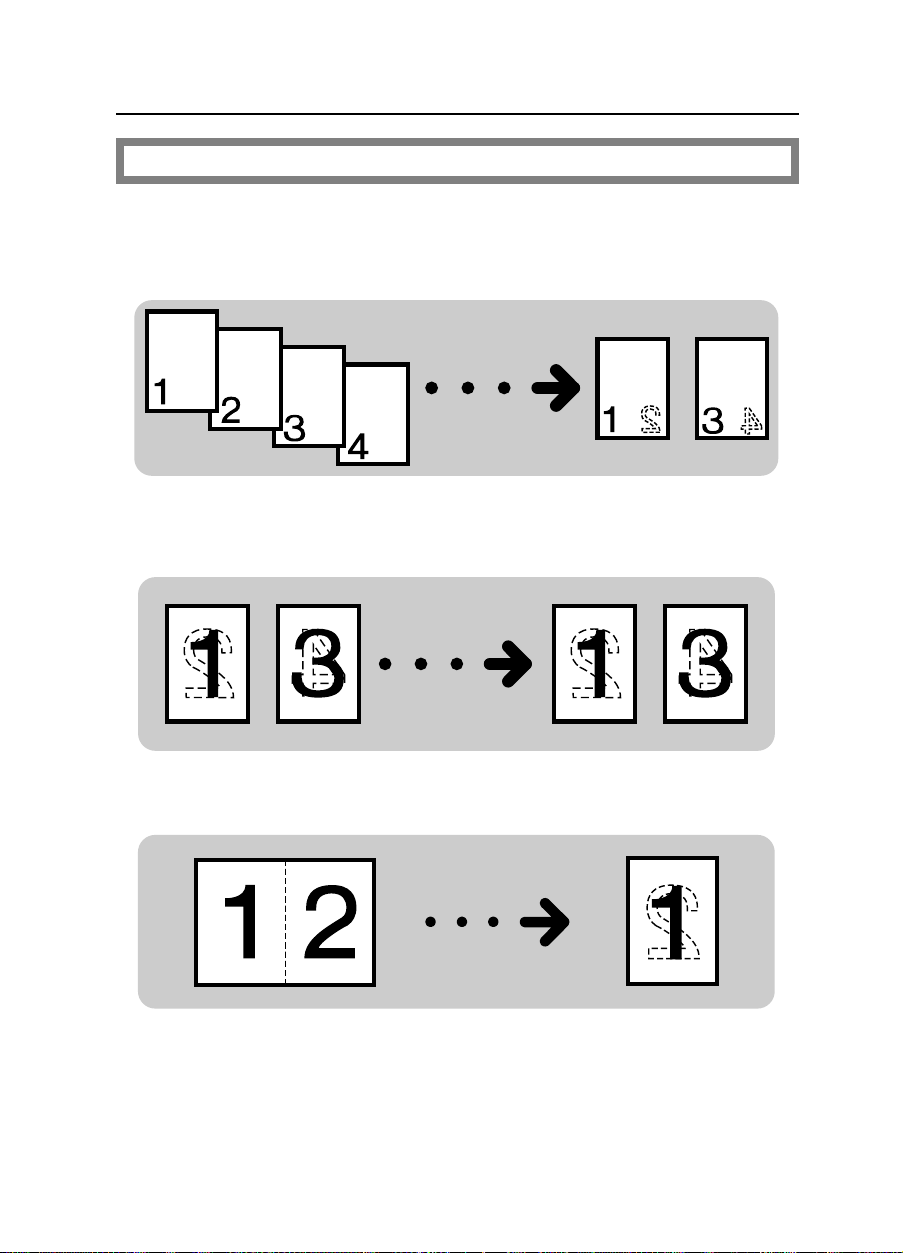
(Series Copies, 2 Sided Original → 1 Sided Copies) .................................83
Combining Two Originals (Combine, Combine 2 Originals) .......................85
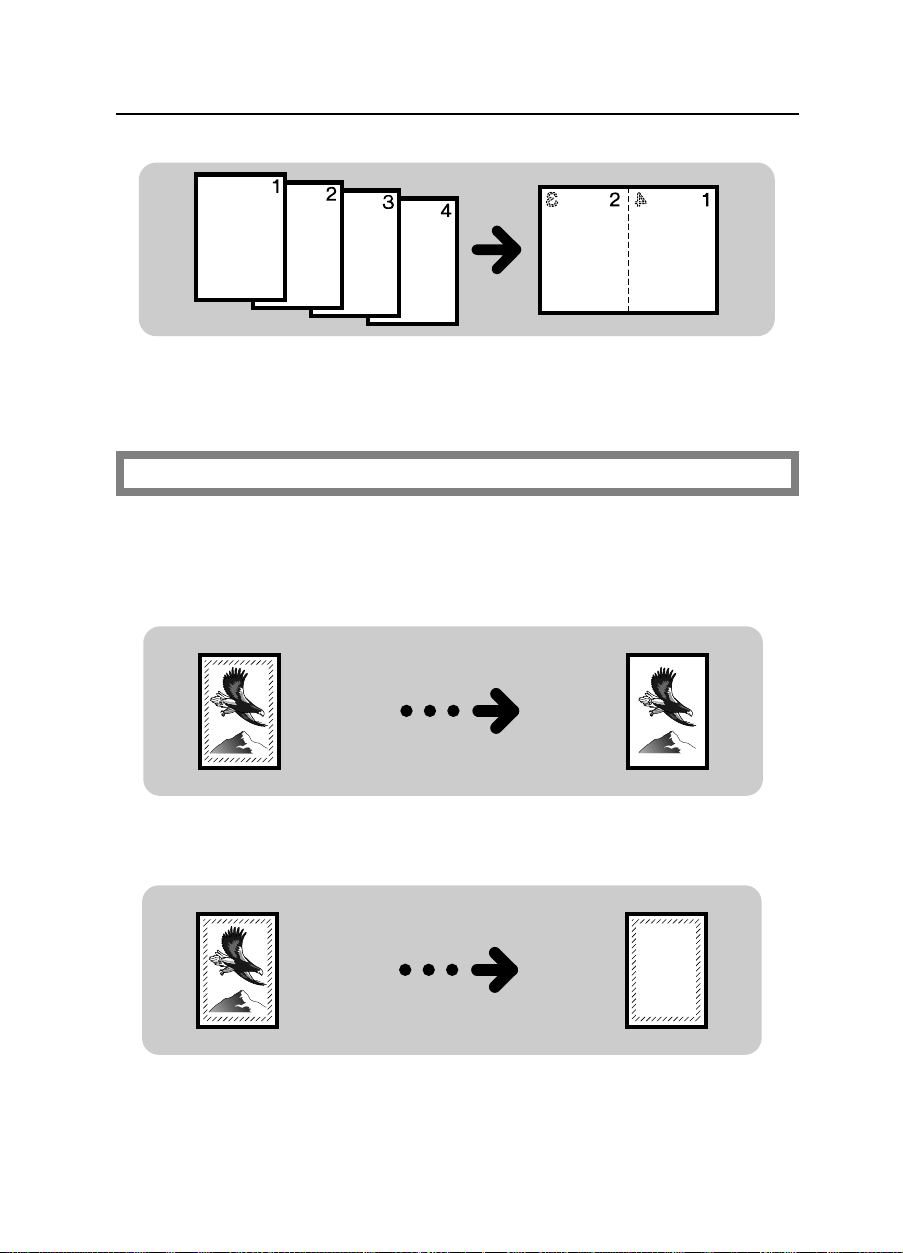
Combining Four Originals (Combine, Combine 4 Originals) ......................87
ADDING MARGINS FOR BINDING (Margin Adjustment).........................90
Margins For One-sided Copying .................................................................90
Margin For Two-sided Copying ...................................................................91
EDITING THE COPY IMAGE (Edit Image)..................................................94
Erasing Part Of Original Image....................................................................94
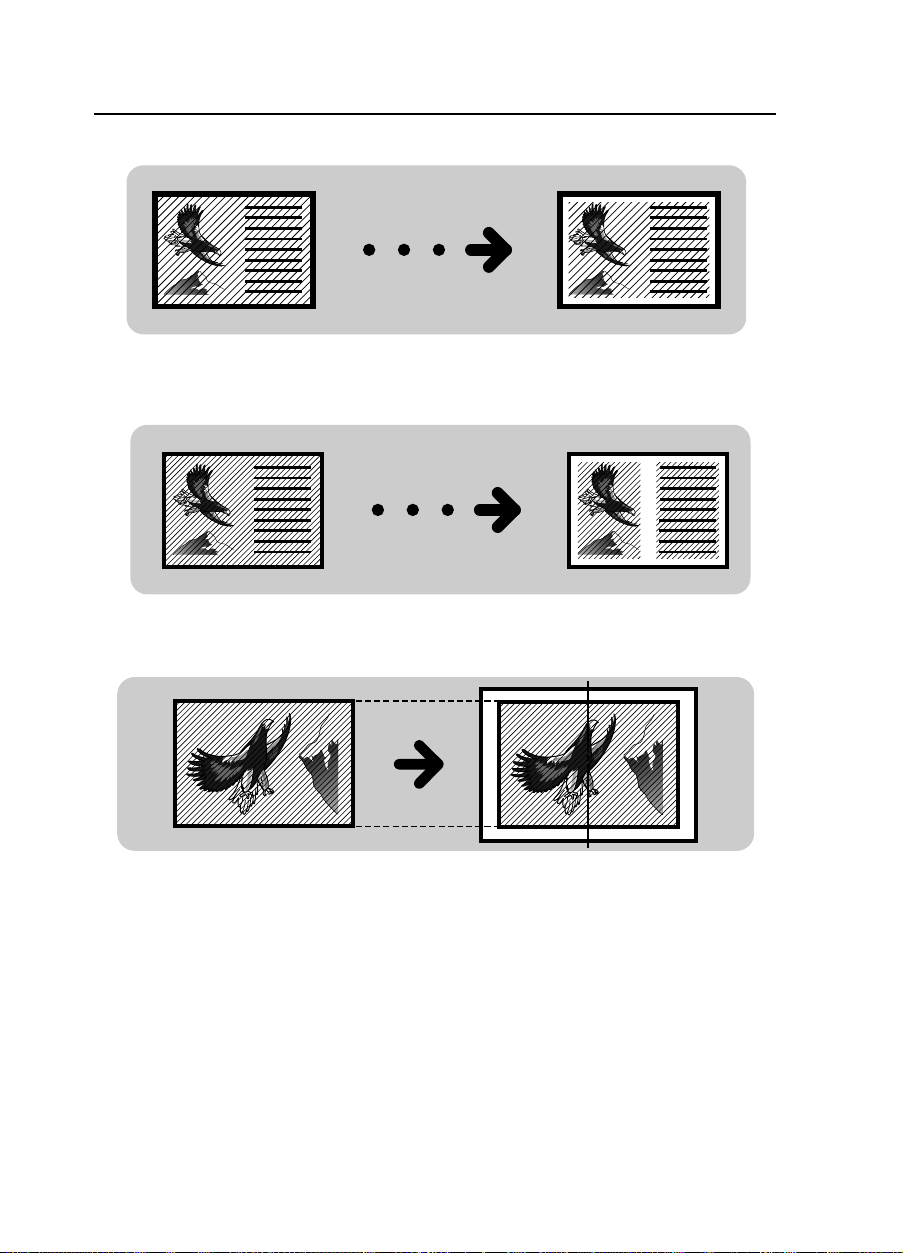
Erasing The Surrounding Area Of The Original Image (Erase Border) .....97
Erasing The Center Margin And Surrounding Area Of The Original Image
(Cent./Bord.) ................................................................................................98
Centering The Copy Image (Centering) ......................................................99
ADDING OR INSERTING SHEETS (Cover/Slip Sheet).............................. 100
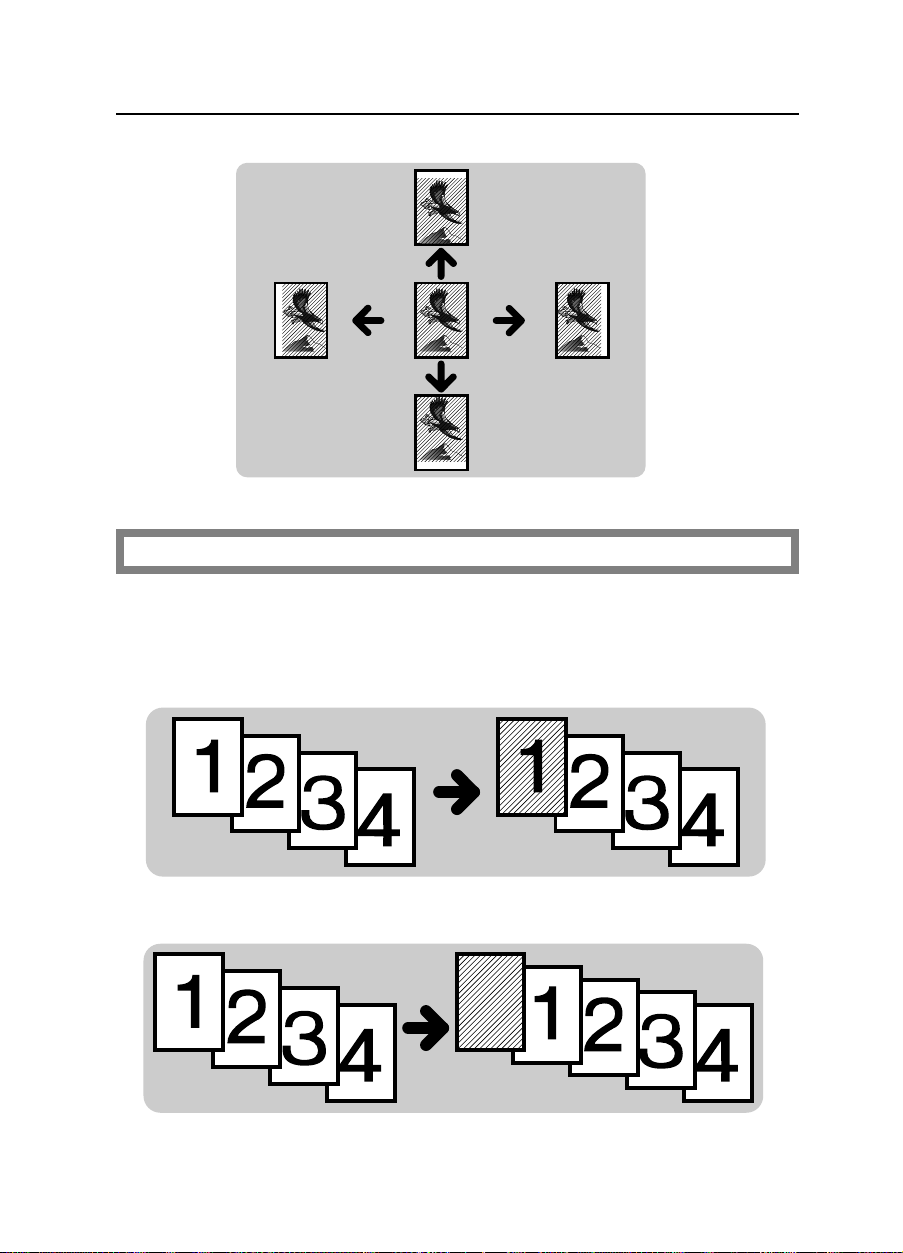
Copying Or Adding A Front Cover (Front Cover) .......................................100
Copying Or Adding Front And Back Covers (Front/Back) ..........................102
Copying Designated Pages Of Originals Onto Slip Sheets
(Paper Designate) .......................................................................................105
Copying Or Inserting Slip Sheets (OHP Slip Sheet) ..................................108
FINISHING..................................................................................................... 110
Sorting Into Sets (123, 123, 123) (Sort) .....................................................110
Stacking Together All Copies Of A Page (111, 222, 333) (Stack) ............113
vii
Page 9

TABLE OF CONTENTS
Stapling Copies (Staple) .............................................................................116
Punching Copies (Punch)............................................................................ 121
COMBINATION CHART ............................................................................... 124
WHAT TO DO IF SOMETHING GOES WRONG
IF YOUR COPIER DOES NOT OPERATE AS YOU WANT ....................... 128
IF YOU CANNOT MAKE COPIES AS YOU WANT .....................................130
LOADING PAPER......................................................................................... 131
Loading Paper In The Paper Tray...............................................................131
Loading Paper In The Optional 3,500-sheet Large Capacity Tray ............. 132
ADDING TONER ...........................................................................................133
ADDING STAPLES .......................................................................................134
CLEARING MISFEEDS................................................................................135
Check The Misfeed Location Display.......................................................... 135
Clearing Paper Misfeeds............................................................................. 136
Clearing Original Misfeeds ..........................................................................138
REMOVING JAMMED STAPLES................................................................. 139
REMOVING PUNCH WASTE ....................................................................... 140
CHANGING THE COPIER’S SETTINGS
CHANGING PAPER SIZE .............................................................................142
USER TOOLS ................................................................................................ 144
How To Access User Tools......................................................................... 144
User Tool Menu ........................................................................................... 145
SERVICE REPRESENTATIVE SETTING .....................................................155
viii
Page 10

TABLE OF CONTENTS
MAINTAINING YOUR COPIER
WHERE TO PUT YOUR COPIER
DO’S AND DON’TS
REMARKS
MAINTAINING YOUR COPIER.....................................................................158
Copier...........................................................................................................158
Platen Cover.................................................................................................159
Dual job feeder .............................................................................................159
Recirculating Document Handler..................................................................160
WHERE TO PUT YOUR COPIER.................................................................161
Copier Environment......................................................................................161
Power Connection........................................................................................162
Access To Copier .........................................................................................163
DO’S AND DON’TS.......................................................................................164
Copier...........................................................................................................164
Dual Job Feeder (Option) ............................................................................165
Recirculating Document Handler (Option) ...................................................165
Sorter Stapler (Option)
Sorter Stapler With Punch (Option)
Finisher (Option)...........................................................................................166
REMARKS..................................................................................................... 166
Copier...........................................................................................................166
SPECIFICATIONS
COPIER ......................................................................................................... 168
DUAL JOB FEEDER (Option)...................................................................... 172
SORTER STAPLER (Option)....................................................................... 174
SORTER STAPLER WITH PUNCH (Option)...............................................176
RECIRCULATING DOCUMENT HANDLER (Option) .................................178
ix
Page 11

TABLE OF CONTENTS
FINISHER (Option) .......................................................................................180
3,500-SHEET LARGE CAPACITY TRAY (Option) ..................................... 181
INDEX
INDEX........................................................................................................... 184
x
Page 12

WHERE IT IS & WHAT IT IS
WHERE IT IS & WHAT IT IS
Copier Type
There are two types of this copier.
Certain types may not be available i n some countries. Fo r details, please con-
❐
tact your local de aler.
Type 1
• Three 550-sheet paper trays
• Optional 3,500 sheet large
capacity tray
550
550
550
(3,500)
Type 2
550
550
Storage tray
• Two 550-sheet paper trays
• One storage tray
• Optional 3,500 sheet large
capacity tray
(3,500)
1
Page 13
WHERE IT IS & WHAT IT IS
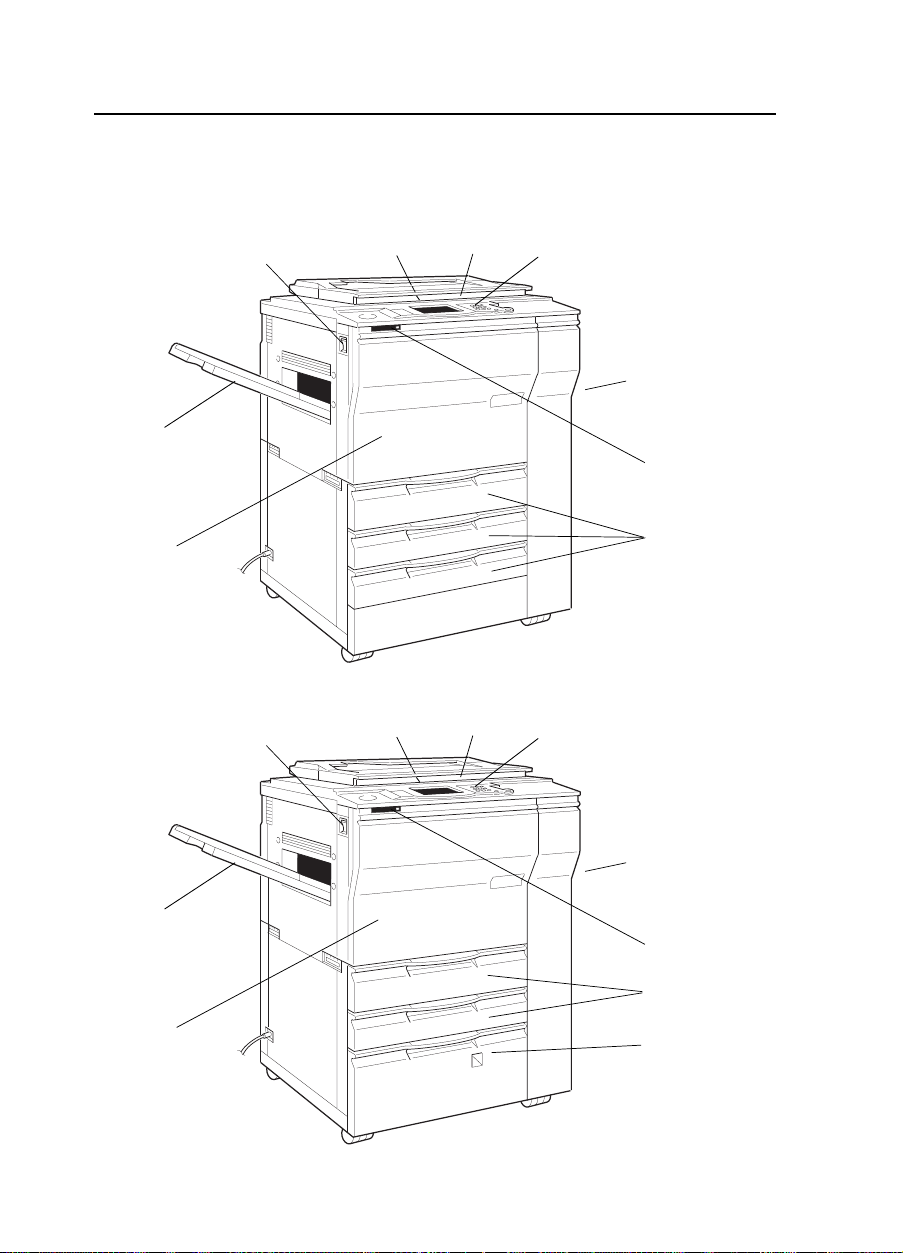
Copier Exterior
Type 1
4
5
3
2
1
9
8
6
Type 2
5
6
7
4
3
2
1
9
8
7
10
2
Page 14

WHERE IT IS & WHAT IT IS
1. Operation unit
2. Platen cover
(option)
3. Exposure glass
4. Main switch
5. Copy tray (option)
6. Front door
7. Paper trays
8. Auto response
sensor
9. Bypass tray
10. Storage tray
Operator controls and indicators are located here.
Lower this cover over originals for copying.
Position originals here face down for copying.
Switches the copier between on and stand-by
conditions ("stand-by" means that the anticondensation heaters are on).
Completed copies are delivered here.
Open to access the inside of the copier.
These trays can hold 550 sheets of copy paper
each.
When the operator stands in front of this sensor,
the copier automatically turns off the Screen
Saver.
Use this tray to copy onto paper that can not be
set in the paper tray. Using this tray, you can
copy onto OHP transparencies, adhesive labels,
translucent paper, or post cards.
You can use this tray to keep copy paper or
spare toner bottles in.
Other options: key counter, key counter bracket set
❐
3
Page 15

WHERE IT IS & WHAT IT IS
Copier Interior
This illustrat ion shows Type 1.
❐
1
2
4
Page 16

WHERE IT IS & WHAT IT IS
1. Fusing Unit
2. Toner bottle
Fuses the copy image to the paper. When accessing the inside of the copier, use caution.
This unit may be very hot.
Replace the toner bottle when the copier instructs you to add toner.
5
Page 17
WHERE IT IS & WHAT IT IS
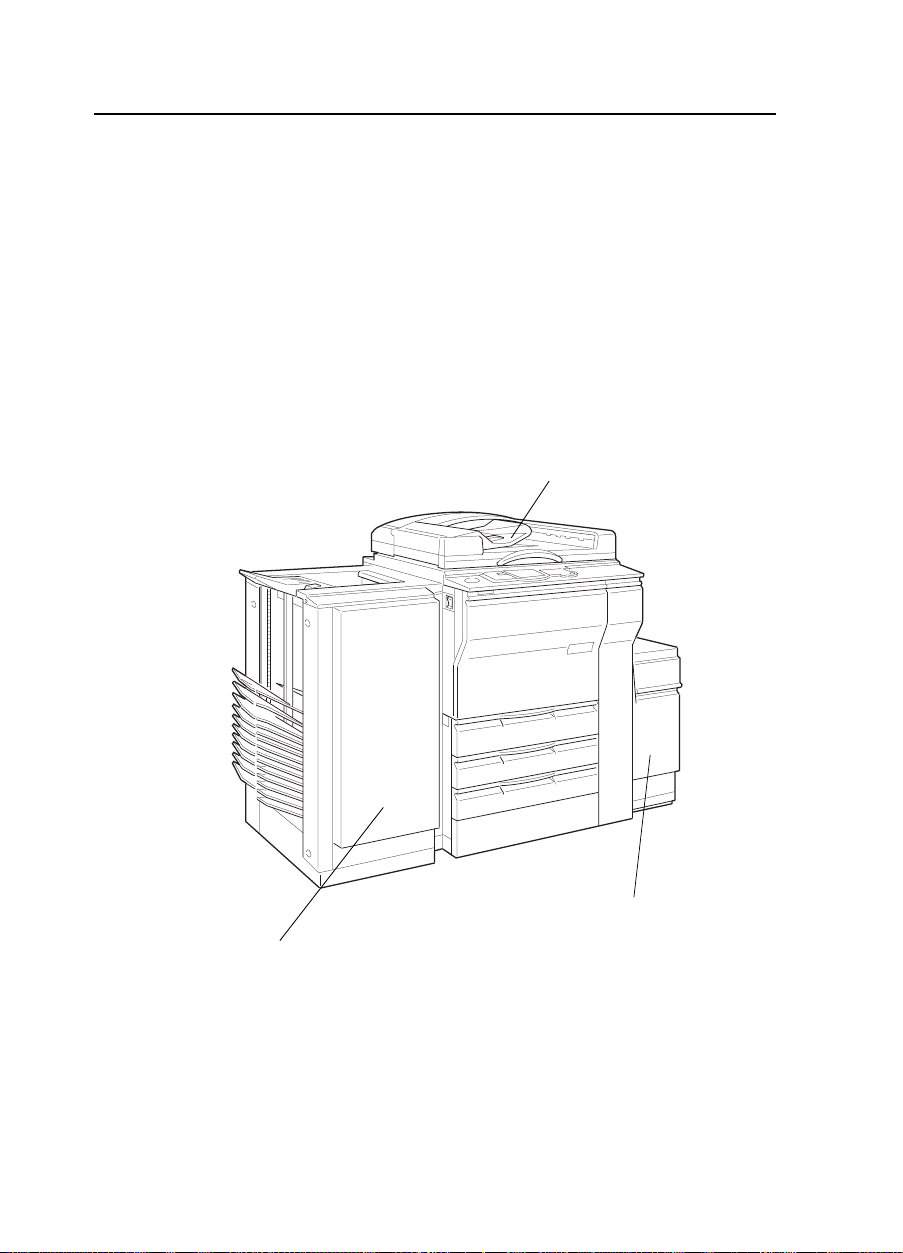
Options
This machine can be provided with the following options:
<Type 1 and 2>
DJF + S/S
DJF + S/S with Punch
DJF = Dual job fe eder
❐
S/S = Sorter stapler
Dual job feeder
Sorter stapler
Sorter stapler with Punch
6
3,500-sheet large capacity tray
Page 18
<Type 1 only>
RDH + Finisher
RDH = Recirculating document handler
❐
Finisher = Finisher
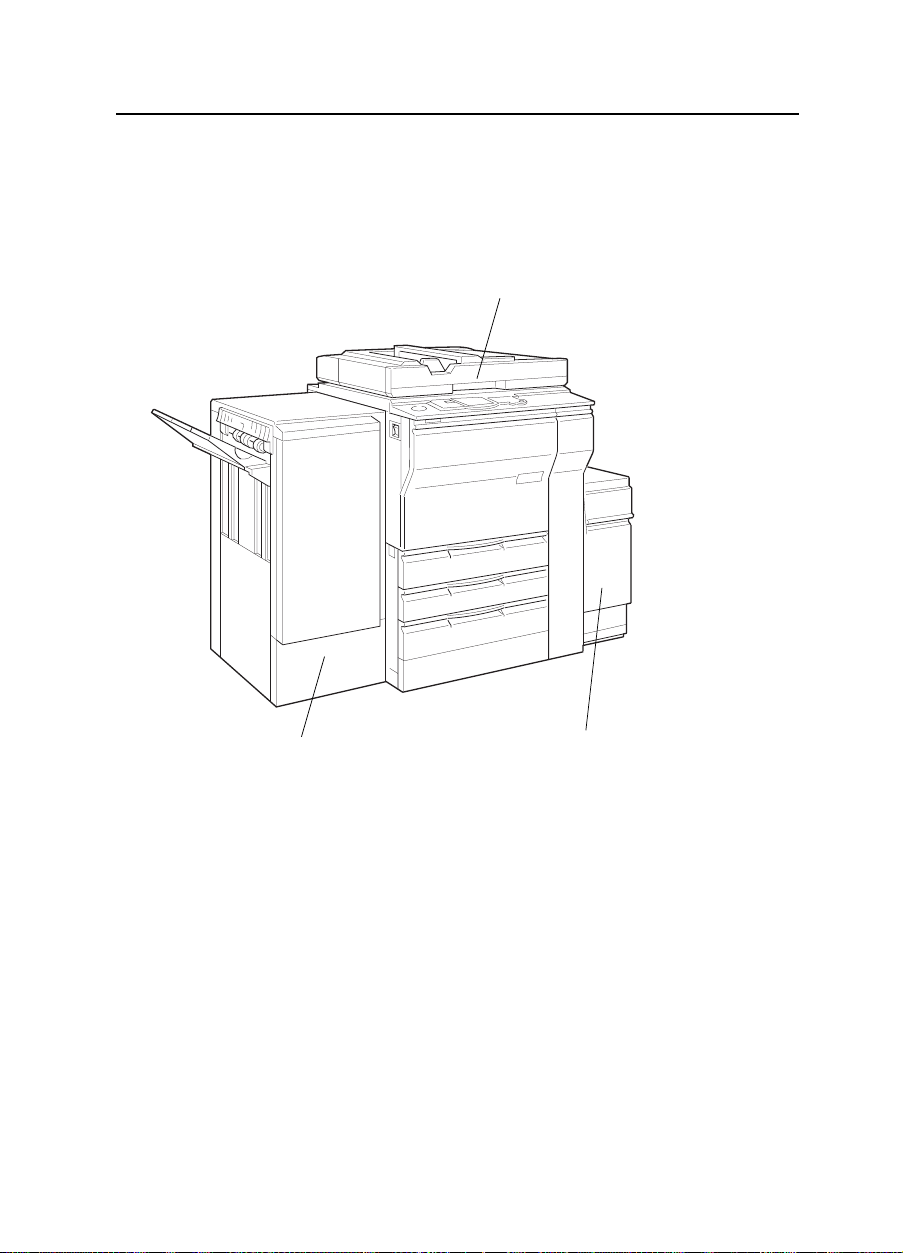
WHERE IT IS & WHAT IT IS
Recirculating document handler
Finisher
Other options: key counter, key counter bracket set
❐
3,500-sheet large capacity tray
7
Page 19

OPERATION UNIT
OPERATION UNIT
1
2
1. Brightness knob
2. Change Screen key
3. Program key
4. Guidance key
4
3
?
5
6
1
2
5
4
78
.
0
/
3
6
9
#
C/
9
Turn to adjust the brightness of the display.
Press to select Regular Screen or Casual
Screen. ☛ See page 30.
Press to select the program mode. ☛ See pages
63.
Press for help on functions. ☛ See page 31.
7
c
10
8
5. Touch panel display
6. Number keys
7. Interrupt key
8. Clear Modes key
9. Clear/Stop key
10. Start key
8
Operation status and messages appear here.
☛ See page 27.
Use to enter the desired number of copies or
data for selected functions.
Press to make interrupt copies during a copy
run. ☛ See page 65.
Press to clear the copier of previously entered
settings and functions.
Press to cancel the copy number entered. While
copying, press to stop copying.
Press to start copying.
Page 20
OPERATION UNIT
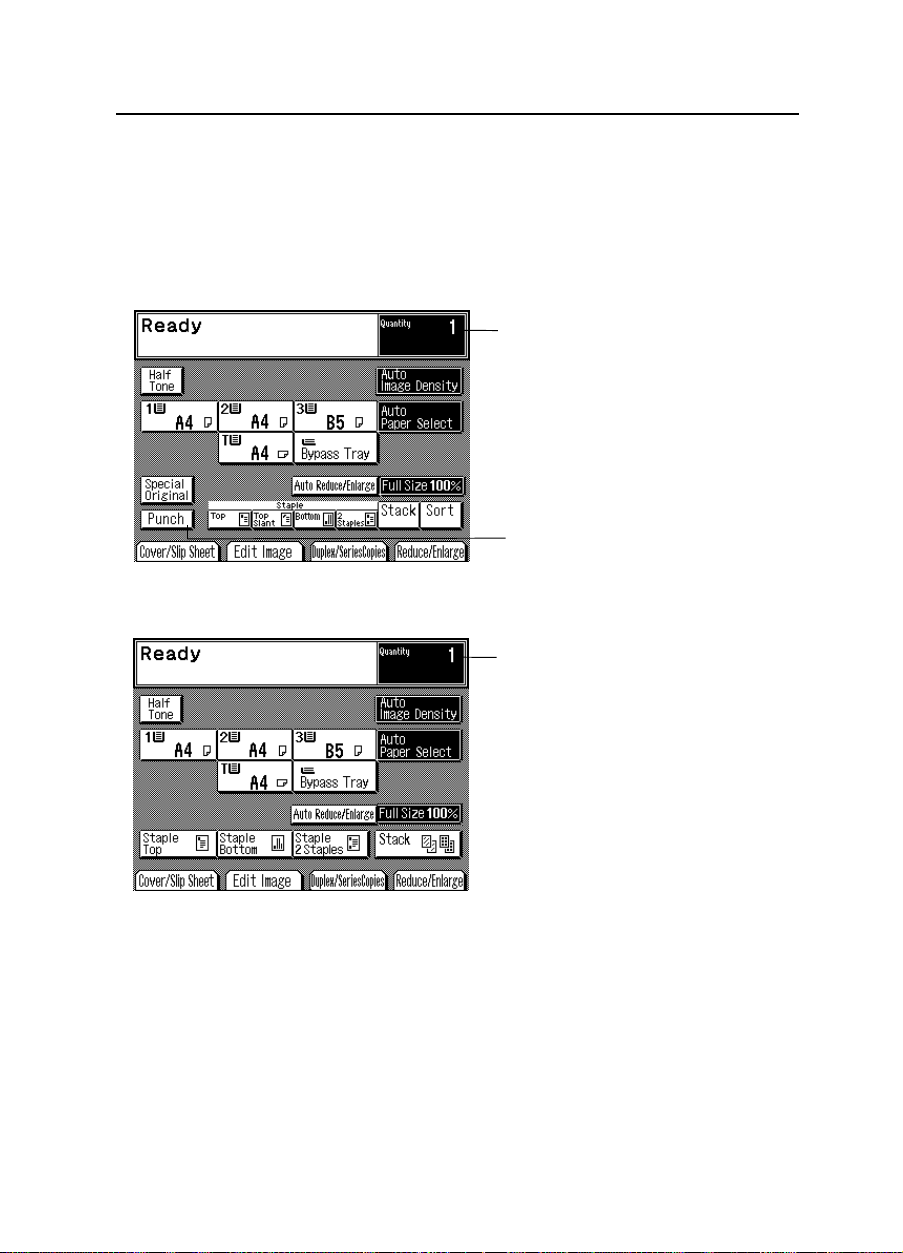
Touch Panel Display
Initial Display
Depending on the options that your machine is equipped with, the displays are
❐
different.
<DJF + S/S> <DJF + S/S with Punch>
COPY COUNTER
Indicates the number of copies
entered, and the number of copies
made.
*If your machine is equipped with
the sorter stapler, there is no
[Punch] key on the display.
<RDH + Finisher>
COPY COUNTER
Indicates the number of copies
entered, and the number of copies
made.
To operate the machine, touch the key you want to use. Instructions telling
you what to do next will then appear.
Regarding de tailed inform ation about each k ey and functio n, ☛ see page 10.
❐
For how to use the touch panel display, ☛ see page 27.
❐
You can chang e the displa y from Regu lar Scr een to Casual Screen. For details,
❐
☛
see page 30.
9
Page 21
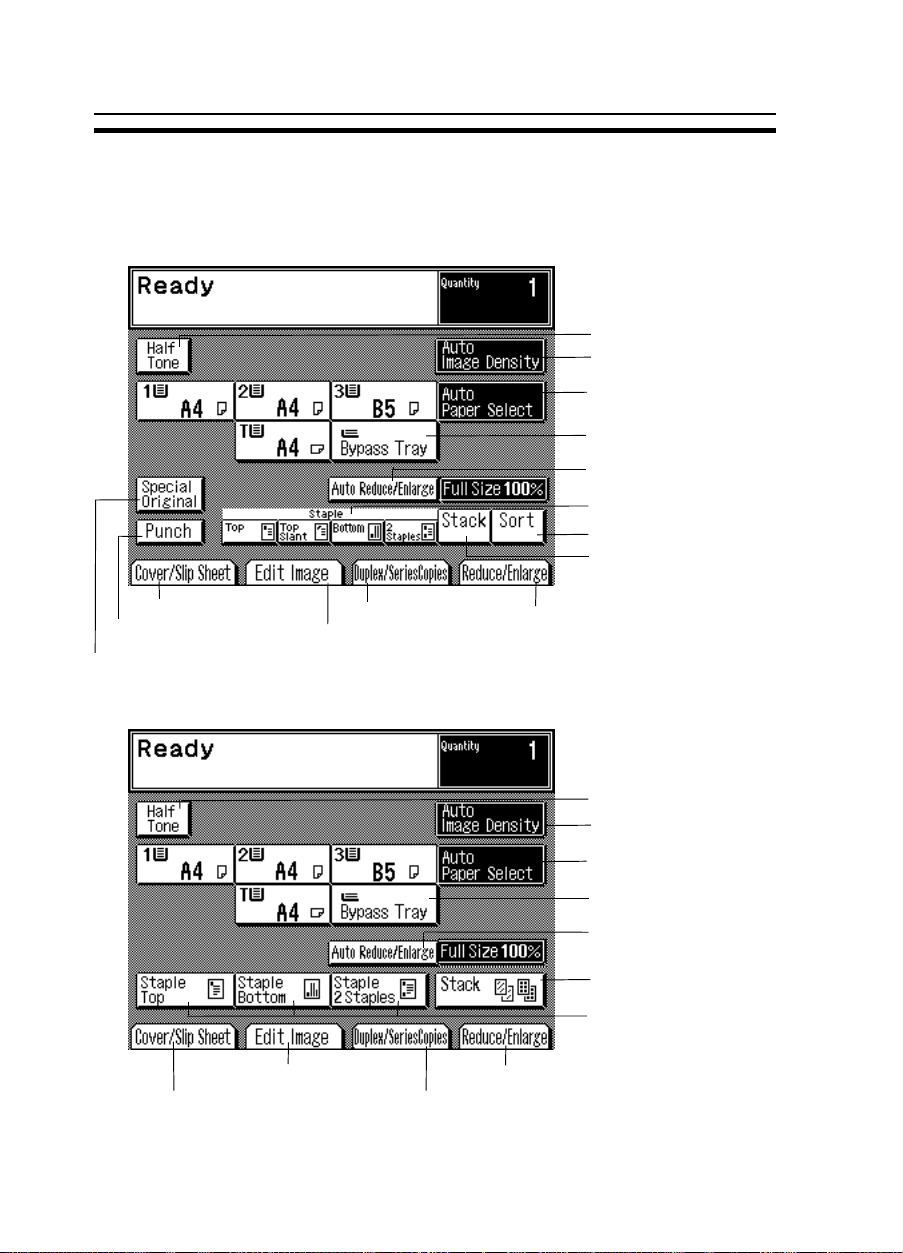
WHAT YOU CAN DO WITH THIS COPIER
WHAT YOU CAN DO WITH THIS COPIER
Regular Screen
<DJF + S/S> <DJF + S/S with Punch>
See page 100.
☛
See page 121.
☛
See page 46.
☛
☛
See page 72.
☛
See page 90.
☛
☛
☛
☛
☛
☛
☛
☛
See page 68.
☛
See page 56.
See page 56.
See page 57.
See page 61.
See page 60.
See page 116.
See page 110.
See page 113.
<RDH + Finisher>
See page 100.
☛
10
See page 90.
☛
See page 68.
☛
See page 72.
☛
See page 56.
☛
See page 56.
☛
See page 57.
☛
See page 61.
☛
See page 60.
☛
See page 113.
☛
See page 116.
☛
Page 22

Casual Screen
<DJF + S/S> <DJF + S/S with Punch>
See page 110.
☛
<RDH + Finisher>
WHAT YOU CAN DO WITH THIS COPIER
See page 56.
☛
See page 56.
☛
See page 57.
☛
See page 61.
☛
See page 68.
☛
See page 72.
☛
See page 116.
☛
Regular Screen and Casual Screen, ☛ See page 30.
❐
See page 56.
☛
See page 56.
☛
See page 56.
☛
See page 61.
☛
See page 68.
☛
See page 72.
☛
11
Page 23
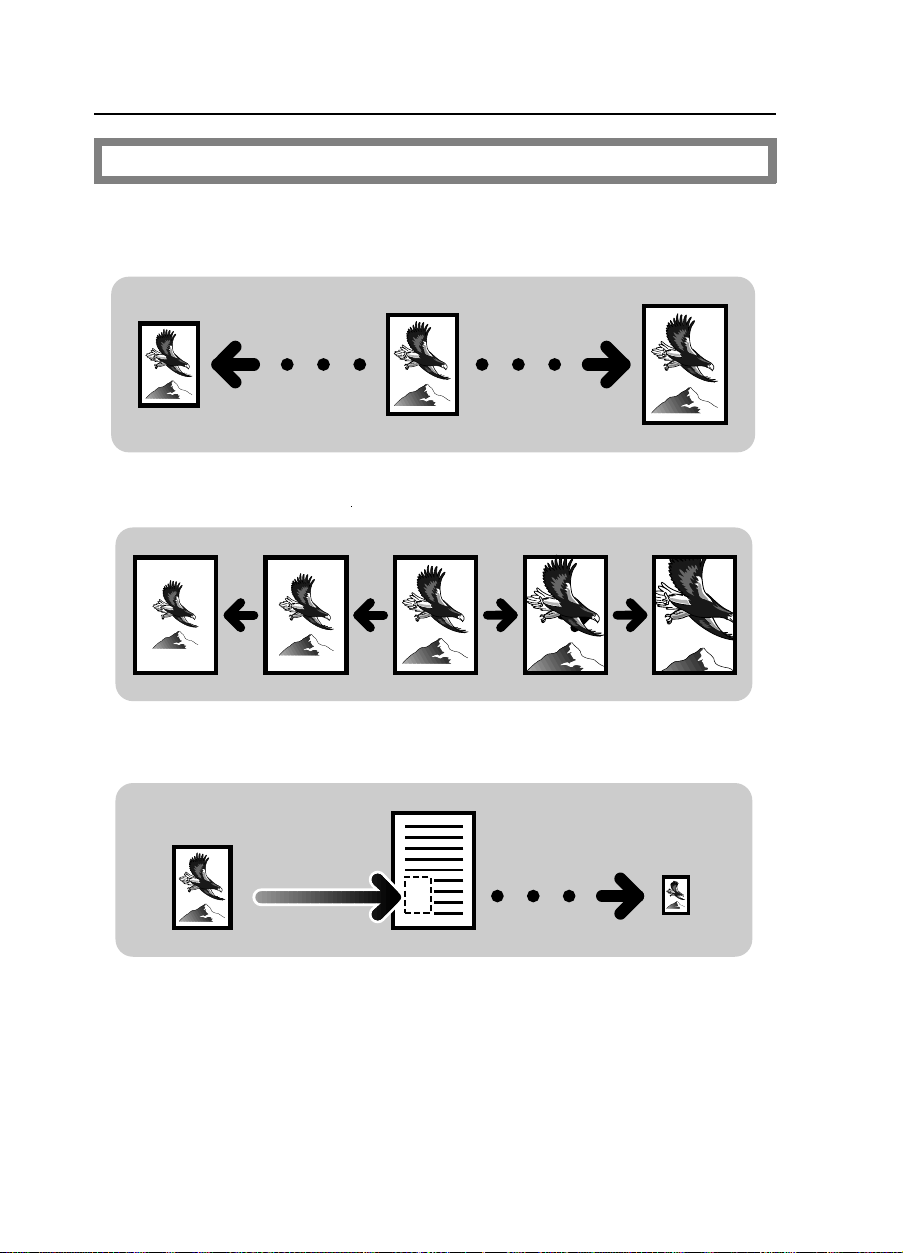
WHAT YOU CAN DO WITH THIS COPIER
Reducing And Enlarging
☛
Reducing and enlarging using preset ratios (Preset R/E)
Reducing and enlarging in 1% steps (Zoom)
See page 68.
Fitting the original to a copy of a different size (Size Magnification)
12
Page 24
WHAT YOU CAN DO WITH THIS COPIER
Working With Both Sides Of Originals And Copies
See page 72.
☛
Making two-sided copies from one-sided originals (Duplex, 1 Sided
Originals → 2 Sided Copy)
Making two-sided copies from two-sided originals (Duplex, 2 Sided
Originals → 2 Sided Copy)
Making two-sided copies from facing pages (Series Duplex, Single)
13
Page 25
WHAT YOU CAN DO WITH THIS COPIER
Making two-sided copies from a book (Series Duplex, Multi)
Making one-sided copies from facing pages (Series Copies, Book → 1
Sided Copy )
Making one-sided copies from two-sided originals (Series Copies, 2
Sided Originals → 1 Sided Copy)
Combining two originals (Combine, Combine 2 Originals)
14
Page 26
WHAT YOU CAN DO WITH THIS COPIER
Combining four originals (Combine, Combine 4 Originals)
Editing The Copy Image
See page 90.
☛
Erasing part of original image
- Save Area
- Delete Area
15
Page 27
WHAT YOU CAN DO WITH THIS COPIER
- Erase Border
- Erase Center and Border
Centering the copy image (Centering)
16
Page 28
WHAT YOU CAN DO WITH THIS COPIER
Adding margins for binding (Margin Adjustment)
Adding Or Inserting Sheets
Copying or adding a front cover (Front Cover)
See page 100.
☛
- Copying
- Adding
17
Page 29
WHAT YOU CAN DO WITH THIS COPIER
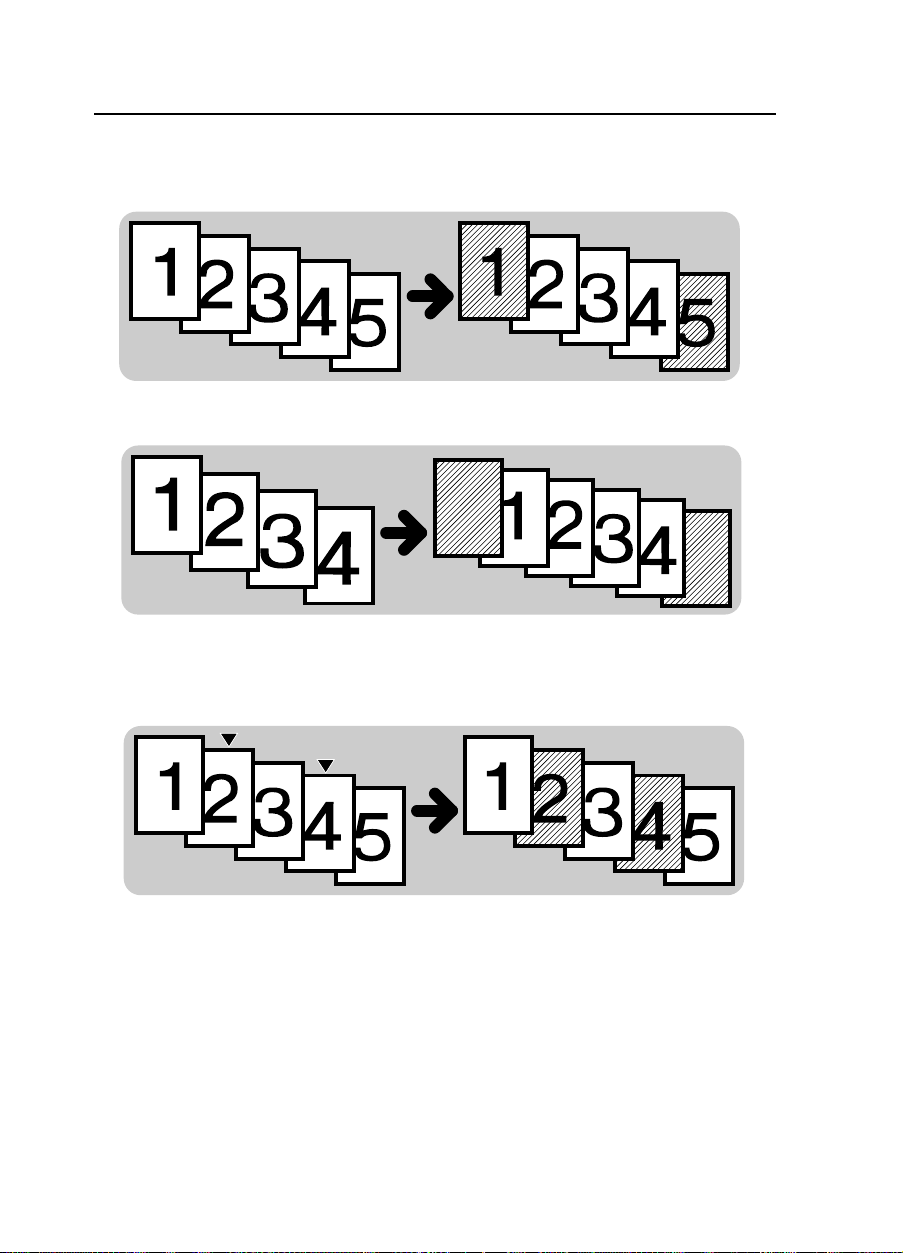
Copying or adding front and back covers (Front/Back)
- Copying
- Adding
Copying designated pages of originals onto slip sheets (Paper Designate)
18
Page 30

WHAT YOU CAN DO WITH THIS COPIER
Copying or inserting slip sheets (OHP Slip Sheet)
- Copying
- Inserting
19
Page 31

WHAT YOU CAN DO WITH THIS COPIER
Finishing (Option)
Sorting into sets (Sort)
Stacking together all copies of a page (Stack)
See page 110.
☛
Stapling copies (Staple)
20
Page 32

Punching copi es (Pun ch)
- 2 holes version
- 3 holes version
WHAT YOU CAN DO WITH THIS COPIER
21
Page 33

WHAT YOU CAN DO WITH THIS COPIER
22
Page 34

BASICS
STARTING THE COPIER........................................................................................... 24
When The Main Switch Is In The Stand-by Position...................................................................... 24
When The Touch Panel Display Is Off............................................................................................ 25
When The Copier Is Set For User Codes........................................................................................ 25
When The Copier Has Been Turned Off By The Weekly Timer .................................................. 26
USING THE TOUCH PANEL DISPLAY ...................................................................... 27
Selecting Functions .......................................................................................................................... 27
Checking The Functions You Have Selected............................................................................... 28
Entering Numbers............................................................................................................................. 29
Regular Screen and Casual Screen ............................................................................................. 30
GETTING HELP ON THE DISPLAY ...........................................................................31
Seeking Guidance In The Stand-by Condition ............................................................................ 31
Seeking Guidance While Entering Copy Job Settings................................................................ 32
BASICS
23
Page 35

9
78
STARTING THE COPIER
STARTING THE COPIER
When The Main Switch Is In The Stand-by Position
Turn on the main switch.
1
Wait for the copier to warm-up.
2
During the warm-up period (less
than 5 minutes), the Start key is
red.
After warm-up, the copier goes
3
into the ready condition and the
Start key lights green.
.
0
/
#
C/
24
Page 36

STARTING THE COPIER
When The Touch Panel Display Is Off
The copier is in Low Power mode.
Stand in front of the auto-response sensor to return to the ready condition.
For details about Low Power mode, ☛ see page 146 .
❐
When The Copier Is Set For User Codes
Input your user code (6 digits)
using the Number keys. Then
touch the [#] key.
❐
To prevent others from making copies using your user code, press the
Clear/Stop
multaneously after copying.
❐
The copier returns in User Code
mode after your job is finished, after
the selected time. This time can be
changed with User Tools. ☛ see
page 147.
❐
For details ab out user codes, ☛ see
page 152.
❐
If you input the wrong user code,
press the
the code again.
Clear Modes
and
Clear/Stop
key si-
key and input
BASICS
25
Page 37

STARTING THE COPIER
When The Copier Has Been Turned Off By The
Weekly Timer
Press the Clear Modes key to
turn the copier back on.
❐
For details abou t the weekl y timer,
☛
see page 154.
❐
The copier will turn itself back off
again 30 min utes l ater.
1
4
3
2
5
6
c
26
Page 38

USING THE TOUCH PANEL DISPLAY
Selecting Functions
USING THE TOUCH PANEL DISPLAY
On the touch panel display, you can find keys, instructions and messages.
By touching keys on the display, you can select or deselect functions and
enter data for the selected modes. If you make a mistake and wish to clear
the current settings, press the Clear Modes key.
The following samples are the displays of the copier that is equipped with DJF
❐
+ S/S with Punch.
Messages and instructions appear
here.
Keys that have been selected.
Keys that have the option of being selected.
Keys that do not have the option of
being selected are screened.
In this manual, keys on the display are indic ated as follows:
Example:
Key on the display:
BASICS
In the manual: [Auto Paper Sel ect] key
Note: Do not press the touch panel display with any hard or sharp object
(pen, pencil, etc.) Always use your fingers or something with a soft tip.
27
Page 39

USING THE TOUCH PANEL DISPLAY
Checking The Functions You Have Selected
When you choose one or more copy settings, the last item you selected will
remain on the screen.
To check all the settings you have chosen so far, touch the [Check Modes]
key.
To change the settings you have chosen, touch the [Change Modes] key.
[Check Modes] key
[Change Modes] key
Touching the [Check Modes] key
28
[Prev.] key
Touch to go back to the last display.
Page 40

USING THE TOUCH PANEL DISPLAY
Entering Numbers
When the display prompts you to enter a number, ty pe it in with the Number keys and touch the [#] key on the display to accept it.
Should you make a mistake:
• If you have not touched the [#] key yet, touch the [Clear] key and then
r e-enter it. If the [Clear] key is not on the display, press the Clear/Stop
key.
• If you have already touched the [#] key, touch the item you wish to
c hange on the display and re-enter the number with the Number keys.
Touch the [#] key on the display to accept it.
BASICS
29
Page 41

USING THE TOUCH PANEL DISPLAY
Regular Screen and Casual Screen
Press the Change Screen key to
switch between Regular and Casual
Screens.
?
Regular Screen
When you select Casual Scr een, you can not use the foll owing fun ctions:
❐
• Cover/Slip Sheet
• Edit Image
• Zoom, Siz e Magnific ation
• Seri es Du plex ( Single )
• S eries C opies (Book → 1 Sided Copies, 2 Sided Original → 1 Sided Copies)
• Combine (Combine 2 Orig inals, Comb ine 4 Original s)
• Preset
• Stack (Option)
• Special Original
Regular Scr een is selected by defaul t. You can change this se tting with User
❐
Tools. ☛ See page 149.
Which folder (Sort/Staple, Duplex, or Reduce/Enlarge) is open on Casual
❐
Screen by de fault can be chang ed with the U ser To ols. ☛ See page 150.
When you ch ange from C asual Scr een to Regu lar Scree n, the cop y settings o n
❐
Casual Scree n are reflected in Regula r Screen. But you change from Regular
Screen to C asual Screen, those on Regula r Screen are not r eflected in Ca sual
Screen.
Casual Screen
30
Page 42

GETTING HELP ON THE DISPLAY
GETTING HELP ON THE DISPLAY
Press the Guidance key when you want to know detailed information about
functions you use. You can use this key in the Stand-by condition or when
entering settings for a copy job.
You cannot us e this function with Casual S creen. If you want to use i t, select
❐
Regular Sc reen by pres sing t he
Seeking Guidance In The Stand-by Condition
Press the Clear Modes key then
1
the Guidance key.
Change Screen
3
6
9
key.
?
c
BASICS
Touch the key you want to know
2
about on the touch panel display.
31
Page 43

GETTING HELP ON THE DISPLAY
Seeking Guidance While Entering Copy Job
Settings
Press the Guidance key.
1
?
❐
The information about functions you
are trying to use will be displa yed on
the touch panel di splay.
32
Page 44

COPY PAPER AND
TONER
COPY PAPER .......................................................................................................... 34
Available Paper Sizes ......................................................................................................................34
Non-recommended Copy Paper.................................................................................................. 35
Notes For Copy Paper..................................................................................................................... 35
Paper Storage .................................................................................................................................. 36
TONER..................................................................................................................... 37
Notes For Toner................................................................................................................................. 37
Toner Storage ................................................................................................................................... 37
COPY PAPER AND TONER
33
Page 45

COPY PAPER
COPY PAPER
Available Paper Sizes
You can change the paper si ze of the 2n d feed sta tion by yours elf, ☛ see page 142.
❐
If you want to chan ge the paper size of 1st or 3rd (Type 1 only) feed stations,
❐
contact your se rvice repr esentativ e.
Paper
Feed
Station
1st paper
feed station
(550 sheets)
2nd paper
feed station
(550 sheets)
<Type 1 only>
3rd paper
feed station
(550 sheets)
Bypass feed
tray
Optional larg e
capacity tray
(3,500 sheets)
;:;:;:;:;:
A3
B4
A4
B5
A5
B6
A6
11" x 17"
8
" x 14"
1/2
8
" x 11"
1/2
8
" x 13"(F4)
1/2
8" x 10
8" x 10"
8" x 13" (F)
8
" x 13"
1/4
10" x 14"
11" x 15"
5
" x 8
1/2
❍: can be used for metric version machines.
●: can be used for inch version machines.
✿: can be set by your service representative for metric version machines.
❀: can be set by your s ervice representative for inch v ersion machines.
❍❍❍❍
❍❍❍❍
❍❍❍❍❍❍❍❍ ❍●
❍❍❍❍❍❍❍❍ ❍●
❍❍✿❍❍❍❍❍
❍
❍
●●●●
●●●●
●●●❍●●●●● ❍●
●❍●●
●●●●●
"
1/2
●●●●●
●●●❍●
●❍●●
●●●●
●●●●
●●❀●●●●● ❍
"
1/2
34
Page 46

COPY PAPER
Non-recommended Copy Paper
Copy paper of the types or in the conditions listed below is not recommended for this copier.
• Folded, curled, creased, or damaged paper
• Torn paper
• Damp paper
• Perforated paper
• Paper with conductive or low electrical resistance such as carbon or
silver coating.
• Wavy paper
• Thermal paper, art paper
• Thin paper that has low stiffness
• Adhesive labels
• Stapled paper
Notes For Copy Paper
Load paper with th e copy side
❐
in the optional large capacity tray and the bypass feed table. If copies are
up
curled, tr y turning the copy p aper over in the tr ay. If there is no impr ovement,
change to copy paper with less curl.
Correct curls in copy paper before loading.
❐
Fan copy paper to get air between the sheets before loading.
❐
Post cards, OHP tran sparencies, tran slucent paper, an d adhesive labels sh ould
❐
be set in the bypass feed table.
OHP transpare ncies, translucent paper, and adhesive labe ls should be fanned
❐
to get air betwee n the sheets before loadi ng.
Do not touc h copy pap er if your fingers are wet or o ily; fing er prin ts may app ear
❐
on the copy.
in the paper trays, and with the copy side
down
COPY PAPER AND TONER
35
Page 47

COPY PAPER
Paper Storage
Paper should always be stored properly. Improperly stored paper might
result in poor image reproduction, creased copies, and paper misfeeds.
Generally, avoid curling and absorption of moisture.
Avoid stor ing paper in hum id areas. Unde r high tempera ture and high humidity,
❐
or low temperat ure and low hu midity con ditions, store paper in a vinyl bag.
Do not stor e pape r where it w ill be e xpos ed to he at.
❐
Store on a flat sur face.
❐
Use older stock firs t.
❐
Do not lay heavy objects on paper.
❐
Keep open reams of paper in the package, and store as you would unopened
❐
paper.
When you don’t use copy paper for a long time, store paper in a vinyl bag.
❐
36
Page 48

TONER
Note: If you want to add toner, ☛ see page 133.
Notes For Toner
R
WARNING:
•
Do not inciner ate used tone r or toner cont ainers. To ner dust migh t
ignite when exposed to an open flame. Dispose of the used toner
containers according to local regulations for plastics.
•
Do not eat or swallow toner.
•
Keep toner or toner containers out of reach of children.
Do not use used toner. This will damage the c opier.
Note:
When adding toner, do not turn off the main switch. If you do, your copy set-
❐
tings are cleared.
TONER
COPY PAPER AND TONER
Toner Storage
Store toner bot tles in a cool , dark plac e.
❐
Never store toner where it will be ex posed to hea t.
❐
Do not lay heavy ob jects on toner bottles.
❐
37
Page 49

TONER
38
Page 50

ORIGINALS
RECOMMENDED ORIGINALS AND NON-RECOMMENDED ORIGINALS.............40
Recommended Originals................................................................................................................ 40
Non-recommended Originals ........................................................................................................40
Notes For Originals ........................................................................................................................... 41
SETTING ORIGINALS ON THE EXPOSURE GLASS .................................................. 42
SETTING ORIGINALS IN THE DUAL JOB FEEDER ...................................................43
Setting A Stack Of Originals (ADF mode/ARDF mode) .............................................................. 43
Setting One Original At A Time (SADF mode).............................................................................. 44
Setting Special Originals.................................................................................................................. 46
SETTING ORIGINALS IN THE RECIRCULATING DOCUMENT HANDLER ................ 51
Setting Originals................................................................................................................................ 51
39
ORIGINALS
Page 51

RECOMMENDED ORIGINALS AND NON-RECOMMENDED ORIGINALS
RECOMMENDED ORIGINALS AND
NON-RECOMMENDED ORIGINALS
Recommended Originals
Regarding or iginals th at the dual job fe eder can ha ndle, ☛ See page 172 .
❐
Regarding or iginals that th e recirculating document handler can handle, ☛ See
❐
page 178.
Non-recommended Originals
Note: The following types of originals are not recommended for use with the
dual job feeder and the recirculating document handler. Place them
directly on the exposure glass.
- Dual job feeder and recirculating document handler
Paper with any k ind of coati ng (suc h as c arbon ) on the back
❐
Folded, curl ed, creased , or damage d originals
❐
Mailing labels, or perforated originals
❐
Bound, stapled , or clippe d originals
❐
OHP transparencies
❐
Translucen t paper
❐
Pasted orig inals
❐
Damp original s
❐
Sticky orig inals
❐
Wavy originals
❐
Originals that are not made from paper
❐
Originals wri tten in penc il on both sid es, or two- sided carbo n origina ls
❐
Thermal fax paper , CRO (c amera read y origi nals) or a luminu m foil
❐
Books, pamph lets, and book lets
❐
40
Page 52

RECOMMENDED ORIGINALS AND NON-RECOMMENDED ORIGINALS
- Dual job feeder
Originals thicke r than 128 g/m2, 34 lb
❐
Originals thin ner than 40 g/m2, 11 lb
❐
Originals betwee n 40 and 52 g/m2, 11 and 14 lb, Thin Paper mode should be
❐
set. ☛ See page 50.
Originals thicke r than 105 g/m2, 28 lb in Duplex mode
❐
Originals thin ner than 52 g/m2, 14 lb in Du plex m ode
❐
Originals lar ger tha n A3, 1 1" x 17"
❐
1/2
Originals smalle r than B6, 5
❐
" x 8
1/2
"
- Recirculating document handler
Originals thicke r than 105 g/m2, 28 lb
❐
Originals thin ner than 52 g/m2, 14 lb
❐
Originals lar ger tha n A3, 1 1" x 17"
❐
1/2
Originals smalle r than A5 ;, 5
❐
" x 8
1/2
"
;
Notes For Originals
Leading and side edges of origi nals are no t copied as sh own in the il lustratio n.
❐
1 sided copy
a = 3.5 ± 2.5 mm, b1 + b2 ≤ 5 mm
Back side of 2 sided copy
(in 1 sided originals to 2 sided copy mode)
When full size copying:
±
*a = 8.5
When reducing or enlarging:
a
* As a right margin of 5 mm, 0.2" is set on the
back side automatically, the value "*a" is 8.5
±
3 mm. If you want to change this margin,
touch the
[Margin Adj.]
3 mm, b1 + b2 ≤ 5 mm
≤
4 mm, b1 + b2 ≤ 5 mm
[Edit Image]
key.
key, then touch the
☛
See page 90.
ORIGINALS
41
Page 53

SETTING ORIGINALS ON THE EXPOSURE GLASS
SETTING ORIGINALS ON THE EXPOSURE
Confirm that no originals are set
1
in the dual job feeder or the recirculating document handler.
Lift the platen cover, the dual job
2
feeder, or the recirculating document handler.
❐
The illustration shows the dual job
feeder.
GLASS
Set the original
3
exposure glass. The original
should be aligned to the rear left
corner.
Lower the platen cover, the dual
4
job feeder, or the recirculating
document handler.
face down
on the
42
Page 54

SETTING ORIGINALS IN THE DUAL JOB FEEDER
SETTING ORIGINALS IN THE DUAL JOB FEEDER
❐
While origin als are fed fro m the original t able to the exp osure glass, do not pull
them out.
❐
Do not lift the dua l job feeder until the or iginals have been complete ly fed out.
❐
If you want to set originals of different sizes at the same time, set Mixed Sized
mode. ☛ See page 47.
❐
If you set originals between 40 and 52 g/m2, 11 and 14 lb, set Thin Paper
mode. ☛ See page 50.
❐
Translucent paper should be used in Thin Paper mode.
❐
Do not press any parts of the dua l job feeder st rongly.
Setting A Stack Of Originals (ADF mode/ARDF
mode)
You can insert a stack of originals (one-sided or two-sided) of the same size
into the dual job feeder. These originals are individually fed onto and
removed from the exposure glass.
❐
You can sti ll use original s that are no t recommended for this mode. Fir st make
a set of copies of the originals by positioning them directly on the exposure
glass , then use th ese copies as origina ls.
.
Correct any curl, fold, or crease
1
in the originals before setting the
originals.
.
Confirm that the Insert Original
2
indicator is lit and the exposure
glass is clear of originals.
ORIGINALS
43
Page 55

SETTING ORIGINALS IN THE DUAL JOB FEEDER
.
Adjust the original guide to the
3
original size.
Set the originals
4
dual job feeder until the Insert
Original indicator goes off.
❐
The last page should be on the bottom.
❐
The original guide should touch the
front side of the originals.
❐
Do not stack originals ab ove the limit
mark.
face up
into the
Setting One Original At A Time (SADF mode)
You can insert one original at a time in the dual job feeder. The original is
automatically fed onto and removed from the exposure glass.
.
Correct any curl, fold, or crease
1
in the originals before setting.
.
Confirm that the Insert Original
2
indicator is lit and the exposure
glass is clear of originals.
44
Page 56

.
Adjust the original guide to the
3
original size.
.
Set the original
4
Insert Original indicator goes off.
❐
If you are copying a stack of origin als
one sheet at a time and you want to
keep them i n order, st art with the last
page of the originals.
❐
The original guide must touch the
front side of the or iginal.
.
Press the Start key.
face up
5
SETTING ORIGINALS IN THE DUAL JOB FEEDER
until the
.
While the Auto Feed indicator is
6
lit after an original is fed, set the
next original. The original is automatically fed and copied.
❐
While the
for about 5 seconds after th e original
is fed, the du al job feede r is rea dy for
another original. You can change this
time using the User Tools. ☛ See
page 147.
Auto Feed
indicator is lit
ORIGINALS
45
Page 57

SETTING ORIGINALS IN THE DUAL JOB FEEDER
Setting Special Originals
By touching the [Special Original]
key and selecting the following
modes, you can set different sized
originals, a pasted original, or thin
originals into the dual job feeder.
[Special Original]
key
• Mixed Sizes mode: You can set originals with different widths and lengths
together. ☛ See page 47.
• Pasted Original mode: You ca n s e t a pa s te d o r ig in a l. ☛ See page 48.
• Thin Paper mode: You can set thin originals. ☛ See page 50.
• Quiet Feed mode: When you use Mixed Sized mode, Pasted Original
mode, or Thin Paper mode, you can reduce the noise
of feeding by setting Quiet Feed mode as well.
❐
You cannot use Mixed Sized mode and Pasted Original mode together.
❐
Translucen t paper shoul d be used in Thi n Paper mode .
46
Page 58

SETTING ORIGINALS IN THE DUAL JOB FEEDER
Setting different sized originals (Mixed Sizes mode)
❐
You can use the following sizes:
Metric version: A3 ;, B4 ;, A4 ; :, B5 ;
Inch version: 11" x 17" ;, 8
Touch the [Special Original]
1
key.
Touch the [Mixed Sizes] key,
2
then touch the [Exit] key.
❐
You can also set Quiet Feed mode.
Correct any curl, fold, or crease
3
in the originals before setting.
Adjust the original guide to match
4
the widest original.
1/2
" x 14" ;, 8
:
1/2
" x 11"
;
Set the originals
5
Insert Original indicator goes off.
❐
Originals must be aligned to the re ar
left corner of the dual job feeder as
shown in t he ill ustra tion.
Press the Start key.
face up
6
until the
ORIGINALS
47
Page 59

SETTING ORIGINALS IN THE DUAL JOB FEEDER
Setting a pasted original (Pasted Original mode)
In this mode, you can set a pasted original into the dual job feeder.
❐
In this mode, set one original at a time.
❐
By setting Quiet Feed mode, you can reduce the noise of feeding.
❐
Always paste or tape origin als on all s ides as shown in the illust ration.
Non-recommended Recommended
Touch the [Special Original]
1
key.
Touch the [Pasted Orig.] key,
2
then touch the [Exit] key.
❐
You can al so set Qu iet Fe ed mod e.
Correct any curl, fold, or crease
3
in the originals before setting.
Adjust the original guide to match
4
the original size.
48
Page 60

SETTING ORIGINALS IN THE DUAL JOB FEEDER
Set one pasted original
5
until the Insert Original indicator
goes off.
❐
The original guide must touch the
front side of the or iginal.
Press the Start key.
6
While the Auto Feed indicator is
7
lit after an original is fed, set the
next original. The original is automatically fed and copied.
❐
While the
for about 5 seconds after th e original
is fed, the du al job feede r is rea dy for
another original. You can change this
time using the User Tools. ☛ See
page 147.
Auto Feed
indicator is lit
face up
49
ORIGINALS
Page 61

SETTING ORIGINALS IN THE DUAL JOB FEEDER
Setting thin originals (Thin Paper mode)
When you set thin originals (paper weight: 40 ~ 52 g/m2, 11 ~ 14 lb) in the
dual job feeder, set Thin Paper mode.
❐
You can set Thin Pa per mode with Mi xed Size mode or Pasted Origi nals mode.
❐
In this mode, set one original at a time.
Touch the [Special Original]
1
key.
Touch the [Thin Pape r] key, then
2
touch the [Exit] key.
❐
You can al so set Qu iet Fe ed mod e.
Set one original
3
Insert Original indicator goes off.
❐
The original guide must touch the
front side of the original.
Press the Start key.
face up
4
50
until the
Page 62

SETTING ORIGINALS IN THE RECIRCULATING DOCUMENT HANDLER
SETTING ORIGINALS IN THE RECIRCULATING
DOCUMENT HANDLER
Setting Originals
❐
While origin als are fed fro m the original t able to the exp osure glass, do not pull
them out.
❐
Do not lift the r ecirculati ng document handler unti l the origi nals have been completely fed out.
❐
Do not move the or iginal gu ide and the fe ed-out unit until the orig inals has be en
completely fed out.
❐
You cannot set originals with different widths and lengths together.
❐
You can sti ll use original s that are no t recommended for this mode. Fir st make
a set of copies of the originals by positioning them directly on the exposure
glass , then use th ese copies as origina ls.
Correct any curl, fold, or crease
1
in the originals before setting.
Confirm that the Set Original in-
2
dicator is lit before setting the
originals.
❐
If it is not lit , confirm tha t the feed-ou t
unit and feed-in unit covers are
closed properly.
Confirm that no previous originals
3
remain on the exposure glass or
in the recirculating document
handler.
ORIGINALS
Adjust the original guides to the
4
original width.
51
Page 63

SETTING ORIGINALS IN THE RECIRCULATING DOCUMENT HANDLER
Set the originals
5
original stacker. The Set Original
indicator should turn off.
❐
Originals should be the same size.
Slide the feed-out unit to match
6
the size marks on the front side
of the recirculating document
handler.
face up
in the
52
Page 64

COPYING
BASIC COPYING....................................................................................................54
BASIC FUNCTIONS.................................................................................................56
Adjusting Copy Image Density ......................................................................................................56
Copying Half-tone Originals .......................................................................................................... 56
Selecting The Copy Paper Size ...................................................................................................... 57
Having The Copier Choose The Reproduction Ratios (Auto Reduce/Enlarge) ...................... 60
Copying From The Bypass Tray ......................................................................................................61
Storing Your Copy Settings In Memory (Program)....................................................................... 63
Other Functions ................................................................................................................................ 65
REDUCING AND ENLARGING ...............................................................................68
Reducing And Enlarging Using Preset Ratios (Preset R/E) ......................................................... 68
Reducing And Enlarging In 1% Steps (Zoom)............................................................................... 69
Fitting The Original To A Copy Of A Different Size (Size Magnification)................................... 71
WORKING WITH BOTH SIDES OF ORIGINALS AND COPIES (Duplex/Series Copies) .72
Making Two-sided Copies From One-sided Originals
(Duplex, 1 Sided Originals → 2 Sided Copy) ............................................................................... 72
Making Two-sided Copies From Two-sided Originals
(Duplex, 2 Sided Original → 2 Sided Copy) ............................................................................... 76
Making Two-sided Copies From Facing Pages (Series Duplex, Single) ................................... 77
Making Two-sided Copies From A Book (Series Duplex, Multi) ................................................. 79
Making One-sided Copies From Facing Pages (Series Copies, Book → 1 Sided Copies) .... 81
Making One-sided Copies From Two-sided Originals
(Series Copies, 2 Sided Original → 1 Sided Copies) ................................................................... 83
Combining Two Originals (Combine, Combine 2 Originals) ..................................................... 85
Combining Four Originals (Combine, Combine 4 Originals) .................................................... 87
ADDING MARGINS FOR BINDING (Margin Adjustment) ...................................90
Margins For One-sided Copying ................................................................................................... 90
Margin For Two-sided Copying ..................................................................................................... 91
EDITING THE COPY IMAGE (Edit Image).............................................................94
Erasing Part Of Original Image....................................................................................................... 94
Erasing The Surrounding Area Of The Original Image (Erase Border) .....................................97
Erasing The Center Margin And Surrounding Area Of The Original Image (Cent./Bord.) .... 98
Centering The Copy Image (Centering) ..................................................................................... 99
ADDING OR INSERTING SHEETS (Cover/Slip Sheet) ...........................................100
Copying Or Adding A Front Cover (Front Cover) ..................................................................... 100
Copying Or Adding Front And Back Covers (Front/Back) ...................................................... 102
Copying Designated Pages Of Originals Onto Slip Sheets (Paper Designate) .....................105
Copying Or Inserting Slip Sheets (OHP Slip Sheet) .....................................................................108
FINISHING ..............................................................................................................110
Sorting Into Sets (123, 123, 123) (Sort) .......................................................................................... 110
Stacking Together All Copies Of A Page (111, 222, 333) (Stack) ........................................... 113
Stapling Copies (Staple) ............................................................................................................... 116
Punching Copies (Punch) ............................................................................................................... 121
COMBINATION CHART .......................................................................................124
COPYING
53
Page 65

BASIC COPYING
BASIC COPYING
You can make copies that are the same size as your originals.
If your copier is equipped with RDH + Finisher, Sort mode is the default setting.
❐
If you want to use Sta ck mode or S taple mode, to uch the each key.
Set your original on the exposure glass, in the dual job feeder, or in the
1
recirculating document handler. ☛ See pages 42 ~ 52.
Enter the number of copies re-
2
quired using the Number keys.
To change the number entered,
❐
press the
the new number .
Clear/Stop
key, then enter
Confirm that the [Auto Paper Se-
3
lect] key is selected. If not, touch
the [Auto Paper Select] key, or
select the copy paper by touching
the key for copy paper.
Regarding Paper Selection, ☛ see
❐
page 57.
54
1
2
5
4
78
.
0
/
C/
3
6
9
#
c
Page 66

Make sure that the magnification
4
ratio is set to 100%. If not, touch
the [Full Size] key.
BASIC COPYING
Press the Start key.
5
To stop the copier during a multi-
❐
copy run, press the
Press the
❐
ing, or press the
again to clear the entered copy number.
Start
Clear/Stop
key to resume copy-
Clear/Stop
key.
key
78
.
0
/
C/
9
#
55
COPYING
Page 67

BASIC FUNCTIONS
BASIC FUNCTIONS
Adjusting Copy Image Density
To match the originals, adjust the image density.
Auto image density
If you select the [Auto Image
Density] key, the copier automat-
ically controls the image density.
Manual image density
If you require darker or lighter
copies, adjust the image density
yourself.
If the [Auto Image Density] key
is selected, touch it to cancel.
Then, touch the [Lighter] (left)
key to lower the image density.
Touch the [Darker] (right) key to
increase the image density.
Copying Half-tone Originals
Copy image from half-tone originals will be improved by selecting
this mode.
56
Page 68

BASIC FUNCTIONS
Selecting The Copy Paper Size
Copying from bypass tray, ☛ See page 61.
❐
Selecting the copy paper size manually
If the [Auto Paper Select] key is selected, touch it to cancel. You will see
the [Paper Selection] keys. Select
the paper tray you want to use.
Having the copier choose the paper size (Auto paper select)
The copier selects a suitable size of copy paper based on the original size
and the reproduction ratio.
Regarding functions that cannot be used together with this function, ☛ see
❐
page 124.
The special paper tray cannot be selected by Auto Paper Select. For more
❐
details, ☛ see page 148.
57
COPYING
Page 69

BASIC FUNCTIONS
- Example 1: When making full size copies
Make sure that the [Auto Paper
1
Select] key is selected. If not,
touch the [Auto Paper Select]
key.
Make sure that the magnification ratio is set to 100%. If not, touch the
2
[Full Size] key.
Set your originals.
3
Press the Start key. Suitable copy paper will be selected.
4
- Example 2: When making reduced copies
Example:
Metric version: original: A3, ratio: 71%
Inch version: original: 11" x 17", ratio: 65%
Make sure that the [Auto Paper
1
Select] key is selected. If not,
touch the [Auto Paper Select]
key.
58
Page 70

BASIC FUNCTIONS
Touch the [Reduce/Enlarge] key. If your machine is a metric version,
2
select 71%. If your machine is an inch version, select 65%.
Set your originals.
3
Press the Start key. Suitable copy paper will be selected.
4
59
COPYING
Page 71

BASIC FUNCTIONS
Having The Copier Choose The Reproduction
Ratios (Auto Reduce/Enlarge)
The copier can select the proper reproduction ratio based on the selected
paper size and the original size.
Regarding functions that cannot be used together with this function, ☛ see
❐
page 124.
Example:
;
Metric version: original: A3
Inch version: original: 11" x 17" ;, copy paper: 8
Touch the [Auto/Reduce En-
1
large] key.
, copy paper: A4
1/2
;
" x 11"
;
Set your originals.
2
.
Choose your copy paper size (e.g. A4 ;, 8
1/2
" x 11" ;).
3
Press the Start key. The original image is enlarged or reduced to fit the
4
selected copy paper.
60
Page 72

BASIC FUNCTIONS
Copying From The Bypass Tray
Use the bypass tray to copy onto paper that is not set in the paper tray.
OHP transpare ncies, adh esive labe ls, post c ards, and translucen t paper can be
❐
set into the bypa ss tray.
Regarding th e pape r siz es and direct ions t hat can be set , ☛ See page 34.
❐
Number of sheets that can be set at one time:
❐
Standard pape r: 50 sheets (80 g/m
OHP transpar encies: 20 shee ts
Adhesive lab els: 1 sheet
Translucen t paper: 1 sheet
Post card: 1 sheet
Correct curls in copy paper, OHP transparenc ies, adhes ive labels , post cards
❐
and transluc ent pa per b efore l oading .
OHP transparenc ies and tra nslucent paper shou ld be fanned to ge t air be-
❐
tween the sh eets b efore l oading .
Translucent paper should be fe d so tha t the paper g rain is or iented w ith the pa-
❐
per path.
When you set an original on the exposure glass, make sure the platen cover,
❐
the dual job feeder, or the recirculating document handler lowered. Or the back
side of the next copy paper might be dirty.
Regarding fu nctions th at cannot be used toge ther with th is functio n, ☛ See
❐
page 124.
2
, 20 lb)
Open the bypass tray.
1
Slide the paper guides to the pa-
2
per width.
If you use large size (more than A4
❐
11" x 8
the extender.
1/2
" ;) copy pap er, swing out
,
;
COPYING
61
Page 73

BASIC FUNCTIONS
Insert the copy paper.
3
Make sure the [Bypass tray] key
4
is selected on the display. If not,
touch it.
Set your originals.
5
Press the Start key.
6
62
Page 74

BASIC FUNCTIONS
Storing Your Copy Settings In Memory (Program)
You can store up to five frequently used copy job settings in machine
memory, and recall them for future use.
The following functions can be stored:
❐
• Image Density
• Paper size
• Au to Redu ce/En large
• Sort/Stack/Staple/Punch mode
• Reducing and Enlarging mode
• Dupl ex/Serie s Copies mode
• Edit Image mode
• Cover/Slip Sheet mode
Special Orig inal m ode
•
You can set Program 5 is selected by default with th e User Tools. ☛ see page
❐
149.
Storing Your Settings
Set the copy settings you want to
1
put into memory.
Press the Program key.
?
2
Touch the [Store program] key.
33
Select the program number you
4
want to store the settings in.
Already progra mmed keys are show n
❐
cross-hatched.
COPYING
63
Page 75

BASIC FUNCTIONS
Recalling Your Settings
Press the Program key.
1
Make sure that the [Recall pro-
2
gram] key is selected.
Select the program number you
3
want to recall.
Already programmed keys are shown
❐
cross-hatc hed.
?
64
Page 76

BASIC FUNCTIONS
Other Functions
Temporarily Stopping One Job To Copy Something Else
(Interrupt Copying)
Use the Interrupt key to interrupt a multi-copy run to make urgently needed
copies.
Regarding functions that cannot be used together with this function, ☛ see
❐
page 124.
Press the Interrupt key. The cop-
1
ier will stop the copy run and
store the present settings in the
memory. The copier will return to
the ready condition.
Remove the previous original. Set your originals for interrupt copying.
1
4
3
2
5
6
c
2
Make your copies.
3
After interrupt copying is completed, press the Interrupt key again. The
4
copier will recall the previous c opy settings.
Reset the previous original and press the Start key to resume the
5
previous run.
COPYING
65
Page 77

BASIC FUNCTIONS
Entering Copy Job Settings During The Warm-up Period
(Auto Start)
If you press the Start key during the warm-up period, the Start key will
blink, and your copies will be made as soon as warm-up finishes .
Set your originals.
1
Set your copy settings during
2
warm-up period.
Press the Start key.
3
To cancel Auto Start, press the
❐
Clear/Stop
key.
78
.
0
/
C/
9
#
66
Page 78

BASIC FUNCTIONS
Presetting copy jobs during the copy run (Preset)
You can set the copy settings for your next job. The copier will start the next
copy job after the current job is completed.
Note: This function can be used only when your machine is equipped
with the optional dual job feeder.
Regarding functions that cannot be used together with this function, ☛ see
❐
page 124.
Touch the [Preset] key.
1
Set the copy job settings for your
2
next job.
Touch the [Exit] key.
3
Set the originals for your next job
4
on top of the originals being copied following the instructions on
the display.
Push in the originals completely, but
❐
do not insert too st rongly.
Touch the [Exit] key.
5
After the first job is finished, the next
❐
job will s tart au tomati cally.
To change or canc el the preset copy
❐
jobs, touch the
low the instruc tions on the display.
[Preset]
key and fol-
COPYING
67
Page 79

REDUCING AND ENLARGING
REDUCING AND ENLARGING
Regarding functions that cannot be used together with this function, ☛ see
❐
page 124.
Reducing And Enlarging Using Preset Ratios
(Preset R/E)
Touch the [Reduce/Enlarge]
1
key.
Make sure that the [Preset R/E]
2
key is selected. Then, select the
preset reducing ratios.
Set your originals.
3
Press the Start key.
4
68
Page 80

REDUCING AND ENLARGING
Reducing And Enlarging In 1% Steps (Zoom)
You can change the reproduction ratio from 50% to 200% in 1% steps.
Using the [+] [-] key
Touch the [Reduce/Enlarge] key.
1
Touch the [Zoom] key.
2
Make sure that the [+] key and [-] key are displayed. If not, touch the
3
[+- key] key.
Adjust the reproduction ratio following the instruc tions on the display.
4
Set your originals.
5
Press the Start key.
6
COPYING
69
Page 81

REDUCING AND ENLARGING
Using the Number keys
Touch the [Reduce/Enlarge] key.
1
Touch the [Zoom] key.
2
Touch the [Number keys] key.
3
Adjust the reproduction ratio following the instructions on the display.
4
Set your originals.
5
Press the Start key.
6
70
Page 82

REDUCING AND ENLARGING
Fitting The Original To A Copy Of A Different Size
(Size Magnification)
Original
A suitable reproduction ratio will be automatically selected when you enter
the lengths of the original and copy image you want.
Touch the [Reduce/Enlarge] key.
Copy size you want
Copy
1
Touch the [Size Mag.] key.
2
Enter the original size and copy paper size using the Number keys
3
following the instructions on the display.
Up to 999 mm (metric version), 99.99" (inch version) can be entered.
❐
For an explanat ion or enter ing numbers , ☛ see page 29.
❐
Set your originals.
4
Press the Start key.
5
71
COPYING
Page 83

WORKING WITH BOTH SIDES OF ORIGINALS AND COPIES (Duplex/Series Copies)
WORKING WITH BOTH SIDES OF ORIGINALS
AND COPIES (Duplex/Series Copies)
Regarding functions that cannot be used together with this function, ☛ see
❐
page 124.
You cannot make mo re than 50 sets of copies in Dup lex mode.
❐
The following paper limitations apply:
❐
Maximum size: Metric version: A3
Inch versio n: 11" x 17"
Minimum size: Metric version: A5 :
Inch versio n: 5
Weight: Metric version: 64 ~ 104 g/m
Inch versio n: 17 ~ 24 lb
You can select "1 Sid ed → 2 Sided" or "2 Sided → 2 Side d" that is s elected as
❐
a default when you se lect Dupl ex mode.
Making Two-sided Copies From One-sided Originals
(Duplex, 1 Sided Originals → 2 Sided Copy)
1/2
;
" x 8
1/2
;
"
:
2
A right margin of 5 mm, 0.2" is set on the back side automatically. If you want
❐
to change this margin, touch the
Adj.]
key. ☛ See page 90.
When you se t an original o n the exposure glass, start wit h the last page of th e
❐
originals.
72
[Edit Image]
key, then touch the
[Margin
Page 84

WORKING WITH BOTH SIDES OF ORIGINALS AND COPIES (Duplex/Series Copies)
If your machine is equipped with DJF
If your machine is equipped with the optional dual job feeder, you can select one of three keys (Even, Odd, or Autocount) depending on the number
of your originals.
[Even] : Select this key if the number of originals is even.
[Odd] : Select this key if the number of originals is odd.
[Autocoun t] : Select this key if you don’t know the number of originals.
The machine automatically counts the number.
Touch the [Duplex/Series Cop-
1
ies] key.
u
Make sure that the [Duplex] key
2
is selected.
Touch the [Even] key, the [Odd] key, or the [Autocount] key.
3
When you touch the
❐
count the number of originals.
Set your originals face up in the dual job feeder.
[Autocount ]
key, follow the instruction on the display to
4
The last pag e of the orig inals sh ould b e on t he botto m.
❐
Press the Start key.
5
COPYING
73
Page 85

WORKING WITH BOTH SIDES OF ORIGINALS AND COPIES (Duplex/Series Copies)
If your machine is equipped with RDH
If your machine is equipped with the optional recir culating document handler, the Autocount function is default.
Touch the [Duplex/Series Cop-
1
ies] key.
u
Make sure that the [Duplex] key
2
is selected.
Touch the [1 sided → 2 sided] key.
3
Set the stack of originals face up in the recirculating document handler.
4
The last page o f the origin als shoul d be on the bo ttom.
❐
Press the Start key.
5
The machine starts counting originals. After counting is finished, copying will
❐
start automatically.
74
Page 86

WORKING WITH BOTH SIDES OF ORIGINALS AND COPIES (Duplex/Series Copies)
If your machine is not equipped with DJF or RDH
If your machine is not equipped with the optional dual job feeder or recirculating document handler, you can select one of two k eys (Even or Odd) depending on the number of your originals.
[Even] : Select this key if the number of originals is even.
[Odd] : Select this key if the number of originals is odd.
Touch the [Duplex/Series Cop-
1
ies] key.
u
Make sure that the [Duplex] key
2
is selected.
Touch the [Even] key or [Odd] key.
3
Set a page of your original on the ex posure glass.
4
Start with the last page of the orig inals.
❐
Press the Start key.
5
COPYING
75
Page 87

WORKING WITH BOTH SIDES OF ORIGINALS AND COPIES (Duplex/Series Copies)
Making Two-sided Copies From Two-sided Originals
(Duplex, 2 Sided Original → 2 Sided Copy)
Note: It is recommended to set originals in the dual job feeder or the
recirculating document handler in this function.
Touch the [Duplex/Series Cop-
1
ies] key.
Make sure the [Duplex] key is
2
selected.
Touch the [2 Sided → 2 Sided]
3
key.
Set your originals in the dual job
4
feeder or the recirculating document handler.
The last pa ge of the originals shou ld
❐
be on the bottom.
<DJF + S/S> <DJF + S/S with Punch>
<RDH + Finisher>
Press the Start key.
5
76
Page 88

WORKING WITH BOTH SIDES OF ORIGINALS AND COPIES (Duplex/Series Copies)
Making Two-sided Copies From Facing Pages
(Series Duplex, Single)
This function makes two-sided copies from two facing pages of a bound
(book) original.
This functio n cann ot be us ed for copy paper large r than A4 :, 8
❐
The center of an original is determined according to the selected copy paper
❐
and reproduction ratio. Make sure to select copy paper and reproduction ratio
suitable for the original.
Set the orig inals as sho wn belo w:
❐
<Dual job feeder>
The last page of th e originals should be on the
bottom.
1/2
" x 11" :.
<Recirculating document handler >
The last page of th e originals should be on the
bottom.
<Exposure glas s>
Start with the last page of
the originals .
Copies
COPYING
77
Page 89

WORKING WITH BOTH SIDES OF ORIGINALS AND COPIES (Duplex/Series Copies)
Make sure tha t the original binding is centered with the book mark on the rear
❐
scale.
Touch the [Duplex/Series Cop-
1
ies] key.
Touch the [Series Duplex] key.
2
Make sure the [Sing le] key is se-
3
lected.
Set your originals.
4
Press the Start key.
5
78
Page 90

WORKING WITH BOTH SIDES OF ORIGINALS AND COPIES (Duplex/Series Copies)
Making Two-sided Copies From A Book (Series
Duplex, Multi)
Use this function to have the copies face each other exactly as the bound
(book) originals do.
In this functi on, place th e origina l on the exp osure gla ss.
❐
The center of an original is determined according to the selected copy paper
❐
and reproduction ratio. Make sure to select copy paper and reproduction ratio
suitable for the original.
For bound originals read from left to right, place the original on the exposure
❐
glass with the cover right side up. You should start with the last page of the
originals and the last page should be aligned to the left scale as shown below:
Copies
COPYING
79
Page 91

WORKING WITH BOTH SIDES OF ORIGINALS AND COPIES (Duplex/Series Copies)
Make sure tha t the original binding is centered with the book mark on the rear
❐
scale.
For binding originals read
❐
side down.
You can also use this function with the dual job feeder or the recirculating
❐
document handl er.
Touch the [Duplex/Series Cop-
1
ies] key.
Touch the [Series Duplex] key.
from righ t to left
, place the book with the cover up-
2
Touch the [Multi] key.
3
Set the originals.
4
Press the Start key.
5
80
Page 92

WORKING WITH BOTH SIDES OF ORIGINALS AND COPIES (Duplex/Series Copies)
Making One-sided Copies From Facing Pages
(Series Copies, Book → 1 Sided Copies)
This function makes one-sided copies from two facing pages of bound
(book) originals.
This functio n cann ot be us ed for copy paper large r than A4 :, 8
❐
The center of an original is determined according to the selected copy paper
❐
and reproduction ratio. Make sure to select copy paper and reproduction ratio
suitable for the original.
Set the orig inals as sho wn belo w:
❐
<Dual job feeder>
The last page of th e originals should be on the
bottom.
1/2
" x 11" :.
<Recirculating document handler >
The last page of th e originals should be on the
bottom.
<Exposure glas s>
Start with the last page of
the originals .
Copies
COPYING
81
Page 93

WORKING WITH BOTH SIDES OF ORIGINALS AND COPIES (Duplex/Series Copies)
Make sure tha t the original binding is centered with the book mark on the rear
❐
scale.
Touch the [Duplex/Series Cop-
1
ies] key.
Touch the [Series Copies] key.
2
Make sure the [Book → 1 Sided]
3
key is selected.
Set your originals.
4
Press the Start key.
5
82
Page 94

WORKING WITH BOTH SIDES OF ORIGINALS AND COPIES (Duplex/Series Copies)
Making One-sided Copies From Two-sided
Originals (Series Copies, 2 Sided Original → 1
Sided Copies)
Note: It is recommended to set originals in the dual job feeder or the
recirculat ing docu ment h andler i n this functi on.
Set the orig inals as sho wn belo w:
❐
<Dual job feeder>
The last page of th e originals should be on the
bottom.
Copies
<Recirculating document handler >
The last page of th e originals should be on the
bottom.
COPYING
83
Page 95

WORKING WITH BOTH SIDES OF ORIGINALS AND COPIES (Duplex/Series Copies)
Touch the [Duplex/Series Cop-
1
ies] key.
Touch the [Series Copies] key.
2
Touch the [2 Sided → 1 Sided]
3
key.
Set your originals in the dual job feeder or the recirculating document
4
handler.
The last page o f the origin als shoul d be on the bo ttom.
❐
Press the Start key.
5
84
Page 96

WORKING WITH BOTH SIDES OF ORIGINALS AND COPIES (Duplex/Series Copies)
Combining Two Originals (Combine, Combine 2
Originals)
This function automatically combines two 1-sided originals on one copy.
Note: This function can be used only when your machine is equipped
with the dual job feeder.
The original si zes that can be used in this function are as follows :
❐
Metric ver sion: A4 :, B5 :, A5
Inch version: 8
Select one of thre e keys (Ev en, Odd, or Autoc ount) dep ending on th e number
❐
of your originals .
[Even]
: Select this k ey if the numb er of origin als is even.
[Odd]
: Select this key if the number of original s is odd.
[Autocount ]
Set the orig inals as sho wn belo w:
❐
1/2
" x 11" :, 8
:Sel ect this key if you don’ t know the numb er of origin als.
The machine auto maticall y counts the number.
Even
1/2
:
" x 5
1/2
"
:
Copies
<Dual job feeder>
The last page of th e originals should be on the
bottom.
Odd
Copies
COPYING
85
Page 97

WORKING WITH BOTH SIDES OF ORIGINALS AND COPIES (Duplex/Series Copies)
Before using this function, select copy paper size. Auto Paper Sel ect function
❐
cannot be us ed in this f unction.
Before using this function, check the reproduction ratio. Auto Reduce/Enlarge
❐
function c annot be use d in t his fu nction .
Touch the [Duplex/Series Cop-
1
ies] key.
Touch the [Combine] key.
2
Touch the [Even] key, the [Odd] key, or the [Autocount] key.
3
When you touch th e
❐
count the number of original s.
Set your originals in the dual job feeder.
[Autocount]
key, follow the in struction on the displa y to
4
The last page o f the origin als shoul d be on the bo ttom.
❐
Press the Start key.
5
86
Page 98

WORKING WITH BOTH SIDES OF ORIGINALS AND COPIES (Duplex/Series Copies)
Combining Four Originals (Combine, Combine 4
Originals)
This function makes one 2 sided copy from four 1 sided originals.
Note: This function can be used only when your machine is equipped
with the dual job feeder.
The original si zes that can be used in this function are as follows :
❐
Metric ver sion: A4 :, B5 :, A5
Inch version: 8
After selecting the Combine 4 Originals function, select the
❐
[Autocount ]
or the
1/2
" x 11" :, 8
key to input the number of originals.
1/2
:
" x 5
1/2
"
:
[Number ke ys]
key
[Number keys]
[Autocount ]
Before using this function, select copy paper size. Auto Paper Select function
❐
cannot be used in this function.
Before using this function, check the reproduction ratio. Auto Reduce/Enlarge
❐
function cann ot be used in th is function.
Set the orig inals as sho wn belo w:
❐
: Select t his ke y if y ou want to inpu t the number of or iginal s
with the
: Select this key if you don’t know the number of originals.
The machine automatically counts the number.
Number
keys.
Copies
<Dual job feeder>
The last page of th e originals should be on the
bottom.
COPYING
87
Page 99

WORKING WITH BOTH SIDES OF ORIGINALS AND COPIES (Duplex/Series Copies)
When using the [Number keys] key
Touch the [Duplex/Series Cop-
1
ies] key.
Touch the [Combine] key.
2
Touch the [Number keys] key.
3
Enter the number of the originals with the Number keys. Then touch
4
the [#] key.
Touch the [Exit] key.
5
Set the originals in the dual job feeder.
6
The last page o f the origin als shoul d be on the bo ttom.
❐
Press the Start key.
7
88
Page 100

WORKING WITH BOTH SIDES OF ORIGINALS AND COPIES (Duplex/Series Copies)
When using the [Autocount] key
Touch the [Duplex/Series Cop-
1
ies] key.
Touch the [Combine] key.
2
Touch the [Autocount] key.
3
Follow the instructions on the display to c ount the number of originals.
4
Set your originals in the dual job feeder.
5
The last pag e of the orig inals sh ould b e on t he botto m.
❐
Press the Start key.
6
COPYING
89
 Loading...