

Page 1
Iumml
FT6645/6655
Operating
Instructions
‘\
/
‘k
Page 2
Notes:
The model names of the machines do not a pear in the following pages.
CfCheck the type of your machine before rea ing this manual.
(For details, see page 2.)
Type 1 = FT6645
Type 2 = FT6655
Certain types may not be available in some countries. For details, please contact
vour local dealer.
Note: Certain options ma not be available in some countries. For details, please
Jcontact your local eater.
Ricoh shall not be responsible for any damage or expense that may result from the use
of parts other than genuine Ricoh parts in your Ricoh office product.
I For good copy quality, Ricoh recommends that you use genuine Ricoh toner.
~ower source:
‘lease make sure to connect the power cord to a power source as above. For details
about Dower cord. see Daae iv.
120V, 60 Hz, more than 20A
I
@ Copyright 1993 Ricoh Co., Ltd.
Page 3
SAFETY INFORMATION
SAFETY INFORMATION
When using your copier, the following safety precautions should always be followed.
Safety During Operation
In this manual, all safety messages are identified by the words “WARNING” and “Caution”.
These words mean the following:
WARNING:
Important information to alert you to a situation that might cause serious injury and
damage to your property if instructions are not followed.
Caution:
Impotiant information that tells how to prevent damage to equipment, or how to avoid a
situation that might cause minor injury.
WARN/NG:
Cl Since some parts of the copier are supplied with high electrical voltage, touch only the parts
specified in this manual and the machine’s display.
Do not modify or replace any parts other than the ones specified in this manual and the
Cl
machine’s display.
IJ Do not incinerate toner or toner containers. Toner dust may ignite when exposed to open
flame.
Cl Do not store toner where it will be exposed to heat.
Cl Do not eat or swallow toner, and keep it out of reach of children.
Cl The fusing unit maybe very hot. Be careful when handling it.
Caution:
~ While copying, do not turn off the main switch.
Cl While copying, do not open the front doors.
U While copying, do not unplug the power cord.
Cl Do not lay anything weighing more than 10 kg (22 lb) on the exposure glass.
C’JKeep corrosive /iquids, such as acid, off the machine.
Cl Do not allow paper clips, staples, or other small metallic objects to fall inside the machine.
Page 4
SAFETY INFORMATION
General Safety Information
~ &lways turn the copier off when you have finished copying for the day, but leave it plugged
.
D When the copier will not be used for a long period, disconnect the power cord.
Cl If the copier must be transported by vehicle, please contact your service representative.
5 When the main switch is in the Stand-by position, the anticondensation heaters are on. In
case of emergency, unplug the machine’s power cord.
~ The main plug on this equipment must be used to disconnect main power.
Page 5
Copier Environment
INSTALLATION REQUIREMENTS
INSTALLATION REQUIREMENTS
Copier Environment
The installation location should be carefully chosen because environmental conditions greatly
affect the performance of a copier.
- Optimum environment conditions -
tJ Temperature: 10- 30”C (50 - 86°F)
Cl Humidity:
D A strong and level base.
0 The copier must be level within 5 mm (0.2”) both front to rear and left to right.
D To avoid possible build-up of ozone, make sure to locate this copier in a large well ventilated
room which has air turnover of more than 30ms/hr/person.
15- 90?40
Environments To Avoid
D Locations exposed to direct sunlight or strong light (more than 1,500 Iux).
D Locations directly exposed to cool air from an air conditioner or heated air from a
heater. (Sudden temperature changes may cause condensation within the copier.)
D Places where the copier may be subjected to frequent strong vibration.
C!Dusty areas.
ClAreas with corrosive gases.
~ Places higher than 2,000 m
(6,500 ft) above sea level.
.,.
Ill
Page 6
INSTALIJ4TION REQUIREMENTS
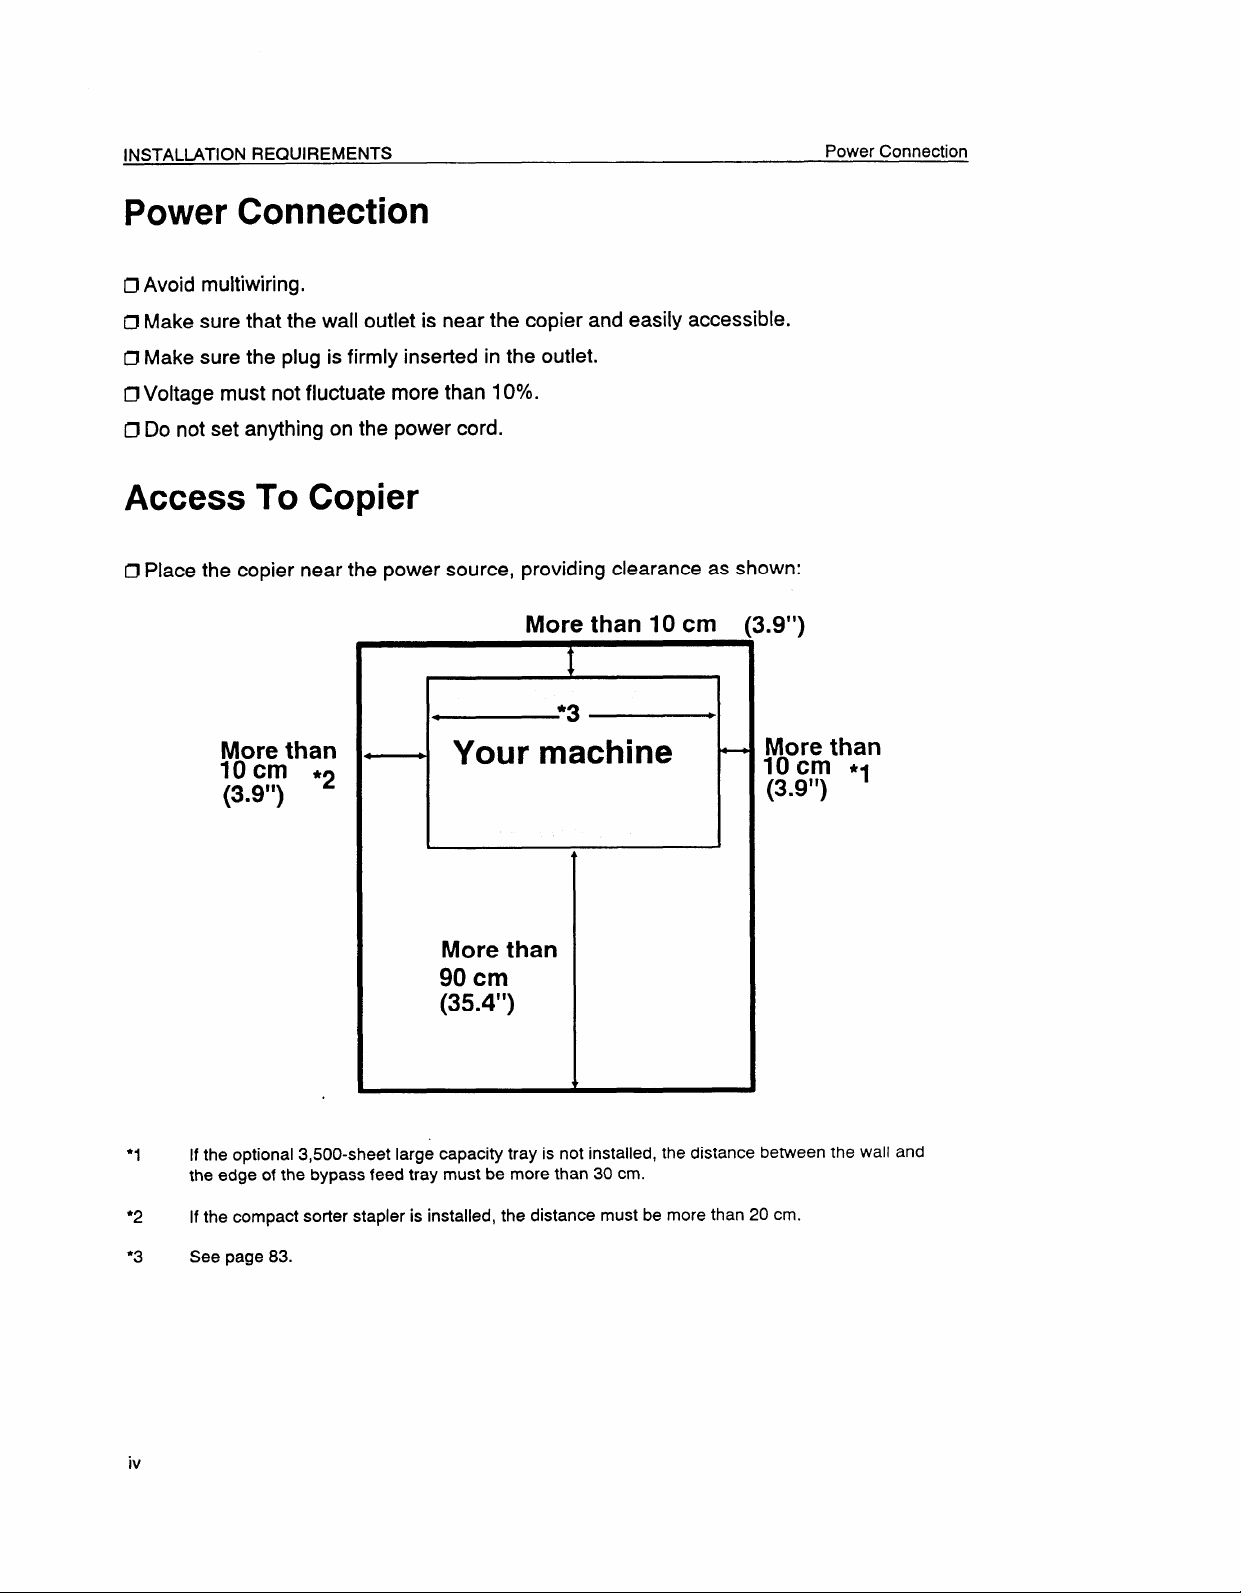
Power Connection
Avoid multiwiring.
D
Cl Make sure that the wall outlet is near the copier and easily accessible.
D Make sure the plug is firmly inserted in the outlet.
~ Voltage must not fluctuate more than 10YO.
Cl Do not set anything on the power cord.
Access To Copier
IJ Place the copier near the power source, providing clearance as shown:
Power Connection
More than 10 cm
L9”)
F===
More than
10cm *2
(3.9”)
●1 Ifthe optional 3,500-sheet large capacity tray is not installed, the distance between the wall and
the edge of the bypass feed tray must be more than 30 cm.
--i
Your machine
P
More than
90 cm
(35.4”)
I
More than
10cm *1
(3.9”)
●2 Ifthe compact sorter stapler is installed, the distance must be more than 20 cm.
●3 See page 83.
iv
Page 7
STORAGE OF SUPPLIES
STORAGE OF SUPPLIES
Storage Of Supplies
Paper Storage
Paper should always be stored properly, Improperly stored paper may result in poor image
reproduction, creased copies, and paper misfeeds.
~ Avoid storing paper in humid areas. (Under high temperature and high humidity conditions,
store copy paper in a vinyl bag,)
Z1Do not store paper where it will be exposed to heat.
U Store on a flat surface.
7 Use older stock first.
~ Do not lay heavy objects on paper.
~ Keep open reams of paper in the package, and store as you would unopened paper.
Toner Storage
~ Store in a cool, dark place.
Cl Do not store toner where it will be exposed to heat.
~ DO not lay anything heavy on toner.
Page 8
TABLE OF CONTENTS
TABLE OF CONTENTS
GUIDE TO COMPONENTS
Copier Type . . . . . . . . . . . . .
Copier Exterior . . . . . . . . . . . .
System Overview . . . . . . . . . . .
Operation Panel
Key Tops . . . . . . . . . . .
Touch Panel Display . . . . .
WHAT YOU CAN DO WITH THIS COPIER .
HOW TO SEE THE GUIDANCE DISPLAY
Seeking Guidance In Stand-by . . . .
Seeking Guidance While Entering Job Settings
CHANGING DEFAULT SETTINGS
User Tools . . . . . . . . . . . . . . . . . .
How To Access The User Tools . . . . . . .
l. Autoreset/Auto off . . . . . . . . . . . . .
2. Select special tray . . . . . . . . . . . . .
3. Setdate/time . . . . . . . . . . . . . . . .
4. Weekly Timer . . . . . . . . . . . . . . . .
5. Set operation modes . . . . . . . . . . .
6. Change fixed R/E . . . . . . . . . . . . . .
7. Set standard tray display . . . . . . . . . .
2
.
.
.
.
.
.
.
.
.
.
.
.
.
.
.
.
.
.
.
.
.
.
.
.
.
.
.
.
.
.
.
.
.
.
.
.
.
.
.
.
.
.
.
.
.
.
.
.
.
.
.
.
.
.
.
.
.
.
.
.
.
.
.
.
.
.
.
.
.
.
.
.
.
.
.
.
.
.
.
.
.
.
.
.
.
.
.
.
.
.
.
.
.
.
.
.
.
.
.
.
.
.
.
.
.
.
.
.
.
.
.
.
.
.
.
.
.
.
.
.
.
.
.
.
.
.
.
.
.
.
.
.
.
.
.
.
.
.
.
.
.
. 3
.
.
.
. 4
.
.
.6
.
.
. 7
.
.
.
. 8
.
.
. 12
.
.
. 13
.
.
.14
.
.
.
.14
.
,15
.15
.
. 16
.
.
.16
,16
.
.
.
. 17
.
, 17
.
.
12. Select ARDF/RDH modes . . . . . . . . .
8. Set User Code(s) . . . . . . . . . . . . . .
9. Check/Reset copy count . . . . . . . . . .
10. Reset data for User Codes . . . . . . . . .
11. Reset User Codes/Counters . . . . . . .
SETTING ORIGINALS IN THE DUAL JOB FEEDER
Recommended Originals . . . . . . . . . . .
Non-recommended Originals . . . . . . . . . .
Setting A Stack Of Originals . . . . . . . . . .
‘Automatic Document Feed (ADF) mode (1 Sided Originals mode)
Automatic Reverse Document Feed (ARDF) mode (2 Sided Originals mode)
Setting One Original At ATime . . . . . . . . . . . . . . . . . . . . . . ...23
Semi-Automatic Document Feed (SADF) mode
Setting Different Sized Originals . . . . . . . . . . . . . . . . . . . . . . ...25
Mixed Sized mode
Setting A Pasted Original .,... . . . . . . . . . . . . . . . . . . . . . ...27
Pasted Original mode
Presetting Originals During A Copy Run . . . . . . . . . . . . . . . . . . . . .29
.17
.18
.18
.18
.18
.
.
.
.
.
.
.
.
.
.
.
.19
.20
.
.21
Page 9
TABLE OF CONTENTS
SEITING ORIGINALS IN THE RECIRCULATING DOCUMENT HANDLER
.
.
.
Recommended Originals . . . . . .
Non-recommended Originals . . . . .
Setting Originals . . . . . . . . . . .
SETTING ORIGINALS ON THE EXPOSURE
. . . . .
. . . . .
. . . . .
GLASS
.
.
.
●
,
✎
.
.
.
✎
.
.
.
. . . . . .
.
.
.
.
,
.
.
. . . . . .
. . . . . .
.
. . . . . .
.
.
.
.
BASIC FUNCTIONS AND KEY TOPS
.
.
,
.
sort , .,.....0.0.000.
Stack . . . . . . . . . . . . . . . .
Stapling Gopies. o . . . . . . . . . .
Manual Staple . . . . . . . . . . . .
Special Brig . . . . . . . . . . . . . .
Preset . . . . . . . . . . . . . . . .
Program Key . . . . . . . . . . . . .
Interrupt Key . . . . . . . . . . . . .
Auto Start Mode . . . . . . . . . . .
●
.
.
.
✎
.
.
✎
.
.
✎
.
.
✎
.
.
✌
●
.
✎
✎
.
✌
✃
.
✎
✎
.
✌
.
.
✎
.
.
✎
.
.
.
✎
.
.
.
✎
.
.
.
,
●
.
.
.
✎
.
●
.
●
.
✎
.
✎
.
.
●
● ✎✎✌✎✎
.
.
.
.
✎
✎ ✎ ✎ ✎ ✎ ✎
.
.
.
.
●
✎
✌
✎
✎
.
.
✎ ✎ ✎ ✎ ✎ ✎
.
✎
.
.
.
✎ ✎ ✎ ✎ ✎ ✎
✎
✎ ✎ ✎ ✎ ✎ ✎
.
.
.
●
0
...0.
.
✎
.
●
●
✎
✎
●
.
. . . . . .
● . . . . .
,
. . . . . .
.
.
.
.
.
FUNCTIONS ON OPERATION SCREENS
Reduce/Enlarge . . . . . . . . . . .
Duplex/Series Copies (Duplex) . . . .
Duplex/Series Copies (Series Duplex)
Duplex/Series Copies (Series Copies)
Duplex/Series Copies (Combine) . .
Edit Image(Editing/Centering) . . . .
Edit Image (Margin Adj.) . . . . . .
Cover/Slip Sheet (Front Cover) , . . .
Cover/Slip Sheet (Front/Back) . . . .
Cover/Slip Sheet (Paper Designate) .
Cover/Slip Sheet (OHP Slip Sheet) .
✎
✎
✎
.
.
✎
✎
.
.
✎
✎
.
.
✎
✎
.
.
✎
✎
.
.
✎
●
●
.
✎
✎
✎
.
●
●
s
✎
.
✎
✎
✎
.
●
✎
✌
.
✎
✎
✎
✎
✎
.
✎
✎
.
✎
✎
✎
✎
.
✎
✎
.
✎
✎
✎
✎
.
✎
✎
●
.
✎
✎
✎
.
●
●
✌
.
✎
✎
.
✎
✎
✎
.
✌
✎
✎
✎
.
.
. . . . . .
✎
✎
.
. . . . . .
✎
.
✎
.
. . . . . .
✎
✎
.
.
✎
.
. . . . . .
✎
.
✎
. . . . . .
✎
.
.
✎
,, .,,,
✌
.
.
✎
.
. . . . . .
✎
.
✎
●
✎
✎
✎
✎
✎
✎
✎
✎
✎
✎
,.,
,
. . . . . .
.
. . . . . .
.
. . . . . .
.
.
.
.
.
.
.
.
.
.
,
.
,
.
.
.
.
.
.
.
.
,,0
●
✎
✎
✎
.31
.
.
.
.32
.
.
.
.32
.
.
.
.
.34
.
.
.37
.
.
.
.38
●
.
.
✎
.39
.
.
,41
✎
.
.
✎
.41
.
.
,41
✎
.
.
.42
✎
.
.
✎
.
.42
.
.42
✎
.
.
✎
.
.
.43
.44
✎
.
.
.48
✎
.
.
,50
✎
.
.
✎
.52
.
.
✎
.56
●
,
.59
✎
✎
.
.60
✎
✎
.
.61
✎
✎
.
✎
.62
●
.
.63
✎
✎
.
LOADING PAPER . . . . . . . . . . . . .
550-sheet Paper Tray . . . . . . . .
Tandem Paper Tray . . . . . . . . .
1,500-sheet Large Capacity Tray . .
✎
✎
✎
✎
Optional 3,500-sheet Large Capacity Tray
Bypass Feed Tray . . . . . . . . . . .
CHANGING PAPER SIZE . . . . . . . . . . .
WHAT TO DO WHEN THINGS GO WRONG . .
USER REMARKS . . . . . . . . . . . . . . .
DO’SAND DONUTS . . . . . . . . . . . . . . .
DAILY MAINTENANCE
Copier . . . . . . . . . . . . . . . . . .
Dual Job Feeder . . . . . . . . . . . . .
Recirculating Document Handler . . . .
“
✎
✎
✎
.
✎
✎
.
✎
✎
✎
✎
✎
.
✎
✎
.
✎
✎
.
✎
✎
.
✎
✎
.
●
✎
✎
.
✎
.
✎
✎
.
✎
✎
✎
,
●
✎
.
✎
.
✎
✎
✎
✎
✎
.
✎
✎
✎
.
✎
✎
.
✎
✎
✎
✎
.
✎
✎
✎
,
✎
✎
✎
.
✎
✎
✎
.
✎
✎
✎
.
✎
✎
✎
.
✎
✎
✎
.
✎
✎
✎
.
✎
✎
✎
.
✎
✎
✎
.
✎
✎
✎
✎
✎
✎
✎
✎
✎
✎
✎
✎
✎
✎
✎
✎
●
✎
●
✎
✎
✎
✎
✎
✎
✎
. . . . . .
.
. . . . . .
.
. . . . . .
.
., .,..
.
●
. . . . . .
.
. . . . . .
.
. . . . . .
.
. . . . . .
.
. . . . . .
.
. . . . . .
.
. . . . . .
.
. . . . . .
.
. . . . . .
✎
✎
✎
✎
✎
✎
✎
✎
✎
✎
✎
✎
✎
.64
.
.66
✎
✎
.
.67
✎
✎
.
.69
✎
✎
.
● 70
✎
✎
,
.71
✎
✎
.
, 73
✎
✎
.
.75
✎
✎
.
.76
✎
✎
.
.77
✎
✎
.
.78
✎
✎
.
. 79
✎
✎
.
.80
✎
✎
.
Page 10
TABLE OF CONTENTS
SPECIFICATIONS
Copier . . . . . . . . .
Dual Job Feeder . . . .
Compact Sorter Stapler .
Floor Type Sorter Stapler
.
.
.
.
...
.
.
.
.
.
Recirculating Document Handler
Finisher . . . . . . . . . . . . .
3,500-sheet Large Capacity Tray
COMBINATION CHART . . . . . . . . .
.
.
.
.
.
.
.
.
.
.
.
.
.
.
.
.
.
.
.
.
.
.
.
.
.
.
.
.
.
.
.
.
.
.
.
.
.
.
.
.
.
.
.
.
.
.
.
.
.
.
.
.
.
.
.
.
.
.
.
.
.
.
.
.
.
.
.
.
.
.
.
.
.
.
.
.
.
.
.
.
.
.
.
.
.
.
.
.
.
.
.
.
.
.
.
.
.
.
.
.
.
.
.
.
.
.
.
.
.
.
.
.
.
.
.
.
.
.
.
.
.
.
.
.
.
.
.
.
.
.
.
.
.
.
.
.
.
.
.
.
.
.
.
.
.
.
.
. 81
.
.
.
. 85
.
.
. 86
.87
. 88
.
.
.
. 89
.
.
.
. 90
.
.
.
. 92
.
.
INDEX . . . . . . . . . . . . . .
.
.
.
.
.
.
.
.
.
.
.
.
.
.
.
.
.
.
.
.
.
. 94
.
.
.
Page 11
Before reading this Operating Instructions,
please refer to pages 2-5 to know which type
of copier and system you have.
1
Page 12

GUIDE TO COMPONENTS
Copier Type
There are two types of copier.
Copier Type
GUIDE TO COMPONENTS
Type
Type
1
a?,
1
550
550
550
P
2
—-——----
(3,500)
.—— — ———
————---
t
Three 550-sheet paper trays
Optional 3,500-sheet large capacity tray
/
I
I
I
I
-1
Tandem paper tray (two 500-sheet paper trays)
One 550-sheet paper tray
1,500-sheet large capacity tray
Optional 3,500-sheet large capacity tray
I
*
1
I
I
(3,500) I
I
!
I
~-.--.--!
2
Page 13
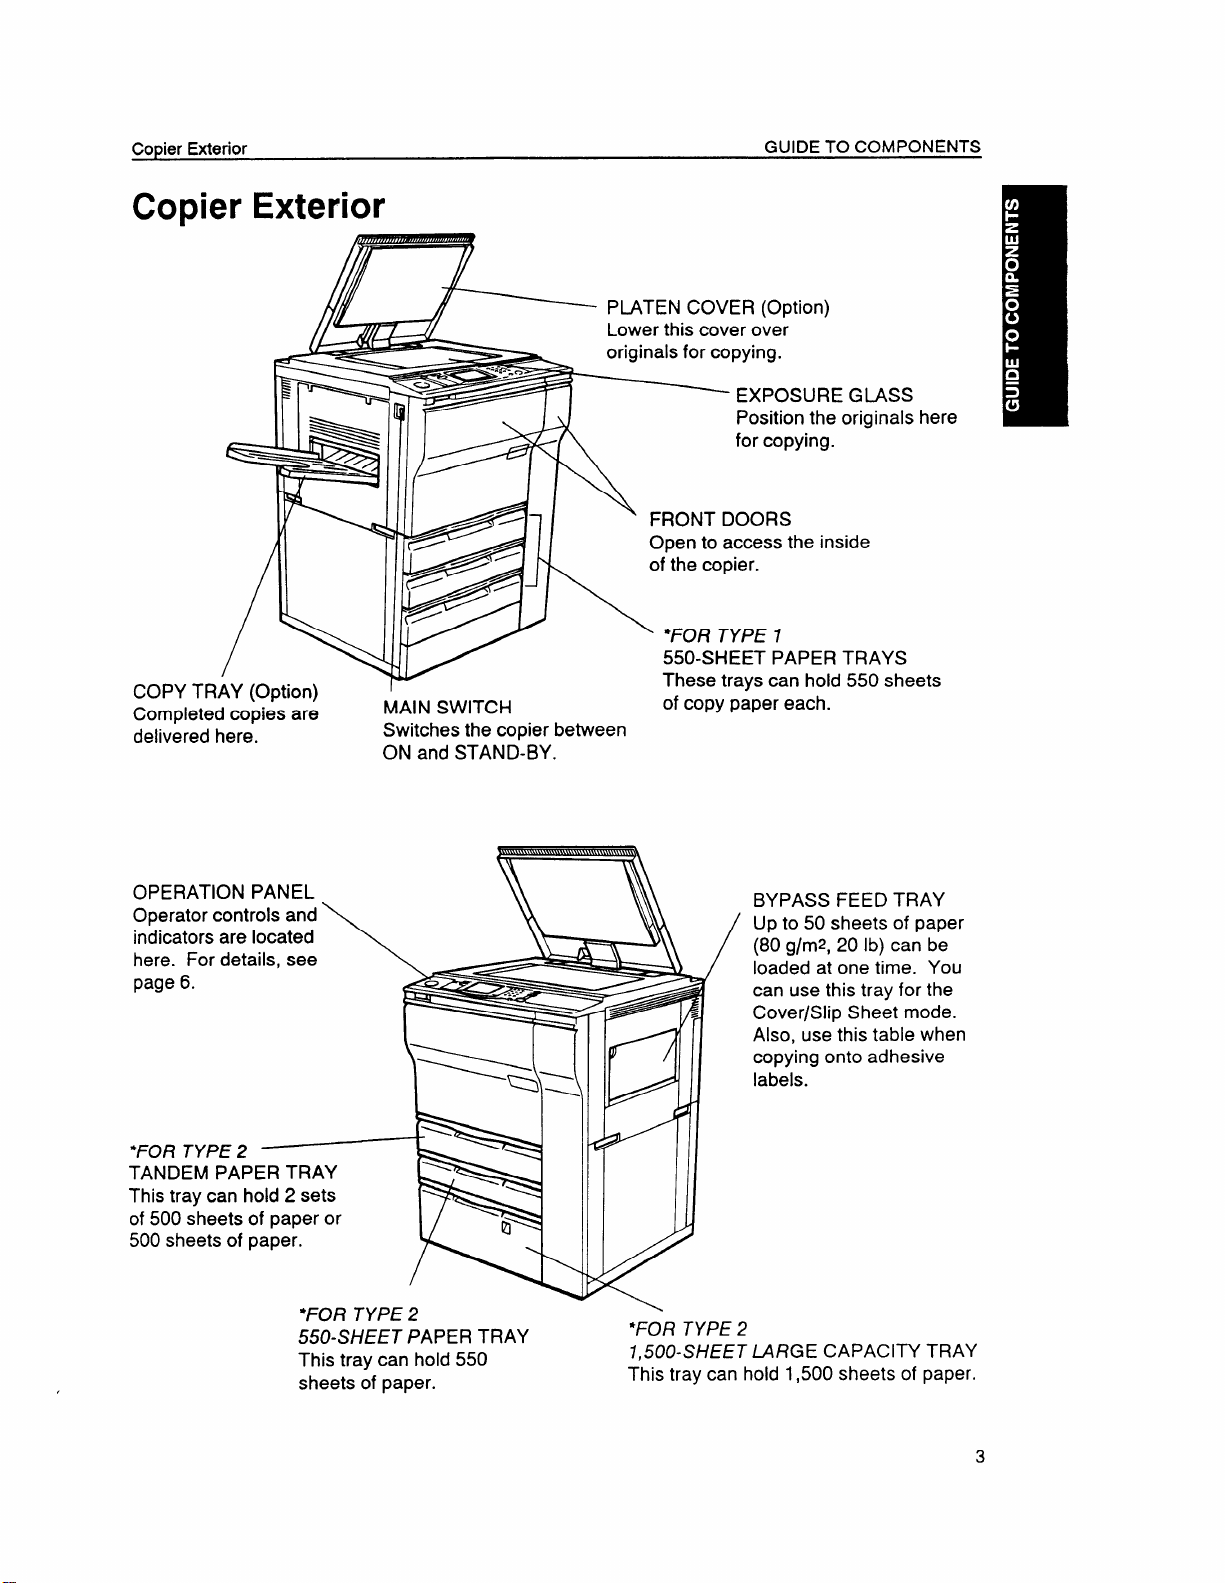
Copier Exterior
Copier Exterior
GUIDE TO COMPONENTS
Ss
als here
:
8
●
●
L
/\ ~ /
COPY TRAY (Option)
Completed copies are
delivered here.
Ep J\
MAIN SWITCH
Switches the copier between
ON and
STAND-BY.
“FOR TYPE 1
550-SHEET PAPER TRAYS
These trays can hold 550 sheets
of copy paper each.
BYPASS FEED TRAY
Up to 50 sheets of paper
(80 g/rep, 20 lb) can be
loaded at one time. You
can use this tray for the
Cover/Slip Sheet mode.
Also, use this table when
copying onto adhesive
labels.
*FOR TYPE 2
55CKWEET PAPER TRAY
This tray can
sheets of paper.
hold 550
\
*FOR TYPE 2
7,500-SHEET
This tray can hold 1,500 sheets of paper.
LARGE CAPACITY TRAY
3
Page 14
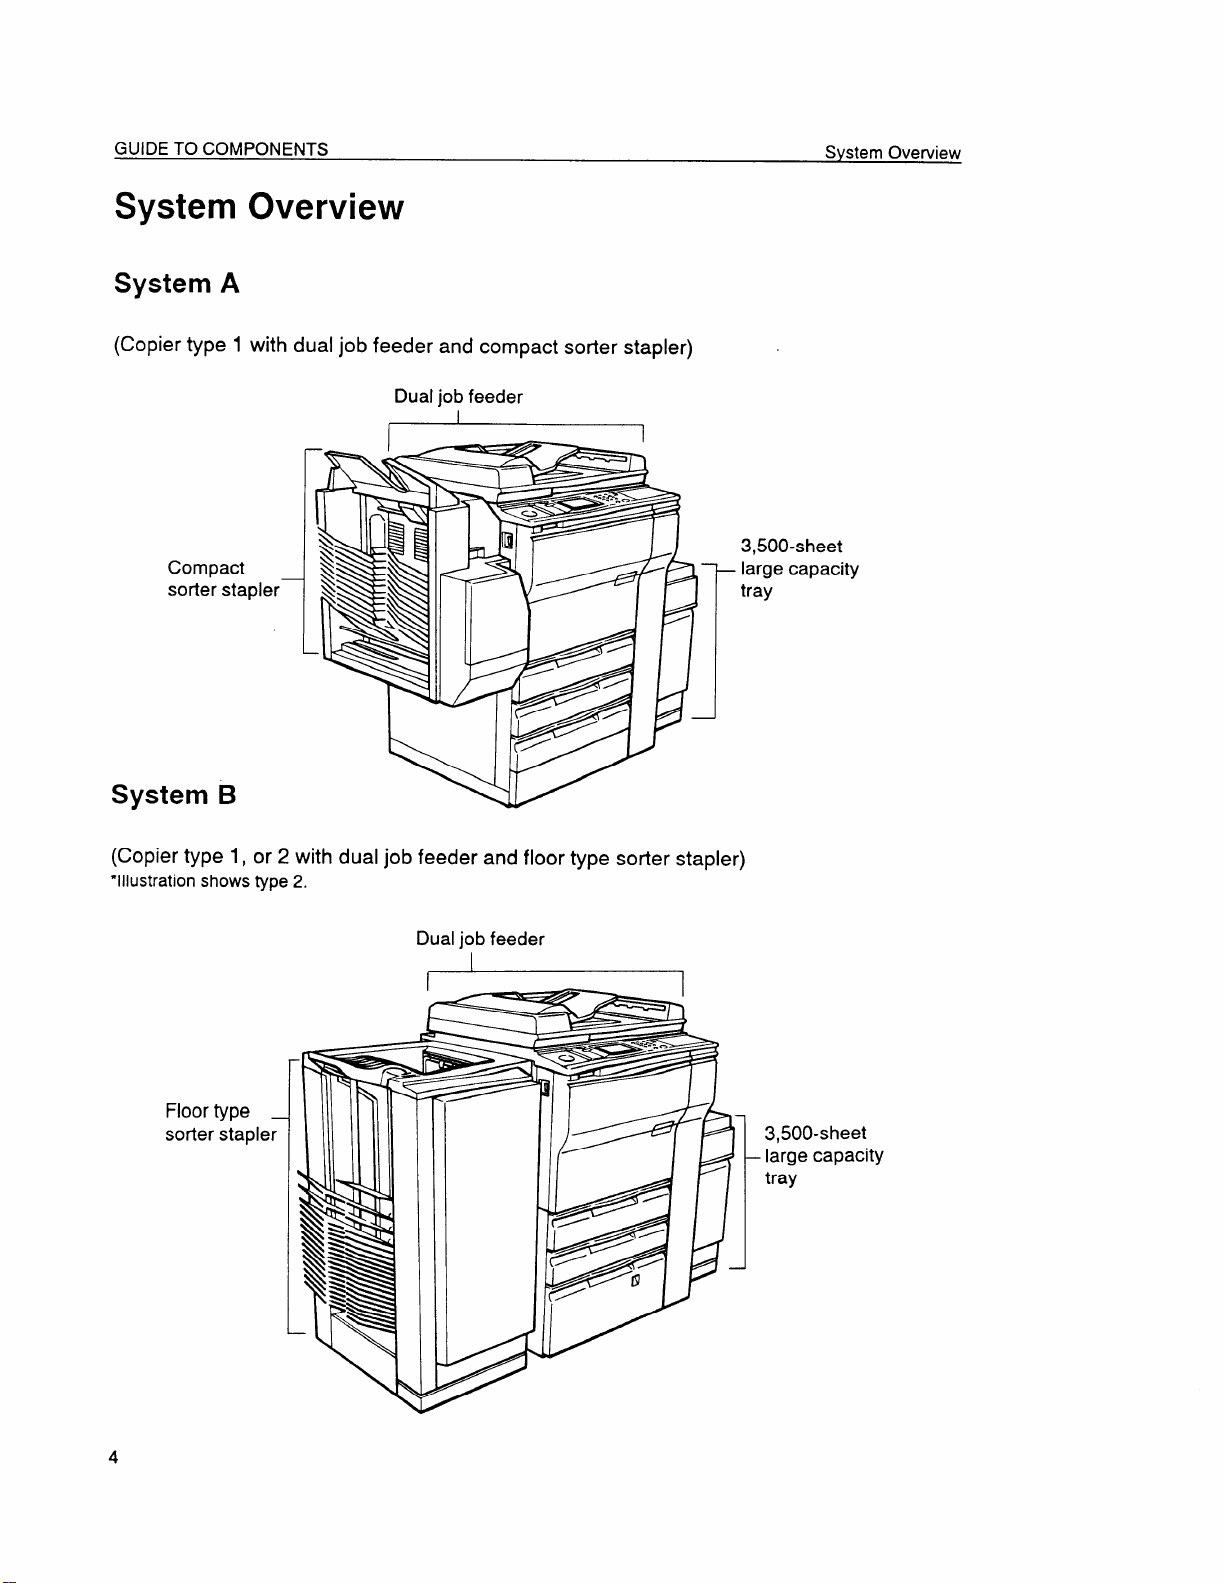
System Overview
System A
(Copier type 1 with dual job feeder and compact sorter stapler)
Dual job feeder
1
Compact
sorter stapler—
3,500-sheet
large capacity
–
tray
System B
(Copier type 1, or 2 with dual job feeder and floor type sorter stapler)
“Illustration shows type 2.
Dual job feeder
.
Floor type _
stapler
sorter
.
3,500-sheet
large capacity
tray
Page 15
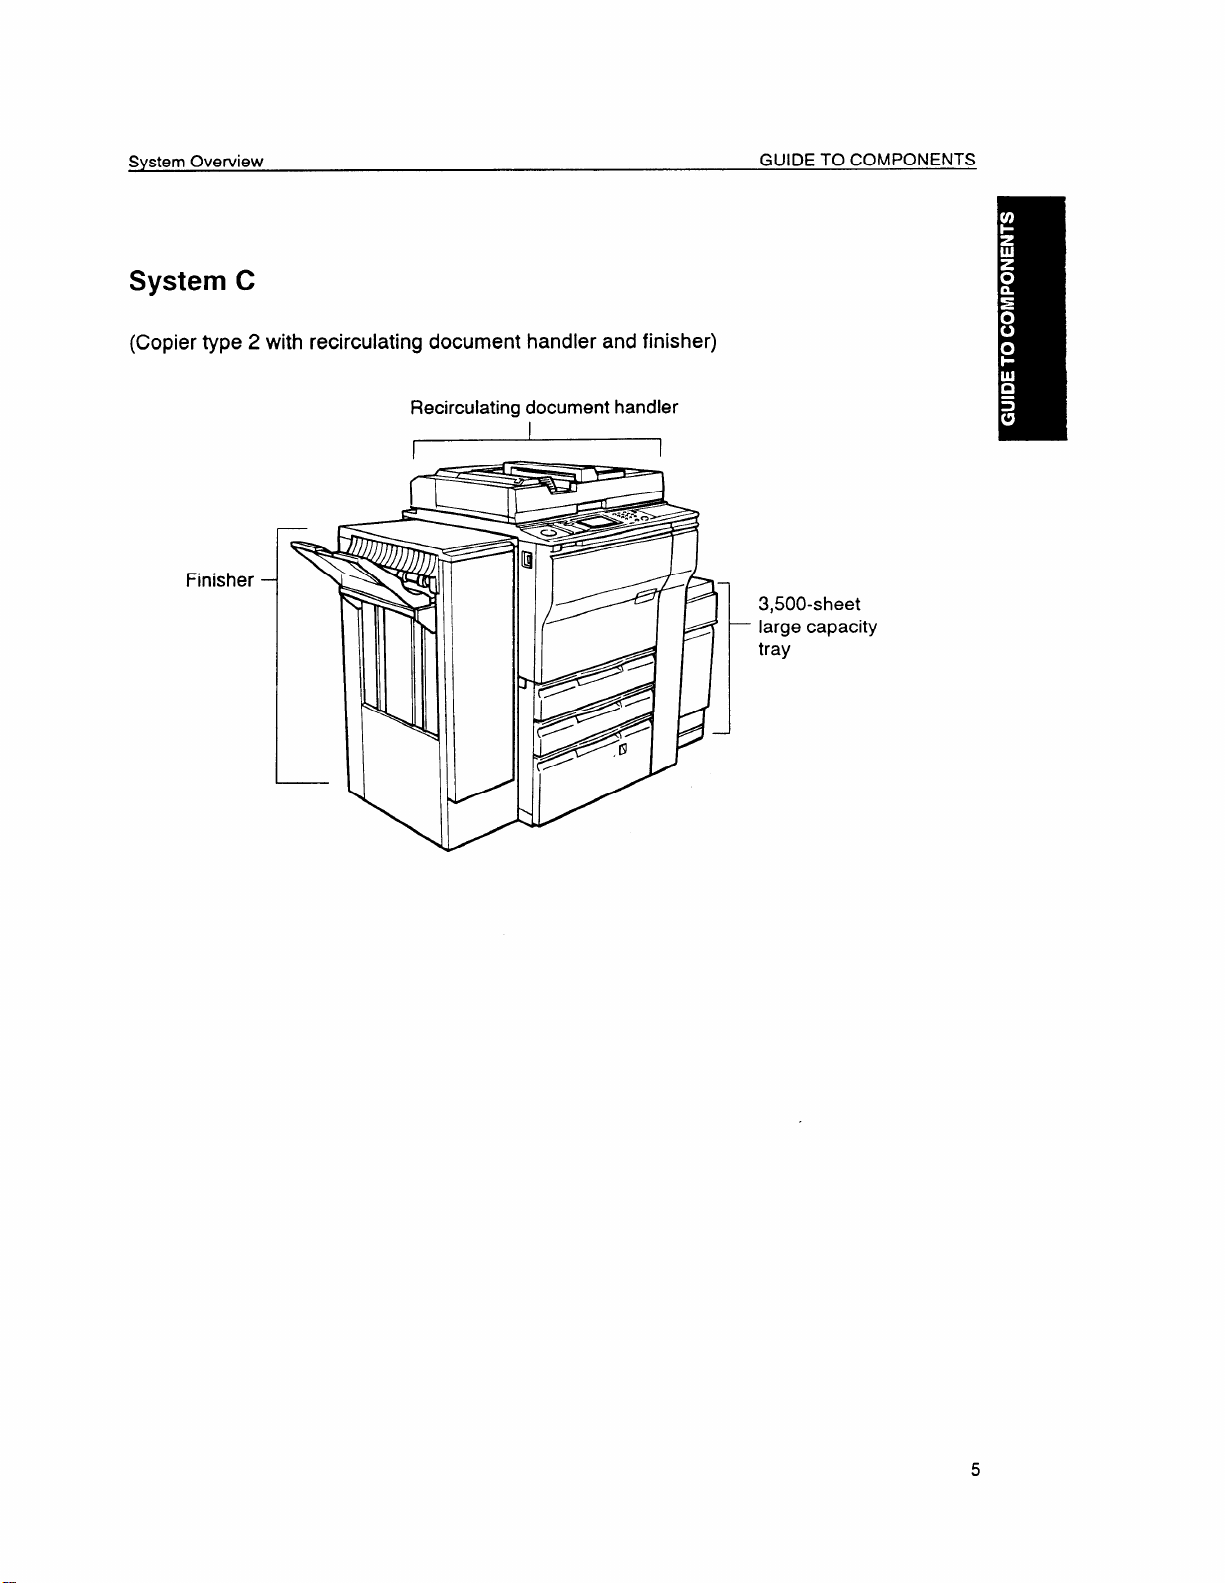
System C
(Copier type 2 with recirculating document handler and finisher)
Recirculating document handler
I 1
i-f==
Finisher
L
/
3,500-sheet
large capacity
–
tray
Page 16
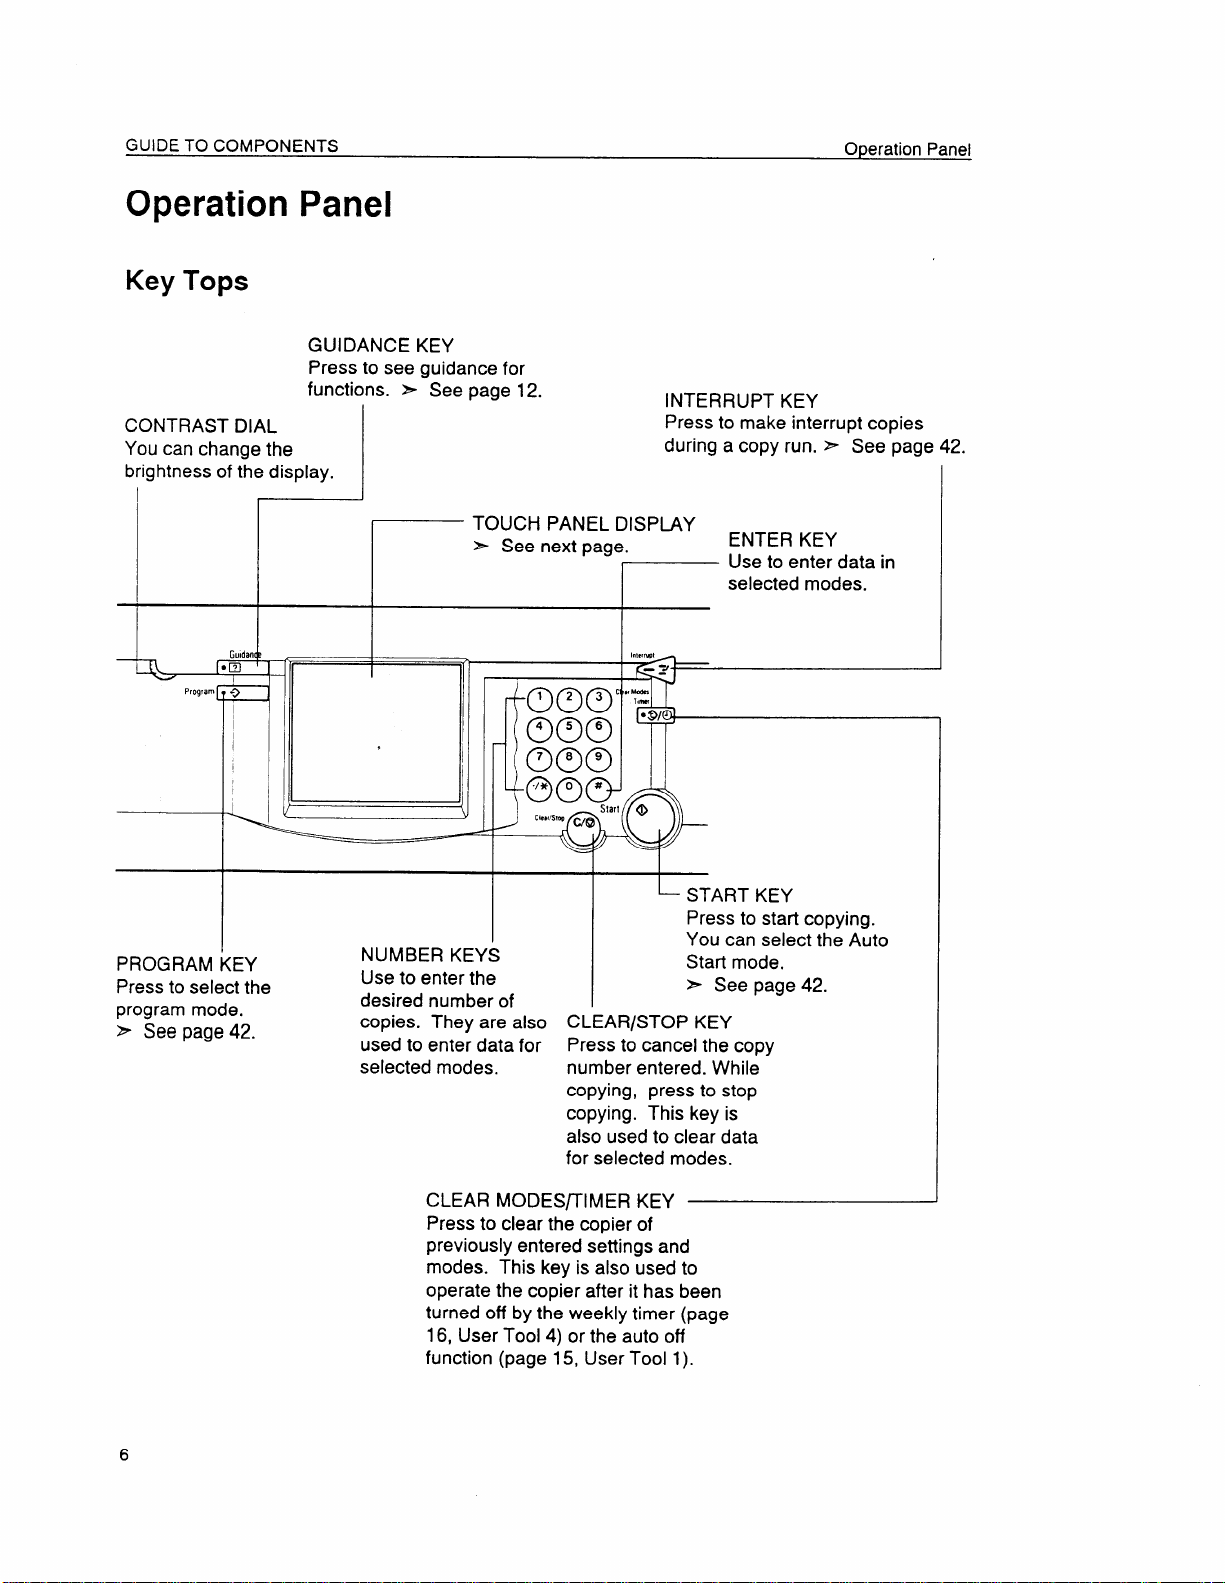
GUIDE TO COMPONENTS
Operation Panel
Key Tops
GUIDANCE KEY
Press to see guidance for
functions. > See page 12.
CONTRAST DIAL
You can change the
brightness of the display.
I
Program ~ ->
I
I
I
I
INTERRUPT KEY
Press to make interrupt copies
during a copy run. Z- See page 42.
TOUCH PANEL DISPLAY
~ See next page.
Operation Panel
ENTER KEY
Use to enter data in
selected modes.
I
I
I
I
PROGRAM ~EY
Press to select the
program mode,
> See page
42.
,
)
NUMBER KEYS
Use to enter the
desired number of
copies. They are also
used to enter data for
selected modes.
L
~ START KEY
Press to start copying.
You can select the Auto
Start
~ See page 42.
CLEAR/STOP KEY
Press to cancel the copy
number entered. While
copying, press to stop
copying. This key is
also used to clear data
for selected modes.
CLEAR MODES/TIMER KEY
Press to clear the copier of
previously entered settings and
modes.
operate the copier after it has been
turned off by the weekly timer (page
16, User Tool 4) or the auto off
function (page 15, User Tool 1).
This key is also used to
mode.
Page 17

Touch Panel Display
Initial Display
System A and B
GUIDE TO COMPONENTS
System C
COPY
OPERATION SCREENS
COPY COUNTER
COUNTER
Indicates the number of copies.
BASIC FUNCTIONS AND KEY TOPS
x See page 35.
S See page 43.
Indicates the number of copies.
BASIC FUNCTIONS AND KEY TOPS
~ See
page 35.
~
........................................
OPERATION SCREENS
S Seepage 43.
Keys that have the option of being selected.
Keys that have been selected.
Keys that have no option to select.
1
Page 18
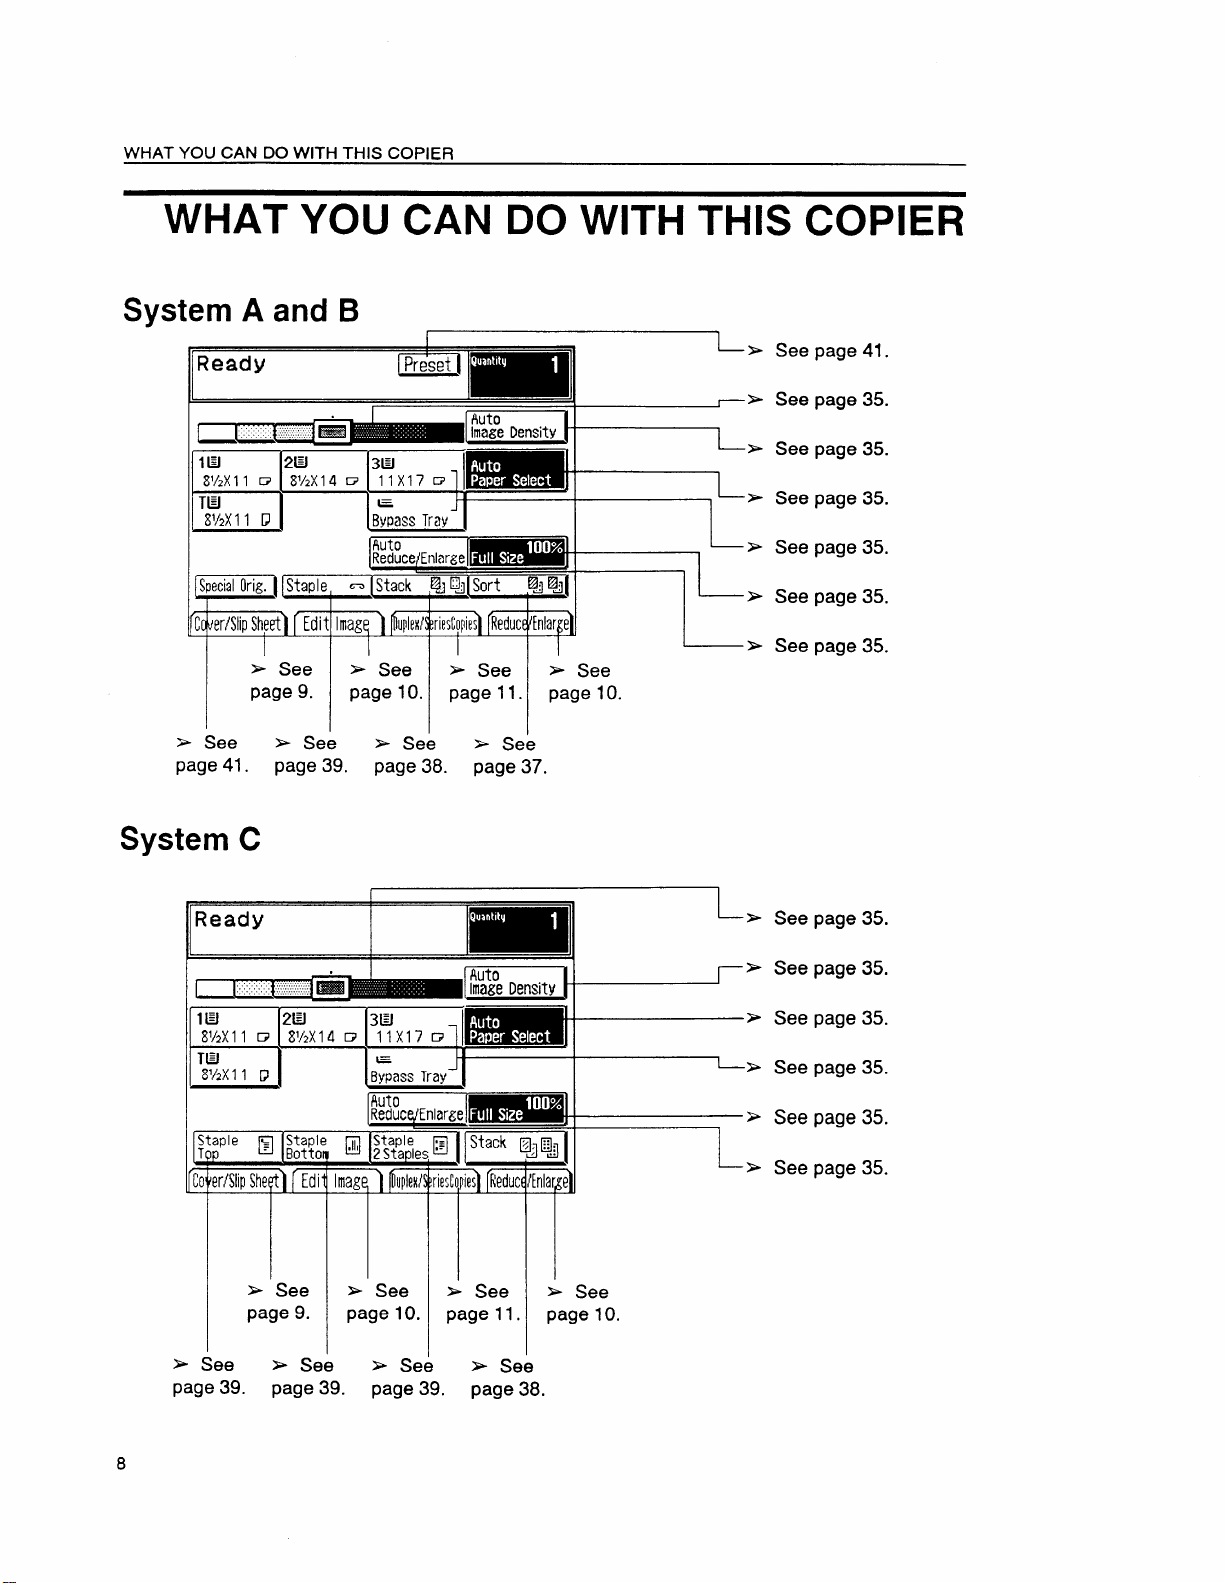
WHAT YOU CAN DO WITH THIS COPIER
WHAT YOU CAN DO WITH THIS COPIER
System A and B
Ready
1“
[
lEJ 2H
81/2x 11 w
TEJ
8V2X11 U
I
8’/2X 14 w
3EI
11X17G
&
.Bwass Tray
Auto
I I
CC~erfSlipShyt] ( Edit Imagq ) f
~ See
page 9.
+ See
page 10.
i
* See ~ See
page 11. page 10.
~> See page 41.
- S See page 35.
X See page 35.
~ See page 35.
1
E
See page 35.
L
S See page
35.
s See
page 41.
System C
t.
Ready
,.,,,.:.,.,......... ..:
I “~
[
lEI
sl/p)(11
T@
8’/2X11
~ See
page 39. page 38. page 37.
.........
2EI
W
W2X14 D
Q
E See s See
page 9.
&
* See
3EJ
llx17c7
=
ByPassTray
page 10.
S See ~ See
page 11.
~ See
page 10.
L-_
~ See page 35.
~ See page 35.
~ See page 35.
S See page 35.
~ See page 35.
S See page 35.
See
~
s See * See
page 39. page 39. page 39. page 38.
8
* See
Page 19
WHAT YOU CAN DO WITH THIS COPIER
.,2
(“)
~hmthwrl
+ See pages 60-63.
lPaperIlesignatel
.,
...
.“,...,,:..,....
..,.,.,.,:.,...,.:,,,,,,,...,.
@i@@fl
+
3.,
“456
789
IN’Yip$hod
m
+
+
@q/
1...”
...........,,,,
#
“2
‘““
33 ‘
Page 20
WHAT YOU CAN DO WITH THIS COPIER
(“”
Editing/
Centwing
I !hveha I
I 1 f
IMeteAreaI
p
A
El
El
* See pages 56-59.
Erm Borderl
Cent./Bord.I
I
IEm!!LJ
+
l%se’t wl
10
(i-e’
* See page 43.
I hull I
Page 21
Dupbl I
WHAT YOU CAN DO WITH THIS COPIER
~ See pages 44-55.
1
+
m
2
Kl%l
1
●rl
:~:
,--.-’,
J
Combine
I hnbine2Nkn. I
Emml
1
1
,’,:&
=’;-.,
u
J
+
2
1
I
ICombine4Min. I
+
1
1
11
Page 22
HOW TO SEE THE GUIDANCE DISPLAY
Seeking Guidance In Stand-by
HOW TO SEE THE GUIDANCE DISPLAY
Press the Guidance key when you want to know detailed information about functions you
use. You can use this key in stand-by or when entering the settings for a copy job.
Seeking Guidance In Stand-by
1. Press the Clear Modes key and the
Guidance key,
2. Touch the key you want to know about
on the touch panel display.
O The touch panel display shown at right is
for systems A and B.
3. For example, if you want to know about
“Key Layout”, touch the Key Layout
key.
&
be’
/ Guidance
~~ Guidance Menu
Press key you want information about.
To return to this screen, press m
key on the screen.
Pn=q ~
mm Q
m
4. Touch the key you want to know about.
IJ If you want to return to the previous dis-
play, touch the
12
Menu key.
~m Key Layout
Operation consists of rTouch Pane I
DisplayJ and rKey TOpSJ .
Press rTouch Panel DispiayJ or rKey
TOpSJfor information.
ID
enu
Page 23
Seeking Guidance While Entering Job Settings
HOW
TO SEE THE GUIDANCE DISPLAY
Seeking Guidance While Entering
1. Press the Guidance key.
I
The information about functions you
have selected just before will be displayed on the touch panel display. For
example, if you have selected the
Staple mode, the guidance appears as
shown at right.
Cl The touch panel display shown at right is
for system B.
Job Settings
Guidance
•~
#
Program● +>
I
n
1
2.
To exit from the Guidance display,
touch the Exit key.
13
Page 24
CHANGING DEFAULT SE7TINGS User Tools
CHANGING DEFAULT SETTINGS
User Tools
This section is for the key operators in charge of this copier.
copier’s default settings using the following user tools.
User Tools Menu
<UserTools>
Selectone of the folloiulngitems.
~ Auto rwet/Auto off
~Select specialtray ~Set standardtraydisplay
~ Set date/tIme
~Weekly Timer ~
~ Set operation modes
m
a
< User Tools>
Selectone of the followingItems.
~ ChangefixedR/E
~ Set UserCode(s)
~ Check/Resetcopy count @
~Reset data for User Codes @
m
How To Access The User Tools
10
Press the Clear Modes key.
You can change or set the
< User Tools>
Selectone of the folIowlng[terns.
~ Check/ResetCODY count
~ Resetdatafor User Codes
n ResetUserCodes/Counters
~ SelectARDF/RDH modes m
m
Q1
:Q
2.
Press the Clear/Stop key for more
than 3 seconds until the User Tools
Menu appears on the touch panel dis-
play.
3.
Select the menu number you want to
use by touching the touch panel display.
~
(Ml
+
a
(~[ U.e to exit from
Imd
This copier has 12 user tools. You can see 5 user tools on the touch panel display
at the same time. Use these keys to see other
Use to return to the user tools menu display.
14
user tools menu.
the usertocd Condition
Page 25
User Tools
[~[ Auto reset/Auto off
The co ier returns to its initial condition automatically after
r
Auto reset
Screen Saver
Off The auto off time can be set from 1 minute to 999 minutes,
Auto
SADF Auto reset
(for machine with dual job
feeder only)
(system
A or B)
rom 1 second to 999 seconds, or the function can be turned
off .
~ default: 60 sec.
When the machine does not detect anyone operating it for
the selected time, the touch panel display turns off
automatically. This time can be set from 1 second to 999
seconds, or the function can be turned off.
~ default: 60 sec.
When the copier is used after the weekly timer has turned it
off, the copier will turn itself back off after the selected time.
or the function can be turned off.
~ default: OFF
In the SADF mode (Semi-Automatic Document Feed, see
page 23), if the next original is not set within the selected
time, the machine will cancel the SADF mode automatically.
The SADF Auto reset time can be set from 1 second to 60
seconds, or the function can be turned off.
Cl default: 5 sec.
CHANGING DEFAULT SEl17NGS
Eour jo is finished. The automatic reset time can be set
I 2 ~Select special tray
Select the tray for the Cover function. Paper for cover
Tray for Cover Sheet
Tray Display for
Cover Sheet
\
Tray for Slip Sheet
1
Tra Display for
i
lip Sheet
1
D The trays set for cover sheets or slip sheets cannot be used for the Auto Paper Select, Auto Tray Switching,
and Duplex copying modes.
sheets will be fed from the selected tray.
Cl default: No select
You can see which tray is set for cover sheets, If you want
to see the tray display only in the Cover mode, select “Mode
selected”. If you want to always see the tray display, select
“Full time”.
0 default: Full time
Select the tray for the Slip Sheet functions (Pa er Desi nate
and OHP Slip Sheet). Paper for slip sheets
the selected tray.
O default: No select
You can see which trav is set for the slit) sheets. If vou want
to see the tray display-only in the Slip S’beet mode, ~elect
“Mode selected”. If you want to always see the tray display,
select “Full time”.
I Cl default: Full time
WI I be fed rom
‘t’ ?
15
Page 26
CHANGING DEFAULT SEITINGS
User Tools
Use to set the copier’s internal clock before setting the weekly timer. Set the clock following
the touch panel display instructions.
If necessary, remember to adjust the clock for daylight saving time (summer time), or return it to standard
0
time.
[~1 Weekly Timer
Use to set the weekly timer. If you set the timer, the copier turns on and off automatically at
the selected time each day.
D default: No weekly timer setting
O If you want to turn on the machine for an entire day, input “000” for the ON time and do not input the OFF
time.
If you want to turn off the machine for an entire day (ex.: Saturday, Sunday), do not input the ON time and
El
input “000” for the OFF time.
~[ Set operation modes
Maxim; ~mc:~ry input The maximum copy quantity can be set from 1 to 999.
Cl default: 999
Panel beeper
The beeper key tone) can be set to on or off.
ACl default: N
The beeper (job end call) sounds when your copyin job is
Job End Call occurs in the machine. T e Jo End Call can be set to on or
RL
finished, supplies (toner,
Faper run out, or if a prob em
off
~ default: ON
m+
+ ~~
Auto and Manual Image Density levels can be adjusted to
lighter or darker.
Image Density Level
Cl default: ~ IW;:; &
~~~ (center)
You can select Program No. 5 (see pa e 42) as a default
Default Setting ?mode. Use it to store job settings you requently use.
Cl default: Normal
You can select the animation display during the warm-up
period and copying run. During the warm-up period, the
remaining warm-up time is displayed. During copying, you
Touch Panel in
Waiting Mode
can see how long It takes to finish co ying by entering the
Enumber of originals with the Number eys and Enter key. To
exit from the animation display, touch the Exit key of the
touch anel display.
PCl de ault: Reset (no animation display)
16
Page 27
User Tools
CHANGING DEFAULT SETTINGS
~[
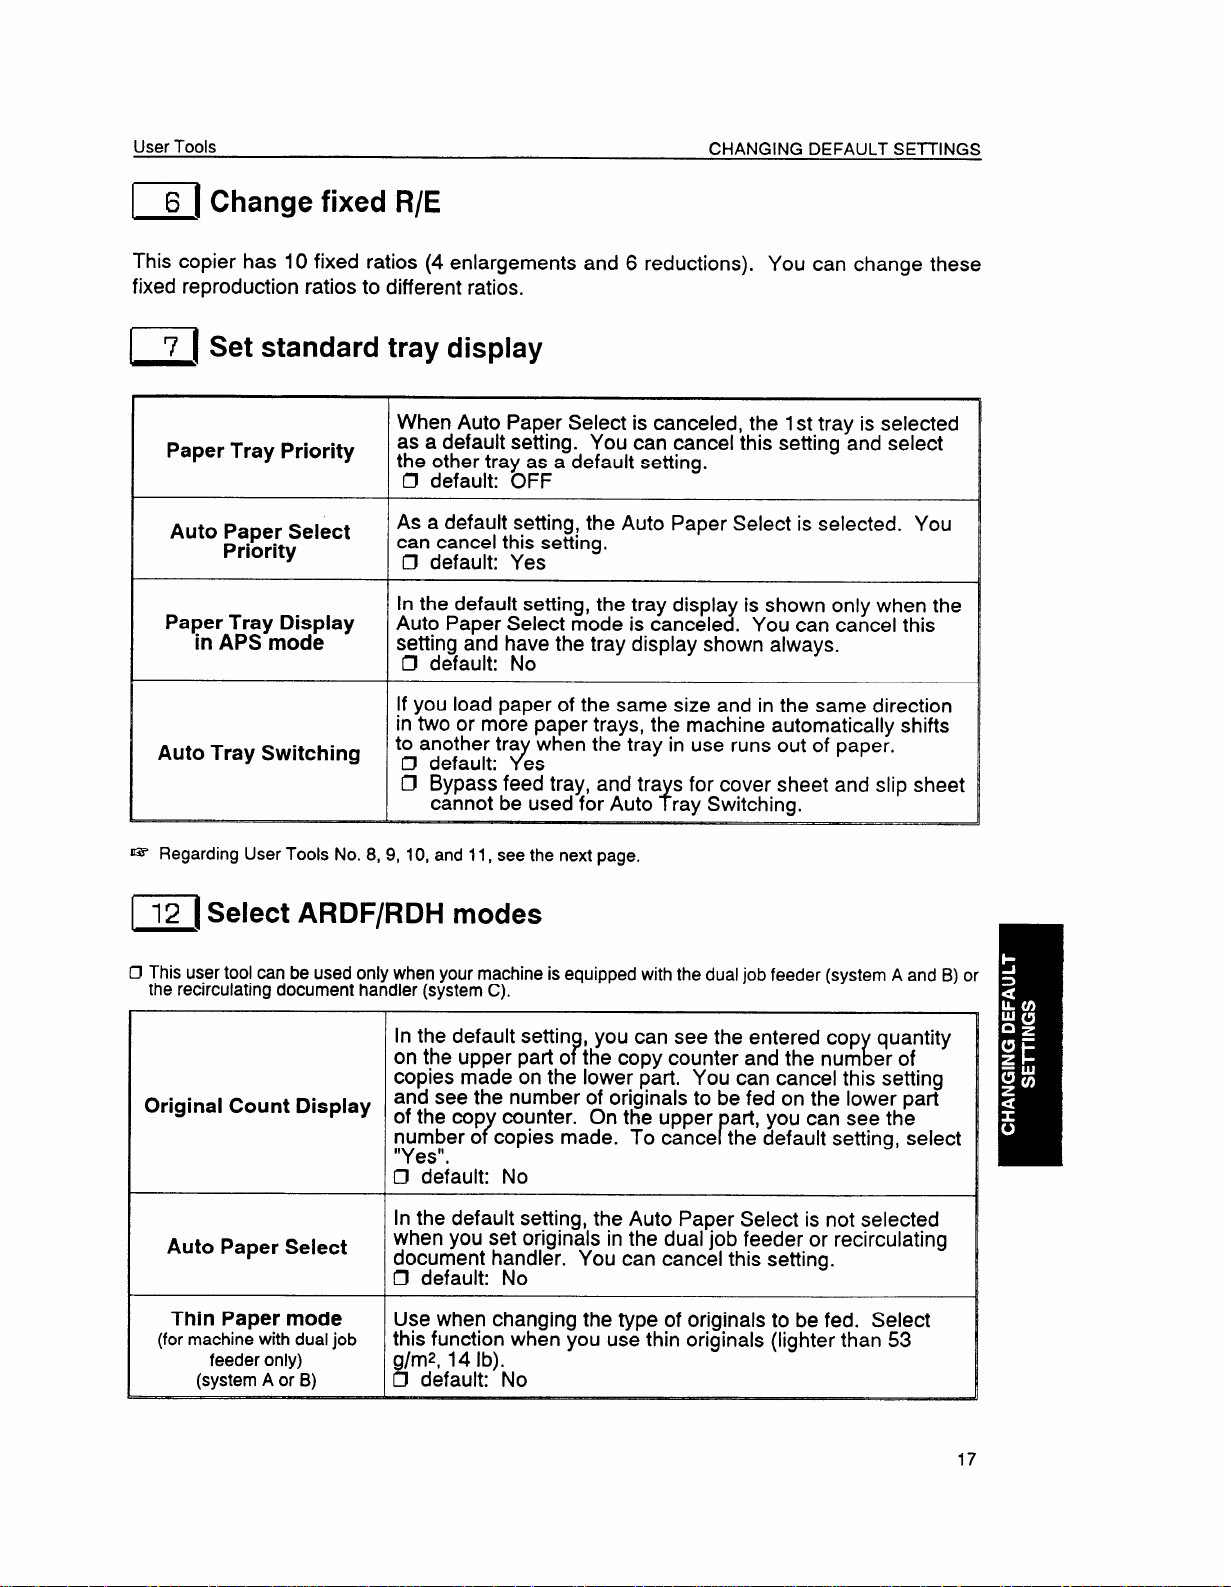
This copier has 10 fixed ratios (4 enlargements and 6 reductions). You can change these
Change fixed R/E
fixed reproduction ratios to different ratios.
7 Set standard tray display
n
When Auto Paper Select is canceled, the 1st tray is selected
Paper Tray Priority
as a default setting. You can cancel this setting and select
the other tray as a default setting.
~ default: OFF
Auto Paper Select
Priority
Paper Tray Display
in APS mode
As a default setting, the Auto Paper Select is selected. You
can cancel this setting,
Cl default: Yes
In the default setting, the tray display is shown only when the
Auto Paper Select mode is canceled. You can cancel this
setting and have the tray display shown always.
~ default: No
If you load paper of the same size and in the same direction
in two or more paper trays, the machine automatically shifts
Auto Tray Switching
to another tra when the tray in use runs out of paper.
Cl default: es
J
Cl Bypass feed tray, and tra s for cover sheet and slip sheet
{cannot be used for Auto ray Switching.
~ Regarding User Tools No. 8, 9, 10, and 11, see the next page.
[ 12 ISelect ARDF/RDH modes
O This user tool can be used only when your machine is equipped with the dual job feeder (system A and B) or
the recirculating document handler (system C).
In the default settin , you can see the entered cop quantity
?
t
r
Original Count Display
Auto Paper Select
Thin Paper mode
(for machine with dual job
only)
feeder
(system A or B)
on the upper part o the copy counter and the num er of
copies made on the lower part. You can cancel this setting
and see the number of originals to be fed on the lower part
of the cop counter. On the upper art, you can see the
number o copies made. To cance the default setting, select
?
“Yes”.
I ~ default: No
I
In the default setting, the Auto Paper Select is not selected
when you set originals in the dual job feeder or recirculating
document handler. You can cancel this setting.
~ default: No
Use when changing the type of originals to be fed. Select
this function when you use thin originals (lighter than 53
g/mz, 14 lb).
Cl default: No
17
Page 28
CHANGING DEFAULT SETTINGS
User Tools
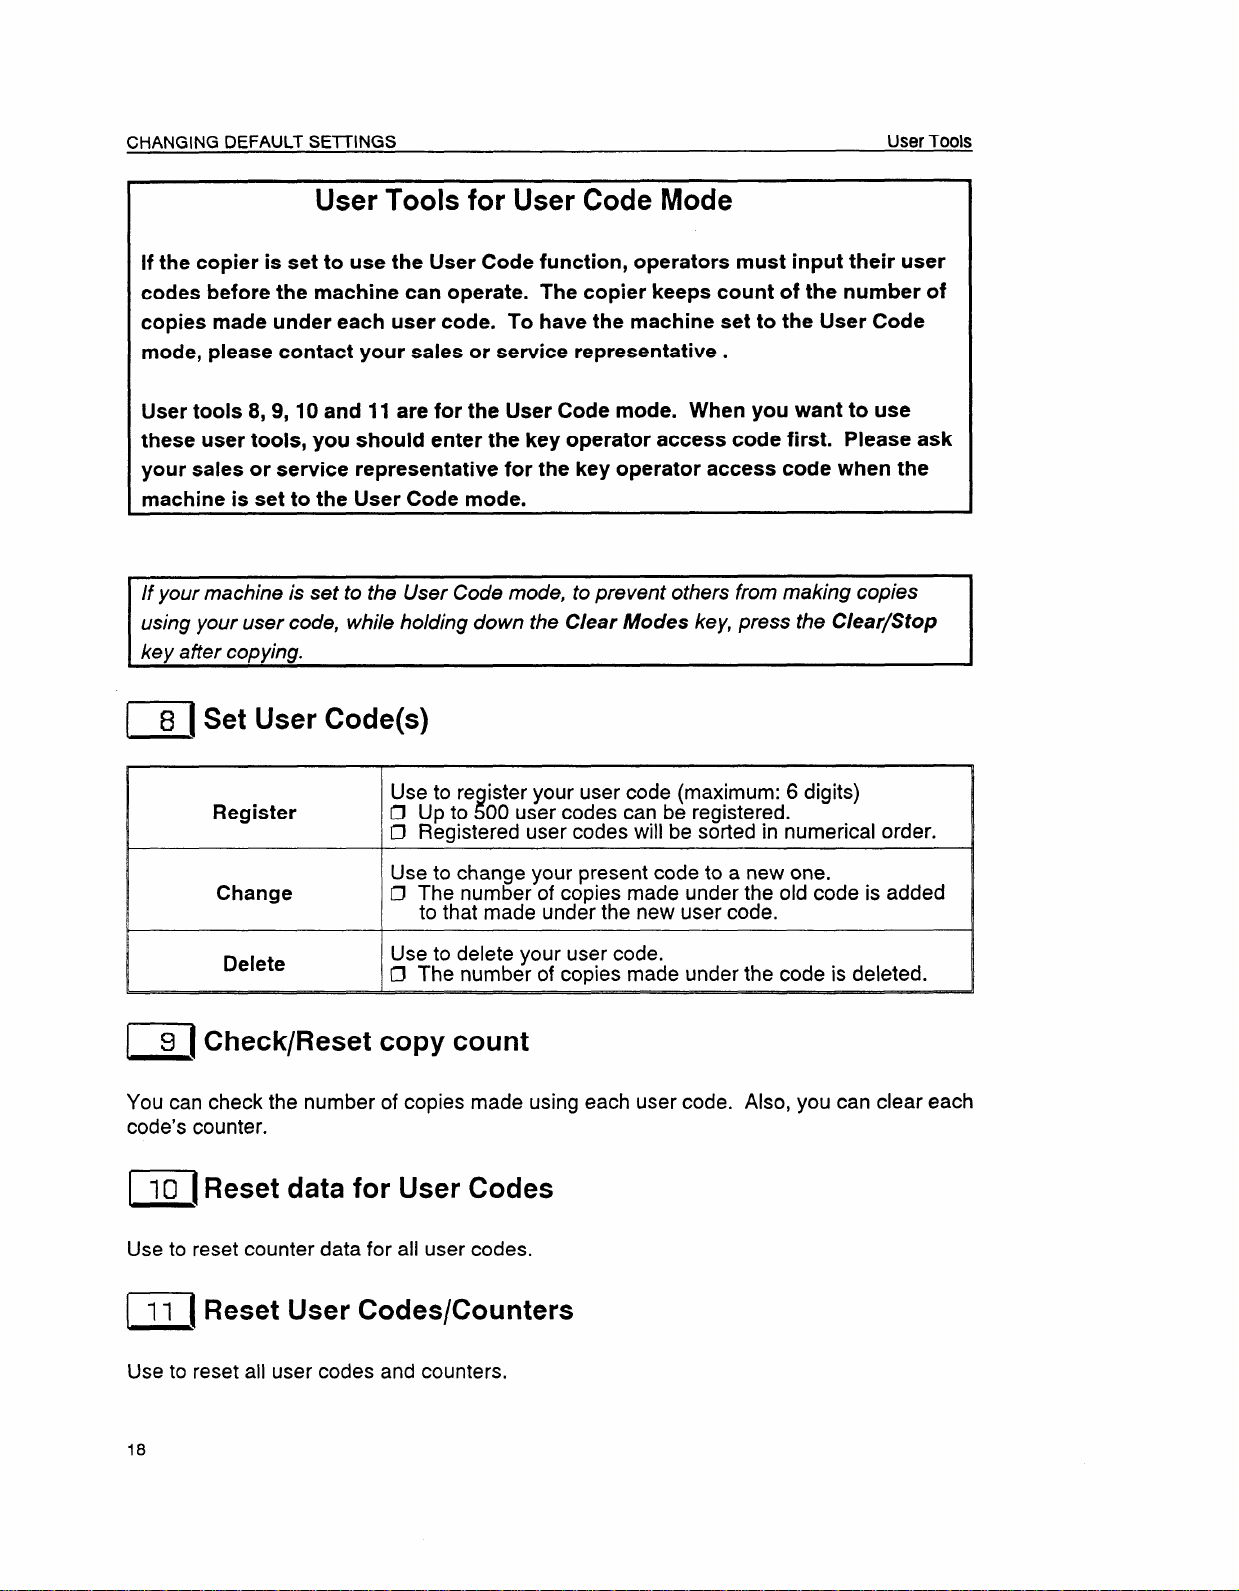
User Tools for User Code Mode
If the copier is set to use the User Code function, operators must input their user
codes before the machine can operate. The copier keeps count of the number of
copies made under each user code. To have the machine set to the User Code
mode, please contact your sales or service representative .
User tools 8,9, 10 and 11 are for the User Code mode. When you want to use
these user tools, you should enter the key operator access code first. Please ask
your sales or service representative for the key operator access code when the
machine is set to the User Code mode.
If your machine is set to the User Code mode, to prevent others from making copies
using your user code, while holding down the Clear Modes key, press the Clear/Stop
kev afier coDvina.
~[ Set User Code(s)
Use to re ister your user code (maximum: 6 digits)
Register ~Cl Up to 00 user codes can be registered.
~ Registered user codes will be sorted in numerical order.
to change your present code to a new one.
Change
Delete
g Check/Reset copy count
c1
You can check the number of copies made using each user code. Also, you can clear each
code’s counter.
Use
D The number of copies made under the old code is added
to that made under the new user code.
Use to delete your user code.
~ The number of copies made under the code is deleted.
~[Reset data for User Codes
Use to reset counter data for all user codes.
11 Reset User Codes/Counters
n
Use to reset all user codes and counters,
18
Page 29
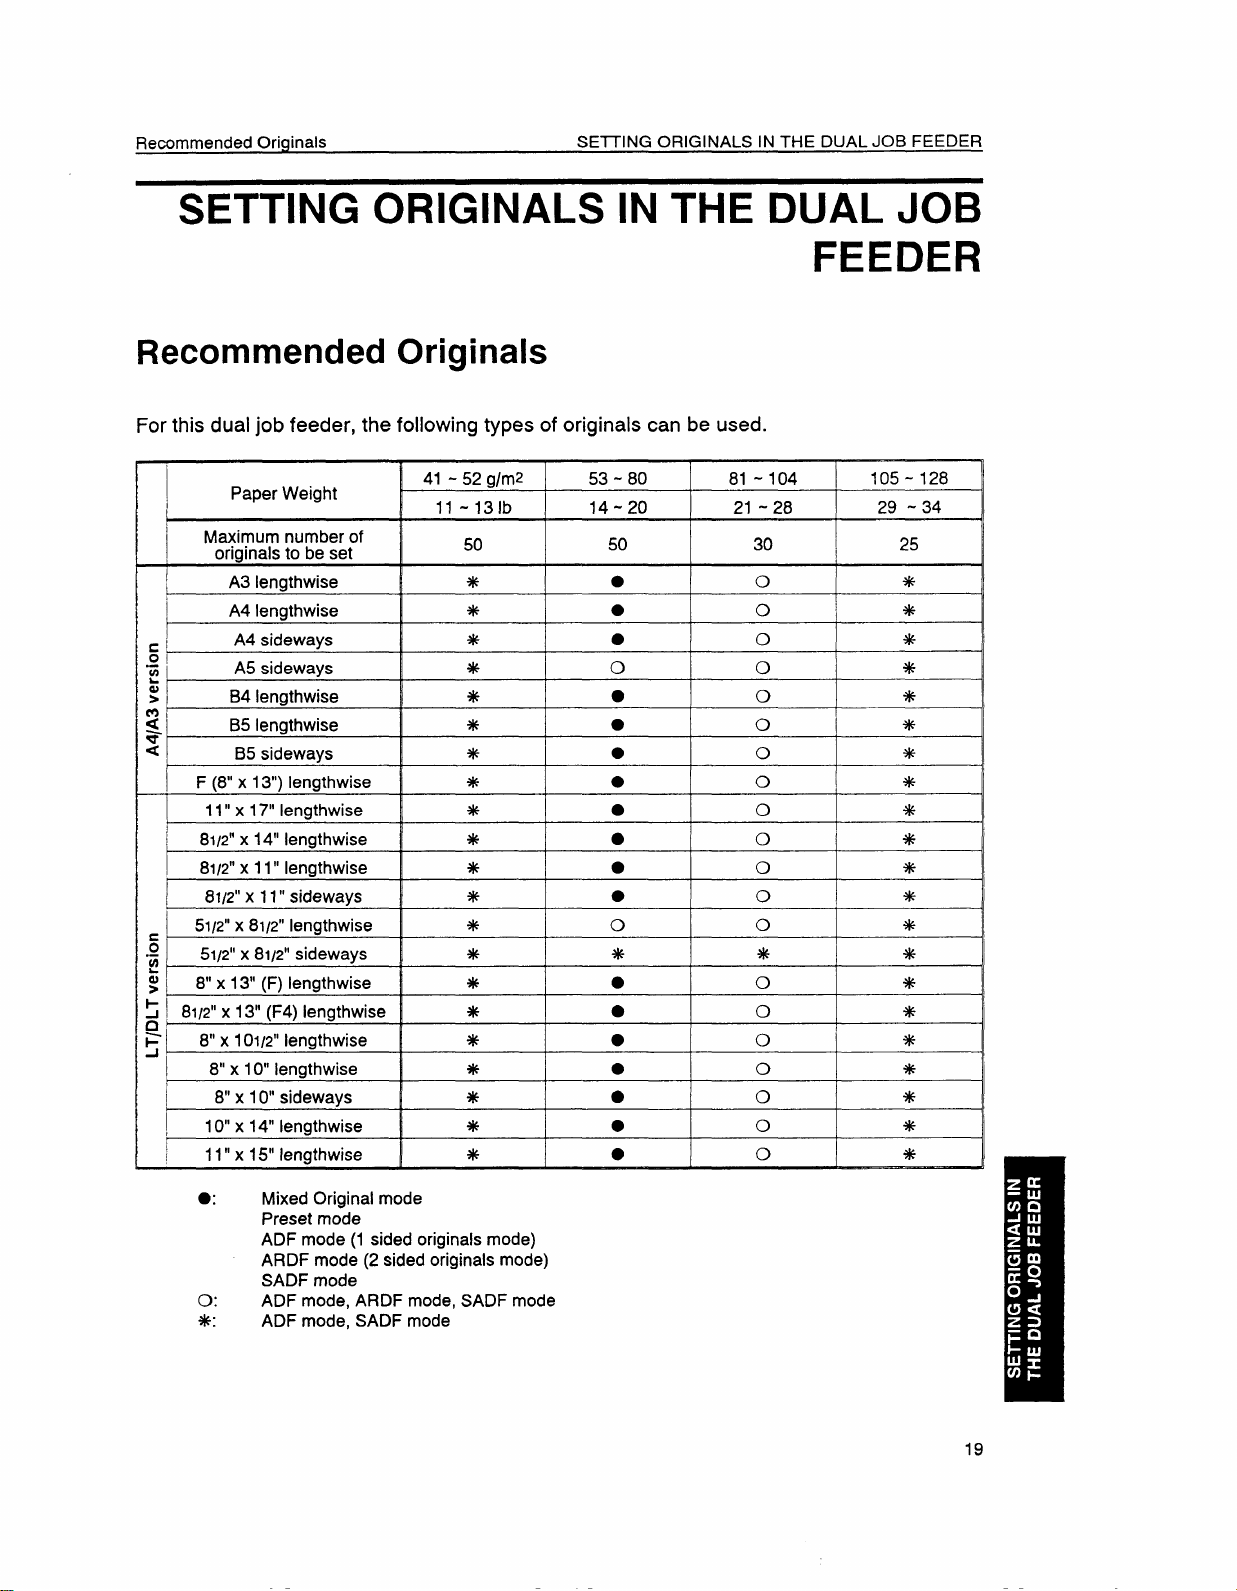
Remmmended Originals
SEITING ORIGINALS IN THE DUAL
SETTING ORIGINALS IN THE DUAL JOB
FEEDER
Recommended Originals
For this dual job feeder, the following types of originals can be used.
JOB FEEDER
Paper Weight
Maximum number of
originals to be set
A3 lengthwise *
A4 lengthwise *
c.
01
z
b
a)
>
2
*
<
~
.-
(0
&
; I
cl)
F
J
I 8“ x 10“ lengthwise
I
~ 10“
I
A4 sideways *
A5 sideways
B4 lengthwise
B5 lengthwise * ●
B5 sideways *
F (8” x 13“) lengthwise *
11” x 17“ lengthwise * ●
81/2” x 14“ lengthwise
81/2”x 11” lengthwise
81I2”x 11” sideways *
51/2” x 81/2” lengthwise * o 0 *
51@’ x 81/2” sideways
8“ x 13” (F) lengthwise
81I2”x 13“ (F4) lengthwise
x 10IK!”lengthwise
8“
8“ x 10“ sideways
x 14” lengthwise
x 15“ lengthwise *
11”
41-52 glmz 53-80
11 -131b 14-20
50
* o
*
*
*
j
i
* * * +$
* ●
*
*
*
*
* ●
50
●
●
●
●
●
●
●
●
●
●
●
o
●
●
81-104
21-28
30 25
o
o
o
0
o
o
o
o *
o *
o *
o
o
o *
o +$
o
0 *
o
o
o
105-128
29 -34
*
*
4$
*
*
*
*
*
*
*
*
*
*
●✚
Mixed Original mode
Preset mode
ADF mode (1 sided originals mode)
ARDF mode (2 sided originals mode)
mode
SADF
o: ADF mode, ARDF mode, SADF mode
*:
ADF mode, SADF mode
Page 30
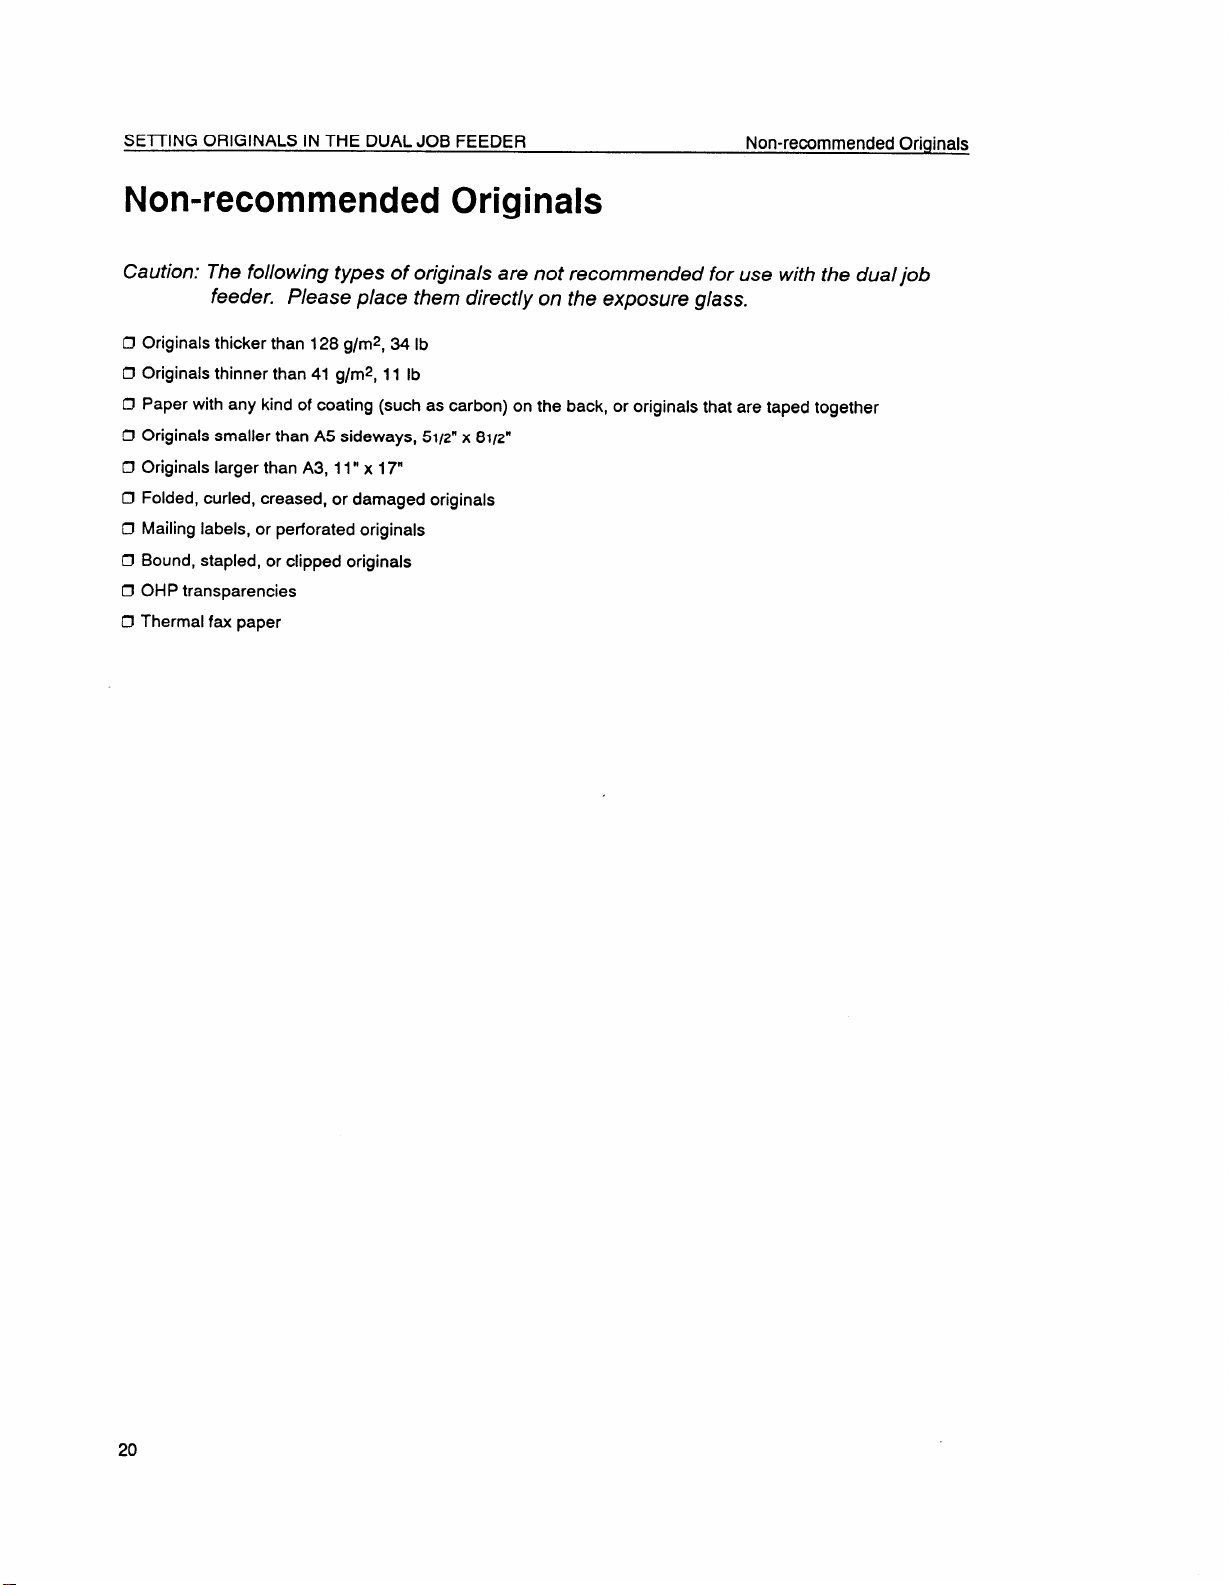
SEITING ORIGINALS IN THE DUAL JOB FEEDER
Non-recommended Oriqinals
Non-recommended Originals
Caution: The following types of originals are not recommended for use with the dual job
feeder. Please place them directly on the exposure glass.
Originals thicker than 128 g/rep,34 lb
o
Originals thinner than 41 g/rep,11 lb
n
c1
Paper with any kind of coating
Originals smaller than A5 sideways,
o
0
Originals larger than A3, 11” x 17“
0
Folded, curled, creased, or damaged originals
Mailing labels, or perforated originals
c1
o
Bound, stapled, or clipped originals
0
OHP transparencies
Thermal fax paper
0
(such as carbon) on the back, or originals that are taped together
5112”x 8112”
20
Page 31

Setting A Stack Of Originals
SEITING ORIGINALS IN THE DUAL JOB FEEDER
Setting A Stack Of Originals
Automatic Document Feed (ADF) mode (I Sided originals mode)
Automatic Reverse Document Feed (ARDF) mode
(2 Sided Originals mode)
In this mode, the operator inserts a stack of originals of the same size into the original table.
These originals are individually fed onto and removed from the exposure glass.
1. Correct any curl, fold, or crease in the
originals before setting. Square the
stack of originals.
9V
.Q
2. Confirm that the Insert Original
dicator is lit before setting.
3. Confirm that no previous originals
remain on the exposure glass.
4. Adjust the original guide to the original
size.
in-
21
Page 32

5, Set originals face up into the dual job
feeder until the
dicator goes off.
IJ The original guide must touch the front
side of the originals.
Cl Do not stack originals above the limit
mark.
Insert Original in-
Press the Start key,
6.
The bottom sheet of the original stack
(last page) is fed into the dual job
feeder first.
‘f=%+
I
I
22
Page 33

Setting One Original At A Time SETTING ORIGINALS IN THE DUAL JOB FEEDER
Setting One Original At A Time
Semi-Automatic Document Feed (SADF) mode
In thk mode, the operator inserts one original at a time into the dual job feeder. The original
automatically fed onto and removed from the exposure glass.
is
Correct
1.
originals before setting.
Confirm that the Insert Original in-
2.
dicator is lit before setting.
Confirm that no previous originals
3.
any curl, fold, or crease in the
remain on the exposure glass.
+@
Qv
4
b
a
tlb
Adjust the original guide to the original
4.
size.
23
Page 34

SEITING ORIGINALS IN THE DUAL JOB FEEDER
5. Set the original face up into the dual
job feeder until the Insert Original
indicator goes off.
O Start with the last page of the originals.
O The original guide must touch the front
side of the original.
6. Press the Start key.
Setting One Original At A Time
-
J
7.8.While the Auto Feed indicator is lit
after an original is fed, set the next
original. The original is automatically
fed and copied.
O While the
dual job feeder is ready for another
original. (You can change this time by
User Tool 1. See page 15.)
Repeat steps
Auto Feed indicator is lit, the
5 and 7 until copying is
completed.
24
Page 35

Setting Different Sized Originals SE7TING ORIGINALS IN THE DUAL JOB FEEDER
Setting Diffe Sized Originals
Mixed Sized mode
In this mode, you can set originals with different widths and lengths together into the dual job
feeder. You can use the following sizes:
A4/A3 version:
LT/DLT version:
1.
Touch the Special Orig. key of the
touch panel display. (See page 41.)
2.
Touch the Mixed Sizes key of the
touch panel display. (See page 41.)
3.
Correct any curl, fold or
originals before setting.
A3, B4, A4 and B5
11” x 17”, 81/2” x 14”, and 81iz” x 11“
4.
Confirm that the Insert Original indicator is lit before setting.
5.
Confirm that no previous originals
remain on the exposure glass.
25
Page 36

SEITING ORIGINALS INTHE DUAL JOB FEEDER
6. Adjust the original guide to match the
widest original.
7. Set the originals face up into the dual
job feeder until the insert Original
indicator goes off.
Setting Different Sized Originals
Cl Originals must be aligned to the rear-left
corner of the dual job feeder,
8. Press the Start key.
as shown.
1, I
—
.
—
7
—
—
—
—
T-Q
J
L IF7
Page 37

Setting A Pasted Original
SEITING ORIGINALS IN THE DUAL JOB FEEDER
Setting A Pasted Original
Pasted Original mode
In this mode, you can set a pasted original into the dual job feeder.
o In this mode, you can set one original at a time.
1. Touch the Special Orig. key of the
touch panel display. (See page 41.)
2. Touch the Pasted Original key of the
touch panel display. (See page 41.)
3. Correct any curl, fold or crease in the
originals before setting.
1
4. Confirm that the Insert Original in-
dicator is lit before
5. Confirm that
remain on the
6. Adjust the original guide to the original
size.
setting.
no previous originals
exposure glass.
27
Page 38

SETTING ORIGINALS IN THE DUAL JOB FEEDER
one pasted original face Up into the
Set
7.
dual job feeder until the
Insert Original
indicator goes off.
O Start with the last page of originals.
Cl The original guide must touch the front
side of the original.
Setting A Pasted Original
8. Press the
Start key.
9. While the Auto Feed indicator is lit
after an original is fed, set the next
original. The original is automatically
fed and copied.
~ While the Auto Feed indicator is lit, the
dual job feeder is ready for another
original. (You can change this time by
User Tool 1. See page 15.)
Clear/Stop~
I
I J “’WL N ))!
—..
10. Repeat steps 7 and 9 until copying is
completed.
28
Page 39

Presetting Originals During A Copy Run
SETTING ORIGINALS IN THE DUAL JOB FEEDER
Presetting Originals During A Copy Run
1. Touch the Preset key of the touch
panel display. (See page 41.)
Following the instructions on the dis-
2.
play, set the copy job settings for your
next job.
3.
Touch the Exit key of the touch panel
display.
Copying
You can preseta jobwith~
llEiD
AutoImageDensity 213 Iyzxlq~
m
Sort
The touch panel display changes as
shown.
Set the originals for your next job on
top of the originals being copied.
Without forcing them, push them in
completely.
O Do not insert the originals too strongly.
Place the preset originals on top
of the originals being copied,
Press ~.
then
Firstoriginals Presetoriginals
J “
I
J[
29
Page 40

SETTING ORIGINALS IN THE DUAL JOB FEEDER
Touch the Exit key of the touch panel
5.
display.
After your first job is finished, the next
will start automatically.
job
Presetting Originals During A Copy Run
,,PJ,esej,,
~–’”7
Place the preset originals on top
of the originals being copied,
then press ~.
First originals
~
;[
/A[=i[ Exit
Presetoriginals
—J—l==\ q
1
;
~
~[
!(
1 @
J“
ClWhen presetting ajob using the compact sorter stapler, you have to remove the currentjob’s copies from the
sorter stapler before the preset job can start.
O When presetting a job using the
before the preset job can start. You have to do this
when you make 11 or more copies in the current job.
when you make 10 copies in the current and 10 or more for the next.
when you make 9 or less copies for the current and 11 or more for the next.
floor type sorter stapler, you might have to remove the current job’s copies
I u
1$
I
q
30
Page 41

Recommended Originals
SEITING ORIGINALS IN THE RECIRCUI,ATING DOCUMENT HANDLER
SETTING ORIGINALS IN THE
RECIRCULATING DOCUMENT HANDLER
Recommended Originals
For this recirculating document handler, the following types of originals can be used.
52-103
SIZE
c
o
,-
~
@
>
2
a
u
c
o
.-
~
@
;
n
i=
J
0 Translucent paper cannot be recirculated.
A3 lengthwise
F (8” x 13“) lengthwise
A4 sideways
A4 lengthwise
A5 lengthwise
11” x 17“ lengthwise
81/2”x 14 lengthwise
11” x 15“ lengthwise
10“ x 14“ lengthwise
8112°x 13“ (F4) lengthwise
8“ x 13“ (F) lengthwise
81I2”x 11“”sideways
8112”x 11” lengthwise
51/2”x 81/2”lengthwise
x 10“ lengthwise
8“
14-27 (lb)
25 sheets 20 sheets
(g/m2)
50 sheets
50 sheets
104
28
40 sheets
20 sheets
40 sheets *3O sheets
●l-L--- -.:-:--1- -----~ k- ---: -..,,1-+-4
I [lt5Sf5 UIIYIIIWS LXIIIIIU1 LW l~LJIGUldl~U.
105-128
29-34
*2O sheets
’30 sheets
31
Page 42

SETTING ORIGINALS IN THE RECIRCULATING DOCUMENT HANDLER
Non-recommended Originals
Non-recommended Originals
Caution: The following types of origins/s are not recommended for use with the recirculat-
ing document handler. Please place them directly on the exposure glass.
O Originals thicker than 128 g/m2, 34 lb
D Originals thinner than 52 g/rep, 14 lb
D Paper with any kind of coating (such as carbon) on the back, or originals that are taped together
D Originals smaller than A5 lengthwise, 51/2” x 81/2” lengthwise
O Originals larger than A3, 11” x 17“
C! Folded, curled, creased, or damaged originals
IJ Mailing labels, perforated originals, or pasted originals
Cl Bound, stapled, or clipped originals
IY OHP transparencies
C! Thermal fax paper
Setting Originals
1. Correct any curl, fold, or crease in the
originals before setting.
O If you want to use originals of which you
cannot correct the curl, fold, or crease, do
the following:
O First make one set of copies of originals,
and use these copies as the recirculating
originals.
Limit the number of copies for one set of
originals to 30.
2. Confirm that the Set Original indicator
is lit. If it is not lit, confirm that the
feed-out unit and feed-in unit covers
are closed properly.
O Make sure that no previous originals
remain on the exposure glass or in the
recirculating document handler.
1
I
-1
I
32
Page 43

Setting Originals
3. Adjust the original guides to the
original width.
SETTING ORIGINALS IN THE RECIRCUIJ+TING DOCUMENT HANDLER
4. If you have more than two originals,
square the stack of originals. Set the
originals face up in the original stacker.
The Set Original indicator should turn
off.
O Originals should be the same size.
Slide the feed-out unit to match the
5.
size marks on the front side of the
recirculating document handler.
I
33
Page 44

SEl17NG ORIGINALS ON THE EXPOSURE GIASS
SETTING ORIGINALS ON THE
EXPOSURE GLASS
If your machine is equipped with the platen cover
1. Lift the platen cover.
2. Set the original face down on the exposure glass.
aligned to the rear left corner.
The original must be
O Before pressing the Start key, lower
platen cover.
If your machine is equipped with the dual job feeder
1. Lift the dual job feeder.
2. Set the original face down on the exposure glass.
aligned to the rear left corner,
Before pressing the Start key, lower the
O
dual job feeder.
If your machine is equipped with the recirculating document handler
1. Lift the recirculating document hand-
ler.
The original must be
the
2. Set the original face down on the exposure glass. The original must be
aligned to the rear left corner.
~ Before pressing
recirculating document handler.
34
the Start key, lower the
Page 45

BASIC FUNCTIONS AND KEY TOPS
BASIC FUNCTIONS AND KEY TOPS
The copier automatically controls the image density accord-
ing to the original background density.
,:,::.=::,.:x,:x
~
I
1
m
-Want’ouseo
After canceling the Auto Image Density, use these keys to
adjust the image density manually. To get a darker image,
touch the right keys. To get a lighter image, touch the left
keys.
The copier selects a suitable size of copy paper based on
the original size and the reproduction ratio.
If you use translucent or transparent paper as an original, the original size
IJ
might not be detected correctly.
O When you use Auto Paper Select when placing the original directly on the
exposure glass, make sure that the platen cover, dual job feeder, or
recirculating document handler is lowered before pressing the Start key.
If not, the original size might not be detected correctly.
After canceling Auto Paper Select, select the paper tray you
Use to make the copy image the same size as the original
image.
IEEiil
The copier automatically selects the proper reproduction
ratio suitable for the selected paper. All originals are copied
onto the same selected paper size.
O If you use translucent or transparent paper as an original, the original size
might not be detected correctly,
IJ When you use the Auto Reduce/Enlarge when placing the original directly
on the exposure glass, make sure that the platen cover, dual job feeder,
or recirculating document handler is lowered before pressing the Start
key. If not, the original size might not be detected correctly.
35
Page 46

BASIC FUNCTIONS AND KEY TOPS
P!zJ
m
When you have selected functions on operation screens, this
key appears on the touch panel display. Touch this key to
see at a glance all the modes you selected.
After the Check Modes key is touched, this key appears on
the touch panel display. Touch this key to return to the display when the Check Modes key was touched.
When you select functions on the operation screens, this key
appears on the touch panel display. Touch this key to
change settings of the following modes.
Copy paper size
Image density control
Finishing (Sort, Stack, and Staple)
Special original setting (system A and B only)
36
..’-
Page 47

sort BASIC FUNCTIONS AND KEY TOPS
Before using the Sort function, please refer to page 4 and 5 to know which system you have because this
function is different depending on the system you have.
System A and B
copy of each original is delivered to each bin and copies are collated into sets.
One
.
System C
System C does not have
the Sort key. As a default setting, copies are assembled as sets in
sequential order by sliding the shift tray from side to side.
System
O For the Sort function, the following limitations apply:
Maximum paper size
Minimum paper size
Maximum paper
weight
Minimum paper
weight
Maximum capacity
Paper that cannot
be used
A
1
A4, 81I2” x 11” or smaller:
System A
A3,11’’x17° A3,11’’x17° A3,11’’x17°
A5 Ierqthwise A4, 81/2” x 11”
51/2”x 81/2’ lengthwise
93 g/m2, 25 lb 157 g/mz, 42 lb
52 g/m2, 14 lb
30 sheets/bin
B4, 81/2” x 14“ or larger:
15 sheets/bin 40 sheets/bin 1,000 sheets
System B
Post cards, tracing paper, OHP sheets, and adhesive labels
System C
System B
Sideways:
Lengthwise:
A5, 5112°x 81I2”
52 g/m2, 14 lb
all sizes:
50 sheets/bin 1,500 sheets
2 sided copies:
A4, 8112”x 11” or smaller:
B4, 8112”x 14“ or larger:
System C
A5, 511Y’x 8112°
157 g/mz, 42 lb
52 g/mz, 14 lb
37
Page 48

BASIC FUNCTIONS AND KEY TOPS
Stack
EEDm!
Before using the Stack function, please refer to page 4 and 5 to know which system you have because
this function is different depending on the system you have.
System A and B
All copies of each original are delivered to the same bin.
System C
Copies from different copy runs are grouped into individual stacks by sliding the shift tray from
side to side.
System A
O For the Stack function, the following limitations apply:
I
Maximum paper size
Minimum paper size
{
Maximum paper
weight
Minimum paper
weight
all sizes:
Maximum capacity
Pape;Jh~~emnot
System A
A3,11’’x17°
A5 Ien?thwise
5112”x 81/2’ lengthwise Lengthwise:
93 g/mz, 25 lb
52 g/mz, 14 lb
15 sheets/bin
System B
Sideways:
all sizes:
2 sided copies:
Post cards, tracing paper, OHP sheets, and adhesive labels
System B
A3,11’’x17°
A4, 8112”x 11“
A5, 511z!”x 81I2”
157 g/mz, 42 lb
52 g/mz, 14 lb
40 sheets/bin
35 sheets/bin
System C
System C
A3,11’’x17°
A5, 5112’x 81I2”
157 g/mz, 42 lb
52 g/mz, 14 lb
A4, 81/2” x 11” or smaller:
1,500 sheets
B4, 81/2” x 14“ or larger:
1,000 sheets
O When using A3, 11” x 17“ paper with system A, it might happen that the compact sorter stapler does not stack
15 sheets depending on the paper brand and condition.
38
Page 49

Stapling Copies
BASIC FUNCTIONS AND KEY TOPS
Stapling Copies
‘ Before using the Staple function, please refer to page 4 and 5 to know which system you have because
this function is different depending on the system you have.
In the Staple function, groups of copies are automatically stapled.
D If you select this function, the Sort function is automatically selected.
Stapling Position and Original Setting
System B [-1
System C
available
Not
Not available
qmq%q
Page 50

BASIC FUNCTIONS AND KEY TOPS
rl Forthe Staple function, the following limitations apply:
Stapling Copies
System B System C
Maximum paper
size
Minimum paper
size
Maximum paper
weight
Minimum paper
weight
A3,11’’x17”
B5, 8112°x 11”
80 g/mz, 20 lb
1
52 g/m2, 14 lb
A3,11”x17° A3,11’’x 17”
B5, 8112°x 11“
80 g/mz, 20 lb 80 g/mz, 20 lb
64 g/m2, 17 lb
A4, 81/2” x 11” or smaller:
from 2 to 20 sheets all sizes:
Stapler capacity
from 2 to 50 sheets
B4, 8112°x 14“ or larger:
from 2 to 10 sheets
Pape~~hua;;$nnot
Post cards, tracing paper, OHP sheets, and adhesive labels
O In the Staple mode, do not use paper that is curled or has low stiffness.
B5, 8112”x 11”
64 g/m2, 17 lb
A4, 81/2” x 11” or smaller:
from 2 to 50 sheets
B4, 81/2” x 14“ or larger:
from 2 to 30 sheets
Page 51

BASIC FUNCTIONS AND KEY TOPS
This key can be used only when you have system A or B.
[
You can staple copies sorted in bins after copying is finished.
(This key has two functions. See below.)
This key can be used only when your machine is equipped with the dual job feeder (system A or B).
1
Use this key when you want to set the different sized
DiEEiEl
~ thedual job feeder. > Seepage 27.
originals together in the dual job feeder. The machine auto-
matically detects the size of each original to be fed. You can
set the following original sizes together. > See page 25.
A4/A3 version: A3, B4, A4 and B5
LT/DLT version: 11” x 17”, 81/2” x 14”, and 81/2” x 11“
Use this key when you want to copy pasted originals using
I
I
IEa
This key can be used only when your machine is equipp
[
You can set the copy settings for your next job. The next job will starl automatically after the
current job is completed. E See page 29.
Cl When presetting a job using the compact sorter stapler, you have to remove the current job’s copies from the
sorter stapler before the preset job can start.
O When presetting a job using the floor type sorter stapler, you might have to remove the current job’s copies
before the preset job can start. You have to do this
when you make 11 or more oopies in the current job.
when you make 10 copies in the current and 10 or more for the next.
when you make 9 or less copies for the current and 11 or more for the next.
ed with the dual job feeder (system A or B).
41
J
Page 52

BASIC FUNCTIONS AND KEY TOPS
●
Program
You can store up to 5 frequently used copy job settings in machine memory, and recall them
for future use.
You can select the Program N0,5 as a default setting using the User Tool 5. See page 16.
O
Entering a program
Recalling a program
Interrupt
● t>
1. Set the copy settings you want to put into memory.
2. Press the Program key.
3. Follow the instructions on the touch panel display.
1.
2. Follow the instructions on the touch panel display.
Press the Program
w
v
key.
~ -J
a
Press to interrupt a multicopy run to make urgently needed copies. The interrupted copy job
settings are stored in the machine’s memory. After interrupt copying is completed, press this
key again to recall the previous copy job settings.
Auto Start Mode
When you press the Start key during warm-up, copying will start automatically after warm-up
is completed. The Start key blinks in red and green alternately in this mode.
42
Page 53

Reduce/Enlarge
FUNCTIONS ON OPERATION SCREENS
FUNCTIONS ON OPERATION SCREENS
You can select one of 10
6 reduction ratios and 4
ratios are preset.
O You can change the fixed ratios using User
Tool 6. See page 17.
The reproduction ratio can be changed
from 50% to 200?10in 10/0steps. There
are two ways to change ratios.
preset ratios.
enlargement
El El ‘efau’t
Il?!k?w
Input the desired ratio using the Num-
ber keys.
The suitable reproduction ratio will be
automatically selected when you enter
the lengths of the original (A) and the
copy image you want (B).
43
Page 54

FUNCTIONS ON OPERATION SCREENS
Duplex/Series Copies (Duplex)
I
1
mm
Before using this function, please refer to page 4 and 5 to know which system you have because this
function is different depending on the system you have.
O A right margin (5 mm, 0.2”) is set on the back side automatically.
System A and B
If your machine is equipped with the dual job feeder (system A or B), you should select one of three keys
(Autocount, Even, or Odd)
If you select the Autocount function, the machine automatically counts the number of
originals. After selecting the Autocount function, follow the instructions on the touch panel
display.
44
Page 55

Duplex/Series Copies (Duplex)
FUNCTIONS ON OPERATION SCREENS
Select
Select this key if the number of originals is odd.
this key if the number of originals is even.
+
Wnen you set originals in the dual job
feeder, the last page of originals
should be on the bottom as shown,
ma
432’
II
I
II
45
Page 56

FUNCTIONS ON OPERATION SCREENS
Duplex/Series Copies (Duplex~
System C .
If your machine is equipped with the recirculating document handler (system C), the Autocount function is
default. Do the following.
1. Set the stack of originals face up in the recirculating document handler.
2.
Press the
The machine starts counting originals. After counting is finished, copying will
start automatically.
Start key.
lJN!wLl
t
11. 1 I
‘“-4’ “ L
When you set originals in the recirculating document handler, the last
page of the originals should be on the
bottom as shown.
46
Page 57

Duplex/Series Copies (Duplex)
mmml
This function makes 2 sided copies from 2 sided originals.
When you set originals in the dual job
feeder, the last page of the originals
should be on the bottom as shown.
FUNCTIONS ON OPERATION SCREENS
When you set originals in the recir-
culating document handler, the last
page of the originals should be on the
bottom as shown .
47
Page 58

FUNCTIONS ON OPERATION SCREENS
w
Qm
Duplex/Series Copies (Series Duplex~
IJoThe following functions cannot be used if copy paper larger than A4 sideways or 8112”x 11”
selected.
The center of an original is determined according to the selected copy paper and
sure to select copy paper and reproduction ratio suitable for the original.
This function makes 2 sided copies from 2 facing pages of a bound (book) original.
When you use the dual job feeder, the
last page of the originals should be on
the bottom as shown.
reproduction
sideways is
ratio. Make
48
When you use the recirculating docu-
ment handler, the last page of the
originals should be on the bottom as
shown.
I
L
s
-1
I
k
f
1
I
1
When you place the original on the
exposure glass, start with the last page
of originals as shown.
O Make sure that the original binding is
centered with the book mark on the rear
scale.
Page 59

Duplex/Series Copies (Series Duplex)
Use this function to have the copies face each other exactly as the bound (book) originals
do. When you use this function, place the original on the exposure glass face down.
For bound originals read from left to right, place the original on the exposure glass with the
cover right side up. You should start with the last page of the originals and the last page
should be aligned to the left scale as shown.
FUNCTIONS ON OPERATION SCREENS
p
+
II
D The center of an oriqinal is determined according to the selected COPYpaper and reproduction ratio. Make
sure to select copy japer and reproduction ratio ~uitable for the original. ~ Make sure that the original binding is centered with the book mark on the rear scale.
O For bound originals read from right to left, place the book with the cover upside down.
Cl You can use this function with the dual job feeder (system
(system C), too,
p
+
II
A or B) or the recirculating document handler
49
Page 60

FUNCTIONS ON OPERATION SCREENS
I
Book+l$iM
2$idod+I$idod
Duplex/Series Copies (Series Copies~
This function makes 1 sided copies from two facing pages of bound (book) originals.
Cl This function cannot be used if copy paper larger than A4 sideways or 81/2” x 11” sideways is selected.
O The center of an original is determined according to the selected copy paper and reproduction ratio. Make
sure to select copy paper and reproduction ratio suitable for the original.
When you set originals in the dual job
feeder, the last page of the originals
should be on the bottom as shown.
When you set originals in the recirculating document handler, the last
page of the originals should be on the
bottom as shown.
1
When you place the original on the
exposure glass, start with the last page
ofooriginals as shown.
50
Make sure that the original binding is
centered with the book mark on the rear
scale.
Page 61

LJlll
’234
When you set originals in the dual job
feeder, the last page of the originals
should be on the bottom as shown.
When you set originals in the recirculating document handler, the last
page of the originals should be on the
bottom as shown.
51
Page 62

FUNCTIONS ON OPERATION SCREENS
I
Duplex/Series Copies (Combine)
7--R
htocount
r
Lven I
Odd
51/2”sideways
originals on one copy.
I-MEL!mm
- Combine2Origs.
Combine4Orixs.
~
The Combine function can be used only when your machine is equipped with the dual job feeder (system
- A or B).
Cl When using the Combine functions, please select the copy paper size below.
This function automatically combines two 1 sided
A4/A3 version:
LT/DLT version: 81/2” x 11” sideways, 81/2” x
A4 sideways, B5 sideways, A5 sideways
(for system A or B)
I
If you select the Autocount function, the machine automatically counts the number of originals.
1
I
When you use the dual job feeder, the
last page of the originals should be on
the bottom as shown.
52
r
-I
Page 63

Duplex/Series Copies (Combine)
FUNCTIONS ON OPERATION SCREENS
1
I
I
L
z
@
Select this key if the number of originals is even.
I
I
I
I
1
I
When you set originals in the dual job
feeder, the last page of
should be on the bottom
the originals
as shown.
53
Page 64

FUNCTIONS ON OPERATION SCREENS
Select this key if the number of originals is odd.
Duplex/Series Copies (Combine)
5
I
I
I
I
I
When you set originals in the dual job
feeder, the last page of the originals
should be on the bottom as shown,
54
Page 65

Duplex/Series Copies (Combine)
FUNCTIONS ON OPERATION SCREENS
This function makes one 2 sided copy from four 1 sided originals.
O After selecting the Combine 4 Origs. function, you have to select the Autocount key or Number keys key to
input the number of originals.
Example: Number of originals: 7
A-
When using the dual job feeder, the
last page of the originals should be on
the bottom as shown.
+
55
Page 66

When making copies in the Editing/Centering mode, set the originals in the dual iob feeder
or the recirculating document handler as shown.
,.. .___—
P
. . .
1
When making co~ies in the Edit-
ing/Centering mode, place the original
on the exposure glass as shown.
\\”
T!N
O In the Save Area and the Delete Area modes, the designated line will vary by f5 mm ( + 0.2”). Therefore,
leave at least 5 mm (0.2”) between the designated line and the image. If this clearance is narrower than this,
undesired image portions might be deleted or saved.
This function erases everything except
the designated area.
c1
If you want to use an editing sheet to
designate the area, please contact your
sales or service representative.
56
Page 67

FUNCTIONS ON OPERATION SCREENS
Edit Image(Editing/Centering]
This function centers the original
image on the copy.
58
Page 68

Edit Image (Margin Adj.)
FUNCTIONS ON OPERATION SCREENS
You can make margins by shifting the image to the left or right, and towards the top or bottom.
This function is convenient when binding copies.
o A41A3 version
Maximum margin width: Left and right:
Cl LT/DLT version
Maximum margin width: Left and right:
o When you make 2 sided copies from 1 sided originals, a right margin (5 mm, 0.2”) is selected for the back
side automatically.
Top and bottom: 15 mm in 2.5 mm steps
Top and bottom:
16 mm in 1 mm steps
0.6” in 0.1” steps
0.6” in 0.1” steps
Margin on 2 sided copies
D
For binding, set the left margin for the front side, and the right margin for the back side.
3Y
Page 69

FUNCTIONS ON OPERATION SCREENS
“,
>.
Cover/Slip Sheet (Front Cover)
Cover mode
The Front Cover function can be used only when your machine is equipped with the dual job feeder (sys-
tem A or
Cl ~5hen using the Front Cover function, you should set the tray for cover sheets using User Tool 2. See page
B) or the recirculating document handler (system C).
Cl You can also select the bypass feed tray for cover sheets.
In this case, make sure to set paper for cover
sheets that are identical in size and direction with the paper to which you are copying, because the machine
cannot detect the length of paper set in the bypass feed tray.
D Two paper trays of identical size and direction are required for this function.
The original on the top of the stack will be copied on the front cover sheet. Front cover sheets
will be fed from the tray set by User Tool 2.
.(hmq+,[r~ ~.. ~ .. ~.‘ ., ~ . ...,
,
● I
I
A blank front cover sheet is added as the first page of the copy set. Front cover sheets will
be fed from the tray set by User Tool 2.
60
Page 70

The Fron~Back Covers function can be used only when your machi~e is equipped with the dual job
feeder (system
~ When using the Front/Back Covers function, you should set the tray for cover sheets using User Tool 2. See
page 15.
You can also select the bypass feed tray for cover sheets. In this case, make sure to set paper for cover
0
sheets that are identical in size and direction with the paper to which you are copying, because the machine
oannot deteot the length of paper set in the bypass feed tray.
Cl Two paper trays of identical size and direction are required for this function.
The originals on the top and bottom of the stack will be copied on cover sheets. Cover sheets
will be fed from the tray set by User Tool 2.
A or B), or the recirculating document hand/er (system C).
.
““”;;”~-
Blank front and back covers are added to the copy set. Cover sheets will be fed from the tray
set by User Tool 2.
61
Page 71

FUNCTIONS ON OPERATION SCREENS
The Paper Designate function can be used only when your machine is equipped with the dual job feeder
(system A or B), or the recirculating document handler (system C).
Before using this function, please refer to pages 4 and 5 to know which system you have because this
function is different depending on the system you have.
Cover/Slip Sheet (Paper Designate)
System A and B (with dual job feeder)
After selecting this function, you have to select the Autocount key or the Number keys key
to input the number of originals.
System C (with recirculating document handler)
After selecting this function, the machine starts counting the number of originals automatically.
13When using the Paper Designate function, you should set the tray for slip sheets using the User Tool 2. See
page 15.
D You can also select the bypass feed tray for slip sheets. In this case, make sure to set paper for slip sheets
that are identical in size and direction with the paper to which you are copying, because the machine cannot
detect the length of paper set in the bypass feed tray.
O Two paper trays of identical size and direction are required for this function.
Designated originals will be copied onto slip sheets fed from the tray set by User Tool 2. Up
to 10 originals can be designated.
62
Page 72

Cover/Slip Sheet (OHP Slip Sheet)
m
o ~5hen using the OHP slip sheet function, you should set the tray for slip sheets using User Tool 2. See page
o You can also select the bypass feed tray for slip sheets. In this case, make sure to set paper for slip sheets
that are identical in size and direction with the paper to which you are copying, because the machine cannot
detect the length of paper set in the bypass feed tray.
D Two paper trays of identical size and direction are required for this function.
m+m*
FUNCTIONS ON OPERATION SCREENS
b
Whenever a different original is copied, a slip sheet will
is copied onto this slip sheet.
be fed and the same original image
—
+
lib
,,
‘[~!
,
321
‘.
,>
j
1,
4’-
/
/
0
,,,
‘;’. -.’-.
!,‘.7
,+
-{
Whenever a different original is copied, a blank slip sheet is placed after each copy.
Ll
1°Y-// H
Page 73

LOADING PAPER
The following paper sizes can be set.
Copier type 1
LOADING PAPER
2nd Pa%~:nFeed
(550 sheets) (550 sheets) 8Tra (3, O
Paper Size
A3
B4
A4
B5
o
o
o 0
o 0
L
o 0 0 0 0 0 00
e o 0 0 0
A6
Ilnxli’”
●
81/zmX14” ●
81/2’xll” ● ●
81t2nX13“tF41
8“ x 101/2”
8“x1O”
8“X13’’ (F)
f?flAn Y 1!?n
I I
Copier type 2
Tandem Paper
Tray 2nd Pati~:nFeed
(~~s:hwesor
x 2 sets)
Paper Size L
A3
0 0
1
04 0
A4
B5 o
A5
B6
A6
11”X17”
8vZ X1@ ● ● ●
81/2”xlln ● ●4
81/2’X13“
(F4)
o
I
●
s
0.
0.
8“x 101/2”
8“x1O”
8mx13mF)
81I4’X13n
10” X14”
11’ X15”
51/2”X81/2’
(550 sheets) (1,500sheets)
L
I
I
0
I
*
I
●
I
● ●
I
o ●
●
I
● ●
●
I
o
● ●
1
● ●
%’
I
I
O~ioneal
Capaa
is eels)
s
Optional
Large
Capa
%Tra (3,
is eels)
s
s
s
3rd ptiy;;~
L
0
3rd paa~e%ed
L s L
s L
0
Bypass Feed Tray
(50 sheets)
s
0 0 00
Bypass Feed Tray
(50 sheets)
s
0
0
0
0 0 0 00
o 0 0
o
o
0
0
o
I
0
00
I
0
I
o
●
● ● ●
●
●
O*
●
●
●
1
●
●
●
00
I
I
1
1
●
I
64
Page 74

“L” means lengthwise.
“S” means sideways.
O can be used for A4A3
● can be used for LT/DLT version machines.
O*: 2 sets of 500 sheets can be set in A4/A3 version machines.
●*: 2 sets of 500
can be set by your sewice representative for A4A3 version machines.
e
can be set by your servioe representative for LT/DLT version machines.
*
sheets can be set in LT/DLT version machines.
version machines.
LOADING PAPER
o You can change the paper size of the 2ndfeed station and bypass feed tray. If
size of other trays, or to select A5 lengthwise (~) or 51/2” x 81/2” lengthwise (lk) for the 2nd feed station, please
contact your sewice representative.
you want to change the paper
Note
0 Adhesive labels should be fed from the bypass feed tray one sheet at one time.
Do not use copy paper that has been already oopied on.
0
O OHP transparencies should be fanned to get air between the sheets before loading.
O OHP transparencies should be fed lengthwise.
Non-recommended Paper
Cl Folded, curled, creased, or damaged paper
Tom paper
0
O Perforated paper
~ Paperwith any kind of coating
O Thermal paper, art paper,
CJPaper with low electrical resistance (for example, aluminum)
O Thin paper that has low stiffness
silver coated paper, carbon
65
Page 75

LOADING PAPER
550-sheet Paper Tray
OForcopiertypel (lst,2nd and3rd feed station)
For copier type 2 (2nd feed station)
Cl You can change the paper size of the 2nd feed station. See page 73.
Pull out the paper tray until it stops.
1.
2. Load paper in the paper tray.
O The paper stack must be flush with the
right side of the paper tray.
550-sheet Paper Tray
O Make sure to read the notice on the pack-
age showing the front side (copy side) of
the paper. Load paper with the copy side
down.
~ Do not stack paper over the limit mark.
3. Push the tray until it stops.
Page 76

Tandem Paper Tray
Tandem Paper Tray
IJ For copier type 2 (1st feed station)
Cl Before loading paper inthetandem tray, refer tothefollowing flowchati.
Have you set A4 sideways,
B5 sideways, or 81/2” x 11”
sideways paper?
YES NO
LOADING PAPER
Was the whole tray pulled out or only the left
part?
The whole
Left part of
tray was the tray was
pulled out.
pulled out.
Follow the Follow the
procedure
procedure on
below. page 68.
If the whole tray is pulled out:
1. Load paper in the left part of the paper
tray.
The paper stack must be flush with the left
0
side of the paper tray.
4
Follow the procedures on page 66.
O Do not stack paper over the limit mark.
Cl Make sure to read the notice on the pack-
age showing the front side (copy side) of
the paper. Load paper with the copy side
down.
67
Page 77

LOADING PAPER Tandem Paper Tray
Load paper in the right part of the
2.
paper tray.
O The paper stack must be flush with the
right side of the paper tray.
Cl Do not stack paper over the limit mark,
D Make sure to read the notice on the pack-
age showing the front side (copy side) of
the paper. Load paper with the copy side
down.
3. Push the tray until it stops.
[f left part of the tray is pulled out:
1. Load paper in the left part of the paper
tray.
O The paper stack must be flush with the left
side of the paper tray.
O Do not stack paper over the limit mark.
Cl Make sure to read the notice on the pack-
age showing the front side (copy side) of
the paper. Load paper with the copy side
down,
2. Push the tray until it stops.
I I I 1
68
Page 78

1,500-sheet Large Capacity Tray
1,500-sheet Large Capacity Tray
o For copier type 2 (3rd feed station)
Press the Down key to lower the bot-
1.
template. The Down keystarts blink-
ing.
If paper has run out, the bottom plate
Cf
lowers automatically and the Down key is
lit. In this case, you need not press the
Down key.
2. After the Down key stops blinking and
lights, pull out the tray until it stops.
LOADING PAPER
3. Load paper in the paper tray.
The paper stack must be flush with the
c1
right side of the paper tray.
Make sure to read the notice on the pack-
o
age showing the front side (copy side) of
the paper. Load paper with the copy side
down.
~ Do not stack paper over the limit mark.
69
Page 79

LOADING PAPER
3. Push the tray until it stops.
Optional 3,500-sheet Large Capacity Tray
Optional 3,500-sheet Large
1. Open the cover of the large capacity
tray.
O When opening the cover, hold it by the lip.
2. Press the Down key to lower the bottom plate. The Down key starts blink-
ing.
If paper has run out, the bottom plate
~
lowers automatically and the Down key is
lit. In this case, you need not press the
Down key.
Capacity Tray
3. After the Down key stops blinking and
lights, load paper in the large capacity
tray.
500 sheets of copy paper can be loaded
c1
at one time.
0
The paper stack must be flush with the left
side of the tray.
Make sure to read the notice on the pack-
c1
age showing the front side (copy side) of
the paper.
up.
70
Load paper with the copy side
Page 80

Bypass Feed Tray
4. Repeat steps 2 and 3.
5. Close the cover.
Bypass Feed Tray
1. Open the bypass feed tray.
LOADING PAPER
2. Slide the paper guides to the paper
width.
3. If you use copy paper larger than A4
sideways or 8112° x 11” sideways, pull
out the paper support guide.
71
Page 81

LOADING PAPER
4, Insert the copy paper.
O Make sure to read the notice on the pack-
age showing the front side (copy side) of
the paper. Load paper with the mpy side
up.
5. After copying is completed, close the
bypass feed tray.
72
Page 82

CHANGING PAPER SIZE
o You can change the pa~~ size of the 2nd tray.
contact your sales or serwce representative.
CHANGING PAPER SIZE
want to change the paper size of other trays, please
If you
Pull out the 2nd paper tray until
1.
stops.
2. Remove copy paper.
3. While pressing the release lever on the
front side guide, slide the front and rear
guides to the paper size you want to
use.
it
I
II /~/ “ I I I A
I
4. While pressing the left guide release
lever, slide the left guide to the paper
size you want to use.
73
Page 83

Select the paper size by adjusting the
5.
paper size selector on the back side of
the tray.
6. Load paper.
Cl The paper stack must be flush with the
right side of the tray.
O Do not stack paper over the limit mark.
IJ Make sure to read the notice on the pack-
age showing the front side (copy side) of
the paper. Load paper with the copy side
down.
7. Adjust the front, rear and left guides
flush with the paper stack.
8. Push the tray until it stops.
74
Page 84

WHAT TO DO WHEN THINGS GO WRONG
WHAT TO DO WHEN THINGS GO WRONG
Problem
Nothing happens when the
main switch IS turned on.
The Start key does not
change from red to green
after the main switch is
turned on? or the machine
stops during a copy run.
Problem Cause Action
Copies appear
dirty.
The reverse side
of an original dark.
image is copied.
Image density level is too Lower the ima e density level.
dark. 8
Image density level is too Lower the image density level.
Check the power cord. If it is not plugged properly, plug
it firmly into the outlet.
Check the touch panel display, and follow the
instructions.
Action
> See page 5.
Lower the ima e density level using
User Tool No. .
> See page 16.
> See page 35.
Lower the ima e density level using
User Tool No. ?)
> See page 16.
8
The same copy The exposure glass, dual Clean the required parts.
area is dirty
whenever making
copies.
Copies are too Image density level is too Select the darker image density level.
light. light.
Par&s of the
original image are correctly.
not copied.
The original image
is not copied.
CJIf you cannot correct the problem by taking the actions above, please contact your service representative.
job feeder belt, or
recirculating document
handler belt is dirty.
Originals are not set Set the originals correctly.
You’ve selected an Select copy paper of the proper size.
incorreot paper size.
Originals are not set Set the originals correctly.
correctly.
> See pages 78-80.
> See page 35.
Select the darker ima e density level
using User Tool No. .
> See page 16.
> See pages 19-34.
> See pages 19-34.
2
75
Page 85

USER REMARKS
Problem
Staples do not come out at You loaded the new staple
all. cartridge.
There are “ammed staples
in the stap er. (system A)
O If you cannot correct the problem by taking the actions above, please contact your service representative.
Cause
t
Action
After loading the new
staple cartridge, staples
may not be ejected the first
few times you try to use the
stapler.
Compact sorter stapler
> Remove the jammed
staples following the
instructions inside
the sorter stapler cover
Floor type sorter stapler
(system B)
> Call your sewice
representative.
Finisher (system C)
> Call
your service
representative.
USER REMARKS
Cl Narrow margins at the leading and side edges of original are not copied. Seethe illustration
below.
a
1
sided copy
a = 3.5 f 2.5 mm
1 sided copy (A6)
a = 3.5 ~ 2.5 mm bl+b2=5mm
Back side of 2 sided copy
In Full Size mode
a=8.5*3mm
Not in Full Size mode
a<4mm
bl+b2<3mm
bl+b2<3mm
bl+b2<3mm
76
Page 86

DO’S AND DON’TS
DO’S AND DON’TS
WHEN ADDING TONER
WARNING: Do not incinerate toner or toner containers. Toner dust may ignite
when exposed to open flame.
[ WARNING: Dispose of the used toner cartridge according to your local
ClWhen adding toner, follow the instructions on the touch panel display.
IJ Do not turn off the main switch. If you do, your copy settings are cleared.
WHEN REMOVING MISFED PAPER
WARNING: Since some parts of the copier are supplied with high electrical
voltage, touch only the parts specified in the instructions inside the
machine door.
WARNING; When removing misfed paper from section “D”, use caution. The
I
ClWhen removing misfed paper, follow the instructions on the touch panel display.
IJ Do not turn off the main switch. If you do, your copy settings are cleared.
Cl Do not leave any torn scraps within the machine.
D After removing misfed paper, make sure that all units and levers are returned to their original
positions and that all covers are closed.
O When removing misfed paper from the dual job feeder, open the cover of the feed-in unit.
fusina unit mav be verv hot.
GENERAL OPERATION
D In the Staple mode, do not use paper that is curled or has low stiffness.
D When ou use the bypass feed tray while placing the original directl on the exposure glass,
lower t e platen cover, dual job feeder, or recirculating document andler before pressing
K
the Start key.
i
I
Page 87

DAILY MAINTENANCE
Platen Cover Copier
DAILY MAINTENANCE
To maintain high copy quality, clean the following parts and units regularly.
Copier
Touch Panel Display
Clean the touch panel display with a
SOft cloth.
dry
Exposure Glass
1. Lift the platen cover, dual job feeder or
recirculating document handler.
2. Clean the exposure glass with a damp
cloth and wipe it with a dry cloth.
0 If stains do not come off, use a glass
cleaner. After using a glass cleaner, wipe
it with a dry cloth.
Platen Cover
1. Lift the platen cover.
2. Clean the platen cover with a damp
cloth and wipe it with a dry cloth.
78
Page 88

Dual Job Feeder DAILY MAINTENANCE
Dual Job Feeder
Belt
1. Lift the dual job feeder.
2. Clean the belt with adamp cloth and
wipe it with a dry cloth.
If stains do not come off, use belt cleaner.
0
Feed-in Unit
Clean the original table and original
guide with a damp cloth and wipe them
with a dry cloth.
79
Page 89

DAILY MAINTENANCE
Recirculating Document Handler
Belt
1. Lift the recirculating document handler.
2. Clean the belt with a damp cloth and
wipe it with a dry cloth.
Cl If stains do not come off, use belt cleaner.
Feed-in Unit
Clean the original stacker and original
guides with a damp cloth and wipe
them with a dry cloth.
Recirculating Document Handler
80
Page 90

Copier
Copier
SPECIFICATIONS
SPECIFICATIONS
Configuration:
Process:
Originals:
Original Size:
Copy Paper Size:
Copy Paper Weight:
Copy Paper Capacity:
Copying Speed: Type 1: 45 copies/minute (A4 sideways, 81/2”x 11” sideways)
First Copy Time:
Console
Dry electrostatic transfer system
Sheet, book
Maximum:
See pages 64 and 65.
Paper tray:
Bypass feed tray: 52-157 g/mz,14-421b
Duplex copying:
See pages 64 and 65.
23 copies/minute
Type 2:
Type 1:
Type 2: 3.1 seconds
55 cOpies/minUte (A4 sideways, 8112°x 11” sideways)
28 copies/minute (A3, 11” x 17“)
3.1 seconds
(A4 sideways, 8112°x 11” sideways, from 1st feed station)
(A4 sideways, 8112°x 11” sideways, from 1st feed station)
A3,11’’x17°
52-128 g/mp,14-341b
64-104 g/mz,17-241b
(A3, 1I” x 1i’”)
Toner Replenishment:
Power Source:
Bottle exchange (1,1 00 g)
Please see the back side of the front cover.
81
Page 91

SPECIFICATIONS
Reproduction Ratio:
Copier
Power Consumption:
I
I
I
Enlargement
Full Size
Reduction
Type 1 and 2
I
Warm-up
I
I
1
I Maximum I
Stand-by
Copying 1.2 KVA 1.3 KVA
A4/A3version
50%
65’ZO
‘!40 74!40
71
75?40 77%
82V0 85?lo
93’-%0 93%
100% 100%
115%
12270
141 Yo 155?40
200?40 200?40
Copier only Full system*
0.9 KVA
I
0.25 KVA
I
1 ,
1.45 KVA
LT/DLT version
I
I
I
121
129%
I
I
I
I 1.5 KVA II
50%
65%
!40
0.9 KVA
0.25 KVA
1
[
1
I
1
II
II
I
82
●Full system:
Copier with dual job feeder, compact sorter stapler, and 3,500-sheet
large capacity tray
Copier with dual job feeder, floor type sorter stapler, and 3,500-sheet
large capacity tray
Copier with recirculating document handler, finisher, and 3,500-sheet
large capacity tray
Page 92

Copier
SPECIFICATIONS
Noise Emission
Sound pressure level:
The measurements are
made according to
1s07779.
Dimensions (W x D x H):
Type 1 and 2
I
1
●Full system:
Copier with dual job feeder,
capacity tray
Copier with dual job feeder,
large capacity tray
Copier with recirculating document handler, finisher and 3,500-sheet
large capacity tray
Copying
1
Copier with copy tray, platen cover
Copier with copy tray, platen cover, 3,500-sheet large capacity
tray
Copier with dual job feeder, compact sorter stapler, 3,500-sheet
large capacity tray
Copier with dual job feeder, floor type sorter stapler, 3,500sheet large capacity tray
Copier with recirculating document handler, finisher, 3,500sheet large capacity tray
Copier only Full system*
55 dB(A) 61 dB(A)
compact soder stapler and 3,500-sheet large
floor type sofier stapler and 3,500-sheet
Width Depth Height
1,280 mm 690 mm 1020 mm
(50.4”) (27.2”) (40.2”)
1,347 mm 690 mm 1020 mm
(53.1”) (27.2”) (40.2”)
1,422 mm 690 mm
(60.0”) (27.2”)
1,568 mm 690 mm
(61.7”) (27.2”) (43.2”)
1,673 mm 690 mm
(65.9”) (27.2”) (44.2”)
I
1
1096 mm
(43.2”)
1,096 mm
l,122mm
83
Page 93

SPECIFICATIONS
Weight:
Type 1
Copier
Copier with dual job feeder, compact sorter stapler, 3,500-sheet large capacity tray
Copier with dual job feeder, floor type soder stapler, 3,500-sheet large capacity tray
Type 2
Copier
t
Copier with dual job feeder, floor type sorter stapler, 3,500-sheet large capacity tray
I
Copier with recirculating document handler, finisher, 3,500- sheet large capacity tray
Weight
(;:!./L)
205,8 kg
(453.7 lb)
235.8 kg
(519.8 lb)
Weight
(&?&)
247.8 kg
I
(546.3 lb) I
(;%!%)
Copier
Optional Equipment:
Dual job feeder
Compact sorter stapler
Floor type sorter stapler
Recirculating document handler
Finisher
3,500-sheet large capacity tray
Platen cover
Copy tray
Page 94

Dual Job Feeder
Dual Job Feeder
SPECIFICATIONS
Original Size:
Original Weight:
Original Table Capacity:
Original Feed:
Original Set:
Original Transport:
Power Source:
Power Consumption:
Weight:
Dimensions (W x D x H):
See page 19.
See page 19,
See page 19.
Automatic document feed (ADF) mode
Automatic reverse document feed
Semi-automatic document feed (SADF) mode
Mixed sized mode
Pasted original mode
Preset mode
Face up, first sheet on top
One flat belt
DC 24V, less than 2A (average) (from copier)
70 w
13 kg (28.7 lb)
680 x 508 x 116 mm (26.8” x 20,0” x 4.6”)
(ARDF) mode
85
Page 95

SPECIFICATIONS
Compact Sorter Stapler
Compact Sorter Stapler
Paper Size for Bins:
Paper Weight for Bins:
Bin Capacity:
Number of Bins:
Stapler Capacity:
Stapling Position:
Staple Replenishment:
See pages 37 and 38.
See pages 37 and 38.
See pages 37 and 38.
20 bins + proof tray
See page 40.
Y-----
—
a=6f3mm
b=6~3mm
1
Cartridge exchange (3,000 pieces/cartridge)
Power Source:
Power Consumption:
Dimensions (W x D x H)
Weight:
DC 24V, 5V (from copier)
50 w
420 x 600x 690 mm (16.5” x 23.6” x 27.1”)
22 kg (48.4 lb)
Page 96

Floor Type Sorter Stapler
Floor Type Sorter Stapler
SPECIFICATIONS
Paper for Proof Tray:
Paper for Bins:
Paper Capacity:
Stapler Capacity:
Staple Position:
Top
1-
Size:
Weight:
Sort mode:
Stack mode:
Staple mode:
Proof tray:
Bins:
See page 40.
Maximum:
Minimum:
A3,11’’x I7°
A6 lengthwise, 51/2’ x 81/2”
52-157 g/mZ,14-42ib
See page 37.
See page 38.
See page 39,
250 sheets (80 g/mz, 20 lb)
Sod mode:
Stack mode: See page 38.
Staple mode: See page 39.
Bottom
See page 37.
2 Positions
a=6*3mm
b=6*3mm
Staple Replenishment:
Power Source:
Power Consumption:
Weight:
Dimensions (W x D x H)
a.6f3mm
b=6*3mm
e=45t5e
a==6f3mm
b=6f3mm
Cartridge exchange (5,000 pieces/cartridge)
DC 24V, DC 5V (from copier)
Average:
Maximum:
less than 80 W
in Sort mode:
in Staple mode:
52 kg (114.7 lb)
566 x 583x 978 mm (22.3” x 23.0” x 38.5”)
a=6*3mm
b=132f2mm
c=66f3mm
less than 100 W
less than 300 W
87
Page 97

SPECIFICATIONS
Recirculating Document Handler
Recirculating Document Handier
Original Size:
Original Weight:
Number of Originals
to be Set:
Original Feed:
Original Set:
Original Transport:
Power Source:
Power Consumption:
Weight:
Dimensions (W x D x H):
See page 31.
See page 31.
See page 31.
RDH mode (1 sided original
Face up, first sheet on top
One flat belt
DC 24V (from copier)
70 w
18 kg (39.7 lb)
645 x 516 x 132
mm (25.4” x 20.3” x 5.2”)
mode, 2 sided original mode)
88
Page 98

Finisher
Finisher
SPECIFICATIONS
Paper Size:
Paper Weight:
Paper Capacity:
.—. ..
Staple
Posltlon:
Staple Top
Sort (default) mode:
●When the shift tray is not shifted, A6 can be stacked.
Stack mode: See page 38.
Staple
Sort (default) mode: See page 37.
Stack mode: See page 38.
Staple mode: See page 40.
Sort (default) mode:
Stack mode: See page 38.
Staple mode: See page 40.
mode: See page 40.
Staple Bottom
See page 37,
See page 37.
Staple 2 Staples
a=6?3mm
b=6f3mm
Staple
Power
Power
Weight:
Dimensions (W x D x H)
Replenishment:
Source:
Consumption:
a-
-H
a=6*3mm
b=6f3mm
Cartridge exchange (5,000 pieces/cartridge)
DC 24V (from copier)
w
44.4
34.2 kg (75.4 lb)
671 x 514x 950 mm (26.4” x 20.3” x 37.4”)
a=6t3mm
b=132i3mm
c=66f3mm
89
Page 99

SPECIFICATIONS
3,500-sheet Large Capacity Tray
3,500-sheet Large Capacity Tray
Copy Paper Size:
Copy Paper Weight:
Power Source:
Power Consumption:
Dimensions (W x D x H):
Weight:
Cl Specifications are subject to change without notice.
See pages 64 and 65.
64-105 g/mz,16-241b
DC 24V, 5V (from copier)
40 w
403 x 529 x 608 mm
X 20.8” X 23.9”)
(15.9”
19.8 kg (43.7 lb)
90
Page 100

91
 Loading...