

Page 1
INTRODUCTION
INTRODUCTION
This manual contains detailed instructions on the operation and maintenance of this copier. To get maximum versatility from this copier, all
operators should carefully read and follow the instructions in this manual.
Please keep this manual in a handy place near the machine.
Please read the next section before using this copier. It contains important
information related to USER SAFETY and PREVENTING EQUIPMENT
PROBLEMS.
SAFETY INFORMATION
When using your copier, the following safety precautions should always be
followed.
Safety During Operation
In this manual, the following important symbols are used:
R
WARNING:
Ignoring this warning could cause serious injury or
even death.
R
Caution:
Ignoring this caution could cause injury or damage to
property.
Examples Of Indications
R
q
•• Symbol
care.
•• Do NOT carry out the operation represented by the
symbol
•• Symbols
This example means "You must remove the wall plug".
R
means a situation that requires you take
m
. This example means "Do not take apart".
●
means you MUST perform this operation.
r
i
Page 2
SAFETY INFORMATION
R
WARNINGS:
•• Only connect the copier to the power source described
m
q
on the inside front cover of this manual. Avoid multi-wiring as it could cause an electric shock or a fire.
•• Avoid using an extension cord. Make sure the wall out-
let is near the copier and freely accessible so that in
event of an emergency it can be unplugged easily.
•• Do not damage, break or make any modifications to the
power cord. Do not place heavy objects on it, pull it
hard or bend it more than necessary. These actions
could cause and electric shock or fire.
•• Do not plug or unplug t he power cord with wet hand s or
an electric shock might occur.
•• Do not remove any covers or screws other than those
specified in this manual. Some parts of the copier are at
a high voltage and could give you an electric shock.
Also, if the machine has laser systems, direct (or indirect) reflected eye contact with the laser beam may
cause serious eyes damage. When the copier needs to
be checked, adjusted or repaired, contact your service
representative.
r
m
s
ii
•• Do not take apart or attempt any modifications to this
copier. There is a risk of fire, electric shock, explosion
or loss of sight.
•• If the copier looks damaged or breaks down, smoke is
coming out, there is a strange smell or anything looks
unusual, immediately turn off the main power switch
then unplug the power cord from the wall. Do not continue using the copier in this condition. Contact your
service representative.
•• Do not put any metal objects or containers holding
water (e.g. vases, flowerpots, glasses) on the copier. If
the contents fall inside the copier a fire or electric shock
could occur.
•• Do not incinerate used toner or toner containers. Toner
dust might ignite when exposed to open flame. Dispose
of the used toner containers according to local regulations for plastics.
Page 3
•• If any metal, liquid or foreign matter falls into the copier,
r
turn off the main switch and unplug the main power
cord. Contact your service representative. Do not keep
using the copier with a fault or defect.
Ru
R
Cautions:
•• When you move the copier, unplug the power cord from
the wall outlet to avoid fire or electric shock.
r
•• When the copier will not be used for a long time, unplug
the power cord.
t
•• Keep the copier away from humidity and dust. A fire or
an electric shock might occur.
m
•• Do not place the copier on an unstable or tilted surface.
If it topples over it could cause injury.
SAFETY INFORMATION
•• Do not insert your hands between sorter bins when
your copier is equipped with the 20-bin sorter stapler. You may be injured.
•• When you pull out the plug from the socket, grip
the plug to avoid damaging the cord and causing
fire or electric shock.
o
n
R
•• Do not reuse stapled paper. Do not use aluminum foil,
carbon-containing paper or other conductive paper. Otherwise, a fire might occur.
•• After you move the copier, fix it with the caster fixture.
Otherwise, the copier might move or come down to
cause a personal injury.
•• If you use this copier in a confined space, make sure
there is a continuous air turnover.
•• When removing misfed paper, do not touch the fusing
section because it could be very hot.
•• This copier has been tested for safety using this sup-
plier’s parts and consumable. We recommend you only
use these specified supplies.
iii
Page 4

WHERE IS IT
& WHAT IS IT
1
Page 5

MODELS
Basic
Two 500-sheet trays
With 1000-sheet large capacity tray
MODELS
500-sheet tray
500-sheet tray
Two 500-sheet trays
A 1000-sheet large capacity tray
500-sheet tray
500-sheet tray
With 1000-sheet large capacity tray and unit for twosided copying
A 500-sheet tray
A 1000-sheet large capacity tray
A unit for two-sided copying
unit for twosided copying
500-sheet tray
1000-sheet
large capacity
tray
1000-sheet
large capacity
tray
2
Page 6
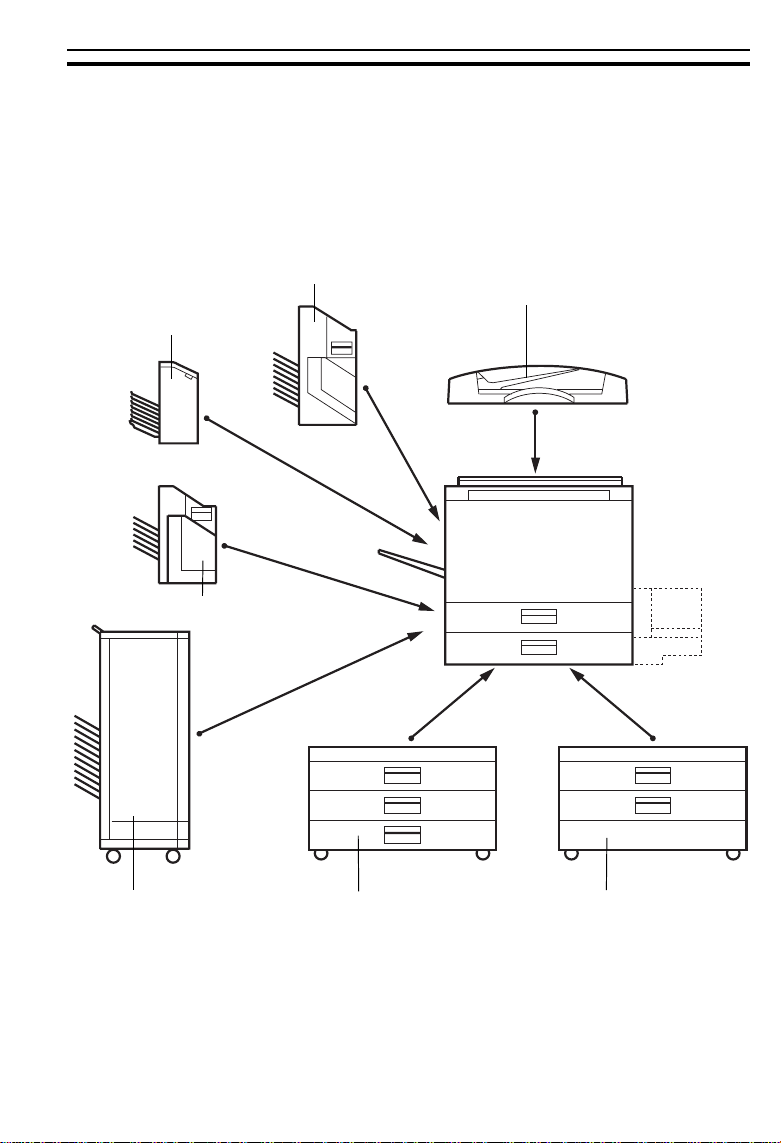
This copier can be provided with the following options:
OPTIONS
OPTIONS
20-bin so rter st apler
20-bin so rter
10-bin sorter stapler
Document feeder
20-bin multi-position
sorter stapler
*Other options: Platen cover (in some areas), key counter
1500-sheet tray unit (three
500-sheet trays)
1000-sheet tray unit (two
500-sheet trays)
3
Page 7
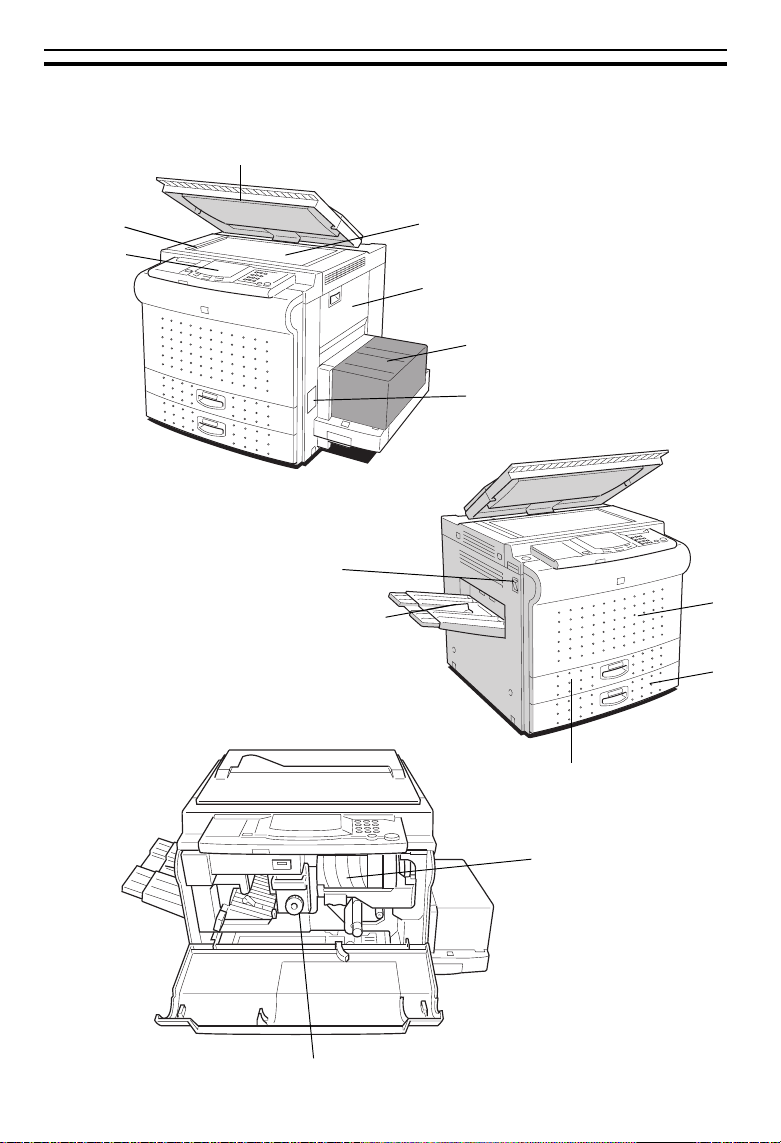
COPIER EXTERIOR AND INTERIOR
COPIER EXTERIOR AND INTERIOR
3
2
4
1
5
6
7
12
8
13
9
*10, *11
14
15
4
Page 8

COPIER EXTERIOR AND INTERIOR
1. Operation panel
2. Left scale
3. Platen cover
(option in so me area s)
4. Exposure glass
5. Bypass feed table
6. 1000-sheet large
capacity tray
7. Key counter holder
8. Front cover
9. 500-sheet tray
*10. 500-sheet tray
*11. Unit for two-sided
copying
12. Main switch
Operator controls and indicators are located here.
Use to align originals on the exposure glass.
Lower this cover over originals for copying.
Position originals here face down for copying.
Use to copy onto OHP sheets, adhesive labels,
translucent paper, post cards, and special size
paper.
This tray can hold 1,000 sheets of copy paper.
Two of three models have this tray. (☛ See page
2.)
Insert the optional key counter here.
Open to access the inside of the copier.
This tray can hold 500 sheets of copy paper.
This tray can hold 500 sheets of copy paper. The
model with a unit for two-sided copying does not
have this tray. Instead, it has the unit for twosided copying (*11).
This unit is used to make two-sided copies.
Switches the copier between on and stand-by
conditions. ("stand-by" means that the anticondensation heaters are on.)
13. Copy tray
14. Toner Bottle
15. Fusing Unit
Completed copies are delivered here.
Replace the toner bottle when the
indicator is lit or blinking.
Fuses the copy image to the paper. When ac-
cessing the inside of the copier, use caution.
This unit may be very hot.
Add Toner
5
Page 9
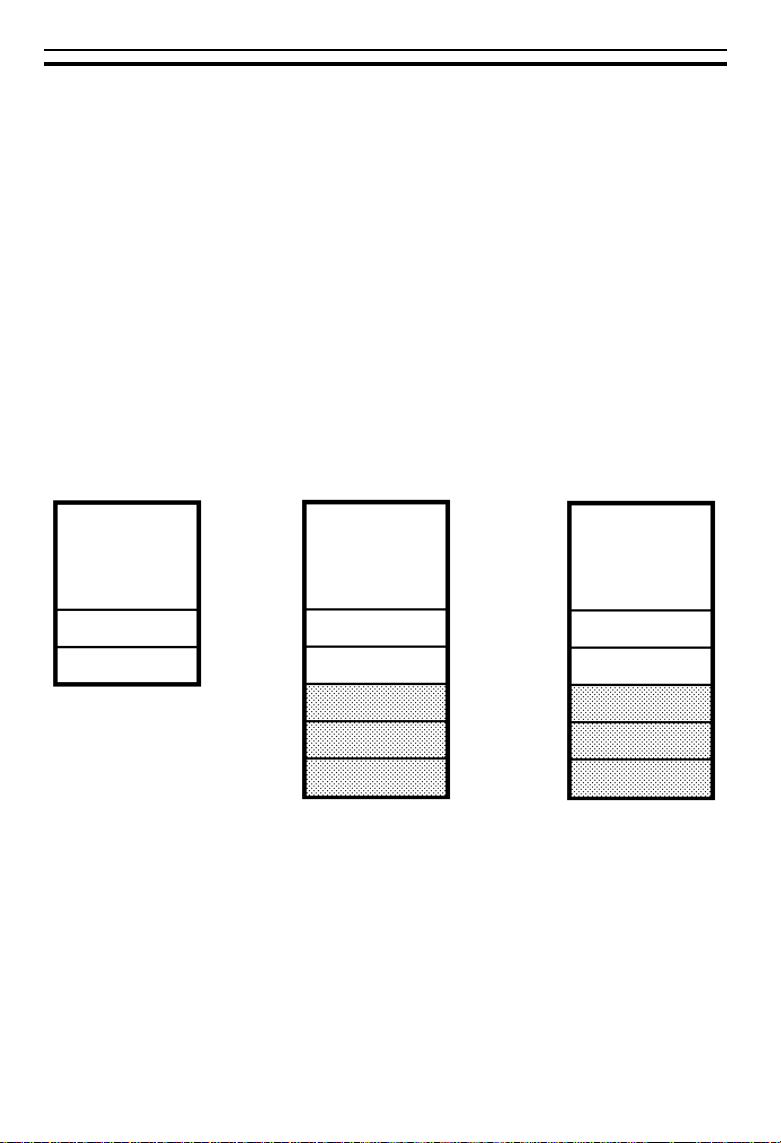
PAPER TRAYS
PAPER TRAYS
Each 500-sheet tray’s name changes depending on what kind of copier and
optional paper tray unit you have. Find your copier among the illustrations
below and on the next page. Then, when you find paper tray’s name (ex.
1st tray) in this manual, confirm which paper tray is pointed in the case of
your copier.
Basic
1st tray
2nd tray
With optional 1000sheet tray unit
1st tray
2nd tray
3rd tray
4th tray
With optional 1500sheet tray unit
1st tray
2nd tray
3rd tray
4th tray
5th tray
6
Page 10
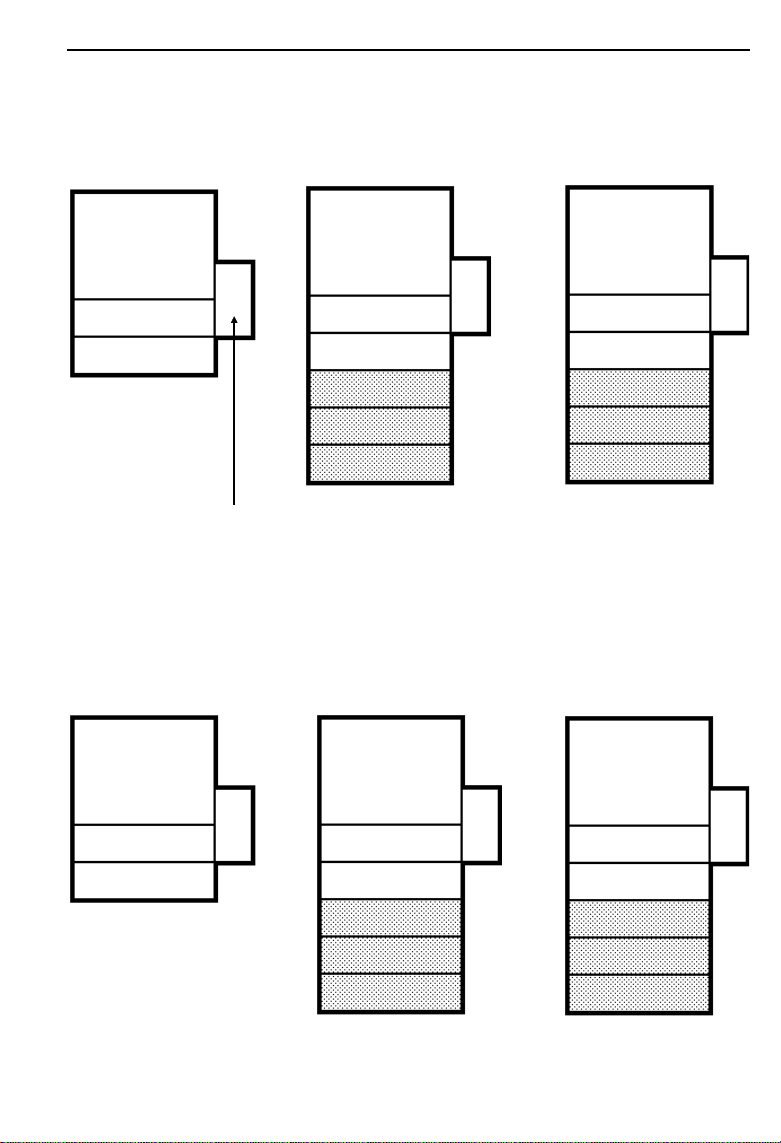
PAPER TRAYS
With large capacity tray
1st tray
2nd tray
large capacity tray
(LCT)
With large capacity tray and unit for
two-sided copying
With large capacity tray and optional 1000-sheet
tray unit
1st tray
2nd tray
3rd tray
4th tray
LCT
With large capacity tray, unit for twosided copying,
and optional 1000sheet tray unit
With large capacity tray and optional 1500-sheet
tray unit
1st tray
2nd tray
3rd tray
4th tray
5th tray
LCT
With large capacity tray, unit for twosided copying,
and optional 1500sheet tray unit
unit for twosided copying
1st tray
LCT
unit for twosided copying
1st tray
2nd tray
3rd tray
LCT
unit for twosided copying
1st tray
2nd tray
3rd tray
4th tray
LCT
7
Page 11
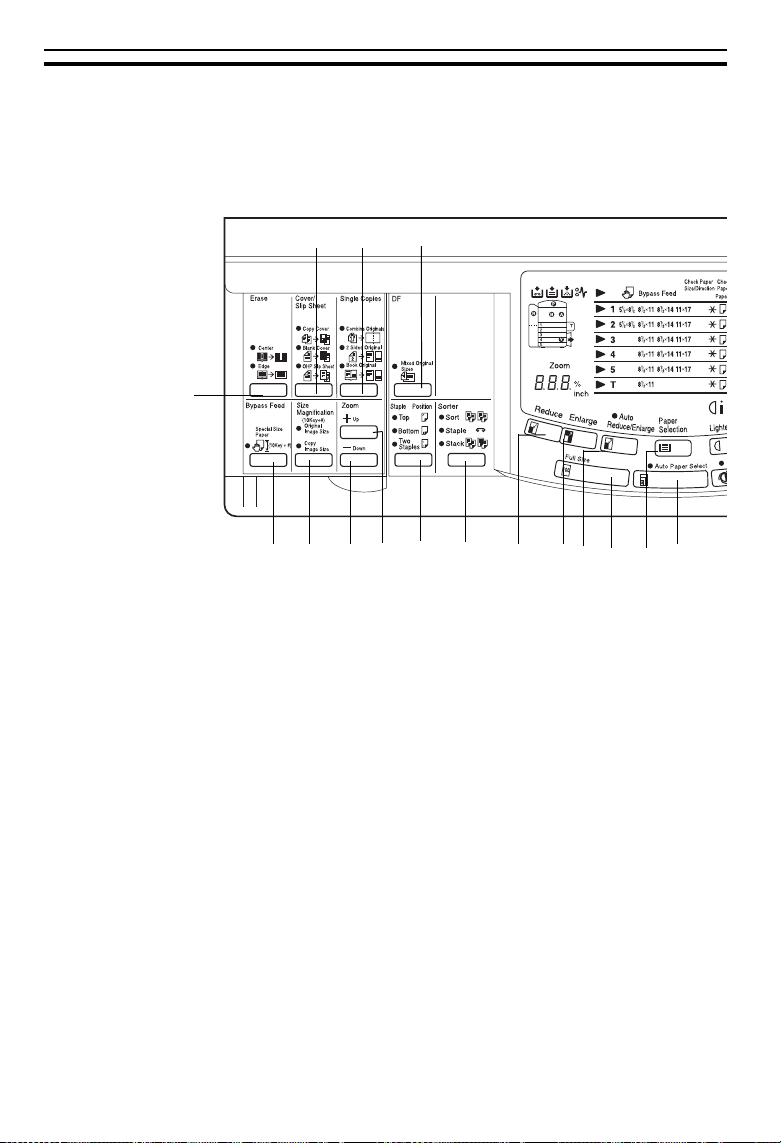
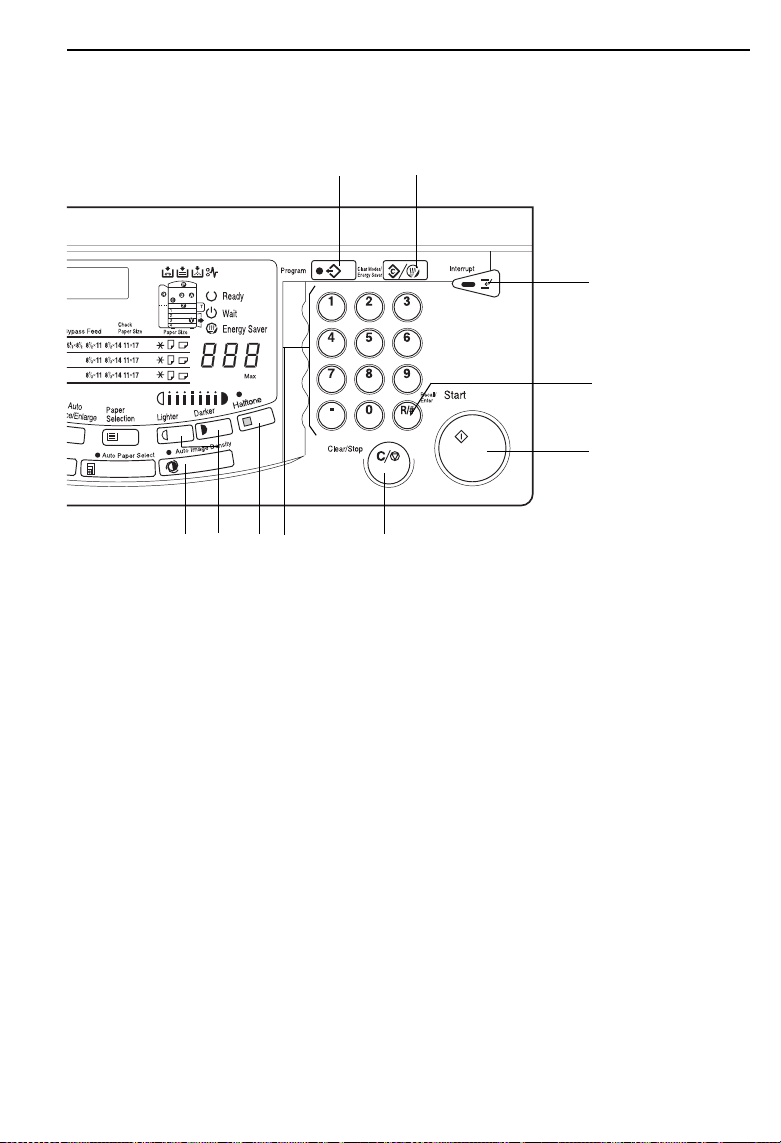
OPERATION PANEL
OPERATION PANEL
Keys 1
Basic & With 1000-sheet Large Capacity Tray
24 25 26
23
22 21 20 19 18 17 16 15 14 13 12 11
1. Program key
2. Clear Modes/Energy Saver key
Press to clear the copier of
previously entered settings.
Press this key for more than 1
second to enter/exit the Energy Saver mode. ☛ See
pages 39 and 92.
3. Interrupt key
50 and 51.
☛
See page 76.
☛ See pages
4. Recall/Enter key
Use to enter data.
5. Start key
Press to start copying.
Use to set the Auto Start.
☛
See page 56.
6. Clear/Stop key
Press to cancel the copy number entered. While copying,
8
press to stop copying. This key
is also used to clear data.
7. Number keys
Use to enter the desired number of copies. They are also
used to enter data.
8. Halftone key
☛
See page 42.
9. Lighter and Da rker ke ys
☛
See page 41.
10. Auto Image Density key
☛
See page 41.
11. Auto Paper Select key
☛
See page 43.
12. Paper Selection key
☛
See page 40.
13. Full Size key
☛ See page 40.
Page 12

1 2
10 9 8 7 6
OPERATION PANEL
3
4
5
14. Auto Reduce/ Enlarge ke y
☛
See page 45.
15. Enlarge key
16. Reduce key
☛ See page 52.
☛
See page 52.
17. Sorter key (option)
☛
See pages 84 ~ 90.
18. Staple Position key (option)
☛
See pages 88 and 89.
19. Zoom Up k ey
Enlarges in 1% steps. ☛ See
page 53.
20. Zoom Down key
Reduces in 1% steps.
page 53.
☛
See
21. Size Ma gnifi cation key
Copier sets the magnification
for your paper and original
sizes. ☛ See page 54.
or
10 Key Zoom key
page 53.
22. Bypass Feed key
☛
See page 49.
23. Erase key
or
☛ See page 73.
Margin Adjustmen t key
☛
See page 74.
24. Cover/Slip Sheet key
☛
See pages 62 ~ 71.
25. Single Copies key
☛
See pages 57 ~ 61.
26. DF key (option)
☛
See page 46.
☛ See
9
Page 13
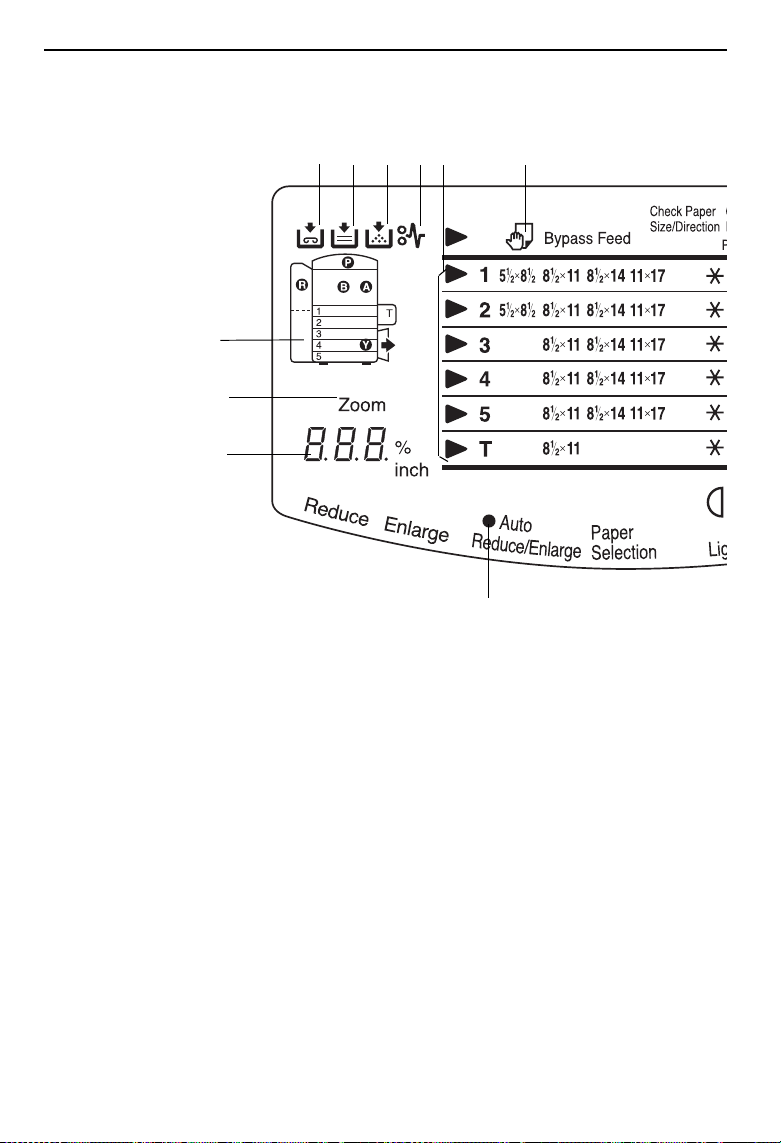
OPERATION PANEL
Indicators 1
Basic & With 1000-sheet Large Capacity Tray
12 13 14 15 16 17
11
10
9
8
1. Ready indicator
38.
2. Wait indicator
38.
☛ See page
☛ See page
3. Energy Saver indicator
☛
See pages 39 and 92.
4. Copy Counter
Indicates the number of copies.
Data display. ☛ See pages 99
and 127.
5. Max indicator
101.
☛ See page
6. Halftone indicator
page 42.
10
☛
See
7. Manual Image Density indicator
☛
See pages 41 and 101.
8. Auto Reduce/Enlarge indicator
☛
See page 45.
9. Three Digit indicator
Data display.
10. Zoom indicator
Lights when you use the Zoom
function.
Page 14

18 19
OPERATION PANEL
1
2
3
4
5
7
6
11. Misfeed Location display
☛
See page 109.
12. Add Staple indicator
pages 98 and 107.
☛ See
13. Load Paper indicator
☛
See pages 98 and 104.
14. Add Toner indicator
pages 98 and 106.
☛ See
15. Check Paper Path indicator
☛
See pages 98 and 109.
16. Paper Size indicators
Show the selected feed station, copy paper size, and direction.
17. Bypass Feed indicator
☛
See page 47.
18. Check Paper Size/Direction
indicator
☛
See page 101.
19. Check Paper Size indicator
☛
See page 100.
11
Page 15

OPERATION PANEL
Keys 2
With 1000-sheet Large Capacity Tray And
Unit For Two-sided Copying
24 25 26 27
23
22 21 20 19 18 17 16 15 14 13 12 11
1. Program key
☛
See page 76.
2. Clear Modes/Energy Saver key
Press to clear the copier of
previously entered settings.
Press this key for more than 1
second to enter/exit the Energy
Saver mode. ☛ See pages 39
and 92.
3. Interrupt key
50 and 51.
☛
See pages
4. Recall/Enter key
Use to enter data in selected
mode.
5. Start key
Press to start copying.
Use to set the Auto Start.
☛
See page 56.
6. Clear/Stop key
Press to cancel the copy number entered. While copying,
12
press to stop copying. This key
is also used to clear data.
7. Number keys
Use to enter the desired number of copies. They are also
used to enter data.
8. Halftone key
☛
See page 42.
9. Light er and D arker k eys
☛
See page 41.
10. Auto Image Density key
☛
See page 41.
11. Aut o Paper Select key
☛
See page 43.
12. Paper Selection key
☛
See page 40.
13. Ful l Size key
☛ See page 40.
Page 16
1 2
10 9 8 7 6
OPERATION PANEL
3
4
5
14. Auto Reduce/ Enlarge ke y
☛
See page 45.
15. Enlarge key
16. Reduce key
☛ See page 52.
☛ See page 52.
17. Sorter key (option)
☛
See pages 84 ~ 90.
18. Staple Position key (option)
☛
See pages 88 and 89.
19. Zoom Up k ey
Enlarges in 1% steps. ☛ See
page 53.
20. Zoom Down ke
Reduces in 1% steps. ☛ See
page 53.
y
21. Size Ma gnifi cation key
Copier sets the magnification
for your paper and original
sizes. ☛ See page 54.
or
10 Key Zoom key
page 53.
22. Bypass Feed key
☛
See page 49.
23. Erase key
or
☛ See page 73.
Margin Adjustmen t key
☛
See page 74.
24. Cover/Slip Sheet key
☛
See pages 62 ~ 71.
25. Single Copies key
pages 57 ~ 61.
26. DF key (option)
☛
See page 46.
27. Duplex key
☛
See pages 80 ~ 83.
☛ See
☛ See
13
Page 17
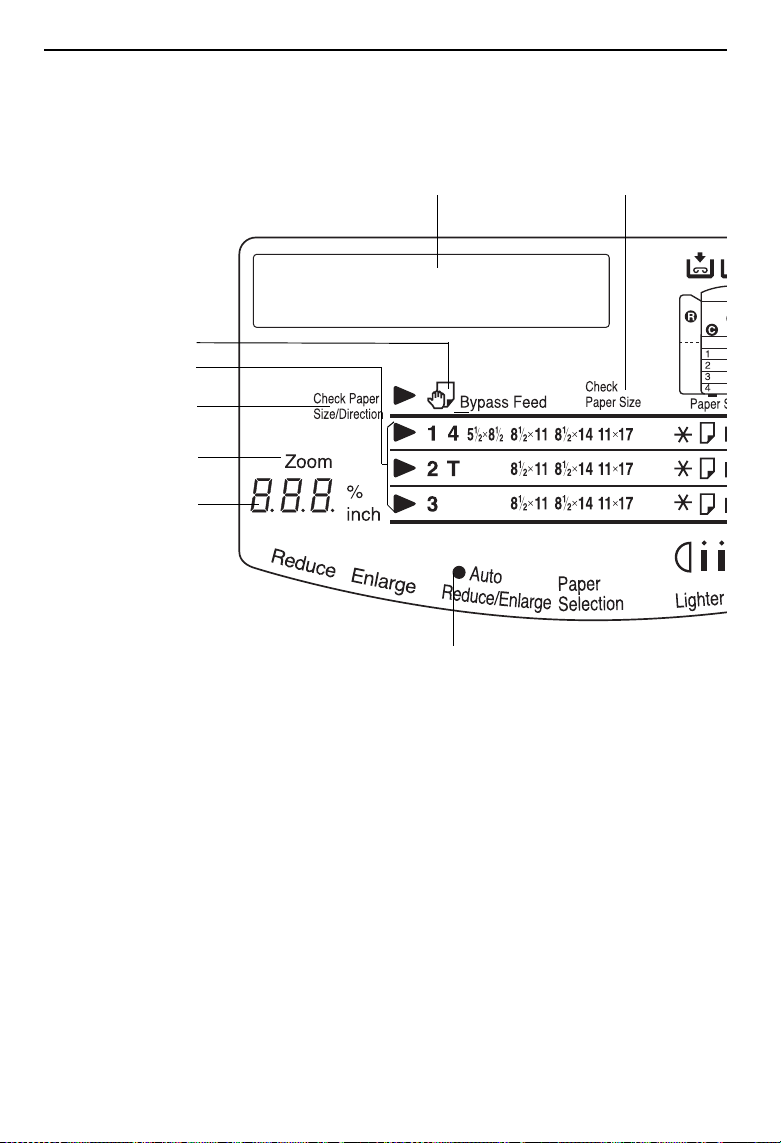
OPERATION PANEL
Indicators 2
With 1000-sheet Large Capacity Tray And
Unit For Two-sided Copying
14 15
13
12
11
10
9
1. Ready indicator
38.
2. Wait indicator
38.
☛ See page
☛ See page
3. Energy Saver indicator
☛
See pages 39 and 92.
4. Copy Counter
Indicates the number of copies.
Data display. ☛ See pages 99
and 127.
5. Max indicator
101.
14
☛ See page
8
6. Halftone indicator
page 42.
☛
See
7. Manual Image Density indicator
☛
See pages 41 and 101.
8. Auto Reduce/Enlarge indicator
☛
See page 45.
9. Three Digit indicator
Data display.
10. Zoom indi cator
Lights when you use the Zoom
function.
Page 18

16 17 18 19 20
OPERATION PANEL
1
2
3
4
5
7
6
11. Check Paper Size/Direction
indicator
☛ See page 101.
12. Paper Size indicators
Show the selected feed station, copy paper size, and direction.
13. Bypass Feed indicator
☛
See page 47.
14. Guidance Display
15. Check Paper Size indicator
☛
See page 100.
16. Misfeed Location display
☛
See page 109.
17. Add Staple indicator
pages 98 and 107.
☛ See
18. Load Paper indicator
☛
See pages 98 and 104.
19. Add Toner indicator
pages 98 and 106.
☛ See
20. Check Paper Path indicator
☛
See pages 98 and 109.
15
Page 19

OPERATION PANEL
16
Page 20

WHAT YOU CAN DO
WITH THIS COPIER
17
Page 21
FUNCTIONS
FUNCTIONS
Auto image density
☛ See page 41.
Manual image density
☛ See page 41.
Halftone copying
☛ See page 42.
Having the copier choose the paper size
☛ See page 43.
Having the copier choose the reproduction ratios
☛ See page 45.
Copying originals of different sizes in the optional docu-
ment feeder
☛ See page 46.
Copying from the bypass feed table
☛ See page 47.
18
Page 22
FUNCTIONS
Copying special paper sizes from the bypass feed table
☛ See page 49.
Temporarily stopping one job to copy something else
☛ See page 50.
Reducing and enlarging
Reducing and enlarging using preset ratios
Reducing and enlarging with the Zoom Up (+) and Zoom Down (-) keys
Reducing and enlarging with Number keys
Fitting the original to a copy of a different size
☛ See page 52.
Entering copy job settings during the warm-up period
☛ See page 56.
19
Page 23

FUNCTIONS
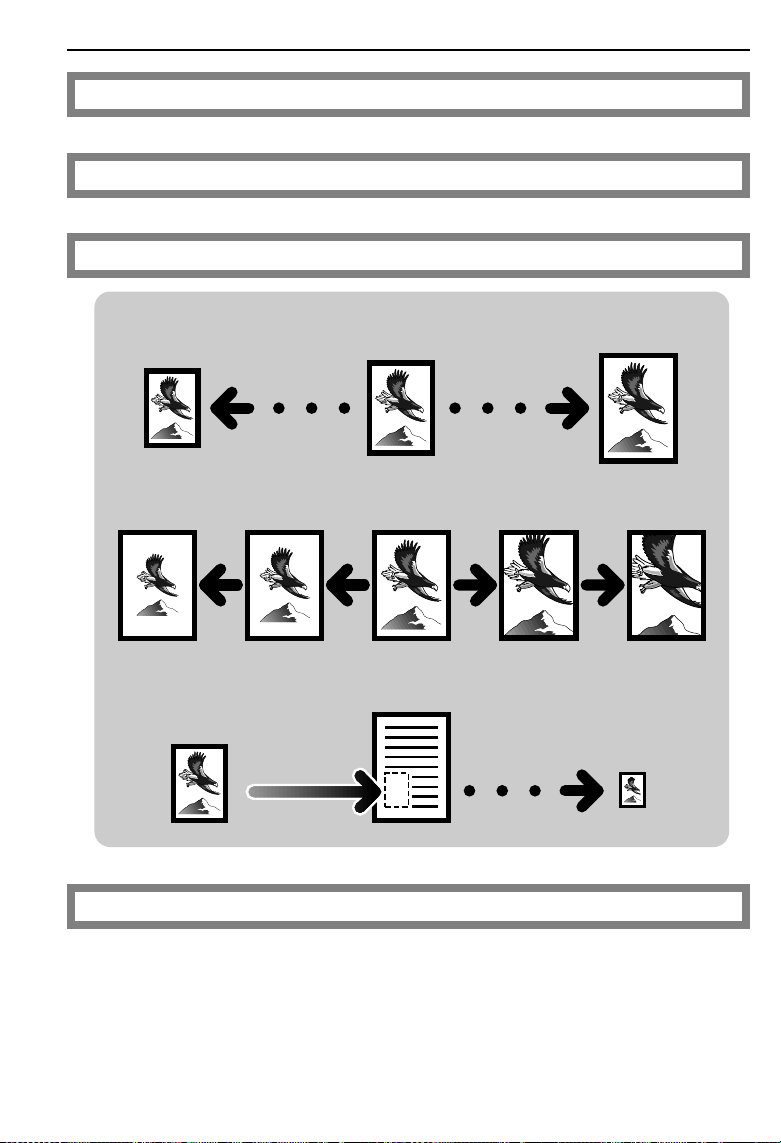
Making one-sided copies from various originals
From 2 one-sided originals to 1 one-sided copy
From 1 two-sided original to 2 one-sided copies
From 2 facing pages to 2 one-sided copies
☛ See page 57.
20
Page 24

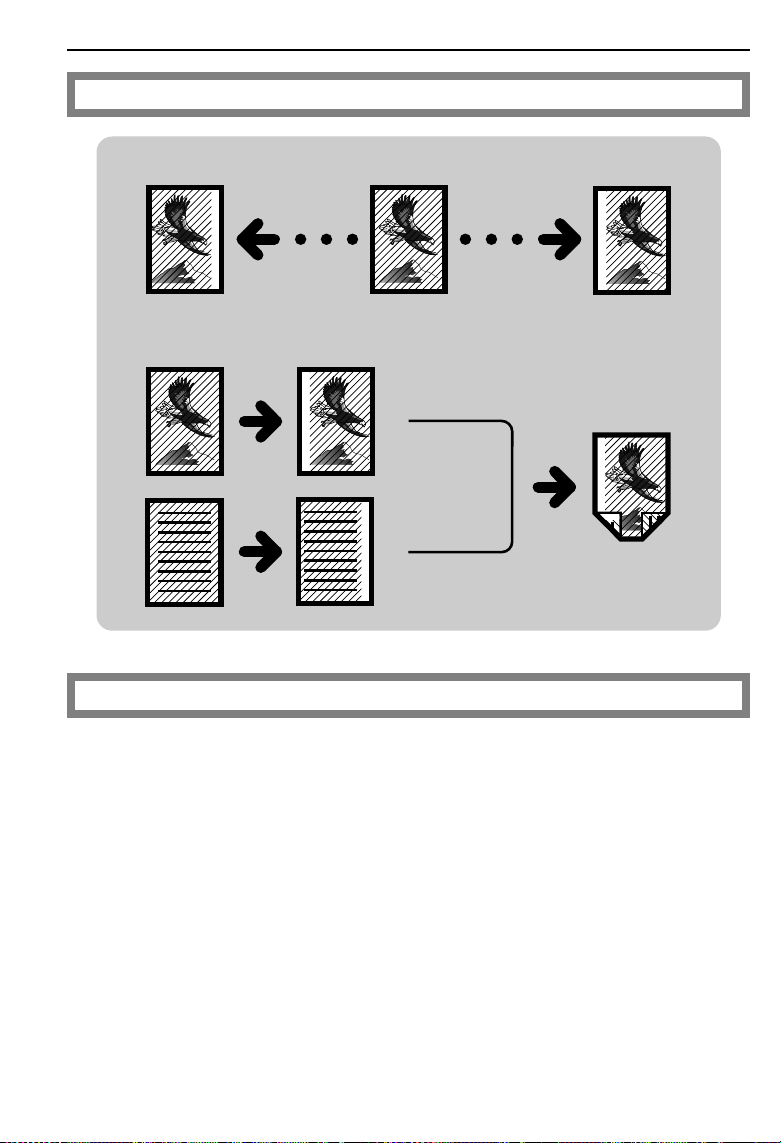
Adding or inserting sheets
FUNCTIONS
Copying the front cover of the originals
Copying the front and back covers of the originals
Adding a front cover sheet
Adding front and back cover sheets
Copying th e front cover of orig inal an d adding
a back cover sheet
Inserting copied slip sheets between OHP
transparencies
Inserting blank slip sheets between OHP
transparencies
☛ See page 62.
21
Page 25
FUNCTIONS
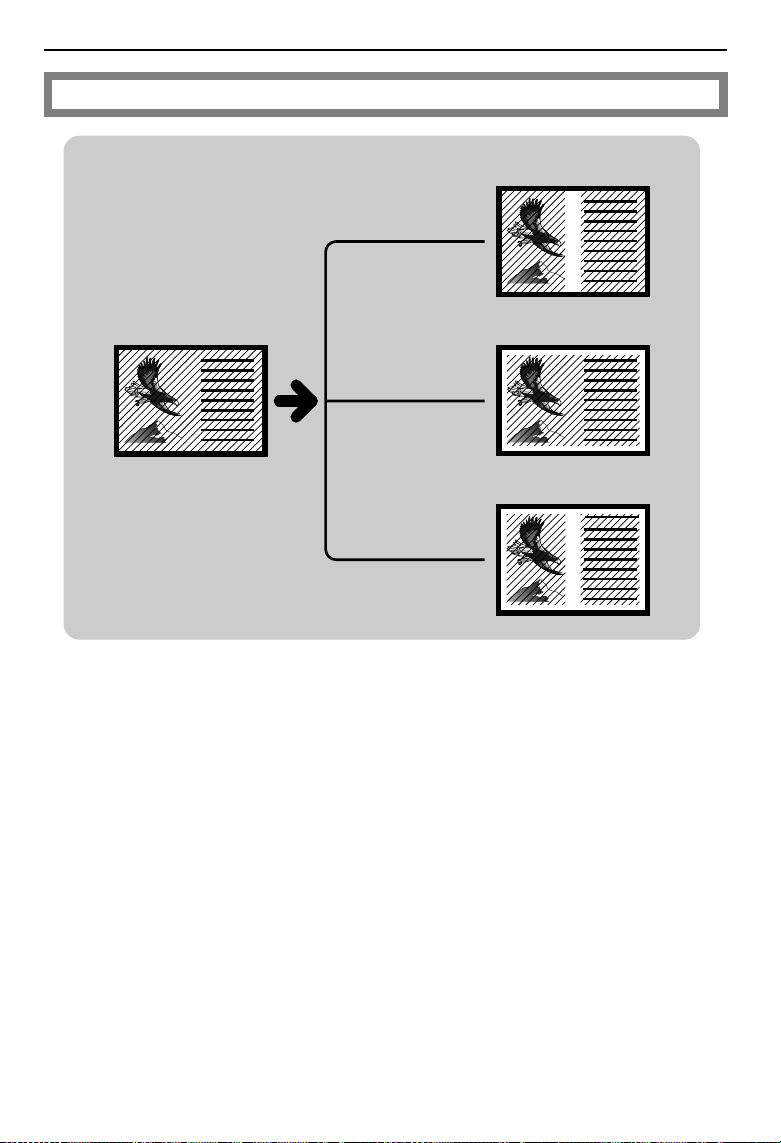
Erasing parts of the copy image
Erasing the center margin of the
original image
Erasing the surrounding area of the
original image
Erasing the center margin and surrounding area of the original image
☛ See page 72.
22
Page 26
Adding margins for binding
Margin for one-sided copying
Margin for two-sided copying
FUNCTIONS
☛ See page 74.
Storing your copy settings in memory
☛ See page 76.
23
Page 27
FUNCTIONS
Making two-sided copies
From an even number of one-sided originals
From an odd number of one-sided originals
From two-sided originals
From facing pages
☛ See page 80.
24
Page 28
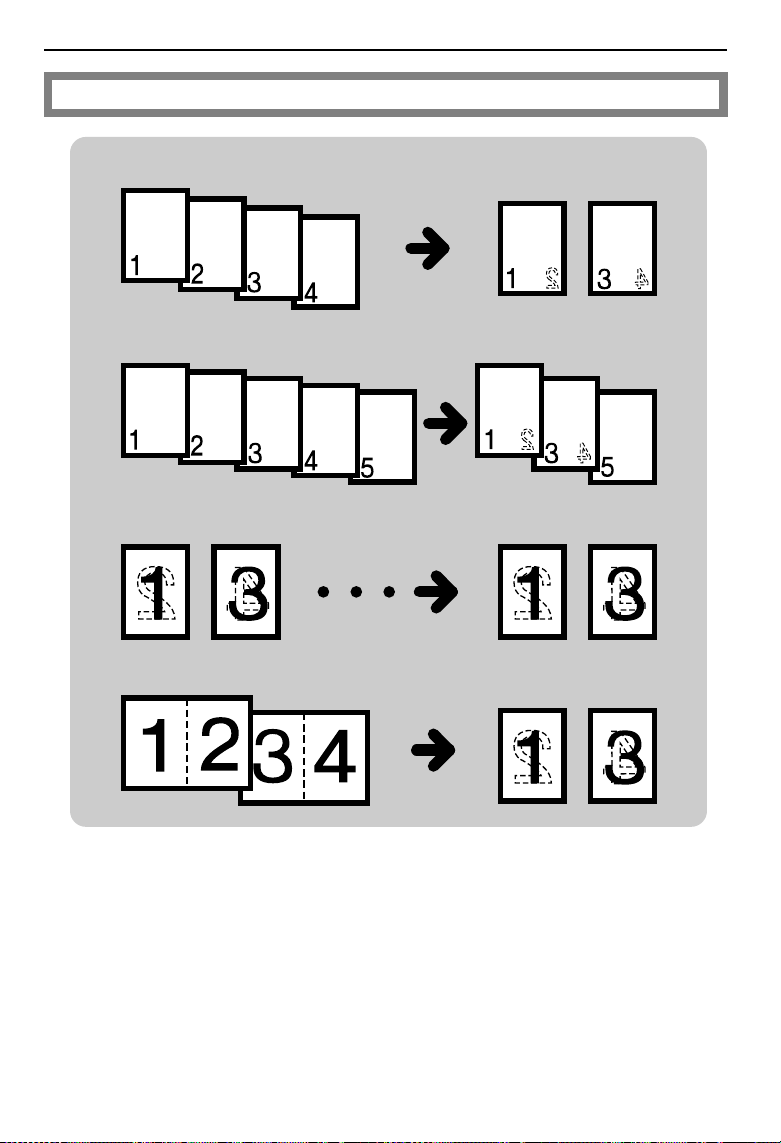
Finishing
FUNCTIONS
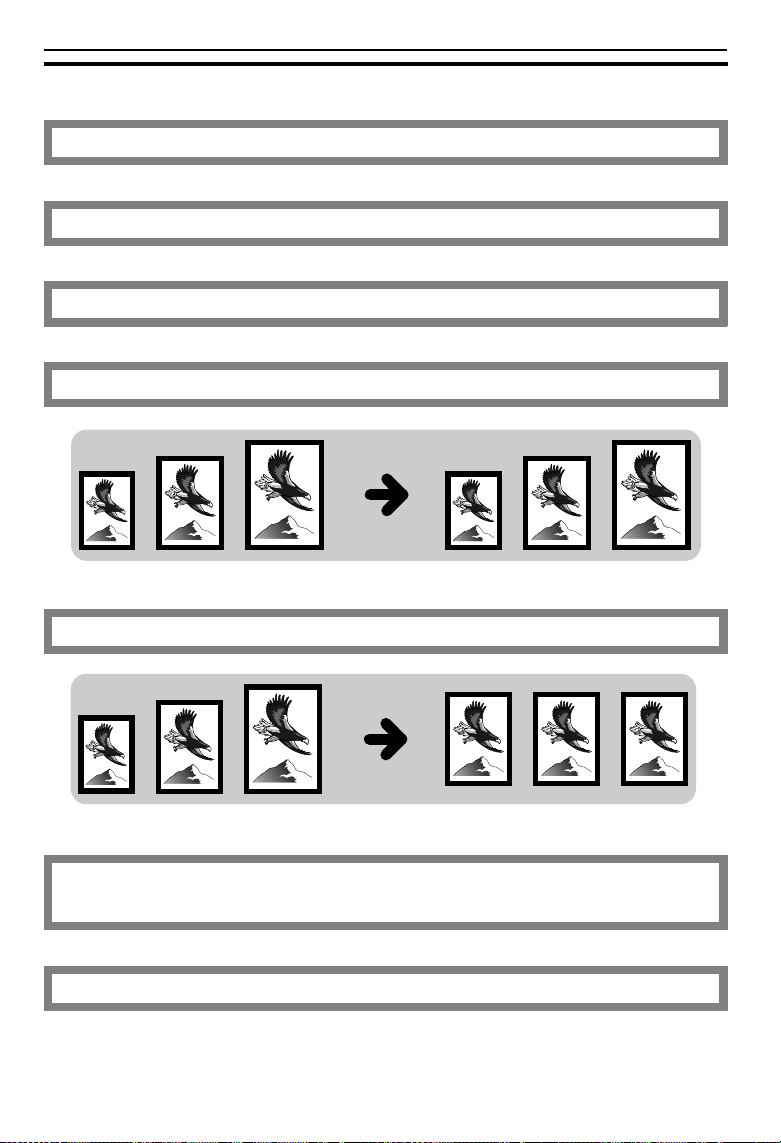
Sorting into sets (123,123,123)
Stapling copies
Stacking together all copies of a
page (111, 222, 333)
☛ See page 84.
25
Page 29
HINTS
HINTS
Example 1
Yo u ha ve t o g iv e a p re s en ta t io n o f yo ur company’s new products to your clients
tomorrow. Now, you have finished making the material but you still have to copy this
material to OHP sheets and also make copies for your clients.
❐
For copying your material onto OHP sheets, you’ll use the optional document
feeder.
❐
For copying your material for your c lients, you’ll use the 20-b in multi-position (or
10-bin, 20-b in) s orter stapler optio ns.
Copying your material onto OHP sheets
If you make copies following the procedure below, sheets will be inserted
between OHP sheets to prevent friction between OHP sheets. This way,
you can smoothly take and set y our OHP sheets.
Inserting copied slip sheets between OHP
➱
transparencies
☛ See page 69.
Copying and stapling your material for your clients
Make the required number of stapled copies.
Stapling copies
➱
26
☛ See page 85.
Page 30

HINTS
Example 2
You are studying for an examination, but because you were absent from
your classes for two days and you could not take notes, you have to ask
your friend to lend you his notebook to make copies of it.
Making 2 one-sided copies from 2 facing pages
➱
☛ See page 60.
Erasing the surrounding area of the original image
➱
☛ See page 72.
27
Page 31

HINTS
Example 3
Every Monday, you distribute a report named "Weekly events at the head
office" to local branches. Your report is always 27 pages . You want to make
required number of 2-sided copies.
❐
Your copier has a large capacity tray and a unit for two-sided copying and a
20-bin sorter.
Making two sided copies from an odd number of
➱
one sided originals
☛ See page 81.
Sorting into sets (123, 123, 123)
➱
Because you make the same copies every Monday, we suggest that you
store these settings in the copier’s memory.
Storing your copy settings in memory
➱
28
☛ See page 84.
☛ See page 76.
Page 32

SETTING ORIGINALS
29
Page 33

ORIGINALS
ORIGINALS
Recommended Originals
❐
Regarding originals that the optional document feeder can handle, ☛ see page
167.
Non-recommended Originals For The Optional
Document Feeder
NOTE: The following types of originals are not recommended for use with the
document feeder. Place them directly on the exposure glass.
❐
Originals thicker than 34 lb
❐
Originals thicker than 28 lb when using two-sided originals
❐
Originals thinner than 11 lb. But for originals between 11 and 14 lb, the document
feeder must be set to Thin Origin al mode. ☛ See page 139.
❐
Originals larger than 11" x 17"
❐
Originals smaller than 5
❐
Originals smaller than 5
page 57.
❐
Paper with any k ind of coati ng (suc h as c arbon ) on the back
❐
Folded, curl ed, creased , or damage d originals
❐
Mailing labels, or perforated originals
❐
Bound, stapled , or clippe d originals
❐
OHP transparencies
❐
Translucen t paper
❐
Pasted orig inals
❐
Damp original s
❐
Sticky orig inals
❐
Wavy originals
❐
Originals that are not made from paper
❐
Originals wri tten in penc il on both sid es, or two- sided carbo n origina ls
❐
Thermal fax pape r
1/2
1/2
" x 8
" x 8
"
1/2
" : when you use Combine Originals ☛ See
1/2
30
Page 34

SETTING ORIGINALS ON THE EXPOSURE
.
Lift the platen cover or the op-
1
tional document feeder.
SETTING ORIGINALS ON THE EXPOSURE GLASS
GLASS
.
Set the original
2
exposure glass. The original
should be aligned to the rear left
corner.
.
Lower the platen cover or the op-
3
tional document feeder.
face down
on the
31
Page 35

SETTING A STACK OF ORIGINALS IN THE OPTIONAL DOCUMENT FEEDER
SETTING A STACK OF ORIGINALS IN THE
OPTIONAL DOCUMENT FEEDER
You can insert a stack of originals ( one-sided or two-sided) of the same size
into the document feeder. These originals are individually fed onto and
removed from the exposure glass.
❐
If you want to set or iginals of dif ferent si zes at the same ti me, ☛ see page 46.
.
Correct any curl, fold, or crease
1
in the originals before setting.
.
Confirm that the
2
indicator is lit before setting the
originals.
.
Confirm that no previous originals
3
remain on the exposure glass.
.
Adjust the guide to the original
4
size.
.
Set the originals
5
document feeder until the
Original
❐
The last page should be on the bottom.
❐
The guide must touch the front side
of the origin als.
indicator goes off.
Insert Original
face up
into the
Insert
32
Page 36

SETTING A STACK OF ORIGINALS IN THE OPTIONAL DOCUMENT FEEDER
❐
Do not stack originals above the limit
mark.
33
Page 37

SETTING ONE ORIGINAL AT A TIME IN THE OPTIONAL DOCUMENT FEEDER
SETTING ONE ORIGINAL AT A TIME IN THE
OPTIONAL DOCUMENT FEEDER
You can insert one original at a time into the document feeder. The original
is automatically fed onto and removed from the exposure glass.
.
Correct any curl, fold, or crease
1
in the originals before setting.
.
Confirm that the
2
indicator is lit before setting the
originals.
.
Confirm that no previous originals
3
remain on the exposure glass.
.
Adjust the guide to the original
4
size.
.
Set the original
5
document feeder until the
Original
❐
If you are copying a stack of originals
one sheet at a time and you want to
keep them in order, s tart with th e last
page of the origina ls.
❐
The original guide must touch the
front side of the original.
indicator goes off.
Insert Original
face up
into the
Insert
34
Page 38

SETTING ONE ORIGINAL AT A TIME IN THE OPTIONAL DOCUMENT FEEDER
.
Press the
Start
key.
6
.
While the
7
lit after an original is fed, set the
next original. The original is automatically fed and copied.
❐
If you have set two or more origina ls,
the Auto Feed indicator i s not lit afte r
the last original is fed. In this case,
press the Start key again after setting an original .
Auto Feed
indicator is
35
Page 39

SETTING ONE ORIGINAL AT A TIME IN THE OPTIONAL DOCUMENT FEEDER
36
Page 40

COPYING
37
COPYING
Page 41

STARTING THE COPIER
STARTING THE COPIER
When The Main Switch Is In The Stand-by Position
Turn on the main switch.
1
Wait for the copier to warm-up.
2
During the warm-up period (less
than 250 seconds), the u
indicator is on.
Wait
On
Stand by
Ready
Wait
After the warm-up, the v
3
indicator lights.
Ready
38
Page 42

STARTING THE COPIER
When The r Energy Saver Indicator Is On
The copier is in the Energy Saver
mode.
Press the
Saver
condition.
Clear Modes/Energy
key to return to the ready
Clear Modes/
Energy Saver
C
In
❐
For details about Energy Saver,
see pages 92 and 133.
The following actions will also make the copier ready:
❐
•
The copier detects anyone operating it.
•
Open ing or clos ing the plat en cover.
•
Open ing or clos ing the opti onal docum ent feeder.
•
Opening any covers.
•
Se tting ori ginals in th e option al documen t feeder.
•
Open ing or clos ing the bypa ss feed tabl e.
•
Setting copy paper in the bypass feed table.
•
Pre ssing any ke y except the Start key.
☛
When The Copier Is Set For User Codes
Input your user code (3 digits)
using the
Recall/Enter
the
❐
To prevent others from making copies using your user code, press the
Clear/Stop and Clear Modes/Energy Saver key simultaneously after
copying.
❐
Regarding user codes, ☛ see page
142.
❐
To set your copier for user codes,
contact your service representative.
☛
See page 150.
Number
key.
keys. Press
COPYING
39
Page 43

FREQUENTLY USED FUNCTIONS
FREQUENTLY USED FUNCTIONS
One-to-one Copying
You can make copies that are the
same size as your originals.
❐
When you have an unit for two-sided
copying, 1-sided even number of
originals to 2-sided copies mode is
the default setting. If you want to
cancel this mode, press the Duplex
key to turn an y Duplex indicators off.
You can change this default setting
using the user tools. ☛ See page
141.
Set your original on the exposure
1
glass or in the optional document
feeder. ☛ See page 31, 32, or
34.
Enter the number of copies re-
2
quired using the
❐
To change the number entered,
press the Clear/Stop key, then enter
the new number .
Confirm that the
3
lect
indicator is on. If not, press
Auto Paper Select
the
select the copy paper using the
Paper Selection
❐
Regarding Auto Paper Select, ☛ see
page 43.
40
Number
Auto Paper Se-
key.
keys.
key, or
Page 44

Make sure that the magnification
4
ratio is set to 100%. If not, press
Full Size
the
key.
FREQUENTLY USED FUNCTIONS
Press the
5
❐
To stop the copier during the multicopy run, press the Clear/Stop key.
❐
Press the Start key to resume copying, or press the Clear/Stop key
again to clear the entered copy number.
Start
key.
7 809
Clear/Stop
C
Adjusting Copy Image Density
To match the type of originals, adjust the image dens ity.
Auto image density
Auto Image Density
If the
cator is lit, the copier automatically controls the image density.
If the indicator is not lit, press the
Auto Image Density
❐
Regarding functions that cannot used
together with this function, ☛ see
page 94.
key.
indi-
R/#
Recall/
Enter
Start
41
COPYING
Page 45

FREQUENTLY USED FUNCTIONS
Manual image density
If you have dark or light originals,
adjust the image density yourself.
Press the
lower the image density. Press
Darker
the
the image density.
Lighter
(right) key to increase
(left) key to
Halftone Copying
Use this function to reproduce tinted image. This function is suitable for
copying photographic originals.
Regarding functions that cannot be used together with this function, ☛ see page
❐
94.
Press the
Halftone
key.
1
Adjust the image density using
2
42
Lighter
the
(right) key.
(left) key or
Darker
Page 46

FREQUENTLY USED FUNCTIONS
Having The Copier Choose The Paper Size (Auto Paper Select)
The copier selects a suitable size of
copy paper based on the original size
and the reproduction ratio.
If you use trans lucent or transparent originals or originals with tags, the original
❐
size might not be detected correctly.
When placing the original on the exposure glass directly, make sure that the
❐
platen cover or optional document feeder is lowered before pressing the Start
key. If not, the original size might not be detected correctly.
Regarding fun ctions that cannot be used together wi th this function, ☛ see page
❐
94.
Example 1: When making full size copies
Make sure that the
1
Select
indicator is lit. If not, press
Auto Paper Select
the
Make sure that the magnification
2
ratio is set to 100%. If not, press
Full Size
the
Set your original on the exposure
3
glass or in the optional document
feeder. ☛ See page 31, 32 or 34.
Press the
4
The copier selects paper of the
same format and orientation as
the original.
key.
Start
Auto Paper
key.
key.
COPYING
43
Page 47

FREQUENTLY USED FUNCTIONS
Example 2: When making reduced copies
Example: Original: 11" x 17"
Reproduction ratio: 65%
Make sure that the
1
Select
indicator is lit. If not, press
Auto Paper Select
the
Select 65% using the
2
key.
Set your original on the exposure
3
glass or in the optional document
feeder. ☛ See page 31, 32, or
34.
Press the
Start
Auto Paper
key.
key.
4
8
1/2" x 11"
selected.
;
copy paper will be
Reduce
44
Page 48

FREQUENTLY USED FUNCTIONS
Having The Copier Choose The Reproduction Ratios (Auto Reduce/Enlarge)
The copier can select the proper reproduction ratio based on the selected
paper size and the original size.
If you use trans lucent or transparent originals or originals with tags, the original
❐
size might not be detected correctly.
When placing the original on the exposure glass directly, make sure that the
❐
platen cover or optional document feeder is lowered before pressing the Start
key. If not, the original size might not be detected correctly.
Regarding fun ctions that cannot be used together wi th this function, ☛ see page
❐
94.
" x 11"
;
;
Example: Original size: 11" x 17"
Copy paper size: 8
1/2
Press the
1
key.
Set your original on the exposure
2
glass or in the optional document
feeder. ☛ See page 31, 32, or
34.
.
Select the copy paper using the
3
Paper Selection
Press the
4
selected.
Auto/Reduce Enlarge
key.
Start
key. 65% will be
COPYING
45
Page 49

FREQUENTLY USED FUNCTIONS
Copying Originals Of Different Sizes In The Optional Document Feeder
As a default setting, you cannot use
originals of different sizes when you
set originals in the optional document
feeder. You can cancel this setting
using the DF key.
You can use origi nals betw een 14 and 21 lb in this funct ion.
❐
If you set the copier in this mode, the copying speed becomes slower in some
❐
modes.
Regarding functions that cannot be used together with this function, ☛ see page
❐
94.
The original guide must be adjusted to the largest original width. It may cause
❐
narrow origi nals to be dis torted.
Set your originals in the optional
1
document feeder. They should be
aligned to the rear left corner.
81/2" x 11"
:
81/2" x 14"
;
Adjust the original guide to the
2
largest original size (width).
Press the DF key.
3
Press the
Start
key.
4
46
ver/
ip Sheet
Copy Cover
Blank Cover
OHP Slip
Single Copies
Combine Originals
2 Sided Original
Book Original
DF
Mixed Original
Sizes
11" x 17"
;
Page 50

FREQUENTLY USED FUNCTIONS
Copying From The Bypass Feed Table
Use the bypass feed table to copy onto OHP transparencies, adhesive
labels, translucent paper, and post cards.
When you ha ve an unit for two-si ded copying, 1-side d even number of ori ginals
❐
to 2-sided copies mode is the default setting. To use the bypass feed copying
function, you have to cancel two-sided copies mode by pressing the Duplex key
to turn any Duplex indicators off. You can change this default setting using the
user tools. ☛ See page 141 .
When you set the special size paper into the bypass feed table, use the Bypass
❐
Feed key. ☛ See page 49.
Adhesive labels should be fed from the bypass feed table one sheet at a time.
❐
OHP transparencies should be fed from the bypass feed table. You can set ten
❐
sheets at a time. However, if misfeed or multi-feed occurs, set sheets one at a
time.
OHP transpare ncies should be fanned t o get air bet ween the shee ts before lo ad-
❐
ing.
Translucent paper should be fed from the bypass feed table.
❐
Translucent paper should be fed so that the paper grain is oriented with the
❐
paper path.
Postcards sh ould be fe d from th e bypass fe ed table. Cor rect any cur ls they mig ht
❐
have before lo ading them .
It is recommended to feed one post card at a time.
❐
When you use the bypass feed table while placing the original directly on the
❐
exposure glass, lower the platen cover or optional document feeder before pressing the Start key.
Regarding fun ctions that cannot be used together wi th this function, ☛ see page
❐
94.
Set your original on the exposure
1
glass or in the optional document
feeder. ☛ See page 31, 32, or
34.
COPYING
47
Page 51

FREQUENTLY USED FUNCTIONS
Open the bypass feed table.
2
Make sure that the o
3
Feed
indicator is lit. If it is not lit,
press the
select the bypass feed table.
Slide the paper guides to the pa-
4
per width and, if necessary,
swing out the extender to support
large size copy paper.
Insert the copy paper into the by-
5
pass feed table.
❐
Approximately 40 sheets of copy paper (20 lb) can b e inse rted at a tim e.
❐
Do not insert copy paper after the
Load Paper (d) indicator turns off.
Paper Selection
Bypass
key to
Paper
Selection
Bypass Feed
p
6
48
Press the
Start
key.
Page 52

FREQUENTLY USED FUNCTIONS
Copying Special Paper Sizes From The Bypass Feed Table
Use the
❐
❐
❐
1
Bypass Feed
When you use adhesive labels, OHP transparencies, translucent paper or postcards, follow the notes on page 47.
When you use the bypass feed table while placing the original directly on the
exposure glass, lower the platen cover or optional document feeder before pressing the Start key.
Regarding fun ctions that cannot be used together wi th this function, ☛ see page
94.
Follow the steps 1 to 5 on pages
47 and 48.
Press the
Bypass Feed
key to copy onto special size paper.
key.
2
Enter the paper width using the
3
Number
❐
To change the number entered,
press the Clear/Stop key and enter
the new number.
❐
You can enter the widths between
4.0" to 11.0".
key.
4
5
Press the
Press the
Recall/Enter
Start
key.
key.
0
R/#
Recall/
Enter
Start
COPYING
49
Page 53

7 8
9
FREQUENTLY USED FUNCTIONS
Temporarily Stopping One Job To Copy Something Else (Interrupt Copying)
Use the
copies.
❐
Interrupt
Regarding functions that cannot be used together with this function, ☛ see page
94.
key to interrupt a multicopy run to make urgently needed
Without the optional document feeder
Press the
1
ier will stop the copy run and
store the present settings in the
memory. The copier will return to
the ready condition.
Remove the previous original. Set
2
your original for interrupt copying
on the exposure glass. ☛ See
page 31.
Make your copies.
Interrupt
key. The cop-
2
Interrupt
1
4
3
3
After interrupt copying is com-
4
pleted, press the
again. The copier will recall the
previous copy settings.
Interrupt
key
Interrupt
Reset the previous original and
5
press the
previous run.
50
Start
key to resume the
Clear/Stop
Recall/
Start
0
Enter
R/#
C
Page 54

With the optional document feeder
FREQUENTLY USED FUNCTIONS
Press the
1
ier will stop the copy run and
store the present settings in the
memory. The original on the exposure glass will exit from the
document feeder. The copier will
return to the ready condition.
Take the originals from the exit
2
stack.
Separately take the remaining
3
originals off the original table.
Make your copies.
Interrupt
key. The cop-
4
After interrupt copying is com-
5
pleted, press the
The copier will recall the previous
copy settings.
Some originals in the exit stack
6
(step 2) weren’t completely copied. Read the number in the
Three Digit
that number of pages from the
top
of the exit stack.
Interrupt
indicator and take
key.
Interrupt
%
inch
Place the sheets you just took on
7
the bottom of the stack you took
from the original table (step 3).
Place the stack you just made in
8
the original table.
Press the
Start
key.
9
COPYING
51
Page 55

FREQUENTLY USED FUNCTIONS
Reducing And Enlarging
Regarding functions that cannot be used together with this function, ☛ see page
❐
94.
Reducing and enlarging using preset ratios
Reducing
Press the
ratio will change as follows:
93%➝85%➝77%➝74%➝65%➝50%
Reduce
key to select the preset reducing ratios. The reducing
Enlarging
Press the
Enlarge
key to select the preset enlarging ratios. The enlarging
ratio will change as follows:
121% ➝ 129% ➝ 155% ➝ 200%
52
Page 56

FREQUENTLY USED FUNCTIONS
Reducing and enlarging with the Zoom Up (+) and Zoom
Down (-) keys (+- Zoom)
You can change the reproduction ratio from 50% to 200% in 1% steps.
Press the
peatedly, or hold down the key
continuously, to increase the ratio
in 1% steps.
Press the
repeatedly, or hold down the key
continuously, to reduce the ratio
in 1% steps.
Zoom Up (+)
Zoom Down (-)
key re-
key
Reducing and enlarging with the number keys (10 key
Zoom)
Note: Before using the 10 Key Zoom, you have to change copier’s default settings
with the user tools. (
Size Magnification key is used as 10 Key Zoom key. In this case, you cannot use Size Magnification.
See page 13 6.) If you select the 10 Key Zoom, th e
☛
Note: After selecting the 10 Key Zoom, put the sticker (key name sheet) for the
10 Key Zoom on the operation panel. The sticker is enclosed as an accessory.
You can enter any reproduction ratio between 50% and 200% using the
Number
keys.
53
COPYING
Page 57

FREQUENTLY USED FUNCTIONS
Press the
1
Magnification)
Enter the desired reproduction ra-
2
tio using the
❐
To change the number entered,
press the Clear/Stop key and enter
the new number .
Press the
10 Key Zoom (Size
key.
Number
Recall/Enter
keys.
key.
3
0
R/#
Recall/
Enter
Start
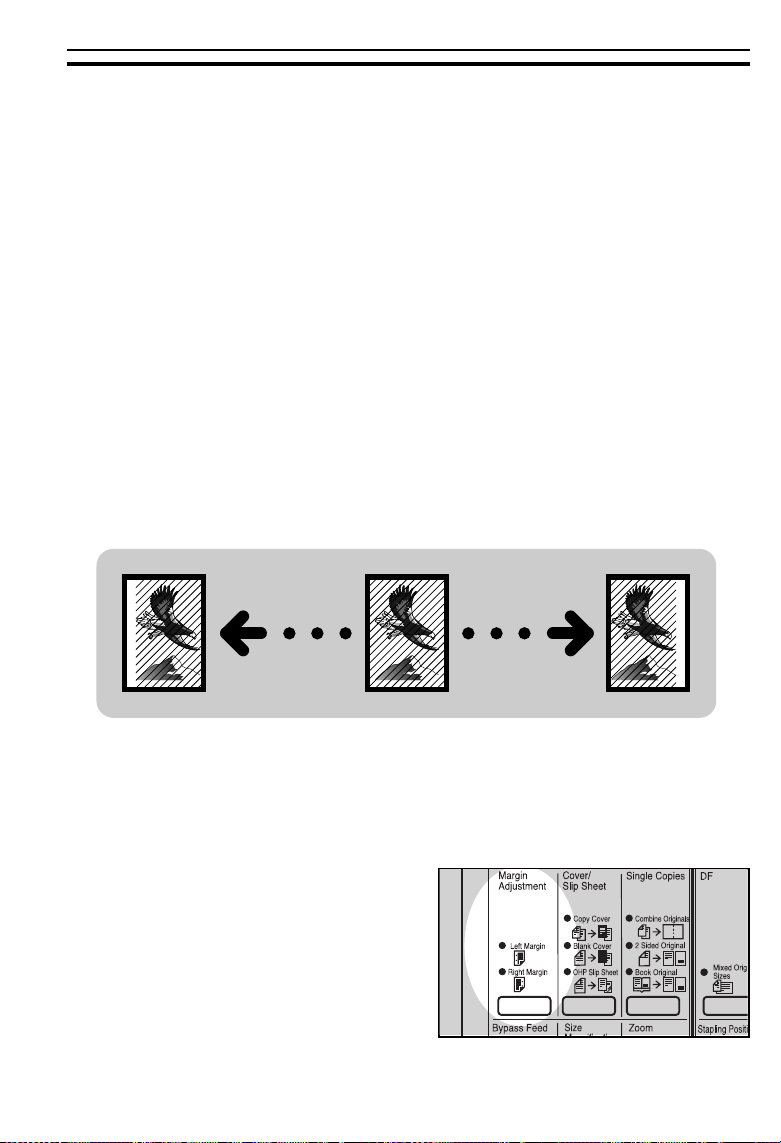
Fitting the original to a copy of a different size
(Size Magnification)
Note: If you select the 10 Key Zoom using the user tool, you cannot use Size
Magnification.
The suitable reproduction ratio will be
automatically selected when you enter
the lengths of the original and copy
image you want.
54
See page 53.
☛
Original
Copy size you want
Copy
Page 58

FREQUENTLY USED FUNCTIONS
Press the
1
key.
Enter the original size using the
2
Number
❐
Up to 99.9" can be entered.
❐
To change the number entered,
press the Clear/Stop key and enter
the new number.
Press the
Size Magnification
keys.
Recall/Enter
key.
3
0
R/#
Recall/
Enter
Start
Enter the copy size using the
4
Number
Press the
keys.
Recall/Enter
key.
5
COPYING
55
Page 59

FREQUENTLY USED FUNCTIONS
Entering Copy Job Settings During The Warm-up Period (Auto Start)
If you press the
Start
key during
the warm-up period, the v
indicator will blink, then the copier
will start copying after the warmup period. Set your copy settings
during warm-up period, then
press the
❐
To cancel Auto Start, press the
Clear/Stop key.
Start
key.
Ready
Recall/
Enter
Start
Ready
Wait
56
Page 60

MAKING ONE-SIDED COPIES FROM VARIOUS ORIGINALS (Single Copies)
MAKING ONE-SIDED COPIES FROM
VARIOUS ORIGINALS (Single Copies)
From 2 One-sided Originals To 1 One-sided Copy (Combine Originals)
Note: This function can be used only when your copier is equipped with the op-
tional document feeder.
The number of originals shou ld be a multiple o f two. If not, add a bl ank sheet to
❐
your origin als.
Original sizes (: only) that can be us ed are as foll ows:
❐
8
" x 11", 5
1/2
Please refer to the followin g table when yo u select the copy paper size and re-
❐
production rati o.
1/2
" x 8
1/2
"
Original Copy paper Ratio
8
" x 11"
" x 11"
;
;
;
;
8
" x 11"
" x 8
1/2
:
"
:
1/2
5
1/2
Regarding fun ctions that cannot be used together wi th this function, ☛ see page
❐
94.
1/2
11" x 17"
8
1/2
11" x 17"
65%
100%
100%
129%
COPYING
57
Page 61

MAKING ONE-SIDED COPIES FROM VARIOUS ORIGINALS (Single Copies)
Press the
1
light the
cator.
Set your originals in the optional
2
document feeder. (☛ See page
32.) When setting originals, the
top and bottom originals should
be placed upside down as shown
in the illustration to make copies
that read from left to right.
❐
If you want to make copies that read
from right t o left, set your origin als as
usual.
Select the copy paper size using
3
Paper Selection
the
Single Copies
Combine Originals
key.
key to
indi-
1
2
3
4
Select the reproduction ratio us-
4
ing the
Press the
Reduce
Start
or
key.
Enlarge
5
58
key.
Page 62

MAKING ONE-SIDED COPIES FROM VARIOUS ORIGINALS (Single Copies)
From 1 Two-sided Original To 2 One-sided Copies (2 Sided Original)
Note : We recommend using this function with the optional document feeder.
Regarding fun ctions that cannot be used together wi th this function, ☛ see page
❐
94.
Press the
1
light the
tor.
Set your originals in the optional
2
document feeder. ☛ See page
32.
Press the
Single Copies
2 Sided Original
Start
key.
3
key to
indica-
COPYING
59
Page 63

MAKING ONE-SIDED COPIES FROM VARIOUS ORIGINALS (Single Copies)
From 2 Facing Pages To 2 One-sided Copies (Book Original)
Copy paper size s (: only) that can b e used are as follo ws:
❐
" x 11", 5
8
1/2
Regarding functions that cannot be used together with this function, ☛ see page
❐
94.
1/2
" x 8
1/2
"
Press the
1
light the
Start with the last page of your
2
book original and work your way
to the beginning.
Place the original
the exposure glass and align the
last page with the left scale.
Single Copies
Book Original
face down
key to
indicator.
on
60
Page 64

MAKING ONE-SIDED COPIES FROM VARIOUS ORIGINALS (Single Copies)
Or, set the facing original in the
optional document feeder. ☛ See
page 32 or 34.
Select the copy paper size using
3
Paper Selection
the
key.
2
1
3
4
4
Press the
Start
key.
COPYING
61
Page 65

ADDING OR INSERTING SHEETS (Cover/Slip Sheet)
ADDING OR INSERTING SHEETS (Cover/Slip
Sheet)
Copying The Front Cover Of The Originals (Copy Cover)
Note: This function can be used only when your copier is equipped with the op-
tional docu ment feed er.
Note: The copier can also copy the back cover of the originals. Set the copier with
the user tools. (
Regarding functions that cannot be used together with this function, ☛ see page
❐
94.
When you use this function with 1-sided even number of originals to 2-sided
❐
copies mode, you w ill g et the f ollowin g copi es.
See page 135.) If you do , ☛ see page 63.
☛
Press the
1
to light the
62
Cover/Slip Sheet
Copy Cover
indicator.
key
Page 66

Set paper for cover sheets in the
2
bypass feed table.
Make sure to set paper that is
identical in size and direction with
the paper to which you are copying (step 3).
ADDING OR INSERTING SHEETS (Cover/Slip Sheet)
Select copy paper using the
3
per Selection
❐
You cannot select the large capacity
tray.
.
Set your originals in the optional
4
document feeder. ☛ See page
32.
.
Press the
Start
key.
key.
Pa-
5
Copying The Front And Back Covers Of The Originals
Note: This function can be used only when your copier is equipped with the op-
tional document feeder.
Note:
You can select this setting with the user tools. (
not select this setting, only the first page of the originals is copied. (
page 62.)
Regarding fun ctions that cannot be used together wi th this function, ☛ see page
❐
94.
See page 135.) If yo u do
☛
☛
See
COPYING
63
Page 67

ADDING OR INSERTING SHEETS (Cover/Slip Sheet)
When you use this function with 1-sided odd number of originals to 2-sided cop-
❐
ies mode, you will ge t the follow ing copie s.
Press the
1
to light the
Set paper for cover sheets in the
2
bypass feed table.
Make sure to set paper that is
identical in size and direction with
the paper to which you are copying (step 3).
Select copy paper using the
3
per Selection
❐
You cannot s elect the large capacity
tray.
Set your originals in the optional
4
document feeder. ☛ See page
32.
Cover/Slip Sheet
Copy Cover
key.
key
indicator.
Pa-
5
64
Press the
Start
key.
Page 68

ADDING OR INSERTING SHEETS (Cover/Slip Sheet)
Adding A Front Cover Sheet (Blank Cover)
Note: This function can be used only when your copier is equipped with the op-
tional document feeder.
Note: The copier can also add the back cover. Set the copier with the user tools.
See page 135.) If you do, ☛ see page 66.
(
☛
Regarding fun ctions that cannot be used together wi th this function, ☛ see page
❐
94.
Press the
1
to light the
tor.
Set paper for cover sheets in the
2
bypass feed table.
Make sure to set paper that is
identical in size and direction with
the paper to which you are copying (step 3).
Select copy paper using the
3
per Selection
❐
You cannot select the large capacity
tray.
Cover/Slip Sheet
Blank Cover
key.
key
indica-
Pa-
COPYING
65
Page 69

ADDING OR INSERTING SHEETS (Cover/Slip Sheet)
Set your originals in the optional
4
document feeder. ☛ See page
32.
Press the
Start
key.
5
Adding Front And Back Cover Sheets
Note: This function can be used only when your copier is equipped with the op-
tional docu ment feed er.
Note:
You can select this setting with the user tools. (
not select this setting, only the front cover is added. (
Regarding functions that cannot be used together with this function, ☛ see page
❐
94.
Press the
1
to light the
tor.
Cover/Slip Sheet
Blank Cover
indica-
key
See page 135.) If you do
☛
See page 65.)
☛
.
Set paper for cover sheets in the
2
bypass feed table.
Make sure to set paper that is
identical in size and direction with
the paper to which you are copying (step 3).
66
Page 70

ADDING OR INSERTING SHEETS (Cover/Slip Sheet)
Select copy paper using the
3
per Selection
❐
You cannot select the large capacity
tray.
.
Set your originals in the optional
4
document feeder. ☛ See page
32.
.
Press the
Start
key.
key.
Pa-
5
Copying The Front Cover Of Original And Adding A Back Cover Sheet (Copy And Blank Covers)
Note: This function can be used only when your copier is equipped with the op-
tional document feeder.
Note:
You can select this setting with the user tools. (
not select this setting, only the first page is copied. (
Regarding fun ctions that cannot be used together wi th this function, ☛ see page
❐
94.
When you use this function with 1 sided even number of originals to 2 sided
❐
copies mode, yo u will get th e following copies.
See page 135.) If yo u do
☛
See page 62.)
☛
67
COPYING
Page 71

ADDING OR INSERTING SHEETS (Cover/Slip Sheet)
Press the
1
to light the
Set paper for cover sheets in the
2
bypass feed table.
Make sure to set paper that is
identical in size and direction with
the paper to which you are copying (step 3).
Select copy paper using the
3
per Selection
❐
You cannot s elect the large capacity
tray.
Set your originals in the optional
4
document feeder. ☛ See page
32.
Cover/Slip Sheet
Copy Cover
key.
key
indicator.
Pa-
Press the
Start
key.
5
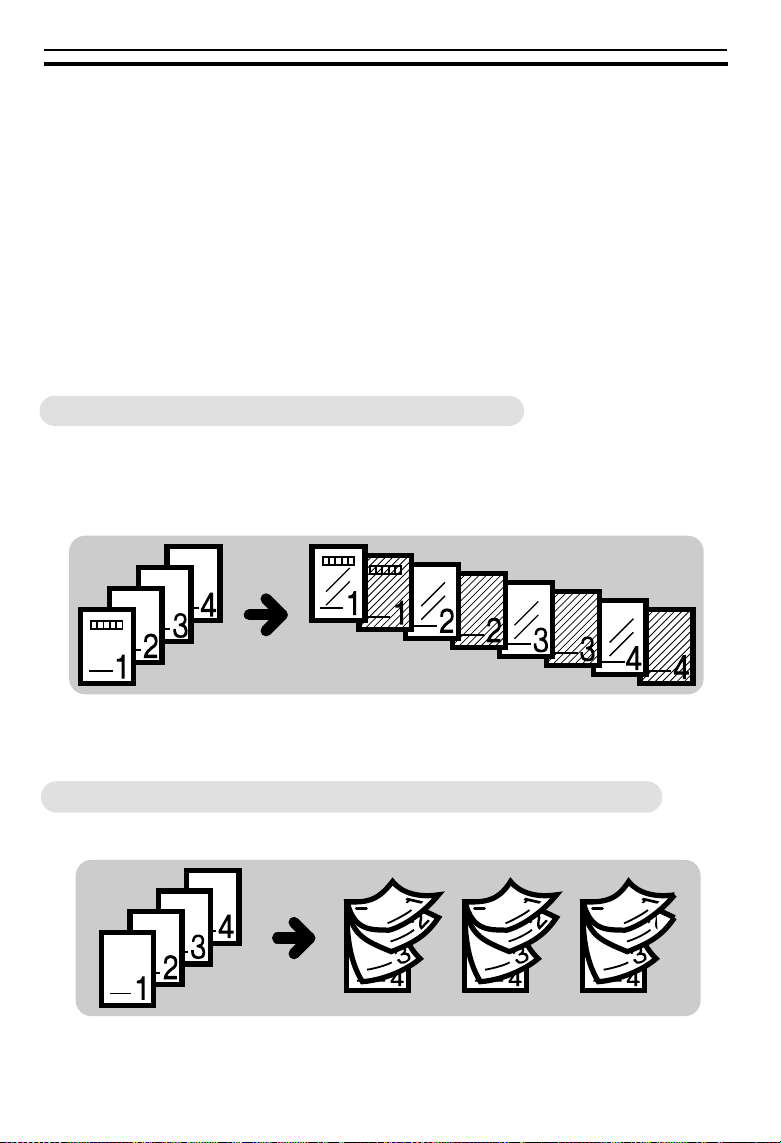
Inserting Copied Slip Sheets Between OHP Transparencies (OHP Copied Slip Sheet)
68
Page 72

ADDING OR INSERTING SHEETS (Cover/Slip Sheet)
Note: The copier can also insert a blank slip sheet. Set the copier with the user
tools. (☛ See page 140.) If you do, ☛ see page 70.
When you ha ve an unit for two-si ded copying, 1-side d even number of ori ginals
❐
to 2-sided cop ies mode is the default settin g. To use the OHP copied slip sheet
function, you have to cancel two-sided copies mode by pressing the Duplex key
to turn any Duplex indicators off. You can change this default setting using the
user tools. ☛ See page 141 .
Regarding fun ctions that cannot be used together wi th this function, ☛ see page
❐
94.
Set the slip sheets in the 500-
1
sheet paper tray.
❐
Do not set the sl ip sheets in the lar ge
capacity tray.
Set the OHP transparencies in
2
the bypass feed table.
❐
You can set ten sheets at a time.
However, if mi sfeed or multi-feed occurs, feed one sheet at a time.
❐
OHP transparencies should be
fanned to get air between the sheets
before loading.
Press the
3
to light the
cator.
Cover/Slip Sheet
OHP Slip Sheet
key
indi-
COPYING
69
Page 73

ADDING OR INSERTING SHEETS (Cover/Slip Sheet)
Using the
4
select the paper tray where you
have set the slip sheets (step 1).
Set your original on the exposure
5
glass or in the optional document
feeder. ☛ See page 31, 32, or
34.
Press the
Paper Selection
Start
key.
key,
6
Inserting Blank Slip Sheets Between OHP Transparencies (OHP Blank Slip Sheet)
Note: You can select this setting with the user tools. (☛ See page 140.) If you do
not select this setting, original images are copied onto slip sheets. (☛ See
page 69.)
Regarding functions that cannot be used together with this function, ☛ see page
❐
94.
When you have an unit for two-sided copying, 1-sided even number of originals
❐
to 2-sided copies mode is the default setting. To use the OHP blank slip sheet
function, yo u have to cancel t wo-sided copies mo de by pressing the Duplex key
to turn any Duplex indicators off. You can change this default setting using the
user tools. ☛ See page 141.
70
Page 74

Set the slip sheets in the 500-
1
sheet paper tray.
❐
Do not set the sl ip sheets in the lar ge
capacity tray.
Set the OHP transparencies in
2
the bypass feed table.
❐
You can set ten sheets at a time.
However, if mi sfeed or multi-feed occurs, feed one sheet at a time.
❐
OHP transparencies should be
fanned to get air between the sheets
before loading.
ADDING OR INSERTING SHEETS (Cover/Slip Sheet)
Press the
3
to light the
cator.
Using the
4
select the paper tray where you
have set the slip sheets (step 1).
Set your original on the exposure
5
glass or in the optional document
feeder. ☛ See page 31, 32, or
34.
Press the
Cover/Slip Sheet
OHP Slip Sheet
Paper Selection
Start
key.
6
key
indi-
key,
COPYING
71
Page 75

ERASING PARTS OF THE COPY IMAGE (Erase)
ERASING PARTS OF THE COPY IMAGE (Erase)
Note:
The Erase key can instead be used as the Margin Adju stment key (☛ See
page 136.) In this case, this function cannot be used.
Erasing The Center Margin Of The Original Image
(Erase Center)
Erasing The Surrounding Area Of The Original Image
(Erase Border)
Erasing The Center Margin And Surrounding Area
Of The Original Image
72
Page 76

ERASING PARTS OF THE COPY IMAGE (Erase)
The positio n of the margin to be erased is dete rmined according t o the selected
❐
copy paper and reproduction ratio. Make sure to select copy paper suitable for
your original.
The width of the margin to be er ased can be c hanged with t he user tools . ☛ See
❐
page 138.
Regarding functions that cannot be used together with this function, ☛ see page
❐
94.
Press the Erase key once to se-
1
lect the Erase Center, twice to
select the Erase Border, or three
times to select both of them.
Set your original on the exposure
2
glass or in the optional document
feeder. ☛ See page 31, 32, or
34.
❐
If you place a book original on the
exposure glass, the original must be
aligned to t he rear left c orner .
Press the Start key.
3
COPYING
73
Page 77
ADDING MARGINS FOR BINDING (Margin Adjustment)
ADDING MARGINS FOR BINDING (Margin
Adjustment)
Note: Before using Margin Adjustment, you have to change copi er’s default set-
tings with the user tools. (☛ See page 136.) If you do this, the Erase key is
used as the Margin Adjustment key. In this case, you cannot use the Erase
function.
Note: After selecting Margin Adjustment, put the sticker (key name sheet) for
Margin Adjustment on the operation panel. The sticker is enclosed as an
accessory.
The width of the margin can be changed with the user tools. ☛ See page 137 .
❐
Regarding fun ctions that cannot be used together wi th this function, ☛ see page
❐
94.
Margin For One-sided Copying
By default, 1-sided even number of originals to 2-sided copies mode is selected
❐
when you hav e an unit for two-si ded copying. In this case, press the
to turn any
user tools. ☛ See page 141 .
Press the Margin Adjustment
1
(Erase) key once to set the left
margin or twice to set the right
margin.
Make your copies.
Duplex
indicators off. You can change this default setting with the
Duplex
2
74
key
Page 78

ADDING MARGINS FOR BINDING (Margin Adjustment)
Margin For Two-sided Copying
Note: This function can be used only when your copier has a unit for two-sided
copying.
With the de fault settin g, 1-sided even num ber of ori ginals to 2- sided cop ies mode
❐
is selected when you have an unit fo r two-side d copying. I n this case, if you want
to make 2 si ded copies f rom 1 sided ev en number of or iginals, you d on’t need to
follow step 1. You can change thi s setting us ing the user tools. ☛ See page 141.
Follow the steps below when you want to set the left margin for the front
side and right margin for the back side for binding when making two-sided
copies that read from left to right.
Press the Duplex key to set the
1
copier to make two-sided copies.
☛ See pages 80 ~ 83.
Press the Margin Adjustment
2
(Erase) key once to set the left
margin for the front side and the
right margin for the back side.
❐
If you want t o set the righ t margin fo r
the front side and the left margin for
the back side (binding for copies that
read from right to left), press the
Margin Adjustment (Erase)
twice.
Make your copies.
3
key
COPYING
75
Page 79

C
STORING YOUR COPY SETTINGS IN MEMORY (Program)
STORING YOUR COPY SETTINGS IN MEMORY
(Program)
You can store up to five frequently used copy job settings in machine
memory, and recall for future use.
Storing Your Settings
Set the copy settings you want to
1
put into memory.
Press the Program key.
2
❐
If you want to cancel storing, press
the
Program
key again.
Program
1 2
Clear Modes/
Energy Saver
While pressing the Recall/Enter
3
key, press the Number key (1, 2,
3, 4, or 5) that you want to s tore
settings in.
❐
❐
will be displayed on the copy
PE
counter while holding the
key if you select a protected pro-
ter
gram number. In this case, repeat
steps 2 and 3 with another program
number.
If you want to protect your program,
follow the p rocedure in the next s ection.
.
Release the Recall/Enter key.
4
76
Recall/En-
y
y Saver
Max
1
2
3
4
5
6
7
8
9
Start
Recall/
Enter
R/#
0
Page 80

STORING YOUR COPY SETTINGS IN MEMORY (Program)
Protecting Your Settings From Being Overwritten
Press the Program key.
1
Hold down the Recall/Enter key
2
and press the Number key (1, 2,
3, 4, or 5) to be protected. While
still holding down the Recall/Enter key, press the Number (0)
key.
Deleting Your Protected Settings
You can delete the settings th at are store d in the protec ted progr am number.
❐
Press the Program key.
1
Hold down the Recall/Enter key
2
and press the Number key (1, 2,
3, 4, or 5) that contains the program you wish to delete. While
still holding down the Recall/En-
ter key, press the Clear/Stop
key.
Program
Clear Modes/
Energy Saver
1 2
COPYING
77
Page 81

C
STORING YOUR COPY SETTINGS IN MEMORY (Program)
Recalling Your Settings
Press the Program key.
1
Enter the program number by
2
pressing the Number key (1, 2,
3, 4, or 5).
❐
If you enter a program number not
registered, EP will be displayed on
the copy counter while holding the
Number
❐
If you recall a protected program
number, P1, P2, P3, P4, or P5 is displayed on the copy counter while
holding the
key.
Number
key.
ver
x
Program
1 2
1
2
4
5
7
8
0
Clear Modes/
Energy Saver
3
6
9
Recall/
Enter
R/#
Start
78
Page 82

C
STORING YOUR COPY SETTINGS IN MEMORY (Program)
Unprotecting Your Settings
Press the Program key.
1
While holding the Number key
2
(1, 2, 3, 4, or 5) that you want to
remove protection from, press the
Clear/Stop key.
❐
While holding the
program number (P1, P2, P3, P4, or
) to be unprotected appeared in
P5
the copy cou nter.
The settings remain as they
were, but are no longer protected. You can store new settings under this number.
Number
key, the
Program
Clear Modes/
Energy Saver
1 2
COPYING
79
Page 83

MAKING TWO-SIDED COPIES (ONLY WITH MODEL HAVING THIS FEATURE)
MAKING TWO-SIDED COPIES (ONLY WITH
MODEL HAVING THIS FEATURE)
Note: This function can be used only if your copier has a unit for two-sided copy-
ing.
To avoid pr oblems cau sed by cur ly copies , try turn ing over the paper st ack in the
❐
500-sheet or large capacity tray. If there is no improvement, change to copy
paper with less curl.
The following pap er limita tions appl y:
❐
Maximum size: 11" x 17"
Minimum size: 5
Weight: 17 ~ 24 lb
* 11" x 15" paper cannot be used.
Up to 50 copi es (1 7 ~ 20 lb pa per) c an be made a t one ti me. If you u se 11" x
❐
17", 21 ~ 24 lb paper, 30 copies can be made at one time.
Regarding fu nctions th at cannot be used toge ther with th is functio n, ☛ see page
❐
94.
From An Even Number Of One-Sided Originals (1 Sided Originals, even)
1/2
" x 8
1/2
"
:
With the defau lt setting, this func tion is selected. In thi s case, you don’t need to
❐
follow step 1. You can change this default setting using the user tools. ☛ See
page 141.
A right margin of 0.2" is set on th e back side au tomatica lly.
❐
❐
If you select the Even Number setting when you have an odd number
of originals, the first page of your
copies will be blank, as shown in the
illustration. Be sure to count your
originals be fore copyin g.
80
Page 84

MAKING TWO-SIDED COPIES (ONLY WITH MODEL HAVING THIS FEATURE)
Press the Duplex key to light the
1
1 Sided Originals (even) indicator.
Set your original on the exposure
2
glass or in the optional document
feeder. ☛ See page 31, 32, or
34.
❐
Start with the last page of the originals.
Press the Start key.
3
From An Odd Number Of One-Sided Originals (1 Sided Originals, odd)
A right mar gin o f 0.2" i s set on the back side a utomat ically .
❐
❐
If you select the Odd Number setting
when you have an even number of
originals, t he first pa ge of your c opies
will be blank, as sh own in the illu stration. Be sure to count your originals
before copyin g.
COPYING
81
Page 85

MAKING TWO-SIDED COPIES (ONLY WITH MODEL HAVING THIS FEATURE)
Press the Duplex key to light the
1
1 Sided Originals (odd) indicator.
Set your original on the exposure
2
glass or in the optional document
feeder. ☛ See page 31, 32, or 34.
❐
Start with the last page of the originals.
Press the Start key.
3
From Two-Sided Originals (2 Sided Original)
Note: It is recommended to use this function with the optional document feeder.
Press the Duplex key to light the
1
2 Sided Original indicator.
Set your original in the optional
2
document feeder. ☛ See page
32 or 34.
❐
Start with the last page of the originals.
Press the Start key.
3
82
Page 86

MAKING TWO-SIDED COPIES (ONLY WITH MODEL HAVING THIS FEATURE)
From Facing Pages (Book Original)
Copy paper size s (: only) that can b e used are as follo ws:
❐
8
1/2
Press the Duplex key to light the
1
Book Original indicator.
" x 11", 5
1/2
" x 8
1/2
"
Start with the last page of your
2
book original and work your way
to the beginning.
Place the original face down on
the exposure glass and align the
last page with the left scale.
Or, set the facing original in the
optional document feeder.
Press the Start key.
3
2
1
3
4
83
COPYING
Page 87

FINISHING (OPTION)
FINISHING (OPTION)
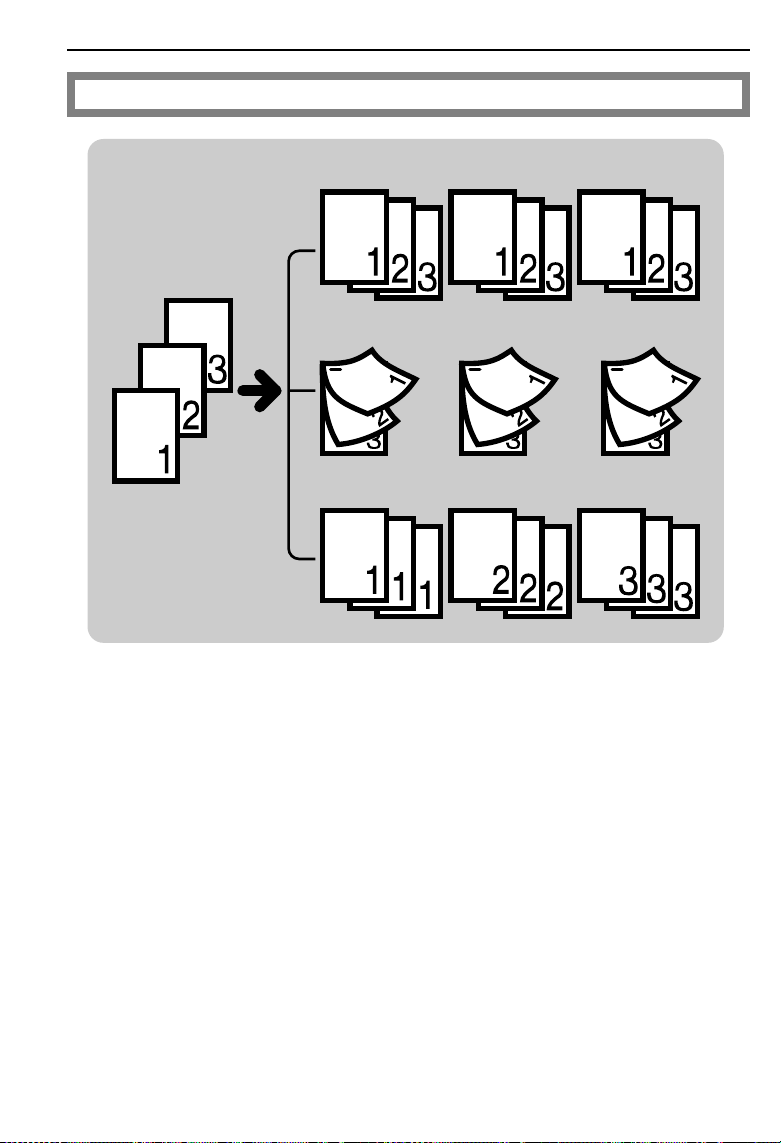
Sorting Into Sets (Sort)
One copy of each originals is delivered to each bin and copies are collated into sets.
Note: This function can be used only when your copier is equipped with the op-
tional 20-bin sorter, 10-bin sorter stapler, 20-bin sorter stapler, or 20-bin
multi-position sorter stapler.
For Sorting, the following limitations apply:
❐
multi-pos ition
sorter stapler
Maximum paper size
:
Minimum paper size 8
20-bin
: 11" x 17"
;
: 8
" x 11"
1/2
" x 11" 8
1/2
20-bin sorter
stapler
: 11" x 17"
;
: 8
" x 11"
:
1/2
" x 11" 8
1/2
10-bin sorter
stapler
:11" x 17"
;
: 8
" x 11"
:
1/2
" x 11"
1/2
20-bin sorter
: 11" x 17"
;
: 8
" x 11"
:
1/2
: 8
" x 11"
;
1/2
: 5
" x 8
:
1/2
Maximum paper weight 42 lb 42 lb 42 lb 24 lb
Minimum paper weight 14 lb 14 lb 14 lb 14 lb
8
" x 11" or
1/2
smaller:
Maximum capacity of
bins
50 copies
30 copies
" x 14" or
8
1/2
larger:
25 copies
Paper that cannot be
used
To avoid pr oblems cau sed by cur ly copies , try turn ing over the paper st ack in the
❐
post cards, translucent paper, OHP transparencies, and adhesive labels
8
" x 11" or
1/2
smaller:
30 copies
" x 14" or
8
1/2
larger:
25 copies
8
" x 11" or smaller:
1/2
30 copies:
8
" x 14":
1/2
15 copies
11" x 17":
10 copies
500-sheet or large capacity tray. If there is no improvement, change to copy
paper with less curl.
Regarding fun ctions that cannot be used together wi th this function, ☛ see page
❐
94.
1/2
"
84
Page 88

FINISHING (OPTION)
Press the Sorter key to light the
1
Sort indicator.
Set your original on the exposure
2
glass or in the optional document
feeder. ☛ See page 31, 32, or
34.
Press the Start key.
3
❐
If you set your originals on the expo sure glass in step 2, repeat steps 2
and 3 until your copying is completed.
Stapling Copies (Staple)
Zoom
Up
Down
Staple Position
Top
Bottom
Two
Staples
Sorter
Sort
Staple
Stack
Note: This function can be used only when your copier is equipped with the op-
tional 10-bin sorter stapler, 20-bin sorter stapler, or 20-bin multi-position
sorter stapler.
If you select Stap ling, Sort ing is autom atically selected.
❐
You cannot u se St apling with S tacki ng.
❐
To avoid problems caused by curly copies, try turning over the paper stack in the
❐
500-sheet or large capacity tray. If there is no improvement, change to copy
paper with less curl.
Regarding functions that cannot be used together with this function, ☛ see page
❐
94.
85
COPYING
Page 89

FINISHING (OPTION)
Stapling position and orientation
20-bin multi-position sorter stapler
Original setting in the optional document feeder Copies
R
R
20-bin sorter stapler
Original setting in the optional document feeder Copies
R
R
86
R
Page 90

10-bin sorter stapler
Original setting in the optional document feeder Copies
FINISHING (OPTION)
R
R
Changing the staple position
If your copier is equipped with the 20-bin sorter stapler, you can select one
of two stapling positions by changing the position of the stapler. Open the
front cover of the sorter stapler and perform the actions illustrated below.
After changin g the positi on of the stap ler, the stap ler shoul d be clicked in position .
❐
When your copier is equipped with the 20-bin multi-position sorter stapler, you
❐
can also chang e the staple position us ing the
88 and 89.
R
For Stapling, the followin g limitati ons apply:
❐
Staple Position
key. ☛ See pages
R
20-bin multi-position
sorter stapler
: 11" x 17"
Maximum paper size
Minimum paper size 8
Maximum paper weight 42 lb 42 lb 21 lb
Minimum paper weight 14 lb 14 lb 14 lb
Stapler capacity 2 ~ 50 copies 2 ~ 20 copies 2 ~ 20 copies
Paper that cannot be used post cards, translucent paper, OHP transparencies, and adhesive labels
;
: 8
" x 11"
:
1/2
" x 11" 8
1/2
20-bin sorter stapler 10-bin sorter stapler
: 11" x 17"
;
: 8
" x 11"
:
1/2
" x 11" 8
1/2
: 11" x 17"
;
: 8
" x 11"
:
1/2
" x 11"
1/2
COPYING
87
Page 91

FINISHING (OPTION)
Stapling copies automatically after copying
Note: This function can be used only when your copier is equipped with the op-
tional document feeder.
Press the Sorter key to light the
1
Sort and Staple indicators.
Zoom
Up
Down
Staple Position
Top
Bottom
Two
Staples
Sorter
Sort
Staple
Stack
If your machine is equipped with
2
the 20-bin multi-position sorter
stapler, select the staple position
using the Staple Position key.
Zoom
Up
Down
Staple Position
Top
Bottom
Two
Staples
Sorter
Sort
Staple
Stack
Set originals in the optional docu-
3
ment feeder. ☛ See page 32.
Press the Start key.
4
Stapling copies manually after copying
Use this function when you place originals on the exposure glass, or in the
optional document feeder, one sheet at a time.
Press the Sorter key to light the
1
Sort indicator.
88
Zoom
Up
Down
Staple Position
Top
Bottom
Two
Staples
Sorter
Sort
Staple
Stack
Page 92

Place originals on the exposure
2
glass, or set originals in the optional document feeder
at a time.
❐
Start with the last page of the originals.
Make your copies.
3
If your machine is equipped with
4
the 20-bin multi-position sorter
stapler, select the staple position
using the Staple Position key
before the Staple indicator stops
blinking.
After copying is completed, press
5
the Sorter key before the Staple
indicator stops blinking.
❐
The
20 seconds. You can change this
time using the user tools. ☛ See
page 138.
indicator blinks for about
Staple
one sheet
Zoom
Zoom
Up
Down
Up
Down
FINISHING (OPTION)
Staple Position
Top
Bottom
Two
Staples
Staple Position
Top
Bottom
Two
Staples
Sorter
Sorter
Sort
Staple
Stack
Sort
Staple
Stack
Stacking Together All Copies Of A Page (Stack)
All copies of each original are delivered to the same bin.
Note: This function can be used only when your copier is equipped with the op-
tional 20-bin sorter, 10-bin sorter stapler, 20-bin sorter stapler, or 20-bin
multi-position sorter stapler.
89
COPYING
Page 93

FINISHING (OPTION)
To avoid pr oblems cau sed by cur ly copies , try turn ing over the paper st ack in the
❐
500-sheet or large capacity tray. If there is no improvement, change to copy
paper with less curl.
Regarding fun ctions that cannot be used together wi th this function, ☛ see page
❐
94.
For Stacki ng, th e foll owing l imit ations apply :
❐
multi-pos ition
sorter stapler
Maximum paper size
:
Minimum paper size 8
20-bin
: 11" x 17"
;
: 8
" x 11"
1/2
" x 11" 8
1/2
20-bin sorter
stapler
: 11" x 17"
;
: 8
" x 11"
:
1/2
" x 11" 8
1/2
10-bin sorter
stapler
: 11" x 17"
;
: 8
" x 11"
:
1/2
" x 11"
1/2
20-bin sorter
: 11" x 17"
;
: 8
:
: 8
;
: 5
:
Maximum paper weight 42 lb 42 lb 42 lb 24 lb
Minimum paper weight 14 lb 14 lb 14 lb 14 lb
Maximum capacity of
bins
Paper that cannot be
used
8
" x 11" or
1/2
smaller:
50 copies
25 copies
" x 14" or
8
1/2
larger:
20 copies
post cards, translucent paper, OHP transparencies, and adhesive labels
8
" x 11" or
1/2
smaller:
25 copies
" x 14" or
8
1/2
larger:
20 copies
8
1/2
smaller:
30 copies
8
1/2
10 copies
Press the Sorter key to light the
1
Stack indicator.
Zoom
Up
Down
Staple Position
Top
Bottom
Two
Staples
Sorter
Sort
Staple
Stack
" x 11"
1/2
" x 11"
1/2
" x 8
1/2
1/2
" x 11" or
" x 14" or
larger:
"
Set your original on the exposure
2
glass or in the optional document
feeder. ☛ See page 31, 32, or
34.
Press the Start key.
3
90
Page 94

COPYING WITH USER CODES
Input your user code (3 digits)
1
using the Number keys. Press
the Recall/Enter key.
Make your copies.
2
To prevent from others from mak-
3
ing copies using your user code,
press the Clear/Stop and Clear
Modes/Energy Saver key simultaneously after copying.
❐
Regarding user codes, ☛ see page
142.
❐
To set your copier for user codes,
contact your service representative.
☛
See page 150 .
COPYING WITH USER CODES
91
COPYING
Page 95

e
SAVING ENERGY
SAVING ENERGY
With the Energy Saver, the copier is reset and uses less electricity.
This function is also turned on aut omatically aft er the selected tim e since copying
❐
is finished, since the last time any key is pressed, or since the copier detects
anyone who operates the copier. You can change this time using the user tools.
☛
See page 133.
Press the Clear Modes/Energy
1
Saver key more than one second
to enter the Energy Saver condition.
❐
All indicators except the r
indicator turn off.
Saver
Energy
Clear Modes/
Energy Saver
C
Int
92
Page 96

SAVING ENERGY
93
COPYING
Page 97

COMBINATION CHART
COMBINATION CHART
This combination chart shows which modes can be used together.
✩ means that these modes can be used together.
★ means that one of these modes will be selected automatically.
✗ means that these modes cannot be used together.
Mode you try to select
Mode you have selected
1 Erase Center
2 Erase Edge
Erase
Erase Center & Border
3
4 Margin Adjustment
5 Preset Reduce/Enlarge
+-
6
Zoom
7 Size Magnification
8 Auto Reduce/Enlarge
Reduce/Enlarge
9 10 Key Zoom
10 From Even One-sided Originals
From Two-sided Originals
11
12 From Book Original
copies
Two-sided
13 From Odd One-sided Originals
14 From Two-sided Original
15 From Book Original
copies
16 From 2 One-sided Originals
One-sided
17 Sorting
18 Stacking
Stapling
19
Finishing
20 Proof Tray Copying
21 Copied Front Cover
22 Blank Front Cover
Sheet
23 OHP Slip Sheet
Cover/Slip
24 Auto Paper Select
25 Bypass Feed Copying
26 Interrupt Copying
Auto Image Density
27
Others
28 Halftone
29 Different Sized Originals in DF
30 Special Paper Size Copying
Erase Reduce/Enlarge Two -si ded cop ies
12345678910111213
★★✗✩✩✩✩✩✩✩✩✩
★ ★✗✩✩✩✩✩✩✩✩✩
★★ ✗✩✩✩✩✩✩✩✩✩
✗ ✗ ✗ ✩✩✩✩✩✩✩✩✩
✩✩✩✩ ★★★★✩✩✩✩
✩✩✩✩★ ★★★✩✩✩✩
✩✩✩✩★★ ★✗✩✩✩✩
✩✩✩✩★★★ ★✩✩★✩
✩✩✩✩★★✗★ ✩✩✩✩
✩✩✩✩✩✩✩✩✩ ★★★
✩✩✩✩✩✩✩✩✩★ ★★
✩✩✩✩✩✩✩✗✩★★ ★
✩✩✩✩✩✩✩✩✩★★★
✩✩✩✩✩✩✩✩✩★★★★
✩✩✩✩✩✩✩✗✩★★★★
✩✩✩✩✩✩✩✗✩✩✗ ✗ ✗
✩✩✩✩✩✩✩✩✩✩✩✩✩
✩✩✩✩✩✩✩✩✩✩✩✩✩
✩✩✩✩✩✩✩✩✩✩✩✩✩
✩✩✩✩✩✩✩✩✩✩✩✩✩
✩✩✩✩✩✩✩✩✩✩✩✗✩
✩✩✩✩✩✩✩✩✩✩✩✗✩
✩✩✩✩✩✩✩✩✩✗ ✗ ✗ ✗
✩✩✩✩✩✩✩★✩✩✩★✩
✗✗✗✗✩✩✩✗✩✗✗✗✗
✩✩✩✩✩✩✩✩✩✗ ✗ ✗ ✗
✩✩✩✩✩✩✩✩✩✩✩✩✩
✩✩✩✩✩✩✩✩✩✩✩✩✩
✩✩✩✩✩✩✩✩✩✩✩✩✩
✗✗✗✗✩✩✩✗✩✗✗✗✗
94
Page 98

COMBINATION CHART
1
2
Erase
3
4
5
6
7
8
Reduce/Enlarge
9
10
11
12
copies
Two-sided
13
14
15
copies
16
One-sided
17
18
19
Finishing
20
21
22
Sheet
23
Cover/Slip
24
25
26
27
Others
28
29
30
One-sided
copies
Finishing
Cover/Slip
sheet
Others
14 15 16 17 18 19 20 21 22 23 24 25 26 27 28 29 30
✩✩✩✩✩✩✩✩✩✩✩✗★✩✩✩✗
✩✩✩✩✩✩✩✩✩✩✩✗★✩✩✩✗
✩✩✩✩✩✩✩✩✩✩✩✗★✩✩✩✗
✩✩✩✩✩✩✩✩✩✩✩✗★✩✩✩✗
✩✩✩✩✩✩✩✩✩✩✩✩★✩✩✩✩
✩✩✩✩✩✩✩✩✩✩✩✩★✩✩✩✩
✩✩✩✩✩✩✩✩✩✩✩✩✗✩✩✩✗
★★★✩✩✩✩✩✩✩★✗★✩✩✩✗
✩✩✩✩✩✩✩✩✩✩✩✩★✩✩✩✗
★★✩✩✩✩✩✩✩✗✩✗★✩✩✩★
★★★✩✩✩✩✩✩✗✩✗★✩✩✩✗
★★★✩✩✩✩✗ ✗ ✗ ✗ ✗★✩✩✩✗
★★★✩✩✩✩✩✩✗✩✗★✩✩✩✗
★★✩✩✩✩✗ ✗ ✗✩✩★✩✩✩✩
★ ★✩✩✩✩✗ ✗✩✗ ✗★✩✩✩✗
★★ ✩✩✩✩✗ ✗ ✗ ✗ ✗★✩✩✗ ✗
✩✩✩ ★✩★✩✩★✩✗★✩✩✩✗
✩✩✩★ ★★★★★✩✗★✩✩✩✗
✩✩✩✩★ ★✩✩★✩✗★✩✩✩✗
✩✩✩★★★ ✩✩✩✩✩★✩✩✩✩
✗ ✗ ✗✩✗✩✩ ★★✗★★✩✩✩✗
✗✗✗✩✗✩✩★ ★✗★★✩✩✩✗
✗✩✗✗✗✗✩★★ ✗★★✩✩✩✗
✩★★✩✩✩✩★★★ ★★✩✩✩★
✩✗✗✗✗✗✩★★★★ ★✩✩✩★
✩✩✩✗✗✗✩✗✗✗✩✩ ✩✩✩✩
✩✩✩✩✩✩✩✩✩✩✩✩✩ ★✩✩
✩✩✩✩✩✩✩✩✩✩✩✩✩★ ✩✩
✩✩✗✩✩✩✩✩✩✩✩✩★✩✩ ✩
✩✗✗✗✗✗✩✗✗✗✗✩★✩✩✩
COPYING
95
Page 99

COMBINATION CHART
96
Page 100

WHAT TO DO IF
SOMETHING GOES
WRONG
97
 Loading...