

Page 1
OPERATOR’S MANUAL
RICOH FAX 170 / 180
Type I
.......
RICOH FAX 180
Type II
.....
RICOH FAX 170
Please read all of these instruct ion s and keep this manua l by your mach ine .
Page 2

USA
FCC Requirements
1. This equipment complies with Part 68 of the FCC rul es . On t he c over of t his equipment is a label that c ont ains, among
other information, the FCC registrat ion number and ringer equivalence number (REN) for thi s equipment. If requested,
this information must be provided to the t el ephone company.
2. This equipment uses t he f ollowing USOC jack: RJ11C
3. The REN is used to determine the quantity of devices which m ay be connec ted t o the telephone l ine. Exces sive RE N’ s
on the telephone line may result in the devices not ringing in res pons e to an i ncomi ng call . In most, but not all areas , t he
sum of the REN’s s hould not exceed five (5.0). Contac t t he t elephone c ompany to determine the maximum REN f or th e
calling area.
4. If this equipment caus es harm to t he tel ephone net work , the t elephone com pany wil l noti f y you in advance t hat
temporary discontinuance of servic e m ay be required. I f advanc e not i c e is not practical, the telephone company will
notify the customer as soon as possible. Also, you will be advised of your ri ght to file a complaint with the FCC i f you
believe it is necessary.
5. The telephone company may m ak e c hanges in i t s f ac il ities, equipment, operations, or procedures that could affect the
operation of the equipment . I f t his happens , t he telephone company will provide advance notic e in order f or you t o m ak e
necessary modificat ions in order to maintain unint errupt ed s ervic e.
6. In the event of operation problems (document j am, copy j am, com muni cat ion error i ndic at ion), ref er to t he solvi n g
problems section in this manual.
7. If you cannot correct the problem, pl ease contact the RICOH CORP. CUSTOMER SUPPORT DEPT. at 1-800-FASTFIX
for repair and warranty informat ion. If it is causing harm to the t el ephone net work, the telephone company may request
you to disconnect the equipment from the network until the problem is resolved.
8. This equipment cannot be used on telephone company-provided coin service. Connec tion to P art y Line Servic e i s
subject to state tariffs.
WHEN PROGRAMMING EMERGENCY NUMBERS AND/OR MAKING TEST CALLS
TO EMERGENCY NUMBERS:
1. Remain on the lin e and bri efly ex plain to the di spatch er the r eason fo r the cal l befor e hangin g up.
2. Perform such activities in the off-peak hours, such as early morning hours or late evenings.
CA NADA
The Industry Canada label ident i f ies c ertified equipment. This c ert ification means that the equi pme nt m eet s c ert ain
telecommunications net work protective, operational, and saf et y requi rements. The department does not guarant ee th e
equipment will operate t o t he user’s satisfaction. B efore installing this equipment, users should e nsure t hat it is permissible
to be connected to the facilities of the l oc al tel ec omm unic ati ons company. The equipment must also be installed using an
acceptable method of connect i on. The cust om er should be aware that compliance with the above condit ions m ay not
prevent degradation of service in some situat ions .
Repairs to certified equipment should be m ade by an aut horized Canadian mai nt enanc e fac ility des i gnated by t he suppli e r.
Any repairs or alterations made by the us er to t his equipment , or equipment malf unc t i ons, may gi ve the t elec ommuni c at ions
company cause to request the user to disconnec t the equi pment . Us ers should ens ure f or their own protection that the
electrical ground connect ions of the power utility, telephone lines, and internal metallic water pipe system, if present , are
connected together . This precaut ion m ay be part icul arly import ant in rural areas .
Caution: Users should not att em pt t o make suc h connections themselves, but should contact the appropriate electric
inspection authority, or electrician, as appropriate.
The standard connecting arrangement code f or this equi pment is CA11A.
The Load Number (LN) assigned to each terminal device denot es the perc ent age of the tot al l oad to be connec ted to a
telephone loop which is used by the device to prevent overloading. The term inat i on of a loop may consist of any
combination of devices subjec t only to the requirement that the sum of the load numbers of all the devices does not exceed
100.
OFFICIAL NOTICE TO USERS
Page 3

SUPPLIES
Caution: Ricoh Shall not be responsible for any damage or expense that may
result from the use of parts other recommended parts.
Paper Roll
Paper Roll Type 30AS is recommended for the best performance.
Headquarters: Ricoh Corporation, 5 Dedrick Place, W es t Caldwell, NJ 07006. 201-882-2000
U.S. Government Marketing: Ri coh Corporation, 1700 N. Moore Street, Suite 1200, A rlingon, VA22209. 403-525-3234
Ricoh Business Machines Ltd.: 23/F., China Overseas Building, 139 Hennessy Road, WANCHAI, Hong Kong. 2862-2888
Ricoh Company., Ltd. 15-5, Minami-A oyama 1-chome, Minatoku, Tokyo 107, Japan
ENG
Part No. H0688601B Printed in China
Page 4

WARNING: This equipment has been tested and found to comply with the
limits for a Class B digital device, pursuant to Part 15 of the FCC Rules.
These limits are designed to provide reasonable protection against harmful
interference in a residential installation. This equipment generates, uses, and
can radiate radio frequency energy and, if not installed and used in
accordance with the instructions, may cause harmful interference to radio
communications. However, there is no guarantee that interference will not
occur in a particular installation. If this equipment does cause harmful
interference to radio or television reception, which can be determined by
turning the equipment off and on, the user is encouraged to try to correct the
interference by one or more of the following measures:
- Reorient or relocate the receiving antenna.
- Increase the separation between the equipment and receiver.
- Connect the equipment into an outlet on a circuit different from that to which
the receiver is connected.
- Consult the dealer or an experienced radio/TV technician for help.
Notice about the Telephone Consumer Protection Act (Valid in the USA only)
Attention Please!
The Telephone Consumer Protection Act of 1991 among other things makes it
unlawful for any person to send any message via a telephone fax machine
unless such message clearly contains in a margin at the top or bottom of each
transmitted page or on the first page of the transmission, the date and time it
is sent and an identification of the business or other entity, or other individual
sending the message and the telephone number of the sending machine or
such business, other entity, or individual. This information is transmitted with
your document by the TTI (Transmit Terminal Identification) feature.
In order for you to meet the requirement, your machine must be programmed
by following the instructions in the accompanying Operation Manual. In
particular, please refer to the "Getting Started" and/or "Programming" sections.
Also refer to the TTI (Transmit Terminal Identification) programming procedure
to enter the business identification and telephone number of the terminal or
business. Do not forget to set the date and time.
Thank you.
Page 5

NOTICE TO USERS (New Zealand)
Equipment connected to the interface port shall be certified to meet the
requirements of Reg. 18 of the New Zealand wiring Regulations 1976.
Telepermitted equipment may only be connected to the interface port.
The operation of this equipment on the same line as telephones or other
equipment with audible warning devices or automatic ring detectors will give
rise to bell tinkle or noise and may cause false tripping of the ring detector.
Should such problems occur, the user is not to contact Telecom Faults
Service.
Immediately disconnect the equipment should it ever suffer physical damage
which results in their internal parts becoming accessible in normal use.
Arrange for its disposal or have it repaired before it is reconnected.
Should it necessary to move the equipment, it is necessary to disconnect the
Telecom network connection before disconnecting the Power lead or any
separate earth lead. Similarly, when reconnecting the equipment it is
necessary to connect the power lead or earth lead before connecting the
telecom Network.
Not all standard telephones will respond to incoming ringing when connected
to the extension socket.
Page 6

IMPORTANT SAFETY INSTRUCTIONS
1. Read all of these instructions.
2. Save these instructions for later use.
3. Follow all warnings and instructions marked on the product.
4. Unplug this product from the wall outlet before cleaning. Do not use liquid cleaners or aerosol
cleaners. Use a damp cloth for cleaning.
5. Do not use this product near water.
6. Do not place this product on an unstable cart, stand, or table. The product may fall, causing
serious damage to the product or injuring the user.
7. Slots and openings in the cabinet and the back or bottom are provided for ventilation; to
ensure reliable operation of the product and to protect it from overheating, these openings
must not be blocked or covered. The openings should never be blocked by placing the
product on a bed, sofa, rug or other similar surface. This product should not be placed in a
built-in installation unless proper ventilation is provided.
8. This product should be operated from the type of power source indicated on the marking
label. If you are not sure of the type of power available, consult an authorized sales person or
your local power company.
9. This product is equipped with a 3-wire grounding type plug, a plug having a third (grounding)
pin. This plug will only fit into a grounding-type power outlet. This is a safety feature. If you are
unable to insert the plug into the outlet, contact your electrician to replace your obsolete
outlet. Do not defeat the purpose of the grounding type plug. (This does not apply in countries
in which the 2-wire, non-grounded type plug is used)
10. Do not allow anything to rest on the power cord. Do not locate this product where persons will
walk on the cord.
11. If an extension cord is used with this product. Make sure that the total of ampere ratings of
the products plugged into the extension cord do not exceed the extension cord ampere rating.
Also, make sure that the total of all products plugged into the wall outlet does not exceed 15
amperes.
12. Never push objects of any kind into this product through cabinet slots as they may touch
dangerous voltage points or short out parts that could result in a risk of fire or electric shock.
Never spill liquid of any kind on the product.
13. Do not attempt to service this product yourself, as opening or removing covers may expose
you to dangerous voltage points or other risks. Refer all servicing to qualified service
personnel.
14. Unplug this product from the wall outlet and refer servicing to qualified service personnel
under the following conditions:
A. When the power cord or plug is damaged or frayed.
B. If liquid has been spilled into the product.
C. If the product has been exposed to rain or water.
D. If the product does not operate normally when the operating instructions are followed.
Adjust only those controls that are covered by the operating instructions since improper
adjustment of other controls may result in damage and will often required extensive work
by a qualified technician to restore the product to normal operation.
E. If the product has been dropped or cabinet has been damaged.
F. If the product exhibits a distinct change in performance, indicating a need for service.
Page 7

Table of Contents
IMPORTANT SAFETY INSTRUCTIONS
INTRODUCTION
WHAT DOES A FAX MACHINE DO? 1
SOME OF THE THINGS THAT THIS MACHINE CAN DO 1
F ACSIMI LE FEATURES AVAILABILITY T ABLE 2
MANUAL OVERVIEW 4
MANUAL CONVENTIONS 5
Key Names 5
Displays 5
Symbols 6
GENERAL PRECAUTIONS
POWER AND GROUNDING 7
Power Supply 7
Grounding 7
COLD WEA THER POWER-UP 8
THUNDERSTORMS 8
P APER PRECAUTIONS 9
OPERATING PRECAUTIONS 9
GENERAL 9
GUIDE TO COMPONENTS
1. OPERATION PANEL 10
Type I Model (USA) 10
(ASIA) 10
Type II Model 10
2. FRONT VIEW 12
3. REAR VIEW 12
INSTALLING THE MACHINE
LOCATION 13
INSTALLATION 13
Installation Procedu re 14
SOME ITEMS MUST BE PROGRAMMED FIRST 16
Overview 16
Setting the Date and Time 17
Setting Your Machine’s Identif icat ion 18
RTI (Identification Display) 18
TTI (Page Header) 19
CSI (Telephone number display) 20
Tone Dial or Pulse Dial? 21
Page 8

When You Change to Daylight Saving Time 21
Cutting Paper 22
Switching the Automatic Cutter On 22
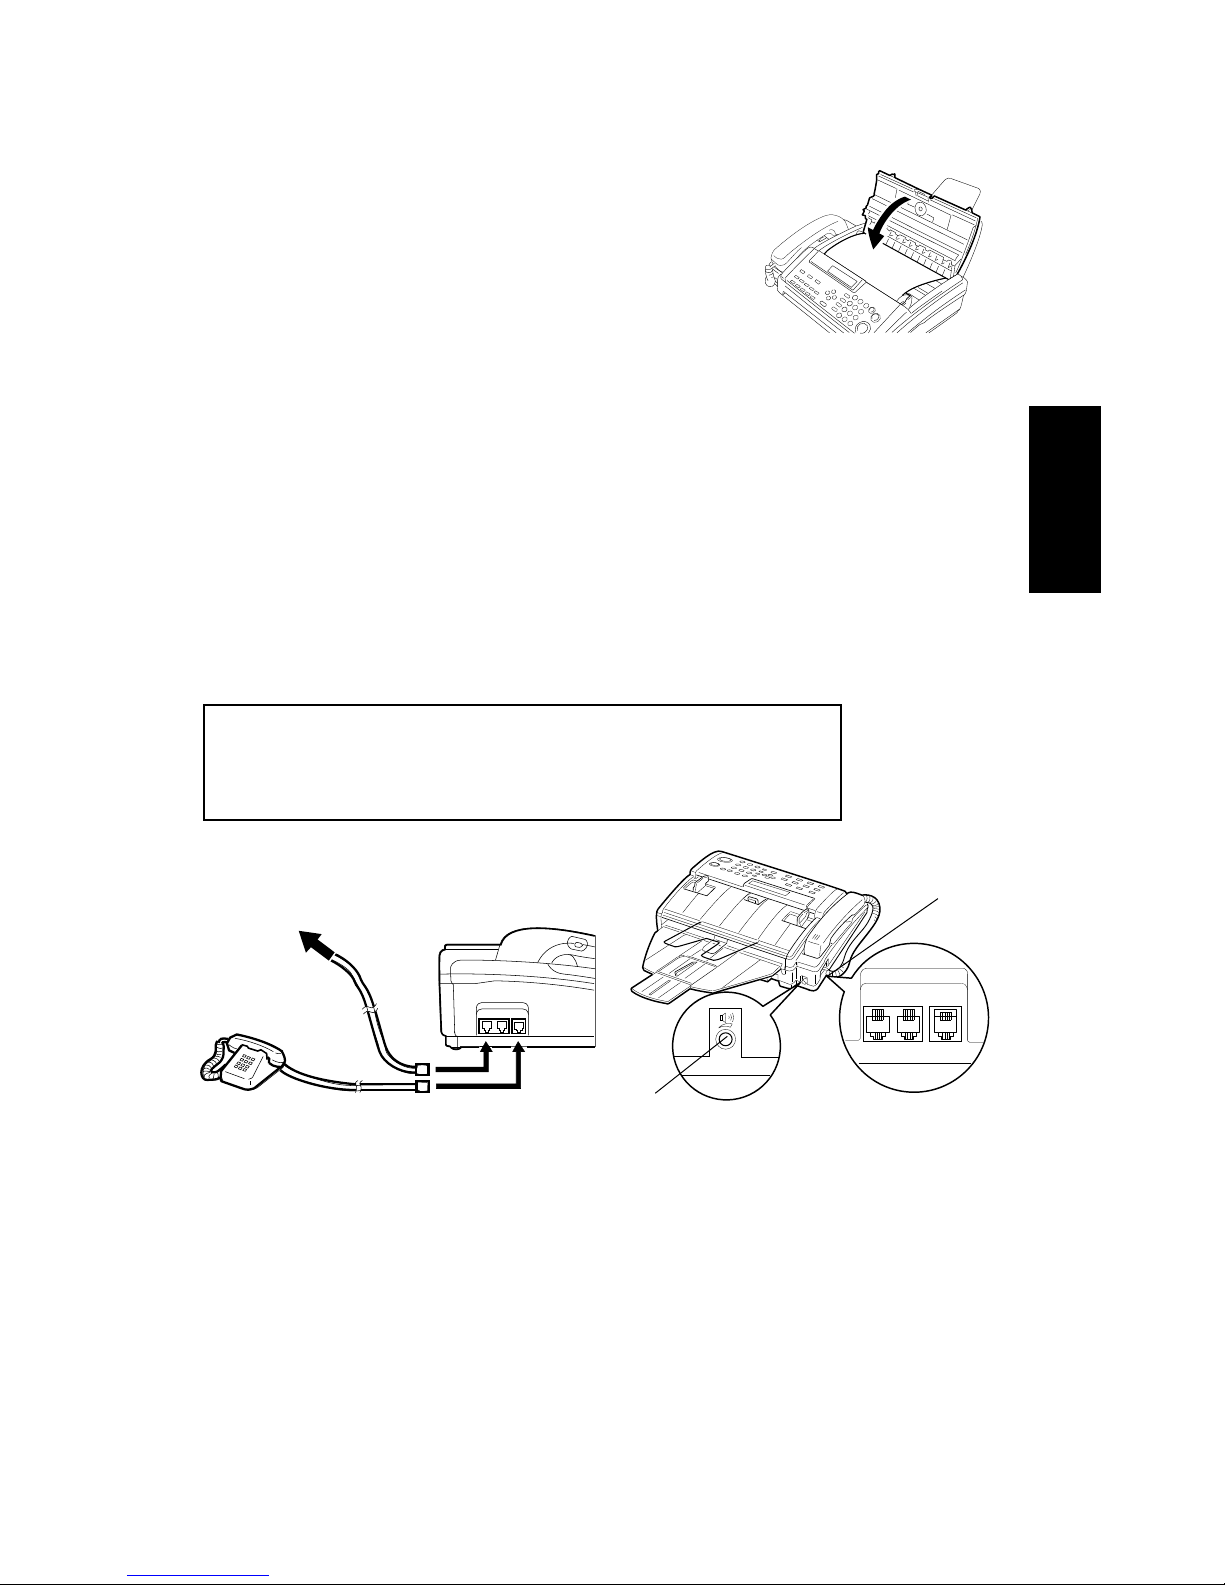
Out Line or Extension Telephone System? 23
Setting The Access Number 23
Cutting the Leading Edge of The Paper 24
STORING OFTEN USED NUMBERS 25
Three Convenient Ways to Dial 25
Quick Dial and Speed Dial 25
Groups (T yp e I Only) 26
Programming Quick Dials 26
Programming a New Quick Dial 27
Editing a Quick Dial 27
Erasing a Quick Dial 28
Programming Speed Dials 29
Programming a New Speed Dial 29
Editing a Speed Dial 30
Erasing a Speed Dial 31
Programming Groups (Type I Only) 31
Programming a Group 31
Editing Group Dial 32
Erasing Group Dials 33
Programming the Group Key 34
OTHER ITEMS TO PROGRAM AT YOUR LEISURE 34
Storing and Dialing Part of a Number 34
BASIC OPERATION
SENDING IMMEDIATELY VS. SCANNING QUICKLY 35
Sending Quickly 35
Scanning Quickly (Type I Only) 35
Sending Quickly(Immediate Transmission) 36
Scanning Quickly (Memory Transmission, Type I Only) 37
Sending to More Than One Location (Broadcasting) 38
Canceling a Memory Transmission 38
Printing The Stored Message s 39
If You Make a Mistake 39
Possible Problems 40
Sending a Page With Very Fine Detail 40
Resolution 41
Selecting The Halfton e Type 41
Home Position Setting Adjustments 42
Dialing with the Telephone Directory 43
Other Features for Transmission 44
Sending at a Specific Time 44
Printing the Page Number (Immediate Transmission Only) 45
Sending Your Identification at the Top of Your Message 46
Page 9

Changing T ra nsmi ssion Mode (Type I Only) 46
Converting Immediate Transmission to Memory Transmission 46
Memory Transmissio n as Your First Choice 46
REDIALING 47
Automatic Redialing 47
Using the Redial Key 48
RECEIVING F AX MESSAGES 49
Choosing the Reception Mode & How to Receive 49
Overview 49
Giving Priority to Autoselect Mode 49
Setting the Auto Ring Coun t 49
Connecting the Telephone Answering Machine (TAM) to Your Fax. 50
Giving Priority to Fax Messages (Fax Mode) 50
Giving Priority to Phone Calls (Manual Receive Mode) 50
Receiving 51
Auto Select Mode 51
FAX Mode 51
Tel Mode 52
When You Connect the Telephone Answering Machine 52
If the caller is another fax machine: 52
If the caller is a telephone caller: 52
Receiving Fax Messages When There Is a Prob lem ( Type I Only) 53
Over view 53
Switching Substitute Recep tion On or Off 53
CHANGING RECEPTION MODE 55
Switching Reception Mode Switch Over On/off 55
Using Reception Mode Switchover 55
MAKING TELEPHONE CALLS 56
Making a Telephone Call 56
Using On Hook Dial 56
Using the Handset 57
Using the Redial key 57
Answering the Telephone 57
To Talk Before Sending a Fax (On Hook Dial) 57
ADVANCED FEATURES
TRANSMISSION 58
Storing an Often Used Docume nt (Type I Only) 58
Overview 58
Storing an Auto Document 58
Using a Program 59
Printing the Contents of an Aut o Docu men t 60
Erasing a Program 60
Printing a List of Auto Documents 60
Tonal Signals 61
Page 10

Operating the Tone Key 61
ECM (Error Correction Mode) and Page Retransmission (Type I Only) 62
Protection Against W ro ng Conn ect ion s 63
Preventing Transfer to a Wron g Con ne ctio n 63
Preventing a Wrong Connection (ID Transmission) 64
RECEPTION 65
Rejecting Messages fro m Certa in Sen de rs 65
Closed Network Reception 65
Rejection of Messages fro m Un ide nt ified Senders 65
Authorized Reception 66
Overview 66
Switching Authorized Reception On/Off 67
Selecting Whether to Exclud e or Include Senders 67
Programming the Autho rized Senders 68
Editing the Authorized Senders 68
Forwarding (Type I Only) 70
Overview 70
Programming the Forwardin g Fea tu re 71
Editing the Forwarding Feature 72
Switching Forwarding On/Off 73
Selecting Which Message to Forward 73
Switching Local Printing On/Off 74
Enabling and Disabling the Forwarding Mark 74
Wild Cards 75
OTHER 76
Calling to Request a Message (Polling) 76
Overview 76
Storing the IDCode 76
Leaving Documents to Be Picked up by Oth ers (Pollin g Transmission) 77
Free Polling 77
Secured Polling 77
Stored ID Override 78
Printing the Contents of Store d Pollin g Messa ge s (Type I Only) 78
Canceling Polling Tra nsmissio n Files 79
Type I Models 79
Ty p e II Mo dels 79
Options for Polling Tra nsmission 79
Picking up Messages Stored Elsewhe re (Pollin g Rece ption) 80
Procedure 80
Stored ID Override Option 80
Canceling Polling Recept ion 81
Options for Polling Recept ion 82
Saving Paper 82
RDS (Remote Diagnostic System) 83
Overview 83
Switching RDS On/ Off 83
AI Short Protocol 84
Page 11

Copying 84
REPORTS
AUTOMATICALLY PRINTED REPORTS 85
SWITCHING REPORTS ON/OFF 86
PRINTING A SAMPLE OF DA TA ON THE REPORTS 87
REPORT FORMATS 88
REPORTS YOU CAN PRINT OUT YOURSELF 89
MAINTAINING YOUR MACHINE
DAILY CARE 91
Procedure 91
REPLACING PAPER 93
Procedure 93
P APER CYCLING 93
SOLVING PROBLEMS
DOCUMENT JAMS 94
COPY JAMS 95
COMMUNICATION PROBLEMS 96
OPERATING DIFFICULTIES 96
DISPLAYED ERROR MESSAGES 97
ERROR CODES 98
TECHNICAL REFERENCE
ENTERING TELEPHONE NUMBERS 100
ENTERING NAMES AND LABELS 100
ON/ OFF SWITCHES AND USER PARAMETERS 101
On /Off Switches 101
User Parameter Settings 102
COUNTERS 106
DOING TWO THINGS AT ONCE (Dual Access) (Type I Only) 106
DOCUMENT TYPE 107
LIMITS ON THE USE OF STORED TELEPHONE NUMBERS 109
SPECIFICATIONS 110
GLOSSARY 111
INDEX
FUNCTION LIST
Type I Models
Type II Models
Quick Reference Card
OFFICIAL NOTICE TO USERS
Page 12
INTRODUCTION
Thank you for purchasing this prod uct . This comp act ma chin e is id eal fo r small
businesses and home of f ice use rs. It is very easy to ope rat e. You will soon
become accustomed to its fe at ure s and will be able to enjoy yea rs of service from
it.
WHAT DOES A FAX MACHINE DO?
A fax machine scans your document and converts it into a series of black and white dots (the
number of dots there are across and down the page depends on the res olution that you selected;
refer to the specifications section of this manual for details). This series of dots is transformed into
an electrical signal and sent out over the telephone line to the destination fax machine.
The receiving fax machine reconstructs your letter from the incoming signal and prints it.
If you are worried about whether the message arrived at the destination, you can check a report
called the TCR(Transaction Confirmation Report). When you print this report, you can see the
result of the most recent fax communications made by your machine.
You can use your fax machine to send and receive many types of documents, even photographs.
SOME OF THE THINGS THAT THIS MACHINE CAN DO
This machine has many feat ure s. Here are samples of what the machin e can do.
See page 76
Calling To Request a Message
Forwarding (TYPE I Only)
See page 70
Authorized Reception
See page 66
Storing an Often Used Document (TYPE I Only)
See page 58
INTRODUCTION
1
Page 13
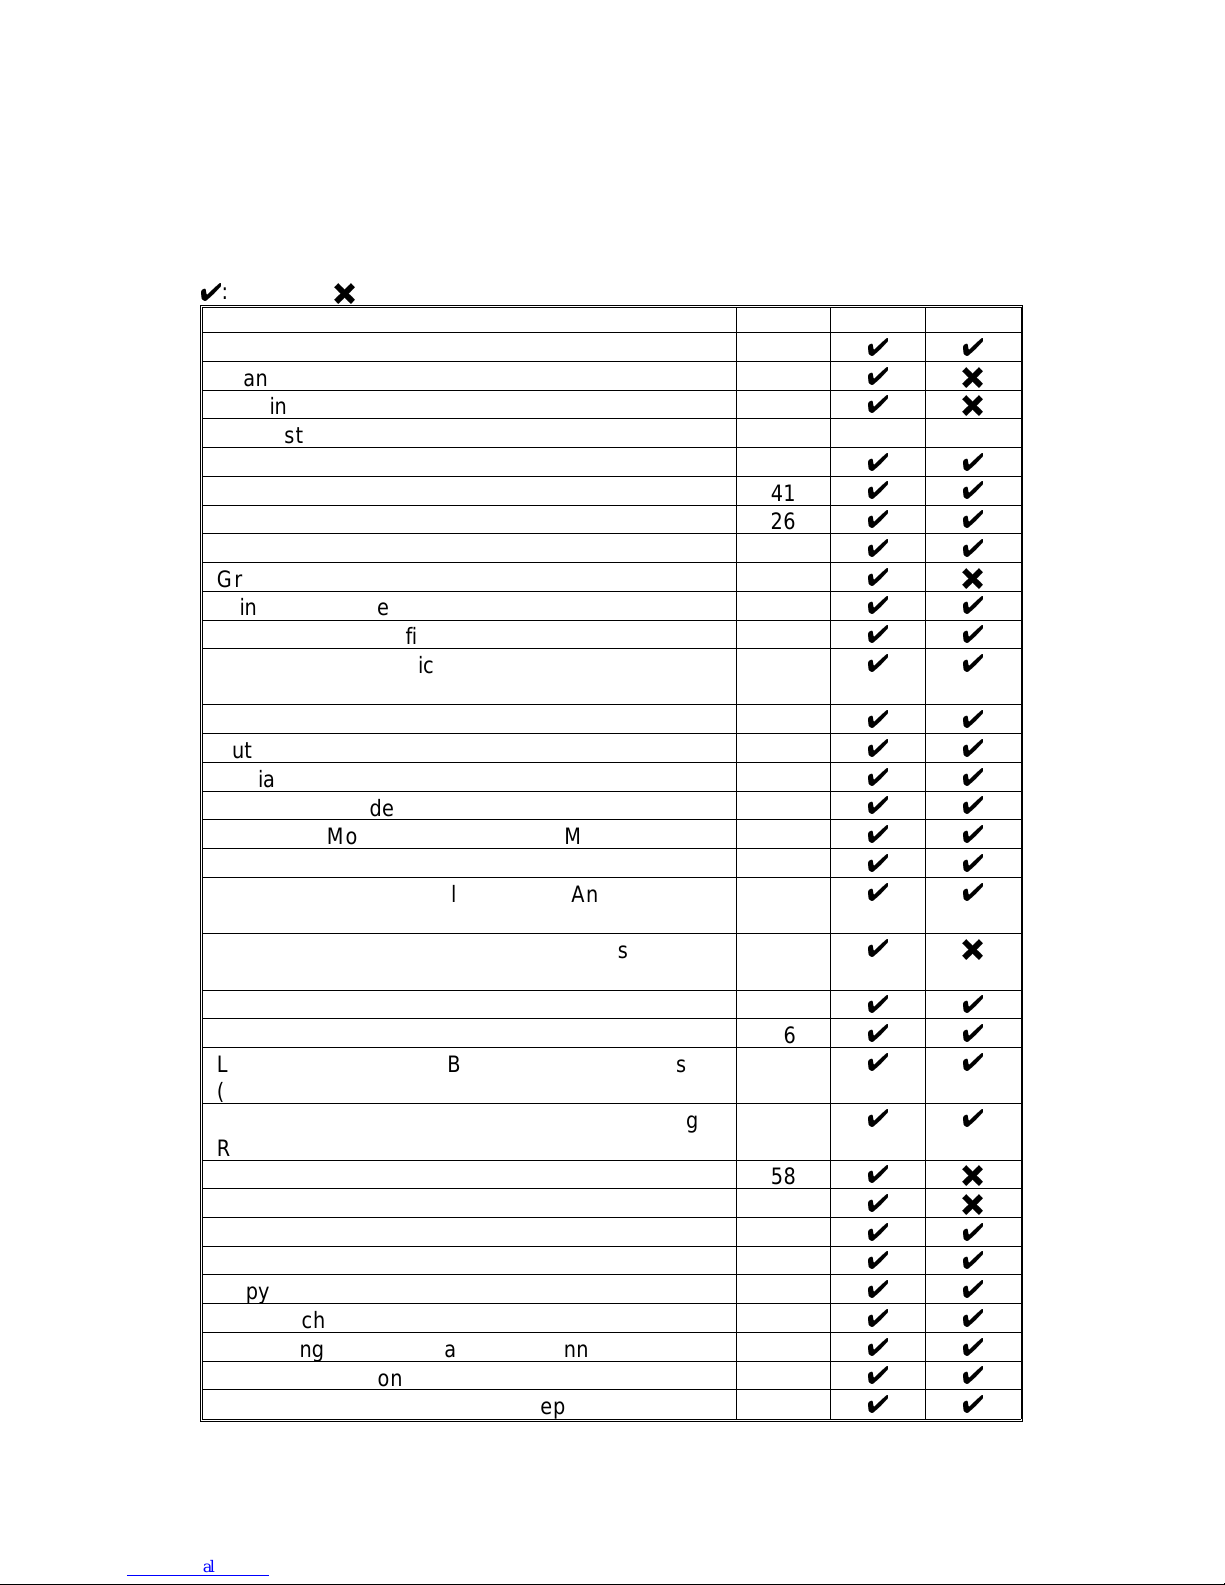
FACSIMILE FEATURES AVAILABILITY TABLE
This table shows whether a feature is available or not on your machine. Make
sure which model you are usin g: T ype I or Type II.
4
: Possible6: Impossible
Feature Page Type I Type II
Sending Quickly (Immediate Transmission) 36
44
Scanning Quickly (Memory Transmission) 37
46
Sending to More Than One Lo cat ion (Broadcasting) 38
46
Contrast Adjustment 41 Auto Auto
Resolution Adju stment 41
44
Halftone 41
44
Quick Dial 26
44
Speed Dial 29
44
Group Dial 31
46
Printing the Page Number (Page Count) 45
44
Sending at a Specific T ime (Se nd Late r ) 44
44
Sending Your Identification at th e Top of Y o ur
Message (TTI Print)
46
44
Telephone Directory 43
44
Automatic Redialing 47
44
Redial Key 48
44
Auto Select Mode 49
44
Telephone Mode (Manual Receive Mode) 50
44
FAX Mode 50
44
Connecting the Ext ernal Telephone Answering
Machine
50
44
Receiving a Fax message When The re I s a
Problem (Substitute Reception)
53
46
Using the Handset 57
44
Using On Hook Dial 56
44
Leaving Documents to Be Picked Up by Others
(Polling T ransmissio n)
77
44
Picking Up messages Stored Elsewhere (Polling
Reception)
80
44
Storing An Often Used Docu men t (Auto Docume nt) 58
46
Forwarding 70
46
Authorized Recept ion 66
44
Wild Cards 75
44
Copying 84
44
One Touch Change Over 55
44
Preventing Transfer to a Wrong Connection 63
44
Preventing a W ron g Connection 64
44
Blocking Wrong Connection Reception 65
44
2
Page 14

FEATURE Page Type I Type II
Rejection of Messages fro m Un ide nt ified Senders 65
44
ECM & Page Retransmission 62
44
RDS 83
44
AI Short Protocol 84
46
Storing And Dialing Part Of A Number (Chain
Dialing)
34
44
Counters 106
44
Doing T wo Thin gs at Once (Du al Acce ss) 106
46
Daylight Saving Time (U.S Only) 21
44
Date and T i me 17
44
Selecting Tone Dial or Pulse Dial (Telephone Line
T ype)
21
44
Tonal Signal 61
44
Extension System 23
44
RTI, TTI and CSI 18,19,
20
44
Paper Save mode 82
44
Automatic Cutter 22
44
Cutting the Leading Edge of the Paper 24
44
On/ Off Switche s 101
44
User Parameter Settings 102
44
TCR (Transmission Con firma tio n Report ) 85
44
Transmission Result Report 85
44
Error Report 85
44
Communication Result Rep ort 85
46
Communication Failure Rep ort 85
46
File Reserve Report 85
46
Power Failure Report 86
46
Polling Clear Report 86
46
File List 89
46
Quick Dial List 89
44
Speed Dial List 89
44
Group Dial List 89
46
Program List 90
46
Authorized Recept ion List 90
44
Fowarding List 90
46
User Parameter List 90
44
INTRODUCTION
F ACS IMILE FEATURES AVAILABILITY TABLE
3
Page 15

MANUAL OVERVIEW
Your facsimile machine is equipped with a wide range of lab or-sa ving and cost
-saving features. This manual contains instructions on how to op era te an d t ake
care of your machine. Please keep it near the machine at all times.
Note that the external appearance of the mach ine in some illustrations may differ
slightly from the actual machin e.
The manual consists of th e fo llowin g sections.
❐ How to Use This Manual - This is the section t ha t yo u are n ow re ad ing . I t
contains an overview of the manual and the convention s used by the aut ho rs.
❐ General Precaution s - This section lists precautions that you sh ou ld ke ep in
mind when operating the machine. Read this section before you begin to use
your machine.
❐ Guide to Compone nt s - This conta ins a diagram that shows where th e main
components and operation panel of your machine are situa te d.
❐ Installation-Th e best pla ce to install your machine is described here. Plea se
also refer to it when you plan to move the machin e to ano th er loca tion. It also
explains the things you have to do bef ore you can send your fa x me ssag e an d
lists important features that will make faxing more conve nie nt.
❐ Basic Operation - This section de scribe s the featu res a nd settings that would
normally be used daily.
❐ Advanced Features - Th is sectio n exp lains how to take advant ag e o f t he
special features of you r fax machine.
❐ Reports - This section explain s the re ports that the machine generat es in the
case of error codes or paper jams, refer to th is sectio n. (Many routine problems
do not need to be solved by an experien ced technician).
❐ Maintaining Your Machine- This section shows you what to do when
consumable supplies run out.
❐ Solving Problems- For examp le if you r machin e can no t commu nica te or there
is a paper jam. Refer to this section. (Many rou tin e pro ble ms do no t need to be
solved by an experienced tech nician.)
❐ Technical Reference-I nput ting characters, specificat ion s, User Swit che s and
other technical informaion.
❐ Quick Reference Guid e - This indicates how to use this machine at a g lance.
NOTE: This manual is for both Type I and Type II Models. Some parts of this man-
ual are divided according to these models. Check which model you are using.
4
Page 16

MANUAL CONVENTIONS
Key Names
On the operation panel, there are four buttons (
i m j k
).They
show the directions up, down, left and rig ht. These are the scroll
keys. They are ofte n use d in th e o pe rating procedure s to ga in
access to various features. For example, if you see "Press the
k
key" in the manual, you are be ing asked to pre ss the right -pointing
arrow of the scroll button. On this machine, the i key also acts as
the No key, the m key is used as the Yes key.
Displays
Messages seen on the display are sho wn in a larg er bo x, usu ally on the right
hand side of the page, directly oppo site the step tha t bro ught it up on the displa y.
After following a step in a proced ure , che ck the display to see if it corresponds to
the one in the manual. This may help you to check whether you a re f ollo wing the
procedure correctly. The following examples show thre e co mmon typ es o f d ispla y.
Example A: The keys that ca n be
pressed are shown in the to p righ t. In
this example, you can press th e Yes or
Start key.
TRANSMIT Y/START
471-319266
Example B: The choices of set tin gs f o r a
feature are shown o n the screen. The
current setting is TT . If yo u press t he
k
key, the setting will be changed to PD.
SELECT LINE Y/
j/k
kTT PD
Example C: The
ABC
in the right corner
of the display indicates tha t you can input letters using the Quick Dial keys,
and numbers using the ten keypad on
the operatio n panel.
RTI ABC
INTRODUCTION
5
Page 17
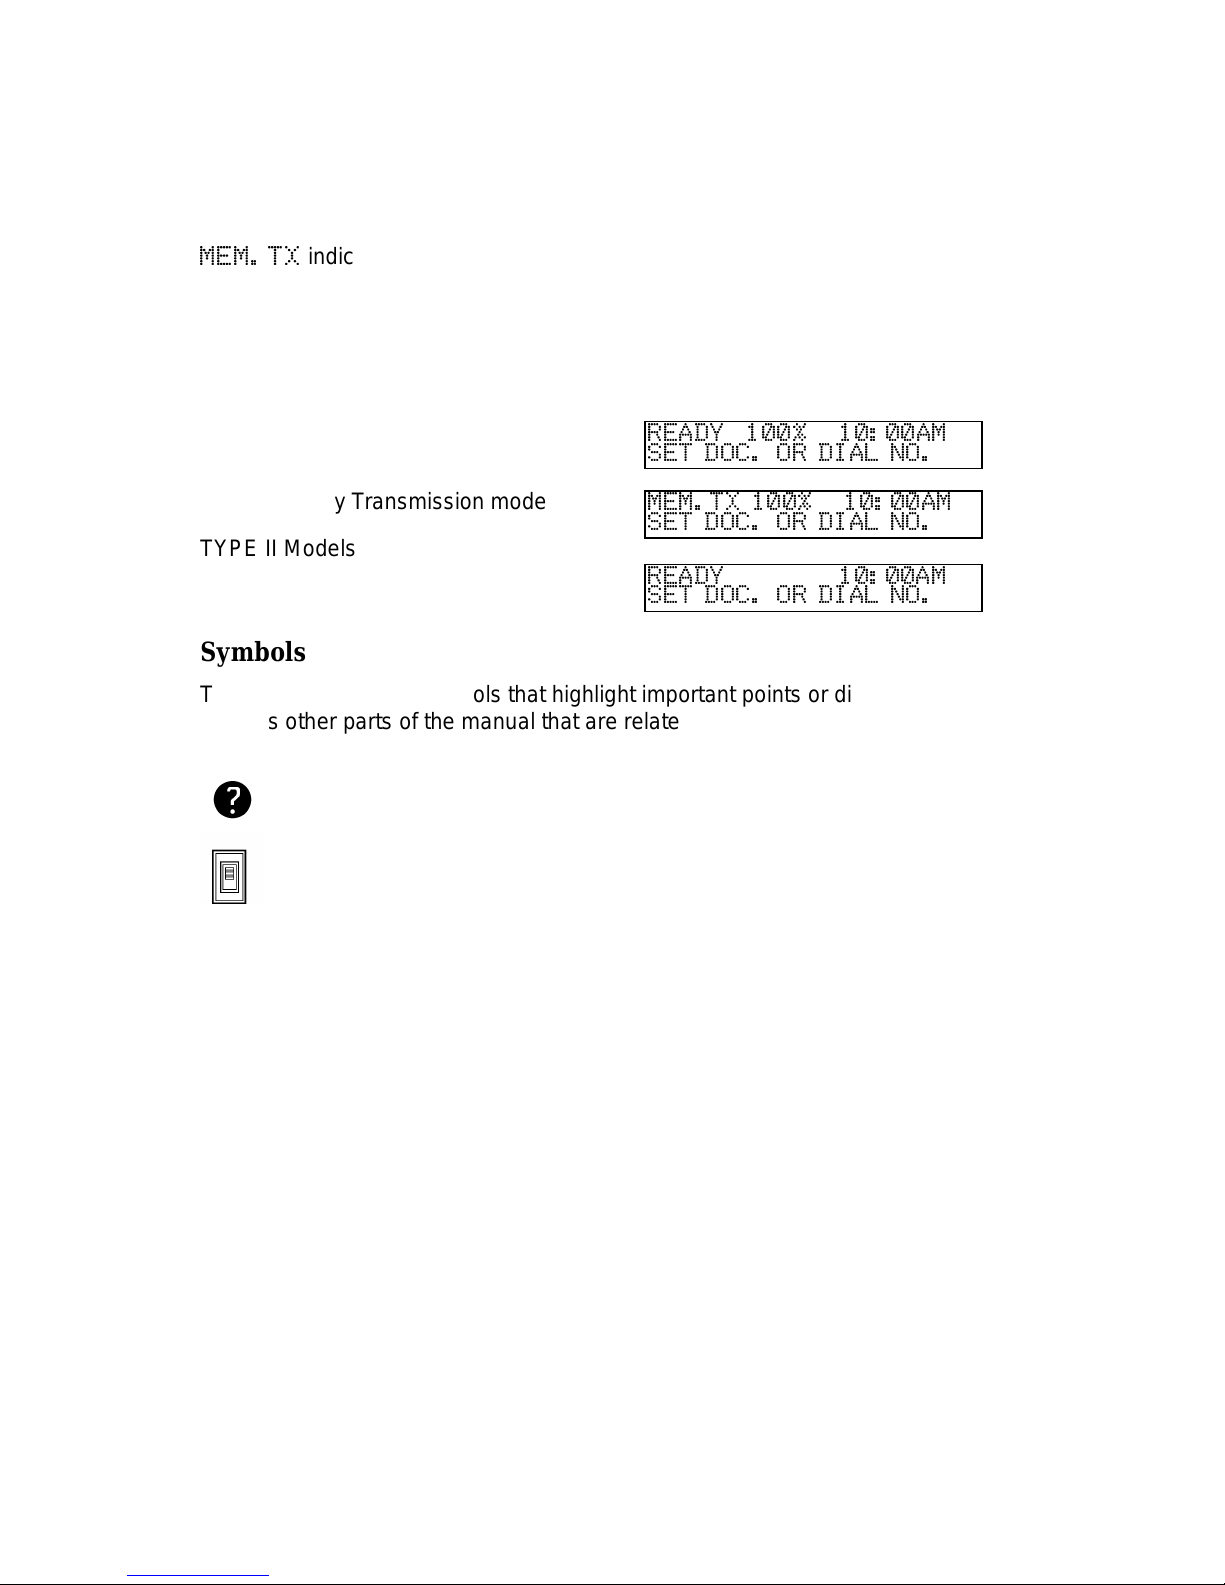
Most procedures start from sta nd by mod e a s sho wn in th e d ispla y. The Type I
model has two types of stand by display and the Type II model has one type of
display. The percentage number shows how much memo ry spa cing is remaining.
MEM.TX
indicates that the machin e is in Memory Transmission mode. If you
start a procedure and do not ent er an yth ing at th e op era tio n pa ne l for more than 1
minute, the machin e ret urns to standby mode. You can select different time spans
after which the machine auto mat ically ret urns to standby mode. If you want to
change this, contact your service representative.
TYPE I Models
❐ Immediate Transmission mode
READY 100% 10:00AM
SET DOC. OR DIAL NO.
❐ Memory Tra nsmissio n mode
MEM.TX 100% 10:00AM
SET DOC. OR DIAL NO.
TYPE II Models
READY 10:00AM
SET DOC. OR DIAL NO.
Symbols
The text contains two symbols that highlight importa nt poin ts or direct you
towards other part s of th e man ua l tha t are related to the feature curren tly be ing
described.
Indicates a hint (for examp le a pa ge numb er whe re rela te d information can
be found).
Indicates that you can switch the current featur e on or o ff using Function 62
or Function 63. Some features must be switched on before they will work.
MANUAL CONVENTIONS
6
Page 18
GENERAL PRECAUTIONS
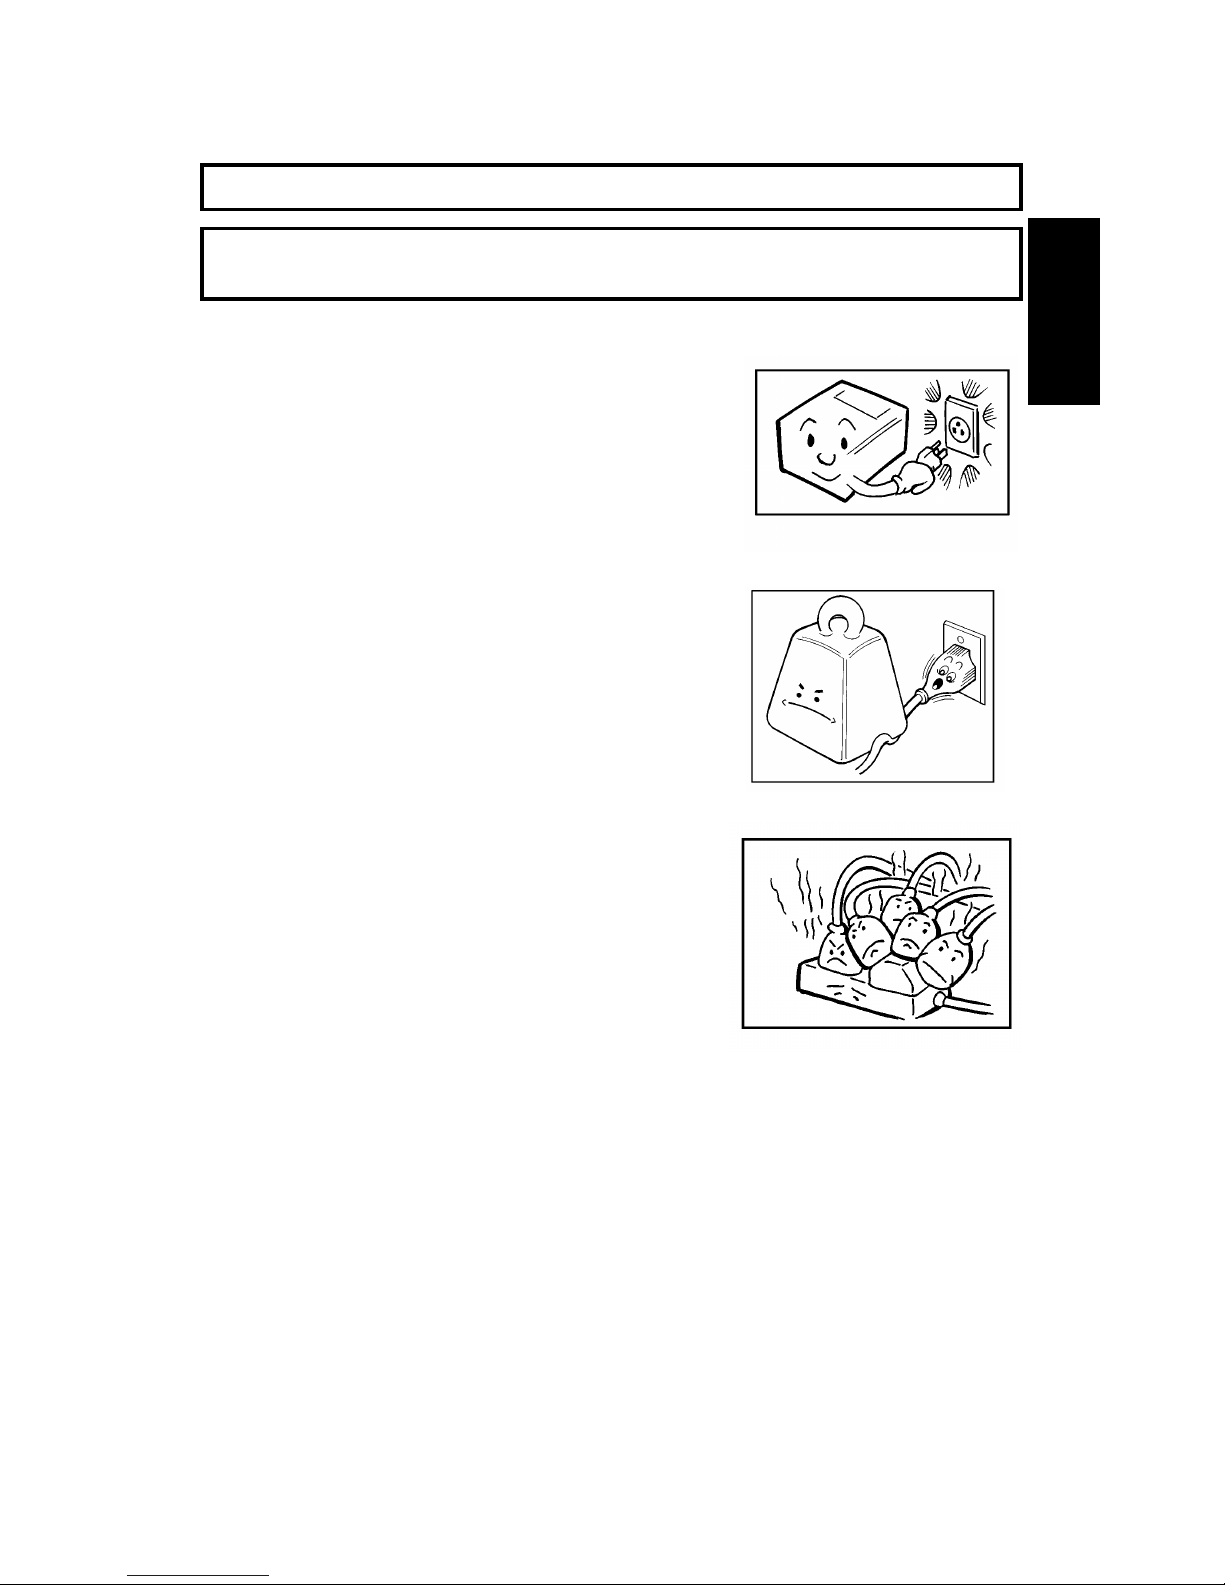
WARNING : Do not attempt any maintenance or troubleshooting other than
that mentioned in this manual.
POWER AND GROUNDING
Pay attention to the followin g :
Power Supply
1. Power requirements:
North America: 115 V, 60Hz
Saudi Arabia: 115 V, 60Hz or
220-240Vac, 50/60 Hz
Other areas: 220-240Vac, 50/60 Hz
2. Insert th e po wer plu g secu rely into the wall
socket.
3. Make sure that the wall outlet is near th e
machine and readily accessible.
4. Do not connect other equipment to the same
socket.
5. Do not step on or set anything on the power
cord.
6. Do not connect other equipment to the same
extension cord.
7. Be sure that the power cord is not in a position
where it would trip someone.
Grounding
Ground the machine an d th e ligh tning protection circuit in acco rdance with
regulations. Do not ground to gas or water pipes, or to a telepho ne ground plug.
Proper grounding is to the ground termin al of the powe r out let . Be sure th at the
ground terminal of the power outlet is properly grounded.
The lightning prot ect ion circu it fo r the machine requires the machine to be
properly grounded. If pro per grou nd ing is provide d, about 90% of lightning
damage can be prevent ed . For saf et y, be sure to connect the mach ine to a
three-prong gro un ded ou tle t.
GENERAL
PRECAUTION
7
Page 19
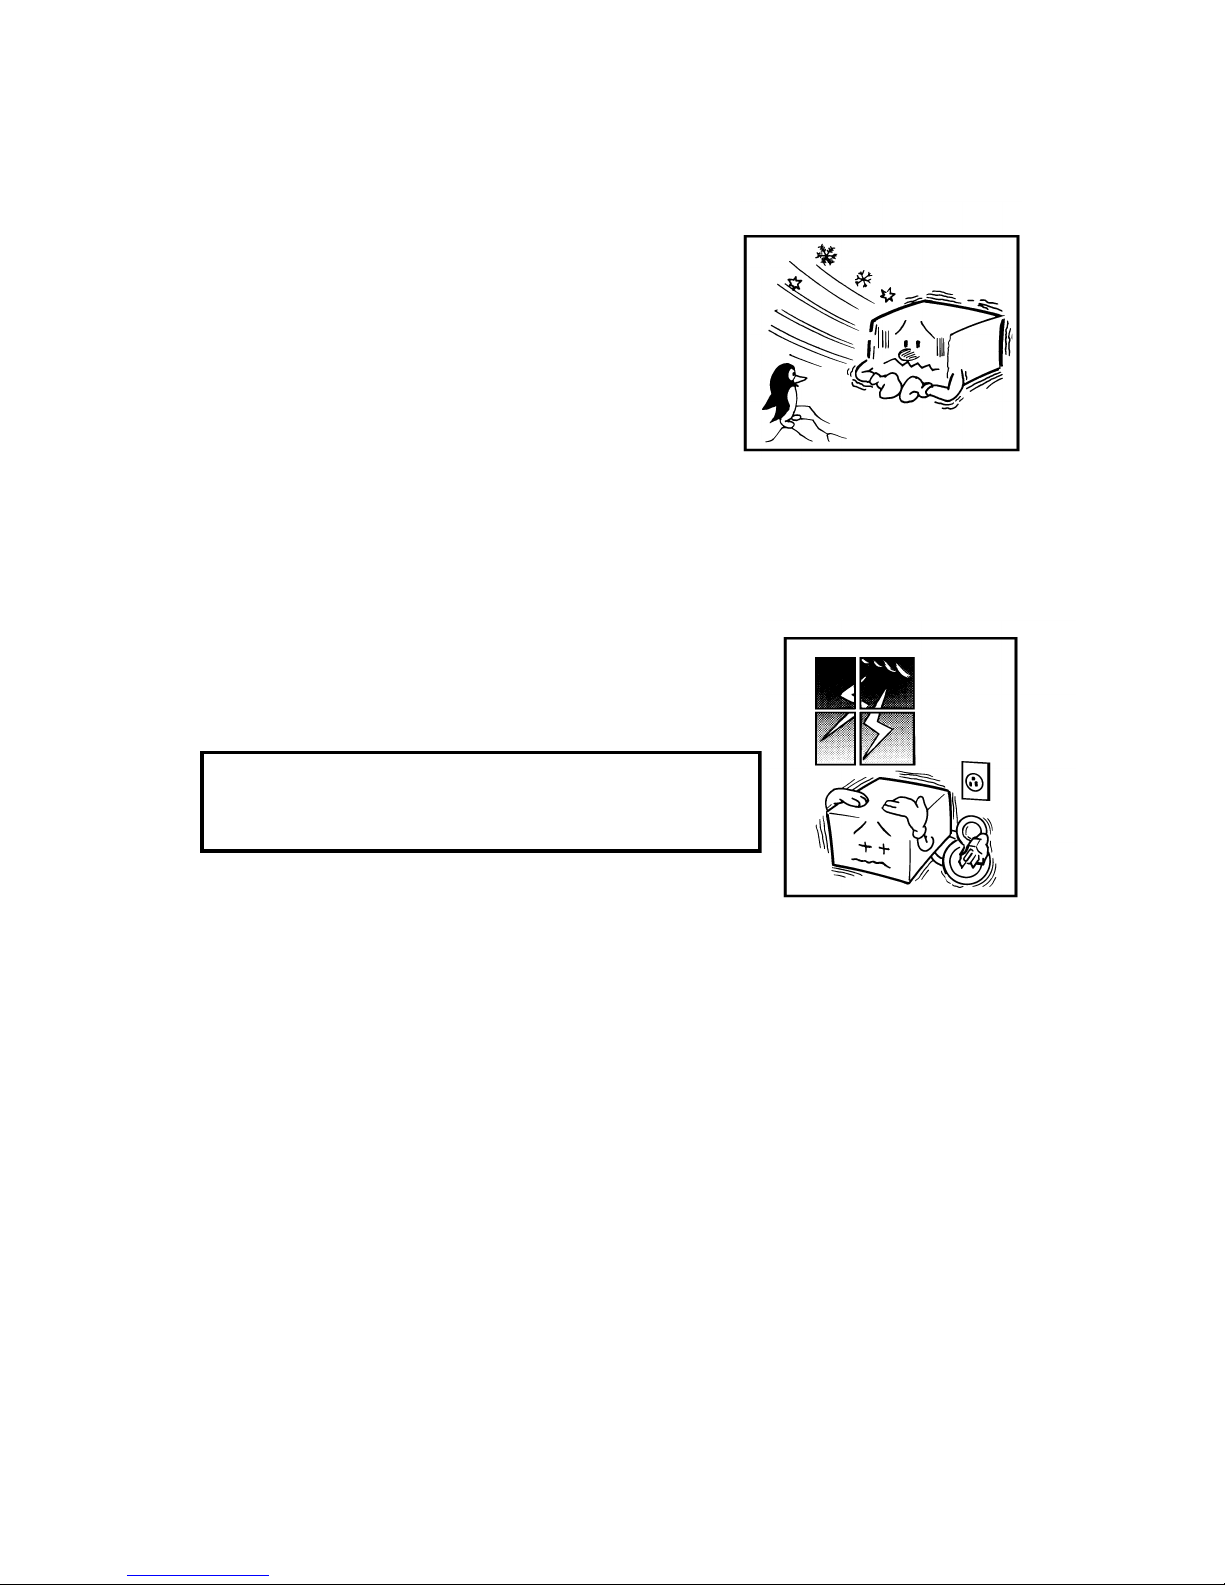
COLD WEATHER POWER-UP
Avoid raising the room temperature abruptly when it
is below 14°C [57°F], or condensa tio n may form
inside the machine.
1. Raise the room temparature to 20°C [68°F] at
less than 10°C [18°F] per hour.
2. Wait for 30 to 60 minutes.
3. Connect the power cord.
NOTE: Do not use the machine near a humidifier.
THUNDERSTORMS
With proper grounding, about 90% of lightning damag e
can be prevented. However, if possible, during severe
electric storms disconnect the power cord and
telephone line cord.
NOTE:
All fax messages stored in the memory are erased if
power cord is disconnected.
Precautions When Installing and Using the Handset
❐ Never install telephone wiring during a lightning storm.
❐ Never install the telep hone jack in wet loca tio ns
❐ Never touch uninsula te d te lephone wires or terminals unless th e te lep ho ne line
has been disconnected at th e ne two rk interface.
❐ Use caution when installing or modifying telephone lines.
❐ Avoid using a teleph one (other than a cordless type) during an ele ctrica l storm.
There may be a remote risk of electric shock from lightning .
❐ Do not use the telephone to report a gas lea k in the vicinity of leak.
8
Page 20

PAPER PRECAUTIONS
The following list of preca ut ion s te lls you how to store and handle your printer
paper.
Unused pape r
❐ Store in a dry, cool, dark place.
❐ Do not store under uneven pressure.
Copies
❐ Store in a dry, cool, dark place.
❐ Do not use adhesives or writing materials contain ing alcohol or ot her orga nic
solvents.
❐ Avoid contact with films or adhe sive tape s contain ing plast icizers.
❐ Avoid contact wit h dia zo ph ot ose nsitive paper.
❐ When a copy gets wet, dry it by wiping it gently with a sof t clot h or tissu e.
❐ Do not scratch or rub it with hard materials.
❐ Do not copy with a mercury lamp diazo copier.
❐ Make a photocopy if the informa tio n is to be kept for a long time .
❐ Do not store copies in vinyl file folders.
OPERATING PRECAUTIONS
❐ While the machine is in operation, unplug the power cord.
❐ Keep corrosive liquids, such as acid , off the machine.
❐ Do not touch copy paper if your fing ers are wet an d oily; fing erp rint s may
appear on the copy.
❐ Do not let paper clips, staples or oth er small met al ob ject s fall int o the machine.
❐ Do not place beverages on or near the machin e, the y may spill on or int o it .
GENERAL
❐ Since some parts of the machine are supplied with high voltage, make sure
that you do not attempt any repairs or att emp t to access any part of th e
machine except those described in this manual.
❐ Do not modify or replace parts othe r tha n those me ntioned in this manual.
❐ After unplugging the power co rd, always wait for more than three seconds
before plugging it back in.
❐ Paper Cutter is locate d in th e pa pe r exit are a.
Paper Cutter is a sharp moving part and is considered hazardous.
CAUTION (115vac areas Only)
This symbol is intended to alert the user to the presence of
important operating and maintenance(servicing). instructions in the
literature accompanying the machine.
This symbol is attached to some components to alert the user not to
touch them, because they may be hazardous.
GENERAL
PRECAUTION
9
Page 21

GUIDE TO COMPONENTS
1. OPERATION PANEL
Type I Model (U SA)
(ASIA)
Type II Model
1
4
3
5
6
8
7
1
4
2
3
5
6
8
7
10
9
1
4
2
3
5
6
8
7
10
9
01
02 03 04 05
06 07 08 09 10
01
02 03 04 05
06 07 08 09 10
01
02 03 04 05
06 07 08 09 10
2
11
12
10
Page 22
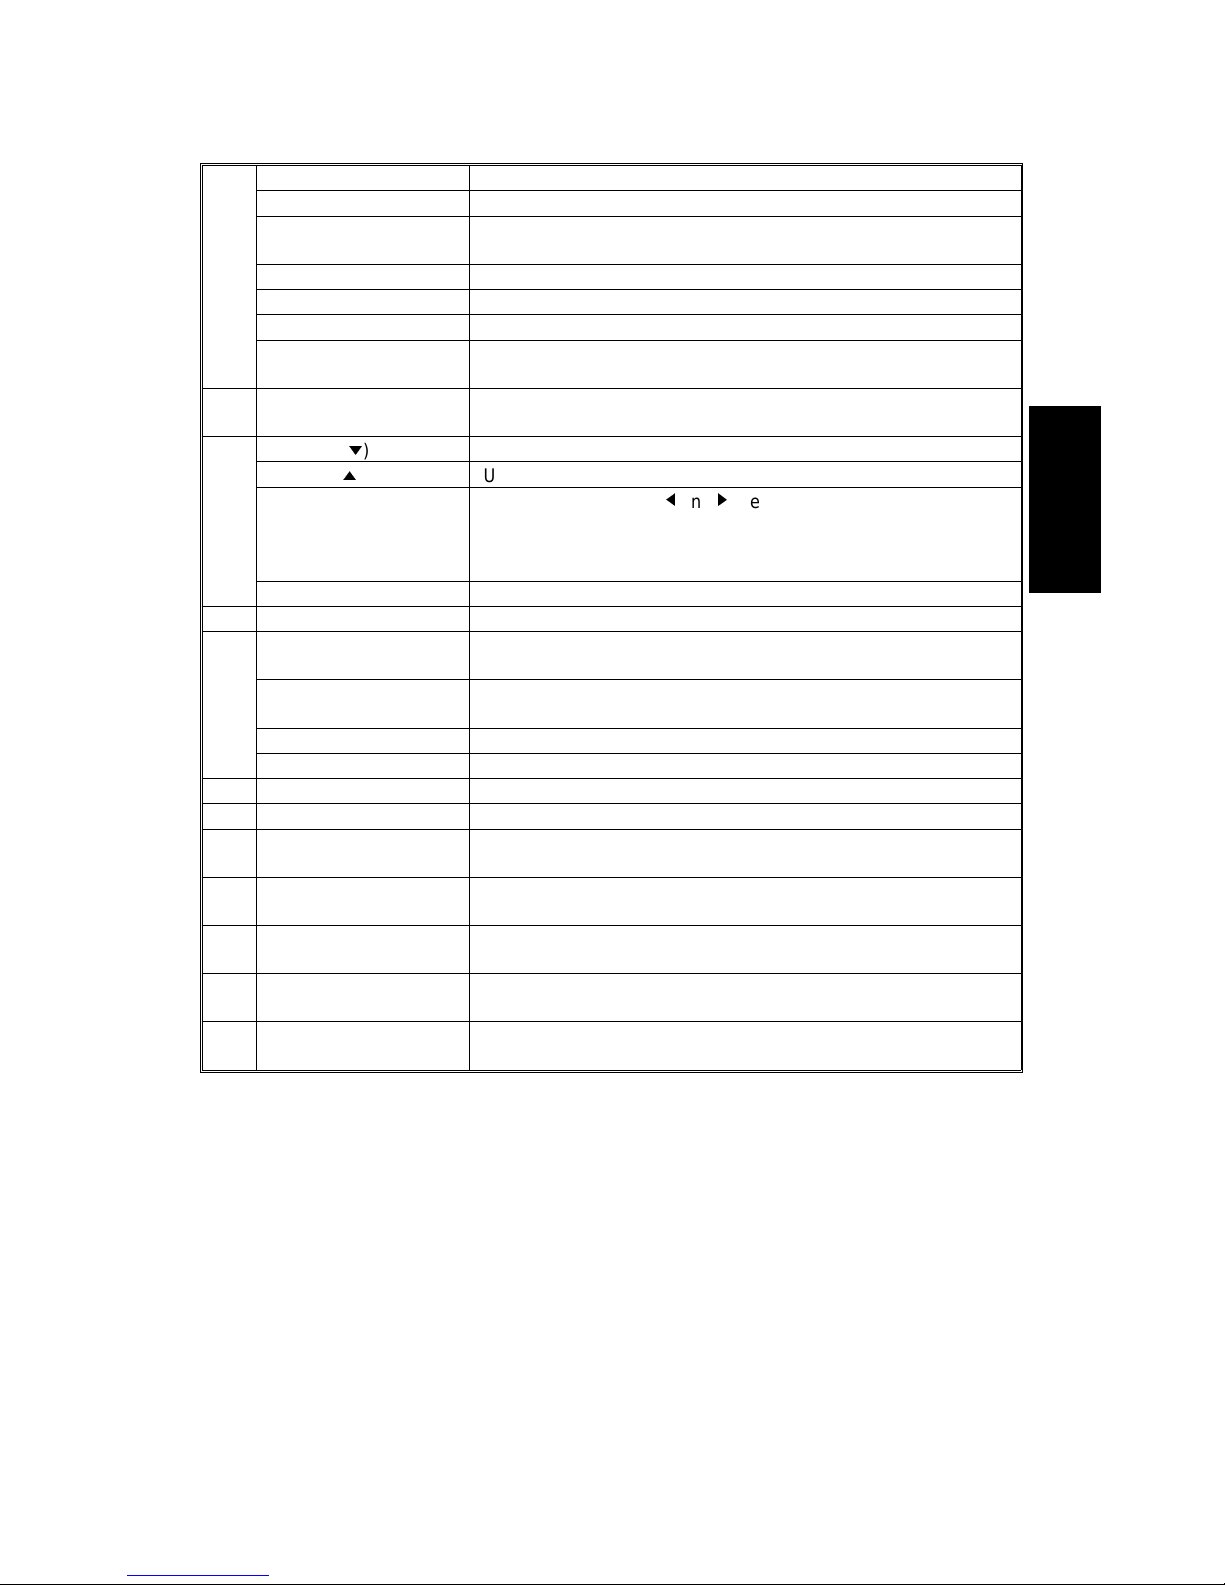
1 Reception Mode Key Press this to select the reception mode.
Auto Select Indicator Lights when you are in Auto Select Mode.
Manual Receive
Indicator
Lights when you are in Telephone mode.
Detail Indicator Lights when you are in Detail mode.
Fine Indicator Lights when you are in Fine mode.
Resolution Key Press this key to select resolution.
Halftone Key/ Halftone
Indicator
Press the key under the indicator to use Halftone Mode, the
indicator lights when you are in Halftone Mode.
2 Check Display
Indicator
Lights or blinks when there is a problem with the machine; look
at the display to determine the nature of the problem.
3 Yes Key (m) Use to answer questions on the display.
No Key (i) Use to answer questions on the display.
Arrow Keys When the arrow keys(j and k)are shown on the display, use
these keys to access the options, items or functions shown by
the arrow. Also use it to move the cursor when programming or
editing a displayed item.
Function Key Press to use one of the numbered functions.
4 Quick Dial Key Each of these can be programmed with a telephone number.
5 Speed Dial Key/ Tel
Directory Key
Press this to dial using a Speed Dial or the Tel Directory feature.
Pause/Redial Key Press this if you need to insert a pause when dialing. Also,
press this to redial.
On Hook Dial Key Press this to dial without picking up the handset.
Clear Key Use this as a backspace key during programming.
6 Ten Keypad Use this as a telephone keypad, or to enter a Speed Dial code.
7 Stop Key Press this to stop the machine and return it to standby mode.
8 Start Key Press this to start fax communications.
Press this to copy a document in the feeder(Type I Only).
9 Receive File Indicator
(Type I Only)
Lights when incoming messages are received into memory.
10 Line Select Key (Type
I Only)
Press this to change to Memory Transmission.
11 Copy Key (Type II
Only)
Press this to copy the document now in the feeder.
12 Communicating
Indicator (Type II Only)
Lights when a fax message is being transmitted or received.
GUIDE TO
COMPONENTS
GUIDE TO COMPONENTS
11
Page 23
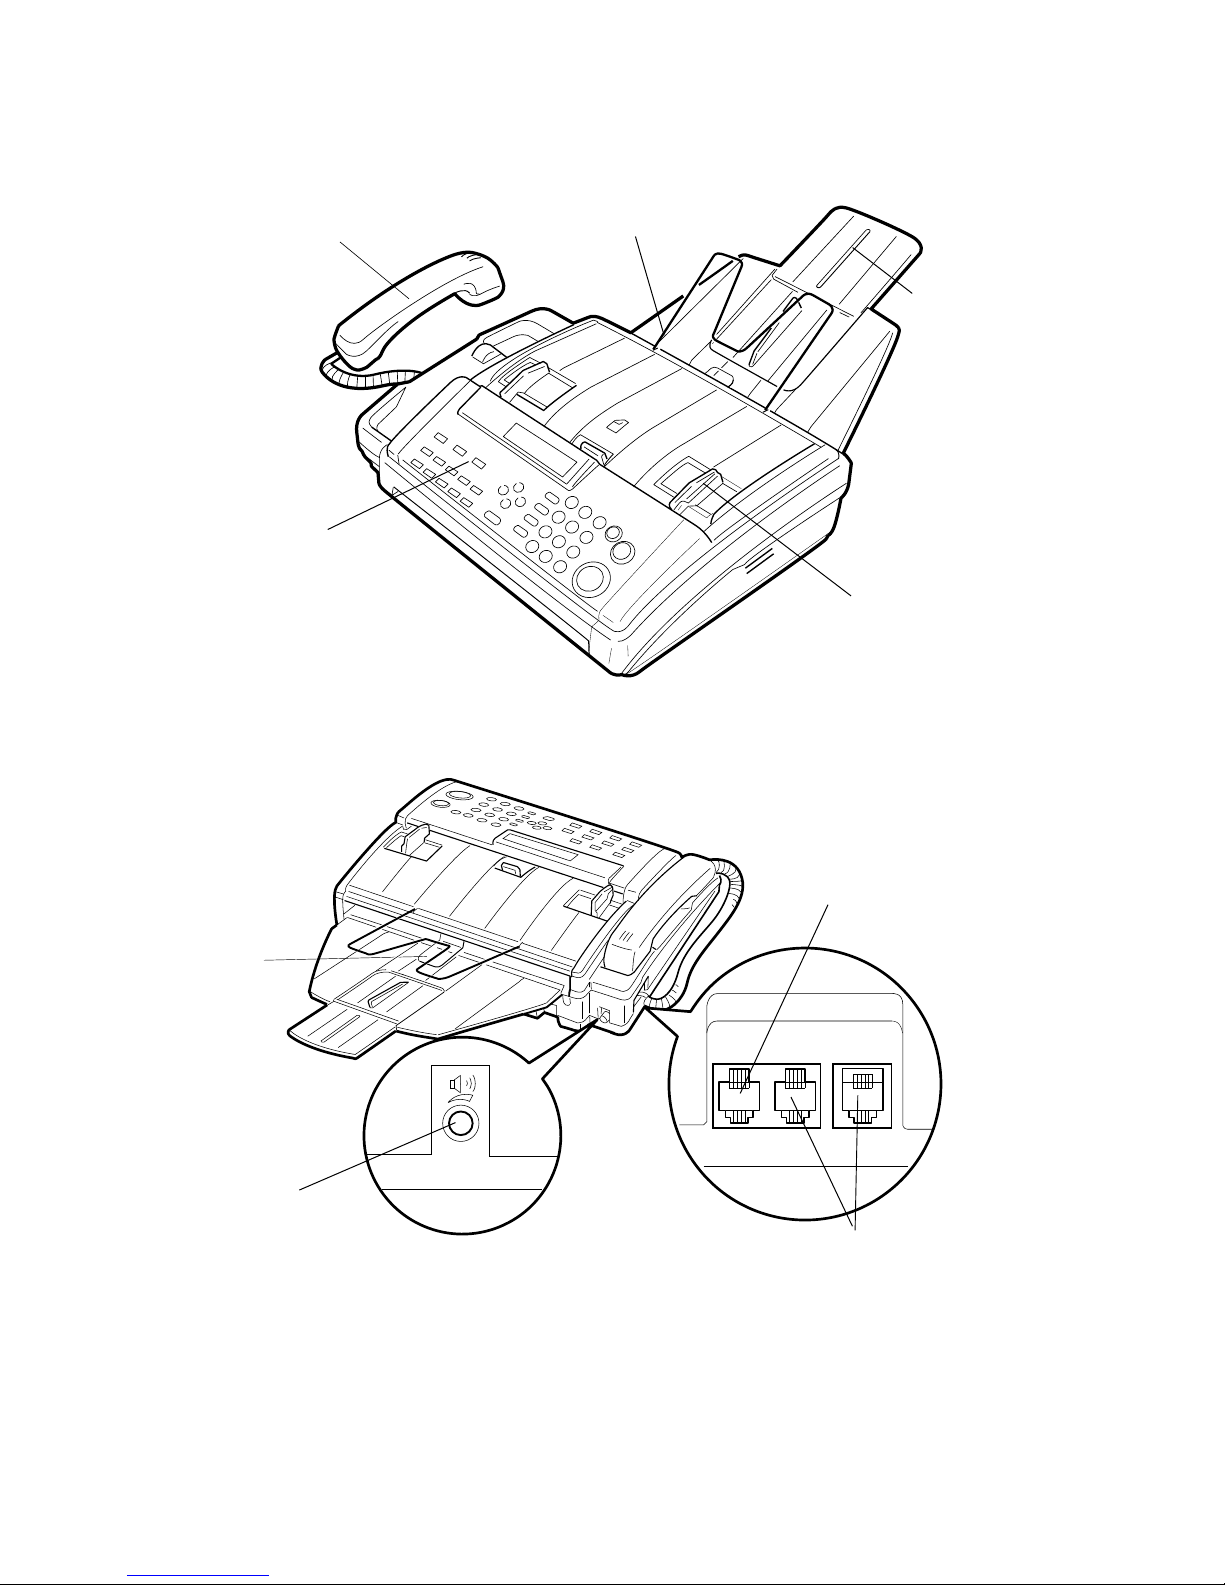
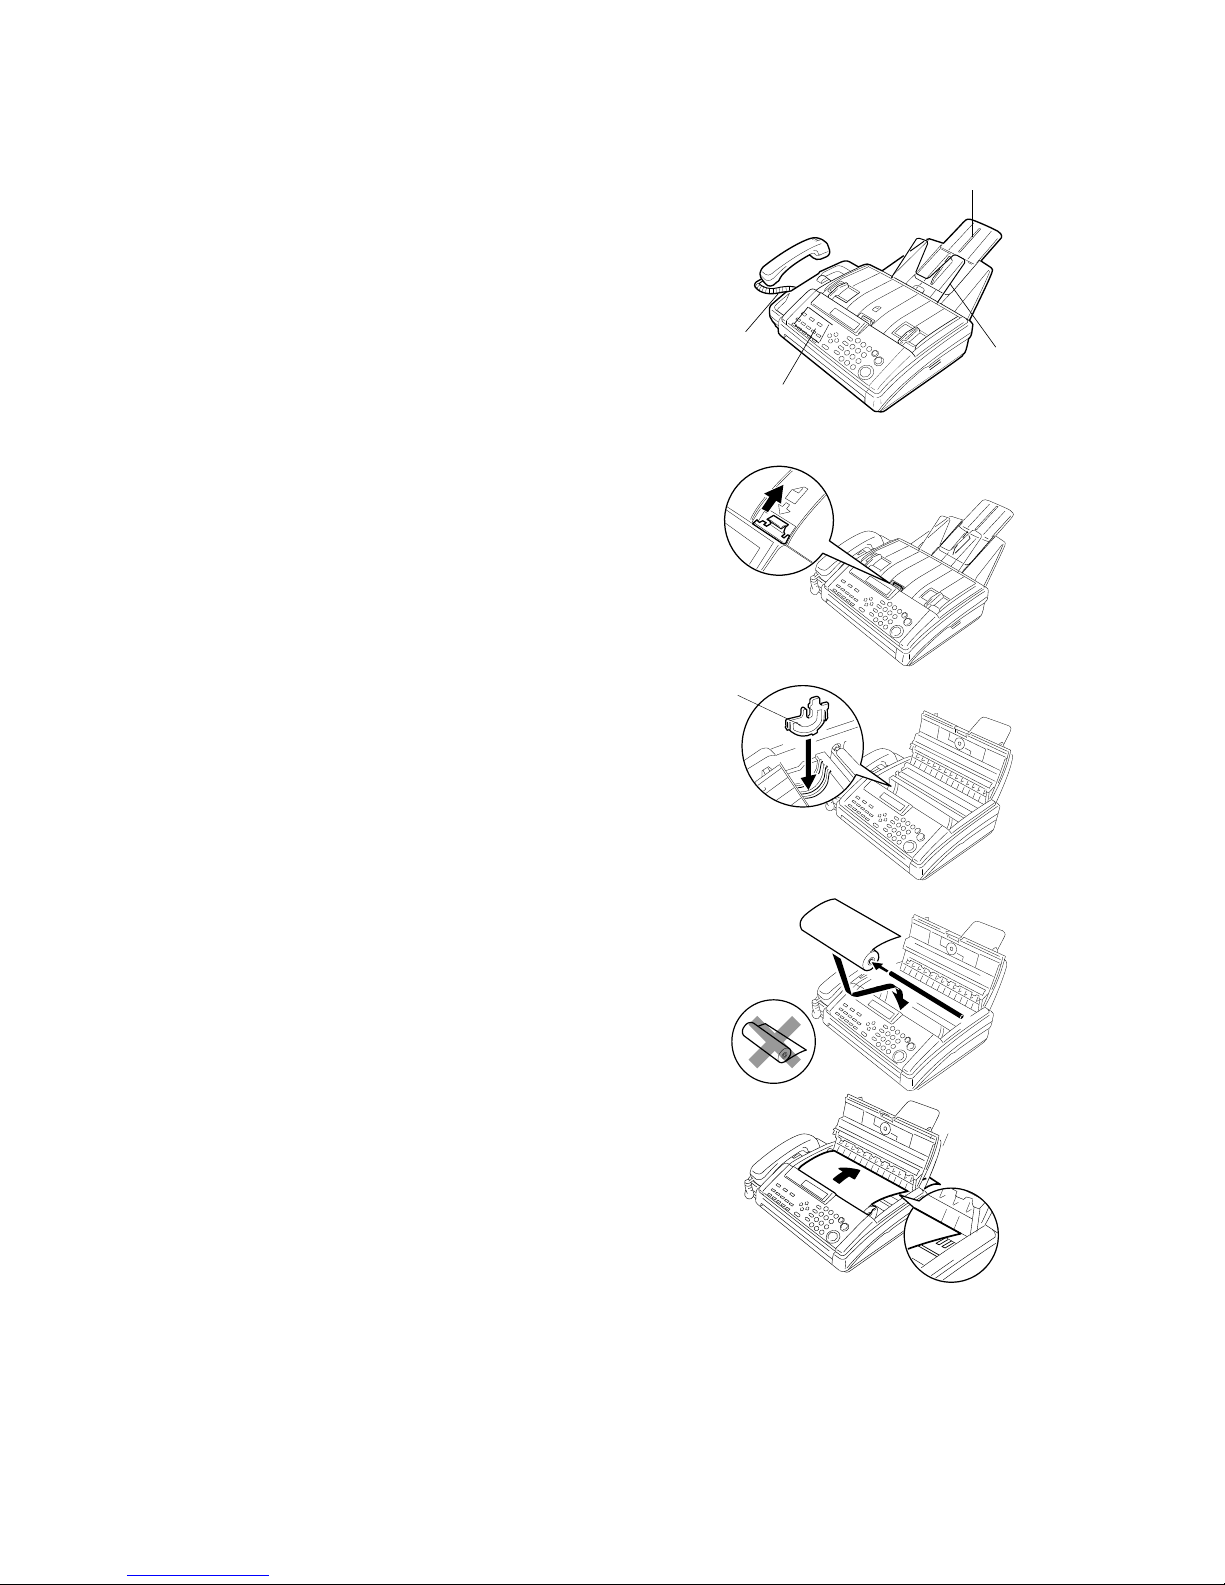
2. FRONT VIEW
3. REAR VIEW
Transparent
Strip
Document Table
Copy Tra y
Document Guide
Operatio n Panel
Handset
LINE TEL2 TEL1
Speaker
V olume Control
Telephone
Company’s Jack
Telephone Handset Jacks
GUIDE TO COMPONENTS
12
Page 24

INSTALLING THE MACHINE
LOCATION
For the best possible performance, install your machine in a place which satisfies
the following conditions.
❐ Not exposed to direct sunlig ht
❐ Well ventilated (air turn ove r at lea st three times per
hour).
❐ Level
❐ Not subject to vibration
❐ Away from other ele ctro nic eq uip men t, to avo id
interference
❐ Away from areas containing corrosive gas.
❐ Dust-free
❐ Condensation-free
❐ Temperature 17 to 28°C[6 3 to 82 °F]
❐ Humidity 40 to 70%RH (do not install near a
humidifier)
❐ Away from heaters and air conditio ners, to avoid
sudden chang es of temperature
❐ Within 2m (2.2 yards) of a three-pin groun ded power outlet
❐ With the clearance as sho wn on the right
NOTE: If you wish to receive legal size messages or copy the legal size docu-
ments, you must allow 8" (20cm) clearan ce at the back of the ma chin e.
INSTALLATION
CAUTION:Do not plug it in until everything is connected properly.
When moving the machine, first disconnect the telephone line, then the power
cord.
NOTE : Before doing the installation proce du re, check the contents of the bo x . In
some models, some of the accessorie s have already be en insta lled .
❐ Fax Machine
❐ Paper Roll
❐ Document Table
❐ Copy tray
❐ Operation Manual
❐ Handset
❐ Telephone Cord
❐ Quick Dial Sheet
❐ Modular Cord
❐ Paper Guide
❐ Paper Holder Rod
INSTALLING THE
MACHINE
8" (20cm)
4" (10cm)
4" (10cm)
13
Page 25
Installation Procedure
1 Attach the accessories to the main machine.
1-1) Copy T ray [A ]
1-2) Document Table [B]
1-3) Quick Dial Sheet [C]
1-4) Telephone Cord [D]
NOTE: Make sure the transparent
strip that prevents paper curling is
above the copy tray.
2. Install a thermal paper roll.
2-1) Lift the catch to unlock the
printer cover. The n, ho ld t he
paper guides and open the
cover.
2-2) Unpack the thermal paper.
2-3) Set the paper guides [E] at each
end to match the paper size.
The paper roll must be set in
the center.
2-4) Install the rod into the paper roll
as shown, then set the roll into
the machine (hold the roll in a
direction so that it rolls away
from you when pulled upwards.)
NOTE: Make sure the ends of rod fit
into the paper guides there is no
slack paper inside the machine.
2-5) Pull out the leadin g ed ge and
insert it between the roller and
the cover until you can see the
leading edge of the paper.
NOTE:
❐ Make sure the transpare nt strip that
prevents paper curling is a bove the copy tray.
❐ Make sure the paper edges are align ed
with the marks printed by the roller.
[C]
[B]
[A]
[D]
[E]
8
1
/
A4
INSTALLING THE MACHINE
14
Page 26
2-6) Close the printer pap er cove r
un til it audib ly lo cks into place .
3. Connect up th e machine.
3-1) Plug in the power cord.
3-2) Connect the telephone line.
3-3) Connect the telephone
handset [F] to the telephone
Jack.
3-4) Connect an external telephone
it you wish.
3-5) Press the Start key to tear off
the excess paper.
4. Adjust th e spe ake r vo lume using the dial [G ] at the back of the ma chin e.
LINE TEL2 TEL1
[G]
[F]
INSTALLING THE
MACHINE
Telephone
Telephone Company’s Jack
Power Source:
North America: 115 Vac, 60 Hz
Saudi Arabia: 115 Vac, 60Hz or 220-240 Vac 50/60 Hz
Other Areas: 2 20 -24 0 Vac, 50/60 Hz
INSTALLING THE MACHINE
15
Page 27

SOME ITEMS MUST BE PROGRAMMED FIRST
Overview
After you have insta lled your ne w machin e an d con ne cted it to the telephone line
for the first time, the machin e will ask you to prog ram th e fo llowin g items. If you do
not program them, you can not start any operation.
❐ Date and Time: see page 17.
❐ Telephone Lin e Type: see page 21.
❐ RTI: see page 18.
❐ TTI: see page 19.
❐ CSI: see page 20.
You should set up your machine’ s clock and iden tif icat ion. In fact, for faxes sent to
and from, or within the United States, the United States Federal Communications
Comission (FCC) states that the fa x message must contain header info rmat ion
that identifies the send er (or th e sender’s organization), and the dat e and time
that the fax was sent .
In addition, you also have to make sure that th e fax machine’s dialing circuits are
set up correctly. There are two settings: Pulse Dial and Tone Dial. If you select the
wrong setting, you r machin e will not be ab le to dial th e fa x number . If you are no t
sure which setting to use , con ta ct your telephone compa ny. To change this
setting, see the following section of the manual.
Make sure that attache d hand set ’s dialin g circuit is set up corre ctly (th ere is
probably a switch on the side of the handset).
Also, it is better to program the followin g fe at ure s bef ore you start to send fax
messages.
❐ Day Light Saving Time (US Only): see page 2 1.
❐ Paper Cutting Se tting: see page 22.
❐ Storing Often Used Numbers: see page 25.
❐ Cutting Leading Edge setting: see page 24.
❐ Outline Access System: see p age 23.
16
Page 28
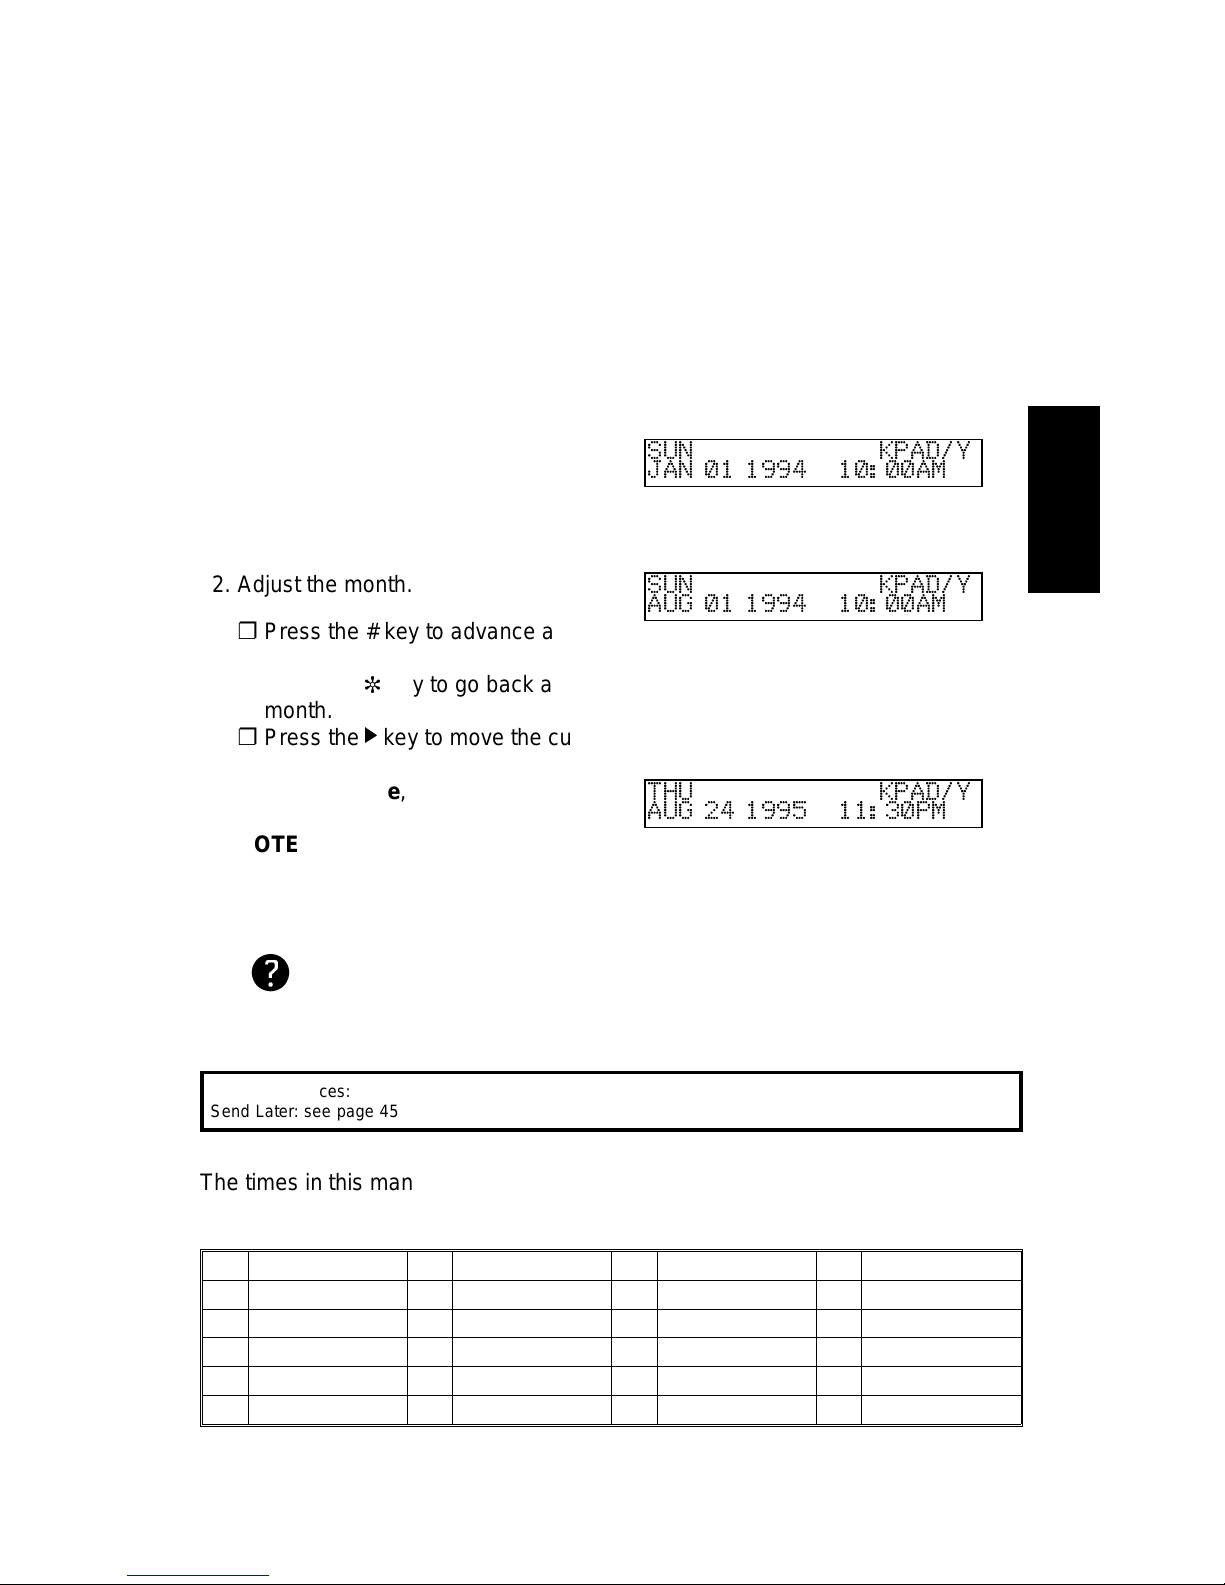
Setting the Date and Time
Your fax machine has an internal clock. It contro ls the follo wing featu res:
❐ The time display on the opera tion panel while the machine is idle.
❐ Operation of time-delay feat ure s like Send Later.
❐ The date and time that is printe d ou t at the other end on pages received from
your machine. Program th e corre ct da te and time when you install the machine.
❐ In areas where the supply is 220 Vac, the order of steps is a little bit dif f ere nt
from the following. You must change the date first, then the mon th an d ye ar.
1. Press the Function key and
6,2,2,2, 2,8,1 using the te n keypad. Then
press the Yes key.
Example: Chang e to August 24, 1995 at
2: 30PM.
SUN KPAD/Y
JAN 01 1994 10:00AM
2. Adjust the month.
SUN KPAD/Y
AUG 01 1994 10:00AM
❐ Press the # key to advance a
month.
❐ Press the \ key to go back a
month.
❐ Press the
k
key to move the cursor
and accept the set tin g.
❐
3. Type in the date, year and time using
the keypad.
NOTE: The day of the week will b e se t
automatically.
Example : Press 2,4,9, 5,1,1,3,0, # usin g
the ten keypad
THU KPAD/Y
AUG 24 1995 11:30PM
4. When the display is correct, press the Yes key, then press the Function key
to finish.
Cross- references:
Send Later: se e page 4 5
The times in this manual are shown AM/PM Format. This forma t is u sed in mo de ls
where the supply is 115 Va c. In oth er are as, the 24-hou r clock format is used. 24
hour equivalents are listed below.
00 Midnight (12am) 06
6 am
12
Noon (12 pm)
18
6 pm
01
1 am
07
7 am
13
1 pm
19
7 pm
02
2 am
08
8 am
14
2 pm
20
8 pm
03
3 am
09
9 am
15
3 pm
21
9 pm
04
4 am
10
10 am
16
4 pm
22
10 pm
05
5 am
11
11 am
17
5 pm
23
11 pm
Press ing the# key changes between AM and PM
INSTALLTING THE
MACHINE
SOME ITEMS MUST BE PROGRAMMED FIRST
17
Page 29
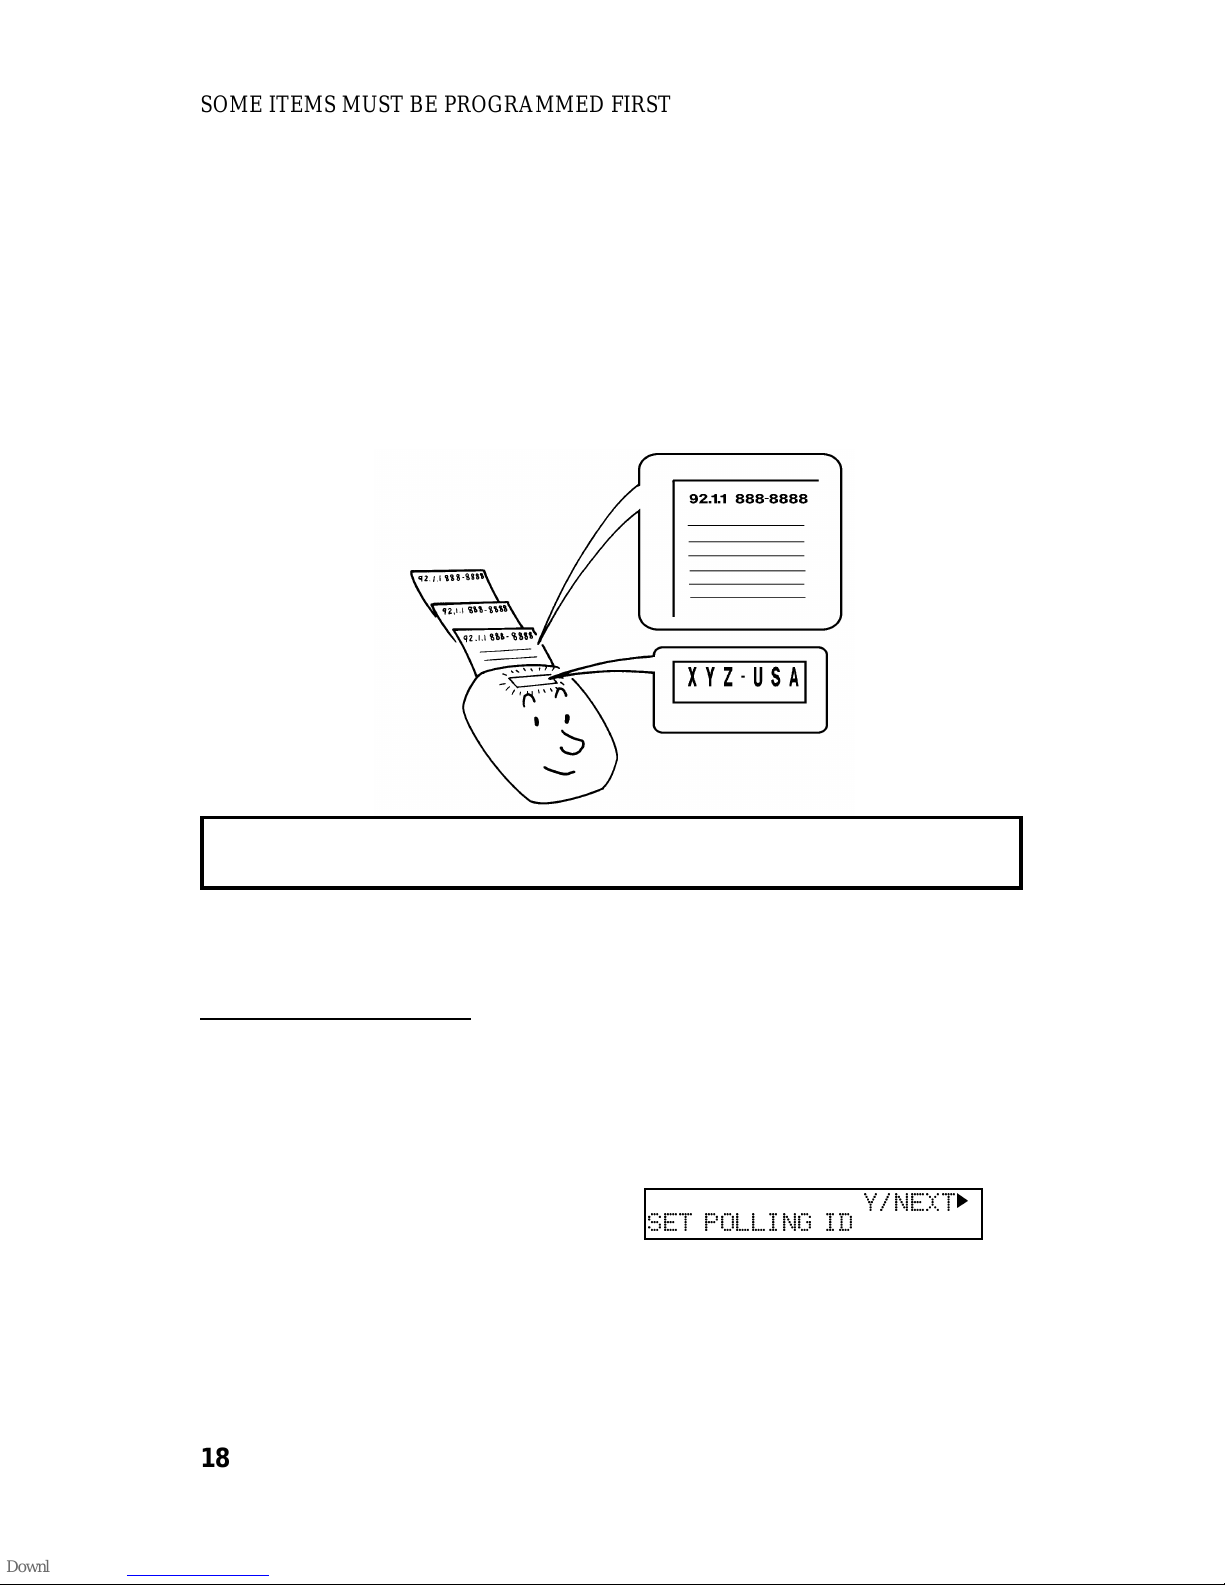
Setting Your Machine’s Identification
There are three labels with which to ide nt ify you rself to the operator at the other
end. These labels are calle d the RTI, th e TTI an d t he CSI.
❐ RTI (Remote Terminal Identification)and CSI (Called Subscribe r Iden tif icat ion):
These appear at the other en d in th e display on the operation panel du ring
communication, and on reports after communication.
❐ TTI(Tran smit Terminal Identification): This is printed at the other end at the top
of each page received from your machine.
You can see the RTI, TTI and CSI of the oth er p art y du ring communication (see
the following diagram) and on reports printe d by the machine late r.
Some machines may reject your transmitted fax messages if you have not
stored the RTI or CSI in advance.
NOTE You can switch the TTI off for a particular transmission if you do not wish
it to be printed on your page s a t th e ot he r e nd . Se e pa ge 46.
R TI (Identification Display)
Your RTI appears on the other party’s operatio n pane l durin g communica tio n if the
other machine was made by the same manufacturer as yours. The RTI can have
up to 20 characters (numbers and letters can be used, along with some symbols).
Program something easy to recog nize, such as your name, company name or
department name with in th e company.
1. P ress the Function key and then
6,2,2,2, 2,6,1 using the ten keypad,
then press the Yes key.
Y/NEXT
k
SET POLLING ID
SOME ITEMS MUST BE PROGRAMMED FIRST
18
Page 30

2 Press the k key until the screen is as
shown opposite.
Y/NEXT
k
SET RTI
3. Press the Yes key.
RTI ABC
llllllllllllllllll
4. Input the RTI that you will b e usin g.
Example: XYZ COMPANY
RTI ABC Y /
j k
XYZ COMPANY
llllllll
NOTE:This name cannot be more than
20 characters long.
5. P ress the Yes key to store your setting.
If you are still in the RTI setting, press
the Yes key again.
6. Either :
❐ Select another feature : Go to step 2.
❐ Finish : Press the Function key.
TTI (Page Header)
Your TTI is printed ay the other end at the top of each page received from your
machine. The TTI can have up to 32 characters (numb ers a nd let ters can be
used, along with some symbols). Prog ram some th ing easy to recog nize, such as
your name, company name or department name within the company.
1. Either
Y/NEXT
k
SET TTI
❐ If you have just entere d th e RTI in
the previous procedure , pre ss the
Yes key.
❐ Press the Function key and
6,2,2,2,2,6,1 using the ten keypad,
then press the Yes key. Press the
k
key until the screen is as shown
above, then press the Yes key.
2. If you have already entered an RT I , th e
TTI will be copy of this name.
TTI CHANGE? Y/N
XYZ COMPANY
lllllllll
❐ If this TTI is correct: Press the No
key then go to step 5.
❐ Otherwise : Press the Yes key.
Inputting and editing are explained on page
100.
INSTALLTING THE
MACHINE
SOME ITEMS MUST BE PROGRAMMED FIRST
19
Page 31

3. Input the TTI that you will be using or
edit the TTI that is already t here.
Example: XYZ CO. HEAD OFFICE
TTI ABC Y /N
XYZ CO.HEAD OFFI CE
lll
NOTE:This cannot be more than 32
characters long.
4. Press the Yes key to store your set tin g. If you are still in the TTI setting, p ress
the Yes key again.
5. Either:
❐ Enter the CSI next: Go to step 1 in the CSI Programming procedure.
❐ Finish : Press the Function key.
CSI (Telephone number display)
Your CSI appears on the other party’ s operation panel during communication
instead of your RT I , if th e ot he r pa rt y’s machin e is ano th er manufacturer’s
product. The CSI can have up to 20 characters (only numbers and spa ces ca n b e
used). Enter your fa x machin e’s telephone number , beca use some fe atures of
your machine may not work if the CSI is not the same as th e te lephone number.
1. Either:
Y/NEXT
k
SET CSI
❐ If you have just entered the TTI in
the previous procedure , pre ss the
Yes key.
❐ Press the Function key and
6,2,2,2,2,6,1 using the ten keypad,
then press Yes key. Press the
k
key until the screen is as shown
above, then press the Yes key.
2. Press the Yes key.
CSI KPAD
llllllllllllllllll
3. Input your telephone number u sing the
ten keypad.
Example: 4712319266
CSI KPAD/Y/N
471231-9266
lllllllll
NOTE:This cannot be not more than
20 characters long.
❐ You may wish to input a "+" sign, a common prac-
tice in Europe to signify your international dial access code. Press the Quick Dial Key 09 un ti l the
"+" appears at the cursor.
4. Press the Yes key to store your setting.
5. Finish : Press the Function key.
Inputting and editing are explained on page
100.
Inputting and editing are explained on page
100.
SOME ITEMS MUST BE PROGRAMMED FIRST
20
Page 32

Tone Dial or Pulse Dial?
If the setting of this fe at ure is incorrect you will not be able to dial using th e
machine’s keypad or automatic dials.
There are two basic types of telephone company exchang e:
❐ Exchanges using Tone Dialing (also known as DTMF, TT or sometimes PB)
❐ Exchanges using Pulse Dialing (also known as PD or DP)
The telephone line type setting in your fax machine must match the type of
exchange that you are conn ected to. If you are not sure what type your loca l
exchange is, ask your teleph on e comp an y.
Change the setting for th e fa x machine using Function 62.
1. P ress the Function key and
6,2,2,2, 2,6,2 using the ten keypad, then
press the Yes key.
Y/NEXT
k
SELECT LINE
2. P ress the Yes key . In th e op po site display, TT is currently selected.
SELECT LINE Y/
j k
kTT PD
3.
Change the settin g by using the
j
and
the
k
keys.
SELECT INE Y/
j k
TT kPD
4. Press the Yes key to store your setting,
then press the Function key to finish.
When You Change to Daylight Saving Time
Whenever local custom require s adva ncing the clock or setting the clock back,
use this feature. You can easily move the clock forward s whe n d aylig ht saving
time begins, and back when it ends.
❐ When you install the mach ine for th e first time, take care that the sett ing is
correct before you set the date and time.
1. Press the Function key and
6,2,2,2, 2,6,2, using the ten keypad, then
press the Yes key.
Y/NEXT
k
SELECT LINE
2.
Press the k key until the screen is as
shown opposite.
Y/NEXT
k
DAYLIGHT TIME ON/OFF
INSTALLTING THE
MACHINE
SOME ITEMS MUST BE PROGRAMMED FIRST
21
Page 33

3. P ress the Yes key.
DAYLIGHT Y/
j k
ON kOFF
4.
Use the j and k keys to switch this feature on or off .
DAYLIGHT Y/
j k
kON OFF
5. P ress the Yes key to store your setting,
then press the Function key.
Cutting Paper
This machine has two paper cutting settings.
❐ Manual Paper Cutting
❐ Automatic Paper Cutt ing
You must select whether or not the machin e should cut the paper automatically
after printing.
NOTE: When you are in manual paper cuttin g mode, after receiving or copyin g,
make sure that your machine is in stand by mod e an d no docu men t is in
the feeder, then press the Start key to cut the paper.
Switching the Automatic Cutter On
If you wish to use Automatic Cutting, you must switch the Auto matic cutt er on. Do
the following procedure.
1. P ress the Function key and the
6,2,2,2, 2,6,2 using the te n keypad, then
press the Yes key.
Y/NEXT
k
SELECT LINE
2.
Press the k key until the display is as
shown opposite.
Y/NEXT
k
AUTO CUTTER ON/OFF
3. P ress the Yes key.
AUTO CUTTER Y/
j k
kON OFF
4.
Change the settin g by using the
j
and
the
k
keys.
AUTO CUTTER Y/
j k
ON kOFF
5. P ress the Yes key to store your setting,
then press the Function key to finish.
SOME ITEMS MUST BE PROGRAMMED FIRST
22
Page 34

Out Line or Extension Telephone System?
You can select an extension lin e o r ou t lin e u sing the PABX Access System.
Out line: You get an outside line with ou t d oin g a nything.
Inside line: You get an outside line by dialin g th e a ccess n umber before the
telephon e nu mb e r s .
1. P ress the Function key and
6,2,2,2, 2,6,3 using the ten keypad, then
press the Yes key.
SETTING? Y/
j
PRINT LIST
j
2. P ress the Yes key. Press the j key
once or press the k key until the set-
tings for Switch 13 are displayed.
KPAD/Y/j
k
SWITCH 13:0000 0000
3. Change the settings of digit 0.
KPAD/Y/j
k
SWITCH 13:0000 0000
4. If you wish to change the setting, press
0 using the ten keypad .
5. P ress the Yes key, then press the Func-
tion key.
NOTE: With On-hook Dial or when using the handset th is fea tu re has no effect.
Setting The Access Number
If you select inside line, you ha ve to prog ram th e nu mber which preceeds the
telephon e nu mb e r.
1. P ress the Function key and
6,2,2,2, 2,6,1 using the ten keypad, then
press the Yes key.
Y/NEXT
k
SET POLLING ID
2. P ress the k key until the display is as
shown opposite.
Y/NEXT
k
SET PSTN ACCESS NO.
3. P ress the Yes key.
NUMBER KPAD
ll
4. Enter the access number.
Example: 0, press 0 using th e ten keypad
NUMBER KPAD/N
0
l
5. P ress the Yes key to store your setting,
then press the Function key to finish.
Digit 0
0: Outline
1: Inside line
INSTALLTING THE
MACHINE
SOME ITEMS MUST BE PROGRAMMED FIRST
23
Page 35

Cutting the Leading Edge of The Paper
In situations where the ma chin e is not copyin g or receiving messages very often,
the edge of the paper roll may curl. If this feature is on, the machine will
automatically cut off the curled part before rece iving or copyin g.
The machine will cut the leading edge of the paper if a messa ge is not rece ived or
a copy made for more than 24 hours. If you wish to cha ng e this perio d, cont act
your service representative .
1. P ress the Function key and
6,2,2,2, 2,6,3 using the ten keypad, then
press the Yes key.
SETTING? Y/
j
PRINT LIST
j
❐ At this time, you can print the us er pa ramet er li st,
press the
j
key then press the Yes key .
2. P ress the Yes key. Press the k key until
the settings for switch 13 are displaye d.
KPAD/Y/j
k
SWITCH 13:0000 0000
3. Change the setting of digit 7.
KPAD/Y/j
k
SWITCH 13:1000 0000
4. If you wish to change the setting, press
7 using the ten keypad.
5. P ress the Yes key, then press the Func-
tion key.
Digit 7
0: The curled edge is not cut automatically.
1: The curled edge is cut automatically
SOME ITEMS MUST BE PROGRAMMED FIRST
24
Page 36

STORING OFTEN USED NUMBERS
Three Convenient Ways to Dial
Instead of dialin g th e full number on the fax machine ’s ke ypa d, you can use
Speed Dial, Quick Dial or Group Dial.
These features allow you to store tele ph one numbers in your machine’s memory.
(A stored number will remain in the memory, and you can use it as many times as
you wish without having to reprog ram it ).
Then, when you need to dial a number , just call it up (for example, by pressing th e
required Quick Dial Key).
Group Dial is available on Type I models only.
Quick Dial and Speed Dial
Quick Dial and Speed Dial are very useful for dialing numbers tha t you often call,
especially if these numbers are very long (like inte rna tio nal numb ers).
These features make your machine much easier to use. However, first you have
to program the telephon e numbe rs tha t you need int o the Qu ick Dial keys and
Speed Dial codes in your machine.
After programming your Qu ick Dials and Speed Dials, you can dia l a tele phon e
number with very few keystrokes.
❐ For Quick Dial, just press the appropriate Quick Dial key then press the Start
key.
❐ For Speed Dial, press the key on the operat ion panel labe led "Speed Dial",
enter a two-digit Speed Dial code, then press the Start key.
You can store up to 10 Quick Dial keys and 50 Speed Dial codes in a Type I
model, 10 Quick Dial keys and 20 Speed Dial codes in a Type II model.
When you store a Quick Dial or a Spe ed Dia l, you can also store the name of the
other party as a quick reference (this name will be displayed on the opera tio n
panel before you press th e St art key, so you can check whether you have
selected the correct number).
For the Quick Dial keys, you can also attach adhesive labels to the Quick Dial
plate.
INSTALLTING THE
MACHINE
25
Page 37

Groups (Type I Only)
If you frequently send the same messa ge at th e same time to mo re th an one
place, program these telephone numbers into a gro up . The n yo u can send the
message to all the addresses in that gro up with just a few keyst roke s.
You can also program a name for that grou p (for example, "Branch Offices"),
which will be displayed befo re you press th e St art key. This helps you to ch eck
whether you selecte d th e corre ct group.
You can store up to 3 groups in this machine.
Groups can be used with the follo wing featu res.
❐ Sending to More Than One Location (Broadcasting): see page 38.
❐ Polling Reception : see pa ge 80.
CAUTION:
There are limits on the number of addresses that can be dialed with each of
these features. Do not store more numbers in the group than the capacity of
the feature that you plan to use it with. These limits are:
Broadcasting :10 addresses
Polling Reception : 10 addresses
Programming Quick Dials
This machine has 10 Quick Dial keys (01 to 10), each of which can be
programmed as one of the following : a Qu ick Dial ke y, a Group or an Auto
Document program. The pa ge numb er in the following table sho ws the location of
the programming procedure.
1 Quick Dial A fax or telephone number. Page 26
2 Group A set of fa x numbers that you
often wish to send the same
fax to at the same time.
Page 31
3 Auto Document A page that you often send,
such as a map.
Page 28
STORING OFTEN USED NUMBERS
26
Page 38

Programming a New Quick Dial
1. P ress the Function key and 3,1 using
the ten keypad, th en press th e Yes key.
n l
QUICK /
j k
PRINT LISTj/SEARCH
k
❐ At this time you can print a Quick Dia l Li st if you
press the j key, then press the Start key.
2. P ress the Quick Dial key that you wish
to program, then press the Yes key.
Example : Quick Dial 01
n
01 KPAD/N
llllllllllllllllll
❐ If a message such as "USED AS AUTO DOCU-
MENT"appears briefly it , th is key is already in use.
Try another key or erase it using function 31. Or,
enter a label: Go to step 5
❐ If a telephone number is displayed, press the No
key.
3. Input the telephone numb er using the
ten keypad. Example : Press
3,8,4,1, 0,3,7,2,2,7
n
01 KPAD/Y/N
38410372227
llllllll
❐ If you make mistake : Press the Clear key to delet e
a digit, or the No key to del et e th e whole number .
If your machine is behind a PBX, include the access code and a pause before the telephone number.
For an international number, place a pause after the country code. To input a pause, press the Pause
key.
4. P ress the Yes key.
n
01 Y/N
PROGRAM LABEL?
5. To enter a label for this Quick Dial :
Press the Yes key.
n
01 ABC
llllllllllllllllll
❐ If you do not want to program a label, pre ss the No
key and go to step 8.
6. Enter the label
Example : NEW YORK OFFICE
n
01 ABC Y/N
NEW YORK OFFICE
llllll
7. P ress the Yes key . If th e disp lay is n ot
as opposite, press the Yes key again.
n l
QUICK/j
k
PRINT LISTj/SEARCH
k
8. Either:
❐ Program another : Go to step 2
❐ Print list of Quick Dial numbers : Press the j key.
❐ Finish : Press the Function key
Editing a Quick Dial
1. Press the Function key and 3,1, at the
ten keypad, then press th e Yes key.
n l
QUICK/
j k
PRINT LIST j/SEARCH
k
❐ At this time you can print a Quick Dia l Li st if you
press the j key, then press the Start key.
Inputting and editing : see page 100.
INSTALLTING THE
MACHINE
STORING OFTEN USED NUMBERS
27
Page 39

2. P ress the Quick Dial key th at you wish
to edit. Example : Quick Dial 01
n
01 CHANGE? Y/
j k
NEW YORK OFFICE
❐ If the wrong number is displayed, use the
j
and
the k keys to scroll through the Quick Dial keys on
the screen.
3. P ress the Yes key.
n
01 KPAD/Y/N
3841037227
lllllllll
4. Edit the number.
n
01 KPAD/Y/N
3104719266
lllllllll
❐ Use the
j
and k keys to move the cursor and use
Clear key to delete characters at the cursor.
5. Press theYes key.
n
01 Y/N
PROGRAM LABEL?
6. Either:
n
01 ABC Y/N
NEW YORK OFFICE
❐ Change the label: Edit the existin g
labels then press the Yes key.
❐
❐ Keep the label as it is : Press the
No key, then go to step 9.
7. Edit the label.
Example: NEW YORK BRA NCH
n
01 ABC Y/N
NEW YORK BRANCH
llllll
8. P ress the Yes key . If th e disp lay is n ot
as opposite, press the Yes key again.
n l
QUICK /
j k
PRINT LISTj/SEARCH
k
9 Either:
❐ Edit anot her: Go to step 2.
❐ Print a list of Quick Dial Numbers. Press the j key.
❐ Finish : Press the Function key.
Erasing a Quick Dial
1. P ress the Function key and 3,1 using
the ten keypad, th en press th e Yes key.
nl
QUICK/j
k
PRINT LIST j/SEARCH
k
❐ At this time, you can print a Quick Dial Lis t if you
press the j key, then press the Start key.
2. Press the Quick Dia l Key that you wish
to erase. Example : Quick Dial 01.
n
01 CHANGE? Y/j
k
NEW YORK OFFICE
❐ If the wrong number is displayed, use the the
j
and the k keys to scroll thro ug h the Quick Dial
Keys on the screen.
3. P ress the Yes key.
n
01 KPAD/Y/j
k
3841037227
lllllllll
STORING OFTEN USED NUMBERS
28
Page 40

4. Erase the number: Press the No key
and then press the Yes key
nl
QUICK/j
k
PRINT LIST j/SEARCH
k
5. Either:
❐ Program another: Go to step 2.
❐ Print a list of Quick Dial numbers: Press the j key.
❐ Finish : Press the Function key.
Programming Speed Dials
Using this feature, you can store tele phon e numbe rs as Spe ed Dial Co des. Type I
has 50 Speed Dial Codes (00 to 49) an d Type II has 20 Speed Dial Codes (00 t o
19). You can also store a label with each tele ph on e nu mbe r for use with the
Telephone Directory.
Telephone Directory
This makes using Speed Dial Codes easier.
When you program a Speed Dial Code, you can program a name and a
telephone number. Then, instead of having to refer to the latest Speed Dial
Code list when you want to dial that number, you can type in the first letter of
the name, and scroll through the list of names that begin with that letter until
you find the right one.
Programming a New Speed Dial
1. P ress the Function key and 3,2 using
the ten keypad, th en press th e Yes key.
Nll
KPAD/j
k
PRINT LIST j/SEARCH
k
❐ At this time you can print Spee d Dia l Li st if you
press the j key, then press the Start key.
2. Input the Speed Dial Code that you
wish to program (Type I:00 to 49, Type
II: 00 to 19) using th e t en keypad. Then
press the Yes key.
Example : Speed Dial Code 01, Press
the speed dial key then 0,1 using the ten
keypad.
N
01 KPAD/N
llllllllllllllllll
❐ If a telephone number is displayed, press the No
key and then press the Yes key.
3. Enter the telephone number using the
ten keypad.
Example : Press 3,8,4,1,7,0,3,2,2,7
N
01 KPAD/Y/N
3841037227
lllllllll
If your machine is behind a PBX, include the access code and a pause before the telephone number.
For an international number, place a pause after the country code. To input a pause, press the Pause
key.
4. P ress the Yes key.
N
01 Y/N
PROGRAM LABEL?
INSTALLTING THE
MACHINE
STORING OFTEN USED NUMBERS
29
Page 41

5. To enter a label for this Quick DIal :
Press the Yes key.
N
01 ABC
llllllllllllllllll
❐ If you do not wish to program a lab el: Press the No
key.
6. Enter the label for this Speed Dial
Example : WASHINGTON OFFICE.
N
01 ABC Y/N
WASHINGTON OFFICE
llll
7. P ress the Yes key . If th e disp lay is n ot
as opposite, press the Yes key again.
N ll
KPAD/j
k
PRINT LISTj/SEARCH
k
8. Either:
❐ Program another : Go to step 2.
❐ Print a list of Speed Dial number: Press the j key.
❐ Finish : Press Function key.
Editing a Speed Dial
1. Press the Function key and 3,2 using
the ten keypad, th en press th e Yes key.
Nll
KPAD/j
k
PRINT LISTj/SEARCH
k
❐ At this time you can print a Speed Dial List if you
press the j key, then press the Start key.
2. Input the Speed Dial code that you
wish to edit. Example Quick Dial 01
N
01 CHANGE? Y/j
k
WASHINGTON OFFICE
❐ If the wrong number is displayed, use the
j
and
k
keys to scroll through the Speed Dial keys on the
screen.
3. P ress the Yes key.
N
01 KPAD/Y/N
2262310471
lllllllll
4. Edit the number.
N
01 KPAD/Y/N
2391500482
lllllllll
❐ Use the
j
and k keys to move the cursor and use
Clear key to delete character at the cursor, the No
key to delete whole digit an d the ten keypad to enter the digits.
5. P ress the Yes key.
N
01 Y/N
PROGRAM LABEL?
6. Either:
N
01 ABC Y/N
WASHINGTON OFFICE
❐ Change the label an d ed it th e exist -
ing labels: Press the Yes key.
❐
❐ Keep the label as it is : Press the
No key, then go to step10.
7. Edit the label.
N
01 ABC Y/N
ATLANTA BRANCH
llllll
Inputting and editing : see page 100.
STORING OFTEN USED NUMBERS
30
Page 42

8. When you have entered the new label:
Press the Yes key. If the display is not
as opposite, press the Yes key again.
N ll
KPAD/
j /k
PRINT LISTj/SEARCH
k
9. Either:
❐ Edit anot her: Go to step 2.
❐ Print a list of Speed Dial Numbers: Press the
j
key.
❐ Finish : Press the Function key.
Erasing a Speed Dial
1. P ress the Function key and 3,2 using
the ten keypad, th en press th e Yes key.
Nll
Y/j
k
PRINT LIST j/SEARCH
j
❐ At this time, you can print a Speed Dial List if you
press the j key, then press the Start key.
2. Input the Speed Dial Code that you
wish to erase. Example: Speed Dial 01
N
01 CHANGE? Y/j
k
ATLANTA BRANCC H
❐ If the wrong number is displayed, use the
j
and
k
keys to scroll through the Speed Dial keys on the
screen.
3.Press the Yes key .
N
01 KPAD/Y/N
226231047
lllllllll
4. Erase the number: Press the No key
and then press the Yes key.
Nll
Y/j
k
PRINT LIST j/SEARCH
k
5 Either:
❐ Program another: Go to step 2.
❐ Print a list of Speed Dial Numbers: Press the j key.
❐ Finish : Press the Function key.
Programming Groups (Type I Only)
Groups allow you to combin e some numb ers into one group, for easy seq uential
transmission to all the numbers in that gro up . The se numbers can be selected
from those already stored in Quick Dial keys or Spee d Dial cod es, or you can
select other numbers by ent erin g them using the ten keypad .
You can also store a label with each group. This label will be displa yed whe n yo u
select the Group.
NOTE: Up to 10 numbers can be stored in a group.
Programming a Group
1. P ress the Function Key and 3,3 using
the ten keypad, th en press th e Yes key.
GROUPl 1-3/
j k
PRINT LIST j/SEARCH
k
❐ At this time, you can print a Group Dia l Li st , if you
press the j key, then press the Start key.
2. Enter the group number using the ten
key pad, then press the Yes key.
GROUP 1 Y/N
PROGRAM QUICK?
❐ There are 3 groups, from 1 to 3.
INSTALLTING THE
MACHINE
STORING OFTEN USED NUMBERS
31
Page 43

3. P ress the Yes key.
GROUP 1 QUICK/N
n l
4. P ress the Quick Dial key you wish to
program the Group Dial in, then pre ss
the Yes key.
GROUP 1 Y/N
PROGRAM LABEL?
5. Either:
GROUP 1 ABC
llllllllllllllllll
❐ If you wish program a label: Press
the Yes key .
❐ If you do not wish to progra m a la-
bel: Press the No Key , then go to
step 8.
6. Enter a label for this Group using the
Quick Dial keys. Example: EUROPE
BRANCH
GROUP 1 ABC Y/
j k
EUROPE BRANCH
lllllll
7. P ress the Yes key . If th e disp lay is n ot
as opposite, press the Yes key again.
GROUP 1 DIAL/N
llllllllllllllllll
8. Enter a number that you wish to store in
this group. For example:
❐ Quick Dial 08 : Press the Quick
Dial 08 key.
GROUP 1 Y/N
n
08
❐ Speed Dial 10: Press the Speed
Dial key and 1,0 using the ten keypad.
GROUP 1 Y/N
N
10
❐ Full number: Input it using th e key-
pad on the operation panel .
GROUP 1 KPAD/Y/N
3104712262
lllllllll
9 Press the Yes key.
10.Either:
❐ Input anot her number: Go to step 8.
❐ Print a list of Group Dial Numbers: Press the j key.
❐ Finish storing numbers in this group : Pre ss the No key an d the Function
key.
Editing Group Dial
1. P ress the Function Key and 3,3 using
the ten keypad, th en press th e Yes key.
GROUPl 1-3/
j k
PRINT LIST j/SEARCH
k
❐ At this time, you can print a Group Dia l li st be
pressing the j key then press the Start key.
Inputting and editing : see page 100
STORING OFTEN USED NUMBERS
32
Page 44

2. Enter the group station numbe r wh ich
you wish to edit using the ten key pa d,
then press the Yes key.
GROUP 1 Y/N
PROGRAM QUICK?
3. Either:
GROUP 1 Y/N
n
04
❐ Change the Quick Dial key where
the group is stored: Press th e Yes
key. Then press the new Quick
Dial key. Press the Yes key to ac-
cept.
❐ Keep the same the Quick Dial key:
Press the No key.
4. Either:
GROUP 1 Y/N
PROGRAM LABEL?
❐ Change the Group label: Press the
Yes key. Edit the label using the
Quick Dial keys, then press the
Yes key to accept the new label.
❐ Keep the same label: Press th e No
key.
5. Either:
❐ Add a new number to the grou p: Enter it using the ten keyp ad , then press
the Yes key.
❐ Erase a number from this grou p: Enter it using the ten keyp ad then pre s s
the Yes key again to confirm the deletion.
❐ Finish: Press the Yes key.
Erasing Group Dials
1. P ress the Function Key and 3,3 using
the ten keypad, th en press th e Yes key.
GROUPl 1-3/
j k
PRINT LIST j/SEARCH
k
❐ At this time, you can print a gro up dia l li st by pre ss-
ing the j key then press the Start key.
2. Enter the group station numbe r wh ich
you wish to edit using the ten key pa d,
then press the Yes key.
GROUP 1 Y/N
PROGRAM QUICK?
❐ There are 3 groups, from 01 to 03.
3. P ress the No key.
GROUP 1 QUICK/N
PROGRAM LABEL?
4. P ress the No key.
GROUP 1 Y/N
CLEAR?
5. P ress the Yes key.
GROUP 1 Y/N
CLEARED
6. Either:
❐ Erase the another number:go to ste p 2.
❐ Finish: press the Function key.
INSTALLTING THE
MACHINE
STORING OFTEN USED NUMBERS
33
Page 45

Programming the Group Key
You can program 3 groups. However, there is no room in Quick Dial keys, this
group key is helpful. You have to program the 10 of the Quick Dial key as the
group dial key.
1. P ress the Function key and 3,1 using
the ten keypad, th en press th e Yes key.
n l
QUICK /
j k
PRINT LISTj/SEARCH
k
2. P ress the Quick Dial 10.
n
10 PROGRAM? Y/
j k
3. P ress the Yes key.
n
10 PROGRAM? Y/N
PROGRAM GROUP KE Y?
4. Press the Yes key.
NOTE: How to transmit using the Group key, see page 39.
OTHER ITEMS TO PROGRAM AT YOUR LEISURE
Storing and Dialing Part of a Number
This feature is called Chain Dialing . This fe at ure allows yo u to co mpo se a
telephone number from various parts, some of which may be store d as Quick Dial
Keys or Speed Dial Codes, and some of which may be input using the keyp ad.
For example, you can prog ram commo nly used area or country codes into Spe ed
Dial Codes or Quick Dial keys. The maximum number of digits is 2 40 inclu din g
pauses.
This feature is convenient if:
❐ You often communicate with man y terminals for which the area code, or the
international code is the same.
❐ You often make international calls.
For example, if you often call Tokyo, Japan, program 011813 (overseas to
Tokyo to the USA) as Quick Dial key 01. This will save work at the op era tio n
panel when dialing a Tokyo number .
❐ Your PBX requires an ID code before th e de stin ation number.
For example, if your ID is 1234567, and the dest ina tio n is store d in Quick Dia l
key 01, enter 1234567 using the ten keypad, press the Pause key, then press
the Quick Dial key 01.
NOTE:Do not store any labels with the Quick Dials and Speed Dials that you
are using with Chain Dialing.
Cross-reference
Quick Dial and speed dial:See page 28 and 29.
34
Page 46

BASIC OPERATION
SENDING IMMEDIATELY VS. SCANNING QUICKLY
Sending Quickly
This is known as Immediate Transmission. It is convenient when:
❐ You wish to send a message immediately.
❐ You wish to check quickly whether you have successfully conne cte d with the
other party.
❐ Your machine’s memory is becoming full.
The machine dials immediately af ter you press the Start key (or at a specified
later time, if you used a time delay feature like Send Later). The message is
scanned and transmitted page by page without being stored in memory.
Scanning Quickly (Type I Only)
This is called Memory Tra nsmissio n : It is co nve nie nt becau se:
❐ Fax messages can be scanned much mo re quickly (yo u can take your
document away from the fax machine wit hout waiting for the transmission to be
be completed).
❐ While your fax message is being sent , an ot he r user can ope rat e the machine
(people will not have to wait by the fax machine a long time).
❐ You can send the same message to more than one pla ce in the same
operation.
After you press the St art key, the machine doesn’t dia l unt il a ll the pages of your
fax message have been stored in the memory. The d ef ault mode of this machine
is Immediate T ra nsmissio n, so the proce dures described in this manual will be
based on the assumptio n th at you are using Immediate Transmission.
Cross-references
Send Later:see page 44
BASIC OPERATION
35
Page 47

Sending Quickly(Immediate Transmission)
For T yp e II mo dels, you can skip step 1 and 2 because the machine is always in
Immediate Transmission mode. The advantages a nd disavantages of Imme dia te
Transmissio n an d Memo ry Transmission are discussed on pages 35.
1. Make sure that the machine is in
standby mode.
READY 100% 10:00AM
SET DOC. OR DIAL NO.
2. If the display does not look like above,
then press the Line Select Key.
3. Follow both steps in any ord er
❐ You can dial in any of these ways:
TRANSMIT Y/START
3104719266
a) Ten Keypad b) Quick Dial c) Speed Dial d) Handset
❐ Carefully place your fax message
face down into the document
feeder.
TRANSMIT OPTION
k
DIAL FAX NUMBER
❐ The Pages must be placed in the feeder with the
first page at the bottom of the stack.
❐ Feed the pages in so that the top edge goes in first.
❐ Do not feed in more th an 10 pages.
❐ Do not use unsuitable types of originals (see page
108).
❐ Adjust the document guides to fit the width of the
pages.
❐ Do not use pages of different sizes.
4. Press the Sta rt key.
5. The machine dials an d th e line to th e other party is connected. While it is
dialing, the number that you dia led is displayed (or if you used Quick Dial or
Speed Dial, the Quick Dial or Speed Dial Label stored for that numb er is
displayed). After t ran smission th e ma chine will return to st andb y mo de .
Selecting Reso lution: See page 41.
Options for Sending a Messa ge : Se e pa ge 44.
Good
Bad
SENDING IMMEDIATELY VS. SCANNING QUICKLY
36
Page 48

Scanning Quickly (Memory Transmission, Type I Only)
1. Make sure that the machine is in
standby mode.
MEM.TX 100% 10:00AM
SET DOC. OR DIAL NO
❐ The displa y on t he operation pa ne l must
be as shown on the right.
2. If the display does not look like above,
then press the Line Select key.
3. Follow both steps in any ord er.
❐ Dial in one of the following ways:
TRANSMIT Y/STRT
3104719266
a) Ten Keypad b) Quick Dial c) Speed Dial d) Handset*
*:Only if the telephone handset is installed.
If your machine is behind a PBX, dial the access code, then a pause, then the telephone numbers.
For international numbers, press the Pause key after entering the country code.
❐ Carefully place your fax message
face down into the auto document
feeder.
MEM.TX OPTION
k
DIAL FAX NUMBER
❐ The Pages must be placed down in the feeder with
the first page at the bottom of th e stack.
❐ Feed the pages in so that the top edge goes in first.
❐ Do not feed in more th an 10 pages.
❐ Do not use unsuitable type of original (see page
108).
❐ Adjust the document guides to fit the width of the
pages.
❐ Do not use pages of different sizes.
4. P ress the Start key.
SAVING TO MEMORY
F-001 P.01 99%
❐ The machine will sc an the doc ument and dial.
File Number
Selecting Contrast and Resolution: See page 41.
Options for Sending a Messa ge : Se e pa ge 44.
Bad
Good
BASIC OPERATION
SENDING IMMEDIATELY VS. SCANNING QUICKLY
37
Page 49

5. The machine dials, and the line to the
other party is connected.
NOTE:Watch the display. The identification of the other party will
appear. If you have dialed the wrong number, as soon as possible
press the Stop key before you are con ne cte d.
6. After sending the message, the machine
hangs up automatically.
Sending to More Than One Location (Broadcasting)
When you are in Memory Transmission, you can send t he same messa ge to
many destinations (ma ximum 1 0 d est ina tions). After dialing the first destination
(step 3 in the abo ve o pe ration), dial another destination number. After dialing all
destinations, press the Start key.
Canceling a Memory Transmission
If you would like to cancel a transmissio n af te r scann ing or if your machin e‘s
memory is becoming full, please fo llow th is p roce dure. This is also useful when
you need space for an important job.
1. Press the Function key and 2,1 using
the ten keypad, th en press th e Yes key.
FILE NO.
lll
KPAD/
j k
PRINT LIST j/SEARCH
k
❐ To print a list of files: Pres s th e
j
key then press
the Start key.
2. Either:
FILE NO. 013 Y/j
k
CHICAGO OFFICE
❐ If you do not know the file numb er:
Scroll through the file numbers with
the k key until the required file appears.
❐ If you know the file number: In pu t it
directly:
Example: File No.013, press 0,1,3.
SENDING IMMEDIATELY VS. SCANNING QUICKLY
38
Page 50

3. P ress the Yes key.
FILE NO. 013 Y/N
CLEAR?
4. Either :
❐ Erase the file: Press the Yes key.
❐ Keep the file: Press the No key.
5. Either:
❐ Erase another file: Press the Yes key and go to step 2.
❐ Finish: Press the Function key.
NOTE:When there are no apropriate files, "
NO FILES
" is displayed.
Printing The Stored Mes sages
1. P ress the Function key and 5,1 using
ten keypad, then press th e Yes key.
FILE NO.
lll
KPAD/
j k
PRINT LIST
j
/SEARCH
k
❐ To print list of files press
j
key, then press the Start
key.
2. Either:
FILE NO.004 START/N
CHICAGO OFFICE
❐ Scroll through the file s on th e disp lay: Press th e k key until the required file
appears. Then press the Yes key.
❐ If you know the file number, input it directly: Enter the file number, then
press the Yes key.
3. Press the Sta rt key.
Transmission Using The Group Key
1. Either:
❐ Place a document into the fee de r.
❐ Press the Q uic k Dial 10 (Group
Key). Then, enter the group number.
GROUP Y/START
G1 DISTRIBUTOR
2. Press the Sta rt key.
If You Make a Mistake
If you make a mistake when inputtin g a name or nu mbe r, either :
❐ Press the No key to erase the entire name or numb er and sta rt ag ain .
❐ Press the Clear key to erase the last letter or digit that you ent ere d.
If you enter the wron g function number,
❐ Press the Function key to return to standby mode and start again.
If you dialed the wrong nu mber , either:
❐ Press the No key.
❐ If scanning has already be gu n, press th e Stop key.
❐ If you already progra mmed the numb er int o th e machine by pressing the Yes
key, remove the document from the feeder and start again.
BASIC OPERATION
SENDING IMMEDIATELY VS. SCANNING QUICKLY
39
Page 51

Possible Problems
You want to take out the doc ume nt:
Open the operation panel and take out the document.
CAUTION: Do not pull out the document without opening the operation panel
or you will damage the machine.
NOTE: If the document will
not come out, push forward
the two green levers.
After you have removed the
document, replace the levers
and close the panel
You want to send more than 10 pages:
While the last page is being fe d in, place more pages (up to 10) in the feeder.
You make a m istak e while dialing:
If you have already pressed the Sta rt key, press the Stop key immediately.
If you haven’t pressed the Start key yet, either:
❐ Press the No key: The entire number is delet ed . E nter a ne w number .
❐ Press the Clear key: Only the last digit is deleted.
You find a mistake after scanning (Memory Tr ans mi ssion):
Use Function 21 to clear the memo ry file. (se e page 38)
The Check Display indicator is blinking:
An error has been detected. Follo w the instru ctio ns on the displa y. For more
information about error displays see page 97.
Sending a Page With Very Fine Detail
You may wish to send many different types of fax messa ges. So me of these may
be difficult to repro du ce at the other end. However, your machine has two settings
(Resolution and Half to ne ) tha t you can ad just to help you transmit your document
with the best possible quality. In this model, contrast is adjusted automatically.
If you are not sure whether your settings are suitable, make a copy of the
document using these settings. The printout shows how the fax message will
look when it is printed at the other end.
❐ If your fax message has more than one page, you can select different settings for each page. For
example, if you wish to use a different resolution just for page 2, change th e res ol ut io n se tting while page
1 is being scanned. Then, while page 2 is being scanned, you can return the resolution setting to the
original setting.
❐ If you try and send a message in fine mode and the receiver does not have this feature, then the message
will be printed in detail mode at the other end.
SENDING IMMEDIATELY VS. SCANNING QUICKLY
40
Page 52

Resolution
If your document con ta ins fin e print or detailed diagrams, use a hig her re solu tio n
setting.
Standard: Suitable for most typewritten documents. When the Detail and Fine
indicators are not lit, this mod e is select ed.
Detail: Use for documents with small print or fine details. When the Detail
indicator is lit, this mode is select ed.
Fine: Use this for high quality repro du ctio n. When the Fine ind icat or is lit, th is
mode is selected.
Halftone:If your document contains a photograph or diagrams with complex
shading pattern or grays, switch Halft on e Mod e on to ach ieve opt imum imag e
quality. This mode is selected when the Halftone indicator is lit. If it is not lit, press
the Halftone key.
Selecting The Halftone Type
This model has two types of Halftone , th e Dith er Pro cess and th e hig her qua lity
Error Diffusion Process. To change the currently used Halftone type, perform th e
following procedure.
1. Press the Function key and
6,2,2,2,2,6,3 using th e te n keypad, then
press the Yes key.
SETTING? Y/
j
PRINT LIST
j
❐ At this time, you can print a User Parameter List
if you press the k key, them press the Start key.
2.
Press the Yes key , then press the jaand
the k keys until the settings fo r Switch
10 are shown.
KPAD/Y/j
k
SWITCH 10: 0000 0000
❐ The setting on t he dis pl ay is the cu rrent
setting.
3. To change the setting of digit 7, press 7
using the ten keypad .
KPAD/Y/j
k
SWITCH 10: 1000 0000
4. Finish : Press the Yes key then the Function key.
Halftone Mode slows down the tra nsmission speed and may increase your
communication costs, espe cially if you use th e Erro r Diffusion process. Higher
resolutions also do this. This is beca use the se set tin gs cre at e la rge r amounts of
data to be sent. Messag es are tran smitted faster if you use the stand ard
resolution settin g, and keep Halft on e off.
Digit 7
0: STD MODE- The machine will use the
higher quality Error Dif f usio n Proc es s.
1: SPD MODE- The machine will use the
Basic Halftone Process
BASIC OPERATION
SENDING IMMEDIATELY VS. SCANNING QUICKLY
41
Page 53

Home Position Setting Adjustments
For resolution and halftone, you can select whet he r the sett ing s re tu rn to the
home position at the end o f t ran smission (in a new machine, they do ). A lso, you
can change the settings of the home po sitio n. If you nee d othe r adju stme nt s,
contact a service represe nt ative. The procedure is as fo llows (see pa ge 10 2 if you
need more information about the User Parameter Settings adjustment procedure).
1. P ress the Function key and
6,2,2,2, 2,6,3 using the ten keypad, then
press the Yes key.
SETTING? Y/
j
PRINT LIST
j
❐ At this time, you can print a User Parameter List if
you press the j key.
2. P ress the Yes key. The setting s fo r
Switch 00 are now displayed on the bottom line of the display. If you wish to
change to Switch 01, press the k key until the settings for Switch 01 are displayed.
KPAD/Y/j
k
SWITCH 00: 0000 0000
❐ The settings that you may need to change are
those for Switch 00 and 01 . The functions of th es e
are as follows.
SWITCH 00 * indicates the factory sett ings.
Digit Purpose
4
5
Resolution Digit 5 Digit 4 Setting Digit 5 Digit 4 Setting
0 0 Standard * 1 0 Fine
0 1 Detail 1 1 Do not use
6
Transmissio n mod e (Type I Only) 0: Memory Transmission
1: Immediate Tran mission *
7 Halftone On/Off home postion 0: Off * 1: On
SWITCH 01
Digit Purpose
7
If you change any of the resolution, transmission mode or halftone
settings before making a transmission, then:
0: The setting(s) will not return to the home po sitio n a ft er t he
transmission or making copies.
1:The setting(s) will return to the home posit ion after th e transmissio n
or making copies.*
3. If you wish to change one of the settings, press the key on the ten keypad
that corresponds to the digit that you
wish to change. For example press 7 to
change digit 7 of the switch.
KPAD/Y/j
k
SWITCH 00: 1000 0000
4. Finish: Press the Yes key, then press the Function key.
SENDING IMMEDIATELY VS. SCANNING QUICKLY
42
Page 54

Dialing with the Telephone Directory
This can be done for any number that you have store d as a Spee d Dial code with
a label programmed for it.
Example: You wish to Dial "XYZ CO. LONDON"
1. Make sure that the machine is in
standby mode.
READY 100% 10:00AM
SET DOC. OR DIAL NO.
2. Carefully place your fax message into
the auto document feeder.
TRANSMIT OPTION
k
DIAL FAX NUMBER
3. P ress the Speed Dial/Tel Directory Key.
SPEED DIAL 0-4
PUSH NUM OR ABC
NOTE: On T yp e II mod els, you will see
"0-1" in the upper right corner of
the display
4. Press the appropriate Quick Dial key for
the Speed dial label.
TEL DIR. Y/
j/k
N
01 XA COMPANY
Quick
Dial
Letter Quick Dial Letter Quick Dial Letter Quick Dial Letter
01 ABC 02 DEF 03 GHI 0 4 JKL
05 MNO 06 PQR 07 STU 08 VWXYZ
5. If the label you want does not appear,
scroll through the labels using the
j
and
k
keys until you find it.
TEL DIR. Y/j
k
N
08 XYZ COMPANY
6. Press the Yes key to dial th e nu mbe r yo u wan t.
7. Either:
❐ Dial more numbers. (Broadcasting:Type I only)
❐ Press the Start key.
Cross-references
Speed Dial : page 29.
BASIC OPERATION
43
Page 55

Other Features for Transmission
When you make a routine transmission, you can use a few optiona l fea tu res.
Press the k key to access them.
Sending at a Specific Time
Using this feature, you can instru ct the machine to delay transmission of your
message until a later time which you specif y. This allows you to take a dva ntage of
off-peak te lephone line charges without having to be by the machine at th e time.
CAUTION (Type I Only):
If your machine’s memory is full, you will have to keep the message in the
document fe eder. This me ans that nobody can us e the doc ument fe eder
unless they remove your document. This would automatically cancel the Send
Later Operation.
1.
Press the k key until "
SEND LATER?
"
is displayed.
SET OPTION Y/
k
SEND LATER?
2. P ress the Yes key.
SET OPTION KPAD/Y
TIME 00:00AM 10:00AM
3. Example: Send at 11:30 PM
Press 1,1,3,0,# using the ten keypad.
SET OPTION */#/Y
TIME 11:30PM 10:00AM
❐ To change AM to PM or the other way around,
Press the # key.
4. Press Yes key
READY 97% 10:00AM
TRANS STANDBY
❐ The send later time cannot be more tha n 24 hours
in the futur e.
SENDING IMMEDIATELY VS. SCANNING QUICKLY
44
Page 56

Printing the Page Number (Immediate Transmission Only)
When your fax message is printed at the ot he r end , page numbers will b e printed
on the top of each page. Using the Page Numbe r fea tu re, you can select the
format in which the page numbers are prin te d.
If you do not use Page Number:
Page numbers will be printed only as a sequence (fo r exa mple P1,P2,P3). This
makes it difficult fo r t he oth er party to tell at a glan ce whe th er an y pages are
missing (for example, due to a double feed in your mach ine ’s docu men t fe eder).
If you use Page Number:
Page numbers will be printed in batch-numberin g format (for exa mple P1/3, P2/3 ,
and P3/3 for a three-page messa ge ). This make s it easy fo r the ot he r party t o se e
how many pages you sent and if any are missing. Ho weve r, you have to input the
number of pages usin g th e keypad before sending the m.
NOTE: ❐ On Type I mo de ls, wh en you use Memory Transmission, Page number
is automatically switched on and the number of pages is automatically
counted.
1. P ress the k key until "
SET PAGES?
"
is displayed.
SET OPTION Y/
k
SET PAGES ?
2. P ress the Yes key.
SET OPTION KPAD
PAGES :
ll
3. Enter the total number of pages you
wish to send Example : 10 pages.
Press 1,0 using the ten keypad.
SET OPTION Y/N
PAGES : 10
4. P ress the Yes key.
TRANSMIT OPTION
k
DIAL FAX NUMBER
BASIC OPERATION
SENDING IMMEDIATELY VS. SCANNING QUICKLY
45
Page 57

Sending Your Identification at the Top of Your Message
Normally, the TTI programmed in your machine is printed at the top of each o f t he
pages you transmit when they are receive d at the other en d. The top of the ima ge
will be overprinted if there is no margin at the top of the transmitte d page.
NOTE: If you switch TTI off, the image received at the other en d will b e u nma rked .
1. P ress the k key until "
TTI PRINT?
"
is displayed.
SET OPTION Y/
k
TTI PRINT?
2. Press the Yes key.
SET OPTION Y/j
k
kON OFF
3.
Press the
j
and the k keys until the dis-
played setting is correct.
SET OPTION Y/j
k
ON kOFF
4. P ress the Yes key.
TRANSMIT OPTION
k
DIAL FAX NUMBER
Cross-reference
TTI: see page 19
Changing Transmission Mode (Type I Only)
Converting Immediate Transmission to Memory Transmission
If there is a message still waitin g in th e do cume nt feeder, you can convert it into
memory file. Press the Line Sele ct key to make sure that th e machine is in
Memory Tran smission mode, then press the Sta rt key. The document will be
scanned and stored into memory, leaving the document feeder free for others to
use.
Memory Transmission as Your First Choice
The default mode of your machin e is Immediate Transmission. If you wish, you
can change this home position to Memory Transmission.
The procedure is as follows. If you need more information about the User
Parameter settin gs ad just men t pro cedure, see page 102.
1. P ress the Function key and
6,2,2,2, 2,6,3 using the ten keypad, then
press the Yes key.
SETTING? Y/
j
PRINT LIST
j
❐ At this time, you can print a User Parameter List, if
you press the j key, then press the Yes key.
Changing Transmis si on Mode (Type I Only)
46
Page 58

2. P ress the Yes key. The setting s fo r
switch 0 are now shown in the display.
The setting that you need to change is
that for digit 6.
KPAD/Y/j
k
SWITCH 00: 0000 0000
3. If you wish to change the setting, press
6 using the ten keypad .
KPAD/Y/
j /k
SWITCH 00: 0100 0000
4. Finish: Press the Yes key, then press
the Function key.
REDIALING
If a message was not transmitted successf ully, that does not mean that you have
to enter the telephone numbe r aga in. In many cases, the machine will redial the
destination automat ically.
Automatic Redialing
The machine will automatically redial the othe r part y if any of the follo wing
conditions occurred.
❐ The other party’s line was busy.
❐ There was no reply from the other party.
❐ The message was rejected by the machine at the othe r e nd beca use of ex-
cessive errors (in this case, redialing will only ta ke place if Me mory Transmission was used).
Redialing is done 4 times at 5 minute int erva ls (for Memory Transmission) or 2
twices at 5 minute intervals (for Immed iat e Transmission). The number of redials
and the redial intervals may be adjuste d by a service tech nicia n.
❐ During redialing, the number being
dialed is displayed as shown on
the right.
3172270471
SET DOC. OR DIAL NO.
❐ If redialing fails for an Immedia te
Transmission, the display shown
opposite. You can convert t his co mmunication to a Memory Transmission to free up the mach ine for
other users. Press the Line Se le ct
key then press the Yes key.
READY 100% 10:00AM
REDIAL STANDBY
Digit6
0: Memory Transmission
1: Immediate Transmission
BASIC OPERATION
REDIALING
47
Page 59

Using the Redial Key
The machine remembers th e last 10 (last one in a Type II Model) number that you
have input. If you have to red ial the nu mbe rs, eit he r:
❐ T yp e I Mod els: Just pre ss the Redia l key unt il the number or na me of the party
you wish to redial is displayed, then press th e St art key.
❐ T yp e II Mode ls: Just press th e Redial key, then press the Start key.
This feature has the following uses:
❐ If the machine is waiting to red ial th e other party, you do not have to wait for the
redialing interval to expire. Press th e Redial key until the required telephone
number or name is displayed, then press the Start key.
❐ If you wish to send anothe r message to the same address that you sent one to
recently, you don’t have to dial the full number again if it is still in the Redia l
memory. Place the message in the feeder, then press the Start key.
❐ Press the Redial key until the required telephone number or name is
displayed, then press Start key.
NOTE: ❐ Using Redial, you cannot retry a failed Memo ry Transmission.
However, you can redial the telephone number, as explained in the
previous pages (Type I Only).
❐ Redial key employs the A I Short Protocol featu re.
1. Follow both steps in any ord er.
❐ Press the Pause/Redial key until
the required number appears in th e
display, then press the Yes key
twice.
REDIAL Y/
j k
n
08 ATLANTA OFFICE
❐ Carefully place your fax message
into the auto document feeder
TRANSMIT OPTION
k
DIAL FAX NUMBER
2. Either:
❐ Select another number. (Type I Only: Broadcasting)
❐ Start the transmission : Press the Start key.
REDIALING
48
Page 60

RECEIVING FAX MESSAGES
Choosing the Reception Mode & How to Receive
Overview
There are three ways to set up your machine to receive fax messages;
❐ Auto Select Mode
❐ Manual Receive Mode
❐ FAX Mode
Giving Priority to Autoselect Mode
This mode is selected when the Auto Se lect in dicato r is lit. If it is not lit, press the
Reception mode Key under the indicator until it is lit.
❐ It will start ringing to allow you to answer the call. If you do not answer with in a
certain time, the machine will connect the caller to the fax machine.
Setting the Auto Ring Count
When the machine detects an incoming call, it will ring to attra ct you r att entio n.
While the machine is ringing you ha ve a cha nce to answer the call, after ringing
stops, the fax machin e ta kes th e line and you are no longer able to answer th e
call yourself. The Auto Ring Co un t is t he number of ringings that the mach ine will
ring.
1. P ress the Function key and
6,2,2,2, 2,6,1 using the ten keypad, then
press the Yes key.
Y/NEXT
k
SET POLL ID
2.
Press the k key until the opposite display appears.
Y/ NEXT
k
SET NO. OF RINGS
3. P ress the Yes key. The factory sett ing
will appear. If you wish to change it,
press the No key to dele te it.
NO.OF RINGS Y/N
08 RINGS
4. Enter the number of rings (Auto Ring
Time).
NO.OF RINGS Y/N
03 RINGS
5. Press the Yes key, then the Function key.
BASIC OPERATION
49
Page 61

Connecting the Telephone Answering Machine (TAM) to Your Fax.
When you are in Auto Select Mode, you can conn ect a Telephone Answering
Machine (TAM).
❐ This mode is useful if you have a te lep ho ne answe ring machin e connected to
the "TEL" jack on your machine.
❐ TAM mode ensures that your answering machine ha s the chan ce to respond to
incoming telephone calls. If th e call ha pp en s to be a fax messa ge , th e
message will be given to the fax machine automatically.
❐ In the TAM Mode,the Auto Ring co un t must be set to one ring more th an the
number of rings that your answering machine waits before it ta kes t he call. To
check this number, have a friend call and do not answer the phone. Count the
number of rings that you hear before the answering machine takes the call.
Giving Priority to Fax Messages (Fax Mode)
This mode is selected when th e Auto Select indicator and Manual Receive
indicators are not lit. If one of th e rece pt ion mode indicators are lit, press th e
Reception Mode key under the indicators unt il t he bot h lig ht s go out. Your
machine will treat each incoming call as if it comes fro m a fax mach ine.
❐ You do not have to be by the machine, as long as you ha ve kep t the power on.
Use this setting if you have con ne cte d th e machine to a special line used only
for fax messages.
Giving Priority to Phone Calls (Manual Receive Mode)
This mode is selected when th e Manual Receive indicator is lit. If it is not lit ,
press the Reception Mode key. This setting is useful if you wish to u se yo ur f ax
machine’s handset to answer telephone calls coming in on the same line as fax
messages.
❐ Your machine will not answer incoming calls automatically.
❐ You must answer every incoming call yourself and decide whet he r the
incoming call is from a fax machine or from a telep ho ne caller.
RECEIVING FAX MESSAGES
50
Page 62

Receiving
Auto Select Mode
1. The machine start ringing.
2. You have two option s:
❐ Pick up the handset. If a person is at the oth er en d, you can can continue a
normal conversation. However, if it is a fax machine, press the Start key
then replace the handse t to receive the message.
❐ Do nothing. The mach ine keep ringing. After a number of rin gs (th e au to
ring time) the machine will beg in to receive a message. You can change the
number of rings (the auto ring time) - see page 49.
FAX Mode
1. The telephone rings once.
2. The machine automa tica lly st art s to rece ive a fa x messag e.
2
1
The machine
rings once.
Connecting
NOW COMMUNICATING
SET DOC.OR DIAL NO.
BASIC OPERATION
RECEIVING FAX MESSAGES
51
Page 63

Tel Mode
1. The machine rings con tin uo usly until you answer the call. Pick up the handset.
2. Either:
❐ If you hear a voice on the other end, speak in reply.
❐ If you hear a tone every few seconds, the other end is a fax terminal (also,
if you don’t hear anythin g, the other end may be an older machine tha t
doesn’t send identificat ion signa ls). Pre ss the Sta rt key to receive the fax
message.
3. If the pe rson at the other end wishes to send you a fax message, remove any
documents, that are in the feeder. Press the Start key to receive th e
message. Then repla ce th e h an dset. The machine will sta rt to receive the
messages.
When You Connect the Telephone Answering Machine
If the caller is another fax machine:
If the caller is a telephone caller:
1. The phone ring s un til t he Auto Ring Count is reached.
2. If you do not pick up th e p hone be fo re t he Au to Ring Count is reached, the
answering machine takes th e call (it starts recording).
3. If the fa x machin e he ars a fa x ma chin e ide ntification signal from the oth er
end, it switches to fax mode automatically for this call. It immed iat ely takes
the line over from the answerin g mach ine and receives the fax message.
3
Ring
1
TAM is answering
NOW COMMUNICATING
SET DOC. OR DIAL NO.
2
Ring
1
T AM : Answerin g
2
TAM: Recording
3
RECEIVING FAX MESSAGES
52
Page 64

Receiving Fax Messages When There Is a Problem (Type I Only)
Over view
If the printer is jammed or out of supplies, you will still be able to receive fax
messages; any messages coming in will be store d in the mach ine ’s memory. This
is called Substitute Reception.
If the "Receive File" indicat or is lit, a messa ge has been store d in th e memo ry
using the Substitute Reception feature.
Check the following:
❐ The paper roll may be used up. If so, replace the paper : see page 93
❐ The printer paper may have jamme d. If so, remove the jam: see page 95
❐ The cover is not closed proper l y. If so, close the cover.
The messages received into memory will be printed and erased once the mach ine
has returned to normal operation afte r paper cycling .
Switching Substitute Reception On or Off
There are two conditions unde r which you may wish to disa ble this fe at ure .
❐ If you do not like keeping received fax messages in memory: After your
machine has received a fax message to memo ry, it sends an OK signal to the
other end. However, if something happens to your machin e and you lose the
fax message before you have a chance to read it, the sender will not be
informed. Therefore, you may not wish to use th e S ubstit ut e Re cep tio n f ea ture.
❐ If you do not wish to have your memory full of mail from un kno wn sen de rs: If
you have not enabled the Authorized Rece ption feature, yo u can receive fax
messages from anybody. However , you can see who they are fro m beca use
their Identification (the TTI) is printe d at the top of each page. I f t he ot her pa rty
has not programmed its identifica tio n (pe rha ps in an att emp t to hide thei r
identity), you may not wish to receive their me ssag es int o memo ry because
they would take up valuable memory spa ce.
Cross-reference
ECM: see page 62. Authorized Reception: see page 66.
BASIC OPERATION
RECEIVING FAX MESSAGES
53
Page 65

If you wish to switch Substitut e Reception on or off, do th e fo llowing. If you need
more information about th e User Parame te r Set tin gs ad just men t pro cedure (see
page 102).
1. P ress the Function key and
6,2,2,2, 2,6,3 using the ten keypad, then
press the Yes key.
SETTING? Y/
j
PRINT LIST
j
2.
Press the Yes key. Press the k key until
the settings for Switch 05 are displa yed .
KPAD/Y/j
k
SWITCH 05:0000 0000
3. Change the settings of digit 0 and 1.
The meanings of these setting are as
follows:
KPAD/Y/j
k
SWITCH 05:0000 0000
* indicates the facto ry settings.
Digit Purpose
0 Substitute Reception 0: Off 1: On *
1
Reception to memory when no
RTI or CSI identifiers were receive d
from the other party 0 Enabled 1: Disabled *
4. If you wish to change the setting, press
0 or 1 using the ten keypad.
5. Press the Yes key, then press the Functi on key.
Digit 1 0
RECEIVING FAX MESSAGES
54
Page 66

CHANGING RECEPTION MODE
This feature is useful because it lets you switch the reception mode quickly for
just one call. For example, if you are in Telephone mode and an incoming call
turns out to be a fax, you can insta nt ly chan ge over to Fax Mode and receive the
message. Similarly, you may change:
❐ From Fax mode to Tel mode
❐ From Auto Mode to Fax mode
❐ From Tel mode to Fax mode
NOTE: ❐ This feature is only available when you are using Tone dial.
❐ In Asian, you can not swith over Fax Mode to Telephone Mode.
❐ In USA, you can switch over Fax Mode to Telephone Mode. After
talking you can switch back Telephone mode to Fax mode.
Switching Reception Mode Switch Over On/off
1. Press the Function key and
6,2,2,2,2,6,3, using the ten keypad, then
press the Yes key.
SETTING? Y/
j
PRINT LIST
j
❐ At this time, you can print a User Parameter List
if you press the k key, then press the Start key.
2. P ress the Yes key . The n p ress t he k key
until the settings for Switch 07 are displayed.
KPAD/Y/j
k
SWITCH 07: 0000 0000
❐ The setting which is in the dis pl ay is th e cu rren t
setting (normally seen in a machine just
delivered from the factory).
3. The setting that you need to change is
digit 5. If you wish to change it press 5
using the ten keypad .
KPAD/Y/j
k
SWITCH 07: 0010 0000
4. Finish : Press the Yes key and the Function key.
Using Reception Mode Switchover
1. Make sure tha t th e mach ine is in On e Touch Change Over Mode.
2. After ring ing , ha ng up the ha nd set , then press 2 twice on the separate
handset’s keyp ad .
3. The machine automatically changes the reception mode.
Digit 5
0: Switch Over Off
1: Switch Over On
BASIC OPERATION
55
Page 67

MAKING TELEPHONE CALLS
You can use your machine for dialing in th e same wa y as you wou ld use a
telephone. This is usefu l wh en you would like to use this machine fo r fa xing as
well as for telephone conversations.
❐ You can dial using Quick Dial keys or Speed Dial Codes.
❐ With the On Hook Dial feature, you do not have to pick up the hand set before
dialing.
❐ You can send a fax message after finishing the conversation, witho ut having to
make a new call.
Cross-reference
Tel Mode
(Manual Receive Mode) : see page 50.
Making a Telephone Call
Using On Hook Dial
Using On Hook Dial is like using the handset (see the next page), except that you
do not have to pick it up before dia ling . Just press th e On Hook Dial key, and dial
the number: When you hear the other party on the fax machin e’s built-in speaker,
you can pick up the handset. This keeps both hands free for referring to telep ho ne
numbers while you are dialing. You can use this feature to talk before sending a
fax, or to just make a telep ho ne call.
1. Press the On Hook Dial key.
ON HOOK MODE
llllllllllllllllll
2. Dial.
ON HOOK MODE
3841037227
lllllllll
NOTE: Do not press the Start key.
If you wish to cancel the call,
press the On Hook Dial key
or the Stop key.
3. Listen to your mach ine ’s built-in speaker.
❐ If you hear a voice , pick up the ha nd set and spea k to the othe party. Later,
if you want to send a fax message aft er th e conversation, proceed to ste p
4, otherwise replace the handse t to finish .
❐ If you hear a high pitched tone instead of voice, you can send your fax mes-
sage now. Go to step 4.
4. Place your document in the feeder then ask th e ot he r part y to pre ss t hei r
Start key.
5. When you he ar a high pitched tone, press the Start key and replace the
handset.
See page 100 for how to dial.
Do not use the ha nd set.
56
Page 68

Using the Handset
Using the fax machine’s bu ilt-in handse t, you can use th e fax machin e in th e
same way as a normal telephone. Pick up the handset and dial on the fax
machine’s ten keypad (or use a Quick Dial key or a Speed Dial Code if you wish).
1. Pick up the hand set .
2. Dial.
NOTE:Do not press the Start key.
3. Continu e as fo r a norma l tele ph on e con versa tion.
Using the Redial Key
Use Redial Key if you wish to redial a number t hat you diale d corre ctly.
1. Press the Pause/Redial key, until the
required number appears in the display,
then press Yes key.
REDIAL Y/j
k
n
08 ATLANTA OFFICE
2. P ress the Start key. The number will be
dialed immediately.
Answering the Telephone
If the telephone rings just once: A fax is coming in. Do not pick up the handset.
If the telephone rings continuously:
1. Pick up the handset and speak to th e othe r part y. If you hear a high-pitched
tone, a fax is coming in. Press the Start key then hang up.
2. If the calle r want s t o sen d you a fax, press th e Sta rt ke y af ter speaking. Then
hang up. If nothing ha pp ens after you press the Start key, the power may be
switched off or the te lep hone may not be conne cte d corre ctly.
To Talk Before Sending a Fax (On Hook Dial)
1. Press the On Hook Dia l key
2. Dial.
NOTE: Do not use the handset and do not press the Start key.
3. If you hear a voice from t he machin e’s bu ilt-in speaker, pick up the handset
and speak to the other party.
❐ If you hear a high-pitched tone instead of a voice, place your fax message in the feeder,
then press the
Start key.
4. When you are read y to sen d you r fax message, place your message in th e
feeder, then a sk the other pa rty to press the Sta rt key.
5. When you he ar a high pitched tone, press the Start key.
BASIC OPERATION
MAKING TELEPHONE CALLS
57
Page 69

ADVANCED FEATURES
TRANSMISSION
Storing an Often Used Document (Type I Only)
Overview
If you often find that you have to often send a part icula r p ag e to peo ple (f or
example, a map, a standard attachment or a set of instructions), store that page in
memory in an Auto Docu men t a ssign ed to a Q uick Dial Key. This feature is called
Auto Document.
Then, when you need to send that pa ge to some body, press the Quick Dial key
that you stored it in, place any ot he r pag es th at you wish to send into the feede r,
dial, and press Start. At t he o th er en d, t he A ut o Document will be printe d first.
You can also program a destination for each Auto Document into th e same Quick
Dial Key.
Before instaling, make sure th at the ECM is switched on. (Funct ion 62).
Storing an Auto Document
1. Make sure that the machine is in
standby mode.
READY 100% 10:00AM
SET DOC. OR DIAL NO.
❐ If you select Memory Transmission, "
READY "
on
the display is replaced by
" MEM TX
"
2. Take the document that you want to be
an Auto Document and pla ce it int o the
feeder.
TRANSMIT OPTION
k
DIAL FAX NUMBER
3. Press the Function key and 3,4 using
ten keypad, then press th e Yes Ke y.
n
l QUICK/
j k
PRINT LISTj/SEARCH
k
4. Press the Quick Dial key that you wish
to store the program in.
Example: Quick Dial key 04
n
04 PROGRAM? Y/
j k
❐ Make sure that this key is vacant.
58
Page 70

5. P ress the Yes key.
n
04 Y/N
PROG. AUTO DUCUMENT?
6. P ress the Yes key. The document b egins to be scanned.
SAVING TO MEMORY
F-013 P.01 98%
n
04 Y/N
PROGRAM LABEL?
7. Either
❐ Enter the label: Press the Yes key.
n
04 ABC
llllllllllllllllll
❐ Otherwise: Press the No key. Go to
step 10.
8. Enter the label for th is A ut o Docu men t.
n
04 ABC/
j k
BRANCH MAP
9. P ress the Yes key . If th e disp lay is n ot
as opposite, press the Yes key again.
nl
QUICK/
j k
PRINT LISTj/SEARCH
k
10.Press the Functi on key.
NOTE: You can program a Quick Dial number an d the Auto Document in the
same Quick Dial key. If you program the key as a Quick Dial before programming the Auto document the display below will ap pe ar in St ep 4. If
you press the Yes key, Whenever you press the Q uick Dial key, the Auto
Document will be attache d to tha t tra nsmissio n.
n
08 PROGRAM? Y/
j k
USED AS DIAL
Using a Program
1. Make sure tha t th e mach ine is in sta ndby mode. (see page 6)
2. If you wish t o att ach a fax message to yo ur A ut o Do cume nt , p lace the
document face do wn into the feeder.
3. Press the programmed Quick Dial key.
Example: Quick Dial key 08
READY 95% 10:15AM
n
08 OFFICE MAP
4. Dial the number , then press the Start
key.
ADVANCED
FEATURES
TRANSMISSION
59
Page 71

Printing the Contents of an Auto Document
1. Press the Function key and 5,3 using
the ten keypad . Th en press the Yes key.
n
l QUICK/
j k
PRINT LIST j/SEARCH
k
2. P ress the Quick Dial key that holds the
Auto Document that you wish to see.
n
04 Y/
j k
BRANCH MAP
3. P ress the Yes key.
n
04 START/N
BRANCH MAP
4. P ress the Start key.
PRINT MEMORY FILE
Erasing a Program
When you wish to dele te an Au to Document program, do th e following.
1. P ress the Function key and 3,4 using
the ten keypad . Th en press the Yes
key.
n
l QUICK /
j k
PRINT LIST j/SEARCH
k
2. Press the Quick Dial key that holds the
program that you wish to erase. Example : Press Quick Dial key 04
n
04 CHANGE? Y/
j k
USED AS AUTO DOC.
3. P ress the Yes key.
n
04 Y/N
PROGRAM LABEL?
4. P ress the No key.
n
04 Y/N
AUTO DOC. CLEAR?
5. To delete the program: Press the Yes
key.
n
l QUICK/
j k
PRINT LIST j/SEARCH
k
6. Either:
❐ Erase another program: Go to step 2.
❐ Return to standby: Press th e Functi on key.
Printing a List of Auto Documents
This procedures a list of pro grammed as Auto Documents.
1. Press the Function key and 4,4 using
the ten keypad, th en press th e Yes key.
START
PRINT PROGRAM LI ST
2. To print : Press the Start key.
TRANSMISSION
60
Page 72

Tonal Signals
On this model the
i
key on the ten keypad is used as th e Tone Key. Some
organizations offer you a special service by telephone, which you can access by
transmitting Touch Tone o r DTMF tones. If your phone service provides o nly
pulse dialing, or if you are calling over a digital network, the ability to generate
Tonal Signals will allow you to access these services. First, dial the other pa rty.
When you are throug h to the oth e r en d, press th e Tone key and enter the code
number that is needed to access the requ ired featu re on the othe r te rmina l.You do
not need to press the Tone key if your machine is set up for dialing in Tone Dial
(DTMF) mode.
Operating the Tone Key
1. Make sure tha t th e mach ine is in sta ndby mode, and that there is no
document in the fe eder .
2. Pick up the te lephone handset, or press th e On Hook Dial key.
3. Dial the remote facility. Do not press the Start key.
4. After your line is connect ed to the remote facilit y, do the following:
❐ If your telephone Line type is DTMF (Tone Dial): Go to step 5.
❐ If your telephone line typ e is Pulse Dial: Pre ss the
i
key on the ten key-
pad. A dot ap pears on the displa y.
5. Input the digits that you need to use the remo te fa cility. These digits will
depend on the remote facility.
NOTE:Do not press the Start key.
6. After you have finish ed your busine ss with the remote facility, hang up.
Cross-reference
Tone Dial (Telephone Line Type): see page 21.
ADVANCED
FEATURES
TRANSMISSION
61
Page 73

ECM (Error Correction Mode) and Page Retransmission
(Type I Only)
ECM is a signaling system that gre at ly re du ces th e cha nce of da ta bein g lost
because of a bad telep ho ne line. ECM is useful if you frequently communica te
over poor telephone lines. With ECM switched on, the commun icat ion cost will
increase if the line is bad, but the data will be sen t much more relia bly.
If ECM is switched off, Page Retran smission will be used. The whole page will be
resent (unless you used Immed iat e Transmission, in which case damaged data
cannot be resent at all). ECM is more ef f icient because it only resends the
damaged parts of the data, the maximum possible number of retra nsmissio n
attempts is much higher, and it also works with Immediate Transmission.
You can switch ECM on by following the procedure below.
1. P ress the Function key and
6,2,2,2, 2,6,2 using the te n keypad. Then
press the Yes key.
Y/NEXT
k
SELECT LINE
2.
Press the k key until "
ECM ON/OFF
"
is displayed.
Y/NEXT
k
ECM ON/OFF
3. P ress the Yes key.
ECM Y/j
k
ON kOFF
4. Use the j and the k keys to switch this
feature on or off.
ECM Y/j
k
kON OFF
5. P ress the Yes key to store your setting,
then press the Function key.
TRANSMISSION
62
Page 74

Protection Against Wrong Connections
Preventing Transfer to a Wrong Connection
This feature preven ts th e au to mat ic swit chin g eq uip men t in the telephone network
from accidentally connect ing you to the wrong termin al.
However, it does not help you if you dialed the wrong number you rself . So , eve n if
this feature is switched on, you sho uld still check your operation panel disp lay to
check whether you have reach ed the correct termin al, and be ready to press the
Stop key if the wrong termina l’s RTI or CSI is displayed.
Your machine compares the number that you diale d with the CSI rece ived from
the other end. If the CSI is not the same as the telephone number, the
transmission is stopped.
This feature has to be switched on by a service techn ician .
NOTE: If you cannot send a message to a cert ain location while using this fea-
ture, contact the oth er en d an d make sure that they have stored their CSI
correctly. (If the other party is using a machine made by another maker,
they may not be familiar with the term CSI. Explain that you are interested
in the telephone numb er th at they stored in the machine for ide nt ification
purposes)
Cross-references CSI: see page 20.
ADVANCED
FEATURES
TRANSMISSION
63
Page 75

Preventing a Wrong Connection (ID Transmission)
This feature helps to stop you fro m accidentally sending a fax messag es to
terminal that is outside your net work. The ID co des of th e co mmun icat ing
machine are checked. If th ey are not the same th e commu nication is stopped.
The ID code is the same as the polling ID.
1. P ress the Function key and
6,2,2,2, 2,6,3 using the ten keypad, then
press the Yes key.
SETTING? Y/
j
PRINT LIST
j
❐ At this time, you can print a User Parameter List if
you press the Start key.
2. P ress the Yes key. then press the j key
until the settings for switch 6 are shown .
The setting that you need to change is
that for digit 2.
KPAD/Y/j
k
SWITCH 06: 0000 0000
3. If you wish to change the setting, press
2 using the ten keypad.
KPAD/Y/j
k
SWITCH 06: 0000 0100
4. Finish: Press the Yes key, then press
the Function key.
Cross-reference Polling ID:See page 76
Digit 2
0: ID Transmission Off
1: ID Transmission On
TRANSMISSION
64
Page 76

RECEPTION
Rejecting Messages from Certain Senders
Closed Network Reception
This feature may help you to pre ven t reception of excessive a amounts of junk fax
mail.
The ID Codes of the communicating machines are checked. If they are not the
same, the communication is stopped.
Contact a service technician if you are inte rest ed in this feat ure .
NOTE: This feature may not be reliable if you are communicating with a termina l
produced by a different manufacturer.
Cross-references ID Transmission: see page 64.
Rejection of Messages from Unidentified Senders
You can make the machine reject incomin g messa ge s tha t req uire storing in to
your machine’ s memory, if they are not accompanied with an identif ier such as the
RTI or CSI. Features that would be affected are Substitute Reception and
Forwarding.
The procedure is as follows (see pag e 102 if you need more information abo ut the
User Parameter Settings adjustment procedure).
1. P ress the Function key and
6,2,2,2, 2,6,3 using the ten keypad, then
press the Yes key.
SETTING? Y/
j
PRINT LIST
j
ADVANCED
FEATURES
65
Page 77

2. P ress the Yes key then press the k key
until Switch 05 is displayed.
KPAD/Y/j
k
SWITCH 05: 0000 0000
3. If you wish to change the setting, press
1 using the ten keypad .
KPAD/Y/j
k
SWITCH 05: 0000 0010
4. Finish: Press the Yes key, then press
the Function key.
Cross-references
Substitute Reception: see page 53. Forwarding: see page 70.
Authorized Reception
Overview
This feature helps you to reject jun k fax mail.
To authorize reception fro m a particular sender:
❐ Specify the senders whose messag es you want to rece ive. Do this by
programming the RTI or CSI of each sender (ask th e sen din g party wha t th eir
RTI/CSI is Or make a communicat ion with that termin al, print a TCR and rea d
off the RTI/CSI). If the other pa rty is using a machine made by another maker,
they may not be familiar with the terms RTI or CSI. Explain that you are
interested in the telephone number th at the y store d in the machine for
identification pu rpo ses. (Function 71)
❐ Switch Authorized Reception on. (Fu nction 62)
❐ Select whether to accep t (Fun ctio n 63 )
- Only messages from A utho rized Senders.
- All messages except tho se fro m Aut horized Sende rs.
If the RTI/ CSI is not th e same as any of tho se th at you have programmed into this
feature, the messag e will not be acce pt ed .
Digit 1
0: Messages are not rejected.
1: Messages are rejected
RECEPTION
66
Page 78

The number of R TI/ CSI ’s tha t you can store for use with this feature and the
forwarding feature is limited to 30 for Type I Models and 10 T yp e II Mo dels.
However, you can use Wild Cards to extend the number of R TI /CS I’s that you can
specify.
NOTE: ❐ If you turn Authorized Reception on and you d o n ot program any
senders’s R TI’s / CSI’s, your machine will not able to accept any
messages. If one of the autho rized termin als cha ng es th eir RTI/CSI,
you have to change the stored RTI also. Othe rwise, you will not be
able to accept messages from that sender any more.
Cross-references
RTI and CSI: see pages 18 and 20. TCR: see page 85.
Switching Authorized Reception On/Off
Before you use Aut ho rized Reception, you have to switch it on using Function 6 2.
If it is switched off, the machin e will accep t an y incomin g fa x message.
1. P ress the Function key and
6,2,2,2, 2,6,2 using the te n keypad. Then
press the Yes key.
Y/NEXT
k
SELECT LINE
2. P ress the k key until "
AUTHORIZED
ON/OFF
" is displayed.
Y/NEXT
k
AUTHORIZED ON/OFF
3. P ress the Yes key.
AUTHORIZED Y/j
k
ON kOFF
4.
Use the j and the k keys to switch this
feature on or off.
AUTHORIZED Y/j
k
kON OFF
5. P ress the Yes key to store your setting,
then press the Function key.
Selecting Whether to Exclude or Include Senders
1. P ress the Function key and
6,2,2,2, 2,6,3 using the te n key-pad,
then press the Yes key.
SETTING? Y/
j k
PRINT LIST
j
2. P ress the Yes key, then press the k key
until the settings for switch 08 are displayed.
KPAD/Y/j
k
SWITCH 08:0000 0000
ADVANCED
FEATURES
RECEPTION
67
Page 79

3. Change the setting of digit 3. Pre ss 3 us-
ing the ten keypad .
KPAD/Y/j
k
SWITCH 08:0000 1100
4. Finish: Press the Yes key , then press
the Function key.
Programming the Authorized S ende rs
1. P ress the Function key and
6,2,2,2, 2,7,1 using the te n keypad then
press the Yes key.
SETTING? Y/
j k
PRINT LISTj/SEARCH
k
❐ At this time, you can pri nt an Authorized Reception
List by pressing the j key, then press the Start key.
2. P ress the Yes key.
RTI/CSI ABC
j k
llllllllllllllllll
3. Type in an RTI or CSI.
Example: XYZ.CO.
RTI/CSI ABC
j k
XYZ.CO.
llllllllllll
4. Press the Yes key . If th e disp lay is n ot
as opposite, press the Yes key again.
RTI/CSI Y/N
STORE AS WILD CARD?
5. Either:
RTI/CSI ABC
j k
llllllllllllllllll
❐ Store this RTI as a Wild card:
Press the Yes key.
❐ Otherwise: Press the No key.
6. Either:
❐ Store another RTI/CSI: Go to step 2.
❐ Finish: Press the Function key.
Editing the Authorized Senders
1. P ress the Function key and
6,2,2,2, 2,7,1 using the te n keypad then
press the Yes key.
SETTING? Y/j
k
PRINT LISTj/SEARCH
k
❐ At this time, you can pri nt an Authorized Reception
List by pressing the j key, then press the Start key.
2. P ress the Yes key.
RTI/CSI ABC
llllllllllllllllll
Digit 3
0: Accept incoming messages o nl y from
specified senders.
1: Accept a ll incoming me ss ages excep t those
from specified senders.
Label inpu t an d editing: see pag e 100.
RECEPTION
68
Page 80

3. P ress the k key until the RTI/CSI tha t
you wish to edit appears.
RTI/CSI CHANGE? Y/
j k
XYZ.CO.
4. P ress the Yes key.
RTI/CSI ABC/Y/N
XYZ.CO.
5. Edit this RTI/CSI and input the correct
one .
RTI/CSI ABC/j
k
ABC COMPANY
6. Press the Yes key . If th e disp lay is n ot
as opposite, press the Yes key again.
RTI/CSI Y/N
STORE AS WILD CARD?
7. Either:
RTI/CSI ABC
j k
llllllllllllllllll
❐ Store this RTI as a Wild card:
Press the Yes key.
❐ Otherwise: Press the No key.
8. Either:
❐ Edit anot her RTI/C SI: Go to step 2
❐ Finish: Press the Function key.
NOTE:If you switch Authorized Reception on without programming any
authorized senders, all incoming messages will be rejected.
ADVANCED
FEATURES
RECEPTION
69
Page 81

Forwarding (Type I Only)
Overview
This feature is known as "Follow Me". Using th is fea tu re, you can pass fa x
messages coming in from certa in loca tio ns on to oth er f ax ma chin es. The
terminals that receive your fo rwarded messages are called "Forwardin g St at ions".
The senders whose incomin g messa ge s you wan t to pass on are called
"Specified Senders". If other fax machines in your org an izat ion have this feature,
you can use forwarding to set up distribution chains for incoming messages.
To set up Forwarding, program your machin e as follows:
❐ Program the phone numbers of the Forwarding St at ion s that you will pass on
messages to, together with the list of Specified Senders for each numb er
(Function 72).
❐ Switch Forwarding on.
❐ Decide whether you wan t you r machine to automatically print messages that it
forwards. (This feature is called Local Printin g, Funct ion 63).
❐ Select how to treat the Specifie d Se nd ers (Fun ctio n 63 ). Eit her f orwa rd:
-All messages except those from Specified Senders.
-Only messages from Specified Se nd ers.
In this machine, you can specify up to 5 forwarding statio ns. The number of
RTI/CSI’s that you can store for use with this f ea tu re a nd Au th orized Reception is
limited to 30. However, you can use Wild Cards to expand the number of
RTI/CSI’s that you can specify. I f th e RTI/CSI of the machine sending you a fax is
not the same as any of those that you have prog ramme d int o this fea tu re, the
message will not be forwarded.
Cross-references
RTI and CSI: see page 18 and 20 TCR: see page 85.
Forwarding Station
Your Machine
Specified Sender
RECEPTION
70
Page 82

You can select whether or not your machine tran smits a fo rward ing mark to be
printed at the other end on the top of each page of the output. This mark brin gs t o
the other party’s attention that th is messag e ha s bee n fo rward ed . Se e pa ge 73 for
more about the Forwarding Mark.
If one of the senders changes their RTI/CSI you must change the stored RTI/CSI,
or you will not be able to forward messages from that sender.
NOTE: First of all, you must program Function 72, see below.
Programming the Forwarding Feature
This procedure shows you how to set up you r machin e to forwa rd incoming fax
messages to the station s tog ethe r wit h a list of Specifie d Se nders’ RTI’s/CSI’s for
each forwarding sta tio n. Read thro ug h th ese procedures before you use th em,
they are a little complicated.
1. P ress the Function key and
6,2,2,2, 2,7,2 using the ten keypad, then
press the Yes key.
SETTING? Y/
j k
PRINT LISTj/SEARCH
k
❐ To print a list, press the
j
key, then press the Start
key.
2. P ress the Yes key.
FORWARD KPAD/j
k
llllllllllllllllll
3. Input the telephone number of the forwarding station using the ten keypad.
FORWARD KPAD/j
k
4710319266
lllllllll
❐ The Forwarding Stati on is th e nu mb er that you
wish to di rec t in coming messa ges to.
❐ If your machine is behind a PBX, add the access
code before the nu mb er, unless this Forwarding
Station is an extension connected to the same
PBX as your machine.
❐ If you do not program any sender’s identification,
all incoming messag es will be fo rward ed .
4. P ress the Yes key.
FORWARD Y/N
SET RTI/CSI?
5. Either:
RTI/CSI ABC j
k
llllllllllllllllll
❐ If you now wish to specify senders
whose messages should be fo rwarded to this statio n: Press th e
Yes key.
❐ If you wish to forward all incoming
messages to this statio n : Pre ss
the No key, go to ste p 8.
6. Input the sender’s RTI or CSI, then
press the Yes key. If the display is not
as opposite, press the Yes key again.
RTI/CSI Y/N
STORE AS WILD CARD?
ADVANCED
FEATURES
RECEPTION
71
Page 83

7. Either:
❐ Store this RTI as a wild card: Press
the Yes key.
❐ Otherwise: Press the No key.
8. Either:
❐ Input anot her RTI/CSI: Go to step 4.
❐ Input another Forwarding Station
number: Press the No key. Go to step 2.
❐ Finish: Press the Function key.
Caution: If you do not specify any senders, all incoming fax messages will be
forwarded.
Editing the Forwarding Feature
1. P ress the Function key and
6,2,2,2, 2,7,2 using the te n key-pad, then
press the Yes key.
SETTING? Y/
j k
PRINT LIST j/SEARCH
k
2. P ress the Yes key.
FORWARD KPAD/j
k
llllllllllllllllll
3. Press the j and the k keys until the
RTI/CSI that you wish to edit appears.
FORWARD CHANGE? Y/j
k
3479037227
4. P ress the Yes key , then edit this forwarding station numb er an d en te r the
correct number using the ten keypad.
FORWARD KPAD/Y/N
3104719266
5. P ress the Yes key.
FORWARD Y/N
SET RTI/CSI?
6. Press the Yes key.
RTI/CSI ABC j
k
llllllllllllllllll
7. Either
RTI/CSI ABC Y/N
SAN JOSE BRANCH
❐ To add RTI’s/CSI’s to this number:
Press the Yes key, then input an
RTI/CSI. Press the Yes key.
❐ To edit RTI’s/CS I’s allocated to this
number: Press the Yes key and
scroll with the j and the k keys until the RTI/CSI th at you wish to edit
appears, then edit it. Press the Yes
key to confirm the new allocation.
RECEPTION
72
Page 84

8. Either:
❐ Store this RTI as a Wild Card: Pre ss the Yes key.
❐ Otherwise: Press the No key
9. Either:
❐ Input anot her RTI/CSI: Go to step 5.
❐ Input another forwarding station numbe r: Pre ss t he No key. Go to step 3.
❐ Finish: Press the Function key.
Switching Forwarding On/Off
Before you use Forwardin g, you ha ve t o swit ch it on usin g Fu nct ion 62 . A ft er you
switch Forwarding on, "
FORWARD
" is displayed when the machine is in standby
mode.
1. P ress the Function key and
6,2,2,2, 2,6,2 using the te n keypad. Then
press the Yes key.
Y/NEXT
k
SELECT LINE
2.
Press the k key until "
FORWARDING
ON/OFF
" is displayed.
Y/NEXT
k
FORWARDING ON/OFF
3. P ress the Yes key.
FORWARDING Y/j
k
ON kOFF
4. Use the j and the k keys to switch this
feature on or off.
FORWARDING Y/j
k
kON OFF
5. P ress the Yes key to store your setting,
then press the Function key.
FOWARD 100% 9:02 AM
SET DOC. OR DIAL NO.
Selecting Which Message to Forward
1. P ress the Function key and
6,2,2,2, 2,6,3 using the ten keypad. then
press the Yes key.
SETTING? Y/
j k
PRINT LIST
j
2.
Press the Yes key , then press the j and
the k keys until the settings for Switch
08 are displayed.
KPAD/Y/
j/k
SWITCH 08: 0000:0000
3.First, change the setting of digit 7. If you
to change digit 7, press 7 using the ten
keypad .
KPAD/Y/j
k
SWITCH 08: 1100 0000
4. Finish: Press the Yes key , then press
the Function key.
Digit 7
0: Only forward messages fro m Spe ci fi ed
Senders.
1: Forward all messag e ex ce pt for those from
Specified Senders
ADVANCED
FEATURES
RECEPTION
73
Page 85

Switching Local Printing On/Off
When you switch Forwarding on, messag es your mach ine forwards are not
printed. If you wish, you can also print them from your machine.
1. P ress the Function key and
6,2,2,2, 2,6,3 using the ten keypad, then
press the Yes key.
SETTING? Y/
j k
PRINT LIST
j
2.
Press the Yes key , then press the k key
until the settings for Switch 11 are displayed. Change th e setting of digit 6.
KPAD/j
k
SWITCH 11: 0000 0000
3. If you wish to change the setting, press
6 using the ten keypad .
KPAD/j
k
SWITCH 11: 0100 0000
4. Finish: Press the Yes key, then press
the Function key.
NOTE: When turned on and your machine fails to forwa rd a messa ge (for exa m-
ple if the line is busy), you will still have printed copy.
Enabling and Disabling the Forwarding Mark
The forwarding mark is printed at the receiving end on the top of each page of the
fax messages that are forwarde d fro m yo ur mach ine . This ma rk will he lp t he
operator at the other en d to recognize messages that have bee n fo rward ed . If you
wish, you can switch this mark off.
To switch the Forwarding Mark on or off, do the followin g pro ced ure (See page
100 if you need more information ab out th e User Parame te r settings adjustment
procedure).
1. P ress the Function key and
6,2,2,2, 2,6,3 using the ten keypad, then
press the Yes key.
SETTING? Y/
j k
PRINT LIST
j
2. P ress the Yes key, then press the j and
the k keys until the settings for Switch
02 are displayed. Change the setting of
digit 0.
KPAD/j
k
SWITCH 02: 0000 0000
3. If you wish to change the setting, press
0 using the ten keypad .
KPAD/j
k
SWITCH 02: 0000 0001
4. Finish: Press the Yes key, then press
the Function key.
Digit 6
0: Local Printing Off
1: Local Printing On
Digit 0
0 Fowarding Mark Off
1 Fowarding Mark On
RECEPTION
74
Page 86

Wild Cards
This feature greatly enh an ces th e effectiveness of the following feature s:
❐ Authorized Reception
❐ Forwarding
In each of these features, you have to store th e RTI or CSI o f vario us terminals
that you normally receive fax messa ges from. Then, when your machine de te cts
an incoming call, it checks the RTI and CSI of the other terminal, and act s
accordingly. When you program RTI’ s for th ese featu res, you can prog ram wild
cards to greatly expand the numbe r of te rmina ls that you can spe cify.
Example:
If you store MAN as a wild card, and a terminal with an RTI that includes
MANCHESTER, HUMAN or HUMANE calls you, your ma chin e will recognize
MAN as a wild card and accept and/o r f orwa rd th e message.
CAUTION:This feature cannot recognize spaces.
Cross-references
Authorized Reception: see page 66. Forwarding: see page 70.
RTI and CSI: see page 18 and 20.
ADVANCED
FEATURES
RECEPTION
75
Page 87

OTHER
Calling to Request a Message (Polling)
Overview
Polling means "picking up" a documen t that has been left for you at a remo te fax
terminal. You can also leave a document in your machine’s memory (on Type I
models) or in the document feede r (Type II models) for other machines to poll
from you.
❐ With polling, telep hone line costs are charged to the perso n rece iving the
message (the message receiver).
❐ Polling can only be used when both mach ines have the Polling feat ure .
Storing the IDCode
This code can be any four-digit co de (usin g d igit s 0 t o 9 and letters A to F),except
0000 and FFFF. This ID Code is also used ID for T ran smission . (se e p age 64).
Before programming the ID Code, agree with other use rs in your fa x network on
an ID Code.
1. P ress the Function key and
6,2,2,2, 2,6,1 using ten keyp ad , then
press the Yes key.
Y/NEXT
k
SET POLLING ID
2 If the above display has not appeared,
press the k key until the screen is as
shown opposite.
3. Press the Yes key.
POLLING ID KPAD
llll
4. Input the Polling ID that you will be using.
Example: 0917 , press 0,9, 1, 7u sing the
ten keypad.
POLLING ID KPAD
0917
5. Press the Yes key .
6. Finish: Press the Function key
Message Transmitter
Message Reciever
76
Page 88

Leaving Documents to Be Picked up by Others (Polling
Transmission)
Use this feature when you wish to leave a docu men t in th e do cument feeder for
callers to pick up. On Type I models only, you can sto re t he documents in memory
until someone picks them up. You cannot specify the t ele phon e number of the
message receiver (the polling terminal), but by using the ID Code there are ways
to make sure that the messag e do es no t go to th e wron g pla ce, as explained
below. There are three types of Polling Transmission:
Free Polling: Anybo dy ca n p oll t he messa ge fro m th e p olle d machine’s memory.
Secured Polling: The messag e will o nly be sent out if the ID Code of the polling
machine is the same as the ID Code store d in th e po lled
machine.
Stored ID Override: There are two ways to use th is fe at ure :
❐ If your ID Code is diffe ren t fro m tha t of the other te rmina l, you can use the
other terminal’s ID Code just for this tran smission (ask the other te rmina l’s
operator what their ID Code is). Your machine’ s store d ID Co de will be ignored.
❐ For extra security, both parties can specify an ID Code just for this
communication. The ID Co des of b oth mach ine s will be ignored. All
communicating parties need to coord inate their ID Codes in this case.
Free Polling
1. Follow both steps in any ord er:
❐ Place your document in the feeder.
TRANSMIT OPTION
k
DIAL FAX NUMBER
❐ Press the Function key and 1,3 us-
ing the ten keypad , then press the
Yes key.
FREE POLLING OPTION
k
SET DOCUMENT
2. P ress the Start key.
❐ Your fax message is held on polling
standby.
Secured Polling
1. Follow both steps in any ord er:
❐ Place your document in the feeder.
TRANSMIT OPTION
k
DIAL FAX NUMBER
❐ Press the Function key and 1,2 us-
ing the ten keypad , then press the
Yes key.
POLLING TRANS OPT
k
SET DOCUMENT
See page 79 for options that are
availabl e with Polling Trans mission.
See page 79 for options that are
available wit h Polling Transmission.
ADVANCED
FEA TURES
OTHER
77
Page 89

2. P ress the Start key.
❐ Your fax message is held on polling standby.
NOTE: If you have not yet stored an ID Code using Function 61, you will be
asked to enter an ID Code. Proceed in the same way as for step 4 in "Stored
ID Override" below.
Stored ID Override
This procedure will override the ID Code stored in your machine. The override is
only effective for this one tran smission .
1. Follow both steps in any ord er:
❐ Place your document in the feeder.
TRANSMIT OPTION
k
DIAL FAX NUMBER
❐ Press the Function key and 1,2 us-
ing the ten keypad , then press the
Yes key.
POLLING TRANS OPT
k
SET DOCUMENT
2.
Press the k key until "
SET POLLING
ID?
" is displayed, then press the Yes
key.
SET OPTION KPAD
ID:
llll
3. Enter the ID code that you wish to use
for this message. Example: 08 24. Press
0,8,2,4 usin g th e ten keypad.
SET OPTION Y/N
ID:0824
4. P ress the Yes key.
POLLING TRANS OPT
k
PUSH START
5. P ress the Start key.
❐ Your fax message is held on polling
standby.
Printing the Contents of Stored Polling Messages (Type I Only)
1. P ress the Function key and 5,2 using
ten keypad, then press th e Yes key.
FILE NO.
lll
KPAD/
j k
PRINT LIST
j
/SEARCH
k
❐ To print list of files press the
j
key, then press the
Start key.
2. Either:
FILE NO.004 START/N
CHICAGO OFFICE
❐ Scroll through the file s on th e dis-
play: Press the k key until the required file appears. The n p ress t he
Yes key.
❐ If you know the file number, input it
directly: Enter the file number, then
press the Yes key.
3. Press the Sta rt key.
See page 79 for options that are
availabl e with Polling Trans mission.
OTHER
78
Page 90

Canceling Polling Transmission Files
Type I Models
1. Press the Function key and 2,3 using
the ten keypad, th en press th e Yes key.
FILE NO.
lll
KPAD/
j k
PRINT LIST j/SEARCH
k
❐ To print a list of files, press the
j
key and the Start
key.
2. Either:
FILE NO.013 Y/N
CLEAR?
❐ If you do not know the file numb er :
Scroll though the file numbers with
the k key until the required file appears. Then press the Yes key.
❐ If you know the file number: Input it
directly. Example: File Number
013, press 0,1,3 using the ten keypad, then press the Yes key.
3. Either
❐ Erase the file : Press the Yes key.
❐ Keep the file : Press the No key.
4. Either:
❐ Erase another file: Press the Yes
key and go to step 2.
❐ Finish: Press the Function key.
Type II Models
When you want to use the machine when the document ha s been set in the
document feeder: Take out the document from the do cume nt feeder. The
transmission is automatically can cele d.
Options for Polling Transmission
When you set a document in th e do cume nt feeder or store the document in the
memory for Polling T ran smission, you also have the following op tio ns.
❐ TTI On/ Off
❐ Page Count
1. Press the
k
key until the required optio n
is displayed. Example : TTI op tio n.
SET OPTION Y/
k
SET TTI PRINT?
2. Press the Yes key.
SET OPTION Y/
j k
ON kOFF
ADVANCED
FEATURES
OTHER
79
Page 91

3. If you wish to switch something on or of f,
press the Yes key , then use the j and
the k keys until the displayed set tin g is
correct.
SET OPTION Y/j
k
kON OFF
4. Finish : Press the Yes key.
Picking up Messages Stored Els ewhere (Polling Reception)
Use this feature when you wish to poll a message from another t ermin al. You can
poll documents from many termin als with only one op era tio n (use Grou ps to make
the most out of this feat ure ) .
You have three options: Free Polling, Secured Polling and Stored ID Override, as
described for Polling Transmission (see page 77).
The maximum number of terminals that you can poll in one opera tion is 10 for
T yp e I Mod els an d 1 fo r Type II Models .
Cross-references Groups: see page 31.
Procedure
1. P ress the Function key and 1,1 using
the ten keypad, th en press th e Yes key.
POLLING RECV OPTION
k
DIAL FAX NUMBER
2. Dial the number(s) and press the Yes
key.
POLLING RECV Y/START
3104719266
3. Press the Sta rt key.
Stored ID Override Option
This procedure overrides the ID Code that is stored in your machine. The override
is effective for th is ope rat ion only.
1. P ress the Function key and 1,1 using
the ten keypad, th en press th e Yes key.
POLLING RECV OPTION
k
DIAL FAX NUMBER
Message Recei ver
Message Transmitter
Message T ran smitte r
Message Transmitter
For how to use other options, such as Send
Later for delayed polling, see page 82.
OTHER
80
Page 92

2. P ress the k key until "
SET POLLING
ID
" is displayed.
SET OPTION Y/N
SET POLLING ID?
3. P ress the Yes key.
SET OPTION KPAD
ID:
llll
4. Enter the ID Code that you wish to use
for this message.
Example: 0917. Press 0,9 ,1 ,7 using the
ten keypad, then press the Yes key
5. P ress the Yes key.
POLLING RECV OPTION
k
DIAL FAX NUMBER
6. Dial and press the Start key.
Canceling Polling Reception
1. P ress the Function key and 2,2 using
the ten keypad.Th en press th e Yes key.
FILE NO.
lll
KPAD/
j k
PRINT LIST j/SEARCH
k
2. Either:
FILE NO.011 KPAD/
j k
n
HEAD OFFICE
❐ If you do not know the file number:
Scroll through the file numbers with
the j and k keys until the required
file appears.
❐ If you know the file number: In pu t it
directly.
3. Press the Yes key twice .
4. Finish: Press the Function key.
For how to use other options, such as Send
Later for delayed polling, see page 81.
ADVANCED
FEATURES
OTHER
81
Page 93

Options for Polling Reception
When you are in the Polling Reception mode, only the send later option is
available.
1. P ress the k key until "
SEND LATER?
"
is displayed.
SET OPTION Y/
k
SEND LATER?
2. P ress the Yes key.
SET OPTION KPAD/Y
TIME 00:00AM 10:00AM
3. Example: Send at 11:30 PM
Press 1,1,3,0,# using the ten keypad.
SET OPTION KPAD/N
TIME 11:30PM 10:00AM
❐ To change AM to PM or the other way around,
Press # key. Also the send later time can no t b e
more than 24 hours in the feature.
Saving Paper
This will help you to reduce paper costs. Whe n the mach ine print s a receive d
message and copies some docu men ts, it re duces the horizontal ratio to half
length.
1. P ress the Function key and
6,2,2,2, 2,6,2 using the ten keypad.
Then press the Yes key.
Y/NEXT
k
SELECT LINE
2. P ress the k key until "
SAVE PAPER
ON/OFF
" is displayed.
Y/NEXT
k
SAVE PAPER ON/OFF
3. P ress the Yes key.
SAVE PAPER Y/j
k
ON kOFF
4.
Use the j and the k keys to switch this
feature on or off.
SAVE PAPER Y/j
k
kON OFF
5. P ress the Yes key to store your setting,
then press the Function key.
OTHER
82
Page 94

RDS (Remote Diagnostic System)
Overview
If your machine has a problem, a service te chn ician can perform various
diagnostic tasks over the telephone line from the service sta tio n to try t o fin d out
what is wrong with your machine . The service te chn ician can a lso u se RDS to
change some of your machine ’s se tt ing s if you request it.
For RDS operations, it may be necessary to stay ne ar th e mach ine .
RDS is automatically switched off 24 hours afte r it has been swit che d on.
Switching RDS On/ Off
Use this function when the service technician has changed the factory setting. If
you wish to switch RDS back on, you must switch it on yourself using the
following procedure.
1. P ress the Function key and
6,2,2,2, 2,6,2 using the te n keypad. Then
press the Yes key.
Y/NEXT
k
SELECT LINE
2.
Press the j key until "
RDS ON/OFF
"
is displayed.
Y/NEXT
k
RDS ON/OFF
3. P ress the Yes key.
RDS Y/j
k
ON kOFF
4.
Use the j and the k keys to switch this
feature on or off.
RDS Y/j
k
kON OFF
5. P ress the Yes key to store your setting,
then press the Function key.
ADVANCED
FEATURES
OTHER
83
Page 95

AI Short Protocol (Type I Only)
This feature emp loys Artificial Intelligence (AI) t o lea rn the communication
characteristics of the machines programmed as Spe ed Dial o r Qu ick Dials. AI
Short Protocol helps you to red uce commun icat ion costs between machines
produced by the same manufacturer. AI short Protocol works if yo u d ial u sing th e
Quick Dial, Speed Dial or Redial Keys. The machine at the other end must have
the AI Short Pro to col Feat ure .
When you send a fax messag e, the two mach ine s carry o ut a handsh akin g
procedure, during which the y esta blish the best way to commu nica te wit h each
other. Using AI short Protocol, this handsh akin g p roce du re o nly t ake s pla ce in full
the first time you dial a particular number . Your machine re memb ers t he op timu m
communication paramet ers fo r ca lling that nu mbe r. The next time you dial that
number, t he machin e will rememb er these para met ers an d the prelimina ry
handshaking will be significa nt ly redu ced , savin g commu nica tio n cost s.
Copying
If you need to make a copy of some th ing, and there is no copier availa ble , use
your fax machine.
Copying an original is a good way to test contrast and resolution before
sending a document, if you are not sure that the settings that you have
chosen are appropriate. The copy made by your printer shows you how the
message would look when received at the other end. If it does not look good,
change the settings and try again.
1. Carefully place your original into the
document feeder.
TRANSMIT OPTION
k
DIAL FAX NUMBER
2. Type I: Press the Start key.
Type II: Press the Copy key.
COPY MODE 1 SETS
3. If you wish, change the number of copies using the ten keypad .
COPY MODE 2 SETS
4. P ress the Start key.
COPYING
P01. 01/01 SET
OTHER
84
Page 96

REPORTS
AUTOMATICALLY PRINTED REPORTS
Unless otherwise indicated, th e auto mat ic print ing of these reports can be turned
on or off by chang ing the user parame ter settings.
TCR (Tra nsm ission Confirm ati on Report)
This report gives details on each commun icat ion ma de by your te rmina l. It is
automatically output eve ry 35 commu nica tio ns on Type I Models and every 10
communications on Type II Models.
T r ans mi ssion Res ult Repor t
This report is printed out after every Immmed iat e Transmission. It shows whether
the transmission was successful or not. If you have switche d th is repo rt off, a
Communication Failure Report will be prin ted whe n a communica tio n fails.
Communication Result Report (Type I Only)
This report is printed out after every Memory Transmission, showing whether it
was successful or not. If you have swit che d this repo rt off, a Communication
Failure Report will be printed afte r an un succe ssfu l Memo ry Transmission.
Error Report
This report is printed after each unsuccessfu l commun icat ion (compa re with the
Communication Failure belo w, which is printed after an operation has been
completed). So while doing a broadcast , the mach ine may print a number of error
reports, and at the end, it prints a Communication Failu re Re po rt (o r Transmission
Result Report if it is switched on).
Check the report and re tra nsmit any pa ges t hat were not sent. Keep any error
reports that are printed, as they may be useful for a service tech nicia n if a
particular problem continues or gets worse.
Communication Failure Report (Type I only)
This report is printed after execut ing an operation, whether it be a sing le
transmission or a broadcast from memory, if a transmission failure occurred
during that operation. It is only printed if the Transmission Result report or
Communication Result Reports are switched off.
File Reserve Report (Type I only)
If you switch this report on, it is printed immedia te ly aft er you store a document in
memory for Memory T ran smission or Pollin g. It gives the file numb er, the time it
was stored, and the destinations (including any Group numbers tha t were
selected).
REPORTS
85
Page 97

Power Failure Report (Type I Only)
This report is printed if the machine’s po wer was off long enough to erase the
memory. The report gives details of the files that were lost. With this inf orma tio n,
you may store messages for transmissio n again , an d con tact th e sen de rs of any
received messages that were lost.
Polling Clear Report (Type I Model)
This is printed after a polling file has been erased from memory.
SWITCHING REPORTS ON/OFF
Some of these reports can be switched on or of f. To switch a report on or off, do
the following (see page 102 if you need more informatio n abou t User Parame te r
settings adjustment procedure).
1. P ress the Function key and
6,2,2,2, 2,6,3 using the ten keypad, then
press the Yes key.
SETTING? Y/
j
PRINT LIST
j
2. P ress the Yes key. The setting s fo r
Switch 00 are now displayed.
KPAD/Y/j
k
SWITCH 00:0000 0000
3.
Press the j and k keys until the settings
for Switch 03 are displayed.Each digit
from 0 to 7(except digit 1) contro ls a report.
KPAD/Y/j
k
SWITCH 03:0000 0000
Switch 03
Digit Purpose
0
Communication Result Report (Memory T ransmiss ion)
(T yp e I Only) 0: Off 1: On
1 Do not change this setting.
2
File Reserve Report (Memor y Transmission)
(Type I Only) 0: Off 1: On
3 File Reserve Report (Polling Reception) 0: Off 1: On
4
Communication Result Report (Polling Recption)
0: Off 1: On
5
Transmissio n Result Report
(Immediate Transmission) 0: Off 1: On
6 Polling Clear Report (Type I Only) 0: Off 1: On
7 TCR 0: Off 1: On
SWITCHING REPORTS ON/OFF
86
Page 98

4. If you wish to change the setting, press
the appropriate key on the keypad.
KPAD/Y/j
k
SWITCH 03:0000 0000
6. Finish: Press the Yes key, then press the Function key.
NOTE: To switch the Error Report on or off, contact a service technicia n.
PRINTING A SAMPLE OF DATA ON THE REPORTS
This feature is only available on th e Type I model.
For reference purpo ses, the machin e can print the first few inches of the fax
message on the following reports:
❐ Communication Result Report
❐ File Reserve Report
❐ Communication Failure Report
❐ Polling Clear Report
The procedure to switch this feat ure on or off is as follo ws (see page 103 if you
need more information about the User P ara met er set tin gs ad just men t pro cedure):
1. P ress the Function key and
6,2,2,2, 2,6,3, using the ten keypad, then
press the Yes key.
SETTING? Y/
j
PRINT LIST
j
2. P ress the Yes key. The setting s fo r
switch 00 are now displayed.
KPAD/Y/j
k
SWITCH 00:0000 0000
3.
Press the j key until the settings for
Switch 04 are displayed.
KPAD/Y/j
k
SWITCH 04:0000 0000
4. The setting that you need to change is
digit 7. If you wish to cha ng e the setting,
press 7 using the ten keypad.
KPAD/Y/j
k
SWITCH 04:1000 0000
6. Finish: Press the Yes key , then press
the Function key.
REPORTS
digit 7 6 5 4 3 2 0
Digit 7
0: This feature is Off
1: This feature is On
PRINTING A S AMP LE OF DATA ON THE REPOR TS
87
Page 99

REPORT FORMATS
Example 1. Error Report
The following report mean s tha t th e mach ine sent four pages but there were
errors during the first two pages.
***
Error Report (Aug 24 1995 12:09PM)
***
TTI XYZ COMPANY
FILE ADDRESS MODE TIME PAGE RESULT
0087 XYZ CO. NEW YORK TES 0’29" P.4 E
PAGE NOT SENT
P. 1
Example 2. TCR
***
TCR (Aug 24 1994 11:40AM)
***
TTI XYZ COMPANY
<TX>
DATE TIME ADDRESS MODE TIME PAGE RESULT FILE
------------------------------------------------------------------- APR 28 9:48AM XYZ NEW YORK TES 1’11" P. 5 OK 005
9:54AM XYZ LONDON TES 0’27" P. 1 OK 007
9:56AM 2125551234 TES 0’28" P. 1 OK 009
10:01AM XYZ BERLIN TES 0’24" P. 1 OK 010
<RX>
DATE TIME ADDRESS MODE TIME PAGE RESULT FILE
------------------------------------------------------------------ APR 28 9:51AM DR J ALVAREZ RS 0’24" P. 1 OK 006
9:58AM 2015551234 RES 0"27" P. 1 OK 008
10:56AM XYZ PARIS RES 0’28" P. 1 OK 011
11:01AM M. JONES RES 0"24" P. 1 OK 012
In the Result column, some rep ort s may have an "E" followed by a code, and
there may be a message printe d at the bot to m of th e report. This code and there
may be a message printed at the bo tt om a problem occurred. The co de are
explained below.
Result Message Explanation
1
Hang up or line
fail
The other party either hung up or had no message
on polling standby. Alternatively, there could have
been a problem with the line.
2 Busy The machine at the other end was busy.
3 No answer The line is dead (no dial tone was detected).
4 No connection There is no facsimile machine at th e ot he r end .
88
Page 100

REPORTS YOU CAN PRINT OUT YOURSELF
You can print these reports at any time by following the ste ps below.
TCR (Tra nsm ission Confirm ati on Report)
In addition to the automat ic outpu t of this rep ort , you can prin t t he TCR at an y
time.
1. Press the Function key and 4,1 using
the ten keypad, th en press th e Yes key.
START
PRINT TCR
2. To print : Press the Start key.
File List (Type I Only)
This is a list of Memory Transmission s, Memo ry Recep tio ns, an d pollin g f iles st ill
in the memory. It gives information about each sto red ope rat ion, such as the fax
numbers, start time, stat us and typ e of operat ion .
1. P ress the Function key and 4,2 using
the ten keypad, th en press th e Yes key.
START
PRINT FILE LIST
2. To print : Press the Start key.
Telephone Number List
This is a list of the telephone numbers and other ite ms yo u have sto red in the
machine’s Quick Dial Keys, Speed Dial Codes and Groups. Type II is only
available for Quick Dial and Speed Dial list.
1. Press the Function key and 4,3 using
the ten keypad, th en press th e Yes key.
ALL LISTS? START/N
QUICK/SPEED/GROUP
2. Either:
❐ To print all lists: Press the Start key.
❐ To select the list: Press the No key
until the lists you want to print are
shown then press the Yes key for
each one.
3. Press the Sta rt key.
You can also print out each telephone numb er list usin g the following function s:
❐ To print a Quick Dial List : Function 31
❐ To print a Speed Dial List: Function 32
❐ To print a Group Dial List: Function 33
REPORTS
89
 Loading...