

Page 1
Cover1-1 Page 1 Friday, Oc tober 27, 2000 8:45 PM
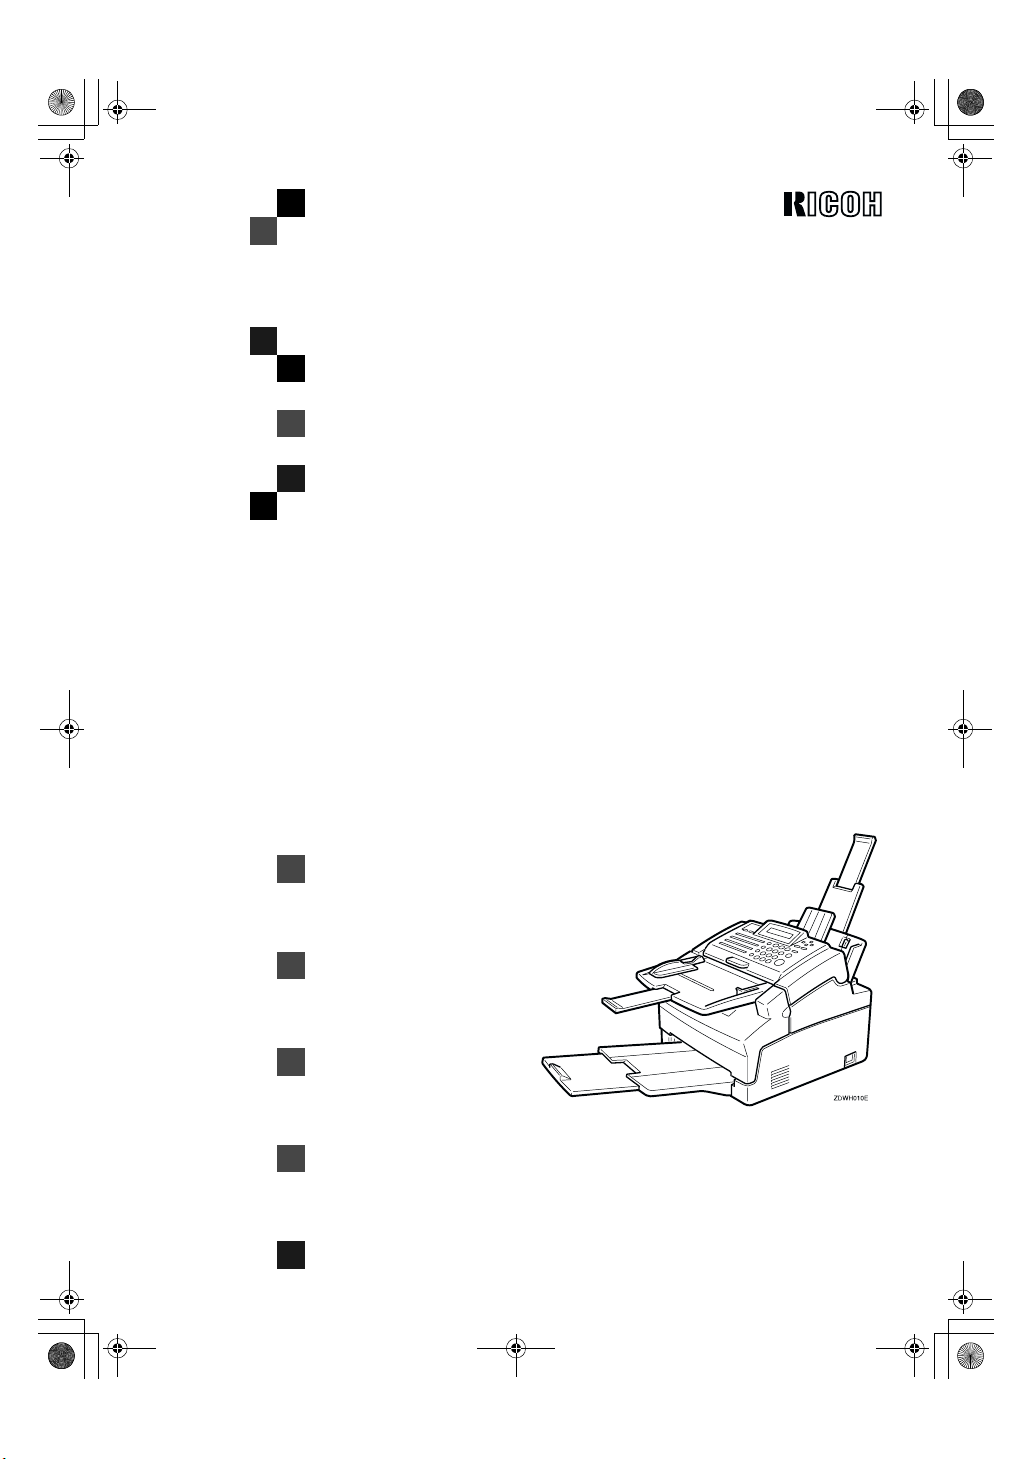
FAX1400L
Operating Instructions
<Advanced Features>
Read this manual carefully before you use this product and keep it handy for future
reference.
For safety, please follow the instructions in this manual.
Page 2

Holsten1AE_Advanced_FM.book Page 1 Thursday, October 26, 2000 12:56 PM
Introduction
This manual contains detailed instructions on the operation and maintenance of this machine. To get
maximum versatility from this machine all operators should carefully read and follow the instructions in
this manual. Please keep this manual in a handy place near the machine.
Please read the Safety Information in the Advanced Features manual before using this machine. It contains important information related to USER SAFETY and PREVENTING EQUIPMENT PROBLEMS.
Notes:
Some illustrations might be slightly different from your machine.
Certain options might not be available in some countries. For details, please contact your local dealer.
Laser Safety:
Direct (or indirect reflected) eye contact with the laser beam may cause serious eye damage. Safety
precautions and interlock mechanisms have been designed to prevent any possible laser beam exposure to the operator.
Warning:
Use of controls or adjustment or performance of procedures other than those specified in this manual
might result in hazardous radiation exposure.
Two kinds of size notation are employed in this manual. With this machine refer to the metric version.
For good copy quality, Ricoh recommends that you use genuine Ricoh toner.
Ricoh shall not be responsible for any damage or expense that might result from the use of parts other
than genuine Ricoh parts in your Ricoh office product.
Important
Parts of this manual are subject to change without prior notice. In no event will the company be liable
for direct, indirect, special, incidental, or consequential damages as a result of handling or operating
the machine.
Power Source:
AC220–240V, 50/60Hz
Please be sure to connect the power cord to a power source as above. For details about power source,
see Chapter 10, “Connecting the Power and Switching On” in the Advanced Features manual.
Page 3
Holsten1AE_Advanced_FM.book Page i Wednesday, November 8, 2000 11:24 AM
Notice
R CAUTION:
Use of controls, adjustments or performance of procedures other than those
specified herein may result in hazardous radiation exposure.
Shielded interconnect cables must be employed with this equipment to ensure
compliance with the pertinent RF emission limits governing this device.
Although this equipment can use either loop disconnect or DTMF signalling,
only the performance of the DTMF signalling is subject to regulatory requirements for correct operation. It is therefore strongly recommended that the equipment is set to use DTMF signalling for access to public or private emergency
services. DTMF signalling also provides faster call set up.
Direct (or indirect reflected) eye contact with the laser beam may cause serious eye damage.
Safety precautions and interlock mechanisms have been designed to prevent any possible laser
beam exposure to the operator.
NOTICE TO USERS (NEW ZEALAND)
The grant of a Telepermit for any item of terminal equipment indicates only that
Telecom has accepted that the item complies with minimum conditions for connection to its network. It indicates no endorsement of the product by Telecom,
nor does it provide any sort of warranty. Above all, it provides no assurance that
any item will work correctly in all respects with another item of Telepermitted
equipment of a different make or model, nor does it imply that any product is
compatible with all of Telecom's network services.
This equipment is not capable, under all operating conditions, of correct operation at the higher speeds for which it is designed. Telecom will accept no responsibility should difficulties arise in such circumstances.
This equipment shall not be set up to make automatic calls to the Telecom "111"
Emergency Service"
If a charge for local calls is unacceptable, the "Dial" button should NOT be used
for local calls. Only the 7-digits of the local number should be dialled from your
telephone. DO NOT dial the area code digit or the "0" prefix.
This equipment may not provide for the effective hand-over of a call to another
device connected to the same line.
This device may be subject to ringing or bell tinkle when calls are made from another device on the same line. If this occurs, the problem should not be referred
to the Telecom Faults Service.
This equipment should not be used under any circumstances, which may constitute a nuisance to other Telecom customers. For example, repeated attempts to
make unsolicited sales offers to the same number or group of numbers, such as
when a block of numbers terminate on the same PABX.
"The call log incorporated in this equipment does not record all answered calls.
The call log, therefore may not agree with the Telecom account which may include calls not shown on the log."
Not all telephones will respond to incoming ringing when connected to the extension socket.
i
Page 4
R
R
Holsten1AE_Advanced_FM.book Page ii Wednesday, November 8, 2000 11:24 AM
Safety Information
When using your equipment, the following safety precautions should always be
followed.
Safety During Operation
In this manual, the following important symbols are used:
WARNING:
CAUTION:
Indicates a potentially hazardous situation which, if instructions
are not followed, could result in death or serious injury.
Indicates a potentially hazardous situation which, if instructions are not
followed, may result in minor or moderate injury or damage to property.
R WARNING:
• Connect the power cord directly into a wall outlet and never use an extension cord.
•
Disconnect the power plug (by pulling the plug, not the cable) if the
power cable or plug becomes frayed or otherwise damaged.
• To avoid hazardous electric shock or laser radiation exposure, do not
remove any covers or screws other than those specified in this manual.
• Turn off the power and disconnect the power plug (by pulling the plug,
not the cable) if any of the following conditions exists:
• You spill something into the equipment.
•
You suspect that your equipment needs service or repair.
• Your equipment's cover has been damaged.
•
Do not incinerate spilled toner or used toner. Toner dust might ignite
when exposed to an open flame.
•
Disposal can take place at our authorized dealer or at appropriate collection sites.
•
Dispose of the used toner cartridge in accordance with the local regulation.
ii
Page 5
Holsten1AE_Advanced_FM.book Page iii Wednesday, November 8, 2000 11:24 AM
R CAUTION:
• Protect the equipment from dampness or wet weather, such as rain, snow,
and so on.
• Unplug the power cord from the wall outlet before you move the equipment.
While moving the equipment, you should take care that the power cord will
not be damaged under the equipment.
• When you disconnect the power plug from the wall outlet, always pull the
plug (not the cable).
• Do not allow paper clips, staples, or other small metallic objects to fall inside
the equipment.
• Keep toner (used or unused) and toner cartridge out of the reach of children.
• For environmental reasons, do not dispose of the equipment or expended
supply waste at household waste collection points. Disposal can take place
at an authorized dealer or at appropriate collection sites.
• The inside of the machine could be very hot. Do not touch the parts with a
label indicating the “hot surface”. Otherwise it could cause a personal burn.
• Do not insert any objects, or place fingers into spaces on the machine. Otherwise, an injury or an electric shock might occur.
• Keep children away from the machine. Otherwise, an injury might occur.
• Our products are engineered to meet high standards of quality and function-
ality, and we recommend that you only use the expendable supplies available at an authorized dealer.
iii
Page 6

Holsten1AE_Advanced_FM.book Page iv Wednesday, November 8, 2000 11:24 AM
Important Safety Instructions
Grounding
In order to prevent potentially hazardous electrical shock, provide means of
connecting to the protective grounding conductor in the building, wiring those
grounding conductors of power cable and 3 pins plug.
Power Supply
The soket-outlet shall be installed near the product and shall be easily accessible.
Ozone Safety (if applicable)
Some product (see P.56 “Machine Environment”) generates ozone during operation.
Normally, the ozone level is safe for operators. If ozone odor may appear, ventilate the room.
iv
Page 7
Holsten1AE _Advanced_F M.book Page v Wednesday, November 8, 20 00 11:24 AM
ENERGY STAR Program
As an ENERGY STAR Partner, we have determined
that this machine model meets the ENERGY STAR
Guidelines for energy efficiency.
The ENERGY STAR Guidelines intend to establish an international energy-saving system for
developing and introducing energy-efficient office equipment to deal with environmental issues, such as global warming.
When a product meets the ENERGY STAR Guidelines for energy efficiency, the Partner shall
place the ENERGY STAR logo onto the machine model.
This product was designed to reduce the environmental impact associated with office equipment by means of energy-saving features, such as Low-power mode.
• Low-power Mode
This product automatically lowers its power consumption after the last hard
copy has been completed. (In this mode, printing a received fax and printing are
available.)
To exit Low-power Mode, press any keys.
The machine returns to the ready condition in about 30 seconds.
For how to change the default interval before entering Low-power mode, see
P.67 “Saving Energy”.
❖❖❖❖ Specification
Low-power
mode
Power consumption 10W
Default Time 5min. (When the number of last hard copy pages is
less than 10.)
15min. (When the number of last hard copy pages
is more than 10.)
----Recycled Paper
Please contact your sales or service representative for recommended recycled
paper types that may be used in this machine.
v
Page 8
R
R
Holsten1AE _Advanced_F M.book Page vi Wednesday, November 8, 2000 11:24 AM
How to Read This Manual
Symbols
In this manual, the following symbols are used:
WARNING:
This symbol indicates a potentially hazardous situation that might result in
death or serious injury when you misuse the machine without following the instructions under this symbol. Be sure to read the instructions, all of which are described in the Safety Information section in the Advanced Features manual.
CAUTION:
This symbol indicates a potentially hazardous situation that might result in minor or moderate injury or property damage that does not involve personal injury
when you misuse the machine without following the instructions under this
symbol. Be sure to read the instructions, all of which are described in the Safety
Information section in the Advanced Features manual.
* The statements above are notes for your safety.
Important
If this instruction is not followed, paper might be misfed, originals might be
damaged, or data might be lost. Be sure to read this.
Preparation
This symbol indicates the prior knowledge or preparations required before operating.
Note
This symbol indicates precautions for operation, or actions to take after misoperation.
Limitation
This symbol indicates numerical limits, functions that cannot be used together,
or conditions in which a particular function cannot be used.
Reference
This symbol indicates a reference.
{}
Keys built into the machine's operation panel.
vi
Page 9

Holsten1AE _Advanced_F M.book Page vii Wednesda y, November 8, 2000 11:24 A M
TABLE OF CONTENTS
Manuals for this machine ......................................................................... 1
Advanced Features (This Manual) ................................................................ 1
Basic Features .............................................................................................. 1
1.Advanced Transmission Features
Sending at a Specific Time (Send Later)................................................. 3
Sending messages with Identification (FAX HEADER).......................... 4
Calling to Request a Message (Polling) .................................................. 5
Picking up Messages Stored Elsewhere (Polling Reception) ....................... 5
Operating Procedure..................................................................................... 5
2.Communication Information
Erasing a Stored Message Before Sending (Functions 21 & 22).......... 7
File List (Function 42) ............................................................................... 8
Printing a Stored Message (Function 51)................................................ 9
Journal (Function 41) .............................................................................. 10
3.Transmission Features
Handy Dialing Functions ........................................................................ 11
Chain Dial.................................................................................................... 11
Redial.......................................................................................................... 11
Dial Options................................................................................................. 12
Sending a Fax Using an External Telephone........................................ 14
Phoning and Faxing on the Same Call .................................................. 15
To Talk before Sending a Fax..................................................................... 15
Tone Signals ............................................................................................ 16
Using the Tone Key..................................................................................... 16
More Transmission Functions ............................................................... 17
Checking if a Transmission Was Successful .............................................. 17
Automatic Redialing.................................................................................... 17
Dual Access ................................................................................................ 18
Printed Reports........................................................................................ 19
File Reserve Report (Switch 03, Bit 2) ........................................................ 19
Communication Result Report (Memory Transmission) (Switch 03, Bit 0)
Communication Failure Report (On if Communication Result Report is Off)
Transmission Result Report (Switch 03, Bit 5)............................................ 19
Report Formats ........................................................................................... 20
... 19
... 19
vii
Page 10
Holsten1AE_Advanced_FM.book Page viii Wednesday, November 8, 2000 11:24 AM
4.Reception Features
General ..................................................................................................... 21
Printing Messages that Have Been Received into Memory (Substitute Reception)
Receiving Message in Telephone Mode ..................................................... 22
Answering the Telephone ........................................................................... 22
Printing Options ...................................................................................... 23
Reverse Order Printing ............................................................................... 23
Page Length Reduction............................................................................... 23
5.Copying
Copying .................................................................................................... 25
6.Facsimile User Tool
Lists You Can Print Out Yourself........................................................... 27
Telephone Number List (Function 43)......................................................... 27
7.Key Operator Settings
Access Code for Functions 61 to 94...................................................... 29
Using Key Operator Settings.................................................................. 30
Setting the Date and Time (Function 91) .................................................... 30
Summer Time / Daylight Saving Time (Function 62) .................................. 30
Selecting the Display Language (Function 93) ........................................... 31
Counters (Function 94) ............................................................................... 31
Rejecting or Accepting Messages from Specified Senders (Authorized Reception)
Programming a List of Senders to Treat Differently (Function 81).............. 32
Switching Authorized Reception ON / OFF (Function 62)........................... 34
Saving Energy with the Power Saving Timer (Function 71)........................ 35
Switching the Power Saving timer ON / OFF (Function 62) ....................... 36
User Parameters......................................................................................... 37
Setting the Access Number (Function 61) .................................................. 40
Setting the Auto Ring Time (Function 61)................................................... 40
Setting the Country Code (Function 61)...................................................... 41
Setting the Phone Line Type (Function 62)................................................. 42
Calling the Service Station.......................................................................... 42
... 21
... 31
8.Troubleshooting
Help List ................................................................................................... 45
Reading Reports...................................................................................... 46
Error Report (Turned On/Off by a Service Representative)........................ 46
Power Failure Report .................................................................................. 46
viii
Page 11

Holsten1AE_Advanced_FM.book Page ix Wednesday, November 8, 2000 11:24 AM
9.Maintaining Your Machine
Changing the Paper Size Settings ......................................................... 47
Cleaning the Rollers and Scanner ......................................................... 48
Replacing the Toner Cartridge and Cleaning Pad................................ 49
Toner Cartridge........................................................................................ 53
10.Installation
Before Installation ................................................................................... 55
Machine Environment ............................................................................. 56
Location....................................................................................................... 56
Installing the Optional Memory Card..................................................... 57
Connecting The External Telephone ..................................................... 58
Connecting the Machine ......................................................................... 59
Connecting Up to the Telephone Line................................................... 60
Connecting the Power and Switching On ............................................. 61
11.Appendix
Option ....................................................................................................... 63
Specifications .......................................................................................... 64
Base Machine ............................................................................................. 64
Document and Paper Specifications ........................................................... 65
Saving Energy............................................................................................. 67
Storage Capacity......................................................................................... 68
Function List (11∼∼∼∼51)............................................................................... 69
Function List (61∼∼∼∼)................................................................................... 70
INDEX........................................................................................................ 72
ix
Page 12

Holsten1AE _Advanced_F M.book Page x Wednesday, November 8, 20 00 11:24 AM
x
Page 13
Holsten1AE _Advanced_F M.book Page 1 Wednesday, November 8, 20 00 11:24 AM
Manuals for this machine
There are the Basic Features manual and the Advanced Features manual for this
machine. Please consult the manual that suits your needs.
Advanced Features (This Manual)
The Advanced Features manual describes more advanced functions, and also
explains settings for key operators.
Basic Features
The Basic Features manual explains the most frequently used fax functions and
operations.
❖❖❖❖ Chapter 1 Introduction
Describes Part Names of the machine and Operation Panel. Also contains
symbols and conventions used in this manual.
❖❖❖❖ Chapter 2 Faxing
Explains basic transmission. You can also find out about other types of transmissions and how to switch the Reception Modes.
❖❖❖❖ Chapter 3 Setup
Explains storing, editing and erasing Own Name and Fax Number. And also
explains Quick Dial, Speed Dial and Group key. These functions store numbers and save time when dialing. Also contains information on how to enter
letters and symbols.
❖❖❖❖ Chapter 4 Troubleshooting
Explains clearing a document jam, loading paper and adjusting the volume
and sounds. When unusual messages appear on display or the indicator
lights, check the list and take the appropriate action.
1
Page 14

Holsten1AE _Advanced_F M.book Page 2 Wednesday, November 8, 20 00 11:24 AM
2
Page 15
Holsten1AE _Advanced_F M.book Page 3 Wednesday, November 8, 20 00 11:24 AM
1. Advanced Transmission
Features
Sending at a Specific Time (Send Later)
This feature is called Send Later.
Using this feature, you can delay
transmission of your fax message until a specified time. This allows you to
take advantage of off-peak telephone
line charges without having to be by
the machine at the time.
Note
❒ If the machine memory is full, your
document will remain in the Automatic Document Feeder. As a result, anybody removing the
document will cancel the transmission.
Set your document, dial the desti-
A
nation fax number and press the
{{{{Yes}}}} key. Do not press the {{{{Start}}}}
key.
Press VVVV.
B
SET OPTION Y/i
SEND LATER?
Note
❒ V is also the {Option} key.
Enter a sending time that falls
D
within the following 24 hours.
SET OPTION Y/N
TIME 23:30 10:00
Note
❒ For example: To send at 23:30,
press {2} {3} {3} {0} from the
key pad.
❒ If you enter the wrong time,
press the {No} key, and enter
again.
Press the {{{{Yes}}}} key.
E
Press the {{{{Start}}}} key.
F
Note
❒ Use Function 21 to erase a
stored fax message before it is
sent (see P.7 “Erasing a Stored
Message Before Sending (Functions 21 & 22)”).
Press the {{{{Yes}}}} key.
C
3
Page 16
Holsten1AE _Advanced_F M.book Page 4 Wednesday, November 8, 20 00 11:24 AM
Advanced Transmission Features
Sending messages with Identification (FAX HEADER)
1
Normally, the FAX HEADER programmed in your machine is printed
at the other party's top of each page
when you transmit. The top of the image will be overprinted if there is no
margin at the top of the transmitted
page.
In some cases, you may wish the other party to receive an unmarked copy
of your original. In this case, you can
switch FAX HEADER off.
Press VVVV twice.
A
SET OPTION Y/i
PRINT FAX HEADER?
Press the {{{{Yes}}}} key.
B
SET OPTION Y/hi
iON OFF
Press WWWW or VVVV until the displayed
C
setting is correct.
SET OPTION Y/hi
ON iOFF
Press the {{{{Yes}}}} key when you
D
have finished.
4
Page 17
Holsten1AE _Advanced_F M.book Page 5 Wednesday, November 8, 20 00 11:24 AM
Calling to Request a Message (Polling)
Calling to Request a Message (Polling)
Polling means “picking up” a document that has been left for you at a remote fax terminal.
Limitation
❒ Polling can only be used when
both machines have the Polling
feature.
Note
❒ With polling, telephone line costs
are charged to the person receiving
the message (the Message Receiver).
Picking up Messages Stored
Elsewhere (Polling Reception)
Use this feature when you wish to
poll a message from another terminal.
Note
❒ The number of terminals that you
can poll in one operation is 1.
Operating Procedure
Press the {{{{Yes}}}} key.
C
POLLING RECV START
2125551234
Press the {{{{Start}}}} key.
D
1
Press {{{{Function}}}} {{{{1}}}} {{{{1}}}}, and then
A
the {{{{Yes}}}} key.
POLLING RECV DIAL
DIAL FAX NUMBER
Enter the Dial number.
B
POLLING RECV Y/START
2125551234kkkkkkkkkk
5
Page 18
Holsten1AE _Advanced_F M.book Page 6 Wednesday, November 8, 20 00 11:24 AM
Advanced Transmission Features
1
6
Page 19
Holsten1AE _Advanced_F M.book Page 7 Wednesday, November 8, 20 00 11:24 AM
2. Communication
Information
Erasing a Stored Message Before Sending (Functions 21 & 22)
Every time you store a fax message in
your machine's memory, a new file is
created. A file is also created for storing instructions to pick up a fax message left elsewhere (see P.5 “Calling to
Request a Message (Polling)”). Each file
is given a number. This number appears on the File Reserve Report,
Journal and Transmission Result Report. To see which files are currently
in memory, you may print a file list.
Either :
A
Erasing a fax message stored in
memory
A Press {{{{Function}}}} {{{{2}}}} {{{{1}}}}, and
then the {{{{Yes}}}} key.
FILE NO.kkk KPAD/hi
PRINT LISTh/SEARCHi
Erasing instructions that pick up
messages (polling)
A Press {{{{Function}}}} {{{{2}}}} {{{{2}}}}, and
then the {{{{Yes}}}} key.
Press VVVV to scroll through the mes-
B
sages.
You will see the display. A number
or a label will appear on the lower
line.
FILE NO.027 Y/hi
5551234
Note
❒ Press W to obtain a list of all the
files and their numbers. If you
already know the number of the
file to erase, enter it directly
from the ten key pad.
Press the {{{{Yes}}}} key.
C
FILE NO.027 Y/N
CLEAR?
Press the {{{{Yes}}}} key again to erase
D
the file.
Press {{{{Function}}}} key.
E
Note
❒ To erase another file, go to step
B.
7
Page 20
Holsten1AE _Advanced_F M.book Page 8 Wednesday, November 8, 20 00 11:24 AM
Communication Information
File List (Function 42)
This is a list of memory transmissions, memory receptions, polling
files still in memory. It gives information about each stored file, such as the
fax numbers, start time, and status.
2
Press {{{{Function}}}} {{{{4}}}} {{{{2}}}}, and then
A
the {{{{Yes}}}} key.
Press the {{{{Start}}}} key to print out
B
the report.
8
Page 21
Holsten1AE _Advanced_F M.book Page 9 Wednesday, November 8, 20 00 11:24 AM
Printing a Stored Message (Function 51)
Printing a Stored Message (Function 51)
If you need to see the contents of any
files, use this feature.
Press {{{{Function}}}} {{{{5}}}} {{{{1}}}}, and then
A
the {{{{Yes}}}} key.
FILE NO.kkk KPAD/hi
PRINT LISTh/SEARCHi
Press VVVV to scroll through the mes-
B
sages.
You will see the display. A number
or a label will appear on the upper
line.
FILE NO.115 Y/hi
5551234
2
Note
❒ Press W to obtain a list of all the
files and their number. If you already know the number of the
file to print, enter it directly
from the ten key pad and skip to
step D.
Press the {{{{Yes}}}} key.
C
A number or a label will appear on
the upper line.
FILE NO.115 START/N
5551234
Press the {{{{Start}}}} key to print the
D
message.
9
Page 22
Holsten1AE_Advanced_FM.book Page 10 Wednesday, November 8, 2000 11:24 AM
Communication Information
Journal (Function 41)
In addition to the automatic printout
of this report, the journal can be printed at anytime.
❖❖❖❖ Journal (Switch 03, Bit 7)
2
This report gives details on each
communication made by your terminal. It is automatically printed
out after 35 transmissions and receptions.
Reference
User Parameter : See P.37 “User
Parameters”.
Press {{{{Function}}}} {{{{4}}}} {{{{1}}}}, and then
A
the {{{{Yes}}}} key.
Press the {{{{Start}}}} key to print out
B
the report.
10
Page 23
Holsten1AE_Advanced_FM.book Page 11 Wednesday, November 8, 2000 11:24 AM
3. Transmission Features
Handy Dialing Functions
Chain Dial
This feature allows you to compose a
telephone number from various
parts, some of which may be stored as
Quick Dial keys or Speed Dial codes,
and some of which may be entered at
the ten key pad.
You can program commonly used
area or country codes into Speed Dial
Codes or Quick Dial Keys.
Example: 01133-1-5553333 (From the
United States to Paris).
Assume that the following Quick Dial
and Speed Dial numbers have already been programmed.
• Quick Dial 01 = 01133 (Overseas to
France)
• Quick Dial 02 = 1 (Paris)
• Speed Dial 10 = 555
❖❖❖❖ On Hook Dial or Handset Mode:
Press {01} {02} and the {Speed Di-
al} key {1} {0} , and then {3} {3}
{3} {3}.
❖❖❖❖ Other:
Press {01} and the {Pause} key.
Then press {02} and the {Pause}
key, {Speed Dial} keys {1} {0}, and
then {3} {3} {3} {3}.
Redial
If a message was not transmitted successfully, you can redial with just a few key-
{
strokes by using the
Using the Redial key
The machine can remember the last
10 numbers dialed on the numeric
keypad, and one previously dialed
Quick Dial/Speed Dial. If you have to
redial one of these numbers, just
press the {Pause/Redial} key until the
required telephone number or name
is displayed, and then press the
{Start} key.
This feature has the following uses.
• If the machine is waiting to redial
the other party, you do not have to
wait for the redialing interval to
expire. Press the {Pause/Redial} key
until the required telephone
number or name is displayed, and
then press the {Start} key.
• If you wish to send another message to the same address that you
sent one to recently, you do not
have to dial the full number again
if it is still in the Redial memory.
Place the Documents in the Automatic Document Feeder, then
press the {Start} key.
Pause/Redial
}
key.
Press the {{{{Pause/Redial}}}} key until
A
the required number appears in
the display, then press the {{{{Yes}}}}
key twice.
REDIAL Y/hi
a01 XYZ CO. NEW YORK
11
Page 24
Holsten1AE_Advanced_FM.book Page 12 Wednesday, November 8, 2000 11:24 AM
Transmission Features
Carefully place your fax message
B
into the Document Guide feeder.
Press the {{{{Yes}}}} key.
C
a09 Y/N
TRANSMIT DIAL/START
PROGR. DIAL OPTION?
DIAL NEXT FAX NUMBER
Press the {{{{Yes}}}} key.
D
If you dial another party
A Select another number. (Broad-
casting)
3
If you dial no more party
A Press the {{{{Start}}}} key to start the
transmission.
Dial Options
The Dial Options provide access to
various code features which are designed to allow confidential transmission between different makers' fax
machines. Use them if the other party's
fax machine is of a different make and
supports the code features. Before you
can use the Dial Options, you need to
program Quick Dial key 09 as the Dial
Option key if you have not done so already (see the following details).
Assigning the Dial Option key
This procedure describes how to set
up Quick Dial key 09 as the Dial Option key.
PROGRAMMED
“
display.
” will flash on the
ak QUICK/hi
PRINT LISTh/SEARCHi
Press the {{{{Function}}}} key.
E
Using Dial Options
To use Dial Options, foll ow the pr ocedures below, only after you have dialed the destination fax number and
before pressing the {Start} key.
Make sure that the machine is in
A
standby mode for faxing.
The display should look like this:
READY 100% 10:00
SET DOC. OR DIAL NO.
Place the entire document face
B
down into the Automatic Document Feeder.
TRANSMIT OPTIONi
DIAL FAX NUMBER
12
Press {{{{Function}}}} {{{{3}}}} {{{{1}}}}, and then
A
the {{{{Yes}}}} key.
ak QUICK/hi
PRINT LISTh/SEARCHi
Press Quick Dial key {{{{09}}}}.
B
a09 PROGRAM? Y/hi
Dial.
C
TRANSMIT Y/START
55512345kkkkkkkkkkkk
Press the Dial Option key (Quick
D
Dial 09).
Y/N
SUB? (S)
Page 25
Holsten1AE_Advanced_FM.book Page 13 Wednesday, November 8, 2000 11:24 AM
Handy Dialing Functions
Do one of the following:
E
• If you wish to set the SUB code
for confidential transmission to
different makers' machines,
press the {Yes} key.
TRANSMIT Y/START
55512345Skkkkkkkkkkk
• To skip SUB, press the {No} key,
and then go to step G for polling
reception from different maker's fax machines.
Enter the SUB code on the ten key
F
pad then press the {{{{Yes}}}}key.
Y/N
SEP? (P)
Do one of the following:
G
• If you wish to set the SEP code,
press the {Yes} key.
TRANSMIT Y/START
55512345S9999Pkkkkkk
• To skip SEP, press the {No} key
and go to Step I.
Enter the SEP code on the ten key
H
pad and then press the {{{{Yes}}}} key.
Enter the SID code on the ten key
J
pad, and then press the {{{{Yes}}}} key.
Y/N
PWD? (W)
Do one of the following:
K
• If you wish to set the PWD
code, press the {{{{Yes}}}} key.
TRANSMIT Y/START
345S9999P1234I3333Wk
• To skip PWD, press the {No}
key and go to step M.
Enter the PWD code on the ten
L
key pad, and then press the {{{{Yes}}}}
key.
Y/N
SPACE?
Do one of the following:
M
• If you wish to enter a space,
press the {Yes} key.
TRANSMIT Y/START
999P1234I3333W4444 k
• Press the {No} key.
3
Y/N
SID? (I)
Do one of the following:
I
• If you wish to set the SID code,
press the {{{{Yes}}}} key.
TRANSMIT Y/START
55512345S9999P1234Ik
• To skip SID, press the {{{{No}}}}
key and go to step KKKK.
Y/N
END OF DIAL NUMBER?
Press the {{{{Yes}}}} key.
N
PROGRAMMED
“
display.
” will flash on the
TRANSMIT DIAL/START
DIAL NEXT FAX NUMBER
Press the {{{{Start}}}} key.
O
13
Page 26
Holsten1AE_Advanced_FM.book Page 14 Wednesday, November 8, 2000 11:24 AM
Transmission Features
Sending a Fax Using an External Telephone
You can send a fax message using the
handset. (External telephone is required.)
Set the document, and then pick
A
up the handset.
3
Dial the other party.
B
If you hear a voice, continue your
C
conversation as you would normally.
If you hear a high-pitched tone
instead of a voice
A Press the {{{{Start}}}} key.
Go to step E.
When you are ready to send your
D
fax message, ask the other party to
press the {{{{Start}}}} key.
Replace the handset.
E
14
Page 27
Holsten1AE_Advanced_FM.book Page 15 Wednesday, November 8, 2000 11:24 AM
Phoning and Faxing on the Same Call
Phoning and Faxing on the Same Call
This feature is available when you
connect the external telephone.
To Talk before Sending a Fax
Pick up the handset.
A
Dial the other party.
B
Note
❒ Do not press the {Start} key.
If you hear a voice, continue your
C
conversation as you would normally.
If you hear a high-pitched tone
instead of a voice
3
A Place your fax message in the
Automatic Document Feeder,
and then press the {{{{Start}}}} key.
Go to step E.
When you are ready to send your
D
fax message, place your message
in the feeder, and then ask the
other party to press the {{{{Start}}}}
key.
Press the {{{{Start}}}} key on the ma-
E
chine.
Replace the handset.
F
15
Page 28

Holsten1AE_Advanced_FM.book Page 16 Wednesday, November 8, 2000 11:24 AM
Transmission Features
Tone Signals
On this model the {p} key on the ten
key pad is used as the Tone key.
Some organizations offer you a special service by telephone, which you
can access by transmitting Touch
tones. If your phone service provides
only pulse dialing, or if you are call-
3
ing over a digital network, the ability
to generate Tone Signals will allow
you to access these services.
First, dial the other party. When you
are through to the other end, press the
Tone key and enter the code number
that is needed to access the required
feature at the other terminal. You do
not need to press the Tone key if your
machine is set up for dialing in Tone
Dial (DTMF) mode.
Enter the numbers for the remote
E
facility you need. After you have
finished your business with the
remote facility, hang up.
Note
❒ Do not press the {Start} key.
Using the Tone Key
Make sure that the machine is in
A
standby mode, and that there is
no document in the feeder.
Pick up the handset, or press the
B
{{{{On Hook Dial}}}} key.
16
Dial the remote facility. Do not
C
press the {{{{Start}}}} key.
Note
❒ If your telephone line type is
DTMF (Tone Dial), go to step E.
After your line is connected to the
D
remote facility, if your telephone
line type is Pulse Dial, press the
{{{{pppp}}}} key on the ten key pad.
A dot appears in the display.
Page 29

Holsten1AE_Advanced_FM.book Page 17 Wednesday, November 8, 2000 11:24 AM
More Transmission Functions
More Transmission Functions
The following functions are useful
when sending faxes.
Checking if a Transmission
Was Successful
Unless otherwise indicated, the automatic printing of these reports can be
turned on or off by changing the bit of
the user parameters (see P.37 “User
Parameters”).
❖❖❖❖ Journal (Switch 03, Bit 7)
This report gives details on each
communication made by your terminal. It is automatically printed
out after 35 transmissions and receptions.
❖❖❖❖ Communication Result Report (Mem-
ory Transmission) (Switch 03, Bit 0)
This report is printed out after
memory transmission, showing
whether it was successful or not. If
you have switched this report off, a
Communication Failure Report
will be printed only when a communication fails.
❖❖❖❖ Communication Failure Report (ON if
Communication Result Report is OFF)
This report is printed if a memory
transmission failure occurred, after a job is completed. It is only
printed if the Communication Result Report is switched off, and in
the event of a communication failure.
❖❖❖❖ Polling Result Report (Switch 03, Bit 4)
This report is printed after your
machine polls a message from another machine.
❖❖❖❖ Printing Part of the Image on the Re-
port (Switch 04, Bit 7)
For reference purposes, the machine prints the first few centimeters of the fax message on the
following reports.
• Communication Result
• File Reserve
• Communication Failure Report
Automatic Redialing
The machine will automatically redial
the other party if any of the following
conditions occur.
• The other party was busy
• There was no reply from the other
party
• The message was rejected by the
machine at the other end because
of excessive errors (in this case, redialing will only take place if
Memory Transmission was used).
Note
❒ The number of redials and redial-
ing interval varies according to
your locale.
❒ The number of redials may differ
according to the line of PABX
used.
❒ The redialing interval may be ad-
justed by service representative.
❒ During redialing, the number be-
ing dialed is displayed as shown
below.
2125551234
DIALING
3
17
Page 30

Holsten1AE_Advanced_FM.book Page 18 Wednesday, November 8, 2000 11:24 AM
Transmission Features
Dual Access
Dual Access means that even if the machine is already carrying out a task, you
may be able to operate the machine.
For instance, if your machine is currently receiving a long fax message, but you
want to send a message and go back to your desk without having to wait by the
machine, you can place your message in the Automatic Document Feeder, select
the required transmission features, dial the number, and press Start. Your message will be scanned and stored to memory while the machine is still receiving.
This means that you can take your fax back to your desk before it is actually sent.
3
However, to be sure whether your transmission was successful or not, keep an
eye open for Error Reports (or check the Journal).
The following table shows which features can operate simultaneously on your
machine.
Job that you wish to carry out at the same time
Job Currently in Progress 1 2 3 4 5 6 7 8 9
1. Storing to Memory —
2. Printing from Memory
3. Copying
4. Printing an Automatic Report
5. Immediate Transmission
6. Memory Transmission
7. Receiving and Printing a
Fax
8. Receiving a Fax to Memory
9. Transmitting a Service Report
✓ × ✓ × ✓✓✓✓
✓ × × × × × × ×
××××✓ × ✓✓
✓ ××× × ×××
××××× ×××
✓ × ✓ ×××××
✓ ××× × ×××
✓ × ✓ ×× × ××
✓ × ✓ ×× × ××
• ✓: Possible
• ×: Impossible
18
Page 31

Holsten1AE_Advanced_FM.book Page 19 Wednesday, November 8, 2000 11:24 AM
Printed Reports
You can have reports printed from
your machine automatically, or print
them out yourself.
Printed Reports
Transmission Result Report
(Switch 03, Bit 5)
File Reserve Report
(Switch 03, Bit 2)
If you switch this report on, it is printed immediately after you store a document in memory for Memory
Transmission. It gives the file
number, the time that it was stored,
and the destinations (including any
Group numbers that were selected).
Communication Result Report
(Memory Transmission)
(Switch 03, Bit 0)
This report is printed out after memory transmission showing whether it
was successful or not. If you have
switched this report off, a Communication Failure Report will be printed
only when a communication fails.
Communication Failure Report
(On if Communication Result
Report is Off)
This report is printed out after immediate transmission showing whether
it was successful or not.
❖❖❖❖ Printing Part of the Image on the Re-
port (Switch 04, Bit 7)
For reference purposes, the machine prints the first few centimeters of the fax message on the
following reports.
• Communication Result
• File Reserve
• Communication Failure Report
3
This report is printed if a memory
transmission failure occurred, after a
job is completed. It is only printed if
the Communication Result Report is
switched off, and in the event of a
communication failure.
19
Page 32

Holsten1AE_Advanced_FM.book Page 20 Wednesday, November 8, 2000 11:24 AM
Transmission Features
Report Formats
* * * COMMUNICATION RESULT REPORT (22.FEB.2001 9:19) * * *
FAX HEADER:XYZ COMPANY
FILE MODE OPTION ADDRESS (GROUP) RESULT PAGE
3
FAX HEADER:XYZ COMPANY
<TRANSMISSION>
DATE TIME ADDRESS MODE TIME PAGE RESULT FILE
<RECEPTION>
DATE TIME ADDRESS MODE TIME PAGE RESULT FILE
* * * JOURNAL(22.FEB.2001 11:07) * * *
ZDWX020E
❖❖❖❖ The Mode Column
See the bottom of the Journal for a full listing of symbols on the Journal. On
other reports a code is given, informing the type of communication. These
codes are explained below.
❖❖❖❖ The Result Column
OK: Successful communication
E: An error occurred
❖❖❖❖ The Footnote on the Journal
Transmission counter: Total number of transmitted pages
Reception counter: Total number of received pages
20
Page 33

Holsten1AE_Advanced_FM.book Page 21 Wednesday, November 8, 2000 11:24 AM
4. Reception Features
General
Printing Messages that Have
Been Received into Memory
(Substitute Reception)
If the Receive File indicator is lit, a
message was stored in memory using
substitute reception. This could be because the machine ran out of paper or
toner, or because the Power Saver has
turned off the print engine.
Check the following items and solve
the problems, and the machine goes
back to the working condition.
• While the Power Saver (see P.35
“Saving Energy with the Power Saving Timer (Function 71)”) is active
and the heater off, press any Key
for the machine go back to the
working condition.
• When “
display, your fax machine is out of
paper. Add paper (see Chapter 4,
“Loading Paper into the Paper
Tray”in the Basic Features manual).
• When “
display, your fax machine is out of
toner. Change the toner cartridge
(see P.49 “Replacing the Toner Car-
tridge and Cleaning Pad”).
• Otherwise, there might be a paper
jam (see Chapter 4, “Clearing a
Copy, Fax, or Print jam”in the Basic Features manual), or an open
cover.
ADD PAPER
ADD TONER
” appears in the
” appears in the
As soon as the machine is back in
working condition, messages stored
in memory will be printed. The Receive File indicator will turn off and
the messages will be erased from
memory.
Note
❒ If a message comes in while you
are copying, the fax machine will
store the message in memory and
the Receive File indicator will
light. The message will be printed
as soon as copying is done.
❒ To turn substitute reception off or
back on, set bit 0 of user parameter
switch 05. See P.37 “User Parame-
ters”.
Rejecting Messages from Senders who
do not Identify Themselves
Your fax machine can reject incoming
messages lacking an identifier signal.
Follow the user parameter procedure
on to enter these settings.
Switch 05, bit 1
• 0: Accept such messages
• 1: Reject such messages
Reference
User Parameter: see P.37 “User Pa-
rameters”
21
Page 34

Holsten1AE_Advanced_FM.book Page 22 Wednesday, November 8, 2000 11:24 AM
Reception Features
Receiving Message in
Telephone Mode
This mode is active when the Manual
Receive indicator is lit. You have to
answer the call yourself and decide
whether it is a fax or a telephone call.
The procedure for answering a call is
as follows:
Pick up the handset of the exter-
A
nal telephone.
Listen to the other end.
4
B
If you hear a voice
A Continue your conversation as
you would normally.
If you hear a fax tone
A Remove any documents from
the Automatic Document Feeder, press the {{{{Start}}}} key, and
then replace the handset.
The machine will start receiving.
Answering the Telephone
This feature is available when you
connect the external telephone.
In Auto mode
When the other party send the fax
message, the machine receive the
message. When the other party give a
telephone call, pick up the external
telephone handset and talk to the other party.
In Fax mode
When you hear a voice from the
speaker inside the machine, pick up
the external telephone handset then
press the {Stop} Key. You can speak
to the other party.
In Telephone mode
The telephone rings continuously.
Pick up the handset and speak to
A
the other party.
22
If you hear a high-pitched tone
A A fax is coming in. Press the
{{{{Start}}}} key, and then hang up.
If the caller wants to send you a
fax
A Press the {{{{Start}}}} key after
speaking, and then hang up.
Note
❒ If nothing happens after you
press the {Start} key, the telephone may not be properly
connected.
Page 35

Holsten1AE_Advanced_FM.book Page 23 Wednesday, November 8, 2000 11:24 AM
Printing Options
As printing options, the Reverse Order Printing, Page Length Reduction
are available.
Reverse Order Printing
Normally, the machine prints the
pages of received messages in the order that they were received uncollated.
However, with Reverse Order Printing, the machine will collate the sequence by printing the message from
the last page first collated. This will
make it easier to distribute the received fax messages, and make reading them more convenient.
Printing Options
Page Length Reduction
If the machine receives a page that is
longer than the paper in the tray, the
machine reduces the length of the received image so that it will fit on one
page.
The image length is within the following limits.
Paper size in the tray Maximum reducible
length
A4 388.8mm
F4 411.7mm
Letter 365.2mm
Legal 411.7mm
4
Preparation
Reverse Order Printing will not
take place unless you switch it on
beforehand.
To switch this feature on or off, see
the User Parameters. (see P.37 “Us-
er Parameters”switch10, bit0).
If the received image is longer than
the above limits, there is no reduction
and the image is split up and printed
on two sheets of paper. Normally, the
last 10mm of the received image will
be repeated at the beginning of the
next page.
However, if you wish, the second
page can continue from where the
first page ended.
Note
❒ Contact your service representa-
tive if you require any adjustments
to this feature.
23
Page 36

Holsten1AE_Advanced_FM.book Page 24 Wednesday, November 8, 2000 11:24 AM
Reception Features
4
24
Page 37

Holsten1AE_Advanced_FM.book Page 25 Wednesday, November 8, 2000 11:24 AM
Copying
If you need to make a copy of something, and there is no copier available,
use your fax machine. Just place your
original in the Automatic Document
Feeder, and press the {Copy} key.
Note
❒ By default, copies are made at De-
tail resolution. To change to Halftone, press the Resolution key.
Place your original in the Auto-
A
matic Document Feeder.
TRANSMIT OPTIONi
DIAL FAX NUMBER
5. Copying
Press the {{{{Copy}}}} key.
B
COPY MODE 01 SETS
iA4
Enter the number of copies that
C
you need.
Note
❒ Example: 2 copies, press {2} on
the ten key pad.
COPY MODE k2 SETS
iA4
❒ This machine makes copies in
the order P1, P2, P1, P2 (for example, when making 2 copies of
a 2 page document).
Press the {{{{Start}}}} key.
D
25
Page 38

Holsten1AE_Advanced_FM.book Page 26 Wednesday, November 8, 2000 11:24 AM
Copying
5
26
Page 39

Holsten1AE_Advanced_FM.book Page 27 Wednesday, November 8, 2000 11:24 AM
6. Facsimile User Tool
Lists You Can Print Out Yourself
You can print these lists at any time
by following the steps below.
Telephone Number List
(Function 43)
You can obtain a list of all the phone
numbers stored in the machine. (You
can also obtain a list of stored numbers as you edit them. See Chapter 3,
“Storing and Editing FAX Numbers
(Function 31 & 32)” in the Basic Features manual. See Chapter 3, “Storing
and Editing a Group of FAX Numbers (Function 33)” in the Basic Features manual.
Press {{{{Function}}}} {{{{4}}}} {{{{3}}}}, and then
A
the {{{{Yes}}}} key.
ALL LISTS? START/N
QUICK/SPEED/GROUP
To print all the numbers (Quick
Dial, Speed Dial, and Group
numbers)
A Press the {{{{start}}}} key. Then
press the {{{{Function}}}} key and
skip the following steps.
Three lists will come out.
B Press the {{{{Yes}}}} key.
SELECT LISTS Y/N
SPEED DIAL LIST?
C Press the {{{{No}}}} key twice, and
then the {{{{Start}}}} key.
START
To print the Speed Dial list
A Press the {{{{No}}}} key twice.
SELECT LISTS Y/N
SPEED DIAL LIST?
B Press the {{{{Yes}}}} key.
SELECT LISTS Y/N
GROUP DIAL LIST?
C Press the {{{{No}}}} key, and then
the {{{{Start}}}} key.
START
To print the Group list
A Press the {{{{No}}}} key three times.
To print the Quick Dial list
A Press the {{{{No}}}} key.
SELECT LISTS Y/N
QUICK DIAL LIST?
SELECT LISTS Y/N
GROUP DIAL LIST?
B Press the {{{{Yes}}}} key, and then
the {{{{Start}}}} key.
START
27
Page 40

Holsten1AE_Advanced_FM.book Page 28 Wednesday, November 8, 2000 11:24 AM
Facsimile User Tool
6
28
Page 41

Holsten1AE_Advanced_FM.book Page 29 Wednesday, November 8, 2000 11:24 AM
7. Key Operator Settings
Access Code for Functions 61 to 94
Accessing functions 61 to 94 requires an access code.
The sole purpose of this feature is to keep others from accidentally misadjusting
the machine. This code cannot be changed, so do not rely on it as a security feature.
The code is 2222
29
Page 42

Holsten1AE_Advanced_FM.book Page 30 Wednesday, November 8, 2000 11:24 AM
Key Operator Settings
Using Key Operator Settings
Setting the Date and Time
(Function 91)
Press {{{{Function}}}} {{{{6}}}} and enter the
A
access code {{{{2}}}} {{{{2}}}} {{{{2}}}} {{{{2}}}}. Press
{{{{9}}}} {{{{1}}}}, and then the {{{{Yes}}}} key.
SAT KPAD/Y
24 FEB 2001 13:35
Change the date with the ten key
B
pad with {{{{2}}}} {{{{8}}}}.
WED KPAD/Y
28 FEB 2001 13:35
Change the month using {{{{#}}}} or
C
{{{{pppp}}}} ({{{{# }}}} to scroll forward, or
7
{{{{pppp}}}} to scroll backward) on the
ten key pad and press VVVV to move
the cursor.
WED */#/Y
28 MAR 2001 13:35
Type in the year and time with
D
the ten key pad as {{{{0}}}} {{{{1}}}} {{{{1}}}} {{{{0}}}}
{2} {{{{5}}}}.
WED KPAD/Y
28 MAR 2001 10:25
When the display is correct, press
E
the {{{{Yes}}}} key, and then the {{{{Function}}}} key.
Summer Time / Daylight
Saving Time (Function 62)
Whenever local custom requires advancing the clock or setting the clock
back, use this feature. You can easily
move the clock forwards when daylight saving time begins, and back
when it ends.
When you install the machine for the
first time, take care that the setting is
correct before you set the date and
time.
Press {{{{Function}}}} {{{{6}}}} and enter the
A
access code {{{{2}}}} {{{{2}}}} {{{{2}}}} {{{{2}}}}. Press
{{{{6}}}} {{{{2}}}} , and then {{{{Yes}}}} key.
Y/NEXTi
SELECT LINE
Display might differ according to
your local.
Press VVVV until this display is shown,
B
and then press the {{{{Yes}}}} key.
Y/NEXTi
SUMMER TIME/DST
Use the WWWW and VVVV on the scroll key
C
to switch the feature on or off.
This mode is off if the display is
shown.
SUMMER TIME/DST Y/hi
ON iOFF
30
To store your setting, press the
D
{{{{Yes}}}} key.
Press {{{{Function}}}} key to finish.
E
Page 43

Holsten1AE_Advanced_FM.book Page 31 Wednesday, November 8, 2000 11:24 AM
Selecting the Display
Language (Function 93)
If you would rather use another language for messages and displays, follow the procedure below.
Press {{{{Function}}}} {{{{6}}}} and enter the
A
access number {{{{2}}}} {{{{2}}}} {{{{2}}}} {{{{2}}}}.
Press {{{{9}}}} {{{{3}}}} , and then the {{{{Yes}}}}
key.
LANGUAGE Y/hi
ENGLISH
Use WWWW and VVVV to scroll through the
B
available languages.
LANGUAGE O/hi
FRANCAIS
Using Key Operator Settings
❖❖❖❖ Print Counter:
The number of pages that your machine has printed (including copies, reports and lists.)
Press {{{{Function}}}} {{{{6}}}} and enter the
A
access code {{{{2}}}} {{{{2}}}} {{{{2}}}} {{{{2}}}}. Press
{{{{9}}}} {{{{4}}}}, and then {{{{Yes}}}} key.
TX :003256
RX :002648
Press the {{{{Yes}}}} key to check the
B
SCAN and PRINT counter.
SCAN :003287
PRINT :002703
When you have finished, press
C
the {{{{Function}}}} key.
Press the {{{{Yes}}}} key, and then the
C
{{{{Function}}}} key to return to the
ready state.
Counters (Function 94)
These counters will help you if you
wish to keep a regular check on how
many pages your machine has sent,
received, and copied. The machine
has the following counters:
❖❖❖❖ TX Counter:
The number of pages that your machine has sent (transmitted)
❖❖❖❖ RX Counter:
The number of pages that your machine has received
❖❖❖❖ Scan Counter:
The number of pages that your machine has scanned (including copies)
Rejecting or Accepting
Messages from Specified
Senders (Authorized
Reception)
This feature is called Authorized Reception. It helps you reject junk fax
mail.
It lets you specify which terminals
you wish to receive fax messages
from; all others will be shut out.
About Authorized Reception
A You must specify a list of senders
(Function 81). See P.32 “Program-
ming a List of Senders to Treat Differently (Function 81)”.
B You must turn Authorized Recep-
tion on (Function 62). See P.34
“Switching Authorized Reception ON
/ OFF (Function 62)”
7
31
Page 44

Holsten1AE_Advanced_FM.book Page 32 Wednesday, November 8, 2000 11:24 AM
Key Operator Settings
C You must set your machine to ac-
cept or reject messages from senders in that list (Function 63). (User
Parameters, switch 08, bit 2 and 3;
see P.37 “User Parameters” ).
If you accept them, the general public
will not have access to your fax machine. You accept messages only from
a group of people you know.
If you reject them, everyone will be
able to send you messages except the
people in the list. This is useful to reject the junk fax mail.
You can store up to 30 identifications
with this feature. You can program
part of an identification and accept
(or reject) messages from all senders
whose identification contains that
part. See Chapter 3, “Wild Cards” in
the Basic Features manual.
Programming the List of Senders
(Special Senders)
Press {{{{Function}}}} {{{{6}}}} and enter the
A
access code {{{{2}}}} {{{{2}}}} {{{{2}}}} {{{{2}}}}. Press
{{{{8}}}} {{{{1}}}}, and then the {{{{Yes}}}} key.
SETTING? Y/hi
PRINT LISTh/SEARCHi
Note
❒ At this time, you can print a
Programmed Special Senders
List by pressing W, and then the
{Start} key.
Press the {{{{Yes}}}} key.
B
NAME/NO. ABC hi
kkkkkkkkkkkkkkkkkkkk
Entering a list of senders to treat
differently (Function 81)
7
How to enter a list of senders to treat
differently, see P.32 “Programming a
List of Senders to Treat Differently
(Function 81)”
Enter OWN NAME or FAX
C
NUMBER using the Quick Dial
key and the ten key pad.
NAME/NO. ABC Y/N
XYZ COMPANYkkkkkkkkk
Programming a List of
Senders to Treat Differently
(Function 81)
You can enter a list of up to 30 identifications (OWN NAME, FAX
NUMBER and Wild Cards) for senders you wish to treat differently. For
instance, for each identification in the
list, you have the following option.
• Authorized Reception: You can accept their calls and reject all others
(or vice-versa) with the Authorized Reception setting (See P.31
“Rejecting or Accepting Messages
from Specified Senders (Authorized
Reception)”).
32
Note
❒ Example: XYZ COMPANY
Reference
How to enter the characters: see
Chapter 3, “Entering Characters" in the Basic Features manual.
Press the {{{{Yes}}}} key.
D
NAME/NO. Y/N
STORE AS WILD CARD?
Page 45

Holsten1AE_Advanced_FM.book Page 33 Wednesday, November 8, 2000 11:24 AM
Using Key Operator Settings
Either:
E
Store this OWN NAME as a wild
card
A Press the {{{{Yes}}}} key.
NAME/NO. ABC hi
kkkkkkkkkkkkkkkkkkkk
Otherwise
A Press the {{{{No}}}} key.
NAME/NO. ABC hi
kkkkkkkkkkkkkkkkkkkk
Either:
F
To program another special
sender
A Go to step CCCC.
To finish
A Press the {{{{Function}}}} key.
Explain that you need the number
programmed into their fax machine
for identification purposes. Or, attempt a communication with their fax
machine and print out a Journal report (see P.10 “Journal (Function 41)” ).
Read the identification under the
OWN NAME or FAX NUMBER
heading of the report.
Editing the OWN NAME/FAX NUMBER
for the special senders
Press {{{{Function}}}} {{{{6}}}} and enter the
A
access code {{{{2}}}} {{{{2}}}} {{{{2}}}} {{{{2}}}}. Press
{{{{8}}}} {{{{1}}}}, and then the {{{{Yes}}}} key.
SETTING? Y/hi
PRINT LISTh/SEARCHi
Press VVVV to scroll through the list.
B
When OWN NAME/FAX
NUMBER you want to change appears, press the {{{{Yes}}}}key.
NAME/NO.CHANGE? Y/hi
XYZ COMPANY
7
----Hints for programming the
special senders
You must specify the sender's identification code (see Chapter 3, “Initial
Settings and Adjustments” in the Basic Features manual ) which could be
a little different from their phone
number.
To get the other party's identification,
call and ask for their FAX NUMBER
or OWN NAME code.
Edit the OWN NAME or FAX
C
NUMBER and press the {{{{Yes}}}}
key.
NAME/NO. ABC Y/N
XYZ COMPANYkkkkkkkkk
33
Page 46

Holsten1AE_Advanced_FM.book Page 34 Wednesday, November 8, 2000 11:24 AM
Key Operator Settings
Either:
D
NAME/NO. Y/N
STORE AS WILD CARD?
Store this OWN NAME as a wild
card
A Press the {{{{Yes}}}} key.
NAME/NO. ABC hi
kkkkkkkkkkkkkkkkkkkk
Otherwise
A Press the {{{{No}}}} key.
NAME/NO. ABC hi
kkkkkkkkkkkkkkkkkkkk
Either:
E
7
To edit another special sender
A Go to step BBBB.
To finish
Press VVVV scroll the OWN NAME/
B
FAX NUMBER. And the OWN
NAME/FAX NUMBER you want to
change appears, press the {{{{Yes}}}} key.
NAME/NO.CHANGE? Y/hi
XYZ COMPANY
Press the {{{{No}}}} key, and then the
C
{{{{Yes}}}} key.
Press {{{{Function}}}} key.
D
Switching Authorized Reception
ON / OFF (Function 62)
Before you use Authorized Reception,
you have to switch the feature on.
Preparation
You must specify a list of senders
beforehand. See P.32 “Program-
ming a List of Senders to Treat Differently (Function 81)”.
Press {{{{Function}}}} {{{{6}}}} and enter the
A
access code {{{{2}}}} {{{{2}}}} {{{{2}}}} {{{{2}}}}. Press
{{{{6}}}} {{{{2}}}}, and then {{{{Yes}}}} key.
A Press the {{{{Function}}}} key.
Erasing a special sender
Press {{{{Function}}}} {{{{6}}}} and enter the
A
access code {{{{2}}}} {{{{2}}}} {{{{2}}}} {{{{2}}}}. Press
{{{{8}}}} {{{{1}}}}, and then the {{{{Yes}}}} key.
SETTING? Y/hi
PRINT LISTh/SEARCHi
34
Y/NEXTi
SELECT LINE
Display might differ according to
your local.
Press VVVV until this display is as
B
shown.
Y/NEXTi
AUTHORIZED ON/OFF
Press the {{{{Yes}}}} key.
C
AUTHORIZED Y/hi
ON iOFF
Page 47

Holsten1AE_Advanced_FM.book Page 35 Wednesday, November 8, 2000 11:24 AM
Using Key Operator Settings
Change the on/off setting by
D
pressing WWWW or VVVV.
Press the {{{{Yes}}}} key, and then
E
{{{{Function}}}} key.
Saving Energy with the Power
Saving Timer (Function 71)
You can set sleep time to let the machine go to saving energy condition
and set the wake up time when it returns to standby mode the next morning. During this Power Saver mode, a
fax message received is stored in the
memory and will be printed automatically the next morning after the wake
up timer is activated.
As a typical example, you could program the heating element inside the
printer to stay off at night and over
the weekend. (You can program different settings for every day of the
week.)
To use the Power Saving timer, you
must:
• Program the timers for each day of
the week.
• Switch the Power Saving timer feature on.
Press {{{{Function}}}} {{{{6}}}} and enter the
A
access code {{{{2}}}} {{{{2}}}} {{{{2}}}} {{{{2}}}}. Press
{{{{7}}}} {{{{1}}}}, and then the {{{{Yes}}}} key.
Y/N
SET POWER SAVER
Press the {{{{Yes}}}} Key.
B
SET TIMER Y/N/hi
SUN
Use WWWW and VVVV to scroll through the
C
days of the week.
SET TIMER Y/N/hi
TUE
Note
❒ Example: Press V twice to go to
Tuesday.
Press the {{{{Yes}}}} key
D
TIMER#1 TUE */#/Y
ON FROM 00:00
To change the ON to OFF, or the
E
other way round, press the {{{{pppp}}}}
or {{{{#}}}} keys.
7
Setting the Power Saving time (Function 71)
Note
❒ While the Power Saving timer is
active, all incoming calls are refused if the memory fills up.
----Example:
For Tuesday, set the Power Saving
timer to switch the heater on at 9:00
and off at 18:00.
Note
❒ There are two timers for each
day, each with an ON/OFF setting. “ON” means that the heater will switch on at the time
indicated. “OFF” means that the
heater will switch off at the time
indicated.
Press VVVV to move the cursor under
F
the time.
TIMER#1 TUE KPAD/Y
ON FROM 00:00
35
Page 48

Holsten1AE_Advanced_FM.book Page 36 Wednesday, November 8, 2000 11:24 AM
Key Operator Settings
Enter the time (9:00) : Press {{{{0}}}}
G
{9} {{{{0}}}} {{{{0}}}} from the key pad.
Scroll through the list of features
B
with VVVV until this display is as
shown.
TIMER#1 TUE KPAD/Y
ON FROM 09:00
Y/NEXTi
POWER SAVER ON/OFF
Press the {{{{Yes}}}} key.
H
Press the {{{{Yes}}}} key.
C
TIMER#2 TUE */#/Y
ON FROM 00:00
POWER SAVER Y/hi
ON iOFF
Note
Change the on/off setting by
❒ Repeat step F to G for the second
timer (18:00)
❒ If you want the heater on all
day, set both timers to ON =
00:00. If you want the heater off
all day, set both timers to OFF =
00:00.
Press the {{{{Yes}}}} key, and then the
I
{{{{Function}}}} key to finish.
7
Note
❒ Go back to step C to program
the timer for another day.
D
pressing WWWW or VVVV.
POWER SAVER Y/hi
iON OFF
Press the {{{{Yes}}}} key, and then
E
{{{{Function}}}} key to finish.
Switching the Power Saving
timer ON / OFF (Function 62)
The Power Saving timer feature must
be switched on using Function 62.
Press {{{{Function}}}} {{{{6}}}} and enter the
A
access code {{{{2}}}} {{{{2}}}} {{{{2}}}} {{{{2}}}}. Press
{{{{6}}}} {{{{2}}}}, and then the {{{{Yes}}}} key.
Y/NEXTi
SELECT LINE
Display might differ according to
your local.
36
Page 49

Holsten1AE_Advanced_FM.book Page 37 Wednesday, November 8, 2000 11:24 AM
Using Key Operator Settings
User Parameters
Adjusting your machine sometimes requires that you change special settings
called user parameters. For each user parameter, you must change a bit in a
switch.
A switch has eight bits. Each bit has a value of 1 or 0, and each bit is numbered
0 to 7 from the right.
❖❖❖❖ Bit values and Bit numbers
Bit number76 5 43210
↓↓ ↓ ↓↓↓↓↓
Bit value 01 0 00000
In the following example we will change bit 3 of switch 05 in the user parameters.
Press {{{{Function}}}} {{{{6}}}} and enter the access code {{{{2}}}} {{{{2}}}} {{{{2}}}} {{{{2}}}}. Press {{{{6}}}} {{{{3}}}},
A
and then the {{{{Yes}}}} key.
You will get this display.
SETTING? Y/h
PRINT LIST h
Note
❒ You can press the W key to see a list. Otherwise, press the {Yes} key.
Press the {{{{Yes}}}} key again and use WWWW and VVVV to change switches.
B
Note
❒ For example go to switch 05 by pressing V five times.
KPAD/Y/hi
SWITCH 05 :0000 0011
To change bit 1, press {{{{1}}}} on the ten key pad.
C
Bit 1 will change from 1 to 0 or from 0 to 1.
KPAD/Y/hi
SWITCH 05 :0000 0001
Note
❒ To change bit 0, press {0} to change bit 1, press {1} and so on.
Press the {{{{Yes}}}} and {{{{Function}}}} keys.
D
7
37
Page 50

Holsten1AE_Advanced_FM.book Page 38 Wednesday, November 8, 2000 11:24 AM
Key Operator Settings
----List of all relevant user parameters
Many bit settings have no effect and are not listed. (Never change these).
SW Bit & Definition Settings
00 5, 4: Default resolution when you send a message
RESOLUTION
6: Default setting for transmission.
TRANSMISSION MODE
01 7: If you change any of resolution, transmission mode
setting before making a transmission , then
Bit 0: The setting(s) will not return to the home position
after the transmission.
Bit 1: The setting(s) will return to the home position after the transmission.
RETURN TO HOME POSITION
03 0: Automatically print memory transmission reports.
COMMUNICATION RESULT REPORT(MEMORY TX)
7
2: Automatically print storage reports for memory
transmission.
FILE RESERVE REPORT(MEMORY TX)
4: Automatically print polling reception reports.
COMMUNICATION RESULT REPORT(POLLING RX)
5: Automatically print immediate transmission reports.
TRANSMISSION RESULT REPORT
7: Automatically print communication reports.
JOURNAL
04 7: Include the first half of the first page with reports?
INCLUSION OF PART OF IMAGE
05 0: Store incoming faxes when machine is out of sup-
plies.
SUBSTITUTE RECEPTION
1: Allow automatic reception from senders that do not
identify themselves.
CONDITIONS OF MEMORY RECEPTION
06 0: Default Setting for sending a header with each page.
FAX HEADER PRINT
Bit: 5, 4
0, 0: STANDARD
0, 1: DETAIL
1, 0: FINE
1, 1: HALFTONE
0: Memory
1: Immediate
0: Off
1: On
0: Off
1: On
0: Off
1: On
0: Off
1: On
0: Off
1: On
0: Off
1: On
0: Off
1: On
0: Off
1: On
0: Accept (Free)
1: Reject (If no OWN NAME/
FAX NUMBER received)
0: Off
1: On
38
Page 51

Holsten1AE_Advanced_FM.book Page 39 Wednesday, November 8, 2000 11:24 AM
SW Bit & Definition Settings
08
10 0: Reverse order Printing
13 1, 0: Access to the public telephone line
AUTHORIZED RECEPTION
3, 2:
(Can also use function 62)
SORT
7: Use dithering halftone (SPD) or standard halftone
(STD)
HALFTONE METHOD
ACCESS METHOD FOR PSTN LINE
Using Key Operator Settings
Bit
3, 2:
X 0: Off
0, 1: Receive messages only
from senders whose OWN
NAME/FAX NUMBERs are
programmed.
1, 1: Receive messages only
from senders whose OWN
NAME/FAX NUMBERs are
not programmed.
0: Off
1: On
0: STD
1: SPD
Bit: 1, 0
1, 0: Ground Start
0, 1: Loop Start
1, 1: Flash Start
0, 0: PSTN
7
User parameter hints
❖❖❖❖ Changing your machine's default settings
These are the settings your machine assumes immediately after it is turned
on, after clearing the machine, or after you or the power saving reactivates it.
Many of the user parameters determine your machine's default settings.
❖❖❖❖ Clear modes after sending or loading a fax message (Switch 01, Bit 7)
Your machine can either reset itself or keep its settings (for a few minutes) after it sends a fax message.
❖❖❖❖ Automatic reports
Many types of automatic reports can be switched on or off. See P.17 “Checking
if a Transmission Was Successful”. See P.19 “Printed Reports” for details.
❖❖❖❖ Accepting messages when out of supplies (Switch 05, Bit 0)
This is also called substitute reception. You can accept messages even when
out of toner or paper by storing them in memory. See P.21 “Printing Messages
that Have Been Received into Memory (Substitute Reception)”
39
Page 52

Holsten1AE_Advanced_FM.book Page 40 Wednesday, November 8, 2000 11:24 AM
Key Operator Settings
Setting the Access Number
(Function 61)
If you select the inside line, you must
program the number which proceeds
the telephone number.
If you program the number, a pause
will be added automatically as soon
as you press the number.
Press {{{{Function}}}} {{{{6}}}} and enter the
A
access code {{{{2}}}} {{{{2}}}} {{{{2}}}} {{{{2}}}}. Press
{{{{6}}}} {{{{1}}}}, and then the {{{{Yes}}}} key.
Y/NEXTi
SET OWN NAME
Press VVVV until the following dis-
B
play is shown.
Y/NEXTi
SET PSTN ACCESS NO.
Setting the Auto Ring Time
(Function 61)
In Auto mode, the machine rings a
number of times to give you the
chance to pick up the handset before
taking the call automatically. You can
alter the number of rings by changing
the Auto Ring Time.
Press {{{{Function}}}} {{{{6}}}} and enter the
A
access code {{{{2}}}} {{{{2}}}} {{{{2}}}} {{{{2}}}}. Press
{{{{6}}}} {{{{1}}}}, and then the {{{{Yes}}}} key.
Y/NEXTi
SET OWN NAME
Press VVVV until the following dis-
B
play appears.
Y/NEXTi
SET NO. OF RINGS
7
Press the {{{{Yes}}}} key.
Press the {{{{Yes}}}} key.
C
NU M BER KPAD
kk
Enter the number which you use
D
to access an outside line.
For example, if you register “0” as
the PSTN Access Number, a pause
will be inserted automatically after
dialing “0”.
NUMBER KPAD/N
0k
Press the {{{{Yes}}}} key to store your
E
setting, and then press the {{{{Function}}}} key.
C
The factory setting will be displayed.
NO. OF RINGS Y/N
08 RINGS
Note
❒ If you wish to keep these set-
tings, go to step E .
Press the {{{{No}}}} key, and then press
D
the new number using the ten key
pad.
Press the {{{{Yes}}}} key, and then the
E
{{{{Function}}}} key.
40
Page 53

Holsten1AE_Advanced_FM.book Page 41 Wednesday, November 8, 2000 11:24 AM
Setting the Country Code
(Function 61)
You can change the country code setting.
Important
❒ If you change the country code,
settings in Function 62 and 63 are
initialized.
❒ Be sure to select the correct coun-
try setting. Selecting the wrong
country may make it impossible
for you to switch to a different setting. If you do accidentally make
the wrong setting and find that
you cannot correct the error, please
contact your service representative
for assistance.
Note
❒ This Function is not available in
some areas.
❒ Please contact your service repre-
sentative, if this function is not
available even though you programmed Country Code in initial
settings.
Press {{{{Function}}}} {{{{6}}}} and enter the
A
access code {{{{2}}}} {{{{2}}}} {{{{2}}}} {{{{2}}}}. Press
{{{{6}}}} {{{{1}}}}, and then the {{{{Yes}}}} key.
Y/NEXTi
SET OWN NAME
Press VVVV until the following dis-
B
play is shown.
Y/NEXTi
SET COUNTRY
Press the {{{{Yes}}}} key.
C
COUNTRY Y/hi
AUSTRALIA
Using Key Operator Settings
Press WWWW or VVVV to select a country or
D
region name. If your country or
region name is not displayed, select “OTHERS”.
Press the {{{{Yes}}}} key.
E
A: After selecting a country or region name in step D, Go to step H.
B: After selecting “OTHERS” in step
D, the following display will appear.
COUNTRY CODE Y/N
22
When B is displayed, go to step F.
Press the {{{{No}}}} key, and then enter
F
the country code.
Important
❒ Make sure you enter the proper
country code. The machine
might function improperly if
you enter the wrong code.
COUNTRY CODE Y/N
23
Note
❒ Country Code List
Code Country / Region
20 Hong Kong
22 Australia
23 New Zealand
24 Singapore
25 Malaysia
18 Thailand
18 Viet Nam
18 Sri Lanka
18 India
Press the {{{{Yes}}}} key to program
G
the country code.
Press {{{{Function}}}} key.
H
7
41
Page 54

Holsten1AE_Advanced_FM.book Page 42 Wednesday, November 8, 2000 11:24 AM
Key Operator Settings
Setting the Phone Line Type
(Function 62)
You must match the fax machine to
the type of line you use: a tone line or
a pulse line. Then, you should connect the line to the machine.
Note
❒ This function is not available in
some areas.
Press {{{{Function}}}} {{{{6}}}} and enter the
A
access code {{{{2}}}} {{{{2}}}} {{{{2}}}} {{{{2}}}}. Press
{{{{6}}}} {{{{2}}}}, and then the {{{{Yes}}}} key.
Y/NEXTi
SELECT LINE
Press the {{{{Yes}}}} key.
B
SELECT LINE Y/hi
7
iTT PD
Note
❒ TT = Touch Tone
❒ PD = Pulse Dial
Press WWWW and VVVV to set your machine
C
PD
TT
”).
for a tone dial line (“
pulse dial line (“
”) or a
Calling the Service Station
The machine has a feature called
Service Report Transmission. Use this
feature when your machine is having
problems. The machine will transmit
information about the condition of
your machine to your service representative. A representative will then
be able to find out what the problem
is before making a visit. Service Report Transmission is available when
the fax number of the service representative has been programmed.
Important
❒ This information is sent to the des-
tination that has been registered in
your machine by a service representative.
Sending a service report
When you need to send a service report, do the following:
Press {{{{Function}}}} {{{{6}}}} and enter the
A
access code {{{{2}}}} {{{{2}}}} {{{{2}}}} {{{{2}}}}. Press
{{{{7}}}} {{{{2}}}}, and then the {{{{Yes}}}} key.
START
SYSTEM PARA. TX
42
SELECT LINE Y/hi
TT iPD
Press the {{{{Yes}}}} key.
D
PROGRAMMED
“
display.
Press the {{{{Function}}}} key.
E
” will flash on the
READY 100% 10:00
SET DOC. OR DIAL NO.
Press the {{{{Start}}}} key.
B
5551234
DIALING
Page 55

Holsten1AE_Advanced_FM.book Page 43 Wednesday, November 8, 2000 11:24 AM
Note
❒ If the transmission was not suc-
cessful, the machine will not redial. You must repeat the
operation. Program your machine's own telephone number
in order for your service representative to identify the sender
of the service report. (see Chapter 3, “Initial Settings and Adjustments” in the Basic Features
manual.)
Using Key Operator Settings
43
7
Page 56

Holsten1AE_Advanced_FM.book Page 44 Wednesday, November 8, 2000 11:24 AM
Key Operator Settings
7
44
Page 57

Holsten1AE_Advanced_FM.book Page 45 Wednesday, November 8, 2000 11:24 AM
8. Troubleshooting
Help List
Use the {No/Help} key to print the Help List.
This list explains the following procedures:
• Immediate Transmission
• Memory Transmission
• Erasing a stored message before it is sent.
• Storing and editing Quick Dial numbers.
• Printing a list of the Quick Dial numbers
• Storing and editing Speed Dial numbers.
• Printing a list of the Speed Dial numbers
• Printing the Journal
45
Page 58

Holsten1AE_Advanced_FM.book Page 46 Wednesday, November 8, 2000 11:24 AM
Troubleshooting
Reading Reports
You can obtain reports from your machine either by having your machine
print them out automatically, or by
printing them out yourself.
Error Report (Turned On/Off
by a Service Representative)
This report is printed after each unsuccessful communication. The communication failure report is printed
after a job has been completed. And at
the end, it prints a communication
failure or transmission result report.
Check it, and retransmit any pages
that were not sent. If a particular
problem continues or gets worse,
keep the error reports for the service
representative.
Power Failure Report
8
This report is printed if the machine's
power was off for long enough to
erase files from the memory. The report gives details of the files that were
lost. With this information, you may
store messages for transmission
again, and contact the senders of any
received messages that were lost.
Note
❒ Phone numbers stored in Quick/
Speed/Groups are not lost.
46
Page 59

Holsten1AE_Advanced_FM.book Page 47 Wednesday, November 8, 2000 11:24 AM
9. Maintaining Your Machine
Changing the Paper Size Settings
When you change the paper size
loaded in the Paper Tray, you need to
change the paper size settings.
Press {{{{Function}}}} {{{{3}}}} {{{{4}}}}, and then
A
the {{{{Yes}}}} key. Alternatively, if
the machine is in standby mode,
just press the WWWW key.
PAPER SIZE Y/hi
A4 (210X297 MM)
Press the WWWW and VVVV keys to select
B
the paper size.
PAPER SIZE Y/hi
LETTER (8.5X11 INCH)
Press the {{{{Yes}}}} key.
C
PAPER SIZE Y/hi
PROGRAMMED
Press the {{{{Function}}}} key to finish.
D
47
Page 60

Holsten1AE_Advanced_FM.book Page 48 Wednesday, November 8, 2000 11:24 AM
Maintaining Your Machine
Cleaning the Rollers and Scanner
To maintain the machine's condition,
clean the rollers and scanner from
time to time.
Open the operation panel.
A
Wipe the rollers.
B
9
Wipe the white sheet (5) with a
A
damp cloth. Roll it round with
your fingers so that you can
wipe the whole surface.
B Wipe the three black rollers. (1,
2, 3) Roll them round with your
fingers so that you can wipe the
whole surface.
Wipe the scanner. (4)
C
Close the operation panel.
D
48
Page 61

R
R
Holsten1AE_Advanced_FM.book Page 49 Wednesday, November 8, 2000 11:24 AM
Replacing the Toner Cartridge and Cleaning Pad
Replacing the Toner Cartridge and
Cleaning Pad
When the Add Toner indicator (D)
starts to blink, the toner cartridge is
almost empty. You will make 100
more copies before you have to
change the toner cartridge.
When the Add Toner indicator (D)
remains lit, it is time to install a new
toner cartridge.
WARNING:
Do not incinerate used toner or toner containers. Toner dust might ignite when exposed to an open flame. Dispose of the used
toner cartridge according to local regulations for plastics.
This machine has been tested for safety using this supplier’s parts and consumables.
We recommend you only use these specified
supplies.
When removing the toner cartridge, do not
touch the electrical elements and a screw inside the machine as this may damage the
unit.
CAUTION:
When removing misfed paper, do not touch
the fusing section because it could be very
hot.
Open the box of the new toner
A
cartridge and check to make sure
it contains a toner cartridge and
cleaning pad.
9
Note
❒ Be sure to hold the toner car-
tridge by its handle.
49
Page 62

Holsten1AE_Advanced_FM.book Page 50 Wednesday, November 8, 2000 11:24 AM
Maintaining Your Machine
Lift up the tabs located on the
B
sides of the machine and open the
front unit.
Important
❒ Please remove the paper on the
Print Delivery Tray, before you
open the Front Unit.
Hold the toner cartridge by its
C
handle and pull it out.
Remove the old cleaning pad.
D
Important
❒ Please replace the cleaning pad
as well, when you replace the
toner.
Note
❒ Be sure to grasp the green han-
dle when removing the cleaning
pad.
Grasp the new cleaning pad by
E
the green handle and insert it into
place.
9
Note
❒ Keep the toner cartridge hori-
zontal to avoid spilling the toner.
50
Page 63

Holsten1AE_Advanced_FM.book Page 51 Wednesday, November 8, 2000 11:24 AM
Replacing the Toner Cartridge and Cleaning Pad
Press down gently but firmly on
F
both sides of the pad to make sure
that it is inserted as far as it can
go.
Important
❒ Do not forget to install the
cleaning pad whenever you install a new toner cartridge.
Prepare the new toner cartridge.
G
Holding the toner cartridge by its
handle, gently shake it side to
side 5 or 6 times to evenly distribute the toner inside.
Note
❒ Be sure to hold the toner car-
tridge by its handle.
Look inside the machine and note
H
the locations of the arrows that indicate the toner cartridge guides
on either side.
Make sure the plastic pins
I
(marked with “pppp” in the step GGGG illustration) on either side of the
toner cartridge slide along the
guides inside the machine.
Note
❒ Be sure to hold the toner car-
tridge by its handle.
9
51
Page 64

Holsten1AE_Advanced_FM.book Page 52 Wednesday, November 8, 2000 11:24 AM
Maintaining Your Machine
To close the front unit, press
J
down firmly but gently on both
sides, until the unit closes and
clicks securely into place.
Note
❒ Background gray cast is some-
times evident just after installing a new toner cartridge.
9
52
Page 65

Holsten1AE_Advanced_FM.book Page 53 Wednesday, November 8, 2000 11:24 AM
Toner Cartridge
• Store in a cool, dark place.
• Never store where it may be exposed to heat.
• Keep out of the reach of children.
• Do not eat toner.
• Do not lay heavy objects on toner cartridge.
• Do not incinerate toner or toner containers. Toner dust might ignite when ex-
posed to an open flame.
Toner Cartridge
53
9
Page 66

Holsten1AE_Advanced_FM.book Page 54 Wednesday, November 8, 2000 11:24 AM
Maintaining Your Machine
9
54
Page 67

Holsten1AE_Advanced_FM.book Page 55 Wednesday, November 8, 2000 11:24 AM
Before Installation
Before installing your machine, read
the safety instructions at the beginning of this manual. To install the machine, follow these procedures:
A Find a suitable location for the ma-
chine.
B Remove all the pieces of tape at-
tached to the machine.
Install the toner cartridge.
C
D Attach the accessories.
E Connect the phone line. (see P.60
“Connecting Up to the Telephone
Line”.)
Connect the power. (see P.61 “Con-
F
necting the Power and Switching
On”.)
G Load the paper in the paper tray.
Enter all necessary information
H
and settings in your machine's
memory. (see Chapter 3, “Initial
Settings and Adjustments” in the
Basic Features manual.)
For details, please refer to the setup
guide, “Before You Use This Machine.”
10. Installation
55
Page 68

R
Holsten1AE_Advanced_FM.book Page 56 Wednesday, November 8, 2000 11:24 AM
Installation
Machine Environment
10
When choosing a location for your
machine, please follow the safety instruction given in the first section.
Location
For the best possible performance, install your machine in a place which
satisfies the following conditions.
• Not exposed to direct sunlight
• Well ventilated (air turnover at
least three times per hour); to
avoid the build-up of ozone, make
sure to locate the machine in a
large well-ventilated room which
has an air turnover of more than 30
3
/hr per person.
m
• Level
• Not subject to vibration
• Away from other electronic equip-
ment, to avoid interference
• Away from areas containing corrosive gas
• Dust-free
• Condensation-free
• Temperature
15°C to 25°C (Recommended
range)
10°C to 35°C (Possible operation
range)
• Humidity (do not install near a humidifier)
30% to 70 % (Recommended
range)
15% to 80 % (Possible operation
range)
• Away from heaters and air conditioners, to avoid sudden changes
of temperature
• Within 5 meters of a three-pin
grounded power outlet (220-240
Volts, 50/60 Hz)
• With the clearance as shown
CAUTION:
This machine generates a certain amount of
ozone. Although the amount generated is
within safety requirements, it is recommended that, to avoid ozone buildup, you
install the machine in a room which is properly ventilated.
56
Page 69

R
Holsten1AE_Advanced_FM.book Page 57 Wednesday, November 8, 2000 11:24 AM
Installing the Optional Memory Card
Installing the Optional Memory Card
Turn off the power switch.
A
Remove the cover from the front
B
right of the machine.
Hold the card in the way shown
C
(pay attention to which side is
printed) and insert it carefully
into the slot.
Place the cover back on the ma-
D
chine.
Turn the power switch on.
E
10
CAUTION:
Insert the Memory Card firmly or the
machine may not work properly.
57
Page 70

Holsten1AE_Advanced_FM.book Page 58 Wednesday, November 8, 2000 11:24 AM
Installation
Connecting The External Telephone
There are two similar sockets located
at the rear of the machine.
• LINE – the telephone line connection
• TEL – for an external telephone
when sharing the line with a telephone
Plug the line cable into the LINE
A
socket at the rear of the machine.
Plug the external telephone cable
C
into the TEL socket at the rear of
the machine.
Connect the other end of the ex-
D
ternal telephone cable to your telephone.
Note
❒ If you wish to also be able to re-
ceive incoming telephone calls,
you must set the Reception
mode to Auto mode.(see Chapter 2 “Reception Modes” in the
Basic Features manual)
10
58
Connect the other end of the line
B
cable to your telephone line wall
socket.
----Connecting Telephone
Answering Machine (TAM ) to
the FAX machine
Plug the TAM line into the TEL socket
at the rear of the machine.
Page 71

R
Holsten1AE_Advanced_FM.book Page 59 Wednesday, November 8, 2000 11:24 AM
Connecting the Machine
Before using the machine, connect the
machine to the telephone line properly. Then plug in the power cable and
switch on.
Make sure the machine is properly
connected to the telephone line and
the power outlet, as shown in the following.
CAUTION:
Do not switch on until everything is connected properly.
Program the Telephone Line Type
setting (use Function 62; see P.42 “Set-
ting the Phone Line Type (Function
62)”). If your telephone normally
sends out tones (touch tone) when dialing, use the TT setting; if it normally
sends out pulses (rotary dial), use the
DP setting. Also, make sure that the
switch on the handset is set up correctly.
Connecting the Machine
Limitation
❒ This function is not available in
some areas.
10
59
Page 72

Holsten1AE_Advanced_FM.book Page 60 Wednesday, November 8, 2000 11:24 AM
Installation
Connecting Up to the Telephone Line
There are similar sockets located at
the back of the machine:
• TEL: For the handset option or external telephone
• LINE: Telephone line connection
Insert the line cable into the la-
A
beled “LINE”.
10
60
Connect the other end to your tel-
B
ephone line.
Important
❒ By law in the United States, you
must program your phone
number identification (your
FAX NUMBER) into your machine before you can connect
the public phone system. See
Chapter 3, “Initial Settings
(Function 61)” in the Basic Features manual.
TSTL020N
Page 73

R
Holsten1AE_Advanced_FM.book Page 61 Wednesday, November 8, 2000 11:24 AM
Connecting the Power and Switching On
Connecting the Power and Switching On
CAUTION:
Do not switch on until everything is connected properly.
Insert the power cable into the
A
socket located at the rear of the
machine.
Plug in the cable to the mains.
B
Turn the power switch on.
C
Important
❒ The power supply is 220–240
Vac.
❒ The power cord should not be
laid in a place where it might
trip somebody.
❒ Do not lay anything on the pow-
er cord.
❒ If you have to use an extension
cord, make sure that it is capable of carrying 300V/10A, and
that your facsimile terminal is
the only piece of equipment
connected to that cord.
10
61
Page 74

Holsten1AE_Advanced_FM.book Page 62 Wednesday, November 8, 2000 11:24 AM
Installation
10
62
Page 75

Holsten1AE_Advanced_FM.book Page 63 Wednesday, November 8, 2000 11:24 AM
Option
❖❖❖❖ FAX EXPANSION CARD TYPE 20
A 2Mbyte memory card can be added.
Reference
See P.57 “Installing the Optional Memory Card”.
11. Appendix
63
Page 76

Holsten1AE_Advanced_FM.book Page 64 Wednesday, November 8, 2000 11:24 AM
Appendix
Specifications
Base Machine
❖❖❖❖ Power supply:
220–240Vac, 50 / 60 Hz
❖❖❖❖ Power consumption:
Standby mode: Average 10 W
Transmission: Average 30 W
Reception: Average 220 W
Copying: Average 250 W
Maximum power consumption:
600 W
*1
❖❖❖❖ Noise Emission
Sound Power Level
During printing 61 dB (A) or less
Stand-by 40 dB (A) or less
Sound Pressure Level
During printing 54 dB (A) or less
Stand-by 34 dB (A) or less
*1
The above measurements made
ISO 7779 are actual value.
*2
It is measured at the position of the
bystander. During Printing.
❖❖❖❖ Protocol:
G3
:
Mainframe Only
*2
Mainframe Only
❖❖❖❖ Transmission time:
G 3: 6 seconds at 14,400 bps, without FAX HEADER, ECM, MMRusing memory for a ITU-T #1 test
document (Slerexe letter) at standard resolution
❖❖❖❖ Data compression:
MH, MR, MMR
❖❖❖❖ Modem Speed:
14,400/12,000/9,600/7,200/4,800/
2,400 bps.
❖❖❖❖ Scanning resolution:
• Standard: 8 × 3.85 lines/mm
• Detail: 8 × 7.7 lines/mm
• Fine: 8 × 15.4 lines/mm (Trans-
mission only)
❖❖❖❖ Paper tray capacity:
100 sheets (70g/m2–90g/m2)
❖❖❖❖ Paper Size:
A4 (Adjustable to Letter, Legal,
and F4 )
❖❖❖❖ Dimensions (W ×××× D ×××× H):
341 × 766 × 472 mm
❖❖❖❖ Weight:
9.1kg
11
❖❖❖❖ Memory Capacity:
• 96 pages/A4 size
• With 2Mbyte memory: 200 pag-
es
64
Page 77

Holsten1AE_Advanced_FM.book Page 65 Wednesday, November 8, 2000 11:24 AM
Document and Paper Specifications
Recommended types of document
Before you send your document, make sure that it meets the following requirements.
Important
❒ Documents that do not meet these requirements can cause your machine to
jam or may cause some components of the machine to become damaged or
dirty.
❖❖❖❖ Scanning area
Specifications
The part shaded will not be scanned, because it is outside the maximum scanning width range.
Correct size for the Automatic Document Feeder
• Thickness 0.05 to 0.2 mm (60g/m2–90g/m2)
• Length and Width: See the above diagram.
If the page is too short, put it inside a document carrier or enlarge it with a
copier.
If the page is too long, divide it into two or more sheets.
11
65
Page 78

Holsten1AE_Advanced_FM.book Page 66 Wednesday, November 8, 2000 11:24 AM
Appendix
Documents (Using the Automatic Document Feeder)
❖❖❖❖ Length:
148–600mm
❖❖❖❖ Width:
148–210mm
❖❖❖❖ Thickness:
0.05 – 0.2mm
Automatic Document Feeder requirements
• Do not insert torn, heavily curled, wavy, creased, dog-eared, damp, or otherwise damaged documents. Make copies of these originals and scan the copies.
• Do not insert folded, stapled, clipped, glued, or taped documents, or documents with a metallic coating. Make copies of these originals and scan the
copies.
• Do not insert documents on which there is undried ink or correction fluid.
Wait for the document to dry.
• If the document has an uneven or slanted edge, do not insert that edge in first.
11
Paper requirements
❖❖❖❖ Paper Weight
70g/m2–90g/m
2
❖❖❖❖ Paper Size:
A4 (Adjustable to Letter, Legal, and F4 )
Important
❒ When you change the paper size loaded in the Paper Tray, you need to
change the paper size settings.
Reference
See P.47 “Changing the Paper Size Settings”
• Do not print to torn, heavily curled, wavy, creased, dog-eared, damp, or otherwise damaged paper.
• Do not print to folded, stapled, clipped, glued, or taped paper.
• Do not print to paper with any kind of coating or printing. Do not print to me-
tallic paper. Do not print to the reverse side of a print.
66
Page 79

Holsten1AE_Advanced_FM.book Page 67 Wednesday, November 8, 2000 11:24 AM
Specifications
Saving Energy
Introduction
To print a fax message your fax machine uses a heating roller to fuse the
image to the paper. This roller must
already be hot when the paper passes
under it. To maintain a temperature
high enough to permit proper fusing,
electricity is consumed. This facsimile
is equipped with various energy saving modes to reduce the consumption
of electricity while the machine is
waiting for a fax message.
Letting the heating roller cool to room
temperature will reduce the amount
of electricity the fax machine consumes. However, the fax machine
will not print incoming messages
right away, it will store them in memory and print them out after the roller
warms up.
Letting the heating roller cool halfway reduces the amount of electricity
the fax machine consumes, but not as
much as letting it cool to room temperature. On the other hand, since
warming up takes only a short time,
incoming fax messages can be printed
right away.
If your fax machine enters saving energy mode, SAVING ENERGY appears on the display.
The saving energy mode is related to
the Night Timer. see P.35 “Setting the
Power Saving time (Function 71)”
Entering Energy Saving mode
The machine enters Energy Saving
mode when:
• Nobody uses the machine for
about 5 minutes (it automatically
enters Energy Saving mode).
Note
❒ It takes 15 minutes for the machine
to enter this mode after the power
switch is turned on, or the front
unit is closed.
Exiting Energy Saving mode
Your machine exits Energy Saving
mode when a fax is received.
To exit Energy Saving mode manually:
• In Fax Standby mode, press any
key.
• Set a document.
Reception in Energy Saving mode
Once in Saving Energy mode, you can
still receive messages. When a message is received, the machine prints it
and returns to Energy Saving mode.
Note
❒ If the machine is in Power Saver
mode, the message will printed
out after the machine exits Power
Saver mode.
11
67
Page 80

Holsten1AE_Advanced_FM.book Page 68 Wednesday, November 8, 2000 11:24 AM
Appendix
Saving Energy with the Night Timer
You can set sleep time to let the machine go to saving energy condition
and set the wake up time when it returns to standby mode the next morning. During this Night Timer mode, a
fax message received is stored in the
memory and will be printed automatically the next morning after the wake
up timer is activated.
As a typical example, you could program the heating element inside the
printer to stay off at night and over
the weekend. (You can program different settings for every day of the
week.)
To use the Night Timer, you must:
• Program the timers for each day of
the week (see P.35 “Saving Energy
with the Power Saving Timer (Function 71)”).
• Switch the Night Timer feature on
(see P.36 “Switching the Power Sav-
ing timer ON / OFF (Function 62)”)
Storage Capacity
Stored Numbers
• 20 Quick Dial keys, each of which
can hold an individual number.
Any three of the Quick Dial keys
can hold a group of numbers.
• 50 individual numbers stored as
two-digit Speed Dial codes.
• 3 groups, each of which can hold
up to 30 destinations.
• 30 FAX NUMBER or OWN NAME
codes (possibly used as wild cards)
for authorized reception .
Destinations
Up to 100 destinations can be set at
any one time. (Ex: message A to 25
destinations, message B to 30, message C to 20 message D to 24 and finally one immediate transmission job
you are programming in now. Total:
100)
11
Memory files
You can have as many as 100 memory
transmission files stored in the machine: This is a theoretical maximum.
The actual number of files you can
have in your machine depends on the
types of the documents, and how
much memory they consume.
68
Page 81

Holsten1AE_Advanced_FM.book Page 69 Wednesday, November 8, 2000 11:24 AM
Function List (11∼∼∼∼51)
Press {Function} key followed by one of the numbers below.
No. Feature Reference
11 Picking a document stored elsewhere P.5
21 Erasing a message stored for transmission P.7
22 Erasing instructions to pick up a document P.7
31 Storing a number in one of the Quick Dial keys at left See Chapter 3, “Storing and
32 Storing a number as a 2-digit code See Chapter 3, “Storing and
33 Storing a group of numbers See Chapter 3, “Storing and
34 Setting the Paper Size P.47
41 Checking the last 35 communications P.10
42 Printing a list of all messages and pick-up files stored
in the machine
43 Printing a list of all the telephone numbers stored in
the fax machine
51 Printing a message stored in the machine P.9
“Calling to Request a Mes-
sage (Polling)”
“Erasing a Stored Message
Before Sending (Functions 21 &
22)”
“Erasing a Stored Message
Before Sending (Functions 21 &
22)”
Editing Fax Numbers (Functions 31 & 32)” in the Basic
Features manual.
Editing Fax Numbers (Functions 31 & 32)” in the Basic
Features manual.
Editing a Group of Fax Numbers (Functions 33)” in the Basic Features manual.
“Changing the Paper Size
Settings”
“Journal (Function 41)”
“File List (Function 42)”
P.8
“Telephone Number List
P.27
(Function 43)”
“Printing a Stored Message
(Function 51)”
Function List (11∼51)
69
11
Page 82

Holsten1AE_Advanced_FM.book Page 70 Wednesday, November 8, 2000 11:24 AM
Appendix
Function List (61∼∼∼∼)
Press {Function} key followed by one of the numbers below.
No. Feature Reference
*1
OWN NAME (a name ID sent to other machines) See Chapter 3, “Initial Settings
61
FAX HEADER (an ID printed on messages you send) See Chapter 3, “Initial Settings
FAX NUMBER (phone ID sent to other machines) See Chapter 3, “Initial Settings
PSTN accessing code P.40
Number of Ringing See P.40
Country Code See P.41
*1
Selecting the phone line P.42
62
Turning authorized reception on or off P.34
Power Saver ON/OFF P.36
Turning the Summer Time / Daylight Saving Time on
or off
*1
Printing and setting user parameters P.37
63
*1
Power Saver P.35
71
*1
Sending the Service Report P.42
11
72
*1
Setting the list of specified senders (Authorized Recep-
81
tion)
*1
Adjusting the clock P.30
91
*1
Adjust the volume See Chapter 4, “Adjusting The
92
(Function 61)” in the Basic
Features manual
(Function 61)” in the Basic
Features manual
(Function 61)” in the Basic
Features manual
“Setting the Access
Number (Function 61)”
“Setting the Auto Ring
Time (Function 61)”
“Setting the Country
Code (Function 61)”
“Setting the Phone Line
Type (Function 62)”
“Switching Authorized Re-
ception ON / OFF (Function
62)”
“Switching the Power Sav-
ing timer ON / OFF (Function
62)”
“Summer Time / Daylight
P.30
Saving Time (Function 62)”
“User Parameters”
“Saving Energy with the
Power Saving Timer (Function
71)”
“Sending a service report”
“Programming a List of
P.32
Senders to Treat Differently
(Function 81)”
“Setting the Date and Time
(Function 91)”
Volume and Sounds the Machine Makes (Function 92) " in
the Basic Features manual
70
Page 83

Holsten1AE_Advanced_FM.book Page 71 Wednesday, November 8, 2000 11:24 AM
No. Feature Reference
*1
Selecting a different language P.31
93
*1
Counters P.31
94
*1
These functions require the access code (see P.29 “Access Code for Functions 61 to 94” ).
Print out this table and use as a quick reference.
Function List (61∼)
“Selecting the Display Lan-
guage (Function 93)”
“Counters (Function 94)”
71
11
Page 84

Holsten1AE_Advanced_FM.book Page 72 Wednesday, November 8, 2000 11:24 AM
INDEX
A
Access Code, 29
Access Number
Activity Report
Add Toner Indicator
Advanced Reception Features
Advanced Transmission Features
Appendix
Assigning
Dial Option key
Authorized Reception
Automatic Redialing
Auto Ring Time
, 63
,
, 20
, 40
40
, 49
,
, 17
, 21
12
, 31
B
Base Machine, 64
Broadcasting
, 12
C
Chain Dial, 11
Changing
Paper Size Settings
Checking if a Transmission Was
Successful,
Cleaning
Clock
Communication Information
Communication Result Report
Connecting The External Telephone
Connecting the Machine
Copying
Counters
Country Code
,
, 48
30
, 25
,
17
31
,
, 47
, 7
, 17, 19
, 59
41
D
Date and Time, 30
Dial Options
Document Feeder
Dual Access
, 12
Acceptable originals
, 18
, 65
E
Erasing
Messages
special sender
, 7
, 34
, 3,
, 58
11
F
FAX HEADER, 4
File list
File Reserve Report
Function List (11∼55)
Function List (61∼)
,
8
, 19
, 69
, 70
G
General, 21
Group Dial List
, 27
H
Handy Dialing Functions, 11
Help List
, 45
I
Indicators
Add Paper
Add Toner
Installation
, 21
, 21
, 55
J
Journal
, 10,
17
K
Key Operator Settings, 29
L
Language Selection, 31
Lists You Can Print Out Yourself
Location
,
56
M
Machine Environment, 56
Maintaining
Memory Card
More Transmission Functions
, 47
, 57
O
on/off Switches
Authorized Reception
Power Saver
Option
, 63
, 34
, 36
, 27
, 17
72
Page 85

Holsten1AE_Advanced_FM.book Page 73 Wednesday, November 8, 2000 11:24 AM
P
Page Length Reduction
Paper Specifications
Phone Line
Phone Line Type
Polling
Polling Reception
Power
Power Saver
Printed Reports
Printing
Printing Options
Programming
, 60
, 5
Canceling a Polling Operation
Polling Reception
61
,
File list
Journal
Part of the Image
Printing Messages
Stored Messages
Telephone Number List
Date and Time
special senders
Summer Time / Daylight Saving Time
, 65
, 42
, 5
, 5
, 35
, 19
, 8
, 10
, 17, 19
,
, 9
, 23
, 30
, 32
R
Redial, 11
11
Redial key
Rejecting
Reports
Reverse Order Printing
,
,
17
, 21, 31
, 46
8
,
, 10, 17,
, 42
20
, 46
Messages
Communication Failure Report
Communication Result Report
Error Report
File List
File Reserve Report
Journal
Polling Result Report
Power Failure Report
Reading Reports
service report
Telephone Number List
Transmission Result Report
User Parameter List
,
21
, 19
, 17
, 46
, 38
, 23
23
, 27
, 27
, 7
, 17,
, 19
, 30
, 17, 19
19
S
Saving Energy
Scanning area
Sending at a Specific Time (Send Later)
Send Later
Service Station
Setting the timer
special senders
Specifications
Storage Capacity
Summer Time
, 3
,
, 65
, 42
, 32
, 64
, 30
67
, 35
,
68
T
Telephone
Telephone Number List
Toner Cartridge
Toner Cartridge Replacement
Tone Signals
Transmission
Transmission Result Report
Troubleshooting
TTI→FAX HEADER
22
,
, 16
Tone Signals
Using Redial
,
, 16
,
,
, 27
53
, 49
11
, 19
45
, 4
U
User parameter hints
User Parameters
Using
Dial Options,
Key Operator Settings
Redial key
Telephone
Tone key
, 11
, 14
, 16
, 37
12
,
39
, 30
, 3
73
Page 86

Holsten1AE_Advanced_FM.book Page 74 Wednesday, November 8, 2000 11:24 AM
MEMO
74 AE AE H538
Page 87

Holsten1AE_Advanced_FM.book Page 1 Thursday, October 26, 2000 12:56 PM
In accordance with IEC 60417, this machine uses the following symbols for the main power switch:
aaaa means POWER ON.
bbbb means POWER OFF.
Copyright © 2000 Ricoh Co., Ltd.
Page 88

Holsten1AE_Advanced_FM.book Page 1 Thursday, October 26, 2000 12:56 PM
RICOH COMPANY, LTD.
15-5, Minami Aoyama 1-chome,
Minato-ku, Tokyo 107-8544, Japan
Phone: +81-(0)3-3479-3111
Ricoh shall not be responsible for any damage or expense
that may result from the use of parts other than recommended parts.
For good copy quality, Ricoh recommends that you use
genuine Ricoh toner.
TONER CARTRIDGE
RICOH FAX TONER CARTRIDGE TYPE 1340 BLACK is recommended for the best performance.
FAX1400L Operating Instructions
Overseas Affiliates
U.S.A.
RICOH CORPORATION
5 Dedrick Place
West Caldwell, New Jersey 07006
Phone: +1-973-882-2000
The Netherlands
RICOH EUROPE B.V.
Groenelaan 3, 1186 AA, Amstelveen
Phone: +31-(0)20-5474111
United Kingdom
RICOH UK LTD.
Ricoh House,
1 Plane Tree Crescent, Feltham,
Middlesex, TW13 7HG
Phone: +44-(0)20-8261-4000
Germany
RICOH DEUTSCHLAND GmbH
Mergenthalerallee 38-40,
65760 Eschborn
Phone: +49-(0)6196-9060
France
RICOH FRANCE S.A.
383, Avenue du Général de Gaulle
BP 307-92143 Clamart Cedex
Phone: +33-(0)1-40-94-38-38
Printed in China
AE AE H538-8702
Spain
RICOH ESPAÑA S.A.
Avda. Litoral Mar, 12-14,
08005 Barcelona
Phone: +34-(0)93-295-7600
Italy
RICOH ITALIA SpA
Via della Metallurgia 12,
37139 Verona
Phone: +39-045-8181500
Hong Kong
RICOH HONG KONG LTD.
21/F., Tai Yau Building,
181, Johnston Road,
Wan Chai, Hong Kong
Phone: +852-2862-2888
Singapore
RICOH ASIA PACIFIC PTE.LTD.
260 Orchard Road,
#15-01/02 The Heeren,
Singapore 238855
Phone: +65-830-5888
 Loading...