

Page 1
Technical Bulletin No. RTB-011
SUBJECT: DF61 Dirty Mark on Back-side of Original DATE:July 31, ’96
PAGE: 1 of 3
PREPARED BY: S. Hizen
FROM: 1st Field Information Dept. QAC
CHECKED BY:
CLASSIFICATION:
Action Required
Troubleshooting
Retrofit Information
Revision of service manual
Information only
Other
MODEL:
Phoenix-series
(DF61)
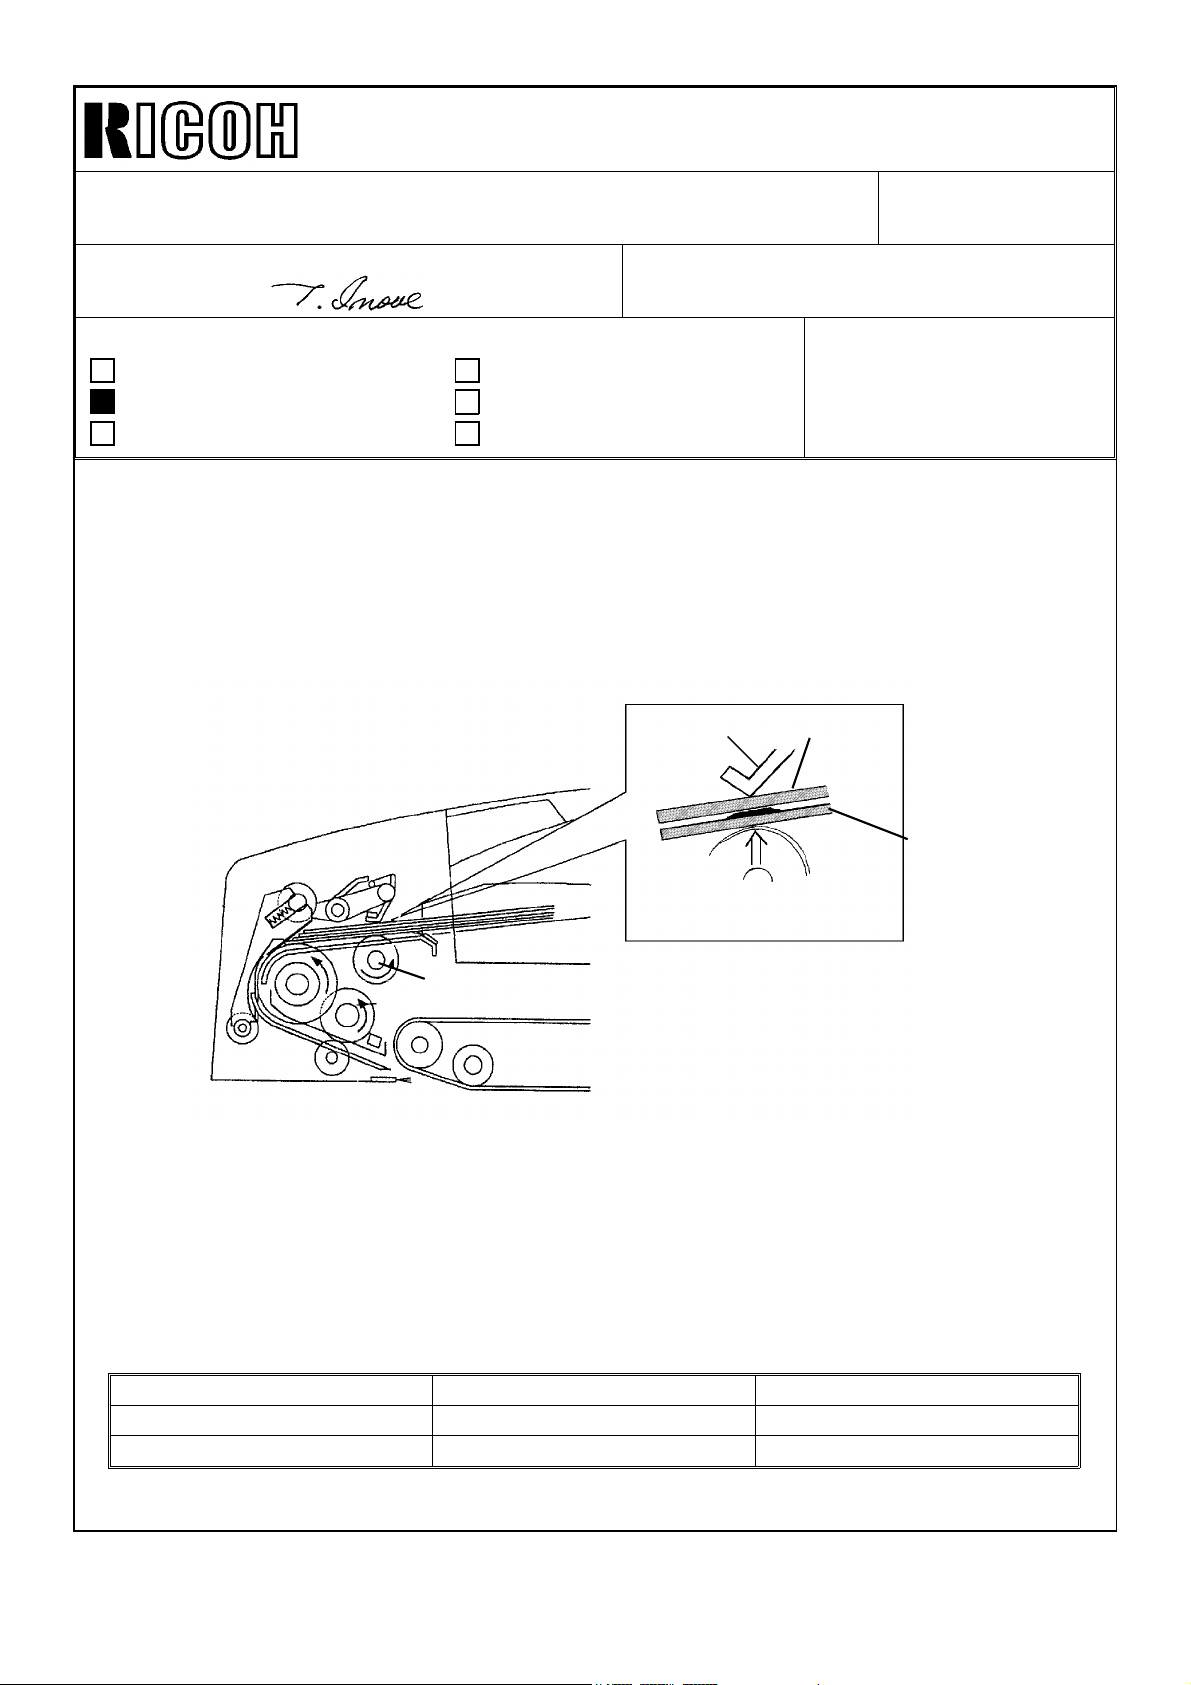
Problem: Three dirty marks on the back side of the original.
Cause: The toner on the first original is transferred to the back of the second
original due to the pressure applied by the pressure lever and the pick-up roller.
(See the illustration)
Pressure Lever
Second
Original
First Original
Pick-up Roller
Pick-up Roller
The dirty marks created are one of the limitations of the DF61. The degree to which
the marks appear varies depending on how completely the image on the first original
is fused, the type of image, and the type of paper used.
Countermeasure:
Due to this countermeasure for the DF61, the specifications listed in the service
manual have been changed as follows:
Specification Item Current DF Modified DF
Original Weight 52 to 128 g/m
2
Original Table Capacity 50 sheets at 80 g/m
2
35 sheets at 80 g/m
52 to 104 g/m
2
2
Page 2

Technical Bulletin No. RTB-011
SUBJECT: DF61 Dirty Mark on Back-side of Original DATE: July 31, ’96
PAGE: 2 of 3
The countermeasure for the dirty marks is designed to reduce the pressure applied
to the originals by replacing the entrance guide stopper spring with a new one. This
change also results in a decrease in the amount of force used to feed the original
and may create an original non-feed problem. Therefore, the separation bracket
has been modified to reduce the angle by 2 degrees.
Separation Bracket
Separation Bracket
2°
CURRENT
Modification Procedure:
1. Remove the three springs from the entrance guide stopper and install the new
spring (P/N:A548 9500) in the middle. If an original non-feed occurs, add the
outside springs (P/N:A548 9500) on both sides.
MODIFIED
Remove the spring
Remove the spring
Replace the spring with a
new one (weaker).
70g (current) → 40g (new)
Page 3

Technical Bulletin No. RTB-011
SUBJECT: DF61 Dirty Mark on Back-side of Original DATE: July 31, ’96
PAGE: 3 of 3
2. Remove the DF separation bracket. (1 snap ring)
3. Replace the separation bracket with A548 9502.
Plastic Plate
Mylar
Plastic
Plate
A548 1291
Current Type
4. Reassemble the parts.
Note: The spring (A548 9500), and the bracket (A548 9502) are available as
spare parts.
A548 9502
Modified Type
Mylar
Page 4

RICOH Technical Bulletin PAGE: 1/3
Bend
Angle
Model: DF61 (Phoenix series) Date: 15-Aug-97
No: 20
Subject: Bent Original Prepared by: S.Hizen
From: QAC 1st Field Information Dept.
Classification:
Troubleshooting
Mechanical
Paper path
Other ( )
Part information
Electrical
Transmit/receive
Action required
Service manual revision
Retrofit information
SYMPTOM
There is a bend (wrapping) on the leading edge
of the original the same size as the width of the
separation belt. If the bend in the original is
large, dirty background may appear on the copy
in the area that corresponds with that bend.
Note: This phenomenon occurs more often if
the original has an upward curl. Originals
output from laser printers are particularly
susceptible.
CAUSE
The problem occurs as a result of the contact between the edge of the original and the
separation belt when the original is fed to the exposure glass. If the upward curl of the
original is large or the cut in the leading edge of the paper is not smooth, this problem is
more likely to occur.
The angle between the separation
belt and the originals, and the
symptoms caused by the angle.
Large: Good for separation, marginal
for original leading edge bending
Small: Good for original leading edge
bending, marginal for double-sheet
feeds.
The Separation Belt Tension also
affects the angle
Strong: If the tension is strong, the
angle is relatively large.
Separation bracket
Originals
Weak: If the tension is weak, the
angle is relatively small
Page 5

RICOH Technical Bulletin PAGE: 2/3
Model: DF61 (Phoenix series) Date: 15-Aug-97
No: 20
SOLUTION
This problem can be resolved by reducing the angle of the belt,
which will help original entrance, or by lowering the guide mylar
by 1 mm to reduce the resistance of the original.
Change the separation belt bracket (A5481291: #20 in the diagram
on the right) and the spring to reduce the angle between the
original and the belt and also decrease the force from the belt
on the edge of the original.
Replacement Part Number: A5489504
The chart below clarifies the modifications made to the separation bracket.
Separation bracket RTB-11
Mass-production. Bracket for the dirty mark
A548-1291 on the back side of original.
Bracket Spring: AA06-3503 A548-9502
Plastic Plate
Mylar
Mylar
Plastic Plate
RTB-20
Bracket for the leading edge
bend.
A548-9504
(This number is for the Bracket and the Spring)
24.5
Plastic Plate
Mylar
Page 6

RICOH Technical Bulletin PAGE: 3/3
Model: DF61 (Phoenix series) Date: 15-Aug-97
Note: If jams occur due to double-sheet feeds, please install the stronger pressure spring
packed with the machine. This measure is designed to facilitate the entrance of the
originals. However, if the friction between the originals is high, and the originals are large,
double-sheet feeds may occur if many originals are used at the same time.
If thin originals are used after the stronger pressure spring has been installed, they may
become creased. If so, please reinstall the original pressure spring and reduce the
number of originals used at one time.
The modified brackets shown above can also be used in the DF64.
No: 20
 Loading...