

Page 1
DDST Unit Type A / Type B
Operating Instructions
Printer / Scanner Reference
Getting Started
1
Installing the Software
2
Using the Printer Function
3
Using the TWAIN Scanner Function
4
Troubleshooting
5
Appendix
6
Read this manual carefully before you use this machine and keep it handy for future reference. For safe and correct use, be sure to read the
Safety Information in the "Copy Reference" before using the machine.
Page 2

Introduction
This manual contains detailed instructions and notes on the operation and use of this machine. For your
safety and benefit, read this manual carefully before using the machine. Keep this manual in a handy
place for quick reference.
Important
Contents of this manual are subject to change without prior notice. In no event will the company be liable for direct, indirect, special, incidental, or consequential damages as a result of handling or operating the machine.
Do not copy or print any item for which reproduction is prohibited by law.
Copying or printing the following items is generally prohibited by local law:
bank notes, revenue stamps, bonds, stock certificates, bank drafts, checks, passports, driver's licenses.
The preceding list is meant as a guide only and is not inclusive. We assume no responsibility for its
completeness or accuracy. If you have any questions concerning the legality of copying or printing certain items, consult with your legal advisor.
Caution:
Use of controls or adjustments or performance of procedures other than those specified in this manual
might result in hazardous radiation exposure.
Two kinds of size notation are employed in this manual. With this machine refer to the inch version.
Trademarks
Microsoft
®
, Windows® and Windows NT® are registered trademarks of Microsoft Corporation in the
United States and/or other countries.
Other product names used herein are for identification purposes only and might be trademarks of their
respective companies. We disclaim any and all rights to those marks.
The proper names of the Windows operating systems are as follows:
• The product name of Windows
• The product name of Windows
• The product name of Windows
Microsoft
Microsoft
Microsoft
• The product name of Windows® XP are as follows:
Microsoft
Microsoft
• The product names of Windows ServerTM 2003 are as follows:
Microsoft
Microsoft® Windows ServerTM 2003 Enterprise Edition
Microsoft
®
Windows® 2000 Advanced Server
®
Windows® 2000 Server
®
Windows® 2000 Professional
®
Windows® XP Professional
®
Windows® XP Home Edition
®
Windows ServerTM 2003 Standard Edition
®
Windows ServerTM 2003 Web Edition
®
98 is Microsoft® Windows® 98
®
Me is Microsoft® Windows® Millennium Edition (Windows Me)
®
2000 are as follows:
Notes
Some illustrations in this manual might be slightly different from the machine.
Certain options might not be available in some countries. For details, please contact your local dealer.
Depending on which country you are in, your machine may include certain options as standard. For
details, please contact your local dealer.
Page 3

Manuals for This Machine
The following manuals describe the operational procedures of this machine. For
particular functions, see the relevant parts of the manual.
Note
❒ Manuals provided are specific to machine type.
❒ Adobe Acrobat Reader is necessary to view the manuals as a PDF file.
❖ General Settings Guide
Provides an overview of the machine and describes System Settings (paper
trays, Key Operator Tools, etc.), and troubleshooting.
❖ Network Guide
Describes procedures for configuring the machine and computers in a network environment.
❖ Copy Reference
Describes operations, functions, and troubleshooting for the machine’s copier
function.
❖ Printer/Scanner Reference (this manual)
Describes system settings, operations, functions, and troubleshooting for the
machine’s printer/scanner function.
i
Page 4

TABLE OF CONTENTS
Manuals for This Machine ......................................................................................i
How to Read This Manual .....................................................................................1
1. Getting Started
Control Panel..........................................................................................................3
Reading the Display and Using Keys.........................................................................4
Connecting the Machine .......................................................................................5
Requirements.............................................................................................................5
Connecting the machine to the host using a USB cable............................................5
2. Installing the Software
Auto Run.................................................................................................................7
Installing the Printer Driver...................................................................................8
Installing the TWAIN Driver...................................................................................9
Software Supplied on CD-ROM ..........................................................................10
DDST Driver.............................................................................................................10
DDST TWAIN Driver ................................................................................................10
3. Using the Printer Function
Printer Features Menu .........................................................................................11
Adjusting Printer Features..................................................................................12
Printer Features Parameters...............................................................................13
Paper Input...............................................................................................................13
List/Test Print ...........................................................................................................13
Maintenance.............................................................................................................14
System .....................................................................................................................16
Host Interface...........................................................................................................16
Setting Paper on the Bypass Tray......................................................................17
Setting the paper size ..............................................................................................18
Setting custom size paper........................................................................................19
Setting thick paper or OHP transparencies ..............................................................20
Setting envelopes.....................................................................................................21
Setting Up the Printer Driver and Canceling a Print Job .................................23
Windows 98SE / Me - Accessing Printer Properties ................................................23
Windows 2000 / XP and Windows Server 2003 - Accessing Printer Properties ......24
Canceling a Print Job ...............................................................................................25
4. Using the TWAIN Scanner Function
TWAIN Scanner ....................................................................................................27
Preparation for Using the Network TWAIN Scanner.........................................28
TWAIN Scanner Screen...........................................................................................28
Setting Originals ..................................................................................................29
Placing Originals ......................................................................................................29
Scanning Originals ..............................................................................................32
ii
Page 5

5. Troubleshooting
The Printer Function............................................................................................33
Error & Status Messages on the Display .................................................................33
The Machine Does Not Print ....................................................................................36
Other Printing Problems...........................................................................................38
The Scanner Function .........................................................................................40
When Scanning Is Not Performed as Expected .......................................................40
When an Error Message Appears on the Client Computer......................................41
6. Appendix
The Printer Function............................................................................................43
Collate and Rotating Collate ....................................................................................43
Edge to Edge Printing ..............................................................................................43
The Scanner Function .........................................................................................44
Relationship between Resolution and File Size .......................................................44
Specifications.......................................................................................................45
Printer.......................................................................................................................45
Scanner....................................................................................................................46
INDEX......................................................................................................... 47
iii
Page 6

iv
Page 7

How to Read This Manual
R
R
Symbols
In this manual, the following symbols are used:
WARNING:
This symbol indicates a potentially hazardous situation which, if instructions
are not followed, could result in death or serious injury.
CAUTION:
This symbol indicates a potentially hazardous situation which, if instructions
are not followed, may result in minor or moderate injury, or damage to property.
* The statements above are notes for your safety.
Important
If this instruction is not followed, paper might misfeed, originals might be damaged, or data might be lost. Be sure to read this.
Preparation
This symbol indicates prior knowledge or preparation is required before operation.
Note
This symbol indicates precautions for operation, or actions to take after mal-operation.
Limitation
This symbol indicates numerical limits, functions that cannot be used together,
or conditions in which a particular function cannot be used.
Reference
This symbol indicates a reference.
[]
Keys and buttons that appear on the computer's display.
[]
Keys that appear on the machine's display.
{}
Keys built into the machine's control panel.
{}
Keys on the computer's keyboard.
1
Page 8

2
Page 9
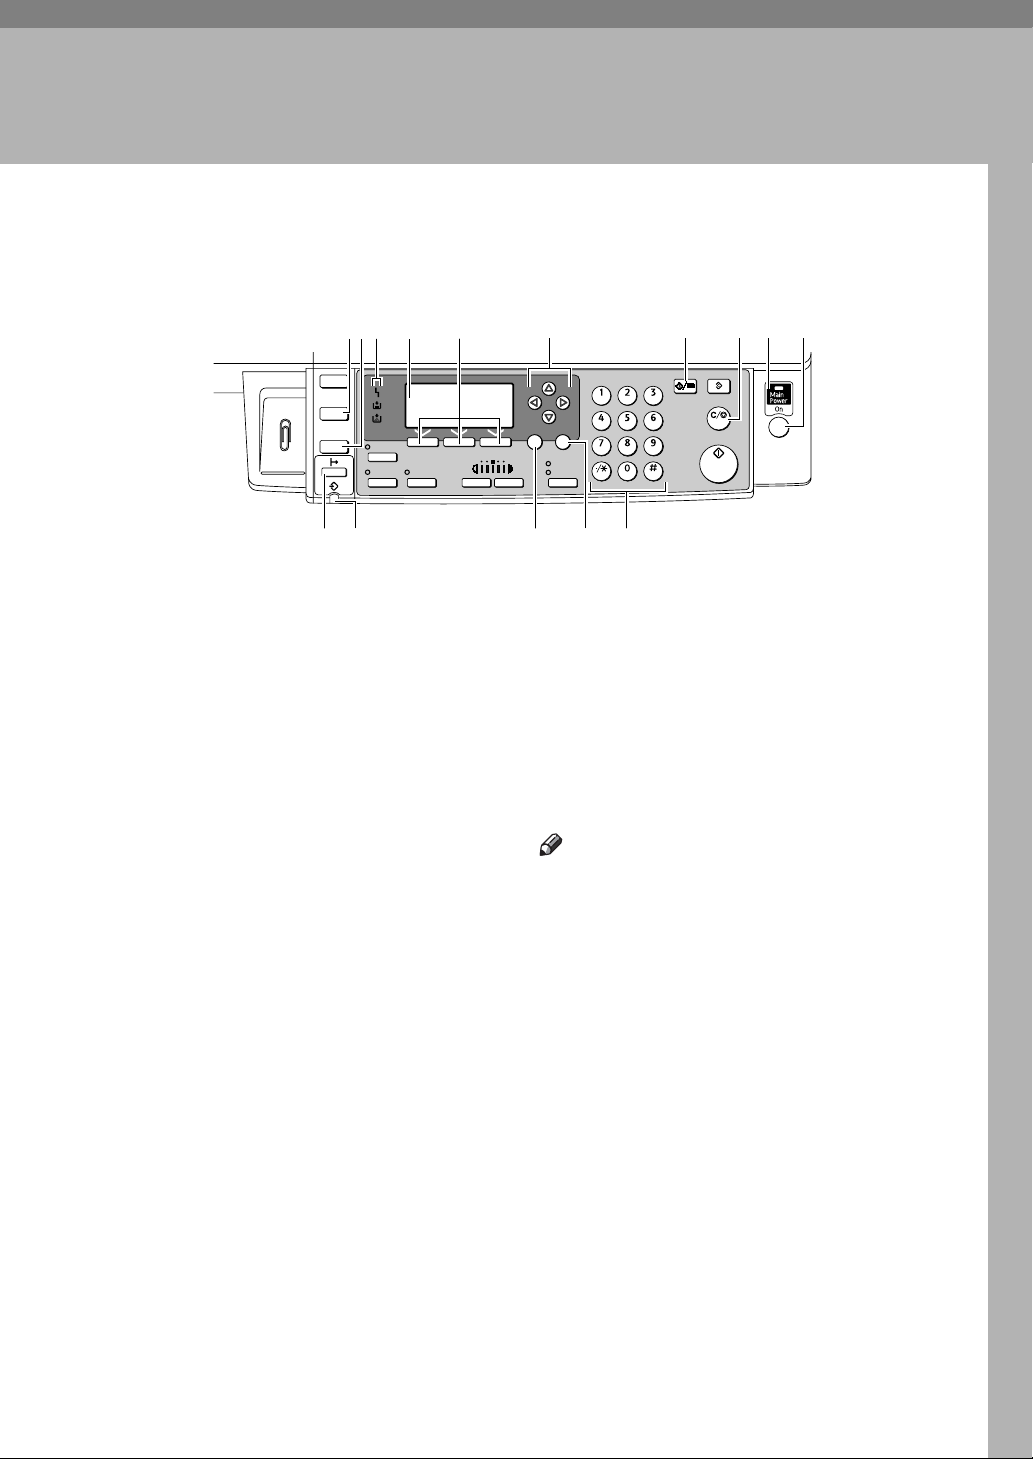
Control Panel
1. Getting Started
1 2
3
Copy
Scanner
Printer
Duplex
Combine/
Series
111512 13 14
4
Sort
5
Lighter Darker
1. {Scanner} key
Press to activate the scanner function.
2. {Printer} key
Press to activate the printer function.
3. Indicators
Displays errors and machine status.
h: Error indicator. See Network Guide
and General Settings Guide.
B
: Load Paper indicator. See
Copy Reference
D: Add Toner indicator. See Copy Reference.
4. Display
Displays operation status and messages.
5. Selection keys
Correspond to items on the display. Press
to select the corresponding item.
6. Scroll keys
Press to select an item.
{U}: scroll upward
{T}: scroll downward
{V}: scroll right
{W}: scroll left
7 98 10
User Tools/Counter
ABC DEF
MNOJKLGHI
WXYTUV
OPER
Enter
ClearModes
Clear/Stop
Start
ANX003S
Escape
6
Original
OK
PRS
Text
Photo
9. Main power indicator and On in-
dicator
The main power indicator lights when
the main power switch is turned on. The
On indicator lights when the operation
switch is turned on.
10. Operation switch
Press to turn the power on. The On indicator
lights. To turn the power off, press again.
.
Note
❒ This key is inactivate during printing
or while setting printer defaults.
11. {Online} key
Press to switch the printer between online and offline.
12. Data In indicator
Blinks while the printer is receiving data
from a computer or printing. Lit when
preparing to print.
13. {Escape} key
Press to cancel an operation or return to
the previous display.
7. {User Tools/Counter} key
Press to change default or operation parameters according to requirement.
8. {Clear/Stop} key
Clear: clears an entered numeric value.
14. {OK} key
Press to set a selected item or entered numeric value.
15. Number keys
Press to enter numeric values.
3
Page 10
1
4
Getting Started
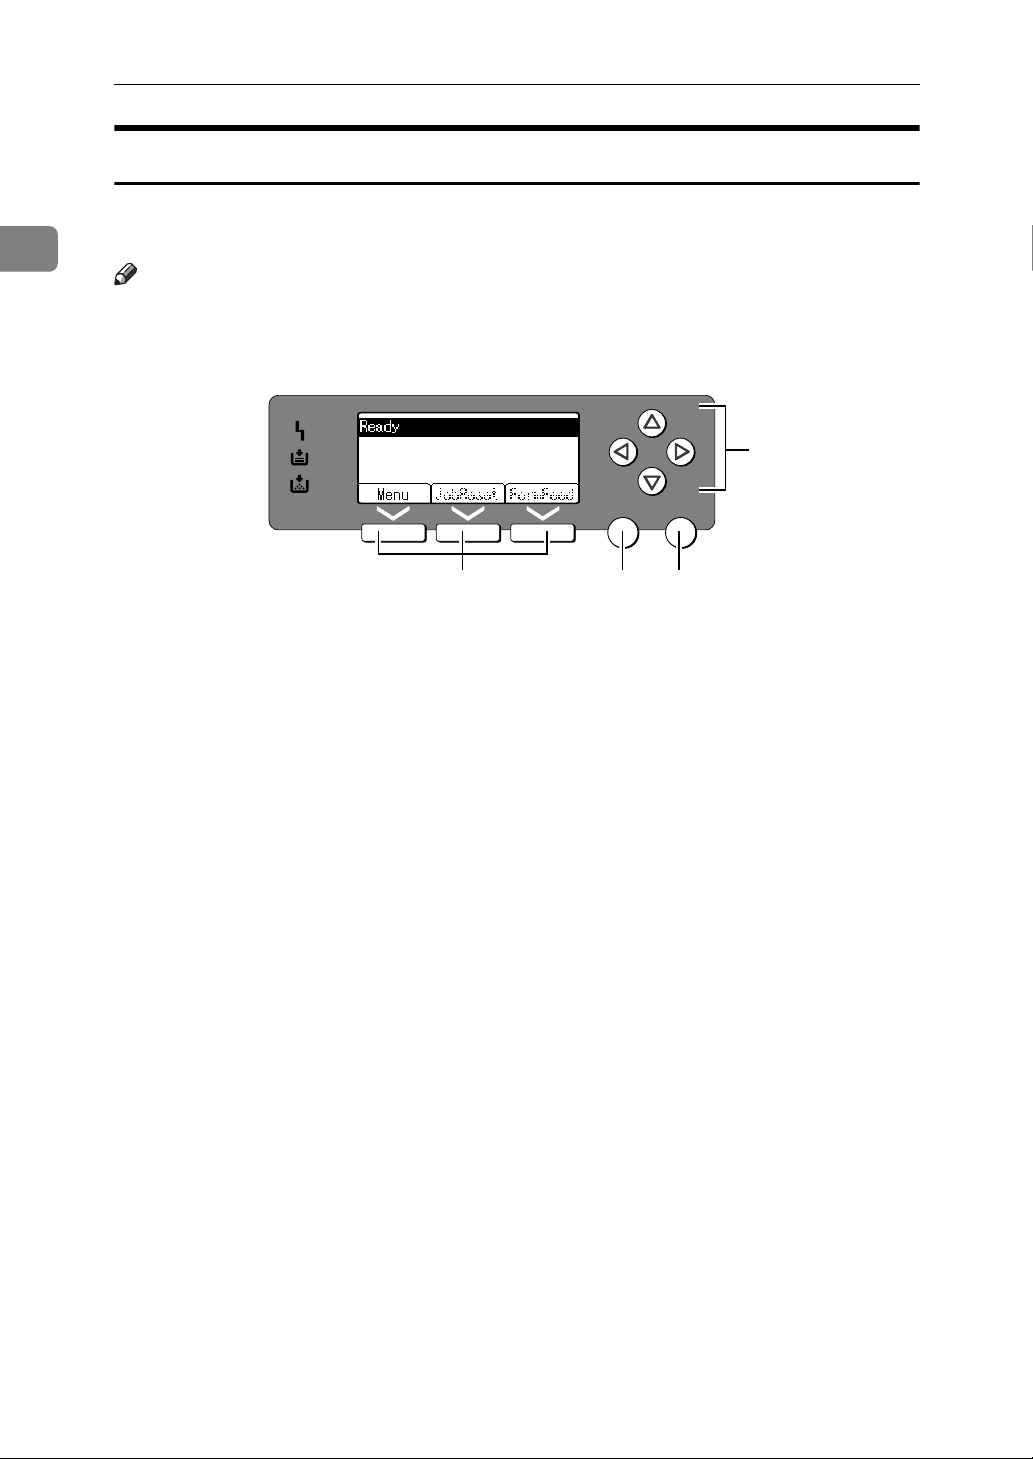
Reading the Display and Using Keys
This section explains how to read the display and using the selection key for the
initial display.
Note
❒ The copy display is set as the default screen when the machine is turned on.
You can change the settings in [System Settings]. See General Settings Guide.
123
1. Selection keys
Correspond to the function items at the
bottom line on the display.
Example: Basic screen
When the instruction "press [JobReset]"
appears in this manual, press the center
selection key.
2. {Escape} key
Press to cancel an operation or return to
the previous display.
Escape
OK
ANX007S
3. {OK} key
Press to set a selected item or entered numeric value.
4. Scroll keys
Press to move the cursor in each direction, step by step.
When the {U}, {T}, {V}, or {W} key appears in this manual, press the scroll key
of the same direction.
4
Page 11
Connecting the Machine
Connecting the Machine
Reference
For details about connection using
Ethernet, see "Connecting the Network Cable to the Network", Net-
work Guide.
Requirements
Before using this machine, make sure
all environmental and electrical requirements are met. Connect the machine to the host computer using the
USB port or network interface unit.
Make sure all cables, connectors, and
electrical outlets necessary to attach
the machine to the host computer or
network are close at hand.
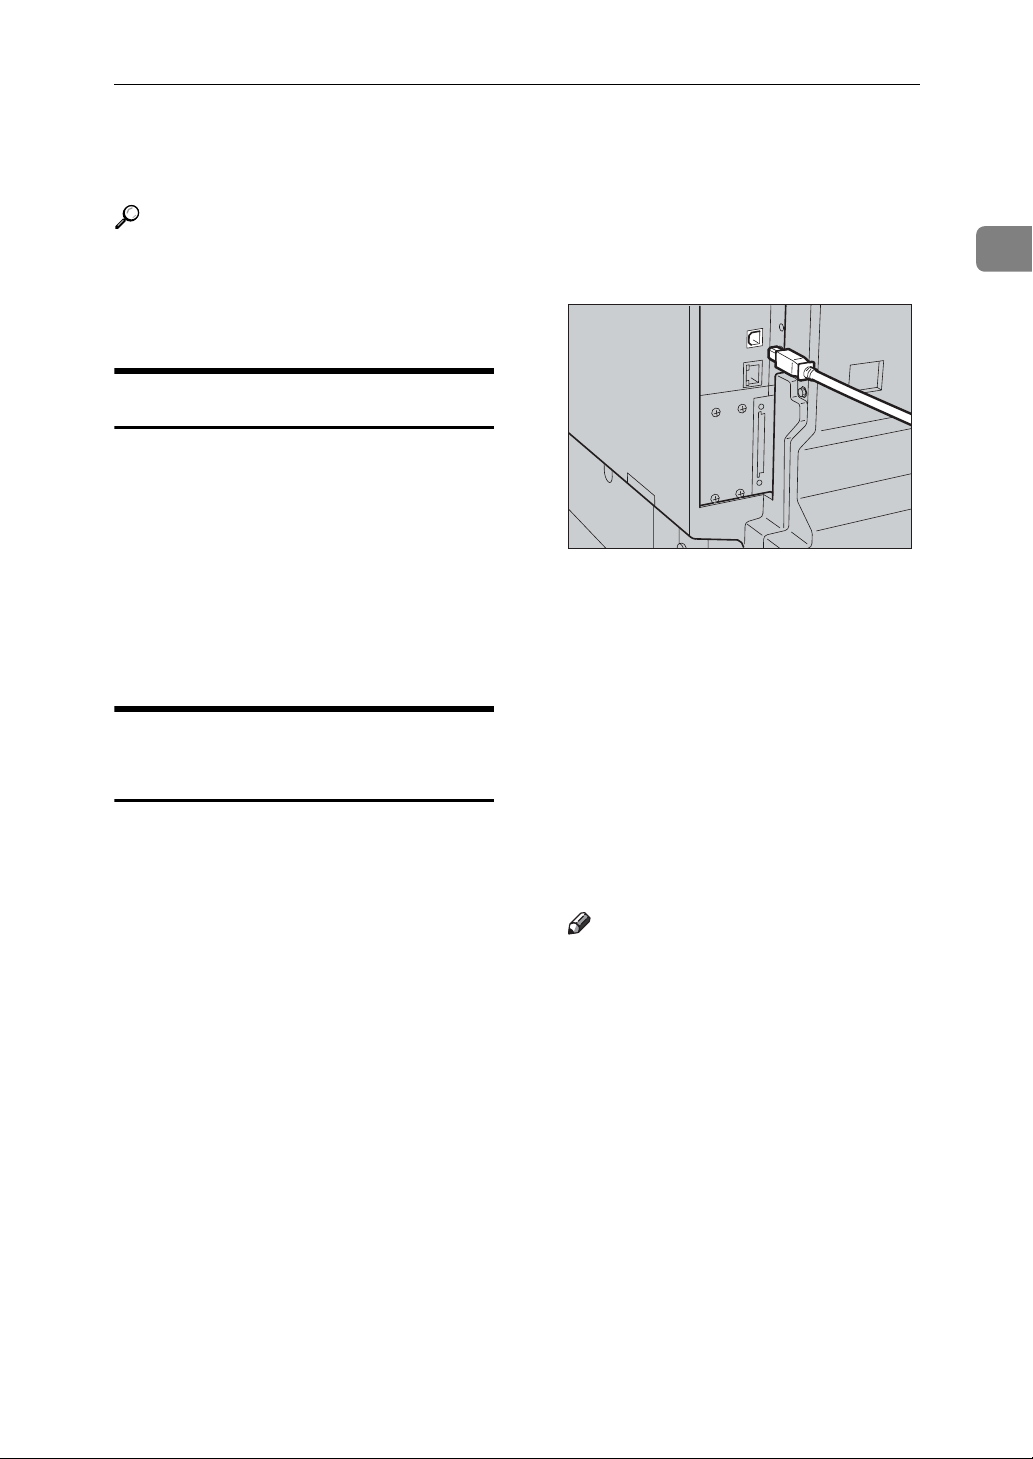
Connecting the machine to the host using a USB cable
You can connect the machine to the host
computer using a USB interface cable.
The USB cable is provided according
to machine model:
• Standard model
The USB cable is provided for this
model.
• Network standard model
The USB cable is not provided for
this model. Purchase a cable that is
suitable for connecting this model
to your computer.
A Connect the USB 2.0 interface ca-
ble to the USB port on the right
side of the machine's back cover.
ANX001S
B Connect the other end to the USB
port on the host computer.
The machine and computer are
now connected. The printer driver
and TWAIN driver must be installed next. For details about how
to install the printer driver and
TWAIN driver, see p.8 “Installing
the Printer Driver” and p.9 “Installing the TWAIN Driver”.
Note
❒ If USB 2.0 is used with Win-
dows 98 SE/Me, only a speed
equivalent that of USB 1.1 is
possible.
1
Follow the procedure below to connect the machine to the host computer
using a USB interface cable.
5
Page 12

1
Getting Started
6
Page 13

2. Installing the Software
This manual assumes you are familiar with general Windows procedures and
practices. If you are not, see the operating instructions that come with Windows
for details.
Auto Run
Inserting the CD-ROM into the CDROM drive starts the installer automatically. The installer helps you install the following printer drivers and
software easily.
Note
❒ When “plug and play” starts, click
[Cancel] in [New Hardware Found],
[Device Driver Wizard] or [Found New
Hardware Wizard] dialog box, and
then insert the CD-ROM. The [New
Hardware Found], [Device Driver Wizard] or [Found New Hardware Wizard]
dialog box appears depending on
the system version of the Windows
98SE / Me / 200 / XP, or Windows
Server 2003.
❒ Auto Run may not work with cer-
tain operating system settings. If
this happens, launch "Setup.exe"
on the CD-ROM root directory.
❒ To disable Auto Run, press the left
{SHIFT} key when inserting the
CD-ROM into the drive and keep it
pressed until the computer finishes reading from the CD-ROM.
Limitation
❒ Under Windows 2000 / XP, or
Windows Server 2003, installing
software using Auto Run requires
Administrator permission. When
you install software using Auto
Run, log on using an account that
has Administrators permission.
7
Page 14

Installing the Software
Installing the Printer Driver
2
When you are using the printer function, you must install the printer driver on the supplied CD-ROM.
A Quit all applications currently run-
ning.
B Insert the CD-ROM into the CD-
ROM drive.
The driver installer starts.
C Select an interface language, and
then click [OK].
The default interface language is
English.
D Click [DDST Printer Drivers].
The DDST Printer Drivers installer
starts.
E The software license agreement
appears in the [License Agreement]
dialog box. After reading through
its contents, click [I accept the agree-
ment.], and then click [Next >].
Note
❒ The printer driver has been in-
stalled, plug and play is enabled, and the icon of the printer
connected to the “USB” port is
added to the [Printers] or [Print-
ers and Faxes] window.
❒ When you use the printer func-
tion on the Ethernet interface
under Windows 98SE / Me, see
"Using the Printer Function",
Network Guide.
❒ When you use the printer func-
tion on the Ethernet interface
under Windows 2000 / XP /
Server 2003, see "Using the
Printer Function", Network
Guide.
F Follow the instructions on the
display to install DDST Printer
Drivers.
If you are required to restart the computer after installing DDST Printer
Drivers, restart the computer.
8
Page 15

Installing the TWAIN Driver
When you are using the scanner function, you must install the TWAIN
driver on the supplied CD-ROM.
A Quit all applications currently run-
ning.
B Insert the CD-ROM into the CD-
ROM drive.
The driver installer starts.
C Select an interface language, and
then click [OK].
The default interface language is
English.
D Click [DDST TWAIN Driver].
Installing the TWAIN Driver
2
The DDST TWAIN Driver installer
starts.
E Click [Close].
9
Page 16

Installing the Software
Software Supplied on CD-ROM
There are some CD-ROMs that come with the printer option of this machine.
DDST Driver
2
The DDST drivers are included on the CD-ROM that comes with this machine.
This allows the computer to communicate with the machine via a printer language.
❖ System requirements
Operating system
• Microsoft Windows 98SE
• Microsoft Windows Me
• Windows 2000
•Windows XP
• Windows Server 2003
Hard disk space
• 80 MB or more
DDST TWAIN Driver
This driver is required to scan an original on the machine.
To use the machine as a network TWAIN scanner, this driver must be installed.
❖ System requirements
10
•Hardware
PC/AT compatible
•CPU
Pentium 300 MHz or faster recommended
• Operating system
Microsoft Windows 98 (SE or later)
Microsoft Windows Millennium Edition
Microsoft Windows 2000 Professional
Microsoft Windows 2000 Server
Microsoft Windows XP Home Edition
Microsoft Windows XP Professional
•Memory
128 MB or more recommended
• Hard disk space
200 MB or more
•Connection
Ethernet/USB
Page 17
3. Using the Printer Function
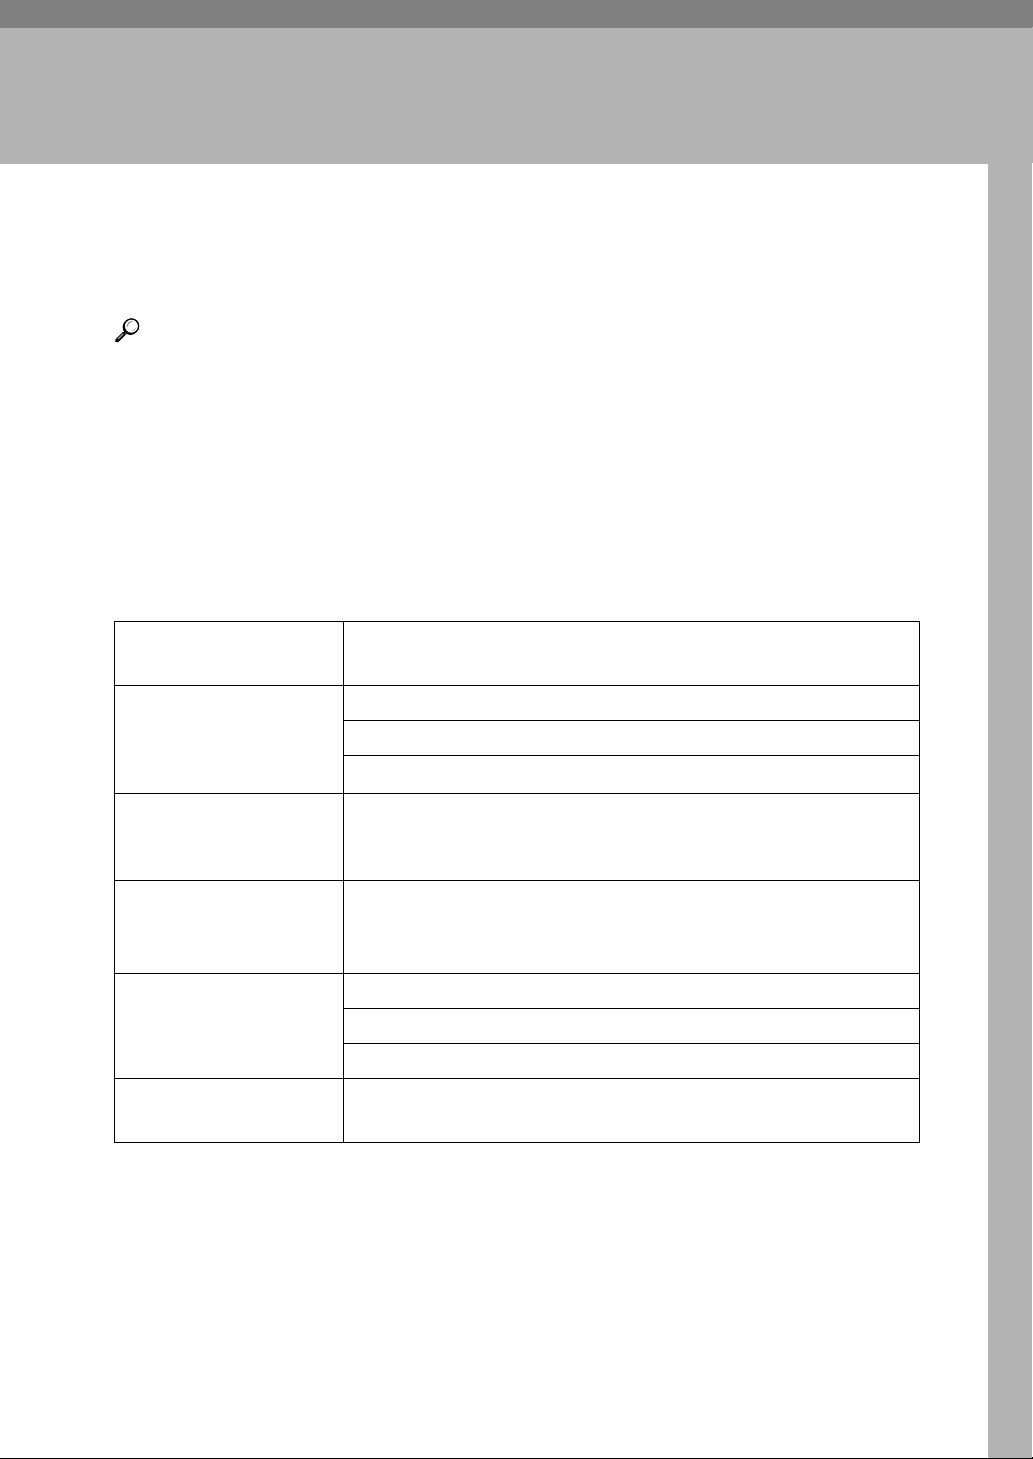
Printer Features Menu
There are five menu items in the Printer Features menu:
Reference
For more information about copier features and system settings, see Copy Reference and General Settings Guide.
•Paper Input
• List/Test Print
•Maintenance
•System
•Host Interface
You can select the following functions.
Menu
Paper Input
See p.13 “Paper Input”.
List/Test Print
See p.13 “List/Test
Print”.
Maintenance
See p.14 “Maintenance”.
System
See p.16 “System”.
Host Interface
See p.16 “Host Interface”.
*1
Appears on the duplex standard model. Check your machine type.
Bypass Paper Size
Auto Paper Select
Duplex
Operations Test
Menu Protect
Auto Continue
Edge Smoothing
Toner Saving
I/O Timeout
*1
Default
11
Page 18
3
Using the Printer Function
Adjusting Printer Features
Printer Features allows basic adjustment of operations when using the machine
as a printer.
Although factory default settings are suitable for most print jobs, Printer Features allows you access to a number of settings that control basic printer operations. Printer Features settings you make are retained even when you turn off
the machine.
For details about copier features and system settings, see Copy Reference and Gen-
eral Settings Guide.
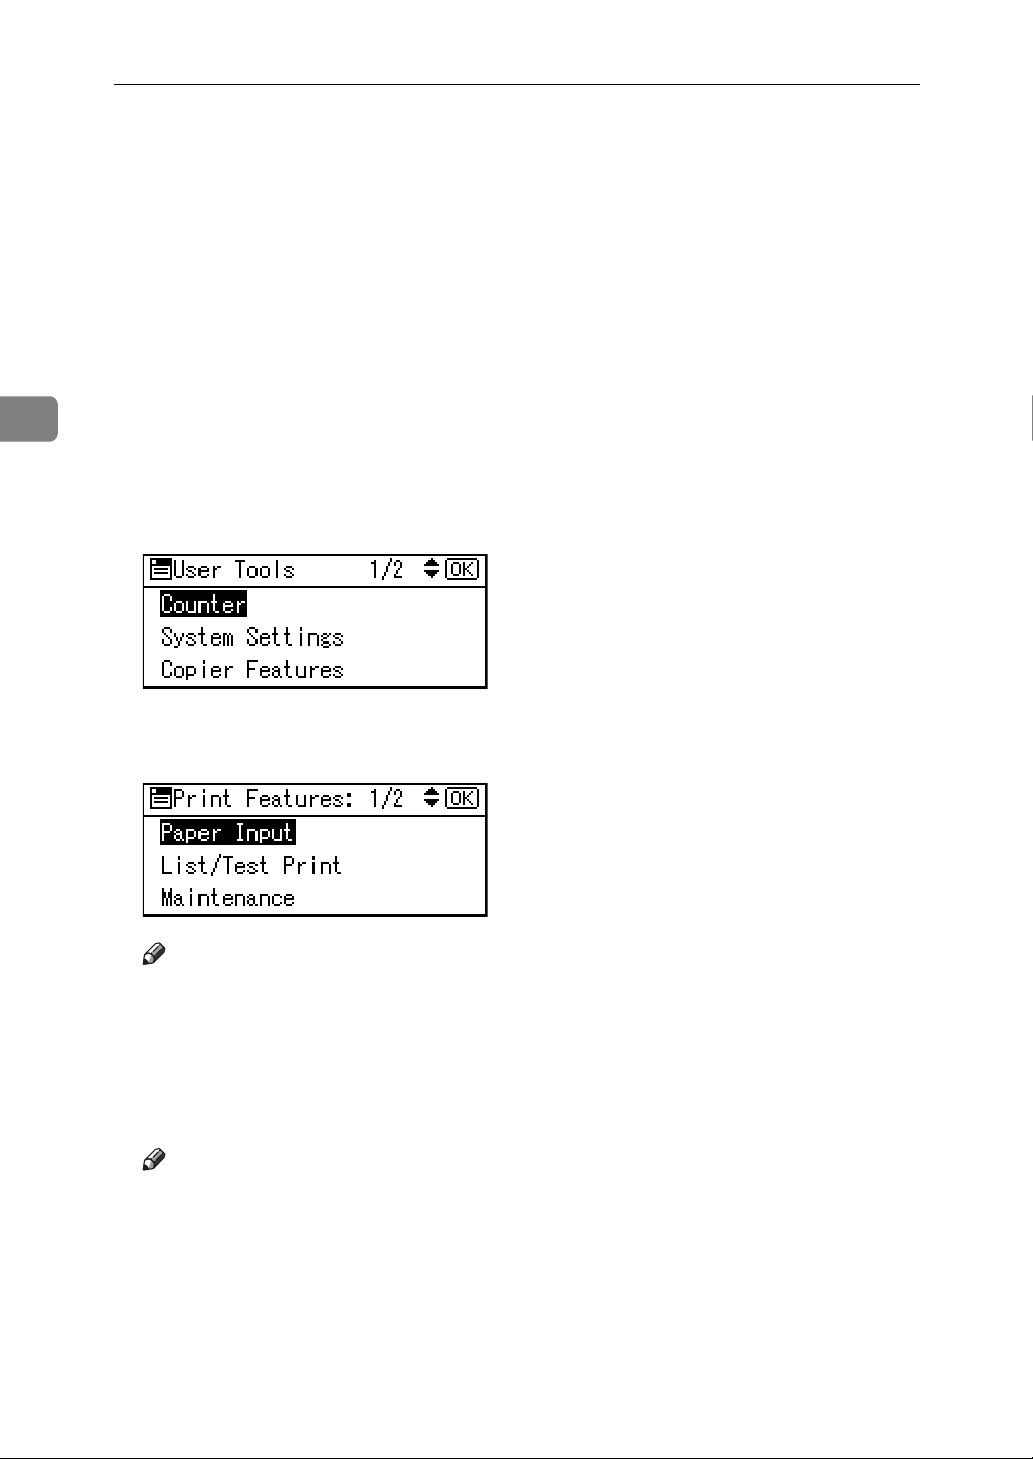
A Press the {User Tools/Counter} key.
B Select [Printer Features] using the {U} or {T} key, and then press the {OK}
key.
C Select the desired item using the {U} or {T} key, press the {OK} key, and
then change its settings.
Note
❒ {OK}: Press to make new settings and go back to previous menus.
❒ {Escape}: Press to return to a previous menu without changing any set-
ting.
D After changing the Printer Features settings, press the {User Tools/Counter}
key.
Note
❒ Changes made to functions remain in effect even if the machine is turned
off.
12
Page 19
Printer Features Parameters
Printer Features Parameters
Paper Input
❖ Bypass Paper Size
The size of the paper set in the bypass tray.
Reference
For more information about paper sizes that can be set in the
bypass tray, see General Settings
Guide.
Note
❒ Default:
•Metric version: A4
• Inch version: 11 × 8/
❖ Auto Paper Select
You can set this to enable Auto Paper Select. This machine automatically detects the paper size from
the print data, and selects the paper feed tray.
Note
❒ Default: On
List/Test Print
❖ Operations Test
You can print the operations test
page.
Printing the operations test page
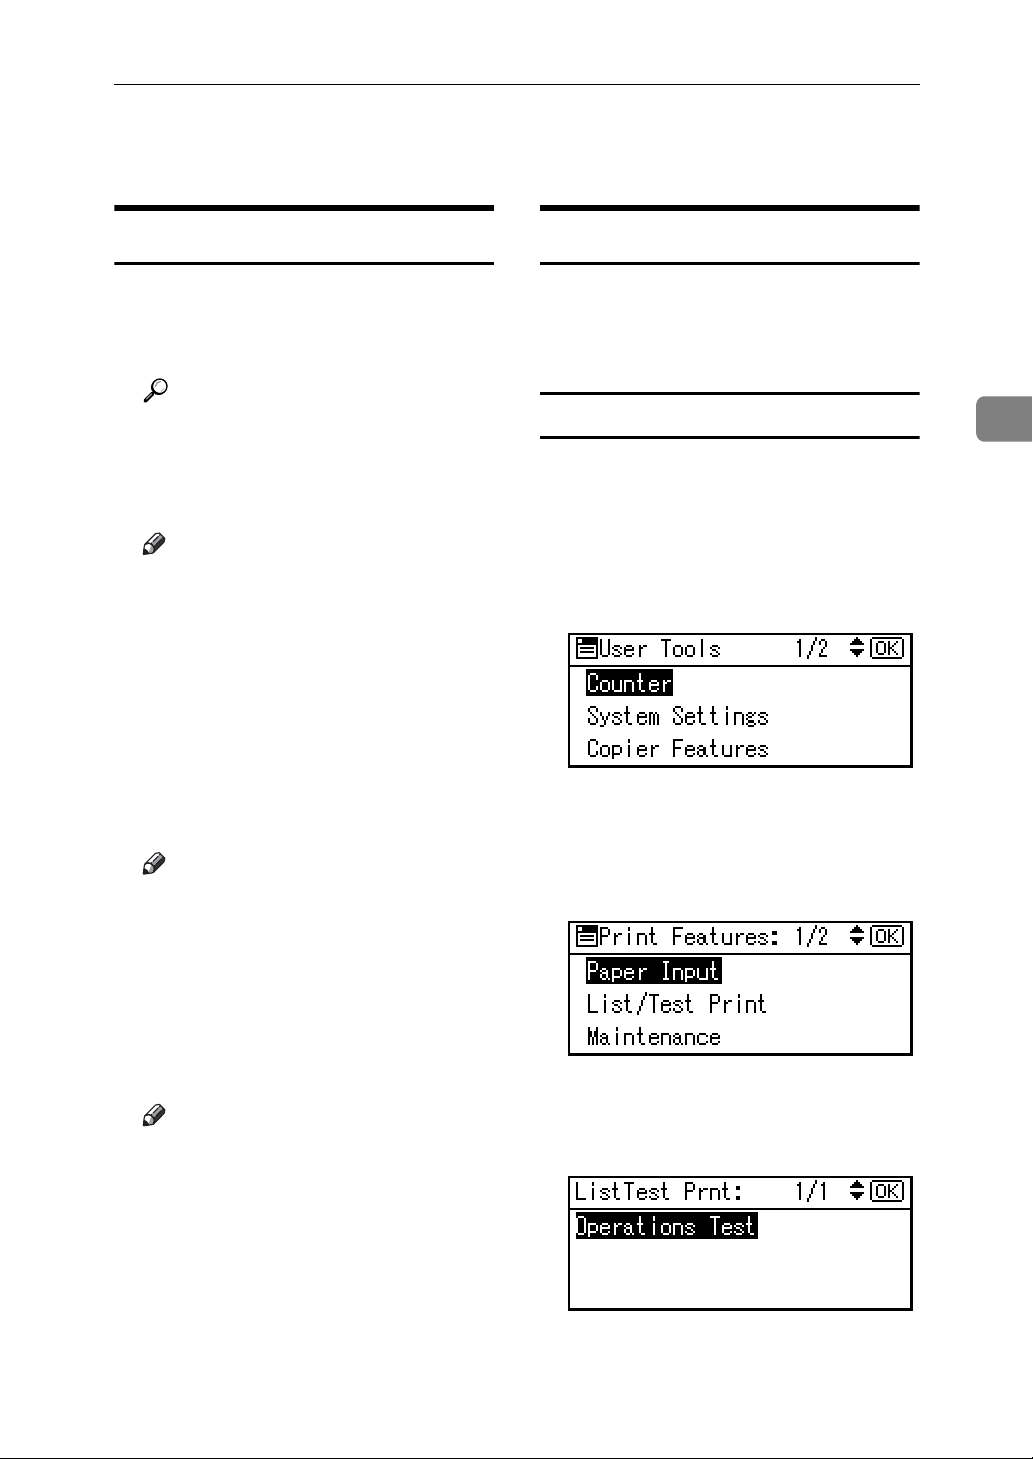
A Press the {User Tools/Counter} key.
The User Tools main menu appears.
B Select [Printer Features] using the
{U} or {T} key, and then press
the {OK} key.
The Printer Features menu appears.
C Select [List/Test Print] using the
{U} or {T} key, and then press
the {OK} key.
3
❖ Duplex
You can set this to enable the duplex printing. This machine detects
the duplex printing from the print
data, and selects the paper feed
tray.
Note
❒ Default: On
D Select [Operations Test] using the
{U} or {T} key, and then press
the {OK} key.
The operations test page is printed.
E Press the {User Tools/Counter} key.
13
Page 20
Using the Printer Function
3
Maintenance
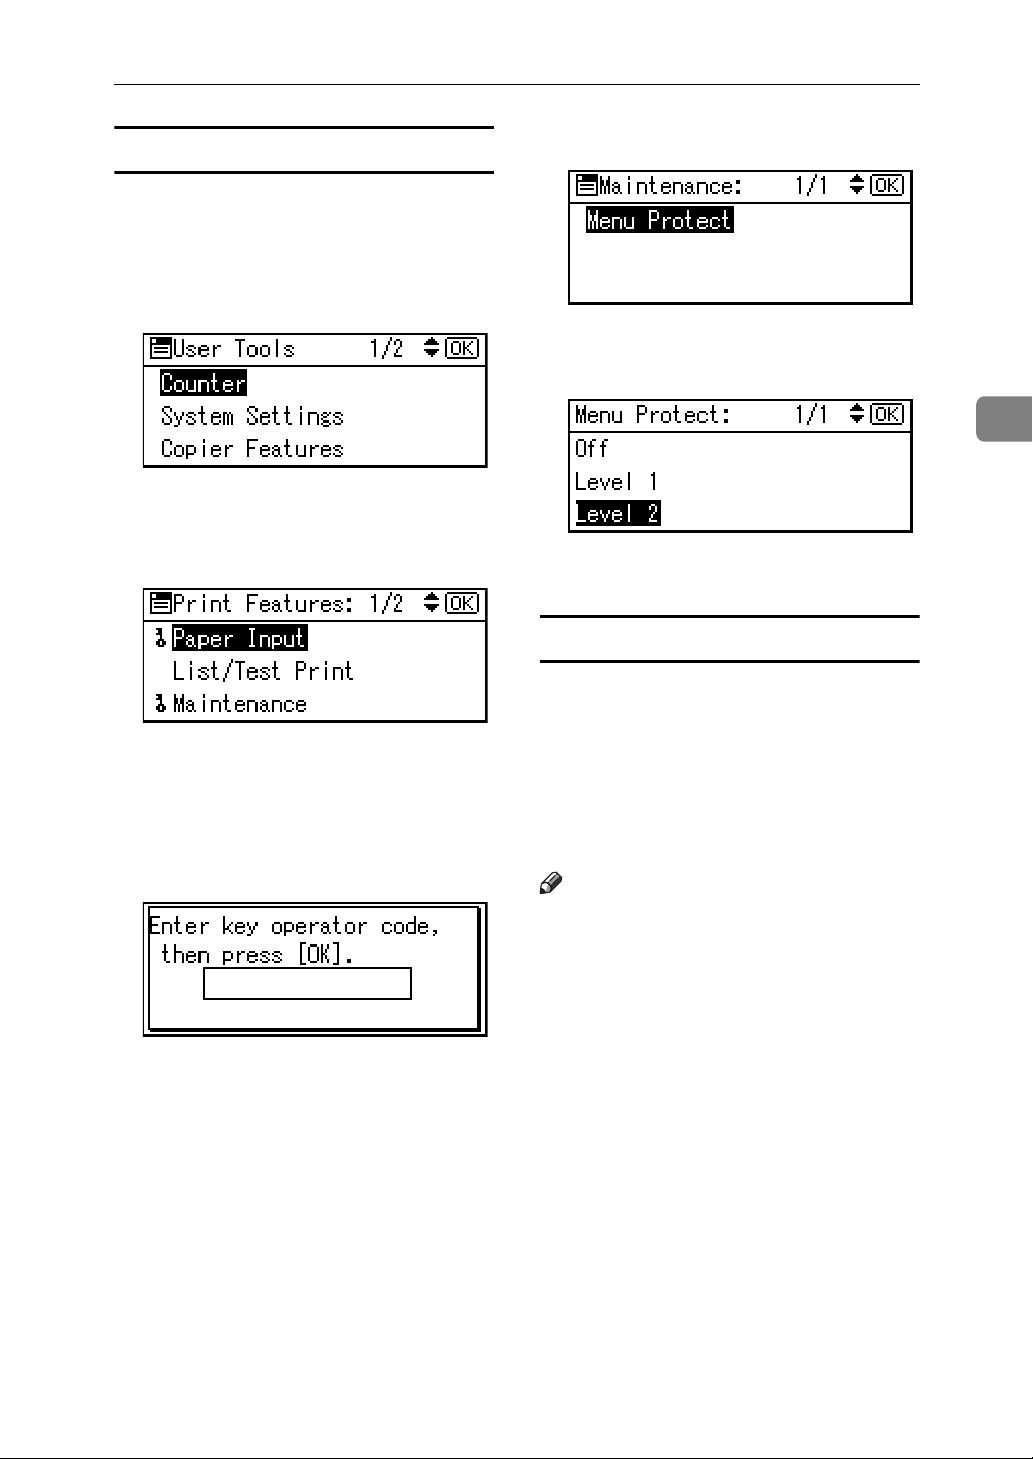
❖ Menu Protect
This procedure allows you to protect menu settings from accidental
change. It makes it impossible to
change menu settings with normal
procedures unless you perform the
required key operations.
• Level 1
You can protect “Maintenance”,
”System”, “Host Interface”.
• Level 2
You can protect ”Paper Input”,
“Maintenance”, ”System”,
“Host Interface”.
•Off
Note
❒ Default: Off
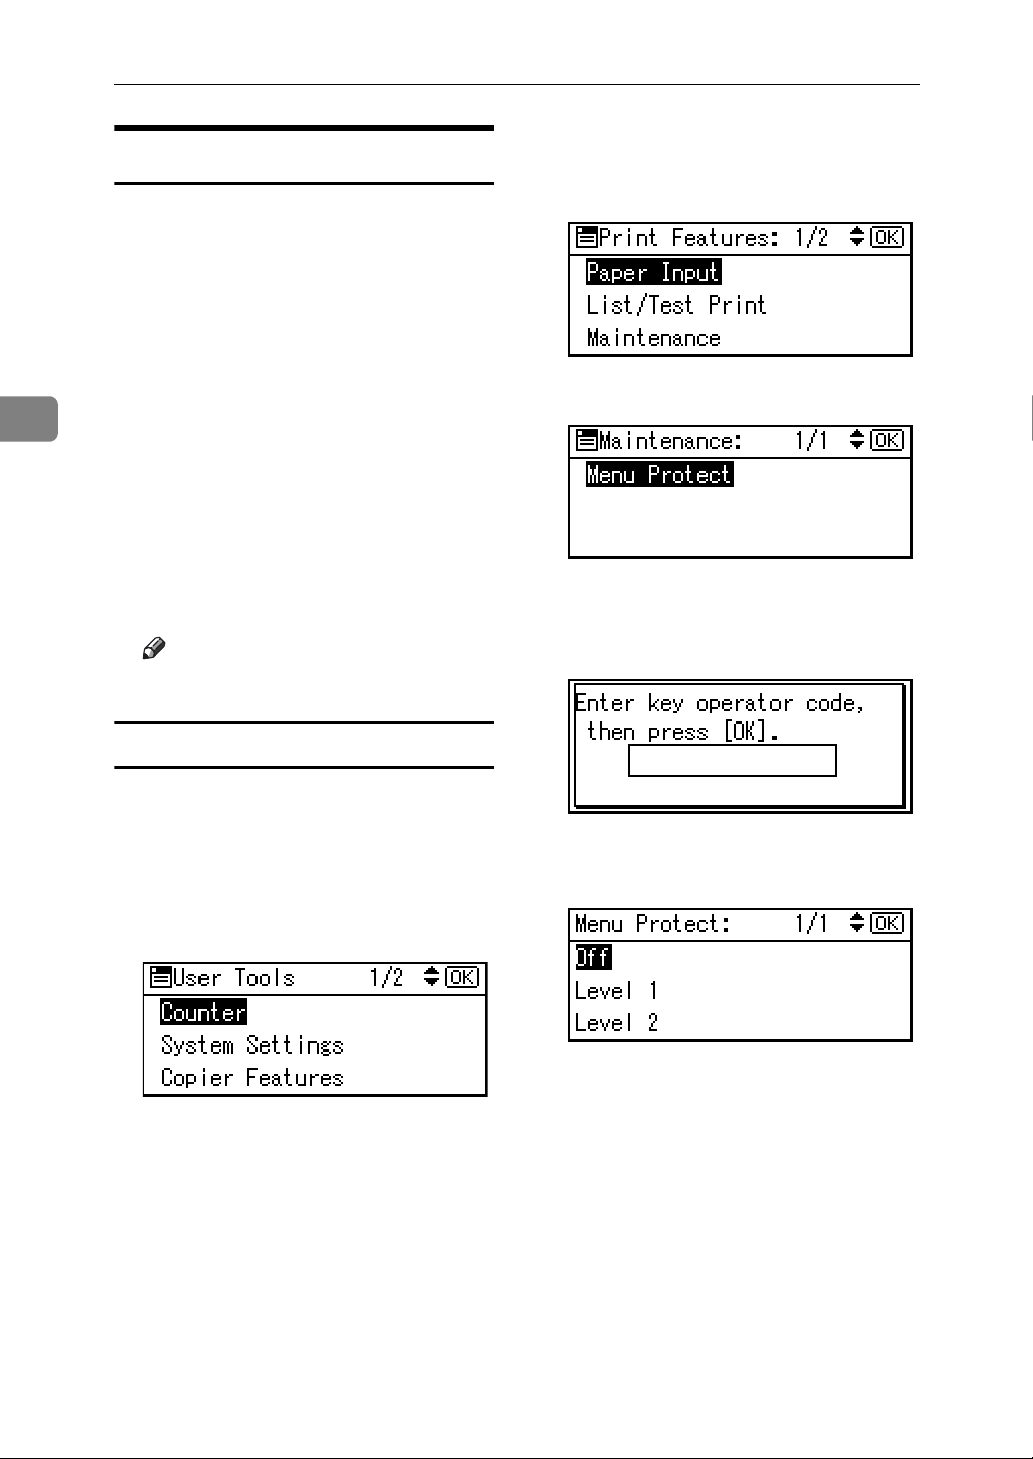
C Select [Maintenance] using the {U}
or {T} key, and then press the
{OK} key.
D Press [Menu Protect].
E Enter an access code using the
number keys, and then press the
{OK} key.
Setting Menu Protect
A Press the {User Tools/Counter} key.
The User Tools main menu appears.
B Select [Printer Features] using the
{U} or {T} key, and then press
the {OK} key.
The Printer Features menu appears.
F Select a menu protect level, and
then press the {OK} key.
G Press the {User Tools/Counter} key.
14
Page 21
Printer Features Parameters
Canceling Menu Protect
A Press the {User Tools/Counter} key.
B Select [Printer Features] using the
{U} or {T} key, and then press
the {OK} key.
C Select [Maintenance] using the {U}
or {T} key, and then press the
{OK} key.
A screen for entering the access
codes appears.
D Enter an access code using the
number keys, and then press the
{OK} key.
E Press [Menu Protect].
F Select [Off], and then press the
{OK} key.
3
G Press the {User Tools/Counter} key.
Temporarily canceling Menu Protect
When you select protected items in
Printer Features, a screen for entering
the access codes appears. When this
happens, enter the correct access
codes using the number keys, and
then press the {OK} key. Menu Pro-
tect is then temporarily canceled.
Note
❒ If you enter the correct access
codes, Menu Protect remains canceled while the Printer Features
menu is displayed.
15
Page 22

Using the Printer Function
3
System
❖ Auto Continue
You can select this to enable Auto
Continue. When it is On, printing
continues even after a system error
occurs.
•Off
•0 minutes
•1 minute
•5 minutes
• 10 minutes
• 15 minutes
Note
❒ Default: Off
❖ Edge Smoothing
Set this to enable Edge Smoothing.
•On
Host Interface
❖ I/O Timeout
You can set how many seconds the
machine should wait before ending a print job. If data from another
port usually arrives in the middle
of a print job, you should increase
this timeout period.
•10 seconds
•15 seconds
•20 seconds
•25 seconds
•60 seconds
Note
❒ Default: 15 seconds
•Off
Note
❒ Default: On
❒ If Toner Saving is set to On,
Edge Smoothing is ignored
even if it is set to On.
❖ Toner Saving
Set this to enable Toner Saving.
•On
•Off
Note
❒ Default: Off
16
Page 23
Setting Paper on the Bypass Tray
Setting Paper on the Bypass Tray
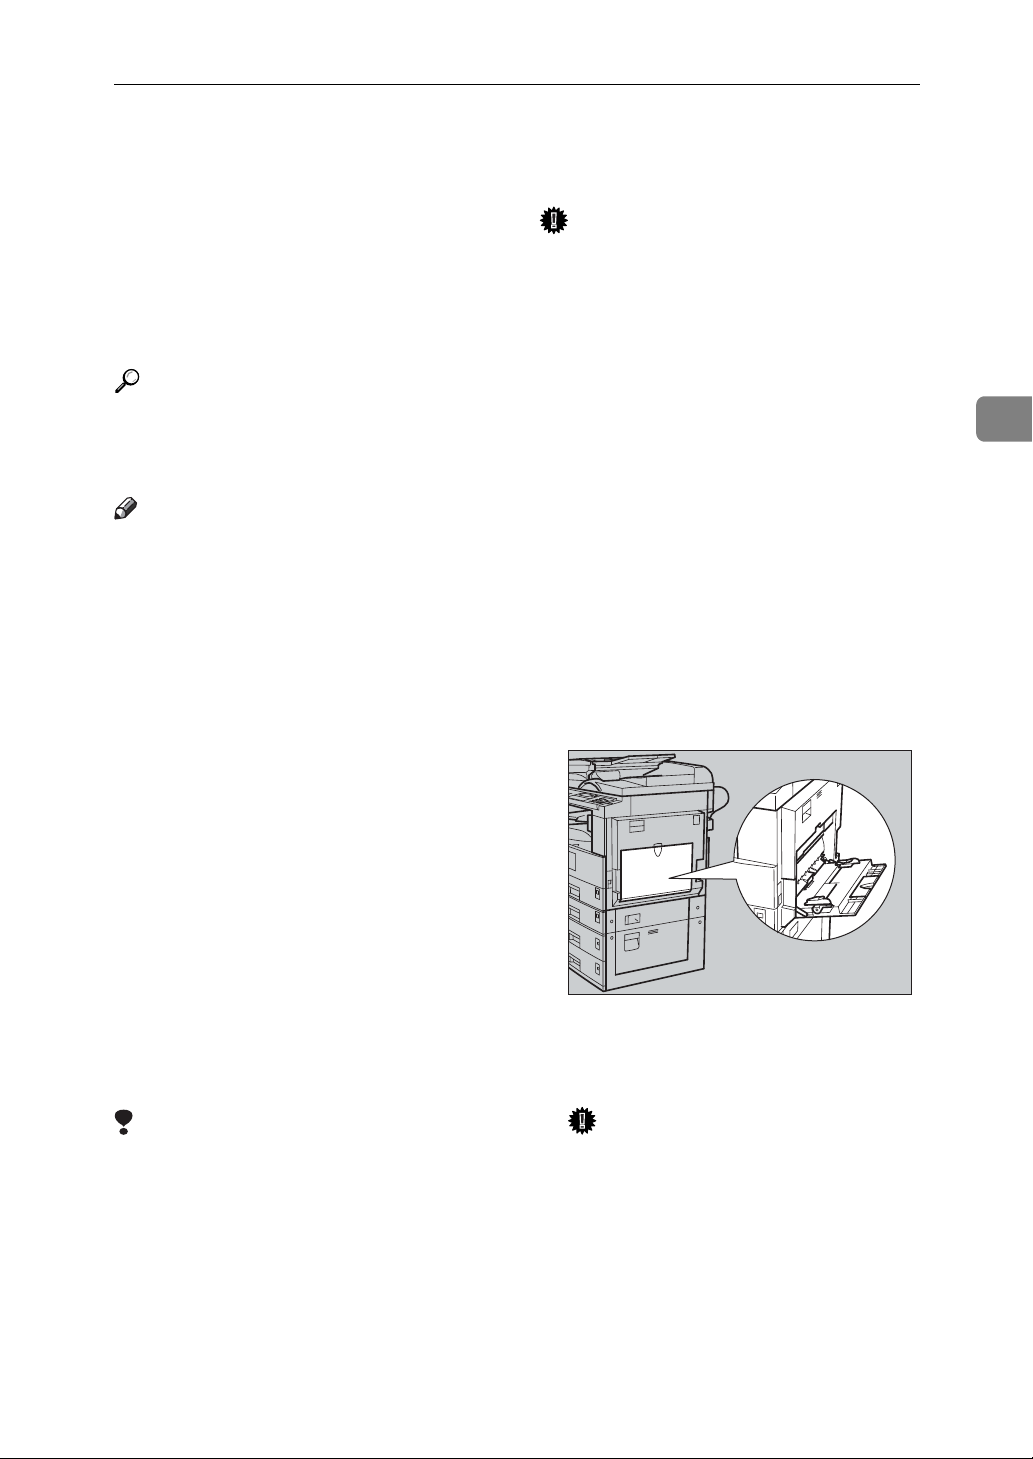
The following explains setting paper
on the bypass tray. Use the bypass
tray to print onto OHP transparencies, labels, thick paper, and envelopes that cannot be loaded in the
paper tray.
Reference
For details about setting paper in
the paper tray, see General Settings
Guide.
Note
❒ When loading letterhead paper,
pay attention to its orientation. See
“Orientation-Fixed Paper or TwoSided Paper”, Copy Reference.
❒ Paper within the following dimen-
sions can be set in the bypass tray:
• Vertical: 90.0-297.0 mm (3.54 in.-
11.69 in.)
• Horizontal: 148.0-600.0 mm (5.83
in.-23.62 in.)
Important
❒ When printing using the printer
function, original images are always rotated by 180 degrees (the
orientation of images to be printed
is opposite to that of the copier
function). When printing onto paper with specific orientation requirements, such as envelopes and
letterheads, make sure to rotate the
paper feed orientation by 180 degrees.
❒ Be sure to set the paper size using
the printer driver when printing
data from the computer. The paper
size set using the printer driver has
priority over the one set using the
control panel.
A Open the bypass tray.
3
❒ Be sure to set the paper with the
side you want to print facing down
in the bypass tray.
❒ When loading OHP transparencies
or thick paper in the bypass tray,
make the paper setting using the
control panel or printer driver.
❒ The number of sheets that can be
loaded in the bypass tray depends
on the paper type.
Limitation
❒ The following functions are disa-
bled when printing from the bypass tray:
• Duplex Printing
•Auto Tray Select
•Auto Tray Switching
AAW019S1
B Adjust the paper guides to the pa-
per size.
Important
❒ If the paper guides are not flush
against the paper, skewed images or paper misfeeds might
occur.
17
Page 24
Using the Printer Function
3
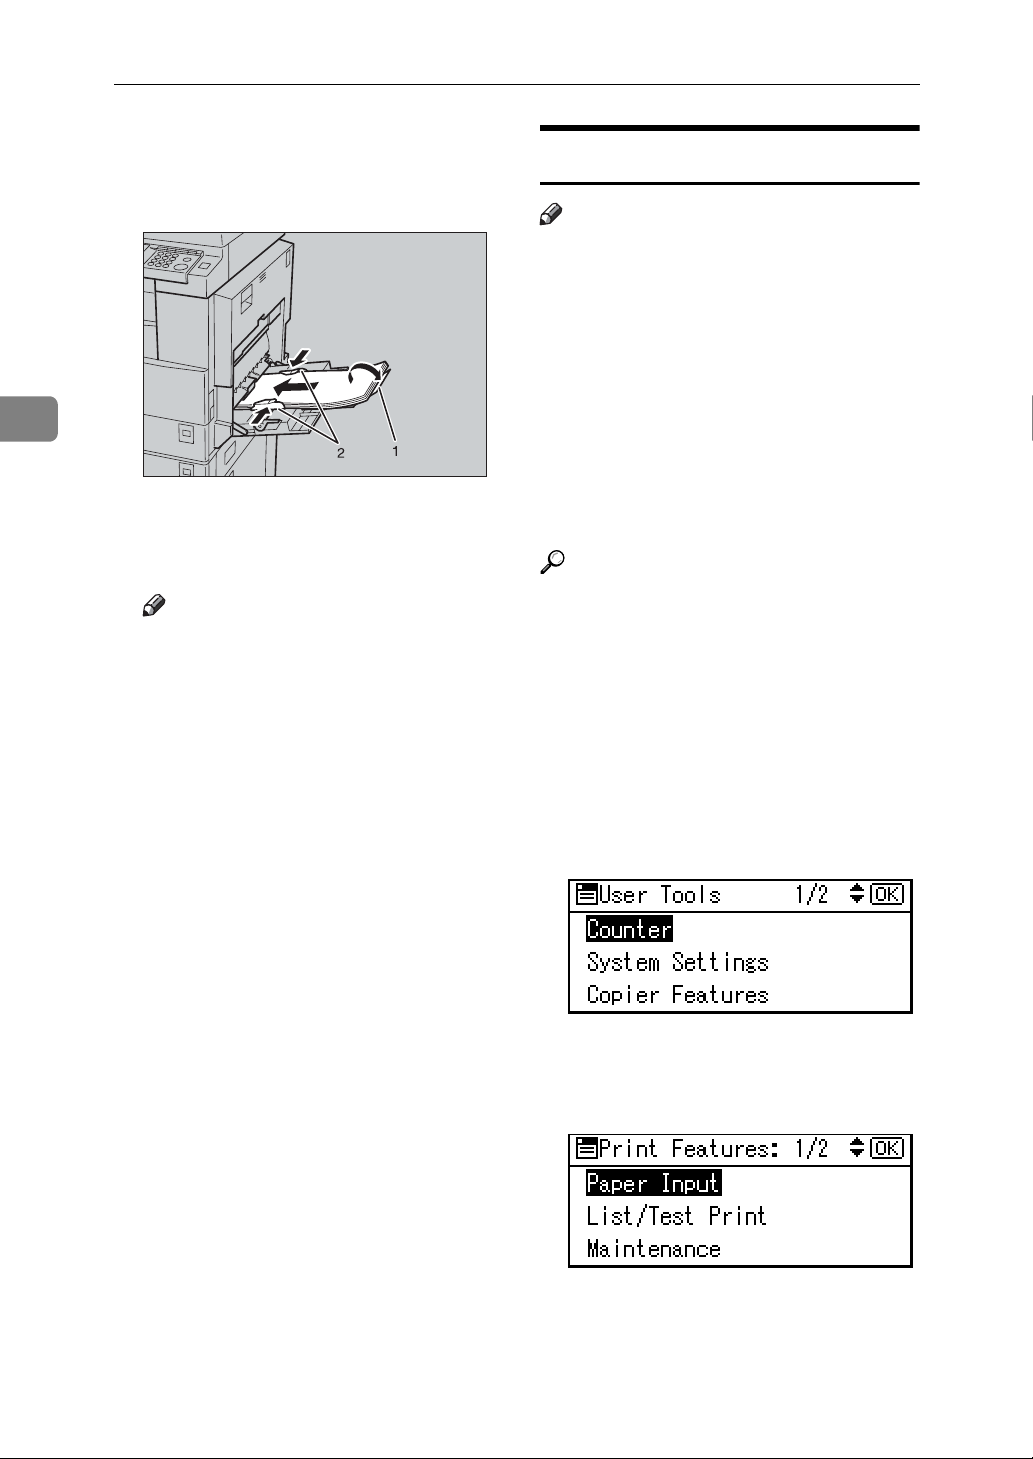
C Gently insert paper face down
into the bypass tray.
AAW020S1
1. Extender
2. Paper guides
Note
❒ Do not stack paper over the lim-
it mark, otherwise a skewed image or misfeeds might occur.
❒ Open out the extender to sup-
port paper sizes larger than A4
1
L, 8
/2"×11" L.
❒ Fan the paper to get air between
the sheets to avoid a multi-sheet
feed.
Setting the paper size
Note
❒ You can set paper size using the
printer driver. The following procedures are not necessary when
setting paper size using the printer
driver.
❒ The paper size set using the printer
driver has priority over that set using the control panel.
❒ When the printer driver is not
used, make settings using the control panel.
Reference
For printer driver settings, see the
printer driver Help.
For details about setting custom
sizes, see p.19 “Setting custom size
paper”.
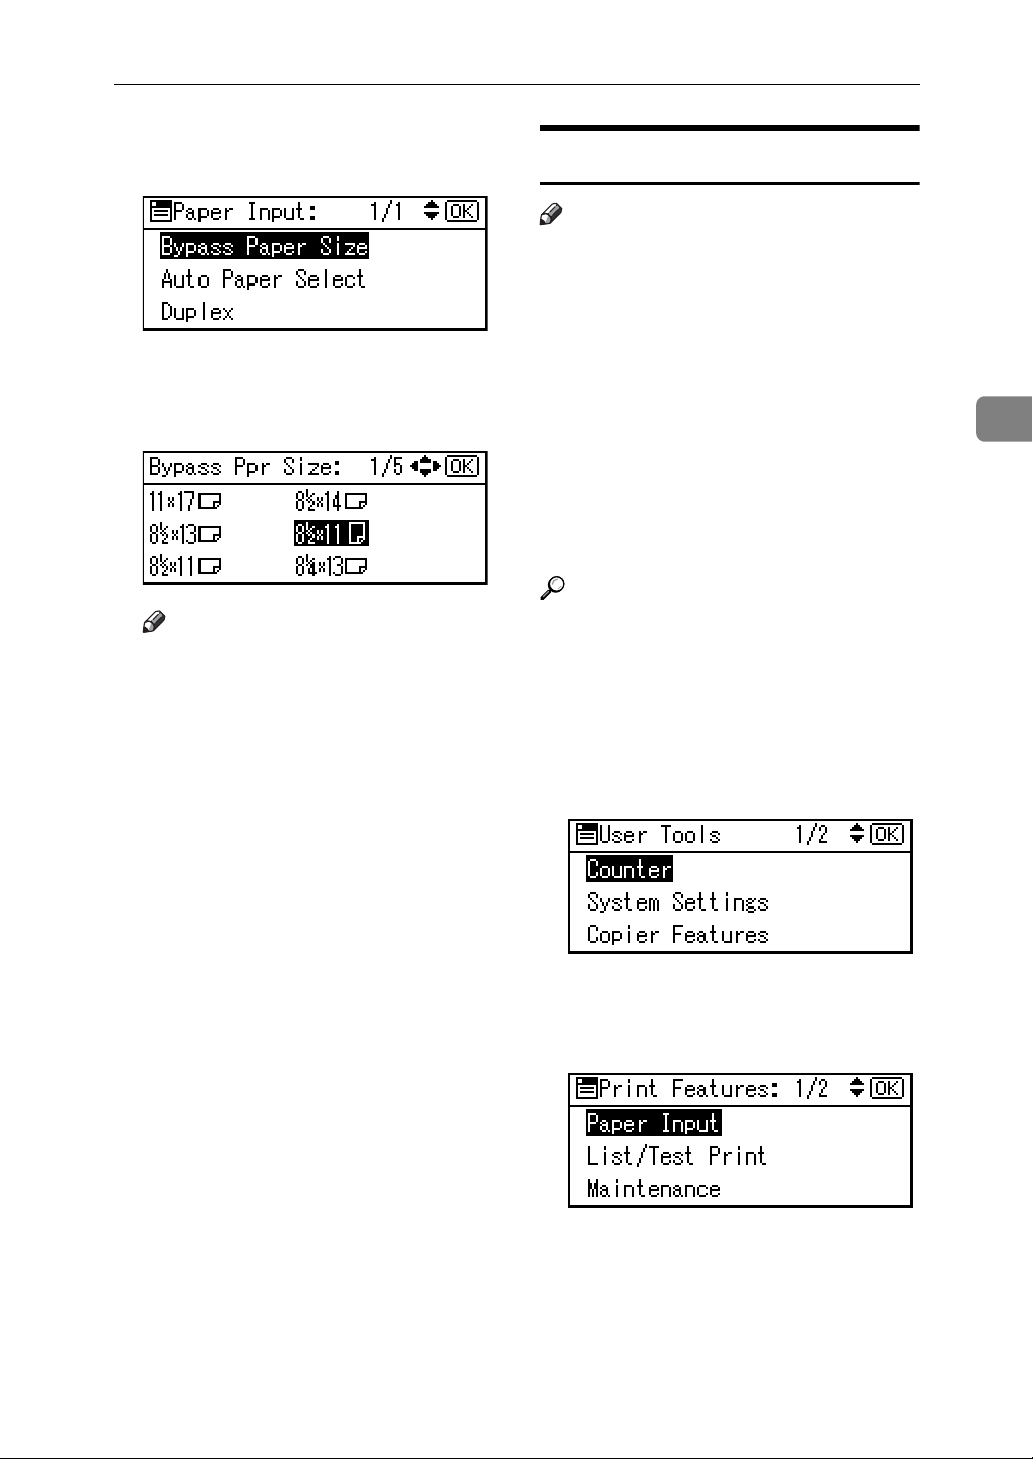
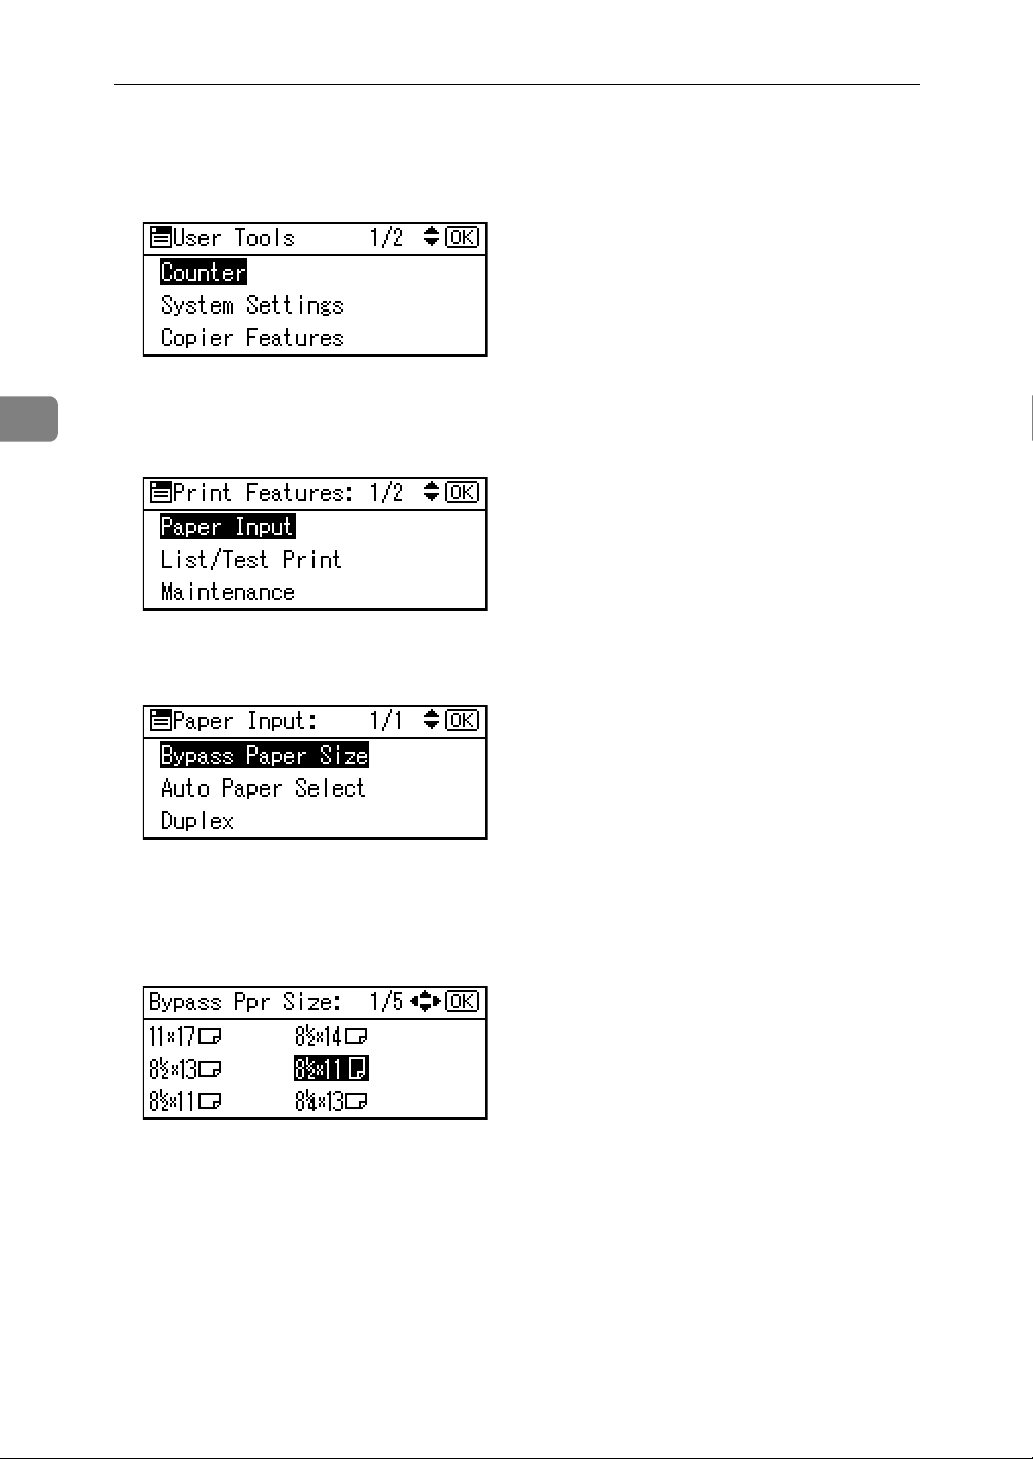
A Press the {User Tools/Counter} key.
B Select [Printer Features] using the
{U} or {T} key, and then press
the {OK} key.
18
❒ When setting an OHP transpar-
ency, make sure that its front
and back sides are properly positioned.
❒ Select paper type when printing
onto OHP transparencies or
thick paper (over 105g/m
details, see p.20 “Setting thick
paper or OHP transparencies”.
❒ Select paper type when printing
onto envelopes. For details, see
p.21 “Setting envelopes”.
❒ Set the paper size, see p.18 “Set-
ting the paper size”
2
). For
C Select [Paper Input] using the {U}
or {T} key, and then press the
{OK} key.
Page 25
Setting Paper on the Bypass Tray
D Select [Bypass Paper Size], and then
press the {OK} key.
E Select the paper size using the
{U} or {T} key, and then press
the {OK} key.
Note
❒ When printing onto thick paper
or OHP transparencies, select
the paper type. For details, see
p.20 “Setting thick paper or
OHP transparencies”.
F Press the {User Tools/Counter} key.
Setting custom size paper
Note
❒ Custom sizes can also be set using
the printer driver. The following
procedures are not necessary
when setting custom sizes using
the printer driver.
❒ Custom size settings set using the
printer driver have priority over
those set using the machine's control panel.
❒ When the printer driver is not
used, make settings using the control panel.
Reference
For printer driver settings, see the
printer driver Help.
A Press the {User Tools/Counter} key.
B Select [Printer Features] using the
{U} or {T} key, and then press
the {OK} key.
3
C Select [Paper Input] using the {U}
or {T} key, and then press the
{OK} key.
19
Page 26
Using the Printer Function
3
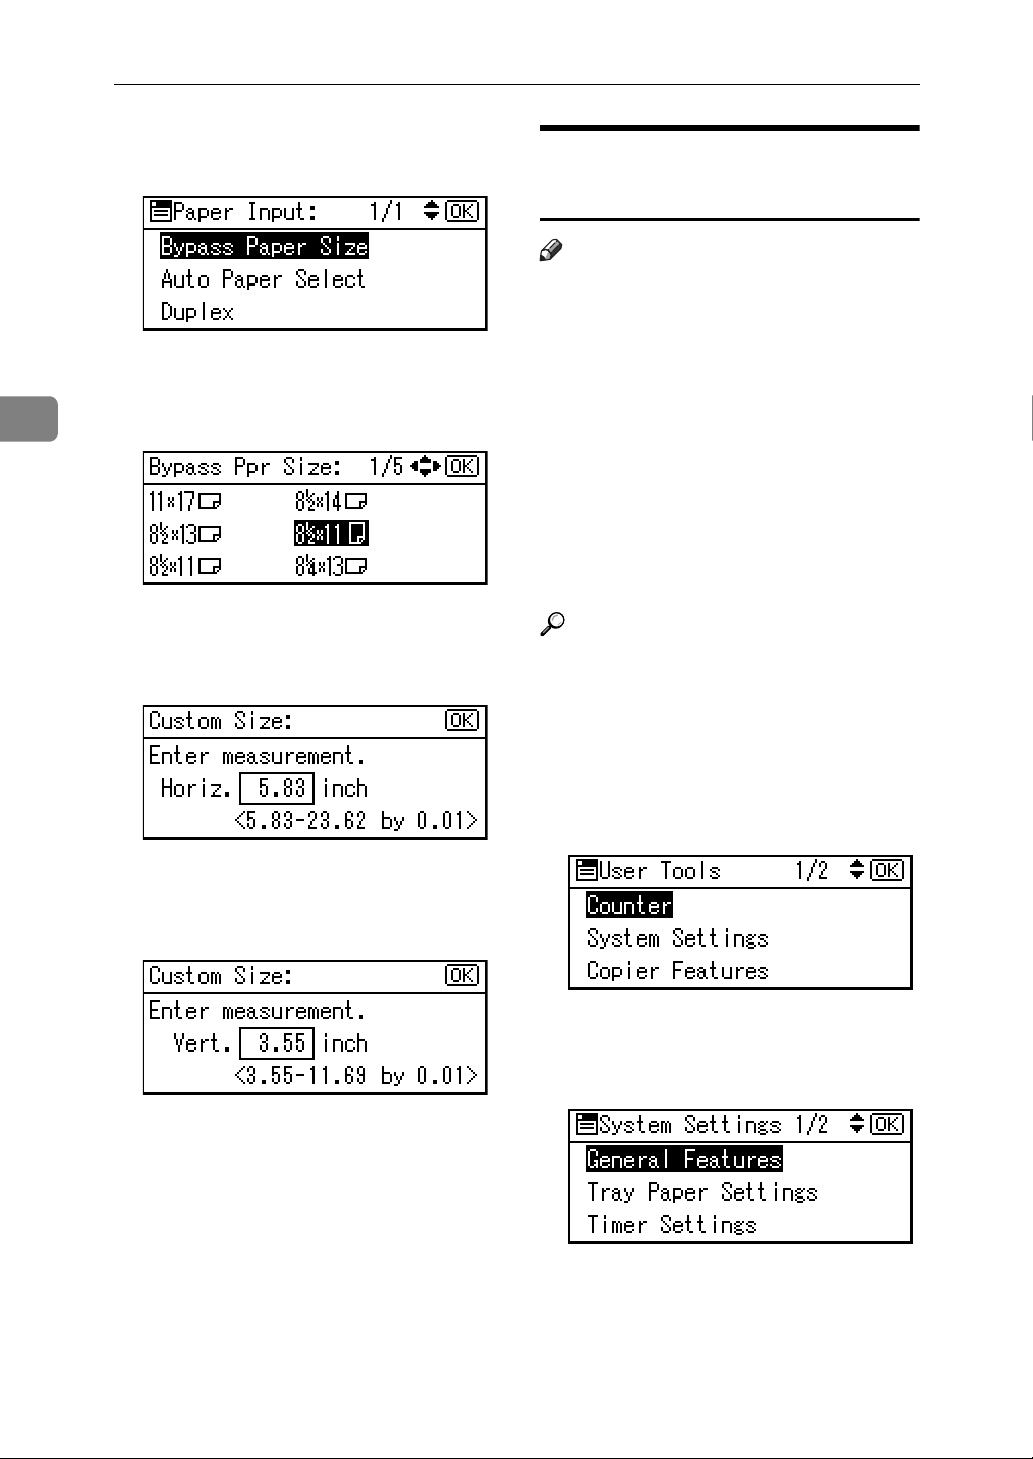
D Select [Bypass Paper Size], and then
press the {OK} key.
E Select [Custom Size] using the {U}
or {T} key, and then press the
{OK} key.
F Enter the horizontal size of the
paper using the number keys, and
then press the {OK} key.
Setting thick paper or OHP transparencies
Note
❒ Paper settings can also be set using
the printer driver. The following
procedures are not necessary
when setting paper sizes using the
printer driver.
❒ Paper size settings set using the
printer driver have priority over
those set using the machine's control panel.
❒ When the printer driver is not
used, make settings using the control panel.
Reference
For printer driver settings, see the
printer driver Help.
G Enter the vertical size of the paper
using the number keys, and then
press the {OK} key.
H Press the {User Tools/Counter} key.
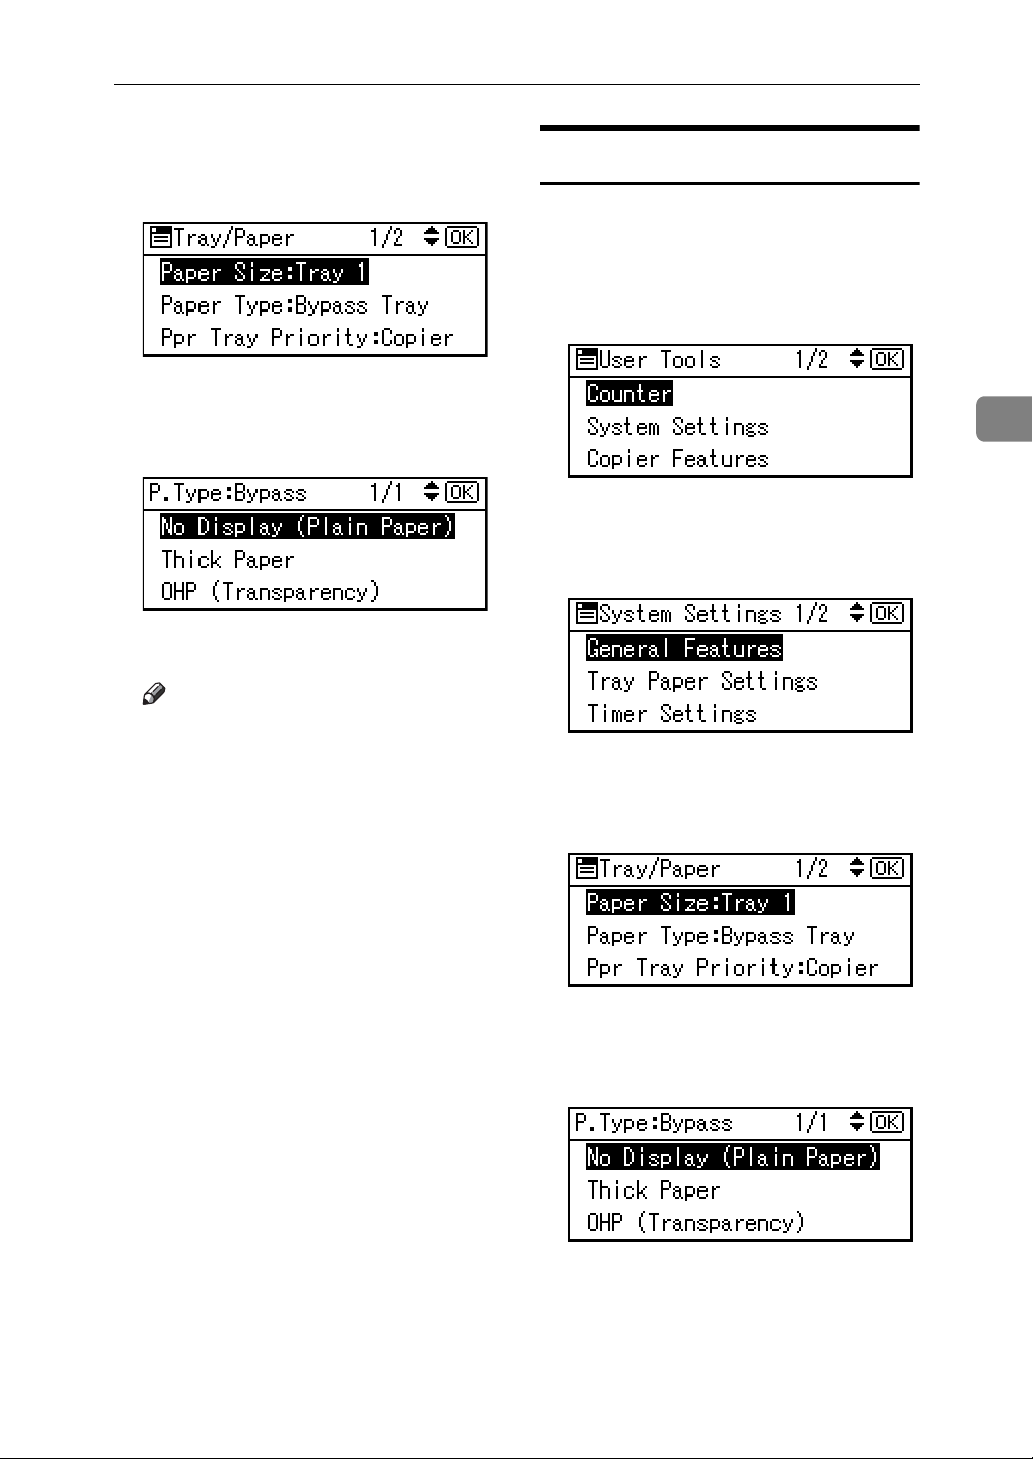
A Press the {User Tools/Counter} key.
B Select [System Settings] using the
{U} or {T} key, and then press
the {OK} key.
C Select [Tray Paper Settings] using
the {U} or {T} key, and then
press the {OK} key.
20
Page 27
Setting Paper on the Bypass Tray
D Select [Paper Type:Bypass Tray] us-
ing the {U} or {T} key, and then
press the {OK} key.
E Select [OHP (Transparency)] or [Thick
Paper] using the {U} or {T} key,
and then press the {OK} key.
F Press the {User Tools/Counter} key.
Note
❒ Settings made remain valid un-
til they are reset again. After
printing on OHP transparencies
or thick paper, make sure you
clear settings for the next user.
Setting envelopes
A Press the {User Tools/Counter} key.
B Select [System Settings] using the
{U} or {T} key, and then press
the {OK} key.
3
C Select [Tray Paper Settings] using
the {U} or {T} key, and then
press the {OK} key.
D Select [Paper Type:Bypass Tray] us-
ing the {U} or {T} key, and then
press the {OK} key.
E Select [Thick Paper] using the {U}
or {T} key, and then press the
{OK} key.
F Press the {Escape} key twice to re-
turn to the User Tools main menu.
21
Page 28
3
Using the Printer Function
G Select [Printer Features] using the
{U} or {T} key, and then press
the {OK} key.
H Select [Paper Input] using the {U}
or {T} key, and then press the
{OK} key.
I Select [Bypass Paper Size], and then
press the {OK} key.
J Select the paper envelope size
from [C6 EnvL], [C5 EnvL], or [DL
EnvL], and then press the {OK}
key.
K Press the {User Tools/Counter} key.
22
Page 29

Setting Up the Printer Driver and Canceling a Print Job
Setting Up the Printer Driver and Canceling
a Print Job
Windows 98SE / Me Accessing Printer Properties
Changing default settings
A On the [Start] menu, point to [Set-
tings], and then click [Printers].
The [Printers] window appears.
B Click the icon of the machine
whose default you want to change.
C On the [File] menu, click [Properties].
The printer properties dialog box
appears.
D Make the settings you want, and
then click [OK].
Note
❒ With some applications, printer
driver settings are not used, and
the application's own settings
are applied.
Making settings from an application
To make settings for a specific application, open the printer properties dialog box from that application. The
following example describes how to
make settings for the WordPad application that comes with Windows
98SE / Me.
Note
❒ Actual procedures for opening the
printer properties dialog box may
vary depending on the application. For more information, see the
operating instructions that come
with the application you are using.
❒ Any setting you make in the fol-
lowing procedure is valid for the
current application only.
A On the [File] menu, click [Print].
The [Print] dialog box appears.
B In the [Name] list, select the ma-
chine you want to use, and then
click [Properties].
The printer properties dialog box
appears.
3
C Make the settings you want, and
then click [OK].
D Click [OK] to start printing.
23
Page 30

Using the Printer Function
3
Windows 2000 / XP and
Windows Server 2003 Accessing Printer Properties
Changing default settings - Printer properties
Limitation
❒ Changing machine settings re-
quires Manage Printers permission. Members of Administrators
and Power Users groups have
Manage Printers permission by default. When you set up options, log
on using an account that has Manage Printers permission.
A On the [Start] menu, point to [Set-
tings], and then click [Printers].
The [Printers] window appears.
Note
❒ Under Windows XP Profession-
al and Windows Server 2003,
open the [Printers and Faxes]
window on the [Start] menu.
❒ Under Windows XP Home Edi-
tion, open the [Printers and Faxes]
window by clicking [Control Pan-
el] from the [Start] button on the
taskbar, click [Printers and Other
Hardware], and then click [Printers and Faxes].
B Click the icon of the machine
whose default you want to change.
C On the [File] menu, click [Properties].
The printer properties dialog box
appears.
D Make the settings you want, and
then click [OK].
Note
❒ Normally you do not have to
change the “Form to Tray Assignment” settings on the [De-
vice Settings] tab in the
PostScript 3 printer driver.
❒ Settings you make here are used
as default for all applications.
Changing default settings - Printing preferences properties
Limitation
❒ Changing machine settings requires
Manage Printers permission. Members of the Administrators and Power Users groups have Manage
Printers permission by default.
When you set up options, log on using an account that has Manage
Printers permission.
A On the [Start] menu, point to [Set-
tings], and then click [Printers].
The [Printers] window appears.
Note
❒ Under Windows XP Profession-
al and Windows Server 2003,
open the [Printers and Faxes]
window on the [Start] menu.
❒ Under Windows XP Home Edi-
tion, open the [Printers and Faxes]
window by clicking [Control Pan-
el] from the [Start] button on the
taskbar, click [Printers and Other
Hardware], and then click [Printers and Faxes].
B Click the icon of the machine
whose default you want to change.
C On the [File] menu, click [Printing
Preferences...].
The [Printing Preferences] dialog box
appears.
24
Page 31
Setting Up the Printer Driver and Canceling a Print Job
D Make the settings you want, and
then click [OK].
Note
❒ Settings you make here are used
as default for all applications.
Making settings from an application
To make settings for a specific application, open the [Print] dialog box
from that application. The following
example describes how to make settings for the WordPad application
that comes with Windows 2000 / XP
and Windows Server 2003.
Note
❒ Actual procedures for opening the
[Print] dialog box vary depending
on the application. For details, see
the operating instructions that
come with the application you are
using.
❒ Any setting you make in the fol-
lowing procedure is valid for the
current application only.
A On the [File] menu, click [Print...].
Canceling a Print Job
A Double-click the printer icon on
the Windows taskbar.
A window appears, showing all
print jobs currently queued for
printing. Check the current status
of the job you want to cancel.
B Select the name of the job you
want to cancel.
C On the [Document] menu, click [Can-
cel Printing].
Note
❒ Under Windows 2000 / XP, and
Windows Server 2003, click
[cancel] on the [Document] menu.
❒ Under Windows 98SE / Me /
2000 / XP, or Windows Server
2003, you can also open the
print job queue window by
double-clicking the machine
icon in the [Printers] machine
window (the [Printers and Faxes]
window under Windows XP
and Windows Server 2003).
3
The [Print] dialog box appears.
B In the [Select Printer] list, select the
machine you want to use, and
then click the tab for which you
want to change print settings.
Note
❒ Under Windows XP and Win-
dows Server 2003, click [Prefer-
ence] to open the Printing
Preferences dialog box.
C Make the settings you want.
D Click [Print] to start printing.
Under Windows XP and Windows
Server 2003, click [OK], and then
click [Print] to start printing.
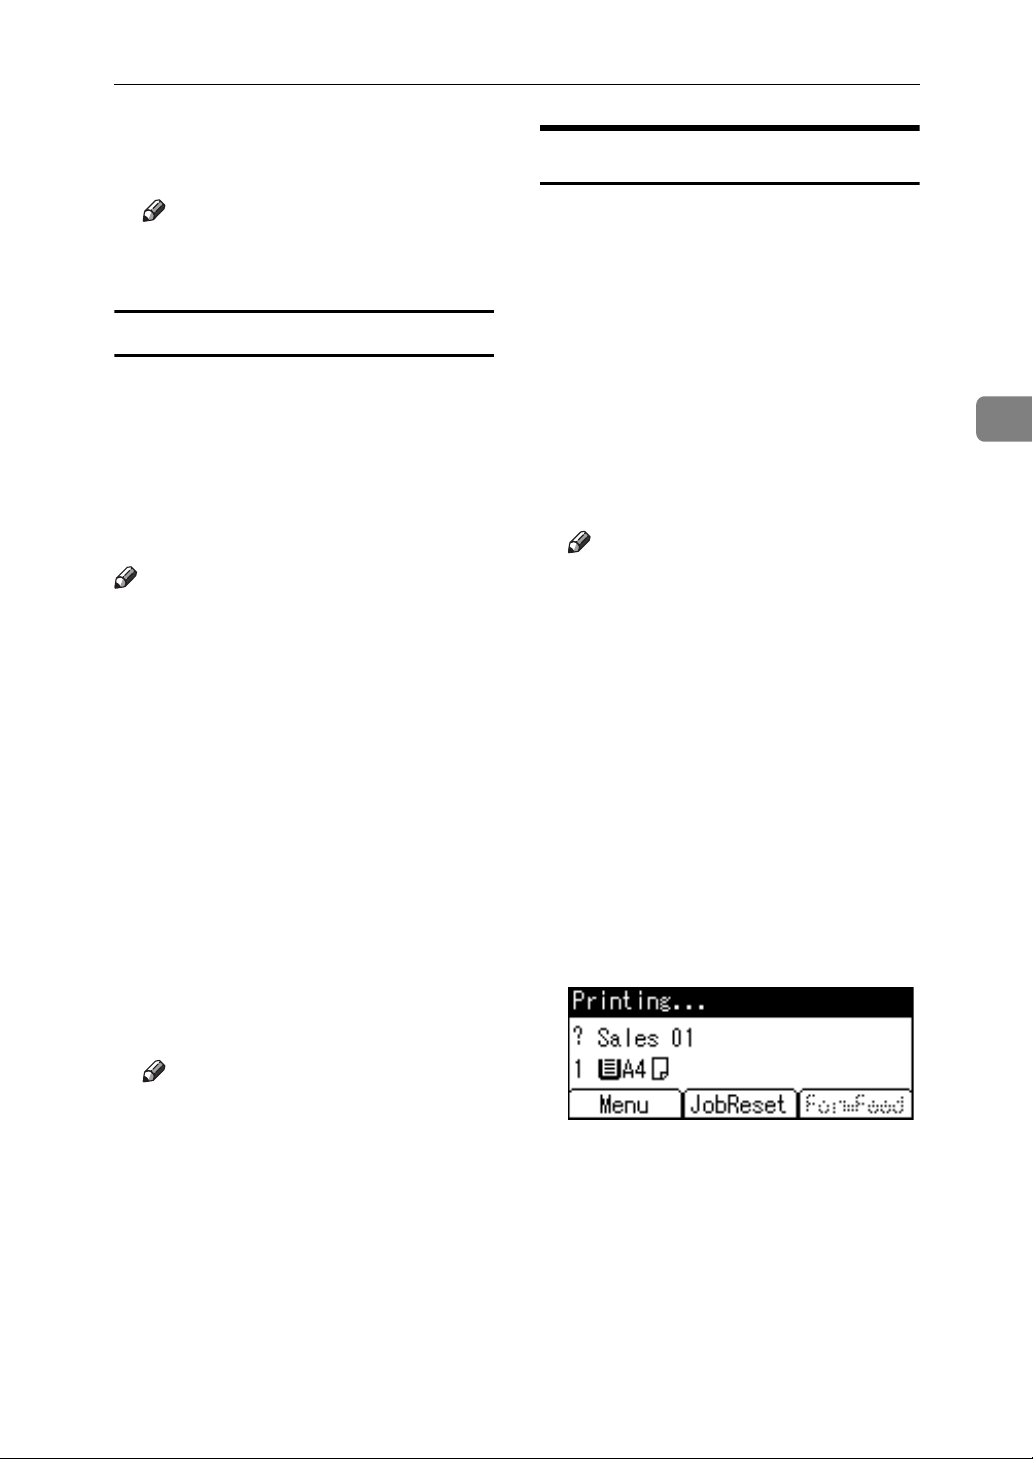
D Press the {Printer} key.
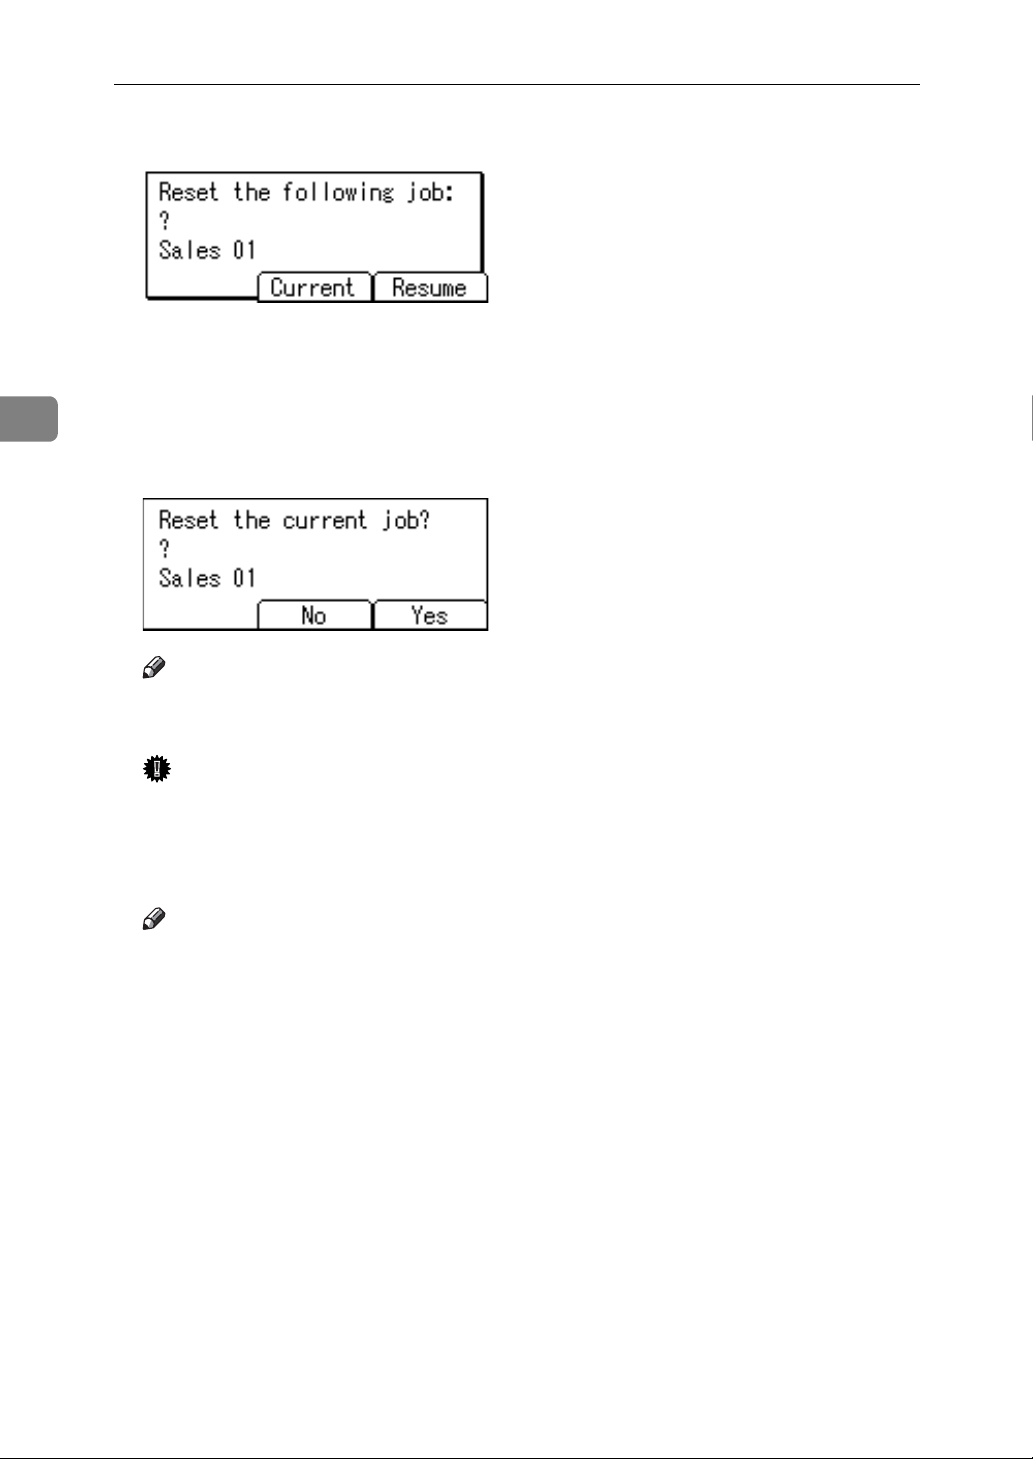
E Press [JobReset].
25
Page 32
3
Using the Printer Function
F Press [Current].
• [Current]: cancels the print job
currently being processed.
• [Resume]: resumes printing jobs.
A confirmation message appears.
G Press [Yes] to cancel the print job.
Note
❒ Press [No] to return to the previ-
ous display.
Important
❒ If the machine is shared by mul-
tiple computers, be careful not
to accidentally cancel someone
else's print job.
Note
❒ You cannot stop printing data
that has already been processed. For this reason, printing
may continue for a few pages
after you press [JobReset].
❒ A print job containing a large
volume of data may take considerable time to stop.
26
Page 33
4. Using the TWAIN Scanner Function
TWAIN Scanner
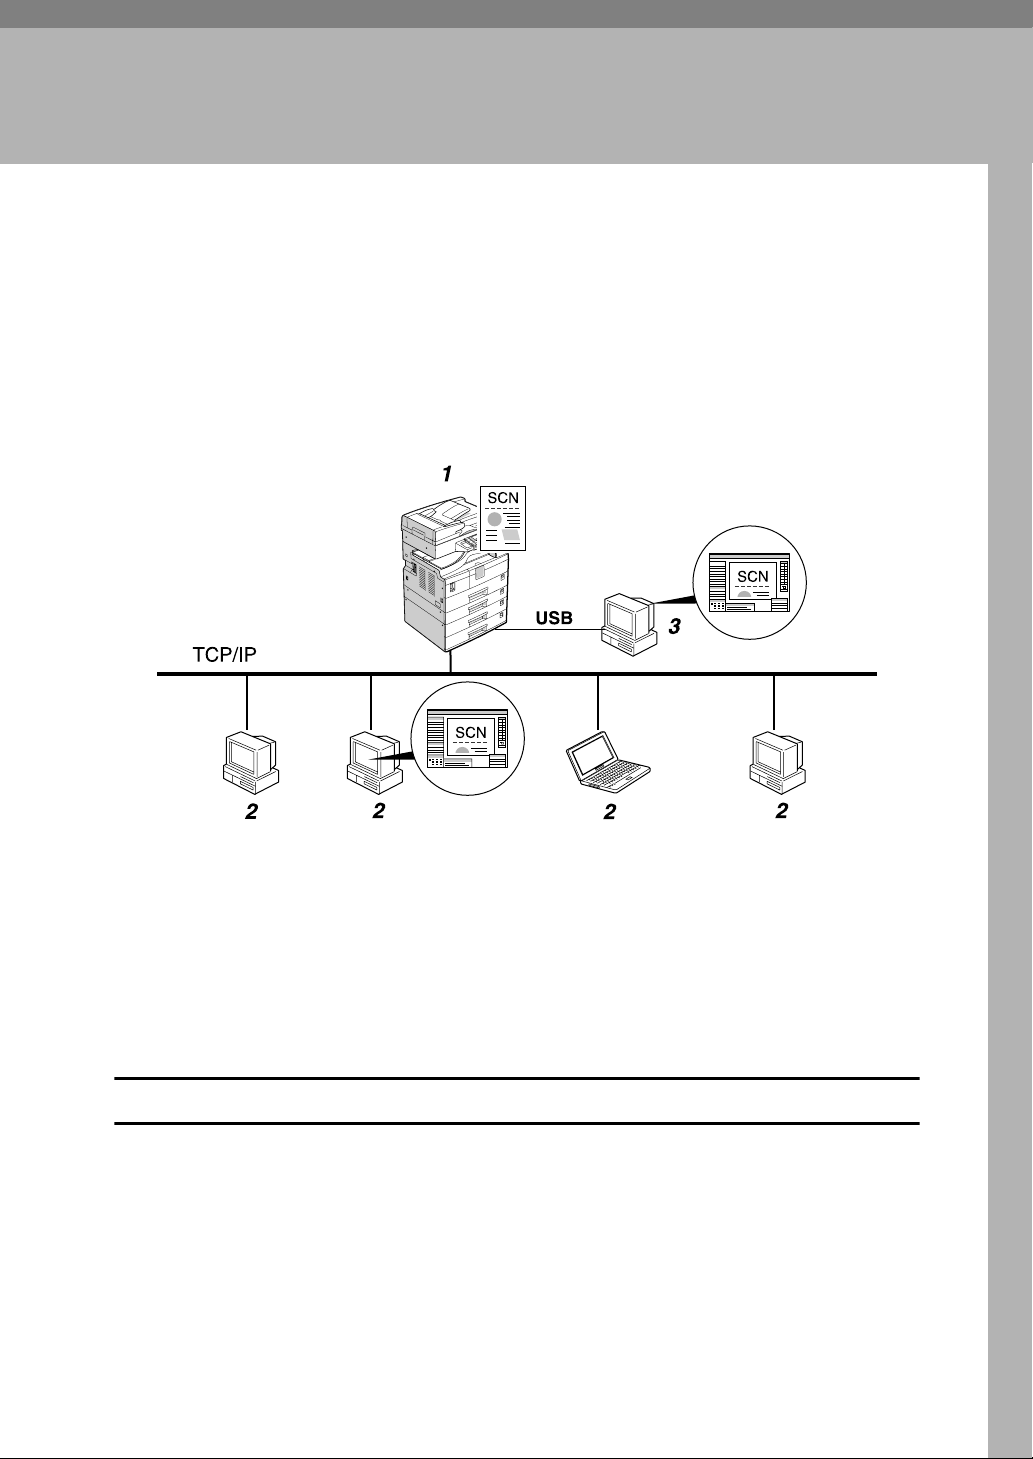
You can use this machine as a TWAIN scanner, by operating this machine from
a client computer on the network. Originals can be scanned with the same operation used for USB-connected scanners.
Also, this machine can be used as a TWAIN-compliant scanner, by directly connected with an off-line Computer over USB.
ANX005S
1. This machine
Connect this machine to a ethernet
(TCP/IP) and/or a USB.
2. Client computer
The scanner can be operated using a
TWAIN-compliant application (such as
Imaging).
Process Flow
3. Off-line computer
This is a PC that is USB-connected to this
machine. You can use this scanner from a
TWAIN-compliant application (such as
Imaging).
A Use a TWAIN-compliant application on a “2. Client computer” or “3. Off-
line computer” to send a command for scanning via the TWAIN driver.
B Originals are scanned by “1. This machine.”
C The scanned data can be edited and stored using the TWAIN-compliant ap-
plication on the “2. Client computer” or “3. Off-line computer.”
27
Page 34
Using the TWAIN Scanner Function
Preparation for Using the Network TWAIN Scanner
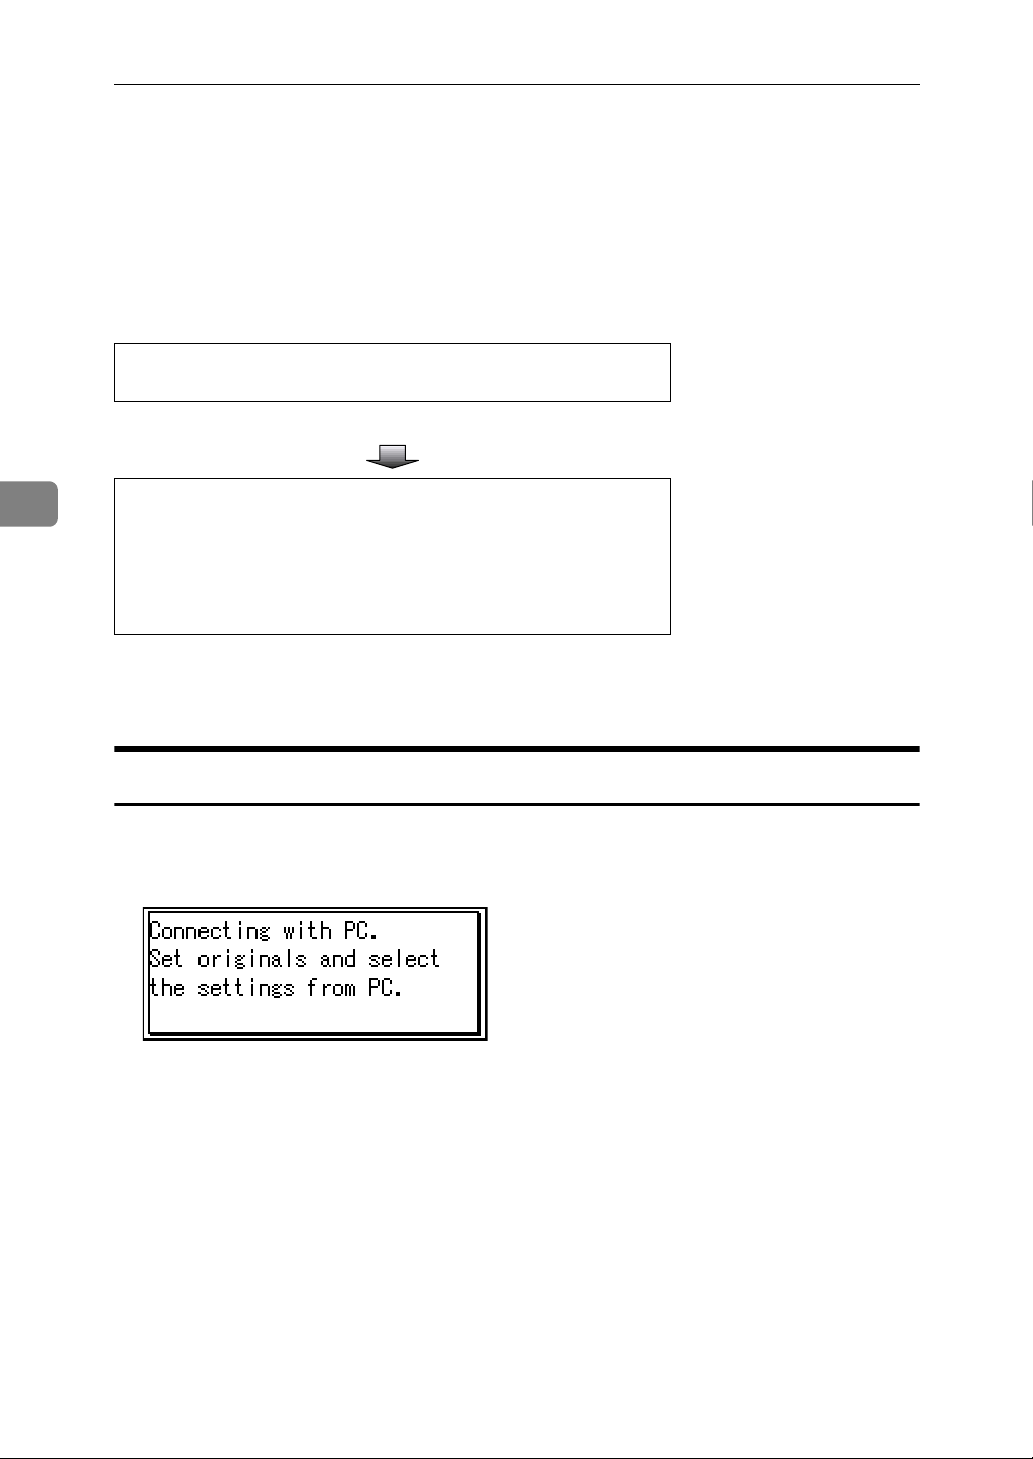
The following overview diagram shows the preparation steps for using this machine as a TWAIN scanner.
4
Install the TWAIN driver on a client computer.
Connect the scanner and client computer with a cable.
*1
If you use this machine as a TWAIN scanner, you need a TWAIN-compliant application on the client computer you use.
*1
See p.9 “Installing the
TWAIN Driver”.
USB connection: See p.5
“Connecting the machine to
the host using a USB cable”.
Ethernet connection: See
“Connecting the Machine”
in Network Guide.
TWAIN Scanner Screen
When using the machine as the TWAIN scanner, it is not necessary to press the
{Scanner} key on the control panel. When the TWAIN driver becomes active on
a client computer, the display automatically switches to the following screen.
28
Page 35
Setting Originals
Setting Originals
The following explains the procedure for placing originals on the exposure glass
and in the ADF, and setting the original scan area and orientation according to
the placement method.
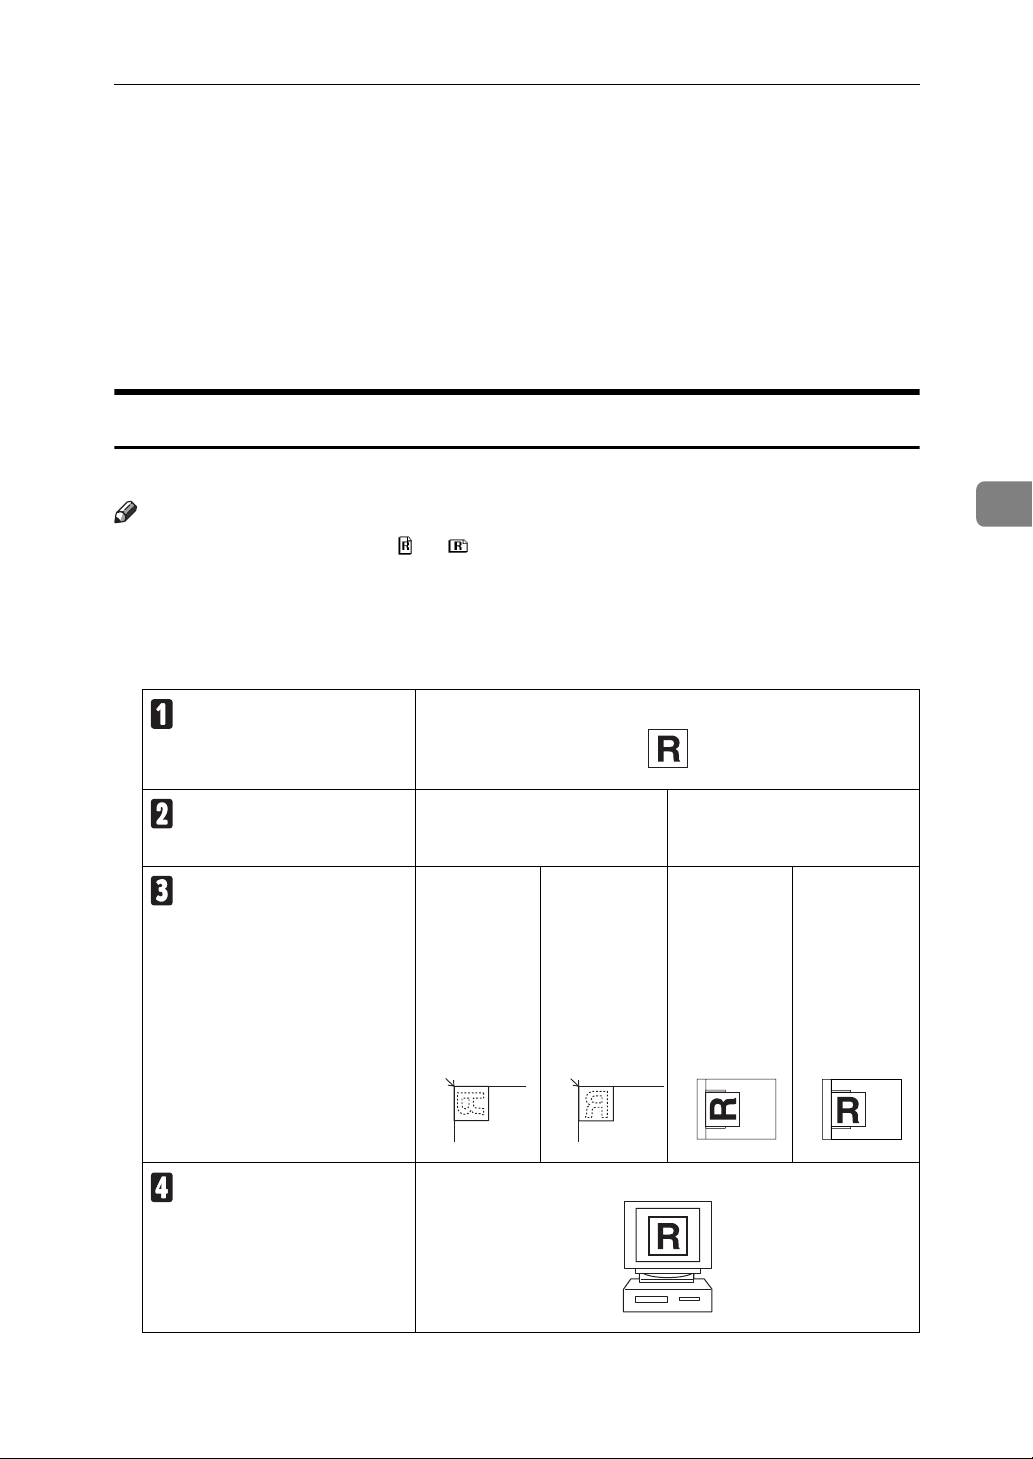
To correctly display the top/bottom orientation of the scanned original on a client computer, the placement of the original and the settings made on the control
panel and scanner driver must match.
Placing Originals
There are two orientations for placing the original. See the table below.
Note
❒ Normally, an original is or , but in the table below, a square original is
used to make original orientation easy to understand. If the actual shape of
the original is different, the combination of original orientation and the orientation specified on the control panel or scanner driver does not change.
❖ Specifying original orientation and setting originals
An original to be scanned
Exposure glass ADF
Decide the placement method.
Place the original.
(There are two original orientations.)
Place the
original so
that the top
edge touches
the top left of
the exposure glass.
Place the
original so
that the top
edge touches
the rear of
the exposure
glass.
Place the top
edge of the
original first.
Place the
original so
that the top
edge touches
the back of
the ADF.
4
The original displayed on a
computer
29
Page 36
Using the TWAIN Scanner Function
4
Placing on the Exposure Glass
Originals which do not fit into the
ADF, such as sheets with glued-on
parts, books, etc., can be placed directly on the exposure glass for scanning.
Note
❒ For details about the originals
which can be placed on the exposure glass, see Copy Reference.
A Lift the exposure glass cover or
the ADF.
Note
❒ Lift the exposure glass cover or
ADF for more than 30 degrees.
The opening/closing action
triggers the automatic original
size detection process.
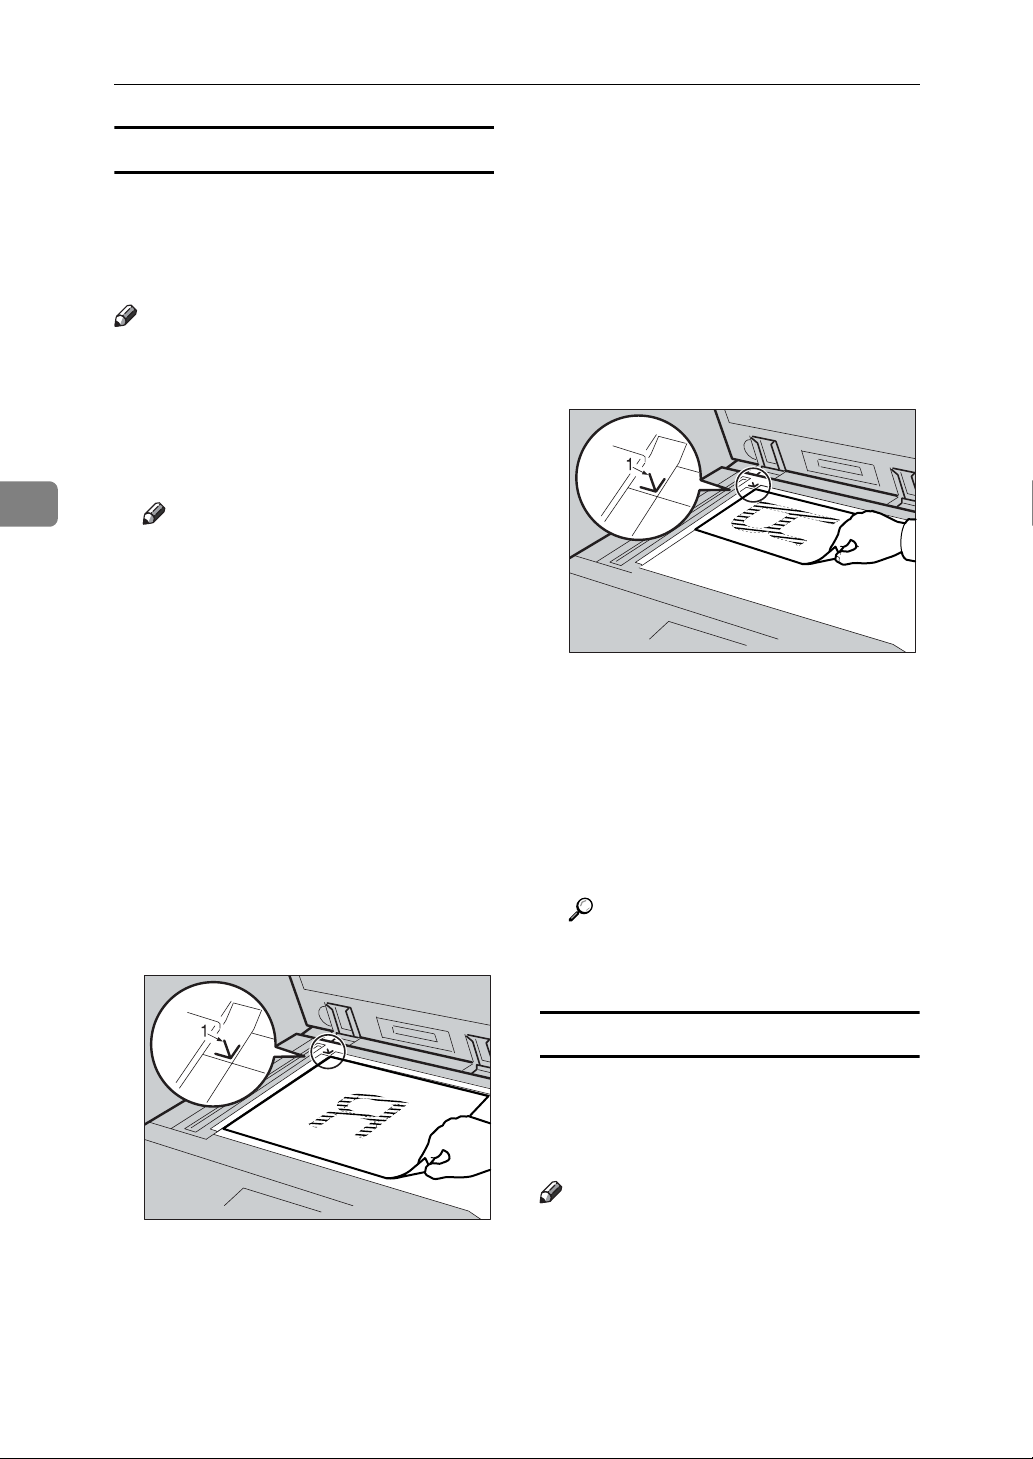
B Place the original on the exposure
glass with the side to be scanned
facing down. Align the original
with the back left corner mark.
There are two original orientations.
❖ When placing the original so that
the top edge touches the rear of
the exposure glass
❖ When placing the original so that
the top edge touches the top left of
the exposure glass
When using the machine as a
network TWAIN scanner, this
orientation is the standard setting for the TWAIN driver. Normally, use this orientation for
placing originals.
AAH005S
1. Positioning mark
C Lower the exposure glass cover or
the ADF.
D Select the original orientation ac-
cording to the orientation of the
placed original.
Reference
p.29 “Specifying original orientation and setting originals”
1. Positioning mark
30
AAH004S
Placing in the Auto Document Feeder
The ADF allows you to place multiple
originals at one time. Originals placed
in the ADF can be scanned on one
side or both sides.
Note
❒ The duplex function is available
only when you have installed the
optional ADF capable of scanning
both sides of a sheet (ARDF).
Page 37
Setting Originals
❖ Originals that can and cannot be
placed in the ADF
For details about the originals that
can and cannot be placed in the
ADF, see Copy Reference.
Attempting to use originals unsuitable for the ADF can lead to a
misfeed and damage to the originals. Place such originals directly
on the exposure glass.
Important
❒ For details about original sizes
that can be detected automatically and notes on placing originals
in the ADF, see Copy Reference.
A Adjust the original guide to match
the size of the originals.
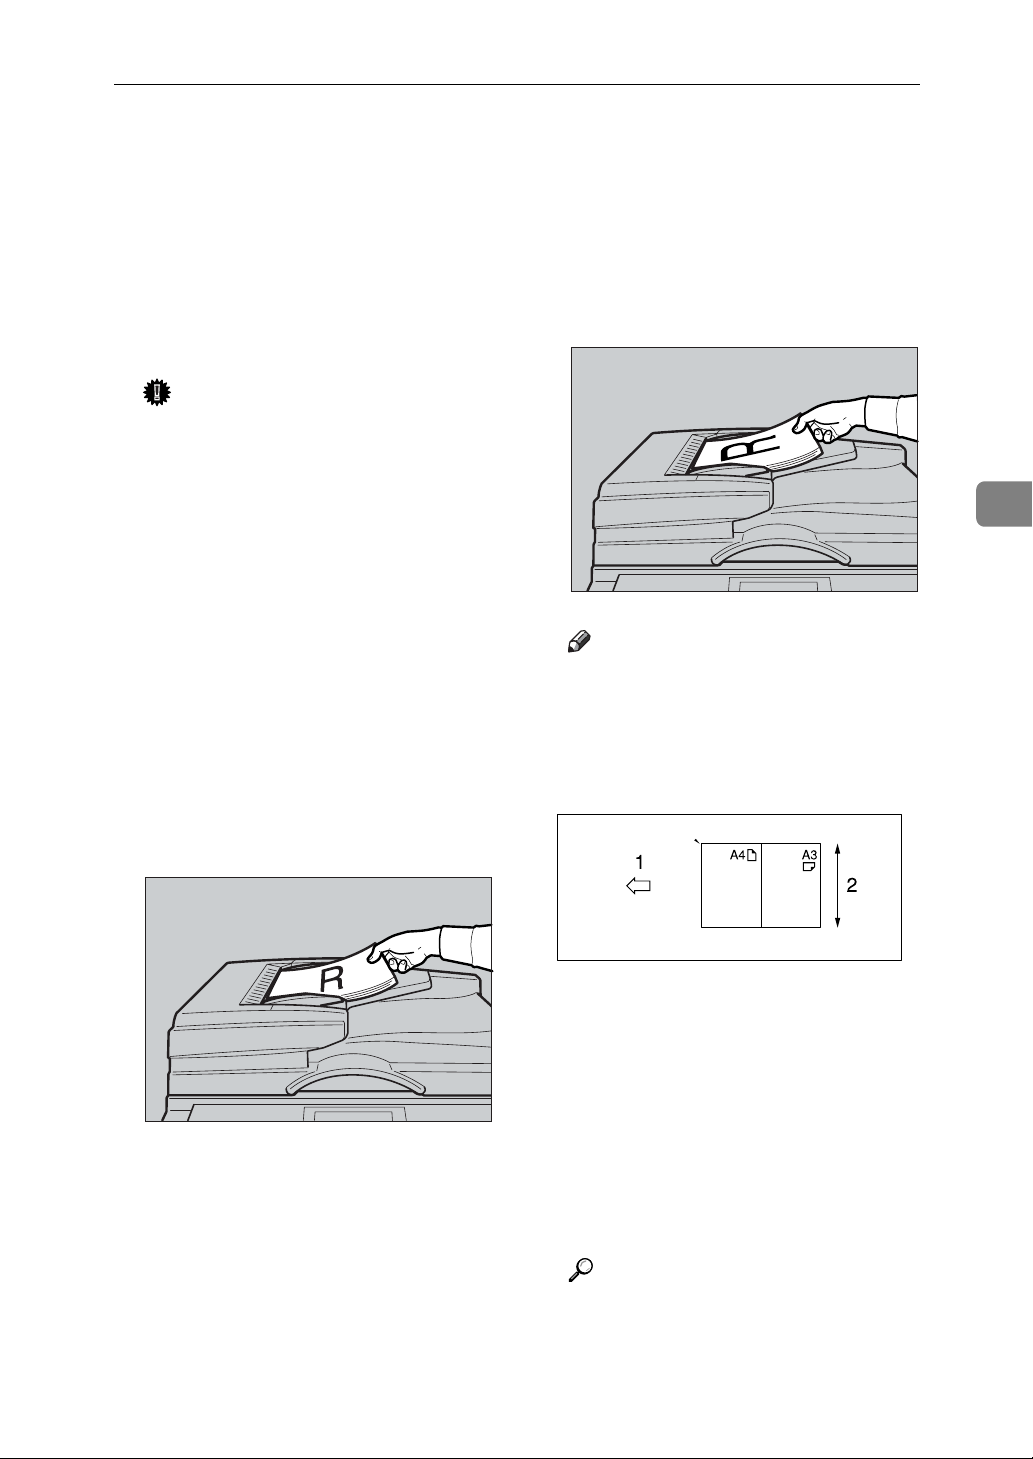
B Place the originals with the side
to be scanned facing up.
For originals which are to be
scanned on both sides, the first
side should face up.
There are two orientations.
❖ When placing the top edges of the
originals first
When using the machine as a
network TWAIN scanner, this
orientation is the standard setting for the TWAIN driver. Normally, use this orientation for
placing originals.
4
AAH007S
Note
❒ Originals of the same width and
different length can be placed at
the same time. Place the originals as shown:
❖
When placing the originals so that the
top edges touch the back of the ADF
AAH006S
AAH022S
1. ADF placement orientation
2. Height
❒ Originals are scanned in the in-
serted order, starting from the
topmost page.
C Select the original orientation ac-
cording to the orientation of the
placed originals.
Reference
p.29 “Specifying original orientation and setting originals”
31
Page 38

Using the TWAIN Scanner Function
Scanning Originals
4
This section explains how to scan
originals using the TWAIN scanner
function. This describes how to scan
originals with Imaging under Windows 2000.
A Start Imaging, and then select the
scanner driver.
B On the [Start] menu, point to [Pro-
gram], point to [Accessories], and
then click [Imaging].
C Click [Select Device…] on the [File]
menu.
If the scanner is already selected,
no scanner settings are necessary.
Proceed to step
.
E
D Select the name of the machine
you want to use in the list, and
then click [OK].
E Place the original in the scanner.
J Save the scan file in Imaging.
K On the [File] menu, click [Save].
L Enter the file name, select the
folder in which you want to save
the file, and then click [Save].
For details about the scanning
function, click [Help] on the Main
Setting dialog box.
Reference
p.29 “Placing Originals”
F Click [Acquire Image…] on the [File]
menu.
The TWAIN Driver dialog box appears.
G Select the connection method.
If you are using Network TWAIN,
enter the IP address in the box under [Select Device].
If you are using USB TWAIN, click
the [USB] check box.
H Click [OK].
Main Setting window appears.
I Click [Preview] or [Scan] to pre-
view or scan image.
Click [Scan] to return to Imaging.
32
Page 39
5. Troubleshooting
The Printer Function
Error & Status Messages on the Display
This section describes the principal messages that appear on the display. If a
message not described here appears, act according to the message.
Reference
Before turning the main power off, see ‘Turning On the Power’, Copy Reference.
❖ Status messages
Message Status
Offline The machine is offline. To start printing, switch the machine
online by pressing {Online} on the control panel.
Please wait. Wait a while.
Printing... The machine is printing. Wait a while.
Ready The machine is ready for use. No action is required.
Resetting Job... The machine is resetting the print job. Wait until “Ready” appears
on the display.
Setting change... The machine settings are being changed. Wait a while.
Waiting... The machine is waiting for the next data to print. Wait a while.
33
Page 40

Troubleshooting
❖ Alert messages
Messages/Second messages Causes Solutions
5
Change Tray # to the following settings:
xxx yyy
Collate cancelled. The collate print function has
Collate : Page max. The maximum number of pages
Duplex cancelled. Duplex printing has been can-
The settings of the selected paper tray are different from
those specified for printing.
# indicates the tray number.
xxx indicates the tray number.
yyy indicates the paper size.
been canceled.
has been exceeded for collation.
celed.
Press [JobReset] to change the
paper tray settings, or press
[FormFeed] to print regardless.
For details about the paper
tray settings, see General Set-
tings Guide.
Turn off the main power
switch, and back on again. If
the message appears again,
contact your sales or service
representative.
Turn off the main power
switch, and back on again. Reduce the number of pages to
be printed, or, increase memory capacity.
When installing a memory
module in the machine, contact your sales or service representative.
Check the paper used is suitable for duplex printing, or, increase memory capacity.
When installing a memory
module in the machine, contact your sales or service representative.
34
Duplex mode is in off position for Tray #
Ethernet Board Error An error has occurred in the
Exceeded max. print size.
Press FormFeed/JobReset.
I/O buffer overflow The maximum size of the I/O
Load paper in Tray # There is no paper in the select-
The selected paper tray has
not been configured for duplex printing.
# indicates the tray number.
Ethernet interface.
The page images to be printed
exceed the maximum print area.
buffer has been exceeded.
ed paper tray.
# indicates the tray number.
Press [JobReset] to change the
paper tray settings, or do single-sided printing.
For details about the tray settings, see General Settings Guide.
Turn off the main power
switch, and back on again. If
the message appears again,
contact your sales or service
representative.
Press [JobReset] to change the
paper tray settings, or press
[FormFeed] to print regardless.
Increase the size of the I/O
buffer through the Host Interface menu.
Load the tray with paper.
Page 41

The Printer Function
Messages/Second messages Causes Solutions
NV-RAM Error An error has occurred in the
printer.
Output Tray changed.
Paper size/type mismatch.
Change settings to:
xxx yyy
[Print] without below
mode?
Printer Font Error An error has occurred in the
Print overrun. The image data has been
The output tray has been changed
because of the paper size limitation of the selected tray.
There is no paper tray that
matches the paper settings selected under Auto Tray Select.
xxx indicates the tray number.
yyy indicates the paper size
and the paper type.
This is an alert message concerning a paper tray in auto
tray select.
font file.
thinned out due to image compression.
Turn off the main power
switch, and back on again. If
the message appears again,
contact your sales or service
representative.
Select the correct output tray.
Press [JobReset] to change the
paper tray settings, or press
[FormFeed] to print regardless.
For details about the paper
tray settings, see General Set-
tings Guide.
Press [Print] to cancel the mode
and print the job.
5
Turn off the main power
switch, and back on again. If
the message appears again,
contact your sales or service
representative.
Increase memory capacity.
When installing a memory
module in the machine, contact your sales or service representative.
Paper Tray is in use. The specified paper tray is in
use by another function, such
as the copier function.
Reset Paper Tray correctly. The selected paper tray does
not exist or is not set correctly.
DToner is almost empty
Add toner
Tray # Error An error has occurred with the
Unauthorized user access. Print job canceled due to user
USB has a problem An error has occurred in the
Toner is running out. Replace the toner cartridge
paper tray.
# indicates the tray number.
restrictions.
USB interface.
Wait until the other function
has finished using the specified paper tray.
Set the paper tray correctly.
soon to prevent poor print
quality.
Press [JobReset] to change the
paper tray settings, or press
[FormFeed] to select another
paper tray and print.
Check the User Code permission status.
Turn off the main power
switch, and back on again. If
the message appears again,
contact your sales or service
representative.
35
Page 42
Troubleshooting
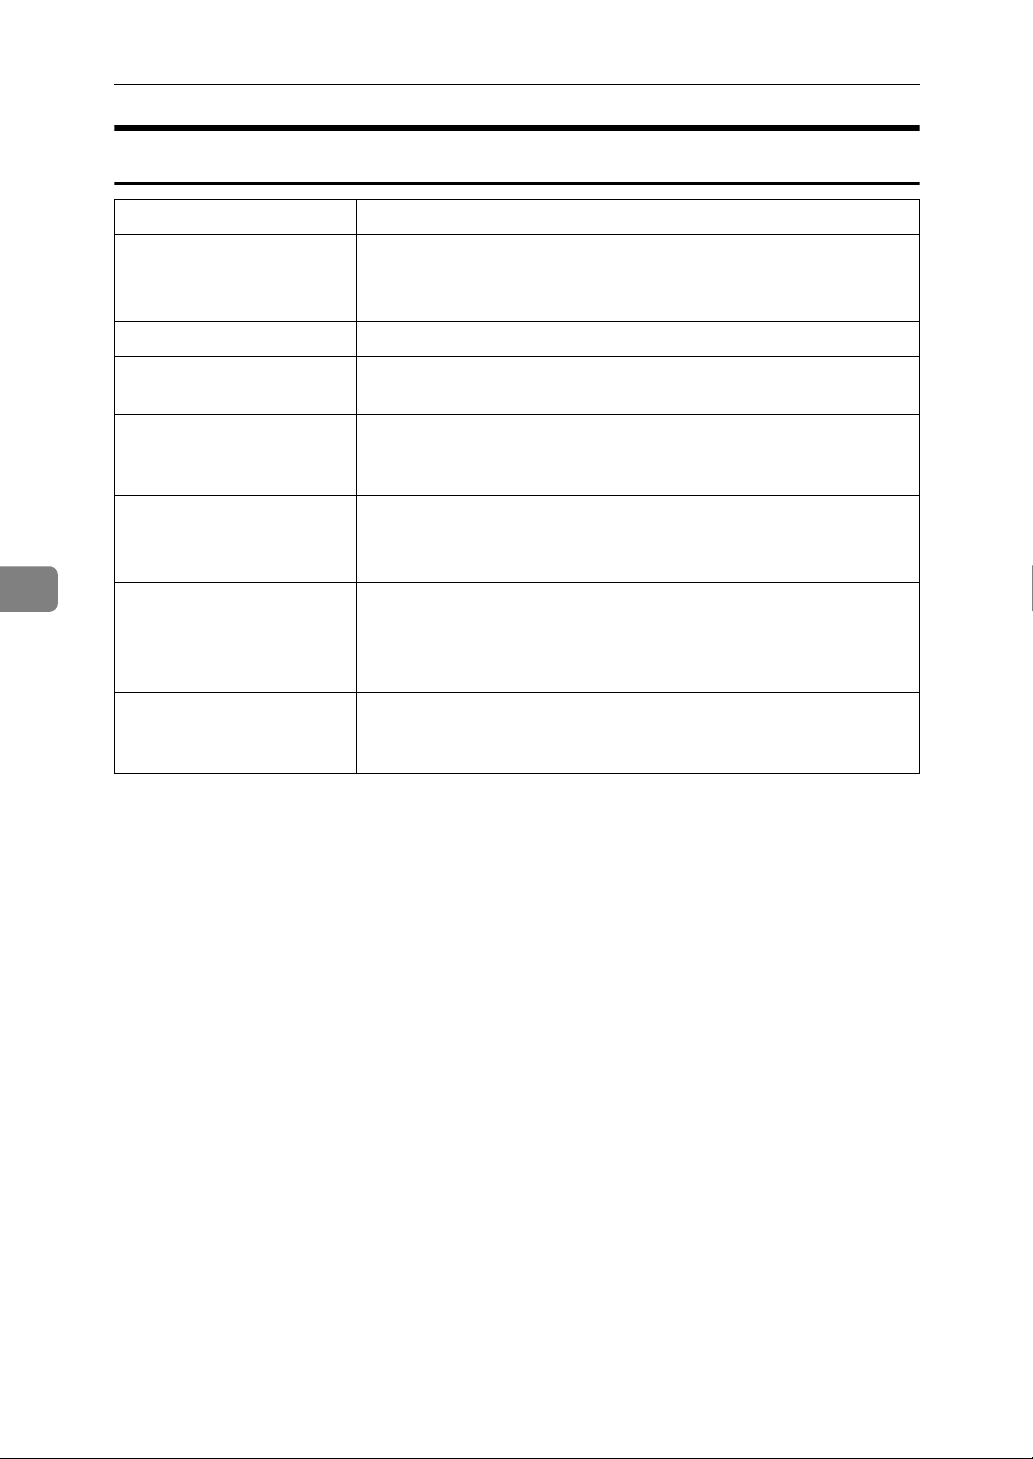
The Machine Does Not Print
Possible Cause Solutions
Is the power on? Check the cable is securely plugged into the power outlet and the
machine.
Turn on the main power switch.
Is the machine online? If not, press {fOnline} on the control panel.
5
Does the Printer key stay
red?
Is there a warning status or
error message on the display?
Is the interface cable connected securely to the machine and computer?
Are you using the correct
interface cable?
Was the interface cable
connected after the machine was turned on?
If so, check the error message on the display and take required action.
If so, check the error message or warning status on the display and
take the required action.
Connect the interface cable securely. If it has a fastener, fasten that
securely as well.
See p.5 “Connecting the Machine”“.
The type of interface cable you should use depends on the computer. Be sure to use the correct one. If the cable is damaged or worn,
replace it.
See p.5 “Connecting the Machine”.
Connect the interface cable before turning on the machine.
36
Page 43

Problem Solutions
The Printer Function
Is the Data In indicator
blinking or lit after starting
the print job?
If not, data is not being sent to the machine.
❖ When the machine is connected to the computer using
the interface cable
Check the machine port settings are correct. For the USB port
connection, the USB port should be set.
• Windows 98SE / Me
A Click the [Start] button, point to [Settings], and then click
[Printers].
B Click the icon of the machine. On the [File] menu, click
[Properties].
C Click the [Details] tab.
D In the [Print to the following port:] list, confirm the correct
port is selected.
• Windows 2000
A Click the [Start] button, point to [Settings], and then click
[Printers].
B Click the icon of the machine. On the [File] menu, click
[Properties].
C Click the [Ports] tab.
D In the [Print to the following port(s)] list, confirm the correct
port is selected.
• Windows XP Professional and Windows Server 2003
A Click the [Start] button, and then click [Printers and Faxes].
B Click the icon of the machine. On the [File] menu, click
[Properties].
C Click the [Ports] tab.
D In the [Print to the following port(s)] list, confirm the correct
port is selected.
• Windows XP Home Edition
A Click the [Start] button, click [Control Panel], click [Print-
ers and Other Hardware], and then click [Printers and Faxes].
B Click the icon of the machine. On the [File] menu, click
[Properties].
C Click the [Ports] tab.
D In the [Print to the following port(s)] list, confirm the correct
port is selected.
5
❖ Network connection
Contact your network administrator.
37
Page 44

Troubleshooting
Other Printing Problems
Problem Causes and Solutions
Smudged print. Settings for thick paper have not been made when printing on thick paper.
Select [Thick] in the [Type:] list on the [Paper] tab on the printer driver.
5
Page layout is not
as expected.
Duplex printing is
not possible.
When using Windows 98SE / Me
or Windows 2000
/ XP, either combined printing or
booklet print does
not come out as
expected.
When using Windows 98SE / Me
or Windows 2000
/ XP, Auto Reduce/Enlarge
print does not
come out as expected.
Print areas differ depending on the machine used. Information that fits on
a single page on one machine may not fit on a single page of another machine.
• Duplex printing cannot be done with paper set in the bypass tray.
When using duplex printing, make settings to use paper from a tray
other than the bypass tray.
• Duplex printing cannot be done with thick paper, OHP transparencies,
or labels specified as the paper type. Specify another paper type.
• Duplex printing cannot be done using a tray for which [Duplex] is not
selected as the paper type in [Tray Paper Settings] in [System Settings]. Select [Duplex] as the paper type in [Paper Input]. See General Settings Guide.
Make sure the application's paper size and orientation settings match those
of the printer driver.
If a different paper size and orientation are set, select the same size and orientation.
38
A print instruction was issued
from the computer, but printing
did not start.
The print job is not
canceled even
when the machine
is switched to offline status.
Photo images are
coarse.
Images are cut off,
or excess is printed.
User code management may be set. Ask the administrator about valid user
codes. To print, the user code must be entered from the printer driver.
Select [Printer Priority] for [Signal Control].
See “User Tools (System Settings)”, General Settings Guide.
Some applications reduce print resolution.
You may be using paper smaller than the size selected in the application.
Use the same size paper as that selected in the application. If you cannot
load paper of the correct size, use the reduction function to reduce the image, and then print.
Page 45

Problem Causes and Solutions
The Printer Function
It takes a long
time to complete a
print job.
It takes too much
time to resume
printing.
Paper is not fed
from the selected
tray.
Optional components connected to
the machine are
not recognized
when using Windows 98SE / Me,
Windows 2000 /
XP, and Windows
Server 2003.
Images are printed in the wrong
orientation.
The data is large or complex so it takes time to process. If the Data In indicator is blinking, data is being processed. Wait until printing resumes.
The data is large or complex so it takes time to process. If the Data In indicator is blinking, data is being processed. Wait until printing resumes.
The machine is in Energy Saver mode. To resume from Energy Saver
mode, it has to warm up, and this takes time. See General Settings Guide.
When you are using a Windows operating system, printer driver settings
override those set using the control panel. Set the desired input tray using
the printer driver.
You have to configure the option setup in printer properties when bidirectional transmission is not enabled.
See the printer driver Help.
5
The feed orientation you selected and the feed orientation selected in the
printer driver's option setup might not be the same. Set the machine's feed
orientation and the printer driver's feed orientation accordingly.
See the printer driver Help.
The printed image
is different from
the image on the
computer's display.
With certain functions, such as enlargement and reduction, image layout
might be different to that on the computer display.
Note
❒ If the problem cannot be solved, contact your sales or service representative.
39
Page 46
Troubleshooting
The Scanner Function
When Scanning Is Not Performed as Expected
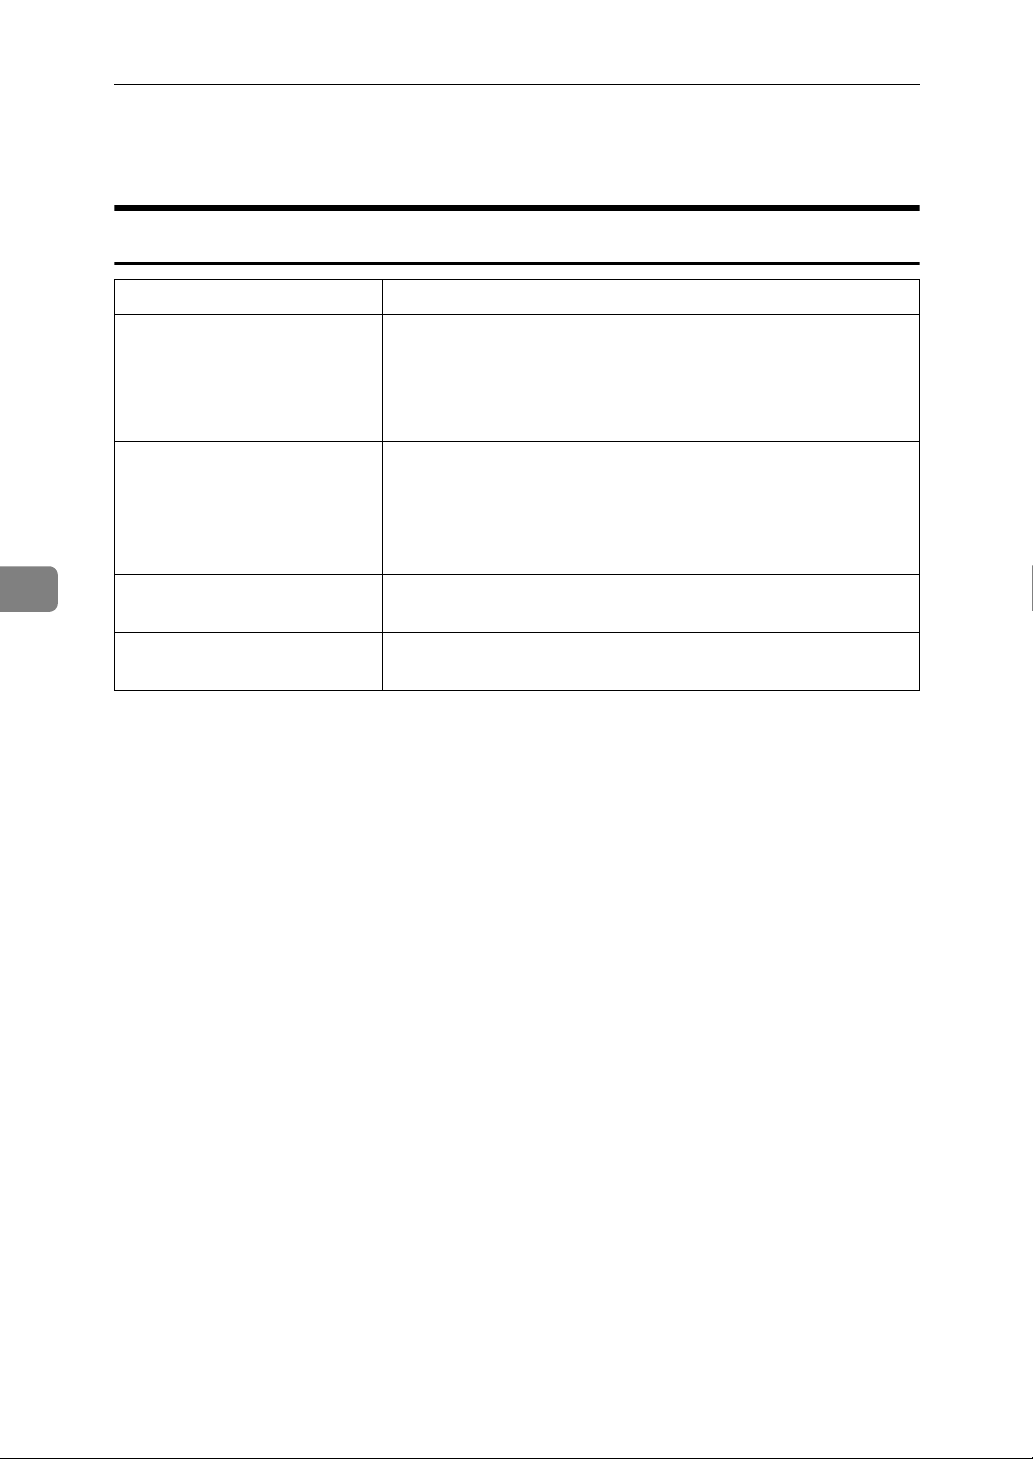
Problems Causes and solutions
5
No image results from scanning.
The image is distorted or out
of position.
The scanned image is dirty. The exposure glass or the exposure glass cover is dirty. Clean
The scanned image is upside
down.
The original was placed with the front and back reversed.
When the original is placed directly on the exposure glass, the
side to be scanned must face down. When the original is fed via
the ADF, the side to be scanned must face up. See p.29 “Placing
Originals”.
• The original was moved during scanning. Do not move the
original during scanning.
• The original was not pressed flat against the exposure glass.
Make sure that the original is pressed flat against the exposure glass.
these parts. See General Settings Guide.
The original was placed upside down. Place the original in the
correct orientation. See p.29 “Placing Originals”.
40
Page 47
The Scanner Function
When an Error Message Appears on the Client Computer
This section describes the main possible causes and actions for error messages
displayed on the client computer when the TWAIN driver is used.
Note
❒ If an error message that is not contained in this section appears, turn off the
main power switch of the machine, and then turn it on again. If the message
is still shown after scanning is performed again, note the content of the message and the error number (if listed in the table), and contact your service representative. For details about how to turn off the main power switch, see
General Settings Guide.
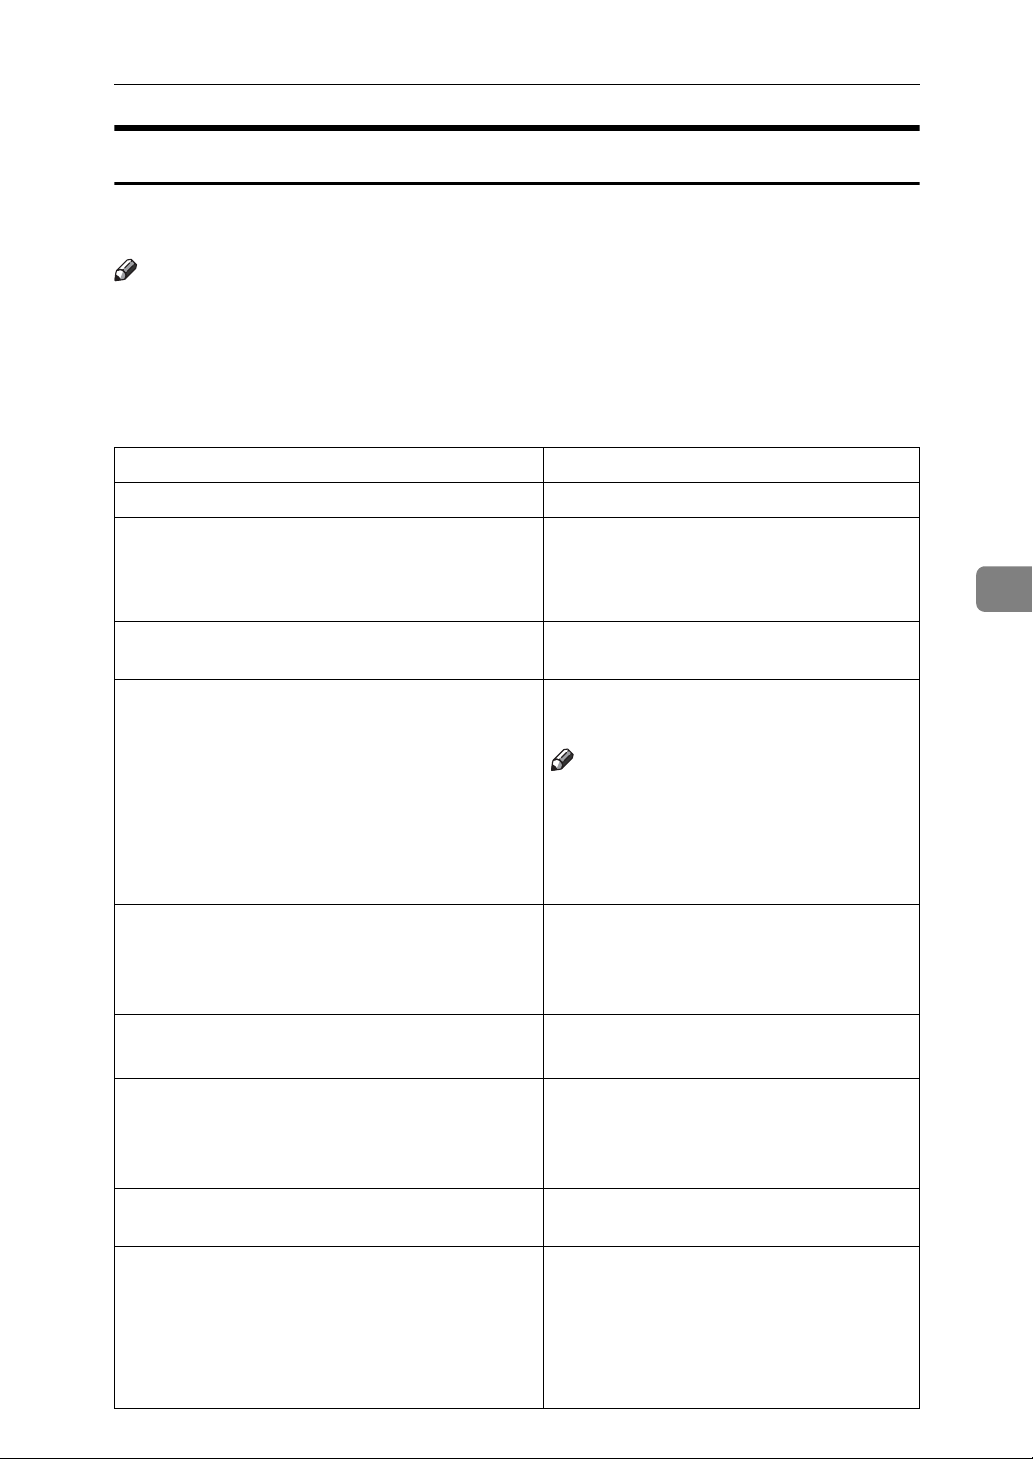
Message Causes and solutions
[ADF cover has been lifted.] The ADF cover is open. Close it.
[Clear Misfeed(s) in ADF.] Remove the jammed originals. When origi-
nals are misfed, place them again. Check
whether the originals are suitable to be
scanned by the machine.
5
[Insufficient memory. Please close all other applications, then restart scanning.]
[Insufficient memory. Resolution is too high. Please reduce resolution or expand scanner.]
Close all the unnecessary applications running on the client computer.
• Reset the scan size.
• Lower the resolution.
Note
❒ When a paper misfeed occurs in the ma-
chine during printing, scanning cannot
be performed. In this case, after the misfed paper has been removed, proceed
with scanning.
[Invalid command. Scanning has been aborted.] Check whether the main power switch of
the machine is turned off.
Check whether the machine is connected to
the network correctly.
[No original on platen glass or ADF.] Place the original correctly.
See p.29 “Placing Originals”.
[No response from the scanner.] • Check whether the machine is connect-
ed to the network correctly.
• The network is crowded. Wait for a
while, and then try to reconnect.
[Scanner is in use by other user. Please wait.] The scanner function is being used. Wait
for a while and reconnect.
[Scanner is not available. Please check scanner connection.]
• Check whether the main power switch
of the machine is turned off.
• Check whether the machine is connected to the network correctly.
• Deselect the personal firewall function
of the client computers.
41
Page 48

5
Troubleshooting
42
Page 49
6. Appendix
The Printer Function
Collate and Rotating Collate
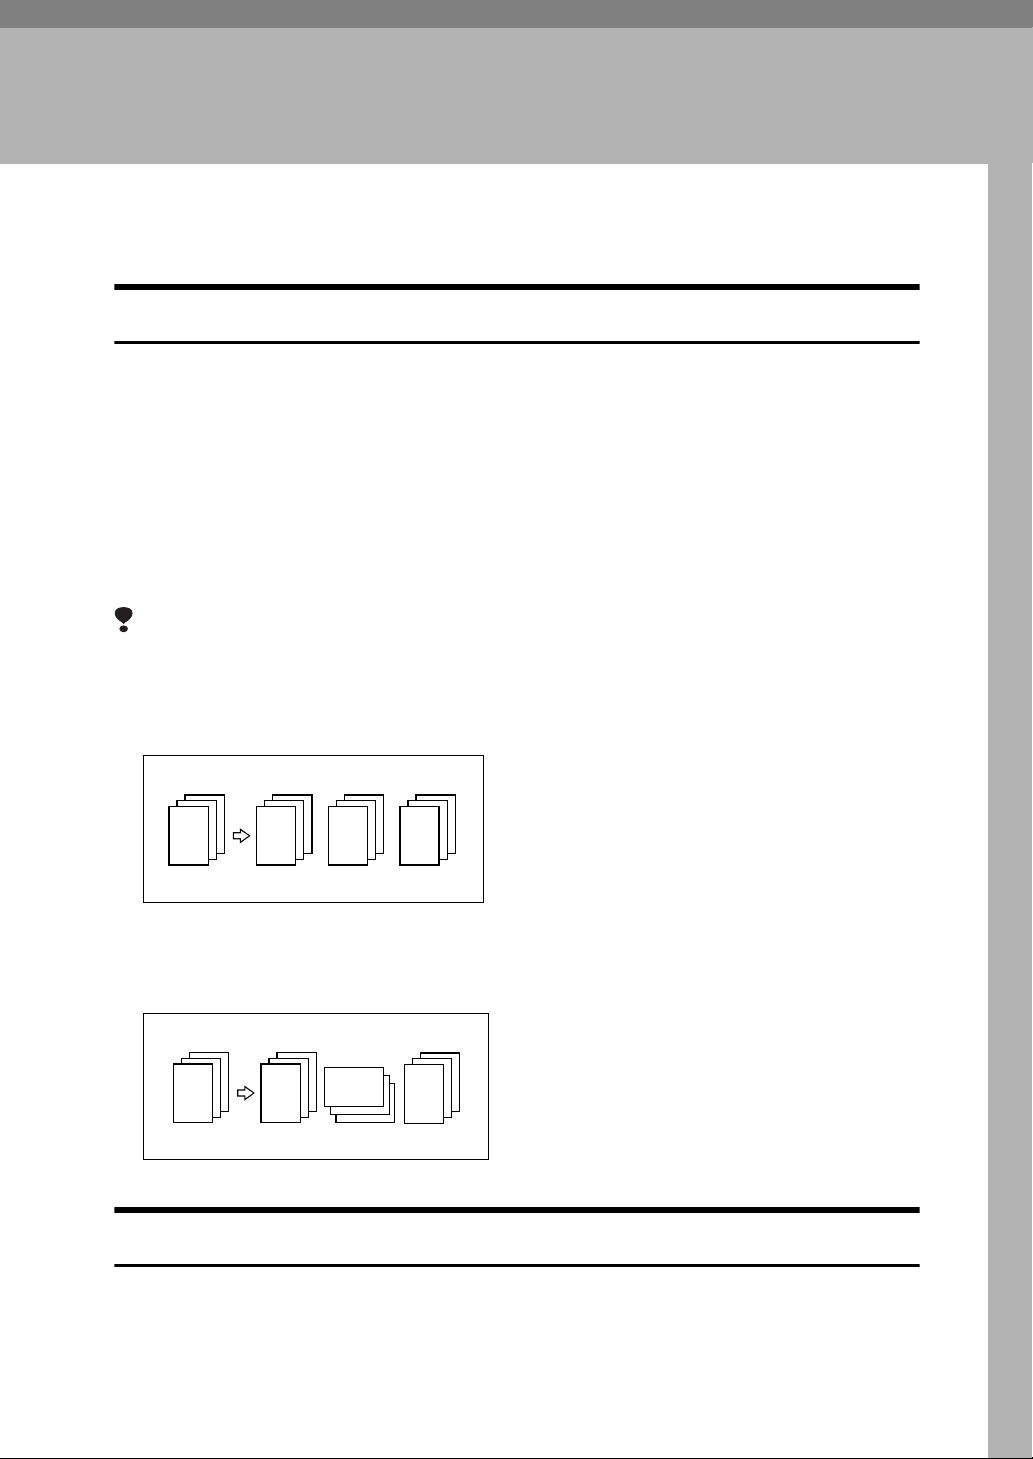
If you select the collate function on the printer driver, the machine will store
print data in memory and automatically collate the printouts.
The collate function can be turned on or off from the printer driver. The machine
automatically rotates the printouts under the following conditions:
•When using A4, 8
• Paper with the same size and different orientations (e.g., A4K in Tray 1 and
A4L in Tray 2)
• Auto Tray Select is specified for tray setting
Limitation
❒ You cannot use the bypass tray with this function.
1
/2×11 or B5 JIS paper
❖ Collate
Outputs can be assembled as sets in sequential order.
3
2
1
3
2
1
3
2
1
3
2
1
CP160-a
❖ Rotating Collate
Every other output set is rotated by 90°K.
1
3
2
1
2
3
2
3
1
3
2
1
CP161-a
Edge to Edge Printing
If you select the [Edge to Edge Printing] function in the [Paper] tab on the printer
driver, you can print on the entire area of A4 sheets, leaving no borders or edges.
43
Page 50

Appendix
The Scanner Function
Relationship between Resolution and File Size
Resolution and scan area are inversely related. The higher the resolution is set,
the smaller the area that can be scanned. Conversely, the larger the scan area, the
lower the resolution that can be set.
The relationship between the scanning resolution and the file size is shown below. If the file size is too large, the message “Exceeded max.data capacity. Check
the scanning resolution.” appears on the control panel of the machine. Specify
the scan size and resolution again.
Limitation
❒ Depending on the image compression level, the maximum image size will be
limited.
When Using as a TWAIN Scanner
6
All combinations up to 297 × 432 mm/11.6 × 17.0 inches (A3, 11 × 17 inches) and
600 dpi are possible.
Reference
To specify the scanning area or resolution when using the machine as a network TWAIN scanner, see TWAIN driver Help.
44
Page 51
Specifications
Specifications
Printer
This section contains the machine's electrical and hardware specifications, including information about its options.
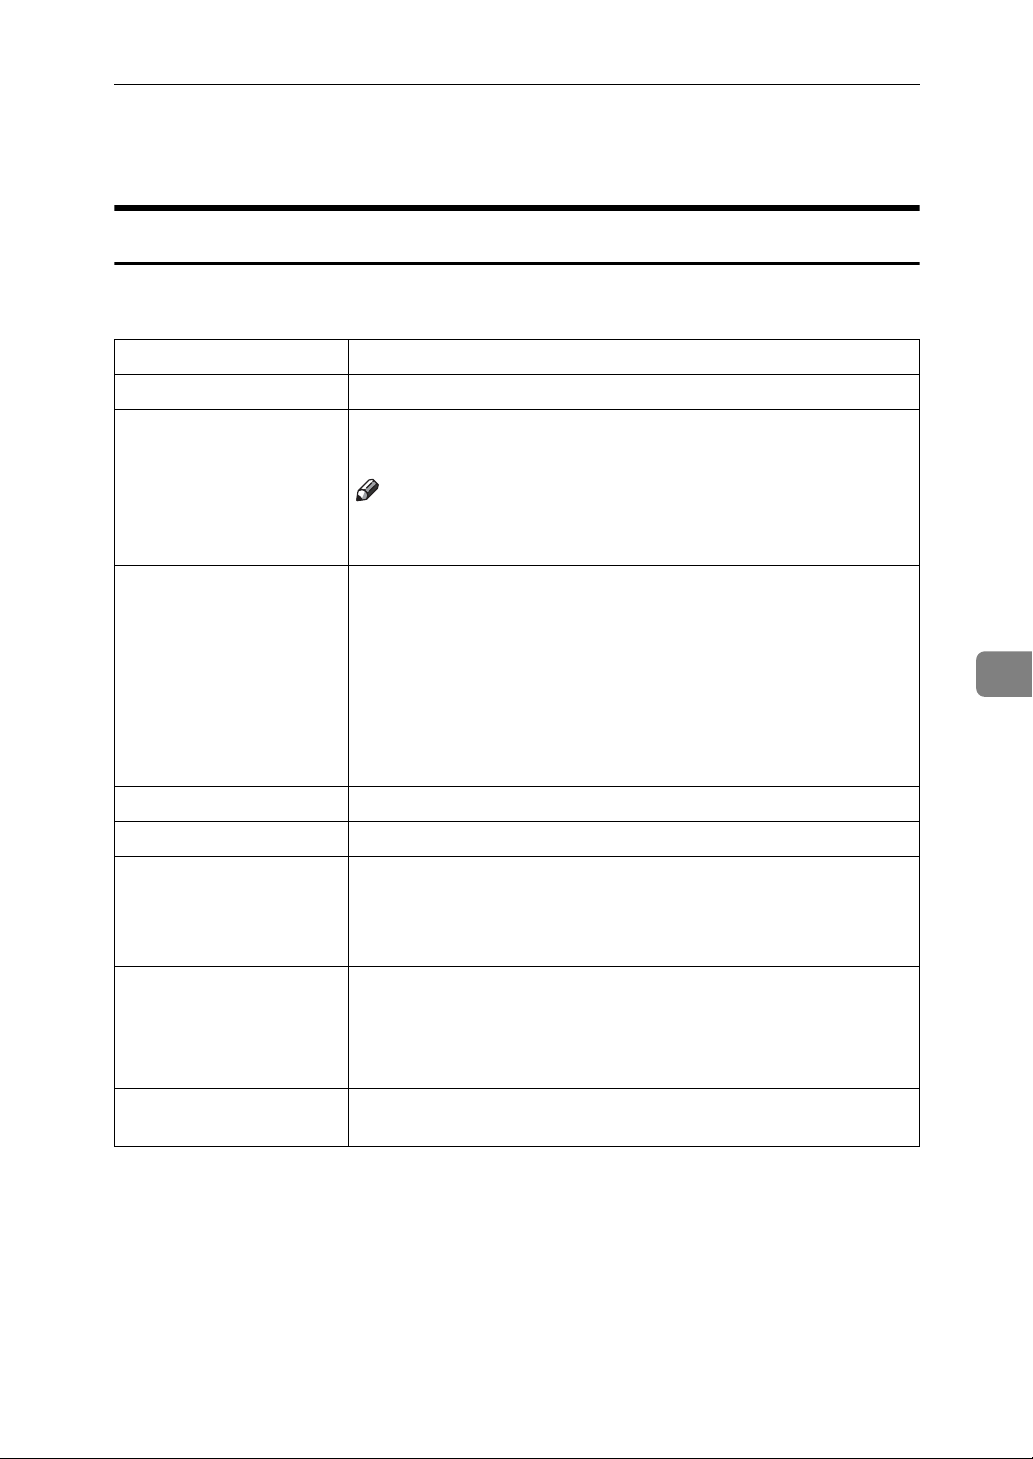
Component Specifications
Resolution 600 dpi
Printing speed 16 ppm/21 ppm
(A4K, 8/" × 11"K plain paper)
Note
❒ Printing speeds depend on the machine. Check which type of
machine you have. See General Settings Guide.
Interface
❖ Standard model
•Standard:
USB 2.0 interface
❖ Network standard model
Standard:
• USB 2.0 interface
• Ethernet interface (100BASE-TX/10BASE-T)
Network protocol TCP/IP
Printer language Host-Based Printing
Memory • Standard model
32 MB
• Network standard model
64 MB
Operating systems supported by this machine
Required network cable 100BASE-TX/10BASE-T shielded twisted-pair (STP, Category/
Windows 98SE / Me
Windows 2000
Windows XP
Windows Server 2003
Type5) cable.
6
45
Page 52
Appendix
Scanner
Scan method Flatbed scanning
Scan speed
Maximum power consumption Less than 1280 W
Image sensor type CCD Image Sensor
Scan types Sheet, book
Interface USB interface, Ethernet interface (10BASE-T or 100BASE-TX)
Maximum scan size 297 × 432 mm/11.6 × 17.0 inches(A3, 11 × 17 inches)
*1
Approx.25 pages/minute [Scan size:A4R, Colors/Gradations:Binary, Resolution: 200dpi, Select device data compression (Binary/Halftone): Data compression (MMR),
Document feeder: ADF, ITU-T No.1 Chart]
6
Scan sizes that can be detected automatically
Resolution 600 dpi
Variable range of scan resolution Setting range: 100 dpi - 600 dpi
*1
Scanning speeds vary according to machine operating conditions, computer (speci-
•Exposure glass
A3S, B4S, A4RS, B5R, 8” × 13”S
•ADF
A3S, B4S, A4RS, B5RS, A5RS, 8.5” × 13”S
fication, network traffic, and software, etc.), and original types.
46
Page 53

INDEX
B
Bypass tray, 17
C
Canceling a job, 25
Connection
Ethernet board connection
USB connection
Control Panel
Control panel
Custom size paper
printing, bypass tray
, 5
, 3
, 4
, 19
D
Data In indicator, 37, 39
DDST TWAIN Driver
Display
, 4
error messages
, 33
E
Error messages, 33
H
Host Interface, 16
I
Interface, 45
L
List/Test Print, 13
, 17
, 10
, 5
O
OHP Transparencies
printing, bypass tray
Operating system
Operations Test
, 13
, 20
, 45
P
Paper Input, 13
paper size
Placing Originals
Printer driver
printer driver
Printer Features
Printer Language
Printing speed
, 18
, 29
Placing on the exposure glass
Placing original in the Auto Document
Feeder (ADF)
DDST
, 10
Printer properties, Windows 2000 / XP
and Windows Server 2003
Printer properties, Windows 98SE / Me
Auto Run
installing
adjusting
menu
, 11
parameters
, 30
, 7
, 8
, 12
, 13
, 45
, 45
, 30
, 24
R
Relationship between resolution and file
, 44
size
When Using as a TWAIN Scanner
Resolution
, 45
,
23
, 44
M
Maintenance, 14
Memory
, 45
N
Network Cable, 45
Network protocol
, 45
S
Scanning originals, 32
Setting Originals
Software supplied on CD-ROM
Specifications
System
, 16
, 29
, 45
, 10
47
Page 54

T
Thick Paper
printing, bypass tray
Troubleshooting
error messages
machine does not print
other printing problems
status messages
When an Error Message Appears on the
Client Computer
When Scanning Is Not Performed as
Expected
TWAIN
installing
TWAIN scanner
, 33
, 40
, 9
, 27
, 20
, 33
, 36
, 38
, 33
, 41
W
Windows 2000 / XP and Windows Server
2003
printer properties, printer driver
Windows 98SE / Me
printer properties, printer driver
, 24
, 23
48 EN USA B866-8673
Page 55

Note to users in the United States of America
Note:
This equipment has been tested and found to comply with the limits for a Class B digital device, pursuant to Part 15 of the FCC Rules. These limits are designed to provide reasonable protection against
harmful interference in a residential installation. This equipment generates, uses and can radiate radio
frequency energy and, if not installed and used in accordance with the instructions, may cause harmful
interference to radio communications. However, there is no guarantee that interference will not occur
in a particular installation. If this equipment does cause harmful interference to radio or television reception, which can be determined by turning the equipment off and on, the user is encouraged to try to
correct the interference by one more of the following measures:
Reorient or relocate the receiving antenna.
Increase the separation between the equipment and receiver.
Connect the equipment into an outlet on a circuit different from that to which the receiver is
connected.
Consult the dealer or an experienced radio /TV technician for help.
Caution:
Changes or modifications not expressly approved by the party responsible for compliance could void
the user's authority to operate the equipment.
Declaration of Conformity
Product Name: Printer/Scanner Controller
Model Number: DDST Unit Type A / Type B
Responsible party: Ricoh Corporation
Address: 5 Dedrick Place, West Caldwell, NJ 07006
Telephone number: 973-882-2000
This device complies with Part 15 of the FCC Rules.
Operation is subject to the following two conditions:
1. This device may not cause harmful interference, and
2. this device must accept any interference received,
including interference that may cause undesired operation.
1. Properly shielded and grounded cables and connectors must be used for connections to a host
computer (and/or peripheral) in order to meet FCC emission limits.
2. An AC adapter with a ferrite core must be used for RF interference suppression.
Note to users in Canada
Note:
This Class B digital apparatus complies with Canadian ICES-003.
Remarque concernant les utilisateurs au Canada
Avertissement:
Cet appareil numérique de la classe B est conforme à la norme NMB-003 du Canada.
Copyright © 2005
Page 56

DDST Unit Type A / Type B Operating Instructions Printer / Scanner Reference
EN USA B866-8673
 Loading...