

Ricoh D3210 Operating Instructions Manual

Operating Instructions
For safe and correct use, be sure to read the Safety Information in Read
This First before using the machine.


TABLE OF CONTENTS
Disclaimer............................................................................................................................................................3
1. Using the Remote Control
Names and Functions of the Remote Control Buttons......................................................................................5
Installing the Batteries into the Remote Control................................................................................................ 7
Removing the Batteries from the Remote Control.............................................................................................9
Remote Control Usage Tips.............................................................................................................................10
2. Connection
Connecting Audio/Video Signals.................................................................................................................. 11
Connecting the VGA Input.......................................................................................................................... 11
Connecting the Digital Inputs......................................................................................................................12
Connecting External Speakers....................................................................................................................12
Connecting Multiple Displays.....................................................................................................................13
Connecting with a USB Cable....................................................................................................................15
3. Using the Touch Screen
Important Instructions for Using the Touch Screen.........................................................................................17
4. The On-Screen Display Menu
The On-Screen Display Menu Overview.......................................................................................................19
Operations in the On-Screen Display Menu................................................................................................. 21
Using the Control Panel Buttons..................................................................................................................21
Using the Remote Control............................................................................................................................23
Picture Menu.....................................................................................................................................................25
Sound Menu..................................................................................................................................................... 27
Screen Menu.................................................................................................................................................... 29
PAP Setting (Picture and Picture).................................................................................................................29
Aspect........................................................................................................................................................... 30
Adjust Screen............................................................................................................................................... 31
Touch Feature...............................................................................................................................................32
Setting Menu.................................................................................................................................................... 33
Language......................................................................................................................................................33
Power Save.................................................................................................................................................. 33
Control Setting..............................................................................................................................................34
Touch Control Setting.................................................................................................................................. 34
Set Monitor ID..............................................................................................................................................35
1

OSD Rotation............................................................................................................................................... 35
Advanced..................................................................................................................................................... 35
Information................................................................................................................................................... 36
All Reset........................................................................................................................................................ 36
5. Product Information
Specifications....................................................................................................................................................37
List of Video Input Signals Supported by the Machine................................................................................. 42
List of PAP Input Signal Combination Supported by the Machine............................................................... 44
List of the Functions and Commands Controlled by the RS-232C Terminal................................................45
Set and Get Commands Table................................................................................................................... 46
Output Signals..................................................................................................................................................48
6. Troubleshooting
Troubleshooting................................................................................................................................................49
7. Appendix
Trademarks....................................................................................................................................................... 53
2

Disclaimer
To the maximum extent permitted by applicable laws, in no event will the manufacturer be liable for any
damages whatsoever arising out of failures of this machine, losses of the registered data, or the use or
non-use of this product and operation manuals provided with it.
Make sure that you always copy or have backups of the data registered in this machine. Documents or
data might be erased due to your operational errors or malfunctions of the machine.
In no event will the manufacturer be responsible for any documents created by you using this machine or
any results from the data executed by you.
3

4
1. Using the Remote Control
DTW201
1
6
7
8
9
5
3
2
4
This chapter explains how to use the remote control.
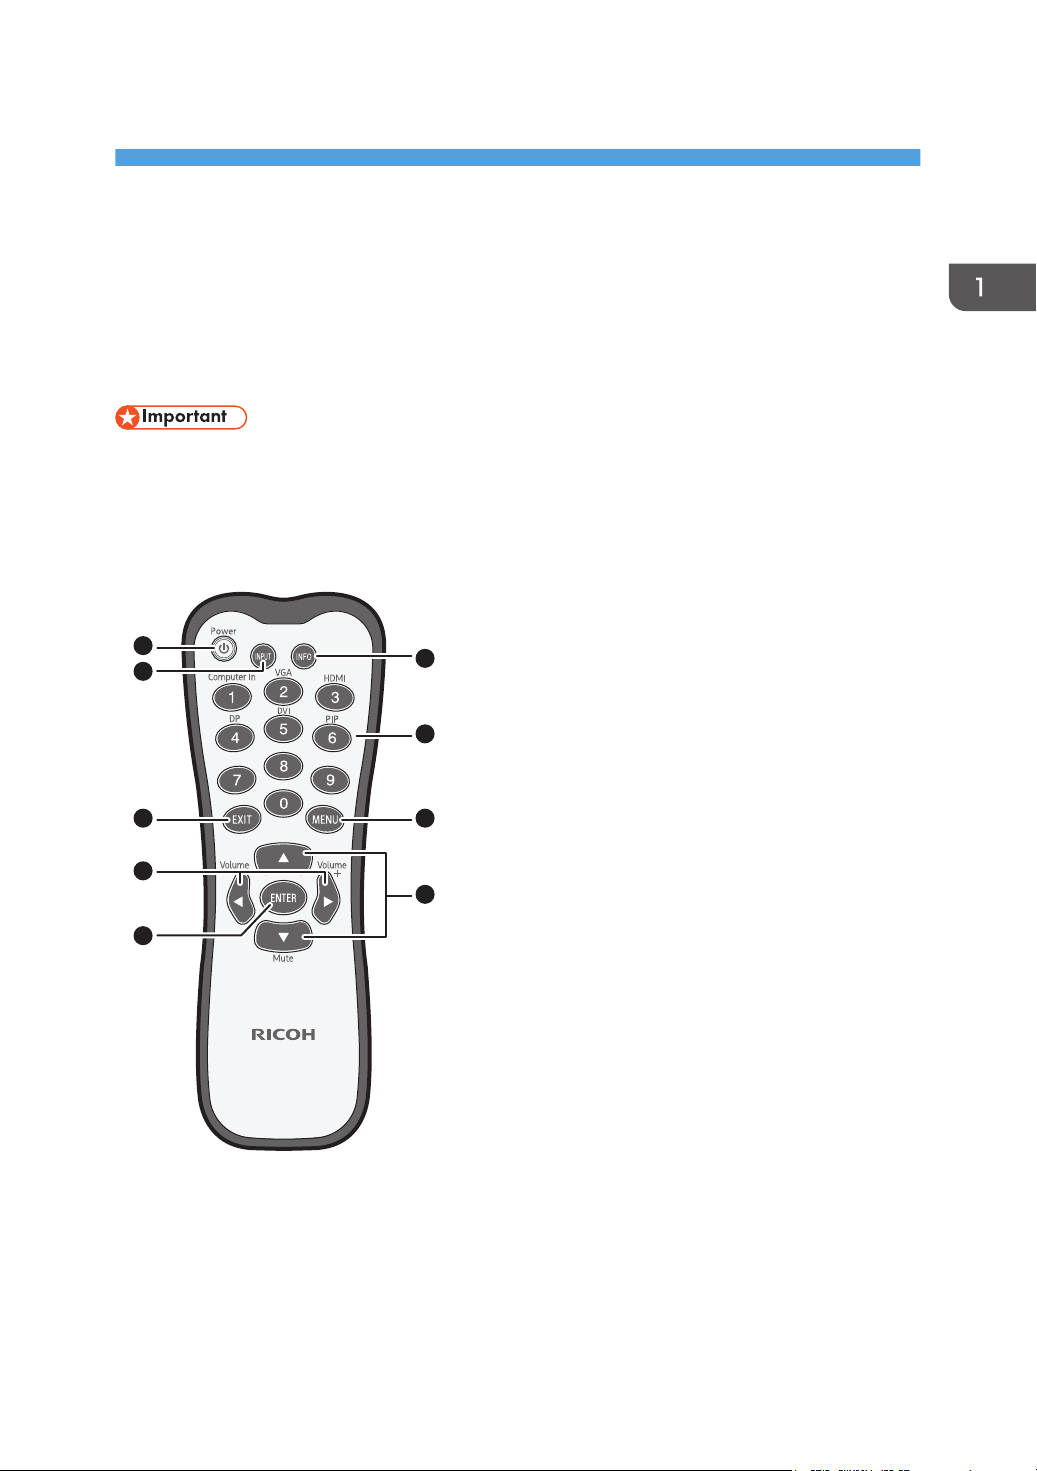
Names and Functions of the Remote Control Buttons
• Do not put the remote control in the direct heat, humidity, and avoid fire.
• Do not drop the remote control, as doing so may cause the remote control to malfunction.
• Confirm there is no object between the remote control and the remote control sensor of the product.
• When the remote control will not be used for an extended period, remove the batteries.
1. [Power]
Turns the machine on or off.
2. [INPUT]
Selects an input source.
5

1. Using the Remote Control
3. [EXIT]
Returns to the previous menu or closes the On-Screen Display menu when the On-Screen Display menu is on.
4. [ ]/[Volume ]/[ ]/[Volume ]
• Scrolls through settings and options in the On-Screen Display menu.
• Turns down/up the volume.
5. [ENTER]
Confirms your selection or save changes.
6. [INFO]
Shows the current input source and resolution.
7. Input source buttons/[PIP]
• Numeric buttons perform as input source buttons.
• Numeric button (6) turns on or off the PIP function.
• [Computer In] is only available if the controller designed compliant with OPS (Open Pluggable
Specification) standard is connected to this display.
• [DVI] is not available on this machine.
8. [MENU]
Opens or closes the On-Screen Display menu.
9. [ ]/[ ]/[Mute]
• Scrolls through settings and options in the On-Screen Display menu when the On-Screen Display menu
is on.
• Turns on or off the mute function. Used to temporarily disable audio input on the machine.
6
Installing the Batteries into the Remote Control
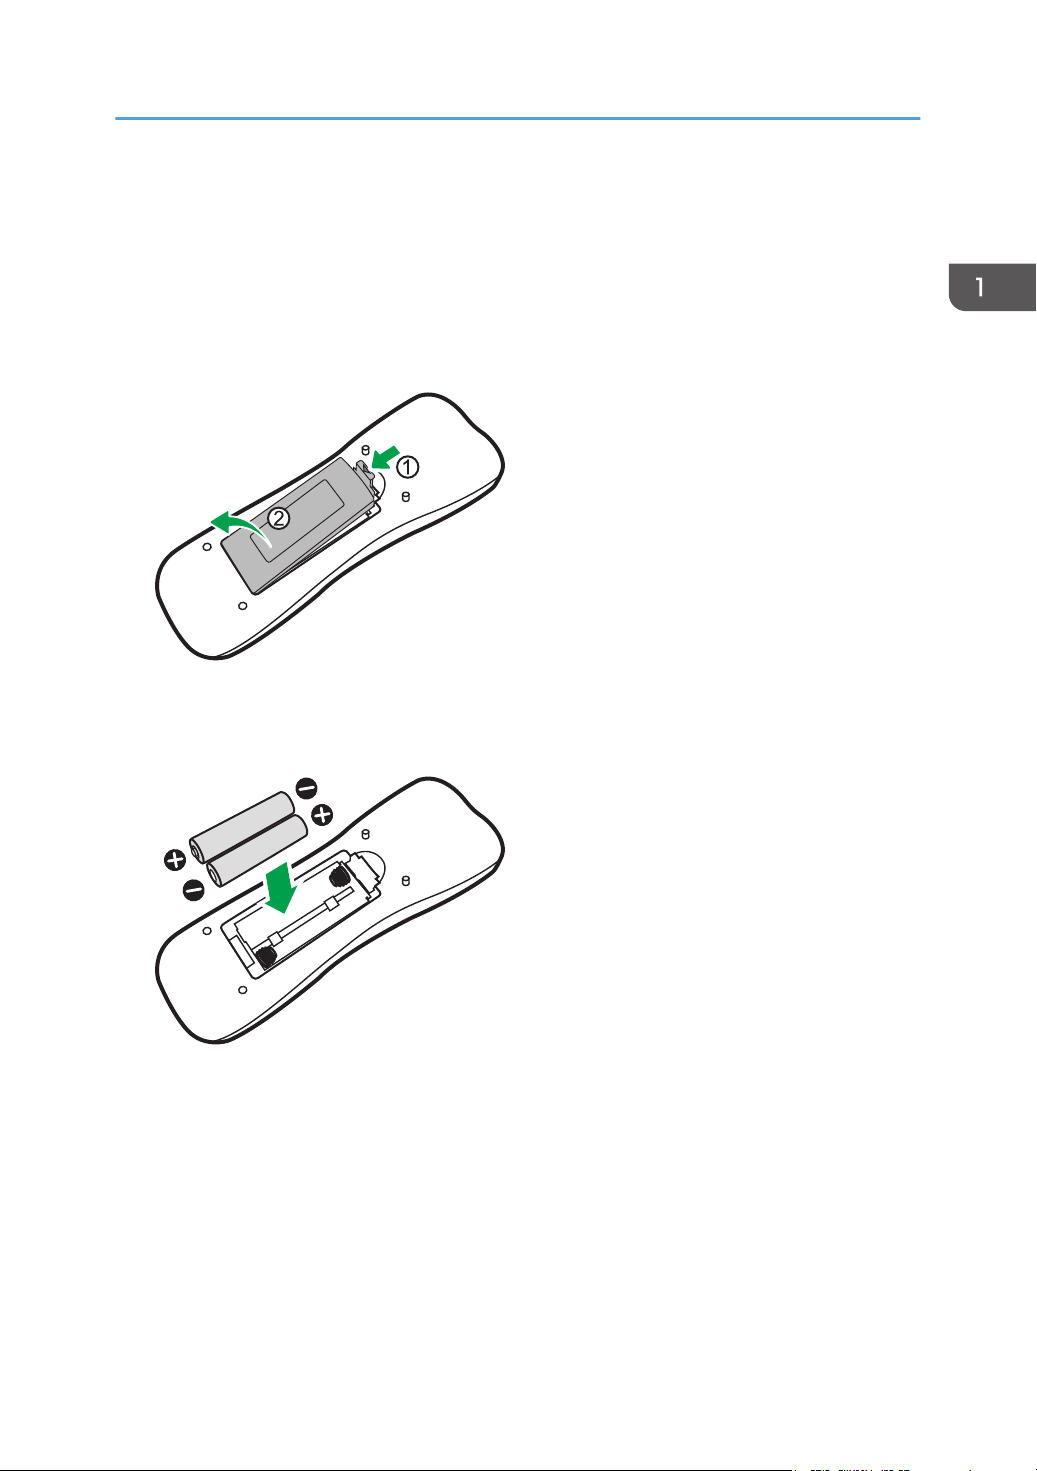
Installing the Batteries into the Remote Control
• When batteries fail to function, replace them immediately.
• There may be local restrictions on the disposal or recycling of batteries. Consult your local
regulations or waste disposal provider.
1. Open the remote control battery cover.
2. Insert the supplied batteries ensuring that the positive and negative marked battery
terminals match the (+) and (-) marks in the battery compartment.
You should replace the supplied batteries as soon as possible.
7
1. Using the Remote Control
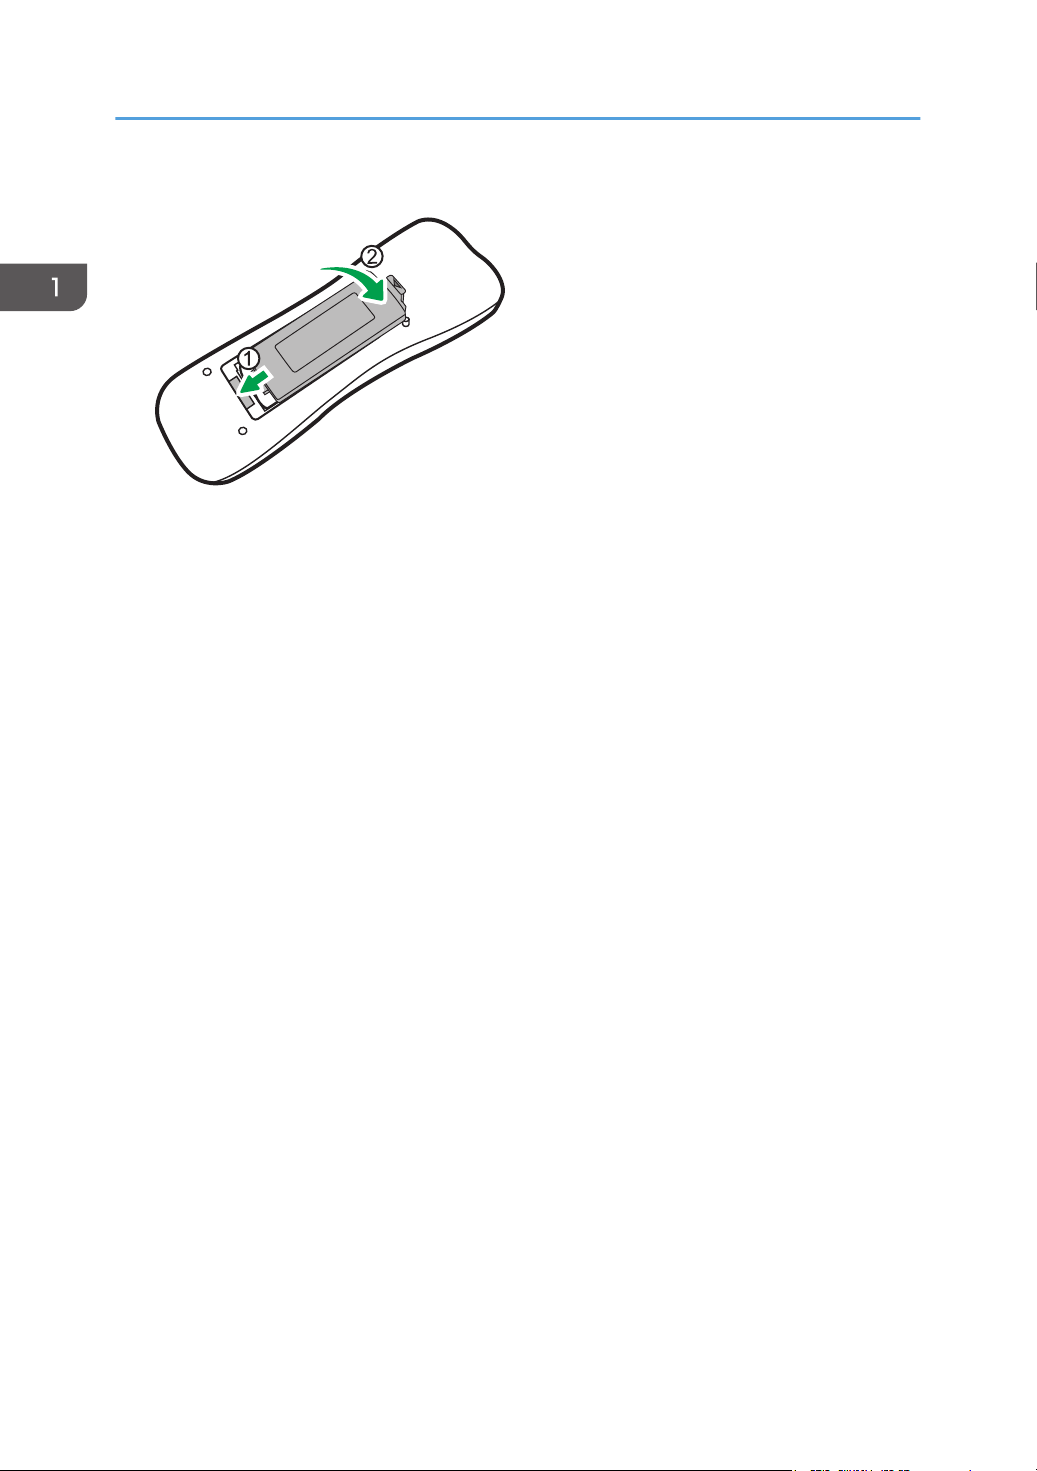
3. Refit the battery cover.
8
Removing the Batteries from the Remote Control
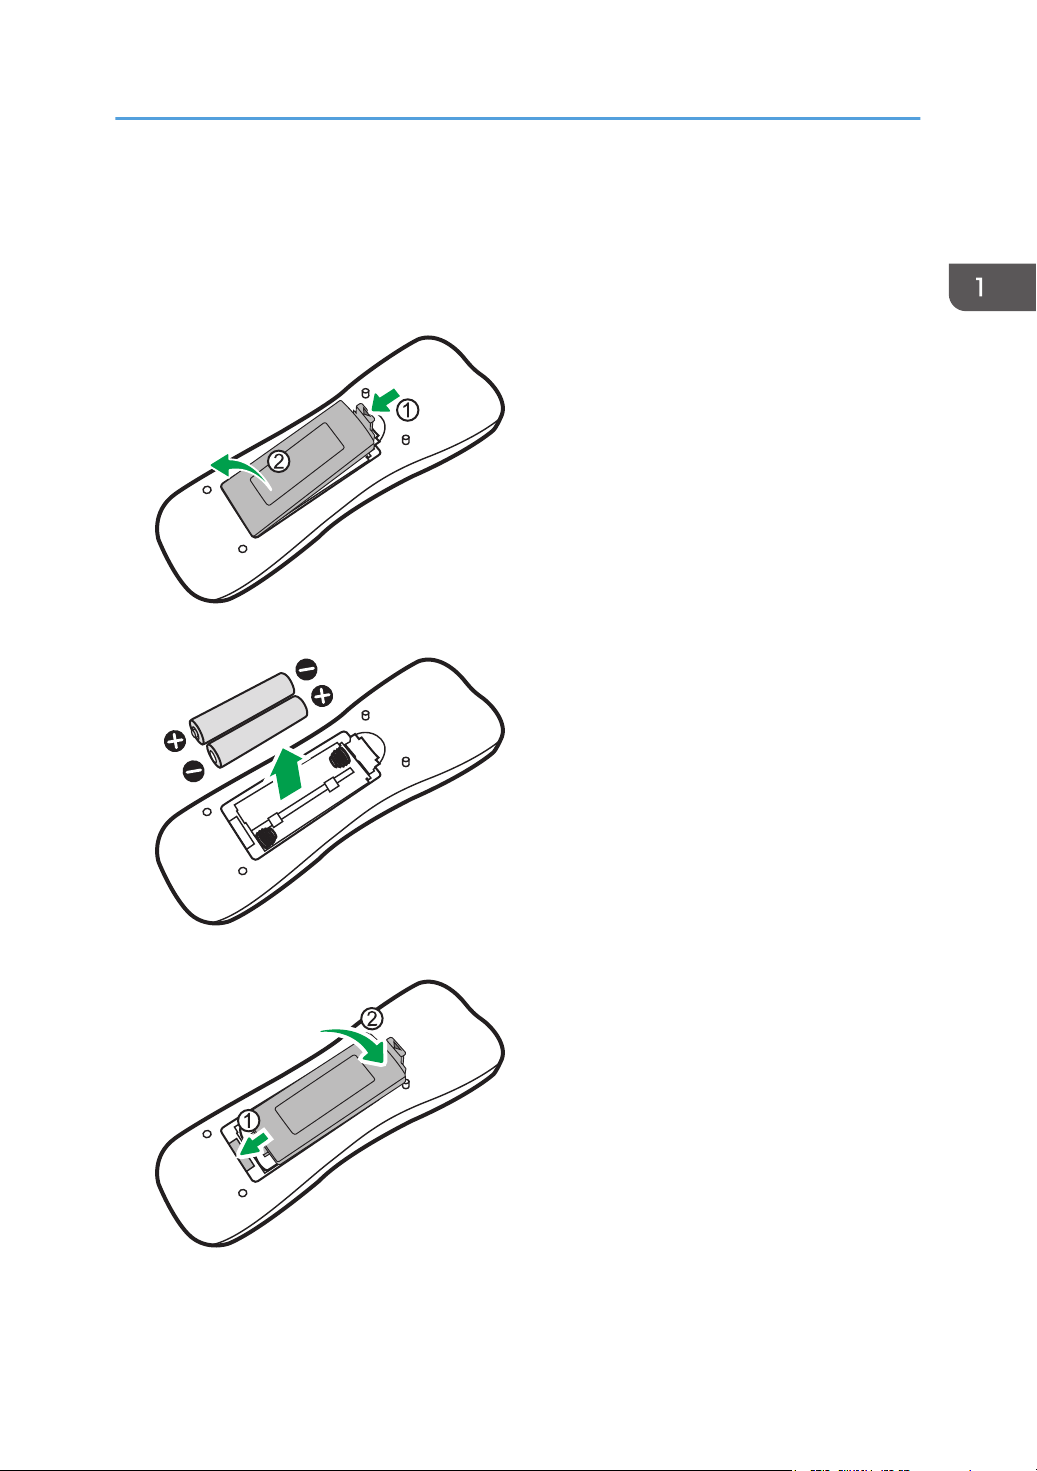
Removing the Batteries from the Remote
Control
1. Open the remote control battery cover.
2. Remove the batteries.
3. Refit the battery cover.
9
EAL010
1
45°45°
1. Using the Remote Control
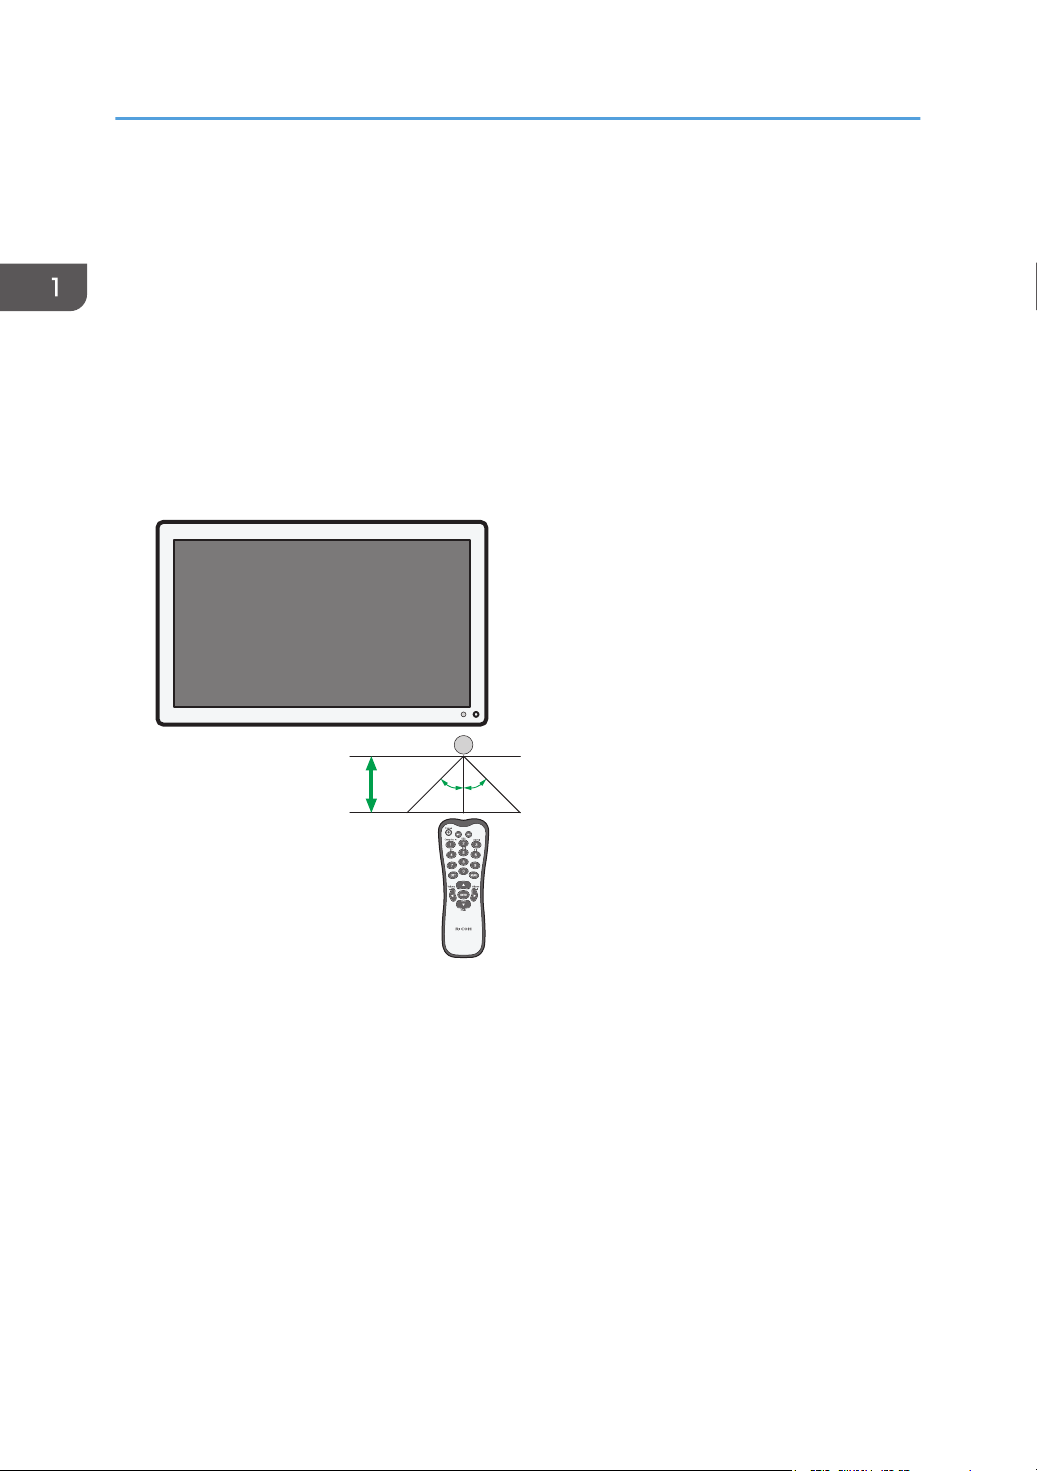
Remote Control Usage Tips
• Point and aim the top front of the remote control directly at the display’s remote control sensor
window when you press the buttons. The maximum distance for the remote control to operate
properly is 5 meters (approx. 16.4 feet) from the top front of the remote control to the remote
sensor window of the display.
• Do not let the remote control become wet or place it in humid environments (like bathrooms).
• If the display’s remote control sensor window is exposed to direct sunlight or strong light, the
remote control may not operate properly. In this situation, change the light source, readjust the
angle of the display or operate the remote control from a location closer to display’s remote
control sensor window.
10
1. Max. 5 m (16.4 feet)

2. Connection
2
1
EAL011
This chapter explains how to connect cables.
Connecting Audio/Video Signals
Pay attention to the following notes when you connect cables:
• Please turn off all devices.
• Familiarize yourself with the audio/video ports on the machine and the devices you want to use.
Be aware that incorrect connections may adversely affect picture quality or result in the picture not
being displayed.
• Do not remove cables from the ports by pulling the cable itself. Always grasp and pull the
connectors at the end of the cable.
• Ensure that all cables are fully inserted and firmly seated.
Connecting the VGA Input
1. Connect the VGA Input jack on the display to the VGA output jack on a computer using a
D-Sub (15-pin) cable.
2. Connect the computer’s audio output jack to the Audio Input (VGA) jack on the machine
using a suitable audio cable.
1. D-Sub (15-pin) cable
11
21
EAL012
2. Connection
2. Audio cable
3. Press the [VGA] button on the remote control.
To select an appropriate audio source, see page 27 "Sound Menu" for details.
• The audio cable is not supplied and should be purchased separately.
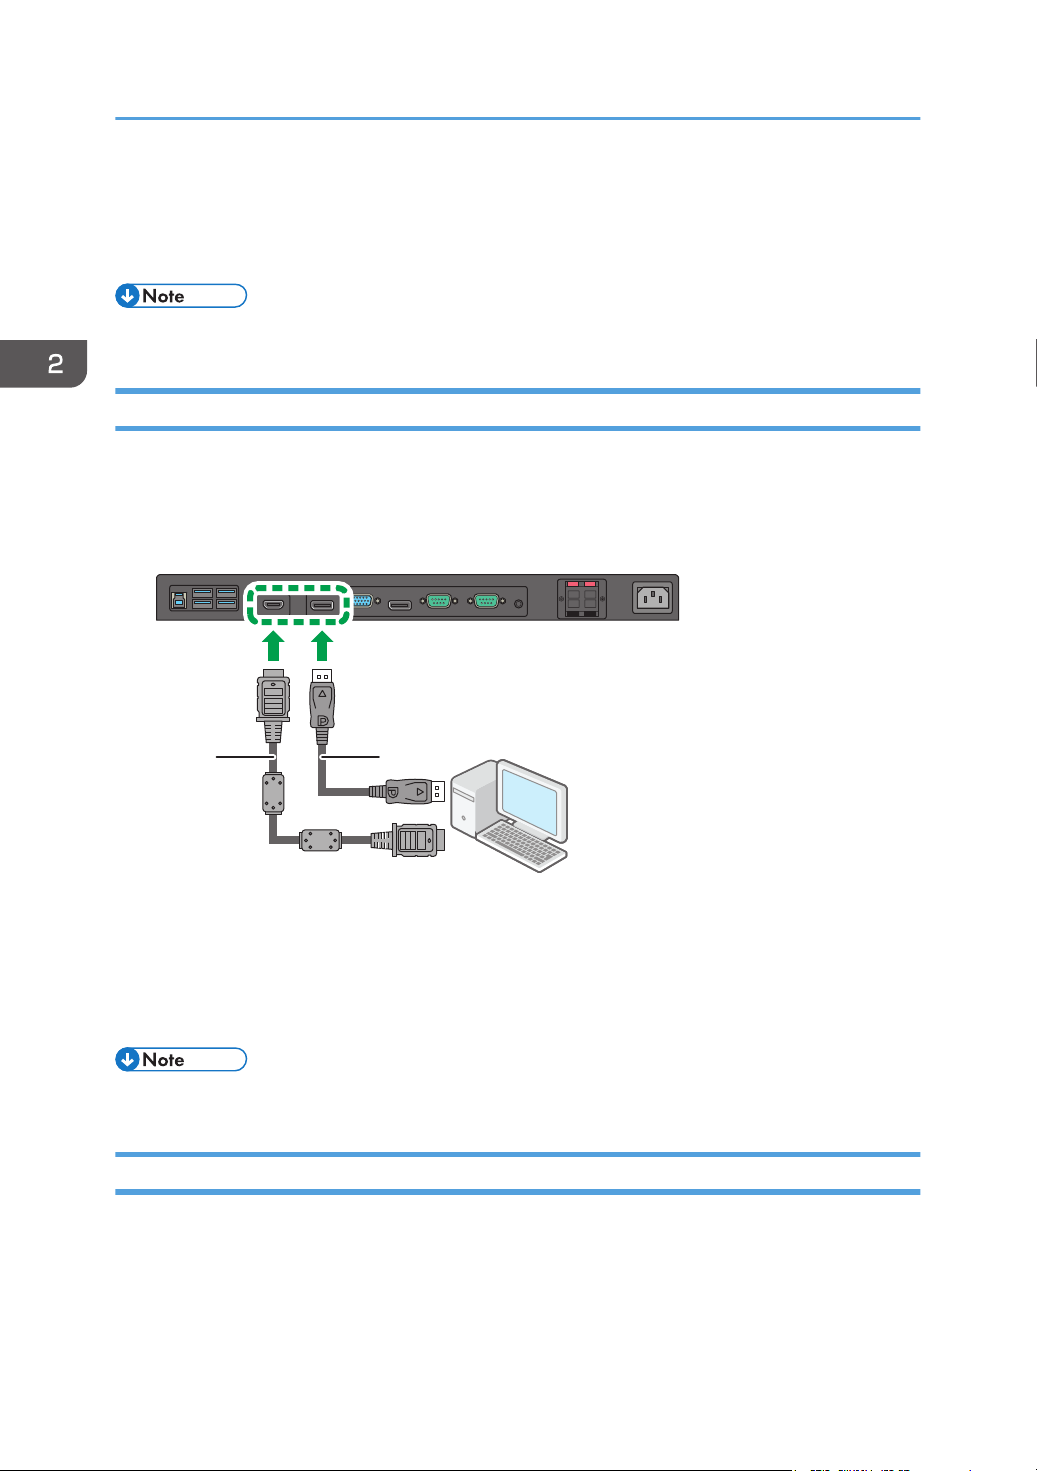
Connecting the Digital Inputs
1. Use the supplied HDMI cable to connect the HDMI output jack of a computer or A/V
device (such as a VCR or DVD player) to the HDMI Input jack on the machine. If the device
has a DisplayPort output jack, connect it to the DisplayPort Input jack on the machine
using a DisplayPort cable.
1. Supplied HDMI cable
2. DisplayPort cable
2. Press the [HDMI] or [DP] button on the remote control.
To select an appropriate audio source, see page 27 "Sound Menu" for details.
• The DisplayPort cable is not supplied and should be purchased separately.
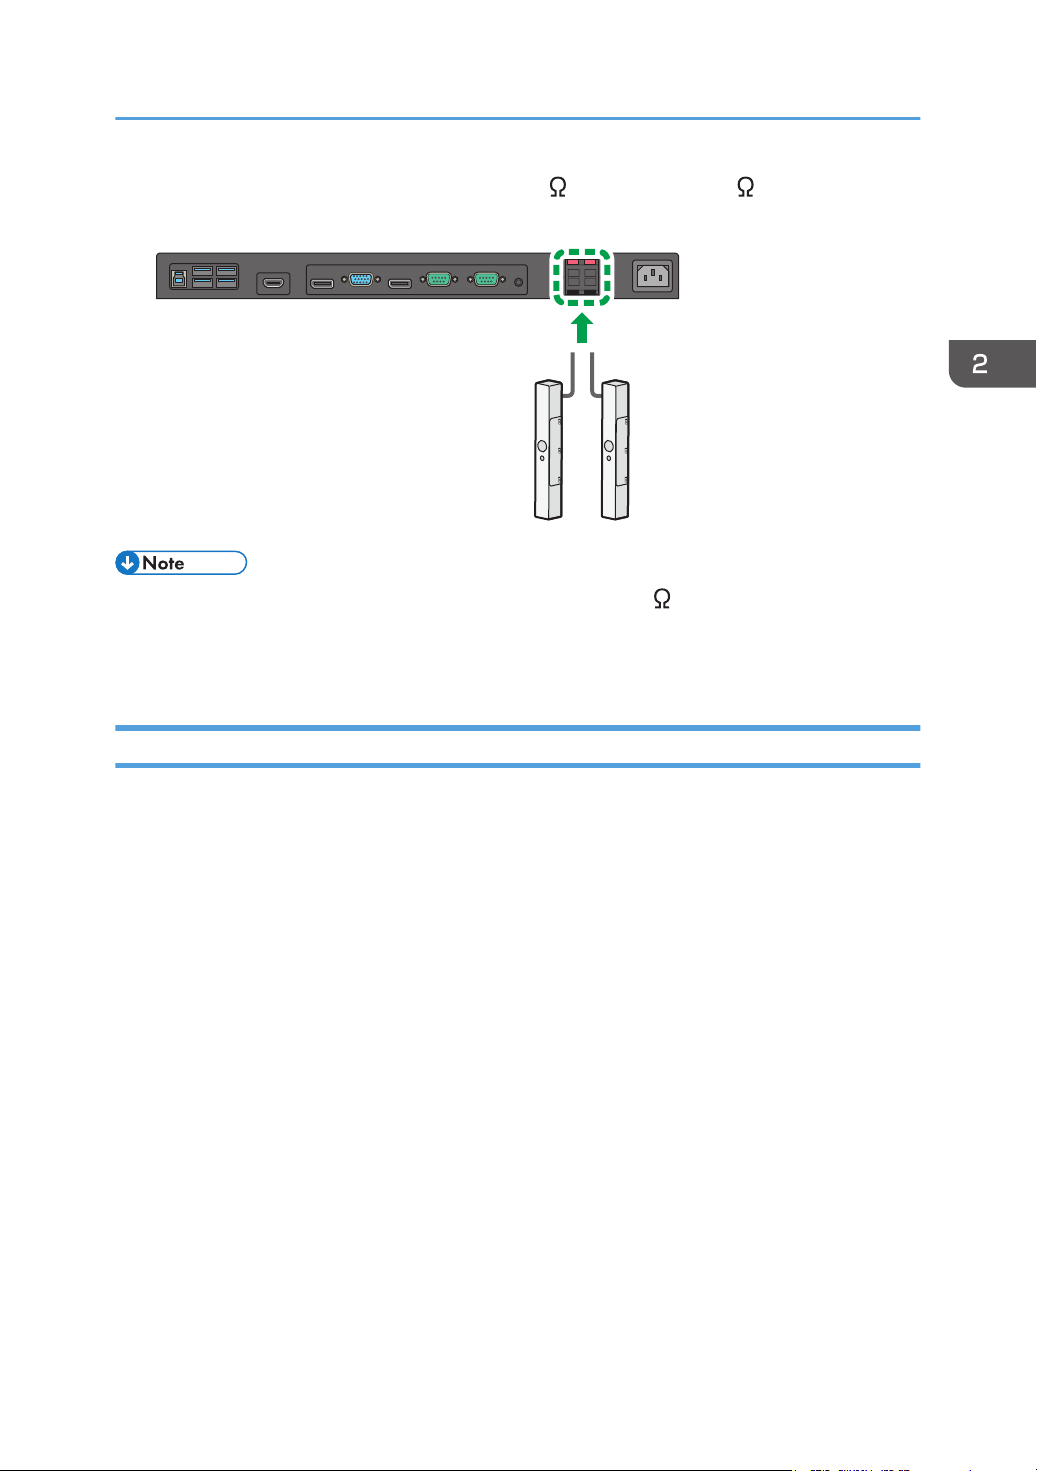
Connecting External Speakers
The built-in amplifier on the machine allows you to output audio signals through external speakers.
12
EAL013
Connecting Audio/Video Signals
1. Connect external speakers to the Speaker R (8 ) 12W/Speaker L (8 ) 12W jacks on the
machine.
• When connecting external speakers, use speakers that support 8 output.
• You can use the remote control or the control panel on the machine to adjust the volume.
• When using external speakers, set Speaker in the Sound menu to [External].
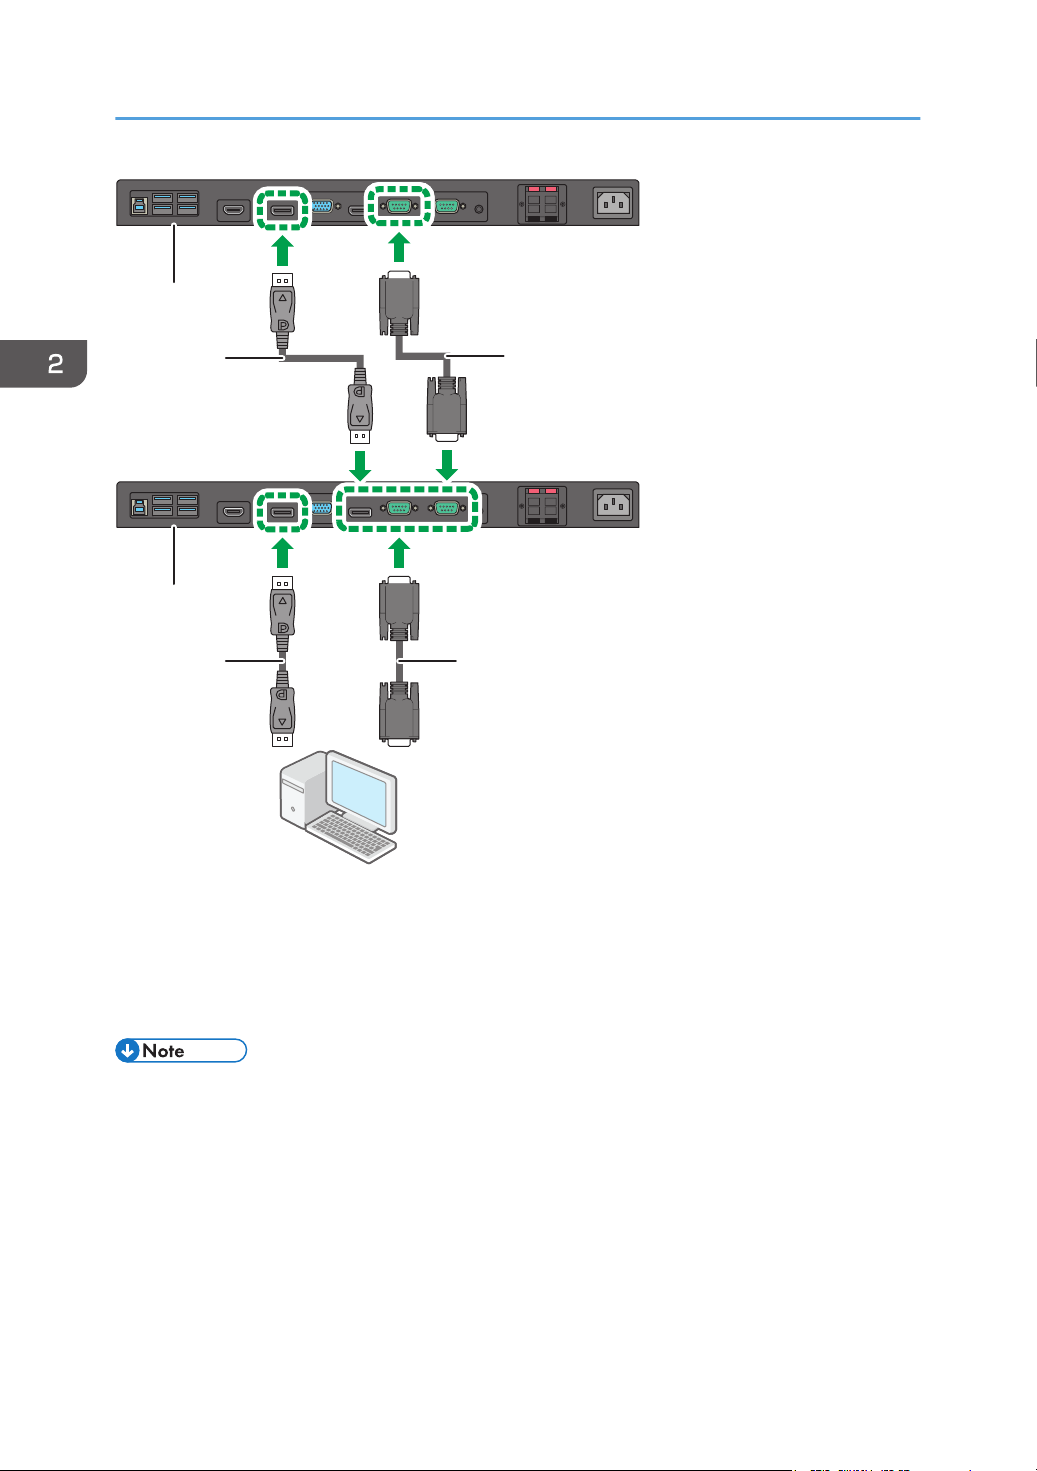
Connecting Multiple Displays
You can connect multiple displays serially (daisy chain) to a computer for management. The number of
displays you can connect serially depends on the resolution of the input signal you use.
13
3
2
EAL014
1
4
32
2. Connection
14
1. Additional display
2. DisplayPort cable
3. RS-232C cable
4. The first display
• The RS-232C cable and DisplayPort cable are not supplied and should be purchased separately.
• This RS-232C daisy chain application requires an RS-232C port equipped computer.
• Use RS-232C serial cross cables for daisy chain application.
• The video signals input to the DisplayPort Input jack of the additional display are output from the
DisplayPort Output jack of the first display.
21
EAL015
Connecting Audio/Video Signals
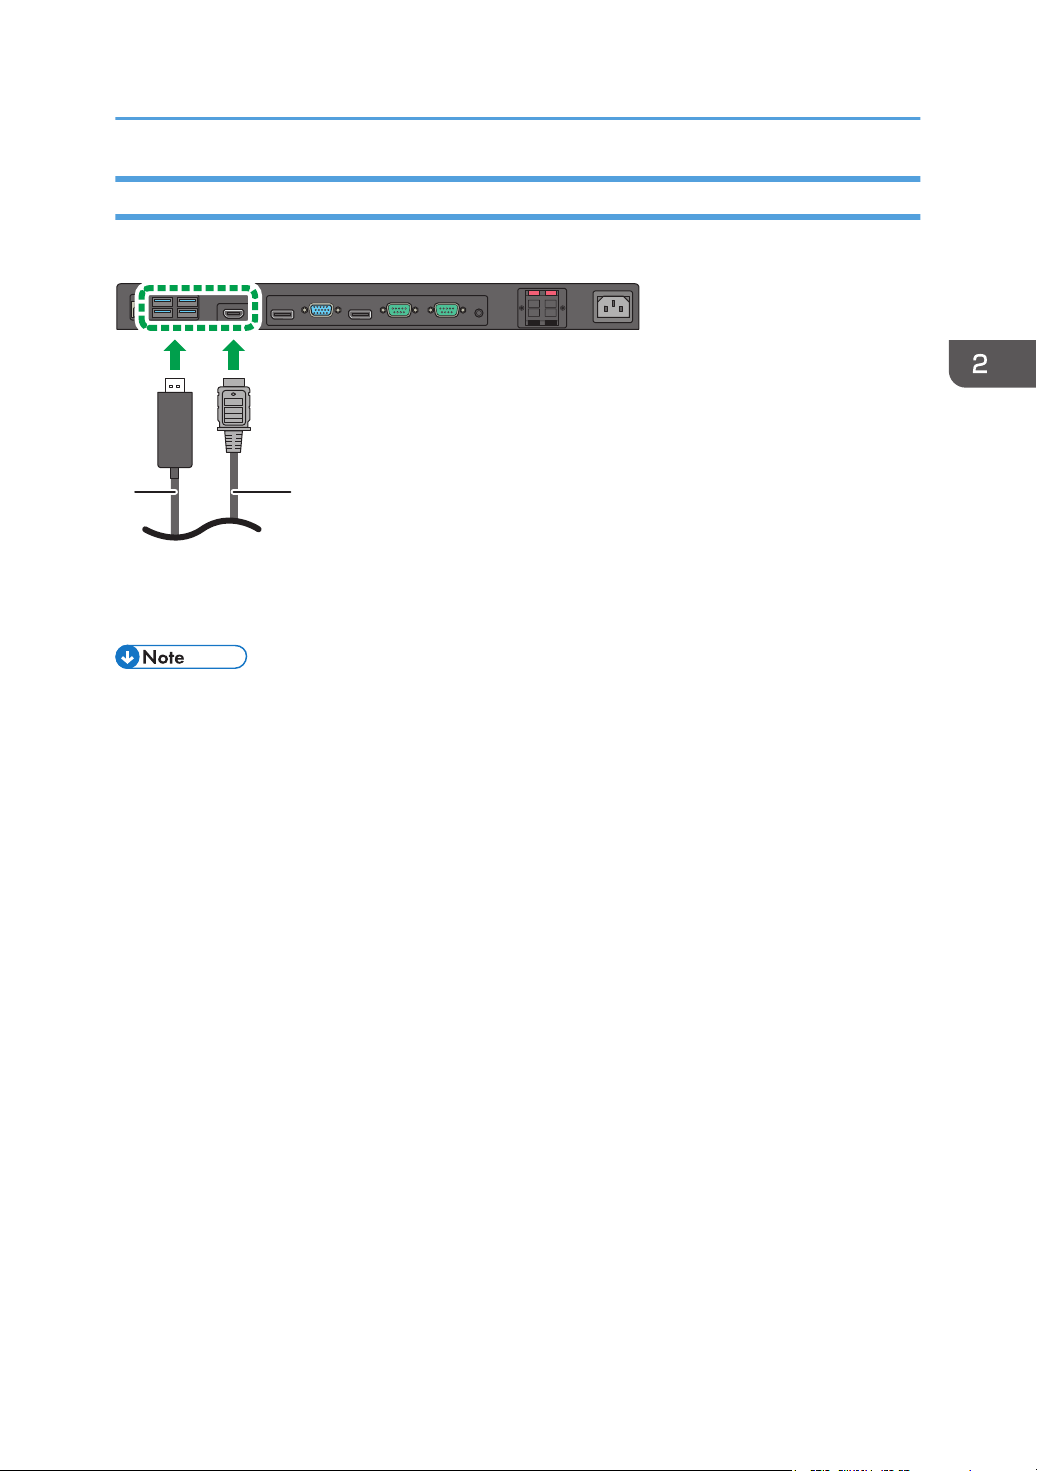
Connecting with a USB Cable
Connect the machine and an external device with a USB cable to supply power to the device.
1. USB cable
2. External device
• For details about the name and description of each USB port, see “Input/Output Terminals”, Read
This First.
15

2. Connection
16
 Loading...