

Page 1
Getting Started
1
Entering Text
2
Operating Instructions
About This Machine
Appendix
3
Read this manual carefully before you use this machine and keep it handy for future reference. For safe and correct use, be sure to read the
Safety Information in this manual before using the machine.
Page 2

Introduction
This manual contains detailed instructions and notes on the operation and use of this machine. For your
safety and benefit, read this manual carefully before using the machine. Keep this manual in a handy
place for quick reference.
Important
Contents of this manual are subject to change without prior notice. In no event will the company be liable for direct, indirect, special, incidental, or consequential damages as a result of handling or operating the machine.
Notes:
Some illustrations in this manual might be slightly different from the machine.
Certain options might not be available in some countries. For details, please contact your local dealer.
Depending on which country you are in, certain units may be optional. For details, please contact your
local dealer.
Two kinds of size notation are employed in this manual. With this machine refer to the metric version.
For good copy quality, the supplier recommends that you use genuine ink from the supplier.
The supplier shall not be responsible for any damage or expense that might result from the use of parts
other than genuine parts from the supplier with your office products.
Power Source
220 - 240V, 50/60Hz, 2A or less
Please be sure to connect the power cord to a power source as above. For details about power source,
see Troubleshooting.
Page 3

Manuals for This Machine
Refer to the manuals that are relevant to what you want to do with the machine.
Important
❒ Media differ according to manual.
❒ The printed and electronic versions of a manual have the same contents.
❒ Adobe Acrobat Reader/Adobe Reader must be installed in order to view the
manuals as PDF files.
❒ Depending on which country you are in, there may also be html manuals. To
view these manuals, a Web browser must be installed.
❖ About This Machine
Be sure to read the Safety Information in this manual before using the machine.
This manual provides an introduction to the functions of the machine. It also
explains the control panel, preparation procedures for using the machine,
how to enter text, and how to install the CD-ROMs provided.
❖ Troubleshooting
Provides a guide to solving common problems, and explains how to replace
paper, print cartridges, and other consumables.
❖ Copy Reference
Explains Copier functions and operations. Also refer to this manual for explanations on how to place originals.
❖ Facsimile Reference
Explains Facsimile functions and operations.
❖ Printer Reference
Explains Printer functions and operations.
❖ Scanner Reference
Explains Scanner functions and operations.
❖ Network Guide
Explains how to configure and operate the machine in a network environment, and use the software provided.
❖ General Settings Guide
Explains User Tools settings, and Address Book procedures such as registering fax numbers, e-mail addresses, and user codes. Also refer to this manual
for explanations on how to connect the machine.
i
Page 4

❖ Security Reference
This manual is for administrators of the machine. It explains security functions that you can use to prevent unauthorized use of the machine, data tampering, or information leakage. For enhanced security, we recommend that
you first make the following settings:
• Install the Device Certificate.
• Enable SSL (Secure Sockets Layer) Encryption.
• Change the user name and password of the administrator using Web Image Monitor.
For details, see “Setting Up the Machine”, Security Reference.
Be sure to read this manual when setting the enhanced security functions, or
user and administrator authentication.
❖ PostScript 3 Supplement
Explains how to set up and use PostScript 3.
❖ UNIX Supplement
For “UNIX Supplement”, please visit our Web site or consult an authorized
dealer.
This manual includes descriptions of functions and settings that might not be
available on this machine.
❖ Other manuals
•Quick Guide
• Manuals for DeskTopBinder Lite
• DeskTopBinder Lite Setup Guide
• DeskTopBinder Introduction Guide
•Auto Document Link Guide
Note
❒ Manuals provided are specific to machine types.
❒ The following software products are referred to using general names:
Product name General name
*1
DeskTopBinder Lite and DeskTopBinder Professional
*1
ScanRouter EX Professional
*1
prise
*1
Optional
and ScanRouter EX Enter-
DeskTopBinder
the ScanRouter delivery software
ii
Page 5
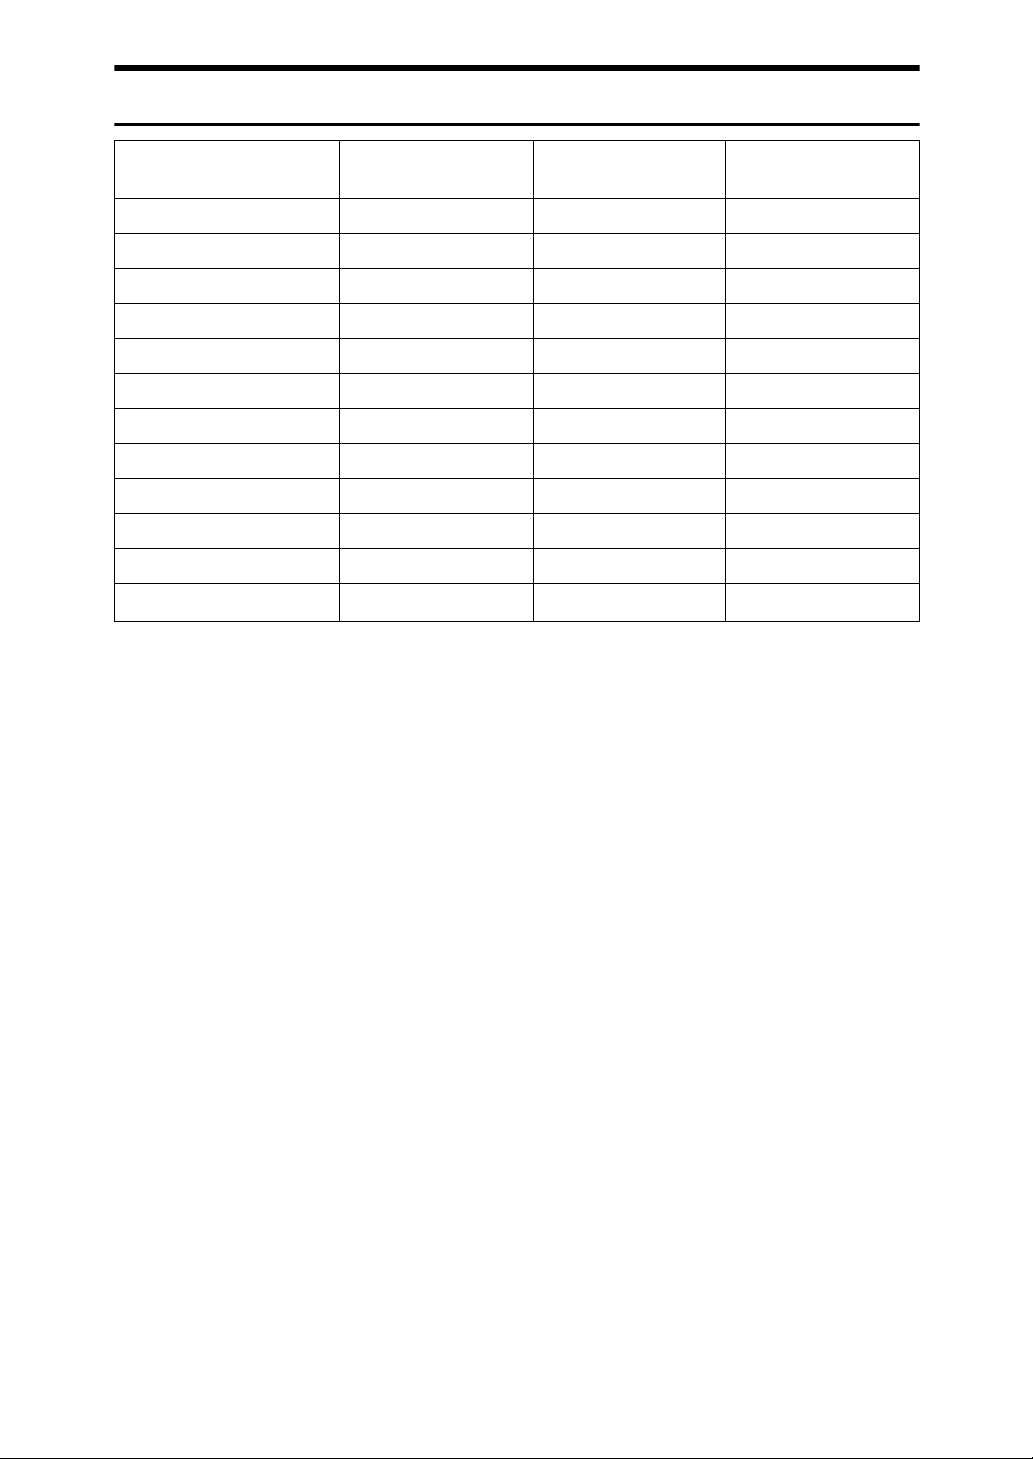
Manuals List
Manual Name Printed Manuals
Provided
About This Machine No No Yes
Troubleshooting No No Yes
Copy Reference No No Yes
Facsimile Reference No No Yes
Printer Reference No No Yes
Scanner Reference No No Yes
Network Guide No No Yes
General Settings Guide No No Yes
Security Reference No No Yes
PostScript 3 Supplement No No Yes
UNIX Supplement No No Yes
Quick Guide
*1
Only the English version of the Quick Guide is provided as a printed manual. Ver-
Yes
*1
HTML Manuals
Provided
No Yes
PDF Manuals
Provided
sions in other languages are provided as PDF manuals.
iii
Page 6
What You Can Do with This Machine
This section introduces the features of this machine.
Note
❒ For details about options, see “Options”.
Reference
p.16 “Options”
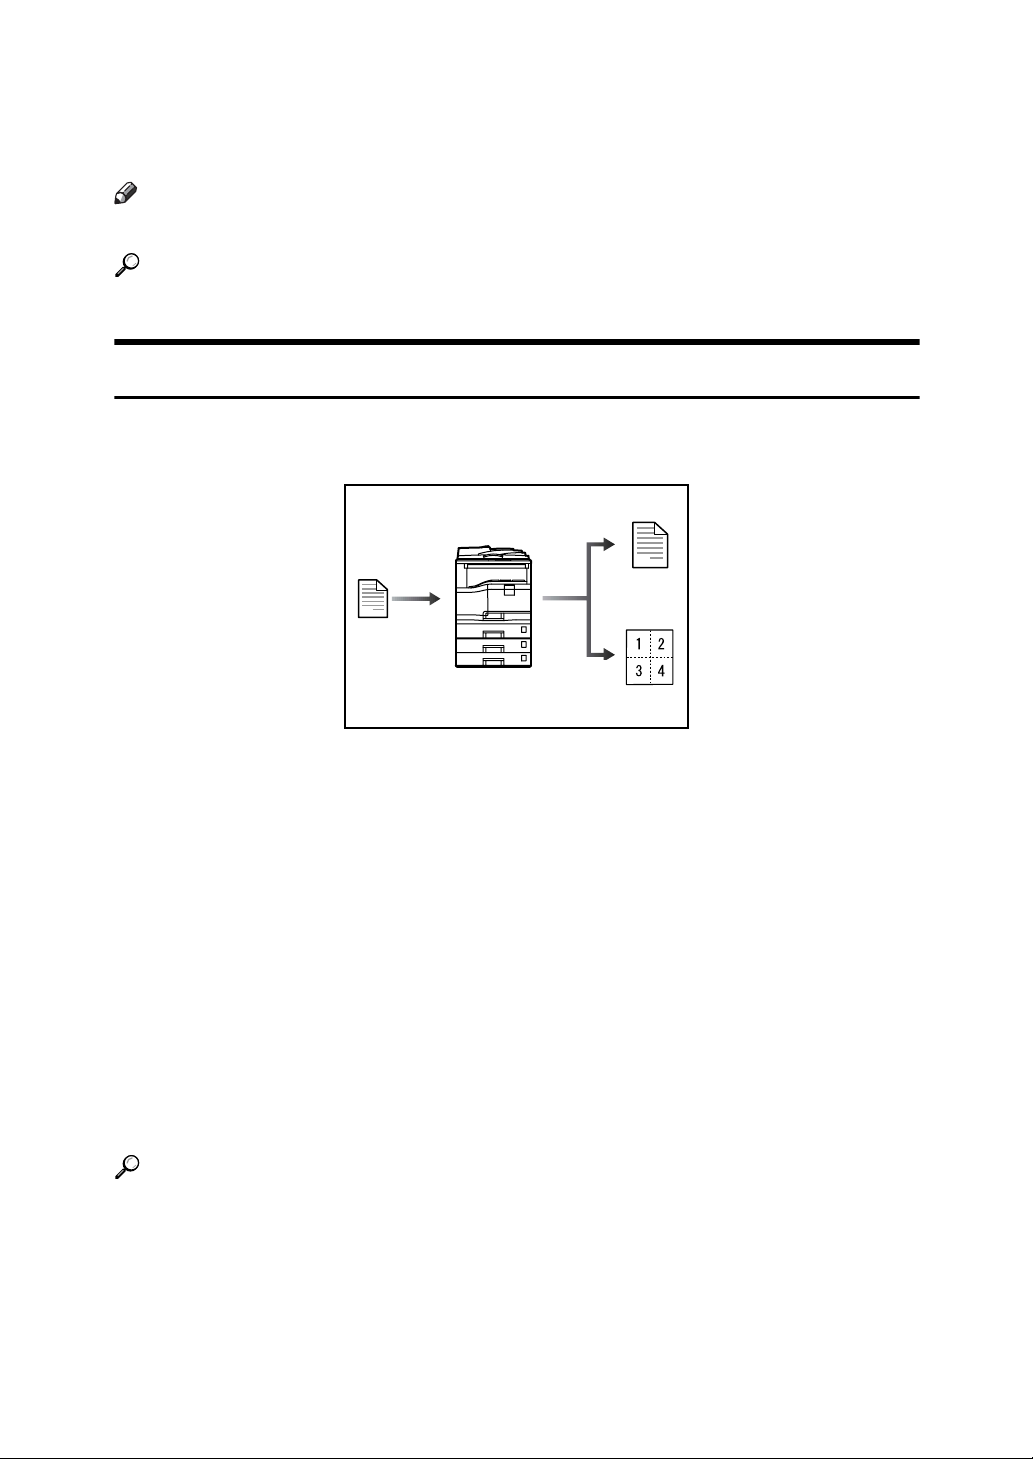
Using This Machine as a Copier
You can make copies of originals.
BDU001S
• You can make copies in full colour. You can switch the colour copy mode depending on the type of originals used and the desired finish.
• You can adjust colour tones and image qualities of copies.
• You can reduce or enlarge the copy image. With Auto Reduce/Enlarge, the
machine automatically detects the original size, and then selects an appropriate reproduction ratio based on the paper size you select. If the orientation in
which your original is placed is different from that of the paper you are copying onto, the machine rotates the original image by 90 degrees and fits it on
the copy paper.
• The Duplex (optional) and Combine functions allow you to save on paper by
copying multiple pages onto single sheets.
•
You can copy onto various types of paper such as envelopes and OHP transparencies.
• You can sort copies.
Reference
See Copy Reference.
iv
Page 7
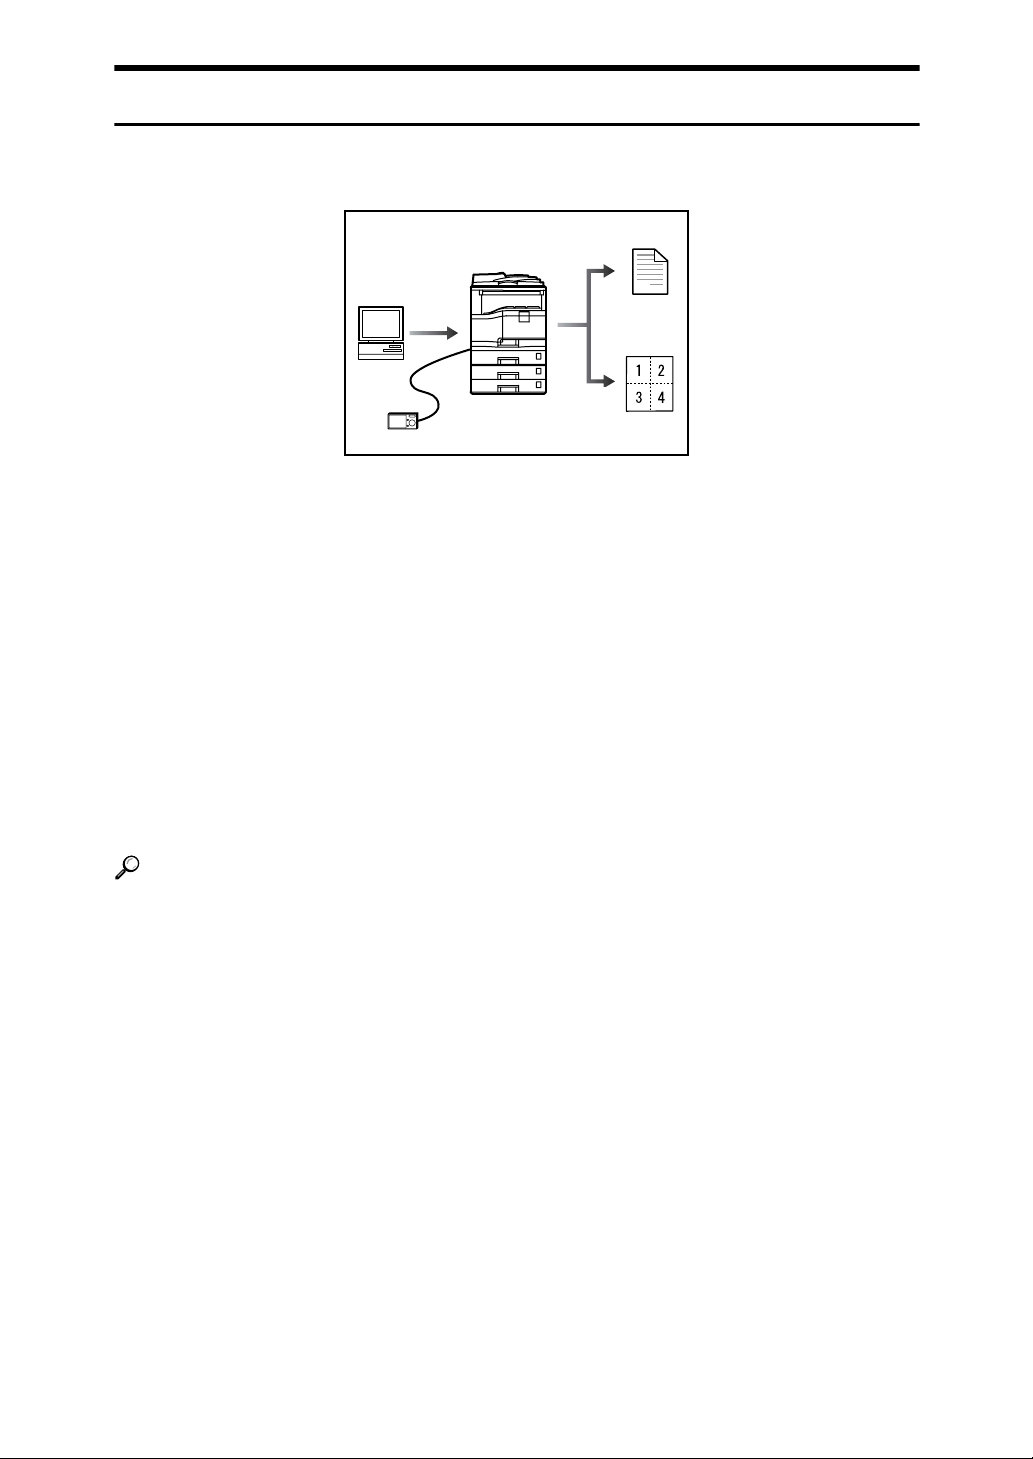
Using This Machine as a Printer
You can print documents created in applications.
BDU002S
• This machine supports network and local connections.
• You can print on glossy paper.
• The optional PostScript 3 unit allows you to send PDF files directly to the machine for printing, without having to open a PDF application.
• The optional Function Upgrade Option allows you to print or delete Sample
Print, Locked Print, Hold Print, and Stored Print jobs that are stored on this
machine's hard disk.
• The optional Function Upgrade Option allows you to collate printed paper.
• With the optional Function Upgrade Option, USB host interface board, and
PictBridge card installed, you can connect a PictBridge-compatible digital
camera to this machine using a USB cable. This allows you to print the photographs stored on the camera using the camera's own interface.
Reference
See Printer Reference.
v
Page 8
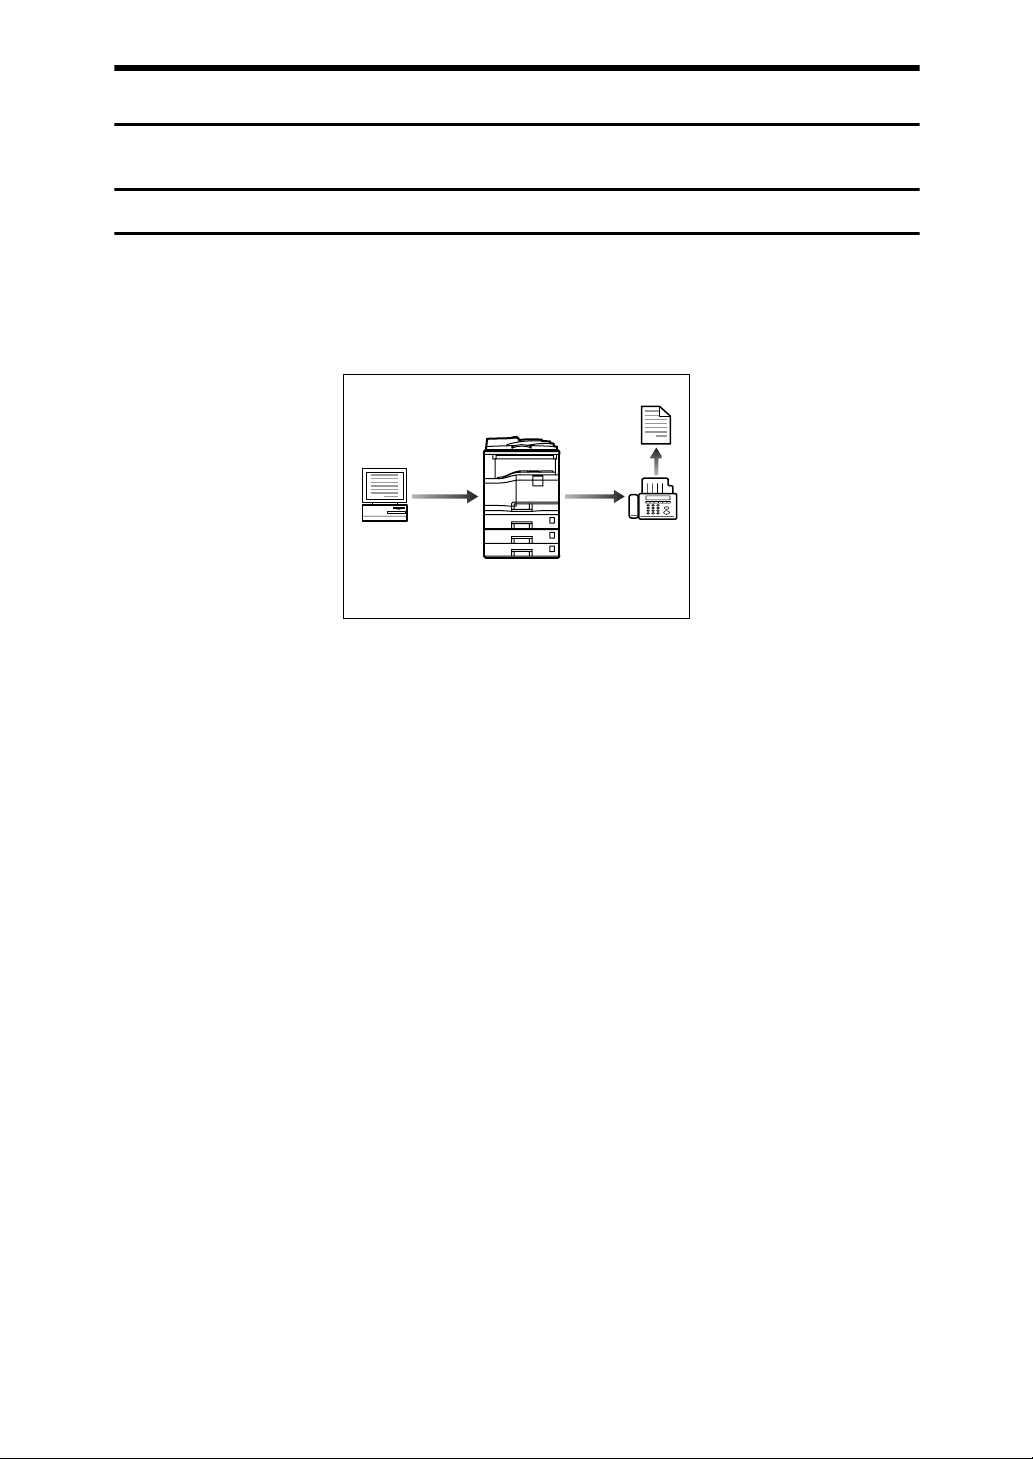
Paperless Fax Transmission
You can send a file by fax without printing it.
Transmission
You can send a fax from your computer over the network (Ethernet or wireless
LAN) to this machine, which then forwards the fax via its telephone connection
(LAN-Fax).
AMA043S
• To send a fax, print from the Windows application you are working with, select LAN-Fax as the printer, and then specify the destination.
• You can also check the sent image data.
• For details about machine's settings, see “Network Settings”, General Settings
Guide.
• For details about how to use the function, see “Fax via Computer”, Facsimile
Reference.
vi
Page 9
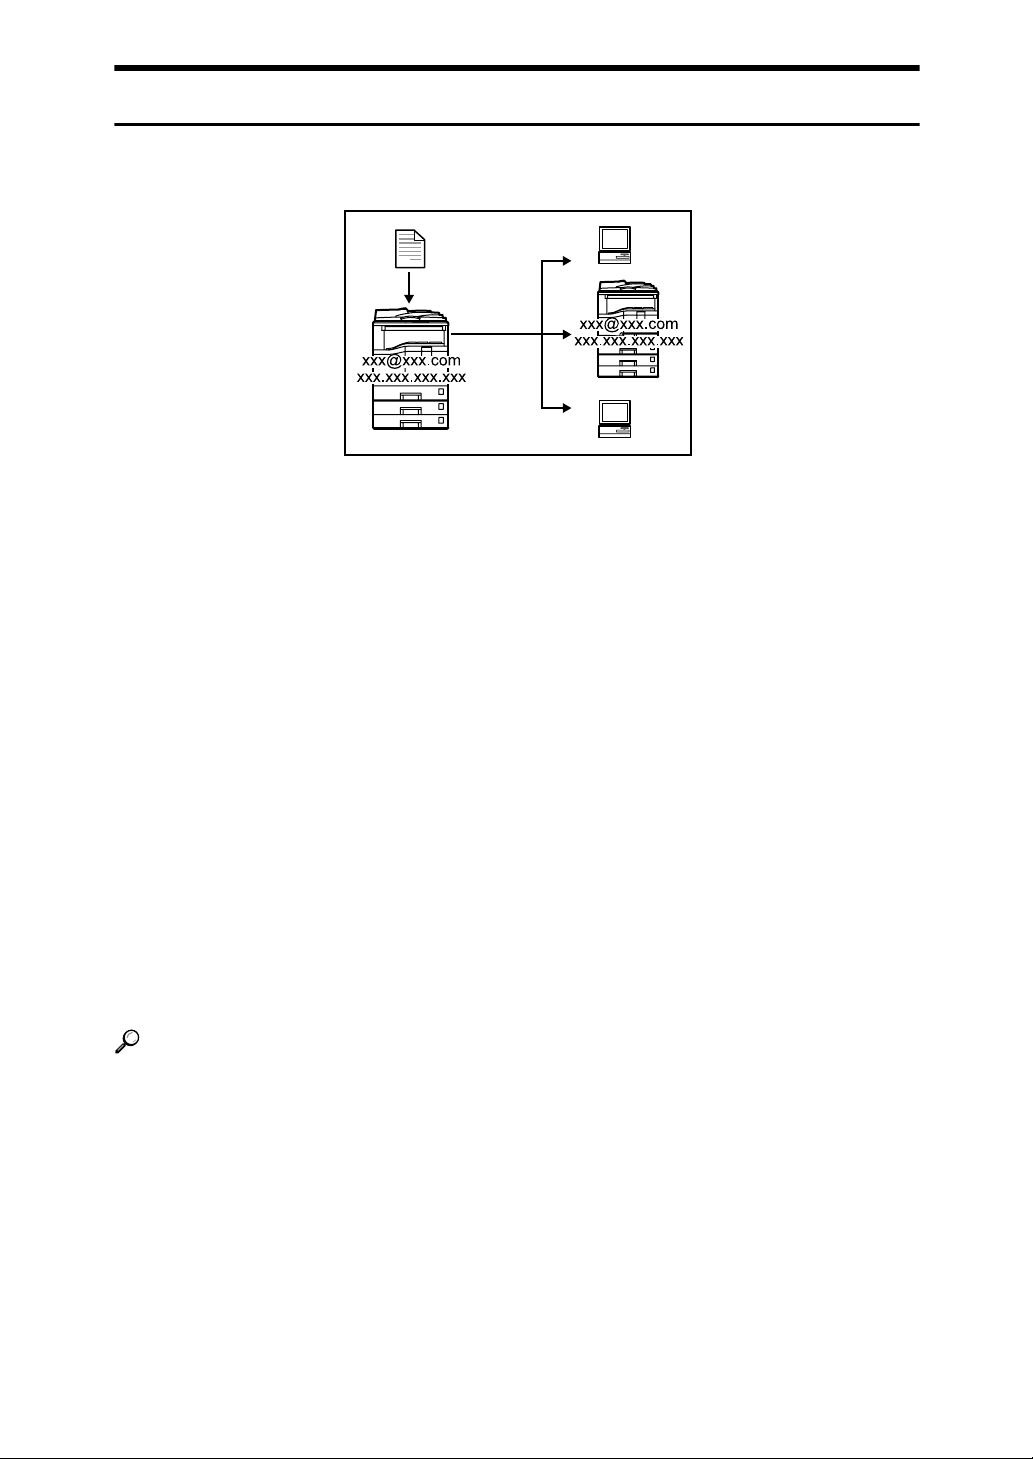
Fax Transmission and Reception Over the Internet
This machine supports Internet Fax and IP-Fax.
ALZ006S
❖ Internet Fax
This machine converts scanned document images to e-mail format, and transmits and receives this data over the Internet.
• To send a document, specify an e-mail address instead of dialing the des-
tination telephone number (Internet Fax Transmission).
• This machine can receive e-mail messages via Internet Fax or from com-
puters (Internet Fax Reception).
• Internet Fax compatible machines and computers that have e-mail ad-
dresses can receive e-mail messages via Internet Fax.
❖ IP-Fax
The IP-Fax function sends or receives documents between two facsimiles directly via a TCP/IP network.
• To send a document, specify an IP address or host name instead of a fax
number (IP-Fax Transmission).
• This machine can receive documents sent via Internet Fax (IP-Fax Reception).
• Using a VoIP gateway, this machine can send to G3 facsimiles connected
to the public switched telephone network (PSTN).
Reference
For details about settings, see “Network Settings”, General Settings Guide.
For details about how to transmit and receive documents over the Internet,
see “Transmission” and “Reception”, Facsimile Reference.
vii
Page 10
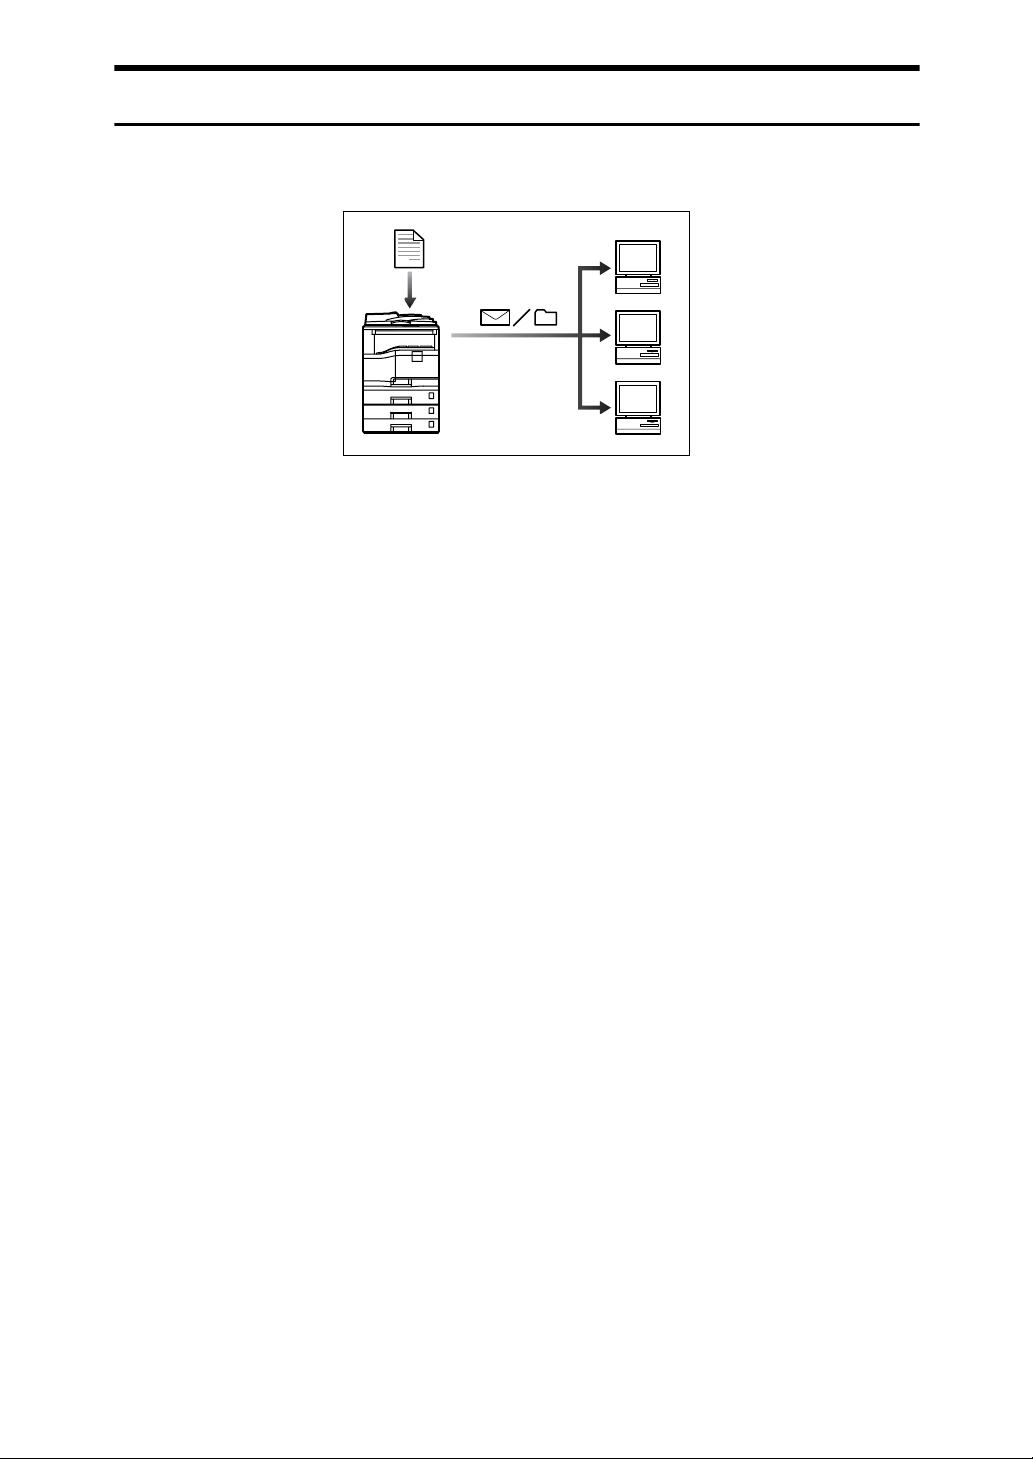
Using the Scanner in a Network Environment
You can use a scanner over the network.
AMA044S
• You can send scan files to a specified destination using e-mail (Sending scan
files by e-mail). See “Sending Scan Files by E-mail”, Scanner Reference.
• You can send scan files directly to folders (Sending scan files by Scan to Folder).
See “Sending Scan Files by Scan to Folder”, Scanner Reference.
• You can use this machine as a delivery scanner for the ScanRouter delivery
software (Network delivery scanner). You can save scan files in the delivery
server or send them to a folder in a computer on the same network. For details
about the machine's settings, see “Network Settings”, General Settings Guide.
For details about how to use the function, see “Delivering Scan Files”, Scanner Reference.
viii
Page 11
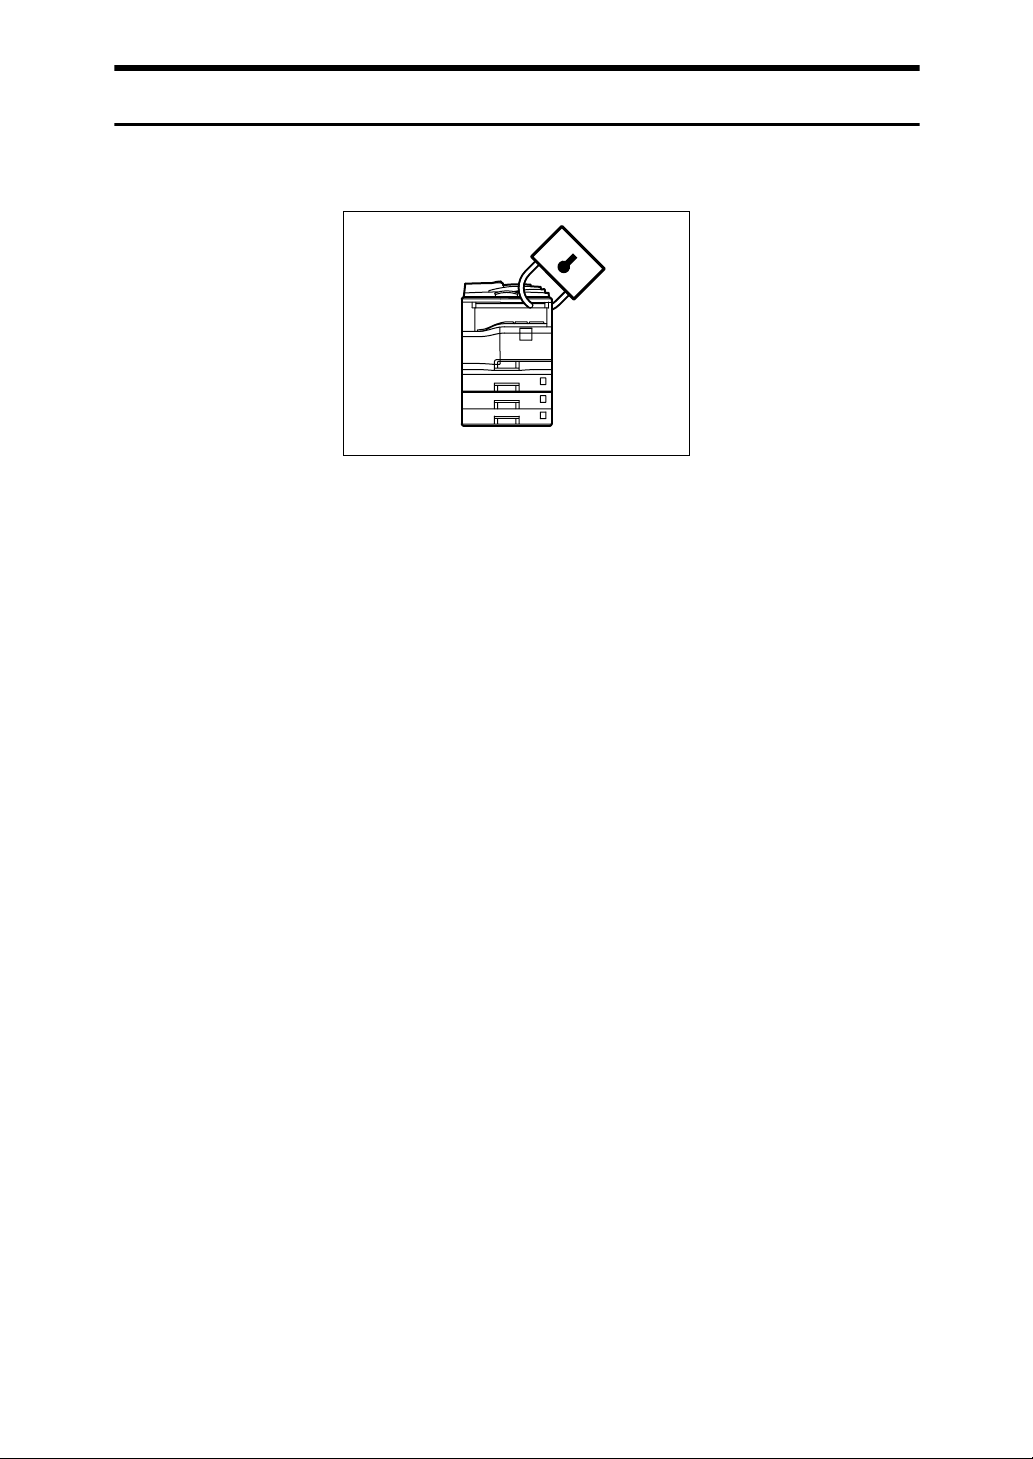
Administrating the Machine (Security Functions)
You can prevent information leakage by managing the machine.
AMA045S
• You can control the use of the machine, as well as prevent machine settings
from being changed without authorization. See Security Reference.
• By setting passwords, you can prevent unauthorized access via the network.
See Security Reference.
• You can erase the data on the hard disk to prevent the information from leaking out. See the manual for the DataOverWriteSecurity Unit (optional) and
Security Reference.
ix
Page 12
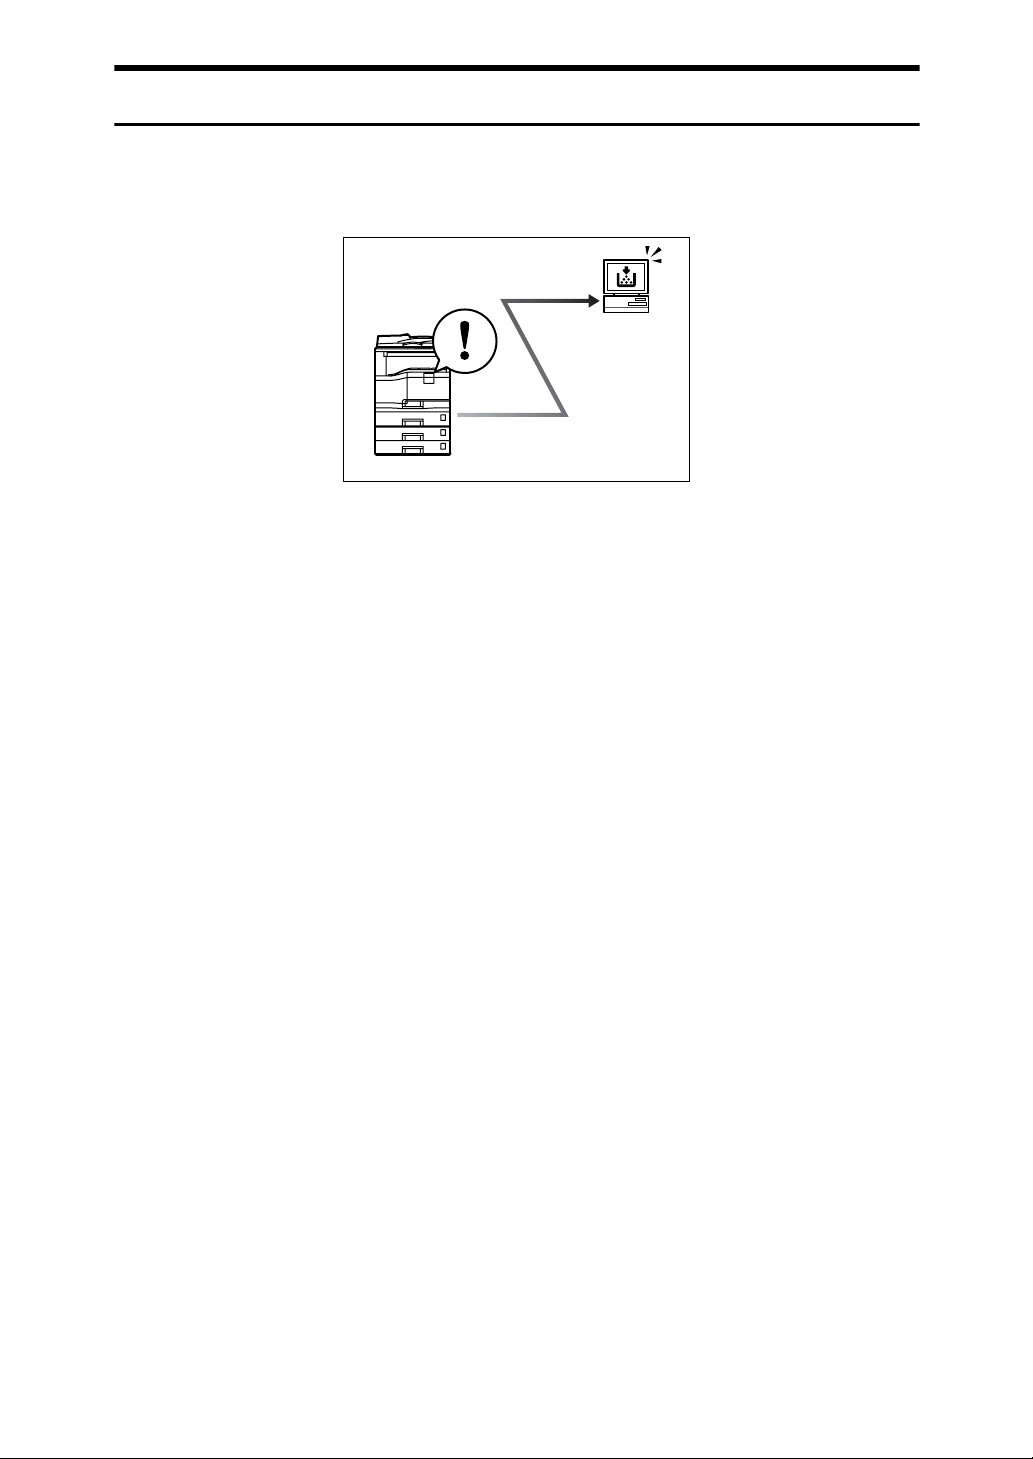
Monitoring the Machine Via Computer
You can change the machine's settings and monitor its status from a connected
computer.
AMA046S
• Web Image Monitor lets you configure and operate the machine using a Web
browser on a computer. You can also install SmartDeviceMonitor for Admin
on a computer to configure and operate the machine.
• Using Web Image Monitor, you can register information in the address book,
specify the machine's settings, and check the machine's status with ease.
• Using Web Image Monitor, you can check and specify the initial settings (system settings, printer features, network settings, security settings/certificate
management, and E-mail Notification), control print jobs, display the print
job journal, and protect the data in the machine using authentication.
• You can also use SmartDeviceMonitor for Admin to register information in
the address book.
x
Page 13
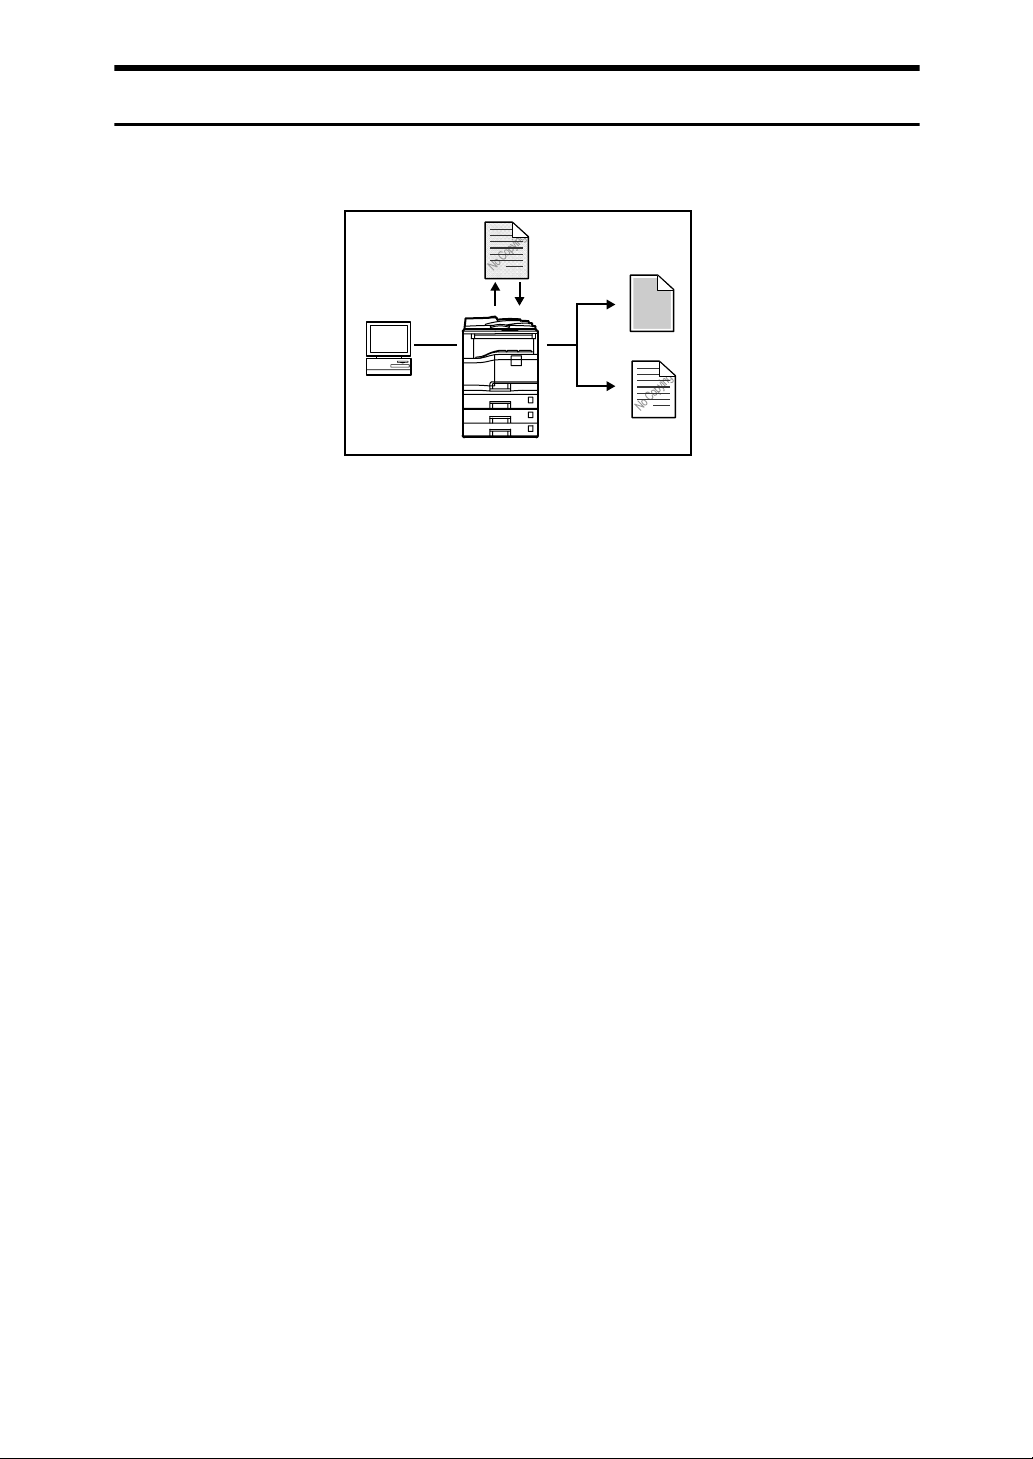
Preventing an Unauthorized Copy
You can print embedded pattern on paper to prevent them from being copied.
AMA001S
• Using the printer driver, you can embed a pattern in the printed document. If
the document is copied on a machine with the Copy Data Security Unit (optional), protected pages are grayed out in the copy, preventing confidential
information from being copied. Protected fax messages are grayed out before
being transmitted or stored. If a document protected by unauthorized copy
guard is copied on a machine that is equipped with the Copy Data Security
Unit, the machine beeps to notify users that unauthorized copying is being attempted. If the document is copied on a machine without the Copy Data Security Unit, the hidden text becomes conspicuous in the copy, showing that
the copy is unauthorized.
•Using the printer driver, you can embed text in the printed document for unauthorized copy prevention. If the document is copied, scanned, or stored in
a Document Server by a copier or multifunction printer, the embedded text
appears conspicuous in the copy, discouraging such unauthorized copying.
xi
Page 14

TABLE OF CONTENTS
Manuals for This Machine ......................................................................................i
Manuals List .............................................................................................................. iii
What You Can Do with This Machine..................................................................iv
Using This Machine as a Copier ............................................................................... iv
Using This Machine as a Printer ................................................................................ v
Paperless Fax Transmission..................................................................................... vi
Fax Transmission and Reception Over the Internet................................................. vii
Using the Scanner in a Network Environment .........................................................viii
Administrating the Machine (Security Functions)...................................................... ix
Monitoring the Machine Via Computer.......................................................................x
Preventing an Unauthorized Copy ............................................................................ xi
Notice ......................................................................................................................1
Important ....................................................................................................................1
Notes To Wireless LAN Interface (optional) Users ....................................................1
How to Read This Manual .....................................................................................2
Symbols .....................................................................................................................2
Names of Major Options ............................................................................................2
Safety Information .................................................................................................3
Safety During Operation.............................................................................................3
Safety Precautions to be Followed.............................................................................3
User Information on Electrical & Electronic Equipment ....................................8
Users in the EU, Switzerland and Norway .................................................................8
All Other Users...........................................................................................................8
ENERGY STAR Program .......................................................................................9
Recycled Paper..........................................................................................................9
1. Getting Started
Guide to Components .........................................................................................11
Control Panel Angle Adjustment Button...................................................................13
Output Tray Guide....................................................................................................15
Options.....................................................................................................................16
Control Panel........................................................................................................18
Display ..................................................................................................................21
Reading the Display and Using Keys.......................................................................21
When the Authentication Screen is Displayed..................................................22
User Code Authentication (Using the Control Panel)...............................................22
User Code Authentication (Using a Printer Driver) ..................................................23
Login (Using the Control Panel) ...............................................................................23
Logout (Using the Control Panel).............................................................................23
Login (Using a Printer Driver)...................................................................................24
Login (Using Web Image Monitor) ...........................................................................24
Logout (Using Web Image Monitor) .........................................................................24
Changing Modes ..................................................................................................25
System Reset...........................................................................................................25
xii
Page 15

Turning On/Off the Power ...................................................................................26
Turning On the Main Power .....................................................................................26
Turning On the Power ..............................................................................................27
Turning Off the Power ..............................................................................................28
Turning Off the Main Power .....................................................................................29
Saving Energy..........................................................................................................30
2. Entering Text
Entering Text ........................................................................................................31
Available Characters ................................................................................................31
Keys .........................................................................................................................31
How to Enter Text ....................................................................................................32
3. Appendix
Dos and Don'ts.....................................................................................................41
Saving Colour Copies ..............................................................................................42
Software and Utilities Included on the CD-ROM............................................... 43
Viewing the Contents of the CD-ROM .....................................................................43
PDF Manuals ...........................................................................................................44
Printer Drivers for This Machine...............................................................................44
TWAIN Driver ...........................................................................................................45
LAN-Fax Driver ........................................................................................................46
DeskTopBinder Lite..................................................................................................47
SmartDeviceMonitor for Admin ................................................................................48
DeskTopBinder-SmartDeviceMonitor for Client .......................................................49
Specifications for the Main Unit .........................................................................50
Specifications for Options ..................................................................................53
Exposure Glass Cover .............................................................................................53
Auto Document Feeder (ADF) .................................................................................53
Auto Document Feeder capable of scanning both sides of a sheet (ARDF)............ 54
Duplex Unit...............................................................................................................54
Lower Paper Tray (1-tray type) ................................................................................55
Lower Paper Trays (2-tray type) ..............................................................................55
Function Upgrade Option .........................................................................................56
IEEE 1284 Interface Board ......................................................................................56
Wireless LAN Board.................................................................................................56
Bluetooth Interface Unit............................................................................................57
USB Host Interface Unit...........................................................................................57
Recommended Paper Sizes and Types .............................................................58
Unusable Paper....................................................................................................62
Paper Storage.......................................................................................................63
INDEX......................................................................................................... 64
xiii
Page 16

xiv
Page 17
Notice
Important
Do not copy or print any item for which reproduction is prohibited by law.
Copying or printing the following items is generally prohibited by local law:
bank notes, revenue stamps, bonds, stock certificates, bank drafts, checks, passports, driver's licenses.
The preceding list is meant as a guide only and is not inclusive. We assume no
responsibility for its completeness or accuracy. If you have any questions concerning the legality of copying or printing certain items, consult with your legal
advisor.
Colours on colour keys or the colour circle may differ slightly from the colours
of actual copies.
This machine is equipped with a function that prevents making counterfeit bank
bills. Due to this function the original images similar to bank bills may not be
copied properly.
Notes To Wireless LAN Interface (optional) Users
Declaration of Conformity
Notice to Users in EEA Countries
This product complies with the essential requirements and provisions of Directive 1999/5/EC of the European Parliament and of the Council of 9 March 1999
on radio equipment and telecommunications terminal equipment and the mutual recognition of their conformity.
The CE Declaration of Conformity is available by accessing the URL:
http://www.ricoh.co.jp/fax/ce_doc/.
Outdoor use of this product in Belgium, France, Germany, Italy, or the Netherlands
is prohibited.
1
Page 18

How to Read This Manual
Symbols
This manual uses the following symbols:
Indicates important safety notes.
Ignoring these notes could result in serious injury or death. Be sure to read these
notes. They can be found in the “Safety Information” section of this manual.
Indicates important safety notes.
Ignoring these notes could result in moderate or minor injury, or damage to the
machine or to property. Be sure to read these notes. They can be found in the
“Safety Information” section of this manual.
Indicates points to pay attention to when using the machine, and explanations
of likely causes of paper misfeeds, damage to originals, or loss of data. Be sure
to read these explanations.
This symbol indicates information or preparations required prior to operating.
Indicates supplementary explanations of the machine's functions, and instructions on resolving user errors.
This symbol is located at the end of sections. It indicates where you can find further relevant information.
[ ]
Indicates the names of keys that appear on the machine's display panel.
{ }
Indicates the names of keys on the machine's control panel.
Names of Major Options
Major options of this machine are referred to as follows in this manual:
• Auto Document Feeder → ADF
• Auto Document Feeder capable of scanning both sides of a sheet → ARDF
2
Page 19
Safety Information
When using this machine, the following safety precautions should always be followed.
Safety During Operation
In this manual, the following important symbols are used:
Indicates a potentially hazardous situation which, if instructions are not followed, could result
in death or serious injury.
Indicates a potentially hazardous situation which, if instructions are not followed, may result
in minor or moderate injury or damage to property.
Safety Precautions to be Followed
This section explains safety precautions that should always be followed when
using this machine.
Environments where the machine can be used
This section explains safety precautions about environments where the machine
can be used.
R WARNING:
• Keep the machine away from flammable liquids, gases, and aerosols.
A fire or an electric shock might occur.
R CAUTION:
• Protect the machine from dampness or wet weather, such as rain and snow.
• Keep the machine away from humidity and dust. Otherwise a fire or an elec-
tric shock might occur.
• Do not place the machine on an unstable or tilted surface. If it topples over,
an injury might occur.
• Make sure the room where you are using the machine is well ventilated and
spacious. Good ventilation is especially important when the machine is used
heavily.
3
Page 20
Handling power cords and power plugs
This section explains safety precautions about handling power cords and power
plugs.
R WARNING:
• Connect the machine only to the power source described on the inside
front cover of this manual. Connect the power cord directly into a wall
outlet and do not use an extension cord.
• Do not damage, break or make any modifications to the power cord.
Do not place heavy objects on it. Do not pull it hard nor bend it more
than necessary. These actions could cause an electric shock or fire.
• Disconnect the power plug (by pulling the plug, not the cable) if the
power cable or plug becomes frayed or otherwise damaged.
• If the power cord is damaged (exposure of the core, disconnection,
etc.), contact your service representative to change a new one. Operating the machine with a damaged power cord may cause an electric
shock or fire.
R CAUTION:
• When you disconnect the power plug from the wall outlet, always pull the
plug (not the cable).
• To disconnect the power cord, pull it out by plug. Do not drag the cord itself.
Doing so may result in damage to the cord, leading to fire or electric shock.
• For safety reason, unplug the power cord from the wall outlet if the machine
will not be used for an extended period of time such as holidays.
4
Page 21
Handling the main machine
This section explains safety precautions about handling the main machine.
R WARNING:
• Turn off the power and disconnect the power plug (by pulling the plug,
not the cable) if any of the following occurs:
• You spill something into the machine.
• You suspect that your machine needs service or repair.
• The external housing of your machine has been damaged.
• Disposal can take place at our authorized dealer.
R CAUTION:
• Before moving the machine, be sure to disconnect all external connections,
especially the power cord from the wall outlet. Damaged power cords are a
fire and electric shock hazard.
• Unplug the power cord from the wall outlet before you move the machine.
While moving the machine, you should take care that the power cord will not
be damaged under the machine.
• After you move the machine, use the caster fixture to fix it in place. Otherwise the machine might move or come down to cause an injury.
• Do not allow paper clips, staples, or other small metallic objects to fall inside
the machine.
• Do not look into the lamp - it can damage your eyes.
• When the optional paper tray unit is installed, do not push the upper part of
the main unit horizontally. An injury might occur if the paper tray unit becomes detached from the main unit.
• Contact your service representative if you need to lift the machine (such as
when relocating it to another floor). Do not attempt to lift the machine without
the assistance of your service representative. The machine will be damaged
if it topples or is dropped, resulting in malfunction and risk of injury to users.
The machine's various handling areas are for service engineer use only. Do
not touch these areas.
• For environmental reasons, do not dispose of the machine or expended
supply waste at household waste collection points. Disposal can take place
at an authorized dealer.
5
Page 22

Handling the machine's interior
This section explains safety precautions about handling the machine's interior.
R WARNING:
• To avoid hazardous electric shock, do not remove any covers or
screws other than those specified in this manual.
R CAUTION:
• During operation, rollers for transporting the paper and originals revolve. A
safety device is being installed so that the machine can be operated safely.
But take care not to touch the machine during operation. An injury might occur.
• Fire and breakdown can result from heavy accumulation of dust inside this
machine. Consult your service representative for details about and charges
for cleaning the machine's interior.
6
Page 23
Handling the machine's supplies
This section explains safety precautions about handling the machine's supplies.
R WARNING:
• Dispose of used ink containers in accordance with local regulations.
R CAUTION:
• To avoid fire or machine failure, do not use aluminum foil, carbon paper, or
similar conductive paper.
• Keep the ink or ink container out of reach of children.
• If ink comes into contact with your eyes, rinse immediately in running water.
For other symptoms, consult a doctor.
• If ink is ingested, induce vomiting by drinking a strong saline solution. Consult a doctor immediately.
• Avoid getting ink on your clothes or skin when removing a paper jam or replacing ink cartridges. If your skin comes into contact with ink, wash the affected area thoroughly with soap and water.
• Be careful not to get ink on your clothes when replacing an ink container. Ink
stains on clothes are hard to remove.
• When loading paper, take care not to trap or injure your fingers.
7
Page 24

User Information on Electrical & Electronic Equipment
Users in the EU, Switzerland and Norway
Our Products contain high quality components and are designed to facilitate recycling.
Our products or product packaging are marked with the symbol below.
The symbol indicates that the product must not be treated as municipal waste.
It must be disposed of separately via the appropriate return and collection systems available. By following these instructions you ensure that this product is
treated correctly and help to reduce potential impacts on the environment and
human health, which could otherwise result from inappropriate handling. Recycling of products helps to conserve natural resources and protect the environment.
For more detailed information on collection and recycling systems for this product, please contact the shop where you purchased it, your local dealer or
sales/service representatives.
All Other Users
If you wish to discard this product, please contact your local authorities, the
shop where you bought this product, your local dealer or sales/service representatives.
8
Page 25

ENERGY STAR Program
ENERGY STAR® Program Requirements for Imaging Equipment
The ENERGY STAR
servation by promoting energy efficient computers and other office equipment.
The program backs the development and dissemination of products that feature energy saving
functions.
It is an open program in which manufacturers participate voluntarily.
Targeted products are computers, monitors, printers, facsimiles, copiers, scanners, and multifunction devices. Energy Star standards and logos are internationally uniform.
®
Program Requirements for Imaging Equipment encourage energy con-
❖ Sleep mode
This machine automatically reduces its power consumption if you do not use
it for a while (default setting: 1 minute). Printing from your computer or of
incoming fax is available in this mode.
If you want to operate this product while it is in this mode, turn the operation
switch on.
• Power consumption: 4.2 W or less
• Default interval: 1 minute
• Recovery time: Less than 5.5 seconds
Note
❒ Using the Auto Off Timer setting, you can change the length of time that the
machine waits before it switches to Sleep mode. See “System Settings”, General Settings Guide.
Recycled Paper
We recommend use of recycled paper which is environmentally friendly. Please
contact your sales representative for recommended paper.
9
Page 26

10
Page 27
1. Getting Started
This section describes how to start using this machine.
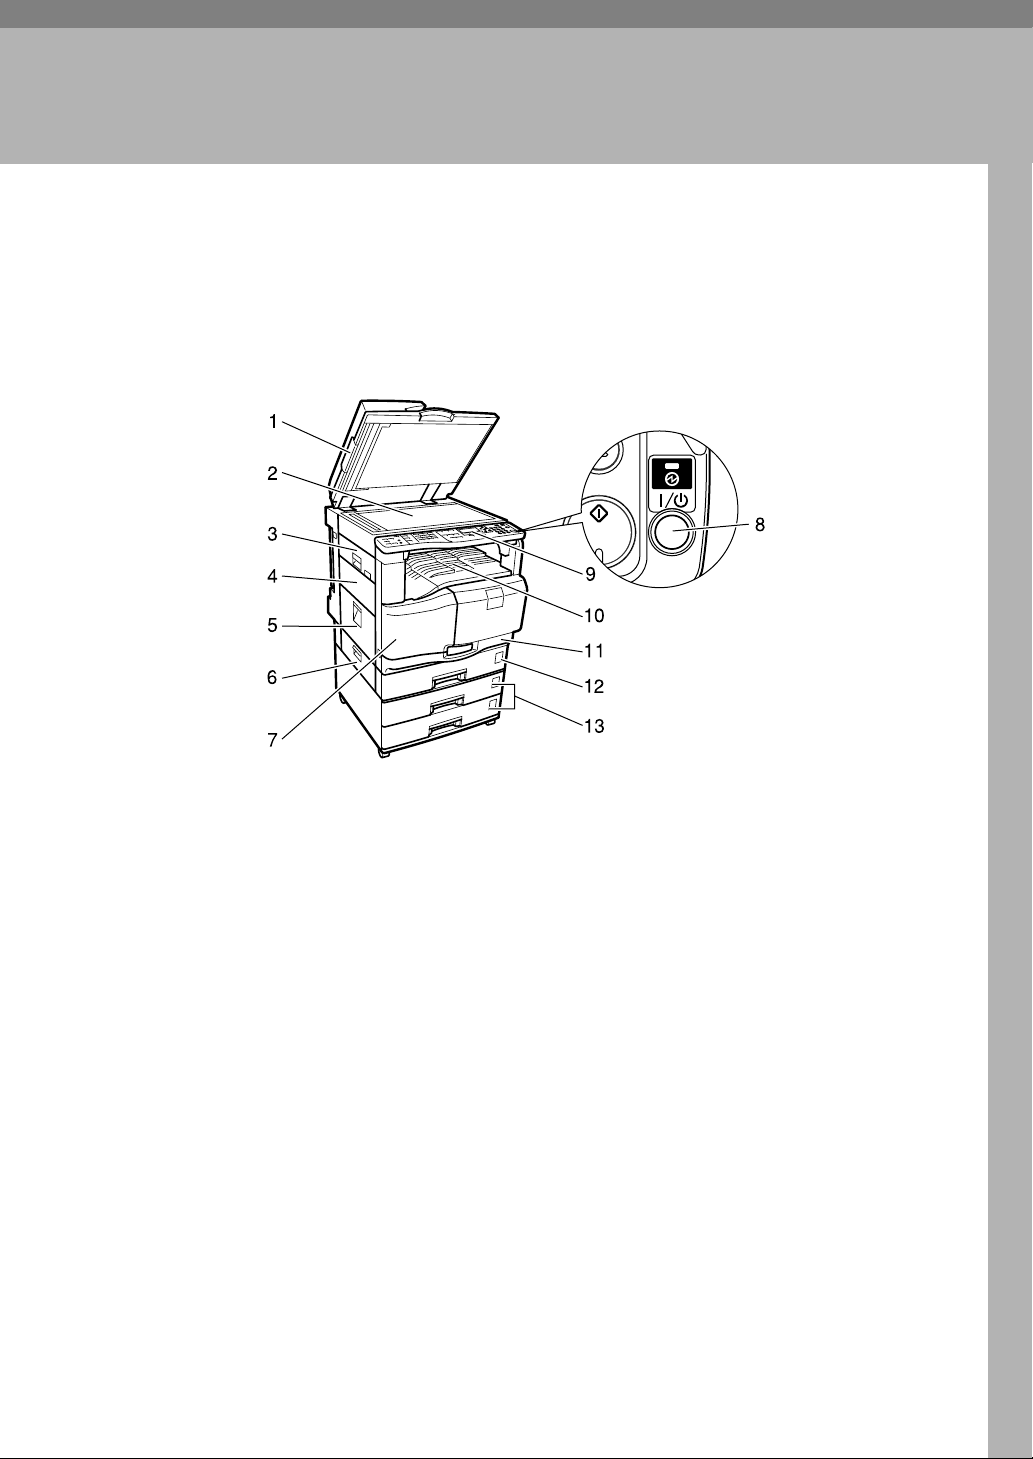
Guide to Components
This section introduces the names and functions of the components.
1. Exposure glass cover (optional),
ADF (optional), or ARDF (optional)
(The illustration shows the ADF.)
See “External options”.
2. Exposure glass
Place originals here face down.
3. Upper Left Cover
Open this cover to remove jammed paper.
4. One-sheet output tray
Open this tray when copying or printing
from the One-sheet bypass tray.
5. Left Cover
Open this cover to remove jammed paper.
6. Lower Left Cover
Open this cover to remove jammed paper.
7. Front Cover
Open to access the inside of the machine.
BDU007S
8. Operation switch
Press to turn the power on (the operation
switch indicator lights up). To turn the
power off, press again (the operation
switch indicator goes off).
9. Control panel
See “Control Panel”.
10. Internal Tray
Copied or printed paper and fax messages are delivered face down here. When
paper jams occur, open the front cover,
and then open this tray.
11. Paper Tray 1
Load paper here.
12. Duplex Unit (optional)
Flips paper during two-sided printing.
13. Lower Paper Trays (optional)
Load paper here.
11
Page 28
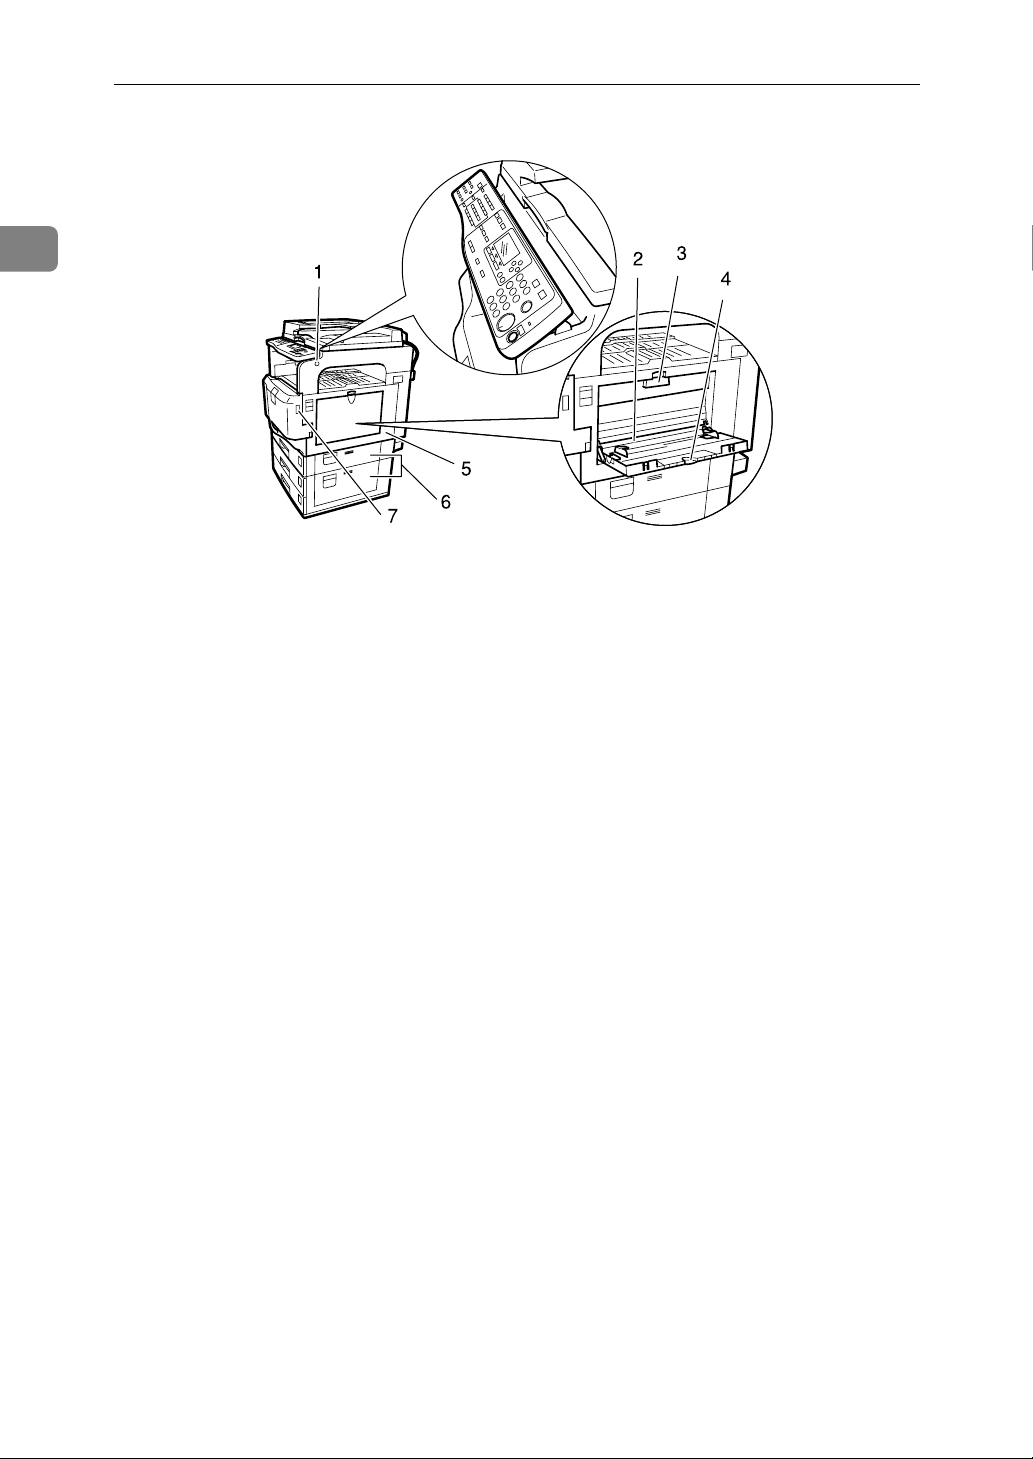
1
Getting Started
BDU004S
1. Control panel angle adjustment
button
Allows you to adjust the angle of the control panel.
2. Bypass Tray
Use this to print on plain, thick, or custom-size paper.
3. One-sheet bypass tray
Use this to print on plain, thick, or custom-size paper, or OHP transparencies.
4. Extender
Pull out this extender when placing paper larger than A4L or 8
bypass tray.
1
/2 × 11L on the
5. Right Cover
Open this cover to remove jammed paper.
6. Lower Right Cover/Bottom Right
Cover
Open this cover to remove jammed paper.
7. Envelope lever
Use when copying or printing onto envelopes.
12
Page 29
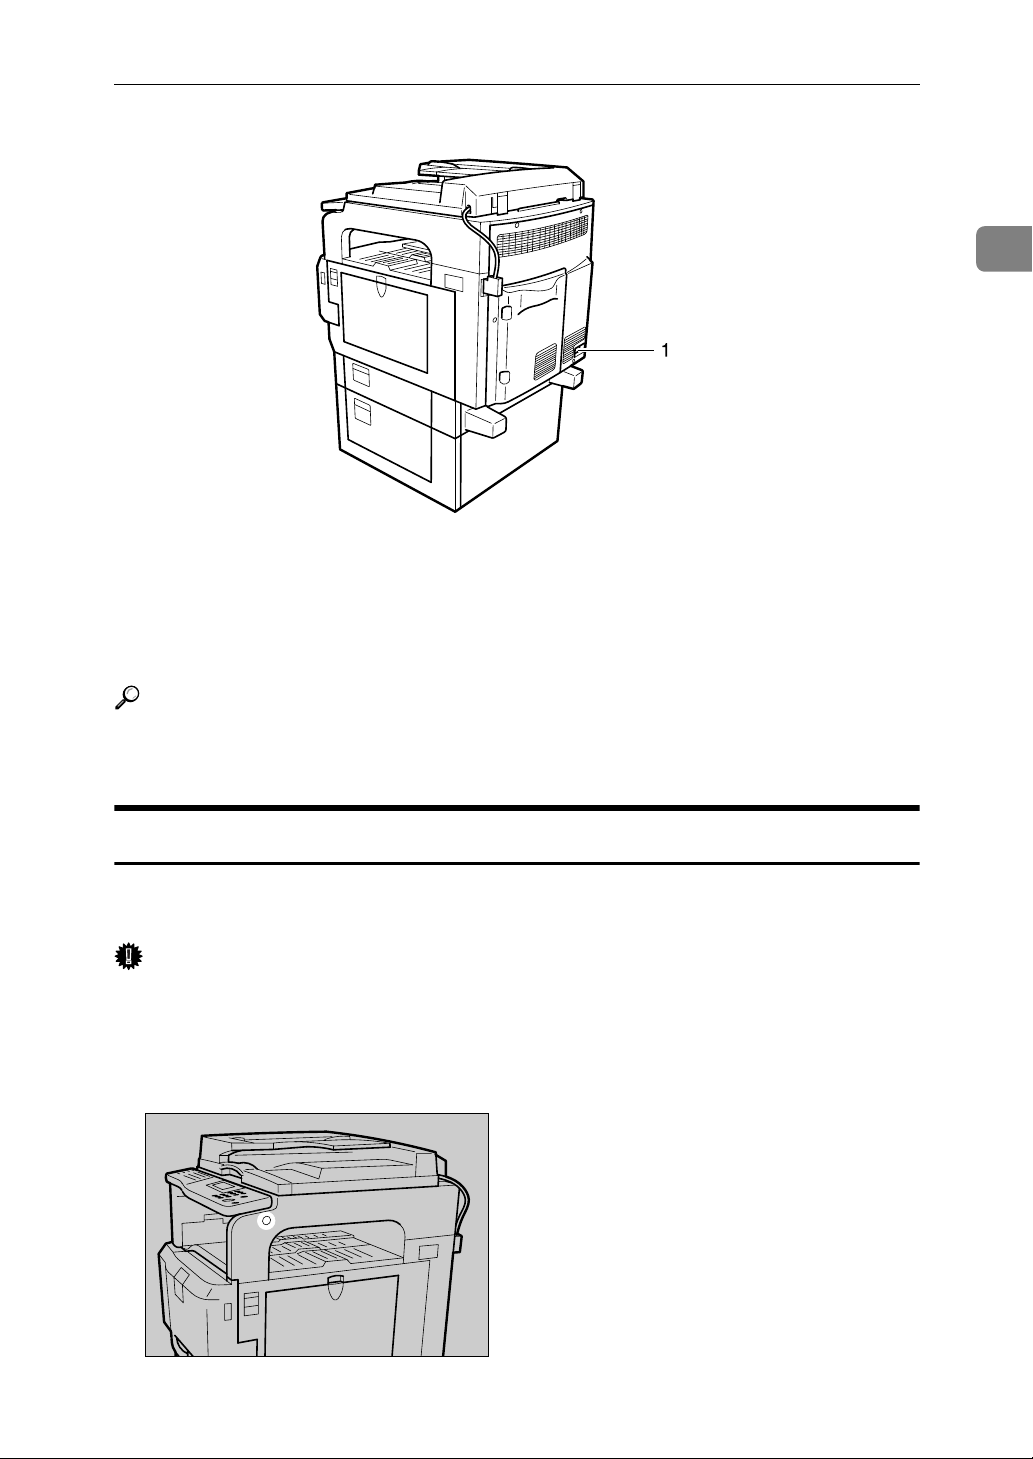
1. Main power switch
If the machine is not powered on after
pressing the operation switch, check that
the main power switch is turned on. If it
is off, turn it on.
Guide to Components
1
ALZ015S
Reference
p.16 “External options”
p.18 “Control Panel”
Control Panel Angle Adjustment Button
By pressing the control panel angle adjustment button, you can adjust the tilt of
the control panel.
Important
❒ Do not force the control panel or adjust it without pressing the adjustment
button. Doing so damages the control panel.
A Press and hold down the control panel angle adjustment button on the
right side of the machine.
ALZ065S
13
Page 30
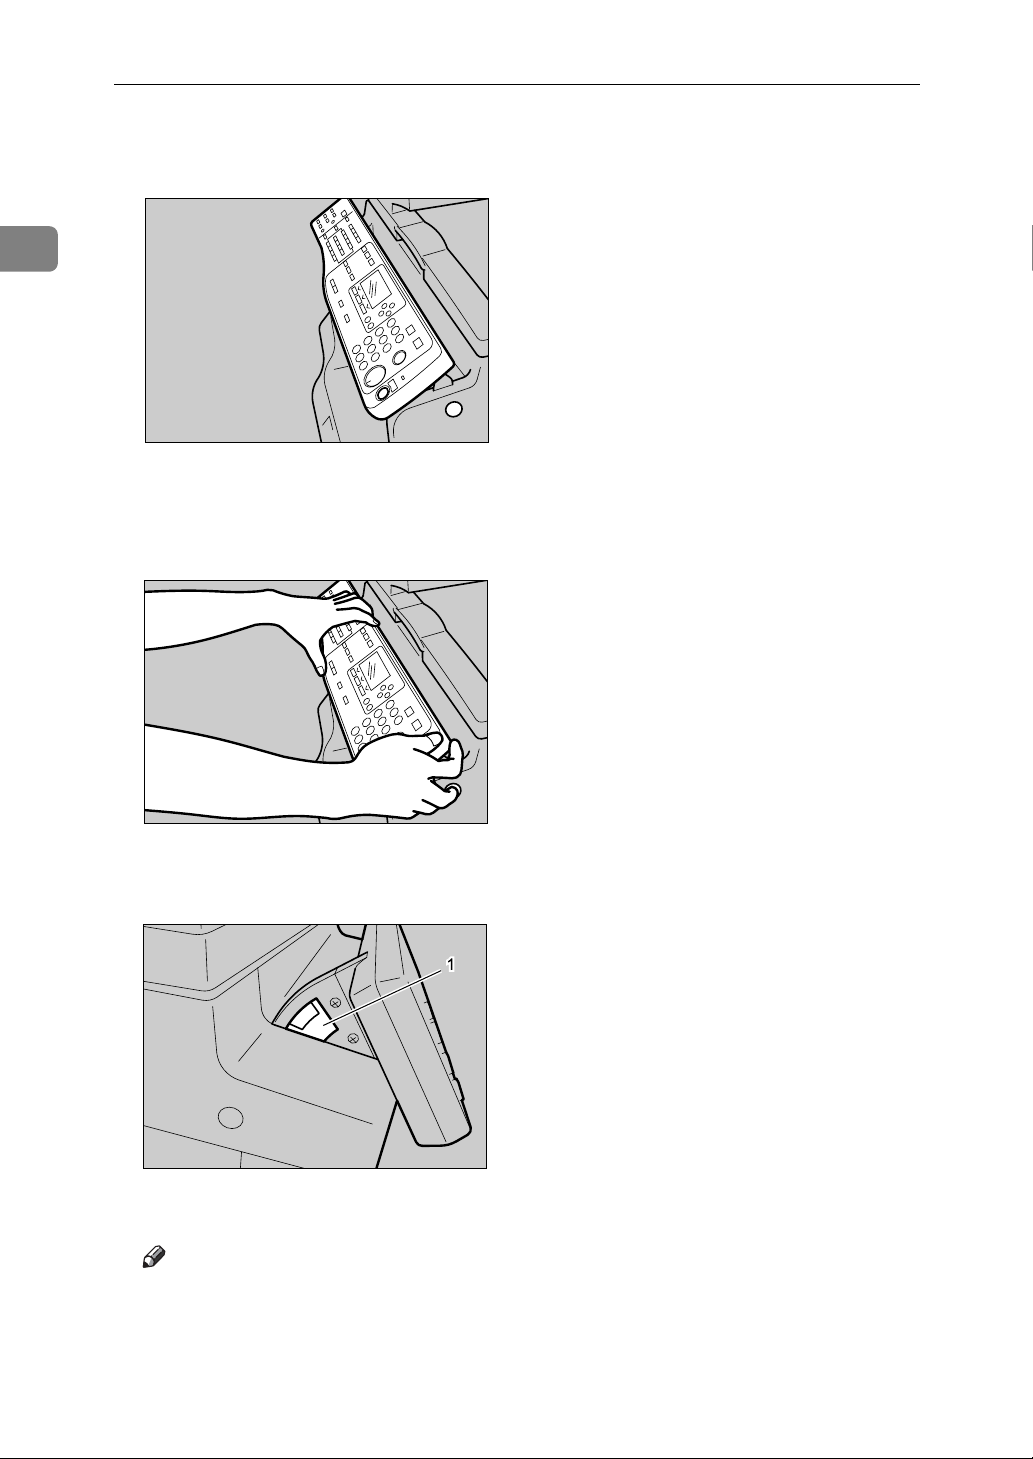
1
Getting Started
B Tilt the control panel forward, and then release the adjustment button to
lock the panel.
ALZ063S
C To tilt the control panel back, press and hold down the adjustment button
to unlock the panel, and then angle the panel carefully until it locks into
position.
14
ALZ066S
Be careful not to get your fingers caught in the gap between the control panel
and the machine.
ALZ064S
1 Gap
Note
❒ You can set the tilt to one of three angles.
Page 31
Guide to Components
Output Tray Guide
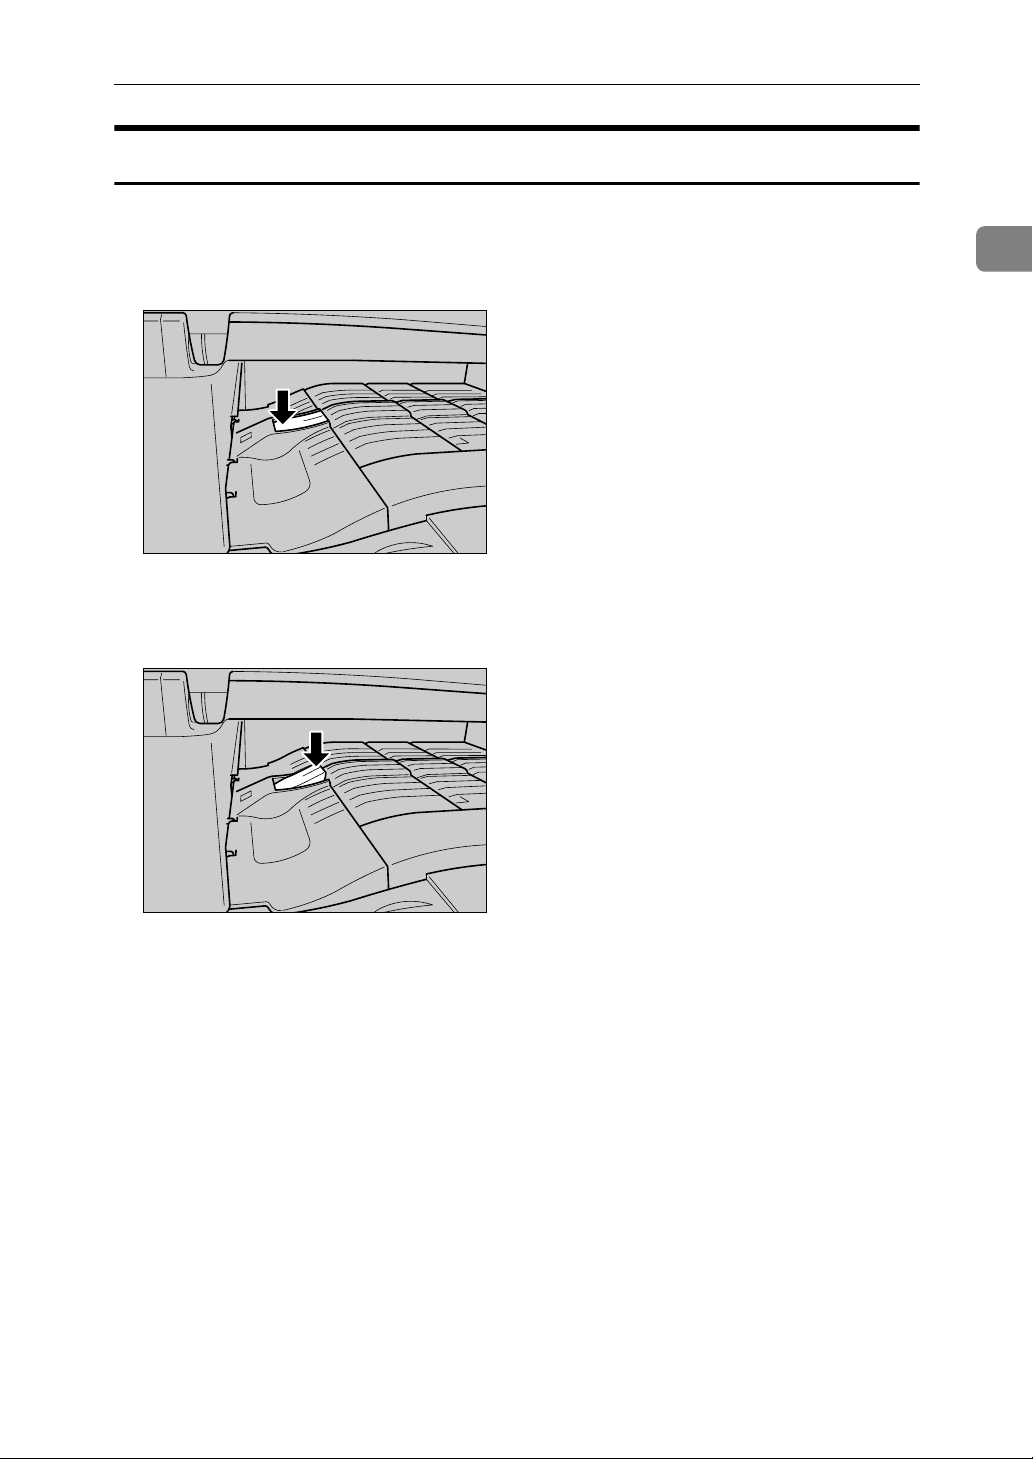
If printed sheets come out curled, pull up the Output Tray Guide.
❖ Using the Output Tray Guide
Pull up the Output Tray Guide until it clicks.
ALZ058S
❖ Pushing in the Output Tray Guide
Push in the Output Tray Guide.
1
ALZ059S
15
Page 32
Getting Started
Options
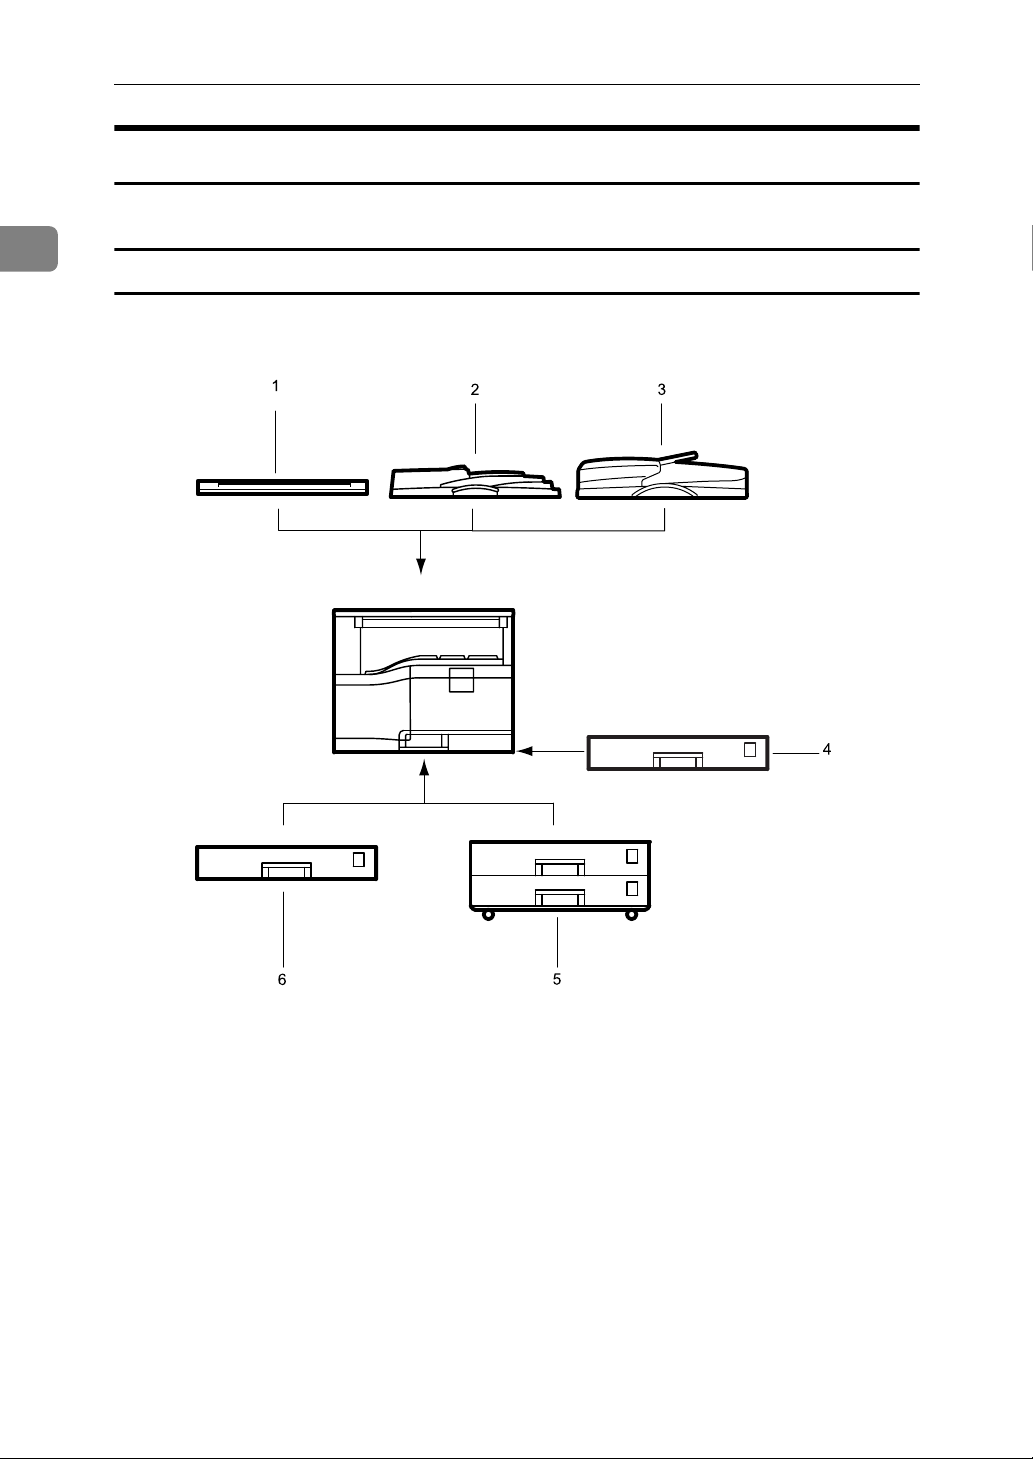
This section introduces the names and functions of main optional parts.
1
External options
This section provides explanations about external options.
1. Exposure Glass Cover
Lower this cover over originals.
2. ADF
Place stacks of originals here. They will
feed in automatically.
3. ARDF
Place stacks of originals here. They will
feed in automatically. This document
feeder can be used for two-sided originals.
16
AMA003S
4. Duplex unit
Allows you to print on both sides of sheets
using the copier and printer functions.
5. Lower Paper Trays
Holds up to 1,000 sheets of paper. Each
paper tray holds 500 sheets.
6. Lower Paper Tray
Holds 500 sheets.
Page 33

Guide to Components
Internal options
This section describes the options that can be installed in the machine.
•Fax unit
Allows you to use the facsimile function.
•Function Upgrade Option
Allows you to copy on both sides of a sheet (colour), and use sort (colour)
function in copier mode.
Allows you to use functions such as Collate and sample print in printer mode.
Allows you to send scan files by E-mail, or by Scan to Folder in scanner mode.
Allows you to use the Internet fax, and IP-Fax functions in facsimile mode.
• USB host interface unit
Allows you to connect a variety of external devices.
• PostScript3 unit
Allows you to print by Adobe PostScript printer driver and send PDF files directly to the machine. The Function Upgrade Option is required.
• IEEE 1284 interface board
Allows you to connect to an IEEE 1284 cable.
• Wireless LAN board
Allows you to install a wireless LAN interface.
• Bluetooth interface unit
Allows you to expand the interface.
•PictBridge card
Allows you to directly print images taken with a PictBridge-compatible digital camera.
1
• Copy Data Security Unit
If a document containing embedded text for unauthorized copy guard is copied, protected pages are grayed out in the copy.
• DataOverWriteSecurity Unit
Allows you to erase data on the Function Upgrade Option.
Note
❒ Only one of the following options can be installed on the machine at any one
time: IEEE 1284 interface board, Wireless LAN board, Bluetooth interface
unit.
❒ If the Copy Data Security Unit is installed in the machine, you cannot use the
scanner and fax functions.
17
Page 34
1
Getting Started
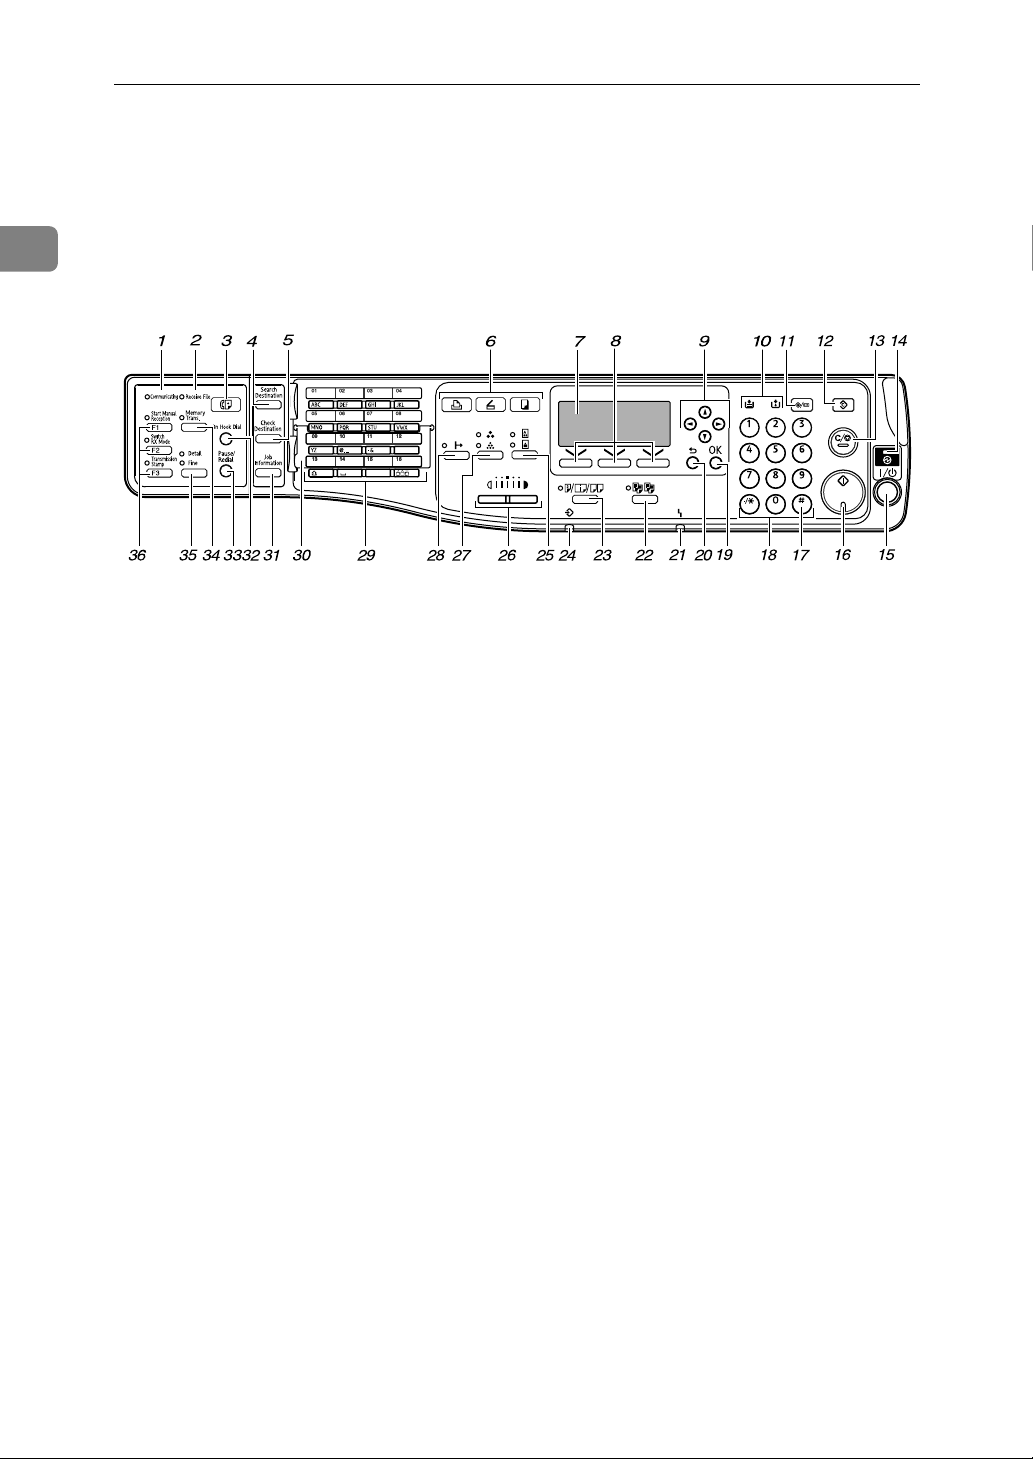
Control Panel
This section introduces the names and functions of the components on the control panel.
This illustration shows the control panel of the machine with options fully installed.
BDU005S
1. Communicating indicator (fac-
simile mode)
Lit during data transmission or reception.
2. Receive File indicator (facsimile
mode)
Remains lit when fax memory receives a
file. Flashes for Memory Lock files.
See “Types of Reception”, Facsimile Reference.
3. {Facsimile} key
Press to activate the facsimile function.
See Facsimile Reference.
4. {Search Destination} key (scanner
and facsimile mode)
Press to search for a destination registered in the destination list.
5. {Check Destination} key (scanner
and facsimile mode)
Press to check the specified destination.
6. Function keys
Press to display the operation screen of
one of the following functions: printer,
scanner, or copy. The indicator of the selected function goes on.
7. Display panel
Displays operational statuses and messages. See “Display”.
8. Selection keys
Correspond to items on the display. Press
to select the corresponding item.
9. Scroll keys
Press to select an item.
{U} :scrolls upward
{T} :scrolls downward
{V} :scrolls right
{W} :scrolls left
10. Indicators
Display errors and machine status.
G: Add Ink indicator. See “Handling
Print Cartridges”, Troubleshooting.
B: Load Paper indicator. See “Loading
paper”, Troubleshooting.
11. {User Tools/Counter} key
•User Tools
Press to change default or operation
parameters according to requirement.
See “Accessing User Tools (System
Settings)”, General Settings Guide.
•Counter
Press to check or print the counter value. See “Counter”, General Settings
Guide.
12. {Clear Modes} key
Press to clear the current settings.
18
Page 35

Control Panel
13. {Clear/Stop} key
•Clear
Clears an entered numeric value.
•Stop
Stops a job in progress, such as copying, scanning, faxing, or printing.
14. Main power indicator
The main power indicator lights when
the main power switch is turned on.
If the operation switch indicator is lit or
flashing, do not turn off the machine's
main power switch. Doing so might damage the hard disk or memory, or cause
ink in the print-head to dry, clogging the
nozzles. See “Turning On/Off the Power”.
15. Operation switch
Press to turn the power on. The operation
switch indicator lights. To turn the power
off, press again. See “Turning On/Off the
Power”.
16. {Start} key
Press to start copying, printing, scanning,
or sending.
17. {q} key (Enter key)
Press to set a selected item or an entered
numeric value.
18. Number keys
Press to enter numeric values.
19. {OK} key
Press to set a selected item or an entered
numeric value.
20. {Escape} key
Press to cancel an operation or return to
the previous display.
21. h Alert indicator
See Network Guide or “Clearing Misfeeds”, Troubleshooting.
22. {Sort} key (copier mode)
Press to automatically sort printed copies.
See “Copier Functions”, Copy Reference.
23. {Duplex/Combine/Series} key (cop-
ier mode)
•Duplex
Perform duplex printing when copying
a multiple-sheet original. For details, see
“Copier Functions”, Copy Reference.
•Combine
Combine and print the pages of a multiple-sheet original onto a single sheet.
For details, see “Copier Functions”,
Copy Reference.
•Series
Print each page of a double-page
spread as a single-page copy.
24. mData In indicator (printer
mode)
Flashes when the machine is receiving
print jobs or LAN-Fax documents from a
computer. See Facsimile Reference and
Printer Reference.
25. {Original} key (copier, scanner
and facsimile mode)
Press to select the most suitable scanning
method for the original. See “Copier
Functions”, Copy Reference, “Selecting
Original Type”, Scanner Reference, and
“Scan Settings”, Facsimile Reference.
26. {Lighter} key, {Darker} key (copi-
er, scanner and facsimile mode)
Press to adjust the scanning density under the copier, fax and scanner functions.
27. {Full Colour/B&W} key (copier and
scanner mode)
Press to switch between “Full Colour”
and “Black & White” according to the
document type or your requirements. See
“Selecting a Colour Mode”, Copy Reference and “Selecting Original Type”,
Scanner Reference.
28. {fOnline} key (printer mode)
Press to switch between on-line and offline modes.
29. Quick Dial keys
Press to enter letters and symbols. See
“Entering Text”. Press to select the registered destination at a single touch. See
Facsimile Reference and Scanner Reference.
1
19
Page 36

Getting Started
1
30. Quick Dial Flip Plate
Tilt the plate downward to change from
the {Quick Dial 01} key to the {Quick Dial
16} key. Tilt the plate upward to change
from the {Quick Dial 17} key to the {Quick
Dial 32} key.
31. {Job Information} key (scanner
and facsimile mode)
Press to obtain status information on
transmitted data.
32. {On Hook Dial} key (facsimile
mode)
Press this to hear dial and data tones on
the fax line while dialing, as if the handset were off the hook. For details, see “On
Hook Dial”, Facsimile Reference.
33. {Pause/Redial} key (facsimile
mode)
•Pause
Press to insert a pause in a fax dialing
sequence. You cannot insert a pause at
the beginning of a sequence. The
pause is indicated by “-”.
•Redial
Press this to select a recently-dialed
destination. For details, see “Specifying a Destination”, Facsimile Reference.
34. {Memory Trans.} key (facsimile
mode)
Press to carry out memory transmission.
See “Transmission Modes”, Facsimile
Reference.
35. {Resolution} key (facsimile
mode)
Press to specify the resolution of the fax.
See “Scan Settings”, Facsimile Reference.
36. User Function keys (facsimile
mode)
You can program frequently used functions in these keys under Set User Function Key. See “Fax Features”, General
Settings Guide.
By default, the following functions are
registered:
{F1} key: Start manual reception
{F2} key: Switch reception mode
{F3} key: Transmission stamp
20
Reference
p.21 “Display”
p.26 “Turning On/Off the Power”
p.31 “Entering Text”
Page 37
Display
Display
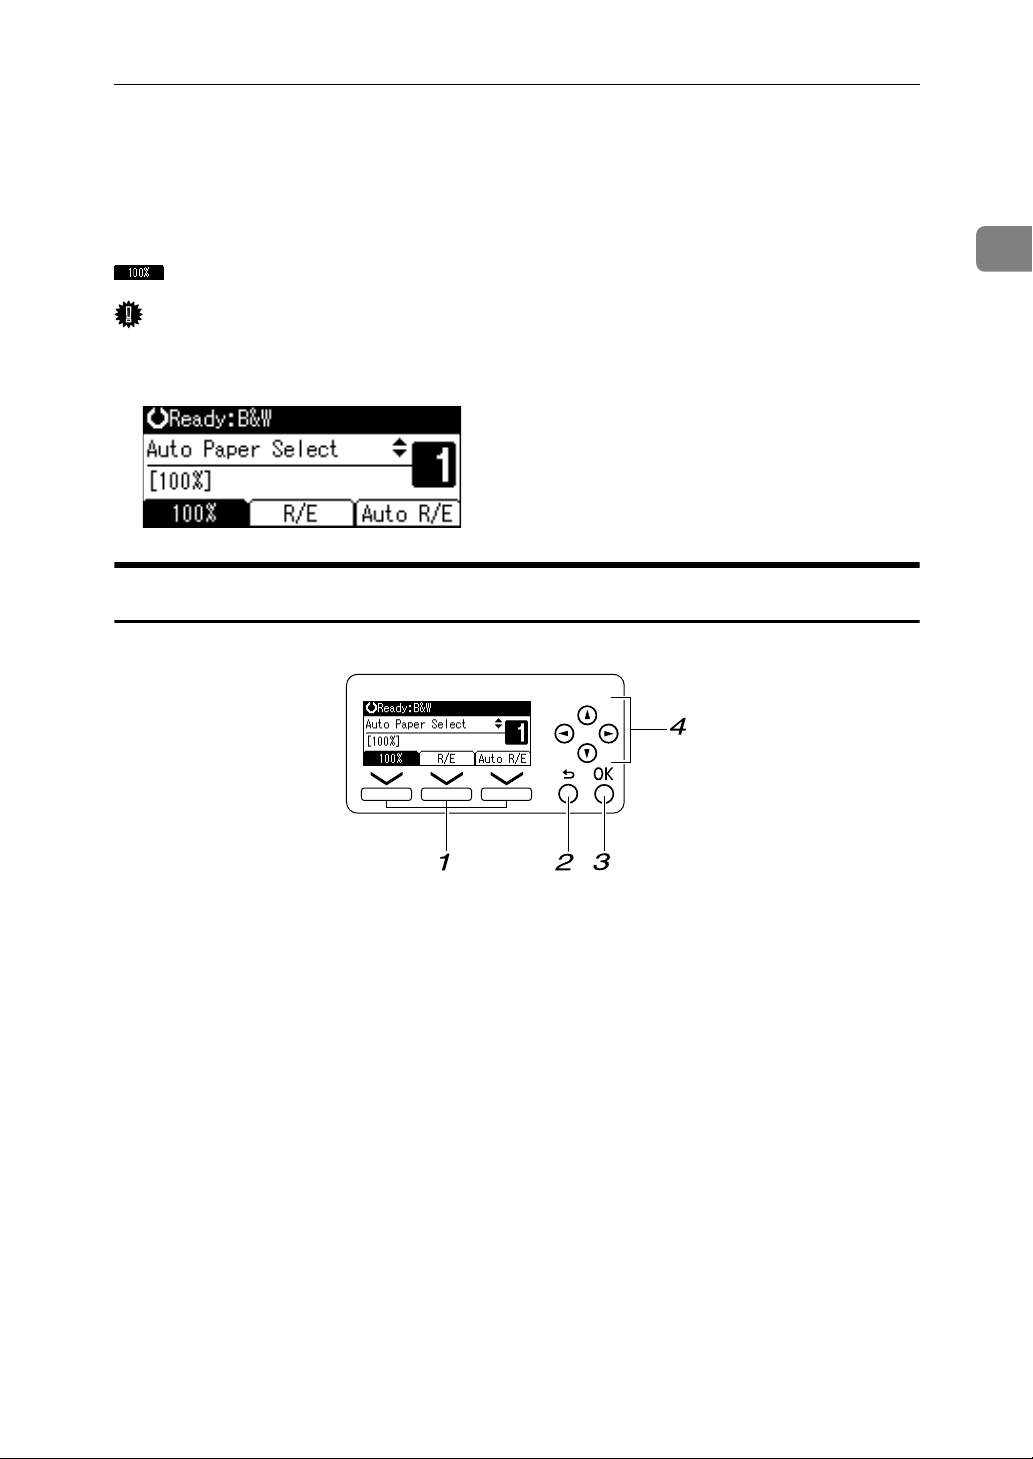
The display panel shows machine status, error messages, and function menus.
When you select or specify an item on the display panel, it is highlighted like
.
Important
❒ A force or impact of more than 30 N (about 3 kgf) will damage the display.
The copy display is set as the default screen when the machine is turned on.
Reading the Display and Using Keys
1
1. Selection keys
Correspond to items at the bottom line on
the display.
Example: The Copy display
• When the instruction “press [100%]”
appears in this manual, press the left
selection key.
• When the instruction “press [R/E]” appears in this manual, press the centre
selection key.
• When the instruction “press [Auto
R/E]” appears in this manual, press the
right selection key.
BDU006S
2. {Escape} key
Press to cancel an operation or return to
the previous display.
3. {OK} key
Press to set a selected item or an entered
numeric value.
4. Scroll keys
Press to move the cursor in each direction, step by step.
When {U}, {T}, {V} or {W} appears in
this manual, press the scroll key of the
same direction.
21
Page 38
Getting Started
When the Authentication Screen is Displayed
1
This section explains the authentication screen.
Important
❒ Ask the user administrator for the login user name, login password, and user
code. For details about user authentication, contact your administrator.
❒ User code to enter on User Code Authentication is the numerical value regis-
tered in the address book as “login user name”.
When Basic Authentication, Windows Authentication, LDAP Authentication, or
Integration Server Authentication is enabled, the authentication screen appears.
The machine is operable only if you enter a valid user name and password. If
User Code Authentication is enabled, you cannot use the machine until you enter a valid user code.
If you are using the machine, you are “logged in”. When you cannot use the machine, you are “logged out”. To prevent use of the machine by unauthorized persons, always log off when you have finished using the machine.
Note
❒ “Authentication failed.” appears if the authentication failed. Check the
login user name and login password.
User Code Authentication (Using the Control Panel)
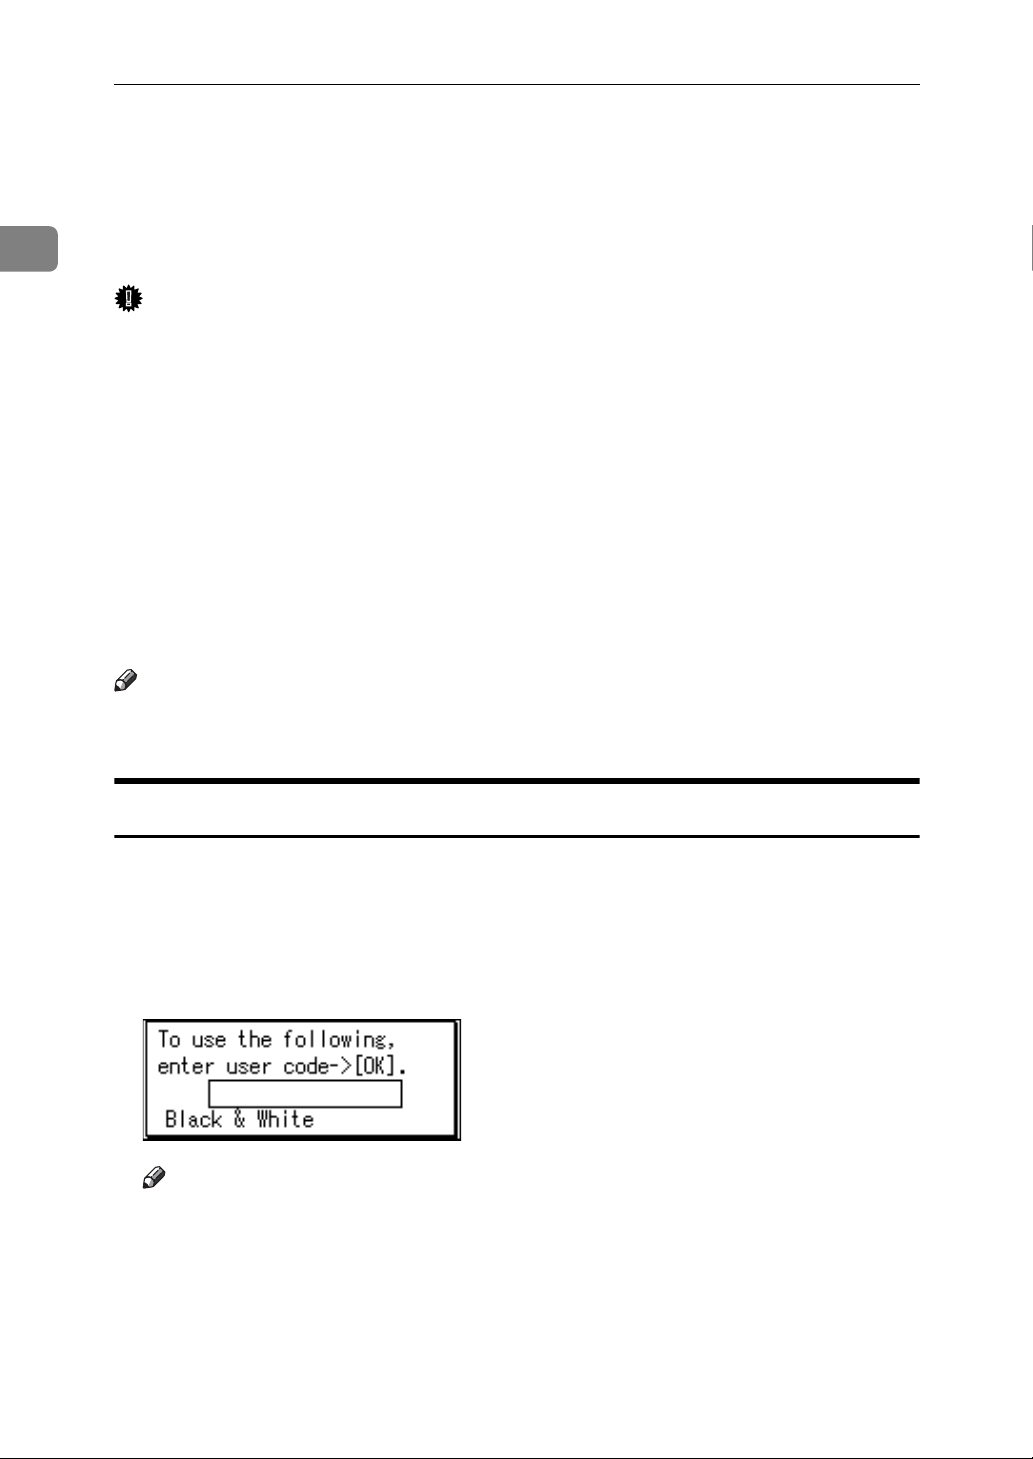
This section explains the procedure for logging in to the machine using the control panel while User Code Authentication is active.
If User Code Authentication is active, a screen prompting you to enter a user
code appears.
A Enter a user code (one to eight digits), and then press the {OK} key.
Note
❒ To log out, press the operation switch.
22
Page 39
When the Authentication Screen is Displayed
User Code Authentication (Using a Printer Driver)
This section explains the procedure for logging in to the machine using a printer
driver while User Code Authentication is active.
If User Code Authentication is active, specify the user code in the printer properties of the printer driver. For details, see the printer driver Help.
Note
❒ If logged in through User Code Authentication, logging out is not necessary.
Login (Using the Control Panel)
This section explains the procedure for logging in to the machine when Basic
Authentication, Windows Authentication, LDAP Authentication, or Integration
Server Authentication is set.
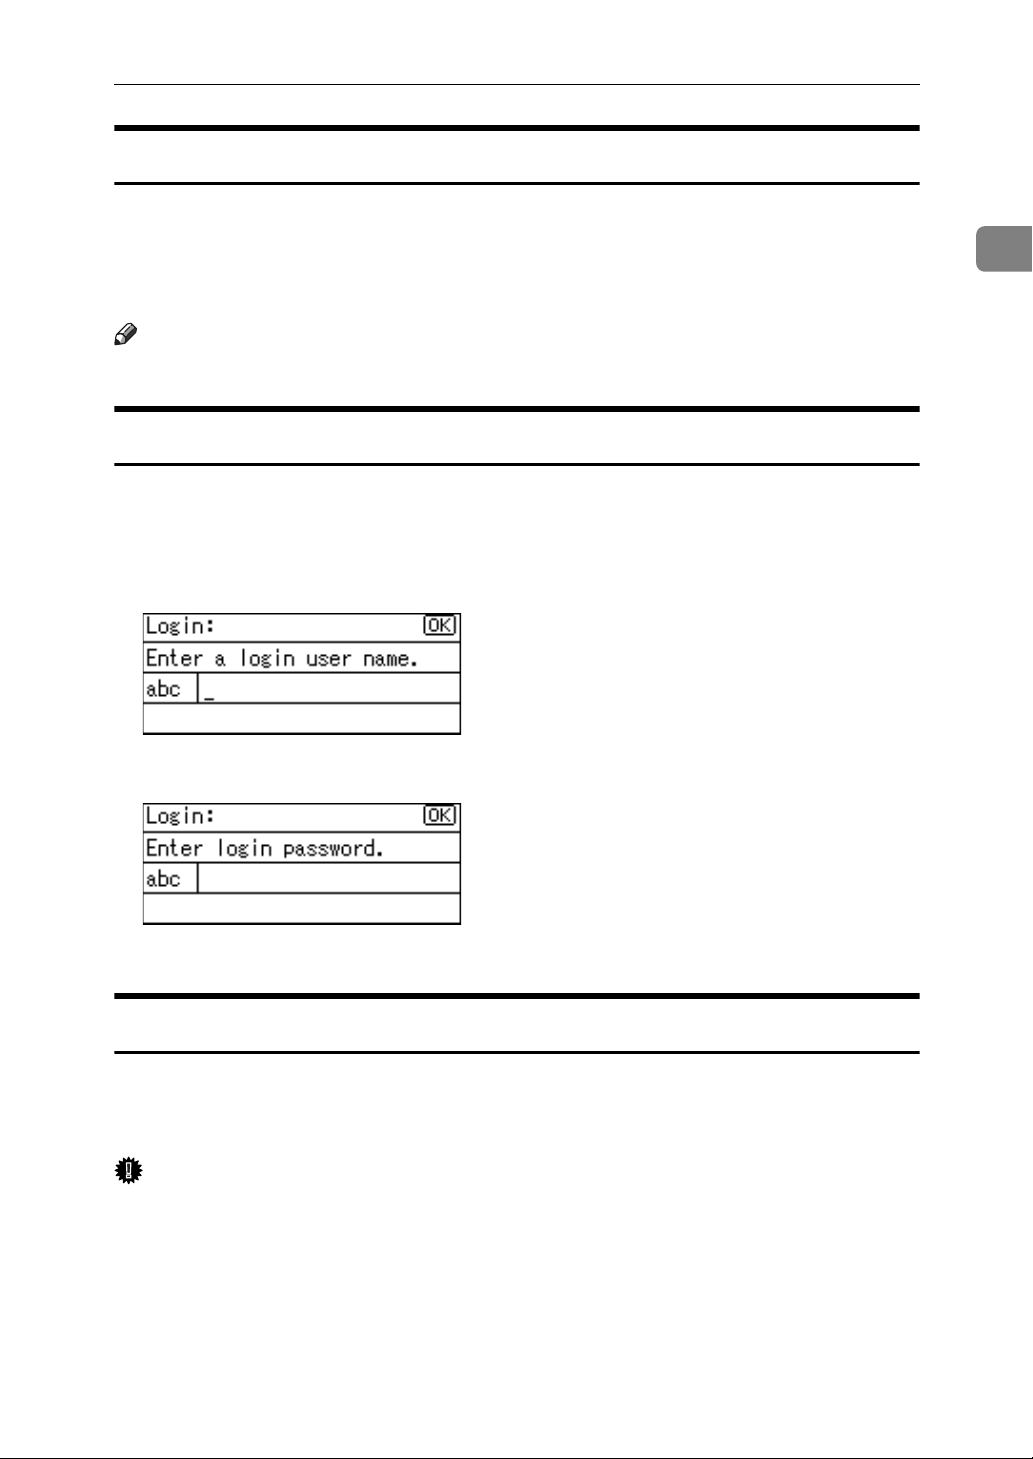
A Enter the login user name and then press the {OK} key.
1
B Enter the login password and then press the {OK} key.
When the user is authenticated, the screen for the function you are using appears.
Logout (Using the Control Panel)
This section explains the procedure for logging out the machine when Basic Authentication, Windows Authentication, LDAP Authentication, or Integration
Server Authentication is set.
Important
❒ To prevent use of the machine by unauthorized persons, always log out when
you have finished using the machine.
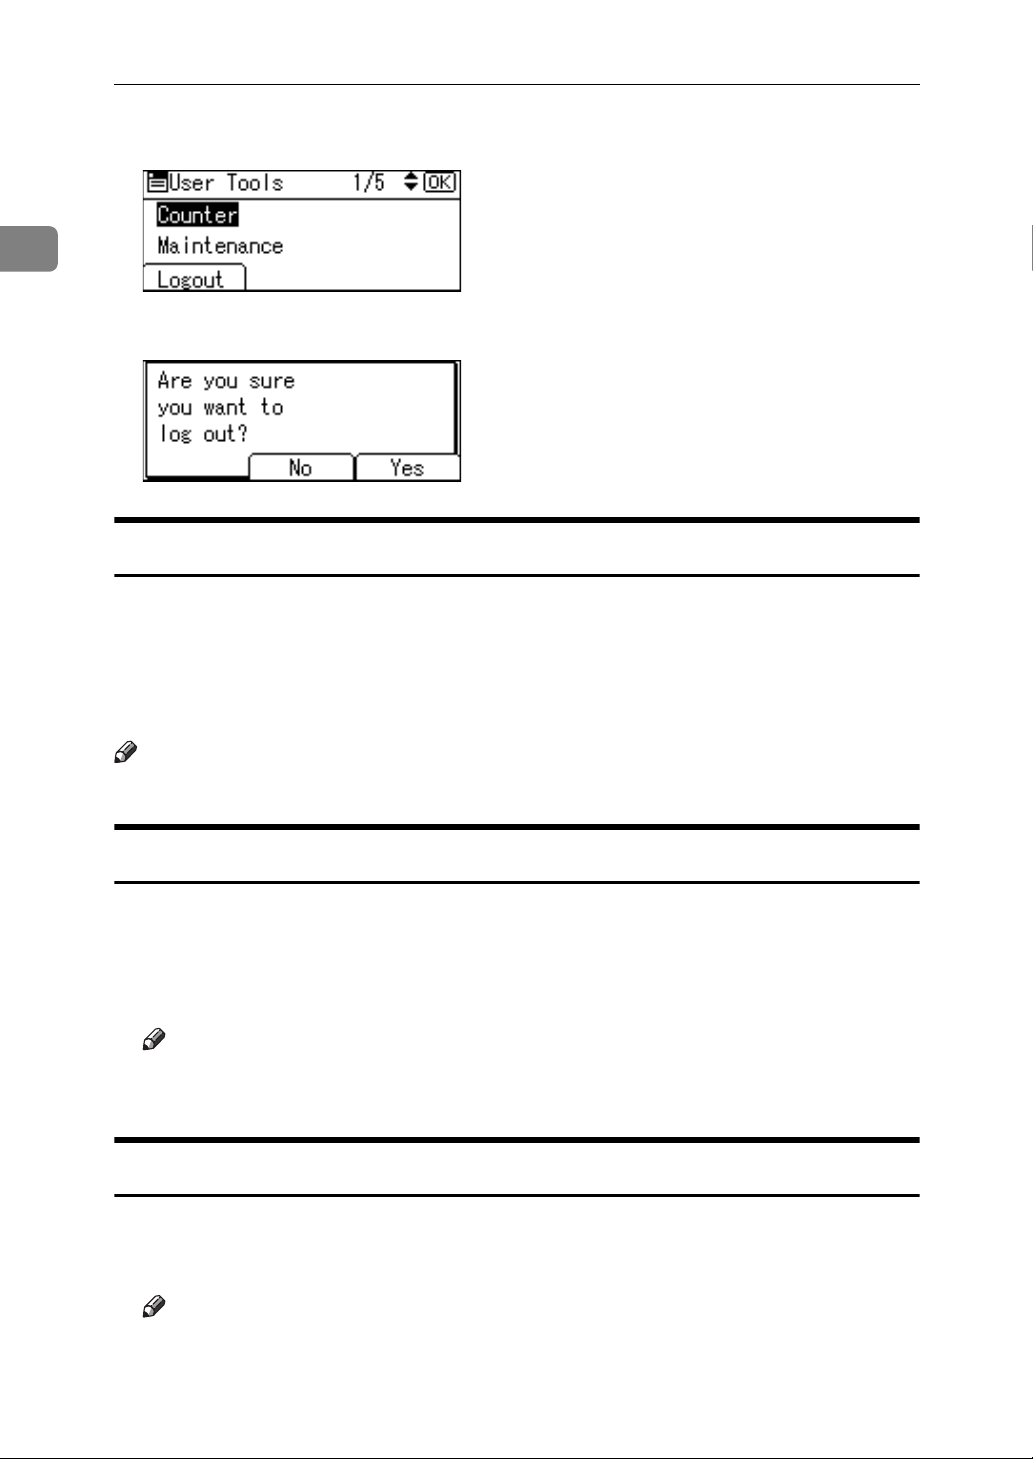
A Press the {User Tools/Counter} key.
23
Page 40
1
Getting Started
B Press [Logout].
C Press [Yes].
Login (Using a Printer Driver)
This section explains the procedure for logging in to the machine using a printer driver.
If Basic Authentication, Windows Authentication, LDAP Authentication, or Integration Server Authentication is active, make encryption settings in the printer
properties of the printer driver, and then specify a login user name and password. For details, see the printer driver Help.
Note
❒ If logged in using a printer driver, you do not have to log out.
Login (Using Web Image Monitor)
This section explains the procedure for logging in to the machine via Web Image Monitor.
A Click [Login].
B Enter a login user name and password, and then click [Login].
Note
❒ For User Code Authentication, enter a user code in [Login User Name], and
then click [OK].
Logout (Using Web Image Monitor)
This section explains the procedure for logging out the machine via Web Image Monitor.
A Click [Logout] to log out.
Note
❒ Delete the cache memory of a Web browser after logging out.
24
Page 41
Changing Modes
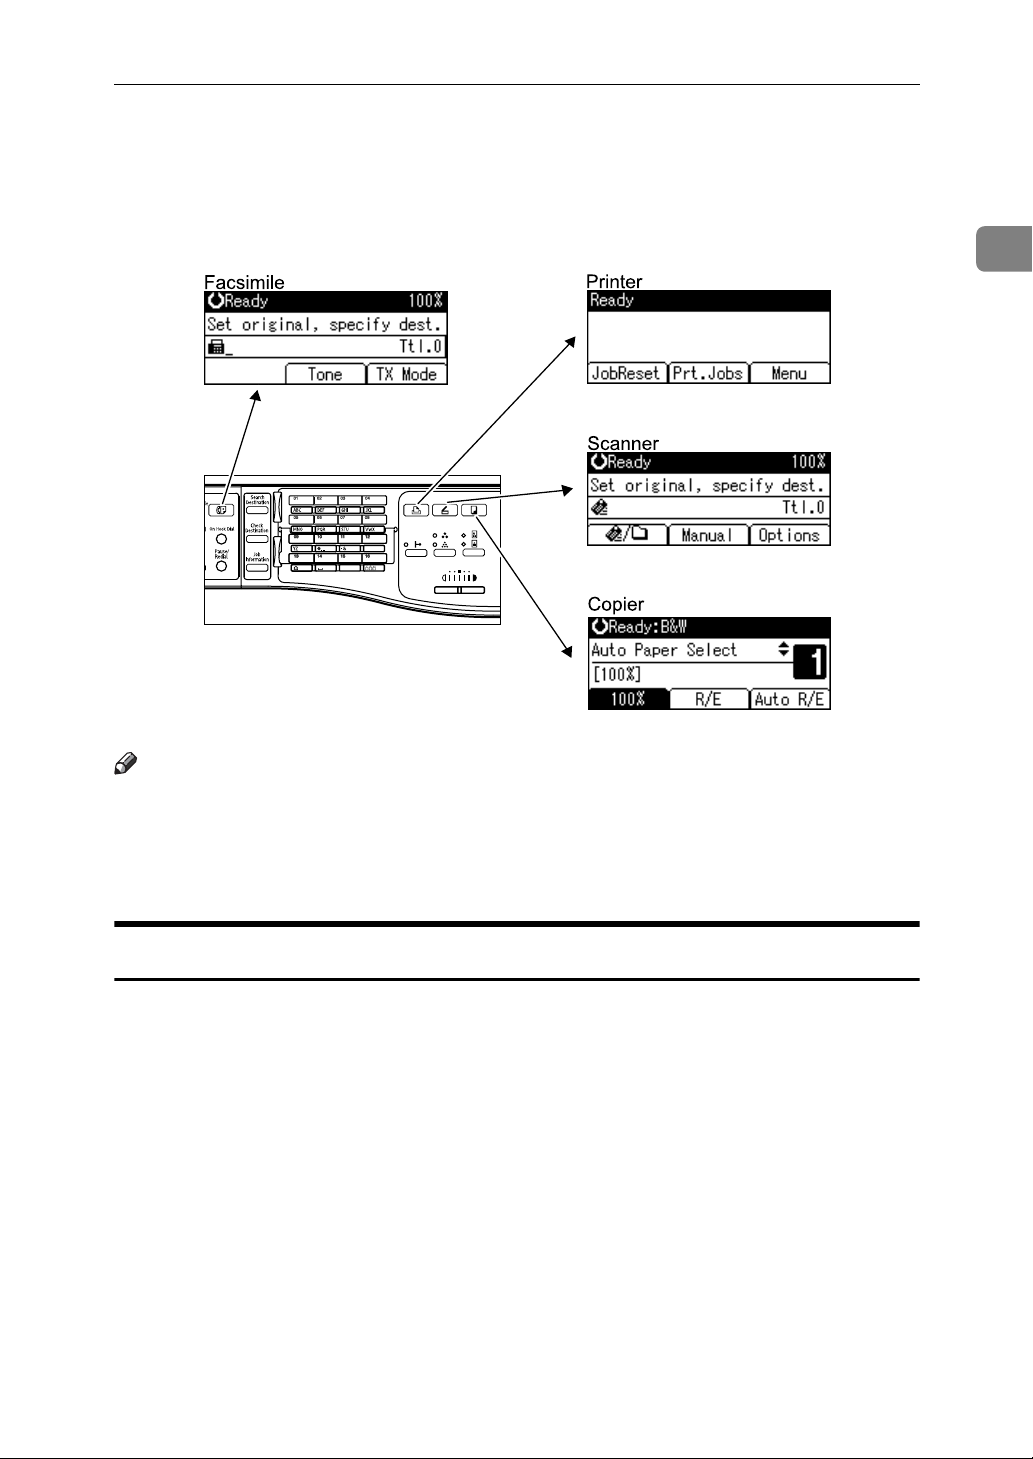
This section explains how to change modes.
Changing Modes
The following illustrations show screens that appear when all options are installed.
BDU010S
Note
❒ You cannot switch modes when accessing User Tools.
1
❒ The copy display is set as the default screen when the machine is turned on.
You can change this default setting under Function Priority. See “System Settings”, General Settings Guide.
System Reset
This section explains System Reset.
After finishing a job, the machine waits a specified length of time and then restores its settings to the default values specified under Function Priority. This
function is called “System Reset”. For procedure for specifying default settings
under Function Priority, see “System Settings”, General Settings Guide.
To change the length of time that the machine waits before restoring its settings
to their default values, use the System Auto Reset Timer setting. See “System
Settings”, General Settings Guide.
25
Page 42
Getting Started
Turning On/Off the Power
This section discusses how to turn on/off the power.
1
❖ Power supply
This machine has two power switches: Operation switch and main power
switch.
• Operation switch (right side of the control panel)
Press to activate the machine. When the machine has finished warming up,
you can make use of each function.
• Main power switch (backside of the machine)
Turning off this switch makes the main power indicator on the right side
of the control panel go off. When this is done, machine power is completely
off.
When the fax unit (optional) is installed, fax files in memory may be lost if
you turn this switch off. Use this switch only when necessary.
Note
❒ This machine automatically enters Sleep Mode and reduces its power con-
sumption if you do not use it for a while with its power “On”. To specify the
time that the machine waits before it enters Sleep mode, configure the Auto
Off Timer setting. See “System Settings”, General Settings Guide.
Turning On the Main Power
Turn on the main power as follows:
Important
❒ Do not turn off the main power switch immediately after turning it on. Doing
so may result in damage to the hard disk or memory or nozzle clogging due
to dried head, leading to malfunctions.
A Make sure the power code is firmly plugged into the wall outlet.
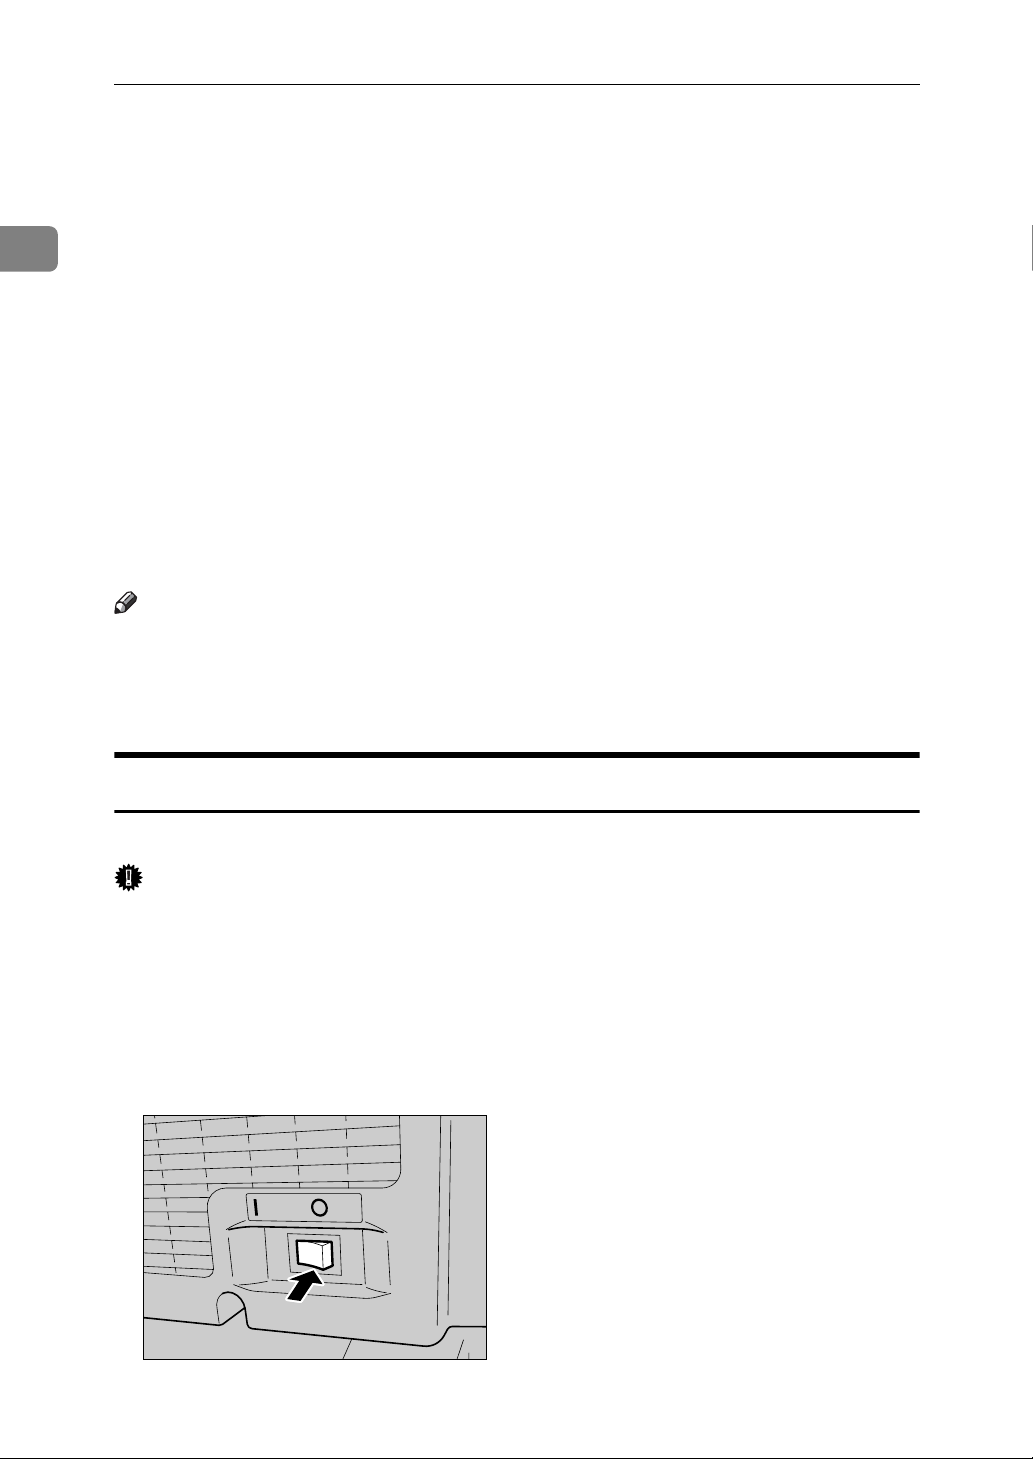
B Turn on (“a”) the main power switch at the back of the machine.
The main power indicator goes on.
ALZ018S
26
Page 43
Turning On/Off the Power
Note
❒ When the message “Restart is required due to a functional er-
ror.” is displayed, follow the instructions and press [Restart] at the bottom
right-hand corner of the screen after the process is completed.
❒ If the “
See “Where to Put Your Machine”, Troubleshooting.
❒ If you have inadvertently set “Set Date” to a date in the future, the machine
may take longer than usual to start printing or to initialize after being
switched on. If this is the case, do not switch the machine off; instead, wait
about 10 minutes.
Temperature Alert” message appears, check the installation site.
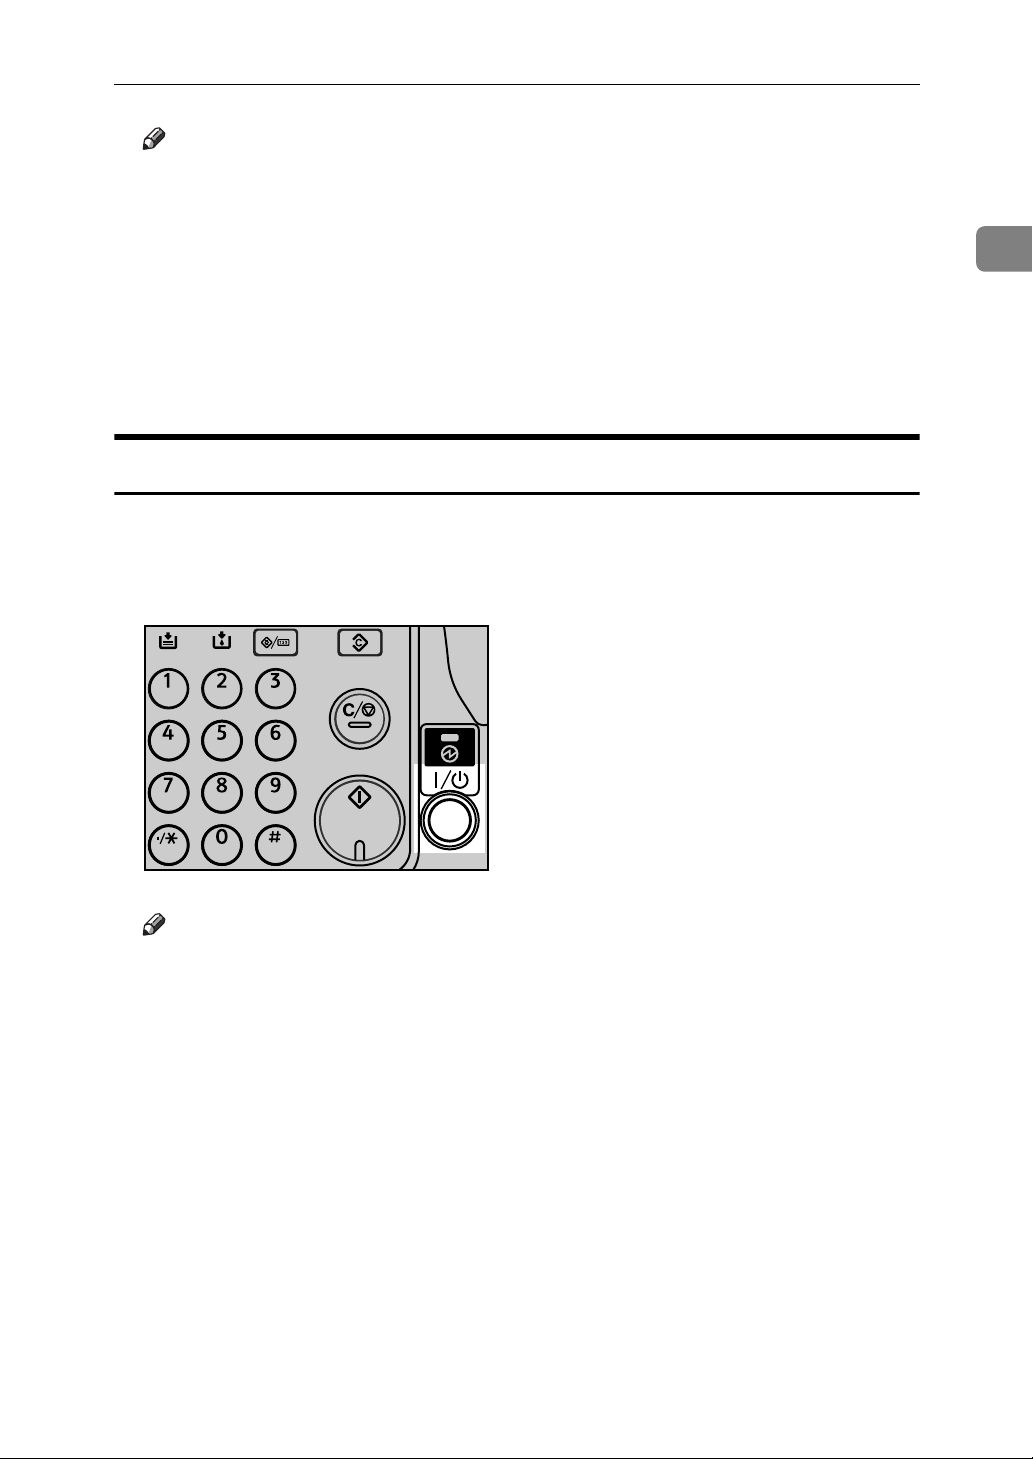
Turning On the Power
Turn on the power as follows:
A Press the operation switch.
The operation switch indicator goes on.
1
BDU008S
Note
❒ If the power does not come on when the operation switch is pressed, check
the main power switch is on. If it is off, turn it on.
27
Page 44
Getting Started
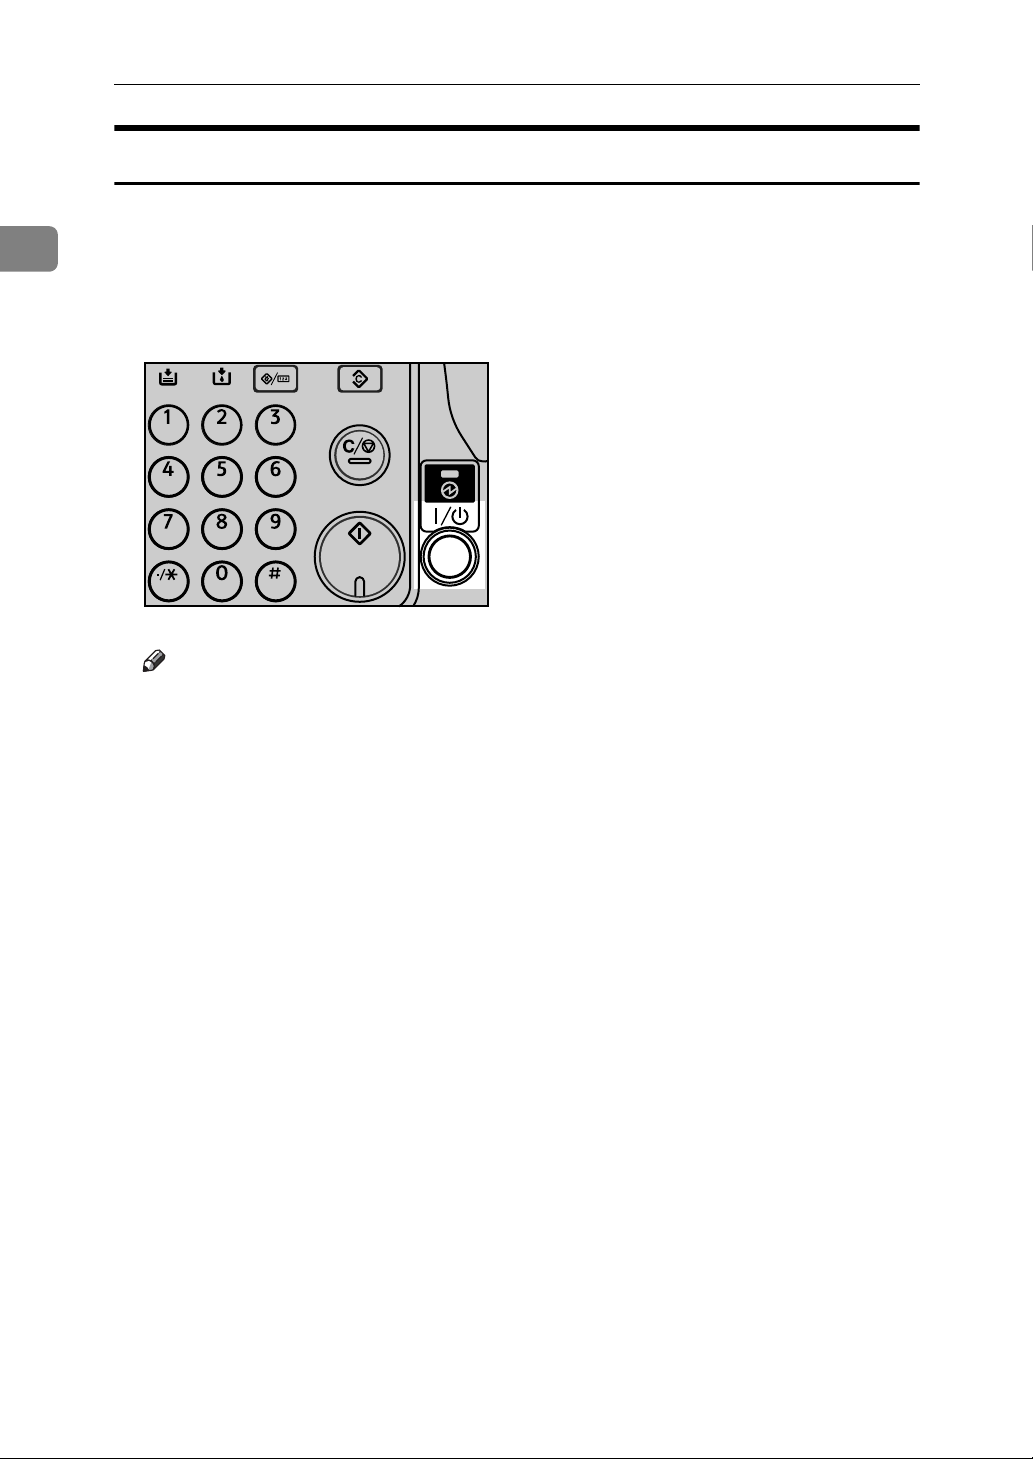
Turning Off the Power
Turn off the power as follows:
1
A Make sure the exposure glass cover, ADF, or ARDF is lowered.
B Press the operation switch.
The operation switch indicator goes off.
BDU008S
Note
❒ Even if you press the operation switch, the operation switch indicator does
not go out, but flashes in the following cases:
• When the exposure glass cover, ADF, or ARDF is open.
• During communication with external equipment.
• When the Function Upgrade Option is active.
• When the print-head is being capped.
• When ink is being supplied.
28
Page 45

Turning Off the Main Power
Turn off the main power as follows:
Turning On/Off the Power
Important
❒ If the operation switch indicator is lit or flashing, do not turn off the main power
switch. Doing so might damage the hard disk or memory, leading to malfunctions.
❒ When the machine finishes printing, it covers its print-heads. Before turning
the machine off, allow the machine 10 seconds to cover its print-heads after
finishing printing.
❒ Make sure to turn off the main power switch before pulling out the power plug. Not
doing so may result in damage to the hard disk or memory, leading to malfunctions.
A Make sure the operation switch indicator is not lit.
B Turn off the main power switch at the back of the machine.
The main power indicator goes off.
Note
❒ When the main power switch is turned off while using the fax function,
waiting fax and print jobs may be canceled, and incoming fax documents
may not be received. If you have to turn off this switch for some reason,
make sure 100% is shown as available memory on the screen before turning off the main power switch or unplugging the power cord. Fax files in
memory are deleted twelve hours after you turn off the main power switch
or unplug the power cord. For details, see “Turning Off the Main Power /
In the Event of Power Failure”, Troubleshooting.
❒ The operation switch indicator does not go off, but flashes in direct dialing
mode even if you press the operation switch. When this happens, check the
items below, and turn off the main power switch.
• the computer is not controlling the machine.
• the machine is not receiving a fax.
1
29
Page 46

1
Getting Started
Saving Energy
This section explains the machine's energy saving function.
This machine has the following energy saving function.
❖ Auto off
This machine automatically enters Sleep mode and reduces its power consumption if you do not use it for a while. This function is called “Auto off”.
You can specify how long the machine remains idle before switching to Sleep
mode under Auto Off Timer. See “System Settings”, General Settings Guide.
Note
❒ The Auto Off function will not operate in the following cases:
• When a warning message is displayed
• When the service call message is displayed
• When paper is jammed
• When the cover is open
• When the “
Add Ink” message is displayed
• When ink is being replenished
• When the User Tools/Counter/Inquiry screen is displayed
• When the facsimile, printer, or other functions are active
• When operations were suspended during printing
• When the On-hook dialing function is in use
• When the address list or group dial is being used
• When the Data In indicator is on or flashing
30
Page 47
2. Entering Text
This section describes how to enter characters.
Entering Text
When you enter a character, it appears at the cursor position. If there is a character already at the cursor position, the newly entered character appears before
it.
Available Characters
You can enter the following characters:
• Alphabetic characters
•Symbols
•Numerals
0123456789
Keys
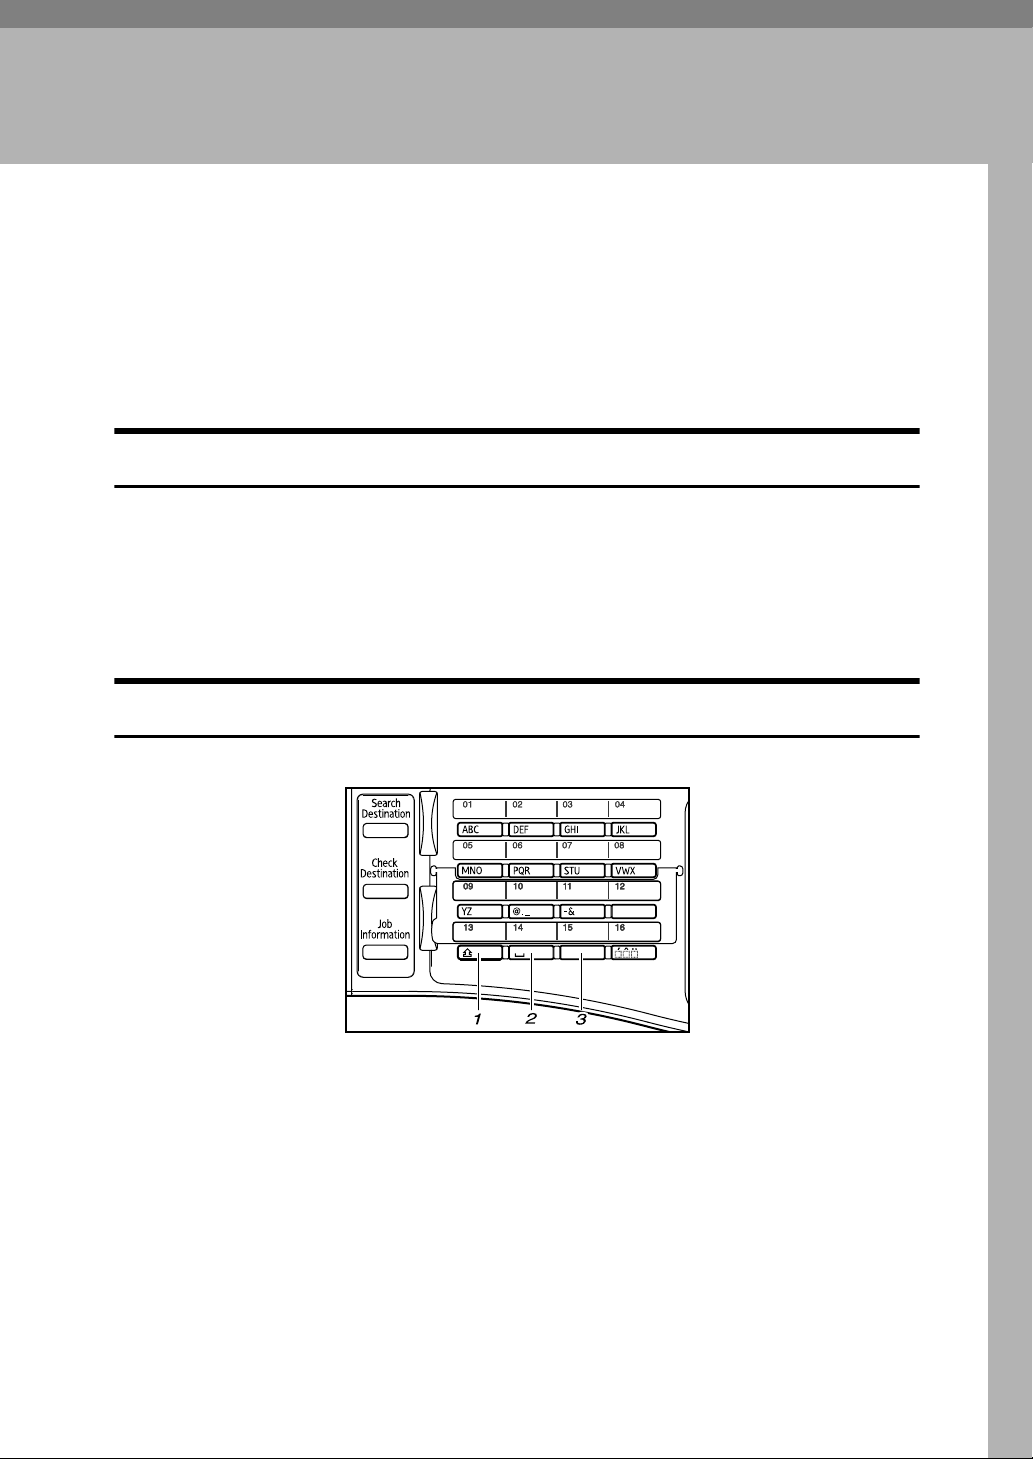
1. {Shift} key ({Quick Dial 13/29} key)
Press to switch between uppercase, lowercase, User Text, and Cyrillic characters.
2. {Space} key ({Quick Dial 14/30} key)
Press to enter a space.
BDU011S
3. {Symbols} key ({Quick Dial 15/31}
key)
Press to enter symbols.
31
Page 48
2
Entering Text
❖ Number keys
Use to enter numbers.
❖ {Quick Dial 01/17} key to {Quick Dial 09/25} key (A to Z)
Press these to enter upper and lower case letters.
❖ {Clear/Stop} key
Deletes a character at the cursor position. You can delete a character at the
right end of a line even if the cursor is placed to the right of the character.
❖ Scroll keys
Shifts the cursor up, down, left and right.
Note
❒ Keys are operable when Quick Dial Flip Plate is flipped upward or downward.
❒ For example, the {Quick Dial 01/17} key functions as the {Quick Dial 01} key
when Quick Dial Flip Plate is flipped downward, and it functions as the
{Quick Dial 17} key if the plate is flipped upward.
❒ Cyrillic characters are available with the Keyboard Type D only.
How to Enter Text
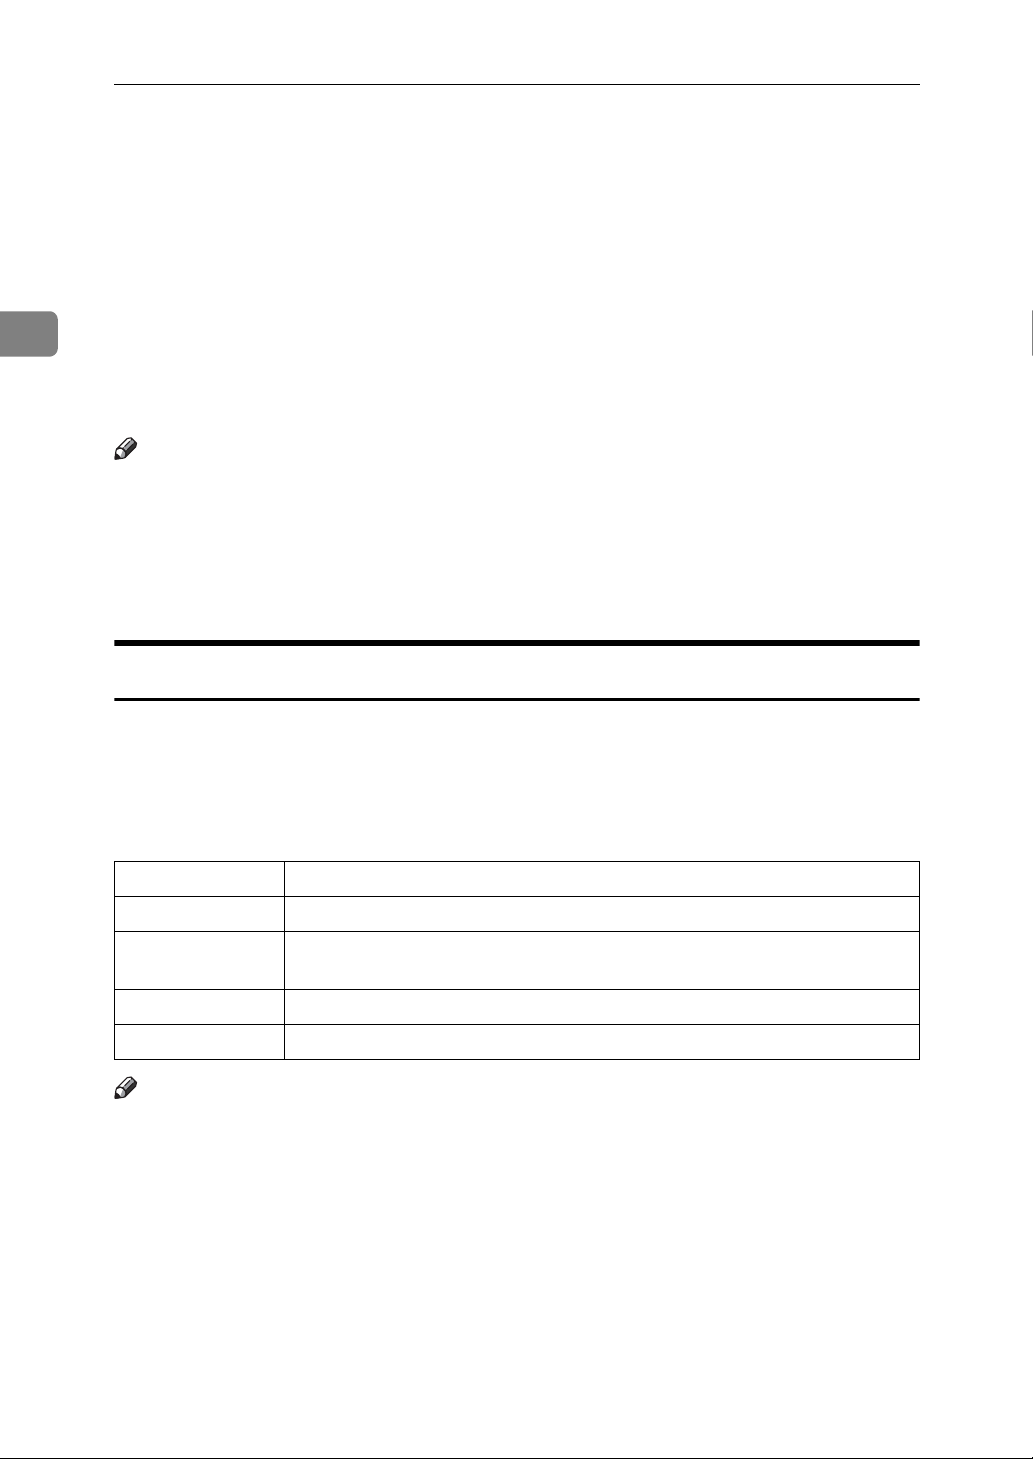
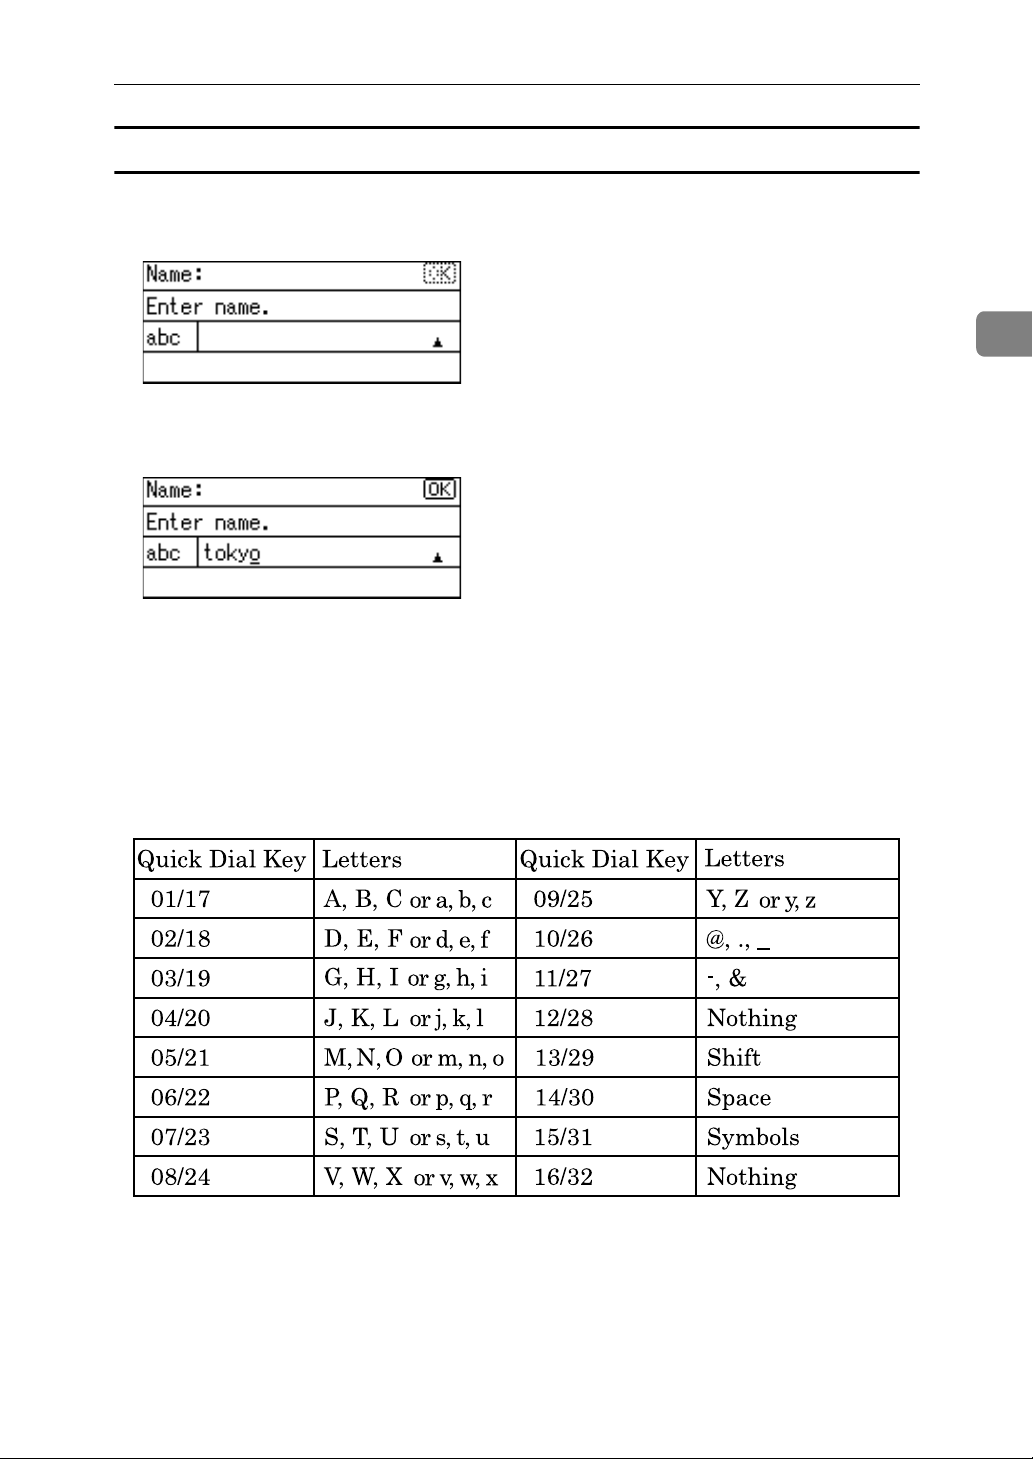
You can enter characters using the {Quick Dial 01/17} to {Quick Dial 09/25} keys. To
enter a letter, press the key repeatedly until the required letter appears.
The language selected using the control panel determines which characters can
be entered. There are four types of keyboard. For each type, you can enter the
characters used in the following languages:
Keyboard Type Language
Type A English
Type B English, French, German, Italian, Spanish, Dutch, Norwegian, Danish,
Swedish, Portuguese, Finnish
Type C Polish, Hungarian, Czech
Type D Russian
Note
❒ Depending on the machine type or function you are using, some characters
may not be available.
32
Page 49
Entering Text
Entering letters
A Press the {Shift} key to switch between lowercase, uppercase, User Text,
and Cyrillic characters.
B Press the appropriate Quick Dial key repeatedly until the letter that you re-
quire appears.
2
C To enter additional letters, repeat step
If the next letter you want to enter is assigned to the same Quick Dial key,
move the cursor by pressing {V}, and then press the Quick Dial key. The cursor moves to the right and the next letter appears on the display.
❖ Keyboard Type A
.
B
BAN031S
33
Page 50
2
Entering Text
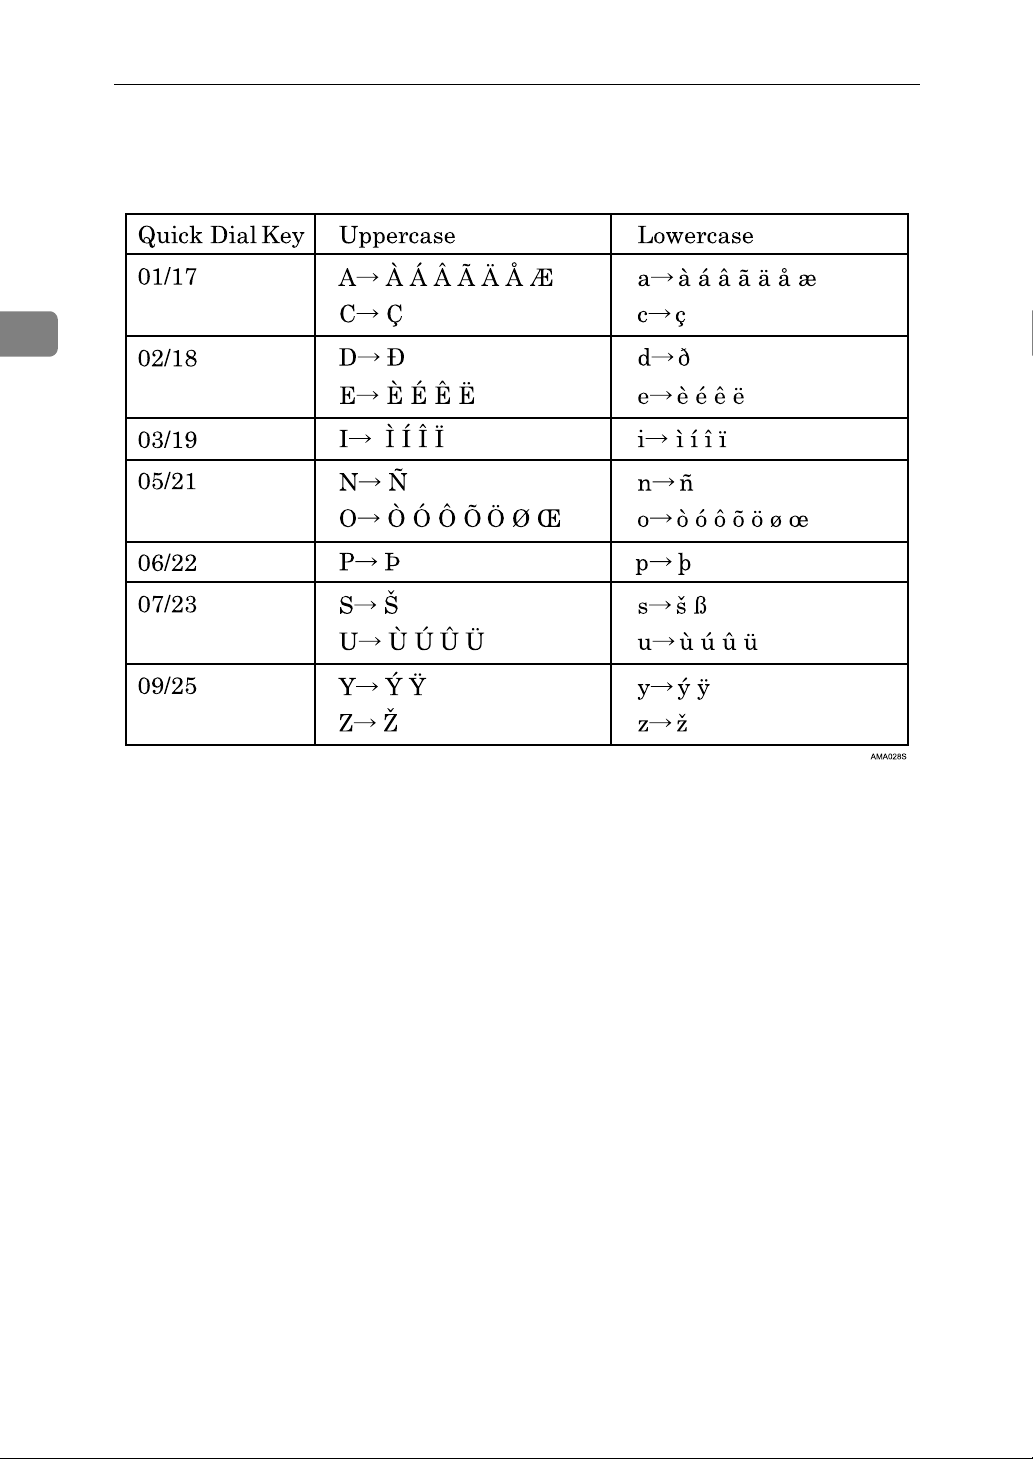
❖ Keyboard Type B
Press one of the following Quick Dial keys to display a basic letter, and
then press the {Quick Dial 16/32} key to select one of its variations.
34
Page 51
Entering Text
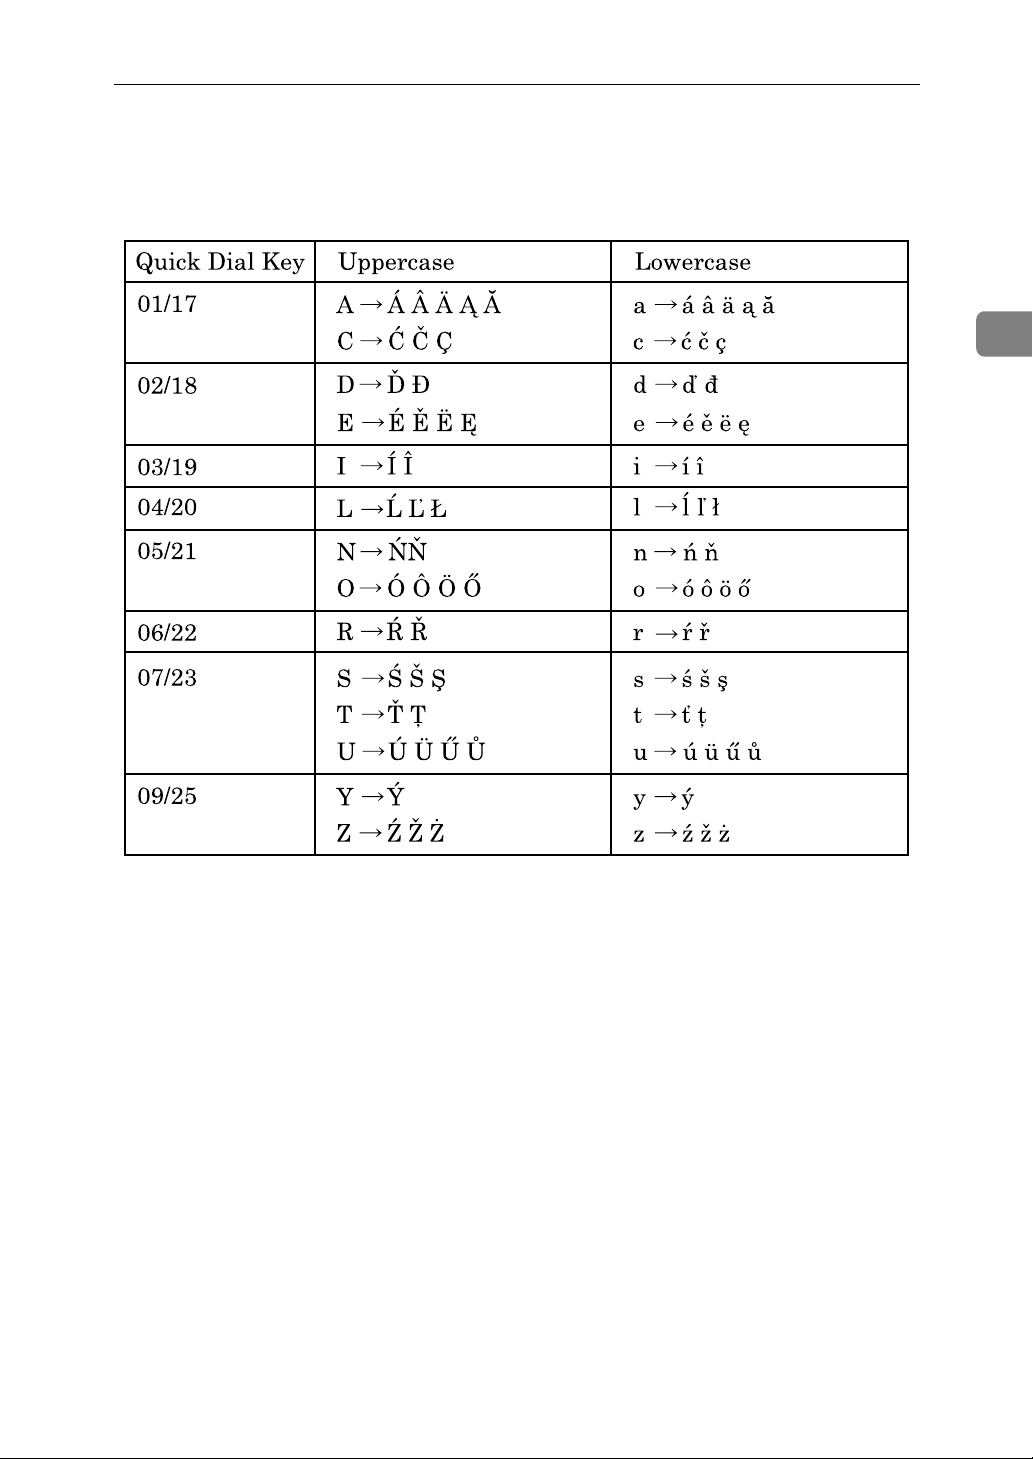
❖ Keyboard Type C
This keyboard type allows you to enter Polish, Hungarian, and Czech letters. Press one of the following Quick Dial keys to display a basic letter,
and then press the {Quick Dial 16/32} key to select one of its variations.
2
ARB028S
35
Page 52
2
Entering Text
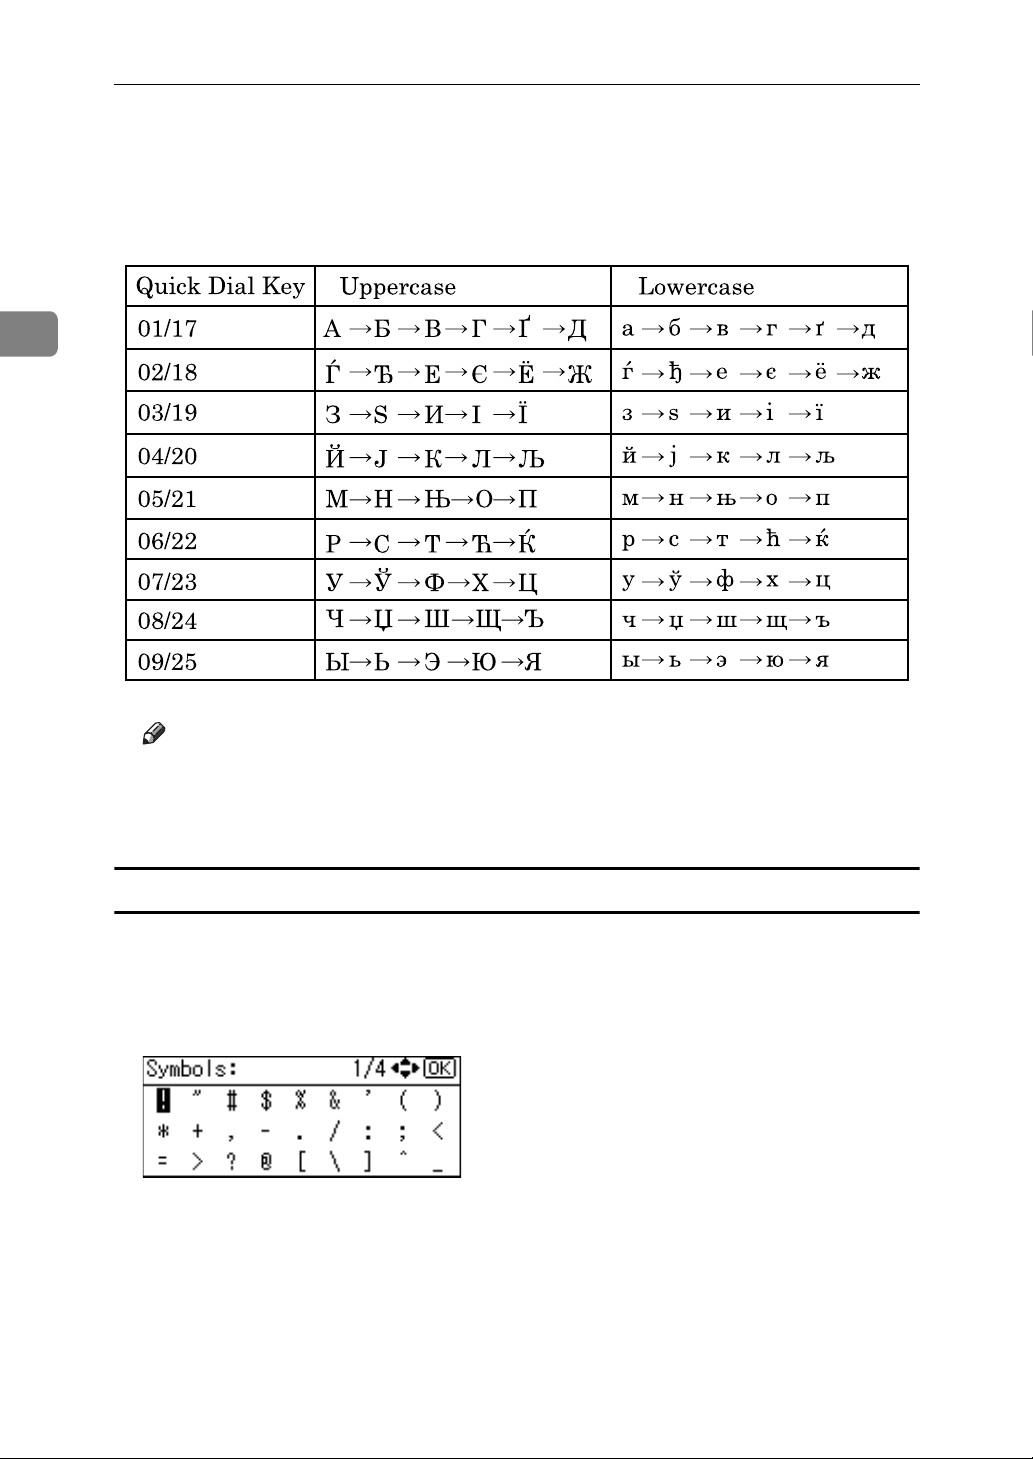
❖ Keyboard Type D
This keyboard type allows you to enter Russian letters. Press the {Shift}
key to enter Cyrillic character mode. To enter a letter, press the corresponding Quick Dial key indicated in the table below. Press the key repeatedly until the required letter is displayed.
Note
❒ To enter a character repeatedly, press a Quick Dial key again.
❒ To insert a character, press {W} or {V} to move the cursor to the position
you want to enter.
Entering symbols
A Press the {Symbols} key.
Symbols appear.
B Select a symbol using the scroll keys.
C Press the {OK} key.
This will enter the symbol and shift the cursor.
ARB029S
36
Page 53
Entering Text
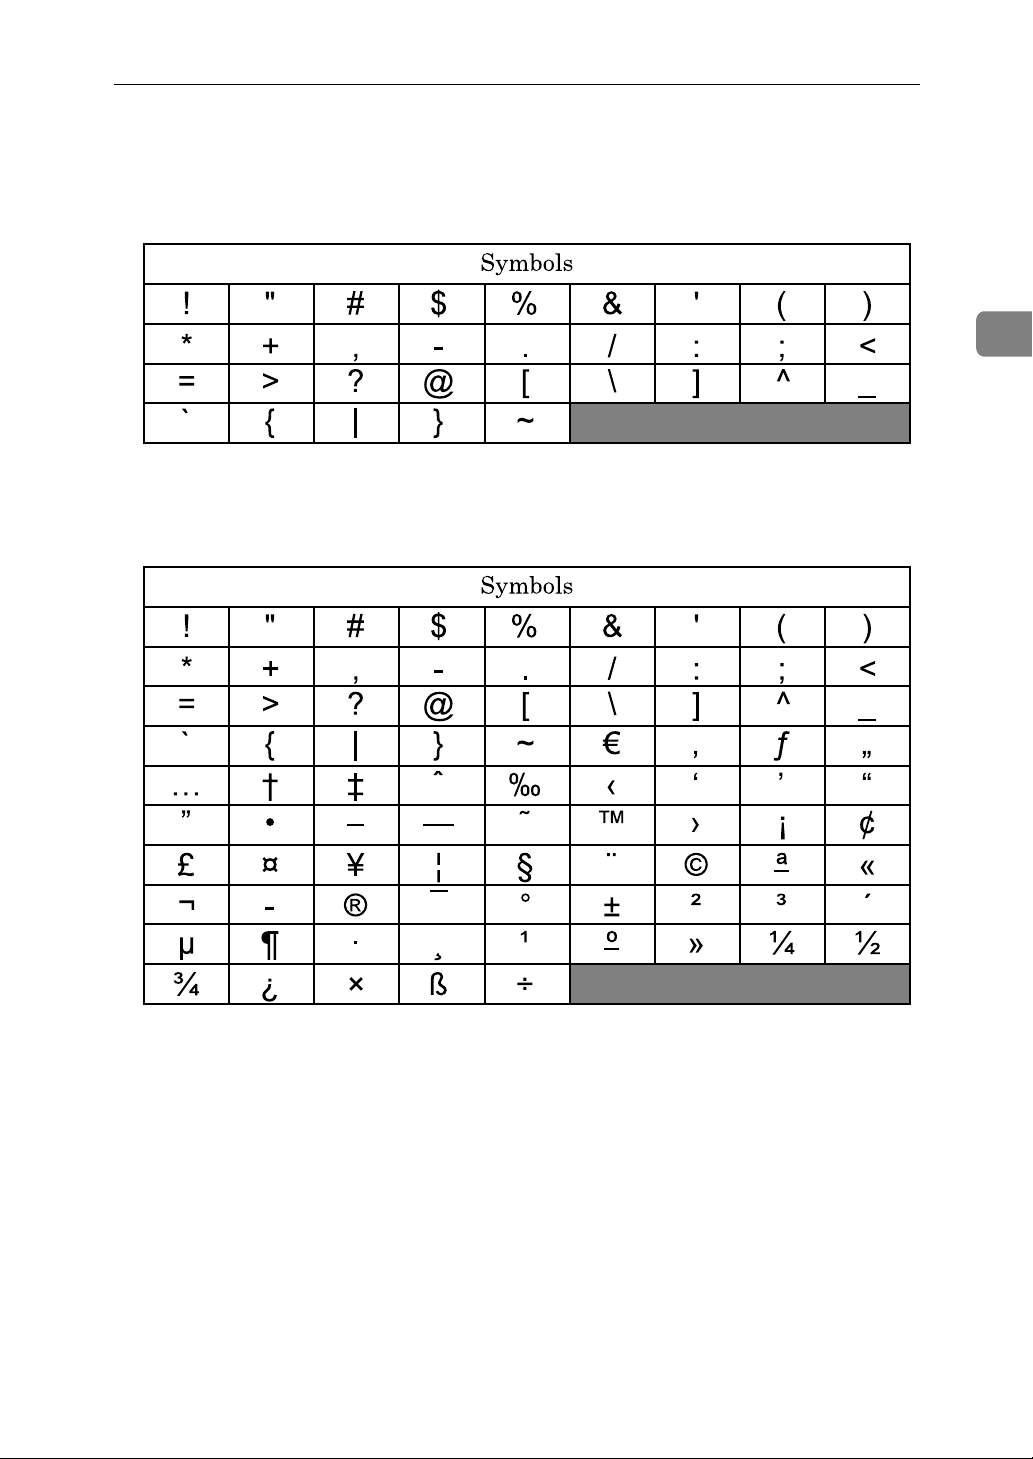
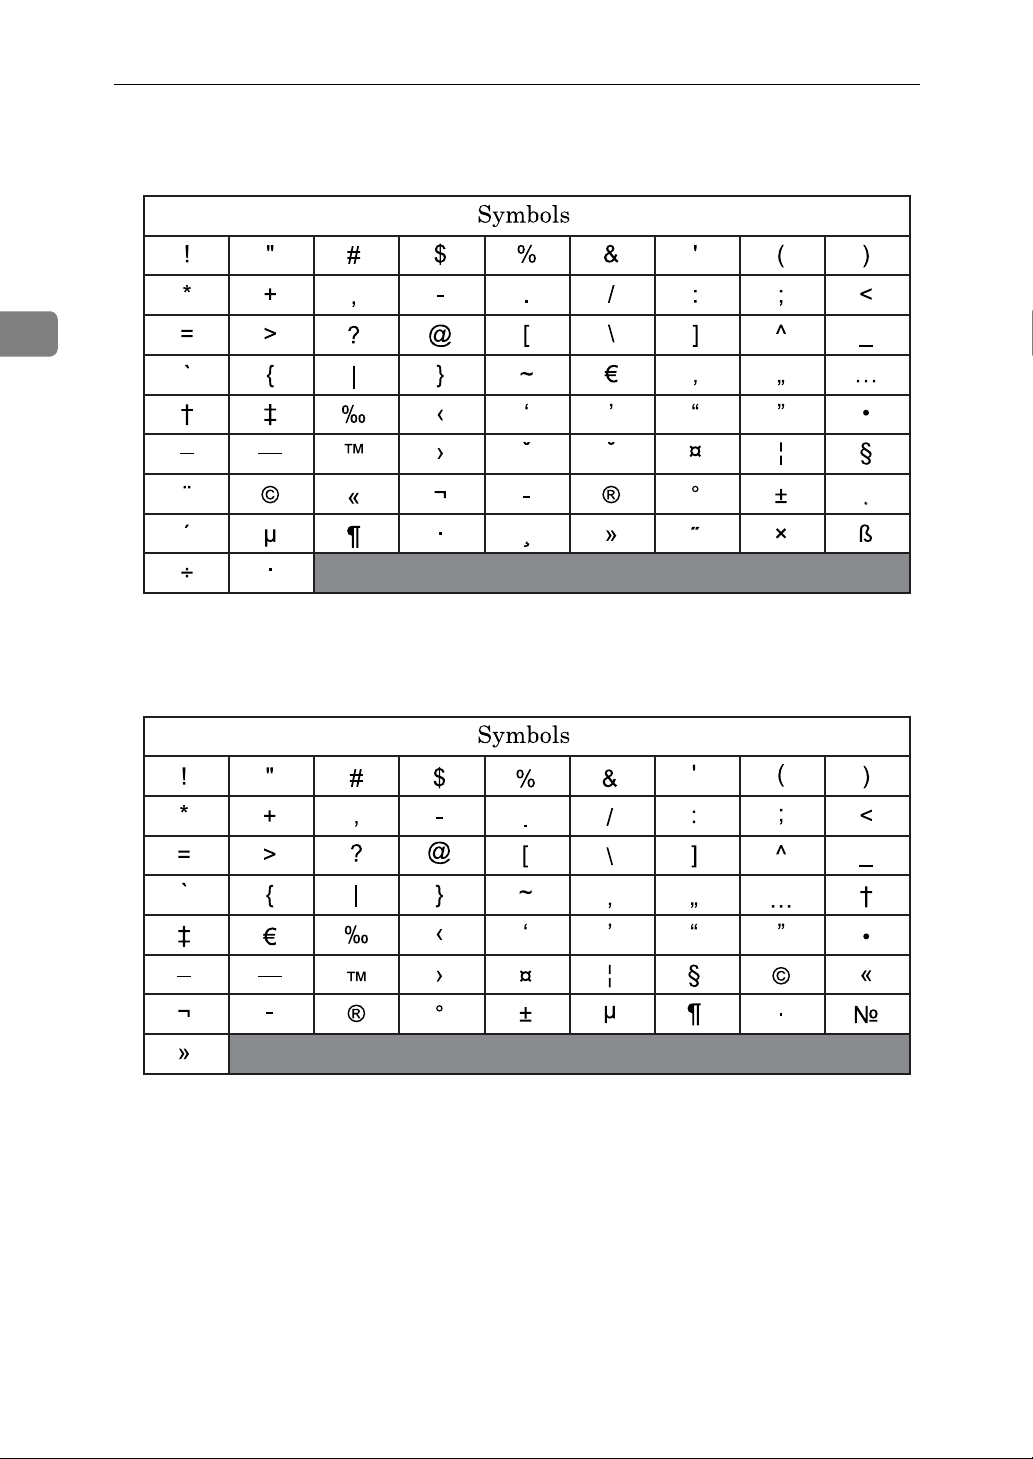
Depending on the selected keyboard type, you can enter the following symbols.
❖ Keyboard Type A
BAN033S
❖ Keyboard Type B
2
BAN021S
37
Page 54
2
Entering Text
❖ Keyboard Type C
AMA033S
❖ Keyboard Type D
AMA034S
38
Page 55
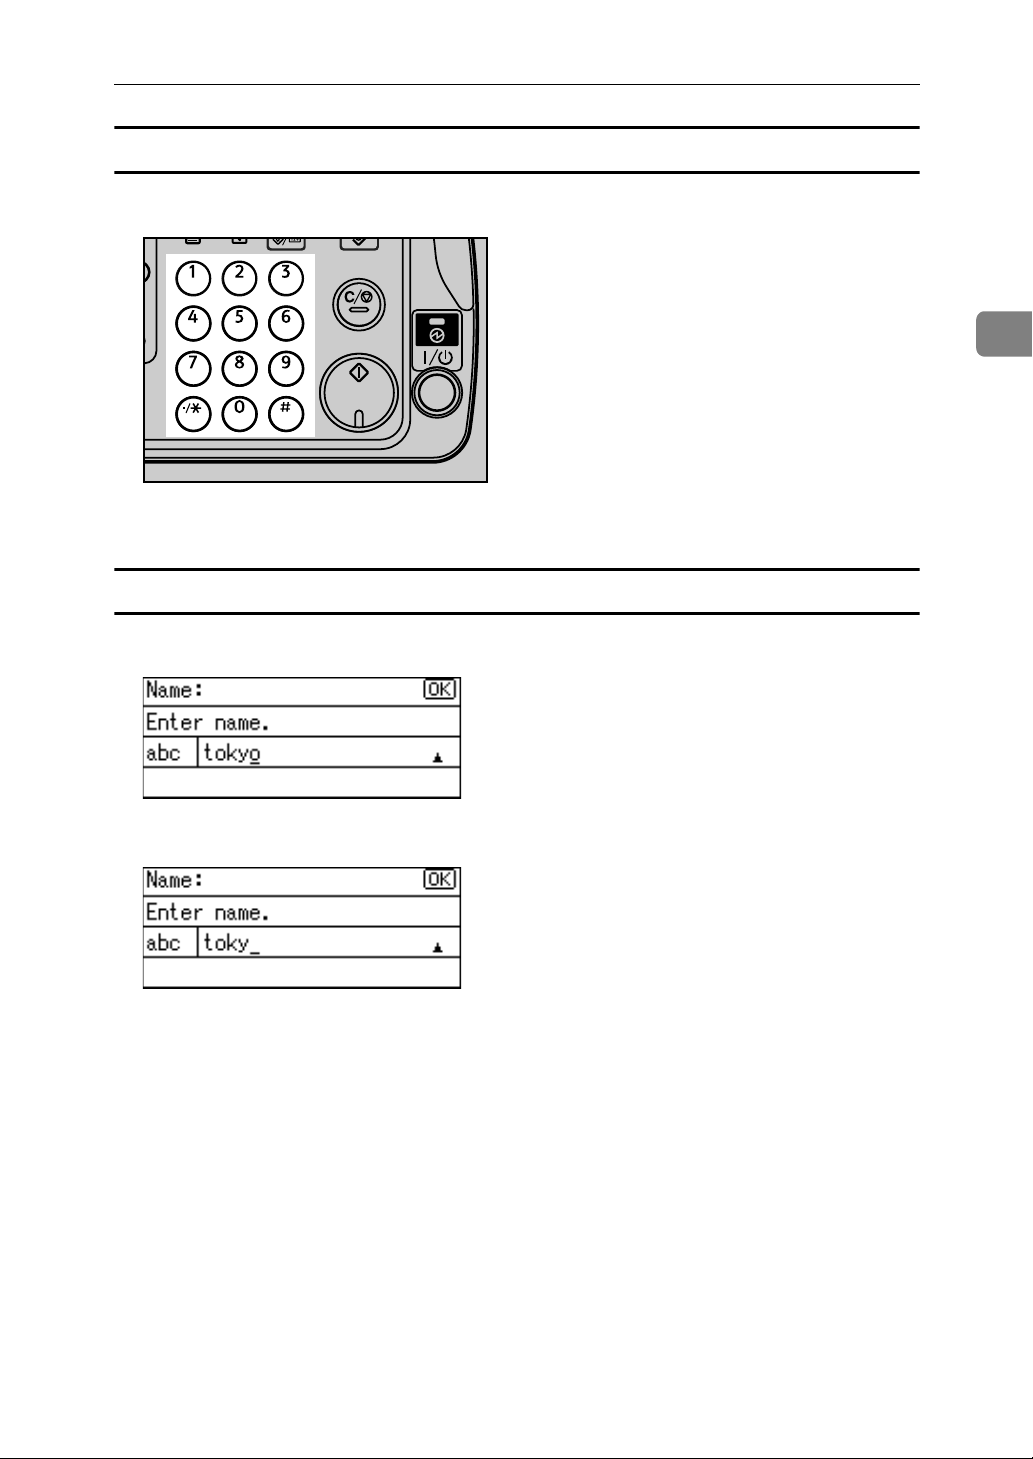
Entering numbers
A Press the number keys.
BDU009S
The number is entered and the cursor moves.
Deleting characters
Entering Text
2
A Use {W} or {V} to move the cursor to the character you want to delete.
B Press the {Clear/Stop} key.
This will delete the character at the cursor position. You can delete a character
at the right end of a line even if the cursor is placed to the right of the character.
39
Page 56
2
Entering Text
Adding user text
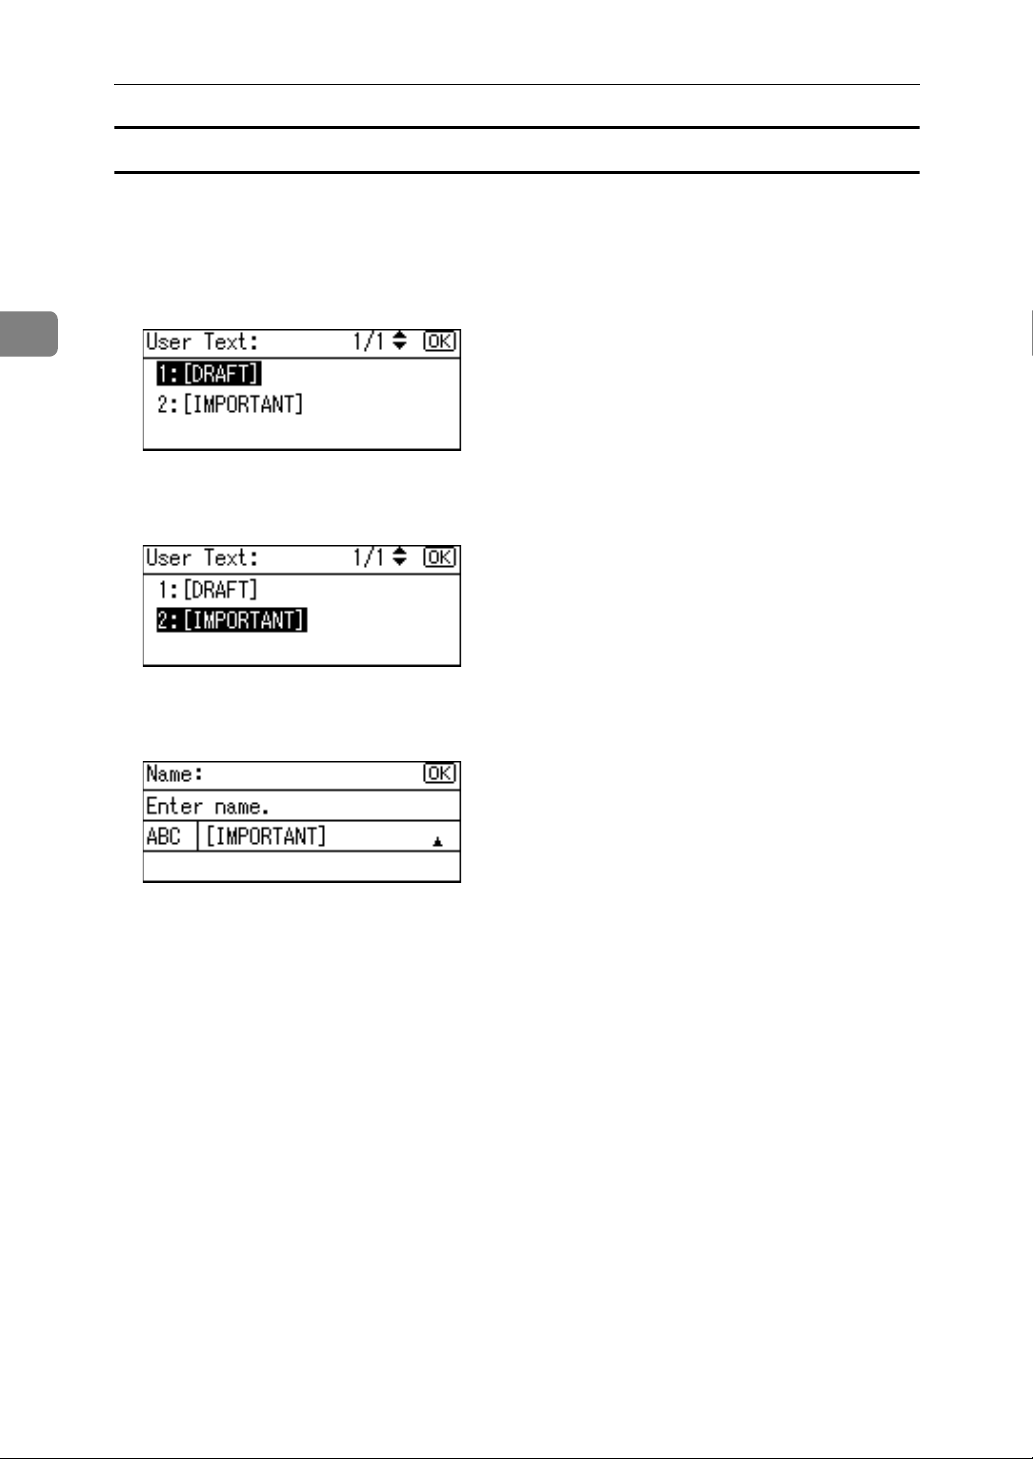
You can select and use a User Text that is registered in [Prog/Change/Del User Text].
For the registration procedure under Prog/Change/Del User Text, see “System
Settings”, General Settings Guide.
A Press the {Shift} key repeatedly to display [User Text].
B Select the text you want to add using {U} or {T}, and then press the {OK}
key.
C To modify the selected text, press the Quick Dial keys to enter letters, and
then press the {OK} key.
40
Page 57
3. Appendix
R
R
This section describes Dos and Don'ts, the provided CD-ROMs, specifications,
and copy paper.
Dos and Don'ts
The following information should be kept in mind during use of this machine.
WARNING:
• Keep the machine away from flammable liquids, gases, and aerosols.
A fire or an electric shock might occur.
CAUTION:
• Unplug the power cord from the wall outlet before you move the machine.
While moving the machine, you should take care that the power cord will not
be damaged under the machine.
Important
❒ If the operation switch indicator is lit or flashing, do not turn off the main
power switch. Doing so might damage the hard disk or memory, or cause ink
in the print-head to dry, clogging the nozzles.
❒ Before unplugging the power cord or turning off the main power switch,
make sure remaining memory space is at 100%, as shown on the screen. See
“Turning Off the Main Power”.
❒ After scanning originals continuously, the exposure glass may become warm,
this is not a malfunction.
❒ The area around the ventilation hole might feel warm. This is caused by ex-
haust air and is not a malfunction.
❒ When the machine is not in use and in stand-by mode, you may hear a small
noise inside. This is caused by the image stabilization process and is not a
malfunction.
❒ Do not turn off the power when the machine is in operation.
❒ The machine might not produce good copy/print images if condensation
forms inside as a result of rapid temperature change.
❒ Do not open the covers of the machine when it is in operation. If you do, mis-
feeds might occur.
❒ Do not move the machine when the power is on.
❒ If you operate the machine improperly or a machine failure occurs, settings
might be lost. Be sure to make a note of your machine settings.
❒ The supplier shall not be liable for any loss or damage resulting from mechan-
ical failure, loss of settings, or use of the machine.
❒ In addition to printing, ink is also consumed when the machine's power is
turned on, head cleaning is performed, and print cartridges are installed.
41
Page 58

Appendix
❒ The machine uses more ink when cold.
❒ A change in temperature or humidity may cause condensation to form, which
can affect print quality.
❒ By using the optional anti-condensation heaters, you can minimize condensa-
tion when using the machine in a climate where daytime and nighttime temperatures differ greatly.
Reference
p.29 “Turning Off the Main Power”
3
Saving Colour Copies
This section explains notes on saving colour copies.
• Like most prints, colour prints will fade if exposed to strong light or dampness and humidity for lengthy periods. Preserve the quality of your copies by
storing them in a binder in a dark, dry place.
• Ink may melt when using solvent type adhesive agents for pasting prints.
42
Page 59

Software and Utilities Included on the CD-ROM
Software and Utilities Included on the CDROM
This section explains the software and utilities included on the CD-ROMs that
are provided with this machine.
Five CD-ROMs come with this machine: “Printer Drivers and Utilities”, “Scanner Driver and Utilities”, “Manuals for Users <General Reference>”, “Manuals
for Users <Facsimile Reference>”, and “Manuals for Administrators <Security
Reference>”. In “Manuals for Users <General Reference>”, operating instructions are stored in PDF format. The “Facsimile Reference” manual is included on
the “Manuals for Users <Facsimile Reference>” CD-ROM. The “Manuals for
Administrators <Security Reference>” CD-ROM that includes Security Reference is for administrators of the machine.
The following are included in these CD-ROMs:
❖ Font Manager
For installing new screen fonts, or organizing and managing fonts already in
the system. For details about Font Manager, see the manual on the CD-ROM
labeled “Printer Drivers and Utilities”.
3
❖ SmartDeviceMonitor for Admin
For the system administrator to manage network printers.
❖ DeskTopBinder-SmartDeviceMonitor for Client
For users to manage their network print status.
❖ Printer Utility for Mac
This utility allows users to download and manage a variety of fonts as well as
manage printers. For details about this utility, see PostScript 3 Supplement.
Viewing the Contents of the CD-ROM
This section explains how to view the contents of the CD-ROMs.
A Insert the CD-ROM into the CD-ROM drive.
The installer starts.
B Click [Browse This CD-ROM].
Explorer starts and displays the contents of the CD-ROM.
43
Page 60
3
Appendix
PDF Manuals
The supplied “Manuals for Users <General Reference>”, “Manuals for Users
<Facsimile Reference>”, and “Manuals for Administrators <Security Reference>” CD-ROMs contain PDF manuals.
A Select a language, and then open the PDF manuals you require.
Note
❒ To view the PDF manuals, you need to have Adobe Acrobat Reader or
Adobe Reader installed on your computer.
Printer Drivers for This Machine
This section explains printer drivers for this machine.
Important
❒ You can install the PCL printer drivers (PCL 5c and PCL 6), the RPCS printer
driver, and the Adobe PostScript printer drivers from the CD-ROM provided
with this machine or download them from the supplier's Web site. If your operating system is Windows XP x64/Vista x64 or Windows Server 2003/2003
R2 x64, you must download the printer drivers from the supplier's Web site.
Select this machine and the operating system you are using, and then download them.
Printing requires installation of a printer driver for your operating system. The
following drivers are included on the CD-ROM labeled “Printer Drivers and
Utilities”.
44
Printer Language PCL 6 PCL 5c RPCS PostScript 3
Windows 2000
Windows XP
Windows Vista
Windows Server 2003
Mac OS
Mac OS X
*1
Microsoft Windows 2000 Professional
*1
*2
*3
*5
*6
OK OK OK OK
OK OK OK OK
OK OK OK -
*4
OK OK OK OK
--- OK
--- OK
Microsoft Windows 2000 Server
Microsoft Windows 2000 Advanced Server
*2
Microsoft Windows XP Professional
Microsoft Windows XP Home Edition
*3
Microsoft Windows Vista Ultimate
Microsoft Windows Vista Enterprise
Microsoft Windows Vista Business
Microsoft Windows Vista Home Premium
Microsoft Windows Vista Home Basic
Page 61

Software and Utilities Included on the CD-ROM
*4
Microsoft Windows Server 2003 Standard Edition
Microsoft Windows Server 2003 Enterprise Edition
Microsoft Windows Server 2003 Web Edition
Microsoft Windows Server 2003 Datacenter Edition
Microsoft Windows Server 2003 R2 Standard Edition
Microsoft Windows Server 2003 R2 Enterprise Edition
Microsoft Windows Server 2003 R2 Datacenter Edition
*5
Versions 8.6 to 9.2 of the Mac OS (Mac OS X Classic mode is supported.)
*6
Mac OS X 10.1 or later (Native mode)
❖ PCL printer drivers
Two kinds of PCL printer driver (PCL 5c and PCL 6) are included. These drivers
allow your computer to communicate with this machine via a printer language.
❖ RPCS printer driver
This printer driver allows the computer to communicate with the printer using a printer language. In addition to the conventional user interface, another
preset user interface is provided.
❖ Adobe PostScript Printer Drivers and PPD files
Adobe PostScript printer drivers allow the computer to communicate with
the printer using a printer language. PPD files allow the printer driver to enable specific printer functions.
3
❖ PPD files
PPD files allow the printer driver to enable specific printer functions.
Note
❒ Some applications may require installation of the PCL 5c printer driver. In
this case, you can install PCL 5c without having to install PCL6.
TWAIN Driver
This section describes the file path to and system requirements of the TWAIN driver.
This driver is required to scan an original using a scanner. To use the machine
as a network TWAIN scanner, this driver must be installed.
❖ File path
The driver is included on the CD-ROM labeled “Scanner Driver and Utilities”
provided with this machine:
\DRIVERS\TWAIN
❖ System requirements
•Hardware
PC/AT-compatible machines that support the following operating system properly
• Operating system
Windows 2000/XP/Vista
Windows Server 2003/2003 R2
• Display resolution
800 × 600 pixels, 256 colours or higher
45
Page 62

3
Appendix
LAN-Fax Driver
This section describes the file path and system requirements of the LAN-Fax
driver.
This driver allows you to use LAN-Fax functions.
❖ File path
The driver is included in the following folders on the CD-ROM labeled “Scanner Driver and Utilities”:
\DRIVERS\LAN-FAX\XP_VISTA
❖ System requirements
•Hardware
PC/AT-compatible
• Operating systems
Windows 2000/XP/Vista
Windows Server 2003/2003 R2
•Display
VGA 640 × 480 pixels or more
Note
❒ Before beginning installation, exit all other applications.
46
Page 63

Software and Utilities Included on the CD-ROM
DeskTopBinder Lite
This section explains the file path and system requirements of DeskTopBinder Lite.
DeskTopBinder is to be installed on the client computers for integration and
management of various kinds of files such as scan files, files created with applications, and existing scan files. This software allows you to use various functions
for stored scan files such as viewing stored files. Also, with the ScanRouter delivery software, you can view the files stored in in-trays of the delivery server or
use other functions for stored files.
For details about the software installed with DeskTopBinder Lite, see “Software
Supplied on CD-ROM”, Scanner Reference.
❖ File path
The software is included in the following folder on the CD-ROM labeled
“Scanner Driver and Utilities” provided with this machine:
\UTILITY\DESKV2
❖ System requirements
•Hardware
PC/AT-compatible machines that support the operating system properly
• Operating system
When installing all functions of DeskTopBinder:
Windows 98SE/Me/2000 SP1 or later/XP/Vista
Windows Server 2003/2003 R2
When installing only SmartDeviceMonitor for Client:
Windows 95 SP1/98/Me/2000 SP1 or later/XP/Vista
Windows Server 2003/2003 R2
Windows NT 4.0 SP5 or later
3
47
Page 64
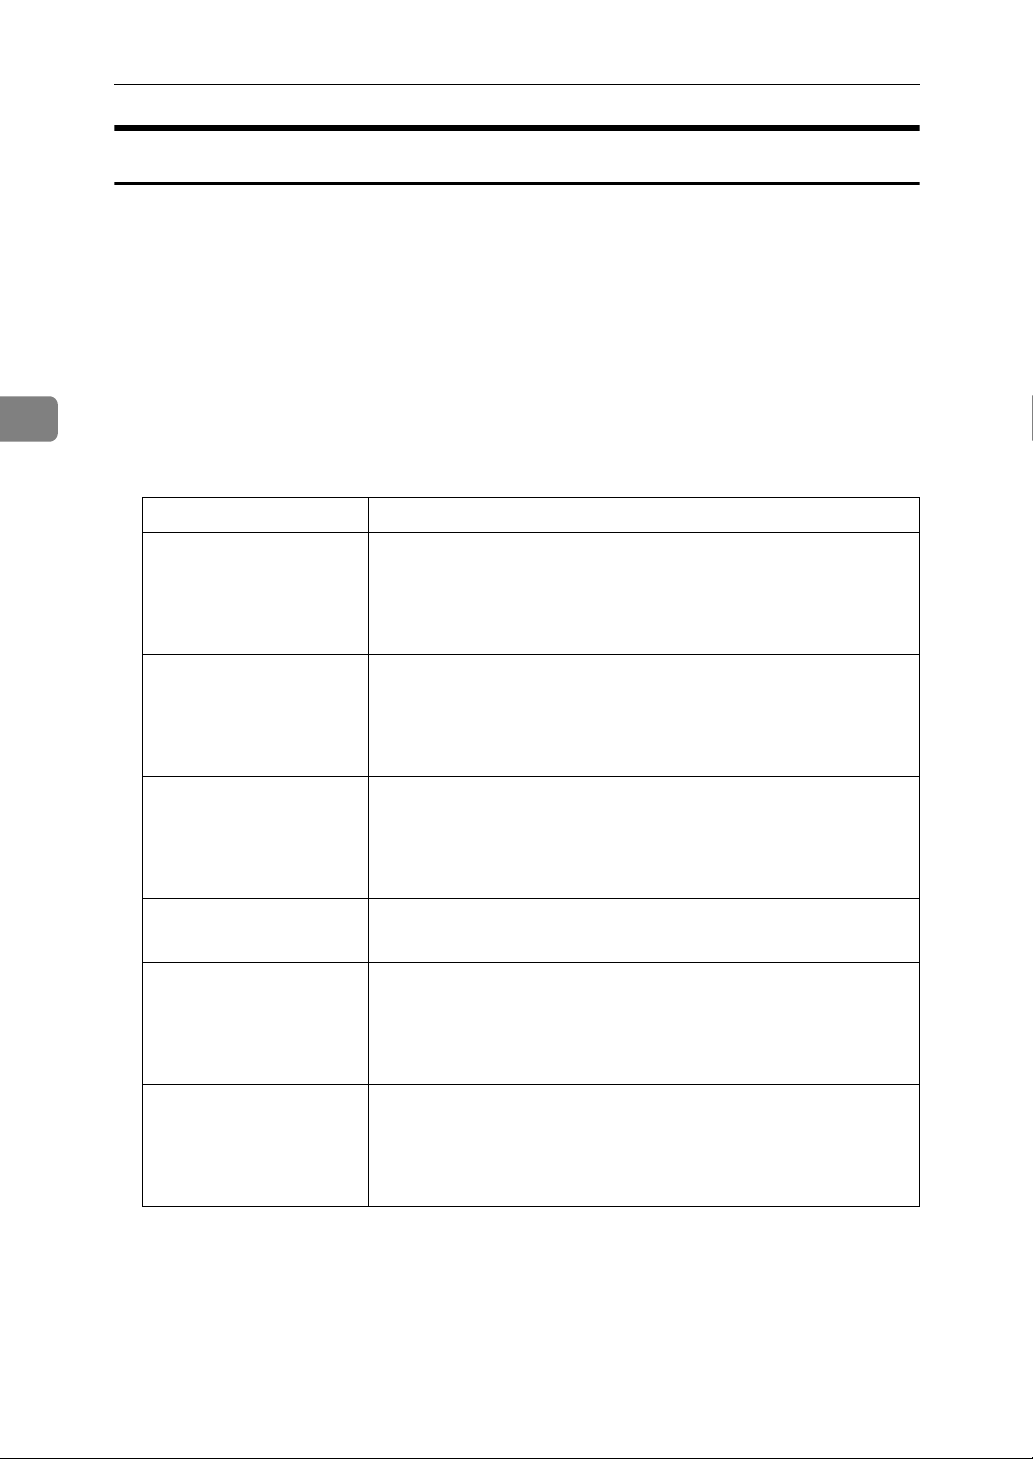
3
Appendix
SmartDeviceMonitor for Admin
This section describes the file path and available functions of SmartDeviceMonitor for Admin.
SmartDeviceMonitor for Admin is an application that uses TCP/IP and
IPX/SPX to monitor network printers. It can monitor multiple network printers
using their IP addresses. We recommend that network administrators use this
application.
❖ File path
SmartDeviceMonitor for Admin is stored in the following folder on the CDROM labeled “Printer Drivers and Utilities”:
NETWORK\DEVMON\ADMIN\DISK1
Operating system Protocol stack
Windows 95 / 98 / Me TCP/IP provided with Windows 95 / 98 / Me
IPX/SPX provided with Windows 95 / 98 / Me
NetWare Client provided with Windows 95 / 98
Novell Client provided with Windows 95 / 98
Windows 2000 TCP/IP provided with Windows 2000
IPX/SPX provided with Windows 2000
NetWare Client provided with Windows 2000
Novell Client provided with Windows 2000 or Windows NT
Windows XP TCP/IP provided with Windows XP
IPX/SPX provided with Windows XP
NetWare Client provided with Windows XP
Novell Client provided with Windows XP
Windows Vista TCP/IP provided with Windows Vista
Novell Client provided with Windows Vista
Windows Server
2003/2003 R2
Windows NT 4.0 TCP/IP provided with Windows NT
TCP/IP provided with Windows Server 2003/2003 R2
IPX/SPX provided with Windows Server 2003/2003 R2
NetWare Client provided with Windows Server 2003/2003 R2
Novell Client provided with Windows Server 2003/2003 R2
IPX/SPX provided with Windows NT
Client Service for NetWare provided with Windows NT
Novell Client provided with Windows 2000 or Windows NT
❖ Available functions
SmartDeviceMonitor for Admin has the functions to check the followings:
48
• Printer supplies such as paper or ink
• Results of print jobs executed from the computer.
Page 65

Software and Utilities Included on the CD-ROM
DeskTopBinder-SmartDeviceMonitor for Client
This section describes the file path and system requirements of DeskTopBinderSmartDeviceMonitor for Client.
DeskTopBinder-SmartDeviceMonitor for Client allows you to manage and print
various data such as files created with an application, images scanned with a
scanner, and existing images as one document.
❖ File path
DeskTopBinder-SmartDeviceMonitor for Client is stored in the following
folder on the CD-ROM labeled “Scanner Driver and Utilities”:
NETWORK\DEVMON\CLIENT\DISK1
❖ System requirements
•Hardware
PC/AT-compatible
• Operating systems
Windows 95 SP1/98SE/Me/2000 SP1 or later/XP/Vista
Windows Server 2003/2003 R2
Windows NT 4.0 SP5 or later
3
Note
❒ See “Software Supplied on CD-ROM”, Scanner Reference or Help of Desk-
TopBinder-SmartDeviceMonitor for Client.
❒ DeskTopBinder includes SmartDeviceMonitor for Client. See Help of Desk-
TopBinder-SmartDeviceMonitor for Client.
49
Page 66

Appendix
Specifications for the Main Unit
This section describes the specifications for the main unit.
❖ Configuration:
Desktop
❖ Original scanning:
One-dimensional solid scanning system through CCD
3
❖ Copy process:
GelSprinter
❖ Resolution:
600 dpi
❖ Exposure glass:
Stationary original exposure type
❖ Warm-up time:
20 seconds or less
❖ Maximum original size:
A3L, 11 × 17L
❖ Paper size:
• Paper tray: A3L - A5K, 11 × 17L - 51/2 × 81/2L
•Bypass tray: A3L - A6L, 11 × 17L - 5
• One-sheet bypass tray: A3L - A6L, 11 × 17L - 5
1
/2 × 81/2L
❖ Paper weight:
• Paper tray: 60 - 105 g/m2, 16 - 28 lb.
2
• Bypass tray: 60 - 162 g/m
• One-sheet bypass tray: 60 - 264 g/m
• Duplex unit: 60 - 105 g/m
, 16 - 43 lb.
2
, 16 - 28 lb.
2
, 16 - 70 lb.
1
/2 × 81/2L
❖ Non-reproduction area (Copier):
• Leading edge: 1.5 - 5.0 mm, 0.1 - 0.2 inch
• Trailing edge: 0.5 - 6.0 mm, 0.1 - 0.3 inch
• Left edge: 0.5 - 4.0 mm, 0.1 - 0.2 inch
• Right edge: 0.5 - 4.0 mm, 0.1 - 0.2 inch
❖ First copy time:
• Colour: 20 seconds or less (A4K, 81/2 × 11K 100%, feeding from Tray 1)
• B&W: 9 seconds or less (A4K, 8
50
1
/2 × 11K 100%, feeding from Tray 1)
Page 67
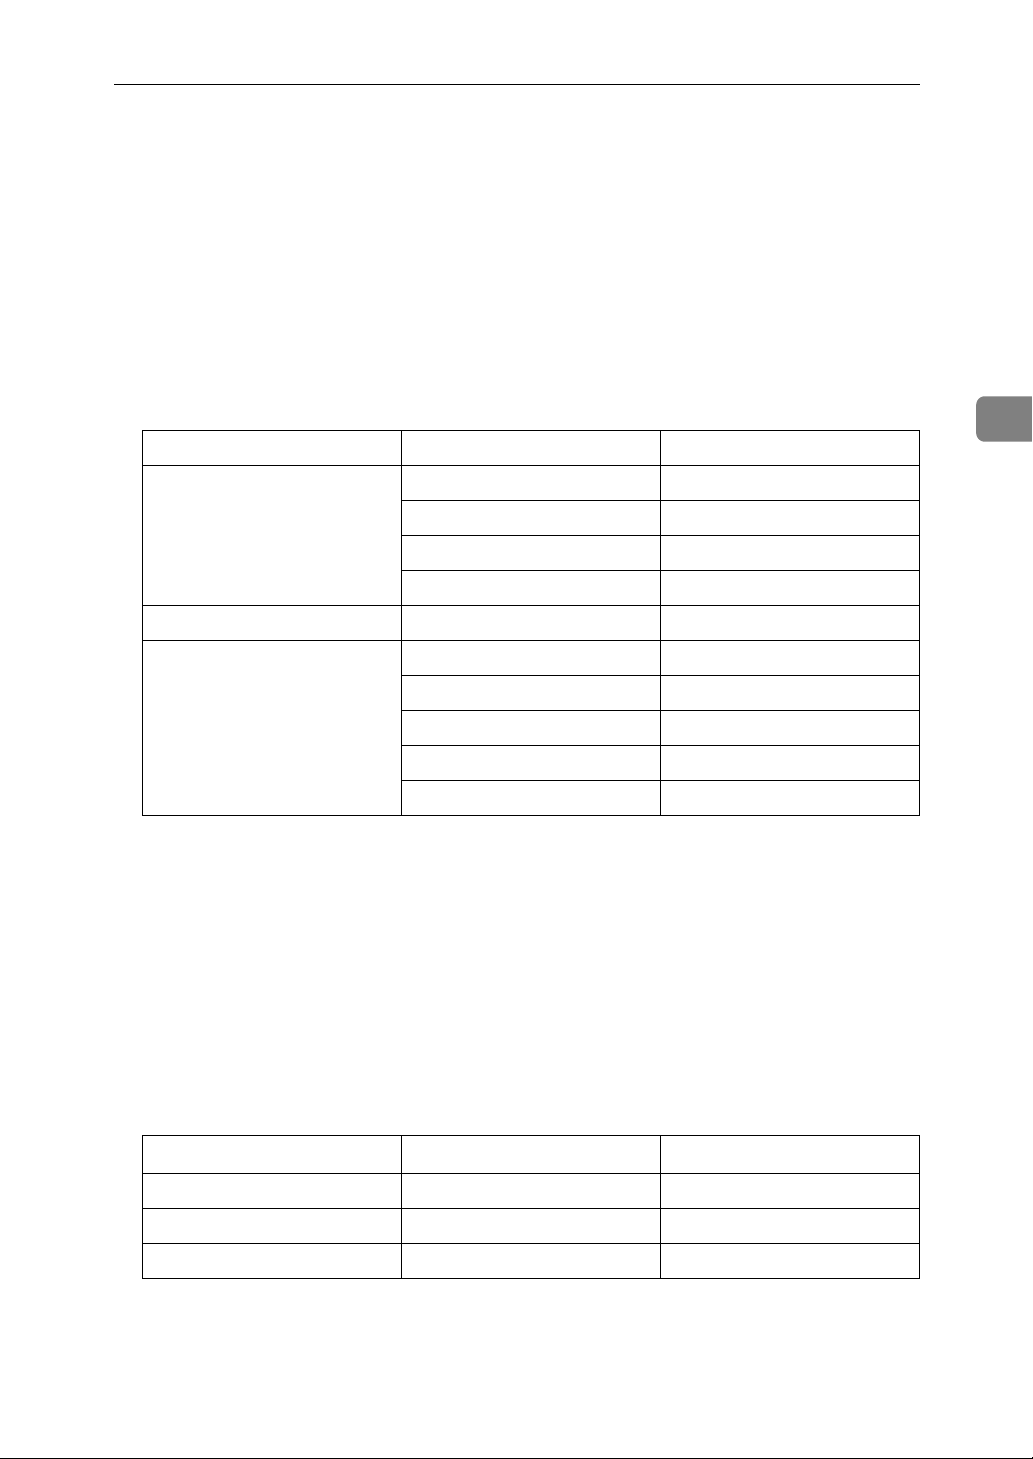
Specifications for the Main Unit
❖ Copying speed:
• Colour: 4 copies/minute (A3L, 11 × 17L, with the Function upgrade option)
• Colour: 3 copies/minute (A3L, 11 × 17L, without the Function upgrade
option)
• B&W: 9 copies/minute (A3L, 11 × 17L)
1
• Colour: 8 copies/minute (A4K, 8
• B&W: 18 copies/minute (A4K, 8
/2 × 11K)
1
/2 × 11K)
❖ Reproduction ratio:
Preset reproduction ratios:
Metric version Inch version
Enlargement 400% 400%
200% 155%
141% 129%
122% 121%
Full size 100% 100%
3
Reduction 93% 93%
82% 78%
71% 65%
50% 50%
25% 25%
Zoom: From 25 to 400% in 1% steps.
❖ Maximum continuous copy run:
1 - 99 copies
❖ Paper capacity:
• Tray 1: 250 sheets (80 g/m2, 20 lb.)
2
• Bypass tray: 100 sheets (80 g/m
, 20 lb.)
• One-sheet bypass tray: 1 sheet
❖ Power consumption:
Main unit only
Stand-by about 42 W about 50 W
During printing about 90 W about 155 W
Complete system
*1
Maximum less than 130 W less than 250 W
*1
The complete system consists of the main unit, ARDF, fax unit, USB host interface
unit, IEEE 1284 interface board, Function Upgrade Option, Copy Data Security
Unit, duplex unit, and Lower Paper Trays.
51
Page 68
3
Appendix
❖ Dimensions (W × D × H up to exposure glass):
550 × 729 × 485 mm, 21.7 × 31.2 × 19.1 inches
❖ Space for main unit (W × D):
550 × 729 mm, 21.7 × 31.2 inches
❖ Noise emission:
• Sound power level
Main unit only Complete system
Stand-by 40.0 dB (A) or less 40.0 dB (A) or less
During printing 62.0 dB (A) or less 66.0 dB (A) or less
• Sound pressure level
Main unit only Complete system
Stand-by 34.0 dB (A) or less 34.0 dB (A) or less
During printing 56.0 dB (A) or less -
• Sound power level and sound pressure level are actual values measured in
accordance with ISO 7779.
Sound pressure level is measured from the position of the bystander. Values are for reference only.
The complete system consists of the main unit, ARDF, fax unit, USB host
interface unit, IEEE 1284 interface board, Function Upgrade Option, Copy
Data Security Unit, duplex unit, and Lower Paper Trays.
❖ Weight:
52 kg (115 lb.) or less
Note
❒ Specifications are subject to change without notice.
52
Page 69

Specifications for Options
Specifications for Options
This section describes the specifications for the options to be externally installed
to the machine body.
Specification values represent the values when the copy function is used. Specification values may vary depending on the function used.
Exposure Glass Cover
Lower this over originals for copying.
Auto Document Feeder (ADF)
❖ Mode:
•ADF mode
❖ Original size:
•A3L - A5KL
• 11 × 17L - 5
❖ Original weight:
• One-sided originals: 52 - 105 g/m2 (14 - 28 lb.)
❖ Number of originals to be set:
• 30 sheets (80 g/m2, 20 lb.)
❖ Maximum power consumption:
• less than 25 W (Power is supplied from the main unit.)
❖ Dimensions (W × D × H):
1
/2 × 81/2KL
3
• 550 × 470 × 90 mm, 21.7 × 18.6 × 3.6 inches
❖ Weight:
• 7 kg (15 lb.) or less
Note
❒ Specifications are subject to change without notice.
53
Page 70

Appendix
Auto Document Feeder capable of scanning both sides of a sheet (ARDF)
❖ Original size:
•A3L - A5KL
1
• 11 × 17L - 5
❖ Original weight:
/2 × 81/2KL
3
• One-sided originals: 40 - 128 g/m2 (10 - 34 lb.)
2
• Two-sided originals: 64 - 105 g/m
(17 - 28 lb.) (Duplex)
❖ Number of originals to be set:
• 50 sheets (80 g/m2, 20 lb.)
❖ Maximum power consumption:
• less than 50 W (Power is supplied from the main unit.)
❖ Dimensions (W × D × H):
• 550 × 470 × 130 mm, 21.7 × 18.6 × 5.2 inches
❖ Weight:
• 10 kg (22 lb.) or less
Note
❒ Specifications are subject to change without notice.
Duplex Unit
❖ Paper size:
A3L, B4 JIS (Japanese Industrial Standard)L, A4KL, B5 JISKL, A5KL,
11 × 17L, 8
1
8
/4 × 14L, 81/4 × 13L, 8KL, 16KKL
1
/2 × 14L, 81/2 × 11KL, 71/4 × 101/2L, 8 × 13L, 81/2 × 13L,
❖ Paper weight:
60 - 105 g/m2 (16 - 28 lb.)
Note
❒ Specifications are subject to change without notice.
54
Page 71

Specifications for Options
Lower Paper Tray (1-tray type)
❖ Paper weight:
60 - 105 g/m2 (16 - 28 lb.)
❖ Paper size:
A3L, B4 JISL, A4KL, B5 JISKL, A5L, 11 × 17L, 81/2 × 14L, 81/2 × 13L,
1
8
/2 × 11KL, 51/2 × 81/2L, 81/4 × 13L, 8 × 13L, 81/4 × 14L, 8KL, 16KKL
❖ Maximum power consumption:
23 W (Power is supplied from the main unit.)
❖ Paper capacity:
500 sheets (80 g/m2, 20 lb.)
❖ Dimensions (W × D × H):
550 × 520 × 134 mm, 21.7 × 20.5 × 5.36 inches
❖ Weight:
17 kg (37.5 lb.) or less
3
Note
❒ Specifications are subject to change without notice.
Lower Paper Trays (2-tray type)
❖ Paper weight:
60 - 105 g/m2 (16 - 28 lb.)
❖ Paper size:
A3L, B4 JISL, A4KL, B5 JISKL, A5L, 11 × 17L, 81/2 × 14L, 81/2 × 13L,
1
8
/2 × 11KL, 51/2 × 81/2L, 81/4 × 13L, 8 × 13L, 81/4 × 14L, 8KL, 16KKL
❖ Maximum power consumption:
28 W (Power is supplied from the main unit.)
❖ Paper capacity:
500 sheets (80 g/m2, 20 lb.) × 2 trays
❖ Dimensions (W × D × H):
550 × 520 × 271 mm, 21.7 × 20.5 × 10.7 inches
❖ Weight:
25 kg (55 lb.) or less
Note
❒ Specifications are subject to change without notice.
55
Page 72

Appendix
Function Upgrade Option
You can increase the machine's functionality by installing this option.
IEEE 1284 Interface Board
❖ Transmission spec.:
IEEE 1284
3
❖ Required cable:
Standard IEEE 1284 compliant Micro Centronics 36 pin cable
Wireless LAN Board
❖ Transmission spec.:
Based on IEEE 802.11b (wireless LAN)
❖ Protocol:
TCP/IP, IPX/SPX, AppleTalk
Note
❒ SmartDeviceMonitor and Web Image Monitor are supported.
❖ Data transfer speed:
Auto select from the following speeds:
1 Mbps, 2 Mbps, 5.5 Mbps, 11 Mbps
❖ Frequency range:
2412 - 2472 MHz (1 - 13 channels)
❖ Transmission mode:
Ad hoc, and infrastructure mode
56
Page 73

Specifications for Options
Bluetooth Interface Unit
❖ Supported Profiles:
• SPP (Serial Port Profile)
• HCRP (Hardcopy Cable Replacement Profile)
• BIP (Basic Imaging Profile)
❖ Frequency Range:
2.45 GHz ISM band
❖ Data Transmission Speed:
723 kbps
Note
❒ The transmission speed is adjusted according to factors such as the dis-
tance and obstacles between the devices, radio signal condition and Bluetooth adaptor.
❖ Maximum Range:
10 m
3
USB Host Interface Unit
❖ Interface Connector:
USB 2.0 host interface A type
❖ Data Transmission Speed:
12 Mbps (Full speed)
❖ Distance Between Devices:
2.5 m
57
Page 74
Appendix
Recommended Paper Sizes and Types
This section describes recommended paper sizes and types.
The following limitations apply to each tray:
❖ Paper tray 1
3
Paper type and
weight
Standard paper
60 - 105 g/m
(16 - 28 lb.)
A3L, B4 JISL
2
B5 JIS
11
8
8
7
8
8K
Custom size
(Vertical: 148 - 432 mm,
Horizontal: 182 - 297 mm.)
*1
Change the paper size in User Tools, and then set the selector in the paper tray according to the changed paper size.
*2
Cannot be used under the printer function.
Metric version Inch version Paper
*1
, A4
*1
KL
, A5K,
*1
×
17L
1
/4 × 14L
1
/2 × 11K, 81/2 × 51/2K
1
/4 × 101/2L
1
/2 × 13L, 81/4 × 13L
L
*1
, 16K
, 81/2 × 14L
*2
KL
KL
, 81/2 × 11L
*1
, 8 × 13L
*1
,
*1
,
*1
,
*1
,
*1
,
*1
,
*1
A3L
A4
11
8
8
8
8
16K
, B4 JISL
K
, B5 JIS
KL
×
17L, 81/2 × 14L,
1
/4 × 14L
1
/2 × 51/2K
×
13L
1
/4 × 13L
KL
*2
*1
, 81/2 × 13L,
*1
*1
*1
, A4L
*1
, A5K
, 81/2 × 11
*1
, 71/4 × 101/2L
*1
, 8KL
,
*1
*1
KL
Custom size
(Vertical: 5.83 - 17.00 inches,
Horizontal: 7.17 - 11.69 inches.)
,
,
,
*1
,
capacity
250 sheets
❖ Paper tray 2 and 3 (option)
Paper type and
weight
Standard paper
2
60 - 105 g/m
(16 - 28 lb.)
A3L, B4 JISL, A4KL, B5 JISKL
8
8 × 13L
Metric version Inch version Paper
1
/2 × 14L, 81/4 × 14L
*1
, 81/2 × 13L
*1
*1
, 81/2 × 11KL, 51/2 × 81/2L
*1
, 81/4 × 13L
, A5L
*1
, 8KL
*1
, 11 × 17L,
*1
, 16KKL
*1
,
capacity
500 sheets
*1
58
Custom size
(Vertical: 182 - 432 mm,
Horizontal: 148 - 297 mm)
*1
Change the paper size in User Tools, and then set the selector in the paper tray to the
new paper size.
*2
Not usable under the printer function.
Custom size
(Vertical: 7.17 - 17.00 inches,
Horizontal: 5.83 - 11.69 inches.)
Page 75

❖ Bypass tray
Recommended Paper Sizes and Types
Paper type and
weight
Standard paper
2
60 - 105 g/m
(16 - 28 lb.)
Thick paper
105 - 163 g/m
(28 - 43.4 lb.)
Metric version Inch version Paper
A3L, B4 JISL
KL
B5 JIS
L
B6 JIS
1
/2 × 14L
8
1
/2 × 11
8
1
7
/4 × 101/2KL
×
13L, 81/2 × 13L
8
1
8
/4 × 13L
KL
16K
*1
, A5L, A5K
*3
, A6L
*1
, 81/4 × 14L
*1
KL
*1
, 8KL
*1
*1
, A4L, A4K
, 51/2 × 81/2L
*1
Custom size
(Vertical: 90 - 305 mm,
Horizontal: 148 - 457.2 mm.
For printer Vertical: 90 - 305 mm,
Horizontal: 148 - 600 mm.)
A3L, B4 JISL
2
B5 JIS
B6 JIS
1
/2 × 14L
8
1
/2 × 11
8
1
/4 × 101/2KL
7
1
8
/2 × 13L
8K
L
KL
L
*1
*1
, A5L, A5K
*3
, A6L
*1
, 81/4 × 14L
KL
*1
, 81/4 × 13L
, 16K
KL
*1
, A4L, A4K
*1
, 51/2 × 81/2L
*1
Custom size
(Vertical: 90 - 305 mm,
Horizontal: 148 - 457.2 mm.
For printer Vertical: 90 - 305 mm,
Horizontal: 148 - 600 mm.)
*2
, 11 × 17L
,
*1
,
*1
,
*2
, 11 × 17L
, 8 × 13L,
*1
capacity
*1
,
*1
,
*1
,
*3
,
*1
,
*1
A3L
B5 JIS
B6 JIS
8
8
5
8
8
16K
, B4 JISL
*1
KL
, A5
*3
L
1
/2 × 14L
1
/2 × 11L, 81/2 × 11K
1
/2 × 81/2L
*1
×
13L
1
/4 × 13L
KL
KL
, A6L
*1
, 81/4 × 14L
, 71/4 × 101/2KL
, 81/2 × 13L
*1
, 8KL
*1
*1
, A4
KL
*1
,
*2
, 11 × 17L,
*1
*1
,
*1
,
*1
100 sheets
,
*3
,
,
*1
,
3
Custom size
(Vertical: 3.55 - 12.00 inches,
Horizontal: 5.83 - 18.00 inches.
For printer Vertical: 3.55 - 12.00 inches,
Horizontal: 5.83 - 23.62 inches.)
*1
,
*1
,
*1
,
*3
,
*1
,
*1
,
*1
A3L
B5 JIS
B6 JIS
8
8
5
8
8
, B4 JISL
*1
KL
, A5
*3
L
1
/2 × 14L
1
/2 × 11L, 81/2 × 11K
1
/2 × 81/2L
*1
×
13L
1
/4 × 13L
KL
, A6L
*1
, 81/4 × 14L
, 71/4 × 101/2KL
, 81/2 × 13L
*1
, 8KL
*1
, A4
KL
*1
,
*2
, 11 × 17L,
*1
*1
,
*1
, 16K
*3
,
,
KL
*1
*4
,
*1
,
*1
Custom size
(Vertical: 3.55 - 12.00 inches,
Horizontal: 5.83 - 18.00 inches.
For printer Vertical: 3.55 - 12.00 inches,
Horizontal: 5.83 - 23.62 inches.)
Label paper
B4 JISL, A4L 30 sheets
(adhesive labels)
Envelope
*1
Press the {q} key, and then select the size of the paper loaded in the tray.
*2
Press the {q} key, select [Custom Size], and then specify the custom paper size using
the number keys.
*3
Not usable under the printer function.
*4
When loading paper, load only as much paper as can be held between the paper
C5 EnvL, C6 EnvL, DL EnvL, 4
1
/8 × 91/2L, 37/8 × 71/2L
*4
guides on the bypass tray.
59
Page 76
Appendix
❖ One-sheet bypass tray
3
Paper type and
weight
Standard paper
2
60 - 105 g/m
(16 - 28 lb.)
Thick paper
105 - 264 g/m
(28 - 70 lb.)
Metric version Inch version Paper
*1
A3L
B6 JISL
8
8 × 13L
, B4 JISL
*3
1
/2 × 11KL
, A6L
*1
, 81/2 × 13L
*1
Custom size
(Vertical: 90 - 305 mm,
Horizontal: 148 - 457.2 mm.
For printer Vertical: 90 - 305 mm,
Horizontal: 148 - 600 mm.)
*1
, B4 JISL
*3
1
/2 × 11KL
, A6L
*1
, 81/2 × 13L
*1
2
A3L
B6 JISL
8
8 × 13L
Custom size
(Vertical: 90 - 305 mm,
Horizontal: 148 - 457.2 mm.
For printer Vertical: 90 - 305 mm,
Horizontal: 148 - 600 mm.)
*1
, A4KL
*2
, 11 × 17L
, 51/2 × 81/2L
*1
, 81/4 × 13L
*1
, A4KL
*2
, 11 × 17L
, 51/2 × 81/2L
*1
, 81/4 × 13L
*1
, B5 JISKL
*1
, 81/2 × 14L
*1
, 71/4 × 101/2KL
*1
, 8KL
*1
, A5KL
*1
, 81/4 × 14L
*1
, 16KKL
*1
,
Custom size
(Vertical: 3.55 - 12.00 inches,
Horizontal: 5.83 - 18.00 inches.
For printer Vertical: 3.55 - 12.00 inches,
Horizontal: 5.83 - 23.62 inches.)
*1
, B5 JISKL
*1
, 81/2 × 14L
*1
, 71/4 × 101/2KL
*1
, 8KL
*1
, A5KL
*1
, 81/4 × 14L
*1
, 16KKL
*1
,
Custom size
(Vertical: 3.55 - 12.00 inches,
Horizontal: 5.83 - 18.00 inches.
For printer Vertical: 3.55 - 12.00 inches,
Horizontal: 5.83 - 23.62 inches.)
capacity
*1
,
*1
,
1 sheet
*3
,
*1
1 sheet
*3
,
*1
OHP transparencies
Label paper
A4L, 81/2 × 11L
B4 JISL, A4L 1 sheet
1 sheet
(adhesive labels)
Envelope
*1
Press the {q} key, and then select the size of the paper loaded in the tray.
*2
Press the {q} key, select [Custom Size], and then specify the custom paper size using
the number keys.
*3
Not usable under the printer function.
C5 EnvL, C6 EnvL, DL EnvL, 4
1
/8 × 91/2L, 37/8 × 71/2L
1 sheet
60
Page 77

Recommended Paper Sizes and Types
Note
❒ Load paper into the paper tray with the print side facing down.
❒ Place paper in the bypass tray with the print side facing up.
❒ When using the bypass tray, it is recommended that you set the paper orien-
tation to L.
❒ You must manually specify the size of custom size paper when loading it on
the bypass tray.
❒ If multiple-sheet jams occur, load the paper sheet by sheet.
❒ When loading OHP transparencies, use the one-sheet bypass tray. For details,
see “Copying from the Bypass Tray”, Copy Reference.
❒ Load adhesive label sheets one at a time.
❒ To prevent misfeeds, when loading OHP transparencies, check both sides of
the sheets, and place them correctly.
❒ When loading OHP transparencies, select [OHP (Transparency)] as the paper
type for the one-sheet bypass tray. For details, see “Copying from the Bypass
Tray”, Copy Reference.
❒ If [OHP (Transparency)] is specified as the paper type for the one-sheet bypass
1
tray, you can copy onto A4K or 8
❒ When loading thick paper (105 - 163 g/m
/2 × 11K paper only.
2
(28 - 43.4 lb.) on the bypass tray,
load only as much paper as can be held between the paper guides on the bypass tray.
❒ When using thick paper (Bypass tray: 105 - 163 g/m
bypass tray: 105 - 264 g/m
2
(28 - 70 lb.)), select [Thick Paper] as the paper type
2
(28 - 43.4 lb.), One-sheet
for the bypass tray or one-sheet bypass tray. For details, see “Copying from
the Bypass Tray”, Copy Reference.
3
❒ When loading adhesive labels, select [Thick Paper] as the paper type for the by-
pass tray or one-sheet bypass tray. For details, see “Copying from the Bypass
Tray”, Copy Reference.
❒ When loading letterhead paper, placing orientation differs according to the
function you are using. See “Loading Paper”, Troubleshooting.
❒ If you load paper of the same size in two or more trays, the machine automat-
ically shifts to the other tray when the first tray in use runs out of paper. This
function is called Auto Tray Switching. (However, if the paper type of one
tray is recycled or special paper, the settings of the other trays must be the
same for the Auto Tray Switching function to work.) This saves interrupting
a copy run to replenish paper when making a large number of copies. You can
set the paper type of the paper trays under Paper Type: Paper Tray 1-3. See
“System Settings”, General Settings Guide. For the instructions on setting the
Auto Tray Switching function, see “Copier Features”, General Settings
Guide.
❒ Glossy paper can be used only with the printer function.
61
Page 78
3
R
Appendix
Unusable Paper
This section describes which types of paper are unusable on this machine.
CAUTION:
• To avoid fire or machine failure, do not use aluminum foil, carbon paper, or
similar conductive paper.
Important
❒ To prevent faults, do not use any of the following kinds of paper:
• Thermal fax paper
• Art paper
• Aluminum foil
• Carbon paper
•Conductive paper
• Paper with perforated lines
• Hemmed-edge paper
•Tab stock
❒ Faults can occur if you copy onto sides that are already printed. Take care to
copy onto unprinted sides only.
Note
❒ To prevent misfeeds, do not use the following kinds of paper:
• Bent, folded, or creased paper
• Torn paper
• Slippery paper
• Perforated paper
• Rough paper
• Thin paper with little stiffness
• Paper with a dusty surface
❒ If you copy or print onto rough grain paper, the output image might be
blurred.
62
Page 79

Paper Storage
Paper Storage
This section describes how to store paper.
• When storing paper, the following precautions should always be followed:
• Do not store paper where it will be exposed to direct sunlight.
• Avoid storing paper in humid areas (humidity: 70% or more).
• Store on a flat surface.
• Do not store paper vertically.
• Under high temperature and humid conditions, or low temperature and humid conditions, store paper in plastic bags.
3
63
Page 80

INDEX
A
Add Ink indicator, 18
ADF
, 2, 11, 16, 53
Alert Indicator
ARDF
, 2, 11, 16, 54
Authentication screen
Auto document feeder
Auto off
Auto Off Timer
, 18
, 22
, 2, 53, 54
, 30
, 30
B
Basic Authentication, 22
Bluetooth interface unit
Bottom Right Cover
Bypass tray
, 11, 58
, 17, 57
, 11
C
CAUTION, 3
CD-ROM
Changing modes
Characters
Check Destination key
Clear Modes key
Clear/Stop key
Colour copies
Communicating indicator
Components
Computer
Control panel
Control panel angle
Control panel angle adjustment button
Copier
Copy Data Security Unit
Copy paper
Copy Reference
Counterfeit bank bills
, 43
, 25
, 31
, 18
, 18
, 18, 31
, 42
, 18
, 11
, x
, 11, 13, 18
, 13
, iv
, xi, 17
, 58
, i
, 1
, 11, 13
Dos and Don'ts
Duplex/Combine/Series key
Duplex unit
, 41
, 18
, 11, 16, 54
E
Energy-saving, 9
ENERGY STAR Program
Enter
, 31
Entering letters
Entering numbers
Entering symbols
Entering text
Enter key (# key)
Envelope lever
Environments where the machine can be used
Escape key
Exposure glass
Exposure glass cover
Extender
External options
, 33
, 39
, 36
, 31
, 18
, 11
, 18, 21
, 11
, 11
, 16
, 9
, 11, 16, 53
F
Facsimile, vi, vii
Facsimile key
Facsimile Reference
Fax transmission and reception over the
internet
Fax unit
Front Cover
Full Colour/B&W key
Function keys
Function Priority
Function Upgrade Option
, 18
, i
, vii
, 17
, 11
, 18
, 18
, 25
, 17, 56
G
General Settings Guide, i
, 3
64
D
Darker key, 18
Data In indicator
DataOverWriteSecurity Unit
Deleting characters
DeskTopBinder
DeskTopBinder Lite
DeskTopBinder-SmartDeviceMonitor for
, 49
Client
Dimensions
Display
Display panel
, 21
, 18
, 17
, 39
, 47, 49
, 47
, 50
, 18, 21
H
Handling power cords and power plugs
Handling the machine's interior
Handling the machine's supplies
Handling the main machine
Hold Print
Humidity
, v
, 63
, 6
, 7
, 5
, 4
Page 81

I
O
IEEE 1284 interface board, 17, 56
Indicators
Information leakage
Ink
, 7
Integration Server Authentication
Internal options
Internal Tray
Internet Fax
IP-Fax
, 18
, ix
, 17
, 11
, vii
, vii
J
Job Information key, 18
L
LAN-Fax, vi, 46
LAN-Fax Driver
LDAP Authentication
Left Cover
Lighter key
Load Paper indicator
Locked Print
Login
, 22, 23, 24
Logout
Lower Left Cover
Lower Paper Tray
Lower Paper Tray (1-tray type)
Lower Paper Trays
Lower Paper Trays (2-tray type)
Lower Right Cover
, 23, 24
, 46
, 22
, 11
, 18
, 18
, v
, 11
, 16, 55
, 11, 16, 55
, 11
M
Machine body, 50
Machine body specification
Machine features
Main power
Main power indicator
Main power switch
Manuals
Manuals for Administrators
Manuals for this machine
Manuals for Users
Memory Trans. key
Monitoring
, i, 43, 44
, iv
, 26, 29
, 11, 26
, 43
, 18
, x
, 50
, 18
, 43
, i
N
Network delivery scanner, viii
Network Guide
Network TWAIN scanner
Number keys
, i
, 45
, 18, 31
, 22
, 55
, 55
OK key, 18, 21
One-sheet bypass tray
One-sheet output tray
On Hook Dial key
Online key
Operation switch
Options
Original key
Output Tray Guide
, 18
, 16, 53
, 18
, 11, 58
, 11
, 18
, 11, 18, 26
, 15
P
Paper, 7, 58, 62, 63
Paper capacity
Paper size
Paper storage
Paper tray 1
Paper tray 2
Paper tray 3
Paper type
Paper weight
Pause/Redial key
PCL
, 44
PDF Manuals
PictBridge
PictBridge card
PostScript
PostScript3 unit
Power
, 26
Power consumption
Power supply
PPD
, 44
Preventing an Unauthorized Copy
Printer
Printer driver
Printer Drivers and Utilities
Printer Reference
, v
, 58
, 58
, 63
, 11, 58
, 58
, 58
, 58
, 58
, 18
, 44
, v
, 17
, 44
, 17
, 9, 50
, 26
, 44
, 43, 44, 48
, i
Q
Quick Dial Flip Plate, 18
Quick Dial keys
, 18, 31
R
Receive File indicator, 18
Resolution key
Right Cover
RPCS
, 44
, 18
, 11
, xi
65
Page 82

S
T
Safety during operation, 3
Safety Information
Safety precautions to be followed
Sample Print
Saving colour copies
Saving Energy
Scanner
Scanner Driver and Utilities
Scanner Reference
ScanRouter delivery software
Scroll keys
Search Destination key
Security functions
Security Reference
Selection keys
Shift key
Sleep mode
SmartDeviceMonitor for Admin
SmartDeviceMonitor for Client
Software and utilities included on the
Sort key
Space for main unit
Space key
Specifications
Specifications for options
Specifications for the main unit
Start key
Storage
Stored Print
Symbols
Symbols key
System Auto Reset Timer
System Reset
, viii
, 31
CD-ROM
, 18
, 18
, 63
, 2
, 18, 21, 31
, 9, 30
, 43
, 31
, v
, 3
, 3
, v
, 42
, 30
, 43, 45, 47, 49
, i
, viii, 47
, 18
, ix
, i
, 18, 21
, x, 48
, 49
, 50
, 50, 53
, 53
, 50
, 31
, 25
, 25
Temperature, 63
Text
, 32
Troubleshooting
Turning off the main power
Turning off the power
Turning on/off the power
Turning on the main power
Turning on the power
TWAIN Driver
, i
, 28
, 26
, 27
, 45
U
Unauthorized access, ix
Unauthorized copy prevention
Unusable paper
Upper Left Cover
USB host interface unit
User Code Authentication
User Function keys
User text
User Tools/Counter key
Using the scanner in a
network environment
, 40
, 62
, 11
, 17, 57
, 22, 23
, 18
, 18
, viii
W
WARNING, 3
Web Image Monitor
Weight
Windows Authentication
Wireless LAN board
, 50
, x, 24
, 22
, 17, 56
, 29
, 26
, xi
66 GB GB D045-7752
Page 83

In accordance with IEC 60417, this machine uses the following symbols for the main power switch and operation switch:
a means POWER ON.
b means POWER OFF.
c means STAND BY.
In accordance with IEC 60417, this machine uses the following symbols for the anti-condensation heater switch:
a means POWER ON.
b means POWER OFF.
Trademarks
Microsoft
®
, Windows®, Windows NT®, Windows Server®, and Windows VistaTM are either registered
trademarks or trademarks of Microsoft Corporation in the United States and/or other countries.
Adobe, Acrobat, Acrobat Reader, PostScript, and Reader are either registered trademarks or trademarks of Adobe Systems Incorporated in the United States and/or other countries.
The Bluetooth® word mark and logos are registered trademarks owned by the Bluetooth SIG, Inc. and
any use of such marks by Ricoh Company, Ltd. is under license.
Novell and NetWare are registered trademarks of Novell, Inc.
PCL® is a registered trademark of Hewlett-Packard Company.
Monotype is a registered trademark of Monotype Imaging, Inc.
AppleTalk and Mac OS are trademarks of Apple Inc., registered in the U.S. and other countries.
UNIX is a registered trademark in the United States and other countries, licensed exclusively through
X/Open Company Limited.
Other product names used herein are for identification purposes only and might be trademarks of their
respective companies. We disclaim any and all rights to those marks.
The proper names of the Windows operating systems are as follows:
• The product name of Windows 95 is Microsoft
• The product name of Windows 98 is Microsoft
®
Windows® 95
®
Windows® 98
• The product name of Windows Me is Microsoft® Windows® Millennium Edition (Windows Me)
• The product names of Windows 2000 are as follows:
Microsoft
®
Windows® 2000 Professional
Microsoft® Windows® 2000 Server
Microsoft® Windows® 2000 Advanced Server
• The product names of Windows XP are as follows:
Microsoft
Microsoft
Microsoft
Microsoft
®
Windows® XP Professional
®
Windows® XP Home Edition
®
Windows® XP Media Center Edition
®
Windows® XP Tablet PC Edition
• The product names of Windows Vista are as follows:
Microsoft
Microsoft
Microsoft
Microsoft
Microsoft
®
Windows VistaTM Ultimate
®
Windows VistaTM Enterprise
®
Windows VistaTM Business
®
Windows VistaTM Home Premium
®
Windows VistaTM Home Basic
• The product names of Windows Server 2003 are as follows:
Microsoft
®
Windows Server® 2003 Standard Edition
Microsoft® Windows Server® 2003 Enterprise Edition
®
Microsoft
Microsoft
Windows Server® 2003 Web Edition
®
Windows Server® 2003 Datacenter Edition
• The product names of Windows Server 2003 R2 are as follows:
Microsoft® Windows Server® 2003 R2 Standard Edition
Microsoft
®
Windows Server® 2003 R2 Enterprise Edition
Microsoft® Windows Server® 2003 R2 Datacenter Edition
• The product names of Windows NT 4.0 are as follows:
Microsoft
®
Windows NT® Workstation 4.0
Microsoft® Windows NT® Server 4.0
Copyright © 2007
Page 84
Operating Instructions About This Machine
GB GB D045-7752
 Loading...