

Ricoh CLP22 Maintenance Manual

Maintenance Guide
Read This First
Trademarks.............................................................................................................3
How to Read This Manual .....................................................................................4
Paper and Other Media
Paper and Other Media Supported by This Printer.............................................5
Paper Recommendations......................................................................................9
Loading Paper............................................................................................................9
Storing Paper .............................................................................................................9
Types of Paper and Other Media...............................................................................9
Paper not supported by this printer..........................................................................12
Print Area .................................................................................................................13
Loading Paper......................................................................................................15
Loading Paper in Tray 1 and the optional paper feed unit .......................................15
Loading Paper in the Bypass Tray ...........................................................................20
Switching between Paper Trays...............................................................................26
Replacing Consumables and Maintenance Kit
Replacing the Toner Cartridge ...........................................................................28
Replacing the Waste Toner Bottle......................................................................32
Replacing the Photo Conductor Unit .................................................................35
Replacing the Fusing Unit...................................................................................44
When “Replace Fusing Unit” Appears on the Display..............................................49
When “Replace Fusing Unit soon” Appears on the Display .....................................49
Replacing the Intermediate Transfer Unit..........................................................51
G1398504_1.00 EN USA G139-8504 Copyright © 2005 1

When “Replace Transfer Belt” Appears on the Display ...........................................57
When “Replace Transfer Belt soon” Appears on the Display...................................58
Cleaning and Adjusting the Printer
Cautions to Take When Cleaning .......................................................................59
Adjusting the Color Registration........................................................................60
Correcting the Color Gradation ..........................................................................62
Set the Gradation Correction Value .........................................................................62
Viewing the Color Calibration Sample Sheet and Gradation Correction Sheet ....... 65
Resetting the gradation correction value to the initial value .....................................67
Adjusting the Image Density...............................................................................69
Adjusting Tray Registration................................................................................71
Troubleshooting
Error & Status Messages on the Control Panel ................................................74
Printer Does Not Print .........................................................................................83
Checking the port connection...................................................................................84
Other Printing Problems .....................................................................................87
Additional Troubleshooting................................................................................93
Removing Misfed Paper
Removing Misfed Paper ......................................................................................95
When “Remove Misfeed A: Internal Path” Appears .........................................96
When “Remove Misfeed B: Fusing Unit” Appears ...........................................99
When “Remove Misfeed Y: Paper Tray” Appears...........................................102
When “Remove Misfeed Z: Duplex Unit” Appears .........................................104
Appendix
Moving and Transporting the Printer...............................................................106
Moving the Printer ..................................................................................................106
Transporting the Printer .........................................................................................107
Consumables .....................................................................................................108
Toner Cartridge ......................................................................................................108
Waste Toner Bottle ................................................................................................109
Photo Conductor Unit.............................................................................................109
Intermediate Transfer Unit (Transfer Unit) .............................................................109
Specifications.....................................................................................................111
Mainframe ..............................................................................................................111
Options...................................................................................................................113
2

Read This First
Trademarks
Microsoft, Windows and Windows NT are registered trademarks of Microsoft
Corporation in the United States and/or other countries.
IPS-PRINT Printer Language Emulation Copyright© 1999-2000 Oak Technology, Inc., All rights reserved.
Bluetooth
Other product names used herein are for identification purposes only and might
be trademarks of their respective companies. We disclaim any and all rights to
those marks.
The proper names of the Windows operating systems are as follows:
•Microsoft
•Microsoft
•Microsoft
• The product names of Windows
Microsoft
Microsoft
Microsoft
• The product names of Windows
Microsoft
Microsoft
• The product names of Windows Server
Microsoft
Microsoft
Microsoft
• The product names of Windows NT
Microsoft
Microsoft
®
is a registered trademark of the Bluetooth SIG, Inc. worldwide.
®
Windows® 95 operating system
®
Windows® 98 operating system
®
Windows® Millennium Edition (Windows Me)
®
®
Windows® 2000 Advanced Server
®
Windows® 2000 Server
®
Windows® 2000 Professional
®
Windows® XP Professional
®
Windows® XP Home Edition
®
Windows ServerTM 2003 Standard Edition
®
Windows ServerTM 2003 Enterprise Edition
®
Windows ServerTM 2003 Web Edition
®
Windows NT® Server 4.0
®
Windows NT® Workstation 4.0
2000 are as follows:
®
XP are as follows:
TM
2003 are as follows:
®
4.0 are as follows:
G1398504_1.00 Copyright © 2005 3

Read This First
How to Read This Manual
The following set of symbols is used in this manual.
This symbol indicates a potentially hazardous situation that might result in death
or serious injury when you misuse the machine without following the instructions
under this symbol. Be sure to read the instructions, all of which are described in
the Safety Information section.
This symbol indicates a potentially hazardous situation that might result in minor
or moderate injury or property damage that does not involve personal injury
when you misuse the machine without following the instructions under this symbol. Be sure to read the instructions, all of which are described in the Safety Information section.
* The statements above are notes for your safety.
If this instruction is not followed, paper might be misfed, originals might be damaged, or data might be lost. Be sure to read this.
This symbol indicates information or preparations required prior to operating.
This symbol indicates precautions for operation, or actions to take after abnormal
operation.
This symbol indicates numerical limits, functions that cannot be used together,
or conditions in which a particular function cannot be used.
This symbol indicates a reference.
[ ]
Keys that appear on the machine's display.
Keys and buttons that appear on the computer's display.
{ }
Keys built into the machine's control panel.
Keys on the computer's keyboard.
4
Paper and Other Media
Paper and Other Media Supported by This
Printer
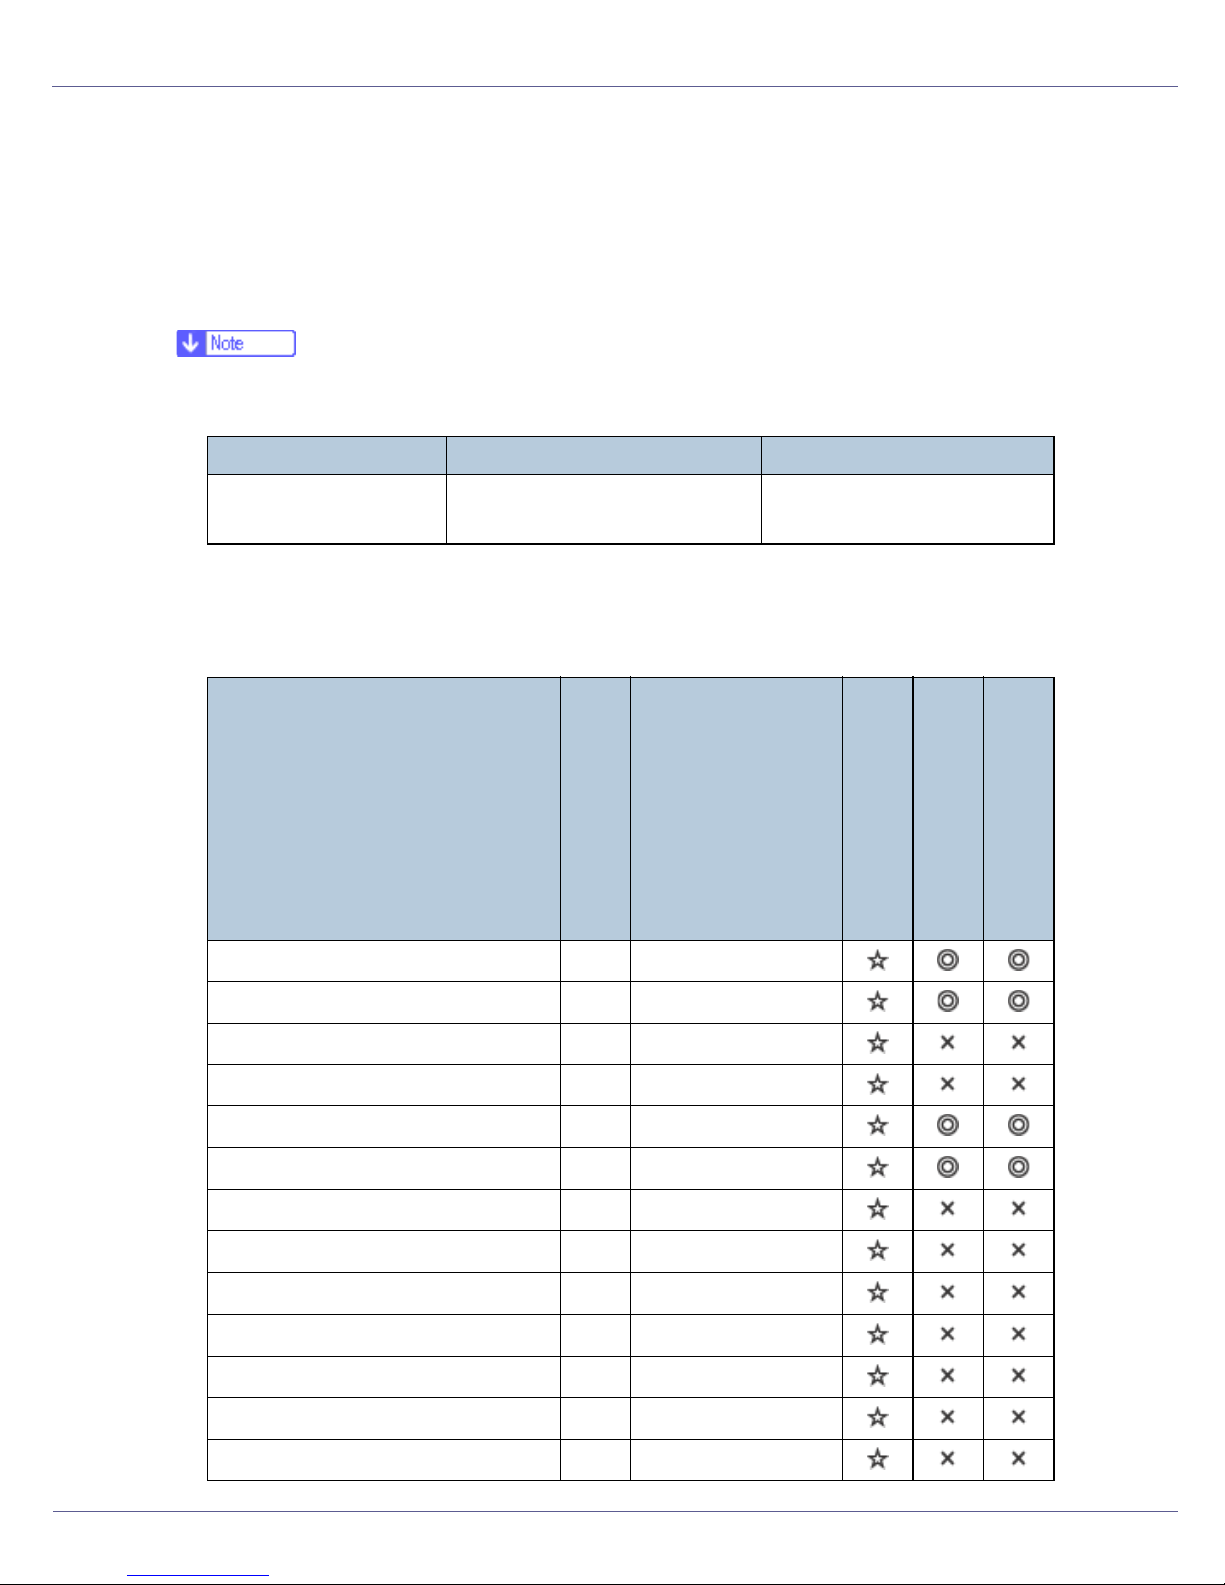
This section describes the paper size, feed direction, and the maximum amount
of paper that can be loaded into each paper tray in this printer.
❒ The following symbols and terminology are used to represent the feed direc-
tion.
In this manual On the display Paper feed direction
K ↑ (Feed direction)
A4 (210 x 297)
8 1/2 x 11
Short-edge feed direction
❒ Be careful of the paper feed direction. The direction is determined for each pa-
per size.
❖ Input Paper Sizes (Metric version)
Feed direction
A4 K 210 × 297
B5 K 182 × 257
A5 K 148 × 210
Size (mm)
Bypass Tray
Tray 1
Paper Feed Unit (Tray 2/3)
A6 K 105 × 148
1
Legal (LG, 8
Letter (LT, 8
1
5
/2 × 81/2 inches
Executive (Exec., 7
Folio (8
Foolscap (F4, 8
F/GL (8 × 13 inches) K 203 × 330
Com#10 Env (4
C5 Env (6.38 × 9.02 inches)
G1398504_1.00 Copyright © 2005 5
/2 × 14 inches)
1
/2 × 11 inches)
1
1
/4 × 13 inches)
1
/2 × 13 inches)
1
/8 × 9 1/2 inches)
/4 × 101/2 inches)
K 216 × 356
K 216 × 279
K 140 × 216
K 184 × 276
K 210 × 330
K 216 × 330
K 104.8 × 241.3
K 162 × 229

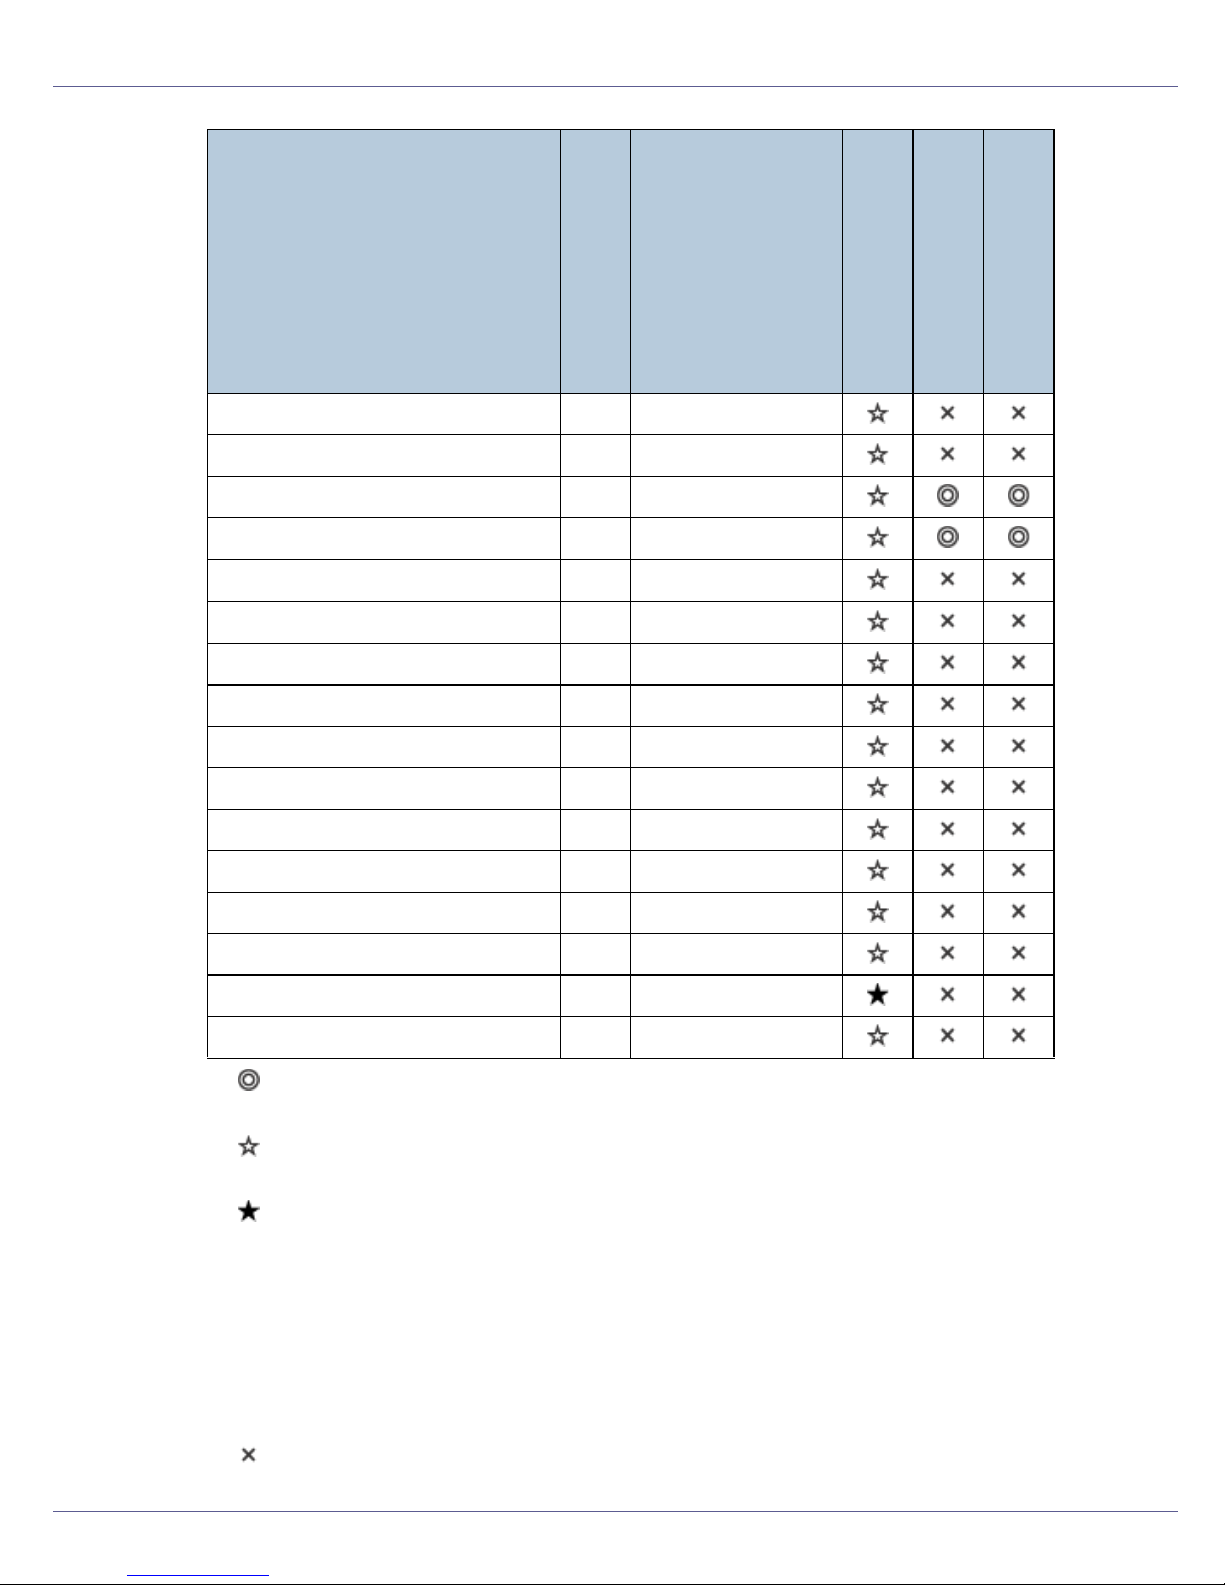
Paper and Other Media
Feed direction
C6 Env (4.49 × 6.38 inches)
DL Env (4.33 × 8.66 inches) K 110 × 220
7
Monarch Env (3
Custom Size - -
16K (7.68 × 10
/8 × 7 1/2 inches)
1
/2 inches)
K 114 × 162
K 98.4 × 190.5
K 195 × 267
Size (mm)
Bypass Tray
Tray 1
•
The size is supported and the printer selects it automatically.
•
The size is supported, but it should be selected using the control panel.
•
The size is supported, but it should be set as a custom size using the control panel.
The supported size may differ depending on the printer language you use.
Set as a custom size setting using the control panel.
The following sizes are supported:
• Bypass Tray: approximately 90 - 216 mm in width, and 148 - 356 mm in
length.
Paper Feed Unit (Tray 2/3)
•
The size is not supported.
❖ Input Paper Sizes (Inch version)
A4 K 8.26” × 11.69”
B5 K 7.17” × 10.12”
Feed direction
Size (inch)
Bypass Tray
Tray 1
Paper Feed Unit (Tray 2/3)
6
Paper and Other Media
Feed direction
A5 K 5.83” × 8.26”
A6 K 4.13” × 5.63”
Legal (LG) K
Letter (LT) K
1
5
/2 × 8 1/2 inches
Executive (Exec.) K
Folio K
Foolscap F4 K
F/GL K 8” × 13”
Com#10 Env K
C5 Env K 6.38” × 9.02”
C6 Env K 4.49” × 6.38”
DL Env K 4.33” × 8.66”
Monarch Env K
K
Size (inch)
1
/2” × 14”
8
1
/2” × 11”
8
51/2” × 81/2”
1
/4” × 101/2”
7
1
/4” × 13”
8
1
8
/2” × 13”
1
/8” × 9 1/2”
4
3 7/8” × 7 1/2”
Bypass Tray
Tray 1
Paper Feed Unit (Tray 2/3)
Custom Size - -
16K K
•
The size is supported and the printer selects it automatically.
•
The size is supported, but it should be selected using the control panel.
•
The size is supported, but it should be set as a custom size using the control panel.
The supported size may differ depending on the printer language you use.
Set as a custom size setting using the control panel.
The following sizes are supported:
• Bypass Tray: approximately 3.55 - 8.50 inches in width, and 5.83 - 14.01
inches in length.
•
7.68” × 10
1
/2”
7

Paper and Other Media
The size is not supported.
❖ Paper weight and number of sheets to be set
Maximum number of
sheets (plain paper)
530 (80 g/m2, 20 lb.)
100 (80 g/m2, 20 lb.)
Tray 1
Paper Feed Unit (Tray 2, Tray 3)
Bypass Tray
Supported paper weight
2
60.2 - 104.7 g/m
lb.)
60.2 - 199 g/m
lb.)
(16 - 28
2
(16 - 53
Check that the top of the stack is not higher than the limit mark inside the tray.
8
Paper and Other Media
Paper Recommendations
Loading Paper
❒ Do not use ink-jet printer paper because it may stick to the fusing unit and
cause a paper misfeed.
❒ Set the paper as described below
• Tray 1, Paper Feed Unit (Tray 2, Tray 3): Print side facing up
• Bypass Tray: Print side facing down
❒ Print quality cannot be guaranteed if paper other than the ones recommended
is used. For more information about recommended paper, contact your sales
or service representative.
❒ Do not use paper that has already been printed onto by other printers.
Storing Paper
• Paper should always be stored properly. Improperly stored paper might result
in poor print quality, paper misfeeds, or printer damage. Recommendations
are as follows:
• Avoid storing paper in humid areas.
• Avoid exposing paper to direct sunlight.
• Store on a flat surface.
• Keep paper in the package in which the paper came.
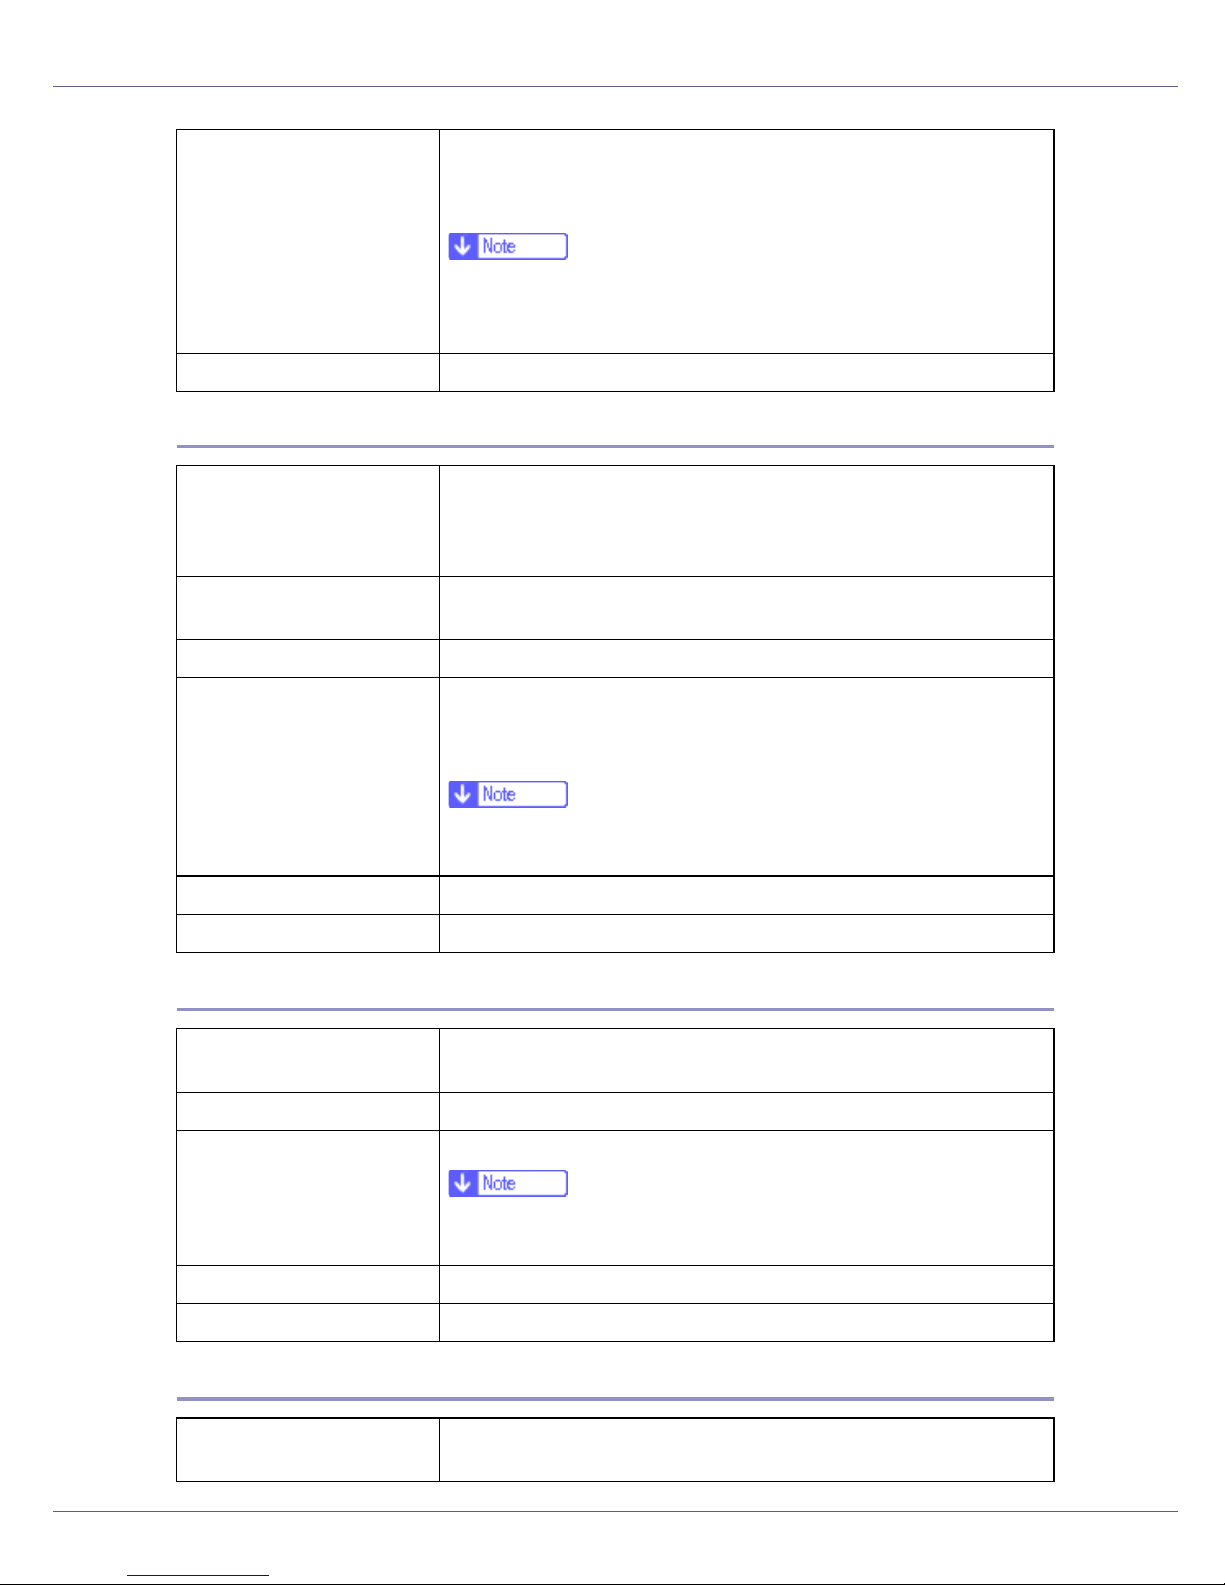
Types of Paper and Other Media
Plain Paper
Paper thickness
Printer setup Make the following two settings using the control panel:
60.2 - 104.7 g/m
• [Thin]: 60.2 - 90.2 g/m
• [Normal]: 90.2 - 104.7 g/m
• Press [Paper Input] menu, [Paper Type], and then [Plain Paper].
• Press [Maintenance] menu, and then [Thin] or [Normal].
2
(16 - 28 lb.)
2
(16 - 24 lb.)
2
(24 - 28 lb.)
Printer driver setup Click [Plain] or [Plain & Recycled] in the [Type:] list.
Enabled paper feeding tray Any input tray can be used.
9
Paper and Other Media
Number of sheets that can
be set
• Tray 1: 530
• Tray 2, Tray 3 (Paper Feed Unit Type 3000): 530
• Bypass Tray: 100
❒ Make sure paper is not stacked higher than the upper limit
mark (T) inside the tray. Make sure paper is not stacked higher
than the paper guides inside the bypass tray.
Both-side printing Possible
Thick Paper
Paper thickness
105 - 199 g/m
• [Thick Paper 1]: 105 - 165 g/m
• [Thick Paper 2]: 165 - 199 g/m
Printer setup Press [Paper Input] menu, [Paper Type] and then [Thick Paper 1] or
[Thick Paper 2] on the control panel.
Printer driver setup Click [Thick1] or [Thick2] in the [Type:] list.
Enabled paper feeding tray Bypass Tray
• [Thick Paper 1]: 30
• [Thick Paper 2]: 10
2
(28 - 53 lb.)
2
(28 - 44 lb.)
2
(44 - 53 lb.)
❒ Make sure paper is not stacked higher than the paper guides
inside the bypass tray.
Both-side printing Not possible
Additional cautions • Print speed is slightly slower than when using plain paper.
Adhesive labels
Printer setup Press [Paper Input] menu, [Paper Type], and then [Labels] on the
control panel.
Printer driver setup Click [Labels] in the [Type:] list.
Enabled paper feeding tray Bypass Tray: 50
❒ Make sure paper is not stacked higher than the paper guides
inside the bypass tray.
Both-sided printing Not possible
Additional cautions Print speed is slightly slower compared to plain paper.
OHP transparencies
Printer setup Press [Paper Input] menu, [Paper Type], and then [Transparency] on
the control panel.
10
Paper and Other Media
Printer driver setup Click [Transparency] in the [Type:] list.
Enabled paper feeding tray Bypass Tray
Number of sheets that can
be set
Both-sided printing Not possible
Additional cautions • Print speed for OHP transparencies is slower than for plain pa-
Bypass Tray: 50
❒ Make sure paper is not stacked higher than the paper guides
inside the bypass tray.
per.
• Due to switching modes, the machine will be on standby for
thirty or forty seconds after the job was received.
• We recommend that you use a 4000 ANSI lumen or brighter
overhead projector to project OHP transparencies.
Glossy Paper
Printer setup Press [Paper Input] menu, [Paper Type], and then [Glossy Paper] on
the control panel.
Printer driver setup Click [Glossy] in the [Type:] list.
Enabled paper feeding tray Bypass Tray: 50
❒ Make sure paper is not stacked higher than the paper guides
inside the bypass tray.
Both-sided printing Not possible
Additional cautions Print speed is slightly slower compared to plain paper.
Envelopes
Printer setup Press [Paper Input] menu, [Paper Type], and then [Thick Paper 1] or
[Thick Paper 2] on the control panel.
Printer driver setup Click [Thick1] or [Thick2]in the [Type:] list.
Enabled paper feeding tray Bypass Tray: 10
❒ Make sure paper is not stacked higher than the paper guides
inside the bypass tray.
Both-sided printing Not possible
11

Paper and Other Media
Additional cautions • Check the print side is facing down.
• Check there is no air in the envelopes before loading.
• For better print quality, we recommend the right, left, top, and
bottom print margins to be at least 15 mm 0.6 inch.
• Load only one size and type of envelope at a time.
• Before loading envelopes, flatten their leading edges (the edge
going into the printer) by running a pencil or ruler across them.
• Some kinds of envelope might cause misfeeds, wrinkles or
print poorly.
• Print quality on envelopes may be uneven if parts of an envelope have differing thicknesses. Print one or two envelopes to
check print quality.
• Use flat envelopes with no curl. If they have a curl, flatten them.
• Use completely flat envelopes that contain no air inside.
• Do not print on both sides of envelopes.
Paper not supported by this printer
Avoid using the following paper as they are not supported by this printer.
• Paper meant for an ink-jet printer
• Bent, folded, or creased paper
• Curled or twisted paper
• Torn paper
• Wrinkled paper
• Damp paper
• Paper that is dry enough to emit static electricity
• Paper that has already been printed onto, except a preprinted letterhead.
Malfunctions are especially likely when using paper printed on by other than
a laser printer (e.g. monochrome and color copiers, ink-jet printers, etc.)
• Special paper, such as thermal paper, aluminum foil, carbon paper and conductive paper
• Paper whose weight is heavier or lighter than the limitation
• Paper with windows, holes, perforations, cutouts, or embossing
• Adhesive label paper on which glue or base paper is exposed
• Paper with clips or staples
• Do not use the following envelopes:
• Envelopes with multiple flaps
• Envelopes with a peel-off adhesive strip
• Envelopes with windows or clasps
12
Paper and Other Media
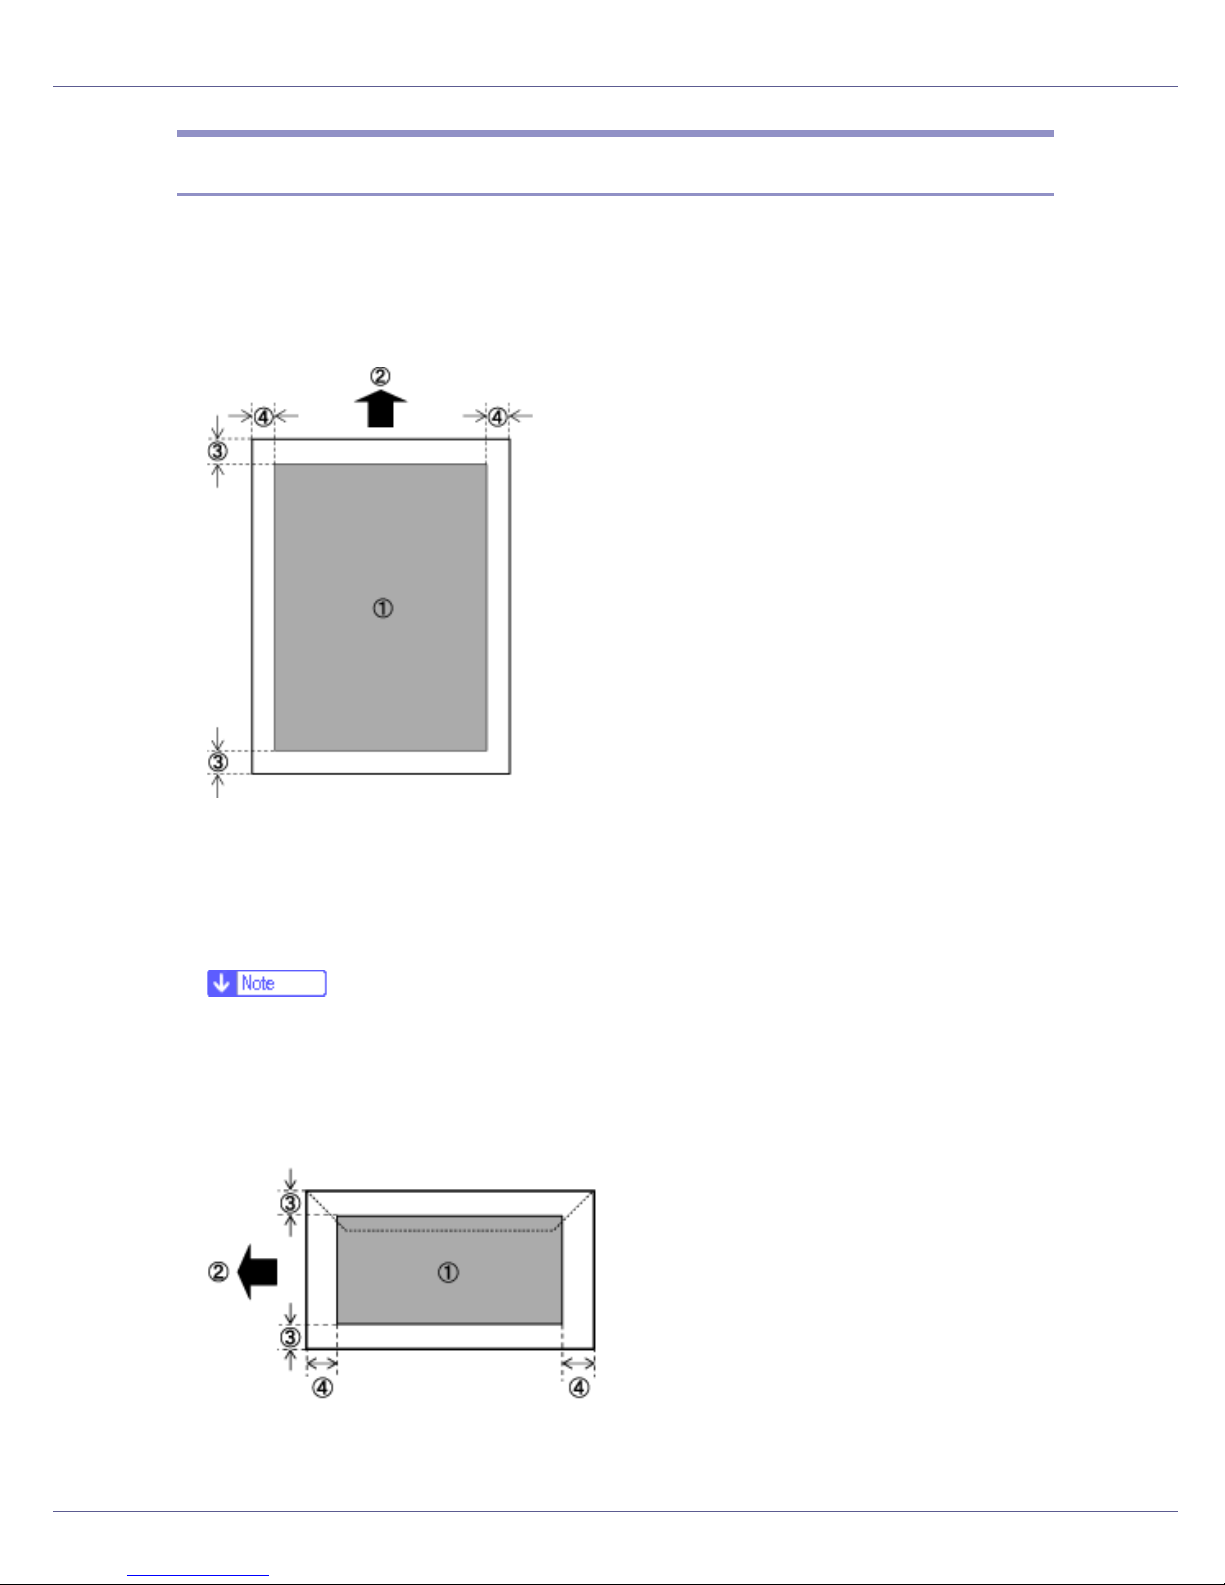
Print Area
The following shows the print area for this printer. Be sure to set the print margins
correctly by the application.
❖ Paper
A Print area
B Feed direction
C Approx. 5 mm (0.2 inches)
D Approx. 5 mm (0.2 inches)
❒ The print area may vary depending on the paper size, printer language and
printer driver settings.
❖ Envelope
A Print area
B Feed direction
13

Paper and Other Media
C Approx. 5 mm (0.2 inches)
D Approx. 5 mm (0.2 inches)
❒ The print area may vary depending on the paper size, printer language and
printer driver settings.
14

Paper and Other Media
Loading Paper
This describes how to load paper into the paper tray and bypass tray.
• Do not pull out the paper tray forcefully. If you do, the tray might fall and
cause an injury.
Loading Paper in Tray 1 and the optional paper feed unit
The following example explains loading procedure for the standard paper tray
(Tray 1). The same procedure can be used for the optional paper feed unit.
❒ Make sure paper is not stacked above the limit mark inside the tray. Misfeeds
might occur.
❒ Do not put different types of paper in a single paper tray.
A Pull the paper tray out of the printer until it stops. Lift it slightly, and then
pull it fully out. Place the paper tray on a flat surface.
❒ You can not pull out Tray 1 if the bypass tray is open.
15
Paper and Other Media
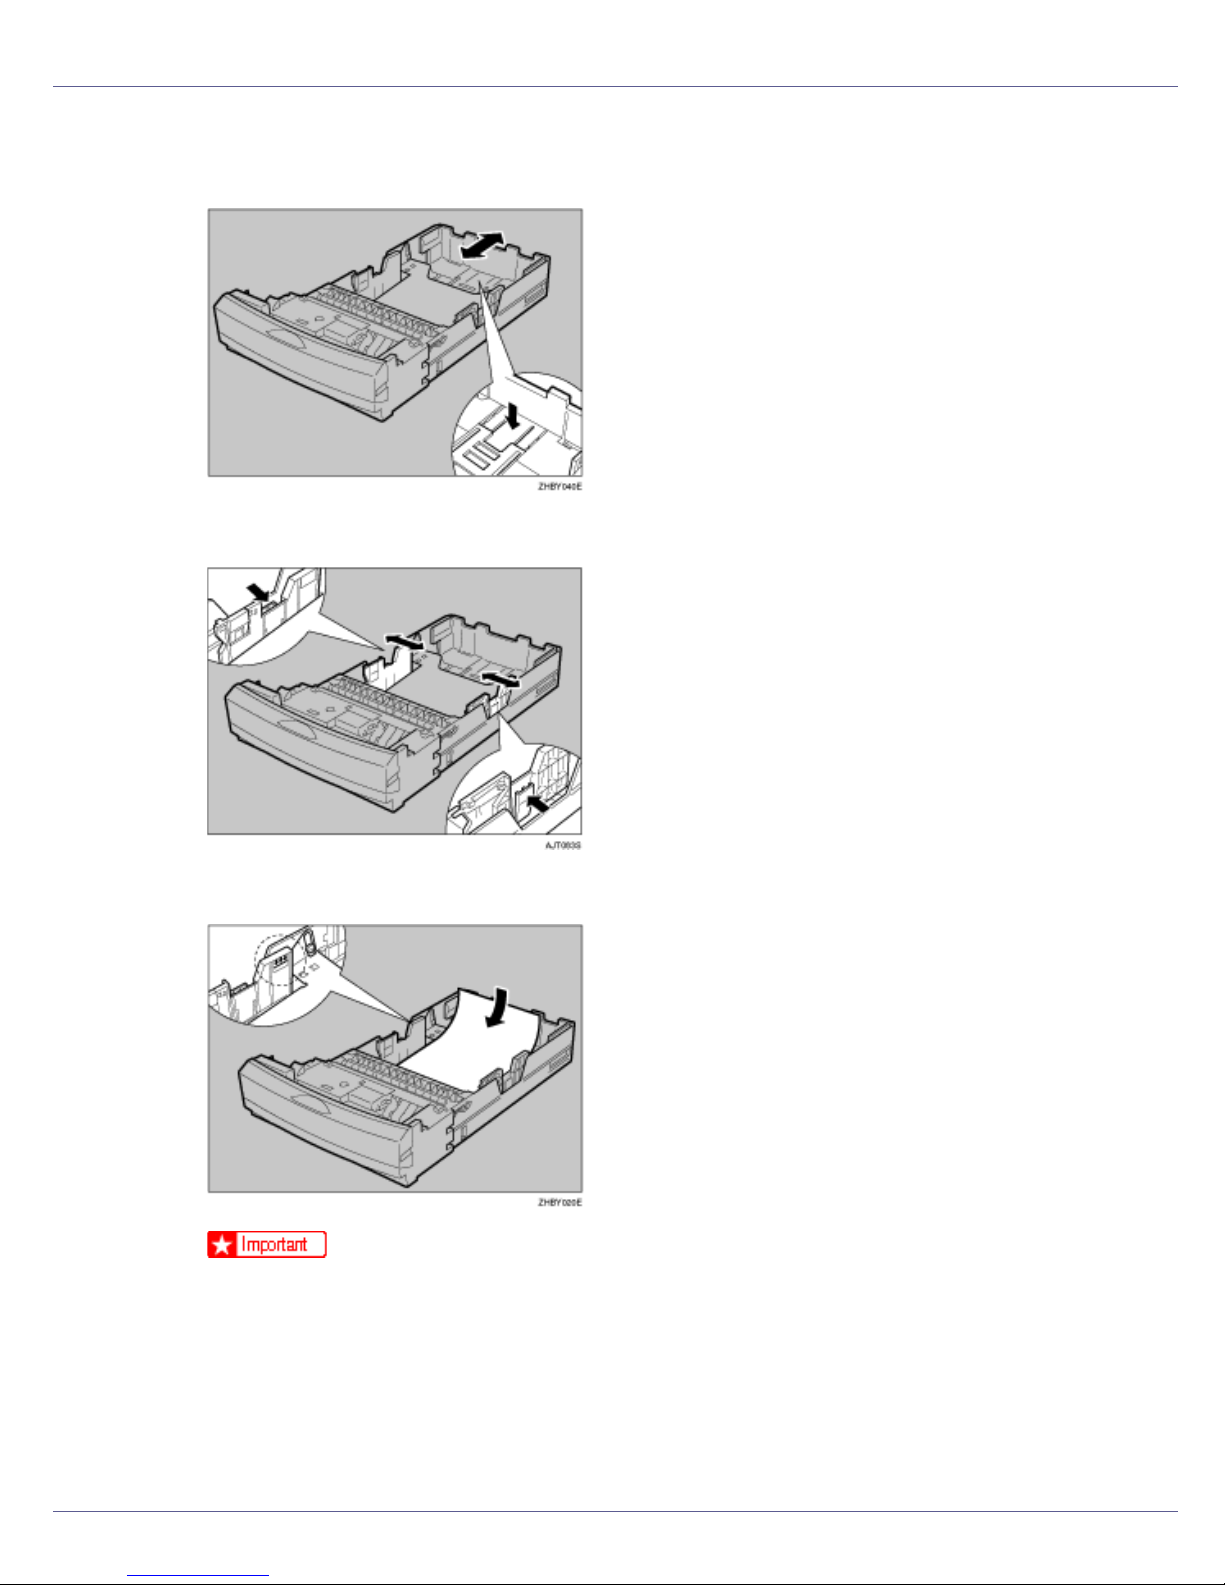
B Press “Push”, and then adjust the rear guide to the paper size you want
to load.
C Adjust the side guides to the paper size you want to load.
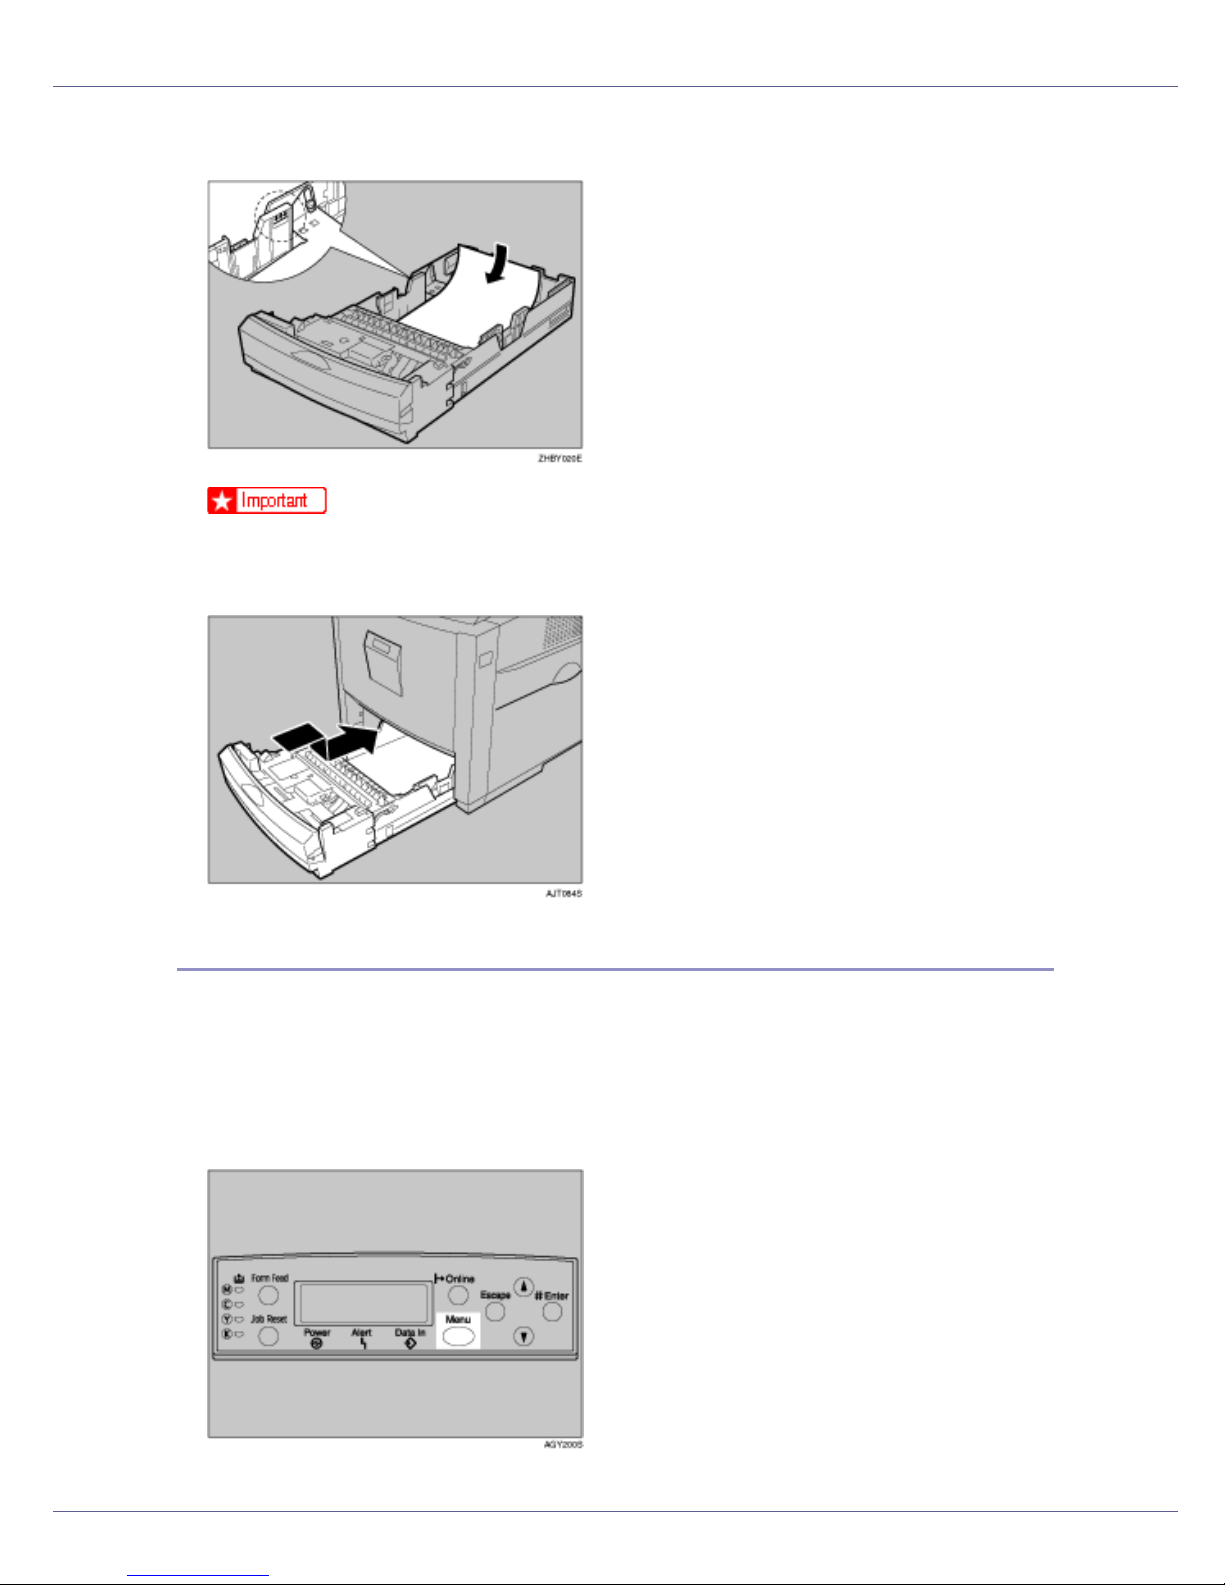
D Load paper print side up in the paper tray.
❒ Make sure the top of the stack is not higher than the limit mark inside the
tray.
❒ To avoid misfeeds, set the side guides to the exact paper size.
❒ Do not load different kinds of paper in the tray.
16

Paper and Other Media
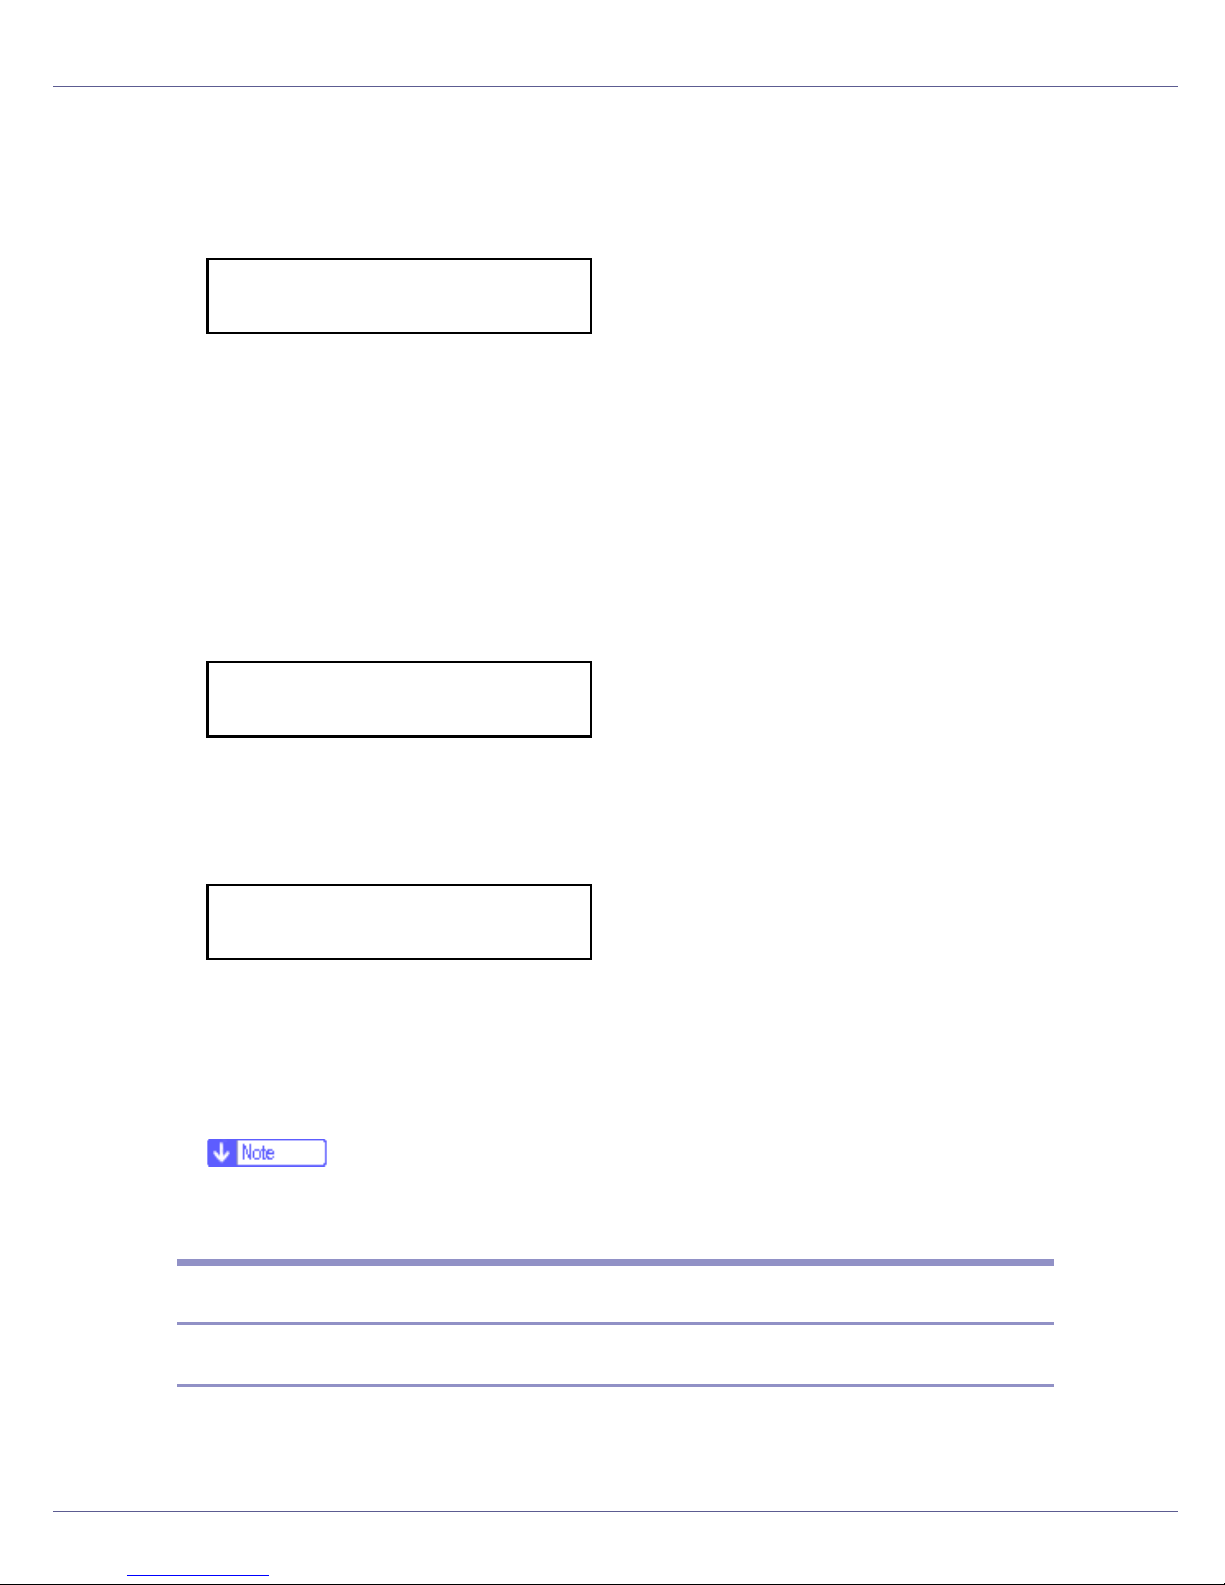
E Slide the paper tray fully into the printer.
❒ Misfeeds can occur if the paper tray is not fully inserted. Make sure it is fully
inserted.
Changing paper size of the paper tray
A Pull the paper tray out of the printer until it stops. Lift it slightly, and then
pull it fully out. Place the paper tray on a flat surface.
❒ You can not pull out Tray 1 if the bypass tray is open.
17
Paper and Other Media
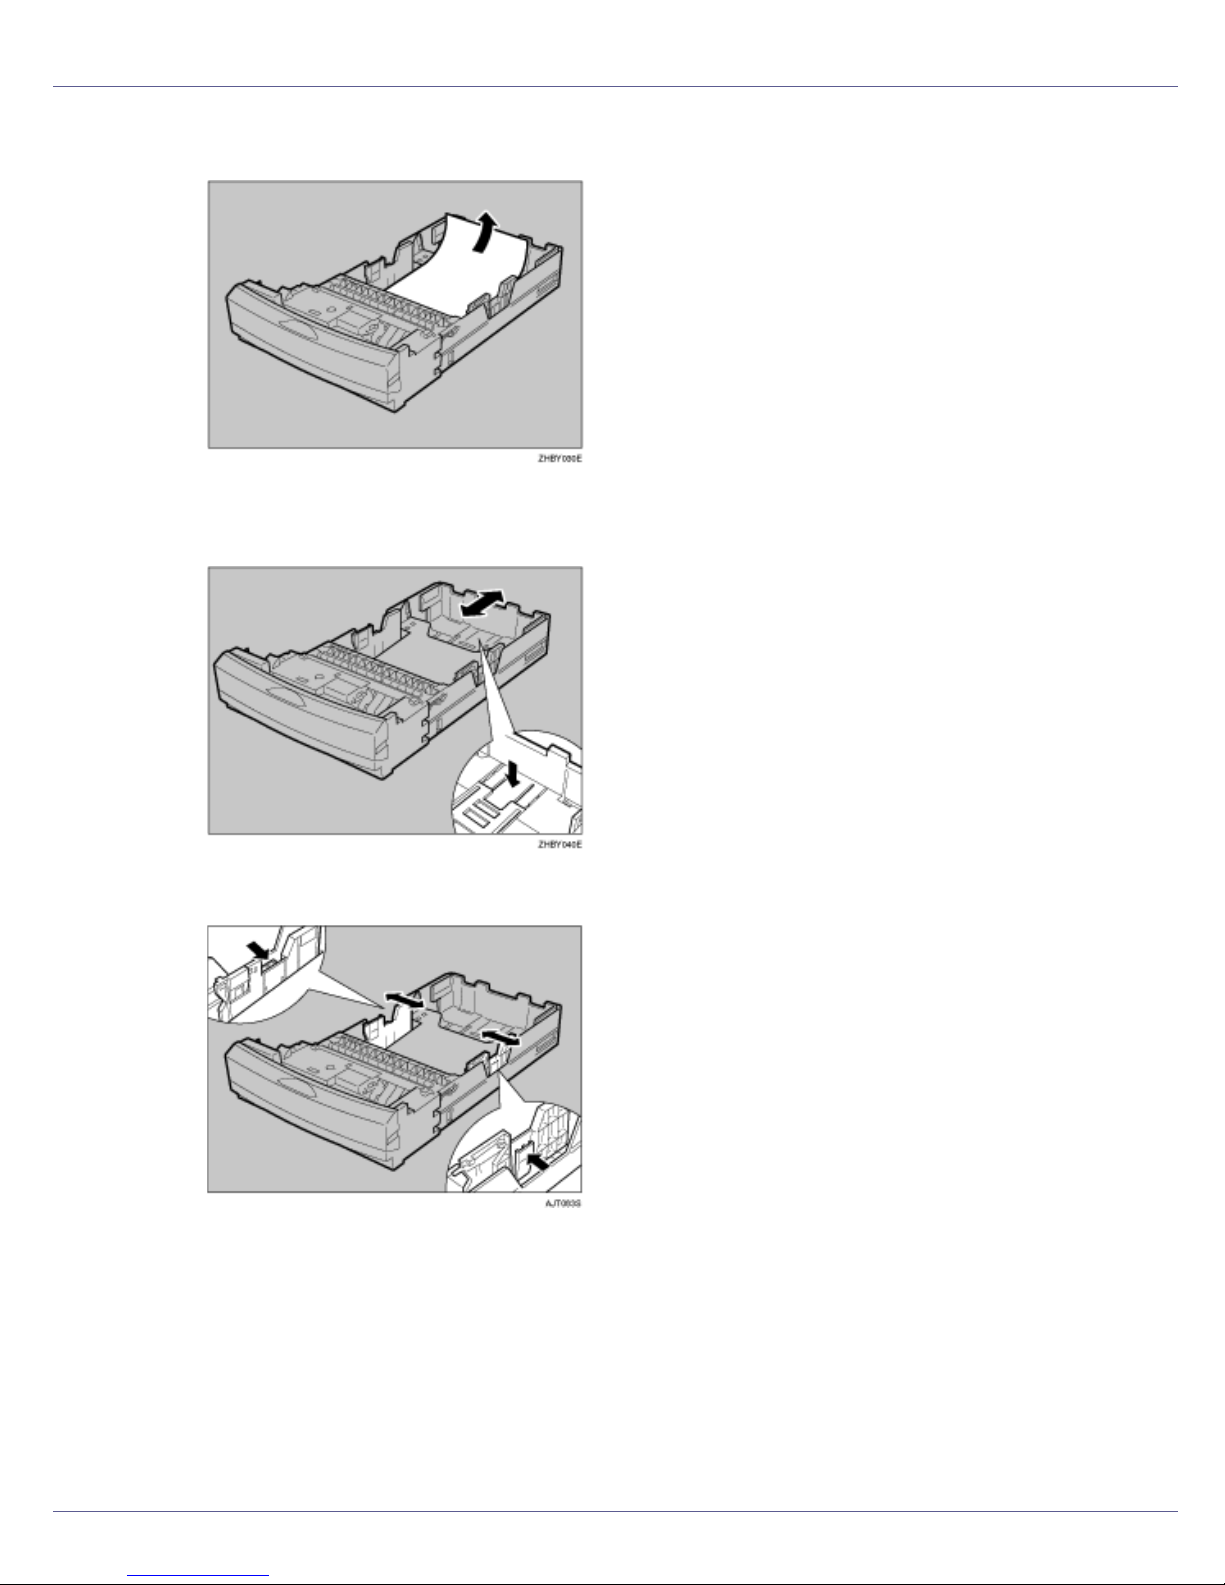
B Remove the paper.
C Press “Push”, and then adjust the rear guide to the paper size you are
using.
D Adjust the side guides to the paper size you want to load.
18
Paper and Other Media
E Load paper print side up in the paper tray.
❒ Check the top of the stack is not higher than the limit mark inside the tray.
F Slide the paper tray fully into the printer.
Specifying a paper type for Tray 1 and the optional paper feed unit
Improve printer performance by selecting the optimum paper type for the tray.
You can select from the following paper types:
• Plain Paper, Recycled Paper, Special Paper, Color Paper, Letterhead, Preprinted
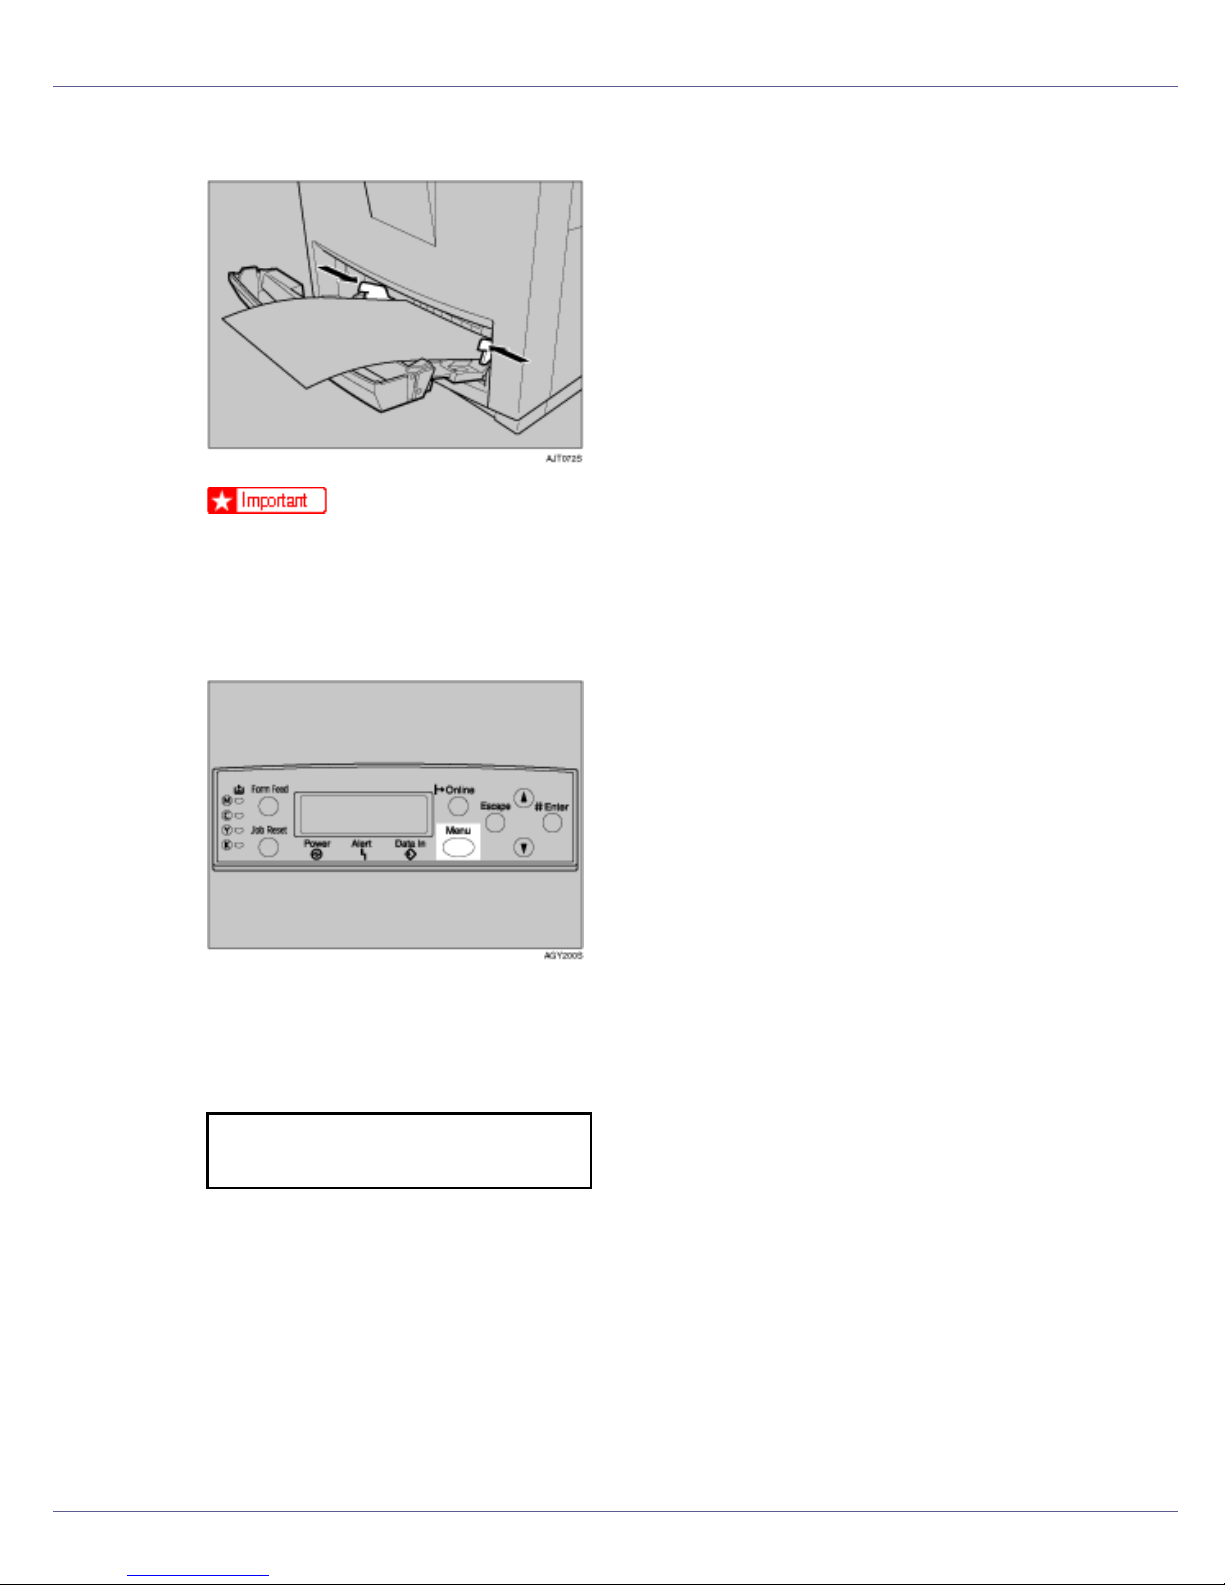
A Press the {Menu} key.
19
Paper and Other Media
The [Menu] screen appears.
B Press the {U} or {T} key to display [Paper Input], and then press the {#
Enter} key.
Menu:
Paper Input
The paper type selection menu appears.
C Press the {U} or {T} key to display [Paper Type], and then press the {# En-
ter} key.
The paper tray selection menu appears.
D Press the {U} or {T} key to display the target paper tray, and then press
the {# Enter} key.
When the optional paper feed units are installed in the printer, [Tray 2] and
[Tray 3] appears (depending on how many units are installed).
Paper Type:
Tray 2
The paper type selection menu appears.
E Press the {U} or {T} key to display the target paper tray, and then press
the {# Enter} key.
Tray 2:
*Plain Paper
After about two seconds, the display returns to the menu.
F Press the {Online} key.
The initial screen appears.
The following message appears on the display:
❒ When selecting Plain Paper, select [Thin] or [Normal] for [Plain Paper] in the
[Maintenance] menu.
Loading Paper in the Bypass Tray
Specifying standard size paper for the Bypass Tray
This section explains how to load standard size paper into the bypass tray.
20

Paper and Other Media
❒ To avoid multi-sheet feeds, fan the paper before loading it onto the paper tray.
❒ Set the size and direction of the loaded paper using the control panel or the
printer driver. Make sure the settings do not conflict. Conflicting settings can
cause paper jams or loss of print quality.
❒ Load paper print side down and in the short-edge feed direction.
A Open the bypass tray.
B Extend the bypass tray.
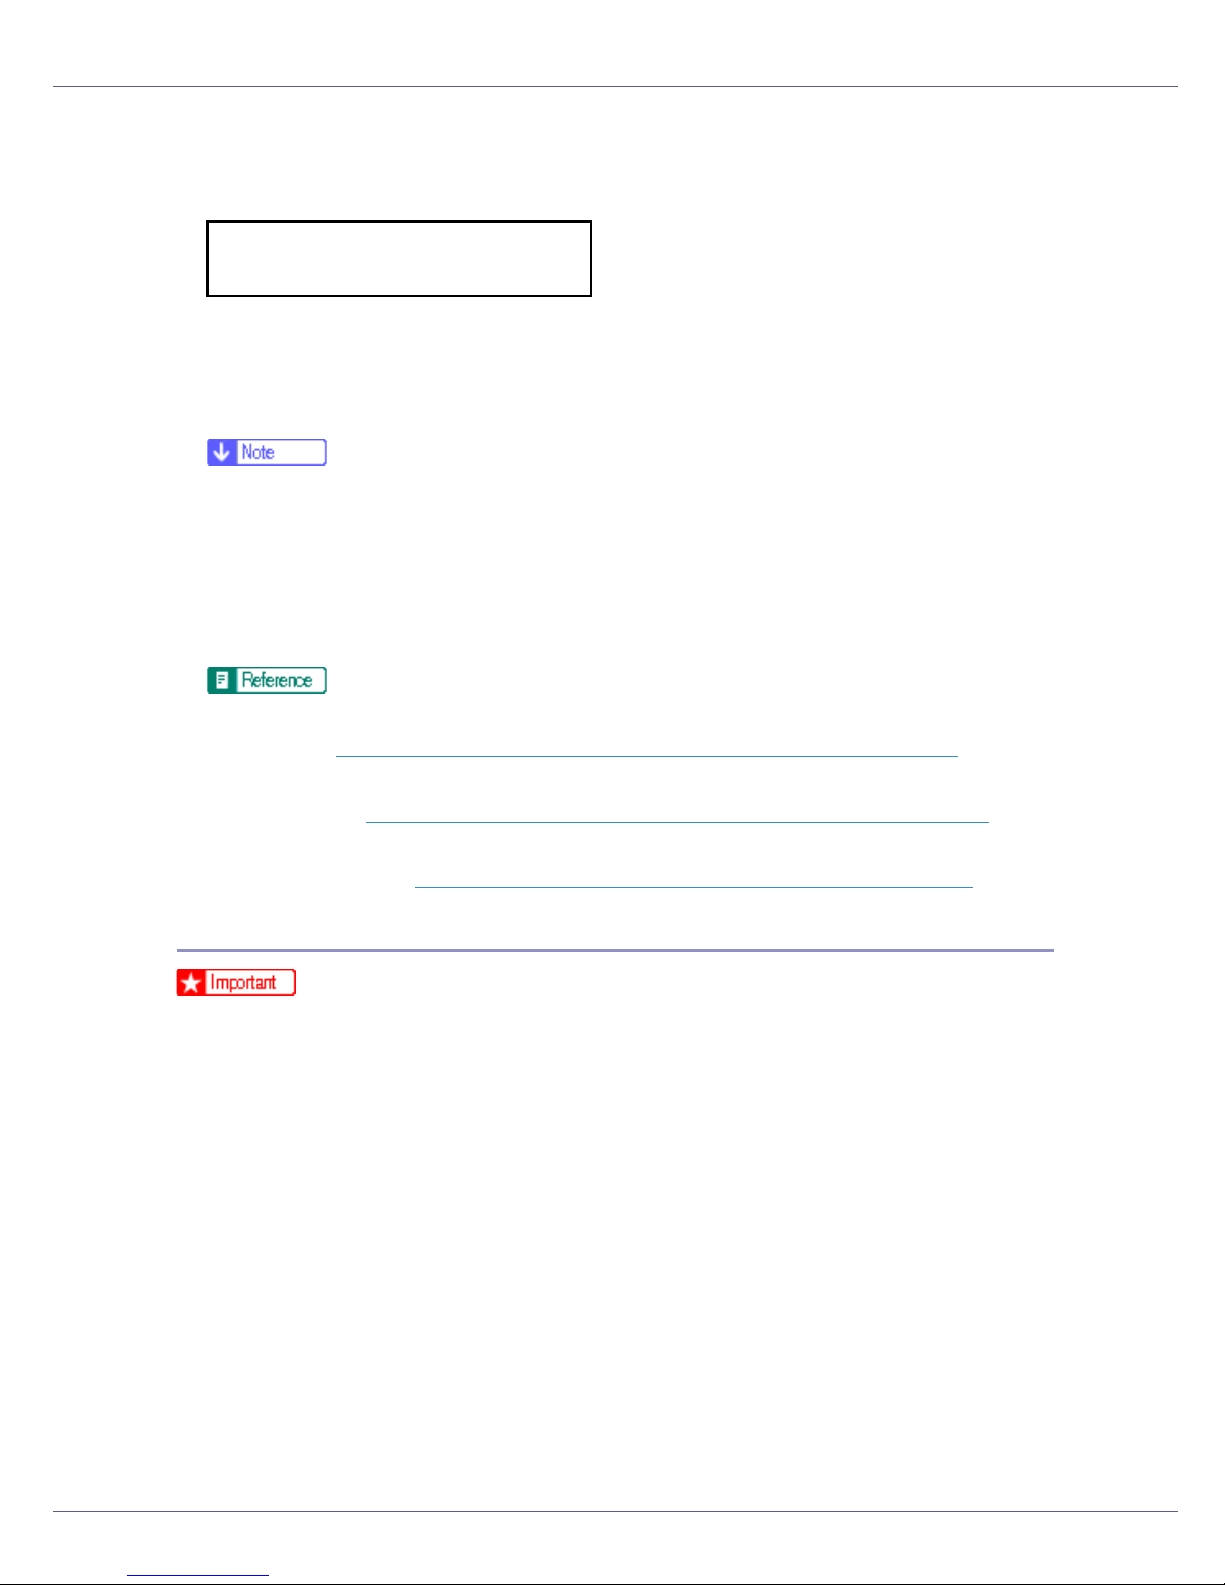
C Slide the side guides outward ( ), and then insert paper print side down
until it stops ( ).
21
Paper and Other Media
D Adjust the side guides to the paper width.
❒ Check the top of the stack is not higher than the limit mark inside the tray.
❒ To avoid multi-sheet feeds, fan the paper before loading it onto the paper
tray.
E Set the paper size using the control panel. Press the {Menu} key.
The [Menu]screen appears.
F Press the {U} or {T} key to display [Paper Input], and then press the {#
Enter} key.
Menu:
Paper Input
The paper selection menu appears.
G Check that [Bypass Size] appears, and then press the {# Enter} key
The paper size selection menu appears.
22
Paper and Other Media
H Press the {U} or {T} key to display the size and orientation of the paper
in the bypass tray.
Bypass Size:
*8 x 13
After about two seconds, the display returns to the menu.
I Press the {Online} key.
The initial screen appears.
❒ To load thick paper, OHP transparencies, or envelopes, make settings for
thick paper or OHP transparencies using the control panel and printer driver.
❒ The number of pages that can be loaded in the bypass tray differs depend-
ing on paper type. Make sure paper is not stacked above the paper guides
inside the bypass tray.
For details about control panel settings for custom size paper or special paper, see p.23 “
To select custom size paper (148 - 356 mm in length, 90 - 216 mm in
width), see p.23 “
For control panel settings when using thick paper, OHP transparencies, or
post cards, see p.25 “
Specifying custom size paper for the Bypass Tray”.
Specifying custom size paper for the Bypass Tray”.
Specifying a paper type for the Bypass Tray”.
Specifying custom size paper for the Bypass Tray
❒ When loading custom size or special paper, specify the paper size using the
control panel and printer driver.
❒ Paper sizes between 148 - 356 in length and 90 - 216 mm in width can be
loaded in the bypass tray.
❒ The custom paper size selected using the printer driver overrides that select-
ed using the control panel. Do not configure settings using the control panel if
you have already made settings using the printer driver. However, when printing with a printer driver other than the RPCS printer driver, you must configure
the settings using the control panel.
❒ You cannot print on custom size paper with an application that does not sup-
port the custom size setting.
23
Paper and Other Media
A Press the {Menu} key.
The [Menu]screen appears.
B Press the {U} or {T} key to display [Paper Input], and then press the {#
Enter} key.
Menu:
Paper Input
The paper selection menu appears.
C Check [Bypass Size] appears, and then press the {# Enter} key.
The paper size selection menu appears.
D Press the {U} or {T} key to display [Custom Size], and then press the {#
Enter} key.
E Press the {U} or {T} key to set the horizontal value, and then press the
{# Enter} key.
Custom Size:
Horiz. 8.50”
By pressing the key, the value increases or decreases by 0.01 inch. By pressing and holding the key, the value varies by 1 inch.
F Press the {U} or {T} key to set the vertical value, and then press the {#
Enter} key.
Custom Size:
Vert. 11.00”
After about two seconds, the display returns to the menu.
G Press the {Online} key.
The initial screen appears.
24

Paper and Other Media
For details about the printer driver, see the printer driver Help.
Specifying a paper type for the Bypass Tray
By selecting the paper type you want to load, the printer performs better. You can
select from the following paper types:
• Plain Paper, Recycled Paper, Special Paper, Color Paper, Letterhead, Preprinted, Labels (adhesive label paper) , Bond Paper, Cardstock, Transparency (OHP transparency), Thick Paper 1, Thick Paper 2, Glossy Paper
❒ Be sure to select the paper type when you load labels, thick paper, or OHP
transparencies in the bypass tray.
❒ The paper type selected using the printer driver overrides that selected using
the control panel.
A Press the {Menu} key.
The [Menu]screen appears.
B Press the {U} or {T} key to display [Paper Input], and then press the {#
Enter} key.
Menu:
Paper Input
The paper selection menu appears.
C Press the {U} or {T} key to display [Paper Type], and then press the {# En-
ter} key.
The paper tray selection menu appears.
D Press the {U} or {T} key to display [Bypass Tray], and then press the {#
Enter} key.
The paper type selection menu appears.
25
Paper and Other Media
E Press the {U} or {T} key to display the loaded paper type, and then
press the {# Enter} key.
Bypass Tray:
Recycled Paper
After about two seconds, the display returns to the menu.
F Press the {Online} key.
The initial screen appears.
The following message appears on the display:
❒ When selecting Plain Paper, select [Thin] or [Normal] for [Plain Paper] in the
[Maintenance] menu.
❒ The following paper types cannot be printed on both sides:
• Special Paper, Labels (adhesive label paper), Cardstock, Transparency
(OHP transparency), Thick Paper 2 (165 - 199 g/m
Plain:Dup.Back (reverse side of plain paper), Thick1:Dup.Back (reverse
side of thick paper)
2
), Thin Paper,
Switching between Paper Trays
When paper of the same size is loaded in both the standard tray and the paper
feed unit (option), and when [Auto Tray Select] is set with the printer driver, paper
will be fed from the standard tray when you start printing. To print on paper loaded in the paper feed unit, switch the tray to be used to the paper feed unit using
[Tray Priority] in the [Paper Input] menu.
A Press the {Menu} key.
The [Menu]screen appears.
26

Paper and Other Media
B Press the {U} or {T} key to display [Paper Input], and then press the {#
Enter} key.
Menu:
Paper Input
The paper selection menu appears.
C Press the {U} or {T} key to display [Tray Priority], and then press the {#
Enter} key.
The paper tray selection menu appears.
D Press the {U} or {T} key to select the tray type you want to use, and
then press the {# Enter} key.
The following message appears on the display:
Tray Priority:
*Tray 2
E Press the {Online} key.
The initial screen appears.
27

Replacing Consumables and Maintenance Kit
Replacing the Toner Cartridge
• Do not incinerate spilled toner or used toner. Toner dust is flammable
and might ignite when exposed to an open flame.
• Disposal should take place at an authorized dealer or an appropriate
collection site.
• If you dispose of the used toner cartridges yourself, dispose of them
according to local regulations.
• Do not store toner, used toner, or toner containers in a place with an
open flame. The toner might ignite and cause burns or a fire.
• Keep toner (used or unused) and the toner cartridge out of reach of children.
• If toner or used toner is inhaled, gargle with plenty of water and move into
a fresh air environment. Consult a doctor if necessary.
• If your skin comes into contact with toner or used toner, wash the affected
area thoroughly with soap and water.
• If toner or used toner gets into your eyes, flush immediately with large
amounts of water. Consult a doctor if necessary.
• If toner or used toner is swallowed, dilute by drinking a large amount of water. Consult a doctor if necessary.
• Avoid getting toner on your clothes or skin when removing a paper jam or
replacing toner. If your skin comes into contact with toner, wash the affected
area thoroughly with soap and water.
• If toner gets on your clothing, wash with cold water. Hot water will set the
toner into the fabric and may make removing the stain impossible.
❒ When handling toner cartridges, never stand them up on either end or position
them upside down.
❒ Store toner cartridges in a cool dark place.
❒ Actual printable numbers vary depending on image volume and density, num-
ber of pages printed at a time, paper type and size, and environmental conditions such as temperature and humidity. Toner quality degrades over time.
You may have to replace the toner cartridge prematurely. We recommend you
prepare a new toner cartridge beforehand.
The color of the lit LED indicates the toner status for each color. A red light indicates the toner cartridge must be replaced.
G1398504_1.00 Copyright © 2005 28
Replacing Consumables and Maintenance Kit
Replace the toner cartridge if the following message appears on the display:
Add Toner
XXX/XXX
❒ A combination of one to four colors, yellow, magenta, cyan, black, appears in
“XXX”.
❒ If cyan, magenta, or yellow toner runs out, you can print in black and white
using black toner. Change the color mode setting to “Black and White” using
the printer driver.
❒ If black toner runs out, you cannot print in black and white or color until the
black toner cartridge is replaced.
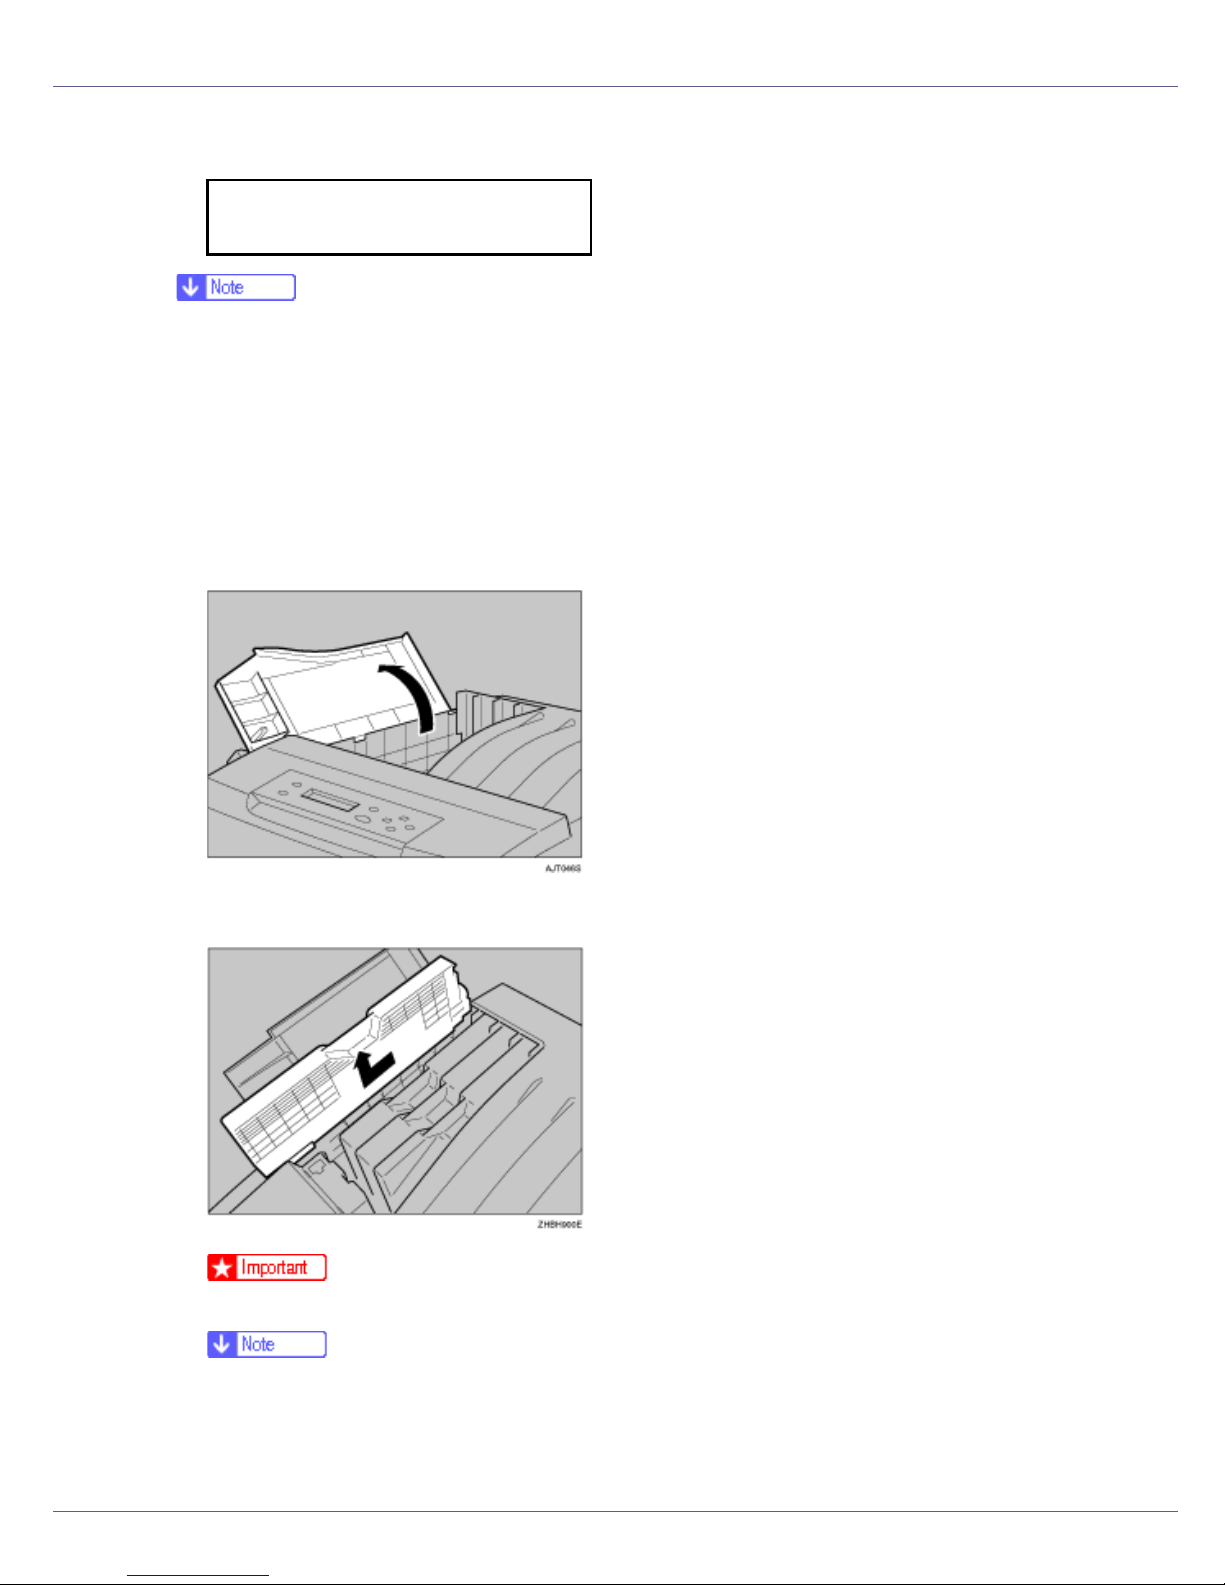
A Open the upper left cover of the printer.
B Remove the toner cartridge you want to replace.
❒ Do not shake the removed toner cartridge. Remaining toner may leak.
❒ All four cartridges are removed using the same procedure.
❒ The illustration uses the yellow cartridge as an example.
C Take a new toner cartridge out of its package.
29
Replacing Consumables and Maintenance Kit
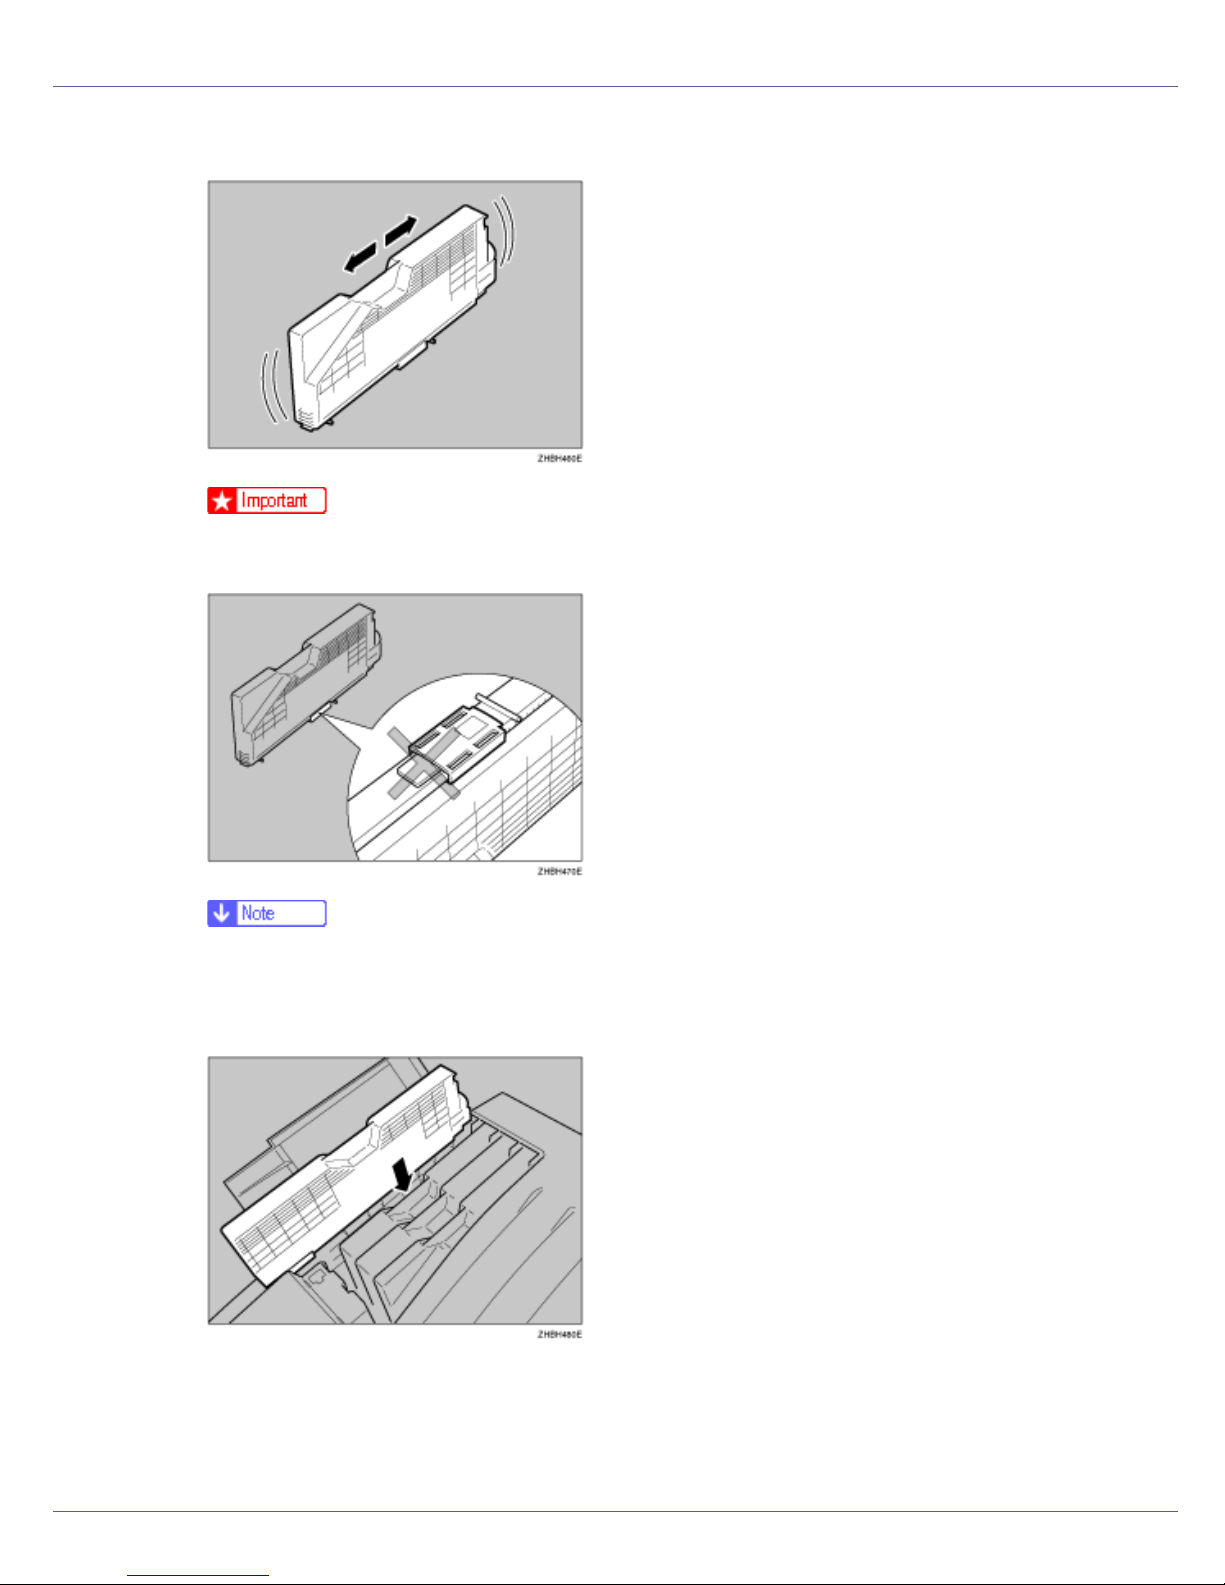
D Shake the toner cartridge from side to side about 10 times.
❒ Do not open the shutter at the bottom of the toner cartridge. Toner may
leak.
❒ The illustration uses the black cartridge as an example.
E Check the toner color and location correspond, and carefully insert the
toner cartridge vertically.
30
 Loading...