

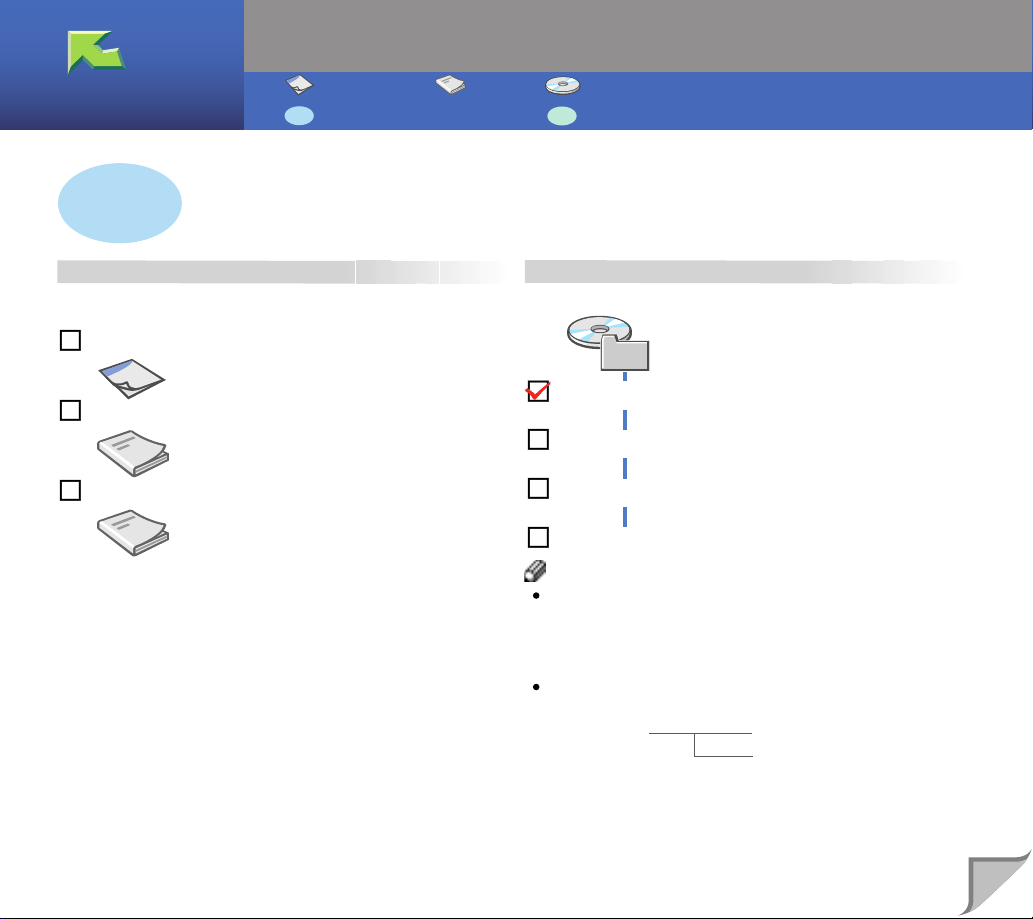
Manuals for This Printer
: Paper Guide : Paper : CD-ROM
: Manuals for Administrators : Manuals for Client Users
Manuals Provided
Printed Manuals
Manuals for This Printer
Setup Guide
Maintenance Guide
CD-ROM Manuals
Manuals for This Printer
Administrator Reference
Printer Client Reference
PostScript 3 Supplement
Note
If the manuals do not open automatically, double-click the following file
on the CD-ROM.
Windows MANUAL.EXE
Macintosh manual
Printed manuals are also included as PDF files on the CD-ROM.
Windows / Macintosh
[Language]
setup
mainte
1
G106-7516

Preparing the Printer
Printer and Option Installation
Setup Guide
Provides information about setting up and its options.
❑
Guide to Printer Parts
❑
Setting Up
❑
Installing Options
Network Printer Configuration
Setup Guide
Manuals for This Printer
2
Administrator Reference
Provides information about setting up the printer as a print
server and making printer settings using the control panel.
❑
Setting Up as a Print Server on Windows 2000/XP,
Windows Server 2003 and Windows NT 4.0
❑
Setting Up as a Print Server on NetWare
❑
Using SmartDeviceMonitor for Admin and a Web
Image Monitor
❑
Making Printer Settings Using the Control Panel
Provides basic information about setting up and using
the printer in a network environment.
❑
Connecting the Printer
❑
Configuring the Printer for the Network Using the
Control Panel
❑
Installing the Printer Driver
Manuals for This Printer
3
Preparing the Client Computer
Printing from Windows, Macintosh, or NetWare
Printer Client Reference
Provides information about setting up and using
the printer in a Windows, Macintosh, or NetWare
environment, and also about software and utilities
included on the CD-ROM.
❑
Windows 95/98/Me, Windows 2000, Windows XP,
Windows Server 2003, Windows NT 4.0
❑ Using the Printer in a Macintosh or NetWare
Environment
❑
Software and Utilities Included on the CD-ROM
❑
Setting up the Printer Driver and Canceling a Print Job
PostScript 3 Supplement
Provides information about terminology and features
of the PostScript 3 Printer Driver.
❑
Setting up Options
❑
Using Printer Utility for Mac
Maintenance
Maintenance and Troubleshooting
Maintenance Guide
Provides information about paper, dealing with error
messages, replacing consumables, cleaning, and
adjusting.
❑
Replacing Consumables and Maintenace Kit
❑
Cleaning and Adjusting the Printer
❑
Paper and Other Media
❑
Troubleshooting

Manuals for This Printer
Icons
Click to go to the top page where you can select other manuals.
Click to go to the next page.
Click to go to the viewed manual's table of contents.
Note
To open multiple manuals at the same time, follow the procedure below:
On the [File] menu, point to [Preferences] , and then click [General...]. Clear the [Open Cross-Doc Links in Same Window] check box in
the [General Preference] dialog box that appears.
4
G106-7516 Copyright © 2004 EN USA GB GB AE AE
Setup Guide
Guide to Printer Parts
Setting Up
Preparing to Print
Installing Options
Read this manual carefully before you use this product and keep it handy for future reference. For safe and correct use, please be sure to read
the Safety Information in this manual before using the machine.

Introduction
This manual describes detailed instructions on the operation and notes about the use of this machine.
To get maximum versatility from this machine all operators are requested to read this manual carefully
and follow the instructions. Please keep this manual in a handy place near the machine.
Do not make copies of any item for which copying is prohibited by law.
Copying the following items is normally prohibited by local law:
Bank bills, revenue stamps, bonds, stock certificates, bank drafts, checks, passports, driver's licenses.
Power Source
120V, 60Hz, 12A or more
Please be sure to connect the power cable to a power source as above.
Laser Safety:
This machine is considered a CDRH class I laser device, safe for office/EDP use. The machine contains 7 milliwatt, 645 - 660 nanometer wavelength, AlGaInp Laser Diode. Direct (or indirect reflected)
eye contact with the laser beam might cause serious eye damage. Safety precautions and interlock
mechanisms have been designed to prevent any possible laser beam exposure to the operator.
Caution:
Use of controls or adjustments or performance of procedures other than those specified in this manual
might result in hazardous radiation exposure.
Do not attempt any maintenance or troubleshooting other than that mentioned in this manual. This machine contains a laser beam generator and direct exposure to laser beams can cause permanent eye
damage.
Important
Contents of this manual are subject to change without prior notice. In no event will the company be liable for direct, indirect, special, incidental, or consequential damages as a result of handling or operating the machine.
Two kinds of size notation are employed in this manual. With this machine refer to the inch version.
For good copy quality, the supplier recommends that you use genuine toner from the supplier.
The supplier shall not be responsible for any damage or expense that might result from the use of parts
other than genuine parts from the supplier with your office products.

Trademarks
Microsoft, Windows, and Windows NT are registered trademarks of Microsoft
Corporation in the United States and/or other countries.
IPS-PRINT Printer Language Emulation Copyright© 1999-2000 Oak Technology, Inc., All rights reserved.
Ethernet is a registered trademark of Xerox Corporation.
Bluetooth is a Trademark of the Bluetooth SIG, Inc. (Special Interest Group) and
licensed to RICOH Company Limited.
The Bluetooth Trademarks are owned by Bluetooth SIG, Inc. USA
Other product names used herein are for identification purposes only and might
be trademarks of their respective companies. We disclaim any and all rights to
those marks.
The proper names of the Windows operating systems are as follows:
• The product name of Windows
• The product name of Windows
• The product name of Windows
Edition (Windows Me).
• The product names of Windows
Microsoft
Microsoft
Microsoft
®
Windows® 2000 Advanced Server
®
Windows® 2000 Server
®
Windows® 2000 Professional
• The product names of Windows
Microsoft
Microsoft
®
Windows® XP Professional
®
Windows® XP Home Edition
• The product names of Windows Server
Microsoft
Microsoft
Microsoft
®
Windows ServerTM 2003 Standard Edition
®
Windows ServerTM 2003 Enterprise Edition
®
Windows ServerTM 2003 Web Edition
• The product names of Windows NT
Microsoft
Microsoft
®
Windows NT® Server 4.0
®
Windows NT® Workstation 4.0
®
95 is Microsoft® Windows® 95.
®
98 is Microsoft® Windows® 98.
®
Me is Microsoft® Windows® Millennium
®
2000 are as follows:
®
XP are as follows:
TM
2003 are as follows:
®
4.0 are as follows:
Notes:
Some illustrations in this manual might be slightly different from the machine.
Certain options might not be available in some countries. For details, please contact your local dealer.
i

Safety Information
R
R
When using this machine, the following safety precautions should always be followed.
Safety During Operation
In this manual, the following important symbols are used:
WARNING:
CAUTION:
Indicates a potentially hazardous situation which, if instructions
are not followed, could result in death or serious injury.
Indicates a potentially hazardous situation which, if instructions are not
followed, may result in minor or moderate injury or damage to property.
ii

R WARNING:
• Only connected the machine to the power source described on the inside front cover of this manual.
• Avoid multi-wiring.
• Do not damage, break or make any modifications to the power cord.
Do not place heavy objects on it, pull it hard or bend it more than necessary. These actions could cause an electric shock or fire.
• Do not plug or unplug the power cord with your hands wet. Otherwise,
an electric shock might occur.
• Make sure the wall outlet is near the machine and freely accessible so
that in event of an emergency it can be unplugged easily.
• Do not remove any covers or screws other than those specified in this
manual. Some parts of the machine are at a high voltage and could
give you an electric shock. Also, if the machine has laser systems, direct (or indirect) reflected eye contact with the laser beam may cause
serious eye damage. When the machine needs to be checked, adjusted, or repaired, contact your service representative.
• Do not take apart or attempt any modifications to this machine. There
is a risk of fire, electric shock, explosion or loss of sight. If the machine has laser system, there is a risk of serious eye damage.
• If the machine looks damaged or breaks down, smoke is coming out,
there is a strange smell or anything looks unusual, immediately turn
off the operation and main power switches then unplug the power
cord from the wall. Do not continue using the machine in this condition. Contact your service representative.
• If metal, liquid or foreign matter falls into the machine, turn off the operation and main power switches, and unplug the main power cord.
Contact your service representative. Do not keep using the machine
with a fault or defect.
• Do not put any metal objects or containers holding water (e.g. vases,
flowerpots, glasses) on the machine. If the contents fall inside the machine, a fire or electric shock could occur.
• Do not incinerate used toner or toner containers. Toner dust might ignite when exposed to an open flame. Dispose of the used toner containers according to local regulations for plastics.
• Confirm that the wall outlet is near the machine and freely accessible,
so that in event of an emergency, it can be unplugged easily.
• To avoid hazardous electric shock or laser radiation exposure, do not
remove any covers or screws other than those specified in this manual.
iii

R CAUTION:
• Keep the machine away from humidity and dust. A fire or an electric shock
might occur.
• Do not place the machine on an unstable or tilted surface. If it topples over,
it could cause injury.
• After you move the machine, fix it with the caster fixture. Otherwise, the machine might move or come down to cause a personal injury.
• When you move the machine, unplug the power code from the wall outlet
to avoid fire or electric shock.
• When machine will not be used for a long time, unplug the power code.
• When you pull out the plug from the socket, grip the plug to avoid damaging
the cord and causing fire or electric shock.
• If you use the machine in a confined space, make sure there is a continuous
air turnover.
• Do not reuse stapled paper. Do not use aluminum foil, carbon-containing
paper or other conductive paper. Otherwise, a fire might occur.
• When removing misfed paper, do not touch the fusing section because it
could be very hot.
• This machine has been tested for safety using this suppliers parts and consumables. We recommend you only use these specified supplies.
• Touch only the handles, no other parts. The fuser oil unit gets very hot and
will burn your hands if you touch it.
• Do not eat or swallow toner.
• Keep toner (used or unused) and toner containers out of reach of children.
• Deliver to collection point for waste products. Do not be disposed of via do-
mestic refuse collection.
• The inside of the machine becomes very hot. Do not touch the parts with a
label indicating a “hot surface”. Touching a “hot surface” could result in a
burn (v: means “hot surface”).
• The User Account Enhance Unit installed on the controller has a IC19 lithium battery which can explode if replaced incorrectly. Replace the User Account Enhance Unit only with the indicated one.
• Do not place the user account enhance unit near or into fire, as the lithium
battery inside this machine will explode and cause a burn.
• Keep the fuser oil unit away from flames. There is a risk of fire or burns.
• Keep the waste oil bottle away from flames. There is a risk of fire or burns.
iv

Note
❒ Disposal should take place at an authorized dealer or an appropriate collec-
tion site.
❒ An lithium battery is contained inside the user account enhance unit. If you
are disposing of the machine personally, do it according to local regulations.
❒ When you use this machine for a long time in a confined space without good
ventilation, you may detect an odd smell. To keep the workplace comfortable,
we recommend that you keep it well ventilated.
Important
❒ Rating voltage of the connector for options: Max. DC 24 V.
v
Positions of R
RWARNING and R
RR
RCAUTION
RR
labels
This machine has labels for RWARNING and RCAUTION at the positions
shown below. For safety, please follow the instructions and handle the machine
as indicated.
vi
ABT065S1

ENERGY STAR Program
As an ENERGY STAR Partner, we have determined
that this machine model meets the ENERGY STAR
Guidelines for energy efficiency.
The ENERGY STAR Guidelines intend to establish an international energy-saving system for
developing and introducing energy-efficient office equipment to deal with environmental issues, such as global warming.
When a product meets the ENERGY STAR Guidelines for energy efficiency, the Partner shall
place the ENERGY STAR logo onto the machine model.
This product was designed to reduce the environmental impact associated with office equipment by means of energy-saving features, such as Low-power mode.
❖❖❖❖ Low-power Mode (Energy Saver mode)
This printer automatically lowers its power consumption 60 minutes after the
last operation has been completed. To exit Low-power (Energy Saver) mode,
press any key on the control panel. For details about how to configure Energy
Saver mode, see “Making Printer Settings using the Control Panel”, Adminis-
trator Reference as a PDF file on the CD-ROM.
❖❖❖❖ Specifications
Energy Saver mode Power Consumption 15 W or less
Default Time 60 minutes
Recovery Time 99 seconds or less
vii

How to Read This Manual
R
R
Symbols
The following set of symbols is used in this manual.
WARNING:
This symbol indicates a potentially hazardous situation that might result in
death or serious injury when you misuse the machine without following the instructions under this symbol. Be sure to read the instructions, all of which are described in the Safety Information section.
CAUTION:
This symbol indicates a potentially hazardous situation that might result in minor or moderate injury or property damage that does not involve personal injury
when you misuse the machine without following the instructions under this
symbol. Be sure to read the instructions, all of which are described in the Safety
Information section.
* The statements above are notes for your safety.
Important
If this instruction is not followed, paper might be misfed, originals might be
damaged, or data might be lost. Be sure to read this.
Preparation
This symbol indicates information or preparations required prior to operating.
Note
This symbol indicates precautions for operation, or actions to take after abnormal operation.
Limitation
This symbol indicates numerical limits, functions that cannot be used together,
or conditions in which a particular function cannot be used.
Reference
This symbol indicates a reference.
[]
Keys that appear on the machine's display panel.
[]
Keys and buttons that appear on the computer's display.
{}
Keys built into the machine's control panel.
{}
Keys on the computer's keyboard.
viii

TABLE OF CONTENTS
Trademarks..............................................................................................................i
Safety Information .................................................................................................ii
Safety During Operation............................................................................................. ii
Positions of RRRRWARNING and RRRRCAUTION labels .............................................vi
ENERGY STAR Program .....................................................................................vii
How to Read This Manual ..................................................................................viii
1. Guide to Printer Parts
Exterior: Front View............................................................................................... 1
Exterior: Rear View ................................................................................................ 3
Interior.....................................................................................................................4
Control Panel..........................................................................................................5
2. Setting Up
Where to Put the Printer........................................................................................ 7
Checking the Contents of the Box .....................................................................10
Unpacking.............................................................................................................12
Installing the Fuser Oil Unit ................................................................................14
Installing the Toner Cartridge.............................................................................16
Loading Paper......................................................................................................18
Loading Paper in Tray 1........................................................................................... 18
Loading Paper in Tray 2 and the Optional Paper Feed Unit ....................................18
2000-sheet Large Capacity Tray..............................................................................20
Turning the Power On .........................................................................................21
Selecting the Display Language.........................................................................22
Test Printing.........................................................................................................23
3. Preparing to Print
Connecting the Printer ........................................................................................25
Connecting to a Network ..........................................................................................25
Connecting the Cable to the USB 2.0 Interface Port................................................ 26
Configuring the Printer for the Network using the Control Panel ..................27
Installing the Printer Driver .................................................................................30
4. Installing Options
Installing Options.................................................................................................33
Using the Screwdriver ......................................................................................... 37
Paper Feed Unit....................................................................................................38
Installing the Paper Feed Unit Type 7100 (500 × 1) ................................................ 38
Installing the Paper Feed Unit Type 7100 (500 × 2) ................................................ 41
Installing the Paper Bank Type 7100 (2000-sheet Large Capacity Tray) ................43
Memory Unit (SDRAM Module)...........................................................................46
ix

IEEE 1394 Interface Board ..................................................................................48
Connecting the Cable to the IEEE 1394 Interface board ......................................... 49
IEEE 1394 Configuration..........................................................................................50
IEEE 1284 Interface Board ..................................................................................53
Parallel Connection ..................................................................................................54
IEEE 802.11b Interface Unit.................................................................................55
IEEE 802.11b (wireless LAN) Configuration ............................................................57
Bluetooth Interface Unit ...................................................................................... 61
User Account Enhance Unit................................................................................63
Printer Hard Disk.................................................................................................. 66
Formatting the Printer Hard Disk Drive .................................................................... 68
Duplex Unit Type 7100.........................................................................................69
Installing the Duplex Reversal Unit Stand................................................................ 69
Installing the Duplex Reversal Unit ..........................................................................72
Installing the Duplex Feed Unit ................................................................................74
INDEX......................................................................................................... 76
x
1. Guide to Printer Parts
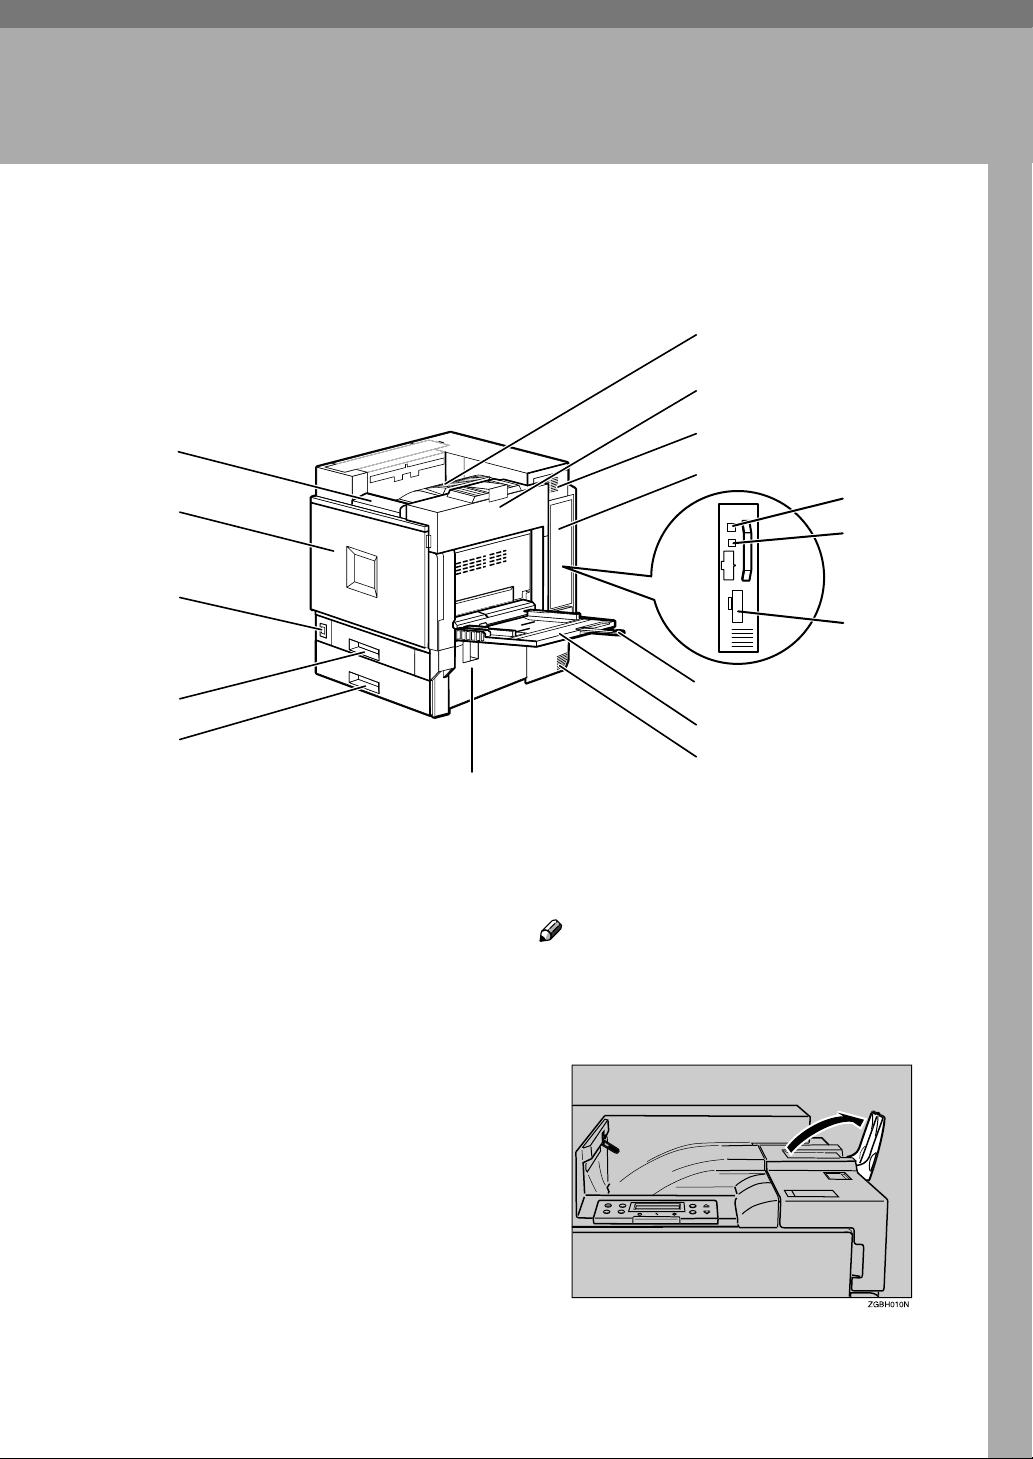
Exterior: Front View
6
7
1
2
3
4
5
16
1. Control panel
Contains keys for printer operation and a
display to show printer status.
See p.5 “Control Panel”.
2. Front cover
Open this when replacing the waste toner
bottle, development unit or photoconductor unit. A screwdriver is attached to
this cover.
8
9
10
11
12
13
14
15
ACE016S1
6. Standard tray
Output is stacked here with the print side
down.
Note
❒ If printed A3 short-edge feed or 11×17
short-edge feed sheets fall off the standard tray, raise the fence to secure
them.
3. Power switch
Use this to switch between power on and
off.
4. Tray 1
Loads up to 500 sheets of plain paper tray
for printing. Only for 11×8
1
/2 K paper.
5. Tray 2
Loads up to 500 sheets of plain paper tray
for printing.
7. Upper right cover
Open this to replace the toner cartridge.
1

Guide to Printer Parts
1
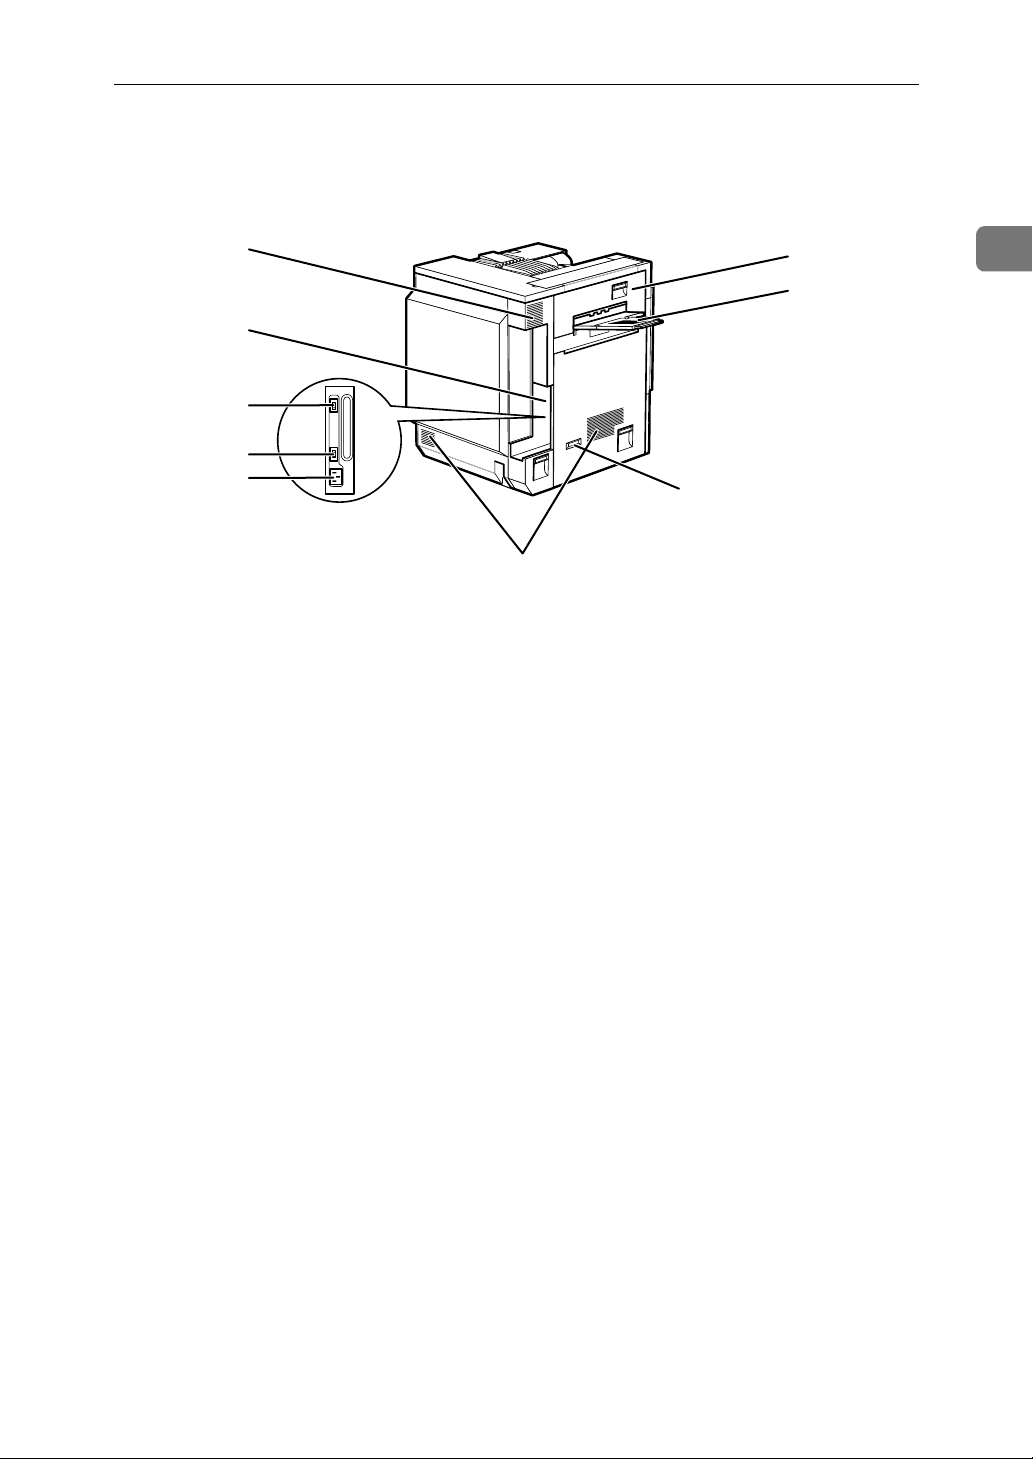
8. Vent
This helps keep internal components
from overheating. Do not block or obstruct the vent. Malfunctions may occur
due to overheating.
9. Controller board
Slide this out to install options such as the
memory unit, IEEE 1284 interface board,
IEEE 802.11b interface unit, user account
enhance unit or printer hard disk.
Plug cables such as the parallel interface
cable and Ethernet cable into their connectors.
10. Ethernet port
Use a network interface cable to connect
the printer to a network.
11. USB port
Use a USB cable to connect the printer to
the host computer.
12. Optional interface board slot
Insert an optional IEEE 1394 interface
board, IEEE 802.11b interface unit, wireless interface board, or IEEE 1284 interface board in this slot. Only one board
can be inserted at a time.
13. Bypass tray extension
Pull this out to load paper in the bypass
tray when its length is longer than A4 L.
14. Bypass tray
Use to print on thick paper, OHP transparencies, custom size paper, and plain
paper. Up to 100 sheets of plain paper can
be loaded.
15. Vent
This helps keep internal components
from overheating. Do not block or obstruct the vent. Malfunctions may occur
due to overheating.
16. Right cover
Open this to remove misfed paper.
2
Exterior: Rear View
6
7
Exterior: Rear View
1
2
3
4
5
1. Vent and dustproof filter
This helps keep internal components
from overheating. Do not block or obstruct the vent. Malfunctions may occur
due to overheating. Remove the vent to
replace the internal dustproof filter.
2. Connector board
Connect the main power cable, cables
from options, etc. to the appropriate port.
3. Duplex unit port
Connect the cable for the duplex reversal
unit to this port.
4. 2 tray finisher/Booklet finisher
port
Connect the cable for the 2 tray finisher or
the booklet finisher to this port.
9
8
ACE061S
5. Power port
Connect the power cable to this port and
the other end to the wall outlet.
6. Upper left cover
Open this to remove misfed paper or
when replacing the fusing unit.
7. External tray
Printed output is stacked here with the
print side up.
8. Vents
These help keep components inside the
printer from overheating. Do not block or
obstruct the vents. Malfunctions may occur due to overheating.
9. Earth leakage breaker
Prevents electric shock.
1
3

Guide to Printer Parts
Interior
1
2
1
8
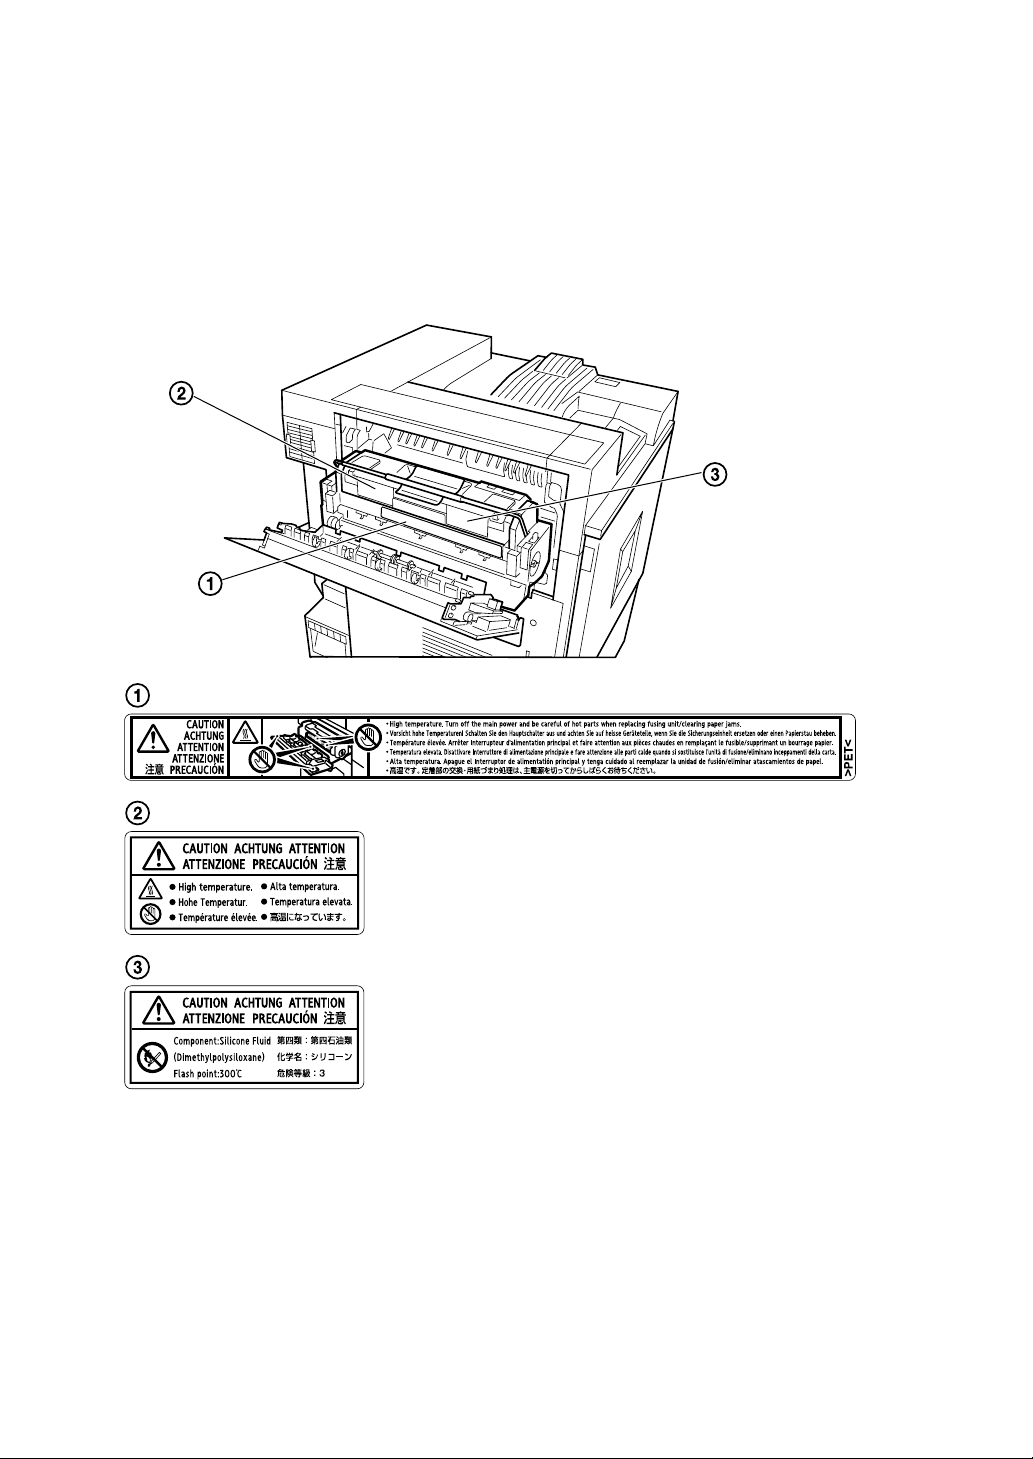
47
1. Fusing unit
Fuses the image onto the paper.
2. Fuser oil unit
Attaches to the fusing unit.
3. Waste toner bottle
Collects toner that is wasted during
printing.
4. Inner cover
Open this when replacing the photoconductor unit or development unit.
653
ZHXH840J
6. Development unit
The printer comes with one black development unit and three color (yellow, cyan, magenta) development units.
7. Toner cartridge
Loads from the printer rear, in the order
of magenta (M), cyan (C), yellow (Y), and
black (K).
8. Waste oil bottle
Collects oil discharged during printing.
5. Photoconductor unit
The printer comes with one black and
three color (yellow, cyan, and magenta)
photoconductor units.
4
Control Panel
Control Panel
1. Display
Displays current printer status and error
messages.
2. {
{Job Reset}}}} key
{{
When the printer is online, press this key
to cancel an ongoing print job.
3. {
{On Line}}}} key
{{
Indicates whether the printer is online or
offline.
Press this to switch between online and
offline.
When the lamp is lit, the printer is online,
enabling data reception from the host
computer.
When the lamp is unlit, the printer is offline, disabling data reception from the
host computer.
Press to return to the ready condition.
4. {
{Form Feed}}}} key
{{
When the printer is offline, press this to
print all data left in the printer's input
buffer.
You can use this to force the printer to
print data received in the online status
when the paper size or type does not
match the actually set size or type.
1
9112345 6 7 8
10
ACE085S
6. Power indicator
This indicator remains lit while the power is on. It is unlit when the power is off
or while the printer is in Energy Saver
mode.
7. Error indicator
Lights up whenever a printer error occurs. However, it is unlit in Energy Saver
mode.
8. Data In indicator
Blinks when the printer is receiving data
from a computer. The Data In indicator is
lit if there is data to be printed.
9. {
{Escape}}}} key
{{
Press this to return to the previous display screen.
10. {
{# Enter}}}} key
{{
Press this to execute menu items selected
on the display.
11. {
Use these to increase or decrease values
on the display when making settings.
Keep the key pressed to quicken scrolling, and increase or decrease values on
the display in units of 10.
}, {{{{TTTT}}}} Keys
{{{UUUU}}}
1
5. {
{Menu}}}} key
{{
Press this to make and check current
printer settings.
5

1
Guide to Printer Parts
6

2. Setting Up
R
R
Where to Put the Printer
The printer's location should be carefully chosen because environmental conditions greatly affect its performance.
WARNING:
• Confirm the wall outlet is near the machine and freely accessible,
so that in the event of emergency, it can be easily unplugged.
• Only connect the machine to the power source described on this
sheet.
• Avoid multi-wiring.
• Do not damage, break or make any modifications to the power ca-
ble. Do not place heavy objects on it, pull it hard or bend it more
than necessary. These actions could damage the cable. A frayed or
damaged cable might cause an electrical fire hazard.
CAUTION:
• Do not handle the plug with wet hands. Doing so might cause an electri-
cal shock.
• Keep the machine in an area that is within optimum environmental con-
ditions. Operating the machine in an environment that is outside the recommended ranges of humidity and temperature can cause an electrical
fire hazard. Keep the area around the socket free of dust. Accumulated
dust can become an electrical fire hazard.
• Place the machine on a strong and level surface. Otherwise, it might fall
and injure someone.
• If you use the machine in a confined space, ensure there is continuous
air circulation.
7
Setting Up
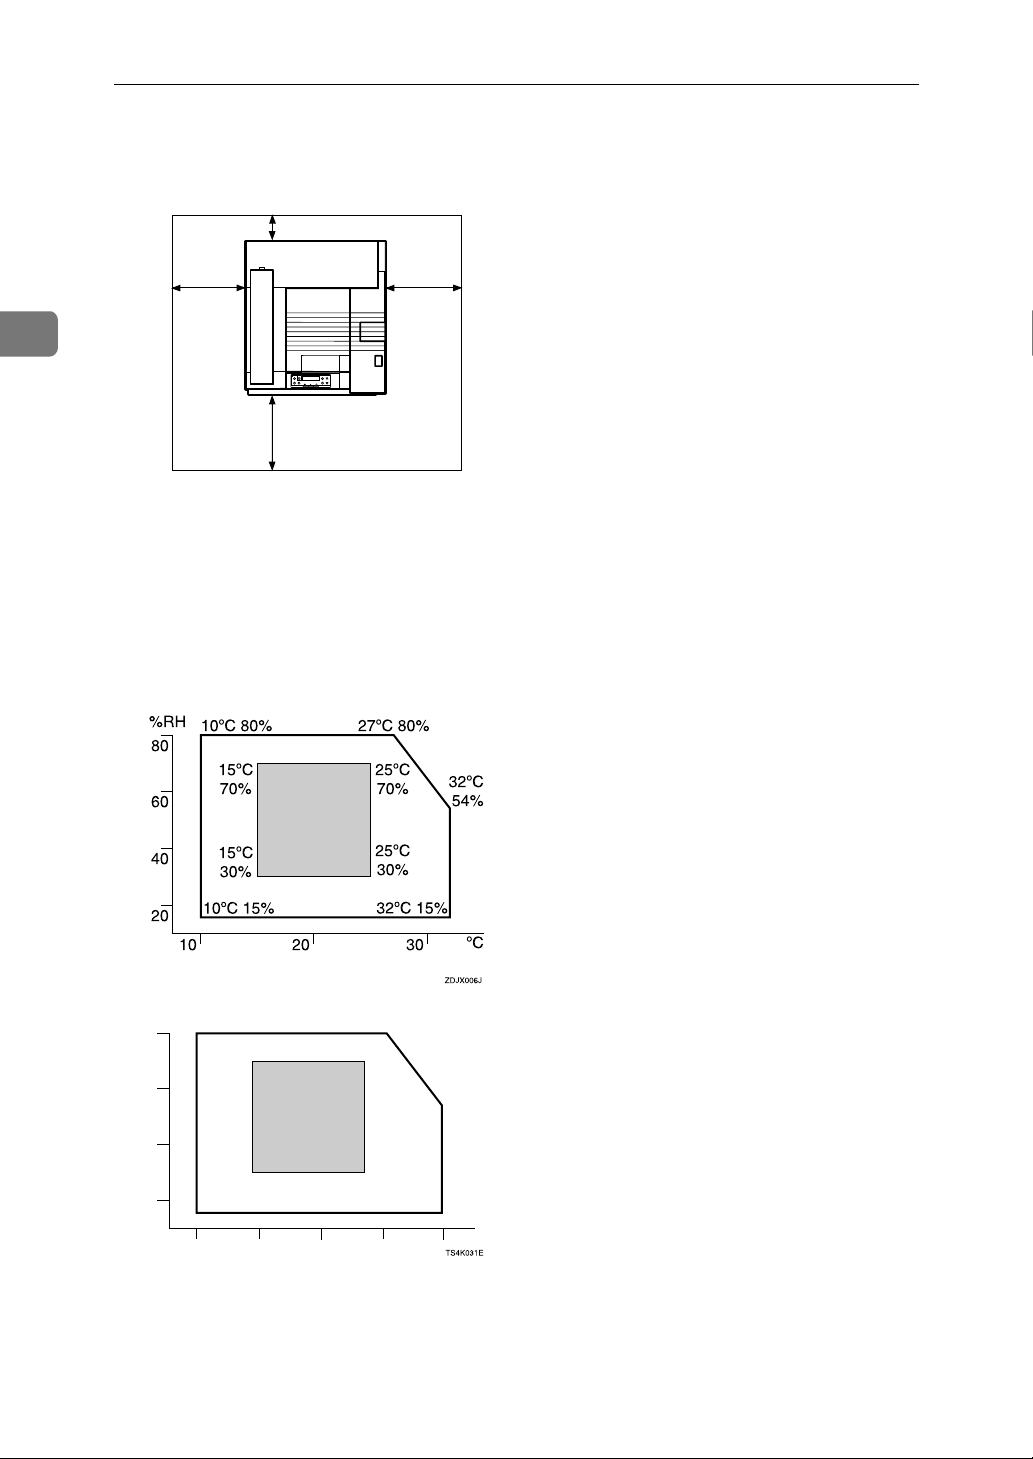
❖❖❖❖ Space Required for Installation
Leave enough space around the printer. This space is necessary to operate the
printer. The recommended (or minimum) space requirements are as follows:
B
2
A
D
C
ZDJX005J
A: 46 cm (19 inch) or more
B: 10 cm (4 inch) or more
C: 55 cm (22 inch) or more
D: 70 cm (28 inch) or more
❖❖❖❖ Optimum Environmental Conditions
Permissible and recommended temperature and humidity ranges are as follows:
%RH
50°F 80%
80
60
40
20
59°F
70%
59°F
30%
50°F 15%
50 80 90
60 70
80.6°F 80%
77°F
70%
89.6°F
54%
77°F
30%
89.6°F 15%
°F
• White area: Permissible Range
• Gray area: Recommended Range
8

Where to Put the Printer
Note
❒ The machine must be level within 5 mm, 0.2” from both front to rear and
left to right.
❒ When you use this machine for a long time in a confined space without
good ventilation, you may detect an odd smell. To keep the workplace
comfortable, we recommend you keep it well ventilated.
❖❖❖❖ Environments to Avoid
Important
❒ Areas exposed to direct sunlight or strong light
❒ Dusty areas
❒ Areas with corrosive gases
❒ Areas that are excessively cold, hot, or humid
❒ Locations near air conditioners or humidifiers
❒ Locations near other electronic equipment
❒ Locations subject to frequent strong vibration
❖❖❖❖ Power Source
Connect the power cable to a power source of the following specification:
• 120V, 60 Hz, 12A or more
2
9
2
Setting Up
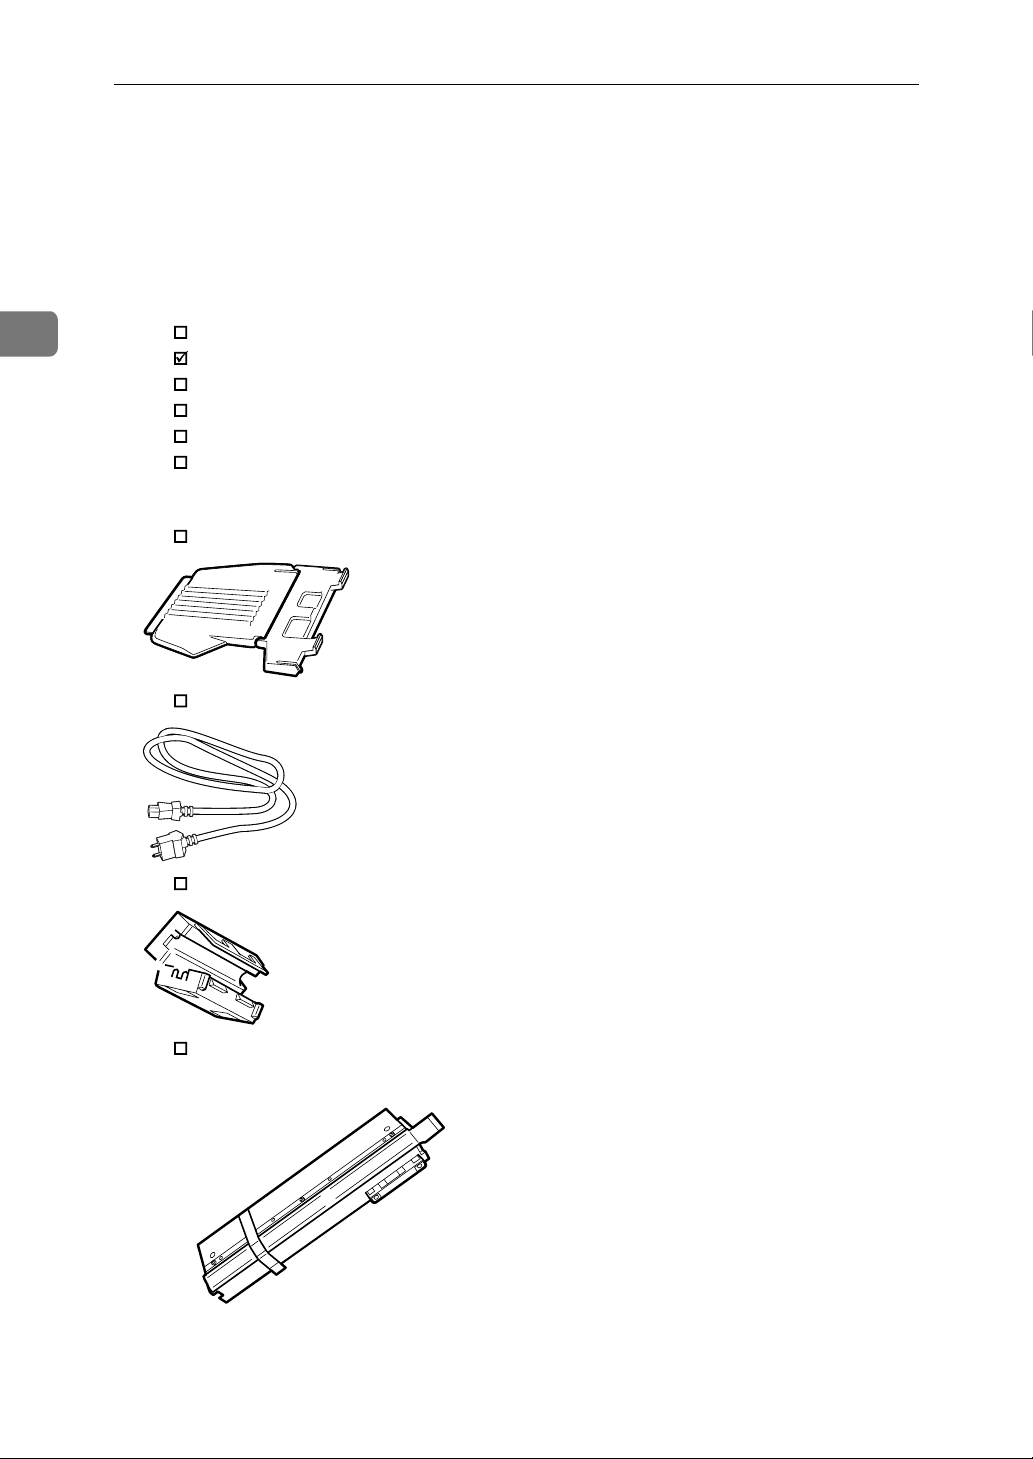
Checking the Contents of the Box
Check the box contains the following items.
AAAA
If there are missing items, contact your sales or service representative.
❖❖❖❖ Manuals and CD-ROMs
Manuals for This Printer
Setup Guide (This manual)
Maintenance Guide
CD-ROM “Printer Drivers and Utilities”
CD-ROM “Operating Instructions”
CD-ROM “Document Management Utility”
❖❖❖❖ Parts
External Tray
Power Cable
Ferrite Core
Fuser Oil Unit
10
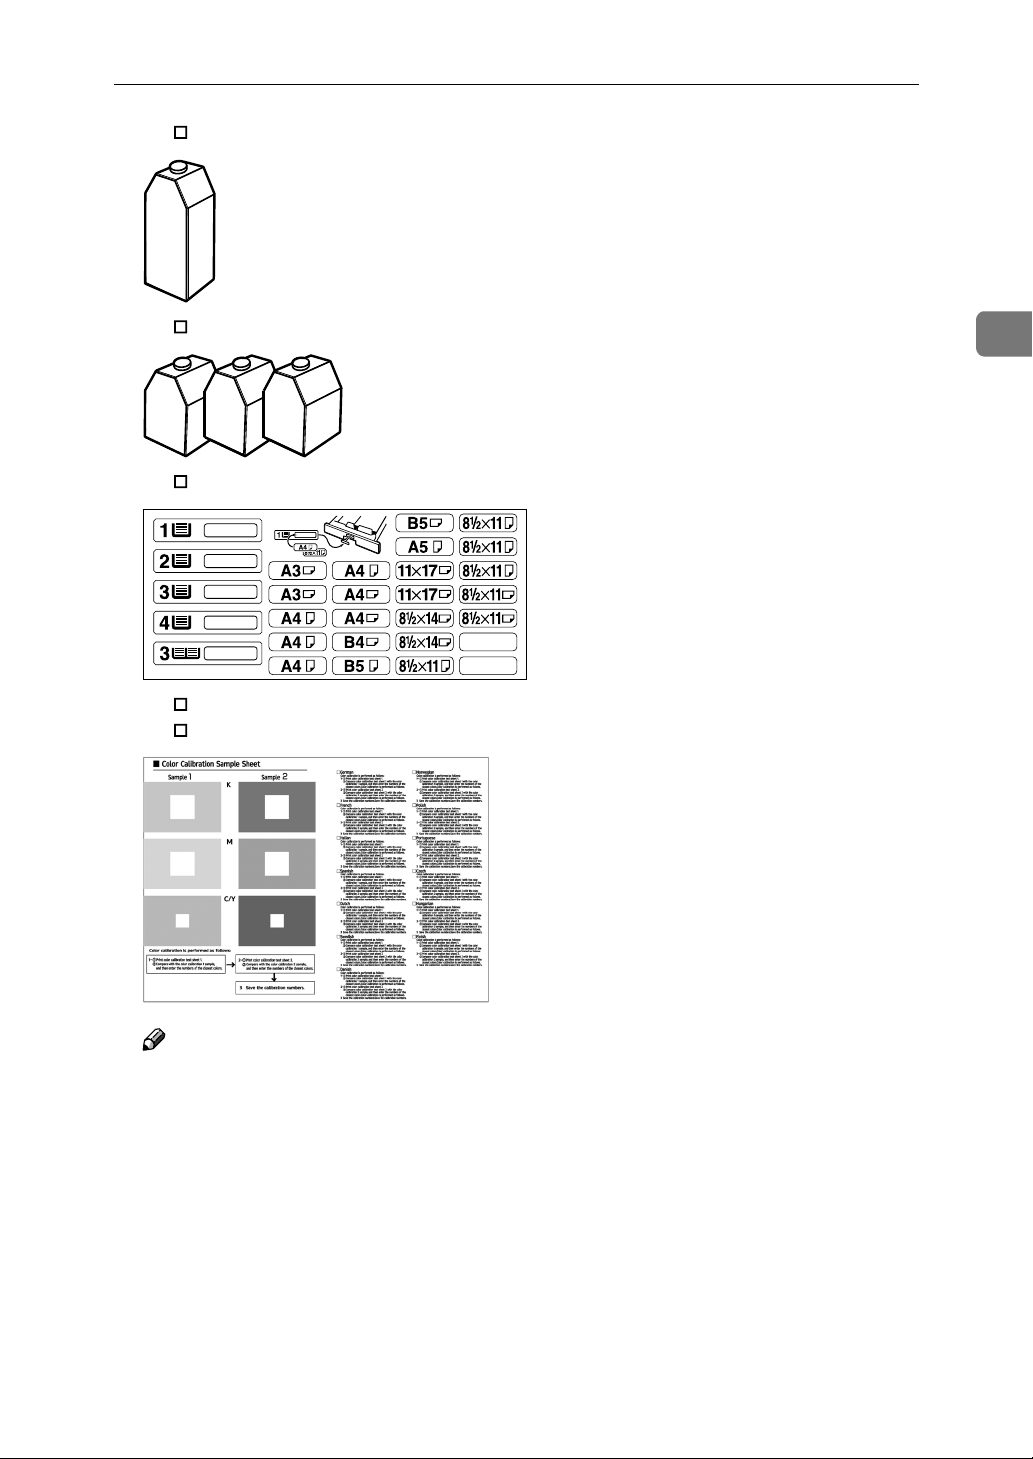
Black Toner Cartridge (K)
Checking the Contents of the Box
Magenta (M), Cyan (C), Yellow (Y) Toner Cartridges
Paper Feed Unit Labels
Additional Documentation
Color Calibration Sample Sheet
2
Note
❒ This package does not include an interface cable. Please purchase one to
use with your host computer. See “Appendix”, Administrator Reference.
11
Setting Up
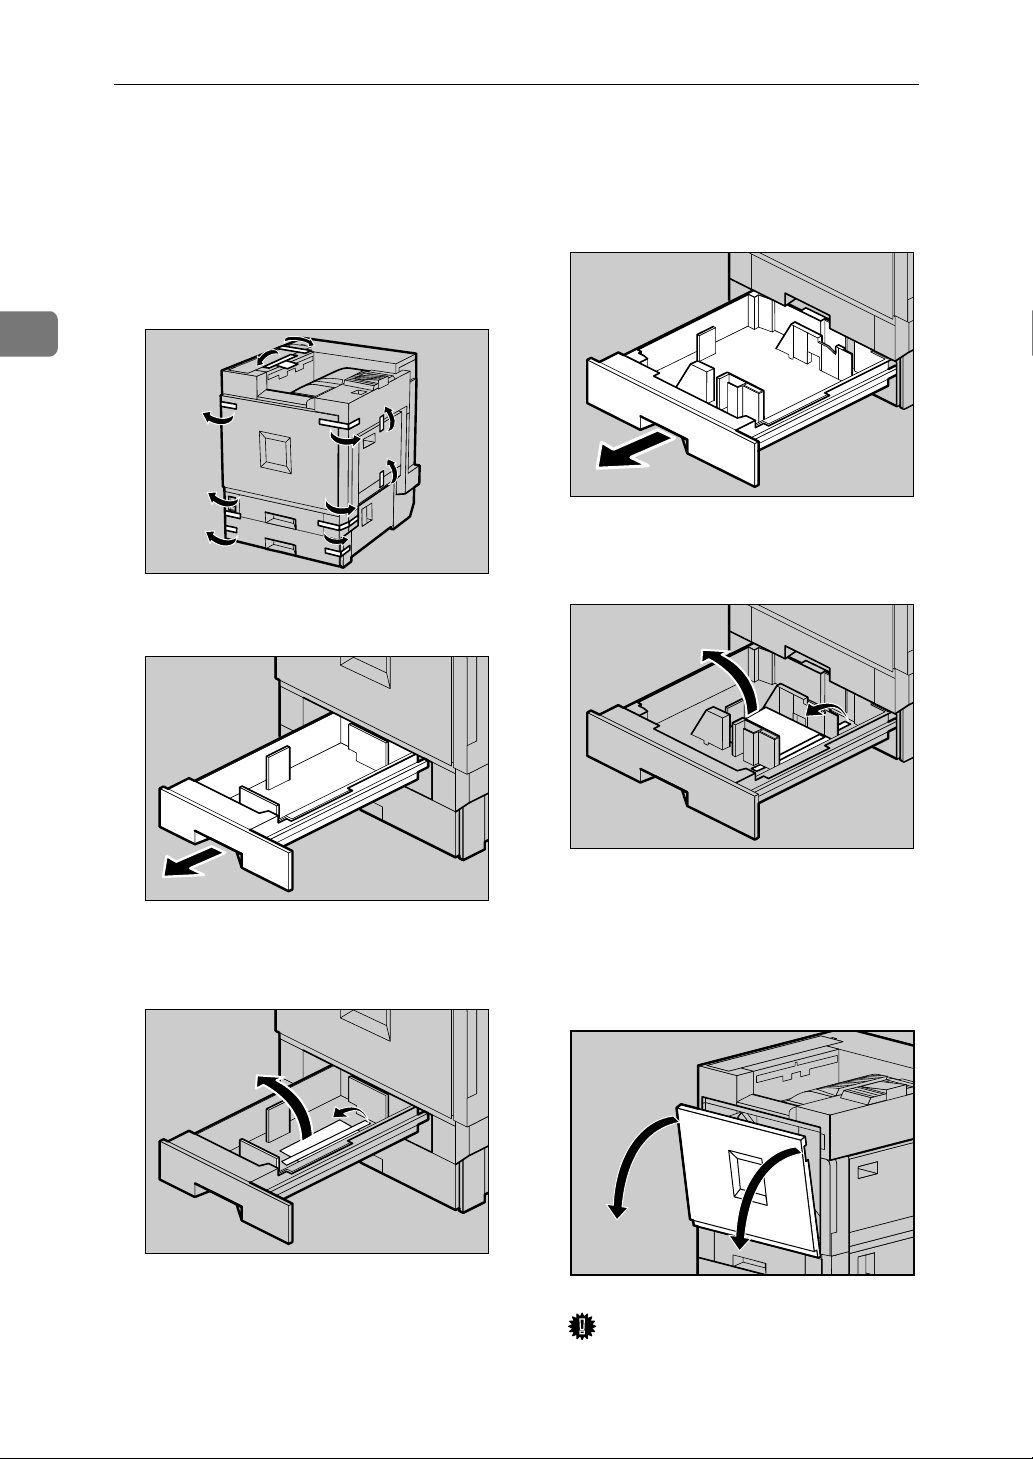
Unpacking
2
Remove the adhesive tape from
AAAA
the printer body. Remove the
cardboard taped to the standard
tray.
Open tray 1.
BBBB
ACE062S
Open tray 2.
EEEE
Remove the adhesive tape and
FFFF
sheet of paper.
ZDJH005J
12
Remove the adhesive tape and
CCCC
sheet of paper.
Close tray 1 slowly.
DDDD
ZDJH003J
ZDJH004J
Close tray 2 slowly.
GGGG
Open the front cover slowly by
HHHH
pulling down using the upper left
and right sides.
Important
❒ Do not place objects on the
opened front cover.
ZDJH006J
ZDJH007J

Unpacking
Remove the adhesive tape.
IIII
Turn the green lever clockwise.
JJJJ
ABT016S1
❒ The removed tape is dirty. Be
careful not to let it touch your
hands or clothes.
Remove the securing pin, as
LLLL
shown, from the transfer unit.
Pinch it, and then pull it out.
Close the front cover slowly by
MMMM
pushing the two areas on the left
and right.
2
ZHXH131J
Hold down the printer’s inner
KKKK
cover, grasp the pieces of tape
protruding from the development
unit, and then slowly pull them
out horizontally.
Important
❒ Be sure to pull out all four piec-
es of tape to avoid printer malfunction during operation.
ZHXH420J
ZHXH130J
Put labels “1” and “2” on the front
NNNN
of the paper trays.
ZDJH041J
ZDJP129J
13
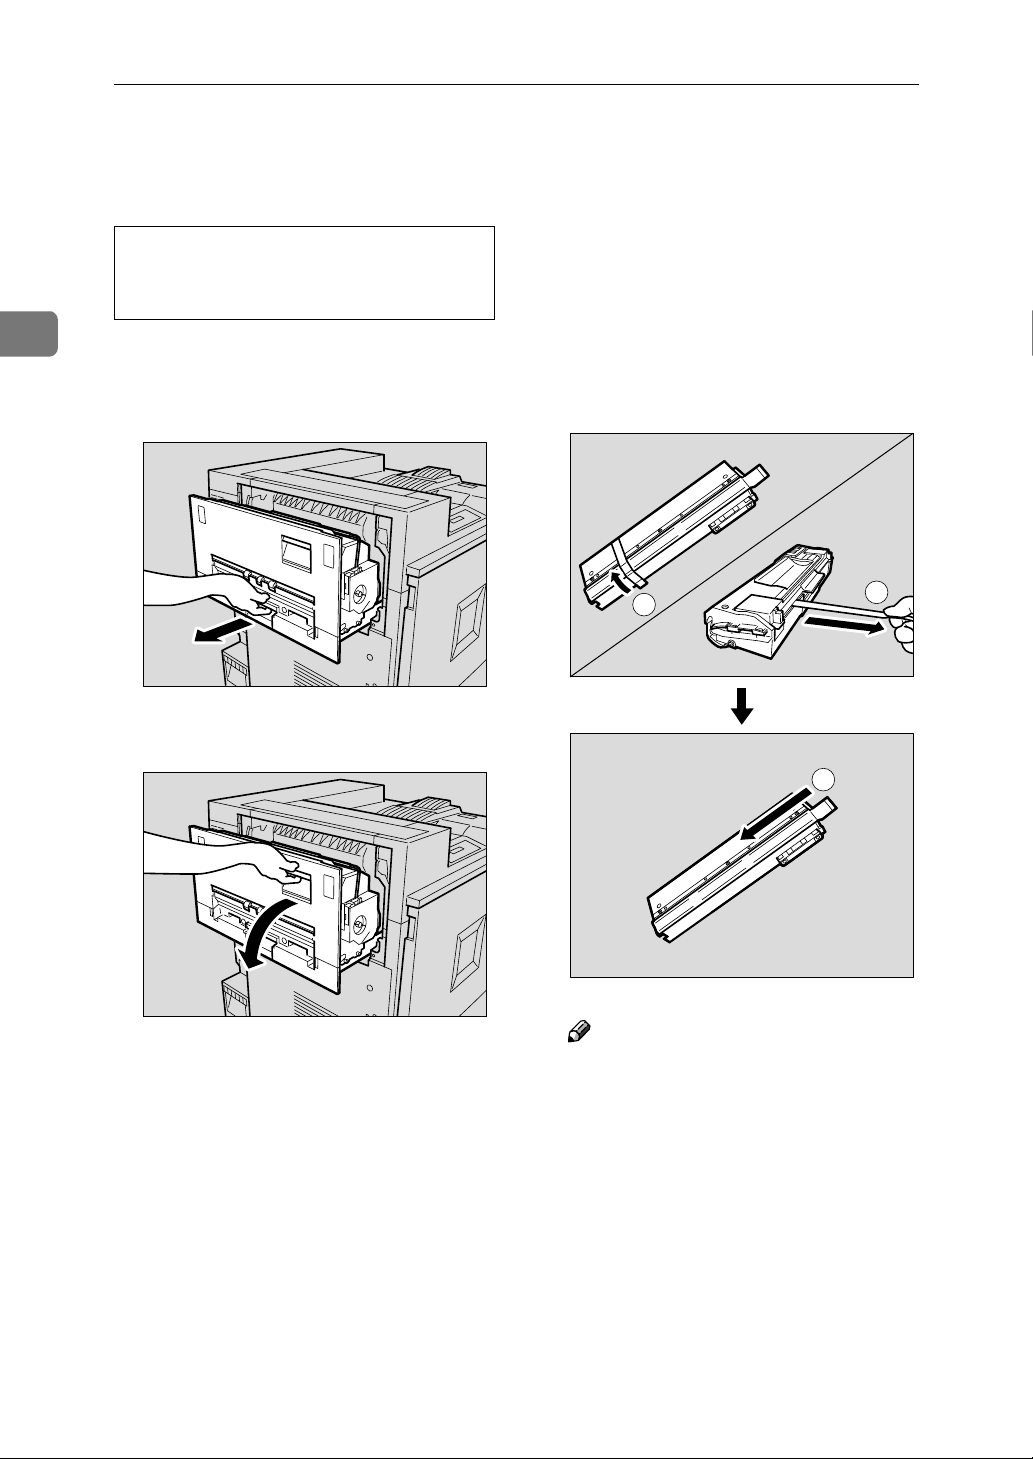
Setting Up
R
Installing the Fuser Oil Unit
2
CAUTION:
• Keep the fuser oil unit away from
flames. There is a risk of fire or
burns.
Install the fuser oil unit in the fusing
unit.
Slowly pull out the left cover.
AAAA
ZHXH010J
Open the upper left cover.
BBBB
Take the fuser oil unit out of the
CCCC
bag. Hold the green upper part of
seal (AAAA), and then slowly peel it
off. Position the fuser oil unit as
shown, and then slowly pull it
(AAAA) out. Finally, hold the upper
part of seal (BBBB), and then slowly
peel it off.
1
2
1
14
ZHXH020J
ZHXHK041J
Note
❒ Be sure to remove seal (A), and
then pull it out horizontally.
 Loading...