

Page 1

Operating Instructions Printer Client Reference
Introduction..........................................................................................................................................7
How to Read This Manual...................................................................................................................9
Checking the Network Environment................................................................................................11
Windows Configuration...................................................................................................................................12
Macintosh Configuration.................................................................................................................................18
UNIX Configuration........................................................................................................................................18
1. Windows 95/98/Me Configuration
Printing Using a Print Server............................................................................................................19
Printing Using a Windows 2000, Windows XP, or Windows NT 4.0 Print Server........................................19
Printing without a Print Server.........................................................................................................26
Configuring Protocols......................................................................................................................................26
Installing Software...........................................................................................................................................29
Printing via Parallel Connection.......................................................................................................41
Installing the PCL 5c or RPCS Printer Driver.................................................................................................41
Installing the PostScript Printer Driver............................................................................................................44
Installing the Printer Driver Using USB..........................................................................................46
Windows 98/Me - Installing the Printer Driver Using USB............................................................................46
Installing the Printer Driver Using IEEE 1394 ...............................................................................48
Printing via IP over 1394 .................................................................................................................................48
Setting Up Options .............................................................................................................................50
1
Page 2

Operating Instructions Printer Client Reference
2. Windows 2000 Configuration
Printing Using a Print Server............................................................................................................53
Printing Using a Windows 2000, Windows XP, or Windows NT 4.0 Print Server........................................53
Printing without a Print Server.........................................................................................................59
Configuring Protocols......................................................................................................................................59
Installing Software...........................................................................................................................................62
Printing via Parallel Connection.......................................................................................................74
Installing the PCL 5c or RPCS Printer Driver.................................................................................................74
Installing the PostScript Printer Driver............................................................................................................77
Installing the Printer Driver Using USB..........................................................................................79
Windows 2000 - Installing the Printer Driver Using USB..............................................................................79
Installing the Printer Driver Using IEEE 1394 ...............................................................................80
Printing via SCSI Print ....................................................................................................................................80
Setting Up Options .............................................................................................................................84
2
Page 3

Operating Instructions Printer Client Reference
3. Windows XP Configuration
Printing Using a Print Server............................................................................................................87
Printing Using a Windows 2000, Windows XP, or Windows NT 4.0 Print Server........................................87
Printing without a Print Server.........................................................................................................93
Configuring Protocols......................................................................................................................................94
Installing Software...........................................................................................................................................96
Printing via Parallel Connection.....................................................................................................107
Installing the PCL 5c or RPCS Printer Driver...............................................................................................107
Installing the PostScript Printer Driver..........................................................................................................109
Installing the Printer Driver Using USB........................................................................................112
Windows XP - Installing the Printer Driver Using USB...............................................................................112
Installing the Printer Driver Using IEEE 1394 .............................................................................113
Printing via SCSI Print ..................................................................................................................................113
Printing via IP over 1394 ...............................................................................................................................116
Setting Up Options ...........................................................................................................................117
4. Windows NT 4.0 Configuration
3
Printing Using a Print Server..........................................................................................................120
Printing Using a Windows 2000, Windows XP, or Windows NT 4.0 Print Server......................................120
Printing without a Print Server.......................................................................................................126
Configuring Protocols....................................................................................................................................126
Installing Software.........................................................................................................................................129
Printing via Parallel Connection.....................................................................................................141
Installing the PCL 5c or RPCS Printer Driver...............................................................................................141
Installing the PostScript Printer Driver..........................................................................................................144
Setting Up Options ...........................................................................................................................146
Page 4

Operating Instructions Printer Client Reference
5. Macintosh Configuration
Mac OS..............................................................................................................................................149
Installing the Printer Driver and Software.....................................................................................................150
Mac OS X ..........................................................................................................................................158
Installing the PPD File...................................................................................................................................158
Setting Up the PPD File.................................................................................................................................159
Setting Up Options ........................................................................................................................................159
Configuring Macintosh....................................................................................................................160
Changing to EtherTalk.................................................................................. ...... ...........................................160
Configuring the Printer..................................................................................................................................161
Changing the Printer Name ...........................................................................................................................161
Changing the Zone................................................................................... ..... ...... ...........................................161
Using the USB Interface...................................................................................................................162
Checking the USB connection.......................................................................................................................162
6. NetWare Configuration
Windows 95/98/Me ........................................................ ......... ..........................................................164
Windows 2000................................................................ ......... ......... .................................................167
Windows XP....................................................................................................... ......... ......................170
Windows NT 4.0................................................................................................................................173
4
Page 5

Operating Instructions Printer Client Reference
7. Software and Utilities Included on the CD-ROM
Software and Utilities Included on the CD-ROM.........................................................................176
Printer Drivers for This Printer......................................................................................................178
SmartNetMonitor for Admin..........................................................................................................181
SmartNetMonitor for Client............................................................................................................183
8. Setting up the Printer Driver and Canceling a Print Job
PCL 5c - Accessing Printer Properties...........................................................................................185
Windows 95/98/Me - Accessing Printer Properties.......................................................................................185
Windows 2000 - Accessing Printer Properties..............................................................................................187
Windows XP - Accessing Printer properties.................................................................................................190
Windows NT 4.0 - Accessing Printer Properties...........................................................................................193
RPCS - Accessing Printer Properties.............................................................................................197
Windows 95/98/Me - Accessing Printer Properties.......................................................................................197
Windows 2000 - Accessing Printer Properties..............................................................................................200
Windows XP - Accessing Printer Properties.................................................................................................203
Windows NT 4.0 - Accessing Printer Properties...........................................................................................206
PostScript 3 - Setting up for Printing.............................................................................................209
Windows 95/98/Me - Accessing Printer Properties.......................................................................................209
Windows 2000 - Accessing Printer Properties..............................................................................................212
Windows XP - Accessing Printer Properties.................................................................................................215
Windows NT 4.0 - Accessing Printer Properties...........................................................................................218
Macintosh - Setting up for Printing...............................................................................................................221
Canceling a Print Job .......................................................................................................................223
Windows 95/98/Me, Windows 2000, Windows XP, Windows NT 4.0 - Canceling a Print Job ..................223
Macintosh - Canceling a Print Job.................................................................................................................224
5
Page 6

Operating Instructions Printer Client Reference
9. Sample Print/Locked Print
Sample Print......................................................................................................................................225
Printing Remaining Sets................................................................................................................................227
Deleting a Sample Print File..........................................................................................................................229
Checking the Error Log.................................................................................................................................231
Locked Print......................................................................................................................................233
Printing a Locked Print File...........................................................................................................................235
Deleting a Locked Print File..........................................................................................................................237
Checking the Error log...................................................................................................................................239
10.Checking Printer Status
SmartNetMonitor for Client............................................................................................................241
Web Browser.....................................................................................................................................242
11.Appendix
Color Guide.......................................................................................................................................243
Color Printing Basics.....................................................................................................................................243
Staple and Punch Position...............................................................................................................246
Stapling..........................................................................................................................................................246
Punching........................................................................................................................................................248
Collate and Job Separation..............................................................................................................250
Using Adobe PageMaker Version 6.0, 6.5, or 7.0..........................................................................252
6
INDEX.................................................................................................................................253
Page 7

Operating Instructions Printer Client Reference
Introduction
To get maximum versatility from this machine all operators should carefully read and follow the instructions in this manual. Please keep this manual in a handy place near the machine.
Please read the Safety Information before using this machine. It contains important information related
to USER SAFETY and PREVENTING EQUIPMENT PROBLEMS.
Trademarks
AppleTalk, EtherTalk, LaserWriter, Macintosh are registered trademarks of Apple Computer, Inc.
Ethernet is a registered trademark of Xerox Corporation.
Microsoft, Windows, Windows NT are registered trademarks of Microsoft Corporation in the United
States and/or other countries.
Novell, Ne tWare are registered trademarks of Novell, Inc.
PostScript is a registered trademark of Adobe Systems, Incorporated.
PowerPC is a registere d trademark of Internati onal Business Machines Corporation.
PCL is a registered trademark of Hewlett-Packard Company.
Bluetooth is a Trademark of the Bluetooth SIG, Inc. (Special Interest Group) and licensed to RICOH
Company Limited.
Copyright © 2001 Bluetooth SIG, Inc.
The Bluetooth Trademarks are owned by Bluetooth SIG, Inc. USA
Other product names used here in are f or i dent if ic at ion purposes only and might be trademarks of their
respective companies. We disclaim any and all rights to those marks.
The proper names of the Windows operating systems are as follows:
• The product name of Windows
• The product name of Windows
• The product name of Windows
• The product names of Windows
Microsoft
Microsoft
®
Windows® XP Professional
®
Windows® XP Home Edition
®
95 is Microsoft® Windows 95.
®
98 is Microsoft® Windows 98.
®
Me is Microsoft® Windows Millennium Edition (Windows Me).
®
XP are as follows:
7
Page 8

Operating Instructions Printer Client Reference
8
• The product names of Windows® 2000 are as follows:
Microsoft
Microsoft
®
Windows® 2000 Advanced Server
®
Windows® 2000 Server
Microsoft® Windows® 2000 Professional
• The product names of Windows NT
Microsoft
• Microsoft
®
Windows NT® Server 4.0
®
Windows NT® Workstation 4.0
®
4.0 are as follows:
Page 9
Operating Instructions Printer Client Reference
R
R
How to Read This Manual
Symbols
In this manual, the following symbols are used:
WARNING:
This symbol indicates a potentially hazardous situation which, if instructions are not followed, could
result in death or seriou s injury.
CAUTION:
This symbol indicates a potentially hazardous situation which, if instructions are not followed, may result in minor or moderate injury, or damage to property.
* The statements above are notes for your safety.
Important
If this instruction is not followed, paper might be misfed, or data might be lost. Be sure to read this.
Preparation
This symbol indicates the prior knowledge or preparations required before operating.
Note
This symbol indicates precautions for operation, or actions to take after mal-operation.
9
Limitation
This symbol indicates numerical limits, functions that cannot be used together, or conditions in which
a particular function cannot be used.
Reference
This symbol indicates a reference.
Page 10

Operating Instructions Printer Client Reference
[]
Keys that appear on the machine's display.
Keys and buttons that appear on the computer's display.
{}
Keys built into the machine's control panel.
Keys on the computer's keyboard.
10
Page 11
Operating Instructions Printer Client Reference
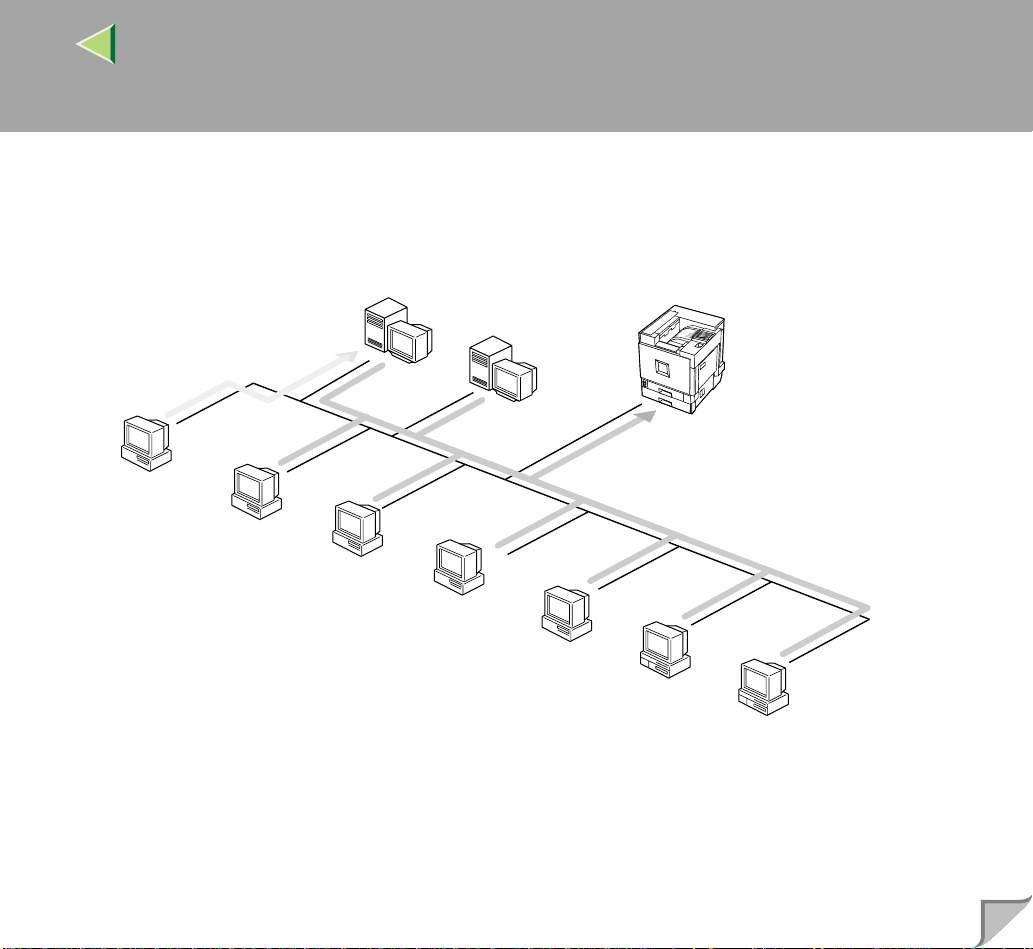
Checking the Network Environment
Windows 2000, Windows XP,
Windows NT 4.0 (Server)
NetWare (Server)
Windows 95/98/Me
Windows 2000
Windows XP
Windows NT 4.0
11
NetWare
(Client)
Macintosh
UNIX
❖❖❖❖ Connecting Printer and Computer
• Network connection (Ethernet cable, IEEE 1394 cable (IP over 1394), IEEE 802.11b (wireless
LAN))
• Parallel connection (parallel cable)
Page 12
Operating Instructions Printer Client Reference
• USB connection (USB cable)
• IEEE 1394 (SCSI print) connection (IEEE 1394 cable)
• Bluetooth
Windows Configuration
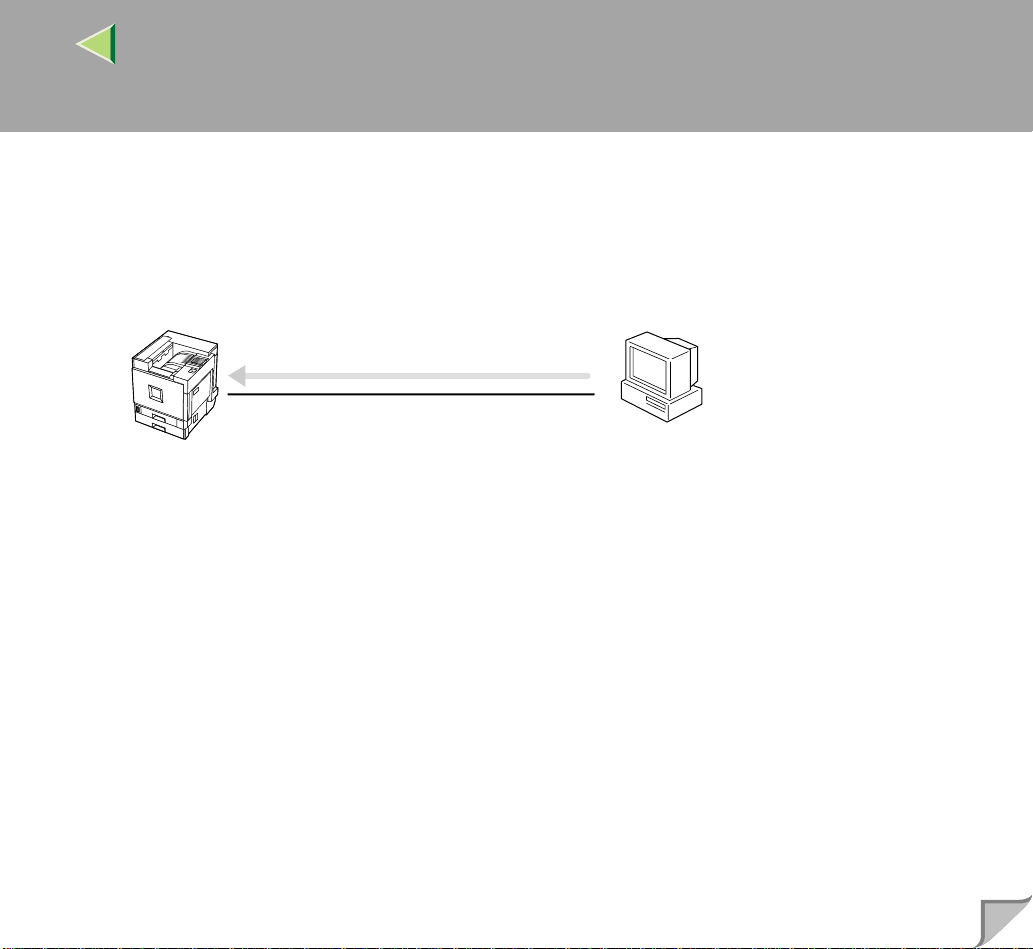
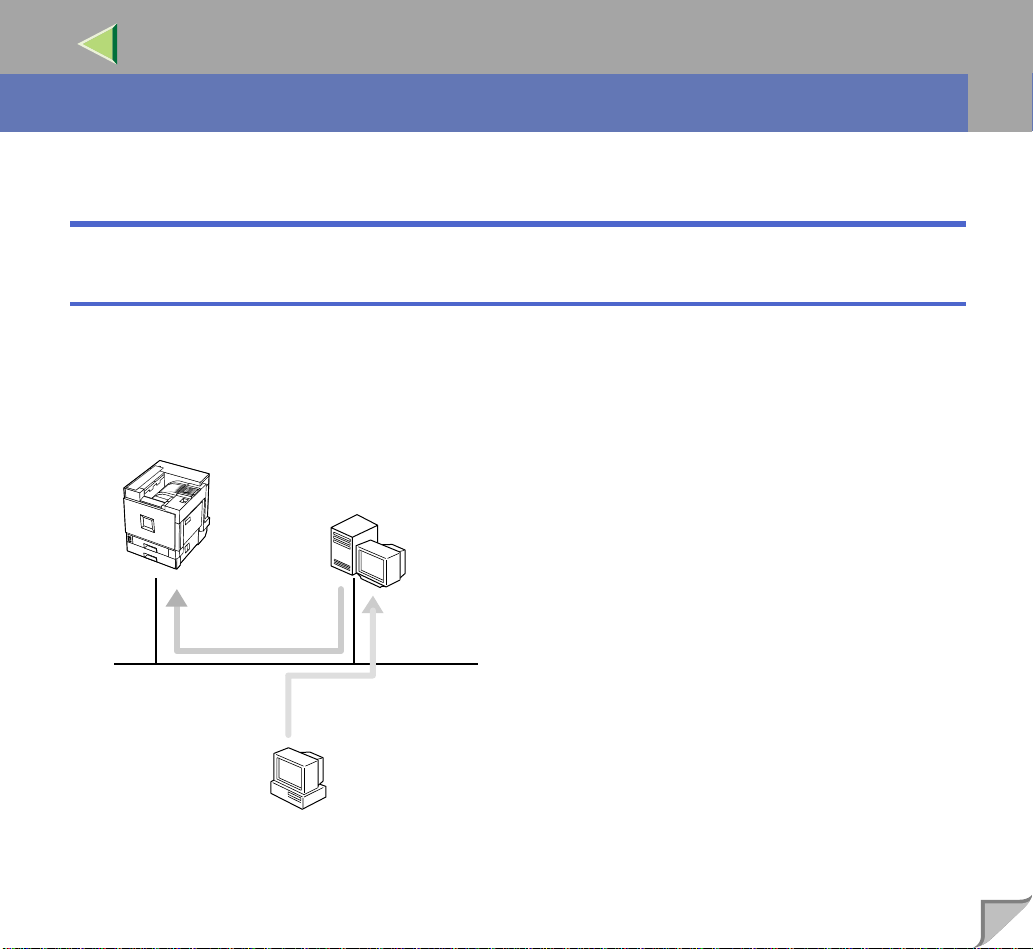
❖❖❖❖ Connecting a Print Server
TM
connection
12
Print Server
Windows 2000, Windows XP and
Windows NT 4.0 Print Server
Windows 95/98/Me
Windows 2000
Windows XP
Windows NT 4.0
• See p.19 “Printing Using a Print Server” in “Windows 95/98/Me Configuration”.
• See p.53 “Printing Using a Print Server” in “Windows 2000 Configuration”.
• See p.87 “Printing Using a Print Server” in “Windows XP Configuration”.
• See p.120 “Printing Using a Print Server” in “Windows NT 4.0 Configuration”.
Page 13

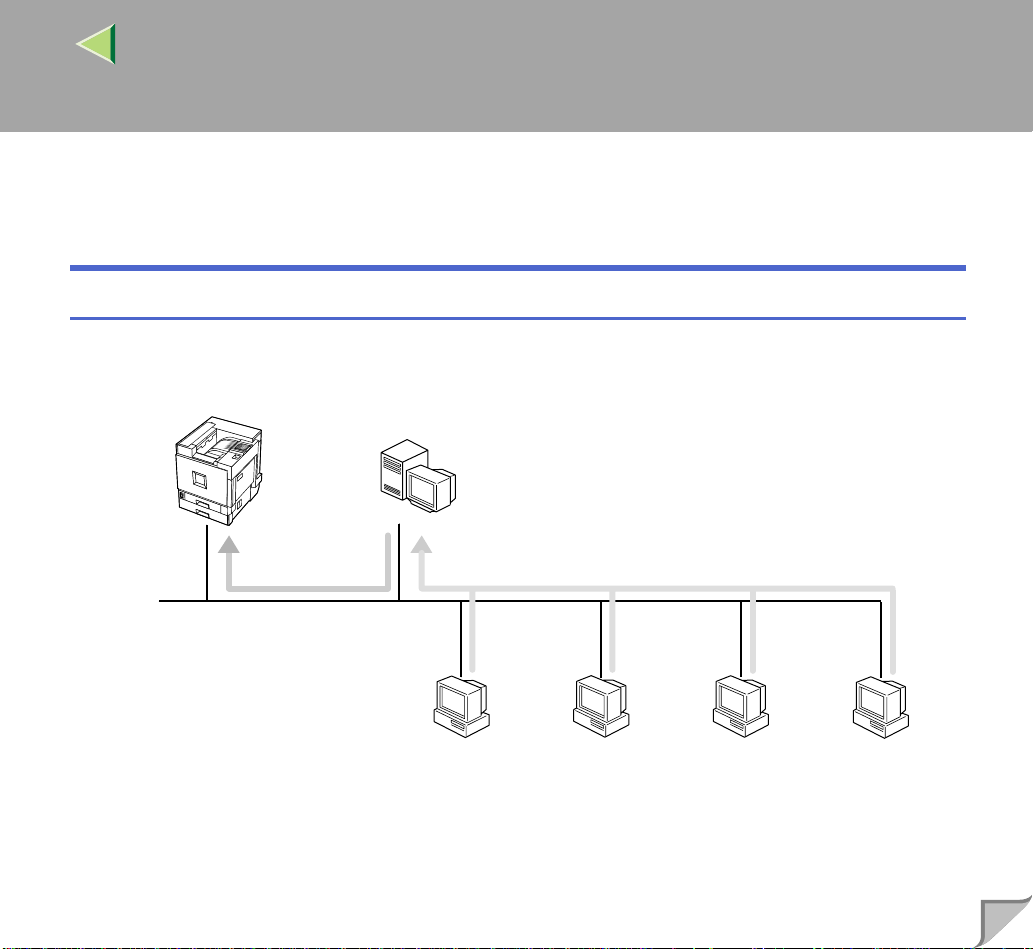
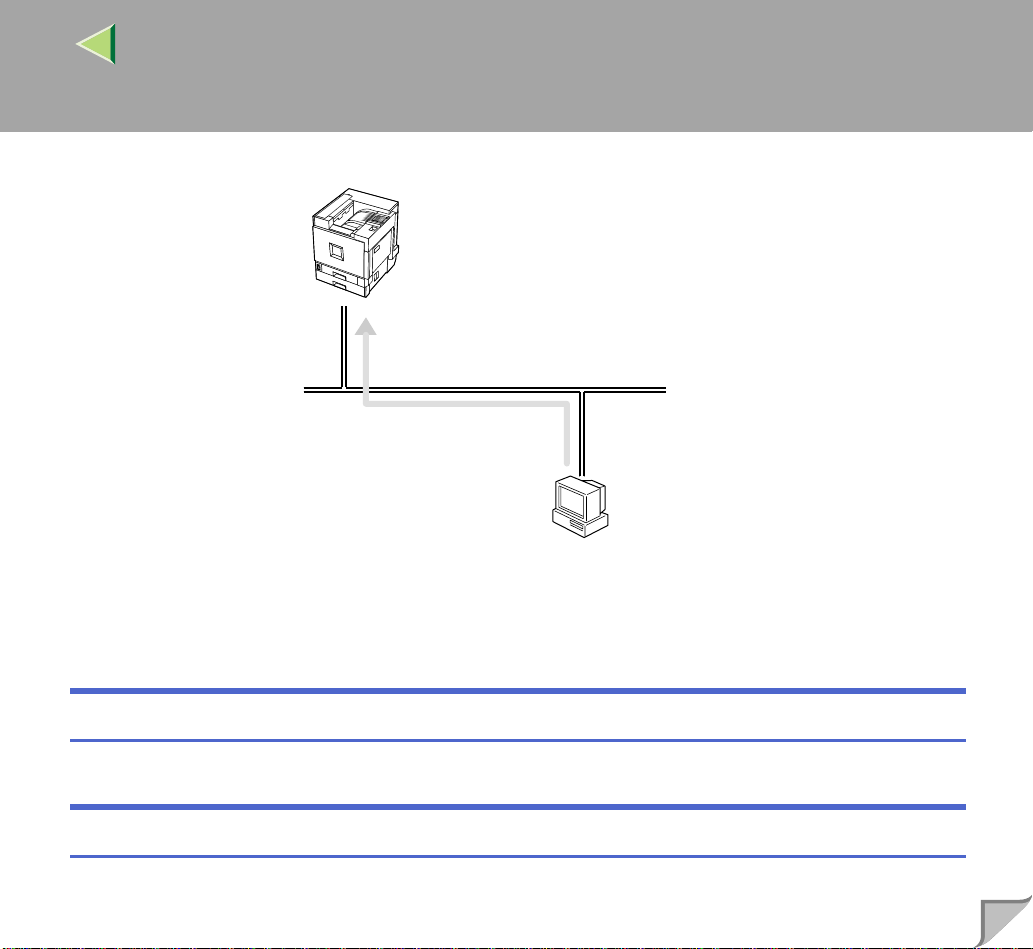
❖❖❖❖ Network Connection
• Ethernet, IEEE 1394 (IP over 1394)
Operating Instructions Printer Client Reference
13
Windows 95/98/Me
Windows 2000
Windows XP
Windows NT 4.0
Macintosh
Page 14
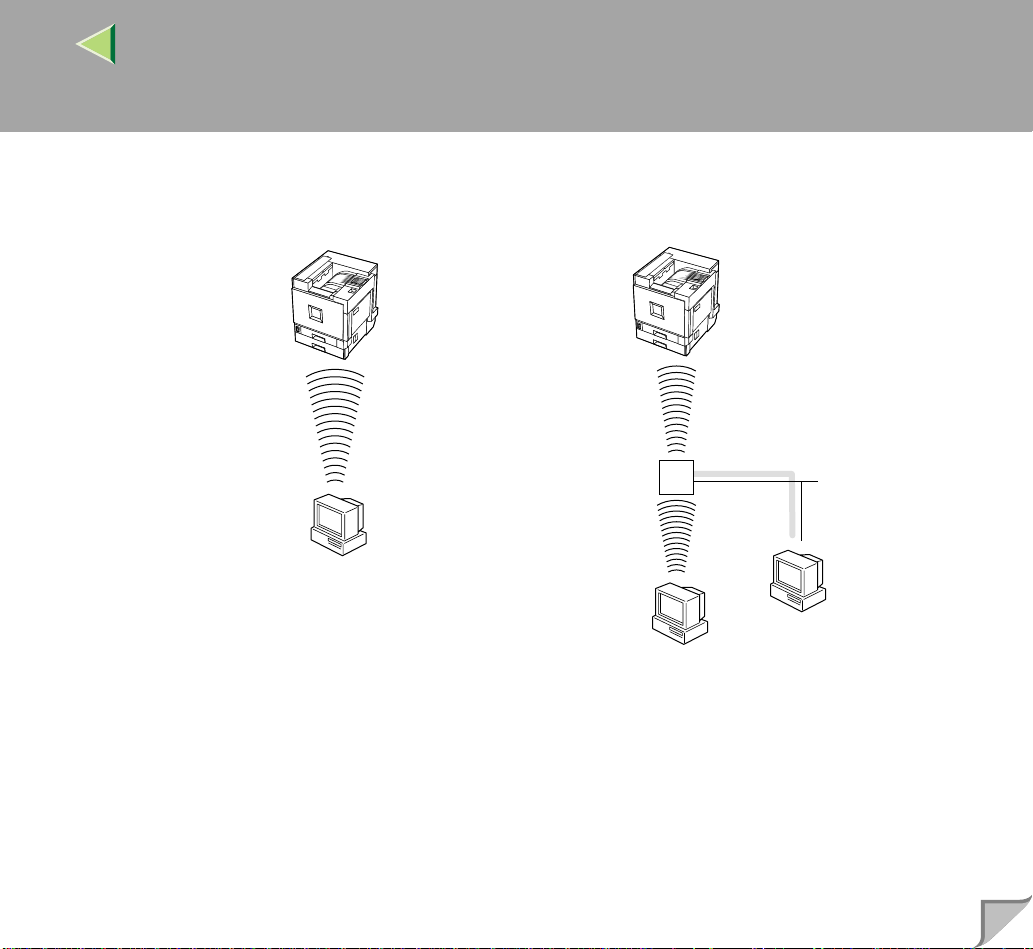
• IEEE 802.11b
Operating Instructions Printer Client Reference
14
❖ad hoc mode
❖infrastructure mode
access point
Page 15
Operating Instructions Printer Client Reference
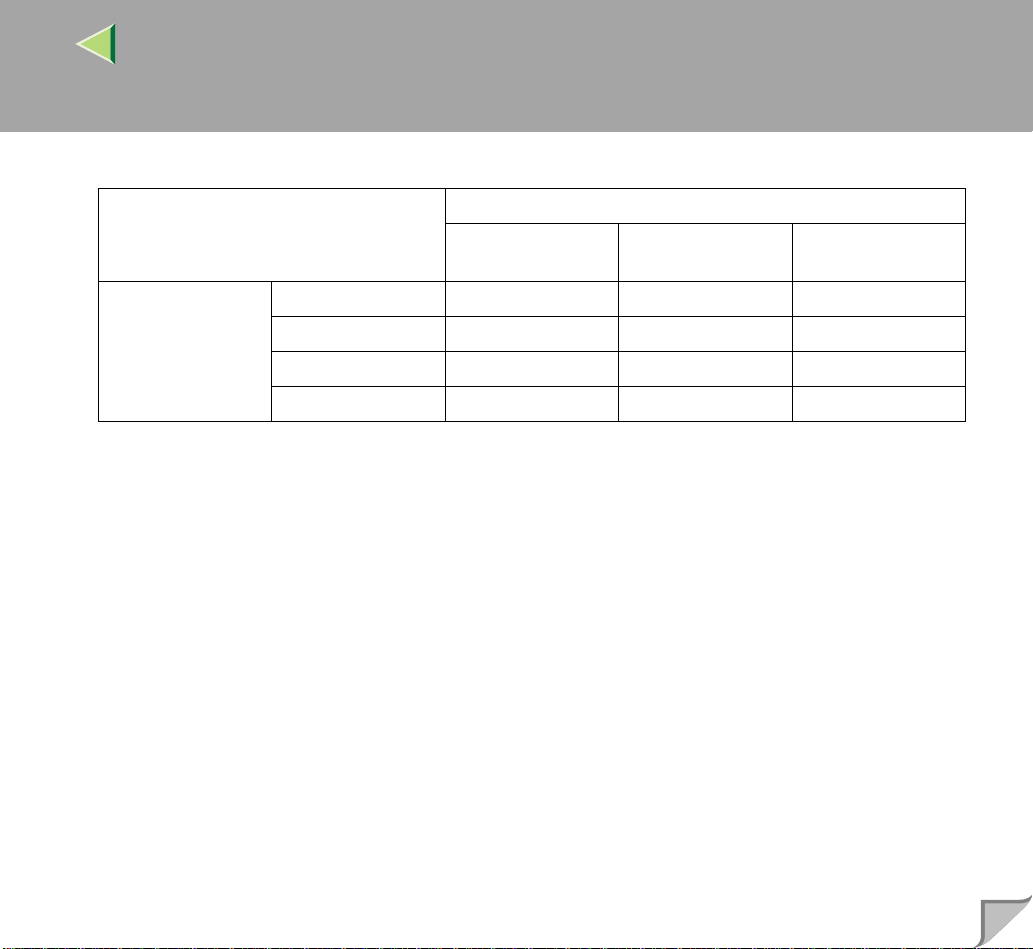
❖❖❖❖ Interface supported protocols
Interface
Ethernet IEEE 802.11b IEEE 1394
(IP over 1394)
Protocol TCP/IP ❍❍❍
NetBEUI ❍❍×
NetWare ❍❍
AppleTalk ❍❍×
❍ the protocol is supported.
× the protocol is not supported.
*1
If the optional 802.11b Interface Unit Type A is installed, you cannot use ad hoc mode.
• See p.26 “Printing without a Print Server” in “Windows 95/98/Me Configuration”.
• See p.59 “Printing without a Print Server” in “Windows 2000 Configuration”.
• See p.93 “Printing without a Print Server” in “Windows XP Configuration”.
• See p.126 “Printing without a Print Server” in “Windows NT 4.0 Configuration”.
*1
×
15
❖❖❖❖ Parallel Connection
• See p.41 “Printing via Parallel Connection” in “Windows 95/ 98/ Me Configuration”.
• See p.74 “Printing via Parallel Connection” in “Windows 2000 Configuration”.
• See p.107 “Printing via Parallel Conn ection” in “Windows XP Configuration”.
Page 16
Operating Instructions Printer Client Reference
• See p.141 “Printing via Parallel Conn ection” in “Windows NT 4.0 Configuration”.
Windows 95/98/Me
Windows 2000
Windows XP
Windows NT 4.0
❖❖❖❖ USB Connection
• See p.46 “Installing the Printer Driver Using U SB” in “Windows 95/ 98/ Me Configuration”.
• See p.79 “Installing the Printer Driver Using U SB” in “Windows 2000 Configuration”.
16
Page 17

Operating Instructions Printer Client Reference
• See p.112 “Installing the Printer Driver Using USB” in “Windows XP Configuration”.
Windows 95/98/Me
Windows 2000
Windows XP
❖❖❖❖ IEEE 1394 Connection
• See p.48 “Inst alli ng the Prin ter Dri ver U sin g IE EE 1394” in “Windows 95/ 98/ Me Configura-
tion”.
• See p.80 “Installing the Printer Driver Using IEEE 1394” in “Windows 2000 Configuration”.
17
Page 18
Operating Instructions Printer Client Reference
• See p.113 “Installing the Printer Driver Using IEEE 1394” in “Windows XP Configuration”.
SCSI print
❖❖❖❖ Connecting a NetWare Server
See p.164 “NetWare Configuration”.
18
Macintosh Configuration
See p.149 “Macintosh Configuration”.
UNIX Configuration
For UNIX printing information, please visit our Web site or consult your authorized retailer.
Page 19
Operating Instructions Printer Client Reference
1. Windows 95/98/Me Configuration
Printing Using a Pri nt Serve r
Printing Using a Windows 2000, Windows XP, or Windows NT 4.0 Print Server
This section describes procedures for setting up a client on a network using Windows 2000, Windows
XP, or Windows NT 4.0 as a print server.
To print from Windows 95/98/Me, you must install the printer driver and change the printer port connection to the print server.
Windows 2000
Windows XP
Windows NT 4.0
Print Server
19
Windows 95/98/ME
Page 20
Operating Instructions Printer Client Reference
Installing the PCL 5c or RPCS Printer Driver
Preparation
To use the print server, install the printer driver by selecting “Network printer server”, and then select
the Windows 2000, Windows XP or Windows NT 4.0 shared printer. For more information about how
to install and settings, see Administrato r Refere nce .
This section assumes the client has already been configured to communicate with a Windows 2000,
Windows XP or Windows NT 4. 0 print server. Do not beg in the followin g procedure un til the client
is set up and configured correctly.
Limitation
❒ When using a print server connected to the machine via SmartNetMonitor for Client, you cannot use
Recovery Printing and Parallel Printing.
❒ When using Windows X P as a pri nt server, th e client computer c annot recei ve notifica tion of pr int
job completion.
AAAA
Quit all applications that are running.
BBBB
Insert the CD-ROM into the CD-ROM drive.
Auto Run will start the installer.
20
Important
❒ Never have two versions of the same printer driver installe d on your system at the same time.
When upgrading to a new version of the printer driver, delete the old version, and then install the
new one.
Note
❒ Auto Run might not work automa tically due to certain operating system s ettings. If this is the
case, launch “Setup. exe” located in the CD-ROM root directory.
Page 21

Operating Instructions Printer Client Reference
CCCC
Select a language for the interface, and then click [OK].
The following languages are available: Cestina (Czech), Dansk (Danish), Deutsch (German), English (English), Espanol ( Spanish), Franc ais (Fr ench), It aliano (Itali an), Magyar (Hungari an), Nederlands (Dutch), Norsk (Norwegian), Polski (Polish), Portugues (Portuguese), Suomi (Finnish),
Svenska (Swedish)
DDDD
Click [PCL/RPCS Printer Drivers].
EEEE
The software license agreement appears in the [License Agreement] dialog box.
After rea ding thro ugh the co ntent, cl ick [I accept the agreement.] to agree with the license agreement, and then click [Next>].
FFFF
In the [Select Program] dialog box, select the printer drivers you want to use, and then click
[Next>].
You can select more than one printer driver.
GGGG
Select the [Printer Name] check box for the model(s) of printer you want to use.
To change the printer name, use the [Change settings for 'Printer Name'] box.
21
HHHH
Double-click the printer name to display its settings.
Note
❒ The details shown for [Comment:], [Driver:], and [Port:] vary dep ending on the operating system
being used, model of printer selected, and port being used.
IIII
Click [Port:], and then click [Add].
JJJJ
Click [Network Printer], and then click [OK].
Page 22

Operating Instructions Printer Client Reference
KKKK
Double-click the computer name you want to use as th e pri nt server in the [Browse for Printer]
window.
LLLL
Select the printer you want to use, and then click [OK].
MMMM
Make sure the location for the selected printer is displayed after [Port:].
NNNN
Configure the user code and default printer as necessary.
❖❖❖❖ User Code
The procedure to specify the user code may differ depending on the printer language.
• RPCS
You can specify the user code when installing the printer driver. You cannot register or edit
the user code from t he pr inter driver dialo g bo x. To change the user code, you must uninst al l
the printer driver, and then register the new user code during the re-install process.
• PCL 5c
You can spec ify the use r code with the Printe r Driver Properties after ins talling the printer
driver. See the printer driver's Help.
22
❖❖❖❖ Default Printer
Select the [Default Printer] check box to set the printer as the default printer.
OOOO
Click [Continue] to start printer driver installation.
PPPP
When the [Select Program] dialog box appears, click [Finish].
QQQQ
When the [Installation Completion] dialog box appears, click [Finish].
Note
❒ If you are required t o restar t the computer a fter the instal lation, r estart and continue con figura-
tion.
Page 23
Operating Instructions Printer Client Reference
RRRR
Set up the o ptions.
Note
❒ You must set up the opti ons when bidi rectional tran smission is d isabled. For m ore informat ion
about bidirectional transmission status, see p.51 “Bidirectional transmission”.
Reference
For more information about option settings, see p.50 “Setting Up Options”.
Installing the PostScript Printer Driver
AAAA
Quit all applications that are running.
BBBB
Insert the CD-ROM into the CD-ROM drive.
Auto Run will start the installer.
Important
❒ Never have two versions of the same printer driver installe d on your system at the same time.
When upgrading to a new version of the printer driver, delete the old version, and then install the
new one.
23
Note
❒ Auto Run might not work automa tically due to certain operating system s ettings. If this is the
case, launch “Setup. exe” located in the CD-ROM root directory.
Page 24

Operating Instructions Printer Client Reference
CCCC
Select a language for the interface, and then click [OK].
The following languages are available: Cestina (Czech), Dansk (Danish), Deutsch (German), English (English), Espanol ( Spanish), Franc ais (Fr ench), It aliano (Itali an), Magyar (Hungari an), Nederlands (Dutch), Norsk (Norwegian), Polski (Polish), Portugues (Portuguese), Suomi (Finnish),
Svenska (Swedish)
Note
❒ The printer driver with the selected language will be ins tal led . The pri nte r dri ver wil l be ins tal led
in English if you select the following languages: Cestina, Magyar, Polski, Portugues, Suomi
DDDD
Click [PostScript 3 Printer Driver].
“Add Printer Wizard” starts.
EEEE
Click [Next>].
FFFF
Click [Network printer], and then click [Next>].
GGGG
Click [Browse].
HHHH
Double-click the computer name you want to use as th e pri nt server in the [Browse for Printer]
window.
24
IIII
Select the printer you want to use, and then click [OK].
JJJJ
After confirming the location for the selected printer shown, click [Next>].
KKKK
Change the name of the printer if you want, and then click [Next>].
Configure the default printer as necessary. Click [Yes] to set the printer as the default printer.
Page 25
Operating Instructions Printer Client Reference
LLLL
Select whether or not you want to print a test page, and then click [Finish].
The installation is complete.
Note
❒ You can specify the user code with the Printer Driver Properties after installing the printer driver.
See the printer driver's Help.
Reference
For more information about option settings, see p.50 “Setting Up Options”.
MMMM
Restart the computer.
25
Page 26
Operating Instructions Printer Client Reference
Printing without a Print Server
Preparation
To use a printer connected to the Ethernet interface, IEEE 802.11b (wireless LAN) interface or IEEE
1394 (IP over 1394) interface, select “SmartNetMonitor” when installing the printer driver.
Configuring Protocols
Configuring TCP/IP and IPP for Printing
Follow these instructions to configure the printer and Windows 95/98/Me to use TCP/IP and IPP.
❖❖❖❖ Configuring the printer
Configure the printer to use TCP/IP.
• Check TCP/IP is set to active. (The factory default is active.)
• Assign an IP address and make other settings required for TCP/IP.
26
Reference
For more information about how to make the above settings, see “Configuring the printer for the
Network”, Setup Guide.
If DHCP is used to assign IP addresses, see Appendix, “When Using DHCP”, Administrator Ref-
erence.
Under Windows Me, when you want to use IP over 1394, see Setup Guide.
Page 27
Operating Instructions Printer Client Reference
Note
❒ After setting the IP address, use the ping command to check it is set correctly.
Windows 95/98
A
Click [Start], point to [Programs], and then click [MS-DOS Prompt].
Windows Me
B
Click [Start], point to [Programs], point to [Accessories], and then click [MS-DOS Prompt].
Enter the following: (Example: IP address is 192.168.15.16)
C
C:> ping 192.168.15.16
If the address is configured correctly, the following message appears:
Reply from 192.168 .1 5. 16 : by te s=3 2 ti me <1 0ms TTL =3 2
If the address is configured incorrectly, the following message appears:
Request timed out.
❖❖❖❖ Configuring a Windows 95/98/Me computer
Follow the procedure below to configure a Windows 95/98/Me computer to use TCP/IP:
A Open [Control Panel] and double-click the [Network] icon. Check “TCP/IP” is listed in the [The
following network components are installed:] box under the [Configuration] tab.
27
Note
❒ If TCP/IP is not installed, click [Add] under the [Configuration] tab and install it. For more infor-
mation about installing TCP/IP, see Windows 95/98/Me Help.
❒ Under Windows Me, if you want to use IEEE 1394 (IP over 1394), make sure TCP/IP is bound
to the IEEE 1394 adaptor being used. The following message appears:
TCP/IP -> (IEEE 1394 adap to r in use)
B Configure TCP/IP with the appropriate IP address, subnet mask and other settings.
Check the settings are correct with the network administrator.
Page 28
Operating Instructions Printer Client Reference
Configuring NetBEUI for Printing
Follow these instructions to configure the printer and Windows 95/98/Me to use NetBEUI.
Limitation
❒ To use NetBEUI, use the SmartNetMonitor for Client port.
❖❖❖❖ Configuring the printer
Configure the printer to use NetBEUI.
• Check NetBEUI is set to active. (The factory default is active.)
Reference
For more information about how to make the above settings, see “Configuring the printer for the
Network”, Setup Guide.
❖❖❖❖ Configuring a Windows 95/98/Me computer
Install NetBEUI on a Windows 95/98/Me computer and set it as the default protocol.
A Open [Control Panel] and double-click the [Network] icon. Check “NetBEUI” is listed in the [The
following network components are installed:] box under the [Configuration] tab.
28
Note
❒ If NetBEUI is not installed , cl ick [Add] under the [Configuration] tab and install it. For more i n-
formation about installing NetBEUI, see Windows 95/98/Me Help.
❒ If “NetBEUI - >Dial-Up Adap tor” is listed in the [
box, select it, and then click [
B Set NetBEUI as the default protocol. Click th e [Configuration] tab, sel ect “NetBEUI” in the [The
Remove
] to remove the binding.
The following network components are installed:
following network components are installed:] box, and then click [Properties].
C Clic k th e [Advanced] tab, select the [Set this protocol to be the default protocol] check box, and
then click [OK].
]
Page 29
Operating Instructions Printer Client Reference
D Click [OK] to close the [Network] dialog box.
E When the restart message appears, click [Yes].
Installing Software
Preparation
If you are not using a print server, install SmartNetMonitor for Client, and then install the printer driver by selecting “SmartNetMonitor for Client”. This enables peer-to-peer network printing via TCP/IP,
NetBEUI, or IPP.
Note
❒ Under Windows Me, you can print using TCP/IP and the IEEE 1394 (IP over 1394) interface.
Installing SmartNetMonitor for Client
AAAA
Quit all applications that are running.
BBBB
Insert the CD-ROM into the CD-ROM drive.
Auto Run will start the installer.
29
Important
❒ Never have two versions of the same printer driver installe d on your system at the same time.
When upgrading to a new version of the printer driver, delete the old version, and then install the
new one.
Note
❒ Auto Run might not work automa tically due to certain operating system s ettings. If this is the
case, launch “Setup. exe” located in the CD-ROM root directory.
Page 30

Operating Instructions Printer Client Reference
CCCC
Select a language for the interface, and then click [OK].
The following languages are available: Cestina (Czech), Dansk (Danish), Deutsch (German), English (English), Espanol ( Spanish), Franc ais (Fr ench), It aliano (Itali an), Magyar (Hungari an), Nederlands (Dutch), Norsk (Norwegian), Polski (Polish), Portugues (Portuguese), Suomi (Finnish),
Svenska (Swedish)
DDDD
Click [SmartNetMonitor for Client/Admin].
EEEE
The software license agreement appears in the [License Agreement] dialog box.
After rea ding thro ugh the co ntent, cl ick [I accept the agreement.] to agree with the license agreement, and then click [Next>].
FFFF
Select the [SmartNetMonitor for Client] check box, and then click [Next >].
GGGG
Follow the instructions on the screen.
Note
❒ If you are required to restart the computer after the installation of SmartNetMonitor for Client, re-
start and continue configuration.
30
Installing the PCL 5c or RPCS Printer Driver
AAAA
Quit all applications that are running.
BBBB
Insert the CD-ROM into the CD-ROM drive.
Auto Run will start the installer.
Important
❒ Never have two versions of the same printer driver installed on your system at the same time. When
upgrading to a new version of the printer driver, delete the old version, and then install the new one.
Page 31

Operating Instructions Printer Client Reference
Note
❒ Auto Run might not work automa tically due to certain operating system s ettings. If this is the
case, launch “Setup. exe” located in the CD-ROM root directory.
CCCC
Select a language for the interface, and then click [OK].
The following languages are available: Cestina (Czech), Dansk (Danish), Deutsch (German), English (English), Espanol ( Spanish), Franc ais (Fr ench), It aliano (Itali an), Magyar (Hungari an), Nederlands (Dutch), Norsk (Norwegian), Polski (Polish), Portugues (Portuguese), Suomi (Finnish),
Svenska (Swedish)
DDDD
Click [PCL/RPCS Printer Drivers].
EEEE
The software license agreement appears in the [License Agreement] dialog box.
After rea ding thro ugh the co ntent, cl ick [I accept the agreement.] to agree with the license agreement, and then click [Next>].
FFFF
In the [Select Program] dialog box, select the printer drivers you want to use, and then click
[Next>].
You can select more than one printer driver.
31
GGGG
Select the [Printer Name] check box for the model(s) of printer you want to use.
To change the printer name, use the [Change settings for 'Printer Name'] box.
HHHH
Double-click the printer name to display its settings.
Note
❒ The details shown for [Comment:], [Driver:], and [Port:] vary dep ending on the operating system
being used, model of printer selected, and port being used.
Page 32

Operating Instructions Printer Client Reference
IIII
Select SmartNetMonitor.
SmartNetMonitor
A Click [Port:], and then click [Add].
B Select [SmartNetMonitor], and then click [OK].
C Select the printer you want to use.
❖❖❖❖ TCP/IP
A Click [TCP/IP], and then click [Search].
Available printers will be listed.
B Click the printer you want to use, and then click [OK].
Note
❒ Printers that respond to an IP broadcast from the computer will be displayed. To print to a
printer not listed here, click [Specify Address], and then enter the printer's IP address or host
name.
❒ Part of the printer’s IP address is used for the port name.
❒ Avoid using an address that is partially similar to one already in use. For example, if “192.
168. 0.2” is already use d, “192. 168. 0.2xx” c annot be us ed. Simil arly, i f “192. 16 8. 0.20”
is already used, “192.168.0.2” cannot be used.
32
❖❖❖❖ NetBEUI
A Click [NetBEUI], and then click [Search].
A list of printers that can be used with NetBEUI appears.
Page 33

Operating Instructions Printer Client Reference
B Click the printer you want to use, and then click [OK].
Note
❒ Printers that respond to a broadcast from the compu ter will be displayed. To pr int to a
printer not listed here, click [
the NetBEUI network addres s is on the configuration pag e. For more information about
printing the configuration page, see “Printing a Configuration Page”, Administrator Refer-
ence. NetBEUI address appears as “\RNPxxxxxxx” on the confi guration p age. Ente r the
printer's network path name in the form of “%%Computer name\Share name”. Do not enter “\\” as head characters but “%%”.
❒ You cannot print to printers beyond routers.
❖❖❖❖ IPP
A Click [IPP].
The IPP setting dialog box appears.
B To specify the printer's IP address, enter “http://printer's-ip-address/printer” or
“ipp://printer's-ip-address/printer” in the [Printer URL] box.
(Example: IP address is 192.168.15.16)
http://192.168.15.16/printer
ipp://192.168.15.16/printer
C If necessary, enter the name s t o distinguish the pr in ter in the [IPP Port Name] box. Enter a
different name from those of existing port names.
If you do not do th is, the addr ess entered in the [Printer URL] box will be s et as the IP P port
name.
D If a proxy server and IPP user name are used, cl ick [Detailed Settings], and then configure
the necessary setting s.
Specify Address
], and then enter the NetBEUI address. Check
33
Note
❒ For more information about these settings, see SmartNetMonitor for Client Help.
E
Click [OK].
Page 34

Operating Instructions Printer Client Reference
JJJJ
Make sure the location for the selected printer is displayed after [Port:].
KKKK
Configure the user code and default printer as necessary.
❖❖❖❖ User Code
The procedure to specify the user code may differ depending on the printer language.
• RPCS
You can specify the user code when installing the printer driver. You cannot register or edit
the user code from t he pr inter driver dialo g bo x. To change the user code, you must uninst al l
the printer driver, and then register the new user code during the re-install process.
• PCL 5c
You can spec ify the use r code with the Printe r Driver Properties after ins talling the printer
driver. See the printer driver's Help.
❖❖❖❖ Default Printer
Select the [Default Printer] check box to set the printer as the default printer.
LLLL
Click [Continue] to start printer driver installation.
34
MMMM
When the [Select Program] dialog box appears, click [Finish].
NNNN
When the [Installation Completion] dialog box appears, click [Finish].
Note
❒ If you are required t o restar t the computer a fter the instal lation, r estart and continue con figura-
tion.
OOOO
Set up the o ptions.
Note
❒ You must set up the opti ons when bidi rectional tran smission is d isabled. For m ore informat ion
about bidirectional transmission status, see p.51 “Bidirectional transmission”.
Page 35

Operating Instructions Printer Client Reference
Reference
For more information about option settings, see p.50 “Setting Up Options”.
Installing the PostScript Printer Driver
AAAA
Quit all applications that are running.
BBBB
Insert the CD-ROM into the CD-ROM drive.
Auto Run will start the installer.
Important
❒ Never have two versions of the same printer driver installe d on your system at the same time.
When upgrading to a new version of the printer driver, delete the old version, and then install the
new one.
Note
❒ Auto Run might not work automa tically due to certain operating system s ettings. If this is the
case, launch “Setup. exe” located in the CD-ROM root directory.
35
CCCC
Select a language for the interface, and then click [OK].
The following languages are available: Cestina (Czech), Dansk (Danish), Deutsch (German), English (English), Espanol ( Spanish), Franc ais (Fr ench), It aliano (Itali an), Magyar (Hungari an), Nederlands (Dutch), Norsk (Norwegian), Polski (Polish), Portugues (Portuguese), Suomi (Finnish),
Svenska (Swedish)
Note
❒ The printer driver with the selected language will be ins tal led . The pri nte r dri ver wil l be ins tal led
in English if you select the following languages: Cestina, Magyar, Polski, Portugues, Suomi
Page 36

Operating Instructions Printer Client Reference
DDDD
Click [PostScript 3 Printer Driver].
“Add Printer Wizard” starts.
EEEE
Click [Next>].
FFFF
Click [Local Printer], and then click [Next>].
A dialog box for selecting the printer manufacturer and model name appears.
GGGG
Select the name of the printer whose driver you want to install, and then click [Next>].
HHHH
In the [Available ports:] box, click [LPT1:], and then click [Next>].
IIII
Change the name of the printer if you want, and then click [Next>].
Configure the default printer as necessary. Click [Yes] to set the printer as the default printer.
JJJJ
Select whether or not you want to print a test page, and then click [Finish].
KKKK
On the [Start] menu, point to [Settings], and then click [Printers].
The [Printers] window appears.
36
LLLL
Click the icon of the printer you w ant to use. On the [File] menu, click [Properties].
MMMM
Click [Details], and then click [Add Port…].
NNNN
In the [Type:] list, click [SmartNetMonitor], and then click [OK].
Page 37

Operating Instructions Printer Client Reference
OOOO
Select the printer you want to use.
TCP/IP
A Click [TCP/IP], and then click [Search].
Available printers will be listed.
B Click the printer you want to use, and then click [OK].
Note
❒ Printers that respond to an IP br oadcast from the computer will be displayed. To print to a
printer not listed here, click [
name.
❒ Part of the printer’s IP address is used for the port name.
❒ Avoid using an address that is partially similar to on e already in use. For exampl e, if “192.
168. 0.2” is already us ed, “192. 168. 0.2xx ” cannot be used. Sim ilarly, if “192. 16 8. 0.20” is
already used, “192.168.0.2” cannot be used.
Specify Address
], and then enter the printer's IP addre ss or host
37
NetBEUI
A Click [NetBEUI], and then click [Search].
A list of printers that can be used with NetBEUI appears.
Page 38

Operating Instructions Printer Client Reference
B Click the printer you want to use, and then click [OK].
Note
❒ Printers that respond to a broadcast from the computer will be displayed. To print to a printer
not listed here, click [
BEUI network address i s on the configuration page . F o r mor e in for ma tio n a bou t p ri nting the
configuration page, see “Printing a Configuration Page”, Admin istrator Reference. NetBEUI
address appears as “\RNPxxxxxxx” on the configuration page. Enter the printer's network
path name in the form of “%%Comp uter na me\ Sha re nam e”. Do n ot en ter “\\” as hea d c haracters but “%%”.
❒ You cannot print to printers beyond routers.
IPP
A Click [IPP].
The IPP setting dialog box appears.
B In the [Printer URL] box, ent er “http://( printer's IP address) /printer” as the pri nter's IP ad-
dress.
(Example: IP address is 192.168.15.16)
http://192.168.15.16/printer
C If necessary, enter the names to distinguish the printer in the [IPP Port Name] box. Enter a
differen t name from those of exis ting port names.
If you do not do t his, the add ress entered in the [Printer URL] box will be set as the IPP por t name.
D If a proxy server and IPP user name are used, click [Detailed Settings], and then configure
the necessary settings.
Specify Address
], and then enter the NetBEUI address. Confirm the Net-
38
Note
❒ For more information about these settings, see SmartNetMonitor for Client Help.
E Click [OK].
Page 39

Operating Instructions Printer Client Reference
PPPP
Click [OK].
QQQQ
Confirm t hat the selecte d port is highl ighted in [Printer to the following port], and then click
[OK].
Note
❒ You can specify the user code with the Printer Driver Properties after installing the printer driver.
See the printer driver's Help.
Reference
For more information about option settings, see p.50 “Setting Up Options”.
RRRR
Restart the computer.
Changing Port Settings
Follow the procedure below to change SmartNetMonitor for Client settings, such as proxy server settings or IPP URL.
Note
❒ There are no settings for NetBEUI.
39
AAAA
In the [Printers] window, click the icon of the printer you want to use. On the [File] menu, cli ck
[Properties].
Page 40

Operating Instructions Printer Client Reference
BBBB
Click the [Ports] tab, and then click [Configure Port].
The [Port Configuration:] dialog box appears.
Note
❒ If you cannot set items on the [
Cancel
Click [
A
Start SmartNetMonitor for Client , and then right-click the Smart NetMo ni tor for Cli ent icon on
B
the taskbar.
Click [
C
check box.
Click [OK] to close the [
D
] to close the [
Extended Features Settings
• For IPP, you can configure User Settings, Proxy Settings and Timeout Settings.
Note
❒ For more information about these settings, see SmartNetMonitor for Client Help.
Recovery/Parallel Printing
Port Configuration:
], and then select the [
Extended Features Settings
] dialog box.
] tab, follow the procedure below:
Set Recovery/Parallel Printing for each port
] dialog box.
40
]
Page 41

Operating Instructions Printer Client Reference
Printing via Parallel Co nnection
To use a printer connected to the parallel interface, selec t “LPT1:” when installing the printer driver.
Installing the PCL 5c or RPCS Printer Driver
AAAA
Quit all applications that are running.
BBBB
Insert the CD-ROM into the CD-ROM drive.
Auto Run will start the installer.
Important
❒ Never have two versions of the same printer driver installe d on your system at the same time.
When upgrading to a new version of the printer driver, delete the old version, and then install the
new one.
Note
❒ Auto Run might not work automa tically due to certain operating system s ettings. If this is the
case, launch “Setup. exe” located in the CD-ROM root directory.
41
CCCC
Select a language for the interface, and then click [OK].
The following languages are available: Cestina (Czech), Dansk (Danish), Deutsch (German), English (English), Espanol ( Spanish), Franc ais (Fr ench), It aliano (Itali an), Magyar (Hungari an), Nederlands (Dutch), Norsk (Norwegian), Polski (Polish), Portugues (Portuguese), Suomi (Finnish),
Svenska (Swedish)
DDDD
Click [PCL/RPCS Printer Drivers].
Page 42

Operating Instructions Printer Client Reference
EEEE
The software license agreement appears in the [License Agreement] dialog box.
After rea ding thro ugh the co ntent, cl ick [I accept the agreement.] to agree with the license agreement, and then click [Next>].
FFFF
In the [Select Program] dialog box, select the printer drivers you want to use, and then click
[Next>].
You can select more than one printer driver.
GGGG
Select the [Printer Name] check box for the model(s) of printer you want to use.
To change the printer name, use the [Change settings for 'Printer Name'] box.
HHHH
Double-click the printer name to display its settings.
Note
❒ The details shown for [Comment:], [Driver:], and [Port:] vary dep ending on the operating system
being used, model of printer selected, and port being used.
IIII
Configure the user code and default printer as necessary.
42
❖❖❖❖ User Code
The procedure to specify the user code may differ depending on the printer language.
• RPCS
You can specify the user code when installing the printer driver. You cannot register or edit
the user code from t he pr inter driver dialo g bo x. To change the user code, you must uninst al l
the printer driver, and then register the new user code during the re-install process.
• PCL 5c/PostScript 3
You can spec ify the use r code with the Printe r Driver Properties after ins talling the printer
driver. See the printer driver's Help.
Page 43

Operating Instructions Printer Client Reference
❖❖❖❖ Default Printer
Select the [Default Printer] check box to set the printer as the default printer.
JJJJ
Click [Continue] to start printer driver installation.
KKKK
When the [Select Program] dialog box appears, click [Finish].
LLLL
When the [Installation Completion] dialog box appears, click [Finish].
Note
❒ If you are required t o restar t the computer a fter the instal lation, r estart and continue con figura-
tion.
MMMM
Set up the o ptions.
Note
❒ You must set up the opti ons when bidi rectional tran smission is d isabled. For m ore informat ion
about bidirectional transmission status, see p.51 “Bidirectional transmission”.
Reference
For more information about option settings, see p.50 “Setting Up Options”.
43
Page 44

Operating Instructions Printer Client Reference
Installing the PostScript Printer Driver
AAAA
Quit all applications that are running.
BBBB
Insert the CD-ROM into the CD-ROM drive.
Auto Run will start the installer.
Important
❒ Never have two versions of the same printer driver installe d on your system at the same time.
When upgrading to a new version of the printer driver, delete the old version, and then install the
new one.
Note
❒ Auto Run might not work automa tically due to certain operating system s ettings. If this is the
case, launch “Setup. exe” located in the CD-ROM root directory.
CCCC
Select a language for the interface, and then click [OK].
The following languages are available: Cestina (Czech), Dansk (Danish), Deutsch (German), English (English), Espanol ( Spanish), Franc ais (Fr ench), It aliano (Itali an), Magyar (Hungari an), Nederlands (Dutch), Norsk (Norwegian), Polski (Polish), Portugues (Portuguese), Suomi (Finnish),
Svenska (Swedish)
44
Note
❒ The printer driver with the selected language will be ins tal led . The pri nte r dri ver wil l be ins tal led
in English if you select the following languages: Cestina, Magyar, Polski, Portugues, Suomi
DDDD
Click [PostScript 3 Printer Driver].
“Add Printer Wizard” starts.
Page 45

Operating Instructions Printer Client Reference
EEEE
Click [Next>].
FFFF
Click [Local Printer], and then click [Next>].
A dialog box for selecting the printer manufacturer and model name appears.
GGGG
Select the name of the printer whose driver you want to install, and then click [Next>].
HHHH
In the [Available ports:] box, click [LPT1:], and then click [Next>].
IIII
Change the name of the printer if you want, and then click [Next>].
Configure the default printer as necessary. Click [Yes] to set the printer as the default printer.
JJJJ
Select whether or not you want to print a test page, and then click [Finish].
Reference
For more information about option settings, see p.50 “Setting Up Options”.
KKKK
Restart the computer.
45
Page 46

Operating Instructions Printer Client Reference
Installing the Printer Driver Using USB
This section gives basic instructions for installing the printer drivers using USB. The printer drivers can
be installed from the provided CD-ROM.
Important
❒ Make sure all other applications are closed and the computer is not currently printing prior to instal-
lation.
Windows 98/Me - Installing the Printer Driver Using USB
The procedure belo w uses Windows 98 as an exampl e. The procedu re for Windows Me may be sl ightly
different.
When the USB cable i s used for the first tim e, the “plug and play” fu nction starts an d the [New Hardware
Found], [Device Driver Wizard] or [Found New Hardware Wizard] dialog box appears depending on the
system used.
If the printer d river is a lready ins talled, th e “plug and play” window appears, and the printer with its
port directed to the USB cable is added to the [Printers] folder.
46
AAAA
Click [Next>].
BBBB
Click [Search for the best driver for your device. (Recommended).], and then click [Next>].
CCCC
Select the [Specify a location:] check box, and then click [Browse...].
The [Browse for Folder] dialog box appears.
Page 47

Operating Instructions Printer Client Reference
DDDD
Insert the CD-ROM provided into the CD-ROM drive.
Note
❒ When Auto Run sta rt s, cl ic k [
❒ If you want to inactivate Auto Run, pres s {{{{Shift}}}} when inserting the CD- ROM into the dr iv e and
keep it pressed until the computer completes transmission to the drive.
EEEE
Select the drive where the printer driver is located according to the operating system used, and
then click [OK].
If the CD-ROM drive is D, the folder will be “D:\Drivers\USBPRINT\WIN98ME”.
FFFF
Confirm the printer driver location, and then click [Next>].
“USB Printing Support” will be installed.
GGGG
Click [Finish].
HHHH
Follow the “plug and play” on the screen to install the printer drivers.
When installation is co mplete, the printer with its port directed to “USB00n” appears on the [Print-
ers] folder. (“n” is the number of printers connected.)
Exit
].
47
Page 48

Operating Instructions Printer Client Reference
Installing the Printer Driver Using IEEE 1394
This section gives ba sic instructi ons for insta lling the pri nter drivers u sing the IEEE 1394 interface. The
printer drivers can be installed fro m the provided CD-ROM.
Preparation
To use a printer connected to the IEEE 1394 (IP over 1394) interface, select “SmartNetMonitor”
when installing the printer driver. See p.26 “Configuring Protocols” and p.29 “Installing Softwar e ”
Important
❒ Make sure all other applications are closed and the computer is not currently printing prior to instal-
lation.
Printing via IP over 1394
You can print by setting the IP address for this machine and the computer on which Windows Me is
installed.
Limitation
❒ When using the IEE E 1 394 ( IP ove r 139 4) in ter fac e in a ne twor k, the Ethernet interfa ce ca nnot be
used on the same network.
48
Note
❒ The maximum number of simultaneous print requests when connecting with IP over 1394 includes
requests via Ethernet interface. For more information, see Administr ato r Refere nc e.
Page 49

Operating Instructions Printer Client Reference
Installing the Printer Driver
To print using SmartNetMonitor, see p.26 “Printing without a Print Server”.
Note
❒ If [Add New Hardware Wizard] starts every time you restart the computer with an operating system that
does not support SCSI print or plug in or out the cable, inactivate the device by following procedures.
A In the [Add New Hardware Wizard] dialog box, confirm that [Windows has found the following new
Hardware: IEEE SBP-2 Device] is displayed, and click [Recommended search for a better driver
[Recommended]], and then click [Next>].
B When the [Windows was unable to locate the software for this device.] message appears, clic k
[Finish].
49
Page 50

Operating Instructions Printer Client Reference
Setting Up Options
You must set up options when bidirectional transmission is disabled.
Note
❒ The description uses the PCL 5c printer driver.
AAAA
On the [Start] menu, point to [Settings], and then click [Printers].
The [Printers] window appears.
BBBB
Click the icon of the pr inter you w ant to use.
CCCC
On the [File] menu, click [Properties].
DDDD
Click the [Accessories] tab.
Note
❒ If you are using the RPCS printer driver, click [
EEEE
In the [Option] box, select the options you have installed. Make any necessary settings.
Printer Configuration...
] under the [
Print Settings
50
] tab.
Note
❒ If you are using the RPCS printer driver, select the options from [
FFFF
Click [OK].
Select printer options:
].
Page 51

Operating Instructions Printer Client Reference
----Bidirectional transmission
When bidirectional t ran smission is enabled, i n f ormat i on a bout paper size and f eed direction sett ings is
automatically sent to the printer by the comput er. You can also check printer status fro m your comp uter.
• Bidirectional transmission is supported by Windows 95/98/Me, Windows 2000, Windows XP and
Windows NT 4.0.
• If you use the RPCS printer driver and bidirectional transmission is enabled, under Windows
95/98/Me, unavailable functions are shaded in the [Change Accessories] dialog box of the printer
properties. The [Change Accessories] dialog box is displa yed by clicking the [Change Accesso-
ries...] button under the [Printer Configuration] tab.
Note
❒ The RPCS printer driver supports bidirectional transmission and updates the printer status automat-
ically.
❒ The PCL 5c printer driv er supports bidirectional transmissio n; you can update the printer status
manually.
❒ The PostScript 3 printer driver does not support bidirectional transmission.
Bidirectional transmission requires the following conditions:
51
❖❖❖❖ When connecting via parallel cable
• The computer must support bidirectional transmission.
• The printer must be set to bidirectional transmission.
• The Interface cable must support bidirectional transmission.
Page 52

Operating Instructions Printer Client Reference
• The machine must be connected to the computer using standard parallel cable and parallel con-
nector.
• Under Windows 95/98/Me, [Enable bidirectional support for this printer] must be selected in
[Spool Settings…] on the [Details] tab with RPCS printer driver.
❖❖❖❖ When connecting with the network
• The printer must be set to bidirectional transmission.
• SmartNetMonitor for Client included on the CD-ROM must be installed, and TCP/IP must be
used.
• Under Windows 95/98/Me, [Enable bidirectional support for this printer] must be selected in
[Spool Settings…] on the [Details] tab with RPCS printer driver.
❖❖❖❖ When connecting with IEEE 1394
• The printer must be connected to the IEEE 1394 connector of a computer using the IEEE 1394
interface cable.
❖❖❖❖ When connecting with USB
The printer must be connected to the computer's USB connector using the USB interface cable.
52
Page 53

Operating Instructions Printer Client Reference
2. Windows 2000 Configuration
Printing Using a Pri nt Serve r
Printing Using a Windows 2000, Windows XP, or Windows NT 4.0 Print Server
This section describes procedures for setting up a client in a network using Windows 2000, Windows
XP, or Windows NT 4.0 as a print server.
To print from Windows 2000, you must install th e printer drive r and change the print er port connection
to the print server.
Windows 2000
Windows XP
Windows NT 4.0
Print Server
53
Windows 2000
Page 54

Operating Instructions Printer Client Reference
Installing the PCL 5c or RPCS Printer Driver
Preparation
To use the print server, install the printer driver by selecting “Network printer server”, and then select
the Windows 2000, Windows XP or Windows NT 4.0 shared printer. For more information about how
to install and settings, see Administrato r Refere nce .
This section assumes the client has already been configured to communicate with a Windows 2000,
Windows XP or Windows NT 4. 0 print server. Do not beg in the followin g procedure un til the client
is set up and configured correctly.
Limitation
❒ When using a print server connected to the machine via SmartNetMonitor for Client, you cannot use
Recovery Printing and Parallel Printing.
Note
❒ When using Windows NT 4.0 as a Print Server, make sure to install the Windows NT 4.0 printer driv-
er before connecting the print server. There is a Windows NT 4.0 printer driver on the CD-ROM labeled “Printer Drivers and Utilities”.
54
AAAA
Quit all applications that are running.
BBBB
Insert the CD-ROM into the CD-ROM drive.
Auto Run will start the installer.
Important
❒ Never have two versions of the same printer driver installed on your system at the same time. When
upgrading to a new version of the printer driver, delete the old version, and then install the new one.
Note
❒ Auto Run might not work automa tically due to certain operating system s ettings. If this is the
case, launch “Setup. exe” located in the CD-ROM root directory.
Page 55

Operating Instructions Printer Client Reference
CCCC
Select a language for the interface, and then click [OK].
The following languages are available: Cestina (Czech), Dansk (Danish), Deutsch (German), English (English), Espanol ( Spanish), Franc ais (Fr ench), It aliano (Itali an), Magyar (Hungari an), Nederlands (Dutch), Norsk (Norwegian), Polski (Polish), Portugues (Portuguese), Suomi (Finnish),
Svenska (Swedish)
DDDD
Click [PCL/RPCS Printer Drivers].
EEEE
The software license agreement appears in the [License Agreement] dialog box.
After rea ding thro ugh the co ntent, cl ick [I accept the agreement.] to agree with the license agreement, and then click [Next>].
FFFF
In the [Select Program] dialog box, select the printer drivers you want to use, and then click
[Next>].
You can select more than one printer driver.
GGGG
Select the [Printer Name] check box for the model(s) of printer you want to use.
To change the printer name, use the [Change settings for 'Printer Name'] box.
55
HHHH
Double-click the printer name to display its settings.
Note
❒ The details shown for [Comment:], [Driver:], and [Port:] vary dep ending on the operating system
being used, model of printer selected, and port being used.
IIII
Click [Port:], and then click [Add].
JJJJ
Click [Network Printer], and then click [OK].
Page 56

Operating Instructions Printer Client Reference
KKKK
Double-click the computer name you want to use as th e pri nt server in the [Browse for Printer]
window.
LLLL
Select the printer you want to use, and then click [OK].
MMMM
Make sure the location for the selected printer is displayed after [Port:].
NNNN
Configure the user code and default printer as necessary.
❖❖❖❖ User Code
When using RPCS, you can speci fy th e user code wit h the Printe r Dri ver Pr operti es af ter insta lling the pri nter driver. See the prin ter driver's Help.
❖❖❖❖ Default Printer
Select the [Default Printer] check box to set the printer as the default printer.
OOOO
Click [Continue] to start printer driver installation.
PPPP
When the [Select Program] dialog box appears, click [Finish].
56
QQQQ
When the [Installation Completion] dialog box appears, click [Finish].
Note
❒
If you are required to restart the computer after the installatio n, restart and continue configur ation.
RRRR
Set up the o ptions.
Note
❒ You must set up the opti ons when bidi rectional tran smission is d isabled. For m ore informat ion
about bidirectional transmission status, see p.85 “Bidirectional transmission”.
Reference
For more information about option settings, see p.84 “Setting Up Options”.
Page 57

Operating Instructions Printer Client Reference
Installing the PostScript Printer Driver
AAAA
Quit all applications that are running.
BBBB
Insert the CD-ROM into the CD-ROM drive.
Auto Run will start the installer.
Important
❒ Never have two versions of the same printer driver installe d on your system at the same time.
When upgrading to a new version of the printer driver, delete the old version, and then install the
new one.
Note
❒ Auto Run might not work automa tically due to certain operating system s ettings. If this is the
case, launch “Setup. exe” located in the CD-ROM root directory.
CCCC
Select a language for the interface, and then click [OK].
The following languages are available: Cestina (Czech), Dansk (Danish), Deutsch (German), English (English), Espanol ( Spanish), Franc ais (Fr ench), It aliano (Itali an), Magyar (Hungari an), Nederlands (Dutch), Norsk (Norwegian), Polski (Polish), Portugues (Portuguese), Suomi (Finnish),
Svenska (Swedish)
57
Note
❒ The printer driver with the selected language will be ins tal led . The pri nte r dri ver wil l be ins tal led
in English if you select the following languages: Cestina, Magyar, Polski, Portugues, Suomi
DDDD
Click [PostScript 3 Printer Driver].
“Add Printer Wizard” starts.
Page 58

Operating Instructions Printer Client Reference
EEEE
Click [Next>].
FFFF
Click [Network printer], and then click [Next>].
GGGG
Click [Next>].
HHHH
Double-click the computer name you want to use as the print server in the [Shared printers:]
window.
IIII
Select the printer you want to use, and then click [Next>].
Configure the default printer as necessary. Click [Yes] to set the printer as the default printer.
JJJJ
Start printer driver installation.
KKKK
Click [Next>].
LLLL
Click [Finish].
The installation is complete.
Note
❒ You can specify the user code with the Printer Driver Properties after installing the printer driver.
See the printer driver's Help.
58
Reference
For more information about option settings, see p.84 “Setting Up Options”.
MMMM
Restart the computer.
Page 59

Operating Instructions Printer Client Reference
Printing without a Print Server
Preparation
To use a printer connect ed to th e Eth ernet i nter fa ce or IE EE 802.1 1b ( wir eles s LAN) int er fac e, select “SmartNetMonitor”, “Standard TCP/IP Port”, or “LPR Port” when installing the printer driver.
• For SmartNe tMonitor, see p.59 “Configuring Protocols”, p.62 “Installing Software”, p.63 “Install-
ing the PCL 5c or RPCS Printer Driver”, and p.68 “Installing the PostScript Printer Driver”.
• For Stand ar d TCP/IP Por t, LPR Po rt, see p.59 “Configuring Protocols ”, p.63 “Installing the PCL
5c or RPCS Printer Driver”, and p.68 “Installing the PostScript Printer Driver”.
Note
❒ If you want to use “LPR Port”, “Print Services for UNIX” must be installed. For details, see
Windows 2000 Help.
Configuring Protocols
59
Configuring TCP/IP and IPP for Printing
Follow these instructions to configure the printer and Windows 2000 to use TCP/IP and IPP.
❖❖❖❖ Configuring the printer
Configure the printer to use TCP/IP.
• Check TCP/IP is set to active. (The factory default is active.)
• Assign an IP address and make other settings required for TCP/IP.
Page 60

Operating Instructions Printer Client Reference
Reference
For more information about how to make the above settings, see “Configuring the printer for the
Network”, Setup Guide.
If DHCP is used to assign IP addresses, see Appendix, “When Using DHCP”, Administrator Ref-
erence.
Note
❒ After setting the IP address, use the ping command to check it is set correctly.
Start
Click [
A
Enter the following: (Example: IP address is 192.168.15.16)
B
], point to [
C:> ping 192.168.15.16
If the address is configured correctly, the following message appears:
Reply from 192.168 .1 5. 16 : by te s=3 2 ti me <1 0ms TTL =3 2
If the address is configured incorrectly, the following message appears:
Request timed out.
❖❖❖❖ Configuring a Windows 2000 computer
Follow the procedure below to configure a Windows 2000 computer to use TCP/IP:
A On the [Start] menu, point to [Settings], and then click [Network and Dial-up Connections].
B Click [Local Area Connection].
C On the [File] menu, click [Properties].
D Con firm th at “In ternet P roto col (TC P/IP) ” is selected in the [Components checked are used by
this connection:] box on the [General] tab.
Programs
], point to [
Accessories
], and then click [
Command Prompt
60
].
Note
❒ If the check box for TCP/IP is not selected, select it.
❒ If TCP/IP is not installed, click [Install...] on the [General] tab and install it. For more information
about installing TCP/IP, see Windows 2000 Help.
Page 61

Operating Instructions Printer Client Reference
E Configure TCP/IP with the appropriate IP address, subnet mask and other settings.
Check the settings are correct with the network administrator.
Configuring NetBEUI for Printing
Follow these instruct ions to conf igure the net work interf ace board and Win dows 2000 to use NetBEUI:
Preparation
To use NetBEUI, use the SmartNetMonitor for Client port.
❖❖❖❖ Configuring the printer
Configure the printer to use NetBEUI.
• Check NetBEUI is set to active. (The factory default is active.)
Reference
For more information about how to make the above settings, see “Configuring the printer for the
Network”, Setup Guide.
❖❖❖❖ Configuring a Windows 2000 computer
Follow the procedure below to configure a Windows 2000 computer to use NetBEUI:
A On the [Start] menu, point to [Settings], and then click [Network and Dial-up Connections].
B Click [Local Area Connection].
C On the [File] menu, click [Properties].
D Check “NetBEUI Protocol ” is selected in the [Components checked are used by this connection:]
box on the [General] tab.
61
Note
❒ If the check box for NetBEUI is not selected, select it.
❒ If NetBEUI is not installed, click [Install...] on the [General] tab to install it. For more information
about installing NetBEUI, see Windows 2000 Help.
Page 62

Operating Instructions Printer Client Reference
Installing Software
Preparation
If you are not using a print server, install SmartNetMonitor for Client, and then install the printer driver by selecting “SmartNetMonitor for Client”. This enables peer-to-peer network printing via TCP/IP,
NetBEUI, or IPP.
Installing SmartNetMonitor for Client
AAAA
Quit all applications that are running.
BBBB
Insert the CD-ROM into the CD-ROM drive.
Auto Run will start the installer.
Note
❒ Auto Run might not work automa tically due to certain operating system s ettings. If this is the
case, launch “Setup. exe” located in the CD-ROM root directory.
62
CCCC
Select a language for the interface, and then click [OK].
The following languages are available: Cestina (Czech), Dansk (Danish), Deutsch (German), English (English), Espanol ( Spanish), Franc ais (Fr ench), It aliano (Itali an), Magyar (Hungari an), Nederlands (Dutch), Norsk (Norwegian), Polski (Polish), Portugues (Portuguese), Suomi (Finnish),
Svenska (Swedish)
DDDD
Click [SmartNetMonitor for Client/Admin].
Page 63

Operating Instructions Printer Client Reference
EEEE
The software license agreement appears in the [License Agreement] dialog box.
After rea ding thro ugh the co ntent, cl ick [I accept the agreement.] to agree with the license agreement, and then click [Next>].
FFFF
Select the [SmartNetMonitor for Client] check box, and then click [Next >].
GGGG
Follow the instructions on the screen.
Note
❒ If you are required to restart the computer after the installation of SmartNetMonitor for Client, re-
start and continue configuration.
Installing the PCL 5c or RPCS Printer Driver
AAAA
Quit all applications that are running.
BBBB
Insert the CD-ROM into the CD-ROM drive.
Auto Run will start the installer.
63
Important
❒ Never have two versions of the same printer driver installe d on your system at the same time.
When upgrading to a new version of the printer driver, delete the old version, and then install the
new one.
Note
❒ Auto Run might not work automa tically due to certain operating system s ettings. If this is the
case, launch “Setup. exe” located in the CD-ROM root directory.
Page 64

Operating Instructions Printer Client Reference
CCCC
Select a language for the interface, and then click [OK].
The following languages are available: Cestina (Czech), Dansk (Danish), Deutsch (German), English (English), Espanol ( Spanish), Franc ais (Fr ench), It aliano (Itali an), Magyar (Hungari an), Nederlands (Dutch), Norsk (Norwegian), Polski (Polish), Portugues (Portuguese), Suomi (Finnish),
Svenska (Swedish)
DDDD
Click [PCL/RPCS Printer Drivers].
EEEE
The software license agreement appears in the [License Agreement] dialog box.
After rea ding thro ugh the co ntent, cl ick [I accept the agreement.] to agree with the license agreement, and then click [Next>].
FFFF
In the [Select Program] dialog box, select the printer drivers you want to use, and then click
[Next>].
You can select more than one printer driver.
GGGG
Select the [Printer Name] check box to select the printer model(s) you want to use.
To change the printer name, use the [Change settings for 'Printer Name'] box.
64
HHHH
Double-click the printer name to display its settings.
Note
❒ The details shown for [Comment:], [Driver:], and [Port:] vary dep ending on the operating system
being used, model of printer selected, and port being used.
IIII
Click [Port:], and then click [Add] in the [Change settings for 'Port'] box.
Page 65

Operating Instructions Printer Client Reference
JJJJ
The next part of the pr ocedure depends on the port in us e. Follow the s ection that c orresponds
to the port you want to use.
• SmartNetMonitor
• Standard TCP/IP Port
• LPR Port
SmartNetMonitor
A Select [SmartNetMonitor], and then click [OK].
B Select the printer you want to use.
❖❖❖❖ TCP/IP
A Click [TCP/IP], and then click [Search].
Available printers will be listed.
B Click the printer you want to use, and then click [OK].
Note
❒ Printers that respond to an IP broadcast from the computer will be displayed. To print to a
printer not listed here, click [
name.
Specify Address
], and then enter the printer's IP address or host
65
❖❖❖❖ NetBEUI
A Click [NetBEUI], and then click [Search].
A list of printers that can be used with NetBEUI appears.
Page 66

Operating Instructions Printer Client Reference
B Click the printer you want to use, and then click [OK].
Note
❒ Printers that respond to a broadcast from the compu ter will be displayed. To pr int to a
printer not listed here, click [
the NetBEUI network addres s is on the configuration pag e. For more information about
printing the configuration page, see “Printing a Configuration Page”, Administrator Refer-
ence. NetBEUI address appears as “\RNPxxxxxxx” on the confi guration p age. Ente r the
printer's network path name in the form of “%%Computer name\Share name”. Do not enter “\\” as head characters but “%%”.
❒ You cannot print to printers beyond routers.
❖❖❖❖ IPP
A Click [IPP].
The IPP setting dialog box appears.
B To specify the printer's IP address, enter “http://printer's-ip-address/printer” or
“ipp://printer's-ip-address/printer” in the [Printer URL] box.
(Example: IP address is 192.168.15.16)
http://192.168.15.16/printer
ipp://192.168.15.16/printer
C If necessary, enter the name s t o distinguish the pr in ter in the [IPP Port Name] box. Enter a
different name from those of existing port names.
If you do not do th is, the addr ess entered in the [Printer URL] box will be s et as the IP P port
name.
D If a proxy server and IPP user name are used, cl ick [Detailed Settings], and then configure
the necessary setting s.
Specify Address
], and then enter the NetBEUI address. Confirm
66
Note
❒ For more information about these settings, see SmartNetMonitor for Client Help.
E
Click [OK].
Page 67

Operating Instructions Printer Client Reference
Standard TCP/IP Port
A In the [Type:] list, click [Standard TCP/IP Port], and then click [OK].
B In the [Add Standard TCP/IP Printer Port Wizard] window, click [Next>].
C In the [Printer Name or IP Address] box, ente r the p rint er name or IP ad dress, a nd then c lick
[Next>].
D In the [Add Standard TCP/IP Printer Port Wizard] window, click [Finish].
LPR Port
A In the [Type:] list, click [LPR Port], and then click [OK].
B In the [Name or address of server providing lpd] box, enter the printer's IP address.
C In the [Name of printer or print queue on that server] box, enter “lp”.
KKKK
Make sure the location for the selected printer is displayed after [Port:].
LLLL
Configure the default printer as necessary.
67
❖❖❖❖ Default Printer
Select the [Default Printer] check box to set the printer as the default printer.
MMMM
Click [Continue] to start printer driver installation.
NNNN
When the [Select Program] dialog box appears, click [Finish].
Page 68

Operating Instructions Printer Client Reference
OOOO
When the [Installation Completion] dialog box appears, click [Finish].
Note
❒ If you are required t o restar t the computer a fter the instal lation, r estart and continue con figura-
tion.
PPPP
Set up the o ptions.
Note
❒ You must set up the opti ons when bidi rectional tran smission is d isabled. For m ore informat ion
about bidirectional transmission status, see p.85 “Bidirectional transmission”.
Reference
For more information about option settings, see p.84 “Setting Up Options”.
Installing the PostScript Printer Driver
AAAA
Quit all applications that are running.
68
BBBB
Insert the CD-ROM into the CD-ROM drive.
Auto Run will start the installer.
Important
❒ Never have two versions of the same printer driver installe d on your system at the same time.
When upgrading to a new version of the printer driver, delete the old version, and then install the
new one.
Note
❒ Auto Run might not work automa tically due to certain operating system s ettings. If this is the
case, launch “Setup. exe” located in the CD-ROM root directory.
Page 69

Operating Instructions Printer Client Reference
CCCC
Select a language for the interface, and then click [OK].
The following languages are available: Cestina (Czech), Dansk (Danish), Deutsch (German), English (English), Espanol ( Spanish), Franc ais (Fr ench), It aliano (Itali an), Magyar (Hungari an), Nederlands (Dutch), Norsk (Norwegian), Polski (Polish), Portugues (Portuguese), Suomi (Finnish),
Svenska (Swedish)
Note
❒ The printer driver with the selected language will be ins tal led . The pri nte r dri ver wil l be ins tal led
in English if you select the following languages: Cestina, Magyar, Polski, Portugues, Suomi
DDDD
Click [PostScript 3 Printer Driver].
“Add Printer Wizard” starts.
EEEE
Click [Next >].
FFFF
Click [Local printer], and then click [Next>].
GGGG
Click [Create a new port:].
HHHH
The next part of the pr ocedure depends on the port in us e. Follow the s ection that c orresponds
to the port you want to use.
• SmartNetMonitor
• Standard TCP/IP Port
• LPR Port
69
Page 70

Operating Instructions Printer Client Reference
SmartNetMonitor
A In the [Type:] list, click [SmartNetMonitor], and then click [OK].
B Select the printer you want to use.
❖❖❖❖ TCP/IP
A Click [TCP/IP], and then click [Search].
Available printers will be listed.
B Click the printer you want to use, and then click [OK].
Note
❒ Printers that respond to an IP broadcast from the computer will be displayed. To print to a
printer not listed here, click [
name.
❖❖❖❖ NetBEUI
A Click [NetBEUI], and then click [Search].
A list of printers that can be used with NetBEUI appears.
B Click the printer you want to use, and then click [OK].
Specify Address
], and then enter the printer's IP address or host
70
Note
❒ Printers that respond to a broadcast from the compu ter will be displayed. To pr int to a
printer not listed here, click [Specify Address], and then enter the NetBEUI address. Confirm
the NetBEUI network addres s is on the configuration pag e. For more information about
printing the configuration page, see “Printing a Configuration Page”, Administrator Refer-
ence. NetBEUI address appears as “\RNPxxxxxxx” on the confi guration p age. Ente r the
printer's network path name in the form of “%%Computer name\Share name”. Do not enter “\\” as head characters but “%%”.
❒ You cannot print to printers beyond routers.
Page 71

Operating Instructions Printer Client Reference
❖❖❖❖ IPP
A Click [IPP].
The IPP setting dialog box appears.
B To specify the printer's IP address, enter “http://printer's-ip-address/printer” or
“ipp://printer's-ip-address/printer” in the [Printer URL] box.
(Example: IP address is 192.168.15.16)
http://192.168.15.16/printer
ipp://192.168.15.16/printer
C If necessary, enter the name s t o distinguish the pr in ter in the [IPP Port Name] box. Enter a
different name from those of existing port names.
If you do not do th is, the addr ess entered in the [Printer URL] box will be s et as the IP P port
name.
D If a proxy server and IPP user name are used, cl ick [Detailed Settings], and then configure
the necessary setting s.
Note
❒ For more information about these settings, see SmartNetMonitor for Client Help.
E Click [OK].
71
Standard TCP/IP Port
A In the [Type:] list, click [Standard TCP/IP], and then click [OK].
B In the [Add Standard TCP/IP Printer Port Wizard] window, click [Next>].
C In the [Printer Name or IP Address] box, ente r the p rint er name or IP ad dress, a nd then c lick
[Next>].
D In the [Add Standard TCP/IP Printer Port Wizard] window, click [Finish].
Page 72

Operating Instructions Printer Client Reference
LPR Port
A In the [Type:] list, click [LPR Port], and then click [Next>].
B In the [Name or address of server providing lpd] box, enter the printer's IP address.
C In the [Name of printer or print queue on that server] box, enter “lp”.
IIII
Confirm to select the name of the printer whos e driver you want to in stall, and then click [Next >].
JJJJ
Change the name of the printer if you want, and then click [Next >].
Configure the default printer as necessary. Click [Yes] to set the printer as the default printer.
KKKK
Click [Next >].
LLLL
Select whether or not you want to print a test page, and then click [Next>].
MMMM
Click [Finish].
Printer driver installation starts.
NNNN
Set up the o ptions.
72
Note
❒ You can specify the user code with the printer properties d ialog box after installing the printer
driver. See the printer driver's Help.
Reference
For more information about option settings, see p.84 “Setting Up Options”.
Page 73

Operating Instructions Printer Client Reference
Changing Port Settings
Follow the procedure below to change SmartNetMonitor for Client settings, such as proxy server settings or IPP URL.
Note
❒ There are no settings for NetBEUI.
AAAA
In the [Printers] window, click the icon of the printer you want to use. On the [File] menu, cli ck
[Properties].
BBBB
Click the [Ports] tab, and then click [Configure Port].
The [Port Configuration:] dialog box appears.
Note
❒ If you cannot set items on the [Recovery/Parallel Printing] tab, follow the procedure below:
Click [Cancel] to close the [Port Configuration:] dialog box.
A
Start SmartNetMonitor for Client , and then right-click the Smart NetMo ni tor for Cli ent icon on
B
the taskbar.
Click [Extended Features Settings], and then select the [Set Recovery/Parallel Printing for each port]
C
check box.
Click [OK] to close the [Extended Features Settings] dialog box.
D
• For IPP, you can configure User Settings, Proxy Settings and Timeout Settings.
73
Note
❒ For more information about these settings, see SmartNetMonitor for Client Help.
Page 74

Operating Instructions Printer Client Reference
Printing via Parallel Co nnection
Preparation
To use a printer connected to the parallel interface, select “LPT1:” when inst alli ng th e prin te r dr iver .
Installing the PCL 5c or RPCS Printer Driver
AAAA
Quit all applications that are running.
BBBB
Insert the CD-ROM into the CD-ROM drive.
Auto Run will start the installer.
Important
❒ Never have two versions of the same printer driver installe d on your system at the same time.
When upgrading to a new version of the printer driver, delete the old version, and then install the
new one.
Note
❒ Auto Run might not work automa tically due to certain operating system s ettings. If this is the
case, launch “Setup. exe” located in the CD-ROM root directory.
74
CCCC
Select a language for the interface, and then click [OK].
The following languages are available: Cestina (Czech), Dansk (Danish), Deutsch (German), English (English), Espanol ( Spanish), Franc ais (Fr ench), It aliano (Itali an), Magyar (Hungari an), Nederlands (Dutch), Norsk (Norwegian), Polski (Polish), Portugues (Portuguese), Suomi (Finnish),
Svenska (Swedish)
Page 75

Operating Instructions Printer Client Reference
DDDD
Click [PCL/RPCS Printer Drivers].
EEEE
The software license agreement appears in the [License Agreement] dialog box.
After rea ding thro ugh the co ntent, cl ick [I accept the agreement.] to agree with the license agreement, and then click [Next>].
FFFF
In the [Select Program] dialog box, select the printer drivers you want to use, and then click
[Next>].
You can select more than one printer driver.
GGGG
Select the [Printer Name] check box for the model(s) of printer you want to use.
To change the printer name, use the [Change settings for 'Printer Name'] box.
HHHH
Double-click the printer name to display its settings.
Note
❒ The details shown for [Comment:], [Driver:], and [Port:] vary dep ending on the operating system
being used, model of printer selected, and port being used.
75
IIII
Configure the default printer as necessary.
❖❖❖❖ Default Printer
Select the [Default Printer] check box to set the printer as the default printer.
JJJJ
Click [Continue] to start printer driver installation.
KKKK
When the [Select Program] dialog box appears, click [Finish].
Page 76

Operating Instructions Printer Client Reference
LLLL
When the [Installation Completion] dialog box appears, click [Finish].
Note
❒ If you are required t o restar t the computer a fter the instal lation, r estart and continue con figura-
tion.
MMMM
Set up the o ptions.
Note
❒ You must set up the options when bidirectional transmission is disabled.
❒ For more informatio n about bidirectional trans mission status, see p.85 “B idirectional tr ansmis-
sion”.
Reference
For more information about option settings, see p.84 “Setting Up Options”.
76
Page 77

Operating Instructions Printer Client Reference
Installing the PostScript Printer Driver
AAAA
Quit all applications that are running.
BBBB
Insert the CD-ROM into the CD-ROM drive.
Auto Run will start the installer.
Important
❒ Never have two versions of the same printer driver installe d on your system at the same time.
When upgrading to a new version of the printer driver, delete the old version, and then install the
new one.
Note
❒ Auto Run might not work automa tically due to certain operating system s ettings. If this is the
case, launch “Setup. exe” located in the CD-ROM root directory.
CCCC
Select a language for the interface, and then click [OK].
The following languages are available: Cestina (Czech), Dansk (Danish), Deutsch (German), English (English), Espanol ( Spanish), Franc ais (Fr ench), It aliano (Itali an), Magyar (Hungari an), Nederlands (Dutch), Norsk (Norwegian), Polski (Polish), Portugues (Portuguese), Suomi (Finnish),
Svenska (Swedish)
77
Note
❒ The printer driver with the selected language will be ins tal led . The pri nte r dri ver wil l be ins tal led
in English if you select the following languages: Cestina, Magyar, Polski, Portugues, Suomi
DDDD
Click [PostScript 3 Printer Driver].
“Add Printer Wizard” starts.
Page 78

Operating Instructions Printer Client Reference
EEEE
Click [Next>].
FFFF
Click [Local Printer], and then click [Next>].
A dialog box for selecting the printer port appears.
GGGG
Select the printer port, and then click [Next>].
HHHH
Change the name of the printer if you want, and then click [Next>].
IIII
Select whether or not you want to print a test page, and then click [Next>].
Printer driver installation starts.
JJJJ
Click [Finish].
KKKK
Set up the o ptions.
Reference
For more information about option settings, see p.84 “Setting Up Options”.
LLLL
Restart the computer.
78
Page 79

Operating Instructions Printer Client Reference
Installing the Printer Driver Using USB
This section gives basic instructions for installing the printer drivers using USB. The printer drivers can
be installed from the provided CD-ROM.
Important
❒ Make sure all other applications are closed and the computer is not currently printing prior to instal-
lation.
Windows 2000 - Installing the Printer Driver Using USB
Limitation
❒ Installing a printer driver requires Administrator permission. When you install a printer driver, log on
using an account that has Administrator permission.
When the USB cable is used for the first time, the [Found New Hardware Wizard] dialog box appears,
and Windows 2000's [USB Printing Support] will automatically install.
If the printer d river is a lready ins talled, th e “plug and play” window appears, and the printer with its
port directed to the USB cable is added to the [Printers] folder.
79
AAAA
Install the printer dri ver by referring to the i nst ruc ti ons for installing the print er d river with
Parallel/Ethernet connection.
When installation is co mplete, the printer with its port directed to “USB00n” appears on the [Print-
ers] folder. (“n” is the number of printers connected.)
Page 80

Operating Instructions Printer Client Reference
Installing the Printer Driver Using IEEE 1394
This section gives ba sic instructi ons for insta lling the pri nter drivers u sing the IEEE 1394 interface. The
printer drivers can be installed fro m the provided CD-ROM.
Important
❒ Make sure all other applications are closed and the computer is not currently printing prior to instal-
lation.
Printing via SCSI Print
Printing using a SCSI print device with the optional 1394 Interface Unit Type 4510 is possible under
Windows 2000.
Important
❒ The optional 1394 Interface Unit Type 4510 can only be used with Service Pack 1 (SP1) or later. If
the Service Pack is not instal led, only one 1 394 bus SCSI p rint device is c onnectable. Th e client
cannot install the printer driver without using an account that has Administrator permission.
❒ Do not connect new IEEE 1394 or USB devices to the computer or turn on another printer while in-
stalling the printer driver.
❒ Before uninstallin g the pri nter driv er, be sur e to dis con nec t the IEEE 139 4 in ter fac e cabl e fr om the
computer.
❒ “SCSI print” must be set to active from the control panel. For more information, see “IEEE 1394 Con-
figuration”, Setup Guide.
80
Note
❒ This machine cannot receive print data from more than one computer at the same time. If you send
data from your computer when data is being received from another, an error message may appear
on the computer display.
Page 81

Operating Instructions Printer Client Reference
Installing the Printer Driver
Note
Found New Hardware Wizard
❒ If [
with Windows 2000, inactivate the device. I f you want to install a nother printer driver after setting
the “1394_00n” port, sele ct the “1394_00n” port by following the proc edure for installing a printer
driver.
❒ When the printer connected via the optional 1394 Interface Unit Type 4510 is installed properly, the
icon in the printer folder changes depending on whether the cable is attached or not.
AAAA
Connect the printer and computer using the IEEE 1394 interface cable.
BBBB
In the [Found New Hardware Wizard] dialog box, click [Next>].
CCCC
When the [This wizard will complete the installation for this Device: (Unknown)] message appears,
click [Search for a suitable driver for my device (recommended)], and then click [Next>].
DDDD
When the [Locate Driver Files] message appears, click [Specify a location], and then cl ick [Next>].
] appears every time the computer is started or the cable is connected
81
EEEE
Hold down the left {{{{SHIFT}}}} key, and then insert th e CD-ROM into the CD-ROM drive.
Keep the left {{{{SHIFT}}}} key held down until the computer has finished accessing the CD-ROM.
If the Auto Run program starts, click [Cancel], and then click [Exit].
FFFF
Click [Browse].
GGGG
Select the printer driver you wan t to use. The following are locations on the CD-R OM where
printer drivers are stored:
• RPCS
\DRIVERS\RPCS\WIN2K_XP\(Language)\DISK1
Page 82

Operating Instructions Printer Client Reference
• PCL 5c
\DRIVERS\PCL5C\WIN2K_XP\(Language)\DISK1
• PostScript 3
\DRIVERS\PS\WIN2K_XP\(Language)\DISK1
HHHH
Click [Open].
IIII
Click [OK].
The [Driver Files Search Results] dialog box appears.
JJJJ
Follow the instructions on the screen.
Note
❒ If the printer driver is already installed, the printer icon is automatically added to the [
er. In this case, installation is not necessary.
❒ When installation is complete, the printer w ith its port directed to “1394_00n” appears on the
Printers
[
❒ If printing does no t work p roperly after instal lation , you need to delete the port and re insta ll the
printer driver. For more information, see “Printer Does Not Print”, Maintenan ce Guide.
❒ If you do not want to install the printer driver when [Found New Hardware Wizard] starts when using
an operating system that supports SCSI print, inactivate the device by following this procedure:
A In the [Found New Hardware Wizard] dialog box, click [Next>].
B When the [This wizard will complete the installation for this Device: (Unknown)] message ap-
C When the [Locate Driver Files] message appears, remove all checks from [Optional search lo-
] folder. (“n” is the number of printers connected.)
pears, click [Search for a suitable driver for my device [recommended]], and then click [Next>].
cations.], and then click [Next>].
Printer
82
] fold-
Page 83

Operating Instructions Printer Client Reference
D When the [Driver Files Search Results] message appears, se lect the [Disable the device. The
Add/Remove Hardware Wizard in the control Panel can be able to complete the driver installa-
tions.] check box, and then click [Finish].
Found New Hardware Wizard
❒ If [
ating system tha t do es n ot s up por t IP over 1 394 , p lug i n o r take out the cable, or ina ctiv ate the
device by the following procedure:
A In the [Found New Hardware Wizard] dialog box, click [Next>].
B When the [This wizard will complete the installation for this Device:] message appears and “IP
over 1394” appears click [Search for a suitable driver for my device [recommended]], and then
click [Next>].
C When the [Locate Driver Files] message appears, remove all checks from [Optional search lo-
cations.], and then click [Next>].
D When the [Driver Files Search Results] message appears, selec t the [Disable the device.] check
box, and then click [Finish].
] appears every time you restart the computer when using an oper-
83
Page 84

Operating Instructions Printer Client Reference
Setting Up Options
You must set up options when bidirectional transmission is disabled.
Note
❒ The description uses the PCL 5c printer driver.
AAAA
On the [Start] menu, point to [Settings], and then click [Printers].
The [Printers] window appears.
BBBB
Click the icon of the pr inter you w ant to use.
CCCC
On the [File] menu, click [Properties].
DDDD
Click the [Accessories] tab.
Note
❒ If you are using the RPCS printer driver, click the [
❒ If you are using the PS printer driver, click the [Device Settings] tab.
Change Accessories
84
] tab.
EEEE
In the [Option] box, select the options you have installed. Make any necessary settings.
Note
❒ If you are using the RPCS printer driver, select the options from [
❒ If you are using the PostScript 3 printer driver, select the options from [
FFFF
Click [OK].
Select printer options:
Installable Options
].
].
Page 85

Operating Instructions Printer Client Reference
----Bidirectional transmission
When bidirectional t ran smission is enabled, i n f ormat i on a bout paper size and f eed direction sett ings is
automatically sent to the printer by the comput er. You can also check printer status fro m your comp uter.
• Bidirectional transmission is supported by Windows 95/98/Me, Windows 2000, Windows XP and
Windows NT 4.0.
• If you use the RPCS prin ter driver and bidi rectional transmission is enabled, un der Windows 2000,
the [Change Accessories] tab is shaded, and cannot be used.
Note
❒ The RPCS printer driver supports bidirectional transmission and updates the printer status automat-
ically.
❒ The PCL 5c printer driv er supports bidirectional transmissio n; you can update the printer status
manually. However, it does not support bidirectional transmission over a parallel connection.
❒ The PostScript 3 printer driver does not support bidirectional transmission.
Bidirectional transmission requires the following conditions:
85
❖❖❖❖ When connecting via parallel cable
• The computer must support bidirectional transmission.
• The printer must be set to bidirectional transmission.
• The Interface cable must support bidirectional transmission.
• The machine must be connected to the computer using standard parallel cable and parallel con-
nector.
• Under Windows 2000, [Enable bidirectional support] must be selected and [Enable printer pool-
ing] must not be selected on the [port] tab with RPCS printer driver.
Page 86

Operating Instructions Printer Client Reference
❖❖❖❖ When connecting with the network
• The printer must be set to bidirectional transmission.
• SmartNetMonitor for Client included on the CD-ROM must be installed, and TCP/IP must be
used.
• Under Windows 2000, [Enable bidirectional support] must be selected and [Enable printer pool-
ing] must not be selected on the [port] tab with RPCS printer driver.
❖❖❖❖ When connecting with IEEE 1394
• The printer must be connected to the IEEE 1394 connector of a computer using the IEEE 1394
interface cable.
• On the printer's control panel, [Active] is select ed in t he SCSI pri nt of IEE E 1394 an d [On] is se-
lected in t he Bidi-SCSI p rint.
• Under Windows 2000, [Enable bidirectional support] must be selected and [Enable printer pool-
ing] must not be selected on the [port] tab with RPCS printer driver.
❖❖❖❖ When connecting with USB
The printer must be connected to the computer's USB connector using the USB interface cable.
86
Page 87

Operating Instructions Printer Client Reference
3. Windows XP Configuration
Printing Using a Pri nt Serve r
Printing Using a Windows 2000, Windows XP, or Windows NT 4.0 Print Server
This section describes procedures for setting up a client in a network using Windows 2000, Windows
XP, or Windows NT 4.0 as a print server.
To print from Windows XP, you must install the printer driver and change the printer port connection
to the print server.
Windows 2000
Windows XP
Windows NT 4.0
Print Server
87
Windows XP
Page 88

Operating Instructions Printer Client Reference
Installing the PCL 5c or RPCS Printer Driver
Preparation
To use the print server, install the printer driver by selecting “Network printer server”, and then select
the Windows 2000, Windows XP or Windows NT 4.0 shared printer. For more information about how
to install and settings, see Administrato r Refere nce .
This section assumes the client has already been configured to communicate with a Windows 2000,
Windows XP or Windows NT 4. 0 print server. Do not beg in the followin g procedure un til the client
is set up and configured correctly.
Limitation
❒ When using a print server connected to the machine via SmartNetMonitor for Client, you cannot use
Recovery Printing and Parallel Printing.
Note
❒ When using Windows NT 4.0 as a Print Server, make sure to install the Windows NT 4.0 printer driv-
er before connecting the print server. There is a Windows NT 4.0 printer driver on the CD-ROM labeled “Printer Drivers and Utilities”.
88
AAAA
Quit all applications that are running.
BBBB
Insert the CD-ROM into the CD-ROM drive.
Auto Run will start the installer.
Important
❒ Never have two versions of the same printer driver installed on your system at the same time. When
upgrading to a new version of the printer driver, delete the old version, and then install the new one.
Note
❒ Auto Run might not work automa tically due to certain operating system s ettings. If this is the
case, launch “Setup. exe” located in the CD-ROM root directory.
Page 89

Operating Instructions Printer Client Reference
CCCC
Select a language for the interface, and then click [OK].
The following languages are available: Cestina (Czech), Dansk (Danish), Deutsch (German), English (English), Espanol ( Spanish), Franc ais (Fr ench), It aliano (Itali an), Magyar (Hungari an), Nederlands (Dutch), Norsk (Norwegian), Polski (Polish), Portugues (Portuguese), Suomi (Finnish),
Svenska (Swedish)
DDDD
Click [PCL/RPCS Printer Drivers].
EEEE
The software license agreement appears in the [License Agreement] dialog box.
After rea ding thro ugh the co ntent, cl ick [I accept the agreement.] to agree with the license agreement, and then click [Next>].
FFFF
In the [Select Program] dialog box, select the printer drivers you want to use, and then click
[Next>].
You can select more than one printer driver.
GGGG
Select the [Printer Name] check box for the model(s) of printer you want to use.
To change the printer name, use the [Change settings for 'Printer Name'] box.
89
HHHH
Double-click the printer name to display its settings.
Note
❒ The details shown for [Comment:], [Driver:], and [Port:] vary dep ending on the operating system
being used, model of printer selected, and port being used.
IIII
Click [Port:], and then click [Add].
JJJJ
Click [A network printer, or a printer attached to another computer ], and then click [OK].
Page 90

Operating Instructions Printer Client Reference
KKKK
Double-click the computer name you want to use as th e pri nt server in the [Browse for Printer]
window.
LLLL
Select the printer you want to use, and then click [OK].
MMMM
Make sure the location for the selected printer is displayed after [Port:].
NNNN
Configure the default printer as necessary.
❖❖❖❖ Default Printer
Select the [Default Printer] check box to set the printer as the default printer.
OOOO
Click [Continue] to start printer driver installation.
Note
❒ During installatio n, the [Hardware Installation] dialog box m ay appear . If this happe ns, click [Con-
tinue Anyway] to continue the installation.
PPPP
When the [Select Program] dialog box appears, click [Finish].
QQQQ
When the [Installation Completion] dialog box appears, click [Finish].
90
Note
❒
If you are required to restart the computer after the installatio n, restart and continue configur ation.
RRRR
Set up the o ptions.
Note
❒ You must set up the opti ons when bidi rectional tran smission is d isabled. For m ore informat ion
about bidirectional transmission status, see p.118 “Bidirectional transmission”.
Reference
For more information about option settings, see p.117 “Setting Up Options”.
Page 91

Operating Instructions Printer Client Reference
Installing the PostScript Printer Driver
AAAA
Quit all applications that are running.
BBBB
Insert the CD-ROM into the CD-ROM drive.
Auto Run will start the installer.
Important
❒ Never have two versions of the same printer driver installe d on your system at the same time.
When upgrading to a new version of the printer driver, delete the old version, and then install the
new one.
Note
❒ Auto Run might not work automa tically due to certain operating system s ettings. If this is the
case, launch “Setup. exe” located in the CD-ROM root directory.
CCCC
Select a language for the interface, and then click [OK].
The following languages are available: Cestina (Czech), Dansk (Danish), Deutsch (German), English (English), Espanol ( Spanish), Franc ais (Fr ench), It aliano (Itali an), Magyar (Hungari an), Nederlands (Dutch), Norsk (Norwegian), Polski (Polish), Portugues (Portuguese), Suomi (Finnish),
Svenska (Swedish)
91
Note
❒ The printer driver with the selected language will be ins tal led . The pri nte r dri ver wil l be ins tal led
in English if you select the following languages: Cestina, Magyar, Polski, Portugues, Suomi
DDDD
Click [PostScript 3 Printer Driver].
“Add Printer Wizard” starts.
EEEE
Click [Next>].
Page 92

Operating Instructions Printer Client Reference
FFFF
Click [A network printer, or a printer attached to another computer], and then click [Next>].
GGGG
Click [Next>].
HHHH
Double-click the computer name you want to use as th e pri nt server in the [Browse for Printer]
window, and then click [Next].
IIII
Double-click the computer name you want to use as the print server in the [Shared printers:]
window.
JJJJ
Select the printer you want to use, and then click [Next>].
KKKK
Start printer driver installation.
Note
❒ During installatio n, the [
tinue Anyway
LLLL
Click [Next>].
Configure the default printer as necessary. Click [Yes] to set the printer as the default printer.
] to continue the installation.
Hardware Installation
] dialog box may appe ar. If this happe ns, clic k [
92
Con-
MMMM
Click [Finish].
The installation is complete.
Note
❒ You can specify the user code with the Printer Driver Properties after installing the printer driver.
See the printer driver's Help.
Reference
For more information about option settings, see p.117 “Setting Up Options”.
NNNN
Restart the computer.
Page 93

Operating Instructions Printer Client Reference
Printing without a Print Server
Preparation
To use a printer connected to the Ethernet interface, IEEE 802.11b (wireless LAN) interface or IEEE
1394 (IP over 1394) interface, select “SmartNetMonitor”, “Standard TCP/IP Port”, or “LPR Port”
when installing the printer driver.
• For SmartNe tMonitor, see p.94 “Configuring Protocols”, p.96 “Installing Software”, p.97 “Install-
ing the PCL 5c or RPCS Printer Driver”, and p.102 “Installing the PostScript Printer Driver”.
• For Stand ar d TCP/IP Por t, LPR Po rt, see p.94 “Configuring Protocols ”, p.97 “Installing the PCL
5c or RPCS Printer Driver”, and p.102 “Installing the PostScript Printer Driver”.
Note
❒ If you want to use “LPR Port”, “Print Services for UNIX” must be installed. For details, see
Windows XP Help.
93
Page 94

Operating Instructions Printer Client Reference
Configuring Protocols
Configuring TCP/IP and IPP for Printing
Follow these instructions to configure the printer and Windows XP to use TCP/IP and IPP.
❖❖❖❖ Configuring the printer
Configure the printer to use TCP/IP.
• Check TCP/IP is set to active. (The factory default is active.)
• Assign an IP address and make other settings required for TCP/IP.
Reference
For more information about how to make the above settings, see “Configuring the printer for the
Network”, Setup Guide.
If DHCP is used to assign IP addresses, see Appendix, “When Using DHCP”, Administrator Ref-
erence.
To use IP over 1394, see Setup Guide.
94
Note
❒ After setting the IP address, use the ping command to check it is set correctly.
Click [Start], point to [All Programs], point to [Accessories], and then click [Command Prompt].
A
Enter the following: (Example: IP address is 192.168.15.16)
B
C:> ping 192.168.15.16
If the address is configured correctly, the following message appears:
Reply from 192.168 .1 5. 16 : by te s=3 2 ti me <1 0ms TTL =3 2
If the address is configured incorrectly, the following message appears:
Request timed out.
Page 95

Operating Instructions Printer Client Reference
❖❖❖❖ Configuring a Windows XP computer
Follow the procedure below to configure a Windows XP computer to use TCP/IP:
A On the [Start] menu, point to [Control Panel], and then click [Network Connections].
B Click [Local Area Connection].
C On the [File] menu, click [Properties].
Note
❒ When using IP over 1394, click [1394 Connection].
D Check “Internet Protocol (TCP/IP) ” is selected in the [This connection uses the following items:]
box on the [General] tab.
Note
❒ If the check box for TCP/IP is not selected, select it.
❒ If TCP/IP is not installed, click [Install...] on the [General] tab and install it. For more information
about installing TCP/IP, see Windows XP Help.
E Configure TCP/IP with the appropriate IP address, subnet mask and other settings.
Check the settings are correct with the network administrator.
95
Page 96

Operating Instructions Printer Client Reference
Installing Software
Preparation
If you are not using a print server, install SmartNetMonitor for Client, and then install the printer driver by selecting “SmartNetMonitor for Client”. This enables peer-to-peer network printing via TCP/IP,
NetBEUI, or IPP.
Installing SmartNetMonitor for Client
AAAA
Quit all applications that are running.
BBBB
Insert the CD-ROM into the CD-ROM drive.
Auto Run will start the installer.
Note
❒ Auto Run might not work automa tically due to certain operating system s ettings. If this is the
case, launch “Setup. exe” located in the CD-ROM root directory.
96
CCCC
Select a language for the interface, and then click [OK].
The following languages are available: Cestina (Czech), Dansk (Danish), Deutsch (German), English (English), Espanol ( Spanish), Franc ais (Fr ench), It aliano (Itali an), Magyar (Hungari an), Nederlands (Dutch), Norsk (Norwegian), Polski (Polish), Portugues (Portuguese), Suomi (Finnish),
Svenska (Swedish)
DDDD
Click [SmartNetMonitor for Client/Admin].
EEEE
The software license agreement appears in the [License Agreement] dialog box.
After rea ding thro ugh the co ntent, cl ick [I accept the agreement.] to agree with the license agreement, and then click [Next>].
Page 97

Operating Instructions Printer Client Reference
FFFF
Select the [SmartNetMonitor for Client] check box, and then click [Next >].
GGGG
Follow the instructions on the screen.
Note
❒ If you are required to restart the computer after the installation of SmartNetMonitor for Client, re-
start and continue configuration.
Installing the PCL 5c or RPCS Printer Driver
AAAA
Quit all applications that are running.
BBBB
Insert the CD-ROM into the CD-ROM drive.
Auto Run will start the installer.
Important
❒ Never have two versions of the same printer driver installe d on your system at the same time.
When upgrading to a new version of the printer driver, delete the old version, and then install the
new one.
97
Note
❒ Auto Run might not work automa tically due to certain operating system s ettings. If this is the
case, launch “Setup. exe” located in the CD-ROM root directory.
CCCC
Select a language for the interface, and then click [OK].
The following languages are available: Cestina (Czech), Dansk (Danish), Deutsch (German), English (English), Espanol ( Spanish), Franc ais (Fr ench), It aliano (Itali an), Magyar (Hungari an), Nederlands (Dutch), Norsk (Norwegian), Polski (Polish), Portugues (Portuguese), Suomi (Finnish),
Svenska (Swedish)
Page 98

Operating Instructions Printer Client Reference
DDDD
Click [PCL/RPCS Printer Drivers].
EEEE
The software license agreement appears in the [License Agreement] dialog box.
After rea ding thro ugh the co ntent, cl ick [I accept the agreement.] to agree with the license agreement, and then click [Next>].
FFFF
In the [Select Program] dialog box, select the printer drivers you want to use, and then click
[Next>].
You can select more than one printer driver.
GGGG
Select the [Printer Name] check box to select the printer model(s) you want to use.
To change the printer name, use the [Change settings for 'Printer Name'] box.
HHHH
Double-click the printer name to display its settings.
Note
❒ The details shown for [Comment:], [Driver:], and [Port:] vary dep ending on the operating system
being used, model of printer selected, and port being used.
98
IIII
Click [Port:], and then click [Add] in the [Change settings for 'Port'] box.
JJJJ
The next part of the pr ocedure depends on the port in us e. Follow the s ection that c orresponds
to the port you want to use.
• SmartNetMonitor
• Standard TCP/IP Port
• LPR Port
Page 99

Operating Instructions Printer Client Reference
SmartNetMonitor
A Select [SmartNetMonitor], and then click [OK].
B Select the printer you want to use.
❖❖❖❖ TCP/IP
A Click [TCP/IP], and then click [Search].
Available printers will be listed.
B Click the printer you want to use, and then click [OK].
Note
❒ Printers that respond to an IP broadcast from the computer will be displayed. To print to a
printer not listed here, click [
name.
❒ You can set a port using TCP/IP and the IEEE 1394 (IP over 1394) interface.
❖❖❖❖ IPP
A Click [IPP].
The IPP setting dialog box appears.
B To specify the printer's IP address, enter “http://printer's-ip-address/printer” or
“ipp://printer's-ip-address/printer” in the [Printer URL] box.
(Example: IP address is 192.168.15.16)
http://192.168.15.16/printer
ipp://192.168.15.16/printer
C If necessary, enter the name s t o distinguish the pr in ter in the [IPP Port Name] box. Enter a
different name from those of existing port names.
If you do not do th is, the addr ess entered in the [Printer URL] box will be s et as the IP P port
name.
Specify Address
], and then enter the printer's IP address or host
99
Page 100

Operating Instructions Printer Client Reference
D If a proxy server and IPP user name are used, cl ick [Detailed Settings], and then configure
the necessary setting s.
Note
❒ For more information about these settings, see SmartNetMonitor for Client Help.
E Click [OK].
Standard TCP/IP Port
A In the [Type:] list, click [Standard TCP/IP], and then click [OK].
B In the [Add Standard TCP/IP Printer Port Wizard] window, click [Next>].
C In the [Printer Name or IP Address] box, ente r the p rint er name or IP ad dress, a nd then c lick
[Next>].
D In the [Add Standard TCP/IP Printer Port Wizard] window, click [Finish].
LPR Port
100
A In the [Type:] list, click [LPR Port], and then click [OK].
B In the [Name or address of server providing lpd] box, enter the printer's IP address.
C In the [Name of printer or print queue on that server] box, enter “lp”.
KKKK
Make sure the location for the selected printer is displayed after [Port:].
LLLL
Configure the default printer as necessary.
❖❖❖❖ Default Printer
Select the [Default Printer] check box to set the printer as the default printer.
 Loading...