

Page 1

Operating Instructions Administrator Reference
Introduction..........................................................................................................................................7
How to Read This Manual...................................................................................................................9
Checking the Network Environment...................................................... ..........................................11
Print Server Configuration...............................................................................................................................12
Netware Configuration ....................................................................................................................................13
1. Windows 2000 Print Server Configuration
Configuring Protocols........................................................................................................................14
Configuring TCP/IP and IPP for Printing........................................................................................................14
Configuring NetBEUI for Printing..................................................................................................................16
Installing Software..............................................................................................................................18
Installing SmartNetMonitor for Client ............................................................................................................18
Installing the PCL 5c or RPCS Printer Driver.................................................................................................19
Installing the PostScript Printer Driver............................................................................................................24
Changing Port Settings........................................................... ..... ...... .................................. . ...........................29
Setting Up Options .............................................................................................................................30
Settings for Printer Share..................................................................................................................33
1
Page 2

Operating Instructions Administrator Reference
2. Windows XP Print Server Configuration
Configuring Protocols........................................................................................................................34
Configuring TCP/IP and IPP for Printing........................................................................................................34
Installing Software..............................................................................................................................37
Installing SmartNetMonitor for Client ............................................................................................................37
Installing the PCL 5c or RPCS Printer Driver.................................................................................................38
Installing the PostScript Printer Driver............................................................................................................43
Changing Port Settings........................................................... ..... ...... .................................. . ...........................47
Setting Up Options .............................................................................................................................48
Settings for Printer Share..................................................................................................................51
3. Windows NT 4.0 Print Server Configuration
Configuring Protocols........................................................................................................................52
Configuring TCP/IP and IPP for Printing........................................................................................................52
Configuring NetBEUI for Printing..................................................................................................................55
Installing Software..............................................................................................................................57
Installing SmartNetMonitor for Client ............................................................................................................57
Installing the PCL 5c or RPCS Printer Driver.................................................................................................58
Installing the PostScript Printer Driver............................................................................................................63
Changing Port Settings........................................................... ..... ...... .................................. . ...........................67
Setting Up Options .............................................................................................................................68
Settings for Printer Share..................................................................................................................71
2
Page 3

Operating Instructions Administrator Reference
4. NetWare Configuration
Configuring NetWare Using the Control Panel...............................................................................72
NetWare 3.x - Advanced Settings......................................................................................................77
Installing SmartNetMonitor for Admin...........................................................................................................78
Setting Up as a Print Server.............................................................................................................................78
Setting Up as a Remote Printer........................................................................................................................80
NetWare 4.x, 5/5.1, 6 - Advanced Settings.......................................................................................84
Installing SmartNetMonitor for Admin...........................................................................................................85
Setting Up as a Print Server.............................................................................................................................85
Setting Up as a Remote Printer........................................................................................................................89
5. Using SmartNetMonitor for Admin
Installing SmartNetMonitor for Admin...........................................................................................95
Changing the Network Interface Board Configuration..................................................................96
Changing Names and Comments......................................................................................................98
Displaying Printer Status.................................................................................................................101
Locking Menus on the Printer's Control Panel.............................................................................102
Changing the Paper Type................................................................................................................103
Managing the Number of Copies to be Printed.............................................................................104
Configuring Energy Save Mode......................................................................................................105
Setting a Password............................................................................................................................106
3
Page 4

Operating Instructions Administrator Reference
6. Using a Web Browser
Going to the Top Page......................................................................................................................108
Configuring the Network Interface Board Settings.......................................................................................109
Changing Names and Comments....................................................................................................114
Displaying Printer Status.................................................................................................................117
7. Making Printer Settings Using the Control Panel
Menu Chart.......................................................................................................................................118
Accessing the Main Menu................................................................................................................122
Paper Input Menu............................................................................................................................125
Paper Input Parameters..................................................................................................................................126
Changing the Paper Input Menu....................................................................................................................129
List/Test Print Menu........................................................................................................................133
List/Test Print Parameters..............................................................................................................................133
Printing a Configuration Page .......................................................................................................................134
Interpreting the Configuration Page..............................................................................................................137
Maintenance Menu...........................................................................................................................140
Maintenance Menu Parameters .....................................................................................................................141
Changing the Maintenance Menu..................................................................................................................144
System Menu....................................................................................................................................151
System Parameters........................................................................................................................................152
Changing the System Menu..........................................................................................................................159
Host Interface Menu.........................................................................................................................163
Host Interface Parameters .............................................................................................................................164
Changing the Host Interface Menu................................................................................................................172
4
Page 5

Operating Instructions Administrator Reference
PCL Menu.........................................................................................................................................175
PCL Parameters.............................................................................................................................................176
Changing the PCL Menu...............................................................................................................................179
PS Menu ............................................................................................................................................182
PS Parameters................................................................................................................................................183
Changing the PS Menu..................................................................................................................................185
Language Menu................................................................................................................................188
Changing the Language Menu.......................................................................................................................188
8. Appendix
SNMP.................................................................................................................................................191
Spool Printing...................................................................................................................................192
Remote Maintenance by telnet........................................................................................................194
Using telnet....................................................................................................................................................194
Commands List..............................................................................................................................................195
Getting Printer Information over the Network.............................................................................222
Printer current status......................................................................................................................................222
Printer configuration......................................................................................................................................227
Understanding the Displayed Information ....................................................................................231
Print Job Information.....................................................................................................................................231
Print Log Information....................................................................................................................................232
Configuring the Network Interface Board.....................................................................................................233
Message List......................................................................................................................................238
System Log Information................................................................................................................................238
5
Page 6

Operating Instructions Administrator Reference
Precautions........................................................................................................................................247
Connecting a Dial Up Router to a Network...................................................................................................247
PostScript Printing from Windows................................................................................................................249
NetWare Printing...........................................................................................................................................249
Using DHCP..................................................................................................................................................250
Configuring a WINS Server .......................................................................................................................... 252
Memory Capacity and Paper Size...................................................................................................254
Specifications.....................................................................................................................................256
Main Unit............ ...... .................................. ..... ...... .................................. ..... ...... ...........................................256
Options...........................................................................................................................................................261
Information about Installed Software............................................................................................269
expat...............................................................................................................................................................269
JPEG LIBRARY............................................................................................................................................270
NetBSD..........................................................................................................................................................270
INDEX.................................................................................................................................273
6
Page 7
Operating Instructions Administrator Reference
Introduction
To get maximum versatility from this machine all operators should carefully read and follow the instructions in this manual. Please keep this manual in a handy place near the machine.
Please read the Safety Information before using this machine. It contains important information related
to USER SAFETY and PREVENTING EQUIPMENT PROBLEMS.
Important
Contents of this manual are subject to change without prior notice. In no event will the company be
liable for direct, indirect, special, incidental, or consequential damages as a result of handling or operating the machine.
Software Version Conventions Used in This Manual
• NetWare 3.x means NetWare 3.12 and 3.2.
• NetWare 4.x means NetWare 4.1, 4.11 and IntranetWare.
Trademarks
Apple, AppleTalk, EtherTalk, LaserWriter, Macintosh are registered trademarks of Apple Computer,
Inc.
Ethernet is a registered trademark of Xerox Corporation.
Microsoft, Windows, Windows NT are registered trademarks of Microsoft Corporation in the United
States and/or other countries.
Netscape, Netscape Navigator are registered trademarks of Netscape Communications Corporation.
Novell, NetWare, NDS are registered trademarks of Novell, Inc.
PostScript is a registered trademark of Adobe Systems, Incorporated.
PCL is a registered trademark of Hewlett-Packard Company.
7
Page 8

Operating Instructions Administrator Reference
Solaris is a trade mark or r egist ered t radema rk of Sun Mi crosys tems, I nc. in t he Unit ed Sta tes a nd o ther
countries.
Bluetooth is a Trademark of the Bluetooth SIG, Inc. (Special Interest Group) and licensed to RICOH
Company Limited.
Copyright © 2001 Bluetooth SIG, Inc.
The Bluetooth Trademarks are owned by Bluetooth SIG, Inc. USA
Other product names used here in are f or i dent if ic at ion purposes only and might be tr ad emar ks of thei r
respective companies. We disclaim any and all rights to those marks.
The proper names of the Windows operating systems are as follows:
• The product name of Windows
• The product name of Windows
• The product name of Windows
• The product names of Windows
Microsoft
Microsoft
• The product names of Windows
Microsoft
Microsoft
®
Windows® XP Professional
®
Windows® XP Home Edition
®
Windows® 2000 Advanced Server
®
Windows® 2000 Server
Microsoft® Windows® 2000 Professional
• The product names of Windows NT
Microsoft
• Microsoft
®
Windows NT® Server 4.0
®
Windows NT® Workstation 4.0
®
95 is Microsoft® Windows 95.
®
98 is Microsoft® Windows 98.
®
Me is Microsoft® Windows Millennium Edition (Windows Me).
®
XP are as follows:
®
2000 are as follows:
®
4.0 are as follows:
8
Page 9
Operating Instructions Administrator Reference
R
R
How to Read This Manual
Symbols
In this manual, the following symbols are used:
WARNING:
This symbol indicates a potentially hazardous situation which, if instructions are not followed, could
result in death or serious injury.
CAUTION:
This symbol indicates a potentially hazardous situation which, if instructions are not followed, may result in minor or moderate injury, or damage to property.
* The statements above are notes for your safety.
Important
If this instruction is not followed, paper might be misfed, or data might be lost. Be sure to read this.
Preparation
This symbol indicates the prior knowledge or preparations required before operating.
Note
This symbol indicates precautions for operation, or actions to take after mal-operation.
9
Limitation
This symbol indicates numerical limits, functions that cannot be used together, or conditions in which
a particular function cannot be used.
Reference
This symbol indicates a reference.
Page 10

Operating Instructions Administrator Reference
[]
Keys that appear on the machine's display.
Keys and buttons that appear on the computer's display.
{}
Keys built into the machine's control panel.
Keys on the computer's keyboard.
10
Page 11
Operating Instructions Administrator Reference
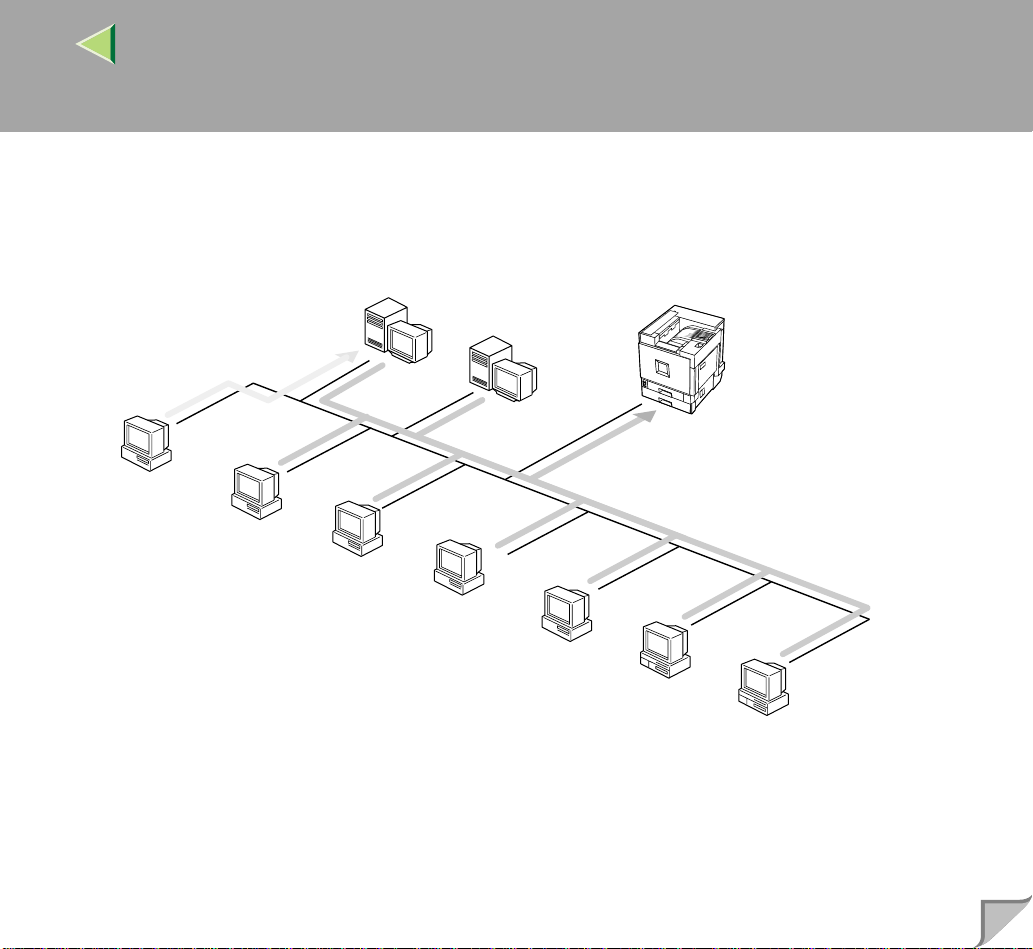
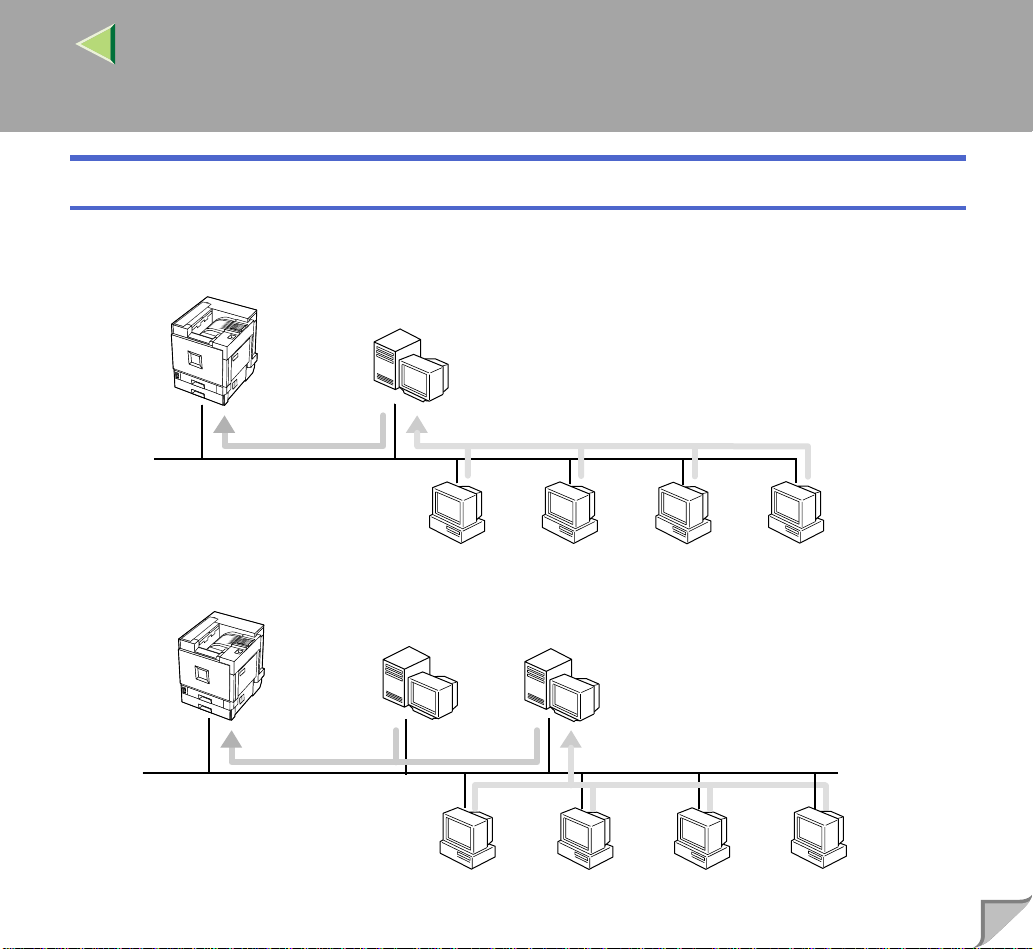
Checking the Network Environment
Windows 2000, Windows XP,
Windows NT 4.0 (Server)
NetWare (Server)
Windows 95/98/Me
Windows 2000
Windows XP
Windows NT 4.0
11
NetWare
(Client)
Macintosh
UNIX
❖❖❖❖ Connecting Printer and Computer
• Network connection (Ethernet cable, IEEE 1394 cable (IP over 1394), IEEE 802.11b (wireless
LAN))
• Parallel connection (parallel cable)
Page 12
Operating Instructions Administrator Reference
• USB connection (USB cable)
• IEEE 1394 (SCSI print) connection (IEEE 1394 cable)
• Bluetooth
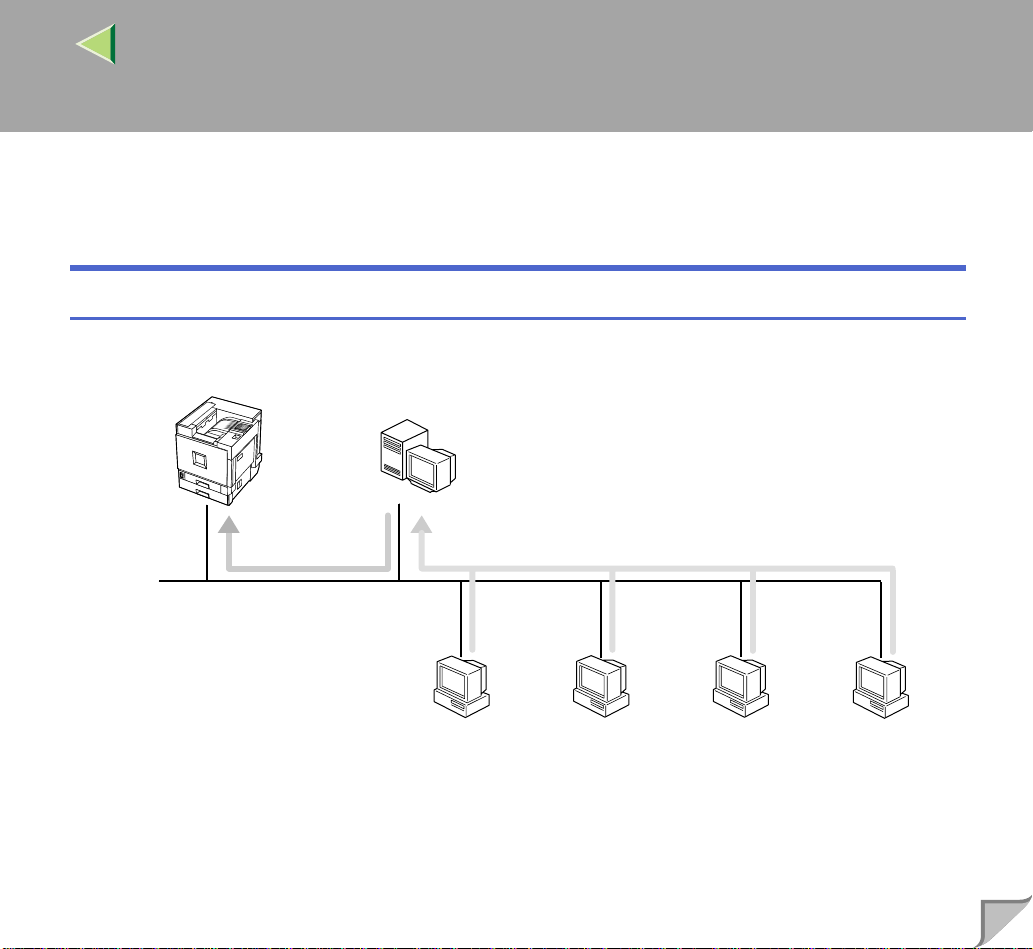
Print Server Configuration
You can use Windows 2000, Windows XP, or Windows NT 4.0 as a Print Server.
TM
connection
12
Print Server
Windows 2000, Windows XP and
Windows NT 4.0 Print Server
Windows 95/98/Me
Windows 2000
See p.14 “Windows 2000 Print Server Configuration”.
See p.34 “Windows XP Print Server Configuration”.
See p.52 “Windows NT 4.0 Print Server Configuration”.
Windows XP
Windows NT 4.0
Page 13
Operating Instructions Administrator Reference
Netware Configuration
To set the machine up as a network printer in a NetWare environment. The network interface board
allows you to use the machine as a print server or remote printer.
Print Server
NetWare
File Server
13
Remote Printer
NetWare
Print Server
See p.72 “NetWare Configuration”.
Windows 95/98/Me
Windows 95/98/Me Windows 2000
Windows 2000
NetWare
File Server
Windows XP
Windows XP
Windows NT 4.0
Windows NT 4.0
Page 14
Operating Instructions Administrator Reference
1. Windows 2000 Print Server Configuration
To use a network printer, click [SmartNetMonitor], [Standard TCP/IP Port], or [LPR Port] when installing
the printer driver.
• SmartNetMonitor
See p.14 “Configuring Protocols ”, p.18 “Installing Software”, p.19 “Installing the PCL 5c or RPCS
Printer Driver”, and p.24 “Installing the PostScript Printer Driver”.
• Standard TCP/IP Port, LPR Port
See p.14 “Configuring Protocols”, p.19 “In stalli ng th e PCL 5c or RPCS Prin ter Driv er”, and p.24
“Installing the PostScript Pri nter Driver”.
Note
❒ If you want to use LPR Port, Print Servic es for UNIX m ust be instal led. For det ails, see Wi ndows
2000 Help.
Configuring Protocols
Configuring TCP/IP and IPP for Printing
This describes how to conf igure the networ k interface boa rd and Windows 2000 to u se TCP/IP and IPP.
Preparation
To use NetBEUI, use the SmartNetMonitor for Client port.
14
Page 15

Operating Instructions Administrator Reference
Configuring the printer
Configure the printer to use TCP/IP.
• Check TCP/IP is set to active. (The factory defau lt is active.)
• Assign an IP address and make other settings required for TCP/IP.
Reference
For more informa tion about ho w to make the a bove settings, see “Windows 2000 Configuration ”,
Printer Client Reference.
If DHCP is used to assign IP addresses, see p.250 “Using DHCP”.
Note
❒ After setting the IP address, use the ping command to confirm that it has been set correctly.
On the [Start] menu, point to [Programs], point to [Accessories] and then click [Command Prompt].
A
Enter the following: (Example: IP address is 192.168.15.16)
B
C:> ping 192.168.15.16
If the address is configured correctly, the following message appears:
Reply from 192.1 68 .15 .1 6 : by tes =3 2 ti me <10 ms TTL =32
If the address is configured incorrectly, the following message appears:
Request timed out.
15
Configuring a Windows 2000 computer
Follow the procedure below to configure a Windows 2000 computer to use TCP/IP.
AAAA
On the [Start] menu, point to [Settings], and then click [Network and Dial-up Connections].
BBBB
Click [Local Area Connection]. On the [File] menu, click [Properties].
Page 16
Operating Instructions Administrator Reference
CCCC
Check [Internet Protocol (TCP/IP)] is selected in the [Components checked are used by this connec-
tion:] box on the [General] tab.
Note
❒ If the check box for TCP/IP is not selected, select it.
❒ If TCP/IP is not ins talled, click [
about installing TCP/IP, see Windows 2000 Help.
DDDD
Configure TCP/IP with an appropriate IP address, subnet mask, and other settings.
Check with the network administrator that the settings are correct.
Install
] on the [
Configuring NetBEUI for Printing
This describes how to configure the network interface board and Windows 2000 to use NetBEUI.
Configuring the printer
Configure the printer to use NetBEUI.
• Check NetBEUI is set to active. (The factory default is active.)
General
] tab and install i t. For more information
16
Reference
For more informa tion about ho w to make the a bove settings , see “Windows 200 0 Configuration”,
Printer Client Reference.
Page 17

Operating Instructions Administrator Reference
Configuring a Windows 2000 computer
Follow the procedure below to configure a Windows 2000 computer to use NetBEUI.
AAAA
On the [Start] menu, point to [Settings], and then click [Network and Dial-up Connections].
BBBB
Click [Local Area Connection]. On the [File] menu, click [Properties].
CCCC
Check [NetBEUI Protocol] is selected in the [Components checked are used by this connection:] box
on the [General] tab.
Note
❒ If the check box for NetBEUI is not selected, select it.
❒ If NetBEUI is not installed, click [
about installing NetBEUI, see Windows 2000 Help.
Install
] on the [
General
] tab and install it. For m ore informat ion
17
Page 18
Operating Instructions Administrator Reference
Installing Software
Installing SmartNetMonitor for Client
AAAA
Quit all applications that are running.
BBBB
Insert the CD-ROM into the CD-ROM drive.
Auto Run will start the installer.
Note
❒ Auto Run might not work automa tically due to certain operating system s ettings. If this is the
case, launch “Setup.exe” located in the CD-ROM root directory.
CCCC
Select a language for the interface, and then cli ck [OK].
The following languages are available: Cestina (Czech), Dansk (Danish), Deutsch (German), English (English), Espanol ( Spanish), Franc ais (Fr ench), It aliano (Itali an), Magyar (Hungari an), Nederlands (Dutch), Norsk (Norwegian), Polski (Polish), Portugues (Portuguese), Suomi (Finnish),
Svenska (Swedish)
18
DDDD
Click [SmartNetMonitor for Client/Admin].
EEEE
The software license agreement appears in the [License Agreement] dialog box.
After rea ding thro ugh the co ntent, cl ick [I accept the agreement.] to agree with the license agreement, and then click [Next>].
FFFF
Follow the instructions on the screen.
Note
❒ If you are required to restart the computer after the installation of SmartNetMonitor for Client, re-
start and continue configuration.
Page 19
Operating Instructions Administrator Reference
Installing the PCL 5c or RPCS Printer Driver
AAAA
Quit all applications that are running.
BBBB
Insert the CD-ROM into the CD-ROM drive.
Auto Run will start the installer.
Important
❒ Never have two versions of the same printer driver installed on your system at the same time. When
upgrading to a new version of the printer driver, delete the old version, and then install the new one.
Note
❒ Auto Run might not work automa tically due to certain operating system s ettings. If this is the
case, launch “Setup.exe” located in the CD-ROM root directory.
CCCC
Select a language for the interface, and then cli ck [OK].
The following languages are available: Cestina (Czech), Dansk (Danish), Deutsch (German), English (English), Espanol ( Spanish), Franc ais (Fr ench), It aliano (Itali an), Magyar (Hungari an), Nederlands (Dutch), Norsk (Norwegian), Polski (Polish), Portugues (Portuguese), Suomi (Finnish),
Svenska (Swedish)
19
DDDD
Click [PCL/RPCS Printer Drivers].
EEEE
The software license agreement appears in the [License Agreement] dialog box.
After rea ding thro ugh the co ntent, cl ick [I accept the agreement.] to agree with the license agreement, and then click [Next>].
FFFF
Select the printer drivers you want to use when the [Select Program] dialog box appears, and
then click [Next>].
You can select more than one printer driver.
Page 20
Operating Instructions Administrator Reference
GGGG
Select the [Printer Name] check box to select the printer model(s) you want to use.
To change the printer name, use the [Change settings for 'Printer Name'] box.
HHHH
Double-click the printer name to display its settings.
Note
❒ The details shown for [Comment:], [Driver:], and [Port:] vary depending on the operating system
being used, model of printer selected, and port being used.
IIII
Click [Port:], and then click [Add] in the [Change settings for 'Port'] box.
The [Add Port] dialog box appears.
JJJJ
The next part of the pr ocedure depends on the port in us e. Follow the s ection that c orresponds
to the port you want to use.
SmartNetMonitor
A Click [SmartNetMonitor], and then click [OK].
B Select the printer you want to use.
20
❖❖❖❖ TCP/IP
A Click [TCP/IP], and then click [Search].
Available printers will be list ed.
B Click the printer you want to use, and then click [OK].
Note
❒ Printers that respond to an IP broadcast from the computer will be displayed. To print to a
printer not listed here, click [
name.
Specify Address
], and then enter the printer's IP address or host
Page 21

Operating Instructions Administrator Reference
❖❖❖❖ NetBEUI
A Click [NetBEUI], and then click [Search].
A list of printers that can be used with NetBEUI appears.
B Click the printer you want to use, and then click [OK].
Note
❒ Printers that respond to a broadcast from the compu ter will be displayed. To pr int to a
printer not listed here, click [
the NetBEUI network addres s is on the configuration pag e. For more information about
printing the conf iguration pag e, see p.134 “Printing a Confi guration Page ”. NetBEUI address appears as “\\RNPxxxx\xxx” on the configuration page. Enter the printer's ne twork
path name in the form of “%%Computer name\Share name”. Do not enter “\\” as head
characters but “%%”.
❒ You cannot print to printers beyond routers.
❖❖❖❖ IPP
A Click [IPP].
The IPP setting dialog box appears.
B To specify the printer's IP address, enter “http://printer's-ip-address/printer” or
“ipp://printer's-ip-address/printer” in the [Printer URL] field.
(Example: IP address is 192.168.15.16)
http://192.168.15.16/printer
ipp://192.168.15.16/printer
C If necessary, enter the name s to distingui sh the prin ter in [IPP Port Name]. Enter a different
name from those of existing port names.
If you do not do this, the ad dress en tered in [Printer URL] will be set as t he IPP port name.
Specify Address
], and then enter the NetBEUI address. Check
21
Page 22

Operating Instructions Administrator Reference
D If a proxy server and IPP user name are used, click [Detailed Settings] and configure the
necessary settings .
Note
❒ For more information about these settings, see SmartNetMonitor for Client Help.
E Click [OK].
Standard TCP/IP Port
A Click [Standard TCP/IP Port], and then click [OK].
B In the [Add Standard TCP/IP Printer Port Wizard] window, click [Next>].
C In the [Printer Name or IP Address] box, enter the printer name or I P ad dress, a nd then c lick
[Next>].
D In the [Add Standard TCP/IP Printer Port Wizard] window, click [Finish].
LPR Port
22
A Click [LPR Port], and then click [OK].
B In the [Name or address of server providing lpd] box, enter the printer's IP address.
C In the [Name of printer or print queue on that server] box, enter “lp”, and then click [OK].
KKKK
Make sure the location for the selected printer is displayed after [Port:].
LLLL
Double-click [Shared] to display share settings.
MMMM
To share the printer, select the [Shared] check box.
Page 23
Operating Instructions Administrator Reference
NNNN
Check the boxes under [Share name] to install th e alternative driver for the necessary system.
Note
❒ Select the [
and [
❒ You can add an alternative driver after instal lation. See p.33 “Settings for Printer Share”.
OOOO
Configure the default printer as necessary.
❖❖❖❖ Default Printer
Select the [Default Printer] check box to set the printer as the default printer.
PPPP
Click [Continue] to start printer driver installation.
QQQQ
When the [Select Program] dialog box appears, click [Finish].
RRRR
When the [Installation completion] dialog box appears, click [Finish].
SSSS
Set up the o ptions.
Shared
] check box to start instal lation of an alternativ e driver ([
Windows 95/98/Me
] are already selected).
Windows NT 4.0/2000
23
]
Note
❒ You must set up the opti ons when bidi rectional tran smission is d isabled. For m ore informat ion
about bidirectional transmission status, see p.31 “Bidirectional transmission”.
Reference
For more information about option settings, see p.30 “Setting Up Options”.
Page 24
Operating Instructions Administrator Reference
Installing the PostScript Printer Driver
AAAA
Quit all applications that are running.
BBBB
Insert the CD-ROM into the CD-ROM drive.
Auto Run will start the installer.
Important
❒ Never have two versions of the same printer driver installe d on your system at the same time.
When upgrading to a new version of the printer driver, delete the old version, and then install the
new one.
Note
❒ Auto Run might not work automa tically due to certain operating system s ettings. If this is the
case, launch “Setup.exe” located in the CD-ROM root directory.
CCCC
Select a language for the interface, and then cli ck [OK].
The following languages are available: Cestina (Czech), Dansk (Danish), Deutsch (German), English (English), Espanol ( Spanish), Franc ais (Fr ench), It aliano (Itali an), Magyar (Hungari an), Nederlands (Dutch), Norsk (Norwegian), Polski (Polish), Portugues (Portuguese), Suomi (Finnish),
Svenska (Swedish)
24
Note
❒ The printer driver with the selected language will be installed. The printe r drive r wil l be ins tal led
in English if you select the following languages: Cestina, Magyar, Polski, Portugues, Suomi
DDDD
Click [PostScript 3 Printer Driver].
Add Printer Wi zard starts.
Page 25

Operating Instructions Administrator Reference
EEEE
Click [Next>].
FFFF
Click [Local printer], and then click [Next>].
GGGG
Click [Create a new port:].
HHHH
The next part of the pr ocedure depends on the port in us e. Follow the s ection that c orresponds
to the port you want to use.
• SmartNetMonitor
• Standard TCP/IP Port
• LPR Port
SmartNetMonitor
A Click [SmartNetMonitor], and then click [Next>].
B Select the printer you want to use.
❖❖❖❖ TCP/IP
A Click [TCP/IP], and then click [Search].
Available printers will be list ed.
B Click the printer you want to use, and then click [OK].
25
Note
❒ Printers that respond to an IP broadcast from the computer will be displayed. To print to a
printer not listed here, click [Specify Address], and then enter the printer's IP address or host
name.
Page 26

Operating Instructions Administrator Reference
❖❖❖❖ NetBEUI
A Click [NetBEUI], and then click [Search].
A list of printers that can be used with NetBEUI appears.
B Click the printer you want to use, and then click [OK].
Note
❒ Printers that respond to a broadcast from the compu ter will be displayed. To pr int to a
printer not listed here, click [
the NetBEUI network addres s is on the configuration pag e. For more information about
printing the conf iguration pag e, see p.134 “Printing a Confi guration Page ”. NetBEUI address appears as “\\RNPxxxx\xxx” on the configuration page. Enter the printer's ne twork
path name in the form of “%%Computer name\Share name”. Do not enter “\\” as head
characters but “%%”.
❒ You cannot print to printers beyond routers.
❖❖❖❖ IPP
A Click [IPP].
The IPP setting dialog box appears.
B To specify the printer's IP address, enter “http://printer's-ip-address/printer” or
“ipp://printer's-ip-address/printer” in the [Printer URL] field.
(Example: IP address is 192.168.15.16)
http://192.168.15.16/printer
ipp://192.168.15.16/printer
C If necessary, enter the name s to distingui sh the prin ter in [IPP Port Name]. Enter a different
name from those of existing port names.
If you do not do this, the ad dress en tered in [Printer URL] will be set as t he IPP port name.
Specify Address
], and then enter the NetBEUI address. Check
26
Page 27

Operating Instructions Administrator Reference
D If a proxy server and IPP user name are used, click [Detailed Settings] and configure the
necessary settings .
Note
❒ For more information about these settings, see SmartNetMonitor for Client Help.
E Click [OK].
Standard TCP/IP Port
A In [Create a new Port], click [Standard TCP/IP], and then click [Next>].
B In the [Add Standard TCP/IP Printer Port Wizard] window, click [Next>].
C In the [Printer Name or IP Address] box, enter the printer name or I P ad dress, a nd then c lick
[Next>].
D In the [Add Standard TCP/IP Printer Port Wizard] window, click [Finish].
LPR Port
27
A Click [LPR Port] in [Create a new Port], and then click [Next>].
B In the [Name or address of server providing lpd] box, enter the printer's IP address.
C In the [Name of printer or print queue on that server] box, enter “lp”, and then click [OK].
IIII
Confirm to select the name of the printer whose driver you want to install, and then click
[Next>].
JJJJ
Change the name of the printer if you want, and then click [Next>].
Configure the default pr inter as neces sary. Select the [Yes] check box to s et the printe r as the defaul t
printer.
Page 28
Operating Instructions Administrator Reference
KKKK
select the [Share as:] check box, and then click [Next>].
To change the printer name, use the [Share as:] box.
LLLL
In the [Location and Comment] dialog box, enter the location and comment about the printer,
and then click [Next>].
MMMM
Select whether or not you want to print a test page, and then click [Next>].
NNNN
Click [Finish].
Printer driver installation sta rts.
OOOO
Set up the o ptions.
Reference
For more information about option settings, see p.30 “Setting Up Options”.
28
Page 29
Operating Instructions Administrator Reference
Changing Port Settings
This describes how to change SmartNetMonitor for Client settings, such as proxy server settings or IPP
URL.
Note
❒ There are no settings for NetBEUI.
AAAA
In the [Printers] window, click the icon of the printer you want to use. On the [File] menu, cli ck
[Properties].
BBBB
Click the [Ports] tab, and then click [Configure Port].
The [Port Configuration:] dialog box appears.
Note
❒ If you cannot set items on the [Recovery/Parallel Printing] tab, follow the procedure below.
Click [Cancel] to close the [Port Configuration:] dialog box.
A
Start SmartNetMonitor for Client , and then right-click the SmartNetMonitor for Cli ent icon on
B
the taskbar.
Click [Extended Features Settings], and then select the [Set Recovery/Parallel Printing for each port]
C
check box.
Click [OK] to close the [Extended Features Settings] dialog box.
D
• For IPP, you can configure User Settings, Proxy Settings, and Timeout Settings.
29
Note
❒ For more information about these settings, see SmartNetMonitor for Client Help.
Page 30
Operating Instructions Administrator Reference
Setting Up Options
You must set up installed options, paper size, and feed direction with the printer driver when bidirectional transmission is disabl ed.
Limitation
❒ Changing the printer settings requires Manage Printers permission. Members of the Administrators
and Power Users grou ps have Manage Printe rs permission by defaul t. When you set up optio ns,
log on using an account that has Manage Printers permission.
Note
❒ The description uses the PCL 5c printer driver.
AAAA
On the [Start] menu, point to [Settings], and then click [Printers].
The [Printers] window appears.
BBBB
Click the icon of the printer you want to use. On the [File] menu, click [Properties].
Note
❒ When you open the printer properties dialog box for the first time after installing the RPCS printer
driver, the confirmation window appears. After that, the initial display of the printer properties dialog box appears.
30
CCCC
Click the [Accessories] tab.
Note
❒ If you are using the RPCS printer driver, click the [Change Accessories] tab.
❒ If you are using the PostScript 3 printer driver, click the [
Device Settings
] tab.
Page 31

Operating Instructions Administrator Reference
DDDD
Select opti o ns y o u h a ve ins t al led fr om t he [Options] group, and then make any necessary settings.
Note
❒ If you are using the RPCS printer driver, select the options from [
❒ If you are using the PostScript 3 printer driver, select the options from [
EEEE
Click [OK].
----Bidirectional transmission
When bidirectional t ran smission is enable d, i nf ormat i on about paper size and feed direction settings is
automatically sent to the printer by a computer. You can also check the printer status from your computer.
• Bidirectional transmission is supported by Windows 95/98/Me, Windows 2000, Windows XP, and
Windows NT 4.0.
• If you use the RPCS printer driver and bidirectional transmission is enabled, the [Change Accesso-
ries] tab is shaded, and cannot be modified
Select printer options:
Installable Options
].
].
31
Note
❒ The RPCS printer driver supports bidirectional transmission and updates the printer status automat-
ically.
❒ The PCL 5c printer driv er supports bidirectional transmissio n; you can update the printer status
manually. However, it does not support bidirectional transmission over a parallel connection.
❒ The PostScript 3 printer driver does not support bidirectional transmission.
Bidirectional transmission requires the following conditions:
Page 32

Operating Instructions Administrator Reference
❖❖❖❖ When connecting via parallel cable
• The computer must support bidirectional transmission.
• The printer must be set to bidirectional transmission.
• The interface cable must support bidirectional transmission.
• The machine must be connected to the computer using standard parallel cable and parallel con-
nector.
• Under Windows 2000, [Enable bidirectional support] must be selected and [Enable printer pool-
ing] must not be selected on the [port] tab with RPCS printer driver.
❖❖❖❖ When connecting with the network
• The printer must be set to bidirectional transmission.
• SmartNetMonitor for Client included on the CD-ROM must be installed, and TCP/IP must be
used.
• Under Windows 2000, [Enable bidirectional support] must be selected and [Enable printer pool-
ing] must not be selected on the [port] tab with RPCS printer driver.
32
Page 33

Operating Instructions Administrator Reference
Settings for Printer Share
Limitation
❒ Changing the printer settings requires Manage Printers permission. Members of the Administrators
and Power Users grou ps have Manage Printe rs permission by defaul t. When you set up optio ns,
log on using an account that has Manage Printers permission.
AAAA
On the [Start] menu, point to [Settings], and then click [Printers].
The [Printers] window appears.
BBBB
Click the icon of the printer you want to use. On the [File] menu, click [Properties].
CCCC
Select the [Shared as:] check box on the [Sharing] tab.
DDDD
To share a printer with users running different versions of Windows, click [Additional Driv-
ers...], and then follow the instruction on the screen.
Note
❒ If you have installed an alternative driver by selecting the [Shared] check box, you do not have to
follow this step.
33
EEEE
Click [OK].
Page 34

Operating Instructions Administrator Reference
2. Windows XP Print Server Configuration
To use a printer connected to the Ethernet interface, click [SmartNetMonitor], [Standard TCP/IP Port], or
[LPR Port] when installing the printer driver.
• SmartNetMonitor
See p.34 “Configuring Protocols ”, p.37 “Installing Software”, p.38 “Installing the PCL 5c or RPCS
Printer Driver”, and p.43 “Installing the PostScript Printer Driver”.
• Standard TCP/IP Port, LPR Port
See p.34 “Configuring Protocols”, p.38 “In stalli ng th e PCL 5c or RPCS Prin ter Driv er”, and p.43
“Installing the PostScript Pri nter Driver”.
Note
❒ If you want to use “LPR Port”, “Print Services for UNIX” must be installed. For detail s, see Wi n-
dows XP Help.
Configuring Protocols
Configuring TCP/IP and IPP for Printing
This describes how to confi gur e t he n etwo rk i nt erf ace board and Windows XP to use TCP/I P and IPP.
34
Page 35

Operating Instructions Administrator Reference
Configuring the printer
Configure the printer to use TCP/IP.
• Check TCP/IP is set to active. (The factory defau lt is active.)
• Assign an IP address and make other settings required for TCP/IP.
Reference
For more information about how to make the above settings, see “Windows XP Configuration”, Print-
er Client Reference.
If DHCP is used to assign IP addresses, see p.250 “Using DHCP”.
Note
❒ After setting the IP address, use the ping command to confirm that it has been set correctly.
On the [Start] menu, point to [All Programs], point to [Accessories], and then click [Command
A
Prompt].
Enter the following: (Example: IP address is 192.168.15.16)
B
C:> ping 192.168.15.16
If the address is configured correctly, the following message appears:
Reply from 192.1 68 .15 .1 6 : by tes =3 2 ti me <10 ms TTL =32
If the address is configured incorrectly, the following message appears:
Request timed out.
35
Page 36

Operating Instructions Administrator Reference
Configuring a Windows XP computer
Follow the procedure below to configure a Windows XP computer to use TCP/IP.
AAAA
On the [Start] menu, point to [Control Panel], and then click [Network Connections].
BBBB
Click [Local Area Connection]. On the [File] menu, click [Properties].
CCCC
Check [Internet Protocol (TCP/IP)] is s elect ed in the [This connection uses the following items:] box
on the [General] tab.
Note
❒ If the check box for TCP/IP is not selected, select it.
❒ If TCP/IP is not ins talled, click [
about installing TCP/IP, see Windows XP Help.
DDDD
Configure TCP/IP with an appropriate IP address, subnet mask, and other settings.
Check with the network administrator that the settings are correct.
Install
] on the [
General
] tab and install i t. For more information
36
Page 37

Operating Instructions Administrator Reference
Installing Software
Installing SmartNetMonitor for Client
AAAA
Quit all applications that are running.
BBBB
Insert the CD-ROM into the CD-ROM drive.
Auto Run will start the installer.
Note
❒ Auto Run might not work automa tically due to certain operating system s ettings. If this is the
case, launch “Setup.exe” located in the CD-ROM root directory.
CCCC
Select a language for the interface, and then cli ck [OK].
The following languages are available: Cestina (Czech), Dansk (Danish), Deutsch (German), English (English), Espanol ( Spanish), Franc ais (Fr ench), It aliano (Itali an), Magyar (Hungari an), Nederlands (Dutch), Norsk (Norwegian), Polski (Polish), Portugues (Portuguese), Suomi (Finnish),
Svenska (Swedish)
37
DDDD
Click [SmartNetMonitor for Client/Admin].
EEEE
The software license agreement appears in the [License Agreement] dialog box.
After rea ding thro ugh the co ntent, cl ick [I accept the agreement.] to agree with the license agreement, and then click [Next>].
FFFF
Follow the instructions on the screen.
Note
❒ If you are required to restart the computer after the installation of SmartNetMonitor for Client, re-
start and continue configuration.
Page 38

Operating Instructions Administrator Reference
Installing the PCL 5c or RPCS Printer Driver
AAAA
Quit all applications that are running.
BBBB
Insert the CD-ROM into the CD-ROM drive.
Auto Run will start the installer.
Important
❒
Never have two versions of the same printer driver installed on your system at the same time. When
upgrading to a new version of the printer dri ver, delete the old version, and then install the new one.
Note
❒ Auto Run might not work automa tically due to certain operating system s ettings. If this is the
case, launch “Setup.exe” located in the CD-ROM root directory.
CCCC
Select a language for the interface, and then cli ck [OK].
The following languages are available: Cestina (Czech), Dansk (Danish), Deutsch (German), English (English), Espanol ( Spanish), Franc ais (Fr ench), It aliano (Itali an), Magyar (Hungari an), Nederlands (Dutch), Norsk (Norwegian), Polski (Polish), Portugues (Portuguese), Suomi (Finnish),
Svenska (Swedish)
38
DDDD
Click [PCL/RPCS Printer Drivers].
EEEE
The software license agreement appears in the [License Agreement] dialog box.
After rea ding thro ugh the co ntent, cl ick [I accept the agreement.] to agree with the license agreement, and then click [Next>].
FFFF
Select the printer drivers you want to use when the [Select Program] dialog appears, and then
click [Next>].
You can select more than one printer driver.
Page 39

Operating Instructions Administrator Reference
GGGG
Select the [Printer Name] check box to select the printer model(s) you want to use.
To change the printer name, use the [Change settings for 'Printer Name'] box.
HHHH
Double-click the printer name to display its settings.
Note
❒ The details shown for [Comment:], [Driver:], and [Port:] vary depending on the operating system
being used, model of printer selected, and port being used.
IIII
Click [Port:], and then click [Add] in the [Change settings for 'Port'] box.
JJJJ
The next part of the pr ocedure depends on the port in us e. Follow the s ection that c orresponds
to the port you want to use.
• SmartNetMonitor
• Standard TCP/IP Port
• LPR Port
SmartNetMonitor
39
A Click [SmartNetMonitor], and then click [OK].
B Select the printer you want to use.
❖❖❖❖ TCP/IP
A Click [TCP/IP], and then click [Search].
Available printers will be list ed.
Page 40

Operating Instructions Administrator Reference
B Click the printer you want to use, and then click [OK].
Note
❒ Printers that respond to an IP broadcast from the computer will be displayed. To print to a print-
er not listed here, click
❖❖❖❖ IPP
A Click [IPP].
The IPP setting dialog box appears.
B To specify the printer's IP address, enter “http://printer's-ip-address/printer” or
“ipp://printer's-ip-address/printer” in the [Printer URL] field.
(Example: IP address is 192.168.15.16)
http://192.168.15.16/printer
ipp://192.168.15.16/printer
C If necessary, enter the name s to distingui sh the prin ter in [IPP Port Name]. Enter a different
name from those of existing port names.
If you do not do this, the ad dress en tered in [Printer URL] will be set as t he IPP port name.
D If a proxy server and IPP user name are used, click [Detailed Settings] and configure the
necessary settings .
Specify Address
[
, and then enter th e pr inter's IP add ress or host name.
]
40
Note
❒ For more information about these settings, see SmartNetMonitor for Client Help.
E Click [OK].
Page 41

Operating Instructions Administrator Reference
Standard TCP/IP Port
A Click [Standard TCP/IP], and then click [OK].
B In the [Add Standard TCP/IP Printer Port Wizard] window, click [Next>].
C In the [Printer Name or IP Address] box, enter the printer name or I P ad dress, a nd then c lick
[Next>].
D In the [Add Standard TCP/IP Printer Port Wizard] window, click [Finish].
LPR Port
A Click [LPR Port], and then click [OK].
B In the [Name or address of server providing lpd] box, enter the printer's IP address.
C In the [Name of printer or print queue on that server] box, enter “lp”, and then click [OK].
KKKK
Make sure the location for the selected printer is displayed after [Port:].
LLLL
Double-click [Shared] to display share settings.
41
MMMM
To share the printer, select the [Shared] check box.
NNNN
Check the boxes under [Share name] to install th e alternative driver for the necessary system.
Note
❒ Select the [
and [
❒ You can add an alternative driver after instal lation. See p.51 “Settings for Printer Share”.
Shared
] check box to start instal lation of an alternativ e driver ([
Windows 95/98/Me
] are already selected).
Windows NT 4.0/2000
]
Page 42

Operating Instructions Administrator Reference
OOOO
Configure the default printer as necessary.
❖❖❖❖ Default Printer
Select the [Default Printer] check box to set the printer as the default printer.
PPPP
Click [Continue] to start printer driver installation.
Note
❒ During installati on, the [Software Installation] dialog box ma y appea r. In this c ase, click [Continue
Anyway] to continue the installation.
QQQQ
When the [Select Program] dialog box appears, click [Finish].
RRRR
When the [Installation completion] dialog box appears, click [Finish].
SSSS
Set up the o ptions.
Note
❒ You must set up the opti ons when bidi rectional tran smission is d isabled. For m ore informat ion
about bidirectional transmission status, see p.49 “Bidirectional transmission”.
42
Reference
For more information about option settings, see p.48 “Setting Up Options”.
Page 43

Operating Instructions Administrator Reference
Installing the PostScript Printer Driver
AAAA
Quit all applications that are running.
BBBB
Insert the CD-ROM into the CD-ROM drive.
Auto Run will start the installer.
Important
❒ Never have two versions of the same printer driver installe d on your system at the same time.
When upgrading to a new version of the printer driver, delete the old version, and then install the
new one.
Note
❒ Auto Run might not work automa tically due to certain operating system s ettings. If this is the
case, launch “Setup.exe” located in the CD-ROM root directory.
CCCC
Select a language for the interface, and then cli ck [OK].
The following languages are available: Cestina (Czech), Dansk (Danish), Deutsch (German), English (English), Espanol ( Spanish), Franc ais (Fr ench), It aliano (Itali an), Magyar (Hungari an), Nederlands (Dutch), Norsk (Norwegian), Polski (Polish), Portugues (Portuguese), Suomi (Finnish),
Svenska (Swedish)
43
Note
❒ The printer driver with the selected language will be installed. The printe r drive r wil l be ins tal led
in English if you select the following languages: Cestina, Magyar, Polski, Portugues, Suomi
DDDD
Click [PostScript 3 Printer Driver].
Add Printer Wi zard starts.
Page 44

Operating Instructions Administrator Reference
EEEE
Click [Next>].
FFFF
Click [Local printer attached to this computer], and then click [Next>].
GGGG
Click [Create a new port:].
HHHH
The next part of the pr ocedure depends on the port in us e. Follow the s ection that c orresponds
to the port you want to use.
• SmartNetMonitor
• Standard TCP/IP Port
• LPR Port
SmartNetMonitor
A Click [SmartNetMonitor], and then click [Next>].
B Select the printer you want to use.
❖❖❖❖ TCP/IP
A Click [TCP/IP], and then click [Search].
Available printers will be list ed.
B Click the printer you want to use, and then click [OK].
44
Note
❒ Printers that respond to an IP broadcast from the computer will be displayed. To print to a
printer not listed here, click [Specify Address], and then enter the printer's IP address or host
name.
Page 45

Operating Instructions Administrator Reference
❖❖❖❖ IPP
A Click [IPP].
The IPP setting dialog box appears.
B To specify the printer's IP address, enter “http://printer's-ip-address/printer” or
“ipp://printer's-ip-address/printer” in the [Printer URL] field.
(Example: IP address is 192.168.15.16)
http://192.168.15.16/printer
ipp://192.168.15.16/printer
C If necessary, enter the name s to distingui sh the prin ter in [IPP Port Name]. Enter a different
name from those of existing port names.
If you do not do this, the ad dress en tered in [Printer URL] will be set as t he IPP port name.
D If a proxy server and IPP user name are used, click [Detailed Settings] and configure the
necessary settings .
Note
❒ For more information about these settings, see SmartNetMonitor for Client Help.
E Click [OK].
45
Standard TCP/IP Port
A In [Create a new Port:], click [Standard TCP/IP], and then click [Next>].
B In the [Add Standard TCP/IP Printer Port Wizard] window, click [Next>].
C In the [Printer Name or IP Address] box, enter the printer name or I P ad dress, a nd then c lick
[Next>].
D In the [Add Standard TCP/IP Printer Port Wizard] window, click [Finish].
Page 46

Operating Instructions Administrator Reference
LPR Port
A In [Create a new Port:], click [LPR Port], and then click [Next>].
B In the [Name or address of server providing lpd] box, enter the printer's IP address.
C In the [Name of printer or print queue on that server] box, enter “lp”, and then click [OK].
IIII
Confirm to select the name of the printer whose driver you want to install, and then click
[Next>].
JJJJ
Change the name of the printer if you want, and then click [Next>].
Configure the default pr inter as neces sary. Select the [Yes] check box to s et the printe r as the defaul t
printer.
KKKK
Select the [Share name:] check box, and then click [Next>].
To change the printer name, use the [Share name: ] box.
LLLL
In the [Location and Comment] dialog box, enter the location and comment about the printer,
and then click [Next>].
46
MMMM
Select whether or not you want to print a test page, and then click [Next>].
NNNN
Click [Finish].
Printer driver installation sta rts.
Note
❒ During installa tion, the [
Anyway
] to continue the installation.
Hardware Installation
] dialog box may ap pear. In this case, click [
Continue
Page 47

Operating Instructions Administrator Reference
OOOO
Set up the o ptions.
Reference
For more information about option settings, see p.48 “Setting Up Options”.
Changing Port Settings
Follow the procedure below to change SmartNetMonitor for Client settings, such as proxy server settings or IPP URL.
AAAA
In the [Printers and Faxes] window, click the icon of the printer you want to use. On the [File]
menu, click [Properties].
BBBB
Click the [Ports] tab, and then click [Configure Port].
The [Port Configuration:] dialog box appears.
Note
❒ If you cannot set items on the [Recovery/Parallel Printing] tab, follow the procedure below.
Click [Cancel] to close the [Port Configuration:] dialog box.
A
Start SmartNetMonitor for Client , and then right-click the SmartNetMonitor for Cli ent icon on
B
the taskbar.
Click [Extended Features Settings], and then select the [Set Recovery/Parallel Printing for each port]
C
check box.
Click [OK] to close the [
D
• For IPP, you can configure IPP User Settings, Proxy Settings, and Timeout Settings.
Extended Features Settings
] dialog box.
47
Note
❒ For more information about these settings, see SmartNetMonitor for Client Help.
Page 48

Operating Instructions Administrator Reference
Setting Up Options
You must set up installed options, paper size and feed direction with the printer driver when bidirectional transmission is disabl ed.
Limitation
❒ Changing the printer settings requires Manage Printers permission. Members of the Administrators
and Power Users grou ps have Manage Printe rs permission by defaul t. When you set up optio ns,
log on using an account that has Manage Printers permission.
Note
❒ The description uses the PCL 5c printer driver.
AAAA
Access the [Printers and Faxes] window from [Start] on the tas kbar.
The [Printers and Faxes] window appears.
BBBB
Click the icon of the printer you want to use. On the [File] menu, click [Properties].
Note
❒ When you open the printer properties dialog box for the first time after installing the RPCS printer
driver, the confirmation window appears. After that, the initial display of the printer properties dialog box appears.
48
CCCC
Click the [Accessories] tab.
Note
❒ If you are using the RPCS printer driver, click the [Change Accessories] tab.
❒ If you are using the PostScript 3 printer driver, click the [
Device Settings
] tab.
Page 49

Operating Instructions Administrator Reference
DDDD
Select opti o ns y o u h a ve ins t al led fr om t he [Options] group, and then make any necessary settings.
Note
❒ If you are using the RPCS printer driver, select the options from [
❒ If you are using the PostScript 3 printer driver, select the options from [
EEEE
Click [OK].
----Bidirectional transmission
When bidirectional t ran smission is enable d, i nf ormat i on about paper size and feed direction settings is
automatically sent to the printer by a c omput er. You can also ch eck printer status f rom your computer.
• Bidirectional transmission is supported by Windows 95/98/Me, Windows 2000, Windows XP, and
Windows NT 4.0.
• If you use the RPCS printer driver and bidirectional transmission is enabled, the [Change Accesso-
ries] tab is shaded, and cannot be used.
Select printer options:
Installable Options
].
].
49
Note
❒ The RPCS printer driver supports bidirectional transmission and updates the printer status automat-
ically.
❒ The PCL 5c printer driv er supports bidirectional transmissio n; you can update the printer status
manually.
❒ The PostScript 3 printer driver does not support bidirectional transmission.
Bidirectional transmission requires the following conditions:
Page 50

Operating Instructions Administrator Reference
❖❖❖❖ When connecting via parallel cable
• The computer must support bidirectional transmission.
• The printer must be set to bidirectional transmission.
• The interface cable must support bidirectional transmission.
• The machine must be connected to the computer using standard parallel cable and parallel con-
nector.
• Under Windows XP [Enable bidirectional support] must be selected and [Enable printer pooling]
must not be selected on the [port] tab with RPCS printer driver.
❖❖❖❖ When connecting with the network
• The printer must be set to bidirectional transmission.
• SmartNetMonitor for Client included on the CD-ROM must be installed, and TCP/IP must be
used.
• Under Windows XP [Enable bidirectional support] must be selected and [Enable printer pooling]
must not be selected on the [port] tab with RPCS printer driver.
50
Page 51

Operating Instructions Administrator Reference
Settings for Printer Share
Limitation
❒ Changing the printer settings requires Manage Printers permission. Members of the Administrators
and Power Users grou ps have Manage Printe rs permission by defaul t. When you set up optio ns,
log on using an account that has Manage Printers permission.
AAAA
Access the [Printers and Faxes] window from [Start] on the tas kbar.
The [Printers and Faxes] window appears.
BBBB
Click the icon of the printer you want to use. On the [File] menu, click [Properties].
CCCC
Select the [Share this printer:] check box on the [Sharing] tab.
DDDD
To share a printer with users running different versions of Windows, click [Additional Driv-
ers...], and then follow the instruction on the screen.
Note
❒ If you have installed an alternative driver by selecting the [Shared] check box, you do not have to
follow this step.
51
EEEE
Click [OK].
Page 52

Operating Instructions Administrator Reference
3. Windows NT 4.0 Print Server Configuration
To use a printer connected to the Ethe rnet interface, clic k [SmartNetMonitor] or [LPR Port] when installing the printer driver.
• SmartNetMonitor
See p.52 “Configuring Protocols ”, p.57 “Installing Software”, p.58 “Installing the PCL 5c or RPCS
Printer Driver”, and p.63 “Installing the PostScript Printer Driver”.
• LPR Port
See p.52 “Configuring Protocols”, p.58 “In stalli ng th e PCL 5c or RPCS Prin ter Driv er”, and p.63
“Installing the PostScript Pri nter Driver”.
Note
❒ If you want to use “LPR Port”, “Microsoft TCP/ IP Printing” must be installed. For details, see Win-
dows NT Help.
Configuring Protocols
Configuring TCP/IP and IPP for Printing
This describes how to c onf igure the network interface board and Win dows NT to use TCP/IP and IPP.
52
Page 53

Operating Instructions Administrator Reference
Configuring the printer
Configure the printer to use TCP/IP.
• Check TCP/IP is set to active. (The factory defau lt is active.)
• Assign an IP address and make other settings required for TCP/IP.
Reference
For more information about how to make the above settings, see “Windows NT 4.0 Configuration”,
Printer Client Reference.
If DHCP is used to assign IP addresses, see p.69 “Bidirectional transmission”.
Note
❒ After setting the IP address, use the ping command to confirm that it has been set correctly.
On the [Start] menu, point to [Programs], and then click [Command Prompt].
A
Enter the following: (Example: IP address is 192.168.15.16)
B
C:> ping 192.168.15.16
If the address is configured correctly, the following message appears:
Reply from 192.1 68 .15 .1 6 : by tes =3 2 ti me <10 ms TTL =32
If the address is configured incorrectly, the following message appears:
Request timed out.
53
Page 54

Operating Instructions Administrator Reference
Configuring a Windows NT computer
Follow the procedure below to configure a Windows NT computer to use TCP/IP.
AAAA
Open [Control Panel] and double-click the [Network] icon. Check “TCP/IP Pro tocol ” is listed in
the [Network protocols] box on the [Protocols] tab.
Note
❒ If TCP/IP is not installed, clic k [
about installing TCP/IP, see Windows NT Help.
BBBB
Check TCP/IP with an appropriate IP address, subnet mask, and other settings.
Check the settings are correct with the network administrator.
CCCC
Click the [Services] tab, and confirm that “Microsoft TC P/IP Printing” is installed.
If “Microsoft TCP/IP Printing” is not installed, click [Add] on the [Services] tab, and inst al l it . Fo r
more information about installing and configuring network services, see Windows NT Help.
Add
] on the [
Protocols
] tab and install it. For more informat ion
54
Page 55

Operating Instructions Administrator Reference
Configuring NetBEUI for Printing
This describes how to configure the network inte rface board and Windows NT to use NetBEUI.
Preparation
To use NetBEUI, use the SmartNetMonitor for Client port.
Configuring the printer
Configure the printer to use NetBEUI.
• Check NetBEUI is set to active. (The factory default is active.)
Reference
For more information about how to make the above settings, see “Windows NT 4.0 Configuration”,
Printer Client Reference.
Configuring a Windows NT computer
55
Install NetBEUI on the Windows NT computer, and then change the LAN adapter number (Lana
Number).
AAAA
Open [Control Panel] and double-click the [Network] icon. Check [NetBEUI Protocol] is listed in
the [Network Protocols] box on the [Protocols] tab.
Note
❒ If NetBEUI is not installed, click [Add...] on the [Protocols] tab, and install it. For more information
about installing NetBEUI, see Windows NT Help.
Page 56

Operating Instructions Administrator Reference
BBBB
Change the Lana Number. Click the [Services] tab, click [NetBEUI Interface] in the [Network
Services:] box, and then click [Properties:].
CCCC
Click the Lana Number correspo nding to the Nbf proto col of the [Network Route] headline, and
then click [Edit].
DDDD
Enter “0” as the Lana Number.
Note
❒ If another protocol's Lana Number is configured to “0”, change it to another number.
EEEE
Click [OK].
FFFF
Click [Close].
GGGG
After confirming the message to restart, click [Yes].
Note
❒ After you change the Lana Number, you must restart the computer.
56
Page 57

Operating Instructions Administrator Reference
Installing Software
Installing SmartNetMonitor for Client
AAAA
Quit all applications that are running.
BBBB
Insert the CD-ROM into the CD-ROM drive.
Auto Run will start the installer.
Note
❒ Auto Run might not work automa tically due to certain operating system s ettings. If this is the
case, launch “Setup.exe” located in the CD-ROM root directory.
CCCC
Select a language for the interface, and then cli ck [OK].
The following languages are available: Cestina (Czech), Dansk (Danish), Deutsch (German), English (English), Espanol ( Spanish), Franc ais (Fr ench), It aliano (Itali an), Magyar (Hungari an), Nederlands (Dutch), Norsk (Norwegian), Polski (Polish), Portugues (Portuguese), Suomi (Finnish),
Svenska (Swedish)
57
DDDD
Click [SmartNetMonitor for Client/Admin].
EEEE
The software license agreement appears in the [License Agreement] dialog box.
After rea ding thro ugh the co ntent, cl ick [I accept the agreement.] to agree with the license agreement, and then click [Next>].
FFFF
Follow the instructions on the screen.
Note
❒ If you are required to restart the computer after the installation of SmartNetMonitor for Client, re-
start and continue configuration.
Page 58

Operating Instructions Administrator Reference
Installing the PCL 5c or RPCS Printer Driver
AAAA
Quit all applications that are running.
BBBB
Insert the CD-ROM into the CD-ROM drive.
Auto Run will start the installer.
Important
❒ Never have two versions of the same printer driver installe d on your system at the same time.
When upgrading to a new version of the printer driver, delete the old version, and then install the
new one.
Note
❒ Auto Run might not work automa tically due to certain operating system s ettings. If this is the
case, launch “Setup.exe” located in the CD-ROM root directory.
CCCC
Select a language for the interface, and then cli ck [OK].
The following languages are available: Cestina (Czech), Dansk (Danish), Deutsch (German), English (English), Espanol ( Spanish), Franc ais (Fr ench), It aliano (Itali an), Magyar (Hungari an), Nederlands (Dutch), Norsk (Norwegian), Polski (Polish), Portugues (Portuguese), Suomi (Finnish),
Svenska (Swedish)
58
DDDD
Click [PCL/RPCS Printer Drivers].
EEEE
The software license agreement appears in the [License Agreement] dialog box.
After rea ding thro ugh the co ntent, cl ick [I accept the agreement.] to agree with the license agreement, and then click [Next>].
Page 59

Operating Instructions Administrator Reference
FFFF
Select the printer drivers you want to use when the [Select Program] dialog appears, and then
click [Next>].
You can select more than one printer driver.
GGGG
Select the [Printer Name] check box to select the printer model(s) you want to use.
To change the printer name, use the [Change settings for 'Printer Name'] box.
HHHH
Double-click the printer name to display its settings.
Note
❒ The details shown for [Comment:], [Driver:], and [Port:] vary depending on the operating system
being used, model of printer selected, and port being used.
IIII
Click [Port:], and then click [Add] in the [Change settings for 'Port'] box.
JJJJ
The next part of the pr ocedure depends on the port in us e. Follow the s ection that c orresponds
to the port you want to use.
• SmartNetMonitor
• LPR Port
59
SmartNetMonitor
A Click [SmartNetMonitor], and then click [OK].
B Select the printer you want to use.
❖❖❖❖ TCP/IP
A Click [TCP/IP], and then click [Search].
Available printers will be list ed.
Page 60

Operating Instructions Administrator Reference
B Click the printer you want to use, and then click [OK].
Note
❒ Printers that respond to an IP broadcast from the computer will be displayed. To print to a
printer not listed here, click [
name.
❖❖❖❖ NetBEUI
A Click [NetBEUI], and then click [Search].
A list of printers that can be used with NetBEUI appears.
B Click the printer you want to use, and then click [OK].
Note
❒ Printers that respond to a n broadcast fro m the computer will be d isplayed. To print to a
printer not listed here, click [Specify Address], and then enter the NetBEUI address. Check
the NetBEUI network addres s is on the configuration pag e. For more information about
the printing of configuration page, see p.134 “Printing a Configuration Page”. NetBEUI address appea rs as “\\RNPxxxx\xxx” on a configuration page. Enter the printer's network
path name in form of “%%Comput er name \Sh are nam e”. Do not enter “\\” as head characters but “%%”.
❒ You cannot print to printers beyond routers.
Specify Address
], and then enter the printer's IP address or host
60
❖❖❖❖ IPP
A Click [IPP].
The IPP settings dialog box appears.
B To specify the printer's IP address, enter “http://printer's-ip-address/printer” or
“ipp://printer's-ip-address/printer” in the [Printer URL] field.
(Example: IP address is 192.168.15.16)
http://192.168.15.16/printer
ipp://192.168.15.16/printer
Page 61

Operating Instructions Administrator Reference
C If necessary, enter the name s to distingui sh the prin ter in [IPP Port Name]. Enter a different
name from those of existing port names.
If you do not do this, the ad dress en tered in [Printer URL] will be set as t he IPP port name.
D If a proxy server and IPP user name are used, click [Detailed Settings] and configure the
necessary settings .
Note
❒ For more information about these settings, see SmartNetMonitor for Client Help.
E Click [OK].
LPR Port
A Click [LPR Port], and then click [OK].
B In the [Name or address of server providing lpd] box, enter the printer's IP address.
C In the [Name of printer or print queue on that server] box, enter “lp”, and then click [OK].
KKKK
Make sure the location for the selected printer is displayed after [Port:].
61
LLLL
Double-click [Shared] to display share settings.
MMMM
To share the printer, select the [Shared] check box.
NNNN
Check the boxes under [Share name] to install th e alternative driver for the necessary system.
Note
❒ Select the [Shared] check box to start installation of an alternative driver ([Windows 98/98/Me] is al-
ready selected).
❒ You can add an alternative driver after instal lation. See p.71 “Settings for Printer Share”.
Page 62

Operating Instructions Administrator Reference
OOOO
Configure the default printer as necessary.
❖❖❖❖ Default Printer
Select the [Default Printer] check box to set the printer as the default printer.
PPPP
Click [Continue] to start printer driver installation.
QQQQ
When the [Select Program] dialog box appears, click [Finish].
RRRR
When the [Installation completion] dialog box appears, click [Finish].
SSSS
Set up the o ptions.
Note
❒ You must set up the opti ons when bidi rectional tran smission is d isabled. For m ore informat ion
about bidirectional transmission status, see p.69 “Bidirectional transmission”.
Reference
For more information about option settings, see p.68 “Setting Up Options”.
62
Page 63

Operating Instructions Administrator Reference
Installing the PostScript Printer Driver
AAAA
Quit all applications that are running.
BBBB
Insert the CD-ROM into the CD-ROM drive.
Auto Run will start the installer.
Important
❒ Never have two versions of the same printer driver installe d on your system at the same time.
When upgrading to a new version of the printer driver, delete the old version, and then install the
new one.
Note
❒ Auto Run might not work automa tically due to certain operating system s ettings. If this is the
case, launch “Setup.exe” located in the CD-ROM root directory.
CCCC
Select a language for the interface, and then cli ck [OK].
The following languages are available: Cestina (Czech), Dansk (Danish), Deutsch (German), English (English), Espanol ( Spanish), Franc ais (Fr ench), It aliano (Itali an), Magyar (Hungari an), Nederlands (Dutch), Norsk (Norwegian), Polski (Polish), Portugues (Portuguese), Suomi (Finnish),
Svenska (Swedish)
63
Note
❒ The printer driver with the selected language will be installed. The printe r drive r wil l be ins tal led
in English if you select the following languages: Cestina, Magyar, Polski, Portugues, Suomi
DDDD
Click [PostScript 3 Printer Driver].
Add Printer Wi zard starts.
Page 64

Operating Instructions Administrator Reference
EEEE
Click [Next>].
FFFF
Click [Local printer], and then click [Next>].
GGGG
Click [Add Port:].
HHHH
The next part of the pr ocedure depends on the port in us e. Follow the s ection that c orresponds
to the port you want to use.
• SmartNetMonitor
• LPR Port
SmartNetMonitor
A Click [SmartNetMonitor], and then click [New Port...].
B Select the printer you want to use.
❖❖❖❖ TCP/IP
A Click [TCP/IP], and then click [Search].
Available printers will be list ed.
B Click the printer you want to use, and then click [OK].
64
Note
❒ Printers that respond to an IP broadcast from the computer will be displayed. To print to a print-
er not listed here, click
Specify Address
[
, and then enter th e pr inter's IP add ress or host name.
]
❖❖❖❖ NetBEUI
A Click [NetBEUI], and then click [Search].
A list of printers that can be used with NetBEUI appears.
Page 65

Operating Instructions Administrator Reference
B Click the printer you want to use, and then click [OK].
Note
❒ Printers that respond to a broadcast from the compu ter will be displayed. To pr int to a
printer not listed here, click [
the NetBEUI network addres s is on the configuration pag e. For more information about
printing the conf iguration pag e, see p.134 “Printing a Confi guration Page ”. NetBEUI address appears as “\\RNPxxxx\xxx” on the configuration page. Enter the printer's ne twork
path name in the form of “%%Computer name\Share name”. Do not enter “\\” as head
characters but “%%”.
❒ You cannot print to printers beyond routers.
❖❖❖❖ IPP
A Click [IPP].
The IPP setting dialog box appears.
B To specify the printer's IP address, enter “http://printer's-ip-address/printer” or
“ipp://printer's-ip-address/printer” in the [Printer URL] field.
(Example: IP address is 192.168.15.16)
http://192.168.15.16/printer
ipp://192.168.15.16/printer
C If necessary, enter the name s to distingui sh the prin ter in [IPP Port Name]. Enter a different
name from those of existing port names.
If you do not do this, the ad dress en tered in [Printer URL] will be set as t he IPP port name.
D If a proxy server and IPP user name are used, click [Detailed Settings] and configure the
necessary settings .
Specify Address
], and then enter the NetBEUI address. Check
65
Note
❒ For more information about these settings, see SmartNetMonitor for Client Help.
E Click [OK].
Page 66

Operating Instructions Administrator Reference
LPR Port
A In [Create a new Port:], click [LPR Port], and then click [New Port...].
B In the [Name or address of server providing lpd] box, enter the printer's IP address.
C In the [Name of printer or print queue on that server] box, enter “lp”, and then click [OK].
D Click [Close] in the [Printer Ports] dialog box, and then click [Next>].
IIII
Confirm to select the name of the printer whose driver you want to install, and then click
[Next>].
JJJJ
Change the name of the printer if you want, and then click [Next>].
Configure the default pr inter as neces sary. Select the [Yes] check box to s et the printe r as the defaul t
printer.
KKKK
Select the [Shared:] check box, sele ct the operati ng system as nece ssary, and then cl ick [Next>].
To change the printer name, use the [Share Name:] box.
LLLL
In the [Location and Comment] dialog box, enter the location and comment about the printer,
and then click [Next>].
66
MMMM
Select whether or not you want to print a test page, and then click [Finish].
NNNN
Printer driver installation starts.
OOOO
Set up the o ptions.
Reference
For more information about option settings, see p.68 “Setting Up Options”.
Page 67

Operating Instructions Administrator Reference
Changing Port Settings
This describes how to change SmartNetMonitor for Client settings, such as proxy server settings or IPP
URL.
Note
❒ There are no settings for NetBEUI.
AAAA
In the [Printers] window, click the icon of the printer you want to use. On the [File] menu, cli ck
[Properties].
BBBB
Click the [Ports] tab, and then click [Configure Port].
The [Port Configuration:] dialog box appears.
Note
❒ If you cannot set items on the [Recovery/Parallel Printing] tab, follow the procedure below.
Click [Cancel] to close the [Port Configuration:] dialog box.
A
Start SmartNetMonitor for Client , and then right-click the SmartNetMonitor for Cli ent icon on
B
the taskbar.
Click [Extended Features Settings], and then select the [Set Recovery/Parallel Printing for each port]
C
check box.
Click [OK] to close the [Extended Features Settings] dialog box.
D
• For IPP, you can configure User Settings, Proxy Settings, and Timeout Settings.
67
Note
❒ For more information about these settings, see SmartNetMonitor for Client Help.
Page 68

Operating Instructions Administrator Reference
Setting Up Options
You must set up installed options, paper size, and feed direction with the printer driver when bidirectional transmission is disabl ed.
Limitation
❒ Changing the printer settings requires Full Control Access permission. Members of the Administra-
tors and Power Users groups have Full Control Access permission by default. When you set up options, log on using an account that has Full Control Access permission.
Note
❒ The description uses the PCL 5c printer driver.
AAAA
On the [Start] menu, point to [Settings], and then click [Printers].
The [Printers] window appears.
BBBB
Click the icon of the printer you want to use. On the [File] menu, click [Properties].
Note
❒ When you open the printer properties dialog box for the first time after installing the RPCS printer
driver, the confirmation window appears. After that, the initial display of the printer properties dialog box appears.
68
CCCC
Click the [Accessories] tab.
Note
❒ If you are using the RPCS printer driver, click the [Change Accessories] tab.
❒ If you are using the PostScript 3 printer driver, click the [
Device Settings
] tab.
Page 69

Operating Instructions Administrator Reference
DDDD
Select opti o ns y o u h a ve ins t al led fr om t he [Options] group, and then make any necessary settings.
Note
❒ If you are using the RPCS printer driver, select the options from [
❒ If you are using the PostScript 3 printer driver, select the options from [
EEEE
Click [OK].
----Bidirectional transmission
When bidirectional t ran smission is enable d, i nf ormat i on about paper size and feed direction settings is
automatically sent to the printer by a c omput er. You can also ch eck printer status f rom your computer.
• Bidirectional transmission is supported by Windows 95/98/Me, Windows 2000, Windows XP, and
Windows NT 4.0.
• If you use the RPCS prin ter driver an d bidirectiona l transmissio n is enabled , on Windows 95/9 8/Me,
the unavailable functions are shaded, and cannot be used.
Select printer options:
Installable Options
].
].
69
Note
❒ The RPCS printer driver supports bidirectional transmission and updates the printer status automat-
ically.
❒ The PCL 5c printer driv er supports bidirectional transmissio n; you can update the printer status
manually.
❒ The PostScript 3 printer driver does not support bidirectional transmission.
Bidirectional transmission requires the following conditions:
Page 70

Operating Instructions Administrator Reference
❖❖❖❖ When connecting via parallel cable
• The computer must support bidirectional transmission.
• The printer must be set to bidirectional transmission.
• The interface cable must support bidirectional transmission.
• The machine must be connected to the computer using standard parallel cable and parallel con-
nector.
• Under Windows NT 4.0 [Enable bidirectional support] must be selected and [Enable printer pool-
ing] must not be selected on the [port] tab with RPCS printer driver.
❖❖❖❖ When connecting with the network
• The printer must be set to bidirectional transmission.
• SmartNetMonitor for Client included on the CD-ROM must be installed, and TCP/IP must be
used.
• Under Windows NT 4.0 [Enable bidirectional support] must be selected and [Enable printer pool-
ing] must not be selected on the [port] tab with RPCS printer driver.
70
Page 71

Operating Instructions Administrator Reference
Settings for Printer Share
Limitation
❒ Changing the printer settings requires Full Control Access permission. Members of the Administra-
tors and Power Users groups have Full Control Access permission by default. When you set up options, log on using an account that has Full Control Access permission.
Use the [Printers] window to set up the printer.
AAAA
On the [Start] menu, point to [Settings], and then click [Printers].
The [Printers] window appears.
BBBB
Click the icon of the printer you want to use. On the [File] menu, click [Properties].
CCCC
Select the [Shared] check box on the [Sharing] tab.
Note
❒ If you use alternate driv ers for Wi ndo ws 95 /98/M e cl ie nt, Se rv ice P ac k 4 or later is req uir ed . In-
stall the appropriate printer driver for each client.
71
DDDD
To share a printer with users running different versi ons of Windows , sele ct the operating sys tem in the [Alternate Drivers:] box, and then follow the instruction on the screen.
Note
❒ If you have i ns talled an alternate driver by sel ec ti ng the [
follow this step.
EEEE
Click [OK].
The printers attached to the network are displayed.
Shared
] check box, you do not have to
Page 72

Operating Instructions Administrator Reference
4. NetWare Configuration
This describes how to conf igure the printer fo r use as a print ser ver or re mo te p rinter in a NetWare e nvironment.
Configuring NetWare Using the Control Panel
Note
❒ IPX/SPX must be installed on your computer. If it is not, see Windows Help for instructions.
AAAA
Press the {{{{Menu}}}} key.
On Line
Job Reset
Menu
Form Feed
Power Error Data In
Escape
#
Enter
ZDJS001N
72
“Menu” appears on the display.
BBBB
Press the {{{{UUUU}}}} or {{{{TTTT}}}} key to display “Host Interface”.
Menu:
Host Interface
Page 73

Operating Instructions Administrator Reference
CCCC
Press the {{{{Enter #}}}} key.
The following message appears on the display:
Host Interface:
I/O Buffer
DDDD
Press the {{{{UUUU}}}} or {{{{TTTT}}}} key to display “Network Setup”.
Host Interface:
Network Setup
EEEE
Press the {{{{Enter #}}}} key.
The following message appears on the display:
Network Setup:
DHCP
73
FFFF
Select NetWare.
Note
❒ All protocols are active by default.
❒ Do not select protocols not used on your network.
❒ If you use Pure IP on NetWare 5/5.1, 6, configure the printer to active TCP/IP.
Page 74

Operating Instructions Administrator Reference
A Press the {{{{UUUU}}}} or {{{{TTTT}}}} key to display “Active Protocol”, and then press the {{{{Enter #}}}} key.
Active Protocol:
TCP/IP
B Press the {{{{UUUU}}}} or {{{{TTTT}}}} key to display “NetWare”.
C Press the {{{{Enter #}}}} key.
The current setting appears on the display.
NetWare:
*Active
D Press the {{{{UUUU}}}} or {{{{TTTT}}}} key to display “NetWare”.
E Press the {{{{Enter #}}}} key.
After about two seconds, the display returns to “Active Protocol”.
F Press the {{{{Escape}}}} key.
The display returns to “Network Setup”.
74
GGGG
Select the frame type for NetWare.
Select one of the following items if necessary:
• Auto (Default)
• Ethernet ll
• Ethernet 802.3
• Ethernet 802.2
• Ethernet SNAP
Page 75

Operating Instructions Administrator Reference
Note
❒ In most situations, use the default setting (“Auto ”). When you first select “Auto ”, the frame type
first detected by the printer is adopted. If the network can u se more than tw o frame type s, the
printer may fail to selec t th e correc t fr am e type if “Auto ” is selected. In this case, s el ect the a ppropriate frame type.
A Press the {{{{UUUU}}}} or {{{{TTTT}}}} key to display “Frame Type (NW)”.
Network Setup:
Frame Type (NW)
B Press the {{{{Enter #}}}} key.
The current setting appears on the display.
Frame Type (NW):
*Auto
C Press the {{{{UUUU}}}} or {{{{TTTT}}}} key to display the frame type you want to use.
D Press the {{{{Enter #}}}} key.
In about two seconds, the display returns to “Network Setup”.
E Press the {{{{On Line}}}} key.
“Ready” appears on the display.
75
Ready
Page 76

Operating Instructions Administrator Reference
HHHH
Print the configuration page to check settings you have made.
For more information about how to print a configuration page, see p.134 “Printing a Configuration
Page”.
❖❖❖❖ SmartNetMonitor for Admin
To use a printer in a NetWare environment, configure the NetWare printing environment using
SmartNetMonitor for Admin.
Note
❒ If you configure the NetWa re printing us ing SmartNetMoni tor for Admin un der the following
environments, Novell NetWare Client is required:
• NDS mode in Windows 95/98/Me
• NDS or Bindary mode in Windows 2000/Windows NT 4.0
❒ Use the version of Novell Client provided with your operating system, or the latest version.
❖❖❖❖ Printers listed by SmartNetMonitor for Admin
SmartNetMonitor for Admin displays a list of printers connected to the network.
If you cannot find the printer on the display ed l is t, r ef er t o th e configuration page pri n te d on t he
printer. For more infor mation abou t print ing a c onfigur atio n page, se e p.134 “Printing a Config-
uration Page”.
76
Page 77

Operating Instructions Administrator Reference
NetWare 3.x - Advanced Settings
The procedure for configuring the printer differs depending on whether the network interface board is
configured as a print server or re mote printer. This section describes how to configure it in a NetWare
3.x environment.
77
Note
❒ This section assumes NetWare is functional and the necessary environment for NetWare Print Serv-
ice is available.
Page 78

Operating Instructions Administrator Reference
Installing SmartNetMonitor for Admin
Install SmartNetMonit or for Admin on your computer . For the installat ion procedure, s ee p.95 “Install-
ing SmartNetMonitor for Admin”.
After installing SmartNetMonitor for Admin, go to p.78 “Setting Up as a Print Server” to use this com-
puter as a print server, or to p.80 “Setting Up as a Remo te Printer” to use it as a remote printer.
Setting Up as a Print Server
AAAA
Log on to the file server as a Supervisor or the equivalent of a Supervisor.
BBBB
Run SmartNetMonitor for Admin.
CCCC
On the [Group] menu, point to [Search Device], and then click [IPX/SPX].
A list of printers appears.
Note
❒ If you cannot identif y which printer to confi gure from the list of printers , print the configuration
page and find it. For more information about printing the configuration page, see p.134 “Printing
a Configuration Page”.
❒ If no printer name a ppears on the l ist, match the IPX/ SPX frame types between the comput er
and printer. Use the [Network] dialog box of Windows to change the computer fram e type. For
more information about changing equipment frame types, see p.72 “Conf igu ri ng Ne tWar e U sin g
the Control Panel”.
78
DDDD
Select the printer you want to configure, and then click [NIB Setup Tool] on the [Tools] menu.
EEEE
Click [Wizard], and then click [OK].
Page 79

Operating Instructions Administrator Reference
FFFF
Enter the device name i n the [Device Name] box, a comment in the [Comment] box if necessa ry,
and then click [Next>].
GGGG
Select the [NetWare] check box, and then click [Next>].
HHHH
Click [Bindery Mode], enter th e file ser ver name in the [File Server Name:] box, and the n click
[Next>].
In the [File Server Name:] box, enter the name of the file server in which the print server is to be
created. You can also select a file server from the list that appears by clicking [Browse].
IIII
Enter the print server name in the [Print Server Name] box, the printe r name in the [Printer
Name] box, and the print queue name in the [Print Queue Name] box, then click [Next>].
• In the [Print Server Name] box, enter the name of the NetWare print server using up to 47 char-
acters.
• In the [Printer Name] box, enter the name of the NetWare printer.
• In the [Print Queue Name] box, enter the name of the print queue to be added to NetWare.
JJJJ
After confirming the settings, click [Next>].
The settings take effect, and NIB Setup Tool closes.
79
KKKK
Exit SmartNetMonitor for A dmin.
LLLL
Turn the p rinter power off an d on.
Note
❒ To check the printer is configured correctly, enter the following after the command prompt:
F:> USERLIST
❒ If the printer works as configured, the name of the print server appears as an attached user.
Page 80

Operating Instructions Administrator Reference
Setting Up as a Remote Printer
AAAA
Log on to the file server as a Supervisor or the equivalent of a Supervisor.
BBBB
Run the SmartNetMonitor for Admin.
CCCC
On the [Group] menu, point to [Search Device], and then click [IPX/SPX].
A list of printers appears.
Note
❒ If you cannot identif y which printer to confi gure from the list of printers , print the configuration
page and find it. For more information about printing the configuration page, see p.134 “Printing
a Configuration Page”.
❒ If no printer name a ppears on the l ist, match the IPX/ SPX frame types between the comput er
and printer. Use the [Network] dialog box of Windows to change the computer fram e type. For
more information about changing equipment frame types, see p.72 “Conf igu ri ng Ne tWar e U sin g
the Control Panel”.
DDDD
Select the printer you want to configure, and then click [NIB Setup Tool] on the [Tools] menu.
80
EEEE
Click [Property Sheet], and then click [OK].
FFFF
Click the [NetWare] tab, and then make the following settings:
A In the [Print Server Name] box, enter the name of the print server.
B In the [File Server Name] box, enter the name of the file server in which a print server is to
be created.
By clic ki n g [Browse], you can sel ect a file serve r among t hose li sted i n the [Browse] dia log box.
C In the [Print Server Operation Mode] group, click [As Remote Printer].
Page 81

Operating Instructions Administrator Reference
D In the [Remote Printer No.] box, enter the printer number.
Important
❒ Use the same printer number as that to be created in the printer server.
E Click [OK] to close the property sheet.
F After a confirmation dialog box appears, click [OK].
GGGG
On the [NIB] menu, click [Exit] to exit NIB Setup Tool.
HHHH
Enter “PCONSOLE” after the command prompt.
F:> PCONSOLE
IIII
Create a print queue as follo ws:
Note
❒ If you use a currently defined print queue, proceed to step
A On the [Available Options] menu, click [Print Queue Information], and then press {{{{Enter}}}}.
B Press {{{{INSERT}}}}, and then enter a print queue name.
C Press {{{{ESC}}}} to return to t he [Available Options] menu.
.
J
81
JJJJ
Create a printer as follows:
A On the [Available Options] menu, click [Print Server Information], and then press {{{{Enter}}}}.
B To create a new print server, press {{{{INSERT}}}}, and then enter a print server name.
If you are using a currently d efined print server, se lect one of the print s ervers shown i n the [Print
Server] list.
Important
❒ Use the same name as that specified in NIB Setup Tool. (Step
- A).
F
Page 82

Operating Instructions Administrator Reference
C On the [Print Server Information] menu, click [Print Server Configuration].
D On the [Print Server Configuration] menu, click [Printer Configuration].
E Select the printer which is indicated as “Not Installed”.
Important
❒ Use the same number as that s pecified as the Remote Printer No. using NIB Setup Tool.
(Step
F If you want to change the name of the printer, enter a new name.
The name “Printer x” is assigned to the pr inter. The “x” stands for the number of the selected
printer.
G For type, click [Remote Parallel, LPT1].
IRQ, Buffer size, Starting form, and Queue service mode are automatically configured.
H Press the {{{{ESC}}}} key, and then click [Yes] in the confirmation dialog box.
I Press the {{{{ESC}}}} key to return to [Print Server Configuration Menu].
KKKK
Assign print queues to the created printer as follows:
A From [Print Server Configuration Menu], click [Queues Serviced By Printer].
B Select the printer created in step
C Press the {{{{INSERT}}}} key to select a queue serviced by the printer.
- D).
F
.
J
82
Note
❒ You can select more than one queue at a time.
D Follow the instructions on the screen to make other necessary settings.
When you have finished the above steps, check the queues are assigned.
LLLL
Press the {{{{ESC}}}} key until “Exit?” appears, and then click [Yes] to close PCONSOLE.
Page 83

Operating Instructions Administrator Reference
MMMM
Start the print server by entering the following from the console of the NetWare Server:
If it is running, restart it after exiting it.
❖❖❖❖ To exit
CAREE: unload ps er ver
❖❖❖❖ To start
CAREE: load pser ve r print_server_name
Note
❒ If the printer works as configured, “Waiting for job” appears.
83
Page 84

Operating Instructions Administrator Reference
NetWare 4.x, 5/5.1, 6 - Advanced Settings
The procedure for configuring the printer differ depending on whether the network interface board is
configured as a print server or re mote printer. This section describes how to configure it in a NetWare
4.x, 5/5.1, 6 environment.
❖❖❖❖ To use NetWare 5/5.1, 6
• Use the pr inter as a print server.
Do not use as a remote printer.
• If you use Pure IP, configure the printer to use TCP/IP. For more informa tion about ho w to make
the settings, see p.72 “Configuring NetWare Using the Control Panel”.
84
Page 85

Operating Instructions Administrator Reference
Installing SmartNetMonitor for Admin
Install SmartNetMonit or for Admin on your computer . For the installat ion procedure, s ee p.95 “Install-
ing SmartNetMonitor for Admin”.
After installing SmartNetMonitor for Admin, go to p.85 “Setting Up as a Print Server” to use this com-
puter as a print server, or to p.89 “Setting Up as a Remo te Printer” to use it as a remote printer.
Setting Up as a Print Server
Important
❒ You must set up the print server using NDS mode in NetWare 4.x, 5/5.1, 6.
AAAA
Log on to the file server as a Supervisor or the equivalent of a Supervisor.
BBBB
Run SmartNetMonitor for Admin.
CCCC
On the [Group] menu, point to [Search Device], and then click [IPX/SPX] or [TCP/IP].
A list of printers appears.
85
Note
❒ If you use Pure IP, click [
❒ If you cannot identif y which printer to confi gure from the list of printers , print the configuration
page and find it. For more information about printing the configuration page, see p.134 “Printing
a Configuration Page”.
❒ If no printer name appears in the list, match the IPX/SPX frame types between the computer and
printer. Use th e [Network] dialog box of Windows to chan ge the comput er frame ty pe. For mo re
information about ch anging equipment fram e types, see p.72 “Configuring NetWare Using the
Control Panel”.
TCP/IP
].
Page 86

Operating Instructions Administrator Reference
DDDD
Select the printer you want to configure, and then click [NIB Setup Tool] on the [Tools] menu.
Note
❒ If you use Pure IP, see p.87 “Using Pure IP in the NetWare 5/5.1, 6 Environment”.
EEEE
Click [Wizard], and then click [OK].
FFFF
Enter the device name i n the [Device Name] box, a comment in the [Comment] box if necessa ry,
and then click [Next>].
GGGG
Select the [NetWare] check box, and then click [Next>].
HHHH
Click [NDS Mode], enter the file serv er name in the [File Server Name:] box, the NDS tree name
in the [NDS Tree:] box and the context in the [NDS Context:] box, and then click [Next>].
In the [File Server Name:] box, enter the name of the file server in which the print server is to be
created. You can also select a file server from the list that appears by clicking [Browse].
By clicking [Browse], you can select a NDS context from those listed in the [Browse] dialog box.
For context, object names are entered from a lower object and divided by a period. For example, if
you want to create a print server into NET under DS, enter “NET.DS”.
86
IIII
Enter the print server name in the [Print Server Name] box, the printe r name in the [Printer
Name] box, the pr int que ue na me in the [Print Queue Name] box, and the print que ue volume in
the [Print Queue Volume], and then click [Next>].
• In the [Print Server Name] box, enter the name of the NetWare print server using up to 47 char-
acters.
• In the [Printer Name] box, enter the name of the NetWare printer.
• In the [Print Queue Name] box, enter the name of the print queue to be added to NetWare.
• In [Print Queue Volume], enter the print queue volume. As a volume, object names are entered
from a lower object and divided by a period. You can select a volume by clicking [Browse].
Page 87

Operating Instructions Administrator Reference
JJJJ
After confirming the settings, click [Next>].
The settings take effect, and NIB Setup Tool closes.
KKKK
Exit SmartNetMonitor for A dmin.
LLLL
Turn the p rinter power off an d on.
Note
❒ To check the printer is configured correctly, enter the following after the command prompt:
F:> NLIST USER /A/B
❒ If the printer works as configured, the name of the print server appears as an attached user.
Using Pure IP in the NetWare 5/5.1, 6 Environment
Note
❒ When not using IPX, it is recommended that you change the print server protocol in the Web brows-
er from [TCP/IP+IPX] to [TCP/IP].
87
AAAA
Log on to the file server as an Admin or the Equivalent of an Admin.
BBBB
Run SmartNetMonitor for Admin.
CCCC
Click [Property Sheet], and then click [OK].
The [NIB Setup Tool] dialog box appears.
Page 88

Operating Instructions Administrator Reference
DDDD
Click the [NetWare] tab, and make the following settings:
A In the [Print Server Name:] box, enter the name of the print server.
B In the [File Server Name:] box, enter the name of the file server in which a print server is to
be created.
By clicking [Browse], you can select a file server among those listed in the [Browse File Server]
dialog box.
C In the [NDS Context:] box, enter the context of the print server.
By click ing [Browse], you can sel ect NDS tree and NDS context from those lis ted in the [Browse
Context] dialog box.
For context, object names are en tered from a lower objec t and div ided b y a per iod. Fo r exampl e,
if you want to create a print server into Net under DS, enter “NET.DS”:
88
D In the [Print Server Operation Mode] group, click [As Print Server].
E Click [OK] to close the property sheet.
F After the confirmation dialog box appears, click [OK].
EEEE
Exit SmartNetMonitor for A dmin.
After this step, proceed to step
on p.89 “Setting Up as a Remote Printer”.
H
Page 89

Operating Instructions Administrator Reference
Setting Up as a Remote Printer
AAAA
Log on to the file server as an Admin or the equivalent of an Admin.
BBBB
Run the SmartNetMonitor for Admin.
CCCC
On the [Group] menu, point to [Search Device], and then click [IPX/SPX].
A list of printers appears.
Note
❒ If you cannot identif y which printer to confi gure from the list of printers , print the configuration
page and find it. For more information about printing the configuration page, see p.134 “Printing
a Configuration Page”.
❒ If no printer name a ppears on the l ist, match the IPX/ SPX frame types between the comput er
and printer. Use the [Network] dialog box of Windows to change the computer fram e type. For
more information about changing equipment frame types, see p.72 “Conf igu ri ng Ne tWar e U sin g
the Control Panel”.
DDDD
Select the printer you want to configure, and then click [NIB Setup Tool] on the [Tools] menu.
89
EEEE
Click [Property Sheet], and then click [OK].
FFFF
Click the [NetWare] tab, and make the following settings:
A In the [Print Server Name] box, enter the name of the print server.
B In the [File Server Name] box, enter the name of the file server in which a print server is to
be created.
By clic ki n g [Browse], you can sel ect a file serve r among t hose li sted i n the [Browse] dia log box.
Page 90

Operating Instructions Administrator Reference
C In the [NDS Context] box, enter the context in which the print server is to be created.
By clicking [Browse], you can select a context from those listed in the [Browse] dialog box.
For context, object na mes are entered from a lower level obj ec t and divided by a per iod . For e x-
ample, if you want to create a print server into NET under DS, enter “NET.DS”:
D In the [Print Server Operation Mode] group, click [As Remote Printer].
E In the [Remote Printer No.] box, enter the number of the printer.
Important
❒ Use the same number as that of the printer to be created in the print server.
F Click [OK] to close the property sheet.
GGGG
On the [NIB] menu, click [Exit] to exit NIB Setup Tool.
90
HHHH
From Windows, run NWadmin.
Reference
For more information about NWadmin, see the documentation provided with NetWare.
IIII
Create a print queue as follo ws:
A Select the container object the print queue is located in among those in the directory tree,
and then click [Create] on the [Object] menu.
B In the [Class of new object] box, click [Print Queue], and then click [OK].
Page 91

Operating Instructions Administrator Reference
C In the [Print Queue name] box, enter the name of the print queue.
D In the [Print Queue Volume] box, click [Browse].
E In the [Available objects] box, click the volume in which the print queue is created, and t hen
click [OK].
F After confirming the settings, click [Create].
JJJJ
Create a printer as follows:
A Select the container object the printer is located in, and then click [Create] on the [Object]
menu.
B In the [Class of new object] box, click [Printer], and then click [OK]. When you are using Net-
Ware 5/5.1, 6, click [Printer (Non NPDS)].
C In the [Printer name] box, enter the name of the printer.
D Select the [Define additional properties] check box, and then click [Create].
KKKK
Assign print queues to the created printer as follows:
A Click [Assignments], and then click [Add] in the [Assignments] group.
B In the [Available objects] box, click the queue created in step
C Click [Configuration], and in the [Printer type] list, click [Parallel], and then click [Communi-
cation].
D Click [Manual load] in the [Communication type] group, and then click [OK].
E After confirming the settings, click [OK].
, and then click [OK].
I
91
LLLL
Create a print server as follo ws:
A Select the context specified using NIB Setup Tool (Step
click [Create].
- AAAA), and on the [Object] menu,
I
Page 92

Operating Instructions Administrator Reference
B In the [Class of new object] box, click [Print Server], and then click [OK]. When yo u are using
NetWare 5/5.1, 6, click [Print Server (Non NPDS)].
C In the [Print Server name] box, enter the name of the print server.
Important
❒ Use the same name as that specified using NIB Setup Tool. (Step
D Select the [Define additional properties] check box, and then click [Create].
MMMM
Assign the printer to the crea ted print server as follows:
A Click [Assignments], and then click [Add] in the [Assignments] group.
B In the [Available objects] box, click the queue created in step
C In the [Printers] group, click the printer ass igned in step BBBB, and then click [Printer Number].
D Enter the printer number, and then click [OK].
Important
❒ Use the same number a s that spec ified as Remote Prin ter No . using NI B Setu p Too l. (Step
- E).
F
E After confirming the settings, click [OK].
K
- A).
F
, and then click [OK].
92
NNNN
Start the print server by typing the following from the console of the NetWare Server.
If it is running, restart it after closing.
❖❖❖❖ To exit
CAREE: unload ps er ver
❖❖❖❖ To start
CAREE: load pser ve r print_server_name
Page 93

Operating Instructions Administrator Reference
5. Using SmartNetMonitor for Admin
Using SmartNetMonitor for Admin, you cannot only monitor the status of network printers, but also
change configuration of the network interface board using TCP/IP or IPX/SPX.
SmartNetMonitor for Admin is equipped with the following functions;
• Device Information function
• Checks the printer's network settings and device details.
• Checks the number of pages printed for each computer, using the user codes.
• Checks results of print jobs executed from the computer.
• Enables you to change the printer's network settings.
• Device Settings function
• Limits settings done from the control panel, and disables changes made to certain items.
• Enables s election of paper typ e loaded in the printer.
• Energy Saver function
• Switches to, and wakes up from Energy Saver mode.
• System Status function
• Checks information about printing, paper quantity, and such, on the computer.
• Groups function
• Monitors multiple p rinters at the s ame time. When there a re many printer s, you can create gro ups
and classify printers to facilita te management.
93
Page 94

Operating Instructions Administrator Reference
Operating system Protocol stack
Microsoft Windows 95/98/Me TCP/IP provided with Windows 95/98/Me
IPX/SPX provided with Windows 95/98/Me
NetWare network client provided with Windows 95/98
Novell Client for Windows 95/98
Microsoft Windows 2000 TCP/IP provided with Windows 2000
IPX/SPX provided with Windows 2000
NetWare Client provided with Windows 2000
Novell Client for Windows NT/2000
Microsoft Windows XP TCP/IP provided with Windows XP
IPX/SPX provided with Windows XP
NetWare Client provided with Windows XP
Novell Client for Windows XP
Microsoft Windows NT 4.0 TCP/IP provided with Wind ow s NT
IPX/SPX provided with Windows NT
Client Service for NetWare provided with Windows NT
Novell Client for Windows NT/2000
94
Note
❒ Select the appropriate protocol stack for your operating system.
Page 95

Operating Instructions Administrator Reference
Installing SmartNetMonitor for Admin
AAAA
Quit all applications that are running.
BBBB
Insert the CD-ROM into the CD-ROM drive.
Auto Run will start the installer.
Note
❒ Auto Run might not work automa tically due to certain operating system s ettings. If this is the
case, launch “Setup.exe” located in the CD-ROM root directory.
CCCC
Select a language for the interface, and then cli ck [OK].
The following languages are available: Cestina (Czech), Dansk (Danish), Deutsch (German), English (English), Espanol ( Spanish), Franc ais (Fr ench), It aliano (Itali an), Magyar (Hungari an), Nederlands (Dutch), Norsk (Norwegian), Polski (Polish), Portugues (Portuguese), Suomi (Finnish),
Svenska (Swedish)
DDDD
Click [SmartNetMonitor for Client/Admin].
95
EEEE
The software license agreement appears in the [License Agreement] dialog box.
After rea ding thro ugh the co ntent, cl ick [I accept the agreement.] to agree with the license agreement, and then click [Next>].
FFFF
Follow the instructions on the screen.
Note
❒ If you are required t o restart the compute r after the installa tion of SmartNetMonito r for Admin,
restart and continue configuration.
Page 96

Operating Instructions Administrator Reference
Changing the Network Interface Board Configuration
AAAA
Run SmartNetMonitor for Admin.
BBBB
Click the [Group] menu, point to [Search Device], and then click [TCP/IP] or [IPX/SPX]. A list of
printers appears.
Note
❒ Select the protocol of the printer for which you want to change configuration.
CCCC
In the list , select the printer for which you want to change configuration.
DDDD
On the [Tools] menu, click [NIB Setup Tool].
NIB Setup Tool starts.
EEEE
Click [Wizard] or [Property Sheet], and then click [OK].
• When configuring the network interface board for the first time, click [Wizard].
• When changing configura ti on of the network in te rface board or conf ig uri ng details, click [Prop-
erty Sheet].
96
Selecting [Wizard]
A Enter the necessary items, and then follow the instructions on the screen.
Selecting [Property Sheet]
A A configuration list appears in the dialog box.
For more information about each item in the dialog box, see SmartNetMonitor for Admin Help.
Page 97

Operating Instructions Administrator Reference
Selecting [Web Browser]
A For the Web browser setting, see p.109 “Configuring the Network Interface Board Set-
tings”.
97
Page 98

Operating Instructions Administrator Reference
Changing Names and Comments
You can change printer names and attach comments to help identify printers listed on SmartNetMonitor
for Admin.
SmartNetMonitor for Admin allows you to change names and comments when TCP/IP or IPX/SPX is
available. You can install SmartNetMonitor for Admin from the CD-ROM provided. For more information about installing SmartNetMonitor for Admin, see p.85 “Installing SmartNetMonitor for Ad-
min”.
The following utilities are used to change printer names and comments:
Note
❒ Each of the names, in TCP/IP form (printer name) and NetBEUI form, is changed individually. Com-
ments are, however, common to both protocols.
❒ The factory default name consists of “RNP” and the last 3 bytes of the MAC address on the network
interface board. For example, if the MAC address is 00:00:74:62:7D:D5, the factory default name is
“RNP627DD5”. Comments are not configured.
AAAA
Run SmartNetMonitor for Admin.
98
BBBB
Click the [Group] menu, poi nt to [Search Device], and click [TCP/IP] or [IPX/SPX]. A list of print-
ers appears.
Note
❒ Select the protocol of the printer for which you want to change configuration.
CCCC
In the list, select the pr inter for the ne twork interface board y ou want to change c onfiguration.
DDDD
On the [Tools] menu, click [NIB Setup Tool].
NIB Setup Tool starts.
Page 99

Operating Instructions Administrator Reference
EEEE
Click [Property Sheet], and then click [OK].
TCP/IP
A Clic k the [General] tab, and then enter th e d ev i ce n am e in th e [Device Name] box and com-
ment in the [Comment] box.
• In the [Device Name] box, enter th e nam e of t he pr inter u sing u p to 1 3 c haract ers. The fac tory
default name consists of “RNP” and the last 3 bytes of the MAC address on the network interface board. For example, if the MAC address is 00:00:74:62:7D:D5, the factory default
name is “RNP627DD5”. Nine character names are not permitte d if the prefi x is “RNP”. Also,
if DHCP is selected as an IP address setting, the number of characters is limited to 13.
• In the [Comment] box, enter a printer comment using up to 31 characters.
NetBEUI
A Click the [General] tab, and then enter the comment in the [Comment] box.
In the [Comment] box, enter a printer comment using up to 31 characters.
B Click the [NetBEUI] tab.
C Enter the computer name in the [Computer Name] box.
• In the [Computer Name] box, enter a name to help identify the printers using NetBEUI. The
factory default name consists of “RNP” and the last 3 bytes of the MAC address on the network interface boar d. For example, if the MAC addr ess is 00:00:74:6 2:7D:D5, the fact ory default name is “RNP627DD5”. A maximum of 13 characters consisting of uppercase
alphabetical lett ers, numbers, or symbols (ex cept “*+,/: ;<=>? [\]| . and space ) can be used . No
name is perm itted if the prefix is “RNP”. You must avoid using same names on a network.
99
Page 100

Operating Instructions Administrator Reference
FFFF
Click [OK].
NIB Setup T ool closes, and the setting is transmitted to the printer.
GGGG
Exit SmartNetMonitor for A dmin.
100
 Loading...