

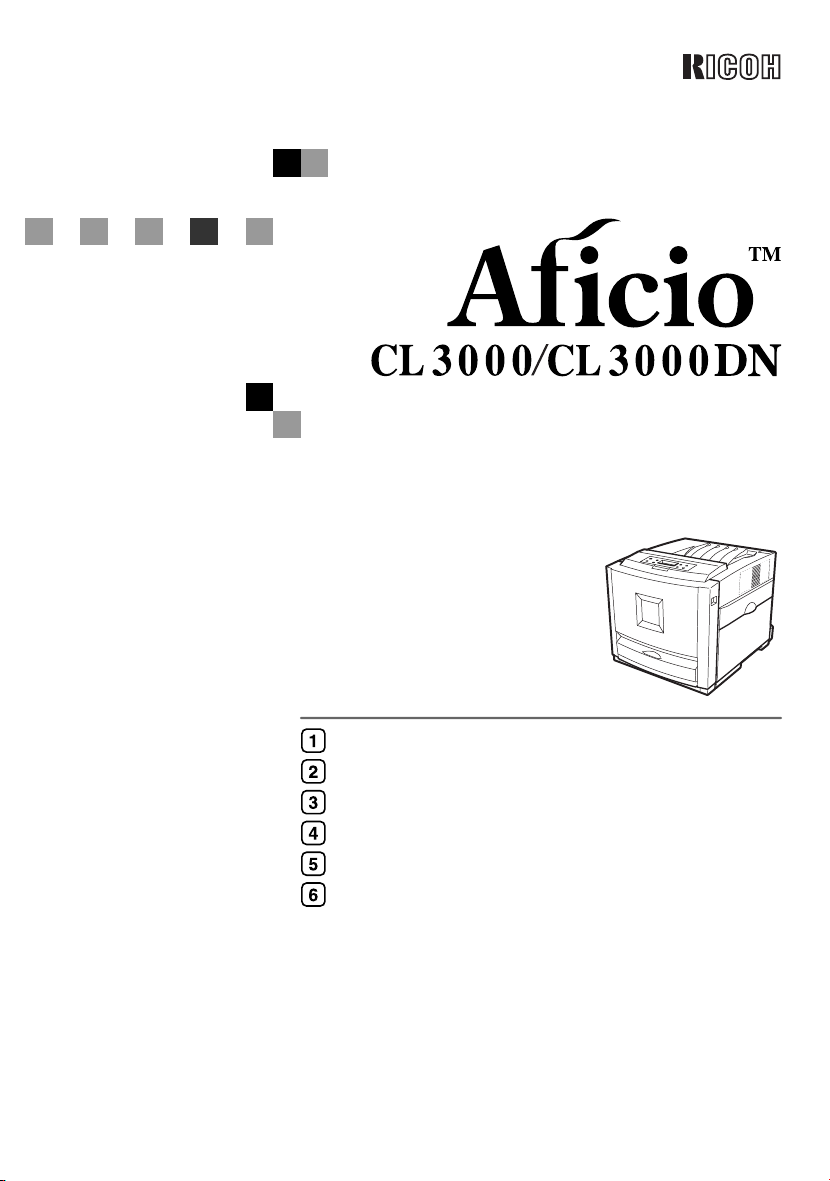
Page 1
Operating Instructions
Maintenance Guide
Getting Started
Paper and Other Media
Replacing Consumables and Maintenance Kit
Cleaning and Adjusting the Printer
Troubleshooting
Appendix
For safety, please read this manual carefully before you use this product and keep it handy
for future reference.
Page 2
Introduction
This manual contains detailed instructions on the operation and maintenance of this machine. To get
maximum versatility from this machine all operators should carefully read and follow the instructions in
this manual. Please keep this manual in a handy place near the machine.
Please read “Safety Information” in this manual before using this machine. It contains important information related to USER SAFETY and PREVENTING EQUIPMENT PROBLEMS.
Power Source
220-240V, 50/60 Hz, 4A or more
Please be sure to connect the power cable to a power source as above.
Operator Safety:
This printer is considered a class 1 laser device, safe for office/ EDP use. The printer contains 7 milliwat, 645 - 660 nanometer wavelength, AlGaInP Laser Diode. Direct (or indirect reflected) eye contact
with the laser beam might cause serious eye damage. Safety precautions and interlock mechanisms
have been designed to prevent any possible laser beam exposure to the operator.
The following label is attached on the back of the printer.
Laser Safety:
The optical housing unit can only be repaired in a factory or at a location with the requisite equipment.
The laser subsystem is replaceable in the field by a qualified Customer Engineer. The laser chassis is
not repairable in the field. Customer engineers are therefore directed to return all chassis and laser subsystems to the factory or service depot when replacement of the optical subsystem is required.
Important
Contents of this manual are subject to change without prior notice. In no event will the company be liable for direct, indirect, special, incidental, or consequential damages as a result of handling or operating the machine.
Caution:
Use of controls or adjustment or performance of procedures other than those specified in this manual
might result in hazardous radiation exposure.
Do not attempt any maintenance or troubleshooting other than that mentioned in this manual. This
printer contains a laser beam generator and direct exposure to laser beams can cause permanent eye
damage.
Two kinds of size notation are employed in this manual. With this machine refer to the metric version.
For good print quality, the supplier recommends that you use genuine toner from the supplier.
The supplier shall not be responsible for any damage or expense that might result from the use of parts
other than genuine parts from the supplier with your office products.
Page 3

TABLE OF CONTENTS
Trademarks.............................................................................................................1
Safety Information .................................................................................................2
Safety During Operation.............................................................................................2
ENERGY STAR Program.......................................................................................6
How to Read This Manual .....................................................................................7
1. Getting Started
Features of this Printer..........................................................................................9
Guide to the Printer .............................................................................................10
Exterior: Front View..................................................................................................10
Basic Model Printer Exterior: Rear View..................................................................11
Network Standard Model Exterior: Rear View..........................................................12
Inside........................................................................................................................13
Control Panel ...........................................................................................................14
2. Paper and Other Media
Paper and Other Media Supported by This Printer...........................................15
Paper Sizes..............................................................................................................15
Paper Recommendations.........................................................................................18
Loading Paper......................................................................................................22
Loading Paper in Tray 1/Optional Paper Feed Unit.................................................22
Loading Paper in the Bypass Tray...........................................................................24
3. Replacing Consumables and Maintenance Kit
Toner Cartridge....................................................................................................29
Waste Toner Bottle Type 125 .............................................................................. 32
Photo Conductor Unit Type 125 Black/Color .................................................... 34
Fusing Unit Type 125...........................................................................................38
Intermediate Transfer Unit Type 125..................................................................42
4. Cleaning and Adjusting the Printer
Cautions to Take When Cleaning.......................................................................47
Adjusting the Color Registration........................................................................48
Adjusting the Image Density...............................................................................49
Adjusting the Tray Registration .........................................................................51
i
Page 4

5. Troubleshooting
Error & Status Messages on the Control Panel ................................................ 53
Printer Does Not Print .........................................................................................62
Other Printing Problems .....................................................................................65
Removing Misfed Paper ......................................................................................69
When "Remove Misfeed A:Internal Path" Appears..................................................69
When "Remove Misfeed B: Fusing Unit" Appears ...................................................70
When "Remove Misfeed Y: Paper Tray" Appears....................................................72
When "Remove Misfeed Z: Duplex Unit" Appears...................................................73
6. Appendix
Moving and Transporting the Printer.................................................................75
Moving the Printer....................................................................................................76
INDEX......................................................................................................... 77
ii
Page 5

Trademarks
Microsoft, Windows and Windows NT are registered trademarks of Microsoft
Corporation in the United States and/or other countries.
IPS-PRINT Printer Language Emulation Copyright© 1999-2000 Oak Technology, Inc., All rights reserved.
Other product names used herein are for identification purposes only and might
be trademarks of their respective companies. We disclaim any and all rights in
those marks.
The proper names of the Windows operating systems are as follows:
®
•Microsoft
•Microsoft
•Microsoft
• The product names of Windows
Microsoft
Microsoft
Microsoft
• The product names of Windows
Microsoft
Microsoft
• The product names of Windows NT
Microsoft
Microsoft
Windows® 95 operating system
®
Windows® 98 operating system
®
Windows® Millennium Edition (Windows Me)
®
®
Windows® 2000 Advanced Server
®
Windows® 2000 Server
®
Windows® 2000 Professional
®
Windows® XP Professional
®
Windows® XP Home Edition
®
Windows NT® Server 4.0
®
Windows NT® Workstation 4.0
2000 are as follows:
®
XP are as follows:
®
4.0 are as follows:
Notes:
Some illustrations in this manual might be slightly different from the machine.
Certain options might not be available in some countries. For details, please contact your local dealer.
1
Page 6

Safety Information
R
R
When using your printer, the following safety precautions should always be followed.
Safety During Operation
In this manual, the following important symbols are used:
WARNING:
CAUTION:
Indicates a potentially hazardous situation which, if instructions
are not followed, could result in death or serious injury.
Indicates a potentially hazardous situation which, if instructions are
not followed, may result in minor or moderate injury or damage to
property.
2
Page 7

R WARNING:
• It is dangerous to handle the plug with wet hands. Doing this may result in receiving an electric shock.
• Connect the power cord directly into a wall outlet and never use an extension cord.
• Disconnect the power plug (by pulling the plug, not the cable) if the
power cable or plug becomes frayed or otherwise damaged.
•
Confirm that the wall outlet is near the machine and freely accessible,
so that in event of an emergency, it can be unplugged easily.
• Only connect the machine to the power source described in the manual.
• Avoid multi-wiring.
• Do not damage, break or make any modifications to the power cord.
Do not place heavy objects on it, pull it hard or bend it more than necessary. These actions could cause an electric shock or fire.
• To avoid hazardous electric shock or laser radiation exposure, do not
remove any covers or screws other than those specified in this manual.
•
Turn off the power and disconnect the power plug (by pulling the plug,
not the cable) if any of the following conditions exists:
• You spill something into the equipment.
• You suspect that your equipment needs service or repair.
• Your equipment's cover has been damaged.
• Do not incinerate spilled toner or used toner. Toner dust might ignite
when exposed to an open flame.
• Disposal should take place at our authorized dealer or at appropriate
collection sites.
•
Dispose of the used toner cartridge in accordance with the local regulation.
• Do not take apart or attempt any modifications to this machine. There
is a risk of fire, electric shock, explosion or loss of sight. If the machine
has laser systems, there is a risk of serious eye damage.
•
Do not place the IC2 lithium battery near or into fire, or it will explode
and cause a burn.
• The User Account Enhance Unit installed on the controller board has
a IC2 lithium battery which can explode if replaced incorrectly. Replace the User Account Enhance Unit only with the indicated one.
3
Page 8

R CAUTION:
• Do not eat or swallow toner.
• Keep toner (used or unused) and toner cartridge out of reach of children.
• Protect the equipment from dampness or wet weather, such as rain, snow,
and so on.
• Unplug the power cord from the wall outlet before you move the equipment.
While moving the equipment, you should take care that the power cord will
not be damaged under the equipment.
• When you disconnect the power plug from the wall outlet, always pull the
plug (not the cable).
• Do not allow paper clips, staples, or other small metallic objects to fall inside
the equipment.
• For environmental reasons, do not dispose of the equipment or expended
supply waste at household waste collection points. Disposal can take place
at an authorized dealer or at appropriate collection sites.
• The inside of the machine becomes very hot. Do not touch the parts with a
"v" label (means hot surface). Touching a part with a "v" label (means hot
surface) could result in a burn.
• The fusing unit becomes very hot. When installing the new fusing unit, turn
off the printer and wait about 30 minutes. After that, install the new fusing
unit. Not waiting for the unit to cool down can result in a burn.
• Do not pull out the fusing unit forcefully. It may cause the unit to fall and result in an injury.
• When touching the fusing unit, do not touch any areas other than the handle
as it may cause a burn.
• Do not put an object on the right cover when it is open.
4
Page 9

R CAUTION:
• When removing misfed paper, do not touch the fusing unit because it could
be very hot.
• To prevent an injury, this printer should be lifted by at least two people.
• When moving the machine, each person should hold the handles that are
located on opposite sides, and then lift it slowly. Lifting it carelessly or dropping it may cause an injury.
• Before installing options, the machine should be turned off and unplugged
for at least half an hour. Components inside the machine become very hot,
and can cause a burn if touched.
• When moving the Paper Feed Unit, hold the handles that are located on the
top of the unit, and then lift it slowly. Lifting it carelessly or dropping it may
cause an injury.
• Do not touch the inside of the controller board compartment. It may cause a
machine malfunction or a burn.
• Keep the machine away from humidity and dust. A fire or an electric shock
might occur.
• Place the machine on a strong and level surface. Otherwise, the machine
might fall and result in an injury.
• If you use the machine in a confined space, confirm that there is a continuous flow of air.
• When pulling the paper tray out, be careful not to pull it strongly. If you do,
the tray might fall and cause an injury.
• This product uses low frequency electromagnetic fields and may cause
harmful interference to sensitive medical implant devices. If you have a cardiac pacemaker or implantable defibrillator, please consult your doctor for
additional suggestion or advice.
5
Page 10
ENERGY STAR Program
As an ENERGY STAR Partner, we have determined
that this machine model meets the ENERGY STAR
Guidelines for energy efficiency.
The ENERGY STAR Guidelines intend to establish an international energy-saving system for
developing and introducing energy-efficient office equipment to deal with environmental issues, such as global warming.
When a product meets the ENERGY STAR Guidelines for energy efficiency, the Partner shall
place the ENERGY STAR logo onto the machine model.
This product was designed to reduce the environmental impact associated with office equipment by means of energy-saving features, such as Low-power mode.
❖❖❖❖ Low-power Mode (Energy Saver mode)
This printer automatically lowers its power consumption 60 minutes after the
last operation has been completed. To exit Low-power (Energy Saver) mode,
press any key on the control panel. For more information about how to configure Energy Saver mode, see “Making Printer Settings with Control Panel” in
the Administrator Reference on the CD-ROM labeled "Operating Instructions".
❖❖❖❖ Specifications
Energy Saver mode Power Consumption 15 W or less
Default Time 60 minutes
Recovery Time 3 seconds or less
6
Page 11

How to Read This Manual
R
R
Symbols
In this manual, the following symbols are used:
WARNING:
This symbol indicates a potentially hazardous situation which, if instructions
are not followed, could result in death or serious injury.
CAUTION:
This symbol indicates a potentially hazardous situation which, if instructions
are not followed, may result in minor or moderate injury or damage to property.
* The statements above are notes for your safety.
Important
If this instruction is not followed, paper might be misfed or data might be lost.
Be sure to read this.
Preparation
This symbol indicates the prior knowledge or preparations required before operating.
Note
This symbol indicates precautions for operation, or actions to take after misoperation.
Limitation
This symbol indicates numerical limits, functions that cannot be used together,
or conditions in which a particular function cannot be used.
Reference
This symbol indicates a reference.
[]
Keys that appear on the machine's panel display.
Keys and buttons that appear on the computer's display.
{}
Keys built into the machine's control panel.
Keys on the computer's keyboard.
7
Page 12

8
Page 13

1. Getting Started
Features of this Printer
❖❖❖❖ High Image Quality
True 1200 x 1200 dpi resolution provides high resolution. You can print various business documents in fine detail from presentations and newsletters
containing illustrations or graphics to catalogues, ads, and pictures. In addition, the built-in automatic color registration function assures high image
quality at all times.
❖❖❖❖ High Performance
By using an intermediate transfer belt with the single path method, we've
achieved short paper path architecture equivalent to the single drum method.
This printer is as compact as a monochrome printer but offers high performance output of 20 pages per minute (ppm) in black and white and 16 ppm in
full color. The printer performs duplex printing at the same speed as simplex
printing with the Interleave function installed. Also, by using induction-heating technology in the fusing unit, a short warm-up time after turning the
printer on has been achieved and also the recovery time from the Energy Saver mode has been reduced for fast printout when you want to print immediately. The printer also comes with our advanced-technology high-speed
controller that allows fast printing and time saving on the total printing time
for large-volume data.
❖❖❖❖ Ease of Use
With a compact body like our other A4 20-ppm monochrome printer, it takes
up minimum space. Also, the optional duplex unit is installed on the front
cover so you don't need extra space or cover opening space. Replacing consumables is easy so you don't need to spend time on maintenance.
By using induction-heating technology in the fusing unit, we've reduced the
time to reach the fusing temperature. And, the printer can reduce power consumption to the lowest level possible when idle.
Many different interface options such as a USB 2.0 interface or wireless LAN
can be installed in the printer according to your requirements.
9
Page 14
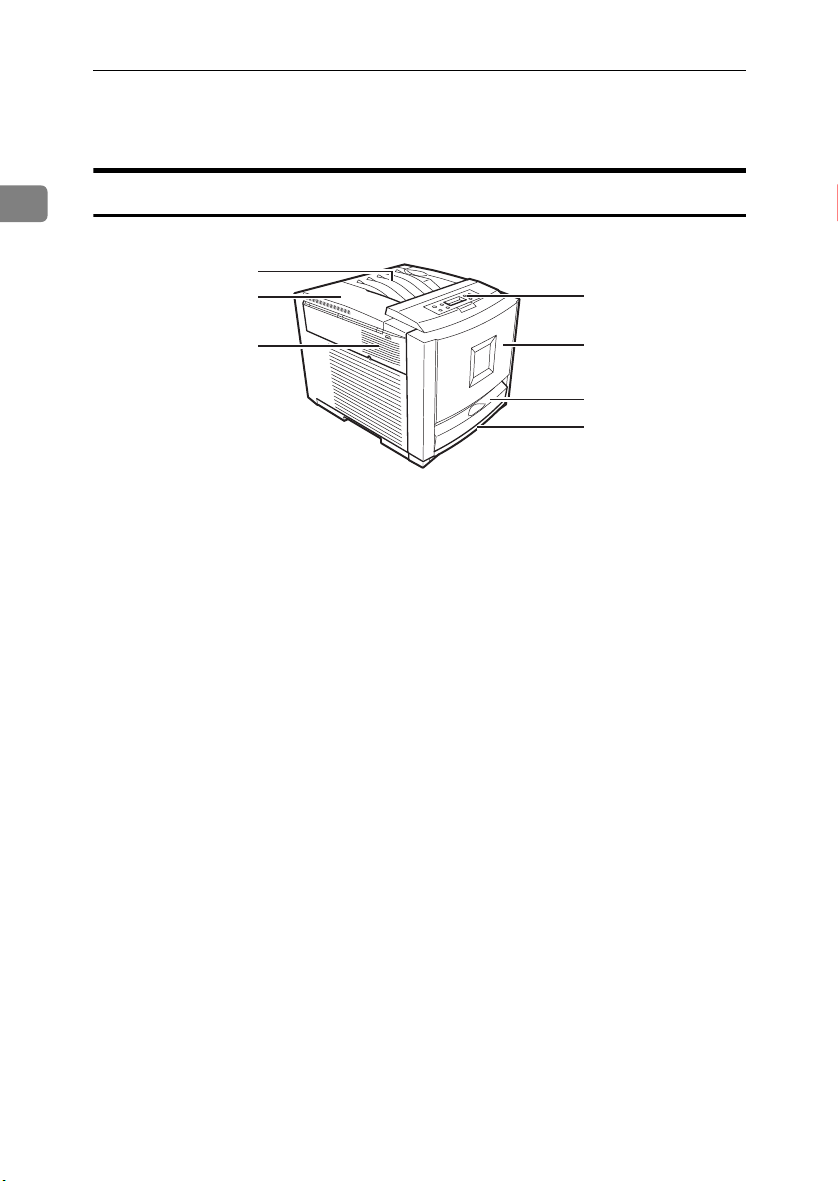
Getting Started
Guide to the Printer
1
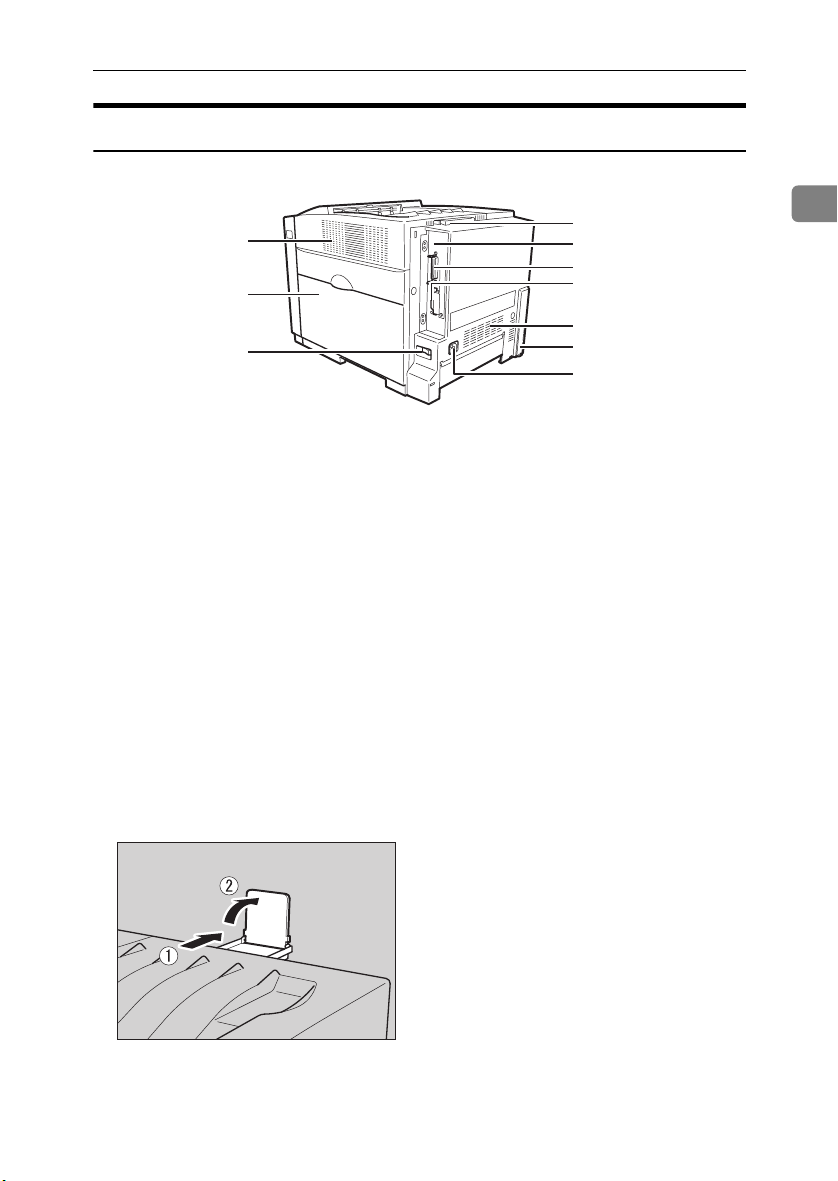
Exterior: Front View
1
2
3
1.
Standard Tray
Output is stacked here with the print side
down.
2.
Upper Left Cover
Open this cover when replacing toner
cartridges.
3.
Ventilator
The ventilator helps to keep the components inside the printer from overheating. Do not block the ventilator as it may
cause a printer malfunction due to overheating.
4.
Control Panel
Contains keys for printer control and a
panel display that shows the printer status.
4
5
6
7
ZHBH020E
5.
Front Cover
Open this cover when replacing the fusing unit or transfer roller, installing the
Duplex Unit, or removing misfed paper.
6.
Bypass Tray
Use to print onto thick paper, OHP transparencies, custom size paper, and envelopes as well as plain paper. When
printing on custom size paper , printer
driver settings are required.
7.
Tray 1
Up to 530 sheets of plain paper can be
loaded.
10
Page 15
Basic Model Printer Exterior: Rear View
Guide to the Printer
1
2
3
1.
Ventilator
The ventilator helps to keep the components inside the printer from overheating. Do not block the ventilator as it may
cause a printer malfunction due to overheating.
2.
Right Cover
Open this cover when replacing photo
conductor units, the transfer belt or waste
toner bottle.
3.
Power Switch
Use this switch to turn the power on and
off.
4.
Standard Tray Extension
Pull out this extension when printing on
paper of its length is longer than that of
A4 or 8
1
/2” × 11”.
ZHBH700E
4
5
6
7
8
9
10
ZHBH031E
5.
Controller Board
Slide this out when installing options
such as Memory Unit, Printer Hard Disk,
1394 Interface Unit, 802.11b Interface
Unit, USB2.0 Interface Unit or User Account Enhance Unit.
6.
Parallel Port
Use a parallel cable to connect the printer
to the computer.
7.
USB Port
Use a USB cable to connect the printer to
the host computer.
8.
Ventilator
The ventilator helps to keep the components inside the printer from overheating. Do not block the ventilator as it may
cause a printer malfunction due to overheating
9.
Optional Paper Feed Unit Con-
nector
Use the Paper Feed Unit connector to
connect the printer to the Paper Feed
Unit.
10.
Power Port
Connect the power cable to this port and
the other end of the cable to the outlet.
1
11
Page 16
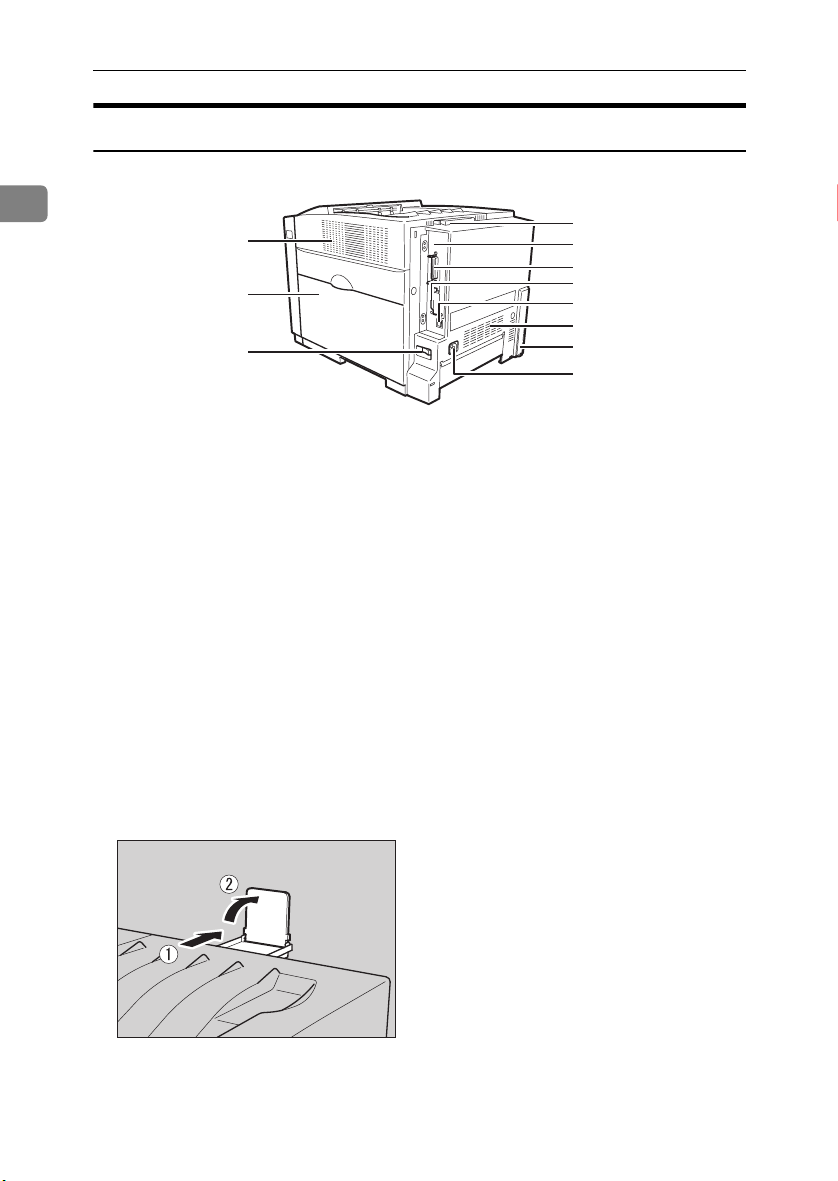
Getting Started
Network Standard Model Exterior: Rear View
1
1
2
3
1.
Ventilator
The ventilator helps to keep the components inside the printer from overheating. Do not block the ventilator as it may
cause a printer malfunction due to overheating.
2.
Right Cover
Open this cover when replacing photo
conductor units, the transfer belt or waste
toner bottle.
3.
Power Switch
Use this switch to turn the power on and
off.
4.
Standard Tray Extension
Pull out this extension when printing on
paper of its length is longer than that of
A4 or 8
1
/2” × 11”.
5.
Controller Board
Slide this out when installing options
such as Memory Unit, Printer Hard Disk,
1394 Interface Unit, 802.11b Interface
Unit, USB2.0 Interface Unit or User Account Enhance Unit.
6.
Parallel Port
Use a parallel cable to connect the printer
to the computer.
7.
USB Port
Use a USB cable to connect the printer to
the host computer.
8.
Ethernet Port
Use a network interface cable to connect
the printer to the network.
9.
Ventilator
The ventilator helps to keep the components inside the printer from overheating. Do not block the ventilator as it may
cause a printer malfunction due to overheating
10.
Optional Paper Feed Unit Con-
4
5
6
7
8
9
10
11
ZHBH030E
nector
Use the Paper Feed Unit connector to
connect the printer to the Paper Feed
ZHBH700E
Unit.
11.
Power Port
Connect the power cable to this port and
the other end of the cable to the outlet.
12
Page 17
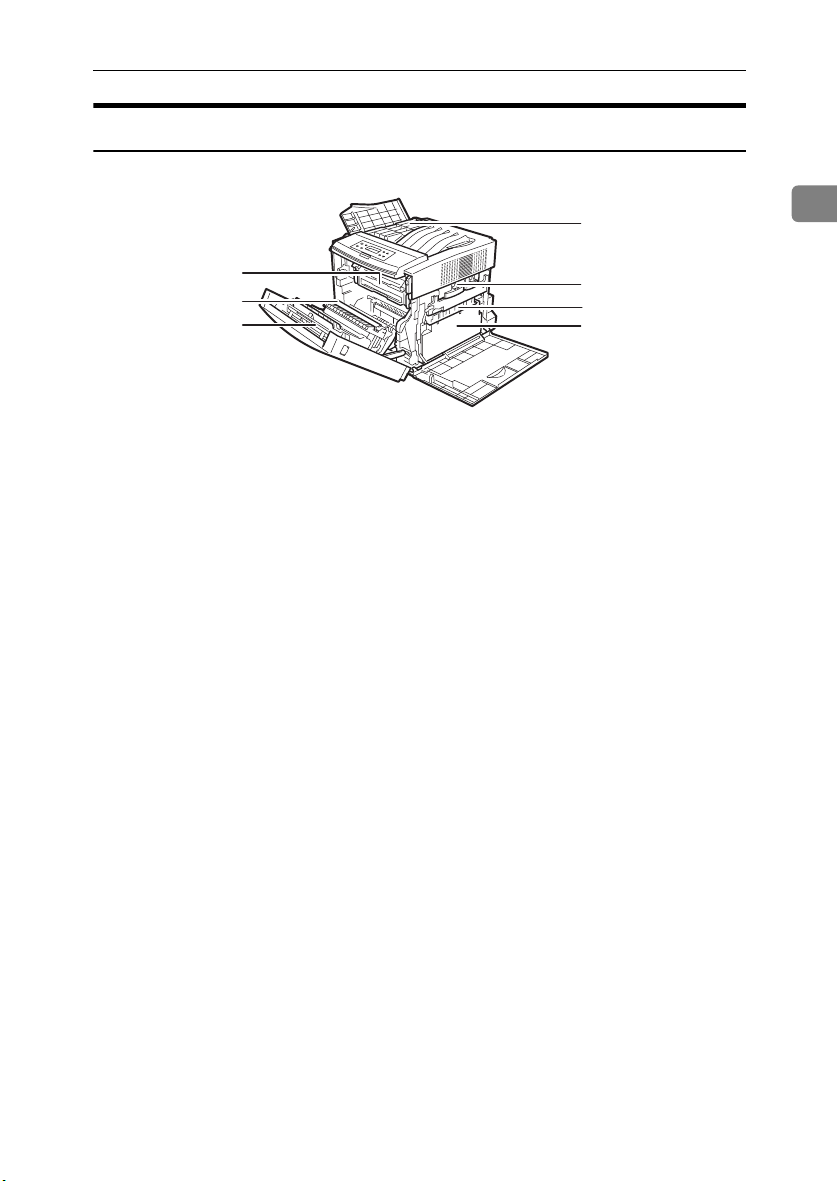
Inside
Guide to the Printer
1
2
3
1.
Fusing Unit
Fuses the image on paper.
When "Replace Fusing Unit" appears on
the panel display, replace this unit.
2.
Transfer Roller
When "Replace Fusing Unit" appears on
the panel display, replace this roller.
3.
Duplex Unit (optional for Basic
Model Printer)
Use to print on both sides of paper.
4.
Toner Cartridges
When "Add Toner (color)" appears on the
panel display, replace the indicated color
of the toner cartridge.
4
5
6
7
ZHBH040E
5.
Photo Conductor Unit Color/Black
When "Replace Color PCU" or "Replace
Black PCU" appears on the panel display,
replace the indicated Photo Conductor
Unit.
6.
Transfer Belt
When "Replace Transfer Belt" appears on
the panel display, replace this unit.
7.
Waste Toner Bottle
Collects waste toner. When "Replace
Waste Toner" appears on the panel display, replace this bottle.
1
13
Page 18
Getting Started
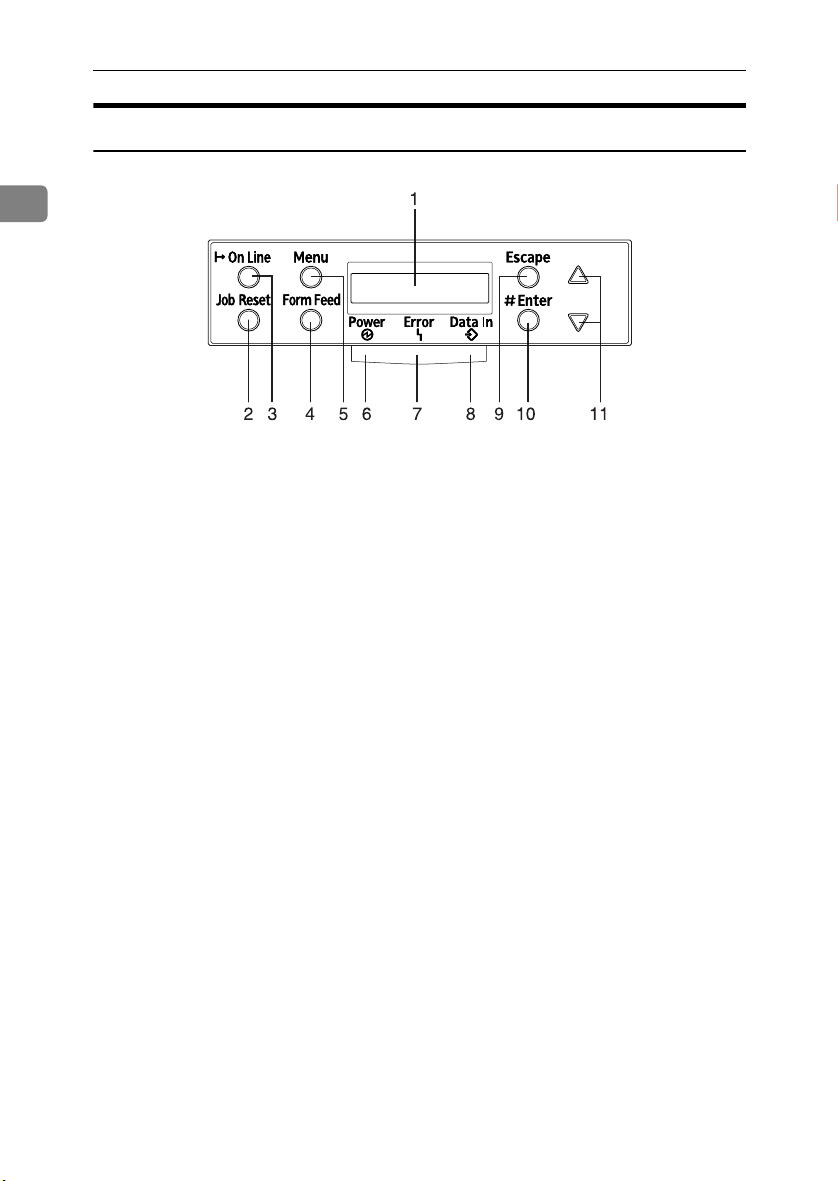
Control Panel
1
ZHBSA010E
1.
Panel Display
Shows the current status of the printer
and error messages.
2. {
{Job Reset}}}} Key
{{
When the printer is online, press this key
to cancel any ongoing print job.
3.
{{{{On Line}}}} Key
Indicates whether the printer is online or
offline.
Press this key to switch between online
and offline.
When the lamp is lit, the printer is online,
enabling data reception from the host
computer.
When the lamp is off, the printer is offline, disabling data reception from the
host computer.
Press this key to return to the ready condition.
4.
{{{{Form Feed}}}} Key
When the printer is offline, press this key
to print all the data left in the printer's input buffer.
You can use this to force the printer to
print the data received in the online status when the paper size or type does not
match with the actual set size or type.
14
5.
{{{{Menu}}}} Key
Press this key to make and check the current printer settings.
6.
Power Indicator
Power indicator is on while the power
switch is on. Power indicator is off when
the power is turned off or while the printer is in Energy Saver mode.
7.
Error Indicator
Lights when a printer error occurs. Goes
off when the printer goes in Energy Saver
mode.
8.
Data In Indicator
Blinks while the printer is receiving data
from a computer. Stays on when there is
data to be printed.
9.
{{{{Escape}}}} Key
Press this key to return to the previous
condition on the panel display.
10.
{{{{Enter #}}}} Key
Press this key to execute menu items selected on the panel display.
11.
{{{{UUUU}}}}{{{{TTTT}}}} Keys
Use these keys to increase or decrease
values on the panel display when making
settings. Keep pressing the key to quicken scrolling, and increase or decrease values on the panel display in units of 10.
Page 19
2. Paper and Other Media
Paper and Other Media Supported by This Printer
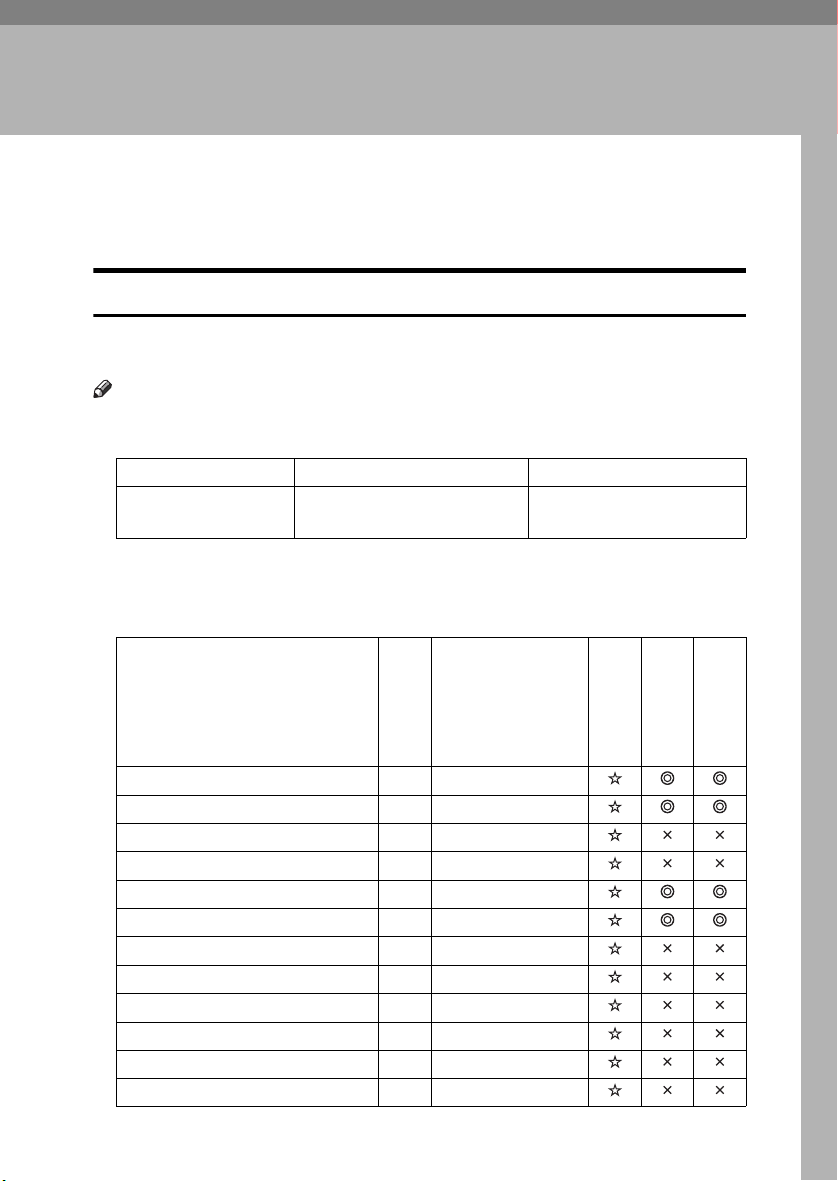
Paper Sizes
This section describes the paper size, feed direction, and the maximum amount
of paper that can be loaded into each paper tray in this printer.
Note
❒ The following symbols and terminology are used to represent the feed direc-
tion.
In this manual On the panel display Paper feed direction
K ↑
(Feed direction)
❒ Be careful of the paper feed direction. The direction is determined for each pa-
per size.
❖❖❖❖ Input Paper Sizes (Metric version)
A4 (210 × 297)
8 1/2 × 11
Short-edge feed direction
A4
B5 JIS
A5
A6
Legal (LG, 8
Letter (LT, 8
1
/2 × 81/2 inches
5
Executive (Exec., 7
Folio (8
Foolscap (F4, 8
F/GL (8 × 13 inches)
Com#10 Env (4
1
/2 × 14 inches)
1
/2 × 11 inches)
1
/4 × 13 inches)
1
/2 × 13 inches)
1
/8 × 9 1/2 inches)
1
/4 × 101/2 inches)
Feed direction
K
K
K
K
K
K
K
K
K
K
K
K
Size (mm)
210 × 297
182 × 257
148 × 210
105 × 148
216 × 356
216 × 279
140 × 216
184 × 276
210 × 330
216 × 330
203 × 330
104.8 × 241.3
Bypass Tray
Tray 1
Paper Feed Unit
(Tray 2/3)
15
Page 20
Paper and Other Media
Feed direction
Size (mm)
C5 Env (6.38 × 9.02 inches)
2
C6 Env (4.49 × 6.38 inches)
DL Env (4.33 × 8.66 inches)
7
Monarch Env (3
Custom Size - -
16K (7.68 × 10
/8 × 7 1/2 inches)
1
/2 inches)
K
K
K
K
K
162 × 229
114 × 162
110 × 220
98.4 × 190.5
195 × 267
Bypass Tray
Tray 1
Paper Feed Unit
(Tray 2/3)
•
Means that the size is supported and the printer selects the paper size automatically.
•
Means that the size is supported. See p.24 “Loading Paper in the Bypass
Tray”.
•
Means that the size is supported but the paper size should be set with the
control panel as a custom size. The supported size is approximately 90 216 mm in width and 148 - 356 mm in length.
•
Means that the size is not supported.
❖❖❖❖ Input Paper Sizes (Inch version)
Legal (LG)
Letter (LT)
1
5
/2 × 8 1/2 inches
Executive (Exec.)
A4
B5 JIS
A5
A6
16
K
K
K
K
K
K
K
K
Feed direction
Size (inch)
81/2 × 14
1
/2 × 11
8
51/2 × 81/
71/4 × 101/
8.26 × 5.83
7.17 × 10.12
5.83 × 8.26
4.13 × 5.63
Bypass Tray
Tray 1
Paper Feed Unit
(Tray 2/3)
2
2
Page 21
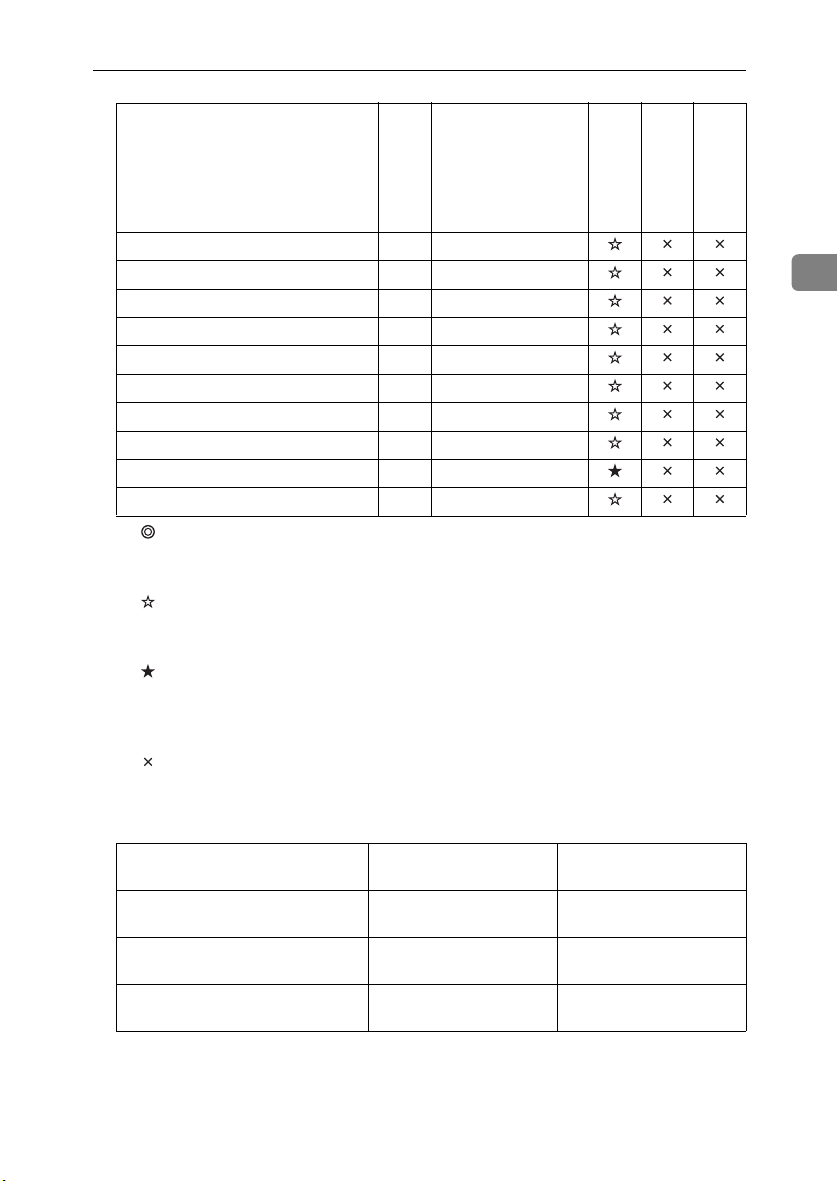
Paper and Other Media Supported by This Printer
Feed direction
Folio
Foolscap F4
F/GL
Com#10 Env
C5 Env
C6 Env
DL Env
Monarch Env
Custom Size - -
16K
K
K
K
K
K
K
K
K
K
Size (inch)
81/4 × 13
1
/2 × 13
8
8 × 13
1
/8 × 9 1/
4
6.38 × 9.02
4.49 × 6.38
4.33 × 8.66
7
3
/8 × 7 1/
7.68 × 10
2
2
1
/
2
Bypass Tray
Tray 1
•
Means that the size is supported and the printer selects the paper size automatically.
•
Means that the size is supported. See p.24 “Loading Paper in the Bypass
Tray”
•
Means that the size is supported but the paper size should be set with the
control panel as a custom size. The supported size is approximately 3.5 -
8.5 inches in width and 5.8 - 14 inches in length.
•
Means that the size is not supported.
Paper Feed Unit
(Tray 2/3)
2
❖❖❖❖ Paper weight and number of sheets to be set
Supported paper weight
Tray 1 60 - 105 g/m2
Bypass Tray 60 - 165 g/m2
PAPER FEED UNIT Type 3000 60 - 105 g/m2
*1
Confirm that the top of the stack is not higher than the limit mark inside the tray.
(16 - 28 lb. Bond)
(16 - 90 lb. Index)
(16 - 28 lb. Bond)
Maximum number of
sheets (plain paper)
530 (80 g/m2, 20 lb. Bond)
100 (80 g/m2, 20 lb. Bond)
530 (80 g/m2, 20 lb. Bond)
*1
17
Page 22

Paper and Other Media
Paper Recommendations
Loading Paper
Important
2
❒ Do not use paper that is meant for an ink-jet printer, or it may stick to the fus-
ing unit and cause a paper misfeed.
❒ Set the paper as described below
• Tray 1: Print side facing up
• Paper Feed Unit: Print side facing up
• Bypass Tray: Print side facing down
❒ Print quality cannot be guaranteed if paper other than the ones recommended
is used. For more information about recommended paper, contact your sales
or service representative.
Storing Paper
• Paper should always be stored properly. Improperly stored paper might result in poor print quality, paper misfeeds, or printer damage. Recommendations are as follows:
• Avoid storing paper in humid areas.
• Avoid exposing paper to direct sunlight.
• Store on a flat surface.
• Keep paper in the package in which the paper came.
Types of Paper and Other Media
❖❖❖❖ Plain Paper
• Plain paper refers to paper up to 105 g/m2 (28 lb. Bond). If you print on pa-
per heavier than 105 g/m
• Any input tray can be used.
• Tray 1 can hold up to 530 sheets.
PAPER FEED UNIT Type 3000 can hold up to 530 sheets.
(Up to two units can be installed to the printer.)
The Bypass Tray can hold up to 100 sheets.
Confirm that the top of the stack is not higher than the limit mark inside
the tray.
• The Bypass Tray supports custom size paper approximately 90 to 216 mm
(3.5 to 8.5 inches) in width, and approximately 148 to 356 mm (5.8 to 14
inches) in length.
18
2
(28 lb. Bond), use the Bypass Tray.
Page 23

Paper and Other Media Supported by This Printer
• When printing on the reverse side of plain paper that has been already
printed on, load it on the Bypass Tray with print side down, and then select
[Plain:Dup. Back] with the control panel or the printer driver. Only the Bypass Tray supports this function.
❖❖❖❖ Thick Paper
• Thick paper refers to paper between 106 g/m2 (28.2 lb. Bond) to 165 g/m
(90 lb. Index).
• Use the Bypass Tray and select the thick paper mode with the control panel
or printer driver. Tray 1 or Paper Feed Unit cannot be used.
• Confirm that the top of the stack is not higher than the limit mark inside
the tray.
• When printing on the reverse side of thick paper that has been already
printed on, load it on the Bypass Tray with print side down, and then select
[Thick:Dup. Back] with the control panel or the printer driver. Only the Bypass Tray supports this function.
Note
❒ The number of sheets to be set may vary depending on the paper thick-
ness and paper type.
❒ There may be noise when printing on thick paper. This is not a malfunc-
tion.
❖❖❖❖ Thin Paper
• Thin paper refers to paper between 60g/m2 (16 lb.Bond) to 70g/m2 (19
lb.Bond).
• Set the printer to Thin Paper mode using the control panel.
2
2
Reference
See “Specifying a paper type” or p.27 “Specifying a paper type for the Bypass Tray”.
❖❖❖❖ Glossy Paper
• Glossy paper refers to paper 130 g/m2 (100 lb Text).
• Use the Bypass Tray and select glossy paper mode with the printer driver.
Tray 1 or Paper Feed Unit cannot be used.
❖❖❖❖ OHP transparencies
When printing on an OHP transparency that has a print side, be sure to print
on the print side. Otherwise, it may stick to the fusing unit and cause a paper
misfeed.
Print quality cannot be guaranteed if OHP transparencies other than the ones
recommended is used. For more information about recommended OHP
transparency, contact your sales or service representative.
• Use the Bypass Tray. Tray 1 or Paper Feed Unit cannot be used.
• The Bypass Tray can hold up to 50 sheets.
19
Page 24

Paper and Other Media
• Separate stuck OHP transparencies every time before printing.
• If OHP transparencies stick together when they feed, set them on the tray
one by one or select "Slip sheet" in the printer driver. For more information
about using "Slip sheet", see the printer driver's Help.
• Confirm that the top of the stack is not higher than the limit mark inside
the tray.
• When printing on OHP transparencies, select the Transparency mode with
2
the control panel or the printer driver.
• Remove OHP transparencies from the tray after use to prevent them from
sticking to each other.
❖❖❖❖ Envelopes
• Use the Bypass Tray. Tray 1 and the Paper Feed Unit cannot be used.
• The Bypass Tray can hold up to 10 envelopes.
• Load envelopes in the Bypass Tray with the print side down.
• Load only one size and type of envelope at a time.
• Do not forcibly push envelopes when loading.
• Confirm that the top of the stack is not higher than the limit mark inside
the tray.
• Use flat envelopes with no curl. If they have a curl, flatten them.
• Use completely flat envelopes that contain no air inside.
• Do not print on both sides of envelopes.
• Do not use the following envelopes:
Envelopes with multiple flaps
Envelopes with a peel-off adhesive strip
Envelopes with windows or clasps
Envelopes made of paper that is not supported by this printer (See p.20
“Paper not supported by this printer”)
• We recommend setting the margins to at least 15 mm (0.6 inch) for all four
directions.
• Envelopes may wrinkle or print quality may be poor depending on the
characteristics of the envelope such as weight and stiffness.
• See p.15 “Paper Sizes” for the supported sizes of envelopes.
❖❖❖❖ Paper not supported by this printer
Avoid using the following paper as they are not supported by this printer.
• Paper meant for an ink-jet printer
• Bent, folded, or creased paper
• Curled or twisted paper
• Torn paper
• Wrinkled paper
20
Page 25
Paper and Other Media Supported by This Printer
• Damp paper
• Paper that is dry enough to emit static electricity
• Paper that has already been printed onto, except a preprinted letterhead
• Special paper, such as thermal paper, aluminum foil, carbon paper and
conductive paper
• Paper whose weight is heavier or lighter than the limitation.
• Paper with windows, holes, perforations, cutouts, or embossing
• Adhesive label paper on which glue or base paper is exposed
• Paper with clips or staples
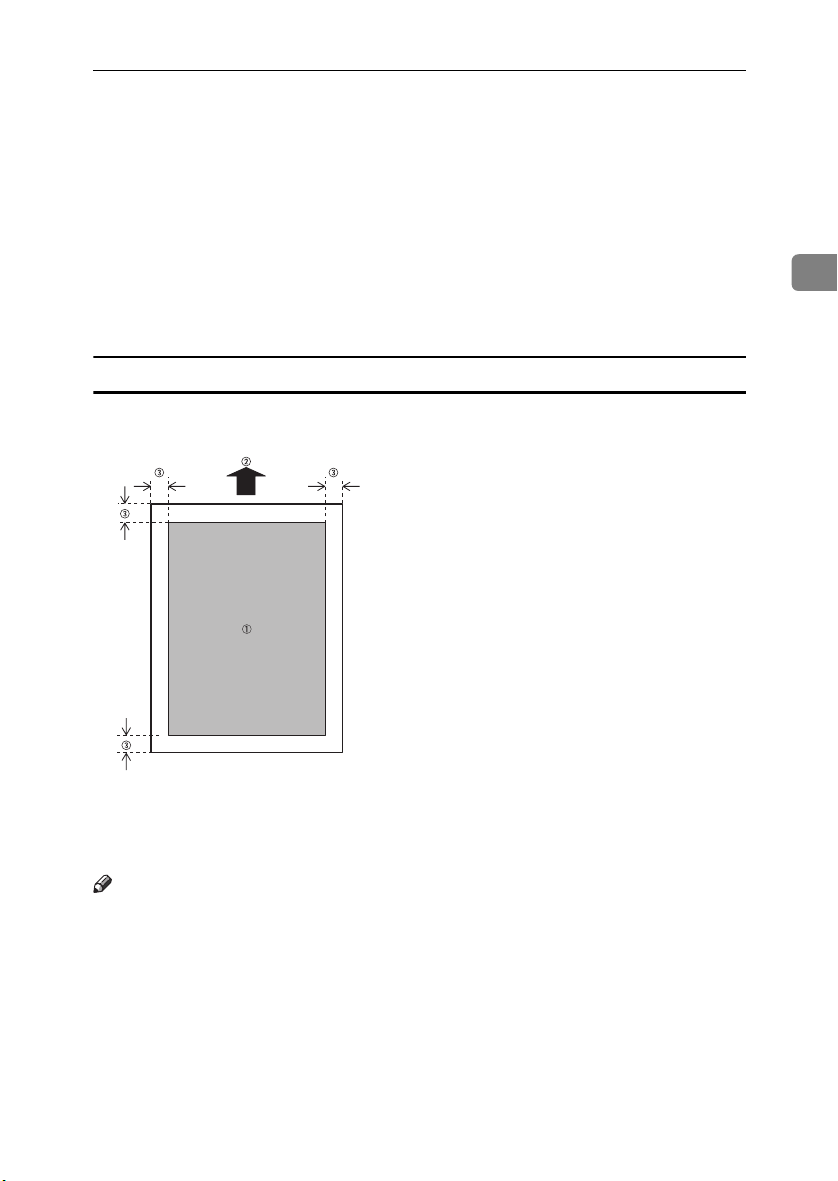
Print Area
The following shows the print area for this printer. Be sure to set the print margins correctly by the application.
2
A : Print area
B : Feed direction
C : Approx. 5 mm (0.2 inch)
Note
❒ The print area may vary depending on the paper size, printer language and
printer driver settings.
21
Page 26
Paper and Other Media
R
Loading Paper
CAUTION:
• When pulling the paper tray out,
be careful not to pull it strongly. If
you do, the tray might fall and
2
cause an injury.
Adjust the side guides to the pa-
CCCC
per size you want to load.
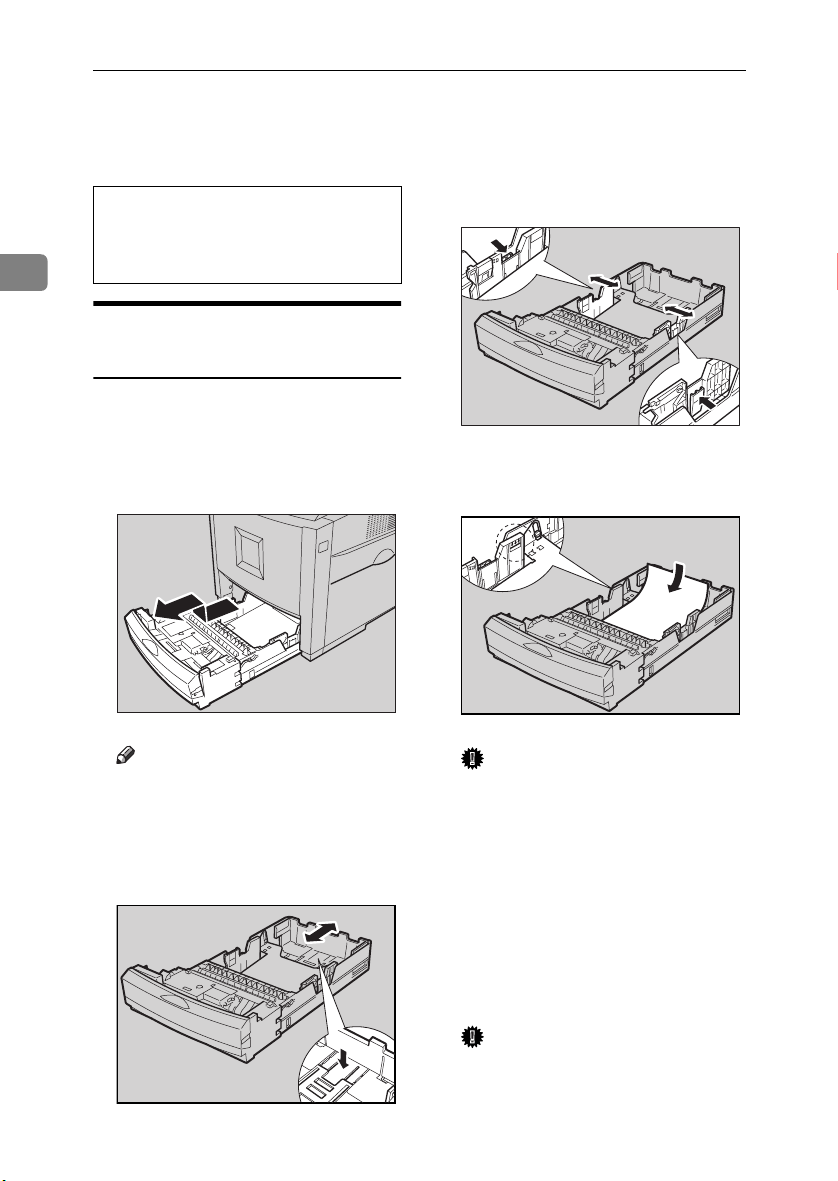
Loading Paper in Tray 1/Optional Paper Feed Unit
Pull the paper tray out of the
AAAA
printer until it stops. After that,
lift it slightly, and then pull it out
completely. Place it on a flat surface.
ZHBY010E
Load paper into the paper tray
DDDD
with the print side up.
ZHBY060E
ZHBY020E
22
Note
❒ You can not pull Tray 1 out if
the Bypass Tray is open.
Press "Push", and then adjust the
BBBB
rear guide to the paper size you
want to load.
ZHBY040E
Important
❒ Make sure that the top of the
stack is not higher than the limit
mark inside the tray.
❒ The side guides should be set
exactly to the paper size to
avoid paper misfeeds.
❒ Do not load different kinds of
paper in the tray.
Slide the paper tray completely
EEEE
into the printer.
Important
❒ Be sure to insert the paper tray
completely. Otherwise, misfeeds might occur.
Page 27

Changing paper size of the paper tray
Pull the paper tray out of the
AAAA
printer until it stops. After that,
lift it slightly, and then pull it out
completely. Place it on a flat surface
Remove the paper.
BBBB
ZHBY010E
Loading Paper
Adjust the side guides to the pa-
DDDD
per size you want to load.
Load paper into the paper tray,
EEEE
with the print side up.
2
ZHBY060E
Press "Push", and then adjust the
CCCC
rear guide to the paper size you
are using.
ZHBY030E
ZHBY040E
ZHBY020E
Important
❒ Confirm that the top of the stack
is not higher than the limit mark
inside the tray.
Slide the paper tray completely
FFFF
into the printer.
Specifying a paper type
By selecting the paper type you want
to load, the printer can perform printing better.
You can select from the following paper types:
• Plain Paper, Recycled Paper, Special Paper, Color Paper, Letterhead, Preprinted, Prepunched,
Bond Paper, Cardstock
23
Page 28

Paper and Other Media
Note
❒ When selecting "Plain Paper", se-
lect either "Thin" or "Normal" for
"PlainPaper Type" in the "Maintenance" menu.
Press the {{{{Menu}}}} key.
AAAA
2
"Menu" appears on the panel display.
Press the {{{{UUUU}}}} or {{{{TTTT}}}} key to dis-
BBBB
play "Paper Input", and then
press the {{{{Enter #}}}} key.
Menu:
Paper Input
Press the {{{{UUUU}}}} or {{{{TTTT}}}} key to dis-
CCCC
play "Paper Type", and then press
the {{{{Enter #}}}} key.
Paper Input:
Paper Type
Press the {{{{UUUU}}}} or {{{{TTTT}}}} key to dis-
DDDD
play "Tray 1", and then press the
{{{{Enter #}}}} key.
Paper Type:
Tray 1
Press the {{{{UUUU}}}} or {{{{TTTT}}}} key to dis-
EEEE
play the loaded paper type, and
then press the {{{{Enter #}}}} key.
Tray 1:
Recycled Paper
In about two seconds, “Menu” appears on the panel display.
Loading Paper in the Bypass
Tray
In addition to plain paper, you can
load thick paper, envelopes, glossy
paper and OHP transparencies onto
the Bypass Tray.
Note
❒ Paper sizes supported by the By-
pass Tray can be 90 - 216 mm (3.5 -
8.5 inches) in width, and 148 - 356
mm (5.8 - 14 inches) in length.
❒ The paper size selected with the
printer driver overrides the one selected with the control panel. You
do not have to make settings with
the control panel if you have already made them with the printer
driver. However, when using a
printer driver other than the RPCS
printer driver, you must make the
settings using the control panel.
For more information about the
printer driver, see the printer driver's Help. Also, see p.27 “Specify-
ing a paper type for the Bypass
Tray”.
❒ If you load thick paper, or plain or
thick paper that has been already
printed on one side, make the settings for the paper type with the
control panel or the printer driver.
See p.26 “Specifying a custom paper size for the Bypass Tray”.
❒ The number of pages that can be
loaded in the Bypass Tray differs
depending on the paper type.
24
Press the {{{{On Line}}}} key.
FFFF
"Ready" appears on the panel display.
Page 29

Loading Paper
Open the Bypass Tray.
AAAA
Extend the Bypass Tray.
BBBB
Slide the side guides outwardAAAA ,
CCCC
and then load paper until it stops
with the print side down BBBB.
ZHBY070E
ZHBY080E
Adjust the side guides to the pa-
DDDD
per width.
Important
❒ Confirm that the top of the stack
is not higher than the limit mark
inside the tray.
❒ Shuffle the paper before loading
the stack onto the tray so multiple sheets are not fed in at the
same time.
Set the paper size using the con-
EEEE
trol panel as follows:
A Press the {{{{Menu}}}} key.
"Menu" appears on the panel
display.
B Press the {{{{UUUU}}}} or {{{{TTTT}}}} key to dis-
play "Paper Input", and then
press the {{{{Enter #}}}} key.
2
ZHBY100E
ZHBY090E
Menu:
Paper Input
C Confirm that "Bypass Size" is
displayed, and then press the
{{{{Enter #}}}} key.
Paper Input:
Bypass Size
25
Page 30

Paper and Other Media
D Press the {{{{UUUU}}}} or {{{{TTTT}}}} key to dis-
play the size and direction of
the paper in the Bypass Tray.
Bypass Size:
8 1/2 × 13
2
In about two seconds, “Menu”
appears on the panel display.
E Press the {{{{On Line}}}} key.
"Ready" appears on the panel
display.
Specifying a custom paper size for the
Bypass Tray
Specify the paper size with the control panel when you load custom size
paper.
Press the {{{{UUUU}}}} or {{{{TTTT}}}} key to dis-
BBBB
play "Paper Input", and then
press the {{{{Enter #}}}} key.
Menu:
Paper Input
Confirm that "Bypass Size" is dis-
CCCC
played, and then press the {{{{Enter
#}}}} key.
Paper Input:
Bypass Size
Press the {{{{UUUU}}}} or {{{{TTTT}}}} key to dis-
DDDD
play "Custom size", and then
press the {{{{Enter #}}}} key.
Bypass Size:
Note
❒ The printer cannot print from ap-
plications that do not support custom paper size.
❒ Set the vertical value for A, and set
the horizontal value for B.
Custom Size
Press the {{{{UUUU}}}} or {{{{TTTT}}}} key to set the
EEEE
vertical value, and then press the
{{{{Enter #}}}} key.
Custom Size:
Vert. 150mm
26
Press the {{{{Menu}}}} key.
AAAA
"Menu" appears on the panel display.
ZHBY110E
The unit on the panel display can
be changed to inches with the control panel.
Press the {{{{UUUU}}}} or {{{{TTTT}}}} key to set the
FFFF
horizontal value, and then press
the {{{{Enter #}}}} key.
Custom Size:
Horiz. 200mm
In about two seconds, "Menu" appears on the display panel.
Press the {{{{On Line}}}} key.
GGGG
"Ready" appears on the panel display.
Page 31

Specifying a paper type for the Bypass
Tray
By selecting the paper type you want
to load, the printer can perform printing better.
You can select from the following paper types:
• Plain Paper, Recycled Paper, Special Paper, Color Paper, Letterhead,
Preprinted, Prepunched, Labels
(adhesive label paper), Bond Paper, Cardstock, Transparency
(OHP transparency), Thick Paper,
Plain:Dup.Back (reverse side of
plain paper), Thick:Dup.Back (reverse side of thick paper), Glossy
Paper
Loading Paper
Press the {{{{UUUU}}}} or {{{{TTTT}}}} key to dis-
CCCC
play "Paper Type", and then press
the {{{{Enter #}}}} key.
Paper Input:
Paper Type
Press the {{{{UUUU}}}} or {{{{TTTT}}}} key to dis-
DDDD
play "Bypass Tray", and then
press the {{{{Enter #}}}} key.
Paper Type:
Bypass Tray
Press the {{{{UUUU}}}} or {{{{TTTT}}}} key to dis-
EEEE
play the loaded paper type, and
then press the {{{{Enter #}}}} key.
2
Note
❒ When selecting "Plain Paper",
select either "Thin" or "Normal"
for "PlainPaper Type" in the
"Maintenance" menu.
Important
❒ You must specify the paper type
when using thick paper, adhesive label paper, OHP transparencies, or when printing on
plain or thick paper that has already been printed on one side.
Press the {{{{Menu}}}} key.
AAAA
"Menu" appears on the panel display.
Press the {{{{UUUU}}}} or {{{{TTTT}}}} key to dis-
BBBB
play "Paper Input", and then
press the {{{{Enter #}}}} key.
Menu:
Paper Input
Bypass Tray:
Thick Paper
Press the {{{{On Line}}}} key.
FFFF
"Ready" appears on the panel display.
27
Page 32

Paper and Other Media
2
28
Page 33

3. Replacing Consumables
R
R
and Maintenance Kit
Toner Cartridge
WARNING:
• Do not incinerate spilled toner
or used toner. Toner dust is
flammable and might ignite
when exposed to an open
flame. Disposal should take
place at an authorized dealer
or an appropriate collection
site. If you dispose of the used
toner cartridges yourself, dispose of them according to local regulations.
CAUTION:
• Keep toner (used or unused) and
the toner cartridge out of reach
of children.
Note
❒ The actual printable numbers vary
depending on the image volume
and density, number of pages to be
printed at a time, paper type and
paper size used, and environmental conditions such as temperature
and humidity. The quality of toner
lowers in time. Because of this, the
toner cartridge may require replacement earlier than expected.
We recommend that you prepare a
new toner cartridge beforehand.
Replace the toner cartridge of the indicated color when the following
message appears on the panel display.
Add Toner
XXX/XXX
or
Toner is Almost
Empty:XXX
Note
❒ The color is displayed for XXX.
❒ If cyan, magenta or yellow toner
runs out, you can print in black
and white using the black toner.
Change the color mode setting to
"Black and White" with the printer
driver.
❒ If black toner runs out, printing is
not possible until the black toner
cartridge is replaced.
Open the upper left cover of the
AAAA
printer.
ZHBH440E
29
Page 34

Replacing Consumables and Maintenance Kit
Remove the toner cartridge for
BBBB
the color you want to replace.
Important
❒ Do not open the shutter at the
bottom of the toner cartridge.
The toner may spill.
3
ZHBH900E
You can remove all four cartridges
in the same way.
In the illustration, yellow cartridge
is used as an example.
Important
❒ Do not shake the removed toner
cartridge. The remaining toner
may spill.
Take out a new toner cartridge
CCCC
from the package.
Shake the toner cartridge back
DDDD
and forth about 10 times.
Check that the toner color and lo-
EEEE
cation are correct, and then insert
the toner cartridge vertically and
slowly.
ZHBH470E
30
ZHBH480E
ZHBH460E
In the illustration, black cartridge
is used as an example.
Page 35

Insert the toner cartridge in the
FFFF
direction of the arrow.
You can install all four cartridges
in the same way.
Important
❒ Do not repeatedly install and re-
move the toner cartridges. This
could result in a toner leak.
Close the upper left cover of the
GGGG
printer.
Toner Cartridge
3
ZHBH490E
ZHBH500E
Note
❒ If the toner cartridge is not in-
stalled properly, you cannot
close the upper left cover of the
printer.
31
Page 36

Replacing Consumables and Maintenance Kit
R
R
Waste Toner Bottle Type 125
WARNING:
• Do not incinerate spilled toner
or used toner. Toner dust is
flammable and might ignite
when exposed to an open
flame. Disposal should take
place at an authorized dealer
3
or an appropriate collection
site. If you dispose of the used
toner containers yourself, dispose of them according to local regulations.
CAUTION:
• Keep toner (used or unused) and
the toner cartridge out of reach
of children.
• Do not put an object on the right
cover when it is open.
Replace the waste toner bottle when
the following message appears on the
panel display.
Unlock the waste toner bottle.
DDDD
Important
❒ Do not lock the waste toner bot-
tle that has been removed. Toner may spill.
ZHBH630E
Replace
Waste Toner
ZHBH640E
Turn off the power.
AAAA
Open the right cover.
BBBB
Remove the used waste toner bot-
EEEE
tle slowly.
32
Take out a new waste toner bottle
CCCC
from the bag.
ZHBH290E
ZHBH650E
Page 37

Place the new waste toner bottle
FFFF
in the position as shown in the illustration.
Lock the waste toner bottle.
GGGG
Waste Toner Bottle Type 125
3
ZHBH660E
Important
❒ Be sure to lock the waste toner
bottle to prevent toner from
leaking inside the printer.
Close the right cover slowly.
HHHH
Turn on the power.
IIII
ZHBH670E
ZHBH430E
33
Page 38

Replacing Consumables and Maintenance Kit
R
R
Photo Conductor Unit Type 125 Black/Color
WARNING:
• Do not incinerate spilled toner
or used toner. Toner dust is
flammable and might ignite
when exposed to an open
flame. Disposal should take
3
place at an authorized dealer
or an appropriate collection
site. If you dispose of the used
toner containers yourself, dispose of them according to local regulations.
CAUTION:
• Keep toner (used or unused) and
the toner cartridge out of reach
of children.
• Do not put an object on the right
cover when it is open.
Replace the black or color photo conductor unit when the following message appears on the panel display.
Replace
Black PCU
or
❖❖❖❖ Photo Conductor Unit Type 125 Black
ZHBH680E
❖❖❖❖ Photo Conductor Unit Type 125 Color
ZHBH690E
Turn off the power.
AAAA
Open the right cover.
BBBB
Replace
Color PCU
Check the contents of the box for the
following items:
ZHBH290E
34
Page 39

Photo Conductor Unit Type 125 Black/Color
Pull out the green levers on the
CCCC
left and right that are fastening
the inner cover to unlock the levers.
Lift the inner cover until it stays
DDDD
up.
ZHBH300E
B Pull out the photo conductor
unit slowly.
ZHBH330E
Photo Conductor Unit Type 125
Color
A Pinch the green lever to unlock
the unit.
3
Remove the photo conductor unit.
EEEE
Photo Conductor Unit Type 125
Black
A Pinch the green lever to unlock
the unit.
ZHBH310E
ZHBH340E
B Pull out the photo conductor
unit slowly until it stops.
ZHBH350E
ZHBH320E
35
Page 40

Replacing Consumables and Maintenance Kit
C Pinch the green part to unlock.
Important
❒ Do not remove the cover at-
tached to the bottom of the photo conductor unit yet.
❒ After you take the new Photo
Conductor Unit out of the bag,
quickly install it.
Align the green arrow at the tip of
HHHH
the photo conductor unit to the
3
ZHBHa910E
D Pull out the photo conductor
unit slowly.
Important
❒ Be sure to hold the unit with
both hands, and then pull it
out slowly.
Take out the new photo conduc-
FFFF
rail inside the printer.
Important
❒ Make sure the green arrow fits
securely on the rail before proceeding to the next step.
❖❖❖❖ Photo Conductor Unit Type 125
Black
tor unit.
Peel off the tape, which is around
GGGG
Photo Conductor Unit by peeling
it downward, and remove the cover on top of the Unit.
36
ZHBH370E
❖❖❖❖ Photo Conductor Unit Type 125
Color
ZHBH681E
ZHBH380E
ZHBHA680E
Page 41

Photo Conductor Unit Type 125 Black/Color
Push the front of the photo con-
IIII
ductor unit slowly, sliding the
unit on the cover and into the machine until it stops.
❖❖❖❖ Photo Conductor Unit Type 125
Black
❖❖❖❖ Photo Conductor Unit Type 125
Color
ZHBH390E
Lower the inner cover slowly.
JJJJ
Push the green lever to fasten the
KKKK
inner cover.
Close the right cover slowly.
LLLL
ZHBH410E
ZHBH420E
3
ZHBH400E
Important
❒ If you do not attach the green
arrow of the photo conductor
unit securely to the rail, you
may damage the photo conductor unit.
Turn on the power.
MMMM
ZHBH430E
37
Page 42

Replacing Consumables and Maintenance Kit
R
Fusing Unit Type 125
CAUTION:
• The inside of the machine becomes very hot. Do not touch the
parts with a "v" label (means
hot surface). Touching a part
with a "v" label (means hot surface) could result in a burn.
3
• The fusing unit becomes very
hot. When installing the new fusing unit, turn off the printer and
wait about 30 minutes. After that,
install the new fusing unit. Not
waiting for the unit to cool down
can result in a burn.
• Do not pull out the fusing unit
forcefully. It may cause the unit
to fall and result in an injury.
• When touching the fusing unit,
do not touch any areas other
than the handle as it may cause
a burn.
Replace the fusing unit when the following message appears on the panel
display.
Replace Fusing
Unit Soon
or
Replace
Fusing Unit
Check the contents of the box for the
following items:
❖❖❖❖ Fusing Unit
ZHBH200E
❖❖❖❖ Transfer Roller
ZHBH590E
Important
❒ Be sure to make the setting from
the control panel after replacing
the fusing unit. Without it, the procedure is incomplete.
Turn off the power.
AAAA
Important
❒ To prevent a burn, after the
power is turned off, be sure to
wait about 30 minutes until the
fusing unit cools down before
touching the fusing unit.
38
Page 43

Fusing Unit Type 125
Open the front cover by pushing
BBBB
the front cover release button.
Pinch the connector lever, and
CCCC
then pull out the connector.
Push the green release buttons on
DDDD
the left and right outwards to unlock the fusing unit.
ZHBP281E
ZHBH210E
Remove the fusing unit slowly.
EEEE
Take out the new fusing unit
FFFF
from the box.
Place the unit as shown, and then
GGGG
insert the new fusing unit slowly.
Insert the fusing unit until it
HHHH
clicks, and then check that the
unit is locked.
ZHBH230E
ZHBH240E
3
ZHBH220E
ZHBH250E
39
Page 44

Replacing Consumables and Maintenance Kit
Push in the connector.
IIII
3
Turn the green part in the direc-
JJJJ
tion of the arrow, and then remove the transfer roller.
Take out the new transfer roller.
KKKK
Important
❒ Do not touch the roller part.
ZHBH260E
ZHBH600E
Hold the green part as shown, and
LLLL
then insert the transfer roller into
the printer.
Important
❒ The end with a longer shaft
must be on the left.
Close the front cover slowly.
MMMM
Turn on the power.
NNNN
Make the setting from the control
OOOO
panel.
When "Replace Fusing Unit"
Appears on the Panel Display
A If the following message is on
the control panel, press the {{{{Es-
cape}}}} key for more than five
seconds. The message disappears and a maintenance reset
is performed automatically.
ZHBH620E
40
ZHBH610E
Replace
Fusing Unit
When "Replace Fusing Unit Soon"
Appears on the Panel Display
A Press the {{{{Menu}}}} key.
“Menu” appears on the panel
display.
Page 45

B Press the {{{{UUUU}}}} or {{{{TTTT}}}} key to dis-
play “Maintenance”, and then
press the {{{{Enter #}}}} key.
Menu:
Maintenance
C Press the {{{{UUUU}}}} or {{{{TTTT}}}} key to dis-
play “Maint. Reset”, and then
press the {{{{Enter #}}}} key.
Fusing Unit Type 125
Maintenance:
Maint. Reset
D Press the {{{{UUUU}}}} or {{{{TTTT}}}} key to dis-
play “Fusing Unit”, and then
press the {{{{Enter #}}}} key.
Maint. Reset
Fusing Unit
The following message appears.
Fusing Unit:
Press # to Reset
E Press the {{{{Enter #}}}} key. Wait for
a few seconds.
F Press the {{{{On Line}}}} key.
"Ready" appears on the panel
display.
3
41
Page 46

Replacing Consumables and Maintenance Kit
R
Intermediate Transfer Unit Type 125
CAUTION:
• The inside of the machine becomes very hot. Do not touch the
parts with a "v" label (means
hot surface). Touching a part
with a "v" label (means hot surface) could result in a burn.
3
Replace the transfer belt when the following message appears on the panel
display.
Turn off the power.
AAAA
Open the right cover of the print-
BBBB
er.
Replace Transfer
Belt soon
or
Replace
Transfer Belt
Check the contents of the box for the
following items:
❖❖❖❖ Transfer Belt
Remove the Waste Toner Bottle.
CCCC
Reference
See p.32 “Waste Toner Bottle
Type 125”.
Pull out the green levers on the
DDDD
left and right that are fastening
the inner cover to unlock the levers.
ZHBH290E
Important
❒ Be sure to make the setting from
the control panel after replacing
the transfer belt. Without it, the
procedure is incomplete.
42
ZHBH510E
ZHBH300E
Page 47

Intermediate Transfer Unit Type 125
Lift the inner cover until it stays
EEEE
up.
Unlock the waste toner bottle.
FFFF
Important
❒ Do not lock the waste toner bot-
tle that has been removed. Toner may spill.
ZHBH310E
ZHBH630E
Remove the waste toner bottle
GGGG
slowly.
Turn the green screws on the left
HHHH
and right in the direction of the
arrows to loosen them.
The screws are not removed.
Pinch the both screws and remove
IIII
the transfer belt slowly until it
stops.
ZHBH650E
3
ZHBH520E
ZHBH640E
ZHBH530E
43
Page 48

Replacing Consumables and Maintenance Kit
Raise the green cover, hold the
JJJJ
transfer belt as shown, and then
remove the transfer belt.
Close the green cover, and then
MMMM
insert it until it stops.
3
ZHBH920E
ZHBH540E
Turn the green screws on the left
Important
❒ Be sure to hold the unit with
both hands, and then pull it out
slowly.
❒ Do not touch the belt part.
Take out the new transfer belt.
KKKK
Holding the transfer belt as
LLLL
shown, insert the transfer belt in
the printer.
NNNN
and right in the direction of the
arrows to tighten them.
ZHBH580E
44
ZHBH560E
Place the waste toner bottle in the
OOOO
position as shown in the illustration.
ZHBH660E
Page 49

Intermediate Transfer Unit Type 125
Lock the waste toner bottle.
PPPP
Important
❒ Be sure to lock the waste toner
bottle to prevent toner from
leaking inside the printer.
Lower the inner cover slowly.
QQQQ
ZHBH670E
Close the right cover.
SSSS
Turn on the power.
TTTT
Make the setting from the control
UUUU
panel.
When "Replace Transfer Belt"
Appears on the Panel Display
A If the following message is on
the control panel, press the {{{{Es-
cape}}}} key for more than five
seconds. The message disappears and a maintenance reset
is performed automatically.
ZHBH430E
3
Push the green levers to fasten the
RRRR
inner cover.
ZHBH410E
ZHBH420E
When "Replace Transfer Belt
Soon" Appears on the Panel
Display
A Press the {{{{Menu}}}} key.
"Menu" appears on the panel
display.
B Press the {{{{UUUU}}}} or {{{{TTTT}}}} key to dis-
play "Maintenance", and then
press the {{{{Enter #}}}} key.
Menu:
Maintenance
45
Page 50

Replacing Consumables and Maintenance Kit
C Press the {{{{UUUU}}}} or {{{{TTTT}}}} key to dis-
play "Maint. Reset", and then
press the {{{{Enter #}}}} key.
Maintenance:
Maint. Reset
D Press the {{{{UUUU}}}} or {{{{TTTT}}}} key to dis-
play "Transfer Belt", and then
press the {{{{Enter #}}}} key.
3
Maint. Reset:
Transfer Belt
The following message appears.
Transfer Belt:
Press # to Reset
E Press the {{{{Enter #}}}} key.
Wait for a few seconds.
F Press the {{{{On Line}}}} key.
"Ready" appears on the panel
display.
46
Page 51

4. Cleaning and Adjusting the
R
R
Printer
Cautions to Take When Cleaning
WARNING:
• Do not remove any covers or screws other than those specified in this
manual. Some parts of the machine are at a high voltage and could
give you an electric shock. Also, if the machine has laser systems, direct (or indirect) reflected eye contact with the laser beam may cause
serious eye damage. When the machine needs to be checked, adjusted, or repaired, contact your service representative.
• Do not take apart or attempt any modifications to this machine. There
is a risk of fire, electric shock, explosion or loss of sight. If the machine
has laser systems, there is a risk of serious eye damage.
CAUTION:
• When removing misfed paper, do not touch the fusing unit because it could
be very hot.
Clean the printer periodically to maintain fine printing.
Dry wipe the exterior with a soft cloth. If dry wiping is not enough, wipe with a
soft, wet cloth that is wrung out well. If you still cannot remove the stain or
grime, use a neutral detergent, and then wipe over with a well-wrung wet cloth,
dry wipe, and let it dry.
Important
❒ To avoid deformation, discoloration, or cracking, do not use volatile chemi-
cals, such as benzine and thinner, or spray insecticide on the printer.
❒ If there is dust or grime inside the printer, wipe with a clean, dry cloth.
47
Page 52

Cleaning and Adjusting the Printer
Adjusting the Color Registration
When the printer is moved, when the
Fusing Unit is replaced, or after printing repeatedly for some time, registration shifting might occur. By
performing color registration adjustment, you can maintain optimum
print results.
If the color documents show registration shifting, perform automatic color
adjustment.
Press the {{{{Menu}}}} key.
4
AAAA
Press the {{{{UUUU}}}} or {{{{TTTT}}}} key to dis-
CCCC
play "Color Regist.", and then
press the {{{{Enter #}}}} key.
Maintenance:
Color Regist.
The following message appears.
Press #
To Adjust
Press the {{{{Enter #}}}} key.
DDDD
Automatic color adjustment begins, and the following message is
displayed.
Adjusting...
"Menu" appears on the panel display.
Press the {{{{UUUU}}}} or {{{{TTTT}}}} key to dis-
BBBB
play "Maintenance", and then
press the {{{{Enter #}}}} key.
Menu:
ZHBS010E
Important
❒ Do not turn off the power
switch while "Adjusting..." appears on the panel display to
avoid printer malfunction.
Automatic color adjustment takes
about two minutes. When it is
complete, the following message
appears.
Maintenance
Completed
48
Maintenance:
Color Regist.
Page 53

Adjusting the Image Density
Adjusting the Image Density
Adjust the image density when the
print side of the page is shaded or the
print image looks patchy.
Important
❒ Extreme settings may create out-
put that appears dirty.
❒ Image density settings should be
made from the application or the
printer driver whenever possible.
Note
❒ Changing the image density set-
ting might cause a deterioration of
color balance. We recommend that
you leave the image density at its
factory default setting.
Press the {{{{Menu}}}} key.
AAAA
ZHBS010E
"Menu" appears on the panel display.
Press the {{{{UUUU}}}} or {{{{TTTT}}}} key to dis-
BBBB
play "Maintenance", and then
press the {{{{Enter #}}}} key.
Menu:
Maintenance
Press the {{{{UUUU}}}} or {{{{TTTT}}}} key to dis-
CCCC
play "Image Density", and then
press the {{{{Enter #}}}} key.
Maintenance:
Image Density
The following message appears on
the panel display.
Image Density:
Prt. Test Sheet
Press the {{{{Enter #}}}} key.
DDDD
The following message appears on
the panel display, and then press
the {{{{Enter #}}}} key.
Prt.Test Sheet:
Press # to Start
Printing
Compare the colors on the printed
EEEE
image density test sheet with
those on the Image Density Adjusting Card.
Note
❒ If the image density of the Im-
age Density Adjusting Card is
equal to the framed part of the
test sheet, you do not need to
adjust the image density value.
4
49
Page 54

Cleaning and Adjusting the Printer
❒ If the image density of the Im-
age Density Adjusting Card is
equal to the density shown
above the frame, select “-” for
the image density setting. If the
image density of the Image
Density Adjusting Card is equal
to the density shown below the
frame, select “+” for the image
density setting.
Press the {{{{UUUU}}}} or {{{{TTTT}}}} key to select
FFFF
the color you want to adjust, and
then press the {{{{Enter #}}}} key.
4
Image Density:
Black
Press the {{{{UUUU}}}} or {{{{TTTT}}}} key to set the
GGGG
image density value, and then
press the {{{{Enter #}}}} key.
Black:
(-10 +10) 0
Note
❒ You can adjust the image densi-
ty in 21 steps from -10 to +10. Increasing the value makes the
printouts darker and decreasing
the value makes the printouts
lighter.
❒ Pressing the {{{{UUUU}}}} or {{{{TTTT}}}} key
makes the value increase or decrease by one.
To adjust another color, repeat the
and G.
steps
F
Press the {{{{On Line}}}} key.
HHHH
"Ready" appears on the panel display.
50
Ready
Page 55

Adjusting the Tray Registration
Adjusting the Tray Registration
You can adjust the registration of
Tray 2 and Tray 3 (optional Paper
Feed Unit). The vertical adjustment is
used for all trays. Normally, you need
not update the registration. But when
the optional Paper Feed Unit or the
Duplex Unit is installed, updating the
registration is useful in some cases.
The following procedure describes
how to adjust the registration of Tray
2. You can use the same procedure to
adjust the other tray as well.
Press the {{{{Menu}}}} key.
AAAA
ZHBS010E
"Menu" appears on the panel display.
Print the test sheet to preview the
DDDD
settings.
A Confirm that "Prt. Test Sheet"
is displayed, and then press
the {{{{Enter #}}}} key.
Registration:
Prt. Test Sheet
B Press the {{{{UUUU}}}} or {{{{TTTT}}}} key to dis-
play the tray to adjust, and
then press the {{{{Enter #}}}} key.
Prt. Test Sheet:
Tray 2
The test sheet is printed, and
then the printer returns to the
previous menu.
Confirm the position of the image
EEEE
on the test sheet, and then adjust
the registration value.
4
Press the {{{{UUUU}}}} or {{{{TTTT}}}} key to dis-
BBBB
play "Maintenance", and then
press the {{{{Enter #}}}} key.
Menu:
Maintenance
Press the {{{{UUUU}}}} or {{{{TTTT}}}} key to dis-
CCCC
play "Registration", and then
press the {{{{Enter #}}}} key.
Maintenance:
Registration
The following steps show how to
adjust the registration value to
make the margins equal.
51
Page 56

Cleaning and Adjusting the Printer
A Press the {{{{Escape}}}} key.
B Press the {{{{UUUU}}}} or {{{{TTTT}}}} key to dis-
play "Adjustment", and then
press the {{{{Enter #}}}} key.
Registration:
Adjustment
C Press the {{{{UUUU}}}} or {{{{TTTT}}}} key to dis-
play the tray to adjust, and
then press the {{{{Enter #}}}} key.
FFFF
GGGG
Adjustment:
4
Horiz.: Tray 2
D Press the {{{{UUUU}}}} or {{{{TTTT}}}} key to set
the registration value (mm).
A : Print Area
B : Feed Direction
❒ Pressing the {{{{UUUU}}}} or {{{{TTTT}}}} key
makes the value increase or
decrease by 0.5 mm steps.
E Press the {{{{Enter #}}}} key.
F Press the {{{{Escape}}}} key.
Print the test sheet to check the
settings you have made.
Press the {{{{On Line}}}} key.
"Ready" appears on the panel display.
Ready
Horiz.: Tray 2:
(-15 +15) 0
Note
❒ Increase the value to shift the
print area in the positive direction, and decrease to shift
in the negative direction.
52
ZDJX900J
Page 57

5. Troubleshooting
Error & Status Messages on the Control Panel
❖❖❖❖ Status Messages
Messages/Second messages Status
Calibrating… The printer is calibrating the color. Wait until "Ready" appears
Energy Save Mode The printer is in Energy Saver (low-power) mode. No action is
Hex Dump Mode The printer receives data in hexadecimal numbers in Hex
Offline The printer is offline. Make the printer online by pressing the
Please Wait The printer is initializing the development unit or HDD. Wait
Processing… The printer is processing the print job. Wait for a while.
Ready The default ready message. The printer is ready for use. No ac-
Resetting Job… The printer is resetting the print job. Wait until "Ready" ap-
Waiting… The printer is waiting for the next data to print. Wait for a
Warming Up… The printer is warming up and not ready. Wait until "Ready"
on the panel display.
required.
Dump mode. Turn off the printer after printing, and then turn
it back on.
{{{{On Line}}}} key to start printing.
for a while.
This message may appear when printing with small size paper
continuously.
Wait for a while.
tion is required.
pears on the panel display.
while.
appears on the panel display.
❖❖❖❖ Alert Messages
Messages/Second messages Description Solution
Add Toner:
XXX
The printer is out of the indicated toner(s).
XXX: Yellow/Magenta/Cyan/Black
Replace with a new toner cartridge of the indicated
color(s). Even when yellow,
magenta or cyan toner runs
out, you can print in black and
white using the black toner.
See p.29 “Replacing Consumables and Maintenance Kit”.
53
Page 58

Troubleshooting
Messages/Second messages Description Solution
Call Service: EC
Power Off On
Cannot check
Signal in Ad hoc
Change Setting
Tray #
/Paper Size:
Paper Type:
5
Close Front and/
or Right Cover
Close Upper Left
Cover
Color Regist
Error
Error: Tray #
Form Feed
/Reset The Job
Then Power OffOn
Hardware Problem
Black PCU
A communication error sent
from the engine to the controller.
The signal strength for the
wireless LAN cannot be
checked because "Ad hoc" is
select ed in "Comm. Mode" f or
"IEEE 802.11b" in the Host Interface menu.
The paper size or paper type
set in the indicated tray differs
from the setting made.
#: tray number
The front or right cover of the
printer is open.
The upper left cover of the
printer is open.
Color registration has failed. Turn the power switc h off and
There is a problem with the in dicated tray.
#: tray number or Bypass Tray
An error has occurred in the
black PCU (Photo Conductor
Unit).
Turn the power switch off and
on. If the message appears
again, contact your sales or
service representative.
Change the transmission
mode to [Infrastructure] in the
Host Interface menu.
Load paper of the selected size
and type in the tray, and then
change the paper setting with
the control panel.
Or press the {{{{Form Feed}}}} key
several times until the tray
with the desired paper type
and paper size appears on the
panel display.
Or press the {{{{Job Reset}}}} key to
cancel the print job.
Close the front or right cover
of the printer.
Close the upper left cover of
the printer.
on. If the message appears
again, contact your sales or
service representative.
Press the {{{{Form Feed}}}} key to
select another tray and make a
print, or turn the power
switch off and on. If the message appears again, contact
your sales or service representative.
Turn the power switch off and
on. If the message appears
again, contact your sales or
service representative.
54
Page 59

Error & Status Messages on the Control Panel
Messages/Second messages Description Solution
Hardware Problem
Bypass Tray
Hardware Problem
Color PCU
Hardware Problem
DIMM
Hardware Problem
Ethernet
Hardware Problem
HDD
Hardware Problem
IEEE1394
Hardware Problem
Wireless Board
Hardware Problem
NV-RAM
An error has occurred in the
Bypass Tray.
An error has occurred in the
color PCU (Photo Conductor
Unit).
The printer detected a DIMM
sum value error.
The printer detected an Ethernet error.
The printer detected a HDD
Board error.
The printer detected an
IEEE1394 Board error.
An error has occurred in the
optional 802.11b Interface
Unit or Bluetooth.
The printer detected a Memory Switch error.
Close the Bypass Tray and
then pull out Tray 1 partially.
Slide it completely into the
printer.
If the message appears yet,
turn the power switch off and
on.
If the message appears again,
contact your sales or service
representative.
Turn the power switch off and
on. If the message appears
again, contact your sales or
service representative.
Turn the power switch off and
on. If the message appears
again, contact your sales or
service representative.
Turn the power switch off and
on. If the message appears
again, contact your sales or
service representative.
Remove and reinstall the
Printer Hard Disk correctly. If
the message appears again,
contact your sales or service
representative.
See the Option Setup Guide.
Remove and reinstall
IEEE1394 Board correctly.
If the message appears again,
contact your sales or service
representative.
Remove and reinstall the IEEE
802.11b board or Bluetooth
board.
If the message appears again,
contact your sales or service
representative.
Remove and reinstall the optional User Account Enhance
Unit.
If the message appears again,
contact your sales or service
representative.
5
55
Page 60

Troubleshooting
Messages/Second messages Description Solution
Hardware Problem
Option RAM
Hardware Problem
Parallel I/F
Hardware Problem
USB
5
Invalid Password
Try Again
Load Correct
Size Paper
/Press #
To Continue
Load Paper
/Paper Size:
Paper Type
There is a problem with the
optional Memory Unit.
There is a problem with the
parallel interface.
There is a problem related to
the Universal Serial Bus Connection and Hardware.
The entered password is not
correct.
The paper size set in the indicated tray differs from the setting made.
The paper size set in the indicated tray differs from the setting made.
Remove and reinstall the optional Memory Unit. If the
message appears again, contact your sales or service representative.
See the Option Setup Guide.
If you use the parallel interface, replace the interface cable that caused the error. If the
message appears again, contact your sales or service representative.
Remove and reinstall the USB
board. If the message appears
again, contact your sales or
service representative.
Enter the correct password.
Load paper of the selected size
in the tray, and then press the
{{{{Enter #}}}} key to resume printing. If you want to ignore the
message and continue printing, press the {{{{Enter #}}}} key.
Load paper of the selected size
in the tray, and then change
the paper size setting with the
control panel.
Or press the {{{{Form Feed}}}} key
several times until the tray
with the desired paper type
and paper size appears on the
panel display.
Or press the {{{{Job Reset}}}} key to
cancel the print job.
Load paper of the selected
type in the tray, and then
change the paper size setting
with the control panel.
Or press the {{{{Form Feed}}}} key
several times until the tray
with the desired paper type
and paper size appears on the
panel display.
Or press the {{{{Job Reset}}}} key to
cancel the print job.
56
Page 61

Error & Status Messages on the Control Panel
Messages/Second messages Description Solution
Load Paper
Tray #
Menu Protected
Cannot Change
No Files
Exist
Remove Misfeed
B: Fusing Unit
Remove Misfeed
A: Internal Path
Remove Misfeed
Y: Paper Tray
Remove Paper
Standard Tray
Replace
Black PCU
Replace
Color PCU
Replace
Fusing Unit
Replace Fusing
Unit Soon
Replace Transfer
Belt soon
The indicated tray is out of paper.
#: tray number
The menu is protected. The setting cannot be c hanged
There are no files available for
Sample Print job or Locked
Print job.
There is a misfeed in the fusing unit.
There is a misfeed in the printer.
There is a misfeed in the input
tray, or the printer is not feeding paper.
The standard output tray is
full.
It is time to replace the black
PCU (Photo Conductor Unit).
It is time to replace the color
PCU (Photo Conductor Unit).
It is time to replace the fusing
unit.
It will be time to replace the
fusing unit soon.
It will be time to replace the
transfer belt soon.
Load paper into the indicated
paper tray.
for the selected menu.
You can check the error files in
the error log.
Remove the misfed paper.
For more information, see
p.70 “When "Remove Misfeed
B: Fusing Unit" Appears”.
Remove the misfed paper.
For more information, see
p.69 “When "Remove Misfeed
A:Internal Path" Appears”.
Remove the misfed paper.
For more information, see
p.72 “When "Remove Misfeed
Y: Paper Tray" Appears”.
Remove paper from the standard output tray.
Replace the black PCU (Photo
Conductor Unit) with a new
black PCU.
See p.29 “Replacing Consumables and Maintenance Kit”.
Replace the color PCU (Photo
Conductor Unit) with a new
color PCU.
See p.29 “Replacing Consumables and Maintenance Kit”.
Replace the fusing unit with a
new one.
See p.29 “Replacing Consumables and Maintenance Kit”.
Prepare a new fusing unit.
Prepare a new transfer belt.
5
57
Page 62

Troubleshooting
Messages/Second messages Description Solution
Replace
Waste Toner
Reset PCU
Correctly
Reset Fusing
Unit Correctly
Reset Paper
Bypass Tray
Reset Toner
5
/Yellow/Magenta/Cyan/Black
Reset Tray #
Correctly
Reset
Duplex Unit
Replace
Transfer Belt
SC XXX-X
Power Off On
Toner is Almost
Empty: Black
Toner is Almost
Empty: Cyan
It is time to replace the waste
toner bottle.
The black or color PCU is not
set correctly or is not set.
The fusing unit is not set correctly or is not set.
There is paper left in the Bypass Tray.
The indicated toner cartridge(s) is/are not set correctly
The indicated tray is not set or
is not set correctly.
#: tray number
The duplex unit is not set correctly or is not set.
It is time to replace the transfer belt.
The Service Code or SC
number indicates the problem.
The black toner is almost empty.
The cyan toner is almost empty.
Replace the waste toner bottle
with a new waste toner bottle.
See p.29 “Replacing Consumables and Maintenance Kit”.
Set the black or color PCU correctly.
See p.29 “Replacing Consumables and Maintenance Kit”.
Set the fusing unit correctly.
See p.29 “Replacing Consumables and Maintenance Kit”.
Remove paper from the Bypass Tray, and then reset the
paper.
Set the indicated toner cartridge correctly.
See p.29 “Replacing Consumables and Maintenance Kit”.
Set the tray correctly.
Or press the {{{{Form Feed}}}} key
several times until the tray
with the desired paper setting
appears on the panel display.
Or press the {{{{Job Reset}}}} key to
cancel the print job.
Remove and reinstall the duplex unit. If the message appears again, contact your sales
or service representative. See
the Option Setup Guide.
Replace the transfer belt with
a new transfer belt.
See p.29 “Replacing Consumables and Maintenance Kit”.
Turn the power switch off and
on. If the message appears
again, contact your sales or
service representative.
Prepare a new black toner cartridge.
Prepare a new cyan toner cartridge.
58
Page 63

Error & Status Messages on the Control Panel
Messages/Second messages Description Solution
Toner is Almost
Empty: Magenta
Toner is Almost
Empty: Yellow
The magenta toner is almost
empty.
The yellow toner is almost
empty.
Prepare a new magenta toner
cartridge.
Prepare a new yellow toner
cartridge.
5
59
Page 64

Troubleshooting
❖❖❖❖ Print Error Messages ("Error Log" in Configuration Page)
Messages/Second messages Description Solution
Collate Cancelled The collate feature has been
Driver Setting Error (Memory)
Duplex Cancelled Duplex printing has been can-
Exceeded Max. Pages (Collate)
5
Exceeded Max. Stored Files The maximum number of files
Exceeded Max. Stored Pages The maximum number of
HDD Full The maximum hard disk area
HDD Not Installed The Sample Print or Locked
I/O Buffer Overflow The maximum size of the I/O
Print Overrun The image data has been
cancelled.
There is an error in the downloaded font(s).
celed.
The maximum number of
pages has been exceeded for
collation.
has been exceeded during
Sample Print or Locked Print.
pages has been exceeded during Sample Print or Locked
Print.
size for form/font has been
exceeded.
An HDD overflow error occurred during Sample Print or
Locked Print.
Print feature was tried without the Printer Hard Disk installed.
buffer has been exceeded.
thinned out due to image
compression.
Install the optional Printer
Hard Disk or increase the
memory capacity to 128MB or
more.
Reset the parameter for downloading fonts.
Confirm that the paper us ed is
supported for duplex printing. Or, increase the memory
capacity.
Install the optional Printer
Hard Disk or increase the
memory capacity to 128MB or
more.
Delete the stored files or reduce the file size of them.
Reduce the number of pages
to print.
Delete unused form/font
types.
Delete the stored files or reduce the file size of them.
To use the Sample Print or
Locked Print feature, install
the optional Printer Hard
Disk. If the message appears
again, contact your sales or
service representative.
Increase the size of the I/O
buffer.
Increase the memory capacity.
60
Page 65

Error & Status Messages on the Control Panel
Messages/Second messages Description Solution
RPCS Graphic Error There is not enough graphics
memory to print the data.
RPCS Memory Overflow A memory overflow occurred
during the print job. After part
of the data for the page was
printed, the print job was suspended.
RPCS Syntax Error Bidirectional transmission
may not be working properly
or the RPCS printer driver settings may not be correct.
There may not be enough
memory or the memory settings for the printer driver
may not match the memory
actually installed on the printer.
This message may appear
when the computer is connected to the printer with parallel interface.
Specify the correct memory
capacity in the [Change Acces-
sories…] option in the RPCS
printer driver's print settings
tab. For more information, see
the printer driver's Help.
To print the image correctly,
add memory to the printer, or
reduce the resolution of the
image.
Specify the correct memory
capacity in the [Change Acces-
sories…] option in the RPCS
printer driver's print settings
tab. For more information, see
the printer driver's Help.
To print the image correctly,
add memory to the printer, or
reduce the resolution of the
image.
Confirm that the option settings for the printer driver
match the options actually installed on the printer.
Specify the correct memory
capacity in the [Change Acces-
sories…] option in the RPCS
printer driver's print settings
tab. For more information, see
the printer driver's Help.
To print the image correctly,
add memory to the printer, or
reduce the resolution of the
image.
Set the parallel interface mode
of the computer to a mode
other than ECP.
5
61
Page 66

Troubleshooting
Printer Does Not Print
Possible Cause Solutions
Is the power on? Confirm that the cable is securely plugged into the power outlet
Does the On Line indicator
stay on?
Does the Error indicator
stay red?
Is paper loaded? Load paper into Tray 1 or on the Bypass Tray.
Can you print a configuration page?
5
Is the interface cable connected securely to the
printer and the computer?
Are you using the correct
interface cable?
and the printer.
Turn on the power.
If not, press {{{{On Line}}}} to light it.
If so, check the error message on the panel display and take the required action.
See p.22 “Loading Paper”.
If you cannot print a configuration page, it probably indicates a
printer malfunction. Contact your sales or service representative.
See "Printing a Configuration Page" in the Administrator Reference.
Connect the interface cable securely. If it has a fastener, fasten it
securely as well.
The type of interface cable you should use depends on the computer you use. Be sure to use the correct one.
If the cable is damaged or worn, replace it with a new one.
See "Specifications" in the Administrator Reference.
62
Page 67

Possible Cause Solutions
Is the Data In indicator
blinking or lit after starting
the print job?
If not blinking or lit, the data is not being sent to the printer.
❖❖❖❖ If the printer is connected to the computer using the in-
terface cable
Make sure the following printer port settings are correct:
• For a parallel port connection, port LPT1 or LPT2 should be
set.
• For a USB port connection, port USB00 (n)
• For a IEEE 1394 (SCSI print) port connection, port
1394_00(n)
*1
(n) is the number of printers connected.
• Windows 95/98/Me
A Click [Start], point to [Settings] and then click [Printers].
B Click to select the icon of the printer. Next, on the [File]
C Click the [Details] tab.
D
• Windows 2000
A Click [Start], point to [Settings] and then click [Printers].
B Click to select the icon of the printer. Next, on the [File]
C Click the [Port] tab.
D Check the [Print to the following port] box to confirm that
• Windows XP
A
B
C Click the [Port] tab.
D
• Windows NT 4.0
A Click [Start], point to [Settings] and then click [Printers].
B Click to select the icon of the printer. Next, on the [File]
C Click the [Port] tab.
D Check the [Print to the following port] box to confirm that
*1
should be set.
menu, click [Properties].
Check the [Print to the following port] box to confirm that
the correct port is selected.
menu, click [Properties].
the correct port is selected.
Access the [Printers and Faxes] window from [Start] on
the taskbar.
Click to select the icon of the printer. Next, on the [File]
menu, click [Properties].
Check the [Print to the following port(s).] box to confirm
that the correct port is selected.
menu, click [Properties].
the correct port is selected.
Printer Does Not Print
*1
should be set.
5
63
Page 68

Troubleshooting
Possible Cause Solutions
When you use 1394 Interface Unit Type 4510
❖❖❖❖ Network Connection
Contact your network administrator.
A Confirm that 1394 Interface Unit Type4510 is attached to the
computer correctly.
B Confirm that IEEE1394 interface cable is connected securely.
C Restart the computer.
If the error occurs even after executing above operation, go to
the following steps.
D Unplug the IEEE 1394 interface cable which is connected to the
printer.
E Execute the utility tool for 1394 Interface Unit Type 4510 which
is stored in the following path in the CD-ROM labeled "Printer
Drivers and Utilities".
UTILITY\1394
Important
5
❒ For more information about using the utility tool for IEEE
1394, see the README file in the same directory in the CDROM.
64
Page 69

Other Printing Problems
Other Printing Problems
Status Possible Causes, Descriptions, and Solutions
Toner smears appear on the
print side of the page.
Paper gets wrinkles. Paper is damp. Use paper that has been stored properly.
The color of the printout is different from the color specified.
Color changes extremely when
adjusted with the printer driver.
Photo images are coarse. Some applications lower the resolution for making prints.
Black gradation is not natural. Select "CMY+K" for [Gray Reproduction] in the printer driver's
Color documents are printed in
black and white.
Fine dot pattern does not print. Change the [Dithering] setting in the printer driver's dialog
Images are cut off, or excess
pages are printed.
When “Replace PCU” appears on the panel display, replace
the photo conductor unit.
See p.29 “Replacing Consumables and Maintenance Kit”.
Set the image density lighter with the control panel in the
"Maintenance" menu.
See p.47 “Cleaning and Adjusting the Printer”.
Confirm that the paper is not curled or bent. Envelopes can
be curled easily. Flatten paper before loading.
See p.15 “Paper and Other Media”.
See p.15 “Paper and Other Media”.
Paper is too thin.
See p.15 “Paper and Other Media”.
The fusing unit is deteriorated or damaged. Replace the unit.
See p.29 “Replacing Consumables and Maintenance Kit”.
If a specific color is missing, turn the power switch off and
on. If this does not solve the problem, contact your sales or
service representative.
Do not extreme settings for the color balance under the [Print
Quality] tab in the printer driver's dialog box.
See the printer driver's Help.
dialog box.
See the printer driver's Help.
The printer driver is not set up for color printing.
See the printer driver's Help.
Some applications print color files in black and white.
box.
See the printer driver's Help.
If you are using paper smaller than the paper size selected in
the application, use the same size paper as that selected in the
application. If you cannot load paper of the correct size, use
the reduction function to reduce the image, and then print.
See the printer driver's Help.
5
65
Page 70

Troubleshooting
Status Possible Causes, Descriptions, and Solutions
It takes too much time to complete the print job.
It takes too much time to resume
printing.
5
Multiple pages are fed at once. Number of paper set in the tray exceeds the limit. Confirm
Paper is not fed from the selected tray.
Photographs and other data intensive pages take a long time
for the printer to process, so simply wait when printing such
data.
Changing the settings with printer driver may help to speed
up printing.
See the printer driver's Help.
The data is so large or complex that it takes time to process
it. If the Data In indicator is blinking, the data is being processed. Just wait until it resumes.
If "Warming Up..." appears on the panel display, the printer
is now warming up. Wait for a while.
The data is so large or complex that it takes time to process
it. If the Data In indicator is blinking, the data is being processed. Just wait until it resumes.
The printer was in the Energy Saver mode. To resume from
the Energy Saver mode, the printer has to warm up, and this
takes time until printing starts. To disable the Energy Saver
mode, select "Off" for "Energy Saver" in the System Settings
menu.
that the top of the stack is not higher than the limit mark inside the tray.
See p.15 “Paper and Other Media”.
Paper is static. Use paper that has been stored properly.
When loading paper, separate paper from each other.
See p.15 “Paper and Other Media”.
Paper is either too thick or too thin.
See p.15 “Paper and Other Media”.
When using the Bypass Tray, confirm that the paper size and
the feed direction on the tray are the same as the ones set
with the control panel.
See p.24 “Loading Paper in the Bypass Tray”.
When you are using a Windows operating system, the printer driver settings override those set using the control panel.
Set the desired input tray using the printer driver.
See the printer driver's Help.
66
Page 71

Other Printing Problems
Status Possible Causes, Descriptions, and Solutions
Paper jams occur frequently. The paper guide in the paper tray is not locked. Lock the pa-
Solid areas, lines or text are
shiny or glossy when created as
a mixture of cyan, magenta, yellow.
Solid lines are printed as broken
lines.
The color of the printout is different from the color on the
computer's display.
Images are printed in the wrong
orientation.
per guide.
See p.22 “Loading Paper”.
The paper size and feed direction loaded on the Bypass Tray
are different from them set with the control panel. Either
change the setting or load paper to meet the setting.
See p.24 “Loading Paper in the Bypass Tray”.
The end guide in the paper tray is not set correctly. Set the
end guide correctly.
See p.22 “Loading Paper”.
Number of paper set in the tray exceeds the limit. Confirm
that the top of the stack is not higher than the limit mark inside the tray.
See p.22 “Loading Paper”.
Paper is damp. Use paper that has been stored properly.
See p.15 “Paper and Other Media”.
Paper is either too thick or too thin.
See p.15 “Paper and Other Media”.
Paper is bent or wrinkled. Use paper that have no bents or
wrinkles.
See p.15 “Paper and Other Media”.
Paper has already been printed on.
See p.15 “Paper and Other Media”.
The fusing unit is deteriorated or damaged. Replace them.
See p.29 “Replacing Consumables and Maintenance Kit”.
Select "K(black)" for [Gray Reproduction] in the printer driver's
dialog box.
See the printer driver's Help.
Change the [Dithering] setting in the printer driver's dialog
box.
See the printer driver's Help.
The colors made using color toner are different from colors
displayed on the display in its production system.
See "Appendix" in the Client Reference.
When [Toner Saving] is checked under the [Print Quality] tab in
the printer driver's dialog box, the color gradation may appear differently.
See the printer driver's Help.
The feed direction you selected and the feed direction selected in Option Setup of the printer driver might not be the
same. Make the proper settings.
5
67
Page 72

Troubleshooting
Status Possible Causes, Descriptions, and Solutions
An error message on the control
panel stays on after removing
the misfed paper.
A print image is not clear. Due to a sudden change in temperature, condensation might
The print side of the page is a
hazy gray.
5
A printed image is different
from the image on the computer's display.
Open the front cover of the printer, and then close it.
appear inside the printer, reducing print quality. If this occurs when you move the printer from a cold room to a warmer room, do not use the printer until it acclimatizes to the
temperature.
Adjust the image density.
To adjust the image density, press
Density from the “Maintenance” menu.
See p.49 “Adjusting the Image Density”.
If paper is curled, flatten it.
Curled or folded paper might cause a hazy gray print. Curling often occurs on envelopes, so be sure to flatten it before
printing.
When you use some functions, such as enlargement and reduction, the layout of the image might be different from that
displayed in the computer display.
You might have selected to replace True Type fonts with
printer fonts in the printing process.
To print an image similar to the image on the computer,
make the settings to print out True Type fonts as an image.
See the printer driver's Help.
{{{{Menu}}}}
, and select Image
Note
❒ If the problem cannot be solved, contact your sales or service representative.
68
Page 73

Removing Misfed Paper
R
A
Removing Misfed Paper
When a paper misfeed occurs, an error message appears on the panel display. Remove the misfed paper from
the location indicated.
Important
❒ Toner dust may be on the misfed
paper after removal. Be careful not
to get it on your hands or clothes.
❒ Toner dust may be on the paper
printed after removing misfed paper. Make a few prints until smears
do not appear any more.
❒ Forcefully removing misfed paper
may cause paper to tear and leave
scraps of paper in the printer. This
might cause a misfeed and damage
the printer.
When "Remove Misfeed A:Internal Path" Appears
CAUTION:
• The inside of the machine be-
comes very hot. Do not touch the
parts with a "v" label (means
hot surface). Touching a part
with a "v" label (means hot surface) could result in a burn.
Note
❒ Close the Bypass Tray if it is ex-
tended. If the Bypass Tray is extended, the front cover does not
open.
If you see the misfed paper, slow-
BBBB
ly pull it out.
If you cannot remove paper easily,
do not forcefully pull it, but go to
next step.
Pull part "A" in the direction of
CCCC
the arrow, and then open the cover.
5
ZHBH120E
Open the front cover by pushing
AAAA
the front cover release button.
ZHBH070E
ZHBP281E
69
Page 74

Troubleshooting
R
A
Remove the misfed paper.
DDDD
When "Remove Misfeed B: Fusing Unit" Appears
CAUTION:
• The inside of the machine be-
comes very hot. Do not touch the
parts with a "v" label (means
hot surface). Touching a part
with a "v" label (means hot surface) could result in a burn.
Open the front cover by pushing
AAAA
the front cover release button.
Close the cover.
EEEE
ZHBH080E
5
70
Close the front cover slowly.
FFFF
ZHBH090E
ZHBP282E
Note
❒ Close the Bypass Tray if it is ex-
tended. If the Bypass Tray is extended, the front cover does not
open.
Pull out levers "B1" on the left and
BBBB
right.
ZHBP281E
ZHBH110E
Page 75

Removing Misfed Paper
Remove the misfed paper.
CCCC
If you cannot remove the paper
easily, do not forcefully pull it, but
go to the next step.
Pull part "B2" toward the front,
DDDD
and then open the guide board.
ZHBH120E
ZHBH130E
Return the guide board.
FFFF
Return levers "B1" on the left and
GGGG
right.
Close the front cover slowly.
HHHH
ZHBH130E
5
ZHBH930E
Remove the misfed paper.
EEEE
ZHBP282E
ZHBH140E
71
Page 76

Troubleshooting
Slide the paper tray completely
When "Remove Misfeed Y:
CCCC
into the printer.
Paper Tray" Appears
Pull out the tray.
AAAA
ZHBH160E
Important
ZHBH940E
5
Important
❒ When pulling it out, be careful not
to pull it strongly. If you do, the
tray might fall and cause an injury.
Remove the misfed paper.
BBBB
❖❖❖❖ Tray 1
❒ Be sure to insert the paper tray
completely. Otherwise, misfeeds might occur.
Open the front cover by pushing
DDDD
the front cover release button,
and then close it to reset the misfeed condition.
72
❖❖❖❖ Tray 2/3
ZHBH760E
ZHBH770E
ZHBH170E
Note
❒ You can apply this procedure
for both the paper tray and the
optional Paper Feed Unit.
Page 77

When "Remove Misfeed Z:
R
Duplex Unit" Appears
CAUTION:
• The inside of the machine be-
comes very hot. Do not touch the
parts with a "v" label (means
hot surface). Touching a part
with a "v" label (means hot surface) could result in a burn.
Open the front cover by pushing
AAAA
the front cover release button.
Removing Misfed Paper
Remove the misfed paper.
CCCC
Close the front cover slowly.
DDDD
ZHBH190EZHBH190E
5
Note
❒ Close the Bypass Tray if it is ex-
tended. If the Bypass Tray is extended, the front cover does not
open.
Pull lever "PULL" of the Duplex
BBBB
Unit AAAA, and then pull up the Duplex Unit until it stops BBBB.
ZHBP281E
ZHBH180E
ZHBP282E
73
Page 78

Troubleshooting
5
74
Page 79

6. Appendix
R
Moving and Transporting the Printer
CAUTION:
• When moving the machine, each person should hold the handles that are
located on opposite sides, and then lift it slowly. Lifting it carelessly or dropping it may cause an injury.
• When you move the printer, remember to unplug the power cord from the
wall outlet to avoid a fire or an electric shock.
• When you pull out the plug from the socket, grip the plug, not the cord, to
avoid damaging the cord and causing a fire or an electric shock.
• When moving the printer after use, do not take out any of the Toners, Photo
Conductor Units, nor the Waste Toner Bottle to prevent toner spill inside the
machine.
Repack the printer in its original packing materials for transporting.
Note
❒ The printer weighs approximately 29.4 kg (64.8 lb.).
Important
❒ Be sure to disconnect all cables from the printer before transporting it.
❒ The printer is a precision piece of machinery. Take care to avoid damage dur-
ing shipment.
❒ If the optional Paper Feed Unit is installed, remove it from the printer, and
then move them separately.
75
Page 80

Appendix
R
Moving the Printer
CAUTION:
• When lifting the machine, use the inset grips on both sides. Otherwise the
printer could break or cause an injury if dropped.
• Before moving the machine, unplug the power cord from the wall outlet. If
the cord is unplugged abruptly, it could become damaged. Damaged plugs
or cords can cause an electrical or fire hazard.
Moving the printer in a short distance
Be sure to check the following points:
AAAA
• The power switch is turned off.
• The power cable is unplugged from the wall outlet.
• The interface cable is unplugged from the printer.
If the external options are installed, remove them.
BBBB
6
See the Option Setup Guide and follow the steps backwards for removing options.
Lift the printer with two people by using the inset grips on both side of the
CCCC
printer, and then move it horizontally to the place where you want to install
it.
If you removed options in step
DDDD
Note
❒ See the Option Setup Guide for installing options.
Important
❒ Be sure to move the printer horizontally. To prevent toner from scattering,
move the printer slowly.
❒ If the optional Paper Feed Unit is installed, remove it from the printer, and
then move them separately.
76
, reinstall them.
BBBB
Page 81

INDEX
A
Adjusting the Color Registration, 48
Adjusting the Image Density
Adjusting the Tray Registration
Appendix
, 75
,
49
, 51
B
Bypass Tray
,
10
C
Caution, 2
Clearing and Adjusting the Printer
Controller Board
Control Panel
, 11, 12
, 10, 14
D
Data In Indicator, 14
Data In indicator
Display panel, messages
Duplex Unit
,
, 63
, 53
13
E
Energy Star, 6
14
,
,
, 20
53
, 14
62
,
, 14
12
,
Enter # Key
Envelopes
Error
Error Indicator
Error indicator
Escape Key
Ethernet Port
F
Form Feed Key, 14
Front Cover
Fusing Unit
, 10
, 13, 38
G
Glossy Paper
Guide to the Printer
Control Panel
Exterior -Front View
Exterior -Rear View
Inside
, 13
,
19
, 14
10
,
, 11, 12
, 47
I
Input Paper Sizes, 15
J
Job Reset Key, 14
L
Loading Paper, 18
Bypass Tray
Optional Paper Feed Unit
paper size
paper type
Tray 1
, 24
, 22
, 23
, 23
, 22
M
Menu Key, 14
messages
Moving the Printer
, 53
, 76
O
OHP transparencies, 19
Online indicator
On Line Key
Online key
Other Printing Problems
,
, 14
62
,
62
, 65
P
Panel Display
Paper Feed Unit Connector
Paper not supported by this printer
Paper Recommendations
Paper Size
Paper weight and number of sheets to be set
Parallel Port
Photo Conductor Unit
Plain Paper
Power Indicator
Power Port
Power Switch
Print Area
Printer Does Not Print
,
, 15
, 11, 12
, 18
, 11, 12
, 11, 12
, 21
14
, 14
, 11, 12
, 18
, 13, 34
62
,
,
20
, 17
77
Page 82

R
Remove Misfed Paper
Duplex Unit
Fusing Unit
Internal Path
Paper Tray
Removing Misfed Paper
Replacing Consumables and Maintenance
Kit
, 29
Right Cover
, 73
, 70
,
, 72
, 11, 12
69
, 69
S
Standard Tray, 10
Standard Tray Extension
Storing Paper
, 18
, 11, 12
T
Thick Paper, 19
Toner Cartridge
Transfer Belt
Transfer Roller
Transfer Unit
Tray 1
, 10
Troubleshooting
,
13
, 13
,
, 13, 29
42
, 53
U
Upper Left Cover, 10
USB Port
, 11, 12
V
Ventilator, 10, 11, 12
W
Warning, 2
Waste Toner Bottle
, 13,
32
78 EE GB G081
Page 83

Declaration of Conformity
“The Product complies with the requirements of the EMC Directive 89/336/EEC and the Low Voltage
Directive 73/23/EEC.”
Notice to Users in EEA Countries
802.11b Interface Unit TypeA(R-WL11):
This product complies with the essential requirements and provisions of Directive 1999/5/EC of the Eu-
ropean Parliament and of the Council of 9 March 1999 on radio equipment and telecommunications
terminal equipment and the mutual recognition of their conformity.
This product is only for use in EEA or other authorized countries. Outdoor use of this product in Belgium, France, Germany, Italy, or the Netherlands is prohibited.
The CE Declaration of Conformity is available on the Internet at URL:
http://www.ricoh.co.jp/fax/ce_doc/.
In accordance with IEC 60417, this machine uses the following symbols for the main power switch:
aaaa means POWER ON.
bbbb means POWER OFF.
Copyright © 2002
Page 84

RICOH COMPANY, LTD.
15-5, Minami Aoyama 1-chome,
Minato-ku, Tokyo 107-8544, Japan
Phone: +81-(0)3-3479-3111
Overseas Affiliates
U.S.A.
RICOH CORPORATION
5 Dedrick Place
West Caldwell, New Jersey 07006
Phone: +1-973-882-2000
The Netherlands
RICOH EUROPE B.V.
Groenelaan 3, 1186 AA, Amstelveen
Phone: +31-(0)20-5474111
United Kingdom
RICOH UK LTD.
Ricoh House,
1 Plane Tree Crescent, Feltham,
Middlesex, TW13 7HG
Phone: +44-(0)20-8261-4000
Germany
RICOH DEUTSCHLAND GmbH
Mergenthalerallee 38-40,
65760 Eschborn
Phone: +49-(0)6196-9060
France
RICOH FRANCE S.A.
383, Avenue du Général de Gaulle
BP 307-92143 Clamart Cedex
Phone: +33-(0)-821-01-74-26
Spain
RICOH ESPAÑA S.A.
Avda. Litoral Mar, 12-14,
08005 Barcelona
Phone: +34-(0)93-295-7600
Italy
RICOH ITALIA SpA
Via della Metallurgia 12,
37139 Verona
Phone: +39-045-8181500
Hong Kong
RICOH HONG KONG LTD.
21/F., Tai Yau Building,
181, Johnston Road,
Wan Chai, Hong Kong
Phone: +852-2862-2888
Singapore
RICOH ASIA PACIFIC PTE.LTD.
260 Orchard Road,
#15-01/02 The Heeren,
Singapore 238855
Phone: +65-830-5888
Operating Instructions Maintenance Guide
Model number: Aficio CL3000, CL3000DN
Printed in The Netherlands
EE GB G081-6570
 Loading...