

Page 1
QUICK INSTALLATION GUIDE
ZHBH291E
ZHBHA680E
ZHBH720E
2 1
<G081-6520>
Please read the Safety Information in the Maintenance Guide before using this machine.
It contains important information related to USER SAFETY and PREVENTING EQUIPMENT PROBLEMS.
WHERE TO PUT THE PRINTER
○○○○○○○○○○○○○○○○○○○○○○○○○○○○○○○○○○○○○○○○○○○○○○○○○○○
The printer’s location should be carefully chosen
because environmental conditions greatly affect its
performance.
Warning
•
Confirm that the wall outlet is near the machine
and freely accessible, so that in event of an
emergency, it can be unplugged easily.
•
Only connect the machine to the power source
described on this manual.
•
Avoid multi-wiring.
•
Do not damage, break or make any
modifications to the power cord. Do not place
heavy objects on it, pull it hard or bend it more
than necessary. These actions could cause an
Environments to Avoid
Important
○○○○○○○○○○○○○○○○○○○○○○○○○○○○○○○○○○○○○○○○○○○○○○○○○○○○○○○○
❒ Locations exposed to direct sunlight or strong light
❒ Dusty areas
❒ Areas with corrosive gases
❒ Areas excessively cold, hot, or humid
❒ Locations near an air conditioner or humidifier
❒ Locations near other electronic equipment
❒ Locations where the printer might be subjected to
frequent strong vibration
Power Connection
Connect the power cord to a power source with the following
specifications:
❒ 220-240 V, 50/60 Hz
electric shock or fire.
Space Required for Installing the Printer
Caution
•
Keep the machine aw ay from humidity and dust.
A fire or an electric shock might occur.
•
Place the machine on a strong and level surf ace.
Otherwise, the machine might fall and result in
an injury.
•
If you use the machine in a confined space,
confirm that there is a continuous flow of air.
Optimum Environmental Conditions
Recommended temperature and humidity
%RH
80
60
15˚C 70%
27˚C 80%10˚C 80%
27˚C 70%
32˚C
60%
Leave enough space around the printer. This space is necessary to
operate the printer. The recommended (or minimum) space
requirement is as follows:
B
A
C
D
UNPACKING THE PRINTER AND
○○○○○○○○○○○○○○○○○○○○○○○○○○○○○○○○○○○○○○○○○○○○○○○○○○○○○
CHECKING THE CONTENTS OF
THE BO X
Caution
•
To prevent an injury , this printer should be lifted
by at least two people.
Check the contents of the box according to the
following list. If one or some items are missing,
please contact your sales or service
representative.
Important
❒ This package does not include an interface cable.
Please purchase one for use with your host
computer. See “Appendix” in the Administrator
Reference.
MANUALS FOR THIS PRINTER
Quick Installation Guide (This manual)
Maintenance Guide
Option Setup Guide
CD-ROM “Printer Drivers and Utilities”
CD-ROM “Operating Instructions”
CD-ROM “DeskTopBinder V2 Lite”
Power Cable
Toner Cartridge (Black)
Toner Cartridge (Yellow)
Toner Cartridge (Cyan)
Toner Cartridge (Magenta)
Photo Conductor Unit (Black)
40
15˚C 30% 27˚C 30%
80.6˚F 80%50˚F 80%
80.6˚F 70%
89.6˚F 15%50˚F 15%
32˚C 15%10˚C 15%
˚C
89.6˚F
60%
˚F
3
(183
15
10 20 30
%RH
80
59˚F 70%
60
40
59˚F 30% 80.6˚F 30%
15
50 60 90
Possible operation range Recommended range
The machine must be level within 5 mm (0.2 inch) both front to
rear and left to right.
To avoid possible build-up of ozone, place this printer in a large well
ventilated room that has an air turnover of more than 30 m
cubic inch)/hr/person.
If you use this printer in a cold area, leave the printer on or severe
cold might damage sensitive components inside the printer.
Depending on the temperature and humidity around the machine,
vapor might occur when printing. Thus steam can be seen when
prints come out.
70 80
A: 13 cm (5.2 inches) or more
ZHBH710E
B: 11 cm (4.4 inches) or more
C: 35 cm (14.0 inches) or more
D: 61 cm (24.4 inches) or more
Photo Conductor Unit (Color)
Ferrite Core (2)
Additional Documents
Remove the plastic bag.
Lift the printer at least two people and move it to
the place where you want to install it.
When lifting the printer, use the inset grips on both sides of the
printer.
Important
❒ When installing the printer to a low position, be
careful not to get your hand or clothes caught under
the printer.
ZHBH750E
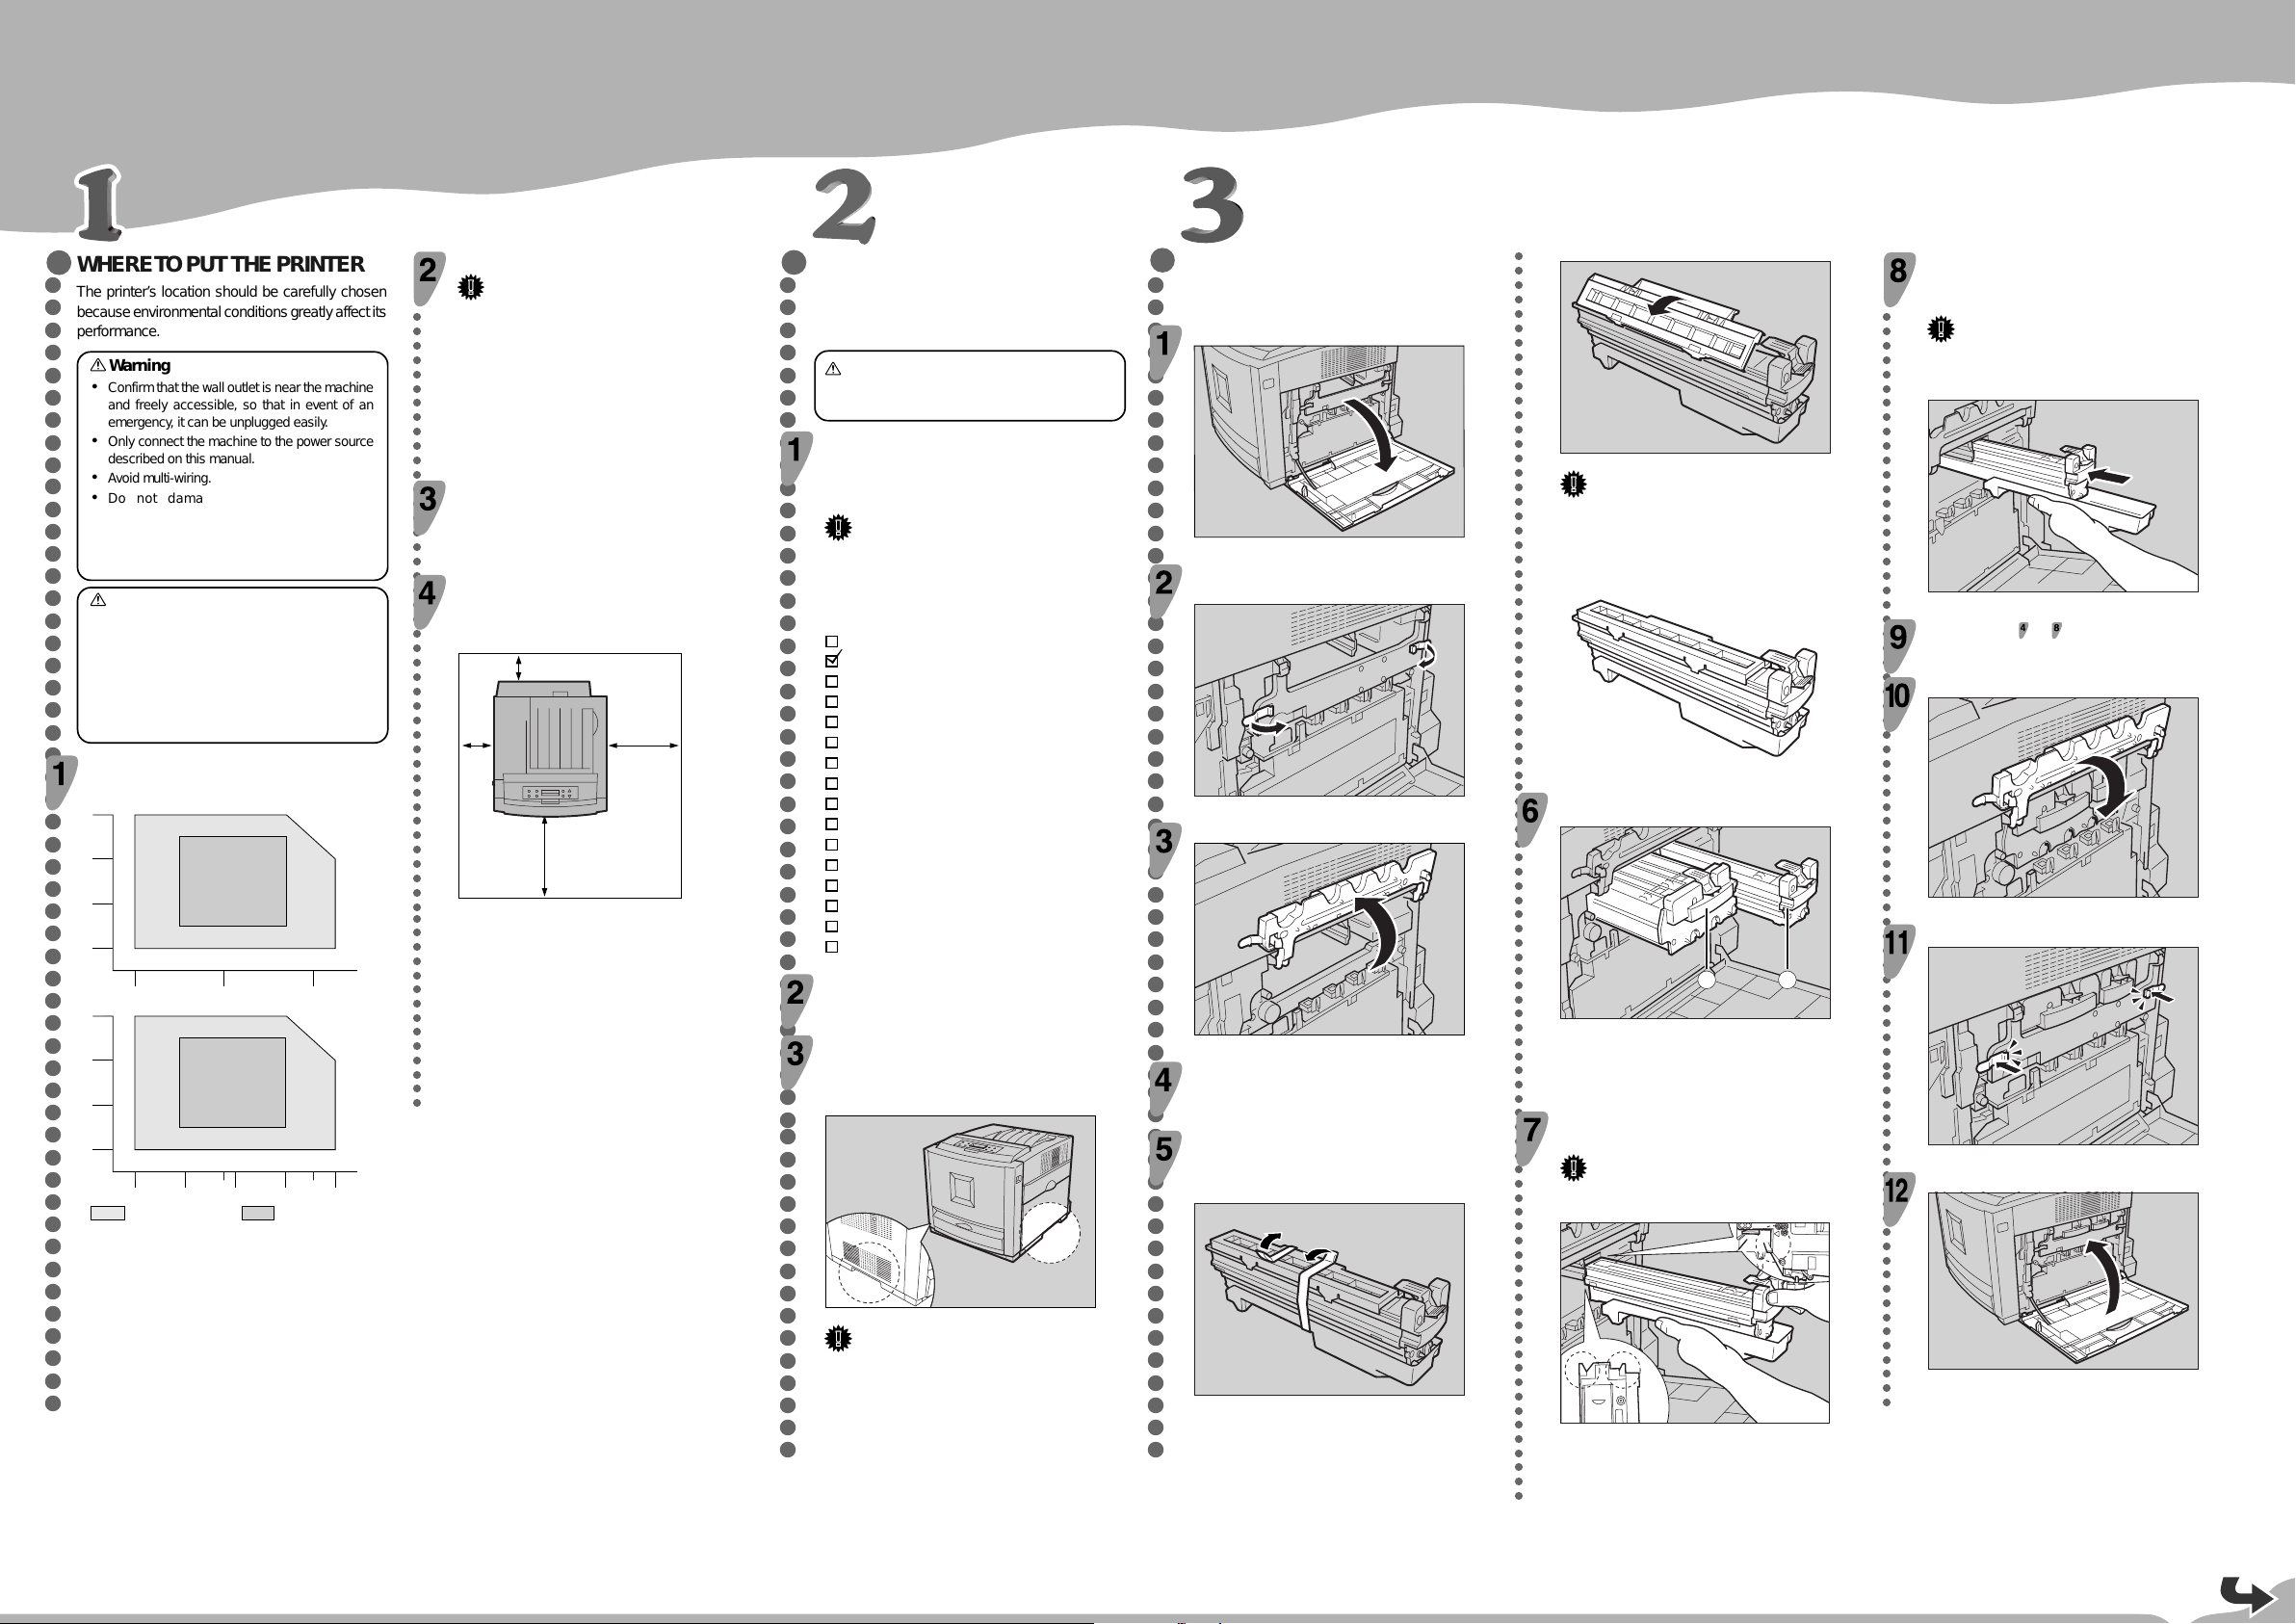
INSTALLING THE PHOTO
○○○○○○○○○○○○○○○○○○○○○○○○○○○○○○○○○○○○○○○○○○○○○○○○○○○○○
CONDUCT OR UNIT
○○○○○○○○○○○○○○○○○○○○○○○○○○○○○○○○○○○○○○○○○○○○○○○○○○○○○○○○○○○○○○○○○○○○○○○○○○○○○○○○○○○○○○○○
Open the right cover of the printer.
Pull out the green lev ers on the left and right that
are fastening the inner cover, and then unlock.
ZHBH301E
Lift the inner cover until it stays up.
ZHBH311E
Take out the black photo conductor unit.
Peel off the tape, which is around Photo
Conductor Unit by peeling it downward, and
remove the cover on top of the Unit.
ZHBH681E
Important
❒ Do not remove the cover attached to the bottom of
the photo conductor unit yet.
❒ After you take the new Photo Conductor Unit out of
the bag, quickly install it.
ZHBH680E
Check the locations for each Photo Conductor Unit.
a Photo Conductor Unit (Black)
b Photo Conductor Unit (Color)
Match the green arrow at the tip of the photo
conductor unit to the rail inside the printer.
Important
❒ Make sure the green arrow fits securely on the rail
before proceeding to the next step.
ZHBH370E
Push the front of the photo conductor unit slowly,
slide the unit on the cover, and then push the
unit in until it clicks.
○○○○○○○○○○○○○○○○○○○○○○○○○○○○○○○○○○○○○○○○○○○○○○○○○○○○○○○○○○○○○○○○○○○○○○○○○○○○○
Important
❒ If you do not attach the green arrow of the photo
conductor unit securely to the rail, you may damage
the photo conductor unit.
ZHBH390E
Repeat steps to to install the color photo
conductor unit.
Lower the inner cover slowly.
ZHBH410E
Push the green lever to fasten the inner cover.
ZHBH420E
Close the right cover of the printer slowly.
ZHBH430E
Page 2

INSTALLING THE TONER
ZHBH740E
○○○○○○○○○○○○○○○○○○○○○○○○○○○○○○○○○○○○○○○○○○○○○○○○○○○○
CARTRIDGE
Open the upper left cover of the printer.
Check the toner color and location are correct,
and then insert the toner cartridge vertically and
slowly.
○○○○○○○○○○○○○○○○○○○○○○○○○○○○○○○○○○○○○○○○○○○○○○○○○○○○○○○○○○○○○○○○○○○
You can check the location for each toner cartridge by reading the
labels on the printer.
LO ADING PAPER
○○○○○○○○○○○○○○○○○○○○○○○○○○○○○○○○○○○○○○○○○○○○○○○○○○○○○○○○
Caution
•
When pulling the paper tray out, be careful not
to pull it strongly. If you do, the tray might fall
and cause personal injury.
Pull the paper tray out of the printer until it stops.
After that, lift it slightly, and then pull it out
completely. Place it on a flat surface.
ZHBH441E
Take out the toner cartridge.
In the illustration, yellow cartridge is used as an example.
ZHBH481E
Push the toner cartridge in the direction of the
Hold the toner cartridge horizontally as illustrated,
and then shake it back and f orth about 10 times.
arrow to fasten the toner cartridge.
Note
❒ You cannot pull the Tray 1 out if the Bypass Tray is
open.
Remove the adhesiv e tape and packing material.
ZHBH491E
In the illustration, black cartridge is used as an example.
ZHBH460E
Repeat steps to , to install the other color
toner cartridges.
Important
❒ Do not open the shutter on the bottom of the toner
cartridge. Toner may spill.
Close the upper left cover of the printer.
Press "Push", and then adjust the rear guide to
the paper size you want to load.
ZHBY010E
ZHBY920E
○○○○○○○○○○○○○○○○○○○○○○○○○○○○○○○○○○○○○○○○○
Load paper into the paper tray with the print side
○○○○○○○○○○○○○○○○○
up.
Important
❒ Make sure that the top of the stack is not higher
than the limit mark inside the tray.
❒ The front and side guides should be set exactly to
the paper size to avoid paper misfeeds.
❒ Do not load different kinds of paper in the tray.
Slide the paper tray completely into the printer.
SELECTING THE PANEL
○○○○○○○○○○○○○○○○○○○○○○○○○○○○○○○○○○○○○○○○○○○○○
DISPLAY LANGU A GE
Follow the procedure to select a language.
Note
❒ You can select one of the following languages:
English, German, French, Italian, Dutch, Swedish,
Norwegian, Danish, Spanish, Finnish, Portuguese,
Czech, Polish or Hungarian.
❒ The default setting is English.
❒ If you want to use the English panel display, it is
not necessary for you to take the following
procedures.
Turn on the printer.
Press the
“Language”.
Press the {Enter #} key .
The following message appears on the panel display.
Press the
the language you want to select.
Press the {Enter #} key .
“Menu” appears on the panel display.
CONNECTING THE POWER
○○○○○○○○○○○○○○○○○○○○○○○○○○○○○○○○○○○○○○○○○
CORD
Warning
•
It is dangerous to handle the plug with wet hands.
Doing this may result in receiving an electric
shock.
Caution
•
When you pull the plug out of the socket, grip
the plug, not the cord, to avoid damaging the
cord and causing a fire or an electric shock.
Important
❒ Be sure to connect the power plug to the socket or
the wall outlet firmly.
❒ The printer power must be off when plugging in and
out the power cord.
Confirm that the printer's power switch is off. If it
is on, turn it off.
After the machine warms up, “Ready” appears on the panel display.
Ready
Press the {Menu} key.
Press the {On Line} key.
“Ready” appears on the panel display.
{▲}
or
{▼}
Menu:
Language
Language:
*English
{▲}
or
{▼}
Menu:
Language
Ready
key to display
key to displa y
Remove the adhesive tapes.
ZHBH470E
ZHBH910E
ZHBH500E
Note
❒ If the toner cartridge is not set properly, you cannot
close the upper left cover of this printer.
ZHBY040E
Adjust the side guides to the paper size you w ant
to load.
ZHBY060E
ZHBH730E
Attach the power cord to the socket on the back
of the printer.
ZHBH030E
Plug the other end securely into the wall outlet.
The following message appears on the panel display.
ZHBS010E
Menu:
Paper Input
Go to sheet 2/2.
Sheet 1/2
Page 3

Sheet 2/2 (From sheet 1/2)
ZHBH1730E
PRINTING THE TEST P AGE
○○○○○○○○○○○○○○○○○○○○○○○○○○○○○○○○○○○○○○○○○○○○○○○○○○○○○○○○○○
You can check if the printer works properly by
printing a test page such as the configuration page.
However, you cannot check the connection
between the printer and the computer by printing
the test page.
Turn on the printer if it is not on yet.
ADJUSTING THE IMAGE
○○○○○○○○○○○○○○○○○○○○○○○○○○○○○○○○○○○○○○○○○○○
DENSITY
To use the printer in its best condition, adjust the
image density.
Press the {Menu} key .
Menu:
Paper Input
"Menu" appears on the panel display.
Press the
"Maintenance", and then press the
{▲}
or
{▼}
key to display
{
Enter #} key.
Menu:
Maintenance
After the machine warms up, “Ready” appears on the panel display.
ZHBH740E
Ready
Press the
Density", and then press the
{▲}
or
{▼}
Maintenance:
key to display "Image
{
Enter #} key .
Image Density
Press the {Menu} key.
Menu:
Paper Input
Press the
{▲}
or
{▼}
key to displa y “List/T est Print”.
Menu:
The following message appears on the panel display.
Image Density:
Prt.Test Sheet
Press the {Enter #} key .
The following massage appears on the panel display, and then Press
Enter #
the {
} key.
Press the
value, and then press the
○○○○○○○○○○○○○○○○○○○○○○○○○○○○○○○○○○○○○
Black
(-10 +10) 0
Note
❒ You can adjust the image density from -10 to +10.
Increasing the value makes the printouts darker and
decreasing the value makes the printouts lighter.
❒ Pressing the {▲} or {▼} key makes the value
increase or decrease by one.
To adjust another color, repeat the steps
Print another image density test sheet and check
if the colors on the test sheet now match those
on the Image Density Adjusting Card. If the y still
do not match, adjust the image density again.
Press the {On Line} key.
“Ready” appears on the panel display.
Ready
List/Test Print
Prt.Test Sheet:
Press the {Enter #} key .
The following message appears on the panel display.
List/Test Print:
Press # to Start
Printing...
Config.Page
Confirm that “Config.Page” is on the display, and
{
then press the
Enter #} key .
In a short time, the test printing will start.
Printing...
Compare the colors on the printed image density
test sheet with those on the Image Density
Adjusting Card.
Press the
want to adjust, and then press the
{▲}
or
{▼}
key to select the color y ou
{
Enter #} key .
Image Density
Black
Important
❒ If you cannot complete the test printing correctly,
see if an error message appears on the panel
display. For more information about error
messages, see “Troubleshooting” in the
Maintenance Guide.
Press the {On Line} key.
“Ready” appears on the panel display.
Ready
{▲}
or
{▼}
key to set the image density
{
Enter #} key.
to .
○○○○○○○○○○○○○○○○○○○○○○○○○○○○○
CONNECTING THE PRINTER TO
○○○○○○○○○○○○○○○○○○○○○○○○○○○○○○○○○○○○○○○○○○○○○○○○○○○○○○○○
Turn on the printer.
A COMPUTER
❖
Connecting the printer to a computer using
a network interface cable.
If your printer is installed with the Network
Interface Board, follow the procedures below.
Important
❒ The interface cable is not provided with the printer.
It is your responsibility to provide the interface
cable appropriate for the computer that you are
using.
Confirm that the printer's power switch is off. If it
is on, turn it off.
ZHBH730E
Loop the network interface cable and attach the
ferrite core.
Note
❒ Attach two ferrite cores to the network interface
cable. One of them must be attached close to the
end of the cable (on the end closet to the printer).
The other must be attached approximately 45 cm
(18") (A) apart from the end. Attach each ferrite
core with a loop.
ZHBP913E
Connect the network interface cable to the
Ethernet port on the back of the printer.
Confirm the LEDs on the Ethernet port.
a is lit when 100 BASE-TX is in use and not lit when 10 BASE-T is
in use.
b is lit when the printer is securely connected to the network.
Go to “CONFIGURING THE PRINTER FOR
THE NETWORK”.
○○○○○○○○○○○○○○○○○○○○○○○○○○○○○○○○○○○○○○○○○○○○○○○○○○○○○○○○○○○○
❖
Connecting the printer to a computer using
a parallel cable.
Important
❒ The parallel cable is not provided with the printer.
It is your responsibility to provide the parallel cable
appropriate for the computer that you are using.
❒ The printer’s parallel connection is a standard bi-
directional interface. It requires a standard 36-pin
parallel cable compliant with IEEE1284 and the
parallel port on the computer.
❒ To avoid electrical interference, use a shielded
cable.
Note
❒ Do not use a parallel cable longer than 2.5 meters
(8.2 feet).
Confirm that the printer’s power s witch is off. If it
is on, turn it off.
Turn the computer off.
Attach the parallel cable to the port of the
printer. Secure the cab le with the metal fittings
as shown in the illustration.
Important
❒ Rating voltage of the parallel port for the computer;
Max. DC 5V.
ZESX338E
○○○○○○○○○○○○○○○○○
Attach the other end of the parallel cable to the
port of the computer. Secure the cable.
Turn on the printer and the computer.
Go to “INSTALLING THE PRINTER
DRIVER”.
○○○○○○○○○○○○○○○○○○○○○○○○○○○○○○○○○○○○○
❖
Connecting the printer to a computer using
a USB cable.
Important
❒ The interface cable is not provided with the printer.
It is your responsibility to provide the interface
cable appropriate for the computer that you are
using.
Connect the interface cable to the USB2.0
interface port.
ZHBP470E
Connect the other end of the interface cable to
the USB interface connector of the computer or
the USB Hub.
Turn off the printer’s power switch.
Connect the other end of the cable to the network
, e.g. hab.
ZHBH010E
Page 4

○○○○○○○○○○○○○○○○○○○○○○○○○○○○○○○○○○○○○○○○○○○○○○○○○○○○○○○○○○○○○○○○○○○○○○○○○○○○○○○○○○○○○○○○
C
CONFIGURING THE PRINTER
○○○○○○○○○○○○○○○○○○○○○○○○○○○○○○○○○○○○○○○○○○○○○○○○
FOR THE NETWORK
You must configure the printer setting using the
control panel when using in a network environment.
Press the
IP”, and then press the
Active Protocol:
TCP/IP
The following list is the items y ou can set and their
D
default settings.
Press the
and then press the
DHCP On
IP Address 011.022.033.044
TCP/IP:
*Active
Subnet Mask 000.000.000.000
Gateway Address 000.000.000.000
Frame Type (NW) Auto
Active Protocol TCP/IP
Ethernet Auto
The procedure below shows how to set the TCP/IP
protocol. Make the settings for the other items by
taking the same procedure.
Press the {Menu} key.
“Menu” appears on the panel display.
Menu:
Paper Input
Press the
Interface”, and then press the
{▲}
or
{▼}
key to display “Host
{
Enter #} key .
Menu:
Host Interface
The interface setiing menu appears.
Start the protocol for use.
A
Press the
“Network Setup”, and then press the
}
#
key .
{▲}
or
{▼}
key to display
{
Enter
Note
❒ * shows the current setting.
In about two seconds, the display returns to the “Active Protocol”
setting screen.
E
Set the rest of the protocols for use.
F
When all settings for the protocol are done,
press the
The “Network Setup” setting screen appears.
Note
❒ The default settings for all of the protocols are
“Active”.
❒ It is recomended to set the unused protocols “Not
Active”.
When you use this machine under DHCP
environment, go to step
machine with a fixed IP address, y ou must mak e
the setting for the required item after making the
setting for DHCP Off. Go to step
Important
❒ When DHCP is On, you cannot make the setting for
the following menus:
IP Address
Subnet Mask
Gateway Address
Note
❒ Consult the network administrator for information
about how to make the setting for the network
Host Interface:
Network Setup
B
Press the
{▲}
or
{▼}
key to displa y “Active
Protocol”, and then press the
Network Setup:
{
Enter #} key .
Make the setting for DHCP Off.
A
Press
then press
Network Setup:
DHCP
Active Protocol
B
Press
press
DHCP:
*Off
{▲}
{▲}
{
Escape} key.
{▲}
or
{
Enter #}.
{▲}
or
{
Enter #}.
or
{▼}
key to displa y “TCP/
{
Enter #} key .
or
{▼}
key to displa y “Active”,
{
Enter #} key .
. When you use this
.
{▼}
to display “DHCP”, and
{▼}
to display “Off”, and then
Set the IP address for the printer.
○○○○○○○○○○○○○○○○○○○○○○○○○○○○○○○○○○○○○○○○○○○○○○○○○○○○○○○○○○○○○○○○○○○○○○○○○○○○○○○○○
Note
❒ Confirm the IP address to the network administrator.
A
Press the
Address”, and then press the
{▲}
or
{▼}
key to display “IP
{
Enter #} key.
Network Setup:
IP Address
The currently selected IP address appears.
Note
❒ When the {Enter #} key is pressed, the cursor moves
to the next field.
❒ When the {▲} or {▼} key is kept pressed for a few
seconds, the value chages by 10.
B
Press the
{▲}
or
{▼}
key to set the value
for the field.
IP Address:
199.022.033.044
C
Press the {Enter #} key.
The cursor moves to the next field.
D
Repeat B and C to set the value for the rest
of the fields.
INSTALLING THE PRINTER
○○○○○○○○○○○○○○○○○○○○○○○○○○○○○○○○○○○○○○○○○○○○○○
DRIVER
You can install the printer drivers and software
easily from the CD-ROM labeled “Printer Drivers
and Utilities”.
The supported operating systems are Windows 95/
98/Me, Windo ws 2000, Windo ws XP and Windows
NT 4.0.
Click [Quick Install] in the window of the CD-R OM
to install PCL5c and RPCS printer drivers. To install
the PostScript 3 printer driver , click the [P ostScript
3 printer driver] button. For more inf ormation about
the PostScript 3 printer driver , see the Administrator
Reference or the Client Reference on the CD-R OM
labeled “Operating Instructions” depending on the
environment you use in.
When the TCP/IP protocol is used, SmartNetMonitor for Client will be installed as well.
When using with TCP/IP protocol, confirm the followings:
❒
The printer is connected to a network with
the network interface cable.
❒
The TCP/IP protocol is set.
❒
The IP address is set for the printer and the
computer.
Insert the CD-ROM labeled “Printer Drivers and
Utilities” into the CD-ROM drive.
Set “Subnet Mask” and “Gateway Address” by
following the same procedure for setting the IP
address.
Important
❒ The subnet mask is the mask value to use a part of
the IP address as a network address. Confirm the
value to the network administrator.
❒ The gateway address is the address of the host or
router that acts as a gateway when interacting with
work stations in another network. Confirm the value
to the network administrator.
Auto Run will start the installer.
Select a language to change the interface
language, and then click [OK].
The following languages are available:
Cestina (Czech), Dansk (Danish), Deutsch (German), English
(English), Espanol (Spanish), Francais (French), Italiano (Italian),
Magyar (Hungarian), Nederlands (Dutch), Norsk (Norwegian),
Polski (Polish), Portugues (Portuguese), Suomi (Finnish), Svenska
(Swedish)
Default interface language is English.
Note
❒ If you are not sure of the setting addresses, leave
them as default.
When all of the settings are done, press the
{
On Line} key.
“Ready” appears on the panel display.
Select [Quick Install].
○○○○○○○○○○○○○○○○○○○○○○○○○○○○○○○○○○○○○○○○○○○○○○○○○○○○○○○○○○○○○○○○○○○○○○
The software license agreement appears in the [License Agreement]
dialog box.
This is an example when English is selected in step .
After reading through all of the contents, click [I
accept the agreement] to agree with the License
Agreement, and then click [Next].
Select the printer model you want to install in the
“Select Printer” dialog box.
Note
❒ For a network connection with TCP/IP, select the
printer whose IP address is displayed in [Connect
to].
❒ For parallel connection, select the printer whose
printer port is displayed in [Connect to].
Ready
Print the configuration page to confirm the settings
made.
See “PRINTING THE TEST PAGE” for printing the configuration
page.
Click [Install].
○○○○○○○○○○○○○○○○○○○○○○○○○○○○○○○○○○○○○○○○○○○○○○○○○○○○○○○○○○○○○○○○○○○○○○○○
The following display appears while installing the printer driver.
When finished, the [Installation Completion] dialog box appears.
Note
❒ Under Windows 2000, the [Digital Signature Not
Found] dialog box may appear when installing the
printer driver. In this case, click [Yes] to continue
the installation.
❒ Under Windows XP, the [Hardware Installation]
dialog box may appear. In this case, click [Continue
Anyway] to continue the installation.
Click [Finish].
Note
❒ A message directing to restart the computer may
appear. In this case, restart your computer to
complete the installation. If no a message appears,
go to step
.
Click [Exit].
The installation is now complete.
Note
❒ * shows the current setting.
In about two seconds, the display returns to the “Network Setup”
setting screen.
Copyright © 2002 G081-6520
Printed in The Netherlands
EE GB
 Loading...