

Page 1
OPERATING INSTRUCTIONS
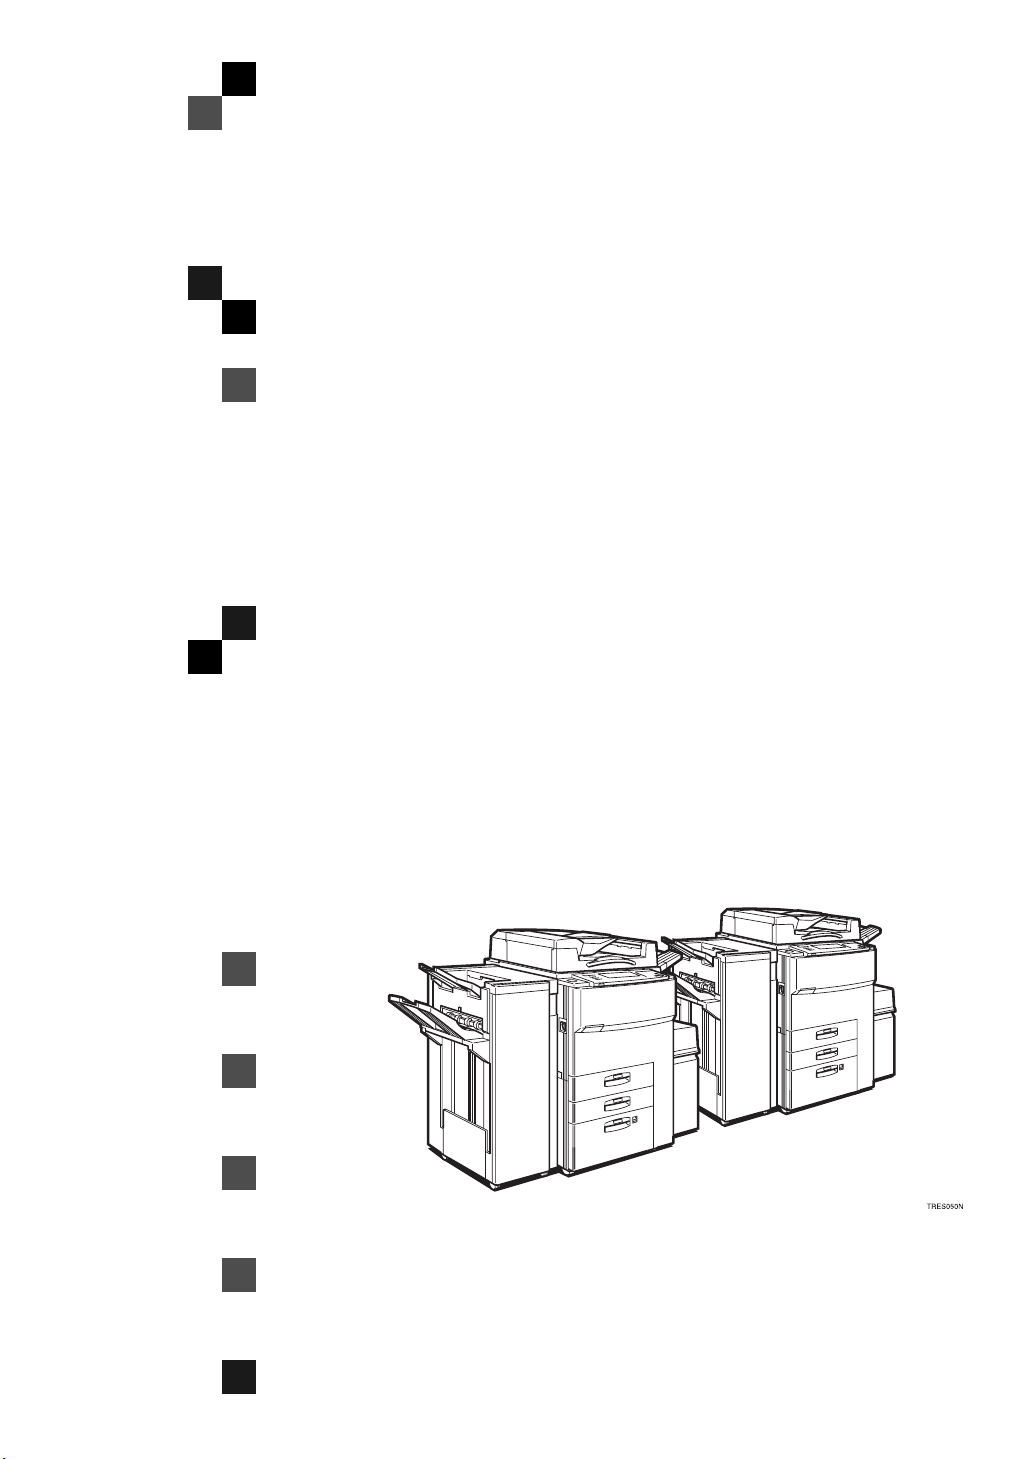
Copy Connector Kit-Type A
Read this manual carefully before you use this product and keep it handy for future
reference.
For safety, please follow the instructions in this manual.
Page 2

Introduction
This manual contains detailed instructions on the operation and maintenance of this machine. To get
maximum versatil ity from this ma chine all opera tors sho uld careful ly read an d follow the ins tructi ons in
this manual. Please keep this manual in a handy place near the machine.
Please read the Safety Information before using this machine. It contains important information related
to USER SAFETY and PREVENTING EQUIPMENT PROBLEMS.
Notes
Some illustrations may be slightly different from your machine.
Certain options may not be available in some countries. For details, please contact your local dealer.
Printer/ Document Server features are available as options.
Notes
Two kinds of size notation are employed in this manual. With this machine refer to the Inch version.
Page 3

Note to users in the United States of America
Note:
This equipment has been tested and found to comply with the limits for a Class A digital devices, pursuant to Part 15 of t he FCC Rules. These li mits are designed to provide reasonabl e p r ote cti on ag ain st
harmful interference when the equipment is operated in a commercial environment. This equipment
generates, uses and can radiate radio frequency energy and, if not installed and used in accordance
with the instruction manual, may caus e harmful in terference to radi o communicati ons. Operat ion of this
equipment in a residential area is likely to cause harmful interference in which case the user will be
required to correct the interference at his own expense.
Warning
Changes or modifications not expressly approved by the party responsible for compliance could void
the user’s authority to operate the equipment.
When this product is installed in a copy machine, it is regarded as a Class A digital device.
Note to users in Canada
Note:
This Class A digital apparatus complies with Canadian ICES-003.
Remarque concernant les utilisateurs au Canada
Avertissement:
Cet appareil numérique de la classe A est conforme à la norme NMB-003 du Canada.
Page 4

Copy Connector Kit-Type A OPERATING INSTRUCTIONS
Printed in Japan
UE USA A808-8607
Page 5
How To Read This Manual
Main Options Available
The main options are:
•Finisher
• Large Capacity Tray (LCT)
Symbols
In this manual, the following symbols are used:
/
WARNING:
This symbol indicates a potentially hazardous situation that might result in
death or serious injury when you misuse the machine without following the instructions under this symbol. Be sure to read the instructions, all of which are described in the Safety Information section.
/
CAUTION:
This symbol indicates a potentially hazardous situation that might result in minor or moderate injury or property damage that does not involve personal injury
when you misuse the machine without following the instructions under this
symbol. Be sure to read the instructions, all of which are described in the Safety
Information section.
* The statements above are notes for your safety.
Important
If this instruction is not followed, paper might be misfed, originals might be
damaged, or data might be lost. Be sure to read this.
Preparation
This symbol indicates that prior knowledge or preparations required before operating.
Note
This symbol indicates precautions for operation, or actions to take after misoperation.
Limitation
This symbol indicates numerical limits, functions that cannot be used together,
or conditions in which a particular function cannot be used.
Reference
This symbol indicates a reference.
i
Page 6

[ ]
Keys that appear on the machine's panel display.
WýýýX
Keys built into the machine's operation panel.
ii
Page 7

TABLE OF CONTENTS
1.OVERVIEW
What Is Connect Copy?............................................................................ 1
How Connect Copy Works........................................................................ 3
Connectable Copier Models.......................................................................... 3
Functions Not Available With Connect Copy ................................................ 4
Interrupt, Printer and Document Server Functions In Connect Copy Mode.. 4
Before You Start............................................................................................ 4
What You Can Do With Connect Copy.................................................... 6
Guide To Components.............................................................................. 8
Operation Panel....................................................................................... 10
Panel Display........................................................................................... 12
Functions Supported By Connect Copy ............................................... 14
2.USING CONNECT COPY
Making Copies............................................................. ..... ..... .... .............. 17
Exiting Connect Copy Mode........................................................................ 20
Differences Between Standard Copy Functions And Connect Copy
Functions ................................................................................................. 21
Basic Functions................................................. .......................................... 21
Copying From The Bypass Tray ................................................................. 22
Programs................... .................................................................................. 22
Cover/Designate .................................... ..................................................... 22
Other Functions........................................................................................... 23
3.TROUBLESHOOTING
If Your Machine Does Not Operate As You Want................................. 25
Messages..................... ............................................................................... 25
Displays....................................................................................................... 27
If Connect Copy Is Cleared......................................................................... 29
If You Cannot Exit Connect Copy.......................................................... 31
If Copying Isn't Working As Expected................................................... 33
When Memory Is Full.................................................................................. 33
4.USER TOOLS
Relationship Between Master Unit And Sub-Unit System Settings.... 35
Relationship Between Master Unit And Sub-Unit Copy Features....... 39
iii
Page 8

5.APPENDIX
Specifications.......................................................................................... 43
INDEX........................................................................................................ 44
iv
Page 9
1. OVERVIEW
What Is Connect Copy?
Connect Copy is a feature that allows you to connect two copiers together using
a cable. When you set up your copy job on one unit (the master unit), data is
transferred to the other unit (the sub-unit) so that copies can be made on both
machines simultaneously.
Connect Copy Benefits
Connect Copy provides the following benefits:
❖❖❖❖
High-speed copying for greater productivity
For large volume copy runs, two connected machines form a single system
that can complete the job in a shorter time. If two 65 copies/minute (A4
1
8
/
" × 11"ùsize) copiers are connected together, a 130 copies/minute (A4ù,
2
1
/
" × 11"ùsize) speed will be available.
8
2
❖❖❖❖
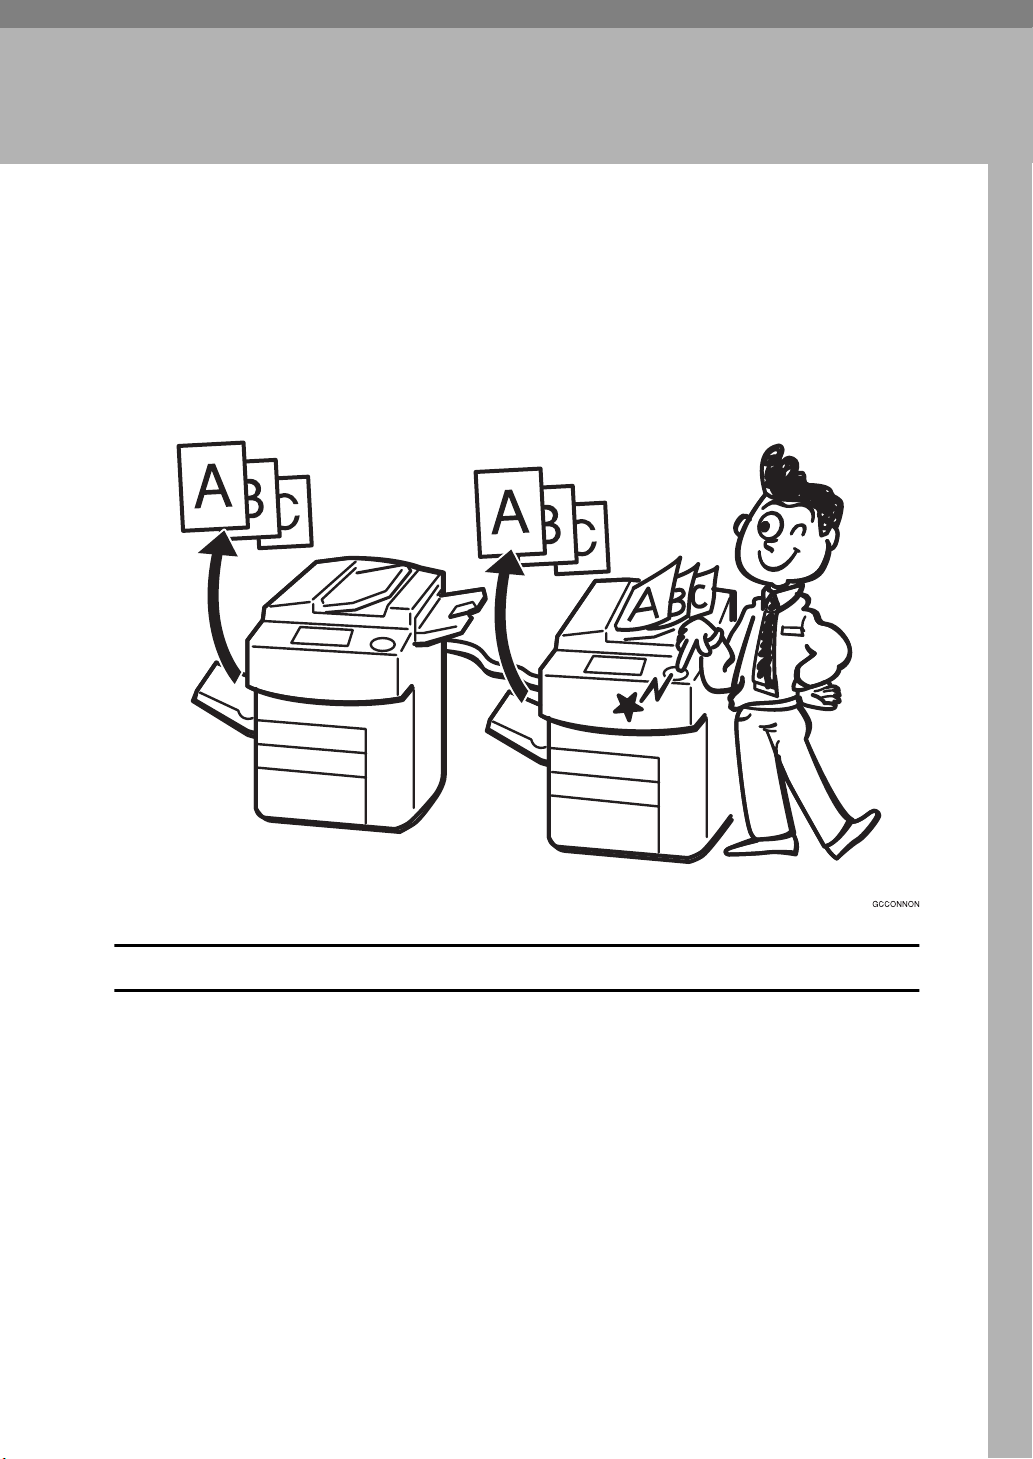
Auto-backup system for less participation of operators
Even if one copier stops because of a paper jam, it has run out of toner, or run
out of paper, the other unit will take over and finish the job automatically. If
the stopped machine is recovered, the units will allocate the job again and
continue using Connect Copy to complete the job in a way that results in maximum productivity.
ù,
1
Page 10

1
OVERVIEW
Note
❒ You cannot make other copy jobs when the two units are connected.
❒ The two machines automatically share the job in order to finish at almost
the same time and get the maximum productivity.
❒ To use the two copiers separately again, touch the
nect them.
Connect
[
key to discon-
]
2
Page 11
How Connect Copy Works
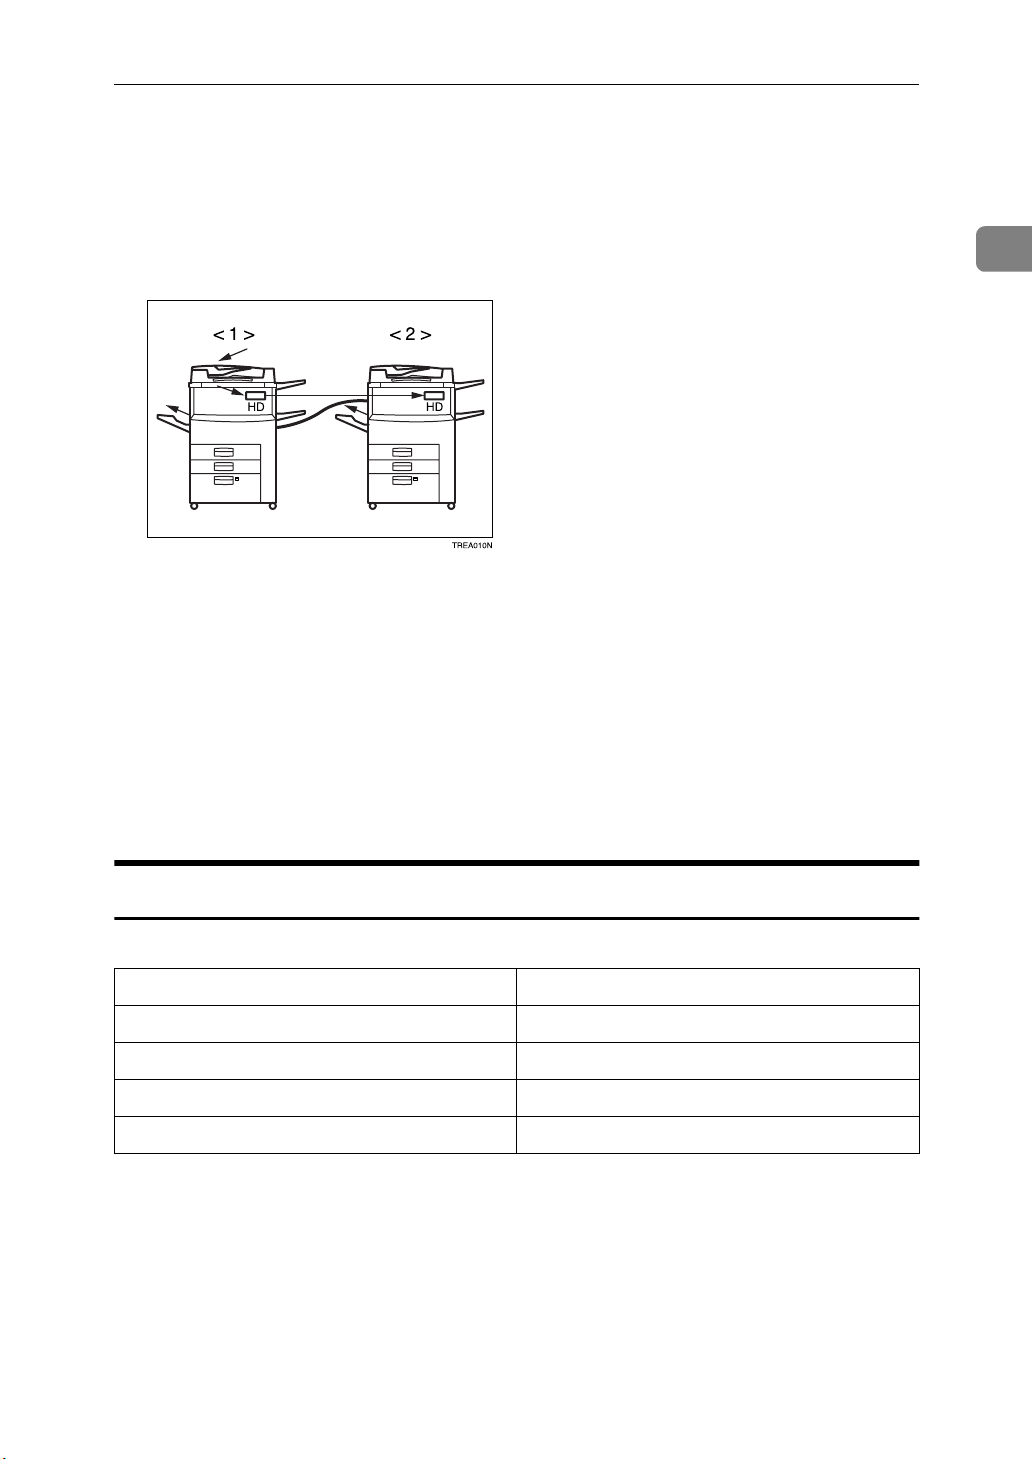
How Connect Copy Works
In this manual we refer to the two copiers as the master unit and sub-unit respectively.
1. Master Unit
2. Sub-Unit
As your original is scanned in, the image data is stored on the master unit hard
disk and transferred simultaneously to the sub-unit hard disk. As soon as scanning has finished, copying starts.
1
The master unit is the copier at which you touch the [
nect Copy mode. When you do this, the other copier becomes the sub-unit. You
can use either machine as the master unit or sub-unit, but you cannot change the
relationship without exiting Connect Copy mode first.
Connect
] key to enter Con-
Connectable Copier Models
• The master unit and sub-unit do not have to be same speed models.
Master Unit Sub-Unit
55 copies/minute copier 55 copies/minute copier
55 copies/minute copier 65 copies/minute copier
65 copies/minute copier 55 copies/minute copier
65 copies/minute copier 65 copies/minute copier
• You can still use Connect Copy even if no optional finisher or large capacity
tray (LCT) is available. However, the optional finisher must be installed in
both units in order to use the Stack and Staple functions, and the optional finisher and punch kit must be installed in both units in order to use the Punch
function.
3
Page 12

1
OVERVIEW
Functions Not Availabl e Wit h Connect Copy
The following functions are not available in Connect Copy mode:
• Next Job
• Book→1 Sided, Book→2 Sided, Multi→2 Sided, Booklet, Magazine
• Slip Sheet
• Double Copies
• Image Repeat
Interrupt, Printer and Document Server Functions In Connect
Copy Mode
• Connect Copy only supports the copy feature.
• You cannot use Connect Copy when a job has been paused using the Interrupt feature.
• You can use the Interrupt feature on the sub-unit while in Connect Copy
mode, but only when the master unit is not scanning originals.
• You cannot use the Printer or Document Server functions in Connect Copy
mode no matter how the “Output Priority” of the User Tools (System Settings) is programmed.
• You cannot switch to the Printer or Document Server functions while in Connect Copy mode. To access these functions you must exit Connect Copy
mode.
Before You Start
Both units must have paper trays loaded with paper of the same size, direction
and type that you wish to copy onto.
To make the most out of the Connect Copy feature, we recommend that:
• The paper tray settings of the master unit and sub-unit match each other.
• The “Original Mode Quality Level” of the User Tools (Copy Features) settings
should be the same on each unit. If they are not the same, the copied images
may differ. Refer to the “Original Mode Quality Level” of the User Tools
(Copy Features) in the “Copy Reference” manual.
4
Page 13

How Connect Copy Works
1
5
Page 14
1
OVERVIEW
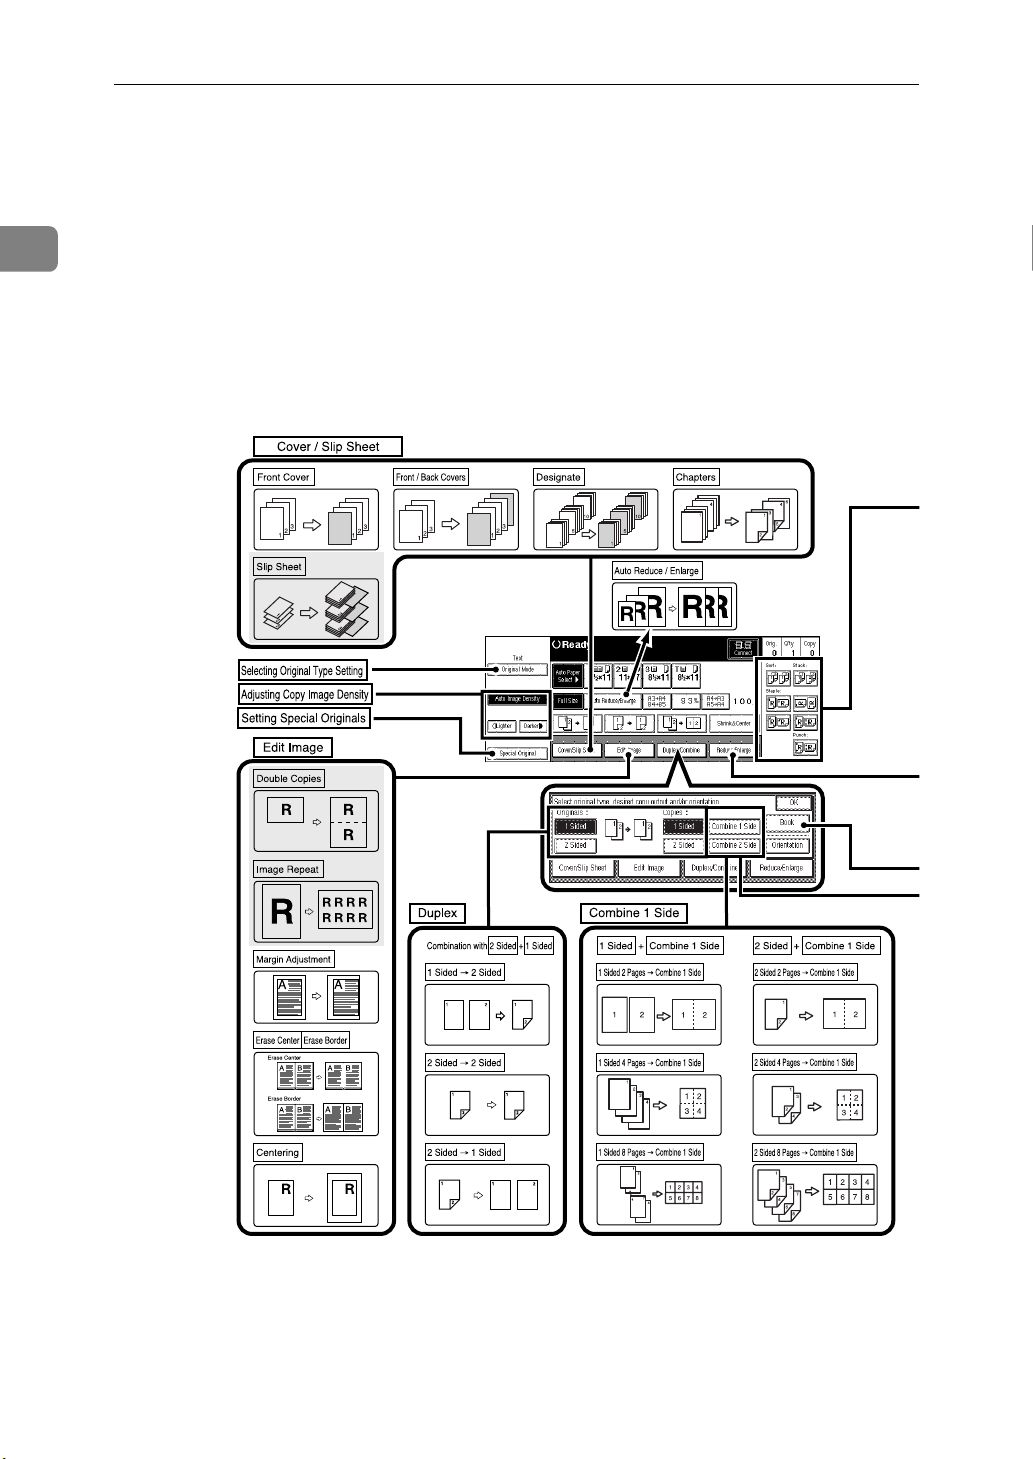
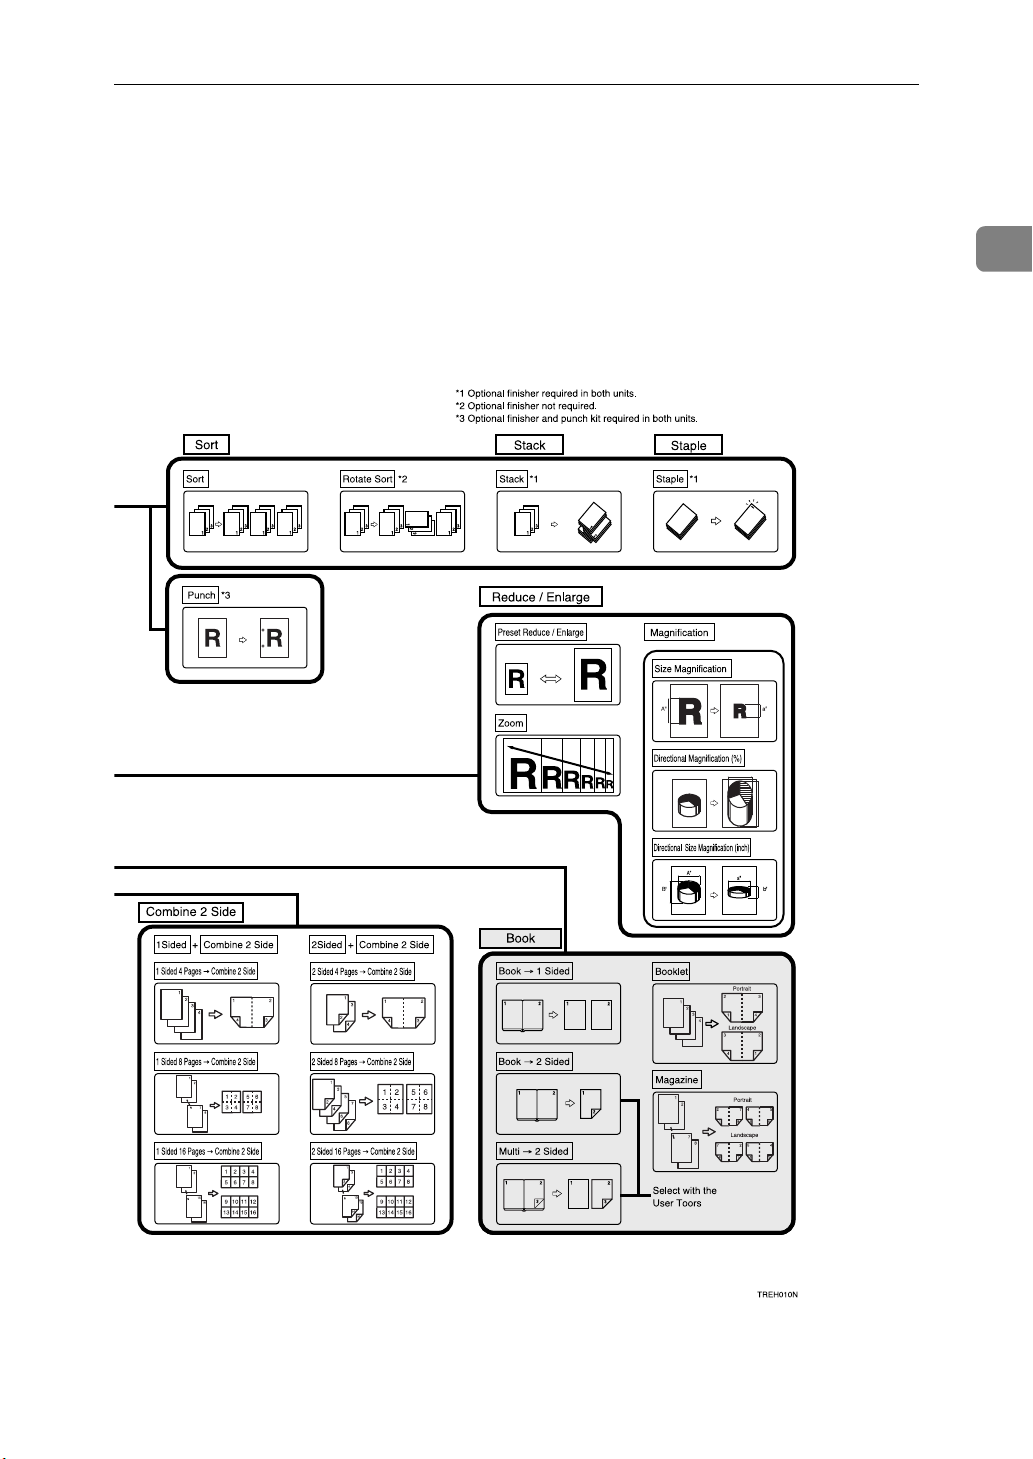
What You Can Do With Connect Copy
Function names and keys that are greyed out are not available in Connect Copy
mode.
For more detailed information on these functions and how to use them, please
refer to the Operating Instructions “Copy Reference” manual.
6
Page 15
What You Can Do With Connect Copy
1
7
Page 16
1
OVERVIEW
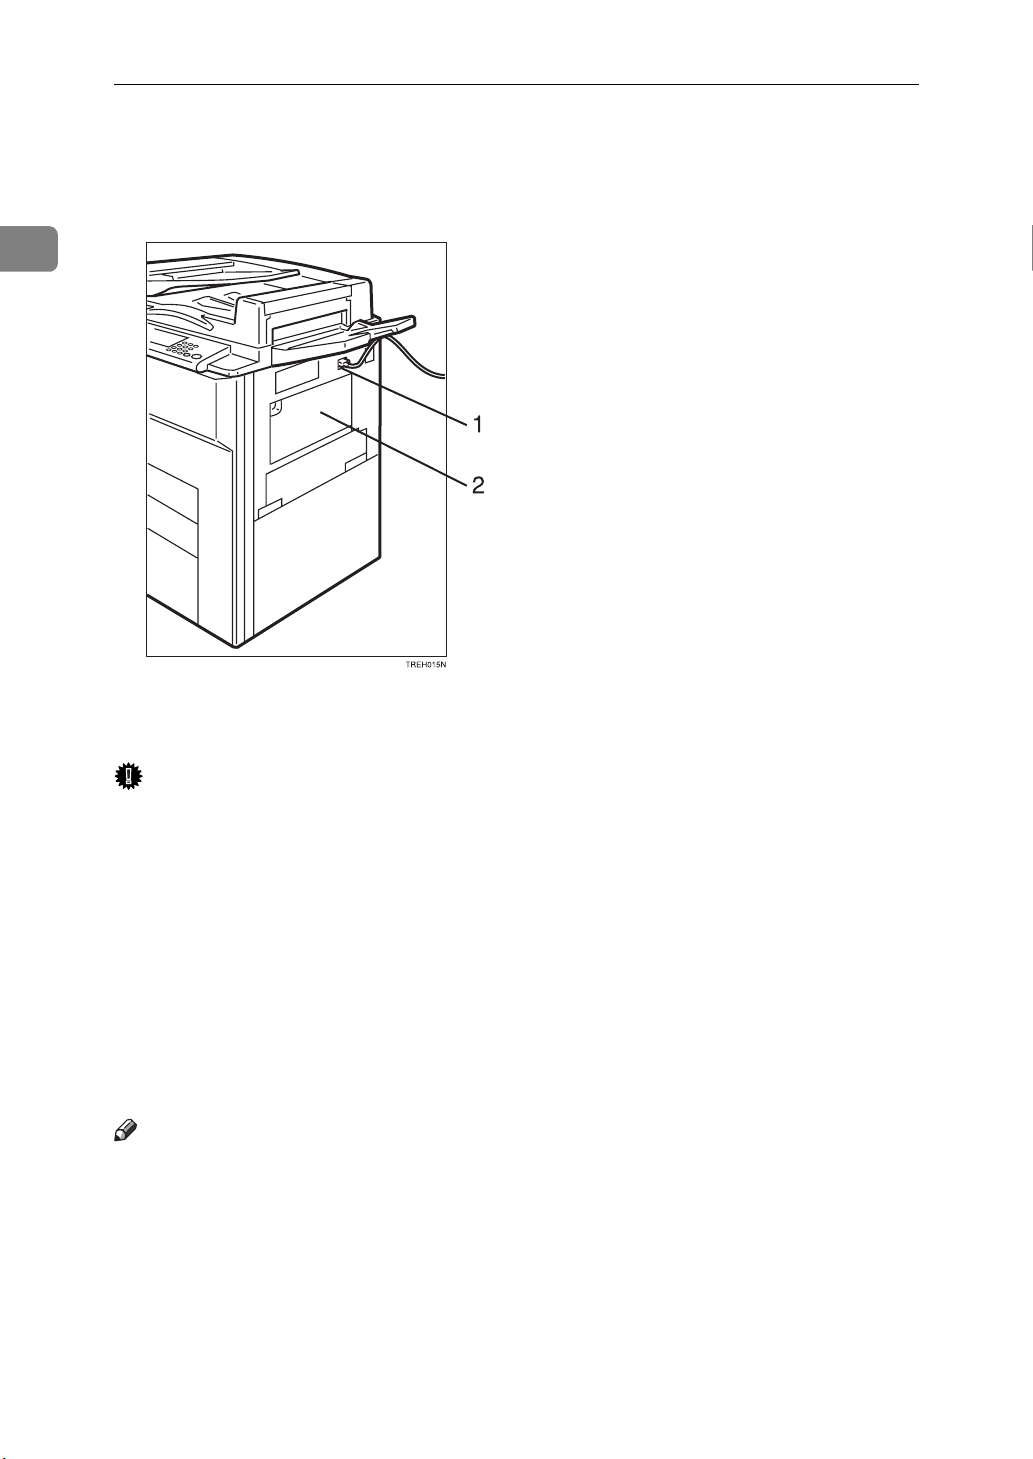
Guide To Components
1. Connect Copy port
Attach the Connect Copy cable here.
Important
❒
Do not connect any other equipment to the Connect Copy port.
❒
Be sure to turn off the main power
switch on both the master unit and
sub-unit before you disconnect the
Connect Copy cable. Unplugging
the cable while power is on could
damage the machines.
2. Bypass tray
Can be used with the Cover/Designate
functions only.
Note
Please contact your service represent-
❒
ative before moving the copier.
8
Page 17

Guide To Components
1
9
Page 18

1
OVERVIEW
Operation Panel
Use the master unit operation panel
to access basic Connect Copy features.
1. Screen contrast knob
Adjusts the brightness of the panel display.
2. Indicators
These indicators show errors or the status
of the machine.
Refer to “WHAT TO DO IF SOMETHING GOES WRONG” in the “Copy
Reference” manual.
3. W
W
User Tools/Counter
WW
• User Tools : Press to change the default settings and conditions to meet
your requirements.
• Counter : Press to check or print the
total number of copies made.
Refer to “USER TOOLS (Copy Features)”
in the “Copy Reference” manual.
Refer to “USER TOOLS (System Settings)” in the “System Settings” manual.
XXXX key
4. Panel display
Shows operation status, error messages,
and function menus.
See⇒ P.12
“Panel Display”
5. W
W
Program
WW
Press to select the program mode.
See⇒ P.22
6. W
W
Clear Modes/Energy Saver
WW
Press the WWWW
on the master unit to exit Connect Copy
mode and return to copy mode with default settings.
7. W
W
Interrupt
WW
Press to make interrupt copies during a
copy run.
See⇒ P.23
8. W
W
Sample Copy
WW
Use this key to make a single sample
copy on the master unit before starting a
long copy run. By checking the finish and
making any necessary changes to the image quality settings before you make
multiple copies, you can save time and
paper.
See⇒ P.24
XXXX key
“Programs”
XXXX key
Clear Modes/Energy Saver
XXXX key
“Interrupt”
XXXX key
“Sample Copy”
XXXX key
9. Main Power indicator
This indicator lights up when the main
power switch is turned on, and goes off
when the switch is turned off.
10
Page 19

Operation Panel
1
10. Operation switch
Press this switch to turn the power on
(the On indicator lights up). To turn the
power off, press this switch again (the
indicator goes off).
11. W
W
XXXX key
Start
WW
XXXX
WWWW
Start
Press the
start reading in your original. When
scanning is complete, the master and
sub-unit start copying simultaneously.
12. W
W
Clear/Stop
WW
• When entering numbers : Cancels a
number you have entered.
• When copying : Press on the master
unit to stop both units copying.
13. W
W
Number
WW
Use to enter the desired number of copies
and data for selected modes.
Use the Enter key to enter data in selected
modes.
key on the master unit to
XXXX key
XXXX keys
On
11
Page 20

OVERVIEW
Panel Display
This section describes the displays on the master unit and sub-unit.
1
Note that when you enter Connect Copy mode, you must access all Connect
Copy features and menus through the master unit display panel.
Master Unit Sub-Unit
Initial
display
in
standard
copy
mode
Initial
display
in Connect
Copy
mode
Display
when
scanning
originals on
the master unit
12
Display
when
copying/Interrupt
copying
Page 21

Master Unit Sub-Unit
Panel Display
Number
of originals
Copy
quantity
Copy
counter
Copy
Paper
Select
How many original pages have been
Not displayed on sub-unit.
scanned by the master unit so far.
How many sets/copies to make. Not displayed on sub-unit.
Displays how many sets/copies
made by the master unit so far.
*1
Only paper trays loaded with the paper of the same size, direction and
type installed in both the master unit
and sub-unit are displayed.
Other paper tray types will be greyed
out and you cannot select them.
Displays how many sets/copies
made by the sub-unit so far.
Only paper trays loaded with the paper of the same size, direction and
type installed in both the master unit
and sub-unit are available.
Note that you can only select the
*2
copy paper from the master unit operation panel.
1
*1
When two or more pages are being copied using Sort and Staple, you can check how
many sets have been copied so far. To toggle the copy counter between the master
unit total and the total for both units, touch the area that displays the number of copies. "Copy” means the number of sets made so far by the master unit and "Total”
means the total number of sets made so far by both units.
*2
The bypass tray can use only for Cover/Designate functions.
13
Page 22

1
OVERVIEW
Functions Supported By Connect Copy
There are some differences in the functions supported by Connect Copy and
standard copying. Functions marked with an [×] in the table below cannot be
used with Connect Copy.
✩…Available
×…Not available
Mode Available or not
Batch (SADF) mode
Mixed Sizes mode
Thin mode
Adjusting Copy Image Density
Selecting Original Type Setting
Selecting Copy Paper
Auto Reduce/Enlarge
Sort
Rotate Sort
Stack
Punch
Staple
Copying From The Bypass Tray
Program
Preset Reduce/Enlarge
Zoom
✩
✩
✩
✩
✩
✩
✩
✩
✩
✩
✩
✩
✩
✩
✩
✩
*1
*2
*3
*2
*4
*5
14
Size Magnification
Directional Magnification (%)
Directional Size Magnification (inch)
Duplex 1 Sided→2 Sided
2 Sided→2 Sided
✩
✩
✩
✩
✩
Page 23

Functions Supported By Connect Copy
Mode Available or not
Combine 1 Sided 2 Pages→Combine 1
Side
1 Sided 4 Pages→Combine 1
Side
1 Sided 8 Pages→Combine 1
Side
1 Sided 4 Pages→Combine 2
Side
1 Sided 8 Pages→Combine 2
Side
1 Sided 16 Pages→Combine 2
Side
2 Sided 2 Pages→Combine 1
Side
2 Sided 4 Pages→Combine 1
Side
2 Sided 8 Pages→Combine 1
Side
2 Sided 4 Pages→Combine 2
Side
✩
✩
1
✩
✩
✩
✩
✩
✩
✩
✩
2 Sided 8 Pages→ Combine 2
Side
2 Sided 16 Pages→Combine 2
Side
Book Book→1 Sided ×
2 Sided→1 Sided ✩
Book→2 Sided ×
Multi→2 Sided ×
Booklet ×
Magazine ×
Cover/Designate/Chapters ✩
Slip Sheet ×
Double Copies ×
Image Repeat ×
Margin Adjustment ✩
Erase Center/Border ✩
✩
✩
15
Page 24

OVERVIEW
Mode Available or not
1
Centering
Interrupt
Next Job
Sample Copy
*1
Only when the optional finisher is not installed in both units.
*2
Optional finisher required in both units.
*3
Optional finisher and punch kit required in both units.
*4
Only with Cover/Designate.
*5
When you recall a program it is retrieved from the master unit. If your program con-
✩
✩
×
✩
*6
*7
tains settings that are not available in Connect Copy mode or the sub-unit does not
support certain features stored in the program, they are ignored.
*6
Available only on the sub-unit, and only when the master unit is not scanning originals.
*7
Master unit only.
16
Page 25

2. USING CONNECT COPY
Making Copies
You can select Connect Copy mode
from either of the two connected copiers by touching the [
The copier you use becomes the master unit, and the other copier the subunit.
Limitation
❒ Once Connect Copy is selected,
you must carry out all operations
from the master unit.
Connect
] key.
ü Make sure the machine is in copy
mode.
Note
❒ If User Codes are turned on, en-
ter a User Code programmed in
the master unit with the number
keys (maximum 8 digits) then
#
press the W
need to enter the user code for
the sub-unit.
Reference
See ⇒ P.24 “User Codes”
X key. You don't
Master Unit display
❖❖❖❖
Sub-Unit display
❖❖❖❖
Reference
If the [
or you cannot select it, see ⇒
P.27 “Displays”.
If you touch the [
and the message “Connect
Copy is not available at this
time. Please check the connected machine. Press [
nect copy will be cancelled”
appears, see⇒ P.25 “Messages”.
Connect
] key is not visible
Connect
Cancel
] key
], con-
û Touch the [
unit that is to be the master unit.
When the key darkens, the two
units are connected.
Connect
] key on the
17
Page 26

USING CONNECT COPY
2
ú Set your originals in the master
unit.
Originals Set in the
document
feeder
R
R
Set on the
exposure
glass
set1EE
R
R
set2EE
❒ To exit Connect Copy mode,
touch the
master unit again.
Connect
[
key on the
]
ø Enter the number of copies you
require with the WWWW
Note
❒ You can enter up to 999 copies.
❒ If you make a mistake, press the
W
Clear/Stop
number.
Number
X key and enter a new
XXXX keys.
Reference
Refer to “Setting Originals” in
the “Copy Reference” manual.
ù Make any settings you require on
the master unit.
Note
❒ Any copy settings that were set
up before you entered Connect
Copy mode will still remain in
effect. However, if optional finishers are not installed on both
the master unit and sub-unit,
the Stack, Staple and Punch features will be automatically disabled.
❒ For more information on func-
tions you can be use with
Connect Copy, see ⇒ P.14
“Functions Supported By Connect
Copy”.
❒ Even though Connect Copy is
selected, only the master unit
will make copies in the following situations:
• When making a single copy
set
• When the original is a single
sheet and you enter a low
number of copies/sets
÷ Press the W
unit.
Copying starts after the original
has been scanned.
Note
❒ If you have set your originals in
the document feeder (ADF),
copying starts simultaneously
in the master unit and sub-unit
after all originals have been
scanned.
❒ Using the Batch (SADF) mode,
you need to set your originals,
W
XXXX key on the master
Start
WW
18
Page 27

Making Copies
then press the W
all the previously set originals
while the Auto Feed indicator is
lit. When all pages have been
scanned in, press the W
Copying starts simultaneously
in the master and sub-unit. Refer to “Batch (SADF) mode“ in
the “Copy Reference” manual.
❒ When scanning from the expo-
sure glass, you need to set the
next page(s) when scanning has
finished, then press W
When all pages have been
scanned in, press the W
Copying starts simultaneously
in the master unit and sub-unit.
❒ To stop originals being scanned
or copied, press the W
key on the master unit and follow the instructions on the display.
Reference
See ⇒ P.33 “When Memory Is
Full”.
X key. After
Start
Start
Clear/Stop
X key.
#
X key.
X key.
#
ö Pick up your copies from the mas-
ter unit and sub-unit.
Note
❒ The number of sheets and sets
copied by the master unit and
sub-unit may be different.
❒ The master unit and sub-unit
may not finish copying at the
same time.
ôôôô
❖❖❖❖
X
1. Master Unit
2. Sub-Unit
❖❖❖❖
Copy Output Order
When copying in Sort/Staple mode
E.g. copying 6-sets of a 3-sheet
original
• Copying with the master unit
(face-down output) — sub-unit
(face-down output)
When using Sort/Staple, your
copies sets are not split between
the master unit and sub-unit.
When copying without Sort/Staple
mode
E.g. making 2 copies of each page
of a 6–sheet original
• Copy with the master unit (facedown output) — sub-unit (faceup output)
2
❒ When using the Sort/Staple fea-
ture, copies are organized into
copy sets. If there is a paper jam
in one machine during this
process, it is not possible for the
other machine to take over the
copy set processing of the down
machine.
19
Page 28

USING CONNECT COPY
1. Master Unit
2. Sub-Unit
Combine your copy stacks from
the master unit and sub-unit as
shown in the diagram.
Exiting Connect Copy Mode
This procedure describes how to exit
Connect Copy mode and return to the
standard copying functions.
2
ôôôôAuto Reset
The machine exits Connect Copy
mode and automatically returns to
the initial condition a certain period
of time after your job has finished.
Note
❒ When the master unit “Auto Reset
Timer” of the User Tools (Copy
Features) delay elapses, the master
unit will be reset automatically.
❒ When the sub-unit “System Reset”
of the User Tools (System Settings)
delay elapses, Interrupt mode will
be cancelled on the sub-unit.
Reference
Refer to the “Auto Reset Timer” of
the User Tools (Copy Features) in
the “Copy Reference” manual.
ü Touch the
master unit.
The
Connect
[
ed.
Note
❒ Settings that were selected on
the master unit while in Connect Copy mode will not be
cleared.
❒ If you press the
ergy Saver
unit, the master unit settings
will revert to those that were selected before entering Connect
Copy mode.
Connect
[
key will be deselect-
]
key on the master
X
key on the
]
W
Clear Modes/En-
ôôôôAuto Off
The machine turns itself off automatically a certain period of time after
your job has finished. This function is
called “Auto Off”.
Note
❒ You can change the Auto Off time.
Reference
Refer to the “Auto Off Timer”of
the User Tools (System Settings) in
the “System Settings” manual.
20
❒ The sub-unit will return to the
state it was in prior to entering
Connect Copy mode.
Reference
If you cannot exit Connect Copy
mode by touching the
key, see ⇒ P.31 “If You Cannot
Exit Connect Copy”.
Connect
[
]
Page 29

Differences Between Standard Copy Functions And Connect Copy Functions
Differences Between Standard Copy
Functions And Connect Copy Functions
This section explains the differences
between standard copy functions and
those used with Connect Copy.
Basic Functions
Adjusting Copy Image Density
Make adjustments to copy image
density on the master unit.
Note
❒ You can adjust copy image density
on the master unit while scanning
originals, but the change will be reflected from the next copying.
❒ The image density level set on the
master unit will be used by both
units. However, in order to produce similar images on both units,
make sure the “Original Mode
Quality Level” settings are the
same on each unit. If they are not
the same, the finish of images may
differ.
Reference
Refer to “Original Mode Quality
Level” of the User Tools (Copy
Features) in the “Copy Reference”
manual.
Refer to “Adjusting Copy Image
Density”of the User Tools (Copy
Features) in the “Copy Reference”
manual.
Selecting Original Type Setting
Select an original type that matches
your original on the master unit.
Reference
Refer to “Selecting Original Type
Setting” in the “Copy Reference”
manual.
Selecting Copy Paper
Use the master unit to select the paper
you wish to copy onto.
Preparation
We recommend that the master
unit and sub-unit have the same
paper tray settings. This is because
only paper trays with the same
size, direction, and type of paper
can be used in Connect Copy
mode.
If several trays with the same paper settings are available in the
sub-unit, paper will be supplied
from the tray specified by the “Paper Tray Priority”of the User Tools
(Copy Features).
Note
❒ After you touch the
to enter Connect Copy mode, only
paper trays common to the master
unit and sub-unit will be selectable. Other paper tray keys will be
greyed out and you cannot select
them.
❒ If you turn “Auto Tray Switching”
of the User Tools (System Settings)
to “Yes”, paper tray with the same
size and type of paper will be selected and make copies with the
image rotated.
There are two ways of selecting copy
paper:
Connect
[
key
]
2
21
Page 30

USING CONNECT COPY
2
❖❖❖❖
Automatic Paper Select
The machine selects a suitable size
of copy paper automatically based
on the original size and the reproduction ratio.
❖❖❖❖
Manual Paper Select
You must choose the tray with the
paper you wish to copy onto: Paper Tray or Large Capacity Tray
(LCT).
Reference
Refer to “Selecting Copy Paper”
the “Copy Reference” manual.
Copying From The Bypass
Tray
Can be used with the Cover/Designate functions only.
Reference
See ⇒ P.22 “Cover/Designate”.
Programs
If you use certain combinations of settings on a frequent basis, store them
in a program on the master unit so
that you can recall them quickly and
easily.
❖❖❖❖
Storing Your Settings
Store your settings in a program in
the master unit.
❖❖❖❖
Deleting A Program
You can delete a stored program.
Copy mode, they will be ignored.
See ⇒ P.14 “Functions Supported By
Connect Copy”.
❒
If your program contains settings
that are not available on the subunit, they are ignored. If the finisher is not installed in the sub-unit,
the staple function is ignored.
❒
You cannot store the setting
whether the Connect Copying
function will be selected automatically in a program.
Reference
Refer to “Program” in the “Copy
Reference” manual.
Cover/Designate
You can make copies of front and
back covers onto special paper, and
copy designated pages onto slip
sheets.
Limitation
❒
The bypass tray can only be used
for cover and slip sheet copy paper.
❒
Before selecting functions on both
the master unit and sub-unit, you
must set the “Bypass Tray: Special
Paper Indication” of the User Tools
(System Settings) setting for Cover
Sheet/Slip Sheet with the User
Tools.
❒
Load paper of the same size and
direction when copying covers
and slip sheets.
22
❖❖❖❖
Recalling A Program
You can recall a stored program
from the master unit.
Note
❒
If your program contains settings
that are not available in Connect
Page 31

Differences Between Standard Copy Functions And Connect Copy Functions
ôôôôWhen using the cover sheet or
the slip sheet set on the bypass
tray
❖❖❖❖
Copying Onto Spacial Paper
Program the paper type before
touching the [
Connect
] key.
Energy Saver mode and enters
Connect Copy mode.
❒
Pressing the
key on the sub-unit has no
X
Saver
effect in Connect Copy mode.
❒
In Connect Copy mode, the subunit will not enter Energy Saver
mode.
W
Clear Modes/Energy
2
Note
❒
You cannot set non-standard size
paper in the Bypass Tray.
Reference
Refer to“When copying onto OHP
transparencies or thick paper” in
the “Copy Reference” manual.
Refer to“Copying From The Bypass Tray” in the “Copy Reference” manual.
Other Functions
Energy Saver Mode
When you hold down the
key for more than
Modes/Energy Saver
about one second on the master unit,
the display goes out and the machine
enters Energy Saver mode. If you
press the
key again, set originals in the document feeder, or raise the document
feeder, the machine returns to the
standby condition. In Energy Saver
mode, the machine uses less electricity.
Note
❒
If you press the
Saver
the current settings will be cleared.
❒
If you touch the [
the master unit, the sub-unit exits
W
Clear Modes/Energy Saver
key during an operation,
X
X
W
Clear Modes/Energy
Connect
W
Clear
] key on
Reference
Refer to “ Energy Saver Mode ” in
the “Copy Reference” manual.
Interrupt
Use this feature if you wish to interrupt a long copy job to make urgently
needed copies.
Note
❒
You can only use Interrupt on the
sub-unit.
❒
You can not use Interrupt on the
sub-unit while the master unit is
scanning an original.
❒
Interrupt mode is not used when
memory is full.
❒
When you have finished Interrupt
copying, please exit this mode. The
Connect Copy job will be reassigned to the Connect Copy job
again.
X
❒
Please exit the Interrupt mode after finishing the job. The next copy
job cannot be set up if the sub-unit
is in Interrupt mode.
Reference
Refer to “Interrupt” in the “Copy
Reference” manual.
23
Page 32

USING CONNECT COPY
2
User Codes
If the User Codes function is turned
on in the master unit, operators must
input their user code before they can
use the machine. The machine also
keeps count of the number of copies
made under each code.
Note
❒ You can turn User Codes on or off
with the master unit System Settings. Refer to “Set User Codes” of
the User Tools (System Settings) in
the “System Settings” manual.
❒ You can monitor the total number
of copies made by the master unit
and sub-unit with the master unit
User Codes function.
❒ If User Codes are set on in the sub-
unit and a code has been entered
before Connect Copy was selected,
the master unit cannot monitor the
number of copies made.
❒ If User Codes are turned on only in
the sub-unit, you can enter Connect Copy mode and make copies
without entering a code. In this
case the number of copies made
will not be monitored.
❒ To cancel Auto Start, press the
W
Clear/Stop
Reference
Refer to “Auto Start” in the “Copy
Reference” manual.
X key.
Sample Copy
This feature lets you make a single
sample copy set so you can make any
adjustments to the copy settings before starting a large copy job. It is only
available on the master unit.
Reference
Refer to “Sample Copy” in the
“Copy Reference” manual.
Reference
Refer to “User Codes” in the
“Copy Reference” manual.
Auto Start
If you press the W
warm-up period, the W
blink, and copying will start as soon
as the warm-up finishes.
Note
❒ Copying will start if “Ready” is
displayed on the master unit.
X key during the
Start
Start
24
X key will
Page 33

3. TROUBLESHOOTING
If Your Machine Does Not Operate As You
Want
Messages
This section describes the most common error messages that may appear on the
display and various countermeasures you can take to solve the problem. If a
message not listed here appears, please refer to the “Message” section of the
“Copy Reference” manual.
Message Problem/Cause Action
Connect Copy is not available at this time. Please
check the connected machine. Press
nect copy will be cancelled.
Cancel
[
, con-
]
Cancel
[
The sub-unit has a paper
jam or needs a fresh supply
of toner or other replenishable supply.
]
Touch the
the master unit and follow
the instructions given on
the sub-unit display.
Reference
Refer to “û Adding
Toner” in the “Copy
Reference”manual.
Refer to “ã ü Clearing
Misfeeds” in the “Copy
Reference” manual.
Refer to “ó Removing
Jammed Staples” in the
“Copy Reference” manual.
If the sub-unit display
shows that a cover is open,
follow the instructions given. For all other situations,
follow the instructions on
the display.
Cancel
[
key on
]
The User Tools menu is
open on the sub-unit.
Touch the
the master unit. Then on
the sub-unit press the
Tools/Counter
the User Tools menu.
Cancel
[
key on
]
W
key to close
X
User
25
Page 34

TROUBLESHOOTING
Message Problem/Cause Action
3
Connect Copy is not available at this time. Please
check the connected machine. Press [
nect copy will be cancelled.
Cancel
], con-
Cancel
[
The sub-unit is busy copying or printing with another function.
The sub-unit is in Interrupt
]
mode.
The sub-unit has been
switched off automatically
by the Weekly Timer feature and is waiting for the
Key Operator Off Code to
be entered.
Cancel
Touch the [
the master unit then stop
the sub-unit from copying/
printing.
Touch the [
the master unit. Then press
Interrupt
the W
sub-unit to exit Interrupt
mode.
] key on
Cancel
] key on
X key on the
Reference
See ⇒ P.23 “Interrupt”.
Touch the [
the master unit. Then on
the sub-unit enter the code
and press the W
Cancel
#
X key.
] key on
Reference
Refer to “Key Operator
Code for Off Setting” of
the User Tools (System
Settings) in the “System
Settings” manual.
Can not connect. The other
machine is use.
The sub-unit is not in copy
mode (i.e. in Printer or
Document Server mode).
Connect
[
multaneously on both the
master unit and sub-unit.
ô indicator is lit on the subunit.
The master unit is not in
copy mode (i.e. in Printer
or Document Server
mode).
] was pressed si-
Touch the [
the master unit. Then press
Copy
the W
unit to switch over to copy
mode.
Touch the [
both the master unit and
sub-unit, then touch the
Connect
[
them.
Follow the instructions
shown on the display.
Touch the [
the master unit. Then press
Copy
the W
ter unit to switch over to
the copy function.
Cancel
] key on
X key on the sub-
Cancel
] key on
] key on just one of
Cancel
] key on
X key on the mas-
26
Page 35

If Your Machine Does Not Operate As You Want
Displays
Machine Status Problem/Cause Action
Connect
The [
does not appear on the display.
] indicator
The main power switch on
the sub-unit is off.
Turn on the sub-unit main
power switch.
The operation switch on
the sub-unit is off.
The master unit is not in
copy mode (i.e. in Printer
or Document Server
mode).
The master unit is in Interrupt mode.
Press the operation switch
on the right side of the operation panel. The On indicator will light.
Note
❒ The machine will be
ready to operate about
five minutes after turning power on.
Reference
See “Operation Switch”
in ⇒ P.10 “Operation
Panel”
Press the W
master unit to switch to the
copy function.
Press the W
the master unit to exit Interrupt mode.
Copy
X key on the
Interrupt
X key on
3
Reference
See ⇒ P.23 “Interrupt”.
27
Page 36

3
TROUBLESHOOTING
Machine Status Problem/Cause Action
Connect
The [
does not appear on the display.
] indicator
The master unit is in Next
Job mode.
Exit Next Job mode in one
of the following ways.
❖❖❖❖
If you are still selecting
copy settings and copying has not started yet:
Touch the [
then remove the originals set in the master
unit auto document
feeder (ADF) .
❖❖❖❖
If Next Job mode is in
progress:
Press the W
key, follow the instructions on the display
then touch the [
key.
Clear
] key
Clear/Stop
Cancel
X
]
The [
out.
Connect
] key is greyed
Reference
Refer to "Next Job" in
the “Copy Reference”
manual.
The “Connect Copy” of the
User Tools setting (Copy
Features) is set to “No”.
Change the setting to “Yes”
or touch the [
on the other unit.
Connect
] key
Reference
See “Connect Copy” in
⇒ P.42 “User Tools (Copy
Features) For Connect
Copy”
The Connect Copy cable is
damaged.
ô indicator is lit. Follow the instructions
The master unit is now
copying or copying will
start as soon as the warmup finishers.
Please contact your service
representative.
shown on the display.
Press the master unit
Clear/Stop
W
copying.
X key to cancel
Reference
Clear/Stop
See “W
⇒ P.10 “Operation Pan-
el”
X key” in
28
Page 37

If Your Machine Does Not Operate As You Want
Machine Status Problem/Cause Action
The
out.
Connect
[
key is greyed
]
Copying has stopped because there is a paper jam
or toner has run out on the
unit you wish to use as the
master unit.
Functions are programmed
that cannot be used with
Connect Copy.
Solve the problem on the
master unit.
Press the master unit
Modes/Energy Saver
clear the programmed
functions.
Clear
W
key to
X
Reference
See ⇒ P.14
Supported By Connect
Copy”
“Functions
.
If Connect Copy Is Cleared
We will now explain the procedures to be used when Connect Copy is cleared.
Machine Status Cause Action
Exited Connect Copy. The master unit main pow-
er switch has been turned
off or the operation switch
has been pressed.
Connect Copy is cancelled
and the display returns to
copy standby mode. On the
master unit, either turn on
the main power switch or
press the operation switch,
then touch the
key and start your copy job
again.
Connect
[
]
3
Reference
See “Operation
Switch”in ⇒ P.10
ation Panel”
“Oper-
29
Page 38

TROUBLESHOOTING
Machine Status Cause Action
3
Exited Connect Copy. Either the sub-unit main
power switch has been
turned off or the operation
switch has been pressed.
The Weekly Timer function
has automatically turned
the master unit off.
A message requesting you
to check the sub-unit is displayed on the master unit.
Touch the [
clear connect-copying. Either turn on the main power switch on the sub-unit or
press the operation switch
and then touch the [
nect
] key.
Cancel
] key and
Con-
Reference
See “Operation
Switch”in⇒ P.10 “Oper-
ation Panel”
Press the master unit operation switch then touch the
Connect
[
] key and copy.
Reference
Refer to the “Weekly
Timer” of the User
Tools (System Settings)
in the “System Settings”
manual.
See “Operation
Switch”in⇒ P.10 “Oper-
ation Panel”
30
An error message indicating a breakdown is shown
on the master unit display.
ô indicator is lit. Follow the instructions dis-
played in the error message. Copying is not
possible.
Page 39

If You Cannot Exit Connect Copy
If You Cannot Exit Connect Copy
Status Cause Action
Nothing happens when
you press the [
Connect
] key.
Originals are being
scanned or copied.
There is a paper jam in either the master unit or subunit.
Press the master unit
Clear/Stop
W
scanning or copying.
X key to cancel
Reference
Clear/Stop
See “W
key”in⇒ P.10 “Opera-
tion Panel”
Clear the paper jam in the
master unit or sub-unit.
X
Reference
Refer to “ãü Clearing
Misfeeds” in the “Copy
Reference” manual.
Refer to “ó Removing
Jammed Staples” in the
“Copy Reference” manual.
If the “Cover Open” display appears, follow the instructions given.
For any other problems,
follow the instructions that
are displayed.
To exit Connect Copy
mode, press the master
Clear/Stop
unit W
touch the [
X key, then
Connect
] key.
3
The master unit W
key was pressed and scanning of the original has
been interrupted.
Clear/Stop
The W
pressed on either the master unit or sub-unit and
copying has been interrupted.
ClearStop
X key was
X
To exit Connect Copy
mode, follow the instructions on the display, then
touch the [
To exit Connect Copy
mode, follow the instructions on the display, then
touch the [
Cancel
Cancel
] key.
] key.
31
Page 40

TROUBLESHOOTING
Status Cause Action
3
Nothing happens when
you press the [
Connect
] key.
The master unit or sub-unit
needs a fresh supply of toner or staples.
Solve the problem in the
appropriate unit.
Reference
Refer to “û Loading
Paper” in the “Copy
Reference” manual.
Refer to “ù Adding
Toner” in the “Copy
Reference” manual.
Refer to “
Staples” in the “Copy
Reference” manual.
Refer to “ø Removing
Punch Waste” in the
“Copy Reference” manual.
For any other problems,
follow the instructions
that are displayed.
To exit Connect Copy
mode, press the master
unit W
then touch the [
key.
See “W
key”in⇒ P.10 “Opera-
tion Panel”
ô Adding
Clear/Stop
Clear/Stop
X key.
Cancel
X
]
32
A paper jam occurred during stapling.
Remove the jammed paper.
To exit Connect Copy
mode, press the
key, then touch the
nect
]
key.
Clear/Stop
W
Con-
[
Reference
Clear/Stop
See “W
key”in⇒ P.10 “Opera-
tion Panel”
X
X
Page 41

If Copying Isn't Working As Expected
If Copying Isn't Working As Expected
This section describes how to troubleshoot problems associated with copying. If
you cannot find a solution here, please refer to “If Your Machine Does Not Operate As You Want” in the “Copy Reference” manual.
Phenomenon Cause Action
Cannot stack, staple or
punch.
The copied images differ. The “Original Mode Quali-
The finisher is not installed
in the sub-unit.
ty Level” of the User Tools
(Copy Features) settings
are not the same.
Touch the
(the key darkens) to exit
Connect Copy mode, then
copy using stack/staple/
punch.
Refer to the “Original
Mode Quality Level” of the
User Tools (Copy Features)
settings in the “Copy Reference” manual.
Connect
[
key
]
When Memory Is Full
Because Connect Copy scans in all your originals into memory, if the number of
originals exceeds a certain limit, the machine will run out of memory.
Limitation
❒ If memory is full on either the master unit or sub-unit, Interrupt Copy will not
be available.
Note
❒ If you set the “Memory Full Auto Scan Restart”of the User Tools (Copy Fea-
tures) to “Yes”, the memory overflow message will not be displayed, but
make Connect Copy for the scanned original automatically. Connect Copy
continues scanning and copying until finishing the job. Please note that copy
sets will be printed out separated by scanning at this time.
3
Message Phenomenon Action
Memory is full. ## originals
have been scanned. Do not
remove the remaining originals. Press
scanned originals.
Clear
[
] [
Press
[
remaining originals.
Cancel
[
Output
[
Output
Resume
Resume
] [
to copy
]
]
to scan the
]
]
Scanning memory is full. Touch
scanned originals and clear
the scanning data. Touch
Clear
[
data and not copy.
Confirmation whether to
continue copying the rest
of the originals.
To continue copying, remove all copies then touch
the
Resume
[
copying, touch the
key.
Output
[
to clear the scanning
]
to copy
]
key. To stop
]
Cancel
[
]
33
Page 42

3
TROUBLESHOOTING
34
Page 43

4. USER TOOLS
Relationship Between Master Unit And
Sub-Unit System Settings
This section describes which System Settings are used by the master unit and
sub-unit in Connect Copy mode.
Note
❒ In Connect Copy mode the W
bled. To access the User Tools on the sub-unit, you need to exit Connect Copy
mode first.
Reference
Refer to the “System Settings” manual for details.
Symbol Meaning
User Tools/Counter
X key on the sub-unit is disa-
✩
←
— Unrelated
★
Menu Master
Basic Page 1
Operation Panel Beeper
Ready Operation Panel
Beeper
Copy Count Display — — The copy counter is always
Auto Response (Human)
Sensor
Auto Tray Switching
Auto Off Timer
Master unit uses the master unit setting or sub-unit uses the
sub-unit setting
Both units use the master unit setting
Depends on the function
Sub-Unit Remarks
Unit
✩✩
✩✩
displayed in count up mode.
✩
✩✩
✩
Invalid Disabled even if the sub-unit
setting is “Yes”.
—
35
Page 44

USER TOOLS
4
Menu Master
Unit
Low Power Shift Time — — In Connect Copy mode, neiLow Power Timer — —
ADF Orig. Ejection ✩ —
<F/F4> Size Setting ✩✩
Basic Page 2
Function Priority — — When the master unit the
Sub-Unit Remarks
ther unit will enter any of the
Energy Saver modes (Low
Power mode, Energy Saver
mode). When Connect Copy
is exited, the machines will enter Energy Saver mode after
the programmed delay elapses.
“Auto Reset Timer” of the
User Tools (Copy Features)
delay elapses then the “System Reset” of the User Tools
(System Settings) delay elapses, only the master unit returns to the function defined
by the “Function Priority” of
the User Tools (System Settings) setting.
36
System Reset — ★ Interrupt mode on the sub-
unit will be cleared by this
timer.
Output Priority — — Connect Copy has priority
over all other functions (Printer, Document Server). When
Connect Copy is exited, other
functions are resumed.
Function Reset Timer — —
Copy: Output Tray ✩✩
Document Server: Output
Tray
Printer: Output Tray — —
Interleave Print — — Connect Copy has priority
——
over all other functions (Printer, Document Server). When
Connect Copy is exited, other
functions are resumed.
Page 45

Relationship Between Master Unit And Sub-Unit System Settings
Menu Master
Unit
Set Time
Set Date ✩✩
Set Time ✩✩
Weekly Timer: Monday to
Sunday
Key Operator Code for Off
Setting
Paper Size Setting
Tray 1: Paper Size Setting ✩✩We recommend that the masTray 2: Paper Size Setting ✩✩
Tray 3: Paper Size Setting ✩✩
✩ —
——
Sub-Unit Remarks
The function is disabled on
the sub-unit in Connect
Copy mode. When Connect
Copy is exited, the power
will be switched off at the
time specified by the timer.
ter unit and sub-unit have the
same paper tray settings. This
is because only paper trays
with the same size, direction,
and type of paper can be used
in Connect Copy mode.
4
Bypass Tray: Special Paper
Indication
Tray 1: Special Paper Indication
Tray 2: Special Paper Indication
Tray 3: Special Paper Indication
LCT: Special Paper Indication
Count Manager
Set User Codes ✩ — Access these settings on the
Key Operator Code — —
★★
✩✩We recommend that the mas-
✩✩
✩✩
✩✩
Can be used only with the
Cover/Designate functions.
ter unit and sub-unit have the
same paper tray settings. This
is because only paper trays
with the same size, direction,
and type of paper can be used
in Connect Copy mode.
master unit. The master unit
settings override those of the
sub-unit.
37
Page 46

USER TOOLS
4
Menu Master
Unit
Memory Allocation ✩✩Memory Allocation for the
AOF (Keep It On.) — — Neither the master unit nor
Sub-Unit Remarks
copy function set in each unit
will be used for Connect Copy
mode.
sub-unit will be turned off by
this feature in Connect Copy
mode. The power will go off
after you have exited Connect
Copy mode and the AOF Delay has elapsed.
38
Page 47

Relationship Between Master Unit And Sub-Unit Copy Features
Relationship Between Master Unit And
Sub-Unit Copy Features
This section describes which Copy Feature settings are used by the master unit
and sub-unit in Connect Copy mode.
Note
❒ In Connect Copy mode the W
User Tools/Counter
bled. To access the User Tools on the sub-unit , you need to exit Connect Copy
mode first.
Reference
Refer to “USER TOOLS (COPY FEATURES)” in the “Copy Reference” manual.
Symbol Meaning
X key on the sub-unit is disa-
4
✩
←
— Unrelated
Menu Master
General features
Auto Paper Select Priority
Auto Paper Select Tray Display
Auto Image Density Priority
Original Mode Priority
Original Mode Display
Master unit uses the master unit setting or sub-unit uses the
sub-unit setting
Both units use the master unit setting
Unit
✩
✩
✩
✩
✩
Sub-Unit Remarks
— Trays with the same size and
direction of paper will be selected from the master unit
and sub-unit automatically.
— The sub-unit displays the type
of paper whether this function
is selected or not.
—
—
—
Original Mode Quality Level
Original Image Density Level
✩✩
✩✩
Same level should be selected
on both units.
Each unit uses its own programmed value.
39
Page 48

USER TOOLS
4
Menu Master
Unit
Auto Reset Timer ✩ — Connect Copy will be can-
Paper Tray Priority ✩✩
Shortcut R/E ✩ —
R/E Priority ✩ —
Duplex Mode Priority ✩ —
Copy Orientation in Duplex
Mode
Original Orientation in Du-
plex Mode
Book Duplex ✩ —
Initial Mode ✩ —
Maximum Copy Quantity ✩ —
Original Beeper ✩ —
Shrink & Center Ratio ✩ —
✩ —
✩ —
Sub-Unit Remarks
celled according to the timer
on the master unit.
Shortcut Keys: F1 ✩ —
Shortcut Keys: F2 ✩ —
Shortcut Keys: F3 ✩ —
Shortcut Keys: F4 ✩ —
Job End Call ✩✩
Reproduction Ratio
Enlarge 1-5 ✩ —
Priority Setting: Enlarge ✩ —
Reduce 1-6 ✩ —
Priority Setting: Reduce ✩ —
When turned on, the beeper
sounds only on the master
unit when copying is completed. Only if the “Ready
Operation Panel Beeper” of
the User Tools (System Settings) is on.
40
Page 49

Relationship Between Master Unit And Sub-Unit Copy Features
Menu Master
Unit
Page Format
Cover Mode ✩ — The master unit setting will be
Copy Back Cover ✩ —
Front Margin: Left/Right ✩ ←
Back Margin: Left/Right ✩ ←
Front Margin: Top/Bottom ✩ ←
Back Margin: Top/Bottom ✩ ←
1→2 Duplex Auto Margin
Adjust
Erase Border ✩ ←
Combine Original Shadow
Erase
Erase Center ✩ ←
Repeat Separation Line — — Not available with Connect
✩ ←
✩ ←
Sub-Unit Remarks
applied.
Copy.
4
Double Copies Separation
Line
Combine Separation Line ✩ ← The master unit setting will be
Booklet/Magazine Original
Orientation
Input/Output
Individual Input/Output
Operation
Next Job Scan Start ✩ —
Batch (SADF) Auto Reset
Time
ARDF Original Table Rise
Time
Face-Up/Down Selection in
Platen Mode
— — Not available with Connect
Copy.
applied.
— — Not available with Connect
Copy.
✩ — Originals will be scanned be-
fore copying in Connect Copy
mode.
✩ —
✩ —
— — This setting will be ignored
and the setting programmed
for Connect Copy will be
used.
Reference
See “step ö ” in⇒ P.17
“Making Copies”
41
Page 50

USER TOOLS
4
Menu Master
Unit
Duplex: Auto Eject
Combine: Auto Eject
Rotate Sort Auto Paper Continue
Auto Sort Mode
Memory Full Auto Scan Re-
start
Count Manager
Check/Reset/Print Copy
Counter
User Code Register/
Change/Delete
Face-Up/Down selection in
Bypass Mode
✩ ←
✩ ←
✩✩
✩
✩ ←
——
——
— — Can be used with the Cover/
Sub-Unit Remarks
The master unit setting will be
applied.
The master unit setting will be
applied.
This function is effective
when “Auto Tray Switching”
of the User Tools (System Settings) setting is “Yes”.
—
The master unit setting will be
applied.
Designate functions only.
ôôôôUser Tools (Copy Features) For Connect Copy
Count Manager
Menu Description
Connect Copy Selects whether the
displayed or not. If you choose “No”, the
Connect
[
this unit cannot become the master unit.
As a default setting, “Yes” is selected. You
can cancel this setting.
key will not be displayed and
]
Note
Default : Yes
❒
Connect
[
button is
]
42
Page 51

Specifications
üûú
5. APPENDIX
Continuous copying speed (full size)
Number of copies 1-999 sheets
ü With two 55 copies/minute models
û With two 65 copies/minute models
ú With one 55 copies/minute model and one 65 copies/minute model
110 copies/minute
(A4ù, 8
size)
58 copies/minute
(A3ø, 11" × 17"ø
size)
1
/2" × 11"ù
130 copies/minute
(A4ù, 81/2" × 11"ù
size)
68 copies/minute
(A3ø, 11" × 17"ø
size)
120 copies/minute
(A4ù, 81/2" × 11"ù
size)
63 copies/minute
(A3ø, 11" × 17"ø
size)
43
Page 52

INDEX
A
,
,
,
20
,
, 25,
43
20
24
,
32
32
,
22
Adding Staples
Adding Toner
Adjusting Copy Image Density
Appendix
Automatic Paper Select
Auto Off
Auto Reset
Auto Start
B
,
,
21
8
Basic Functions
Bypass tray
C
11
, 1,
, 25,
3
,
,
22
31
8
Clearing Misfeeds
,
,
22
Clear key
Clear Modes/Energy Saver key
Connect Copy
Connect Copy port
Copying From The Bypass Tray
Cover
Cover/Designate
,
,
,
21
10
22
M
,
,
10
22
Main Power indicator
Manual Paper Select
Master Unit
,
3
N
Number key
,
11
O
Operation Panel
Operation switch
Options
Original Mode Quality Level
Originals
Original Type
,
, 18,
,
10
,
11
i
19
,
21
P
4
,
,
22
, 12,
21
,
10
10
Panel Display
Paper Tray
Printer
Program
Program key
,
, 4,
21
D
Document feeder (ADF)
,
Document Server
4
E
Energy Saver
,
23
F
Finisher
, i,
3
I
Indicators
Interrupt
Interrupt key
,
, 4,
10
23
,
10
L
Large Capacity Tray (LCT)
Loading Paper
,
32
,
18
,
R
,
, 25,
32
31
Removing Jammed Staples
Removing Punch Waste
S
,
,
,
11
11
3
,
24
,
10
,
,
10
21
,
21
Sample Copy
Sample Copy key
Screen contrast knob
Selecting Copy Paper
Selecting Original Type Setting
Start key
Stop key
Sub-Unit
U
User Codes
USER TOOLS
i
User Tools/Counter key
,
24
,
35
,
10
44 UE USA A808
 Loading...