

Page 1
icb1-f_FM.book Page 1 Monday, July 17, 2000 3:51 PM
Capture Box Option
Type 270
Operating Instructions
Read this manual carefully before you use this product and keep it handy for future
reference.
For safety, please follow the instructions in this manual.
Page 2
icb1-f_FM.book Page 1 Monday, July 17, 2000 3:51 PM
Capture Box Option Type 270 Operating Instructions
UE USA B369-8020-4-L
Page 3

icb1-f_FM.book Page 1 Monday, July 17, 2000 3:51 PM
Introduction
This manual contains detailed instructions on the operation and maintenance of this machine. To get
maximum versatility from this machi ne all operators s ho uld carefully re ad and follow the instructions in
this manual. Please keep this manual in a handy place near the machine.
Please read the Safe ty Inf ormat ion bef ore us ing t his mac hine. It contai ns im portan t in forma tion r elat ed
to USER SAFETY and PREVENTING EQUIPMENT PROBLEMS.
Notes:
Some illustrations may be slightly different from your machine.
Certain options may not be available in some countries. For details, please contact your local dealer.
Power Source:
120V, 60Hz, 1A
Please be sure to connect the power cord to a power source as above. For details about the power
source,⇒ P.29
“Power Connection”
Page 4

icb1-f_FM.book Page 1 Monday, July 17, 2000 3:51 PM
Note to users in the United States of America
Notice:
This equipment has been tes ted and f ound to com ply wi th the l imits for a Class B digita l devic e, pursuant to Part 15 of the FCC Rules. These limits are designed to provide reasonable protection against
harmful interference in a reside nti al insta llat ion. Thi s equipm ent generate s, uses and can radiate radio
frequency energy an d, if not in st alled and us ed in a ccor dance with t he i nstru ction s, may cause harmfu l
interference to radio communications. However, there is no guarantee that interference will not occur
in a particular installation. If this equipment does cause harmful interference to radio or television reception, which c an be determined by t u rn ing the equipment off and on, the user is en co ur age d to try to
correct the interference by one more of the following measures:
Reorient or relocate the receiving antenna.
Increase the separation between the equipment and receiver.
Connect the equipment into an outle t on a c i rc ui t dif ferent f rom tha t t o w hich t he receiver is
connected.
Consult the dealer or an experienced radio /TV technician for help.
Warning
Changes or modifications not expressly approved by the party responsible for compliance could void
the user's authority to operate the equipment.
Properly shield ed and gr ounded cab les and connectors must be used for connect ions to h ost com puter
(and/or peripheral) in order to meet FCC emission limits.
Conect the PEU board to Capture Box with the shielded cable provided.
Conect the PC-Fax Expander Type 185 to Capture Box with a shielded RS232C serial cable.
Note to users in Canada
Note:
This Class B digital apparatus complies with Canadian ICES-003.
Remarque concernant les utilisateurs au Canada
Avertissement:
Cet appareil numérique de la classe B est conforme à la norme NMB-003 du Canada.
Declaration of Conformity
Product Name: Capture Box
Model Number: Option Type 270
Responsible party: Ricoh Corporation
Address: 5 Dedrick Place, West Caldwell, NJ 07006
Telephone number: 973-882-2000
This device complies with part 15 of FCC Rules.
Operation is subject to the following two conditions:
1. This device may not cause harmful interference, and
2. this device must accept any interference received,
including interference that may cause undesired operation.
In accordance with IEC 60417, this machine uses the following symbols for the main switch:
means POWER ON.
a
means STAND BY.
c
Page 5
R
R
icb1-f_FM.book Page i Monday, July 17, 2000 3:51 PM
Safety Information
When using your machine, the following safety precautions should be always
followed.
Safety During Operation
In this manual, the following important symbols are used:
WARNING:
CAUTION:
R
WARNING:
•
Connect the power cord directly into a wall outlet and never use an extension cord.
•
Disconnect the power plug (by pull i ng the pl ug, not the cable) if the
power cable or plug becomes frayed or otherwise damag ed.
•
To avoid hazardous electric shock or laser radiation exposure, do not
remove any covers or screws other than those specified in this manual.
•
Turn off the pow er and discon nect the power pl ug (by pulli ng the plug,
not the cable) if any of the following conditions exists:
•
•
•
•
Do not incinerate spilled toner or used toner. Toner dust might ignite
when exposed to an open flame.
•
Disposal can take place at our authorized dealer or at appropriate collection sites.
•
Dispose of the used toner bottle in accordance with the local regulation.
Ignoring this warning could cause serious injury or ev en de at h.
Ignoring this caution could cause injury or dam age to property.
You spill something into the equipment.
You suspect that your equipment needs service or repair.
Your equipment's cover has been damaged.
i
Page 6
icb1-f_FM.book Page ii Monday, July 17, 2000 3:51 PM
R
CAUTION:
•
Protect the equipment from dampness or wet weather, such as rain, snow,
and so on.
•
Unplug the power cord from the wall outlet before you move the equipment.
While moving the equipment, you should take care that the power cord will
not be damaged under the equipment.
•
When you disconnect the power plug from the wall outlet, always pull the
plug (not the cable).
•
Do not allow paper clips, staples, or other small metallic objects to fall inside
the equipment.
•
Keep toner (used or unused) and toner bottle out of the reach of children.
•
For environmental reasons, do not dispose of the equipment or expended
supply waste at household waste collection points. Disposal can take place
at an authorized dealer or at appropriate collection sites.
•
The inside of the machine could be very hot. Do not touch the parts with a
label indicating the “hot surface”. Otherwise it could cause a personal burn.
•
Our products are engineered to meet high standards of quality and functionality, and we recommend that you only use the expendable supplies available at an authorized dealer.
ii
Page 7
R
R
icb1-f_FM.book Page iii Monday, July 17, 2000 3:51 PM
How to Read This Manual
In this manual, Capture Box refers to Capture Box Option Type 270.
Symbols
In this manual, the following symbols are used:
WARNING:
This symbol indicates a potentially hazardous situation that might result in
death or serious injury when you misuse the machine without following the instructions under this symbol. Be sure to read the instructions, all of which are described in the Safety Information section.
CAUTION:
This symbol indicates a potentially hazardous situation that might result in minor or moderate injury or property damage that does not involve personal injury
when you misuse the machine without following the instructions under this
symbol. Be sure to read the instructions, all of which are described in the Safety
Information section.
* The statements above are notes for your safety.
Important
If this instruction is not followed, paper might be misfed, originals might be
damaged, or data might be lost. Be sure to read this.
Preparation
This symbol indicates the prior knowledge or preparations required before operating.
Note
This symbol indicates precautions for operation, or actions to take after misoperation.
Reference
This symbol indicates a reference.
[]
Keys that appear on the machine's panel display.
{}
Keys built into the machine's operation panel.
iii
Page 8
icb1-f_FM.book Page iv Monday, July 17, 2000 3:51 PM
TABLE OF CONTENTS
1.Getting Started
What Is Capture Box?............................................................................... 1
Part Names................................................................................................. 2
Capture Box Main Body................................................................................ 2
I/O Device (Copier) Operation Panel ............................................................ 4
Power.......................................................................................................... 5
Turning Capture Box On............................................................................... 5
Turning Capture Box Off............................................................................... 5
Capture Box Initial Settings...................................................................... 7
TCP/IP Settings............................................................................................. 7
Web Browser Settings................................................................................... 8
2.Basic Document Capture
Copying/Fax Transmission..................................................................... 11
Copying / Faxing with Document Capture................................................... 11
Copying /Faxing Without Document Capture.............................................. 11
Scanning.................................................................................................. 12
Capturing Scanned Documents ............................................. ..................... 12
Scan Settings .............................................................................................. 12
Incoming Faxes ................................................. ...................................... 14
Document Owners................................................................................... 15
Browsing Users........................................................................................... 15
Checking which Users Are Owners............................................................. 15
Deselecting Owners.................................................................................... 15
Storing Documents under the Default Owner ............................................. 16
3.Captured Data
Data Transferred to eCabinet................................................................. 17
Information Appended to All Images........................................................... 17
Information Appended to Outgoing Fax Images ......................................... 17
Information Appended to Incoming Fax Images ......................................... 17
Document Segmentation........................................................................ 18
Segmentation of Copy Documents............................................................. 18
Segmentation of Fax Documents................................................................ 19
Segmentation of Scanned Documents........................................................ 19
Capture Limitations................................................................................. 20
All Devices................................................................................................ 20
Copying....................................................................................................... 20
Faxing ......................................................................................................... 21
Capture and Printing of Incoming Faxes .............................................. 22
iv
Page 9

icb1-f_FM.book Page v Monday, July 17, 2000 3:51 PM
4.Troubleshooting
Troubleshooting...................................................................................... 23
5.Display Messages
Display Messages.................................................................................... 25
6.Remarks
Do's and Don'ts ....................................................................................... 27
Where to Put Your Machine.................................................................... 28
Machine Environment ................................................................................. 28
Power Connection................................................ ..... .. ..... .. .. ..... .. ... .. .. ..... .. .. 29
Access to Machine...................................................................................... 29
Disposing of the Machine............................................................................ 29
7.Specifications
Capture Box Option Type 270................................................................ 31
INDEX........................................................................................................ 32
v
Page 10

icb1-f_FM.book Page vi Monday, July 17, 2000 3:51 PM
vi
Page 11
icb1-f_FM.book Page 1 Monday, July 17, 2000 3:51 PM
1. Getting Started
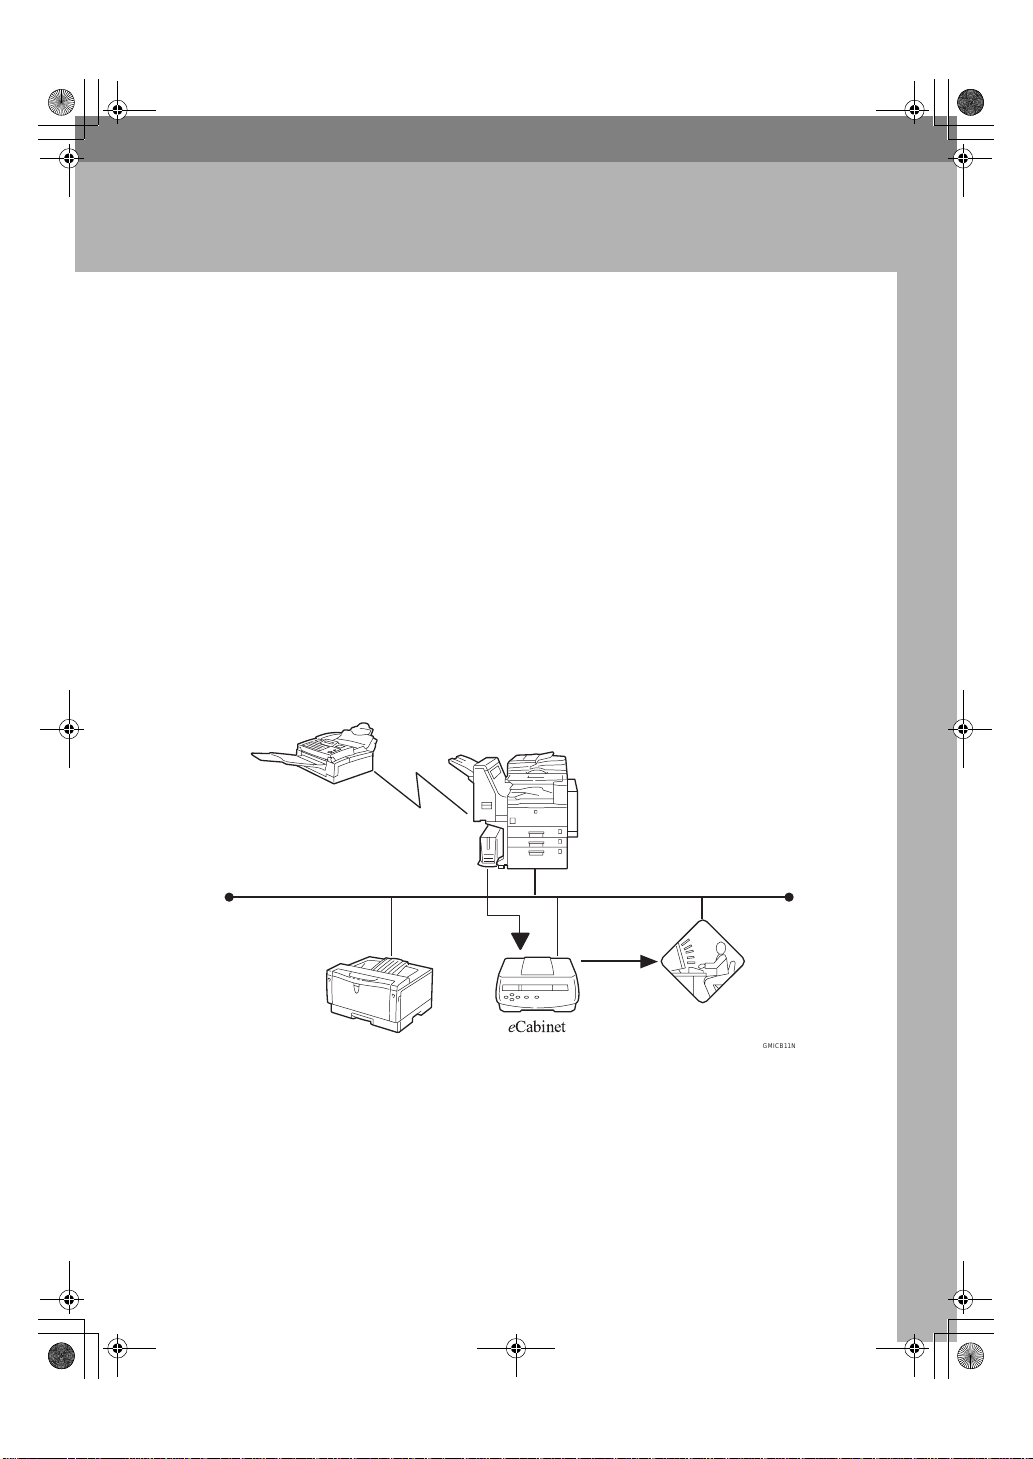
What Is Capture Box?
Capture Box Option Type 270 allows you to capture paper documents, such as
faxes and copies, in electronic format.
Whenever copies are made, faxes are sent, faxes are received or originals are
scanned, these images are captured and transferred to eCabinet for storage
(eCabinet is a thin server for managing documents). By using standard copying
and faxing procedures, documents can be accumulated in a manner transparent
to the user. The data transferred to eCabinet for storage can be viewed at any
time from a Web browser running on a client PC.
Capture Box Option Type 270 transfers images captured from an I/O Device
(copier) to eCabinet.
As well as transferring the captured image data, Capture Box Option Type 270
also attaches additional information, such as the date and the document owners.
Documents can be easily searched for from eCabinet using this information.
When capturing a document, for security purposes you can choose whether all
users can access it or only certain users you specify.
GMICB11N.eps
Capture
Box
e
Cabinet
GMICB11N
1
Page 12
icb1-f_FM.book Page 2 Monday, July 17, 2000 3:51 PM
Getting Started
Part Names
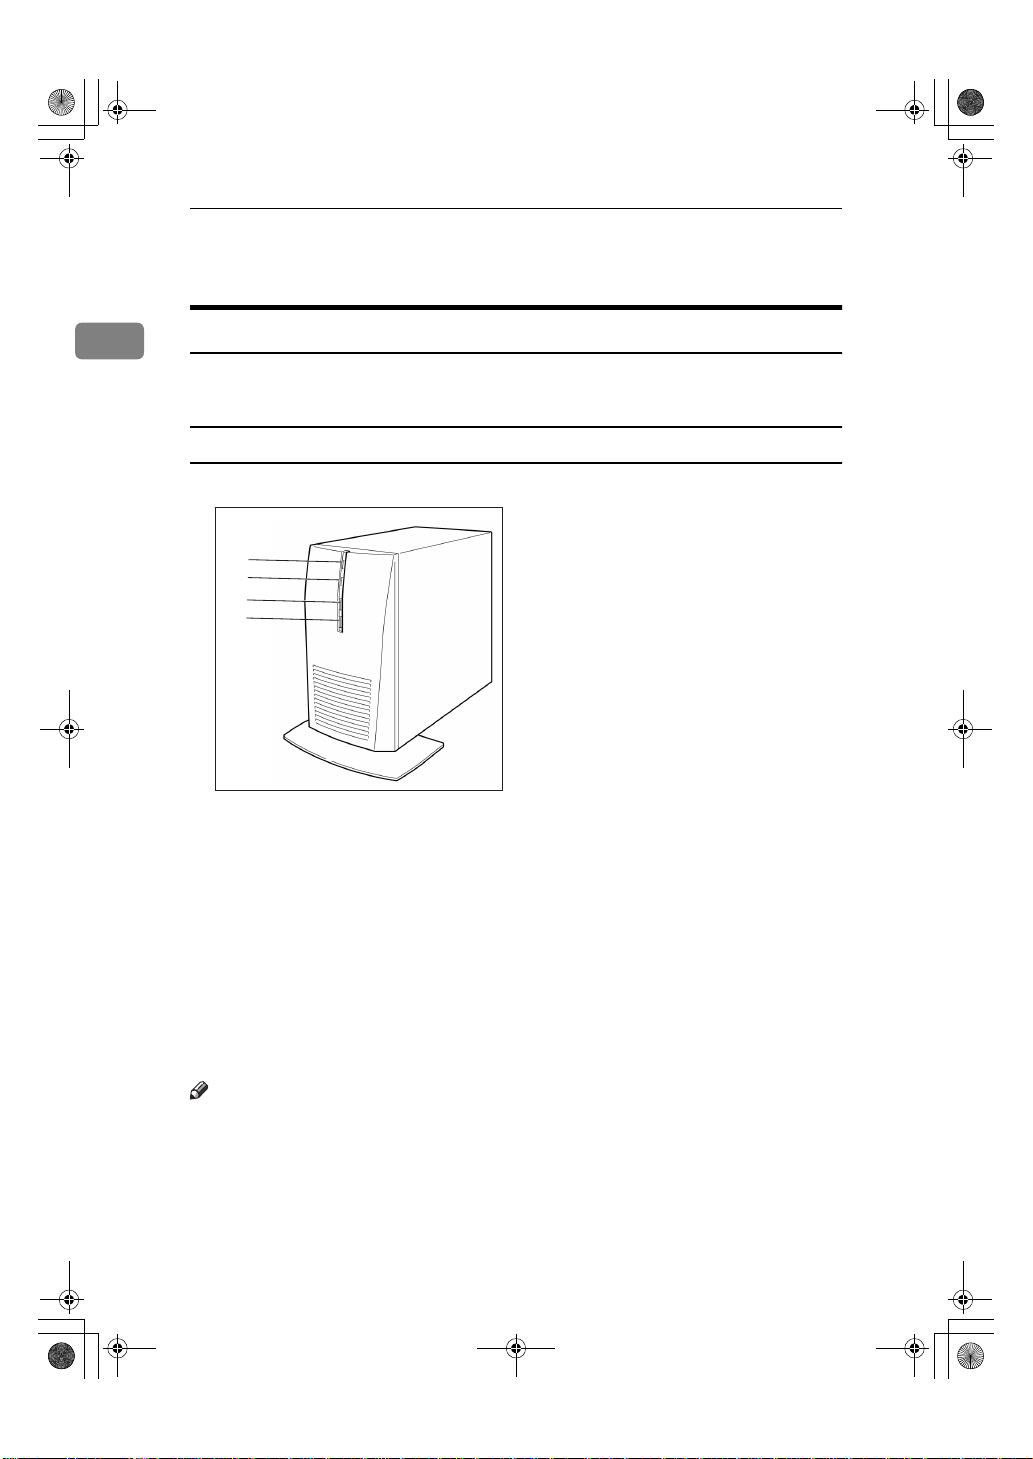
1
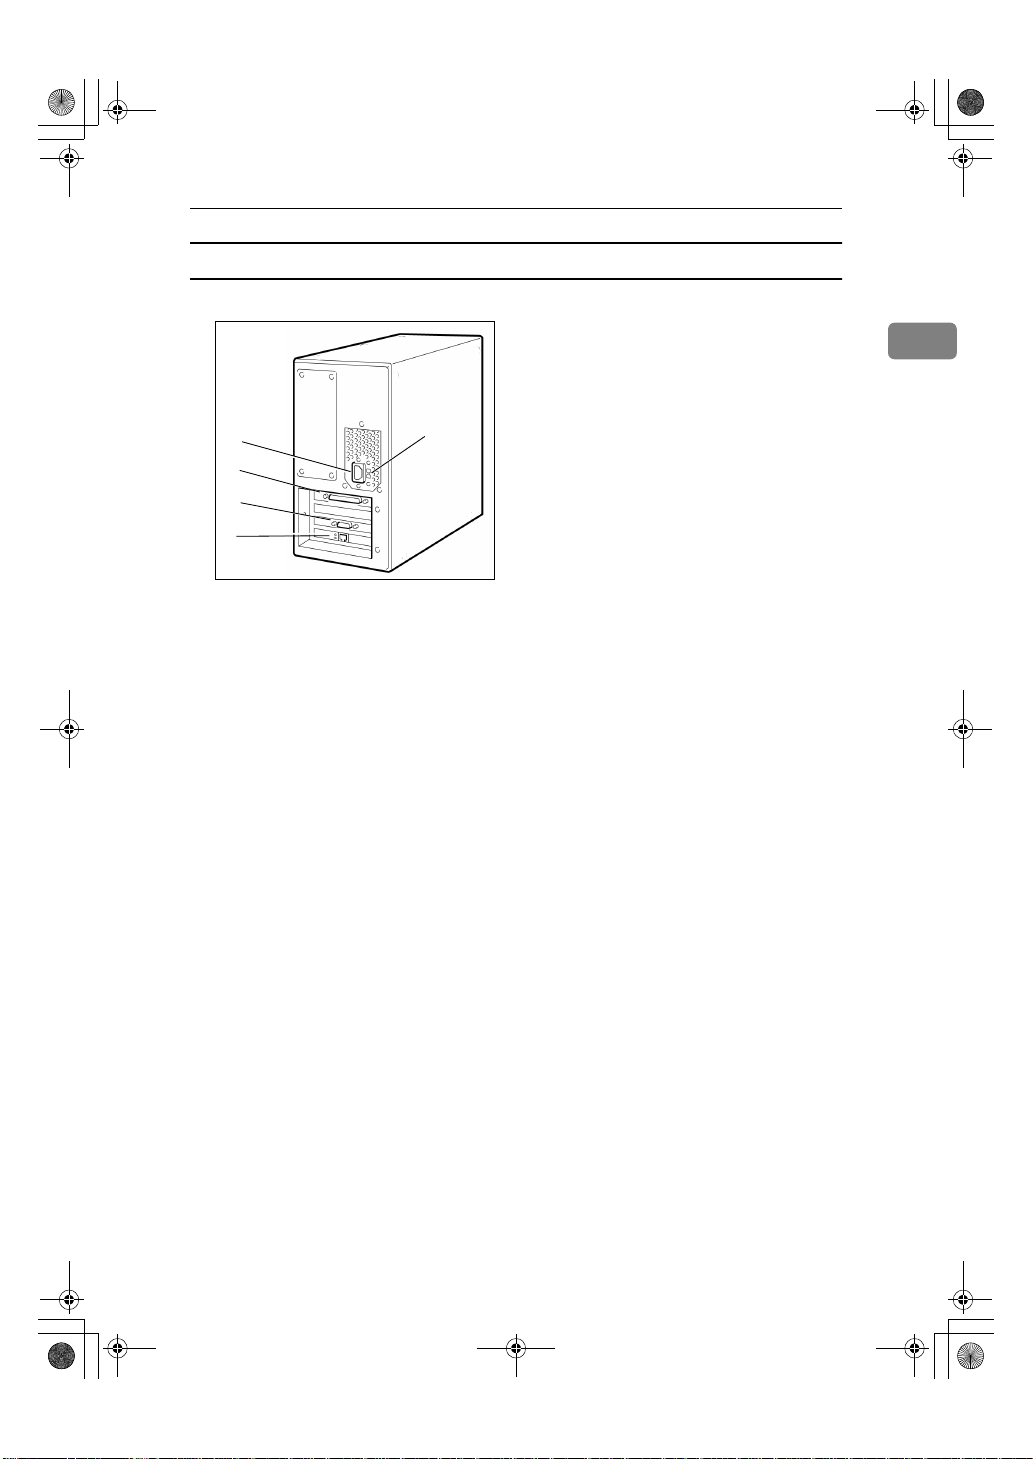
Capture Box Main Body
This section describes the layout of Capture Box when viewed from the front
and rear.
Front
Zdxh010N.eps
1
2
3
4
ZDXH010N
A Hard Disk Access indicator
Lights when the hard disk is being accessed.
B Power indicator
Lights when the power is on.
C Power switch
Since power up and power down of Capture Box is controlled from the I/O
Device (copier), only use this switch under special circumstances, such as if
Capture Box will not turn off for some reason.
D Reset switch
Reboots Capture Box. Only touch this switch if Capture Box will not turn off
even when the power switch is pressed.
Note
❒ Under normal circumstances it is not necessary to touch the power switch or
reset switch.
2
Page 13
icb1-f_FM.book Page 3 Monday, July 17, 2000 3:51 PM
Rear
Zdxh020N.eps
Part Names
1
1
5
2
3
4
ZDXH020N
A Power connector:
Connect one end of the power cord here and the other end to an AC 120V
power outlet. Always connect to an outlet with an earth terminal.
B I/O Device connection port:
Connect the I/O Device.
C RS232C serial cable connector:
Connect in order to be able to capture incoming faxes.
PC-FAX EXPANDER Type 185 is necessary.
D Ethernet port:
Connect this port to the network with a 10BASE-T ,100BASE-TX compliant
cable. 100BASE-TX is recommended.
E 120V/220-240V flipover switch
Do not touch the 120V/220-240V flipover switch.
• An RS232C serial cable is required for transferal of fax documents to Capture
Box.
3
Page 14

icb1-f_FM.book Page 4 Monday, July 17, 2000 3:51 PM
Getting Started
I/O Device (Copier) Operation Panel
This section describes the indicators, keys and switches related to Capture Box.
Zdxs12n.eps
1
ZDXS12N
A
User Tools/Counter
{
}
key
Press to change the default settings
to meet your requirements. Also
use to power down of Capture
Box.
B Scanner Error indicator
Lights when there is a scanner or
Cpture Box malfunction, the connection is broken, or captured data
cannot be passed to Capture Box.
C Cursor keys
Press to select items (e.g. users) on
the display panel.
D
Check Modes
{
}
key
Press to show a list of users selected as document owners when the
Capture Menu display is shown.
E
Clear Modes
{
}
key
Press to deselect all owners when
the Capture Menu display is
shown.
F Number keys
Use the letters associated with
each number to search for users.
G
{
Clear/Stop
}
key
Use to deselect owners one at a
time. Also use to stop scanning
H Function keys
Press to switch between Copy, Facsimile and Printer modes.
I
User Select
{
}
key
Press to display the “Capture
menu” menu where you can choose
the document owner(s).
•lit
Capture Box is running normally.
•flashing
Can capture copies or outgoing
faxes.
•Unlit
Cannot capture copies or outgoing faxes at the moment.
Caputure Box might not be runnin properly.
J
Start
{
}
key
In Scan mode, use to switch from
the User Select display to the Scan
Setting display.
K Main power indicator
Lights when the I/O Device (copier) main power is turned on. When
unlit, the main power is turned off.
L On indicator
Lights when the operating switch
is turned on. When unlit, the operating switch is turned off.
M Operation switch
Press to turn the power on: the On
indicator will light. Press again to
turn the power off.
4
Page 15

icb1-f_FM.book Page 5 Monday, July 17, 2000 3:51 PM
Power
Power
Power up and power down of Capture Box is controlled from the I/O
Device (copier). If the I/O Device
(copier) main power is on, the Capture Box power is also turned on. You
can check whether the Capture Box
power indicator is lit to confirm this.
When the I/O Device (copier)
key indicator is lit, it is possi-
Select
}
ble to capture documents.
Preparation
In principle, connection of the I/O
Device (copier) and use of the
main power switch should be confined to service representatives
and administrators.
Before you begin the following
procedure, turn the I/O Device
(copier) power off.
User
{
Turning Capture Box On
Follow these steps to turn Capture
Box on.
Make sure the Capture Box power
A
cord plug is firmly inserted into
the power outlet.
Make sure the cable connecting
B
Capture Box and the I/O Device
(copier) is plugged in.
Note
❒ An RS232C serial cable is re-
quired for transferal of fax documents to Capture Box.
Turn the I/O Device (copier) main
C
power on. Make sure the Capture
Box power indicator is lit.
If the I/O Device (copier) display
D
panel is not lit, press the operation panel power switch located
on the right. Check that the User
Select indicator is lit.
Note
❒ If the I/O Device (copier) is
turned on and not used for a
given period of time, the display goes blank and the machine enters an energy saving
mode. For details, refer to the I/
O Device (copier) documentation.
❒ Even if the I/O Device (copier)
power is on and the
key indicator is flashing,
lect
}
capture might not be possible if
the connection between the I/O
Device (copier) and Capture
Box has been lost. This could be
due to a Capture Box malfunction. In this case turn the power
on again in the recommended
manner.
User Se-
{
Turning Capture Box Off
To turn Capture Box off, the I/O Device (copier) main power switch must
also be turned off. We recommend
that only your service representative
operate this switch. Always consult
your system administrator before
turning off the main power switch.
Follow these steps to turn Capture
Box off.
1
5
Page 16

icb1-f_FM.book Page 6 Monday, July 17, 2000 3:51 PM
Getting Started
1
On the operation panel, press the
A
User Tools/Counter
{
Zaas120e.eps
Press number key
B
"User Select".
Data001.tif
Note
key.
}
5
{
to choose
}
❒ If the “Key Operator Code” dis-
play appears, enter the key operator code. This code restricts
access to various settings, such
as management of machine usage. Ask your system administrator for the key operator code.
Press number key
C
Data002.tif
.
2
{
}
Press [
D
Data003.tif
Yes
].
After the shutdown in progress
message, a message appears on the
display prompting you turn off the
I/O Device (copier) main power
switch.
Data004.tif
Turn off the I/O Device (copier)
E
main power switch.
Data0041.tif
Note
❒ If power is turned off before
transfer of captured data is
complete, transfer starts from
the subsequent transfer when
power is next turned on.
Limitation
❒ After the shutdown message is
The shutdown confirmation message appears.
displayed, copy functions etc.
are not possible.
6
Page 17

icb1-f_FM.book Page 7 Monday, July 17, 2000 3:51 PM
Capture Box Initial Settings
Capture Box Initial Settings
A few settings need to be made before
you can use Capture Box.
The Capture Box IP address can be set
manually, or acquired automatically
by DHCP.
TCP/IP Settings
From the operation panel, press
A
the
User Tools/Counter
{
Zaas120e.eps
The "User Tools Main Menu" display appears.
Press number key
B
"User Select".
Data001.tif
The "User Select Features" display
appears.
Note
❒ If the “Key Operator Code” dis-
play appears, enter the key operator code. This code restricts
access to various settings, such
as management of machine usage. Ask your system administrator for the key operator code.
key.
}
to choose
5
{
}
Press number key
C
Data005.tif
.
1
{
}
The "Network Settings" display
appears.
Configuring Network Settings
Manually
A Press number key
Data006.tif
B Enter the IP address.
Data007.tif
Note
.
1
{
}
❒ Each time 3 digits are en-
tered, the next field is highlighted. To move between
fields, press the 0 or 1 key.
C Press [
D Press number key
E Enter the subnet mask.
Data008.tif
F Press [
If you press [
OK
OK
].
.
2
}
{
].
]on the next
Prev.
display a message indicating
Capture Box will restart appears.
1
7
Page 18

icb1-f_FM.book Page 8 Monday, July 17, 2000 3:51 PM
Getting Started
1
Having Network Settings
Configured Automatically (DHCP)
A Press [
Data006.tif
B Press [
].
DHCP
PrevMenu
].
A message indicating Capture
Box will restart appears.
Note
❒ [
]After restarting, on the
1
“Network Settings” display
you can press to check the IP
address setting.
Limitation
❒ While Capture Box is reboot-
ing, documents cannot be
transferred to eCabinet.
Copying etc. is also not possible from the I/O Device
(copier).
Checking the MAC Address
Web Browser Settings
These steps describe how to configure
further Capture Box settings from a
Web browser.
Note
❒ For details about the settings, refer
to the Capture Box help pages.
Make sure Capture Box has fin-
A
ished rebooting. The I/O Device
(copier) User Select indicator
should be lit. Then launch your
Web browser and enter the IP address of Capture Box (http://
***.***.***.***/).
From the top page, click on [
B
figuration
data0010.tif
].
Con-
A Press number key
.
3
{
}
A message appears showing the
MAC address of Capture Box.
Data009.tif
Note
❒ The default password is “pass-
word”. To change it, click on
[
Password
].
The MAC address is unique to
each machine.
B Press [
Exit
].
The "Network Settings" display
reappears.
8
Page 19

icb1-f_FM.book Page 9 Monday, July 17, 2000 3:51 PM
Capture Box Initial Settings
Click on [
C
data0011.tif
Make the settings, then click on
D
[
Apply
data0012.tif
Click on [
E
The “Master Server Name” page
appears.
Make the settings, then click on
F
[
Apply
data0013.tif
Click on [
G
The "Network" page appears.
Date & Time
].
Master Server Name
].
Network
].
] .
Make the settings, then click on
H
].
[
Apply
data0014.tif
1
If changes were made, a message
indicating Capture Box will restart
appears on the I/O Device (copier)
display panel.
From the I/O Device (copier),
press the [
Important
❒ If you intended to configure
eCabinet as a DNS server for
your NOA Workgroup, enter
the IP address of eCabinet in the
].
DNS Server Field. If eCabinet is
configured to act as your DNS
server, before configuring Capture Box you must configure
eCabinet to recognize the hostname and IP address of Capture
Box. For more information, refer to "DNS Management" in the
eCabinet Installation Guide.
❒ If you wish to use an existing
DNS server for your eCabinet
and Capture Box , enter the IP
address of the DNS server in the
DNS Server Field. Before configuring Capture Box, you must
have configured the following
records on the DNS server :
• A : The address record for resolving the host name of
Capture Box to its IP address.
• PTR : The pointer record for
resolving the IP address of
Capture Box to its host name.
OK
] key.
9
Page 20

icb1-f_FM.book Page 10 Monday, July 17, 2000 3:51 PM
Getting Started
After Capture Box has rebooted,
I
Click on [
The "Connections" page appears.
Connections
1
Note
❒ It may take a short while to con-
nect to eCabinet.
Make the settings, then click on
J
[
].
Apply
data0015.tif
].
10
Do not leave the Device Hostname
setting left as “Not Set”.
Page 21

icb1-f_FM.book Page 11 Monday, July 17, 2000 3:51 PM
2. Basic Document Capture
Copying/Fax Transmission
The following describes how to
choose the document owners then
carry out a basic copy or fax operation.
Other scanning methods are described elsewhere in this manual.
P.12 “Scanning”
⇒
Reference
For more details on fax and copy
features, refer to the Copy Reference and Facsimile Reference.
Copying / Faxing with Document Capture
Make sure the Capture Menu dis-
A
play is shown.
Data016.tif
Note
❒ If the Capture Menu display is
not shown, press the
or
lect
❒ If [
Setting display, press [
then press the
Clear Modes
}
{
] is shown on the Scan
Prev.
{
User Select
key.
}
{
User Se-
Prev.
key.
}
Select the document owners.
C
P.15 “Document Owners”
⇒
Data017.tif
Press the
D
key.
The machine switches to Copy or
Fax mode. The
dicator flashes to inform you that
capture will take place.
Data019.tif
Carry out the fax or copy opera-
E
tion as you hold normally.
Copy
{
{
User Select
Copying /Faxing Without
Document Capture
From the Capture Menu display,
A
press [
Data020.tif
]
Don't save
] .
or
}
Facsimile
{
key in-
}
}
On the Capture Menu display,
B
press [
User
].
Press the
B
key.
The machine switches to Copy or
Fax mode. The
dicator stays off to inform you that
capture will not take place.
Copy
{
{
or
}
{
User Select
Facsimile
}
}
key in-
11
Page 22

icb1-f_FM.book Page 12 Monday, July 17, 2000 3:51 PM
Basic Document Capture
Scanning
2
When you press [
ture Menu display, the User Select
display appears automatically.
] on the Cap-
Scan
Capturing Scanned Documents
Set your original in the document
A
feeder or on the exposure glass.
On the Capture Menu display,
B
press [
Select the owner.
C
Data021.tif
P.15 “Document Owners”
Press the
D
The Scan Setting display appears.
Check the scan settings and make
E
any adjustments as necessary.
Data022.tif
Scan
{
].
Start
key.
}
If you set your document on the ex-
❖
posure glass...
• Set the next page of your
original then press the
key. When all pages have
been scanned in, press [
]. The Scan Setting display
ish
reappears.
Start
{
Fin-
Scan Settings
There are 5 kinds of scan settings:
•Resolution
• 1 Sided/2 Sided
•Scan Size
• Original Type
• Image Density
Original Type and Image Density can
be adjusted with the keys shown below.
Zaas054n.eps
}
12
Press the
F
The "Scanning..." display appears.
If you set your document in the
❖
{
Start
key.
}
document feeder...
After all pages of the document
are scanned in, the Scan Setting
display reappears automatically.
Resolution
Select a resolution of 300dpi or
600dpi. The default is 600dpi.
Press [
A
Data022.tif
Press 0 or 1 to select the resolu-
B
tion.
Data023.tif
Dpi
].
Page 23

icb1-f_FM.book Page 13 Monday, July 17, 2000 3:51 PM
Scanning
Press [
C
The Scan Setting display reappears.
OK
].
1 Sided/2 Sided
Select whether to scan one side or
both sides of the original.
Press [].
A
Data022.tif
Press 0 or 1 to select 1 Sided/2
B
Sided.
Data024.tif
Press [
C
The Scan Setting display reappears.
OK
].
Scan Size
Press [
D
The Scan Setting display reappears.
❒ You can adjust the Original
].
OK
Note
Type and Image Density settings in the same way as when
making copies.
2
By default, Auto (Auto Scan Size) is
selected and the size of your original
is detected automatically. If you prefer, follow these steps to select the
size manually.
Press [
A
B
Data025.tif
C
ScanSize
Press [
Next
tween the two menu displays.
Press 0 or 1 to select the scan
size.
] or [
].
] to switch be-
Prev.
13
Page 24

icb1-f_FM.book Page 14 Monday, July 17, 2000 3:51 PM
Basic Document Capture
Incoming Faxes
You can have incoming faxes captured by Capture Box then forwarded
to eCabinet for storage.
2
In order to have incoming faxes captured, configure the settings required.⇒ P.22 “Capture and Printing of
Incoming Faxes”
Once configured, capture takes plase
automatically without require user
intervertion.
14
Page 25

icb1-f_FM.book Page 15 Monday, July 17, 2000 3:51 PM
Document Owners
Document Owners
Selecting one or more users as owners
of a captured document allows those
users to read and delete documents
from eCabinet.
Browsing Users
To browse through users on the User
Select display, press the [
0 and 1 keys.
Selecting an Owner
Make sure the user name is highlighted, then press [
Select
].
A check mark appears next to the user
name.
Data026.tif
If you press [
], all users regis-
Public
tered with eCabinet can read it.
Searching for Users with the Number
Keys
Next
], [
Prev.
Number
Key
],
Note
User Name Search Letters
2ABC
3DEF
4GHI
5JKL
6MNO
7PQRS
8TUV
9WXYZ
# Users beginning with a number
❒ If the number key you press does
not correspond to any existing user, the users closest in the list are
displayed.
Checking which Users Are Owners
To check which users are selected as
owners, press the
Data028.tif
Check Modes
{
key.
}
2
E.g. if you press the
key, user
4
{
}
names starting with G, H and I are
displayed.
Data027.tif
The following table lists the search
letters available under each number
key.
To return to the User Select display,
press [
EXIT
].
Deselecting Owners
To deselect an owner, from the User
Select display highlight the user
name then press [
key to clear the check mark.
Stop
}
If you press the
ownership is removed from all users
and the Capture Menu display reappears.
] or the
Select
Clear Modes
{
Clear/
{
key,
}
15
Page 26

icb1-f_FM.book Page 16 Monday, July 17, 2000 3:51 PM
Basic Document Capture
Storing Documents under the Default Owner
2
If the
without selecting any owners, the operation that follows results in the document being registered under the
default owner.
You can change the default owner
from the Capture Box Cpture Control
Web page.
Note
❒ If no default owner has been regis-
tered by the system administrator,
the document is stored in eCabinet
under owner "Unknown" and all
users can access it.
Copy
{
}
or
key is pressed
Fax
{
}
16
Page 27

icb1-f_FM.book Page 17 Monday, July 17, 2000 3:51 PM
3. Captured Data
Data Transferred to eCabinet
This section describes the information that is transferred to eCabinet in addition
to the image data.
This information is appended to the document as text data. Most of the fields
can act as keys when searching for documents.
Information Appended to All Images
The following items can be used as serch keys when searching eCabinet.
Field Description
Creation date When the document was stored in Capture Box
Document owner Any user names that were specified as owners of this document
Capture device type Copier, Fax, Scanner
Capture device function Copier, Fax Send/Receive, Scanner
Public Whether the document is public: true or false
Information Appended to Outgoing Fax Images
Field Description
Fax number The fax number the fax was sent to
Information Appended to Incoming Fax Images
Field Description
RCVFAX TSI The sender's RTI/TSI
17
Page 28

icb1-f_FM.book Page 18 Monday, July 17, 2000 3:51 PM
Captured Data
Document Segmentation
3
This section describes how the machine divides copy jobs, faxes and
scans into separate documents for
capture.
Segmentation of Copy Documents
Copy jobs are captured as separate
documents in the following cases.
Setting Originals in the ADF
• When all originals set in the ADF
are copied
• When "Single-sided to double-sided" or Combine is selected, the
["Set next orig. Press Start.Press #
after last original."message is displayed, and an original is added or
is pressed
#
}
{
Setting Originals in the SADF
• When copying has finished and
the next original was not set within
the SADF Auto Reset Time (default 4 seconds)
• When Sort mode is selected and
the
copying
• When "Single-sided to double-sided", Combine, or when printing/
overlaying page numbers or
stamps on the first page only and
the
copying
• When copy mode is canceled, the
reset key is pressed etc. and SADF
mode is canceled
18
key was pressed to end
#
}
{
key is pressed to finish
#
}
{
Setting Originals on the Exposure Glass
• When scanning from the exposure
glass
• When Sort mode is selected and
the
copying
• When "Single-sided to double-sided", Combine, or when printing/
overlaying page numbers or
stamps on the first page only and
the
copying
• When the
ish copying
key is pressed to finish
#
{
}
key is pressed to finish
#
}
{
key is pressed to fin-
#
}
{
When a Scanning Operation Is
Interrupted
•If the
• Documents set in the ADF: when
Clear/Stop
{
key is pressed, processing is interrupted
paper runs out, toner runs out,
copy paper jams, or a document
jam occurs in the ADF, capture of
the remaining documents is put on
standby. When the
key is pressed, the docu-
Copy
}
{
ment is segmented at the point in
time at which the job was canceled.
Note
❒ If
Clear/Stop
{
copying continued, the job will
be stored as a single document
including the pages copied after
the interruption occurred.
❒ Copies made with the Interrupt
Copy feature are not captured.
❒ If power is lost during capture,
originals captured so far are
captured as a single document.
key then the Exit
}
Clear Mode
{
is pressed then
}
or
}
Page 29

icb1-f_FM.book Page 19 Monday, July 17, 2000 3:51 PM
Document Segmentation
Segmentation of Fax Documents
Individual transmissions and receptions are captured as separate documents. In addition, faxes are captured
as separate documents in the following cases.
When Scanning In o f a Document for F ax
Transmission Is Interrupted
•If the
scanning is interrupted, and the
document is segmented where the
fax transmission was halted
• Pages scanned in up until the
{
stored in eCabinet
Note
❒ When a document jam occurs in
the ADF, capture of the remaining
documents is put on standby.
When the
key is pressed, the document is
segmented at the point in time at
which the job was canceled.
❒ With the Batch Transmission func-
tion, multiple incoming faxes
might be captured as a single document.
Clear/Stop
{
Clear/Stop
{
key is pressed,
}
key is pressed are
}
Clear Modes
}
or
Copy
{
Setting Originals on the Exposure Glass
• When pressing the
prompted to by a message on the
display
#
{
When a Scanning Operation Is
Interrupted
• When the
during scanning. A confirmation
message appears on the display.
If the [
ing is interrupted and the document is segmented.
• Images captured up until the
Clear/Stop
{
stored in eCabinet
}
Clear/Stop
{
] key is pressed, process-
Exit
key is pressed are
}
key is pressed
}
key when
}
3
Segmentation of Scanned Documents
Scanned originals are captured as
separate documents in the following
cases.
Setting Originals in the ADF
• When all originals set in the ADF
are scanned in
19
Page 30

icb1-f_FM.book Page 20 Monday, July 17, 2000 3:51 PM
Captured Data
Capture Limitations
All Devices
Any scan settings selected may not be
reflected in the captured document.
The actual image might differ from
the image of the captured document.
3
The following limitations apply when
scanning in both sides of originals
with the Duplex feature:
• When Top to Bottom is selected,
the captured image may differ depending on:
• Whether the original was scanned
from the ADF or exposure glass
• Whether the original was set in the
long edge or short edge direction
• When Top to Top is selected, the
captured image may differ from
the scanned image if the original is
fed short edge first into the ADF
Copying
• Copies made with the Interrupt
Copy feature are not captured
• Any enlargement or reduction of
original images with the Reduce/
Enlarge function will not be reflected in captured copies
Scan Settings Not Reflected in Captured
Documents
Combine
❖
Documents are captured without
separation lines
Cover
❖
Cover divisions are not captured
OHP Slip Sheets
❖
Capture takes place without slip
sheets
Stamp/Page Numbering
❖
Page images are captured without
page numbers or Stamp images
Repeat Image
❖
Images are captured onto a single
page without separation lines
Situations When the Copy Result and
Captured Data Differ
• When copying a portrait original
onto landscape paper loaded in the
bypass tray, part of the image
might not be copied. However, the
captured image will be rotated automatically and no portion of the
image will be lost.
• When using the Series Copies
function, the position where the
image is split on the captured image might not exactly match the
copies
• When copying a portrait original
onto paper loaded in the bypass
tray, the paper size might not be
detected
• Margins around the image on copies and captured documents may
be slightly different when using
the Combine feature
20
Overlay copying
❖
The original document data is captured
Page 31

icb1-f_FM.book Page 21 Monday, July 17, 2000 3:51 PM
Faxing
Outgoing Faxes
• Even when an error occurs during
memory transmission, all scanned
pages are captured
• If an error occurs when sending
using immediate transmission
from the ADF and the fax is canceled, the number of pages captured may differ from the actual
number of pages scanned into the
ADF
• Polling transmission is not supported
• If outgoing faxes are sent with an
Auto Document attached, the
Auto Document will not be captured
Capture Limitations
3
Incoming Faxes
• When receiving large faxes, the image is split onto several A4 KLor
" × 11"KLpages when print-
8
1/2
ed. However, the captured image
data is not split.
• Messages received with the Confidential Reception, Memory Lock,
and Subaddress features are not
captured but are registered on logs
• Faxes using the Transfer Request,
Polling Reception and Memory
Forwarding features are not captured or registered on logs
• If communication during reception is interrupted, transmission is
halted by the sending party, this
information is not captured. The
captured data will consist of the
data that has been received so far.
21
Page 32

icb1-f_FM.book Page 22 Monday, July 17, 2000 3:51 PM
Captured Data
Capture and Printing of Incoming Faxes
3
You can specify whether incoming
faxes are transferred to Capture Box
with the I/O Device (copier) User Parameters. To specify whether these
faxes are then transferred to eCabinet
for capture, access the Capture Box
settings from your Web browser.
Data029.tif
You can also choose whether incoming faxes are printed out at the I/O
Device (copier), and how Confidential Receptions are handled.
User Parameter Settings(SW31)
Setting
Transfer incoming faxes and
print them(default)
Do not transfer incoming faxes,
but print them
Transfer incoming faxes, but do
not print them. Faxes received
with the Confidential Reception
feature are not transferred Capture Box but stored in the I/O
Device (copier).
Bit
54
00
-1
10
Important
❒ If the bit switches are set to not
print incoming faxes and Incoming
Fax Capture is turned off from the
Capture Box-Web-Capture Control screen, incoming faxes are not
captured or printed and all fax
data will be lost.
Note
❒ If you specify that incoming faxes
are transferred to Capture Box as
well as printed out, it will take a
while before the fax is printed out.
This is because printing takes place
after the transfer is complete.
❒ PC-Fax Expander Type 185 and An
RS232C serial cable are required
for capture of incoming faxes.Use
the cable recommended for the PCFax Expander Type 185 or an
RS232C serial cable.
Reference
For how to adjust the User Parameters, refer to“Changing the
User Parameters ”in the Facsimile Reference.
22
Page 33

icb1-f_FM.book Page 23 Monday, July 17, 2000 3:51 PM
4. Troubleshooting
Troubleshooting
Problem Possible Causes Suggested Solution
Copies, incoming faxes,
and outgoing faxes are not
captured.
Copies and outgoing faxes
are not captured.
Only incoming faxes are
not captured.
A fax memory transmission that was canceled is
still captured.
Capture Box power has
been lost or the power connection broken. If power is
restored, it will take about
2 minutes for Capture Box
to reboot, during which
capture is not possible.
[
Don't Save
Capture Box memory was
full but some has just become free,
not canceled automatically.
The I/O Device (copier)
has been configured not to
print out incoming faxes,
and incoming fax capture
is turned off from the Capture Box Capture Control
Web page.
The RS232C serial cable
might have become disconnected.
If the transmission was
canceled after scanning
had finished, it will still be
captured and only the
transmission will be canceled.
]
is selected. If
[
Don't Save
]
is
Make sure the Capture menu display
appears when you press the {
lect
sure the Capture Box power is on.
Make sure "Don't Save" is not highlighted on the User Select display. If
it is highlighted, press {
With the User Parameters, make sure
the I/O Device (copier) is configured
to transfer incoming faxes to eCabinet. From the Capture Box Capture
Control Web page, make sure that incoming fax capture is turned on. You
can check whether faxes have been
received by viewing the log. However, data cannot be restored.
Make sure the RS232C serial cable is
connected properly.
If necessary, delete the document
from eCabinet.
Clear
User Se-
}.
} key. If it does not appear, make
• Since printing of incoming faxes takes place after the data has been transferred to Capture Box, printing may be slow to start.
• If the other party has turned Batch Transmission on, multiple incoming faxes
may be captured as a single document.
23
Page 34

icb1-f_FM.book Page 24 Monday, July 17, 2000 3:51 PM
Troubleshooting
4
24
Page 35

icb1-f_FM.book Page 25 Monday, July 17, 2000 3:51 PM
5. Display Messages
Display Messages
Message Cause Solution
Cannot communicate
with the server. Check operating status and server
connection.
Compressing data. This is displayed when the
Disk is almost full The Capture Box hard disk
Disk is full.Check server
status.http://capture.box.hostname/ Job
will not be saved.
File save error One or more documents
Function Problems Press
Shutdown. If error appears again, call service.
Please wait. The scanner is warming up
Press start to continue. This message is displayed
Problems with serial cable. Cannot save Facsimile
data to server. Check connection of the cable.
Remove original on glass. There is an original left on
Reset 1 original then Press
start to continue.
Restarting… Capture Box is restarting to
An error occurred when
connecting to eCabinet.
hard disk has become full
]
[
OK
is pressed. Data is
and
being compressed.
is almost full.
The Capture Box hard disk
is full. Capture is not possible while this message is
displayed.
could not be captured.
An error occurred. If this message is displayed, press
(Scan Setting display).
after an ADF jam was
cleared during scanning.
The serial cable is not connected (the fax was not
captured).
the exposure glass.
This message is displayed
after an ADF jam was
cleared during scanning.
reflect changes made from
the Capture Box Web page.
Please consult your system administrator.
Wait until some free disk space becomes available.
Check the Capture Box Web page.
Wait until enough documents have
been transferred to eCabinet to free
up disk space.
Check the Capture Box Web page. If
an error, such as a Network Error, has
occurred, consult your system administrator. Wait until some free disk
space becomes available.
Check the Capture Box error messages from your Web browser.
[
Shutdown
If after the machine has restarted this
message appears again, please contact your service representative.
Please wait.
There is no need to set the original
again. Press the {
Check the serial connection.
Remove the original from the exposure glass.
Set the specified number of originals
again, then press the {
Please wait.
]
to shut the machine down.
Start
} key.
Start
} key.
25
Page 36

icb1-f_FM.book Page 26 Monday, July 17, 2000 3:51 PM
Display Messages
Message Cause Solution
Settings have been
changed.Press OK to Restart/Update Capture
Box. Job will not be saved
during restart.
This function is not available. Press cancel to exit.
Transmission error An error occurred when
5
[
]
OK
The Capture Box settings
have been changed from
the Capture Box Web page.
A serious error occurred. Please call your service representa-
transferring to eCabinet.
Press
tive.
Check the Capture Box Web page for
the cause of the error and act accordingly.
to restart Capture Box.
26
Page 37

R
icb1-f_FM.book Page 27 Monday, July 17, 2000 3:51 PM
Do's and Don'ts
CAUTION:
•
Unplug the power cord from the wall outlet before you move the equipment.
While moving the equipment, you should take care that the power cord will
not be damaged under the equipment.
• Do not disconnect the Capture Box power cord.
• Do not touch the power switch or reset key unnecessarily.
6. Remarks
27
Page 38

R
R
R
icb1-f_FM.book Page 28 Monday, July 17, 2000 3:51 PM
Remarks
Where to Put Your Machine
Machine Environment
Your machine's location should be carefully chosen because environmental conditions greatly affect its performance.
Optimum environmental conditions
CAUTION:
•
Keep the equipment away from humidity and dust. Otherwise a fire or an
electric shock might occur.
•
Do not place the equipment on an unstable or tilted surface. If it topples
over, it could cause injury.
CAUTION:
•
Before moving the equipment, be sure to pull all four handles fully out. Not
doing this may result in an injury, such as getting your fingers pinched. After
6
moving the equipment, return the four handles to their original positions.
•
When the optional paper tray unit is installed, do not push the upper part of
the main unit horizontally. If the paper tray unit becomes detached from the
main unit, this could cause an injury.
CAUTION:
•
If you use the equipment in a confined space, make sure there is a continuous air turnover.
• Temperature: 10 – 32°C (50 – 89.6°F), humidity 50% at 32°C, 89.6°F
• Humidity: 15 – 80%, temperature 27°C, 80.6°F at 80%
• A strong and level base.
• The machine must be level within 5mm, 0.2" both front to rear and left to
right.
Environments to avoid
• Locations exposed to direct sunlight or strong light (more than 1,500 lux).
• Locations directly exposed to cool air from an air conditioner or heated air
from a heater. (Sudden temperature changes might cause condensation within the machine.)
• Places where the machine might be subjected to frequent strong vibration.
•Dusty areas.
• Areas with corrosive gases.
28
Page 39

R
R
R
icb1-f_FM.book Page 29 Monday, July 17, 2000 3:51 PM
Power Connection
WARNING:
•
Only connect the machine to the power source described on the inside
front cover of this manual. Connect the power cord directly into a wall
outlet and do not use an ext ention cord.
•
Do not damage, break or make any modifications to the power cord.
Do not place heavy objects on it. Do not pull it hard nor bend it more
than necessary. These actions could cause an electric shock or fire.
CAUTION:
•
Unplug the power cord from the wall outlet before you move the equipment.
While moving the equipment, you should take care that the power cord will
not be damaged under the equipment.
CAUTION:
•
When you disconnect the power plug from the wall outlet, always pull the
plug (not the cable).
Where to Put Your Machine
Access to Machine
Place the machine near the power source, providing clearance as shown.
Cp99ee.eps
D
A
C
B
CP999EE
A,B : at least 1 inch
C,D : at least 4 inches
Disposing of the Machine
If you want to dispose of the machine, contact your local dealer or service representative.
6
29
Page 40

icb1-f_FM.book Page 30 Monday, July 17, 2000 3:51 PM
Remarks
6
30
Page 41

icb1-f_FM.book Page 31 Monday, July 17, 2000 3:51 PM
7. Specifications
Capture Box Option Type 270
Hardware Specifications:
❖
Dimensions 225×374×315mm, (8.9"×14.7"×12.4")
Weight 8.2Kg (18.2lb)
power source 120V, 60Hz, 1A
Network Topology 100Base-TX (recommended), 10Base-T (acceptable)
Function Specifications:
❖
Capturing sources Copy, Outgoing Fax, Incoming Fax, Scanner
Maximum number of registerable users
Maximum number of selectable users
Operation I/O device operation panel
Copy Capture Resolution : 600dpi (*1)
Outgoing FAX capture
(*2)
Incoming FAX capture
(*3)
Scanner Resolution : 300dpi / 600dpi (*1)
*1: eCabinet converts images to 300dpi when saving.
*2: Capture to outgoing faxes requires the Fax option.
*3: Capture to outgoing faxes requires the PC-Fax Expander Type 185 option
and an RS232C serial cable.
150
150
Web I/F
Maximum number of Pages : 255 Pages/Document
Capture speed: 22cpm (ADF 1to1)
Max capture size : 11.0" × 17.0"Lor A3
Maximum number of pages : 255 Pages/Document
Max capture size : 11.0" × 17.0"Lor A3
The number of max pages : no limitation (depends on the Fax
option implementation memory capacity)
Maximum number of Pages : 255 Pages/Document
Capture speed : 35Scan/minute(A4/8.5" × 11.0"L 300dpi)
,22Scan / minute (A4/8.5" × 11.0" L 600dpi) Max capture size
: 11.0" × 17.0"Lor A3
Detectable Original size (Exposure Glass) : 11.0" × 17.0", 8.5" ×
14.0", 8.5" × 11.0" K/L, 10.0" × 14.0" K, 8.5"× 13.0" K, 8.0" ×
10.0"L
Detectable Original size (ADF) : 11.0" × 17.0, 8.5" × 14.0, 8.5" ×
11.0" K/L, 10.0" × 14.0" K , 5.5" × 8.5" K/L, 8.0" × 10.0"
Scan Type: Text, Text/Photo, Photo
Scan density : 7 levels
L
L
L
L
31
Page 42

icb1-f_FM.book Page 32 Monday, July 17, 2000 3:51 PM
INDEX
C
,
,
,
,
15
11
11
11
Check Modes
Copying
Copying / Faxing with Document
Capture
Copying / faxing Without Document
Capture
D
Default Owner
Display Messages
Document Capture
Document Owners
Checking Owners
Deselecting Owners
Selecting an Owner
Document Segmentation
,
16
,
,
,
25
11
15
,
,
,
15
,
15
15
18
F
Fax Transmission
,
11
H
Hard Disk Access indicator
,
2
I
,
,
,
22
14
7
Incoming Faxes
Incoming faxes
Initial Settings
R
Reset switch
,
2
S
Scanning
Scan Settings
Segmentation of Scanned Documents
,
12
,
12
T
TCP/IP Settings
Network Settings (DHCP)
Network Settings Manually
,
7
,
8
,
U
,
Users
15
User Select
User Tools/Counter
,
4
,
4
W
Web Browser Settings
,
8
,
19
7
L
Limitations
,
20
M
Machine Environment
,
28
O
Operation Panel
,
4
P
,
Power
Power indicator
Power switch
5
,
2
,
2
32 UE USA B369
 Loading...