

Page 1

Setup Guide
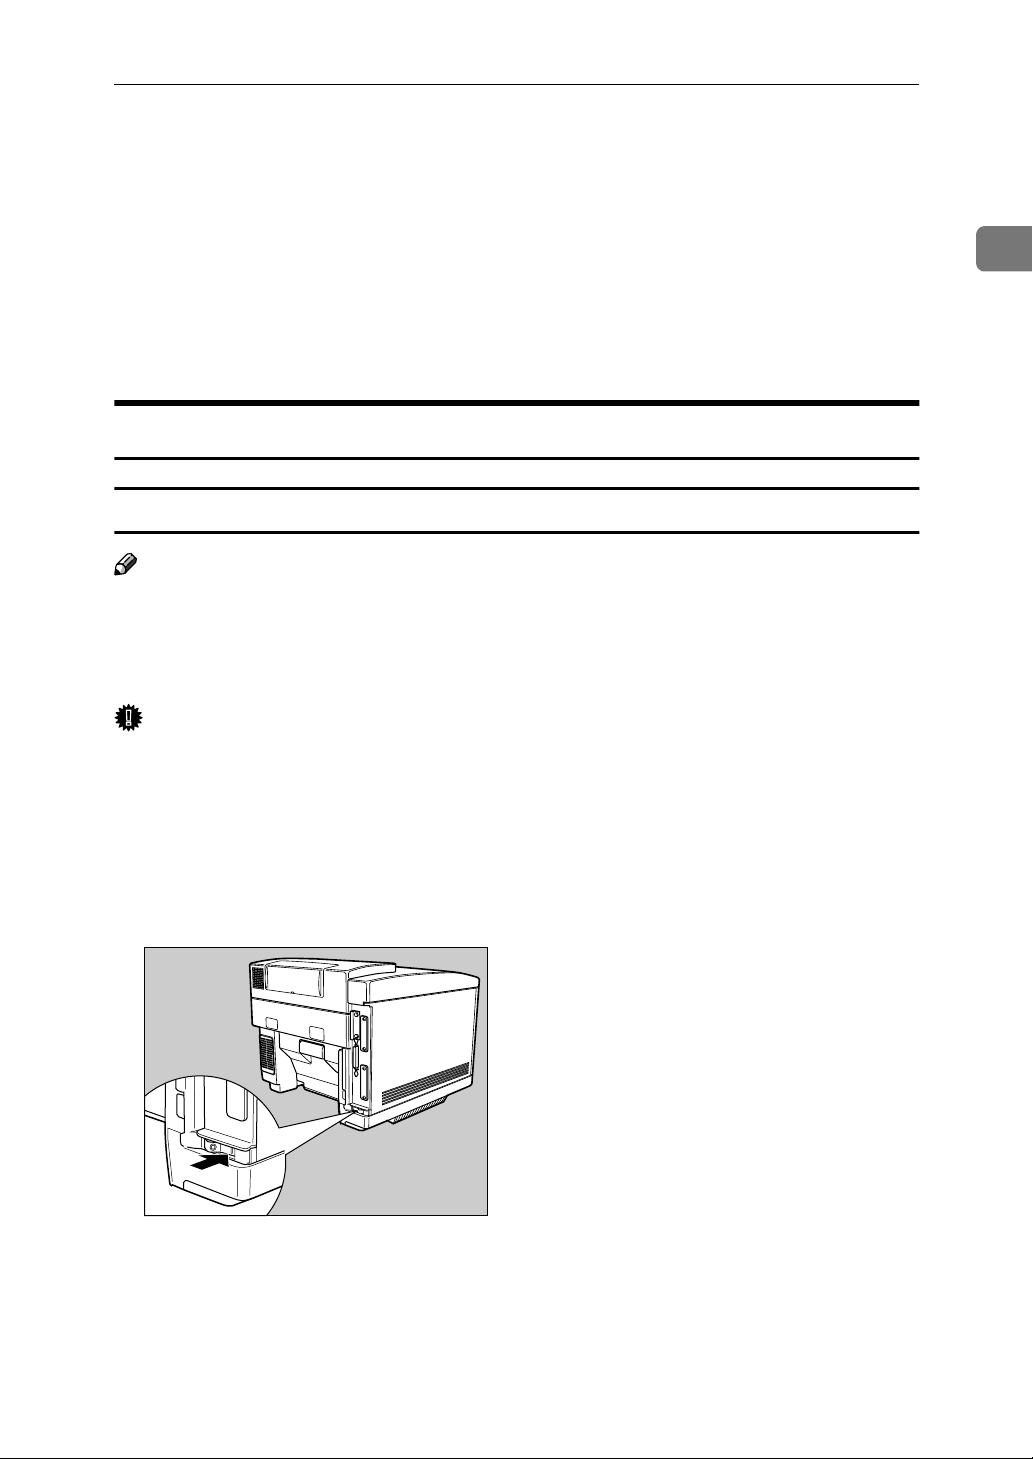
Zdgh010j.eps
Read this manual carefully before you use this product and keep it handy for future
reference.
For safety, please follow the instructions in this manual.
Page 2

Introduction
This manual contains detailed instructions on the operation and maintenance of this machine. To get
maximum versatility from this machine all operators should carefully read and follow the instructions in
this manual. Please keep this manual in a handy place near the machine.
Please read the Safety Information before using this machine. It contains important information related
to USER SAFETY and PREVENTING EQUIPMENT PROBLEMS.
Notes:
The name of the applications do not appear in the following pages. Confirm which applications you will
be using before reading this manual.
Descriptions in this manual Application
PRINTER MANAGER FOR ADMINISTRATOR
Aficio Manager for Admin
Net Vision for Admin
PRINTER MANAGER FOR CLIENT Aficio Manager for Client
Net Vision for Client
Power Source
120 V, 50/60 Hz, 11 A or more
Please be sure to connect the power cord to a power source as above.
Operator Safety:
This machine is considered a CDRH class 1 laser device, safe for office/ EDP use. The machine contains 5-milliwatt, 760 - 800 nanometer wavelength, GaAIAs laser diode. Direct (or indirect reflected) eye
contact with the laser beam might cause serious eye damage. Safety precautions and interlock mechanisms have been designed to prevent any possible laser beam exposure to the operator.
Laser Safety:
The optical housing unit can only be repaired in a factory or at a location with the requisite equipment.
The laser subsystem is replaceable in the field by a qualified Customer Engineer. The laser chassis is
not repairable in the field. Customer engineers are therefore directed to return all chassis and laser subsystems to the factory or service depot when replacement of the optical subsystem is required.
Important
Parts of this manual are subject to change without prior notice. In no event will the company be liable
for direct, indirect, special, incidental, or consequential damages as a result of handling or operating
the machine.
Caution:
Use of controls or adjustment or performance of procedures other than those specified in this manual
might result in hazardous radiation exposure.
Do not attempt any maintenance or troubleshooting other than that mentioned in this manual. This machine contains a laser beam generator and direct exposure to laser beams can cause permanent eye
damage.
Two kinds of size notation are employed in this manual. With this machine refer to the inch version.
Supplier shall not be responsible for any damage or expense that might result from the use of parts
other than genuine supplier's parts in your supplier's office product.
For good copy quality, supplier recommends that you use genuine supplier's toner.
Page 3

Trademarks
RICOH-SCRIPT2® is a registered trademark of Ricoh Company.
Microsoft
crosoft Corporation in the United States and/or other countries.
Adobe
Incorporated.
Ethernet
AppleTalk, Apple and Macintosh are registered trademarks of Apple Computer,
Incorporated.
Other product names used herein are for identification purposes only and might
be trademarks of their respective companies. We disclaim any and all rights in
those marks.
Notes:
Some illustrations might be slightly different from your machine.
Certain options might not be available in some countries. For details, please contact your local dealer.
®
, Windows® and Windows NT® are registered trademarks of Mi-
®
, PostScript® and Acrobat® are registered trademarks of Adobe Systems
®
is a registered trademark of Xerox Corporation.
Notes:
The proper names of the Windows operating systems are as follows:
•Microsoft
•Microsoft
•Microsoft
•Microsoft
•Microsoft
•Microsoft
•Microsoft
®
Windows® 95 operating system
®
Windows® 98 operating system
®
Windows ® Millennium Edition (Windows Me)
®
Windows® 2000 Professional
®
Windows® 2000 Server
®
Windows NT® Server operating system Version 4.0
®
Windows NT® Workstation operating system Version 4.0
i
Page 4

Safety Information
R
R
When using your equipment, the following safety precautions should always be
followed.
Safety During Operation
In this manual, the following important symbols are used:
WARNING:
CAUTION:
Indicates a potentially hazardous situation which, if instructions are
not followed, could result in death or serious injury.
Indicates a potentially hazardous situation which, if instructions are not followed, may result in minor or moderate injury or damage to property.
R WARNING:
• Connect the power cord directly into a wall outlet and never use an extension cord.
• Confirm that the wall outlet is near the machine and freely accessible,
so that in event of an emergency, it can be unplugged easily.
• Disconnect the power plug (by pulling the plug, not the cable) if the
power cable or plug becomes frayed or damaged.
• To avoid hazardous electric shock or laser radiation exposure, do not
remove any covers or screws other than those specified in this manual.
• Turn off the power and disconnect the power plug (by pulling the plug,
not the cable) if any of the following conditions exist:
• You spill something into the equipment.
• You suspect that your equipment needs service or repair.
• Your equipment's cover has been damaged.
• Do not incinerate spilled toner or used toner. Toner dust is flammable
and might ignite when exposed to an open flame.
• Disposal should take place at an authorized dealer or appropriate collection site.
• If you dispose of the used toner containers yourself, dispose of them
according to local regulations.
ii
Page 5

R CAUTION:
• Protect the equipment from dampness or wet weather, such as rain, snow,
and so on.
• Unplug the power cord from the wall outlet before you move the equipment.
While moving the equipment, you should take care that the power cord will
not be damaged under the equipment.
• When you disconnect the power plug from the wall outlet, always pull the
plug (not the cable).
• Do not allow paper clips, staples, or other small metallic objects to fall inside
the equipment.
• Do not eat or swallow toner.
• Keep toner (used or unused) and toner cartridge out of reach of children.
• For environmental reasons, do not dispose of the equipment or expended
supplies at a household waste collection point. Disposal should take place
at an authorized dealer or an appropriate collection site.
• Our products are engineered to meet the highest standards of quality and
functionality. When purchasing expendable supplies, we recommend using
only those specified by an authorized dealer.
• The inside of the machine becomes very hot. Do not touch the parts with a
label indicating a “hot surface”. Touching a “hot surface” could result in a
burn injury. (
• Symbols
• When removing misfed paper, do not touch the fusing section because it
could be very hot.
• If you use this printer in a cold area, leave the printer on. Otherwise, severe
cold might damage sensitive components inside the printer.
v
: means “hot surface”.)
R
means a situation that requires you take care.
iii
Page 6
Energy Star Program
As an ENERGY STAR Partner, we have determined
that this machine model meets the ENERGY STAR
Guidelines for energy efficiency.
The ENERGY STAR Guidelines intend to establish an international energy-saving system for
developing and introducing energy-efficient office equipment to deal with environmental issues, such as global warming.
When a product meets the ENERGY STAR Guidelines for energy efficiency, the Partner shall
place the ENERGY STAR logo onto the machine model.
This product was designed to reduce the environmental impact associated with office equipment by means of energy-saving features, such as Low-power mode.
❖❖❖❖ Low-power mode (Energy Saver mode)
This printer automatically lowers its power consumption 60 minutes after the
last operation has been completed when the Energy Level is set to level 1. To
exit Low-power (Energy Saver) mode, press any key on the operation panel.
To change the setting of the Energy Saver mode, see “Using the Operation
Panel” in the “Printer Reference” included as a PDF file on the CD-ROM.
❖❖❖❖ Specifications
Lower-power mode
(Energy Saver mode)
Power Consumption 35 W or less
Default Time 30 minutes
----Recycled Paper
In accordance with the ENERGY STAR Program, we recommend use of recycled
paper which is environment friendly. Please contact your sales representative
for recommended paper.
iv
Page 7

Manuals for This Printer
There are six manuals that separately describe the procedures for the installation
of a printer and for the operation and maintenance of the printer and its optional
equipment.
To enhance safe and efficient operation of the printer, all users should read and
follow the instructions contained in the following manuals.
❖❖❖❖ Quick Installation Guide
Describes the procedures for installing the printer.
❖❖❖❖ Setup Guide
Describes the procedures and provides necessary information about setting
up the printer and its options (this manual).
❖❖❖❖ Printer Reference
Describes the procedures and provides necessary information about using
the printer and its options. The manual is included as a PDF file on the CDROM.
❖❖❖❖ RICOH-SCRIPT2 Operating Instructions
Describes the menus and features you can set using the RICOH-SCRIPT2
printer driver. The manual is provided as a PDF file which is included on the
CD-ROM labeled “Printer Drivers and Utilities”.
❖❖❖❖ Network Interface Board Operating Instructions
Describes the procedures and provides necessary information about setting
up and using the printer in a network environment. The manual is provided
as a PDF file which is included on the CD-ROM labeled “Printer Drivers and
Utilities”.
❖❖❖❖ UNIX Supplement
Provides information about setting up and using the printer in a UNIX environment. This manual is included as a PDF file on the CD-ROM labeled
“Printer Drivers and Utilities”.
v
Page 8

How to Read This Manual
R
R
Symbols
In this manual, the following symbols are used:
WARNING:
This symbol indicates a potentially hazardous situation which, if instructions
are not followed, could result in death or serious injury.
CAUTION:
This symbol indicates a potentially hazardous situation which, if instructions
are not followed, may result in minor or moderate injury or damage to property.
* The statements above are notes for your safety.
Important
If this instruction is not followed, paper might be misfed, originals might be
damaged, or data might be lost. Be sure to read this.
Preparation
This symbol indicates the prior knowledge or preparations required before operating.
Note
This symbol indicates precautions for operation, or actions to take after misoperation.
Limitation
This symbol indicates numerical limits, functions that cannot be used together,
or conditions in which a particular function cannot be used.
Reference
This symbol indicates a reference.
[]
Keys that appear on the machine's panel display.
Keys and buttons that appear on the computer's display.
{}
Keys built into the machine's operation panel.
Keys on the computer's keyboard.
vi
Page 9

TABLE OF CONTENTS
1.Getting Started
Features of This Printer ............................................................................ 1
Printer Drivers for This Printer................................................................. 3
Software and Utilities Included on the CD-ROM..................................... 4
Guide to the Printer................................................................................... 5
Exterior-Front View ....................................................................................... 5
Exterior-Rear View ........................................................................................ 6
Interior ........................................................................................................... 7
Operation Panel ............................................................................................ 8
Turning the Printer On and Off...................................................................... 9
2.Installing Options
Available Options .................................................................................... 14
Installing the Memory Unit...................................................................... 15
Installing the Network Interface Board Type306 .................................. 17
Connecting the Printer to the Network ........................................................ 18
Buttons and Indicators on the Network Interface Board.............................. 19
Installing the Paper Cassette Type204 (Legal) ..................................... 20
Installing the PAPER FEED UNIT Type206............................................ 21
Installing the AD390 (Duplex Unit)......................................................... 25
3.Configuring the Printer for the Network
Configuring the Printer for the Network with the Operation Panel..... 29
4.Installing the Printer Driver and Software
Installation Method.................................................................................. 35
Installing by Auto Run ............................................................................ 37
Installing the IPDL-C Printer Driver ....................................................... 38
Windows 95/98/Me - Installing the IPDL-C Printer Driver ........................... 38
Windows 2000 - Installing the IPDL-C Printer Driver .................................. 39
Windows NT 4.0 - Installing the IPDL-C Printer Driver ............................... 40
Installing the RICOH-SCRIPT2 Printer Driver ....................................... 42
Windows 95/98/Me - Installing the RICOH-SCRIPT2 Printer Driver ........... 42
Windows 2000 - Installing the RICOH-SCRIPT2 Printer Driver .................. 45
Windows NT 4.0 - Installing the RICOH-SCRIPT2 Printer Driver ............... 48
Using Adobe PageMaker Version 6.0 or 6.5............................................... 51
Macintosh.................................................................................................... 52
INDEX........................................................................................................ 57
vii
Page 10

viii
Page 11

1. Getting Started
Features of This Printer
This printer is designed especially for office workgroups, both for shared usage
within a network environment, and for one-to-one usage by being connected directly to a computer.
❖❖❖❖ High quality photo image printing
With the 1200 × 600 dpi equivalent resolution, this printer provides you high
quality color printing.
This is particularly effective when printing photographic images, such as images produced by a digital camera and scanner as well as when printing text
and graphics. Using this printer, photo images are rendered more smoothly
and with higher detail.
❖❖❖❖ High performance
This printer provides the high-speed printing.
• Color Printing: 6 ppm (A4, 8
• Monochrome Printing: 24 ppm (A4, 8
1
/2 " × 11", simplex)
1
/2 " × 11", simplex)
❖❖❖❖ Duplex printing
With the optional paper feed unit and duplex unit installed, this printer provides auto duplex printing.
❖❖❖❖ Network connectivity
This printer is network ready with the optional Network Interface Board.
❖❖❖❖ Network utility
PRINTER MANAGER, software consisting of ADMINISTRATOR and CLIENT versions, is provided. With this software, multiple print devices can be
utilized effectively together on a network. This software offers several convenient functions such as parallel printing and recovery printing.
❖❖❖❖ PostScript capabilities
Using RICOH-SCRIPT2 provides the printer with PostScript capabilities. You
can use the printer in the Windows or Macintosh environments.
❖❖❖❖ Easy handling for administration
You can set up User Codes for individuals or as a unit of a department. This
allows you to keep records of the printing done for each User Code. You can
also set up a User ID for each print job. To print a job log or a statistics report
shows you color category, result and status of printing per each User Code
and User ID. Viewing the contents of a job log or a statistics report through
the PRINTER MANAGER FOR ADMINISTRATOR is available. Maximum
100 User Codes and 64 User IDs can be set.
1
Page 12

Getting Started
❖❖❖❖ Major specifications
1
Printing Speed
*1
24 ppm
6 ppm
*2
*3
Maximum Print Quality 1200 × 600 dpi resolutions
Emulation IPDL-C, RICOH-SCRIPT2
Maximum Paper Size
Paper Tray: Custom size
*4
, length 356mm, width
216mm
Paper feed unit: A4, 210 × 297 mm
Standard Memory Size 32 MB
Maximum Memory Size with Op-
256 MB
tional Memory
*1
A4K
*2
Monochrome printing
*3
Full color printing
*4
When the optional Paper Cassette Type204 (Legal) is installed.
2
Page 13

Printer Drivers for This Printer
Printer Drivers for This Printer
Printing requires installation of a printer driver appropriate to the operating system. The following drivers are included on the CD-ROM that comes with this
printer.
Printer Language
Operating System IPDL-C RICOH-SCRIPT2
Windows 95
Windows 98
Windows Me
Windows 2000
Windows NT 4.0
Macintosh
*1
Microsoft Windows 95 operating system
*2
Microsoft Windows 98 operating system
*3
Microsoft Windows Millennium Edition (Windows Me)
*4
Microsoft Windows 2000 Professional, Microsoft Windows 2000 Server
*5
Microsoft Windows NT Server operating system Version 4.0, Microsoft Windows NT
Workstation operating system Version 4.0 in a computer using a x86 processor
*6
Macintosh OS with LaserWriter 8
*1
*2
*3
*4
*5
*6
√√
√√
√√
√√
√√
√
1
Limitation
❒ The printer drivers supplied with this printer do not support operation under
a system running Windows NT with a RISC based processor (MIPS R Series,
Alpha AXP, Power PC).
❖❖❖❖ IPDL-C printer drivers
The IPDL-C printer drivers are included on the CD-ROM that comes with this
printer. The IPDL-C printer drivers allow the computer to communicate with
the printer via a printer language.
⇒ P.38 “Windows 95/98/Me - Installing the IPDL-C Printer Driver”
⇒ P.39 “Windows 2000 - Installing the IPDL-C Printer Driver”
⇒ P.40 “Windows NT 4.0 - Installing the IPDL-C Printer Driver”
❖❖❖❖ RICOH-SCRIPT2 printer drivers and PPD (PostScript printer description) files
The RICOH-SCRIPT2 printer drivers and the PPD files are included on the
CD-ROM that comes with this printer. The RICOH-SCRIPT2 printer drivers
allow the computer to communicate with the printer via a printer language.
The PPD files allow the printer driver to enable printer specific functions.
⇒ P.42 “Windows 95/98/Me - Installing the RICOH-SCRIPT2 Printer Driver”
⇒ P.45 “Windows 2000 - Installing the RICOH-SCRIPT2 Printer Driver”
⇒ P.48 “Windows NT 4.0 - Installing the RICOH-SCRIPT2 Printer Driver”
⇒ P.52 “Macintosh”
3
Page 14

Getting Started
Software and Utilities Included on the CDROM
1
❖❖❖❖ PRINTER MANAGER FOR ADMINISTRATOR
A utility for the system administrator to manage printers on the network.
Reference
For the name of PRINTER MANAGER FOR ADMINISTRATOR you use,
see the inside of front cover of this manual.
For more information about using PRINTER MANAGER FOR ADMINISTRATOR, see PRINTER MANAGER FOR ADMINISTRATOR Help.
❖❖❖❖ PRINTER MANAGER FOR CLIENT
A utility for users to manage their own print jobs on the network.
Reference
For the name of PRINTER MANAGER FOR CLIENT you use, see the inside of front cover of this manual.
For more information about using PRINTER MANAGER FOR CLIENT,
see PRINTER MANAGER FOR CLIENT Help.
❖❖❖❖ Multidirect Print
A utility for printing on a "Peer-to-Peer" network.
Reference
For more information about using Multidirect Print, see the “Operating Instructions” for the optional Network Interface Board included as a PDF file
on the CD-ROM.
❖❖❖❖ PortNavi
A utility that helps you to use network printers effectively. It is useful in environments where two or more network printers are used.
❖❖❖❖ Acrobat Reader
A utility that allows you to read PDF (Portable Document Format).
❒ Documentation about using the printer is included on the CD-ROM in a
4
Reference
For more information about PortNavi, see the “Operating Instructions” for
the optional Network Interface Board included as a PDF file on the CDROM.
Note
PDF format.
Page 15
Guide to the Printer
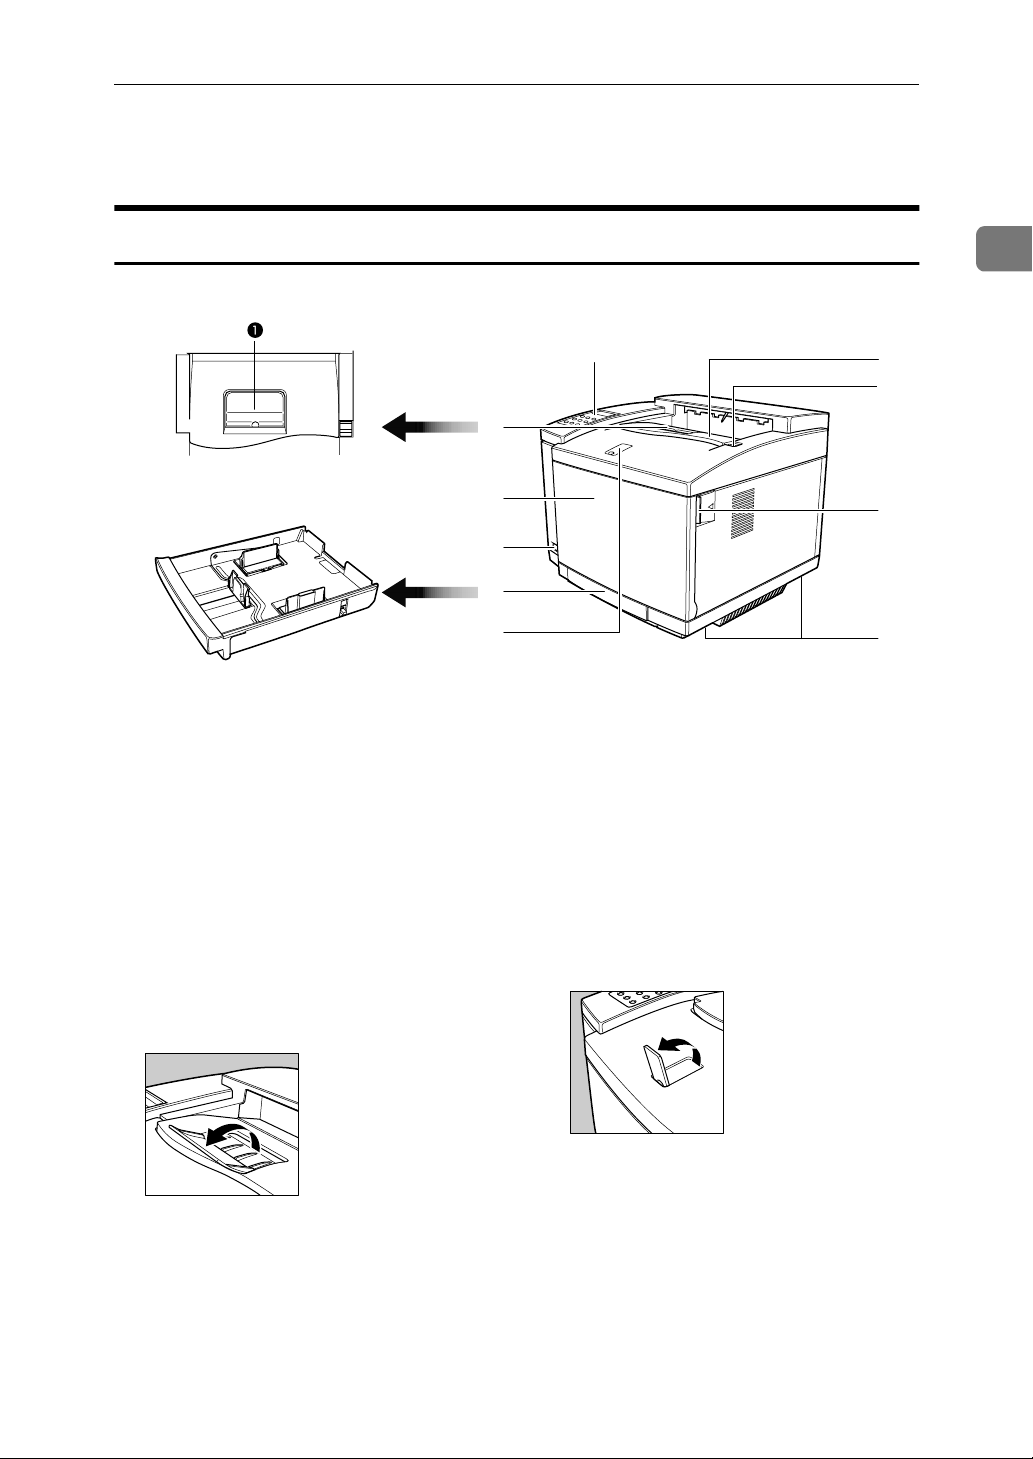
Guide to the Printer
Exterior-Front View
1. Operation Panel
Contains keys for printer operation and a
panel display that shows the printer status.
1
2
3
4
5
6
4. Power Switch
This switch enables you to turn the printer power on and off while the main power switch on the rear is turned on.
1
10
9
8
7
ZDHH010E
2. Top Cover
Open this cover when replacing consumables or when removing misfed paper.
A Paper Stopper A: Raise this paper
stopper so that printed pages are aligned
better on the output tray. Raising this paper stopper also keeps printed pages
from falling from the output tray.
ZDGH020J
3. Front Cover
Open this cover when replacing toner
cartridges or the waste toner bottle, or
when removing misfed paper.
5. Paper Tray
Load paper into this tray for printing.
6. Paper Stopper B
Raise this stopper to keep printed pages
from falling from the output tray.
ZDGH030J
5
Page 16

Getting Started
1
7. Inset Grips
Use these grips to lift the printer. There
are four grips, two on the left side and
two on the right side of the printer.
ZDGH040J
Exterior-Rear View
1
2
3
8. Front Cover Open Lever
Press this lever to open the front cover.
9. Top Cover Open Lever
Press this lever to open the top cover.
10. Output Tray
Printed pages are stacked here.
4
5
1. Ventilator
Allows air to be discharged, preventing
components inside the printer from overheating. Remove this cover when replacing the ozone filter.
Note
❒ Do not leave the ventilator obstructed
or blocked. Doing so creates the danger of malfunction due to overheating.
2. Rear Cover
Open this cover when removing misfed
paper.
3. Power Connector
Connect the power cord to this connector.
6
6
ZDHH020E
4. Printer Board
Remove to install optional memory unit
or network interface board.
5. Parallel Interface Connector
Plug the parallel cable that connects the
printer to the computer into this connector.
6. Main Power Switch
First turn on the main power switch, and
use the power switch on the front panel
to turn the printer on or off.
Normally, keep the main power switch
turned on.
Turn off the main power switch when the
printer is not to be used for a long period
of time or when moving the printer.
Page 17
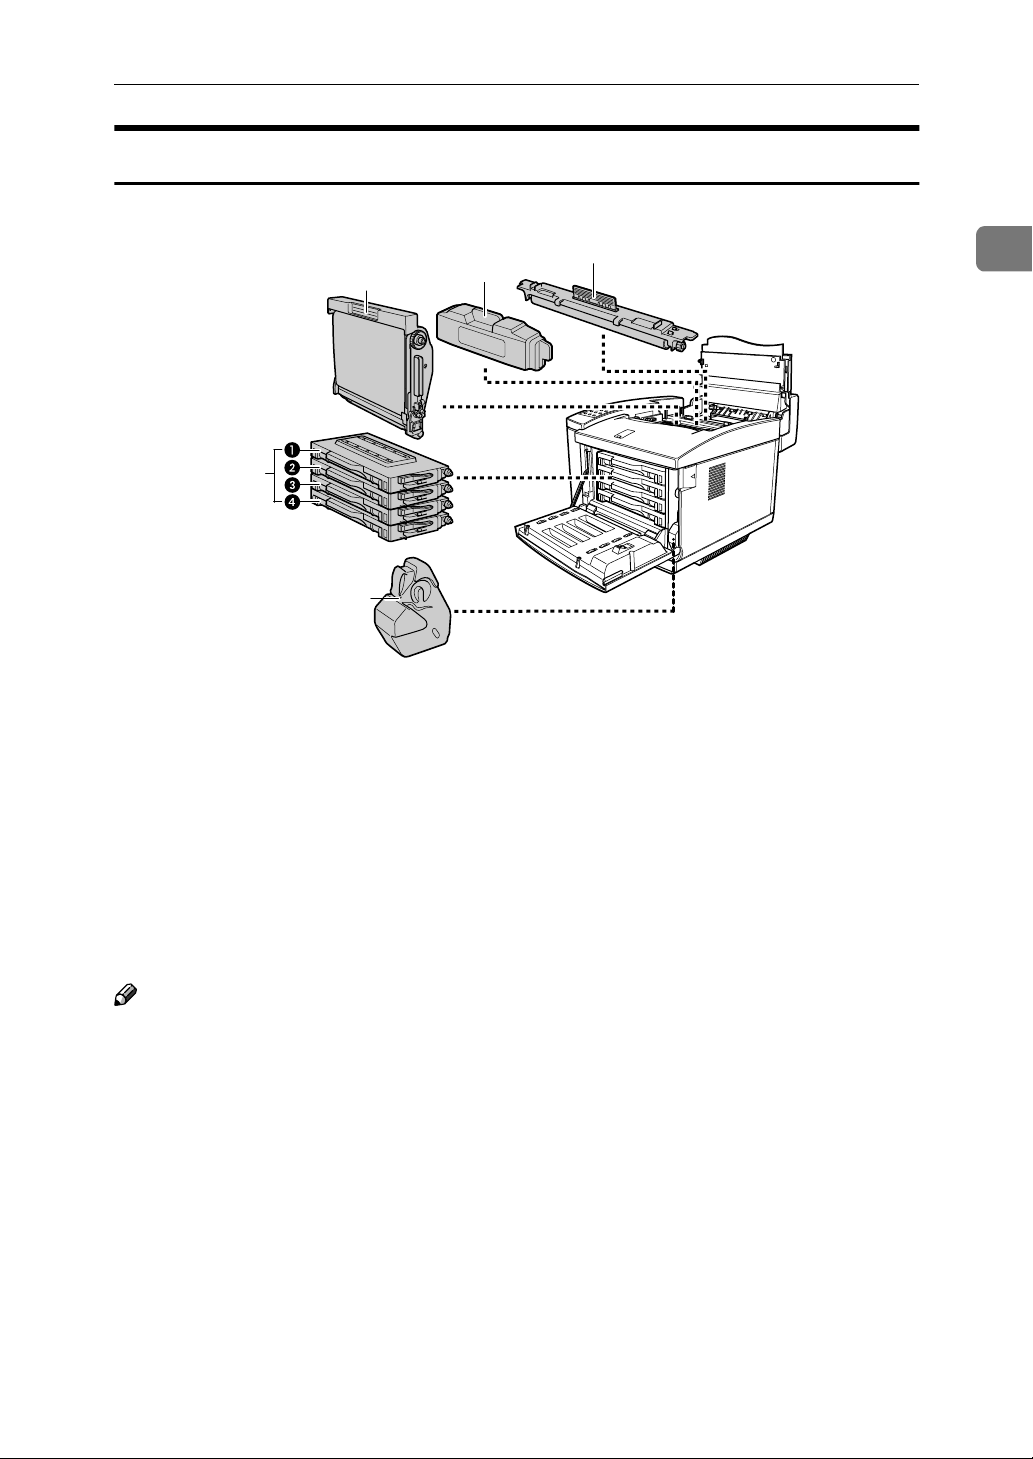
Interior
Guide to the Printer
3
2
4
5
1. Fuser Cleaner
This cleans unnecessary toner from the
fuser roller.
2. Fuser Oil Bottle
This bottle holds oil used for fusing toner
to the paper.
3. Photoconductor Unit
This unit is used to compose the image
being printed.
1
ZDGH060J
4. Toner Cartridges
A K: black toner
B Y: yellow toner
C M: magenta toner
D C: cyan toner
5. Waste Toner Bottle
This bottle is a receptacle for waste toner
generated during the printing process.
1
Note
❒ Be careful to prevent the green film in
the photoconductor unit from becoming dirty or damaged, and do not
touch the black belt in the unit. The
condition of these components directly affects output quality.
7
Page 18
1
0
2
Getting Started
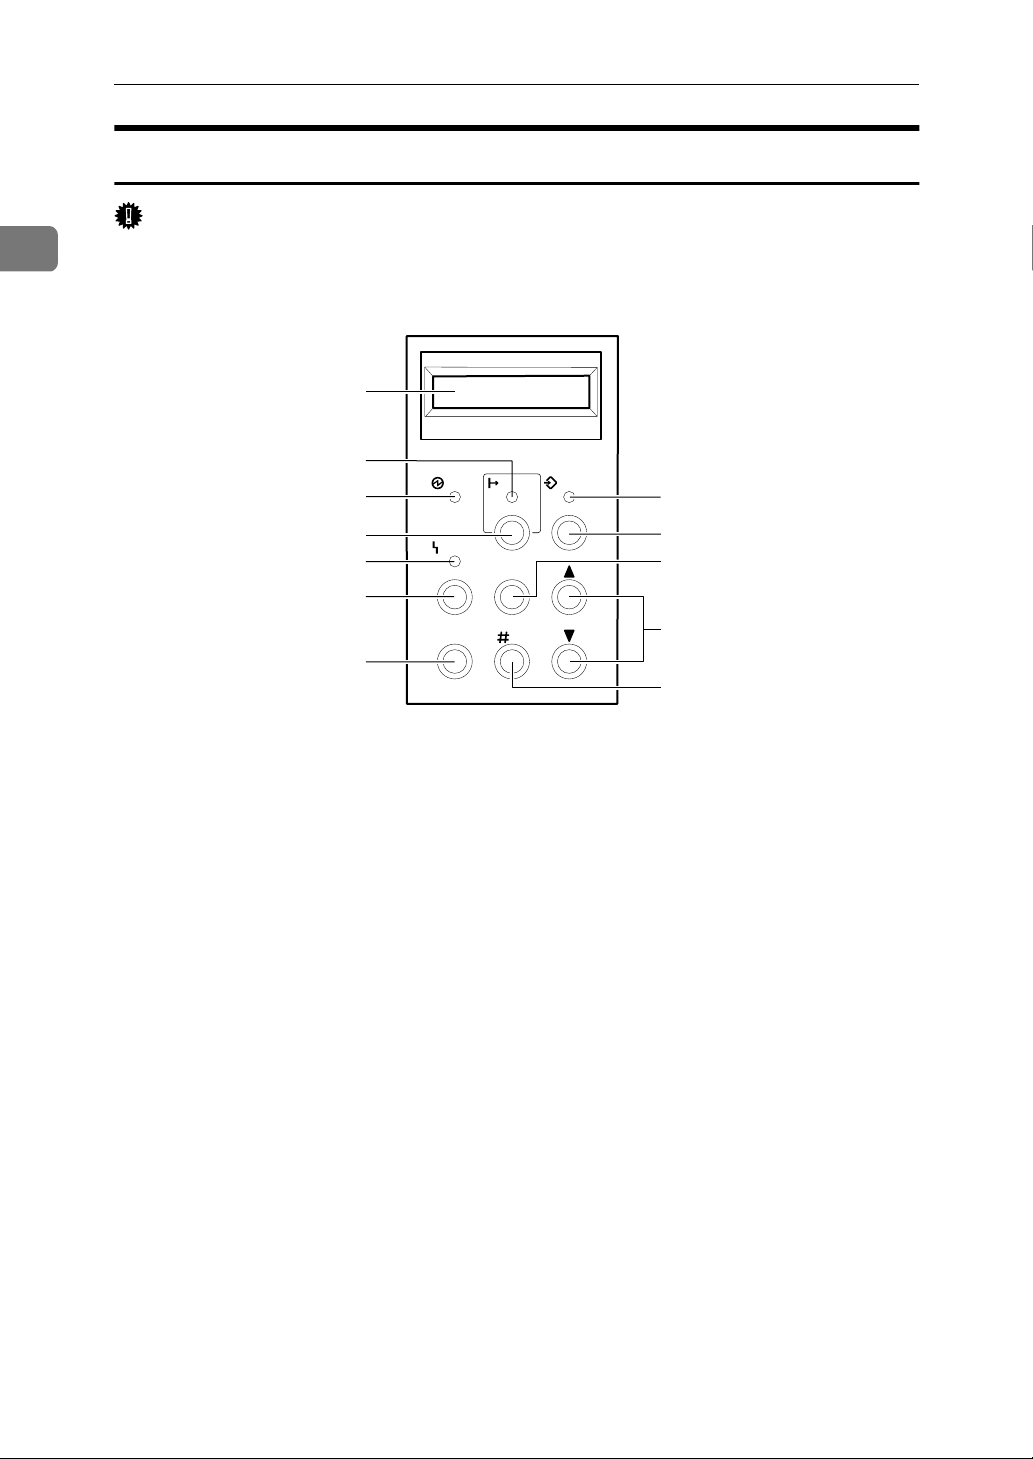
Operation Panel
Important
❒ Never press any operation panel key while the Data In indicator on the oper-
ation panel is lit or blinking.
1
2
3
4
5
Power On Line Data In
Reset
Error
EscapeMenu
6
Media Enter
7
1
11
1
9
8
ZDHS011E
1. Panel Display
The display shows the current status of
the printer and error messages. ⇒ "Error
& Status Messages on the Operation Panel" in the "Printer Reference" included as
a PDF file on the CD-ROM
2. On Line indicator
Tells you whether the printer is online or
offline.
Stays on while the printer is online (a
state in which the printer can receive data
from the computer).
Stays off when the printer is offline (a
state in which printer cannot receive data).
3. Power indicator
Stays on while the printer power is on.
Stays off when the power is turned off or
while the printer is in the Energy Saver
mode.
4. {
{On Line}}}} key
{{
Press this key to switch the printer between online and offline.
5. Error indicator
Lights up whenever any printer error occurs. A message describing the cause of
the error also appears on the panel display. ⇒ "Error & Status Messages on the
Operation Panel" in the "Printer Reference" included as a PDF file on the CDROM
6. {
{Menu}}}} key
{{
Press this key to make and check the
printer settings.
7. {
{Media}}}} key
{{
Use this key to select a tray, change the
paper size, and to make other settings for
printing.
8. {
{#Enter}}}} key
{{
Press this key to execute menu items selected on the panel display.
8
Page 19
Guide to the Printer
{{{{UUUU}}}}{{{{TTTT}}}} keys
9.
Use these keys to scroll through the selected items and to adjust values on the
panel display when making settings.
10. {
{Escape}}}} key
{{
Press this key to return to the previous
menu without changing any data.
{{{{Reset}}}} key
11.
Pressing this key while offline resets the
printer to its power on default settings.
Pressing this key while online cancels the
ongoing print job.
12. Data In indicator
Blinks while the printer is receiving data
from a computer.
Stays on if there is data to be printed.
Turning the Printer On and Off
Turning on the printer
Note
❒ This printer has two power switches; the main power switch on the rear and
the power switch on the front panel. Normally, keep the main power switch
turned on and use the power switch on the front panel to turn the printer on
and off.
1
Important
❒ If the printer will not to be used for a long period of time, first turn off the
printer by the power switch on the front panel. Then turn the main power
switch off, or disconnect the power plug from the wall outlet.
Confirm that the power cord is securely plugged into the outlet and the
A
printer.
Set the printer's main power switch to the On position.
B
ZDGH070J
9
Page 20
1
Getting Started
Depress the printer's power switch to turn the printer on.
C
ZDGH080J
After the printer is turned on, it takes about four minutes to warm up before
being able to print. The following message appears on the operation panel.
IPDL-C
Warming Up
When the printer is turned on, the Power indicator will blink repeatedly.
Once it stops blinking and remains on, you will be able to send data from a
computer to the printer. When the following message appears on the operation panel, the printer will be able to begin printing.
IPDL-C
Ready
Turning off the printer
Confirm that the Data In and Error indicators are off.
A
Note
❒ The Data In indicator stays on when printing and blinks while receiving
data from the computer. Do not turn off the printer while it is printing or
receiving data.
❒ When the Error indicator lights up, a printer error has occurred. Confirm
the message that appears on the operation panel and troubleshoot the
problem. ⇒ "Error & Status Messages on the Operation Panel" in the
"Printer Reference" included as a PDF file on the CD-ROM
10
Page 21

Guide to the Printer
Press the printer's power switch so that it is unlocked from the depressed
B
position.
ZDGH080J
The Power indicator turns off.
1
11
Page 22

1
Getting Started
12
Page 23

2. Installing Options
R
CAUTION:
• Before installing options, the machine should be turned off and unplugged
for at least thirty minutes. Components inside the machine become very
hot, and can cause a burn injury if touched.
• Before moving the machine, unplug the power cord from the outlet. If the
cord is unplugged abruptly, it could become damaged. Damaged plugs or
cords can cause an electrical or fire hazard.
• When lifting the machine, use the inset grips on both sides. The machine
could break or cause an injury if dropped.
• It is recommended that at least two persons are used to lift the printer. Otherwise, the printer might fall and cause personal injury.
13
Page 24

2
Installing Options
Available Options
You can increase the functionality of the printer by adding options. The following options can be installed on the printer.
Reference
For more information about the options, see "Options" in the "Printer Reference" included as a PDF file on the CD-ROM. Do not use options other than
those specified in this manual.
4
5
1. Memory Unit ⇒
the Memory Unit”
• Memory Unit Type B (32MB)
• Memory Unit Type B (64MB)
• Memory Unit Type B (128MB)
⇒ P.15 “Installing
⇒⇒
2. Network Interface Board
Type306⇒⇒⇒⇒ P.17 “Installing the Net-
work Interface Board Type306”
1
2
3
ZDHH030E
3. PAPER FEED UNIT Type206⇒
P.21 “Installing the PAPER FEED
UNIT Type206”
4. AD390 (duplex unit)⇒
stalling the AD390 (Duplex Unit)”
⇒ P.25 “In-
⇒⇒
5. Paper Cassette Type204 (Legal)⇒
P.20 “Installing the Paper Cassette
Type204 (Legal)”
⇒
⇒⇒
⇒
⇒⇒
14
Page 25

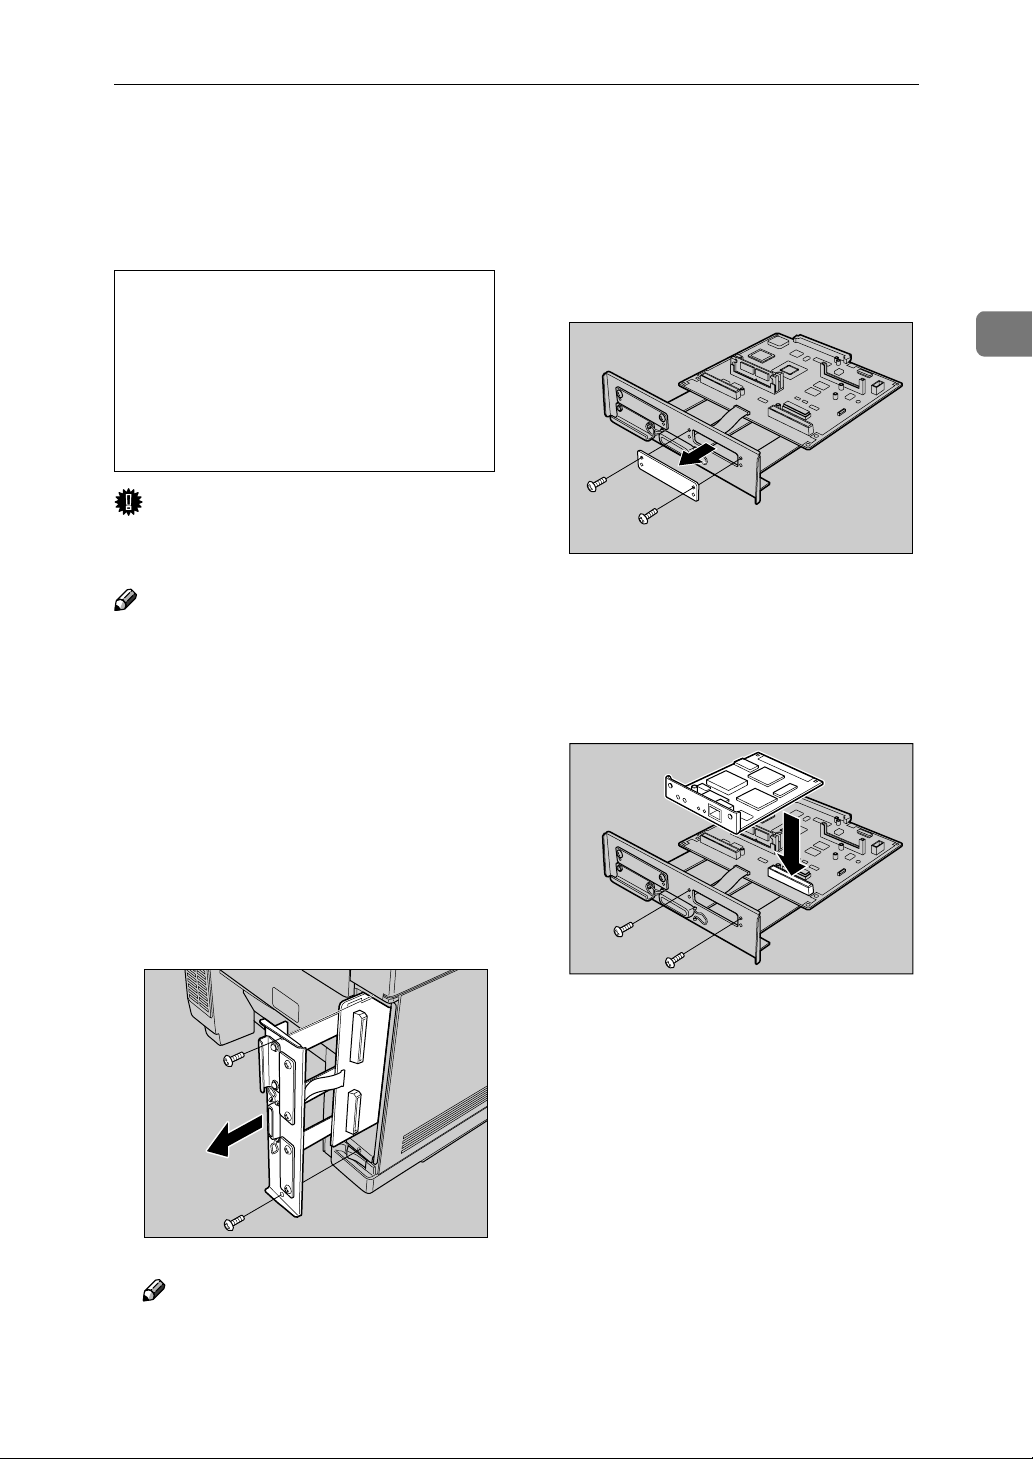
Installing the Memory Unit
R
Installing the Memory Unit
CAUTION:
• Before installing options, the machine should be turned off and
unplugged for at least thirty minutes. Components inside the
machine become very hot, and
can cause a burn injury if
touched.
Important
❒ The memory unit can be damaged
by small amounts of static electricity. Before touching it, you should
touch some metal to remove static
electricity from your body.
Turn off the printer's power
A
switch and remove all cables and
cords from the printer.
Remove both screws and remove
B
the printer board from the printer
as shown in the illustration.
Open the two levers on the slot
C
(AAAA), insert the memory unit by
aligning its notch (a) with the
guide on the connector, and push
it downward so that the two levers close to lock the memory unit
(BBBB).
Note
❒ There are two slots for the mem-
ory units. When installing only
one memory unit, be sure to insert it into the slot as shown in
the above illustration.
2
ZDGP170J
❒ To remove the memory unit,
open the two levers so that the
memory unit is released, then
pull it up gently.
ZDGP010J
Note
❒ A coin can be used to remove
the screws.
15
Page 26

2
Installing Options
Insert the printer board into the
D
printer. Fasten both screws.
Note
❒ A coin can be used to fasten the
screws.
Connect all cables removed in
E
step
.
A
ZDGP020J
Plug the printer's power cord
F
back into the printer and the outlet. Turn on the printer's power
switch.
Print a configuration page to con-
G
firm that the memory unit is properly installed.
Reference
⇒ "Printing the Configuration
Page" in the "Printer Reference"
included as a PDF file on the
CD-ROM
Note
❒ If the memory unit is not prop-
erly installed, follow the above
procedure to reinstall it. If you
fail again, contact your sales or
service representative.
Important
❒ To make the printer recognize
the installed option properly,
you must set up the option with
the printer driver.
16
Page 27
Installing the Network Interface Board Type306
R
Installing the Network Interface Board
Type306
CAUTION:
• Before installing options, the machine should be turned off and
unplugged for at least thirty minutes. Components inside the
machine become very hot, and
can cause a burn injury if
touched.
Important
❒ Use a shielded twisted-pair (STP)
network cable.
Note
❒ There are two connectors on the
printer board. You can install the
network interface board in either.
❒ Two network interface boards can-
not be installed at a time.
Turn off the printer's power
A
switch and remove all cables and
cords from the printer.
Remove both screws and the met-
C
al plate from the printer board.
Insert the network interface
D
board into the slot and fasten it
with both screws that were removed in step
illustration.
, as shown in the
C
2
ZDGP190J
Remove both screws and remove
B
the printer board from the printer
as shown in the illustration.
Note
❒ A coin can be used to remove
the screws.
ZDGP200J
ZDGP010J
17
Page 28

2
Installing Options
Insert the printer board into the
E
printer. Fasten both screws.
Connect all cables removed in
F
step
Plug the printer's power cord
G
back into the printer and the outlet. Turn on the printer's power
switch.
.
A
ZDGP040J
Connecting the Printer to the Network
Follow these steps to connect the
printer to the network.
Confirm that you have the correct
A
network cable.
Confirm that the printer's power
B
switch is turned off. If it is on,
turn it off.
Loop the network cable. The loop
C
should be about 15 cm (6 inch)
from the end of the cable on the
end closest to the connector.
Attach the ferrite core to the loop.
D
Print a configuration page to con-
H
firm that the network interface
board is properly installed.
Reference
⇒ "Printing the Configuration
Page" in the "Printer Reference"
included as a PDF file on the
CD-ROM
Note
❒ If the network interface board is
not properly installed, follow
the above procedure to reinstall
it. If you fail again, contact your
sales or service representative.
Attach the network cable to the
E
10BASE-T/100BASE-TX port of
the printer.
TFWX980E
ZDGP050J
18
Connect the other end of the cable
F
into the network.
Page 29

Buttons and Indicators on the Network Interface Board
1
Installing the Network Interface Board Type306
2
3
4
ZDGX010E
1. Button
Hold down this button for more than two
seconds to print the network configuration page. Hold down this button for
more than five seconds to print system
log information.
2. Indicator (orange)
Stays on while the network interface
board is working.
3. Indicator (green)
Stays on while 100BASE-TX is working.
Stays off while 10BASE-T is working.
4. Indicator (green)
Stays on while the printer is in a network
environment.
2
19
Page 30

2
R
Installing Options
Installing the Paper Cassette Type204 (Legal)
CAUTION:
• The paper tray does not have a
stopper. When pulling out, be
careful not to pull it strongly. If
you do, the tray might fall and
cause personal injury.
Carefully pull the paper tray (tray
A
1) out of the printer and place it
on a flat surface.
Note
❒ Keep the paper tray with paper
in a cool and dark place.
Slide the Paper Cassette Type204
B
completely into the printer.
ZDGY010J
ZDHP010E
20
Page 31

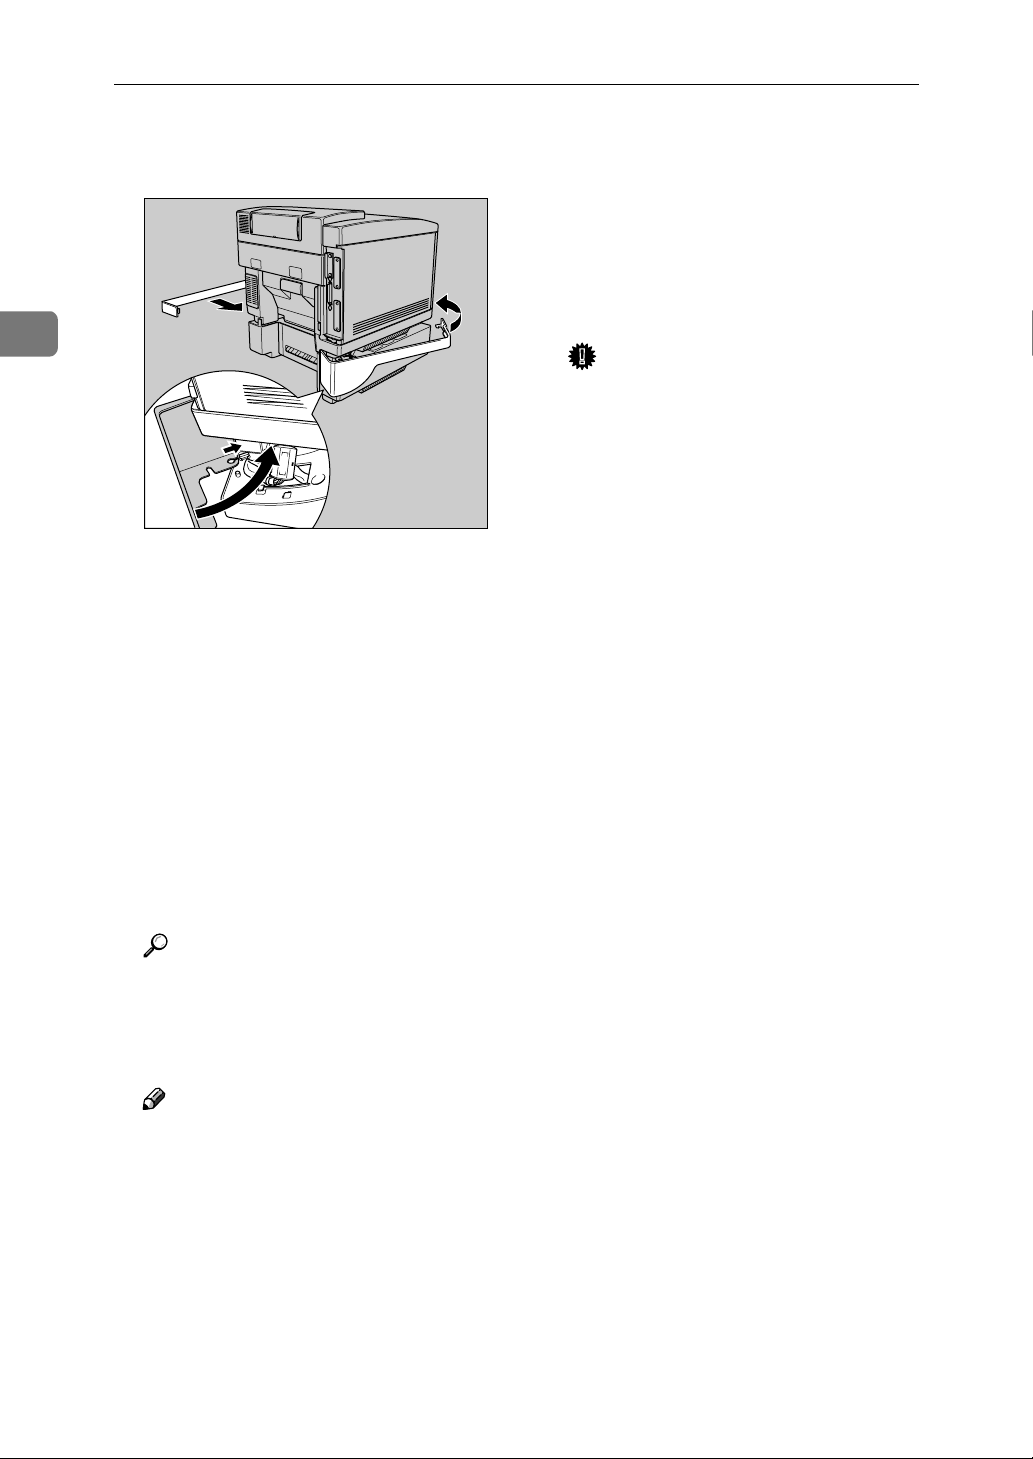
Installing the PAPER FEED UNIT Type206
R
Installing the PAPER FEED UNIT Type206
CAUTION:
• It is recommended that at least
two persons are used to lift the
printer. Otherwise, the machine
might fall and cause personal injury.
• When lifting the machine, use
the inset grips on both sides of
the machine. Otherwise, the machine might fall and cause personal injury.
Note
❒ To install the optional duplex unit,
it is necessary to install the paper
feed unit first.
Check the contents of the box for
A
the following items.
• Paper feed unit (1 pc)
• Left side cover (1 pc)
• Right side cover (1 pc)
Remove the adhesive tape.
B
Adjust the level adjustors located
C
under the paper feed unit, if necessary.
You can raise up the right side of
the paper feed unit (and the printer) by adjusting the level adjustors
as illustrated. This will keep the
printer level, even if the location
for the printer is slightly inclined,
for example.
2
ZDGP070J
ZDHP020E
If adjusting the level adjustors is
not necessary, go to step
.
D
ZDGP080J
21
Page 32
Installing Options
2
Remove the screw and securing
D
bracket from the paper feed unit.
Turn off the printer's power
E
switch and remove all cables and
cords from the printer.
Remove the paper cassette from
F
the printer.
Remove the connector cover from
G
the printer.
ZDGP090J
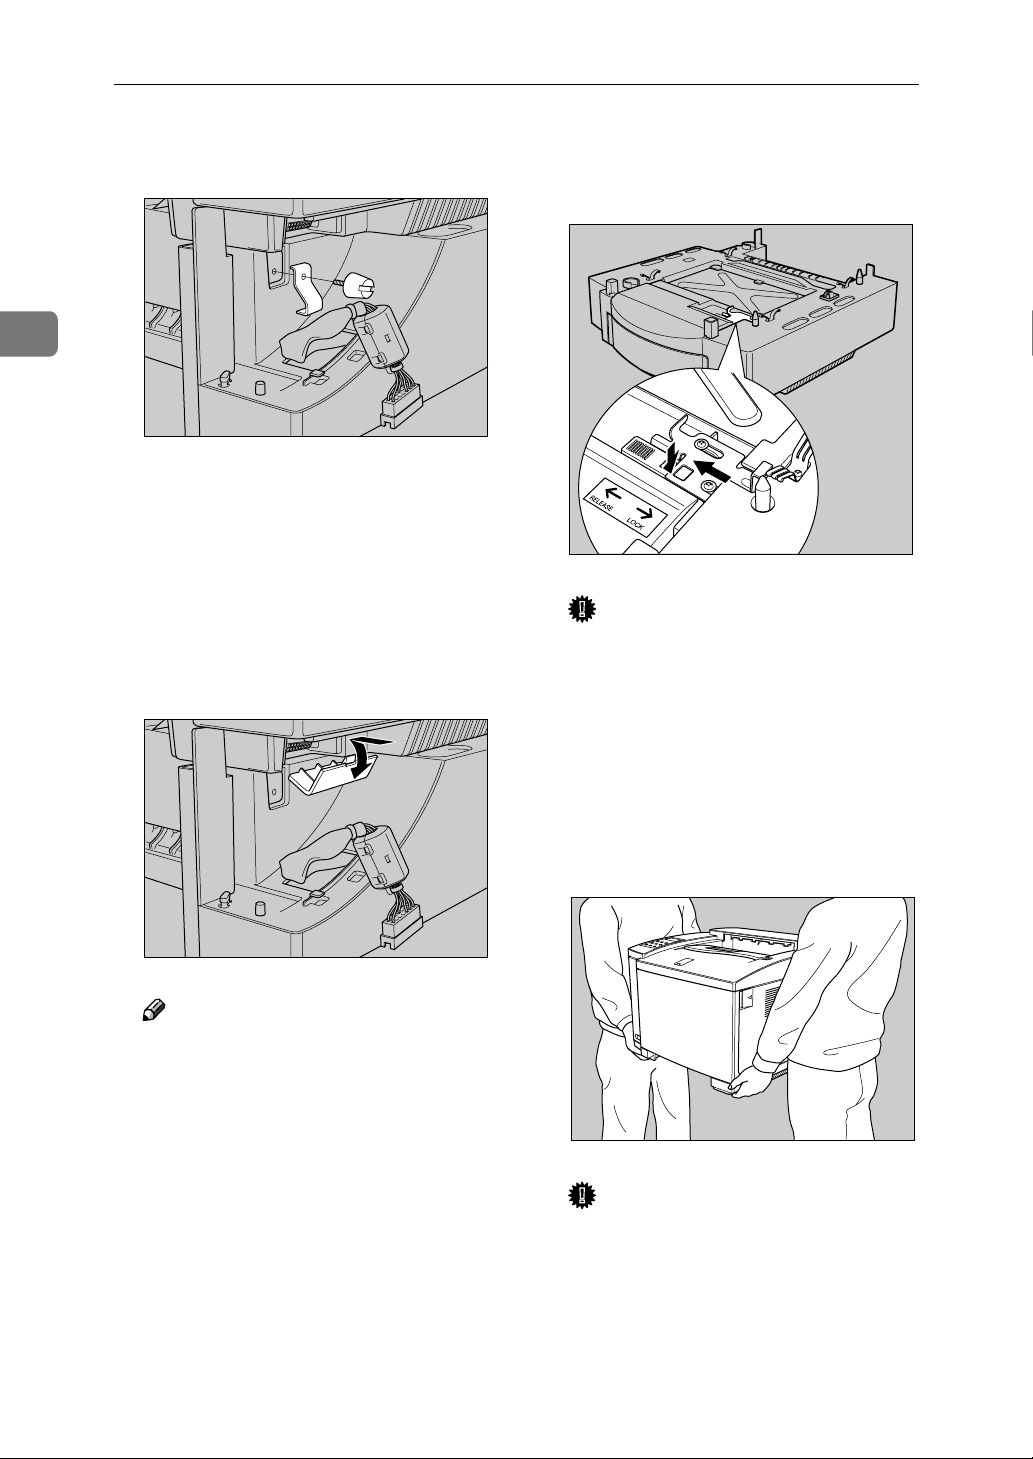
Set the locking plate on the paper
H
feed unit to the “RELEASE” position.
Important
❒ Be sure to set the locking plate
to the “RELEASE” position. If
you place the printer on the paper feed unit with the locking
plate set to the “LOCK”posi-
tion, the printer or the paper
feed unit may be damaged.
ZDGP110J
22
ZDGP100J
Note
❒ Keep the removed connector
cover. When you detach the paper feed unit, re-attach the connector cover to the printer.
Lift the printer using the inset
I
grips on both sides of the printer.
Important
❒ It is recommended that at least
two persons are used to lift the
printer.
ZDGP120J
Page 33

Installing the PAPER FEED UNIT Type206
Align the printer onto the 2 up-
J
right pins on the paper feed unit
and then lower it gently.
Set the locking plate, which was
K
moved to the “RELEASE” position in step
tion again.
, to the “LOCK” posi-
H
ZDGP130J
Insert the securing bracket re-
L
moved in step
under the printer, and secure the
bracket using the screw removed
in step
Connect the paper feed unit cable
M
to the lower socket inside the
printer securely. Make sure the
protruding part of the cable connector is facing downward.
.
D
into the groove
D
2
ZDGP140J
ZDGP510J
ZDGP150J
23
Page 34
Installing Options
2
Attach the right and left side cov-
N
ers.
Install the paper cassette removed
O
in step
Connect all cables removed in
P
step
to the printer.
F
.
E
❒ The tray which is selected when
the printer is turned on can be
changed to the paper feed unit
using the Operation Panel.
⇒”Using the Operation Panel”
in the “Printer Reference” included as a PDF file on the CDROM
Important
❒ To make the printer recognize
the installed option properly,
you must set up the option with
the printer driver.
ZDGP160J
Plug the printer's power cord
Q
back into the printer and the outlet. Turn on the printer's power
switch.
Print a configuration page to con-
R
firm that the paper feed unit is
properly installed.
Reference
⇒ "Printing the Configuration
Page" in the "Printer Reference"
included as a PDF file on the
CD-ROM
Note
❒ If the paper feed unit is properly
installed, you can see “Tray 2”
under the “Printer Information”
of the configuration page.
❒ If the paper feed unit does not
work, follow the above procedure to reinstall it. If it still does
not work, contact your sales or
service representative.
24
Page 35

Installing the AD390 (Duplex Unit)
R
Installing the AD390 (Duplex Unit)
CAUTION:
• Before installing options, the machine should be turned off and
unplugged for at least thirty minutes. Components inside the
machine become very hot, and
can cause a burn injury if
touched.
Note
❒ To install the duplex unit, you
need to install the optional paper
feed unit first.
❒ Once the duplex unit is installed
on the printer, it is necessary to
open the upper portion of the duplex unit before you can open the
top cover of the printer.
Turn off the printer's power
A
switch and remove all cables and
cords from the printer.
Remove the three covers from the
C
printer as shown in the illustration.
Remove the two covers from the
D
paper feed unit as shown in the illustration.
2
ZDGP400J
Take out the duplex unit cable as
B
shown in the illustration.
ZDGP270J
ZDGP410J
25
Page 36

Installing Options
2
Remove the left side cover.
E
Confirm the location of the two
F
guide pins and two hooks on the
duplex unit, as well as the corresponding cutouts and holes on
the paper feed unit and the printer.
ZDGP420J
Attach the duplex unit to the
G
printer.
Insert the two guide pins on the
duplex unit to the cutouts on the
paper feed unit, and insert the
hooks on the duplex unit to the
holes on the printer while slightly
lifting up the duplex unit. Then
push in the duplex unit against the
printer.
Open the upper portion of the du-
H
plex unit.
Gently open the upper portion using the left and right inset grips.
ZDGP440J
26
ZDGP430J
ZDGP450J
Page 37

Installing the AD390 (Duplex Unit)
Secure the duplex unit with the
I
two screws, as shown in the illustration.
Remove the adhesive tape and the
J
packing material.
ZDGP460J
Connect the duplex unit cable to
L
the upper socket inside the printer securely. Make sure the protruding part of the cable
connector is facing downward.
Attach the left side cover.
M
2
ZDGP480J
Close the upper portion of the du-
K
plex unit.
ZDGP470J
Connect all cables removed in
N
step
Plug the printer's power cord
O
back into the printer and the outlet. Turn on the printer's power
switch.
.
A
ZDGP490J
27
Page 38

2
Installing Options
Print a configuration page to con-
P
firm that the duplex unit is properly installed.
Reference
⇒ "Printing the Configuration
Page" in the "Printer Reference"
included as a PDF file on the
CD-ROM
Note
❒ If the duplex unit is properly in-
stalled, you can see “:Dx.x” at
the end of the Firmware Version
section of the configuration
page.
❒ If the duplex unit does not
work, follow the above procedure to reinstall it. If it still does
not work, contact your sales or
service representative.
Important
❒ To make the printer recognize
the installed option properly,
you must set up the option with
the printer driver.
28
Page 39
3. Configuring the Printer for
the Network
Configuring the Printer for the Network with the Operation Panel
After installing the optional Network
Interface Board, configure it for the
network using the printer's operation
panel.
The following table shows the operation panel settings and their defaults.
These are included in the ”System
Menu”.
Setting name Default value
32 IP Address 011.022.033.044
33 Subnet Mask 000.000.000.000
34 Gateway Add
(Gateway Address)
35 Access CTL.
(Access Control
Address)
36 Access Mask
(Access Control
Mask)
37 Net Boot
(Network Boot)
38 Frame NW
(Frame type NetWare)
39 Active PTL.
(Active Protocol)
000.000.000.000
000.000.000.000
000.000.000.000
None
Auto Select
All Active
Press {{{{#Enter}}}}.
C
Use the following table to select
D
the menu item appropriate for the
network.
Menu item on
the panel
display
All Active (Default Setting)
None
TCP/IP Only
NetWare Only
TCP & NetWare
EtherTalk Only
TCP& EtherTalk
NetW&EtherTalk
TCP&NW&EtherTK
NetBEUI Only
TCP & NetBEUI
NetW& NetBEUI
TCP & NW & NB
Etalk&NetBEUI
TCP& ETK& NB
NW & ETK & NB
Active Protocol
*1
*2
TCP
NW
''''
'
'
''
''
''
'''
''
''
'' '
'''
'''
*3
ET
'
''
• ' means that this protocol is ac-
tive.
NB
*4
'
Press {{{{Menu}}}}.
A
Press {{{{TTTT}}}} to display the follow-
B
ing message.
<Menu> j
System Menu l
• A blank cell means that this protocol is not active.
*1
TCP/IP
*2
NetWare
*3
EtherTalk
*4
NetBEUI
29
Page 40
Configuring the Printer for the Network
3
Note
❒ You should not select protocols
that are not used on the network.
❒ When using Pure IP in NetWare
5, select TCP/IP to be active.
A Press {{{{TTTT}}}} or {{{{UUUU}}}} until the fol-
lowing message appears.
<System Menu> j
39.Active PTL. l
B Press {{{{#Enter}}}}.
The current setting appears on
the panel display.
<Active PTL.> j
*All Active l
C Press {{{{UUUU}}}} or {{{{TTTT}}}} until the pro-
tocol you want to use appears.
D Press {{{{#Enter}}}}.
The actual procedure may differ
depending on the protocol you
use. Follow the appropriate
procedure below.
TCP/IP E V F V G V I V J V K
NetWare HV I V J V K
AppleTalk
NetBEUI I V J V K
If you use TCP/IP, you should as-
E
sign the IP Address to the printer.
Note
❒ To get an IP address for the
printer, contact your network
administrator.
I V J V K
A Press {{{{UUUU}}}} or {{{{TTTT}}}} until the fol-
lowing message appears.
<System Menu> j
32.IP Address l
B Press {{{{#Enter}}}}.
The current IP address appears
on the panel display.
011.022.033.044
j jl/#
C Press {{{{UUUU}}}} or {{{{TTTT}}}} to specify the
leftmost digit of the IP address.
111.022.033.044
j jl/#
D Press {{{{#Enter}}}}.
The pointer (U) moves to the
next digit as shown.
111.022.033.044
j jl/#
Note
❒ You can return the pointer
(U) to the previous (left) digit
by pressing {Escape}.
❒ If you press {Escape} when
the pointer (U) is on the leftmost position, the specified
IP address is reset.
E Press {{{{UUUU}}}} or {{{{TTTT}}}} to specify the
second digit of the IP address.
191.022.033.044
j jl/#
30
❒ If you use TCP/IP, you should
assign the IP address to the
printer.
F Press {{{{#Enter}}}}.
Page 41
Configuring the Printer for the Network with the Operation Panel
G Repeat steps EEEE and FFFF to spec-
ify the remaining digit of the
IP address.
191.168.015.016
j
Check if the pointer (U) is at the
rightmost digit, press {#Enter}
to register the IP address you
specified.
<System Menu> j
32.IP Address l
If you use TCP/IP, you should as-
F
sign “33.Subnet Mask”, “34.Gateway Add”, “35.Access CTL.” and
“36.Access Mask” using the same
procedure for specifying the IP
address. ⇒⇒⇒⇒ P.32 “Address”
If you use TCP/IP, you can make
G
settings for “Network Boot”.
You can select how to assign the
printer's address using the computer. Select one of the items on
the following table.
Menu item on
the panel
display
ARP+PING '
ARP & RARP ''
ARP & BOOTP ''
ARP&RARP&B
OOTP
None (Default
Setting)
RARP+TFTP '
BOOTP '
RARP &
BOOTP
DHCP '
*1
ARP+PING
*2
RARP+TFTP
*3
BOOTP
*4
DHCP
Available methods
*1
AR
'''
*2
RA
BO
''
*3
DH
Note
❒ You should set up the server, if
you want to use “RARP+TFTP”,
“BOOTP” or “DHCP”.
A Press {{{{TTTT}}}} or {{{{UUUU}}}} until the fol-
lowing message appears.
<System Menu> j
37.Net Boot l
B Press {{{{#Enter}}}}.
The current setting appears on
the panel display.
3
<Net Boot> j
*None l
C Press {{{{UUUU}}}} or {{{{TTTT}}}} until the
method you want to use appears.
D Press {{{{#Enter}}}}.
If you use NetWare, select the
H
NetWare frame type.
Select one of the items below if
necessary.
• Auto Select (Default)
• Ethernet 802.3
*4
• Ethernet 802.2
• Ethernet 2
• Ethernet SNAP
Note
❒ In most situations, use the de-
fault setting (“Auto Select”).
When you select “Auto Select”,
the frame type first detected by
the printer is adopted. If the network can use more than two
frame types, the printer may fail
to select the correct frame type if
“Auto Select” is selected. In this
case, select the appropriate
frame type.
31
Page 42

Configuring the Printer for the Network
3
A Press {{{{TTTT}}}} or {{{{UUUU}}}} until the fol-
lowing message appears.
<System Menu> j
38.Frame NW l
B Press {{{{#Enter}}}}.
The current setting appears on
the panel display.
<Frame NW> j
*Auto Select l
C Press {{{{UUUU}}}} or {{{{TTTT}}}} until the
frame type you want to use appears.
D Press {{{{#Enter}}}}.
Press {{{{On Line}}}}.
I
The following message appears on
the panel display.
Take Offline
Then Press Reset
Press {{{{On Line}}}}.
J
The On Line indicator turns off
and the printer is offline.
Press {{{{Reset}}}}.
K
The printer is reset and the settings
are available.
Print the configuration page to
L
check settings you have made.
A Press {{{{Menu}}}}.
B Press {{{{TTTT}}}} or {{{{UUUU}}}} until the ”List
Print” appears.
C After confirming that “Con-
fig.Page” is on the display,
press {{{{#Enter}}}}.
D Press {{{{#Enter}}}}.
The configuration page is now
printed. Check the contents of
the configuration page.
E Press {{{{On Line}}}}.
The "Ready" message appears
on the panel display.
----Address
❖❖❖❖ Subnet Mask
A number used to mathematically
“mask” or hide the IP addresses on
the network by eliminating those
parts of the address that are alike
for all the machines on the network.
❖❖❖❖ Gateway Address
A gateway is a connection or interchange point that connects two
networks. A gateway address is for
the router or host computer used
as a gateway.
Note
❒ To get the above two addresses,
contact your network administrator.
❒ If you do not know the address-
es, please use the default settings.
❖❖❖❖ Access Control Address and Access
Control Mask
Access Control Address and Access Control Mask are used to control the IP addresses that have
access to the computer used for
printing, with the IP address. If it is
not necessary for you to control the
access rights, select “0.0.0.0”.
32
Page 43
Configuring the Printer for the Network with the Operation Panel
Note
❒ When the Access Control Ad-
dress settings coincide with the
masked result of the IP address
of the computer, print jobs from
that IP address can be accepted
by the Network Interface Board.
❒ For example, if you assign
192.168.15.16 as the Access Control Address to the Network Interface Board, the combination
of the Access Control Mask and
IP address that can have access
are as follows.
3
Access Control
Mask
0. 0. 0. 0 xxx.xxx.xxx.xxx
255. 0. 0. 0 192.xxx.xxx.xxx
255.255. 0. 0 192.168.xxx.xxx
255.255.255. 0 192.168. 15.xxx
255.255.255.255 192.168. 15. 16
Limitation
IP addresses that
have access
❒ These settings control only
printing requests.
33
Page 44

3
Configuring the Printer for the Network
34
Page 45

4. Installing the Printer Driver
and Software
This manual assumes that you are familiar with general Windows procedures
and practices. If you are not, see the documentation that comes with Windows
for details.
Installation Method
The following table shows how to install the printer drivers and software.
Auto Run
Typical
IPDL-C printer driver ❍❍❍
RICOH-SCRIPT2 printer
driver
PRINTER MANAGER FOR
ADMINISTRATOR
PRINTER MANAGER FOR
CLIENT
PortNavi ❍❍
Multidirect Print ❍
Acrobat Reader ❍
*1
Available operating systems are as follows: Windows 95/98/Me, Windows 2000,
Windows NT 4.0
*2
Recommended for most users.
*3
Recommended for network printing users.
*4
Recommended for expert users.
*2
Network
*1
*3
❍❍
Custom
❍
*4
Add Printer
Wizard
❍
Reference
For more information about the printer drivers, see P.3 “Printer Drivers for
This Printer”. For installing the printer drivers, see P.38 “Installing the IPDL-C
Printer Driver”or P.42 “Installing the RICOH-SCRIPT2 Printer Driver”.
For more information about the software and utilities, see P.4 “Software and
Utilities Included on the CD-ROM”.
Important
❒ Before starting this installation, close all documents and applications. In a net-
work environment, confirm that users who are logged on are disconnected.
Be sure to do this when it will create the least interference with other users.
❒ After installing a printer driver, you must restart the computer.
35
Page 46

4
Installing the Printer Driver and Software
Note
❒ If the "plug and play" function is started, click [Cancel] in the [New Hardware
Found], [Device Driver Wizard] or [Found New Hardware Wizard] dialog box, and
then insert the CD-ROM. The [New Hardware Found], [Device Driver Wizard] or
[Found New Hardware Wizard] dialog box appears depending on the system ver-
sion of the Windows 95/98/Me or Windows 2000.
❒ The appropriate language name is used for the CD-ROM folder: ENGLISH
(English), DEUTSCH (German), FRANCAIS (French), ITALIANO (Italian),
ESPANOL (Spanish), NEDRLNDS (Dutch), NORSK (Norwegian), DANSK
(Danish), SVENSKA (Swedish)
❖❖❖❖ User Codes
User Codes are eight digit codes that allow you to keep track of printing done
under each code. To use this feature, the network administrator should assign
User Codes and inform users of them before they install the printer driver.
• With the IPDL-C printer driver, if you want to set a User Code, you must
do it when installing the printer driver.
• With the RICOH-SCRIPT2 printer driver, only [Off] or [On] can be selected.
The numerical value cannot be changed. If [On] is selected, “99999999” is
automatically set as a default. So if you want to distinguish between the
RICOH-SCRIPT2 and IPDL-C printer drivers, set the different User Code
in the IPDL-C printer driver.
• In Windows 95/98/Me, if you want to change the User Code, reinstalling
the printer driver is required.
• In Windows 95/98/Me, changing the printer name makes the User Code
ineffective. If you want to set the User Code again, reinstalling the printer
driver is required.
----Using the Shared Printer on Windows 2000 or Windows NT 4.0 for
Windows 95/98/Me Client
If you want to share the printer on Windows 2000 or Windows NT 4.0, install the
printer driver for Windows 95/98/Me for an alternate driver.
Note
❒ When using the alternate driver function with the Windows NT 4.0, use the
Windows NT 4.0 Service Pack 4 or later.
For more information about installing the printer driver as an alternate driver,
see P.39 “Windows 2000 - Installing the IPDL-C Printer Driver” or P.40 “Windows
NT 4.0 - Installing the IPDL-C Printer Driver”.
36
Page 47

Installing by Auto Run
Installing by Auto Run
You can install the IPDL-C printer driver and software, and set them up easily
by using Auto Run.
Follow these steps to install the IPDL-C printer driver and software on Windows
95/98/Me, Windows 2000, Windows NT 4.0.
Limitation
❒ If your system is Windows 2000 or Windows NT 4.0, installing a printer driv-
er by Auto Run requires Administrators permission. When you install a printer driver by Auto Run, log on using an account that has Administrators
permission.
Note
❒ Auto Run might not automatically work with certain OS settings. In this case,
launch "INSTTOOL.EXE" located on the CD-ROM root directory.
❒ If you want to cancel Auto Run, hold down the {SHIFT} key (when your sys-
tem is Windows 2000, hold down the left {SHIFT} key) while inserting the CDROM. Keep the {SHIFT} key held down until the computer has finished accessing the CD-ROM.
Close all applications that are running.
A
Insert the CD-ROM into the CD-ROM drive.
B
Follow the instructions on the screen.
C
Restart the computer after installation is complete.
D
Set up the options with the printer driver.
E
4
37
Page 48

Installing the Printer Driver and Software
Installing the IPDL-C Printer Driver
Windows 95/98/Me - Installing the IPDL-C Printer Driver
Installing the printer driver
Install the driver in accordance with the steps explained. ⇒ P.37 “Installing by
Auto Run”
Setting up options
4
Note
❒ When setting up options, you should access the Printer Properties from Win-
dows. You cannot access the Printer Properties from an application.
Click [Start] on the taskbar, point to [Settings], and then click [Printers].
A
The [Printers] window appears.
Click the icon of the printer you want to use. On the [File] menu, click [Prop-
B
erties].
Click the [Setup] tab, and then click [Installable Options].
C
The [Installable Options] dialog box appears.
From the [Option Tray:] and [Total Printer Memory:] boxes, select any options
D
you have installed.
Selecting the wrong tray here will make it impossible to use the tray correctly.
Selecting the wrong amount of memory here may cause printing problems.
Be sure to change this setting whenever you add more memory.
Note
❒ If the optional paper feed unit and the optional duplex unit are installed,
simply check the[Duplex] check box, and the paper feed unit will automatically be selected in the[Option Tray:] box. Automatic duplex printing becomes possible with the printer.
38
Reference
You can confirm how much memory the printer is currently equipped
with by printing a configuration page. ⇒ "Printing the Configuration
Page" in the "Printer Reference" included as a PDF file on the CD-ROM
Click [OK].
E
Click [OK].
F
Page 49

Installing the IPDL-C Printer Driver
Windows 2000 - Installing the IPDL-C Printer Driver
Installing the printer driver
Install the driver in accordance with the steps explained.⇒ P.37 “Installing by
Auto Run”
Note
❒ During installation, the [Digital Signature Not Found] dialog box might appear.
In this case, click [Yes] to continue the installation.
If you want to share the printer on Windows NT 2000, use the [Sharing] tab in the
Printer Properties to specify the alternate printer driver. For details, see the instructions manual of the Windows 2000.
When prompted for the Windows 95/98/Me alternate printer driver location,
select the following folder in the CD-ROM.
\DRIVERS\IPDL-C\WIN9X_ME\DISK1\
4
Setting up options
Limitation
❒ Changing the printer settings requires Manage Printers permission. Members
of the Administrators and Power Users groups have Manage Printers permission by default. When you set up options, log on using an account that has
Manage Printers permission.
Note
❒ When setting up options, you should access the Printer Properties from Win-
dows. You cannot access the Printer Properties from an application.
Click [Start] on the taskbar, point to [Settings], and then click [Printers].
A
The [Printers] window appears.
Click the icon of the printer you want to use. On the [File] menu, click [Prop-
B
erties].
Click the [Installable Options] tab.
C
39
Page 50

4
Installing the Printer Driver and Software
From the [Option Tray:] and [Total Printer Memory:] boxes, select any options
D
you have installed.
Selecting the wrong tray here will make it impossible to use the tray correctly.
Selecting the wrong amount of memory here may cause printing problems.
Be sure to change this setting whenever you add more memory.
Note
❒ If the optional paper feed unit and the optional duplex unit are installed,
simply check the[Duplex] check box, and the paper feed unit will automatically be selected in the[Option Tray:] box. Automatic duplex printing becomes possible with the printer.
Reference
You can confirm how much memory the printer is currently equipped
with by printing a configuration page. ⇒ "Printing the Configuration
Page" in the "Printer Reference" included as a PDF file on the CD-ROM
Click [OK].
E
Windows NT 4.0 - Installing the IPDL-C Printer Driver
Installing the printer driver
Install the driver in accordance with the steps explained. ⇒ P.37 “Installing by
Auto Run”
If you want to share the printer on Windows NT 4.0, use the [Sharing]tab in the
Printer Properties to specify the alternate printer driver. (For details, refer to the
instructions manual of the Windows 4.0.)
When prompted for the Windows 95/98/Me alternate driver location, select the
following folder in the CD-ROM.
\DRIVERS\IPDL-C\WIN9X_ME\DISK1\
Setting up options
Limitation
❒ Changing the printer settings requires Full Control access permission. Mem-
bers of the Administrators, Server Operators, Print Operators, and Power Users groups have Full Control permission by default. When you set up options,
log on under Full Control permission.
Note
❒ When setting up options, you should access the Printer Properties from Win-
dows. You cannot access the Printer Properties from an application.
40
Page 51

Installing the IPDL-C Printer Driver
Click [Start] on the taskbar, point to [Settings], and then click [Printers].
A
The [Printers] window appears.
Click the icon of the printer you want to use. On the [File] menu, click [Prop-
B
erties].
Click the [Installable Options] tab.
C
From the [Option Tray:] and [Total Printer Memory:] boxes, select any options
D
you have installed.
Selecting the wrong tray here will make it impossible to use the tray correctly.
Selecting the wrong amount of memory here may cause printing problems.
Be sure to change this setting whenever you add more memory.
Note
❒ If the optional paper feed unit and the optional duplex unit are installed,
simply check the[Duplex] check box, and the paper feed unit will automatically be selected in the[Option Tray:] box. Automatic duplex printing becomes possible with the printer.
Reference
You can confirm how much memory the printer is currently equipped
with by printing a configuration page. ⇒ "Printing the Configuration
Page" in the "Printer Reference" included as a PDF file on the CD-ROM
Click [OK].
E
4
41
Page 52

4
Installing the Printer Driver and Software
Installing the RICOH-SCRIPT2 Printer Driver
Windows 95/98/Me - Installing the RICOH-SCRIPT2 Printer Driver
With Windows 95/98/Me, you should install both the Windows 95/98/Me
PostScript printer driver and the PPD file.
Note
❒ Be sure to install the PPD file for Windows 95/98/Me. Do not accidentally in-
stall the PPD file for Windows 2000 or Windows NT 4.0.
Installing the printer driver
Preparation
The Windows 95/98 operating system CD-ROM or diskettes are required for
installing the printer driver.
The following procedure describes installation when the printer is connected
to the computer via a parallel interface.
Close all applications that are currently running.
A
Click [Start] on the taskbar, point to [Settings], and then click [Printers].
B
The [Printers] window appears.
Double-click the [Add Printer] icon.
C
[Add Printer Wizard] starts.
Click [Next].
D
Click [Local printer], and then click [Next].
E
A dialog box for selecting the printer manufacturer and model name appears.
Click [Have Disk].
F
A dialog box for installing a driver from a disk appears.
Press the {{{{SHIFT}}}} key and insert the CD-ROM into the CD-ROM drive.
G
Keep the {{{{SHIFT}}}} key pressed until the computer has finished accessing the
CD-ROM.
If the Auto Run program starts, click [Cancel].
42
Page 53

Installing the RICOH-SCRIPT2 Printer Driver
Click [Browse].
H
Note
❒ The Windows 95/98/Me printer driver is in the following folder in the
CD-ROM:
\DRIVERS\RPS2\WIN9X_ME\(Language)\
In the box, double-click [DRIVERS], [RPS2] and [WIN9X_ME]. Then double-
I
click the folder of the appropriate language. Finally, click [OK].
Click [OK].
J
A dialog box for selecting the printer model appears.
Click the name of the printer you want to install, and then click [Next].
K
A dialog box for selecting the printer port appears.
From the [Available ports:] box, select the printer port, and then click [Next].
L
Change the name of the printer if you want, and then click [Next].
M
In the next dialog box asking if you want to print a test page, select [No] and
N
then click [Finish].
4
The installer copies the printer driver files from the CD-ROM to the computer's hard disk.
Note
❒ Print a test page after completing installation and restarting Windows.
If you are asked to insert the Windows 95/98 system disk, insert it in the
O
computer, and then click [OK].
If you are asked to provide the location of the required file for Windows 95/
P
98, do the following:
• Select the [WIN95] or [WIN98] folder on the system disk.
• Navigate to the folder where Windows is installed. Then, select the appro-
priate folder. The location of the appropriate folder may differ depending
on the version of your operating system. The following are examples:
\WINDOWS\SYSTEM\OPTION\CABS
\WINDOWS\OPTION\CABS
Restart the computer.
Q
Set up any options with the printer driver.
R
43
Page 54

4
Installing the Printer Driver and Software
Setting up options
Note
❒ When setting up options, you should access the Printer Properties from Win-
dows. You cannot set up options when accessing the Printer Properties from
an application.
Click [Start] on the taskbar, point to [Settings], and then click [Printers].
A
The [Printers] window appears.
Click the icon of the printer you want to use. On the [File] menu, click [Prop-
B
erties].
Click the [Device Options] tab.
C
From the [Installable options] box, select the options you have installed.
D
The current settings are displayed in the [Change settings for:] list box.
Note
❒ The following items are available here: [Option Tray], [VMOption].
Use the [Change settings for:] list box to select the appropriate setting for the
E
selected option.
Click [Apply] to apply the settings you made.
F
After making all settings you want, click [OK].
G
Reference
You can confirm that how much memory the printer is currently equipped
with by printing a configuration page. ⇒ "Printing the Configuration
Page" in the "Printer Reference" included as a PDF file on the CD-ROM
44
Page 55

Installing the RICOH-SCRIPT2 Printer Driver
Windows 2000 - Installing the RICOH-SCRIPT2 Printer Driver
With Windows 2000, you should install both the Windows 2000 PostScript driver and the PPD file.
Limitation
❒ Installing a printer driver requires Manage Printers permission. Members of
the Administrators, and Power Users groups have Manage Printers permission by default. When you install a printer driver, log on using an account
that has Manage Printers permission.
❒ Be sure to install the PPD file for Windows 2000. Do not accidentally install
the PPD file for Windows 95/98/Me or Windows NT 4.0.
Installing the printer driver
Preparation
The following procedure describes installation when the printer is connected
to the computer via a parallel interface.
Close all applications that are currently running.
A
Click [Start] on the taskbar, point to [Settings], and then click [Printers].
B
The [Printers] window appears.
Double-click the [Add Printer] icon.
C
[Add Printer Wizard] starts.
Click [Next].
D
Click [Local printer], clear the [Automatically detect and install my Plug and Play
E
printer] check box, and then click [Next].
A dialog box for selecting the printer port appears.
Click the port you want to use, and then click [Next].
F
A dialog box for selecting the printer manufacturer and model name appears.
4
Click [Have Disk].
G
A dialog box for installing a driver from a disk appears.
Press the left {{{{SHIFT}}}} key and insert the CD-ROM into the CD-ROM drive.
H
Keep the left {{{{SHIFT}}}} key pressed until the computer has finished accessing
the CD-ROM.
If the Auto Run program starts, click [Cancel].
45
Page 56

4
Installing the Printer Driver and Software
Click [Browse].
I
Note
❒ The Windows 2000 printer driver is in the following folder in the CD-
ROM:
\DRIVERS\RPS2\WIN2000\(Language)\
In the box, double-click [DRIVERS], [RPS2] and [WIN2000]. Then double-click
J
the folder of the appropriate language for the operating system. Finally,
click [Open].
Click [OK].
K
A dialog box for selecting the printer model appears.
Click the name of the printer you want to install, and then click [Next].
L
A dialog box for changing the printer name appears.
Change the name of the printer if you want, and then click [Next].
M
Click [Next].
N
In the next dialog box asking if you want to print a test page, select [No] and
O
then click [Next].
A confirmation dialog box appears.
Note
❒ Print a test page after completing installation and restarting Windows.
Confirm the settings you have set, and then click [Finish].
P
The installer copies the printer driver files from the CD-ROM to the computer's hard disk.
Note
❒ If the [Digital Signature Not Found] dialog box appears, click [Yes] to continue
the installation.
Restart the computer after installation is complete.
Q
Set up any options with the printer driver.
R
46
Page 57

Installing the RICOH-SCRIPT2 Printer Driver
Setting up options
Limitation
❒ Changing the printer settings requires Manage Printers permission. Members
of the Administrators and Power Users groups have Manage Printers permission by default. When you set up options, log on using an account that has
Manage Printers permission.
Note
❒ When setting up options, you should access the Printer Properties from Win-
dows. You cannot set up options when accessing the Printer Properties from
an application.
Click [Start] on the taskbar, point to [Settings], and then click [Printers].
A
The [Printers] window appears.
Click the icon of the printer you want to use. On the [File] menu, click [Prop-
B
erties].
Click the [Device Settings] tab.
C
4
From the [Installable Options] list, select the options you have installed.
D
Note
❒ The following items are available here: [Total Printer Memory:], [Option Tray:],
and [Duplex Unit:].
Click [Apply] to apply the settings you made.
E
After making all settings you want, click [OK].
F
Reference
You can confirm that how much the printer is currently equipped with by
printing a configuration page. ⇒ "Printing the Configuration Page" in the
"Printer Reference" included as a PDF file on the CD-ROM
47
Page 58

Installing the Printer Driver and Software
Windows NT 4.0 - Installing the RICOH-SCRIPT2 Printer Driver
With Windows NT 4.0, you should install both the Windows NT 4.0 PostScript
driver and the PPD file.
Limitation
❒ Installing a printer driver requires Full Control access permission. Members
of the Administrators, Server Operators, Print Operators, and Power Users
groups have Full Control permission by default. When you set up options, log
on under Full Control permission.
❒ We recommend that you upgrade your Windows NT 4.0 operating system to
the latest version before installing the printer driver. Contact your Windows
retailer for details about the latest version available.
4
❒ Be sure to install the PPD file for Windows NT 4.0. Do not accidentally install
the PPD file for Windows 95/98/Me or Windows 2000.
Installing the printer driver
Preparation
The CD-ROM containing the Windows NT Server operating system version
4.0, or the Windows NT Workstation operating system is required for install-
ing the printer driver.
The following procedure describes installation when the printer is connected
to the computer via a parallel interface.
Close all applications that are currently running.
A
Click [Start] on the taskbar, point to [Settings], and then click [Printers].
B
The [Printers] window appears.
Double-click the [Add Printer] icon.
C
[Add Printer Wizard] starts.
After confirming that the [My Computer] option is selected, click [Next].
D
A dialog box for selecting the printer port appears.
48
Click the check box of the printer port you want to use, and then click [Next].
E
A dialog box for selecting the printer manufacturer and model name appears.
Click [Have Disk].
F
A dialog box for installing a driver from a disk appears.
Press the {{{{SHIFT}}}} key and insert the CD-ROM into the CD-ROM drive.
G
Keep the {{{{SHIFT}}}} key pressed until the computer has finished accessing the
CD-ROM.
If the Auto Run program starts, click [Cancel].
Page 59

Installing the RICOH-SCRIPT2 Printer Driver
Click [Browse].
H
Note
❒ The Windows NT 4.0 printer driver is in the following folder in the CD-
ROM:
\DRIVERS\RPS2\NT4\(Language)\
In the box, double-click [DRIVERS], [RPS2] and [NT4]. Then double-click the
I
folder of the appropriate language. Finally, click [Open].
Click [OK].
J
A printer model selection dialog box appears.
Click the name of the printer you want to install, and then click [Next].
K
A dialog box for changing the printer name appears.
Change the name of the printer if you want, and then click [Next].
L
Click [Next].
M
In the next dialog box asking if you want to print a test page, select [No] and
N
then click [Finish].
4
The installer copies the printer driver files from the CD-ROM to the computer's hard disk.
Note
❒ Print a test page after completing installation and restarting Windows.
If you are asked to insert the Windows NT 4.0 system disk, insert it in the
O
computer, and then click [OK].
If you are asked to provide the drive of the system disk, use the drive con-
P
taining the Windows NT 4.0 system disk.
If you are asked to provide the location of the required file, select the ap-
Q
propriate folder. The location of the appropriate folder may differ depending on the version of your operating system. The following is an example:
• Folder named [i386] on the Windows NT 4.0 system disk.
Restart the computer after installation is complete.
R
Set up any options with the printer driver.
S
49
Page 60

4
Installing the Printer Driver and Software
Setting up options
Limitation
❒ Changing the printer settings requires Full Control access permission. Mem-
bers of the Administrators, Server Operators, Print Operators, and Power Users groups have Full Control permission by default. When you set up options,
log on under Full Control permission.
Note
❒ When setting up options, you should access the Printer Properties from Win-
dows. You cannot set up options when accessing the Printer Properties from
an application.
Click [Start] on the taskbar, point to [Settings], and then click [Printers].
A
The [Printers] window appears.
Click the icon of the printer you want to use. On the [File] menu, click [Prop-
B
erties].
Click the [Device Settings] tab.
C
From the [Installable Options] list, select the options you have installed.
D
Note
❒ The following items are available here: [Total Printer Memory:], [Option Tray:],
and [Duplex Unit:].
Click [Apply] to apply the settings you made.
E
After making all settings you want, click [OK].
F
Reference
You can confirm that how much memory the printer is currently equipped
with by printing a configuration page. ⇒ "Printing the Configuration
Page" in the "Printer Reference" included as a PDF file on the CD-ROM
50
Page 61

Installing the RICOH-SCRIPT2 Printer Driver
Using Adobe PageMaker Version 6.0 or 6.5
You should install the PPD file for PostScript printing with Adobe PageMaker.
Installing the PPD files
Close Adobe PageMaker if it is currently running.
A
Press the {{{{SHIFT}}}} key and insert the CD-ROM into the CD-ROM drive.
B
Keep the {{{{SHIFT}}}} key press until the computer has finished accessing the
CD-ROM.
If the Auto Run program starts, click [Cancel].
Select the CD-ROM drive.
C
In the box, double-click [DRIVERS], [RPS2] and [PM6]. Then double-click the
D
folder of the appropriate language.
You can see the PPD file.
4
Copy the PPD file into the appropriate folder. The location of the appropri-
E
ate folder may differ depending on the version of software or how you installed the software on your operating system. The following are examples:
• Adobe PageMaker version 6.0: PM6\RSRC\PPD4
• Adobe PageMaker version 6.5: PM65\RSRC\(Language)\PPD4
Selecting the PPD files
Launch Adobe PageMaker.
A
On the [File] menu, click [Print].
B
The [Print Document] dialog box appears.
From the [Printers] list box, select the printer you want to use.
C
Note
❒ Confirm that “RPS” is shown after the printer name.
In the [PPD] list box, select the printer you want to use.
D
51
Page 62

4
Installing the Printer Driver and Software
Macintosh
Use the Macintosh LaserWriter 8 driver that comes with your operating system.
Important
❒ For more information about the functions of the LaserWriter 8 printer driver,
see the documentation that comes with your operating system.
❒ The PPD file is not compatible with QuickDrawGX.
❒ The LaserWriter printer driver for a Macintosh does not come with this print-
er. Use the appropriate printer driver that comes with the Macintosh operating system you are using.
Reference
This manual describes only the settings specific to this printer. Settings actually may differ depending on the version of the LaserWriter driver you are using. For more information about the LaserWriter functions, see the
documentation that comes with the Macintosh.
Note
❒ The versions of the LaserWriter driver are separated into two categories.
"LaserWriter 8.3x or earlier" refers to the LaserWriter 8.3x driver and all drivers before that. "LaserWriter 8.4x or later" refers to LaserWriter 8.4x, 8.6x and
8.7. LaserWriter 8.6x was used to make this manual. The settings may differ
depending on the version of the LaserWriter driver being used.
Installing the PPD files
Limitation
❒ Be sure to install the PPD file correctly. If not installed correctly, you cannot
use it, even though it is physically installed on the printer.
Start the Macintosh.
A
Double-click the hard disk icon, and then double-click the [Extensions] fold-
B
er inside the [System Folder].
Insert the CD-ROM into the CD-ROM drive.
C
Double-click the CD-ROM icon.
D
The contents of the CD-ROM appear.
Double-click the [PRINTER DESCRIPTIONS] folder in the CD-ROM, and then
E
double-click the folder having the appropriate language name.
Select the appropriate PPD file for the printer.
F
Copy the PPD file in the [Printer Descriptions] folder located inside the [Exten-
G
sions] folder.
52
The PPD file is installed.
Page 63

Installing the RICOH-SCRIPT2 Printer Driver
Installing the ColorSync profiles
ColorSync profiles make it possible for the printer to print colors of similar intensity to those that appear on the computer display. You must install the ColorSync profiles to use this feature.
Note
❒ The ColorSync profiles conform with the color characteristics defined by the
International Color Consortium (ICC).
❒ Some computer displays may require particular settings to be controlled by
ColorSync. For more information, see the documentation that comes with
your display.
The following profiles are provided for the printer.
❖❖❖❖ Transparency
Adjusts the image density to optimize the output for overhead projectors.
This profile is selected automatically whenever [OHP Transparency] is selected
as the paper type.
❖❖❖❖ Presentation
Enhances the reproduction of documents that contain text and graphics. This
profile is best for printing charts, colored graphs, presentation materials and
so on.
❖❖❖❖ Photograph
Use this profile to enhance the reproduction of photos and graphics that include midtones.
❖❖❖❖ Solid Color
Use this profile for printing specific colors, logos and so on.
The following procedure describes how to install the ColorSync Profiles.
Start the Macintosh.
A
Double-click the hard disk icon, and then open the appropriate folder for
B
installing the ColorSync profiles.
4
Note
❒ The location of the appropriate folder may differ depending on the version
of the operating system. The following are examples:
• System: Preferences: ColorSync Profiles
• System: ColorSync Profiles
Insert the CD-ROM into the CD-ROM drive.
C
The icon of the CD-ROM appears.
Double-click the CD-ROM icon.
D
The contents of the CD-ROM appear.
53
Page 64

4
Installing the Printer Driver and Software
Double-click the [ColorSync™ Profiles] folder in the CD-ROM.
E
Copy all four files in the [ColorSync™ Profiles] folder.
F
The ColorSync profiles are installed.
Setting up the PPD file
Preparation
Confirm that the printer is connected to an AppleTalk network before performing the following procedure.
On the Apple menu, select [Chooser].
A
Click the [LaserWriter 8] icon.
B
In the [Select a PostScript Printer] list, click the name of the printer you want
C
to use, and then click [Create].
Note
❒ If your network has multiple zones, click the name of the zone the printer
belongs to in the [AppleTalk Zones] list in the lower left side of the [Chooser]
dialog box.
Click the name of the printer, and then click [Select].
D
Note
❒ Be sure to select the PPD file correctly. If the correct PPD file is not selected,
certain options may not be available.
The PPD file is set up and the LaserWriter 8 icon appears at the left of the
printer name in the list. Next, follow the procedure on P.54 “Setting up op-
tions” to make the option settings, or to close the [Chooser] dialog box.
Setting up options
On the Apple menu, select [Chooser].
A
Click the [LaserWriter 8] icon.
B
In the [Select a PostScript Printer] list, click the name of the printer you want
C
to use, and then click [Setup].
Note
❒ If your network has multiple zones, click the name of the zone the printer
belongs to in the [AppleTalk Zones] list in the lower left side of the [Chooser]
dialog box.
54
Click [Configure].
D
A list of options appears.
Page 65

Installing the RICOH-SCRIPT2 Printer Driver
Select the option you want to set up and the appropriate settings for it.
E
Note
❒ If the option you want to set up does not appear, the PPD file has not been
set up correctly. Check the name of the PPD file shown in the dialog box.
Reference
For more information about setting up options, see the “Operating Instructions” for RICOH-SCRIPT2 included as a PDF file on the CD-ROM.
Click [OK].
F
The list of options closes.
Click [OK].
G
The [Chooser] dialog box appears.
Installing screen fonts
The screen fonts described below can be found in the CD-ROM, in the folder
named [Fonts].
4
Screen fonts are 10, 12, 14, 18 and 24 point bitmap fonts. Other sizes make characters appear with ragged edges on the computer screen but they print with
smooth edges.
Note
❒ The screen fonts included on the CD-ROM are as follows: AG-Ricoh, HN-
Ricoh, CS-Ricoh, BM-Ricoh, ZC-Ricoh, ZD-Ricoh.
Start the Macintosh.
A
Insert the CD-ROM into the CD-ROM drive.
B
The CD-ROM icon appears.
Double-click the CD-ROM icon.
C
The contents of the CD-ROM appear.
Copy the fonts you want to install in the [System] folder.
D
A confirmation dialog box appears.
Click [OK].
E
The fonts are installed.
Restart the Macintosh.
F
Note
❒ The names of the fonts you have installed appear in the pull-down menu
when you select fonts with applications.
55
Page 66

4
Installing the Printer Driver and Software
----Screen Fonts
Screen fonts are bitmap fonts, which are formed by grouping dots together. Because of this, screen fonts appear jagged on your computer screen when you enlarge or reduce them. It is recommended that you install as many different sizes
as possible for each font to avoid such jagged appearances. Screen fonts are provided for this printer in 10, 12, 14, 18 and 24 point sizes.
56
Page 67

INDEX
A
Access Control Address
Access Control Mask
14
,
37
,
29
,
Active Protocol
AD390
Adobe PageMaker
Auto Run
,
C
ColorSync
,
53
D
,
,
25
14
,
2
,
9
Data In indicator
duplex printer
duplex unit
install
E
,
,
8
,
9
8
{#Enter} key
Error indicator
{Escape} key
F
Frame type NetWare
front cover
front cover open lever
fuser cleaner
fuser oil bottle
,
,
5
7
,
7
G
Gateway Address
, 29,
, 29,
, 29,
51
,
29
,
6
32
32
32
I
inset grips
install
IP Address
IPDL-C printer driver
IPDL-C printer driver
,
6
Adobe PageMaker, PPD
,
29
,
25
15
,
,
52
3
duplex unit
Macintosh, ColorSync
Macintosh, PPD
Macintosh, screen fonts
memory unit
network interface board
Paper Cassette Type204 (legal)
PAPER FEED UNIT Type206
Windows 2000, IPDL-C
Windows 2000, RICOH-SCRIPT2
Windows 95/98/Me, IPDL-C
Windows 95/98/Me, RICOH-SCRIPT2
Windows NT 4.0, IPDL-C
Windows NT 4.0, RICOH-SCRIPT2
,
Windows 2000, install
Windows 95/98/Me, install
Windows NT 4.0, install
L
LaserWriter
,
52
M
Macintosh
main power switch
{Media} key
memory unit
Memory Unit Type B (128MB)
Memory Unit Type B (32MB)
Memory Unit Type B (64MB)
{Menu} key
Multidirect Print
,
52
install, PPD
,
8
,
,
,
15
8
install
14
,
,
52
,
4
6
,
,
,
,
,
53
,
,
39
55
17
,
,
51
39
,
,
40
,
,
40
14
14
38
14
,
,
38
20
21
,
,
,
45
42
48
57
Page 68

N
R
,
17
,
,
29
,
14
v
Network Boot
network interface board
install
Network Interface Board Operating
Instructions
Network Interface Board Type306
O
,
,
6
,
8
, 5,
8
8
On Line indicator
{On Line} key
operation panel
options
output tray
,
13
P
panel display
paper cassette
Paper Cassette Type204
Paper Cassette Type204 (legal)
install
paper feed unit
PAPER FEED UNIT Type206
install
paper stopper
paper tray
parallel interface connector
photoconductor unit
PortNavi
power connector
Power indicator
power switch
,
PPD
Macintosh, install
Macintosh, set up
printer board
printer driver
Printer Reference
,
8
,
14
,
14
,
20
,
14
,
14
,
21
,
5
,
5
,
6
,
7
,
4
,
6
,
8
,
5
3
,
52
,
54
,
6
,
3
,
v
Q
Quick Installation Guide
,
v
,
14
rear cover
{Reset} key
RICOH-SCRIPT2 Operating Instructions
RICOH-SCRIPT2 printer driver
RICOH-SCRIPT2 printer driver
,
6
,
9
,
Windows 2000, install
Windows 95/98/Me, install
Windows NT 4.0, install
45
,
,
48
,
42
S
screen fonts
Setup Guide
simplex printer
Subnet Mask
,
55
,
v
,
, 29,
2
32
T
,
,
7
5
,
6
toner cartridges
top cover
top cover open lever
U
36
,
v
UNIX Supplement
User Code
,
V
ventilator
,
6
W
waste toner bottle
Windows 2000
install, IPDL-C
install, RICOH-SCRIPT2
Windows 95/98/Me
install, IPDL-C
install, RICOH-SCRIPT2
Windows NT 4.0
install, IPDL-C
install, RICOH-SCRIPT2
,
,
,
,
7
39
,
45
38
,
42
40
,
48
,
v
3
58
UE USA G063
Page 69

Note to users in the United States of America
Notice:
This equipment has been tested and found to comply with the limits for a Class B digital device, pursuant to Part 15 of the FCC Rules. These limits are designed to provide reasonable protection against
harmful interference in a residential installation. This equipment generates, uses and can radiate radio
frequency energy and, if not installed and used in accordance with the instructions, may cause harmful
interference to radio communications.
However, there is no guarantee that interference will not occur in a particular installation. If this equipment does cause harmful interference to radio or television reception, which can be determined by turning the equipment off and on, the user is encouraged to try to correct the interference by one more of
the following measures:
Reorient or relocate the receiving antenna.
Increase the separation between the equipment and receiver.
Connect the equipment into an outlet on a circuit different from that to which the receiver is
connected.
Consult the dealer or an experienced radio/TV technician for help.
Warning
Changes or modifications not expressly approved by the party responsible for compliance could void
the user's authority to operate the equipment.
Caution (in case of 100BaseTX environment):
Properly shielded and grounded cables (STP) and connectors must be used for connections to host
computer (and/or peripheral) in order to meet FCC emission limits.
Declaration of Conformity
Product Name: Printer
Model Number: AP206/SLP6c/C7006
Responsible party: Ricoh Corporation
Address: 5 Dedrick Place, West Caldwell, NJ 07006
Telephone number: 973-882-2000
This device complies with part 15 of FCC Rules.
Operation is subject to the following two conditions:
1. This device may not cause harmful interference, and
2. this device must accept any interference received,
including interference that may cause undesired operation.
Properly shielded cables must be used for connections to host computer (and/or peripheral)
in order to meet FCC emission limits.
Network interface cable with ferrite core must be used for RF interference suppression.
Note to users in Canada
Note:
This Class B digital apparatus complies with Canadian ICES-003.
Remarque concernant les utilisateurs au Canada
Avertissement:
Cet appareil numérique de la classe B est conforme à la norme NMB-003 du Canada.
In accordance with IEC 60417, this machine uses the following symbols for the main power switch:
aaaa means POWER ON.
bbbb means POWER OFF.
Copyright © 2000
Page 70

UE USA G063-8647
 Loading...