

Page 1
QUICK INSTALLATION GUIDE
32.5
60
27 8010 80
32.5 2010 20
RH
80
60
40
20
10 20 30
27 50
27 70
17.5
70
17.5
50
<G063-8935>
Please read the Safety Information in the “Printer Reference” before using this machine.
It contains important information related to USER SAFETY and PREVENTING EQUIPMENT PROBLEMS.
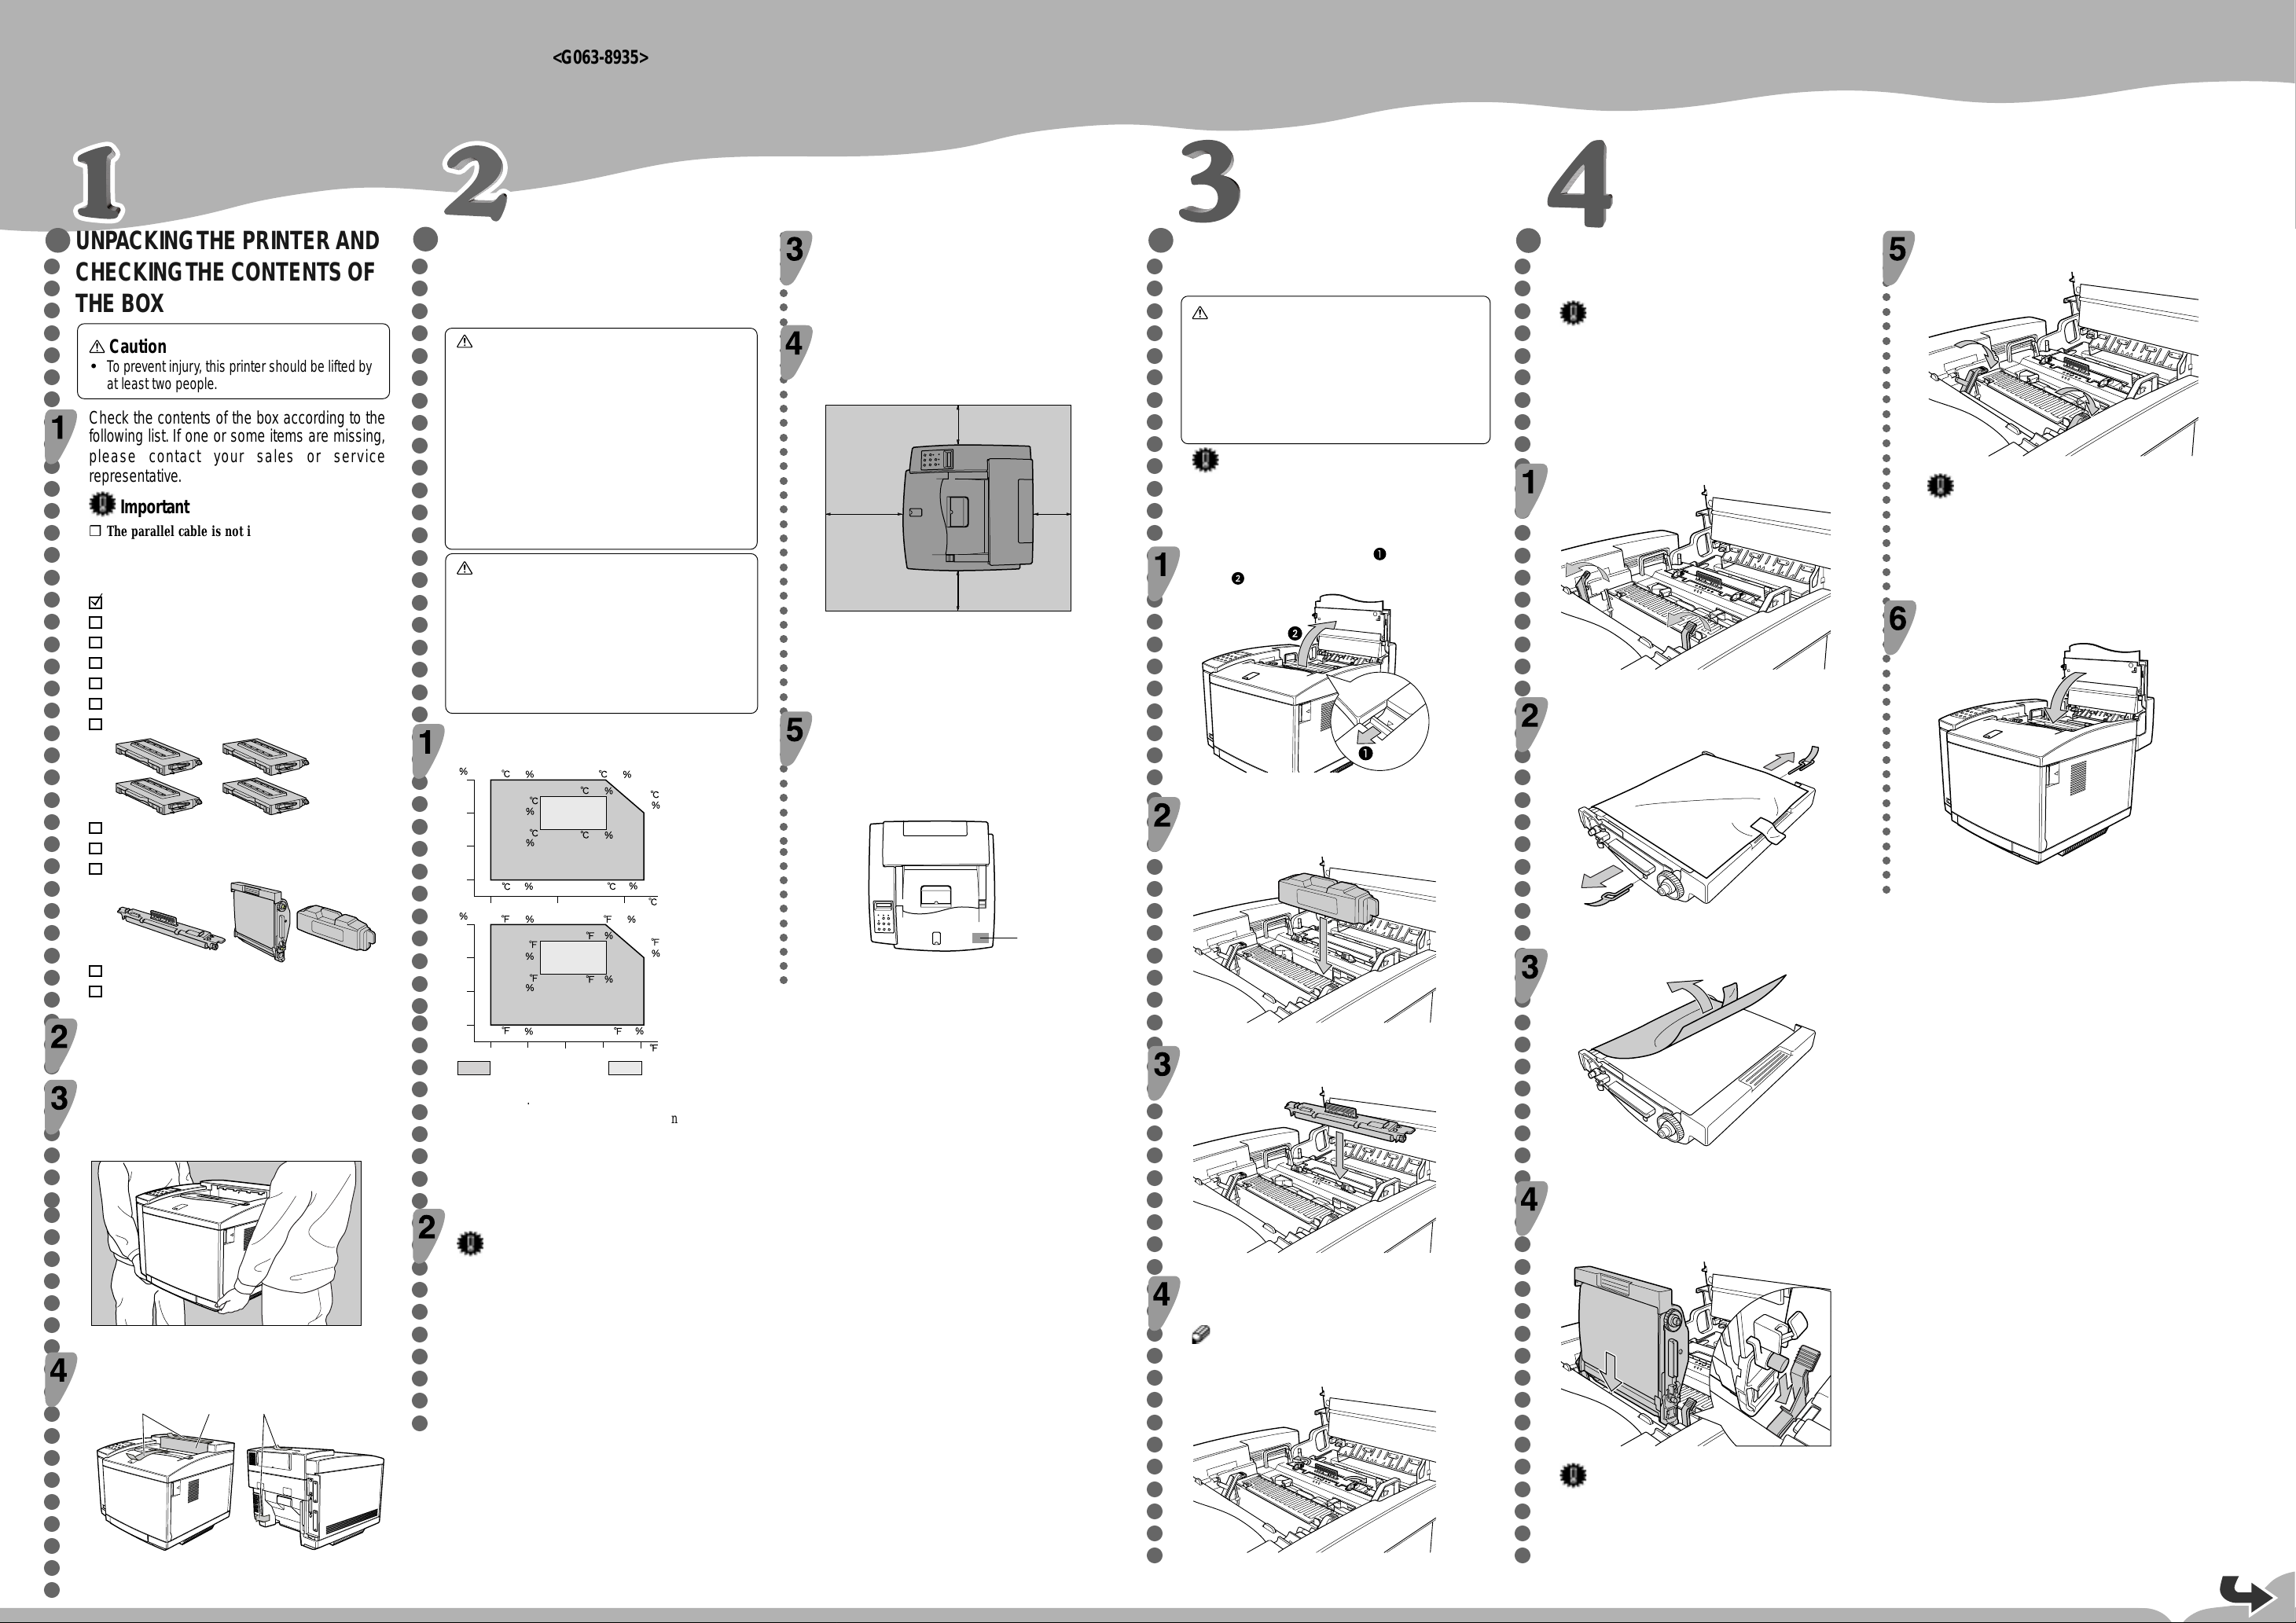
UNPACKING THE PRINTER AND
○○○○○○○○○○○○○○○○○○○○○○○○○○○○○○○○○○○○○○○○○○○○○○○○○○○○○○○○○○○○○
CHECKING THE CONTENTS OF
WHERE TO PUT THE PRINTER
○○○○○○○○○○○○○○○○○○○○○○○○○○○○○○○○○○○○○○○○○○○○○○○○○○○○○
The printer’s location should be carefully chosen
because environmental conditions greatly aff ect its
THE BO X
Caution
•
To prev ent injury, this printer should be lifted by
at least two people.
Check the contents of the box according to the
following list. If one or some items are missing,
please contact your sales or service
representative.
Important
❒ The parallel cable is not included in the box. It is
your responsibility to provide the parallel cable
appropriate for the computer you are using.
Quick Installation Guide (this sheet)
Setup Guide
CD-ROM
Toner Cartridge (Black)
Toner Cartridge (Yellow)
Toner Cartridge (Cyan)
Toner Cartridge (Magenta)
performance.
Warning
•
Confirm that the wall outlet is near the machine
and freely accessible, so that in event of an
emergency, it can be unplugged easily.
•
Only connect the machine to the power source
described on this sheet.
•
Avoid multi-wiring.
•
Do not damage, break or make any
modifications to the power cord. Do not place
heavy objects on it, pull it hard or bend it more
than necessary. These actions could cause an
electric shock or fire.
Caution
•
Keep the machine a way from humidity and dust.
A fire or an electric shock might occur.
•
Place the machine on a strong and lev el surface.
Otherwise, the machine might fall and cause
personal injury.
•
If you use the machine in a confined space,
confirm that there is a continuous flow of air.
Optimum Environmental Conditions
Recommended temperature and humidity
Fuser Cleaner
Photoconductor Unit
Fuser Oil Bottle
○○○○○○○○○○○○○○○○○○○○○○○○○○○○○○○○○○○○○○○○○○○○○○○○○○○○○
Power Connection
Connect the power cord to a power source with the following
specifications:
❒ 220-240 V, 50/60 Hz, 6 A or more
Space Required for Installing the Printer
Leave enough space around the printer. This space is necessary to
operate the printer. The recommended (or minimum) space
requirement is as follows:
A
D
C
A: more than 50 cm (19.7")
B: more than 20 cm (7.9")
C: more than 50 cm (19.7")
D: more than 70 cm (27.6")
Attaching the Sticker
A sticker, stating that paper for an ink-jet printer cannot be used
with this printer, is supplied.
Please attach the sticker to the bottom right corner of the top of the
printer [A] so that the sticker is easy to see.
B
ZDHH800E
INSTALLING THE FUSER OIL
○○○○○○○○○○○○○○○○○○○○○○○○○○○○○○○○○○○○○○○○○○○○○○○○○○○○○○○○○○○
BO TTLE AND FUSER CLEANER
Caution
•
Do not incinerate the oil bottle. This action could
cause a fire or a personal injury.
•
Spilt oil is very slippery. If oil is spilt, wipe it up
with an alkaline cleaner. Otherwise, the oily
surfaces can create the danger of slipping and
personal injury.
Important
Prior to moving or transporting the printer, wipe out
the fuser oil completely as explained in the “Printer
Reference” included as a PDF file on the CD-ROM.
INSTALLING THE
○○○○○○○○○○○○○○○○○○○○○○○○○○○○○○○○○○○○○○○○○○○○○○○○○○○○○○○○○○○
PHO T OCONDUCTOR UNIT
Important
❒ Do not touch the surface of the photoconductor unit.
This could damage the photoconductor unit and
reduce the print quality.
❒ Do not expose the photoconductor unit to a light
source greater than 800 luxes for more than two
minutes. This could damage the photoconductor unit
and reduce the print quality.
Lift the green lock levers to a vertical position.
Pull the top cover open le ver , to open the top
cover
.
Return the green lock levers to their original
○○○○○○○○○○○○○○○○○○○○○○○○○○○○○○○○○○○○○○○○○○○○○
positions.
ZDHH155E
Important
❒ Do not return lock levers with force. If you cannot
lock them easily, remove the photoconductor unit
from the printer. Then insert it again until the gears
mesh securely. After that, try again to return the
levers to their original positions.
Close the top cover until the center of the cover
locks securely.
ZDHH125E
Remove the pins on both sides of the
photoconductor unit.
ZDHH105E
Insert the oil bottle. When inserting, the side with
the label should be facing toward you, and the
mouth of the bottle facing down.
ZDHH810E
Power Cord
Additional Documentation
Remove the plastic bag.
Lift the printer and move it to the place where
you want to install it.
When lifting the printer, use the inset grips on both sides of the
printer.
ZDHP125E
Remove adhesiv e tape [A] and pac king material
[B] from the printer.
AAB
RH
80
60
40
20
The machine must be level within 5 mm, 0.2” both front to rear
and left to right.
To avoid possible build-up of ozone, place this printer in a large well
ventilated room that has an air turnover of more than 30 m
person.
If you use this printer in a cold area, leave the printer on or severe
cold might damage sensitive components inside the printer.
63.5
70
63.5
50
50 60
Possible operation range Recommended range
80.6 70
80.6 50
70
80.6 8050 80
90.5
60
90.5 2050 20
90
80
3
/hr/
Environments to Avoid
Important
❒ Locations exposed to direct sunlight or strong light
❒ Dusty areas
❒ Areas with corrosive gases
❒ Areas excessively cold, hot, or humid
❒ Locations near an air conditioner or humidifier
❒ Locations near other electronic equipment
❒ Locations where the printer might be subjected to
frequent strong vibration
A
ZDHH810E
ZDHH175E
Install the fuser cleaner . When installing, the roller
should be facing toward you.
ZDHH235E
Turn the lock lev ers to hold the oil bottle and fuser
cleaner .
Note
❒ Turn the right lock lever clockwise, and the left one
counterclockwise.
ZDHH615E
Remove the protective sheet.
ZDHH616E
Insert the photoconductor unit so that the
protruding axles on both sides are aligned with
the tracks inside the green lock levers. Lower it
until the gears mesh securely.
ZDHH145E
ZDHH245E
ZDHH015E
Important
❒ When inserting the photoconductor unit, be careful
not to touch or damage the surface.
Page 2
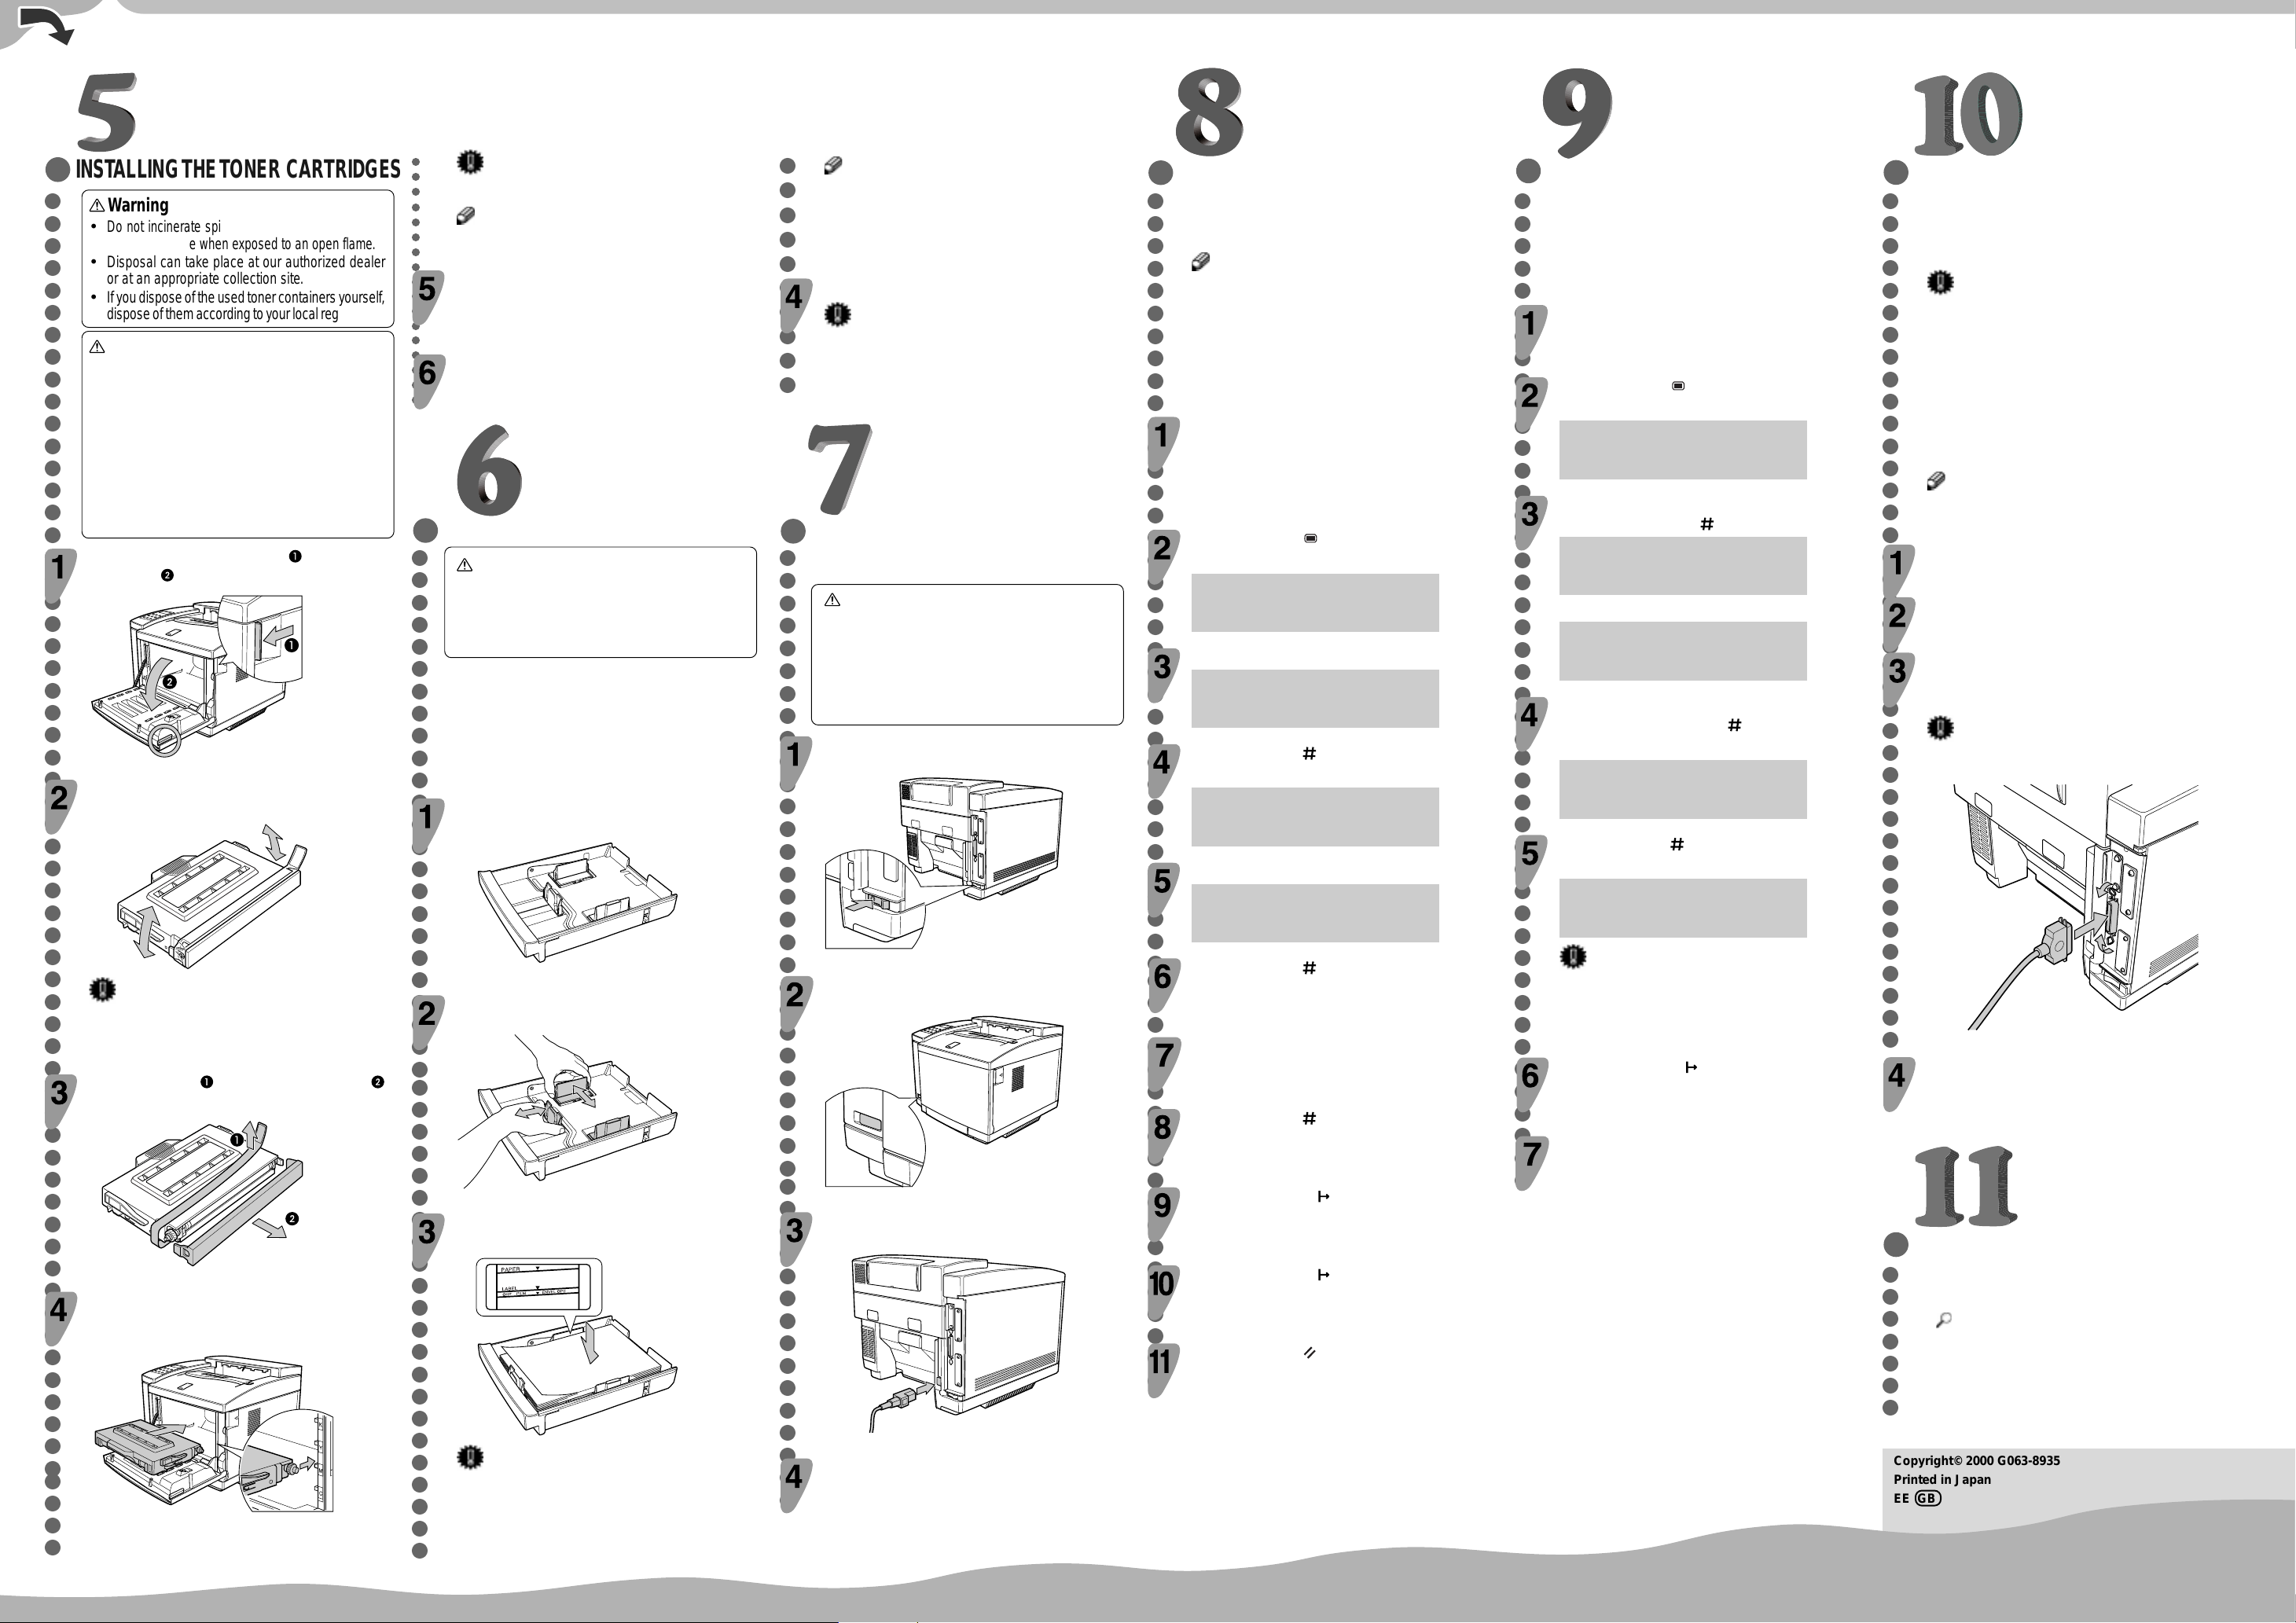
INST ALLING THE TONER CARTRIDGES
○○○○○○○○○○○○○○○○○○○○○○○○○○○○○○○○○○○○○○○○○○○○○○○○○○○○○○○○○○○○○○
Warning
•
Do not incinerate spilled toner or used toner. Toner
dust might ignite when exposed to an open flame.
•
Disposal can take place at our authorized dealer
or at an appropriate collection site.
•
If you dispose of the used toner containers yourself ,
dispose of them according to your local regulations.
Caution
•
Do not open the front cover when the paper tra y is
pulled out halfway. If you do, it might cause a
personal injury.
•
Do not eat or swallow toner.
•
Keep toner (used or unused) and toner cartridges
out of reach of children.
•
Our products are engineered to meet the highest
standards of quality and functionality. When
purchasing expendable supplies, we recommend
using only those provided by an authorized dealer .
Pull the front cover open lever , to open the
front cover
.
ZDHH165E
Hold the new toner cartridge (cyan) and shake it
well, about 3 to 4 times, as shown in the illustr ation.
ZDHT205E
Important
❒ If the toner cartridge is not shaken enough, toner
might not be evenly distributed in the cartridge. In
this case, the print quality might be reduced.
Remove the tape and the protective cov er
as shown in the illustration.
○○○○○○○○○○○○○○○○○
Important
❒ Do not use excessive force in sliding in the cartridge.
Note
❒ When inserting the cartridge, the side with the seal
should be up.
Repeat steps 2 - 4 for installing the magenta,
yellow, and black toner cartridges. When
installing, start with the magenta toner cartridge,
then yellow, and then black.
Close the front cover until the center of the front
cover locks securely.
INSTALLING THE PAPER TRAY
○○○○○○○○○○○○○○○○○○○○○○○○○○○○○○○○○○○○○○○○○○○○○○
Caution
•
The paper tray does not have a stopper. When
pulling it out, be careful not to pull it strongly. If
you do, the tray might fall and cause personal
injury.
The follo wing procedure describes how to load A4
K
paper.
For more infor mation about the paper sizes that
can be set in the paper tra y, see “Paper and Other
Media Supported by This Printer” in the “Printer
Reference” included as a PDF file on the CD-ROM.
○○○○○○○○○○
Note
❒ If you set a custom paper size, you should enter the
paper size with the printer’s operation panel. For
more information, see “Loading Paper in the Paper
Tray” in the “Printer Reference” included as a PDF
file on the CD-ROM.
Slide the paper tray completely into the printer.
Important
❒ Be sure to insert the paper tray completely.
Otherwise, misfeeds might occur , or the front cover
might touch the paper tray.
CONNECTING THE POWER
○○○○○○○○○○○○○○○○○○○○○○○○○○○○○○○○○○○○○○○○○○○
CORD
Caution
•
When you pull the plug out of the socket, grip
the plug to avoid damaging the cord and causing
a fire or an electric shock.
•
It is dangerous to handle the plug with wet hands.
Doing this may result in receiving an electric
shock.
Check that the printer’s main power switch (on
the rear) is set to the Off position.
Pull the paper tray out of the printer . Place it on a
flat surface.
ZDHY017E
If necessary, slide the front and side guides to
Check that the printer’s power switch is set to
the Off position (not depressed).
the paper size you want to use.
ZDHH076E
SELECTING THE P ANEL
○○○○○○○○○○○○○○○○○○○○○○○○○○○○○○○○○○○○○○○○○○○○○○○○○○○○○○
DISPLAY LANGU A GE
Follow the procedure below to select a language.
Note
❒ You can select one of the following languages:
English, German, French, Italian, Dutch, Spanish,
or Japanese.
❒ The default setting is English.
❒ If you want to use the English panel display, it is
not necessary for you to do the following
procedures.
PRINTING THE TEST PAGE
○○○○○○○○○○○○○○○○○○○○○○○○○○○○○○○○○○○○○○○○○○○○○
You can check if the printer works properly by
printing a test page such as the configuration page.
Howe ver , you cannot check the connection between
the printer and the computer by printing the test
page.
Turn on the printer. First set the main power s witch
to the On position, and then depress the power
switch.
Press the Menu ( ) key.
The following message appears on the panel display.
Turn on the printer. First set the main power s witch
to the On position, and then depress the power
switch.
After the machine warms up, the ready message appears on the
panel display.
Press the ▼ or ▲ key to displa y “List Print”, and
then press the Enter (
Press the Menu ( ) key.
The following message appears on the panel display.
<Menu> ▲
IPDL-C Menu ▼
Press the ▲ or ▼ key to displa y “System Menu”.
The following message appears on the panel display.
<Menu> ▲
System Menu ▼
Press the Enter ( ) key.
The following message appears on the panel display.
Confirm that “1.Config.Page” is on the display,
and then press the Enter (
The following message appears on the panel display.
<System Menu> ▲
1.Paper Tray ▼
Press the Enter ( ) key.
Press the ▲ or ▼ key to displa y “10. Language”.
In a short time, the test printing will start.
<System Menu> ▲
10.Language ▼
Press the Enter ( ) key.
Press the ▲ or ▼ key until the language you
want to select appears on the lower line of the
panel display.
Press the Enter ( ) key.
❒ If you cannot complete the test printing correctly,
Press the On Line ( ) key.
<Menu> ▲
IPDL-C Menu ▼
) key.
<Menu> ▲
List Print ▼
<List Print> ▲
1.Config.Page ▼
) key.
<Config.Page>
Press # key
Printing...
Config.Page
Important
see if an error message appears on the panel display .
For more information about error messages, see
“Troubleshooting” in the “Printer Reference”.
CONNECTING THE PRINTER TO
○○○○○○○○○○○○○○○○○○○○○○○○○○○○○○○○○○○○○○○ ○○○○○○○
A COMPUTER
Connect the printer to a computer using a parallel
cable.
Important
❒ The parallel cable is not provided with the printer.
It is your responsibility to provide the parallel cable
appropriate for the computer that you are using.
❒ The printer’s parallel connection is a standard bi-
directional interface. It requires a standard 36-pin
parallel cable compliant with IEEE1284 and the
parallel port on the computer.
❒ To avoid electrical interference, use a shielded
cable.
Note
❒ Do not use a parallel cable more than 2.5 meters
(8.2 feet) long.
Confirm that the printer’s power switch is turned
off. If it is on, turn it off.
Turn the computer off.
Attach the parallel cable to the port of the
printer. Secure the cable with the metal fittings
as shown in the illustration.
Important
❒ Rating voltage of the parallel port for the computer;
Max. DC 5V.
ZDHH056E
Attach the other end of the parallel cable to the
port of the computer. Secure the cable.
ZDHT206E
Align the toner cartridge (cyan) to the “C” mark
of the printer as shown in the illustration. Slide
the cartridge in along the printer’s guide rail.
ZDHT025E
ZDHY035E
Load paper into the paper tray, with the print side
up.
ZDHY045E
Important
❒ Make sure that the top of the stack is not higher
than the limit mark inside the tray.
❒ The front and side guides should be set exactly to
the paper size to avoid paper feed problems.
❒ Do not load different kinds of paper in the tray.
ZDHH085E
Attach the power cord to the socket on the back
side of the printer.
ZDHH055E
Plug the other end securely into the wall outlet.
Press the On Line ( ) key.
The On Line indicator is lit.
Press the On Line ( ) key again.
The On Line indicator turns off.
Press the Reset ( ) key.
The setting becomes effective.
Turn off the printer’s power switch.
SETTING UP FOR PRINTING
Printing requires installation of a printer driver to
the operating system.
Reference
❒ See “Printer Driver for This Printer” in the “Setup
Guide”.
❒ If you want to install options, see “Installing
Options” in the “Setup Guide”.
Copyright© 2000 G063-8935
Printed in Japan
EE GB
 Loading...