

Page 1
B229
B229B229
B229
Page 2

2
Table of Contents
Table of ContentsTable of Contents
Table of Contents
Control Panel......................................................................3
When the output looks like …............................................4
Cleaning Print-Heads.........................................................5
Flushing Print-Heads.........................................................8
Adjusting Head Position.....................................................9
Changing Paper Size ........................................................ 11
When blinks ................................................................12
Unusable Paper ................................................................12
Page 3
3
Control Panel
Control PanelControl Panel
Control Panel
Reference:
Reference:Reference:
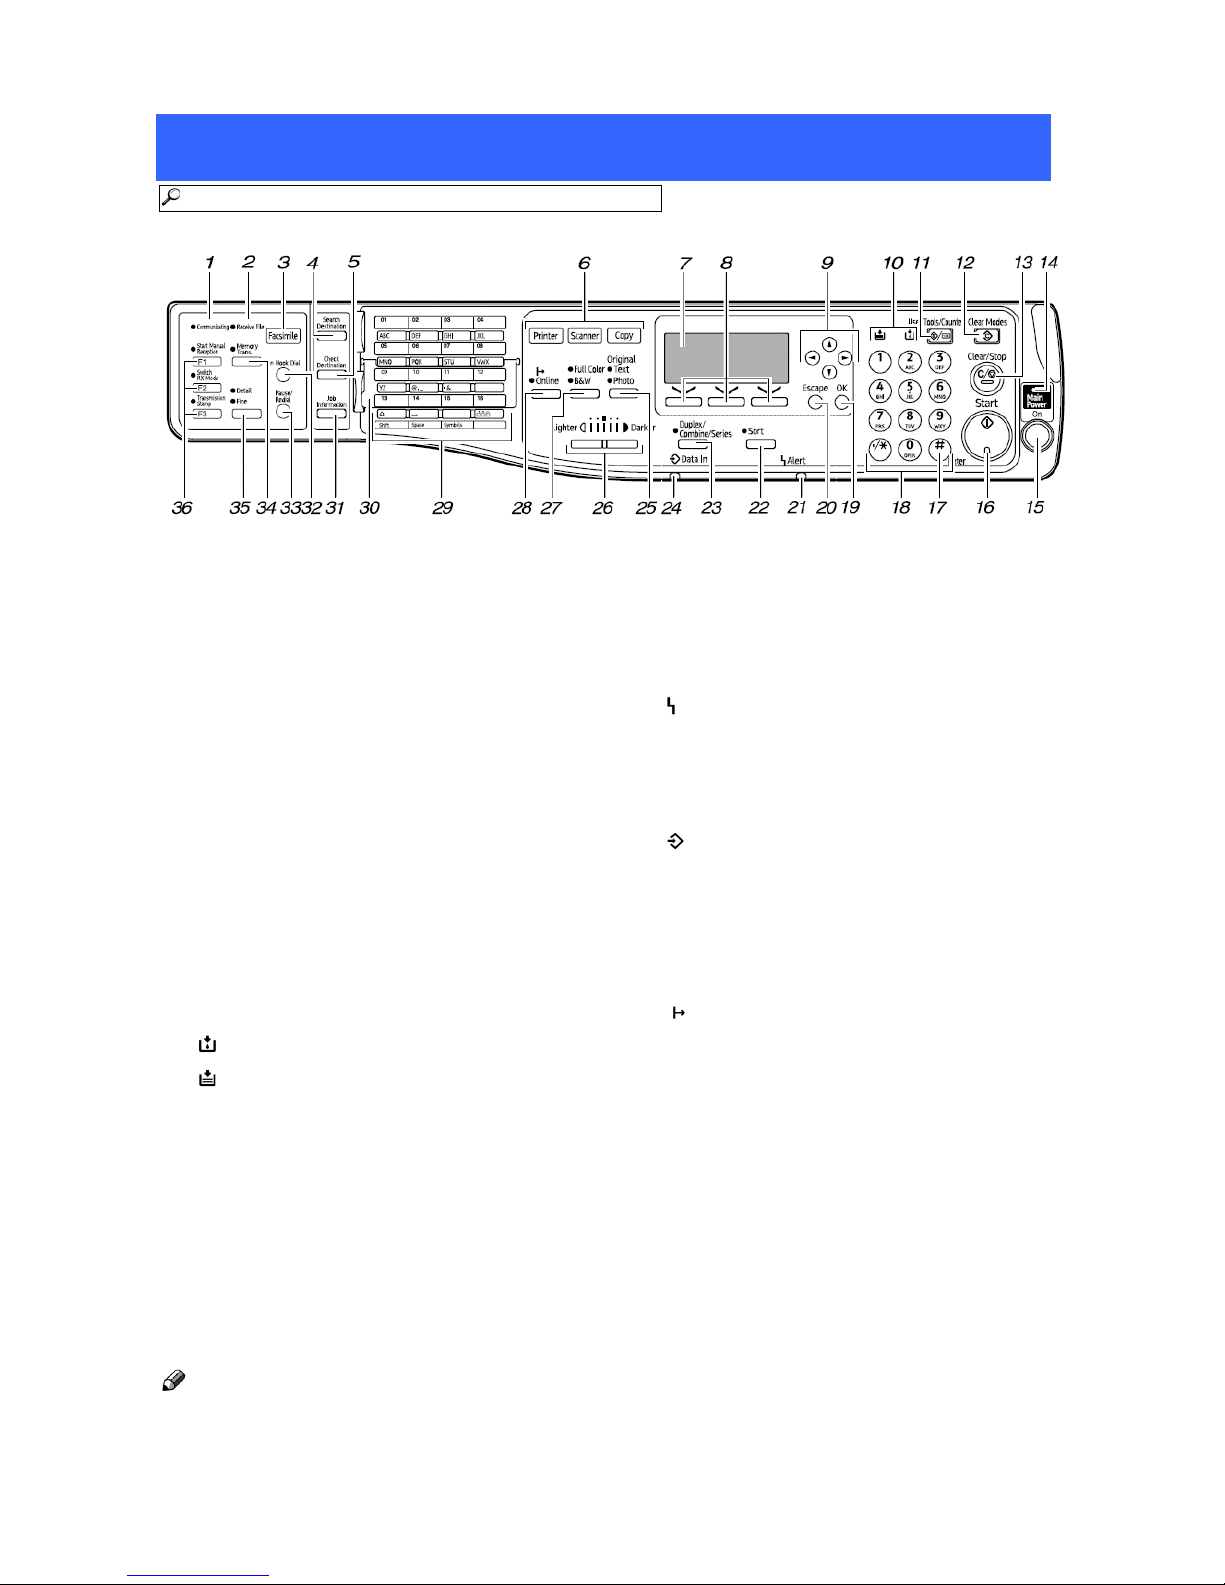
Reference: See “Control Panel”, About This Machine.
1. Communication indicator
(facsimile mode)
2. Received File indicator (facsimile mode)
3. [Facsimile] key
4. [Search Destination] key
(scanner and facsimile mode)
5. [Check Destination] key
(scanner and facsimile mode)
6. Function keys
7. Display panel
8. Selection key
9. Scroll key
10. Indicators
Add Ink indicator
Load Paper indicator
11. [User Tools/Counter] key
12. [Clear Modes] key
13. [Clear/Stop] key
14. Main power indicator
15. Operation switch
16. [Start] key
17. [#] key
18. Number keys
19. [OK] key
20. [Escape] key
21. Alarm
22. [Sort] key (copier mode)
23. [Duplex/Combine/Series] key
(copier mode)
24. Data-in indicator (printer mode)
25. [Original] key (copier and scanner mode)
26. [Lighter] key, [Darker] key
(copier, scanner and facsimile mode)
27. [Full Color/B&W] key
28. [ Online] key (printer mode)
29. Quick Dial keys
30. Quick Dial Flip Plate
31. [Job Information] key
(scanner and facsimile mode)
32. [On Hook Dial] key (facsimile mode)
33. [Pause/Redial] key (facsimile mode)
34. [Memory Trans] key (facsimile mode)
35. [Resolution] key (facsimile mode)
36. User Function keys (facsimile mode)
Note
NoteNote
Note
Depending on the machines or options, the functions you can use will be different. For
details about machine's functions, see “Options”, About This Machine.
Page 4
4
When
When When
When the
thethe
the output
output output
output llllooks like …
ooks like …ooks like …
ooks like …
Reference:
Reference:Reference:
Reference: For details, see “Maintenance” in Other User Tools section, General Settings Guide.
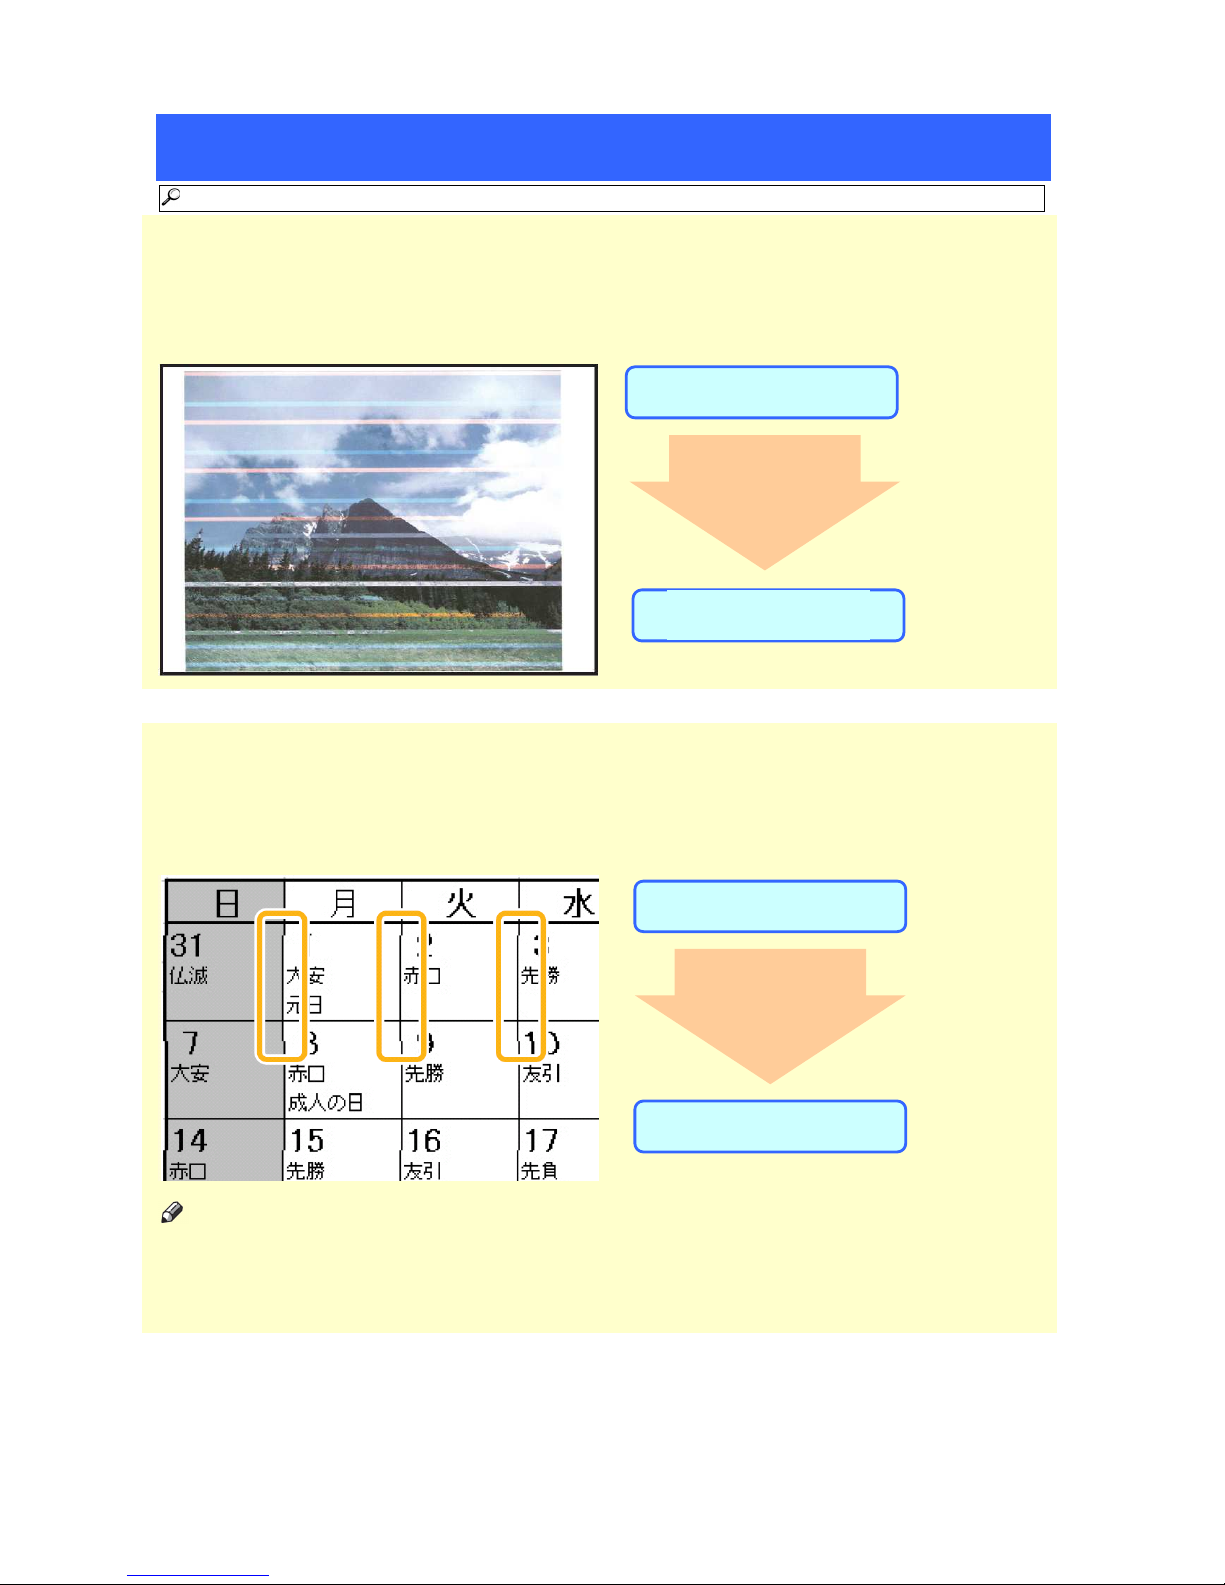
Output paper with white lines or color drift
Output paper with white lines or color driftOutput paper with white lines or color drift
Output paper with white lines or color drift
When white lines appear on the paper or color drift occurs, perform the following:
Output Image of white lines and color drift
Output paper with blurry colors or
Output paper with blurry colors or Output paper with blurry colors or
Output paper with blurry colors or misaligned vertical
misaligned verticalmisaligned vertical
misaligned vertical lines
lines lines
lines
When the color of output image blurs or vertical lines are misaligned, perform/adjust the following:
Output Image of misaligned vertical lines
Note
NoteNote
Note
When misaligned verticals occur during using printer function, the condition may improve if you
select [Quality] in [Print priority according to selected paper]. In this case, however, the printer speed
is reduced.
Clean Print-heads
If the problem is
not solved:
Clean Print-heads
Head Position Adjust
If the problem is
not solved:
P.5
P.5 P.5
P.5 ---- 7
7 7
7
P.5
P.5 P.5
P.5 ---- 7
7 7
7
P.8
P.8P.8
P.8
P.9
P.9 P.9
P.9 ---- 10
10 10
10
Flush Print Heads
Page 5
5
Clean
CleanClean
Cleaning
inging
ing Print
Print Print
Print----HHHHeads
eadseads
eads
Reference:
Reference:Reference:
Reference: See “Nozzle Check Pattern”, Troubleshooting.
Printing
Printing Printing
Printing Nozzle Check Pattern
Nozzle Check PatternNozzle Check Pattern
Nozzle Check Pattern
This machine makes prints by spraying inks from nozzles of print-heads and the nozzles are
clogged on rare occasions.
When a specified color is not printed or patchy, the nozzle may be clogged. In this case, check the
nozzles by following steps. When the nozzles are clogged, clean the print-heads.
Before
BeforeBefore
Before the operation:
the operation: the operation:
the operation:
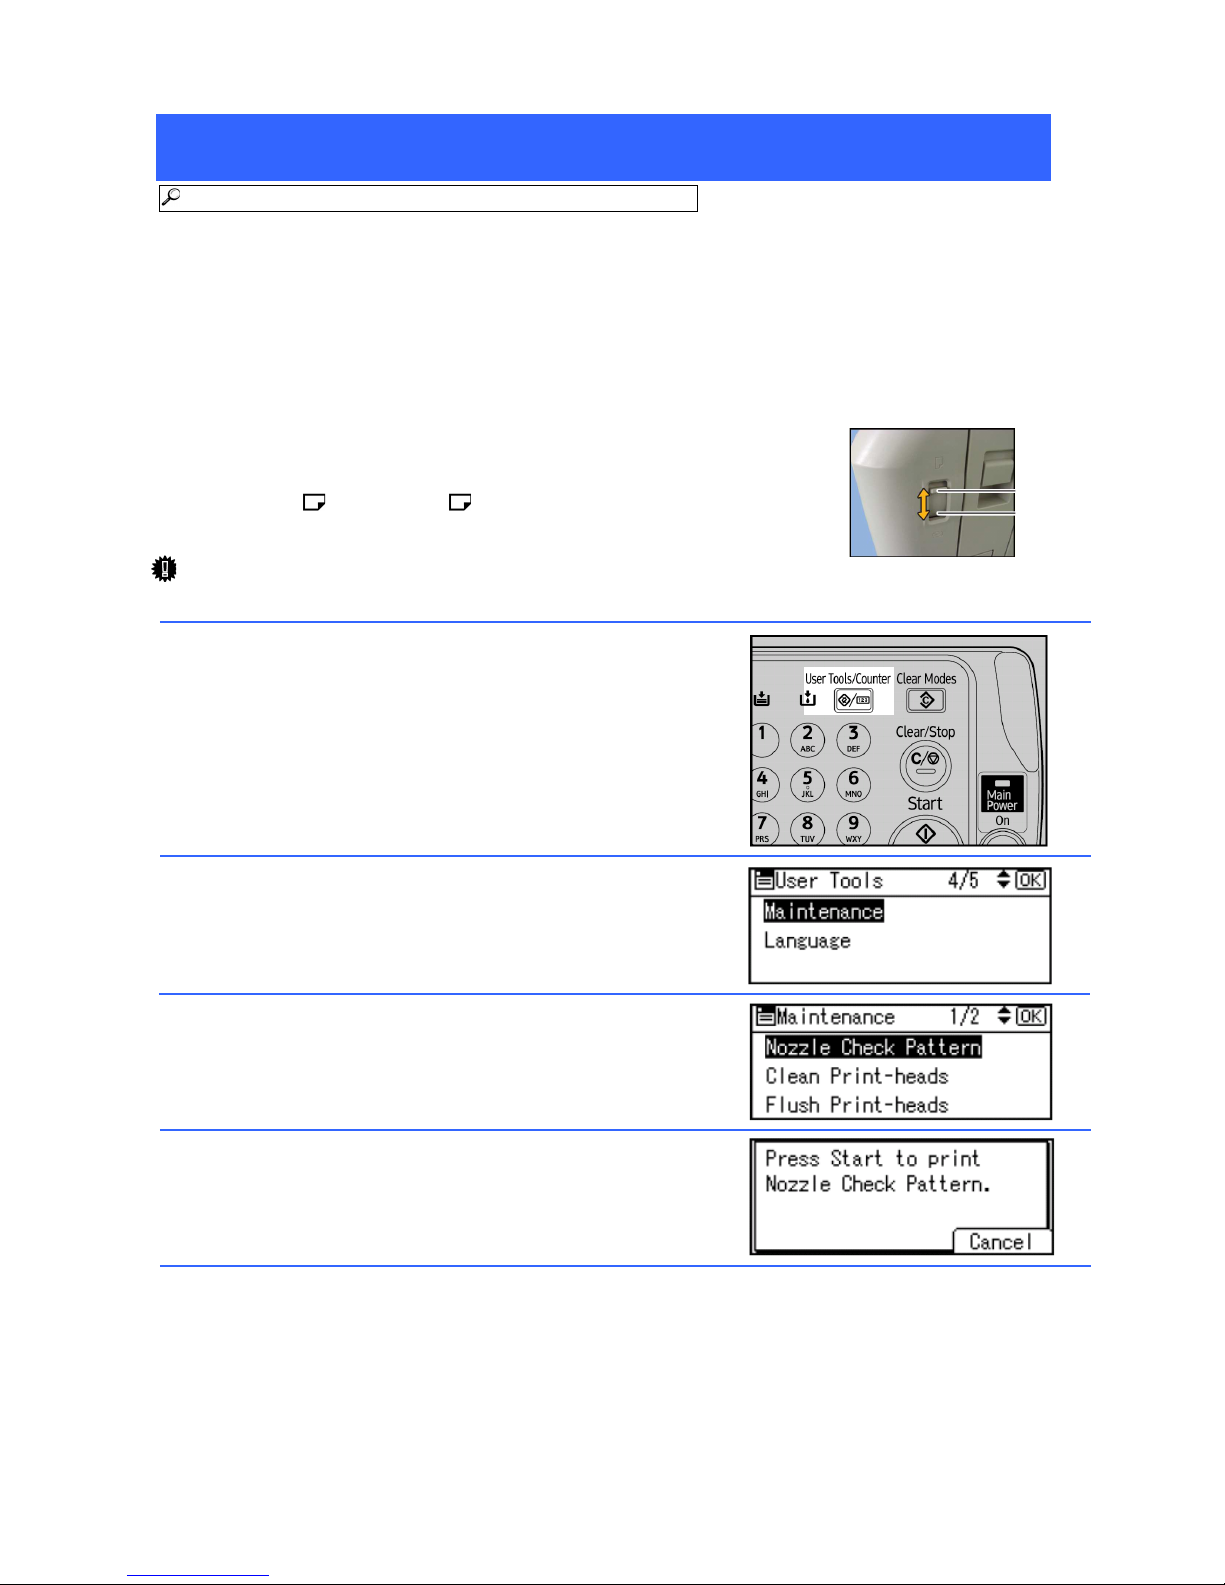
Make sure the Envelope Lever, which is on the right side of the machine,
has been raised. Otherwise, you will be unable to print.
Check that A4
or 8½” × 11” size paper SEF is set in Tray 1. You
cannot print the test pattern if paper is not set correctly.
Important
ImportantImportant
Important
During printing the test pattern, do not conduct any other operations.
1) Press the [User Tools/Counter] key.
2) Select [Maintenance] using [▲] or [▼], and then press the
[OK] key.
3) Select [Nozzle Check Pattern] using [▲] or [▼], and then
press the [OK] key.
4) Press the [Start] key.
Check the print results of the test pattern. Go on to the next page
and check the results.
Normal
Envelope
Envelope Lever
Page 6
6
Cleaning Print-Heads (Continued).
Reference:
Reference:Reference:
Reference: See steps 5 and 6 in “Nozzle Check Pattern”, Troubleshooting.
Check
CheckCheck
Checking
inging
ing the Nozzle Check Pattern.
the Nozzle Check Pattern. the Nozzle Check Pattern.
the Nozzle Check Pattern.
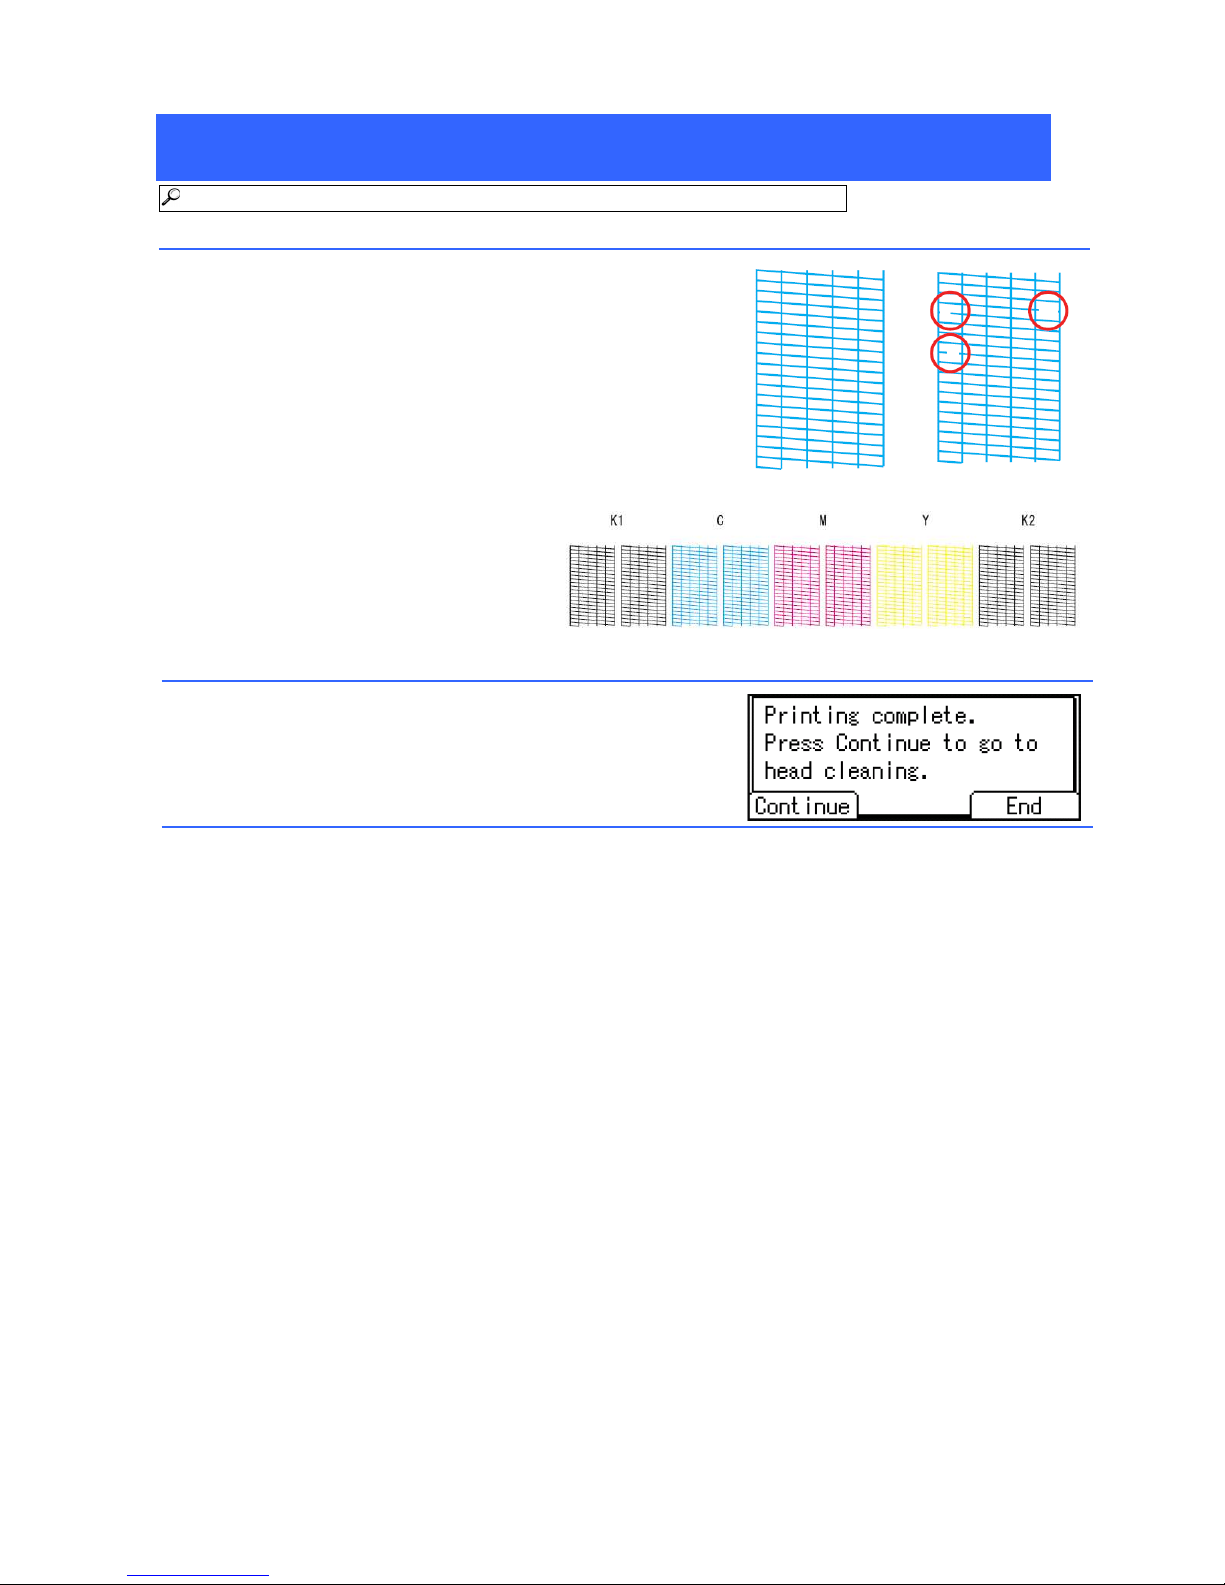
1) Check the print results of the Nozzle Check Pattern.
In the test pattern, "K1", "C", "M", "Y", and "K2" correspond to
[Black 1], [Cyan], [Magenta], [Yellow], and [Black 2] of [Clean
Print-heads] and [Flush Print-heads] functions, respectively ([User
Tools/Counter] - [Maintenance]).
For example, if “K1” nozzle is not correct, select [Black 1] of
[Clean Print-heads] or [Flush Print-heads] and then clean/flush
the nozzles.
2) If the printing is blurred, unclear, or missing lines (see
above) press [Continue] to perform head cleaning.
If you do not need to perform head cleaning, press [End] to finish.
Normal print results
If a nozzle is not firing
Page 7
7
Cleaning Print-Heads (Continued).
Reference:
Reference:Reference:
Reference: See “Clean Printheads”, Troubleshooting.
Clean
CleanClean
Cleaning
inging
ing Print
Print Print
Print----HHHHeads
eadseads
eads
Important
ImportantImportant
Important
Cleaning print-heads consumes ink.
Perform no other operations during head cleaning.
Head cleaning is not possible if even one color has run out.
Cleaning may be incomplete if ink in a cartridge gets too low or runs out during cleaning.
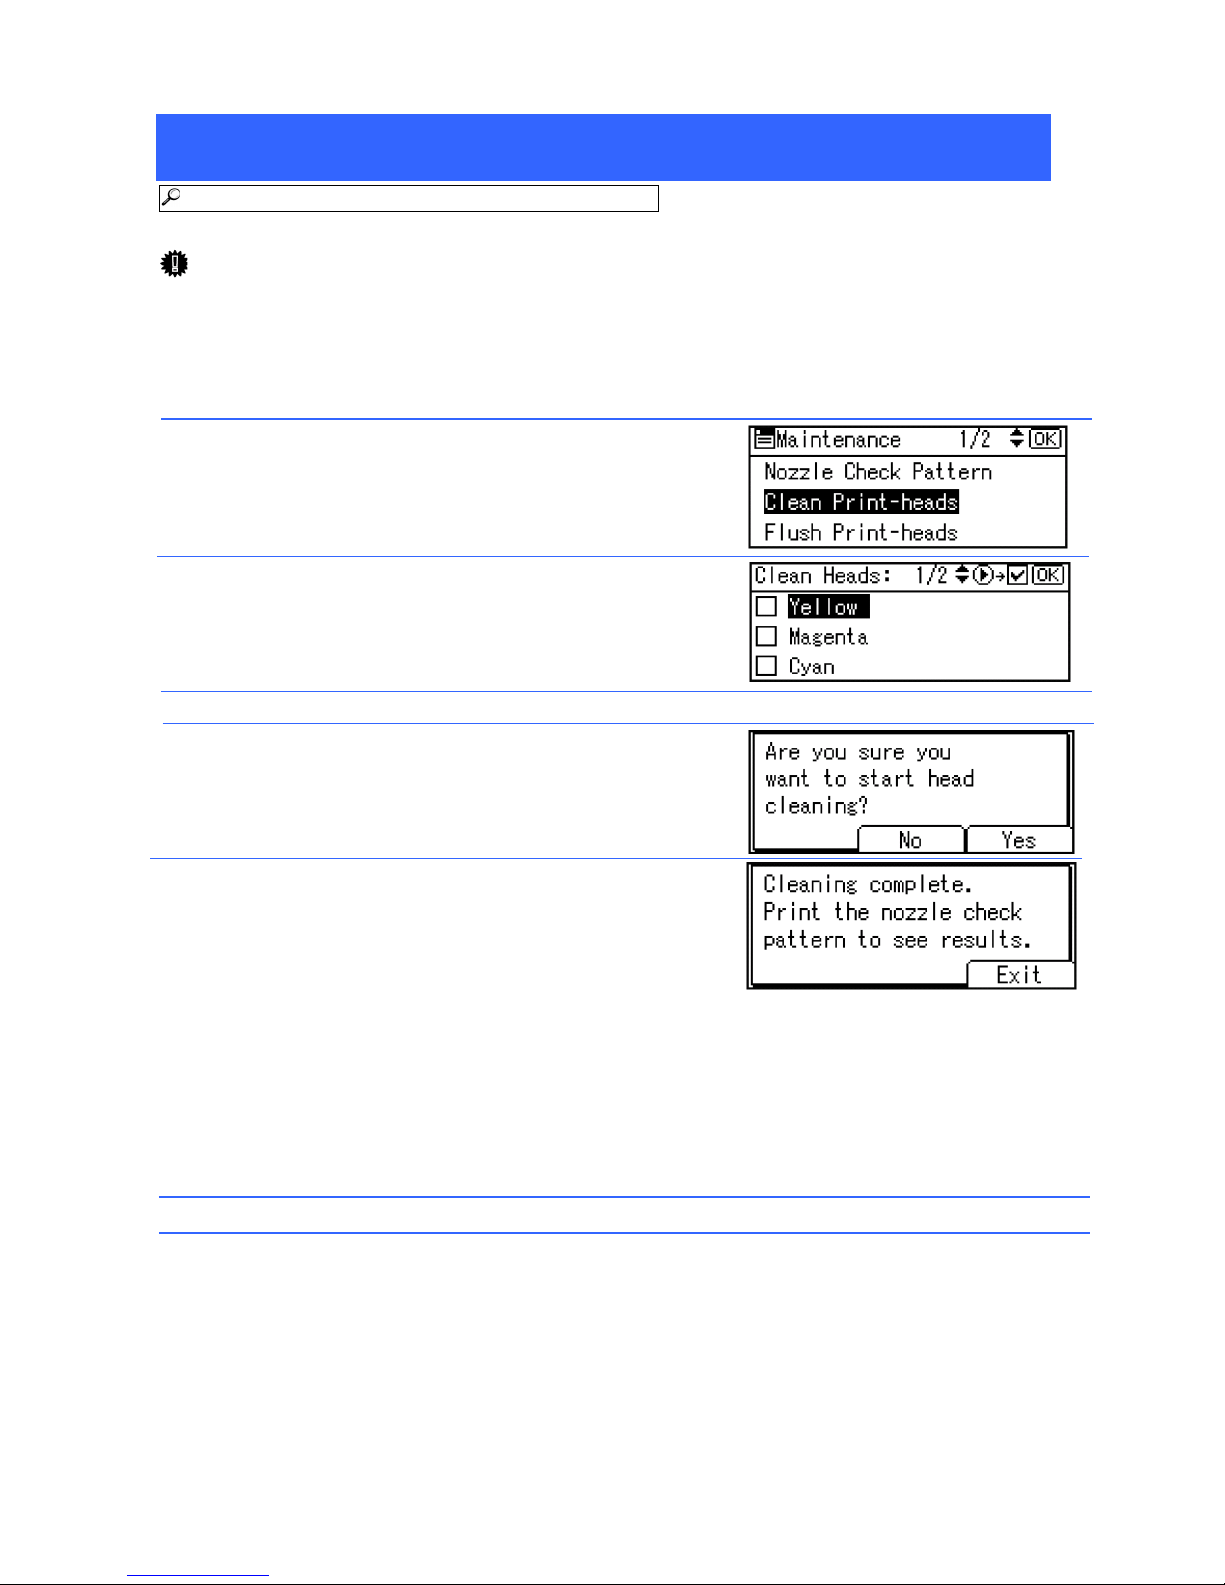
1) Select [Clean Print-heads] using [▲] or [▼], and then
press the [OK] key.
2) Select the color of which head you want to clean using [▲]
or [▼], and then press the [►] key. A check mark will
appear in the square next to the color you have selected.
Note: You can select more than one col
Note: You can select more than one colNote: You can select more than one col
Note: You can select more than one color at a time.
or at a time.or at a time.
or at a time.
3) Press the [OK] key.
4) Press [Yes].
Head cleaning begins.
5) Press [Exit] and check the results of head cleaning.
The display goes back to step 1 by pressing [Exit]. Select [Nozzle
Check Pattern] and check the print results.
* If you have repeated head cleaning three times and the problem is
not solved, check the following conditions and then perform
flushing or adjust the head position
When the nozzle is clogged:
When the nozzle is clogged:When the nozzle is clogged:
When the nozzle is clogged:
Go to step 3 in “Flushing Print-Heads” on page 8 and perform flushing.
When the vertical line is misaligned:
When the vertical line is misaligned: When the vertical line is misaligned:
When the vertical line is misaligned:
Go to “Adjusting Head Position” on pages 9 and 10 and adjust head position.
6) Press the [User Tools/Counter] key and finish cleaning after checking the normal print results.
Page 8
8
Flush
FlushFlush
Flushing
inging
ing Print
Print Print
Print----HHHHeads
eadseads
eads
RRRReference:
eference:eference:
eference: See “Flush Printheads”, Troubleshooting.
Use this function if repeated head cleaning fails to reactivate a mis- or non-firing nozzle. This
function cleans the print-heads far more thoroughly. It consumes much more ink than head
cleaning.
Import
ImportImport
Important
antant
ant
Flushing consumes ink. Perform flushing only when necessary.
Perform no other operations during flushing.
Flushing is not possible if even one color has run out.
Flushing may be incomplete if ink in a cartridge gets too low or runs out during flushing.
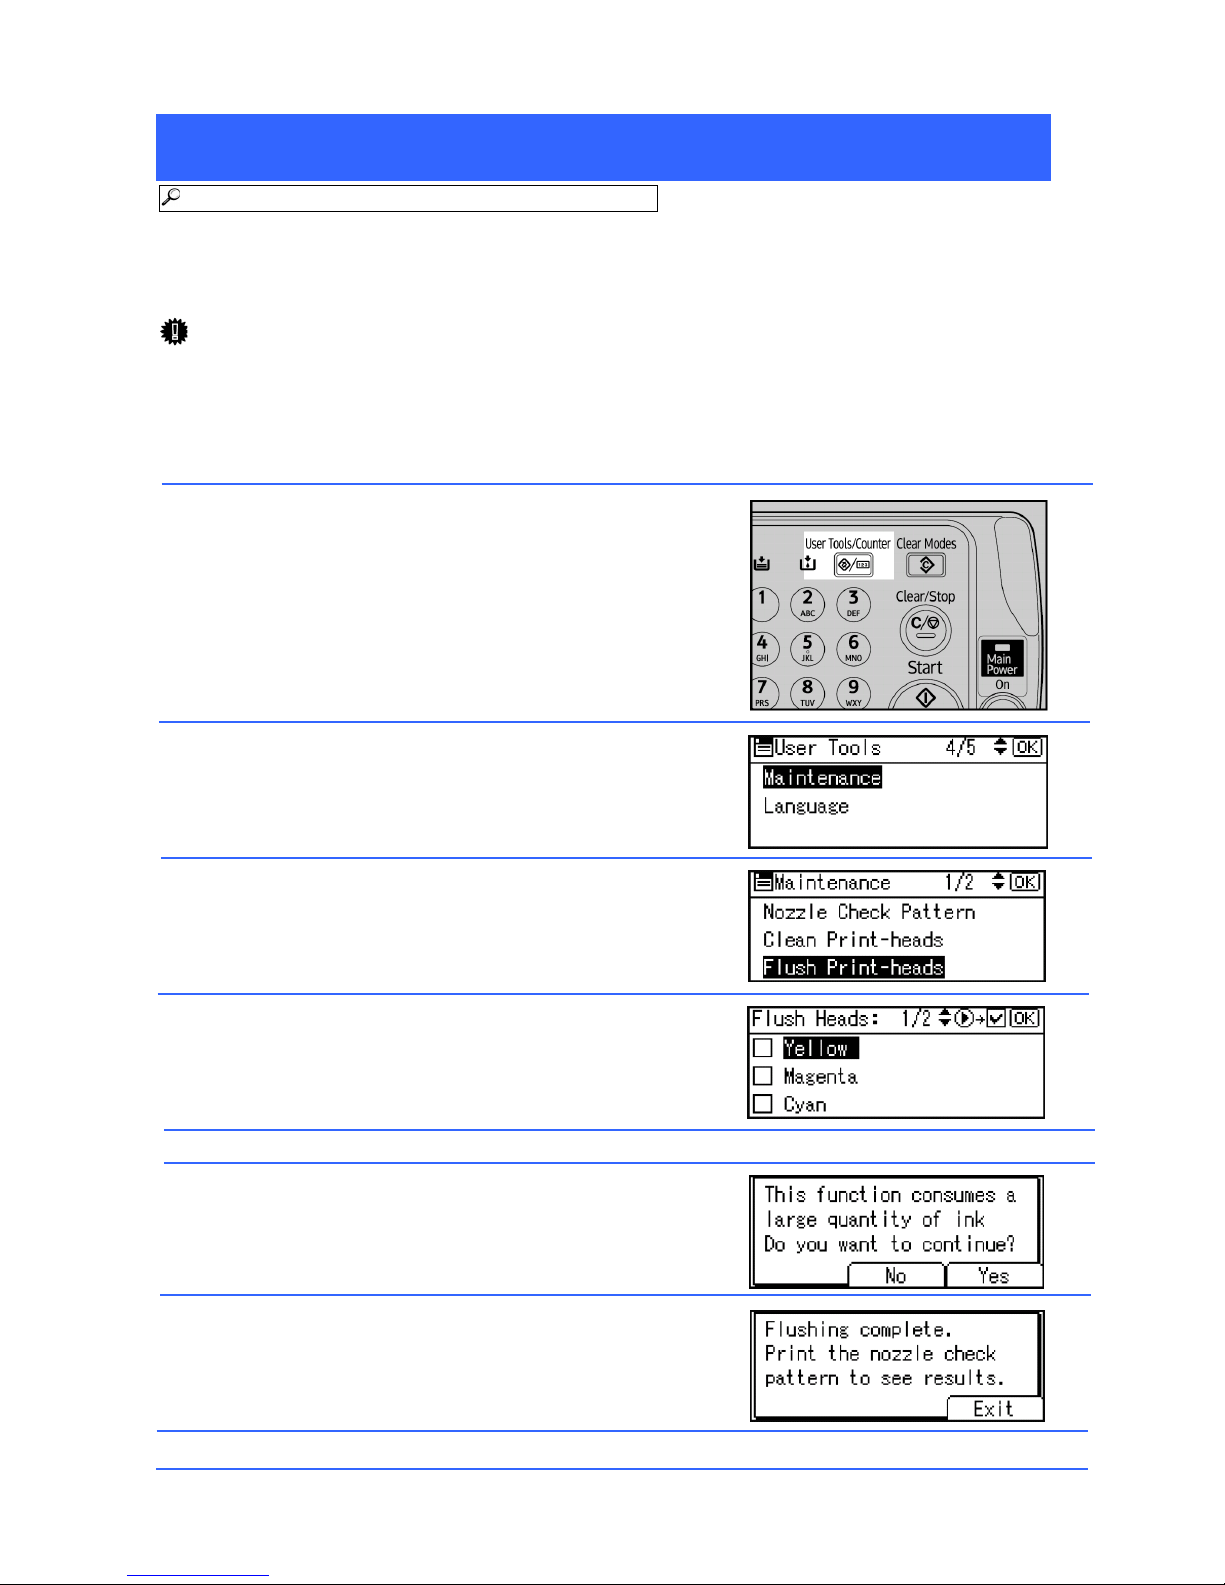
1) Press the [User Tools/Counter] key.
2) Select [Maintenance] using [▲] or [▼], and then press the
[OK] key.
3) Select [Flush Print-heads] using [▲] or [▼], and then
press the [OK] key.
Start from this step when you perform flushing after pressing [Exit]
in step 5 on page 7.
4) Select the color of which head you want to clean using [▲]
or [▼], and then press the [►] key. A check mark will
appear in the square next to the color you have selected.
Note: You can select more than one color at a time.
Note: You can select more than one color at a time.Note: You can select more than one color at a time.
Note: You can select more than one color at a time.
5) Press the [OK] key.
6) Press [Yes].
Flushing begins.
7) Press [Exit] and check the results of head cleaning.
Press [Exit] and the display goes back to step 3. Select [Nozzle
Check Pattern] and check the print results.
8) Check the normal print results and press the [User Tools/Counter] key to finish.
Page 9
9
Adj
AdjAdj
Adjust
ustust
usting
ing ing
ing Head Position
Head PositionHead Position
Head Position
Reference:
Reference:Reference:
Reference: See “Head Position Adjust”, Troubleshooting.
Printing the test pattern for
Printing the test pattern for Printing the test pattern for
Printing the test pattern for Head Position Adjust
Head Position AdjustHead Position Adjust
Head Position Adjust....
This machine adopts an ink jet system. Since the characteristic of ink changes by environment
such as temperature and humidity, it may cause misaligned vertical lines or color drift. Head
Position Adjust may effect to such cases.
Before the operation
Before the operationBefore the operation
Before the operation
Make sure the Envelope Lever, which is on the right side of the machine, has been raised. Otherwise,
you will be unable to print.
Check that A4
or 8½” × 11” size paper SEF is set in Tray 1. You cannot print the test pattern if
paper is not set.
Important
ImportantImportant
Important
During printing the test pattern, do not conduct any other operations.
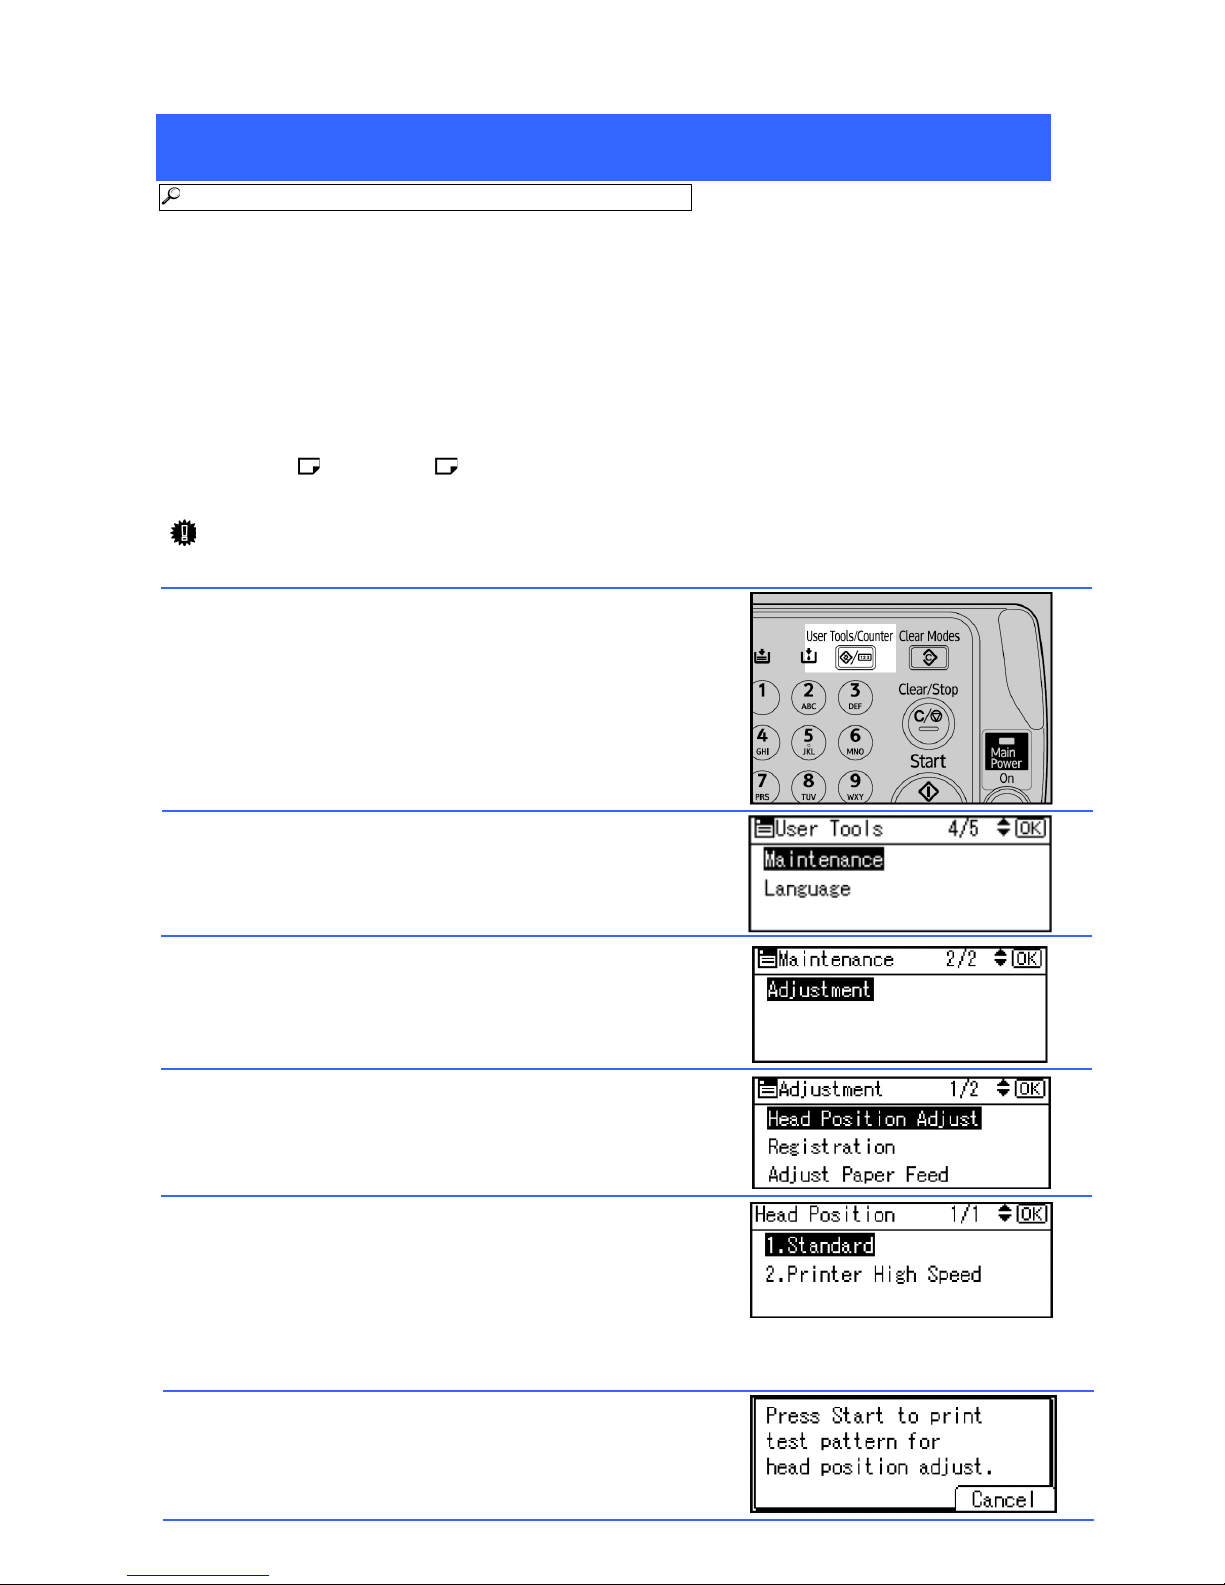
1) Press the [User Tools/Counter] key.
2) Select [Maintenance] using [▲] or [▼], and then press the
[OK] key.
3) Select [Adjustment] using [▲] or [▼], and then press the
[OK] key.
4) Select [Head Position Adjust] using [▲] or [▼], and then
press the [OK] key.
5) Select which head position you want to adjust using [▲] or
[▼], and then press the [OK] key.
The item you select differs depending on the write mode you want to
adjust. Select [2.Printer High Speed] if you have selected Plain and
Fast mode (300 dpi) for the printer. Otherwise, select [1.Standard].
6) Press the [Start] key.
The Head Position Adjust test pattern is printed. Go on to the next
page and check the print results of Head Position Adjust test
pattern.
Page 10
10
Adjusting Head Position (Continued).
Reference:
Reference:Reference:
Reference: See steps 7 to 12 in “Head Position Adjust”, Troubleshooting.
Check the test pattern for
Check the test pattern for Check the test pattern for
Check the test pattern for Head Position Adjust
Head Position AdjustHead Position Adjust
Head Position Adjust
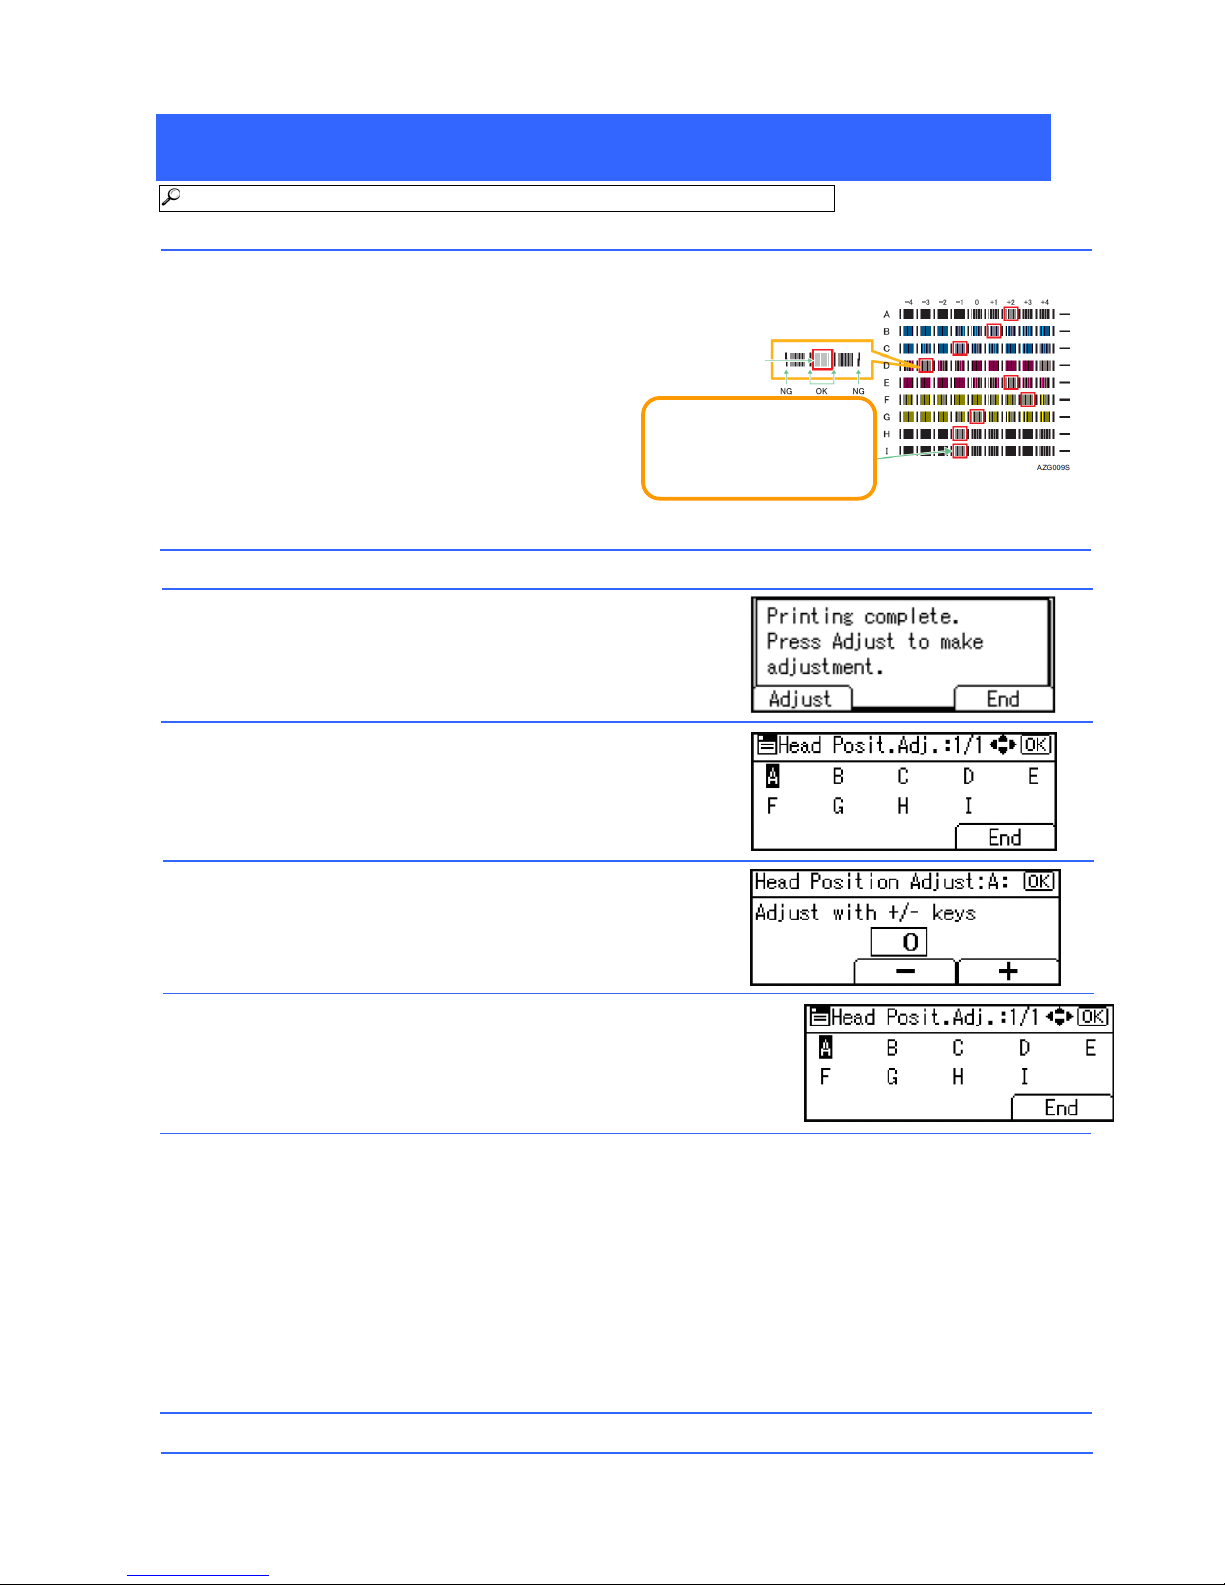
Check the optimal adjustment value based on the print results of the test pattern.
Check the optimal adjustment value based on the print results of the test pattern.Check the optimal adjustment value based on the print results of the test pattern.
Check the optimal adjustment value based on the print results of the test pattern.
The best adjust value is the one that matches the
following conditions:
* The square pattern that has faintest color closest
to gray.
* Vertical lines on both sides are closet to straight.
If the value in column “A” is “+2”, the adjustment
value of [A] is [+2]. Also check the appropriate value
for the “B” to “I” lines.
Adjust
Adjust Adjust
Adjust the
the the
the Head Position
Head Position Head Position
Head Position
1) Press [Adjust].
2) Select the item you want to adjust, and then press the
[OK] key.
3) Enter the adjustment value checked in the test pattern for
the Head Position adjust, and then press the [OK] key.
The display goes back to that of Step 2.
4) Press [End].
The display goes to step 4 in “Printing the test pattern for Head
Position Adjust” on the previous page.
The pattern,
which meets the
conditions
Check the appropriate
pattern for each line.
e.g. “+2” for “A”, “+1” for “B”,
“-3” for “D”, “+2” for E…
5) Print the test pattern and check the
adjustment results.
Adjustment is complete when the values are all “0”.
6) Press the [User Tools/Counter] key to finish.
Page 11
11
Flush Print Heads
Note
NoteNote
Note
Check followings when paper is jammed:
1. Check the paper
For the details of paper, please refer “Unusable Paper” on the next page.
2 Check the paper in the paper tray.
If the paper size of the paper tray and the paper size, which is set, are different, paper may be
jammed or be copied inappropriate place. Set the selector to the appropriate paper size.
Changing Paper Size
Changing Paper SizeChanging Paper Size
Changing Paper Size
Reference:
Reference:Reference:
Reference: For details, see “Changing the Paper Size”, Troubleshooting.
When changing the paper size, you should set up the paper size selector.
Important
ImportantImportant
Important
If you set a paper size which is not in the paper size selector, adjust the selector to “*” and set
“Paper Tray” in User Tools/Counter menu.
The steps of changing the paper size are different by paper trays. Check the paper tray before
changing.
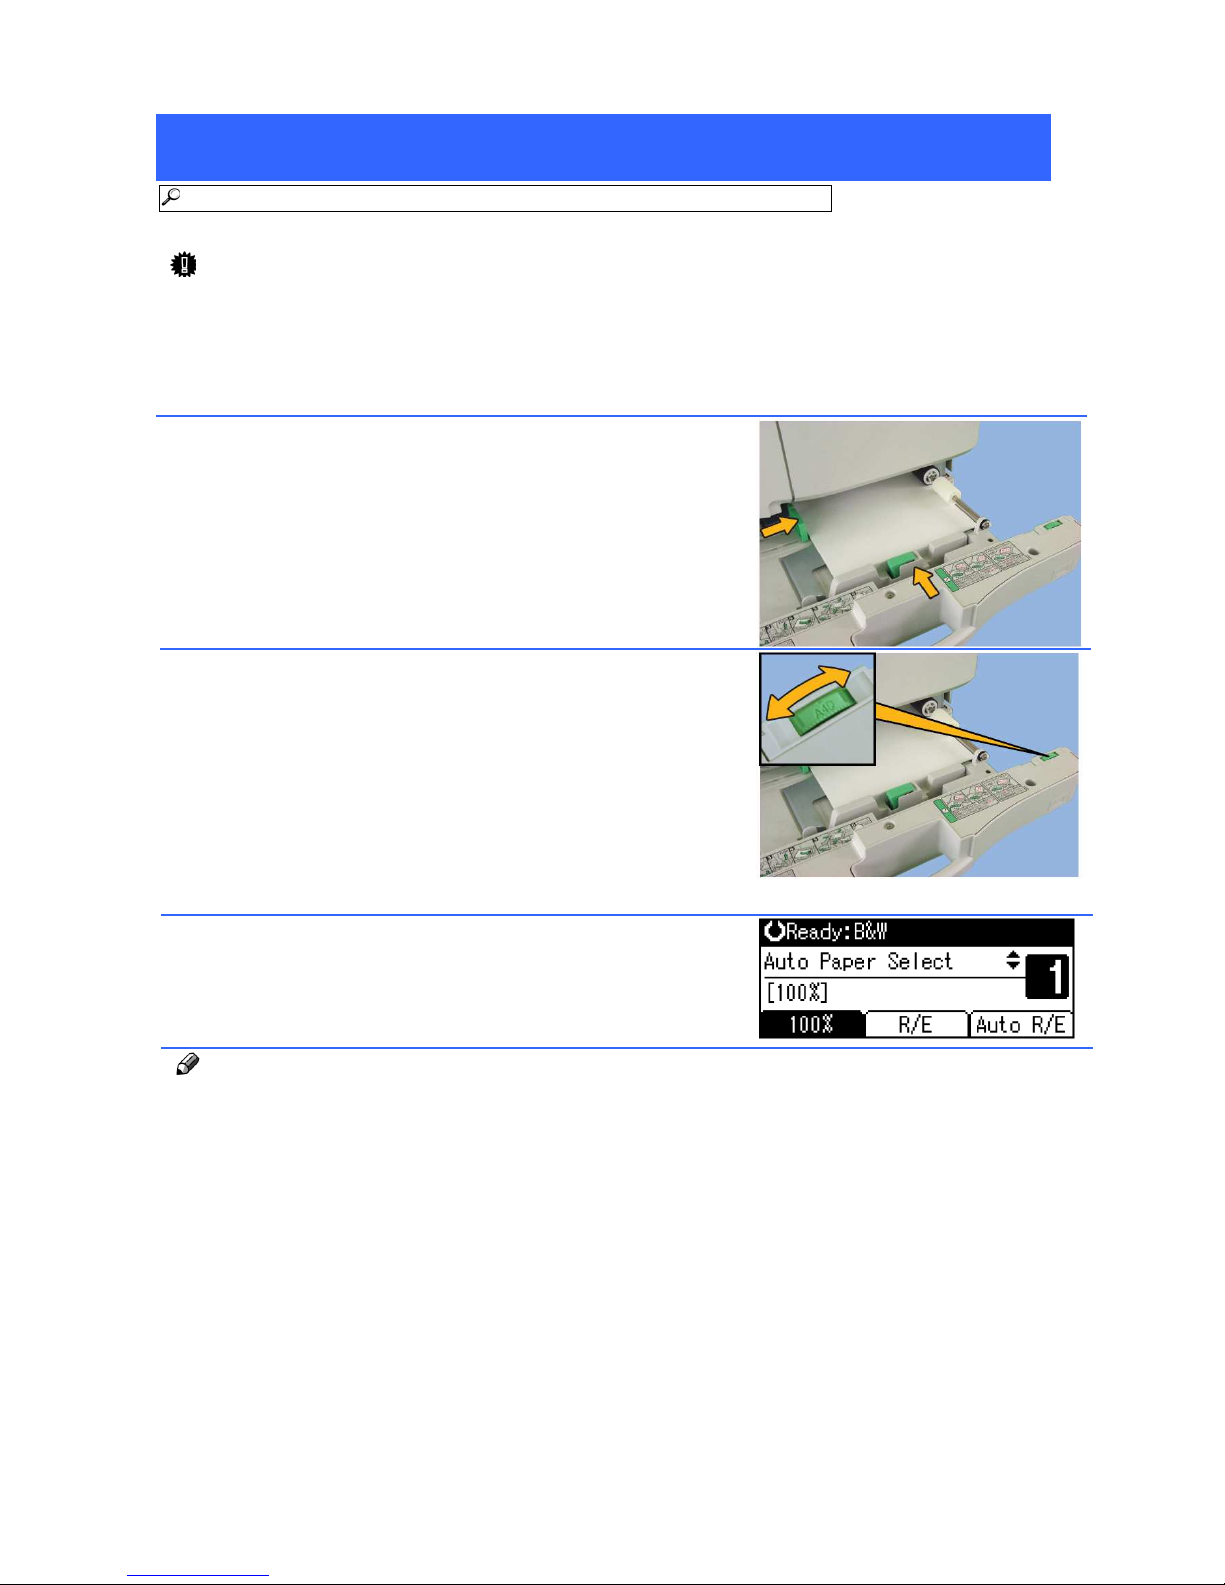
1) Set the side fence and back fence to the appropriate place
and then set the paper to the tray.
2) Adjust the paper size selector to the changed paper size.
If you set a paper size which is not in the paper size selector,
adjust the selector to “*” and set “Paper Tray” in User
Tools/Counter menu.
3) Gently push the paper tray all the way in then check the
paper size on the display.
Page 12
12
When
When When
When blinks
blinks blinks
blinks
Reference:
Reference:Reference:
Reference: For details, see “Handling Print Cartridges”, Troubleshooting.
When ink is almost run out, the Add Ink indicator ( ) blinks. You can use the ink until the
indicator stays lit.
Unusable Paper
Unusable PaperUnusable Paper
Unusable Paper
Reference:
Reference:Reference:
Reference: See “Unusable Paper”, About This Machine.
CAUTION
CAUTIONCAUTION
CAUTION:
::
:
To prevent failure, do not use any of the following kinds of paper:
• Thermal fax paper • Art paper • Aluminum foil • Carbon paper • Conductive paper
• Paper with perforated lines • Hemmed-edge paper • Tab stock • Tracing paper
Failure can occur if you copy onto sides that are already printed. Take care to copy onto unprinted
sides only.
To prevent misfeeding, do not use the following kinds of paper:
• Bent, folded, or creased paper • Torn paper • Slippery paper • Perforated paper
• Rough paper • Thin paper with little stiffness • Paper with a dusty surface
If you copy onto rough grain paper, the image might be blurred.
You may not be able to print rightly when you print to colored or patterned paper.
Do not use paper with staples, aluminum foil, carbon paper, or similar conductive paper to
avoid a fire or machine failure.
 Loading...