

Page 1
Network Guide
Functions Available over a Network
1
Connecting the Network Cable to the Network
2
Setting Up the Machine on a Network
3
Windows Configuration
4
Using the Printer Function
5
Configuring the Network Interface Board Using a Web Browser
6
Appendix
7
Read this manual carefully before you use this machine and keep it handy for future reference. For safe and correct use, be sure to read the
Safety Information in the "Copy Reference" before using the machine.
Page 2

Introduction
This manual contains detailed instructions and notes on the operation and use of this machine. For your
safety and benefit, read this manual carefully before using the machine. Keep this manual in a handy
place for quick reference.
Important
Contents of this manual are subject to change without prior notice. In no event will the company be liable for direct, indirect, special, incidental, or consequential damages as a result of handling or operating the machine.
Two kinds of size notation are employed in this manual. With this machine refer to the metric version.
Trademarks
Microsoft
®
, Windows® and Windows NT® are registered trademarks of Microsoft Corporation in the
United States and/or other countries.
Other product names used herein are for identification purposes only and might be trademarks of their
respective companies. We disclaim any and all rights to those marks.
The proper names of the Windows operating systems are as follows:
• The product name of Windows
• The product name of Windows
®
98 is Microsoft® Windows 98.
®
Me is Microsoft® Windows Millennium Edition (Windows Me).
• The product names of Windows® 2000 are as follows:
Microsoft® Windows® 2000 Advanced Server
Microsoft® Windows® 2000 Server
Microsoft
• The product names of Windows
Microsoft® Windows® XP Professional
Microsoft
• The product names of Windows
Microsoft® WindowsTM Server 2003 Standard Edition
Microsoft
®
Windows® 2000 Professional
®
XP are as follows:
®
Windows® XP Home Edition
TM
Server 2003 are as follows:
®
WindowsTM Server 2003 Enterprise Edition
Microsoft® WindowsTM Server 2003 Web Edition
Note:
Some illustrations in this manual might be slightly different from the machine.
Page 3

Manuals for This Machine
The following manuals describe the operational procedures of this machine. For
particular functions, see the relevant parts of the manual.
Note
❒ Manuals provided are specific to machine type.
❒ Adobe Acrobat Reader is necessary to view the manuals as a PDF file.
❖ General Settings Guide
Provides an overview of the machine and describes System Settings (paper
trays, Key Operator Tools, etc.) and troubleshooting.
❖ Network Guide (this manual)
Describes procedures for configuring the machine and computers in a network environment.
❖ Copy Reference
Describes operations, functions, and troubleshooting for the machine’s copier
function.
❖ Printer/Scanner Reference
Describes system settings, operations, functions, and troubleshooting for the
machine’s printer/scanner function.
i
Page 4

TABLE OF CONTENTS
Manuals for This Machine ......................................................................................i
How to Read This Manual .....................................................................................1
1. Functions Available over a Network
Using the Printer....................................................................................................3
Network TWAIN Scanner.......................................................................................4
2. Connecting the Network Cable to the Network
Confirming the Connection...................................................................................5
Connecting to the Ethernet Interface .........................................................................6
3. Setting Up the Machine on a Network
User Tools Menu (Interface Settings) ..................................................................7
Printer.........................................................................................................................7
Network TWAIN Scanner ...........................................................................................7
Network Configuration................................................................................................8
Settings You Can Change with User Tools ................................................................9
4. Windows Configuration
Configuring TCP/IP ..............................................................................................11
Configuring a Windows 98SE / Me Computer..........................................................11
Configuring a Windows 2000 Computer ..................................................................11
Configuring a Windows XP Computer......................................................................12
Configuring a Windows Server 2003 computer........................................................12
5. Using the Printer Function
Printing with a Print Server................................................................................. 13
Printing without a Print Server ...........................................................................14
Using TCP/IP Port Type P10001 .............................................................................14
Using Standard TCP/IP Port ....................................................................................15
Using LPR Port ........................................................................................................15
Using the IPP Port....................................................................................................16
6. Configuring the Network Interface Board Using a Web Browser
Features ................................................................................................................17
Settings You Can Change with a Web Browser................................................18
Configuring the Network Interface Board Settings ..........................................19
ii
Page 5

7. Appendix
Using DHCP..........................................................................................................21
SNMP.....................................................................................................................22
Error Messages on the Display ..........................................................................23
Messages without Code Numbers ...........................................................................23
Messages with Code Numbers ................................................................................24
Specifications.......................................................................................................25
INDEX......................................................................................................... 26
iii
Page 6

iv
Page 7

How to Read This Manual
R
R
Symbols
In this manual, the following symbols are used:
WARNING:
This symbol indicates a potentially hazardous situation which, if instructions
are not followed, could result in death or serious injury.
CAUTION:
This symbol indicates a potentially hazardous situation which, if instructions
are not followed, may result in minor or moderate injury, or damage to property.
* The statements above are notes for your safety.
Important
If this instruction is not followed, paper might be misfed, originals might be
damaged, or data might be lost. Be sure to read this.
Preparation
This symbol indicates prior knowledge or preparation is required before operation.
Note
This symbol indicates precautions for operation, or actions to take after mal-operation.
Limitation
This symbol indicates numerical limits, functions that cannot be used together,
or conditions in which a particular function cannot be used.
Reference
This symbol indicates a reference.
[]
Keys that appear on the machine's display.
[]
Keys and buttons that appear on the computer's display.
{}
Keys built into the machine's control panel.
{}
Keys on the computer's keyboard.
1
Page 8

2
Page 9
1. Functions Available over a Network
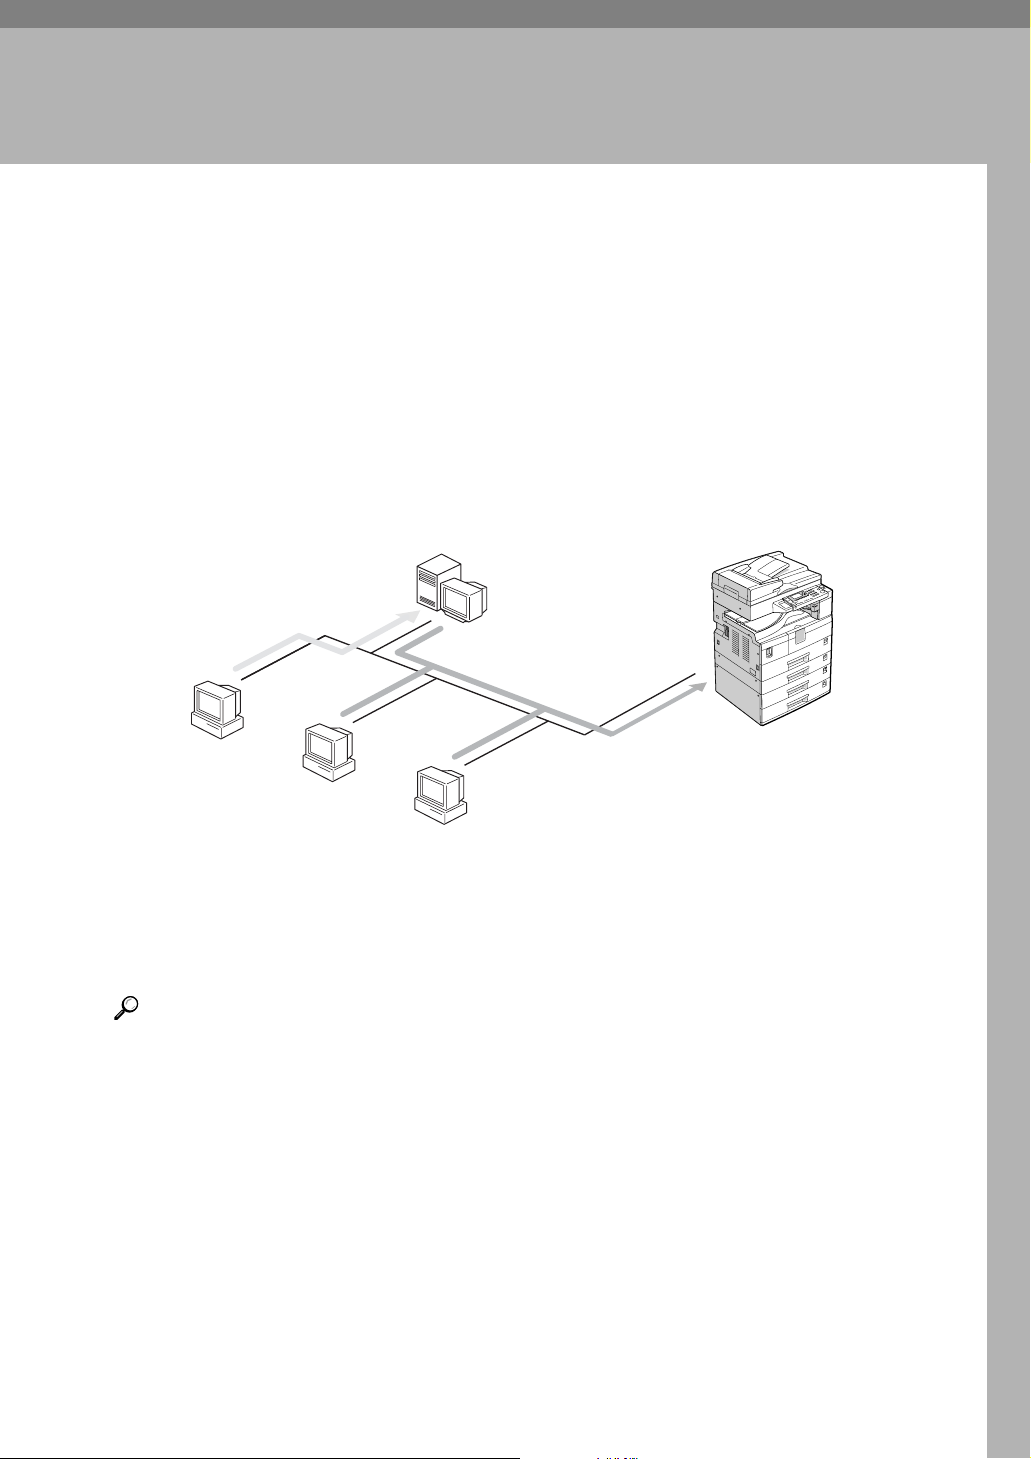
This machine provides printer and scanner functions over a network.
Using the Printer
The network interface board is compatible with Windows 2000 (TCP/IP, IPP
), Windows XP (TCP/IP, IPP
*1
), Windows Server 2003 (TCP/IP, IPP
*1
), and
Windows 98SE / Me protocols. This allows you to operate the machine in a network that uses different protocols and operating systems.
*1
IPP (Internet Printing Protocol) is a protocol for printing via the Internet.
Windows 98SE/Me
Windows 2000/XP
Windows Server 2003
(Print Server)
Windows 98SE/Me
Windows 2000/XP
Windows Server 2003
*1
ANY004S
Reference
For details about what settings to make, see p.7 “Setting Up the Machine on a
Network”.
For details about using this function, see p.13 “Using the Printer Function”.
3
Page 10
1
Functions Available over a Network
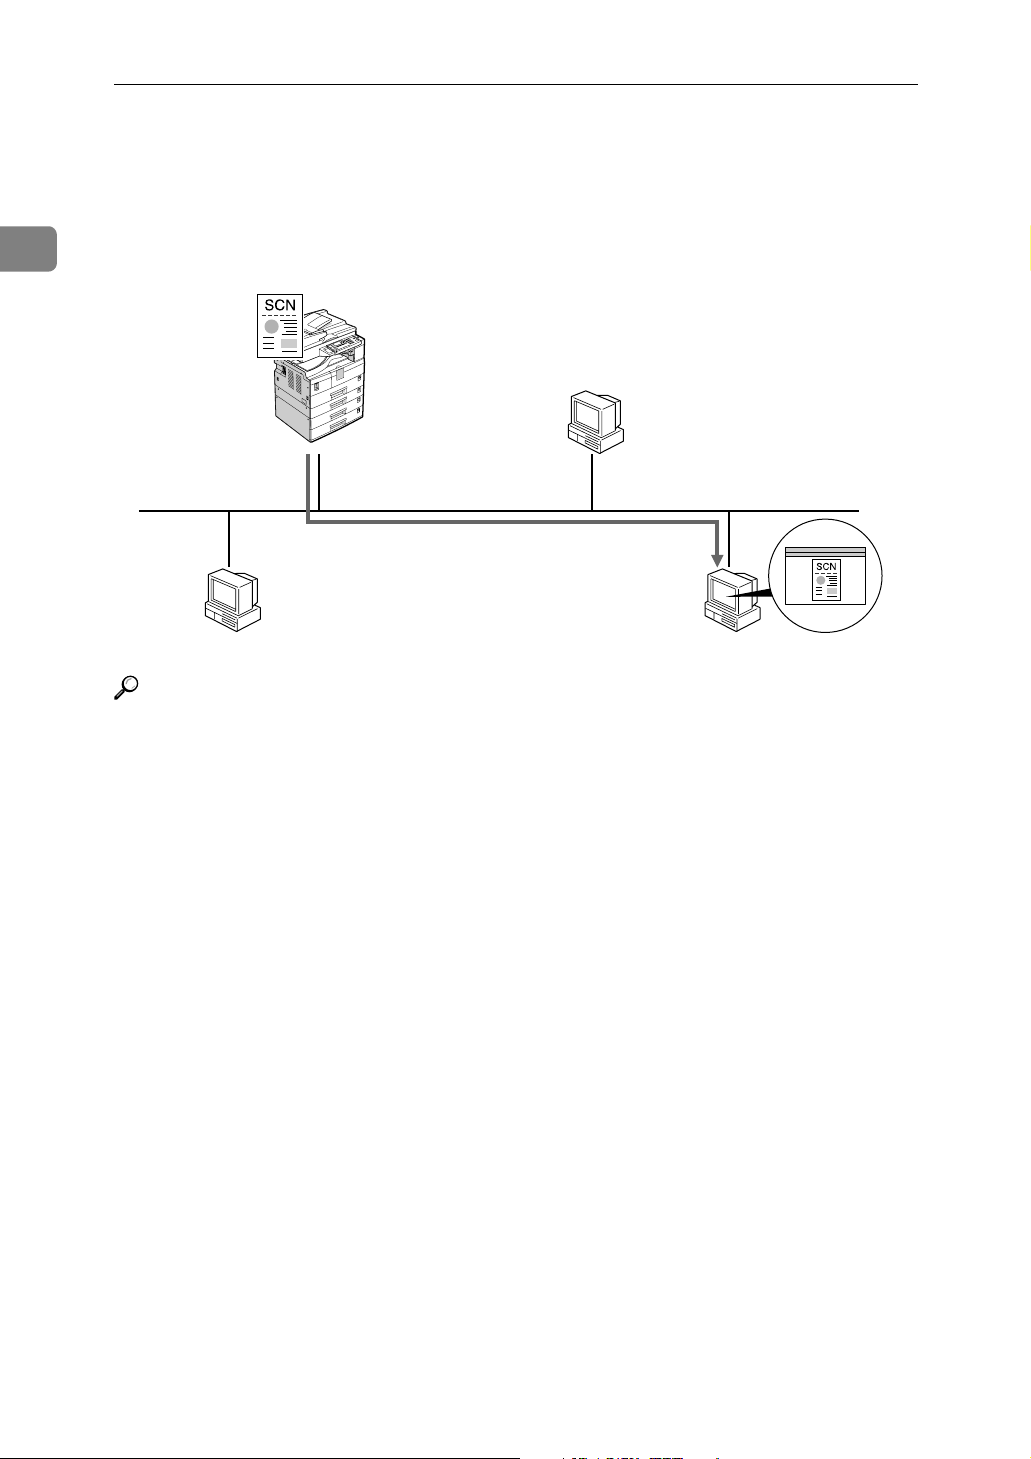
Network TWAIN Scanner
You can use the scanning function of this machine from a computer connected
via a network. You can scan documents the same way you would if you were
using a scanner connected directly to your computer.
ANY003S
Reference
For details about what settings to make, see p.7 “Setting Up the Machine on a
Network”.
For details about using this function, see “Using the Network TWAIN Scanner Function”, Scanner Reference.
4
Page 11
2. Connecting the Network Cable to the Network
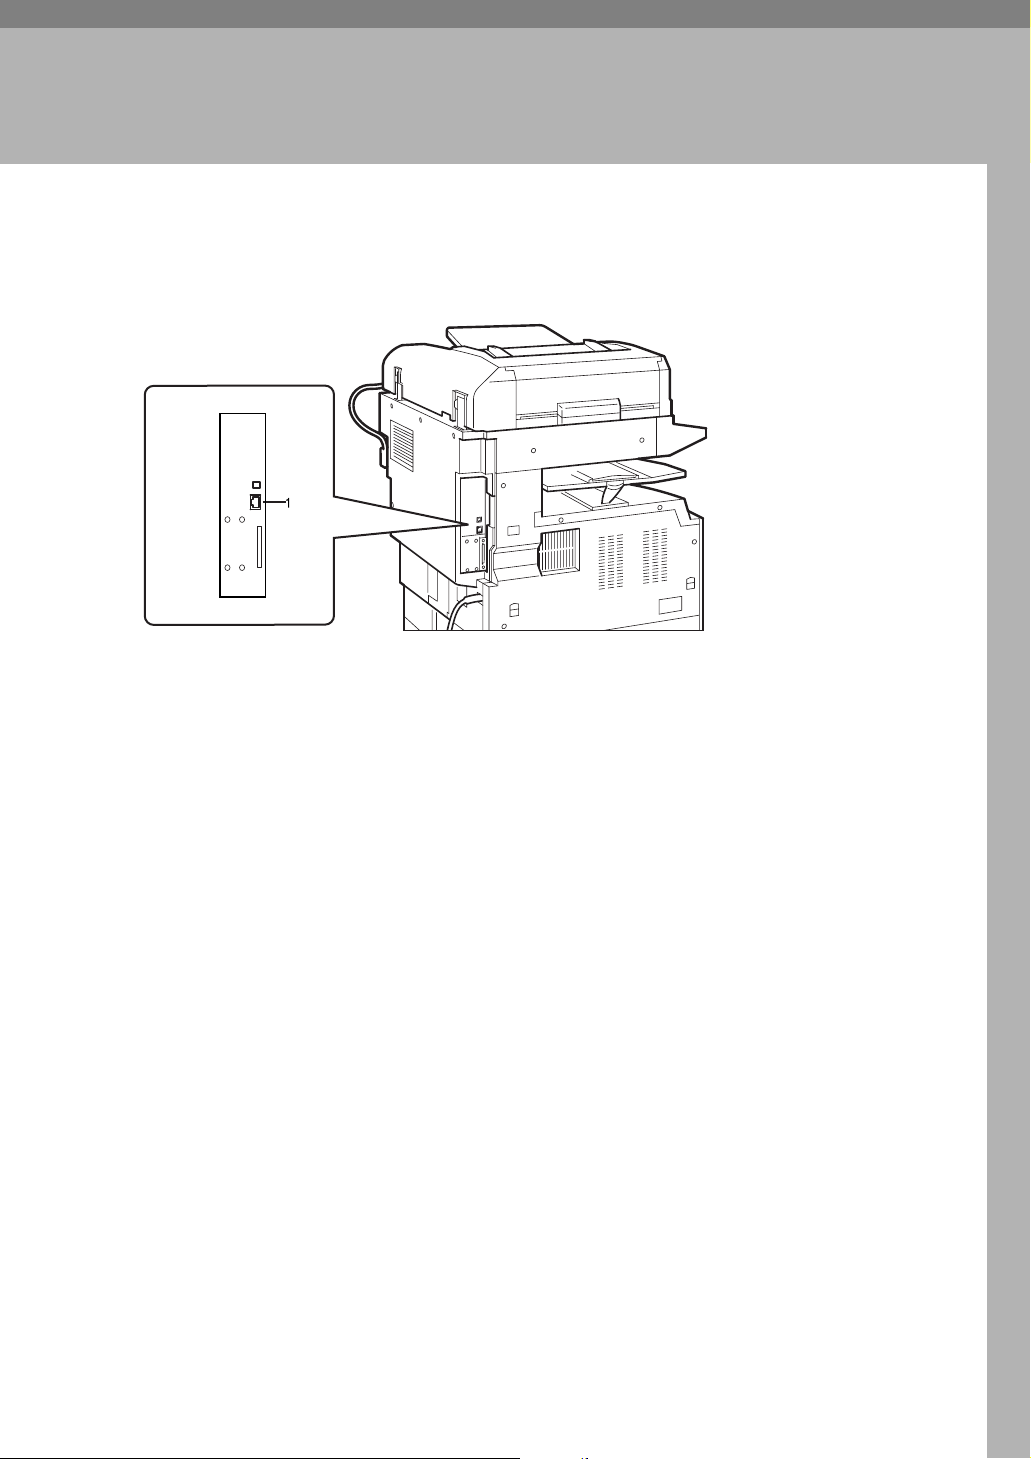
Confirming the Connection
ANY002S
1. 10BASE-T/100BASE-TX port
Port for connecting the network interface
cable.
5
Page 12

Connecting the Network Cable to the Network
2
Connecting to the Ethernet Interface
The network interface board supports
10BASE-T or 100BASE-TX connections.
A Turn off the main power switch.
Important
❒ Make sure the main power is
off. See “Turning On the Power”, Copy Reference.
B Loop the network interface cable
and attach the ferrite core.
Note
❒
The network interface cable loop
should be about 10 cm (4”)(A)
from the end of the cable (closest end to the printer). The ferrite core at the end of the cable
should be a ring type.
C Connect the network interface ca-
ble to the 10BASE-T/100BASE-TX
port.
ANY001S
D Turn on the main power switch.
1.
2.
AAW022S1
1. Indicator (green)
Remains green when the machine is
properly connected to the network.
AAW026S1
2. Indicator (yellow)
Turns yellow when 100 BASE-TX is
operating. Turns off when 10 BASE-T
is operating.
6
Page 13

3. Setting Up the Machine on a Network
User Tools Menu (Interface Settings)
This section describes the network settings you can change with User Tools (Interface Settings). Make settings according to functions you want to use and the
interface to be connected.
Important
❒ These settings should be made by the systems administrator, or after consult-
ing with the systems administrator.
Reference
For details about settings, see p.9 “Settings You Can Change with User Tools”
❖ Viewing the Information Displayed in the List
$ These items must be set to use the function. Be sure to set them before attempting to use the corresponding function.
❍ These items must be set if required.
Printer
Interface Settings/Network
See p.9 “Interface Settings”.
*1
Check [Effective] is selected for TCP/IP.
IP Address $
Gateway Address ❍
Effective Protocol
Ethernet Speed ❍
Network TWAIN Scanner
Interface Settings/Network
See p.9 “Interface Settings”.
*1
Check [Effective] is selected for TCP/IP.
IP Address $
Gateway Address ❍
Effective Protocol
Ethernet Speed ❍
Settings
Settings
*1
*1
$
$
7
Page 14
Setting Up the Machine on a Network
3
Network Configuration
Any change you make with User
Tools remains in effect even if the
main power switch or operation
switch is turned off, or the {Clear
Modes} key is pressed.
Configuring the network using the control panel
Note
❒ Operations for Interface Settings
are different from normal operations. After using User Tools, press
the {User Tools/Counter} key to exit.
❒ If the key operator code has been
set, the key operator code entry
screen appears. Enter the code, and
then press the {OK} key. For details about the key operator code,
see General Settings Guide.
A Press the {User Tools/Counter} key.
B Select [Interface Settings] using the
{U} or {T} key, and then press
the {OK} key.
C Select the setting you want to
change, and then press the {OK}
key.
D
Change the setting, and then press
the {OK} key.
Note
❒ Press the {Escape} key to cancel
the setting.
E Press the {User Tools/Counter} key.
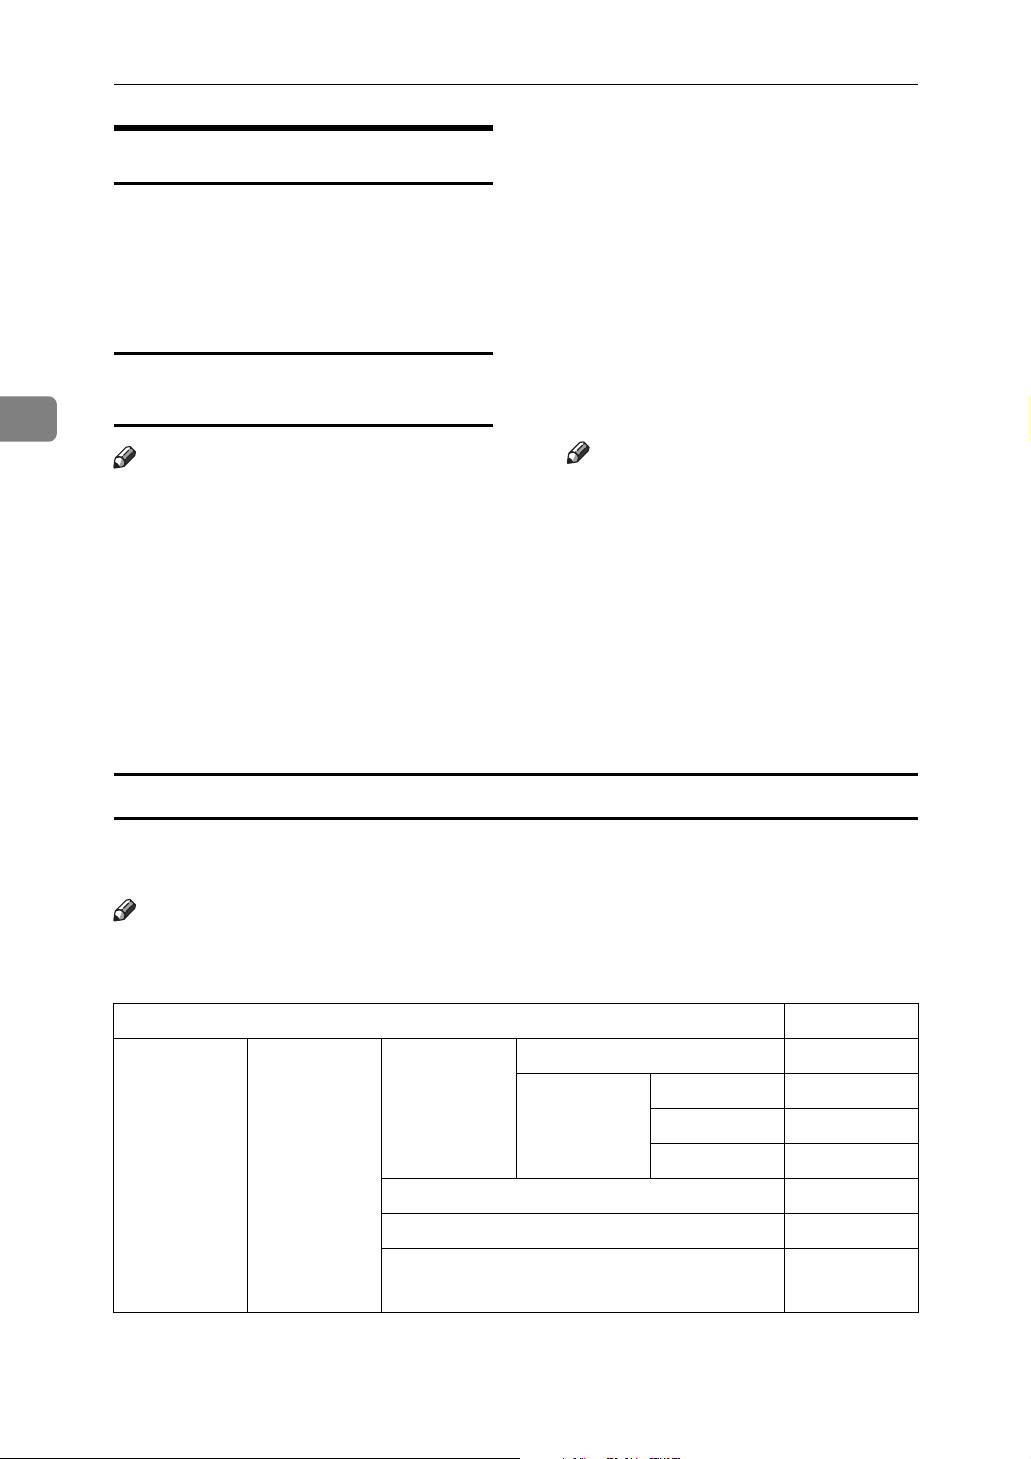
Configuring the network using other utilities
As well as using the control panel to make network settings, utilities such as a
Web browser can also be used. The following table shows available settings:
Note
❒❍ Indicates machine settings can be changed.
❒ - Indicates the setting cannot be changed from that device.
Name on the control panel Web browser
Interface Settings
Network IP Address Auto-Obtain (DHCP) ❍
Specify IP Add. ❍
Subnet M ❍
Mac Add. -
Gateway Address ❍
Effective Protocol -
-
Ethernet Speed
8
Page 15

Settings You Can Change with User Tools
User Tools Menu (Interface Settings)
❖ Effective Protocol
Select the protocol to use in the
network.
• TCP/IP:Effective/Invalid
Interface Settings
❖ IP Address
Before using this machine in the
network environment, you must
configure the IP address and subnet mask.
•Auto-Obtain (DHCP)
•Specify
When you select [Specify], enter
[IP Address:]and [Sub-net Mask:]
as “xxx.xxx.xxx.xxx”(“x” indicates a number).
• IP Address: 011.022.033.044
•
Sub-net Mask: 000.000.000.000
Note
❒ Default: Auto-Obtain (DHCP)
❒ When you select [Specify], be
sure not to set the same [IP Ad-
dress:] as that of another ma-
chines on the network.
❒ The physical address (MAC ad-
dress) also appears.
Note
❒ Default: TCP/IP: Effective
❖ Ethernet Speed
Set the access speed for networks.
Select a speed that matches your
network environment. [Auto Select]
should usually be selected.
•Auto Select
• 100Mbps Fixed
•10Mbps Fixed
Note
❒ Default: Auto Select
3
❖ Gateway Address
A gateway is a connection or interchange point between two networks. Configure the gateway
address for the router or host computer used as a gateway.
•
Gateway Address:000.000.000.000
Note
❒ Default: 000.000.000.000
9
Page 16

3
Setting Up the Machine on a Network
10
Page 17

4. Windows Configuration
Configuring TCP/IP
This describes how to configure Windows for TCP/IP and IPP.
Configuring a Windows 2000
Computer
Configuring a Windows 98SE /
Me Computer
Follow the procedure below to configure a Windows 98SE / Me computer to use TCP/IP.
A Open [Control Panel], and then
double-click the Network icon.
Make sure [TCP/IP] is selected in
the [The following network compo-
nents are installed] box on the [Con-
figuration] tab.
Note
❒ Select TCP/IP if it is not already
selected.
❒ If TCP/IP is not installed, click
[Add] on the [Configuration] tab to
install it. For details about installing TCP/IP, see Windows
98SE / Me Help.
B Click [Properties].
C Configure TCP/IP using the ap-
propriate IP address, subnet
mask, and other settings.
Check with the network administrator that the settings are correct.
Follow the procedure below to con-
figure a Windows 2000 computer to
use TCP/IP.
A On the [Start] menu, point to [Set-
tings], and then click [Network and
Dial-up Connections].
B Double-click [Local Area Connec-
tion]. On the [General] tab, click
[Properties].
C
Make sure [Internet Protocol (TCP/IP)
is selected in the [Components
checked are used by this connection]
box on the [General] tab.
Note
❒ Select TCP/IP if it is not already
selected.
❒ If TCP/IP is not installed, click
[Install] on the [General] tab to install it. For details about installing TCP/IP, see Windows 2000
Help.
D Click [Properties].
E Configure TCP/IP using the ap-
propriate IP address, subnet
mask, and other settings.
]
Check with the network administrator that the settings are correct.
11
Page 18

Windows Configuration
4
Configuring a Windows XP Computer
Follow the procedure below to configure a Windows XP computer to use
TCP/IP.
A On the [Start] menu, click [Control
Panel], and then click [Network Connections].
B Click [Network Connections], and
then double-click [Local Area Con-
nection].
C On the [General] tab, click [Proper-
ties].
D
Make sure [Internet Protocol (TCP/IP)
is selected in the [This connection
uses the following items] box on the
[General] tab.
Note
❒ Select TCP/IP if it is not already
selected.
❒ If TCP/IP is not installed, click
[Install] on the [General] tab to install it. For details about installing TCP/IP, see Windows XP
Help.
E Click [Properties].
F Configure TCP/IP using the ap-
propriate IP address, subnet
mask, and other settings.
Check with the network administrator that the settings are correct.
Configuring a Windows Server
2003 computer
Follow the procedure below to con-
figure a Windows Server 2003 com-
puter to use TCP/IP.
A On the [Start] menu, point to [Con-
trol Panel], point to [Network Connections], and then click [Local Area
Connection].
B On the [General] tab, click [Proper-
ties].
C
Make sure [Internet Protocol (TCP/IP)
is selected in the [This connection
]
uses the following items] box on the
[General] tab.
Note
❒ Select TCP/IP if it is not already
selected.
❒ If TCP/IP is not installed, click
[Install] on the [General] tab to install it. For details about installing TCP/IP, see Windows
Server 2003 Help.
D Click [Properties].
E Configure TCP/IP using the ap-
propriate IP address, subnet
mask, and other settings.
Check with the network administrator that the settings are correct.
]
12
Page 19

5. Using the Printer Function
Printing with a Print Server
This describes how to configure a client computer on a network using
Windows 2000 / XP, Windows Server
2003 as a print server.
When using a Windows 2000 / XP, or
Windows Server 2003 print server, select a shared printer on Windows
2000 / XP, or Windows Server 2003.
This section describes running [Add
Printer Wizard] on each client compu-
ter, and adding the Windows 2000 /
XP, and Windows Server 2003 print
servers as the network printer.
These instructions are for Windows
98SE.
Windows 98SE/Me
Windows 2000/XP
Windows Server 2003
Print Server
A Right-click [Network Neighborhood],
and then click [Explore] in the context menu.
B On the network tree, double-click
the name of the computer used as
the print server. The printers connected to the network are displayed.
C Double-click the name of the
printer you want to use, and then
click [Yes].
The printer icon appears in the
[Printers] window.
Windows 98SE/Me
Windows 2000/XP
Windows Server 2003
Client
ANY005S
This section assumes the client is already configured to communicate
with a Windows 2000 / XP, or Windows Server 2003 print server. Do not
begin the following procedure until
the client computer is set up and configured correctly.
13
Page 20

5
Using the Printer Function
Printing without a Print Server
You can use this machine as a network printer without connecting to a
print server.
You can configure the following
ports:
❖ TCP/IP Port Type P10001
You can print via TCP/IP using
TCP/IP Port Type P10001.
Note
❒ A TCP/IP Port Type P10001 can
be used with Windows 98SE /
Me.
❖ Standard TCP/IP port
You can print via TCP/IP using a
standard TCP/IP port.
Note
❒ A standard TCP/IP port can be
used with Windows 2000 / XP
or Windows Server 2003.
❖ LPR port
You can print via TCP/IP using an
LPR port.
Using TCP/IP Port Type P10001
TCP/IP Port Type P10001 can be used
with Windows 98SE / Me when a
printer driver have been installed.
A In the [Printers] window, click the
icon of the printer you want to
use. On the [File] menu, click
[Properties].
B Click the [Details] tab, and then
click [Add Port].
C Click [Other] radio button, and
then click [TCP/IP Port Type P10001],
and then click [OK].
Add TCP/IP Port Type P10001
Wizard will start.
D Click [Next >].
E Enter the IP address, and then
click [Next >].
Note
❒ Enter [Port Name:] if necessary.
14
Note
❒ An LPR port can be used with
Windows 2000 / XP, or Windows Server 2003.
❖ IPP port
You can print via ipp or http using
an IPP port.
Note
❒ An IPP port can be used with
Windows XP, or Windows
Server 2003.
F Click [Finish].
Page 21

Printing without a Print Server
Configuring the port settings
A In the [Printers] window, click the
icon of the printer you want to
use. On the [File] menu, click
[Properties].
B Click the [Details] tab, and then
click [Port Settings…].
The TCP/IP Port Type P10001
Configuration dialog box appears.
• You can select either Raw or
LPR port to print.
• You can change the IP address
of the Port.
Note
❒ If the IP address of the ma-
chine is changed, you must
change the port settings also.
• Both Raw and LPR support
SNMP.
Important
❒ Do not change Port Number,
Timeout, and Queue Name.
E In the [Printer Name or IP Address]
box, enter the printer name or IP
address, and then click [Next].
F In the [Add Standard TCP/IP Printer
Port Wizard] dialog box, click [Fin-
ish].
G Click [OK].
H Check the location for the select-
ed printer, and click [Close].
Using LPR Port
This describes how to change the port
settings under Windows 2000 when a
printer driver has been installed.
A In the [Printers] window, click the
icon of the printer you want to
use. On the [File] menu, click
[Properties].
B Click the [Ports] tab, and then
click [Add Port].
C Click [LPR Port], and then click
[New Port].
5
Using Standard TCP/IP Port
This describes how to change the port
settings under Windows 2000 when a
printer driver has been installed.
A In the [Printers] window, click the
icon of the printer you want to
use. On the [File] menu, click
[Properties].
B Click the [Ports] tab, and then
click [Add Port].
C Click [Standard TCP/IP], and then
click [New Port].
D In the [Add Standard TCP/IP Printer
Port Wizard] dialog box, click [Next].
D In the [Name or address of server pro-
viding lpd] box, enter the printer's
IP address.
E In the [Name of printer or print queue
on that server] box, enter “lp”, and
then click [OK].
F Click [OK].
G Check the location for the select-
ed printer, and click [Close].
15
Page 22

Using the Printer Function
5
Using the IPP Port
An IPP port can be used with Windows 2000 / XP, or Windows Server
2003.
This describes how to set the port settings under Windows XP.
A In the [Printers and Faxes] window,
click [Add printer] on the [File]
menu.
Add Printer Wizard will start.
B Click [Next >].
C Click [A network printer or a attached
to another computer] radio button,
and then click [Next >].
D
Click the [Connect to a printer on the
Internet or on a home or office network:
radio button, and then enter “http://printer's IP address/ipp/port1”
or “ipp://printer's IP address/ipp/port1” in the
[
URL:] box.
G Select the printer driver.
The printer driver is following:
• Windows 98SE / Me
CD-ROM
drive:DRIVERSDDSTWIN9X_
ME(language)DISK1
• Windows 2000 / XP, Windows
Server 2003
CD-ROM
drive:DRIVERSDDSTWIN2K_
XP(language)DISK1
H Click [OK], and then click [OK].
I Click [Next >], and then [Finish].
]
(Example: IP address is 192.168.15.16)
http://192.168.15.16/ipp/
port1
ipp://192.168.15.16/ipp/
port1
E Click [Next >].
F Click [Have Disk], and then click
[Browse].
16
Page 23

6.
Configuring the Network Interface
Board Using a Web Browser
Features
You can check the status of a machine and change its settings using the Web
browser.
❖ What can it do?
You can remotely check the status of a machine or specify its settings over the
network using a computer's Web browser.
The following functions are available with Web browser:
• Displaying machine status/settings
• Resetting network settings
• Making machine settings
❖ Configuring the machine
This requires TCP/IP to be installed. After the machine has been configured
to use TCP/IP, it will be possible to adjust settings using a Web browser.
Reference
For details about configuring the machine to use TCP/IP, see p.7 “Setting
Up the Machine on a Network”.
❖ Browser
Note
❒ If you are using a proxy server, change the Web browser settings. Consult
your network administrator about the settings.
❒ This machine information cannot be refreshed automatically. Click [Re-
load] or [Refresh] on the Web browser.
❖ Specifying the address
In the [ Address] box, enter the address (for example http://XXX.XXX,XXX,XXX, where the Xs are the numbers of the IP address).
If the host name of the machine is registered on the DNS server or WINS server, you can enter it.
17
Page 24

Configuring the Network Interface Board Using a Web Browser
Settings You Can Change with a Web Browser
❖ System
• Reset
Reset the settings of this machine.
•Factory Defaults
Reset the settings of this machine to default.
•Unit Status
Display the network settings of this machine.
• Network Address
Display the serial number and Ethernet address (MAC address) of this machine,
• Change Password
Change the password.
❖ Protocols
6
• Setup TCP/IP
Configure the settings of TCP/IP of this machine.
•Setup IPP
Configure the IPP settings of this machine.
❖ Others
Printer Status
Display the printer status of this machine.
18
Page 25

Configuring the Network Interface Board Settings
Configuring the Network Interface Board
Settings
A Start the Web browser.
B In the [Address] box, enter the ma-
chine's IP address (for example
http://XXX.XXX.XXX.XXX where
the Xs are the numbers of the IP
address).
The status of the machine you
chose appears on the Web browser.
C In the menu area, select the item,
and then make the necessary settings.
Note
❒ Enter a password if necessary.
❒ Default password is "sysadm".
6
19
Page 26

Configuring the Network Interface Board Using a Web Browser
6
20
Page 27

7. Appendix
Using DHCP
If this machine is configured for DHCP, and the DHCP request fails four times,
BOOTP takes over the request. If the BOOTP request fails three times, the Default IP address is used.
21
Page 28

Appendix
SNMP
The machine is equipped with an SNMP (Simple Network Management Protocol) agent that operates under UDP and IPX on the Ethernet interface. Using the
SNMP manager you can get information about the machine.
The default community names are “public” and “private”. You can get MIB information using these community names.
❖ Supported MIBs
•MIB-II
•PrinterMIB
•HostResourceMIB
7
22
Page 29

Error Messages on the Display
Error Messages on the Display
This section describes the most common network-related messages that appear
on the display. If a message not described here appears, act according to that
message.
Messages without Code Numbers
Reference
Before turning the main power off, see “Turning On the Power”, Copy Reference.
Message Causes Solutions
hCannot connect to network
Check IP Address
hCannot connect to network
Contact key operator
Ethernet Board Error An Ethernet board error has
hServer communicat. failed
Contact key operator
Cannot connect to the network.
Cannot connect to the network.
occurred.
Cannot communicate with the
server.
Check the machine's IP address.
Check the network. If this
message continues to appear,
contact your key operator.
Turn off the main power
switch, and then turn it back
on. If the message continues to
appear, contact your sales or
service representative.
Check the server. If this message continues to appear, contact your key operator.
7
23
Page 30

Appendix
Messages with Code Numbers
Note
❒ A message reporting an error appears on the display as shown.
7
Message Causes Solutions
Cannot
connect
with DHCPserver
The same
IP Address alreadyexis
ts
Check
networksettings
The same
IP Address existson
several
interfaces
Cannot
set within the
samesubnet range
The DHCP server cannot be
found.
The specified IP address overlaps
another IP address.
An unauthorized value is specified as the IP address or gateway
address.
IP addresses overlap across multiple interfaces.
IP addresses of simultaneously
operating interfaces overlap.
Subnet masks overlap across multiple interfaces. The subnet masks
of simultaneously operating interfaces overlap.
Check the DHCP server is running
on the network.
The IP address specified for the
machine overlaps another IP address in use. Check the address of
the device indicated in <MAC address>.
Change the IP address, subnet
mask, or gateway address to the
correct value.
The IP address of the specified interface overlaps the IP address of
another interface. Configure the
IP address so it does not overlap.
The subnet range of the specified
interface overlaps the subnet
range of another interface.
Configure the subnet mask so it
does not overlap.
Code
numbers
101
102
103
004
005
❖ Code Numbers
The problem interface is displayed.
•1XX: Ethernet
• 0XX: Independent of interface
24
Page 31

Specifications
Interface 100BASE-TX, 10BASE-T
Protocol • Printer
TCP/IP
LPR
IPP
• Network Scanner
TCP/IP
• Management Function
TCP/IP
SNMP
HTTP
DHCP
SNMP MIB-II, PrinterMIB, HostResourceMIB
Specifications
7
25
Page 32

INDEX
C
configuration
Web Browser
D
DHCP, 21
E
Effective Protocol, 9
Ethernet Speed
G
Gateway Address, 9
I
Interface Settings, 9
IP Address
M
, 9
, 9
, 17
MIB, 22
S
SNMP, 22
specifications
, 25
W
Web Browser, 17
26 GB GB EN USA AE AE B866-8535A
Page 33

Copyright © 2005
Page 34

Network Guide
GB GB
EN USA
AE AE B866-8535A
 Loading...