

Page 1

340/350/450
OPERATING INSTRUCTIONS
SYSTEM SETTINGS
Modes
User Tools (System Settings)
Read this manual carefully before you use this product and keep it handy
for future reference.
For safety, please follow the instructions in this manual.
Page 2

Introduction
This manual contains detailed instructions on the operation and maintenanc e of this machine. To get
maximum versatility from this machine all operators should carefully read and follow the instructions in
this manual. Please keep this manual in a handy place near the machine.
Please read the Safety Information before using this machine. It contains important information related
to USER SAFETY and PREVENTING EQUIPMENT PROBLEMS.
- Notes:
Some illustrations may be slightly different from your machine.
Certain options may not be available in some countries. For details, please contact your local dealer.
Operator Safety:
This machine is considered a class 1 laser device, safe for office/EDP use. The machine contains two
5-milliwat, 760 - 800 nanometer wavelength, GaAIAs laser diodes. Direct (or indirect reflected) eye contact with the laser beam might cause serious eye damage. Safety precautions and interlock mechanisms have been designed to prevent any possible laser beam exposure to the operator.
The following label is attached on the back side of the machine.
CLASS 1 LASER PRODUCT
IN ACCORDANCE WITH IEC 825
LASER KLASSE 1 nach IEC 825
Laser Safety:
The optical housing unit can only be repaired in a factory or at a location with the requisite equipment.
The laser subsystem is replaceable in the field by a qualified Customer Engineer. The laser chassis is
not repairable in the field. Customer engineers are therefore directed to return all chassis and laser subsystems to the factory or service depot when replacement of the optical subsystem is required.
Warning:
Use of controls or adjustment or performance of procedures other than those specified in this manual
might result in hazardous radiation exposure.
Notes:
The model names of the machines do not appear in the following pages. Check the type of your machine before reading this manual. (For details, see ⇒ P.2
“Machine Types”
.)
• Type 1: Aficio 340
• Type 2: Aficio 350
• Type 3: Aficio 450
Certain types might not be available in some countries. For details, please contact your local dealer.
Two kinds of size notation are employed in this manual. With this machine refer to the metric version.
For good copy quality, Ricoh recommends that you use genuine Ricoh toner.
Ricoh shall not be responsible for any damage or expense that might result from the use of parts other
than genuine Ricoh parts in your Ricoh office product.
Power Source
220 – 240 V, 50/60 Hz, 6 A or more
Please be sure to connect the power cord to a power source as above. For details about power source,
see “Power Connection” of the “Copy Reference”.
Page 3

HOW TO READ THIS MANUAL
R
Symbols
In this manual, the following symbols are used:
R
WARNING:
This symbol indicates a potentially hazardous situation that might result in
death or serious injury when you misuse the machine without following the instructions under this symbol. Be sure to read the instructions, all of which are described in the Safety Information in the “Copy Reference”.
CAUTION:
This symbol indicates a potentially hazardous situation that might result in minor or moderate injury or property damage that does not involve personal injury
when you misuse the machine without following the instructions under this
symbol. Be sure to read the instructions, all of which are described in the Safety
Information in the “Copy Reference”.
* The statements above are notes for your safety.
Important
If this instruction is not followed, paper might be misfed, originals might be
damaged, or data might be lost. Be sure to read this.
Preparation
This symbol indicates the prior knowledge or preparations required before operating.
Note
This symbol indicates precautions for operation, or actions to take after misoperation.
Limitation
This symbol indicates numerical limits, functions that cannot be used together,
or conditions in which a particular function cannot be used.
Reference
This symbol indicates a reference.
[ ]
Keys that appear on the machine's panel display.
{ }
Keys built into the machine's operation panel.
L
Page 4

TABLE OF CONTENTS
MANUALS FOR THIS MACHINE................................................................. 1
MACHINE TYPES ......................................................................................... 2
ADDITIONAL FUNCTIONS PROVIDED BY OPTIONAL MEMORY UNITS 3
Copy Mode.................................................................................................... 3
Facsimile Mode (Option)............................................................................... 4
1.MODES
CHANGING MODES..................................................................................... 5
MULTI-ACCESS............................................................................................ 6
COPY MODE............................................................................................... 10
Changing To Copy Mode............................................................................ 10
FAX MODE.................................................................................................. 12
Changing To Facsimile Mode ..................................................................... 12
Printing A Received Fax.............................................................................. 12
Sending A Fax............................................................................................. 13
2.USER TOOLS (SYSTEM SETTINGS)
KEYS FOR USER TOOLS (SYSTEM SETTINGS) .................................... 15
ACCESSING THE USER TOOLS
(SYSTEM SETTINGS)................................................................................. 16
Exiting from User Tools............................................................................... 17
USER TOOLS MENU (SYSTEM SETTINGS) ............................................ 18
SETTINGS YOU CAN CHANGE WITH THE USER TOOLS ..................... 19
System Settings 1/6..................................................................................... 19
System Settings
System Settings
System Settings
System Settings
System Settings
2
/6..................................................................................... 20
3
/6..................................................................................... 21
4
/6..................................................................................... 23
5
/6..................................................................................... 25
6
/6..................................................................................... 26
INDEX........................................................................................................ 27
LL
Page 5

MANUALS FOR THIS MACHINE
This is a multi-functional machine combining copying and facsimile functions.
This manual describes procedures common to these functions. Each function's
reference describes the operational procedures separately for the copying and
facsimile functions. Please consult the manual that suits your needs.
❖❖❖❖
System Settings (this manual)
Provides an overview of the machine. This manual introduces the functions
of the machine. It also introduces the options allowing you to use additional
functions and describes how to access the system user tools to make the machine easier to use.
❖❖❖❖
When using as a copier
• Copy Reference
Describes the various copying functions from basic copying to more advanced functions such as reducing/enlarging copies or combining originals into one copy.
❖❖❖❖
When using as a facsimile
• Facsimile Reference (option)
Describes the operational procedures and functions to use the machine as
a facsimile.
1
Page 6

MACHINE TYPES
There are three models of this machine. The main differences between them are
memory capacity and copy speed. To make sure which model you have, see the
inside front cover.
Type 1 Type 2 Type 3
Copy speed 35 copies/minute
(A4K, 8
11"K)
Memory capacity 4 MB
(8 MB optional
memory available)
Fax unit Option Option Option
1
/2" ×
35 copies/minute
(A4K, 81/2" ×
11"K)
12 MB 12 MB
45 copies/minute
(A4K, 81/2" ×
11"K)
2
Page 7

ADDITIONAL FUNCTIONS PROVIDED BY
OPTIONAL MEMORY UNITS
You can expand the capabilities of this machine to include fax functions. When
you want to add a function, contact your sales or service representative.
Copy Mode
In copy mode you can make basic copies and also copy using more sophisticated
techniques, such as reduction/enlargement or combining several originals onto
one copy. You can install an optional memory expansion for storage of document images, thereby making the best use of memory with various copy functions.
Expansion Memory (option)
❖❖❖❖
8 MB copier memory unit (Electric sort kit) (option for Type 1)
Provides various functions including Image Rotate, Sort, and Duplex Copy.
❖❖❖❖
Copier hard disk (Image enhance kit)
Provides various functions such as:
• Archive File (copying stored images)
• Following functions using the Enhanced Image Copy:
Sort/Rotate Sort/Rotate Stack/Shift Sort/Shift Stack/Staple
Combine
Duplex
Repeat
Image Rotate
3
Page 8

Facsimile Mode (Option)
You can send and receive fax messages in facsimile mode. Installation of optional expansion memory allows more functions to be used, and more data to be
stored.
Options for Memory Expansion
❖❖❖❖
4 MB memory card
Provides a variety of memory-based functions including confidential reception, envelope reception, and two-sided printing. Also increases the number
of personal codes, groups, speed dials, files in memory, special stations, etc.
❖❖❖❖
Fax hard disk
Increases memory capacity, allowing you to increase the number of transmit
originals and receive images to be stored in memory.
❖❖❖❖
400 dpi high resolution card
Allows sending/receiving in super fine mode. Also allows JBIG compression.
4
Page 9
1. MODES
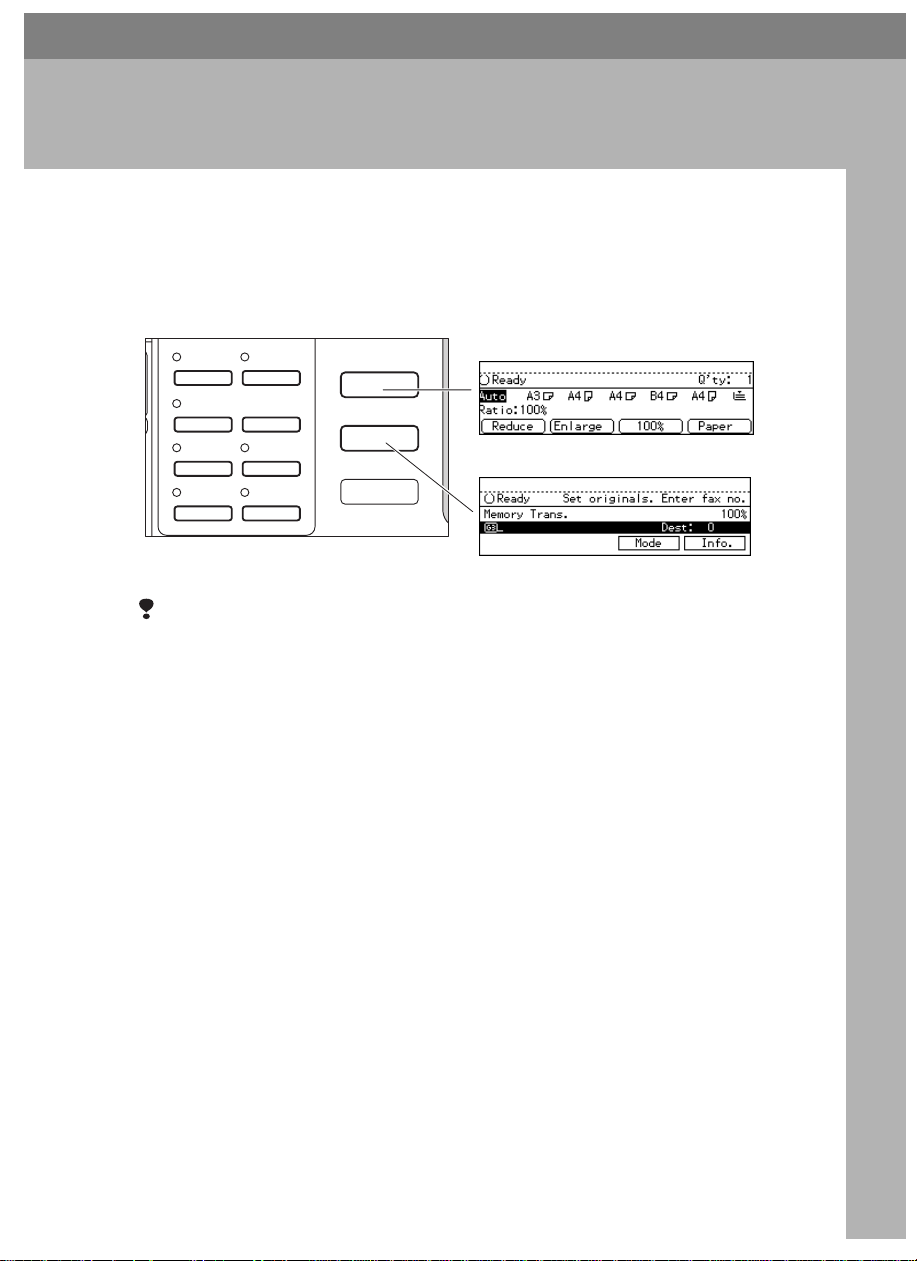
CHANGING MODES
You can use this machine not only as a copier, but optionally as a fax machine as
well. Press the {
facsimile functions.
Enhanced
Image
Menu
Copy
Auto Reduce/
Enlarge
Zoom
} key to use copy functions, or press the {
Copy Mode
Copy
Fax
} key to use
Series
Copies
1
Margin
Adjust
34
Combine
Copies
2
Erase Center/
Border
Fax
Facsimile Mode
Limitation
❒ You cannot switch modes in any of the following cases:
• When scanning in a fax message for transmission.
• During immediate transmission.
• When accessing the user tools.
• During interrupt copying.
ND0X02EE
è
Page 10

1
MODES
MULTI-ACCESS
You can carry out another job using a different function while the current job is
being performed.
This allows you to handle your jobs efficiently regardless of how the machine is
being used. For example:
• While making copies, the machine can send a fax message that has been
stored in memory.
• You can make copies while receiving fax data.
Performing multiple functions simultaneously like this is called Multi-accessing.
Limitation
❒ You cannot use Multi-accessing during interrupt copying.
Note
❒ You can choose which mode has highest priority for print jobs. The default is
the current mode shown on the display. See “16.
tem Settings
❒ When your machine is equipped with the optional internal tray 2, you can
specify the tray used for each function so that completed documents are not
mixed. For example, set one tray for faxes and another tray for copies. If you
require the optional internal tray 2, contact your local dealer or service representative. See “15.
4
/6”.
2XWSXWý7UD\” in ⇒ P.23 “System Settings
3ULQWý3ULRULW\” in ⇒ P.23 “Sys-
4
/6”.
ç
Page 11

----Multi-accessing example
The order of multi-accessing operations is as follows:
Time
Operation
Mode
Print
Job
1st 2nd 3rd 4th
MULTI-ACCESS
1
Copying
2 originals
Printing 2
received
faxes
Memory
transmission
operation
Facsimile Copy
(2 pages)
Memory
Background*1 Scanning Printing
*1
This job runs in the background, regardless of any current data scanning/writing op-
reception *1
Start
1st page
for
memory
reception
1st
copy
Received
data
processing
2nd page for
memory
reception
2nd
copy
Completion
Printing
the
1st
received
fax
Start
Printing
the
2nd
received
fax
Scanning the
1st page
Start
receiving
Scanning the
2nd page
Memory
reception
MULTI2EE
erations.
Note that you can also receive faxes into memory with such a job.
----Sample operations
This chart is based on the following conditions:
• When “16. Print priority” is set to “Interleave” (See “16. Print Priority” in ⇒
P.23 “System Settings
4
/6”)
• For details on operations under other conditions, contact your service representative.
æ
Page 12

MODES
1
Mode after
Copy Facsimile
you select
Mode before
you select
Copying
Enhanced Image Copy
Copy Copying ❍❍
En-
❍❍
hanced
Image
Copy
Memory
❍❍
Copy
Sort ❍❍
Stapling
Scan-
*5 ❍ *5 ❍ *4
❍
ЧЧЧЧЧЧ✩ × ✩
ning An
Original
for
Memory
Transmission
Memory
✩✩✩✩✩✩×××✩
Transmission
Immedi-
ЧЧЧЧ ЧЧЧЧЧЧ
ate
Transmission
Transmission
Memory
✩✩✩✩✩✩×××✩
Reception
Printing
✩✩✩✩
Received
Data
Facsimile
Reception
Memory Copy
Sort
Stapling
*4 ❍ *4 ❍ *4
❍
*4 ❍ *4 ❍ *4
❍
*4 ❍ *4 ❍ *4
❍
*4 ❍ *4 ❍ *4 ❍ *1
❍
*4
❍
*5
×
*5 ✩ *2 ✩ *6
✩
*5
Transmission Reception
Scanning An Original for
Memory Transmission
Memory Transmission
Immediate Transmission
Memory Reception
Printing Received Data
❍✩❍✩✩
× ✩ × ✩✩
× ✩ × ✩✩
*1
❍
*1
❍
*3 ✩ *6
→
✩✩
✩
✩
*5
*2
✩
→
❍
✩
*1
✩
å
Page 13

MULTI-ACCESS
✩…means that these functions can be used together.
❍…means that you can interrupt the current job with Function keys or the {
terrupt
} key to proceed to a subsequent job.
In-
→…means that another job will automatically start after the current job is fin-
ished.
×…means that you will manually start another job after the current job is fin-
ished (i.e. these functions cannot be used together).
*1
Simultaneous operations are only available when copies are being made after their
originals are all scanned.
*2
You might fail to print received data, depending on size or orientation of the original.
*3
Priority is given to the subsequent job; after the subsequent job is finished, the interrupted operation is automatically resumed.
*4
If the optional copier hard disk is installed, you can make interrupt copies with the
{
*5
If you are making stapling copies on paper larger than A4, 81/2" × 11" with the optional 1000-sheet finisher, the subsequent operation is disabled until the current job
is finished. After you start interrupt copying with the {
is automatically changed to “Internal Tray”.
*6
During parallel receptions, any subsequent job is disabled until the receptions are
completed.
Interrupt
} key.
} key, the Output Tray
Interrupt
1
ä
Page 14

MODES
COPY MODE
1
Changing To Copy Mode
You can always make a copy when
the machine isn't printing or scanning
a fax data.
A Press the {
The copy display appears on the
panel display.
Reference
For details, see the “Copy Reference”.
Interrupt Copying To Make Urgently
Needed Copies
You can interrupt the current copying
job or printing of a received fax to
make a copy.
Limitation
❒ When the optional
is not installed, you cannot use the
following functions during interrupt copying:
•Duplex
• Combine
• Sort
• Copying archive files
❒ You cannot use the interrupt copy
function in the following cases:
• during fax immediate transmis-
sion
• while scanning an original for
memory transmission
• during interrupt copying
Copy
} key.
copier hard disk
A Press the {
If the machine is scanning originals, it will immediately stop the
scanning job. On the other hand, if
the machine is performing a copy
or print job, it will still continue the
job until you press the {
after pressing the {
When the current job stops, the interrupt copy display appears on
the panel display.
Note
❒ When you interrupt a copying
job, remove the previous original.
Interrupt
} key.
Interrupt
Start
} key
} key.
B Make your copies.
Important
❒ If the remaining memory space
is 0 %, the machine fails to receive fax data. Wait until the
machine completes printing a
received fax, then start making
copies.
Note
❒ While copying, a received fax
document is stored in memory
and the Receive File indicator is
lit.
C After interrupt copying is com-
pleted, remove the original and
delivered copies.
D Press the {
The machine resumes the printing
job of the received fax document.
Interrupt
} key again.
ìí
Page 15

Resuming the interrupted
copying job
A Reset the previous original.
B Press the {
The machine resumes the interrupted copy run.
Start
} key.
Copying And Multi-accessing
Note
❒ Machine operations are different
depending “16. Print Priority” (See
⇒ P.23 “System Settings
User Code Manage” (See ⇒ P.25
“System Settings
Reference
⇒ P.6 “Multi-Access”
❖❖❖❖
When “Print Priority” = “Fax” or “Dis-
4
/6”) or “18.
5
/6”) settings.
play” (default)
The machine completes the operation of the function set by Print priority before performing the
operation of another function.
COPY MODE
1
Limitation
❒ While the machine is perform-
ing two-sided printing in fax
mode, you cannot make twosided copies until the printing
ends.
❖❖❖❖
When “Print Priority” = “Interleave”
The machine performs the operations in the order in which they are
initiated. If another function is initiated during operation, the machine completes the current
operation before performing the
operation of the function initiated.
ìì
Page 16

MODES
FAX MODE
1
Changing To Facsimile Mode
You can always use the machine as a
facsimile when you are not copying.
A Press the {
The facsimile display appears on
the panel display.
Note
❒ The Memory Transmission/Re-
ception function is performed
automatically even when another function is being used.
You need not switch the display. When data is received in
memory, the Receive File indicator is lit.
Reference
For details, see the “Facsimile
Reference”.
Fax
} key.
Printing A Received Fax
When you are not copying, a received
fax is printed automatically. You do
not need to switch to Facsimile mode.
If you wish to print a received fax
while copying, see below.
Preparation
Machine operations are different
depending “16.
⇒ P.23 “System Settings
8VHUý &RGHý 0DQDJH” (See ⇒ P.25
“System Settings
Reference
See ⇒ P.6 “Multi-Access”.
Printing a received fax while copying
❖❖❖❖
When “Print Priority” = “Fax” or “Display” (default)
The machine once interrupts the
copying and receives a fax. Upon
completing the fax reception, it resumes the interrupted copying job.
❖❖❖❖
When “Print Priority” = “Interleave”
The machine performs the operations in the order in which they are
initiated. If another function is initiated during operation, the machine completes the current
operation before performing the
operation of the function initiated.
3ULQWý3ULRULW\” (See
4
/6”) or “18.
5
/6”) settings.
ìë
❖❖❖❖
Printing a received fax in a hurry
Press the {
facsimile display. The copying job
is interrupted and the machine
starts printing the received fax automatically. After printing the fax,
Fax
} key to switch to the
Page 17

FAX MODE
press the {
previous job again.
Copy
} key and do the
Sending A Fax
Sending a fax while printing a received
fax
Scanning originals for memory
transmission
The machine can scan your originals
for memory transmission even while
printing a received fax.
A Complete the usual operations
for sending a fax, then press the
Start
} key.
{
Immediate transmission
Immediate transmission interrupts
the job of printing a received fax. This
is because the page memory is occupied as your originals are scanned.
A Complete the usual operations
for sending a fax, then press the
{
Start
} key.
1
Sending a fax while copying
While scanning copy originals
A Press the {
then the {
Copying is stopped and the display is switched to the Facsimile
mode.
Note
❒ Remove the copy originals.
Clear/Stop
Fax
} key.
} key and
ìê
Page 18

MODES
While outputting copy
1
A Press the {
the facsimile display.
You can send a fax while copying.
Note
❒ Remove any originals of your
copy job.
Fax
} key to switch to
B Complete the usual operations
for sending a fax, then press the
Start
} key.
{
C After the transmission has fin-
Copy
ished, press the {
} key.
D Reset the copy job originals, then
Start
press the {
The machine resumes the interrupted copy run.
} key.
ìé
Page 19

2. USER TOOLS (SYSTEM
SETTINGS)
KEYS FOR USER TOOLS (SYSTEM SETTINGS)
12
Sort
1-Sided 2-Sided
2
Commu-
Receive
Confidential
nicating
File
File
Start
TEL
TX File
Manual RX
Mode
Status
F1
F3 F4 F5
F2
01 02 03 04 05 06 07
A B C D E F G
08 01 10 11 12 13 14
H I J K L M N
15 16 17 18 19 20 21
OPQRSTU
22 23 24 25 26 27 28
VWXYZ
Standard
Detail
Super Fine
Immediate
Trans.
Memory
Trans.
1
1
Book 2-Sided
Staple
Stack
2-Sided 2-Sided
2
Enhanced
Auto Reduce/
Image
Enlarge
Menu
Zoom
Series
Combine
Copies
Copies
1
2
Margin
Erase Center/
Adjust
Border
34
2
2
User Tools / Counter
Copy
Fax
*
.
Text Photo
Photo
Special Orig.
Lighter Darker
Auto Image Density
Speed Dial
On Hook Dial
Pause /
Redial
Tone
Program
Interrupt
Clear
Modes
/
C
Energy Saver
23
1
ABC DEF
456
MNOJKLGHI
7809
WXYZTUVPQRS
Enter
Main
Power
On
Clear / Stop
C
Start
1. {
User Tools/Counter
} key
2. Panel Display
3. {
Selection
} keys
Press the key under the item you wish to
select.
4. < and > keys (Cursor keys)
Press to select an item on the panel display.
5. {
Number
} keys
Use to enter a numeric value.
key
#
6. {
}
Press to set a value you have entered.
7. {
Clear/Stop
Press to delete a number you have entered.
} key
643
75
ND2A01EE
ìè
Page 20

USER TOOLS (SYSTEM SETTINGS)
ACCESSING THE USER TOOLS
(SYSTEM SETTINGS)
2
This section is for the key operators in
charge of this machine. You can
change or set the machine's default
settings.
Preparation
After using the user tools, be sure
to exit it to return to Copy mode.
The settings are not canceled even
if the operation switch is turned off
or the {
Clear Modes/Energy Saver
key is pressed.
Limitation
❒ Function names displayed in a
faint font become available when
the machine is expanded.
Reference
For information on Copy and Fax
User Tools, see the appropriate reference manual.
A Press the {
User Tools/Counter
} key.
The User Tools Main Menu appears.
Sort
Staple
Stack
1-Sided 2-Sided
2-Sided 2-Sided
2
1
1
Book 2-Sided
2
2
2
User Tools / Counter
C Search for the desired menu. En-
ter its number with the {
keys.
}
Number
}
ìç
B Enter {
1
} with the {
Number
The system settings menu appears.
ND2L0103
} keys.
Note
]
❒[↓↓↓↓
: Press to go to the next
Next
page.
]
: Press to go back to the
Prev.
❒[↑↑↑↑
previous page.
Reference
⇒ P.18 “User Tools Menu (Sys-
tem Settings)”
Page 21

ACCESSING THE USER TOOLS (SYSTEM SETTINGS)
D Change the settings by following
the instructions on the panel dis-
OK
play. Then press the [
Reference
⇒ P.19 “Settings You Can Change
With The User Tools”
Note
❒ [OK]: Press to set the new set-
tings and return to the previous
menu.
Cancel
❒ [
]: Press to return to the
previous menu without changing any data.
] key.
Exiting from User Tools
A After changing the user tools set-
2
2
2
Exit
User Tools/
User Tools / Counter
ND2L0103
] key on the
tings, press the {
Counter
} key.
Sort
1-Sided 2-Sided
1
1
Book 2-Sided
Staple
Stack
2-Sided 2-Sided
2
Note
❒ You can also exit from user tools
by pressing the [
User Tools Main Menu.
2
ìæ
Page 22

2
USER TOOLS (SYSTEM SETTINGS)
USER TOOLS MENU (SYSTEM SETTINGS)
ìå
Page 23

SETTINGS YOU CAN CHANGE WITH THE USER TOOLS
SETTINGS YOU CAN CHANGE WITH THE
USER TOOLS
Reference
For how to access the user tools, see ⇒ P.16 “Accessing The User Tools (System
Settings)”.
2
System Settings 1/
Menu Description
01. Function Priority
(facsimile option required)
02. Panel Beeper The beeper (key tone) sounds when a key is pressed.
03. Ready·Beeper Choose whether the machine beeps when it becomes ready
04. Copy Count Display The copy counter can be set to show the number of copies
6
You can specify the mode to be displayed immediately after
the operation switch is turned on or System Reset mode is
turned on.
Note
❒
Default: Copy
This beeper can be turned on or off.
Note
❒
Default: ON
for a copy run after power up.
Note
❒
Default: ON
made (count up) or the number of copies remaining to be
made (count down).
Note
❒
Default: Up (count up)
ìä
Page 24

USER TOOLS (SYSTEM SETTINGS)
2
System Settings 2/
Menu Description
05. System Reset The machine returns to its prioritized mode automatically
6
after your job is finished, after the selected time. This function is called “System Reset”. The time can be set from 10 to
999 seconds, or no system reset.
Note
❒ Default: YES (60 seconds)
❒ You can specify the prioritized mode with the user tools.
See “01. Function Priority” in ⇒ P.19 “System Settings
06. Function Switch
(facsimile option required)
How long the machine waits before switching to the default
mode if no operation has been performed after an operation
has finished.
Note
❒ Default: 3 seconds
07. Low Pwr. Shift Time The machine enters Low Power mode automatically after
your job is finished, after the selected time. The time can be
set from 1 to 240 minutes.
In Low Power mode, power consumption is saved about 35
% as compared with Stand-by mode. This value is a reference applicable to Type 1 (mainframe only).
Note
❒ Default: 15 minutes
08. Low Power Timer The machine enters to Energy Saver mode automatically after your job is finished, after the selected time. The time can
be set from 10 to 999 seconds, or off.
1
/6”
ëí
Note
❒ Default: Yes (60 seconds)
Page 25

SETTINGS YOU CAN CHANGE WITH THE USER TOOLS
System Settings 3/
Menu Description
09. Energy Saver Mode The machine enters Energy Saver mode in the following cas-
6
es:
• If you hold down the {
about a second or more.
• When the preset time selected with the Low Power Timer
has passed.
Clear Modes/Energy Saver
} key for
Reference
See “08. Low Power Timer” in⇒ P.20 “System Settings
2
/6”.
In Energy Saver mode, power consumption is saved as
shown below, as compared with Stand-by mode.
• Level 1 (default): Saving about 25 %
• Level 2: Saving about 30 %
Warm-up time required for Energy Saver mode to return to
the ready condition is as follows:
• Level 1 (default): About 3 seconds
• Level 2: About 10 seconds
Note
❒ Default: Level 1
❒ The values above are references applicable to Type 1
(mainframe only).
10. Auto Off Timer The machine turns itself off automatically to conserve energy after your job is finished, after the selected time. This
function is called “Auto Off ”. The time can be set from 1 to
240 minutes.
2
Note
❒ Default: 60 minutes
❒ Auto Off might not be effective when the machine is in
the following conditions:
• An error message is displayed.
• The remaining memory space for facsimile mode is
less than 100%.
❒ To return to the ready condition from Auto Off, the ma-
chine requires the same warm-up time as the time for becoming ready after its power is turned on.
❒ When the machine receives a fax in Auto Off mode, it au-
tomatically prints the fax.
ëì
Page 26

2
USER TOOLS (SYSTEM SETTINGS)
Menu Description
11. Paper Size-Tray Select the size of the copy paper set in the paper tray.
Note
❒ If the specified paper size differs from the size of paper
actually set in the paper tray, a paper misfeed might occur because the paper size is not detected correctly.
Reference
See “Changing The Paper Size” in the “Copy Reference”.
12. Pap.Tray Priority
(for Copy mode only)
You can select the paper tray which will be selected as a default in the following conditions:
• When the operation switch is turned on.
• When System Reset or Auto Reset mode is turned on.
• When the {
Clear Modes/Energy Saver
} key is pressed.
• When the Auto Paper Select mode is not selected.
Tray1
Tray2
Tray3
Tray4
LCT
Optional Trays
ëë
ND6A0200
Note
❒ Default: Tray 1
❒ Tray 3, Tray 4, and LCT (Large Capacity Tray) are op-
tions.
Page 27

SETTINGS YOU CAN CHANGE WITH THE USER TOOLS
System Settings 4/
6
Menu Description
13. Auto Tray Switch If you load paper of the same size in two or more trays, the
machine automatically shifts another tray when the tray in
use runs out of paper. You can set or cancel this setting.
Note
❒ Default: Yes
❒ If you put recycled paper or special paper in paper trays
using the Special Paper Indicate menu, the Auto Tray
Switch function is available to these trays only when
their settings are identical.
Reference
See “14. Sp. Paper Ind.” in ⇒ P.23 “System Settings
4
/6”.
14. Sp. Paper Ind. When recycled paper or special paper is in the paper trays,
paper type can be indicated on the panel display.
Note
❒ Default: No Display
❒ “Rcyd. ppr.” appears on the panel display when recycled
paper is selected, and “Sp. ppr.” appears when special
paper is selected.
15. Output Tray You can specify a tray to which documents are delivered for
each mode (copy and facsimile).
External Tray
Finisher
Internal Tray
Internal Tray 2
2
Finisher
Proof
Finisher
ND0P0202
Note
❒ You can specify a single tray for two or more modes.
❒ With the optional 3000-sheet finisher installed, B4, 8
× 14" or larger paper will be automatically delivered to
the “Finisher Proof” even if you specified “Internal Tray”
as an output tray.
1
/2"
ëê
Page 28

2
USER TOOLS (SYSTEM SETTINGS)
Menu Description
16. Print Priority (set-
ting the multi-accessing
function)
Sets the print priority for each mode.
• “Display”
Print priority is given to the mode displayed on the display.
•“Copy”
Print priority is given to the copy function.
•“Fax”
Print priority is given to the fax function.
• “Interleave”
Prints jobs in the order in which they are initiated regardless of mode/function.
Different function's print output might be mixed. If you
want to avoid such mixing, specify an independent tray for
each feature using “Output Tray”. When using different
functions, attaching internal tray 2 allows you to specify an
independent tray for each function. If you want to attach
one, contact your local dealer.
Note
❒ Interrupt printing is disabled functions that have “User
Code Manage” set to “Yes”. The machine switches the
display after the time specified by “Function Switch” and
starts printing with the function.
ëé
Reference
⇒ P.6 “Multi-Access”
“15. Output Tray” in ⇒ P.23 “System Settings
“18. User Code Manage” in ⇒ P.25 “System Settings
“06. Function Switch” in ⇒ P.20 “System Settings
4
/6”
5
/6”
2
/6”
Page 29

SETTINGS YOU CAN CHANGE WITH THE USER TOOLS
System Settings 5/
Menu Description
17. Contrast You can adjust the brightness of the panel display.
18. User Code Manage
If the machine is set to use the User Code function, operators must input their user
codes before the machine can operate. The machine keeps count of the number of copies made under each user code.
Note
❒ Enter a previously registered key operator code with the {
Reference
“Key Operator Code”
Code Manage-Copy Specify whether to employ user codes to restrict copier us-
19. Management Setting
Use these settings to manage use of the machine.
Note
❒ Enter a previously registered key operator code with the {
Reference
“Key Operator Code”
Show/PrintCounter You can check and print the number of copies made under
Print CounterList You can print the counter data for all functions.
Key Operator Code If you select “Yes”, only operators who know the key oper-
6
Number
} keys.
ers and manage the number of copies made.
Note
❒ Default: No
Number
} keys.
each function.
ator code can access the “18. User Code Manage” and “19.
Management Setting” user tools.
2
Note
❒ Default: No
❒ If you select “Yes”, you should register the key operator
code. See below.
Reg/Chg KeyOpCode Use to register or change the key operator code (up to 8 dig-
its).
ëè
Page 30

USER TOOLS (SYSTEM SETTINGS)
2
System Settings 6/
Menu Description
22. ADF Orig. Ejection As a default setting, the scanned originals from the docu-
6
ment feeder (ADF) are ejected to the ADF external tray. But,
if there is no space to attach an ADF external tray, you can
change the output tray to the ADF tray. However, if the output tray is set to the ADF tray, it takes a little more time than
to the ADF external tray.
Note
❒ Default: ADF External Tray
24. <F/F4>Size Setting
Currently three types of F size are available; 8
× 13" and 8" × 13".
The document feeder or platen cover sensor cannot distinguish these 3 types of originals.
This function sets the F size from the document feeder or
platen cover sensor.
Auto Paper Select or Auto Reduce/Enlarge in the case of F
size originals functions based on this setting.
1
/
" × 13", 8
2
Note
❒ Default: 8
1
/
" × 13"L
2
1
/4"
ëç
Page 31

INDEX
Symbols
# key
ìè
,
A
ADF Orig. Ejection
Auto Off Timer
Auto Tray Switch
,
C
Clear/Stop key
Code Manage-Copy
Contrast
Copy Count Display
Copy Mode
Cursor keys
,
,
ëè
, ì, ê,
ìè
,
E
Energy Saver Mode
F
F/F4 Size Setting
Facsimile Mode
Function Priority
Function Switch
, ì, é,
I
Interrupt Copying
K
,
,
,
ëì
,
ìè
,
ëí
,
ìí
ìä
ëê
,
,
ëç
,
ìí
ëç
ëè
ëì
ìä
ìë
N
Number keys
,
ìè
O
Output Tray
,
ëê
P
Panel Beeper
Panel Display
Pap.Tray Priority
Paper Size-Tray
Print CounterList
Print Priority
,
,
,
ìä
,
ëé
ìè
,
,
ëë
ëë
ëè
R
Ready Beeper
Reg/Chg KeyOpCode
,
ìä
,
S
Selection keys
Show/PrintCounter
Sp. Paper Ind.
System Reset
,
,
,
ëí
ìè
ëê
,
ëè
U
User Code Manage
User Tools (System Settings)
User Tools/Counter key
,
ëè
,
ëè
ìè
,
ìè
Key Operator Code
Keys for User Tools (System Settings)
,
ëè
L
Low Power Timer
Low Pwr. Shift Time
,
ëí
,
ëí
M
Management Setting
Modes
Multi-Access
,
è
,
ëè
,
ç
ìè
,
ëæ
Page 32

In accordance with ISO Standard 7001, this machine uses the following symbols for the main power
switch:
a means POWER ON.
c means STAND BY.
Copyright © 1998 Ricoh Co., Ltd.
Page 33

RICOH COMPANY, LTD.
15-5, 1 chome, Minami-Aoyama,
Minato-ku, Tokyo
Telephone: Tokyo 3479-3111
Overseas Affiliates
340/350/450 Operating Instructions
U.S.A.
RICOH CORPORATION
5 Dedrick Place
West Caldwell, New Jersey 07006
(TEL) 973-882-2000
Netherlands
RICOH EUROPE B.V.
Groenelaan 3 P.O. Box 114
1180 AC - Amstelveen Holland
(TEL) 020-5474111
United Kingdom
RICOH U.K. LTD.
Ricoh House
1 Plane Tree Crescent, Feltham,
Middlesex, TW13 7HG
(TEL) 181-261-4000
Germany
RICOH DEUTSCHLAND GMBH
Mergenthalerallee 38-40,
65760 Eschborn
(TEL) (06196) 906-0
Singapore
RICOH ASIA PACIFIC PTE. LTD.
#15-01/02 The Heeren,
260 Orchard Road,
Singapore 238855
(TEL) 65-830-5888
Printed in China
AE AE A2308608
Spain
RICOH ESPAÑA S.A.
Guitard, 45
08014 Barcelona
(TEL) 490-09-60
Italy
RICOH ITALIA S.p.A.
Via della Metallurgia, 12
(zona Basson) - 37139 VERONA
(TEL) 045-851 00 44
Hong Kong
RICOH HONG KONG LTD.
23/F., China Overseas Building,
139, Hennessy Road,
Wan Chai, Hong Kong
(TEL) 2862-2888
France
RICOH FRANCE S.A.
383 Avenue du Général de Gaulle,
B.P. 307, 92143 Clamart Cedex
(TEL) 01-4094-3838
 Loading...