

Page 1
PRINTER Option Type
450
OPERATING INSTRUCTIONS
PRINTER REFERENCE (option)
PEN0000TN
Read this manual carefully before you use this product a nd keep it handy for future
reference.
For safety, please follow the instructions in this manual.
Page 2

PRINTER Option Type 450 OPERATING INSTRUCTIONS
Printed in Japan
UE USA A867-8600
Page 3

Introduction
This manual contains detailed instructions on the operation and maintenance of this machine. To get
maximum versati lit y from this machine all oper ators shou ld caref ully rea d and follow the instruc tions in
this manual.
Please read the Safety Information in the “Copy Reference” before using this machine. It contains important information related to USER SAFETY and PREVENTING EQUIPMENT PROBLEMS.
Important
Parts of this manual are subject to change without prior notice. In no event will the company be liable
for direct, indirect, special, incidental, or consequential damages as a result of handling or operating
the machine.
Trademarks
Microsoft
®
, Windows®, and MS-DOS® are registered t r ademarks of Mi crosof t Corpor atio n in t he Unite d
States and/or other countries.
PostScript
®
is registered tra dem ark of Adobe System Incorporated.
Other product names used her ein are for identification purposes only and might be trademarks of their
respective companies. We discl aim any and all rights in those m arks.
Warnin g:
Use of controls or adjustment or performance of procedures other than those speci fied in this manual
might result in hazardous radiation exposure.
Notes:
Some illustrations might be slightly different from your machine.
Certain options might not be available in some countries. For details, pleas e contact your local dealer.
Page 4

Note to users in the United States of America
Notice:
This equipment has been tested and found to comply with the limits for a Class B digital device, pursuant to
Part 15 of the FCC Rules. These limits are designed to provide reasonable protection against harmful interference in a residential installation. This equipment generates, uses and can radiate radio frequency energy
and, if not installed and used in accordance with the instructions, may cause harmful interference to radio
communications.
However, there is no guarantee that interference will not occur in a particular installation. If this equipment
does cause harmful interference to radio or television reception, which can be determined by turning the
equipment off and on, the user is encouraged to try to correct the interference by one more of the following
measures:
Reorient or relocat e the receiving antenna.
Increase the separation between the equipmen t and receiver.
Connect the equipment into an outlet on a circuit different from that to which the receiver is
connected.
Consult the dealer or an expe rienced radio/TV technician for help.
Warning
Changes or modifications not expressly approved by the party responsible for compliance could void
the user's authority to operate the equipment.
Caution (in case of 100BaseTX environment):
Properly shielded and grounded cables (STP) and connectors must be used for connections to host
computer (and/or peripheral) in order to meet FCC emission limits.
Declaration of Conformity
Product Name: Printer controller
Model Number: Type 450
Responsibl e party: Ricoh Corporatio n
Address: 5 Dedrick Place, West Caldwell, NJ 07006
Telephone number: 973-882-2000
This device complies with part 15 of FCC Rules.
Operation is subject to the following two conditions:
1. This device may not cause harmful interference, and
2. this device must accept any interference received,
including interference that may cause undesired operation.
Note to users in Canada
Note:
This Class B digital appz wit h Canadian ICES-003.
Remarque concer na nt le s utilisateurs au Canada
Avertissement:
Cet appareil numér ique de la classe B est conforme à la norme NMB-003 du Canada.
Copyright © 1998
Page 5

How To Read This Manual
R
R
Symbols
In this manual, the following symbols are used:
WARNING:
This symbol indicates a potentially hazardous situation that might result in
death or serious injury when you misuse th e m a ch ine wit h ou t followin g th e instructions under this symbol. Be sure to read the instructions, all of which are described in the Safety Information section.
CAUTION:
This symbol indicates a potentially hazardous situation that might result in minor or moderate injury or property damage that does not involve personal injury
when you misuse the machine without following the instructions under this
symbol. Be sure to read the instructions, all of which are desc ribed in the Safety
Information section.
* The statements above are notes for your safety.
Important
If this instruction is not followed, paper might be misfed, originals might be
damaged, or data might be lost. Be sure to read this.
Preparation
This symbol indicates th e prior knowledg e or preparations required b efore operating.
Note
This symbol indicates precautions for operation, o r actions to t ake after misoperation.
Limitation
This symbol indicates numerical limit s, functions t hat can not be used together,
or conditions in which a p articular func tion cann ot be u sed.
Reference
This symbol indicates a reference.
[ ]
Keys that appear on the machine's panel display.
Keys and buttons that appear on the computer's display.
{ }
Keys built into the machine's operation panel.
Keys on the computer's keyboard.
i
Page 6

Option List
The following are the options that you can add to enhance the basic capabilities
of the printer.
• Hard Disk : Printer Hard Disk Type 450
• Memory expansion : RAM SIMM
• NIB : Network Interface Board 450-E (NIB 450-E)
• Mailb ox : Mailbox CS360
• PostScript
®
: PostScript®3 Kit Type 450
ii
Page 7

TABLE OF CONTENTS
Manuals for this Machine.......................................................................... 1
Manuals for this Machine .............................................................................. 1
1.Setting up
Requirements.............................................. ..................................... .......... 3
Requ irem en ts........... ... ... ............. ... ... .... ... ... ... .... ... ... ... ... ............. .... ... ... ... .... . 3
Parall el C abl e Re qu i rem e nt s ......... ... .... ... ... ... .... ... ... ... ... .... ... ... ... .... ... ........... 3
Network Connections.................................................................................... 3
Connecting the Machine........................................................................... 5
Connecting the machine to the Host using the Parallel Cable...................... 5
Connecting the machine to the Hub using the Network Interfac e Board 450-E
(NIB 450-E) ................................................................................................... 5
2.Making Adjustments with the Operation Panel
Operation Panel......................................................................................... 8
Adjusting Printer Features..................................................................... 10
Acces s ing th e Pri n te r Feat ur e s... ... ... .... ... ... ... .... ... ... ... ... .... ............. ... ... ... ... 10
Printer Fea tu re s M enu ...... .... ... ... ... ... .... ... ... ... .... ... ... ... ... .... ... ... ... .... ............ 12
Printer Fea tu re s Par a m eter s.......... ... .... ... ... ... .... ... ... ... ... .... ............. ... ... ... ... 13
Adjusting System Settings..................................................................... 21
Acces s ing th e Sys t em Se tt ing s............. ... ... ... .... ............ .... ... ... ... .... ... ... ... ... 21
System Settings Menu................................................................................ 24
System Settings Parameters....................................................................... 24
3.Installing the PCL 6/5e Printer Driver
Installing the PCL 6/5e Printer Driver.................................................... 27
Windows 95/98 - Installing the PCL 6/5e Printer Driver.............................. 27
Windows 3.1x - Installing the PCL 6/5e Printer Driver ................................ 28
Windows NT 4.0 - Installing the PCL 6/5e Printer Driver............................ 28
Uninstalling the PCL 6/5e Printer Driver............................................... 30
Windows 95/98 - Uninstalling the PCL 6/5e Printer Driver.......................... 30
Windo ws 3. 1x - Uni nsta l lin g the PC L 6/ 5e Pri nt er Dri v er......... ... .... ... ... ... ... 30
Windo ws NT 4.0 - Uninst all in g the PC L 6/5 e Pri n te r Driv er........ .... ... ... ... ... 31
4.Installing the PostScript® Printer Driver
Installing the PostScript® Printer Driver.............................................. 33
Windows 95/98 - Installing the PostScript® Printer Driver........................... 33
Windows 3.1x - Installing the PostScript
Windows NT 4.0 - Installing the PostScript
Macintos h - Installing the PostScript
®
Printer Driver ........................... 34
®
Printer Driver......................... 35
®
Printer Driver................................... 36
iii
Page 8

Uninstalling the PostScript® Printer Driver .......................................... 37
Windows 95/98 - Uninstalling the PostScript® Printer Driver ...................... 37
Windows 3.1x - Uninstalling the PostScript
Windows NT 4.0 - Uninstalling the PostScript
®
Printer Driver ........................ 37
®
Printer Driver .................... 37
5.Installing the Font Manager
Installing the Font Manager.................................................................... 39
Windows 95/98/NT4.0 - Installing the Font Manager.................................. 39
Windows 3.1x - Installing the Font Manager............................................... 39
Uninstalling the Font Manager............................................................... 41
Windows 95/98/NT4.0 - Uninstalling the Font Manager.............................. 41
Windows 3.1x - Uninstalling the Font Manager........................................... 41
6.Printing a Document
Changing a Mode..................................................................................... 43
Starting a Print Job ................................................................................. 44
Windows 95/98 - Starting a print Job .......................................................... 44
Windows 3.1x - Starting a print Job ............................................................ 44
Windows NT4.0 - Starting a print Job ......................................................... 45
Canceling a Print Job.............................................................................. 47
Windows 95/98 - Canceling a print Job...................................................... 47
Windows 3.1x - Canceling a print Job......................................................... 47
Windows NT4.0 - Canceling a print Job..................................................... 48
7.Troubleshooting
Error & Status Messages on the Operation Panel................................ 51
Machine Does not Print........................................................................... 56
Other Printing Problems......................................................................... 57
8.Appendix
Specifications.......................................................................................... 59
INDEX........................................................................................................ 61
iv
Page 9

Manuals for this Machine
Manuals for this Machine
There are four manuals that describe the operational procedures separately for
the operation and maintenance of the machine.
This manual, the Printer Reference, contains detailed instructions for using this
machine as a printer.
To ensure safe and efficient operation of the machine, all users shou ld read and
follow the instructions cont a ined in th e following manuals.
System Settings
❖❖❖❖
Describes the pro cedures and functions f or adjusting t he settings and defaults
of this machine for fax and copier.
Copy Reference
❖❖❖❖
Describes the procedures and functions for using this machine as a copier.
FAX Reference
❖❖❖❖
Describes the procedures an d functions for using this machine as a fax.
Printer Reference
❖❖❖❖
Describes the system settings, procedures and functions for using this machine as a printer.(This Manual)
1
Page 10

This page is intentionally blank.
2
Page 11
1. Setting up
Requirements
Requirements
Before using this machine you must make sure that all the environmental and
electrical requirements have been met. Connect the machine to your host computer using the parallel port, optional Network Interface Board 450-E (NIB 450E), or both.
Make sure that all the cables, connectors, and electrical outlets necessary to attach the machine to your host computer or network are present.
Reference
For further information on using the parallel port. ⇒ P.5 “Connecting the Machine”
For information on using a network. ⇒ P.5 “Connecting the Machine”
Parallel Cab le Req uir em ent s
Connect the machine to your host computer using a parallel port. This machine
does not provide t he paral l el ca ble to co nnect t he mac hine to the host computer.
The machine's parallel connection is a standard bi-directional interface. It requires a standard 36-pin parallel cable compliant with IEEE 1284 and a parallel
port available on the host computer.
Note
Do not use a parallel cable more than 3 meters (10 feet) long.
❒
Network Connections
Optional Network Interface Board 450-E (NIB 450-E) can be installed to allow direct connection to an Ethernet network.
The Ethernet card supports 10BaseT or 100BaseTX connections.
You can use the machine in a network environmen t as follows.
• Using the appropriate network management software and printer driver.
• Attaching the machine to a networked computer set up as a server.
3
Page 12

1
Setting up
Client
Windows 3.1x, 95, 98, NT 4.0, Macintosh
Driver
PCL 6/5e , PostScript
File Server
Netware 3.x , Netware 4.x
Protocol
IPX/SPX, TCP/IP , EtherTalk(Macintosh only)
®
In a mixed network environment, the protocol automatically switches among
network protocols.
Reference
Refer to the configuration guide that comes with the Network Interface Board
450-E (NIB 450-E) for more information on installing.
For information on resolving network connection problems. ⇒ P.51 “Trouble-
shooting”
Note
Consult your Network Administrator before connecting your machine to a
❒
network.
4
Page 13
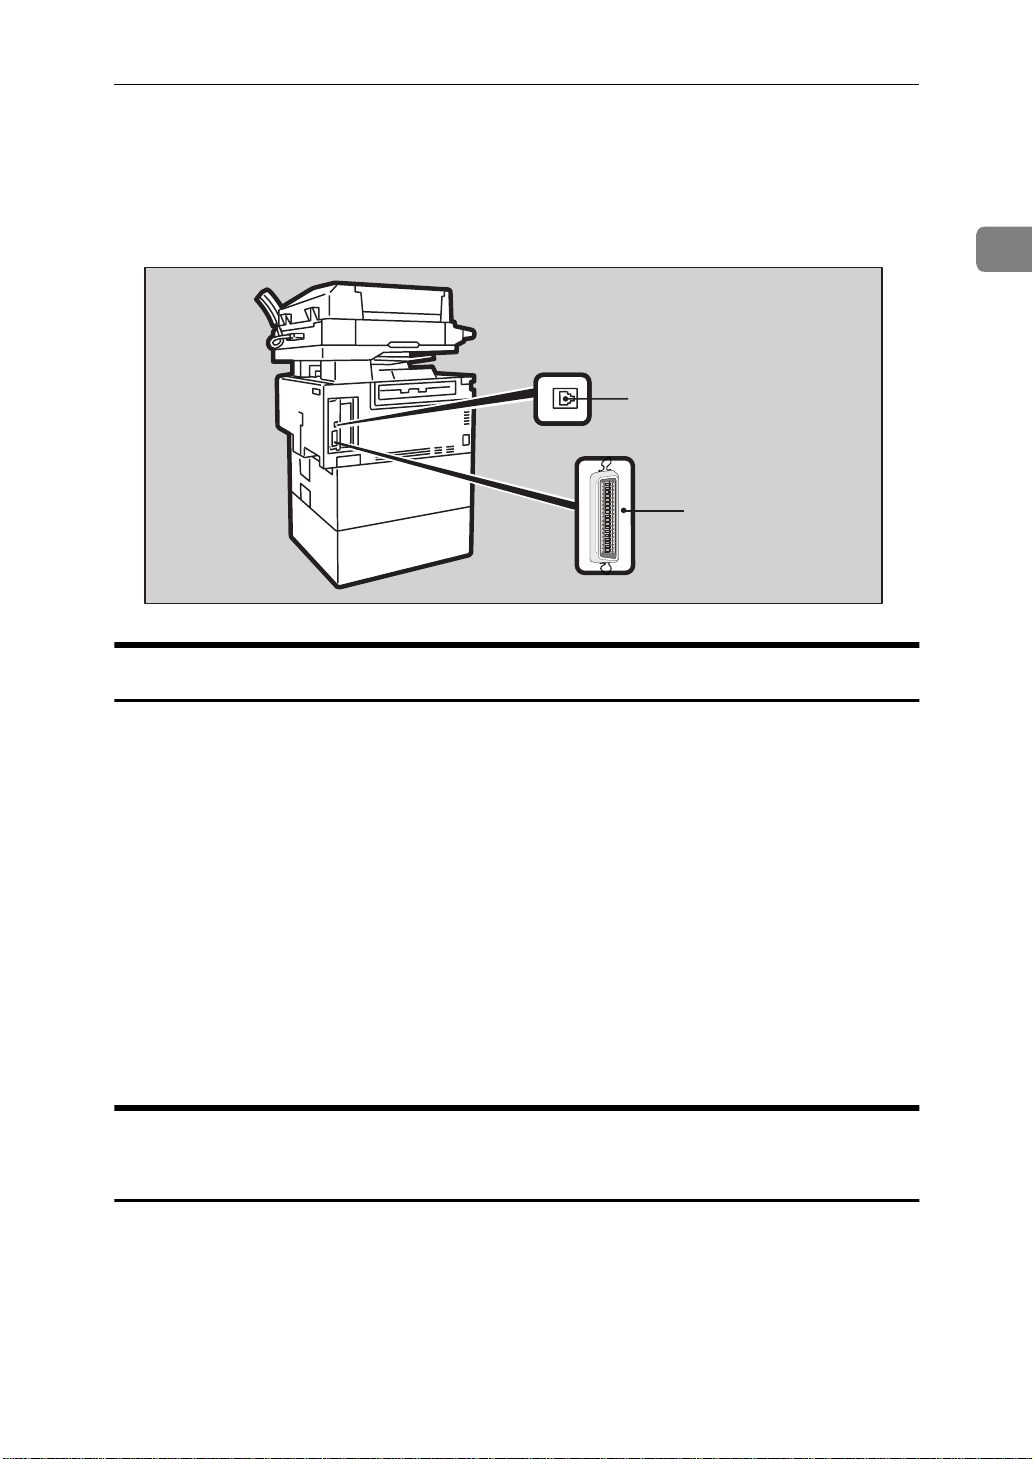
Connecting the Machine
Connecting the Machine
Make sure the shape and the position of the connector are as shown in the illustration.
10BaseT/100BaseTX
Parallel Port
PEN0010TW
1
Connecting the machine to the Host using the Parallel Cable
Connect the machine t o the hos t co mpute r us ing a p aral lel cab l e complia nt wi t h
IEEE 1284 (supplied by you).
Follow these steps to connect the machine to your host computer:
A
Make sure you have the c orrect cable.
B
Make sure both the machine and the host computer are turned off.
C
Plug the 36-pin end of the parallel cable into the parallel port at the back on
the left side cover of the machine.
D
Squeeze the wire clips on each side of the connector together until they
snap into place. The clips hold the cable securely in place.
E
Plug the other end of the parallel cable into the computer's parallel port.
Connecting the machine to the Hub using the Network Interface Board 450-E (NIB 450-E)
Connect the machine using the Network Interface Board 450-E (NIB 450-E).
Follow these steps to connect the machine.
A
Make sure you have a cor rect c a ble.
B
Make sure the machine is turned off.
5
Page 14

Setting up
C
Plug the end of the network interface cable into the 10BaseT/100BaseTX
port at the back on the left side cover of the machine.
D
Plug the other end of the cable into the Hub.
1
Note
You can not connect to a Macintosh computer directly.
❒
You should confirm that the cable is connected to the 10BaseT/100BaseTX
❒
port.
Do not connect the cable to the ISDN port by mistake.
❒
In case of 100BaseTX environment, properly shielded and grounded cable
❒
(STP) must be u sed for conne ction to h ost comp uter (and/or H UB ) in order to meet FCC and EMC Directive 89/336/EEC emission limits.
6
Page 15
2. Making Adjustments with the Operation Panel
This section is for the maintenance operators.
The User Tools set the default settings, which are divided into four menu items;
System, Copy, Fax, and Printer. Th is section deals with the inform ation on adjusting the printer settings using the System and the Printer menus.
Note
After using the user tools, be sure to return to Prin ter mode. The settings are
❒
not canceled even if the operation swit ch is turned off or the
ergy Saver
Function names displayed in a faint font become available when the machine
❒
is expanded.
Reference
For information on adjusting the Copy and the Fax settings. ⇒ Refer to the
"Copy Reference" , the "Fax Reference" or the "System Settings. "
key is pressed.
}
Clear Modes/En-
{
7
Page 16
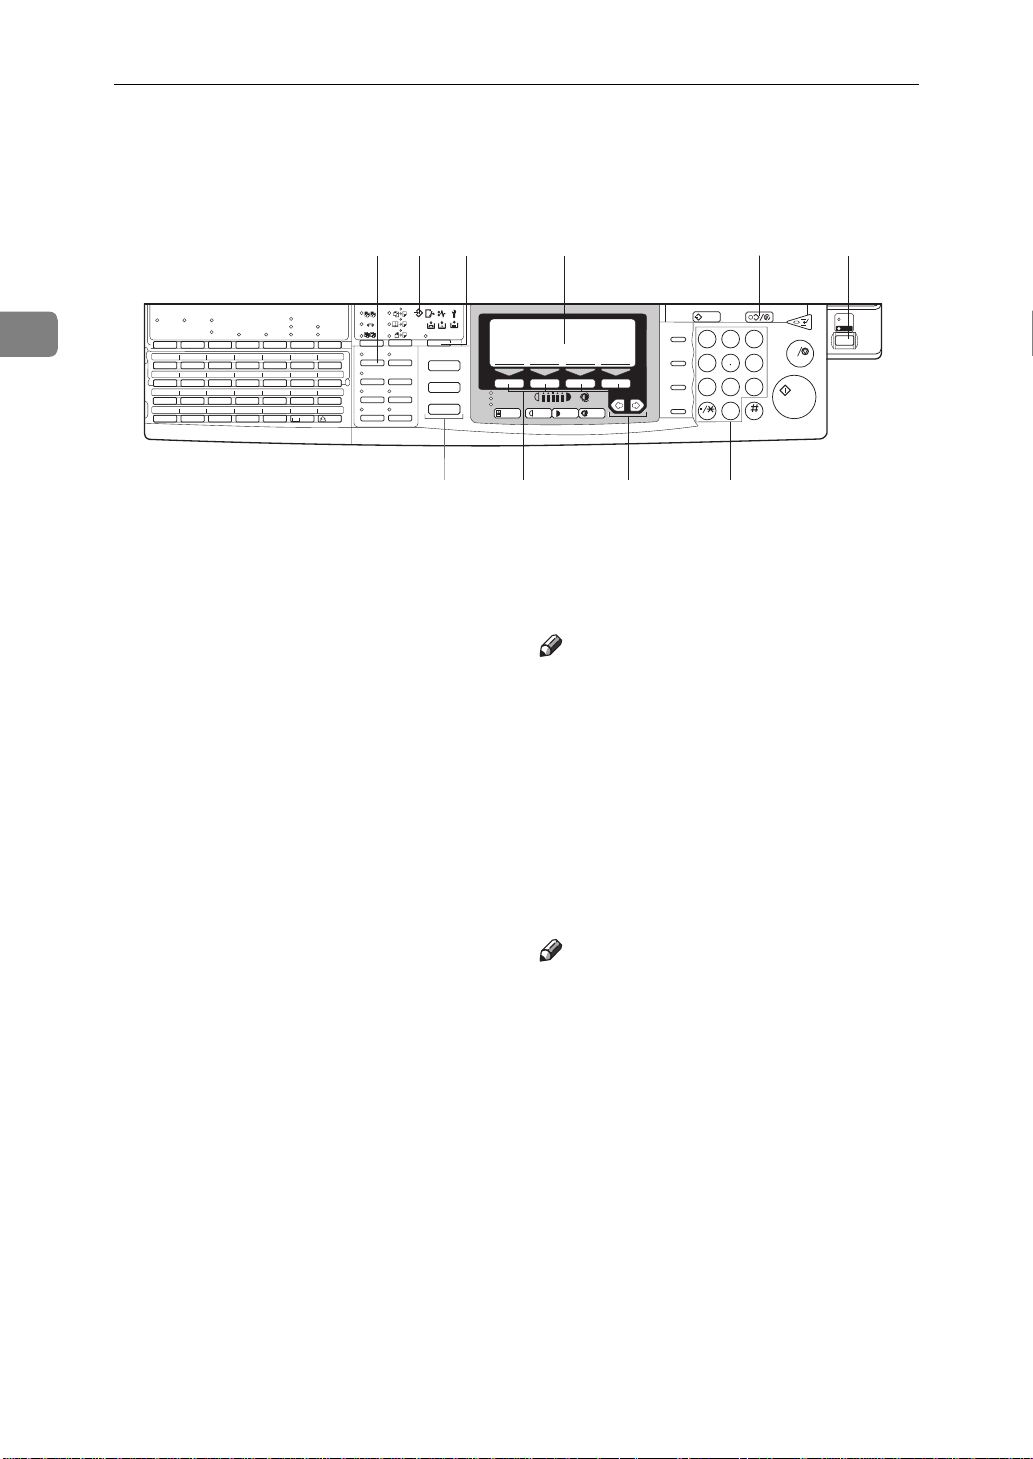
Making Adjustments with the Operation Panel
Operation Panel
2
2
34
2
2
2
User Tools / Counter
Copy
Fax
Printer
Commu-
Receive
Confidential
nicating
File
File
Start
TEL
TX File
Manual RX
Mode
Status
F1
F3 F4 F5
F2
01 02 03 04 05 06 07
A B C D E F G
08 01 10 11 12 13 14
H I J K L M N
15 16 17 18 19 20 21
OPQRSTU
22 23 24 25 26 27 28
VWXYZ
Standard
Detail
SuperFine
Immediate
Trans.
Memory
Trans.
1
Sort
1-Sided 2-Sided
1
1
Book 2-Sided
Staple
Stack
2-Sided 2-Sided
2
Enhanced
Auto Reduce/
Image
Enlarge
Menu
Zoom
Series
Combine
Copies
Copies
1
2
Margin
Erase Center/
Adjust
Border
34
7
1.
Enhanced Image
{{{{
}}}}
key
When Copier Hard Disk (Image Enhance
Kit) is installed, press this key to make
the collation.
If the indicator doesn't light, you can't
make the co llation, a s Copier Hard D isk
(Image Enhance Kit) is not installed.
2.
Data In indicator
Shows if the print job is being sent from
the host computer.
If the indicator is blinking, the job is being sent.
If the indicator stays on, there is the data
to be printed out.
5
Interrupt
Program
Modes
/
Clear
C
Energy Saver
*
Text Photo
Photo
Special Orig.
.
8
Speed Dial
1
On Hook Dial
456
Pause /
Redial
7809
Lighter Darker
Auto Image Density
5.
Clear Modes/Energy Saver
{{{{
PRS
Tone
23
ABC DEF
OPER
109
Clear / Stop
C
MNOJKLGHI
Start
WXYTUV
Enter
Press this key for about 1 second to
switch to and from Energy Saver mode.
Note
❒
This key is not effective, while the default settings of the Printer Features
are being changed using User Tools.
⇒
P.10
P.21
6.
Operation Switch
“Adjusting Printer Features”
“Adjusting System Settings”
Press this switch to turn the power on.
(The On ind icator light s up.) To turn of f
the power, p ress this swi tch again. (T he
On indicato r goes off.)
}}}}
key
6
Main
Power
On
PEN0100TW
,
3.
User Tools/Counter
{{{{
User Tools
❖❖❖❖
}}}}
key
Press to change the default settings
and conditions to meet your requirements.
Counter
❖❖❖❖
Press to c heck or print th e total num ber of prin ts made.
⇒
P.10
“Adjusting Print er Features”
“Adjusting System Settings”
4.
Panel Display
Shows the operation status, error messages, and function menus.
8
, P.21
Note
❒
This key is not effective, while the default settings of the Printer Features
are being changed using User Tools.
⇒
7.
P.10
P.21
Function
{{{{
“Adjusting Printer Features”
“Adjusting System Settings”
}}}}
key
Press to change modes(Copy, Fax, Printer) shown on the panel display. To use
the printer function, press the
Printer
[
key.
8.
Selection
{{{{
}}}}
keys
Press these keys under the item you wish
to select.
,
]
Page 17

9.
<<<<
Use these keys to move to another page
of the panel display.
10.
{{{{
Use these keys to enter a numeric value.
>>>>
and
Number
keys (Cursor keys)
}}}}
keys
Operation Panel
2
9
Page 18
Making Adjustments with the Operation Panel
Adjusting Printer Features
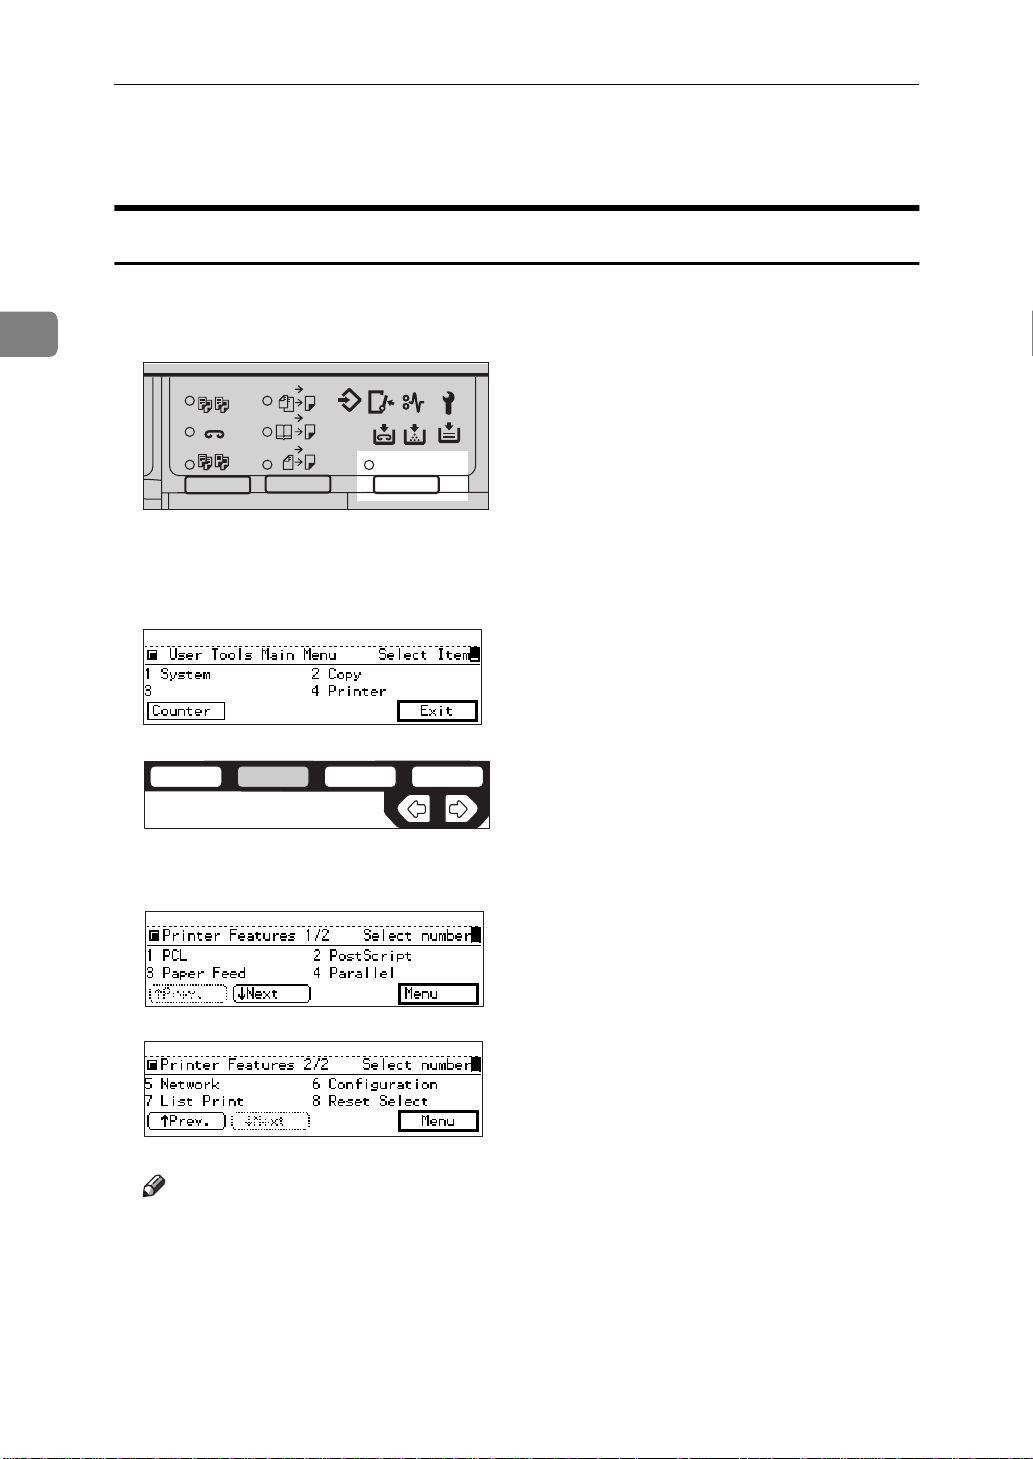
Accessing the Printer Features
2
A
Press the
User Tools/Counter
{{{{
}}}}
key.
The User Tools Main M e nu appears.
B
Sort
Staple
Stac
Enter
{{{{4}}}}
with the
1-Sided 2-Sided
1
Book 2-Sided
2-Sided 2-Sided
2
User Tools /
Number
{{{{
PEN0200TN
}}}}
keys.
The Printer Features menu appears.
PEN0300DD
PEN0400TN
10
C
Search for the desired menu with the
PEN0500DD
PEN0600DD
Note
❒
❒
↓↓↓↓Next
{
↑↑↑↑Prev.
{
: Press to go to the next page
}
: Press to go back to the previous page.
}
⇒ P.8 “Operation Panel”
Number
{{{{
}}}}
keys.
Page 19
Adjusting Printer Features
D
Change the settings by following the instructions on the panel display.
Then press
{{{{OK}}}}
.
Note
: Press to set the new settings and return to the previous menu.
{OK}
❒
❒
Cancel
{
: Press to re turn to the p revious menu wi thout ch anging any dat a.
}
⇒ P.13 “Printer Features Parameters”
Exiting from User Tools
A
After changing the user tools settings, go back to the User Tools Main
Menu.
2
B
Press the
User Tools/Counter
{{{{
Sort
Staple
Stac
1-Sided 2-Sided
1
Book 2-Sided
2-Sided 2-Sided
2
}}}}
key.
User Tools /
PEN0200TN
Note
You can also exit from user tools by pressing the
❒
Tools Main Menu.
key on the User
Exit
{
}
11
Page 20
2
Making Adjustments with the Operation Panel
Printer Features Menu
12
PEN0700CW
Page 21
Printer Features Parameters
PCL
Menu Description
Adjusting Printer Features
01. Orientation You can specify the page orientation:
• Portrait
•Landscape
Note
❒
Default:
02. Form Lines You can specify the number of lines per page:
5 to 128
The default settings depend on the paper size.
Note
❒
Default: 64 (A4)
❒
Default: 60 (
03. Font Sour ce You can specify the location of th e default font:
Internal
❖❖❖❖
Specifi e s that you want to use the r e sident font a s
the default font.
Soft
❖❖❖❖
Specifies that you want to use the font downloaded from the host machine as the default font.
Portrait
1
8
/2 × 11
)
2
Note
❒
Default:
04. Font Number You can specify the value for the default font you
want to use:
0 to 999
Note
❒
Default:
Internal
0
13
Page 22

2
Making Adjustments with the Operation Panel
Menu Description
05. Point Size You can specify the value for the point size you want
to use for the selected font in increments of 0.25:
4.00 to 999.75
Note
❒
Default:
When an incorrect size is entered, it blinks for about 2
seconds. Enter the correct size a t that time.
06. Font Pitch You can specify the number of character s per inch for
the selected font in increments of 0.01:
0.44 to 99.99
12.00
Note
❒
Default:
07. Symbol Set You can specify the set of print characters for the selected font. Search for the desired font among the options shown in the 6 screens.
Roman-8 , Windows Latin 1 , Wind ows Lat in 2 , Wi ndows Latin 5 , Windows Baltic , Win 3.0 , Legal , ISO
Latin 1 , ISO Latin 2 , ISO Latin 5 , ISO 4 , ISO 6 , ISO
11 , ISO 15 , ISO 17 , ISO 21 , ISO 60 , ISO 69 , PC-8 ,
PC-850 , PC-852 , PC-T004 , PC-8 DN , P C-T urk , Ve ntura Math , Ventura US , Ventura Intel , Microsoft
Publishing , Pifont , Desktop , Math -8 , PS Math , PS
Text , MC Text
10.00
14
Note
❒
Default:
PostScript
Menu Description
Printer Errors
®
You can specify whether the PostSc ript
should be printed:
• Off
•On
Note
❒
Default:
Roman-8
Off
®
Erro r Repor t
Page 23

Adjusting Printer Features
Paper Feed
Menu Description
01.Input You can ma ke the input settings as follows.
Paper Size
❖❖❖❖
You can specify the paper size when the paper size
is not specified by the application.
1
A3 , 11 × 17 , B4 , 8
×
13 , A4 , 8
1
8
/2 , A6
1
/2 × 11 , 71/4 × 101/2 , B5 , A5 , 51/2 ×
Note
❒
Default : M e tric Version
❒
Default: Inch Vers ion
Tray Priority
❖❖❖❖
You can spe ci fy the input pape r tray. Only the installed trays appear on the panel display.
Auto , LCT , Bypass , Tray1 , Tray2 , Tray3 , Tray4
/2 × 14 , 81/4 × 13 , 8 × 13 , 81/2
A4
1
8
/2 × 11
2
Note
❒
Default:
Auto Tray Switch
❖❖❖❖
You can specify whether the Auto Tray Switch is
on. When the Auto Tray Switch is On, and the current paper tray becomes empty during a print job,
the machine automatically changes the paper tray
to the one that contains the same paper size and
orientation.
•On
•Off
Auto
Note
❒
Default:
Bypass Paper Type
❖❖❖❖
You can specify th e type o f paper in the Bypass
Tray:
• Standard
•OHP
•Thick Paper
On
Note
❒
Default:
Standard
15
Page 24

2
Making Adjustments with the Operation Panel
Menu Description
02. Output (1/2) You can make the output settings as follows.
Duplex
❖❖❖❖
You can specify whether you want to print on both
sides of each page.
If so, you c an also specify th e orient ation of paper.
•Off
• Bind-Long
•Bind-Short
Note
❒
Default:
Sort
❖❖❖❖
You can specify whether you want to collate the
output.
If so, you can also specify the printing order.
•Off
•Shift
• Rotate
Off
Note
❒
Default:
Staple
❖❖❖❖
You can speci fy whether you want to staple the
output.
If so, you can also specify the stapling position
among the options shown in the 5 screens.
Off , Left Slant Port , Left Slant Land , Left Vart
Port , Left Vart Land , Left Ho riz Po rt , Le ft Ho ri z
Land , Left 2 Port , Left 2 Land , Right Slant Port ,
Right Slant Land , Right Vart Port , Right Vart
Land , Right Horiz Port , Right Horiz Land , Right
2 Port , Right 2 Land , Top 2 Port , Top 2 Land
Note
❒
Default:
Off
Off
16
Page 25

Menu Description
Adjusting Printer Features
02. Output (2/2)
Punch
❖❖❖❖
You can s pecify whether you want to p unch the
output for filing.
If so, you can also spe cify the punching position
among the options shown in the 2 screens.
Off , Left Port , Left Land , Right Port , Right Land
, Top Port , Top Land
Note
❒
Default:
Mailbox Tray Prio
❖❖❖❖
You can specify to which bins pr in t out should be
delivered.
1 , 2 , 3 , 4 , 5 , 6 , 7 , 8 , 9
Note
❒
Default:
Parallel
Menu Description
2
Off
1
01. Emulation You can specify the page description language for
print jobs re ce ived through the parallel port:
•Auto
•PCL
• PostS cript
®
Note
❒
Default:
02. Bi-Direction You can specify whether bi-directional communication between this machine and the host computer is
enable.
• Off
•On
Auto
Note
❒
Default:
On
17
Page 26

2
Making Adjustments with the Operation Panel
Menu Description
03. I/O Timeout You can specify how many seconds to wait until an
incomplete print job should end, a nd the next por t in
the polling sequence should be set in increments of 1.
5-300sec
Note
❒
Default:
30sec.
Network
Menu Description
01. I/O Timeout You can specify how many seconds to wait until an
incomplete print job should end, a nd the next por t in
the polling sequence should be set in increments of 1.
5-300sec
Note
❒
Default:
30sec.
02. TCP/IP
IP Address
❖❖❖❖
You can specify the IP Address.
Note
❒
Default:
Subnet Mask
❖❖❖❖
You can specify the Subnet Mask.
Note
❒
Default:
Gateway Address
❖❖❖❖
You can specify the Gateway Address.
Note
❒
Default:
All zero
All zero
All zero
18
Page 27

Adjusting Printer Features
Configuration
Menu Description
01. Resolution You can s p ecify the print resolution in dots per inch:
• 300dpi
• 600dpi
Note
❒
Default:
03. Auto Continu e You can s peci fy whe ther the Au to Con tinue featu re is
enabled. When it is On, printing continues after a system error occurs:
•Off
•On
Note
❒
When it is on, and certain types of error occur, the
current job might be canceled, and the machine automatically resumes the next job.
❒
Default:
600dpi
On
2
04. Edge Smoothing You can specify whether the Edge Smoothing feature
is enabled.
•Off
•On
Note
❒
Default:
05. Autocont.Timeout You can speci fy how many seconds to wait until the
Auto Continue Feature shoul d end in inc rements of 1.
5-300 sec
On
Note
❒
Default:
30sec.
19
Page 28

2
Making Adjustments with the Operation Panel
List Print
Menu Description
01. PS Font List You can print a list of installed PS fonts.
02. PCL Font List You can print a list of installed PCL fonts.
03. PS Demo Page You can print a PS Demo Page.
04. PCL Demo Page You can print a PCL Demo Page.
05. Configuration Page You can print a page describing the printer configuration.
Reset Select
Menu Descrip tio n
01. Job Reset You can cancel the print job currently being processed.
02. Menu Reset You can cancel the print job and restore some of the
menu pa rameters to their factory defaults.
Note
❒
The following paramete rs do not cha nge back to
their facto ry defaults:
• Bi-D i re ction
• TCP/IP Settin gs
03. System Reset You can rese t the system .
20
Page 29

Adjusting System Settings
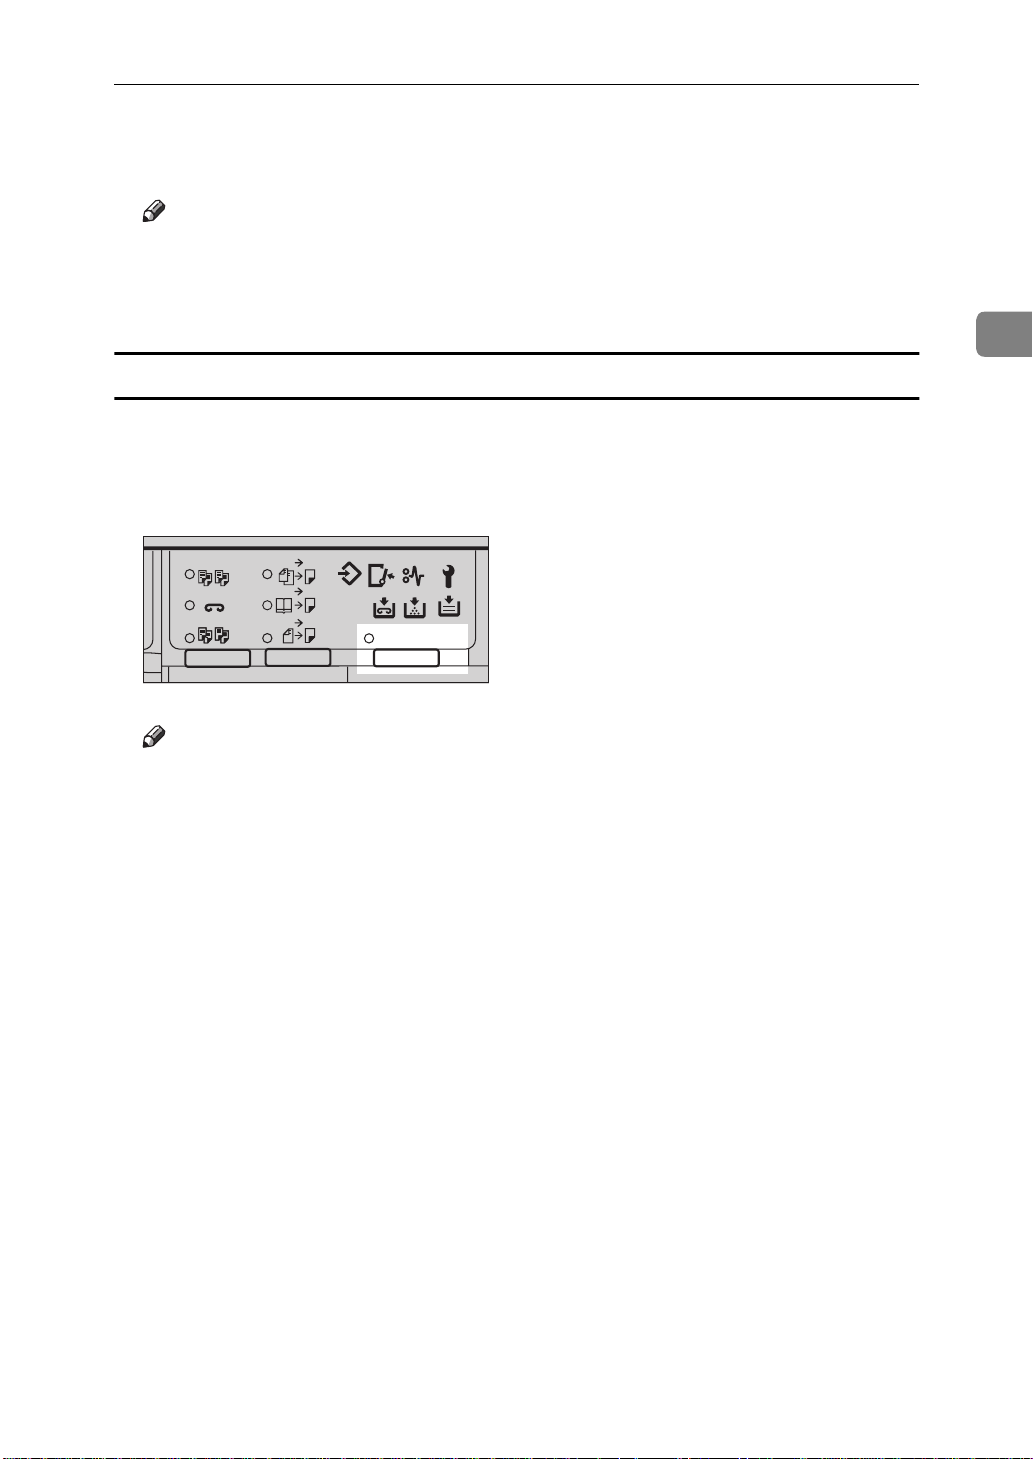
Accessing the System Settings
Adjusting System Settings
A
Press the
User Tools/Counter
{{{{
}}}}
The User Tools Main M e nu appears.
B
Sort
Staple
Stac
Enter
{{{{1}}}}
with the
1-Sided 2-Sided
1
Book 2-Sided
2-Sided 2-Sided
2
User Tools /
Number
{{{{
}}}}
keys.
The System menu appears.
key.
2
PEN0200TN
PEN0300DD
PEN0400TN
21
Page 30

Making Adjustments with the Operation Panel
2
C
Search for the desired menu with the
PEN0800DD
PEN0900DD
PEN1000DD
PEN1100DD
Number
{{{{
}}}}
keys.
PEN1200DD
PEN1300DD
Note
❒
❒
↓↓↓↓Next
{
↑↑↑↑Prev.
{
: Press to go to the next page
}
: Press to go back to the previous page.
}
⇒ P.8 “Operation Panel”
D
Change the settings by following the instructions on the panel display.
Then press
{{{{OK}}}}
.
Note
: Press to set the new settings and return to the previous menu.
{OK}
❒
❒
Cancel
{
: Press to re turn to the p revious menu wi thout ch anging any dat a.
}
⇒ P.24 “System Settings Parameters”
22
Page 31

Adjusting System Settings
Exiting from User Tools
A
After changing the user tools settings, go back to the User Tools Main
Menu.
B
Press the
User Tools/Counter
{{{{
Sort
Staple
Stac
1-Sided 2-Sided
1
Book 2-Sided
2-Sided 2-Sided
2
}}}}
key.
User Tools /
PEN0200TN
Note
You can also exit from user tools by pressing the
❒
Tools Main Menu.
key on the User
Exit
{
}
2
23
Page 32

2
Making Adjustments with the Operation Panel
System Set ting s Men u
System Settings Parameters
This section contains the information on the parameters only used for the Printer.
Reference
For information on the other parameters in the System Settings menu. ⇒ P.24
“System Settings Parameters”
For information on how to access the user tools. ⇒ P.21 “Accessi ng the System
Setti ngs”
24
PEN1400CW
Page 33

Adjusting System Settings
2
System Settings
Menu Description
01. Function Priority You can specify th e mode to be dis playe d immediately after the operation switch is turned on or the System Res et mode is turned on.
Note
❒
Default:
15. Output Tra y You can speci fy a tray to which documents are delivered for each mode (Copy, Fax and Printer).
Copy
Note
❒
You can specify a single tray for two or more
modes.
Even if "Internal Tray" is specified as th e Output tray,
the paper whose horiz ontal size to the machine is
300mm or longer will be delivere d to "Finishe r Proof"
or "Mailbox Proof" tray.
With the optional 3000-s heet f in isher in stalled , it will
be automatically delivered to the “Finisher Proof”
tray.
With the optional Mailbox and the optional 3000sheet finisher installed, it will be automatically delivered to the “Mailbox Proof” tray.
Finisher
External Tray
Internal Tray
Internal Tray
2
Finisher
Proof
Finisher
Mailbox
Proof
Mailbox
PEN1600TW
25
Page 34

Making Adjustments with the Operation Panel
Menu Description
2
16. Print Priority (setti ng the
multi-ac cess ing functi on)
23. Memory Priority You can s e lect which functi on should be prioritized
Sets the print priority for each mode.
• "Disp lay" Print priori ty is given to th e mode
shown on the display.
• "Cop y" Pri nt prio ri ty is giv en to the co py fu ncti o n.
• "Fax" Print priority is given to t he fax function.
• "Printer" Print priority is given to the printer func-
tion.
• "Interleave" Makes use of the Multi-Access func-
tions to pr int jobs in the or der in which th e y are
initiated regardless of mode/function.
As the output from the different functions may be inconveniently placed on the same tray, it is possible to
separate o utput trays for e ach functio n using the
"Output Tray" feature.
for the memory allocation of Copier Hard Disk (Image Enhance Kit) .
26
Page 35

3. Installing the PCL 6/5e Printer Driver
Installing the PCL 6/5e Printer Driver
Printing requires installation of a printer driver for your operating system.
This section provides basic procedures for installing the printer driver. The ac-
tual procedure differs somewhat depending on your operating system.
Follow the right one of the procedures below.
Windows 95/98 - Installing the PCL 6/5e Printer Driver
Follow these steps to install the PCL 6/5e printer driver on your Windows 95/
98 system :
A
Insert the CD labeled Printer Drivers and Utilities for Windows/Mac in the
CD-ROM drive.
B
Close all the applications that are currently running.
C
Click on
D
Click on
E
In the “Run” window, click on
F
Select the CD-ROM Drive.
G
Open the folder called “Pcl6 (or Pcl5e)”.
H
Open the folder called "Win31_95".
I
Open the folder of appropriate language.
J
Open the folder called "Disk1".
K
Open the file titled "Setup.exe".
L
Click on
M
Follow the instructions on the screen.
Start
[
]
on the task bar.
Run
[
]
.
[OK]
.
Browse…
[
]
.
27
Page 36

Installing the PCL 6/5e Printer Driver
Windows 3.1x - Installing the PCL 6/5e Printer Driver
Follow these steps to install the PCL 6/5e printer driver on your W indow s 3.1x
system:
A
Insert the CD labeled Printer Drivers and Utilities for Windows/Mac in the
CD-ROM drive.
B
Close all the applications that are currently running.
3
C
From the
D
In the “Run” window, click on
E
Select the CD-ROM Drive in the Dr ives list.
F
Open the folder called “Pcl6 (or Pcl5e)”.
G
Open the folder called "Win31_95".
H
Open the folder of appropriate language.
I
Open the folder called "Disk1".
J
Open the file titled "Setup.exe".
K
Click on
L
Follow the instructions on the screen.
Program Manager
[
[OK]
.
]
, select
Run
[
Browse…
[
]
from t he
]
.
File
[
]
menu.
Windows NT 4.0 - Installing the PCL 6/5e Printer Driver
Follow these steps to install the PCL 6/5e printer driver on your Windows
NT4.0 system:
28
A
Insert the CD labeled Printer Drivers and Utilities for Windows/Mac in the
CD-ROM drive.
B
Close all the applications that are currently running.
C
Click on
D
Click on
E
In the “Run” window, click on
F
Select the CD-ROM Drive.
G
Open the folder called “Pcl6 (or Pcl5e)”.
H
Open the folder called "Nt4".
Start
[
]
on the task bar.
Run
[
]
.
Browse…
[
]
.
Page 37

I
Open the folder of appropriate language.
J
Open the folder called "Disk1".
K
Open the file titled "Setup.exe".
Installing the PCL 6/5e Printer Driver
L
Click on
M
Follow the instructions on the screen.
[OK]
.
3
29
Page 38

3
Installing the PCL 6/5e Printer Driver
Uninstalling the PCL 6/5e Printer Driver
This section provides basic procedures for un installing the printer driver. The
actual procedure differs somewhat depending on your operating system.
Follow the right one of the procedures below.
Windows 95/98 - Uninstalling the PCL 6/5e Printer Driver
Follow these steps to uninstall the printer d river:
A
Insert the CD labeled Printer Drivers and Utilities for Windows/Mac in the
CD-ROM drive.
B
Close all the applications that are currently running.
C
Click on
D
Click on
E
In the “Run” window, click on
F
Select the CD-ROM Drive.
G
Open the folder called “Pcl6 (or Pcl5e)”.
H
Open the folder called "Win31_95".
I
Open the folder of appropriate language.
J
Open the folder called "Disk1".
K
Open the file titled "Unsetup.exe".
L
Click on
M
Follow the instructions on the screen.
Start
[
]
on the task bar.
Run
[
]
.
[OK]
.
Browse…
[
]
.
Windows 3.1x - Uninstalling the PCL 6/5e Printer Driver
Follow these steps to uninstall the printer d river:
A
Insert the CD labeled Printer Drivers and Utilities for Windows/Mac in the
CD-ROM drive.
B
Close all the applications that are currently running.
30
C
From the
D
In the “Run” window, click on
Program Manager
[
]
, click on
Browse…
[
Run
[
]
from the
]
.
File
[
]
menu.
Page 39

E
Select the CD-ROM Drive in the Dr ives list.
F
Open the folder called “Pcl6 (or Pcl5e)”.
G
Open the folder called "Win31_95".
H
Open the folder of appropriate language.
I
Open the folder called "Disk1".
J
Open the file titled "Unsetup.exe".
Uninstalling the PCL 6/5e Printer Driver
K
Click on
L
Follow the instructions on the screen.
[OK]
.
Windows NT 4.0 - Uninstalling the PCL 6/5e Printer Driver
Follow these steps to uninstall the printer d river:
A
Insert the CD labeled Printer Drivers and Utilities for Windows/Mac in the
CD-ROM drive.
B
Close all the applications that are currently running.
C
Click on
D
Click on
E
In the “Run” window, click on
F
Select the CD-ROM Drive.
G
Open the folder called “Pcl6 (or Pcl5e)”.
H
Open the folder called "Nt4".
Start
[
]
on the task bar.
Run
[
]
.
Browse…
[
]
.
3
I
Open the folder of appropriate language.
J
Open the folder called "Disk1".
K
Open the file titled "Unsetup.exe".
L
Click on
M
Follow the instructions on the screen.
[OK]
.
31
Page 40

3
Installing the PCL 6/5e Printer Driver
This page is intentionally blank.
32
Page 41

4. Installing the PostScript
®
Printer Driver
Installing the PostScript® Printer Driver
Printing requires installation of a printer driver for your operating system.
This section provides basic procedures for installing the printer driver. The ac-
tual procedure differs somewhat depending on your operating system.
Follow the right one of the procedures below.
Windows 95/98 - Installing the PostScript® Printer Driver
Follow these steps to in stall the PostScript® printer driver on Windows 95/98
system:
A
Insert the CD labeled Printer Drivers and Utilities for Windows/Mac in the
CD-ROM drive.
B
Close all the applications that are currently running.
C
Click on
D
Click on
E
In the “Run” window, click on
F
Select the CD-ROM Drive.
G
Open the folder called "Ps".
H
Open the folder called "Win95_98".
I
Open the folder of appropriate language.
J
Open the folder called "Disk1".
K
Open the file titled "Setup.exe".
L
Click on
M
Follow the instructions on the screen.
Start
[
]
on the task bar.
Run
[
]
.
[OK]
.
Browse…
[
]
.
33
Page 42

4
Installing the PostScript® Printer Driver
----Using the printer driver with the Adobe PageMaker for Windows 95/
98
If you use the printer under Windows95/98 with the Adobe PageMaker, you
need to copy the PPD file to the PageMaker directory.
The PPD file is the file with extension ".ppd" under on the directory
\PS\WIN95_98\ENGLISH\DISK1\, on the CD labeled Printer Drivers and
Utilities for Windows/Mac. The last directory, "ENGLISH" may be substituted
by appropriate language name. Copy this file to the PageMaker's directory.
For PageMaker 6 default installation, the directory is "C:\PM6\RSRC\USENGLISH\PPD4", and for PageMaker 6.5 default installation, the directory is
"C:\PM65\RSRC\USENGLISH\PPD4". The "USENGLISH" may be different,
depending on your language selection.
Windows 3.1x - Installing the PostScript ® Printer Driver
Follow these steps to install the PostScript® printer dri ver on your Windows 3. 1x
system:
A
Insert the CD labeled Printer Drivers and Utilities for Windows/Mac in the
CD-ROM drive.
B
Close all the applications that are currently running.
C
From the
D
In the “Run” window, click on
E
Select the CD-ROM Drive in the Dr ives list.
F
Open the folder called "Ps".
G
Open the folder called "Win31".
H
Open the folder of appropriate language.
I
Open the folder called "Disk1".
J
Open the file titled "Setup.exe".
K
Click on
L
Follow the instructions on the screen.
Program Manager
[
[OK]
.
]
, click on
Browse…
[
Run
[
]
from the
]
.
File
[
]
menu.
34
Page 43

Installing the PostScript® Printer Dr iver
----Using the printer driver with the Adobe PageMaker for Windows 3.1x
If you use the p rinter under Windows 3.1x wi th the Adobe Pag eMaker, you need
to copy the PPD file to the PageMaker directory.
The PPD file is the file with extension ".ppd" under on the directory
\PS\WIN3.1\ENGLISH \DISK1\, on t he CD labeled Print er Drivers and Utilities for Windows/Mac. The last directory, "ENGLISH" may be substituted by
appropriate language name. Copy this file to the PageMaker's directory.
For PageMaker 6 default installation, the directory is "C:\PM6\RSRC\USENGLISH\PPD4", and for PageMaker 6.5 default installation, the directory is
"C:\PM65\RSRC\USENGLISH\PPD4". The "USENGLISH" may be different,
depending on your language selection.
Windows NT 4.0 - Installing the PostScript® Printer Driver
Follow these steps to install the PostScript® printer driver on Windo ws NT4.0
system:
4
A
Insert the CD labeled Printer Drivers and Utilities for Windows/Mac in the
CD-ROM drive.
B
Close all the applications that are currently running.
C
Click on
D
Click on
E
In the “Run” window, click on
F
Select the CD-ROM Drive.
G
Open the folder called "Ps".
H
Open the folder called "Nt4".
I
Open the folder of appropriate language.
J
Open the folder called "Disk1".
K
Open the file titled "Setup.exe"
L
Click on
M
Follow the instructions on the screen.
Start
[
]
on the task bar.
Run
[
]
.
[OK]
.
Browse…
[
]
.
35
Page 44

4
Installing the PostScript® Printer Driver
----Using the printer driver with the Adobe PageMaker for Windows
NT4.0
If you use the printer under Windows NT4.0 with the Adobe PageMaker, you
need to copy the PPD file to the PageMaker directory.
The PPD file is the file with extension ".ppd" under on the directory
\PS\WINNT4\ENGLISH\DISK1\, on the CD labeled Printer Drivers and Utilities for Windows/Mac. The last directory, "ENGLISH" may be substituted by
appropriate language name. Copy this file to the PageMaker's directory.
For PageMaker 6 default installation, the directory is "C:\PM6\RSRC\USENGLISH\PPD4", and for PageMaker 6.5 default installation, the directory is
"C:\PM65\RSRC\USENGLISH\PPD4". The "USENGLISH" may be different,
depending on your language selection.
Macintosh - Installing the PostScript® Printer Driver
Be sure to install the appropriate driver for Macintosh. T he softw are requires a
System 7.6 or later Macintosh operating system.
®
Follow the step s below to install the P ostScript
that is contained in the PostScript
®
option.
printer driver for Macintosh
A
Insert the CD labeled Printer Drivers and Utilities for Windows/Mac in the
CD-ROM drive.
B
Double click on the CD icon.
C
Double click on a folder of appropriate language.
D
Double click on the installer icon.
E
Follow the instructions on the screen.
36
Page 45

Uninstalling the PostScript® Printer Dr iver
Uninstalling the PostScript
This section provides basic procedures for un installing the printer driver. The
actual procedure differs somewhat depending on your operating system.
Follow the right one of the procedures below.
®
Printer Driver
Windows 95/98 - Uninstalling the PostScript® Printer Driver
Follow these steps to uninstall the printer d river:
A
Click on
B
Point to
C
Select the printer you want to delete.
D
From the
A confirmation dialog box appears.
E
Click on
Start
[
]
on the task bar.
Settings
[
[
Yes
[
File
]
and click on
]
menu, click on
]
to delete the printer driver.
Printers
[
Delete
[
]
.
]
.
4
Windows 3.1x - Uninstalling the PostScript® Printer Driver
Follow these steps to uninstall the printer d river:
A
Open the
B
Double click on the Prin ter icon.
C
Select the printer you want to delete and click on
A confirmation dialog box appears.
D
Click on
E
Click on
Control Panel
[
Yes
[
]
to delete the printer.
Close
[
]
to delete the printer driver.
]
.
Remove
[
]
.
Windows NT 4.0 - Uninstalling the PostScript® Printer Driver
Follow these steps to uninstall the printer d river:
A
Click on
B
Point to
C
Select the printer you want to delete.
Start
[
Settings
[
]
on the task bar.
]
and click on
Printers
[
]
.
37
Page 46

Installing the PostScript® Printer Driver
4
D
From the
A confirmation dialog box appears.
E
Click on
File
[
]
menu, click on
Yes
[
]
to delete the printer driver.
Delete
[
]
.
38
Page 47

5. Installing the Font Manager
Installing the Font Manager
Printing under a Windows syst em requires installation of the Font Manager for
your operating system.
This section provides basic procedures for installing the Font Manager.
The actual procedure differs somewhat depend ing on y ou r operating s ystem.
Follow the right one of the procedure below.
Windows 95/98/NT4.0 - Installing the Font Manager
Follow these steps to install the Font Manager on Windows 95/98/NT4.0 system:
A
Insert the CD labeled Printer Drivers and Utilities for Windows/Mac in the
CD-ROM drive.
B
Close all the applications that are currently running.
C
Click on
D
Click on
E
In the “Run” window, click on
F
Select the CD-ROM Drive.
G
Open the folder called "Fontman".
H
Open the folder called "Disk1".
I
Open the file titled "Setup.exe".
J
Click on
K
Follow the instructions on the screen.
Start
[
]
on the task bar.
Run
[
]
.
[OK]
.
Browse…
[
]
.
Windows 3.1x - Installing the Font Manager
Follow these steps to install the Font Manager on Windows 3.1x system:
A
Insert the CD labeled Printer Drivers and Utilities for Windows/Mac in the
CD-ROM drive.
B
Close all the applications that are currently running.
39
Page 48

Installing the Font Manager
5
C
From the
D
In the “Run” window, click on
E
Select the CD-ROM Drive in the Drivers list.
F
Open the folder called "Fontman".
G
Open the folder called "Disk1".
H
Open the file titled "Setup.exe".
I
Click on
J
Follow the instructions on the screen.
Program Manager
[
[OK]
.
]
, click on
Browse…
[
Run
[
]
.
]
.
40
Page 49

Uninstalling the Font Manager
Uninstalling the Font Manager
This section provides basic procedures for uninstalling the Font Manager. The
actual procedure differs somewhat depending on your operating system.
Follow the right one of the procedures below.
Windows 95/98/NT4.0 - Uninstalling the Font Manager
Follow these steps to uninstall the Font Manager:
A
Click on
B
Point to
C
Double click on the file titled “Add/Remove Programs”.
D
Click on the
E
Click on
A confirmation dialog box appears.
F
Click on
G
Follow the instructions on the screen.
Start
[
]
on the task bar.
Settings
[
Add/Remove...
[
Yes
[
]
and click on
AGFA Font Manager
[
]
.
Control Panel
[
]
in the list box.
]
.
]
.
Windows 3.1x - Uninstalling the Font Manager
Follow these steps to uninstall the Font Manager:
A
Open the “AGFA Font Manager” window in the
B
Double click on “unInstallShield”.
C
Follow the instructions on the screen.
Program Manager
[
5
]
.
41
Page 50

5
Installing the Font Manager
This page is intention ally blank .
42
Page 51

6. Printing a Document
Changing a Mode
You can use this machine not only as a copier, but opti onally as a fax machine or
a printer as well. Press the
key to use the printer fu nctions.
Print
[
]
Enhanced
Image
Menu
Series
Copies
1
Margin
Adjust
34
Auto Reduce/
Enlarge
Zoom
Combine
Copies
2
Eras e Center/
Border
Copy
Fax
Printer
Copy Mode
Facsimile Mode
Printer Mode
Limitation
You cannot switch modes in any of the following cases:
❒
• W hen scanning in a fax message for transmission.
• Dur in g immediate transmission.
PGB1700TW
• When accessing the user tools.
• During interrupt copying.
43
Page 52

Printing a Document
Starting a Print Job
This section provides basic procedures for starting and canceling a print job
from a Windows application. The actual procedure differs somewhat depending
upon the application used. For full details on printing, refer to the documentation and on-line help that comes with your application.
Windows 95/98 - Starting a print Job
Follow these steps to print a document.They are shown using WordPad as an example.
6
A
From the
B
Specify the size, source, orientation and margins of the paper, and click on
[OK]
.
Note
Use
❒
printer's paper tray.
Use
❒
C
Input the text you want to print.
D
From the
The “Print” dialog box appears.
E
Make sure that the name of your machine is selected under
click on
Note
If another printer is shown under
❒
lect the name of your machine.
Clicking the
❒
changing the settings of the printer drivers settings.
File
[
]
menu, click on
to select the paper size that matches the paper loaded in the
Size
[
]
Source
[
[OK]
to select
]
File
[
]
menu, click on
to start printing.
dialog box's
Print
[
]
Auto Tray Select
[
Page Setup
[
Print
[
]
.
Name
[
Properties
[
]
.
.
]
Name
[
, use the drop down menu to se-
]
button displays a screen for
]
]
, and then
Windows 3.1x - Starting a print Job
Follow these steps to print a document.They are shown using Write as an example.
A
Use Write to create a document to print.
44
B
From the
File
[
]
menu, click on
Print Setup
[
]
.
Page 53

Starting a Print Job
C
Make sure that the name of your machine is selected for the
and specify the paper size and source that you want to use.
Note
Use
❒
printer's paper tray.
Use
❒
D
Click on
The above step closes the “Print Setup” dialog box.
E
From the
The “Print” dialog box appears.
Note
Click the
❒
to change the pri nter s etup, and specify th e number and the range o f pages
to be printed.
F
Make sure that the name of your machine is selected under
and then click on
Note
If another printer is selected, click on
❒
machine.
to select the paper size that matches the paper loaded in the
Size
[
]
Source
[
[OK]
File
[
to select
]
.
]
menu, click on
dialog box's
Print
[
]
[
[OK]
to start printing.
Auto Tray Select
Print
[
Setup
[
.
]
]
.
button to open the printer driver screen
]
Setup...
[
andd select the name of your
]
Default Printer
[
Printer Name
[
]
,
]
,
6
Windows NT4.0 - Starting a print Job
Follow these steps to print a document.They are shown using WordPad as an example.
A
From the
The “Page Setup” dialog box appears.
B
Specify the size, source, orientation and margins of the paper, and click on
[OK]
.
Note
Use
❒
printer's paper tray.
Use
❒
C
Input the text you want to print.
D
From the
The “Print” dialog box appears.
File
[
]
menu, click on
to select the paper size that matches the paper loaded in the
Size
[
]
Source
[
to select
]
File
[
]
menu, click on
Auto Tray Select
[
Page Setup
[
Print
[
]
.
]
.
.
]
45
Page 54

Printing a Document
6
E
Make sure that the name of your machine is selected under
click on
❒
❒
[OK]
to start printing.
Note
If another printer is shown under
lect the name of your machine.
Cliking the
changing the settings of the printer drivers settings.
dialog box's
Print
[
]
[
Properties
[
, use the drop down menu to se-
Name
]
button displays a screen for
]
Name
[
]
, and then
46
Page 55

Canceling a Print Job
Canceling a Print Job
This section provides basic procedures for starting and canceling a print job
from a Windows application. The actual procedure differs somewhat depending
upon the application you are using. For full details on printing, refer to the documentation and the on-line help that comes with your app lication.
Windows 95/98 - Canceling a print Job
Follow the steps below to cancel a prin t job.
A
Press the
The foreground and background of the
versed.
B
Ready changes into Off line, and
C
Double click on the prin ter icon displayed on the task bar.
This opens a printer window that shows a queue of documents being processed by the printer. It includes documents being printed, as well as paused.
The word “Printing” in the ”Status” column indicates documents for which
print data is being sent from your computer to the printer. If nothing is shown
in the ”Status” column, it means that the document is waiting for being printed.
D
Click the document name you want to cancel.
E
From the
The selected documents are cleared from the queue.
F
Press the
This clears data of the print job.
G
Press the
The foreground and background of the
versed, and Ready appears on the panel display.
Online
{{{{
Document
[
JobReset
{{{{
Online
{{{{
}}}}
key of your machine's operation panel.
Online
{
JobReset
{{{{
]
menu, click on
}}}}
key of your machine's operation panel.
}}}}
key of your machine's operation panel.
Cancel Printing
[
Online
{
on the panel display is re-
}
}}}}
appears on the panel display.
]
.
on the panel display is re-
}
6
Windows 3.1x - Canceling a print Job
Follow the steps below to cancel a prin t job.
A
Press the
The foreground and background of the
versed.
Online
{{{{
}}}}
key of your machine's operation panel.
{
Online
on the panel display is re-
}
47
Page 56

Printing a Document
6
B
Ready changes into Off line, and
C
Double click on the ”Print Manager” icon.
This opens the ”Print Manager” window.
D
Select the name of the printer that is printing and click
This above step interrupts the transmission of print data to the printer.
E
Select the document you wa nt to c a ncel and click
A dialog box appears to confirm whether you really want to cancel the print
job.
F
Click on
Note
To resume the printer being paused in the step D, select the paus ed printer
❒
and click on
G
Press the
This clears the print job's data.
H
Press the
The foreground and background of the
and Ready appears on the panel display.
[OK]
.
JobReset
{{{{
Online
{{{{
Resume
[
}}}}
key of your machine's operation panel.
.
]
}}}}
key of your machine's operation panel.
JobReset
{{{{
{
}}}}
appears on the panel display.
Pause
Online
[
Cancel
[
in the panel display reversed,
}
]
.
]
.
Windows NT4.0 - Canceling a print Job
Follow the steps below to cancel a prin t job.
A
Press the
The foreground and background of the
versed.
B
Ready changes into Off line, and
C
Double click on the prin ter icon displayed on the task bar.
This opens a printer window that shows a queue of documents being processed by the printer. It includes documents being printed, as well as paused.
The word ”Printing” in the ”Status” column indicates documents for which
print data is being sent from your computer to the printer. If nothing is shown
in the ”Status” column, it means that the document is paused.
D
Click the document name you want to cancel.
E
From the
The selected documents are cleared from the queue.
Online
{{{{
Document
[
}}}}
key of your machine's operation panel.
on the panel display is re-
}
}}}}
appears on the panel display.
]
.
]
menu, click
Online
{
JobReset
{{{{
Cancel Printing
[
48
Page 57

Canceling a Print Job
F
Press the
This clears data of the print job.
G
Press the
The foreground and background of the
versed, and Ready appears on the panel display.
JobReset
{{{{
Online
{{{{
}}}}
key of your machine's operation panel.
}}}}
key of your machine's operation panel.
{
Online
on the panel display is re-
}
6
49
Page 58

Printing a Document
6
This page is intention ally blank .
50
Page 59

7. Troubleshooting
Error & Status Messages on the Operation Panel
Messages Description Comments
Ready The printer is Online and
ready to m ake a print.
Offline The printer is O ff line. If you want to change into
Please Wait. The printe r is warming up
or processing internally.
Network Board Firmware downloa ding….
Engine HDD is full. Sort
uncompleted.
Empty Hole Punch receptacle
The New NIB 450-E firmware is being downloaded.
Engine HDD Full occurr e d
during the current co llate
operation.
The Punc h Trash got ful l
durin g the c urrent punchi ng
job.
If you want to change into
Offline mode, press
Online, press the reversed
Online
{
Wait for the machine to get
ready.
Wait until it is downloaded.
The current collation ends
and the pages that are already on the disk are pr inted
without the collation.
This message remains until
the next pri nt job begins.
Punchi ng cannot b e made
though the print job continues. Dump the punch trash.
This message remains until
the next pri nt job begins.
.
}
Online
{
.
}
Memory Error. Only 1
set can be ou tput.
Add Staples The staples are running out
Network Board Initializing…
An Engine HDD error occurred d uring the current
collate operation.
during the current sta p l ing
job.
The NIB 450-E firmware is
being initialized.
The print job can be completed with only one output
copy of the document.
This message remains until
the next pri nt job begins.
The stapling is being continued, even if this message appears.
This message remains until
the next pri nt job which
doesn' t re quire stapling begins.
Wait until it is initialized.
51
Page 60

Troubleshooting
Messages Description Comments
7
Going Offline The machine is shifti ng from
Online to Offline.
The job has been Reset. The current job has been re-
set.
Functional Problem
SC2000
Printer HDD Error
Printer HDD cannot be
used.
Printer HDD Error
Press Reset to cancel the
current job
Parallel communica ti on
Error
A controller diagnostic error
or a controller exception error occur re d while the po wer is on.
The printer controller h as
some problems on the hardware.
A controlle r disk error is detected while the power is on.
A controlle r disk error is detected while a macro or font
is being downloaded from
the host to the printer controller.
A parallel communication
error occurred duri ng the
print job via the parallel
port.
Wait until it shifts to Offline.
Turn the main switch off,
and then back on. If the error
appears again, please call
service.
Even if this error occurs, other functions (Copy and Fax)
are still available.
Pres s
firming the error, and the
printer will start without the
controller disk capability.
Press
current job.
If this error often occurs ,
change the disk.
Press
print job, and check the parallel communication settings
again.
Continue
{
Reset
{
Reset
{
after con-
}
to cancel the
}
to cancel the
}
52
Network failure. Network co mmunication is
not available.
An installed network card
fails to correctly establish
communicat ion with the
network.
Pres s
the network settings, and the
printer will start without the
network capability.
Even if a network card is installed, no error will occur
when it isn't plugged into a
network connection.
Continue
{
and check
}
Page 61

Error & Status Messages on the Operation Panel
Messages Description Comments
Print overrun A print overrun occurred on
a file being printed. Only
part of the data on the page
will be printed, and t he print
job is suspended.
Memory overflow Memory overflow occurred
during the print job. Af ter
part of the data on the page
is printed, the print job is
suspended.
This is because the emulation language sent a file too
comple x for the printer to
interpret with the avail able
memory, or there isn't
enough memory space to
download the fonts.
To ignore this error, press
Continue
{
will be resumed.
To cancel the print job, press
Reset
{
After a few s econds without
any key p re ss , the print job
will be canceled automatically.
To pri n t the ima g e correc tly,
add memory to the machine,
or reduce the resolution of
the image and re-send the
print job.
To cancel the print job, press
Reset
{
After a few s econds without
any key p re ss , the print job
will be canceled automatically.
To pri n t the ima g e correc tly,
add memory to the machine.
This message remains until
the next pri nt job.
, and the print job
}
.
}
.
}
7
Printer HDD is full. A controller disk becomes
full while downloading a
macro or font from the host
to the printer controller.
Output tray is full. The specified output tray of
the print job is full, and the
print job is suspended.
To cancel the print job, press
Reset
{
After a few s econds without
any key p re ss , the print job
will be canceled automatically.
To execute the operation correctly, clear room on the disk
partition priority.
Remove the output f rom the
output tray, and the print job
will be resumed automatically.
.
}
53
Page 62

Troubleshooting
Messages Description Comments
7
<xxx> Tra y is not available.
<xxx> is not set corr ectly.
Open Duplex Unit side
tray, or press...
<Paper Out Icon>
Add paper
Something is wrong with
the specified input tray.
The print job is suspended.
The specified input tray is
not set correctly.
The cover of the Duplex unit
is not opened when the paper size of duplex printing is
one of the following.
11 × 17, 8
1
/4 × 13, 8 × 13, 81/2 × 13
8
There is no paper in the
specified input tray , al though the paper siz e specified from the host and that
from the panel display are
the same.
The print job is suspended.
1
/2 × 14, A3, B4,
Press
current job.
After a few seconds without
any key p re ss, the print job
will be canceled automatically.
Close the specified input
tray, and the print job will be
resumed automatically.
Open the Duplex unit cover,
and the print job will be resumed automaticall y.
Press
current job.
After a few seconds without
any key p re ss, the print job
will be canceled automatically.
Put the specified paper in the
specified input tray, and the
print job will be resumed automatically.
Press
current job.
After a few seconds without
any key p re ss, the print job
will be canceled automatically.
Reset
{
Reset
{
Reset
{
to cancel the
}
to cancel the
}
to cancel the
}
54
<Paper Out Icon>
Add paper
The paper siz e specified
from the host is not set in
any trays, when the tray selection is set to Auto.
Put the specified paper i n
any of the in put trays, and
the print job will be resumed
automatically.
To continue the print job using the incorrect paper, press
Continue
{
To cancel the print job, press
Reset
{
After a few s econds without
any key presses, the print job
will be canceled automatically.
.
}
.
}
Page 63

Error & Status Messages on the Operation Panel
Messages Description Comments
<Paper Out Icon>
Add paper
<Paper Out Icon>
Add paper
The paper siz e specified
from the host and that from
the panel display are different for the input tray for the
current print job.
The print job is suspended.
No paper is detected in the
Bypass Tray.
Put the specified paper in the
spe cified tray and change
the paper settings of the User
Tools correctly, so the print
job will be automaticall y re sumed.
To continue the print job using the incorrect paper, press
Continue
{
To cancel the print job, press
Reset
{
After a few s econds without
any key p re ss , the print job
will be canceled automatically.
Set the specified paper in the
Bypass Tray, and the print
job will be res umed automatically.
To cancel the print job, press
Reset
{
After a few s econds without
any key p re ss , the print job
will be canceled automatically.
.
}
.
}
.
}
7
Paper Misfeed h as interrupt e d Printing.
Paper is left in Staple
Tray.
Open Finiser and remove paper.
A paper misfeed occurred,
and you re moved all the
misfed paper.
The print job is interrupted.
Paper remains in the staple
tray, though the stapling job
is canceled or a new stapling
job is being started.
To cancel the print job, press
Reset
{
To make the Jam recover y
operation, press
Remove the paper from th e
staple tray, and the print job
will be resumed automatically.
.
}
Continue
{
.
}
55
Page 64

Troubleshooting
Machine Does not Print
Possible Cause Solutions
Is the power on? Turn on the machine.
Is the interface cable properly connected? Connect the interface cable properly.
If there are any connectors or screws,
make sure they are fastened securely.
Are you using the correct interface cable? Be sure to use the correct one. If the cable
is damaged or worn, replace it with a new
one.
7
Did you connect the interface cable after
turning on the main switch?
Is your machine Online? Bring it Online by pressing the
Is the specified paper set? Place the specified paper in any of the in-
Are there any error messages on the panel
display?
Does the indicator above the Printe r key
stay red ?
Is the Data-in Indicato r blinking or lit? If it is not, the data doe sn't reach th e ma-
Can you pri nt a configuratio n page? If you can't, check the printer cable co n-
Can you make a test print? If you can't, your m achine might be ou t of
Make sure to connect the interf ac e cable
before tu rni ng on the main switch.
Online
{
button.
put trays.
Check the error message, and do the re-
quired action.
Check the error message, and do the re-
quired action.
chine. Check the printer cable connection.
Also make sure that the printer port set-
tings are correct.
nection.
Also make sure that the printer port set-
tings are correct.
order. Consult your local service personnel.
}
56
Page 65

Other Printing Problems
Problem Action
Other Printing Problems
Image is printed on the reverse s ide of the
paper.
Multiple pages are fed through the printer
at once.
Paper misfeeds occur frequently. Check the paper size settings. Use the rec-
Operation panel error message stays on
after remov ing the misfed paper.
It takes a long time for the printer to start
printing.
It takes too much time to complete the
print job.
Set the paper ups i de d own.
Remove all the paper fro m the tray and
fan them gently.
ommended paper. Avoid using curled,
folded, or wrinkled paper, perforated paper, or glossy paper.
Paper misfeed message will remain until
the front cover is opened and then closed.
Open the front cover and close it.
The machine might be in Energy Saver
mode or Low Power mode, which requires mo re time for warming up and re suming the print job. If you can't wait,
change the setting s of Low Pw r. Shift
Time and L ow Power Timer.
The data is so large or complex that it
takes time to process it.
If the Data In indicator is blinking, the
data processing is being done.
Just wait until it is finished.
7
Windows95, NT4.0
The computer doesn't recognize the in-
stalled printer options.
Windows3.1
The printe r can't send the print job.
If the printer is not bi-directional, spec if y
which options you have installed using
the printe r driver.
Refer to t he HELP file of the printer driver.
The mem ory buffer might be full. Set the
Print Ma na ge r to “OFF”, or m a ke the
time-out setting longer.
57
Page 66

Troubleshooting
Problem Action
Desired tray isn't used for the output. Check the tray of the Finisher or the Mail-
box.
Even if "Internal Tray" is specified as the
Output tray, the pape r whose horizontal
size to the machine is 300mm or longer
will be delivered to "Finisher Proof" or
"Mailbox Proof" tray.
With the optional 3000-sheet finisher installed, it will be automatically delivered
to the “Finisher Proof” tray.
With the optional Mailbox and the optional 3000-sheet finisher installed, it will be
automatically delivered to the “Mailbox
Proof” tray.
7
58
Page 67

8. Appendix
Specifications
This section contains the electrical and hardware specifications for your printer,
including the information on the options.
Component Specification
Basic printer Resolution 600dpi , 400dpi , 300dpi
Standard Centronics-compatible
Page description
language
Fonts PCL45 Font sets , PS 136 Font sets
Hard D i sk
Memory
Interface:
A st anda rd 36-pin printer ca ble and a parallel
port on th e host comp ute r.
Note
❒
Do not use a parallel cable that is longer than
10 feet(3 meters).
Centronics:
IEEE 1284 Level 2 compliant bi-directional parallel port
PCL5e , PCL6 (5e +XL) , PostScript
Storage capacity:
DRAM SIMM module:
Standard 8MB, Up to 72MB
1.6GB
59
Page 68

Appendix
Component Specification
Options Mailbox
Network
Protocol TCP/IP, IPX/SPX , EtherTalk for Macintosh
Postscript
bility
®
capa-
Weight:
Dimension
37kg , 82lb
(W×D×H):
600 × 545 × 980 mm
2.75" × 3.9" × 0.3"
Number of trays:
9bins , 1Proof Tray
Paper weight:
2
Bin : 60 to 90g/m
Proof: 52 to 157g/m
, 16 to 24lb
2
, 14 to 42lb
Paper capacity:
Bin: 100sheet per tray (A4K, 8
2
m
) / 70sheets per tray (Others)
1
Proof: 500s he e t per tray (A4K, 8
80g/m
Power consumption:
topology:
PostScrip t® 3
2
) / 300sheets per tray (Others)
48W
Ethernet , 10BaseT/100BaseTX
TM
/2"×11"K, 80g/
1
/2"×11"K,
8
60
Page 69

INDEX
O
10BaseT/100BaseTX
, 3,
6
C
{Clear Modes/Energy Saver}
,
,
19
,
1
9
Configuration
Copier Hard Disk (Image Enhanced Kit)
Copy Reference
Cursor keys
,
8
D
Data In ind icator
,
8
E
{Enhanced Image}
Exiting from User Tools
,
8
, 11,
23
F
,
,
1
,
39
8
FAX Reference
Font Manager
{Function}
,
8, 26
Operation Panel
Operation Swit ch
, 8,
,
51
8
P
, 13,
PCL
Panel Display
Paper Feed
Parallel
Parallel Cable
PostScript®
Printer Features
Printer Reference
,
17
27
,
,
15
, 3,
, ii, 14,
8
,
,
5
33
10
1
R
,
,
20
3
Requirements
Reset Select
S
{Selection}
System Settings
System Settings Parameters
,
8
, 1, 21,
25
,
24
H
Hard Disk
,
ii
L
List Print
,
20
M
Macintosh
Mailbox
Memory
,
36
,
ii
, ii, 26,
59
N
Network
Network Connections
Network Interf ace B oard 450-E
(NIB 450-E)
{Number}
,
18
, ii, 3,
,
9
,
3
5
U
{User Tools/Counter}
W
Windows 3.1
Windows 95/98
Windows NT4.0
, 28, 30, 34,
, 8, 10,
37
, 27, 30, 33,
, 28, 31, 35,
21
37
37
61
Page 70

62 <pubsNumber> UE
USA A867
 Loading...