

Page 1
A1338607
Operating Instructions
Page 2
Operator Safety:
A1338607
This copier is considered a CDRH class I laser device, safe for office/EDP use. The
Copier contains a 15-milliwat, 760-800 nanometer wavelength, GaAIAs laser diode.
Direct (or indirect reflected) eye contact with the laser beam may cause serious eye
damage. Safety precautions and interlock mechanisms have been designed to prevent
any possible laser beam exposure to the operator.
Laser Safety:
The Center for Devices and Radiological Health (CDRH) prohibits the repair of
laser-based optical unit in the field. The optical housing unit can only be repaired in a
factory or at a location with the requisite equipment. The laser subsystem is
replaceable in the field by a qualified Customer Engineer. The laser chassis is not
repairable in the filed. Customer engineers are therefore directed to return all chassis
and laser subsystems to the factory or service depot when replacement of the optical
subsystem is required.
Warning:
Use of controls or adjustment or performance of procedures other than those specified
in this manual may result in hazardous radiation exposure.
As an Energy Star Partner, we have determined that this copier model
meets Energy Star Guidelines for energy efficiency.
with copying equipment by means of energy saving feature such as Auto Off, Low
Power, and Duplex Mode Priority modes.
For details, see the following pages.
For good copy quality, Ricoh recommends that you use genuine Ricoh toner.
Ricoh shall not be responsible for any damage or expense that may result from the
use of parts other than genuine Ricoh parts in your Ricoh office product.
This product was designed to reduce the environmental impact associated
❖ Auto Off Mode : see page 138.
❖ Low Power Mode : see page 137.
❖ Duplex Mode Priority : see page 141.
Note: Some illustrations may be slightly different from your machine.
Note: Certain options may not be available in some countries. For details,
Power Source: 120 V, 60 Hz, more than 12A
Please make sure to connect the power cord to a power source as above. For details
about power source, see page 160.
please contact your local dealer.
Copyright 1996, Ricoh Co., Ltd.
Page 3

TABLE OF CONTENTS
TABLE OF CONTENTS
WHERE IS IT & WHAT IS IT
SYSTEM OVERVIEW....................................................................................3
COPIER EXTERIOR & INTERIOR................................................................4
OPERATION PANEL ....................................................................................6
Hard Keys.................................................................................................... 6
Touch Panel Display.................................................................................... 8
WHAT YOU CAN DO WITH THIS COPIER
FUNCTIONS ..................................................................................................12
without optional finisher............................................................................... 12
with optional finisher.................................................................................... 12
BASICS
STARTING THE COPIER .............................................................................24
When The Main Switch Is In The Stand-by Position .................................. 24
When The Display Is Off And The Indicator Of The Clear Modes/Low
Power Mode Key Is Lit ............................................................................... 24
When The Copier Is Set For User Codes................................................... 25
USING THE TOUCH PANEL DISPLAY.......................................................26
GETTING HELP ON THE DISPLAY.............................................................28
RECOMMENDED & NON-RECOMMENDED ORIGINALS..........................29
Recommended Originals ............................................................................. 29
Non-recommended Originals For The Optional Document Feeder ............ 29
SETTING ORIGINALS ON THE EXPOSURE GLASS.................................30
SETTING A STACK OF ORIGINALS IN THE OPTIONAL DOCUMENT
FEEDER (ADF)..............................................................................................30
SETTING ONE ORIGINAL AT A TIME IN THE OPTIONAL DOCUMENT
FEEDER (SADF)...........................................................................................32
iv
Page 4

TABLE OF CONTENTS
COPYING
BASIC OPERATIONS ...................................................................................36
One-to-one Copying (Full Size Copying) .....................................................36
Entering Copy Job Settings During The Warm-up Period (Auto Start) .......37
Adjusting Copy Image Density.....................................................................37
Selecting The Copy Paper Size (Manual Paper Select)..............................38
Having The Copier Choose The Paper Size(Auto Paper Select)................39
Having The Copier Choose The Reproduction Ratios
(Auto Reduce/Enlarge).................................................................................41
Selecting Original Type Setting
(Letter, Letter/Photo, Photo, Generation Copy) ..........................................43
Sorting Into Sets (123,123,123) (Sort, Rotate Sort) ....................................44
Stacking Together All Copies Of A Page (111,222,333) (Rotate Stack) ...48
Copying From The Bypass Tray ..................................................................50
Temporarily Stopping One Job To Copy Something Else (Interrupt) ..........53
Recalling Job Settings (Job Recall) .............................................................53
Storing Your Copy Setting In Memory (Program) ........................................54
REDUCING AND ENLARGING (Reduce/Enlarge) ....................................55
Reducing And Enlarging Using Preset Ratios (Preset R/E) ........................55
Reducing And Enlarging In 1% Steps .........................................................56
Fitting The Original To A Copy Of A Different Size.....................................58
WORKING WITH BOTH SIDES OF ORIGINALS AND COPIES
(Duplex/Series Copies) ................................................................................61
Making Two-sided Copies (Duplex) .............................................................61
Making One-sided Copies (Series Copies)..................................................68
COMBINING ORIGINALS INTO ONE COPY (Combine) ...........................70
PRINTING ID NUMBERS, PAGE NUMBERS, AND MESSAGES (Stamp)74
Printing Numbers On The Background Of Your Copies (Background
Numbering)................................................................................................... 74
Printing Preset Messages On Your Copies
(Auto Stamping) - English Only ....................................................................75
Printing Your Own Messages On Your Copies (User Stamping) ................79
Printing Dates And Page Numbers (Date Stamping, Page Numbering) .....81
v
Page 5

TABLE OF CONTENTS
EDITING THE COPY IMAGE (Adjust Image).............................................86
Copying The Image Twice On One Page
(Double Copies)........................................................................................... 86
Erasing The Centre And The Border
(Erase Centre/Border) ................................................................................. 88
Adjusting The Margin (Margin Adjustment)................................................. 89
Repeating An Image Over The Entire Copy (Image Repeat) ..................... 91
Reversing Black and White (Positive/Negative) .......................................... 93
Merging Images (Overlay/Merge)................................................................ 94
OPTIONAL FINISHING.................................................................................96
Sorting Into Sets (123,123,123) (Sort) ........................................................ 96
Stapling (Staple) .......................................................................................... 100
Stapling Position And Original Setting ........................................................ 101
When Setting One Original At A Time ........................................................ 104
When Setting A Stack Of Originals In The Document Feeder ................... 104
COMBINATION CHART................................................................................105
WHAT TO DO IF SOMETHING GOES WRONG
IF YOUR COPIER DOES NOT OPERATE AS YOU WANT.......................110
IF YOU CANNOT MAKE CLEAR COPIES .................................................112
IF YOU CANNOT MAKE COPIES AS YOU WANT.....................................113
LOADING PAPER.........................................................................................117
Non-recommended Paper ........................................................................... 117
Notes For Paper .......................................................................................... 117
Loading Paper In The Paper Tray ............................................................... 118
Loading Paper In The Large Capacity Tray................................................ 119
ADDING TONER...........................................................................................120
ADDING STAPLES.......................................................................................121
CLEARING MISFEEDS.................................................................................122
Check The Display ...................................................................................... 122
vi
Page 6

TABLE OF CONTENTS
When Misfeeds Occur In A, B, C, Y, Or Z Section .....................................123
When Misfeed Occurs At The Large Capacity Tray ....................................123
When Misfeed Occurs In P Section.............................................................124
When Misfeeds Occur In R Section.............................................................124
REMOVING JAMMED STAPLES.................................................................125
CHANGING THE COPIER’S SETTINGS
CHANGING PAPER SIZE.............................................................................128
Changing Paper Size In The 1st Tray .........................................................128
Changing The Paper Size In The Optional Tray Unit (Trays 2, 3, and 4) ..133
USER TOOLS................................................................................................134
User Tools Menu.......................................................................................... 134
How To Change The Basic Settings And Copy Features ...........................136
Basic Settings............................................................................................... 137
Copy Features .............................................................................................. 141
How To Register User Stamp ......................................................................152
SERVICE REPRESENTATIVE SETTINGS..................................................153
MAINTAINING YOUR COPIER
DO’S AND DON’TS
REMARKS
WHERE TO PUT YOUR COPIER
USE AND STORAGE OF SUPPLIES
MAINTAINING YOUR COPIER.....................................................................156
Copier........................................................................................................... 156
Document Feeder (Option) ...........................................................................156
DO’S AND DON’TS.......................................................................................157
Copier........................................................................................................... 157
Document Feeder (Option) ...........................................................................158
Finisher (Option) ...........................................................................................158
REMARKS.....................................................................................................159
Copier........................................................................................................... 159
WHERE TO PUT YOUR COPIER.................................................................160
Copier Environment ......................................................................................160
vii
Page 7

TABLE OF CONTENTS
Power Connection ....................................................................................... 160
Access To The Copier................................................................................. 161
USE AND STORAGE OF SUPPLIES...........................................................162
Copy Paper .................................................................................................. 162
Paper Storage.............................................................................................. 163
Toner Storage .............................................................................................. 163
SPECIFICATIONS
COPIER..........................................................................................................166
DOCUMENT FEEDER (OPTION).................................................................169
FINISHER (OPTION).....................................................................................170
1000-SHEET TRAY UNIT (OPTION)............................................................171
1500-SHEET TRAY UNIT (OPTION)............................................................171
viii
Page 8

eu-1
INTRODUCTION
This manual contains detailed instructions on the operation and maintenance of this copier. To get maximum versatility from this copier all operators should carefully read and follow the instructions in this manual. Please
keep this manual in a handy place near the machine.
Please read the next section before using this copier. It contains important
information related to USER SAFETY and PREVENTING EQUIPMENT
PROBLEMS.
SAFETY INFORMATION
When using your copier, the following safety precautions should always be
followed.
Safety During Operation
In this manual, the following important symbols are used:
R This symbol is intended to alert the user to the presence of impor-
tant operating and maintenance (servicing) instructions in the
literature accompanying the machine.
nx This symbol is attached to some components to alert the user not
to touch them, because they may be very hot.
In addition, all safety messages are identified by the words "WARNING" and
"CAUTION". These words mean the following:
RWARNING:
RCAUTION:
Important information to alert you to a situation that
might cause serious injury and damage to your property
if instructions are not followed.
Important information that tells how to prevent damage to
equipment, or how to avoid a situation that might cause minor
injury.
i
Page 9

eu-1
RWARNINGS:
Since some parts of the copier are supplied with high voltage, touch
only the parts specified in this manual.
Do not modify or replace any parts other than the ones specified in
this manual.
Do not incinerate toner or toner containers. Toner dust might ignite
when exposed to open flames.
Do not store toner where it will be exposed to heat.
Do not eat or swallow toner, and keep it out of reach of children.
The fusing unit may be very hot. Be careful when handling it.
RCAUTIONS:
While copying, do not turn off the main switch.
While copying, do not open the front cover.
While copying, do not unplug the power cord.
While copying, do not lift the platen cover, or the document feeder.
Do not lay anything weighing more than 10 kg (22 lb) on the exposure
glass.
Keep corrosive liquids, such as acid, off the machine.
Do not allow paper clips, staples, or other small metallic objects to fall inside
the machine.
ii
Page 10

eu-1
General Safety Information
❐ Always turn the copier off when you have finished copying for a day, but leave it
plugged in.
❐ When the copier will not be used for a long period, disconnect the power cord.
❐ If the copier must be transported by vehicle, please contact your service repre -
sentative.
❐ When the main switch is in the Stand-by position, the optional heaters are on. In
case of emergency, unplug the machine’s power cord.
❐ To disconnect the power source, the main plug must be pulled.
iii
Page 11

eu-2
WHERE IS IT & WHAT IS IT
WHERE IS IT &
WHAT IS IT
SYSTEM OVERVIEW ................................................................................................................. 3
COPIER EXTERIOR & INTERIOR ............................................................................................... 4
OPERATION PANEL................................................................................................................. 6
Hard Keys............................................................................................................................................... 6
Touch Panel Display ............................................................................................................................. 8
1
Page 12

eu-2
2
Page 13
eu-2
WHERE IS IT & WHAT IS IT
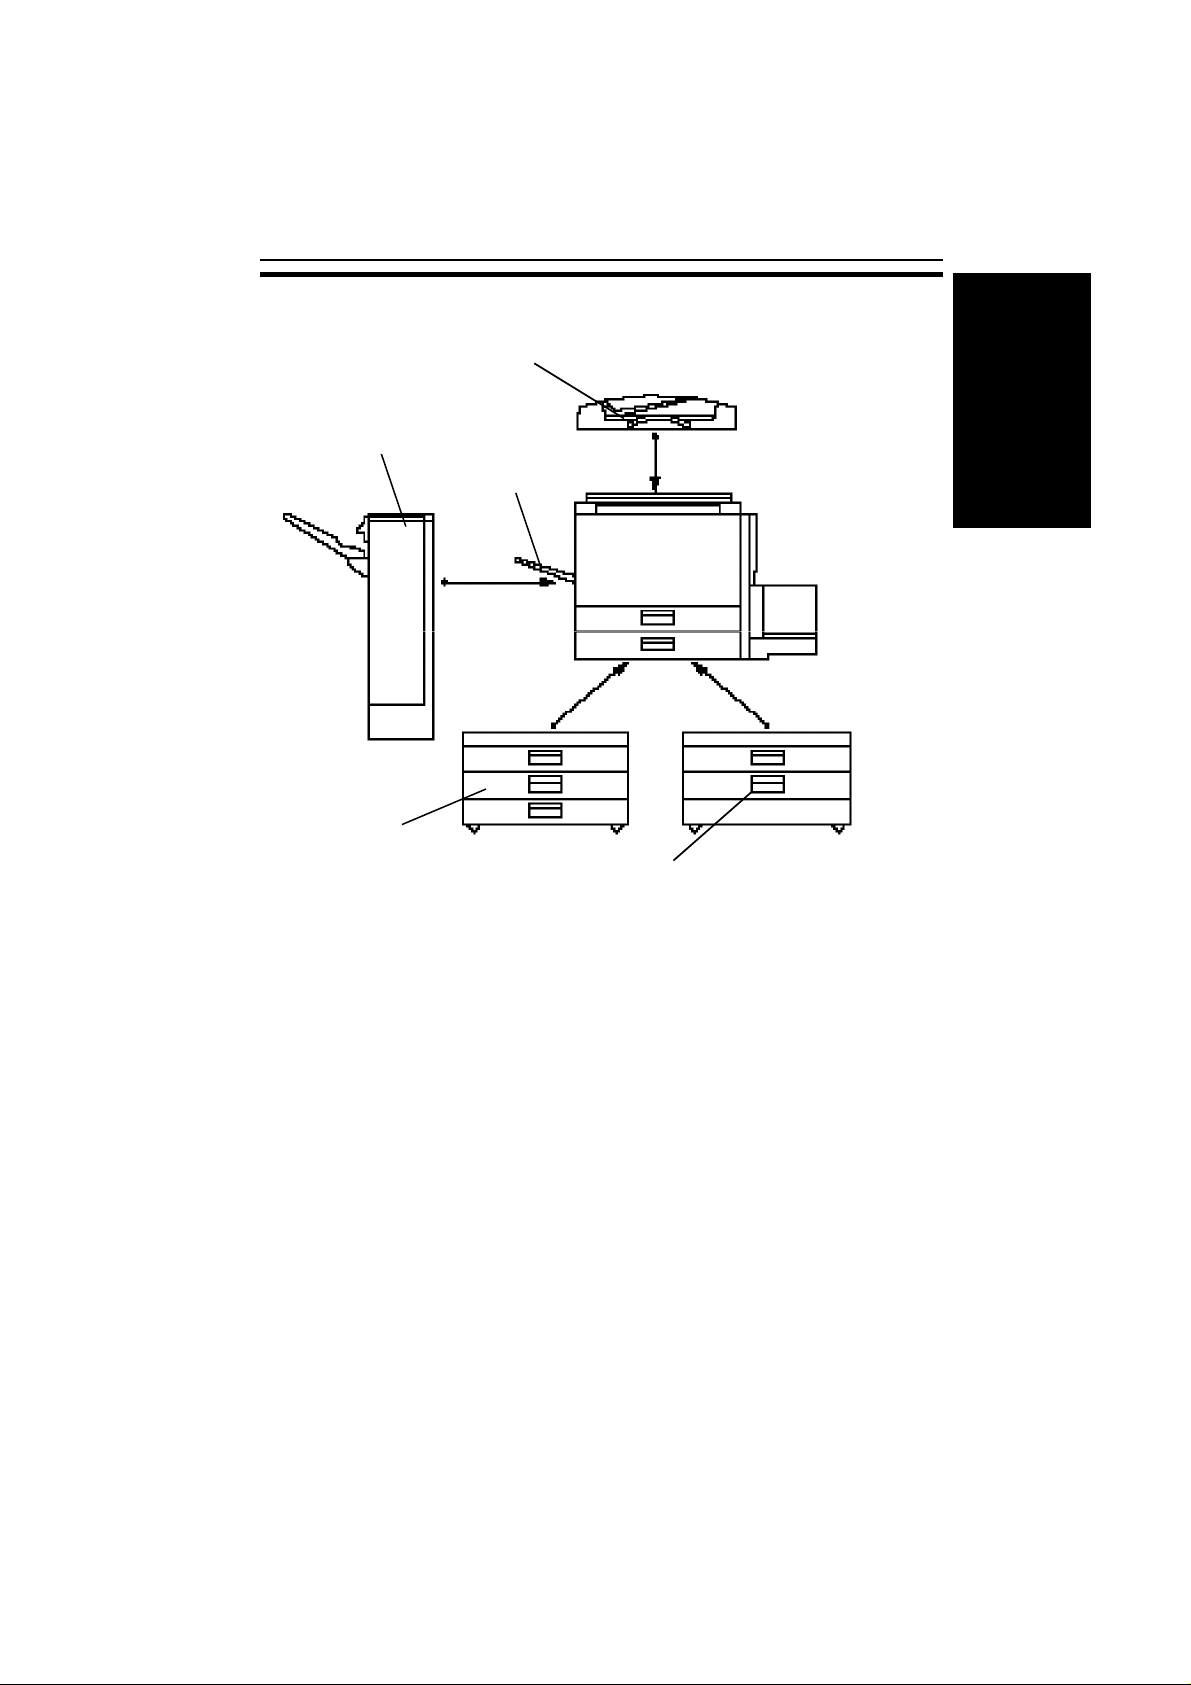
SYSTEM OVERVIEW
SYSTEM OVERVIEW
1
3
2
4
1. Document feeder
(Option)
2. Copy tray
Insert a stack of originals here. They will be fed
automatically.
Completed copies are delivered here.
(Option)
3. Finisher
Sorts, stacks, and staples copies.
(Option)
4. 1500-sheet tray unit
Holds 1500 sheets of copy paper.
(Option)
5. 1000-sheet tray unit
Holds 1000 sheets of copy paper.
(Option)
❐ Other options: platen cover and key counter
5
3
Page 14

COPIER EXTERIOR & INTERIOR
eu-2
COPIER EXTERIOR & INTERIOR
1
2
3
4
5
6
7
8
9
10
13
15
4
14
12
11
Page 15

eu-2
WHERE IS IT & WHAT IS IT
COPIER EXTERIOR & INTERIOR
1. Copy tray (option) Completed copies are delivered here. Regarding
the capacity of the tray, ☛ see page 166.
2. Main switch Switches the copier between on and standby con-
ditions.
3. Auto response
(human) sensor
When someone comes close to the copier, it will
automatically switch from Low Power mode to
standby mode.
4. Platen cover (option) Lower this cover over originals for copying.
5. Exposure glass* Position originals here face down for copying.
*After turning off the main switch, the exposure glass might be hot
because of the anticondensation function. This is not a problem.
6. Front cover Open to access the inside of the copier.
7. Unit for two-sided
Makes two-sided copies.
copies (Duplex unit)
8. Paper tray Holds 500 sheets of copy paper.
9. Bypass tray Use to copy onto OHP sheets, adhesive labels,
translucent paper, post cards, and non-standard
size paper.
10. Large capacity tray Holds 1,000 sheets of copy paper.
11. Right cover of
Open to remove misfed paper.
the optional tray unit
12. Key counter holder Insert the optional key counter here.
13. Operation panel Operator controls and touch panel are located
here. ☛ See the next page.
14. Toner bottle
Replace the toner bottle when " f Add Toner"
is displayed on the display. ☛ See page 120.
15. Fusing unit Fuses the copy image to the paper. When ac -
cessing the inside of the copier, use caution.
This unit may be very hot.
5
Page 16

OPERATION PANEL
Hard Keys
eu-2
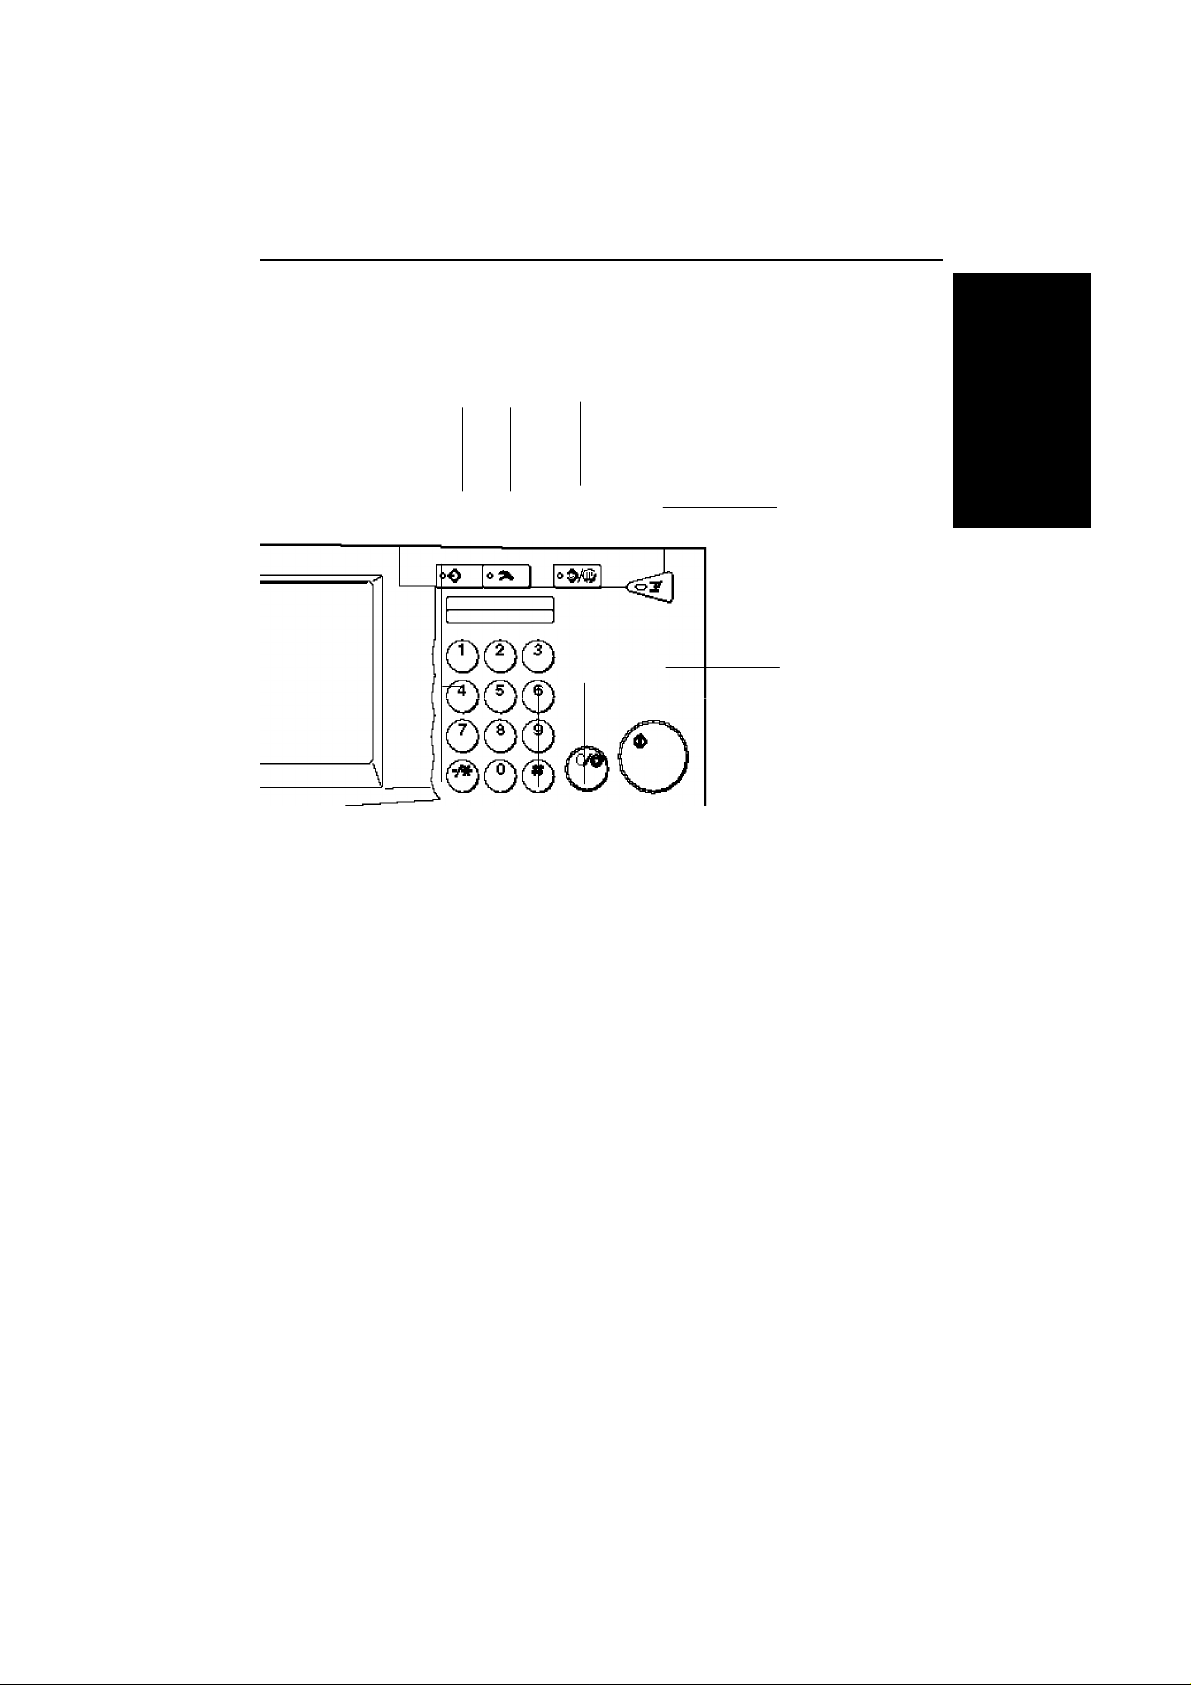
OPERATION PANEL
1
1. Contrast Dial
Changes the brightness of the
display.
2. User Tools key
Changes the basic settings and
copy features. ☛ See page 134.
2 3
5. Program key
Press to select the program
mode. ☛ See page 54.
6. Job Recall key
Use to recall your previous copy
settings. ☛ See page 53.
4
3. Guidance key
Shows guidance for functions.
☛ See page 28.
4. Touch Panel Display
☛ See page 26.
6
Page 17
5
WHERE IS IT & WHAT IS IT
6
7
7
eu-2
OPERATION PANEL
8
9
12
11
7. Clear Modes/Low Power Mode
key
Press to clear the previously entered copy job settings. Also use
to switch to and from Low Power
mode. ☛ See pages 24 and 137.
8. Interrupt key
Press to make interrupt copies
during a copy run.
☛ See page 53.
9. Start key
Press to start copying. Use to set
the Auto Start. ☛ See page 37.
10
10. Clear/Stop key
While entering numbers, press to
cancel a number you have entered. While copying, press to
stop copying.
11. Enter key
Use to enter data in selected
modes.
12. Number keys
Use to enter the desired number
of copies and data for selected
modes.
7
Page 18
OPERATION PANEL
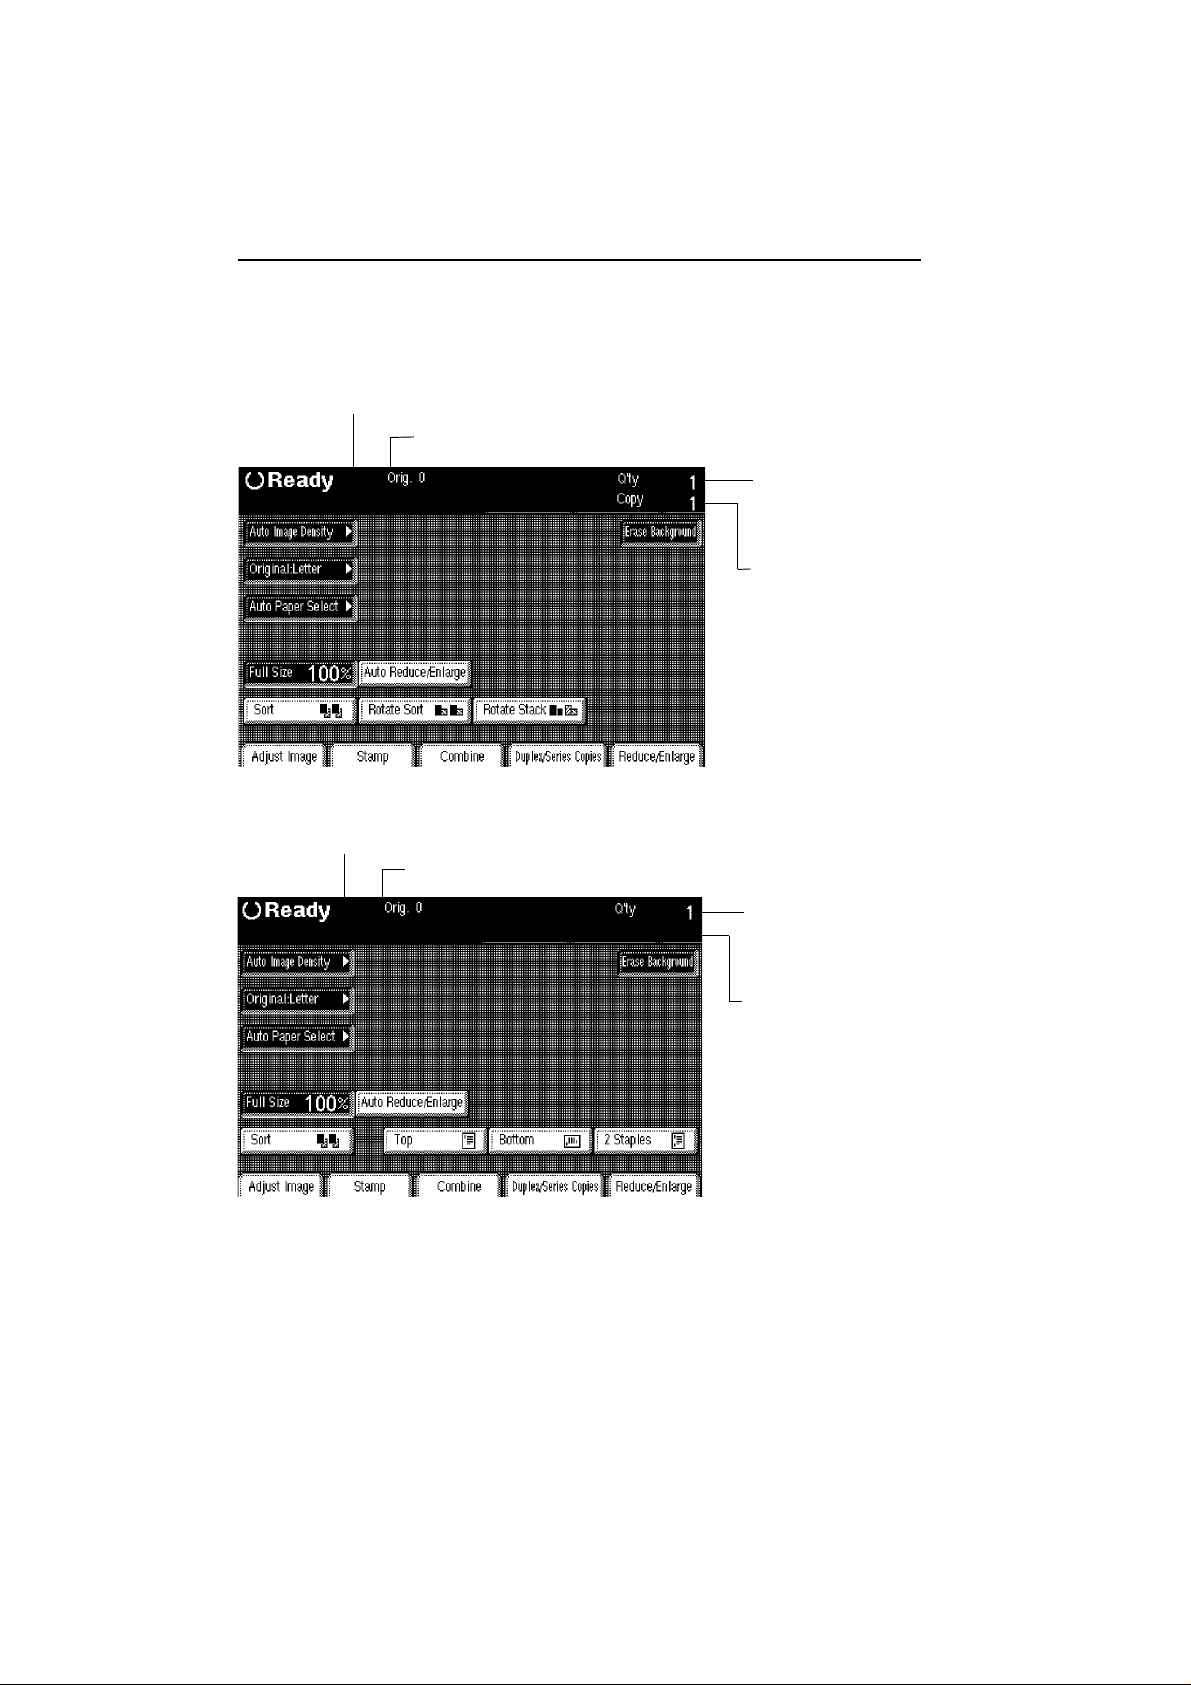
Touch Panel Display
without optional finisher
Message area
Copier status and messages
Original Counter
Number of originals scanned so far.
eu-2
Copy Set Total
Total number of copy
sets entered.
Copy Set Counter
Number of copy sets
made so far.
with optional finisher
Message area
Original Counter
8
Copy Set Total
Copy Set Counter
Page 19

eu-2
WHERE IS IT & WHAT IS IT
OPERATION PANEL
❐ Regarding detailed information about each key and its functions, ☛ see page
12.
❐ For how to use the touch panel display, ☛ see page 26.
9
Page 20

OPERATION PANEL
eu-2
10
Page 21

eu-3
WHAT YOU CAN DO WITH
THIS COPIER
WHAT YOU CAN DO
WITH THIS COPIER
11
Page 22

FUNCTIONS
without optional finisher
eu-3
FUNCTIONS
☛ See page 37.
☛ See page 39.
☛ See page 41.
☛ See page 36.
☛ See page 44.
☛ See page 86.
☛ See page 74.
with optional finisher
☛ See page 37.
☛ See page 37.
☛ See page 70.
☛ See page 37.
☛ See page 38.
☛ See page 43.
☛ See page 38.
☛ See page 48.
☛ See page 55.
☛ See page 61.
☛ See page 38.
☛ See page 39.
☛ See page 41.
☛ See page 36.
☛ See page 96.
12
☛ See page 86.
☛ See page 74.
☛ See page 70.
☛ See page 61.
☛ See page 43.
☛ See page 38.
☛ See page 100.
☛ See page 55.
Page 23
Getting Help On The Display
WHAT YOU CAN DO WITH
THIS COPIER
☛
Adjusting Copy Image Density
☛
Having The Copier Choose The Paper Size
☛
eu-3
FUNCTIONS
See page 28.
See page 37.
See page 39.
Having The Copier Choose The Reproduction Ratios
☛
See page 41.
Selecting Original Type Setting
☛
See page 43.
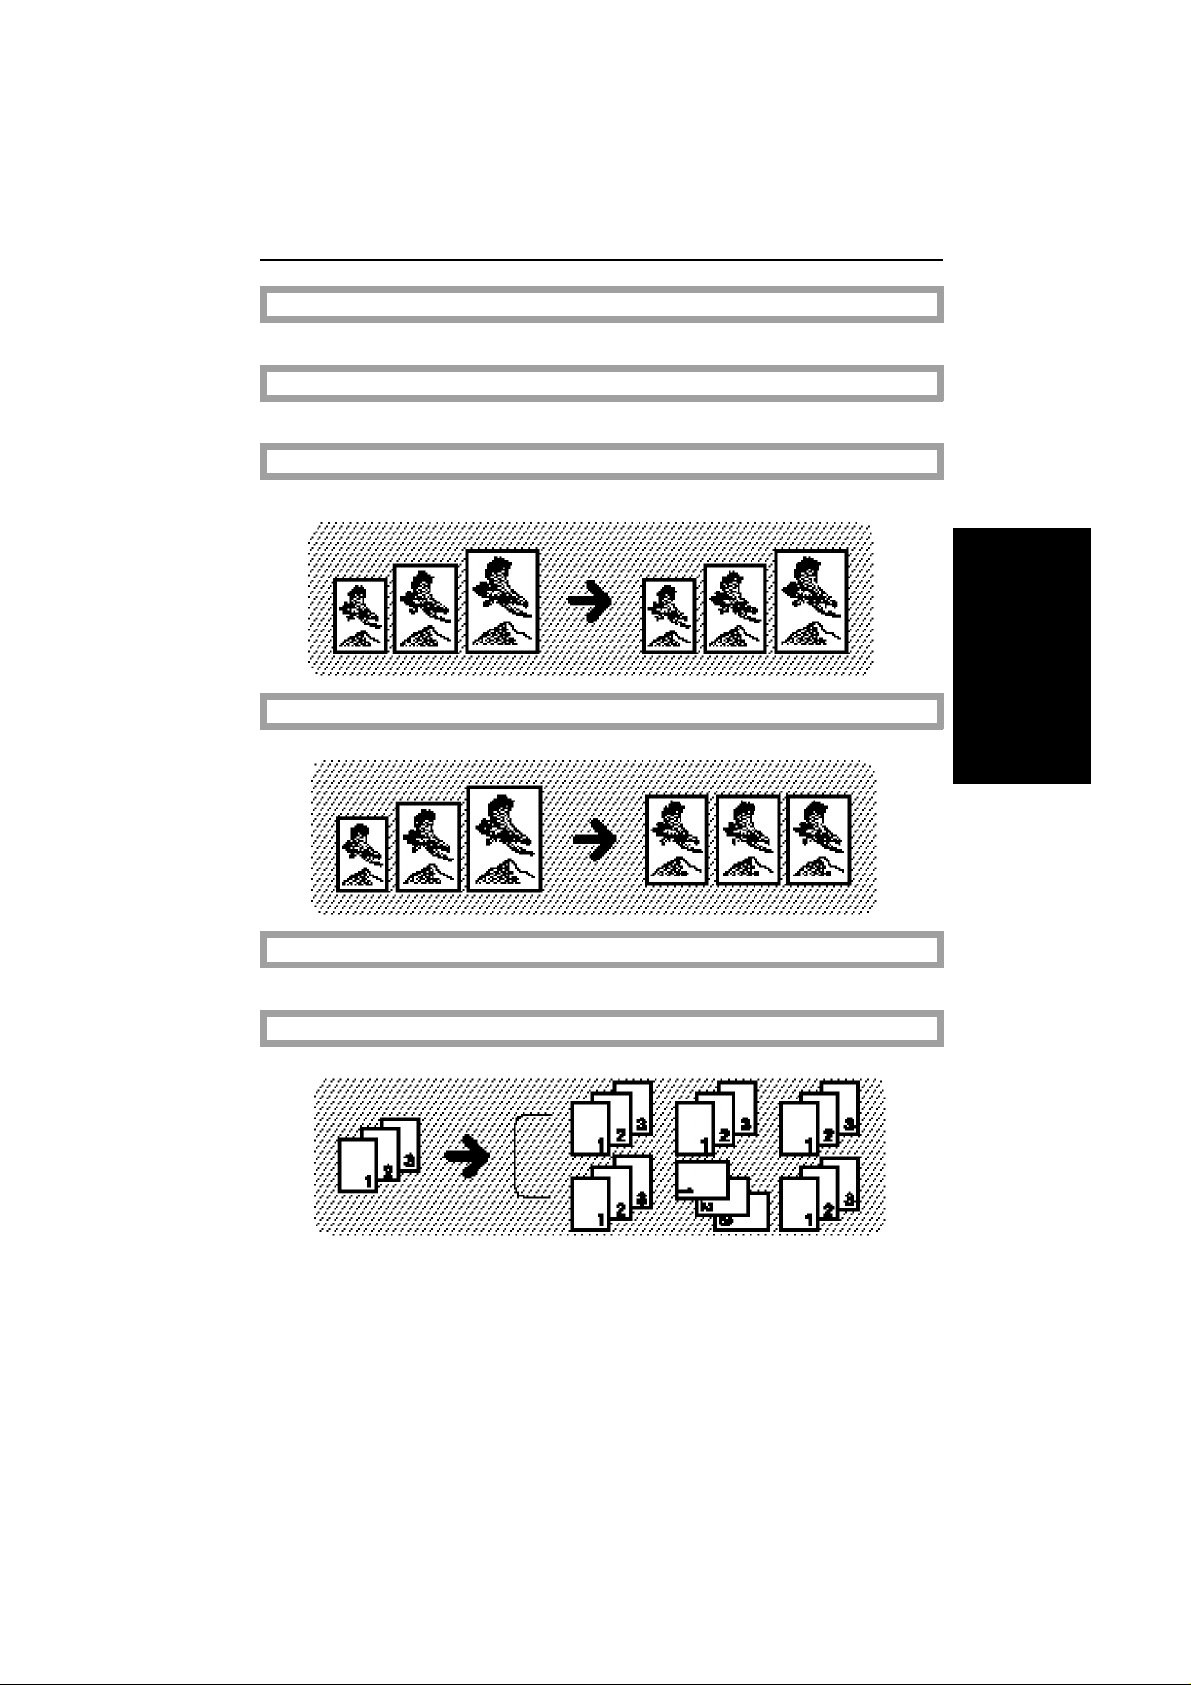
Sorting Into Sets
☛
See page 44.
13
Page 24
FUNCTIONS
Stacking Together All Copies Of A Page
☛
See page 48.
Copying From The Bypass Tray
☛
See page 50.
Temporarily Stopping One Job To Copy Something Else
☛
See page 53.
eu-3
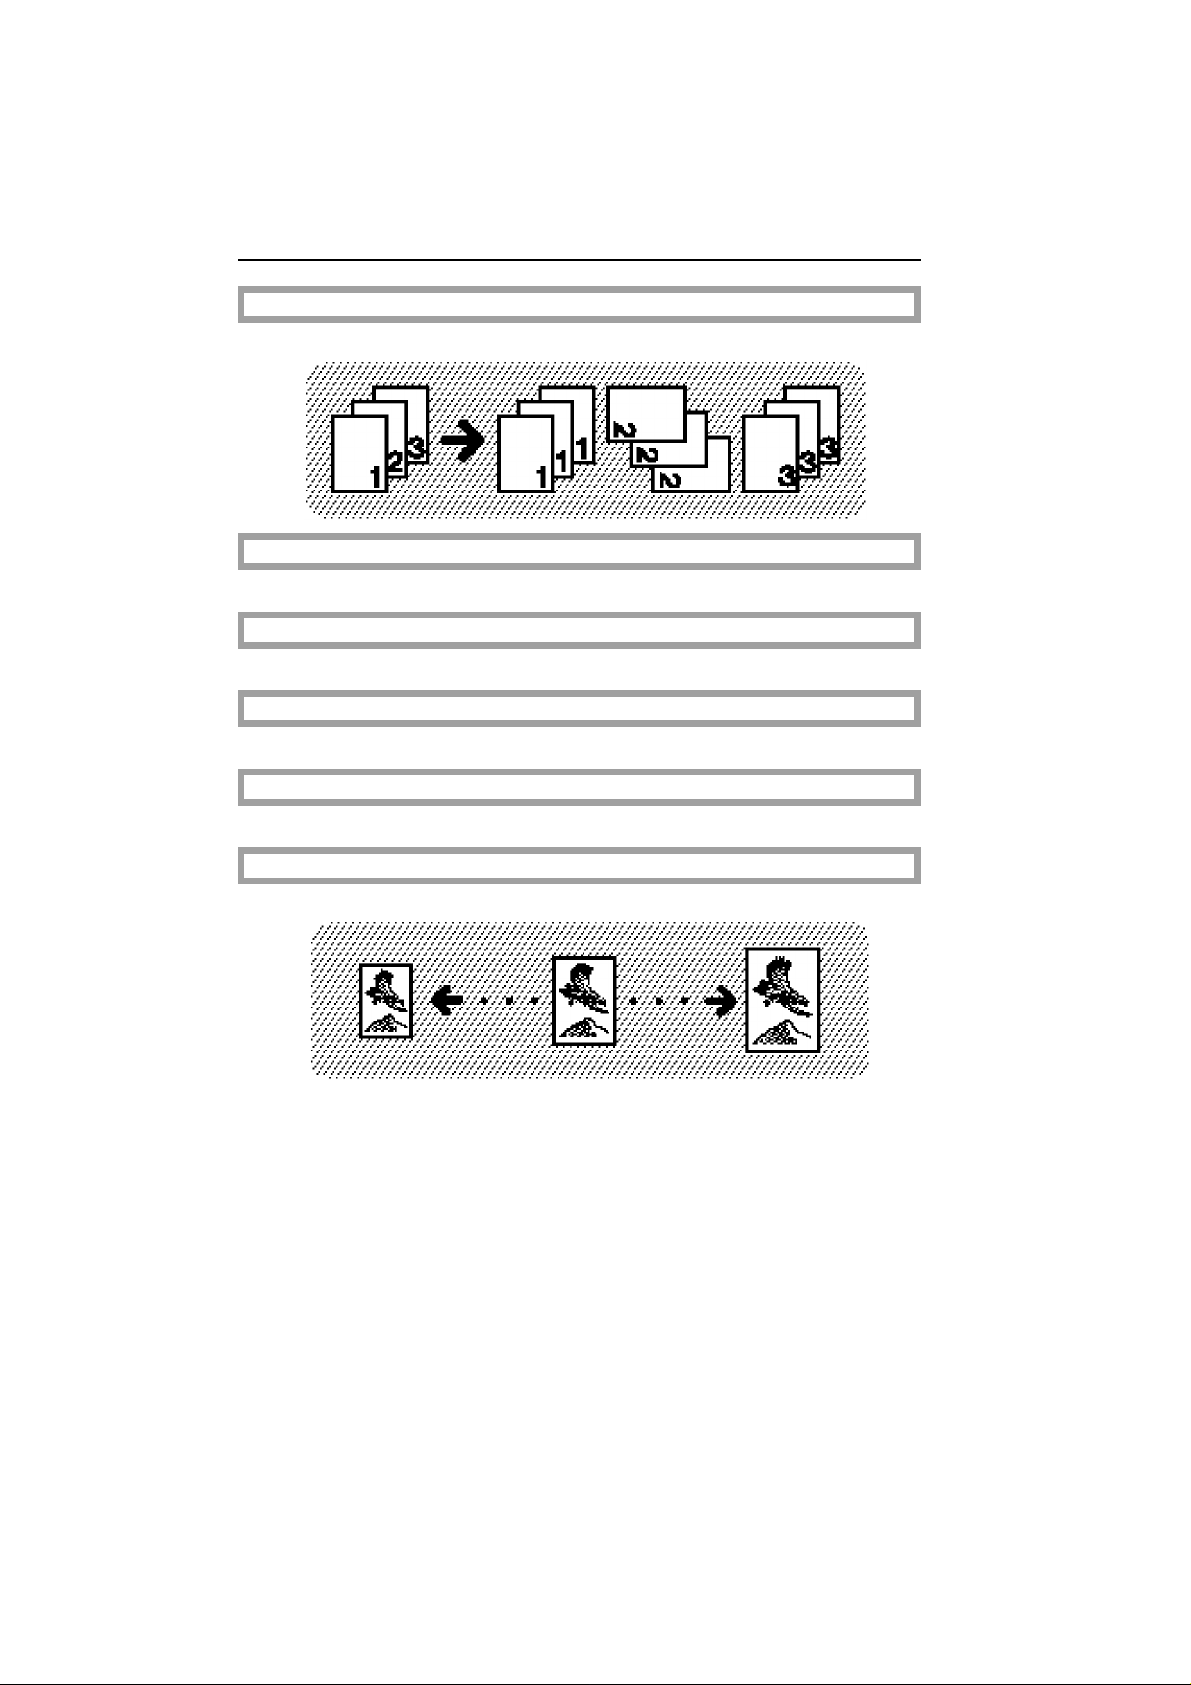
Recalling Job Settings
☛
See page 53.
Storing Your Copy Settings In Memory
☛
See page 54.
Reducing And Enlarging Using Preset Ratios
☛
See page 55.
14
Page 25

Reducing And Enlarging In 1% Steps
WHAT YOU CAN DO WITH
THIS COPIER
Using the [+] and [-] keys or Number keys
Stretching and squeezing the image
FUNCTIONS
☛
See page 56.
eu-3
Fitting The Original To A Copy Of A Different Size
Fitting the image in the copy area as it is
Stretching and squeezing the image into the copy area
☛
See page 58.
15
Page 26
FUNCTIONS
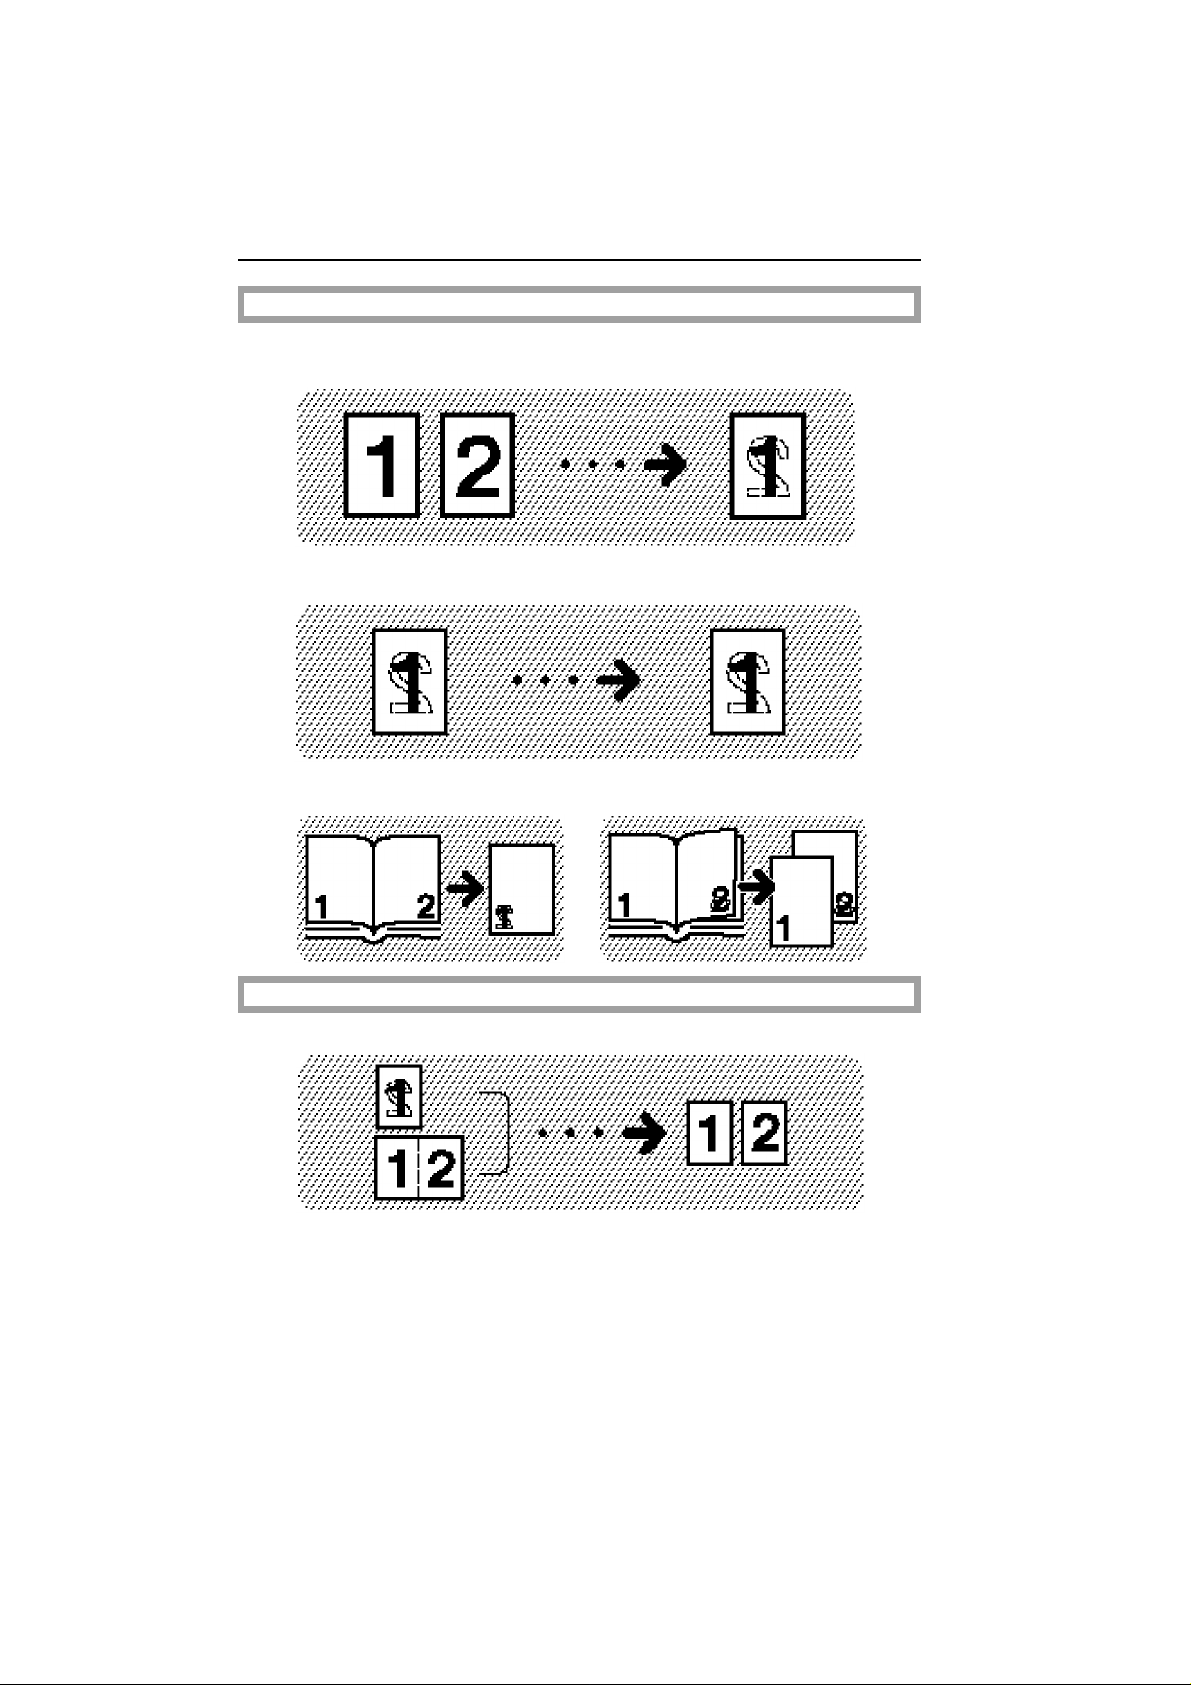
Making Two-sided Copies
From one-sided originals
From two-sided originals
☛
See page 61.
eu-3
From book originals (Single) (Multi)
Making One-sided Copies
16
☛
See page 68.
Page 27

From 2 one-sided
WHAT YOU CAN DO WITH
THIS COPIER
originals
From 4 one-sided
originals
Combining Originals Into One Copy
FUNCTIONS
☛
See page 70.
eu-3
From 8 one-sided
originals
From 16 one-sided
originals
Printing Numbers On The Background Of Your Copies
☛
See page 74.
17
Page 28

FUNCTIONS
Printing Preset Messages On Your Copies
☛
See page 75.
Printing Your Own Messages On Your Copies
☛
See page 79.
eu-3
18
Printing Dates And Page Numbers
☛
See page 81.
Page 29
WHAT YOU CAN DO WITH
THIS COPIER
FUNCTIONS
Copying The Image Twice On One Page
☛
See page 86.
Erasing The Centre And The Border (Erase Centre/Border)
☛
See page 88.
eu-3
19
Page 30
FUNCTIONS
Adjusting The Margin
☛
See page 89.
Repeating An Image Over The Entire Copy
☛
See page 91.
eu-3
20
Reversing Black And White
Merging Images
☛
See page 93.
☛
See page 94.
Page 31

eu-3
WHAT YOU CAN DO WITH
THIS COPIER
FUNCTIONS
Optional Finishing
Sorting into sets (123, 123, 123) ☛ See page 96.
Stapling ☛ See page 100.
21
Page 32

FUNCTIONS
eu-3
22
Page 33

eu-4
BASICS
BASICS
STARTING THE COPIER............................................................................................................ 24
When The Main Switch Is In The Stand-by Position .......................................................................... 24
When The Display Is Off And The Indicator Of The Clear Modes/Low Power Mode Key Is Lit . 24
When The Copier Is Set For User Codes............................................................................................ 25
USING THE TOUCH PANEL DISPLAY ....................................................................................... 26
GETTING HELP ON THE DISPLAY ............................................................................................ 28
RECOMMENDED & NON-RECOMMENDED ORIGINALS ....................................................... 29
Recommended Originals.................................................................................................................... 29
Non-recommended Originals For The Optional Document Feeder............................................. 29
SETTING ORIGINALS ON THE EXPOSURE GLASS................................................................... 30
SETTING A STACK OF ORIGINALS IN THE OPTIONAL DOCUMENT FEEDER (ADF) .............. 30
SETTING ONE ORIGINAL AT A TIME IN THE OPTIONAL DOCUMENT FEEDER (SADF)......... 32
23
Page 34

STARTING THE COPIER
STARTING THE COPIER
When The Main Switch Is In The Stand-by Position
.
Turn on the main switch.
1
.
Wait for the copier to warm up. Dur-
2
ing the warm-up period (within 140
seconds), "u Please wait." ap-
pears on the display.
eu-4
.
After warm-up, "v Ready" ap-
3
pears on the display.
When The Display Is Off And The Indicator Of The
Clear Modes/Low Power Mode Key Is Lit
The copier is in Low Power mode.
Hold down the Clear Modes/Low
1
Power Mode key until the indicator is not lit. The machine will
return to the standby condition.
❐ For details about Low Power mode,
☛ see page 137.
24
Page 35

❐ The following actions will also make the copier ready:
BASICS
♦ The copier detects anyone operating it.
♦ Opening or closing the optional platen cover.
♦ Opening or closing the optional document feeder.
♦ Setting originals in the optional document feeder.
♦ Opening or closing the bypass tray.
♦ Pressing any key.
When The Copier Is Set For User Codes
The display instructs you to input
1
your user code, as shown in the
illustration.
eu-4
STARTING THE COPIER
Input your user code (6 digits)
2
using the Number keys.
❐ To change the entered code, touch the
[C] key or press the Clear/Stop key.
Then, enter the new code.
Touch the [#] key or press the
3
Enter key.
❐ To prevent others from making copies
with your user code, when you have
finished using the machine, hold down
the Clear/Stop key and press the
Clear Modes/Low Power Mode key.
❐ Regarding user codes, ☛ see page
140.
25
Page 36

USING THE TOUCH PANEL DISPLAY
USING THE TOUCH PANEL DISPLAY
On the touch panel display, you can find keys, instructions and messages.
By touching keys on the display, you can select or deselect functions and
enter data for the selected modes. The display uses the following conventions:
Keys that have the option of being selected.
Keys that have been selected.
Keys that have no option to select.
In this manual, we use the following convention:
eu-4
Key on the display:
In the manual : [Auto Paper Select] key
RCaution:
Initial display
Do not press the touch panel display with any hard or sharp
object (pen, pencil, etc.). Always use your fingers or something
with a soft tip.
Messages and instructions ap pears here.
tag sheets
26
Page 37

BASICS
USING THE TOUCH PANEL DISPLAY
Display after selecting functions on the tag sheets
After selecting functions on tag sheets,
the clip appears on the tag.
[Check Modes] key
95.2.14
eu-4
When you have selected functions on tag sheets, this key appears on the
upper right area on the touch panel display. Touch this key to see at a
glance all the modes you selected.
[Prev.] key
This key appears in the upper right corner of the display when you touch
the [Check Modes] key. Press to go back to the previous display.
[Change Modes] key
When you select functions on the tag sheets, this key appears on the display. Touch this key to change settings of the following modes:
image density, original type settings, copy paper size,
Auto Reduce\Enlarge, and finishing
27
Page 38

95.2.14
GETTING HELP ON THE DISPLAY
GETTING HELP ON THE DISPLAY
Press the Guidance key when you want to know detailed information about
functions you use.
Press the Clear Modes/Low
1
Power Mode key then the Guidance key.
eu-4
Touch the key you want to know
2
about on the touch panel display.
For example, if you want to know
about "How to operate the display", touch the [How to operate
the display ] key.
❐ To go to the next page, touch the
[Next] key. To return to the previous
page, touch the [Prev.] key.
❐ To go back to the display shown af -
ter pressing the Guidance key, touch
the [Menu] key.
❐ To exit from the guidance display,
touch the [Exit] key.
28
Page 39

eu-4
BASICS
RECOMMENDED & NON-RECOMMENDED ORIGINALS
RECOMMENDED & NON-RECOMMENDED
ORIGINALS
Recommended Originals
❐ Regarding originals that the optional document feeder can handle, ☛ see page
169.
Non-recommended Originals For The Optional
Document Feeder
RCAUTION:
The following types of originals are not recommended for use
with the document feeder. Place them directly on the exposure glass.
❐ Originals thicker than 128 g/m
❐ Originals thicker than 105 g/m
❐ Originals thinner than 40 g/m
(11 and 14 lb), the document feeder must be set to Thin Paper mode. ☛ See
page 139.
❐ Originals larger than A3, 11" x 17"
❐ Originals smaller than A5, 51/2" x 81/2"
❐ Paper with any king of coating (such as carbon) on the back
❐ Folded, curled, creased, or damaged originals
❐ Mailing labels, or perforated originals
❐ OHP transparencies
❐ Translucent paper
❐ Pasted originals
❐ Damp originals
❐ Sticky originals
❐ Wavy originals
❐ Originals that are not made from paper
❐ Originals written in pencil on both sides, or two-sided carbon originals
❐ Thermal fax paper, CRO (camera ready original) or aluminum foil
❐ Originals with globs of ink from a ball-point pen
2
, 34 lb
2
, 28 lb when using two-sided originals
2
, 11 lb. But for originals between 40 and 52 g/m
2
29
Page 40

SETTING ORIGINALS ON THE EXPOSURE GLASS
SETTING ORIGINALS ON THE EXPOSURE
.
Lift the optional platen cover or
1
the optional document feeder.
.
Set the original face down on the
2
exposure glass. The original
should be aligned to the rear left
corner.
eu-4
GLASS
.
Lower the optional platen cover
3
or the optional document feeder.
SETTING A STACK OF ORIGINALS IN THE
OPTIONAL DOCUMENT FEEDER (ADF)
You can insert a stack of originals (one-sided or two-sided) of the same size
into the document feeder. These originals are individually fed onto and
removed from the exposure glass.
❐ If you want to set originals of different sizes at the same time, use the user
tools. ☛ See page 151.
Correct any curl, fold, or crease
1
in the originals before setting.
30
Page 41

BASICS
SETTING A STACK OF ORIGINALS IN THE OPTIONAL DOCUMENT FEEDER (ADF)
Confirm that the Insert Original
2
indicator is lit before setting the
originals.
Confirm that no previous originals
3
remain on the exposure glass.
Adjust the guide to the original
4
size.
eu-4
Set the originals face up into the
5
document feeder until the Insert
Original indicator goes off.
❐ The last page should be on the bot -
tom.
❐ The guide must touch the front side
of the originals.
❐ Do not stack originals above the limit
mark.
31
Page 42

SETTING ONE ORIGINAL AT A TIME IN THE OPTIONAL DOCUMENT FEEDER (SADF)
SETTING ONE ORIGINAL AT A TIME IN THE
OPTIONAL DOCUMENT FEEDER (SADF)
You can insert one original at a time into the document feeder. The original
is automatically fed onto and removed from the exposure glass.
Correct any curl, fold, or crease
1
in the originals before setting.
Confirm that the Insert Original
2
indicator is lit before setting the
originals.
Confirm that no previous originals
3
remain on the exposure glass.
eu-4
Adjust the guide to the original
4
size.
Set the original face up into the
5
document feeder until the Insert
Original indicator goes off.
❐ If you are copying a stack of originals
one sheet at a time and you want to
keep them in order, start with the last
page of the originals.
❐ The original guide must touch the
front side of the original.
32
Page 43

BASICS
SETTING ONE ORIGINAL AT A TIME IN THE OPTIONAL DOCUMENT FEEDER (SADF)
Press the Start key.
6
While the Auto Feed indicator is
7
lit after an original is fed, set the
next original. The original is automatically fed and copied.
❐ If you have set more than two origi -
nals, the Auto Feed indicator is not
lit after the last original is fed. In this
case, press the Start key again after
setting an original.
eu-4
33
Page 44

SETTING ONE ORIGINAL AT A TIME IN THE OPTIONAL DOCUMENT FEEDER (SADF)
eu-4
34
Page 45

eu-5
COPYING
COPYING
BASIC OPERATIONS................................................................................................................ 36
One-to-one Copying (Full Size Copying) .......................................................................................... 36
Entering Copy Job Settings During The Warm-up Period (Auto Start) .......................................... 37
Adjusting Copy Image Density ........................................................................................................... 37
Selecting The Copy Paper Size (Manual Paper Select).................................................................. 38
Having The Copier Choose The Paper Size(Auto Paper Select) ................................................... 39
Having The Copier Choose The Reproduction Ratios (Auto Reduce/Enlarge)........................... 41
Selecting Original Type Setting (Letter, Letter/Photo, Photo, Generation Copy) ....................... 43
Sorting Into Sets (123,123,123) (Sort, Rotate Sort)............................................................................. 44
Stacking Together All Copies Of A Page (111,222,333) (Rotate Stack) ...................................... 48
Copying From The Bypass Tray ........................................................................................................... 50
Temporarily Stopping One Job To Copy Something Else (Interrupt) ............................................ 53
Recalling Job Settings (Job Recall) ................................................................................................... 53
Storing Your Copy Setting In Memory (Program)............................................................................. 54
REDUCING AND ENLARGING (Reduce/Enlarge) ............................................................... 55
Reducing And Enlarging Using Preset Ratios (Preset R/E) .............................................................. 55
Reducing And Enlarging In 1% Steps................................................................................................. 56
Fitting The Original To A Copy Of A Different Size........................................................................... 58
WORKING WITH BOTH SIDES OF ORIGINALS AND COPIES (Duplex/Series Copies)........ 61
Making Two-sided Copies (Duplex)................................................................................................... 61
Making One-sided Copies (Series Copies) ....................................................................................... 68
COMBINING ORIGINALS INTO ONE COPY (Combine) ..................................................... 70
PRINTING ID NUMBERS, PAGE NUMBERS, AND MESSAGES (Stamp) .................................74
Printing Numbers On The Background Of Your Copies (Background Numbering) .................... 74
Printing Preset Messages On Your Copies (Auto Stamping) - English Only.................................. 75
Printing Your Own Messages On Your Copies (User Stamping)..................................................... 79
PRINTING ID NUMBERS, PAGE NUMBERS, AND MESSAGES (Stamp) .................................79
Printing Dates And Page Numbers (Date Stamping, Page Numbering).................................... 81
EDITING THE COPY IMAGE (Adjust Image)......................................................................... 86
Copying The Image Twice On One Page (Double Copies) .......................................................... 86
Erasing The Centre And The Border (Erase Centre/Border) .......................................................... 88
Adjusting The Margin (Margin Adjustment) ...................................................................................... 89
Repeating An Image Over The Entire Copy (Image Repeat) ....................................................... 91
Reversing Black and White (Positive/Negative)............................................................................... 93
Merging Images (Overlay/Merge) ..................................................................................................... 94
OPTIONAL FINISHING ............................................................................................................. 96
Sorting Into Sets (123,123,123) (Sort) .................................................................................................. 96
Stapling (Staple) ................................................................................................................................... 100
Stapling Position And Original Setting ............................................................................................... 101
When Setting One Original At A Time............................................................................................... 104
When Setting A Stack Of Originals In The Document Feeder ....................................................... 104
COMBINATION CHART ..........................................................................................................105
35
Page 46

BASIC OPERATIONS
BASIC OPERATIONS
One-to-one Copying (Full Size Copying)
You can make copies that are the same size as your originals.
Set your original on the exposure
1
glass or in the optional document
feeder. ☛ See pages 30 ~ 33.
Enter the number of copies re-
2
quired using the Number keys.
❐ To change the number entered,
press the Clear/Stop key, then enter
the new number.
eu-5
Confirm that the [Auto Paper Se-
3
lect] key is dark. If not, touch the
[Auto Paper Select] key, or se-
lect the proper paper size using
keys on the display.
❐ Regarding Auto Paper Select, ☛ see
page 39.
❐ Regarding selecting paper size,
☛ see page 38.
Make sure that the [Full Size]
4
key is dark. If not, touch it.
36
Page 47

COPYING
BASIC OPERATIONS
Press the Start key.
5
❐ To stop the copier during the multi -
copy run, press the Clear/Stop key.
❐ Press the Start key to resume copy -
ing, or press the Clear/Stop key to
clear the entered copy number.
Entering Copy Job Settings During The Warm-up Period (Auto Start)
During the warm-up period (within 140
seconds), the display is as shown. If
you enter your copy job settings and
press the Start key during the warm
up period, the copier will start copying
automatically when the copier reaches
the ready condition.
❐ To cancel Auto Start, press the
Clear/Stop key.
eu-5
Adjusting Copy Image Density
Auto and manual image density
If the [Auto Image Density] key is
dark, Auto Image Density is selected.
If not, touch the [Auto Image Den-
sity] key.
If the [Auto Image Density] key is
light, Manual Image Density mode is
selected. To get a darker image,
touch the [Darker] key. To get a
lighter image, touch the [Lighter] key.
37
Page 48

eu-5
BASIC OPERATIONS
Erasing Background (Erase Background)
Use this mode to mask out a dirty background (e.g. with a newspaper) and
get clear copies.
Confirm that the [Erase Background]
key is dark. If not, touch it.
Selecting The Copy Paper Size (Manual Paper Select)
You can select the desired copy paper size manually by touching one of
the tray keys in the display.
❐ Regarding setting copy paper in the
bypass tray, ☛ see page 50.
❐ The keys that have an
cannot be used for Auto Paper Se lect.
(asterisk)
*
38
Page 49

eu-5
COPYING
BASIC OPERATIONS
Having The Copier Choose The Paper Size(Auto
Paper Select)
The copier selects a suitable size of
copy paper based on the original size
and the reproduction ratio. Make sure
that the [Auto Paper Select] key is
dark. If not, touch the [Auto Paper
Select] key.
❐ If you use translucent or transparent originals or originals with tags, the original
size might not be detected correctly.
❐ When placing the original on the exposure glass directly, make sure that the
optional platen cover or optional document feeder is lowered before pressing
the Start key. Otherwise, the original size might not be detected correctly.
❐ When the original is set at a different direction from the copy paper in the paper
tray and the required paper size is A4, 81/2" x 11" or smaller, the copier auto matically rotates the original image by 90o to match the copy paper direction
and make copies.
❐ The tray keys that have an
❐ Regarding the combination of the Auto Paper Select and Stapling, ☛ see page
101.
❐ Regarding functions that cannot be used together with this function, ☛ see
page 105.
(asterisk) cannot be used for the Auto Paper Select.
*
39
Page 50

BASIC OPERATIONS
❐ When you use Auto Paper Select, refer to the following table for possible copy
paper sizes
Metric version
Original Possible selected paper sizes for copy
A or B type* A or B type*
8" x 13" 8" x 13"***, A or B type*
1/4" x 13" 81/4" x 13"***, A or B type*
8
1/2" x 13" 81/2" x 13"***, A or B type*
8
LT type**, 8" x 10" LT type**, 8"x 10", A or B type*
* :A type (A3, A4, A5), B type (B4, B5, B6)
** :LT type: 11" x 17", 81/2" x 11"
*** :F/F4 size selected by user tools. ☛ See page 138.
Inch version
Original Possible selected paper sizes for copy
LT type LT type
A4 A4, LT type
8" x 13" 8" x 13"**, LT type
1/4" x 13" 81/4" x 13"**, LT type
8
1/2" x 13" 81/2" x 13"**, LT type
8
11" x 15", 10" x 14", 8" x 10" 11" x 15", 10" x 14", 8" x 10", LT type
* :LT type: 11" x 17", 81/2" x 14", 8 1/2" x 11", 51/2" x 81/2"
** :F/F4 size selected by user tools. ☛ See page 138.
eu-5
40
Page 51

eu-5
COPYING
BASIC OPERATIONS
Having The Copier Choose The Reproduction
Ratios (Auto Reduce/Enlarge)
The copier can choose an appropriate reproduction ratio based on the
paper and original sizes you select.
❐ If you use translucent or transparent originals or originals with tags, the original
size might not be detected correctly.
❐ When placing the original on the exposure glass directly, make sure that the
optional platen cover or optional document feeder is lowered before pressing
the Start key. Otherwise, the original size might not be detected correctly.
❐ When the original is set at the different direction from the selected copy paper,
the copier cannot rotate the image by 90o. Make sure to set the original in the
same direction as the copy paper.
❐ Regarding functions that cannot be used together with this function, ☛ see
page 105.
Example:
Metric version: Original: A3 ;, Copy paper: A4 ;
Inch version: Original: 11" x 17" ;, Copy paper: 81/2" x 11" ;
Touch the [Auto/Reduce En-
1
large] key.
Set your original on the exposure
2
glass or in the optional document
feeder. ☛ See pages 30 ~ 33.
41
Page 52

BASIC OPERATIONS
Select the copy size you require:
3
Metric version:
Touch the [A4 ;] paper tray key.
Inch version:
Touch the [81/2" x 11" ;] paper
tray key.
Press the Start key. The original
4
image is reduced to fit the selected copy paper.
eu-5
42
Page 53

eu-5
COPYING
BASIC OPERATIONS
Selecting Original Type Setting
(Letter, Letter/Photo, Photo, Generation Copy)
There are four types of original type setting. Select the appropriate original
type to match the kind of originals you are copying from.
❐ Letter mode is the default. You can change this setting using the user tools.
☛ See page 141.
Letter
Select Letter mode when your originals contain only letters (no picture).
Letter/Photo
Select Letter/Photo when your originals contain photographs or pictures with
letters.
Photo
Delicate tones of photographs and pictures can be reproduced with this
mode.
Generation copy
If your originals are copies, so called generation copies, the copy image can
be reproduced sharply and clearly.
Letter mode is selected by de-
1
fault. Select the desired setting
by touching one of four keys.
43
Page 54

eu-5
BASIC OPERATIONS
Sorting Into Sets (123,123,123) (Sort, Rotate Sort)
The copier puts images of more than two originals into memory and copies
are collated into sets. In Sort mode, every copy set is delivered on the copy
tray. In Rotate Sort mode, every other copy set is rotated by 90o and
delivered to the copy tray, so that each set can be easily separated.
Notes for above modes
❐ You can make up to 999 copy sets at a time. However, when the number of
copies exceeds the capacity of the copy tray, remove copies from the copy
tray. Regarding the capacity of the copy tray, ☛ see page 166.
❐ After starting copying, the only setting you may change is image density, The
change will apply from the next copy. ☛ See page 37.
❐ The maximum number of pages that can be stored is as follows:
A4, 81/2" x 11": Approximately 100 pages (images)
❐ You can change the settings of these modes with the user tools. ☛ See page
151.
❐ Regarding functions that cannot be used together with this function, ☛ see
page 105.
Notes for Rotate Sort mode
❐ Paper sizes that can be used in Rotate Sort mode are as follows:
A4, B5, 81/2" x 11"
❐ Two paper trays that are identical in size and different in direction are required.
You can change this setting using the user tools. ☛ See page 151.
❐ This mode does not support different size originals.
44
Page 55

eu-5
COPYING
BASIC OPERATIONS
Notes for Sort mode
❐ When you make two-sided copies in Sort mode, the maximum number of cop -
ies stacked in the unit for two-sided copies (duplex unit) is as follows:
A3, 11" x 17": 30 sheets
Other sizes: 50 sheets
❐ Different size originals can be used only when you make one-sided copies
from one-sided originals.
Touch the [Sort], or [Rotate Sort]
1
key.
Enter the number of copy sets with the Number keys.
2
When setting one original at a time
3
Set an original on the exposure glass or in the optional document
➊
feeder (☛ see page 30 or 32). Then press the Start key. The copier
starts memorizing the original image.
❐ Start with the last page to be copied.
When the Start key turns green, or the Auto Feed indicator on the
➋
document feeder is lit, set the next original. If you have set the original
on the exposure glass in step ➊, press the Start key.
❐ Set the original in the same direction as step ➊.
❐ When the memory reaches 0%, the copier stops memorizing. Press the
Start key to finish copy jobs which are already into memory. After that,
follow the instructions on the display.
Repeat step ➋ until all originals are scanned.
➌
After all originals are put into memory, press the Enter key.
➍
❐ If you are making one-sided copies, the first set of copies will have completed.
Press the Start key.
➎
45
Page 56

BASIC OPERATIONS
When setting a stack of originals in the
3
document feeder
Set a stack of the originals in the document feeder ( ☛ see page 30),
➊
then press the Start key.
❐ The last page should be on the bottom.
❐ When memory runs out during copying, the machine can be programmed to
behave in two ways with the user tools.
♦ Memory Full Auto Scan Restart = [Yes]
→ After all images in memory are copied, the machine will re-start
scanning automatically.
You should re-order your copies after all copy jobs are finished.
♦ Memory Full Auto Scan Restart = [No]
→ The machine will wait for you to press the Start key. At this point you
should remove your copies from the copy tray. Press the Start key
and then follow the instructions on the display to continue copying.
eu-5
If you want to change the setting with the user tools, ☛ see page 151.
❐ If you make one-sided copies, the first set of copies has been completed
when all original images are stored in the memory.
46
Page 57

eu-5
COPYING
BASIC OPERATIONS
Stopping storing images and deleting stored images during copying
Press the Clear/Stop key.
1
❐ The copying run of the 1st set and scanning will stop.
Press the Clear/Stop key again. If you want to delete stored images,
2
touch the [Yes] key following the instructions on the display.
❐ You cannot delete the stored images by press the Clear/Stop key, if copies
have been stacked in the unit for two-sided copies (duplex unit) when mak ing two-sided copies. In this case, after the step 1, press the Clear
Modes/Low Power Mode key. So that, all settings and stored images will
be cleared. Then remove copies in the duplex unit by opening the front
cover. For position of the duplex unit, ☛ see page 4.
47
Page 58

eu-5
BASIC OPERATIONS
Stacking Together All Copies Of A Page
(111,222,333) (Rotate Stack)
Each original is copied together. Every other copies is delivered to the copy
tray, turned 90o.
❐ You can make up to 999 copy sets at a time. However, when the number of
copies exceeds the capacity of the copy tray, remove copies from the copy
tray. Regarding the capacity of the copy tray, ☛ see page 166.
❐ These modes do not support different size originals.
❐ After starting copying, the only setting you may change is image density, The
change will apply from the next copy. ☛ See page 37.
❐ Two paper trays that are identical in size and different in direction are required.
You can change this setting with the user tools. ☛ See page 151.
❐ The paper sizes that can be used in the Rotate Stack mode is as follows:
A4, B5, 81/2" x 11"
❐ Regarding functions that cannot be used together with this function, ☛ see
page 105.
48
Page 59

Touch the [Rotate Stack] key.
COPYING
1
Enter the number of copies with the Number keys.
2
When setting one original at a time
3
Set an original on the exposure glass or in the optional document
➊
feeder (☛ see page 30 or 32). Then press the Start key.
❐ Start with the last page to be copied.
When the Start key turns green or the Auto Feed indicator on the
➋
document feeder is lit, set the next original. If you have set the original
on the exposure glass in step ➊, press the Start key.
❐ Set the original in the same direction as step ➊.
eu-5
BASIC OPERATIONS
Repeat step ➋ until your copying is finished.
➌
When setting a stack of originals in the
3
document feeder
Set a stack of the originals in the document feeder ( ☛ see page 30),
➊
then press the Start key.
❐ Last page should be on the bottom.
49
Page 60

eu-5
BASIC OPERATIONS
Copying From The Bypass Tray
Use the bypass tray to copy onto OHP transparencies, adhesive labels, translucent paper, post cards, and copy paper that cannot be set in the paper tray.
11" x 17"
8" x 13"
2
, 17 lb) can be inserted at a time.
;, 81/2" x 11" : ;, 51/2" x 81/2" : ;,
;,
❐ Approximately 40 sheets of copy paper (64 g/m
❐ Before making copies onto OHP transparencies, adhesive labels, translucent
paper, and post cards, read the notes for them. ☛ See page 162.
❐ When you make copies using the bypass tray, it is recommended to set paper
in the bypass tray lengthwise (;).
❐ When using the bypass tray, the large capacity tray cannot be used.
❐ The following sizes can be used as standard size copy paper. If you use other
paper sizes, you should input vertical and horizontal dimensions.
Metric version Inch version
;, B4 ;, A4 : ;, B5 : ;, A5 : ;,
A3
: ;, A6 : ;, 11" x 17" ;
B6
❐ Regarding the functions that cannot be used together with this function, ☛ see
page 105.
Set your original on the exposure
1
glass or in the optional document
feeder. ☛ See pages 30 ~ 33.
Open the bypass tray. The [By-
2
pass Tray] key appears on the
display.
❐ If the [Bypass Tray] key is not dark,
touch it.
50
Page 61

When copying onto standard size copy paper
COPYING
3
Slide the paper guides to the
➊
paper width and, if necessary,
swing out the extender to support large size copy paper.
Insert the copy paper into the
➋
bypass tray until the beeper
sounds.
❐ The beeper can be canceled with
the user tools. ☛ See page 137.
eu-5
BASIC OPERATIONS
Press the Start key.
➌
When copying onto non-standard size paper
3
Acceptable non-standard paper sizes:
Metric version:
Vertical: 100 ~ 297 mm (in 1 mm steps)
Horizontal: 148 ~ 432 mm (in 1 mm steps)
Inch version:
Vertical: 4.0" ~ 11.7" (in 0.1" steps)
Horizontal: 6.0" ~ 17.0" (in 0.1" steps)
Press the Enter key.
➊
The display changes as shown.
➋
51
Page 62

BASIC OPERATIONS
Enter the vertical size of the pa -
➌
per using the Number keys.
❐ To change the number entered,
touch the [C] key or press the
Clear/Stop key.
Touch the [#] key in the display
➍
or press the Enter key.
Enter the horizontal size of the
➎
paper using the Number keys.
Then, touch the [#] key in the
display or press the Enter key.
Touch the [Exit] key to close
➏
this menu.
eu-5
The [Bypass Tray] key changes
➐
to [Special Paper Size] key.
Adjust the guides to copy paper
➑
size and insert the copy paper
until the beeper sounds.
❐ The beeper can be canceled with
user tools. ☛ See page 137.
Press the Start key.
➒
52
Page 63

Temporarily Stopping One Job To Copy
COPYING
Something Else (Interrupt)
You can make urgently needed copies during a multicopy run by pressing the Interrupt key. The interrupted copy job settings are stored in the machine’s memory. After interrupt copying is completed, press this key again to recall the previous copy job settings.
❐ In Interrupt mode, t is displayed on
the display.
❐ If you use this function with the op-
tional document feeder, you might
have to reset originals not to be copied
after interrupt copying is finished. Fol low the instructions on the display.
❐ Regarding the functions that cannot
be used together with this function,
☛ see page 105.
eu-5
BASIC OPERATIONS
Recalling Job Settings (Job Recall)
The previous copy job settings before auto reset or Low Power mode can be recalled by pressing the Job Re- call key. When the previous copy job setting is saved, the Job Recall indicator is lit.
53
Page 64

eu-5
BASIC OPERATIONS
Storing Your Copy Setting In Memory (Program)
Your ten frequent copying jobs can be stored in the machine’s memory.
❐ The stored program cannot be deleted. If you want to change the stored pro -
gram, overwrite the stored program.
Storing your settings
Set the copy settings you want to
1
put into memory.
Press the Program key.
2
❐ If you want to cancel storing, touch the [Cancel] key.
Touch the [Store] key.
3
Touch one of the [1] ~ [10] keys
4
that you want to store your settings in.
❐ A key with m has already settings in
it. If you want to overwrite settings,
touch the key with m and follow the
instructions on the display.
Recalling a program
Press the Program key.
1
Make sure that the [Recall] key is dark. If not, touch it.
2
Touch one of the [1] ~ [10] keys that has m on it.
3
54
Page 65

eu-6
COPYING
REDUCING AND ENLARGING (Reduce/Enlarge)
REDUCING AND ENLARGING
(Reduce/Enlarge)
❐ Regarding functions that cannot be used together with this function, ☛ see
page 105.
Reducing And Enlarging Using Preset Ratios
(Preset R/E)
You can select one of 12 preset ratios
(5 enlargement ratios, 7 reduction ratios).
❐ You can add 2 fixed preset ratios using the user tools. ☛ See page 142.
Touch the [Reduce/Enlarge] key.
1
Confirm that the [Preset R/E] key
2
is dark. If not, touch the [Preset
R/E] key.
Touch the desired reproduction
3
ratio.
❐ Refer to the copy and paper sizes on
keys to select the appropriate ratio to
match your originals and copy paper.
55
Page 66

eu-6
REDUCING AND ENLARGING (Reduce/Enlarge)
Reducing And Enlarging In 1% Steps
Using the [+] and [-] keys or Number keys (Zoom)
The reproduction ratio can be
changed from 25% to 400% in 1%
steps. There are two ways to change
ratios.
Touch the [Reduce/Enlarge] key.
1
Touch the [Zoom] key.
2
When using the [+] and [-] keys
3
Enter the desired reproduction
➊
ratios touching the [+] and [-]
keys on the display.
When using number keys
3
Touch the [Number Keys] key.
➊
56
Page 67

eu-6
COPYING
REDUCING AND ENLARGING (Reduce/Enlarge)
Enter the desired ratio using the
➋
Number keys.
❐ To change the number entered,
touch the [C] key or press the
Clear/Stop key, then enter the
new number.
Touch [#] key on the display or
➌
press the Enter key.
Stretching and squeezing the image
(Directional Magnification)
Copies can be reduced or enlarged at
different reproduction ratios horizontally and vertically. There are two
ways to change ratios.
Touch the [Reduce/Enlarge] key.
1
Touch the [D. Mag. (%)] key.
2
When using number keys
3
Touch the [Horizontal] or [Ver -
➊
tical] key that you want to
change the ratio.
Enter the desired ratio using the
➋
Number keys.
❐ To change the entered ratios,
touch the [C] key or press the
Clear/Stop key. Then, enter the
new ratios.
Touch the [#] key or press the
➌
Enter key.
57
Page 68

eu-6
REDUCING AND ENLARGING (Reduce/Enlarge)
When using [+] and [-] keys
3
Touch the [+- Keys] key.
➊
Touch the [Horizontal ] or [Verti -
➋
cal] key that you want to change
the ratio. Select the desired ratios
using [+] and [-] keys.
Fitting The Original To A Copy Of A Different Size
Fitting the image in the copy area as it is
(Size Magnification)
The suitable reproduction ratio will be
automatically selected when you enter
the lengths of the original and copy
image you want.
Touch the [Reduce/Enlarge] key.
1
Touch the [Size Magnification]
2
key.
58
Original Original
Copy size
you want
Copy
Page 69

eu-6
COPYING
REDUCING AND ENLARGING (Reduce/Enlarge)
Enter the original size with the
3
Number keys.
❐ To change the entered size, touch
the [C] key or press the Clear/Stop
key. Then, enter the new size.
Touch the [#] key or press the
4
Enter key.
Enter the copy size by the Num-
5
ber keys. Touch the [#] key or
press the Enter key.
Stretching and squeezing the image into the copy area
(Directional Size Magnification)
Copies can be reduced or enlarged to
match independent horizontal and
vertical size settings.
Touch the [Reduce/Enlarge] key.
1
Touch the [D. Size Mag. (mm)]
2
key.
Original
Copy size
you want
Copy
59
Page 70

eu-6
REDUCING AND ENLARGING (Reduce/Enlarge)
Enter the original horizontal size
3
by the Number keys.
❐ To change the entered size, touch
the [C] key or press the Clear/Stop
key. Then, enter the new size.
Touch the [#] key or press the
4
Enter key.
Repeat steps 3 and 4 to enter
5
the other sizes, following the display instructions.
60
Page 71

eu-6-2
COPYING
WORKING WITH BOTH SIDES OF ORIGINALS AND COPIES (Duplex/Series Copies)
WORKING WITH BOTH SIDES OF ORIGINALS
AND COPIES (Duplex/Series Copies)
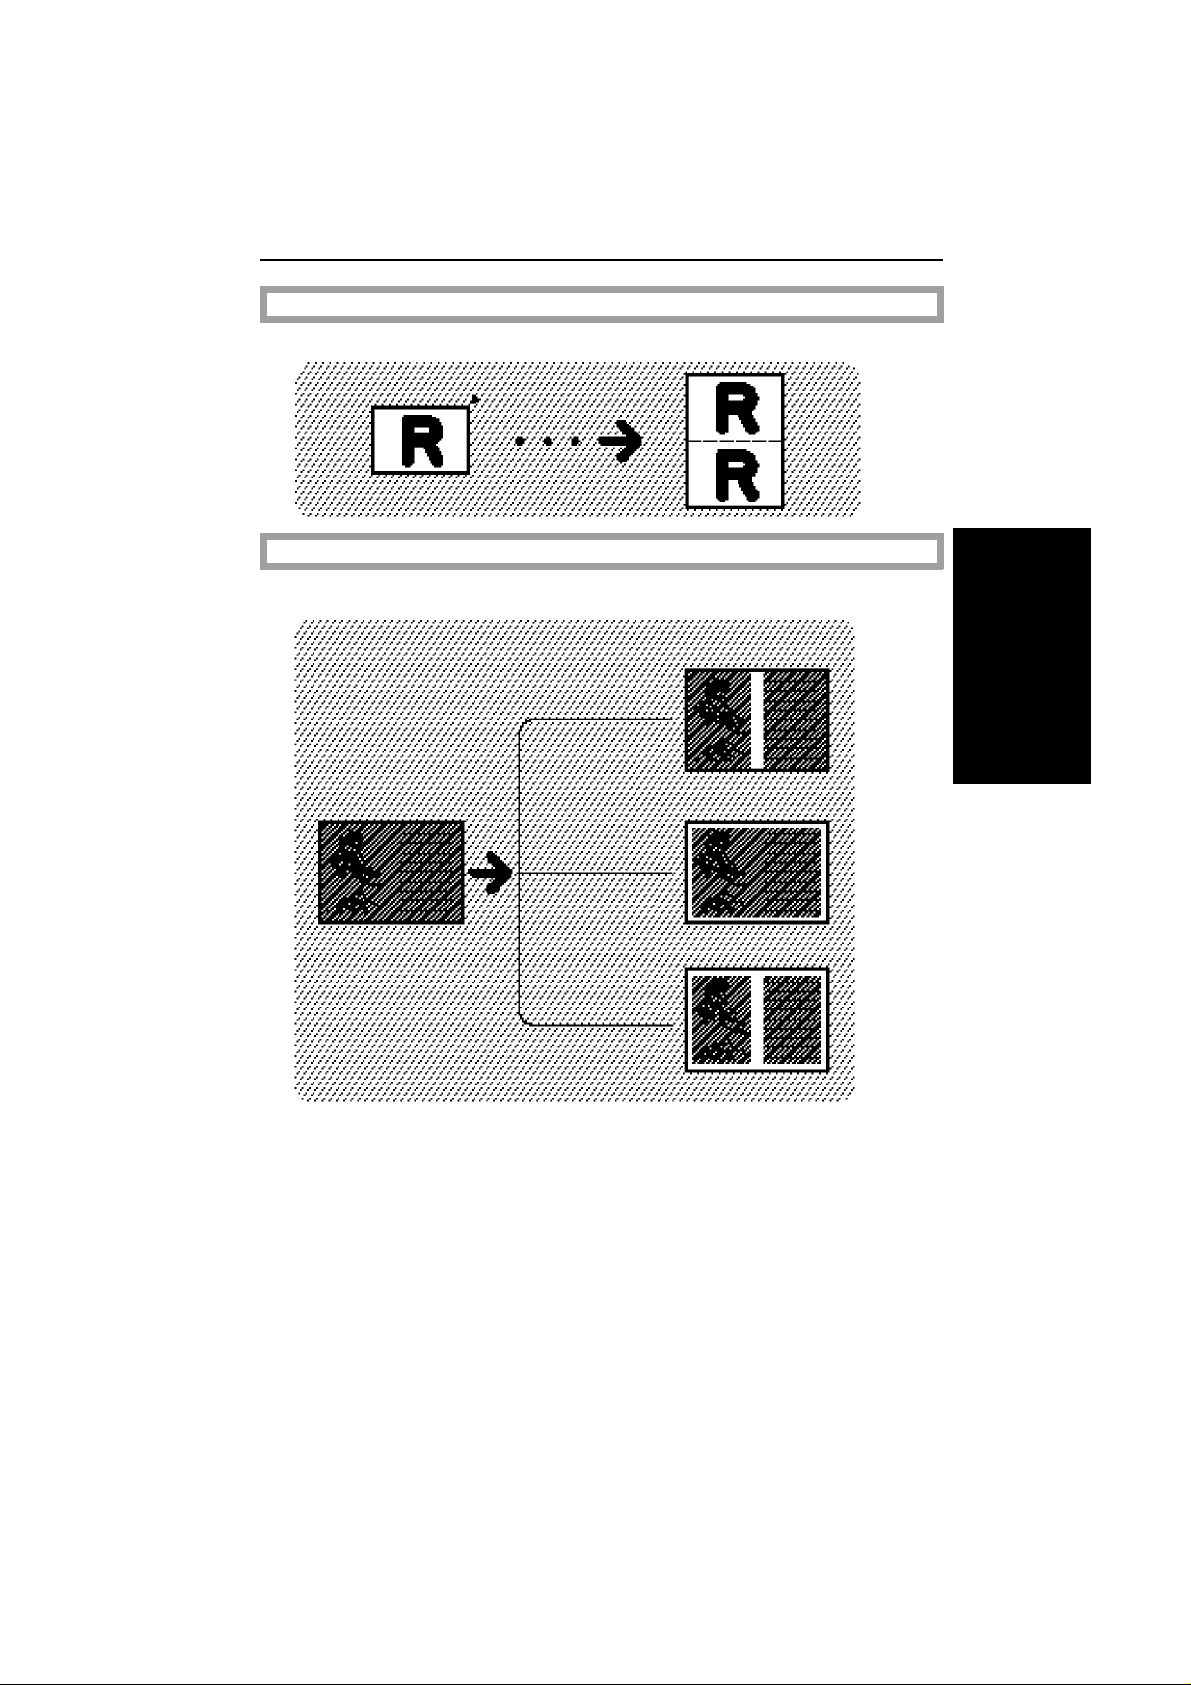
Making Two-sided Copies (Duplex)
From one-sided originals From two-sided originals
(1 Sided ➝ 2 Sided) (2 Sided ➝ 2 Sided)
From book originals (Single) From book originals (Multi)
This mode makes two-sided copies
from two facing pages of a bound
(book) original.
❐ When you make two-sided copies from one-sided originals, a right margin of 5
mm (0.2") is automatically set on the back side. You can change this setting
with the user tools. ☛ See pages 142 and 143.
❐ You can change a setting of this mode with the user tools. ☛ See page 150.
❐ Single and Multi modes do not support different size originals.
❐ Regarding functions that cannot be used together with this function, ☛ see
page 105.
This mode makes the copies face
each other exactly as the bound
(book) originals do.
61
Page 72

eu-6-2
WORKING WITH BOTH SIDES OF ORIGINALS AND COPIES (Duplex/Series Copies)
❐ The following paper limitations apply:
Metric version: Maximum size: A3 ;
Minimum size: A5 :
Weight: 64 ~ 105 g/m
2
Inch version: Maximum size: 11" x 17" ;
Minimum size: 51/2" x 81/2" :
Weight: 17 ~ 24 lb
❐ Maximum number of copies (not in Sort, Rotate Sort, or Staple mode):
Metric version: 50 sheets
30 sheets (A3, 81 ~ 105 g/m2)
Inch version: 50 sheets
30 sheets (11" x 17", 22 ~ 24 lb)
62
Page 73

eu-6-2
COPYING
WORKING WITH BOTH SIDES OF ORIGINALS AND COPIES (Duplex/Series Copies)
❐ If you select Stapling ( [Top]) and Page Numbering ([P1, P2...] or [1/5, 2/5...])
together when making two-sided copies, it is recommended to set Duplex and
Page Numbering modes as described below to avoid page numbers and staple
position overlap on the reverse side of copies.
1 At first, set the Duplex mode as you want.
2 Touch the [Stamp] key.
3 Touch the [Page Numbering] key and select [P1,P2...] or [1/5,2/5...].
☛ See pages 82 ~ 85.
4 If you select [Top to Top] in step 1, it is recommended that the [Shift
Position] key is selected (dark). If you select [Top to Bottom] in step 1,
it is recommended that the [Shift Position] key is not selected.
[Top to Top]
[Top to Bottom]
63
Page 74

eu-6-2
WORKING WITH BOTH SIDES OF ORIGINALS AND COPIES (Duplex/Series Copies)
Originals and copies directions when making two-sided
copies from one-sided originals
When making two-sided copies from one-sided originals, you can select the
orientation ([Top to Top], [Top to Bottom]). Referring to the illustration
below, select one of them.
Stapling
position
on the exposure glass
Original setting
in the document
feeder
Copies
:
direction
[Top to
Top]
;
direction
;
direction*
:
direction
[Top to
Bottom]
;
direction*
;
direction*
❐ * recommended when your original is larger than B4, 8 1/2" x 14" or larger.
64
Page 75

eu-6-2
COPYING
WORKING WITH BOTH SIDES OF ORIGINALS AND COPIES (Duplex/Series Copies)
Touch the [Duplex/Series Cop-
1
ies] key.
Confirm that the [Duplex] key is
2
dark. If not, touch the [Duplex] key.
When you want to make two-sided copies from
3
one-sided originals
Touch the [1 Sided ➝ 2 Sided]
➊
key.
Select [Even] or [Odd] for the
➋
number of originals.
Select [Top to Top] or [Top to
➌
Bottom] for the orientation referring to the table on page 64.
Touch the [Exit] key.
➍
Set your originals (☛ see pages 30~33) and make your copies.
➎
❐ If you set originals in the optional document feeder, the last page should be
on the bottom.
❐ If you set one original in the optional document feeder at a time, start with
the last page to be copied. Follow the procedures on pages 32 ~ 33.
❐ If you place originals on the exposure glass, start with the last page to be
copied. After setting your original, press the Enter or Start key following the
instructions on the display.
65
Page 76

eu-6-2
WORKING WITH BOTH SIDES OF ORIGINALS AND COPIES (Duplex/Series Copies)
When you make two-sided copies from two-sided
3
originals
Touch the [2 Sided ➝ 2 Sided]
➊
key.
Set your originals (☛ see pages 30 ~ 33) and make your copies.
➋
❐ If you set originals in the optional document feeder, the last page should be
on the bottom.
❐ If you set one original in the optional document feeder at a time, start with
the last page to be copied. Follow the procedures on pages 32 ~ 33.
❐ If you place originals on the exposure glass, start with the last page to be
copied. After setting your original, press the Enter or Start key following the
instructions on the display.
When you make two-sided copies from book originals
3
(Single, Multi)
66
Touch the [Single] or [Multi ] key.
➊
Touch the [Change Modes]
➋
key and select the copy paper
size, because Auto Paper Select is canceled.
Page 77

eu-6-2
COPYING
WORKING WITH BOTH SIDES OF ORIGINALS AND COPIES (Duplex/Series Copies)
Confirm that the reproduction ratio is appropriate. If not, select the
➌
proper ratio by touching the [Reduce/Enlarge] key referring to the fol-
lowing table.
Book original size Copy paper Ratio
; A4 : 100%
A3
; A4 : 141%
A4
11" x 17"
8
Set your originals. Start with the last page of your book original and
➍
; 81/2" x 11" : 100%
1/2" x 11" ; 81/2" x 11" : 129%
work your way to the beginning.
Place the original face down on
the exposure glass and align
the last page with the left scale.
Or, set the facing original in the
optional document feeder as
shown in the illustration.
❐ If you set originals in the optional document feeder, the last page should be
on the bottom.
❐ If you place your original on the exposure glass, or set one original at a time
in the document feeder, start with the last page to be copied.
Make your copies by pressing the Start key.
➎
❐ If you select the [Multi] in step ➊ and set your original on the exposure
glass, repeat steps ➍ and ➎ until all originals are finished. To finish your
job, press the Enter key following the instructions on the display.
❐ If you select the [Multi] in step ➊ and set one original at a time in the
document feeder in step ➍, press the Enter key to finish your job following
the instructions on the display.
67
Page 78

eu-6-2
WORKING WITH BOTH SIDES OF ORIGINALS AND COPIES (Duplex/Series Copies)
Making One-sided Copies (Series Copies)
You can make one-sided copies from
two facing pages of bound (book)
originals and from two-sided originals.
Note: The optional document feeder is required when you select one-sided
copies from two-sided originals.
❐ When making one-sided copies from book originals, the maximum paper size
(: only) that can be used is as follows:
Metric version: A4 :
Inch version: 81/2" x 11" :
❐ Book ➝ 1 Sided mode does not support different size originals.
❐ Regarding functions that cannot be used together with this function, ☛ see
page 105.
Touch the [Duplex/Series Cop-
1
ies] key.
Touch the [Series Copies] key.
2
Select the desired mode by
3
touching a key.
68
Page 79

eu-6-2
COPYING
WORKING WITH BOTH SIDES OF ORIGINALS AND COPIES (Duplex/Series Copies)
If you select the [Book ➝ 1 Sided] key in step 3, touch the [Change
4
Modes] key and select the copy paper size because Auto Paper Select
is canceled. Confirm that the reproduction ratio is appropriate. If not,
select the proper ratio by touching the [Reduce/Enlarge] key. ☛ See
the table on page 67.
Set your originals (☛ see pages 30 ~ 33) and make your copies.
5
❐ If you set originals in the optional document feeder, the last page should be on
the bottom. ☛ See the second illustration on page 67.
❐ When you set a book original on the exposure glass, start with the last page to
be copied aligning it with the left scale. ☛ See the top illustration on page 67.
Press the Start key.
6
69
Page 80

eu-6-2
COMBINING ORIGINALS INTO ONE COPY (Combine)
COMBINING ORIGINALS INTO ONE COPY
(Combine)
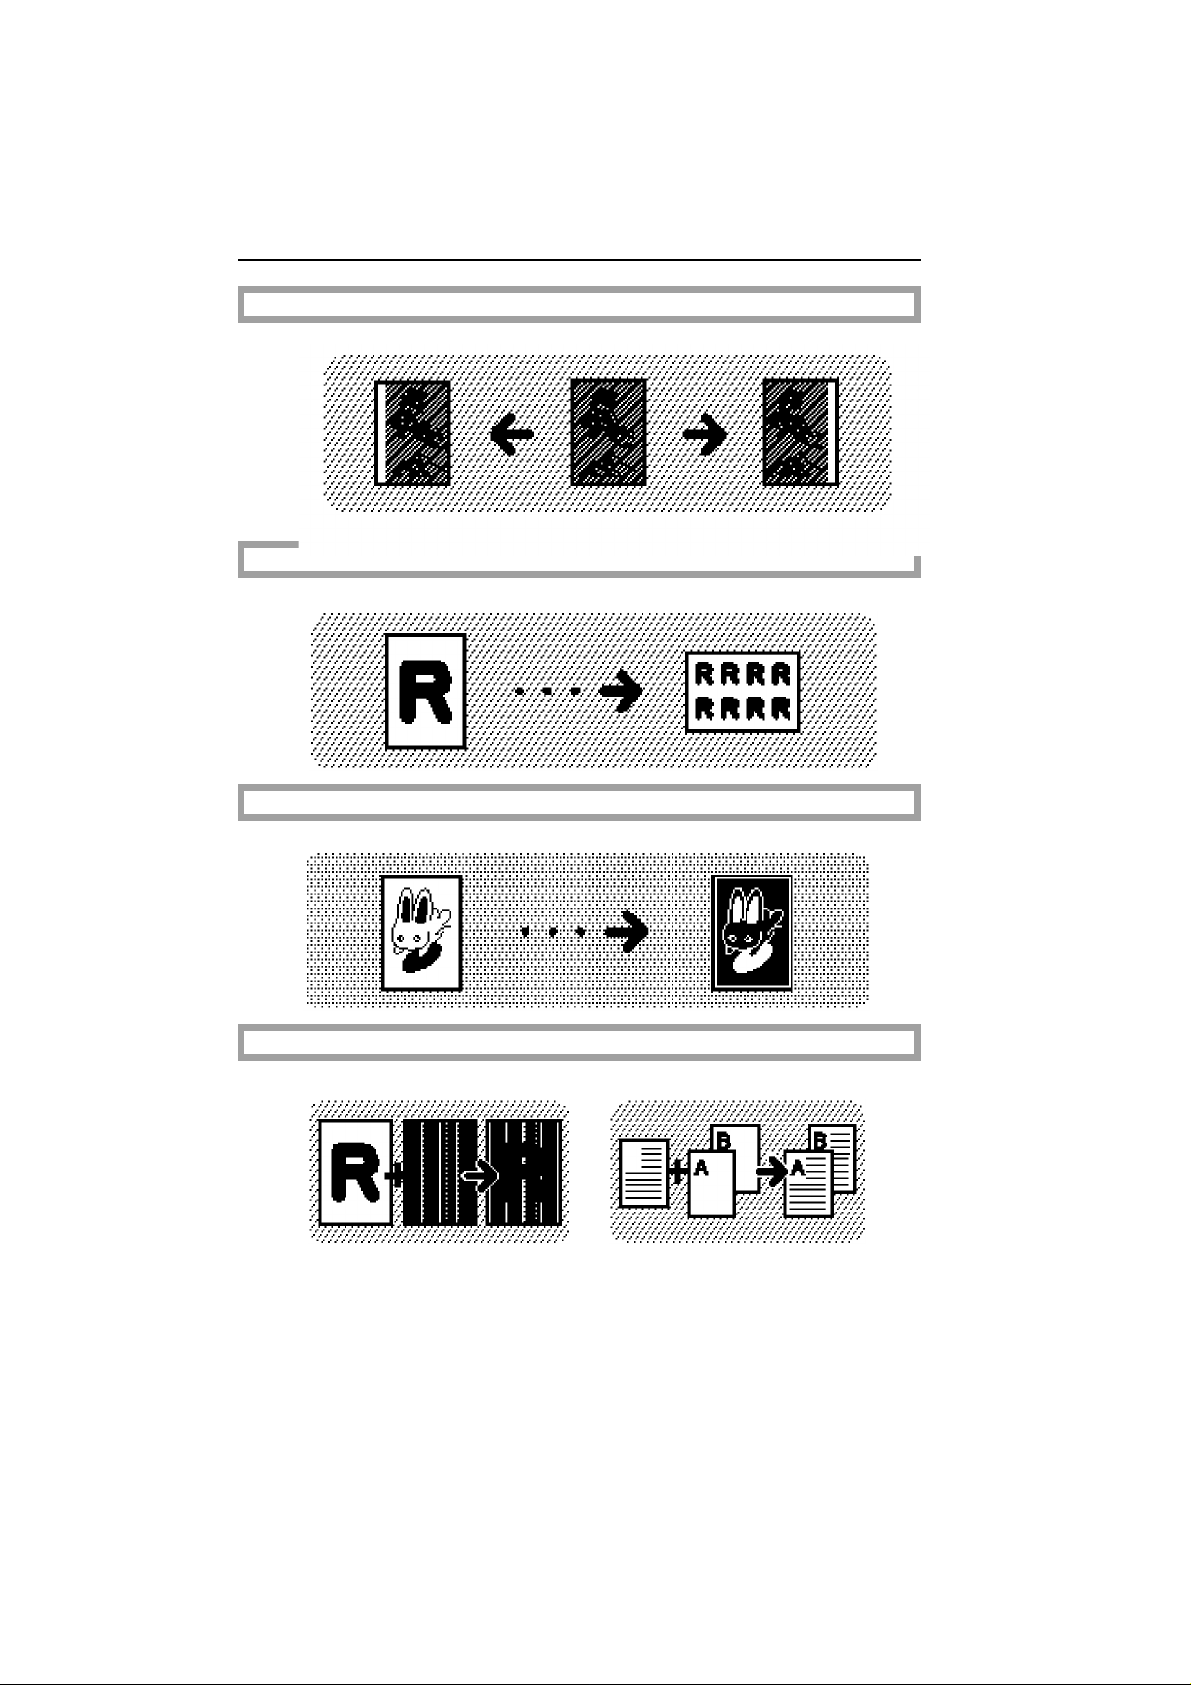
From 2 One-sided Originals To 1 One-sided Copy
From 4 One-sided Originals
From 8 One-sided Originals To 1 Two-sided Copy
From 16 One-sided Originals To Booklet
70
Page 81

eu-6-2
COPYING
COMBINING ORIGINALS INTO ONE COPY (Combine)
❐ If you want to make a booklet from
16 originals, fold copies as shown in
the illustration.
❐ If you want to make a booklet that
reads from right to left, change the
default setting with the user tools.
☛ See page 144.
❐ Even if the number of originals in the
optional document feeder is less than
the number required in the selected
mode, copies can be made as shown
in the illustration. You can change
this setting with the user tools.
☛ See page 150.
❐ If you add a blank sheet to the bot -
tom of the stack of your originals, the
copies can be made as shown in the
illustration.
❐ Auto Stamping, Date Stamping and
Page Numbering will be copied one
per copy paper as shown in the illus -
tration. This doesn’t apply to Booklet
mode.
❐ Auto Stamping, Date Stamping and
Page Numbering will be copied one
per original when you make a booklet
from 4 or 16 originals as shown in
the illustration.
71
Page 82

eu-6-2
COMBINING ORIGINALS INTO ONE COPY (Combine)
❐ When you make a booklet from 4 or 16 originals, the maximum paper size that
can be used is as follows:
Metric version: A4
Inch version: 81/2" x 11"
❐ In this mode, the copier selects the reproduction ratio automatically. This repro -
duction ratio depends on the original and copy paper sizes as follows:
Metric version: original: A4, copy paper: A4
Inch version: original: 8 1/2" x 11", copy paper: 81/2" x 11"
❐ Even if the direction of originals is different from that of copy paper, the copier
will automatically rotate the image by 90o to make copies properly.
❐ The original size is decided when the first original is stored in the memory. So,
you cannot use originals containing different sizes and directions together.
❐ Separation line between originals can be printed using the user tools. ☛ See
page 144.
❐ Regarding functions that cannot be used together with this function, ☛ see
page 105.
Touch the [Combine] key.
1
Select one of the desired com-
2
bine modes.
❐ The suitable reproduction ratio is se-
lected automatically.
Touch the [Change Modes] key.
3
72
Page 83

eu-6-2
COPYING
COMBINING ORIGINALS INTO ONE COPY (Combine)
Select the same size copy paper
4
as the original.
When setting one original at a time
5
Set the original on the exposure glass or in the document feeder
➊
(☛ see page 30 or 32). Then press the Start key.
❐ Start with the last page to be copied.
When the Start key turns green or the Auto Feed indicator on the
➋
document feeder is lit, set the next original. If you have set the original
on the exposure glass in step ➊, press the Start key.
Repeat step ➋ until all originals are scanned.
➌
❐ If the number of scanned originals is the required number in the selected
mode, copying will start automatically.
To finish your copying job, press the Enter and Start keys following the
➍
instructions on the display.
When setting a stack of originals in
5
the document feeder
Set a stack of originals (☛ see page 30) in the document feeder and
➊
press the Start key.
❐ The last page should be on the bottom.
73
Page 84

eu-6-2
PRINTING ID NUMBERS, PAGE NUMBERS, AND MESSAGES (Stamp)
PRINTING ID NUMBERS, PAGE NUMBERS,
AND MESSAGES (Stamp)
Printing Numbers On The Background Of Your
Copies (Background Numbering)
You can number your copies by printing a number on the background of
the copy. This function can help you
to keep track of confidential documents.
❐ Background Numbering cannot be ro -
tated. For example, if you select Ro tate Sort with the Background Num bering, the copies will be as shown in
the illustration.
❐ You can change some settings (size, density) of the numbers with the user
tools. ☛ See page 150.
❐ Regarding functions that cannot be used together with this function, ☛ see
page 105.
Touch the [Stamp] key.
1
74
Page 85

eu-6-2
COPYING
PRINTING ID NUMBERS, PAGE NUMBERS, AND MESSAGES (Stamp)
Touch the [Background Num-
2
bering] key.
Enter the number you want to
3
print on the first set using the
Number keys.
❐ To change the entered number,
touch the [C] key or press the
Clear/Stop key. Then, enter the new
number.
Touch the [Exit] key.
4
Set your originals (☛ see pages
5
30 ~ 33) and press the Start key.
Printing Preset Messages On Your Copies
(Auto Stamping) - English Only
NOTE: If your machine is the metric version, this function cannot be used
as a default setting. If you want to use this function, contact your
sales or service representative.
One of the following seven messages
can be stamped on copies.
URGENT, COPY, PRIORITY
PRELIMINARY, CONFIDENTIAL,
For Your Information,
For Internal Use Only
*A frame is printed around the message.
❐ You can change some settings of Auto Stamping (stamping position, size, den -
sity) using the user tools. ☛ See pages 146 ~ 147.
❐ One message can be stamped at a time.
❐ Regarding functions that cannot be used together with this function, ☛ see
page 105.
75
Page 86

eu-6-2
COPY
COPY
COPY
COPY
COPY
COPY
COPY
COPY
COPY
COPY
COPY
COPY
COPY
COPY
COPY
COPY
COPY
COPY
PRINTING ID NUMBERS, PAGE NUMBERS, AND MESSAGES (Stamp)
Original setting, stamping position and direction
Key on Display
Stamping Position
Direction: Horizontal
➀ ➁ ➂ ➃ ➄ ➅ ➆ ➇ ➈
Original Setting
: direction
; direction
Direction: Vertical
Original Setting
COPY COPY COPY
➁
➀
COPY COPY COPY
➃
➆ ➇
COPY COPY COPY
➀ ➁
➂
➄ ➅
➈
➂
COPY COPY COPY
➀ ➁ ➂
COPY COPY COPY
➄ ➅ ➃
➆ ➇ ➈
COPY COPY COPY
76
: direction
; direction
➄ ➅
➃
➆ ➇ ➈
➀ ➁ ➂
➄ ➅ ➃
➆ ➇ ➈
Page 87

eu-6-2
COPYING
PRINTING ID NUMBERS, PAGE NUMBERS, AND MESSAGES (Stamp)
Touch the [Stamp] key.
1
Touch the [Auto Stamping] key.
2
Select the desired message by
3
touching a key.
If changing the stamping position and direction
4
Touch the [Change] key.
➊
Select the desired position and
➋
direction by touching keys. For
position and direction, refer to
the previous page. Touch the
[Exit] key.
77
Page 88

eu-6-2
PRINTING ID NUMBERS, PAGE NUMBERS, AND MESSAGES (Stamp)
If stamping on the front page only
4
Touch the [Front Page Only]
➊
key.
Enter the total number of pages
➋
of your originals using the
Number keys.
❐ Example:
If you have 2 two-sided originals,
the number of pages is 4.
❐ When you want to change the en-
tered number, touch the [C] key
or press the Clear/Stop key.
Then, enter the new number.
Touch the [Exit] key.
➌
Touch the [Exit] key. Set your
5
originals (☛ see pages 30 ~ 33)
and press the Start key.
❐ Start with the last page to be copied.
78
Page 89

eu-6-2
COPYING
PRINTING ID NUMBERS, PAGE NUMBERS, AND MESSAGES (Stamp)
Printing Your Own Messages On Your Copies (User Stamping)
Up to four messages which you use frequently can be stored in the
machine’s memory. You can make copies with your message stamped.
❐ Before using this function, you have to store your messages using the user
tools. ☛ See page 152.
❐ You can change some settings of User Stamping using the user tools. ☛ See
page 148.
❐ Regarding original setting, stamping position and stamping direction, ☛ see page
76.
❐ One message can be stamped at one time.
❐ Regarding functions that cannot be used together with this function, ☛ see
page 105.
Touch the [Stamp] key.
1
Touch the [User Stamping] key.
2
Select the desired number where
3
your message is stored by touching a key.
❐ Keys with no stored message cannot
be selected. In the illustration, user
stamps 1 and 2 have been stored.
79
Page 90

eu-6-2
PRINTING ID NUMBERS, PAGE NUMBERS, AND MESSAGES (Stamp)
If changing the stamping position and direction
4
Touch the [Change] key.
➊
Select the desired position and
➋
direction by touching keys. For
position and direction, ☛ see
page 76.
Touch the [Exit] key.
➌
If stamping on the front page only
4
Touch the [Front Page Only]
➊
key.
Enter the number of your origi-
➋
nals using the Number keys.
❐ When you want to change the
number entered, touch the [C]
key or press the Clear/Stop key.
Then, enter the new number.
Touch the [Exit] key.
➌
Touch the [Exit] key.
5
Set your originals (☛ see pages
6
30 ~33 ) and press the Start key.
80
Page 91

eu-6-3
COPYING
PRINTING ID NUMBERS, PAGE NUMBERS, AND MESSAGES (Stamp)
Printing Dates And Page Numbers
(Date Stamping, Page Numbering)
Date Stamping
❐ You can change the settings of Date Stamping with the user tools. ☛ See
page 148 ~ 149.
❐ If you select Date Stamping and Page Numbering together, the last stamping
direction selected takes priority.
❐ Regarding copies in Date Stamping and Combine mode, ☛ see page 71.
❐ The size and fonts of Date Stamping cannot be changed.
❐ Regarding functions that cannot be used together with this function, ☛ see
page 105.
Original setting, stamping position and direction
Direction: Horizontal
Direction: Vertical
Top Left
Top Left
Bottom Right
Bottom Right
81
Page 92

eu-6-3
PRINTING ID NUMBERS, PAGE NUMBERS, AND MESSAGES (Stamp)
Touch the [Stamp] key.
1
Touch the [Date Stamping] key.
2
Select the desired direction and
3
position of Date Stamping using
the keys on the display. Regarding position and direction, ☛ see
previous page.
Touch the [Exit] key.
4
Set your originals (☛ see pages
5
30 ~ 33) and press the Start key.
Page Numbering
You can print page numbers on your
copy. There are three types of page
numbering (P1, P2..., 1/5, 2/5..., or
-1-, -2-...)
82
Original
Page 93

eu-6-3
COPYING
PRINTING ID NUMBERS, PAGE NUMBERS, AND MESSAGES (Stamp)
❐ You can change the settings of page numbering with the user tools. ☛ See
pages 144 ~ 145.
❐ If you select Date Stamping and Page Numbering together, the last stamping
direction selected takes priority.
❐ Regarding copies in Page Numbering and Combine mode, ☛ see page 71.
❐ If you select Stapling ( [Top]) and Page Numbering ( [P1, P2...] or [1/5, 2/5...] )
together when making two-sided copies, page numbers and staple position
might overlap. To avoid this, do the procedure described on page 63.
❐ The size and font of Page Numbering cannot be changed.
❐ Regarding functions that cannot be used together with this function, ☛ see
page 105.
Original setting, stamping position and direction
Original setting
Touch the [Stamp] key.
1
Touch the [Page Numbering]
2
key.
Horizontal
Vertical
83
Page 94

eu-6-3
PRINTING ID NUMBERS, PAGE NUMBERS, AND MESSAGES (Stamp)
Select the desired format and ori-
3
entation by touching the keys on
display. Then, touch the [Exit]
key.
❐ Regarding the [Shift Position] key,
☛ see page 62.
If you selected [P1, P2...] or [-1-,-2-...] in step 3
4
Enter the total page number of
➊
originals using the Number
keys.
❐ To change the number entered,
touch the [C] key or press the
Clear/Stop key, and then enter a
new number.
Touch the [Exit] key.
➋
☛Go to step 5
If you selected [1/5,2/5...] in step 3
4
Confirm that the [Total pages]
➊
key is dark. If not, touch it. En ter the total number of originals
using the Number keys.
❐ To change the number entered,
touch the [C] key or press the
Clear/Stop key, and then enter a
new number.
Touch the [Exit] key.
➋
❐ Regarding [Last page] key, ☛
see page 85.
☛Go to step 5
84
Page 95

eu-6-3
COPYING
PRINTING ID NUMBERS, PAGE NUMBERS, AND MESSAGES (Stamp)
[Last page] key
In most cases, it is not necessary to input the data for this key. Use this key
for the following conditions:
❐ Example 1: If you want to make an insertion into a completed copy set (in this
case 2/3)
Enter "3" for the [Total pages]
➊
key.
Enter "2" for the [Last page]
➋
key.
Using the original for 2/3 page,
➌
make your copy.
❐ Example 2: If you have 80 originals, and want to make copies using 40 origi -
nals at a time.
Set 80 ~ 41 pages of originals.
➊
Enter "80" for the [Total pages]
key, and make your copies.
Set 40 ~ 1 pages of originals.
➋
Enter "80" for the [Total pages]
key. Enter "40" for the [Last
page] key, and make your copies.
First copy set
Second copy set
When setting one original at a time
5
Set an original on the exposure glass or in the optional document
➊
feeder (☛ see pages 30 or 32). Then, press the Start key.
❐ Start with the last page to be copied.
When the Start key turns green or the Auto Feed indicator of the docu-
➋
ment feeder is lit, set the next original. If you have set the original on
the exposure glass in step ➊, press the Start key.
Repeat step ➋ until your copying is finished.
➌
When setting a stack of originals in
5
the document feeder
Set a stack of originals in the document feeder ( ☛ see page 30), then
➊
press the Start key.
❐ Last page should be on the bottom.
85
Page 96

eu-6-3
EDITING THE COPY IMAGE (Adjust Image)
EDITING THE COPY IMAGE (Adjust Image)
Copying The Image Twice On One Page (Double Copies)
The one original image is copied
twice on one copy as shown in the
illustration. The separation line is copied in broken line.
❐ You can change the type of separation line or delete it with the user tools.
☛ See page 143.
❐ Please refer to the following table when you select original and copy paper
sizes with 100% ratio:
Metric version:
Original Copy paper
A5 ; A4 :
B6 ; B5 :
Inch version:
Original Copy paper
51/2" x 81/2" ; 81/2" x 11" :
❐ It is impossible to turn lengthwise ( ;) original images 90 ° on lengthwise (;)
copy paper. In this case, select : copy paper referring to the above table.
❐ A5 ;, B6 ; and 5 1/2" x 81/2" ; originals cannot be detected properly on the
exposure glass. Make sure to select the copy paper manually or set the origi nals in the optional document feeder. This setting can be changed by your
service representative. ☛ See page 153.
86
Page 97

eu-6-3
COPYING
EDITING THE COPY IMAGE (Adjust Image)
❐ Regarding functions that cannot be used together with this function, ☛ see
page 105.
Confirm that the [Auto Paper Se-
1
lect] and [Full Size] keys are
dark.
Touch the [Adjust Image] key.
2
Touch the [Double Copies] key.
3
Set your originals in the optional
4
document feeder (☛ see page
30).
❐ If your original is A5 ;, B6 ; or
51/2" x 81/2" ; and you do not set
your originals in the document feeder,
select the copy paper manually before
making copies by touching the
[Change Modes] key.
Press the Start key.
5
87
Page 98

eu-6-3
EDITING THE COPY IMAGE (Adjust Image)
Erasing The Centre And The Border (Erase Centre/Border)
This function erases the centre and/or
all four sides of the original image,
such as book originals.
❐ The default setting of the erased margin is as follows. You can change this set -
ting using the user tools. ☛ See page 143.
Metric version: 10 mm
Inch version: 0.4"
❐ The position of the margin to be erased is determined according to the original
size and reproduction ratio. If your original is non-standard size, undesired ar eas might be erased.
: original
❐ If you select copy paper manually, make sure to select the same direction as
that of your original.
❐ Regarding functions that cannot be used together with this function, ☛ see
page 105.
88
copy
; original
copy
Page 99

Touch the [Adjust Image] key.
eu-6-3
COPYING
1
Touch the [Erase Centre/Border]
2
key.
Select keys.
3
Touch [Exit] key.
4
Set your originals (☛ see pages
5
30 ~33) and press the Start key.
EDITING THE COPY IMAGE (Adjust Image)
Adjusting The Margin (Margin Adjustment)
You can shift the image either left or
right to make a binding margin.
❐ The margin width default is as follows. You can change this setting using the
user tools. ☛ See page 142.
Metric version: 5 mm
Inch version: 0.2"
❐ Margin for two-sided copies (orientation: Top to Top):
For copies that read from left to right, set the front left and back right margins.
For copies that read from right to left, set the front right and back left margins.
89
Page 100

eu-6-3
EDITING THE COPY IMAGE (Adjust Image)
❐ When you make two-sided copies from one sided originals, a right margin 5
mm (0.2") is set on the back side automatically as a default setting. You can
change this setting using the user tools. ☛ See page 143.
❐ Regarding functions that cannot be used together with this function, ☛ see
page 105.
Touch the [Adjust Image] key.
1
Touch the [Margin Adjustment]
2
key.
Set the margin width by touching
3
the right or left arrow key.
❐ To clear the width entered, touch the
[Clear] key.
Touch the [Exit] key.
4
Set your original (☛ see pages
5
30 ~ 33) and press the Start key.
90
 Loading...