

Page 1

INTRODUCTION
INTRODUCTION
This manual contains detailed instructions on the operation and maintenance
of this machine. To get maximum versatility from this copier all operators
should carefully read and follow the instructions in this manual. Please keep
this manual in a handy place near the machine.
Please read the “SAFETY INFORMATION” section in the “General Reference” before using this machine. It contains important information related to
USER SAFETY and PREVENTING EQUIPMENT PROBLEMS.
i
Page 2
FUNCTIONS
12
12
4
3
2
1
43
12
2
1
8
7
85
67
41
23
2
1
16
15
1613 14 15
85
67
41
23
12
9
10 11
12
12
12
2
1
3
2
1
3
2
1
3
2
1
3
2
1
3
2
1
3
2
1
3
2
1
3
B
A
B
A
B
A
B
A
B
A
B
A
12
1
2
1
2
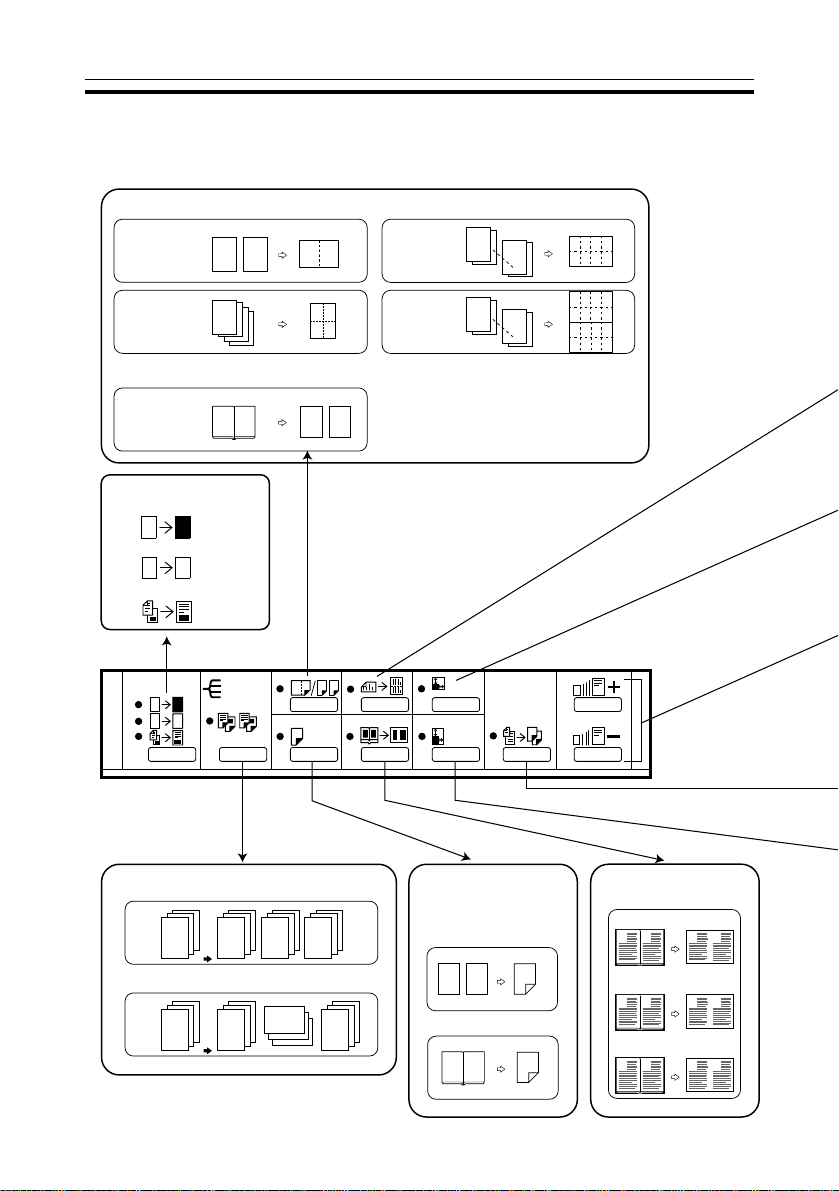
Duplex/Series Copies
Sort
Combine ➔page 35.
Series Copies ➔ page 34.
Sort ➔ page 16.
Duplex ➔ page 30.
(optional duplex unit is
required)
Erase Centre/Border
➔ page 39.
1-sided ➔ 2-sided
Book ➔ 2-sided
Rotate Sort ➔page 16.
Book ➔ 2 copies
2 originals into
1 copy
4 originals into
1 copy
8 originals
into 1 copy
16 originals
into 1 copy
Erase Centre
Erase Border
Erase Centre/Border
Editing
Positive/Negative ➔ page 42.
Repeat ➔ page 42.
Overlay ➔ page 44.
A A
R
RR
RR
2
mm
R
A A
RR
RR
FUNCTIONS
ii
Page 3
Double Copies ➔ page 38.
FUNCTIONS
R
R
RR
R
R
R
R
Directional Size
Magnification ➔ page 28.
Zoom ➔ page 27.
R
Auto Reduce/Enlarge
➔ page 14.
Directional
Magnification (%) ➔ page 29.
aa
Reduce/Enlarge ➔ page 25.
Selecting Original
Type Setting ➔ page 29.
Selecting Copy
Paper ➔ page 13.
Adjusting Image
Density ➔ page 11.
iii
Page 4
T ABLE OF CONTENTS
TABLE OF CONTENTS
INTRODUCTION ...........................................................................................i
FUNCTIONS ................................................................................................ ii
GUIDE TO COMPONENTS ....................................................................... viii
Options................................................................................................ ix
OPERATION PANEL (HARD KEYS) ..............................................................x
PANEL DISPLAY ......................................................................................... xii
Display Panel Layout..........................................................................xiii
FUNCTION LIST BASED ON OPTIONS ..................................................... xiv
ORIGINALS
ORIGINALS .................................................................................................2
Recommended And Non-recommended Originals ...............................2
SETTING ORIGINALS...................................................................................4
Setting An Original On The Exposure Glass ........................................4
Setting Originals In The Document Feeder ..........................................5
Setting Originals Of Special Sizes........................................................6
COPYING
BASIC PROCEDURE ..................................................................................10
BASIC FUNCTIONS ...................................................................................11
Adjusting Image Density..................................................................... 11
Selecting The Original Type ...............................................................12
Selecting Copy Paper.........................................................................13
Having The Machine Choose The Reproduction Ratio
(Auto Reduce/Enlarge).......................................................................14
SORTING INTO SETS (123, 123, 123) (Sort/Rotate Sort) ........................16
Panel Display For Sort/Rotate Sort ....................................................17
Stopping Image Storage And Deleting Stored Images During Copying.......17
Making Copies In Sort Or Rotate Sort Mode......................................18
COPYING FROM THE BYPASS TRAY .........................................................19
When Copying Onto Special Size Copy Paper .................................. 20
iv
Page 5

TABLE OF CONTENTS
STORING YOUR COPY SETTINGS IN MEMORY (Program) .....................22
Storing/Changing The Program..........................................................22
Recalling A Program ...........................................................................23
OTHER FUNCTIONS ..................................................................................23
Temporarily Stopping One Job To Copy Something Else (Interrupt) ..23
Entering Copy Job Settings During The Warm-up Period (Auto Start) ........24
Original Beeper ..................................................................................24
REDUCING AND ENLARGING USING PRESET RATIOS
(Reduce/Enlarge) ...................................................................................25
REDUCING AND ENLARGING IN 1% STEPS (Zoom) ...............................27
STRETCHING AND SQUEEZING THE IMAGE INTO THE COPY AREA
(Directional Size Magnification) ............................................................28
STRETCHING AND SQUEEZING THE IMAGE IN 1% STEPS
(Directional Magnification(%)) ..............................................................29
MAKING TWO-SIDED COPIES (Duplex)
(optional duplex tray is required) ......................................................... 30
MAKING ONE-SIDED COPIES FROM BOOK ORIGINALS (Series Copies).....34
COMBINING ORIGINALS INTO ONE COPY (Combine) ........................35
COPYING THE IMAGE TWICE ON ONE PAGE (Double Copies) ..................38
ERASING THE CENTRE AND THE BORDER (Erase Centre/Border) .........39
If You Have Pressed The [Centre] Key ..............................................40
If You Have Pressed The [Border] Key ..............................................41
If You Have Pressed The [Ctr/Bdr] Key..............................................41
EDITING THE COPY IMAGE......................................................................42
Reversing Black And White (Positive/Negative).................................42
Repeating An Image Over The Entire Copy (Repeat) ........................42
Merging Images (Overlay)..................................................................44
COMBINATION CHART ............................................................................45
WHAT TO DO IF SOMETHING GOES WRONG
IF YOUR COPIER DOES NOT START ..........................................................48
IF YOU CANNOT MAKE CLEAR COPIES..................................................49
IF YOU CANNOT MAKE COPIES AS YOU WANT.....................................51
v
Page 6

T ABLE OF CONTENTS
CHANGING THE MACHINE’S SETTINGS
ACCESSING THE USER TOOLS (COPY FEATURES) ...................................54
Returning To Copy Mode.................................................................... 55
USER TOOLS MENU (COPY FEATURES) ....................................................56
SETTINGS YOU CAN CHANGE WITH THE USER TOOLS ...........................57
General Features 1/2 .........................................................................57
General Features 2/2 .........................................................................58
Adjust Image 1/2 ................................................................................59
Adjust Image 2/2 ................................................................................60
Input/Output 1/2 .................................................................................61
Input/Output 2/2 .................................................................................62
SERVICE REPRESENTATIVE SETTINGS ........................................................62
SPECIFICATIONS
MAINFRAME .............................................................................................64
OPTIONAL COPIER MEMORY UNIT (8 MB) .............................................66
OPTIONAL COPIER MEMORY UNIT (4 MB) .............................................66
INDEX
INDEX........................................................................................................ 68
vi
Page 7

TABLE OF CONTENTS
vii
Page 8
GUIDE TO COMPONENTS
Platen cover (option)
Holds down the original
placed on the exposure
glass.
Operation panel
⇒⇒
⇒ See page x.
⇒⇒
Main switch
Switches the machine
on/off.
Left side cover
Open to remove misfed
paper .
V entilation hole
Prevents overheating.
Do not obstruct the
ventilation hole by placing or
leaning an object near it. If
the machine overheats, a
fault might occur.
AC switch
Do not touch this switch.
This switch is used only by
service representative.
· If the machine does not
operate after turning on the
main switch, check if the
AC switch is turned on. If
not, turn on it.
GUIDE TO COMPONENTS
<Front View>
Exposure glass
Fit an original face
down to the rear left
corner .
Internal tray 2 (option)
Copied or printed paper
is delivered here face
down.
Internal tray 1
Copied or printed paper
is delivered here face
down.
Front cover
Open to remove misfed
paper or supply toner.
Duplex T ray (unit for
two-sided copies)
(option)
Paper tray
Set paper here. ⇒ See
“B LOADING P APER”
of “General Reference”.
1000-sheet tray unit
(option)
External tray
Open to deliver copies,
prints and faxes face up
when copying from the
bypass tray or copying
a long size original.
<Right Side View>
viii
Bypass tray
Use to copy or print
onto post cards, OHP
transparencies, or other
non-standard size
paper .
Right Side Cover
Open to remove misfed
paper .
Page 9

Options
GUIDE TO COMPONENTS
(1) Internal 1-bin tray
(Internal tray 2)
Sorts copies, faxes,
and prints.
(2) ADF (document feeder)
Set a stack of originals
here and they will be fed
one at a time automatically.
GUIDE TO
COMPONENTS
(3) Duplex tray (4) 1000-sheet tray unit
Consists of two paper trays.
❑ Other options: platen cover
ix
Page 10

Communicating
Receive
File
Facsimile
Error
F1 F2 F3 F4 Stamp
Immediate
Trans.
Memory
Trans.
Standard
Detail
Super Fine
ABCDEFG
HI J K L MN
OP QRSTU
VWXYZ
123
2
mm
R
A A
RR
RR
User Tools
Printer
Error
Manual
Receive
TX Files
Status
Reception
Mode
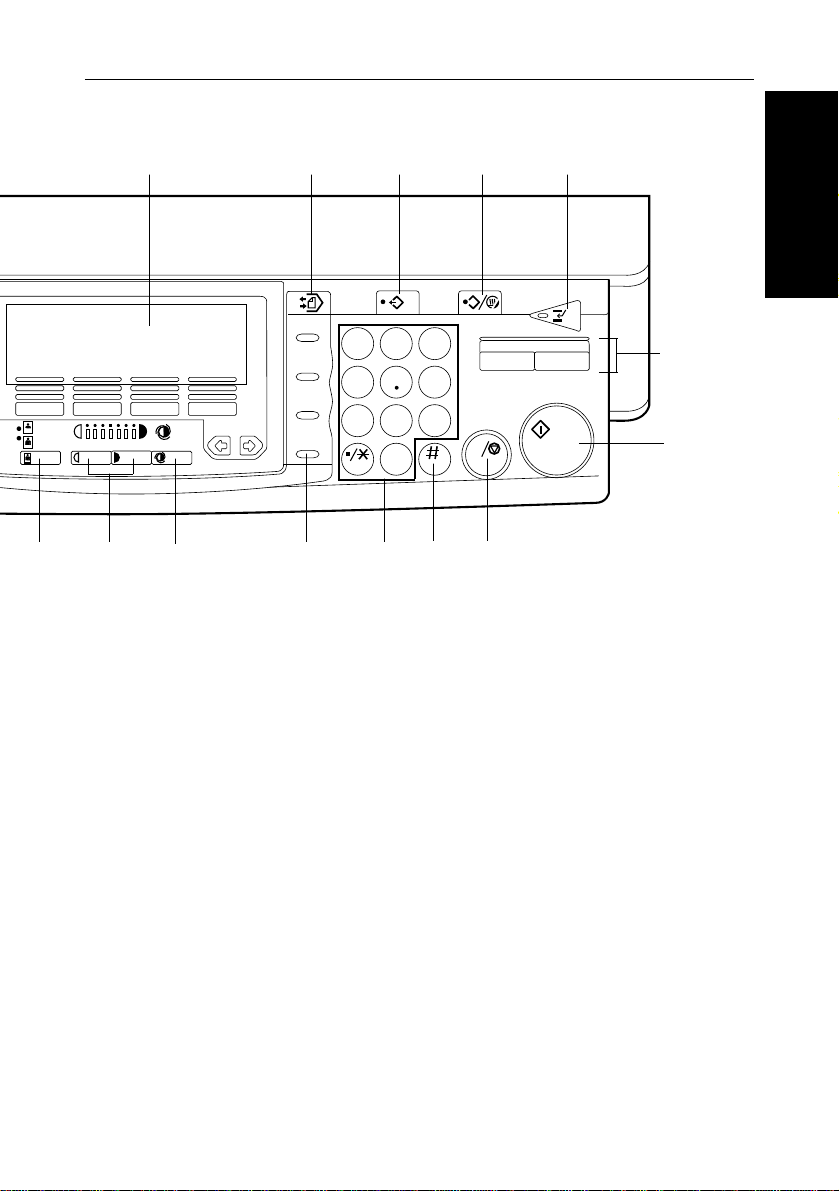
OPERATION PANEL (HARD KEYS)
OPERATION PANEL (HARD KEYS)
(1) User Tools key
Use to change modes and
customize settings. ⇒ See page 54.
(2) Editing key
Selects Positive/Negative, Repeat,
or Overlay mode. ⇒ See page 42.
(3) Sorter key
Automatically sorts copies.
⇒ See page 16.
(4) Combine/Series Copies key
Combine ... Combines 2~16 originals
Series .... Makes two separate
⇒ See pages 34 ~ 35.
(5) Duplex key
Makes two-sided copies.
⇒ See page 30.
(6) Double Copies key
Copies the image twice on one page
so that two identical copies are
vertically positioned. ⇒ See page 38.
(7) Erase Centre/Border key
Erases the shadow at the center and/
or all four sides of the original image.
⇒ See page 39.
(8) Directional Size Magnification key
Makes a copy with the specified
height and width. ⇒ See page 28.
◆◆
◆Copy Operation Panel
◆◆
into one copy.
one-sided copies from
one original.
*
(1)
1
*
*
1
(2) (3) (4) (5) (6)(7) (8) (9) (10) (1 1)
(9) Directional Magnification (%) key
Enlarges or reduces the image at different
reproduction ratios horizontally and vertically.
⇒ See page 29.
(10) Auto Reduce/Enlarge key
Enlarges or reduces the image automatically
according to the specified paper size.
⇒ See page 14.
(11) + Zoom Up key, - Zoom Down key
Changes the reproduction ratio in 1% steps.
⇒ See page 27.
Flip up the operation panel plate.
· Do not press the plate or put something on it
when it is opened.
2
x
Page 11
OPERATION PANEL (HARD KEYS)
(22)(23)(24)
C
Speed Dial
On Hook Dial
Pause/
Redial
aa
Tone
(12) (13) (14) (15) (16) (17)
(12) Original T ype key
Selects type of originals. ⇒ See page 12.
(13) Lighter and Darkey keys
Adjusts the copy image density.
⇒ See page 12.
(14) Auto Image Density key
123
456
7809
*1
Copy
C
(20) Interrupt key
Use to interrupt the current job and make
copies. ⇒ See page 23.
(21) Clear Modes/Energy Saver key
Clear Modes ....Cancels the settings.
Energy Saver ...Hold down this key for more
⇒ See page 12.
(15) Number keys
Use to enter numbers − for example
reproduction ratios or number of copies.
(16) Enter key
Sets a value you have entered.
(17) Clear/Stop key
Clear ... Cancels an entered value.
Stop .... Stops/cancels a copy run.
(18) Start key
Press to start copying.
(22) Program key
Use to program and recall frequently used
settings. ⇒ See page 22.
(23) Memory Copy key
Lights when making copies with memory .
When canceling using memory, you can get
better image quality copies from originals with
gray scale. ⇒ See page 13.
(24) Panel Display
*1: These keys and indicator are for the
optional Fax unit.
(19) Function key
*2: See “General Reference”.
Press to switch from Copy mode to another
feature. T o return to Copy mode press the
Copy key.
(20)(21)
Facsimile
than a second to enter
Energy Save mode.
⇒⇒
⇒ See page xii.
⇒⇒
GUIDE TO
COMPONENTS
(19)
(18)
xi
Page 12
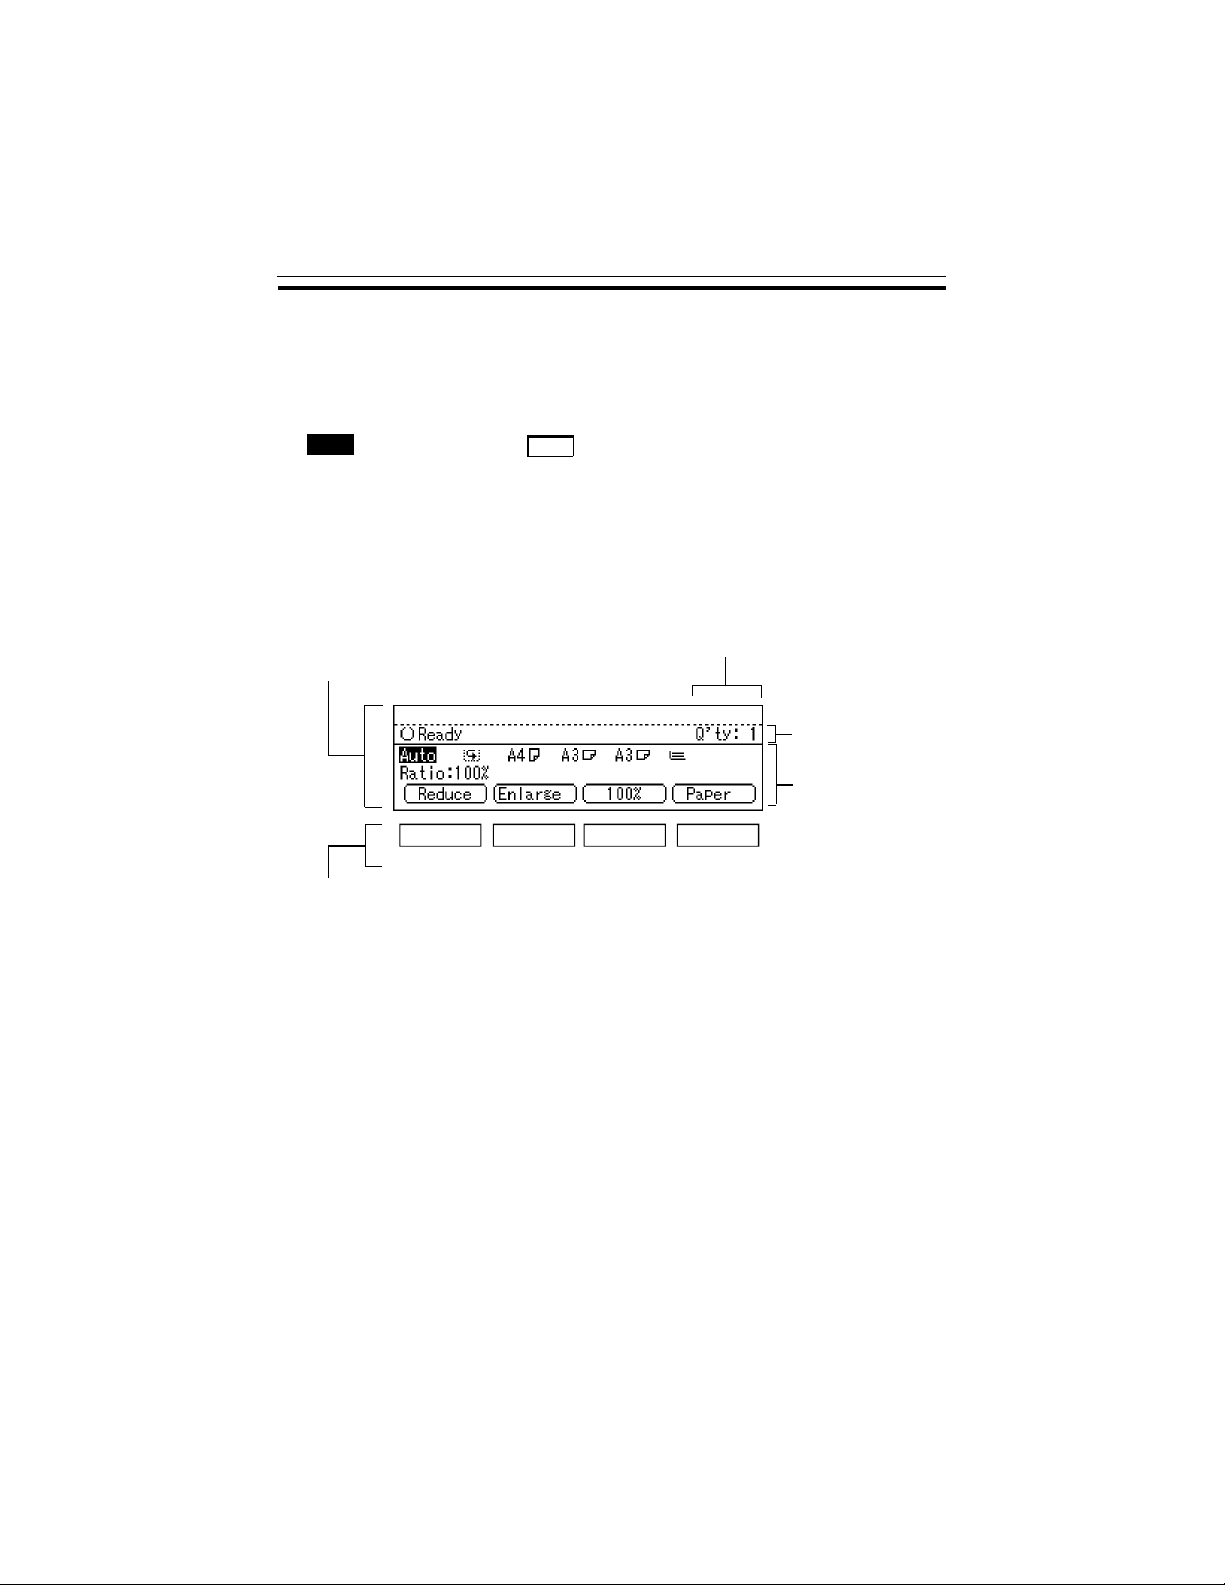
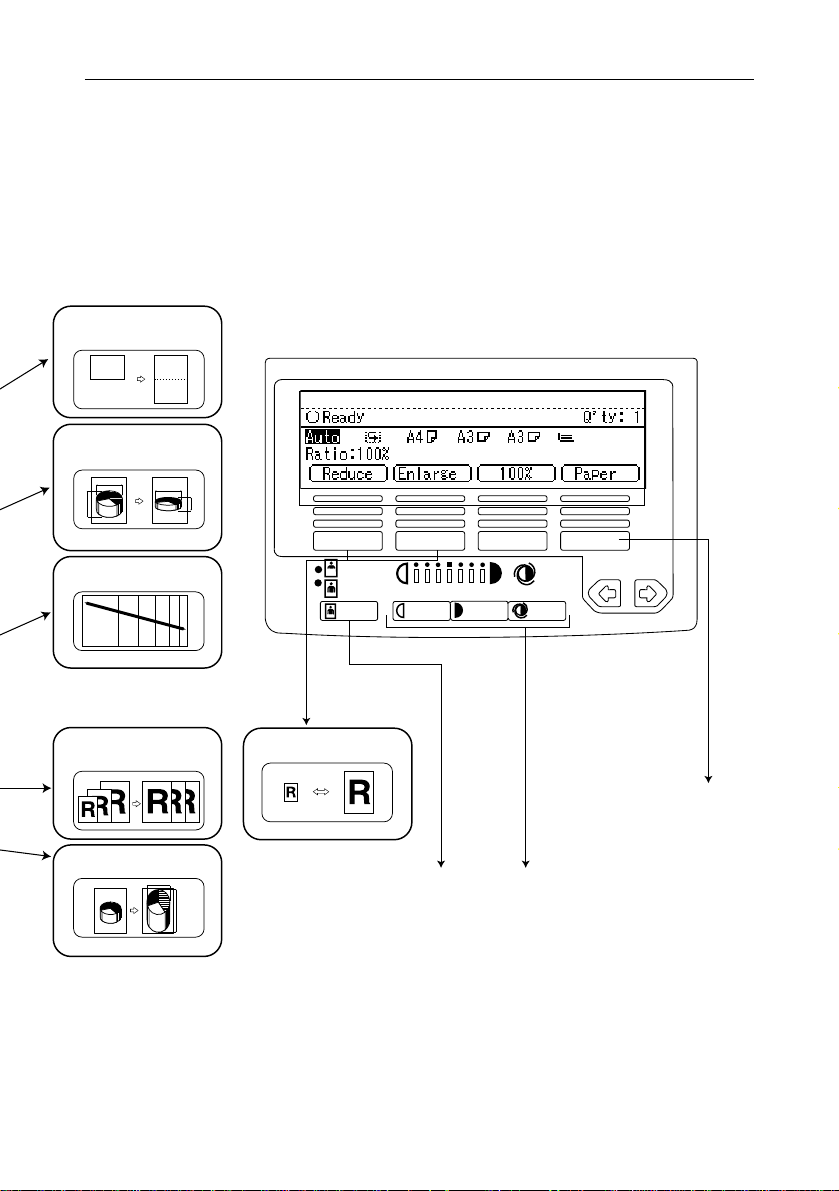
Auto
OK
PANEL DISPLAY
PANEL DISPLAY
The panel display shows operational status, error messages, and function
menus.
❑ When you select or specify an item on the panel display, it is highlighted like
. Keys appearing as
❑ By default, the machine is in Copy mode when you switch on.
This can be changed.
Reference.”
⇒ See “USER TOOLS - SYSTEM SETTINGS” in “General
Note: Do not apply a strong shock or force of about 30 N (about 3 kgf)
or more to the panel display. Otherwise, the display might be
damaged.
cannot be used.
The function items for the
selected feature are displayed.
Number of originals set
Displays operational
status or messages.
Displays items which
can be selected or
specified.
< >
These keys correspond to the items on the display.
Press a relevant key to select a function.
◆In this manual, we use the following conventions
Key name on the panel display: OK
In the manual: [OK]
◆Common keys
[OK] Sets a selected function or entered value and returns to the pre-
vious screen.
[Cancel] Cancels a selected function or entered value and returns to the
previous screen.
[
↑↑Prev.] When there are too many items fit on the display, use these keys
[
↓↓Next] to move between pages.
< > Press to highlight the selection you wish to select.
[PrevMenu] [Menu]
Press to return to the previous menu.
[Exit] Sets a selected function or entered value and returns to the pre-
vious screen.
xii
Page 13
GUIDE TO
COMPONENTS
PANEL DISPLAY
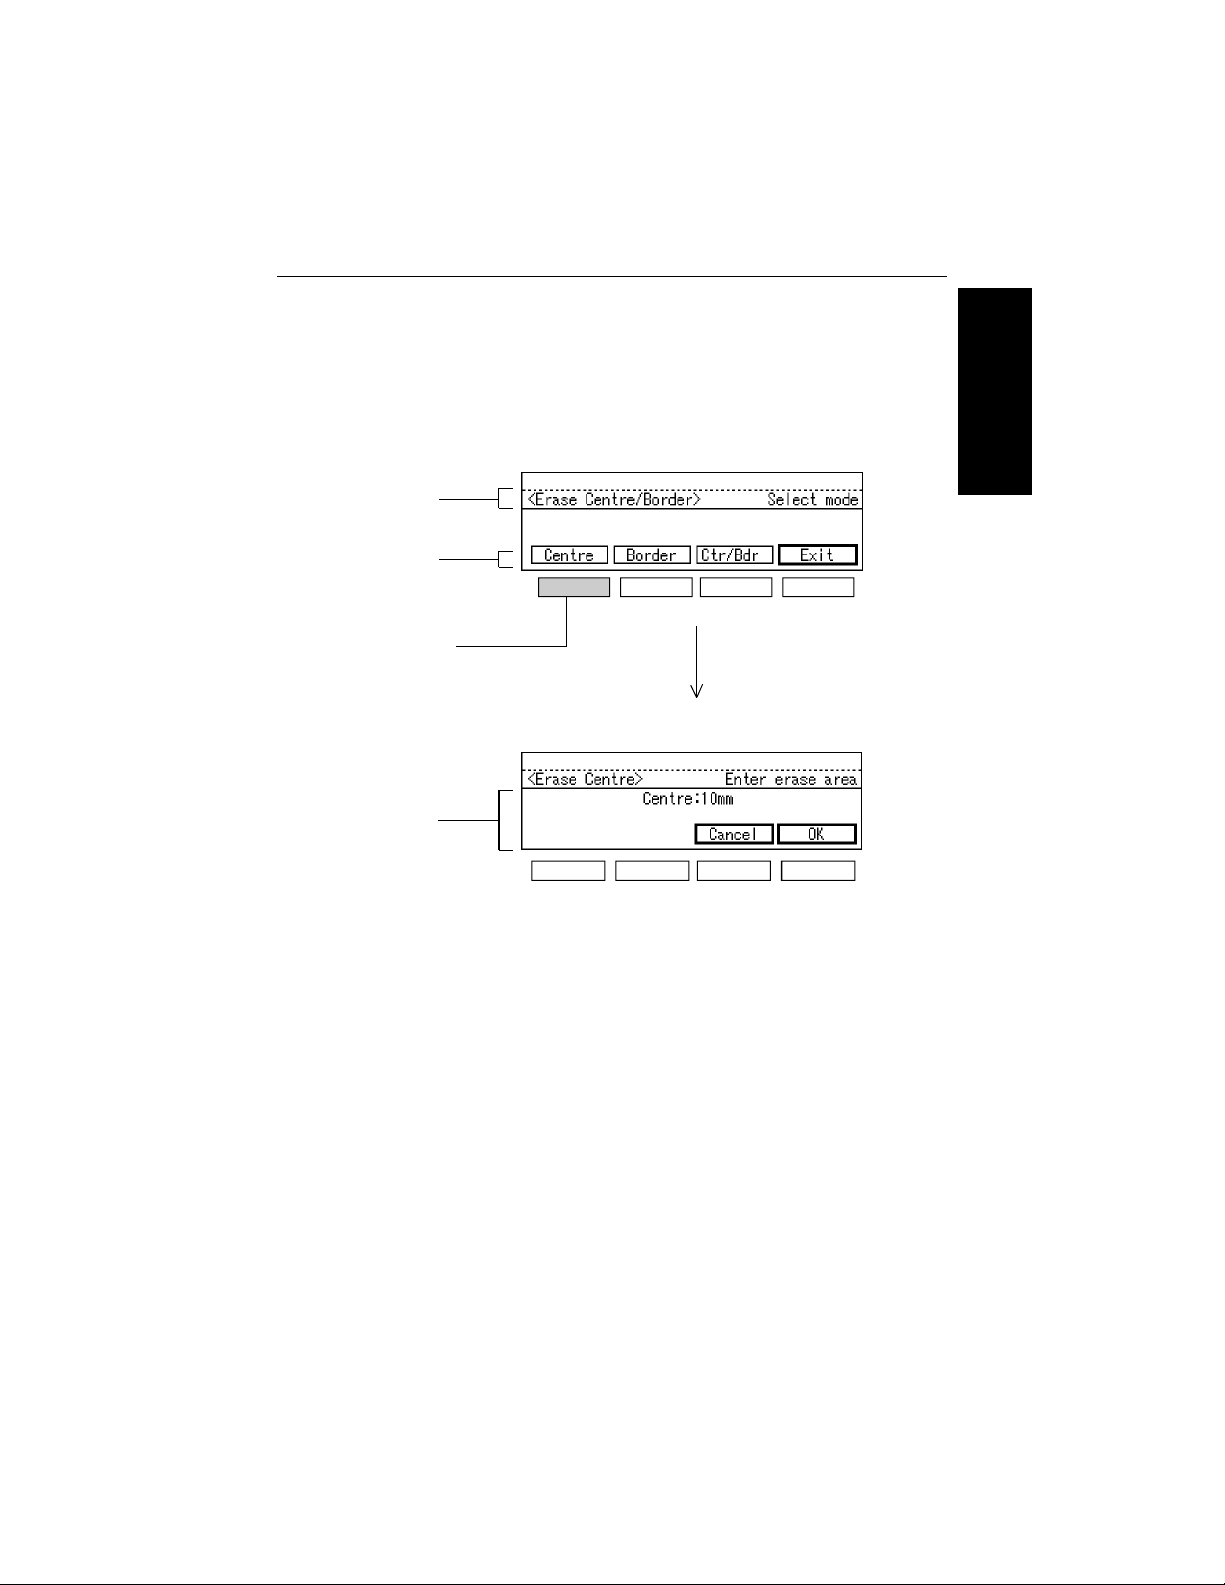
Display Panel Layout
The basic elements used on the display are shown below. Understanding
their meaning help you exploit this machine’s features quickly and easily.
<Sample Display for Erasing the Centre/Border>
Operational status or
message
Selectable/specifiable
functions are displayed.
Screened key means to
press it.
Selectable/specifiable
functions are displayed.
Press the [Centre] key.
[OK] ..........Confirms the settings and returns you
to the previous screen.
[Cancel] ....Cancels the settings and returns you
to the previous screen.
xiii
Page 14
Erase Centre/Border
FUNCTION LIST BASED ON OPTIONS
FUNCTION LIST BASED ON OPTIONS
The function that are available to you depend on your machine configuration
and which options you have. See the table below.
❍... Available ×... Not available
Place originals
Function
Adjusting Image Density ❍ ❍ ❍
Selecting Original Type ❍ ❍ ❍
Auto Paper Select ❍ ❍ ❍
Selecting Copy Paper ❍ ❍ ❍
Auto Reduce/Enlarge
Sort
Rotate Sort
Copying from the Bypass Tray ❍ ❍ ❍
Program ❍ ❍ ❍
Reduce/Enlarge ❍ ❍ ❍
Zoom
Directional Size Magnification
Directional Size Magnification (%) ❍ ❍ ❍
Duplex
Series Copies Book
Combine
Double Copies ❍ ❍ ❍
1-sided
Book
2 originals
4 originals
8 originals
16 originals
➝
2-sided
➝
2-sided ❍
➝
2 copies ❍ ❍ ❍
➝
1 copy (2 in 1)
➝
1 copy (4 in 1)
➝
1 copy (8 in 1) ❍ ❍ ❍
➝
1 copy (16 in 1) ❍ ❍ ❍
❍ ❍ ❍
*1
*1 *3
❍ ❍ ❍
❍ ❍ ❍
*1 *2
*2
❍ ❍ ❍
❍ ❍ ❍
❍ ❍ ❍
on the
exposure
glass
❍ ❍
❍ ❍
❍ ❍
❍ ❍
in the
document
feeder
*1 May require optional memory unit, depending on the size of originals.
⇒ See “Sort/Rotate Sort”, or “Duplex”.
*2 Requires the optional duplex tray.
*3 Requires two paper trays identical in size but with different orientations.
xiv
Page 15

ORIGINALS
ORIGINALS ........................................................................................................... 2
Recommended And Non-recommended Originals ................................................... 2
SETTING ORIGINALS ............................................................................................. 4
Setting An Original On The Exposure Glass................................................................... 4
Setting Originals In The Document Feeder................................................................... 5
Setting Originals Of Special Sizes ................................................................................... 6
ORIGINALS
1
Page 16

ORIGINALS
ORIGINALS
Recommended And Non-recommended Originals
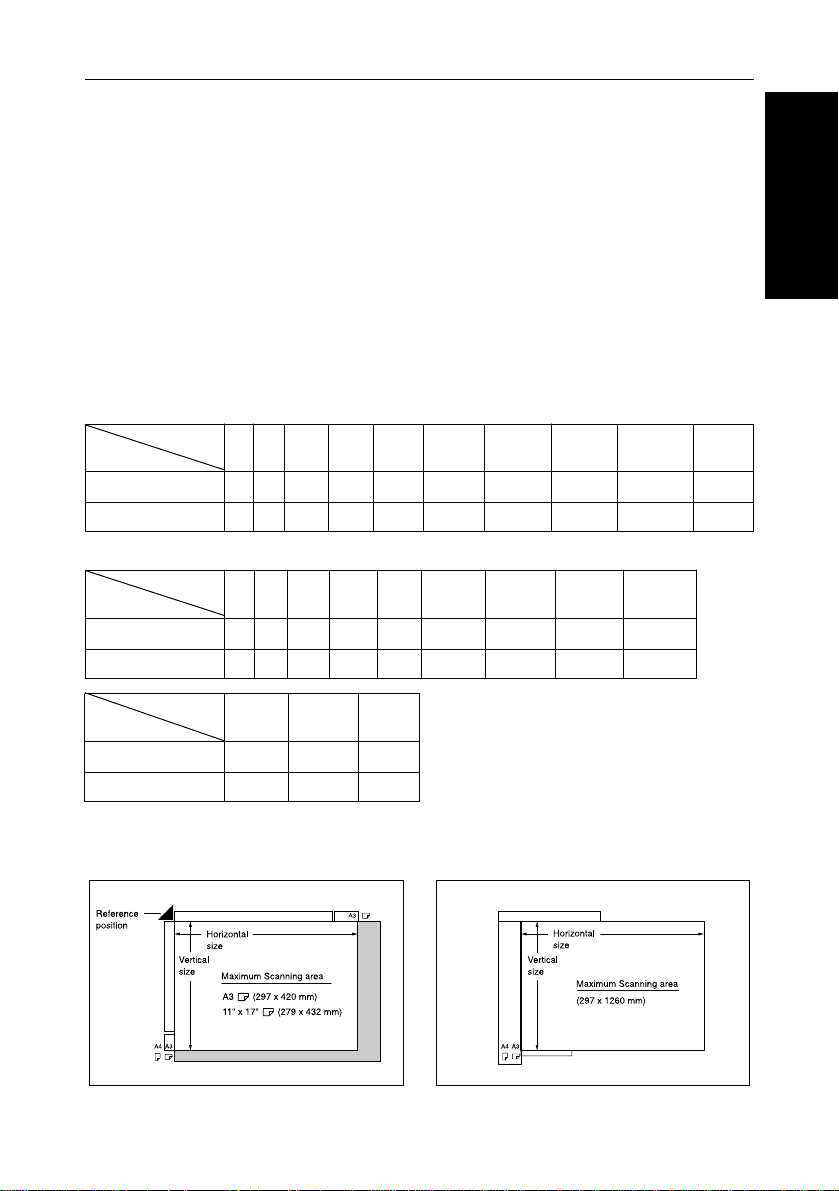
Sizes and weights of recommended originals
Metric version
Weight
__
52 - 105 g/m
(14 - 28 lb)
Weight
52 - 105 g/m
(14 - 28 lb)
2
2
on the exposure
glass
in the document
feeder
Inch version
on the exposure
glass
in the document
feeder
Size
Up to A3 (297 × 420 mm)
Maximum : 297 × 432 mm
A3L - A5KL
Maximum 297 × 1260 mm
Size
Up to 11" × 17" (279 x 432 mm)
Maximum : 1 1.7" × 17"
1 1" × 17" L - 5½ " × 8½" KL
Maximum : 1 1.7" × 49.6"
❑ You can set up to about 30 originals (80 g/m2, 20 lb) in the document feeder.
❑ If you use sizes other than those above, enter the vertical and horizontal sizes.
⇒ See page 6.
Non-recommended originals for the document feeder
❑ Setting the following originals in the document feeder may cause a paper misfeeds
or damage to the originals. Set these originals on the exposure glass.
· Originals of sizes other than those shown above
· Originals with staples or clips
· Perforated or torn originals
· Curled, folded, or creased originals
· Pasted originals
· Originals with any kind of coating, such as thermosensitive paper, art paper,
aluminum foil, carbon paper, or conductive paper
· Originals with indexes, tags, or other projecting parts
· Sticky originals such as translucent paper
· Thin and soft originals
· Originals of inappropriate weight (⇒ See the above table.)
· Originals in bound form such as books
· Transparent originals such as OHP transparencies or translucent paper
2
Page 17
ORIGINALS
Sizes difficult to detect
❑ It is difficult for the machine to detect the sizes of the following originals. Auto
Paper Select might not select paper of the correct size for these originals. Select
the paper size manually for these originals.
· Originals with indexes, tags, or other projecting parts
· Transparent originals such as OHP transparencies or translucent paper
· Dark originals with many characters and drawings
· Originals which partially contain solid printing
· Originals which have solid printing at their edges
· Originals other than those (with
o) in the tables below.
Sizes detectable by auto paper select
Metric version
Size
Place of original
Exposure glass oo o o
Document feeder oo o o o
Inch version
Size
Place of original
Exposure glass
Document feeder
A3 B4 A4 B5 A5
L L KL KL KL L L KL KL L
A3 B4 A4 B5 A5
L L KL KL KL L L KL KL
×× × × ×
×× × × ×
11"×17" 8½"×14" 8½"×11" 5½"×8½" 8"×13"
×× × × ×
××× ×
11"×17" 8½"×14" 8½"×11" 5½ "×8½"
ooo
×
oooo
o
o
ORIGINALS
Size
Place of original
Exposure glass ooo
Document feeder o
10"×14" 8½"×13" 8"×10"
LL K
×
o
Sizes and scanning area/missing image area
Exposure glass Document feeder
❑ When you correctly set an original in the document feeder or on the exposure
glass, an area of about 3mm width surrounding the original might not be copied.
3
Page 18
SETTING ORIGINALS
SETTING ORIGINALS
Set the original on the exposure glass or in the document feeder. This should
be done correctly according to the type of originals and copying method.
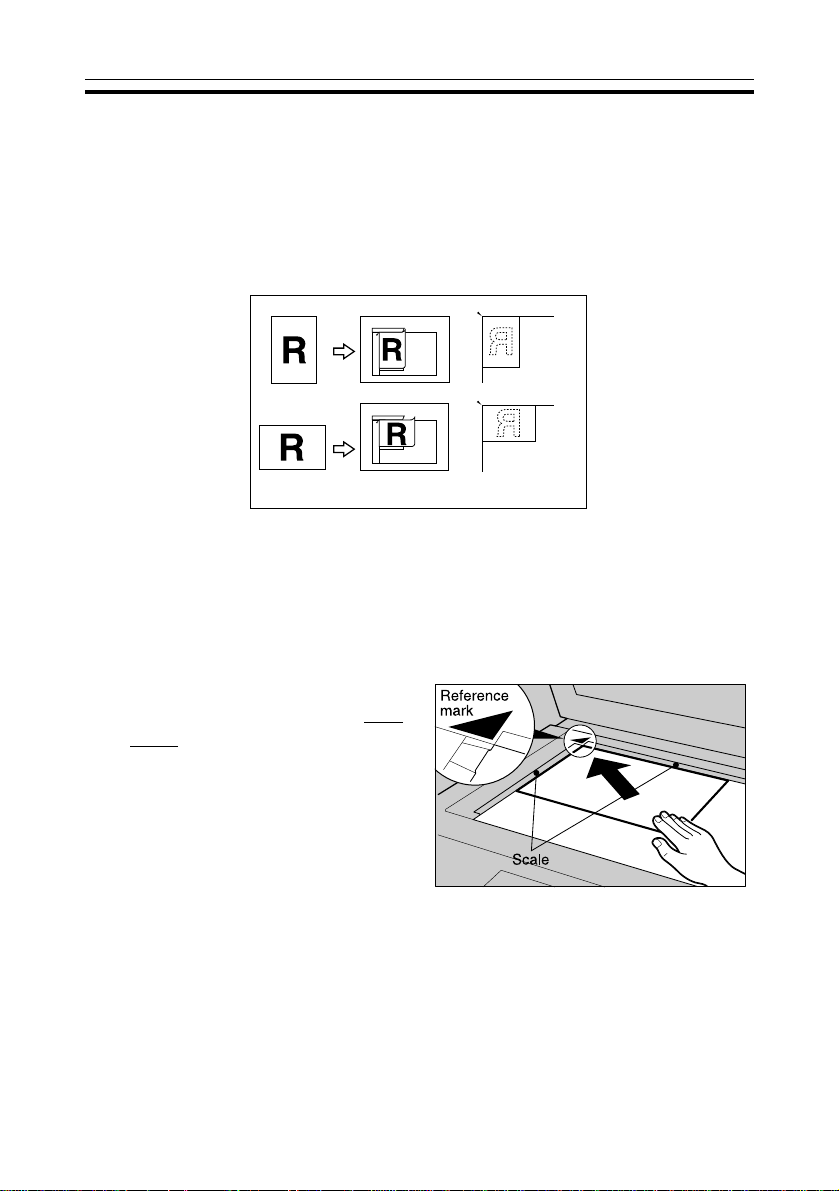
❑ Align the original to the rear left corner. The copying results might vary depend-
ing on the direction of the set original. See the description of each function.
<Originals> <Set in the document feeder> <Set on the exposure glass>
❑ Set the original after correction fluid and ink has completely dried. Not taking this
precaution could mark the exposure glass causing marks to be copied.
Setting An Original On The Exposure Glass
Lift the platen cover/document
1
feeder. Set the original
down
on the exposure glass.
The original should be aligned
to the rear left corner.
❑ Be sure to open the platen cover
/document feeder by more than
30°. Otherwise the original size
might not be detected correctly.
Lower the platen cover/docu-
2
ment feeder.
4
face
Page 19
SETTING ORIGINALS
Setting Originals In The Document Feeder
❑ You cannot set originals of different sizes at the same time.
❑ If you copy thin originals, set one original at a time in the document feeder or on the
exposure glass to avoid damage to the originals due to a multi-sheet feed (which
means that multiple sheets are fed together at the same time).
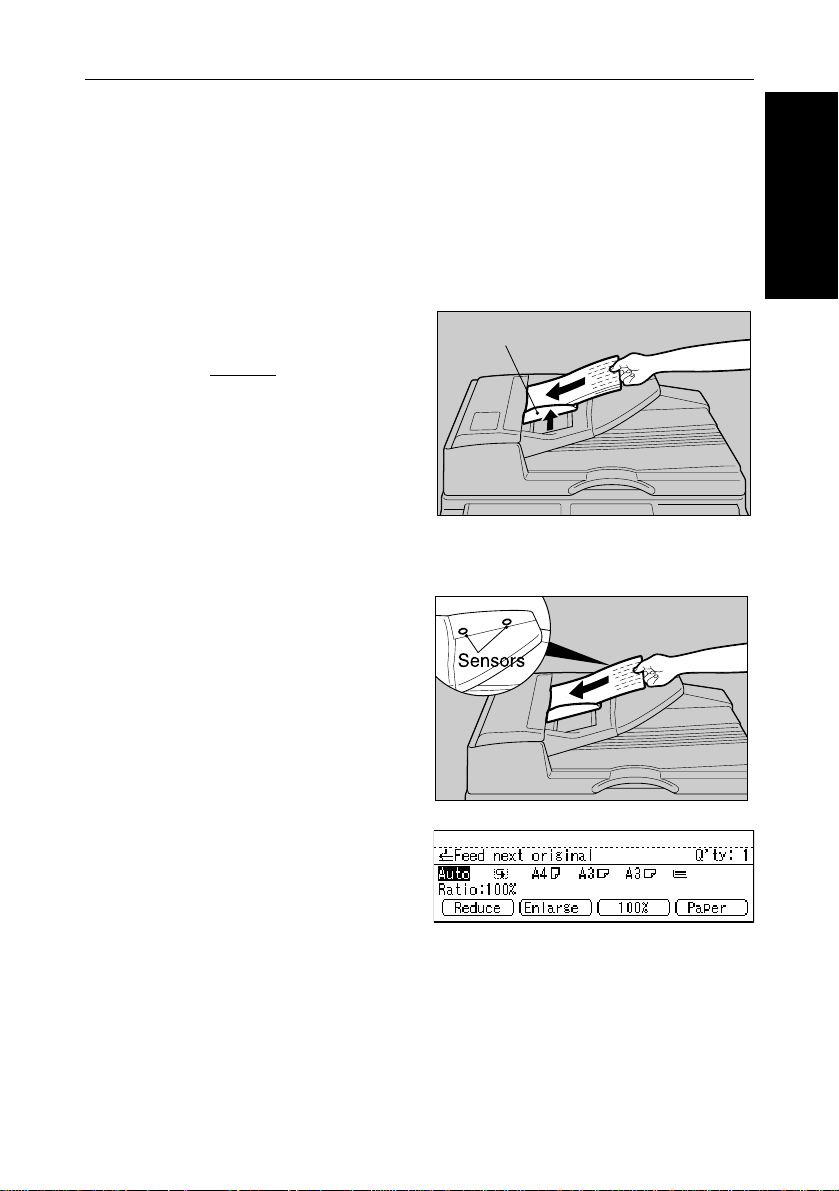
Setting a stack of originals in the document feeder
ORIGINALS
Adjust the document guide to
1
the original size. Set the aligned
originals
ment feeder.
face up
into the docu-
Document guide
Setting one original at a time in the document feeder
Set one original into the docu-
1
ment feeder. Press the Start
key.
When the message appears
2
(see the illustration), set the
next original. The second and
subsequent originals can be fed
automatically without pressing
the Start key.
❑ Do not block the document feeder sensor. Also, be sure to set originals correctly.
Otherwise, the original size might not be detected correctly.
❑ You can adjust the time the machine waits before being ready for the next origi-
nal. ⇒ See page 61.
5
Page 20
SETTING ORIGINALS
Setting Originals Of Special Sizes
❑ You can set originals of the following sizes.
Metric version: length 128 to 1260 mm, width: 105 to 297 mm
Inch version: length 5.0" to 49.6", width: 4.1" to 11.7"
❑ You cannot use the Editing functions with the special size originals.
❑ You cannot make multi-copies of special size originals.
❑ Special original size setting will be cleared by Copy Reset or by pressing the
Clear Modes/Energy Saver key.
Set one original in the document feeder.
1
Select paper or bypass tray (k) with [Paper] or the < > keys.
2
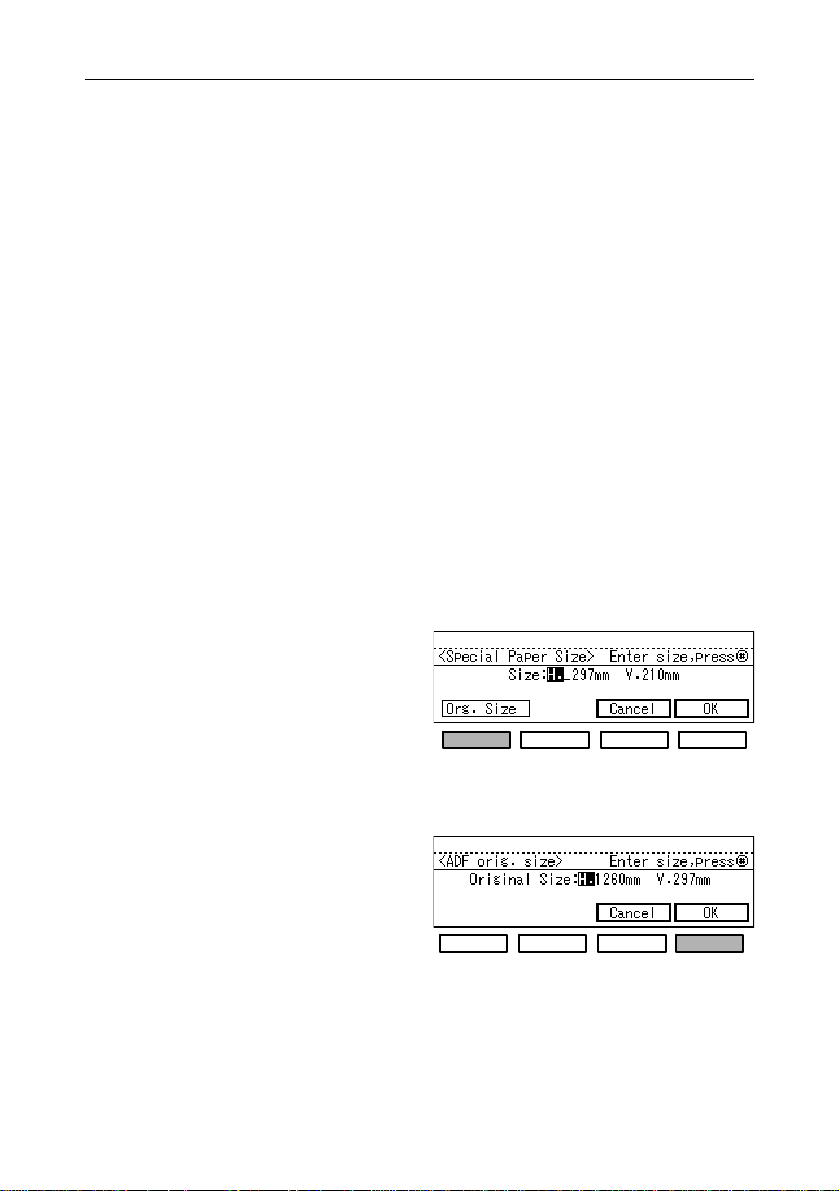
Press the # key. The non-standard paper menu will appear.
3
❑ If you select the bypass tray in step 2, the display appears.
When you have selected the bypass tray in step
➊ Enter the horizontal size of the
copy paper with the Number keys
and press the # key.
➋ Enter the vertical size of the copy
paper with the Number keys
press the [Org. Size] key.
❑ Go to step 4.
Enter the horizontal size of the
4
original with the Number keys
and press the # key.
Enter the vertical size of the
5
original with the Number keys
and press the [OK] key.
❑ K*(special original size) appears on the display.
Press the Start key.
6
6
22
2
22
Page 21

SETTING ORIGINALS
Canceling the special original size setting
Special original size setting will be cleared by Auto Reset, or by pressing the
Clear Modes/Energy Saver key. However, if you press the Clear Modes/
Energy Saver key, all other settings are also cleared. If you want to cancel
only the special original size setting, do the following procedure.
Make sure that originals are in the document feeder.
1
Select any paper size (except bypass tray) with the [Paper] or < > keys.
2
Press the # key.
3
Press the [Cancel] key.
4
ORIGINALS
7
Page 22

SETTING ORIGINALS
8
Page 23

COPYING
BASIC PROCEDURE ............................................................................................. 10
BASIC FUNCTIONS .............................................................................................. 11
Adjusting Image Density .............................................................................................. 11
Selecting The Original Type.......................................................................................... 12
Selecting Copy Paper .................................................................................................. 13
Having The Machine Choose The Reproduction Ratio (Auto Reduce/Enlarge) .. 14
SORTING INTO SETS (123, 123, 123)(Sort/Rotate Sort) ...................................... 16
Panel Display For Sort/Rotate Sort ............................................................................... 17
Stopping Image Storage And Deleting Stored Images During Copying ............... 17
Making Copies In Sort Or Rotate Sort Mode .............................................................. 18
COPYING FROM THE BYPASS TRAY ..................................................................... 19
When Copying Onto Special Size Copy Paper ......................................................... 20
STORING YOUR COPY SETTINGS IN MEMORY (Program) ................................. 22
Storing/Changing The Program................................................................................... 22
Recalling A Program..................................................................................................... 23
OTHER FUNCTIONS ............................................................................................. 23
Temporarily Stopping One Job To Copy Something Else (Interrupt) ....................... 23
Entering Copy Job Settings During The Warm-up Period (Auto Start) .................... 24
Original Beeper ............................................................................................................. 24
REDUCING AND ENLARGING USING PRESET RATIOS (Reduce/Enlarge) ......... 25
REDUCING AND ENLARGING IN 1% STEPS (Zoom) ........................................... 27
STRETCHING AND SQUEEZING THE IMAGE INTO THE COPY AREA
(Directional Size Magnification) ....................................................................... 28
STRETCHING AND SQUEEZING THE IMAGE IN 1% STEPS
(Directional Magnification(%)) ........................................................................ 29
MAKING TWO-SIDED COPIES (Duplex) (optional duplex tray is required) .... 30
MAKING ONE-SIDED COPIES FROM BOOK ORIGINALS (Series Copies) ......... 34
COMBINING ORIGINALS INTO ONE COPY (Combine) .................................... 35
COPYING THE IMAGE TWICE ON ONE PAGE (Double Copies) ........................ 38
ERASING THE CENTRE AND THE BORDER (Erase Centre/Border) ..................... 39
If You Have Pressed The [Centre] Key ......................................................................... 40
If You Have Pressed The [Border] Key .......................................................................... 41
If You Have Pressed The [Ctr/Bdr] Key ......................................................................... 41
EDITING THE COPY IMAGE ................................................................................. 42
Reversing Black And White (Positive/Negative) ........................................................ 42
Repeating An Image Over The Entire Copy (Repeat) ............................................. 42
Merging Images (Overlay)........................................................................................... 44
COMBINATION CHART ....................................................................................... 45
COPYING
9
Page 24
BASIC PROCEDURE
BASIC PROCEDURE
Make sure that the machine is
1
in Copy mode.
❑ Press the Copy key if the Ready
screen is not displayed. ⇒ See page
xi.
When in User Code mode
➊ Enter the user code (less than four digits) with the Number keys and then press
the # key. The machine gets ready for copying. ⇒ See “STARTING THE MACHINE” in “General Reference.”
Make sure that there are not previous settings remaining. Press the
2
Clear Modes/Energy Saver key.
Set the original.
3
⇒ See “SETTING ORIGINALS” on page 4.
Choose any settings you require.
4
Enter the number of copies with
5
the Number keys.
❑ If you enter a wrong value,
press the Clear/Stop key and
re-enter a correct value.
Press the Start key. The ma-
6
chine starts copying.
❑ To stop the machine, press the Clear/Stop key.
❑ T o return the machine to the initial condition after copying, press the Clear Modes/
Energy Saver key.
❑ You can change the default settings of basic functions.
See “USER TOOLS - SYSTEM SETTINGS” in “General Reference.”
10
123
456
78
9
0
Copy
C
Facsimile
Page 25

BASIC PROCEDURE
BASIC FUNCTIONS
❑ If you do not operate the machine for a certain period after copying, the machine
returns to the initial screen. This is called “Copy Reset.”
You can change the Copy Reset period. ⇒ See “USERS TOOLS-SYSTEM SETTING” in “General Reference.”
❑ You can specify whether or not Energy Save mode at the same time as System
Auto Reset comes effect. ⇒See “USERS TOOLS-SYSTEM SETTING” in “General Reference.”
❑ Copy Reset does not work in the following cases:
• When an original is left in the machine.
• When an original image is stored in memory.
• When in the User Tools mode.
• When the paper tray with no paper is selected.
BASIC FUNCTIONS
The following basic functions are explained in this section.
Adjusting Image Density
Auto and Manual Image Density
Selecting Original Type
Te xt/Photo and Photo
COPYING
Selecting Copy Paper
Auto Paper Select and Manual Paper Select
One-to-one Copying and Auto Reduce/Enlarge
Sort This function sorts copies.
Rotate Sort
This function rotates every other copy set by 90° and delivers all copy sets
to the paper trays if you set the paper trays for alternate sheets (L and K)
of the same size.
❑ You can change the settings selected after the main switch is turned on, after the
Energy Save is reset, or after the Copy Reset. ⇒ See page 57.
Adjusting Image Density
There are three ways to adjust the image density:
◆◆
◆Auto Image Density
◆◆
The machine adjusts the image density automatically for copying. The dark
background on newspaper or recycled paper is not copied.
11
Page 26
BASIC FUNCTIONS
◆◆
◆Manual Image Density
◆◆
You can adjust the image density to get a darker or lighter image.
◆◆
◆Combination of Auto and Manual Image Density
◆◆
Use this combination when the originals have dirty background and you want
to adjust the density without affecting the background.
Auto Image Density
Be sure that the Auto Image
1
Density indicator is lit.
❑ If it is not lit, press the Auto
Image Density key.
❑ Choose any other settings and
make your copies.
aa
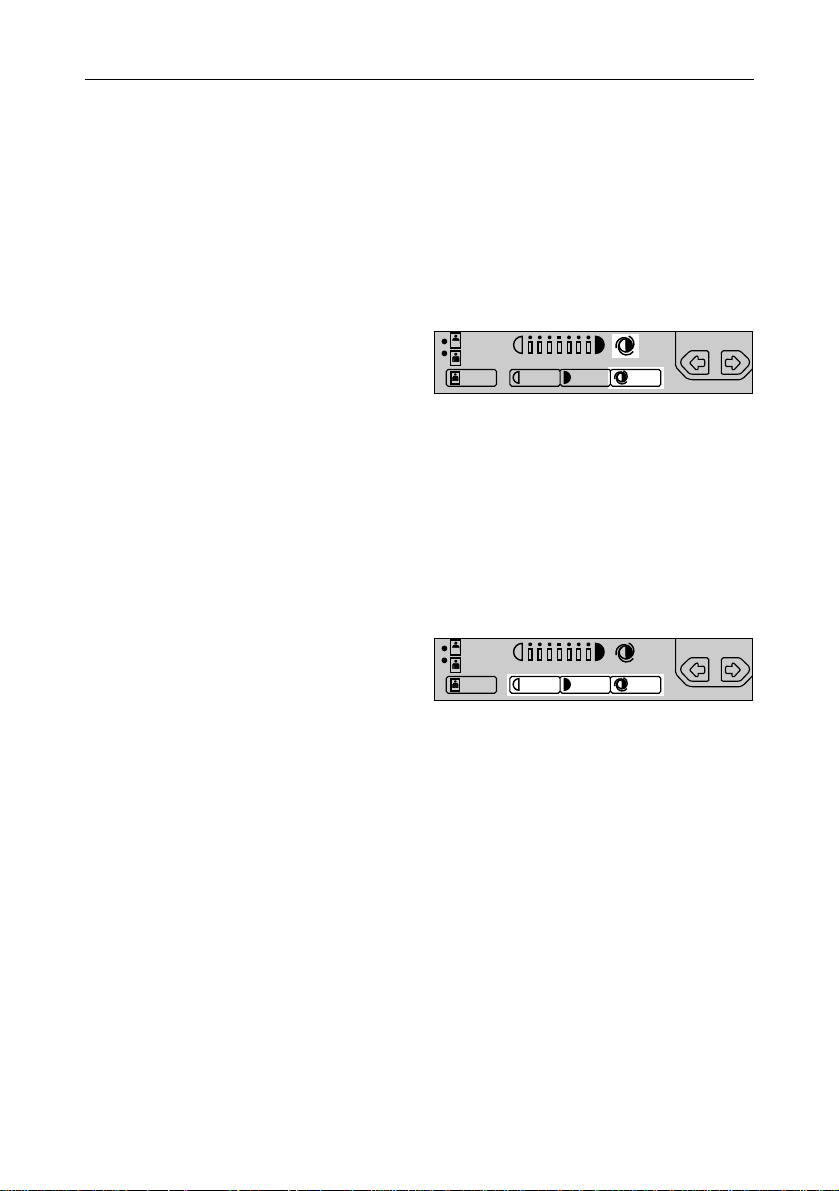
Adjusting image density manually (Manual Image Density)
Press the Auto Image Density key.
1
❑ Auto Image Density indicator turns off.
Press the Lighter or Darker key
2
to adjust the image density.
❑ Choose any other other
settings and make your copies.
aa
Adjusting the image density with auto and manual image
density
Make sure that the Auto Image Density indicator is lit. Press the Lighter
1
or Darker key to adjust the density.
❑ Choose any other settings and make your copies.
Selecting The Original Type
You can select two original types.
◆◆
◆Text/Photo
◆◆
Use this mode when making copies with originals containing photographs or
containing drawings with letters.
12
Page 27

BASIC FUNCTIONS
◆◆
◆Photo
◆◆
Select this mode when copying photographs or drawings. This mode is especially suitable for large photographs or drawings.
Press the Original Type key
1
and select the type of original.
❑ Pressing the Original Type key to step through the available types as follows:
• No indicator lights: Text
• Upper indicator lights: Text/Photo
• Lower indicator lights: Photo
❑ If you want to use the originals with gray scale, you can get better image quality
copies by canceling the Memory Copy mode. To cancel the Memory Copy mode,
press the Memory Copy key to turn off the indicator on it.
When you cancel the Memory Copy mode, there are some limitations as follows:
• If you set an original in the document feeder, the machine cannot make
multiple copies of the original. If you want to make multiple copies, place
originals on the exposure glass.
• The copying speed decreases from 20 copies/minute to 15 copies/minute
(for A4 K, 8½" × 11" K).
• Image Rotation, Rotate Sort, Combine, continuous copying in the Duplex
mode, and top to bottom binding in the Duplex mode are impossible.
❑ Choose any other settings and make your copies.
aa
Selecting Copy Paper
COPYING
There are two ways to select paper:
◆◆
◆Auto Paper Select
◆◆
The machine selects a suitable size of paper automatically based on the
original size and the reproduction ratio.
❑ When the original is set at a different direction from the copy paper in the paper
tray, the machine automatically rotates the original image by 90° to match the
copy paper direction and make copies. This applies to the following paper sizes;
❑Metric version : A4 KL, B5 KL
❑Inch version : 8½" x 11" KL
❑ If you use A4, B5 or 8½" x 11" originals and there are two paper trays with paper
identical in size and different in direction with originals, the machine copies onto
the copy paper (sideways K) which allows copying at the fastest speed (except
for sorting).
13
Page 28

BASIC FUNCTIONS
❑ When copying from originals with gray scale, press the Memory Copy key to
cancel using the memory. Select copy paper identical in direction to the original.
◆◆
◆Manual Paper Select
◆◆
Select the paper tray or bypass tray. ⇒ See “COPYING FROM THE BYPASS TRAY” on page 19.
❑ Regarding paper size that can be used for this machine, ⇒ See “COPY PAPER”
in the “General Reference”.
❑ Regarding original sizes that can be detected, see page 3.
❑ For some originals, the matching size of copy paper cannot be selected. ⇒ See
page 3.
Selecting copy paper
Select copy paper with [Paper]
1
or <> keys.
❑ If you select the bypass tray ( k or
!). ⇒ See “COPYING FROM THE
BYPASS TRAY” on page 3.
❑ Choose any other settings and make
your copies.
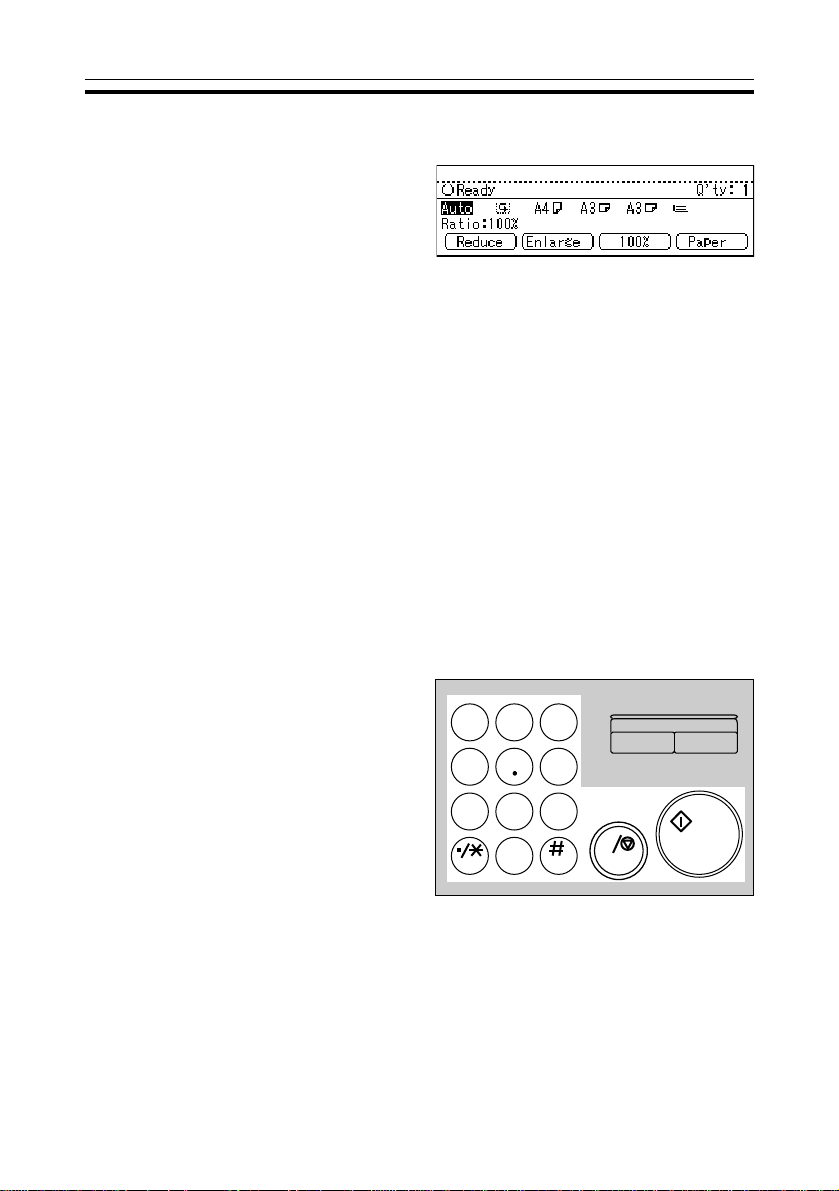
Having The Machine Choose The Reproduction Ratio (Auto Reduce/Enlarge)
The machine can choose an appropriate reproduction ratio based on the
paper and original sizes you select.
14
Page 29

BASIC FUNCTIONS
❑ With this function, it is not necessary for you to select the reproduction ratio.
❑ This function is useful for copying from originals of different sizes to paper of the
same size.
❑ The following reproduction ratios are selectable:
Exposure glass: 25 to 400%
Document feeder: 37 to 150%
❑ Copying from the bypass tray is impossible with this feature.
❑ When the original is set at a different direction from the selected copy paper, the
machine cannot rotate the image by 90°. Be sure to set the original in the same
direction as the copy paper.
❑ The following originals can be detected correctly;
Metric version: A3 L, B4 L, A4 KL, B5 KL,
A5 KL (for document feeder only), 8" x 13" L
Inch version: 11" x 17" L, 8½" x 14" L, 8½" x 11" KL, 10" x 14" L,
8" x 10" K, 5½" x 8½" KL (for document feeder only)
8½" x 13" L (for document feeder only)
❑ For some originals, the matching size of copy paper cannot be selected. ⇒ See
page 3.
COPYING
Press the Auto Reduce/En-
1
large key.
Select copy paper with [Paper]
2
or <> keys.
❑ Choose any other settings and
make your copy.
A A
RR
R
RR
2
mm
15
Page 30

SORTING INTO SETS (123, 123, 123) (Sort/Rotate Sort)
SORTING INTO SETS (123, 123, 123)
(Sort/Rotate Sort)
The machine can make copies and
collate them into sets for meetings or
other purposes. Each set will be ordered by page number . In Rotate Sort
mode, every other copy set is rotated
by 90° and delivered to the tray so
that each set can be easily separated.
Sort mode delivers copy sets without
rotation.
❑ By default, the Rotate Sort is selected when you try to use the sorting function.
You can change this setting. ⇒ See page 62.
❑ You can make up to 99 copy sets at a time.
❑ The output tray can hold the following number of sheets:
Output tray Number of sheets
Internal tray 1 50 0
Internal tray 2 12 5
External tray 100
Sort
Rotate
Sort
3
2
1
3
2
1
3
2
1
3
2
1
3
2
1
1
2
3
2
1
2
1
3
3
If the number of sheets exceeds the capacity, remove the sheets.
❑ Sort/Rotate Sort mode does not support different-size or different-direction originals.
❑ After starting copying, the only setting you can change is image density and
original type. These changes does not apply to images that have been stored in
the memory.
❑ You cannot copy from the bypass tray with this feature.
❑ Originals of the following sizes can be used:
Paper size Sort Rotate Sort
Without optional
memory unit
With optional
memory unit
A4, B5, 8½" x 11"
B4, 8½" x 14", A3, 11" x 17 "
A4, B5, 8½ x 11"
B4, 8½" x 14", A3, 11" x 17 "
· Two paper trays are required for the Rotate Sort. Put copy paper K and L of
the same size on the paper trays.
16
Page 31

SORTING INTO SETS (123, 123, 123) (Sort/Rotate Sort)
❑ As a default, two paper trays identical in size but different in direction must be
available in Rotate Sort mode. You can change this setting. ⇒ See page 62.
❑ The copying speed might be slower than that for normal copying. Also, it de-
pends on the type of original and the type of original you have programmed the
machine except.
❑ The number of originals that can be stored in memory depends on their type.
The memory capacity for originals with photographs is smaller than that for originals without.
Panel Display For Sort/Rotate Sort
❑ You can set the panel display to indicate the number of originals fed through the
document feeder. ⇒ See page 61.
Example) Making two copy sets of each of three originals
Before copying: Q’ty: 2 ... Number of copy set you enter
During copying:
Orig. 1 → 2 → 3 ... Number of scanned originals
Copy 1 → 1 → 12 → 2→ 2 ... Number of copies
COPYING
Stopping Image Storage And Deleting Stored Images During Copying
◆Stopping storing while scanning originals
· Press the Clear/Stop key.
◆Deleting stored images after copying has been interrupted
· Press the Clear Modes/Energy Saver key. The stored images will be cleared.
◆Re-staring scanning originals
· Press the Start key.
17
Page 32

SORTING INTO SETS (123, 123, 123) (Sort/Rotate Sort)
Making Copies In Sort Or Rotate Sort Mode
Press the Sorter key.
1
Enter the number of copies and choose any settings you require.
A A
RR
R
RR
2
mm
2
When setting originals one at a time on the exposure
glass or in the document feeder
Set the original and then press the Start key. The machine starts scan-
3
ning.
❑ Start with the first page to be copied.
❑ When making one-sided copies, the first set of copies comes out first.
Set the next original and then press the Start key.
4
❑ Set the originals in the same direction as step 3.
❑ When the remaining memory space reaches 0 %, the machine stops memoriz-
ing. Press the [Output] key to finish copy jobs which are already in memory.
Continue copying by following the instructions on the panel display. If you want to
delete the stored images, press the [Clear] key.
When the machine finishes scanning all the originals, press the # key .
5
Press the Start key. The copies will be delivered.
6
When setting a stack of originals in the document feeder
Set the originals and then press the Start key.
3
When the machine finishes scanning, copies are automatically delivered.
❑ The first page must be on top.
❑ When the machine makes one-sided copies, the first set of copies comes out
first.
18
Page 33

SORTING INTO SETS (123, 123, 123) (Sort/Rotate Sort)
COPYING FROM THE BYPASS TRAY
❑ When the remaining memory space reaches 0%:
· The machine stops scanning originals.
· Press the [Output] key to finish copy jobs which are already into memory.
Remove copies from the tray and continue copying following the instructions
on the panel display.
· If you press the [Clear] key, the copy jobs which have been stored will be
cleared and copying stops.
COPYING FROM THE BYPASS TRAY
Use the bypass tray to copy onto OHP transparencies, adhesive labels, translucent paper, post cards, and copy paper that cannot be set in the paper tray .
❑ See “Copy Paper” in “General Reference” for information about the size and
direction of copy paper to be set on the bypass tray.
❑ Be sure to specify the size of copy paper other than following because the ma-
chine cannot automatically detect the size. You can set copy paper with a width
of 90 to 305 mm (3.5" to 12") and length of 148 to 432 mm (5.8" to 17.0").
❑ When you make multi-copies using sideways (K) paper from the bypass tray,
reverse sides of copies might be stained. It is recommended to set paper in the
bypass tray lengthwise (L).
COPYING
❑ Regarding paper sizes that can be used, see “COPY PAPER” in the “General
Reference”.
❑ Open the external tray before copying because the external tray is selected to
receive copies by default. You can change this setting.
⇒ See page “USER TOOLS - SYSTEM SETTINGS” in the “General Reference”.
Open the bypass tray.
1
Select the bypass tray (k or !)
2
with the [Paper] or the < >
keys.
19
Page 34

COPYING FROM THE BYPASS TRAY
Lift the paper hold lever.
3
❑ Swing out the extender if
setting copy paper larger than
A4K, 8½" × 11"K .
Slide the paper guides to match
4
the paper width. Insert the copy
paper until it stops.
❑ If the guides are not flush with
the copy paper, a skew image
or paper jam might occar.
❑ The image will be copied on the
side of paper that you place
face up.
❑ Fan OHP transparencies or
translucent paper to get air
between them to avoid a multisheet feed (multiple sheets fed
together at the same time).
Extender
Paper hold
lever
Paper guide
Lower the paper holder lever.
5
Otherwise, paper misfeed might
occur.
❑ If you have set copy paper
larger than A4K, 8½" × 11" K,
support the trailing edge of
copy paper with your hand
when lowering the paper
holder.
When Copying Onto Special Size Copy Paper
❑ Specify the size of copy paper to avoid paper jams.
➊ Press the # key.
20
Page 35

COPYING FROM THE BYPASS TRAY
❑ If you use the special size original, you should set the original in the document
feeder first and input the original size. ⇒ See page 6.
➋ Enter the horizontal size of the pa-
per with the Number keys and
then press the # key.
❑ T o change the number entered, press
the Clear/Stop key, then enter the
new number.
➌ Enter the vertical size with the Number keys and then press the [OK] key.
❑ If you start copying without pressing the [OK] key or if the entered size is differ-
ent from the copy paper, the reverse side of the copy might be marked. Be sure
to specify the size of the paper and press the [OK] key.
❑ After entering the size, ! appears on the panel display.
❑ If you have set the special size original in the document feeder, press the [Orig.
Size] key and enter the original size. ⇒ See page 6.
❑ The entered size is not reset by turning off the main switch or pressing the Clear
Modes/Energy Saver key. Re-entering size or canceling this setting reset the
entered size. ⇒ See page 21.
Set the originals and then press the Start key.
6
COPYING
❑ When copying onto OHP transparencies, remove the copies one by one as they
come out.
Canceling the special size paper setting
➊ Select ! (special paper size) with
the [Paper] or the < > keys.
➋ Press the # key.
➌ Press the [Cancel] key.
21
Page 36

STORING YOUR COPY SETTINGS IN MEMORY (Program)
STORING YOUR COPY SETTINGS IN MEMORY
(Program)
If there are certain combinations that you use frequently , you can store these
settings as a program. Each time you need to perform this job, you only need
to recall the program, saving time and trouble.
❑ You can store up to two programs.
❑ The size of copy paper can be memorized. Thus, if copy paper of the same size
is set, the upper tray is selected.
❑ Programs are not cleared by turning the power off or by pressing the Clear Modes/
Energy Saver key. It is canceled when you overwrite them with another pro-
gram.
❑ You cannot erase a program. To change a program, overwrite it with a new one.
⇒ See “Storing/Changing the Program.”
❑ You cannot register the number of copies.
Storing/Changing The Program
Set the copy settings you want
1
to store.
Press the Program key. The
2
program screen is displayed.
Press the [Store] key.
3
With the < and > keys, select
4
a program number . Then, press
the [OK] key.
When you finish, m is displayed.
❑ The program number with m has al-
ready settings in it.
22
C
Page 37

STORING YOUR COPY SETTINGS IN MEMORY (Program)
When the program is already registered (Change)
➊ Check the program and then decide whether or not to overwrite it.
⇒ To find out the stored settings, see “Recalling a Program.”
❑ To overwrite the program, press the [Yes] key.
❑ To cancel your selection, press the [No] key and then select an unregistered
number.
OTHER FUNCTIONS
Recalling A Program
Press the Program key. The
1
program screen is diplayed.
With the Number keys, enter
2
the number of the program to
be recalled. Then, press the
[OK] ke y. The registered settings for the program are displayed.
❑ A number without m does not have
settings in it.
COPYING
Set the original and then press
3
the Start key.
OTHER FUNCTIONS
Temporarily Stopping One Job To Copy Something Else (Interrupt)
You can make urgently needed copies during a multi-copy run.
Press the Interrupt key. The key’s indicator lights.
1
Remove the originals currently set for copying, and set your originals for
2
interrupt copying. Make your copies.
23
Page 38

OTHER FUNCTIONS
After interrupt copying, remove the originals for interrupt copying and
3
the copies.
Press the Interrupt key. The key’ s indicator goes out, and the previous
4
copy job settings are recalled.
❑ Reset the previous originals.
❑ The previous copy job settings are left intact so the previous copy job can be
resumed simply by pressing the Start key.
Entering Copy Job Settings During The Warm-up Period (Auto Start)
“Please wait” is displayed during the warm-up period after you turn the main
switch on. If you enter the copy job settings and press the Start key during
this period, the machine starts copying automatically when it reaches the
ready condition.
❑ To cancel Auto Start, press the Clear/Stop key.
❑ After you enter the copy job settings and press the Start key, the indicator on the
Start key blinks.
❑ Auto Start is impossible right after you add copy paper to the paper tray.
Original Beeper
The beeper sounds and a message is displayed when an operator forgets to
remove originals from the exposure glass after copying. ⇒ See page 58.
24
Page 39

REDUCING AND ENLARGING USING PRESET RATIOS (Reduce/Enlarge)
REDUCING AND ENLARGING USING PRESET
RATIOS (Reduce/Enlarge)
Y ou can select a preset ratio for copying.
◆◆
◆Preset ratios for original sizes and copy paper sizes
◆◆
Metric Version
Enlarging ratio (%) Original → Copy paper size
1
400*
1
200*
141 A4→A3 A5→A4 A6→A5 B5→B4 B6→B5
122 A4→B4 A5→B5 A6→B6
115 B4→A3 B5→A4 B6→A5
A5→A3 A6→A4 B6→B4
COPYING
Reducing ratio (%) Original size → Copy paper size
93 (for providing a margin on four sides of an original)
11" × 14" → B4*
2
87 A3→B4 A4→B5 A5→B6
82 B4→A4 B5→A5 B6→A6
71 A3→A4 A4→A5 A5→A6 B4→B5 B5→B6
65 A3→F
50 A3→A5 A4→A6 B4→B6
1
25*
*1 This ratio is cannot be selected when the document feeder is used.
*2 Size (1 1" x 14") is a computer’s printing paper size.
25
Page 40

REDUCING AND ENLARGING USING PRESET RATIOS (Reduce/Enlarge)
Inch Version
Enlarging ratio (%) Original → Copy paper size
1
400*
1
200*
1
155*
129 8½" x 11"→11" x 17"
121 8½" x 14"→11" x 17"
Reducing ratio (%) Original size → Copy paper size
93 (for providing a margin on four sides of an original)
85 F→8½" x 11"
77 8½" x 14"→8½" x 11"
74 11" x 15"→8½" x 11"
65 11" x 17"→8½" x 11"
50 11" x 17"→5½" x 8½"
1
25*
*1 This ratio is cannot be selected when the document feeder is used.
5½" x 8½"→11" x 17"
5½" x 8½"→8½" x 14"
❑ You can select a ratio regardless of the size of an original or copy paper. With
some ratios, parts of image might not be copied and blank margins appears on
copies.
Select a ratio with the [Reduce]
1
or [Enlarge] key.
❑ Each time you press the key, the ra-
tio changes.
Set the original and then press
2
the Start key.
26
Page 41

REDUCING AND ENLARGING IN 1% STEPS (Zoom)
REDUCING AND ENLARGING IN 1% STEPS
(Zoom)
You can change the reproduction ratio in 1% steps.
❑ The following ratios can be selected:
Setting originals on the exposure glass: 25 - 400 %
Setting originals in the document feeder: 37 - 150 %
❑ You can select a preset ratio which is near the desired ratio, and then adjust it
with the +Zoom Up or -Zoom Down key.
Specify the ratio with the
1
+Zoom Up or -Zoom Down
key. The specified ratio is displayed on screen.
COPYING
❑ When you press the +Zoom Up or -Zoom Down key once, the ratio is changed
in 1% steps. When you hold them down, the ratio is changed in 10% steps.
❑ If you make a mistake, correct the ratio with the +Zoom Up or -Zoom Down key.
Set the original and then press the Start key.
2
27
Page 42

STRETCHING AND SQUEEZING THE IMAGE INT O THE COPY AREA
Horizontal
original size
Vertical original size
Horizontal
copy size
Vertical copy size
STRETCHING AND SQUEEZING THE IMAGE
INTO THE COPY AREA (Directional Size
Magnification)
The machine can reduce or enlarge
copies to match independent horizontal and vertical size settings.
❑ Specify the vertical and horizontal sizes of the original and those of the copy, as
shown in the illustration.
❑ The following ratios can be selected;
Setting originals on the exposure glass: 25 - 400 %
Setting originals in the document feeder:
❑ If the calculated ratio is 24% or less, it is rounded up to 25%. If it is 401% or
more, it is rounded up to 400%.
Horizontal
Vertical
: 37 - 150 %
: 25 - 400 %
Set the original.
1
Press the D. Size Mag. key.
2
The setting screen is displayed.
Enter the horizontal original size
3
with the Number keys. Then,
press the # or > key.
❑ Acceptable values are as follows:
• Metric version: 1 to 999 mm in 1 mm steps
• Inch version: 0.1" to 99.9" in 0.1" steps
❑ If you make a mistake, press the Clear/Stop key and then enter the correct
value.
28
A A
R
RR
RR
2
mm
Page 43

STRETCHING AND SQUEEZING THE IMAGE INT O THE COPY AREA
Enter the horizontal copy size with the Number keys. Then, press the
4
# or > key.
❑ If you press the [OK] key after entering horizontal original and copy size, the
machine enters the size magnification (not directional) mode.
Enter the vertical original size with the Number keys. Then, press the
5
# or > key.
Enter the vertical copy size with the Number keys. Then, press the
6
[OK] key.
❑ To change the size, select the desired item with the < or > key and then enter
the new size.
Press the Start key.
STRETCHING AND SQUEEZING THE IMAGE IN 1% STEPS
7
STRETCHING AND SQUEEZING THE IMAGE IN
1% STEPS (Directional Magnification(%))
COPYING
The machine can reduce or enlarge
copies at different reproduction ratios
horizontally and vertically.
❑ The following ratios are specifiable:
Setting originals on the exposure glass: 25 - 400 %
Setting originals in the document feeder:
Set the original.
Horizontal
Vertical
1
Horizontal %
Vertical %
: 37 - 150 %
: 25 - 400 %
29
Page 44

STRETCHING AND SQUEEZING THE IMAGE IN 1% STEPS
MAKING TWO-SIDED COPIES (Duplex)
Press the Direct. Mag.(%) key .
2
The setting screen is displayed.
Enter the horizontal ratio with
3
the Number keys. Then, press
the # or > key.
❑ You can also specify the ratio with
the +Zoom Up or -Zoom Down keys.
Enter the vertical ratio with the
4
Number keys. Then, press the
[OK] key.
❑ If you make a mistake, press the #,
<, or > key and then enter the cor-
rect value.
Press the Start key.
5
MAKING TWO-SIDED COPIES (Duplex)
(optional duplex tray is required)
The machine can make a two-sided
copy from two one-sided originals or
from two facing pages of a bound
original (book).
30
12
12
1
1
2
2
Page 45

MAKING TWO-SIDED COPIES (Duplex)
❑ There are two ways to make copies:
• 1-sided
The machine makes a two-sided copy from two one-sided originals.
→→
→ 2-sided
→→
• Book
❑ Book Original Sizes and 2-sided Copy Sizes (ratio=100%)
→→
→ 2-sided
→→
The machine makes a two-sided copy from two facing pages of a bound
original (book).
Metric version Inch version
Original Copy paper Original Copy paper
A3L A4K 2-sided 11" x 17" L 8½" x 11" K 2-sided
B4L B5K 2-sided
A4L A5K 2-sided
❑ The machine cannot make 2-sided copies using the following copy paper:
• Paper smaller than A5
• Translucent paper
• Adhesive labels
• OHP transparencies
• Post cards
❑ If you want to make two-sided copies from one-sided originals larger than A4,
8½" x 11", the optional memory unit is required.
❑ You cannot use the bypass tray with this feature.
❑ The machine cannot rotate the image by 90° for L copy paper when making a
two-sided copy from two facing pages of a book. Select K copy paper.
❑ A binding margin is set on the reverse side for copying. You can change the
margin width and position. You can also change the default settings (5mm, 0.2"
is default). ⇒ See page 59.
COPYING
If you select 1-sided
❑ When setting the originals in the document feeder, the first page must be on top.
If you set one original at a time, start with the first page to be copied.
❑ When setting the originals on the exposure glass, set the originals starting with
the first page.
❑ If you set an odd number of 1-sided originals, the reverse side of the last page is
left blank.
→→
→ 2-sided, observe the following notes:
→→
31
Page 46

MAKING TWO-SIDED COPIES (Duplex)
❑ You can select an original direction
(Top to Top/T op to Bottom). Align the
top and bottom edges of originals
when setting, as shown in the illustration.
❑ Set A 3L, B4L, 11" x 17"L or 8½"
x 14"L originals as shown in the illustration.
Top to Top
ABC
Top to Bottom
Top to Top
BA
Top to Bottom
Press the Duplex key. The set-
1
ting screen is displayed.
Select one of Duplex modes
2
with the < or > key.
❑ If you select Book → 2-sided, press
6
the [OK] key and go to step
Press the [Orientn.] key.
.
3
32
Top to Top
Top to Bottom
C
B
A
Page 47

MAKING TWO-SIDED COPIES (Duplex)
Select [Top to Top] or [Top to
4
Bottom] with the < or > key.
Then, press the [OK] key.
❑ Although you have canceled the
Memory Copy mode, the Memory
Copy Mode is automatically selected
when you select the [Top to Bot-
tom]. [Top to Bottom] is only available in the Memory Copy mode.
❑ [Top to Bottom] for B4, 8½" x 14" or
larger originals can be selected only
when you have the optional memory
unit.
Press the [OK] key.
5
If you have selected Book → 2-sided in step 2, select copy paper by
6
pressing the [Paper] key. To do this, refer to the table on page 31.
COPYING
Set the originals and then press the Start key.
7
❑ Regarding setting originals, see page 4.
❑ When you set the originals on the exposure glass or one original at a time in the
document feeder, remove the first original after it is scanned and then repeat
7
. To finish copying with the odd number of originals, press the # key.
step
❑ If a copy is left on the duplex tray, a message is displayed. Press the Start key to
exit the copy from the duplex tray.
You can select whether or not to automatically exit the last copy with the back
side blank from the duplex tray. ⇒ See page 61.
33
Page 48

MAKING ONE-SIDED COPIES FROM BOOK ORIGINALS (Series Copies)
MAKING ONE-SIDED COPIES FROM BOOK
ORIGINALS (Series Copies)
The machine can make two separate
one-sided copies from two facing
pages of bound (book) originals.
❑ Book Original Sizes and 1-sided Copy Sizes (ratio=100%)
Metric version Inch version
Original Copy paper Original Copy paper
A3L A4K x 2 11" x 17" L 8½" x 11" K x 2
B4L B5K x 2
A4L A5K x 2
❑ You cannot use the bypass tray with this feature.
Press the Combine/Series
1
Copies key . The setting screen
is displayed.
12
12
Press the [Series] key.
2
Press the [Exit] key.
3
Select copy paper by pressing
4
the [Paper], < or > key.
Set the originals and then press
5
the Start key.
34
Page 49

COMBINING ORIGINALS INTO ONE COPY (Combine)
12
12
43
12
2
3
1
4
2
1
16
15
2
1
8
7
8567
41
2
3
8567
12
9
10 11
4123
1613 14 15
COMBINING ORIGINALS INTO ONE COPY
(Combine)
The machine can copy from multiple
one-sided originals to one sheet of
copy paper.
COPYING
❑ The number of originals copied (combined) is 2, 4, 8, or 16.
❑ The machine can print a separation line between copied images. ⇒ See page
60.
❑ You can use this mode with the Duplex mode. The number of originals you input
will be the number of images copied on the one side of the copy.
35
Page 50

COMBINING ORIGINALS INTO ONE COPY (Combine)
◆◆
◆Setting Originals
◆◆
<Original set in the document feeder>
Originals reading from right to left
1
2
3
4
Originals reading from top to bottom
1
2
3
4
1
3
2
4
2
4
1
3
❑ The machine cannot copy originals different in size and direction.
❑ You cannot use the bypass tray with this feature.
❑ Even if the direction of originals in the document feeder is different from that of
the copy paper, the machine will automatically rotate the image by 90° to make
copies properly.
❑ Copying is possible even if the number of originals in the document feeder is less
than the specified number of originals to be combined.
You can change these default settings. ⇒ See page 61.
❑ If the number of originals is less than
the number of originals to be combined, the copies can be made as
shown in the illustration.
1
2
3
21
3
Press the Combine/Series
1
Copies key . The setting screen
is displayed.
Press the [Combine] key.
2
36
Page 51

COMBINING ORIGINALS INTO ONE COPY (Combine)
Enter the number of originals
3
with the Number keys and then
press the [OK] key.
Press the [Exit] key.
4
Select copy paper with the [Paper] or the < > key.
5
❑ The Auto Reduce/Enlarge is selected automatically. You need not to select the
reproduction manually.
Set the originals and then press the Start key.
6
COPYING
❑ When you set the originals in the document feeder, the first page must be on top.
If you set one original at a time, start with the first page.
❑ When you set the originals on the exposure glass, start with the first page.
❑ When you set the originals on the exposure glass or one original at a time in the
document feeder, remove the first original after it is scanned. Then, repeat step
6
. To finish copying, press the # key and the Start key.
37
Page 52

COPYING THE IMAGE TWICE ON ONE PAGE (Double Copies)
COPYING THE IMAGE TWICE ON ONE PAGE
(Double Copies)
The machine can copy the one original image twice on one page as
shown below. The separation line
appears as a broken line by default.
❑ It is impossible to turn lengthwise (L) original images 90° on lengthwise (L)
copy paper. In this case, select K copy paper referring to the table below.
❑ The machine cannot properly detect A5L and 5½" x 8½" L originals on the
exposure glass. Be sure to select the copy paper manually or set the originals in
the document feeder (option).
Original size A5 L 5½"x8½" L
Setting originals (metric version only) (inch version only)
on the exposure glass X X
in the document feeder O O
❑ You can change the type of separation lines or eliminate the lines. ⇒ See page 60.
◆◆
◆ Combinations of Originals and Copy Paper (ratio=100%)
◆◆
Metric version
Original size and direction Copy paper size and direction
A5 L A4 K
Inch version
Original size and direction Copy paper size and direction
5½" x 8½" L 8½" x 11" K
Press the Double Copies key.
1
Set the original and then press
2
the Start key.
38
Page 53

ERASING THE CENTRE AND THE BORDER (Erase Centre/Border)
ERASING THE CENTRE AND THE BORDER
The machine can make copies of a
book or magazine originals by erasing the shadow at the centre and/or
four sides of copy paper.
(Erase Centre/Border)
Erasing the centre
B
A
B
A
Erasing the border
B
A
Erasing the centre/border
B
A
❑ There are three ways to make copies:
• Centre
The machine erases the shadow at the center of copy paper.
• Border
The machine erases the shadow at the four sides of copy paper
• Centre/Border
The machine erases the shadow at the center and four sides of copy paper.
❑ The default setting of the margin width is as follows:
• Metric version: 10 mm
• Inch version: 0.4"
❑ You can specify the margin width as follows. Change the default settings to specify
the margin position and width. ⇒ See page 59.
B
A
B
A
COPYING
• Metric version: 3 to 50 mm in 1 mm steps
• Inch version: 0.1" to 2.0" in 0.1" steps
❑ Areas you do not want to delete might be erased if you use non-standard size
paper.
❑ You cannot use the bypass tray with this feature.
39
Page 54

ERASING THE CENTRE AND THE BORDER (Erase Centre/Border)
◆◆
◆Direction and margin to be
◆◆
erased on copy paper
L copy paper K copy paper
Erased part
Press the Erase Centre/Bor-
1
der key. The setting screen is
displayed.
Press the key corresponding to
2
the part to be erased.
If You Have Pressed The [Centre] Key
➊ Enter the center width with the
Number keys and then press the
[OK] key.
❑ If you make a mistake, press the
Clear/Stop key and then enter the
correct value.
3 to 50mm
Erased part
➋ Press the [Exit] key.
40
Page 55

ERASING THE CENTRE AND THE BORDER (Erase Centre/Border)
If You Have Pressed The [Border] Key
➊ Enter the border width with the
Number keys and then press the
[OK] key.
❑ If you make a mistake, press the
Clear/Stop key and then enter the
correct value.
➋ Press the [Exit] key.
If You Have Pressed The [Ctr/Bdr] Key
➊ Enter the center width with the
Number keys and then press the
# or > key.
COPYING
➋ Enter the border width with the
Number keys and then press the
[OK] key.
❑ If you make a mistake, press the
Clear/Stop key and then enter the
correct value.
➌ Press the [Exit] key.
Set the originals and then press
3
the Start key.
41
Page 56

EDITING THE COPY IMAGE
EDITING THE COPY IMAGE
Reversing Black And White (Positive/Negative)
Black and white images of the original are reversed.
Press the Editing key until the
1
setting screen is displayed.
Select “Y es” with the < > keys
2
and press the [OK] key.
Set the originals and press the
3
Start key.
Repeating An Image Over The Entire Copy (Repeat)
The original image is copied repeatedly.
❑ The number of repeated images depends on the original size, copy paper size,
and reproduction ratio. Refer to the table on page 43.
❑ You cannot use the bypass tray with this feature.
❑ Part of a repeated image might not be copied depending on copy paper size, copy
paper direction, or reproduction ratio.
❑ Separate lines between repeated images can be printed using the user tools.
⇒ See page 60.
42
Page 57

EDITING THE COPY IMAGE
◆ Original size, copy paper size, reproduction ratio, and number of repeated
images
Metric version:
Original size Copy paper size Reproduction ratio and number of
repeated images
A5 K A4 K 71% → 4 images
A5 L A4 L 35% → 16 images
A5 K A4 L 100% → 2 images
A5 L A4 K 50% → 8 images
25% → 32 images
Inch version:
Original size Copy paper size Reproduction ratio and number of
repeated images
5½"x8½" K 8½"x11" K 65% → 4 images
5½"x8½" L 8½"x11" L 32% → 16 images
5½"x8½" K 8½"x11" L 100% → 2 images
5½"x8½" L 8½"x11" K 50% → 8 images
25% → 32 images
Press the Editing key until the
1
setting screen is displayed.
COPYING
Select “Y es” with the < > keys
2
and press the [OK] key.
Select the copy paper size with
3
[Paper], <, or > key.
❑ If you want to change the reproduc-
tion ratio, change it referring to the
above tables.
Set your originals and press the Start key.
4
43
Page 58

EDITING THE COPY IMAGE
Merging Images (Overlay)
The machine can merge two different originals onto the same copy paper.
ABCDE ABCDE ABCDE
ABCDE ABCDE ABCDE
ABCDE ABCDE ABCDE
ABCDE ABCDE ABCDE
ABCDE ABCDE ABCDE
ABCDE ABCDE ABCDE
ABCDE ABCDE ABCDE
ABCDE ABCDE ABCDE
ABCDE ABCDE ABCDE
ABCDE ABCDE ABCDE
ABCDE ABCDE ABCDE
ABCDE ABCDE ABCDE
ABCDE ABCDE ABCDE
ABCDE ABCDE ABCDE
ABCDE ABCDE ABCDE
ABCDE ABCDE ABCDE
❑ There are three ways to make Overlay copy.
• Overlay-1
Two different originals can be merged onto the same copy paper.
• Overlay-2
The machine merges two originals and only the overlapped image will be
copied.
• Overlay-3
The machine merges two originals and all areas excluding.
Press the Editing key until the
1
setting screen is displayed.
ABCDE ABCDE ABCDE
ABCDE ABCDE ABCDE
ABCDE ABCDE ABCDE
ABCDE ABCDE ABCDE
ABCDE ABCDE ABCDE
ABCDE ABCDE ABCDE
ABCDE ABCDE ABCDE
ABCDE ABCDE ABCDE
ABCDE ABCDE ABCDE
ABCDE ABCDE ABCDE
ABCDE ABCDE ABCDE
ABCDE ABCDE ABCDE
ABCDE ABCDE ABCDE
ABCDE ABCDE ABCDE
ABCDE ABCDE ABCDE
ABCDE ABCDE ABCDE
ABCDE ABCDE ABCDE
ABCDE ABCDE ABCDE
ABCDE ABCDE ABCDE
ABCDE ABCDE ABCDE
ABCDE ABCDE ABCDE
ABCDE ABCDE ABCDE
ABCDE ABCDE ABCDE
ABCDE ABCDE ABCDE
ABCDE ABCDE ABCDE
ABCDE ABCDE ABCDE
ABCDE ABCDE ABCDE
ABCDE ABCDE ABCDE
ABCDE ABCDE ABCDE
ABCDE ABCDE ABCDE
ABCDE ABCDE ABCDE
ABCDE ABCDE ABCDE
ABCDE ABCDE ABCDE
ABCDE ABCDE ABCDE
ABCDE ABCDE ABCDE
ABCDE ABCDE ABCDE
ABCDE ABCDE ABCDE
ABCDE ABCDE ABCDE
ABCDE ABCDE ABCDE
ABCDE ABCDE ABCDE
ABCDE ABCDE ABCDE
ABCDE ABCDE ABCDE
ABCDE ABCDE ABCDE
ABCDE ABCDE ABCDE
ABCDE ABCDE ABCDE
ABCDE ABCDE ABCDE
ABCDE ABCDE ABCDE
ABCDE ABCDE ABCDE
Select “Overlay-1”, “Overlay-2”
2
or “Overay-3” with the < >
keys. Then press the [OK] key .
Set the originals and press the
3
Start key.
❑ When you set originals on the exposure glass, start with the first page to be
copied. After the first original is scanned, remove originals and repeat step
3.
44
Page 59

COMBINATION CHART
COMBINATION CHART
❍: means that these modes can be used together.
×: means that these modes cannot be used together. The mode before you select
will be the mode you’re working in.
●: means that these modes cannot be used together . The mode after you select will
be the mode you’re working in.
The following shows the combinations of functions.
COPYING
*1: Only the Erase Border mode can be used together.
45
Page 60

COMBINATION CHART
46
Page 61

WHAT TO DO IF SOMETHING
GOES WRONG
IF YOUR COPIER DOES NOT START ..................................................................... 48
IF YOU CANNOT MAKE CLEAR COPIES ............................................................. 49
IF YOU CANNOT MAKE COPIES AS YOU WANT ................................................. 51
THING GOES WRONG
WHAT TO DO IF SOME-
47
Page 62

IF YOUR COPIER DOES NOT START
IF YOUR COPIER DOES NOT START
◆◆
◆When Messages are Displayed
◆◆
This is a summary of important messages. If a message not listed here is
displayed, take corrective action by following the instructions in the message.
Message
❑ Please wait.
❑ Cannot detect
orig. size.
❑ Check orig.
direct.
❑ Check paper
size.
❑ Sorting with this
size is impossible.
❑ Max. quantity:
##.
Problem/cause
· This message is displayed after turning
the main switch on,
adding toner, or replacing the PCU.
· Improper original is
set. ⇒ See page 3.
· Original is not set.
· There is no copy paper that is the same direction as the originals.
· There is no copy paper that matches the
reproduction ratio.
__
· The number of copies
exceeds the limit.
Corrective action
· Wait for the machine to warm-up.
· You can make the copy job settings.
⇒ See “Auto Start” on page 24.
· If you turn the main switch on, you
have to wait about 35 seconds until
the machine can make copies.
· The machine initialize about 3 minutes after adding toner.
· The machine initialize about 2 minutes after replacing the PCU.
· If non-standard size original is set,
select copy paper by using the [Paper] key rather than by using Auto
Paper Select. Do not use the Auto
Reduce/Enlarge.
· Set originals on the exposure glass,
or enter the non-standard original
size ⇒ See pages 4 and 6.
· Set the original.
· Set the original in the same direction as the copy paper.
· Pressing the Start key to copy the
image to the selected copy paper.
· Check the paper size, and select
the proper paper size.
· Check the copy paper size that can
be used for the Sorting. For large
paper sizes, the optional memory
unit is required.
· You can change the limit on the
number of copies which can be
made at a time. ⇒ See page 58.
48
Page 63

IF YOUR COPIER DOES NOT START
IF YOU CANNOT MAKE CLEAR COPIES
Message
❑ Reset the Du-
plex Tray.
❑ Service Call this
function is not
available. Press
Cancel to exit.
◆◆
◆Others
◆◆
❑ Panel display is
invisible.
❑ The machine
does not work
after turning on
the main switch.
Problem/cause
__
· The machine has a
problem.
· The Energy Save mode
is set.
· The main switch is
turned off.
__
Corrective action
· Reset the duplex tray (unit) correctly. ⇒ See page viii.
· Press the [Cancel] key. Call your
service representative.
· Press Clear Modes/Energy Saver
key to cancel the Energy Save
mode.
· Turn on the main switch.
· Turn on the AC switch. ⇒ See page
viii.
IF YOU CANNOT MAKE CLEAR COPIES
The following shows the causes of unclear copies and corrective actions.
THING GOES WRONG
WHAT TO DO IF SOME-
Problem
❑ Copies appear
dirty.
❑ Reverse side of
an original image is copied.
❑ A shadow ap-
pears on copies
if you use the
pasted originals.
Cause
· Image density is too
dark.
· Auto image Density is
not selected.
· Image density is too
dark.
· Auto Image Density is
not selected.
· Image density is too
dark.
Corrective action
· Adjust the image density. ⇒ See
page 11.
· Select Auto Image Density.
· Adjust the image density. ⇒ See
page 11.
· Select Auto Image Density.
· Adjust the image density. ⇒ See
page 11.
· Change the setting direction of the
original.
· Put mending tape on the pasted
part.
49
Page 64

IF YOU CANNOT MAKE CLEAR COPIES
Problem
❑ Something other
than the original
image is copied.
❑ Copies are too
light.
❑ Parts of the im-
age are not copied.
❑ Copies are blank.
❑ Moire pattern is
produced on copies.
Cause
· Exposure glass, platen
cover, or document
feeder belt are dirty.
· Image density is too
light.
· Improper copy paper
is set.
· Toner cartridge is almost empty.
· Original is not set in
the correct location.
· Improper paper size is
selected.
· Original is not set correctly.
· Your original has dot
pattern image or many
lines.
Corrective action
· Clean the exposure glass, platen
cover, and document feeder belt.
⇒ See “MAINTAINING YOUR MACHINE” in “General Reference”.
· Select Auto Image Density. Adjust
the image density. ⇒ See page 11.
· If you copy onto rough grain paper, paper with a processed surface, or dump paper, the copy
might be too light. Change to dry,
and undamaged paper.
· Replace the toner cartridge with a
new one. ⇒ See “ADDING TONER”
in “General Reference”.
· Set the original correctly. ⇒ See
page 4.
· Select the proper paper size.
⇒ See page 13.
· Set the original face down on the
exposure glass.
Set the original face up in the document feeder. ⇒ See page 5.
· Sometimes, a moire pattern can be
prevented by changing the setting
direction of the original.
R
50
Page 65

IF YOU CANNOT MAKE COPIES AS YOU WANT
IF YOU CANNOT MAKE COPIES
AS YOU WANT
Problem
❑ Misfeeds occur
frequently.
❑ Some of the se-
lected functions
are unavailable.
❑ In Double Cop-
ies mode, parts
of the original
image are not
copied.
❑ In Centre/Bor-
der mode, parts
of the original
image are not
copied.
❑ Parts of the
original image
are not copied
when making 2sided copies.
◆◆
◆Combine
◆◆
Cause
· Paper size setting is
incorrect.
· Selected functions
cannot be combined.
· Combination of original and copy paper is
not correct.
· Margin is too wide.
· Margin of your original
is too narrow.
· Binding margin is too
wide.
· Margin opposite to the
binding margin is too
narrow.
Corrective action
· Set the correct paper size using the
user tools. ⇒ See “CHANGING
THE PAPER SIZE” in “General
Reference”.
· Check the combination of functions. Select the appropriate functions. ⇒ See page 45.
· Select the proper original and copy
paper . ⇒ See page 38.
· Set the narrower margin using the
user tools.
⇒ See “Erase Border” on page 59.
⇒ See “Erase Centre” on page 59.
· Set the narrower margin. ⇒ See
page 59.
THING GOES WRONG
WHAT TO DO IF SOME-
Problem
❑ Parts of the im-
age are not copied or parts of
the copy paper
are blank.
❑ Order of copies
is not correct.
Cause
· Your set originals are
not identical in size
and direction.
· Your set originals are
in incorrect order.
Corrective action
· It is impossible to combine originals
as they are not identical in size and
direction. Copy these originals with
the same size paper, set copies
which are identical in size and direction, and then select Combine.
· When you set a stack of originals
in the document feeder, the first
page must be on top.
When you set an original on the
exposure glass, start with the first
page to be copied.
51
Page 66

IF YOU CANNOT MAKE COPIES AS YOU WANT
◆◆
◆Duplex
◆◆
Problem
❑ Order of copies
is not correct.
❑ Orientation of
copies (Top to
Top, To p to Bottom) is not correct.
Cause
· Your originals are set
in incorrect order.
· Your originals are set
in incorrect direction.
Corrective action
· When you set a stack of originals
in the document feeder, the first
page must be on top.
· When you set an original on the
exposure glass, start with the first
page to be copied.
· Align the top of originals to the rear
scale. ⇒ See page 30.
❑ Y ou can set B4, 8½ × 14" or larger
originals as follows.
When doing this, take action ➊ or ➋.
➊ Select “Top to Bottom” to make
copies in “Top to Top” orientation.
Select “Top to Top” to make copies in “Top to Bottom” orientation.
➋ Alternate the originals as shown
below when setting them.
52
Page 67

CHANGING THE
MACHINE
ACCESSING THE USER TOOLS (COPY FEATURES)............................................... 54
Returning To Copy Mode ............................................................................................. 55
USER TOOLS MENU (COPY FEATURES)................................................................ 56
SETTINGS YOU CAN CHANGE WITH THE USER TOOLS ....................................... 57
General Features 1/2 .................................................................................................... 57
General Features 2/2 .................................................................................................... 58
Adjust Image 1/2 ........................................................................................................... 59
Adjust Image 2/2 ........................................................................................................... 60
Input/Output 1/2 ........................................................................................................... 61
Input/Output 2/2 ........................................................................................................... 62
SERVICE REPRESENTATIVE SETTINGS ................................................................... 62
′′
′S SETTINGS
′′
CHANGING THE
MACHINE’S SETTINGS
53
Page 68

ACCESSING THE USER TOOLS (COPY FEATURES)
ACCESSING THE USER TOOLS
(COPY FEATURES)
The User Tools allows you to change the default values for each function and
to customize the machine’s operation so it matches your most frequent needs.
❑ Change the default settings when the machine is in a different mode from the
normal copy mode. After that, be sure to return the machine to normal copy
mode.
❑ The stored settings are not canceled by turning the power off or by pressing the
Clear Modes/Energy Saver key.
❑ For information about the user tools for system setting, see “CHANGING THE
MACHINE’S SETTINGS” in “General Reference.”
❑ For information about the settings for the optional fax and printer modes, see
each Operating Instructions.
◆◆
◆Key operations
◆◆
❑ Pressing the [
❑ Pressing the [PrevMenu] key returns to the previous menu.
↑↑
↑Prev.] or [
↑↑
↓↓
↓Next] key changes the screen.
↓↓
Make sure that the machine is
1
ready for copying.
❑ If the Copy mode display is not
displayed, press the Copy key.
Press the User T ools key. The
2
User Tools Main Menu screen
is displayed.
Press the [Copy] key. The
3
Copy Features screen is displayed.
Enter the number of the item
4
that you want to change settings
with the Number key.
54
Page 69

ACCESSING THE USER TOOLS (COPY FEATURES)
Search for the setting you want to change with the [
5
its number with the Number key.
⇒ See “USER TOOLS MENU (COPY FEATURES)” on page 56.
Change the default settings by following the instructions in the display
6
message. Then, press the [OK] key.
❑ ⇒ See “SETTINGS YOU CAN CHANGE WITH THE USER TOOLS” on page 57.
❑ Pressing the [OK] key sets the new settings and returns you to the previous
selection screen.
❑ Pressing the [Cancel] key cancels the new settings and returns you to the previ-
ous selection screen.
↓↓
↓Next] key. Enter
↓↓
Returning To Copy Mode
Press the User Tools key after
1
changing the default settings.
The machine returns to the
Copy mode.
❑ You can also returns to the Copy
mode by pressing the [Exit] key on
the User Tools Main Menu screen.
55
CHANGING THE
MACHINE’S SETTINGS
Page 70

USER TOOLS MENU (COPY FEATURES)
USER TOOLS MENU (COPY FEATURES)
56
Page 71

SETTINGS YOU CAN CHANGE WITH THE USER T OOLS
SETTINGS YOU CAN CHANGE WITH THE
❑ For details on accessing the user tools, ⇒ see page 54.
❑ Shaded items (
General Features 1/2
) are selected as the default setting.
USER TOOLS
Description
1 APS Priority (Auto Paper Select Priority)
· As a default setting, Auto Paper Select is
selected when the power is turned on, or
modes are reset. You can cancel this setting.
2 AID Priority (Auto Image Density Priority)
· “Text”
If you do not press the Original Type key,
Text mode is selected as a default. With this
user tool, you can select/cancel the Auto Image Density with Text mode. If you select
“Yes” (Auto Image Density is selected), this
is useful for copying originals with dirty backgrounds.
* This setting is also applied to the Text/Photo mode.
· “Photo”
As a default, Auto Image Density is not selected when you select Photo mode with
the Original Type key. You can cancel this
setting.
3 Original Priority
· Changes the type of originals to be selected
when the power is turned on or when modes
are cleared.
4 Show All Keys
· When “Yes”, [Reduce], [Enlarge] and [100%]
keys, and paper sizes in the trays are shown
on the display. When “No”, the keys are hidden as below.
Procedure
➊ Select “No” or “
< or > key.
➋ Press the [OK] key.
➊ Select “
< or > key.
➋ Press the [OK] key.
➌ Select “No” or “
< or > key.
➍ Press the [OK] key.
➊ Select a type of originals with the
< or > key.
“
➋ Press the [OK] key.
➊ Select “No” or “
< or > key.
➋ Press the [OK] key.
Text
” or “Photo” with the
”, ”Photo” or “Text · Photo”
Text
” with the
Yes
” with the
Yes
Yes ” with the
CHANGING THE
MACHINE’S SETTINGS
[Go to next page.]
57
Page 72

SETTINGS YOU CAN CHANGE WITH THE USER TOOLS
❑ For details on accessing the user tools, ⇒ see page 54.
❑ Shaded items (
) are selected as the default setting.
General Features 2/2
Description
5 Max. Copy Q’ty (Maximum Copy Quantity)
· The maximum copy quantity can be set between 1 and 99.
6 Original Beeper
· Specifies whether or not to sound the beeper
to tell you that an original is left on the exposure glass.
❑ If the Panel Beeper is set to OFF, this func-
tion does not come effect. ⇒ See “SETTINGS YOU CAN CHANGE WITH THE
USER TOOLS” of “General Reference”.
7 Photo Mode
· You can select the resolution when you select the Photo mode by Original Type key.
Procedure
➊ Enter the number with the Num-
ber keys.
· The entry value must be from 1 to
99
.
➋ Press the [OK] key.
➊ Select “Off” or “
or > key.
➋ Press the [OK] key.
➊ Enter 1 or 2 with Number keys.
“1 :Memory Copy :On”
“2 :Memory Copy : Off”
➋ Select “Fine”, “Normal”, or
“Coarse” with the < or > key.
Memory Copy On :
Memory Copy Off : Normal
➌ Press the [OK] key.
On ” with the <
Fine
58
Page 73

SETTINGS YOU CAN CHANGE WITH THE USER T OOLS
❑ For details on accessing the user tools, ⇒ see page 54.
❑ Shaded items (
) are selected as the default setting.
Adjust Image 1/2
Description
1 Erase Border
· Changes the width of the border to be
erased in Erase Border mode.
⇒ See page 39.
2 Erase Centre
· Changes the width of the center to be erased
in Erase Centre mode.
⇒ See page 39.
3 Left Dup. Margin (Left Duplex Margin)
(optional duplex tray required)
· Changes the left binding margin on the reverse side when you make two-sided copies from one-sided originals.
⇒ See page 30.
4 Top Dup. Margin (Top Duplex Margin)
(optional duplex tray required)
· Changes the top binding margin on the reverse side when you make two-sided copies from one-sided originals.
⇒ See page 30.
Procedure
➊ Enter the width with the Number
keys.
The width can be changed as follows:
· Metric version: 3 to 50 mm in 1
mm steps. (
· Inch version: 0.1 " ~ 2.0" in 0.1"
steps (
➋ Press the [OK] key.
➊ Enter the width with the Number
keys.
The width can be changed as follows:
· Metric version: 3 to 50 mm in 1
mm steps. (
· Inch version: 0.1 " ~ 2.0" in 0.1"
steps (
➋ Press the [OK] key.
➊ Enter the width with the Number
keys.
The width can be changed as follows:
· Metric version: 0 to 50 mm in 1
mm steps. (
· Inch version: 0 ~ 2.0" in 0.1"
steps (
➋ Press the [OK] key.
➊ Enter the width with the Number
keys.
The width can be changed as follows:
· Metric version: 0 to 50 mm in 1
mm steps. (
· Inch version: 0 ~ 2.0" in 0.1"
steps (
➋ Press the [OK] key.
0.4"
0.4"
0.2"
0.2"
10 mm
)
10 mm
)
)
)
5 mm
5 mm
)
)
)
)
CHANGING THE
MACHINE’S SETTINGS
[Go to next page.]
59
Page 74

SETTINGS YOU CAN CHANGE WITH THE USER T OOLS
❑ For details on accessing the user tools, ⇒ see page 54.
❑ Shaded items (
) are selected as the default setting.
Adjust Image 2/2
Description
5 D. Copy Sep. Line (Double Copies Sepa-
ration Line)
· Changes the type of separation lines for
double copies.
⇒ See page 38.
None Solid Broken Crop
marks
6 Comb/IR Sep. Line (Combine/Image
Repeat Separation Line)
· Changes the type of separation lines for
Combine and Repeat modes ⇒ See pages
35 and 42.
None Solid Broken 1 Crop
Broken 2
marks
Procedure
➊ Select a type of separation lines
with the < or > key.
None
“
”, “Solid”, “Broken”, or
“Crop marks”
➋ Press the [OK] key.
➊ Select a type of separation lines
with the < or > key.
None
“
”, “Solid”, “Broken 1”, “Bro-
ken 2”, or “Crop Marks”
➋ Press the [OK] key.
60
Page 75

SETTINGS YOU CAN CHANGE WITH THE USER T OOLS
❑ For details on accessing the user tools, ⇒ see page 54.
❑ Shaded items (
) are selected as the default setting.
Input/Output 1/2
Description
1 Duplex Auto Eject (optional duplex tray
required)
· As a default setting, when making two-sided
copies from one-sided originals, the last
copy paper can exit from the duplex tray
automatically with the back side blank. You
can change this setting.
❑ This function is ineffective when you set
one original at a time on the exposure glass
or in the document feeder.
2 Comb. Auto Eject (Combine Auto Eject)
· As a default setting, even if the number of
originals in the document feeder is less than
the entered number in the Combine mode,
copies can be made. You can change this
setting.
❑ This function is ineffective when you set
one original at a time on the exposure glass
or in the document feeder.
3 Original Count (optional document
feeder required)
· Specifies whether or not to display the number of originals fed via the document feeder.
❑ If you select “Yes”, the display shows the
number of originals fed via the document
feeder and copy count while copying. The
entered copy sets are not displayed.
Procedure
➊ Select “No” or “
< or > key.
➋ Press the [OK] key.
➊ Select “No” or “
< or > key.
➋ Press the [OK] key.
➊ Select “
or > key.
➋ Press the [OK] key.
No ” or “Yes” with the <
Yes
Yes ” with the
” with the
CHANGING THE
MACHINE’S SETTINGS
4 SADF Auto Reset (optional document
feeder required)
· When you set one original at a time in the
document feeder, the document feeder is
ready for another (next) original after the
selected time. You can adjust this time.
⇒ See page 5.
[Go to next page.]
➊ Enter the time with the Number
keys.
· The entry value must be from 4
seconds to 60 seconds (in 1 second steps).
·
4 seconds
➋ Press the [OK] key.
61
Page 76

SETTINGS YOU CAN CHANGE WITH THE USER T OOLS
SERVICE REPRESENT A TIVE SETTINGS
❑ For details on accessing the user tools, ⇒ see page 54.
❑ Shaded items (
) are selected as the default setting.
Input/Output 2/2
Description
5 Rotate Sort
· By default, the Rotate Sort is selected when
you use sorting function. You can cancel this
setting.
6 R. Srt. Auto Pap. Cont (Rotate Sort Auto
Paper Continue)
· In the Rotate Sort mode you can specify
whether or not to continue copying onto
available copy paper in the following cases:
· When K or L copy paper runs out during copying.
· When copy paper identical in size but different in direction is not set in the paper
tray.
➊ Select “No” or “
< or > key.
➋ Press the [OK] key.
➊ Select “
< or > key.
➋ Press the [OK] key.
Procedure
Yes ” with the
” or “Yes” with the
No
SERVICE REPRESENTATIVE SETTINGS
Some features can be adjusted by your service representative to suit your
needs. This section gives a brief description of these features. For more
information, contact your service representative.
A3, 11" x 17" Double Count
When you use A3, 11" x 17" paper, your service representative can set the
machine to count each A3, 11" x 17" as two copies.
Auto Paper Select Small Size Detection (for metric version)
Your service representative can sets the machine to detect the original size
on the exposure glass as A5 K whenever the machine cannot detect it with
Auto Paper Select.
62
Page 77

SPECIFICATIONS
MAINFRAME ....................................................................................................... 64
OPTIONAL COPIER MEMORY UNIT (8 MB) ......................................................... 66
OPTIONAL COPIER MEMORY UNIT (4 MB) ......................................................... 66
63
SPECIFICATIONS
Page 78

MAINFRAME
MAINFRAME
Configuration: Desktop
Photosensitivity type: KS III OPC drum (φ 30)
Original scanning: One-dimensional solid scanning system
through CCD
Copy process: Dry electrostatic transfer system
Development: Dry two-component magnetic brush devel-
opment system
Fusing: Heating roll system
Resolution: 400 dpi
Grayscale: 256 levels
Exposure glass: Stationary original exposure type
Original reference position: Rear left corner
Warm-up time: Within 35 seconds (20 °C)
Originals: Sheet/book/objects
Maximum original size: A3L, 297 x 420 mm, 11" × 17" L
Copy paper size: See page 22 of the “General Reference”
Duplex tray: See page 70 of the “General
Reference”.
Copy paper weight:
Paper tray: 60 - 90 g/m2 (16 - 24 lb)
Bypass tray: 60 - 157 g/m2 (16 - 41 lb)
Duplex tray: 60 - 90 g/m2 (16 - 24 lb)
Non-reproduction area: Leading edge: 3 ± 2 mm
Left edge: 2 ± 1.5 mm
Trailing edge: 4 mm or less
Right edge: 3 mm or less
64
Page 79

MAINFRAME
First copy time: less than 9.8 seconds
(A4K, 8½" × 11"K feeding from 1st paper
tray and exiting to internal tray 1)
less than 8.8 seconds
(A4K, 8½" × 11"K feeding from 1st paper
tray and exiting to external tray)
Copying speed: 11 copies/minute (A3 L, 11" × 17" L)
20 copies/minute (A4 K, 8½" × 11" K)
* in the Memory Copy mode
Reproduction ratio: Preset reproduction ratios ;
Metric version Inch version
400% 400%
200% 200%
Enlargement
Full Size 100% 100%
Reduction
141% 155%
122% 129%
115% 121%
93% 93%
87% 85%
82% 77%
61% 65%
50% 50%
25% 25%
Zoom: 25 - 400% (in 1% steps)
Tolerance: 100% ± 1% (main scan,
Picture element density: 400 dpi
Continuous copying count: 1 - 99 copies
❑ Specifications are subject to change without notice.
subscan)
Enlarge/Reduce: ± 1%
(main scan, subscan)
SPECIFICATIONS
65
Page 80

OPTIONAL COPIER MEMOR Y UNIT (8 MB)
OPTIONAL COPIER MEMOR Y UNIT (4 MB)
OPTIONAL COPIER MEMORY UNIT (8 MB)
Memory capacity: 8 MB
Number of originals Up to 99 pages (reference value based on
to be stored: ITU-T No.1 chart)
Approximately 75 pages (reference value
based on ITU-T No.4 chart)
Additional function: Sort with B4, 8½" × 14" or larger originals
Duplex (1-sided → 2-sided) with B4, 8½" × 14"
or larger originals
❑ Specifications are subject to change without notice.
OPTIONAL COPIER MEMORY UNIT (4 MB)
Memory capacity: 4 MB
Number of originals Up to 99 pages (reference value based on
to be stored: ITU-T No.1 chart)
Approximately 45 pages (reference value
based on ITU-T No.4 chart)
Additional function: Sort with B4, 8½" × 14" or larger originals
Duplex (1-sided → 2-sided) with B4, 8½" × 14"
or larger originals
❑ Specifications are subject to change without notice.
66
Page 81

INDEX
67
INDEX
Page 82

INDEX
INDEX
Symbols
+Zoom Up key x, 27
-Zoom Down key x, 27
< > xii
[↑Prev.] xii
[↓Next] xii
[Cancel] xii
[Clear] key 18
[Combine] key 36
[Copy] key 54
[Enlarge] 26
[Exit] xii
[Menu] xii
[OK] xii
[Output] key 18
[PrevMenu] xii
[Reduce] 26
[Series] key 34
1000-sheet tray unit (option) viii
A
A3, 11" x 17" Double Count 62
AC switch viii
Adjust Image 59, 60
AID Priority 57
APS Priority 57
Auto Image Density 11
Auto Image Density key xi
Auto Paper Select 13
Auto Paper Select Small Size Detection 62
Auto Reduce/Enlarge 14
Auto Reduce/Enlarge key x, 15
Auto Start 24
68
B
BASIC PROCEDURE 10
BYPASS TRAY 19
Bypass tray viii
C
Clear Modes/Energy Saver key xi
Clear/Stop key xi
Comb. Auto Eject 61
Comb/IR Sep. Line 60
COMBINATION CHART 45
Combination of Auto and Manual
Image Density 12
Combine 35, 51
Combine/Series Copies key x, 34, 36
Copy Features 54
Copy Mode 55
Copy Paper 13
D
D. Copy Sep. Line 60
D. Size Mag. key 28
Direct. Mag.(%) key 30
Directional Magnification (%) key x
Directional Magnification(%) 29
Directional Size Magnification 28
Directional Size Magnification key x
Double Copies 38
Double Copies key x
Duplex 30, 52
Duplex Auto Eject 61
Duplex key x
Duplex Tray viii
Duplex Tray 49
Page 83

E
EDITING 42
Editing 42
Editing key x, 43, 44
Enter key xi
Erase Border 59
Erase Center 59
Erase Centre/Border 39
Erase Centre/Border key x, 40
Exposure glass viii
External tray viii
F
Front cover viii
Function key xi
G
General Features 58
General Features 1/2 57
I
Input/Output 61, 62, 62
Internal tray 1 viii
Internal tray 2 (option) viii
Interrupt key xi, 23
L
Left Dup. Margin 59
Left side cover viii
Lighter and Darkey keys xi
M
MACHINE’S SETTINGS 53
Main switch viii
Manual Image Density 12
Manual Paper Select 14
INDEX
Max. Copy Q’ty 58
Max. quantity 48
Memory Copy key xi, 13
messages 48
N
Number keys xi
O
OPERATION PANEL x
Operation panel viii
OPTIONAL COPIER MEMORY UNIT
(4 MB) 66
OPTIONAL COPIER MEMORY UNIT
(8 MB) 66
Options ix
Orientn 32
orig. size. 48
Original Beeper 24, 58
Original Count 61
Original Priority 57
Original Type 12
Original Type key xi
ORIGINALS 2
Originals Of Special Sizes 6
Overlay 44
P
Panel Display xii, xi
paper size 48
Paper tray viii
Photo 13
Photo Mode 58
Platen cover viii
Program 22
Program key xi, 22
INDEX
69
Page 84

INDEX
R
R. Srt. Auto Pap. Cont 62
Reduce/Enlarge 25
Repeat 42
Right Side Cover viii
Rotate Sort 16, 62
S
SADF Auto Reset 61
Series Copies 34
Setting Originals 4
Show All Keys 57
Sort 16
Sorter key x, 18
Special Size Copy Paper 20
Specifications 63, 67
Start key xi
T
Text 13
Text/Photo 12
Top Dup. Margin 59
Top to Top/Top to Bottom 32
U
User Code mode 10
USER TOOLS 54
User Tools key x, 54
USER TOOLS MENU 56
V
Ventilation hole viii
Z
Zoom 27
70
 Loading...