

Page 1
INTRODUCTION
This manual contains detailed instructions on the operation and maintenance
of this copier. To get maximum versatility from this copier all operators should
carefully read and follow the instructions in this manual. Please keep this
manual in a handy place near the machine.
Please read the next section before using this copier. It contains important
information related to USER SAFETY and PREVENTING EQUIPMENT
PROBLEMS.
SAFETY INFORMATION
When using your machine, the following safety precautions should always be
followed.
Safety During Operation
In this manual, the following important symbols are used:
R
WARNING: Ignoring this warning could cause serious injury
or even death.
R
CAUTION: Ignoring this caution could cause injury or dam-
age to property.
Examples Of Indications
R
Symbols R means a situation that requires you take care.
v
Symbols v means “Hot surface”.
q
Do NOT carry out the operation represented by the symbol m.
This example means “Do not take apart.”
r
Symbols
ample means “You must remove the wall plug.”
●●
●
means you MUST perform this operation. This ex-
●●
i
Page 2

RR
R
WARNINGS:
RR
••
•
Only connect the machine to the power source described on the
••
inside front cover of this manual.
••
•
Avoid multi-wiring
m
o
q
r
••
••
•
Do not damage, break or make any modifications to the power
••
cord. Do not place heavy objects on it, pull it hard or bend it
more than necessary. These actions could cause an electric
shock or fire.
••
•
Do not plug or unplug the power cord with your hands wet. Oth-
••
erwise, an electric shock might occur.
••
•
Make sure the wall outlet is near the machine and freely acces-
••
sible so that in event of an emergency it can be unplugged easily.
••
•
Do not remove any covers or screws other than those specified in
••
this manual. Some parts of the machine are at a high voltage and
could give you an electric shock. Also, if the machine has laser systems, direct (or indirect) reflected eye contact with the laser beam
may cause serious eye damage. When the machine needs to be
checked, adjusted, or repaired, contact your service representative.
••
•
Do not take apart or attempt any modifications to this machine. There
••
is a risk of fire, electric shock, explosion or loss of sight. If the machine has laser systems, there is a risk of serious eye damage.
••
•
If the machine looks damaged or breaks down, smoke is coming
••
out, there is a strange smell or anything looks unusual, immediately turn off the main and AC switches then unplug the power
cord from the wall. Do not continue using the machine in this
condition. Contact your service representative.
••
•
If metal, liquid or foreign matter falls into the machine, turn off
••
the main and AC switches, and unplug the main power cord.
Contact your service representive. Do not keep using the machine with a fault or defect.
m
s
s
ii
••
•
Do not put any metal objects or containers holding water
••
(e.g.vases, flowerpots, glasses) on the machine. If the contents
fall inside the machine, a fire or electric shock could occur.
••
•
Do not incinerate used toner or toner containers. T oner dust might
••
ignite when exposed to an open flame. Dispose of the used toner
containers according to local regulations for plastics.
••
•
Do not incinerate the photoconductor unit. Toner dust might ig-
••
nite when exposed to open flame. Dispose of the used
photoconductor unit according to local regulations for plastics.
Page 3

RR
R
CAUTIONS:
RR
••
•
Keep the machine away from humidity and dust. A fire or an
••
m
o
r
t
o
electric shock might occur.
••
•
Do not place the machine on an unstable or tilted surface. If
••
it topples over, it could cause injury.
••
•
After you move the machine, fix it with the caster fixture.
••
Othewise, the machine might move or come down to cause a
personal injury.
••
•
When you move the machine, unplug the power cord from
••
the wall outlet to avoid fire or electric shock.
••
•
When the machine will not be used for a long time, unplug
••
the power cord.
••
•
When you pull out the plug from the socket, grip the plug to
••
avoid damaging the cord and causing fire or electric shock.
••
•
If you use the machine in a confined space, make sure there
••
is a continuous air turnover.
m
n
R
••
•
Do not reuse stapled paper. Do not use aluminum foil, car-
••
bon-containing paper or other conductive paper. Otherwise,
a fire might occur.
••
•
When removing misfed paper, do not touch the fusing sec-
••
tion because it could be very hot.
••
•
This machine has been tested for safety using this supplier’s
••
parts and consumables. We recommend you only use these
specified supplies.
iii
Page 4

TABLE OF CONTENTS
WHAT YOU CAN DO WITH THIS MACHINE..................................... 1
MANUALS FOR THIS MACHINE ...................................................... 2
GUIDE TO COMPONENTS............................................................... 3
Options.................................................................................................5
OPERATION PANEL (HARD KEYS) ................................................... 6
PANEL DISPLAY ................................................................................ 8
Displays And Key Operations ...............................................................8
BASICS
STARTING THE MACHINE .............................................................. 10
Turning On The Power ....................................................................... 10
Turning Off The Power ....................................................................... 11
CHANGING MODES..................................................................... 12
MULTI-ACCESSING ....................................................................... 13
USING AS A COPIER..................................................................... 15
Changing To Copy Mode ....................................................................15
Interrupt Copying To Make Urgently Needed Copies .........................15
Printing Simultaneously......................................................................16
USING AS A FACSIMILE ................................................................ 17
Changing To Facsimile Mode .............................................................17
Printing A Received Fax ..................................................................... 17
Sending A Fax .................................................................................... 18
USING AS A PRINTER .................................................................... 19
Printing...............................................................................................19
Printing While There Are No Other Active Jobs.................................. 19
Printing While Copying.......................................................................19
CONSUMABLES
COPY PAPER ................................................................................. 22
Recommended Paper Sizes And Types .............................................22
Non-recommended Paper ..................................................................23
Paper Storage.................................................................................... 24
iv
Page 5

Loading Paper ....................................................................................24
TONER ........................................................................................... 24
Handling T oner ...................................................................................24
Toner Storage.....................................................................................24
Adding Toner ......................................................................................24
PHOTOCONDUCTOR UNIT (PCU)................................................. 25
Handling Photoconductor Unit............................................................25
Photoconductor Unit Storage .............................................................25
Replacing Photoconductor Unit..........................................................25
WHAT TO DO IF SOMETHING GOES WRONG
IF THE MACHINE DOES NOT WORK AS YOU WANT ..................... 28
BB
B LOADING PAPER ...................................................................... 29
BB
DD
D ADDING TONER ....................................................................... 30
DD
Sending A Fax When D Is Lit ............................................................31
REPLACING PHOTOCONDUCTOR UNIT (PCU) ............................ 32
xx
AA
x
A CLEARING MISFEEDS .......................................................... 36
xx
AA
When A, B, C, D, And/Or R Is Lit .......................................................37
When Z Is Lit......................................................................................37
When Original Is Misfed .....................................................................37
CHANGING THE MACHINE’S SETTINGS
CHANGING THE PAPER SIZE ......................................................... 40
Changing The Paper Size For Paper Tray 1 ......................................40
Changing The Paper Size For Optional Tray Unit ..............................43
USER TOOLS - SYSTEM SETTINGS .................................................. 44
Accessing The User Tools (System Settings) ....................................44
Returning To The Copy Mode.............................................................46
USER TOOLS (SYSTEM SETTINGS) MENU ....................................... 47
SETTINGS YOU CAN CHANGE WITH THE USER TOOLS ................ 48
System Settings 1/5 ..........................................................................48
System Settings 2/5 ..........................................................................49
System Settings 3/5 ..........................................................................51
System Settings 4/5 ..........................................................................54
System Settings 5/5 ..........................................................................56
v
Page 6

DO’S AND DON’TS
WHERE TO PUT YOUR MACHINE
MAINTAINING YOUR MACHINE
DO’S AND DON’TS........................................................................ 62
WHERE TO PUT YOUR MACHINE .................................................. 63
When Moving The Machine................................................................ 63
Machine Environment.........................................................................63
Space Required For Installing The Machine ......................................64
Power Connection..............................................................................65
MAINTAINING YOUR MACHINE................................................... 66
Cleaning The Exposure Glass............................................................66
Cleaning The Platen Cover ................................................................ 66
Cleaning The Document Feeder Belt ................................................. 67
Cleaning The 1-Bin Tray (Internal Tray2) ...........................................67
SPECIFICATIONS
MAINFRAME ................................................................................. 70
OPTIONAL DOCUMENT FEEDER ................................................... 73
OPTIONAL DUPLEX TRAY .............................................................. 74
OPTIONAL INTERNAL 1-BIN TRAY (INTERNAL TRAY 2) .................. 75
OPTIONAL PAPER TRAY UNIT......................................................... 76
INDEX
INDEX ............................................................................................ 78
vi
Page 7
WHAT YOU CAN DO WITH THIS MACHINE
WHAT YOU CAN DO WITH THIS MACHINE
You can expand capabilities of this machine to include fax and printer features.
When you want to add a feature, contact your sales or service representative.
Copy Mode
You can make copies in various ways including reducing/enlarging
copies and combining originals into one copy as well as basic copying. As a default, you can use memory to make various type of copies.
Options
• Copier Memory unit (4MB)
• Copier Memory unit (8MB)
This option allows you to sort A3L, B4L, 11" × 17" L,
and 8 ½" × 14" L copies in addition to A4 and 8 ½" × 11".
Facsimile Mode (Optional Fax Unit)
Options:
• ISDN unit • 400dpi High Resolution Card
• Memory Card (2MB) • Fax Hard Disk
• Memory Card (4MB) • Function Upgrade Card
Printer Mode (Optional Printer Controller)
Options:
• PostScript Level 2 Emulation Unit
• Printer Hard Disk Unit
1
Page 8

MANUALS FOR THIS MACHINE
MANUALS FOR THIS MACHINE
This is a multi-function machine combining facsimile and printer features as
well as copying features. This manual describes procedures common to these
features. Each feature’s reference describes the operational procedures separately for the copying, facsimile, and printer features. Please consult the
manual that suits your needs.
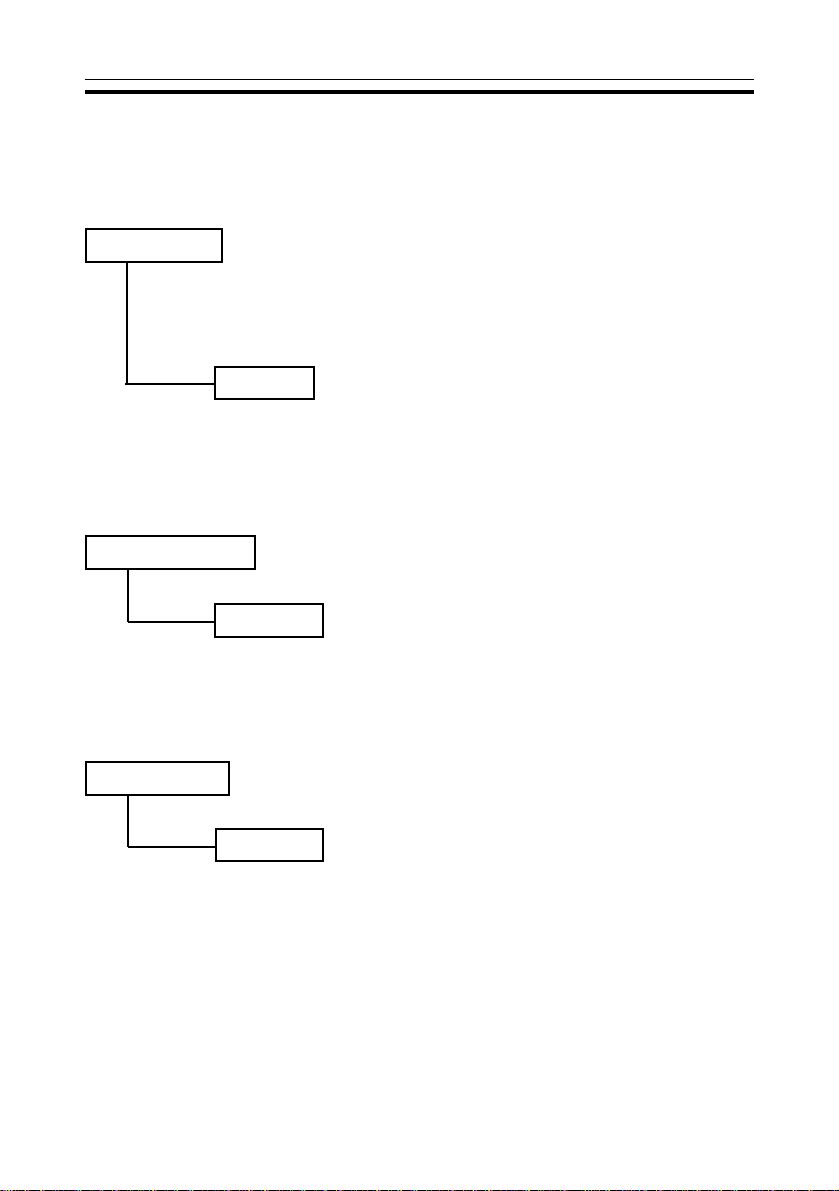
General Reference (this manual)
Provides an overview of the machine. This manual introduces the features of the machine and describes the basic operations. It also introduces the options allowing you to use additional functions and describes
how to access the system user tools to make the machine easier to use.
When using as a copier
Copy Reference
Describes the various copying functions from basic copying to more advanced features such as reducing/enlarging
copies or combining originals into one copy.
When using as a facsimile
Facsimile Reference (option)
Describes the operational procedures and functions to use
the machine as a facsimile.
When using as a printer
Printer Reference (option)
Printer (PostScript Emulation) Reference (option)
Printer (Utility/Driver) Reference (option)
Describes the operational procedures and functions to use
the machine as a printer.
2
Page 9
GUIDE TO COMPONENTS
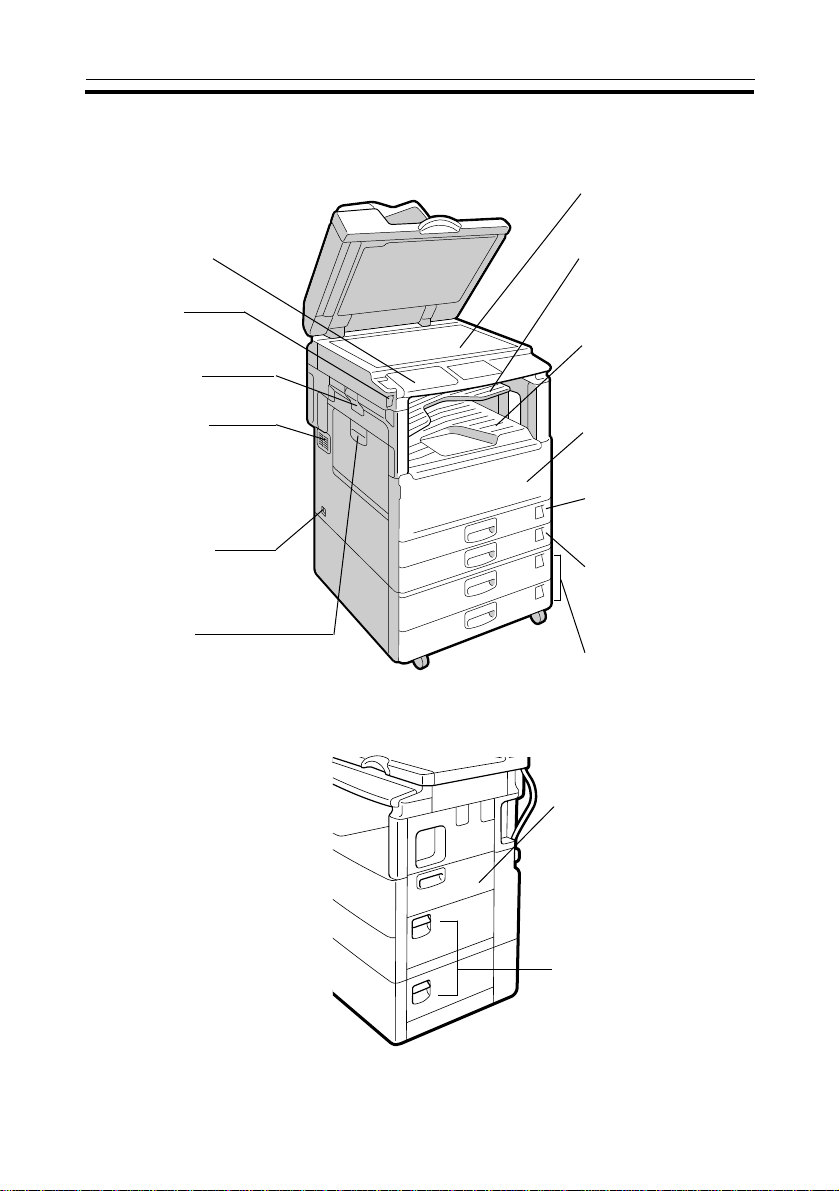
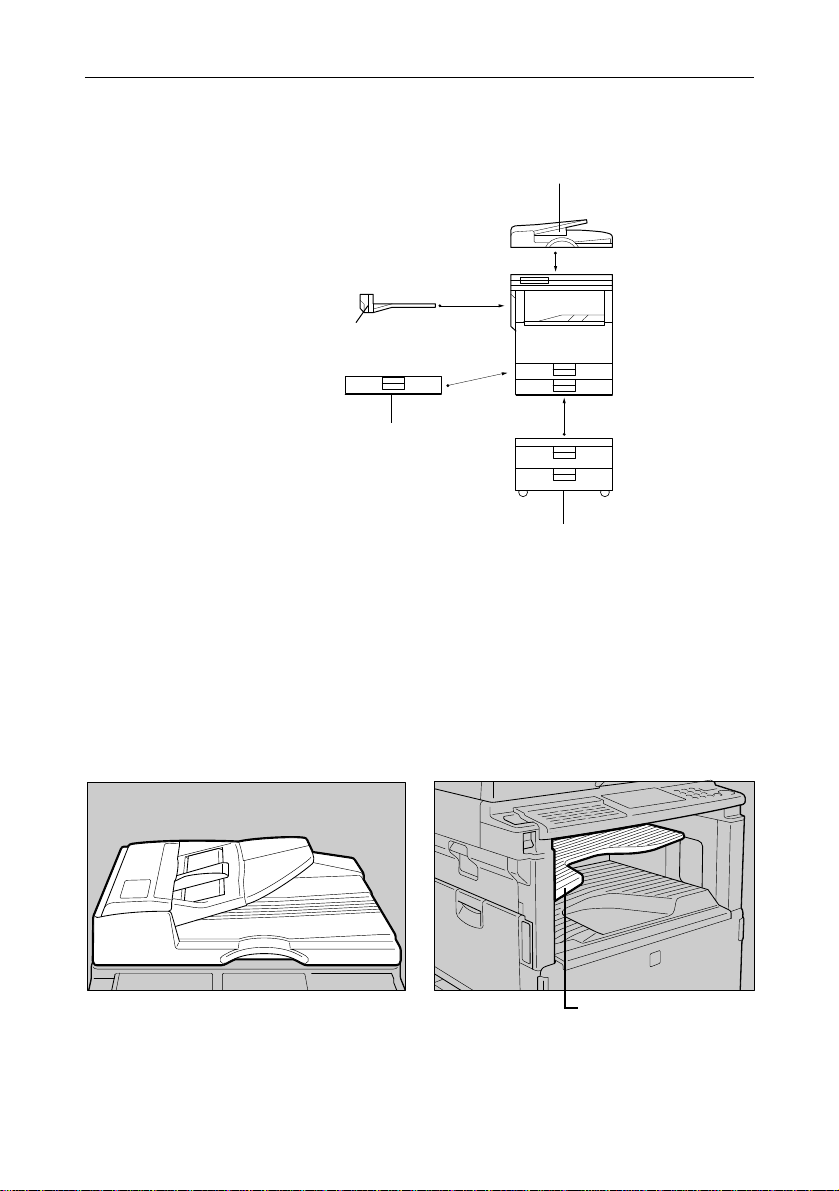
GUIDE TO COMPONENTS
Optional
Platen cover
Holds down the original
placed on the exposure glass.
Operation panel
⇒⇒
See page 6.
⇒
⇒⇒
Main switch
Switches the machine
on/stand-by .
Left side cover
Open to remove misfed paper.
Ventilation hole
Prevents overheating. Do not
obstruct the ventilation hole
by placing or leaning an object
near it. If the machine
overheats, a fault might occur.
∗∗
AC switch
Do not touch this switch. This
switch is used only by a
service representative.
External tray
Open to deliver copies, prints
and faxes face up when
copying from the bypass tray
or copying a long original.
∗1
∗∗
∗∗
∗2
∗∗
<Front View>
<Right Side View>
Exposure glass
Fit an original face down
in the rear left corner .
Internal tray 2(option)
Copied or printed paper
is delivered here face
down.
Internal tray 1
Copied or printed paper
is delivered here face
down.
Front cover
Open to remove misfed
paper or supply toner.
Duplex tray
(Unit for two-sided
copies) (option)
Paper tray
Set paper here.
“B LOADING P APER”
⇒ See page 29.
1000-sheet tray unit
(option)
Bypass tray
Use to copy or print onto
post cards, OHP transparencies, or other non-standard
size paper .
⇒ See "COPYING FROM
THE BYP ASS TRAY" in the
"Copy Reference".
Right Side Cover
Open to remove misfed
paper.
∗1: If the machine does not operate after turning on the main switch, check if the AC switch is
turned on. If not, turn on it.
∗2: If you leave the AC switch off for more than about one hour , all files in memory are lost.
(for the optional facsimile feature)
3
Page 10
GUIDE TO COMPONENTS
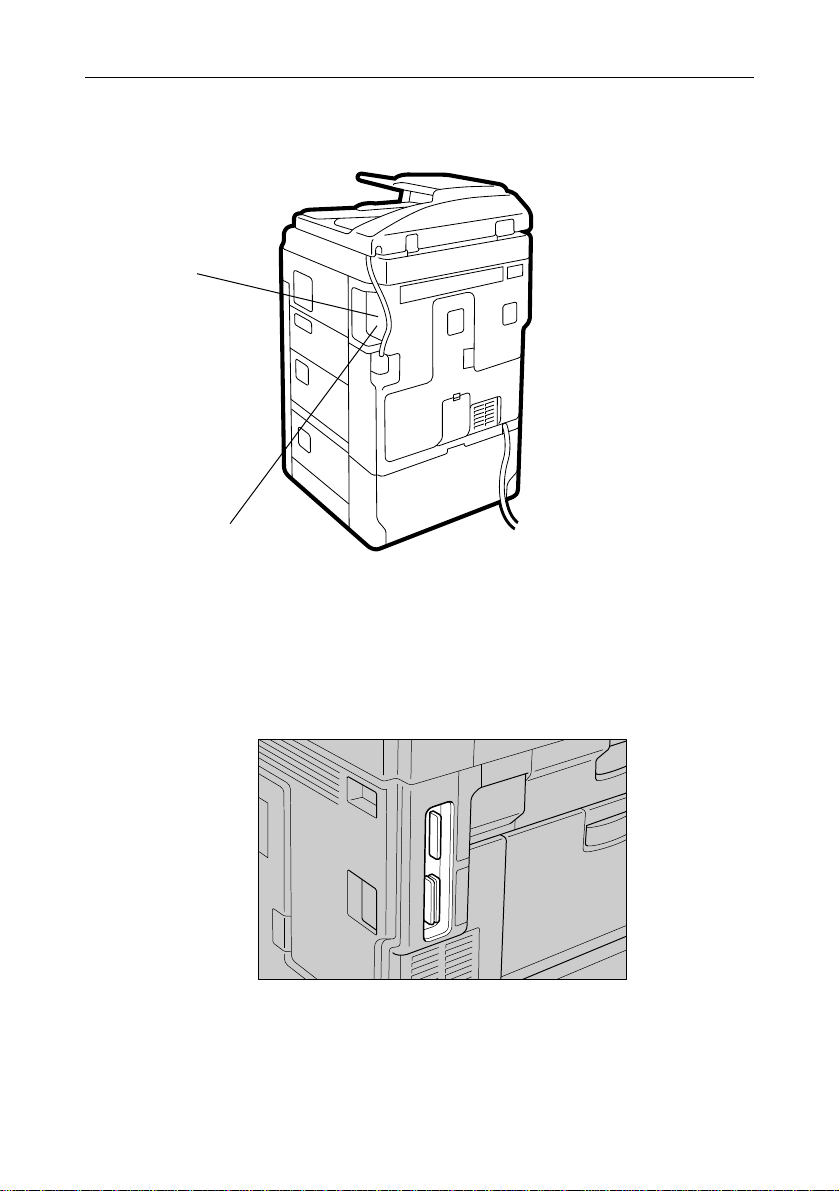
Card holder
(for the optional
printer feature)
Cable connector
Connect the optional
printer interface cable
here.
<Rear View>
Card holder
(for the optional
facsimile features)
Insert the optional
cards here. For details,
see the "Facsimile
Reference".
4
Page 11
Options
GUIDE TO COMPONENTS
(1) Document feeder
⇒ See page 73.
Insert a stack of originals
here. They will be fed
automatically .
(2) Internal 1-bin tray
(Internal tray 2)
⇒ See page 75.
(3) Duplex tray (Unit for two-
sided copies)
⇒ See page 74.
Use to make two-sided
copies.
(4) 1000-sheet tray unit
⇒ See page 76.
Consists of two paper
trays.
(2)
Other options: platen cover
Document feeder
Insert a stack of originals here. They will be
fed automatically.
(1)
(3)
(4)
Internal 1-bin tray (hereafter referred to as
internal tray 2)
Sorts copies, faxes, and prints.
Paper Receiving lamp
· You can also specify an output tray for each
feature. ⇒ See page 54.
· The Paper Receiving lamp will light when
copies, prints, or faxes are delivered to the
tray.
5
Page 12

Communicating
Receive
File
Facsimile
Error
F1 F2 F3 F4 Stamp
Immediate
Trans.
Memory
Trans.
Standard
Detail
Super Fine
ABCDEFG
HI J K LMN
OP QR S T U
VWXY Z
123
2
mm
R
A A
RR
RR
User Tools
Printer
Error
Manual
Receive
TX Files
Status
Reception
Mode
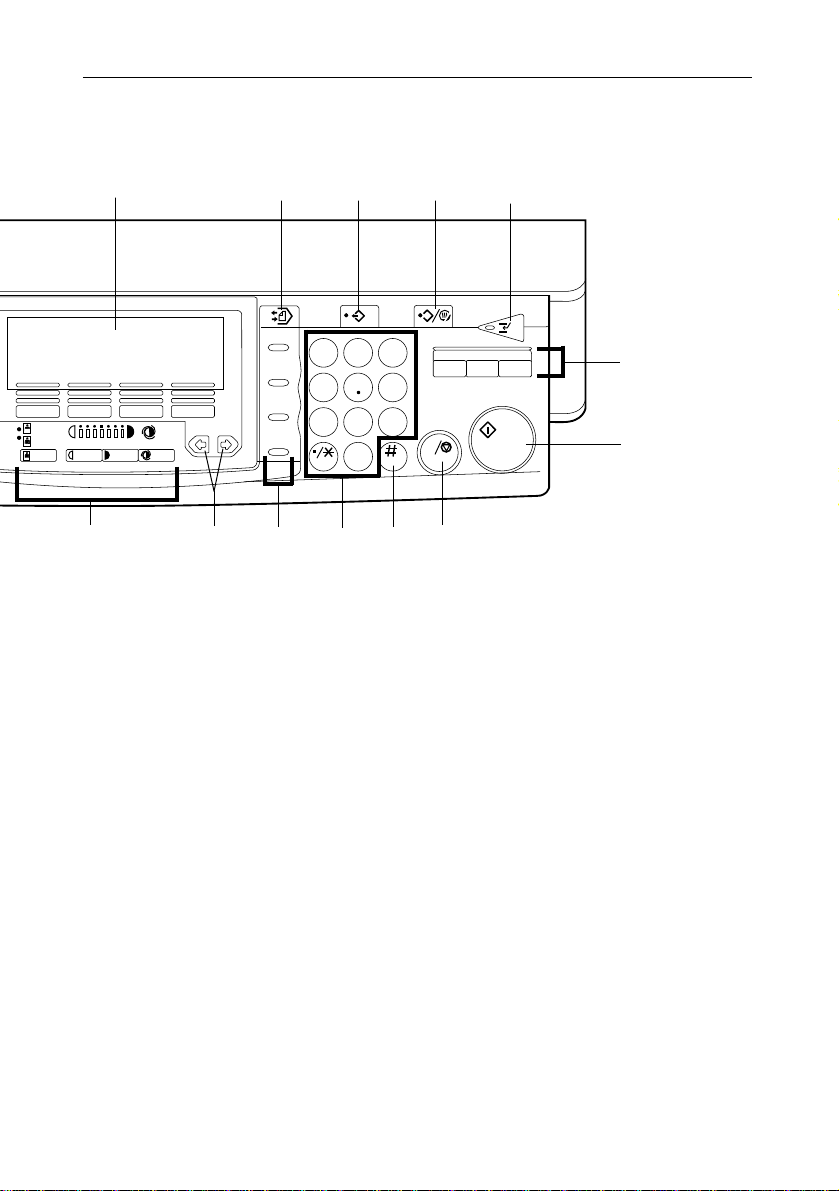
OPERATION PANEL (HARD KEYS)
OPERATION PANEL (HARD KEYS)
(1) These indicators show errors or
the status of the machine.
(2) User T ools key
Use to change the default values
and conditions to meet your
requirements. ⇒ See page 44.
(3) Clip Holder
Place removed clips or staples
here.
(4)Fax Operation Panel (for a
machine with the fax feature)
⇒ See “Facsimile Reference.”
(5)Copy Operation Panel
⇒ See “Copy Reference.”
◆◆
◆Copy Operation Panel
◆◆
(3)
(2)
2
*
(4)
(5)
Flip up the operation panel plate.
· Do not press the plate or put
something on it when it is opened.
*
(1)
2
1
*
6
Page 13
OPERATION PANEL (HARD KEYS)
(18)
aa
(6) (8)
(6) ⇒ See “Copy Reference.”
< >< >
(7)
< > key
< >< >
Press to select an item on the panel
display.
(8) ⇒ See “Facsimile Reference.”
(9) Number keys
Use to enter a numeric value such as the
number of copies or reproduction ratio.
Also use to dial fax numbers.
(10)Enter
(11)Clear/Stop key
(12)Start key
##
# key
##
Sets a value you have entered.
Clear
- Clears an entered value such as the
number of copies.
Stop
- Stops a copy or print run. Also use to
stop a report being printed or stop a
document being scanned for Memory
Transmission.
Press to start copying, printing or faxing.
(7)
(17)
Speed Dial
On Hook Dial
Pause/
Redial
Tone
(16)
123
456
7809
(10)
(9)
(15) (14)
C
Printer Facsimile
Copy
C
(13)
(12)
(1 1)
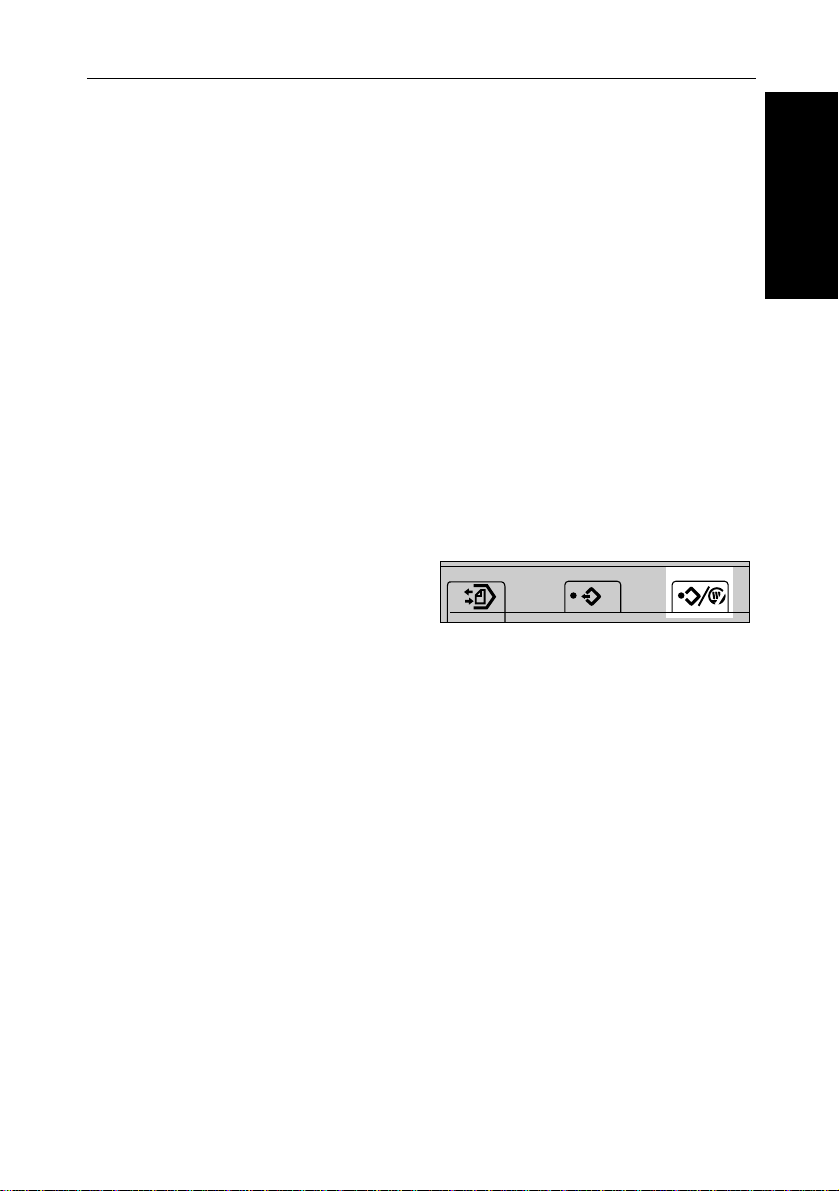
(13)Function keys
Press to switch modes.
⇒ See page 12.
(14)Interrupt key
Interrupts the current copy or print run to
perform another job.
⇒ See page 15.
(15)Clear Modes/Energy Saver key
Clear Modes
- Cancels the current settings.
Energy Saver
- Hold down this key for about a second
or more to enter Energy Saver mode.
⇒ See page 50.
(16)Program key
⇒ See “Copy Reference.”
(17)Memory Copy key
⇒ See “Copy Reference.”
(18)Panel Display
⇒ See “Panel Display” on page 8.
∗1: See "Facsimile Reference".
∗2: See "Printer Reference".
7
Page 14
P ANEL DISPLAY
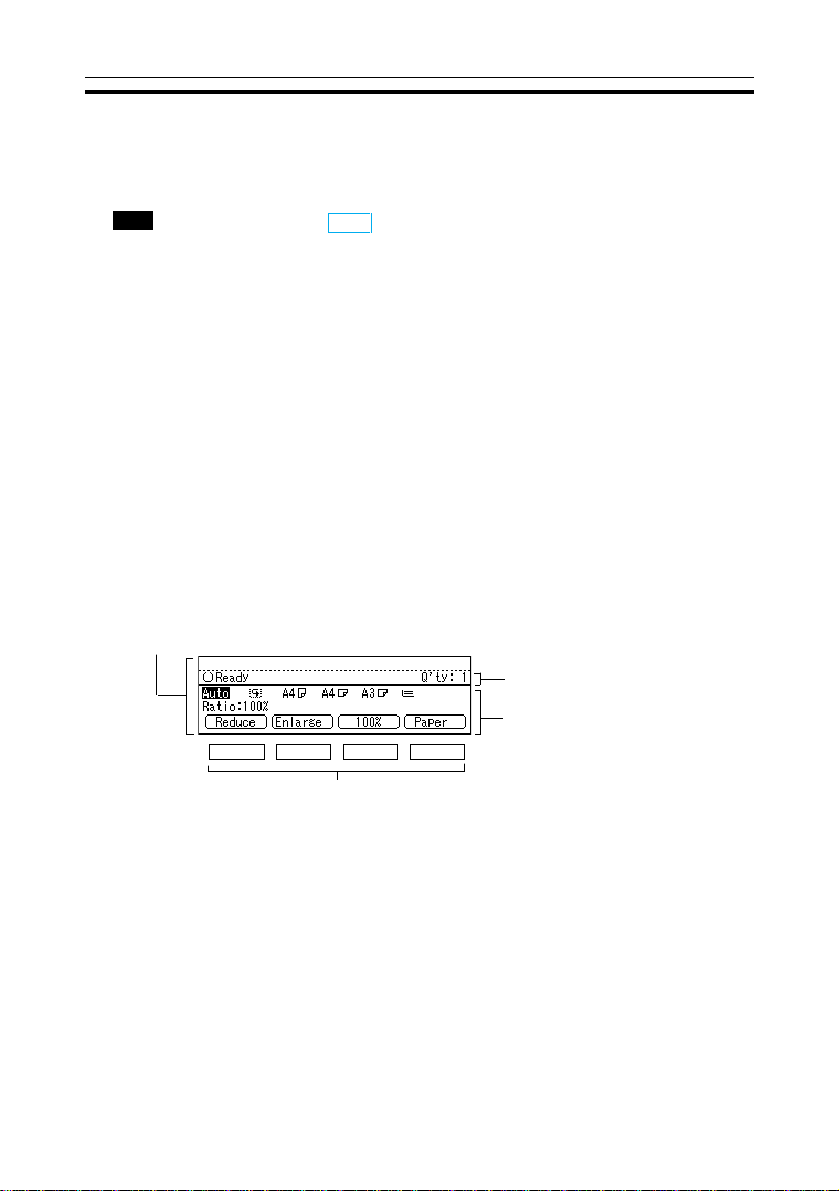
PANEL DISPLAY
The panel display shows the operational status, messages, and function menus.
❑ When you select or specify an item on the panel display, it is highlighted like,
Auto
. Keys appearing as
❑ Panel display items are not touch keys. Use the four keys under the display to
select or specify an item.
❑ By default, the machine is in copy mode when you switch on. This can be changed.
⇒ See page 48.
Note: Do not apply a strong shock or force of about 30 N (3 kgf) or more
to the panel display. Otherwise, the display might be damaged.
Displays And Key Operations
❑ In a menu, you can make a selection in three different ways depending on the
situation;
· Press the four keys under the display.
· Press the < > key.
· Use the Number keys.
For details on the operational procedures, see the descriptions of each function.
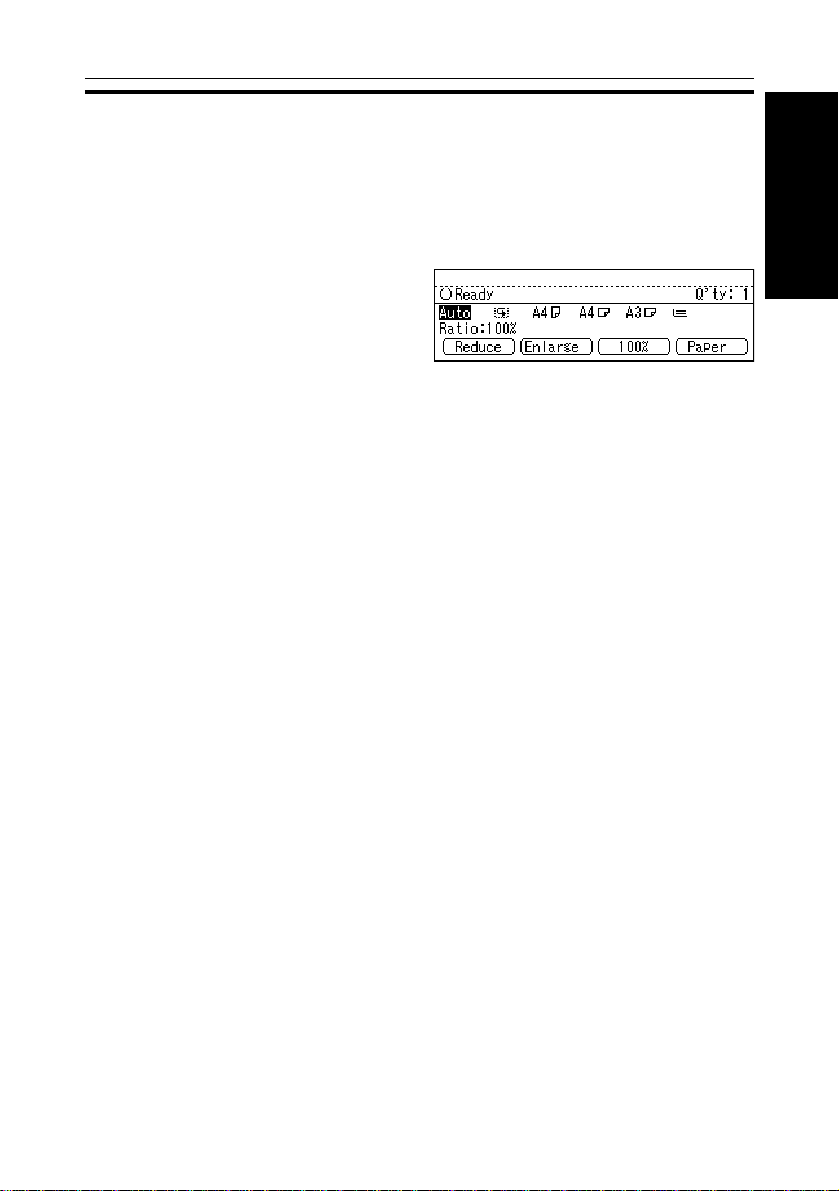
<Example: Copying Display>
The function items for the selected feature are displayed.
cannot be used.
OK
Displays operational
status or messages.
Displays items which can
Press the key under the item you wish to select.
◆◆
◆In this manual, we use the following conventions
◆◆
be selected or specified.
Key name on panel display: OK
In the manual: [OK]
◆◆
◆Common keys
◆◆
[OK] Sets a selected function or entered value and returns to
the previous screen.
[Cancel] Cancels a selected function or entered value and returns
to the previous screen.
↑↑
[
↑ Prev.] If there are too many items to fit on the display, use these keys
↑↑
↓↓
[
↓ Next] to move between pages.
↓↓
< >< >
< > Use to highlight the item you want to select.
< >< >
[PrevMenu] [Menu]
[Exit]
Press to return to the previous menu.
Sets a selected function or entered value and returns to the
previous screen.
8
Page 15

BASICS
STARTING THE MACHINE .................................................................................... 10
Turning On The Power ................................................................................................... 10
Turning Off The Power ................................................................................................... 11
CHANGING MODES ........................................................................................... 12
MULTI-ACCESSING ............................................................................................. 13
USING AS A COPIER ........................................................................................... 15
Changing To Copy Mode ............................................................................................ 15
Interrupt Copying To Make Urgently Needed Copies .............................................. 15
Printing Simultaneously ................................................................................................. 16
USING AS A FACSIMILE ...................................................................................... 17
Changing To Facsimile Mode...................................................................................... 17
Printing A Received Fax................................................................................................ 17
Sending A Fax ................................................................................................................ 18
USING AS A PRINTER ........................................................................................... 19
Printing ............................................................................................................................ 19
Printing While There Are No Other Active Jobs .......................................................... 19
Printing While Copying ................................................................................................. 19
BASICS
9
Page 16
ST ARTING THE MACHINE
STARTING THE MACHINE
To start the machine, turn on the main switch. The machine enters the ready
condition after about 35 seconds.
❑ This machine automatically enters the energy saving mode or turns itself off when
you do not use the machine with its power on for a specified period of time. ⇒ See
pages 50 and 51.
Turning On The Power
This machine has two types of power switches called the main and AC switches.
◆◆
◆Main switch
◆◆
Turn on this switch to activate the machine.
You can make copies or faxes after the warm-up time.
◆◆
◆AC switch
◆◆
Do not touch the AC switch. This switch should be used only by a service
representative.
❑ If you leave the AC switch off for more than about one hour, all files in memory are
lost. ⇒ See “Facsimile Reference”.
❑ If the machine does not operate after turning on the main switch, check if the AC
switch is turned on. If not, turn on it.
Make sure that the power cord is
1
plugged into the wall outlet firmly.
Turn on the main switch in the
2
upper left corner of the front side
of the machine.
The panel display will come on.
❑ You cannot make copies while the message “Please wait” is shown on the display.
However, you can specify the Auto Start function. ⇒ See “Auto Start” of the Copy
Reference.
10
Page 17
STARTING THE MACHINE
If you are asked for a user code
If the machine is set to the User Code function, users must input their codes
before the machine can operate.The machine keeps count of the number of
copies under each user code.
Enter your user code (less than 4 digits) using the Number keys and
1
press the Enter # key.
The machine enters the ready condition.
❑ To prevent others from making copies with your user code, press the Clear Modes/
Energy Saver key and the Clear/Stop key at the same time.
❑ User Code Mode ⇒ See page 56.
❑ About one minute after a copy run, the machine returns to the user code entry
condition.
When the Clear Modes/Energy Saver key is lit
The machine is in Energy Save mode.
1 Press Clear Modes/Energy Saver
or any other key. The machine will
return to the standby condition.
C
BASICS
“System Auto Reset” ⇒ See page 49.
“Auto Energy Saver” ⇒ See page 50.
“Energy Save Mode” ⇒ See page 50.
Turning Off The Power
Turn off the main switch in the upper left corner of the front side of the
1
machine.
Note: Before you unplug the power cord, make sure that the remain-
ing memory space indicates 100 % on the facsimile feature
screen. Files stored in memory will be lost an hour after
unpluging the power cord.
11
Page 18
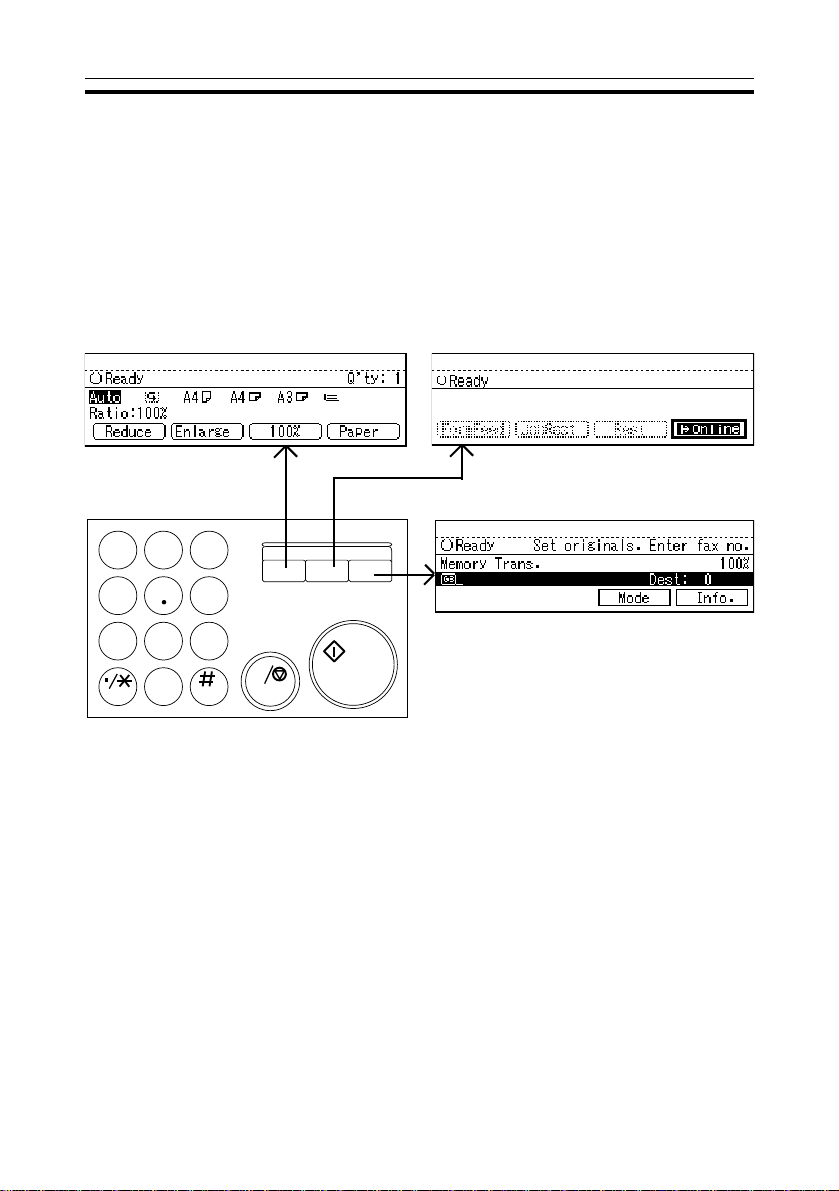
CHANGING MODES
CHANGING MODES
In addition to copier features, this machine can be used optionally as a facsimile or printer. When you turn on the main switch, the Copy mode screen
appears allowing you to perform a copy run. If you want to use another
feature, press a relevant key such as the Facsimile key on the upper right
side of the operation panel.
<Copy Mode> <Printer Mode>
<Facsimile Mode>
123
Copy
Printer Facsimile
456
78
❑You cannot change functions during scanning an original for fax, performing im-
mediate transmission, or setting a user tool.
❑ If you require, the machine can be set to clear current settings when you change
to a different mode. This does not apply to the Copy and the Printer mode. ⇒ See
“Clear Function Setting” on page 48.
0
9
C
12
Page 19
MULTI-ACCESSING
MULTI-ACCESSING
You can carry out another job using a different feature while the current job is
being performed. This allows you to handle your jobs efficiently regardless of
how the machine is being used. For example:
• While making a copy, the machine sends a fax message stored in the
memory.
• You can make a copy while printer data is being received.
Performing multiple features simultaneously like this is called “multi-accessing.”
❑ Use “Simultaneous Print” to specify whether to apply the multi-accessing function
to printing. The default value is “Yes”. ⇒ See page 55.
❑ If you install optional internal tray 2, you can specify the tray for each feature so
that completed documents are not mixed. For example, set one tray for faxes
and another tray for copies. If you require optional internal tray 2, contact your
local dealer or service representative.
❑ You cannot use the multi-accessing during interrupt copying.
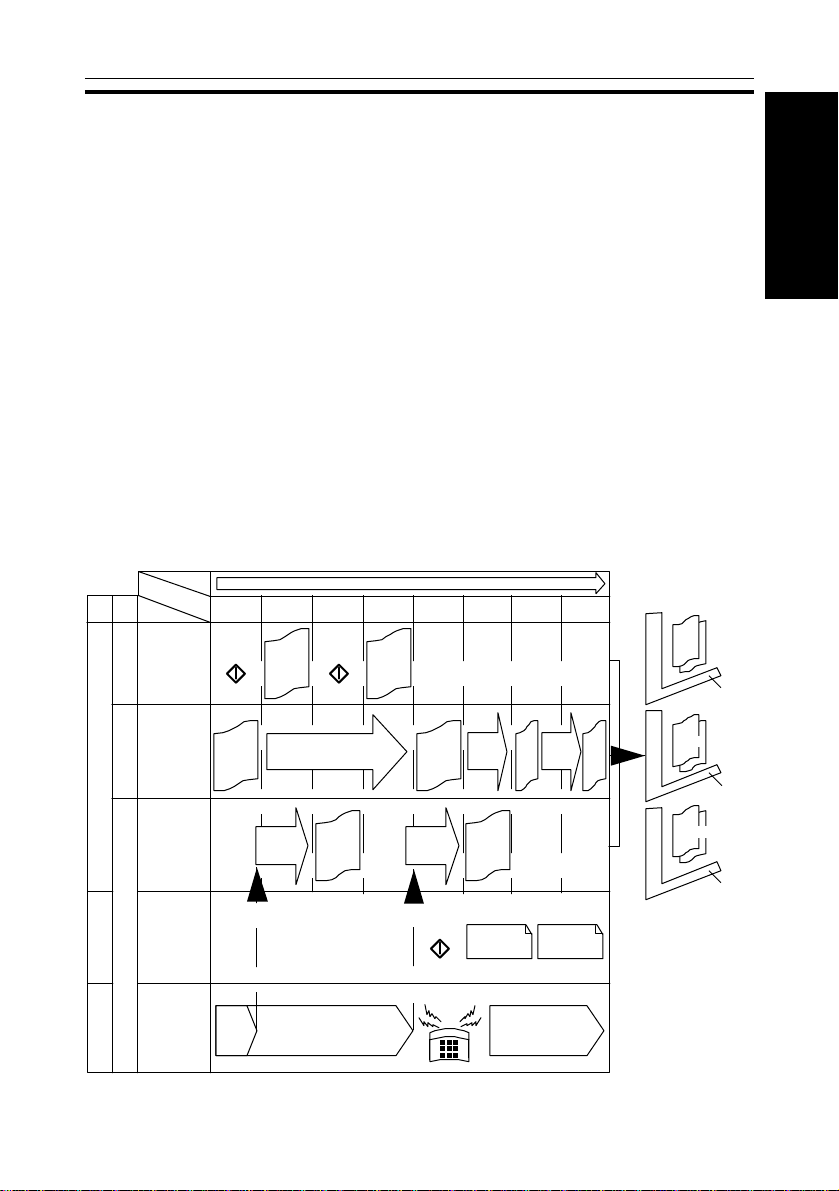
◆◆
◆Multi-Accessing Example
◆◆
Time
Feature
Copy
Printer
Printing
Facsimile
Scanning
Print
Job
Copying
2 originals
Printing
4 pages
Printing
2 recieved
faxes
Memory
transmission
operation
(2 pages)
1st 2nd 3rd 4th 5th 6th 7th 8th
Start
Printing
the 1st
page
Recieved
data
processing
Start
1st
copy
Print data processing
Printing
the 1st
recieved
fax
2nd
copy
Printing
the 2nd
page
Recieved
data
processing
Start
Print
data
processing
Printing
the 2nd
recieved
fax
Scanning
the 1st page
Printing
the
3rd
page
processing
Scanning
the 2nd page
Copy
1
2
Internal
tray 2
Printing
the
4th
page
Printer
1
2
Internal
tray 1
Facsimile
1
2
External
tray
Operation
BASICS
Completion
Start
* Memory
reception
Background*
* “Background” is a process which operates regardless of the data scanning/writing operation.
* You can also receive faxes with memory in a background process.
1st
page for
memory
reception
2nd page for memory
reception
receiving
Memory reception
❑ Files are copied or printed in sequence of readiness for printing.
13
Page 20
MULTI-ACCESSING
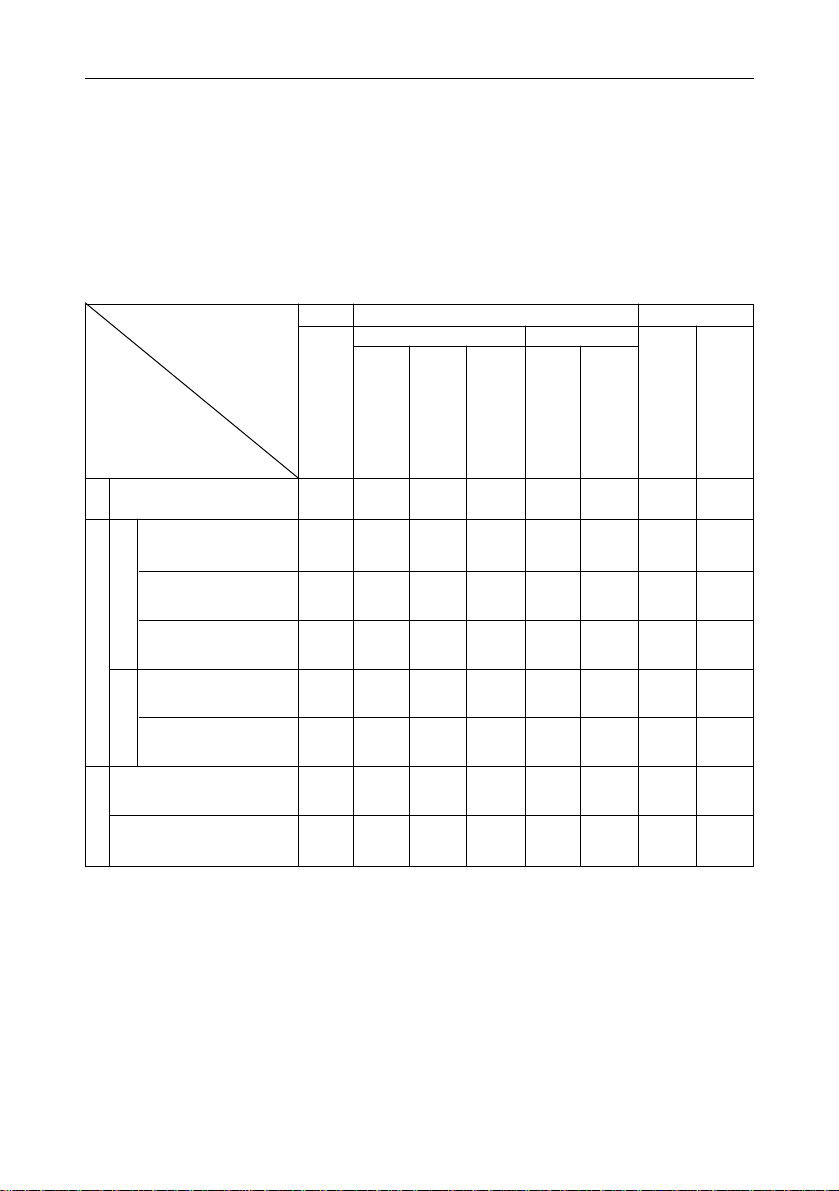
◆◆
◆Sample Operations
◆◆
This chart is based on the following conditions:
• Simultaneous Print : Yes ⇒ See page 55.
• Restricted Access : No ⇒ See page 57.
❍ - Can be processed simultaneously.
∆
- Mode after you select takes priority.
× - Can’t be processed simultaneously .
Users have to operate manually.
Mode after you select
Mode before you select
Copying −×❍×❍❍❍❍
Copy
Scanning an original for
memory transmission
Memory transmission ❍❍ ×××❍❍❍
Transmission
Immediate transmission ×××−××❍❍
Facsimile
Memory reception ❍❍ ×××❍❍❍
Copy
Transmission Reception
Copying
Scanning an original for
memory transmission
×−❍×❍❍❍❍
Facsimile
Memory transmission
Immediate transmis-
sion
Memory reception
Printing received data
Note 1
Printer
Data reception
Printing received data
Reception
Printing received data ❍❍❍ ∆❍− ❍❍
Data reception ❍❍❍❍❍❍ −❍
Printer
Printing ❍❍❍❍❍❍❍−
Note 2 Note 3
Note 1: The machine might not print received data because the High Resolution Card (F AX Memory Unit) is
occupied depending on the original size and direction.
Note 2: The machine might stop printing received data because the High Resolution Card (FAX Memory Unit)
is occupied depending on the original size and direction.
Note 3: Printing received data is stopped because the High Resolution Card (F AX Memory Unit) is occupied
for scanning an original to be transmitted.
14
Page 21
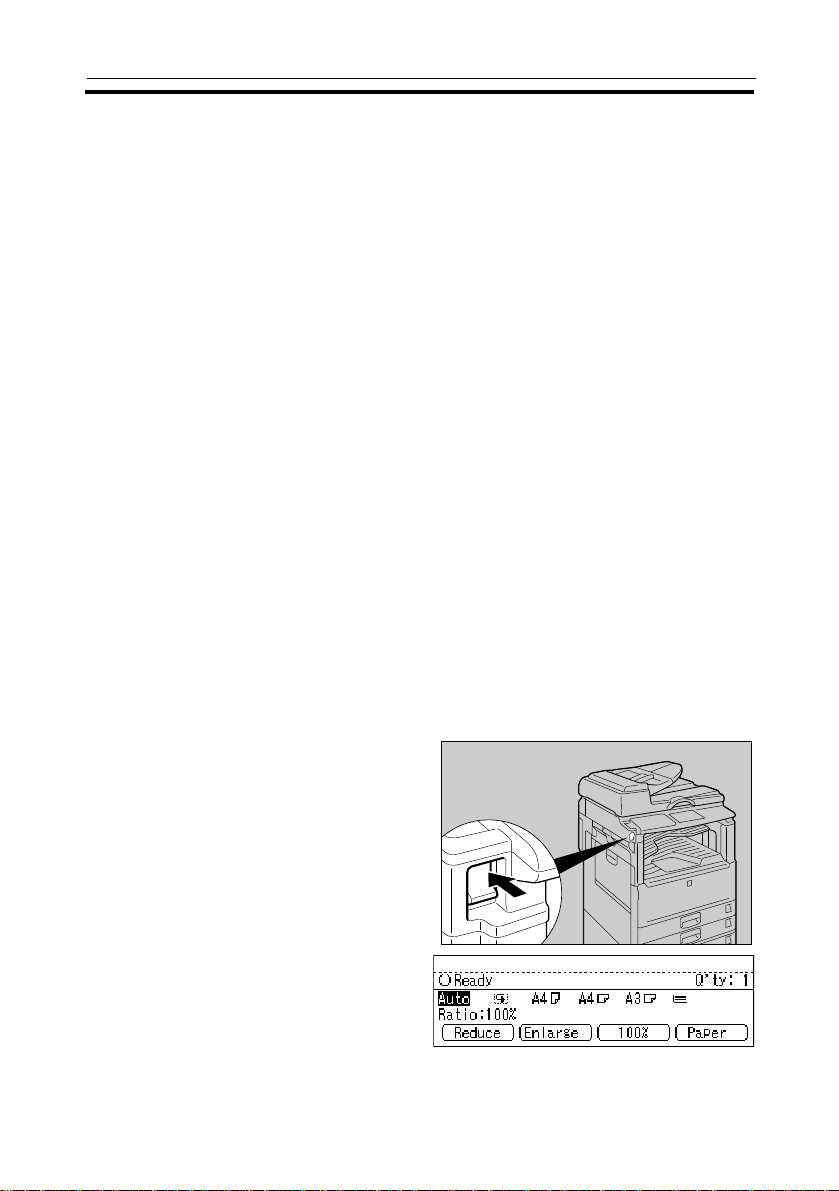
Changing To Copy Mode
USING AS A COPIER
USING AS A COPIER
You can always make a copy when another feature isn’t printing or scanning.
Press the Copy key.
1
The copy screen appears on the
panel display.
❑ For details, see “Copy Reference.”
Interrupt Copying To Make Urgently Needed Copies
You can interrupt the current copying job or printing job of another feature to
make a copy.
❑ You cannot use the following functions during interrupt copying:
Duplex, Combine
❑ You cannot use the interrupt copy function during performing immediate transmis-
sion, scanning an original for memory transmission, or interrupt copying.
Press the Interrupt key.
1
The current copying or printing job stops and the interrupt copy screen
appears on the display.
❑ When you interrupt a copying job, remove the interrupted original.
BASICS
Make your copies.
2
❑ While copying, a received fax document is stored in memory and the Receive
File indicator lights.
When the interrupt copy run is completed, remove the original and deliv-
3
ered copy.
Press the Interrupt key again.
4
The machine resumes the printing job with another feature.
15
Page 22

USING AS A COPIER
Resuming the interrupted copying job
➊ Set the removed original on the exposure glass.
➋ Press the Start key.
The machine resumes the interrupted copy run.
Printing Simultaneously
You can choose whether the current job can be interrupted or not.
◆◆
◆“Simultaneous Print” = “Yes”
◆◆
Documents are copied or printed in order of readiness for printing.
Press the Copy key to switch to the copy screen and make a copy in a
normal way.
“MULTI-ACCESSING” ⇒ See page 13.
❑ When another feature is printing data in the Duplex mode, you cannot make a
two-sided copy until the printing job is completed.
◆◆
◆“Simultaneous Print” = “No”
◆◆
You cannot make a copy until the printing job of the current feature is completed.
16
Page 23
USING AS A FACSIMILE
Changing To Facsimile Mode
USING AS A FACSIMILE
You can always use the machine as a facsimile when another mode is not
printing or scanning originals.
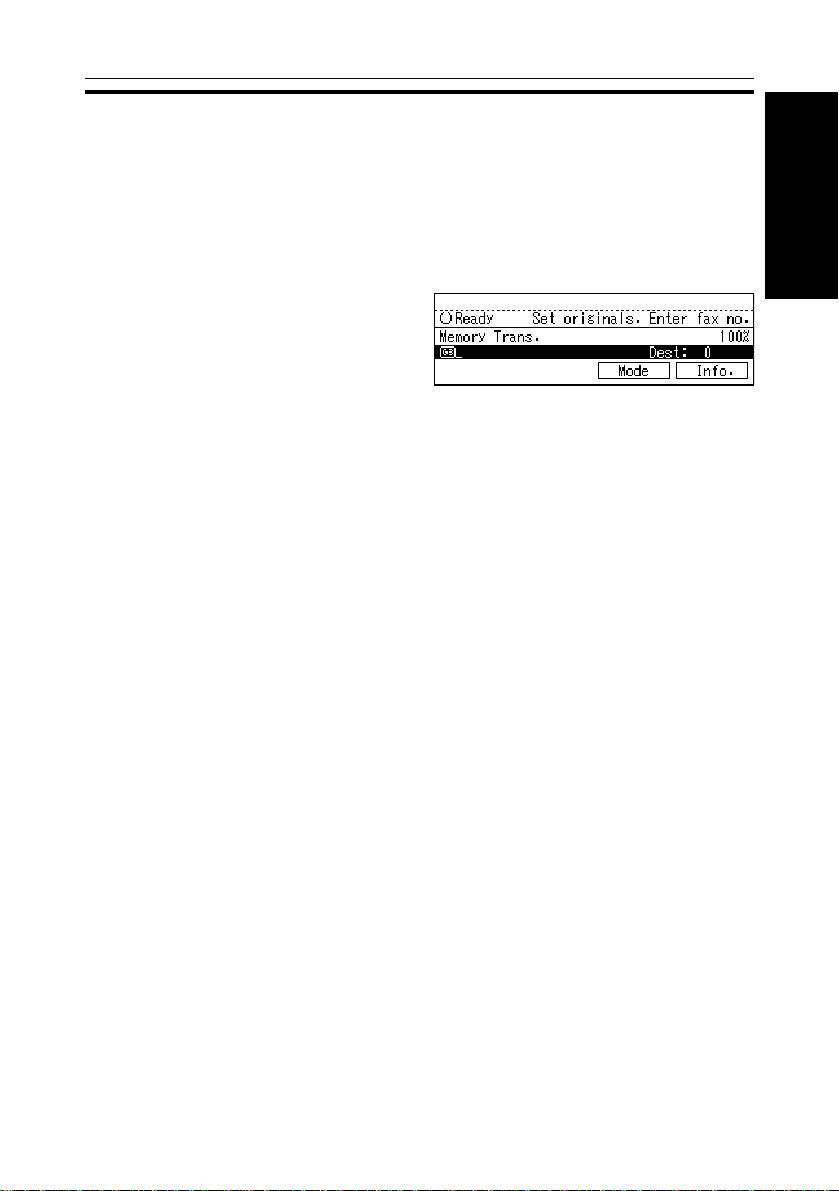
Press the Facsimile key.
1
The facsimile screen appears
on the panel display.
❑ For details, see “Facsimile Reference.”
❑ The Memory Transmission/Reception function is performed automatically even
when another feature is being used. You need not switch the screen. When data
is received in memory, the Receive File indicator lights.
Printing A Received Fax
When another feature is not printing or copying, a received fax is printed
automatically even when you do not switch the screen. If you wish to print a
received fax while printing or copying with another feature, see the descriptions shown below.
Printing a received fax while printing with the printer
◆◆
◆“Simultaneous Print” = “Yes”
◆◆
Documents are printed in order of readiness for printing.
BASICS
❑ When making two-sided copies, you cannot use the two-sided printing function
(fax) until the copy run is completed.
◆◆
◆“Simultaneous Print” = “No”
◆◆
When a fax is received, the Receive File indicator lights. However, you
cannot print the fax until the printing job is completed.
◆◆
◆Printing a stored fax in a hurry (“Simultaneous Print” = “No”)
◆◆
Press the Facsimile key to switch to the facsimile panel display. The machine stops the current printing and the fax will be printed automatically.
A certain period of time after printing the fax, the machine resumes the
previous printing automatically.
17
Page 24

USING AS A FACSIMILE
Printing a received fax during copying
◆◆
◆“Simultaneous Print” = “Yes”
◆◆
Documents are printed in order of readiness for printing.
◆◆
◆“Simultaneous Print” = “No”
◆◆
When a fax is received, the Receive File indicator lights. However, you
cannot print the fax until the copying job is completed.
◆◆
◆Printing a received fax in a hurry ("Simultaneous Print" = "No")
◆◆
Press the Facsimile key to switch to the facsimile panel display. The
machine starts printing the fax automatically. After printing the fax, press
the Copy key and do the previous job again.
Sending A Fax
Sending a fax while printing with the printer or during
copying
Press the Facsimile key to switch to the facsimile screen.
1
The printing or copying job is interrupted.
❑ When you interrupt a copying job, remove the interrupted original.
Set your original for transmission and select any setting you require.
2
Dial the number and press the Start key.
When the machine is ready, it automatically starts sending the fax.
After the transmission has finished, press the key corresponding to the
3
feature you interrupted to resume the previous job.
Resuming interrupted copying job
➊ Set the removed original on the exposure glass or in the optional document feeder .
➋ Press the Start key.
The machine resumes the interrupted copy run.
18
Page 25

Printing
USING AS A PRINTER
USING AS A PRINTER
You can always use the machine as a printer when another mode is not
printing.
Printing from a computer
Send a Print command from your computer.
1
Data reception
- This function is performed automatically even when another feature is being used.
You need not switch the panel display.
When data is received, the Data-in
Switching to the printer display
Press the Printer key. The printer panel display appears. Follow the
1
instructions on the display.
Printing While There Are No Other Active Jobs
Data is automatically printed when there are no other current jobs - you do
not have to change the display over.
❑ The printer operation depends on settings of “Simultaneous Print” and “Restricted
Access”. ⇒ See pages 55 and 57.
mm
m indicator lights.
mm
BASICS
Printing While Copying
◆◆
◆“Simultaneous Print” = “Yes”
◆◆
Documents are printed or copied in order of readiness for printing.
❑ When making a two-sided copy, you cannot print data in the Duplex mode with the
printer until the copy run is completed.
◆◆
◆“Simultaneous Print” = “No”
◆◆
You cannot print data until the copy run is completed.
19
Page 26

USING AS A PRINTER
◆◆
◆Printing when you are in a hurry (“Simultaneous Print” = “No”)
◆◆
Press the Printer key to stop the current copying job. The printer starts
printing data automatically a certain period of time after the copying job is
stopped. After printing, press the Copy key and do the previous job again.
Using the printer while received fax is being printed
◆◆
◆“Simultaneous Print” = “Yes”
◆◆
Documents are printed in order of readiness for printing.
◆◆
◆“Simultaneous Print” = “No”
◆◆
Y ou cannot print data with the printer until the received fax is printed completely.
◆◆
◆Printing in a hurry (“Simultaneous Print” = “No”)
◆◆
Press the Printer key to switch to the printer panel display.
1
Printing of the received fax is interrupted. The printer starts printing
data automatically. The machine resumes the fax printing job automatically a certain period of time after the printing job is completed.
❑ While printing with the printer, a received fax document is stored in memory and
the Receive File indicator lights.
20
Page 27

CONSUMABLES
COPY PAPER ....................................................................................................... 22
Recommended Paper Sizes And Types ...................................................................... 22
Non-recommended Paper .......................................................................................... 23
Paper Storage ............................................................................................................... 24
Loading Paper ............................................................................................................... 24
TONER ................................................................................................................. 24
Handling Toner .............................................................................................................. 24
Toner Storage................................................................................................................. 24
Adding Toner ................................................................................................................. 24
PHOTOCONDUCTOR UNIT (PCU) ....................................................................... 25
Handling Photoconductor Unit ................................................................................... 25
Photoconductor Unit Storage...................................................................................... 25
Replacing Photoconductor Unit ................................................................................. 25
CONSUMABLES
21
Page 28

COPY PAPER
COPY PAPER
Recommended Paper Sizes And Types
❑ The paper sizes, quantity, and types that can be set in each tray are shown below.
Metric version
A3 L, A4 KL, A5 K,
8½" × 11"KL, 8" × 13"L
Standard sizes
A3L, A4KL, A 5K, B4L, B5KL, 1 1" × 17"L, 8½" × 11"KL,
8½" × 14"L, 8" × 10½"KL, 11" × 14"L, 10" × 14"L,
8½" × 13"L, 10" × 15"L, 8" × 13"L, 8¼" × 13"L, 8¼" × 14"L,
8" × 10"KL, 11" × 15"L, 7¼" × 10½"KL,
❑ You have to specify paper size using the user tools.
Paper Trays
Special sizes
⇒ See page 40.
Vertical : 182 ~ 297 mm
Horizontal: 148 ~ 432 mm
❑ You have to specify paper
size using the user tools.
⇒ See page 40.
Irregular sizes
A4L, B5L, A5L, B6L
Size
A3 L, B4L, 11" × 17"L 1 1" × 17"L, 8" × 13"L
Standard
Non-standard size
• Copying mode
• Facsimile mode
Bypass T r ay (No te 1)
• Printer mode
• Postcards, adhesive labels, translucent paper (long grain)
* It is recommended to set postcards one sheet at a time.
V ertical : 90 - 305mm, 3.5" - 12.0"
Horizontal: 148 - 432mm, 5.8" - 17.0"
V ertical : 90 - 305mm, 3.5" - 12.0"
Horizontal: 148 - 432mm, 5.8" - 17.0"
V ertical : 90 - 297mm, 3.6" - 11.7"
Horizontal: 148 - 432mm, 5.8" - 17.0"
Inch version
11" × 17"L, 8½" × 14"L,
8½" × 11"KL , 8½" × 13"L,
A4KL
Vertical : 7.2" ~ 11.7"
Horizontal: 5.8" ~ 17.0"
❑ You have to specify paper
size using the user tools.
⇒ See page 40.
8½" × 11 "L , 5½" × 8½"L
Max. no.
of sheets.
250
(paper tray of
mainframe)
500
(Optional
paper tray)
100
10
1
Paper weight
60 - 90g/m
(16 - 24 lb)
60 - 157g/m
(16 - 41 lb)
2
2
Note 1: When you set non-standard size paper in the bypass tray, you have to specify the
⇒⇒
size.
⇒
See "COPYING FROM THE BYPASS TRAY" in the "Copy Reference”.
⇒⇒
22
Page 29

COPY PAPER
❑ If you have two or more trays with paper of the same size and direction, the
machine will use the other trays when paper runs out during a copy run. This
saves interrupting a copy run to replenish paper even when you make a large
number of copies. You can change this setting.
⇒ See page 53.
❑ When you set the “Confidential Reception” function to “Yes” in the Facsimile mode,
you cannot use the other trays for receiving a fax from a sender to which a paper
tray is assigned. If the specified tray runs out of paper, the machine receives a
fax using Substitute Reception mode.
⇒ See “Facsimile Reference.”
◆◆
◆Setting paper in the long grain direction
◆◆
❑ When setting translucent paper in the bypass tray, set it with the grain lengthwise
as shown in the figure blow. Copy paper is divided into the vertical and horizontal
types depending on the grain direction. If you set paper in the other direction, a
paper misfeed might occur.
4)
1) Grain flow
2)Vertical type
3) Horizontal type
1)
2)
4)How to set paper in the bypass
tray
CONSUMABLES
3)
Non-recommended Paper
R
CAUTION: Do not reuse stapled paper. Do not use aluminum foil, car-
bon-containing paper or other conductive paper. Otherwise,
a fire might occur.
Do not set the following paper. Otherwise, a paper misfeed might occur.
· Bent, folded, or creased paper · Torn paper
· Perforated paper · Non-smooth paper
· Slippery paper · Thin paper that has low stiffness
❑ If you make a copy on rough grain paper, the copy image might be blurred.
❑ Do not use paper with any kind of coating, such as thermosensitive paper, a rt
paper, aluminum foil, carbon paper, and conductive paper. Otherwise, a fault
might occur.
❑ Do not use paper which has been copied or printed on by other equipment.
23
Page 30

COPY PAPER
TONER
Paper Storage
❑ When storing paper, the following precautions should always be followed:
· Keep paper away from direct sunlight.
· Store in a dry location (humidity: 70 % or less).
· Store on a flat surface.
❑ After you unpack the container of paper, store the paper in a polyvinyl bag to
avoid it getting damp.
❑ If you use damp, bent paper, a paper misfeed might occur. In such a case, set the
paper upside down.
Loading Paper
“BLOADING PAPER” ⇒ See page 29.
“CHANGING THE PAPER SIZE” ⇒ See page 40.
TONER
Handling Toner
RR
R
WARNING: Do not incinerate used toner or toner containers. T oner
RR
dust might ignite when exposed to open flame. Dispose of the used toner containers according to local
regulations for plastics.
Toner Storage
R
CAUTION: This machine has been tested for safety using this supplier’s
parts and consumables. We recommend you only use these
specified supplies.
❑ When storing toner, the following precautions should always be followed:
· Store toner cartridges in a cool, dry place free from direct sunlight.
· Do not store toner where it will be exposed to heat.
· Do not eat or swallow toner, and keep it out of reach of children.
· Store on a flat surface.
Adding Toner
“D ADDING TONER” ⇒ See page 30.
24
Page 31

PHOTOCONDUCTOR UNIT (PCU)
PHOTOCONDUCTOR UNIT (PCU)
Handling Photoconductor Unit
RR
R
WARNING: Do not incinerate the photoconductor unit. Toner dust
RR
might ignite when exposed to open flame. Dispose of
the used photoconductor unit according to local regulations for plastics.
Photoconductor Unit Storage
R
CAUTION: This machine has been tested for safety using this supplier’s
parts and consumables. We recommend you only use these
specified supplies.
❑ When storing photoconductor units, the following precautions should always be
followed:
· Store PCU in a cool, dark place free from direct sunlight.
· Do not store PCU in a wet place.
· Follow the instructions on the carton box of PCU.
Replacing Photoconductor Unit
“REPLACING PHOTOCONDUCTOR UNIT” ⇒ See page 32.
CONSUMABLES
25
Page 32

PHOTOCONDUCT OR UNIT (PCU)
26
Page 33

WHAT TO DO IF SOMETHING
GOES WRONG
IF THE MACHINE DOES NOT WORK AS YOU WANT ............................................ 28
BB
B LOADING PAPER ............................................................................................ 29
BB
DD
D ADDING TONER ............................................................................................. 30
DD
Sending A Fax When D Is Lit ........................................................................................ 31
REPLACING PHOTOCONDUCTOR UNIT (PCU) ................................................... 32
xx
AA
x
A CLEARING MISFEEDS ................................................................................ 36
xx
AA
When A, B, C, D, And/Or R Is Lit ................................................................................... 37
When Z Is Lit .................................................................................................................... 37
When Original Is Misfed ................................................................................................ 37
THING GOES WRONG
WHAT TO DO IF SOME-
27
Page 34

IF THE MACHINE DOES NOT WORK AS YOU WANT
IF THE MACHINE DOES NOT WORK AS YOU WANT
◆◆
◆If an error message is displayed
◆◆
This section describes typical error messages. If an error message not
described below is displayed, follow the instructions on the display.
■■
■Message
■■
❑
“Please wait” is displayed.
Reset the Duplex
❑
Tray.
❑
Please input user
code, then press
key.
❑
Set Key Counter.
◆◆
◆Others
◆◆
■■
■State
■■
■■
■State/Cause
■■
· This message appears when
you turn on the main switch,
add toner, or replace the PCU.
· The duplex tray is pulled out.
· The machine is set to the User
#
Code mode.
· The key counter or card is not
set.
■■
■Cause
■■
■■
■Action
■■
· Wait for a while.
· You can enter copy job settings during the warm-up period.
⇒
“Auto Start”
ence.”
· When you turn on the main switch, it
takes 35 seconds for the machine to
enter the ready condition.
· The machine initialize about 3minutes after adding toner.
· The machine initialize about 2 minutes after replacing the PCU.
· Reset the duplex tray.
“GUIDE TO COMPONENTS”
⇒
See page 3.
· Enter your user code.
⇒
See page 11.
· Set the key card or counter.
See “Copy Refer-
■■
■Action
■■
❑
The panel display is
turned off.
❑
The machine is not
turned on even though
you turn on the main
switch.
28
· The machine is in the Energy
Save mode.
· The main switch is turned off.
· The AC switch is turned off.
· Press the Clear Modes/Energy
· Turn on the main switch.
· Turn on the AC switch.
Saver key.
⇒
See page 3.
Page 35

BB
B LOADING PAPER
BB
BB
B LOADING PAPER
BB
❑ For details of paper types and sizes that can be set, ⇒ see page 22.
❑ You can change the paper size. ⇒ See page 40, “CHANGING THE PAPER SIZE”
Pull out the paper tray fully.
1
If you try to load paper in the
2
paper tray of the mainframe,
lower the bottom plate.
Square the paper and set it in
3
the tray.
❑ Do not stack the paper above
the limit mark inside the paper
tray.
❑ Shuffle the paper before setting
it in the tray.
THING GOES WRONG
WHAT TO DO IF SOME-
Push the paper tray in until it
4
stops.
29
Page 36

DD
D ADDING TONER
DD
DD
D ADDING TONER
DD
RR
R
WARNING: Do not incinerate used toner or toner containers. T oner
RR
dust might ignite when exposed to open flame. Dispose of the used toner containers according to local
regulations for plastics.
R
CAUTION: This machine has been tested for safety using this supplier’s
parts and consumables. We recommend you only use these
specified supplies.
❑ If you use toner other than that recommended, a fault might occur.
❑ When adding toner, make sure that the main switch is turned on.
❑ Replace the toner bottle with the power turned on. If you turn off the power, speci-
fied job settings are cleared and you cannot resume copying or printing.
❑ For details of the toner storage, see “TONER.” ⇒ See page 24.
❑ Even if D blinks, you can make about 50 copies or prints. However, you should
replace the toner as soon as possible.
❑ If no toner remains, D will light and you cannot make any copies or prints.
❑ You can send a fax even if D is lit to show that no toner remains. ⇒ See page 31.
Open the front cover of the
1
machine.
Replace the toner following the
2
instructions on the sticker explaining how to replace toner.
❑ The machine initialize about 3
minutes after adding toner.
30
Page 37

Copy
Printer Facsimile
C
123
456
78
0
9
DD
D ADDING TONER
DD
Sending A Fax When
This machine can send a fax even when D is lit.
❑ You might not perform any communicating job if the total number of messages
transmitted with no toner and those not described in the Journal/TCR output exceeds 256 (with optional Function Upgrade Card, 1000). You should replace the
toner as soon as possible.
Make sure that the facsimile
1
screen is shown on the panel
display. If another feature’s
screen is displayed, press the
Facsimile key to switch to the
facsimile screen.
Press the [Exit] key.
2
The error message screen
closes.
Send your fax.
DD
D Is Lit
DD
3
THING GOES WRONG
WHAT TO DO IF SOME-
⇒ See “Memory Transmission” in “Facsimile Reference”
⇒ See “Immediate Transmission” in “Facsimile Reference”
31
Page 38

REPLACING PHOTOCONDUCTOR UNIT (PCU)
REPLACING PHOTOCONDUCTOR UNIT (PCU)
When “Change Photoconductor unit” appears on the panel display, it is time
to replace the photoconductor unit.
RR
R
WARNING: Do not incinerate the photoconductor unit. Toner dust
RR
might ignite when exposed to open flame. Dispose of
the used photoconductor unit according to local regulations for plastics.
NOTE: Do not tilt the used PCU after removing it from the machine. If you do,
toner might fall out.
NOTE: Do not hold the developer cartridge when removing the used PCU
from your machine. If you do, the cartridge might come unlocked and
fall.
NOTE: Do not touch the photoconductor (green material). If you do, abnor-
mal copies might be made.
NOTE: Before you remove the used PCU from the machine, wait until the
machine has completely stopped and is making no sound. Failure to
take this precaution could result in a fault.
NOTE: If there are misfeeds, remove the misfed paper before removing the
used PCU.
NOTE: Be sure to remove the sealing tape before setting the new PCU. Leav-
ing it on could cause a fault.
NOTE: After replacing the PCU, the machine will take about 2 minutes to
initialize. During this period, do not open the front cover or turn off the
main switch. If you do, a fault might occur.
Open the front cover.
1
Turn the lever B1 to the left.
2
32
Page 39

Push the release lever of PCU
3
to unlock the PCU. Pull out the
PCU slightly.
REPLACING PHOTOCONDUCT OR UNIT (PCU)
While hoding the release lever,
4
pull the PCU out slightly, then
pull it out untill it stops.
❑ Do not hold the developer car-
tridge when removing the used
PCU from your machine. If you
do, the cartridge might be unlocked and fall out.
Hold the PCU with both hands
5
and slightly swing it to the right
and left 2~3 times to unlock it
as shown in the illustration.
Pull the PCU out.
6
❑ Do not tilt the used PCU after
removing it from the machine. If
you do, toner might fall.
developer cartridge
THING GOES WRONG
WHAT TO DO IF SOME-
33
Page 40

REPLACING PHOTOCONDUCTOR UNIT (PCU)
Unpack the new PCU.
7
Remove the two clamps from
8
the new PCU.
Remove the protection sheets
9
from the PCU.
❑
Do not touch the photoconductor
(green material) and charge roller
(brown material). If you do, abnormal
copies might be made.
Insert the new PCU.
a
Push the new PCU in until the
b
release lever lock.
34
Page 41

Peel the sealing tape off gently
c
as shown in the illustration.
❑ Ease off the tape little by little
to avoid scattering toner.
Return the lever B1 to its origi-
d
nal position.
Close the front cover. Initializa-
e
tion will begin.
REPLACING PHOTOCONDUCT OR UNIT (PCU)
sealing tape
THING GOES WRONG
WHAT TO DO IF SOME-
35
Page 42

xx
AA
x
A CLEARING MISFEEDS
xx
AA
xx
AA
x
A CLEARING MISFEEDS
xx
AA
If a paper or original misfeed occurs, one or more misfeed locations are displayed. This section describes the procedure for clearing misfeeds.
R
CAUTION When removing misfed paper, do not touch the fusing sec-
tion because it could be very hot.
❑ When clearing misfeeds, do not turn off the power. If you do, specified functions
and values are cleared.
❑ Be sure to remove the paper completely without tearing it. If a piece of the paper
remains inside the machine, a paper misfeed might re-occur or another failure
might occur.
❑ If paper misfeeds occur repeatedly, contact your service representative.
❑ Two or more misfeed locations might be displayed simultaneously. In such a
case, check all the displayed locations.
· A, B, C, D, Y, and R ⇒ See page 37.
· Z ⇒ See page 37.
· Original Misfeed ⇒ See page 37.
❑ You can find a sticker explaining how to remove misfed paper in the relevant parts of
the machine such as the inside of the front cover and duplex tray.
❑ Even when you remove the misfed paper, specified job settings such as the num-
ber of copies remain the same. Clear the misfeeds and close the front cover.
Then you can press the Start key to continue the suspended copy or print run.
❑ When the message “Reset xx original(s)” is displayed, return the xx originals to
the document feeder.
36
Page 43

When A, B, C, D, And/Or R Is Lit
Open the front cover of the
1
machine.
Remove the misfed paper fol-
2
lowing the instructions on the
sticker explaining how to remove misfed paper.
When Z Is Lit
Pull out the duplex tray.
1
Remove the misfed paper fol-
2
lowing the instructions on the
sticker explaining how to remove misfed paper.
xx
AA
x
A CLEARING MISFEEDS
xx
AA
THING GOES WRONG
WHAT TO DO IF SOME-
When Original Is Misfed
Remove the misfed paper fol-
1
lowing the instructions on the
sticker explaining how to remove misfed paper
37
Page 44

xx
AA
x
A CLEARING MISFEEDS
xx
AA
38
Page 45

CHANGING THE
MACHINE’S SETTINGS
CHANGING THE PAPER SIZE ............................................................................... 40
Changing The Paper Size For Paper Tray 1................................................................. 40
Changing The Paper Size For Optional Tray Unit ....................................................... 43
USER TOOLS - SYSTEM SETTINGS ........................................................................ 44
Accessing The User Tools (System Settings)................................................................. 44
Returning To The Copy Mode ...................................................................................... 46
USER TOOLS (SYSTEM SETTINGS) MENU ............................................................. 47
SETTING YOU CAN CHANGE WITH THE USER TOOLS ......................................... 48
System Settings 1/5 ....................................................................................................... 48
System Settings 2/5 ....................................................................................................... 49
System Settings 3/5 ....................................................................................................... 51
System Settings 4/5 ....................................................................................................... 54
System Settings 5/5 ....................................................................................................... 56
CHANGING THE
MACHINE’S SETTINGS
39
Page 46

CHANGING THE PAPER SIZE
CHANGING THE PAPER SIZE
Paper sizes that this machine accepts are grouped into 3 categories − Standard, Special, and Irregular sizes.
If you do not tell the machine the correct paper size, misfeeds may occur.
The outline procedure for changing the paper size is as follows:
A) Adjust the paper guides in the paper tray and load your paper.
B) Tell the machine the new paper size.
• For standard sizes (these printed on the paper size selector), you only need
to adjust the paper size selector to the new size.
• For other sizes, adjust the paper size selector to “*”, and specify the paper
size with the [Special] or [Irreg.] key.
For more information on paper size, ⇒ See page 22.
The next section will take you through this procedure step by step.
Changing The Paper Size For Paper Tray 1
Make sure that paper tray 1 is
1
not feeding paper for a copy or
print run, and pull out the tray
until it stops.
❑ Remove any remaining paper.
Lower the bottom plate.
2
Square the paper and set it in
3
the tray.
❑ Do not stack the paper over the
limit mark.
❑ Shuffle the paper before setting
it in the tray.
40
Page 47

While pressing the release le-
4
vers on the front and rear
guides, slide the front and rear
guides to the paper size you
want to use.
While pressing the release le-
5
ver, slide the left guide to the
paper size you want to use.
Adjust the paper size selector.
6
CHANGING THE PAPER SIZE
Selecting the paper size with the paper size selector
The available paper sizes on the paper size selector are shown below.
If the paper size you need is not there, follow the steps on page 42.
❑ Metric version : A3L, A4KL, A5K, 8½" x 11"KL, 8" x 13"L
❑ Inch version : 11" x 17"L, 8½" x 14"L, 8½" x 11"KL, 8½" x 13"L,
A4KL
➊ Adjust the paper size on the paper size selector on the right side of the
paper tray.
41
CHANGING THE
MACHINE’S SETTINGS
Page 48

Commu-
nicating
Receive
File
Facsimile
Error
User Tools
Printer
Error
CHANGING THE PAPER SIZE
Selecting non-standard size paper (Sizes not on the paper
size selector)
➊ Select “*” on the paper size selector on the right side of the paper tray.
➋ Press the User Tools key.
➌ Press the [System] key. The
System Settings screen is displayed.
➍ Press the [
↓↓
↓Next] key twice to
↓↓
switch to the Special Paper Size
screen. Enter “10” with the Num-
ber keys.
➎ Press the < and > keys to se-
lect the paper tray.
Special paper size
❑ Regarding special paper sizes, ⇒ see page 22.
➏ Press the [Special] key.
42
Page 49

CHANGING THE PAPER SIZE
❼ With [
❽ With the < and > keys, select
❾ Press the User Tools key.
↑↑
↑ Prev .] and [
↑↑
move between pages to find the
paper size you want to select.
the paper size then press the [OK]
key.
The user tool setting is changed.
↓↓
↓ Next] keys,
↓↓
Irregular paper size
❑ Regarding irregular paper sizes, ⇒ see page 22.
➏ Press the [Irreg.] key.
➐ Enter the vertical size using the Number keys and press the # key.
➑ Enter the horizontal size using the Number keys and press the [OK] key.
➒ Press the User Tools key.
The user tool setting is changed.
Push the paper tray in until it stops.
7
❑ The loaded paper size and direction are displayed on the panel display.
CHANGING THE
MACHINE’S SETTINGS
❑ “∗” is displayed on the panel display when you load irregular size paper.
Changing The Paper Size For Optional Tray Unit
Change the paper size following the previous steps 1 → 4 → 5 → 6 → 3
1
→ 7 on pages 40 ~ 43.
43
Page 50

USER TOOLS - SYSTEM SETTINGS
USER TOOLS - SYSTEM SETTINGS
Accessing The User Tools (System Settings)
This function allows you to change the default settings for each feature and
customize the machine for operations you often carry out.
❑ When you change the user tool settings, use a mode different from the Copy
mode. When you have changed the settings, be sure to return the machine to the
Copy mode.
❑ When you specify or change the user tool settings, they are not canceled even
when you turn off the power or press the Clear Modes/Energy Saver key unless
you change them again.
❑ For user tool items other than the above, such as “Copy,” “Facsimile,” and “Printer,”
see the appropriate manual.
◆◆
◆Key operations
◆◆
❑ If there are too many items to fit on the display, use the [
keys to move between pages.
❑ When you press the [PrevMenu] key, the screen returns to the previous menu.
↑↑
↑Prev.] and [
↑↑
↓↓
↓ Next]
↓↓
Make sure that the machine is
1
in Copy mode.
❑ If the copy screen is not dis-
played, press the Copy key.
Press the User Tools key.
2
The User Tools Main Menu appears.
Press the [System] key.
3
The System Settings screen
appears.
44
User Tools
Commu-
nicating
Printer
Error
Receive
File
Facsimile
Error
Page 51

USER TOOLS - SYSTEM SETTINGS
Use the [
4
keys to find the item you need.
Then enter the item number
with the Number key, e.g. ”09”.
↓↓
↓Next] and [
↓↓
↑↑
↑Prev]
↑↑
CHANGING THE
MACHINE’S SETTINGS
Change the user tool setting following the messages on the screen and
5
press the [OK] or [Enter] key.
❑ “SETTINGS YOU CAN CHANGE WITH THE USER TOOLS” ⇒ See page 48.
❑ Pressing [OK] fixes the setting you have chosen and returns you to the previous
menu.
❑ If you haven’t pressed [OK] yet, you can cancel the current setting by pressing
[Cancel]. The previous menu will come up.
45
Page 52

USER TOOLS - SYSTEM SETTINGS
Returning To The Copy Mode
After changing the User Tools
1
settings, press the User Tools
key to return to Copy mode.
User Tools
Commu-
nicating
Printer
Error
Receive
File
Facsimile
Error
❑ Pressing [Exit] on the User Tools main menu achieves the same effect.
46
Page 53

USER TOOLS (SYSTEM SETTINGS) MENU
USER TOOLS (SYSTEM SETTINGS) MENU
❑ Some of the features cannot be used depending on the machine model you use.
User T ools key
“Auto Reset”
“Output Tray ”
“Set User Codes”
“Restricted Access”
CHANGING THE
MACHINE’S SETTINGS
47
Page 54

SETTING YOU CAN CHANGE WITH THE USER T OOLS
SETTING YOU CAN CHANGE WITH THE USER
TOOLS
❑ For details on accessing the User Tools, ⇒ see page 44.
❑ Shaded items (
❑ Function numbers may vary depending on options attached to the machine.
) are selected as the default settings.
System Settings 1/5
Description Operational procedure
❑❑
❑
01 Function Priority (facsimile and printer options
❑❑
required)
· Specifies the feature to be displayed immediately after power on or after system auto reset.
❑❑
❑
02 Clear Function Setting
❑❑
· Sets the machine to clear the current feature mode
when you use another feature such as the facsimile.
· The copy and printer modes are not cleared.
❑❑
❑
03 Panel Beeper
❑❑
· Disables the beeper when you press a key.
❑❑
❑
04 Copy Count Display
❑❑
· Select whether the copy counter (number of prints
made) count up or down.
➊
Use < and > keys to select
a function you want to display.
“
Copier
➋
Press the [OK] key.
➊
Select “Yes” or “No” with the
<
➋
Press the [OK] key.
➊
Select “On” or “OFF” with the
<
➋
Press the [OK] key.
➊
Select “Up” or “Down” with the
<
➋
Press the [OK] key.
”, “Fax”, “Printer”
and > keys.
and > keys.
and > keys.
48
Page 55

SETTING YOU CAN CHANGE WITH THE USER T OOLS
❑ For details on accessing the User Tools, ⇒ see page 44.
❑ Shaded items (
❑ Function numbers may vary depending on options attached to the machine.
) are selected as the default settings.
System Settings 2/5
Description Operational procedure
❑❑
❑
05 Auto Reset
❑❑
· The machine returns to its initial condition automatically when you do not operate it for a certain
period of time after a key operation. This is called
“Auto Reset.”
· The Auto Reset user tool changes the time after
· When you specify “No”, the Auto Reset function is disabled.
1 System Auto Reset
You can change the time after which:
· the machine displays the screen selected in the
"01 Function Priority".⇒ See "Function Priority"
on page 48
· the machine enter the Energy Save mode when
you do not operate the machine for the specified
period of time after a copy run or key
operation.⇒See "Auto Energy Saver" on page 50.
2 Copy Reset
· Changes the time after which the machine returns
to the initial copy condition when you do not operate the machine for the specified period of time
after a copy run or key operation.
3 Fax Reset (facsimile option required)
· Changes the time after which the machine returns
to the initial facsimile mode when you do not operate the machine for the specified period of time
after a key operation.
4 Printer Reset (printer option required)
· Changes the time after which the machine returns
to the initial printer condition when you do not operate the machine for the specified period of time
after a print run or key operation.
which the machine resets itself.
➊
Enter a number between 1 to 4
with the Number keys.
When changing the time
For the system, copy, or printer
➋
Select “Yes” with the > key.
➌
Enter the time in seconds with the
Number keys.
· 10 to 180 sec. (in 1 second steps)
60 sec.
·“
” (system, copy)
·“No” (printer)
➍
Press the [OK] key.
(When disabling Auto Reset)
➋
Select “No” with the < key.
➌
Press the [OK] key.
For the facsimile
➋
Select “Yes” with the > key.
➌
Select a time with the < and
keys.
30sec., 1min.,
➍
Press the [OK] key.
3 min.
, 5min.
CHANGING THE
MACHINE’S SETTINGS
>
49
Page 56

SETTING YOU CAN CHANGE WITH THE USER T OOLS
❑ For details on accessing the User Tools, ⇒ see page 44.
❑ Shaded items (
Function numbers may vary depending on options attached to the machine.
❑
) are selected as the default settings.
Description Operational procedure
❑❑
❑
06 Function Timeout (facsimile and printer op-
❑❑
tions required)
· Specifies the time after which the machine
switches to another feature (copier, facsimile,
or printer) when you do not operate the machine.
· The machine switches the screen after the specified pe-
riod of time only when you set “Simultaneous Print” to
“No”.
⇒
See page 55.
When changing the time (sec.)
➊
Select “xxx sec.” with the > key.
➋
Enter the time in seconds with the
Number keys.
· 10 to 180 sec. (in 1 second steps)
60 sec.
·“
➍
Press the [OK] key.
”
When switching to another feature
immediately
➊
Select “Immediate” with the < key.
➋
Press the [OK] key.
❑❑
❑
07 Auto Energy Saver
❑❑
➊
· Sets the machine whether the machine enter
the Energy Save mode at the same time as the
➋
Yes
Select “
>
keys.
” or “No” with the < and
Press the [OK] key.
System Auto Reset function is executed or not.
· The copy feature mode is cleared.
· “System Auto Reset”
❑❑
❑
08 Energy Save Mode
❑❑
The machine enters the selected level in the following cases:
· When pressing the Clear Modes/Energy Saver
⇒
See page 49.
➊
Select “Level 1” or “
the < and > keys.
➋
Press the [OK] key.
Level 2
key for about a second or more.
· When the System Auto Reset time has passed
when “Auto Energy Saver” and “System Auto
Reset” are set to “Yes”.
· “Auto Energy Saver” ⇒ See page 50.
·
“Auto Shut Off”
·
“System Auto Reset”
Level
⇒
See page 51.
⇒
See page 49.
Required time to return to the ready
condition after pressing the Clear
Modes/Energy Saver key
Required time return to the ready.
condition after turning on the main
switch*1
” with
Level 1
Level 2 (default)
*1: In this case, the main switch is turned off by Auto shut Off.
· If you want to conserve energy , it is recommended to select the level 2.
· The above value is a guide. The value might vary depending on the environment.
about 3 seconds about 30 seconds
about 30 seconds about 30 seconds
50
Page 57

SETTING YOU CAN CHANGE WITH THE USER T OOLS
❑ For details on accessing the User Tools, ⇒ see page 44.
❑ Shaded items (
) are selected as the default settings.
❑ Function numbers may vary depending on options attached to the machine.
System Settings 3/5
Description Operational procedure
❑❑
❑
09 Auto Shut Off
❑❑
The machine turns itself off automatically to conserve energy when you do not operate it for a certain period of time after a copy run or key operation. This is called “Auto Shut Off.” The Auto Shut
Off user tool changes this time.
•
Auto Shut Off might not come effect if the remaining memory space is 99% or if error message appears on
the panel display.
•
If you want to conserve energy, it is recommended to set the "Auto Energy Saver" to "No".
Auto Energy Saver = Yes (
System
Copy
Copy + FAX
Copy + Printer
Copy + FAX +
Printer
Off*
On*1*
On*1*
On*1*
Main
Switch
3
2
2
2
⇒⇒
⇒ See page 50.)
⇒⇒
Fax messages can be received and
printed automatically .
Data from computer can be received
and printed automatically .
Fax message can be received and
printed automatically .
Data from computer can be received
and printed automatically .
When changing the time
➊
Enter the time with the Number
keys.
➋
5 to 120 min. (in 1 minute steps)
·
15 min.
➌
Press the [OK] key.
Notes
How to exit from Auto Shut
Turning on the main switch
Pressing the Clear
Modes/Energy Saver key
Pressing the Clear
Modes/Energy Saver key
Pressing the Clear
Modes/Energy Saver key
Off
CHANGING THE
MACHINE’S SETTINGS
Auto Energy Saver = No (
System
Copy
Copy + FAX
Copy + Printer
Copy + FAX +
Printer
Off*
Off*
Off*
Off*
Main
Switch
3
3
3
3
⇒⇒
⇒ See page 50.)
⇒⇒
Notes
Fax messages can be received and
printed automatically .
Data from computer can be received,
but not be printed.
Fax message can be received and
printed automatically .
Data from computer can be received,
and printed automatically .
How to exit from Auto Shut
Off
Turning on the main switch
Turning on the main switch
Turning on the main switch
Turning on the main switch
*1: The machine enter the Energy Save mode.
*2: The required time to return to the ready condition varies depending on the Energy Save
level. ⇒ See "Energy Save Mode" on page 50.
*3: If the main switch is turned off, it takes about 30 seconds to the ready condition.
51
Page 58

SETTING YOU CAN CHANGE WITH THE USER T OOLS
❑ For details on accessing the User Tools, ⇒ see page 44.
❑ Shaded items (
❑ Function numbers may vary depending on options attached to the machine.
) are selected as the default settings.
Description Operational procedure
❑❑
❑
10 Special Paper Size
❑❑
· Specify the paper size with this user tool when
you load non-standard size paper in the paper
tray.
· If the specified paper size differs from the size of paper
actually set in the paper tray, a paper misfeed might occur because the paper size is not detected correctly.
➊
Select the paper tray with the < and
>
keys.
For special size paper
➋
Press the [Special] key.
➌
Select the paper size with the < and
>
keys.
· Regarding paper sizes, ⇒ see page
22.
➍
Press the [OK] key.
For irregular size paper
➋
Press the [Irreg.] key.
➌
Enter the paper length with the Num-
ber keys and press the
➍
Enter the paper width with the Num-
##
#
##
key.
ber keys.
➎
Press the [OK] key.
· Regarding sizes, ⇒ see page 22.
52
Page 59

SETTING YOU CAN CHANGE WITH THE USER T OOLS
❑ For details on accessing the User Tools, ⇒ see page 44.
❑ Shaded items ( ) are selected as the default settings.
❑ Function numbers may vary depending on options attached to the machine.
Description Operational procedure
❑❑
❑
11 Paper Tray Priority (for Copy mode only)
❑❑
· Changes the paper tray to be selected when you
turn on the power, the mode is reset, or if Auto
Paper Select is not specified.
➊
Select the paper tray with the < and
>
keys.
“
Tray 1
”, “Tray 2”, “T ray 3”, “Tray 4”
➋
Press the [OK] key.
1
2
3
4
❑❑
❑
12 Auto Tray Switch (for Copy mode only)
❑❑
· If you load paper of the same size and in same
direction in two or more trays,the machine auto-
Duplex tray
(option)
2
3
4
Optional trays
↓
➊
Select “
>
➋
Press the [OK] key.
matically shifts to another tray when the tray in
use runs out of paper. You can cancel this setting.
Yes
keys.
” or “No” with the < and
CHANGING THE
MACHINE’S SETTINGS
53
Page 60

SETTING YOU CAN CHANGE WITH THE USER T OOLS
❑ For details on accessing the User Tools, ⇒ see page 44.
❑ Shaded items (
❑ Function numbers may vary depending on options attached to the machine.
) are selected as the default settings.
System Settings 4/5
Description Operational procedure
❑❑
❑
13 Bypass Auto Select
❑❑
If you select “Yes”, the bypass tray is selected
in the following conditions:
· after turning on the main switch and there is
paper in the bypass tray.
· after exiting from the Energy Save mode and
there is paper in the bypass tray.
❑❑
❑
14 Output Tray
❑❑
Specifies a tray to which documents are delivered
for each feature (copier, facsimile, and printer).
· Y ou can also specify a single tray for two or more features.
· Even when you specify the external tray , documents are
delivered to internal tray 1 when you do not open the
external tray .
1 Copier
· Specifies a tray to which copies are delivered.
2 Fax (facsimile option required)
· Specifies a tray to which faxes are delivered.
3 Printer (printer option required)
· Specifies a tray to which printed documents are
delivered from the printer.
This item is valid when you initialize the printer
feature.
⇒
See “Printer Reference”.
➊
Select “Y es” or “No” with the < and
>
keys.
➋
Press the [OK] key.
➊
Enter a number between 1 to 3 with
the Number keys.
➋
Select your desired tray type with
the [Prev.] and [Next] keys.
If you select “xx Tray”, this setting
is applied when paper feeds from
paper tray. If you select “xx Bypass”,
this setting is applied when paper
feeds from bypass tray. You can
select following:
1. Copier - Copy Tray, Copy Bypass
2. Fa x - Fax Tra y, Fax Bypass
3. Printer - Printer Tray, Printer Bypass
➌
Select the output tray from the following with the < and > keys.
“Int. Tray 1”, “Int. T ray 2”, “Ext. T ray”
Copy, Fax, and Printer Tray: “
Copy, Fax, and Printer Bypass: “
➍
Press the [OK] key.
Int.Tray 1
Ext.Tray
“GUIDE TO COMPONENTS”
⇒ See page 3.
”
”
54
Page 61

SETTING YOU CAN CHANGE WITH THE USER T OOLS
❑ For details on accessing the User Tools, ⇒ see page 44.
❑ Shaded items (
❑ Function numbers may vary depending on options attached to the machine.
) are selected as the default settings.
Description Operational procedure
❑❑
❑
15 Simultaneous Print (setting the multi-ac-
❑❑
➊
cessing function)
· Disables interrupt copying or printing during a
➋
Yes
Select “
>
keys.
” or “No” with the < and
Press the [OK] key.
print run of another feature.
· When you set this function to “Y es”, all printed documents
are delivered to a single tray and different features’ documents are mixed.
If you attach the optional 1-bin tray (internal tray 2) to the
machine, you can specify an output tray for each feature.
If you want to attach it, contact your service representative.
· Interrupt printing is disabled for a feature for which “Restricted Access” is set to “Yes”. The machine switches
the screen after the time specified with “Function T imeout”
and starts printing with the feature.
Ristricted Access ⇒ See page 57.
Function Timeout ⇒ See page 50.
Output Tray ⇒ See page 54.
➊
❑❑
❑
16 Contrast
❑❑
· Adjusts the screen brightness.
Select the brightness level with the
<
and > keys.
· Levels 1 to 8
·
Level 4
➋
Press the [OK] key.
CHANGING THE
MACHINE’S SETTINGS
55
Page 62

SETTING YOU CAN CHANGE WITH THE USER T OOLS
❑ For details on accessing the User Tools, ⇒ see page 44.
❑ Shaded items ( ) are selected as the default settings.
❑ Function numbers may vary depending on options attached to the machine.
System Settings 5/5
Description Operational procedure
❑❑
❑
17 Set User Codes
❑❑
· Allows only specific persons to use the machine
or you to manage the number of copies or prints
made in each division of your company.
When a key operator code is regis-
⇒⇒
tered
⇒
See page 58.
⇒⇒
➊
Enter the key operator code (less
than 4 digits) with the Number
keys.
➋
Press the [Enter] key.
1 Copy User Codes
· Specifies whether to use user codes to restrict
copier users or manage the number of copies
made.
2 Fax User Codes (facsimile option required)
➊
Enter a number between 1 to 3 with
the Number keys.
➋
Select “Y es” or “No” with the < and
>
➌
Press the [OK] key.
· Specifies whether to use user codes to restrict
facsimile users.
3 Printer User Codes (printer option required)
· Specifies whether to use user codes to restrict
printer users or manage the number of prints
made.
keys.
56
Page 63

SETTING YOU CAN CHANGE WITH THE USER T OOLS
❑ For details on accessing the User Tools, ⇒ see page 44.
❑ Shaded items (
❑ Function numbers may vary depending on options attached to the machine.
) are selected as the default settings.
Description Operational procedure
❑❑
❑
18 Restricted Access
❑❑
· Specifies the user restriction settings using options (e.g., key counter) or user codes settings.
⇒
See “Set User Codes” on page 56.
When a key operator code is registered
➊
Enter the key operator code (less
than 4 digits) with the Number keys.
➋
Press the [Enter] key.
1 Reset Counters
Counter
· You can check the number of copies or prints
➊
Enter “1” with the Number key.
➋
Select your desired user code with
the < and > keys.
under each user code.
Single
· You can reset each user code’s counter to 0.
➊
Enter “1” with the Number key.
➋
Select your desired user code with
the < and > keys.
➌
Press the [Single] key.
➍
Press the [Yes] key.
CHANGING THE
MACHINE’S SETTINGS
All
· You can reset all user code’s counter to 0.
➊
➋
➌
Enter “1” with the Number key.
Press the [All] key.
Press the [Yes] key.
57
Page 64

SETTING YOU CAN CHANGE WITH THE USER T OOLS
❑ For details on accessing the User Tools, ⇒ see page 44.
❑ Shaded items (
❑ Function numbers may vary depending on options attached to the machine.
) are selected as the default settings.
Description Operational procedure
2 Reg.User Codes (Register User Codes)
· Registers a user code.
· You can register up to 20 codes.
· A user code must be less than four digits.
3 Chg/Del User Code (Change/Delete User
Codes)
· Changes a user code.
· The counter is not reset even when you change a user
code.
➊
Enter “2” with the Number key.
➋
Enter the user code with the Number keys.
· 0 to 9999
➌
Press the [Enter] key.
➊
Enter “3” with the Number key.
➋
Select your user code to be
changed with the < and > keys.
➌
Press the [Change] key.
➍
Enter a new code with the Number
keys.
· 0 to 9999
➎
Press the [Enter] key.
➊
· Deletes a user code.
· If you delete a user code, the counter is reset automati-
cally.
Enter “3” with the Number key.
➋
Select your user code to be deleted
with the < and > keys.
➌
Press the [Delete] key.
➍
Press the [Enter] key.
➎
Press the [Yes] key.
➊
4 Key Operator Code
· Sets the machine to be managed with key operator codes (passwords, less than 4 digits for
operating User Code and Ristricted Access set-
Enter “4” with the Number key.
➋
Select Yes or No with the < and
>
keys.
➌
Press the [OK] key.
ting).
5 Reg/Chg Key Op Code (Register/Change
Key Operator Code)
· Registers or changes a key operator code.
· A key operator code must be less than four digits.
6 Copier Access
· Sets the machine to restrict copier users with
the key counter.
* Note: If you want to restrict machine users, contact your service representative.
➊
Enter “5” with the Number key.
➋
Enter the key operator code with the
Number keys.
· 0 to 9999
➌
Press the [Enter] key.
➊
Enter “6” with the Number key.
➋
Select Yes or No with the < and
>
keys.
➌
Press the [OK] key.
58
Page 65

SETTING YOU CAN CHANGE WITH THE USER T OOLS
❑ For details on accessing the User Tools, ⇒ see page 44.
❑ Shaded items (
❑ Function numbers may vary depending on options attached to the machine.
) are selected as the default settings.
Description Operational procedure
7 Fax Access (facsimile option required)
· Sets the machine to restrict facsimile users with
the key counter.
· This function does not manage the number of transmitted faxes.
· This function prints received faxes regardless of the restriction.
· You can also use personal codes to restrict users.
⇒
See “Restricted Access” in “Facsimile Reference.”
8 Printer Access (printer option required)
· Sets the machine to restrict printer users with
the key counter.
* Note: If you want to restrict machine users, contact your service representative.
➊
Enter “7” with the Number key.
➋
Select Yes or No with the < and
>
keys.
➌
Press the [OK] key.
➊
Enter “8” with the Number key.
➋
Select Yes or No with the < and
>
keys.
➌
Press the [OK] key.
CHANGING THE
MACHINE’S SETTINGS
59
Page 66

SETTING YOU CAN CHANGE WITH THE USER T OOLS
60
Page 67

DO’S AND DON’TS
WHERE TO PUT YOUR MACHINE
MAINTAINING YOUR MACHINE
DO’S AND DON’TS .............................................................................................. 62
WHERE TO PUT YOUR MACHINE ......................................................................... 63
When Moving The Machine ......................................................................................... 63
Machine Environment .................................................................................................. 63
Space Required For Installing The Machine............................................................... 64
Power Connection ........................................................................................................ 65
MAINTAINING YOUR MACHINE ......................................................................... 66
Cleaning The Exposure Glass ....................................................................................... 66
Cleaning The Platen Cover.......................................................................................... 66
Cleaning The Document Feeder Belt ......................................................................... 67
Cleaning The 1-Bin Tray (Internal Tray2) ..................................................................... 67
61
OTHERS
Page 68

DO’S AND DON’TS
DO’S AND DON’TS
❑ Do not turn off the main switch while copying or printing. When turning off the
main switch, make sure that copying or printing is completed.
❑ After the turning off the main switch, the anti-condensation heaters remain on.
R
CAUTIONS: When the machine will not be used for a long period, unplug
the power cord.
❑ Do not open the covers of machine while copying or printing.If you do, misfeeds
might occur.
❑ Do not move the machine while copying or printing.
❑ If you operate the machine improperly or a failure occurs on the machine, your
machine settings might be lost. Be sure to take a note of your machine settings.
❑ Supplier shall not be liable for any loss or damages resulting from a failure on the
machine, loss of machine settings, and use of the machine.
❑ When you send or receive an important document, it is recommended to call the
recipient or sender to check that the document is sent properly.
62
Page 69

WHERE TO PUT YOUR MACHINE
WHERE TO PUT YOUR MACHINE
The installation location should be carefully chosen because environmental
conditions greatly affect the performance of a machine. When you move the
machine in your office, follow the following notes.
When Moving The Machine
R
CAUTION: When you move the machine, unplug the power cord from
the wall outlet to avoid fire or electric shock.
❑ If the machine must be transported a long distance or by vehicle, please contact
your service representative.
❑ When you move the machine a short distance, make sure to do the following:
· Turn off the power.
· Grip the plug and pull out the from the socket.
· Close any covers or trays of the machine.
· Move the machine gently keeping it flat. If you tilt it, the damage might
occur.
Machine Environment
R
CAUTION: Keep the machine away from humidity and dust. A fire or an
electric shock might occur.
R
CAUTION: Do not place the machine on an unstable or tilted surface. If
it topples over, it could cause injury.
R
CAUTION: After you move the machine, fix it with the caster fixture.
Otherwise, the machine might move or come down to cause
a personal injury.
OTHERS
63
Page 70

WHERE TO PUT YOUR MACHINE
Machine environment after moving
Do not subject the machine to the following conditions. If you move the machine to an improper location, copies or prints will not be made normally or a
failure might occur.
❑ Excessively cold, heat or humidity.
The optimum environmental conditions are as follows :
Temperature : 10 - 30°C
Humidity : 15 - 90%
❑ Locations exposed to direct sunlight.
❑ Locations near an air conditioner or humidifier
❑ Locations subjected to strong vibration
❑ Locations with bad ventilation
❑ Dusty areas
❑ Unstable floor and base
• Place the machine on a flat base. The machine must be level within 5mm,
0.2" both front to rear and left to right.
• The floor must be stable. If you wish to place the machine on a raised surface,
select a solid and stable piece of furniture dedicated for use with machines. The
surface must be larger than the base of the machine.
Space Required For Installing The Machine
Leave enough space around the machine. This space is necessary for you or
a service representative to operate the machine. The minimum space requirement (mainframe only) is as follows:
a (front) b (right) c (rear) d (left)
75 cm (29.6") 1 cm (0.4") 1 cm (0.4") 1 cm (0.4")
When you open the external and bypass trays completely , the required space
is as follows:
150mm
110mm
d
550mm
c
580mm
100mm
100mm
Mainframe only
a 75cm (29.6")
b
b 11cm (4.3")
c 1cm (0.4")
1,010mm
a
d 8cm (3.2")
Regarding the required space when options are equipped, please contact
your service representative.
64
Page 71

WHERE TO PUT YOUR MACHINE
Power Connection
RR
R
WARNING: Only connect the machine to the power source de-
RR
scribed on the inside cover of this manual.
RR
R
WARNING: Avoid multi-wiring.
RR
RR
R
WARNING: Do not damage, break or make any modifications to
RR
the power cord. Do not place heavy objects on it, pull it
hard or bend it more than necessary. These actions
could cause an electric shock.
RR
R
WARNING: Do not plug or unplug or unplug the power cord with
RR
your hands wet. Otherwise, an electric shock might occur.
RR
R
WARNING: Make sure the wall outlet is near the machine and freely
RR
accessible so that in event of an emergency it can be
unplugged easily.
R
CAUTION: When you pull out the plug from the socket, grip the plug to
avoid damaging the cord and causing fire or electric shock.
R
CAUTION: When the machine will not be used for a long time, unplug
the power cord.
❑ When the AC and main switches are in the Stand-by positions, the optional anti-
condensation heaters are on. In case of emergency, unplug the machine’s power
cord.
❑ When you unplug the power cord, the anti-condensation heaters turn off.
❑ Insert the plug firmly into the wall outlet.
65
OTHERS
Page 72

MAINTAINING YOUR MACHINE
MAINTAINING YOUR MACHINE
If the exposure glass, platen covers or document feeder belt is dirty , you may
not be able to make copies as you want. Clean them if you find them dirty.
◆◆
◆Cleaning the machine
◆◆
Wipe the machine with a soft, damp cloth. After wiping the machine with a
damp cloth, wipe it with a dry cloth to remove the water.
Note: Do not use chemical cleaner or organic solvent such as thinner
or benzene. If they get into the machine or melt plastic parts, a
failure might occur.
Note: Do not clean parts other than those specified in this manual.
Such parts should be cleaned by your service representative.
Cleaning The Exposure Glass
Cleaning The Platen Cover
66
Page 73

MAINTAINING YOUR MACHINE
Cleaning The Document Feeder Belt
Cleaning The 1-Bin Tray (Internal Tray2)
67
OTHERS
Page 74

MAINTAINING YOUR MACHINE
68
Page 75

SPECIFICATIONS
MAINFRAME ....................................................................................................... 70
OPTIONAL DOCUMENT FEEDER .......................................................................... 73
OPTIONAL DUPLEX TRAY ..................................................................................... 74
OPTIONAL INTERNAL 1-BIN TRAY (INTERNAL TRAY 2) ......................................... 75
OPTIONAL PAPER TRAY UNIT ............................................................................... 76
69
SPECIFICATIONS
Page 76

MAINFRAME
MAINFRAME
Configuration: Desktop
Photosensitivity type: KS III OPC drum (φ 30)
Original scanning: One-dimensional solid scanning system
through CCD
Copy process: Dry electrostatic transfer system
Development: Dry two-component magnetic brush devel-
opment system
Fusing: Heating roll system
Resolution:
Copy: 400dpi
Fax: 200 × 100dpi
200 × 200dpi
400 × 400dpi
Printer: 300dpi
600dpi
Gray scale: 256 levels
Exposure glass: Stationary original exposure type
Original reference position: Rear left corner
Warm-up time: Within 35 seconds (20°C)
Originals: Sheet/book/objects
Maximum original size: A3L (297 × 420 mm), 11" × 17"L
Copy paper size: ⇒ See page 22.
Duplex tray: A3L, B4L, A4KL, B5KL, A5 K,
11" × 17"L, 8½" ×14"L, 8½" × 11"KL,
7¼" × 10 ½"KL, 8" × 13"L, 8½" × 13"L,
8¼" × 13"L,
width (182 ~ 297 mm) × length (148 ~ 432 mm)
Copy paper weight:
Paper tray: 60 - 90 g/m2 (16 - 24 lb)
Bypass tray: 60 - 157 g/m2 (16 - 41 lb)
Duplex unit: 60 - 90 g/m2 (16 - 24 lb)
70
Page 77

Non-reproduction area: Leading edge 3 ± 2 mm
Left edge 2 ± 1.5 mm
Trailing edge 4 mm or less
Right edge 3 mm or less
First copy time: Less than 9.8 seconds
(A4K, 8½" × 11"K, feeding from 1st paper
tray and exiting to internal tray 1)
less than 8.8 seconds
(A4K, 8½" × 11"K, feeding from 1st paper
tray and exiting to external tray)
Copy paper capacity:
1st and 2nd paper trays: 250 sheets or less than 28mm, 1.10"
Bypass tray: 100 sheets or less than 11mm, 0.43"
Power source: 220/230/240V, 50/60Hz 6A
MAINFRAME
Power consumption:
Warm-up about 750W about 750W
Stand-by about 130Wh about 140Wh
Copying about 500W about 530W
Maximum less than 850W less than 1kW
Auto shut off about 2.2W about 2.4kW
* System: Mainframe with document feeder, 1-bin tray
Dimensions:
With document feeder
With document feeder
(bypass tray is open)
With document feeder
( bypass tray extender is used
for large size paper.)
Mainframe only System*
paper tray unit and duplex tray.
Width Depth Height
550mm
21.7"
650mm
25.6"
750mm
29.6"
580mm
22.9"
580mm
22.9"
580mm
22.9"
797mm
31.4"
797mm
31.4"
797mm
31.4"
Noise Emission: Sound pressure level (The measurement are
made according to ISO7779.)
Mainframe only System*
Stand-by 17.5 dB(A) 17.5 dB(A)
Copying 47.5 dB(A) 52.0 dB(A)
* system: Mainframe with document feeder, 1-bin tray
paper tray unit and duplex tray.
SPECIFICATIONS
71
Page 78

MAINFRAME
Sound power level (The measurement are made
according to ISO7779.)
Mainframe only System*
Stand-by 30 dB(A) 30 dB(A)
Copying 61.5 dB(A) 64.5 dB(A)
*System: Mainframe with document feeder, 1-bin tray
paper tray unit, and duplex tray.
Weight:
Mainframe: Approximately 57 kg, 125.7lb or less
Mainframe and Approximately 67.5kg, 148.8lb or less
document feeder:
❑ Specifications are subject to change without notice.
72
Page 79

OPTIONAL DOCUMENT FEEDER
OPTIONAL DOCUMENT FEEDER
Mode: ADF mode, SADF mode
Original size: A3 L - A5KL
11" × 17"L - 5½" × 8½"KL
Copy mode:
length:128~1260mm(5.0"~49.6")
width:105~297mm(4.1"~11.7")
Facsimile mode:
⇒ See "Facsimile Reference"
Original thickness : 52 - 105 g/m2 (14 - 27 lb)
××
(788
× 1,091 mm)
××
Number of originals to be set:
Copying speed: 1 to 1 copy mode: 15 copies/minute (A4K,
Maximum power consumption:
××
Dimensions (W
Weight: 9 kg, 19.9 lb
Reproduction ratio: 37 - 150 %
Function: Stamp function (for the facsimile feature)
❑ Specifications are subject to change without notice.
××
× D
× H) 550 × 470 × 120 mm (21.7" × 18.5" × 4.8")
××
××
30 sheets (80g/m2,20lb)
8½" × 11" K)
25 W (power is supplied from the main
frame.)
*Stamp cartridge is packed in the optional Fax Unit.
SPECIFICATIONS
73
Page 80

OPTIONAL DUPLEX TRAY
OPTIONAL DUPLEX TRAY
Paper size: ⇒See page 70.
Copy paper weight: 60 - 90 g/m2 (16 - 24 lb)
Stack capacity: 1 sheet
Copying speed: 16 copies/minute (A4K, 8½" × 11 " K, 2nd
paper tray)
Power consumption:
××
Dimensions (W
Weight: Approximately 5.2kg, 11.5lb
❑ Specifications are subject to change without notice.
××
× D
× H) 514 × 453.5 × 77 mm (20.3" × 17.9" × 3.1")
××
××
25 W (power is supplied from the main
frame.)
74
Page 81

OPTIONAL INTERNAL 1-BIN TRAY (INTERNAL TRA Y 2)
OPTIONAL INTERNAL 1-BIN TRAY
(INTERNAL TRAY 2)
Number of bins: 1
Available paper size: A3L - A5K
11" × 17"L - 8 ½" × 11"KL
Paper capacity: 125 sheets (80g/m2, 20lb)
Copy paper weight: 52 - 105 g/m2 (14 - 27 lb)
Maximum power consumption:
××
Dimensions (W
Weight: 2 kg (4.4 lb)
Others: This tray has a paper receiving lamp.
❑ Specifications are subject to change without notice.
××
× D
× H): 486 × 412 × 106 mm (19.2" × 16.3" × 4.2")
××
××
29 W (power is supplied from the main frame.)
75
SPECIFICATIONS
Page 82

OPTIONAL P APER TRAY UNIT
OPTIONAL PAPER TRAY UNIT
Copy paper weight : 60 - 90 g/m2 (16 - 24 lb)
Available paper size: ⇒ See page 22.
Maximum power consumption:
Paper capacity: 500 sheets ( 80g/m2, 20lb) or less than 60 mm
××
Dimensions (W
Weight: 23 kg (50.7 lb)
❑ Specifications are subject to change without notice.
❑ For details of options for the copier , facsimile, and printer , see other manu-
als.
××
× D
× H): 530 × 565 × 322 mm (20.9" × 22.3" × 12.7")
××
××
40 W (power is supplied from the main
frame.)
(2.4") × 2 trays
76
Page 83

INDEX
INDEX
77
Page 84

INDEX
INDEX
Symbols
< > key 7
1-Bin Tray (Internal Tray2) 67
1000-sheet tray unit 3, 5
Alphabetical Index
A
AC switch 10, 3
All 57
Auto Energy Saver 50
Auto Reset 49
Auto Shut Off 51
Auto Tray Switch 53
B
Bypass Auto Select 54
Bypass tray 3
C
Cable connector 4
Card holder 4
CAUTIONS iii
Chg/Del User Code 58
Clear Function Setting 48
Clear Modes/Energy Saver key 7
Clear/Stop key 7
CONSUMABLES 21
Contrast 55
Copier Access 58
Copy Count Display 48
Copy Mode 12, 15, 1
COPY PAPER 22
Copy Reference 2
Copy Reset 49
Copy User Codes 56
D
developer cartridge 33
DOCUMENT FEEDER 73
Document feeder 5
Document Feeder Belt 67
DO’S AND DON’TS 62
DUPLEX tray 74
Duplex tray 3, 5
E
Energy Save mode 11
Energy Save Mode 50
error message 28
Exposure Glass 66
Exposure glass 3
External tray 3
F
Facsimile Mode 12, 17, 1
Facsimile Reference 2
Fax Access 59
Fax Reset 49
Fax User Codes 56
Front cover 3
Function keys 7
Function Priority 48
Function Timeout 50
G
General Reference 2
I
INTERNAL 1-BIN TRAY(internal
tray 2) 75
Internal tray 1 3
Internal tray 2 5
Internal tray 2(option) 3
Interrupt Copying 15
Interrupt key 7
Irregular paper size 43
78
Page 85

INDEX
K
Key Operator Code 58
L
Left side cover 3
M
Machine Environment 63
Main switch 10, 3
mainframe 70
MAINTAINING 66
Memory Copy key 7
MISFEEDS 36
MULTI-ACCESSING 13
N
Number keys 7
O
Operation panel 3
Output Tray 54
P
Panel Beeper 48
PANEL DISPLAY 8
Panel Display 7
PAPER 29
Paper Receiving lamp 5
PAPER SIZE 40
paper size selector 41
Paper tray 3
paper tray 29
Paper Tray Priority 53
PAPER TRAY UNIT 76
PCU 25
pcu 32
Photoconductor unit 25
photoconductor unit 32
Platen Cover 66
Platen cover 3
platen cover 5
Power Connection 65
Printer (Postscript) Reference 2
Printer (Utility/Driver) Reference 2
Printer Access 59
Printer Mode 12, 1
Printer Reference 2
Printer Reset 49
Printer User Codes 56
Printing 19
Program key 7
R
Reg.User Codes 58
Reg/Chg Key Op Code 58
Reset Counters 57
Restricted Access 57
S
SAFETY INFORMATION i
Set User Codes 56
Simultaneous Print 55
Single 57
Special Paper Size 52
Special paper size 42
Start key 7
System Auto Reset 49
SYSTEM SETTINGS 44
T
TONER 24, 30
U
USER TOOLS 44
User Tools key 6
V
Ventilation hole 3
W
WARNINGS ii
INDEX
79
Page 86

INDEX
80
 Loading...