

Page 1
Network Interface Board
Type185–E
(Option)
OPERATING INSTRUCTIONS
Read this manual carefully before you use this product and keep it handy for future
reference.
For safety, please follow the instructions in this manual.
Page 2

Introduction
To get maximum use from this machine, all operators should carefully read and follow the instructions
in this manual.
Please read the Safety Information in the “Copy Reference” that comes with the printer before using
this machine. It contains important information related to USER SAFETY and PREVENTING EQUIPMENT PROBLEMS.
Important
Parts of this manual are subject to change without prior notice. In no event will the company be liable
for direct, indirect, special, incidental, or consequential damages as a result of handling or operating
the machine.
Note
The names of the applications do not appear in the following pages. Confirm which applications you
will be using before reading this manual.
Descriptions in this manual Application
PRINTER MANAGER FOR ADMINIS-
Aficio Manager for Admin
TRATOR
PRINTER MANAGER FOR CLIENT Aficio Manager for Client
Software Versions Conventions Used in this Manual
• NetWare3.x means NetWare 3.11, 3.12 and 3.2.
• NetWare4.x means NetWare 4.1, 4.11 and IntranetWare.
Trademarks
Apple, AppleTalk, EtherTalk, LaserWriter, Macintosh are registered trademarks of Apple Computer,
Inc.
Ethernet is a registered trademark of Xerox Corporation.
Microsoft, Windows, Windows NT are registered trademarks of Microsoft Corporation in the United
States and/or other countries.
Netscape, Netscape Navigator are registered trademarks of Netscape Communications Corporation.
Novell, NetWare, Client32, NDS are registered trademarks of Novell, Inc.
PostScript is a registered trademark of Adobe Systems, Incorporated.
Sun is a registered trademark of Sun Microsystems, Inc.
SunOS is a t rademark of Sun Microsystems, Inc.
Other product names us ed herei n are for iden tifica tion purp oses on ly and migh t be tradem arks of th eir
respective companies. We disclaim any and all rights in those marks.
Note
The proper names of the Windows operating systems are as follows:
• Microsoft Windows 95 operating system
• Microsoft Windows 98 operating system
• Microsoft Windows for Workgroups operating system Version 3.11
• Microsoft Windows NT Server network operating system Version 4.0
• Microsoft Windows NT Workstation operating system Version 4.0
Page 3

TABLE OF CONTENTS
Introduction................................................................................................ 1
Setting Up the Printer in a Network......................................................... 2
Printing without Using a Print Server ............................................................ 2
Printing with a Windows NT Print Server...................................................... 3
Printing as a NetWare Print Server............................................................... 4
1.Windows 95/98 Configuration
Configuring Windows 95/98..................................................................... 7
Preparing to Use the TCP/IP Protocol for Printing........................................ 8
Preparing to Use the NetBEUI Protocol for Printing...................................... 9
Installing the Multi Direct Print Application.................................................. 10
Setting Up the Printer Driver....................................................................... 11
Uninstalling the Multi Direct Print Application.............................................. 13
2.Windows NT 4.0 Configuration
Preparing for a Network Connection..................................................... 15
Preparing to Use the TCP/IP Protocol for Printing...................................... 16
Preparing to Use the NetBEUI Protocol for Printing.................................... 18
Installing the Multi Direct Print Application.................................................. 19
Setting Up the Printer Driver....................................................................... 20
Uninstalling the Multi Direct Print Application.............................................. 22
Setting up a Client Computer................................................................. 23
Windows 95/98............................................................................................ 23
Windows NT 4.0.......................................................................................... 24
Configuring LPR Port Printing............................................................... 25
3.NetWare Configuration
Installing the NIB Setup Tool.................................................................. 27
Installing the PRINTER MANAGER FOR ADMINISTRATOR..................... 27
Running the NIB Setup Tool ....................................................................... 28
Quick Setup Using the NIB Setup Tool Wizard..................................... 29
NetWare 3.x - Advanced Settings.......................................................... 32
Setting Up as Print Server........................................................................... 32
Setting Up as Remote Printer ..................................................................... 35
NetWare 4.x, 5 - Advanced Settings ...................................................... 38
Setting Up as Print Server........................................................................... 38
Setting Up as Remote Printer ..................................................................... 41
Setting Up a Client Computer................................................................. 45
Windows95/98............................................................................................. 45
Windows 3.1x.............................................................................................. 46
i
Page 4

4.Macintosh Configuration
Configuring Macintosh...................................... ............................ ..... .... 49
Changing to EtherTalk ................................................................................ 49
Configuring the Printer................................................................................ 50
Changing Printer Name............................................................................... 50
Changing Zone............................................................................................ 51
5.Appendix
Multi Direct Print...................................................................................... 53
Select Printer
[
Network
[
Configuring the Network Interface Board with a Web Browser.......... 56
Going to the Top Page................................................................................ 57
Assigning IP Address with ARP+PING.................................................. 59
Remote Maintenance by Telnet (mshell)............................................... 60
Operation Flow............................................................................................ 60
Command List............................................................................................. 61
SNMP........................................................................................................ 68
Understanding the Displayed Information............................................ 69
Print Job Information................................................. .................................. 69
Print Log Information................................................................................... 70
Network Statistical Information.................................................................... 71
Configuring the Network Interface Board.................................................... 72
]
................ ............................................................................... 54
]
............... ................................................................................. ...... 55
Message List............................................................................................ 75
System Log Information.............................................................................. 75
Precautions.............................................................................................. 80
Connecting a dial up router to a Network.................................................... 80
When Printing PostScript from Windows .................................................... 81
When print it with NetWare ......................................................................... 81
When Using DHCP ..................................................................................... 82
When using the NIB Setup Tool.................................................................. 83
Network Configuration Page.................................................................. 84
Specifications.......................................................................................... 86
INDEX........................................................................................................ 87
ii
Page 5
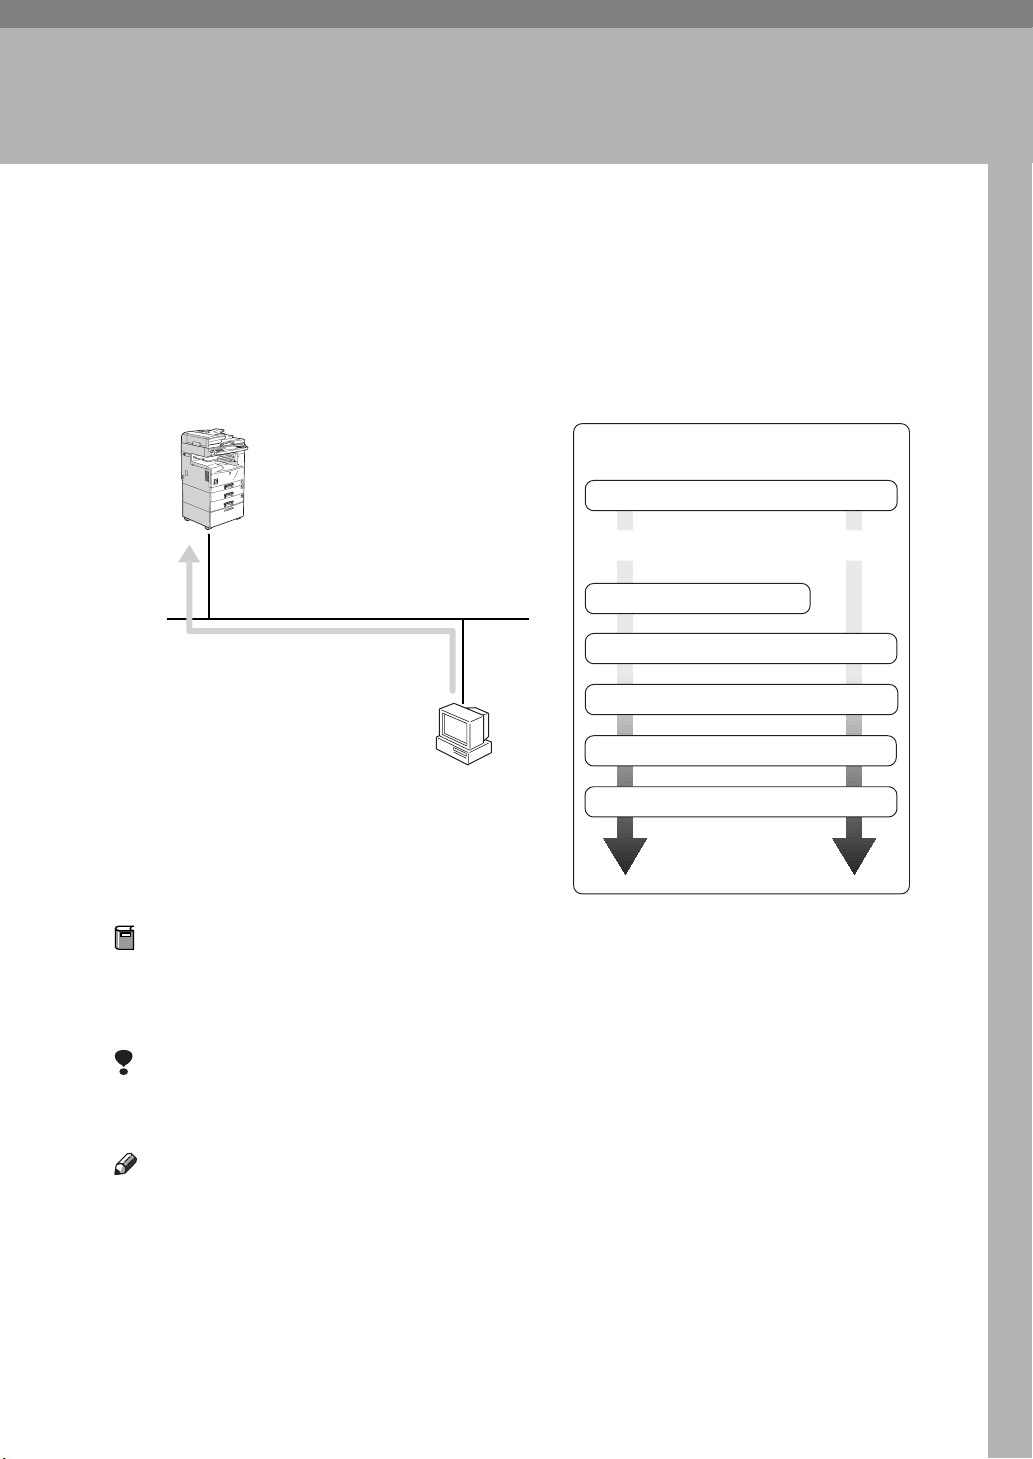
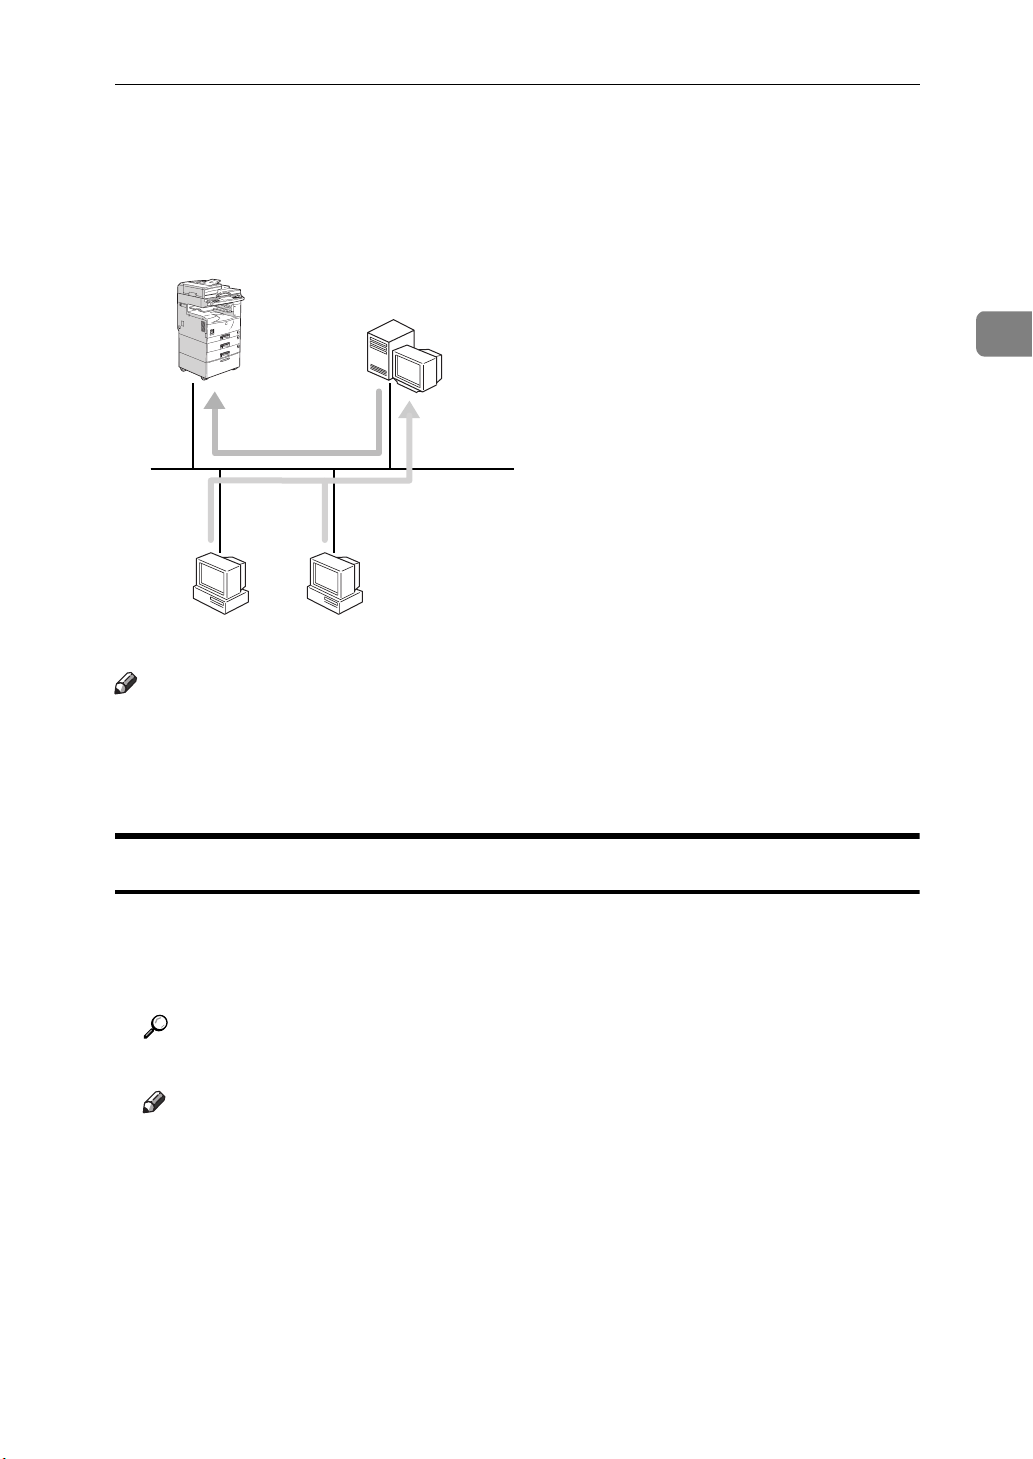
Introduction
This manual contains detailed instructions on configuring your printer for using
as a network printer. The actual procedures may differ depending on your network environment. Use the procedures for your network environment.
Windows NT (Server)
NetWare (Server)
Windows 95/98
Windows NT
NetWare
(Client)
Macintosh
Important
❒
The procedures written in this manual assume that you are a network administrator. If you aren't, be sure to consult your network administrator before
configuration.
Reference
Refer to the manual that comes with the printer for information on physically
installing the Network Interface Board and cabling.
Refer to the manual that comes with the printer for information on configuring the Network Interface Board with the Operation panel.
Features
❖
• Support for 100BASE-TX and 10BASE-T
• The Network Interface Board is compatible with NetWare (IPX/SPX),
Windows NT (TCP/IP, NetBEUI), Windows 95/98 (TCP/IP, NetBEUI) ,
and Macintosh (AppleTalk) protocols. This allows you to use the printer in
a network that uses different protocols and operating systems.
• A computer used as dedicated print server is not required, because the
Network Interface Board can be configured as a NetWare print server.
• The Network Interface Board can connect the printer to the network without requiring its own power supply because the Network Interface Board
is installed inside the printer.
1
Page 6
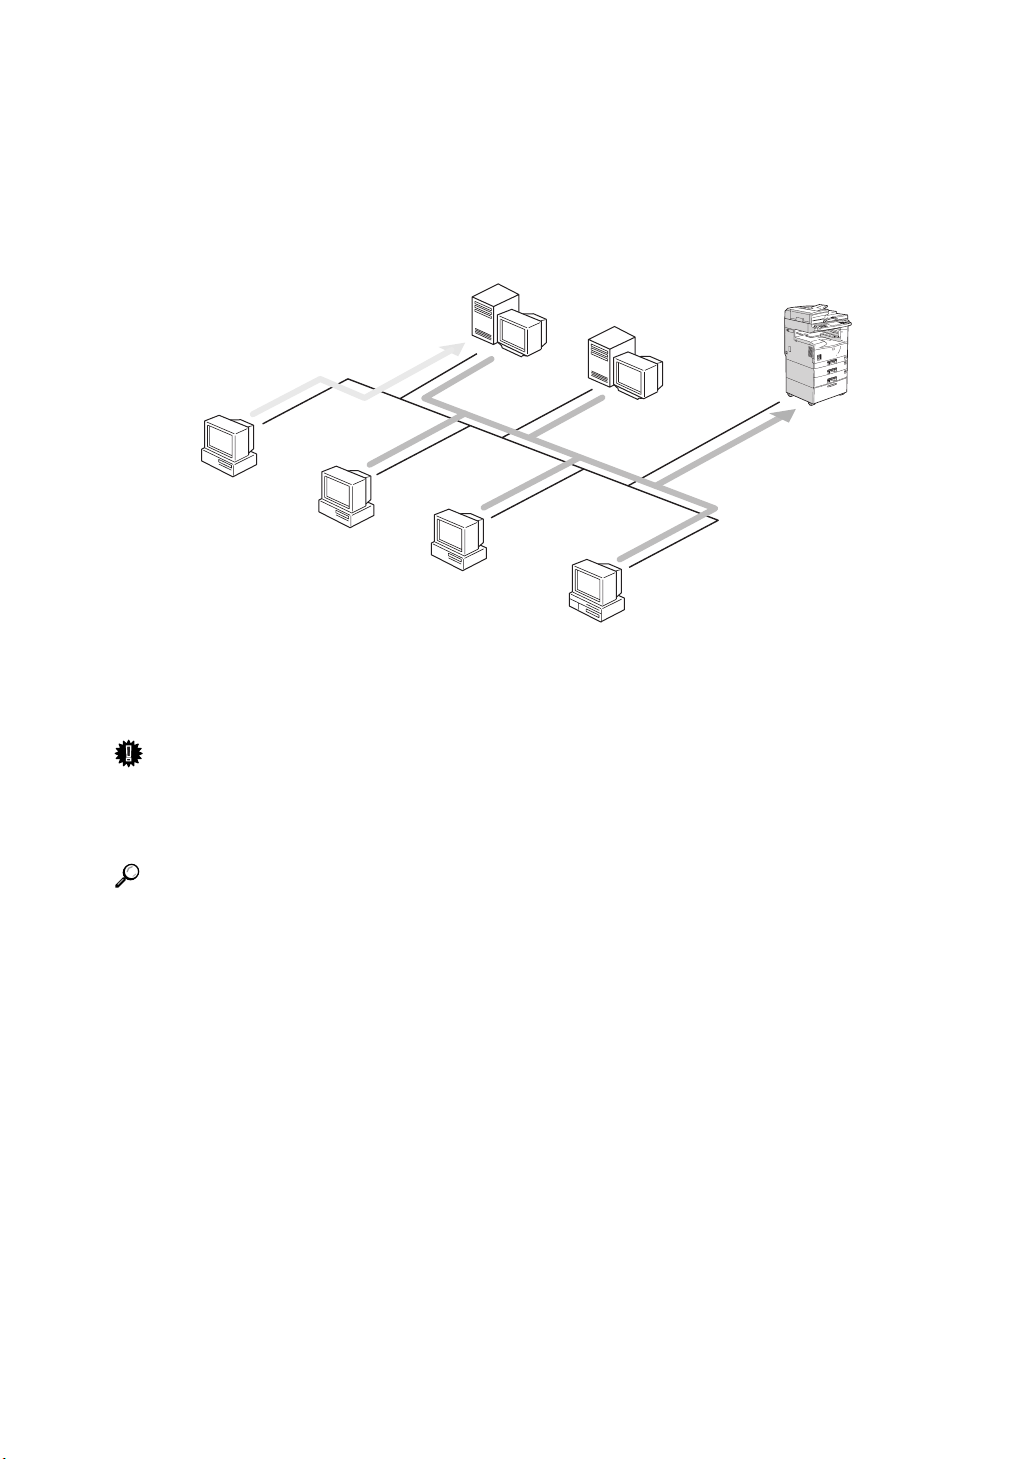
Setting Up the Printer in a Network
Printing without Using a Pri nt Server
You don't have to use a print server. The actual procedure differs depending on
your operating system.
Macintosh
AppleTalk
TCP/IP
NetBEUI
Windows 95/98
• Windows 95/98⇒ P.7
• Windows NT 4.0⇒ P.15
•Macintosh⇒ P.49
TCP/IP
NetBEUI
Windows NT4.0
2
Page 7
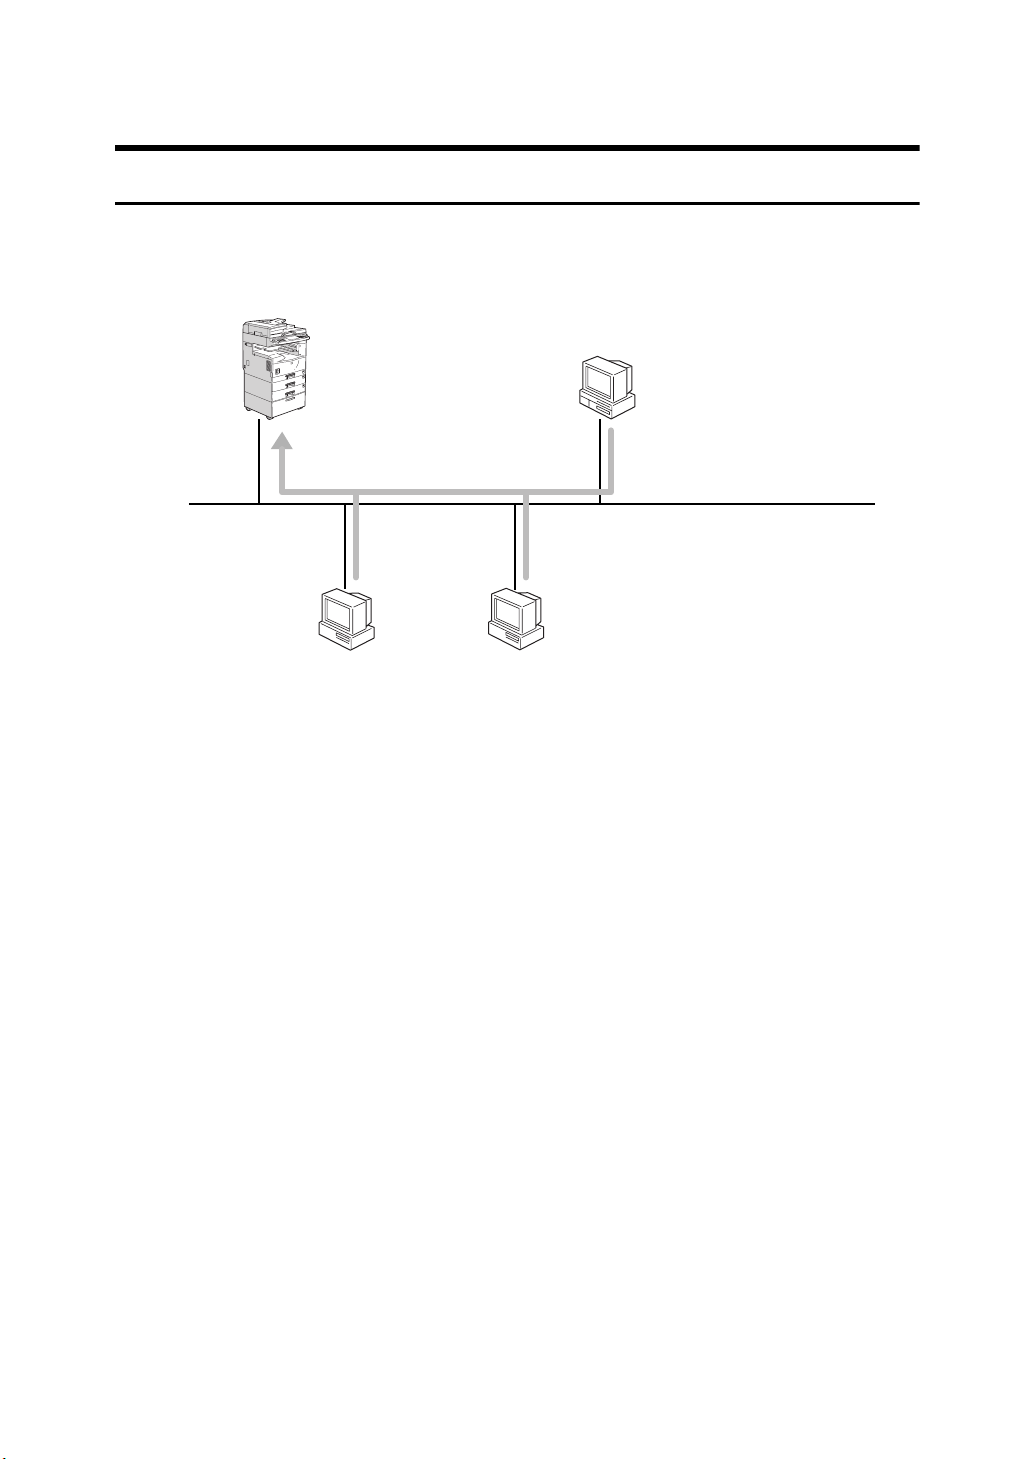
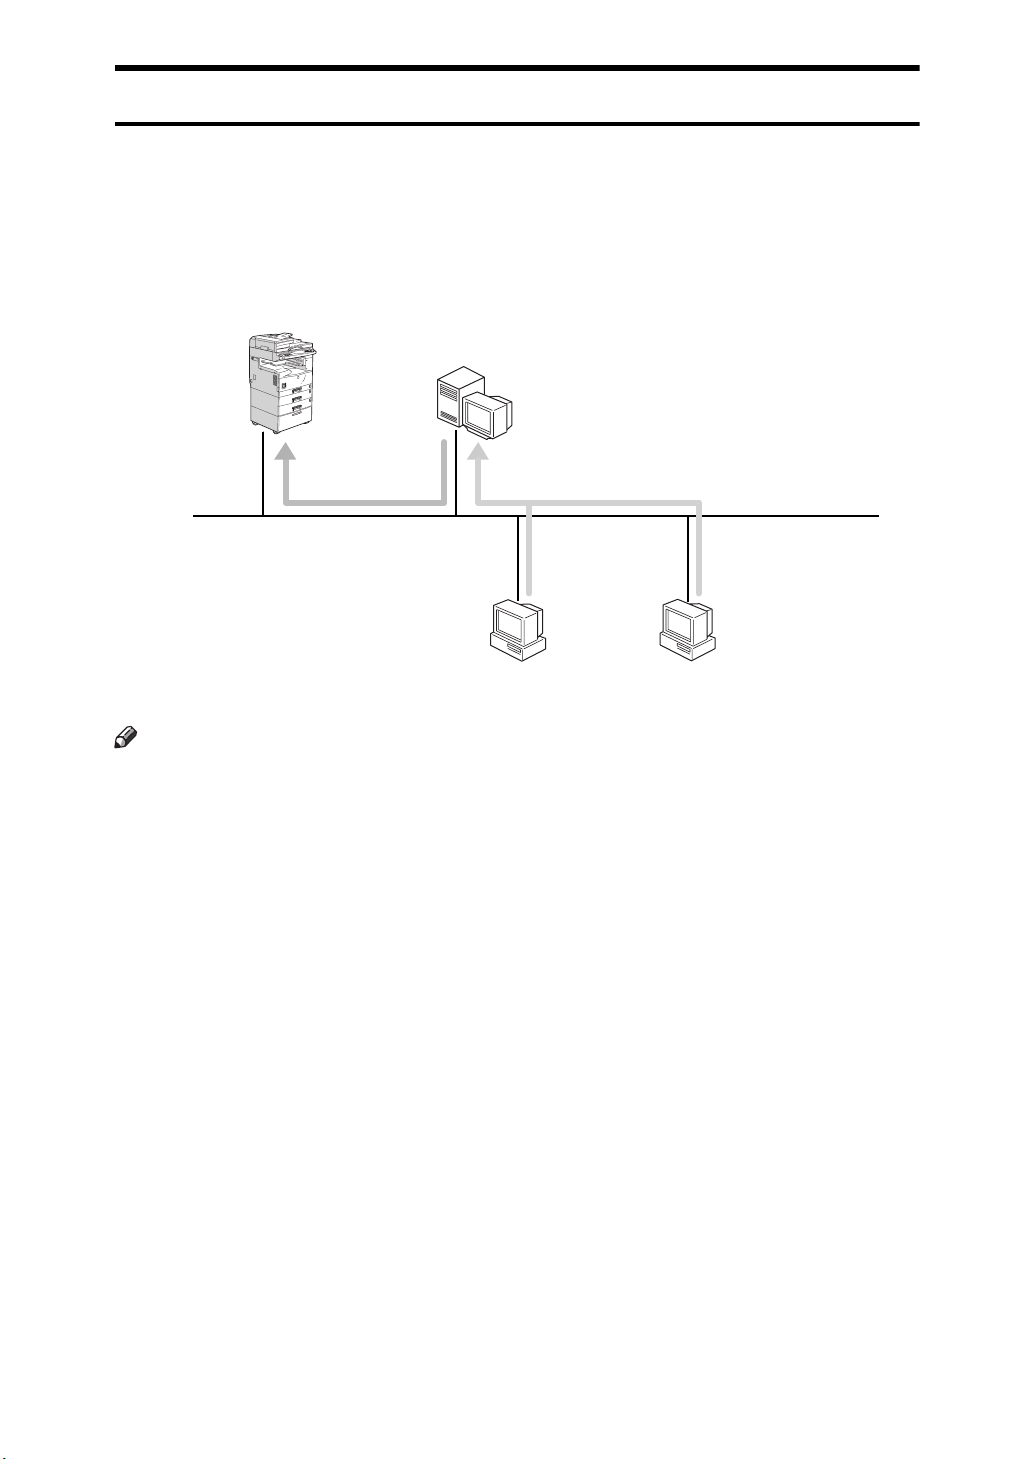
Printing with a Windows NT Print Server
When Windows NT Server or Workstation is the operating system being used
on the print server, TCP/IP or NetBEUI protocols are used.
Windows NT Server (or Workstation) 4.0
Print Server
TCP/IP
NetBEUI
Windows 95/98
Windows NT4.0
Note
❒
For instructions on setting up TCP/IP or NetBEUI in a Windows NT environment, refer to P.15
❒
Client setup instructions are different for each type of Windows OS.
“Preparing for a Network Connection”
.
• Windows 95/98⇒ P.23
• Windows NT 4.0⇒ P.24
3
Page 8
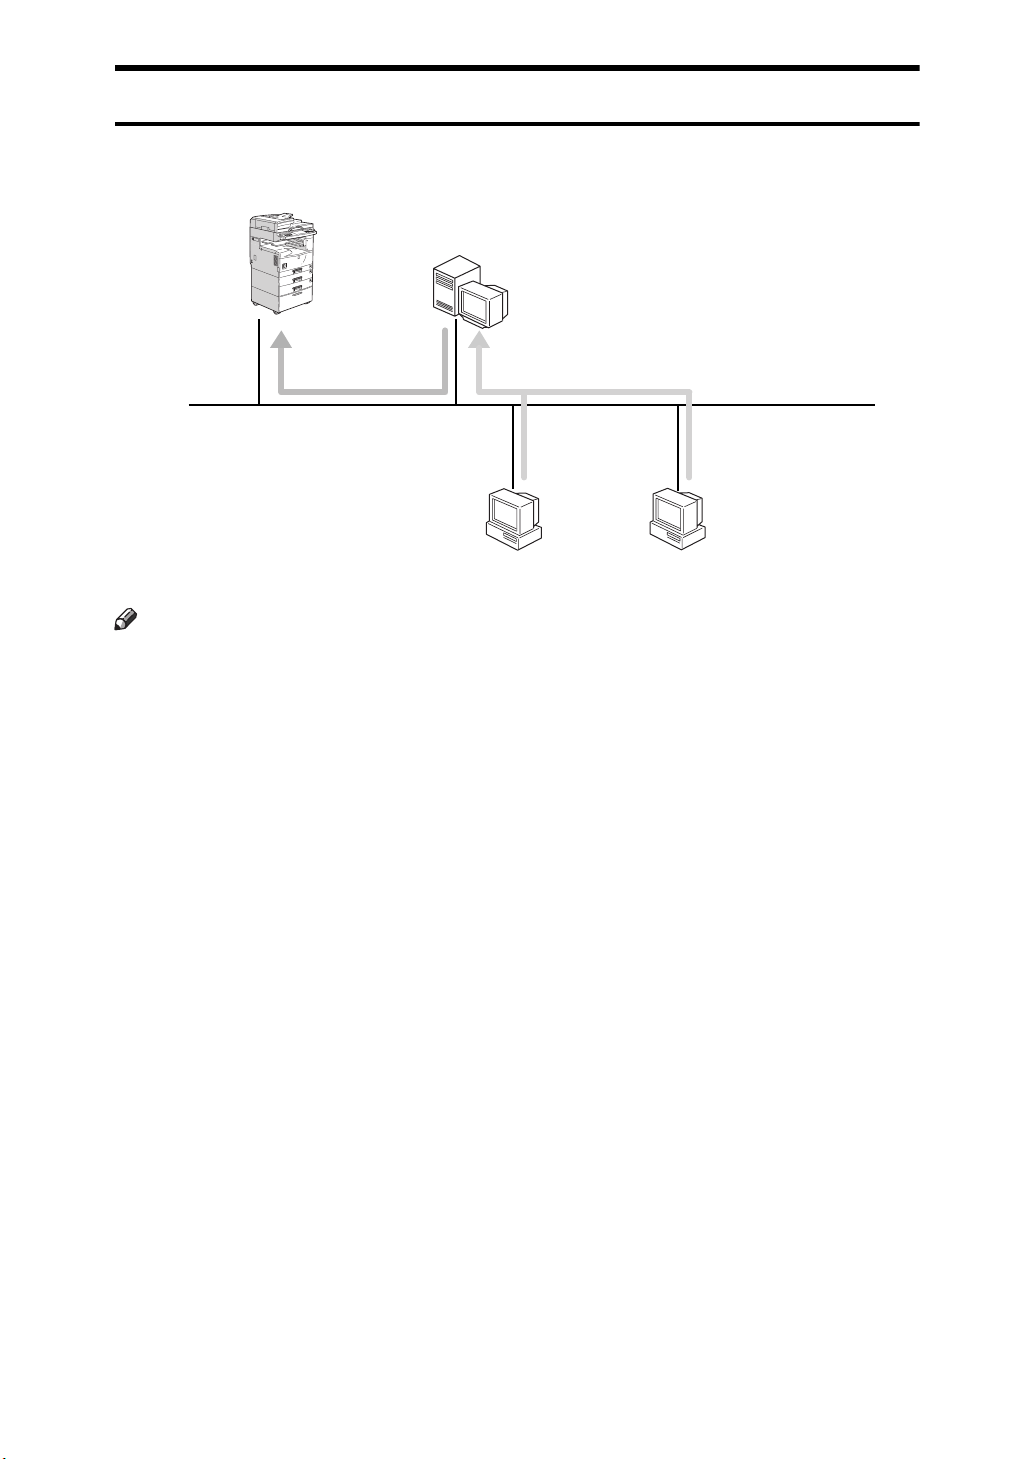
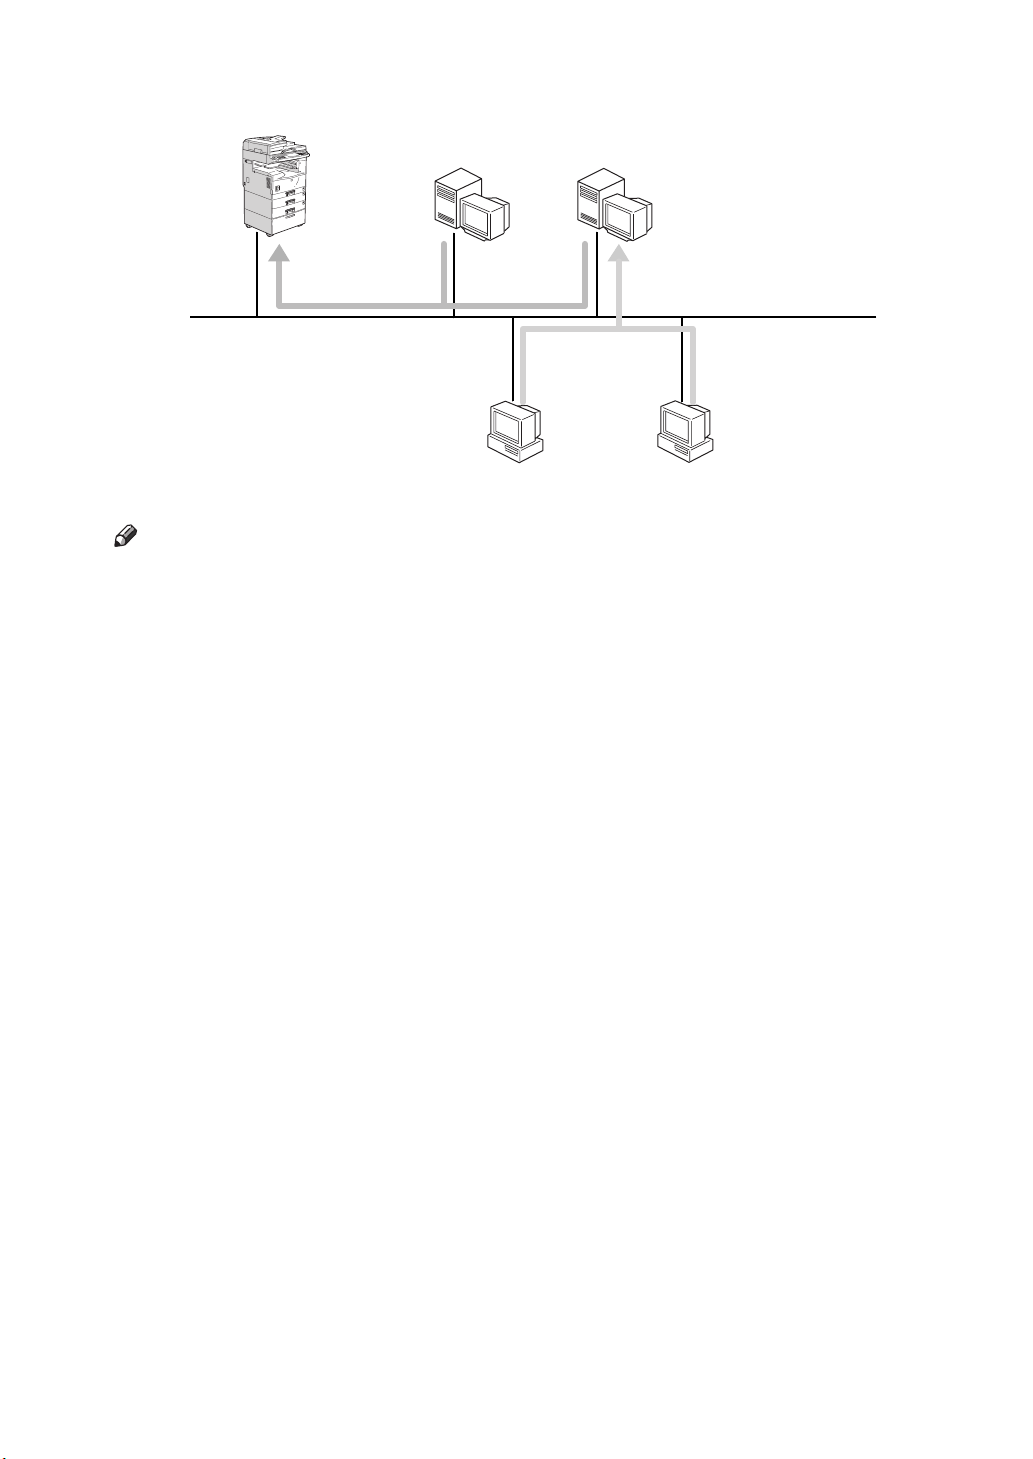
Printing as a NetWare Print Server
The Network Interface Board allows you to set up your printer in a NetWare environment as either a print server or a remote printer. A dedicated NetWare
print server is not required. If a dedicated print server is being used, your printer
should be configured as a remote printer.
Configure as Print Server
❖
Print Server
Note
❒
The actual procedures for configuring your printer may differ depending on
NetWare
File Server
Windows 95/98
Windows 3.1x
the version of NetWare.
• NetWare 3.x⇒ P.32
• NetWare 4.x, 5⇒ P.38
❒
The actual procedures for configuring your client computer may differ depending on the operating system.
• Windows 95/98⇒ P.45
• Windows 3.1x⇒ P.46
4
Page 9
Configure as Remote Printer
❖
Remote Printer
NetWare
Print Server
Windows 95/98
NetWare
File Server
Windows 3.1x
Note
❒
The actual procedures for configuring your printer may differ depending on
the version of NetWare.
• NetWare 3.x⇒ P.35
• NetWare 4.x, 5⇒ P.41
❒
The actual procedures for configuring your client computer may differ depending on the operating system.
• Windows 95/98⇒ P.45
• Windows 3.1x⇒ P.46
5
Page 10

6
Page 11

1. Windows 95/98
Configuration
You can use your printer as a network printer with Windows 95 and Windows
98 using the Multi Direct Print application, and TCP/IP or NetBEUI protocols.
This chapter explains how to configure your printer and Windows.
Configuring Windows 95/98
Basic Procedure
Selecting the protocol
TCP/IP NetBEUI
Assigning the IP address
TCP/IP
NetBEUI
Windows 95/98
Preparation
The Multi Direct Print Application supports the TCP/IP protocol and the
NetBEUI protocol. Consult the network administrator before selecting the
protocol.
Limitation
❒
When you use the NetBEUI protocol, you cannot print to a printer which is
located on the other side of a router.
Note
❒
You can use both TCP/IP and NetBEUI protocols in a computer. To use both
protocols you must first install them.
Configuring Windows environment
Installing the Multi Direct Print
Installing the printer driver
Changing the port
7
Page 12

1
Windows 95/98 Configuration
Preparing to Use the TCP/IP Protocol for Printing
To use the TCP/IP protocol to print, the network must be configured as described below.
Config u r ing the Printer
Configure your printer to use the TCP/IP protocol.
• Confirm that the TCP/IP protocol is set to be active. (The factory default is active)
• Assign an IP address and make other settings required for using the TCP/IP
protocol.
Reference
For more information on how to make the above settings, refer to the Operating Instructions for your printer.
If DHCP is used to assign IP addresses, refer to P.82
Note
❒
After setting the IP address, use the PING command to confirm that it has
been set correctly.
A
Click
B
Input the following. (Example IP address is 192.168.15.16)
C:> ping 192.168.15.16
If the address has been configured correctly, the following message appears.
Reply from 192.168.15.16 : bytes=32 time<10ms TTL=32
If the address has been configured incorrectly, the following message appears.
Request timed out.
Start
[
]
, point to
Programs
[
]
, and then click
“When Using DHCP”
MS-DOS Prompt
[
]
.
.
Configuring a Windows 95/98 computer
Follow these steps to configure a Windows 95/98 computer to use the TCP/IP
protocol.
Double-click the
A
is in the
tab.
Note
❒
If TCP/IP is not installed, click
more information, refer to the Windows 95/98 online help.
The following network components are installed
[
Network
[
icon of
]
Control Panel
[
Add
[
Configuration
]
[
of
, and confirm that “TCP/IP”
]
box of
]
]
tab, and install it. For
Configuration
[
8
]
Page 13

Configuring Windows 95/98
Configure the TCP/IP protocols with the appropriate IP address, subnet
B
mask and other settings.
Confirm with the network administrator that the settings are correct.
Preparing to Use the NetBEUI Protocol for Printing
To use the NetBEUI protocol to print, the network must be configured as described below.
Config u r ing the Printer
Configure your printer to use the NetBEUI protocol.
• Confirm that the NetBEUI protocol is set to be active. (The factory default is
active.)
Reference
For more information on how to make the above settings, refer to the Operating Instructions for your printer.
1
Configuring a Windows 95/98 computer
Install the NetBEUI protocol into a Windows 95/98 computer, and configure
NetBEUI as the default protocol.
Double-click the
A
BEUI” is in the
tab.
tion
]
Note
❒
If NetBEUI is not installed, click
For more information, refer to the Windows 95/98 online help.
Configure the NetBEUI protocol as the default protocol. Click the
B
tab, select “NetBEUI” in the
ration
]
stalled
Click the
C
click
Click
D
After confirming the message to restart, click
E
list, and click
]
Advanced
[
.
OK
[
]
, to close the
OK
[
]
Network
[
The following network components are installed
[
tab, select
]
icon in the
]
Properties
[
Network
[
Control Panel
[
Add
[
The following network components are in-
[
]
Set this protocol to be the default protocol
[
dialog.
]
Configuration
]
[
of
, and confirm that “Net-
]
list of
]
]
tab, and install it.
.
Yes
[
]
Configura-
[
Configu-
[
, and
]
9
Page 14

Windows 95/98 Configuration
Installing the Multi Direct Print Application
Follow these instructions to install Multi Direct Print.
1
Preparation
You must restart the computer after installing Multi Direct Print. Be sure to
close all applications before beginning the installation process.
Note
❒
You must install Multi Direct Print and the appropriate printer driver in order
to print. If you print, using the TCP/IP protocol, to be able to browse the
printer via the network, PRINTER MANAGER FOR CLIENT (⇒refer to the
inside of the front cover of this manual) needs to be installed. If the installer
starts automatically with the AutoRun program, you can install both of these
programs. For more information on how to install these programs, refer to the
Operating Instructions for your printer.
Insert the CD-ROM that comes with the printer into your computer's CD-
A
ROM drive.
Note
❒
If the installer starts automatically, you can use it to install Multi Direct
Print, and set up the printer driver, and then go to procedure F.
B
C
Open
In the
Control Panel
[
Install/Uninstall
[
, and double click the
]
tab, click
]
Install
[
.
]
Add/Remove Programs
[
icon.
]
10
Click
D
Input the name of the CD-ROM drive in the
E
gram
clude the quotation marks), and then click
❒
After the
F
After the
G
er now.
The computer restarts, and Multi Direct Print can now be used. If you select
“No”, be sure to restart the computer manually before launching Multi Direct
Print for the first time.
Go to P.11
Next >
[
box, followed by “:\NETWORK\MDP\DISK1\SETUP” (do not in-
]
Note
An example would be “D:\NETWORK\MDP\DISK1\SETUP” when the
drive letter is “D”.
]
.
]
Welcome
[
Setup Complete
[
, and click
“Setting Up the Printer Driver”
dialog appears, click
]
dialog appears, click
]
Finish
[
.
]
Command line for installation pro-
[
Finish
[
Next >
[
after the computer restarts.
.
]
.
]
Yes, I want to restar t my comput-
[
Page 15

Configuring Windows 95/98
Setting Up the Printer Driver
Using Multi Direct Print to print is not possible until the printer driver is installed and the correct port selected.
Preparation
The target printer must be turned on before starting the installation process.
Install the printer drivers.
A
If the printer drivers have already been installed, you can proceed to the next
step.
Reference
For more information, refer to the Operating Instructions for your printer.
Note
❒
Any port can be selected during the installation, however, LPT1 is recommended.
1
In the
B
by clicking it. On the
Click the
C
In the
D
ing it, and then click
The
IP are displayed.
❒
❒
To print using the NetBEUI protocol, click
E
Printers
[
Add Port
[
Select Printer
[
Limitation
If PRINTER MANAGER FOR CLIENT is not installed in your computer,
printers which can print with TCP/IP are not displayed.
Note
The printers which have replied to a broadcast from the computer are listed here. To print to a printer that is not on this list, or to directly input the
port name, highlight
input the port name with procedure G.
window, highlight the icon of the printer you want to use
]
Details
[
menu, click
File
[
]
tab, and then click
]
box, click
]
]
dialog appears, and the printers which can print with TCP/
[
OK
]
[
New Printer
[
Other
, and select
]
]
Properties
[
Add Port
[
[
by clicking it, and click
NetBEUI
[
.
]
.
]
RICOH Multi Di rect P rint
Next >
[
.
]
by click-
]
]
, and then
11
Page 16

Windows 95/98 Configuration
1
Select the printer you want to use by clicking it, and click
F
Reference
If you want to know more about a particular item in the dialog, refer to
“Multi Direct Print”
P.53
Note
❒
You can identify the “Printer Name” and “Address” on the “configuration
page” printed by the printer.
Confirm that the Port name of the printer is correct, and click
G
If you did not select a printer with procedure F, you must enter the Port name.
.
Next >
[
.
]
Next >
[
Inputting the Port name for use with the TCP/IP protocol
Input the IP address of the Network Interface Board into the
A
box.
You can input the host name or a domain name instead of an IP address
Host Name
into the
❒
[
Limitation
You cannot use a host name that begins with “%%”.
]
box.
IP address
[
.
]
]
Note
❒
When you use DHCP to assign IP addresses to Network Interface
Boards, you can use a printer name (Current Hostname on the network
configuration page) as the host name.
Inputting the port name for use with the NetBEUI protocol
Print a configuration page, and confirm the Network path name.
A
Reference
For information on printing a configuration page, refer to the Operating
Instructions for your printer.
Input the printer's Network path name in form of “%%Computer name
B
\Share name”. Do not input “\\” as head characters but “%%”.
Confirm the port name in the
H
Confirm that the port name is displayed in the
I
and click
Configuration is complete.
When you print, the printing procedure is no different. When you select the
printer configured here, the computer automatically uses Multi Direct Print.
OK
[
.
]
Port Name
[
box, and click
]
Print to the following port
[
Finish
[
.
]
box,
]
12
Page 17

Uninstalling the Multi Direct Print Application
Configuring Windows 95/98
Open
A
With
B
click
After a confirmation message appears, click
C
UninstallShield removes all of the components of the Multi Direct Print application.
When the uninstallation is complete, restart the computer.
D
Control Panel
[
Install/Uninstall
[
Add/Remove
[
, and double click the
]
tab, select
]
.
]
RICOH Multi Direct Print
[
Add/Remove Programs
[
by clicking it, and
]
.
Yes
[
]
icon.
]
1
13
Page 18

1
Windows 95/98 Configuration
14
Page 19
2. Windows NT 4.0
Configuration
You can use your printer as a network printer with Windows NT 4.0 using the
Multi Direct Print application, and TCP/IP or NetBEUI protocols. This chapter
explains how to configure your printer and Windows NT.
Preparing for a Network Connection
Basic Procedure
Selecting the protocol
TCP/IP NetBEUI
Assigning the IP address
TCP/IP
NetBEUI
Windows NT4.0
Preparation
The Multi Direct Print Application supports the TCP/IP protocol and the
NetBEUI protocol. Consult the network administrator before selecting the
protocol.
Limitation
❒
When you use the NetBEUI protocol, you cannot print to a printer which is
located on the other side of a router.
Note
❒
You can use both TCP/IP and NetBEUI protocols in a computer. To use both
protocols you must first install them.
Configuring Windows environment
Installing the Multi Direct Print
Installing the printer driver
Changing the port
15
Page 20

Windows NT 4.0 Configuration
Preparing to Use the TCP/IP Protocol for Printing
Follow these instructions to configure the Network Interface Board and Windows NT to use the TCP/IP protocol.
Config u r ing the Printer
2
Configure your printer to use the TCP/IP protocol.
• Confirm that the TCP/IP protocol is set to be active. (The factory default is active)
• Assign an IP address and make other settings required for using the TCP/IP
protocol.
Reference
For more information on how to make the above settings, refer to the Operating Instructions for your printer.
If DHCP is used to assign IP addresses, refer to P.82
Note
❒
After setting the IP address, use the PING command to confirm that it has
been set correctly.
A
Click
B
Input the following. (Example IP address is 192.168.15.16)
C:> ping 192.168.15.16
If the address has been configured correctly, the following message appears.
Reply from 192.168.15.16 : bytes=32 time<10ms TTL=32
If the address has been configured incorrectly, the following message appears.
Request timed out.
Start
[
]
, point to
Programs
[
]
, and then click
“When Using DHCP”
Command Prompt
[
.
]
.
16
Page 21

Preparing for a Network Connection
Configuring a Windows NT Computer
Follow these steps to configure a Windows NT to use the TCP/IP protocol.
Double-click the
A
Protocol” is in the
Note
❒
If the TCP/IP protocol is not installed, click
install it. For more information, refer to the Windows NT online help.
Configure the TCP/IP protocols with the appropriate IP address, subnet
B
mask and other settings.
Confirm with the network administrator that the settings are correct.
Click the
C
installed.
If “Microsoft TCP/IP Printing” is not installed, click
tab, and install it. For additional help in installing and configuring network
services, refer to the Windows NT online help.
Services
[
Network
[
Network protocols
[
tab, and confirm that the “Microsoft TCP/IP Printing” is
]
icon of
]
Control Panel
[
box of the
]
, and confirm that “TCP/IP
]
Add
[
tab.
]
Protocols
[
]
in the
]
tab, and
Services
[
Protocols
[
Add
[
]
in the
2
]
17
Page 22

Windows NT 4.0 Configuration
Preparing to Use the NetBEUI Protocol for Printing
Follow these instructions to configure the Network Interface Board and Windows NT to use the NetBEUI protocol.
Config u r ing the Printer
2
Configure your printer to use the NetBEUI protocol.
• Confirm that the NetBEUI protocol is set to be active. (The factory default is
active.)
Reference
For more information on how to make the above settings, refer to the Operating Instructions for your printer.
Configuring a Windows NT Computer
Install the NetBEUI protocol into a Windows NT computer, and enter the LAN
adapter number (Lana Number).
Double-click the
A
BEUI Protocol” is in the
Note
❒
If the NetBEUI protocol is not installed, click
and install it. For more information, refer to the Windows NT online help.
Change the Lana Number. Click the
B
face
of the
]
Network Services
[
Network
[
icon in the
]
Network protocols
[
box , and click
]
[
Services
[
Control Panel
box of the
]
[
tab, select the
]
Properties
[
, and confirm that “Net-
]
tab.
]
Protocols
[
NetBIOS inter-
[
Add
Protocols
[
]
in the
.
]
]
tab,
18
Select the Lana Number corresponding
C
headline, and click
Input “0” as the Lana Number.
D
Note
❒
If the other protocol's Lana Number is configured with “0”, you must
change the Lana Number a number other than “0”.
Click
E
Click
F
After confirming the message for restart, click
G
Note
❒
When you change the Lana Number, You must restart.
OK
[
close
[
.
]
, and close the
]
Edit
[
.
]
Network
[
dialog.
]
Nbf protocol
[
Yes
[
of the
]
.
]
Network route
[
]
Page 23

Preparing for a Network Connection
Installing the Multi Direct Print Application
Follow these instructions to install Multi Direct Print.
Preparation
You must restart the computer after installing Multi Direct Print. Be sure to
close all applications before beginning the installation process.
Note
❒
You must install Multi Direct Print and the appropriate printer driver in order
to print. If you print, using the TCP/IP protocol, to be able to browse the
printer via the network, PRINTER MANAGER FOR CLIENT (⇒refer to the
inside of the front cover of this manual) needs to be installed. If the installer
starts automatically with the AutoRun program, you can install both of these
programs. For more information on how to install these programs, refer to the
Operating Instructions for your printer.
❒
To install this software you must be logged on as a member of the Administrators group.
Insert the CD-ROM that comes with the printer into your computer's CD-
A
ROM drive.
2
Note
❒
If the installer starts automatically, you can use it to install Multi Direct
Print, and set up the printer driver, and then go to procedure F.
Open
B
In the
C
Click
D
Input the name of the CD-ROM drive in the
E
gram
clude the quotation marks), and then click
❒
After the
F
After the
G
er now.
The computer restarts, and Multi Direct Print can now be used. If you select
“No”, be sure to restart the computer manually before launching Multi Direct
Print for the first time.
Go to P.11
Control Panel
[
Install/Uninstall
[
Next >
[
box, followed by “:\NETWORK\MDP\DISK1\SETUP” (do not in-
]
Note
An example would be “D:\NETWORK\MDP\DISK1\SETUP” when the
drive letter is “D”.
]
.
]
Welcome
[
Setup Complete
[
, and click
“Setting Up the Printer Driver”
, and double click the
]
tab, click
]
dialog appears, click
]
dialog appears, click
]
Finish
[
.
]
Install
[
Add/Remove Programs
[
.
]
Command line for installation pro-
[
Finish
[
Next >
[
after the computer restarts.
.
]
.
]
Yes, I want to restar t my comput-
[
icon.
]
19
Page 24

2
Windows NT 4.0 Configuration
Setting Up the Printer Driver
Using Multi Direct Print to print is not possible until the printer driver is installed and the correct port is selected.
Preparation
The target printer must be turned on before starting the installation process.
Install the printer drivers.
A
If the printer drivers have already been installed, you can proceed to the next
step.
Reference
For more information, refer to the Operating Instructions for your printer.
Note
❒
Any port can be selected during the installation, however, LPT1 is recommended.
In the
B
by clicking it. On the
Click the
C
In the
D
ing it, and then click
The
IP are displayed.
❒
❒
To print using the NetBEUI protocol, click
E
Select the printer you want to use by clicking it, and click
F
Printers
[
Available Printer Ports
[
Select Printer
[
Limitation
If PRINTER MANAGER FOR CLIENT is not installed in your computer,
printers which can print with TCP/IP are not displayed.
Note
The printers which have replied to a broadcast from the computer are listed here. To print to a printer that is not on this list, or to directly input the
port name, highlight
input the port name with procedure G.
window, highlight the icon of the printer you want to use
]
Ports
[
menu, click
File
[
]
tab, and click
]
New Port
[
]
dialog appears, and the printers which can print with TCP/
New Printer
[
Add Port
[
box, highlight
]
.
]
]
Properties
[
.
]
RICOH Multi Direct Print
[
by clicking it, and click
NetBEUI
[
.
]
Next >
[
.
]
Next >
[
by click-
]
]
, and then
.
]
20
Reference
If you want to know more about a particular item in the dialog, refer to
“Multi Direct Print”
P.53
.
Page 25
Preparing for a Network Connection
Note
❒
You can identify the “Printer Name” and “Address” on the “configuration
page” printed by the printer.
Confirm that the Port name of the printer is correct, and click
G
If you did not select a printer with procedure F, you must enter the Port name.
Next >
[
Inputting the Port name for use with the TCP/IP protocol
Input the IP address of the Network Interface Board into the
A
box.
You can input the host name or a domain name instead of an IP address
Host Name
into the
❒
❒
[
Limitation
You cannot use a host name that begins with “%%”.
Note
When you use DHCP to assign IP addresses to Network Interface
Boards, you can use a printer name (Current Hostname on the network
configuration page) as the host name.
]
box.
IP address
[
Inputting the port name for use with the NetBEUI protocol
Print a configuration page, and confirm the Network path name.
A
.
]
2
]
Reference
For information on printing a configuration page, refer to the Operating
Instructions for your printer.
Input the printer's Network path name in form of “%%Computer name
B
\Share name”. Do not input “\\” as head characters but “%%”.
Confirm the port name in the
H
In the
I
Confirm that the port name is displayed in the
J
box and ' mark is inside the check box. And then click
Configuration is complete.
When you print, the printing procedure is no different. When you select the
printer configured here, the computer automatically uses Multi Direct Print.
Printer Ports
[
dialog, click
]
Port Name
[
Close
[
box, and click
]
.
]
[
Finish
[
Print to the following port(s)
OK
[
.
]
.
]
]
21
Page 26

Windows NT 4.0 Configuration
Uninstalling the Multi Direct Print Application
2
Open
A
In the
B
and click
After a confirmation message appears, click
C
UninstallShield removes all of the components of the Multi Direct Print application.
When the uninstallation is complete, restart the computer.
D
Control Panel
[
Install/Uninstall
[
Add/Remove
[
, and double click the
]
tab, select the
]
.
]
RICOH Multi Direct Print
[
Add/Remove Programs
[
]
.
Yes
[
]
icon.
]
by clicking it,
22
Page 27
Setting up a Client Computer
Setting up a Client Computer
This section describes the procedures for setting up a client in a network that
uses Windows NT Server or Windows NT Workstation as a print server.
Windows NT 4.0
Print Server
Windows 95/98 Windows NT4.0
2
Note
❒
Explanation of this section assumes that the client has already been configured to communicate with a Windows NT print server. Do not proceed with
the following instructions until the client has been set up and configured correctly.
Windows 95/98
To print from Windows 95/98, you must install the printer driver and change
the printer port to the print server.
Install the printer driver as a local printer.
A
Reference
For more information, refer to the Operating Instructions for your printer.
Note
❒
Any port can be selected during the installation, however, LPT1 is recommended.
Click
B
Select the icon of the printer you want to use by clicking it. On the
C
menu, click
Start
[
, point to
]
Properties
[
Settings
[
.
]
, and then click
]
Printers
[
.
]
File
[
]
Click the
D
Details
[
tab, and click
]
Add Port
[
.
]
23
Page 28

Windows NT 4.0 Configuration
2
Click
E
On the network tree, double-click the name of the computer used as the
F
print server.
The printers attached to the network are displayed.
Select the name of the printer you want to use by clicking it, and click
G
Click
H
Confirm that the port name is displayed in the
I
and click
Network
[
OK
[
]
[
.
OK
]
, and click
]
.
Browse
[
.
]
Print to the following port
[
Windows NT 4.0
Printers
Use the
A
B
C
[
Click
Double-click the
This launches the Add Printer Wizard.
Click
Start
[
Network printer server
[
]
window to set up the printer.
, point to
]
[
Settings
[
Add Printer
, and then click
]
icon.
]
, and click
]
Next >
[
Printers
[
.
]
.
]
OK
[
box,
]
.
]
In the
D
print server.
The printers attached to the network are displayed.
Highlight the printer you want to use by clicking it, and click
E
❒
❒
Select whether you use this printer as the default printer, and click
F
After installation is complete, click
G
The icon of the newly installed printer appears in the
Shared Printers
[
Note
If the printer driver is not installed in the print server, a message appears.
If a driver has been installed on the client, click
structions on the screen.
There is a Windows NT printer driver in the CD-ROM that comes with the
printer.
box, double-click the name of the computer used as a
]
[
OK
]
[
, and follow the in-
Finish
[
.
]
Printers
[
]
window.
OK
.
]
[
Next >
.
]
24
Page 29

Configuring LPR Port Printing
Configuring LPR Port Printing
This section explains the procedure for printing to a LPR port from Windows
NT.
Preparation
The TCP/IP protocols must be installed and configured correctly. Refer to
“Preparing to Use the TCP/IP Protocol for Printing”
P.16
Note
❒
The following instructions assume that the printer drivers have already been
installed. This is a procedure to change the printer port to LPR.
, for more information.
2
Click
A
Select the icon of the printer you want to use by clicking it. On the
B
menu, click
Click the
C
In the
D
click
[
Note
❒
If “LPR Port” does not appear, “Microsoft TCP/IP Printing” has not been
installed.
Input the IP address of the Network Interface Board into the
E
dress of server providing lpd
Input “lp” into the
F
.
OK
]
[
Click
G
Confirm that the port name is displayed in the
H
box and the ' mark is inside the check box. And then click
, point to
Start
[
]
Properties
[
tab, and then click
Ports
[
]
Available Printer Ports
[
New Port
Close
[
.
]
.
]
Settings
[
.
]
Name of printer or print queue on that server
[
, and then click
]
box, select
]
box.
]
Add Port
[
LPR Port
[
Printers
[
.
]
.
]
by clicking it, and then
]
box, and click
]
print to the following port(s)
[
OK
[
]
File
[
Name or ad-
[
.
]
]
25
Page 30

2
Windows NT 4.0 Configuration
26
Page 31

3. NetWare Configuration
This chapter describes how to configure your printer to use as a print server or
a remote printer in a NetWare environment.
Note
❒
NetWare must be set to active using the operation panel of your printer. For
information on how to set it, refer to the Operating Instructions for your
printer.
Installing the NIB Setup Tool
A utility called the NIB Setup Tool is provided to configure your printer to work
in a NetWare environment. Installing the PRINTER MANAGER FOR ADMINISTRATOR (⇒refer to the inside of the front cover of this manual) installs the
NIB Setup Tool on your computer. This section describes how to install the
PRINTER MANAGER FOR ADMINISTRATOR, and how to run the NIB Setup
Tool.
Limitation
❒
NetWare 3.x, 4.x or 5 must be functional to run the NIB Setup Tool.
❒
The NIB Setup Tool is supported to work with the following operation systems.
• Microsoft Windows 95/98
• Microsoft Windows NT 4.0
Installing the PRINTER MANAGER FOR ADMINISTRATOR
Follow these steps to install the PRINTER MANAGER FOR ADMINISTRATOR.
Preparation
You should install the PRINTER MANAGER FOR ADMINISTRATOR on
your computer. If you install it on a file server and execute it via the network,
it might not work correctly.
Be sure to close all applications before starting the installation procedure.
Insert the CD-ROM that comes with your printer into your computer's CD-
A
ROM drive.
Note
❒
If the installer starts automatically, you can use it to install the PRINTER
MANAGER FOR ADMINISTRATOR, and go to procedure F.
27
Page 32

NetWare Configuration
3
Open
B
In the
C
Click
D
Input the name of the CD-ROM drive in the [command line for installation
E
program] box, followed by “\NETWORK\PRINTMAN\ADMIN\DISK1\SETUP” (do not include the quotation marks) and then click
“Finish”.
❒
After the
F
The Software License Agreement appears.
G
After reading through all of the contents by clicking
agree with the License Agreement.
Select a directory in which it is to be installed, and click
H
If you change the displayed directory, click
Control Panel
[
Install/Uninstall
[
Next >
[
Note
An example would be “D:\NETWORK\PRINTMAN\ADMIN\DISK1\SETUP” when the drive name is “D”.
.
]
Welcome
[
, and double click the
]
tab, click
]
dialog appears, click
]
Install
[
]
Add/Remove Programs
[
.
Next >
[
.
]
Browse
[
PageDown
[
]
to select another one.
Next >
[
icon.
]
]
, click
.
]
[
Yes
]
to
The installation program starts.
After the confirmation dialog appears, the installation program is complete.
Running the NIB Setup Tool
Click
A
up Tool
, point to
Start
[
]
program.
]
Programs
[
, and then click
]
NIB Setup Tool
[
in the
]
NIB Set-
[
28
Page 33

Quick Setup Using the NIB Setup Tool Wizard
Quick Setup Using the NIB Setup Tool
Wizard
Using the NIB Setup Tool, you can easily set up a NetWare printing environment after physically installing the Network Interface Board into the printer,
Wizard
You can select
When you configure the Network Interface Board for the first time, use the Wiz-
ard method.
[
Property Sheet
]
[
or
]
as an installation method.
Limitation
❒
When the Wizard method is used, the Network Interface Board is configured
to work as a Print Server. To configure it as a remote printer, use the Property
Sheet method. For more information, refer to P.32
Settings”
Note
❒
This section assumes that NetWare is functional and that the necessary environment for the NetWare Print Services is available.
❒
You should install the client software released from Novell on the Windows
before running the NIB Setup Tool for configuring in NDS mode or using
Windows NT 4.0.
Log in to the file server as an Admin or Admin equivalent.
A
Run the NIB Setup Tool.
B
Click
C
The Browse dialog of the Network Interface Board appears.
and P.38
Reference
“Running the NIB Setup Tool”
Wizard
[
“NetWare 4.x, 5 - Advanced Settings”
⇒
P.28.
and click
]
[OK]
.
“NetWare 3.x - Advanced
.
3
Click
D
Select the IPX address of the Network Interface Board you are configuring
E
by clicking it, and click
If you don't know which Network Interface Board you are configuring, print
the Configuration Page using the printer's operation panel, and select the
MAC address that is on the page.
Confirm that the MAC and IPX addresses are correct, and click
F
Input the printer name into the
G
The factory default is RNP followed by the last 6 digits of the MAC address.
We recommend that you change it to something that is easier to remember or
something based on the structure of your network.
IPX protocol
[
.
]
Next >
[
.
]
Device Name
[
box.
]
Finish
[
.
]
29
Page 34

NetWare Configuration
3
Input your comments in the
H
The input comments are displayed with the device name when using a utility
such as PRINTER MANAGER FOR ADMINISTRATOR.
In the dialog for selecting a network environment, place ' mark for
I
and remove ' mark for the
Ware
]
Click
J
A dialog for configuring the NetWare environment appears.
Select
K
Mode
When you are using NetWare version 4.x, 5, you can select
❒
In the
L
print server is to be created.
Clicking
dialog.
Next >
[
[
when printing under the NDS mode.
]
Note
In case of configuring NDS Mode, if the
you need to check the version of the client software released from Novell.
Recomended to install the latest version of the client software released
from Novell.
[
.
]
Bindery Mode
File Server Name
Browse
[
when printing under the Bindery mode, or select
]
]
, you can select a file server among those listed in the Browse
box, input the name of the file server in which a
]
Comment
[
box, and click
]
TCP/IP
[
.
]
NDS Mode
[
Next >
[
]
is unable to selected,
.
]
NDS Mode
[
]
.
Net-
[
NDS
[
If you selected
M
print server is created into the
NDS Context
[
Browse
Clicking
listed in the Browse dialogs.
As a context, object names are input from a lower object and divided by a period. For example, if you want to create a file server into NETWORK under
DS, input “NETWORK.DS”.
Click
N
Input the name of the print server you are creating on the NetWare environ-
O
ment into the
The factory default name is already entered. You should change it if necessary.
Input the name of the Printer into the
P
Print Queue into the
The factory default for Printer Name is “Print Server Name” followed by “_1”
and that for Print Queue Name is “Print Server Name” followed by “_Q”(
quotation marks are not included). You should change them if necessary.
[
Next >
[
NDS Mode
[
box.
]
]
, you can select a NDS tree and a NDS context among those
.
]
Print Server Name
[
, input the name of the NDS tree in which the
]
NDS Tree
[
box.
]
Print Queue Name
[
box, and input the context into the
]
Printer Name
[
box.
]
box, and the name of the
]
30
Page 35

Quick Setup Using the NIB Setup Tool Wizard
If you selected
Q
Queue Volume
[
Browse
Clicking
Click
R
A dialog to confirm the printing environment appears.
After confirming the environment, click
S
If you want to change the settings, click
Clicking
the Printer, and the Print Queue on NetWare.
After the confirmation dialog appears, select
T
the NIB Setup Tool.
[
Next >
[
Next >
[
NDS Mode
[
box.
]
]
, you can select one of those shown in the Browse dialog.
.
]
]
, the NIB Setup Tool automatically creates the Print Server,
, input the volume of the print queue into the
]
Next >
[
< Back
[
]
Quit
[
.
]
and make the settings again.
and click
]
Finish
[
to exit
]
3
31
Page 36

NetWare Configuration
NetWare 3.x - Advanced Settings
The actual procedures for configuring your printer differ depending on whether
the Network Interface Board is configured as a print server or as a remote printer. This section describes how to configure it in the NetWare 3.x environment.
Basic Procedure
Installing the NIB Setup Tool
3
Print Server Remote Printer
Configuring the Network Interface Board
Configuring the NetWare
Turning the power
off and on
Preparation
The following procedures use the Property Sheet method in configuring the
Network Interface Board. If you configure the Network Interface Board as a
NetWare print server for the first time after physically installing it, we recommend you use the Wizard method. For more information, refer to P.29
Setup Using the NIB Setup Tool Wizard”
Note
❒
This section assumes NetWare is functional and that the necessary environment for the NetWare Print Service is available.
Start the print server
.
“Quick
Setting Up as Print Server
Log in to the file server as a Supervisor or a Supervisor equivalent.
A
Run the NIB Setup Tool.
B
Reference
“Running the NIB Setup Tool”
Click
32
C
The Browse dialog of the Network Interface Board appears.
Click
D
Property Sheet
[
IPX protocol
[
and click
]
.
]
⇒
[OK]
P.28.
.
Page 37

NetWare 3.x - Advanced Settings
Select the IPX address of the Network Interface Board which is to be con-
E
figured by clicking it, and click
Note
❒
If you don't know which Network Interface Board you are configuring,
print the Configuration Page using the printer's operation panel, and select
the MAC address that is on the page.
Next >
[
.
]
Confirm that the MAC and IPX addresses are correct, and click
F
NIB Setup Tool
[
The
Click
G
The property sheet appears.
Click the
H
A
B
C
D
E
In the
I
Input “PCONSOLE” from the command prompt.
J
F:> PCONSOLE
Configure
[
NetWare
[
In the
In the
print server is to be created.
Click
log.
In the
Click
After a confirmation dialog appears, click
Print Server Name
[
File Server Name
[
Browse
[
Print Server Operation Mode
[
OK
[
]
menu, click
NIB
[
]
]
window appears.
.
]
tab, and make the following settings.
]
box, input the name of the print server.
]
box, input the name of the file server in which a
]
]
to select a file server among those listed in the Browse dia-
group, click
]
to close the property sheet.
to exit the NIB Setup Tool.
Exit
[
]
As Print Server
[
.
OK
[
]
Finish
[
.
]
.
]
3
Create a print queue as follows.
K
Note
❒
If you use a currently defined print queue, proceed to the step L.
A
B
C
In the
Press
Press
Available Options
[
{
Insert
{
Esc
and input a print queue name.
}
to return to the
}
menu, select
]
Available Options
[
Print Queue Information
[
menu.
]
.
]
33
Page 38

3
NetWare Configuration
Create a printer as follows.
L
In the
A
To create a new print server, press
B
If you use an currently defined print server, select one of the print servers
shown in the
❒
In the
C
In the
D
Select the printer which is indicated as “Not Installed”.
E
If you change the name of the printer, input a new name.
F
A name "Printer x" is assigned to the printer. x stands for the number of the
selected printer.
As Type, select
G
The IRQ, Buffer size, Starting form, and Queue service mode are automatically configured.
Press
H
Press
I
Available Options
[
Print Server
[
Important
Use the same name as that specified in the NIB Setup Tool. (Step H-A).
Print Server Information
[
Print Server Configuration menu
[
Remote Parallel, LPT1
[
, and click
Esc
}
{
to return to the
{
Esc
}
menu, select
]
]
list.
menu, select
]
in the confirmation dialog.
Yes
]
[
Print Server Configuration Menu
[
Print Server Information
[
{
Insert
]
]
and input a print server name.
}
Print Server Configuration
[
, select
.
[
.
]
Printer Configuration
.
]
.
]
.
]
Assign print queues to the created printer as follows.
M
In the
A
Select the printer created in the Step L.
B
Press
C
❒
Follow the instructions on the screen to make other necessary settings.
D
When you have finished the above steps, make sure that the queues are assigned.
Press
N
Turn the printer power off and on.
O
Note
❒
To confirm if the printer is configured correctly, enter as follows from the
command prompt.
F:> USERLIST
❒
If the printer works as configured, the name of the print server appears as
an attached user.
Print Server Configuration Menu
[
{
Insert
Note
You can select more than one queue at a time.
{
Esc
to select a queue serviced by the printer.
}
until “Exit?” appears, and select
}
, select
]
Queues Serviced By Printer
[
to exit PCONSOLE.
Yes
]
[
.
]
34
Page 39

NetWare 3.x - Advanced Settings
Setting Up as Remote Printer
Log in to the file server as a Supervisor or a Supervisor equivalent.
A
Run the NIB Setup Tool.
B
Reference
“Running the NIB Setup Tool”
⇒
P.28.
Click
C
The Browse dialog of the Network Interface Board appears.
Click
D
Select the IPX address of the Network Interface Board which is to be con-
E
figured by clicking it, and click
❒
Confirm that the MAC and IPX addresses are correct, and click
F
NIB Setup Tool
[
Click
G
The property sheet appears.
Click the
H
A
B
Property Sheet
[
IPX protocol
[
Note
If you don't know which Network Interface Board you are configuring,
print the Configuration Page using the printer's operation panel, and select
the MAC address that is on the page.
]
window appears.
Configure
[
NetWare
[
In the
In the
print server is to be created.
Print Server Name
[
File Server Name
[
and click
]
.
]
.
]
tab, and make the following settings.
]
box, input the name of the print server.
]
box, input the name of the file server in which a
]
[OK]
Next >
[
.
.
]
Finish
[
3
.
]
Browse
Clicking
Browse dialog.
In the
C
In the
D
Important
❒
Use the same printer number as that to be created in the printer server.
Click
E
After a confirmation dialog appears, click
F
In the
I
[
Print Server Operation Mode
[
Remote Printer No.
[
to close the property sheet.
OK
[
]
menu, click
NIB
[
]
]
, you can select a file server among those listed in the
box, input the printer number.
]
to exit the NIB Setup Tool.
Exit
[
]
group, click
]
[
As Remote Printer
[
.
OK
]
.
]
35
Page 40

3
NetWare Configuration
Input “PCONSOLE” from the command prompt.
J
F:> PCONSOLE
Create a print queue as follows.
K
Note
❒
If you use a currently defined print queue, proceed to the step L.
In the
A
Press
B
Press
C
Create a printer as follows.
L
In the
A
To create a new print server, press
B
If you use an currently defined print server, select one of the print servers
shown in the
❒
In the
C
In the
D
Select the printer which is indicated as “Not Installed”.
E
Available Options
[
{
Insert
{
Esc
[
Important
Use the same name as that specified in the NIB Setup Tool. (Step H-A).
[
[
and input a print queue name.
}
to return to the
}
Available Options
Print Server
[
Print Server Information
Print Server Configuration menu
menu, select
]
Available Options
[
menu, select
]
]
list.
menu, select
]
Print Queue Information
[
menu.
]
Print Server Information
[
{
Insert
]
and input a print server name.
}
Print Server Configuration
[
, select
Printer Configuration
[
.
]
.
]
.
]
.
]
Important
❒
Use the same number as that specified as Remote Printer No. using the
NIB Setup Tool. (Step H-D).
If you change the name of the printer, input a new name.
F
A name "Printer x" is assigned to the printer. x stands for the number of the
selected printer.
As Type, select
G
The IRQ, Buffer size, Starting form, and Queue service mode are automatically configured.
Press
H
I
Press
{
{
Esc
Esc
}
}
Remote Parallel, LPT1
[
, and click
to return to the
Yes
[
in the confirmation dialog.
]
Print Server Configuration Menu
[
.
]
.
]
36
Page 41

NetWare 3.x - Advanced Settings
Assign print queues to the created printer as follows.
M
In the
A
Select the printer created in the Step L.
B
Press
C
❒
Follow the instructions on the screen to make other necessary settings.
D
When you have finished the above steps, make sure that the queues are assigned.
Print Server Configuration Menu
[
{
Insert
Note
You can select more than one queue at a time.
to select a queue serviced by the printer.
}
, select
]
Queues Serviced By Printer
[
.
]
3
Press
N
Start the print server by inputting as follows from the console of the Net-
O
Ware Server.
If it is running, restart it after exiting it.
To exit
❖
CAREE: unload ps er ver
To start
❖
CAREE: load pser ve r
Note
❒
If the printer works as configured, “Waiting for job” appears.
until “Exit?” appears, and Select
{
Esc
}
print_server_name
to exit PCONSOLE.
Yes
]
[
37
Page 42

NetWare Configuration
NetWare 4.x, 5 - Advanced Settings
The actual procedures for configuring your printer differ depending on whether
the Network Interface Board is configured as a print server or as a remote printer. This section describes how to configure it in the NetWare 4.x, 5 environment.
To use NetWare 5
❖
• Load the IPX protocol into the file server in advance.
• You cannot use the NDPS (Novell Distributed Print Services) mode.
3
Basic Procedure
Installing the NIB Setup Tool
Print Server Remote Printer
Configuring the Network Interface Board
Configuring the NetWare
Turning the power
off and on
Preparation
The following procedures use the Property Sheet method in configuring the
Network Interface Board. If you configure the Network Interface Board as a
NetWare print server for the first time after physically installing it, we recommend you use the Wizard method. For more information, refer toP.29
Setup Using the NIB Setup Tool Wizard”
Note
❒
This section assumes NetWare is functional and that the necessary environment for the NetWare Print Service is available.
❒
You should install the client software released from Novell on the Windows
before running the NWAdmin.
Start the print server
.
“Quick
Setting Up as Print Server
Important
❒
You can set up the print server using the NDS or Bindery mode in NetWare
4.x, 5. The following procedure is for setting up the print server using the
NDS mode in NetWare 4.1. When you set up the print server using the Bind-
38
Page 43

NetWare 4.x, 5 - Advanced Settings
ery mode, use the NIB Setup Tool Wizard. ⇒ P.29
Setup Tool Wizard”
Log in to the file server as an Admin or an Admin equivalent.
A
Run the NIB Setup Tool.
B
Reference
“Running the NIB Setup Tool”
Click
C
The Browse dialog of the Network Interface Board appears.
Click
D
Select the IPX address of the Network Interface Board which is to be con-
E
figured by clicking it, and click
❒
Confirm that the MAC and IPX addresses are correct, and click
F
NIB Setup Tool
[
Property Sheet
[
IPX protocol
[
Note
If you don't know which Network Interface Board you are configuring,
print the Configuration Page using the printer's operation panel, and select
the MAC address that is on the page.
]
window appears.
and click
]
.
]
⇒
[OK]
Next >
[
P.28.
.
.
]
“Quick Setup Using the NIB
Finish
[
3
.
]
Click
G
The property sheet appears.
Click the
H
A
B
C
D
E
F
Configure
[
[
In the
In the
print server is to be created.
Clicking
Browse dialog.
In the
be created.
Clicking
Browse dialog.
❒
In the
Click
After a confirmation dialog appears, click
Print Server Name
[
File Server Name
[
NDS Context
[
Note
Object names must be input from a lower level and divided by a period.
For example, if you want to create a file server into NETWORK under
DS, input “NETWORK. DS”.
Print Server Operation Mode
[
OK
[
.
]
NetWare
Browse
[
[
]
tab, and make the following settings.
]
box, input the name of the print server.
]
box, input the name of the file server in which a
]
]
, you can select a file server among those listed in the
box, input the context in which the print server is to
]
Browse
to close the property sheet.
]
, you can select a context among those listed in the
group, click
]
[
As Print Server
[
.
OK
]
.
]
39
Page 44

NetWare Configuration
3
In the
I
From Windows, run NWAdmin.
J
Note
❒
The actual NWAdmin programs differ depending on the version of it and
that of the operating system. Run the NWADMIN.EXE except the following cases. When you are using the NetWare 4.11 or higher on Windows
3.1x, run the NWADMN3X.EXE. When you are using the IntranetWare on
Windows95/98, run the NWADMN95.EXE. When you are using the NetWare 5, run the NWADMN32.EXE.
❒
The NWAdmin programs are located in the PUBLIC directory in the SYS
volume. The NWADMN95.EXE is located in the PUBLIC\WIN95 directory. The NWADMN32.EXE is located in the PUBLIC\WIN32 directory.
❒
For more information on NWAdmin, see the documentation that comes
with the NetWare.
Create a print queue as follows.
K
Select the container object the print queue is located in among those in
A
the directory tree, and click
In the
B
click
In the
C
In the
D
In the
E
created to highlight it, and click
menu, click
NIB
[
]
Class of new object
[
.
OK
[
]
Print Queue name
[
Print Queue Volume
[
Available objects
[
to exit the NIB Setup Tool.
Exit
[
]
Create
[
box, click “Print Queue” to highlight it, and
]
box, input the name of the print queue.
]
box, click Browse button.
]
box, click the volume in which the print queue is
]
in the
]
OK
[
Object
[
.
]
menu.
]
40
Important
❒
Select the volume on the file server specified in the NIB Setup Tool.
(Step H-B).
After confirming the settings, click
F
Create a printer as follows.
L
Select the container object the printer is located in, and click
A
the
Object
[
In the
B
. When you are using the NetWare 5, click “Printer (Non NDPS)”.
OK
]
[
In the
C
Click
D
Assign print queues to the created printer as follows.
M
Click
A
In the
B
light it, and click
menu.
]
Class of new object
[
Printer name
[
Define additional properties
[
Assignments
[
Available objects
[
box, input the name of the printer.
]
, and click
]
OK
[
box, click “Printer” to highlight it, and click
]
box, click the queue created in the step K to high-
]
.
]
Add
[
Create
[
to place ' mark, and click
]
in the
]
.
]
Assignments
[
[
group.
]
Create
[
Create
in
]
.
]
Page 45

NetWare 4.x, 5 - Advanced Settings
Click
C
dropdown menu, and then click
Click
D
After confirming the settings, click
E
Create a print server as follows.
N
Select the context specified using the NIB Setup Tool (Step H-C), and in
A
the
In the
B
click
NDPS)”.
In the
C
❒
Click
D
Assign the printer to the created print server as follows.
O
Click
A
In the
B
light it, and click
After confirming the settings, click
C
Configuration
[
Manual load
[
Object
[
Important
Use the same name as that specified using the NIB Setup Tool. (Step H-
A
).
menu, click
]
Class of new object
[
. When you are using the NetWare 5, click “Print Sever (Non
OK
[
]
Print Server name
[
Define additional properties
[
Assignments
[
Available objects
[
, and in the
]
in the
]
, and click
]
OK
[
Communication type
[
Create
[
box, click “Print Server” to highlight it, and
]
box, input the name of the print server.
]
box, click the queue created in the step L to high-
]
.
]
Printer type
[
Communication
[
OK
[
.
]
to place ' mark, and click
]
in the
Add
[
]
OK
[
box, select
]
.
]
group, and click
]
.
]
Assignments
[
.
]
Parallel
[
[
group.
]
Create
using the
]
.
[OK]
.
]
3
Turn the printer power off and on.
P
Note
❒
To confirm if the printer is configured correctly, enter as follows from the
command prompt.
F:> NLIST USER /A/B
❒
If the printer works as configured, the name of the print server appears as
an attached user.
Setting Up as Remote Printer
Log in to the file server as Admin.
A
Run the NIB Setup Tool.
B
Reference
“Running the NIB Setup Tool”
Click
C
The Browse dialog of the Network Interface Board appears.
Property Sheet
[
and click
]
⇒
[OK]
P.28.
.
41
Page 46

NetWare Configuration
3
Click
D
Select the IPX address of the Network Interface Board which is to be con-
E
figured by clicking it, and click
❒
Confirm that the MAC and IPX addresses are correct, and click
F
NIB Setup Tool
[
Click
G
The property sheet appears.
Click the
H
A
B
C
IPX protocol
[
Note
If you don't know which Network Interface Board you are configuring,
print the Configuration Page using the printer's operation panel, and select
the MAC address that is on the page.
Configure
[
NetWare
[
In the
In the
print server is to be created.
Clicking
Browse dialog.
In the
be created.
Print Server Name
[
File Server Name
[
[
NDS Context
[
.
]
]
window appears.
.
]
tab, and make the following settings.
]
]
box, input the name of the file server in which a
]
Browse
]
, you can select a file server among those listed in the
box, input the context in which the print server is to
]
Next >
[
box, input the name of the print server.
.
]
Finish
[
.
]
Browse
Clicking
Browse dialog.
Note
❒
Object names must be input from a lower level and divided by a period.
For example, if you want to create a file server into NETWORK under
DS, input “NETWORK. DS”.
In the
D
In the
E
Important
❒
Use the same number as that of the printer to be created in the print
server.
Click
F
After a confirmation dialog appears, click
G
In the
I
[
Print Server Operation Mode
[
Remote Printer No.
[
to close the property sheet.
OK
[
]
menu, click
NIB
[
]
]
, you can select a context among those listed in the
box, input the number of the printer.
]
to exit the NIB Setup Tool.
Exit
[
]
group, click
]
[
As Remote Printer
[
.
OK
]
.
]
42
Page 47

NetWare 4.x, 5 - Advanced Settings
From Windows, run NWAdmin.
J
Note
❒
The actual NWAdmin programs differ depending on the version of it and
that of the operating system. Run the NWADMIN.EXE except the following cases. When you are using the NetWare 4.11 or higher on Windows
3.1x, run the NWADMN3X.EXE. When you are using the IntranetWare on
Windows95/98, run the NWADMN95.EXE. When you are using the NetWare 5, run the NWADMN32.EXE.
❒
The NWAdmin programs are located in the PUBLIC directory in the SYS
volume. The NWADMN95.EXE is located in the PUBLIC\WIN95 directory. The NWADMN32.EXE is located in the PUBLIC\WIN32 directory.
❒
For more information on NWAdmin, see the documentation that comes
with the NetWare.
Create a print queue as follows.
K
Select the container object the print queue is located in among those in
A
the directory tree, and click
In the
B
click
In the
C
In the
D
In the
E
created to highlight it, and click
After confirming the settings, click
F
Class of new object
[
.
OK
]
[
Print Queue name
[
Print Queue Volume
[
Available objects
[
]
box, click the volume in which the print queue is
]
Create
[
box, click “Print Queue” to highlight it, and
]
box, input the name of the print queue.
box, click Browse button.
]
in the
]
OK
[
.
]
Create
[
Object
[
.
]
menu.
]
3
Create a printer as follows.
L
Select the container object the printer is located in, and click
A
the
Object
[
In the
B
. When you are using the NetWare 5, click “Printer (Non NDPS)”.
OK
]
[
In the
C
Click
D
Assign print queues to the created printer as follows.
M
Click
A
In the
B
light it, and click
Click
C
dropdown menu, and then click
Click
D
After confirming the settings, click
E
menu.
]
Class of new object
[
Printer name
[
Define additional properties
[
Assignments
[
Available objects
[
Configuration
[
Manual load
[
box, input the name of the printer.
]
, and click
]
OK
[
, and in the
]
in the
]
box, click “Printer” to highlight it, and click
]
box, click the queue created in the step K to high-
]
.
]
Communication type
[
to place ' mark, and click
]
in the
Add
[
]
Printer type
[
Communication
[
[
OK
.
]
Assignments
[
box, select
]
.
]
group, and click
]
[
group.
]
Parallel
[
Create
[
Create
using the
]
[OK]
in
]
.
]
.
43
Page 48

NetWare Configuration
Create a print server as follows.
N
Select the context specified using the NIB Setup Tool (Step H-C), and in
A
the
In the
B
click
NDPS)”.
Object
[
menu, click
]
Class of new object
[
. When you are using the NetWare 5, click “Print Sever (Non
OK
[
]
Create
[
.
]
box, click “Print Server” to highlight it, and
]
3
In the
C
❒
Click
D
Assign the printer to the created print server as follows.
O
Click
A
In the
B
light it, and click
In the
C
light it, and click
Input the printer number and click
D
❒
After confirming the settings, click
E
Start the print server by inputting as follows from the console of the Net-
P
Ware Server.
Print Server name
[
Important
Use the same name as that specified using the NIB Setup Tool. (Step H-
A
).
Define additional properties
[
Assignments
[
Available objects
[
[
Printers
[
Important
Use the same number as that specified as Remote Printer No. using the
NIB Setup Tool. (Step H-E).
group, click the printer assigned in the step B to high-
]
[
box, input the name of the print server.
]
to place ' mark, and click
]
, and click
]
box, click the queue created in the step L to high-
]
.
OK
]
Printer Number
Add
[
]
.
]
in the
.
OK
[
]
.
OK
]
[
Assignments
[
[
group.
]
Create
]
.
44
If it is running, restart it after exiting it.
To exit
❖
CAREE: unload ps er ver
To start
❖
CAREE: load pser ve r
print_server_name
Page 49

Setting Up a Client Computer
Setting Up a Client Computer
This section describes how to set up a client computer when you use a NetWare
print server.
Note
❒
This section assumes that the client has NetWare client applications installed
and is correctly configured to communicate with a NetWare print server. If
not, install necessary applications before starting the setting up procedure.
Windows95/98
Follow these steps to set up a Windows 95/98 client.
Preparation
Log in to the NetWare file server before starting the following procedure.
Install the printer driver of the printer you want to use as “Local printer”.
A
Reference
For more information on installing the printer driver, refer to the Operating Instructions for your printer.
Note
❒
Any port is selected during the installation, however, LPT1 is recommended.
Click
B
In the
C
clicking it.
On the
D
Start
[
Printers
[
File
[
, point to
]
window, select the icon of the printer you want to use by
]
menu, click
]
Settings
[
, and then click
]
Properties
[
Printers
[
.
]
.
]
3
Click
E
Click
F
On the network tree, double-click the name of the computer used as the
G
print server.
The names of the printers attached to the network are displayed.
Click the queue you want to print to highlight it, and click
H
Click
I
In the
Click
J
Details
[
Network
[
OK
[
Print to the following port
[
OK
[
tab, and click
]
and click
]
.
]
to close the printer's property, and again, open it.
]
Add Port
[
Browse
[
]
box, a network path to the printer appears.
.
]
.
]
OK
[
.
]
45
Page 50

NetWare Configuration
3
Click the
K
Remove the ' marks from the
L
es.
Note
❒
You should not check these boxes, since they should be specified using the
printer driver. If they are checked, the printer might not print correctly.
Printer Settings
[
tab.
]
Form feed
[
and the
]
Enable banner
[
When Using the PostScript Printer Driver
Follow these steps to set up for the PostScript Printer Driver
Click the
A
Click
B
Remove the ' marks from the
C
CTRL+D after job
Click
M
OK
[
PostScript
[
Advanced
[
to close the property.
]
tab.
]
.
]
check boxes.
]
Send CTRL+D before job
[
and the
]
Windows 3.1x
Follow these steps to set up a Windows 3.1x client.
check box-
]
Send
[
Install the printer driver of the printer you want to use as “Local printer”.
A
Reference
For more information on installing the printer driver, refer to the Operating Instructions for your printer.
Double-click the
B
In the
C
clicking it, and then, click
In the
D
The Network driver dialog appears.
In the
E
the queue you want to print to highlight it.
❒
Click
F
The specified queue is captured to the LPT1.
Installed Printers
[
Ports
[
]
Ports
[
]
Note
You should log in to the print server in order to see the print queues.
Capture
[
Printers
[
box, click
box, click
.
]
icon of
]
box, select the printer driver you want to use by
]
Connect
[
LPT1
[
]
to highlight it, and in the
LPT1
[
]
Control Panel
[
.
]
to highlight it, and click
.
]
Network
[
Resources
[
.
]
box, click
]
46
Page 51

Setting Up a Client Computer
Click
G
The
Remove the × marks from the
H
❒
Click
I
Close the Network driver.
J
Click
K
Click
L
LPT Settings
[
NetWare Settings
[
Note
You should not check these boxes, since they should be specified using the
printer driver. If they are checked, the printer might not print correctly.
to close the
OK
[
]
to close the
OK
[
]
to close the
Close
[
]
.
]
]
dialog appears.
NetWare Settings
[
Connect
[
Printers
[
Form feed
[
dialog.
]
dialog.
]
and the
]
dialog.
]
Enable banner
[
check boxes.
]
3
47
Page 52

3
NetWare Configuration
48
Page 53

4. Macintosh Configuration
Configuring Macintosh
This chapter explains how to configure a network printer in a Macintosh EtherTalk environment. The actual procedures to configure a network printer are
slightly different depending on the version of the Mac OS. This chapter describes how to configure your printer for Mac OS 8. If you are using a different
version, refer to the manual that comes with your version of the Mac OS for more
information.
Basic Procedure
Changing to EtherTalk
Configuring the printer
Changing printer name
Changing zone
Limitation
❒
To print from a Macintosh, the optional PostScript 3 is required.
Changing to EtherTalk
Follow these steps to configure a Macintosh computer to use EtherTalk.
Reference
For information on installing the software required for EtherTalk, refer to the
Macintosh manuals.
Open
A
Select “Ethernet” from the
B
If you change zones, select a name from the
C
Close the
D
Control Panels
[
AppleTalk
[
, and double-click the
]
Connect via
[
control panels.
]
pop-up menu.
]
AppleTalk
[
pop-up menu.
zone
[
]
icon.
]
Restart the Macintosh.
E
49
Page 54

4
Macintosh Configuration
Configuring the Printer
Use the operation panel to activate the EtherTalk protocol (factory default is active).
Reference
For information on configuration, refer to the Operating Instructions for your
printer.
Changing Printer Name
If the network has several same model printers, the names will be the same.
Printers that have the same name will have their names changed slightly in the
Chooser. For example, three printers named “printer” will appear in the chooser
as “printer0”, “printer1” and “printer2”.
Use applications such as
printer names in the Macintosh EtherTalk environment. These utilities are distributed by Apple Computer, Inc.
Apple Printer Utility
LaserWriter Utility
or
to change
50
Page 55

Configuring Macintosh
Changing Zone
It may be necessary to change the zone configuration.
Use applications such as
Apple Printer Utility
the zone configuration in the Macintosh EtherTalk environment. These utilities
are distributed by Apple Computer, Inc.
Note
❒
If your Macintosh is configured to use TCP/IP, you can change the zone configuration with a Web browser. ⇒ P.56
Board with a Web Browser”
Follow these steps to use the Apple Printer Utility.
A
Insert the CD-ROM that comes with the printer into your computer's CDROM drive.
B
Copy the “Zone Name.ps” file in the “Zone Name” folder to the hard disk.
C
Open the copied “Zone Name ps” file using a text editor, and change the
“NewZone” , which is in the second line from the bottom, to the name of the
new zone.
%!PS-Adobe2.0 %%
Title: Changing Zone (EtherNet only)
%%CreationDate: Tue Dec 16 1997
%%EndComments
true 0 startjob not {ERROR}if
(%EtherTalk%) << /EtherTalkZone (
NewZone
%%EOF
D
Save the “Zone Name.ps”.
E
Run the Apple Printer Utility, and select the printer for which the new zone
name is to be used.
F
Select the
Send PostScript File
[
]
in the
Utilities
[
Name.ps” to the printer.
LaserWriter Utility
or
to change
“Configuring the Network Interface
) >> setdevparams
]
menu, and send the “Zone
4
51
Page 56

4
Macintosh Configuration
52
Page 57

5. Appendix
Multi Direct Print
Multi Direct Print is a Windows program that allows you to print on a Peer-toPeer network. This program allows you to print directly to a network printer,
even if there is no print server.
OS Protocol stack
Microsoft Windows 95/98 The Microsoft version of TCP/IP that comes with
Windows.
Microsoft Windows NT 4.0
Note
❒
If your printer is in the middle of warming up or printing, an error message
might appear a certain time after you request a print job. You can change how
long the printer should wait to display the message by clicking
Details
in the
Windows NT4.0.
[
]
tab on Windows 95/98, and
The Microsoft version of NetBEUI that comes with
Windows.
Port Settings
[
Configure Port
[
]
in the
Ports
[
]
tab on
]
53
Page 58

Appendix
6
Select Printer
[
]
A list of available printers appears on this screen. This example is for the English
version.
5
1
4
Printer Name
1.
The contents of this list are different for
TCP/IP and NetBEUI protocols.
TCP/IP
TCP/IP
]
, the printer name
]
, the printer name
If you selected
of the Network Interface Board appeared. If you selected
computer name of the Network Interface
Board appeared.
Note
The printer name can be found on the
❒
printer configuration page.
The printer name is set to “RNP” and
❒
the last 6 digits of the MAC address of
the Network Interface Board. For example, a board with a MAC address of
00:00:74:62:5C:65, would be named
RNP625C65. You can change this
name to something more convenient.
Address
2.
The contents of this list are different for
TCP/IP and NetBEUI protocols.
If you selected
of the Network Interface Board appeared. If you selected
[
[
2 3
5
NetBEUI
[
NetBEUI
[
]
, the
]
, the
computer name of the Network Interface
Board appeared.
Note
The form of the Network path name is
❒
“%% computer name \ name of printer type”.
Comment
3.
Comments that are registered on the Network Interface Board.
4.
Refresh
[
Click to refresh the contents of the display. When refreshing, the name of this
button changes to
stop the refresh.
5.
About
[
Version and copyright information.
Protocol
6.
Select to display the printers which can
print using the selected protocol.
]
Stop
]
[
. Click on it to
]
54
Page 59

Network
[
When you select a printer with the
automatically. These examples are for the English version.
❖ TCP/IP ❖ NetBEUI
1 3
2
Host name
1.
If you print, using the TCP/IP protocol,
to select a printer using a host name or a
domain name, input the name here. Input the IP address into the
box when selecting a printer by IP address.
]
Select Printer
IP address
[
[
]
]
dialog, the Port name is input
Multi Direct Print
5
Limitation
❒
You cannot use a host name that
begins with “%%”.
Note
When you use DHCP to assign IP ad-
❒
dresses to Network Interface Boards,
you can use a printer name (Current
Hostname on the network configuration page) as the host name.
IP address
2.
If you print, using the TCP/IP protocol.
Input the IP address of the printer.
Printer name
3.
Input the printer's Network path name in
form of “%%Computer name \Share
name”. Do not input “\\” as head characters but “%%”.
55
Page 60

5
Appendix
Configuring the Network Interface Board with a Web Browser
The Network Interface Board functions as a Web server in addition to allowing
a printer to function as a network printer. You can use a Web browser to view
the printer status and configure the Network Interface Board.
Configuring the Printer
❖
This facility requires TCP/IP to be installed. After the printer has been configured to use the TCP/IP protocol, it will be possible to adjust the settings
using a web browser.
Reference
For information on configuring the printer to use TCP/IP, refer to the Operating Instructions for your printer.
Operating System Browser Requirements
❖
OS Browser
Microsoft Windows 95/98
Microsoft Windows NT 3.51/4.0
Mac OS 7.6.1 ∼ 8.1
Solaris 2.5 ∼ 2.6
Limitation
❒
Using Windows NT 3.51 with Internet Explorer 3.02 may cause problems.
❒
Sometimes after clicking
Refresh
case, click
❒
The text on the screen may disappear or be aligned incorrectly if the font
size settings of the browser are set to be too large. It is recommended that
you use a font size equal to or smaller than “10 point” with Netscape Navigator, and “Medium” or smaller with Internet Explorer.
[
]
or
Back
[
Reload
[
]
Microsoft Internet Explorer 3.02/4.0
Netscape Navigator 3.0/4.0
]
, the previous page may not appear. In this
.
56
Page 61

Configuring the Network Interface Board with a Web Browser
Going to the Top Page
After launching your Web browser, enter the IP address of the printer. See the
example below. This example is for the English version.
http://192.168.15.16/
(In this example. the IP address of the Network Interface Board is 192.168.15.16.)
Note
❒
If a DNS server is used in the network, you can enter the host name as an URL.
For example, http://webmonitor.netprinter.com/. In order to do this, you
must the register the IP address and host name of the Network Interface
Board with the DNS server. Consult the network administrator for information on how to do this.
❒
If the network uses proxy servers, the browser may run slowly.
3
Header Button
1.
You can register favorite URLs with
URL
]
[
. To view the help section, click
Help
]
[
.
Important
❒
It costs to use the browser to access
a website.
Note
The help file is stored on the CD-ROM
❒
in HTML format.
Menu Button
2.
Buttons to configure the Network Interface Board and confirm the status of the
printer.
1
2
The password is the same as that used
❒
in the remote maintenance (mshell)
and that used in the NIB Setup Tool. If
you change a password on the Web
browser, the other passwords are also
changed.
Representation Area
3.
Displays the name and comments of the
Network Interface Board, and the status
of the printer.
5
Note
Network Config
When you click
❒
log appears requesting the user name
and password. Input only the password in this dialog. The factory default password is “password”.
[
]
, a dia-
57
Page 62

Appendix
5
-
Linking the address (URL) to the
You can link the address (URL) of the
Help
]
[
Help
[
button
]
button to the help files on your com-
puter or on a Web server.
A
Copy the help file on the CD-ROM to the desired location. The help files are
located in folders labeled with abbreviated language names. For example, English help files are in the "EN" folder. Be sure to copy the entire "EN" folder to
the new location.
B
Using a web browser, navigate to the Top Page and click
C
Input your password, (it is not necessary to enter a user name) and click
D
Input the path to the help file in the
Help URL
[
]
box.
Network config
[
If you copied the help file to "C:\HELP\EN" then enter "file://C:/HELP/".
For example if you copied the file to a web server and the address (URL) that
will be linked to the help files is "http://a.b.c.d/HELP/EN/index.html", enter "http://a.b.c.d/HELP/".
E
Click
Apply
[
]
.
When a warning message appears, select to continue configuring this procedure.
]
.
[
OK
]
.
58
Page 63

Assigning IP Address with ARP+PING
Assigning IP Address with ARP+PING
Using TCP/IP, you can assign the IP address using ARP and PING. The following example is for a BSD UNIX workstation (SunOS 4.x).
Preparation
ARP+PING should be set to active in the network boot configuration before
assigning the IP address using ARP+PING. For how to set it to active, refer to
the Operating Instructions for your printer.
Log in to the workstation as root.
A
Use the arp command to assign the IP address to the MAC address of the
B
Network Interface Board.
# arp -s 192.168.15.16 00:00:74:62:5C:65
Note
❒
192.168.15.16 is the IP address, 00:00:74:62:5C:65 is the MAC address.
Assign the IP address using the PING command.
C
# ping 192.168.15.16
5
Use the PING command again, to confirm the address.
D
# ping 192.168.15.16
If the address has been configured correctly, the following message appears.
192.168.15.16 is alive
If the address has been configured incorrectly, the following message appears.
no answer from 192.168.15.16
-
How to Confirm the MAC Address
The MAC address (Ethernet address) of the Network Interface Board is required
in order to use ARP and PING to assign the IP address.
The MAC address can be seen on the printer configuration page.
Reference
For more information on printing a configuration page, refer to the Operating
Instructions for your printer.
59
Page 64

Appendix
Remote Maintenance by Telnet (mshell)
You can view the printer status and configure the network interface board using
telnet.
Note
❒
You should specify a password so that only the network administrator, or a
person having network administrator privileges, can use remote maintenance (mshell).
Operation Flow
The following is a sample procedure in using Telnet.
Limitation
❒
Only one person at a time can be logged on to do remote maintenance.
5
Using the IP address or host name of the printer, start telnet.
A
% telnet
Note
❒
In order to use the host name instead of the IP address, you must write it
to the /etc/hosts file.
Input the password.
B
Note
❒
The factory default is “password”.
Input a command.
C
Reference
For information on telnet commands, refer to P.61
Finish telnet.
D
msh> logout
When the configuration is revised, a confirmation message requests whether
or not the changes should be saved.
Input “yes” to save the changes, and press
E
If you do not want to save the changes, input “no”and press
want to make additional changes, input “return” at the command line, and
{
press
IP_address
Enter
}
.
{
Enter
“Command List”
.
}
{
Enter
}
. If you
.
60
Note
❒
If the “Can not write NVRAM information” message appears, the changes
are not saved. Repeat the steps above.
Page 65

Remote Maintenance by Telnet (mshell)
❒
The Network Interface Board is reset automatically when the settings are
changed.
❒
When the Network Interface Board is reset, the active print job which has
already been sent to the printer, will finish printing. However, jobs that haven't been sent yet will be cancelled.
Command List
This is a list of commands that can be used via remote maintenance.
Note
❒
Input “help”, to see a list of commands that can be used.
msh> help
❒
Input “help command_name”, to display information on the syntax of that
command.
msh> help
TCP/IP Address
command_name
5
Use the ifconfig command to configure TCP/IP (IP address, subnet mask, broadcast address, default gateway address).
Reference
❖
msh> ifconfig
Configuration
❖
msh> ifconfig le 0
Parameter Configuration Item
(no parameter) IP address
netmask subnet mask
gateway default gateway address
The following is an example for configuring an IP address of 192.168.15.16.
msh> ifconfig le0 192.168.15.16
The following is an example for configuring a subnet mask of 255.255.255.0.
msh> ifconfig le0 netmask 255.255.255.0
Note
❒
This affects the configuration of the Network Board of the IP address that is
used.
❒
To input an address using hexadecimal, add “0x” to the first command.
parameter address
61
Page 66

5
Appendix
-
Address
Subnet Mask
❖
A number used to mathematically “mask” or hide the IP address on the network by eliminating those parts of the address that are alike for all the machines on the network.
Default Gateway Address
❖
A gateway is a connection or interchange point that connects two networks.
A gateway address is for the router or host computer used as a gateway.
Note
❒
To get the above addresses, contact your network administrator.
Access Control
Use the access command to view and configure access control.
Reference
❖
msh> access
Configuration
❖
msh> access
Parameter Configuration Method
control Access Control Address
mask Access Control Mask
Note
❒
The Access Control Address and the Access Control Mask are used to limit
access to the computer used for printing by denying access to users based on
their IP address. If it is not necessary to limit access, set the Access Control
Mask to “0.0.0.0”.
❒
When the Access Control Address matches masked result of the IP address
computer attempting to print, print jobs from that IP address can be accepted
by the Network Interface Board.
❒
For example, if you assign 192.168.15.16 as the Access Control Address to the
Network Interface Board, the combination of the Access Control Mask and
the IP addresses that can print are as follows. The XXX is a variable that
means any number from 1 to 255 is acceptable.
parameter address
62
Access Control Mask IP addresses that can access
the printer
0. 0. 0. 0 XXX.XXX.XXX.XXX
Page 67

Remote Maintenance by Telnet (mshell)
Access Control Mask IP addresses that can access
the printer
255. 0. 0. 0 192.XXX.XXX.XXX
255.255. 0. 0 192.168.XXX.XXX
255.255.255. 0 192.168. 15.XXX
255.255.255.255 192.168. 15. 16
Network Boot
Use the set command to configure a network boot.
msh> set
“On” means active and “Off” means inactive.
Parameter Configuration Method
parameter
{on | off}
ping ARP+PING
tftp RARP+TFTP
bootp BOOTP
dhcp DHCP
Note
❒
When you use RARP+TFTP, BOOTP, DHCP, the server also needs to be configured.
❒
DHCP takes precedence over all other settings.
5
63
Page 68

Appendix
Protocol
Use the set command to allow/prevent remote access for each protocol.
msh> set
Protocol
protocol
{up | down}
5
appletalk
tcpip
netware
netbeui
lpr
ftp
rsh
diprint
web
Note
❒
If you prohibit remote access using TCP/IP and then logout, you cannot use
“Up” means active and “Down”
means inactive.
remote access. If this was a mistake, you can use the printer operation panel
to allow access by TCP/IP.
❒
When you prevent access via TCP/IP, you are also prevented from using lpr,
ftp, rsh, diprint, and web.
Status of Printer
The following commands can be used to get information about the current status
of the printer.
msh>
command
64
Command Information that is displayed
status Status of printer.
Information about the print job.
info Information about the paper tray, output
tray, emulation and program of printer.
prnlog [ID] Lists the last 10 print jobs.
netstat Information on the Network Interface
Board.
Note
❒
More information on the print job is displayed when the ID number is added
after the prnlog command.
Page 69

Remote Maintenance by Telnet (mshell)
Reference
For more information on the meaning of the data returned with these commands, refer toP.72
“Configuring the Network Interface Board”
.
Information about the Network Interface Board Configuration Settings
Use the show command to display the Network Interface Board configuration
settings.
msh> show [-p]
Note
❒
Add “-p” to the show command to have the information displayed one screen
at a time.
Reference
For more information on the meaning of the data returned with this command, refer to P.72
“Configuring the Network Interface Board”
.
System Log Information
5
Use the syslog command to display information stored in the printer's system
log.
msh> syslog
Reference
For more information on the displayed information, refer to P.75
Information”
.
“System Log
SNMP
Use the snmp command to display and edit SNMP configuration settings such
as the community name.
Note
❒
You can configure from No. 1 to 10 SNMP settings.
❒
The factory default settings for No. 1 and 2 are as follows.
Number 1 2
community name public admin
IP address 0.0.0.0 0.0.0.0
access type read-only
trap off
read-write
trap off
65
Page 70

5
Appendix
Display
❖
Shows the SNMP information and available protocols.
msh> snmp ?
msh> snmp [-p] [
Note
❒
If the -p option is added, you can view the displays one by one.
❒
If the registered number is not added, you can view the status of all the registered numbers.
Community name configuration
❖
You can set the community name of the Network Interface Board.
msh> snmp
Note
❒
The community name must consist of 15 characters or less.
Access type configuration
❖
You can select the access type from those listed below.
msh> snmp
number
number
registered_number
name
type
community_name
access_type
]
Access Type Type of access which is permitted
read Read only access is permitted.
write Read and write access is permitted.
trap User is notified of trap messages.
no All access is denied.
Protocol configuration
❖
You should use the following command to set the protocols to active or inactive. If you set a protocol to inactive, you cannot use all the registered numbers for it.
msh> snmp {ip | ipx} {o n | off }
• “On” means active and “Off” means inactive
If you want to change the protocol settings for each registered number, use
the following command. Make sure that the protocol set to inactive using the
above command, cannot set to be active using this command.
msh> snmp
Access Configuration
❖
You can configure an address of a host depending on the protocols used.
The Network Interface Board accepts requests only from hosts having addresses with access types of “read-only” or “read-write”. Input “0” to have
the Network Interface Board accept requests from any host without requiring
a specific type of access.
number
active {ip | ipx} {on | off}
66
Page 71

Remote Maintenance by Telnet (mshell)
The following example shows how set the protocol for an address.
msh> snmp
Note
❒
When using the TCP/IP protocol, input ip followed by a space and then
the IP address.
❒
When using the IPX/SPX protocol, input ipx followed by a space and then
the IPX address followed by a decimal and then the MAC address of the
Network Interface Board.
The following is an example of how to configure registration number 3 with
the IP address 192.168.15.16.
msh> snmp 3 ip 192.168.15.16
The following is an example of how to configure registration number 3 with
the IPX address 7390A448, and the MAC address 00:00:74:62:5C:65.
msh> snmp 3 ipx 7390A 44 8. 00 007 46 25 C6 5
number
{ip | ipx}
address
Changing the Password
Use the passwd command to change the remote maintenance password.
Important
❒
Be sure not to forget or lose the password.
Note
❒
The default factory password is “password”.
Input “passwd”.
A
msh> passwd
Input the current password.
B
Old password:
Input the new password.
C
New password:
Note
❒
The password must consist of 3 to 8 alphanumeric characters and symbols.
Upper and lower case characters are considered unique. For example, R is
different from r.
❒
The password is the same as that used in the configuration of the Network
Interface Board using a Web browser and that used in the NIB Setup Tool.
If you change a password on the mshell, the other passwords are also
changed.
5
Input the new password once again.
D
Retype new password:
67
Page 72

5
Appendix
SNMP
The Network Interface Board functions as a SNMP (Simple Network Management Protocol) agent using the UDP and IPX protocols. Using the SNMP manager you can get information about the printer.
The factory default community names are “public” and “admin”. You can get
MIB information using these community names.
Reference
For more information on configuring the community name, refer to P.65
MP”
in “Remote Maintenance by Telnet (mshell)”.
Limitation
❒
The kinds of supported MIBs differ depending on your printer.
Supported MIBs
❖
• MIB-II
• PrinterMIB
• HostResourceMIB
“SN-
• RicohPrivateMIB
68
Page 73

Understanding the Displayed Information
Understanding the Displayed Information
This section describes how to read the displayed information on the status of the
Network Interface Board.
Print Job Information
The status of the print job can be viewed using the following commands.
• mshell : Use the status command ⇒ P.64
Item Name Meaning
ID Number of the print request.
Source The name of the host requesting the print job.
Process The type of print command.
“Status of Printer”
.
Status Status of print job.
• Active
Printing or being prepared for printing.
•Waiting
Waiting to be transferred to the printer.
Time The time when the print request was received.
5
69
Page 74

5
Appendix
Print Log Information
This is a record of jobs that have been printed up to now. The most recent ten
records are displayed.
This record can be displayed with the following commands.
• mshell : Use the prnlog command ⇒ P.64
Item Name Meaning
ID Printing request number.
Source The user name, workstation name or address of the host
that sent the print job.
Process The type of print command used.
Bytes The size of the file in bytes.
Result Communication result.
•OK
Indicates that the print job was completed correctly.
•NG
Indicates that the print job was not completed normally.
• Canceled
rcp, rsh or lpr print commands were stopped. A problem
occurred with the printing application. This message
doesn't appear when ftp or RPRINTER is used.
“Status of Printer”
.
Time The time when the print request was received.
User The user name, workstation name or address of the host
that sent the print job.
Address IP address.
Process The type of print command used.
Print Start Time The time the print process was started.
Print End Time The time the print process was completed.
Open Count The number of print processes that the application made.
Eof Count The reception number of file unit.
Data Size The number of bytes of received data.
70
Page 75

Understanding the Displayed Information
Network Statistical Information
This section is about the information provided about the Network Interface
Board.
Detailed information about the words used to describe the status of the Network
Interface Board are described below.
• mshell : Use info command ⇒ P.64
Item Name Meaning
System elapsed time The time that passed since the network interface board
started.
Total printing time The total time spent in processing the print data.
Total open count The total open (printing process) count that application re-
quired.
“Status of Printer”
.
Current connection
count
Total connection count The total number of print jobs sent to the Network Interface
Print error count The number of times the printing process sent an error mes-
Access error count The number of times the connection was refused because of
Print request full count The number of times a connection was refused because the
The number of job connecting with the Network Interface
Board currently.
Board.
sage.
the value of the access control.
number of print requests exceeded the number of allowed
sessions.
5
71
Page 76

Appendix
Configuring the Network Int erface Board
Network Interface Board settings can be displayed and confirmed using the
commands below.
• mshell : Use show command ⇒ P.65
Board Configuration Settings”
Item Name Meaning
.
“Information about the Network Interface
5
Common
Mode
Protocol Up/Down
AppleTalk
TCP/IP
NetWare
NetBEUI
NVRAM version
Device name
Comment
Location
Contact
Soft switch
AppleTalk
Mode
Net
Object
Type
Zone
Up means active, Down means inactive.
Internal version number.
AppleTalk protocol in selection.
Network number.
Macintosh printer name.
The type of printer.
Name of the zone that the printer belongs to.
72
Page 77

Item Name Meaning
Understanding the Displayed Information
TCP/IP
Mode
ftp
lpr
rsh
diprint
web
telnet
download
EncapType
Network boot
Filter
Max DSTs
Address
Netmask
Broadcast
Gateway
AccessCtrl
AccessMask
Time server
Home page URL
Home page link name
Help page URL
SNMP protocol
Up means active, Down means inactive.
Frame type.
Network boot.
Internal parameter.
IP address.
Subnet mask.
Broadcast address.
Default gateway address.
Access control address.
Access control mask.
URL of homepage.
URL name of homepage.
URL of help page.
Protocol used with SNMP.
5
73
Page 78

Appendix
Item Name Meaning
5
NetWare
Mode
EncapType
RPRINTER number
RPRINTER name
Print server name
File server name
Context name
Switch
Mode
NDS/Bindery
Packet negotiation
Print job timeout
NetBEUI
Mode
Switch
Mode
Direct print
Notification
Workgroup name
Computer name
Comment
Share name[1]
(this value is fixed)
Frame type.
Remote printer number.
Remote printer name.
Print server name.
Name of the connect file server.
Context of print server.
Active mode.
(this value is fixed)
Time of the job timeout.
(this value is fixed)
(this value is fixed)
(this value is fixed)
Notices of finishing to print.
Name of the workgroup.
Name of the computer.
Comment.
Share name. (name of the printer type)
74
Shell mode Mode of remote maintenance tool.
Page 79

Message List
Message List
This is a list of messages recorded to the printer's system log. The system log can
be viewed using the syslog command.
System Log Information
You can use the following methods to view the system log.
• mshell : Use the syslog command ⇒ P.65
• Network Configuration Page : Configure PCL for the Printer Language, and
push the switch on the Network Interface Board while five seconds ⇒ P.84
“Network Configuration Page”
.
Message When the Network Interface Board Starts or Restarts.
“System Log Information”
.
RICOH Network Interface Board
Ver.x.x.x
PRINTER SYSTEM “system name”
Ver.x.x.x
Attach FileServer=“file server name” The printer is attached to “file server
Current Interface Speed:xxxMbps The speed of the network (10 Mbps or 100
Current IPX address The current IPX address.
Frametype=“frame type name” The "frame type name" is configured to be
NetBEUI Computer Name=“computer
name”
Start httpd The Web server has been started.
Start npmpd for IPX The npmpd for IPX protocol has been
Start npmpd for TCP/IP The npmpd for TCP/IP protocol has been
Start smbd direct print mode(NetBEUI) You can print from a client on the Win-
The version number of the Network Interface Board.
The system name and version of the printer.
name” as the nearest server.
Mbps).
used on NetWare.
The NetBEUI Computer Name is defined
as "computer name".
started.
started.
dows network via the print server.
5
Start snmpd Ver.2.0 The SNMP agent of the displayed version
has been started.
Vendor= , Country= , Lang= The vendor, the country code, and the lan-
guage.
75
Page 80

Appendix
NetWare (When the Network Interface Board is Started)
When working as a print server
❖
5
Access to NetWare server “file server
name” denied. Either there is no account
for this print server on the NetWare server
or the password was incorrect.
Attach to print queue “print queue name” Attached to the print queue.
File server is empty The file server is not registered. Register
Login to fileserver “file server name”
(“NDS|BINDERY”)
Open log file “file name” The specified log file has been opened.
Printer “printer name” has no queue The print queue is not assigned to the
Print queue “print queue name” cannot
be serviced by printer 0, “print server
name”
The print server received error “error
number” during attempt to log in to the
network.Access to the network was denied.Verify that the print server name and
password are correct.
Cannot log in to the file server. Confirm
that the print server is registered on the
file server. If a password is specified for
the print server, delete it.
your file server using the utility.
Logged in to the file server with NDS or
BINDERY mode.
printer. Using NWAdmin, assign the
print queue to the printer, and then restart
it.
Print services are not available for the
print queue. Confirm that the volume of
the print queue exists on the specified file
server.
Cannot log in to the file server. The print
server is not registered or the password is
specified. Register the print server without specifying a password.
76
When working as a remote printer
❖
Cannot create service connection Cannot establish a connection with the file
server. Your request may exceed the maximum number of connections that the file
server can deal with at a time.
Cannot find rprinter (“print server
name”/”printer number”)
Establish a connection with the print server, “print server name”
The printer having the number displayed
on the print server does not exist. Confirm
the number of the printer registered to the
print server.
A connection with the print server has
been established.
Page 81

Message List
No local target for “print server name” Cannot get routing information on the file
server. If a different frame type is configured from that used on the network, you
should select "Auto Select" as a frame
type.
Required file server (“file server name”)
not found
Required print server (“print server
name”) not found
Unable to attach to print server (“print
server name”)
Cannot find the required file server.
Cannot find the print server. Confirm the
name of the print server.
Cannot connect to the print server. The
print server refuses a connection for some
reason. Confirm the configuration of the
print server.
NetBEUI (When the Netw ork Interface Board is Started)
Back to default name (<Computer name>) The same Computer name is detected on
the network. As unable to add computer
name to the suffix, Computer name back
to default name. Configure a new com-
puter name that is unique one.
Print session full Cannot accept the print session.
Required computer name (<Computer
name>) is duplicated name
The same Computer name is detected on
the network. The start job determines the
computer name by adding the computer
name to the suffix (0,1....). Configure a
new computer name that is unique one.
5
77
Page 82

5
Appendix
TCP/IP
When the address is configured
❖
Invalid gateway address The Gateway address is not correct for the
specified IP address.
When using lpr
❖
filter data error Some data cannot be handled by the filter
option. Confirm the file code and the set-
tings of the filter option.
lost connection The connection was cut by a counterpart.
Check the printer to which you requested
to print.
print requests full Cannot accept the print request (max. 5
sessions). Confirm the status of the printer
with mshell, and print it again after the
print request becomes less than 5 sessions.
printer permission denied Cannot get a permission to use the print-
er. Confirm the access rights with the ac-
cess control address and the access control
mask.
printer refuse Something is wrong with your printer.
Confirm the status of the printer.
At the beginning of the message, the IP address of the client is displayed within parentheses.
78
Page 83

Message List
When using SNMP
❖
Exit snmpd The agent is complete. Reset the printer
or turn the printer off and on.
recvfrom:packet discarded,length(Reception packet length)> (Packet size),from
addr <Address of partner point>
session <Community name appointed>
not defined
snmpin:Bad use of session <community
Name> from <Address>
snmpin:error in snmpdecipher,code (<Error No.>)
snmpin:error in snmpservsend,code (<Error No.>)
The received packet was ignored since
the length of the packet exceeds the limit.
Confirm whether the administration station sent a packet whose length is longer
than 1025 bytes.
The community name of the received
packet is not defined. Confirm that the
community name of the administration
station is the same as that specified to the
printer.
The community name of the received
packet is not the same as that of the administration station. Confirm the community name specified to the printer.
An error occurred on the received packet.
Check if the number of the objects sent
from the administration station is more
than 31 and if there are wrong MIB requests.
Cannot send a response packet. Normally, this message is followed by the messages below *1 *2.
5
snmpin:pkt too large,code (<Error num-
*1
ber>)
snmpin:error in sending too large request
back,code (<Error number>),giving up
snmpin:received bad version The version of the received packet is in-
The response packet to the request is too
big to send. Reduce the number of the objects per request.
The packet notifying the error is too big to
*2
send. Reduce the number of the objects
per request.
valid. Confirm that the version of the administration station is version-1(0).
Error numbers in the messages are codes for internal use.
79
Page 84

Appendix
Precautions
Please pay attention to the following when using a network interface board.
When configuration is necessary, give a messenger after configuring justly.
Connecting a dial up router to a Network
When the file server of NetWare exists in the network of remote side, the router
continues being connected by a packet sent from printer, there may be a thing
asked great communication charges. Because this is a thing by specification of
NetWare, you need to cope by network administration shown in the following
in order to evade this problem. Please cope with configuration of printer when
you cannot cope in network administration.
Correspondence Method on Network Administration
5
Filter the packets so that they do not pass over the dial up router.
Note
❒
The MAC address of the printer doing the filtering is printed on the printer
configuration page. Refer to the Operating Instructions, for information on
printing a configuration page.
❒
See the instructions below for information on configuring the printer if the
router cannot be configured.
Correspondence Method by Configuration of Printer (When Use NetWare)
Following the setup method in this manual, configure the file server.
A
Set the frame type for a NetWare environment.
B
Reference
For more information on selecting a frame type, refer to the Operating Instructions for your printer.
Correspondence Method by Configuration of Printer (When do not Use NetWare)
80
While not printing, the Network Interface Board sends packets on the net-
A
work. Set the NetWare to inactive.
Reference
For more information on selecting a protocol, refer to Operating Instructions for your printer.
Page 85

Precautions
When Printing PostScript fr om Windows
When print PostScript from Windows, refer to the Operating Instructions that
comes with the optional PostScript 3, and configure to use the Network Interface
Board with your printer driver.
When print it with NetWa re
Configuration of form feed
You should not configure of form feed on NetWare. You do not need to configure on NetWare in order to control newpage with printer driver of Windows.
There is the case that cannot print it justly when you configure.
If you want to do not do form feed, configure according to OS using it as follows.
Form feed
• In case of Windows 3.1x, remove a check of
alog.
• In case of Windows95/98, you remove a check of
tings
]
tab of property of printer.
[
Form feed
[
Network Settings
]
[
in
]
with
]
Printer Set-
[
di-
5
Configuration of banner page
Please do not configure of banner page on NetWare.
If you want to do not add banner page, configure according to OS using it as fol-
lows.
Enable banner
• In case of Windows 3.1x, remove a check of
dialog.
• In case of Windows95/98, you remove a check of
Settings
]
tab of property of printer.
[
Enable banner
[
Network Settings
]
[
in
]
with
Printer
[
Printing after Resetting the Printer
After resetting the remote printer, it will be cut off from the print server for about
30-40 seconds before connecting again. Due to the NetWare specification, print
jobs may be accepted, but they will not be printed during this interval.
When using the printer as a remote printer, wait about 2 minutes after resetting
the printer before attempting to print.
]
81
Page 86

5
Appendix
When Using DHCP
The following points are important when using DHCP (Dynamic Host Configuration Protocol).
Supported Systems
Windows NT Server 4.0 can be configured as a DHCP server.
Give the printer a static address
Configure the DHCP server to so that the printer has a static address.
Note
❒
When multiple DHCP servers exist, turn an equal reservation into all DHCP
server. A Network Interface Board works by information from DHCP server
replied to in the first place.
Follow these steps to provide the printer with a static IP address.
Start the DHCP manager.
A
Select the scope that will be used, and on the
B
.
tion
]
Enter the IP address into
C
Enter the MAC address of the Network Interface Board into
D
.
er
]
Note
❒
Do not use hyphens to separate the numbers.
❒
If you don't know the MAC address, it can be found on the “configuration
page” printed by the printer.
Input a name and comment into the
E
Note
❒
For additional information about client names, please refer to P.83
Others”
Click
F
An IP address is reserved.
Add
[
.
.
]
IP Address
[
.
]
Client Name
[
Scope
[
]
menu, click
]
and
Client Comment
[
Unique Identifi-
[
Reserva-
[
boxes.
]
“The
82
G
Click
Close
[
, to close dialog.
]
Page 87

The Others
Precautions
Active Lease
• When you click
client leases appears. When the reserved IP address is not assigned to a Network Interface Board, a client name of this dialog appears the name that was
input into with
assigned to a Network Interface Board and comes to use it, an appearing client name changes in a printer name configured by Network Interface Board.
However, only 13 characters appear here from the beginning of printer name.
• When IP address is not assigned by the DHCP server, the Network Interface
Board uses 11.22.33.44 as temporary IP address. You can confirm the printer's
IP address on the network configuration page. ⇒ P.84
Page”
• Because 11.22.33.44 is a special IP address, you cannot print using this address.
• When used DHCP relay agent with the environment that dial up router was
connected to a network, router is connected whenever packet can leave outgoing from Network Interface Board, and there may be the thing that great
communication charges suffer.
[
Add Reserved Clients
[
]
on the
Scope
[
]
dialog. When the reserved IP address is
]
menu of DHCP manager, a list of
“Network Configuration
When using the NIB Setup Tool
If the Network Interface Board is not browsed using the TCP/IP protocol, check
if the TCP/IP environment is correctly configured in your computer.
5
83
Page 88

5
Appendix
Network Configuration Page
You can confirm the network information on the network configuration page.
Confirm that the printer is online.
A
Push the switch on the Network Interface Board for two seconds, and re-
B
lease it.
The network configuration page is printed.
Note
❒
If you push the switch for five seconds, the system log information is printed. For more information on the meaning of the data printed , refer to P.75
“System Log Information”
.
84
Page 89

Network Configuration Page
Node Number : 00:00:74:62:5c:65
Soft Switch : 0x41dc
Printer name : NET_PRINTER
TCP/IP ( Up )
IP Address : 192.168.015.016
Netmask : 255.255.255.000
Gateway : 000.000.000.000
AccessCtrl : 000.000.000.000 (0x00000000)
AccessMask : 000.000.000.000 (0x00000000)
Auto IP(Nboot) : DHCP
Mode : 0x40 0x01
EncapType : DIX Ethernet II
Current Hostname : NET_PRINTER
Current IP Address : 192.168.015.018
Current Netmask : 255.255.255.000
Current Gateway : 000.000.000.000
NetWare ( Up )
IPX Address : 7390A448:000074625C65
EncapType : Auto
RPRINTER number : 0
Print server name : PSERV.NETWORK.DS
File server name : CAREE
Mode : Print server
NetBEUI ( Up )
Switch : 0x06
Workgroup name : WORKGROUP
Computer name : NET_PRINTER
Share name : IPSiO_NX700
Current path name :
AppleTalk ( Up )
Mode : EtherTalk phase 2
Net : 0x3f7a
Object : IPSiO NX700
Type : LaserWriter
Zone : *
\\
NET_PRINTER\IPSiO_NX700
1
2
3
*
4
5
6
5
MAC address
1.
Printer name
2.
TCP/IP
3.
IP address
Subnet mask
Default gateway address
Access control address
Access control mask
Network boot
(Command boot)
Frame type
* : The current configuration is dis-
played in DHCP active.
NetWare
4.
IPX address
Frame type
Remote printer number
Print server name
Name of the connect file server
Active mode
NetBEUI
5.
(this value is fixed)
Workgroup name
Computer name
Share name
Network path name
AppleTalk
6.
Network number
Macintosh printer name
The type of printer
Name of the zone that printer belong
to
85
Page 90

5
Appendix
Specifications
LAN interface 100BASE-TX, 10BASE-T
Frame type EthernetII, IEEE802.2, IEEE802.3, SNAP
Protocol • IPX/SPX
NetWare 3.11, 3.12, 3.2, 4.1, 4.11, 5, IntranetWare
•TCP/IP
Windows 95
Windows 98
Windows NT 4.0
• NetBEUI
Windows 95
Windows 98
Windows NT 4.0
• AppleTalk
Mac OS 7.1 or later
SNMP MIB-II, PrinterMIB, HostResourceMIB, RicohPrivateMIB
86
Page 91

INDEX
A
63
,
,
62
access control address
access control mask
ARP+PING
, 59,
B
BOOTP
,
63
C
client computer, setup
,
,
27
,
49
,
,
,
46
, 23,
,
66
32
,
56
,
,
38
7
Windows 3.1x
Windows 95/98
Windows NT 4.0
community name
configuration
LPR port printing, Windows NT 4.0
Macintosh
NetWare
NetWare 3.x
NetWare 4.x, 5
Web browser
Windows 95/98
Windows NT 4.0
24
15
62
45
,
25
L
LPR port Printing, Windows NT 4.0
M
,
60
75
,
59
,
53
,
,
10
19
,
49
MAC address
Macintosh, configuration
message
,
MIB
68
,
mshell
Multi Direct Print
Multi Direct Print, install
Windows 95/98
Windows NT 4.0
N
,
27
,
32
,
NetWare 3.x, configuration
NetWare 4.x, 5, configuration
NetWare, configuration
,
,
27
,
,
63
83
29
network boot
NIB Setup Tool
install
precautions
quick setup
38
,
25
D
default gateway address
, 63,
DHCP
dial up router, precautions
82
E
EtherTalk
,
49
I
information
Network Interface Board configuration
65, 72
69
70
61
,
,
75
27
Network Statistics
print job
print log
system log
install
Multi Direct Print, Windows 95/98
Multi Direct Print, Windows NT 4.0
NIB Setup Tool
IP address
,
,
, 65,
, 59,
,
71
62
,
80
,
,
P
password
precautions
print server, setup
, 57,
67
,
80
NetWare 3.x
NetWare 4.x, 5
,
32
,
38
R
RARP+TFTP
remote printer, setup
,
NetWare 3.x
NetWare 4.x, 5
,
63
,
35
,
41
S
setup
,
46
, 23,
,
,
11
,
20
45
24
10
19
client computer, Windows 3.1x
client computer, Windows 95/98
client computer, Windows NT 4.0
printer driver, Windows 95/98
printer driver, Windows NT 4.0
, 65,
SNMP
68
87
Page 92

,
,
62
86
,
64
specifications
status of printer
subnet mask
U
uninstall
Multi Direct Print, Windows 95/98
Multi Direct Print, Windows NT 4.0
W
,
,
13
22
Web browser
Windows 95/98, configuration
Windows NT 4.0, configuration
,
56
Z
,
Zone
51
,
,
7
15
88
Page 93

89 UE USA EE GB B307
Page 94

Note to users in the United States of America
Notice:
This equipment has been tested and found to comply with the limits for a Class B digital device, pursuant to Part 15 of
the FCC Rules. These limits are designed to provide reasonable protection against harmful interference in a residential
installation. This equipment generates , u ses and can radiate radio frequency ene rgy an d, i f not in stal led and used i n
accordance with the instructions, may cause harmful interference to radio communications.
However, there is no guarantee that interference will not occur in a particular installation. If this equipment does cause
harmful interference to radio or television reception, which can be determined by turning the equipment off and on, the
user is encouraged to try to correct the interference by one more of the following measures:
Reorient or relocate the receiving antenna.
Increase the separation between the equipment and receiver.
Connect the equipment into an outlet on a circuit different from that to which the receiver is connected.
Consult the dealer or an experienced radio/TV technician for help.
Warning
Changes or modifications not expressly approved by the party responsible for compliance could void the user's authority to operate the equipment.
Caution (in case of IEEE1284 or 100BASE-TX environment):
Properly shielded and grounded cables (STP) and connectors must be used for connections to host computer (and/or
peripheral) in order to meet FCC emission limits.
Caution (in case of 100BASE-TX environment):
AC adapter with ferrite core must be used for RF interference suppression.
Declaration of Conformity
Product Name: Network Interface Board
Model Number: Type185–E
Responsible party: Ricoh Corporation
Address: 5 Dedrick Place, West Caldwell, NJ 07006
Telephone number: 973-882-2000
This device complies with part 15 of FCC Rules.
Operation is subject to the following two conditions:
1. This device may not cause harmful interference, and
2. this device must accept any interference received,
including interference that may cause undesired operation.
Note to users in Canada
Note:
This Class B digital apparatus complies with Canadian ICES-003.
Remarque concernant les utilisateurs au Canada
Avertissement:
Cet appareil numérique de la classe B est conforme à la norme NMB-003 du Canada.
Declaration of Conformity
“The Product complies with the requirements of the EMC Directive 89/336/EEC and the Low Voltage Directive 73/23/
EEC.”
Warning
Changes or modifications not expressly approved by the party responsible for compliance could void the user's authority to operate the equipment.
In accordance with IEC 60417, this machine uses the following symbols for the main power switch:
means POWER ON.
a
means POWER OFF.
b
Copyright © 1999
Page 95

OPERATING INSTRUCTIONS
Network Interface Board Type185–E (Option)
UE USA B307-8617
EE GB
 Loading...