

Ricoh Aficio 180 User Manual o prt185
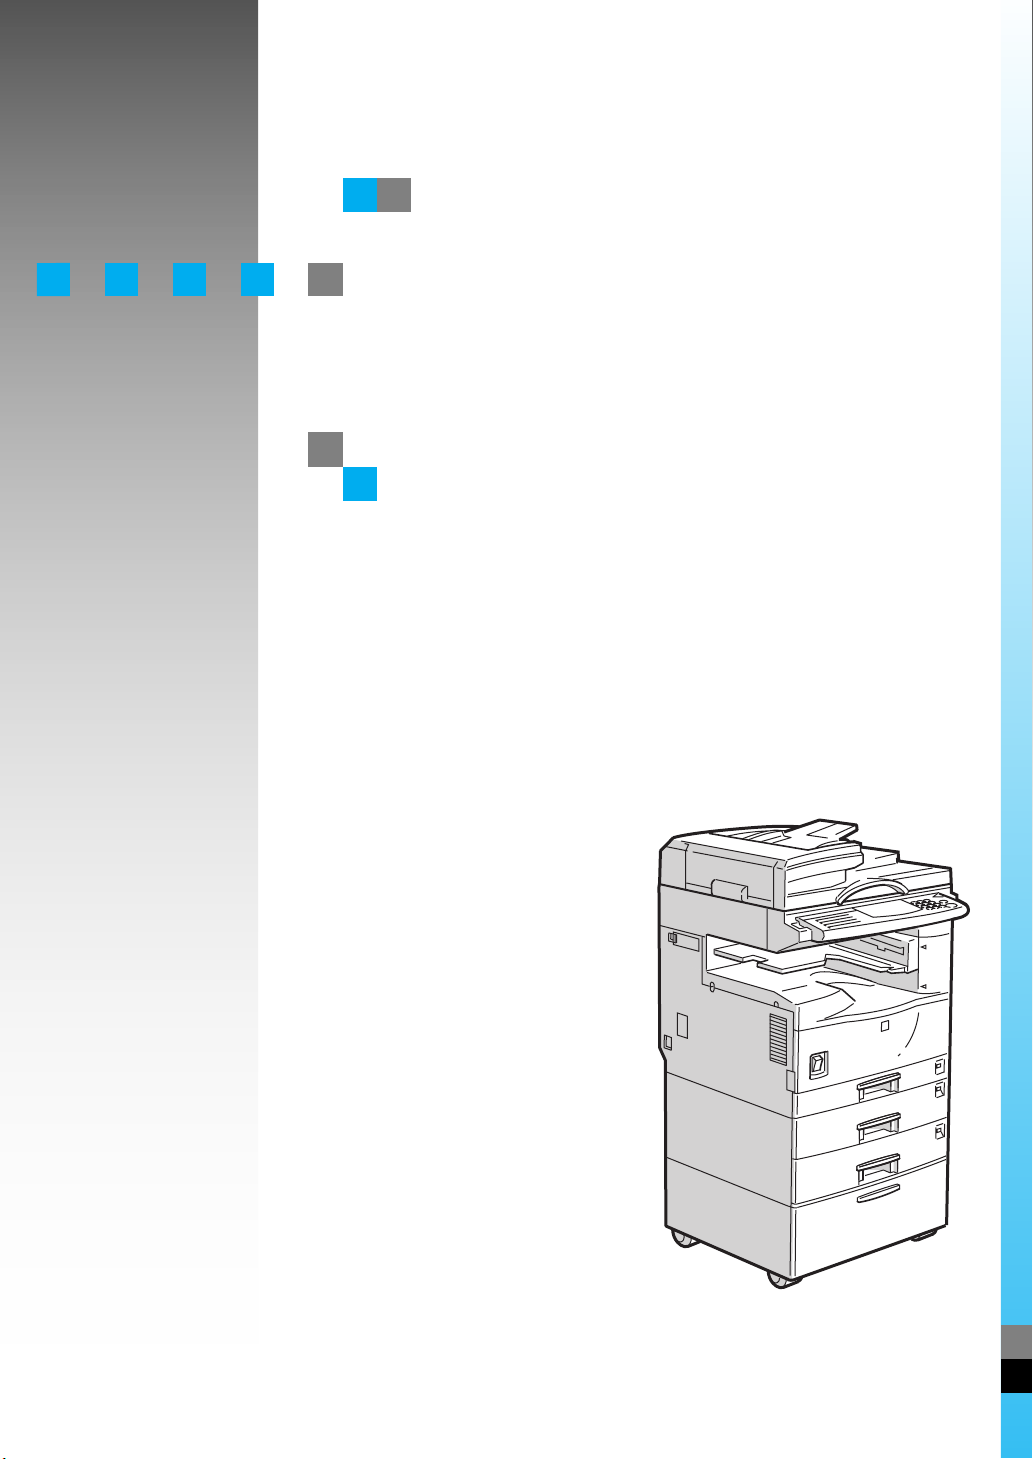
PRINTER Option Type
185
OPERATING INSTRUCTIONS
PRINTER REFERENCE (option)
Read this manual carefully before you use this product and keep it handy for future
reference.
For safety, please follow the instructions in this manual.

Introduction
This manual contains detailed instructions on the operation and maintenance of this machine. To get
maximum versatil ity from this ma chine all opera tors sho uld careful ly read an d follow the ins tructi ons in
this manual.
Please read the Safety Information in the “Copy Reference” before using this machine. It contains important information related to USER SAFETY and PREVENTING EQUIPMENT PROBLEMS.
Important
Parts of this manual are subject to change without prior notice. In no event will the company be liable
for direct, indirect, special, incidental, or consequential damages as a result of handling or operating
the machine.
Trademarks
®
Microsoft
, Windows®, and MS-DOS® are registered trad emarks of M icrosoft C orporation in the Unit ed
States and/or other countries.
®
Ethernet
PostScript
is a registered trademark of Xerox Corporation.
®
, Acrobat® are a registered trademark of Adobe System Incorporated.
PCL® is a registered trademark of Hewlett-Packard Company.
Other product names us ed herei n are for iden tifica tion purp oses on ly and migh t be tradem arks of th eir
respective companies. We disclaim any and all rights in those marks.
IPS-PRINT™ Printer Language Emulation
©
Copyright 1988 - 1999, XIONICS DOCUMENT TECHNOL-
OGIES, INC., All Rights Reserved.
Warning:
Use of controls or adjustment or performance of procedures other than those specified in this manual
might result in hazardous radiation exposure.
Notes:
Some illustrations might be slightly different from your machine.
Certain options migh t no t be av ail abl e in some countries. F or de tails, please contac t yo ur local dealer.

How to Read this Manual
R
Symbols
In this manual, the following symbols are used:
R
WARNING:
This symbol indicates a potentially hazardous situation which, if instructions
are not followed, could result in death or serious injury.
CAUTION:
This symbol indicates a potentially hazardous situation which, if instructions
are not followed, may result in minor or moderate injury or damage to property.
* The statements above are notes for your safety.
Important
If this instruction is not followed, paper might be misfed, originals might be
damaged, or data might be lost. Be sure to read this.
Preparation
This symbol indicates the prior knowledge or preparations required before operating.
Note
This symbol indicates precautions for operation, or actions to take after misoperation.
Limitation
This symbol indicates numerical limits, functions that cannot be used together,
or conditions in which a particular function cannot be used.
Reference
This symbol indicates a reference.
[]
Keys that appear on the machine's panel display.
Keys and buttons that appear on the computer's display.
{}
Keys built into the machine's operation panel.
Keys on the computer's keyboard.
i

TABLE OF CONTENTS
1.Getting Acquainted
Connecting the Machine........................................................................... 1
Requirements................................................................................................ 1
Connecting the Machine to the Host Using the Parallel Cable ..................... 3
Connecting the Machine Using the Network Interface Board Type 185 ....... 3
Features of this Machine.......................................................................... 5
Printer Drivers for this Machine..................................................................... 6
Software and Utilities Included on the CD-ROM................................. .......... 7
Guide to this Machine............................................................................... 8
Operation Panel............................................................................................ 8
Panel Display ................................................................................................ 9
Basic key Operations.................................................................................... 9
Online and Offline ....................................................................................... 10
2.
Configuring the Printer for the Network with the Operation Panel
Configuring the Printer for the Network with the Operation Panel..... 11
3.Installing the Printer Driver and Software
Auto Run Program................................................................................... 17
Installing by Auto Run ................................................................................ 18
Installing the PCL 5e/6 Printer Driver...................................... ..... ......... 19
Windows 95/98 - Installing the PCL 6/5e Printer Driver.............................. 19
Windows NT4.0 - Installing the PCL 6/5e Printer Driver ............................. 19
Windows 3.1x - Installing the PCL 6/5e Printer Driver................................ 20
Installing the PostScript Printer Driver................................................. 22
Windows 95/98 - Installing the PostScript Printer Driver............................. 22
Windows NT4.0 - Installing the PostScript Printer Driver............................ 22
Windows 3.1x - Installing the PostScript Printer Driver............................... 23
Using the Adobe PageMaker Version 6.0 or 6.5......................................... 24
Macintosh....................................................................................... ............. 24
4.Uninstalling the Printer Driver and Software
Uninstalling the PCL 6/5e Printer Driver............................................... 27
Windows 95/98 - Uninstalling the PCL 6/5e Printer Driver.......................... 27
Windows NT4.0 - Uninstalling the PCL 6/5e Printer Driver......................... 27
Windows 3.1x - Uninstalling the PCL 6/5e Printer Driver............................ 28
Uninstalling the PostScript Printer Driver............................................. 29
Windows 95/98 - Uninstalling the PostScript Printer Driver........................ 29
Windows NT4.0 - Uninstalling the PostScript Printer Driver ....................... 29
Windows 3.1x - Uninstalling the PostScript Printer Driver .......................... 30
Macintosh - Uninstalling the PostScript Printer Driver ................................ 30
ii

5.Setting Up the Printer Driver and Canceling a Print Job
PCL 6/5e - Accessing the Printer Properties........................................ 31
Windows 95/98 - Accessing the Printer Properties..................................... 31
Windows NT4.0 - Accessing the Printer Properties.................................... 32
Windows 3.1x - Accessing the Printer Setting dialog box........................... 33
PostScript - Setting Up for Printing....................... .... ..... ....................... 35
Windows 95/98 - Accessing the Printer Properties..................................... 35
Windows NT4.0 - Accessing the Printer Properties.................................... 36
Windows 3.1x - Accessing the Printer Setting dialog box........................... 37
Macintosh - Setting Up for Printing ............................................................. 39
Canceling a Print Job.............................................................................. 40
Windows 95/98 - Canceling Print Job......................................................... 40
Windows NT4.0 - Canceling a Print Job ..................................................... 40
Windows 3.1x - Canceling a Print Job ........................................................ 41
Macintosh - Canceling a Print Job .............................................................. 42
6.Troubleshooting
Error & Status Messages on the Operation Panel................................ 43
Error & Status Messages on the Operation Panel...................................... 43
Getting Printer Information over the Network.............................................. 45
Machine Does not Print........................................................................... 51
Other Printing Problems......................................................................... 54
7.Using the Operation Panel
Adjusting Printer Features..................................................................... 56
Printer Features Menu ................................................................................ 56
Accessing Printer Features......................................................................... 58
Printer Features Parameters....................................................................... 60
Specifying the Custom Paper Size for the Bypass Tray............................. 65
Printer Condition ......................................................................................... 66
Printing with the Operation Panel.......................................................... 67
Using the Proof Print................................................................................... 67
8.Appendix
Specifications.......................................................................................... 71
INDEX........................................................................................................ 72
iii

iv
1. Getting Acquainted
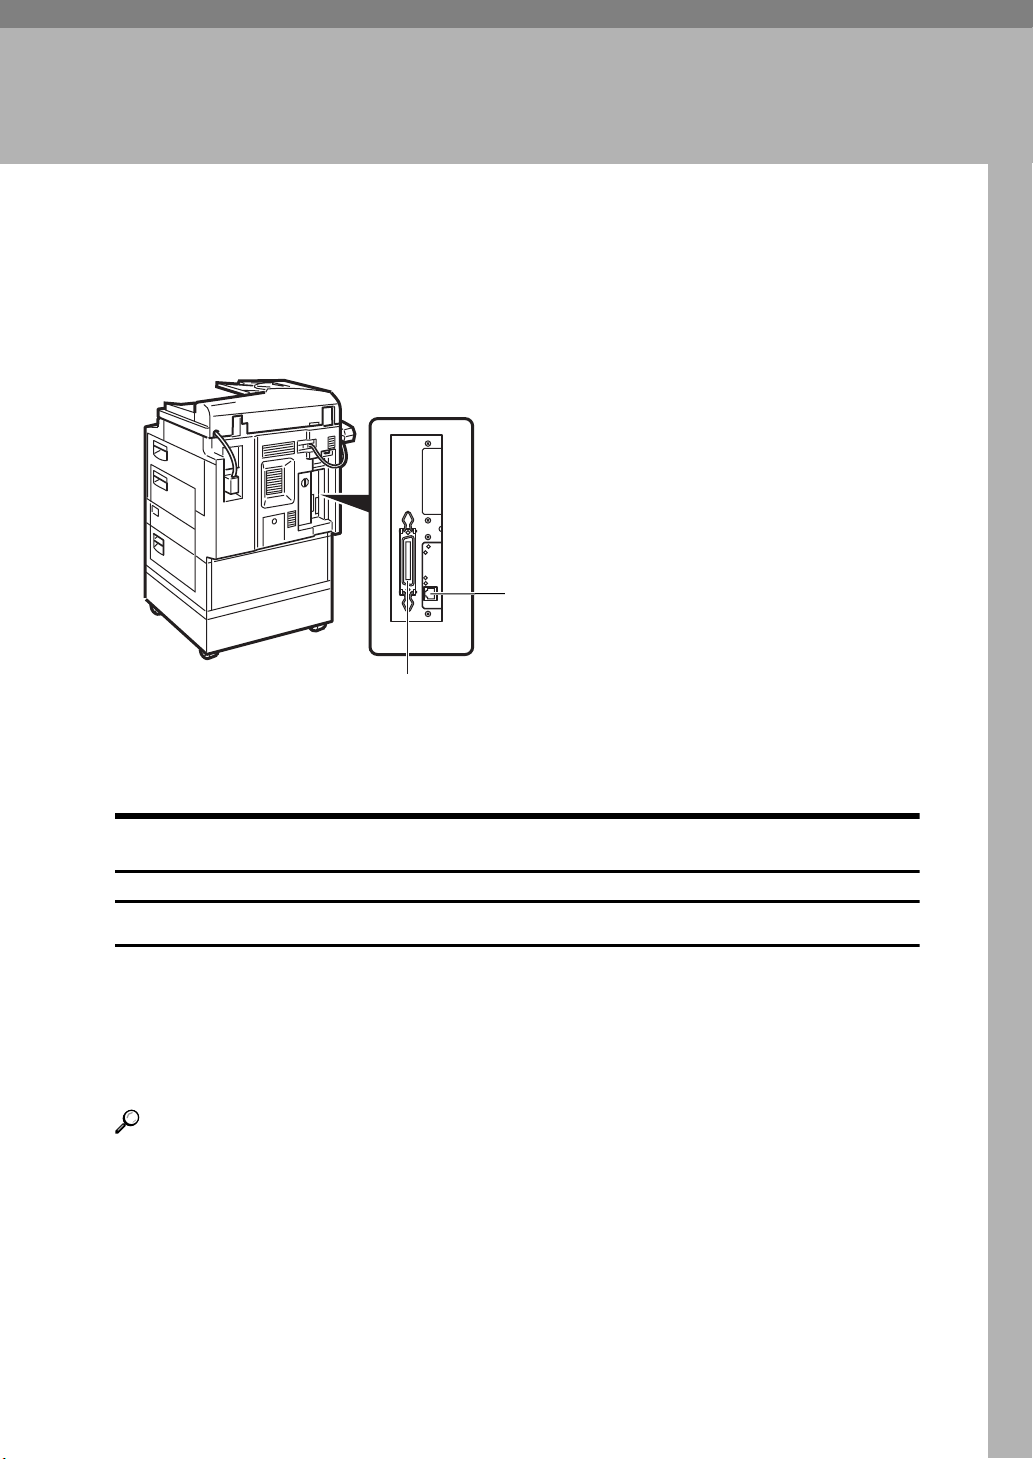
Connecting the Machine
Make sure the shape and the position of the connector are as shown in the illustration.
2
THYHP10E
1
1. Parallel Port
2. 10BASE-T/100BASE-TX
Requirements
Requirements
Before using this machine, make sure that all the environmental and electrical
requirements have been met. Connect the machine to your host computer using
the parallel port, optional Network Interface Board Type 185, or both.
Make sure that all the cables, connectors, and electrical outlets necessary to attach the machine to your host computer or network are present.
Reference
For more information on using the parallel port, see P.3 “Connecting the Machine to the Host Using the Parallel Cable”
For more information on using a network, see P.2 “Network Connections”
1
1
Getting Acquainted
Parallel Cable Requirements
Connect the machine to your host computer using a parallel port. This machine
does not provide the parallel cable to connect the machine to the host computer.
The machine's parallel interface is a standard bi-directional interface. It requires
a standard 36-pin parallel cable compliant with IEEE 1284 and a parallel port
available on the host computer.
Note
❒ Do not use a parallel cable that is longer than 3 meters (10 feet ).
Network Connections
The optional Network Interface Board Type 185 can be installed to allow direct
connection to an Ethernet network.
The Network Interface Board supports 10BASE-T or 100BASE-TX connections.
You can use the machine in the follows network environments:
• Using the appropriate network management software and printer driver.
• Attaching the machine to a networked computer set up as a server.
Client
Driver
File Server
Protocol
*1
With the Windows NT4.0 by the computer based x86 only.
*2
Under the Windows 95/98/NT4.0 only.
Windows 95, 98, NT 4.0
Script 3 Kit Type 185 is required )
PCL 6/5e , PostScript 3
NetWare 3.x, NetWare 4.x, NetWare 5
IPX/SPX, TCP/IP, AppleTalk, NetBEUI
*1
, 3.1x, Macintosh (optional Post-
*2
In a mixed network environment, the protocol switches automatically.
Reference
For more information on installing the Network Interface Board Type 185, see
the operating instructions that comes with it.
For more information on resolving network connection problems, see P.43
“Troubleshooting”
Note
❒ Consult your network administrator before connecting your machine to a
network.
2

Connecting the Machine
Connecting the Machine to t he Host Using the Parallel Cable
Connect the machine to the host computer using a parallel cable compliant with
IEEE 1284 (supplied by you).
Follow these steps to connect the machine to your host computer:
A Make sure you have the correct cable.
B Make sure both the machine and the host computer are turned off.
C Plug the 36-pin end of the parallel cable into the parallel port at the right
side of the back cover of the machine.
Reference
See P.1 “Connecting the Machine” to make sure of the position of the paral-
lel port.
D Squeeze the wire clips on each side of the connector together until they
snap into place. The clips hold the cable securely in place.
E Plug the other end of the parallel cable into the computer's parallel port.
1
Connecting the Mac hine Using the Network Interfa ce Board Type 185
Connect the machine to the network using the Network Interface Board Type
185.
Follow these steps to connect the machine.
A Make sure you have the correct cable.
Note
❒ Under 100BASE-TX environment, properly shielded and grounded cable
(STP) make sure to use for the connection to your host computer (and/or
HUB) in order to meet FCC and EMC Directive 89/336/EEC emission limits.
B Make sure the machine is turned off.
C Loop the network interface cable. The loop should be about 10 cm (4”) from
the end of the cable on the end closest to the printer.
3

1
Getting Acquainted
D Attach the ferrite core to the loop.
TAHX010E
E Attach the network interface cable to the 10BASE-T/100BASE-TX connector
on the right side of the back cover of the machine.
Reference
See P.1 “Connecting the Machine” to make sure of the position of the
10BASE-T/100BASE-TX port.
Note
❒ Make sure that the cable is connected to the 10BASE-T/100BASE-TX port.
❒ Do not connect the cable into the Fax port.
F Connect the other end of the cable into the network.
Button and indicators on the network interface board
1
2
3
4
1. Button
Press this button for more than 2 seconds
to print “Network Configuration Page”.
Press this button more than 5 seconds to
print “System Log Information”.
2. Indicator (orange)
Stays on while the network interface
board is working.
3. Indicator (green)
Stays on while the 100BASE-TX is working. Stays off while 10BASE-T is working.
4. Indicator (green)
Stays on while the machine is in a network enviroment.
4

Features of this Machine
Features of this Machine
This printer is designed especially for office workgroups, both for shared usage
within network environment, and for one-to-one usage by being connected directly to your computer.
❖
Time Saving
You can save time you spend on your print tasks.
• Printing Speed
*1
A4L, 81/2" × 11"L, maximum printing speed from a standard paper tray.
❖
Compact Body
Its compact body requires minimum space to place it on your desk or desk
side.
❖
Network Connectivity
Your printer is network ready with the optional network interface board.
❖
Proof Print
You can print a sample set to check and correct the settings before making a
large print run.
*1
: 18 ppm
1
❖
Major Specifications
Printing Speed
Maximum Print Quality True 600 × 600dpi resolutions
Printer Language
Maximum Input Paper Size
(Paper Tray and Bypass Tray)
Standard Memory Size 16MB
Maximum Memory Size with Optional Memory 80MB
*1
A4L, 81/2" × 11"
*2
Emulations
*3
Option
L
18 pages per minute
PCL 5e, PCL 6
PostScript 3
A3, 11" × 17"
*1
*2
*3
5

1
Getting Acquainted
Printer Drivers fo r th is Mac h in e
Printing requires installation of a printer driver for your operating system. The
following drivers are included in the CD-ROM comes with this machine.
Printer Language PCL 5e PCL 6 PostScript 3
Operating system
Windows 95
Windows 98
Windows 3.1x
Windows NT4.0
Macintosh
*1
Microsoft Windows 95 operating system
*2
Microsoft Windows 98 operating system
*3
Microsoft Windows for Workgroups operating system Version 3.11
*4
Microsoft Windows NT Server network operating system Version 4.0, Microsoft
Windows NT Workstation operating system Version 4.0
*5
Required system is 7.1 or later operating system.
*6
Requires Service Pack 3 or later.
*7
Adobe PostScript Printer Driver and PostScript Printer Description (PPD) files are included in the CD-ROM.
*8
Required the optional Network Interface Board Type 185.
*1
*2
*3
*4
*5
√√
√√
√√ √
√√
√
√
√
√
*6 *7
*7 *8
*6
*6
❖
PCL printer drivers
Printer drivers allow the computer to communicate with the printer via a
printer language. Two kinds of PCL printer drivers, PCL 6 and PCL 5e, are
included in the CD-ROM comes with this machine. We recommend the PCL
6 as your first choice. However, some of your applications might require the
installation of the PCL 5e printer driver. In this case, you can install PCL 5e in
addition to the PCL 6.
⇒ P.19 “Windows 95/98 - Installing the PCL 6/5e Printer Driver”
⇒ P.19 “Windows NT4.0 - Installing the PCL 6/5e Printer Driver”
⇒ P.20 “Windows 3.1x - Installing the PCL 6/5e Printer Driver”
❖
Adobe PostScript Printer Drivers and PPD files
Adobe PostScript printer drivers and the PPD files are included in the CDROM comes with this machine. Adobe PostScript printer driver allows the
computer to communicate with the printer via a printer language. And the
PPD files allow the printer driver to enable the printer specific functions.
⇒ P.22 “Windows 95/98 - Installing the PostScript Printer Driver”
⇒ P.22 “Windows NT4.0 - Installing the PostScript Printer Driver”
⇒ P.23 “Windows 3.1x - Installing the PostScript Printer Driver”
⇒ P.24 “Macintosh”
6

Features of this Machine
Software and Utilities Included on the CD-ROM
❖
Agfa Font Manager
Helps you to install new fonts, or organize and manage fonts already installed on your system.
❖
PRINTER MANAGER FOR ADMINISTRATOR
A utility for the system administrator to manage printers on the network.
Reference
For the name of the PRINTER MANAGER FOR ADMINISTRATOR you
use, see the Operating Instruction for the Network Interface Board which
is on the CD-ROM that came with this machine.
See the PRINTER MANAGER FOR ADMINISTRATOR Online Help for
details on using the PRINTER MANAGER FOR ADMINISTRATOR.
❖
PRINTER MANAGER FOR CLIENT
A utility for users to manage their own print jobs on the network.
Reference
For the name of the PRINTER MANAGER FOR CLIENT you use, see the
Operating Instruction for the Network Interface Board which included in
the CD-ROM comes with this machine.
1
See the PRINTER MANAGER FOR CLIENT Online Help for details on using the PRINTER MANAGER FOR CLIENT.
❖
Multi Direct Print
A utility for printing on a "Peer-to-Peer" network.
Reference
For more information of the Multi Direct Print, see the Operating Instructions for Network Interface Board.
❖
Acrobat Reader
A utility that allows you to read PDF (Portable Document Format).
Note
❒ Documantation on using the printer included on the CD-ROM in PDF for-
mat.
7
Getting Acquainted
Guide to this Machine
1
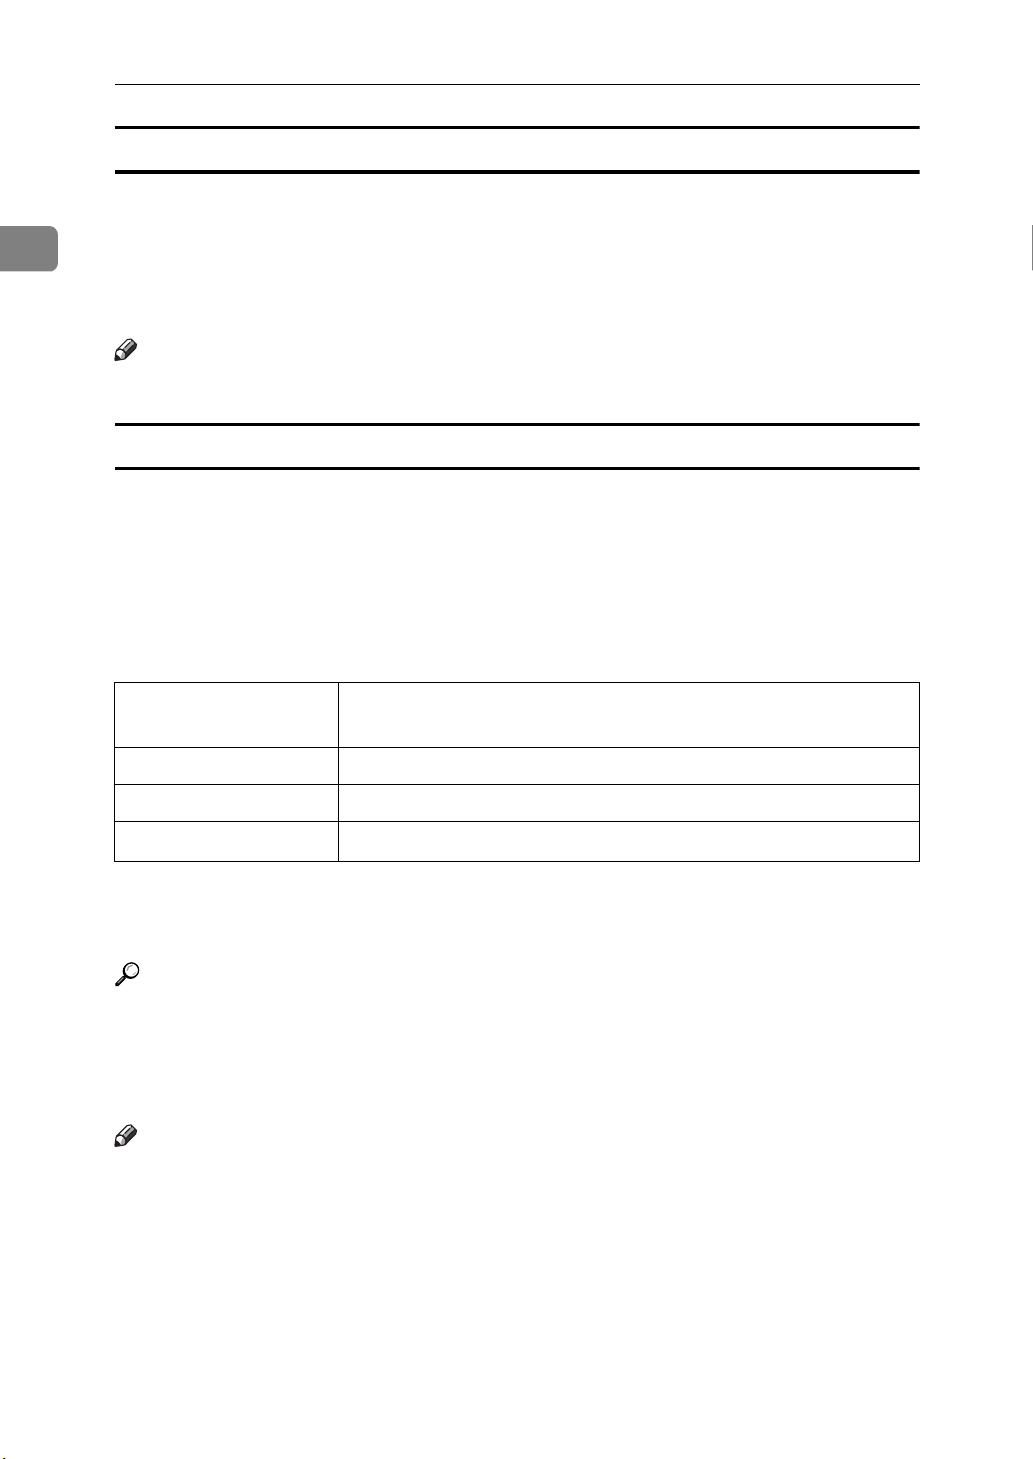
Operation Panel
key
key
}
2
7
1
1.
User Tools
{
Press to change the default settings and
conditions to meet your requirements.
}
2. Error Indicator
Lights up whenever a printer error occurs. A message describing the cause of
the error also appears on the panel display.
3. Panel Display
Shows the operation status, error messages, and function menus.
4.
Energy Saver
{
Press this key for about 1 second to
switch to and from Energy Saver mode.
5. Function keys
Press to change the functions (Copy,
Printer, Facsimile) shown on the panel
display. To use the printer function, press
the
Printer
{
key.
}
5
3
8
9
4
10
7. Selection keys
Press these keys to select the function on
the panel display.
8. 01 keys
9. Number keys
10. Data In indicator
Shows if a print job is being sent from the
host computer.
If the indicator is blinking, a job is being
sent.
If the indicator stays on the data is printing.
11. On Line indicator
Stays on while the printer is online.
6
1
THYS010E
1
6. Operation Switch
Press this switch to turn the power on.
(the On indicator lights up). To turn the
power off, press this switch again (the On
indicator goes off).
8
Guide to this Machine
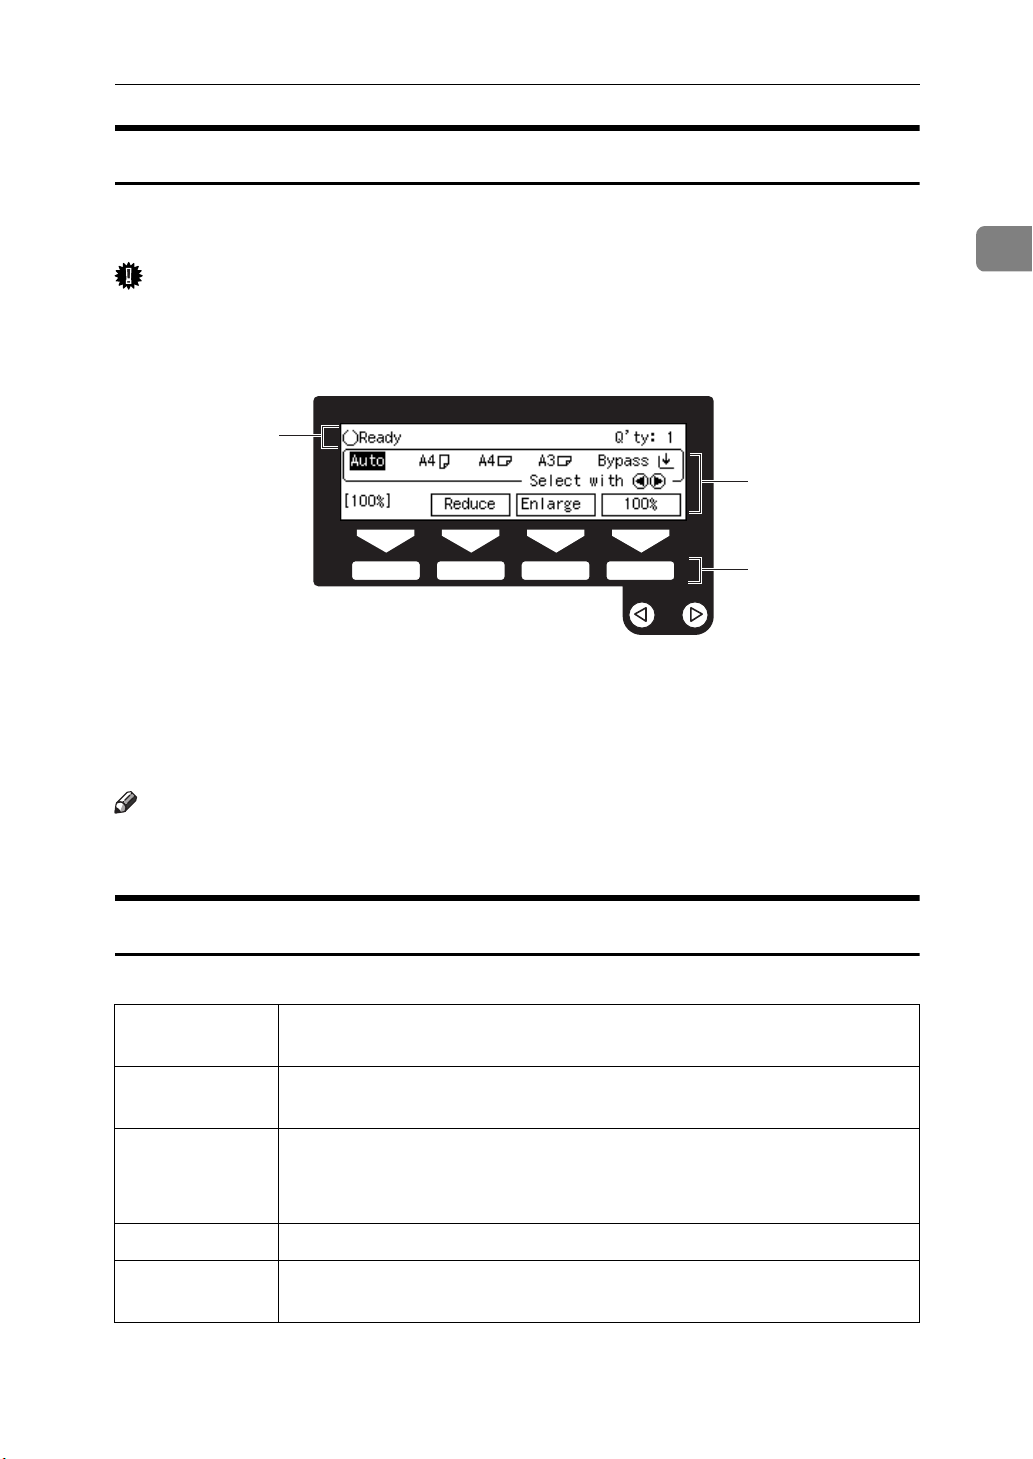
Panel Display
The panel display shows operational status, error messages, and function
menus.
Important
❒ Do not apply a strong shock or a force of about 30 N (about 3 kgf) or more to
the panel display. Otherwise, the display might be damaged.
1
2
3
1
1. Operation and Error Messages ap-
pear.
2. Items which can be selected or
specified.
Note
The selected item is highlighted on the
❒
panel display.
3. These keys correspond to the
keys that are in the bottom line of
the display.
Basic key Operations
Following table shows basic key operations.
[
[
[↑][↓] If all functions cannot be displayed, press these keys to switch to the
[
] key Press this key to set the function or numeric value, and the previous
Enter #
display appears.
Escape
Cancel
] key Press this key to cancel the function or numeric value, and the pre-
vious display appears.
previous or next page.
Increase or decrease the counter on the display panel.
] key Press this key to cancel the function and previous display appears.
] Press this key to set the function or numeric value, and normal dis-
[
Exit
play screen appears.
9
Getting Acquainted
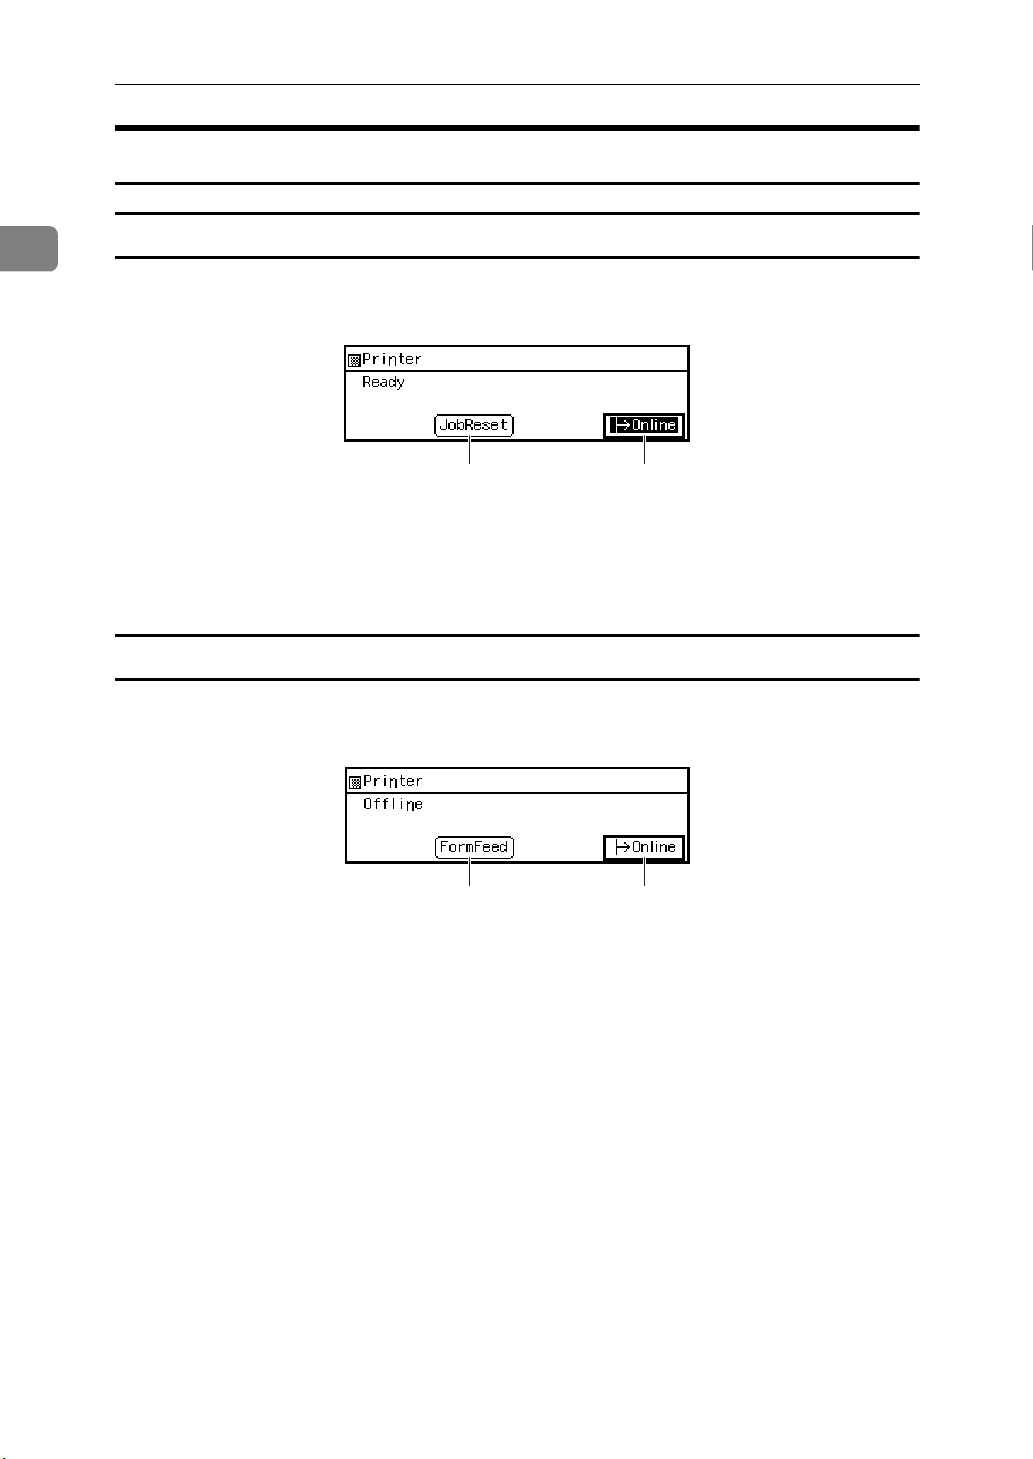
Online and Offline
1
Online
Online is the state in which the printer can receive data from the computer.
12
1.
[
Job Reset
Press this key when the printer is online
to cancel the current print job.
key
]
2.
[
Online
Press this key to change the online status,
the printer offline conditions.
key
]
Offline
Offline is a state in which the printer cannot receive data from the computer.
1.
[
FormFeed
Press this key during when the printer is
offline to print out all the data left in the
printer's input buffer.
key
]
10
12
2.
[
Online
Press this key to change the online status,
the printer offline conditions.
key
]
2.
Configuring the Printer for the
Network with the Operation Panel
Configuring the Printer for the Network with the Operation Panel
After installing the optional network
interface board, configure it for the
network using the printer's operation
panel.
The following table shows the operation panel settings and their default
settings. These are included in the
”Main Menu“.
Items Default
32 IP Address 011.022.033.044
33 Subnet Mask 000.000.000.000
34 Gateway Ad-
dress
35 Access Control
(Access Control
Address)
36 Access Mask
(Access Control
Mask)
000.000.000.000
000.000.000.000
000.000.000.000
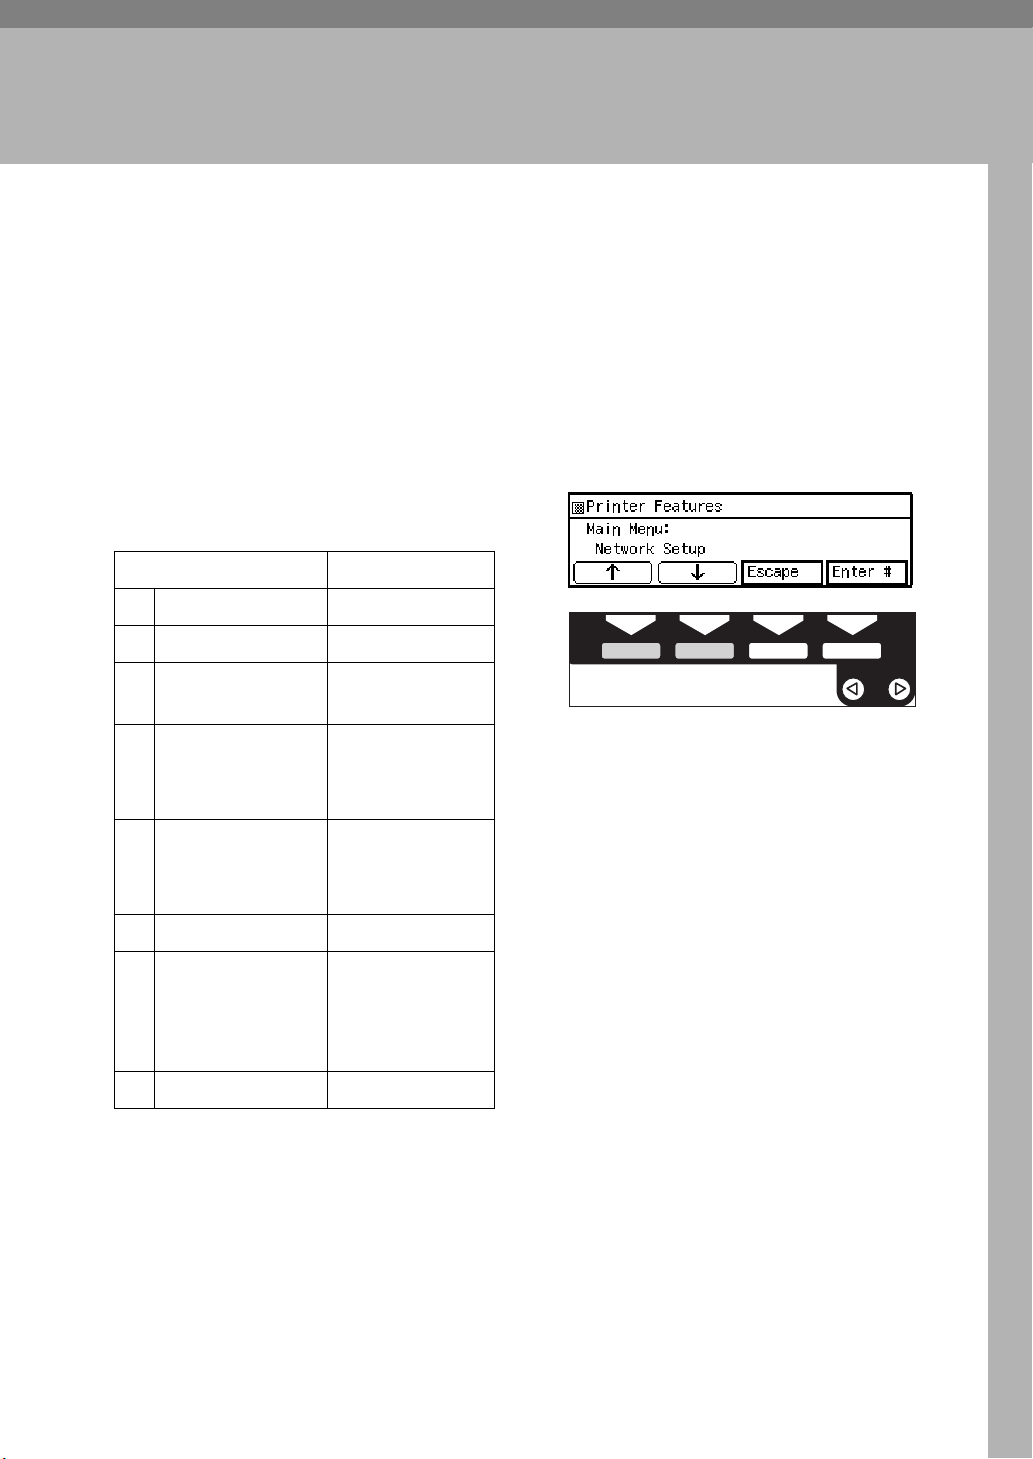
A Press
B Press
C Press
message appears.
D Press
User Tools
{
on the number keys.
4
}
{
[↑][↓]
[
Enter #
.
}
until the following
THYS850E
.
]
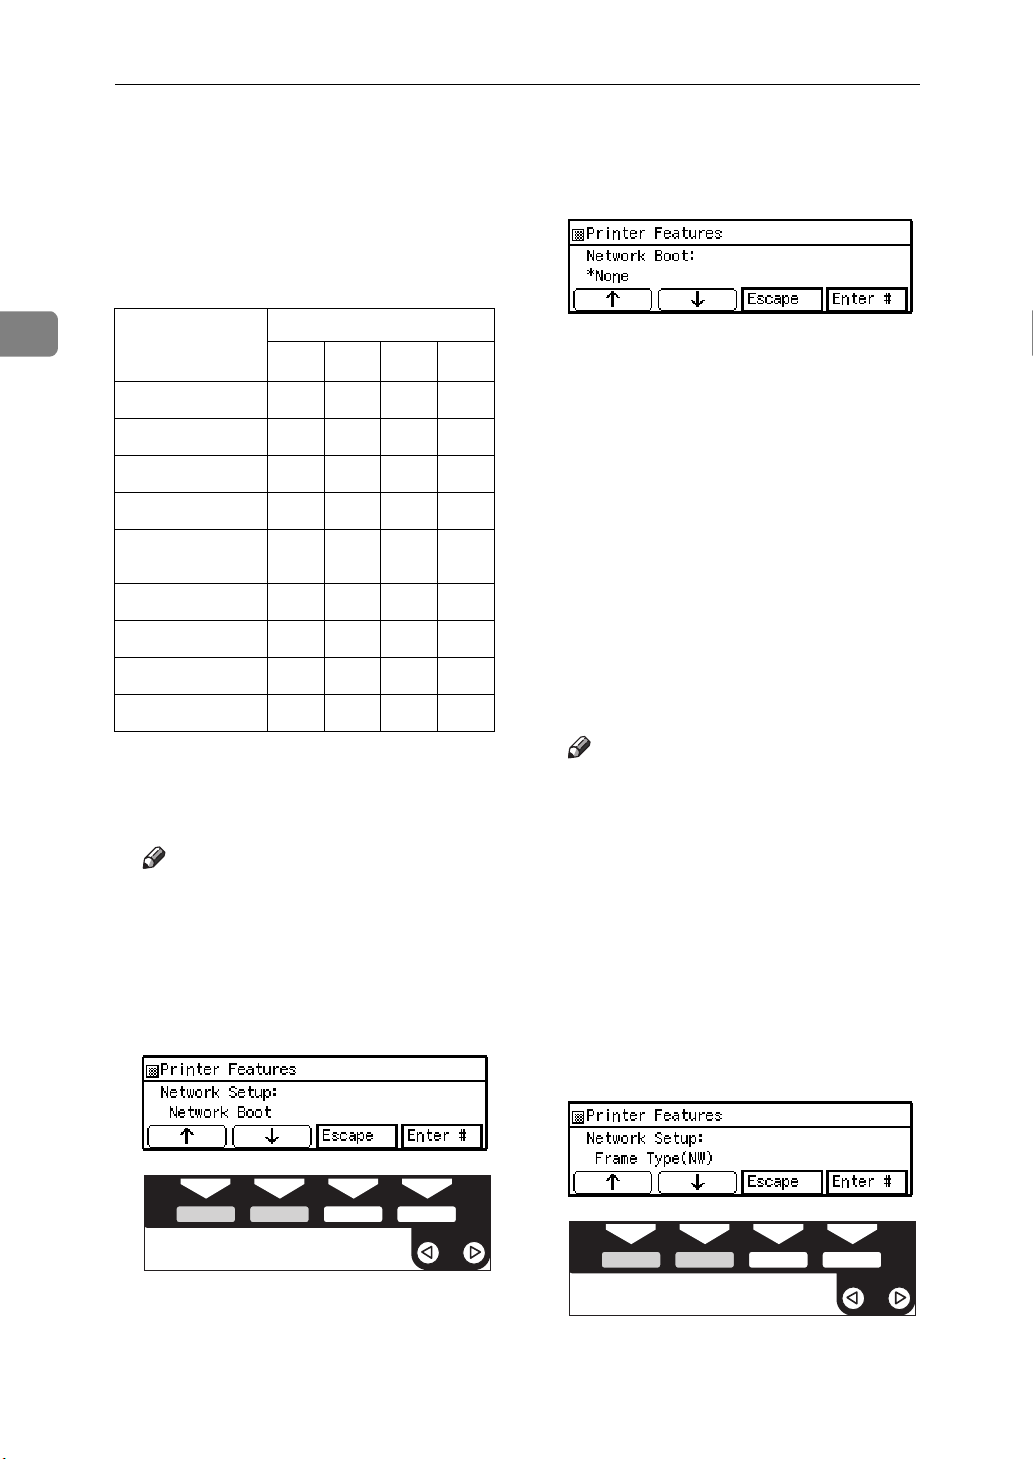
37 Network Boot None
38 Frame
Type(NW)
(Frame Type
NetWare)
39 Active Protocol All Active
Auto Select
11

Configuring the Printer for the Network with the Operation Panel
2
E Select the protocol you want to
use. You can select one of the
items on the table below.
Menu item on
the panel dis-
play
All Active
(Default Setting)
None
TCP/IP Only
NetWare Only
TCP/IP & NetW
ATalk Only
TCP/IP & ATalk
NetWare &ATalk
TCP & ATK & NW
NetBEUI only
TCP/IP & NB
NetBEUI&NetW
TCP & NB & NW
NetBEUI & ATalk
TCP & NB & ATK
NB & NW & ATalk
•' means that this protocol is active.
• Blank cell means that this protocol is not active.
*1
TCP/IP
*2
NetWare
*3
AppleTalk
*4
NetBEUI
Active Protocol
*1
*2
TCP
NW
AT
*3
NB
*4
''''
'
'
''
'
''
''
'''
'
''
''
'' '
''
'''
'''
A Press
until the following
[↑][↓]
message appears.
B Press
[
Enter #
.
]
The current settings appear on
the panel display.
C Press
until the protocol
[↑][↓]
you want to use appears.
D Press
[
Enter #
.
]
The actual procedure may differ
somewhat depending on the
protocol you use. Follow the appropriate procedure below.
TCP/IP F V G V H V I V K
NetWare J V K
AppleTalk K
NetBEUI K
THYS850E
12
Note
❒ You should not select protocols
that are not used on your network.
Limitation
❒ If you want to select AppleTalk,
you should install the optional
PostScript 3 kit Type 185.

Configuring the Printer for the Network with the Operation Panel
F If you use TCP/IP, you should as-
sign the IP Address to your printer.
Note
❒ To get the IP Address for your
printer, contact your network
administrator.
❒ If you use TCP/IP, you must as-
sign an IP Address to your
printer.
❒ The IP Address is show by Byte
on the panel display.
A Press
message appears.
until the following
[↑][↓]
D Press
The current Byte 2 of the IP Address appears.
E Use
of the IP Address.
Repeat step C and D to specify
the rest of the IP Address.
F Press
Address you specified.
[
Enter #
[↑][↓]
[
Enter #
.
]
to specify the Byte 2
to register the IP
]
2
B Press
The current Byte 1 of the IP Address appears on the panel display.
C Use
dress.
[
Enter #
[↑][↓]
.
]
to specify the IP Ad-
THYS850E
THYS620E
G If you use TCP/IP, you should as-
sign the “Subnet Mask” and
“Gateway Address” using the
same procedure for specifying the
IP Address.
H If you use TCP/IP, set the “Access
Control” and “Access Mask” using the same procedure for specifying the IP Address, if necessary.
13
Configuring the Printer for the Network with the Operation Panel
2
I If you use TCP/IP, you can make
settings for “Network Boot”.
You can select how to assign the
printer's address using the computer. Select one of the items on
the following table.
Menu item on the
panel display
ARP+PING
ARP & RARP
ARP & BOOTP
APR&RARP&BOOTP
None
(Default Seting)
RARP + TFTP
BOOTP
RARP & BOOTP
DHCP
Available method
*1
*2
BO
*3
DH
'
'
RA
AR
'
''
''
'''
'
''
*4
B Press
[
Enter #
.
]
The current setting appears on
the panel display.
C Press
[↑][↓]
until the method
you want to use appears.
D Press
[
Enter #
.
]
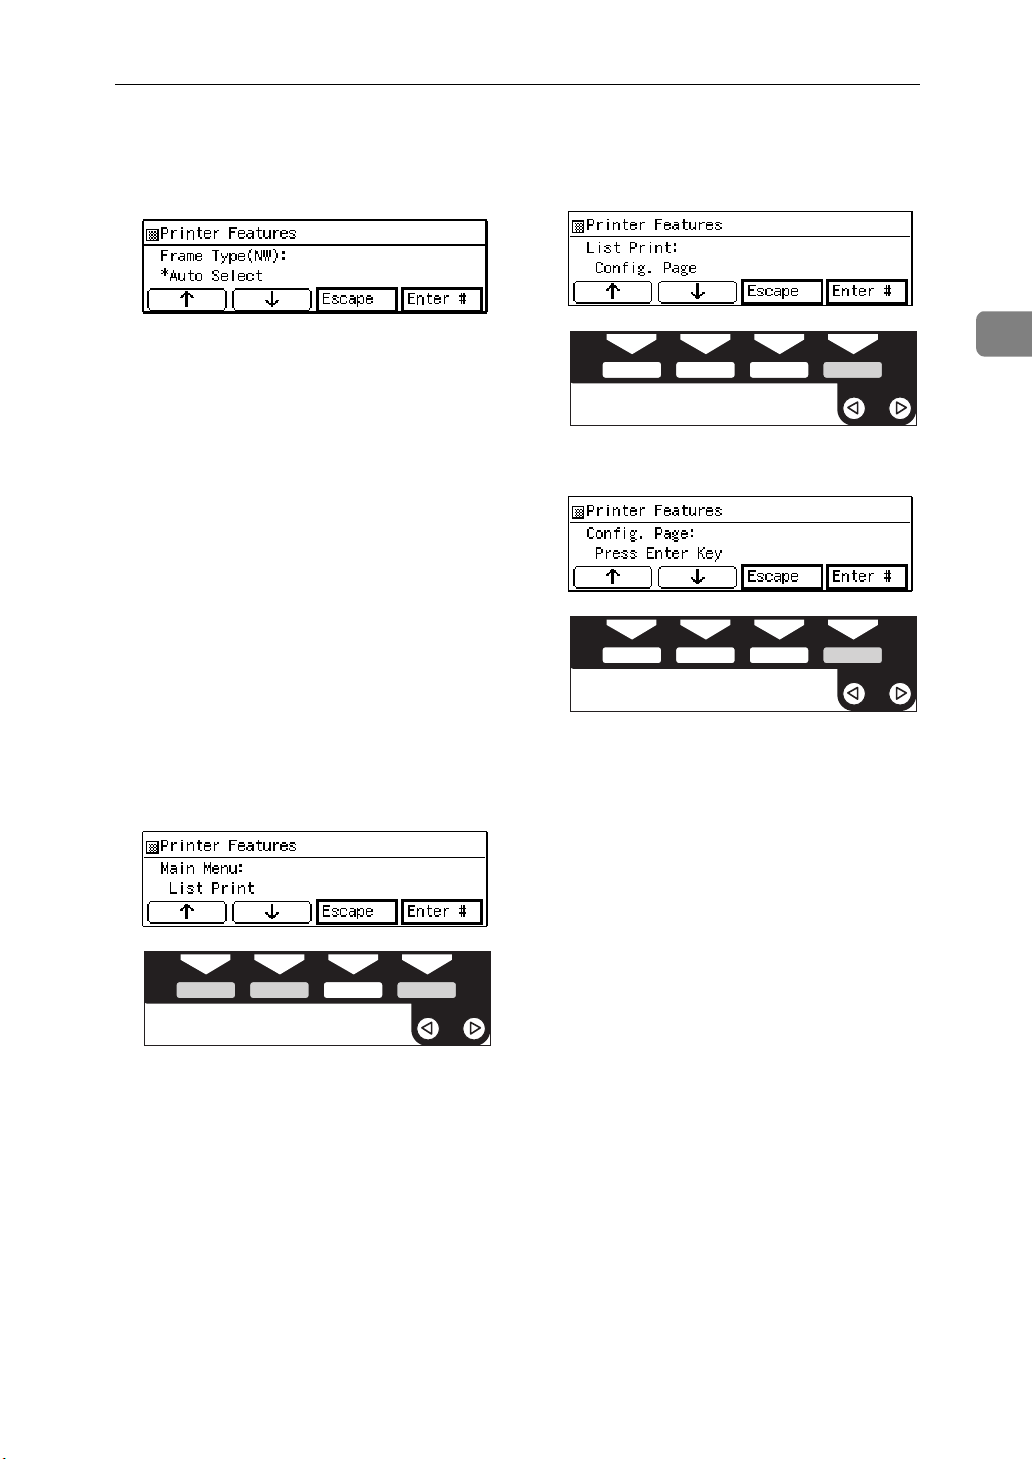
J If you use NetWare, select the
frame type for NetWare.
Select one of the items below if
necessary.
• Auto Select (Default)
• Ethernet 802.3
• Ethernet 802.2
• Ethernet II
• Ethernet SNAP
*1
ARP+PING
*2
RARP+TFTP
*3
BOOTP
*4
DHCP
Note
❒ You should set up your server,
if you want to use
“RARP+TFTP”, “BOOTP”, or
“DHCP”.
A Press
until the following
[↑][↓]
message appears.
THYS850E
Note
❒ Usually, you can use the default
setting (“Auto Select”). With
“Auto Select”, the frame type
detected by the printer first is
adopted. If your network can
use more than two frame types,
the printer may fail to select the
correct frame type. In this case,
select the appropriate frame
type.
A Press
until the following
[↑][↓]
message appears.
THYS850E
14
Configuring the Printer for the Network with the Operation Panel
B Press
[
Enter #
.
]
The current setting appears on
the panel display.
C Press
until the frame
[↑][↓]
type you want to use appears.
D Press
[
Enter #
.
]
K Exit from the setup menu to the
available function settings.
A Press
B Press
C Press
[
Escape
[
Escape
[
Exit
.
]
.
]
.
]
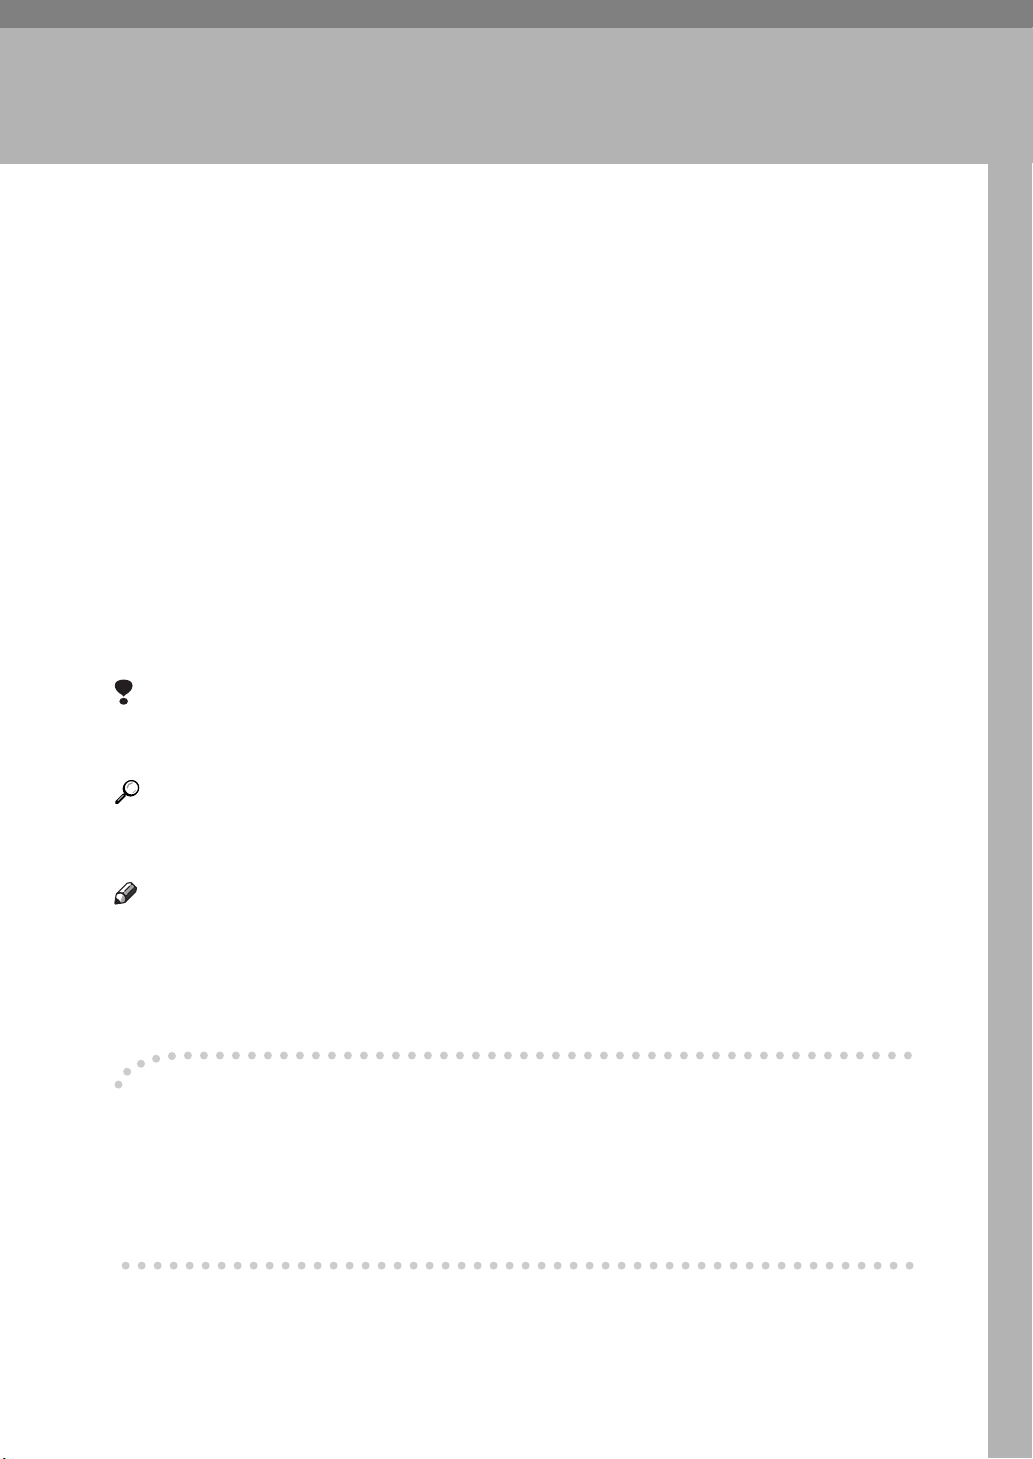
L When printing a configuration
page, confirm your printer's configuration.
A Press
B Press
C Press
User Tools
{
on the number keys.
4
{
}
[↑][↓]
Print”, and then press
.
}
to display “List
[
Enter #
]
D After make sure that “Config.
Page” is on the display, press
[
Enter #
.
]
2
THYS620E
E Press
[
Enter #
When printing a configuration
page, you can confirm your
.
printer's configuration.
.
]
THYS620E
THYS851E
15

Configuring the Printer for the Network with the Operation Panel
2
-Address
❖
Subnet Mask
A number used to mathematically
"mask" or hide IP Address on the
network by eliminating those parts
of the address that are alike for all
the machines on the network.
❖
Gateway Address
A gateway is a connection or interchange point that connects two
networks. A gateway address is for
the router or host computer used
as a gateway.
Note
❒ To get the addresses, contact
your network administrator.
❖
Access Control Address and Access
Control Mask
Access Control Address and Access Control Mask are used to control the IP Address that have
access to the computer used for
printing, with the IP Address. If it
is not necessary for you to control
the access rights, select “0.0.0.0”.
Access Control
Mask
0. 0. 0. 0 XXX.XXX.XXX.XXX
255. 0. 0. 0 192.XXX.XXX.XXX
255.255. 0. 0 192.168.XXX.XXX
255.255.255. 0 192.168. 15.XXX
255.255.255.255 192.168. 15. 16
IP Address that
have access
16
Note
❒ When the Access Control Ad-
dress settings coincide with the
masked result of the IP Address
of the computer, print jobs from
that IP Address can be accepted
by the network interface board.
❒ For example, if you assign
192.168.15.16 as the Access Control Address to the network interface board, the combination
of the Access Control Mask and
IP Address that can have access
are as follows.(xxx: for any numerical value)
3. Installing the Printer Driver
and Software
All of the procedures in this manual assume that you are familiar with general
Windows procedures and practices. If you are not, see the documentation that
comes with Windows for details.
Auto Run Program
You can install the printer driver by using the Auto Run program.
Auto Run is available for the following operating systems:
• Windows 95/98
• Windows NT4.0
If your system is the Windows 3.1x or Macintosh, see the information on install-
ing the printer driver.
See P.20 “Windows 3.1x - Installing the PCL 6/5e Printer Driver”
See P.23 “Windows 3.1x - Installing the PostScript Printer Driver”
See P.24 “Macintosh”
Limitation
❒ Installing the printer driver requires full control access rights. To install the
printer driver, log on as an Administrator.
Reference
For more information on the software and utilities included on the CD-ROM,
see P.7 “Software and Utilities Included on the CD-ROM”.
Note
❒ Auto Run program might not automatically work with certain OS settings. In
this case, start "SETUP.EXE" to install printer driver on the root.
❒ If you want to cancel the Auto Run program, insert the CD-ROM while press-
ing the
-Using the shared printer on Windows NT4.0
If you want to share the printer on Windows NT4.0, you must not install the
printer driver using the Auto Run.
For more information on installing the printer driver as an Alternative driver,
see P.19 “Windows NT4.0 - Installing the PCL 6/5e Printer Driver”
SHIFT
{
key until your computer finishes accessing the CD-ROM.
}
17

3
Installing the Printer Driver and Software
Installing by Auto Run
Follow these steps to install the printer driver on Windows 95/98/Windows
NT4.0:
Important
❒ Never have two versions of the same printer driver installed on your system
at the same time. When upgrading to a new version of the printer driver, delete the old version, and then install the new one.
Note
❒ For the "plug and play" function, turn on the power of the printer first, and
then your computer, if the machine is connected to your computer via the
parallel port.
on the system version of the Windows 95/98.
❒ If the
the
[
New Hardware Found
[
Cancel
[
New Hardware Found
dialog box or
]
, and then insert the CD labeled Printer Drivers and Utilities.
]
or
]
[
Device Driver Wiz ard
[
Device Driver Wizard
appears depending
]
appears, click
]
A Close all applications that are currently running.
B Insert the CD labeled Printer Drivers and Utilities for Windows 95/98/
NT4.0 in the CD-ROM drive.
C Follow the instructions on the screen.
D Restart your computer after installation is complete.
E You should set up the options with the printer driver.
18

Installing the PCL 5e/6 Printer Driver
Installing the PCL 5e/6 Printer Driver
Windows 95/98 - Installing t he PCL 6/5e Printer Driver
Installing the printer driver
Install the driver in accordance with the steps explained. ⇒ P.18 “Installing by
Auto Run”
Setting up options
Note
❒ When setting up options, you should access the Printer Properties from Win-
dows. You cannot access the Printer Properties from an application.
3
A Click
The
[
Printers
[
Start
, point to
]
window appears.
]
[
Settings
B Select the icon of the printer you want to use by clicking it. On the
menu, click
C Click
[
Properties
[
Accessories
tab.
]
.
]
D Select any options you have installed from the
E Click
[
OK
.
]
, and then click
]
[
Printers
[
Options
.
]
group.
]
[
File
Windows NT4.0 - Installing the PCL 6/5e Printer Driver
Installing the printer driver
Install the driver in accordance with the steps explained. ⇒ P.18 “Installing by
Auto Run”
If you want to share the printer on Windows NT4.0, you must not install the
printer driver using the Auto Run. In this case, cancel the Auto Run program
and install the printer driver using
Install the printer driver of the Windows NT4.0 is from the following folder in
the CD-ROM.
[
Add Printer Wizard
in the
]
[
Printers
window.
]
]
• PCL5e
\DRIVERS\PCL5E\NT4\(Language)\DISK1\
• PCL6
\DRIVERS\PCL6\NT4\(Language)\DISK1\
19
 Loading...