

Ricoh AFICIO120 User Manual

Paper type: OK Prince Eco G100(55kg), Paper Thickness=80 µm // Pages in book=80 // Print scale=81%
Gap (when printed at 81% scale) = Pages in book × Paper thickness / 2 = 3.200000 mm
Operating Instructions
Copy Reference
Type for 2512/1202/5612/Aficio 120
Printed in China
UE USA B045-7267
For safety, please read this manual carefully before you use this product and keep it
handy for future reference.

Paper type: OK Prince Eco G100(55kg), Paper Thickness=80 µm // Pages in book=80 // Print scale=81%
Gap (when printed at 81% scale) = Pages in book × Paper thickness / 2 = 3.200000 mm
Introduction
This manual contains detailed instructions on the operation and maintenance of this machine. To get
maximum versatility from this machine all operators should carefully read and follow the instructions in
this manual. Please keep this manual in a handy place near the machine.
Please read the Safety Information in the Copy Reference before using this machine. It contains important information related to USER SAFETY and PREVENTING EQUIPMENT PROBLEMS.
Notes
Some illustrations may be slightly different from your machine.
Certain options may not be available in some countries. For details, please contact your local dealer.
Operator Safety
This machine is considered a CDRH class I laser device, safe for office/EDP use. The machine contains a 5-milliwatt, 760-800 nanometer wavelength, GaAIAs laser diode. Direct (or indirect reflected )
eye contact with the laser beam might cause serious eye damage. Safety precautions and interlock
mechanisms have been designed to prevent any possible laser beam exposure to the operator.
Laser Safety:
The Center for Devices and Radiological Health (CDRH) prohibits the repair of laser-based optical unit
in the field. The optical housing unit can only be repaired in a factory or at a location with the requisite
equipment. The laser subsystem is replaceable in the field by a qualified Customer Engineer. The laser
chassis is not repairable in the field. Customer engineers are therefore directed to return all chassis
and laser subsystems to the factory or service depot when replacement or the optical subsystem is required.
Warning:
Use of controls or adjustment or performance of procedures other than those specified in this manual
might result in hazardous radiation exposure.
Two kinds of size notation are employed in this manual. With this machine refer to the inch version.
In accordance with IEC 60417, this machine uses the following symbols for the main power switch:
aaaa means P OWER ON.
cccc means STAND BY.
For good copy quality, the supplier recommends that you use genuine toner from the supplier.
The supplier shall not be responsible for any damage or expense that might result from the use of parts
other than genuine parts from the supplier with your office products.
Power Source
120V, 60Hz, 7A or more
Please be sure to connect the power cord to a power source as above. For details about power source,
see P.59 “Power Connection”.

R
R
StellaC1a-EN-CopyF_V4_FM.book Page i Wednesday, September 12, 2001 4:03 PM
Safety Information
When using this machine, the following safety precautions should always be followed.
Safety During Operation
In this manual, the following important symbols are used:
WARNING:
CAUTION:
Indicates a potentially hazardous situation which, if instructions
are not followed, could result in death or serious injury.
Indicates a potentially hazardous situation which, if instructions are not
followed, may result in minor or moderate injury or damage to property.
R WARNING:
• Connect the power cord directly into a wall outlet and never use an extension cord.
•
Disconnect the power plug (by pulling the plug, not the cable) if the
power cable or plug becomes frayed or otherwise damaged.
• To avoid hazardous electric shock or laser radiation exposure, do not
remove any covers or screws other than those specified in this manual.
• Turn off the power and disconnect the power plug (by pulling the plug,
not the cable) if any of the following occurs:
• You spill something into the machine.
•
You suspect that your machine needs service or repair.
• The external housing of your machine has been damaged.
•
Do not incinerate spilled toner or used toner. Toner dust might ignite
when exposed to an open flame.
•
Disposal can take place at our authorized dealer.
• Dispose of the used toner cartridge in accordance with the local regulations.
i
StellaC1a-EN-CopyF_V4_FM.book Page ii Wednesday, September 12, 2001 4:03 PM
R CAUTION:
• Protect the machine from dampness or wet weather, such as rain and snow.
• Unplug the power cord from the wall outlet before you move the machine.
While moving the machine, you should take care that the power cord will not
be damaged under the machine.Unplug the power cord from the wall outlet
before you move the machine. While moving the machine, you should take
care that the power cord will not be damaged under the machine.
• When you disconnect the power plug from the wall outlet, always pull the
plug (not the cable).
• Do not allow paper clips, staples, or other small metallic objects to fall inside
the machine.
• Keep toner (used or unused) and toner cartridge out of the reach of children.
• For environmental reasons, do not dispose of the machine or expended
supply waste at household waste collection points. Disposal can take place
at an authorized dealer.
• The inside of the machine could be very hot. Do not touch the parts with a
label indicating the “hot surface”. Otherwise an injury might occur.
• Our products are engineered to meet high standards of quality and functionality, and we recommend that you use only the expendable supplies available at an authorized dealer.
ii
StellaC1a-EN-CopyF_V4_FM.book Page iii Wednesday, September 12, 2001 4:03 PM
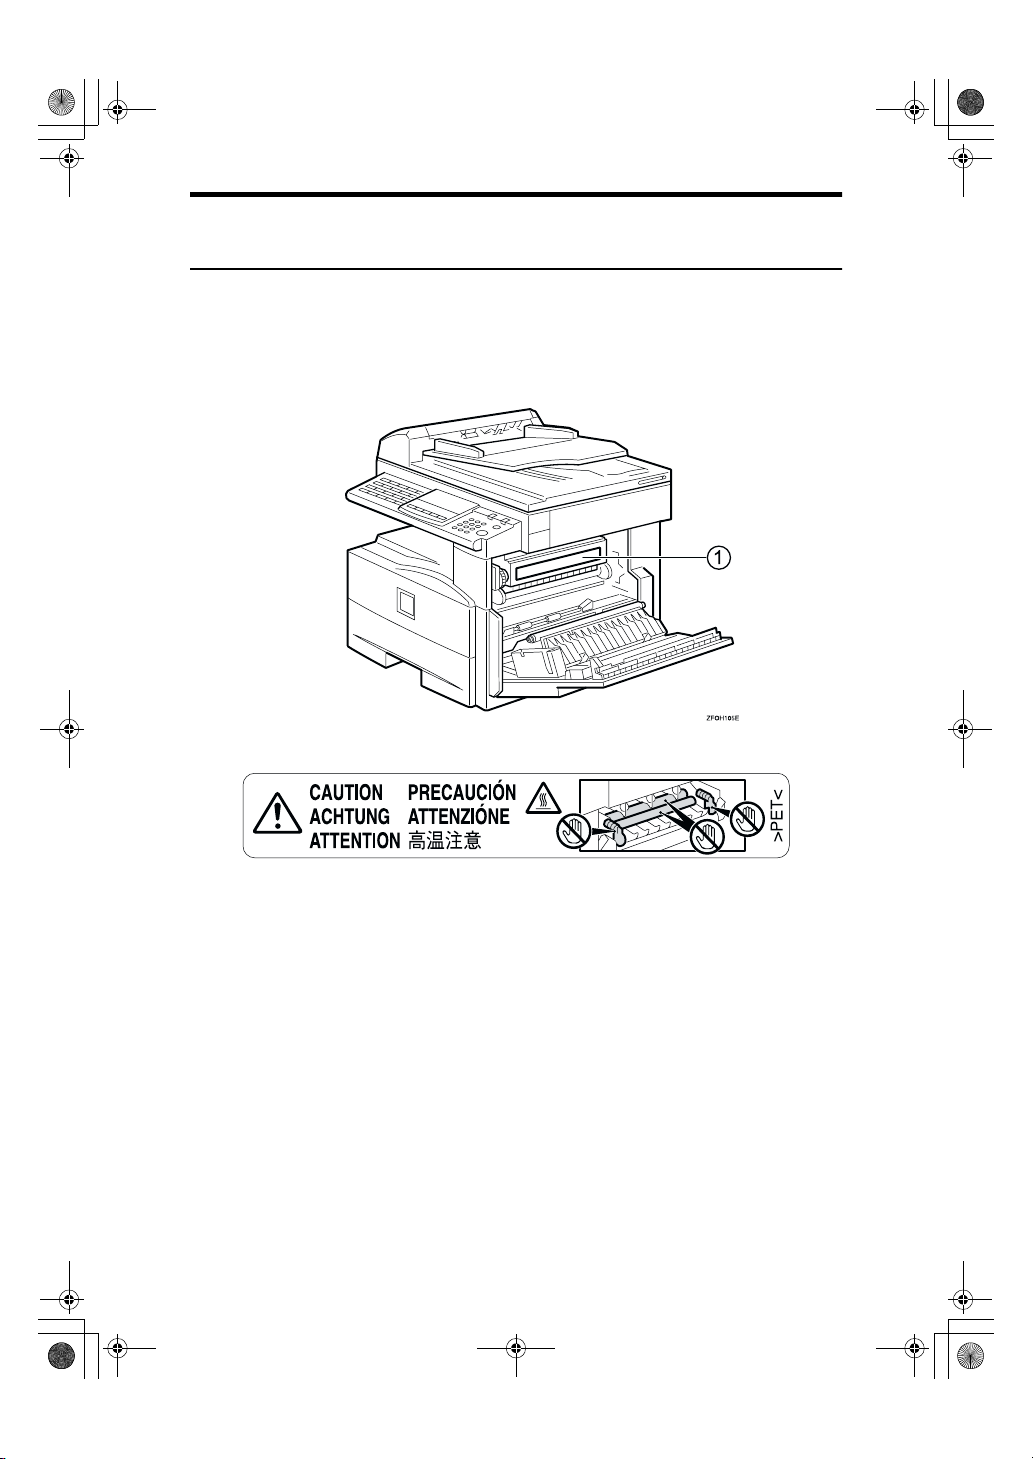
Positions of Labels and Hallmarks for RRRRWARNING and
RRRRCAUTION
This machine has labels and hallmarks for RWARNING,RCAUTION at the
positions shown below. For safety, please follow the instructions and handle the
machine as indicated.
The inside of the machine becomes very hot. Do not touch the inside. Doing so
could result in a burn.
A
iii
R
R
StellaC1a-EN-CopyF_V4_FM.book Page iv Wednesday, September 12, 2001 4:03 PM
How to Read this Manual
Symbols
In this manual, the following symbols are used:
WARNING:
This symbol indicates a potentially hazardous situation that might result in
death or serious injury when you misuse the machine without following the instructions under this symbol. Be sure to read the instructions, all of which are described in the Safety Information section.
CAUTION:
This symbol indicates a potentially hazardous situation that might result in minor or moderate injury or property damage that does not involve personal injury
when you misuse the machine without following the instructions under this
symbol. Be sure to read the instructions, all of which are described in the Safety
Information section.
* The statements above are notes for your safety.
Important
If this instruction is not followed, paper might be misfed, originals might be
damaged, or data might be lost. Be sure to read this.
Preparation
This symbol indicates the prior knowledge or preparations required before operating.
Note
This symbol indicates precautions for operation, or actions to take after misoperation.
Limitation
This symbol indicates numerical limits, functions that cannot be used together,
or conditions in which a particular function cannot be used.
Reference
This symbol indicates a reference.
{}
Keys built into the machine's operation panel.
iv
StellaC1a-EN-CopyF_V4_FM.book Page v Wednesday, September 12, 2001 4:03 PM
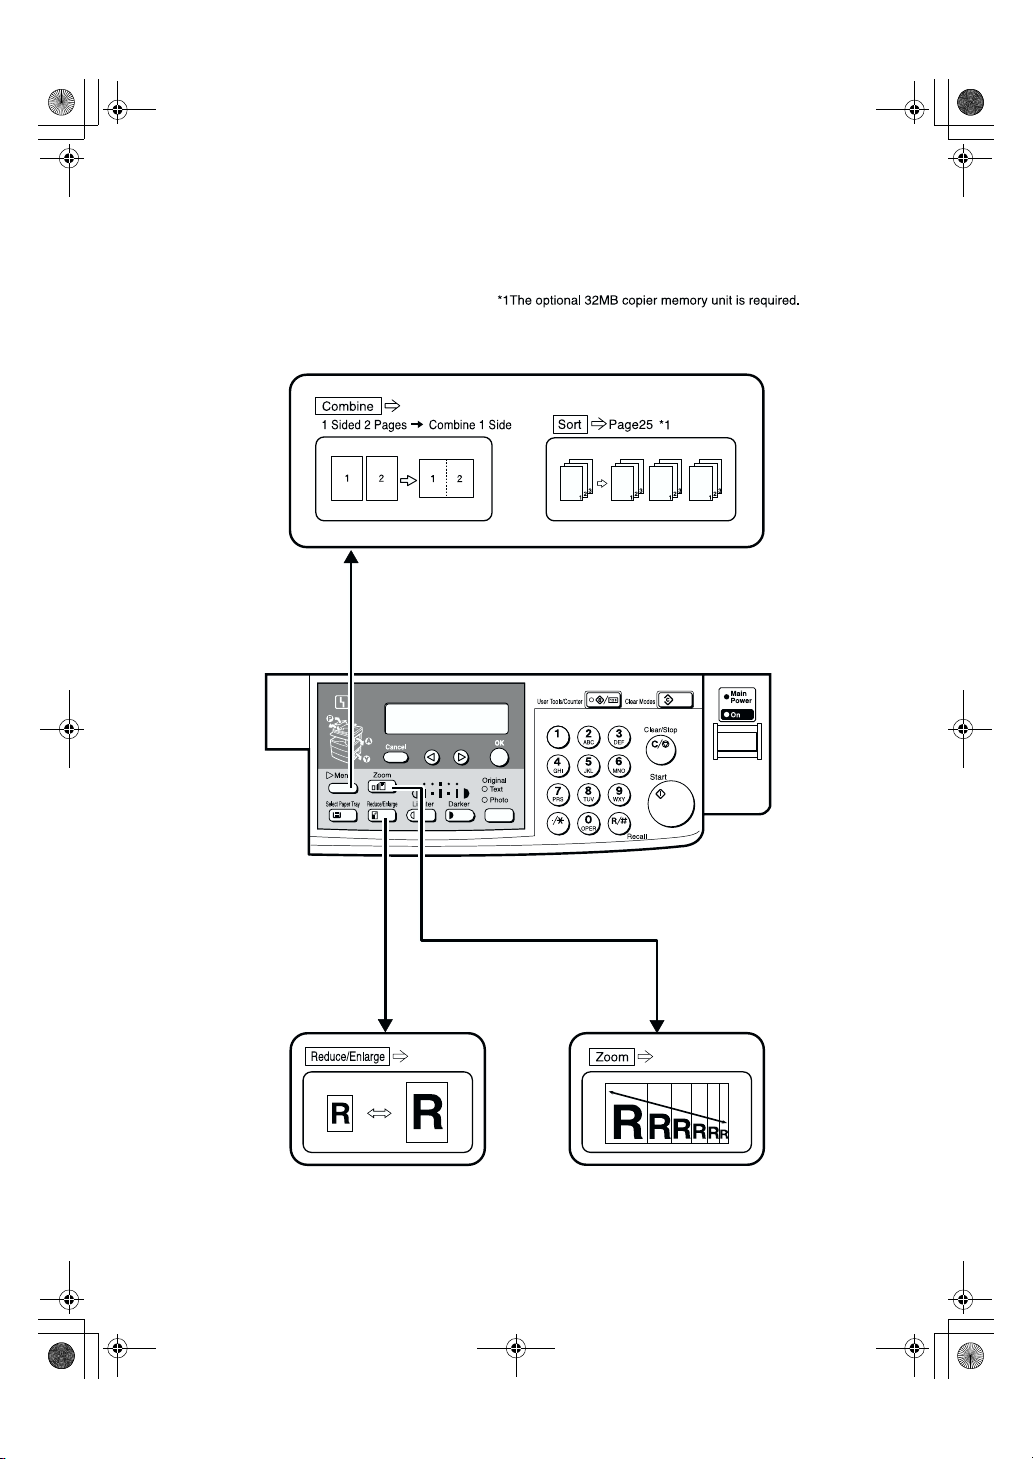
What You Can Do with This Machine
Page36
Page33
Page35
GCFM132N
v
StellaC1a-EN-CopyF_V4_FM.book Page vi Wednesday, September 12, 2001 4:03 PM
TABLE OF CONTENTS
Guide to Components ................................................................................ 1
Options........................................................................................................ 3
Control Panel .............................................................................................. 4
Panel Display .............................................................................................. 6
Displays and Key Operations......................................................................... 6
1.Basics
Turning On the Power ................................................................................ 7
Turning On the Main Power ........................................................................... 7
Starting the Machine ...................................................................................... 8
Changing Modes......................................................................................... 9
Originals.................................................................................................... 10
Sizes and Weights of Recommended Originals........................................... 10
Original Sizes and Scanning Area/Missing Image Area............................... 11
Copy Paper................................................................................................ 12
Recommended Paper Sizes and Types....................................................... 12
Non-recommended Paper............................................................................ 13
Paper Storage .............................................................................................. 14
Toner.......................................................................................................... 15
Handling Toner............................................................................................. 15
Toner Storage .............................................................................................. 15
Used Toner .................................................................................................. 15
2.Copying
Basic Procedure ....................................................................................... 17
Placing Originals ...................................................................................... 19
Placing Originals on the Exposure Glass..................................................... 19
Loading Originals in the Document Feeder (ADF) ....................................... 20
Placing Standard Size Originals................................................................... 20
Placing Custom Size Originals..................................................................... 21
Basic Functions........................................................................................ 23
Adjusting Copy Image Density ..................................................................... 23
Selecting an Original Type ........................................................................... 23
Selecting Copy Paper .................................................................................. 24
Sort ............................................................................................................ 25
Sort............................................................................................................... 25
Copying from the Bypass Tray ............................................................... 27
When copying onto OHP transparencies..................................................... 28
When copying onto standard size paper...................................................... 29
When copying onto custom size copy paper................................................ 29
When copying onto envelopes ..................................................................... 30
vi
StellaC1a-EN-CopyF_V4_FM.book Page vii Wednesday, September 12, 2001 4:03 PM
Other Functions........................................................................................ 31
User Codes .................................................................................................. 31
Auto Start ..................................................................................................... 32
Preset Reduce/Enlarge ............................................................................ 33
Zoom.......................................................................................................... 35
Combine .................................................................................................... 36
Combination Chart ................................................................................... 38
3.Troubleshooting
Machine Operation Problems.................................................................. 39
General ........................................................................................................ 39
Display ......................................................................................................... 39
Cannot Make Clear Copies ...................................................................... 40
Cannot Make Desired Copies.................................................................. 41
Combine....................................................................................................... 41
hhhh Loading Paper...................................................................................... 42
hhhh Changing the Toner Cartridge............................................................ 43
hhhh Clearing Misfeeds................................................................................ 45
Changing the Paper Size ......................................................................... 47
Changing the Paper Size in the Paper Tray................................................. 47
Selecting the Paper Size with the User Tools .............................................. 48
4.User Tools (Copier Features)
Accessing the User Tools (Copier Features)......................................... 51
Exiting the User Tools .................................................................................. 52
User Tools Menu (Copier Features)........................................................ 53
Settings You Can Change with the User Tools ..................................... 54
Copier Features ........................................................................................... 54
5.Remarks
Do's and Don'ts ........................................................................................ 57
Where to Put Your Machine..................................................................... 58
Machine Environment .................................................................................. 58
Power Connection........................................................................................ 59
Access to Machine....................................................................................... 60
Maintaining Your Machine ....................................................................... 61
Cleaning the Exposure Glass....................................................................... 61
Cleaning the Exposure Glass Cover............................................................ 61
Cleaning the Document Feeder (ADF)......................................................... 61
vii

StellaC1a-EN-CopyF_V4_FM.book Page viii Wednesday, September 12, 2001 4:03 PM
6.Specifications
Mainframe.................................................................................................. 63
Document Feeder (ADF) (Option) ........................................................... 66
32MB Copier Memory Unit (Option)........................................................ 67
INDEX......................................................................................................... 68
viii
StellaC1a-EN-CopyF_V4_FM.book Page 1 Wednesday, September 12, 2001 4:03 PM
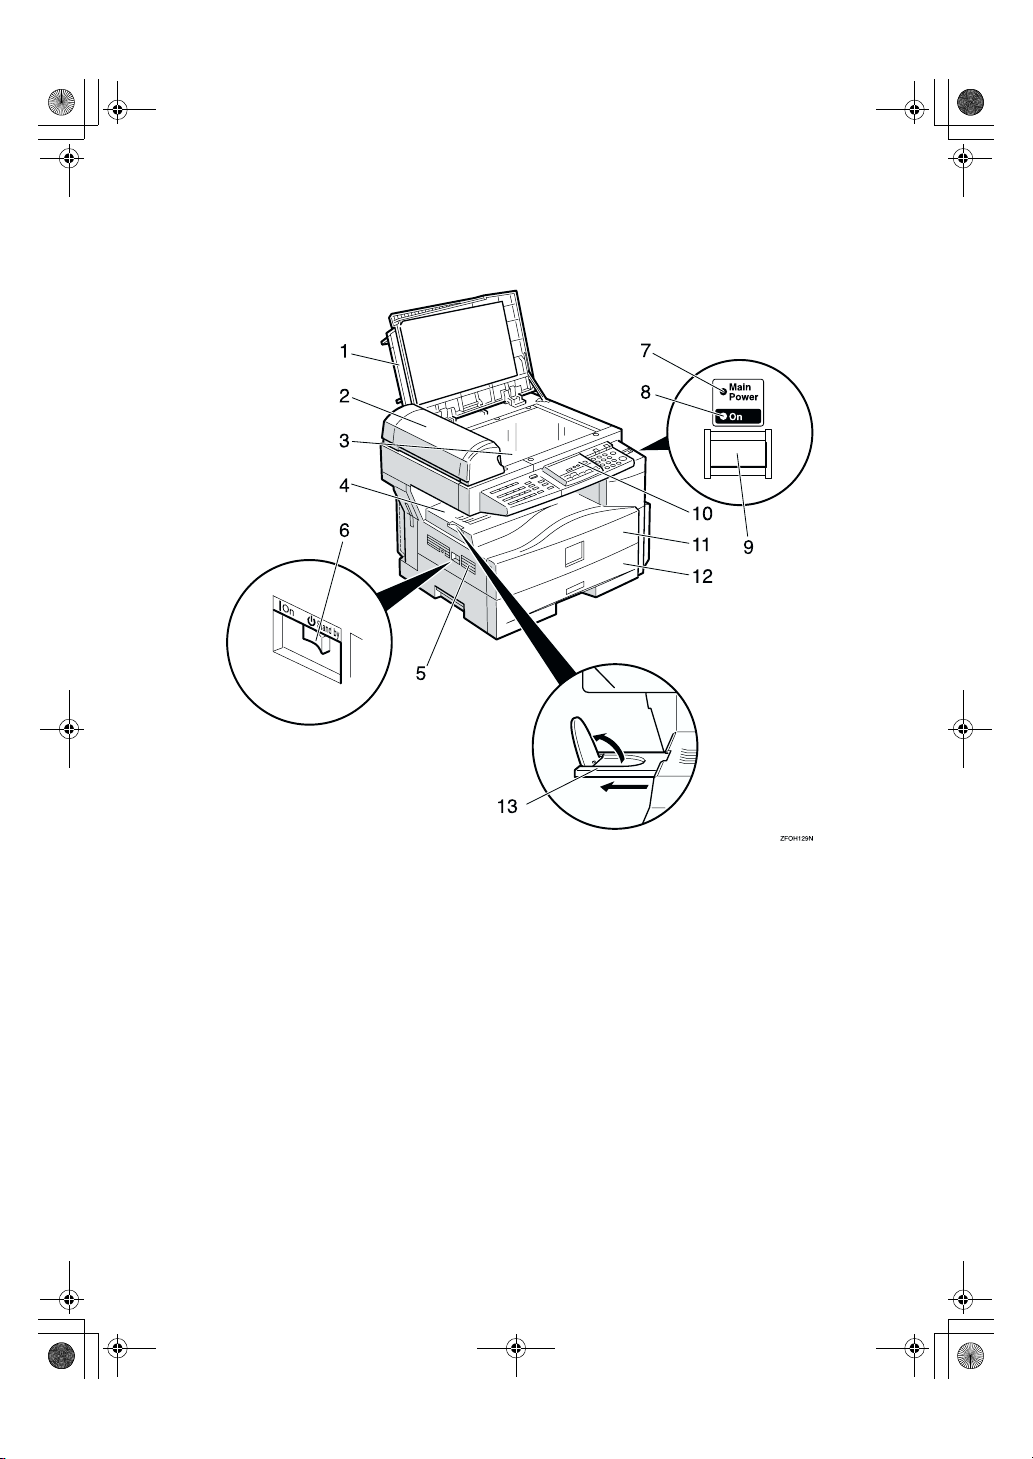
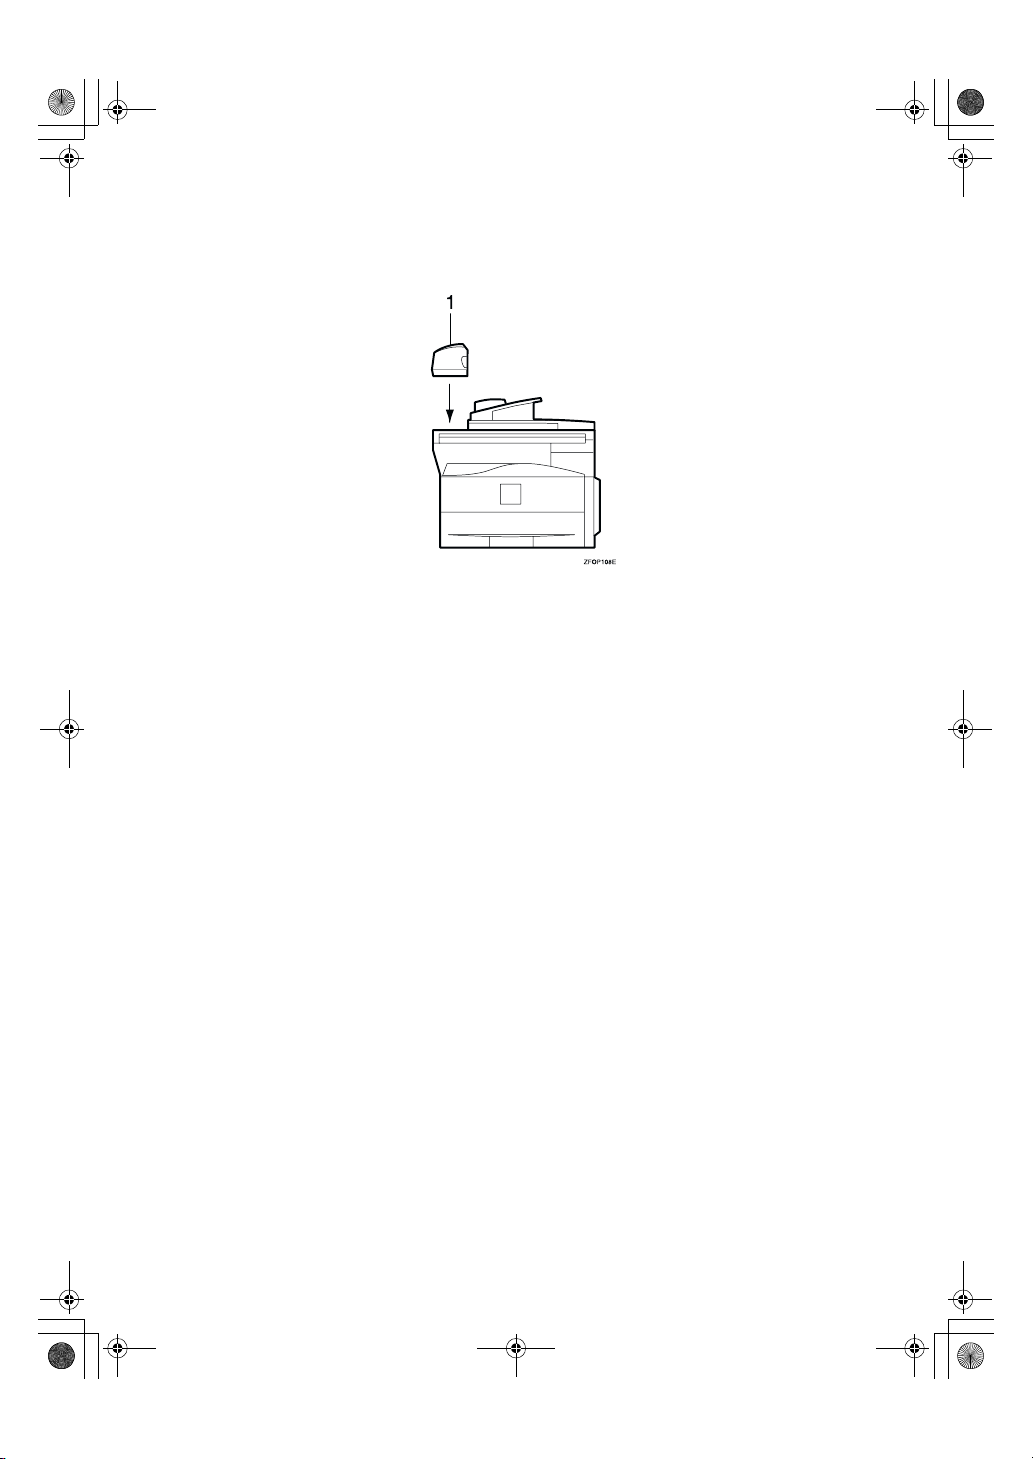
Guide to Components
1.
Exposure glass cover
Lower the exposure glass cover over the
original placed on the exposure glass for
copying.
2.
Document feeder (ADF) (Option)
Originals will be fed automatically.
3.
Exposure glass
Position originals here face down for
copying. See p.10 “Originals”.
4.
Internal tray
Copied paper is delivered here face
down.
5.
Ventilation hole
Prevents overheating. Do not obstruct
the ventilation hole by placing or leaning
an object near it. If the machine overheats, a fault might occur.
6.
Main power switch
If the machine does not operate after
turning on the operation switch, check if
the main power switch is turned on. If it
is off, turn it on. However, if the machine
is installed with the fax function, do not
turn the main power off.
7.
Main Power indicator
This indicator lights up when the main
power switch is turned on, and goes off
when the switch is turned off.
1
StellaC1a-EN-CopyF_V4_FM.book Page 2 Wednesday, September 12, 2001 4:03 PM
8.
On indicator
This indicator lights up when the operation switch is turned on, and goes off
when the switch is turned off.
9.
Operation switch
Press this switch to turn the power on
(the On indicator lights up). To turn the
power off, press this switch again (the On
indicator goes off).
1.
Bypass tray
Use to copy onto OHP transparencies,
adhesive labels, translucent paper, postcards, envelopes, and custom size paper.
See p.27 “Copying from the Bypass
Tray”.
10.
Control panel
See p.4 “Control Panel”.
11.
Front cover
Open to access the inside of the machine.
12.
Paper tray
Place paper here. See p.42 “h Loading
Paper”.
13.
Internal tray guide
Swing out to support large papers and
raise the end fence.
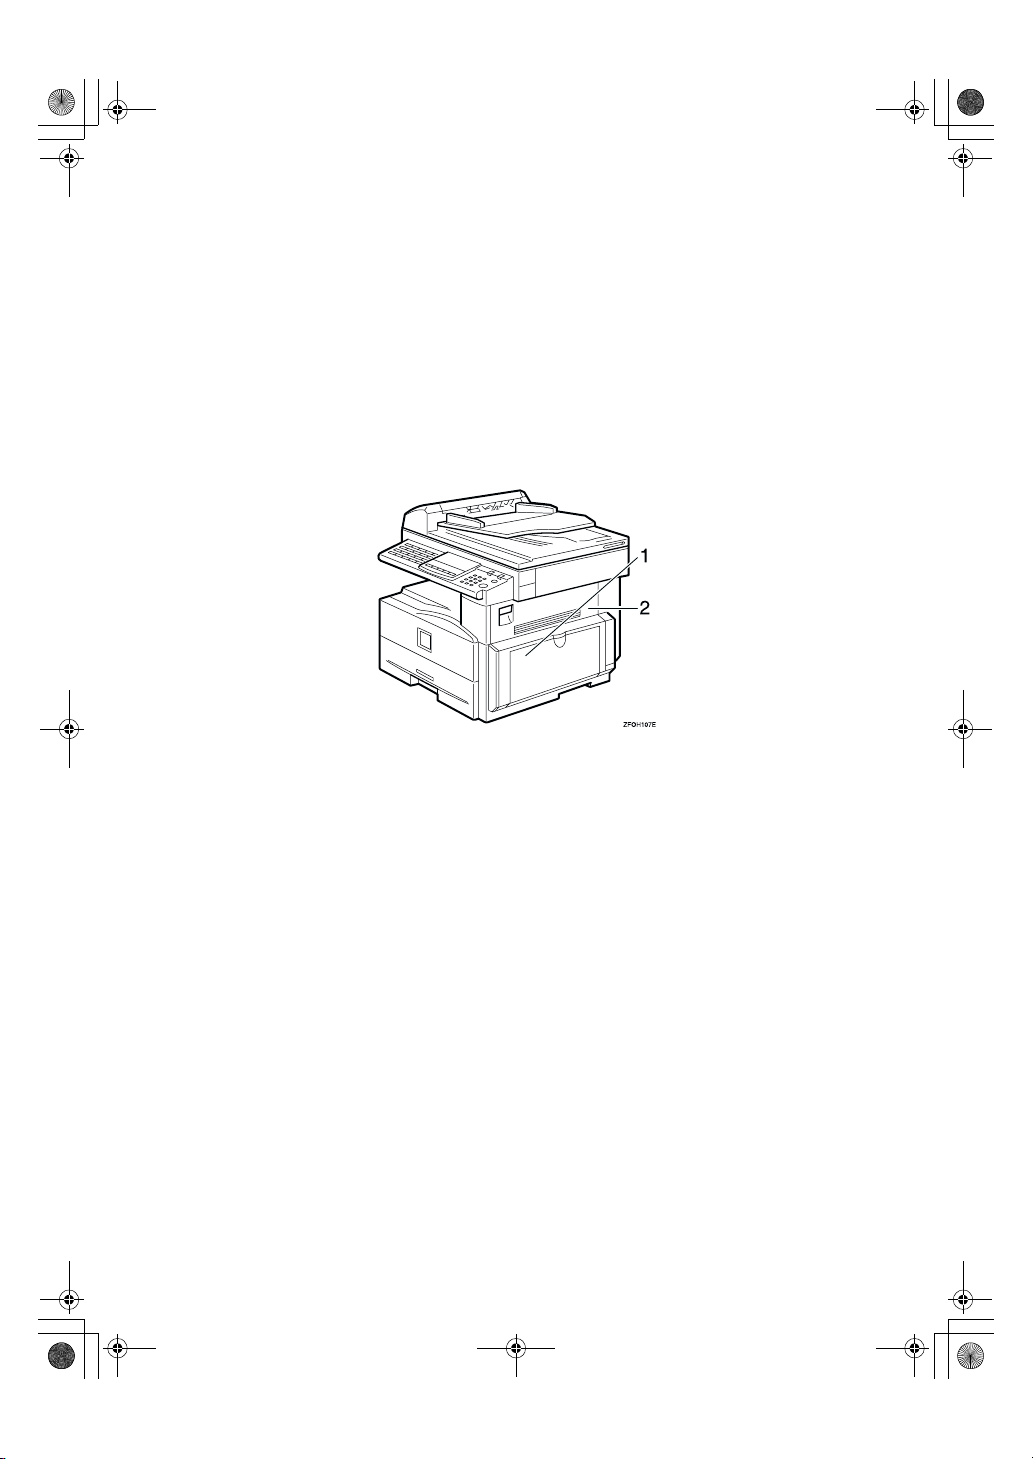
2.
Right cover
Open this cover to remove jammed paper
fed from the paper tray.
2
StellaC1a-EN-CopyF_V4_FM.book Page 3 Wednesday, September 12, 2001 4:03 PM
Options
1.
Document feeder (ADF)
Originals will be fed automatically.
Other options:
• 32MB copier memory unit
Increases memory capacity.
3
StellaC1a-EN-CopyF_V4_FM.book Page 4 Wednesday, September 12, 2001 4:03 PM
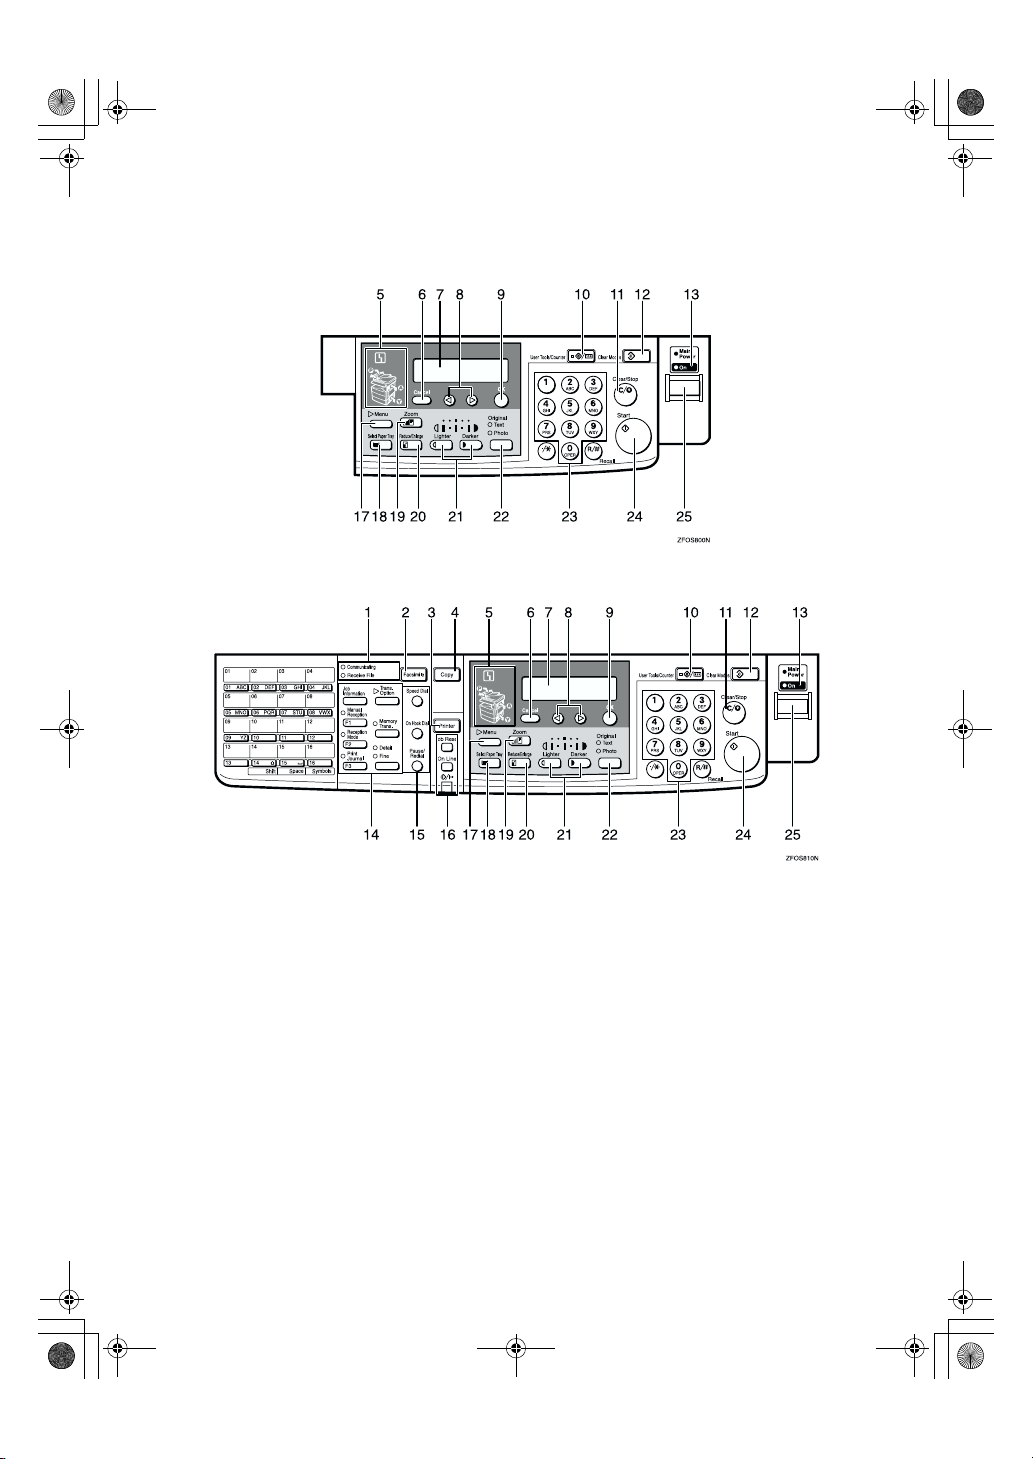
Control Panel
❖❖❖❖ Copier only
❖❖❖❖ Fax and/or printer installed
1.
Indicators for fax mode (Fax in-
stalled machine only)
See the Facsimile Reference manual.
2.
{{{{Facsimile}}}} key (Fax installed ma-
chine only)
Press to use facsimile functions.
3.
{{{{Printer}}}} key (Printer installed ma-
chine only)
Press to use printer functions.
4.
{{{{Copy}}}} key
Press to use copy functions.
4
5.
Indicators
These indicators show errors or the status
of the machine. See p.39 “Troubleshoot-
ing”.
6.
{{{{Cancel}}}} key
Press to cancel an operation or return to
the previous display.
7.
Panel display
Shows operation status, error messages,
and function menu. See p.6 “Panel Display”.
8.
00001111 keys (Cursor keys)
Press to select an item on the panel display.
StellaC1a-EN-CopyF_V4_FM.book Page 5 Wednesday, September 12, 2001 4:03 PM
9.
{{{{OK}}}} key
10.
{{{{User Tools/Counter}}}} key
Press to change the default settings and
conditions to meet your requirements.
See p.51 “User Tools (Copier Features)”.
11.
{{{{Clear/Stop}}}} key
While entering numbers, press to cancel a
number you have entered. While copying, press to stop copying.
12. {
{Clear Modes}}}} key
{{
Press to clear the previously entered copy
job settings.
13.
On indicator
This indicator lights up when the operation switch is turned on, and goes off
when the operation switch is turned off.
14.
Fax function keys (Fax installed
machine only)
Press to change modes. To use copy functions, press the {{{{Copy}}}} key.
15.
Dial Function keys (Fax in-
stalled machine only)
See the Facsimile Reference manual.
16.
Printer function keys (Printer in-
stalled machine only)
Press to change modes. To use copy functions, press the {{{{Copy}}}} key.
17. {
{Menu}}}} key
{{
Press this key to set the following functions.
• Combine
Press to make combined copies. See
p.36 “Combine”.
• Sort (Optional 32MB copier memory
unit is required)
Automatically sorts copies. See p.25
“Sort”
• Original Size
Select the original size that matches
the originals placed. See p.20 “Placing
Standard Size Originals”
18.
{{{{Select Paper Tray}}}} key
Press to select the paper tray.
19.
{{{{Zoom}}}} key
Changes the reproduction ratio in 1%
steps.
20.
{{{{Reduce/Enlarge}}}} key
Press to make reduced or enlarged copies. See p.33 “Preset Reduce/Enlarge”.
21.
{{{{Lighter}}}} and {{{{Darker}}}} keys
Adjusts the copy image density.
22.
{{{{Original}}}} key
Press to select the original type.
23.
Number keys
Use to enter the desired number of copies
and data for selected modes.
24. {
{Start}}}} key
{{
Press to start copying. Also use to initiate
Auto Start. See p.32 “Auto Start”.
25.
Operation switch
Press this switch to turn the power on or
return from the Low Power mode, the
Sleep mode or the Auto Off mode (the
On indicator lights up). To turn the power off, press this switch again (the On indicator goes off).
5

StellaC1a-EN-CopyF_V4_FM.book Page 6 Wednesday, September 12, 2001 4:03 PM
Panel Display
The panel display shows the status of the machine, error messages, and function
menus.
Important
❒ Do not apply a strong shock or force of about 30N (about 3kgf) or more to the
panel display. Otherwise, the display might be damaged.
Note
❒ The machine is in Copy mode when turned on. This can be changed. See “Set-
tings You Can Change with the User Tools” in the System Settings manual.
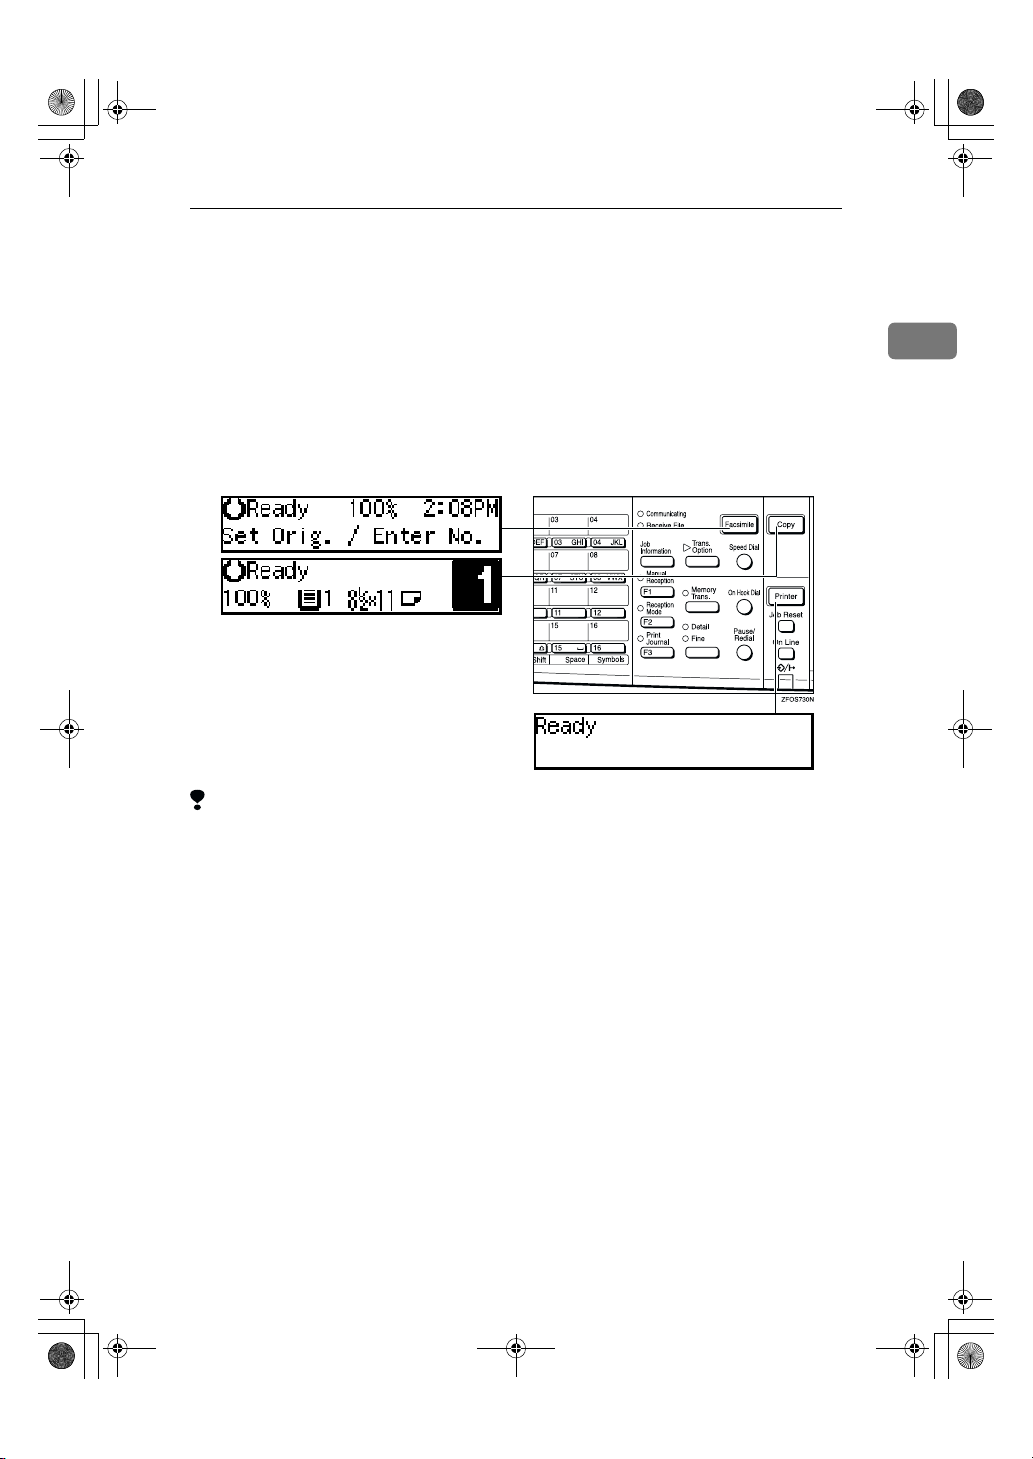
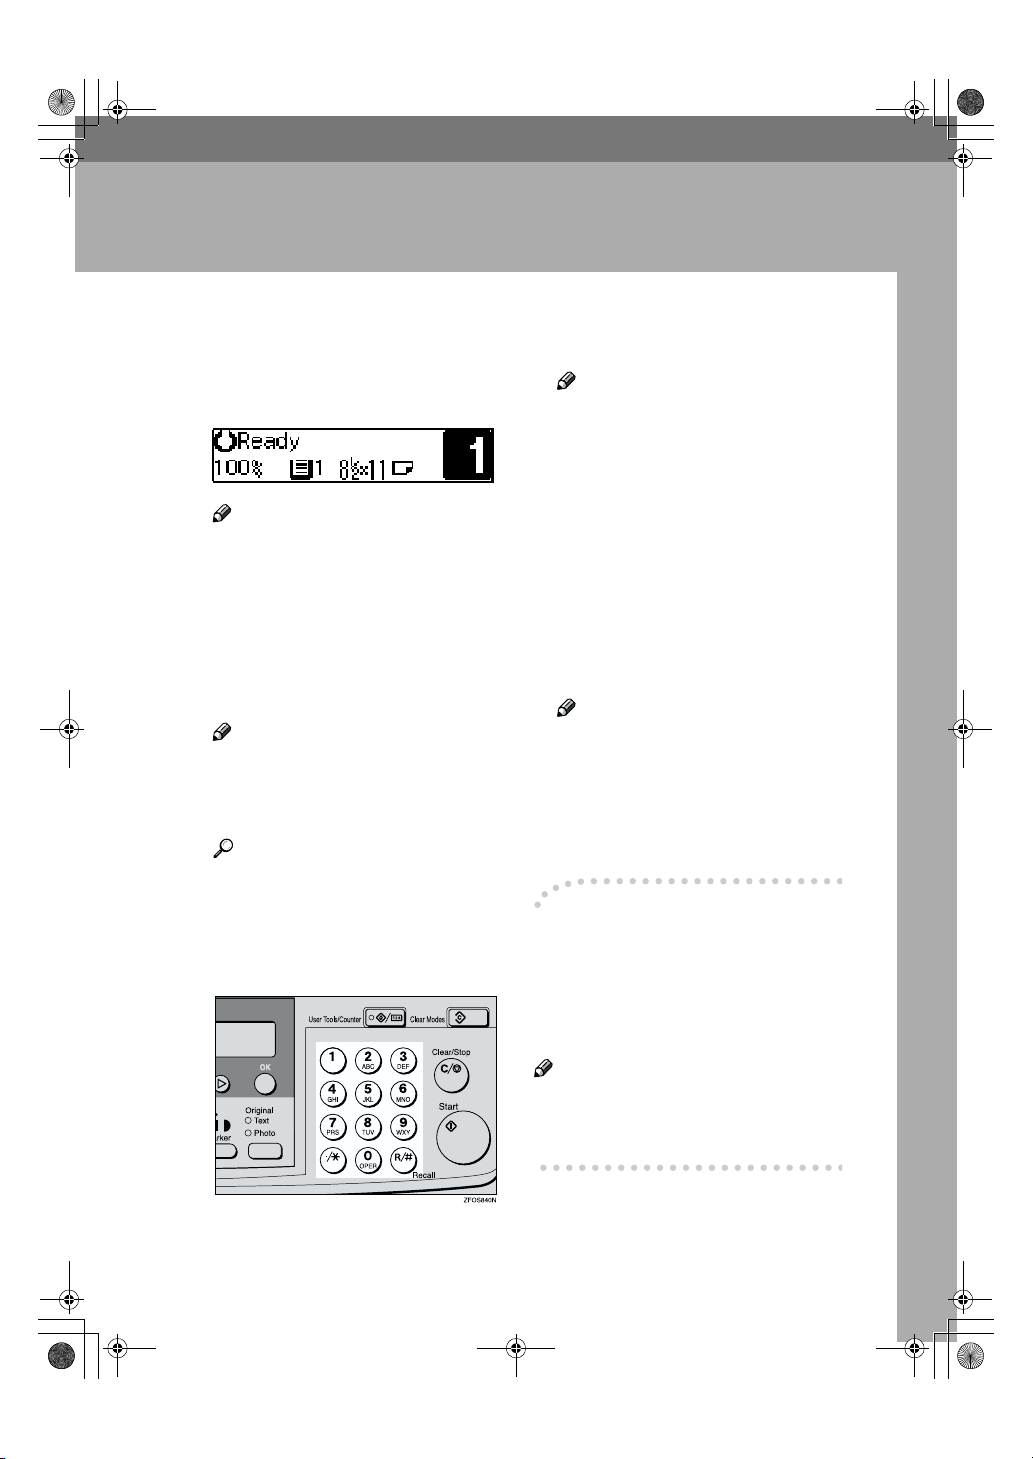
Displays and Key Operations
❖❖❖❖ Copy display
1.
Upper line: The machine status or
currently selected functions appear
here.
2.
Bottom line: Items which can be
selected or specified, or messages
appear here. Currently selected
items are displayed with brackets.
❖❖❖❖ Common keys
0
1
or
{{{{Cancel}}}}
Press to cancel an operation or return to the previous display.
{{{{Clear /Stop}}}}
{{{{Clear Modes}}}}
{{{{OK}}}}
Press to move between pages or select function.
While entering numbers, press to cancel a number you have entered.
While copying, press to stop copying.
Press to cancel the settings and return to the standby mode.
Press to set a selected function or entered value.
6
3.
Number of copies set and number
of copies made.

StellaC1a-EN-CopyF_V4_FM.book Page 7 Wednesday, September 12, 2001 4:03 PM
1. Basics
Turning On the Power
To turn the machine on, press the operation switch.
Note
❒ This machine automatically enters Energy Saver mode or turns itself off if you
do not use the machine for a while. See “6. Auto Off Timer” in the System Settings manual.
----Power switches
This machine has two power switches.
❖❖❖❖ Operation switch (right side of the control panel)
Press this switch to activate the machine. When the machine has warmed up,
you can make copies.
❖❖❖❖ Main power switch (left side of the machine)
When the machine is not to be used for an extended period of time, turn off
the main power switch.
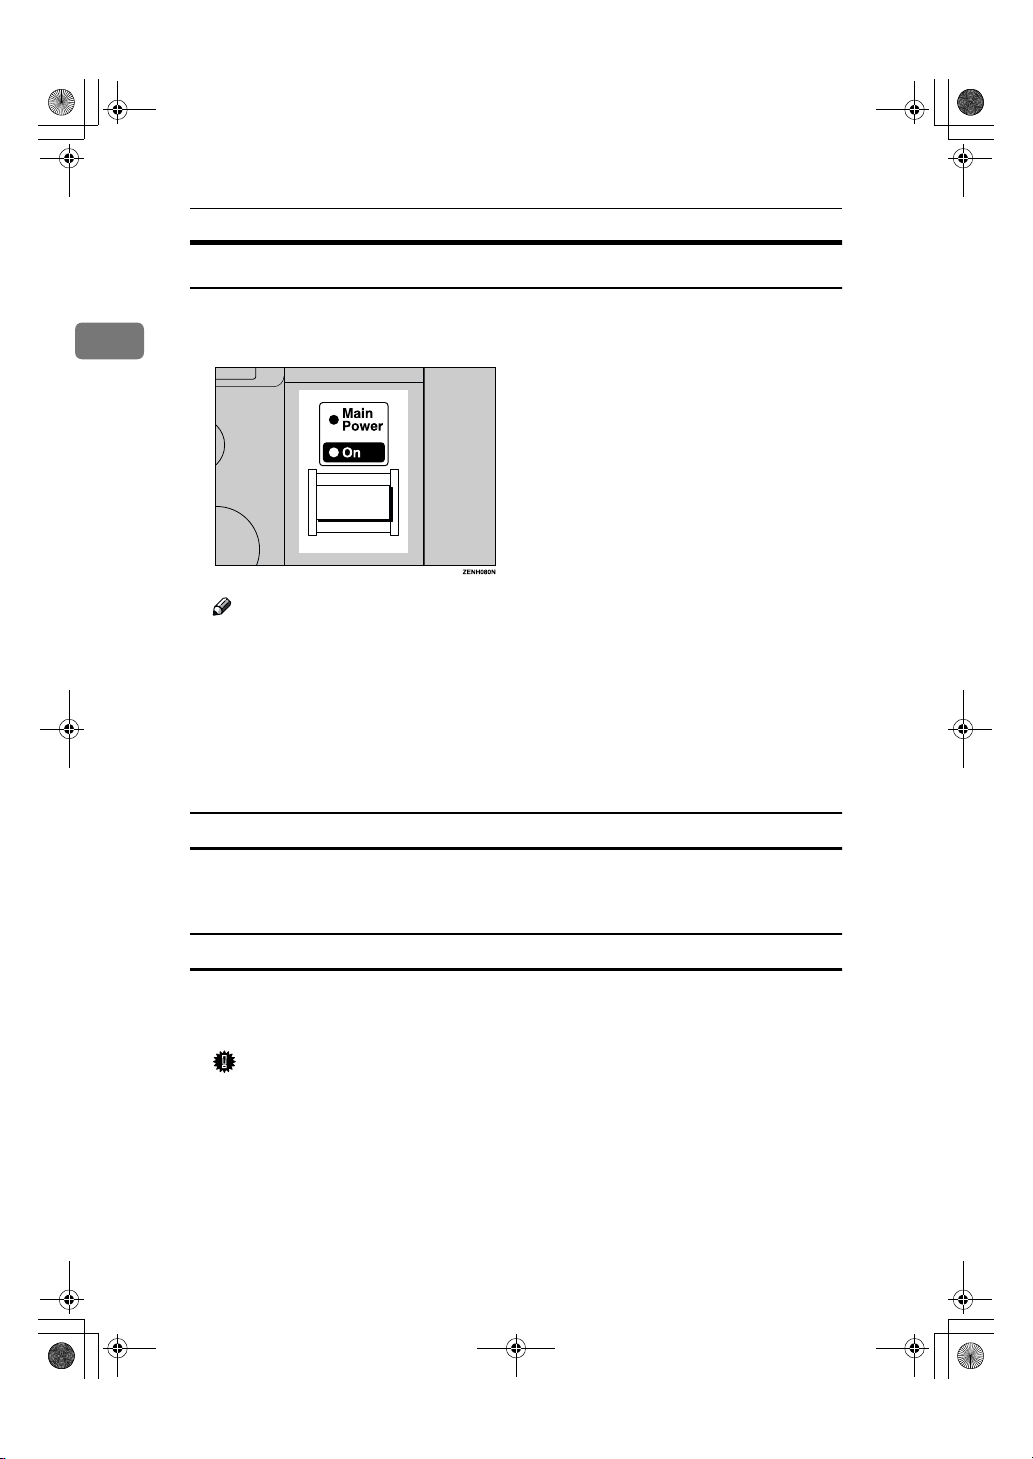
Turning On the Main Power
Make sure that the power cord is firmly plugged into the wall outlet.
AAAA
Turn on the main power switch.
BBBB
The main power indicator on the control panel goes on.
7
StellaC1a-EN-CopyF_V4_FM.book Page 8 Wednesday, September 12, 2001 4:03 PM
Basics
Starting the Machine
Press the operation switch to make the On indicator go on.
AAAA
1
The display panel will come on.
Note
❒ If the power is not turned on when the operation switch is pressed, check
if the main power switch is on. If off, turn it on.
❒ During the warm-up period (less than 20 seconds), you can use the Auto
Start function. See p.32 “Auto Start”.
❒ You can set up a copy job and press the {{{{Start}}}} key while the “Select Modes
and Press Start” message is displayed.
❒ When “Input User Code and Press OK” is displayed, enter your user code.
Shutting Down the Machine
Press the operation switch to make the On indicator go off and change to
AAAA
Low Power mode.
Turning Off the Main Power
Turn off the main power switch.
AAAA
The main power indicator of the control panel goes off.
Important
❒ Fax files stored in memory will be lost 12 hours after you turn the main
power switch off or you unplug the power cord.
8
StellaC1a-EN-CopyF_V4_FM.book Page 9 Wednesday, September 12, 2001 4:03 PM
Changing Modes
You can use this machine not only as a copier, but optionally as a fax machine or
a printer as well. Press the {{{{Copy}}}} key to use copy functions, or press the {{{{Fac-
simile}}}} key to use facsimile functions.
If the display shows a mode other than copy mode, press the {{{{Copy}}}} key to
switch to copy mode.
For details about how to change the mode the machine starts in when you turn
the operation switch on, see “1. Function Priority” in the System Settings manual.
Changing Modes
1
Limitation
❒ You cannot switch modes in any of the following cases:
• When scanning in a fax message for transmission.
• During immediate transmission.
• When accessing the user tools.
• During On Hook dialing for fax transmission.
• During Energy Saver mode.
9

StellaC1a-EN-CopyF_V4_FM.book Page 10 Wednesday, September 12, 2001 4:03 PM
Basics
Originals
1
Sizes and Weights of Recommended Originals
❖❖❖❖ Metric version
Where original is placed Original Size Original Weight
Exposure glass Up to A4
Document feeder (ADF) A4L – A5
L
KL
--
52 – 105g/m
2
❖❖❖❖ Inch version
Where original is placed Original Size Original Weight
Exposure glass Up to 8
Document feeder (ADF) 8
1
/2" × 14"L – 51/2" ×
1
KL
/2"
8
1
/2" × 11"
L
--
14 – 28 lb
Non-recommended originals for the document feeder (ADF)
Placing the following originals in the document feeder (ADF) might cause paper
misfeeds or damage to the originals. Place these originals on the exposure glass.
• Originals other than those specified in p.10 “Sizes and Weights of Recom-
mended Originals”
• Stapled or clipped originals
• Perforated or torn originals
• Curled, folded, or creased originals
• Pasted originals
• Originals with any kind of coating, such as thermal fax paper, art paper, alu-
minum foil, carbon paper, or conductive paper
• Originals with indexes, tags, or other projecting parts
• Sticky originals such as translucent paper
• Thin originals that have low stiffness
• Originals of inappropriate weight other than those specified in p.10 “Sizes
and Weights of Recommended Originals”
• Bound originals such as books
• Transparent originals such as OHP transparencies or translucent paper
10
StellaC1a-EN-CopyF_V4_FM.book Page 11 Wednesday, September 12, 2001 4:03 PM
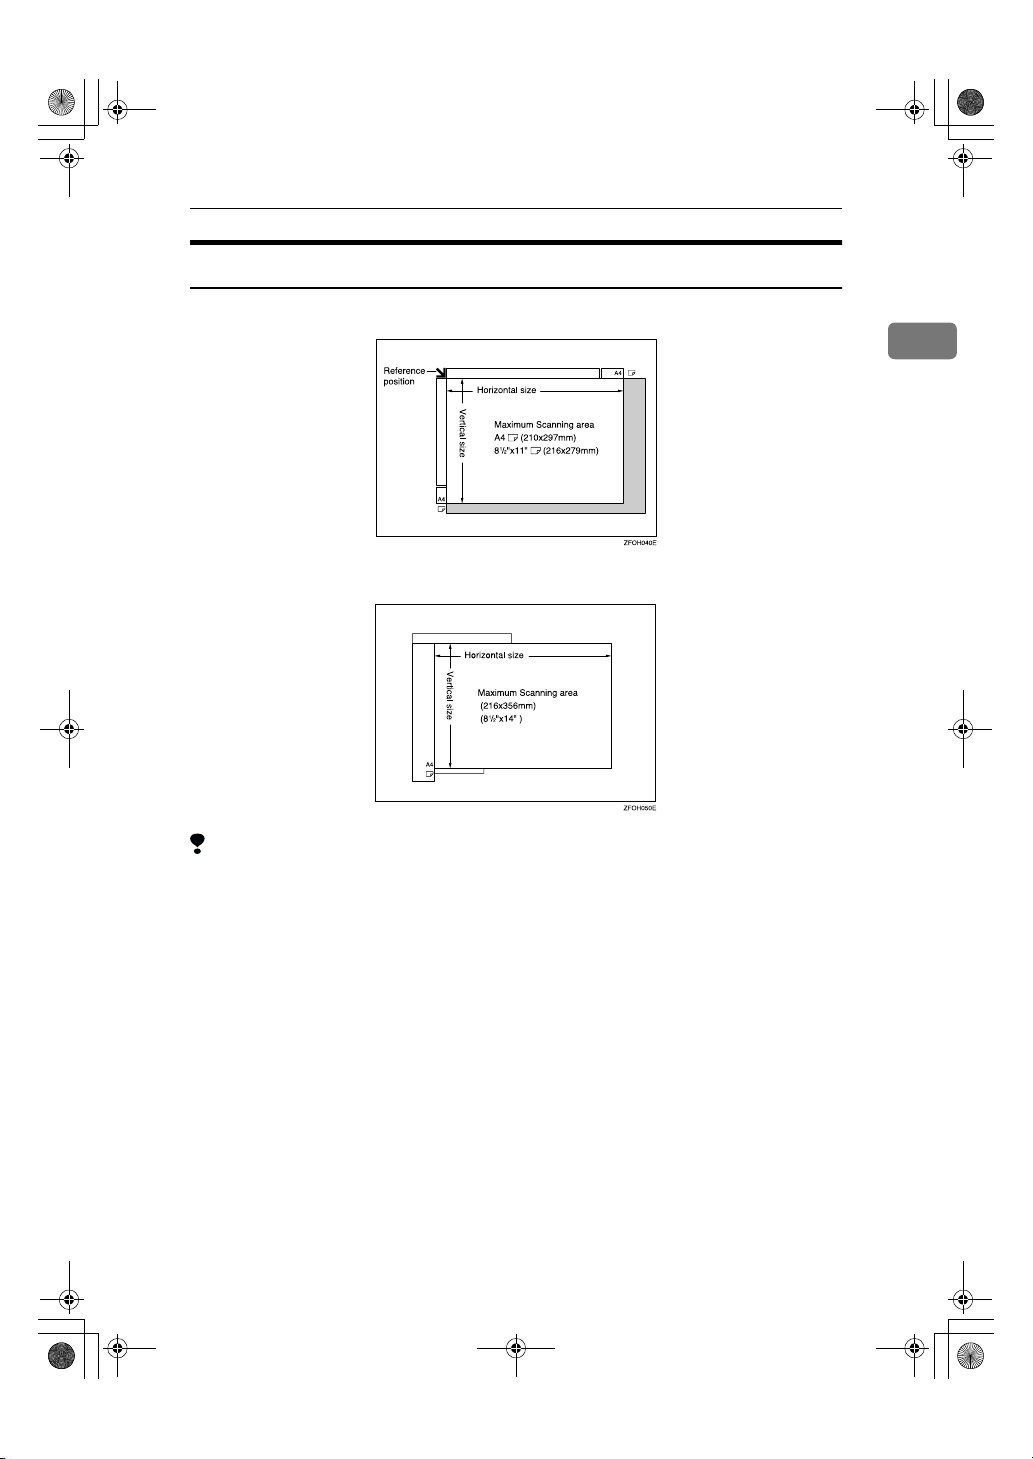
Original Sizes and Scanning Area/Missing Image Area
❖❖❖❖ Exposure glass
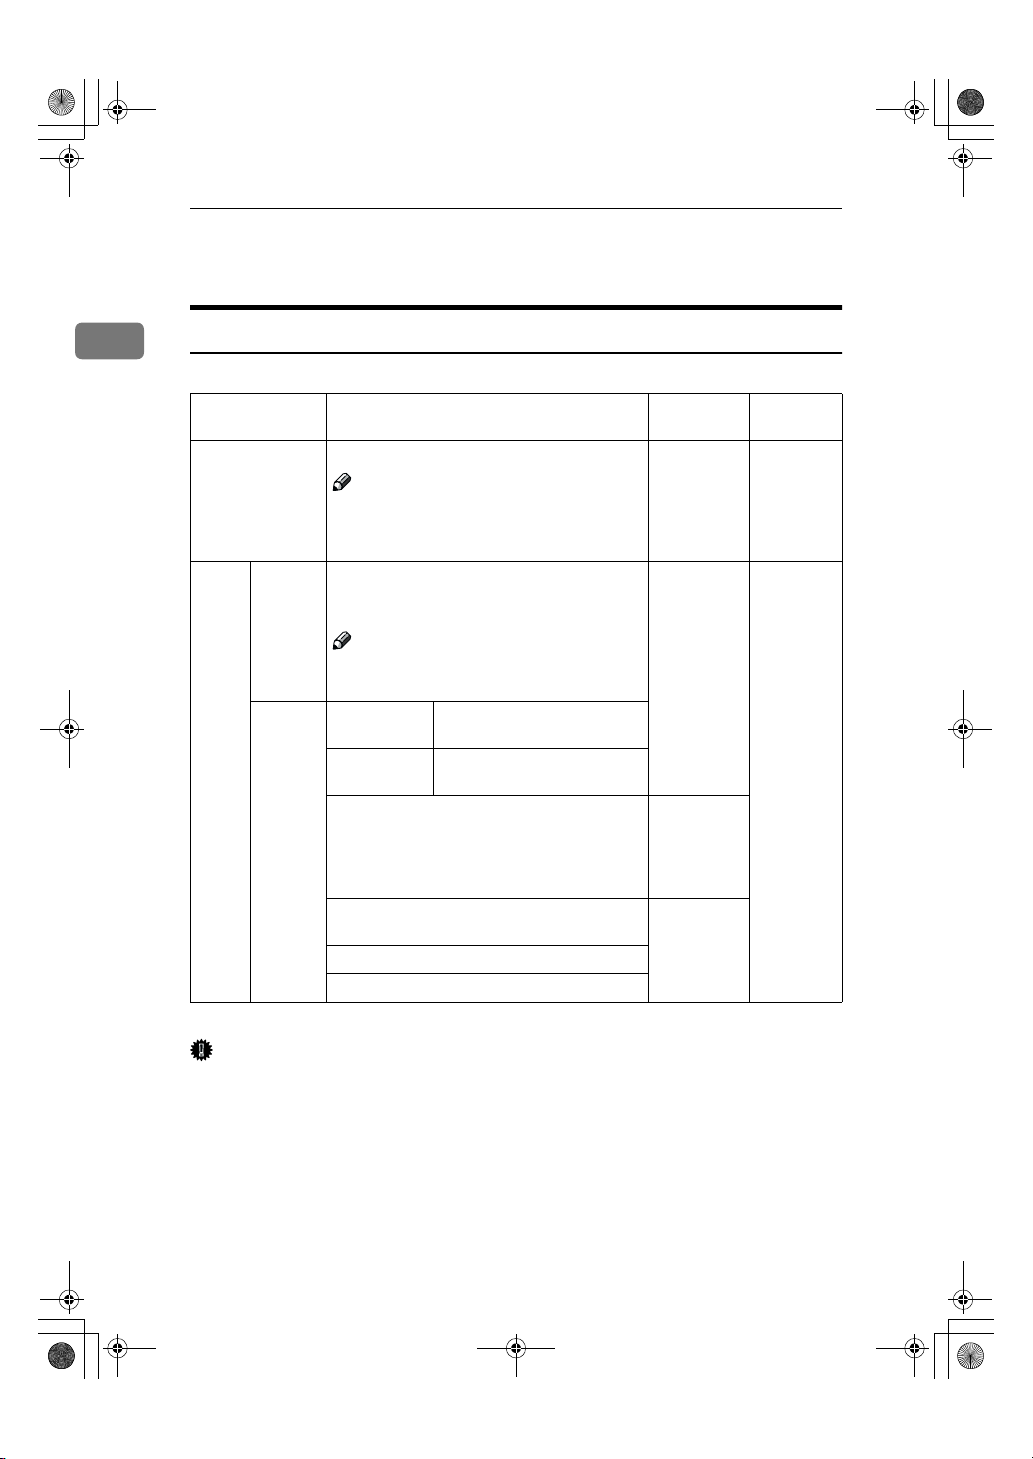
❖❖❖❖ Document feeder (ADF)
Originals
1
Limitation
❒ Even if you correctly place originals in the document feeder (ADF) or on the
exposure glass, margins (about 4mm, 0.2") on all four sides might not be copied.
11
StellaC1a-EN-CopyF_V4_FM.book Page 12 Wednesday, September 12, 2001 4:03 PM
Basics
Copy Paper
1
Recommended Paper Sizes and Types
The following limitations apply to each tray:
Paper sizes Paper
Paper Tray A4L, A5K, 8
Note
❒
You can specify the paper size with the
user tools. See p.48 “Selecting the Paper
Size with the User Tools”.
Bypass
tray
Standard sizes
A4L , A5KL, 81/2" × 11"L, 51/2" × 81/2"
1
L
/2" × 14"L, 8" × 13"L, 81/2" × 13"L,
, 8
1
8
/4" × 13"L, 81/4" × 14"
1
/2" × 11"L, 51/2" × 81/2"
L
K
weight
60 – 90g/m
16 – 24 lb
K
60 – 157g/m2,
16– 42 lb
2
,
Paper capacity
250 sheets
1 sheet
*1
*1
Note
❒
You can specify the paper size. See p.27
“Copying from the Bypass Tray”
Custom
sizes
*1
Paper weight: 80g/m2, 20 lb
Metric version
Inch version Vertical: 3.5" – 8.5"
Envelopes: Com#10 Env (104.8 × 241.3mm,
1
/8" × 91/2"), CA Env (162 × 229mm, 6.38" ×
4
9.02"), C6 Env (114 × 162mm, 4.49" × 6.38"), DL
Env (110 × 220mm, 4.33" × 8.66"), Monarch
Env (98.4 × 190.5mm, 3
Translucent paper ( A4L), OHP transparencies
postcards
Adhesive labels ( A4L)
Vertical: 90 – 216mm
Horizontal: 140 – 356mm
Horizontal: 5.5" – 14"
7
/8" × 71/2")
72 – 90g/m
19 – 24 lb
–
2
,
Important
❒ Use of damp or curled paper may cause a misfeed. If a misfeed occurs, try
turning over the paper stack in the paper tray. If there is no improvement,
change to copy paper with less curl.
12
R
StellaC1a-EN-CopyF_V4_FM.book Page 13 Wednesday, September 12, 2001 4:03 PM
Note
❒ Postcards should be fed from the bypass tray.
❒ When printing on envelopes, note the following:
• Load the envelope with the copy side face down on the bypass tray.
• Check that envelope flap is securely folded up.
• Before loading the envelope, flatten the leading edge (the side being fed
into the machine) by running a pencil or ruler across them.
• Use only rectangular envelopes.
Reference
If you want to add paper, see p.42 “h Loading Paper”.
If you want to change the paper size, see p.47 “Changing the Paper Size”.
Non-recommended Paper
CAUTION:
• Do not use aluminum foil, carbon paper, or similar conductive paper to avoid
a fire or machine failure.
Copy Paper
1
Important
❒ Do not use any of the following kinds of paper or a fault might occur.
• Thermal fax paper
• Art paper
• Aluminum foil
• Carbon paper
• Conductive paper
❒ Do not use copy paper that has been already copied on. Otherwise, a paper
misfeed might occur.
Note
❒ Do not use any of the following kinds of paper or a misfeed might occur.
• Bent, folded, or creased paper
• Damp paper
• Torn paper
• Slippery paper
• Perforated paper
• Rough paper
• Thin paper that has low stiffness
• Paper with much paper dust on its surface
❒ If you make copies on rough grain paper, the copy image might be blurred.
13
StellaC1a-EN-CopyF_V4_FM.book Page 14 Wednesday, September 12, 2001 4:03 PM
Basics
❒ Do not use envelopes in the following conditions.
• damp
• excessively curled or twisted
1
• stuck together
• damaged in any way
• with stamps attached
• with windows, holes, perforations, cutouts or embossing
• with metal clasps, string ties or metal folding bars
• designed to be interlocked
• with nicked edges or bent corners
• with rough, wrinkled or laid finishes
• with any exposed adhesive, when the flap is in the sealed or closed posi-
tion
Paper Storage
Note
❒ When storing paper, the following precautions should always be followed:
• Do not store paper where it will be exposed to direct sunlight.
• Avoid storing paper in humid areas (humidity: 70% or less).
• Store on a flat surface.
❒ Keep open reams of paper in the package, and store as you would unopened
paper.
❒ Under high temperature and high humidity, or low temperature and low hu-
midity conditions, store paper in a plastic bag.
14
R
R
R
StellaC1a-EN-CopyF_V4_FM.book Page 15 Wednesday, September 12, 2001 4:03 PM
Toner
Toner
Handling Toner
WARNING:
• Do not incinerate used toner or toner containers. Toner dust might ignite when exposed to an open flame. Dispose of used toner containers
in accordance with local regulations.
CAUTION:
• Keep toner (used or unused) and toner containers out of reach of children.
CAUTION:
• Our products are engineered to meet high standards of quality and functionality, and we recommend that you use only the expendable supplies available at an authorized dealer.
Important
❒ If you use toner other than that recommended type, a fault might occur.
Reference
If you want to add toner, see p.43 “h Changing the Toner Cartridge”.
Toner Storage
Note
❒ When storing toner, the following precautions should always be followed:
• Store toner containers in a cool, dry place free from direct sunlight.
• Store on a flat surface.
1
Used Toner
Note
❒ Toner cannot be re-used.
15
StellaC1a-EN-CopyF_V4_FM.book Page 16 Wednesday, September 12, 2001 4:03 PM
Basics
1
16
StellaC1a-EN-CopyF_V4_FM.book Page 17 Wednesday, September 12, 2001 4:03 PM
Basic Procedure
2. Copying
Make sure that the machine is in
AAAA
Copy mode.
Note
❒ If not, press the {{{{Copy}}}} key.
If the machine is set for User
BBBB
Code, enter the code with the
number keys, and then press the
{{{{OK}}}} key. See p.31 “User Codes”.
Make sure that there are no previ-
CCCC
ous settings remaining.
Note
❒ To clear settings, press the
{{{{Clear Modes}}}} key.
Place your originals.
DDDD
Reference
See p.19 “Placing Originals”.
Make the desired settings.
EEEE
Enter the number of copies re-
FFFF
quired with the number keys.
Note
❒ You cannot enter the number of
copies when you select the bypass tray.
❒ The maximum copy quantity
can be set between 1 and 99 (default: 99). See “1. Max. Copy
Q'ty” in p.54 “Copier Features”.
❒ To change the number entered,
press the {{{{Clear/Stop}}}} key, and
then enter the new number.
Press the {{{{Start}}}} key.
GGGG
The machine starts copying.
Note
❒ To stop the machine during the
multi-copy run, press the
{{{{Clear/Stop}}}} key.
❒ To return the machine to the ini-
tial condition after copying,
press the {{{{Clear Modes}}}} key.
----System Reset
The machine returns to its prioritized
mode automatically after your job is
finished, after a certain period of
time. This function is called “System
Reset”.
Note
❒ You can change the System Reset
time. See “3. System Reset” in the
System Settings manual.
17

StellaC1a-EN-CopyF_V4_FM.book Page 18 Wednesday, September 12, 2001 4:03 PM
Copying
----Auto Off
The machine turns itself off automatically after your job is finished, after a
certain period of time. This function is
called “Auto Off”.
2
Note
❒ How to exit Auto Off mode:
• Turn on the operation switch
• Place an original in the docu-
ment feeder (ADF)
• Lift and lower the exposure
glass cover
❒ You can change the Auto Off time.
See “6. Auto Off Timer” in the System Settings manual.
18
StellaC1a-EN-CopyF_V4_FM.book Page 19 Wednesday, September 12, 2001 4:03 PM
Placing Originals
Placing Originals
Limitation
❒ Place originals after correction flu-
id and ink has completely dried.
Not taking this precaution could
mark the exposure glass and cause
marks to be copied.
Note
❒ Basically, the originals should be
aligned to the rear left corner.
However, some copy functions
may produce different results depending on the direction of the
originals. For details, see explanations of each function.
Originals Document
feeder
(ADF)
Exposure
glass
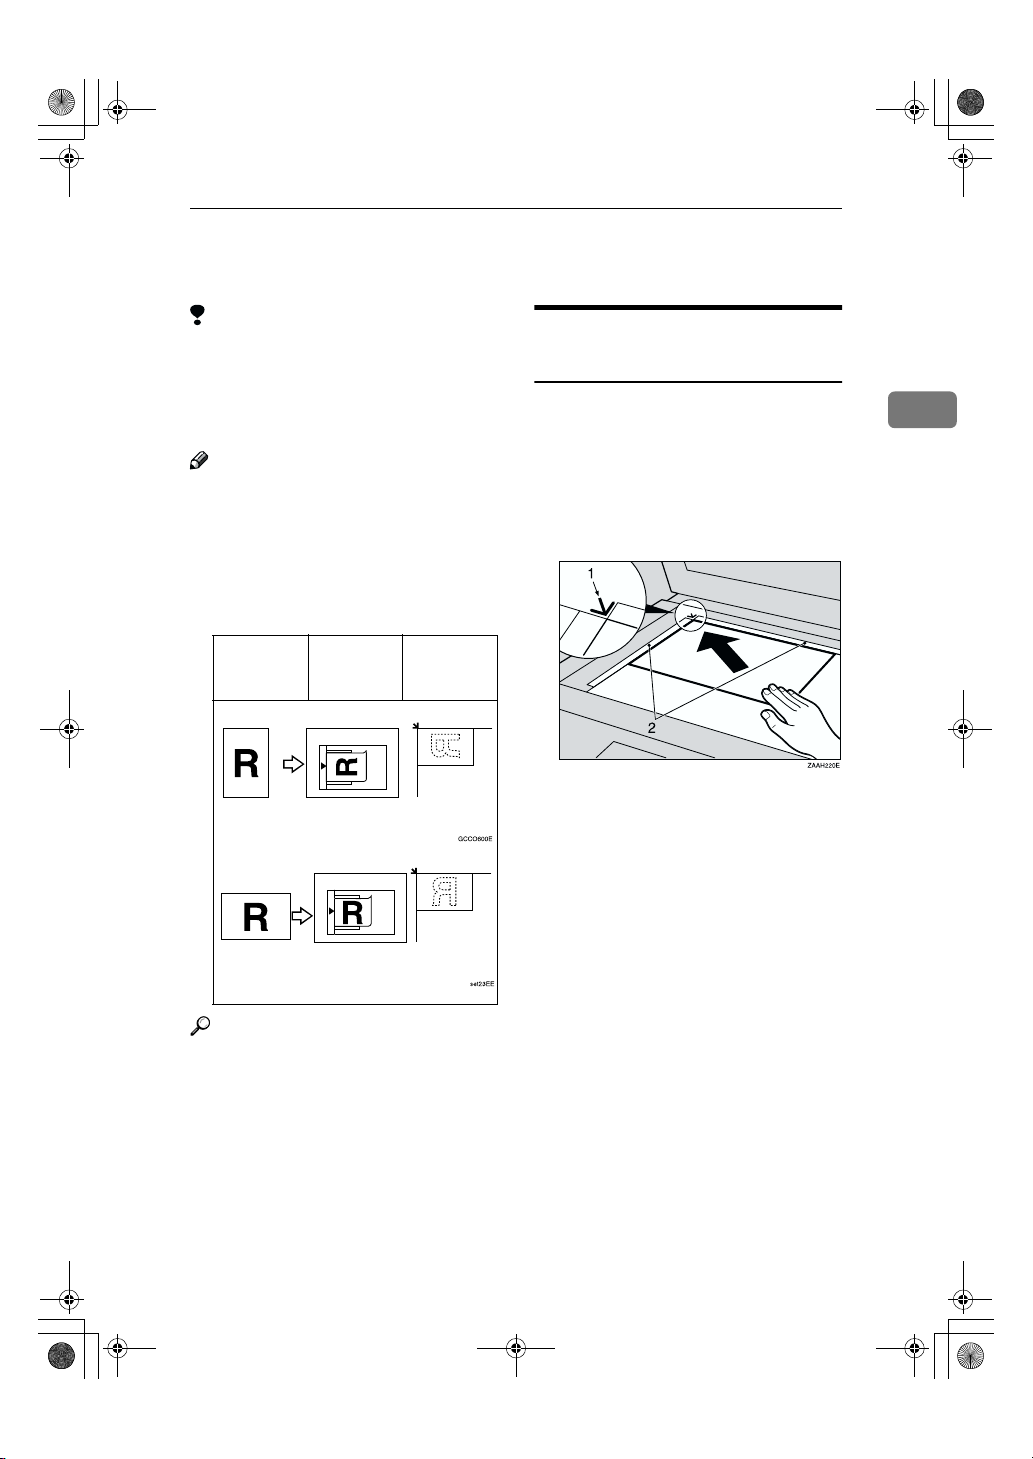
Placing Originals on the
Exposure Glass
Lift the exposure glass cover or
AAAA
the document feeder (ADF).
Place the original face down on
BBBB
the exposure glass. The original
should be aligned to the rear left
corner.
1.
Reference mark
2.
Scale
Lower the exposure glass cover or
CCCC
the document feeder (ADF).
2
Reference
See p.10 “Originals”.
19
StellaC1a-EN-CopyF_V4_FM.book Page 20 Wednesday, September 12, 2001 4:03 PM
Copying
Loading Originals in the
Document Feeder (ADF)
Note
❒ The original might become dirty if
it is written with a pencil or similar
2
tools.
❒ Do not place any foreign objects on
the document feeder (ADF) or cover it with your hand.
Reference
Regarding originals that the document feeder (ADF) can handle, see
p.10 “Originals”.
Note
❒ Do not stack originals above the
limit mark.
❒ To avoid a multi-sheet feed,
shuffle the originals before setting them in the document feeder (ADF).
Placing Standard Size
Originals
Note
❒ When the copy paper size and the
original size differ, follow the steps
below.
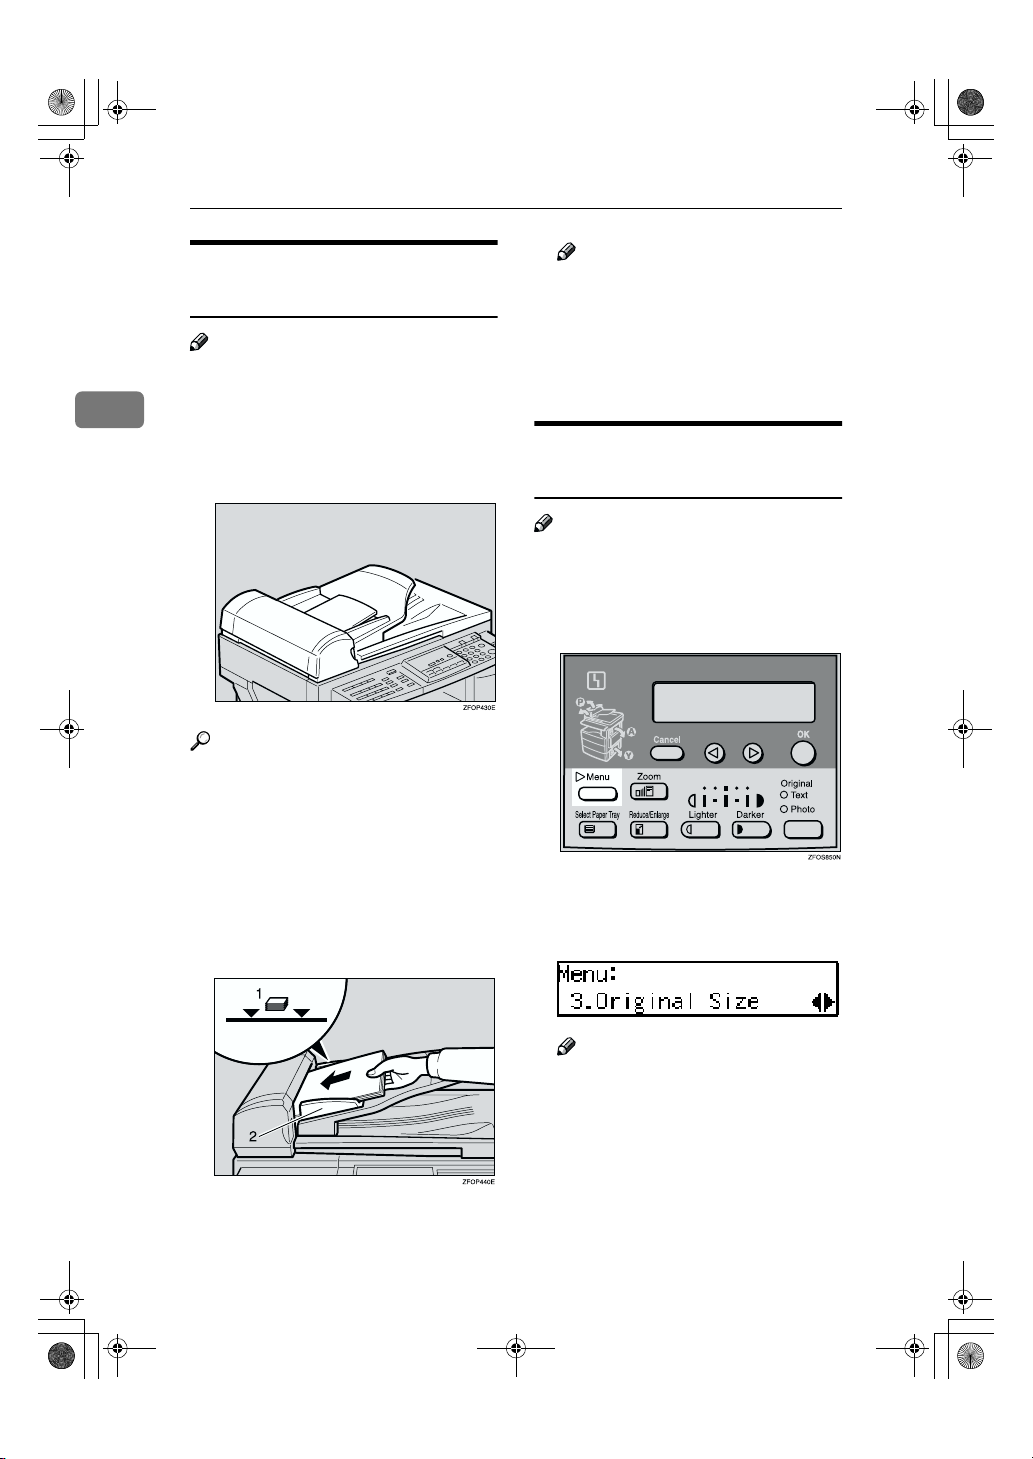
Press the {{{{Menu}}}} key.
AAAA
20
Adjust the guide to the original
AAAA
size.
Place the aligned originals face
BBBB
up into the document feeder
(ADF).
1.
Limit mark
2.
Document guide
Press the 0000 or 1111 key to select "3.
BBBB
Original Size", and then press the
{{{{OK}}}} key.
Note
❒ You can also enter this mode by
pressing the {{{{R/#}}}} key.
❒ When the bypass tray is select-
ed, the {{{{R/#}}}} key does not work
to enter this mode.
 Loading...