

Page 1
650
OPERATING INSTRUCTIONS
COPY REFERENCE
Read this manual carefully before you use this product and keep it handy for future
reference.
For safety, please follow the instructions in this manual.
Page 2

RICOH COMPANY , LTD.
15-5, 1 chome, Minami-Aoyama,
Minato-ku, Tokyo 107, Japan
Telephone: Tokyo 3479-3111
Overseas Affiliates
U.S.A.
RICOH CORPORAT ION
5 Dedrick Place
West Caldwel l, New Je r sey 07 006
(TEL) 973-882-2000
Netherlands
RICOH EUROPE B.V .
Groenelaan 3 P.O. Box 1 14
1180 AC - Amstelveen Holland
(TEL) 020-54 74 111
United Kingdom
RICOH U.K. LTD.
Ricoh House
1 Plane Tree Crescent, Feltham,
Middlesex, TW13 7HG
(TEL) 181-261-4000
Germany
RICOH DEUTSC HLA N D G M B H
Mergenthalerallee 38-40,
65760 Eschborn
(TEL) (06196) 906-0
Singapore
RICOH ASIA PACIFIC PTE. LTD.
#15-01/02 The Heeren,
260 Orchard Road,
Singapore 238855
(TEL) 65-830-5888
Spain
RICOH ESPAÑA S.A.
Guitard, 45
08014 Barcel ona
(TEL) 490-09-60
Italy
RICOH ITALIA S .p. A.
Via della Metallurgia, 12
(zona Basson) - 37139 VERONA
(TEL) 045-851 00 44
Hong Kong
RICOH HONG KONG LTD.
23/F., China Overseas Building,
139, Hennessy Road,
Wan Chai, Hong K on g
(TEL) 2862-2888
France
RICOH FRANCE S.A.
383 Avenue du Général de Gaulle,
B.P. 307, 92143 Clamart Cedex
(TEL) 01-4094-3838
650 OPERATING INSTRUCTIONS
Printed in Japan
UE USA A2297207
Page 3

Introduction
This manual contains detailed instructions on the operation and maintenance of this machine. To get
maximum versatility from this machi ne all operators should carefully read a nd follow the instr u ctions in
this manual. Please keep this manual in a handy place near the machine.
Please read the Safe ty Inf ormat ion bef ore us ing t his mac hine. It contai ns im portan t in forma tion r elat ed
to USER SAFETY and PREVENTING EQUIPMENT PROBLEMS.
Notes:
Some illustrations may be slightly different from your machine.
Certain options may not be available in some countries. For details, please contact your local dealer.
Operator Safety:
This machine is considered a CDRH class I laser device, safe for office/ EDP use. The machine contains two 5-milliwat, 760 - 800 nanometer wavelength, GaAIAs laser diodes. Direct (or indirect reflected) eye contact wit h the laser beam might cause se rious eye damage. Saf ety pr ecautions an d inter lock
mechanisms have been designed to prevent any possible laser beam exposure to the operator.
Laser Safety:
The Center for Devices and Radi ologi cal Hea lth (CD RH) pr ohibit s th e repai r of las er-bas ed opt ica l unit
in the field. The optical housing unit can only be repaired in a factory or at a location with the requisite
equipment. The laser subsystem is replac eable in t he fiel d by a qual ified Cus tomer En gineer. The laser
chassis is not repairable in the field. Customer engineers are therefore directed to return all chassis
and laser subsystems to the fact ory or se rvice dep ot when replaceme nt or the opt ical subsyst em is required.
Warning:
Use of controls or adjustment or performance of procedures other than those specified in this manual
might result in hazardous radiation exposure.
Two kinds of size notation are employed in this manual. With this machine refer to the Inch version.
For good copy quality, Ricoh recommends that you use genuine Ricoh toner.
Ricoh shall not be responsi ble for any damage or exp ense that mi ght res ult from the use of parts other
than genuine Ricoh parts in your Ricoh office product.
Power Source
120 V, 60 Hz, 16 A or more
Please be sure to connec t the power co rd to a power s ource as abov e. For detai ls about power sourc e,
see ⇒ P.217
“Power Connection”
.
Page 4

Note to users in the United States of America
Notice:
This equipment has been tested and found to comply with the limits for a Class B digital device, pursuant to Part 15
of the FCC Rules. These limits are designed to provide reasonable protection against harmful interference in a residential installation. This equipment generates, uses and can radiate radio frequency energy and, if not installed and
used in accordance with the instructions, may cause harmful interference to radio communications. However, there
is no guarantee that interference will not occur in a particular installation. If this equipment does cause harmful interference to radio or television reception, which can be determined by turning the equipment off and on, the user
is encouraged to try to correct the interference by one more of the following measures:
Reorient or relocate the receiving antenna.
Increase the separation between the equipment and receiver.
Connect the equipment into an outlet on a circuit different from that to which the receiver is connected.
Consult the dealer or an experienced radio /TV technician for help.
Warning
Changes or modifications not expressly approved by the party responsible for compliance could void the user's authority to operate the equipment.
1. Properly shielded and grounded cables and connectors must be used for connec tions to host computer (and/or
peripheral) in order to meet FCC emission limits.
2. AC adapter with ferrite core must be used for RF interference suppression.
This device complies with Part 15 of FCC Rules.
Operation is subject to the following two conditions:
1. This device may not cause harmful interference, and
2. This device must accept any interference received,
including interference that may cause undesired operation.
Ricoh Corporation, 5 Dedrick Place, West Caldwell, NJ 07006
201-882-2000
Note to users in Canada
Note:
This Class B digital apparatus complies with Canadian ICES-003.
Remarque concernant les utilisateurs au Canada
Avertissement:
Cet appareil numérique de la classe B est conforme à la norme NMB-003 du Canada.
In accordance with ISO Standard 7001, this machine uses the following symbols for the main power switch:
means POWER ON.
aaaa
means STAND BY.
cccc
Copyright © 1998 Ricoh Co., Ltd.
Page 5
Safety Information
R
R
When using your machine, the following safety precautions should be always be
followed.
Safety During Operation
In this manual, the following important symbols are used:
WARNING:
CAUTION:
Examples Of Indications
Ignoring this warning could cause serious injury or ev en de at h.
Ignoring this caution could cause injury or damage to property.
Symbols R mean a situation that requires you take care.
Symbols v mean “Hot surface”.
Do NOT carry out the operation represented by this symbol m.
This example means “Do not take apart”.
Symbols $ mean you MUST perform this operation.
This example means “You must remove the wall plug”.
i
Page 6
R
WARNING:
•
Only connect the machine to the power source described on
the inside front cover of this manual.
•
Avoid multi-wiring.
•
Do not damage, break or make any modifications to the power cord. Do not place heavy objects on it, pull it hard or bend
it more than necessary. These actions could cau se an electric shock or fire.
•
Do not plug or unplug the power cord with your hands wet.
Otherwise, an electric shock might occur.
•
Make sure the wall outlet is near the machine and freely accessible so that in event of an emergency it can be unplugged easily.
•
Do not remove any covers or screws other than those specified in this manual. Some parts of the machine are at a high
voltage and could give you an electric shock. Also, if the machine has laser systems, direct (or indirect) reflected eye
contact with the laser beam may cause serious eye damage.
When the machine needs to be checked, adjusted, or repaired, contact your service representative.
•
Do not take apart or attempt any modifications to this machine. There is a risk of fire, electric shock, explosion or loss
of sight. If the machine has laser systems, there is a risk of
serious eye damage.
•
If the machine looks damaged or breaks down, smoke is
coming out, there is a strange smell o r anything looks unusual, immediately turn off the operation and main power
switches then unplug the power cord fro m the wall. Do not
continue using the machine in this condition. Cont act your
service representative.
•
If metal, liquid or foreign matter falls into the machine, turn
off the operation and main power switches, and unplug the
main power cord. Contact your service representative. Do
not keep using the machine with a fault or defect.
•
Do not put any metal objects or containers holding water
(e.g. vases, flowerpots, glasses) on the machine. If the contents fall inside the machine, a fire or electric shock coul d
occur.
ii
Page 7

•
Do not incinerate used toner or toner containers. Toner dust
might ignite when exposed to an open flame. Dispose of the
used toner containers according to local regulations for
plastics.
iii
Page 8

R
CAUTION:
Keep the machine away from humidity and dust. A fire or an elec-
•
tric shock might occur.
•
Do not place the machine on an unstable or tilted surface. If it topples over, it could cause injury.
•
After you move the machine, fix it with the caster fixture. Otherwise, the machine might move or come down to cause a personal
injury.
•
When you move the machine, unplug the power cord from the
wall outlet to avoid fire or electric shock.
•
When the machine will not be used for a long time, unplug the
power cord.
•
When you pull out the plug from the socket, grip the plug to avoid
damaging the cord and causing fire or electric shock.
•
If you use the machine in a confined space, make sure there is a
continuous air turnover.
•
Do not reuse stapled paper. Do not use aluminum foil, carboncontaining paper or other conductive paper. Otherwise, a fire
might occur.
•
When removing misfed paper, do not touch the fusing section because it could be very hot.
•
This machine has been tested for safety using this supplier's
parts and consumables. We recommend you only use these
specified supplies.
•
Do not eat or swallow toner.
•
Keep toner (used or unused) and toner containers out of reach of
children.
•
This equipment is only to be installed by a qualified service personnel.
iv
Page 9

•
Deliver to collection point for waste products. Do not be disposed
of via domestic refuse collection.
v
Page 10

Energy Star
As an Energy Star Partner, we have determined that this machine model meets
Energy Star Guidelines for energy efficiency.
This product was designed to reduce the environmental impact associated with
copying equipment by means of energy saving feature such as Auto Off mode.
For details, see the following pages.
❖❖❖❖ Auto Reset Timer
See “Auto Off Timer” of the “System Settings” manual.
❖❖❖❖ Low Power Shift Time
See “Low Power Shift Time“ of the “System Settings” manual.
❖❖❖❖ Duplex Priority
See “Duplex Mode Priority” in ⇒ P.201 “General Features 2/3”.
Recycled Paper
----
Please contact your sales or service representative for recommended recycled
paper types that may be used in this machine.
vi
Page 11

How To Read This Manual
R
R
Symbols
In this manual, the following symbols are used:
WARNING:
This symbol indicates a potentially hazardous situation that might result in
death or serious injury when you misuse the machine without following the instructions under this symbol. Be sure to read the instructions, all of which are described in the Safety Information section.
CAUTION:
This symbol indicates a potentially hazardous situation that might result in minor or moderate injury or property damage that does not involve personal injury
when you misuse the machine without following the instructions under this
symbol. Be sure to read the instructions, all of which are described in the Safety
Information section.
* The statements above are notes for your safety.
Important
If this instruction is not followed, paper might be misfed, originals might be
damaged, or data might be lost. Be sure to read this.
Preparation
This symbol indicates the prior knowledge or preparations required before operating.
Note
This symbol indicates precautions for operation, or actions to take after misoperation.
Limitation
This symbol indicates numerical limits, functions that cannot be used together,
or conditions in which a particular function cannot be used.
Reference
This symbol indicates a reference.
[ ]
Keys that appear on the machine's panel display.
{ }
Keys built into the machine's operation panel.
vii
Page 12

TABLE OF CONTENTS
What You Can Do With This Machine (Copy Mode)............................... 2
Guide To Components.............................................................................. 4
Output Tray Guide......................................................................................... 6
Options ....................................................................................................... 7
Operation Panel......................................................................................... 8
Panel Display........................................................................................... 10
Displays And Key Operations..................................................................... 10
Function List Based On Options............................................................ 12
1.BASICS
Starting The Machine.............................................................................. 15
Starting The Machine.................................................................................. 15
Turning On The Power ................................................................................ 16
Turning Off The Power................................................................................ 17
Originals................................................................................................... 18
Sizes And Weights Of Recommended Originals......................................... 18
Sizes Difficult To Detect.............................................................................. 19
Original Sizes And Scanning Area/Missing Image Area ............................. 20
Copy Paper............................................................................................... 21
Recommended Paper Sizes And Types..................................................... 21
Non-recommended Paper........................................................................... 23
Paper Storage. ............................................................................................ 23
Toner......................................................................................................... 25
Handling Toner.............................................................. ....................... ....... 25
Toner Storage............................................................................................. 25
Used Toner ... ................ ................................ ......................... ..................... 25
2.COPYING
Basic Procedu re . ............ ......................................................................... 27
Setting Originals...................................................................................... 29
Setting Originals On The Exposure Glass .................................................. 29
Setting Originals In The Document Feeder................................................. 30
Setting Special Originals............................................................................. 31
Basic Functions....................................................................................... 36
Adjusting Copy Image Density.................................................................... 36
Selecting Original Type Setting................................................................... 38
Selecting Copy Paper ... .............................................................................. 39
Auto Reduce/Enlarge—Having The Machine Choose The Reproduction Ratios .. 43
Sort/Stack/Staple..................................................................................... 45
Sort—Sorting Into Sets (123, 123, 123)...................................................... 47
viii
Page 13

Stack—Stacking Together All Copies Of A Page (111, 222, 333).............. 49
Staple.......................................................................................................... 51
Punch........................................................................................................ 56
Copying From The Bypass Tray ............................................................ 59
When copying onto OHP transparencies or thick paper............................. 62
Program—Storing Your Copy Settings In Memory .............................. 64
Storing Your Settings.................................................................................. 64
Deleting A Program..................................................................................... 65
Recalling A Program................................................................................... 66
Other Functions....................................................................................... 67
Energy Saver Mode—Saving Energy ......................................................... 67
Interrupt—Temporarily Stopping One Job To Copy Something Else .......... 67
User Codes................................................................................................. 68
Auto Start—Entering Copy Job Settings During The Warm-up Period ....... 69
Original Beeper ............................. ......... ...... ... ....... ....... ........ ... ..... ....... ....... 69
Next Job—Presetting Next Copy Job During A Copy Run.......................... 70
Sample Copy—Checking Output Quality Before Making A Long Copy Run.. 70
Preset Reduce/Enlarge—Reducing And Enlarging Usi ng P reset Ratios.. 71
Zoom—Reducing And Enlarging In 1 % Steps..................................... 75
Size Magnification................................................................................... 78
Directional Magnification (%)—Stretching And Squeezing The Image
In 1 % Steps ............................................................................................. 80
Directional Size Magnification (Inch)—Stretching And Squeezing The
Image Into The Copy Area...................................................................... 83
Operation For Duplex/Combine ............................................................. 86
Duplex—Making Two-Sided Copies ...................................................... 88
1 Sided → 2 Sided—Making Two-sided Copies From One-sided Originals.. 88
→
2 Sided
2 Sided—Making Two-sided Copies From Two-sided Originals.. 93
Combine—Combining Originals Into One Copy................................... 95
1 Sided 2 Pages → Combine 1 Side........................................................... 97
1 Sided 4 Pages → Combine 1 Side........................................................... 99
1 Sided 8 Pages → Combine 1 Side......................................................... 100
1 Sided 4 Pages → Combine 2 Side......................................................... 101
1 Sided 8 Pages → Combine 2 Side......................................................... 103
1 Sided 16 Pages → Combine 2 Side....................................................... 105
2 Sided 2 Pages → Combine 1 Side......................................................... 106
2 Sided 4 Pages → Combine 1 Side......................................................... 108
2 Sided 8 Pages → Combine 1 Side......................................................... 109
2 Sided 4 Pages → Combine 2 Side......................................................... 111
2 Sided 8 Pages → Combine 2 Side......................................................... 113
2 Sided 16 Pages → Combine 2 Side....................................................... 115
Book........................................................................................................ 117
Series Copies—Making One-sided Copies From Various Originals......... 118
Book..................... ....................................................................... .............. 121
ix
Page 14

Cover/Slip Sheet—Adding Or Inserting Sheets.................................. 131
Front Cover—Copying Or Adding A Front Cover...................................... 132
Front/Back Covers—Copying Or Adding Front And Back Covers............ 134
Designate—Copying Designated Pages Of Originals Onto Slip Sheets... 136
Chapters—Separating One-sided Originals Into Chapters
Of Two-sided Copies................................................................................. 138
Slip Sheet—Copying Or Inserting Slip Sheet ..................................... 140
Double Copies—Copying The Image Twice On One Page................ 143
Image Repeat—Repeating An Image Over The Entire Copy. ............ 145
Margin Adjustment—Adjusting The Margin..................... .. .............. .. . 147
Erase Center/Border—Erasing The Center And The Border............. 149
Centering....................................... ......................................................... 1 5 4
Combination Chart......... ....................................................................... 156
3.WHAT TO DO IF SOMETHING GOES WRONG
If Your Machine Does Not Operate As You Want ............................... 159
Message............. ....................................................................... ................ 159
Display ............................................... ....................................................... 160
If You Cannot Make Clear Copies ........................................................ 161
If You Cannot Make Copies As You Want........................................... 163
Adjust Image............................................................... .............................. 163
Combine............................................................................................. ....... 164
Duplex.................................. ..................................................................... 165
B Loading Paper................................................................................... 166
Optional 3500-sheet Large Capacity Tray ................................................ 170
D Adding Toner .................................................................................... 172
x Clearing Misfeeds............................................................................. 174
Changing The Paper Size..................................................................... 182
d Adding Staples ................................................................................. 185
e Removing Jammed Staples............................................................. 188
y Removing Punch Waste................................................................... 191
4.USER TOOLS (COPY FEATURES)
Accessing The User Tools (Copy Features) ....................................... 193
Exiting From User Tools............................................................................ 194
User Tools Menu (Copy Features) ....................................................... 196
Settings You Can Change With The User Tools................................. 198
General Features 1/3.......................... ....................................................... 198
General Features
x
2
/3.......................... ....................................................... 201
Page 15

General Features 3/3.......................... ....................................................... 203
Reproduction Ratio
Reproduction Ratio
Page Format
Page Format
Input Output .............................................................................................. 210
Count Manager ......................................................................................... 212
1
/2.......................... ..................................................... 204
2
/2.......................... ..................................................... 204
1
/2.......................... .............................................................. 205
2
/2.......................... .............................................................. 206
5.REMARKS
Do's And Don'ts..................................................................................... 215
Where To Put Your Machine................................................................. 216
Machine Environment ............................................................................... 216
Power Connection..................................................... .. ... .. .. .. ..... .. ..... .. ..... .. 217
Access To Machine................................................................................... 218
Maintaining Your Machine.................................................................... 219
Cleaning The Exposure Glass .................................................................. 219
Cleaning The Document Feeder............................................................... 219
6.SPECIFICATION
Mainframe............................................................................................... 221
Document Feeder.................................................................................. 225
Finisher (Option)....... ............................................................................. 226
Punch Kit (Option)................................................................................. 228
Copy Tray(Option)................................................................................. 229
3500-Sheet Large Capacity Tray (LCT) (Option)................................. 230
INDEX...................................................................................................... 231
xi
Page 16

xii
This page is intentionally blank.
Page 17

This page is intentionally blank.
1
Page 18

1 2
1
2
1 2
34
4
3
2
1
1 2
2
1
8
7
6
5
4
3
2
1
1 234
5678
12
2
1
1
2
1
2
12
1
2
1 Sided 2 Pages → Combine 1 Side ⇒
Page 97
1 Sided 4 Pages → Combine 1 Side ⇒
Page 99
1 234
5678
2
1
8
7
1 Sided 8 Pages → Combine 1 Side ⇒
Page 100
2 Sided 2 Pages → Combine 1 Side ⇒
Page 106
1 2
34
4
3
2
1
2 Sided 4 Pages → Combine 1 Side ⇒
Page 108
2 Sided 8 Pages → Combine 1 Side ⇒
Page 109
Duplex
Combine 1 Side
1 Sided → 2 Sided ⇒
Page
88
Combination with 2 Sided + 1 Sided
1 Sided + Combine 1 Side 2 Sided + Combine 1 Side
2 Sided → 2 Sided ⇒
Page 93
Selecting Original Type Setting
⇒
Page 38
Adjusting Copy Image Density ⇒ Page 36
Setting Special Originals ⇒
Page 31
2 Sided → 1 Sided ⇒
Page 120
A
A
BAB
A
B
A
B
A
Erase Center
Erase Border
Image Repeat ⇒ Page 145
Double Copies ⇒ Page 143
Centering ⇒ Page 154
Margin Adjustment
⇒
Page 147
Erase Center Erase Border ⇒
Page 149
3
2
1
3
2
1
3
2
1
3
2
1
10
5
1
10
5
1
Front Cover ⇒ Page 132
Slip Sheet ⇒ Page 140
Front / Back Covers ⇒
Page
134
Designate ⇒ Page 136 Chapters ⇒ Page 138
Auto Reduce / Enlarge ⇒ Page 43
1
2
3
1
2
3
6
5
4
4
1
2
1
3
Edit Image
Cover / Slip Sheet
What You Can Do With This Machine (Copy Mode)
2
Page 19

2
1
3
2
1
3
2
1
3
2
1
3
2
1
3
2
1
3
2
1
3
2
1
3
2
1
3
2
1
A" a"
A"
a"
4
3
2
1
3
21
4
1 234
5678
2
1
16
15
9 10 11 12
13 14 15 16
12
3
1
2
3
Sort
Stack
Staple
1 Sided 4 Pages → Combine 2 Side ⇒
Page
101
1 2
34
8
7
2
1
5 6
78
1 Sided 8 Pages → Combine 2 Side ⇒ Page 103
1 Sided 16 Pages → Combine 2 Side ⇒
Page
105
4
3
2
1
3
21
4
2 Sided 4 Pages → Combine 2 Side ⇒
Page 111
8
7
6
5
4
3
2
1
5 6
78
1 2
34
2 Sided 8 Pages → Combine 2 Side ⇒
Page 113
1 234
5678
9
10 11 12
13 14 15 16
4
3
2
1
16
15
14
13
2 Sided 16 Pages → Combine 2 Side ⇒
Page 115
Zoom ⇒ Page 75
Preset Reduce / Enlarge ⇒ Page 71
Size Magnification ⇒
Page
78
Directional Magnification (%) ⇒
Page
80
Directional Size Magnification (inch) ⇒
Page
83
Combine 2 Side
Book
Magnification
Reduce / Enlarge
1Sided + Combine 2 Side 2Sided + Combine 2 Side
12
12
Book → 1 Sided ⇒ Page 118
Multi → 2 Sided ⇒ Page 123
12
1
2
Book → 2 Sided ⇒ Page 121
4
3
2
1
4
32
1
1
23
4
Portrait
Landscape
Booklet ⇒ Page 125
Portrait
Landscape
2
1
8
7
87216
54
3
1
27
83
45
6
Magazine ⇒ Page 128
Select with the
User Toors ⇒ Page 202
Sort ⇒ Page 47 Rotate Sort *2 ⇒ Page 47 Stack *1 ⇒ Page 49 Staple *1 ⇒ Page 51
Punch *3 ⇒ Page 56
*1 Optional finisiher is required.
*2 This mode can be used when the optional finisher is not installed.
*3 Optional finisher and punch kit are required.
b
"
B
"
TSPH301N
3
Page 20

Guide To Components
On
TSPS050N
1. Document Feeder (ADF)
The document feeder automatically feeds a
stack of originals one by one.
2. Exposure glass
Position originals here face down for copying. See ⇒ P.18 “Originals”.
3. Output tray
Copied paper i s delivered here fac e down.
4. Output tray guide
Note
❒This guide prevents copied OHP transpar-
encies and translucent paper from being
curled when delivered. See ⇒ P.6 “Out-
put Tray Guide”.
5. Main power switc h
Note
❒If the machine does not operate after turn-
4
ing on the operation switch, check if the
main power switch is turned on. If it is
off, turn it on.
6. ADF external tray
When copying on e-sided originals , th e originals are delivered here.
7. On indicator
This indicator lights up when the operati on
switch is turned on, and goes off when the
switch is turned off.
8. Operation switch
Press this switch to turn the power on (the
indicator lights up). To turn the power
On
off, press this sw itch again (the On indicato r
goes off).
9. Operation panel
See ⇒ P.8 “Operation Pane l” .
Page 21
10. Front cover
Open to access the inside of the machine.
11. Paper tray
Set paper here.
Tray 1 is a tandem tray where the paper on
the left side automatically moves to th e rig ht
side when the paper on the right side has run
out. See ⇒ P.166 “
TSPH010E
B
Loading Paper”.
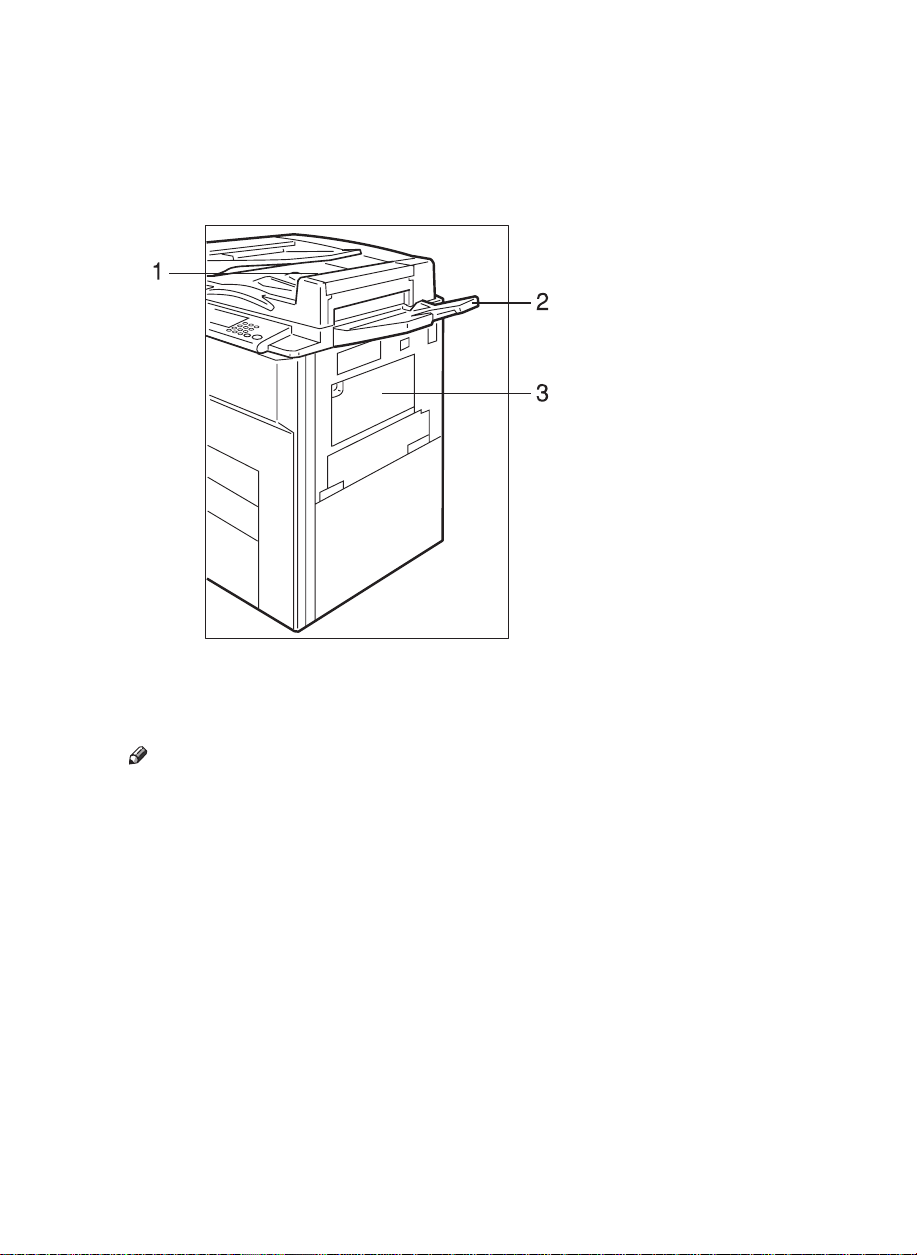
1. ADF tray
When copying two-sided origina ls, the originals are delivered here.
Note
❒Even when copying one-sided originals,
you can select the ADF tray. See “ADF
Tray Setting” of the “System Settings”
manual.
2. ADF external tray
When copying one-sided originals, the originals are delivered here.
3. Bypass tray
Use to copy onto OHP transparencies, adhesive labels, tra nslu ce nt pa pe r, post ca rds, an d
non-standard size paper. See ⇒ P.59 “Copy-
ing From The Bypa ss Tray”.
5
Page 22

1
TSPH240E
1. Ventilation hole
Prevents overheating. Do not obstruct the
ventilation hole by placing or leaning an
object near it. If the machine overh eat s, a
fault might occur.
Output Tray Guide
When copying onto OHP transparencies and translucent paper, raise the guide. This
prevents copies from being curled when delivered.
❖❖❖❖To copy onto normal paper and thick paper
Lower the right end of the guide until it clicks.
TSPH020E
❖❖❖❖To copy onto OHP transparencies and translucent paper
Raise the right end of the guide until it clicks.
TSPH030E
6
Page 23

Options
SP50PE
1. Finisher
Sorts, stacks , and staples copies. Y ou can
also punch copi es. (The Punch functi on is
optional.)
•1: Proof tray
•2: Shift tray
Other option:
•Punch kit
2. Output tray (Can be installed
when the finisher is not installed.)
Copied paper is del i vered here face dow n.
3. Large Capacity Tray (LCT)
Holds 3,500 shee ts of paper.
7
Page 24

Operation Panel
2134
Screen
Contrast
User Tools/
Counter
5
14
Program
Clear Mod
Energy Sa
Enter
1. Screen Contrast knob
Adjusts the brightness of the panel display.
2. Indicators
These indicators show errors or th e status of
the machine.
See ⇒ P.159 “WHAT TO DO IF SOME-
THING GOES WRONG”.
3. {
{User Tools/Counter}}}} key
{{
•User Tools
Press to change the default set tin gs and
conditions to meet your requirements.
•Counter
Press to check or pr int the tota l number of
copies made.
See ⇒ P.193 “USER TOOLS (COPY FEA-
TURES)”.
4. Panel display
Shows operation status, error messages, and
function menu s. See ⇒ P.10 “Panel Dis-
play”.
8
5. {
{Program}}}} key
{{
Press to select the program mode. See ⇒
P.64 “Program—S torin g Your C opy Se tti ngs
In Memory”.
6. {
{Clear Modes/Energy Saver}}}} key
{{
Press to clear th e prev iously e ntered copy job
settings. Also use to switch to and from
Energy Saver mode . Se e ⇒ P.67 “Energy
Saver Mode—Savi ng Energy”.
7. {
{Interrupt}}}} key
{{
Press to make interrupt copies duri ng a copy
run. See ⇒ P.67 “Interrupt—Temporarily
Stopping One Job To Cop y S om ething Else”.
8. {
Use this k ey to mak e a single sa mple cop y
before starting a l ong copy run. By checking
the finish and making any necessary changes
to the image quality settings before you make
multiple copies, you can save time and paper.
See ⇒ P.70 “Sample Copy—Checking Out-
put Quality Before Maki ng A Long Copy
Run”.
{Sample Copy}}}} key
{{
Page 25

Program
Clear Modes/
Energy Saver
Enter
Clear/Stop
Start
Interrupt
Sample Copy
109
On
Main Power
11121314
TSPH200N
9. On indicator
This indicator lights up when the operation
switch is turned on, and goes off when the
switch is turned off.
10. Main Power indicator
This indicator lights up when the main p ower
switch is turned on, and goes off when the
switch is turned off.
11. Operation switch
Press this switch to turn the p ower on (the
indicator lights up). To turn the power
On
off, press this switch again (the On indicator
goes off).
12. {
{Start}}}} key
{{
Press to start copying. Use to set the Auto
Start. See ⇒ P.69 “Auto Start—Entering
Copy Job Settings During The W arm-up
Period”.
13. {
{Clear/Stop}}}} key
{{
While entering numbers, press to cancel a
number to have entered. While copying,
press to stop copying.
14. {
{Number}}}} keys
{{
Use to enter the desired number of copies
and data for selected modes.
Use the Enter key to enter data in selected
modes.
9
Page 26

Panel Display
The panel display shows operational status, error messages, and function menus.
Important
❒Do not apply a strong shock or force of about 30 N (about 3 kgf) or more to the
panel display. Otherwise, the display might be damaged.
Note
❒The function items displayed serve as selector keys. You can select or specify an
item by lightly pressing it.
❒When you select or specify an item on the panel di splay, it is highlighted like
.
❒Keys appearing as cannot be used.
Displays And Key Operations
Note
❒The following illustrations are examples for the machine with the optional finisher
unit and large capacity tray (LCT) installed.
❖❖❖❖Copy initial display
OK
1
1. Original Mode, Image Density
and Special Original mode.
2. Operational status or messages.
3. You can register up to three fre-
quently used reduce/enlarge ratios
other than the fixed reduce/enlarge
ratios. See “Shortcut R/E” in ⇒
10
24
35
8
P.201 “General Features
2
6
7
TPEH220N
/3”.
4. Shows the remaining capacity of
memory as a percentage.
5. Displays the number of originals
scanned into memory, number of
copies set, and number of copies
Page 27

made.
6. Sort, Stack, Staple or Punch
mode.
7. Displays the contents of the Short-
cut keys. You can register frequently
used functions in these keys. See
“Shortcut Keys” in ⇒ P.203 “Gen-
❖❖❖❖Function menu display
1. Items you can select.
3
eral Features
/3”.
8. Shows the available functions.
Touch a function name to display its
menu. For example, touch the
[Reduce/Enlarge] key to bring up the
Reduce/Enlarge menu.
12
3
TSPH230N
2. The key highlighted with the
lower line underlined indicates the
tray feeding the paper.
3. The [Check Modes] key appears
when you have selected function (s).
Touch this key to view the functions
currently selected.
11
Page 28
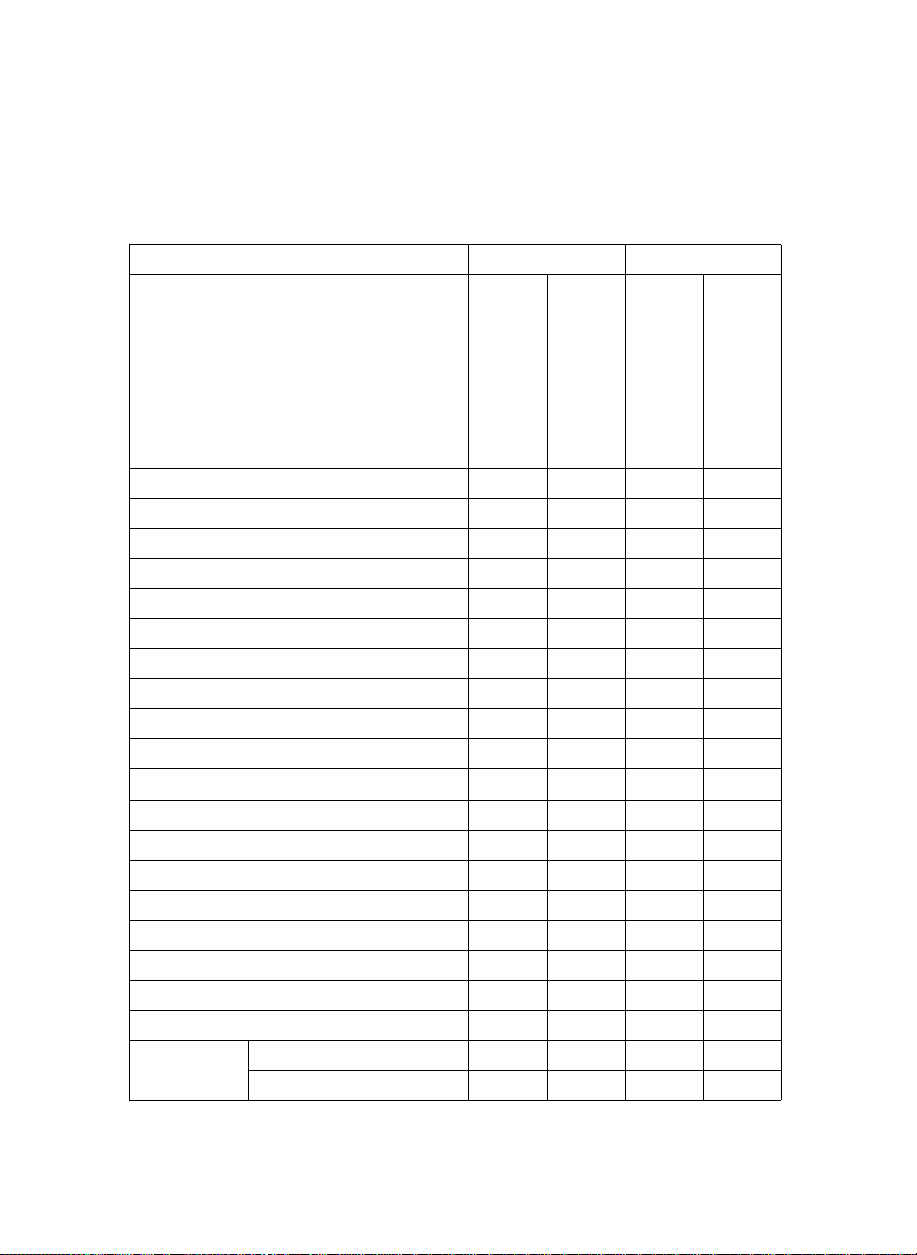
Function List Based On Options
The function that are available to you depend on your machine configuration and
which options you have. See the table below.
❍…Available
×…Not available
Finisher (Option) Place originals
without installed
Batch (SADF) ❍❍-- ❍
Mixed Sizes ❍❍-- ❍
Thin ❍❍-- ❍
Adjusting Image Density ❍❍❍❍
Selecting Original Type ❍❍❍❍
Selecting Copy Paper ❍❍❍❍
Auto Reduce/Enlarge ❍❍❍❍
Sort ❍
Rotate Sort ❍
Stack
Punch
Staple
Copying from the Bypass Tray ❍❍❍❍
Program ❍❍❍❍
Reduce/Enlarge ❍❍❍❍
Zoom ❍❍❍❍
Size Magnification ❍❍❍❍
Directional Magnification (%) ❍❍❍❍
Directional Size Magnification (inch) ❍❍❍❍
2 Sided
→
2 Sided ❍❍❍❍
→
2 Sided ❍❍❍❍
Duplex 1 Sided
×
×
×
installed
×
×
❍❍❍
❍
❍❍❍
on the exposure glass
❍❍
❍❍
*1
❍
in the document feeder
*1
❍
*1
12
Page 29

Finisher (Option) Place originals
without installed
installed
on the exposure glass
in the document feeder
Combine 1 Sided 2 pages → 1 Side ❍❍❍❍
1 Sided 4 pages → 1 Side ❍❍❍❍
1 Sided 8 pages → 1 Side ❍❍❍❍
1 Sided 4 pages → 2 Side ❍❍❍❍
1 Sided 8 pages → 2 Side ❍❍❍❍
1 Sided 16 pages → 2 Side ❍❍❍❍
2 Sided 2 pages → 1 Side ❍❍❍❍
2 Sided 4 pages → 1 Side ❍❍❍❍
2 Sided 8 pages → 1 Side ❍❍❍❍
2 Sided 4 pages → 2 Side ❍❍❍❍
2 Sided 8 pages → 2 Side ❍❍❍❍
2 Sided 16 pages → 2 Side ❍❍❍❍
Book Book → 1 Sided ❍❍❍❍
2 Sided → 1 Sided ❍❍❍❍
1 Sided → 2 Sided ❍❍❍❍
2 Sided → 2 Sided ❍❍❍❍
2 Sided → 2 Sided ❍❍❍❍
Booklet ❍❍❍❍
Magazine ❍❍❍❍
Cover/Designate/Chapters ❍❍❍❍
Slip Sheet ❍❍❍❍
Double ❍❍❍❍
Repeat ❍❍❍❍
Margin Adjust ❍❍❍❍
Erase Center/Border ❍❍❍❍
Centering ❍❍❍❍
*1
The optional punch ki t r equired.
13
Page 30

14
This page is intentionally blank.
Page 31

1. BASICS
Starting The Machine
To start the machine, press the operation switch to turn the power on.
Note
❒ This machine automatically enters Energy Saver mode or turns itself off if you
do not use the machine for a while. See “Energy Saver Mode—Saving Energy” and ”Auto Off Timer” of the System Settings.
Power switches
----
This machine has the operation switch and main power switch.
Operation switch (right side of the operation panel)
❖❖❖❖
Press this switch to activate the machine. When the machine has warmed up,
you can make copies.
Main power switch (left side of the machine)
❖❖❖❖
When the machine is not to be used for an extended period of time, turn off
the main power switch.
Starting The Machine
Make sure that the power cord is plugged into the wall outlet firmly.
A
Turn on the main power switch.
B
Main Power
On
Stand by
SWN
15
Page 32

BASICS
t
Turning On The Power
Press the operation switch to make the On indicator light up.
A
1
Main Power
TSPS010N
Start
op
Interrupt
Sample Copy
On
The panel display will come on.
Note
❒ If the power is not turned on when the operation switch is pressed, check
if the main power switch is on. If off, turn it on.
❒ During the warm-up period (less than 330 seconds), you can use the Auto
Start function. See ⇒ P.69 “Auto Start—Entering Copy Job Settings During
The Warm-up Period”.
When the machine is set for user codes
Enter your user code using the {{{{
A
Note
}}}} keys. Then press the {{{{#}}}} key.
Number
❒ To prevent others from making copies with your user code, press the {
Modes/Energy Saver
} key and the {
Clear/Stop
} key simultaneously after
copying.
Reference
For setting user codes, see ⇒ P.212 “Count Manager”.
Clear
When the
{{{{
Clear Modes/Energy Saver
}}}}
indicator is lit
The machine is in Energy Saver mode.
Press any key.
A
The machine will return to the ready condition.
Note
❒ The machine will also return to the ready condition when an original is set
in the document feeder, or the document feeder is opened.
16
Page 33

Reference
t
See “Low Power Timer” of the “System Settings” manual.
Starting The Machine
Turning Off The Power
Press the operation switch to make the On indicator go off.
A
Start
op
Interrupt
Sample Copy
On
Main Power
TSPS010N
1
17
Page 34

BASICS
Originals
1
Sizes And Weights Of Recommended Originals
❖❖❖❖ Metric version
Where original is set Original Size Original Weight
Exposure glass Up to A3 --
Document feeder 1-sided originals:
A3L – B6
2-sided originals:
A3L – A5
Thin Paper mode:
A3L – B6
KL
KL
K
52 – 128 g/m
52 – 105 g/m
41 – 128 g/m
2
2
2
❖❖❖❖ Inch version
Where original is set Original Size Original Weight
Exposure glass Up to 11" × 17" --
Document feeder 1-sided originals:
11" × 17"L – 5
2-sided originals:
11" × 17"L – 5
Thin Paper mode:
11" × 17"L – 5
1
/2" × 81/2"
1
/2" × 81/2"
1
/2" × 81/2"
14 – 34 lb
KL
14 – 28 lb
KL
11 – 34 lb
KL
Non-recommended originals for the document feeder
Setting the following originals in the document feeder might cause paper misfeeds or damage to the originals. Set these originals on the exposure glass.
• Originals other than those specified in ⇒ P.18 “Sizes And Weights Of Recom-
mended Originals”
• Stapled or clipped originals
• Perforated or torn originals
• Curled, folded, or creased originals
• Pasted originals
• Originals with any kind of coating, such as thermal fax paper, art paper, aluminum foil, carbon paper, or conductive paper
18
Page 35

Originals
• Originals with perforated lines
• Originals with indexes, tags, or other projecting parts
• Sticky originals such as translucent paper
• Thin original that has low stiffness
• Originals of inappropriate weight ⇒ P.18 “Sizes And Weights Of Recommended
Originals”
• Bound originals such as books
• Transparent originals such as OHP transparencies or translucent paper
Sizes Difficult To Detect
It is difficult for the machine to detect the sizes of the following originals, so select the paper size manually.
• Originals with indexes, tags, or other projecting parts
• Transparent originals such as OHP transparencies or translucent paper
• Dark originals with many letters and drawings
• Originals which partially contain solid image
• Originals which have solid image at their edges
• Originals other than those (with ❍) in the table below. See ⇒ P.19 “Sizes de-
tectable by the Auto Paper Select”.
1
Sizes detectable by the Auto Paper Select
Metric version
❖❖❖❖
Size A3LB4LA4
Place of
original
Exposure
glass
Document
feeder
*1
❍❍❍ ❍
❍❍❍ ❍❍❍ ❍ ❍
You can select from 81/2" × 13", 81/4" × 13" and 8" × 13" using the user tool (system
settings). See “<F/F4> Size Setting” of the “System Settings” manual.
K
L
B5
A5
B6
11 "
11 "
×
17"
L
×
15"
L
K
K
K
L
L
L
×× × × × × ×
1
/2"
81/2" ×
8
11"
×
14"
L
L
×
❍
K
51/2" ×
1
8
/2"
KL
×
8
×
L
1
/2"
13"
❍
❍
*1
19
Page 36

BASICS
❖❖❖❖ Inch version
Size A3LB4LA4
Place of
1
original
Expo-
ЧЧЧЧЧЧ ❍ × ❍❍ ××
K
L
B5
K
L
A5
K
L
B6
K
L
11" ×
17"
L
11" ×
15"
L
8
×
14"
1
/2"
L
81/2" ×
11"
K
L
51/2" ×
1
8
/2"
KL
sure
glass
Docu-
××❍ ××× ❍❍❍❍ ❍❍
ment
feeder
*1
You can select from 81/2" × 13", 81/4" × 13" and 8" × 13" using the user tool (system
settings). See ”<F/F4> Size Setting“ of the ”System Settings“ manual.
, 8
×
L
1
13"
/2"
*1
Original Sizes And Scanning Area/Missing Image Area
❖❖❖❖ Exposure glass
Reference
position
Vertical size
A3A4
Horizontal size
Maximum Scanning area
A3 (297x420mm)
11"x17" (279x432mm)
A3
CP01AEE
Limitation
❒ Even if you correctly set originals in the document feeder or on the exposure
glass, 3 mm, 0.1" margins on all four sides might not be copied.
20
Page 37

Copy Paper
Copy Paper
Recommended Paper Sizes And Types
The following limitations apply to each tray:
Metric version Inch version Paper
*1
Tray 1
(With a separator as
Tandem tray.)
*1
Tray 1
(Without a separator in the tray.)
Tray 2
A4K, B5K, 8
Note
You have to specify paper size using
❒
the user tools. See ⇒ P.182
The Paper Size”
A3L, B4L, A4KL, B5KL, 11" × 17"L,
1
8
/2" × 14"L, 81/2" × 11"
A3L, (B4L),
A4
KL
A5K, (11" × 17"L),
1
(8
/2" × 14"L),
1
(8
/2" × 11"L),
1
(8
/2" × 13"K), 81/2"
13"L, (8" × 10 1/2"
×
), (8" × 10"L),
L
(8"
13"L), 81/4" ×
×
13"L, (10" × 14"L),
(11"
15"L), (51/2" ×
×
1
8
/2"K)
1
/2" × 11"
, (B5KL),
K
.
KL
(A3L), (B4L),
(A4KL),
(B5KL), (A5K),
11" × 17"L, 8
14"L, 8
11"KL, (8
13"L), 8" × 10
, 8" × 10"L, 8" ×
L
13"L, (8
13"L), 10" × 14"L,
11" × 15"L, 5
1
8
/2"
K
“Changing
1
/2" ×
1
/2" ×
1
/2" ×
1
/2"
1
/4" ×
1
/2" ×
weight
52 – 128
2
g/m
, 14
– 34 lb
52 – 128
2
g/m
, 14
– 34 lb
52 – 128
2
g/m
, 14
– 34 lb
1
Paper
capacity
500 +
500
sheets
500
sheets
550
sheets
1500-sheet LCT
Note
You have to
❒
❒
specify the paper
size with the
user tools when
selecting paper
sizes in parentheses. See ⇒
P.182
“Changing
The Paper Size”
*1
B4L, A4KL, B5KL, 81/2" × 14"L,
1
/2" × 11"
8
.
KL
Note
You have to
specify the paper
size with the
user tools when
selecting paper
sizes in parentheses. See ⇒
P.182
“Changing
The Paper Size”
.
52 – 128
2
g/m
, 14
– 34 lb
1,500
sheets
21
Page 38

BASICS
Metric version Inch version Paper
weight
Bypass
tray
1
*4 *6
*3
Standard
size
Non-standard size
*2
A3L, A4L, A5L,
8" × 13"
L
Vertical: 100 – 300
mm
Horizontal: 148 –
A3L, 11" × 17"L,
1
8
/2" × 14"L, 81/2"
/2"
L
1
/2" ×
11"L, 5
×
1
8
Vertical: 4.0" – 11.7"
Horizontal: 6.0" –
17.0"
52 – 163
g/m
– 90 lb
52 – 163
g/m
– 90 lb
2
2
Paper
capacity
50 sheets
, 14
1 sheet
, 14
432 mm
Postcards, adhesive labels, translucent paper, OHP transparencies
*1
The paper tray fence is fixed. If you wish to change the size of paper set in this tray,
please contact your service representative.
*2
If you wish to copy onto non-standard size paper, set the paper in the Bypass Tray
and specify the size. See ⇒ P.59
*3
If you wish to copy onto OHP transparencies or thick paper, select OHP or Thick Paper mode. See ⇒ P.62
*4
Note that you cannot copy onto thick paper or OHP transparencies when “Face-Up/
“When copying onto OHP transparencies or thick paper”
Down selection in Bypass Mode” is set to “Face Up Exit.” Use standard high-quality
paper with a weight of 52 – 128 g/m
tion in Bypass Mode” in ⇒ P.212
*5
Always set one sheet at a time. See ⇒ P.59
*6
When setting copy paper, make sure the stack height does not exceed the limit mark.
“Copying From The Bypass Tray”
2
(14 – 34 lb) instead. See “Face-up/Down selec-
“Count Manager”
*5
.
.
“Copying From The Bypass Tray”
.
.
The maximum number of sheets you can set at once depends on the paper thickness
and condition.
Important
If you use damp or curled paper, a misfeed might occur. In such a case, try
❒
turning over the paper stack in the paper tray. If there is no improvement,
change to copy paper with less curl.
22
Note
When you use the bypass tray, be sure to set the copy paper direction to L.
❒
Post cards should be fed from the bypass tray.
❒
If you load paper of the same size and in the same direction in two or more
❒
trays, the machine automatically shifts to another tray when the tray in use
runs out of paper. This function is called Auto Tray Switch. (If you put recycled paper or special paper in paper trays using the Special Paper Indicate
menu, this function is not available to these trays unless their settings are
identical.) This saves interrupting a copy run to replenish paper even when
you make a large number of copies. You can cancel this setting. See “Auto Paper Select”, and “Auto Tray Switching” of the “System Settings” manual, and
“Bypass Tray: Special paper Indication” of the “System Settings” manual.
Reference
Loading Paper”
If you want to add paper, see ⇒ P.166
“
B
.
Page 39

Copy Paper
R
If you want to change the paper size, see ⇒ P.182 “Changing The Paper Size”.
Non-recommended Paper
CAUTION:
Do not reuse stapled paper. Do not use aluminum foil, carbon-
•
containing paper or other conductive paper. Otherwise, a fire
might occur.
Important
❒ Do not use paper with any kind of coating as follows. Otherwise, a fault might
occur.
•Thermal fax paper
• Art paper
•Aluminum foil
• Carbon paper
•Conductive paper
• Colored OHP transparencies
• Paper with perforated lines
• Hemmed paper
❒ Do not use copy paper that has been already copied on. Otherwise, a fault
might occur.
Note
❒ Do not use the following type of paper because a paper misfeed might occur.
• Bent, folded, or creased paper
• Torn paper
• Slippery paper
• Perforated paper
• Rough paper
• Thin paper that has low stiffness
• Paper with much paper dust on its surface
❒ If you make a copy on rough grain paper, the copy image might be blurred.
❒ Do not use paper which has been copied or printed on.
1
Paper Storage
Note
❒ When storing paper, the following precautions should always be followed:
23
Page 40

BASICS
• Do not store paper where it will be exposed to direct sunlight.
• Avoid storing paper in humid areas (humidity: 70 % or less).
• Store on a flat surface.
1
❒ Keep open reams of papers in the package, and store as you would unopened
paper.
❒ Under high temperature and high humidity, or low temperature and low hu-
midity conditions, store papers in a vinyl bag.
24
Page 41

Toner
R
R
R
Toner
Handling Toner
WARNING:
•
Do not incinerate used toner or toner containers. Toner dust
might ignite when exposed to an open flame. Dispose of the
used toner containers according to local regulations for
plastics.
CAUTION:
•
Do not eat or swallow toner.
•
Keep toner (used or unused) and toner containers out of reach of
children.
CAUTION:
•
This machine has been tested for safety using this supplier's
parts and consumables. We recommend you only use these
specified supplies.
Important
❒ If you use toner other than that recommended, a fault might occur.
Reference
If you want to add toner, see ⇒ P.172 “
D
Adding Toner”.
Toner Storage
1
Note
❒ When storing toner, the following precautions should always be followed:
• Store toner containers in a cool, dry place free from direct sunlight.
• Do not store toner where it will be exposed to heat.
• Do not eat or swallow toner, and keep it out of reach of children.
• Store on a flat surface.
Used Toner
Note
❒ Used toner cannot be re-used.
25
Page 42

BASICS
1
This page is intentionally blank.
26
Page 43

2. COPYING
Basic Procedure
Make sure that the machine is in Copy mode.
A
When the machine is set for user code, enter the user code with the {{{{Num-
B
ber}}}} keys and then press the {{{{#}}}} key.
Reference
See ⇒ P.68 “User Codes”.
Make sure that there are no previous settings remaining.
C
Note
❒ To clear settings, press the {Clear Modes/Energy Saver} key.
Set your originals.
D
Reference
See ⇒ P.29 “Setting Originals”.
Set your desired settings.
E
Enter the number of copies required with the {{{{Number}}}} keys.
F
Sample Copy
Start
Clear/Stop
Enter
TSPS020N
27
Page 44

COPYING
Note
❒ The maximum copy quantity can be set between 1 and 999 (default: 999).
See “Maximum Copy Quantity” in ⇒ P.201 “General Features
❒ To change the number entered, press the {
new number.
Clear/Stop
} key and enter the
2
/3”.
Press the {{{{
G
2
The machine starts copying.
Note
❒ Usually, when you set a single original on the exposure glass or in the doc-
ument feeder, the copied paper is delivered face-up. However, with some
functions copies will be delivered face-down.
❒ You can specify to deliver copied paper either face up or face down. (Ex-
cept for copying through the bypass tray) See “Platen Mode Exit” in ⇒
P.210 “Input Output”.
❒ To stop the machine during the multi-copy run, press the {
❒ To return the machine to the initial condition after copying, press the {
Modes/Energy Saver
----
Auto Reset
The machine returns to its initial condition automatically after your job is finished, after a certain period of time. This function is called “Auto Reset”.
Note
❒ You can change the Auto Reset time. See “Auto Reset Timer” in ⇒ P.198
“General Features 1/3”.
----
Auto Off
The machine turns itself off automatically after your job is finished, after a certain period of time. This function is called “Auto Off”.
Start
}}}} key.
} key.
Clear/Stop
} key.
Clear
Note
❒ You can change the Auto Off time. See “Auto Off Timer” of the “System Set-
tings” manual.
28
Page 45

Setting Originals
Setting Originals
Limitation
❒ Set the original after correction fluid and ink has completely dried. Not taking
this precaution could mark the exposure glass and cause marks to be copied.
Note
❒ Basically the originals should be aligned to the rear left corner. However,
some copy functions may produce different results depending on the direction of the originals. For details, see explanations of each function.
Originals Set in the
document
feeder
R
R
Reference
See ⇒ P.18 “Originals”.
R
R
Set on the
exposure
glass
set1EE
set2EE
2
Setting Originals On The Exposure Glass
Lift the document feeder.
A
Note
❒ Be sure to open the document feeder by more than 30°, otherwise the orig-
inal size might not be detected correctly.
Set the original face down on the exposure glass. The original should be
B
aligned to the rear left corner.
29
Page 46

COPYING
1
2
1: Reference mark
2: Scale
Note
❒ Start with the first page to be copied.
Lower the document feeder.
C
2
ND1C01EE
Setting Originals In The Document Feeder
Note
❒ The last page should be on the bottom.
❒ Do not stack originals beyond the limit mark on the side fence of the docu-
ment feeder.
2
❒ When copying thin originals (40 – 52 g/m
document feeder at a time or place it on the exposure glass to avoid damage
due to a multi-sheet feed (if several sheets are fed together at the same time).
❒ The original might become dirty if it is written with a pencil or similar tools.
❒ Usually, one-sided originals are delivered to the ADF external tray, and two-
sided originals to the ADF tray.
Reference
Regarding originals that the document feeder can handle, see ⇒ P.18 “Origi-
nals”.
, 11 – 14 lb), set one original in the
Setting a stack of originals in the document feeder
Adjust the guide to the original size.
A
Set the aligned originals face up into the document feeder.
B
30
Page 47

Setting Originals
Setting a stack of originals is completed when the bottom plate rises.
TSPH040E
Important
❒ After the bottom plate of the document feeder rises, do not add or force in
originals.
Note
❒ To avoid a multi-sheet feed, shuffle the originals before setting them in the
document feeder.
❒ You can set the timing for the bottom plate of the document feeder to rise.
See “ARDF Original Table Rise Time” in ⇒ P.210 “Input Output”.
Setting Special Originals
When using Batch (SADF), Mixed Sizes or Thin mode
2
Batch (SADF) mode
Up to 100 standard originals can be set in the document feeder at a time. If there
are more than 100 originals, set Batch (SADF) mode so that originals can be fed
automatically without pressing the {
ument feeder.
Important
❒ When setting special originals such as translucent paper, set them one by one.
Note
❒ In Batch (SADF) mode, even when one original is set in the document feeder,
the original is automatically fed each time it is set.
} key each time they are set in the doc-
Start
31
Page 48

COPYING
Touch the [
A
Special Original
] key.
2
Touch the [
B
Touch the [OK] key.
C
Set your originals, then press the {{{{
D
The Auto Feed indicator is lit.
After all the previously set originals are fed, set the next originals while the
E
Auto Feed indicator is lit.
The second and subsequent originals can be fed automatically without pressing the {
Batch (SADF)
} key.
Start
] key.
Start
}}}} key.
32
DF02E
Note
❒ When the Sort, Combine or Duplex function has been set, press the {#} key
at the end of setting the originals.
❒ You can change the lighting-up time of the Auto Feed indicator. See “Batch
(SADF) Auto Reset Time.” in ⇒ P.210 “Input Output”.
Page 49

Setting Originals
Mixed sizes mode
When originals of different sizes are set on the document feeder at a time, the
machine automatically checks the size of the originals and makes copies.
Limitation
❒ When setting originals of different sizes on the document feeder and making
copies without using Mixed sizes mode, parts of the original image might not
be copied.
2
❒ The weight of originals that can be set with this function is 52 – 81 g/m
20 lb.
❒ The paper sizes that can be set with this function are as follows:
Metric version A3 L, B4 L, A4 KL, B5
Inch version
❒ For smaller originals, the copy image might be slanted since the originals
might not be correctly aligned with the original guide.
11" × 17"L, 8
1
/2" × 14"L, 81/2" × 11"KL, 51/2" × 81/2"
KL
, 14 –
KL
2
Touch the
A
Touch the
B
Touch the
C
Align the rear and left edges of the originals as shown in the illustration.
D
[
Special Original
[
Mixed Sizes
[OK]
key.
]
key.
]
key.
33
Page 50

COPYING
1
2
1: Set into the document feeder (ADF).
2: Vertical size
Important
❒ If the originals are of different vertical sizes, put the longer original on the
bottom; otherwise the original size might not be detected correctly.
Adjust the guide to the widest original size.
E
Set the aligned originals face up into the document feeder.
F
X14
11X17
2
CP19AE
Thin mode
Important
❒ Set to Thin mode when you place thin paper into the document feeder; other-
wise your originals might be damaged.
Touch the
A
[
Special Original
]
key.
34
Touch the
B
[
Thin
]
key.
Page 51

Touch the [OK] key.
C
Setting Originals
2
35
Page 52

COPYING
Basic Functions
The following basic functions are explained in this section.
❖❖❖❖ Adjusting Copy Image Density
Auto and Manual Image Density
2
❖❖❖❖ Selecting Original Type Setting
Text, Text·Photo, Photo, Pale, Generation Copy
❖❖❖❖ Selecting Copy Paper
Auto Paper Select and Manual Paper Select
❖❖❖❖ Auto Reduce/Enlarge
The machine can choose an appropriate reproduction ratio based on the paper and original sizes you select.
Note
❒
You can select functions to be activated when Auto Reset is turned on, when
Energy Saver is turned off, or after the machine is powered on. See ⇒ P.198
“General Features
❒
You can change default settings for basic functions. See ⇒ P.198 “Settings You
Can Change With The User Tools”.
1
/3”.
Adjusting Copy Image Density
You can adjust the copy image density to match your originals.
There are three types in this function:
❖❖❖❖ Auto Image Density
The machine automatically adjusts the image density.
❖❖❖❖ Manual Image Density
If you require darker or lighter copies, adjust the image density yourself.
❖❖❖❖ Combined Auto and Manual Image Density
Use when copying originals with a dirty background (such as newspapers).
You can adjust the foreground density while leaving the background unchanged.
Select one of Image Density modes.
A
36
Page 53

Auto Image Density
Basic Functions
A Make sure that the [
Note
❒ If not, touch the [
Manual Image Density
A Touch the [
B Touch the [
Auto Image Density
] or [
Lighter
Auto Image Density
Auto Image Density
] key to cancel it.
] key to adjust the image density.
Darker
] key is selected.
2
] key.
Combined Auto and Manual Image Density
A Make sure that the Auto Image Density is selected.
B Touch the [
Lighter
] or [
] key to adjust the density.
Darker
37
Page 54

COPYING
Selecting Original Type Setting
Select one of the following types to match your originals:
❖❖❖❖ Text
Select this mode when your originals contain only letters (no pictures).
2
❖❖❖❖ Text·Photo
Select Text·Photo when your originals contains photographs or pictures with
letters.
❖❖❖❖ Photo
Delicate tones of photographs and pictures can be reproduced with this
mode.
❖❖❖❖ Pale
Select this mode for originals that have lighter lines written in pencil, or for
faint copied slips. The faint lines will be clearly copied.
❖❖❖❖ Generation Copy
If your originals are copies (generation copies), the copy image can be reproduced sharply and clearly.
Note
❒
You can directly display the original type keys on the copy original display.
See “Original Mode Display” in ⇒ P.198 “General Features
❒
You can adjust the quality level for each original type. See “Original Mode
Quality Level” in ⇒ P.198 “General Features
Touch the
A
[
Original Mode
]
key.
1
/3”.
1
/3”.
38
Page 55

Select the original types.
B
Touch the [OK] key.
C
Note
❒ If no other functions are to be set, press the {
} key to start copying.
Start
Basic Functions
2
Selecting Copy Paper
There are two ways to select copy paper:
Auto Paper Select
❖❖❖❖
The machine selects a suitable size of copy paper automatically based on the
original size and the reproduction ratio. ⇒ P.41 “Rotated Copy”.
Manual Paper Select
❖❖❖❖
Choose the tray containing the paper you wish to copy onto: Paper Tray, Bypass Tray or Large Capacity Tray (LCT).
Reference
See ⇒ P.59 “Copying From The Bypass Tray”.
Limitation
❒ The machine cannot auto-select trays that you have designated as “Thin”
or “Special Paper” using the Special Paper Indication function. Therefore,
if all trays designated as “Thin” or “Special Paper”, the Auto Paper Select
function is not available. Refer to the “Paper Size Setting” section of the
“System Settings” manual for more details.
39
Page 56

COPYING
Note
❒ When you use Auto Paper Select, refer to the following table for possible copy
paper sizes and directions. (if the ratio is 100 %)
Metric version
❖❖❖❖
Where original is set Paper size and direction
2
Exposure glass
A3 L, B4 L, A4 KL, B5 KL, 8
*1
L
1
/2" × 13"
Document feeder A3 L, B4 L, A4 KL, B5 KL, A5 KL,
B6KL, 11" × 17" L, 11" × 15" L, 8
11" KL, 8
*1
You can select from 81/2" × 13", 81/4" × 13" and 8" × 13" using the user tool (system
1
/2" × 13" L
*1
1
/2" ×
settings). See ”<F/F4> Size Setting“ of the ”System Settings“ manual.
Inch version
❖❖❖❖
Where original is set Paper size and direction
Exposure glass
11" × 17" L, 8
1
/2" × 14" L, 81/2" × 11"
KL
Document feeder
*1
You can select from 81/2" × 13", 81/4" × 13" and 8" × 13" using the user tool (system
A4 KL, 11" × 17" L, 11" × 15"L, 8
14" L, 8
8
1
/2" × 11" KL, 51/2" × 81/2"KL,
1
/2" × 13" L
*1
1
/2" ×
settings). See ”<F/F4> Size Setting“ of the ”System Settings“ manual.
❒ For some originals, the original size might not be detected correctly. See
⇒
P.19 “Sizes Difficult To Detect”.
❒ When you set special paper, such as recycled paper, in the paper tray, you can
have the kind of paper shown on the display. See “Bypass Tray: Special Paper
Indication” of the “System Settings” manual.
40
Select the copy paper.
A
Page 57

Auto Paper Select
Basic Functions
A Make sure that the [
Auto Paper Select
] key is selected.
Manual Paper Select
A Select the paper tray, bypass tray or LCT.
Note
❒ When selecting the bypass tray, open the bypass tray.
2
----Rotated Copy
If the direction in which your original is set (landscape or portrait) is different
from the paper you are copying onto, this function rotates the original image by
90° and fits it on the copy paper. This function works when Auto Paper Select or
Auto Reduce/Enlarge are selected. See ⇒ P.39 “Auto Paper Select” and ⇒ P.43
“Auto Reduce/Enlarge—Having The Machine Choose The Reproduction Ratios”.
41
Page 58

COPYING
Original
orientation
Paper orientation
Rotates the
image and
copies it
R
R
2
Limitation
❒ You cannot use the Rotated Copy function with Auto Paper Select if the Auto
Tray Switching setting in the user tools is set to “NO”. Refer to the “Auto Tray
Switching” section of the “System Settings” manual.
❒ You cannot use the Rotated Copy function when enlarging onto 8
11" × 17" size paper. In this case, set your original in the landscape direction.
Original Size and Direction
You cannot
rotate:
However,
you can rotate:
1
/2"×
8
11"
or
1
5
/2"×
1
8
/2"
1
/2"×
8
11"
or
1
5
/2"×
1
8
/2"
GCROTA0E
GCROTA1E
R
GCROTA3E
R
when
enlarging to
→
when
enlarging to
→
1
/
" × 14" or
2
Copy Paper Size and Direction
1
/2"×
8
14"
or
11"×17"
R
GCROTA2E
1
/2"×
8
14"
or
11"×17"
R
GCROTA4E
❒ You cannot use the Rotated Copy function when “Top Slant” or “2 Staples” is
selected for stapling or if Punch function is selected. If you try, a “Check pa-
per size and direction” message is displayed. See ⇒ P.51 “Staple” and ⇒ P.56
“Punch”.
42
Page 59

Basic Functions
Auto Reduce/Enlarge—Having The Machine Choose The
Reproduction Ratios
The machine can choose an appropriate reproduction ratio based on the paper
and original sizes you select.
Limitation
❒ You cannot use the bypass tray with this function.
Note
❒ When you use Auto Reduce/Enlarge, refer to the following table for possible
original sizes and directions:
Metric version
❖❖❖❖
2
Where original is set Original size and direction
Exposure glass
A3 L, B4 L, A4 KL, B5 KL, 8
*1
L
1
/2" × 13"
Document feeder A3 L, B4 L, A4 KL, B5 KL, A5 KL,
B6 KL, 11" × 17" L, 11" × 17" L, 8
11" KL, 8
*1
You can select from 81/2" × 13", 81/4" × 13" and 8" × 13" using the user tool (system
1
/2" × 13" L
*1
1
/2" ×
settings). See ”<F/F4> Size Setting“ of the ”System Settings“ manual.
Inch version
❖❖❖❖
Where original is set Original size and direction
Exposure glass
11" × 17" L, 8
1
/2" × 14" L, 81/2" × 11"
KL
Document feeder
*1
You can select from 81/2" × 13", 81/4" × 13" and 8" × 13" using the user tool (system
A4 KL, 11" × 17" L, 11" × 15" L,8
1
14" L, 8
8
/2" × 11" KL, 51/2" × 81/2" KL,
1
/2" × 13" L
*1
1
/2" ×
settings). See ”<F/F4> Size Setting“ of the ”System Settings“ manual.
43
Page 60

COPYING
❒ The reproduction ratios the machine will select are 32–400 %.
❒ For some originals, the original size might not be detected correctly. See ⇒
P.19 “Sizes Difficult To Detect”.
❒ You can set originals of different sizes in the document feeder at a time. See
⇒ P.33 “Mixed sizes mode”.
Touch the [
A
Auto Reduce/Enlarge
] key.
2
Select the paper tray.
B
44
Page 61

Sort/Stack/Staple
Sort/Stack/Staple
The machine can scan your originals into memory and automatically sort the
copies.
❖❖❖❖ Sort
•Sort
• Rotate Sort (This mode cannot be selected when the Finisher is installed.)
❖❖❖❖ Stack (optional finisher required)
•Stack
(the optional finisher required)
❖❖❖❖ Staple (the optional finisher required)
•Top
•Top Slant
• Bottom
2
•2 Staples
Limitation
❒
Once copying has started, the only copy setting you can change is Image Density.
❒
You cannot use the bypass tray with this function.
45
Page 62

COPYING
Note
❒ The maximum tray capacity is as follows. When the number of copies exceeds
the tray capacity, remove copies from the tray.
Metric version
❖❖❖❖
Output tray
2
• B4 or larger: 250 sheets (80 g/m
• A4 or smaller: 500 sheets (80 g/m
Finisher Proof tray (Without punch):
• B4 or larger: 50 sheets (80 g/m
• A4 or smaller: 250 sheets (80 g/m
Shift tray (Without punch):
• Except A4: 1,500 sheets (80 g/m
• A4: 3,000 sheets (80 g/m
Inch version
❖❖❖❖
Output tray
1
•8
/2" × 14" or larger: 250 sheets (20 lb)
1
/2" × 11" or smaller: 500 sheets (20 lb)
•8
Finisher Proof tray (Without punch):
1
/2" × 14" or larger: 50 sheets (20 lb)
•8
1
/2" × 11" or smaller: 250 sheets (20 lb)
•8
Shift tray (Without punch):
1
•Except 8
1
•8
/2" × 11": 1,500 sheets (20 lb)
/2" × 11": 3,000 sheets (20 lb)
2
)
2
)
2
)
2
)
2
)
2
)
46
Page 63

Sort—Sorting Into Sets (123, 123, 123)
Copies can be assembled as sets in sequential order.
❖❖❖❖ Sort
3
2
1
❖❖❖❖ Rotate Sort
3
2
1
There are two types in the Sort function:
❖❖❖❖ Sort
Copies can be assembled as sets in sequential order.
3
3
2
1
1
2
1
1
2
3
2
3
3
2
1
3
2
1
Sort/Stack/Staple
2
Note
❒
The paper sizes that can be used in Sort function are as follows:
Metric version A3L, B4L, A4KL, B5
Inch version
❒
When the optional finisher is installed, the shift tray moves backward or
11" × 17" L, 8
1
/2" × 14" L, 81/2" × 11"
KL
KL
forward each time the copies of one set or those of each job are delivered,
causing the next copy to shift when delivered so that you can tell the division of each set or job.
Reference
For the paper capacity of the optional finisher, see ⇒ P.51 “Staple”.
❖❖❖❖ Rotate Sort
Every other copy set is rotated by 90°KL and delivered to the copy tray.
Note
❒
This mode cannot be selected when the optional finisher is installed.
❒
The paper sizes that can be used in Rotate Sort function are as follows:
47
Page 64

COPYING
Metric version A4KL, B5
Sort
1
8
/2" × 11"
] or [
Inch version
❒ To use the Rotate Sort function, two paper trays identical in size and dif-
ferent in direction (KL) are required.
Touch the [
A
2
When the finisher is not installed
❖❖❖❖
When the finisher is installed
❖❖❖❖
KL
KL
Rotate Sort
] key.
48
Note
❒ When the optional finisher is installed, [
Enter the number of copy sets with the {{{{
B
Limitation
❒ The maximum number of sets is 999.
Set your originals, then press the {{{{
C
Start
Rotate Sort
Number
}}}} key.
] is not displayed.
}}}} keys.
When setting a stack of originals in the document feeder
A Set a stack of originals in the document feeder, then press the {{{{
After all the originals are scanned, the copies are delivered to the tray.
Note
❒ The last page should be on the bottom.
Start
}}}} key.
Page 65

Sort/Stack/Staple
❒ If an original is misfed during sorted copying, reset your originals in the
document feeder according to the instruction on the display. The display will indicate the number of scanned originals.
When setting an original on the exposure glass or in the document feeder
using Batch (SADF) mode
Reference
⇒ P.31 “Batch (SADF) mode”.
A Set the original, then press the {{{{
Start
}}}} key.
Note
❒ Start with the first page to be copied.
B Set the next original, then press the {{{{
Start
}}}} key.
Note
❒ Set the original in the same direction as the first one.
C After all originals are scanned, press the {{{{#}}}} key.
D Press the {{{{
Start
}}}} key.
The copies are delivered to the tray.
Stack—Stacking Together All Copies Of A Page (111, 222, 333)
Copies can be assembled with each page set.
Stack
❖❖❖❖
1
3
2
1
1
1
3
2
3
2
3
2
2
Stack (optional finisher required)
❖❖❖❖
Every other page set is shifted for ease of separation. The shift tray of the finisher provides this function by sliding from side to side.
Note
❒ The sizes that can be used in this function are as follows:
Metric version A3L, B4L, A4KL, B5
Inch version
11" × 17" L, 8
1
/2" × 14" L, 81/2" × 11"
KL
KL
49
Page 66

COPYING
Reference
For the maximum tray capacity of the optional finisher, see ⇒ P.226 “Finisher
(Option)”.
[
Touch the
A
Stack
]
key.
2
Enter the number of copies with the {{{{
B
Set your originals.
C
When setting a stack of originals in the document feeder
A Set a stack of originals in the document feeder, then press the {{{{
After all the originals are scanned, the copies are delivered to the tray.
Note
❒ The last page should be on the bottom.
When setting an original on the exposure glass or in the document feeder
using Batch (SADF) mode
Reference
See ⇒ P.31 “Batch (SADF) mode”.
A Set the original, then press the {{{{
Note
❒ Start with the first page to be copied.
B Set the next original, then press the {{{{
Note
❒ Set the original in the same direction as the first one.
C After all originals are scanned, press the {{{{
The copies are delivered to the tray.
Start
Number
}}}} key.
Start
}}}} keys.
}}}} key.
Start
Start
}}}} key.
}}}} key.
50
Page 67

Staple
The optional finisher is required to use this function.
Each copy set can be stapled together.
Limitation
❒ You cannot use the following paper in this function:
• Post cards
• Translucent paper
• OHP transparencies
• Adhesive labels
•Curled paper
• Low stiffness paper
• Paper of different sizes
Sort/Stack/Staple
2
Note
❒ For this mode, the following limitation applies. When the number of copies
exceeds the tray capacity, copying stops. In this case, remove the copies from
the shift tray and then resume copying.
Metric version
❖❖❖❖
With finisher
Paper size A3L, B4L, A4KL, B5
Stapler capacity (without punch)
• A4 or smaller: 50 sheets (80 g/m
• B4 or larger: 30 sheets (80 g/m
Shift tray capacity (A4K)
*1
Depending on the number of sheets to be stapled and whether sheets have punch
holes or not, the maximums tray capacity might be reduced.
*1
3,000 sheets (80 g/m2)
KL
2
)
2
)
51
Page 68

COPYING
❖❖❖❖ Inch version
With finisher
Paper size
Stapler capacity (without punch)
2
1
Shift tray capacity (8
*1
Depending on the number of sheets to be stapled and whether sheets have punch
holes or not, the maximums tray capacity might be reduced.
/2" × 11"K)
*1
11" × 17"L, 8
1
5
/2" × 81/2"
1
•8
1
•8
3,000 sheets (20 lb)
1
/2" × 14"L, 81/2" × 11"KL,
KL
/2" × 11" or smaller: 50 sheets (20 lb)
/2" × 14" or larger: 30 sheets (20 lb)
❒ In the following cases, the copies will be delivered to the shift tray without
stapling.
• When the number of copies for one set is over the stapler capacity.
• When memory reaches 0 % during copying.
❒ When you select Staple, Sort mode is automatically selected.
Reference
If you want to add staples, see ⇒ P.185
When staple is jammed, see ⇒ P.188
“
d
Adding Staples”
“
e
Removing Jammed Staples”
.
.
52
Page 69

Sort/Stack/Staple
----Stapling position and original setting
When there is copy paper that is identical in size and direction as your original,
stapling positions are as follows:
Original setting Stapling po-
sition
STAPLEAE
Exposure
glass
Document
Feeder
K
Top
L
2
*1
STAPLEBE
Top Slant
K
L
K
L
STAPLECE
*1
STAPLEDE
*1
Original images are not rotated. When selecting these stapling positions, set the orig-
Bottom
K
L
2 Staples
inals in the same direction as copy paper is set.
Note
❒ You cannot change stapling positions during copying.
53
Page 70

COPYING
❒ When the original image is rotated, the stapling direction turns by 90°.
❒ With [
the same direction as the original is available, the image will be rotated and
the paper of the same size as the original but oriented in the different direction will be selected.
❒ The maximum original image size that can be rotated is as follows:
2
Metric version A4
Inch version
❒ You cannot use the Rotated Copy function when “Top Slant” or “2 Staples” is
selected. If you try, a “Check paper size and direction” message is displayed.
Select one of four stapling positions.
A
Top
] or [
] selected at the stapling position, if no paper oriented in
Bottom
1
/2" × 11"
8
Enter the number of copy sets with the {{{{
B
Set your originals, then press the {{{{
C
Start
}}}} key.
Number
}}}} keys.
When setting a stack of originals in the document feeder
A Set a stack of originals in the document feeder, then press the {{{{
After all the originals are scanned, the copies are delivered to the tray.
Note
❒ The last page should be on the bottom.
Start
When setting an original on the exposure glass or in the document feeder
using Batch (SADF) mode
Reference
See ⇒ P.31 “Batch (SADF) mode”.
A Set the original, then press the {{{{
Note
❒ Start with the first page to be copied.
B Set the next original, then press the {{{{
Note
❒ Set the original in the same direction as the first one.
C After all originals are scanned, press the {{{{#}}}} key.
D Press the {{{{
The copies are delivered to the tray.
Start
}}}} key.
Start
}}}} key.
Start
}}}} key.
}}}} key.
54
Page 71

Sort/Stack/Staple
To stop scanning
When you are using the Sort, Stack, or Staple function, the originals are scanned
into memory.
Press the {{{{
A
Clear/Stop
}}}} key.
To resume scanning
A Touch the [No] key.
Scanning is resumed.
Note
❒ Scanned images in memory are not cleared.
To clear scanned images of the originals
A Touch the [
Scanning is stopped with the images cleared.
Yes
] key.
When memory reaches 0 %
Scanning will be stopped if the size of scanned image data exceeds memory capacity.
Note
❒ There is enough memory to store approximate 200 to 650 originals of A4, 8
" × 11" size. The number of originals that can be stored in memory varies de-
2
pending on the memory setting and original type.
Reference
Scanning will stop when memory reaches 0 % during sorted copying. However, you can change this setting so that all the scanned pages are copied and
delivered to the tray first, then the machine automatically continues scanning
the remaining originals. See “Memory Full Auto Scan Restart” in ⇒ P.210 “In-
put Output”.
1
2
/
Press the {{{{
A
The scanned pages are delivered to the tray. Then, the image data in memory
is cleared.
Remove the copies and continue copying by following the instructions on
B
the display.
Start
}}}} key.
55
Page 72

COPYING
Punch
The optional finisher and punch kit are required to use this function.
The function is used to make punch holes in copies.
❖❖❖❖ 2 holes version
2
PUNCH1
❖❖❖❖ 3 holes version
56
PUNCHAE
Limitation
❒
You cannot use the Rotated Copy function if Punch function is selected. If you
try, a “Check Paper size and direction” message is displayed. In this case, set
your original in the same direction (landscape or portrait) as the copy paper.
Page 73

Note
❒ Original setting directions and punch hole positions are as shown below.
Original setting directions and punch hole positions
❖❖❖❖
Original setting direction Punch hole positions
Exposure glass Document feeder
2 holes
K
L
Punch
2
3 holes
K
L
❒ Punchable paper sizes are as follows:
Metric version A3L, B4L, A4KL, B5KL, A5
Inch version
11" × 17"L, 8
1
/2" × 14"L, 81/2" × 11"
KL
KL
❒ Since punch holes are made in each copy, the punch hole positions vary
slightly.
❒ The punch hole positions change according to the direction of the paper se-
lected.
Reference
If the punch waste box is full, see ⇒ P.191 “
[
Touch the
A
Punch
]
key.
y
Removing Punch Waste”.
57
Page 74

COPYING
Note
❒ When stapling copies, also select a stapling position. See ⇒ P.51 “Staple”.
Set your originals, then press the {{{{
B
Start
}}}} key.
2
58
Page 75

Copying From The Bypass Tray
Copying From The Bypass Tray
Use the bypass tray to copy onto OHP transparencies, adhesive labels, translucent paper, post cards, and copy paper that cannot be set in the paper tray.
Limitation
❒ When copying several originals using the bypass tray, copies are delivered
face-up (“Face Up Exit”) and in reverse order by default.
❒ Only change the setting to “Face Down Exit” if you are using high quality
copy paper with a weight of 52 – 105 g/m
Selection in Bypass Mode” in ⇒ P.212 “Count Manager”.
❒ If you try and have copies delivered face-down when copying onto other
types of paper or adhesive labels, a paper jam may occur.
Note
❒ If you select “Face Down Exit” when only one original is set on the exposure
glass or in the document feeder, you must set the “Face-Up/Down Selection
in Bypass Mode” setting to “Face Down Exit” and the “Face Up/Down Selection in Platen Mode” setting to “Face Down Exit” with the User Tools. See
“Face Up/Down Selection in Bypass Mode” in ⇒ P.212 “Count Manager” and
“Face Up/Down Selection in Platen Mode” in ⇒ P.210 “Input Output”.
❒ The machine can automatically detect the following sizes as standard size
copy papers:
Metric version
Inch version
A3L, A4L, A5L, 8
A3L, 11" × 17"L, 8
1
2
(14 – 28 lb). See “Face-up/Down
1
/2" × 13"
/2" × 14"L, 81/2" × 11"L, 51/2" × 81/2"
L
L
2
❒ If you do not use the standard size copy paper, you should input vertical and
horizontal dimensions. The sizes that you can input are as follows:
Metric version • Vertical: 100 – 300 mm
• Horizontal: 148 – 432 mm
Inch version • Vertical: 4.0" – 11.7"
• Horizontal: 6.0" – 17.0"
❒ To make copies onto OHP transparencies or thick paper exceeding 104.7 g/
2
, 28 lb, specify the paper type in ⇒ P.62 “When copying onto OHP transpar-
m
encies or thick paper”.
Reference
For details about paper capacity of the bypass tray, see ⇒ P.21 “Copy Paper”.
59
Page 76

COPYING
Open the bypass tray.
A
2
TSPH070E
Adjust the guides to copy paper size.
B
Important
❒ If the guides are not flush with the copy paper, a skew image or paper mis-
feeds might occur.
Lightly insert the copy paper face up until the beeper sounds.
C
The k indicator on the display is automatically selected.
60
TSPH060E
Note
❒ The face side of the paper set is copied on.
❒ Do not stack paper over the limit mark; otherwise a skew image or paper
misfeeds might occur.
❒ If the beeper is turned off, lightly insert the copy paper until it stops. See
“Operation Panel Beeper” of the “System Settings” manual.
❒ When the document feeder is open, set the direction of the copy paper to
L.
❒ Swing out the extender to support larger size copy paper larger than A4L,
1
/
" × 11"L.
8
2
❒ Fan paper to get air between the sheets and avoid a multi-sheet feed.
❒ Before setting, adjust the paper if curled or warped.
Page 77

Copying From The Bypass Tray
When copying onto size-unreadable standard size paper and nonstandard size special paper
Important
❒ You should specify the size of copy paper to avoid paper misfeeds.
A Press the {{{{#}}}} key.
B Touch the
[
Non Standard
]
key.
2
C Touch the
{{{{
Number
Note
❒ To change the number entered, press the {
new number.
D Touch the
the {{{{
Note
❒ To change the number entered, press the {
new number.
E To register the non-standard size entered, touch the
Note
❒ Only one non-standard size can be stored.
❒ To recall the non-standard size stored, touch the
F Touch the
[
Vert inch
}}}} keys, then press the {{{{#}}}} key.
[
Horz inch
}}}} keys, then press the {{{{#}}}} key.
Number
[OK]
]
key and enter the vertical size of the paper with the
Clear/Stop
]
key and enter the horizontal size of the paper with
Clear/Stop
[
key.
} key and enter the
} key and enter the
[
]
key.
Store
]
key.
Recall
Set your originals, then press the {{{{
D
Start
}}}} key.
61
Page 78

COPYING
When copying onto OHP transparencies or thick paper
To make copies onto OHP transparencies or thick paper, you need to specify the
paper type.
Limitation
❒ When you select “OHP” or “Thick Paper”, copy paper is delivered face-up
2
even if you have set the “Face Up/Down Selection in Bypass Mode” setting
to “Face Down Exit.” See “Face-Up/Down Selection in Bypass Mode” in ⇒
P.212 “Count Manager”.
Note
❒ Select
A
B
[
Thick Paper
Open the bypass tray, and adjust the guides to the paper size.
Important
❒ If the guides are not flush with the copy paper, a skew image or paper mis-
feeds might occur.
Lightly insert the OHP transparencies or thick paper face up until the beeper sounds.
The k indicator on the display is automatically selected.
Note
❒ When you set a OHP transparencies, make sure that its front and back fac-
es are properly positioned.
❒ To avoid paper misfeeds, shuffle a stack of paper before setting it in the
tray.
]
if the paper weight is more than 104.7 g/m2 , 28 lb.
62
Press the {{{{#}}}} key.
C
[
]
Select
D
Touch the
E
Set your originals and press the {{{{
F
OHP
or
[OK]
[
Thick Paper
key.
]
.
}}}} key.
Start
Page 79

Copying From The Bypass Tray
Important
❒ When copying onto OHP transparencies, remove copied sheets one by
one.
2
63
Page 80

COPYING
Program—Storing Your Copy Settings In
Memory
You can store frequently used copy job settings in machine memory, and recall
them for future use.
2
❖❖❖❖ Storing Your Settings
You can store your settings you frequently use.
❖❖❖❖ Deleting A Program
You can delete a stored program.
❖❖❖❖ Recalling A Program
You can recall a stored program.
Note
❒
You can store up to ten programs.
❒
You can select the standard mode or program No. 10 as the mode to be set
when modes are cleared or reset is made, or immediately after the operation
switch is turned on.
❒
Paper settings are stored based on paper size. So if you place more than one
paper tray of a same size, the paper tray prioritized with the user tools will be
selected first. See “Paper Tray Priority” in ⇒ P.198 “General Features
❒
Programs are not cleared by turning the power off or by pressing the {
Modes/Energy Saver
them with another program.
} key. They are canceled only when you delete or overwrite
1
/3”.
Clear
Storing Your Settings
Edit the copy settings so that all functions you want to store in this program
A
are selected.
Press the {{{{
B
Program
}}}} key.
64
Program
Clear Modes/
Energy Saver
Interrupt
TSPS030N
Page 81

Program—Storing Your Copy Settings In Memory
Touch the [
C
Touch the program number you want to store.
D
When the settings are successfully stored, the m indicator appears.
Note
❒ Program numbers with m already have settings in them.
❒ If this program number is already being used, the machine will ask you if
you wish to overwrite it - Touch the [
Store
] key.
] or [No] key.
Yes
Deleting A Program
You can delete a stored program.
Press the {{{{
A
Program
Program
}}}} key.
Clear Modes/
Energy Saver
Interrupt
TSPS030N
2
Touch the [
B
Touch the program number you want to delete.
C
Delete
] key.
65
Page 82

COPYING
Touch the [
D
Yes
] key.
2
Note
❒ To cancel the deletion, touch the [No] key.
CCCC
To delete another program, repeat steps
E
Recalling A Program
You can recall a stored program.
Press the {{{{
A
Touch the program number you want to recall.
B
The stored settings are displayed.
Program
Program
}}}} key.
Clear Modes/
Energy Saver
Interrupt
TSPS030N
and
DDDD
.
66
Note
❒ Only programs with m contain a program.
Set your originals, then press the {{{{
C
Start
}}}} key.
Page 83

Other Functions
Other Functions
Energy Saver Mode—Saving Energy
If you do not operate the machine for a certain period after copying, or when you
press and hold the {
display disappears and the machine enters Energy Saver mode. When you press
the {
Clear Modes/Energy Saver
ment feeder, or when the document feeder is opened, the machine returns to the
ready condition. In Energy Saver mode, the machine uses less electricity.
The Energy Saver mode makes a two-step reduction in electricity: one for the period up to the time set for Low Power mode, the other for the period after that
time.
Note
❒ If you press the {
rent settings will be cleared.
Reference
See “Low Power Timer” of the “System Settings” manual.
Clear Modes/Energy Saver
} key again, when the originals are set in the docu-
Clear Modes/Energy Saver
Interrupt—Temporarily Stopping One Job To Copy Something
Else
} key for more than one second, the
} key during the operation, the cur-
2
Use this function if you wish to interrupt a long copy job to make urgently need
copies.
Note
❒ The procedure for making interrupt copies depends on which kind of opera-
tion the machine is currently carrying out.
While a document is being fed
Press the {{{{
A
The Interrupt key lights up and copying stops.
Remove the originals that were being copied and set the originals you wish
B
to copy.
Press the {{{{
C
The machine starts making your copies.
When your copy job is finished, remove your originals and copies.
D
Interrupt
Start
}}}} key.
}}}} key.
67
Page 84

COPYING
Press the {{{{
E
The Interrupt key indicator goes out.
Replace the originals that were being copied before.
F
Press the {{{{
G
The previous copy job settings will be restored and the machine will continue
2
copying from where it left off.
Interrupting during copying after all originals have been fed
Press the {{{{
A
The interrupt key lights up.
Note
❒ Copying will not stop yet.
Set your original.
B
Press the {{{{
C
The machine stops the original job and starts copying your original.
When copying is complete, remove your originals and copies.
D
Press the {{{{
E
The Interrupt indicator goes out.
The previous copy job settings will be restored and the machine will continue
copying from where it left off.
Interrupt
Start
Interrupt
Start
Interrupt
}}}} key again.
}}}} key.
}}}} key.
}}}} key.
}}}} key again.
User Codes
If the machine is set to use the User Code function, operators must input their
user codes before the machine can be operated. The machine keeps count of the
number of copies made under each user code.
Note
❒ When the machine is set for user codes, the machine will prompt you for your
user codes after the operation switch is on or the Auto Reset comes into effect.
❒ You can adjust how long the machine waits before switching to the user code
input display. See “Auto Reset Timer” in ⇒ P.198 “General Features
❒ To prevent others from making copies using your user code, press the {
Modes/Energy Saver
68
} and {
Clear/Stop
} keys simultaneously after copying.
1
/3”.
Clear
Page 85

Other Functions
Reference
For user code setting, see “Settings You Can Change With The User Tools” of
the “System Settings” manual.
For registering, changing and deleting user codes, see ⇒ P.212 “Count Man-
ager”.
Auto Start—Entering Copy Job Settings During The Warm-up
Period
If you press the {
blink, and your copies will be made as soon as warm-up finishes.
Make any adjustments to copy settings during the warm-up period.
A
Set your originals.
B
Press the {{{{
C
Copying automatically starts when the {
es red and green and the machine is ready for copying.
Note
❒ To cancel Auto Start, press the {
❒ With “Individual Input/Output Operation” set to “Yes”, originals are
scanned even if the paper has run out or paper jamming has occurred. Supply paper or remove the jammed paper so that copying will automatically
start without pressing the start key.
Reference
See “Individual Input/Output Operation” and “Next Job Scan Start” in ⇒
P.210 “Input Output”.
Start
} key during the warm-up period, the {
Start
}}}} key.
} key indicator alternately flash-
Start
Clear/Stop
} key.
} key will
Start
Original Beeper
The beeper sounds and an error message is displayed when you leave your originals on the exposure glass after copying.
2
Note
❒ You can adjust when the beeper sounds with the “Auto Response (Human)
Sensor” setting:
• If set to “YES”, the beeper sounds as soon as you leave the machine after
copying.
• If set to “NO”, the beeper sounds 2 seconds after copying. Refer to the “Au-
to Response (Human) Sensor” setting of the “System Settings” manual.
❒ To cancel this function, see “Original Beeper” in ⇒ P.201 “General Features
”.
3
2
/
69
Page 86

COPYING
Next Job—Presetting Next Copy Job During A Copy Run
You can preset the next copy job during copying.
After copying, the next copying automatically starts.
Touch the [
A
Set the next copy job and touch the [OK] key.
2
B
Note
❒ To cancel the job during setting, touch the [
Set the originals in the document feeder and press the {{{{
C
The originals placed are scanned.
After copying, the next job automatically starts.
Note
❒ You can proceed to the first set copy job page when you touch [Current Job
Status], and to the next set copy job when you touch the [Next Job Status]
key. See “Next Job Scan Start” in ⇒ P.210 “Input Output”.
Next Job
] key.
Cancel
] key.
Start
}}}} key.
Sample Copy—Checking Output Quality Before Making A Long
Copy Run
Before making copies, you can check the finish by making one copy first.
Limitation
❒ This function can be used only when the Sort function has been set.
Set the functions to be used with the Sort function, enter the number of
A
copies to be made.
Set the originals.
B
70
Press the {{{{
C
One copy is delivered for proof copying.
The finish check page is displayed. After checking the finish, touch the
D
[
Yes
The number of copies is made excluding the one copy for proof copying.
Note
❒ If you touch [No] after checking the finish, return to step
set the Staple, Punch or density adjustment function again.
Sample Copy
] key if the sample is acceptable.
}}}} key.
A
where you can
Page 87

Preset Reduce/Enlarge—Reducing And Enlarging Using Preset Ratios
Preset Reduce/Enlarge—Reducing And
Enlarging Using Preset Ratios
You can select a preset ratio for copying.
Note
❒ You can select one of 12 present ratios (5 enlargement ratios, 7 reduction ra-
tios).
❒ Use “Shrink & Center” to reduce the image to 93 % of its original size with the
center as reference. You can register this function in a shortcut key in the initial display.
❒ You can change the preset ratios to other ratios you frequently use. See ⇒
P.204 “Reproduction Ratio
❒ You can set and display three kinds of ratio in the initial display. See “Short-
cut R/E” in ⇒ P.201 “General Features
❒ You can select a ratio regardless of the size of an original or copy paper. With
some ratios, parts of the image might not be copied or margins will appear on
copies.
❒ Copies can be reduced or enlarged as follows:
1
/2”.
2
/3”.
2
Metric version
❖❖❖❖
Ratio (%) Original
400 (enlarge area by 16) --
200 (enlarge area by 4) A5→A3
141 (enlarge area by 2) A4→A3, A5→A4
122 F→A3, A4→B4
115 B4→A3
93 --
82 F→A4, B4→A4
75 B4→F4, B4→F
→→→→
Copy paper size
71
Page 88

COPYING
Ratio (%) Original
71 (reduce area by 1/2)
A3→A4, A4→A5
Copy paper size
→→→→
65 A3→F
50 (reduce area by
1
/4)
A3→A5, F→A5
❖❖❖❖ Inch version
2
Ratio (%) Original
400 (enlarge area by 16) --
200 (enlarge area by 4)
155 (enlarge area by 2)
129
121
1
5
/2" × 81/2"→11" × 17"
1
5
/2" × 81/2"→81/2" × 14"
1
8
/2" × 11"→11" × 17"
1
/2" × 14"→11" × 17"
8
93 --
85
78
73
65
50 (reduce area by
1
/4) 11" × 17"→51/2" × 81/2"
1
F→8
/2" × 11"
1
/2" × 14"→81/2" × 11"
8
11" × 15"→8
11" × 17"→8
Copy paper size
→→→→
1
/2" × 11"
1
/2" × 11"
72
Touch the [
A
Reduce/Enlarge
] key.
Note
❒
To select a preset ratio in the initial display, directly touch the shortcut reduce/enlarge key and proceed to step E.
Page 89

Preset Reduce/Enlarge—Reducing And Enlarging Using Preset Ratios
Select [
B
Note
❒ You can specify which of [
priority and displayed when the [
Priority” in ⇒ P.201 “General Features
Select a ratio.
C
Note
❒ You can specify the reduce/enlarge ratios of the keys displayed when the
[
Reduce/Enlarge
large” in ⇒ P.204 “Reproduction Ratio
duction Ratio
Touch the [OK] key.
D
Set your originals, then press the {{{{
E
Enlarge
] or [
] key is touched, followed by [
2
/2”.
Reduce
].
Reduce
], [
Enlarge
Reduce/Enlarge
Start
] and [
Input Ratio
2
/3”.
1
/
” and “Reduce” in ⇒ P.204 “Repro-
2
}}}} key.
] key is touched. See “R/E
Enlarge
] or [
Reduce
] is to be given
]. See “En-
Shrink&Center mode
2
Use Shrink & Center mode to reduce the image by 93 % of its original size with
the center position as reference. You can register this function in a shortcut key
in the initial display.
Note
❒ For storing “Shrink&Center”, see “Shortcut Keys” in ⇒ P.203 “General Fea-
❒ You can change the Reduce/Enlarge ratio for “Shrink&Center”. See
3
/3”.
tures
“Shrink&Center” in ⇒ P.203 “General Features
3
/3”.
73
Page 90

COPYING
Touch the [
A
Shrink&Center
] key displayed in the initial display.
2
If you do not wish to combine it with the Reduce/Enlarge function, set your
B
originals, then press the {{{{
Start
}}}} key.
74
Page 91

Zoom—Reducing And Enlarging In 1 % Steps
Zoom—Reducing And Enlarging In 1 %
Steps
You can change the reproduction ratio in 1 % steps.
Note
❒ The following ratios can be selected:
• Metric version: 32 – 400 %
• Inch version: 32 – 400 %
❒ You can select a ratio regardless of the size of an original or copy paper. With
some ratios, parts of the image might not be copied or margins will appear on
copies.
❒ You can select a preset ratio which is near the desired ratio, then adjust the
ratio with the [n] or [o] key.
2
Touch the
A
[
Reduce/Enlarge
]
key.
75
Page 92

COPYING
Enter the ratio.
B
2
When using the [n] or [o] key
A Select a preset ratio which is close to the desired ratio by using
or
[Enlarge]
B Enter the desired reproduction ratios with the
Note
❒ To change the ratio in 1 % steps, just touch the
change the ratio in 10 % steps, touch and hold down the
.
or
[oooo]
[n]
key.
or
[n]
[o]
or
[nnnn]
When using the {Number} keys
A Touch the
[Input Ratio]
key.
[Reduce]
key. To
key.
[o]
76
B Enter the desired ratio with the
Number
{{{{
keys.
}}}}
Page 93

Note
❒ To change the ratio entered, touch the
tio.
C Touch the
[OK]
key.
Zoom—Reducing And Enlarging In 1 % Steps
[
]
key and enter the new ra-
Clear
Set your originals, then press the {{{{
C
Start
}}}} key.
2
77
Page 94

COPYING
Size Magnification
You can calculate a ratio from the lengths of the original and copy for enlarging
or reducing the copy.
2
A" a"
Preparation
Measure and specify the lengths of the original and copy by comparing “A”
with “a.”
Note
❒ A ratio is selected in the range of 32 to 400 %.
❒ If the calculated ratio is over the maximum or under the minimum ratio, it is
corrected within the range of the ratio automatically. However, with some ratios, parts of the image might not be copied or blank margins will appear on
copies.
78
Touch the
A
Touch the
B
[
Reduce/Enlarge
[
Size Mag.
]
key.
]
key.
Page 95

Size Magnification
Enter the length of the original with the {{{{
C
key.
Note
❒ You can enter sizes within the following ranges:
Metric version 1 - 999 mm (in 1 mm steps)
Inch version 0.1" - 99.9" (in 0.1" steps)
❒ To change the length entered, press the {
the new length.
Enter the length of the copy with the {{{{
D
Note
❒ To change the length entered, press the {
the new length.
❒ To change the length after pressing the {#} key, select
and enter the desired length.
Number
Clear/Stop
}}}} keys and press the {{{{#}}}} key.
Number
Clear/Stop
}}}} keys and press the {{{{#}}}}
[
Clear
[
Clear
[
]
]
Original
key and enter
key and enter
]
[
or
Copy
} or
} or
2
]
Touch the
E
Touch the
F
Set your original, then press the {{{{
G
[OK]
[OK]
key.
key.
Start
}}}} key.
79
Page 96

COPYING
Directional Magnification (%)—Stretching
And Squeezing The Image In 1 % Steps
Copies can be reduced or enlarged at different reproduction ratios horizontally
and vertically.
2
Note
❒ The following ratios can be selected:
• Metric version: 32 – 400 %
• Inch version: 32 – 400 %
❒ You can select a ratio regardless of the size of an original or copy paper. With
some ratios, parts of the image might not be copied or blank margins will appear on copies.
❒ You can also select a preset ratio which is close to the desired ratio by using
Reduce or Enlarge, then adjust the ratio with the [n] or [o] key.
Touch the
A
[
Reduce/Enlarge
a%
]
key.
b%
CP2P01EE
80
Note
❒ When specifying a ratio with the
is close to the desired ratio by using
[n]
or [o] key, select a preset ratio which
[
Reduce
]
or
[
Enlarge
]
.
Page 97

Directional Magnification (%)—Stretching And Squeezing The Image In 1 % Steps
Touch the [
B
Touch the [
C
Size Mag.
D. Mag. (%)
To specify a ratio with the
A Touch the [
B Touch the [
nnnnoooo Keys
Horizontal
] key.
] key.
] key.
[n]
] key.
or
[o]
2
key
C Adjust the ratio using the [
Note
❒ Touching the [n] or [o] key changes the ratio in 1 % steps. Touching
and holding down the [n] or [o] key changes it in 10 % steps.
❒ If you have incorrectly entered the ratio, readjust the ratio with the [n]
or [o] key.
D Touch the [
E Adjust the ratio with the [
F Touch the [OK] key.
Vertical
] key.
nnnn
nnnn
] or [
] or [
oooo
oooo
] key.
] key.
81
Page 98

COPYING
When using the { Number} keys
A Touch the [
Horizontal
] key.
2
B Enter the desired ratio with the
Note
❒ To change the ratio entered, press the
ter the new ratio.
C Touch the [
D Enter the desired ratio with the
E Touch the [OK] key.
Touch the [OK] key.
D
Set your originals, then press the
E
Vertical
] key.
Number
{{{{
Number
{{{{
Start
{{{{
keys, followed by the
}}}}
Clear/Stop
{
keys, followed by the
}}}}
key.
}}}}
key or [
}
Clear
key.
{{{{#}}}}
] and en-
key.
{{{{#}}}}
82
Page 99

Directional Size Magnification (Inch)—Stretching And Squeezing The Image Into The Copy Area
Directional Size Magnification (Inch)—
Stretching And Squeezing The Image Into
The Copy Area
The suitable reproduction ratios will be automatically selected when you enter
the horizontal and vertical lengths of the original and copy image you want.
2
1
24
1: Horizontal original size
2: Vertical original size
3: Horizontal copy size
4: Vertical copy size
Preparation
Specify the vertical and horizontal sizes of the original and those of the copy,
as shown in the illustration.
Note
❒ You can enter sizes within the following ranges:
Metric version 1 – 999 mm (in 1 mm steps)
Inch version 0.1" – 99.9" (in 0.1" steps)
❒ If the calculated ratio is over the maximum or under the minimum ratio, it is
corrected within the range of the ratio automatically. However, with some ratios, parts of the image might not be copied or blank margins will appear on
copies.
3
CP2M01EE
83
Page 100

COPYING
Touch the [
A
Reduce/Enlarge
] key.
2
Touch the [
B
Touch the [
C
Size Mag.
D. Size Mag. (inch)
] key.
] key.
84
Enter the horizontal size of the original with the {{{{
D
the {{{{#}}}} key.
Note
❒ To change the value entered, press the {
and enter the new value.
Enter the horizontal size of the copy with the {{{{
E
the {{{{#}}}} key.
Enter the vertical size of the original with the {{{{
F
the {{{{#}}}} key.
Enter the vertical size of the copy with the {{{{
G
[OK] key.
Number
Clear/Stop
Number
Number
Number
}}}} keys. Then, press
} key or the [
}}}} keys. Then, press
}}}} keys. Then, press
}}}} keys. Then, press the
Clear
] key
 Loading...