

Page 1
PRINTER Option Type
650
OPERATING INSTRUCTIONS
DOCUMENT SERVER™ REFERENCE
(option)
Read this manual carefully before you use this product and keep it handy for future
reference.
For safety, please follow the instructions in this manual.
Page 2

PRINTER Option Type 650 OPERATING INSTRUCTIONS
Printed in Japan
UE USA A868-8650
Page 3

Introduction
This manual contains detailed instructions on the operation and maintenance of this machine. To get
maximum versatil ity from this ma chine all opera tors sho uld careful ly read an d follow the ins tructi ons in
this manual.
Please read the Safety Information in the “Copy Reference” before using this machine. It contains important information related to USER SAFETY and PREVENTING EQUIPMENT PROBLEMS.
Important
Parts of this manual are subject to change without prior notice. In no event will the company be liable
for direct, indirect, special, incidental, or consequential damages as a result of handling or operating
the machine.
Trademarks
®
Microsoft
, Windows®, and MS-DOS® are registered trad emarks of M icrosoft C orporation in the Unit ed
States and/or other countries.
®
PostScript
PCL
is a registered trademark of Adobe System Incorporated.
®
is a registered trademark of Hewlett-Packard Company.
Document Server™ is a trademark of Ricoh Company, LTD.
Other product names us ed herei n are for iden tifica tion purp oses on ly and migh t be tradem arks of th eir
respective companies. We disclaim any and all rights in those marks.
Warning:
Use of controls or adjustment or performance of procedures other than those specified in this manual
might result in hazardous radiation exposure.
Notes:
Some illustrations might be slightly different from your machine.
Certain options migh t no t be av ail abl e in some countries. F or de tails, please contac t yo ur local dealer.
We shall not be res ponsible for a ny loss of t he saved docum ents that result from mis takes, elec trostatic
or electric noises, or damages of the machine. We recommend to sa ve important data in your compu ter
or to print them out in case they should be lost accidentally.
Page 4

Copyright © 1998
Page 5
How to Read this Manual
R
R
Symbols
In this manual, the following symbols are used:
WARNING:
This symbol indicates a potentially hazardous situation that might result in
death or serious injury when you misuse the machine without following the instructions under this symbol. Be sure to read the instructions, all of which are described in the Safety Information section.
CAUTION:
This symbol indicates a potentially hazardous situation that might result in minor or moderate injury or property damage that does not involve personal injury
when you misuse the machine without following the instructions under this
symbol. Be sure to read the instructions, all of which are described in the Safety
Information section.
* The statements above are notes for your safety.
Important
If this instruction is not followed, paper might be misfed, originals might be
damaged, or data might be lost. Be sure to read this.
Preparation
This symbol indicates the prior knowledge or preparations required before operating.
Note
This symbol indicates precautions for operation, or actions to take after misoperation.
Limitation
This symbol indicates numerical limits, functions that cannot be used together,
or conditions in which a particular function cannot be used.
Reference
This symbol indicates a reference.
[ ]
Keys that appear on the machine's panel display.
Keys and buttons that appear on the computer's display.
{ }
Keys built into the machine's operation panel.
Keys on the computer's keyboard.
i
Page 6

TABLE OF CONTENTS
Manuals for this Machine.......................................................................... 1
Guide to Components............................................................................... 2
Mainframe............................ ......................................................................... 2
Operational Panel ................ ......................................................................... 3
Panel Display ................................................................... ............................. 4
1.What You Can Do with the Document Server
Overview..................................................................................................... 9
Useful Features ........................................................................................... 10
Features and Benefits............................................................................. 11
Proof Printing ......................... ..................................................................... 11
On Demand Printing.................................................................................... 14
Confidential Printing.................................................................................... 16
File Merge Printing...................................................................................... 18
Scanned File Printing............................................................... ................... 20
2.Sending Data to the Document Server
Overview................................................................................................... 23
The Required Settings ................. .................................... ........................... 24
Windows 95/98/3.1x/NT 4.0- Sending Data to t h e Document Server .. 25
PCL 6/5e..................................................................................................... 25
3.Scanning the Originals
Basic Procedure...................................................................................... 28
4.Printing Saved Documents
Basic Procedure...................................................................................... 30
Sample Printing ........................................................................................... 31
Print First Page ........................................................................................... 31
5.Deleting Saved Documents
Basic Procedure...................................................................................... 34
6.Setting Default Parameters (Document Server)
Accessing User Tools (Document Server)............................................ 36
Document Server Setting Parameters................................................... 37
Basic Tab.................................................................................................... 37
Document Manage Tab.................................. .................. ........................... 37
ii
Page 7

7.Troubleshooting
Error Messages.......................................... .... ..... ..... ............................ .... 39
8.Appendix
Specifications.......................................................................................... 41
INDEX........................................................................................................ 42
iii
Page 8

This page is intentionally blank.
iv
Page 9

Manuals for this Machine
There are four manuals that describe the operational procedures separately for
the operation and maintenance of the machine.
This manual, the Document Server Reference, contains detailed instructions for
using this machine as a Document Server.
To ensure safe and efficient operation of the machine, all users should read and
follow the instructions contained in the following manuals.
❖❖❖❖
System Settings
Describes the procedures and functions for adjusting the settings and defaults
of this machine for copier.
❖❖❖❖
Copy Reference
Describes the procedures and functions for using this machine as a copier.
❖❖❖❖
Printer Reference
Describes the system settings, procedures and functions for using this machine as a printer.
❖❖❖❖
Document Server Reference (This Manual)
Describes the procedures and functions for using this machine as a Document
Server.
1
Page 10
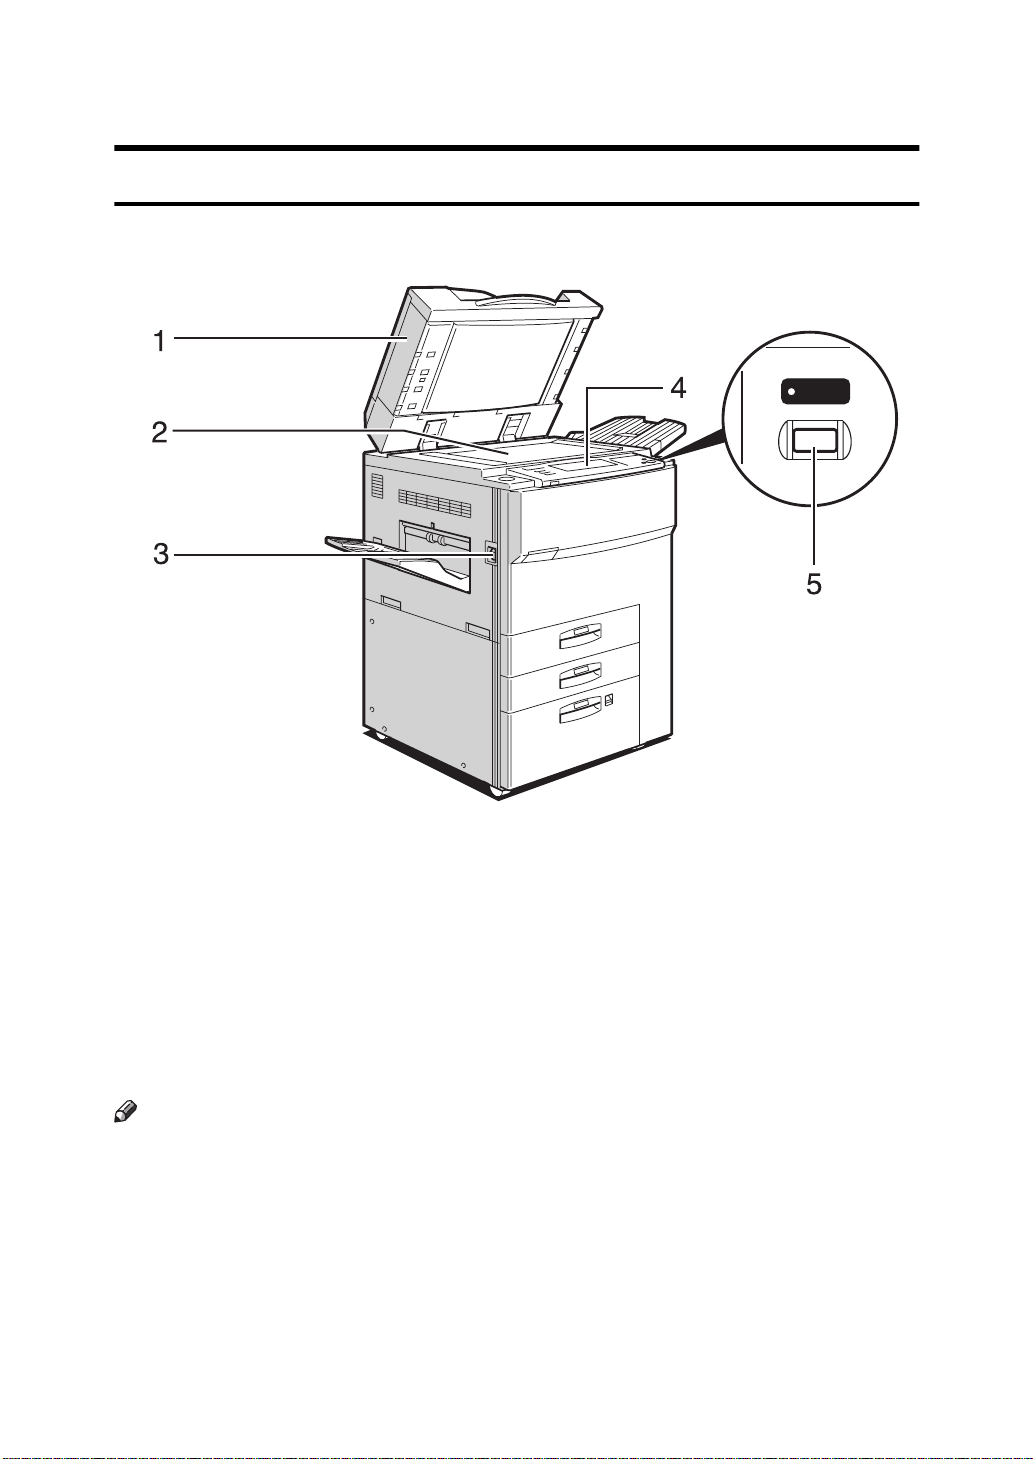
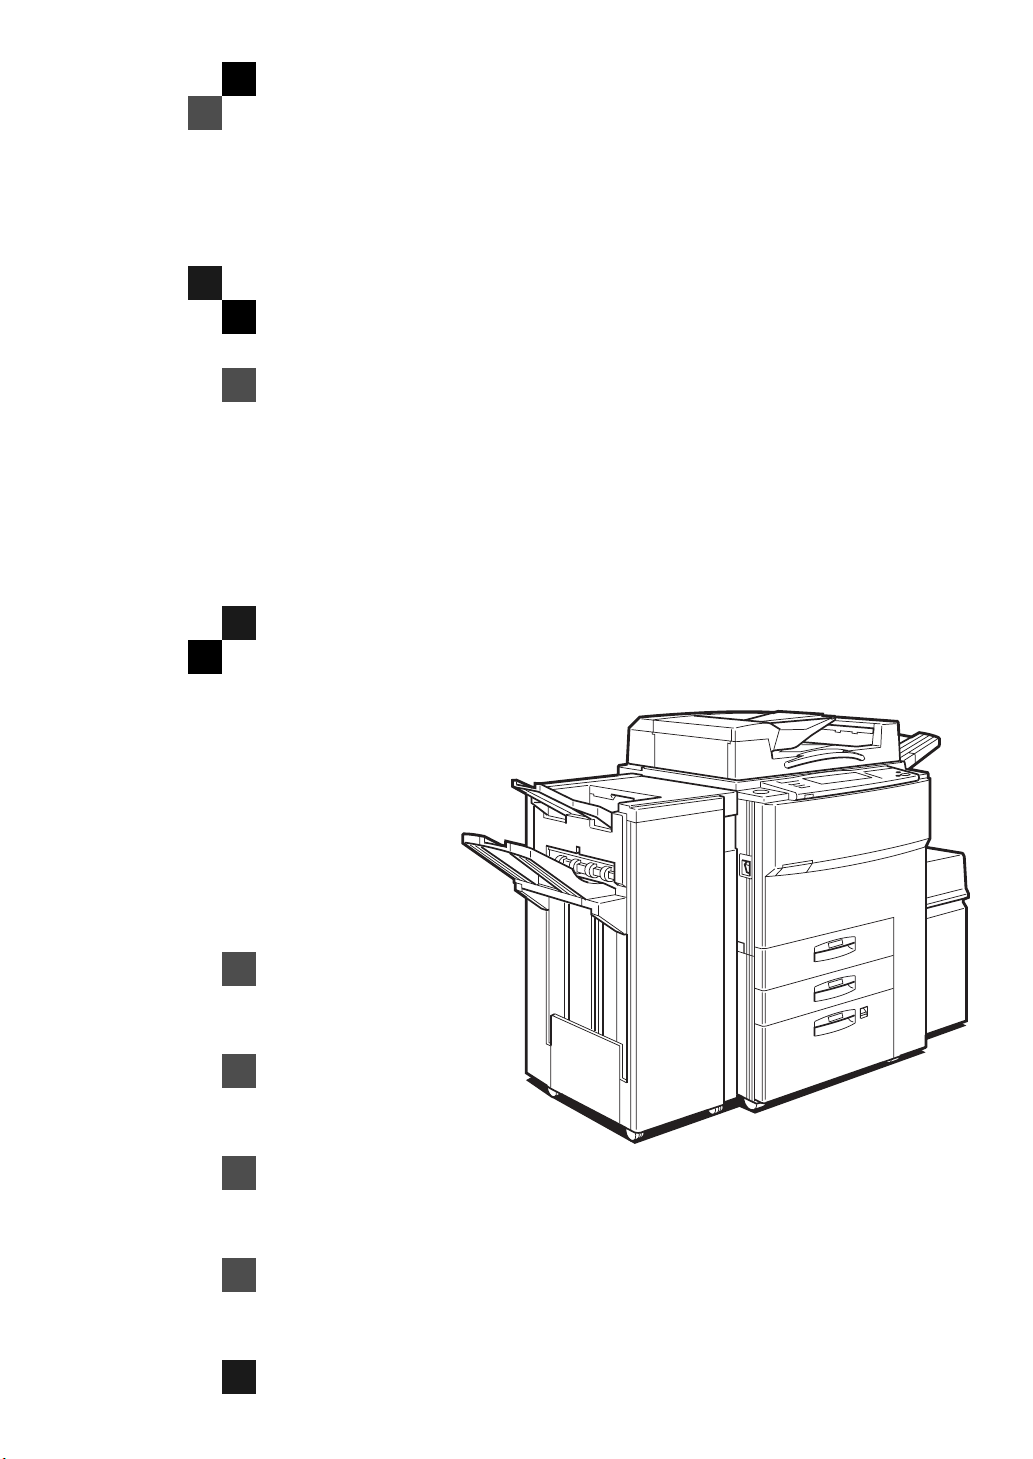
Guide to Components
Mainframe
On
1. Auto Document Feeder (ADF)
The document feeder automatically feeds
a stack of originals one by one.
2. Exposure Glass
Position originals here face down for
scanning.
3. Main Power switch
Note
If the machine does not operate after
❒
turning on the Operation Switch,
check if the main power switch is
turned on. If it is off, turn it on.
4. Operational Panel
Use to check the status of the machine,
and to enter the desired jobs or settings.
2
TSPS051N
5. Operation Switch
Press this switch to turn the power on
(the On indicator lights up).
To turn the power off, press this switch
again (the On indicator goes off).
Page 11

Operational Panel
1
8
7
1.
User Tools/Counter
{{{{
❖❖❖❖
User tools
Press to change the default settings
and conditions to meet your requirements.
❖❖❖❖
Counter
Press to check or print the total number of prints and copies made.
key
}}}}
2
2. Panel Display
Shows operation status, error messages,
and function menus. ⇒ P.4
play”
3.
Clear Modes/Energy Saver
{{{{
❖❖❖❖
Clear Modes
Press to clear the previously entered
job settings.
❖❖❖❖
Energy Saver
Press this key for more than about 1
seconds to switch the machine to Energy Saver mode.
4.
Sample Copy
{{{{
Use this key to print a single sample set
before starting a long print run using Sort
function. ⇒ P.31
key
}}}}
“Sample Printing”
“Panel Dis-
key
}}}}
5. Main Power indicator
Lights up when the main power switch is
turned on, and goes off when the switch
is turned off.
3
10
9
4
11
5
6
6. Operation Switch
Press this switch to turn the power on
(the On indicator lights up).
To turn the power off, press this switch
again (the On indicator goes off).
7. Function keys
Press to change functions (Copy, Printer,
Document Server) shown on the panel
display. To use the Document Server
function, press the
Document Server
{
key.
}
8. Function Status indicators
These indicators show the status of each
function.
❖❖❖❖
Green
Indicates the function is working.
❖❖❖❖
Red
Indicates the function is interrupted
because of errors.
Press the Function key to switch the
panel display and check the error
message.
9. Number keys
Use to enter a numeric value such as the
desired number of prints and zooming
ratio.
10.
Clear/Stop
{{{{
Press to cancel the number which are being entered, or to stop scanning or printing.
key
}}}}
Start
key
}}}}
11.
{{{{
Press to start scanning or printing a document.
3
Page 12

Panel Display
The panel display shows operational status, error messages, and function
menus.
Important
Do not apply a strong shock or force of about 30 N (about 3 kgf) or more to
❒
the panel display. Otherwise, the display might be damaged.
❖❖❖❖
Document Server initial display
Touch the
Document Server
{
key, and the Document Server initial display ap-
}
pears.
❖❖❖❖
The “Select File” menu
1.
[
Scan Originals
Touch to go to the “Saving” menu.
key
]
54321
8
7
the selected line is highlighted and the
print priority is also shown.
6
2. Document List
Shows the saved documents with the information of User ID, File Name, how
many pages it has, and when it was
saved.
Touch the desired line to select the document. When any document is selected,
4
Note
Touch the [
❒
screen.
Touch the [
❒
previous screen.
] key to go to the next
Next
T
] key to return to the
Prev
U
Page 13
3. Memory
Shows the remaining capacity of memory
as a percentage.
4.
[
Print 1st Page
Touch to print the 1st page of the selected
document.
Note
This key appears only when any doc-
❒
ument is selected.
key
]
5. Job information
•Page
Shows the number of the total pages
of the selected documents.
•Q'ty
Shows the specified number of print
sets.
❖❖❖❖
The “Saving” menu
•Copy
Shows which set is being printed.
key
UUUU
key
]
Prev
keys
]
6.
[
Print Setting
Touch to go to the Set Job menu.
Note
This key appears only when any doc-
❒
ument is selected.
7.
[
Touch to delete the selected document.
Note
This key appears only when any doc-
❒
ument is selected.
8.
[
Touch to go to the next or the previous
screen.
Delete
Next
TTTT
]
], [
5
1
2
3
4
7
6
8
10 11
1413
15
9
12
16 17
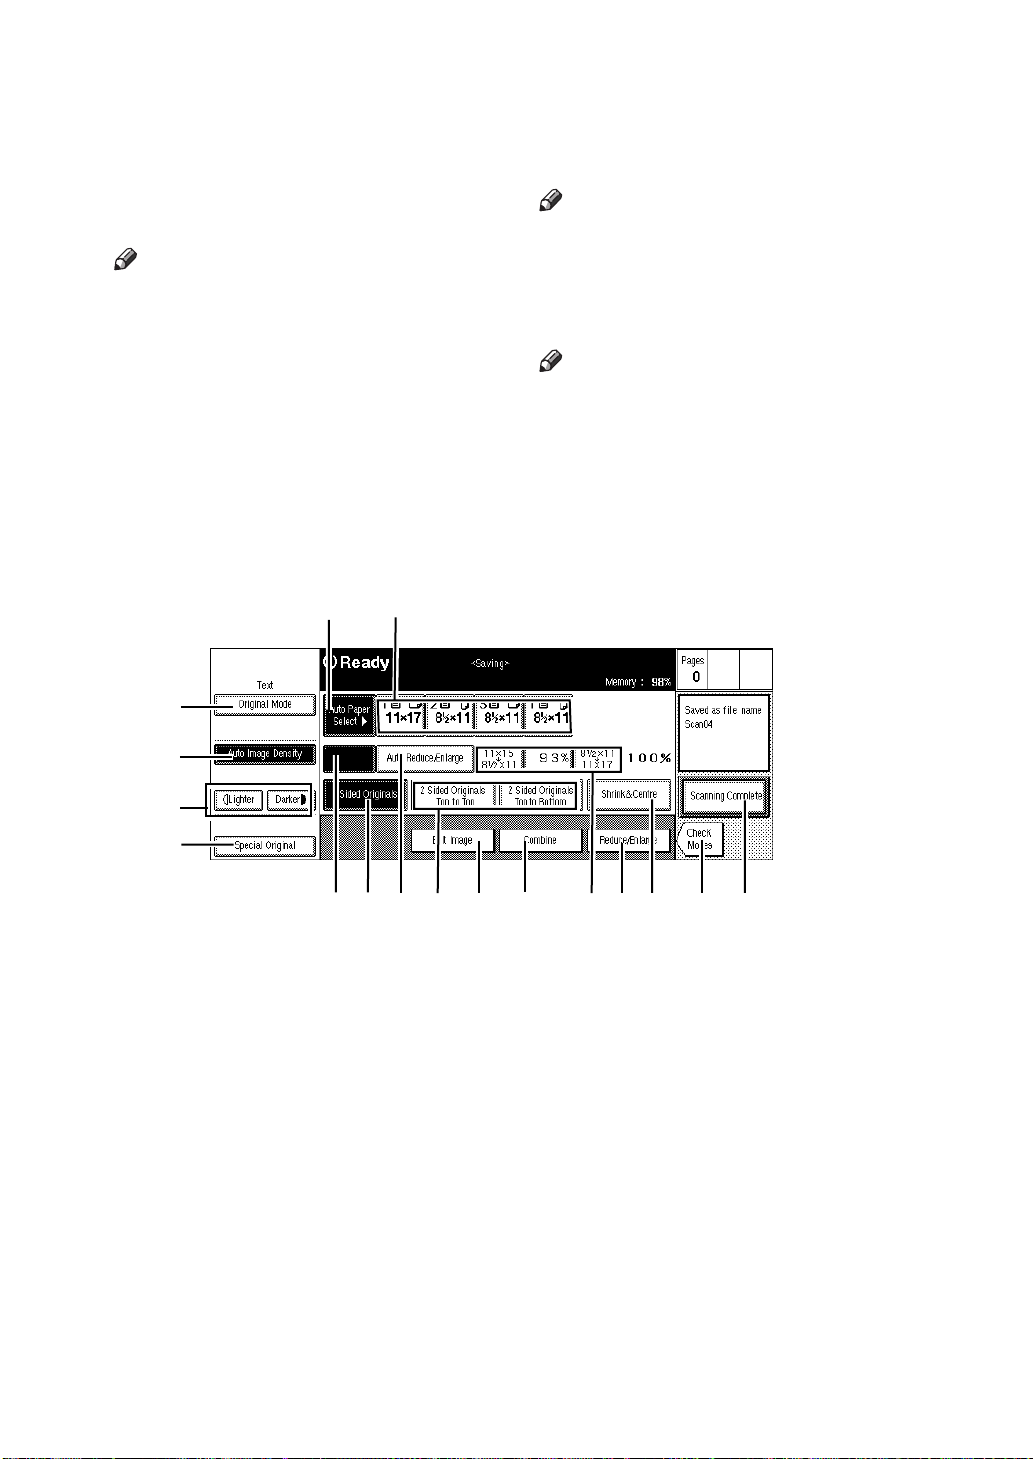
For more information on settings, refer to Copy Reference.
1.
[
Original Mode
Touch to select the mode to match the image type of your originals.
2.
[
Auto Image Density
Touch to have the machine to adjust the
image density to match your originals.
key
]
key
]
3. Manual Image Density keys
Touch to adjust the image density manually.
You can combine Auto and Manual Image density by touching one of these keys
when the Auto Image Density key is
highlighted.
4.
[
Special Original
Touch to have the machine recognize
how to feed your originals from the document feeder (ADF) when your originals
are special, such as mixed sizes or thin
paper.
5.
[
Auto Paper Select
Touch to have the machine select a suitable size of paper automatically based on
the original size and the scanning ratio.
key
]
]
key
5
Page 14

6. Manual Paper Select keys
Touch to select the desired paper size.
7.
[
Full Size
Touch to scan the full size image.
8.
[
Auto Reduce/Enlarge
Touch to have the machine choose the
scanning ratio based on the paper and
original sizes you select.
key
]
key
]
9. Preset Reduce/Enlarge keys
Touch to select a preset ratio.
10.
[
1 Sided Originals
Touch this key when scanning 1 sided
originals.
Note
Set your originals in the correct direc-
❒
tion. Otherwise, you might not make
duplex printing correctly.
Refer to “Duplex – Making Two-Sided
❒
Copies” in the Copy Reference.
key
]
11. 2 Sided Originals keys
Touch one of these keys when scanning
the 2 sided originals according to the orientation of the images.
•Top to Top
The pages of this orientation can be
folded or bound along the vertical axis.
•Top to Bottom
The pages of this orientation can be
folded or bound along the horizontal
axis.
Touch to erase the center margin of
the original image.
• Erase Border
Touch to erase the surrounding area
of the original image.
• Centering
Touch to move the image to the center.
Note
When you print the document
❒
whose image was moved to the
center using Centering function,
you should use the same paper size
as specified in the Saving menu. If
the paper size specified in printing
is different from that specified in
saving, the image cannot be moved
to the center correctly.
14.
[
Combine
Touch to combine multiple scanned documents to be saved into one file.
15.
[
Reduce/Enlarge
Touch to reduce or enlarge the image to
be saved into the Document Server.
16.
[
Check Modes
Touch to check the current settings.
17.
[
Scanning Complete
Touch to go to the “Select File” menu.
key
]
key
]
key
]
key
]
Note
Set your originals in the correct direc-
❒
tion. Otherwise, you might not make
duplex printing correctly.
Refer to “Duplex – Making Two-Sided
❒
Copies” in the Copy Reference.
key
]
key
]
12.
[
Shrink & Center
Touch to reduce the image to 93 % of its
original size with the center as reference.
13.
[
Edit Image
Touch to edit the scanned images using
the following functions:
• Erase Center
6
Page 15

❖❖❖❖
The “Set Job” menu
4
1
2
3
8
6
5
9
7
For more information on settings, refer to Copy Reference.
1. File information
Shows User ID, File Name, and the priority of the selected document(s).
Note
Use the [
❒
next or previous file information.
2.
[
Use to see the next or previous file information.
TTTT
Next
], [
Next
T
UUUU
], [
Prev
] keys to see the
Prev
U
keys
]
Should be used if the pages are to be
folded or bound along the horizontal
axis.
Note
If you cannot make duplex printing
❒
correctly, your originals might not
have been set in the correct direction
when scanning.
Refer to “Duplex – Making Two-Sided
❒
Copies” in the Copy Reference.
11
10
12
13
14
15
Note
The file information is shown in the
❒
order of print priority.
3.
[
Select File
Touch to go to the “Select File” menu.
4.
[
Auto Paper Select
Touch to have the machine select a suitable size of paper automatically based on
the original size and the print ratio.
key
]
key
]
5. Manual Paper Select keys
Touch to select the desired paper size.
6.
[
1 Sided Print
Touch to print on one side of paper.
key
]
7. 2 Sided Print keys
Touch to print on both sides of paper.
•Top to Top
Should be used if the pages are to be
folded or bound along the vertical axis.
•Top to Bottom
key
]
key
]
8.
[
Cover/Slip Sheet
Touch to make setting for adding covers
or slip sheets.
9.
[
Margin Adjust
Touch to adjust margins in printing the
selected documents.
Note
Margin Adjust function is automati-
❒
cally selected when you make Duplex
printing.
10. Sort
Touch to make the print output delivered
as sets in sequential order.
11. Rotate Sort
Touch to have every other print set rotated by 90° and delivered to the tray.
Note
This key appears only when the opti-
❒
cal Finisher is not installed.
7
Page 16

Refer to “Sort – Sorting Into Sets” in
❒
the Copy Reference.
12. Stack
Touch to have prints assembled with
each page set.
Note
This key appears only when the op-
❒
tional Finisher is installed.
Refer to “Stack – Stacking Together
❒
All Copies Of A Page” in the Copy
Reference.
13. Staple
Touch one of the keys to have each print
set stapled together at the position shown
in the display.
Note
This key appears only when the op-
❒
tional Finisher is installed.
Refer to “Staple” in the Copy Refer-
❒
ence.
14. Punch
Touch to have each print set punched.
Note
This key appears only when the op-
❒
tional Punch kit is installed in the optional Finisher.
Refer to “Punch” in the Copy Refer-
❒
ence.
15.
[
Check Modes
Touch to check the current settings.
key
]
8
Page 17

1. What You Can Do with the
Document Server
Overview
The Document Server enables you to save your documents in the mainframe
memory, then edit and print as you want.
There are two ways to save documents.
• Sending data from your computer
• Scanning originals from the document feeder (ADF), or the exposure glass of
the machine
1 3 2
A Prepare the documents you want to save.
B Save the documents.
The documents are saved in the mainframe memory.
C Print the documents.
You can print any of the saved documents with any desired settings at any
time.
9
Page 18

What You Can Do with the Document Server
Useful Features
The following printing features are available with the Document Server.
1
❖❖❖❖
Proof Printing
You can print a sample set to check and correct the settings before making a
large print run.
❖❖❖❖
On Demand Printing
You can print the saved documents as you want at any time.
❖❖❖❖
Confidential Printing
You can print a confidential document to the Document Server with a password to prevent others from printing it.
❖❖❖❖
File Merge Printing
You can combine multiple documents to print them in one set.
❖❖❖❖
Scanned File Printing
You can combine multiple scanned documents into one set of document.
10
Page 19

Features and Benefits
Features and Benefits
Proof Printing
You can print a sample set to check and correct the settings before making a large
print run.
❖❖❖❖
Your Current Situation might be…
• When you need to print out multiple sets of documents from your comput-
er, you will print one sample set to check and specify the number of prints
for the rest of the print job.
• If the settings are not what you want, you have to revise them and print
again and again until the settings become OK.
• When you need additional sets of the documents for a meeting, you have
to print from your computer again.
1
11
Page 20

1
What You Can Do with the Document Server
❖❖❖❖
With the Document Server...
If your document from your computer is saved in the machine, you can make
use of the
prints once using the operation panel, and press the
checking the settings, just touch the
You don't have to make the settings again.
The complex print jobs such as duplex, stapling, and punching can easily be
specified using the operation panel just as a copier.
You can also easily change the number of prints for additional usage with the
operation panel.
Sample Copy
{
key. You have only to specify the desired number of
}
Sample Copy
{
key to start the rest of the print job.
]
[
Yes
key. After
}
1
2
3
Note
The
❒
❒
❒
Sample copy
{
Stapling requires the installation of the optional Finisher.
Punching requires the installation of the optional Punch kit in the optional
Finisher.
key is effective only when you are using Sort function.
}
12
Page 21

Basic Procedure
Follow these steps to make a proof printing.
Features and Benefits
A Send the data of the desired document to the Document Server.
A Check the box for
[
Print to Docu ment Server
B Enter the User ID in the Document Server tab.
Note
The procedure using the PS driver may be somewhat different.
❒
For more information, refer to
❒
“Sending Data to the Document Server” (
P.23.
in the Setup tab.
]
B Print the document using the operation panel of your machine.
Screen
User Tools/
Contrast
Counter
A Press the
Document Server
{{{{
you want to print.
Program
key if you needed, and select the documents
}}}}
Clear Modes/
Energy Saver
Enter
Clear/Stop
Interrupt
Sample Copy
Start
1
⇒
On
Main Power
B Make the desired settings as you want.
C Press the
Sample Copy
{{{{
key.
}}}}
Note
❒
The
{
Sample Copy
key is effective only when you are using Sort func-
}
tion.
For more information, refer to
❒
“Sample Printing” (
⇒
P.31.
13
Page 22

What You Can Do with the Document Server
On Demand Printing
You can print any of the saved documents as you want at any time.
1
❖❖❖❖
Your Current Situation might be…
• When you need to print multiple sets of documents in duplex and with sta-
ple, you will print originals, then make duplex copy and staple them by
hands.
• Wasting your time to find your documents among those of others, or wait-
ing for the machine to finish the other person's job.
❖❖❖❖
With the Document Server
If you send your document from your computer and save it in the Document
Server, you can print at any time with any necessary print settings such as duplex and stapling. Your documents will not be confused with those of others
in the exit tray.
As it is printed directly from the mainframe memory, the print quality is
higher than that of copies.
You don't have to wait long, since the data has already been processed in the
memory. They will be printed at a high speed from the first set.
14
Page 23

Features and Benefits
Note
Stapling requires the installation of the optional Finisher.
❒
Punching requires the installation of the optional Punch kit in the optional
❒
Finisher.
Basic Procedure
Follow these steps for On Demand Printing.
A Send the data of the desired document to the Document Server.
1
A Check the box for
[
Print to Docu ment Server
in the Setup tab.
]
B Enter the User ID in the Document Server tab.
Note
The procedure using the PS driver may be somewhat different.
❒
For more information, refer to
❒
“Sending Data to the Document Server” (
P.23.
B Print the document using the operation panel of your machine.
Screen
User Tools/
Contrast
Counter
A Press the
Document Server
{{{{
you want to print.
Program
key if you needed, and select the documents
}}}}
Clear Modes/
Energy Saver
Enter
Clear/Stop
Interrupt
Sample Copy
Start
⇒
On
Main Power
B Make the desired settings.
C Press the
{{{{
Start
key.
}}}}
Note
For more information, refer to
❒
“Printing Saved Documents” (
⇒
P.29.
15
Page 24

1
What You Can Do with the Document Server
Confidential Printing
You can print a confidential document to the Document Server with a password
to prevent other from printing it.
❖❖❖❖
Your Current Situation might be…
When your printer is on a network, you have to worry about the security of
confidential documents, such as personal data.
❖❖❖❖
With the Document Server
When you send a confidential document to the Document Server, you can
specify a password to prevent others from printing and reading it.
You can send confidential documents to other machines, if you fix a certain
password only for concerning staff.
????
16
Page 25

Basic Procedure
Follow these steps to make a Confidential Printing.
Features and Benefits
A Send the data of the desired document to the Document Server.
A Check the box for
[
Print to Docu ment Server
B Enter your User ID in the Document Server tab
C Enter your password in the Document Server Tab.
Note
The procedure using the PS driver may be somewhat different.
❒
For more information, refer to
❒
“Sending Data to the Document Server” (
P.23.
in the Setup tab.
]
B Print the document using the operation panel of your machine.
Screen
Contrast
User Tools/
Counter
Program
Clear Modes/
Energy Saver
Enter
Clear/Stop
Interrupt
Sample Copy
Start
1
⇒
On
Main Power
A Press the
Document Server
{{{{
key if you need and the select the documents
}}}}
you want to print.
B Enter the password using the Number keys.
C Press the
{{{{
Start
key.
}}}}
Note
For more information, refer to
❒
“Printing Saved Documents” (
⇒
P.29.
17
Page 26

What You Can Do with the Document Server
File Merge Printing
You can combine multiple documents to print them in one set.
1
❖❖❖❖
Your Current Situation might be…
• You want to make one file by combining several files that are made using
different applications, or that are made by several persons.
• You want to combine electronic data and paper documents to print as one
set.
AB
1
❖❖❖❖
With the Document Server
You can combine any of the documents saved in the Document Server.
Electronic data created by different applications or persons and scanned documents can be combined.
2
Z
AB
18
Z
Y
X
XY
Page 27

Basic Procedure
Follow these steps to make a file merge printing.
Features and Benefits
A Save the desired documents.
Printing the document to the Document Server
A Check the box for
[
Print to Docu ment Server
in the Setup tab.
]
B Enter your User ID in the Document Server tab.
Note
The procedure using the PS driver may be somewhat different.
❒
Scanning originals using the machine
A Press the
Document Server
{{{{
key if you needed.
}}}}
B Place the originals either into the document feeder (ADF) or on the ex-
posure glass.
C Press the
{{{{
Start
key.
}}}}
B Print the document using the operation panel of your machine.
Screen
Contrast
User Tools/
Counter
Program
Clear Modes/
Energy Saver
Interrupt
Sample Copy
On
1
Main Power
A Press the
Document Server
{{{{
key if needed.
}}}}
B Select the documents you want to print.
C Make the desired settings.
D Press the
{{{{
Start
key.
}}}}
Note
For more information, refer to
❒
“Printing Saved Documents” (
Start
Clear/Stop
Enter
P.29.
⇒
19
Page 28

What You Can Do with the Document Server
Scanned File Printi ng
You can combine multiple scanned documents to print them in one set.
1
❖❖❖❖
Your Current Situation might be…
You want to combine several originals that are different in density, size, paper weight.
• Scrapped and pasted originals
• Photo originals
• One sided originals
• Two sided originals
❖❖❖❖
With the Document Server
You can save the originals individually by making the best settings for each
original, and edit them as a file.
It doesn't matter whether the originals were scanned using the document
feeder (ADF) or the exposure glass. As you can specify the print order for several files, you can combine them as you want, and print them as a file.
20
You can check the print result by printing a sample set before making a large
print run by pressing the
If you aren't satisfied with the print result of some pages of the set, you have
only to scan that part again.
Sample Copy
{
key.
}
Page 29

Basic Procedure
Follow these steps to make a Scanned File Printing.
Features and Benefits
A Save the desired documents.
Scanning originals using the machine
A Press the
Document Server
{{{{
key if needed.
}}}}
B Place originals either into the document feeder (ADF) or on the exposure
glass.
C Press the
{{{{
Start
key.
}}}}
B Make the print settings and check the sample copy.
Screen
Contrast
User Tools/
Counter
1
2
Program
3
Clear Modes/
Energy Saver
Enter
Clear/Stop
Interrupt
Sample Copy
Start
On
4
1
Main Power
A Select the documents in the order that you want to print them out.
B Make the desired settings.
C Enter the desired number of prints using the Number keys.
D Press the
Sample Copy
{{{{
key.
}}}}
Note
❒
The
{
Sample Copy
key is effective only when you are using Sort func-
}
tion.
21
Page 30

1
What You Can Do with the Document Server
C Start the rest of the print operation.
Screen
User Tools/
Contrast
Counter
1
Program
Clear Modes/
Energy Saver
Enter
Clear/Stop
Start
Interrupt
Sample Copy
On
Main Power
A Check the print result of the sample set, and if it is OK, touch the
key in the confirmation dialog.
The rest of the print job will be made. You don't have to select nor make
the settings again.
[
Yes
]
22
Page 31

2. Sending Data to the
Document Server
Overview
You can send the data from your computer to the Document Server using the
printer driver.
The actual procedure somewhat differs depending on your operating system
and your printer driver.
This section describes the basic procedures to send data to the Document Server.
❖❖❖❖
Operation Environment
Printer Driver Operating System
PCL Windows 95/98
Windows 3.1x
Windows NT 4.0
PostScript
®
Windows 95/98
Important
While the data is being sent to the Document Server, you might not cancel the
❒
job correctly. If not, you should delete the transmitted data using the opera-
tion panel of the machine. ⇒ P.33
The Document Server can save up to 50 documents. If it already has 50 docu-
❒
ments, or the memory becomes full, you can't save a new document. Even if
you try to save it, it is ignored. Unnecessary documents should be deleted
from the memory if it is not needed any more.
❖❖❖❖
About Weekly Timers
The Weekly Timers allow you to restrict use of the machine to certain times
of the day and week. The machine will turn the operation switch on/off at the
specified times of the week.
When the machine is turned off by the timer, you can send data to the Document Server in the following cases.
• The “Key Operator Code for Off Setting” is not specified.
• The “Key Operator Code for Off Setting” is specified, and you can enter the
code.
Note
In this case, you cannot send data without entering the “Key Operator
❒
Code for Off Setting”.
“Deleting Saved Documents”
23
Page 32

Sending Data to the Document Server
Reference
For more information on the Weekly Timers, refer to “System Settings Parameters” in the Printer Reference.
For more information on the Key Operator Code for Off Setting, refer to
“Key Operator Code for Off Setting” in the “System Settings” manual.
2
The Required Settings
A User ID is required to use the Document Server.
You should specify your User ID with the printer driver.
You can also specify a password and a file name for each job.
⇒ Refer to the online help for more information on the settings in the printer
driver.
Required settings Description
User ID A User ID is required for the Document Server to
identify the user. You can't use the Document Server
without it.
Type up to 8 digits of numbers or alphabets.
Note
Make sure that your User ID is different from
❒
those of others.
Password You can specify a password for each job, if necessary.
Type 4 digits of numbers.
If a password is specified in sending data to the Document Server, the document is saved with the password, and no one can edit nor print it without the
password.
24
Note
You should not forget the specified password.
❒
Without the password, you can't edit nor print the
document.
If you should forget the password, consult your
❒
network administrator to delete the document.
File Name You can specify a file name for each job, if necessary.
Type up to 8 digits of numbers or alphabets.
Note
Make sure to specify a different file name for each
❒
job. Otherwise, the same file names will be listed
and it will be hard to choose one of them.
Page 33

Windows 95/98/3.1x/NT 4.0- Sending Data to the Document Server
Windows 95/98/3.1x/NT 4.0- Sending Data
to the Document Server
The actual procedure differs depending on your printer driver. Check if your
printer driver is PCL or PostScript
Preparation
Make sure that the machine is connected to a computer, which has the printer
driver installed.
For more information on connecting to a computer or installing the printer
driver. ⇒ Refer to Printer Reference.
For the settings for the network, contact your network administrator.
Important
You should not specify more than one set of print with your application.
❒
Make sure that the box for
❒
Document Server.
®
, and follow one of the procedures below.
[
Collate
is not checked before sending data to the
]
PCL 6/5e
You can send data from your computer to the Document Server using the PCL
6/5e printer driver.
Basic Procedure
2
Note
For further details, refer to the help file of your printer driver.
❒
Follow these steps to send data to the Document Server.
A Open the file you want to save in the Document Server.
B Click
C Click
D Click the
Note
If you want to send the data to the Document Server only this time, check
❒
the box for
E Click the
ify a password and a file name.
from the
]
[
Print
[
Properties
[
[
]
Setup
[
Clear after one job
Document Server
.
]
tab, and check the box for
menu.
[
]
File
[
Print to Document Server
.
]
tab, and specify your User ID. If necessary, spec-
]
.
]
25
Page 34

2
Sending Data to the Document Server
Important
You should not forget the password. You can't edit nor print the document
❒
without the password.
Note
❖❖❖❖
User ID
Up to 8 digits of numbers and alphabets.
❖❖❖❖
Password
4 digits of numbers.
❖❖❖❖
File Name
Up to 8 digits of numbers and alphabets.
F Click
G Click
.
]
[
OK
to send the data to the Document Server.
]
[
OK
Settings with the Operation Panel
When sending data to the Document Server, the following settings of the printer
driver are ignored. You can specify the ignored settings using the operation panel of the machine.
Tab Parameter
Setup Duplex, Collate, Staple, Punch
Copies
Paper ALL settings
Note
The ignored settings are grayed out when the box for
❒
in the Setup tab is checked.
If the data is made using a spread sheet application such as Excel, you should
❒
send it sheet by sheet. If you send the whole book at a time, each sheet will be
saved as one file with the same file name.
[
Print to Document Se rver
]
26
Page 35

3. Scanning the Originals
You can scan the originals you want to save in the Document Server using the
operation panel of the machine. The originals can be set either on the exposure
glass or into the document feeder (ADF).
The saved documents will automatically be named in the order of scanning as
"Scan01", "Scan02"….
Limitation
You can't specify a User ID or a password when scanning the originals.
❒
You can't change the file names that are assigned automatically.
❒
❖❖❖❖
About Weekly Timers
The Weekly Timers allow you to restrict use of the machine to certain times
of the day and week. The machine will turn the operation switch on/off at the
specified times of the week.
When the machine is turned off by the timer, you can send data to the Document Server in the following cases.
• The “Key Operator Code for Off Setting” is not specified.
• The “Key Operator Code for Off Setting” is specified, and you can enter the
code.
Note
In this case, you cannot send data without entering the “Key Operator
❒
Code for Off Setting”.
Reference
For more information on the Weekly Timers, refer to “System Settings Parameters” in the Printer Reference.
For more information on the Key Operator Code for Off Setting, refer to
“Key Operator Code for Off Setting” in the “System Settings” manual.
27
Page 36

Scanning the Originals
Basic Procedure
This section describes how to scan originals.
Follow these steps to scan the originals to be saved in the Document Server.
Note
You can't specify a User ID or a password.
❒
You can't change the document names which are assigned automatically.
❒
The scanned images are saved in the Document Server.
❒
3
A Press the
The "Select File" menu appears.
B Touch the
The "Saving" menu appears.
Document Server
{{{{
[
Scan Originals
}}}}
key.
]
key.
C Set your originals either on the exposure glass or into the document feeder
(ADF).
Reference
For more information on the types of the originals that can be set and how
to set. ⇒ Refer to "Setting Originals" in the "Copy Reference".
D Make the desired settings.
Reference
For more information on how to make the settings. ⇒ “Copy Reference”
E Press the
Note
To stop scanning, press the
❒
To resume the paused scanning job, touch the
❒
mation dialog. To delete the saved images and cancel the job, touch the
[
Cancel
are automatically fed out.
{{{{
key, and the rest of the originals set in the document feeder (ADF)
]
Start
key.
}}}}
Clear/Stop
{
key.
}
[
Continue
key in the confir-
]
F Repeat Step C
C to EEEE if you want to add more pages into one document.
CC
G After scanning all the pages, touch the
28
[
Scanning Complete
key.
]
Page 37

4. Printing Saved Documents
You can print any of the documents saved in the Document Server.
❖❖❖❖
About Weekly Timers
The Weekly Timers allow you to restrict use of the machine to certain times
of the day and week. The machine will turn the operation switch on/off at the
specified times of the week.
When the machine is turned off by the timer, you can send data to the Document Server in the following cases.
• The “Key Operator Code for Off Setting” is not specified.
• The “Key Operator Code for Off Setting” is specified, and you can enter the
code.
Note
In this case, you cannot send data without entering the “Key Operator
❒
Code for Off Setting”.
Reference
For more information on the Weekly Timers, refer to “System Settings Parameters” in the Printer Reference.
For more information on the Key Operator Code for Off Setting, refer to
“Key Operator Code for Off Setting” in the “System Settings” manual.
29
Page 38

Printing Saved Documents
Basic Procedure
Follow these steps to select a document and print it out.
4
A Press the
The "Select File" menu appears.
Document Server
{{{{
key.
}}}}
B Touch the line for the document you want to print.
The selected line is highlighted.
Note
The file names are listed in the order of the User ID.
❒
If the desired file name is not shown, see the next or previous screen using
❒
the
[
T
If you can't choose the desired document by its name, you can print the
❒
first page to check the contents. Touch the line for the desired document,
and touch the
Touch the selected line again to cancel the print job.
❒
If the "Enter Password" menu appears, enter your password using the
❒
Number keys, and touch the
press the
key.
]
cel
C To print more than one document, repeat step B
ments in the order you want to print them out.
Next
and
]
[
[
Print 1st page
Clear/Stop
{
keys.
]
Prev
U
key.
]
key. To delete the entered numeric value,
[
]
OK
key. To cancel a selected document, touch the
}
B to select the desired docu-
BB
[
Can-
The selected order is shown in the "Priority" column next to the selected document(s).
Note
To change the print order, touch the highlighted lines to return to the nor-
❒
mal conditions, then select them again in the order you want to print.
Touch the
❒
[
key to cancel all the settings.
]
Reset
D If you need to change any of the print settings, touch the
The "Set Job" menu appears.
Reference
For more information on the print settings, refer to the “Copy Reference”.
E Enter the required number of prints with the Number keys.
Up to 999 can be entered.
Note
If you print more than one set using Sort function, you can check the print
❒
result by printing out only the first set. ⇒ P.31
30
[
Print Setting
“Sample Printing”
key.
]
Page 39
Basic Procedure
F Press the
The machine starts printing.
Note
To pause the print job, press the
❒
log, touch the
it.
After the print job is completed, a message appears. Touch the
❒
delete the document, or touch the
{{{{
Start
key.
}}}}
[
Continue
Clear/Stop
{
key to resume it, or touch the
]
key to save it.
[
]
No
key. In the confirmation dia-
}
[
Cancel
key to cancel
]
key to
[
]
Yes
Sample Printing
If you print multiple sets using Sort function, you can check if the print order
or the print settings are correct by printing out only the first set using the
key.
Copy
}
Limitation
Sample Printing can be made only when you are using Sort function.
❒
A Follow step A
B Press the
A to EEEE of the Basic Procedure.
AA
Sample Copy
{{{{
key.
}}}}
Sample
{
4
C After the first set is printed out, touch the
print job. Touch the
menu for changing the setting.
key to cancel it and return back to the "Set Job"
]
[
No
key to print the rest of the
]
[
Yes
Print First Page
You can print the first page of the document selected in the "Select File" menu,
and check the contents of it.
Note
If more than one document is selected, the first page of each document is
❒
printed.
Select the desired document(s) in the “Select File” menu, and touch the
❒
key.
1st page
]
[
Print
31
Page 40

4
Printing Saved Documents
This page is intentionally blank.
32
Page 41

5. Deleting Saved Documents
You should delete any of the saved documents using the operation panel of the
machine.
This chapter describes how to delete saved documents.
Important
You can save up to 50 documents in the Document Server. No more docu-
❒
ment can be saved, when there are 50 documents in the Document Server.
You should delete unnecessary documents.
By default, each document is automatically deleted 24 hours after it is saved
❒
in the Document Server. If you want a document to remain in the Document
Server longer, turn off the “Auto file delete in 24 hours” feature using the
User Tools.⇒ P.37
Note
You can delete all the saved documents at a time. ⇒ P.37
❒
Tab”
“Basic Tab”
“Document Manage
❖❖❖❖
About Weekly Timers
The Weekly Timers allow you to restrict use of the machine to certain times
of the day and week. The machine will turn the operation switch on/off at the
specified times of the week.
When the machine is turned off by the timer, you can send data to the Document Server in the following cases.
• The “Key Operator Code for Off Setting” is not specified.
• The “Key Operator Code for Off Setting” is specified, and you can enter the
code.
Note
In this case, you cannot send data without entering the “Key Operator
❒
Code for Off Setting”.
Reference
For more information on the Weekly Timers, refer to “System Settings Parameters” in the Printer Reference.
For more information on the Key Operator Code for Off Setting, refer to
“Key Operator Code for Off Setting” in the “System Settings” manual.
33
Page 42

Deleting Saved Documents
Basic Procedure
Follow these steps to delete a saved documents.
5
A Press the
The " Select File" menu appears.
Document Server
{{{{
key.
}}}}
B Select a document you want to delete by touching the name of it.
The selected name is highlighted.
Note
The document names are listed in the order of the User IDs. If the desired
❒
document name is not shown in the display, scroll it using the
keys.
When a document is selected, the
❒
key to print out the first page of the document to check the contents of it.
If you select a document which requires a password, the "Input the pass-
❒
word" window appears. Input the password using the Number keys, and
then touch the
key, and then input the correct one again. To cancel selecting a doc-
Stop
}
ument, touch the
To cancel a selected document, touch the highlighted line again.
❒
C Repeat Step B
D Touch the
A confirmation dialog appears.
B if you want to select more than one document.
BB
[
Delete
key. If you input the wrong password, press the
]
[
OK
key.
]
key.
]
[
Cancel
[
Print 1st page
key appears. Touch this
]
[U]
or
Clear/
{
[T]
E Touch the
34
key to delete it.
]
[
Yes
Page 43

6. Setting Default Parameters
(Document Server)
You can change or set the default parameters of the Document Server using the
User Tools.
35
Page 44

Setting Default Parameters (Document Server)
Accessing User Tools (Document Server)
Reference
Regarding the user tools for system settings. ⇒ "Accessing The User Tools
(System Settings)" of the "System Settings" manual.
6
A Press the
The User Tools main menu appears.
B Touch the
The Document Server Setting menu appears.
User Tools/Counter
{{{{
[
Document Server Setting
key.
}}}}
key.
]
C Search for the desired menu. Follow the instructions on the panel display.
Note
Touching the “General Features” tab or the “Document Manage” tab
❒
changes the menu.
If key operator code is specified, the menu to input the key operator code
❒
appears before the Document Manage menu appears. ⇒ Refer to "Key Op-
erator Code" in the “System Settings” manual.
Input the key operator code using the Number keys, and then touch the
❒
key.
]
[
OK
D After changing the user tools settings, touch the
Server Setting menu.
The User Tools main menu appears.
E Touch the
key on the User Tools main menu.
]
[
Exit
key on the Document
]
[
Exit
36
Note
After using the user tools, be sure to exit from user tools.
❒
The settings specified here are not canceled even if the main power switch
❒
or operation switch is turned off or the
pressed.
Clear Modes/Energy Saver
{
}
key is
Page 45

Document Server Setting Parameters
Document Server Setting Parameters
There are two tabs in the “Document Server Setting” menu.
Basic Tab
Menu Description
Auto Reset Timer The machine returns to its initial condi-
tion automatically after your job is finished, after the selected time. This
function is called "Auto Reset". The time
can be set from 10 to 999 seconds, or no
system reset (0 second).
To turn the Auto Reset Timer off, input 0
second.
Note
Default:
❒
60
Auto file delete in 24 hours You can specify whether a file is automat-
ically deleted 24 hours after it is saved.
Only the files saved after this mode is set
to ON will be deleted automatically.
If this mode is set to Off, all the files saved
in the server will not be deleted.
Note
Default:
❒
Duplex mode priority You can specify whether Duplex mode is
effective when the machine is turned on,
or Auto Reset is made.
Note
Default:
❒
On
Off
6
37
Page 46

Setting Default Parameters (Document Server)
Document Manage Tab
If a key operator code is specified, the menu to input the key operator code appears before the “Document Manage” tab appears. Input the key operator code
using the Number keys, and then touch the
Note
If key operator code is specified, the menu to input the key operator code ap-
❒
pears before the “Document Manage” tab appears. Input the key operator
code using the Number keys, and then touch the
Menu Description
Delete all the saved documents You can delete all the saved documents by
touching [
and [
❒
key.
[
]
OK
key.
[
]
OK
Delete all the saved documents
] in the confirmation dialog.
Yes
Note
All the documents including those
with a password are deleted.
],
6
38
Page 47

7. Troubleshooting
Error Messages
Messages Description Comments
Up to 50 files can be
saved.
Please delete all unknown files.
Memory capacity is
full. Please delete the
saved data.
Memory is full. Print
job download canceled. *
Print job capacity
reached. Cannot add
any more jobs. *
There are already
50 files saved in the
Document Server.
Memory becomes
full.
Memory of the
Document Server
is full.
There are already
50 files saved in the
Document Server.
Delete any of the unnecessary files and
then scan the document again. ⇒ P.33
“Deleting Saved Documents”
Delete any of the unnecessary files and
then scan the document again.⇒ P.33
“Deleting Saved Documents”
Important
When memory allocation is changed,
❒
the documents saved in the Document Server will be deleted.
You should print the saved docu-
❒
ments before changing the memory
allocation.
Delete any unnecessary files, and then
send the data to the Document Server
again. ⇒ P.33
ments”
Delete any unnecessary files, and them
send the data to the Document Server
again.⇒ P.33
ments”
“Deleting Saved Docu-
“Deleting Saved Docu-
Note
The messages marked with * are shown in the Panel Display of the Printer
❒
Function.
39
Page 48

Troubleshooting
7
This page is intentionally blank.
40
Page 49

8. Appendix
Specifications
Specification
Memory Capacity Default : About 400 pages (A4, 600 dpi, ITU-T chart)
Note
This setting can be changed to up to 999 pages using the user
❒
tool. ⇒ Refer to "Memory Allocation" in the Printer Reference.
Number of files to be
saved
Max : 50 files
Note
The Document Server cannot hold more than 50 files, even
❒
if memory is not full.
41
Page 50

INDEX
O
1 Sided Print
2 Sided Print
,
,
7
7
A
,
,
37
Auto Document Feeder (ADF)
Auto file delete in 24 hours
Auto Paper Select
Auto Reset Timer
,
,
7
37
C
Clear Modes/Energy Saver
,
Clear/Stop
Cover/Slip Sheet
3
,
7
,
3
D
,
,
33
,
Delete all the saved documents
Deleting Saved Documents
Document Server initial display
Document Server Setting Parameters
,
Duplex mode priority
37
E
Error Messages
Exposure Glass
,
,
39
2
F
,
,
18
3
,
3
File Merge Printing
Function keys
Function Status indicators
,
, 2,
3
,
14
3
On Demand Printing
Operational Panel
Operation Switch
P
2
Panel Display
Printing Saved Documents
Proof Printing
,
Punch
,
3
,
29
,
11
8
R
Rotate Sort
,
7
S
,
3
,
5
,
20
,
27
,
7
,
4
,
23
,
7
,
35
,
41
8
8
3
38
Sample Copy
Saving menu
Scanned File Printing
4
,
37
Scanning the Originals
Select File
Select File menu
Sending Data to the Document Server
Set Job menu
Setting Default Parameters
,
Sort
7
Specifications
,
Stack
,
Staple
,
Start
U
G
Guide to Components
,
User Tools/Counter
2
,
3
M
Mainframe
Main Power indicator
Main Power switch
Manual Paper Select
Margin Adjust
,
2
,
3
,
2
,
7
,
7
N
Number keys
,
3
42 UE USA A868
Page 51

R
™
PRINTER O
p
OPE
DOCUMENT SERVER
PRINTER Option Type 650 OPERATING INSTRUCTIONS
Page 52

e Safety Information in the “Copy Reference” before using this machine. It contains im-
tion related to USER SAFETY and PREVENTING EQUIPMENT PROBLEMS.
anual are subject to change without prior notice. In no event will the company be liable
ect, special, incidental, or consequential damages as a result of handling or operating
dows®, and MS-DOS® are registered trad emarks of M icrosoft C orporation in the Unit ed
ther countries.
registered trademark of Adobe System Incorporated.
tered trademark of Hewlett-Packard Company.
er™ is a trademark of Ricoh Company, LTD.
ames used herein are for identifi cation purpose s only and m ight be tradem arks of th eir
panies. We disclaim any and all rights in those marks.
or adjustment or performance of procedures other than those specified in this manual
hazardous radiation exposure.
ns might be slightly different from your machine.
might not be availabl e in some countries. F or de tails, please contac t yo ur local dealer.
responsible for a ny loss of t he saved docum ents that res ult from mis takes, electros tatic
s, or damages of the machine. We recom mend to save important data in yo ur computer
out in case they should be lost accidentally.
 Loading...