

Page 1
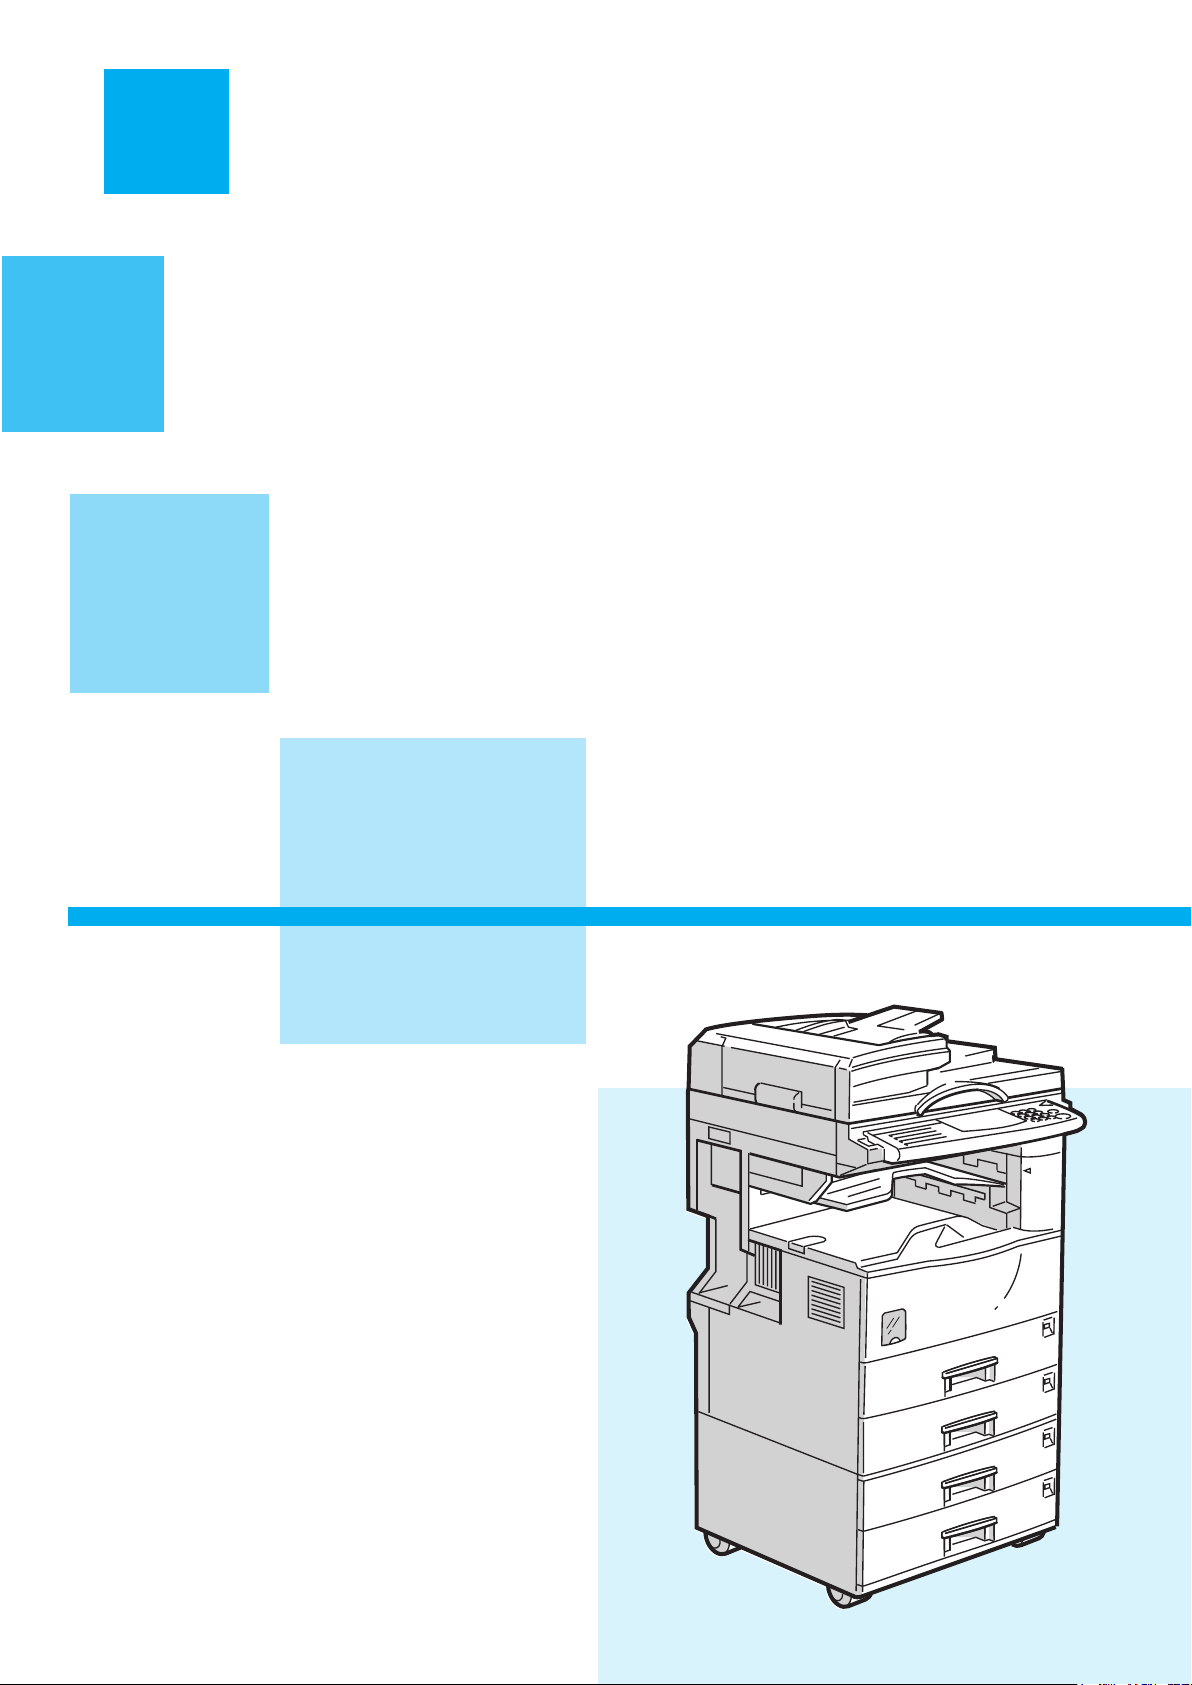
1. Basics
How to Make Copies ..................................................................... page2
2. Reduce/Enlarge
Copying to Different Copy Paper Sizes ............................................ page4
3. Duplex
Making 2-Sided Copies from 1-Sided Originals............................... page6
4. Tray 2
Copying onto Non-standard Paper from Tray 2 ............................... page8
5. Combine
Combining Originals into 1 Copy .............................................page10
6. Stamp/Page Numbering
Stamping Messages and Page Numbers on Copies ....................page12
7. OHP Slip Sheet
Inserting OHP Slip Sheets ......................................................... page14
8. Stapling
Stapling While Copying.............................................................page16
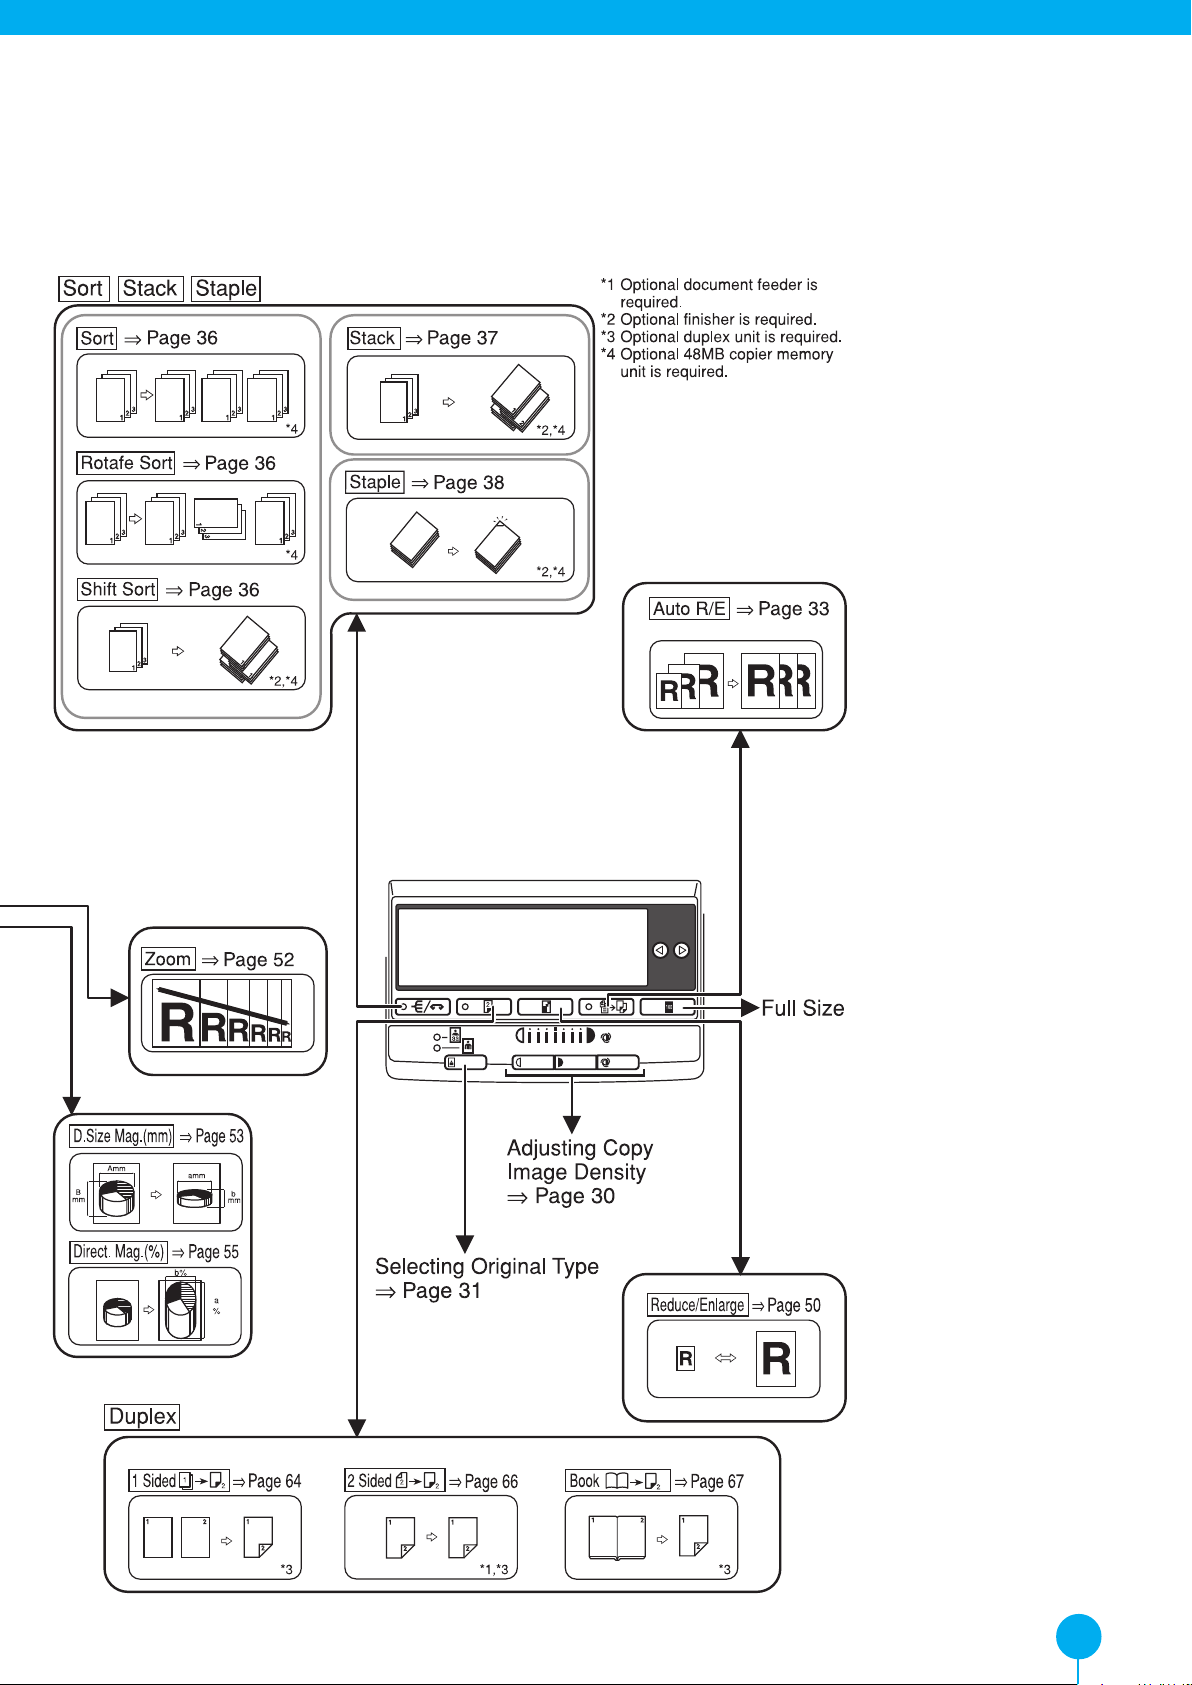
9. Features at a Glance................................... page18
COPY QUICK GUIDE
This machine comes in two models which are referred
to in this manual as Type 1 and Type 2. Check the
inside front cover of the Copy Reference for the model
you have before reading this guide.
Some limitations may apply to functions for details
please refer to the Copy Reference.
Page 2
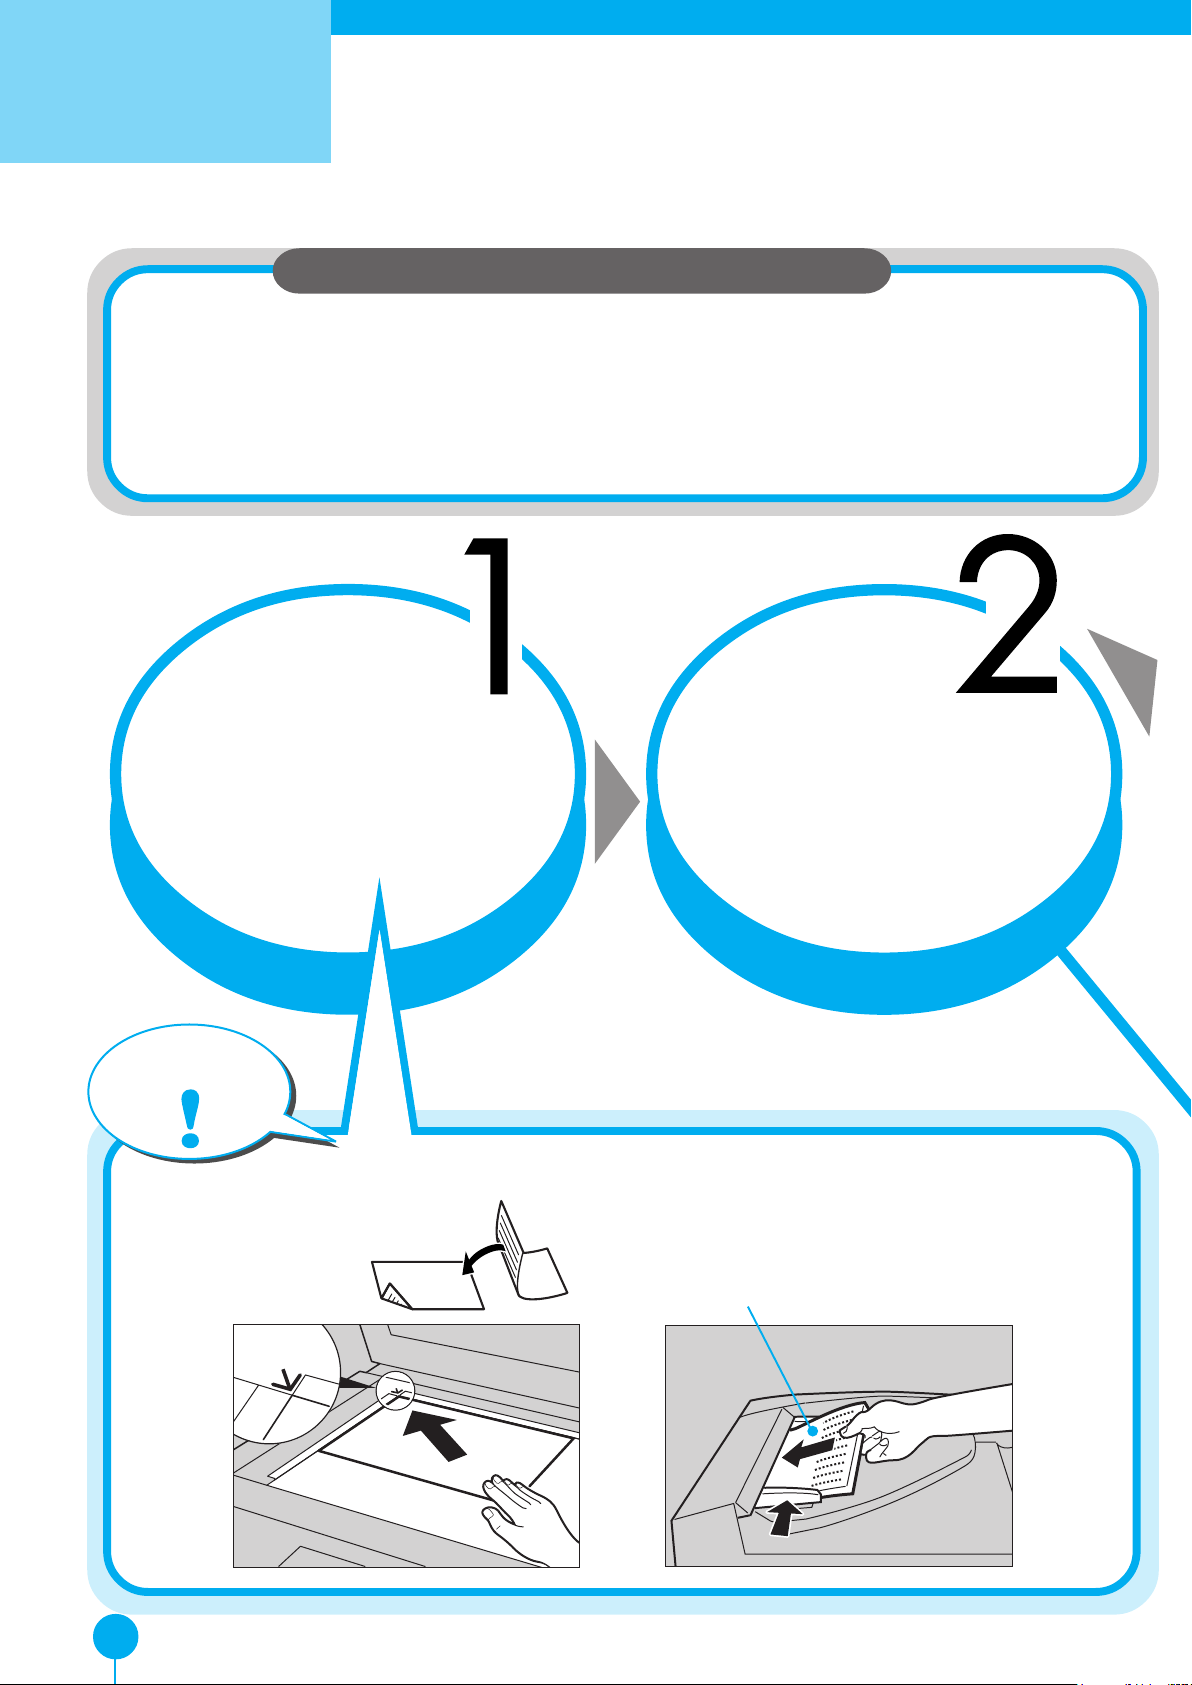
Basics
You can make copies without having to worry about paper size and image density since they are
chosen automatically.
ll
lAuto Image Density
ll
Automatically selects the image density.
ll
lAuto Paper Select
ll
Automaticaliy selects a suitable size of copy paper.
How to Make Copies
Useful Functions
Set the original.
Tip
Face - down
Make sure that
A:[Auto] is selected.
B:[100%] is displayed.
C:The
In the Document FeederOn the Exposure Glass
Face - up
Auto Image Density Auto Image Density
Auto Image Density
Auto Image Density Auto Image Density
indicator is lit.
2
Page 3
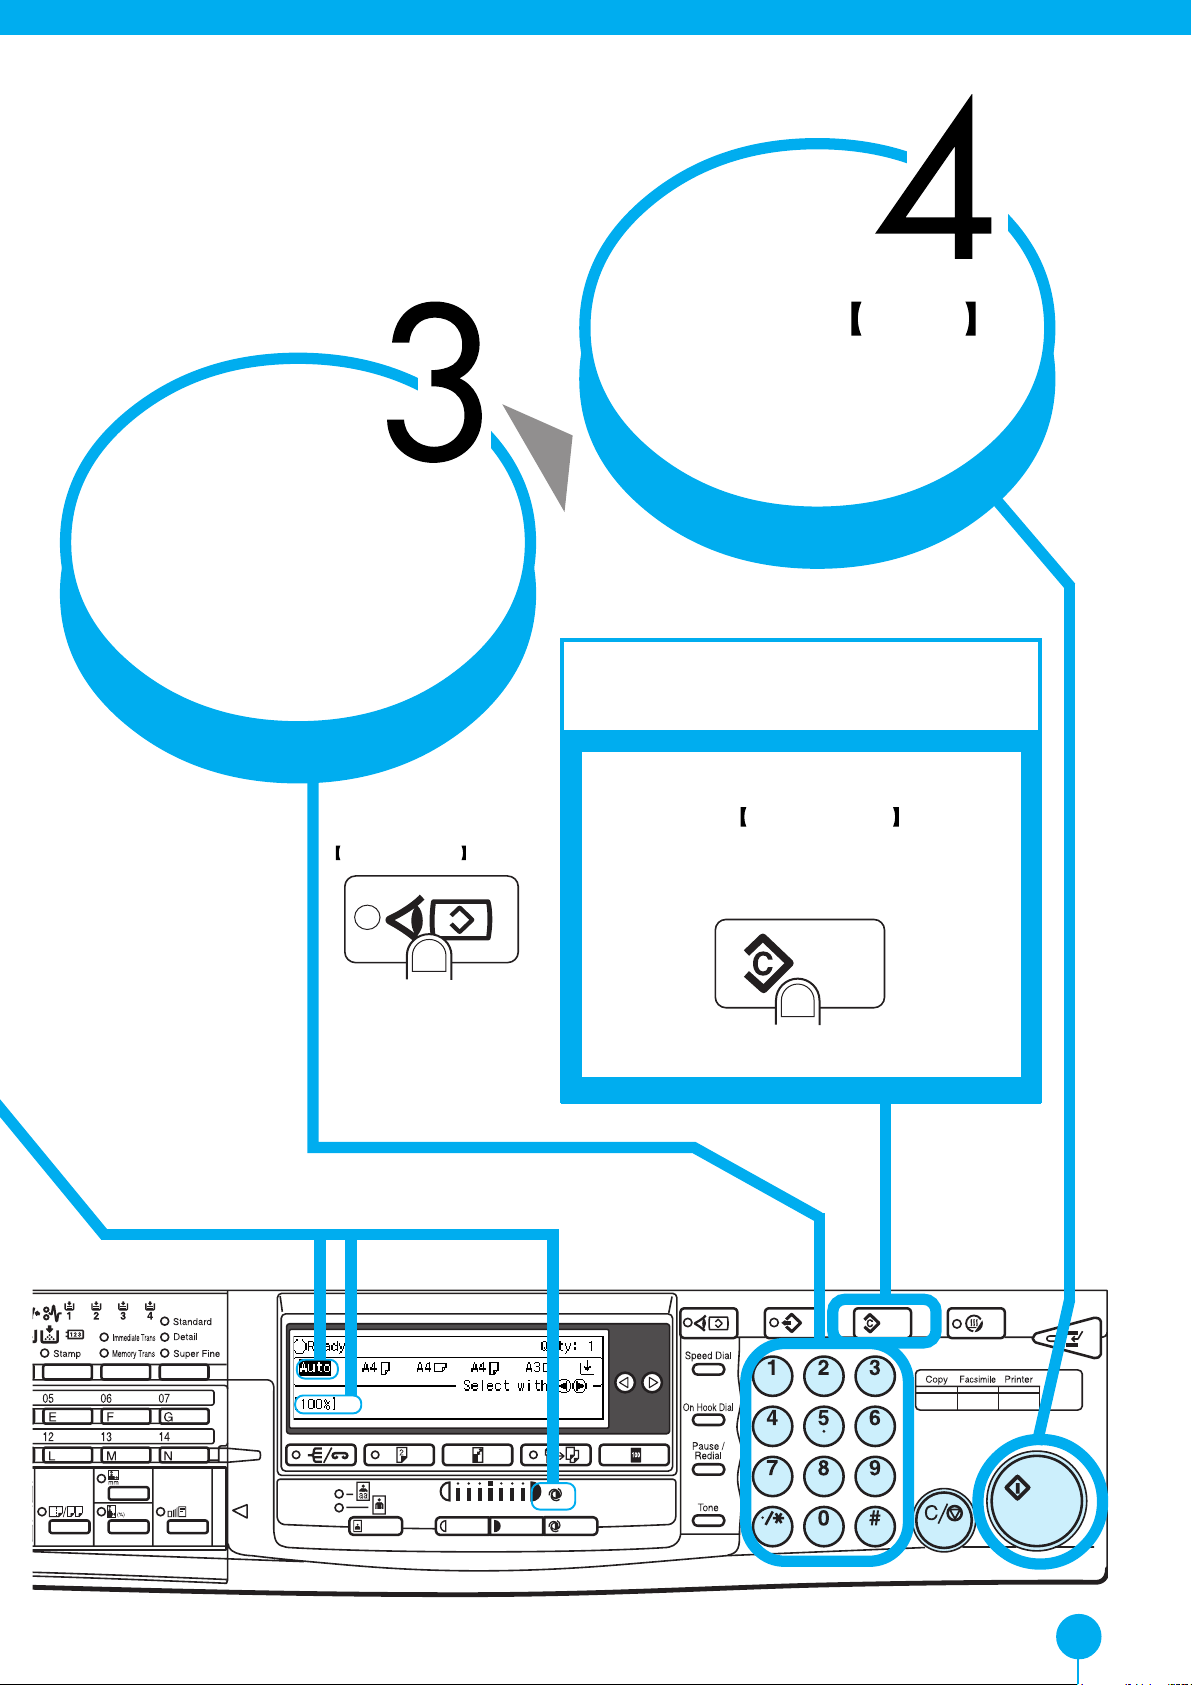
Enter the number
of copies with the
Number keys.
Press the
StartStart
Start
StartStart
key .
Never Forg et!
*To check selected
modes, press the
Check ModesCheck Modes
Check Modes
Check ModesCheck Modes
key.
A B C
Press the
clear previously entered settings.
Clear ModesClear Modes
Clear Modes
Clear ModesClear Modes
key to
3
Page 4
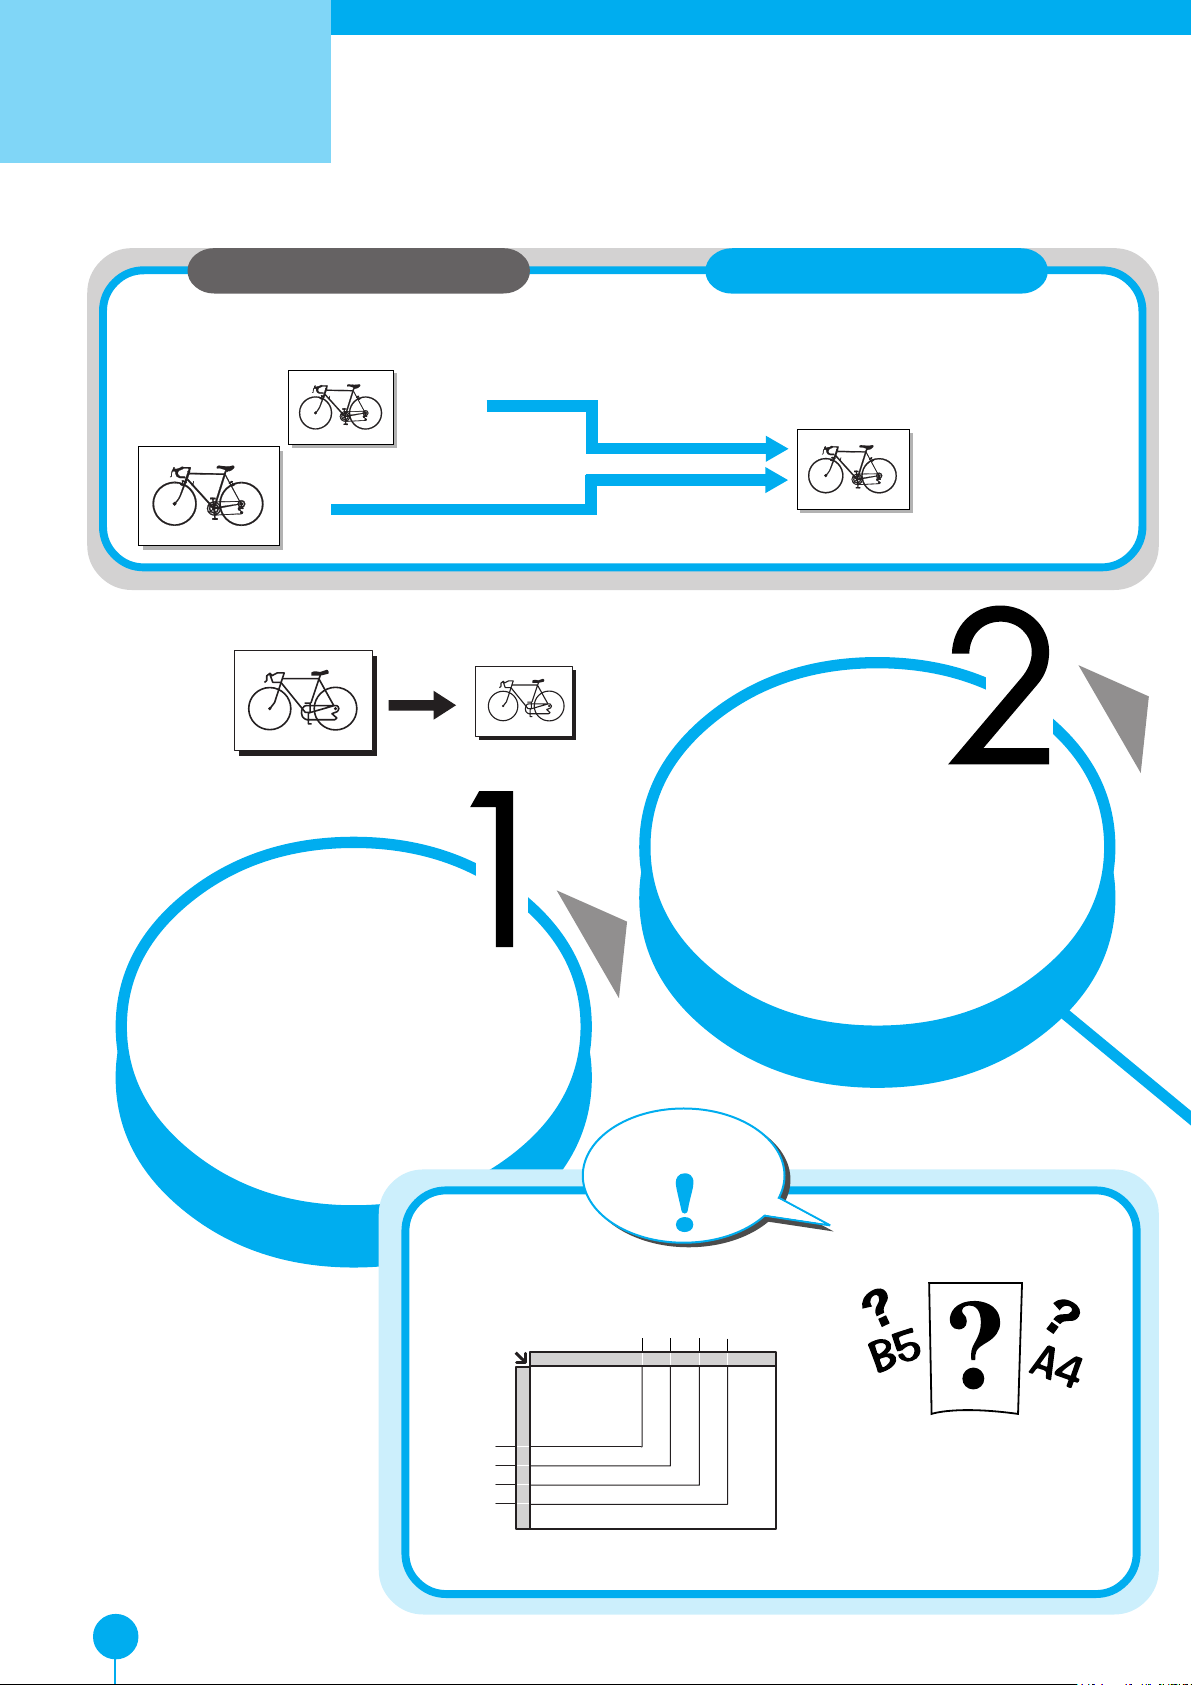
Reduce/Enlarge
Copying to Different Copy Pap
In this situation ...
You wish to reduce or enlarge different size
originals onto a certain size copy paper.
B5 JIS
A3
A3
Example:
A4
Use this function:
This machine can choose an appropriate reproduction ratio based on the paper and original sizes
you select (Auto Reduce/Enlarg e).
EnlargingEnlarging
Enlarging
EnlargingEnlarging
A4
ReducingReducing
Reducing
ReducingReducing
Press the
[Auto R/E][Auto R/E]
[Auto R/E]
[Auto R/E][Auto R/E]
Set the original.
key.
Tip
Copy Paper Size
B5 A4 B4 A3
B5
A4
B4
A3
B5
A4
B4
A3
You can check the copy
paper size against the scale
on the exposure glass.
4
Page 5

Select A4 copy
paper with the
keys.
In addition, the following functions are available:
Preset Reduce/EnlargePreset Reduce/Enlarge
Preset Reduce/Enlarge
Preset Reduce/EnlargePreset Reduce/Enlarge
ZoomZoom
Zoom
ZoomZoom
Directional Size Magnification(mm)Directional Size Magnification(mm)
Directional Size Magnification(mm)
Directional Size Magnification(mm)Directional Size Magnification(mm)
Directional Magnification(%)Directional Magnification(%)
Directional Magnification(%)
Directional Magnification(%)Directional Magnification(%)
For details, please read the Copy Reference.
Press the
key .
StartStart
Start
StartStart
5
Page 6
Duplex
Making 2-Sided Copies fro
The optional duplex unit is required to use this function.
In this situation ...
You wish to reduce output volume.
Set the originals
in the document
feeder. Make sure
you set them in the
Use this function:
Use the Duplex function to copy onto both
sides of paper.
Press the
[Duplex][Duplex]
[Duplex]
[Duplex][Duplex]
key and make sure
that
[1 Sided [1 Sided
[1 Sided
[1 Sided [1 Sided
] ]
]
] ]
correct direction.
Tip
If you get the orientation
wrong, copies will be
delivered upside down.
is selected.
1. Identify the top of
the original.
2. Set the original in the document
feeder as shown below.
Don't set the original
like this.
6
Page 7

1. Press the [
Orientn.Orientn.
Orientn.] key.
Orientn.Orientn.
Top to
bottom
2. Select [
keys.
TT
op to Bottomop to Bottom
T
op to Bottom] with the
TT
op to Bottomop to Bottom
3. Press the
[OK][OK]
[OK] key.
[OK][OK]
Select the
orientation.
Top to
top
Press the
key .
StartStart
Start
StartStart
7
Page 8

Tra y 2
You can set the thin paper, thick paper, transparencies in tray 2.
Set the original.
Copying onto Non-standard Pap
Useful Functions
When you set the
thin paper , thick paper
transparencies, push the
swtich-over lever to right.
Pull out tray 2
and insert the
copy paper.
Set the paper size
selector to the new
paper size.
*If you cannot find your desired
paper size, select “
For details, see above right.
8
”.
Page 9

Tip
Setting Non-standard Size Paper in Tray 2
1. Set the paper size selector
to “ ”.
2. Select Tray 2 with the
key. Then press the #
key.
3. Press the [Pap.Size] key.
4. Select your desired paper
size with the or
key. Then press the [OK]
key. Go to step 6.
5. If you cannot find your
desired paper size, select
[Custom Size:], then press
the [OK] key.
6. Enter the horizontal and
vertical size. Then press
the [OK] key.
7. Press the [Pap.Type] key.
Then select the paper type
and press the [OK] key.
8. Press the [Exit] key.
Push the paper
tray in until it
stops.
Press the
key .
StartStart
Start
StartStart
*When you set standerd
paper in Tray2, push the
switch-over lever to left.
9
Page 10

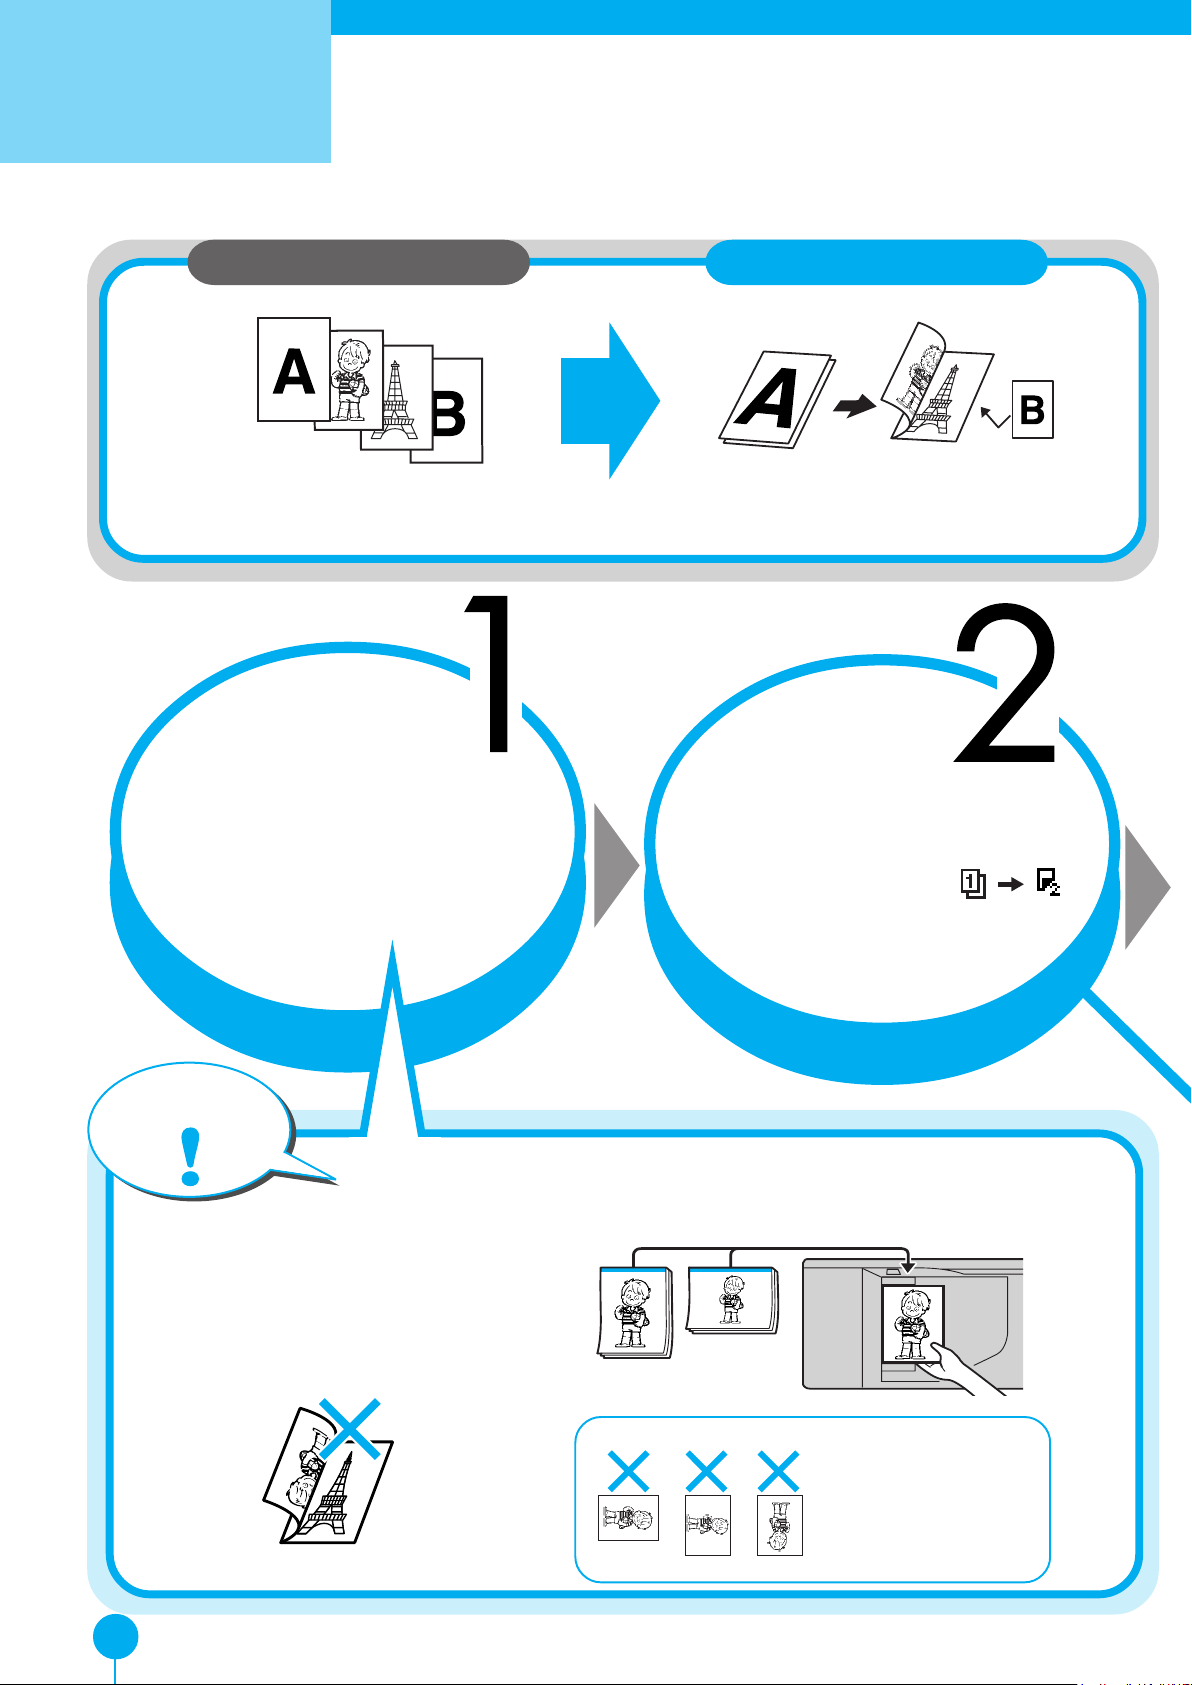
Combine
Combining Originals int
You wish to save paper or cut down
on filing space.
Example:
In this situation ...
Press the
/Series/Series
/Series
/Series/Series
CombineCombine
Combine
CombineCombine
key.
Use this function:
The machine can copy multiple 1-sided
originals onto 1 sheet of copy paper.
1
2
3
4
12
43
Set the originals
in the document
feeder.
Tip
Setting the Originals in the Document Feeder
Originals reading from left to right
1
2
3
4
21
Press the
[Combine][Combine]
[Combine] key.
[Combine][Combine]
Originals reading from top to bottom
1
2
1
2
3
43
* Set the originals upside down.
4
1
(4) (3)
2
10
Page 11

Combining multiple 1-sided originals into one 2-sided copies
4 pages
2-sided copy
8 pages
2-sided copy
Select
[4 Orig. ] with
the
press the
1
2
3
4
1
4
keys then
[OK][OK]
[OK] key .
[OK][OK]
2
3
<Front> <Back>
1
16 pages
2-sided
copy
2
The optional duplex unit is required.
Select the copy
paper with
the
keys.
15
1423
16
<Front> <Back>
9
8567
1210 11
1613 14 15
Press the
key.
[Exit][Exit]
[Exit]
[Exit][Exit]
Press the
key.
StartStart
Start
StartStart
11
Page 12

Stamp/page
Numbering
Stamping Messages and Pa
In this situation ...
You wish to have page numbers or
a message (e.g.CONFIDENTIAL)
printed on copies.
Use this function:
Use the Preset Stamp function. You can select
the following phrases.
• CONFIDENTIAL • COPY • URGENT
• PRIORITY • For your Information
• PRELIMINARY •For Internal Use Only.
To print page numbers, use the Page Numbering
function.
You can choose from the following numbering
formats:
• P1, P2 · · · • 1/5, 2/5 · · · • – 1 –, – 2 – · · ·
Set the originals.
Press the
StampStamp
Stamp key .
StampStamp
Press the
[Position][Position]
[Position] key.
[Position][Position]
Press the
[[
PresetPreset
[
Preset
[[
PresetPreset
]]
]
key and Select
]]
your desired phrase. Then
press the [OK] key.
12
Page 13
Select the format of the
Press the
[P[P
age no.]age no.]
[P
age no.] key.
[P[P
age no.]age no.]
Change stamp
position with the
keys.
numbering with the
keys.
Then press the [OK] key .
Enter start page, start No.
and total pages with the
Number Keys. Then press
the [OK] key twice.
Then press the [OK] key twice.
Press the
StartStart
Start key .
StartStart
13
Page 14

OHP Slip
Sheet
Inserting OHP Slip Sh
In this situation ...
You wish to insert slip sheets between
OHP transparencies.
Use this function:
Use the OHP Slip Sheet function to insert
slip sheets. You can also copy the same
original image onto the slip sheets.
Set the
originals
in the document
feeder.
Press the
Cover/OHP SlipCover/OHP Slip
Cover/OHP Slip
Cover/OHP SlipCover/OHP Slip
SheetSheet
Sheet
SheetSheet
key .
Press the
[OHP Slip] key.
Specify
whether to copy on to OHP slip
sheets with the keys. Then
press the [OK] key and then press
the [Exit] key .
14
Page 15

Tip
Before you use this function, you need to specify “Tray 2” or “Bypass” as the OHP
transparencies tray.
For details, refer to the Copy Reference.
* If your machine does not have the bypass tray, only “Tray 2” can be selected.
* If your machine has the bypass tray, “Bypass” is selected by default.
Set the OHP
transparencies on
the bypass tray or
tray 2.
Select the slip
sheet tray.
Press the
StartStart
Start key .
StartStart
15
Page 16

Stapling
Stapling While Copying
The optional finisher is required to use this function.
In this situation ...
You don’t have time to staple each
copy set together by hand.
Set the originals
in the document
feeder.
Use this function:
If your machine has the
finisher, each copy set
can be stapled together
automatically.
Press the
key.
[Staple][Staple]
[Staple]
[Staple][Staple]
Press the
[Sort/Staple][Sort/Staple]
[Sort/Staple] key.
[Sort/Staple][Sort/Staple]
16
Page 17

Tip
Orientation of the original Copies
Press the
key.
[OK][OK]
[OK]
[OK][OK]
Enter the
number of
copies with the
Number keys.
Press the
StartStart
Start key .
StartStart
17
Page 18

Features at
a Glance
For details, please refer to the following pages in the Copy Reference.
18
EE GB A267
Page 19
19
Page 20

Make copies of this manual and
stick them on the wall.
Stick the copies on the
wall.
Set this manual
face down on the
exposure glass.
Press the
[Start][Start]
[Start] key.
[Start][Start]
A267-6700
EE GB
Printed in The Netherlands
 Loading...