


1013/1013F
Operating Instructions
Basic Guide
Read this manual carefully before you use this product and keep it handy for future
reference.
For safety, please follow the instructions in this manual.

RICOH COMPANY, LTD.
15-5, Minami Aoyama 1-chome,
Minato-ku, Tokyo 107-8544, Japan
Phone: +81-(0)3-3479-3111
Overseas Affiliates
U.S.A.
RICOH CORPORATION
5 Dedrick Place
West Caldwell, New Jersey 07006
Phone: +1-973-882-2000
The Netherlands
RICOH EUROPE B.V.
Groenelaan 3, 1186 AA, Amstelveen
Phone: +31-(0)20-5474111
United Kingdom
RICOH UK LTD.
Ricoh House,
1 Plane Tree Crescent, Feltham,
Middlesex, TW13 7HG
Phone: +44-(0)20-8261-4000
Germany
RICOH DEUTSCHLAND GmbH
Mergenthalerallee 38-40,
65760 Eschborn
Phone: +49-(0)6196-9060
France
RICOH FRANCE S.A.
383, Avenue du Général de Gaulle
BP 307-92143 Clamart Cedex
Phone: +33-(0)-821-01-74-26
Spain
RICOH ESPAÑA S.A.
Avda. Litoral Mar, 12-14,
08005 Barcelona
Phone: +34-(0)93-295-7600
Italy
RICOH ITALIA SpA
Via della Metallurgia 12,
37139 Verona
Phone: +39-045-8181500
Hong Kong
RICOH HONG KONG LTD.
21/F., Tai Yau Building,
181, Johnston Road,
Wan Chai, Hong Kong
Phone: +852-2862-2888
Singapore
RICOH ASIA PACIFIC PTE.LTD.
260 Orchard Road,
#15-01/02 The Heeren,
Singapore 238855
Phone: +65-830-5888
1013/1013F Operating Instructions Basic Guide
Printed in The Netherlands
EE GB B045-6600
Introduction
This manual contains detailed instructions on the operation and maintenance of this machine. To get
maximum versatility from this machine all operators should carefully read and follow the instructions in
this manual. Please keep this manual in a handy place near the machine.
Please read the Safety Information before using this machine. It contains important information related
to USER SAFETY and PREVENTING EQUIPMENT PROBLEMS.
Notes:
Some illustrations may be slightly different from your machine.
Certain options may not be available in some countries. For details, please contact your local dealer.
Operator Safety
This machine is considered a class I laser device, safe for office/EDP use. The machine contains a
5-milliwatt, 760 - 800 nanometer wavelength, GaAIAs laser diode. Direct (or indirect reflected) eye contact with the laser beam might cause serious eye damage. Safety precautions and interlock mechanisms have been designed to prevent any possible laser beam exposure to the operator.
The following label is attached on the back side of the machine.
Laser Safety:
The optical housing unit can only be repaired in a factory or at a location with the requisite equipment.
The laser subsystem is replaceable in the field by a qualified Customer Engineer. The laser chassis is
not repairable in the field. Customer engineers are therefore directed to return all chassis and laser subsystems to the factory or service depot when replacement of the optical subsystem is required.
Warning:
Use of controls or adjustment or performance of procedures other than those specified in this manual
might result in hazardous radiation exposure.
Notes:
The model names of the machines do not appear in the following pages. Check the type of your machine before reading this manual.
• Type1: 1308
• Type2: 1308 F
Certain types might not be available in some countries. For details, please contact your local dealer.
Two kinds of size notation are employed in this manual. With this machine refer to the metric version.
For good copy quality, Rex-Rotary recommends that you use genuine Rex-Rotary toner.
Rex-Rotary shall not be responsible for any damage or expense that might result from the use of parts
other than genuine Rex-Rotary parts in your Rex-Rotary office product.
Power Source
220-240V, 50/60Hz, 4A or more
Please be sure to connect the power cord to a power source as above. For details about power source,
see “Power Connection” in the Copy Reference manual.
Read this manual carefully before you use this product and keep it handy for future reference.
For safety, please follow the instructions in this manual.

Introduction
This manual contains detailed instructions on the operation and maintenance of this machine. To get
maximum versatility from this machine all operators should carefully read and follow the instructions in
this manual. Please keep this manual in a handy place near the machine.
Please read the Safety Information before using this machine. It contains important information related
to USER SAFETY and PREVENTING EQUIPMENT PROBLEMS.
Notes
Some illustrations may be slightly different from your machine.
Certain options may not be available in some countries. For details, please contact your local dealer.
Operator Safety
This machine is considered a class I laser device, safe for office/EDP use. The machine contains a
5-milliwatt, 760 - 800 nanometer wavelength, GaAIAs laser diode. Direct (or indirect reflected) eye contact with the laser beam might cause serious eye damage. Safety precautions and interlock mechanisms have been designed to prevent any possible laser beam exposure to the operator.
The following label is attached on the back side of the machine.
Laser Safety:
The optical housing unit can only be repaired in a factory or at a location with the requisite equipment.
The laser subsystem is replaceable in the field by a qualified Customer Engineer. The laser chassis is
not repairable in the field. Customer engineers are therefore directed to return all chassis and laser subsystems to the factory or service depot when replacement of the optical subsystem is required.
Warning:
Use of controls or adjustment or performance of procedures other than those specified in this manual
might result in hazardous radiation exposure.
Notes:
The model names of the machines do not appear in the following pages. Check the type of your machine before reading this manual.
• Type1: 1302
• Type2: 1302f
Certain types might not be available in some countries. For details, please contact your local dealer.
Two kinds of size notation are employed in this manual. With this machine refer to the metric version.
For good copy quality, Gestetner recommends that you use genuine Gestetner toner.
Gestetner shall not be responsible for any damage or expense that might result from the use of parts
other than genuine Gestetner parts in your Gestetner office product.
Power Source
220-240V, 50/60Hz, 4A or more
Please be sure to connect the power cord to a power source as above. For details about power source,
see “Power Connection” in the Copy Reference manual.
Read this manual carefully before you use this product and keep it handy for future reference.
For safety, please follow the instructions in this manual.

Introduction
This manual contains detailed instructions on the operation and maintenance of this machine. To get
maximum versatility from this machine all operators should carefully read and follow the instructions in
this manual. Please keep this manual in a handy place near the machine.
Please read the Safety Information before using this machine. It contains important information related
to USER SAFETY and PREVENTING EQUIPMENT PROBLEMS.
Notes
Some illustrations may be slightly different from your machine.
Certain options may not be available in some countries. For details, please contact your local dealer.
Operator Safety
This machine is considered a class 1 laser device, safe for office/EDP use. The machine contains a
5-milliwatt, 760 - 800 nanometer wavelength, GaAIAs laser diode. Direct (or indirect reflected) eye contact with the laser beam might cause serious eye damage. Safety precautions and interlock mechanisms have been designed to prevent any possible laser beam exposure to the operator.
The following label is attached on the back side of the machine.
Laser Safety:
The optical housing unit can only be repaired in a factory or at a location with the requisite equipment.
The laser subsystem is replaceable in the field by a qualified Customer Engineer. The laser chassis is
not repairable in the field. Customer engineers are therefore directed to return all chassis and laser subsystems to the factory or service depot when replacement of the optical subsystem is required.
Warning:
Use of controls or adjustment or performance of procedures other than those specified in this manual
might result in hazardous radiation exposure.
Notes:
The model names of the machines do not appear in the following pages. Check the type of your machine before reading this manual.
• Type1: 1305
• Type2: 1305 f
Certain types might not be available in some countries. For details, please contact your local dealer.
Two kinds of size notation are employed in this manual. With this machine refer to the metric version.
For good copy quality, Nashuatec recommends that you use genuine Nashuatec toner.
Nashuatec shall not be responsible for any damage or expense that might result from the use of parts
other than genuine Nashuatec parts in your Nashuatec office product.
Power Source
220-240V, 50/60Hz, 4A or more
Please be sure to connect the power cord to a power source as above.
Read this manual carefully before you use this product and keep it handy for future reference.
For safety, please follow the instructions in this manual.

Declaration of Conformity
“The Product complies with the requirements of the EMC Directive 89/336/EEC and the Low Voltage
Directive 73/23/EEC.”
In accordance with IEC 60417, this machine uses the following symbols for the main power switch:
aaaa means POWER ON.
cccc means STAND BY.
Trademarks
®
Adobe
, Acrobat®, and PostScript® are registered trademarks of Adobe Systems Incorporated.
®
Microsoft
, Windows®, Windows NT® are registered trademarks of Microsoft Corporation in the United
States and / or other countries.
Macintosh is a registered trademark of Apple Computer, Incorporated.

Introduction
This manual contains detailed instructions on the operation and maintenance of this machine. To get
maximum versatility from this machine all operators should carefully read and follow the instructions in
this manual. Please keep this manual in a handy place near the machine.
Please read the Safety Information before using this machine. It contains important information related
to USER SAFETY and PREVENTING EQUIPMENT PROBLEMS.
Notes
Some illustrations may be slightly different from your machine.
Certain options may not be available in some countries. For details, please contact your local dealer.
Operator Safety
This machine is considered a class I laser device, safe for office/EDP use. The machine contains a
5-milliwatt, 760 - 800 nanometer wavelength, GaAIAs laser diode. Direct (or indirect reflected) eye contact with the laser beam might cause serious eye damage. Safety precautions and interlock mechanisms have been designed to prevent any possible laser beam exposure to the operator.
The following label is attached on the back side of the machine.
Laser Safety:
The optical housing unit can only be repaired in a factory or at a location with the requisite equipment.
The laser subsystem is replaceable in the field by a qualified Customer Engineer. The laser chassis is
not repairable in the field. Customer engineers are therefore directed to return all chassis and laser subsystems to the factory or service depot when replacement of the optical subsystem is required.
Warning:
Use of controls or adjustment or performance of procedures other than those specified in this manual
might result in hazardous radiation exposure.
Notes:
The model names of the machines do not appear in the following pages. Check the type of your machine before reading this manual.
• Type1: IS2013
• Type2: IS2013F
Certain types might not be available in some countries. For details, please contact your local dealer.
Two kinds of size notation are employed in this manual. With this machine refer to the metric version.
For good copy quality,Infotec recommends that you use genuine Infotec toner.
Infotec shall not be responsible for any damage or expense that might result from the use of parts other
than genuine Infotec parts in your Infotec office product.
Power Source
220-240V, 50/60Hz, 4A or more
Please be sure to connect the power cord to a power source as above. For details about power source,
see “Power Connection” in the Copy Reference manual.
This information is based on our present state of knowledge and is intended to provide general notes
on our products and their uses.
It should not therefore be construed as guaranteeing specific properties of the products described or
their suitability for particular applications.
Any existing industrial property rights must be observed. The quality of our products is guaranteed under our General Conditions of Sale.
Read this manual carefully before you use this product and keep it handy for future reference.
For safety, please follow the instructions in this manual.

Declaration of Conformity
“The Product complies with the requirements of the EMC Directive 89/336/EEC and the Low Voltage
Directive 73/23/EEC.”
In accordance with IEC 60417, this machine uses the following symbols for the main power switch:
aaaa means POWER ON.
cccc means STAND BY.
Trademarks
®
Adobe
, Acrobat®, and PostScript® are registered trademarks of Adobe Systems Incorporated.
®
Microsoft
, Windows®, Windows NT® are registered trademarks of Microsoft Corporation in the United
States and / or other countries.
Macintosh is a registered trademark of Apple Computer, Incorporated.

Safety Information
R
R
When using your equipment, the following safety precautions should always be
followed.
Safety During Operation
In this manual, the following important symbols are used:
WARNING:
CAUTION:
Indicates a potentially hazardous situation which, if instructions
are not followed, could result in death or serious injury.
Indicates a potentially hazardous situation which, if instructions are not
followed, may result in minor or moderate injury or damage to property.
R WARNING:
• Connect the power cord directly into a wall outlet and never use an extension cord.
•
Disconnect the power plug (by pulling the plug, not the cable) if the
power cable or plug becomes frayed or otherwise damaged.
• To avoid hazardous electric shock or laser radiation exposure, do not
remove any covers or screws other than those specified in this manual.
• Turn off the power and disconnect the power plug (by pulling the plug,
not the cable) if any of the following conditions exists:
• You spill something into the equipment.
•
You suspect that your equipment needs service or repair.
• Your equipment's cover has been damaged.
•
Do not incinerate spilled toner or used toner. Toner dust might ignite
when exposed to an open flame.
•
Disposal can take place at our authorized dealer or at appropriate collection sites.
•
Dispose of the used toner cartridge in accordance with the local regulation.
i

R CAUTION:
• Protect the equipment from dampness or wet weather, such as rain, snow,
and so on.
• Unplug the power cord from the wall outlet before you move the equipment.
While moving the equipment, you should take care that the power cord will
not be damaged under the equipment.
• When you disconnect the power plug from the wall outlet, always pull the
plug (not the cable).
• Do not allow paper clips, staples, or other small metallic objects to fall inside
the equipment.
• Keep toner (used or unused) and toner cartridge out of the reach of children.
• For environmental reasons, do not dispose of the equipment or expended
supply waste at household waste collection points. Disposal can take place
at an authorized dealer or at appropriate collection sites.
• The inside of the machine could be very hot. Do not touch the parts with a
label indicating the “hot surface”. Otherwise it could cause a personal burn.
• Our products are engineered to meet high standards of quality and functionality, and we recommend that you only use the expendable supplies available at an authorized dealer.
ii
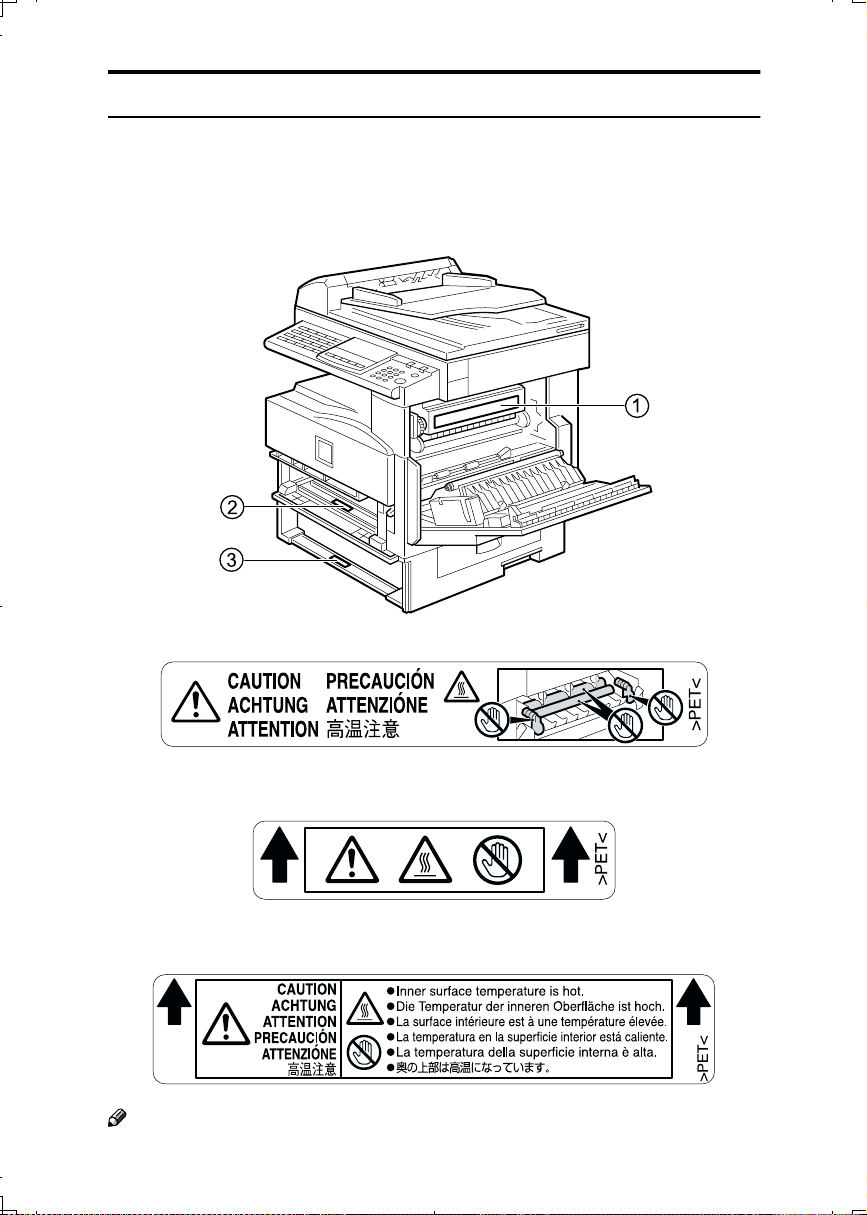
Positions of Labels and Hallmarks for
This machine has labels and hallmarks for RWARNING,RCAUTION at the
positions shown below. For safety, please follow the instructions and handle the
machine as indicated.
The inside of the machine becomes very hot. Do not touch the inside. Doing so
could result in a burn.
A
RRRR
WARNING and
RRRR
CAUTION
B The anti-condensation heater in the inner lower part of the machine becomes
very hot. Do not touch it. Doing so could result in a burn.
C The anti-condensation heater in the inner upper part of the machine becomes
very hot. Do not touch it. Doing so could result in a burn.
Note
❒ The anti-condensation heater is optional. For details, contact your service rep-
resentative.
iii
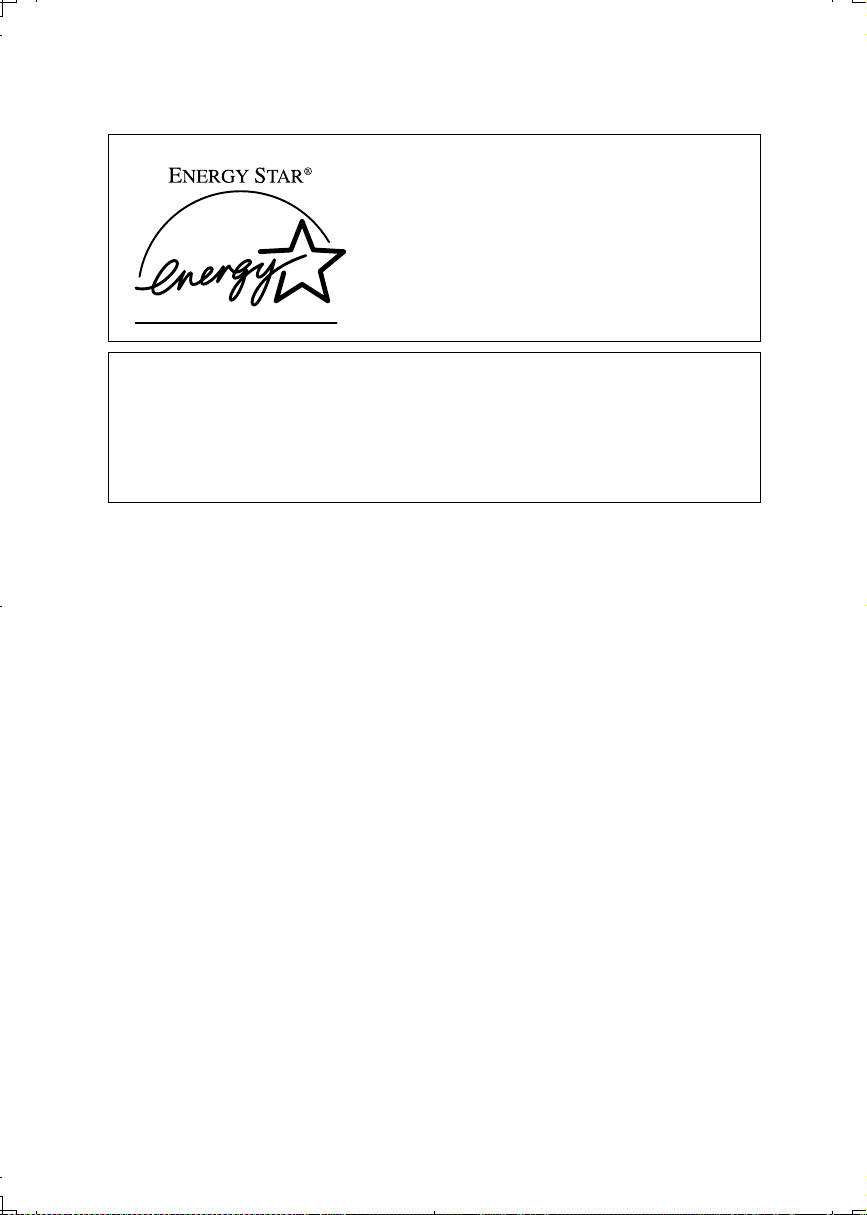
ENERGY STAR Program
As an ENERGY STAR Partner, we have determined
that this machine model meets the ENERGY STAR
Guidelines for energy efficiency.
The ENERGY STAR Guidelines intend to establish an international energy-saving system for
developing and introducing energy-efficient office equipment to deal with environmental issues, such as global warming.
When a product meets the ENERGY STAR Guidelines for energy efficiency, the Partner shall
place the ENERGY STAR logo onto the machine model.
This product was designed to reduce the environmental impact associated with office equipment by means of energy-saving features, such as Low-power mode.
•Low Power mode
This product automatically lowers its power consumption 15 minutes after
the last copy or print job has finished. Fax reception and printing is still possible in Low Power mode, but if you wish to make copies press the operation
switch first.
For details about how to change the default interval that the machine waits
before entering Low Power mode, see “4. Energy Saver Timer” in the System
Settings manual.
• Sleep mode (Fax or printer installed)
If the fax or printer features are installed, this product automatically lowers
its power consumption even further 30 minutes after the last copy or print job
has finished. Fax reception and printing is still possible in Sleep mode, but if
you wish to make copies press the operation switch first.
For details about how to change the default interval that the machine waits
before entering Sleep mode, see “6. Auto Off Timer” in the System Settings
manual.
• Auto Off mode (Copier only)
To conserve energy, this product automatically turns off 30 minutes after the
last copying or printing job has completed. If you wish to make copies when
the machine is in Auto Off mode, press the operation switch first.
For details about how to change the default interval that the machine waits
before entering Auto Off mode, see “6. Auto Off Timer” in the System Settings manual.
iv

Specification
Copier only Fax or printer installed
Low Power
mode
Sleep mode Power
Auto Off mode
Power
consumption
Default interval
Recovery time 10 seconds 10 seconds
consumption
Default interval
Recovery time - 20 seconds
Power
consumption
Default interval
Recovery time 20 seconds -
50 Wh 60 Wh
15 minutes 15 minutes
- 20 Wh
- 30 minutes
less than 2 Wh -
30 minutes -
Recycled Paper
In accordance with the ENERGY STAR Program, we recommend use of recycled
paper which is environment friendly. Please contact your sales representative
for recommended paper.
v

TABLE OF CONTENTS
Manuals for This Machine.......................................................................... 1
1.Modes
Changing Modes......................................................................................... 3
Copy Mode .................................................................................................. 4
Changing to Copy Mode ................................................................................ 4
2.User Tools (System Settings)
Accessing the User Tools (System Settings) .......................................... 5
Exiting from the User Tools............................................................................ 6
User Tools Menu (System Settings) ......................................................... 7
3.Copying
What You Can Do with This Machine ....................................................... 9
Turning On the Power .............................................................................. 10
Turning On the Main Power .........................................................................10
Starting the Machine .................................................................................... 11
Shutting Down the Machine......................................................................... 11
Turning Off the Main Power ......................................................................... 11
Basic Procedure ....................................................................................... 12
Placing Originals .......................................................................................... 12
Basic Functions........................................................................................ 14
Adjusting Copy Image Density..................................................................... 14
Selecting an Original Type........................................................................... 14
Auto Start.................................................................................................. 15
Preset Reduce/Enlarge ............................................................................ 16
Combine .................................................................................................... 17
vi

4.Troubleshooting
hhhh Changing the Toner Cartridge............................................................ 19
hhhh Clearing Misfeeds ................................................................................ 22
Changing the Paper Size ......................................................................... 24
Changing the Paper Size in the Paper Tray................................................. 24
Changing the Paper Size in the Optional Paper tray unit............................. 25
Selecting the Paper Size with the User Tools.............................................. 26
5.User Tools (Copier Features)
Accessing the User Tools (Copier Features)......................................... 27
Exiting the User Tools.................................................................................. 27
User Tools Menu (Copier Features)........................................................ 28
6.Remarks
Do's and Don'ts ........................................................................................ 29
Where to Put Your Machine..................................................................... 30
Machine Environment .................................................................................. 30
Power Connection........................................................................................ 31
Access to Machine....................................................................................... 32
7.Specification
Mainframe.................................................................................................. 33
INDEX......................................................................................................... 34
vii

viii

Manuals for This Machine
This is a multi-functional machine combining copier, printer and fax functions.
A separate manual is provided for each function. Please consult the manual that
suits your needs.
❖❖❖❖ System Settings
Provides an overview of the machine. This manual introduces the functions
of the machine. It also introduces the options allowing you to use additional
functions and describes how to access the system user tools to make the machine easier to use.
Each language version is in an appropriate folder on the CD-ROM in PDF format. Please open the folder and choose the language version of your preference. Adobe Acrobat Reader is required in order to read these files. If Adobe
Acrobat Reader is not installed on your computer, install it from the CD-ROM
containing the System Settings and Copy Reference manual.
Note
❒ A PDF file might not be displayed or printed properly depending on the
environment or language you use.
❖❖❖❖ Copy Reference
Describes the various copying functions from basic copying to more advanced functions such as reducing/enlarging copies or combining two originals onto one copy.
Each language version is in an appropriate folder on the CD-ROM in PDF format. Please open the folder and choose the language version of your preference. Adobe Acrobat Reader is required in order to read these files. If Adobe
Acrobat Reader is not installed on your computer, install it from the CD-ROM
containing the System Settings and Copy Reference manual.
Note
❒ A PDF file might not be displayed or printed properly depending on the
environment or language you use.
❖❖❖❖ Basic Guide
Explains the most frequently used copy functions and troubleshooting.
❖❖❖❖ Facsimile Reference Basic Features (Option for Type1)
Explains the most frequently used facsimile functions and operations.
❖❖❖❖ Facsimile Reference Advanced Features (Option for Type1)
Describes more advanced facsimile functions and also explains settings for
key operations.
❖❖❖❖ Printer Reference 1 (Option)
Describes the system settings, procedures and functions for using this machine as a printer.
1

❖❖❖❖ Printer Reference 2 (Option)
Describes the procedures and provides necessary information about using
this machine as a printer.
❖❖❖❖ Network Interface Board Quick Configuration Guide (Option)
Describes the procedures and provides necessary information about setting
up and using the printer under the network environment.
❖❖❖❖ PS Level 2 Emulation Type 2 Operating Instructions Supplement (Option)
Describes the menus and features you can set using the PostScript printer
driver.
❖❖❖❖ Network Interface Board Type 2 Owner's Manual (Option)
Describes the procedures and provides necessary information about setting
up and using the printer under the network environment.
❖❖❖❖ Unix Supplement (Option)
Provides information about setting up and using the printer in a UNIX environment.
System Requirements
To run the CD-ROM manual, you need the following:
System: Windows 95, Windows 98, Windows Me, Windows NT4.0, Windows
2000 or Macintosh Computer
However, operation cannot be assured under all circumstances. Please be aware
that the manual may not run with certain computers and/or operating system
versions.
2

1. Modes
Changing Modes
Press the {{{{Copy}}}}, {{{{Facsimile}}}} or {{{{Printer}}}} key to switch to copy, fax or printer
mode respectively.
Limitation
❒ You cannot switch modes in any of the following cases:
• When scanning in a fax message for transmission.
• During immediate transmission.
• When accessing the user tools.
• During On Hook dialing for fax transmission.
• During Energy Saver mode.
3

Modes
Copy Mode
1
Changing to Copy Mode
You can always make a copy when
the machine is not printing or scanning fax data.
Press the {{{{Copy}}}} key.
AAAA
The copy display appears on the
panel display.
4

2. User Tools (System Settings)
Accessing the User Tools (System Settings)
This section is for the key operators in
charge of this machine. You can
change or set the machine's default
settings.
Press the {{{{User Tools/Counter}}}} key.
AAAA
Press the 0000 or 1111 key until “2.Sys-
BBBB
tem Settings” is displayed, and
then press the {{{{OK}}}} key.
Press the 0000 or 1111 key until your
CCCC
desired menu is displayed, and
then press the {{{{OK}}}} key.
*1
*1
5

User Tools (System Settings)
2
*1
Displays when the optional paper
tray unit is equipped with your
machine.
Change the settings by following
DDDD
the instructions on the panel display, and then press the {{{{OK}}}} key.
Exiting from the User Tools
After changing the user tools set-
AAAA
tings, press the {{{{User Tools/Counter}}}} key.
6

User Tools Menu (System Settings)
User Tools Menu (System Settings)
2
*1
Displays when the optional paper tray unit is equipped with your machine.
7

User Tools (System Settings)
2
8

3. Copying
What You Can Do with This Machine
Reference
See the Copy Reference manual.
9

Copying
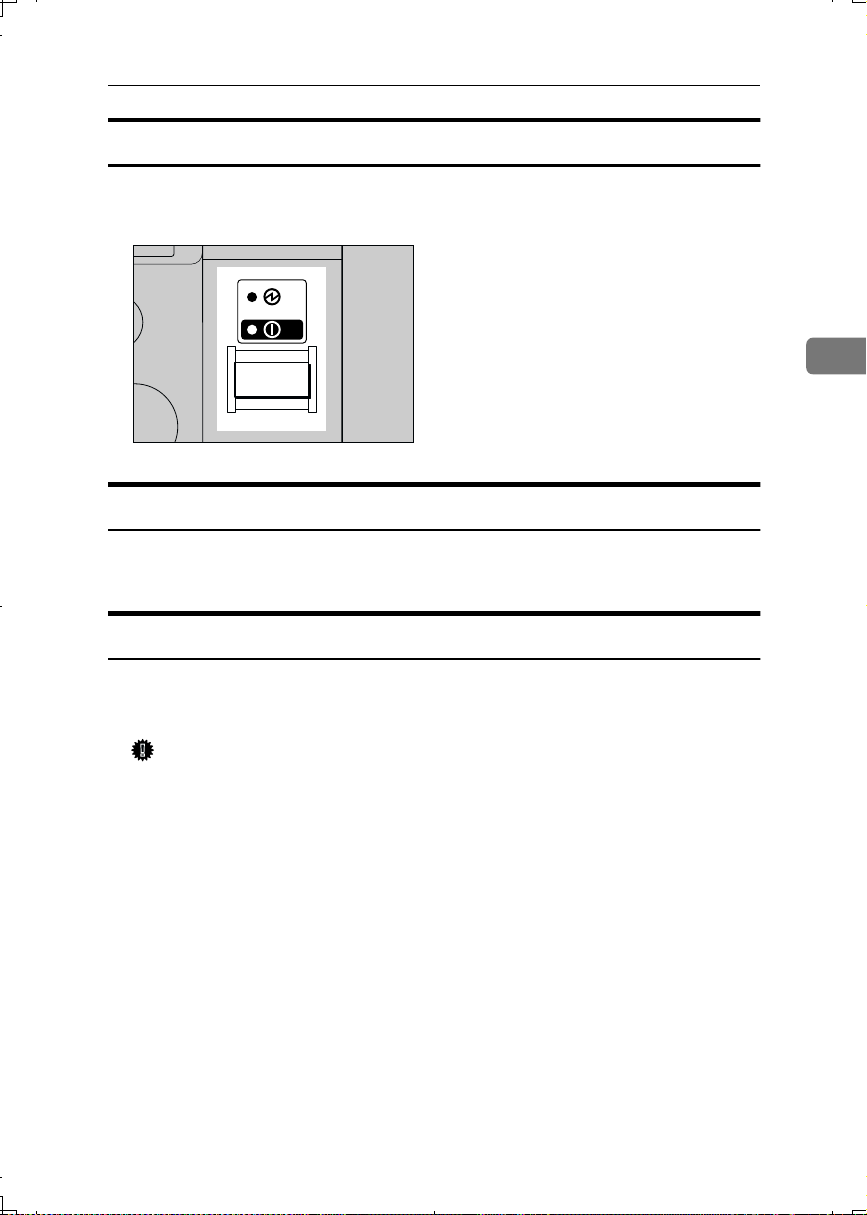
Turning On the Power
To turn the machine on, press the operation switch.
----Power switches
This machine has two power switches.
❖❖❖❖ Operation switch (right side of the control panel)
3
Press this switch to activate the machine. When the machine has warmed up,
you can make copies.
❖❖❖❖ Main power switch (left side of the machine)
When the machine is not to be used for an extended period of time, turn off
the main power switch.
Turning On the Main Power
Make sure that the power cord is firmly plugged into the wall outlet.
AAAA
Turn on the main power switch.
BBBB
The main power indicator on the control panel goes on.
10
Turning On the Power
Starting the Machine
Press the operation switch to make the On indicator go on.
AAAA
The display panel will come on.
ZENH080E
Shutting Down the Machine
Press the operation switch to make the On indicator go off and change to
AAAA
Low Power mode.
Turning Off the Main Power
3
Turn off the main power switch.
AAAA
The main power indicator of the control panel goes off.
Important
❒ Fax files stored in memory will be lost 12 hours after you turn the main
power switch off or you unplug the power cord.
11
Copying
Basic Procedure
Make sure that the machine is in
AAAA
Copy mode.
If the machine is set for User
BBBB
3
Code, enter the code with the
number keys, and then press the
{{{{OK}}}} key.
Reference
See “User Codes” in the Copy
Reference manual.
Make sure that there are no previ-
CCCC
ous settings remaining.
Place your originals.
DDDD
Note
❒ For details about placing origi-
nals, see the following pages.
Placing Originals
Placing Originals on the Exposure Glass
Lift the exposure glass cover or
AAAA
the document feeder (ADF).
Place the original face down on
BBBB
the exposure glass. The original
should be aligned to the rear left
corner.
12
Make the desired settings.
EEEE
Enter the number of copies re-
FFFF
quired with the number keys.
Press the {{{{Start}}}} key.
GGGG
1.
Reference mark
2.
Scale
Lower the exposure glass cover or
CCCC
the document feeder (ADF).
Loading Originals in the Document
Feeder (ADF)
Adjust the guide to the original
AAAA
size.
Place the aligned originals face
BBBB
up into the document feeder
(ADF).
1.
Limit mark
2.
Document guide
Basic Procedure
3
13

Copying
Basic Functions
Adjusting Copy Image Density
You can adjust the copy image density to match your originals.
If you require darker or lighter copies, adjust the image density yourself.
Press the {{{{Lighter}}}} or {{{{Darker}}}} key
3
AAAA
to adjust the image density.
Selecting an Original Type
There are two ways to match your
originals:
❖❖❖❖ Text
If you do not select either mode,
your originals will be scanned
with the settings suitable for text
originals with this mode.
❖❖❖❖ Photo
Delicate tones of photographs and
pictures can be reproduced with
this mode.
Press the {{{{Original}}}} key, and then
AAAA
select the original type.
14

Auto Start
If you press the {{{{Start}}}} key during the
warm-up period, the {{{{Start}}}} key will
blink and your copies will be made as
soon as warm-up finishes.
Make any adjustments to copy
AAAA
settings during the warm-up period.
Place your originals.
BBBB
Press the {{{{Start}}}} key.
CCCC
The {{{{Start}}}} key indicator flashes
green.
Note
❒ To cancel Auto Start, press the
{{{{Clear/Stop}}}} key.
Auto Start
3
15

Copying
Preset Reduce/Enlarge
You can select a preset ratio for copying.
Press the {{{{Reduce/Enlarge}}}} key.
AAAA
3
Copies can be reduced or enlarged as
follows:
❖❖❖❖ Metric version
Ratio (%) Original
200 (enlarge
area by 4)
141 (enlarge
area by 2)
100 Full Size
93 A little reduced.
71 (reduce
area by
50 (reduce
area by 1/4)
1
/2)
A6→A4
A5→A4
(Create Margin)
A4→A5
A4→A6
→→→→
Copy paper size
❖❖❖❖ Inch version
Press the {{{{Reduce/Enlarge}}}} key or
BBBB
the 0000 or 1111 key until the desired
reduce/enlarge size is displayed.
Press the {{{{OK}}}} key.
CCCC
Place your originals, and then
DDDD
press the {{{{Start}}}} key.
Note
❒ When the copy paper size and
the original size differ, set the
original size. For details, see
“Placing Standard Size Originals” in the Copy Reference
manual.
Ratio (%) Original
1
155 (enlarge
area by 2)
129 51/2" × 81/2"→ 81/2" × 11"
100 Full Size
93 A little reduced.
78 8
65 (reduce
1
area by
/4)
/2" × 81/2"→ 81/2" × 14"
5
(Create Margin)
1
/2" × 14" → 81/2" × 11"
1
8
/2" × 11" → 51/2" × 81/2"
16
→→→→
Copy paper size

Combine
Combine
Use this feature to combine two original images onto one page.
12
Note
❒ Direction of the originals and ar-
rangement of combined images.
❖❖❖❖ Portrait (KKKK) originals
❖❖❖❖ Landscape (LLLL) originals
12
Combine1
Make sure that “1. Combine ”
BBBB
is selected, and then press the
key.
Select “ “ with the 0000 or 1111
CCCC
key, and then press the {{{{OK}}}} key.
Press the {{{{Select Paper Tray}}}} key to
DDDD
select the copy paper.
Place your originals.
EEEE
Note
❒ Set the direction of the original
to L.
When placing an original on the
exposure glass
AAAA Place the original, and then
press the {{{{Start}}}} key.
BBBB Place the next original, and
then press the {{{{Start}}}} key.
{{{{OK}}}}
3
Press the {{{{Menu}}}} key.
AAAA
Note
❒ To finish copying, press the
{{{{R/#}}}} key to eject the copy.
When loading originals in the
document feeder (ADF)
AAAA Load your originals, and then
press the {{{{Start}}}} key.
17

Copying
3
18

4. Troubleshooting
R
R
R
hhhh Changing the Toner Cartridge
When h is displayed, it is time to supply toner.
WARNING:
• Do not incinerate used toner or toner containers. Toner dust might ignite when exposed to an open flame. Dispose of used toner containers
in accordance with local regulations for plastics.
CAUTION:
• Keep toner (used or unused) and toner containers out of reach of children.
CAUTION:
• Our products are engineered to meet high standards of quality and functionality, and we recommend that you only use the expendable supplies available at an authorized dealer.
Important
❒ If you use toner other than that recommended, a fault might occur.
❒ When adding toner, do not turn off the power switch. If you do, your settings
are cleared.
❒ Always add toner after the machine instructs you to add toner.
• Open the front cover of the machine.
• Lift the green holder.
• Push the green lever, and then gently pull
out the holder.
19

Troubleshooting
• Press the Toner Cartridge backward to
raise its head, and then gently pull out the
bottle.
• Hold the new bottle horizontally, and then
shake it 5 or 6 times.
Note
4
❒ Do not remove the black cap when
shaking.
• Remove the black cap.
Note
❒ Do not remove the inner cap.
20
• Put the Toner Cartridge on the holder, and
then press its head forward.
• Push the holder in until it clicks.

h Changing the Toner Cartridge
• Push down the green holder.
• Close the front cover of the machine.
4
21

Troubleshooting
R
hhhh Clearing Misfeeds
4
CAUTION:
• The fusing section of this equipment might be very hot. You should be very
careful that you don't touch this section when removing the misfed paper.
Important
❒ When clearing misfeeds, do not turn off the power switch. If you do, your
copy settings are cleared.
❒ To prevent misfeeds, do not leave any torn scraps of paper within the ma-
chine.
❒ If paper misfeeds occur repeatedly, contact your service representative.
Note
❒ More than one misfed areas may be indicated. In this case, check every appli-
cable area. Refer to the following charts: A, P, Y.
❒ You can find a sticker explaining how to remove misfed paper inside of the
right cover.
❒ When the machine instructs you to place originals once again, place your
originals in the feeding position. The display might indicate the number of
originals you should return.
22

h Clearing Misfeeds
4
23
Troubleshooting
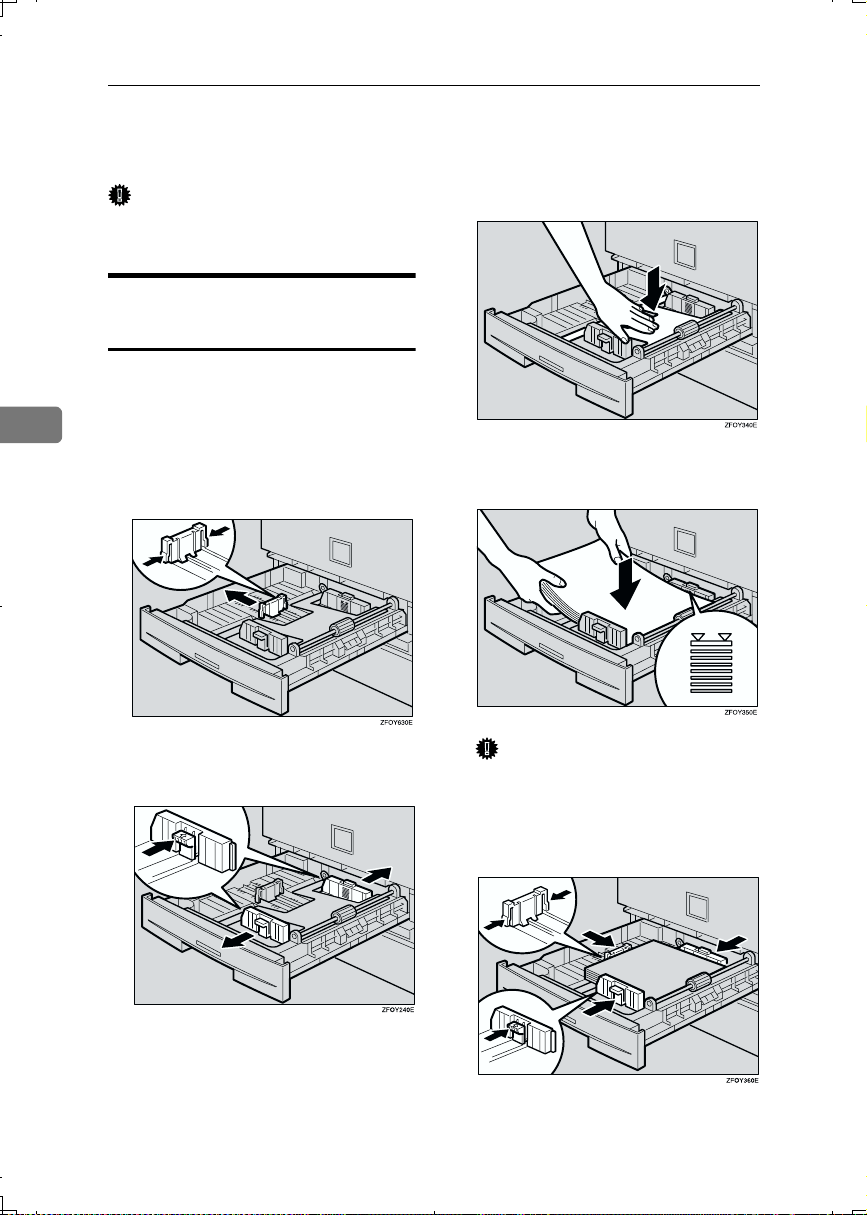
Changing the Paper Size
Important
❒ Select the paper size with the user
tools, or misfeeds might occur.
Push the metal plate down.
EEEE
Changing the Paper Size in the Paper Tray
Make sure that the paper tray is
AAAA
not being used.
4
Pull out the paper tray until it
BBBB
stops.
Adjust the back fence.
CCCC
While pressing the release lever,
DDDD
adjust the side fences.
Square the paper and load it in
FFFF
the tray.
Important
❒ Do not stack paper over the lim-
it mark.
24
Adjust the side and back fences to
GGGG
the new paper size.

Changing the Paper Size
Important
❒ When setting small quantities of
copy paper, be careful not to
squeeze in the side fence too
much or paper will not be fed
properly.
Push the paper tray in until it
HHHH
stops.
Note
❒ Select the new paper size with
the User Tools. For details, see
the following “Selecting the Pa-
per Size with the User Tools”.
Changing the Paper Size in the Optional Paper tray unit
Make sure that the paper tray is
AAAA
not being used.
Pull out the paper tray until it
BBBB
stops.
Adjust the back fence.
CCCC
While pressing the release lever,
DDDD
adjust the side fences.
Push the metal plate down, and
EEEE
then square the paper and load it
in the tray.
4
Important
❒ Do not stack paper over the lim-
it mark.
Adjust the side and back fences to
FFFF
the new paper size.
25

Troubleshooting
Important
❒ When loading small quantities
of copy paper, be careful not to
squeeze in the side fence too
much or paper will not be fed
properly.
Push the paper tray in until it
GGGG
stops.
Note
❒ Select the new paper size with
the User Tools. For details, see
the following “Selecting the Pa-
4
per Size with the User Tools”.
Press the 0000 or 1111 key to select the
DDDD
paper tray you want to change the
paper size for, and then press the
{{{{OK}}}} key. When you select “1.
Tray 1“ or “2. Tray 2“, go to step
If you have selected “3. Bypass”
EEEE
on step
or “Custom Size”, and then press
the {{{{OK}}}} key.
, select “Standard Size”
DDDD
.
FFFF
Selecting the Paper Size with
Select the desired paper size.
the User Tools
Press the {{{{User Tools/Counter}}}} key.
AAAA
FFFF
When you have selected
“Custom Size”on step 5
AAAA Enter the horizontal size of the
paper with the number keys,
and then press the {{{{OK}}}} key.
26
Press the 0000 or 1111 key to display
BBBB
“2.System Settings”, and then
press the {{{{OK}}}} key.
Press the 0000 or 1111 key until “8.
CCCC
Tray Paper Size” is displayed,
and then press the {{{{OK}}}} key.
BBBB Enter the vertical size of the pa-
per with the number keys, and
then press the {{{{OK}}}} key.
Press the {{{{User Tools/Counter}}}} key
GGGG
to exist from the User tools.
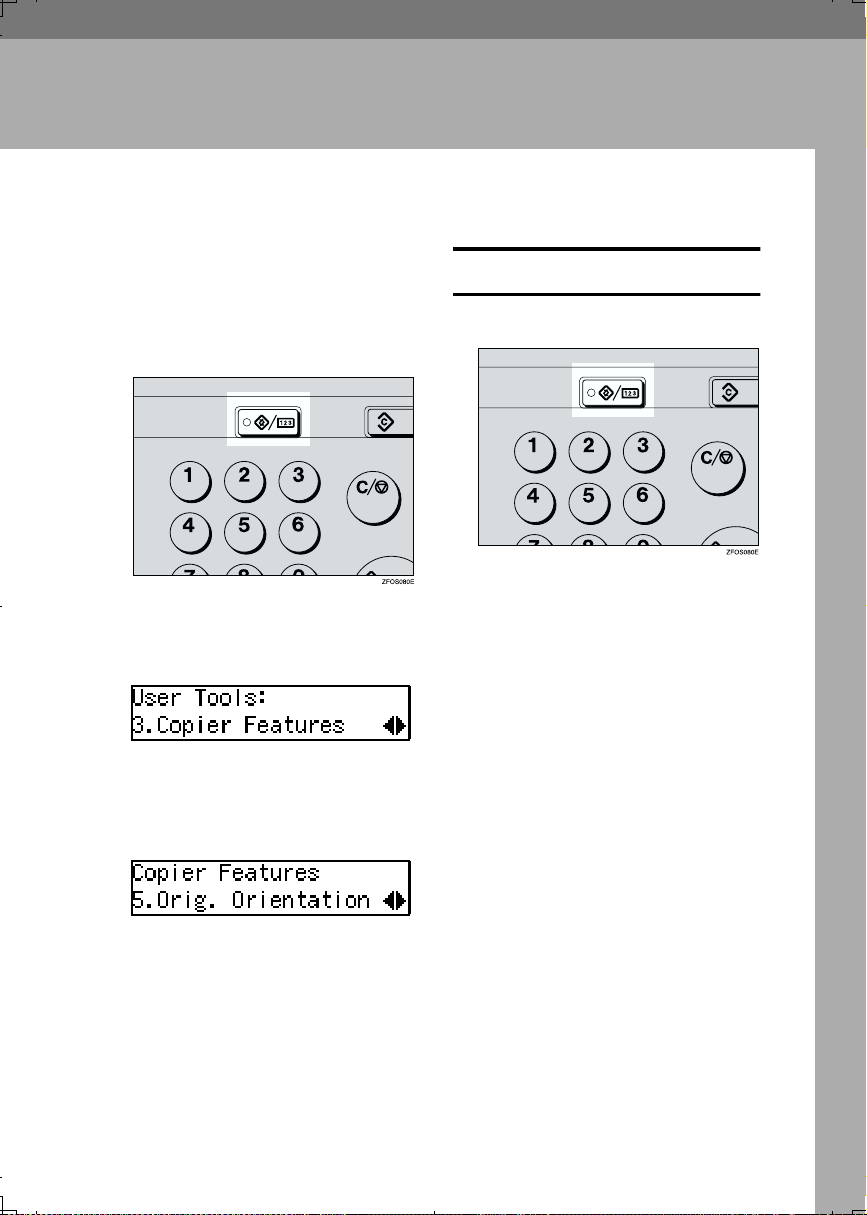
5. User Tools (Copier Features)
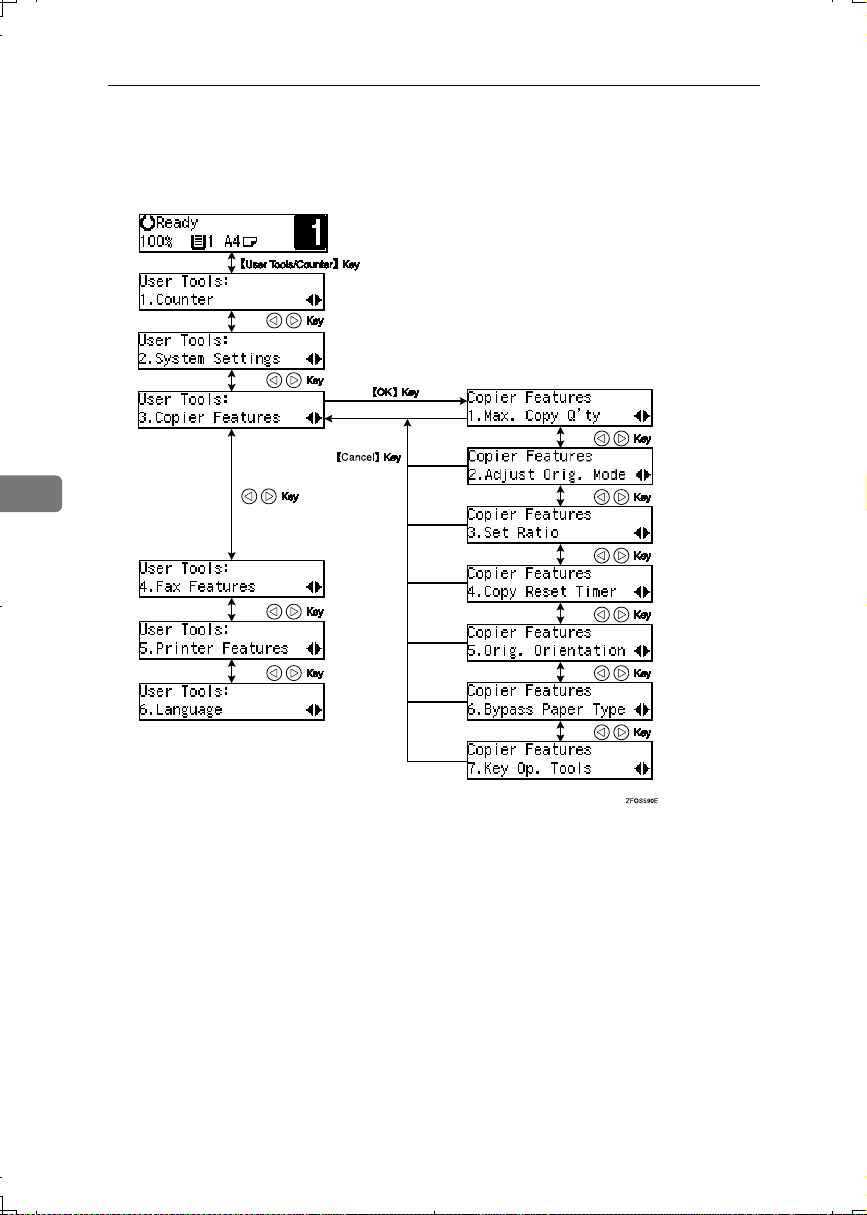
Accessing the User Tools (Copier Features)
This section is for the key operators in
charge of this machine. The user tools
allow you to change or set the machine's default settings.
Press the {{{{User Tools/Counter}}}} key.
AAAA
Press the 0000 or 1111 key to display
BBBB
“3. Copier Features”, and then
press the {{{{OK}}}} key.
Exiting the User Tools
Press the {{{{User Tools/Counter}}}} key.
AAAA
Press the 0000 or 1111 key until de-
CCCC
sired User Tools menu is displayed, and then press the {{{{OK}}}}
key.
Change the settings by following
DDDD
the instructions on the panel display, and then press the {{{{OK}}}} key.
27
User Tools (Copier Features)
User Tools Menu (Copier Features)
5
28

6. Remarks
R
Do's and Don'ts
CAUTION:
• Unplug the power cord from the wall outlet before you move the equipment.
While moving the equipment, you should take care that the power cord will
not be damaged under the equipment.
Important
❒ Make sure the remaining memory space is 100%, before you unplug the pow-
er cord.
❒ While the machine is unplugged, you can neither send nor receive a fax.
Reference
For details, see the Facsimile Reference manual.
• When you use this machine for a long time in a confined space without good
ventilation, you may notice an odd smell. To keep the workplace comfortable,
we recommend that you keep it well ventilated.
• Do not touch areas on or around the fusing unit. These areas get hot.
• After making copies continuously, you may feel the exposure glass is heated.
This is not a malfunction.
• You may feel warm around the ventilation hole. This is caused by exhaust air,
and is not a malfunction.
• Do not turn off the operation switch while copying or printing. When turning
off the operation switch, copying with memory and printing continue. However, scanning of copy originals is interrupted.
• The machine might fail to produce good copy images if condensation forms
inside the machine due to temperature change.
• Do not open the covers of the machine while copying or printing. If you do,
misfeeds might occur.
• Do not move the machine while copying or printing.
• If you operate the machine improperly or a failure occurs, your settings might
be lost. Be sure to take a note of your machine settings.
• Supplier shall not be liable for any loss or damages resulting from a failure on
the machine, loss of machine settings, and use of the machine.
29

Remarks
R
R
R
Where to Put Your Machine
Machine Environment
Your machine's location should be carefully chosen because environmental conditions greatly affect its performance.
Optimum environmental conditions
CAUTION:
• Keep the equipment away from humidity and dust. Otherwise a fire or an
electric shock might occur.
• Do not place the equipment on an unstable or tilted surface. If it topples
over, it could cause injury.
CAUTION:
• Before moving the equipment, be sure to pull all four handles fully out. Not
doing this may result in an injury, such as getting your fingers pinched. After
6
moving the equipment, return the four handles to their original positions.
• When the optional paper tray unit is installed, do not push the upper part of
the main unit horizontally. If the paper tray unit becomes detached from the
main unit, this could cause an injury.
CAUTION:
• If you use the equipment in a confined space, make sure there is a continuous air turnover.
• Temperature: 10 – 32°C (50 – 89.6°F), humidity 54% at 32°C, 89.6°F
• Humidity: 15 – 80%, temperature 27°C, 80.6°F at 80%
• A strong and level base.
• The machine must be level within 5mm, 0.2" both front to rear and left to
right.
• To avoid possible build-up of ozone, be sure to locate this machine in a large
well ventilated room that has an air turnover of more than 30 m
3
30
/hr/person.

Where to Put Your Machine
R
R
R
Environments to avoid
• Locations exposed to direct sunlight or strong light (more than 1,500 lux).
• Locations directly exposed to cool air from an air conditioner or heated air
from a heater. (Sudden temperature changes might cause condensation within the machine.)
• Locations close to such machines generating ammonia such as diazo copy
machines.
• Places where the machine might be subjected to frequent, strong vibrations.
• Dusty areas.
• Areas with corrosive gases.
Power Connection
WARNING:
• Only connect the machine to the power source described on the inside
front cover of this manual. Connect the power cord directly into a wall
outlet and do not use an extension cord.
• Do not damage, break or make any modifications to the power cord.
Do not place heavy objects on it. Do not pull it hard nor bend it more
than necessary. These actions could cause an electric shock or fire.
6
WARNING:
• Unplug the power cord from the wall outlet before you move the equipment. While moving the equipment, you should take care that the power cord will not be damaged under the equipment.
CAUTION:
• When you disconnect the power plug from the wall outlet, always pull the
plug (not the cable).
• When the main switch is in the Stand-by position, the optional anti-condensation heaters are on. In case of emergency, unplug the machine's power cord.
• When you unplug the power cord, the anti-condensation heaters turn off.
• Make sure the plug is firmly inserted in the outlet.
• Voltage must not fluctuate more than 10%.
• The socket-outlet shall be installed near the equipment and shall be easily ac-
cessible.
31

Remarks
Access to Machine
Place the machine near the power source, providing clearance as shown.
1.
Rear: more than 1cm (0.4")
2.
Right: more than 1cm (0.4")
Note
6
❒ For information about required space when options are installed, please con-
tact your service representative.
3.
Front: more than 75cm (29.6")
4.
Left: more than 1cm (0.4")
32

7. Specification
Mainframe
*1
❖❖❖❖ Noise Emission
• Sound power level
Stand-by 40.0dB (A) 40.0dB (A)
During printing 62.0dB (A) 66.0dB (A)
• Sound pressure level
Stand-by 27.0dB (A) 27.0dB (A)
During printing 54.0dB (A) 54.0dB (A)
*1
The above measurements made in accordance with ISO 7779 are actual value.
*2
It is measured at the position of the operator.
*3
The Complete System consists of mainframe with full options.
For details about other specifications, see “Specifications” in the Copy Reference
manual.
:
Mainframe only
*2
Mainframe only
Complete System
Complete System
*3
*3
33

INDEX
A
Access to Machine, 32
Adjusting Copy Image Density
Auto Start
, 15
B
Basic Functions
,
14
C
Changing the Paper Size, 24
Changing the Toner Cartridge
Clearing Misfeeds
Combine
Copy Mode
, 17
, 22
, 4
D
Document feeder, 13
Do's and Don'ts
, 29
E
Exposure glass, 12
F
Facsimile Advanced Features, 1
,
, 19
M
Machine Environment, 30
14
Mainframe
Main power switch
Modes
, 3
,
33
, 10
O
Operation switch
Originals
Original Type
, 12
, 14
,
10
P
Power Connection, 31
Preset Reduce/Enlarge
, 16
R
Remarks, 29
S
Safety Information, i
Selecting an Original Type
Specification
,
33
, 14
U
User Tools (Copier Features), 27
5
User Tools (System Settings)
,
34

MEMO
35

MEMO
36 EE GB B045
 Loading...