

Page 1

Printer/Scanner Unit
Type 1045
Operating Instructions
Network TWAIN Scanner Reference
Read this manual carefully before you use this product and keep it handy for future
reference.
For safety, please follow the instructions in this manual.
Page 2

Introduction
To get maximum versatility from this machine all operators should carefully read and follow the instructions in this manual. Please keep this manual in a handy place near the machine.
Please read the Safety Information in the Copy Reference before using this machine. It contains important information related to USER SAFETY and PREVENTING EQUIPMENT PROBLEMS.
Important
Parts of this manual are subject to change without prior notice. In no event will the company be liable
for direct, indirect, special, incidental, or consequential damages as a result of handling or operating
the machine.
Caution:
Use of controls or adjustment or performance of procedures other than those specified in this manual
might result in hazardous radiation exposure.
Trademarks
®
Microsoft
, Windows® and Windows NT® are registered trademarks of Microsoft Corporation in the
United States and/or other countries.
Ethernet
®
is a registered trademark of Xerox Corporation.
Other product names used herein are for identification purposes only and might be trademarks of their
respective companies. We disclaim any and all rights in those marks.
Note
The proper names of the Windows operating systems are as follows:
•Microsoft® Windows® 95 operating system
•Microsoft® Windows® 98 operating system
•Microsoft® Windows® Millennium Edition (Windows Me)
®
•Microsoft
Windows® 2000 Professional
•Microsoft® Windows® 2000 Server
•Microsoft® Windows NT® Server operating system Version 4.0
®
•Microsoft
Windows NT® Workstation operating system Version 4.0
•Microsoft® Windows NT® Server operating system Version 3.51
•Microsoft® Windows NT® Work station operating system Version 3.51
Page 3

Manuals for This Machine
The following manuals describe the operational procedures and maintenance of
this machine.
To enhance safe and efficient operation of this machine, all users should read
and follow the instructions carefully.
❖❖❖❖ Copy Reference
Describes the procedures and functions for using this machine as a copier.
❖❖❖❖ System Settings
Describes the system settings of this machine.
❖❖❖❖ Printer Unit Type 1045 Printer Reference 1
Describes the system settings, procedures and functions for using this machine as a printer.
❖❖❖❖ Printer Unit Type 1045 Printer Reference 2
Describes the procedures and provides necessary information about using
this machine as a printer. This manual is included as a PDF file on the CDROM labeled “Operating Instructions for Printer”.
❖❖❖❖ Network Printing Guide Operating Instructions
Describes the procedures and provides necessary information about setting
up and using the printer under the network environment. We recommend
this manual as your first choice to read, and it is included as a PDF file on the
CD-ROM labeled “Operating Instructions for Printer”.
❖❖❖❖ PostScript 3 Unit Type 1045 Operating Instructions Supplement
Describes the menus and features you can set using the PostScript 3 printer
driver. This manual is provided as a PDF file on the CD-ROM labeled “Operating Instructions for Printer”.
❖❖❖❖ UNIX Supplement
Provides information about setting up and using the printer in a UNIX environment. This manual is included as a PDF file on the CD-ROM labeled “Operating Instructions for Printer”.
❖❖❖❖ Scanner Reference
Describes the procedures and functions for using this machine as a scanner.
❖❖❖❖ Printer/Scanner Unit Type 1045 Network TWAIN Scanner Reference
Describes the procedures and provides necessary information about using
this machine as a network scanner. This manual is included as a PDF file on
the CD-ROM labeled “Scanner Driver & Document Management Utilities”(this manual).
i
Page 4

How to Read This Manual
Symbols
In this manual, the following symbols are used:
Important
If this instruction is not followed, paper might be misfed, originals might be
damaged, or data might be lost. Be sure to read this.
Preparation
This symbol indicates the prior knowledge or preparations required before operating.
Note
This symbol indicates precautions for operation, or actions to take after misoperation.
Limitation
This symbol indicates numerical limits, functions that cannot be used together,
or conditions in which a particular function cannot be used.
Reference
This symbol indicates a reference.
[]
Keys that appear on the machine's panel display.
Keys and buttons that appear on the computer's display.
{}
Keys built into the machine's control panel.
Keys on the computer's keyboard.
ii
Page 5

TABLE OF CONTENTS
1.Preparation
Features....................................................................................................... 1
TWAIN Driver ................................................................................................. 1
Network TWAIN Scanner ............................................................................... 2
Network Delivery Scanner.............................................................................. 3
Environment................................................................................................ 5
Software and Utilities on the CD-ROM ..................................................... 7
TWAIN Driver ................................................................................................. 7
2.Installing the Scanner Driver and Utilities
Using Windows 95/98/Me, Windows 2000 or Windows NT 4.0............... 9
Installing the Scanner Driver by Auto Run ..................................................... 9
Using Windows NT 3.51........................................................................... 11
Installing the TWAIN Driver.......................................................................... 11
3.
Basic Scanning Operations Using the DeskTopBinder V2 Lite
Flow of Original Scanning Operations ................................................... 13
Scanning Originals................................................................................... 14
Scanning Originals ....................................................................................... 14
Editing and Printing...................................................................................... 17
Functions of the TWAIN Driver ............................................................... 18
TWAIN Driver Functions .............................................................................. 18
4.Appendix
Getting Help .............................................................................................. 19
Using the TWAIN Driver Help ...................................................................... 19
The Relationship between the Data Size and the Scanning Area,
as well as the Resolution....................................................................... 21
List of Data Size Resolutions ....................................................................... 22
Troubleshooting ....................................................................................... 25
When Scanning is not Performed as Expected............................................ 25
When the Scan Setting Error is Displayed................................................... 25
INDEX......................................................................................................... 26
iii
Page 6

iv
Page 7

1. Preparation
The drivers and utilities (provided on the CD-ROM) are available to use the machine with the Printer/Scanner option installed on the network.
The network scanner has two functions: the “Network TWAIN Scanner” and the
“Network Delivery Scanner”.
This chapter provides necessary information on the features of the drivers and
scanner, the best environment for the drivers and utilities, as well as the drivers
and utilities included on the CD-ROM labeled “Scanner Driver & Document
Management Utilities”.
Note
❒ You can add the Network Delivery Scanner function using ScanRouter V2
Lite which comes with the Printer/Scanner Option of this machine. Use this
function to deliver scanned images to clients on the network.
❒ This manual mainly explains how to use the Network TWAIN Scanner func-
tion. For more information on the operation and configuration settings of the
Network Delivery Scanner function, see the manual that comes with ScanRouter V2 Lite.
Features
TWAIN Driver
The TWAIN Driver is necessary for scanning originals with the machine. Make
sure that this driver is installed prior to using the machine as a scanner.
If the driver is configured for commercially available applications that work
with TWAIN or the included DeskTopBinder V2 Lite, the driver will automatically launch and set the scanning configurations when scanning originals.
Also, this driver contains several functions such as setting character strings like
dates and pages numbers, and making corrections for tilted characters.
DeskTopBinder V2 Lite
This software, installed in a client computer, manages various types of data files.
Using this software with the TWAIN Driver, the machine can be used as a Network TWAIN Scanner. For more information, see the manual that comes with
DeskTopBinder V2 Lite.
1
Page 8

1
Preparation
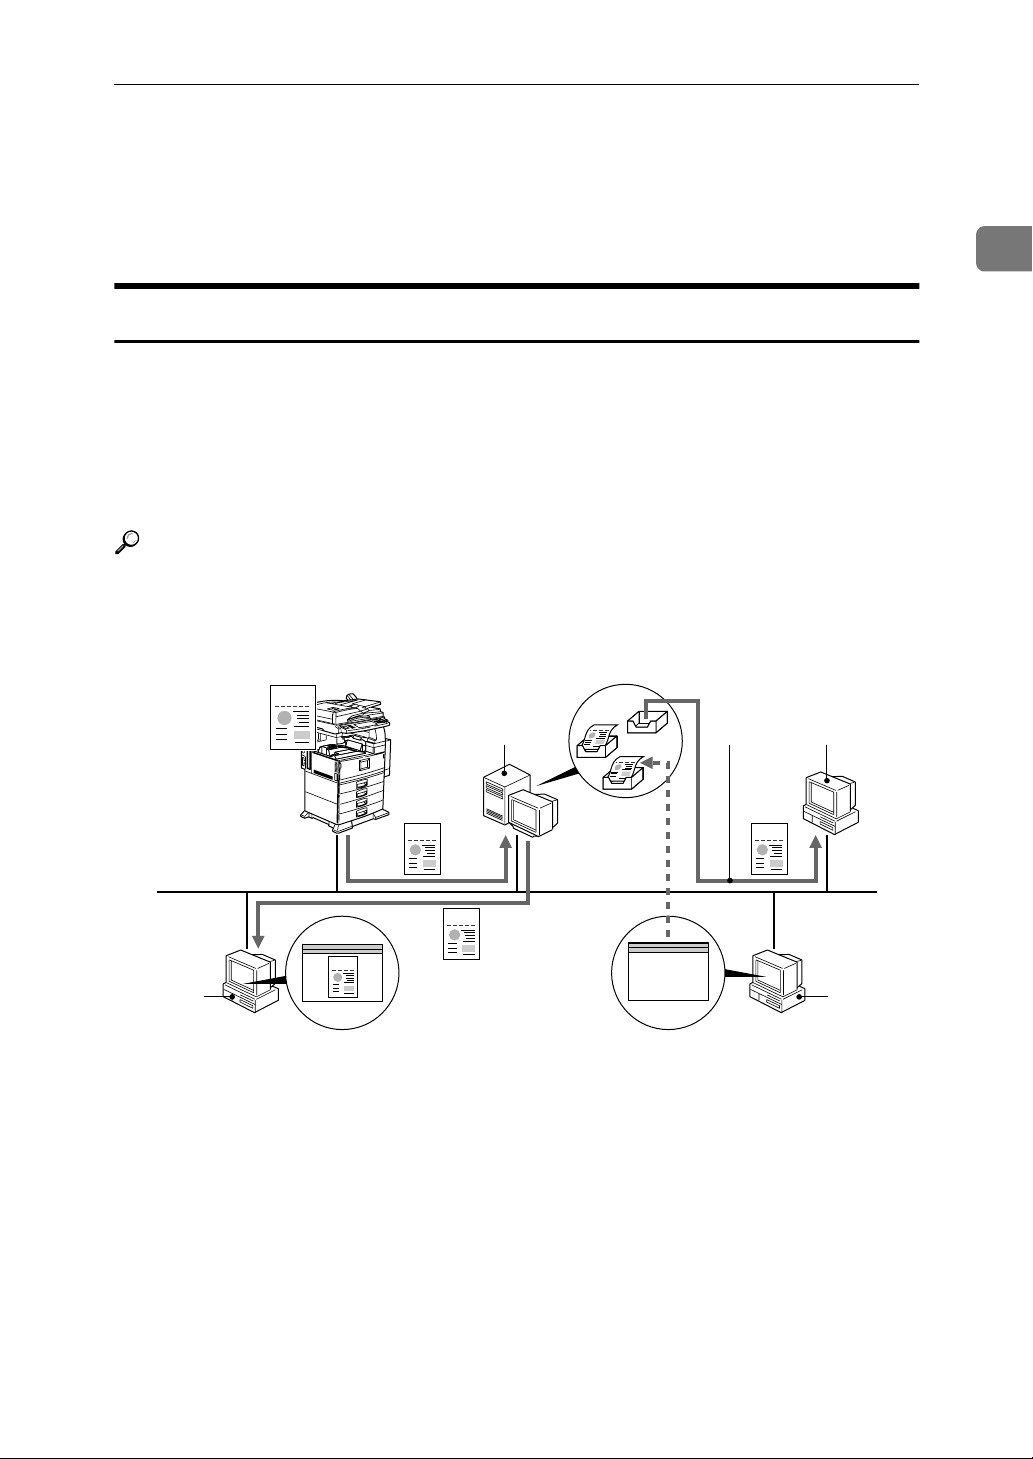
Network TWAIN Scanner
When the machine is connected to a network, the Network TWAIN Scanner
function allows the machine to be used by any client computer on the network
in the same way as a local scanner.
After setting an original on the machine, the DeskTopBinder V2 Lite or other
TWAIN compatible applications can be used on a client computer where the
TWAIN Driver is installed. The applications running on the client computer use
the driver to make scan settings and send the scanning command to the machine. The scanned data is sent to the client computer via the network.
SCN
1. Delivery server
Not used when the machine operates as a
Network TWAIN Scanner. ⇒ P.3 “Net-
work Delivery Scanner”
2. Scanning command
3. Scanned data
1
3
2
SCN
4
4. Client computer
When scanning, it starts the TWAIN
Driver and sends instructions about the
scan as well as the scan settings.
5. DeskTopBinder V2 Lite
Scanned data can be viewed and edited
by using the TWAIN Driver. ⇒ P.13 “Ba-
sic Scanning Operations Using the DeskTopBinder V2 Lite”
SCN
5
ZEKX020E
To use the Network TWAIN Scanner to scan originals, follow these steps:
Set originals
A
Set originals on the exposure glass (platen glass) or in the Document Feeder
(ADF) on the machine.
Reference
For more information on setting originals on the exposure glass (platen
glass) or in the Document Feeder (ADF), see the Copy Reference.
2
Page 9
Features
Configure the scanner settings from a network client
B
Start TWAIN Driver from an application that works with TWAIN Driver, and
then configure the scanner settings.
Start the scan
C
The TWAIN Driver starts scanning.
Network Delivery Scanner
When used as a Network Delivery Scanner, the machine delivers scanned data
to a specified destination selected from a list of destinations pre-registered in the
delivery server. This requires that ScanRouter V2 Lite is installed on the delivery
server on the network.
Scanned data can also be stored in the machine and selected later for repeated
delivery.
Reference
For detailed information on the Network Delivery Scanner, see the Scanner
Reference.
1
SCN
SCN SCN
1
SCN
SCN
5
6
1. Scanned data
Specify destination and scan originals.
The scanned data is then sent to the delivery server.
2. Delivery server
The server in which the ScanRouter V2
Lite is installed. It delivers scanned data
to devices connected to the network. Using the Delivery Management Tool of
ScanRouter V2 Lite, destinations and
sender names are registered in address
book format, and delivery options can be
set individually for each destination.
3
2
7
SCN
SCN
6
3. IN tray
IN trays are created for each registered
destination. Scanned data is stored in the
IN trays of the delivery server.
4. ScanRouter V2 Lite
Monitors the IN tray of the delivery server. When scanned data is sent to the IN
tray from the machine, it processes the
data according to settings made with the
Delivery Management Tool.
5. Client computer
54
5
ZEKX010E
3
Page 10

Preparation
1
6. DeskTopBinder V2 Lite
Software installed in the client computer.
Allows viewing and deleting of the
scanned data in the IN tray, and also
downloading the data to the client computer.
Reference
7. Delivered scanned data
Data sent from the machine is separated
for each user in the delivery server, and
then data is processed for each user according to the settings made with the Delivery Management Tool of ScanRouter
V2 Lite.
For more information on operating the Network Delivery Scanner, see the
manual that comes with ScanRouter V2 Lite.
Note
❒ The first four steps can be done in any order.
Select the receiver
A
Use the control panel to set the address of the client that will receive scanned
data.
Select the sending client computer
B
Use the control panel to set the address of the client that will deliver scanned
data.
Configure the scanner settings
C
Use the control panel to configure the scanner settings.
Set originals
D
Set originals on the exposure glass (platen glass) or in the Document Feeder
(ADF) on the machine.
Reference
For more information on setting originals on the exposure glass (platen
glass) or in the Document Feeder (ADF), see the Copy Reference.
Start the scan
E
The scan starts.
4
Page 11

Environment
Environment
To use TWAIN Driver or DeskTopBinder V2 Lite, the following hardware and
software environment is required.
❖❖❖❖ Personal Computer
The computer must be a PC/AT compatible.
The computer must have a CD-ROM drive. (The driver is provided on a CDROM.)
Limitation
❒ When using Windows NT, the driver does not work with RISC base pro-
cessors (MIPS R series, Alpha AXP, Power PC).
❖❖❖❖ OS
TWAIN Driver: Windows 95/98/Me, Windows 2000 or Windows NT 4.0/
3.51
DeskTopBinder V2 Lite : Windows 95/98/Me, Windows 2000 or Windows
NT 4.0
1
Note
❒ Neither software works with Windows 3.1.
❒ DeskTopBinder V2 Lite does not work with Windows NT 3.51.
❖❖❖❖ Memory
Windows 95/98/Me: 16MB or more (48MB or more recommended)
Windows 2000: 20MB or more (64MB or more recommended)
Windows NT 4.0/3.51: 24MB or more (64MB or more recommended)
❖❖❖❖ Display
TWAIN Driver: Requires SVGA (800×600) supporting 256 colors or more.
DeskTopBinder V2 Lite : Requires SVGA (800×600) supporting 65,536 colors
or more.
❖❖❖❖ Hard Disk
100MB of hard disk space (100MB or more recommended) are required for
the installation, and to save and preview image files.
❖❖❖❖ Ethernet Board
It must be compatible with Windows 95/98/Me, Windows 2000 or Windows
NT 4.0/3.51 environments.
Note
❒ The Ethernet board does not work if it is not recognized in the Windows
95/98/Me, Windows 2000 or Windows NT 4.0/3.51 environments.
❖❖❖❖ Ethernet Cable
Use category 5 STP cabling with an RJ-45 connector.
5
Page 12

1
Preparation
❖❖❖❖ Network Protocol
TCP/IP
❖❖❖❖ TWAIN Compliant Application
An application compliant to TWAIN 1.6 or later must be installed.
Note
❒ If you are not sure that the application you are using is compliant to
TWAIN 1.6 or later, contact the manufacturer of the application.
6
Page 13

Software and Utilities on the CD-ROM
Software and Utilities on the CD-ROM
The following is an explanation of the contents of the CD-ROM labeled “Scanner
Driver & Document Management Utilities”.
For information about the software included on the CD-ROM labeled “Printer
Drivers and Utilities”, see Printer Unit Type 1045 Printer Reference 1.
TWAIN Driver
The TWAIN Driver is necessary for scanning originals with the machine. In order to use this machine as a network TWAIN scanner, it is necessary that you
install this driver. If the driver is configured for commercially available applications that work with TWAIN or the included DeskTopBinder V2 Lite, the driver
will automatically launch and set the scanning configurations when scanning
originals.
Also, this driver contains several functions such as setting character strings like
dates and pages numbers, and making corrections for tilted characters.
1
DeskTopBinder V2 Lite
This software, installed in a client computer, manages various types of data files.
Using this software with the TWAIN Driver, the machine can be used as a Network TWAIN Scanner. For more information, see the manual that comes with
DeskTopBinder V2 Lite.
7
Page 14

1
Preparation
8
Page 15

2. Installing the Scanner Driver
and Utilities
To use the machine as a network scanner, TWAIN Driver is essential.
Note
❒ If you do not have applications that work with TWAIN, it is necessary to also
install the DeskTopBinder V2 Lite. Please be aware that the DeskTopBinder
V2 Lite does not work with Windows NT 3.51.
This chapter assumes that the reader has sufficient understanding of the Windows operating system. See the Windows operation manual for details about its
functions and operation.
The ways for installing the scanner driver on your computer vary depending on
your operating system. Follow the procedures described below.
Using Windows 95/98/Me, Windows 2000 or Windows NT 4.0
Install the scanner driver for Windows 95/98/Me, Windows 2000 or Windows
NT 4.0 using the Plug & Play function of the OS. Here, Windows 98 is used as an
example for explanation. The basic operations are similar for Windows 95/Me,
Windows 2000, and Windows NT 4.0.
Note
❒ Before installing, make sure that your computer is set up in an environment
that can support the TCP/IP protocol. See the manual that comes with your
computer for details.
Installing the Scanner Driver by Auto Run
You can install the scanner driver and utilities and set them up easily by using
Auto Run.
Follow these steps to install the scanner driver and utilities on Windows 95/98/
Me, Windows 2000 or Windows NT 4.0.
Limitation
❒ If your system is Windows 2000 or Windows NT 4.0, installing the scanner
driver by Auto Run requires Administrators permission. When you install
the scanner driver by Auto Run, log on using an account that has Administrators permission.
❒ It is not possible to install the scanner driver and utilities using Autorun in
Windows NT 3.51. For installing in Windows NT 3.51, see P.11 “Using Win-
dows NT 3.51”.
9
Page 16

2
Installing the Scanner Driver and Utilities
Note
❒ Auto Run might not automatically work with certain OS settings. In this case,
launch “CDLAUNCH.EXE” located on the CD-ROM root directory.
❒ If you want to install without using Auto Run, hold down the {SHIFT} key
(when your system is Windows 2000, hold down the left {SHIFT} key) while
inserting the CD-ROM. Keep the {SHIFT} key down until the computer has
finished accessing the CD-ROM.
❒ If [Cancel] is pressed during installation, the installation will be stopped and
the remaining scanner driver and utilities will not be installed. If [Cancel] has
been pressed, re-install the remaining scanner driver and utilities after restarting the computer.
Close all applications that are running.
A
Insert the CD-ROM labeled “Scanner Driver & Document Management
B
Utilities” into the CD-ROM drive.
Follow the instructions on the screen.
C
Restart the computer after installation is complete.
D
Set up the options with the scanner driver.
E
10
Page 17

Using Windows NT 3.51
Using Windows NT 3.51
Limitation
❒ To install the driver when using Windows NT 3.51, log-on as a member of the
Administrator group.
Installing the TWAIN Driver
Insert the CD-ROM labeled “Scanner Driver & Document Management
A
Utilities” into the CD-ROM drive.
Select [Run] from the [File] menu in the [File Manager].
B
The [Run] dialog box appears.
Inside the [Command Line] box, input “DRIVERS\TWAIN\OTHERS\SETUP”
C
after the name of the drive in which the CD-ROM is located and click [OK].
For example, if the CD-ROM is placed in the D drive, input “D:\DRIV-
ERS\TWAIN\OTHERS\SETUP ”.
Follow the instructions on the screen.
D
Restart the computer after installation is complete.
E
2
11
Page 18

2
Installing the Scanner Driver and Utilities
12
Page 19

3. Basic Scanning Operations
Using the DeskTopBinder V2 Lite
This chapter describes the basic flow of operations when scanning with the
DeskTopBinder V2 Lite. In addition, some functions of the TWAIN Driver are
introduced.
Note
❒ DeskTopBinder V2 Lite works with Windows 95/98/Me, Windows 2000 or
Windows NT 4.0.
Limitation
❒ DeskTopBinder V2 Lite does not work with Windows NT 3.51. If you are us-
ing Windows NT 3.51, you must access the TWAIN Driver from commercially available applications that work with TWAIN.
Flow of Original Scanning Operations
When using DeskTopBinder V2 Lite for scanning, the basic flow of operations is
as follows.
Select the driver of the scanner
A
Start up DeskTopBinder V2 Lite and select the driver (TWAIN Driver).
Set the conditions for scanning
B
Start up TWAIN Driver and set the conditions for scanning an original.
Place an original
C
Place an original on the machine.
Scan the original
D
Scan the original. The scanned image can be edited and printed using DeskTopBinder V2 Lite.
Reference
For information about editing and printing of the scanned image, see the
DeskTopBinder V2 Lite Help file.
Save the image
E
Save the scanned image.
Close the application
F
Close DeskTopBinder V2 Lite.
On P.14 “Scanning Originals” , the procedure for each of the above steps is explained.
13
Page 20

Basic Scanning Operations Using the DeskTopBinder V2 Lite
Scanning Originals
Here, the operations for scanning images with the scanner using DeskTopBinder
V2 Lite are explained. When the application you are using is not TWAIN compatible, perform scans using DeskTopBinder V2 Lite.
Note
❒ By pressing the {F1} key on the keyboard of the PC while using DeskTop-
Binder V2 Lite, the Help file appears.
3
Scanning Originals
Here, the method for scanning a single original as introduced on P.13 “Flow of
Original Scanning Operations”.
Start up DeskTopBinder V2 Lite and select the driver of the scanner.
A
A Click [Start], point to [Programs], and then click [DeskTopBinder V2 Lite]
from [DeskTopBinder V2 Lite].
DeskTopBinder V2 Lite starts up.
B From the [Tools] menu, click [Scanner Settings].
The [Scanner Settings] dialog box appears.
C Click [Select Scanner Driver].
The [Select Source] dialog box appears.
D Click the machine name you want to use in the list, then click [Select].
TWAIN Driver is selected as the scanner source.
E Click [OK].
The [Scanner Settings] dialog box closes.
Set the scanning conditions.
B
A From the [File] menu, point to [Add Document], and then click [Scan... ].
14
The TWAIN Driver start up.
After a short time, the dialog box of the TWAIN Driver that operates the
scanner appears. This dialog box is called the scanner control dialog box.
Note
❒ The title bar displays the scanner currently being used. When multiple
machines are connected, confirm that the indicated machine name is the
machine to be used. If the intended machine is different, continue from
step B. If it is not necessary to change the machine, continue from step D.
B Click [Select Scanner].
The [Select Scanner] dialog box appears.
Page 21

Scanning Originals
C In the [Name] box, select the machine to be used, and then click [OK].
The dialog box closes and the machine is selected.
Note
❒ If the machine to be used does not appear in the list, check the following
points. Click [Refresh] and select the machine.
• Make sure that the IP address is configured and that the machine is
correctly connected to the network.
• If the driver is still not displayed in the list after the above operations,
consult with your network administrator.
D Select the icon in the [Mode].
Depending on the type of original or the objective for scanning, select from
one of the following four types.
• [Standard] is suitable for scanning standard originals that comprise
mainly text.
• [Photo] is suitable for scanning originals that include photos, shaded il-
lustrations, etc.
• [OCR] is suitable for conversion processing with an OCR (Optical Char-
acter Reading) application after scanning the original.
• [Filing] is suitable for use with filing applications, etc.
Note
❒ Here, the easy setting method using “Easy Window” is explained. For
advanced settings, click [Details] to display “Details Window”. For information regarding the “Details Window”, see the TWAIN Driver
Help file.
E If necessary, change the setting of the [Document] group.
Reference
For the [Document] group setting, see the Help file.
Note
❒ When scanning only a number of originals in the Document Feeder
(ADF), select [ADF (Prefeed off)] from [Document]. When scanning by selecting [ADF], one sheet is left in the Document Feeder (ADF) after scanning. By scanning with [ADF (Prefeed off)] selected, the last scanned
original comes out of the Document Feeder (ADF).
❒ For machines where the Document Feeder (ADF) is not pre-installed,
[Duplex] cannot be selected in [Side].
3
Place originals on the machine.
C
Place an original on the exposure glass or in the Document Feeder (ADF) in
order to be scanned. For how to place originals on the machine, see the operating instructions provided with the machine.
15
Page 22

3
Basic Scanning Operations Using the DeskTopBinder V2 Lite
When you want to configure the scanning area, follow the steps below.
D
Note
❒ When you do not configure the scanning area, continue from step
A Click [Preview] .
The original that was placed is scanned and the [Preview] dialog box appears. The scanning area in the preview appears within the broken lines.
B Configure the scanning area by dragging a border or the top line.
When reconfiguring the area, click and drag one corner of the area towards its opposite corner.
Note
❒ For details about the preview, see the TWAIN Driver Help file.
❒ Depending on the scanning resolution, the area to be scanned may pos-
sibly be subject to restrictions. For the relationship between the resolution and the scanning area, see P.21 “The Relationship between the Data
Size and the Scanning Area, as well as the Resolution” .
❒ The resolution of the preview screen is fixed. When different values
have been assigned for the X, Y resolutions, the preview screen and the
scanned image will look different.
C Click [Close].
.
E
The [Preview] dialog box closes.
Click [Scan].
E
The original is scanned and displayed in the view window of DeskTopBinder
V2 Lite while the scanner control dialog box closes automatically.
Note
❒ The scanned image can be edited, including rotating it and cutting it to
size, and printed after having been edited. For editing and printing operations, see the DeskTopBinder V2 Lite Help file.
Save the scanned image.
F
A In the [File] menu, click [Exit].
The [Input Document Information] dialog box appears.
B Input the file name and click [OK].
The image is stored in DeskTopBinder V2 Lite, and the DeskTopBinder
viewer closes.
Note
❒ The stored image can be written as a file. For details, see the DeskTop-
Binder V2 Lite Help file.
16
Close DeskTopBinder V2 Lite.
G
A From the [File] menu, click [Exit].
DeskTopBinder V2 Lite closes.
Page 23

Scanning Originals
Editing and Printing
With DeskTopBinder V2 Lite, it is possible to edit and print opened or scanned
images. For details on how to edit and print, see the DeskTopBinder V2 Lite
Help file.
3
17
Page 24

Basic Scanning Operations Using the DeskTopBinder V2 Lite
Functions of the TWAIN Driver
The following is an introduction to the various functions of the TWAIN Driver.
Reference
For more details about each function or other functions, see the Help file.
TWAIN Driver Functions
3
❖❖❖❖ Automatic Tilt Correction
This function automatically corrects character strings that were scanned
slanted.
Note
❒ This function is only valid when [Colors / Gradations] on the [Quality] tab of
the scanner control dialog box has been set to [Binary]. Also, the correction
will not be reflected in the preview.
❖❖❖❖ Printing to the Image
This function allows you to imprint dates, page numbers or your favorite
characters to a scanned image. You can also change the fonts of the imprints,
as well as the numerical order of the scanned images to ascending or descending order.
❖❖❖❖ Scanning Mode Registration
This function allows you to register other scanning configurations that are often used as scanning modes besides the already pre-installed ones. After registration, you can quickly scan with these scanning configurations.
The general configurations that come with the pre-installed scanning modes
are quite sufficient. However, you can add and remove other scanning
modes beside the pre-installed ones.
18
Page 25

4. Appendix
Getting Help
The TWAIN Driver Help section explains procedures as well as scanning condition configuration methods when scanning images using DeskTopBinder V2
Lite and commercially available applications compatible with TWAIN.
Using the TWAIN Driver Help
Click [Start], select [Programs] and click [Help Files] from the [Type1045 TWAIN
A
V3] folder.
The [Help Topics] window of the TWAIN Driver Help appears.
When searching for keywords, double click on the [Index] tab and a list of keywords will appear. You can scroll the list or search by entering words or
phrases.
Double click on the topic you want to read or select the topic and click [Dis-
B
play].
The content of the selected topic is displayed. However, if there are subtopics
under the selected topic, these will be displayed.
The contents of Help appear.
C
By using the buttons at the top of the Help screen and menu, you can do the
following things:
❖❖❖❖ Help Topics
Opens the [Help Topics] window.
❖❖❖❖ Back
Goes back to the previous Help screen.
❖❖❖❖ Print
Prints the contents of the displayed topic.
❖❖❖❖ Options
Has the following functions:
• Annotate
Attaches an annotation to Help.
• Copy
Copies the contents of Help.
• Print Topics
Prints the contents of the displayed topic.
19
Page 26

4
Appendix
• Font
You can change the font size to [Small], [Normal] or [Large].
• Keep Help on Top
You can change Help to [Default], [On Top], [Not On Top].
• Use System Colors
You can also change the colors used by Help to the system color.
Click on the button in the upper right hand corner to exit Help.
D
TWAIN Driver Help closes.
20
Page 27

The Relationship between the Data Size and the Scanning Area, as well as the Resolution
The Relationship between the Data Size and
the Scanning Area, as well as the Resolution
The resolution and the scanning area as well as the data size are all affected in
the following way.
• When the resolution (dpi) is set to a high value, the data size becomes larger
and the scanning area which can be set becomes smaller.
• When the scanning area is set larger, the data size becomes larger, and the resolution becomes lower.
Note
❒ The maximum resolution that can be set is 2400dpi.
❒ The size of the scanning area is the standard.
❒ Scanning is not possible if all settings have not been entered.
❒ The data size that works with applications and the data size that can be
scanned with the TWAIN Driver are different. For the data size that can work
with applications, see the manuals that came with each of the applications.
4
Limitation
❒ Depending on the image compression level as well as the capacity of the built
in memory, the maximum image size will be limited.
❒ When using the Document Feeder (ADF), the resolution can be set up to
1200dpi.
21
Page 28

Appendix
List of Data Size Resolutions
According to the scanning area and resolution, the size of the scanned data can
be determined. The following charts display the standards for scanned data size.
When [Binary] [Half-tone] is Selected
4
Paper size
A3 297/
A4 210/
A5 148/
A6 105/
B4 257/
B5 182/
B6 128/
11×17 (DLT) 279/
8/×14 (LG) 216/8/356/
Width
(mm/
inch)
11.7
8.3
5.8
4.1
10.1
7.2
5.0
11.0
Height
(mm/
inch)
420/
16/
297/
11.7
210/
8.3
148/
5.8
364/
14.3
257/
10.1
182/
7.2
432/
17.0
14.0
Resolution(dpi)
100 200 300 400 500 600 700 800
235 943 2121 3772 5893 8487 - -
117 470 1061 1886 2946 4247 5779 7545
58 234 528 939 1469 2116 2876 3759
29 117 264 468 734 1058 1437 1880
176 705 1591 2826 4422 6364 - -
87 353 794 1414 2208 3183 4329 5659
43 174 394 702 1098 1582 2155 2815
227 913 2051 3652 5702 8217 - -
144 579 1304 2324 3629 5225 7110 -
22
8/×11 (LT) 216/8/356/
14.0
5/×8/ (HLT) 140/5/216/
8/
8/×13 216/8/330/
13.0
113 455 1024 1826 2852 4105 5587 7304
56 227 512 913 1423 2051 2794 3652
134 538 1211 2158 3370 4852 6602 -
Page 29

The Relationship between the Data Size and the Scanning Area, as well as the Resolution
Numerical Value: Data Size (Unit = KB)
Paper size
A3 297/
A4 210/
A5 148/
A6 105/
B4 257/
B5 182/
B6 128/
11×17 (DLT) 279/
8/×14 (LG) 216/8/356/
Width
(mm/
inch)
11.7
8.3
5.8
4.1
10.1
7.2
5.0
11.0
Height
(mm/
inch)
420/
16/
297/
11.7
210/
8.3
148/
5.8
364/
14.3
257/
10.1
182/
7.2
432/
17.0
14.0
Resolution(dpi)
900 1000 1100 1200 1300 1400 1500 1600
---------
---------
4759 5877 7113 8467 - - - - -
2381 2936 3555 4233 4963 5759 6614 7520 -
---------
7167--------
3564 4401 5326 6339 7441 - - - -
---------
---------
∼∼∼∼
2400
4
8/
279/
11.0
13.0
8/×11 (LT) 216/
5/×8/ (HLT) 140/5/216/8/4616 5702 6902 8217 - - - - -
8/×13 216/8/330/
---------
---------
Numerical Value: Data Size (Unit = KB)
23
Page 30

Appendix
When [Binary value 256 colors(gray-scale)] is Selected
4
Paper size
A3 297/
A4 210/
A5 148/
A6 105/
B4 257/
B5 182/
B6 128/
11×17 (DLT) 279/
8/×14 (LG) 216/8/356/
Width
(mm/
inch)
11.7
8.3
5.8
4.1
10.1
7.2
5.0
11.0
Height
(mm/
inch)
420/
16/
297/
11.7
210/
8.3
148/
5.8
364/
14.3
257/
10.1
182/
7.2
432/
17.0
14.0
Resolution(dpi)
100 200 300 400 500 600 ∼∼∼∼2400
18887552-----
94437768496----
470 1881 4234 7527 - - -
235 940 2117 3763 5880 8468 -
14165664-----
70828326372----
352 1410 3173 5642 - - -
18267304-----
11624648-----
8/
279/
11.0
8/
13.0
8/×11 (LT) 216/
5/×8/ (HLT) 140/5/216/
8/×13 216/8/330/
91336528217----
456 1826 4108 7304 - - -
10794316-----
Numerical Value: Data Size (Unit = KB)
24
Page 31

Troubleshooting
Troubleshooting
This section explains the possible causes and actions to take when the machine
does not scan an image in the expected manner, or when a scan setting error
message is displayed on the client computer from which scanning is performed
with TWAIN Driver.
When Scanning is not Performed as Expected
The scanned image is dirty. • The Exposure Glass, the ADF Exposure Glass,
the Pressure Plate or the Document Roller is
dirty.
The scanned image is distorted or out of
position.
The scanned image is upside down. • The original was placed upside down. Set the
The original image cannot be scanned. • The original was placed with the front and back
• The original was moved while being scanned. Do
not move the original during scanning.
• The original is not pressed flat against the Exposure Glass. Make sure the original is pressed flat
against the Exposure Glass.
original in the correct direction.
reversed. Set the original in the correct direction.
When the Scan Setting Error is Displayed
Reference
If an error message appears on the display panel on the machine, see the Scanner Reference.
Message Possible causes and Actions
Insufficient memory. Close all other applications, then restart scanning.
• Reset the scanning size.
• Lower and reset the resolution.
• Set with no compression. See Scanner Reference
for details on the setting.
4
Note
❒ The chart for half tone scanning on P.21
lationship between the Data Size and the Scanning
Area, as well as the Resolution”
apply. It is possible that scanning cannot be performed if large values are set for brightness
when using half tone or high resolution.
❒ When paper jams occur in the machine during
printing, it is also possible that scanning cannot
occur. In this case, after the jammed paper has
been removed, proceed with scanning.
might not always
“The Re-
25
Page 32

INDEX
A
Auto Run
,
9
B
Basic operations
,
13
C
Closing
,
16
D
DeskTopBinder V2 Lite
,
Scanning
13
H
Hardware Environment
M
,
Mode
15
, 1,
,
N
,
,
3
2
Network Delivery Scanner
Network TWAIN Scanner
P
Preview
,
16
S
Saving
Scanner Driver
7
Scanning
Software Environment
,
16
Installing
, 13,
,
14
9
,
5
T
5
TWAIN Driver
Help
,
19
, 1,
7
26
EE GB UE USA B361
Page 33

Note to users in the United States of America
Notice:
This equipment has been tested and found to comply with the limits for a Class B digital device, pursuant to Part 15 of the FCC Rules. These limits are designed to provide reasonable protection against
harmful interference in a residential installation. This equipment generates, uses and can radiate radio
frequency energy and, if not installed and used in accordance with the instructions, may cause harmful
interference to radio communications.
However, there is no guarantee that interference will not occur in a particular installation. If this equipment does cause harmful interference to radio or television reception, which can be determined by turning the equipment off and on, the user is encouraged to try to correct the interference by one more of
the following measures:
Reorient or relocate the receiving antenna.
Increase the separation between the equipment and receiver.
Connect the equipment into an outlet on a circuit different from that to which the receiver is
connected.
Consult the dealer or an experienced radio/TV technician for help.
Warning
Changes or modifications not expressly approved by the party responsible for compliance could void
the user's authority to operate the equipment.
Caution (in case of 100BASE-TX environment):
Network interface cable with ferrite core must be used for RF interference suppression.
Note to users in Canada
Note:
This Class B digital apparatus complies with Canadian ICES-003.
Remarque concernant les utilisateurs au Canada
Avertissement:
Cet appareil numérique de la classe B est conforme à la norme NMB-003 du Canada.
Declaration of Conformity
“The Product complies with the requirements of the EMC Directive 89/336/EEC and the Low Voltage
Directive 73/23/EEC.”
Warning
Changes or modifications not expressly approved by the party responsible for compliance could void
the user's authority to operate the equipment.
Copyright © 2001
Page 34

Printer/Scanner Unit Type 1045 Operating Instructions
EE GB
UE USA B361-8600
 Loading...