

Page 1
OPERATING INSTRUCTIONS
(Type 450e)
Read this manual carefully before you use this product and keep it handy for future
reference.
For safety, please follow the instructions in this manual.
Page 2

ScanRouter OPERATING INSTRUCTIONS (Type 450e)
Printed in Japan
UE USA B359-8531
Page 3

Introduction
To get maximum versa tility from this machin e all opera tors shoul d carefull y read and f ollow th e instructions in this manual. Please keep this manual in a handy place near the machine.
Please read the Safety Informat ion in the “Operating Instructions” before usi ng this mac hine. It c ontains
important information related to USER SAFETY and PREVENTING EQUIPMENT PROBLEMS.
Trademarks
Adobe, Acrobat are registered trademarks of Adobe Systems Incorporated.
Microsoft, Windows, Windows NT are registered trademarks of Microsoft Corporation in the United
States and/or other countries.
Netscape, Netsca pe Navigat or are re gistered tra demarks of Netscap e Communi cations Corporati on in
the United States and/or other countries.
Other product names us ed herei n are for iden tifica tion purp oses on ly and migh t be tradem arks of th eir
respective companies. We disclaim any and all rights in those marks.
Note
The proper names of Windows operating system are as follows:
®
•Microsoft
Windows® 95 operating system
•Microsoft® Windows® 98 operating system
®
•Microsoft
Windows NT® Server network operating system Version 4.0
•Microsoft® Windows NT® Workstation operating system Version 4.0
Page 4

Copyright © 2000
Page 5

TABLE OF CONTENTS
Introduction................................................................................................ 1
Overview................................... .................................................................... 1
Setup Orders................................................................................................. 2
Client Computer Operations.......................................................................... 2
1.ScanRouter Station Setup
System Requirements............................................................................... 3
Installing the ScanRouter Station Software............................................ 4
Uninstalling ScanRouter Station Software.................................................... 5
2.Station Management and Operation
Starting and Stopping ScanRouter Station............................................. 7
Starting as an application after Logging on to Windows ............................... 7
Starting as a Service when Windows is Started............................................ 8
Changing the Starting Option........................................................................ 8
Environment Settings ............................................................................... 9
Creating a Shared Folder as a Destination Folder........................................ 9
Environment Settings
[
]
Dialog Box................................................................... 9
User/Group............................................................................................... 11
Registering a User ...................................................................................... 11
Registering a Group.................................................................................... 15
Deleting a User/Group ................................................................................ 16
Changing the User/Group Order on the copier Panel Display .................... 17
Importing and Exporting User Information .................................................. 18
Daily Operation........................................................................................ 21
Checking the Error Log............................................................................... 21
Non-forwarding Documents ........................................................................ 22
Checking the Free Disk Space.................................................................... 22
ScanRouter Maintenance Tool............................................................... 24
3.User Tools
Delivery Scanner Setup.......................................................................... 25
Enabling Delivery Option................................ ..................................... ........ 25
Adjusting Delivery Settings ......................................................................... 27
Scanner Setup ........................................... ............................ .... ..... ..... .... 32
Items for Scanner Setup ............................................................................. 32
Resolutions and Original Sizes................................................................... 33
Registering Items for Scanner Setup.......................................................... 34
i
Page 6

4.Delivering Originals
Delivery Settings..................................................................................... 37
Setting Originals...................................................................................... 41
Scanning 1-sided Originals......................................................................... 42
Scanning 2-sided Originals......................................................................... 43
Setting Originals on the Platen Glass ......................................................... 44
Setting Originals in the Document Feeder (ADF)........................................ 45
Setting the Direction of the Originals .................................................... 46
Changing the Scanner Settings Temporarily........................................ 47
5.Client Operation
Receiving Documents with Client Software.......................................... 49
System Requirements................................................................................. 49
Setting up the Reception Environment for Client Software......................... 50
Receiving Documents................................................................................. 54
Client Software Properties .......................................................................... 57
Displaying Documents in the Shared Folders...................................... 61
6.Appendix
Troubleshooting...................................................................................... 63
Copier...................... .................................................................................... 63
ScanRouter Client Software ........................................................................ 63
ScanRouter Station Error Log Messages.............................................. 64
The Copier Error Messages.................................................................... 65
File Formats............................................................................................. 68
INDEX........................................................................................................ 69
ii
Page 7
Introduction
Overview
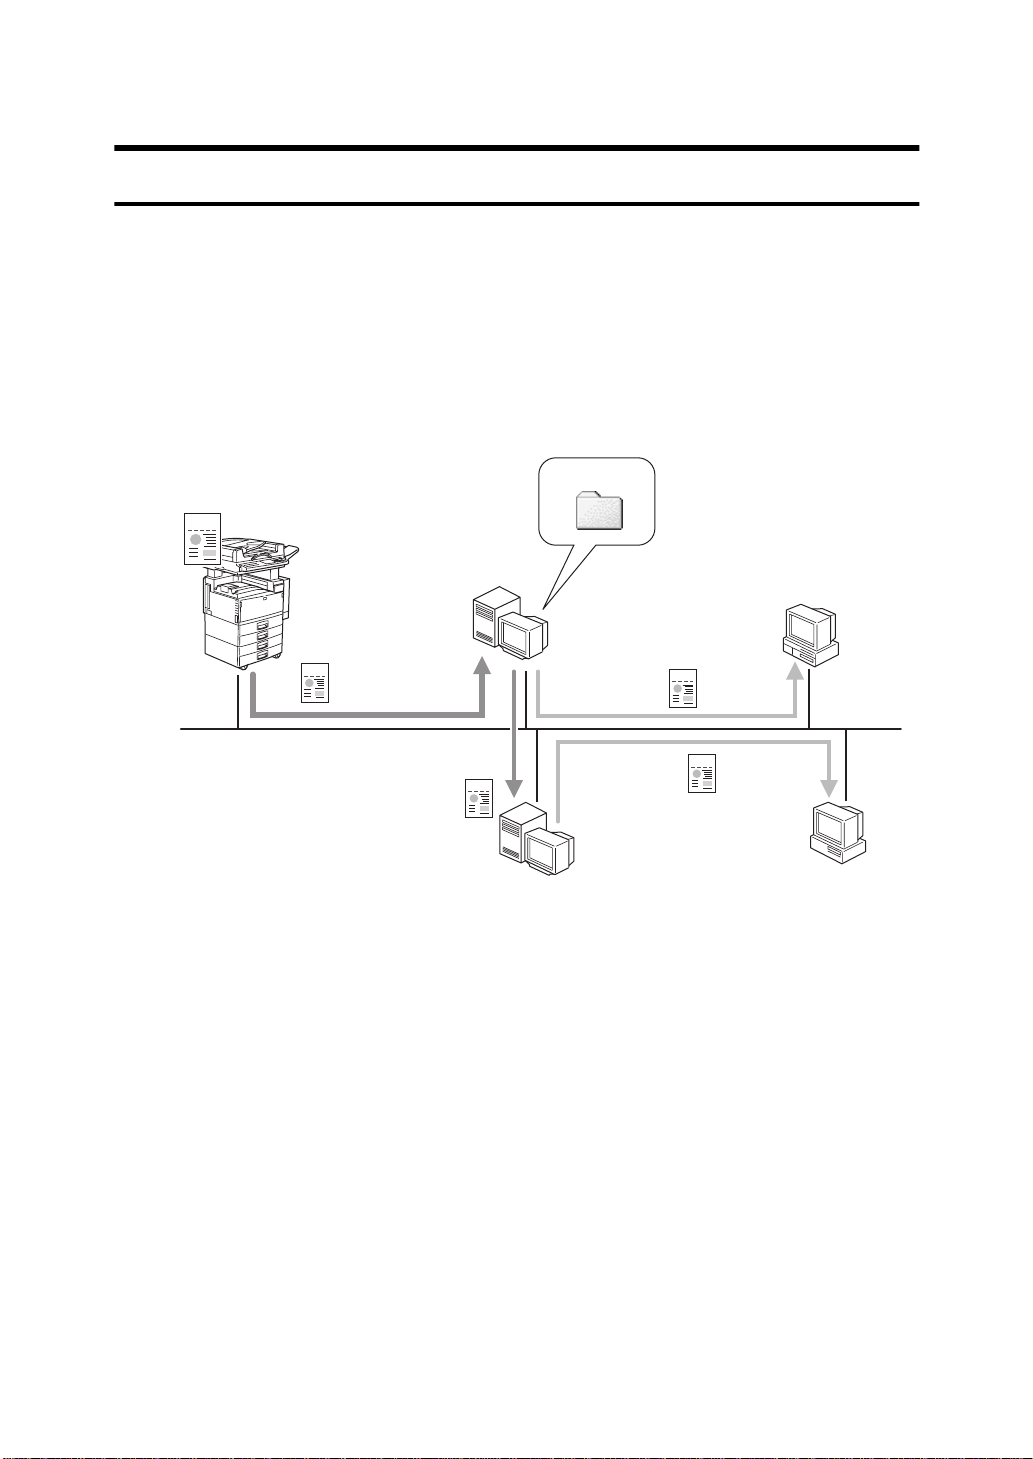
With ScanRouter, you can deliver scanned documents from the copier to folders
located on the station, or directly to file servers on the network.
❖
Summary of the copier Delivery Operations
The illustration below describes examples of document delivery with the
copier. After being delivered to ScanRouter Station, the documents are processed in various ways depending on the settings of ScanRouter Station.
C
SCN
SCN
A. ScanRouter Station
B. Client
C. User Folder
D. Delivered
E. File Server
F. Received using Client Software
A
F
SCN
SCN
SCN
D
E
G
B
B
TNSX190E
G. Browsed/Copied through the network
1
Page 8

Documents sent from the copier to ScanRouter Station can be delivered and
saved to the folders as below.
A User folders located on ScanRouter Station
B Shared folders selected as destination folders
Note
❒
A destination folder can be selected from shared folders located on ScanRouter Station, or located on other file servers on the network.
Setup Orders
To deliver documents received from the copier with ScanRouter, ScanRouter
Station and the copier must be properly configured. First, configure the basic
settings to be used, and then make a delivery from the copier after the environment settings have been made.
In this manual, the main references are as follows:
A “ScanRouter Station Setup”
B “Station Management and Operation”
C “User Tools”
D “Delivering Originals”
⇒
P.25
⇒
⇒
P.37
P.3
⇒
P.7
Client Computer Operations
With the client computer, you can check the contents of the document by using
the appropriate application for that type of file. The following are examples of
client computer operations.
❖
When documents are saved in the user folder
If “Folder” has been selected in
[
Delivery Type
alog box, the documents are saved in the user folder located on ScanRouter
Station.
To open these documents from the client computer, use ScanRouter Client
Software to receive the documents and use the appropriate application for
that type of file.
Reference
“Receiving Documents with Client Software” ⇒ P.49
in the
]
[
Environment Settings
di-
]
❖
When documents are delivered to the destination folder
If “Save to File” has been selected in
[
Delivery Type
in the
]
[
Environment Settings
]
dialog box, the documents are saved in the selected destination folder.
To open these documents from the client computer, access the destination
folder through the network and use the appropriate application for that type
of file.
Reference
“Displaying Documents in the Shared Folders” ⇒ P.61
2
Page 9

1. ScanRouter Station Setup
System Requirements
The computer used as ScanRouter Station must meet the following system requirements.
Limitation
❒
Do not install this application in a computer used as a mail server, Web server, database, and so on.
❖
CPU
Pentium 133MHz minimum (200MHz or faster recommended)
❖
RAM
32MB minimum (64MB or more recommended)
❖
Hard Disk Space
At least 10MB of disk space is required for installation.
The computer used as ScanRouter Station needs 300MB or more of free disk
space in the partition where the application is installed. This space is used for
saving documents.
❖
Operating Systems
• Microsoft Windows 95 (with Service Pack 1, or OSR2 or later)
• Microsoft Windows 98
• Microsoft Windows NT Server 4.0 (with Service Pack 3 or later)
• Microsoft Windows NT Workstation 4.0 (with Service Pack 3 or later)
Note
❒
If installing this application in a Windows NT Server, we recommend that
you install the application in a member server. Do not install this application in a primary domain controller or a backup domain controller.
❖
Protocols
TCP/IP protocol
Note
❒
To deliver documents to file servers on the network, additional protocols
may be required.
3
Page 10

1
ScanRouter Station Setup
Installing the ScanRouter Station Software
There are two ways to start ScanRouter Station: as an application after logging
on to Windows, or as a Service when Windows is started.
Decide which option you want to select before beginning the installation, because this setting is made during the installation.
Note
❒
After installation, you can still change the way in which this application is
started.⇒ P.8 “Changing the Starting Option”
❒
To prevent others from using the station when installing this application in
Windows NT 4.0, we recommend that you start this application as a Service.
Comparing the sta rt in g op tio ns :
Starts as an application after logging on to Windows
User starts this application
manually when logging on
to Windows.
Status
Delivery to destination
folders in the file server on
the network
Note
❒
Quit all open applications before beginning the installation.
❒
When installing in a computer running Windows NT 4.0, log on as a member
of the Administrators group.
or
Starts automatically after a
shortcut to this application
is placed in the [
folder
Available Not available
StartUp
Starts as a Service
Starts automatically when
Windows is started (no
logon process is required)
]
A Start Windows on the computer that will be used to run ScanRouter Sta-
tion, and then insert the ScanRouter CD-ROM into the computer.
The language selection dialog box appears.
Note
❒
If the window doesn’t appear, double-click on “Setup.exe” located on the
root directory of the CD-ROM, to start the Installer.
B Select the language of the application to be installed, and click
4
C Click
[
ScanRouter Station
.
]
[
OK
.
]
Page 11

Installing the ScanRouter Station Software
D When the
The license contract for this application is displayed.
E Click
F When the
nation if required, and then click
[
Welcome
.
[
Yes
]
[
Choose Destination Location
G Select the starting option and click
H When selecting
this application in the
Note
❒
If placing a shortcut to this application in the
Station starts automatically after logging on.
When installation is complete, the
Important
❒
Do not use Windows Explorer or other applications to access the folder
where ScanRouter is installed, or problems could occur.
dialog box appears, click
]
dialog box appears, change the desti-
]
[
Next
[
Next
[
Launch after Log on
[
StartUp
, select the option to place a shortcut to
]
folder.
]
[
Setup Complete
.
[
Next
]
.
]
.
]
[
StartUp
dialog box appears.
]
folder, ScanRouter
]
Uninstalling ScanRouter Station Software
1
If you want to save the documents in the user folder, back up the documents
with ScanRouter Maintenance Tool before the uninstallation.⇒ P.24 “ScanRouter
Maintenance Tool”
A If ScanRouter Station is running, stop the station.
Reference
“Stopping the Station” ⇒ P.8
B Delete ScanRouter from the computer using
trol Panel.
[
Add/Remove Programs
in Con-
]
C Delete the folder in which ScanRouter was installed.
If the location of the folder has not been changed, the path name for this folder
is “Program Files\ScanRouter”.
5
Page 12

1
ScanRouter Station Setup
6
Page 13
2. Station Management and Operation
Starting and Stopping ScanRouter Station
There are two ways to start ScanRouter Station: as an application after logging
on to Windows, or as a Service when Windows is started.
The setting for starting ScanRouter Station should be made during the installation, however, you can change this setting after the installation. ⇒ P.8 “Changing
the Starting Option”
Limitation
❒
If the free disk space in the partition where this application is installed becomes less than 200MB, you will not be able to use the station until 200MB of
free disk space becomes available. ⇒ P.22 “Checking the Free Disk Space”
Starting as an application after Logging on to Windows
If delivering documents to file servers on the network, use the station user name
to log on.
If logging on with a different user name, a network drive mapping may change,
or delivery documents may not be available due to the access privileges of the
destination folder.
Starting the Station
A Click
ScanRouter Station
[
B When a message asks if you want to start ScanRouter Station, click
After the station starts, the icon of ScanRouter Client Manager is displayed on
the taskbar.
If clicking
Note
❒
ScanRouter Client Manager is the application to enable ScanRouter Client
Software to receive documents. Starting or stopping ScanRouter Station affects operations made with ScanRouter Client Manager.
❒
When right-clicking on the icon of ScanRouter Client Manager, the
command appears. However, do not use this command to exit from ScanRouter Client Manager, or you will not be able to receive documents with
ScanRouter Client Software.
[
Start
, point to
]
]
, click
No
]
[
.
[
Start
[
Programs
from the main dialog box.
]
, point to the
]
[
ScanRouter
folder and click
]
[
Yes
[
Exit
.
]
]
7
Page 14

Station Management and Operation
Stopping the Station
2
A Click
ScanRouter Station
[
B Click
[
C When a message asks if you want to stop the station, click
Station Status
[
Client Manager.
[
Start
Stop
, point to
]
.
]
is switched to “Stopped” and you can exit from ScanRouter
]
.
]
[
Programs
, point to the
]
[
ScanRouter
folder and click
]
.
[
Yes
]
Starting as a Service when Windows is Started
You don’t have to do anything if this option is selected. ScanRouter Station starts
automatically when Windows is started.
Starting or stopping ScanRouter Station affects operations made with ScanRouter Client Manager. No icon is displayed on the taskbar when ScanRouter Station
is running as a Service.
Limitation
❒
If starting as a Service, delivery to file servers on the network is not possible.
Changing the Starting Option
To change the starting option, you must reinstall this application and select the
option you want to use during the installation (this overwrites the old option).
Follow the instructions to overwrite the application. ⇒ P.4 “Installing the Scan-
Router Station Software”
Important
❒
Do not uninstall ScanRouter Station Software before reinstalling. If you do, all
registered information will be deleted.
❒
Make sure that ScanRouter Station is not running before beginning the reinstallation procedure. ⇒ P.8 “Stopping the Station”
8
Page 15

Environment Settings
Environment Settings
Creating a Shared Folder as a Destination Folder
To deliver a scanned document from the copier to a selected folder, you must
first create a folder in the destination computer and set it as a shared folder.
A destination folder can be selected from two kinds of folder.
• A shared folder in the computer where ScanRouter Station Software is installed.
• A shared folder in file server located on the network.
Note
❒
The user who starts ScanRouter Station must have the following access
permission depending on the operating system in use where the share
folder is located.
2
• Windows 95/98:
• Windows NT 4.0:
Note
❒
To deliver documents to the file server, a network drive must be mapped to
the selected folder which is located in the file server.
[
Environment Settings] Dialog Box
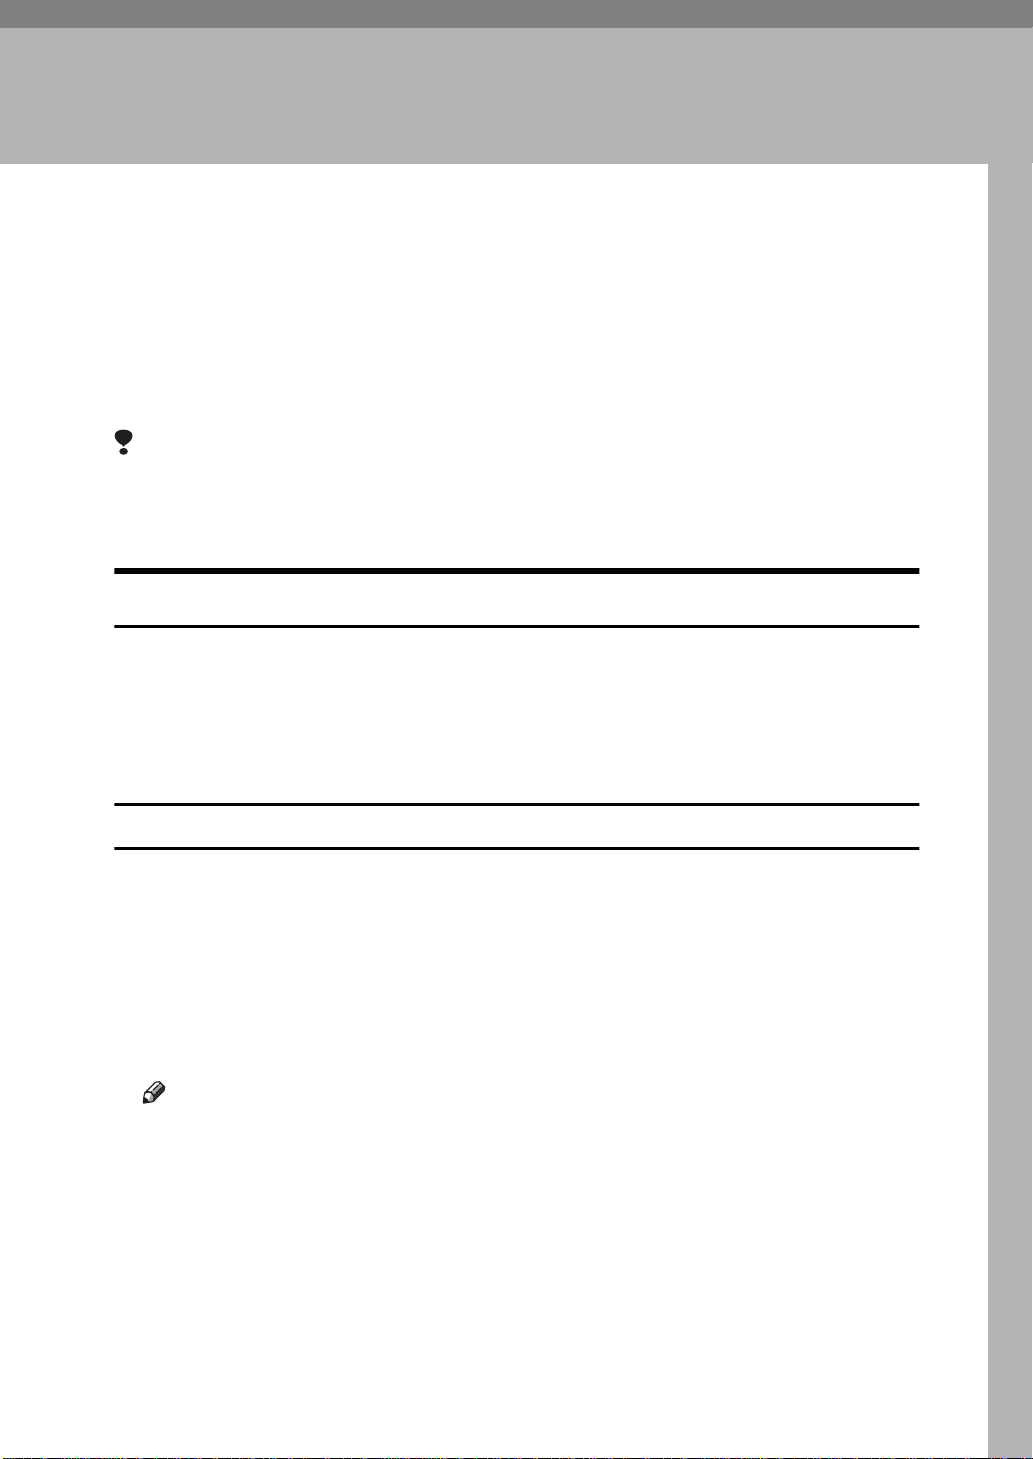
You can change default settings such as the password for ScanRouter Station.
❖
Displaying the [Environment Settings] Dialog Box
A Click
ScanRouter Station
[
B When a message asks if you want to start the station, click
C Click
D Enter the administrator password and then click
Note
❒
When the installation is complete, just click
has been set.
, point to
[
Start
]
.
]
[
Environment Settin gs
access permission
[
Full
]
or
[
Full
]
[
Change
[
Programs
]
, point to the
]
.
access permission
]
[
ScanRouter
[
OK
]
because no password
[
OK
]
folder and click
]
.
[
OK
]
.
9
Page 16
Station Management and Operation
1
2
2
3
4
5
Administrator
1.
[
Click
ministrator password. To prevent an inadvertent settings change, we recommend
that you use this password function.
Change Password
]
to change the ad-
Note
The maximum length of the password
❒
is 8 characters.
This password is the same as the
❒
password used in ScanRouter Maintenance Tool.
Non-forwarding Folder
2.
Select a folder to hold documents that
cannot be delivered to their destination
folders.
Delivery Type
3.
Select a document delivery type. This
setting appears as the default delivery
type when registering a user.
•Save to File
Documents are saved in the destination folder selected in [
tion
] in the [
You can set the default destination
folder by clicking [
•Folder
Documents are saved in the user folder located in the station. The saved
documents can be received by the client computer with ScanRouter Client
Software.
User Settings
Delivery Destina-
] dialog box.
Properties
].
10
Note
The file format used for saved docu-
❒
ments is singlepage TIFF or JPEG.
Limitation
❒
You cannot select a folder in the
network as a non-forwarding folder. A non-forwarding folder must
be a folder in the computer where
ScanRouter Station Software is installed.
Format
4.
Select the file format to save documents.
This setting appears as the default file
format when registering a user.
Reference
For more information about the file
formats, see P.68
Error Log
5.
Set the maximum number of error log
items to be saved. When the number of
items exceed this number, the oldest item
is deleted.
“File Formats”
.
Page 17
User/Group
User/Group
Registering a User
The way of delivered and saved documents depends on the user settings. To deliver documents from the copier, you need to register users with ScanRouter Station.
Note
❒
After registering a user with ScanRouter Station, a user folder is created on
the station. If “Folder” is selected in
in the user folder.
❒
It may be convenient for you to create a group if you want to deliver the same
document to multiple users.⇒ P.15 “Registering a Group”
Limitation
❒
The maximum number of users and groups that can be registered is 99.
[
Delivery Type
, documents will be saved
]
2
A Click
ScanRouter Station
[
[
Start
, point to
]
.
]
[
Programs
, point to the
]
[
ScanRouter
folder and click
]
B When a message asks if you want to start ScanRouter Station, click
C Click
[
User/Group
D Enter the administrator password and then click
Note
❒
When the installation is complete, just click
been set.
E Click to select the Short ID number (001-099), and then click
You can also double-click the Short ID number.
.
]
.
[
OK
]
because no password has
[
OK
]
[
Register
[
Yes
]
.
]
.
11
Page 18

Station Management and Operation
Note
❒
The Short ID number can be used to select the delivery destination from
the copier. You can select the delivery destination with a simple process
with this number.
❒
The icon displayed in front of the user/group name represents : User
Group
2
F When the
then click
[
Registration Type Selection
.
[
OK
]
dialog box appears, click
]
G Enter the User name and make the appropriate settings.
Reference
For more information about user settings, see P.13 “[User Settings] Dialog
Box”.
H When the settings are complete, click
[
OK
.
]
[
User
and
]
12
Page 19
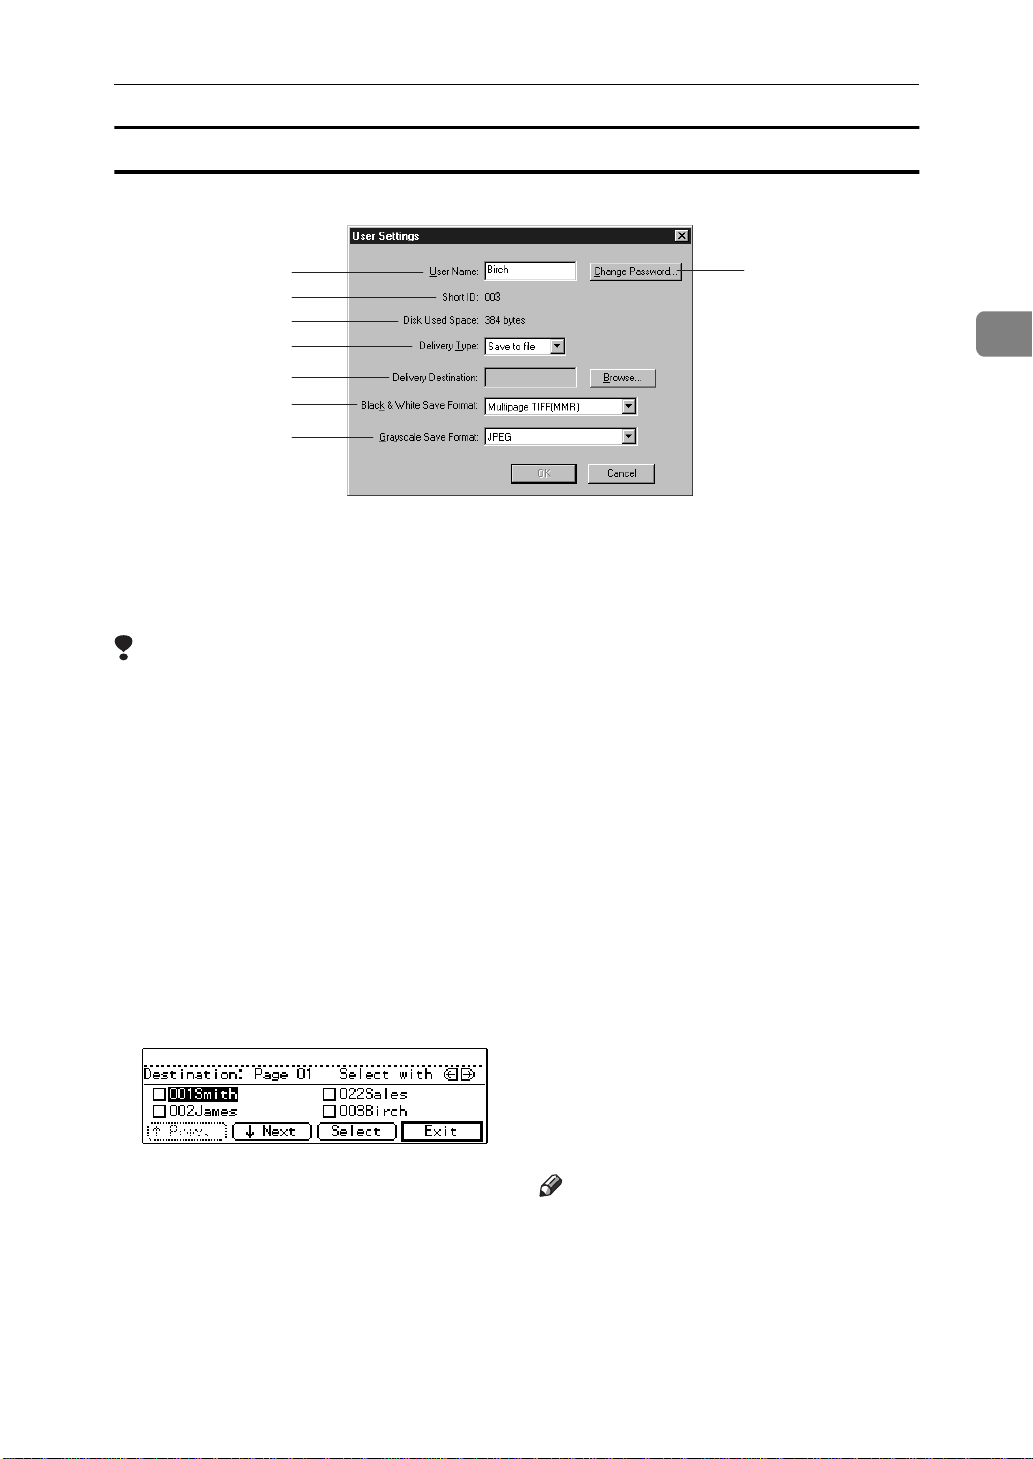
[
8
User Settings] Dialog Box
1
2
3
4
5
6
7
User/Group
2
User Name
1.
Enter the name of the user. The maximum length of the User Name is 14 characters.
Limitation
❒
The following characters cannot be used in the User Name:
+%#”&<>\:/
❒
Starting with a space, and ending
with a space or period (.) is not allowed in the User Name.
❒
A capital letter and a lower-case letter are considered to be the same.
Short ID
2.
The Short ID number can be used to select
the delivery destination from the copier
and is displayed as a prefix to the User
Name.
Delivery Type
4.
From the drop-down menu, select a location where documents are delivered in
case a user is selected as the delivery destination.
•Save to File
Select this option if you want to deliver the documents to the destination
folder in the computer. The destination folder can be selected in [
Destination
•Folder
Select this option if you want to save
the documents in the user folder located on ScanRouter Station. The saved
documents can be received by the client computer with ScanRouter Client
Software.
Delivery Destination
5.
Select a destination folder if “Save to
File” is selected in [
A destination folder can be selected from
shared folders located on ScanRouter Station, or located on file servers on the network.
].
Delivery Type
Delivery
].
Disk Used Space
3.
The disk space used by the user folder.
Note
To deliver documents to the file serv-
❒
er, a network drive must be mapped
to the selected folder which is located
on the file server.
13
Page 20

2
Station Management and Operation
Black & White Save Format
6.
Select the file format of a Black & White
image document from the drop-down
list.
A Black & White image is a document
whose document type is set as “Text”,
“Text/Photo”, or “Photo” when scanned
from the copier.
Reference
For more information about the
file formats, see P.68 “File For-
mats”.
Note
This option is available only when
❒
“Save to File” is selected in [
].
Type
Grayscale Save Format
7.
Select the file format of a Grayscale image
document from the drop-down list.
A Grayscale image is a document whose
document type is set as “Gray Scale”
when scanned from the copier.
Deliviry
Reference
For more information about file
formats, see P.68 “File Formats”.
Note
This option is available only when
❒
“Save to File” is selected in [
Type
].
[
Change Password
8.
The password for the user folder can be
changed.
]
Deliviry
14
Page 21

User/Group
Registering a Group
You can register multiple users to a group. It may be convenient for you to create a group when delivering the same document to multiple users. If you select
a group for the delivery destination, documents are delivered to each of the users in the group. The delivery type varies depending on the settings of each user.
Limitation
❒
The maximum number of users and groups that can be registered is 99.
A Click
ScanRouter Station
[
[
Start
, point to
]
.
]
[
Programs
, point to the
]
[
ScanRouter
folder and click
]
B When a message asks if you want to start ScanRouter Station, click
C Click
[
User/Group
D Enter the administrator password and then click
E Click to select a Short ID number (001-099), and then click
You can also double-click the Short ID number.
Note
❒
The Short ID number can be used to select the delivery destination from
the copier. You can select the delivery destination with a simple process
with this number.
F When the
click
[
Register Type Selection
.
OK
]
[
G Enter a group name in the
.
]
.
[
OK
]
[
Register
dialog box appears, click
]
[
Group Name
box.
]
[
Group
and then
]
]
[
Yes
.
2
.
]
The maximum length of the group name is 14 characters.
Limitation
❒
The following characters cannot be used in the Group Name: +%#”&<>\:/
❒
Starting with a space, and ending with a space or period(.) is not allowed
in the Group Name.
❒
A capital letter and a lower-case letter are considered to be the same.
H Click to select the user you want to add to the group from the
list, and then click
You can select multiple members using the SHIFT key or the CTRL key.
Note
❒
To delete a member from the group, click to select the member you want
to delete from the
I When the group settings are complete, click
.
[←]
[
Group Member
list, and then click
]
.
[
OK
]
[→]
[
.
Non-member
]
15
Page 22

2
Station Management and Operation
Deleting a User/Group
With this function, you can delete a user/group. If you delete a user, all saved
documents in that user’s folder will be deleted.
Note
❒
When “Save to File” is selected in
box, the destination folder and the documents in that folder will not be deleted even if the user is deleted.
❒
After deleting a user, the user is also automatically deleted from any groups
to which it belonged.
[
Delivery Type
in the
]
[
User Settings
dialog
]
A Click
ScanRouter Station
[
[
Start
, point to
]
.
]
[
Programs
, point to the
]
[
ScanRouter
folder and click
]
B When a message asks if you want to start ScanRouter Station, click
C Click
[
User/Group
D Enter the administrator password and then click
E Click to select the user/group you want to delete, and then click
You can select multiple users/groups using the SHIFT key or the CTRL key.
F After the confirmation message appears, click
.
]
.
[
OK
]
[
Delete
.
[
OK
]
[
Yes
.
]
.
]
16
Page 23
User/Group
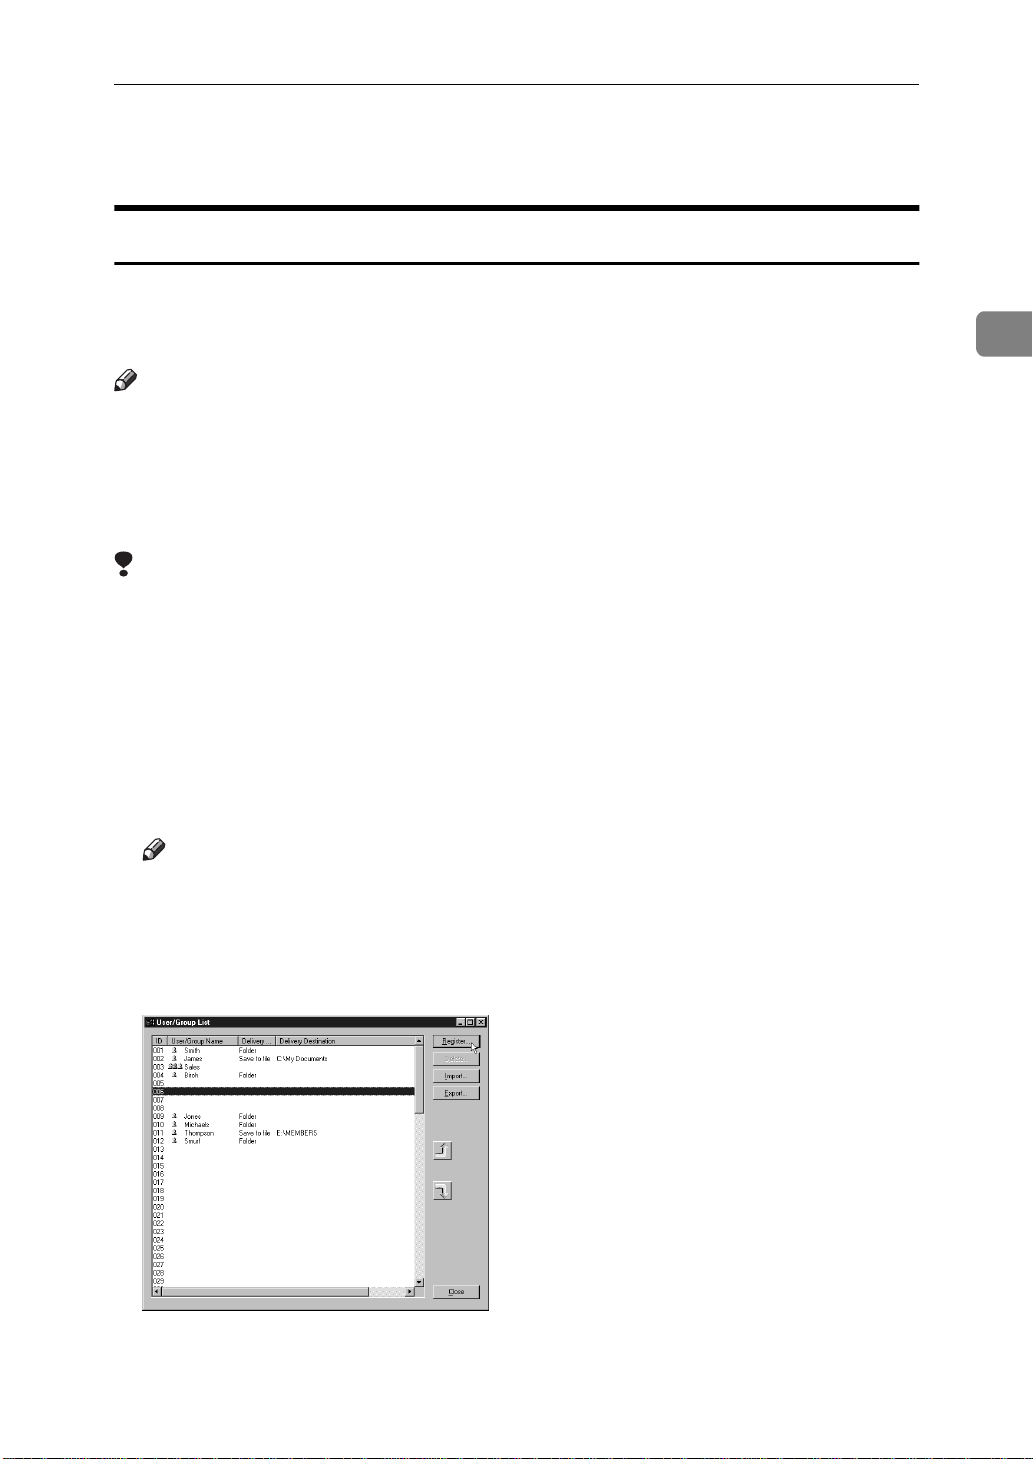
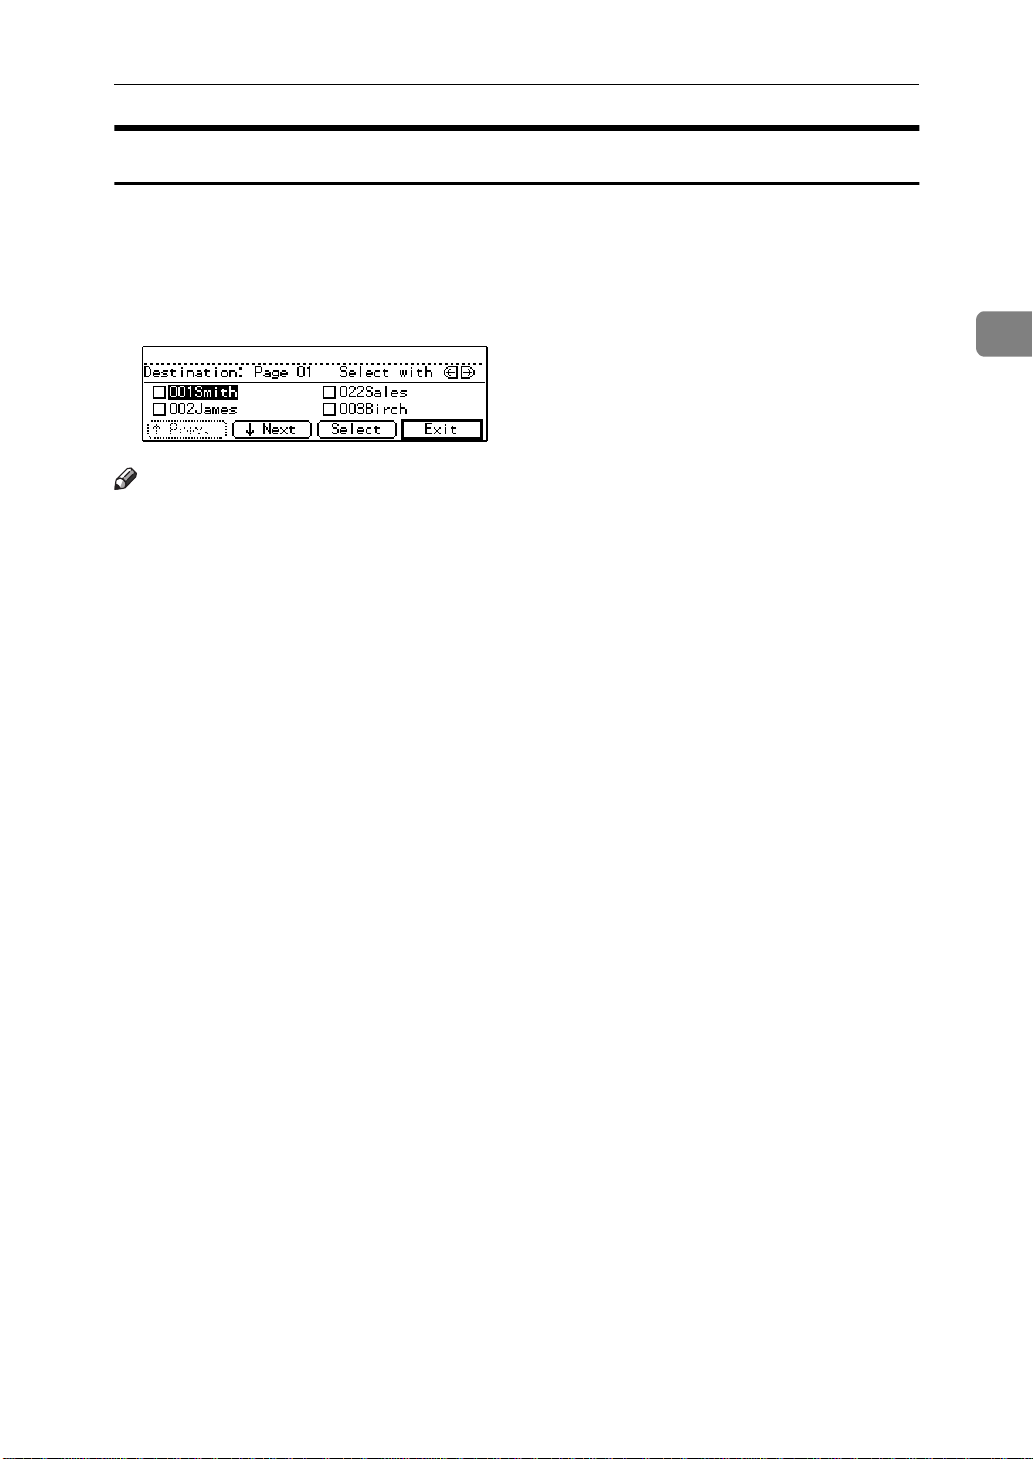
Changing the User/Gro up Order on the copier Panel Display
You can change the order of users/groups in the
This change will be reflected on the copier Panel Display. It may be convenient
for you to put frequent-users on top of the list, or to segment users by department.
Example: The copier panel display
Note
❒
Short ID numbers remain the same after changing the order of the list.
A Click
ScanRouter Station
[
[
Start
, point to
]
.
]
[
Programs
, point to the
]
[
User/Group List
[
ScanRouter
]
B When a message asks if you want to start ScanRouter Station, click
C Click
[
User/Group
D Enter the administrator password and then click
.
]
.
[
OK
]
dialog box.
]
folder and click
.
[
Yes
]
E Click to select the user/group, whose position on the list you want to
change.
You can select multiple users/groups using the SHIFT key or the CTRL key.
2
F Click
You can also drag the line of the user/group to a different position.
[↑]
or
[↓]
.
17
Page 24

2
Station Management and Operation
Importing and Export ing User Information
User settings can be saved as a CSV file format (Export), or can be edited by other
applications and opened with ScanRouter Station (Import).
Limitation
❒
Only the user information is saved in the CSV file. You cannot import or export the group information.
Import
Imports the Short ID and User Name from the CSV file.
Note
❒
Only the Short ID and User Name settings are imported. Other items are not
imported.
❒
[
Delivery Type
❒
For more information about importing the CSV file format, see P.20 “CSV File
Format”.
A Click
[
[
Start
ScanRouter Station
B When a message asks if you want to start ScanRouter Station, click
C Click
[
User/Group
D Enter the administrator password and then click
E Click
[
Import
F Select the CSV file you want to import, and click
If the contents of the CSV file are not correct, an error message is displayed.
Correct the error and import the CSV file again.
of the imported users will be set to “Folder”.
]
, point to
]
.
]
.
]
.
]
[
Programs
, point to the
]
[
ScanRouter
[
OK
[
Open
folder and click
]
.
]
.
]
[
Yes
.
]
G If you select the option of overwriting current Short ID numbers, a message
asks if you want to continue this process every time. Click
Note
❒
If you click
with the contents of the CSV file. In this case, password for the user folders
whose settings are overwritten become invalid.
, the current Short ID and User Name settings are replaced
[
OK
]
[
OK
or
]
[
Cancel
.
]
18
❒
If you click
❒
When overwriting the settings, saved documents are processed as follows:
• All documents saved in the user folders will be deleted.
• Neither the destination folders nor the documents in the destination
folders will be deleted.
[
Cancel
, the current Short ID and User Name settings are kept.
]
Page 25

User/Group
Export
Writes the current User Settings to the CSV file.
Note
❒
For more information about exporting to the CSV file format, see P.20 “CSV
File Format”.
Important
❒
We recommend that you edit the exported data with a text editor. When you
import the exported data into some applications such as a spreadsheet, some
characters may be treated as numerals so that the following errors may occur:
• First characters such as “0” and “+” may be ignored.
• The display style may be changed.
A Click
ScanRouter Station
[
[
Start
, point to
]
.
]
[
Programs
, point to the
]
[
ScanRouter
folder and click
]
B When a message asks if you want to start ScanRouter Station, click
C Click
[
User/Group
D Enter the administrator password and then click
E Click
[
Export
F Select the file you want to export and click
.
]
.
[
OK
]
.
]
.
[
Save
]
[
Yes
2
.
]
19
Page 26

2
Station Management and Operation
CSV File Format
The information in the user folder can be imported/exported to the file format
described below.
Enter “ScanRouterUsr” in the first line of the CSV file, and enter the user information in the following lines. Information about each user item (A-K) must be
separated with a comma (,) in each line.
ScanRouterUsr
A, B, C, D, E, F, G, H, I, J, K
A, B, C, D, E, F, G, H, I, J, K
Exported Information from ScanRouter
AUser Name
B Short ID (001-099)
C-1
DFOLDER
EBlank
FBlank
G Black & White Save Format
H Grayscale Save Format
I MAKE_THUMB
J MANUAL_DELETE
KBlank
Note
❒
When importing the data into ScanRouter Station, any characters (including
a space) can be used in items other than User Name and Short ID, however,
each item must be separated with a comma (,).
❒
When exporting the data, the description for each item is added to the text of
“ScanRouterUsr” in the first line, however, these items are not necessary and
will be ignored when the data is imported.
20
Page 27

Daily Operation
Daily Operation
Checking the Error Log
While using ScanRouter Station Software, errors are saved in the error log. Examine the error log whenever improper actions or missed deliveries occur.
Note
❒
You can change the number of items to be stored in the error log with the
dialog box.
vironment Settings
❒
For more information about messages shown in the error log, see P.64 “ScanRouter Station Error Log Messages”.
]
[
En-
2
A Click
ScanRouter Station
[
B When a message asks if you want to start ScanRouter Station, click
C Click
The
[
[
Error Log
, point to
[
Start
]
Error Log
[
Programs
.
]
.
]
dialog box appears.
]
, point to the
]
[
ScanRouter
folder and click
]
[
Yes
.
]
D To see additional detailed information about a log entry, double-click on
the line you want to see.
The
Detailed Error Log
[
E If the error log includes a document, click
image.
Deleting the Error Log
Deletes all of the items saved to the log.
Note
❒
The log items are also deleted automatically, from the oldest item to the newest, when the number of items exceeds the value set in the
dialog box.
tings
]
dialog box appears.
]
[
Show
to see the first page of the
]
[
Environment Set-
A Click
[
Delete All Log
B Enter the administrator password and click
in the
]
[
Error Log
dialog box.
]
[
OK
.
]
C When a message asks if you want to delete the error log, click
[
OK
.
]
21
Page 28

Station Management and Operation
Non-forwarding Documents
Documents which cannot be delivered to their destination folders are saved in
the non-forwarding folder set in the
trators must check the folder periodically and take appropriate actions with the
saved documents.
[
Environment Settings
dialog box. Adminis-
]
2
Note
❒
You can configure the non-forwarding folder settings in the
dialog box. ⇒ P.9 “[Environment Settings] Dialog Box”
tings
]
[
Environment Set-
Checking the Free Disk Space
When ScanRouter Station Software starts, the main dialog box shows the free
disk space in the following drives:
• The drive where ScanRouter Station Software is installed
• The drive selected for the delivery destination
Note
❒
The information in the main dialog box is not refreshed automatically. Click
[
Refresh
to get an accurate description of the available hard disk space.
]
A shortage of free disk space may cause problems such as stopping the station
or preventing delivery of documents to the destination folder. Check the
amount of available hard disk space periodically to make sure the required
amount of free space is available.
Note
❒
When the amount of available hard disk space reaches the limits described
below, the drive information is displayed in red and documents will not be
delivered to the destination folders (the documents will be saved in the nonforwarding folder).
• 200MB for the drive where ScanRouter Station Software is installed
• 50MB for the drive on the network computer
❒
Keep 200MB or more free disk space in the selected drive where the non-forwarding folder is located, because documents which cannot be delivered to
their destination folders are saved in the non-forwarding folder.
22
Page 29

Daily Operation
❒
There is a possibility that a large-sized document may not be delivered even
if there is enough free disk space.
❒
If the free disk space in the drive, where this application is installed, becomes
less than 200MB, the station stops until the free disk space becomes available.
❒
The icon of the non-connected network drive is marked with an “X” and “Disable” is displayed in the
[
Free Space
column.
]
2
23
Page 30

Station Management and Operation
ScanRouter Maintenance Tool
With Maintenance Tool which comes with ScanRouter Station Software, you can
initialize the system or make a backup.
To start ScanRouter Maintenance Tool, click
the
ScanRouter
[
folder and click
]
[
ScanRouter Maintenance Tool
Start
[
, point to
]
[
Programs
.
]
, point to
]
2
Note
❒
Make sure that ScanRouter Station is stopped when starting ScanRouter
Maintenance Tool.
❖ [
Initialization
Returns ScanRouter Station settings to their default values, the way they were
immediately after installation. All information about registered users, and all
saved documents are deleted.
❖ [
Initialize Folder
Moves the saved documents from the user folder to the selected folder, and
initializes the user folder.
Click this button to show the folder selection dialog box, and then select the
destination folder.
❖ [
Backup
Backs up all information about the system.
Click this button to show the folder selection dialog box, and then select the
folder to be backed up.
Note
❒
Select a folder which contains no sub-folders or files.
]
]
]
24
❖ [
Restore
Restores all information about the system that was backed up.
Click this button to show the folder selection dialog box, and then select the
folder where the backup data was stored.
❒
❖ [
Export Error Log
Writes an error log in CSV file format.
❖ [
Change Administrator Password
Click this button to change the administrator password.
❒
❒
]
Note
All new data which has been registered since the backup will be deleted.
]
]
Note
The maximum length of the password is 8 characters.
This password is the same as the password used in ScanRouter Station.
Page 31

3. User Tools
To use the copier as a network delivery scanner, it must be configured for use as
both a network scanner and a delivery scanner.
First, see the “Operating Instructions” that comes with Scanner Option for instructions on setting up the network scanner, and then configure the delivery
scanner settings.
Delivery Scanner Setup
The following settings are required to
use the copier as a network delivery
scanner.
Note
❒
When using the copier as a delivery scanner, initial network settings are required in addition to
the settings described below. If the
setup has not been completed yet,
see the “Operating Instructions”
that comes with Scanner Option
for information on how to do this.
Enabling Delivery Option
First, select
[
Installed
Option. If you don’t do this, you
won’t be able to change any delivery
settings.
A Press {
User Tools/Counter
Sort
Staple
Stac
1-Sided 2-Sided
2-Sided 2-Sided
for the Delivery
]
2
1
1
Book 2-Sided
2
2
2
}.
User T ools / Counter
To use the copier as a network delivery scanner, the following items
should be configured:
Note
❒
Settings of the items marked with
“'” are necessary for delivery and
must be configured. Settings of
other items can be changed if required.
Setting Item Required
Delivery option '
Delivery Server Address '
Function Priority
TWAIN connection time out.
Scanner Auto Clear Time
Date
Auto Address Update
Measurement Unit
B Press {
The
[
pears.
C Press
} on the Number keys.
5
Scanner Features
[
Config.
.
]
menu ap-
]
PEN0200TN
ND2C0103
25
Page 32

User Tools
3
D Press
play
press
E Press
The current setting is displayed
with “*”.
↓
[
[
7.Delivery option
OK
[
[↓]
several times to dis-
Next
]
.
]
, and select
, and then
]
[
Installed
.
]
ND2C0103
ND2C0102
H Press
[
PrevMenu
and press
]
[
Exit
.
]
ND2C0104
I Turn off the copier’s main switch
and then turn it on.
Now it is ready to adjust the delivery settings.
F Press
G Press
.
[
OK
]
[
PrevMenu
ND2C0103
.
]
ND2C0104
26
Page 33

Adjusting Delivery Settings
Delivery Scanner Setup
C Enter the IP address of Scan-
Router Station.
A Press {
B Press {
The
[
User Tools/Counter
Sort
Staple
Stac
1-Sided 2-Sided
2
1
1
Book 2-Sided
2
2-Sided 2-Sided
2
2
} on the Number keys.
5
Scanner Features
}.
User T ools / Counter
menu ap-
]
PEN0200TN
pears.
C First, set the IP address of Scan-
Router Station.
A Press
[
Network
.
]
To move between each field, press
<
or >.
If you make a mistake, press
{
Clear/Stop
D Press
} and try again.
.
[
OK
]
The IP address of ScanRouter
Station has been set.
E Press
[
PrevMenu
.
]
3
ND2C0103
B Press
display
dress
↓
[
, and then press
]
several times to
Next
]
7. Delivery Server Ad-
[
[OK]
.
ND2C0101
ND2C0103
D Press
[
Config.
.
]
Next, adjust the settings for the
scanner-side operations.
ND2C0104
ND2C0103
27
Page 34

User Tools
3
E Select a priority setting from De-
livery/TWAIN functions.
Select the display mode when
ing the copier to a scanner. If you
want to use the machine only as a delivery scanner, select
[
machine is used as a TWAIN scanner
and scans are made from the copier,
select
[
TWAIN
A Make sure that
is displayed, and then press
ity
]
OK
]
[
B Press
or
]
ery
OK
]
[
.
[↑]
.
.
]
or
[↓]
[
TWAIN
[
1.Function Prior-
to display
, and then press
]
Delivery
switch-
. If the
]
ND2C0103
[
Deliv-
A Press
display
out
↓
[
, and then press
]
several times to
Next
]
[
2.TWAIN connection time
[OK]
.
ND2C0103
B Press < or >, and select “Off”
or “On”.
If you want to switch immediately, select “Off”, or if you
want to switch only after the
specified timeout period has
passed since the last operation
was made with the scanner, select “On”.
F Set the time for the
tion time out
There are two options to comply
with the scan request to the TWAIN
scanner while the copier is being
used as a delivery scanner.
• switching to a TWAIN scanner
immediately.
• switching only after the specified timeout period has passed
since the last operation was
made with the scanner.
28
ND2C0105
C If “On” is selected, set the tim-
eout period (3-30 seconds) to
ND2C0103
switch to the TWAIN scanner
with the Number keys.
[
TWAIN connec-
.
]
If the scan request to a TWAIN
scanner is made, the scanner
will be switched to the TWAIN
scanner only after the timeout
period has passed since the last
operation was made with the
scanner.
Page 35

Delivery Scanner Setup
D Press
G Set the time for the
Clear Time
.
[
OK
]
option.
]
[
Scanner Auto
You can automatically cancel the
settings and return to the main
menu after a specified amount of
time has passed since the last operation was made with the scanner.
If you want to clear the settings,
the length of time should be set.
A Press
display
Time
↓
[
, and then press
]
several times to
Next
]
[
3. Scanner Auto Clear
[OK]
.
ND2C0103
C If “On” is selected, enter the
length of time (10-999 seconds)
until returning to the main
menu.
D Press
[
OK
.
]
H Set the current date and time.
A Press
display
OK
[
↓
[
.
]
several times to
Next
]
[
4.Date
, and then press
]
3
ND2C0103
ND2C0103
B Press < or >, and select “Off”
or “On”.
If you want to keep the current
settings, select “Off”, or if you
want to cancel the current settings and return to the main
menu after the specified time
has passed, select “On”.
ND2C0105
ND2C0103
B Set the current date and time.
To move between each field,
press < or >.
If you make a mistake, press
{
Clear/Stop
} and try again.
29
Page 36

User Tools
3
C Press
[
OK
.
]
ND2C0103
I Select the automatic update op-
tion for the address book.
With this option, you can update
the address book information automatically when selecting a destination and a sender from the
address book.
If
[
Auto Address Update
the address book information is
updated only when the copier’s
operation switch is turned on.
is disabled,
]
A Press
play
↓
[
Next
[
8. Auto Address Update
and then press
B Press
or
[↑]
, and then press
[
Off
]
four times to dis-
]
.
OK
]
[
or
to display
[↓]
[OK]
ND2C0103
[On]
.
ND2C0103
,
]
Note
❒
If updating the address book
automatically, you can use the
latest address book. If the address book is changed frequently, select
❒
If the address book is not
[
Auto Address Update
changed frequently, disable
so that you
to Address Update
]
don’t have to wait for the address book to be updated unnecessarily.
❒
If
[
Auto Address Update
is dis-
]
abled, be sure to turn the copier’s operation switch off then on
to update the copier’s address
book after the station’s address
book has been changed. If the
station’s address book has been
updated, none of the documents will be delivered and
they will be saved in the nonforwarding folder until the
copier’s address book is updated.
]
[
Au-
J Select the measurement unit.
In this option, you can select “mm”
or “inch” as the measurement unit
for scanning custom-sized origi-
.
nals.
A Press
surement Unit
.
OK
]
[
[
↓
to display
Next
]
, and then press
]
[
9. Mea-
ND2C0103
30
Page 37

Delivery Scanner Setup
B Press
or
K Press
L Press
Exit
]
[
[↑]
, and then press
[
inch
]
[
PrevMenu
[
PrevMenu
.
or
to display
[↓]
.
]
, and then press
]
[
[OK]
mm
.
ND2C0103
ND2C0104
]
3
ND2C0104
The copier is now ready to be used
as a network delivery scanner.
31
Page 38

User Tools
Scanner Setup
3
You can register scanner settings
(density, original type, resolution,
and original size), which are selected
when scanning. If registering the settings in advance for the frequently
scanned types of originals, you can
select these settings easily when delivering a document.
Note
❒
Up to three custom settings can be
registered as “User1”, “User2”,
and “User3”.
❒
The setting registered as “Default”
becomes the default scanning setting. If no setting has been selected
when delivering a document, the
original is scanned with the setting
registered as “Default”.
Items for Scanner Setup
There are four items in scanner settings as follows:
❖
Density
The density for scanning originals.
Select from seven levels, from
“Lighter (1)” to “Darker (7)”. The
default setting is the middle density.
• Text/Photo
For originals containing both a
high-contrast black-and-white
image such as text, and a halftone image such as a photograph or a drawing.
• Photo
For originals containing a halftone image such as a photograph or a drawing (Black &
White).
• Gray Scale
For originals containing a halftone image such as a photograph or a picture (Grayscale).
Note
❒
If “Photo” is selected, the image
is scanned in a Black & White
mode, and if “Gray Scale” is selected, the image is scanned in a
Grayscale mode. In general,
Black & White is suitable for
printing and Grayscale is for
displaying on the computer
screen.
❖
Resolution
Select from 100dpi, 200dpi, 300dpi,
400dpi, and 600dpi. The default
setting is “100dpi”.
32
❖
Original Type
Originals are scanned using the
settings appropriate for that type.
The default setting is “Text”.
•Text
For originals containing a highcontrast black-and-white image
such as text.
Note
❒
If scanning at a high resolution,
the scanned image quality is
high but the size of the data is
large. When processing a large
amount of data, ScanRouter Station and the entire system may
take a long time. Be sure to select the appropriate resolution
for that image.
Page 39

❖
Original Size
Select a scanned area. The default
setting is “Auto Paper Select”.
• Auto Paper Select
Scanning an original size using
the copier’s Auto Paper Select
function.
For more information, see the
“Copy Reference”.
•A3S, A4S, A4R, A5S, A5R,
81/2x14S, 81/2x13S, 81/2x11S,
81/2x11R, 51/2x81/2S
1
5
/2x81/2R
, JIS B4S, JIS B5S,
,
JIS B5R, Custom Size
If the paper size is selected from
above, the original is scanned at
the selected size regardless of
the original size.
Note
❒
If
[
Custom Size
is selected,
]
you can use either “mm” or
“inch” as the measurement
unit to specify the scanned
area.
❒
The measurement unit setting can be adjusted in
in the
figuration
Features
]
menu.
]
[
Scanner
[
Con-
Scanner Setup
Resolutions an d Original Sizes
In some cases, a large-sized original
cannot be scanned at high resolution.
If the following message appears after the scan fails, adjust the scanner
settings and then scan the original
again.
The relationship between resolutions
and original sizes are as follows:
❖
When “Text”, “Text/Photo”, or “Photo” is selected as an Original Type:
Scanning is possible with all combinations up to A3, or 600dpi.
❖
When “Gray Scale” is selected as an
Original Type:
Scanning is possible in combinations marked with “'” in the following table.
100
200
300
400
600
dpi
dpi
dpi
dpi
dpi
A3 ''
3
JIS B4 ''
A4 '''
JIS B5 '''
A5 ''''
1
8
/2x14
1
8
/2x13
1
8
/2x11
51/2x81/
''
''
'''
''''
2
33
Page 40

User Tools
3
Registering Items for Scanner Setup
A Press {
Sort
Staple
Stac
B Press {
The
[
pears.
C Press
User Tools/Counter
1-Sided 2-Sided
2
1
1
Book 2-Sided
2
2-Sided 2-Sided
2
2
} on the Number keys.
5
Scanner Features
Scan
.
]
[
}.
User T ools / Counter
menu ap-
]
PEN0200TN
E To display the item you want to
set up, press
and then press
F Press <> or
value, and then press
The following is an example of the
density setting.
↑
[
Prev.
OK
]
[
[↑][↓]
or
]
[↓Next
.
ND2C0103
to select the
.
[
OK
]
,
]
ND2C0102
D Use the Number keys to enter the
number of the scanner settings to
be configured.
The density option is displayed as
the first item of the scanner settings.
ND2C0103
The following is an example of the
resolution setting.
G Repeat steps E and F, and set up
other items as well.
Reference
For more information about the
operation when
[
Custom Size
selected as the original size, see
P.35 “Selecting [Custom Size] as
the Original Size”.
]
is
34
Page 41

Scanner Setup
H Press
complete.
[
PrevMenu
if all settings are
]
ND2C0104
I If registering other user numbers
as well, repeat steps D-H.
J Press
is complete.
[
PrevMenu
if the registration
]
Selecting [Custom Size] as the Original
Size
If
[
Custom Size
inal size, you can use either “mm” or
“inch” as the measurement unit to
specify the scanned area.
Note
❒
The measurement unit setting can
be adjusted in
Scanner Features
[
A Display
nal size selection display, and
then press
is selected for an orig-
]
[
Configuration
menu.
]
[
Custom Size
.
[
OK
]
on the origi-
]
in the
]
3
K Press
Exit
]
[
[
PrevMenu
.
ND2C0104
, and then press
]
ND2C0104
ND2C0103
B Enter the length from the refer-
ence position to the starting point,
and the length of the scanned area, with the Number keys and
then press {
The following is an example with
“mm” selected as the measurement unit.
After pressing {
moved to the next field. Or, you
can press < or > to move the cursor.
A reference position is defined as
the place where the original is set,
as illustrated below:
}.
#
}, the cursor is
#
35
Page 42

User Tools
3
A On the platen glass
A
D
E
BC
F
TNSY090E
A. Reference position
B. Horizontal starting position
C. Horizontal scanning positionl
D. Vertical starting position
E. Vertical scanning position
F. Scanned area
B In the Document Feeder (ADF)
C
G
B
A
D
C Press
values.
after you enter all the
[
OK
]
ND2C0103
F
E
TNSY120E
A. Reference position
B. Horizontal starting position
C. Horizontal scanning position
D. Vertical starting position
E. Vertical scanning position
F. Scanned area
G. Direction to Set Original
The maximum scanned area is
297mm (W) x 432mm (L) (423mm
for Grayscale). Make sure that the
scanned area is no larger than this.
36
Page 43

4. Delivering Originals
Delivery Settings
You can deliver the scanned image of
the originals to users registered in
ScanRouter Station.
Note
❒
Scanned originals are forwarded
from the copier to ScanRouter Station, and then delivered to the selected users.
❒
The delivery type from ScanRouter
Station to the users varies depending on the station settings.
A Set originals.
Reference
“Setting Originals” ⇒ P.41
B Press {
The display that appears when
pressing the {
differs depending on System Settings and Scanner Features settings. Display the delivery scanner
mode display by the following
procedures depending on the display that appears.
A If the printer and scanner se-
Printer/Scanner
Printer/Scanner
lection display appears, press
[
Scanner
.
]
}.
} key
B If the printer display appears,
press {
C If the TWAIN scanner mode
display appears, Press
❒
After switching to delivery
mode, the following display appears.
Printer/Scanner
Note
The TWAIN scanner mode
display appears if the
TWAIN mode is selected in
[
Function Priority
menu.
ner Features
]
} again.
in the
]
[
Cancel
[
Scan-
]
ND2C0104
.
ND2C0101
37
Page 44

Delivering Originals
C Select scanner settings (density,
original type, resolution, and
original size).
The currently selected settings are
listed on the display. If these settings are correct, go to step
lect a delivery destination. Follow
the steps below if you want to
change the settings.
to se-
D
❒
To change the scanner settings temporarily, select
[
Manual Setup
Settings
[
and then press
]
. When the scanner
]
setup mode display appears,
adjust the scanner settings.⇒
P.47 “Changing the Scanner
Settings Temporarily”
D Select a delivery destination.
4
Note
❒
If you want to cancel the operation and start again, press {
}.
Modes
A Press
[
Menu
.
]
Clear
ND2C0101
B Press < or >, and select a
scanner setting from “User1”,
“User2”, or “User3”, and then
Press
[
OK
.
]
A Press
[
Dest.
.
]
ND2C0102
The Short ID and the name of
each user/group registered in
ScanRouter Station are displayed.
Note
❒
If
[
Auto Address Update
is en-
]
abled, the address book is replaced with the latest one.
B Select the user/group for the de-
livery destination with < or >.
38
Note
❒
Up to three custom settings
can be registered as “User1”,
“User2”, or “User3” in Scanner Setup mode. If registering the appropriate settings
for the frequently scanned
originals in advance, you can
select these settings easily.⇒
P.32 “Scanner Setup”
ND2C0105
If you know the Short ID of the
user/group (001-099) you want
to select, input the number with
the Number keys. If you don’t
know the Short ID, display the
user/group by pressing
or
↓
[
, and then select the
Next
]
↑
[
Prev.
user/group with < or >.
]
Page 45

Delivery Settings
Note
❒
The order of users/groups
on the display can be
changed with ScanRouter
Station.
C Press
[
Select
.
]
The selected user/group is
specified as a delivery destination, with a ' mark in the check
box. Press
[
Select
to cancel the
]
selection.
ND2C0103
E Select a sender (where the origi-
nal is delivered from).
Note
❒
After selecting a sender, the sender’s name can be found when receiving or viewing documents
from the delivery destination.
❒
The sender’s column will be
blank if no sender is specified.
❒
Select a single sender from the
users/groups registered in
ScanRouter Station.
A Press
[
Sender
.
]
ND2C0103
4
D When delivering multiple us-
ers/groups, repeat step B-C.
E When all the delivery destina-
tions are set, press
[
Exit
.
]
ND2C0104
The selected destination appears on the display. If multiple
delivery destinations have been
selected, you can view them
with < or >.
The Short ID and the name of
each user/group registered in
ScanRouter Station are displayed.
B
Select a user/group for the sender with
<
or >.
If you know the Short ID of the
user/group (001-099) you want
to select, input the number with
the Number keys. If you don’t
know the Short ID, display the
user/group by pressing
or
↓
[
, and then select the
Next
]
[
user/group with < or >.
↑
Prev.
]
39
Page 46

Delivering Originals
4
C Press
[
Select
.
]
The selected user/group is
specified as a sender, with a '
mark in the check box. Press
to cancel the selection.
lect
]
D Press
[
Exit
.
]
ND2C0103
[
Se-
Reference
For more information about
the direction of the original,
see P.46 “Setting the Direction
of the Originals”.
G Press {
Start
}.
The scan begins.
To cancel the scan, press {
}. After the scan is canceled, all
Stop
the scanned data is deleted and no
delivery is made.
When placing the originals on the
platen glass, the following display
appears every time after a single
page is scanned.
Clear/
ND2C0104
F When originals are set in posi-
tion or when scanning 2-sided
originals, select the correct direction of the original from the copier as follows:
A Press [R
B Select the direction of the orig-
inal, and then press
↔R
1
.
]
2
ND2C0104
.
[
OK
]
If there is another page to scan,
place the original and press {
Start
}.
If there is no page to scan, press
[
Finish
.
]
After the scan is complete, the display returns to the scanner settings
menu and the scanned data is delivered to ScanRouter Station.
Note
❒
If you do not press {
Finish
[
within one minute after
]
Start
} or
scanning, the scan is regarded
as finished, and only the
scanned pages are delivered to
ScanRouter Station.
40
ND2C0103
Page 47

Setting Originals
Setting Originals
The originals can be placed in either portrait or landscape position for scanning,
however, if you want the original to appear with the appropriate direction on
the computer display, be sure to place the original correctly on the scanner.
The direction of the original to be set depends on the width of the originals as
follows:
• A4 size (297mm) or narrower width:
A4 A4
R
R
• A4 size (297mm) or wider width:
A4
R
Note
❒
Depending on the direction of the original to be set on the scanner, you need
to select the correct direction from the copier for delivery⇒ P.46 “Setting the
Direction of the Originals”. After changing the direction setting, the scanned
image can be rotated by the copier so that the original appears correctly on
the computer display.
Limitation
❒
The document feeder (ADF) is required to scan 2-sided originals.
❒
If the document feeder (ADF) is not installed, “2 Side Bind” or “2 Top Bind”
on the panel display appear dimmed and cannot be selected.
4
41
Page 48

Delivering Originals
Scanning 1-sided Originals
Direction setting depends on the width of the originals as follows:
4
Width of the Origi-
nals
Setting originals on
the Platen Glass
P.44 “Setting Origi-
⇒
nals on the Platen Glass”
Setting originals in the
Document Feeder
(ADF)
P.45 “Setting Origi-
⇒
nals in the Document
Feeder (ADF)”
A4 (297mm) or narrower Wider than A4 (297mm)
Place the original face down
and align its upper side with
the left side of the platen
glass.
Set the originals face up with
the bottom edge of the document in the document feeder
(ADF).
Select [
R
] in .
1
Place the original face down
and align its upper side with
the rear side of the platen
glass.
Set the originals face up and
align the top edge of the originals with the rear side of the
document feeder (ADF).
Select [
R
] in .
1
42
Setting the Direction
of the Originals
P.46 “Setting the Di-
⇒
rection of the Originals”
Note
This setting is set as the de-
❒
fault.
Page 49

Scanning 2-sided Originals
Direction setting depends on the width of the originals as follows:
Setting Originals
Width of the Origi-
nals
Setting originals in the
Document Feeder
(ADF)
P.45 “Setting Origi-
⇒
nals in the Document
Feeder (ADF)”
Setting the Direction
of the Originals
P.46 “Setting the Di-
⇒
rection of the Originals”
A4 (297mm) or narrower Wider than A4 (297mm)
Set the originals face up with
the bottom edge of the document in the document feeder
(ADF).
Side-bound Originals
Side Bind
R
2
R
S
RS
] in .
RS
Select [
Top-bound Originals
R
S
Set the originals face up and
align the top edge of the originals with the rear side of the
document feeder (ADF).
Side-bound Originals
RS
Select [
Top-bound Originals
Side Bind
R
2
] in .
R
S
4
Select [
Top Bind
R
2
] in .
Select [
Top Bind
R
2
] in .
43
Page 50

4
Delivering Originals
Setting Originals o n the Platen
Glass
A
Lift the platen cover/document
feeder (ADF).
Note
❒
Be sure to open the platen cover/document feeder (ADF) by
more than 30 degrees, otherwise the original size will not be
detected.
B Place the original face down and
align its upper left corner with the
reference mark in the upper left
corner of the platen glass.
For more information about the direction of the original to be set, see
P.41 “Setting Originals”.
B Width of the original is wider
than A4 (297mm)
TNSY023E
With this setting, you need to
select the correct direction from
the copier for delivery. ⇒ P.46
“Setting the Direction of the Originals”
C Close the platen cover/document
feeder (ADF).
A
Width of the original is A4 (297mm)
or narrower
TNSY021E
44
Page 51

Setting Originals in the
Document Feeder (ADF)
A Adjust the guide to the original
size.
B Set the aligned originals face up
(if 2-sided originals, first-page
up) in the document feeder
(ADF).
For more information about the direction of the original to be set, see
P.41 “Setting Originals”.
Note
❒
You can set the originals with
different horizontal sizes if their
vertical sizes are the same.
❒
The stacked originals set in the
document feeder (ADF) are
scanned from the top page.
A
Width of the original is A4 (297mm)
or narrower
Setting Originals
B Width of the original is wider
than A4 (297mm)
TNSY033J
With this setting, you need to
select the correct direction from
the copier for delivery.⇒ P.46
“Setting the Direction of the Originals”
Note
❒
If scanning 2-sided originals,
you need to select the correct direction from the copier for delivery, regardless of the
direction to be set on the scanner.⇒ P.46 “Setting the Direction
of the Originals”
4
TNSY031J
45
Page 52

Delivering Originals
RS
RS
Setting the Direction of the Originals
4
When originals are set in direction
or when scanning 2-sided originals,
select the correct direction of the original from the copier as follows:
A Press
[
R
↔R
1
.
]
2
ND2C0104
B Select the appropriate combina-
tion from the
with < or >.
[
Duplex/Dir
menu
]
• Side-bound originals:
R
Side Bind
[
2
• Top-bound originals:
R
Top Bind
[
2
R
R
S
S
C Press
[
OK
.
]
]
]
❖
Setting the Direction of the originals
If the originals are set in the
direction, select from the upper
line options, and if set in the
direction, select from the lower
line options.
❖
1-sided/2-sided originals
If scanning 1-sided originals, select [R
If scanning 2-sided originals, select [R
Bind
position of the originals.
.
]
1
Side Bind
2
depending on the binding
]
or [R
]
ND2C0105
Top
2
ND2C0103
46
Page 53

Changing the Scanner Settings Temporarily
Changing the Scanner Settings
Temporarily
Scanner settings can be selected from
“User1”, “User2”, or “User3” which
were registered in advance, however,
you can change these settings temporarily when scanning.
A Press
ner mode display.
[
on the delivery scan-
Menu
]
ND2C0101
B To change the scanner settings
temporarily, select
and then press
[
Manual Setup
[
Settings
.
]
Reference
For more information about
each of the items, see P.32 “Items
for Scanner Setup”.
D Press < or > to select the option,
and then press
The display returns to the scanner
setup mode.
]
OK
[
.
]
E If changing the another item’s set-
ting as well, repeat step C-D.
F Press
are complete.
when all the settings
[
Exit
]
4
ND2C0103
ND2C0101
When the scanner setup mode display appears, adjust the scanner
settings.
C Select the item you want to
change with < or >,and then
press
[
OK
.
]
ND2C0103
G To change the scanner settings
temporarily, select
and then press
[
Manual Setup
.
[
OK
]
ND2C0103
]
47
Page 54

4
Delivering Originals
48
Page 55

5. Client Operation
Receiving Documents with Client Software
With ScanRouter Client Software installed in a client computer, you can receive
documents saved in a user folder in ScanRouter Station.
Important
❒
After receiving documents with the client computer, the saved documents in
ScanRouter Station will be deleted.
System Requirements
The computer running Client Software must meet the following system requirements:
❖
CPU
Pentium 133MHz or faster
❖
RAM
24MB minimum (64MB recommended)
❖
Hard Disk Space
At least 2.6MB of disk space is required for installation.
50MB or more free disk space is required to run Client Software.
❖
Operating Systems
• Microsoft Windows 95
• Microsoft Windows 98
• Microsoft Windows NT Workstation 4.0
❖
Protocols
TCP/IP protocol
49
Page 56

5
Client Operation
Setting up the Reception Environment for Client Software
Installing Client Software
Follow the steps below to install ScanRouter Client Software.
Note
❒
Quit all open applications before beginning the installation.
❒
When installing in a computer running Windows NT 4.0, log on as a member
of the Administrators group.
A Start Windows on the computer where you want to install this application,
and then insert the ScanRouter CD-ROM into the computer.
The language selection dialog box appears.
Note
❒
If the window doesn’t appear, double-click on “Setup.exe” located on the
root directory of the CD-ROM, to start the Installer.
B Select the language of the application to be installed, and click
C Click
[
ScanRouter Client Software
D When the
[
Welcome
dialog box appears, click
]
.
]
.
[
Next
]
E Follow the instructions to be displayed.
[
OK
.
]
50
Page 57

Receiving Documents with Client Software
Setting up the Reception Environment
After installation, you need to set up ScanRouter Station, select the user folder,
and configure the reception environment.
A Click
lected during the installation process, and then click
.
ware
]
The
[
ScanRouter Client Software Login
[
Start
, point to
]
[
Programs
, point to the program folder, which was se-
]
[
ScanRouter Client Soft-
dialog box appears.
]
B Configure each of the options.
A Enter the IP address or the host name of ScanRouter Station in the
ery Station
Ask ScanRouter administrator for details.
Note
❒
If a DNS server or WINS server is not used, Client Software may take a
long time to start if an IP address is not entered.
box.
]
[
Deliv-
5
❒
ScanRouter Station can be selected from the network tree which is displayed by clicking
names. If the computer name set in ScanRouter Station and the host
name are different, directly enter the IP address or the host name.
B Click
A list of user folders created in ScanRouter Station is displayed.
C Click to select the user folder where documents are saved, and then click
[
D Enter the password for the folder, which was entered in the
the
For information about the password to be entered, ask the ScanRouter administrator.
E Click to select the
If this check box is selected, you don't have to enter the password every
time Client Software starts.
.
OK
]
[
Password
[
Browse
located on the right of the
]
box.
]
[
Browse
[
Save Password
. However, the list displays only computer
]
box.
[
User
]
box, in
[
User
]
check box if required.
]
51
Page 58

Client Operation
5
F Click
The settings for the folder is now complete. The icon for Client Software is
displayed on the taskbar.
Next, configure the settings for document reception.
[
OK
.
]
C Right-click Client Software icon on the taskbar, and then click
from the pop-up menu.
The properties of Client Software are displayed.
D Set the time interval to check and receive documents in the
A Select the
[
Reception Mode
option.
]
[
Reception
[
Properties
tab.
]
]
If you select
reception status of the selected folders in ScanRouter Station, and receives
new documents automatically. When you select this option,
ception Interval
If you want to receive documents manually, select
B Configure other settings.
For more information about these items, see P.58 “[Reception] Tab”, or see
Help.
E Configure settings in the
For more information about each of the items, see P.59 “[Application] Tab”,
P.60 “[Save] Tab”, or see Help.
Note
❒
The saving location for received documents can be selected by
in the
Path
]
[
Automatic Reception
must be configured as well.
]
[
Application
tab.
[
Save
]
F When all of the settings are complete, click
52
Now Client Software is ready to receive documents.
, Client Software periodically checks the
]
[
Automatic Re-
[
No Automatic Recept ion
tab and the
]
[
OK
.
]
[
Save
tab.
]
[
File Save
.
]
Page 59

Receiving Documents with Client Software
Exiting from Client Software
With the following procedure, you can exit from Client Software.
A Right-click the Client Software icon on the taskbar, and then click
from the pop-up menu.
[
Exit
]
5
53
Page 60

Client Operation
Receiving Documents
With ScanRouter Client Software, you can receive documents saved in the user
folder located on ScanRouter Station. The documents can be received automatically or manually.
Note
❒
When receiving documents with Client Software, make sure that the ScanRouter Station setting is configured to save documents in the user folder.
❒
After the client computer receives the documents, the saved documents in
ScanRouter Station will be deleted.
Important
❒
The received documents are saved in the hard disk of the client computer.
There is a possibility the available free disk space will become full if documents aren’t removed from the hard disk regularly.
5
Note
❒
The received documents are saved to the location set in the
ScanRouter Client Properties
[
window.⇒ P.60 “[Save] Tab”
]
[
Save
tab in the
]
Receiving Documents Automatically
Select
Router Client Properties
tion from ScanRouter Client Software at the specified interval, set in
Reception Interval
cally.
[
Automatic Reception
in the
]
in
]
[
Reception Mode
window in advance. Client Software acquires informa-
]
[
Reception
tab, and receives new documents automati-
]
in the
]
[
Reception
tab in the
]
Automatic
[
A Make sure that Client Software icon is displayed on the taskbar.
If no icon is displayed, follow the steps below to start Client Software.
A Click
click
[
The icon appears on the taskbar.
Client Software acquires information from ScanRouter Client Software at the
specified interval, set in
receives new documents automatically. After receiving documents, a reception notification, whose style is defined in the
er Client Properties
, point to
[
Start
]
ScanRouter Client Software
window, will be delivered.
]
[
Programs
[
Automatic Reception Interval
, point to the
]
.
]
[
ScanRouter Client
in the
]
[
Reception
[
Reception
tab in the
]
folder, and
]
tab, and
]
[
ScanRout-
[
Scan-
54
Page 61

Receiving Documents Manually
Receiving Documents with Client Software
Documents are received manually if
tion Mode
vance, or if you want to check for and receive documents immediately.
in the
]
[
Reception
tab in the
]
[
No Automatic Rece ption
[
ScanRouter Client Properties
is selected in
]
window in ad-
]
A Make sure that Client Software icon is displayed on the taskbar.
If not, follow the steps below to start Client Software.
A Click
click
[
The icon appears on the taskbar.
B Double-click the icon, or right-click the icon and click
pop-up menu.
After a moment a notification will be displayed.
❖
When receiving new documents
You will receive a notification whose style is defined in the
in the
❖
When there are no documents
The pop-up dialog box notifies you that there are no received documents.
, point to
[
Start
]
ScanRouter Client Software
ScanRouter Client Properties
[
[
Programs
, point to the
]
.
]
window.
]
[
ScanRouter Client
[
Reception
folder, and
]
]
[
Reception
[
Recep-
from the
tab
]
5
Note
❒
If the document file size is large, station-side processing and document delivery may take a long time.
Opening a Received Do c u ment
When receiving a document from ScanRouter Station, you will receive a notification whose style is defined in the
window. Open a new document to check the contents.
erties
]
If selecting
Follow the instructions below depending on the settings in the
• If Launch application has been selected
After clicking
ing multiple documents at once, all of the documents are opened.
• If no application has been selected
Only a notification is delivered. To open the document, use an application
which is suitable for the file format of the document.
[
Popup
in
]
[
Notify on Reception
, the application starts to open the document. When receiv-
OK
]
[
[
Reception
]
tab in the
]
, The notification message will appear.
[
ScanRouter Client Prop-
[
Application
tab.
]
55
Page 62

Client Operation
-Document File Name
5
Received documents are saved in the folder selected in
tab. A document file name reflects the setting in
Save
]
[
as follows:
Sender_mmddhhmmss_n.xxx
•Sender
The name of the user or group selected as the sender when scanning a document from the copier. If no sender has been selected, this part is blank.
• mmddhhmmss
Date and time when the document has been saved in ScanRouter Station.
•n
If the received file uses a single page format, this number represents the page
number. If the received file uses a multi-page format, this number represents
the total number of pages in the document.
•xxx
The file format (tif, dcx, pcx, bmp, pdf, jpg).
For example, if a 2-page document in single page TIFF format, sent from “ABC”
was received on April 1, at 12:34:56, the document is saved in two files as below:
• ABC_0401123456_1.tif
• ABC_0401123456_2.tif
[
File Save Path
[
Format
in the
]
in the
]
[
Save
tab
]
If the same document was received in PDF format, the document is saved in the
following file.
• ABC_0401123456_2.pdf
56
Page 63

Client Software Properti es
5
[
Log in] Tab
1
2
3
4
Delivery Station
1.
Enter the IP address or the host name of
ScanRouter Station. If a station and a client computer exist in the same network
segment, you can select the station from
the network tree in which is displayed by
clicking [
❒
Browse
Limitation
Some network environments may
not support the
In this case, enter the IP address or
the host name of ScanRouter Stations.
❒
If a computer name and the host
name are different, enter the IP address or the host name of ScanRouter Station.
].
[
Browse
function.
]
Receiving Documents with Client Software
Save Password
4.
Select this check box to save the password. If not selected, the password request dialog box appears every time
Client Software starts.
5.
If receiving documents from two or more
ScanRouter Station or from two or more
user folders, click this button to add another station or user folder.
Note
Up to ten stations and user folders can
❒
be selected.
5
User
2.
Enter the name of the user folder where
received documents are saved. By click-
Browse
ing [
from the list of user folders located in
ScanRouter Station.
Password
3.
Enter the password which is set for the
user folder.
], you can select the folder
57
Page 64

Client Operation
[
Reception] Tab
1
2
3
5
Reception Mode
1.
Configures the way that documents are
received by Client Software.
• Automatic Reception
Client Software periodically acquires
information about the reception status
of the selected folder in ScanRouter
Station, and receives new documents
automatically. When you select this
option, [
must be configured as well.
• No Automatic Reception
If you want to receive documents
manually, select this option.
Automatic Reception Interval
2.
Configures the interval setting (1-60 minutes) for acquiring information from
ScanRouter Station when [
ception
Notify on Reception
3.
Select the type of document reception notification. Multiple options can be selected.
•Popup
Displays the pop-up dialog box. If the
Launch application has been selected
in the [
the application from this dialog box to
open the document.
• Sound
Causes the computer to beep when a
document is received.
Automatic Reception Interval
] is selected.
Application
] tab, you can start
Automatic Re-
• Flashing Icon
Causes the icon on the taskbar to flash
when a document is received. To stop
flashing, click the icon.
]
58
Page 65

[
Application] Tab
1
2
Launch Application
1.
Sets the application to open received documents.
• Choose Application
When selecting [
from the pop-up menu of the icon on
the taskbar, the application selected in
Application Name
[
selected in [
[
Reception
cation from the notification dialog box
to open the received document.
• Do Not Launch
No application is configured to open
received documents. [
tion
dimmed.
] tab, you can start the appli-
] in the pop-up menu appears
Launch Application
] starts. If [
Notify on Reception
Popup
] in the
Launch Applica-
] is
Receiving Documents with Client Software
5
]
Application Name
2.
Enter the path of the application you
want to start. Or after clicking [
you can select the path from the list in the
[
Launch Application Selection
If the application is not displayed, click
[
Browse
] in the [
tion
] dialog box to find the application.
Launch Application Selec-
Browse
] dialog box.
Limitation
❒
Some applications, such as Paint,
may not support this function.
],
59
Page 66

5
Client Operation
[
Save] Tab
1
2
File Save Path
1.
Enter the full path for saving received
documents. Or after clicking [
you can select the path from the list in the
[
Browse Folder
] dialog box.
Browse
],
Format
2.
Select the image data format for saving
received documents.
Two image data formats are used: Black
& White and Grayscale. If you select
“Text”, “Text/Photo”, or “Photo” when
scanning a document from the copier, the
document will be saved in Black & White
image data format. If you select “Gray
Scale” when scanning a document from
the copier, the document will be saved in
Grayscale image data format.
Note
If “Do Not Change Received Data For-
❒
mat” is selected, the document will be
received as a TIFF or JPEG file, depending on the copier’s setting.
Reference
For more information about image
data formats, see P.68 “File For-
mats”.
60
Page 67

Displaying Documents in the Shared Folders
Displaying Documents in the Shared
Folders
Documents which are delivered from ScanRouter Station to the destination folders can be opened from the client computer through the network.
Note
❒
The user who opens the documents in the destination folder must have
“Read” permission for that folder.
-Document File Name
Delivered documents in the shared folders are saved in the following format, depending on each user’s
Sender_mmddhhmmss_nnn.xxx
•Sender
The name of the user or group selected as the sender when scanning a document from the copier. If no sender has been selected, this part is blank.
Black & White
[
and
]
[
Grayscale
image data format settings.
]
5
• mmddhhmmss
Date and time when the document has been saved in ScanRouter Station.
• nnn
If the received file uses a single page format, this number represents the page
number. If the received file uses a multi-page format, this number represents
the total number of pages in the document.
•xxx
The file format (tif, dcx, pdf, jpg).
For example, if a 2-page document in single page TIFF format, sent from “ABC”
was received on April 1, at 12:34:56, the document is saved in two files as below:
• ABC_0401123456_001.tif
• ABC_0401123456_002.tif
If the same document was received in PDF format, the document is saved in the
following file.
• ABC_0401123456_002.pdf
61
Page 68

5
Client Operation
62
Page 69

Troubleshooting
Copier
Problem Cause / Action
6. Appendix
The delivery scanner mode
doesn’t appear on the panel display.
If the TWAIN scanner mode appears when switching the copier to a scanner, see P.37 “Delivery Set-
tings” to switch to a delivery scanner.
If the scanner mode cannot be switched from
“TWAIN” to “Deliver”, the delivery scanner setting is not correct. See P.25 “Delivery Scanner Set-
up” to adjust the setting.
ScanRouter Client Software
Problem Cause / Action
A connection to ScanRouter Station cannot be made when starting ScanRouter Client Software.
Client Software takes a long time
to start.
Make sure that ScanRouter Station is running.
If a DNS server or WINS server is not used, Client
Software may take a long time. Enter the IP address of ScanRouter Station in [
the [
window.
Log in
] tab in the [
Delivery Station
ScanRouter Client Properties
] in
]
63
Page 70

Appendix
ScanRouter Station Error Log Messages
The following are messages that frequently appear in the error log:
Message Cause / Action
6
Delivery is canceled because
empty disk capacity is insufficient.
Drive for save is not prepared. • Windows is not started on the destination com-
ScanRouter Station stops temporarily because the
free disk space becomes less than 200MB. Increase
the amount of free disk space. The station resumes
automatically after the free disk space becomes
available.
puter.
• No network drive has been mapped to the network folder which is selected as a destination
folder. Map the network drive to the network
folder again.
Note
Use the setting for re-connection at logon if
❒
you want document delivery to the destination folders in the computers on the network.
Access Privilege for writing is not
in the destination.
Write permission to the destination folder has not
been given. Make sure the correct User Name is
used when logging on. If the User Name is correct,
change the access privileges of the destination
folder.⇒ P.9 “Creating a Shared Folder as a Destina-
tion Folder”
64
Cannot deliver because the number of users in the destination
group is 0.
Address version does not match. A document cannot be delivered to the selected
A document cannot be delivered because no members exist in the destination group. The document
is saved in the non-forwarding folder.⇒ P.9 “[En-
vironment Settings] Dialog Box”
destination because the address book version of
ScanRouter Station and the version of the copier
are different. This error occurs when [
Update
] is [
Off
] in the copier setting. After updating
the address book of ScanRouter Station, be sure to
turn the copier off and on to update the address
book.
Auto Address
Page 71

The Copier Error Messages
The Copier Error Messages
If the error message appears on the panel display, follow the instructions described below:
Note
❒
These messages are related to the delivery scanner operations. If any message
which is not listed here is displayed, see the “Operating Instructions” that
comes with Scanner Option.
Message Cause / Action / Reference
Updating the address book.
Please wait.
Address update failed.
Try again?
[
Yes][No
]
Auto Address Update
If [
settings and when you press [
the address book is updated by the user/
group information from ScanRouter Station.
Therefore, you can always use the latest information. Updating may take longer, depending
on the number of users/groups and the network condition.
Unable to get the user/group information
from ScanRouter Station. Press [
try again.
If this message appears repeatedly, one of the
following may cause this trouble:
• ScanRouter Station is not started.
• ScanRouter Station is temporarily stopped
due to a shortage of free disk space or other
resources.
] is enabled in scanner
Dest.
] or [
Sender
Yes
] and then
],
6
65
Page 72

Appendix
Message Cause / Action / Reference
6
Cannot communicate with the server.
Check the operating status and server connection.
OK
]
[
No response from ScanRouter Station. One of
the following may cause this trouble:
• The power of the computer running ScanRouter Station Software is off. Or, ScanRouter Station is not started.
Delivery Server Address
• [
] is incorrect.
• The copier may not be connected to the network properly. Check the LED on the Network Interface Board.
A
B
C
D
TACH032E
A. The red light is on when the copier network scanner is working normally.
B. The orange light is on when the Network
Interface Board is working normally.
C. The green light is on when 100BASE-TX
is being used and is off when 10BASE-T is
being used.
D. The green light is on when the network
connection is normal.
66
Invalid data size.
Check the scanning resolution.
[
OK
]
In some cases, a large-sized original cannot be
scanned at high resolution. For more information, see P.33 “Resolutions and Original Sizes”.
Page 73

The Copier Error Messages
Message Cause / Action / Reference
Cannot detect original size.
Check whether original is placed,
and select the proper size.
OK
]
[
Page limit exceeded, to scan remaining pages, press Exit then Start ( to
run as a new Job).
[
OK
]
Memory full. Cannot scan.
Scanning has stopped, the scanned
data has been deleted.
Memory full. Cannot continue, send
the existing scanned data or delete,
reset and repeat the process.
No original is placed on the platen glass. Or,
cannot detect the original size.
• Place the original on the platen glass.
• Open the platen cover/document feeder
(ADF) more than 30 degrees to detect the
original size correctly.
• Some paper sizes will not be automatically
detected (e.g. small-sized paper or foreignsized paper). For more information, see the
“Copy Reference”.
Achieved the maximum pages (100 pages )
which can be scanned continuously. Press
OK
]. The scanned originals will be sent. The
[
selected destination and other scanner settings
remain after pressing [
originals and press {
Due to the memory shortage in the copier,
scanning has been stopped in the middle.
The first message appears when the first page
of the originals cannot be scanned. In this case,
OK
press [
The next message appears when the second or
later pages of the originals cannot be scanned.
If you want to send the scanned pages (up to
the previous page) only, press [
cedure must be completed within about 15
minutes after the error occurs.
If pressing [
ed and no data is sent.
Scan the remaining pages after the memory capacity is back to normal.
].
Delete
OK
], set the rest of the
Start
}.
Send
]. This pro-
], all the stored data is delet-
6
Error in sending image.
Scan with the same settings and re-
send.
You have exceeded data capacity,
please wait until the current data has
been sent.
Scanner is in use.
Cannot scan due to another applica-
tion currently in use.
Failed to send a scanned image to ScanRouter
Station due to a network error. Scan the originals again because the scanned data has been
deleted.
If the same message appears again, the amount
of network traffic could be the reason, therefore, contact the network administrator.
Five documents are waiting to be sent to ScanRouter Station. Wait until the current document data is sent.
The document feeder (ADF) is currently being
used to copy or send a fax. Set the originals in
the document feeder (ADF) again.
67
Page 74

Appendix
File Formats
The following file format types are available for ScanRouter Station Software
and ScanRouter Client Software:
ScanRouter Station Software ScanRouter Client Software
6
Available File
Format
Note
❒
In ScanRouter Station Software, if “Text”, “Text/Photo”, or “Photo” is selected when scanning a document from the copier, the document will be
saved in Black & White image data format, and if “Gray Scale” is selected, the
document will be saved in Grayscale image data format.
❒
In case of multiple-page documents, one file will be created for each page because Multipage option is not available for Grayscale image.
❖
TIFF, TIFF-F
File formats used to save bitmap images. These formats are used for Black &
White, Grayscale, and Color images.
One file is created for single-page images in TIFF, and one file for multiplepage image in Multipage TIFF and TIFF-F.
You can select the TIFF Compression Format as MH, MR, or MMR. In general,
the order is MH, MR, MMR from high to low compression ratios (depending
on the image). The TIFF-compressed image can be restored to the original image.
TIFF-F stands for “Tiff Class F Specification” and is one of the fax image data
formats. The TIFF-F format created by ScanRouter is 200dpi and the Compression Format is MH only.
TIFF, TIFF-F, DCX, PDF, JPEG TIFF, TIFF-F, PCX, BMP, DCX,
PDF, JPEG
68
❖
PCX, BMP
File formats used to save bitmap images. These formats are not available for
the Multipage option.
❖
DCX
A file format to save bitmap images. This format is available for the Multipage option.
❖
PDF
This file format can be opened with the Adobe Acrobat application. Multipage images can be saved in one file with this file format.
❖
JPEG
This method can compress image data from 1/10 to 1/100 of the original size.
The compressed image cannot be restored. This method is suitable for landscape images or photo data because the compression effect tends to be less obvious with these kinds of images.
Page 75

INDEX
A
Auto Address Update
,
30
B
,
BMP
68
C
Change
,
17
8
,
21
Starting Option
User/Group Order on the copier Panel
,
20
,
,
35
Display
Checking the Error Log
Checking the Free Disk Space
CSV File
Custom Size
D
32
,
,
,
,
,
21
16
25
,
25
37
61
,
27
Daily Operation
,
Date
DCX
Delete
Delivery Option
Delivery Scanner
Delivery server address
Delivery Settings
Density
Displaying Documents
29
,
68
User/Group
,
Shared Folders
E
,
65
,
,
64
53
Error Log Messages
Error Messages
Exit
Client Software
,
Export
19
F
File Format
File Name
Function Priority
, 10, 14, 60,
Documents in the Shared Folders
Documents received with Client
,
Software
56
,
68
28
,
22
,
61
I
Import
Install
,
18
Client Software
ScanRouter Station
,
50
,
4
J
,
JPEG
68
M
Maintenance Tool
Measurement Unit
,
,
24
30
N
Non-forwarding Documents
,
22
O
Original Size
Original Type
,
,
33
32
P
,
PCX
PDF
,
68
68
R
Receiving Documents
Register
,
,
,
15
11
32
Group
User
Resolution
,
54
S
41
,
32
,
,
29
47
Scanner Auto Clear Time
Scanner Settings
Registering Items
Temporary Changes
,
,
,
,
51
9
61
Setting Originals
Setting the Direction of the originals
Set up
Reception Environment of Client
Software
Shared Folder
Create
Shared Folders
Display
,
46
69
Page 76

Start
,
,
,
49
ScanRouter Station
Stop
ScanRouter Station
System Requirements
Client Software
,
Station
3
T
,
TIFF
TIFF-F
Troubleshooting
TWAIN connection time out
68
,
68
,
63
U
7
7
,
28
User Tools
,
25
70 UE USA B359
 Loading...