

Ricoh adc1fax OPERATING INSTRUCTIONS
FAX Option Type 450e
OPERATING INSTRUCTIONS
FACSIMILE REFERENCE (option)
Read this manual carefully before you use this product and keep it handy for future
reference.
For safety, please follow the instructions in this manual.

FAX Option Type 450e OPERATING INSTRUCTIONS
Printed in Japan
UE USA A874-8607

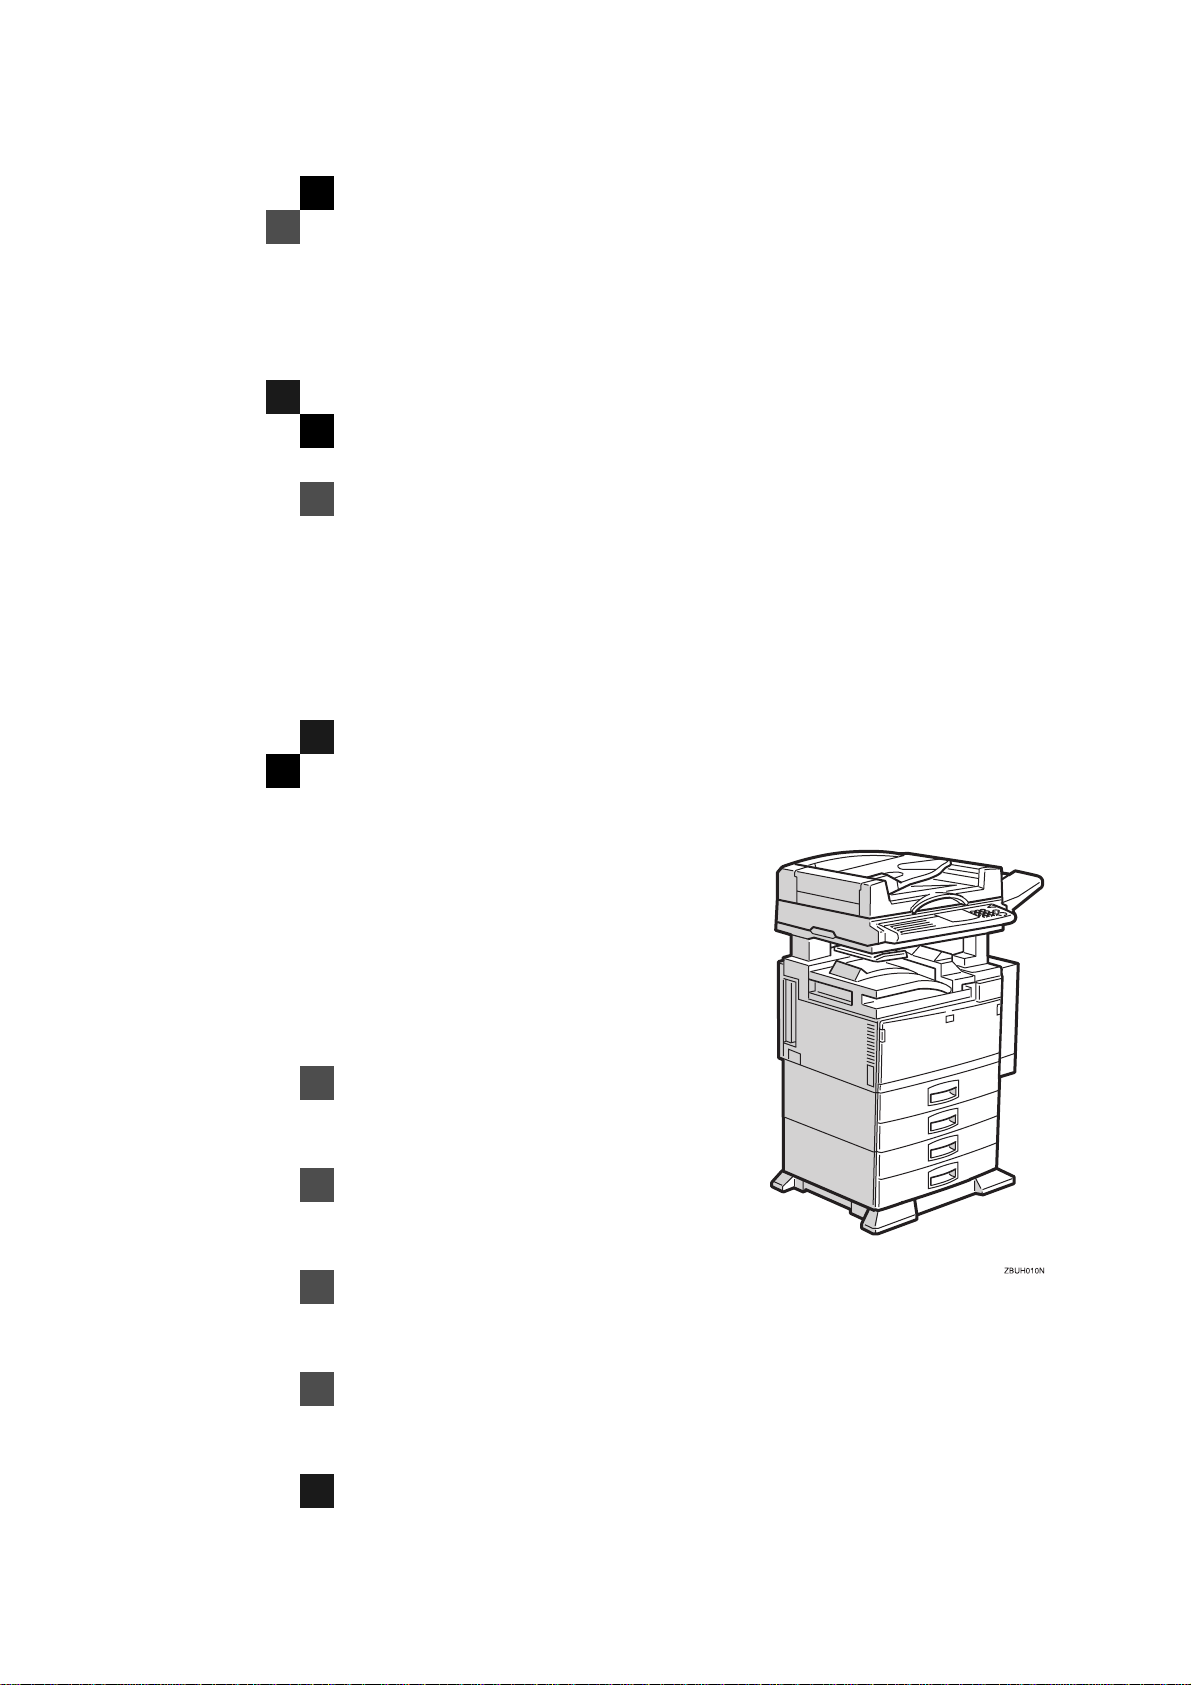
Available Options
• Stamp Unit (FAX Stamp Type 450)
• Fax Function Upgrade Unit (Fax Function Upgrade Type 185)
• Expansion Memory (32MB: DIMM)
• ISDN Unit (ISDN Option Type 450)
• Handset (Handset Type 450)
Supplies
• Marker Ink (Marker Type 30)


NOTICE
R
CAUTION:
Use of controls, adjustments or performance of procedures other than those
specified herein may result in hazardous radiation exposure.
Shielded interconnect cables must be employed with this equipment to ensure
compliance with the pertinent RF emission limits governing this device.
Direct (or indirect) reflected eye contact with the laser beam may cause serious eye
damage. Safety precautions and interlock mechanisms have been designed to prevent any possible laser beam exposure to the operator.
Note
❒ Some illustrations may be slightly different from your machine.
❒ Certain options may not be available in some countries. For details, please
contact your local dealer.
----Notice about the Telephone Consumer Protection Act (Valid in USA
only).
The Telephone Consumer Protection Act of 1991 among other things makes it
unlawful for any person to send any message via a telephone fax machine unless
such message clearly contains in a margin at the top or bottom of each transmitted page or on the first page of the transmission, the date and time it is sent and
an identification of the business, other entity, or other individual sending the
message and the telephone number of the sending machine or such business,
other entity or individual. This information is transmitted with your document
by the TTI (Transmit Terminal Identification) feature. In order for you to meet
the requirement, your machine must be programmed by following the instructions in the accompanying Operation Manual. In particular, please refer to the
chapter of Installation. Also refer to the TTI (Transmit Terminal Identification)
programming procedure to enter the business identification and telephone
number of the terminal or business. Do not forget to set the date and time.
Thank you.
i

Note to users in the United States of America
----Notice:
This equipment has been tested and found to comply with the limits for a Class
B digital device, pursuant to Part 15 of the FCC Rules. These limits are designed
to provide reasonable protection against harmful interference in a residential installation. This equipment generates, uses and can radiate radio frequency energy and, if not installed and used in accordance with the instructions, may cause
harmful interference to radio communications. However, there is no guarantee
that interference will not occur in a particular installation. If this equipment does
cause harmful interference to radio or television reception, which can be determined by turning the equipment off and on, the user is encouraged to try to correct the interference by one more of the following measures:
• Reorient or relocate the receiving antenna.
• Increase the separation between the equipment and receiver.
• Connect the equipment into an outlet on a circuit different from that to which
the receiver is connected.
• Consult the dealer or an experienced radio /TV technician for help.
----Warning
Changes or modifications not expressly approved by the party responsible for
compliance could void the user's authority to operate the equipment.
ii

iii
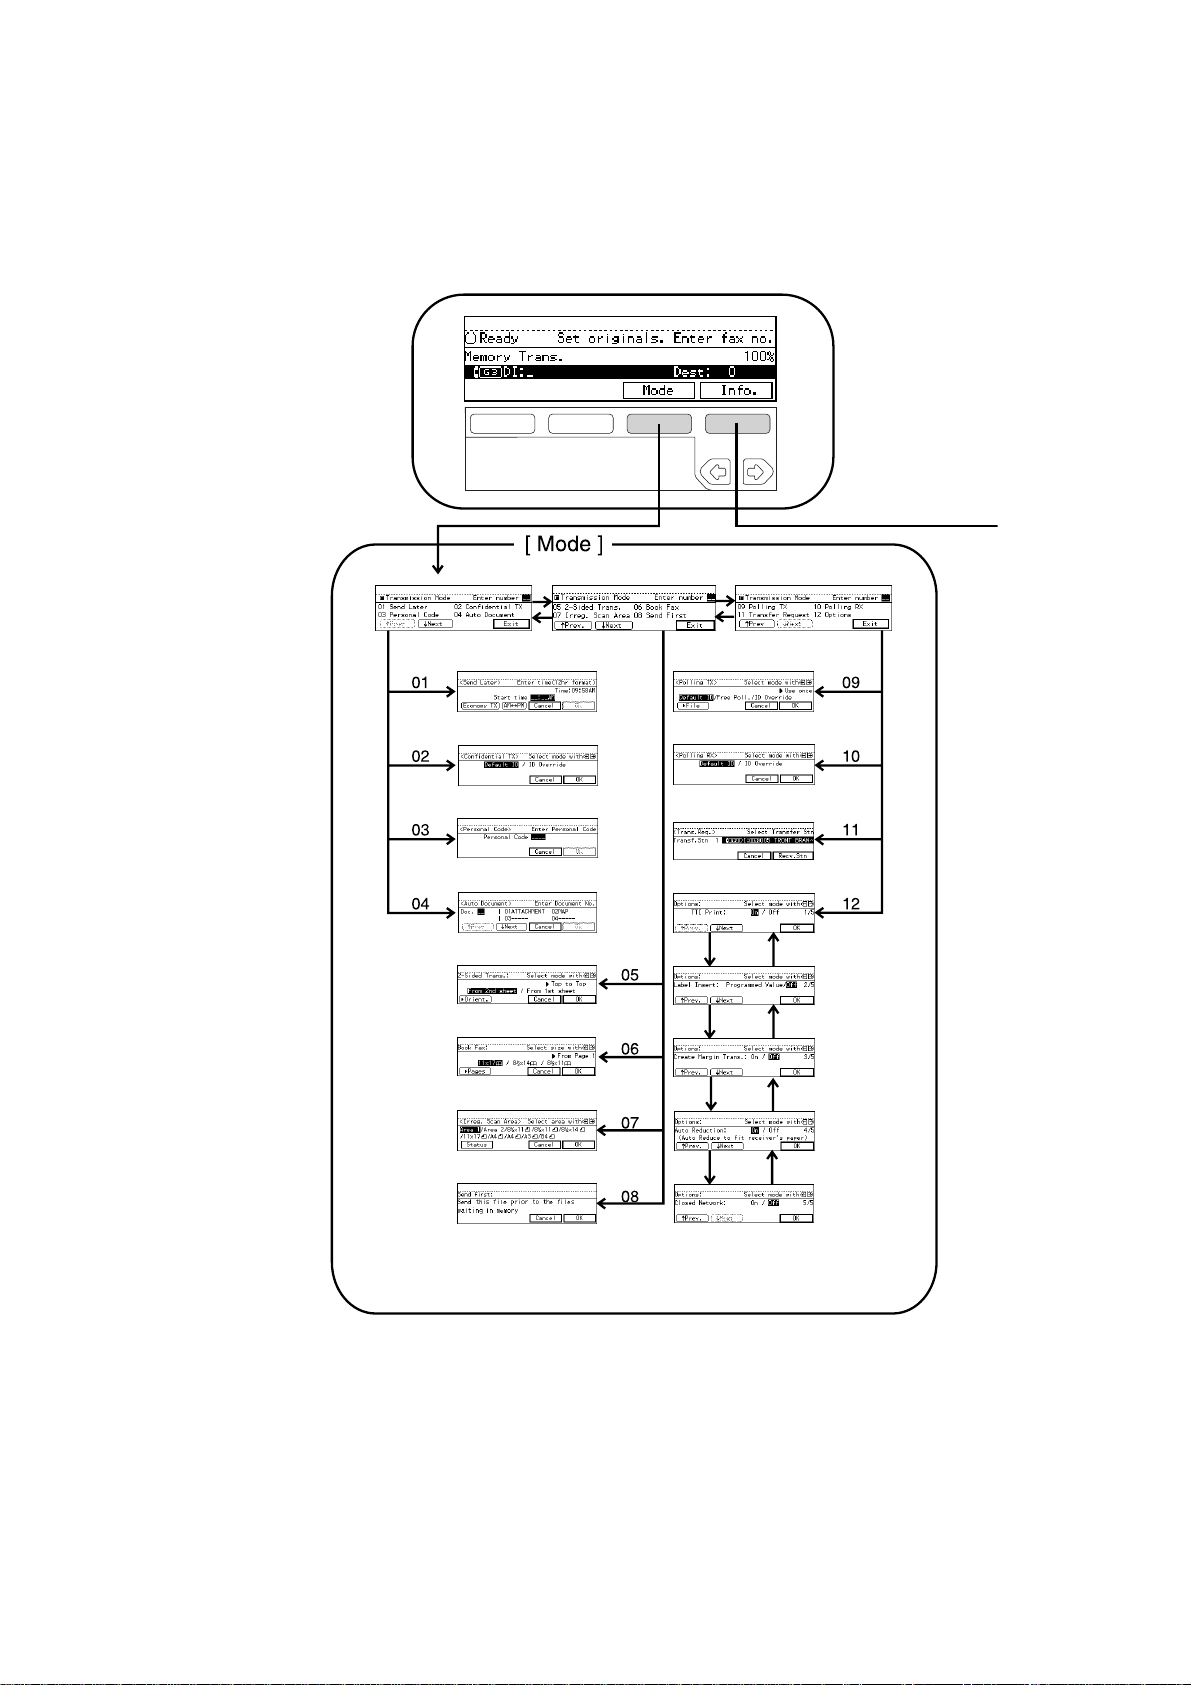
Function Map
iv
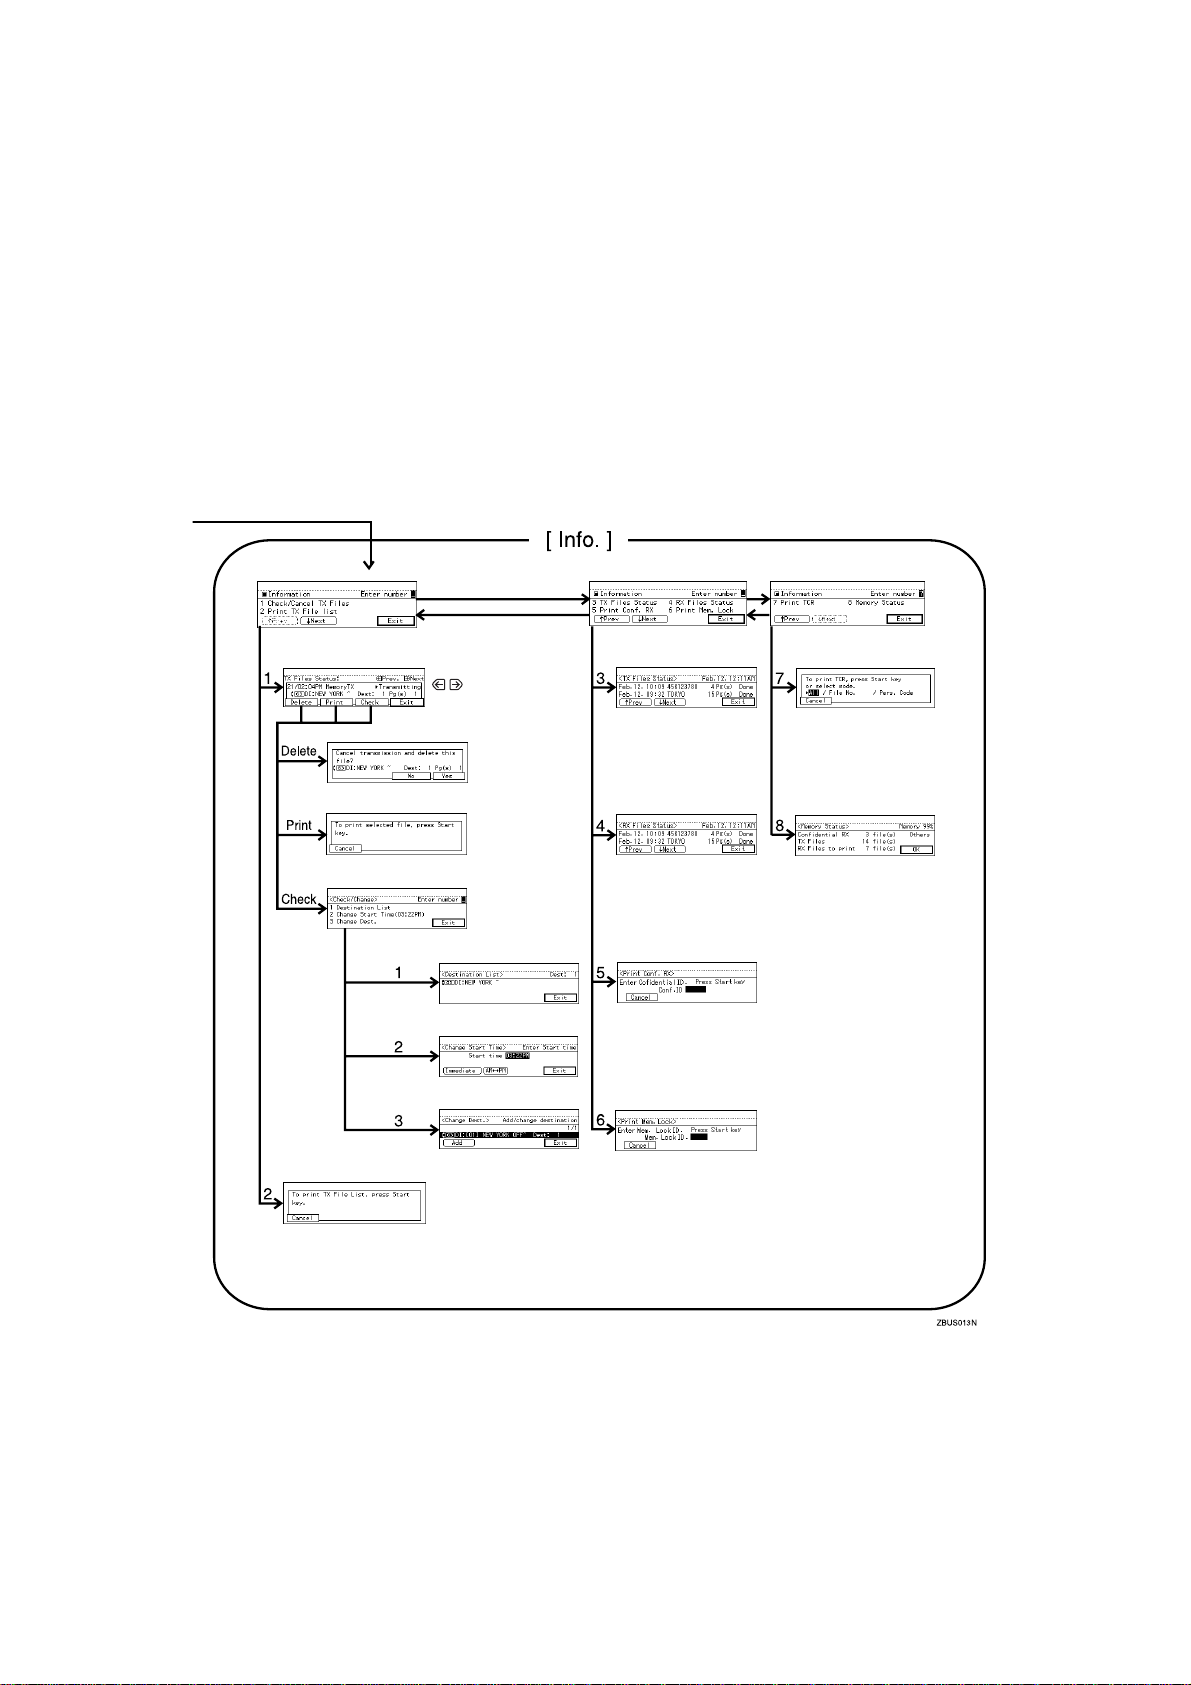
Select the file
v

Table of Contents
1.Getting Started
Guide to Components............................................................................... 1
Front View..................................................................................................... 1
Rear View...................................................................................................... 3
Operation Panel......................................................................................... 4
Starting the Machine................................................................................. 7
Turning On The Power.................................................................................. 7
Turning off The power................................................................................... 8
Switching between Copy Mode, Facsimile Mode and Printer/Scanner
Mode ......................................................................................................... 9
Reading the Display................................................................................ 10
Reading the Display Panel and Using Keys................................................ 10
Standby Display....................................... ..... .............................................. 11
Communication Display .............................................................................. 11
Display Prompts................................... .............................................. ..... .... 12
Useful Functions ..................................................................................... 13
Auto Fax Reception Power-up.................................................................... 13
Dual Access......................................... .... ..... .............................................. 13
Personal Code Access......................... .... ............................................... .... 13
Transmission with Image Rotation.............................................................. 14
Simultaneous Broadcast............................................................................. 14
Multi-port........................................................................................ .... ......... 14
Acceptable Types of Originals............................................................... 15
Acceptable Original Sizes........................................................................... 15
Original Sizes Difficult to Detect.................................................................. 16
Paper Size and Scanned Area.................................................................... 16
How to Set an Original............................................................................ 19
Setting a Single Original on the Exposure Glass........................................ 20
Setting Originals in the Document Feeder (ADF)........................................ 21
Where Incoming Message are Delivered—Output Tray....................... 23
When the Selected Output Tray Becomes Full........................................... 23
When the Finisher Unit is Installed.............................................................. 23
2.Sending a Fax Message
Overview................................................................................................... 25
Overview.......................................... .... .... ..... .... .......................................... 25
Memory Transmission ............................................................................ 26
Memory Storage Report.............................................................................. 30
Transmission Result Report (Memory Transmission)................................. 30
Communication Failure Report .... .... .... .... ..... .... .... .... .... ..... .... .... .... .... ..... .... 31
Canceling a Memory Transmission....................................................... 32
vi

Canceling a Transmission While the Original is Being Scanned In ............ 32
Canceling a Transmission While the Message is Being Sent..................... 32
Immediate Transmission ........................................................................ 34
Transmission Result Report (Immediate Transmission) ............................. 36
On-hook Dial............................................................................................... 36
Manual Dial................................................................................................. 37
Canceling an Immediate Transmission................................................. 38
Canceling a Transmission Before You Have Pressed Start........................ 38
Canceling a Transmission After You Have Pressed the Start Key ............. 38
Scan Settings........................................................................................... 39
Resolution............................................ .............................................. ..... .... 39
Original Type........................ .............................................. .... ..................... 40
Image Density (Contrast)............................................................................ 41
Mixing Scan Settings in a Multiple Page Original........................................ 41
Changing the Line Type.......................................................................... 43
Dialing....................................................................................................... 45
Number Keys ........................................................................................... 46
Pause................................... .... .... .... .... .............................................. ..... .... 47
Tone..................................... .... .... .... .... .............................................. ..... .... 48
Subaddress.................................................................................... .... ......... 48
Chain Dial.................................................................................................... 49
Quick Dials.................................................................................................. 49
Speed Dials.......................... .... .............................................. .... ................. 50
Groups ... .... ..... .... .... .............................................. .... .................................. 52
Redial................................................................................. .... ..................... 53
Transmission Features........................................................................... 55
Stamp............................................................ .... .......................................... 55
ID Transmission (Closed Network) ............................................................. 55
F Code (SUB).............................................................................................. 56
F Code (SID)............................................................................................... 57
JBIG Transmission................... .............................................. .... ................. 57
3.Receiving a Fax Message
Immediate Reception .............................................................................. 59
Memory Reception .................................................................................. 60
Substitute Reception............................................................................... 61
Screening Out Messages from Anonymous Senders ................................. 61
Selecting the Reception Mode ............................................................... 63
Facsimile Mode (Auto Reception Mode)............................................ ..... .... 63
Telephone Mode......................................................................................... 63
Reception Functions............................................................................... 64
Transfer Station........................................................................................... 64
Transfer Result Report................................................................................ 65
ID Reception (Closed Network)................................................................... 65
vii

F Code (SEP).............................................................................................. 65
F Code (PWD)............................................................................................. 67
JBIG Reception................................ .... .... ..... .... .......................................... 67
Printing Functions................................................................................... 68
Print Completion Beep.......................................... .... .................................. 68
Checkered Mark.......................................................................................... 68
Center Mark ............................................. ..... .............................................. 68
Reception Time........................................................................................... 68
Multi-copy Reception................................................................................... 69
2-Sided Printing........................................................................................... 69
180 Degree Rotation Printing...................................................................... 70
Image Rotation............................................................................................ 71
Combine 2 originals .................................................................................... 71
Page Separation and Length Reduction..................................................... 72
Reverse Order Printing ... ..... .... .... .............................................. .... ............. 72
Page Reduction........................................................................................... 72
TSI Print...................................................................................................... 73
CIL/TID Print ... .... .... .............................................. .... .................................. 73
When There is No Paper of the Correct Size.............................................. 74
Having Incoming Messages Printed on Paper From the Bypass Tray........ 77
4.Advanced Transmission Features
Overview................................................................................................... 79
Overview.......................................... .... .... ..... .... .......................................... 79
Send Later................................................................................................ 80
Confidential Transmission ..................................................................... 82
Personal Code Transmission................................................................. 84
Sending an Auto Document ................................................................... 86
2-Sided Transmission (Double-Sided Transmission).......................... 88
Book Fax .................................................................................................. 90
Choosing the Area to be Scanned Yourself (Irregular Scan Area)..... 92
Send First................................................................................................. 94
Polling Transmission.............................................................................. 96
Polling Transmission Clear Report.............................................................. 99
Polling Reception.................................................................................. 100
Polling Reserve Report............................................................................. 102
Polling Result Report .. .... ..... .............................................. .... ................... 102
Transfer Request................................................................................... 103
Specifying an End Receiver...................................................................... 105
Transmission Options........................................................................... 106
Selecting Transmission Options for a Single Transmission...................... 107
viii

5.Communication Information
Checking and Canceling Transmission Files..................................... 111
Canceling a Transmission......................................................................... 111
Printing a File............................................................................................ 112
Checking and Editing a File ...................................................................... 113
Printing a List of Files in Memory (Print TX File List)........................ 117
Checking the Transmission Result (TX File Status) .......................... 118
Checking the Reception Result (RX File Status)................................ 119
Printing a Confidential Message.......................................................... 120
Confidential File Report............................................................................. 121
Printing a File Received with Memory Lock........................................ 122
Printing the TCR.................................................................................... 124
Displaying the Memory Status............................................................. 125
6.Troubleshooting
When Toner Runs Out........................................................................... 127
Error Messages and Their Meanings................................................... 128
Solving Problems.................................................................................. 129
Indicators ............................................................................................... 131
When the Receive File Indicator is Lit....................................................... 131
When the Confidential File Indicator is Lit or Blinking............................... 131
When the {
} key is Lit in Red............................................................... 132
Fax
When an Error Report is Printed.......................................................... 133
When Power is Turned off or Fails ...................................................... 134
7.Facsimile User Tools
Accessing the User Tools..................................................................... 135
Exiting User Tool mode............................................................................. 136
Register/Delete Menu............................................................................ 137
Registering Quick Dials............................................................................. 137
Deleting Quick Dials.................................................................................. 139
Quick Dial Key and Function Key Label (Dial label).................................. 141
Registering Groups................................................................................... 144
Registering End Receivers for Multi-step Transfer ................................... 147
Deleting Groups........................................................................................ 151
Registering Speed Dials............................................................................ 152
Deleting Speed Dials................................................................................. 155
Storing Keystroke Programs ..................................................................... 156
Deleting a Keystroke Program .................................................................. 160
Registering an Auto Document...................................................... .... ..... .. 161
Deleting an Auto Document...................................................................... 164
ix

Printing an Auto Document ....................................................................... 165
Registering An Irregular Area.................................................................... 166
Deleting an Irregular Area......................................................................... 168
Reports/Lists.......................................................................................... 170
Initial Setup TX....................................................................................... 172
Initial Setup RX...................................................................................... 174
To Set the Bypass Paper Size.................................................................. 176
Assigning User Function Keys ............................................................ 179
Storing/Editing the Contents of a User Function Key................................ 179
Using a User Function Key ....................................................................... 180
Functions You Can Store In User Function Keys...................................... 181
Key Operator Settings........................................................................... 182
Personal Codes............... ..... .... .... .... .............................................. .... ....... 182
RTI/TTI...................................................................................................... 187
Memory Lock............................................................................................. 189
Counters.................................................................................................... 190
Monitor Volume......................................................................................... 191
Registering the Economy Transmission Time .......................................... 193
ID Code..................................................................................................... 194
Multistep Transfer ..................................................................................... 196
Special Senders to Treat Differently (Special RX Nos.)............................ 199
Authorized Reception................................................................................ 205
Forwarding................................................................................................ 209
ECM.......................................................................................................... 217
Transfer Report......................................................................................... 218
G3 Analog Line ......................................................................................... 219
G3 Digital Line........................................................................................... 221
G4 Digital Line........................................................................................... 223
Date/Time.................................................................................................. 225
Changing the User Parameters................................................................. 227
Summer Time............................................................................................ 234
Fax Auto Reset ......................................................................................... 234
Paper Feed Selection................................................................................ 235
RDS (Remote Diagnostic System)............................................................ 235
8.Entering Text
Entering and Modifying Text................................................................ 237
Available Characters................................................................................. 237
Keys.......................................................................................................... 237
How To Enter Text........................................ .... .... .... .... ............................ 238
9.Maintaining Your Machine
Connecting the Machine to a Telephone Line and Telephone.......... 241
Connecting the Telephone Line................................................................ 241
Connecting the Machine to the ISDN ....................................................... 242
x

Connecting the Optional External Telephone ........................................... 242
Selecting the Line Type............................................................................. 243
Replacing the Stamp Cartridge............................................................ 244
Stamp Cover Layout ................................................................................. 244
10.Appendix
Optional Equipment .............................................................................. 245
Expansion Memory (32MB: DIMM)........................................................... 245
Fax Function Upgrade Unit....................................................................... 245
ISDN Unit (ISDN Option Type 450)........................................................... 246
Stamp (Fax Stamp Type 450)................................................................... 246
Handset (Handset Type 450).................................................................... 246
Specifications........................................................................................ 247
Function List.......................................................................................... 248
Advanced Transmission Features............................................................. 248
Communication Information ...................................................................... 250
User Tools................................................................................................. 251
INDEX...................................................................................................... 255
xi

This page is intentionally blank.
xii
1. Getting Started
Guide to Components
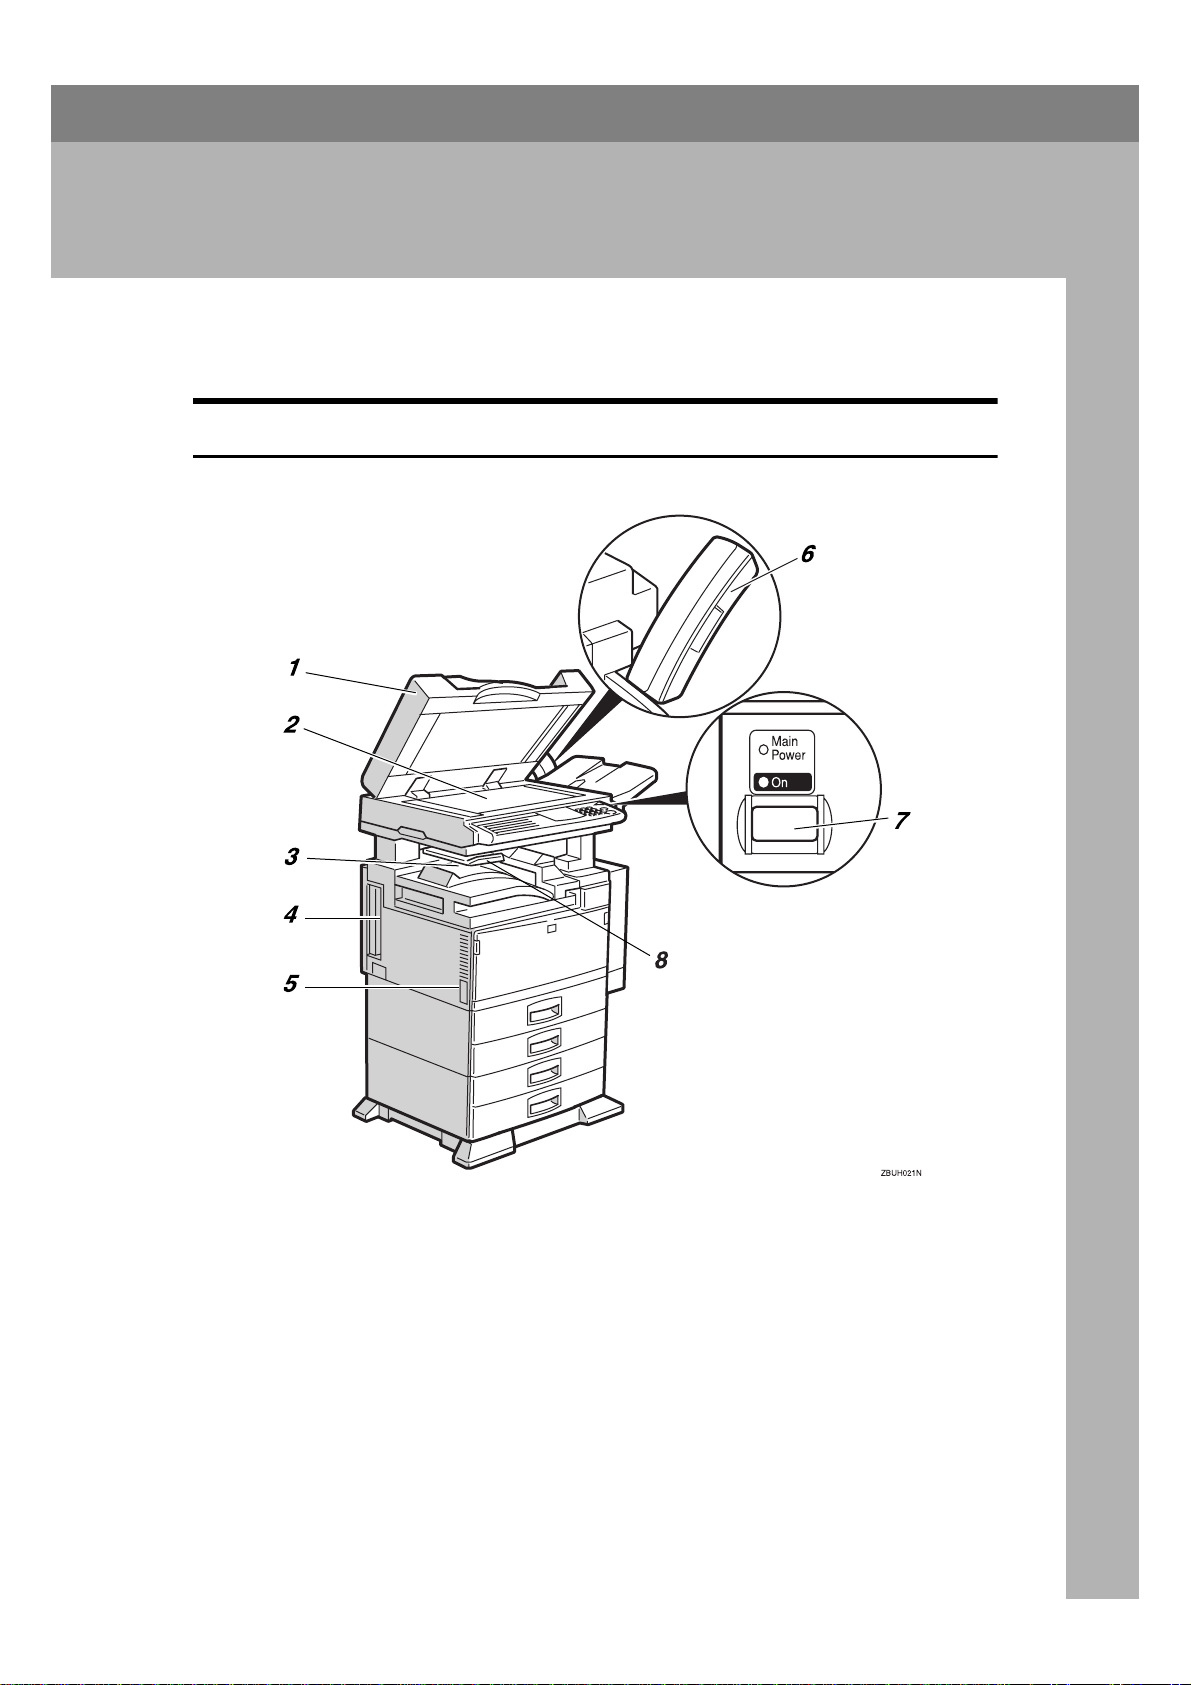
Front View
1.
Document Feeder (ADF)/Platen
Cover
Holds a document stack of up to 50
sheets which are fed automatically one at
a time. Place documents face up here.
2.
Exposure Glass
Place the original face down aligning its
upper left corner with the reference mark
at the upper left corner of the exposure
glass. Close the platen cover when you
set a document on the exposure glass.
3.
Internal Tray
By default, received fax messages are delivered here. Other trays can be selected
for prints or copies.
See “Changing the Machine's Settings” in
the System Settings manual.
4.
ISDN Line Connector ⇒⇒⇒⇒ P.242
“Connecting the Machine to the ISDN”
1

Getting Started
5. Main Power Switch
Do not touch this switch. This switch
should be only used by a service representative.
1
Note
❒ If the Operation switch is on and there
is still no power, turn on the
Power
❒ If you leave the
off for more than about an hour, all
files in memory are lost.
6.
Optional Handset
This permits voice communication.
7.
Operation Switch
Press this switch to turn the power on
(the On indicator lights up). To turn the
power off, press this switch again (the
indicator goes off). ⇒ P.7 “Turning On
The Power”, P.13 “Auto Fax Reception Power-up”, P.134 “When Power is Turned off or
Fails”
8.
Internal Tray 2 (option)
You can chose to have prints or copies delivered here.
switch.
Main Power
Main
switch
On
2
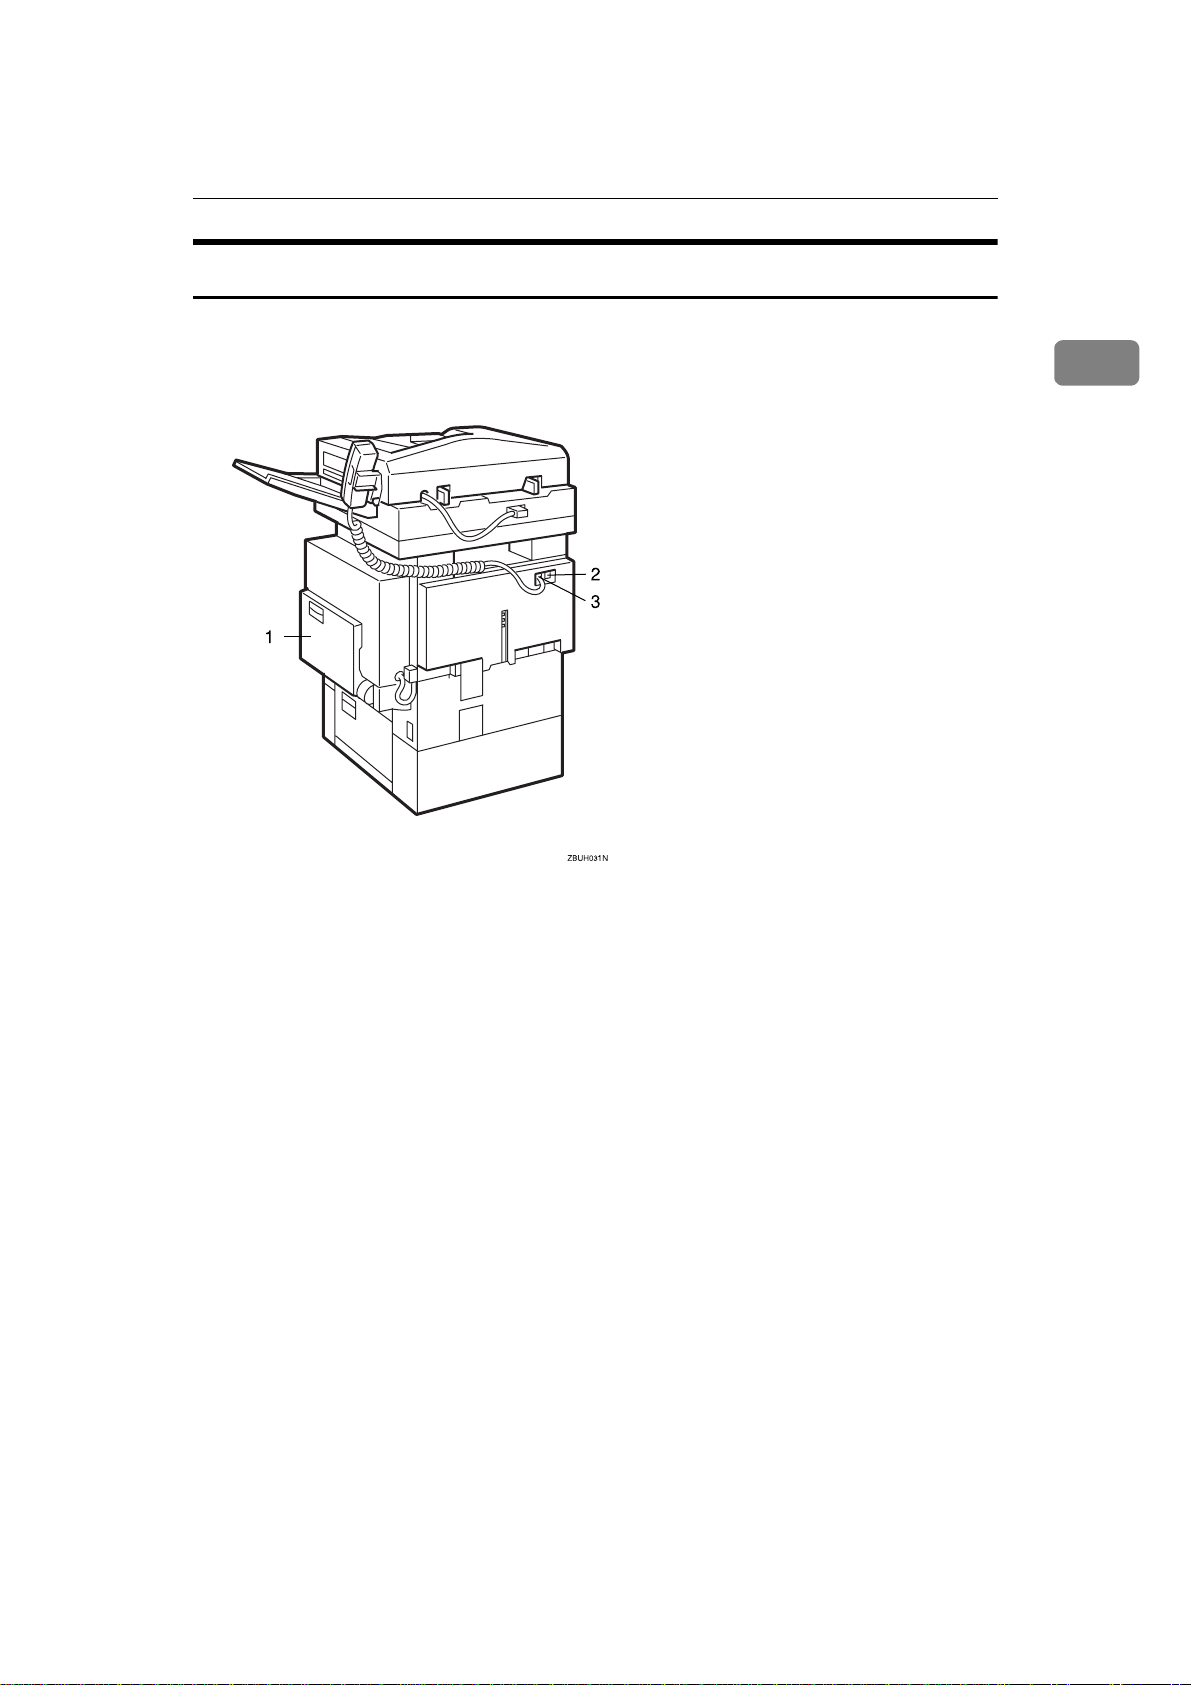
Rear View
Guide to Components
1
1.
Bypass Tray
Select this tray for non-standard size paper.
See P.19 “How to Set an Original” in the
Copy Reference manual.
2.
Analog Line Connector
3.
Optional Handset/External Tele-
phone Connector
3
1
Getting Started
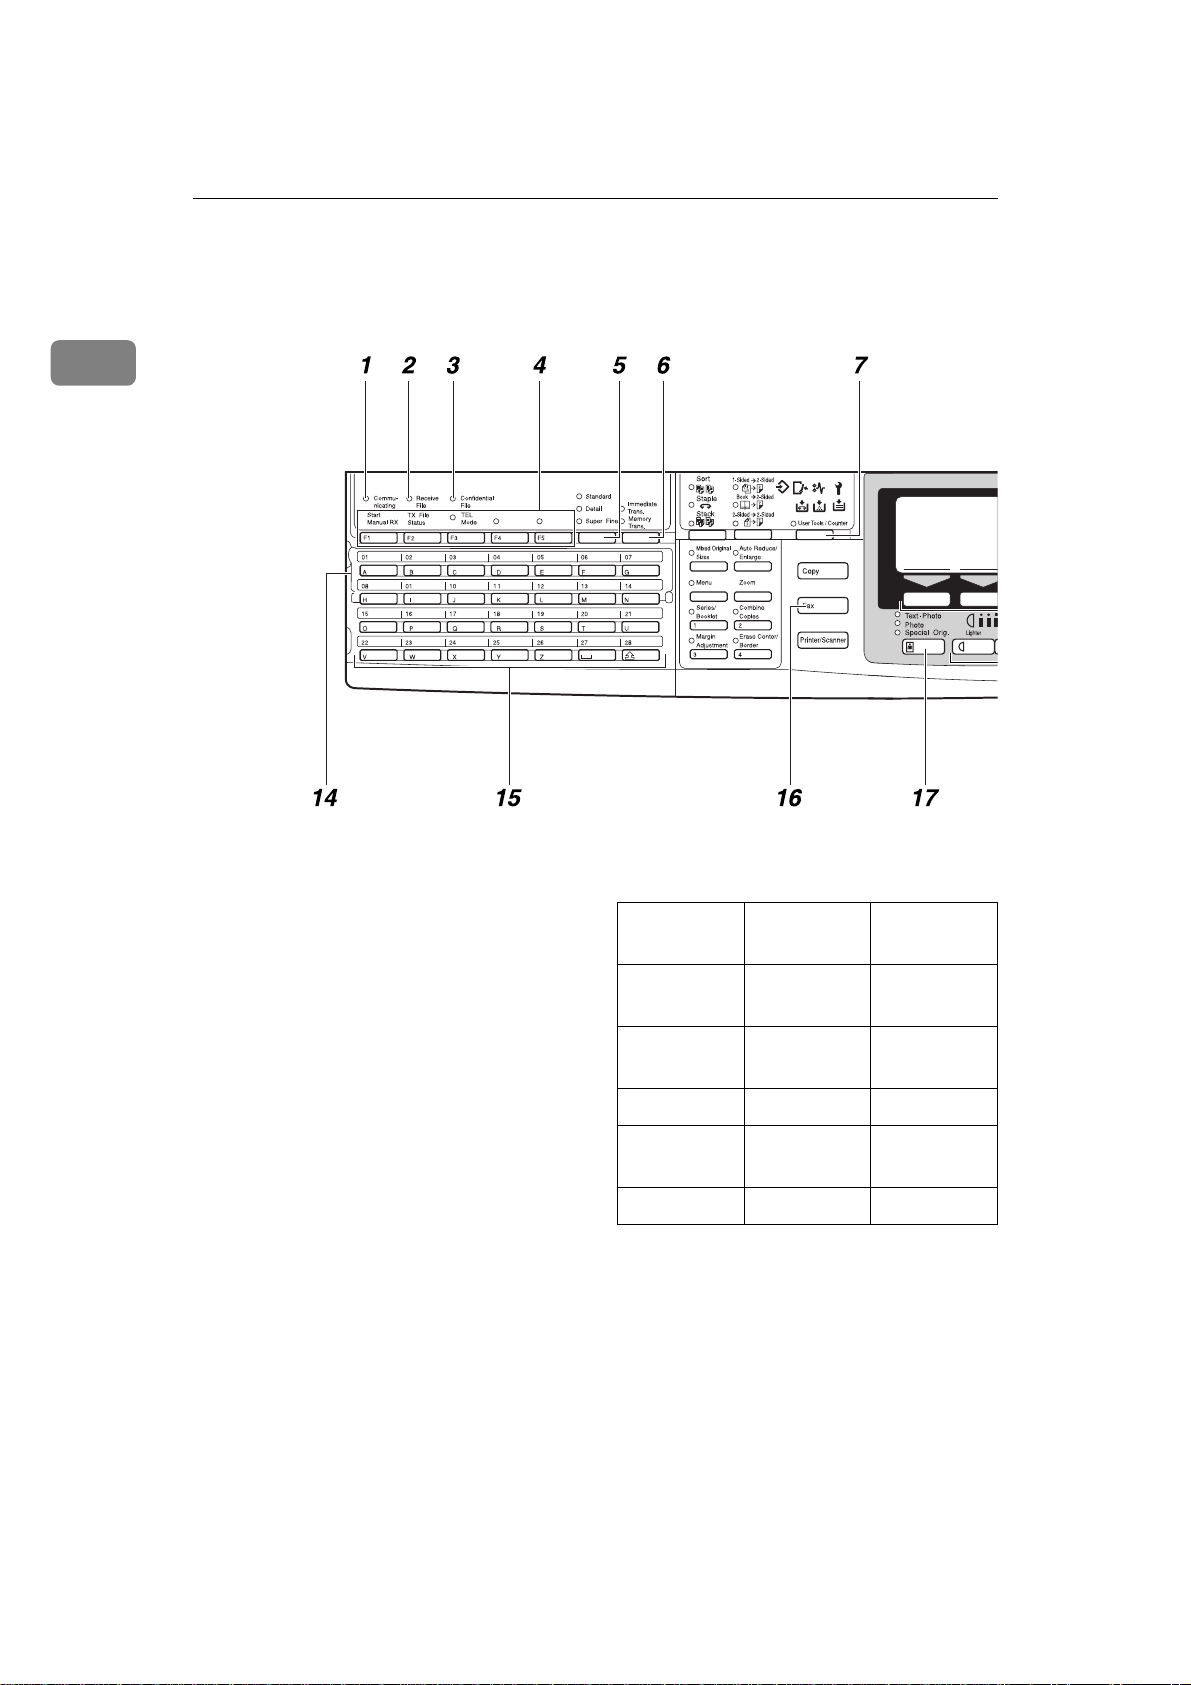
Operation Panel
1.
Communicating Indicator
Lights during transmission or reception.
2.
Receive File Indicator
Lights to tell you a message has been received into memory.
Note that this indicator does not inform
you of a Confidential reception.
3.
Confidential File Indicator
Blinks when a Memory Lock file has been
stored in memory.
Lights when a message has been received
into memory with Confidential Reception. ⇒ P.120 “Printing a Confidential Mes-
sage”
4.
User Function keys
Each of these can be programmed for
rapid access to frequently used features.
❖❖❖❖
Features Programmed by Default
Key Standard With the
ISDN Unit
F1 Start Manu-
al RX
F2 TX File Sta-
tus
F3 TEL Mode ←
F4 - ISDN Selec-
F5 - Stamp
←
←
tion
4
Operation Panel
1
5.
Resolution key
Press to switch between
Super Fine
and
Memory required).
6.
Transmission Mode key
Press this key to toggle between Memory
Transmission (
mediate Transmission (
Trans.
) modes.
User Tools/Counter
7.
{{{{
Press to enter User Tools mode. These
tools allow you to customize the default
settings.
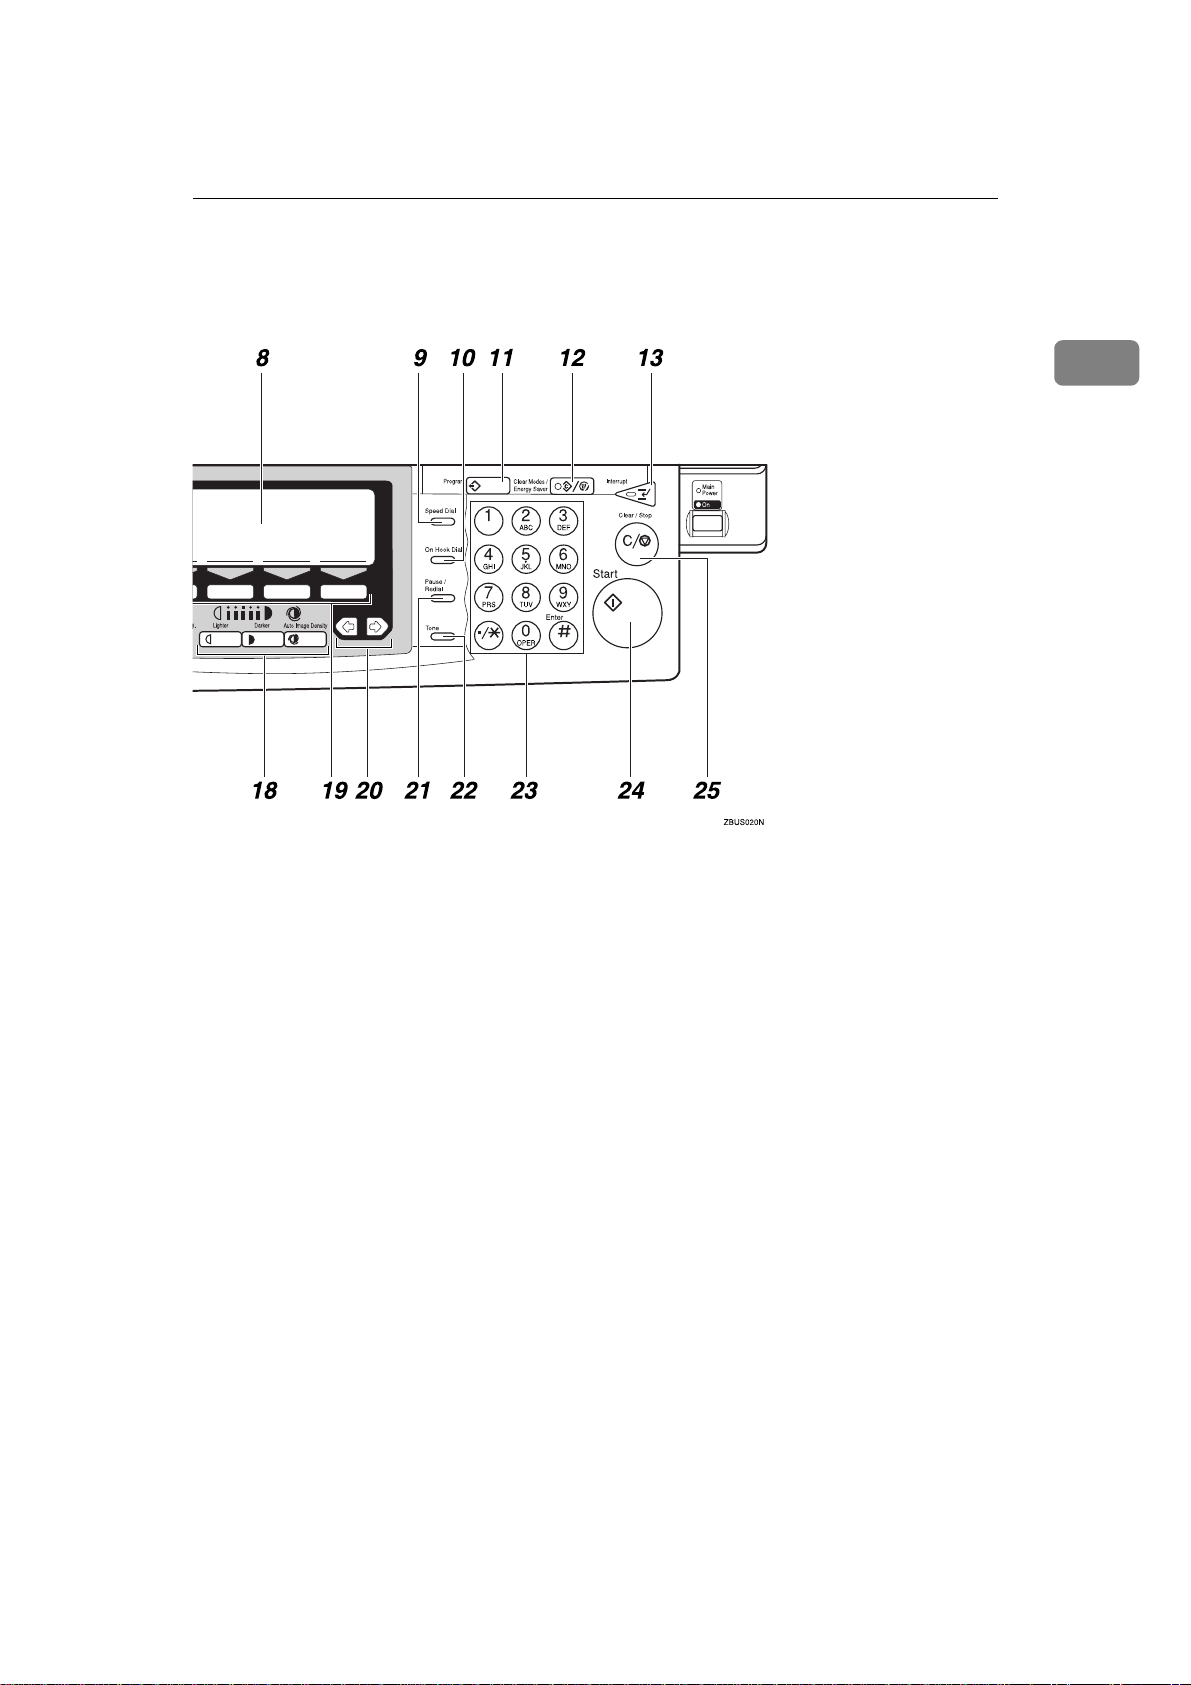
8.
LCD display
This guides you through tasks and informs you of the machine status. Messages appear here.
Memory Trans.
Standard, Detail
(optional Expansion
) and Im-
Immediate
}}}} key
Speed Dial
9.
{{{{
Press to select a Speed Dial.
On Hook Dial
10.
{{{{
Use to dial a number from the numeric
keypad without having to lift the handset.
Program
11.
{{{{
This key is used in Copy operation mode.
Clear Modes/Energy Saver
12.
{{{{
Cancels the current settings and returns
the machine to standby mode.
}}}} key
}}}} key
}}}} key
}}}} key
5

Getting Started
1
Interrupt
13. {
{
{{
Interrupts the current fax operation to
start copying.
}}}} key
14. Quick Dial Flip Plate
Flip this plate down to access Quick Dial
keys 01 through 28, flip up to access keys
29 through 56.
15. Quick Dial keys
Use to dial numbers at a single touch or
to enter letters and symbols. Also use for
the Group Dial, Keystroke Program features.
Fax
16.
{{{{
}}}} key
Press to switch to Facsimile mode.
Original Type
17.
{{{{
Use when sending a halftone image such
as a photograph or a color original.
Lighter
18.
{{{{
Auto Image Density
{{{{
Press this key to adjust the image density
of the scanned image.
}}}} key
}}}} and {{{{
Darker
}}}} key
}}}} keys and
Start
24. {
{
}}}} key
{{
Press to start all tasks.
Clear/Stop
25. {
{
{{
Clear:
Deletes one character or digit.
Stop:
Interrupts the current operation (trans-
mission, scanning, copying or printing).
}}}} key
Selection
19.
{{{{
Press the key number the item you wish
to select.
20.
<<<<>>>> keys
Press to move the cursor or select functions.
Pause/Redial
21.
{{{{
Pause:
Inserts a pause when you are dialing or
storing a fax number. A pause cannot be
inserted as the first digit.
Redial:
Press to redial one of the last ten num-
bers.
Tone
22.
{{{{
Press to send tonal signals down a pulse
dialing line.
23.
Number keys
Use to dial fax numbers or enter the number of copies.
}}}} keys
}}}} key
}}}} key
6
Starting the Machine
To start the machine, turn on the operation switch.
Note
❒ This machine automatically enters
Energy Saver mode or turns itself
off if you do not use the machine
for a while. See “08. Energy Saver
Timer”, “09. Auto Off Timer” in
the System Settings manual.
----Power switches
This machine has two power switches: See P.1 “Guide to Components”
Operation switch
❖❖❖❖
Turn on this switch to activate the
machine. When the machine has
warmed up, you can make copies
or send faxes.
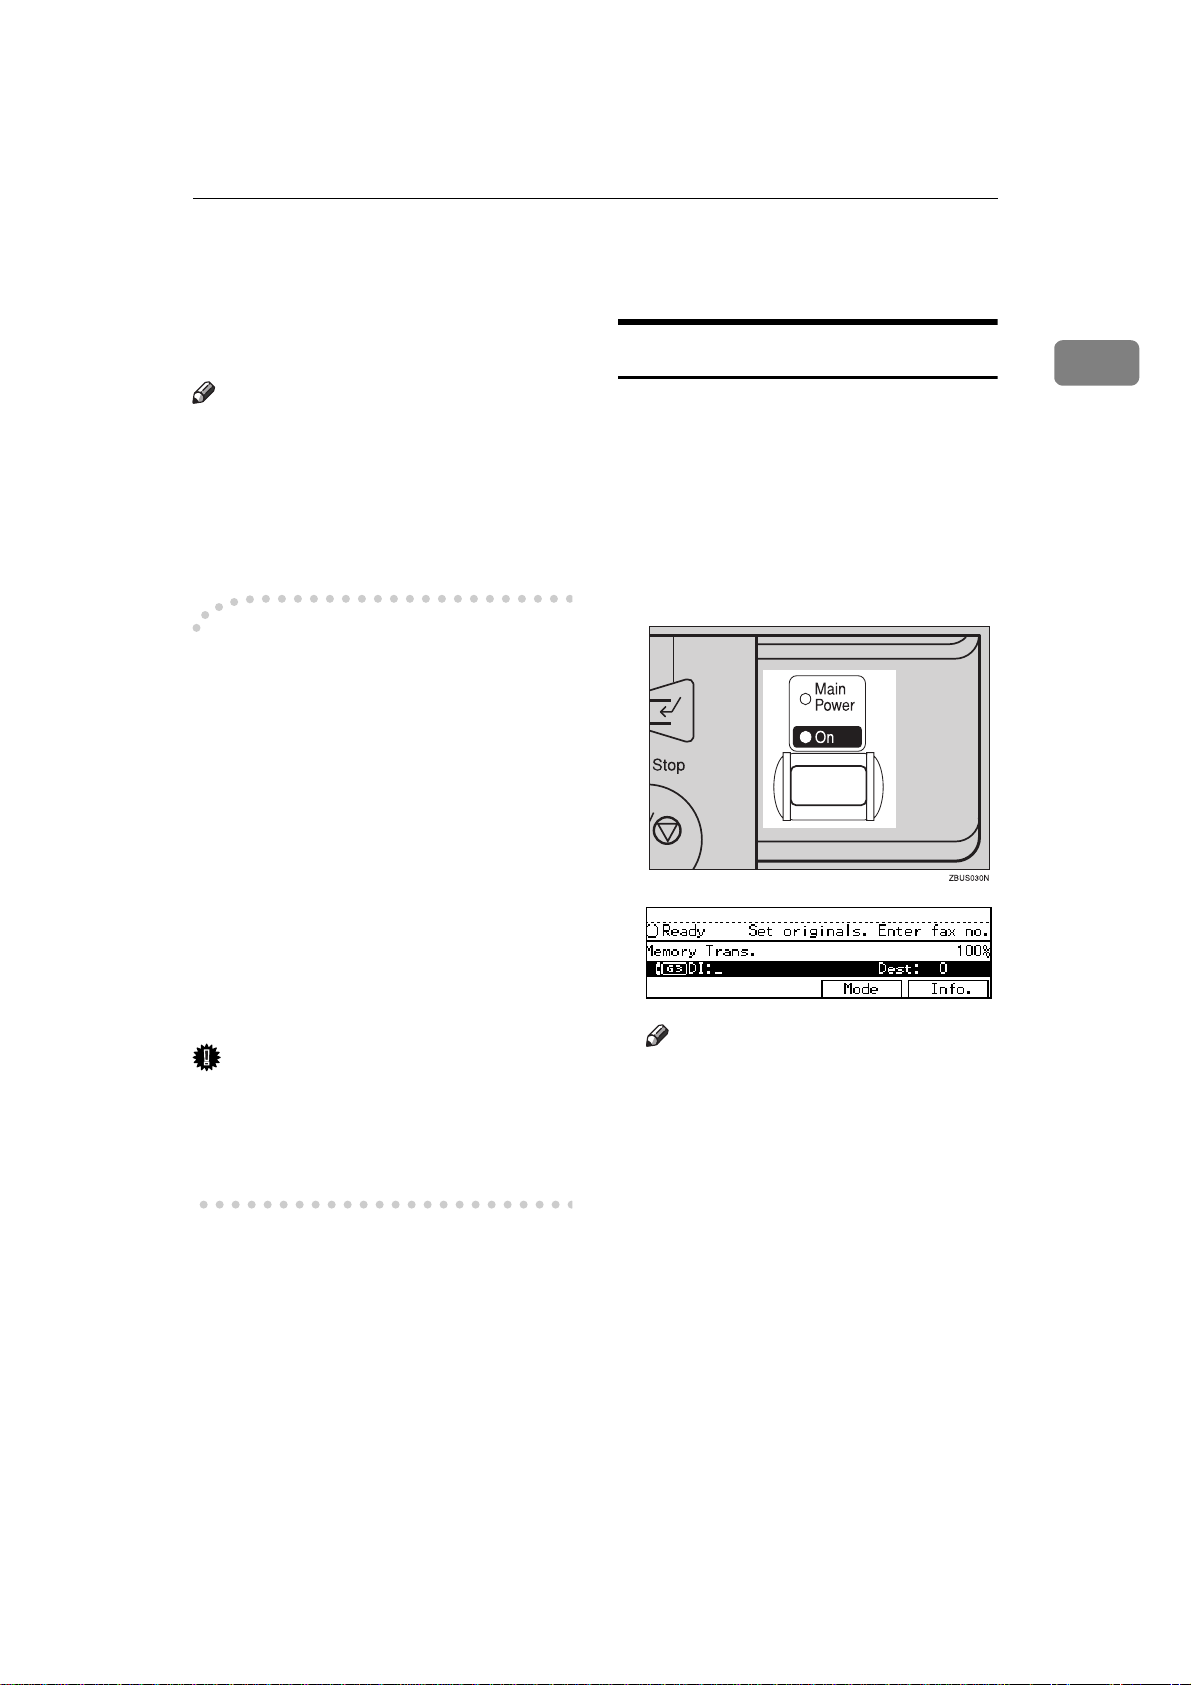
Starting the Machine
Turning On The Power
A Make sure that the power cord is
plugged into the wall outlet firmly and the Main Power switch is
on.
B Turn on the operation switch. The
On indicator should light.
The panel display will turn on.
1
Main power switch
❖❖❖❖
Do not touch the Main Power
switch. It should be used only by a
service representative when the
optional fax unit is installed.
Important
❒ If you leave the Main Power
switch off for more than one hour,
all fax files in memory are lost. See
“Turning Off The Power” below.
Note
❒ If nothing happens when you
turn on the operation switch,
make sure that the Main Power
switch is turned on.
7

1
Getting Started
Turning off The power
A Turn off the operation switch.
The On indicator will go out.
Important
❒ Before you unplug the power
cord, make sure that the display
in Facsimile mode indicates that
the remaining memory space is
100%.
❒ Fax files stored in memory will
be lost an hour after you turn
the Main Power switch off or
you unplug the power cord. ⇒
P.134 “When Power is Turned off
or Fails”
8
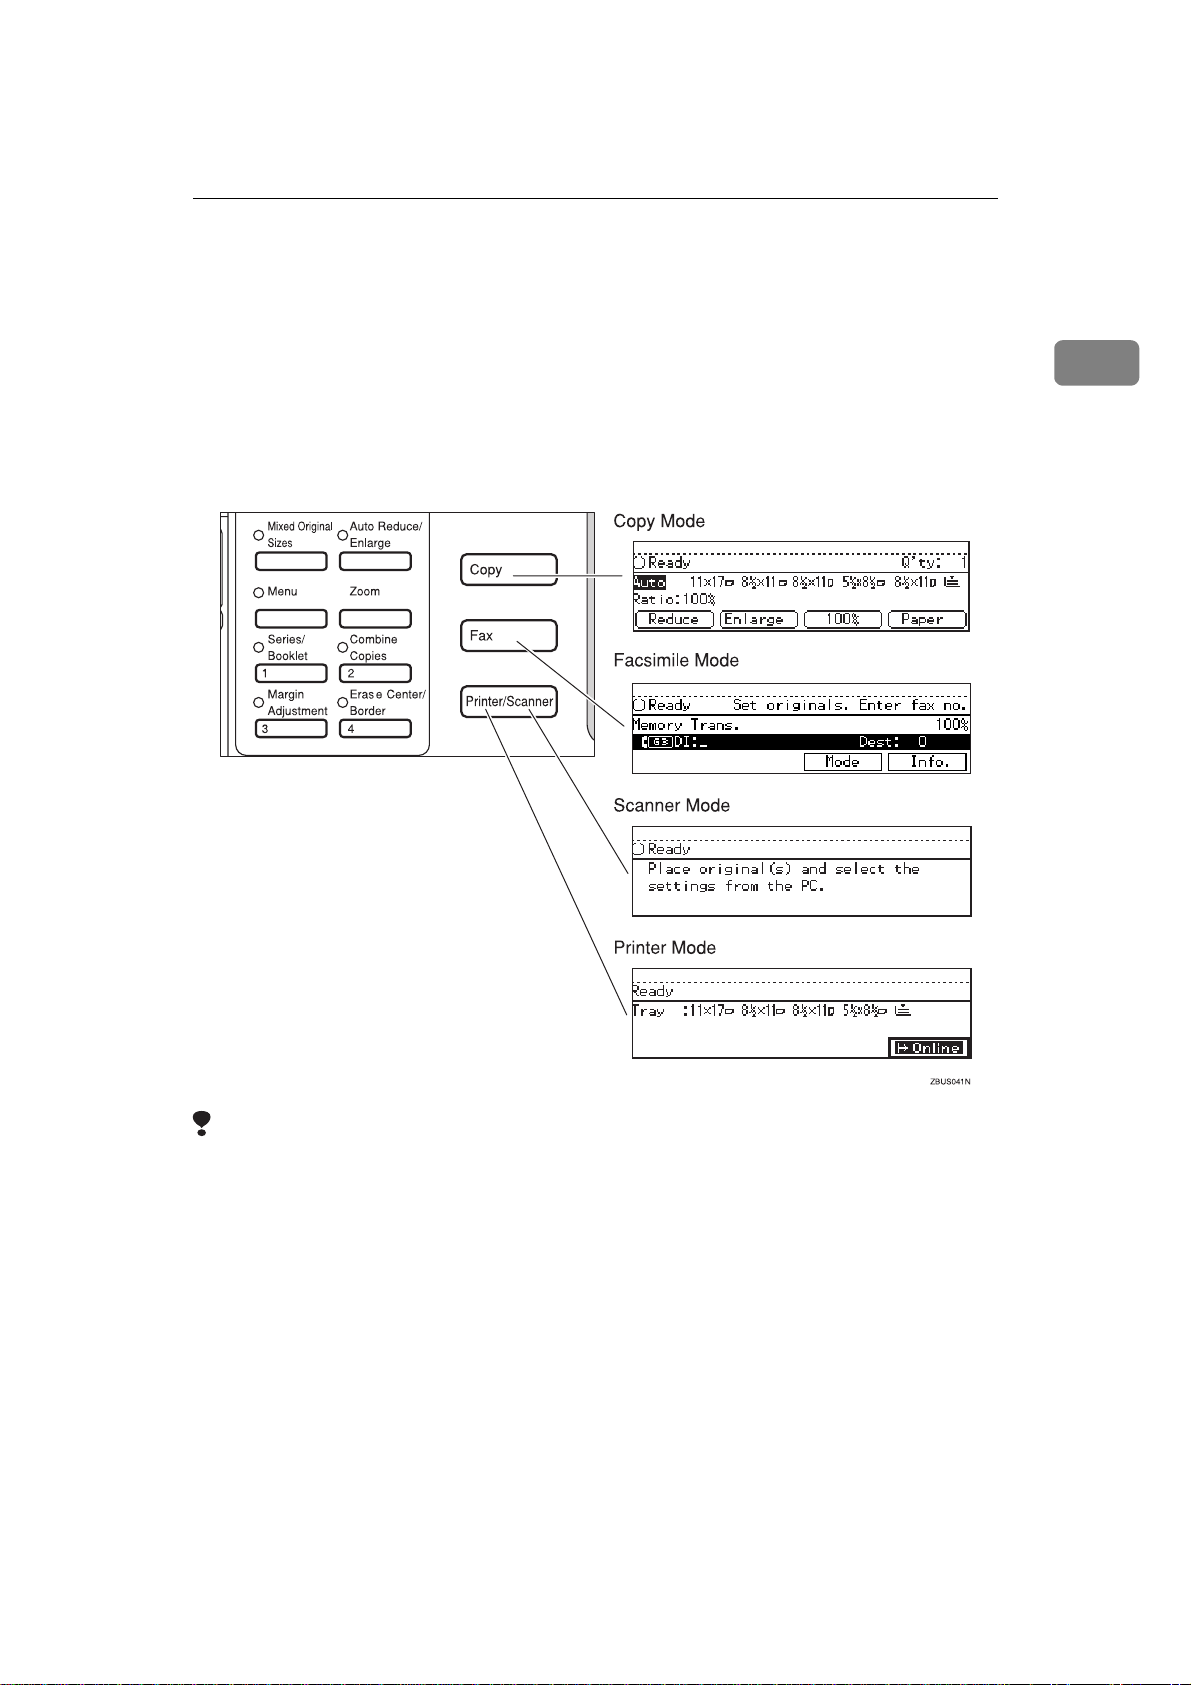
Switching between Copy Mode, Facsimile Mode and Printer/Scanner Mode
Switching between Copy Mode, Facsimile
Mode and Printer/Scanner Mode
You can use this machine both as a fax machine and a copier. Ordinarily when
you turn on the power switch, the copier display is shown and you are ready to
make copies. When you wish to use fax functions, press the {
right of the operation panel.
Fax
} key on the
1
Limitation
❒ You cannot switch modes under the following circumstances:
• While scanning in a fax
• During Immediate Transmission
• While editing the System Settings
• During Interrupt Copying
• While using On-hook Dial
9

Getting Started
Reading the Display
The display tells you the machine status and guides you through operations.
1
Note
❒ Functions that have been selected are hilighted (e.g. ). Keys that you
can not select are shown with a dashed outline (e.g. ).
❒ All procedures in this manual assume that you are in Facsimile mode. By de-
fault, when you turn the machine on it is in Copy mode. Press the {
change to Facsimile mode. You can have the machine start in Facsimile mode.
See “Changing the Machine's Settings” in the System Settings manual.
11 17
Fax
} key
Reading the Display Panel and Using Keys
1.
Display for the currently selected
function.
2.
Machine status and messages.
3.
Press these keys to navigate menu
screens and confirm or cancel selections.
4.
Press to select an item from a se-
lection. The currently selected item
is hilighted.
Note
❒
Press < to select the item one place to
the left.
❒
Press > to select the item one place to
the right.
10
Reading the Display
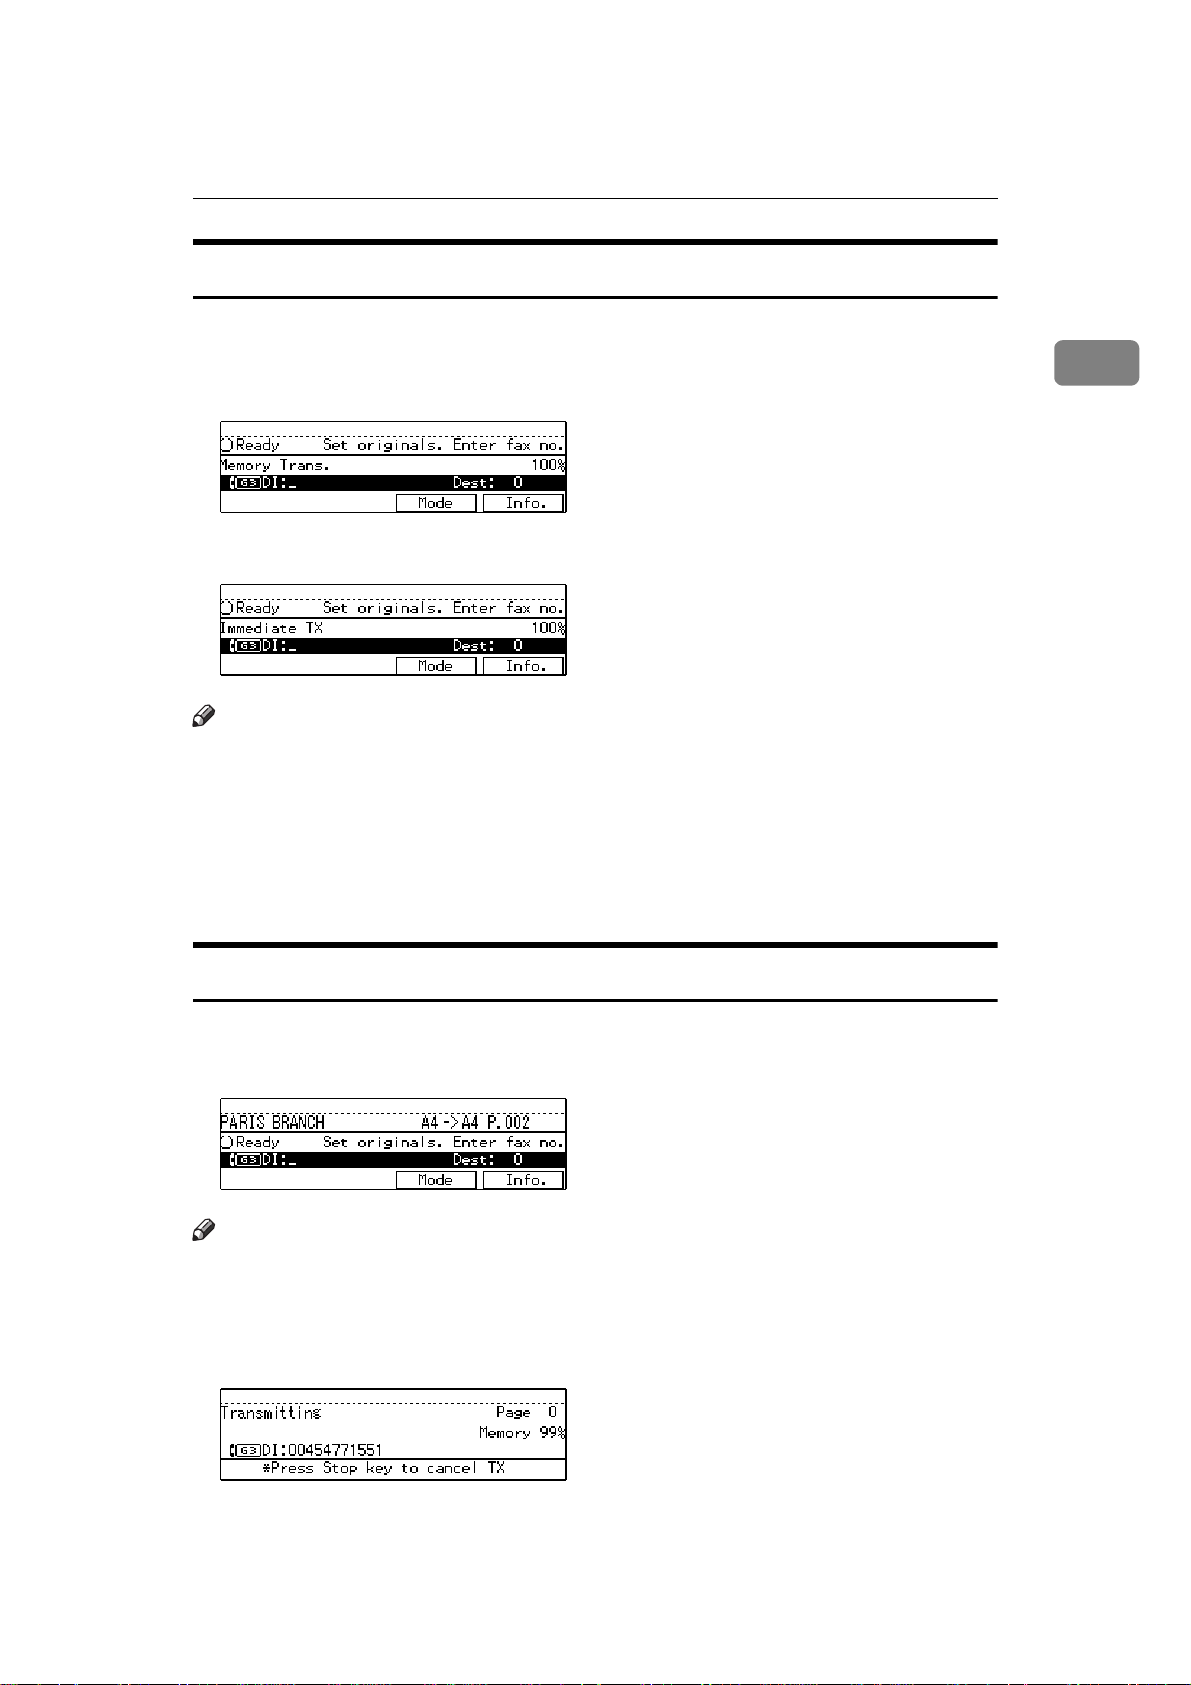
Standby Display
While the machine is in standby mode (immediately after it is turned on or after
Clear Modes/Energy Saver
the {
❖❖❖❖
Memory Transmission
❖❖❖❖
Immediate Transmission
Note
❒
To return the machine to standby mode, do one of the following:
• If you have set an original and are in the sending process, remove the orig-
inal.
• If you have not set an original and are in the sending process, press the
Clear Modes/Energy Saver
{
• If you are in User Tools mode, press the {
} key is pressed), the following display is shown.
} key.
User Tools/Counter
} key.
1
Communication Display
While the machine is communicating the status is displayed.
❖❖❖❖
Display during Memory Transmission or Memory Reception:
Note
❒
Even when the machine is sending or receiving a fax message from/into
memory, you can still scan the next original into memory. ⇒ P.13 “Dual Ac-
cess”
❖❖❖❖
Immediate Transmission:
11
1
Getting Started
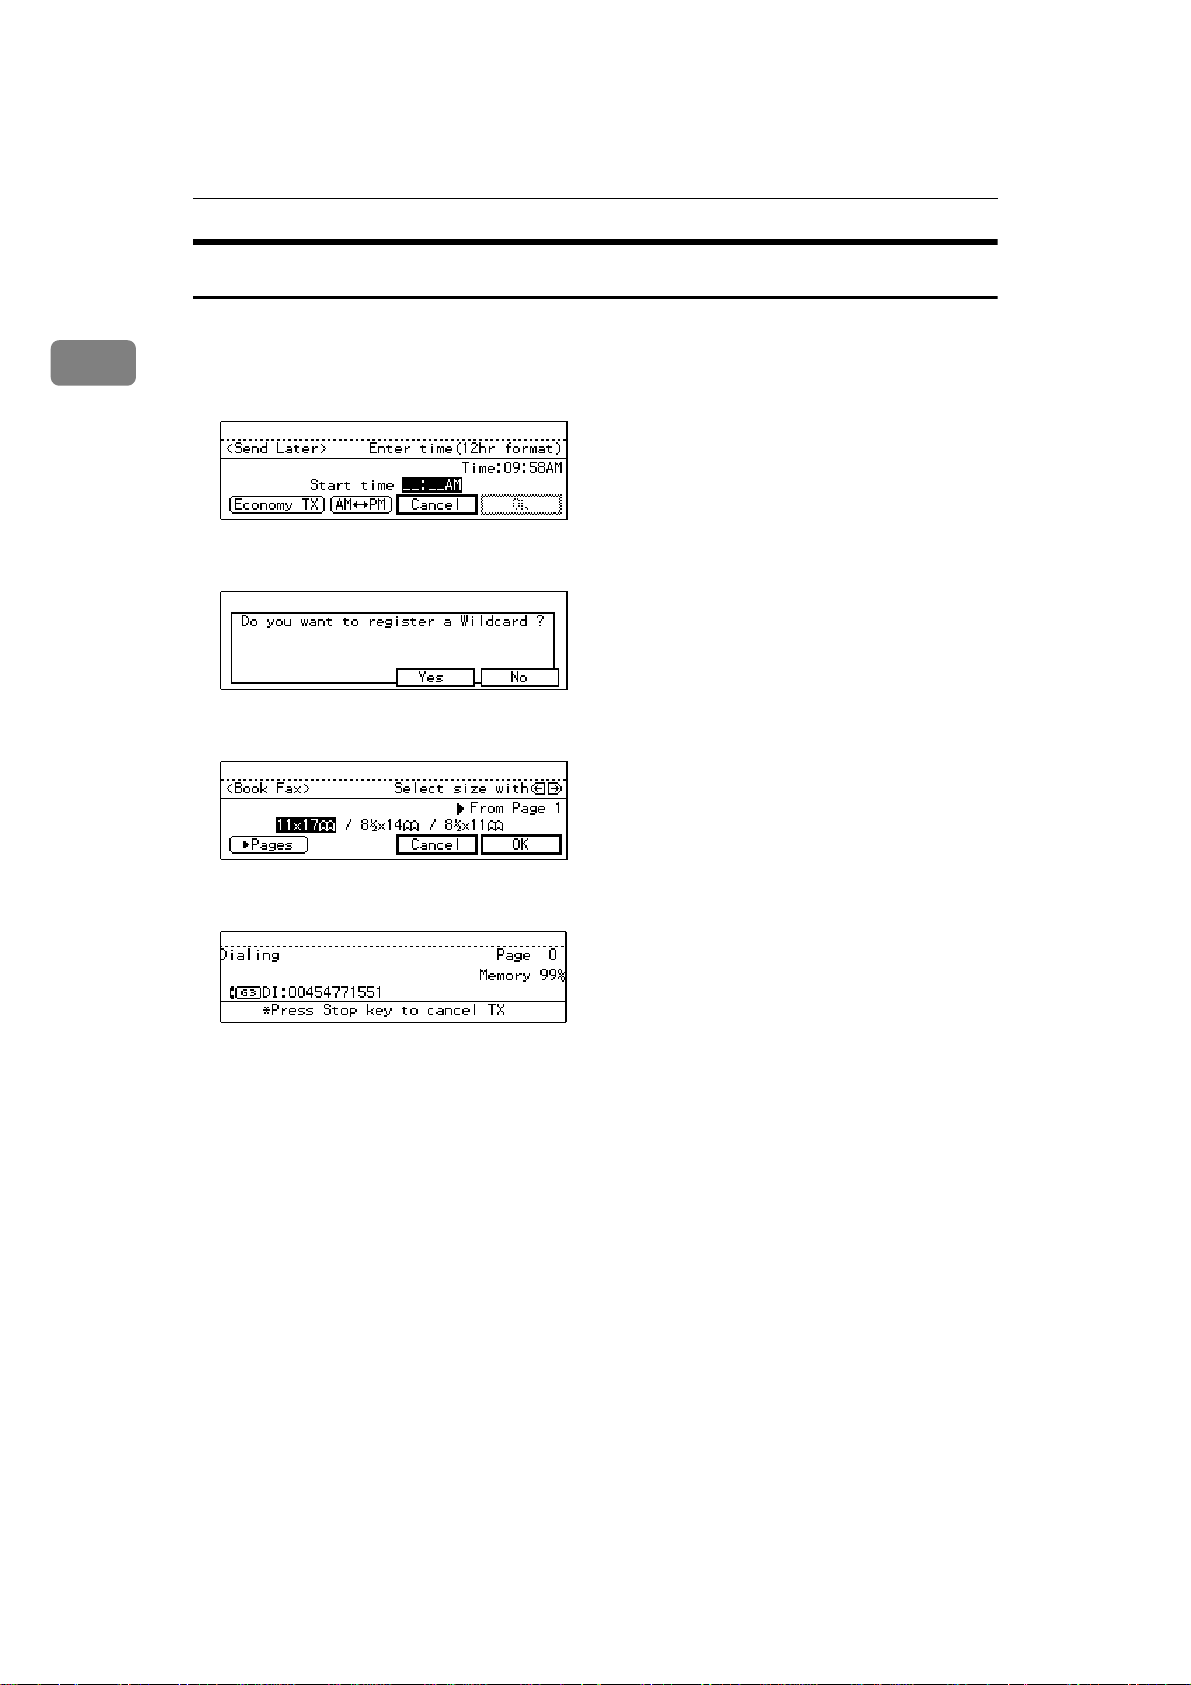
Display Prompts
Depending on the situation, the machine will show various prompts on the display.
❖❖❖❖
Instructions and Requests
❖❖❖❖
Questions
❖❖❖❖
Selections
❖❖❖❖
Status
12

Useful Functions
Useful Functions
Auto Fax Reception Power-up
This machine can be set to shut down
automatically if nobody has used it
for a while. In these situations, even
through the operation switch is off,
the machine can still receive incoming messages as long as the Main
Power switch is on.
Important
❒ Reception is not possible if both
the operation switch and Main
Power switch are turned off.
Note
❒ By default, messages are printed as
soon as they are received (Immediate Reception). To change this, see
P.227 “Changing the User Parame-
ters”.
Personal Code Access
The machine can be set up so that nobody can use it without entering a
personal code. This prevents unauthorized people from sending fax
messages and can be used to track fax
machine use by giving a personal
code to each user.
❒ You can store up to 20 personal
❒ Register personal codes and turn
❒ Even if Restricted Access is en-
Dual Access
A If Personal Code Access is turned
The machine can scan other messages
into memory even while sending a
fax message from memory, receiving
a message into memory, or automatically printing a report. Since the machine starts sending the second
message immediately after the current transmission terminates, the line
will be used efficiently.
Note that during Immediate Transmission or when in User Tools mode,
the machine cannot scan an original.
B Enter a personal code (8 digit
Note
codes (up to 50 with optional Fax
Function Upgrade Unit installed).
Personal Code Access on. The default setting is off. ⇒ P.182 “Regis-
tering Personal Codes”, P.185
“Personal Code Access”
abled, the machine can receive and
print a fax message.
on, the following display appears:
number) using the number keys,
[
and press
####
]
.
1
Note
❒ If a user enters a personal code
that is not registered, the machine returns to step A.
13

Getting Started
1
Transmission with Image Rotation
For most purposes, set A4/81/
originals in the lengthwise direction
(L). If you set an A4/8
1
/
"×11" origi-
2
nal in the sideways direction (K), the
image will be sent rotated by 90°. Pro-
viding the receiver has A4/8
lengthwise paper (L), the message
will be printed the same size as the
original.
Limitation
❒ This feature is not available with
Parallel Memory Transmission or
Immediate Transmission.
❒ When Image Rotation is used, all
messages are sent by normal Memory Transmission.
1
/
"×11"
2
"×11"
2
Simultaneous Broadcast
The optional ISDN Unit is required.
The Standard Broadcast feature sends
faxes one at a time to multiple destinations in the order that you specified
the destination numbers.
The Simultaneous Broadcast feature,
however, can send faxes two at a time
to multiple destinations by transmitting simultaneously over different
lines.
This results in a shorter overall transmission time.
Multi-port
When the optional ISDN Unit is installed, communications can take
place simultaneously through two
lines at once.
Option Available
Line
Types
Without
option
ISDN Unit PSTN+
Note
PSTN G3
ISDN
ISDN G3 (ISDN)+G4
❒ You cannot perform 2 Immediate
Transmissions simultaneously.
❒ If two fax messages are received si-
multaneously, they cannot be
printed out at the same time.
❒ If two communications are in
progress, the display indicates the
first communication that was initiated.
❒ You can choose to have messages
received on a specified line printed
using paper from optional Internal
Tray 2. See the System Settings
manual for details.
Available
Protocol
Combinations
G3+G4
or
G3 (ISDN)+G4
14
 Loading...