

Page 1

Operating Instructions
Troubleshooting
When the Machine Does Not Operate As Wanted
1
Troubleshooting When Using the Copy/Document Server Function
2
Troubleshooting When Using the Facsimile Function
3
Troubleshooting When Using the Printer Function
4
Troubleshooting When Using the Scanner Function
5
Adding Paper, Toner and Staples
6
Clearing Misfeeds
7
Remarks
8
Read this manual carefully before you use this machine and keep it handy for future reference. For safe and correct use, be sure to read the
Safety Information in "About This Machine" before using the machine.
Page 2

Introduction
This manual contains detailed instructions and notes on the operation and use of this machine. For your
safety and benefit, read this manual carefully before using the machine. Keep this manual in a handy
place for quick reference.
Important
Contents of this manual are subject to change without prior notice. In no event will the company be liable for direct, indirect, special, incidental, or consequential damages as a result of handling or operating the machine.
Notes:
Some illustrations in this manual might be slightly different from the machine.
Certain options might not be available in some countries. For details, please contact your local dealer.
Depending on which country you are in, certain units may be optional. For details, please contact your
local dealer.
Caution:
Use of controls or adjustments or performance of procedures other than those specified in this manual
might result in hazardous radiation exposure.
Two kinds of size notation are employed in this manual. With this machine refer to the inch version.
For good copy quality, the supplier recommends that you use genuine toner from the supplier.
The supplier shall not be responsible for any damage or expense that might result from the use of parts
other than genuine parts from the supplier with your office products.
Power Source
120 V, 60 Hz, 20 A or more.
Please be sure to connect the power cord to a power source as shown above. For details about power
source, see p.127 “Power Connection”.
Page 3

Manuals for This Machine
Refer to the manuals that are relevant to what you want to do with the machine.
Important
❒ Media differ according to manual.
❒ The printed and electronic versions of a manual have the same contents.
❒ Adobe Acrobat Reader/Adobe Reader must be installed in order to view the
manuals as PDF files.
❒ Depending on which country you are in, there may also be html manuals. To
view these manuals, a Web browser must be installed.
❖ About This Machine
Be sure to read the Safety Information in this manual before using the machine.
This manual provides an introduction to the functions of the machine. It also
explains the control panel, preparation procedures for using the machine,
how to enter text, and how to install the CD-ROMs provided.
❖ Troubleshooting
Provides a guide to solving common problems, and explains how to replace
paper, toner, and other consumables.
❖ Copy/Document Server Reference
Explains Copier and Document Server functions and operations. Also refer to
this manual for explanations on how to place originals.
❖ Facsimile Reference
Explains Facsimile functions and operations.
❖ Printer Reference
Explains Printer functions and operations.
❖ Scanner Reference
Explains Scanner functions and operations.
❖ Network Guide
Explains how to configure and operate the machine in a network environment, and use the software provided.
This manual covers all models, and includes descriptions of functions and
settings that might not be available on this machine. Images, illustrations, and
information about operating systems that are supported might also differ
slightly from those of this machine.
❖ General Settings Guide
Explains User Tools settings, and Address Book procedures such as registering fax numbers, e-mail addresses, and user codes. Also refer to this manual
for explanations on how to connect the machine.
i
Page 4
❖ Security Reference
This manual is for administrators of the machine. It explains security functions that you can use to prevent unauthorized use of the machine, data tampering, or information leakage. For enhanced security, we recommend that
you first make the following settings:
• Install the Device Certificate.
• Enable SSL (Secure Sockets Layer) Encryption.
• Change the user name and password of the administrator using Web Image Monitor.
For details, see “Setting Up the Machine”, Security Reference.
Be sure to read this manual when setting the enhanced security functions, or
user and administrator authentication.
❖ PostScript 3 Supplement
Explains how to set up and use PostScript 3.
❖ UNIX Supplement
For "UNIX Supplement", please visit our Web site or consult an authorized
dealer.
❖ Other manuals
• Manuals for DeskTopBinder Lite
• DeskTopBinder Lite Setup Guide
• DeskTopBinder Introduction Guide
•Auto Document Link Guide
Note
❒ Manuals provided are specific to machine types.
❒ "PostScript3 Supplement" and "UNIX Supplement" include descriptions of
functions and settings that might not be available on this machine.
❒ The following software products are referred to using general names:
Product name General name
DeskTopBinder Lite and DeskTopBinder Professional
*1
*1
Optional
DeskTopBinder
ii
Page 5

TABLE OF CONTENTS
Manuals for This Machine ......................................................................................i
How to Read This Manual .....................................................................................1
Symbols .....................................................................................................................1
1. When the Machine Does Not Operate As Wanted
Indicators................................................................................................................3
Panel Tone..............................................................................................................4
Checking Machine Status and Settings...............................................................5
When the Function Status Indicator Lights Up in Red.......................................8
When You Have Problems Operating the Machine.............................................9
When a Job Is Not Performed.............................................................................13
2. Troubleshooting When Using the Copy/Document Server Function
Messages Displayed When Using the Copy/Document Server Function.......17
When You Cannot Make Clear Copies ............................................................... 23
When You Cannot Make Copies As Wanted .....................................................25
Display During Connect Copy ..................................................................................30
If Connect Copy Is Canceled ...................................................................................30
If You Cannot Exit from Connect Copy ....................................................................31
When Memory Is Full ...............................................................................................32
3. Troubleshooting When Using the Facsimile Function
Adjusting the Volume..........................................................................................33
Messages Displayed When Using the Facsimile Function.............................. 35
When You Cannot Send or Receive Fax Messages as Wanted.......................43
When Memory Is Full ...............................................................................................46
When an Error Report Is Printed ........................................................................47
Turning Off the Main Power / In the Event of Power Failure............................48
When an Error Occurs Using Internet Fax ........................................................49
Error Mail Notification...............................................................................................49
Error Report (E-Mail)................................................................................................49
Server-Generated Error E-mail ................................................................................49
iii
Page 6

4. Troubleshooting When Using the Printer Function
When You Cannot Connect to the USB Interface .............................................51
Messages Displayed When Installing the Printer Driver.................................. 52
Windows 2000..........................................................................................................52
Windows XP, Windows Server 2003........................................................................53
Windows Vista..........................................................................................................53
Messages Displayed When Using the Printer Function................................... 54
Status Messages......................................................................................................54
Messages Displayed on the Control Panel When Using the Printer Function .........55
Messages Printed on the Error Logs or Reports......................................................57
Checking the Error Log ............................................................................................63
When You Cannot Print.......................................................................................64
When the Data In Indicator Does Not Light Up or Flash ..........................................66
Other Printing Problems .....................................................................................67
5. Troubleshooting When Using the Scanner Function
When Scan Results Are Not As Expected .........................................................73
When You Cannot Send Scanned Files.............................................................74
When Stored Files Cannot Be Accessed .................................................................74
When You Cannot Browse the Network to Send a Scan file ...................................74
When the TWAIN Driver Cannot Be Started ............................................................74
When Stored Files Cannot Be Edited ......................................................................75
When the Network Delivery Function Cannot Be Used ...........................................75
Operations Are Not Possible When Messages Are Displayed.................................75
Messages Displayed When Using the Scanner Function ................................76
When a Message Is Displayed on the Control Panel...............................................76
When a Message Is Displayed on the Client Computer...........................................82
6. Adding Paper, Toner and Staples
Loading Paper......................................................................................................87
Loading Paper into Tray 1 (Tandem Tray) ...............................................................87
Loading Paper into Tray 2 and 3..............................................................................89
Loading Paper into the Large Capacity Tray (LCT) .................................................90
Loading Paper in the Interposer...............................................................................91
Changing the Paper Size.....................................................................................94
Changing the Paper Size in Tray 2 and 3 ................................................................94
Adding Toner........................................................................................................99
Inserting Toner .......................................................................................................100
Used Toner ............................................................................................................101
Sending Fax Messages When Toner Has Run Out ...............................................101
Adding Staples...................................................................................................102
3,000 Sheet-50 Sheet Staple Finisher and Booklet Finisher ................................. 102
3,000 Sheet-100 Sheet Staple Finisher .................................................................103
Booklet Finisher (Saddle Stitch).............................................................................104
iv
Page 7

7. Clearing Misfeeds
Removing Jammed Paper .................................................................................105
Locating Jammed Paper ........................................................................................106
When A Is lit ...........................................................................................................108
When B Is lit ...........................................................................................................108
When C Is lit...........................................................................................................108
When D Is lit...........................................................................................................109
When E Is lit ...........................................................................................................109
When F Is lit ...........................................................................................................110
When N Is Lit..........................................................................................................111
When P Is Lit..........................................................................................................112
When Q Is lit...........................................................................................................113
When R Is Lit..........................................................................................................114
When W Is lit ..........................................................................................................117
When U Is lit...........................................................................................................117
Removing Jammed Staples ..............................................................................118
3,000 Sheet-50 Sheet Staple Finisher and Booklet Finisher ................................. 118
3,000 Sheet-100 Sheet Staple Finisher .................................................................119
Booklet Finisher (Saddle Stitch).............................................................................120
Removing Punch Waste ....................................................................................121
3,000 Sheet-50 Sheet Staple Finisher and Booklet Finisher ................................. 121
3,000 Sheet-100 Sheet Staple Finisher .................................................................122
8. Remarks
Where to Put Your Machine ..............................................................................125
Machine Environment ............................................................................................125
Moving....................................................................................................................126
Power Connection..................................................................................................127
Access to the Machine...........................................................................................128
Maintaining Your Machine ................................................................................129
Cleaning the Exposure Glass.................................................................................129
Cleaning the Exposure Glass Cover ......................................................................130
Cleaning the Auto Document Feeder.....................................................................130
INDEX....................................................................................................... 132
v
Page 8

vi
Page 9

How to Read This Manual
Symbols
This manual uses the following symbols:
Indicates important safety notes.
Ignoring these notes could result in serious injury or death. Be sure to read these
notes. They can be found in the “Safety Information” section of About This Machine.
Indicates important safety notes.
Ignoring these notes could result in moderate or minor injury, or damage to the
machine or to property. Be sure to read these notes. They can be found in the
“Safety Information” section of About This Machine.
Indicates points to pay attention to when using the machine, and explanations
of likely causes of paper misfeeds, damage to originals, or loss of data. Be sure
to read these explanations.
Indicates supplementary explanations of the machine’s functions, and instructions on resolving user errors.
This symbol is located at the end of sections. It indicates where you can find further relevant information.
[ ]
Indicates the names of keys that appear on the machine’s display panel.
{ }
Indicates the names of keys on the machine’s control panel.
1
Page 10

2
Page 11
1. When the Machine Does Not Operate As Wanted
This chapter describes basic troubleshooting procedures that are applicable to
all functions of this machine.
Indicators
This section describes Indicators displayed when the machine requires the user
to remove misfed paper, add paper, or perform other procedures.
x: Misfeed indicator Appears when a misfeed occurs. See p.105 “Removing
Jammed Paper”.
B: Add Paper indicator Appears when paper-out condition occurs. See p.87
“Loading Paper”.
D: Add Toner indicator Appears when toner runs out. See p.99 “Adding Toner”.
d: Add Staple indicator Appears when staples run out. See p.118 “Removing
Jammed Staples”.
y: Empty Hole Punch Receptacle
indicator
L: Service Call indicator Appears when the machine is malfunctioning or re-
M: Open Cover indicator Appears when the front cover, etc., is open.
Appears when the hole punch receptacle is full. See
p.121 “Removing Punch Waste”
quires maintenance.
3
Page 12
1
When the Machine Does Not Operate As Wanted
Panel Tone
The following table describes the meaning of the various beep patterns that the
machine produces to alert users about left originals and other machine conditions.
Beep pattern Meaning Cause
Two long beeps. Machine has warmed up. A control panel or screen key was
pressed. Single short beeps are produced only when valid keys are
pressed.
Single short beep. Panel/screen input ac-
cepted.
Single long beep. Job completed. A Copier / Document Server Features
Five long beeps. Soft alert. The screen is changing back to the ini-
Five long beeps repeated
four times.
Five short beeps repeated
five time.
Soft alert. An original has been left on the expo-
Strong alert. Machine requires user attention. Paper
A control panel or screen key was
pressed. Single short beeps are produced only when valid keys are
pressed.
job has finished.
tial screen after the machine came out
of energy-saving mode or was reset.
sure glass.
might have jammed or toner might
need replenishing.
Note
❒ Users cannot mute the machine's beep alerts. When the machine beeps to alert
users of a paper jam or toner request, if the machine's covers are opened and
closed repeatedly within a short space of time, the beep alert might continue,
even after normal status has resumed.
Reference
For details about enabling or disabling beep alerts, see “System Settings”,
General Settings Guide.
4
Page 13

Checking Machine Status and Settings
Checking Machine Status and Settings
You can check the machine's system status.
❖ Maintenance Info
You can check the following items under [Maintenance Info]:
• [Remaining Toner]
Displays the amount of remaining toner.
• [No Staples]
Displays the amount of remaining staples.
• [Punch Receptacle Full]
Displays whether the hole punch receptacle is full.
• [Paper Tray]
Displays the paper type and size loaded in the paper tray.
• [Output Tray Full]
Displays whether the output tray is overloaded.
• [Original Misfeed]
Displays state of and solutions for original misfeeds.
• [Paper Misfeed]
Displays state of and solutions for paper jams.
• [Cover Open]
Indicates whether front cover, duplex unit, etc, is open.
❖ Data Storage
You can check the following items under [Data Storage]:
1
• [HDD Remaining Memory]
Displays the amount of available hard disk drive memory.
• [HDD File(s)]
Displays the total number of jobs stored in the hard disk drive.
• [Print Job(s)]
Displays the number of jobs for Hold print/Stored print/Locked
print/Sample print.
• [Fax TX / RX File(s)]
Displays the number of TX standby files, Print memory lock files, Reception print files, and other files stored in the hard disk drive.
• [Memory Erase Status]
Displays the state of the memory data.
5
Page 14
1
When the Machine Does Not Operate As Wanted
❖ Machine Address Info
You can check the following items under [Machine Address Info]:
• [Fax No.]
Displays the machine's fax number.
• [H.323 Own Fax No.]
Displays the machine's alias telephone number.
• [SIP User Name]
Displays the machine's SIP user name.
• [Fax E-mail Account]
Displays the machine's fax e-mail account.
• [Machine IPv4 Address]
Displays the machine's IPv4 address.
• [Machine IPv6 Address]
Displays the machine's IPv6 address.
❖ Inquiry
You can check the following items under [Inquiry]:
• [Machine Repairs]
Displays the machine number and contact number that are required for
service.
• [Sales Representative]
Displays the sales representative's telephone number.
• [Supply Order]
Displays the contact number for placing supply orders.
• [Supply Details]
Displays the name of toner, staples, etc, used on the machine.
A On the control panel, press [System Status].
6
Page 15

Checking Machine Status and Settings
B Press each tab and check the contents.
C After checking the information, press [Exit]. The previous screen returns.
1
Note
❒ [No Staple], [Punch Receptacle Full], [Output Tray Full], [Original Misfeed], [Paper
Misfeed], and [Cover Open] appear only when these errors occur.
❒ For details about how to locate and remove misfeeds, see “Locating
Jammed Paper” or “Removing Jammed Paper”.
Reference
p.106 “Locating Jammed Paper”.
p.105 “Removing Jammed Paper”.
7
Page 16

When the Machine Does Not Operate As Wanted
When the Function Status Indicator Lights Up in Red
1
When an indicator to the right of a function key lights up, press the corresponding function key. Then, follow the instructions displayed on the control panel.
Problem Cause Solution
Documents and reports
do not print out.
Documents and reports
do not print out.
An error has occurred. The function whose indi-
The machine is unable to
connect to the network.
The paper output tray is
full.
There is no copy paper
left.
cator is lit is defective.
A network error has occurred.
Remove the paper from the tray.
Add more paper. See p.87 “Loading Paper”.
Record the code number shown in the
display and contact your service representative. See “When a Message Appears” of each chapter.
You can use other functions normally.
• Check the displayed message and
take an appropriate action. See
“When a Message Appears” of each
chapter.
• Check that the machine is correctly
connected to the network, and that
the machine is correctly set. See
“Network Settings”, General Settings Guide.
• Contact the administrator.
• When the function key is still lit,
even if you take the measures
above, contact your service representative.
Note
❒ If an error occurs in the function you are using, check the message that ap-
pears on the control panel, and then refer to “When a Message is Displayed”
for the relevant function.
Reference
p.17 “Messages Displayed When Using the Copy/Document Server Function”
p.35 “Messages Displayed When Using the Facsimile Function”
p.54 “Messages Displayed When Using the Printer Function”
p.76 “Messages Displayed When Using the Scanner Function”
8
Page 17
When You Have Problems Operating the Machine
When You Have Problems Operating the
Machine
The following chart gives explanations of common problems and messages.
If other messages appear, follow the instructions displayed.
Important
❒ Check the contact address and Serial No. of Machine shown in the call service
message, and then contact your service representative.
Problem Cause Solution
“
Please wait.” ap-
pears.
Please wait.” ap-
“
pears.
Although the copier
screen appears when the
machine is turned on using the main power
switch, it cannot be
switched to another
screen by pressing the
{Printer} or {Scanner} key.
The machine has just
been turned on and the
User Tools screen is displayed, but the User
Tools menu has items
missing.
This message appears
when you turn on the operation switch.
This message appears
when you change the toner bottle.
Functions other than the
copier function are not
yet ready.
Functions other than the
copier function are not
yet ready. Time required
varies by function. Functions appear in the User
Tools menu when they
become ready for use.
Wait for the machine to get ready.
Wait for the machine to get ready.
Wait a little longer.
Wait a little longer.
1
The display is off. The screen contrast knob
is turned to the dark position.
The display is off. The machine is in Energy
Saver mode.
The display is off. The operation switch is
turned off.
Nothing happens when
the operation switch is
turned on.
The main power switch is
turned off.
Set the screen contrast knob to the light
position to see the display panel properly. See “Control Panel”, About This
Machine.
Press the {Energy Saver} key to cancel
Energy Saver Mode.
Turn on the operation switch.
Turn on the main power switch.
9
Page 18

When the Machine Does Not Operate As Wanted
Problem Cause Solution
1
“Memory is full.
Do you want to
store scanned
file?
The main power indicator continues blinking
and does not turn off
when pressed.
“
ing...
Original images are
printed on the reverse
side of the paper.
” appears.
Self check-
” appears.
The scanned originals exceed the number of
sheets/pages that can be
stored in the hard disk.
This occurs in the following cases:
• The exposure glass
cover or ADF is open.
• The machine is communicating with external equipment.
• The hard disk is active.
The machine is performing image adjustment operations.
You may have loaded the
paper incorrectly.
•Press [Store File] to store pages that
have been scanned. Delete unnecessary files with [Delete File].
•Press [No] if you are not storing pag-
es that have been scanned. Delete
unnecessary files with [Delete File].
Close the exposure glass cover or ADF,
and check if the machine is communicating with a computer.
The machine may perform periodic
maintenance during operations. The
frequency and duration of maintenance
depends on the humidity, temperature,
and printing factors such as number of
prints, paper size, and paper type. Wait
for the machine to get ready.
Load paper correctly. Place paper in the
paper tray with the print side down.
Load paper into the bypass tray with
the print side up. See p.93 “OrientationFixed Paper or Two-Sided Paper”.
10
Misfeeds occur frequently.
Misfeeds occur frequently.
Misfeeds occur frequently.
Misfeeds occur frequently.
The tray's side fence may
not be locked.
The tray's end fence may
not be set properly.
Paper of undetectable
size has been loaded.
There is a foreign object
on the finisher tray.
• Remove the paper. See p.105 “Removing Jammed Paper”.
• Check the side fence is locked. See
p.94 “Changing the Paper Size”.
• Remove the paper. See p.105 “Removing Jammed Paper”.
• Check the end fence is set properly.
See p.94 “Changing the Paper Size”.
• Remove the paper. See p.105 “Removing Jammed Paper”.
• When loading the paper of undetectable size, specify the paper size in
“Tray Paper Size”. See "Tray Paper
Size: Tray 2", "Tray Paper Size: Tray
3", General Settings Guide and
“Copy Paper”, About This Machine.
• Remove the paper. See p.105 “Removing Jammed Paper”.
• Do not place anything on the finisher tray. It may cause a paper jam.
Page 19
When You Have Problems Operating the Machine
Problem Cause Solution
Misfeeds occur frequently.
An error message remains, even if misfed paper is removed.
Cannot print in duplex
mode.
Cannot print in duplex
mode.
The user code entry
screen is displayed.
The Authentication
screen appears.
The staple cartridge is not
set correctly.
• When a misfeed message appears, it remains until you open
and close the cover as
required.
• Paper is still jammed
in the tray.
You cannot use paper in
the bypass tray for duplex printing.
You have selected a tray
which is set to [1 Sided
Copy] in [Tray Paper Settings] in [System Settings].
Users are restricted by
user management.
Basic Authentication,
Windows Authentication, LDAP Authentication or Integration Server
Authentication is set.
The Booklet Finisher requires the saddle stitch stapler cartridge also. See
p.102 “Adding Staples”.
Clear misfed paper, and then open and
close the front cover. see p.105 “Removing Jammed Paper”.
For duplex printing, select Tray 1-3 in
copier mode or with the printer driver.
Set the tray to [2 Sided Copy] in [Tray Pa-
per Settings] in [System Settings].
Enter the user code (up to eight digits),
and then press {q}.
Enter your login user name and user
password. See “When the Authentication Screen is Displayed”, About This
Machine.
1
You do not have
“
the privileges to
use this function.
“
” is displayed.
You do not have
the privileges to
use this function.
displayed even though
you have entered a valid
user code.
Authentication failed. The entered login user
Authentication failed. The machine cannot per-
The selected file(s) contained file(s) without access privileges. Only
file(s) with access privileges will be deleted.
” continues to be
The use of the function is
restricted to authenticated users only.
This user code is not allowed to use the function
selected.
name or login password
is not correct.
form authentication.
You have tried to delete
files without the authority to do so.
Contact the administrator.
Press the {Energy Saver} key. Confirm
that the display goes off, and then press
the {Energy Saver} key again. The display will return to the user code entry
display. When printing under the copier or printer function, press the {Energy
Saver} key only after printing has fin-
ished.
Inquire the user administrator for the
correct login user name and login password.
Contact the administrator.
Files can be deleted by the person who
created the file. To delete a file which
you are not authorized to delete, contact the person who created the file.
11
Page 20

1
When the Machine Does Not Operate As Wanted
Note
❒ If you cannot make copies as you want because of paper type, paper size, or
paper capacity problems, use recommended paper. See “Copy Paper”, About
This Machine.
❒ Using curled paper often causes misfeeds, soiled paper edges, or slipped po-
sitions while performing staple or stack printing. When using curled paper,
take the stiffness out of the paper with your hands to straighten out the curl,
or load the paper upside down. Also, to prevent paper from curling, lay paper
on a flat surface, and do not lean it against the wall.
12
Page 21
When a Job Is Not Performed
When a Job Is Not Performed
If you are not able to carry out your job, it may be that the machine is being used
by another function.
Wait until the current job is completed before trying again. In certain cases, you
can carry out another job using a different function while the current job is being
performed. Performing multiple functions simultaneously like this is called
“Multi-accessing”.
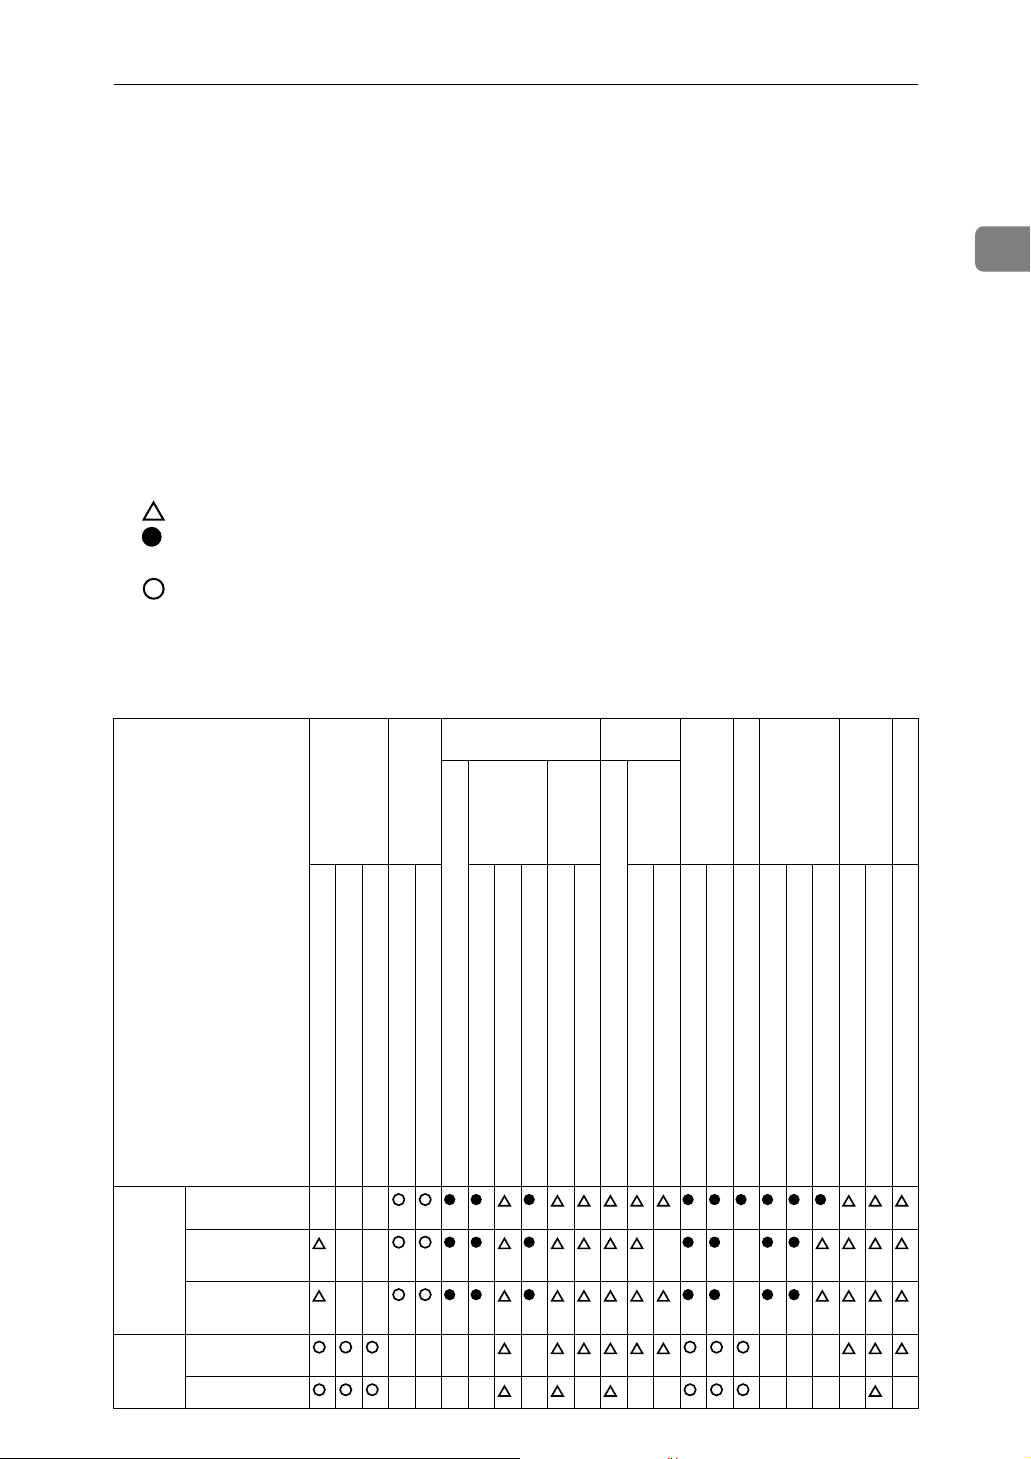
Combination Chart
❖ Function Compatibility
The chart shows Function Compatibility when print priority is set to “Interleave”. See “Print Priority”, General Settings Guide.
: Simultaneous operations are possible.
: Operation is enabled when the relevant function key is pressed and re-
mote switching (of the scanner/external extension) is done.
: Operation is enabled when the {Interrupt} key is pressed to interrupt the
preceding operation.
→ : Operation is performed automatically once the preceding operation ends.
× : The operation must be started once the preceding operation ends. (Simul-
taneous operations are not possible.)
1
Function you want to se-
Function in progress
Operations for
Copying
Copier
Stapling
Sort
Operations for
Copying
Copying
Copying
Interrupt
Copier
lect
Interrupt Copying
Operations for Copying
Stapling
Sort
Operations for Copying
×××
→
*1 → *1 *5 *2 *2
*1
→
*1 → *1
*1
×××× × ×××
×××× × → →→ ×××→ →
Facsimile Printer
Transmission Operation/Manual Reception Operation
Copying
Transmission
Scanning an Original for Memory Transmission
Memory Transmission
Immediate Transmission
Reception
Memory Reception
Printing Received Data
*2 *2
Scanner
Print
Data Reception
Printing
Stapling
Operations for Scanning
→
*2
*2
TWAIN
Scanning
Scanning
×
×
Document Server
Operations for Document Server
Scanning a Document to Store in Document Server
*2
*4 *4 *4
*2
DeskTopBinder
Web Document Server
Printing from Document Server
Printing from Document Server
Sending a Facsimile from Document Server
Printing
13
Page 22

When the Machine Does Not Operate As Wanted
1
Function you want to se-
Function in progress
Transmission Operation/Manual Reception Operation
Facsimile
Scanning an original for Memory
Transmission
Memory Transmission
Immediate
Transmission
Transmission
Memory Reception
Printing Received Data
Reception
Data Reception
Printing
Printer
Stapling
Print
Operations for
scanning
Scanner
Scanning
TWAIN Scanning
Operations for
Document Server
Scanning a Document to Store in
Document Server
Printing from
Document Server
Document Server
lect
Copier
Operations for Copying
Stapling
Sort
Facsimile Printer
Copying
Transmission
Transmission Operation/Manual Reception Operation
Scanning an Original for Memory Transmission
Memory Transmission
Immediate Transmission
Interrupt Copying
Operations for Copying
Reception
Memory Reception
Print
Scanner
Data Reception
Printing Received Data
Printing
Stapling
Operations for Scanning
Scanning
×× ×
ЧЧЧЧЧЧЧ ×
××××
*2
*3 *3 *3 *7
ЧЧЧЧЧЧЧ
×
*3
*3
×××× →
*2
*3 *3 *3 *7
*7 *7
×
→→→
→→
→
*5
→→
××
*2 *2
*2 *2
×××
ЧЧЧЧЧЧЧЧЧ ЧЧЧЧЧ
×× × ×
××××
*2
*4
TWAIN
Document Server
Scanning
Operations for Document Server
*2
×××
*6 *6 *6
DeskTopBinder
Scanning a Document to Store in Document Server
Printing from Document Server
Printing from Document Server
→
*4 *4 *4
Web Document Server
Sending a Facsimile from Document Server
Printing
14
Page 23
When a Job Is Not Performed
Function you want to se-
Function in progress
Printing from
Document Server
Sending a Facsimile from Document Server
DeskTopBinder
Printing
Server
lect
Copier
Operations for Copying
Facsimile Printer
1
Copying
Transmission
Transmission Operation/Manual Reception Operation
Scanning an Original for Memory Transmission
Interrupt Copying
Stapling
Sort
Operations for Copying
Reception
Memory Transmission
Immediate Transmission
Memory Reception
Print
Scanner
TWAIN
Document Server
Data Reception
Printing Received Data
Printing
Stapling
Operations for Scanning
Scanning
Scanning
Operations for Document Server
DeskTopBinder
Scanning a Document to Store in Document Server
Printing from Document Server
Printing from Document Server
Web Document Server
Sending a Facsimile from Document Server
Printing
*4
→
*4
Web Document
*1
Simultaneous operations are only possible after the preceding job documents are all
scanned and [New Job] key appears.
*2
You can scan a document after the preceding job documents are all scanned.
*3
Operation is possible when extra lines are added.
*4
During stapling, printing automatically starts after the current job.
*5
Stapling is not available.
*6
Simultaneous operation become possible after you press [New Job] key.
*7
During parallel reception, any subsequent job is suspended until the receptions are
completed.
Note
❒ Stapling cannot be used at the same time for multiple functions.
❒ If the machine is capable of executing multiple functions simultaneously,
specify which function should have priority in “Print Priority”. This setting is
factory-preset to “Display Mode”. For setting of Printing Priority Function,
see “Print Priority”, General Settings Guide.
❒ When 3,000 Sheet-50 Sheet Staple Finisher, 3,000 Sheet-100 Sheet Staple Fin-
isher or Booklet Finisher is installed on the machine, you can specify the output tray where documents are delivered. See “Output tray settings”, General
Settings Guide.
❒ While printing is in progress, scanning a document using another function
may take more time.
15
Page 24

1
When the Machine Does Not Operate As Wanted
16
Page 25
2.
Troubleshooting When Using the
Copy/Document Server Function
This chapter describes likely causes of and possible solutions for copier/document server function problems.
Messages Displayed When Using the Copy/Document Server Function
This section describes the machine's main messages. If other messages appear,
follow the instructions they contain.
Important
❒ If you cannot make copies as you want because of the paper type, paper size
or paper capacity problems, use recommended paper. See “Copy Paper”,
About This Machine.
❒ For messages that are not listed here, see p.9 “When You Have Problems Op-
erating the Machine”.
Message Cause Solution
Cannot detect
original size.
Cannot detect
original size.
Cannot detect
original size.
Check original
orientation.
Check paper size.
Rotate Sort is
not available
with this paper
size.
Improper original is
placed.
Improper original is
placed.
Original is not placed. Place your originals.
Original is not placed in a
proper orientation.
Improper paper size is
set.
A size of paper for which
Rotate Sort is not available is selected.
Select paper manually, not in Auto Paper Select mode, and do not use Auto
Reduce / Enlarge function. See “Sizes
difficult to detect”, Copy/Document
Server Reference.
Place the original on the exposure glass.
See “Placing Originals on the Exposure
Glass” and “Sizes difficult to detect”,
Copy/Document Server Reference.
Change the orientation of the original.
If you press the {Start} key, copy will
start onto the selected paper.
Select the proper paper size. See “Sort”,
Copy/Document Server Reference.
17
Page 26

Troubleshooting When Using the Copy/Document Server Function
Message Cause Solution
2
Cannot punch this
paper size.
The Punch function cannot be used with paper
size selected.
The following paper sizes are available
for Punch mode:
•2 holes:
A3L, B4L, A4KL, B5KL,
A5KL, B6L, A6L, 11”×17”L,
11”×15”L, 11”×14”L, 10”×15”L,
1
10”×14”L, Legal (8
1
/2”×11”)KL, Half Letter
ter (8
1
(5
/2”×81/2”)KL, Executive
1
/4”×101/2”)KL, F/GL
(7
(8”×13”)L, Foolscap (8
1
Folio (8
8”×10
/4”×13”)L, 81/4”×14”L,
1
/2”KL, 8”×10”KL, 8KL,
/2”×14”)L, Let-
1
/2”×13”)L,
16KKL, 210×340L, 210×182KL,
210×170KL. Select one of these siz-
es.
•3 holes:
A3L, B4L, A4K, B5K, 11”×17”L,
11”×15”L, 11”×14”L, 10”×15”L,
1
10”×14”L, Letter(8
1
ecutive (7
8”×10
/4”×101/2”)K,
1
/2”K,8”×10”K, 8KL,
/2”×11”)K, Ex-
16KK. Select one of these sizes.
•4 holes:
Metric version:
A3L, B4L, A4K, B5K, 11”×17”L,
11”×15”L, 11”×14”L, Let-
1
/2”×11”)K, Executive
ter(8
1
(7
/4”×101/2”)K, 8”×101/2”K,
8KL, 16KK.
Narrow 2 × 2 version:
A3L, B4L, A4KL, B5KL,
A5KL, B6L, 11”×17”L,
11”×15”L, 11”×14”L, 10”×15”L,
1
10”×14”L, Legal(8
1
ter(8
/2”×11”)KL, Half Letter
1
/2”×81/2”)KL, Executive
(5
1
(7
/4”×101/2”)KL, F/GL
(8”×13”)L, Foolscap (8
1
Folio (8
8”×10
/4”×13”)L, 81/4”×14”L,
1
/2”KL, 8”×10”KL, 8KL,
/2”×14”)L, Let-
1
/2”×13”)L,
16KKL, 210×340L, 210×182KL,
210×170KL. Select one of these siz-
es.
18
Stapling capacity exceeded.
The number of sheets per
set is over the staple capacity.
Check the stapler capacity. See “Supplementary Information”, Copy/Document Server Reference.
Page 27

Messages Displayed When Using the Copy/Document Server Function
Message Cause Solution
Cannot staple paper of this size.
Duplex is not
available with
this paper size.
Maximum number of
sets is nn.
(A figure is placed at n.)
File being stored
exceeded max.
number of pages
per file. Copying
will be stopped.
The Staple function cannot be used with paper
size selected.
A paper size not available
in Duplex mode has been
selected.
The number of copies exceeds the maximum copy
quantity.
The scanned originals
have too many pages to
store as one document.
Select a paper size that can be used in
Staple mode. See “Supplementary Information”, Copy/Document Server
Reference.
The following paper sizes are available
for Duplex mode: A3L, B4L, A4KL,
B5KL, A5KL, 11”×17”L,
11”×15”L, 11”×14”L, 10”×15”L,
10”×14”L, Legal (8
1
(8
/2”×11”)KL, Half Letter
1
/2”×81/2”)KL, Executive
(5
1
(7
/4”×101/2”)L, F/GL (8”×13”)L,
Foolscap (8
1
/4”×13”)L, 81/4”×14”L,
(8
8”×10
Select one of these sizes.
You can change the maximum copy
quantity. See “Max. Copy Quantity”,
General Settings Guide.
Press [Exit], and then store again with an
appropriate number of pages.
1
/2”×13”)L, Folio
1
/2”L, 8”×10”L, 8KL, 16KKL.
1
/2”×14”)L, Letter
2
Magazine or Booklet mode is not
available due to
mixed image mode.
Orig. is being
scanned by another function.
Please wait.
You do not have
the privileges to
use this function.
You selected the Magazine or Booklet function
for originals scanned using different functions,
such as copy and printer.
Document Server or
Scanner function is in
use.
This user code is not allowed to use the function
selected.
Make sure originals for the Magazine or
Booklet function are scanned using the
same function.
To cancel the job in process, press [Exit],
and then press the {Document Server} or
{Scanner} key. Next, press the
{Clear/Stop} key. When the message
The Clear / Stop key was
“
pressed. Are you sure you
want to stop scanning?
pears, press [Cancel].
Contact the administrator.
” ap-
19
Page 28
Troubleshooting When Using the Copy/Document Server Function
Message Cause Solution
2
You do not have
the privileges to
use this function.
Authentication
has failed.
Authentication
has failed.
The selected
file(s) contained file(s)
without access
privileges. Only
file(s) with access privileges
will be deleted.
Please wait.
This user code is not allowed to use the function
selected.
The entered login user
name or login password
is not correct.
The machine cannot perform authentication.
You have tried to delete
files without the authority to do so.
The destination list is being updated from the network using
SmartDeviceMonitor for
Admin. Depending on
the number of destinations to be updated, there
may be some delay before you can resume operation. Operations are
not possible while this
message is displayed.
If the message continues to be displayed
and you cannot switch the screen, press
the {Energy Saver} key. Confirm that the
display goes off, and then press the {En-
ergy Saver} key again. The display will
return to the user code entry display.
When printing under the copier or
printer function, press the {Energy Sav-
er} key only after printing has finished.
Inquire the user administrator for the
correct login user name and login password.
Contact the administrator.
Files can be deleted by the person who
created the file. To delete a file which
you are not authorized to delete, contact
the person who created the file.
Wait until the message disappears. Do
not switch off the power while this message is displayed.
20
Page 29
❖ Connect Copy
Message Cause Solution
Messages Displayed When Using the Copy/Document Server Function
Cannot connect to
the sub-machine.
Check the status
of the sub-machine.
Cannot print from
the sub-machine.
Check the status
of the sub-machine.
Cannot print from
the sub-machine.
Check the status
of the sub-machine.
Sub-machine is in
Interrupt mode.
Sub-machine does
not have the same
paper setting(s).
•The L indicator is lit.
• The hard disk of the
sub-machine is malfunctioning.
A paper misfeed has occurred on the sub-machine, or toner or other
supplies need to be replenished.
The sub-machine's User
Tools menu is open.
The sub-machine is in Interrupt mode.
Paper type or tray settings on the two machines do not match.
Press [Exit] on the main machine and
follow the instructions on the display.
Follow the instructions displayed. For
details, see p.99 “Adding Toner”, p.105
“Removing Jammed Paper”, p.118 “Removing Jammed Staples”.
If the sub-machine's display indicates
that a cover is open, follow the instructions displayed.
Press the {User Tools/Counter} key to
close the User Tools menu.
Press the {Interrupt} key on the sub-machine to cancel Interrupt mode.
Make the same settings on both machines.
2
The Cover Sheet
setting(s) of the
sub-machine is
different from
the main machine.
The Slip Sheet
setting(s) of the
sub-machine is
different from
the main machine.
The Designation
Sheet setting(s)
of sub-machine is
different from
main machine.
Sub-machine paper
settings must be
the same to use
this tray.
No stamp data in
the sub-machine.
Cover settings on the two
machines do not match.
Slip Sheet settings on the
two machines do not
match.
Designation Sheet settings on the two machines do not match.
Paper tray settings on the
two machines do not
match.
Stamp data on the submachine has been deleted.
Make the same settings on both machines.
Make the same settings on both machines.
Make the same settings on both machines.
Make the same settings on both machines.
Reprogram the stamp on the sub-machine.
21
Page 30

Troubleshooting When Using the Copy/Document Server Function
Message Cause Solution
2
Cannot print from
the sub-machine.
Sub-machine will
be disconnected.
Z-fold is available only when
Sort mode is selected in Connect
Copy.
The sub-machine has
stopped due to power
failure or communication
error.
Sort has not been selected
with Z-fold.
Continue copying using the main machine.
Select the Sort function.
Reference
p.9 “When You Have Problems Operating the Machine”
22
Page 31

When You Cannot Make Clear Copies
When You Cannot Make Clear Copies
This section describes likely causes of and possible solutions for unclear copies.
Problem Cause Solution
Copies appear dirty. Image density is too high. Adjust the image density. See “Adjust-
ing Copy Image Density”, Copy/Document Server Reference.
Copies appear dirty. Auto Image Density is
not selected.
On the control panel, select [Auto Density].
2
The reverse side of an
original image is copied.
The reverse side of an
original image is copied.
A shadow appears on
copies if you use pasted
originals.
The same copy area is
dirty whenever making
copies.
The same copy area is
dirty whenever making
copies.
Copies are too light. Image density is too light. Adjust the image density. See “Adjust-
Image density is too high. Adjust the image density. See “Adjust-
ing Copy Image Density”, Copy/Document Server Reference.
Auto Image Density is
not selected.
Image density is too high. Adjust the image density. See “Adjust-
The exposure glass, scanning glass, or ADF is
dirty.
Original type is set to
[Text / Photo], and an original with text and photographs that can hardly be
distinguished from each
other is loaded.
On the control panel, select [Auto Density].
ing Copy Image Density”, Copy/Document Server Reference.
Change the orientation of the original.
Put mending tape on the pasted part.
Clean them. See p.129 “Maintaining
Your Machine”.
Select [Generation Copy], and then begin
copying. See “Generation Copy”,
Copy/Document Server Reference.
ing Copy Image Density”, Copy/Document Server Reference.
Copies are too light. A light copy may result
when you use damp or
rough grain paper.
Copies are too light. Toner bottle is almost
empty.
Copies are too light. The paper is damp. Use paper that has been stored in the
Parts of images are not
copied.
Parts of images are not
copied.
The original is not set correctly.
The correct paper size is
not selected.
Use the recommended paper. See
“Copy Paper”, About This Machine.
Contact your service representative.
Add toner. See p.99 “Adding Toner”.
recommended temperature and humidity condition. See “Copy Paper”,
About This Machine.
Set originals correctly. See “Placing
Originals”, Copy/Document Server
Reference.
Select the proper paper size.
23
Page 32

Troubleshooting When Using the Copy/Document Server Function
Problem Cause Solution
2
Images appear only partially.
Black lines appear. The exposure glass or
White lines appear. The exposure glass or
White lines appear. When D is blinking, ton-
Copies are blank. The original is not set cor-
A moiré pattern is produced on copies.
Black spots appear on the
copy of a photographic
print.
The paper is damp. Use paper that has been stored in the
scanning glass is dirty.
scanning glass is dirty.
er is beginning to run out.
rectly.
Your original has a dot
pattern image or many
lines.
Because of high humidity, the photographic print
has stuck to the exposure
glass.
recommended temperature and humidity condition. See “Copy Paper”,
About This Machine.
Clean them. See p.129 “Maintaining
Your Machine”.
Clean them. See p.129 “Maintaining
Your Machine”.
Add toner. See p.99 “Adding Toner”.
When using the exposure glass, face the
originals down. When using the ADF,
face them up.
Place the original on the exposure glass
at a slight angle.
Place the print on the exposure glass in
either of the following ways:
• Place an OHP transparency on the
exposure glass, and then place the
print on top of the OHP transparency.
• Place the print on the exposure
glass, and then place two or three
sheets of white paper on top of it.
Leave the exposure glass cover or
auto-document feeder (ADF) open
when copying.
24
Page 33

When You Cannot Make Copies As Wanted
When You Cannot Make Copies As
Wanted
This section describes likely causes of and possible solutions for unclear copies.
❖ Basic
Problem Cause Solution
Misfeeds occur frequently.
Misfeeds occur frequently.
Misfeeds occur frequently.
Misfeeds occur frequently.
Misfeeds occur frequently.
Misfeeds occur frequently.
The number of sheets
loaded exceeds the capacity of the machine.
The paper tray's side
fences are set too tightly.
The paper is damp. Use paper that has been stored in the
The paper is too thick or
too thin.
The copy paper is wrinkled or has been folded/creased.
Printed paper is being
used.
Load paper only as high as the upper
limit markings on the side fence of the
paper tray or bypass tray. See “Copy
Paper”, About This Machine.
Push the side fences lightly, and then
reset it. Also, we recommend you set at
least 20 sheets of thick paper.
recommended temperature and humidity condition. See “Copy Paper”,
About This Machine.
Use recommended paper. See “Copy
Paper”, About This Machine.
Use recommended paper. Use paper
that has been stored in the recommended temperature and humidity condition. See “Copy Paper”, About This
Machine.
Use recommended paper. Do not use
paper that has been already copied or
printed onto. See “Copy Paper”, About
This Machine.
2
Copy paper becomes
creased.
Copy paper becomes
creased.
Copies are not stapled. There are jammed staples
Copies are not stapled. The number of copies ex-
Copies are not stapled. Copy paper is curled. Turn the copy paper over in the tray.
Staples are wrongly positioned.
The paper is damp. Use paper that has been stored in the
recommended temperature and humidity condition. See “Copy Paper”,
About This Machine.
The paper is too thin. Use recommended paper. See “Copy
Paper”, About This Machine.
Remove jammed staples. See p.118 “Re-
in the stapler.
ceeds the capacity of the
stapler.
Originals are not set correctly.
moving Jammed Staples”.
Check the stapler capacity. See “Supplementary Informations”, Copy/Document Server Reference.
Check the correct position to place the
originals. See “Staple”, Copy/Document Server Reference.
25
Page 34

Troubleshooting When Using the Copy/Document Server Function
Problem Cause Solution
2
You cannot combine several functions.
When sorting, the pages
are divided into two
blocks.
Saddle-stitched documents come apart and do
not stack properly.
Paper does not output
during printing with stapling.
The copy is grayed out or
a text pattern appears in
the background of the
copy.
Images are skewed. The side fence in the pa-
Selected functions cannot
be used together.
The memory became full
in the middle of sorting
and the pages were delivered in two blocks.
Certain types of paper are
resistant to folding and
open out after being folded and stitched.
When you stop printing
while using the staple
function, paper not stapled during printing may
be left in the staple unit.
You have copied a copyguarded document protected from unauthorized
copying.
per feed tray is not
locked.
Check the combination of functions
and make the settings again. See “Function Compatibility”, Copy/Document
Server Reference.
You can interrupt copying when the
memory becomes full. See “Memory
Full Auto Scan Restart”, General Settings Guide.
Use recommended paper. See “Recommended Paper Sizes and Types”, About
This Machine.
Press the {Clear Modes} key and cancel
copy settings, including stapling.
Check the document. See “Using [Data
Security for Copying]”, Printer Reference.
Make sure the side fence is locked. See
p.94 “Changing the Paper Size”.
Images are skewed. The paper is feeding in at
a slant.
❖ Edit
Problem Cause Solution
In Double Copies mode,
parts of the original image are not copied.
In Erase Border, Erase
Center, or Erase Center /
Border mode, parts of the
original image are not
copied.
In Erase Border, Erase
Center, or Erase Center /
Border mode, parts of the
original image are not
copied.
Combination of original
and copy paper is not correct.
You set a wide erased
margin.
Originals are not scanned
correctly.
Load the paper correctly. See p.87
“Loading Paper”.
Select A3L for A4K originals and A4
for A5 originals.
Make the margin width narrower. You
can adjust it between 2 - 99 mm (0.1” -
3.9”). See “Erase Border Width” and
“Erase Center Width”, General Settings
Guide.
Place the originals correctly.
26
Page 35

When You Cannot Make Copies As Wanted
Problem Cause Solution
In Margin Adjustment
mode, parts of the original image are not copied.
In Margin Adjustment
mode, parts of the original image are not copied.
In Image Repeat mode,
the original image is not
copied repeatedly.
❖ Stamp
Problem Cause Solution
The stamp position is
wrong.
You set a wide erased
margin.
There is a lack of margin
space on the opposite
side of the binding position.
You selected copy paper
the same size as the originals, or you did not select
the proper reproduction
ratio.
The paper orientation is
wrong.
Set a narrower margin with User Tools.
You can set the width between 0 - 30
mm (0” - 1.2”).
See “Front Margin: Left/Right”, “Back
Margin: Left/Right”, “Front Margin:
Top/Bottom” and “Back Margin:
Top/Bottom”, General Settings Guide.
Set a narrower margin with User Tools.
You can set the width between 0 - 30
mm (0” - 1.2”).
See “Front Margin: Left/Right”, “Back
Margin: Left/Right”, “Front Margin:
Top/Bottom” and “Back Margin:
Top/Bottom”, General Settings Guide.
Select copy paper larger than the originals or select the proper reproduction
ratio.
Check the paper orientation and stamp
position.
2
❖ Combine
Problem Cause Solution
You cannot make a book
from Booklet or Magazine mode by folding
copies.
When using Combine,
parts of the image are not
copied.
Copies are not in correct
order.
You selected a setting
(“Open to left”or “Open
to right”) that does not
match the orientation of
originals.
You specified a reproduction ratio that does not
match the sizes of your
originals and copy paper.
You placed the originals
in the incorrect order.
In [Copier / Document Server Features], under [Edit], set [Orientation: Booklet, Maga-
zine] properly.
When you specify a reproduction ratio
using Manual Paper Select mode, make
sure that the ratio matches your originals and the copy paper. Select the correct reproduction ratio before using
Combine mode.
When placing a stack of originals in the
ADF, the last page should be on the bottom.
If you place an original on the exposure
glass, start with the first page to be copied.
27
Page 36

Troubleshooting When Using the Copy/Document Server Function
❖ Duplex
Problem Cause Solution
2
Cannot print in duplex
mode.
Cannot print in duplex
mode.
Cannot print in duplex
mode.
Copies are not in correct
order.
When using Duplex,
copy is made Top to Bottom even though [Top to
Top] is selected.
You have loaded paper
on the bypass tray.
You have loaded paper
exceeding 110 g/m
You have selected a tray
which is set to [1 Sided
Copy] in [Tray Paper Settings] in [System Settings].
You placed the originals
in the incorrect order.
You placed the originals
in the wrong orientation.
2
.
Remove paper loaded on the bypass
tray. Load paper in another tray.
Change the paper.
Set the tray to [2 Sided Copy] in [Tray Pa-
per Settings] in [System Settings]. See
“System Settings”, General Settings
Guide.
When placing a stack of originals in the
ADF, the last page should be on the bottom.
If you place an original on the exposure
glass, start with the first page to be copied.
Furthermore, set [Face Down] in [Copy
Eject Face Method in Glass Mode], [Input /
Output] under [Copier / Document Server
Features]. See “Input/Output”, General
Settings Guide.
Place the original in the correct orientation. See “Original Orientation”,
Copy/Document Server Reference.
❖ Document Server
Exceeded max.
“
number of pages
per file. Do you
want to store the
scanned pages as
1 file?
You forgot your password.
28
Problem Cause Solution
The number of scanned
pages exceeds the capacity per file of the Document Server.
” appears.
You cannot access a protected file without entering the password.
To store scanned pages as a file, press
[Store File]. Scanned data is stored as a
file in the Document Server. If you do
not want to store scanned pages, press
[No]. Scanned data is deleted.
Contact the administrator.
To delete the files stored in the document server, select [Delete All Files in Doc-
ument Server] in [Administrator Tools] in
[System Settings]. As this will perma-
nently delete every single file, make
sure the document server does not contain any files you want to keep. See
“Delete All Files in Document Server”,
General Settings Guide.
Page 37

When You Cannot Make Copies As Wanted
Problem Cause Solution
You cannot find out what
is stored in a file.
Memory frequently becomes full.
You may not be able to
ascertain the contents of a
file simply from the file
name.
The document server
memory is full.
You can switch the Select File screen between [List] and [Thumbnail] display to
check the contents of the file. In list display, the file name, and date of storage,
and user name are shown. In thumbnail
display, an image of the stored file appears. You can enlarge the image by
pressing [Preview]. Use the Select File
screen to check information other than
the file name. See “Checking the Details
of a Stored Document”, Copy/Document Server Reference.
Delete unnecessary files. On the file selection display, select unnecessary files,
and then press [Delete File]. If this does
not increase available memory, do the
following.
• Switch to the scanner screen, and
then delete unnecessary files stored
under the scanner function.
• Switch to the printer screen, and
then delete unnecessary files stored
under Sample Print, Locked Print,
Hold Print, or Stored Print.
2
You want to check print
quality before making a
large print run.
Original is be-
“
ing scanned by
another function.
Please wait.
pears.
“
Cannot display
” ap-
preview of this
page.
you can not check the
thumbnail image.
” appears, and
❖ Connect Copy
Problem Cause Solution
You cannot staple,
punch, or Z-fold.
You get different copy results from the main and
sub-machines.
You can print a single
copy without specifying
the setting again.
Copier or Scanner function is in use.
The image data may have
been corrupted.
The main and sub-machines do not have the
same option installed.
The Copy Quality setting
differs on the two machines.
Check print quality by printing out
only the first set using the {Sample
Copy} key.
To cancel a job in progress, first press
[Exit], and then press the {Copy} key or
{Scanner} key. Next, press the
{Clear/Stop} key. When the message
The Stop key was pressed.
“
Stop copying?
[Stop].
Pressing [Exit] displays the preview
screen without a thumbnail.
Press [Connect Copy] to cancel Connect
Copy.
Make the same Copy Quality setting
one the two machines.
” appears, press
29
Page 38

Troubleshooting When Using the Copy/Document Server Function
Display During Connect Copy
This section describes about the display during Connect Copy.
Problem Cause Solution
2
[Connect Copy] is not displayed.
[Connect Copy] is not displayed.
[Connect Copy] is not displayed.
[Connect Copy] is not displayed.
[Connect Copy] is not displayed.
[Connect Copy] is not displayed.
[Connect Copy] appears
faded.
The sub-machine's main
power is off.
Functions that cannot be
used with Connect Copy
are selected on the main
machine (such as storing
or copying the first page
of a document in the Document Server).
The main machine is in
Interrupt mode.
The [Connect Copy Key Dis-
play] setting is off.
The cable connecting the
two machines is damaged.
The L is lit. Follow the instructions displayed.
Functions that cannot be
used with Connect Copy
have been set.
Turn on the main machine's main power.
Cancel the functions selected on the
main machine.
Press the {Interrupt} key on the sub-machine to cancel Interrupt mode.
Select [Display] for the [Connect Copy Key
Display] setting.
Contact your service representative.
Press the {Clear Modes} key to clear the
settings.
If Connect Copy Is Canceled
This section describes about causes and remedies when Connect Copy is canceled.
Problem Cause Solution
30
The machine cancels
Connect Copy.
The machine cancels
Connect Copy.
The machine cancels
Connect Copy.
An error message indicates the main machine
has broken down.
The main machine's main
power is off, or the operation
switch has been pressed.
The sub-machine's main
power is off.
The Weekly Timer setting
is coming into effect on
the main machine.
The L is lit. Copying is not possible. Follow the in-
Turn on the sub-machine's main power
or operation switch, and then press
[Connect Copy].
A message instructing you to check the
sub-machine appears on the display of
[
the main machine. Press
Connect Copy. Turn on the sub-machine's main power, press
and then make your settings again.
Turn on the main machine's operation
switch , and then press [Connect Copy].
structions displayed.
Cancel] to clear
[
Connect Copy]
Page 39

When You Cannot Make Copies As Wanted
If You Cannot Exit from Connect Copy
This section describes about causes and remedies if you cannot exit from Connect Copy.
Problem Cause Solution
There is no response
when you press [Connect
Copy].
There is no response
when you press [Connect
Copy].
There is no response
when you press [Connect
Copy].
There is no response
when you press [Connect
Copy].
There is no response
when you press [Connect
Copy].
There is no response
when you press [Connect
Copy].
Scanning is in progress. Press the {Clear/Stop} key on the main
machine, and then press [Stop].
Copying is in progress. Press the {Clear/Stop} key on the main
machine, and then press [Stop].
A paper misfeed has occurred on either the main
machine or sub-machine.
A paper misfeed has occurred on either the main
or sub-machine.
A paper misfeed has occurred on one of the machine, or toner or other
supplies need to be replaced.
A paper misfeed has occurred on one of the machine, or toner or other
supplies need to be replaced.
Follow the instructions displayed.
For details, see p.105 “Removing
Jammed Paper” and p.118 “Removing
Jammed Staples”.
If the sub-machine's display indicates
that a cover is open, follow the instructions displayed.
To cancel Connect Copy, Press the
{Clear/Stop} key on the main machine,
and then press [Stop].
Follow the instructions displayed.
For details, see p.87 “Loading Paper”,
p.99 “Adding Toner”, and p.105 “Removing Jammed Paper”.
To cancel Connect Copy, press the
{Clear/Stop} key on the main machine,
and then press [Stop].
2
There is no response
when you press [Connect
Copy].
A paper misfeed has occurred during stapling.
Removed the jammed paper.
For details, see p.118 “Removing
Jammed Staples”.
To cancel Connect Copy, press the
{Clear/Stop} key on the main machine,
and then press [Stop].
31
Page 40

Troubleshooting When Using the Copy/Document Server Function
When Memory Is Full
This section describes likely causes of and possible solutions for problems related to full memory.
Message Cause Solution
2
Memory is full.
nn originals have
been scanned.
Press [Print] to
copy scanned
originals. Do not
remove remaining
originals.
“n” in the message represents a changeable
number.
Press [Continue]
to scan and copy
remaining originals.
❖ Connect Copy
Message Cause Solution
Sub-machine memory is full. Submachine will be
disconnected.
The scanned originals exceeds the number of pages that can be stored in
memory.
The machine checked if
the remaining originals
should be copied, after
the scanned originals was
printed.
The quantity of data exceeds the capacity of the
sub-machine.
Press [Print] to copy scanned originals
and cancel the scanning data. Press
[Stop] to cancel the scanning data and
not copy.
To continue copying, remove all copies,
and then press [Continue]. To stop copying, press [Stop].
Continue printing on the main machine.
Note
❒ If you set [Memory Full Auto Scan Restart] in User Tools to [On], even if the mem-
ory becomes full, the memory overflow message will not be displayed. The
machine will make copies of the scanned originals first, then automatically
proceed scanning and copying the remaining originals. In this case, the resulting sorted pages will not be sequential. See “Input / Output”, General Settings Guide.
32
Page 41

3. Troubleshooting When
Using the Facsimile Function
This chapter explains likely causes of and possible solutions for facsimile function problems.
Adjusting the Volume
The following describes how to adjust the volume.
You can change the volume of the following sounds that the machine makes.
❖ On Hook Mode
Heard when the [On Hook] is pressed.
❖ At Transmission
Heard when Immediate transmission is performed.
❖ At Reception
Heard when the machine receives a document.
❖ At Dialing
Heard after pressing the {Start} key, until the line connects to the destination.
❖ At Printing
Heard when a received document is printed.
A Press the {User Tools/Counter} key.
ANS700S
B Press [Facsimile Features].
33
Page 42

3
Troubleshooting When Using the Facsimile Function
C Check that [General Settings] screen appears.
D Press [Adjust Sound Volume].
E Press [Lower] or [Louder] to adjust the volume, and then press [OK].
F Press the {User Tools/Counter} key.
The standby display appears.
Note
❒ You can adjust the On Hook volume when you press the [On Hook]. See
“On Hook Dial”, Facsimile Reference.
❒ When you press [Check] on the Adjust Sound Volume screen, you will hear
a confirmation sound so you can check the volume.
❒ If you press [Cancel], the volume setting is canceled. The display returns to
that of step
❒ You can set the volume level to between 0 and 7.
.
D
34
Page 43

Messages Displayed When Using the Facsimile Function
Messages Displayed When Using the
Facsimile Function
This section explains the machine's main messages. If other messages appear,
follow their instructions.
Message Cause Solution
Error occurred,
and transmission
was cancelled.
Put original
back, check it
and press the
Start key.
Cannot detect
original size.
Place original
again, then press
the Start key.
Functional problems with facsimile. Data will be
initialized.
Remove the paper
from Internal
Tray 1.
•Original jammed during Immediate Transmission.
• A problem occurred
in the machine, or
noise occurred on the
telephone line.
Original jammed during
Memory Transmission.
The machine failed to detect the size of the original.
There is a problem with
the fax.
The Internal Tray 1 is full. Remove the paper. If the other tray is
Press [Exit], and then send the documents again.
Place originals that have not been
scanned on the exposure glass or ADF
again.
Place original again, and then press the
{Start} key.
Record the code number shown in the
display and contact your service representative. Other functions can be used.
also full, the tray name shown in the
display changes. Remove paper from
the tray indicated in the display.
3
Original is being
scanned by another function.
Switch to the
following function, then press
the Stop key to
cancel scanning
or press the
Start key to continue.
The machine is scanning
an original under another
function.
Before sending a file by fax, cancel the
job in progress. To do this, press [Exit],
and then press the {Copy} or {Document
Server} key to display the suspended
function. Then, on the copier or document server screen, press the
{Clear/Stop} key to display the “
The
Stop key has been pressed.
Are you sure you want to
stop copying?
” or “The Clear
/ Stop key was pressed. Are
you sure you want to stop
scanning?
[Stop].
” prompt, and then press
35
Page 44

Troubleshooting When Using the Facsimile Function
Message Cause Solution
3
Updating the destination list...
Please wait.
Specified destination(s) or
sender's name has
been cleared.
The selected
file(s) contained
file(s) without
access privileges. Only file(s)
with access privileges will be
deleted.
Connection with
LDAP server has
failed. Check the
server status.
The destination list is being updated from the network using
SmartDeviceMonitor for
Admin or Web Image
Monitor. Depending on
the number of destinations to be updated, there
may be some delay before you can resume operation. Operation is not
possible while this message is displayed.
You tried to delete a document for which you do
not have permission to
delete.
A network error has occurred and connection
has failed.
Wait until the message disappears. Do
not switch off the power while this
message is displayed.
Only the administrator can delete this
document. Contact the administrator if
you want to delete a document for
which you do not have permission to
delete.
Try the operation once more. If the message is still shown, the network may be
crowded. Check the information of
[System Settings]. See “System Settings”,
General Settings Guide.
LDAP server authentication has
failed. Check the
settings.
Exceeded max. No.
of display search
results.
Max.:
Exceeded time
limit for LDAP
server search.
Check the server
status.
The user name or password does not match that
specified for LDAP server authentication.
The number of search results has exceeded the
maximum number of
items that can be displayed.
A network error has occurred and connection
has failed.
Make settings correctly for the user
name and the password for LDAP server authentication.
Search again after changing the search
conditions.
Try the operation once more. If the message is still shown, the network may be
crowded. Check the information of
[System Settings]. See “System Settings”,
General Settings Guide.
36
Page 45

Messages Displayed When Using the Facsimile Function
Message Cause Solution
The specified
group contains
some destination(s) that do
not have access
privileges. Do
you want to select only the
privileged destination(s)?
Cannot find the
specified path.
Please check the
settings.
Sender has not
been specified.
E-mail address
entered is not
correct. Please
re-enter.
You do not have
the privileges to
use this function.
The specified group contains some destinations
for sending by e-mail and
some destinations for
sending by Scan to Folder.
The name of the computer or folder entered as
the destination is wrong.
The sender has not been
specified.
The entered e-mail address is wrong.
Use of this function is restricted.
To select destinations for sending by email, press [Select] for the message dis-
played on the e-mail screen. To select
destination for sending by Scan to Folder, press [Select] for the message displayed on the Scan to Folder screen.
Check whether the computer name and
the folder name for the destination are
correct.
A sender's name should be specified
before sending e-mail. Send e-mail after
specifying the sender's name.
Make sure the e-mail address is correct,
and then enter it again.
Contact the administrator.
3
Authentication
has failed.
Authentication
has failed.
Check whether
there are any
network problems.
{13-10}
Check whether
there are any
network problems.
{13-11}
Wrong login user name
or password.
Authentication is not
possible from this machine.
The alias telephone
number you entered is already registered on the
gatekeeper by another
device.
Cannot access gatekeeper.
Confirm correct login user name or
password.
Contact the administrator.
•In [Facsimile Features], under [Initial
Settings], select [H.323 Settings], and
then check the alias telephone
number is correctly programmed.
You can also use the Web Image
Monitor for confirmation. See the
Web Image Monitor's Help.
• Consult the administrator.
•In [Facsimile Features], under [Initial
Settings], select [H.323 Settings], and
then check “Gatekeeper Address” is
correctly programmed. You can also
use the Web Image Monitor for confirmation. See the Web Image Monitor's Help.
• Consult the administrator.
37
Page 46

Troubleshooting When Using the Facsimile Function
Message Cause Solution
3
Check whether
there are any
network problems.
{13-17}
Check whether
there are any
network problems.
{13-18}
Check whether
there are any
network problems.
{13-24}
Check whether
there are any
network problems.
{13-25}
Registering of user name
is rejected by SIP server.
Cannot access SIP server. • In [Facsimile Features], under [Initial
The password registered
for the SIP server is not
the same as the password
registered for this machine.
In [Effective Protocol],
[IPv4] is not enabled, or an
incorrect IP address has
been registered.
•In [Facsimile Features], under [Initial
Settings], select [SIP Settings], and
then check “SIP Server IP Address”
and “SIP User Name” are correctly
programmed. You can also use the
Web Image Monitor for confirmation. See the Web Image Monitor's
Help.
• Consult the administrator.
Settings], select [SIP Settings], and
then check “SIP Server IP Address”
is correctly programmed. You can
also use the Web Image Monitor for
confirmation. See the Web Image
Monitor's Help.
• Consult the administrator.
Contact the administrator.
•In [System Settings], under [Interface
Settings], select [Effective Protocol],
and then check [IPv4] is programmed to [Active]. You can also
use the Web Image Monitor for confirmation. See the Web Image Monitor's Help.
•In [System Settings], under [Interface
Settings], select [Machine IPv4 Ad-
dress], and then check the IP address
is correctly programmed. You can
also use the Web Image Monitor for
confirmation. See the Web Image
Monitor's Help.
• Contact the network administrator.
38
Check whether
there are any
network problems.
{13-26}
The [Effective Protocol]
and [SIP Server IPv4 Ad-
dress] settings are differ-
ent, or an incorrect IP
address has been registered.
•In [System Settings], under [Interface
Settings], select [Machine IPv4 Ad-
dress], and then check the IP address
is correctly programmed. You can
also use the Web Image Monitor for
confirmation. See the Web Image
Monitor's Help.
• Contact the network administrator.
Page 47

Messages Displayed When Using the Facsimile Function
Message Cause Solution
Check whether
there are any
network problems.
{14-01}
Check whether
there are any
network problems.
{14-09}
Cannot find the DNS
server, SMTP Server or
folder for forwarding.
E-mail transmission was
refused by SMTP authentication, POP before
SMTP authentication or
login authentication of
the computer in which
the folder for transfer is
specified.
• Check that the DNS server IPv4 ad-
dress is correctly programmed using Web Image Monitor. See the
Web Image Monitor's Help.
• Check that the host name and IPv4
address of SMTP Server are correctly programmed using Web Image
Monitor. See the Web Image Monitor's Help.
• Check that the SMTP server is cor-
rectly programmed using Web Image Monitor. See the Web Image
Monitor's Help.
• Check that the folder for forwarding
is correctly specified.
• Check that the computer in which
the folder for forwarding is specified is correctly operated.
• Check that the LAN cable is correct-
ly connected to the machine.
• Consult the administrator.
• Check that the machine e-mail ad-
dress is correctly programmed from
[File Transfer] under [System Settings].
See “File Transfer”, General Settings
Guide. You can also use the Web
Image Monitor for confirmation.
See the Web Image Monitor's Help.
• Check that the user name and pass-
word of the E-mail Account are correctly programmed from [File
Transfer] under [System Settings]. See
“File Transfer”, General Settings
Guide. You can also use the Web
Image Monitor for confirmation.
See the Web Image Monitor's Help.
• Check that the user ID and pass-
word for the computer in which the
folder for forwarding is specified
are correctly programmed.
• Check that the folder for forwarding
is correctly specified.
• Check that the computer in which
the folder for forwarding is specified is correctly operated.
• Consult the administrator.
3
39
Page 48

Troubleshooting When Using the Facsimile Function
Message Cause Solution
3
Check whether
there are any
network problems.
{14-33}
Check whether
there are any
network problems.
{15-01}
Check whether
there are any
network problems.
{15-02}
No machine's e-mail address is programmed.
No POP3/IMAP4 server
address is programmed.
Cannot log on to the
POP3/IMAP4 server.
• Check that the e-mail address of
mail account is correctly programmed using [File Transfer] under
[System Settings]. See “File Transfer”, General Settings Guide. You
can also use the Web Image Monitor
for confirmation. See the Web Image
Monitor's Help.
• Consult the administrator.
• Check that the host name or IPv4
address of the POP3/IMAP4 server
is correctly programmed using the
Web Image Monitor. See the Web
Image Monitor's Help.
• Consult the administrator.
• Check that the user name and pass-
word of the E-mail Account are correctly programmed using [File
Transfer] under [System Settings]. See
“File Transfer”, General Settings
Guide. You can also use the Web
Image Monitor for confirmation.
See the Web Image Monitor's Help.
• Consult the administrator.
Check whether
there are any
network problems.
{15-03}
No machine e-mail address is programmed.
• Check that the machine e-mail ad-
dress is correctly programmed using [File Transfer] under [System
Settings]. See “File Transfer”, Gener-
al Settings Guide. You can also use
the Web Image Monitor for confirmation. See the Web Image Monitor's Help.
40
Page 49

Messages Displayed When Using the Facsimile Function
Message Cause Solution
Check whether
there are any
network problems.
{15-11}
Check whether
there are any
network problems.
{15-12}
Cannot find the DNS
server or POP3/IMAP4
server.
Cannot log on to the
POP3/IMAP4 server.
• Check that the DNS server IPv4 ad-
dress is correctly programmed using Web Image Monitor. See the
Web Image Monitor's Help.
• Check that the DNS server is cor-
rectly programmed using Web Image Monitor. See the Web Image
Monitor's Help.
• Check that the host name or IPv4
address of the POP3/IMAP4 server
is correctly programmed using Web
Image Monitor. See the Web Image
Monitor's Help.
• Check that the POP3/IMAP4 server
is correctly programmed using Web
Image Monitor. See the Web Image
Monitor's Help.
• Check that the LAN cable is correct-
ly connected to the machine.
• Consult the administrator.
• Check that the user name and pass-
word of the E-mail Account are correctly programmed from [File
Transfer] under [System Settings]. See
“File Transfer”, General Settings
Guide. You can also use the Web
Image Monitor for confirmation.
See the Web Image Monitor's Help.
• Check that the user name and pass-
word for POP before SMTP authentication are correctly programmed
from [File Transfer] under [System
Settings]. See “File Transfer”, Gener-
al Settings Guide. You can also use
the Web Image Monitor for confirmation. See the Web Image Monitor's Help.
• Consult the administrator.
3
41
Page 50

3
Troubleshooting When Using the Facsimile Function
Note
❒ If the “Check whether there are any network problems.” message ap-
pears, the machine is not correctly connected to the network or the settings of
the machine are not correct. If you do not need to connect to a network, you
can specify the setting so this message is not displayed, and then the {Facsim-
ile} key no longer lights. See “Parameter Settings”, General Settings Guide. If
you reconnect the machine to the network, be sure to set “Display” with User
Parameters.
❒ If the paper tray runs out of paper, “
ing you to add more paper. If there is paper left in the other trays, you can receive documents as usual, even if the message appears on the display. You
can turn this function on or off with “Parameter Setting”. See “Parameter Settings”, General Settings Guide.
Add paper.” appears on the display, ask-
42
Page 51

When You Cannot Send or Receive Fax Messages as Wanted
When You Cannot Send or Receive Fax
Messages as Wanted
This section explains likely causes of and possible solutions for transmission and
reception-related problems.
❖ Transmission/Reception
Problem Cause Solution
Both transmission and receiving are impossible.
❖ Transmission
Problem Cause Solution
Document appears blank
at the other end.
Transmission failed due
to “maximum e-mail
size” error.
When using On Hook
Dial or Manual Dial,
Receiving da-
“
ta...
transmission is not allowed.
” appears and
The modular cord may be
disconnected.
The original was placed
upside down.
If the e-mail size specified
on the machine is too
large, the Internet Fax
document cannot be sent.
If the machine fails to detect the size of the original when {Start} key is
pressed, it performs a receiving operation.
Make sure that the modular cord is correctly connected. See “Connecting the
Machine to a Telephone Line and Telephone”, General Settings Guide.
When the original is placed directly on
the exposure glass, the side to be
scanned must face down. When the
original is fed via the ADF, the side to
be scanned must face up.
In [Facsimile Features], under [Send Set-
tings], set [Max. E-mail Size] to [Off], or set
the maximum e-mail size to larger value. Then, re-send the document.
Press [Scan Size] in [Scan Settings], select
the scan area, and then resend the document. If you use On Hook Dial or
Manual Dial frequently, it is recommended that you set “Receive documents by pressing the {Start} key when
originals are not set.” to “Off” in User
Parameters. If this is set to “Off”, when
using Manual Dial you cannot receive
by pressing the {Start} key. See “Parameter Settings”, General Settings Guide.
3
LAN-Fax Driver does not
work.
LAN-Fax Driver does not
work.
The entered login user
name, login password, or
driver encryption key is
incorrect.
A high security level is
set by the extended security function.
Check your login user name, login
password, or driver encryption key,
and enter them correctly. Contact the
administrator.
Contact the administrator.
43
Page 52

Troubleshooting When Using the Facsimile Function
Problem Cause Solution
3
Although a group specification was set for the following, reception was not
possible.
Receiving Station of Information Box, Forwarding, Forwarding of
Special Sender, Reception
Report e-mail, Email TX
Results, routing e-mail
received via SMTP.
❖ Reception
Problem Cause Solution
The machine failed to
print received fax documents.
The machine failed to
print received fax documents.
The number of specified
destinations exceeds the
maximum number that
can be specified as a
group.
If this happened when
the Receive File indicator
was lit, low paper may
have caused printing to
stop.
In [Facsimile Features], under [Reception Settings],
[Store] has been selected
for [Reception File Setting].
A maximum of 500 parties can be specified for a group. Check if there are over
the specified numbers registered in the
address book. If a group was registered
in another group or designated in 1-5 of
Transfer Box, transmission is canceled
but an error message does not appear.
See “Registering a Group”, General Settings Guide.
• Load paper into the tray.
• Add toner.
See “Substitute Reception”, Facsimile
Reference.
Print the fax documents using a Web
browser or the Print Stored RX File
function. See “Printing Received and
Stored Documents” and “Printing fax
information using a Web browser”,
Facsimile Reference.
The machine failed to
print received fax documents.
Add Paper indicator is lit. Load paper into the tray. See p.87
“Loading Paper”.
❖ Printing
Problem Cause Solution
Print is slanted. The tray's side fences
might not be locked.
Print is slanted. The paper is fed at a slant. Load the paper correctly. See p.87
Misfeeds occur frequently.
Misfeeds occur frequently.
Misfeeds occur frequently.
The number of feeding in
exceeds the capacity of
the machine.
The paper is damp. Use paper that has been stored in the
The paper is too thick or
too thin.
Check the side fences are locked. See
p.94 “Changing the Paper Size”.
“Loading Paper”.
Load paper only as high as the upper
limit markings on the side fences of the
paper tray or bypass tray. See “Copy
Paper”, About This Machine.
recommended temperature and humidity condition. See “Copy Paper”,
About This Machine.
Use recommended paper. See “Copy
Paper”, About This Machine.
44
Page 53

When You Cannot Send or Receive Fax Messages as Wanted
Problem Cause Solution
Misfeeds occur frequently.
Copy paper becomes
creased.
Copy paper becomes
creased.
Copy paper becomes
creased.
Images are only partially
printed.
Black lines appear on the
print produced at the
destination.
Background of received
images appears dirty. Images from the back of the
page appear.
The copy paper is wrinkled or has been folded/creased.
Printed paper is being
used.
The paper is damp. Use paper that has been stored in the
The paper is too thin. Use recommended paper. See “Copy
The paper is damp. Use paper that has been stored in the
The exposure glass or
scanning glass is dirty.
Image density is too high. Adjust scan density. See “Image Densi-
Use recommended paper. Use paper
that has been stored in the recommended temperature and humidity condition. See “Copy Paper”, About This
Machine.
Use recommended paper. See “Copy
Paper”, About This Machine.
recommended temperature and humidity condition. See “Copy Paper”,
About This Machine.
Paper”, About This Machine.
recommended temperature and humidity condition. See “Copy Paper”,
About This Machine.
Clean them. See p.129 “Maintaining
Your Machine”.
ty (Contrast)”, Facsimile Reference.
3
Printed or sent images
are spotty.
Received image is too
light.
Received image is too
light.
Received image is too
light.
Received image is too
light.
The ADF, exposure glass
or scanning glass is dirty.
When using moist,
rough, or processed paper, areas of print may
not be fully reproduced.
When D is blinking, toner is beginning to run out.
• The image density has
been set too low.
The original of the transmitted fax was printed on
paper that is too thin.
Clean them. See p.129 “Maintaining
Your Machine”.
Make sure that ink or correction fluid is
dry before placing originals.
Only use recommended paper. See
“Copy Paper”, About This Machine.
Add toner. See p.99 “Adding Toner”.
• Increase the scanning density. See
“Density (Contrast)”, Facsimile Reference.
Ask the sender to reprint the original
on thicker paper and fax it again.
45
Page 54

Troubleshooting When Using the Facsimile Function
❖ Others
Problem Cause Solution
3
All fax documents stored
in memory have been
lost. Those documents include ones stored
through Memory Transmission/Reception,
Memory Lock, Substitute
Reception, or Auto Document.
When a correct password
is entered, you cannot
print documents that appear in the confidential
box or bulletin board box,
or transmit / print out
stored documents.
[Prg. Dest.] or [Manual Entry] does not appear.
When about one hour
passes after power to the
machine is turned off, all
fax documents stored in
memory are lost.
Documents are locked by
a security function if incorrect passwords are entered a certain number of
times.
This function is made unavailable by the enhanced security function.
If any documents have been lost for this
reason, a Power Failure Report is automatically printed when the machine is
turned on. If fax documents stored for
Memory Transmission have been lost,
check the destinations and resend the
documents. If fax documents received
through Memory, Memory Lock or
Substitute Reception have been lost,
ask the senders to resend the documents. If Auto Documents have been
lost, reprogram them. See p.48 “Turning Off the Main Power / In the Event
of Power Failure”.
Contact the administrator.
Contact the administrator.
The following functions
are not available: Forwarding, Store File in the
Information Box, routing
e-mail received via
SMTP.
This function is made unavailable by the enhanced security function.
Contact the administrator.
When Memory Is Full
This section explains likely causes of and possible solutions for problems related
to full memory.
Problem Cause Solution
Memory is full.
Cannot scan any more.
Transmitting scanned
pages only.
The memory is full. If you press [Exit], the machine returns
to standby mode and starts transmitting the stored pages.
46
Page 55

When an Error Report Is Printed
When an Error Report Is Printed
An Error Report is printed if a document cannot be successfully sent or received.
Possible causes include a problem with the machine or noise on the telephone
line. If an error occurs during transmission, resend the original. If an error occurs
during reception, ask the sender to resend the document.
Note
❒ If an error happens frequently, contact your service representative.
❒ The “Page” column gives the total number of pages. The “Page not sent” or
“Page not received” column gives the number of pages not sent or received
successfully.
❒ You can display a destination with the User Parameters. See “Parameter Set-
tings”, General Settings Guide.
❒ You can display a sender name with the User Parameters. See “Parameter Set-
tings”, General Settings Guide.
3
47
Page 56

Troubleshooting When Using the Facsimile Function
R
Turning Off the Main Power / In the Event of Power Failure
This section explains the machine status when the power is turned off or if the
power fails.
CAUTION:
• When you disconnect the power plug from the wall outlet, always pull the
plug (not the cable).
3
Important
❒ Do not turn off the main power switch while the power indicator is lit or
blinking. If you do, the hard disk and memory may be damaged and failure
could result.
❒ Turn off the main power switch before pulling out the plug. If you pull out
the plug with the switch on, the hard disk and memory may be damaged and
failure could result.
❒ Make sure that 100% is shown on the display before you unplug the machine.
If a lower value is shown, some data is currently present in memory.
❒ Right after a power failure, the internal battery needs to be sufficiently re-
charged to guard against future data loss. Keep the machine plugged in and
the main power switch on for about 24 hours after the power loss.
Even if the main power switch is turned off, the contents of the machine memory
(for example, programmed numbers) will not be lost. However, if power is lost
for about one hour because the main power switch is turned off, there is a power
cut, or the power cable is removed, contents of the Fax memory are lost. Lost
items will include any fax documents stored in memory using Memory Transmission/Reception, Auto Document, Confidential Reception, Memory Lock, or
Substitute Reception.
If a file was deleted from memory, a Power Failure Report is automatically printed as soon as the power is restored.
This report can be used to identify lost files. If a memory stored for Memory
Transmission was lost, resend it. If a document received by Memory Reception
or Substitute Reception was lost, ask the sender to resend it.
48
Page 57

When an Error Occurs Using Internet Fax
When an Error Occurs Using Internet Fax
This section explains reports that the machine sends if an Internet Fax error occurs.
Error Mail Notification
The machine sends the Error Mail Notification to the sender when it is unable to
successfully receive a particular e-mail message. A “cc” of this notification is also
sent to the administrator's e-mail address when one is specified.
Important
❒ If an incoming Internet Fax from another party bypasses the SMTP server,
even if reception is not successful, an Error Mail Notification is not sent to the
sender.
Note
❒ You can select to send Error Mail Notification with User Parameters. See “Pa-
rameter Settings”, General Settings Guide.
3
❒ If Error Mail Notification cannot be sent, the Error Report (E-Mail) is printed
by the machine.
❒ If an error occurs when an e-mail is received via SMTP, the SMTP server
sends an error e-mail to the originator of the document.
Error Report (E-Mail)
The Error Report (E-Mail) is printed by the machine when it is unable to send an
Error Mail Notification.
Server-Generated Error E-mail
The transmitting server sends this error e-mail to the originator of e-mail that
cannot be transmitted successfully (due to reasons such as specifying an incorrect e-mail address).
Important
❒ If an Internet Fax transmission bypasses the SMTP server, even if transmis-
sion is not successful, an error e-mail is not sent from the server.
Note
❒ After a server-generated error e-mail is printed, the first page of the sent doc-
ument is printed.
49
Page 58

3
Troubleshooting When Using the Facsimile Function
50
Page 59

4. Troubleshooting When
Using the Printer Function
This chapter describes likely causes of and possible solutions for printer function
problems.
When You Cannot Connect to the USB Interface
This section describes how to troubleshoot a problem related to USB connection.
Problem Cause Solution
The machine is not automatically recognized.
Windows has already
configured the USB settings.
The USB cable is not connected properly.
Check whether the computer has identified the
machine as an unsupported device.
Turn off the power of the machine, reconnect the USB cable, and then turn it
on again.
Open Windows' Device Manager, and
then, under [Universal Serial Bus control-
lers], remove any unauthorized devic-
es. Unauthorized devices have a [!] or
[?] icon by them. Take care not to accidentally remove required devices. For
details, see Windows Help.
51
Page 60

Troubleshooting When Using the Printer Function
Messages Displayed When Installing the Printer Driver
This section describes what to do if a message appears when installing the printer driver.
The following describes operations when a message appears during installation
of the printer driver. Message number 58 or 34 indicates that the printer driver
cannot be installed using Auto Run. Install the printer driver using [Add Printer]
or [Install Printer].
Windows 2000
4
This section describes the procedure under Windows 2000.
A On the [Start] menu, point to [Settings], and then click [Printers].
B Double-click the Add Printer icon.
C Follow the instructions in Add Printer Wizard.
If the CD-ROM drive is D, the source files of the printer driver are stored in
the following location:
• RPCS (“Printer Driver and Utilities” CD-ROM)
D:\DRIVERS\RPCS\XP_VISTA\(Language)\DISK1
• PCL 5e (“Printer Driver and Utilities” CD-ROM)
D:\DRIVERS\PCL5E\XP_VISTA\(Language)\DISK1
• PCL 6 (“Printer Driver and Utilities” CD-ROM)
D:\DRIVERS\PCL6\XP_VISTA\(Language)\DISK1
• PostScript 3 (“Scanner Driver and Utilities” CD-ROM)
D:\DRIVERS\PS\XP_VISTA\(Language)\DISK1
If the installer starts, click [Cancel] to quit.
52
Page 61

Messages Displayed When Installing the Printer Driver
Windows XP, Windows Server 2003
This section describes the procedure under Windows XP or Windows Server
2003.
A On the [Start] menu, click [Printers and Faxes].
B Click [Add a printer].
C Follow the instructions in Add Printer Wizard.
If the CD-ROM drive is D, the source files of the printer driver are stored in
the following location:
• RPCS (“Printer Driver and Utilities” CD-ROM)
D:\DRIVERS\RPCS\XP_VISTA\(Language)\DISK1
• PCL 5e (“Printer Driver and Utilities” CD-ROM)
D:\DRIVERS\PCL5E\XP_VISTA\(Language)\DISK1
• PCL 6 (“Printer Driver and Utilities” CD-ROM)
D:\DRIVERS\PCL6\XP_VISTA\(Language)\DISK1
• PostScript 3 (“Scanner Driver and Utilities” CD-ROM)
D:\DRIVERS\PS\XP_VISTA\(Language)\DISK1
If the installer starts, click [Cancel] to quit.
4
Windows Vista
This section describes the procedure under Windows Vista.
A On the [Start] menu, click [Control Panel].
B Click [Hardware and Sound].
C Click [Add a printer] on the [Printers] area.
D Follow the instructions in Add Printer Wizard.
If the CD-ROM drive is D, the source files of the printer driver are stored in
the following location:
• RPCS (“Printer Driver and Utilities” CD-ROM)
D:\DRIVERS\RPCS\XP_VISTA\(Language)\DISK1
• PCL 5e (“Printer Driver and Utilities” CD-ROM)
D:\DRIVERS\PCL5E\XP_VISTA\(Language)\DISK1
• PCL 6 (“Printer Driver and Utilities” CD-ROM)
D:\DRIVERS\PCL6\XP_VISTA\(Language)\DISK1
• PostScript 3 (“Scanner Driver and Utilities” CD-ROM)
D:\DRIVERS\PS\XP_VISTA\(Language)\DISK1
If the installer starts, click [Cancel] to quit.
53
Page 62

Troubleshooting When Using the Printer Function
Messages Displayed When Using the Printer Function
This section describes the principal messages that appear on the panel display.
If a message not described here appears, act according to the message.
Reference
Before turning the main power off, see “Turning On the Power”, About This
Machine.
Status Messages
4
This section describes the machine status messages.
Message Problem
Ready
Printing...
Waiting...
Offline
Please wait.
Resetting job...
Setting change...
Hex Dump Mode
This is the default ready message. The machine is ready
for use. No action is required.
The machine is printing. Wait a while.
The machine is waiting for the next data to print. Wait a
while.
The machine is offline. To start printing, switch the machine online by pressing {Online} key.
The machine is preparing the development unit. Wait a
while.
The machine is resetting the print job. Wait until
“
Ready” appears on the display panel.
The machine is setting changing. Wait a while.
In the Hex Dump mode, the machine receives data in
hexadecimal format. Turn off the machine after printing,
and then turn back on.
54
Page 63

Messages Displayed When Using the Printer Function
Messages Displayed on the Control Panel When Using the Printer Function
This section describes likely causes of and possible solutions for the error messages that appear on the control panel.
Message Cause Solution
Cannot connect
with the wireless
card. Turn the
main power switch
off, then check
the card.
/ Prob-
lems with the
wireless card.
/
Problems with the
wireless board.
Failed to obtain
file system.
File system is
full.
Problem with Hard
Disk.
• IEEE 802.11b interface
unit was not inserted
when the machine
was turned on, or it
was pulled out after
the machine turned
on.
• The settings are not
updated although the
unit is detected, or errors are found while
accessing the unit.
PDF direct printing could
not be performed because
the file system could not
be obtained.
PDF file do not print out
because the capacity of
file system is full.
An error has occurred in
the hard disk drive.
Turn off the machine and check the
IEEE 802.11b interface unit is inserted
correctly. Then, turn the machine on
again. If the message appears again, call
your service representative.
4
Decrease the number of files sent to the
machine.
Delete all unnecessary files from the
hard disk, or decrease the number of
files sent to the machine.
Turn off the main power switch, and
back on again. If the message appears
again, contact your service representative.
The entered password is incorrect.
USB has a problem.
The tray selected
for other pages
is the same as
the one for Slip
Sheets ([Designate]).Cannot
print.
Check the setting.
The password of the encrypted PDF file has been
entered incorrectly.
An error has occurred in
the USB interface.
The tray selected for other pages is the same as the
one for slip sheets.
Enter the correct password.
Turn off the main power switch, and
back on again. If the message appears
again, contact your service representative.
Reset the job. Be sure that the tray you
select for slip sheets is not providing
paper for other pages.
55
Page 64

Troubleshooting When Using the Printer Function
Message Cause Solution
4
Hardware Problem:
Ethernet
You do not have
the privileges to
use this function.
Authentication
has failed.
Parallel I/F
board has a problem.
Printer font error.
Memory Overflow
An error has occurred in
the Ethernet board.
Use of this function is restricted.
• The login user name
or password entered
is incorrect.
• The machine currently cannot perform authentication.
An error has occurred in
the parallel interface
board.
An error has occurred in
the font settings.
Maximum capacity of
PCL 5e/6 or PostScript 3
list display has been exceeded.
Turn off the main power switch, and
back on again. If the message appears
again, contact your service representative.
Contact the administrator.
• Check your login user name and
password.
• Contact the administrator.
Turn off the main power switch, and
back on again. If the message appears
again, contact your service representative.
Contact your service representative.
Reduce the value of [Resolution] in the
printer driver. Alternatively, select
[Frame Priority] from [Memory Usage] in
[System]. If this message continues to
appear after taking these steps, decrease the number of files sent to the
machine.
56
Page 65

Messages Displayed When Using the Printer Function
Messages Printed on the Error Logs or Reports
This section describes likely causes of and possible solutions for the error messages that are printed on the error logs or reports.
Message Cause Solution
84: Error
85: Error
86: Error
Address Book is
currently in use
by another function. Authentication has failed.
Auto-registration
of user information has failed.
Cannot store data
of this size.
There is no work area
available for image
processing.
The specified graphics library is unavailable.
Parameters of the control
code are invalid.
The machine currently
cannot perform authentication because the address
book is being used by another function.
Automatic registration of
information for LDAP Authentication or Windows
Authentication failed because the address book is
full.
The paper size exceeded
the capacity of the document server.
•In [Printer Features], under [Sys-
tem], set [Memory Usage] to [Font
Priority].
• Decrease the number of files sent
to the machine.
Check that the data is valid.
Set the parameters correctly.
Wait a while, and then retry the operation.
Contact the administrator.
Reduce the paper size of the file that
you want to send to a size that the
document server can store. Custom
size files can be sent but not stored
afterward.
4
Collate has been
cancelled.
Command Error
Collate was canceled. Turn the main power switch off and
then back on again. If the message
appears again, contact your sales or
service representative.
An RPCS command error
occurred.
Check using the following procedure:
• Check if the communication between the computer and the machine is working correctly.
• Check if the correct printer driver
is being used.
• Check if the machine's memory
size is set correctly in the printer
driver.
• Check that the printer driver is
the most up-to-date version
available.
57
Page 66

Troubleshooting When Using the Printer Function
Message Cause Solution
4
Data storage error.
Document Server is
not available to
use. Cannot store.
Duplex has been
cancelled.
Error has occurred.
Exceeded max. capacity of Document
Server. Cannot
store.
You tried to print a Sample
Print, Locked Print, Hold
Print, or Stored Print file,
or to store a file in the document server when the
HDD is malfunctioning.
You cannot use the document server function.
Duplex printing was canceled.
A syntax error, etc., occurred.
The HDD became full after
a file was stored.
Contact your service representative.
Contact the administrator.
• Select the proper paper size for
the duplex function. See “Specifications for the Main Unit”, About
This Machine.
•In [System Settings], under [Tray
Paper Settings], select [2 Sided
Copy].
Check that the PDF file is valid.
Delete some of the files stored in the
document server or reduce the size
that you want to send.
Exceeded max.
number of files of
Document Server.
Cannot store.
Exceeded max.
number of files to
print for temporary / stored
jobs.
Exceeded max.
number of pages of
Document Server.
Cannot store.
Exceeded max.
number of pages to
print for temporary / stored
jobs.
Exceeded max. pages. Collate is incomplete.
The maximum file capacity
of the document server
was exceeded.
While printing a Sample
Print, Locked Print, Hold
Print or Stored Print file,
the maximum file capacity
was exceeded.
The maximum page capacity of the document server
was exceeded.
While printing a Sample
Print, Locked Print, Hold
Print or Stored Print file,
the maximum page capacity was exceeded.
The number of pages exceeds the maximum
number of sheets that you
can use Collate with.
Delete some of the files stored in the
document server.
Delete unneeded files stored in the
machine.
Delete some of the files stored in the
document server or reduce the
number of pages that you want to
send.
Delete unneeded files stored in the
machine.
Reduce the number of pages to print.
Reduce the number of pages to print.
58
Page 67

Messages Displayed When Using the Printer Function
Message Cause Solution
Failed to obtain
file system.
File system is
full.
HDD is full.
HDD is full.
Hardware Problem:
Ethernet
Hardware Problem:
HDD
PDF direct printing could
not be performed because
the file system could not be
obtained.
PDF file do not print out
because the capacity of file
system is full.
The HDD became full
while printing a Sample
Print, Locked Print, Hold
Print or Stored Print file.
When printing with the
PostScript 3 printer driver,
the HDD's capacity for
fonts and forms has been
exceeded.
An error has occurred in
the Ethernet board.
An error has occurred in
the hard disk drive.
In [Printer Features], under [System],
set [Memory Usage] to [Font Priority].
Delete all unnecessary files from the
hard disk, or decrease the file size
sent to the machine.
Delete unneeded files stored in the
machine.
Alternatively, reduce the data size of
the Sample Print, Locked Print, Hold
Print or Stored Print file.
Delete unneeded forms or fonts registered in the machine.
Turn off the main power switch, and
back on again. If the message appears again, contact your service
representative.
Turn off the main power switch, and
back on again. If the message appears again, contact your service
representative.
4
Hardware Problem:
Parallel I/F
Hardware Problem:
USB
Hardware Problem:
Wireless Board
Hardware Problem:
Wireless Card
An error has occurred in
the parallel interface
board.
An error has occurred in
the USB interface.
Access to the wireless
board in which the wireless LAN interface unit is
inserted is possible, but an
error was detected.
• A wireless card that the
machine cannot use has
been installed.
• An error has occurred
with the wireless card.
Turn off the main power switch, and
back on again. If the message appears again, contact your service
representative.
Turn off the main power switch, and
back on again. If the message appears again, contact your service
representative.
Turn off the machine, and check the
wireless board is inserted correctly.
Then, turn the machine on again. If
the message appears again, call your
service representative.
Turn off the machine, and check the
wireless card. Then, turn the machine on again. If the message appears again, call your service
representative.
59
Page 68

Troubleshooting When Using the Printer Function
Message Cause Solution
4
I/O buffer overflow.
Information for
user authentication is already
registered for another user.
Insufficient Memory
Memory Overflow
An input buffer overflow
occurred.
The user name for LDAP
or RDH authentication
was already registered in a
different server with a different ID, and a duplication of the user name
occurred due to a switching of domains (servers),etc.
A memory allocation error
occurred.
The memory is full. • On the RPCS printer driver's
•In [Printer Features], under [Sys-
tem], set [Memory Usage] to [Font
Priority].
•In [Printer Features], under [Host In-
terface], select [I/O Buffer], and
then set the maximum buffer size
to a larger value.
• Reduce the number of files being
sent to the machine.
Contact the administrator.
On the RPCS printer driver's [Print
Quality] tab, open the [Change User
Settings...] dialog box, and then, on
the [Image Adjustments] tab, specify a
lower value for [Resolution].
[Print Quality] tab, open the
[Change User Settings...] dialog
box, and then, on the [Image Ad-
justments] tab, specify a lower
value for [Resolution].
•In [Printer Features], under [Sys-
tem], set [Memory Usage] to [Font
Priority].
If this message continues to appear
after taking these steps, decrease the
number of files sent to the machine.
60
Memory Retrieval
Error
No response from
the server. Authentication has
failed.
Output tray has
been changed.
A memory allocation error
occurred.
A timeout occurred while
connecting to the server for
LDAP authentication or
Windows Authentication.
The output tray was
changed because the paper
size of the specified output
tray is limited.
Turn off the main power switch, and
back on again. If the message appears again, replace the RAM.
Check the status of the server.
Specify the proper output tray.
Page 69

Messages Displayed When Using the Printer Function
Message Cause Solution
Print overrun.
Problem: Printer
Font Error
Punch has been
cancelled.
Receiving data
failed.
Sending data
failed.
Staple has been
cancelled.
Images were discarded
while printing.
An error has occurred in
the font settings.
Punch printing was canceled.
Data reception was aborted.
The machine received a
command to stop transmission from the printer
driver.
Stapling printing was canceled.
On the RPCS printer driver's [Print
Quality] tab, open the [Change User
Settings...] dialog box, and then, on
the [Image Adjustments] tab, specify a
lower value for “Resolution”.
Contact your service representative.
Check the paper orientation, print
orientation, and punch position.
Certain settings can produce print
results that might not be as expected.
Resend the data.
4
Check if the computer is working
correctly.
Check the paper orientation, paper
quantity, print orientation, and staple position. Certain settings can
produce print results that might not
be as expected.
The entered password is incorrect.
The print job has
been cancelled because capture
file(s) could not
be stored: Exceeded max. memory.
The print job has
been cancelled because capture
file(s) could not
be stored: Exceeded max. number of
files.
The print job has
been cancelled because capture
file(s) could not
be stored: Exceeded max. number of
pages per file.
The password of the encrypted PDF file has been
entered incorrectly.
The HDD became full after
a file was stored.
The maximum file capacity
of the document server
was exceeded.
The maximum page capacity of the document server
was exceeded.
Enter the correct password.
Delete the files stored in the document server or reduce the file size to
be sent.
Delete the files stored in the document server.
Delete some of the files stored in the
document server or reduce the
number of pages that you want to
send.
61
Page 70

Troubleshooting When Using the Printer Function
Message Cause Solution
4
You do not have a
privilege to use
this function.
This job has been
cancelled.
You do not have a
privilege to use
this function.
This job has been
cancelled.
Z-fold error.
The entered login user
name or login password is
not correct.
The logged in user is not
allowed to use the selected
function.
Z-folding was canceled. Check the tray, paper orientation,
Check that the user name and password are correct.
Contact the administrator.
print orientation, and Z-fold settings
again.
If the printing does not start, contact your service representative.
Note
❒ The contents of errors may be printed on the Configuration Page. Check the
Configuration Page in conjunction with the error log. For details about how
to print the Configuration Page, see “List / Test Print”, General Settings
Guide.
62
Page 71

Messages Displayed When Using the Printer Function
Checking the Error Log
If files could not be stored due to printing errors, identify the cause of the errors
by checking the error log on the control panel.
Important
❒ The most recent 50 errors are stored in the error log. If a new error is added
when there are 50 errors already stored, the oldest error is deleted. However,
if the earliest error is a Sample Print, Locked Print, Hold Print, or Stored print
error, it is not deleted. The error is stored separately until the number of errors reaches 30.
❒ If the main power switch is turned off, the log is deleted.
A Press the {Printer} key to display the printer screen.
ANS701S
B Press [Error Log].
4
An error log list appears.
63
Page 72

Troubleshooting When Using the Printer Function
When You Cannot Print
Use the following procedures if printing does not start even after performing
[Print].
Problem Cause Solution
Printing does not start. The power is off. Check the cable is securely plugged
into the power outlet and the machine.
Turn on the main power switch.
4
Printing does not start. The machine is set to “Of-
fline”.
Printing does not start. The cause is displayed on
the display of the control
panel.
Printing does not start. The interface cable is not
connected correctly.
Printing does not start. The correct interface ca-
ble is not being used.
Printing does not start. The interface cable was
connected after the machine was switched on.
Printing does not start. If the machine is operat-
ing in an extended wireless LAN, failure to print
might result from a weak
wireless signal.
Press {Online} key.
Check the error message or warning
status on the display panel and take the
required action.
Connect the interface cable securely. If
it has a fastener, fasten that securely as
well. See “Connecting to the Interfaces”, General Settings Guide.
The type of interface cable you should
use depends on the computer. Be sure
to use the correct one. If the cable is
damaged or worn, replace it. See “Connecting to the Interfaces”, General Settings Guide.
Connect the interface cable before turning on the machine.
To check signal status, press the {User
Tools/Counter} key, and then press [System Settings] on the display panel. On
the [Interface Settings] tab, select [IEEE
802.11b], and then press [Wireless LAN
Signal]. If signal quality is poor, move
the machine to a location where radio
waves can pass or remove objects that
might cause interference.
(You can check signal status only when
using wireless LAN in the infrastructure mode.)
64
Printing does not start. If the machine is operat-
ing in an extended wireless LAN, SSID settings
are incorrect.
Check using the machine's display panel that the SSID is correctly set. See
“Network Settings”, General Settings
Guide.
Page 73

When You Cannot Print
Problem Cause Solution
Printing does not start. If the machine is operat-
ing in an extended wireless LAN, the receiver's
MAC address may be
preventing communication with the access point.
Printing does not start. The extended wireless
LAN has not started.
Printing does not start. The login user name,
login password, or driver
encryption key is invalid.
Printing does not start. Advanced encryption has
been set using the Extended Security function.
Data-in indicator does
not blink or light up.
If the data-in indicator is
unlit or not flashing even
after performing [Print],
the machine has not received the data.
Check access point settings when in the
infrastructure mode. Depending on the
access point, client access may be limited by MAC address. Also, check there
are no problems in transmission between access point and wired clients,
and between access point and wireless
clients.
Confirm the orange LED is lit, and the
green LED is lit or blinks during transmission.
Check the login user name, login password, or driver encryption key.
4
Check the settings of the Extended Security function with the administrator.
• When the machine is connected to a
computer via a cable, check the
computer print port settings are correct. See “Confirming the Connection Method”, Printer Reference.
• When it is networked with a computer, Contact the administrator.
The status indicator of
the printer is lit.
Updating the
“
destination
list... Please
wait. Specified
destination(s) or
sender's name has
been cleared.
pears.
[List / Test Print] is disabled.
Printing does not start
when using the extended
wireless LAN in Ad-hoc
mode.
” ap-
The cause is displayed on
the display of the control
panel.
The destination list is being updated from the network using
SmartDeviceMonitor for
Admin.
A mechanical error might
have occurred.
The correct Communication Mode is not set.
Check the error message on the display
panel and take required action. See p.54
“Messages Displayed When Using the
Printer Function”.
Wait until the message disappears. Do
not switch off the power while this
message is displayed. Depending on
the number of destinations to be updated, there may be some delay before you
can resume operation. Operations are
not possible while this message is displayed.
Contact your service representative.
See “List/Test Print”, General Settings
Guide.
Turn the main power off and back on.
See “Turning On the Power”, About
This Machine.
Or, change the settings for [System Set-
tings], [Interface Settings], and [Network].
See “Network Settings”, General Settings Guide.
If the printing does not start, consult your service representative.
65
Page 74

4
Troubleshooting When Using the Printer Function
When the Data In Indicator Does Not Light Up or Flash
When the Data In indicator does not light up or flash after starting a print job,
data is not being sent to the machine.
When the machine is connected to the computer using the interface cable
The following shows how to check the print port when the data-in indicator
does not light up or blink.
Check if the print port setting is correct. When it is connected using a parallel interface, connect it to LPT1 or LPT2.
❖ For Windows 2000
A Click the [Start] button, point to [Settings], and then click [Printers].
B Click the icon of the machine. On the [File] menu, click [Properties].
C Click the [Ports] tab.
D In the [Print to the following port(s)] list, confirm the correct port is selected.
❖ For Windows XP Professional or Windows Server 2003
A Click the [Start] button, and then click [Printers and Faxes].
B Click the icon of the machine. On the [File] menu, click [Properties].
C Click the [Ports] tab.
D In the [Print to the following port(s)] list, confirm the correct port is selected.
❖ For Windows XP Home Edition
A Click the [Start] button, and then click [Control Panel].
B Click [Printers and Other Hardware].
C Click [Printers and Faxes].
D Click the icon of the machine. On the [File] menu, click [Properties].
E Click the [Ports] tab.
F In the [Print to the following port(s)] list, confirm the correct port is selected.
❖ For Windows Vista
A Click the [Start] button, and then click [Control Panel].
B Click [Hardware and Sound].
C Click [Printers].
D Right-click the icon of the machine, and then click [Properties].
E In the [Print to the following port(s)] list, confirm the correct port is selected.
66
Page 75

Other Printing Problems
Other Printing Problems
This section describes likely causes of and possible solutions for problems that
can occur when printing from a computer.
Problem Cause Solution
Print has smudges. Settings for thick pa-
per have not been
made when printing
on thick paper in the
bypass tray.
The print on the entire
page is faded.
The print on the entire
page is faded.
The print on the entire
page is faded.
The print on the entire
page is faded.
Fine lines are fuzzy, of
inconsistent thickness or color, or do
not appear.
When D is blinking,
toner is beginning to
run out.
The paper is damp. Use paper that has been stored in the recom-
The paper is unsuitable.
If the [Toner saving]
check box is selected
in the printer driver
settings, the entire
page will be faded
when printed.
Super fine lines have
been specified in the
application, or a color
that is too light has
been specified for the
lines.
• PCL 5e/6 and PostScript 3
Select [Thick] in the [Type:] list on the [Paper]
tab.
•RPCS
Select [Thick] in the [Paper type:] list on the
[Print Settings] or [Setup] tab.
Add toner. See p.99 “Adding Toner”.
4
mended temperature and humidity condition.
See “Copy Paper”, About This Machine.
Use the recommended paper. (Printing on
coarse or treated paper might result in faint
print image.) See “Copy Paper”, About This
Machine.
For the RPCS printer driver, [Toner saving] is located on the [Print Quality] tab. For the PostScript 3 printer driver, see PostScript 3
Supplement. See the printer driver Help.
Change the dithering settings. See the printer
driver Help.
If the problem continues after you change the
dithering settings, use the settings of the application in which the image was created to
change the color and thickness of the lines.
Image bleeds when
rubbed.
Paper is not fed from
the selected tray.
If you are using thick
paper, [Paper type:]
might not be set to
[Thick].
When you are using a
Windows operating
system, printer driver
settings override
those settings using
the display panel.
On the printer driver's [Print Settings] or [Setup]
tab, set [Paper type:] to [Thick]. See the printer
driver Help.
Set the desired input tray using the printer
driver. See the printer driver Help.
67
Page 76

Troubleshooting When Using the Printer Function
Problem Cause Solution
4
The printed image is
different from the image on the computer's
display.
The printed image is
different from the image on the computer's
display.
Images are printed at
slant.
Print is slanted. The paper is feeding
Misfeeds occur frequently.
Misfeeds occur frequently.
Misfeeds occur frequently.
With certain functions, such as enlargement and reduction,
image layout might
be different to that on
the computer display.
You might have selected to replace True
Type fonts with machine fonts in the
printing process.
The tray's side fence
might not be locked.
in at a slant.
The number of sheets
loaded exceeds the capacity of the machine.
The paper is damp. Use paper that has been stored in the recom-
The paper is too thick
or too thin.
In the application, change the layout, character
size, and character settings.
To print an image similar to that of the computer display, make settings to print True Type
fonts as an image. See the printer driver Help.
Check the side fence are locked. See p.94
“Changing the Paper Size”.
Load the paper correctly. See p.87 “Loading
Paper”.
Load paper only as high as the upper limit
markings on the side fence of the paper tray or
bypass tray. See “Copy Paper”, About This
Machine.
mended temperature and humidity condition.
See “Copy Paper”, About This Machine.
Use recommended paper. See “Copy Paper”,
About This Machine.
68
Misfeeds occur frequently.
Misfeeds occur frequently.
Copy paper becomes
creased.
Copy paper becomes
creased.
White lines appear. When D is blinking,
When printing graphics, the output and the
screen are different.
Garbled characters
are printed.
The copy paper is
wrinkled or has been
folded/creased.
Printed paper is being
used.
The paper is damp. Use paper that has been stored in the recom-
The paper is too thin. Use recommended paper. See “Copy Paper”,
toner is beginning to
run out.
If the printer driver is
configured to use the
graphics command,
the graphics command from the machine is used to print.
The correct printer
language might have
not been selected.
Use recommended paper. Use paper that has
been stored in the recommended temperature
and humidity condition. See “Copy Paper”,
About This Machine.
Use recommended paper. See “Copy Paper”,
About This Machine.
mended temperature and humidity condition.
See “Copy Paper”, About This Machine.
About This Machine.
Add toner. See p.99 “Adding Toner”.
If you want to print accurately, set the printer
driver to print without using the graphics
command. See the printer driver Help.
Set the correct printer language.
Page 77

Problem Cause Solution
Other Printing Problems
Images are printed in
the wrong orientation.
There is considerable
delay between the
print start instruction
and actual printing.
There is considerable
delay between the
print start instruction
and actual printing.
The feed orientation
you selected and the
feed orientation selected in the printer
driver's option setup
might not be the
same.
“Sleep mode” might
be set.
Processing time depends on data volume. High volume
data, such as graphics-heavy documents,
take longer to process.
Set the machine's feed orientation and the
printer driver's feed orientation accordingly.
See the printer driver Help.
The machine requires time to warm up if it has
been in “Sleep mode”. In [System Settings], under [Timer Settings], select [Auto Off Timer], and
then specify “Sleep mode”.
If the data-in indicator is blinking, data has been
received by the printer. Wait for a moment.
Making the following setting on the printer
driver may reduce the computer's workload.
❖ PCL 5e/6
Select the lower value for [Resolution] on
the [Print Quality] tab in the printer properties dialog box.
❖ PostScript 3
Select the lower value in Resolution. The
location of this setting is given below. If
your operating system is Windows, select
[Optimize for Speed] in [PostScript Output Option]. [PostScript Output Option] is located as
follows:
• Windows 2000/XP/Vista, Windows
2003 Server
[PostScript Output Option] in [PostScript
Options] on [Advanced...] on [Layout] tab
in the printing preferences dialog box.
• Mac OS 9.x
[Printer Specifications] in the print dialog
box.
• Mac OS X
[Set 3] tab in [Printer Features] in the print
dialog box.
4
❖ RPCS
•On the [Print Quality] tab, select [Speed]
in the [Print priority] area.
•On the [Print Quality] tab, open the
[Change User Settings...] dialog box, and
then, on the [Image Adjustments] tab,
specify a lower value for [Resolution].
To enable [Change User Settings...], select the
[User settings] check box.
See the printer driver Help.
69
Page 78

Troubleshooting When Using the Printer Function
Problem Cause Solution
4
Images are cut off, or
excess is printed.
Page layout is not as
expected.
Photo images are
coarse.
Solid lines are printed
as broken lines.
Optional components
connected to the machine are not recognized when using
Windows
2000/XP/Vista and
Windows Server 2003.
You may be using paper smaller than the
size selected in the application.
Print areas differ depending on machine
used. Information
that fits on a single
page on one machine
may not fit on a single
page of another machine.
Some applications
print at lower resolution.
Dither patterns do not
match.
Bidirectional communication is not working.
Use the same size paper as that selected in the
application. If you cannot load paper of the
correct size, use the reduction function to reduce the image, and then print. See the printer
driver Help.
Adjust the [Printable area:] setting in the [Printer
Configuration...] in the RPCS printer driver. See
the printer driver Help.
Use the application's settings to specify a higher resolution.
Make the following settings with the printer
driver: Change the [Dithering:] setting on the
[Image Adjustments] tab in the [Change User Settings...] dialog box, on the [Print Quality] tab in
the RPCS printer driver. See the printer driver
Help.
Set up optional devices on the Properties of the
printer.
See the printer driver Help.
70
Duplex printing is
malfunctioning.
Duplex printing is
malfunctioning.
Duplex printing is
malfunctioning.
Duplex printing cannot be done with paper set in the bypass
tray.
You have loaded thick
paper heavier than
110 g/m
Duplex printing cannot be done with a
tray for which [1 Sided
Copy] has been speci-
fied as Paper Type on
the System Settings
menu.
2
.
When using duplex printing, make settings to
use paper from a tray other than the bypass
tray.
Specify another paper type.
In [System Settings], under [Tray Paper Settings],
select [2 Sided Copy].
Page 79

Problem Cause Solution
Other Printing Problems
When using Windows 2000/XP/Vista
or Windows Server
2003, combined printing or booklet printing does not come out
as expected.
A print instruction
was issued from the
computer, but printing did not start.
PDF files do not print
out/cannot perform
[PDF Direct Print].
PDF files do not print
out/cannot perform
[PDF Direct Print].
The correct application or printer driver
settings are not made.
User Authentication
may have been set.
PDF files are password-protected.
PDF files cannot be
printed if they are
print-disabled via
PDF File Security.
Make sure the application's paper size and orientation settings match those of the printer
driver. If a different paper size and orientation
are set, select the same size and orientation.
Ask the administrator for the user code, which
must be specified in the printer driver before
printing. On the [Printer Configuration] tab in the
printer properties dialog box, click [User
Code...], and then enter the user code in the di-
alog box that opens.
To print password-protected PDF files, enter
the password in the [PDF Menu] or on Web Image Monitor.
• For details about [PDF Menu], see “PDF
Menu”, General Settings Guide.
• For details about Web Image Monitor, see
the Web Image Monitor Help.
Change the PDF File Security setting.
4
PDF files do not print
out/cannot perform
[PDF Direct Print].
[PDF Direct Print] pro-
duces strange or malformed characters.
Printing by Bluetooth
is slow.
High compression
PDF files created using the machine's
scanner function cannot print directly.
Fonts were not embedded.
The number of jobs
exceeds the capacity
of the machine.
Open the application used to create the PDF,
and then print the file using the application's
driver.
Re-save the file in normal (non-compressed)
PDF format.
Some types of High Compression PDF files are
not supported. Consult your sales representative about the supported file types.
Embed fonts in the PDF file you want to print
and then print.
Reduce the number of jobs.
71
Page 80

Troubleshooting When Using the Printer Function
Problem Cause Solution
4
Printing by Bluetooth
is slow.
• A communication
error might have
occurred.
• Interference from
IEEE 802.11b
(wireless LAN)
devices can reduce
communication
speed.
• Bluetooth transmission speeds are
not high.
• Remove the machine from close proximity
with IEEE 802.11b wireless LAN devices.
• If there are active IEEE 802.11b wireless
LAN devices or other Bluetooth devices
nearby, relocate the machine or disable
those devices.
If the problem cannot be solved, contact your service representative.
72
Page 81

5. Troubleshooting When
Using the Scanner Function
This chapter describes likely causes of and possible solutions for scanner function problems.
When Scan Results Are Not As Expected
This section describes causes and remedies when scan results are not as expected.
Problem Cause Solution
The scanned image is
dirty.
The image is distorted
or out of position.
The image is distorted
or out of position.
The scanned image is
upside down.
No image results from
scanning.
Images are scanned in
rotated.
The scanned image
contains white spaces.
The exposure glass or auto document feeder (ADF) is dirty.
The original was moved during
scanning.
The original was not pressed flat
against the exposure glass.
The original was placed upside
down.
The original was placed with the
front and back reversed.
If you set the original with its upper edge backward and save gray
scale images as a TIFF or JPEG
file, they are scanned in rotated.
If you scan originals using func-
•
tions other than the network
TWAIN scanner function, certain paper size and resolution
settings may produce scanned
images that are larger than the
specified size because of margins being added to the sides.
• If the File Format Converter
(optional ) is installed, the
margins may become wider.
Clean these parts. See p.129
“Maintaining Your Machine”.
Do not move the original during
scanning.
Make sure that the original is
pressed flat against the exposure
glass.
Place the original in the correct
orientation. See “Placing Originals”, Copy/Document Server
Reference.
When the original is placed directly
on the exposure glass, the side to be
scanned must face down. When the
original is fed via the ADF, the side
to be scanned must face up. See
“Placing Originals”, Copy/Document Server Reference.
When placing a stack of originals
in the ADF, place their upper
edges first.
Scanning at a higher resolution
may reduce the margins.
The scanned image is
grayed out or a text pattern appears in the
background.
You have copied a copy guarded
document protected from unauthorized copying.
Check the document. For details
about how to prevent unauthorized copying of the document,
see “Using [Data Security for Copy-
ing]”, Printer Reference.
73
Page 82

Troubleshooting When Using the Scanner Function
When You Cannot Send Scanned Files
The following sections explain likely causes of and solutions for Network Delivery and E-mail Sending-related problems.
When Stored Files Cannot Be Accessed
This section describes likely causes of and possible solutions for job access-related problems.
Problem Cause Solution
5
The stored file is locked
and is not accessible.
The file, which is password protected, is locked because the password was incorrectly entered ten
times.
Contact the administrator.
When You Cannot Browse the Network to Send a Scan file
This section describes likely causes of and possible solutions for the Browser
Network failing to operate when files are sent.
Problem Cause Solution
The network cannot be
browsed when specifying the destination folder.
The following machine settings
may not be correct:
• IPv4 address
• Subnet Mask
Check the settings. See “Network
Settings”, General Settings
Guide.
When the TWAIN Driver Cannot Be Started
This section describes likely causes of and possible solutions for the TWAIN
driver failing to operate.
Problem Cause Solution
74
The Scanner Properties
dialog box cannot be
displayed.
Advanced encryption has been
specified in the extended security
setting.
For details about the extended security setting, contact an administrator.
Page 83

When You Cannot Send Scanned Files
When Stored Files Cannot Be Edited
This section describes likely causes of and possible solutions for the TWAIN
driver failing to operate.
Problem Cause Solution
Stored files cannot be
deleted. File names and
passwords cannot be
changed. Files cannot
be redelivered.
Limits have been imposed using
the available extended security
function.
Contact the administrator.
When the Network Delivery Function Cannot Be Used
This section describes likely causes of and possible solutions for the Network
Delivery function failing to operate.
Problem Cause Solution
The network delivery
function cannot be
used.
The network delivery
function cannot be
used.
The delivery software may be an
old version or a security setting
may be specified.
The network delivery function
setting is not correct.
Contact the administrator.
Specify it correctly. See “Settings
Required to Use the Network Delivery Scanner”, General Settings
Guide.
Operations Are Not Possible When Messages Are Displayed
5
This section describes likely causes of and possible solutions for messages that
appear and when the machine fails to operate.
Message Cause Solution
Destination list /
machine settings
are updated. Selected destinations or function
settings have been
cleared. Please
re-select the settings.
The destination list is being updated from the network using
SmartDeviceMonitor for Admin.
Depending on the number of destinations to be updated, there
may be some delay before you
can resume operation. Operations are not possible while this
message is displayed.
Wait until the message disappears. Do not switch off the power while this message is
displayed.
75
Page 84

Troubleshooting When Using the Scanner Function
Messages Displayed When Using the Scanner Function
This section describes likely causes of and possible solutions for error messages
that may appear on the machine's control panel.
When a Message Is Displayed on the Control Panel
This section describes causes and remedies if an error message appears on the
display of the control panel.
Important
❒ If a message not described here appears, act according to the message. For in-
formation about how to turn off the main power switch, see About This Machine.
5
Message Cause Solution
Connection with
LDAP server has
failed. Check the
server status.
LDAP server authentication has
failed. Check the
settings.
The destination
list has been updated. Specified
destination(s) or
sender's name has
been cleared.
Updating the destination list has
failed. Try
again?
The destination
list has been updated. Specified
destination(s) or
sender's name has
been cleared.
A network error has occurred and connection
has failed. Try the operation once more.
The user name and password differ from those
set for LDAP Authentication.
A specified destination or
sender's name was
cleared when the destination list in the delivery
server was updated.
A network error has occurred.
The destination list is being updated.
Try the operation once more. If the message is still shown, the network may be
crowded. Check the information of
[System Settings]. See “System Settings”,
General Settings Guide.
Make settings correctly for the user
name and the password for LDAP server authentication.
Specify the destination or sender's
name again.
Check whether the server is connected.
If a destination or sender's name was already selected, re-select it after this
message disappears.
76
Page 85

Messages Displayed When Using the Scanner Function
Message Cause Solution
Exceeded max.
number of files
which can be sent
at the same time.
Reduce the number
of the selected
files.
Cannot detect
original size.
Place original
again, then press
the Start key.
Exceeded max. No.
of results to
display.
Max.:
You do not have
the privileges to
use this function.
The number of files exceeded the maximum
number possible.
You have loaded paper of
a size not shown on the
paper size selector.
Search results have exceeded the max. displayable number.
The machine has not been
set to allow you to use the
function.
Reduce the number of files and send
them again.
• Place the original correctly.
• Specify the scan size.
• When placing an original directly
on the exposure glass, the lifting/
lowering action of the ADF triggers
the automatic original size detection
process. Lift the ADF by more than
30 degrees. See “Placing Originals”,
Copy/Document Server Reference.
Search again after changing the search
conditions.
Contact the administrator.
5
Exceeded max.
number of standby
files.
Try again
after the current
file is sent.
Exceeded time
limit for LDAP
server search.
Check the server
status.
The specified
group contains
some destination(s) that do
not have access
privileges. Do
you want to select only the
privileged destination(s)?
The maximum number of
standby files was exceeded.
A network error has occurred and connection
has failed.
The specified group contains some destinations
for sending by e-mail and
some destinations for
sending by Scan to Folder.
There are 100 files waiting in the sending queue for e-mail, Scan to Folder, or
delivery functions. Wait until files have
been sent.
Try the operation once more. If the message is still shown, the network may be
crowded. Check the information of
[System Settings]. See “System Settings”,
General Settings Guide.
To select destinations for sending by email, press [Select] for the message dis-
played on the e-mail screen. To select
destination for sending by Scan to Folder, press [Select] for the message displayed on the Scan to Folder screen.
77
Page 86

Troubleshooting When Using the Scanner Function
Message Cause Solution
5
Cannot find the
specified path.
Please check the
settings.
Exceeded max.
number of alphanumeric characters for the
path.
The selected
file(s) contained
file(s) without
access privileges. Only file(s)
with access privileges will be
deleted.
Some of selected
files are currently in use.
They could not be
deleted.
The destination computer name or folder name
is invalid.
The maximum number of
specifiable alphanumeric
characters in a path has
been exceeded.
You have tried to delete
files without the authority to do so.
You cannot delete a file
which is waiting to be
transmitted (“Waiting...”
status displayed) or
whose information is being changed with DeskTopBinder.
Check whether the computer name and
the folder name for the destination are
correct.
The maximum number of characters
which can be entered for the path is 128.
Check the number of character you entered, and then enter the path again.
See “Transmission function”, Scanner
Reference.
The files can be deleted by the file administrator. To delete a file which you
are not authorized to delete, contact the
administrator.
Cancel transmission (“Waiting...”status
cleared) or the DeskTopBinder setting,
and then delete the file.
Cannot cancel
sending all selected file(s).
Certain file(s)
are currently being sent.
Selected file is
currently in use.
Cannot change
file name.
Selected file is
currently in use.
Cannot change
password.
Selected file is
currently in use.
Cannot change
user name.
You cannot cancel a file
currently being sent.
You cannot change the
name of a file whose status is “Waiting...” or that
is being edited with
DeskTopBinder.
You cannot change the
name of a file whose status is “Waiting...” or that
is being edited with
DeskTopBinder.
You cannot change the
password of a file whose
status is “Waiting...” or
that is being edited with
DeskTopBinder.
You can only cancel files waiting to be
sent. You cannot cancel files already
sent or currently being sent, files that
were sent but did not reach the destination, or files that have been canceled.
Change the file name after canceling
delivery or completing editing.
Delete the password after canceling delivery or completing editing.
A sender's name should be specified
before sending e-mail. Send e-mail after
specifying the sender's name.
78
Page 87

Messages Displayed When Using the Scanner Function
Message Cause Solution
Connection with
the destination
has failed. Check
the status and
connection. To
check the current
status, press
[Scanned Files
Status].
Authentication
with the destination has failed.
Check settings.
To check the current status,
press [Scanned
Files Status].
Sender has not
been specified.
Exceeded max. Email size. Sending E-mail has
been cancelled.
Check [Max. Email Size] in
Scanner Features.
The correct Network settings are not made.
The entered user name or
password was invalid.
The sender's name was
not specified.
The maximum e-mail size
has been exceeded.
• Check the network settings of the
client computer.
• Check that components such as the
LAN cable are connected properly.
• Check that the server settings are
correct and the server is working
properly.
• Check that the user name and password are correct.
• Check that the ID and password for
the destination folder are correct.
• A password of 128 or more characters may not be recognized.
5
A sender's name should be specified
before sending e-mail. Send e-mail after
specifying the sender's name.
• Increase the size of [Max. E-mail Size].
•Set [Divide & Send E-mail] to [Yes (per
Page)] or [Yes (per Max. Size)].
See “Send Settings”, General Settings
Guide.
Sending the data
has failed. The
data will be resent later.
Transmission has
failed. To check
the current status, press
[Scanned Files
Status].
Transmission has
failed. Insufficient memory in
the destination
hard disk. To
check the current
status, press
[Scanned Files
Status].
A network error has occurred and a file was not
sent correctly.
While a file was being
sent, a network error occurred and the file could
not be sent correctly.
Transmission has failed.
There was not enough
free space on the hard
disk of the SMTP server,
FTP server, or client computer at the destination.
Wait until sending is retried automatically after the preset interval. If sending
fails again, contact the administrator.
Try the operation once more. If the message is still shown, the network may be
crowded. Contact the administrator. If
multiple files were sent, use the
Scanned Files Status screen to check for
which file the problem occurred.
Allocate sufficient space.
79
Page 88

Troubleshooting When Using the Scanner Function
Message Cause Solution
5
Output buffer is
full. Sending the
data has been
cancelled. Please
try again later.
Exceeded max.
number of pages
per file. Do you
want to store the
scanned pages as
1 file?
Exceeded maximum
number of file to
store. Delete all
unnecessary
files.
Exceeded max.
number of stored
files. Cannot
send the scanned
data as capturing
files is unavailable.
Too many jobs are in
standby state, and sending was canceled.
The file being stored has
exceeded the max.
number of pages for one
file.
Too many files are waiting to be delivered.
Too many files are waiting to be delivered.
Retry sending after sending jobs in
standby state completes.
Specify whether to use the data or not.
Scan the pages that were not scanned
and store them as a new file. See "Storing Files Using the Scanner Function"
Scanner Reference.
Please try again after they have been
delivered.
Please try again after they have been
delivered.
Exceeded max.
number of files
which can be used
in Document Server at the same
time.
Entered protection code for
destination is
incorrect. Please
re-enter.
Entered user code
is not correct.
Exceeded max.
number of alphanumeric characters.
Authentication
has failed.
The maximum number of
files that can be stored in
the document server has
been exceeded.
The correct protect destination code was not entered.
The entered user code is
incorrect.
The maximum enterable
number of alphanumeric
characters has been exceeded.
The entered login user
name or login password
is incorrect.
Check the files stored by the other functions, and then delete unneeded files.
See “Document Server”, Copy/Document Server Reference.
Make sure the protection code is correct, and then enter it again. See “Registering a Protection Code”, General
Settings Guide.
Check the authentication setting, and
then specify a correct user code.
Make sure the maximum number of
characters which can be entered, and
then enter it again. See “Values of Various Set Items for Transmission/Storage/Delivery Function”, Scanner
Reference.
Check the login user name and login
password. The machine is unable to authenticate. Contact an administrator.
80
Page 89

Messages Displayed When Using the Scanner Function
Message Cause Solution
The entered path
is not correct.
Please re-enter.
Captured file exceeded max.
number of pages
per file. Cannot
send the scanned
data.
Original is being
scanned by another function.
Please wait.
E-mail address
entered is not
correct. Please
re-enter.
Memory is full.
Scanning has been
cancelled. Press
[Send] to send
the scanned data,
or press [Cancel]
to delete.
The entered path format
is incorrect.
The maximum number of
pages per file has been
exceeded.
The machine is using another function such as
copying.
The entered e-mail address is incorrect.
Because there is not
enough free hard disk
space in the machine for
delivering or sending by
e-mail while storing in
the Document Server,
only some of the pages
could be scanned.
Confirm the destination computer and
the path, and then enter it again.
Reduce the number of pages in the
transmitted file, and then resend the
file. See “Storage function”, Scanner
Reference.
Retry scanning after the operation with
the other function is completed.
Make sure the e-mail address is correct,
and then enter it again.
5
Specify whether to use the data or not.
Memory is full.
Cannot scan. The
scanned data will
be deleted.
Memory is full.
Do you want to
store scanned
file?
No paper. Load
paper of one of
the following
sizes, then press
[Start Printing].
Because of insufficient
hard disk space, the first
page could not be
scanned.
Because there is not
enough free hard disk
space in the machine for
storing in the Document
Server, only some of the
pages could be scanned.
No paper is set in the
specified paper tray.
Try one of the following measures:
• Wait for a while, and then retry the
scan operation.
• Reduce the scan area or scanning
resolution. See “Items for Specifying Scan Settings”, Scanner Reference.
• Delete unneeded stored files. See
“Deleting a Stored File”, Scanner
Reference.
Specify whether to use the data or not.
Load paper of the sizes listed in the
message.
81
Page 90

Troubleshooting When Using the Scanner Function
Message Cause Solution
5
Exceeded max.
data capacity.Check the
scanning resolution, then reset
original(s).
Exceeded max.
data capacity.Check scanning
resolution, then
press Start key
again.
Exceeded max.
page capacity per
file. Press
The scanned original exceeded maximum data
capacity.
The scanned data exceeded maximum data capacity.
The number of scanned
pages exceeded maximum page capacity.
Specify the scan size and resolution
again. Note that it may not be possible
to scan very large originals at a high
resolution. See “Relationship between
Resolution and File Size”, Scanner Reference.
Specify the scan size and resolution
again. Note that it may not be possible
to scan very large originals at a high
resolution. See “Relationship between
Resolution and File Size”, Scanner Reference.
Select whether to send the data so far.
[Send] to send
the scanned data,
or press [Cancel]
to delete.
When a Message Is Displayed on the Client Computer
This section describes likely causes of and possible solutions for the main error
messages displayed on the client computer when using the TWAIN driver.
Important
❒ If a message not described here appears, act according to the message. For in-
formation about how to turn off the main power switch, see About This Machine.
Message Cause Solution
Clear Misfeed(s)
in ADF.
Invalid Winsock
version. Please
use version 1.1
or higher.
The name is already in use.
Check the registered names.
A paper misfeed has occurred inside the ADF.
You are using an invalid
version of Winsock.
You tried to register a
name that is already in
use.
Remove jammed originals, and place
them again.
Check whether the originals are suitable to be scanned by the machine.
Install the operating system of the computer or copy Winsock from the operating system CD-ROM.
Use another name.
82
Page 91

Messages Displayed When Using the Scanner Function
Message Cause Solution
Cannot detect the
paper size of the
original. Specify
the scanning
size.
Cannot add any
more scanning
mode.
Cannot specify
any more scanning
area.
Call Service
Please call your
service representative.
Scanner is not
available on the
specified device.
The set original was misaligned.
The maximum number of
registerable scan modes
has been exceeded.
The maximum number of
registerable scan areas
has been exceeded.
An unrecoverable error
has occurred in the machine.
The TWAIN scanner
function cannot be used
on this machine.
• Place the original correctly.
• Specify the scan size.
• When placing an original directly
on the exposure glass, the lifting/lowering action of the ADF
triggers the automatic original size
detection process. Lift the ADF by
more than 30 degrees.
The maximum number of modes that
can be stored is 100. Delete unneeded
modes.
The maximum number of scanning areas that can be stored is 100. Delete unneeded scanning area.
Call your service representative.
5
Contact your service representative.
Scanner is not
available. Check
the scanner connection status.
No response from
the scanner.
No response from
the scanner.
Error has occurred in the
scanner.
Fatal error has
occurred in the
scanner.
• The machine's main
power switch is off.
• The machine is not
connected to the network correctly.
The machine is not connected to the network
correctly.
The network is crowded. Wait for a while, and then try to recon-
The application-specified scan conditions have
exceeded the setting
range of the machine.
An unrecoverable error
has occurred on the machine.
• Set the main power switch to “On”.
• Check whether the machine is connected to the network correctly.
• Deselect the personal firewall function of the client computer.
• Use an application such as telnet to
make sure SNMPv1 or SNMPv2 is
set as the machine’s protocol. See
“Network Settings”, General Settings Guide and “Using telnet”,
Network Guide.
Check whether the machine is connected to the network correctly.
nect.
Check whether the scanning settings
made with the application exceed the
setting range of the machine.
An unrecoverable error has occurred in
the machine. Call your service representative.
83
Page 92

Troubleshooting When Using the Scanner Function
Message Cause Solution
5
Cannot connect to
the scanner.
Check the network
Access Mask settings in User
Tools.
Scanner is not
ready. Check the
scanner and the
options.
Insufficient memory. Reduce the
scanning area.
An access mask is set. Contact the network or scanner admin-
istrator.
The ADF cover is open. Check whether the ADF cover is closed.
Scanner memory is insufficient.
• Reset the scan size.
• Lower the resolution.
• Set with no compression. See
TWAIN Driver help.
The problem may be due to the following cause:
• Scanning cannot be performed if
large values are set for brightness
when using halftone or high resolution. See "Relationship between Resolution and Original Size", Scanner
Reference.
Insufficient memory. Reduce the
scanning area.
Cannot find "XXX"
scanner used for
the previous
scan. "YYY" will
be used instead.
("XXX" and "YYY" indicate scanner names.)
When a paper misfeed
occurs in the machine
during printing, scanning
cannot be performed.
• The main power
switch of the previously used scanner is
not set to “On”.
• The machine is not
connected to the network correctly.
After the misfed paper has been removed, proceed with scanning.
• Check whether the main power
switch of the scanner used for the
previous scan is turned off.
• Check the previously used scanner
is connected to the network correctly.
• Cancel the Personal Firewall of the
client computer.
• Use an application such as telnet to
make sure SNMPv1 or SNMPv2 is
set as the machine’s protocol. See
“Network Settings”, General Settings Guide and “Using telnet”,
Network Guide.
• Select the scanner used for the previous scan.
84
Page 93

Messages Displayed When Using the Scanner Function
Message Cause Solution
Error has occurred in the
scanner driver.
Communication error has occurred
on the network.
Scanner is in use
for other function. Please
wait.
Insufficient memory. Close all
other applications, then restart scanning.
No User Code is
registered. Consult your system
administrator.
An error has occurred in
the driver.
A communication error
has occurred on the network.
A function of the machine
other than the scanner
function is being used
such as the copier function.
Memory is insufficient. • Close all the unnecessary applica-
Access is restricted with
user codes.
• Check whether the network cable is
connected correctly to the client
computer.
• Check whether the Ethernet board
of the client computer is recognized
correctly by Windows.
• Check whether the client computer
can use the TCP/IP protocol.
Check whether the client computer can
use the TCP/IP protocol.
Wait for a while and reconnect.
tions running on the client computer.
• Uninstall the TWAIN driver, and
then reinstall it after restarting the
computer.
Contact the administrator of the machine.
5
Any of Login User
Name, Login Password or Driver
Encryption Key is
incorrect.
The entered login user
name, password, or driver encryption key was
invalid.
• Check the login user name, login
password, and driver encryption
key.
• Permission to use this function has
not been granted. Contact the administrator.
85
Page 94

5
Troubleshooting When Using the Scanner Function
86
Page 95

6. Adding Paper, Toner and
R
Staples
This chapter describes troubleshooting procedures that are applicable to all the
machine's functions.
Loading Paper
This section describes what to do when paper runs out and needs reloading.
CAUTION:
• When loading paper, take care not to trap or injure your fingers.
Tray 1 use letter size (81/2” × 11” K) paper exclusively. Load only letter size at
all times.
Note
❒ Fan the paper before loading.
❒ Straighten curled or warped paper before loading.
❒ If you want to load paper other then letter size paper in Tray 1, contact your
service representative.
❒ For paper types and sizes, see “Recommended Paper Sizes and Types”,
About This Machine.
❒ To load paper in the bypass tray, see “Copying from the Bypass Tray”,
Copy/Document Server Reference.
Loading Paper into Tray 1 (Tandem Tray)
The following procedure describes loading paper into Tray 1.
Important
❒ When paper loaded in the right side of Tray 1 runs out, paper on the left is
automatically shifted to the right. While the paper is moving, a message instructing you to wait appears. Do not pull out the tray at this time.
❒ For the right stack, align the right edge of the copy paper with the right edge
of the tray. For the left stack, align the left edge of the copy paper to the left
edge of the tray.
❒ Tray 1 uses letter size (8
then letter size paper, contact your service representative.
❒ Do not stack paper over the limit mark.
1
/2” × 11” K) paper. If you want to load paper other
87
Page 96

Adding Paper, Toner and Staples
A Carefully pull out the paper tray until it stops.
ANS051S
B Square the paper and place it print side down.
• Whole tray pulled out
6
ANS052S
• Left half of the tray pulled out
ANS053S
C Carefully push the paper tray fully in.
Note
❒ You can load paper even while making copies from Tray 1. You can pull
out the left half of the tray while copying is in.
88
Page 97

Loading Paper
Loading Paper into Tray 2 and 3
The following procedure describes loading paper into Tray 2 and 3.
Important
❒ Various sizes of paper can be loaded in Tray 2 and 3 by adjusting the positions
of side fence and end fence.
❒ Check the paper edges are aligned at the right side.
❒ Do not stack paper over the limit mark.
A Carefully pull out the paper tray until it stops.
ANS054S
B Square the paper and load it print side down.
ANS055S
C Carefully push the paper tray fully in.
Note
❒ If you load a paper size that is not selected automatically, you will need to
specify the paper size with the control panel. Following paper sizes that
are not selected automatically.
❒ The tray can hold up to 550 sheets.
6
Reference
p.94 “Changing the Paper Size”
p.96 “Changing to a Size that is Not Automatically Detected”
89
Page 98

Adding Paper, Toner and Staples
Loading Paper into the Large Capacity Tray (LCT)
The following procedure describes loading paper into the large capacity tray
(LCT).
Important
❒ The LCT loads A4K, B5K, 81/2 × 11K paper.
❒ Align the paper neatly and press its edge to the right and left plate. Poorly
loaded paper causes misfeeds.
❒ Check that the paper edges are aligned at the left side.
❒ Do not stack paper over the limit mark.
A Open the top cover of the large capacity tray (LCT).
6
ANS031S
B Load the paper in the tray along the edge on the left.
ANS032S
90
Page 99

C Press the {Down} key.
The key blinks while the bottom plate is moving down.
ANS033S
Loading Paper
D Load paper by repeating steps
and C.
B
E Close the top cover of the large capacity tray (LCT).
Note
❒ The tray can hold up to 4,000 sheets.
Loading Paper in the Interposer
The following procedure describes loading paper into the interposer.
Important
❒ Load paper on the side already printed (the front side). If you are using the
Booklet Finisher (Saddle Stitch), load sheets print side down.
❒ Load paper in the interposer in the same orientation as paper in the paper
tray.
❒ The staple or punching location will be on the left side of the paper, when you
are facing the machine.
❒ Do not place anything on top of or leave documents on the sensor. This may
lead to the paper size not being correctly scanned or paper jams.
❒ When using the Z-fold function, the paper in the interposer must be of the
same size as the prints after they have been Z-folded. If the paper in the interposer is larger than the Z-folded sheets, a misfeed might occur.
6
91
Page 100

Adding Paper, Toner and Staples
A Load paper orderly.
AMS056S
B Adjust the side fence to the paper size.
6
AMS057S
Note
❒ To set the paper in the interposer, align the orientation of originals in the
ADF as shown below.
ANR026S
92
 Loading...