

Page 1
Operating Instructions
Scanner Reference
Sending Scan Files by E-mail
1
Sending Scan Files by Scan to Folder
2
Storing Files Using the Scanner Function
3
Delivering Scan Files
4
Scanning Originals with the Network TWAIN Scanner
5
Various Scan Settings
6
Appendix
7
Read this manual carefully before you use this machine and keep it handy for future reference. For safe and correct use, be sure to read the
Safety Information in "About This Machine" before using the machine.
Page 2

Introduction
This manual contains detailed instructions and notes on the operation and use of this machine. For your
safety and benefit, read this manual carefully before using the machine. Keep this manual in a handy
place for quick reference.
Important
Contents of this manual are subject to change without prior notice. In no event will the company be liable for direct, indirect, special, incidental, or consequential damages as a result of handling or operating the machine.
Notes:
Some illustrations in this manual might be slightly different from the machine.
Certain options might not be available in some countries. For details, please contact your local dealer.
Caution:
Use of controls or adjustments or performance of procedures other than those specified in this manual
might result in hazardous radiation exposure.
Two kinds of size notation are employed in this manual. With this machine refer to the inch version.
Page 3

Manuals for This Machine
Refer to the manuals that are relevant to what you want to do with the machine.
Important
❒ Media differ according to manual.
❒ The printed and electronic versions of a manual have the same contents.
❒ Adobe Acrobat Reader/Adobe Reader must be installed in order to view the
manuals as PDF files.
❒ Depending on which country you are in, there may also be html manuals. To
view these manuals, a Web browser must be installed.
❖ About This Machine
Be sure to read the Safety Information in this manual before using the machine.
This manual provides an introduction to the functions of the machine. It also
explains the control panel, preparation procedures for using the machine,
how to enter text, and how to install the CD-ROMs provided.
❖ General Settings Guide
Explains User Tools settings, and Address Book procedures such as registering fax numbers, e-mail addresses, and user codes. Also refer to this manual
for explanations on how to connect the machine.
❖ Troubleshooting
Provides a guide to solving common problems, and explains how to replace
paper, toner, staples, and other consumables.
❖ Security Reference
This manual is for administrators of the machine. It explains security functions that the administrators can use to protect data from being tampered
with, or prevent the machine from unauthorized use.
Also refer to this manual for the procedures for registering administrators, as
well as setting user and administrator authentication.
❖ Copy/ Document Server Reference
Explains Copier and Document Server functions and operations. Also refer to
this manual for explanations on how to place originals.
❖ Facsimile Reference
Explains Facsimile functions and operations.
❖ Printer Reference
Explains Printer functions and operations.
❖ Scanner Reference
Explains Scanner functions and operations.
i
Page 4

❖ Network Guide
Explains how to configure and operate the machine in a network environment, and use the software provided.
This manual covers all models, and includes descriptions of functions and
settings that might not be available on this machine. Images, illustrations, and
information about operating systems that are supported might also differ
slightly from those of this machine.
❖ Other manuals
• PostScript3 Supplement
•UNIX Supplement
• Manuals for DeskTopBinder Lite
• DeskTopBinder Lite Setup Guide
• DeskTopBinder Introduction Guide
•Auto Document Link Guide
Note
❒ Manuals provided are specific to machine types.
❒ For "UNIX Supplement", please visit our Web site or consult an authorized
dealer.
❒ "PostScript3 Supplement" and "UNIX Supplement" include descriptions of
functions and settings that might not be available on this machine.
❒ The following software products are referred to using general names:
Product name General name
DeskTopBinder Lite and DeskTopBinder Professional
ScanRouter EX Professional
EX Enterprise
*
Optional
*
*
*
and ScanRouter
DeskTopBinder
the ScanRouter delivery software
ii
Page 5

TABLE OF CONTENTS
Manuals for This Machine ......................................................................................i
Notice ......................................................................................................................1
How to Read This Manual .....................................................................................2
Symbols .....................................................................................................................2
About the Scanner Functions...............................................................................3
Display Panel..........................................................................................................4
Confirmation Displays ................................................................................................4
Scanner Features...................................................................................................7
1. Sending Scan Files by E-mail
Before Sending Scan Files by E-mail.................................................................11
Outline of Sending Scan Files by E-mail..................................................................11
Preparation for Sending by E-mail ...........................................................................12
Registering E-mail Addresses in the Address Book.................................................12
E-mail Screen...........................................................................................................13
Basic Operation for Sending Scan Files by E-mail...........................................14
Switching to the E-mail Screen ..........................................................................17
Specifying E-mail Destinations ..........................................................................18
Selecting the Destination from the Machine’s Address Book...................................18
Entering an E-mail Address Manually ......................................................................21
Selecting Destinations by Searching an LDAP Server.............................................22
Registering a Directly-Entered Destination in the Address Book.............................25
Specifying the E-mail Sender .............................................................................26
Selecting a Sender from the List ..............................................................................26
Using a Registration Number to Specify a Sender Name ........................................27
Selecting the Sender by Searching the Machine’s Address Book ...........................28
Specifying the E-mail Subject.............................................................................29
Specifying the E-mail Message ..........................................................................30
Selecting a Message from the List ...........................................................................30
Manual Entry of a Message .....................................................................................31
Simultaneous Storage and Sending by E-mail .................................................32
Sending the URL by E-mail .................................................................................33
2. Sending Scan Files by Scan to Folder
Before Sending Files by Scan to Folder............................................................ 35
Outline of Sending Scan Files by Scan to Folder.....................................................35
Preparation for Sending by Scan to Folder ..............................................................37
Registering Destination Folders in the Address Book..............................................38
Scan to Folder Screen .............................................................................................39
Basic Operations When Using Scan to Folder..................................................40
Switching to the Scan to Folder Screen ............................................................ 42
iii
Page 6

Specifying Scan to Folder Destinations ............................................................ 43
Selecting the Destination from the Machine’s Address Book...................................43
Sending Files to a Shared Network Folder ..............................................................46
Sending Files to an FTP Server ...............................................................................50
Sending Files to NetWare server .............................................................................52
Registering the Path to the Selected Destination in the Address Book ...................56
Simultaneous Storage and Sending by Scan to Folder ................................... 57
3. Storing Files Using the Scanner Function
Before Storing Files.............................................................................................59
Outline of File Storage under the Scanner Function ................................................59
Basic Operation for Storing Scan Files ............................................................. 61
Specifying File Information for a Stored File ....................................................63
Specifying a User Name ..........................................................................................63
Specifying a File Name ............................................................................................64
Specifying a Password.............................................................................................65
Displaying the List of Stored Files.....................................................................66
List of Stored Files ...................................................................................................66
Searching the List of Stored Files ............................................................................68
Checking Stored Files from a Client Computer ................................................ 70
Using Desk Top Binder Lite to Display Stored Files ................................................70
Using Web Image Monitor to Display Stored Files...................................................70
Sending a Stored File ..........................................................................................71
Sending Stored Files................................................................................................71
Managing Stored Files.........................................................................................73
Deleting a Stored File...............................................................................................73
Changing Information for a Stored File ....................................................................74
4. Delivering Scan Files
Before Delivering Files ........................................................................................79
Outline of Scan File Delivery....................................................................................79
Preparing to Deliver a File........................................................................................80
Installing DeskTopBinder Lite from the Supplied CD-ROM .....................................81
Network Delivery Scanner Screen ...........................................................................82
Basic Operation for Delivering Files..................................................................83
Switching to the Network Delivery Scanner Screen.........................................86
Specifying Delivery Destinations .......................................................................87
Selecting Destinations Registered in the Destination List of the Delivery Server ....87
Specifying the Sender .........................................................................................90
Selecting a Sender from the Sender List .................................................................90
Selecting the Sender by Entering the Registration Number.....................................91
Selecting a Sender by Searching the Delivery Server’s Destination List ................. 92
Specifying the Subject of the E-mail to Be Transmitted via the Delivery Server... 93
Simultaneous Storage and Delivery...................................................................94
iv
Page 7

5. Scanning Originals with the Network TWAIN Scanner
Before Using the Network TWAIN Scanner ....................................................... 95
Outline of the Network TWAIN Scanner...................................................................96
Preparing to Use the Network TWAIN Scanner ....................................................... 97
Installing the TWAIN Driver from the Supplied CD-ROM.........................................98
Basic Network TWAIN Scanner Operation ........................................................ 99
6. Various Scan Settings
Specifying Scan Settings ..................................................................................101
Items for Specifying Scan Settings..................................................................102
Scan Type ..............................................................................................................102
Resolution ..............................................................................................................102
Image Density ........................................................................................................102
Scan Size ...............................................................................................................103
Edit .........................................................................................................................111
Setting for Scanning Sides of Originals ..........................................................112
One-sided original ..................................................................................................112
Two-sided original ..................................................................................................112
Setting of Original Feed Type...........................................................................114
Original Orientation ................................................................................................114
Batch, SADF ..........................................................................................................116
Mixed Sizes............................................................................................................118
Divide .....................................................................................................................119
Stamp.....................................................................................................................120
Scanning Multiple Pages of Originals as One File .........................................122
Setting File Type and File Name.......................................................................124
Setting File Type ....................................................................................................124
Setting File Name...................................................................................................125
Programs ............................................................................................................127
Registering Frequently Used Setting .....................................................................127
Recalling a Program...............................................................................................128
Changing a Registered Program............................................................................129
Deleting a Program ................................................................................................130
Changing the Registered Program Name ..............................................................130
Scan Settings When Using Twain Scanner.....................................................132
Setting Original Orientation on the TWAIN Scanner .............................................. 132
When Scanning Originals of Mixed Sizes Using TWAIN Scanner .........................133
7. Appendix
Relationship between Resolution and Scan Size ........................................... 135
When Using E-mail, Folder Sending, Storing or Network Delivery Function .........136
When Using as a TWAIN Scanner.........................................................................137
Scan Settings and File Types ...........................................................................139
Software Supplied on CD-ROM ........................................................................140
Auto-Run Program .................................................................................................140
TWAIN Driver .........................................................................................................140
DeskTopBinder Lite................................................................................................141
v
Page 8

Values of Various Set Items for Transmission/Storage/Delivery Function ... 143
Transmission Function ...........................................................................................143
Storage Function....................................................................................................145
Network Delivery Function .....................................................................................146
Specifications.....................................................................................................147
INDEX....................................................................................................... 148
vi
Page 9

Notice
❖ Declaration of Conformity
Product Name: Printer/Scanner Controller
Model Number: Printer/Scanner Unit Type 3010, Scanner Enhance Option
Type 3010
Responsible party: Ricoh Corporation
Address: 5 Dedrick Place, West Caldwell, NJ 07006
Telephone number: 973-882-2000
This device complies with Part 15 of the FCC Rules.
Operation is subject to the following two conditions:
A This device may not cause harmful interference, and
B this device must accept any interference received,
including interference that may cause undesired operation.
❖ Note to users in the United States of America
This equipment has been tested and found to comply with the limits for a
Class B digital device, pursuant to Part 15 of the FCC Rules. These limits are
designed to provide reasonable protection against harmful interference in a
residential installation. This equipment generates, uses and can radiate radio
frequency energy and, if not installed and used in accordance with the instructions, may cause harmful interference to radio communications. However, there is no guarantee that interference will not occur in a particular
installation. If this equipment does cause harmful interference to radio or television reception, which can be determined by turning the equipment off and
on, the user is encouraged to try to correct the interference by one more of the
following measures:
• Reorient or relocate the receiving antenna.
• Increase the separation between the equipment and receiver.
• Connect the equipment into an outlet on a circuit different from that to
which the receiver is connected.
• Consult the dealer or an experienced radio /TV technician for help.
❖ Caution:
Changes or modifications not expressly approved by the party responsible
for compliance could void the user's authority to operate the equipment.
❖ Note to users in Canada
This Class B digital apparatus complies with Canadian ICES-003.
❖ Remarque concernant les utilisateurs au Canada
❖ Avertissement:
Cet appareil numérique de la classe B est conforme à la norme NMB-003
du Canada.
1
Page 10
How to Read This Manual
Symbols
This manual uses the following symbols:
Indicates important safety notes.
Ignoring these notes could result in serious injury or death. Be sure to read these
notes. They can be found in the "Safety Information" section of About This Machine.
Indicates important safety notes.
Ignoring these notes could result in moderate or minor injury, or damage to the
machine or to property. Be sure to read these notes. They can be found in the
"Safety Information" section of About This Machine.
Indicates points to pay attention to when using the machine, and explanations
of likely causes of paper misfeeds, damage to originals, or loss of data. Be sure
to read these explanations.
Indicates supplementary explanations of the machine’s functions, and instructions on resolving user errors.
This symbol is located at the end of sections. It indicates where you can find further relevant information.
[ ]
Indicates the names of keys that appear on the machine’s display panel.
{ }
Indicates the names of keys on the machine’s control panel.
2
Page 11

About the Scanner Functions
This section describes functions you can use in the scanner mode.
For details about each function, see respective chapters.
❖ Sending scanned files
There are several methods you can use to send captured data as files to computers.
• Sending scan files by e-mail
For details, see chapter 1 "Sending Scan Files by E-mail".
• Sending scan files to a shared folder
For details, see chapter 2 "Sending Scan Files by Scan to Folder".
• Sending scan files to an FTP server
For details, see chapter 2 "Sending Scan Files by Scan to Folder".
• Sending scan files to a NetWare server
For details, see chapter 2 "Sending Scan Files by Scan to Folder".
• Delivering scan files using the delivery server
For details, see chapter 4 "Delivering Scan Files".
❖ Scanning originals using the TWAIN driver
Use the TWAIN driver to specify the machine where originals will be scanned
from a client computer. For details, see chapter 5 "Scanning Originals with the
Network TWAIN Scanner".
❖ Storing files
You can store scan files on the machine's hard disk. Stored files can be sent
later. For details, see chapter 3 "Storing Files Using the Scanner Function".
Reference
p.11 “Sending Scan Files by E-mail”
p.35 “Sending Scan Files by Scan to Folder”
p.79 “Delivering Scan Files”
p.95 “Scanning Originals with the Network TWAIN Scanner”
p.59 “Storing Files Using the Scanner Function”
3
Page 12
Display Panel
This section explains the two confirmation displays - Check Modes and Scanned
Files Status.
You can find explanations about the E-mail screen, Scan to Folder screen, List of
Stored Files screen, or Network Delivery Scanner screen in this manual. For details, see "E-mail Screen", "Scan to Folder Screen", "List of Stored Files", and "Network Delivery Scanner Screen".
Reference
p.13 “E-mail Screen”
p.39 “Scan to Folder Screen”
p.66 “List of Stored Files”
p.82 “Network Delivery Scanner Screen”
Confirmation Displays
This section explains the two confirmation displays - Check Modes and Scanned
Files Status.
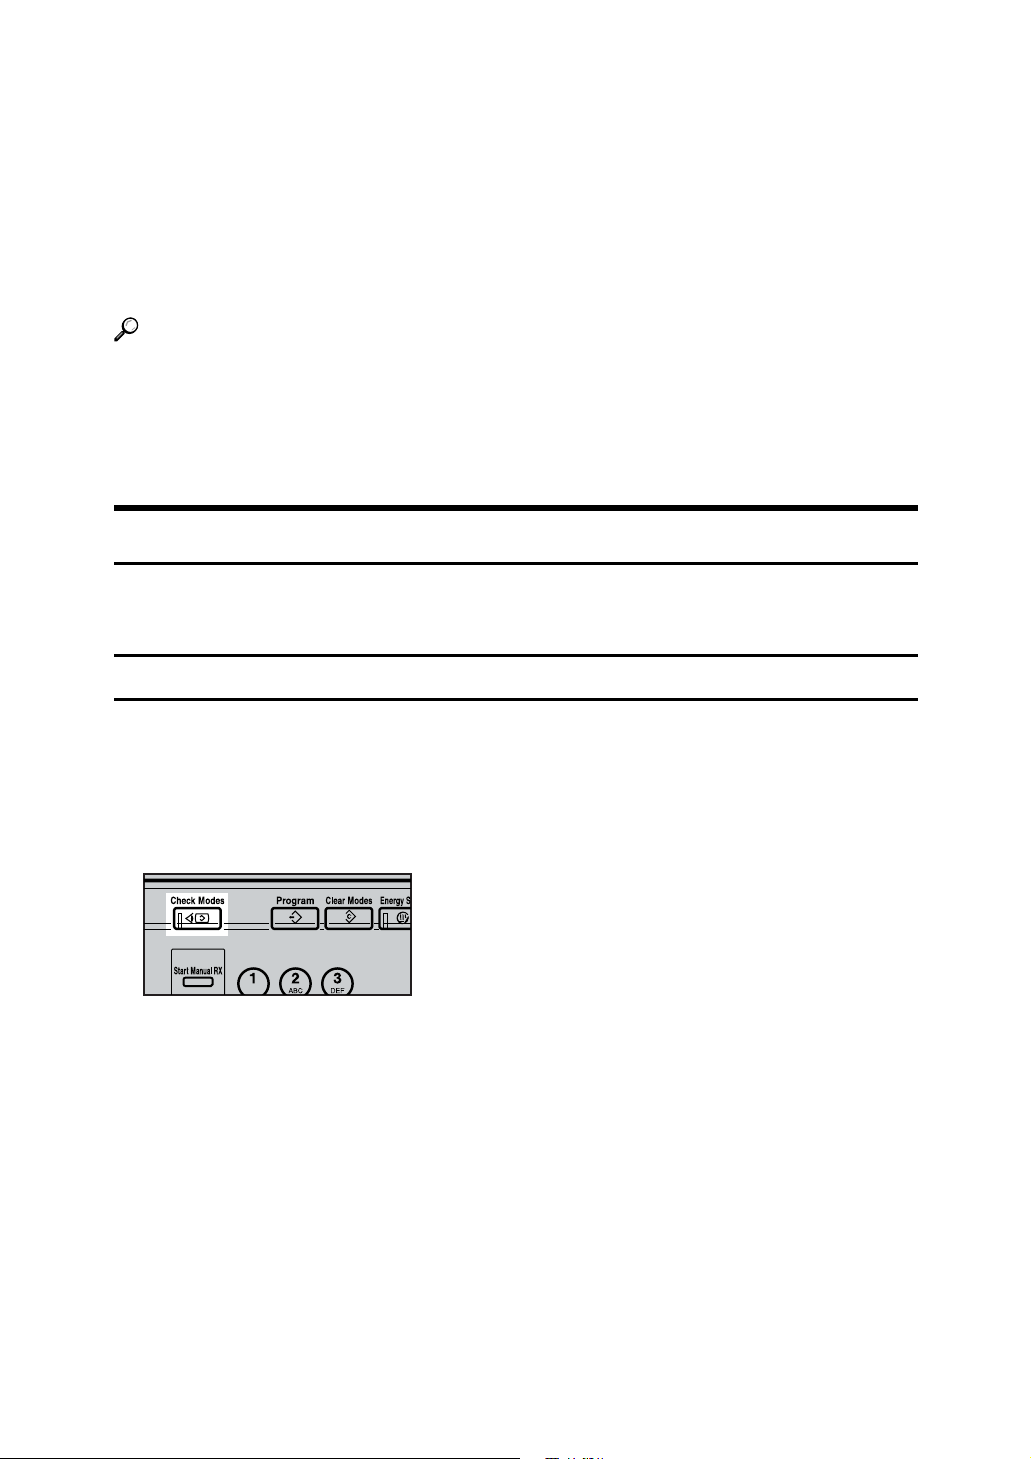
Check Modes
This section explains items that are displayed and how to display the Check
Modes screen.
Use the Check Modes screen to check scanning and transmission settings.
Pressing the {Check Modes} key switches the screen from the initial scanner
screen to the Check Modes screen.
ARQ005S
4
Page 13
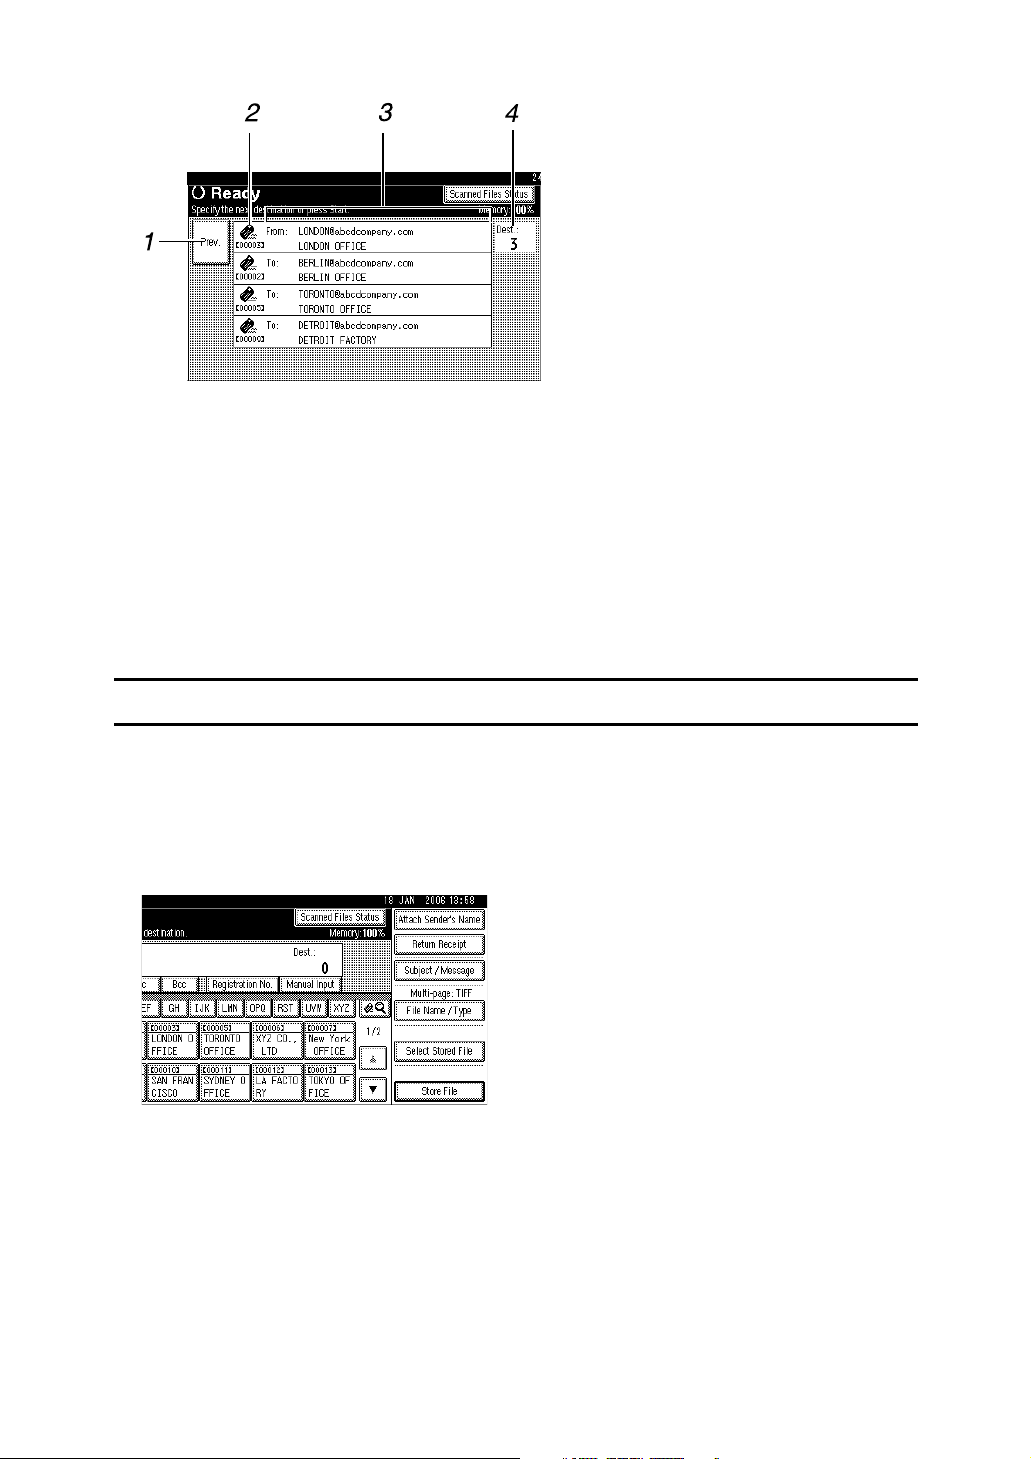
❖ Check Modes
ARQ003S
1. [Prev.]
Press to return the initial scanner screen.
2. Transmission function icon
Displays the icon of the transmission
function in use.
3. Sender and Destinations list
Displays the sender and transmission or
delivery destinations list.
Use [UPrev.] or [TNext] to scroll through
the list.
4. Number of destinations
Displays the number of specified destinations.
Scanned Files Status
This section explains items that are displayed and how to display the Scanned
Files Status screen.
Use the Scanned Files Status screen to check e-mail transmission, Scan to Folder,
and delivery results.
Press [Scanned Files Status] to display the Scanned Files Status screen.
Up to 5 transmission or delivery results are displayed at the same time. Press
[UPrev.] or [TNext] to switch between results.
5
Page 14
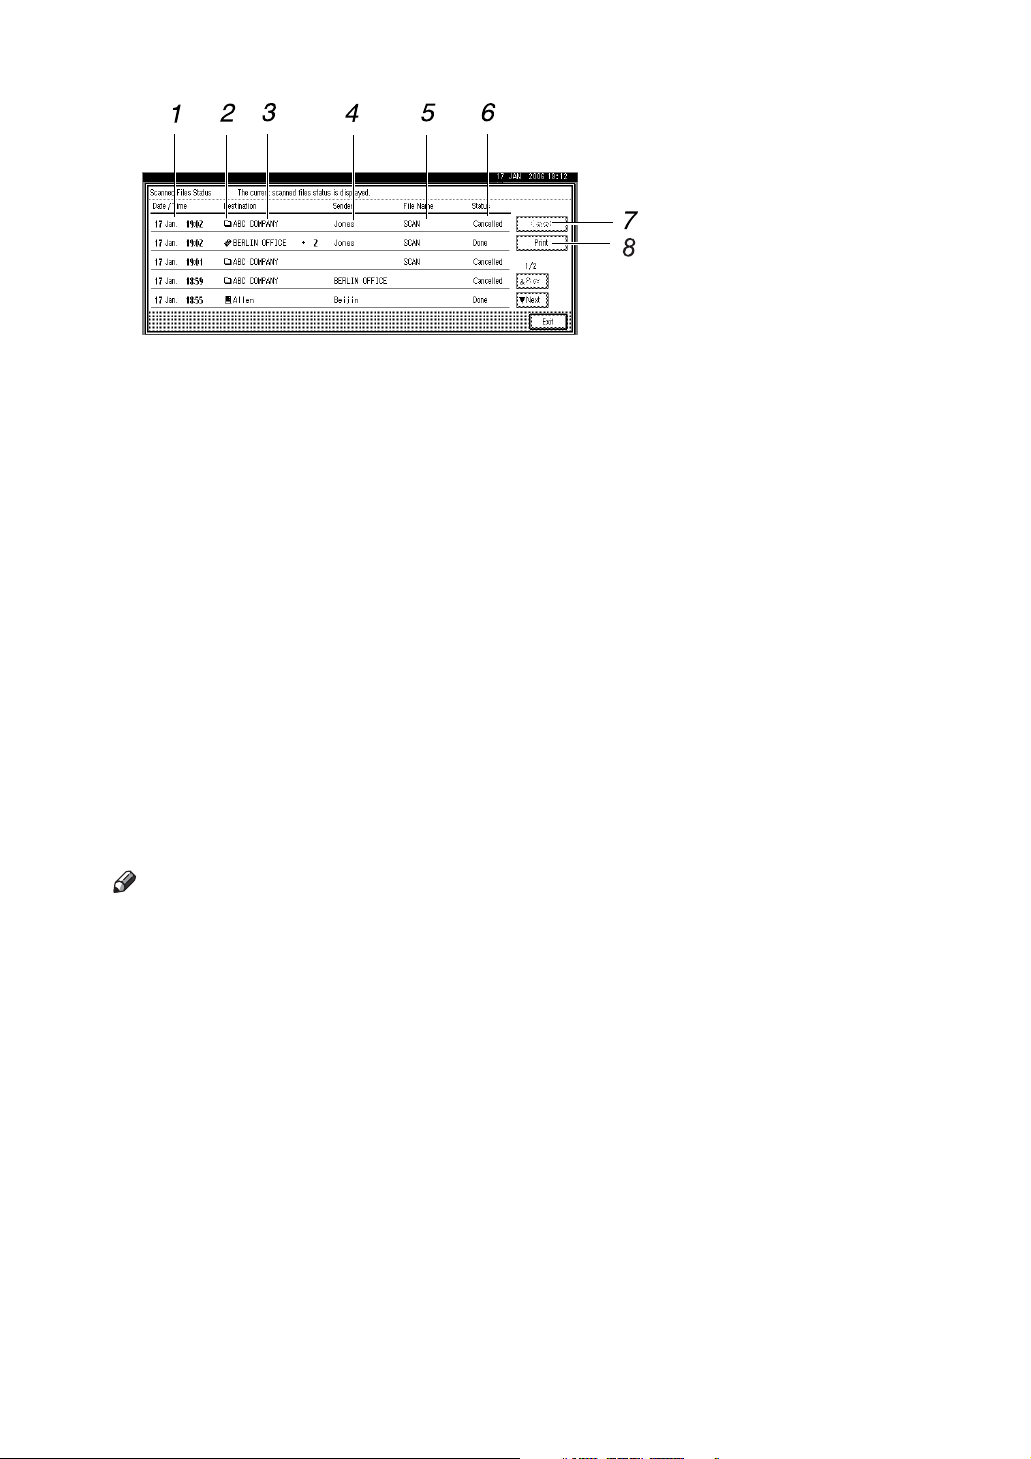
❖ Scanned Files Status
ARQ004S
1. Date/Time
Displays the time and date transmission
was specified by this machine or the time
and date when Done, Error, or Cancelled
was confirmed.
2. Transmission function icon
Displays the icon of the transmission
function used.
3. Destination
Displays the transmission destination.
If you have selected multiple destina-
tions, the first selected destination is displayed.
Other destinations appear as “+ X”. (X indicates the number of destinations.)
4. Sender
Displays the sender name.
5. File Name
Displays the stored file name of files that
are simultaneously sent and stored, or of
stored files that are sent.
6. Status
Displays one of the following transmission statuses: Done, Sending..., Waiting..., Error, or Cancelled.
7. [Cancel]
To cancel transmission, select a file
whose status is [Waiting...], and then press
[Cancel].
8. [Print]
Press to print transmission results.
Note
❒ Depending on security settings, some transmission results might not be dis-
played.
6
Page 15

Scanner Features
This section explains Scanner Features settings.
To display the Scanner Features screen, press the {User Tools / Counter} key. For
detailed setting method, see General Settings Guide.
❖ Scan Settings
Items Description
Default Scan Settings Make various basic settings, such as scan type, resolu-
tion, image density, and scan size.
Wait Time for Next Orig.: Exposure
Glass
Wait Time for Next Original(s):
SADF
Original Setting Set whether originals are one-sided or two-sided as
Switch to Batch Select [SADF] or [Batch] as the scanning mode that ap-
Mixed Original Sizes Priority This setting determines whether the original size is
Original Orientation Priority Select the default original orientation. When originals
Change Initial Mode Set the initial scanner screen settings that appear
Set which operation the machine performs while waiting for additional originals after scanning from the exposure glass.
Set the operation of this machine on the queue for additional originals after scanning the originals with Automatic Document Feeder (ADF). This function is not
available unless ADF is installed.
the default.
pears under [Original Feed Type] on the initial display of
scanner mode.
automatically detected when originals of different sizes are inserted in the ADF.
are always positioned the same way, select that orientation as the default.
when the operation switch is turned on or the {Clear
Mode} key is pressed.
7
Page 16

❖ Destination List Settings
Items Description
Destination List Display Priority 1 Select the default destination list from the machine's
destination list or from the Destination List managed
by the delivery server.
This setting is available only when the Network Delivery Scanner function is enabled by the ScanRouter delivery software.
Destination List Display Priority 2 Select whether to prioritize the e-mail destination list
or the folder destination list.
Select Title Select the titles for e-mail and Scan to Folder destina-
tions and group destinations. Selected titles appear in
the e-mail and Scan to Folder destination list used
when searching for destinations.
Update Delivery Server Destination List
Allows you to update the delivery server's destination
list by pressing [Update Delivery Server Destination List].
To use this function, under [System Settings], set [Deliv-
ery Option] to [On].
This setting is available only when the Network Delivery Scanner function is enabled by the ScanRouter delivery software.
8
Page 17

❖ Send Settings
Items Description
TWAIN Standby Time Select the machine's response if a client computer tries
to use the TWAIN scanner while scanning is in
progress.
File Type Priority Select whether to send scanned originals as single-
page files or as a multiple-page file.
For single-page files, select either TIFF/JPEG or PDF.
For multi-page files, select either TIFF or PDF.
Compression (Black & White) Specify a compression method for files scanned in
black and white.
Compression (Gray Scale) Specify a compression method for files scanned in
gray scale.
Print & Delete Scanner Journal Specify the machine's response of the maximum num-
ber of scanner journals is exceeded.
Print Scanner Journal Allows you to print the scanner journal. The scanner
journal is then deleted.
Delete Scanner Journal Allows you to delete the scanner journal without
printing it.
Max. E-mail Size Select whether or not to limit the size of e-mail that has
attachments.
Divide & Send E-mail Select whether or not to divide files that exceed the
size specified in [Max. E-mail Size] and send them as
multiple e-mails.
E-mail Information Language Allows you to select the language of the messages that
appear when you send scanned files by e-mail.
Store File Priority Select [Send & Store], [Store Only], or [Off] as the default
that is displayed when the operation switch is turned
on or the {Clear Mode} key is pressed.
Stored File E-mail Method Sets the default for whether to attach a file or send
URL Link when sending stored files by e-mail.
❖ Administrator Tools
Items Description
Menu Protect Set the default access level for functions whose set-
tings can be changed by users other than the administrator.
9
Page 18

10
Page 19
1. Sending Scan Files by E-mail
You can attach scan files to e-mails and send them via connections such as LAN
and the Internet.
Before Sending Scan Files by E-mail
This section explains the necessary preparations and the procedure for sending
scan files by e-mail.
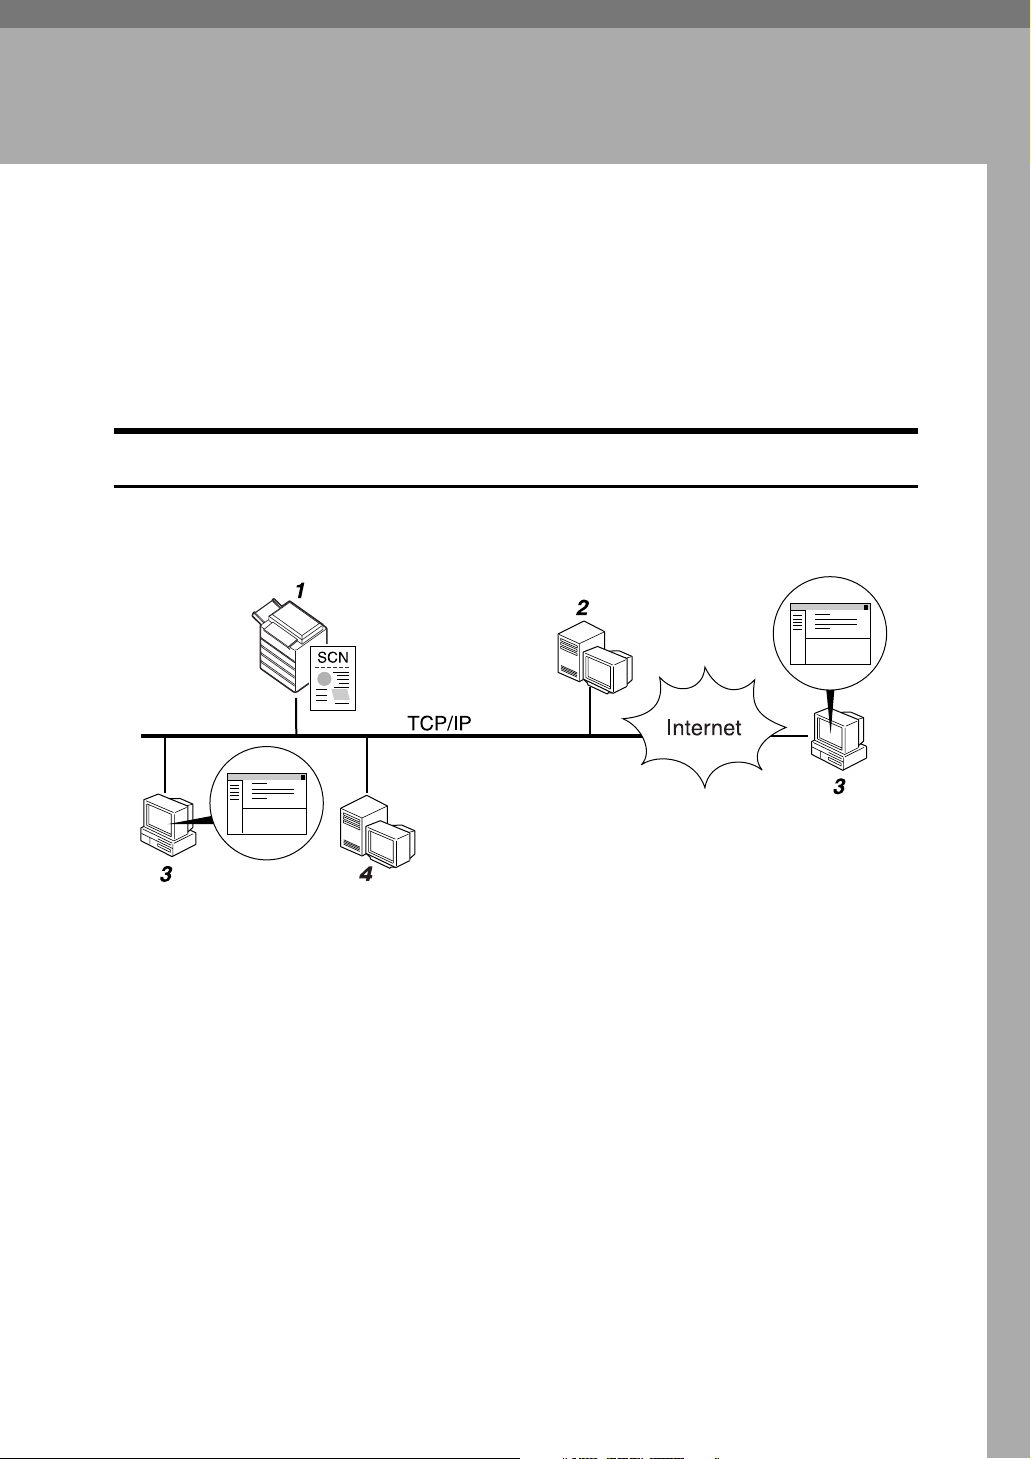
Outline of Sending Scan Files by E-mail
This section outlines the function for sending scan files by e-mail.
1. This machine
A scan file can be attached to an e-mail and
sent to a mail server.
2. SMTP server
You need to have an access to an e-mail
server that supports SMTP (Simple Mail
Transfer Protocol), to send scan files by email. However, it is not essential to have
an e-mail server inside the LAN where
this machine belongs. It transfers a received e-mail to a specified destination
through a LAN or the Internet.
ZZZ508S
3. Client computer
Use e-mail client software to receive email messages and scan file attachments
that are generated by this machine.
4. LDAP Server
Use this server for administering e-mail
accounts, searching the network, and authenticating the computers that access
the machine. Using the LDAP server, you
can search for destinations from the machine.
11
Page 20

1
Sending Scan Files by E-mail
Preparation for Sending by E-mail
This section explains the preparation and settings for sending scan files by email.
A Connect the machine to the network.
Connect the machine to the network using an Ethernet cable or wireless LAN
(IEEE 802.11b).
B Make the necessary network setting in [System Settings].
If you have connected the machine to the network using an Ethernet cable,
make the following settings. For details, see General Settings Guide.
• Specify the machine’s IP address and subnet mask
• Make settings for the DNS server
• Specify the gateway address
•In [Effective Protocol], enable [TCP/IP]
• Specify the SMTP server
C If necessary, change settings in [Send Settings] under [Scanner Features].
Note
❒ To connect the machine to the network using a wireless LAN (IEEE
802.11b), an extended wireless LAN board is required respectively. For details, see Network Guide.
❒ Items to set up in [System Settings] vary depending on the network environ-
ment. For more information about network settings, see General Settings
Guide.
❒ For more information about [Scanner Features], see General Settings Guide.
Registering E-mail Addresses in the Address Book
You can register frequently used e-mail addresses in the address book.
Register e-mail addresses in [Address Book Management] under [Administrator
Tools] from [System Settings]. Addresses can also be registered as groups.
Note
❒ For details about registering e-mail addresses in the address book, see Gener-
al Settings Guide.
❒ You can also register e-mail addresses in the address book using Web Image
Monitor or SmartDeviceMonitor for Admin. For details about how to install
these applications, see Network Guide. For details about registering addresses in the address book, see Help of respective applications.
❒ Depending on the machine type, you may not be able to use the machine
when it is updating the address book using CSV files (retrieved using SmartDeviceMonitor for Admin) that contain user codes.
12
Page 21
Before Sending Scan Files by E-mail
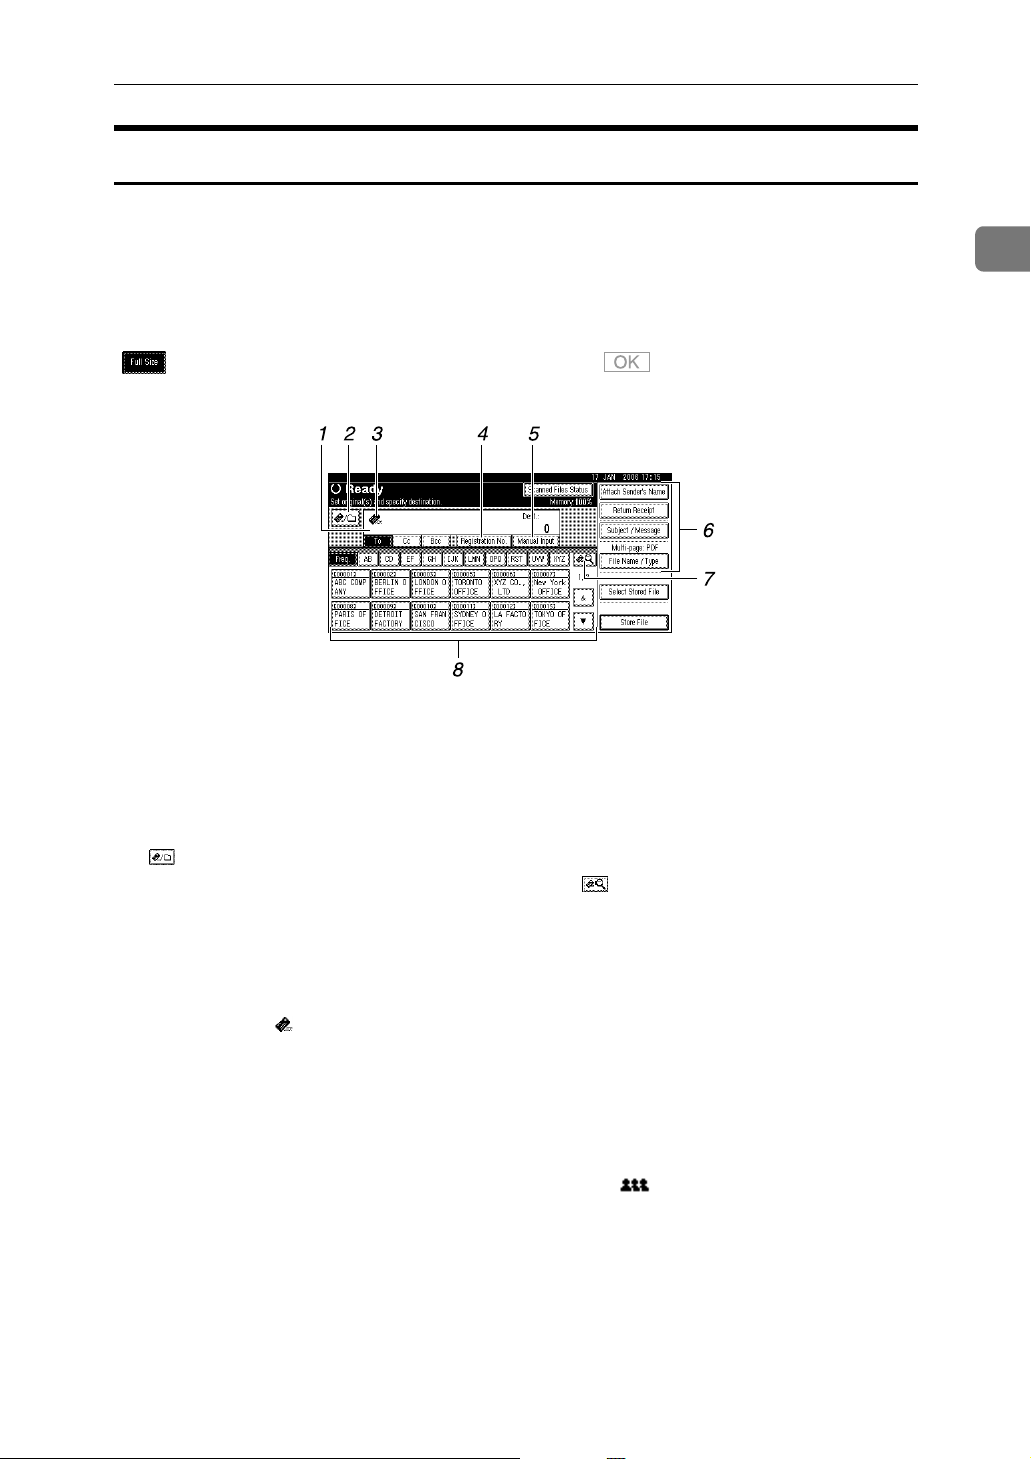
E-mail Screen
This section explains the screen layout when sending scan files by e-mail.
The function items displayed serve as selector keys. You can select or specify an
item by pressing it.
When you select or specify an item on the display panel, it is highlighted like
[]. Keys that cannot be selected appear like [].
1
1. Destination field
The specified destination appears. If
more than one destination has been specified, press [UPrev.] or [TNext] to scroll
through the destinations.
2. [] E-mail / Scan to Folder
Press to switch between the e-mail function and the Scan to Folder function. You
can send a file to e-mail destinations and
Scan to Folder destinations at the same
time
3. E-mail icon ( )
Indicates that the E-mail screen is displayed.
4. [Registration No.]
Press this key to specify the destination
using a 5-digit registration number.
5. [Manual Input]
To specify destinations not registered in
the address book, press this key, and then
enter the e-mail addresses using the soft
keyboard that appears.
6. [Attach Sender's Name] [Return Re-
ceipt] [Subject / Message] [File Name /
Type]
Press to specify the sender, return receipt
setting, subject, message, and names and
formats of the files you want to send.
7. [] Switch Destination
List/Search/Switch Title
Press to switch a destination from the delivery server list to a destination list of
this machine, to search for a destination.
8. Destination List
The list of destinations registered in this
machine appears. If all of the destinations
cannot be displayed, press [U]or [T] to
switch the screen.
Group destinations are denoted by this
symbol ( ).
13
Page 22
Sending Scan Files by E-mail
Basic Operation for Sending Scan Files by E-mail
This section describes the basic operation for sending scan files by e-mail.
1
A Make sure that no previous settings remain.
If a previous setting remains, press the {Clear Modes} key.
B If the network delivery scanner screen or Scan to Folder screen appears,
switch to the E-mail screen.
For details, see "Switching to the E-mail Screen".
C Place originals.
D If necessary, press [Scan Settings] to specify scanner settings such as scan
type, resolution, image density, or scan size.
For details, see "Various Scan Settings".
E If necessary, press [1 Sided Orig.] or [2 Sided Orig.] to scan one or both sides of
the originals.
For details, see "Setting for Scanning Sides of Originals".
F If necessary, press [Original Feed Type] to specify settings such as original ori-
entation.
For details, see "Setting of Original Feed Type".
G If necessary, press [File Name / Type] to specify settings such as file name and
file format.
For details, see "Setting File Type and File Name".
H Specify the destination.
You can specify multiple destinations.
For details, see "Specifying E-mail Destinations".
I To specify the e-mail sender, press [Attach Sender's Name].
For details, see "Specifying the E-mail Sender".
14
Page 23

Basic Operation for Sending Scan Files by E-mail
J If necessary, press [Return Receipt] to make settings for the Return Receipt
function.
If you select [Return Receipt], the selected e-mail sender will receive e-mail notification when his/her e-mail is opened by the recipient.
K If necessary, specify the e-mail subject.
For details, see "Specifying the E-mail Subject".
L If necessary, enter the e-mail message.
For details, see "Specifying the E-mail Message"
M Press the {Start} key.
If you are scanning batches, place the next originals.
Note
❒ If you have selected two or more destinations, the destinations can be
made to appear one by one by pressing [UPrev.] or [TNext] next to the destination field.
❒ To cancel a selected destination, press [UPrev.] or [TNext] to display the
destination in the destination field, and then press the {Clear / Stop} key.
You can cancel a destination selected from the destination list by pressing
the selected destination again.
❒ In [System Settings], you can specify the Administrator's E-mail Address as
the default sender name. This lets you send e-mail without entering anything for [Attach Sender's Name]. For details, see General Settings Guide.
1
❒ Depending on the security setting, the logged-on user may be specified as
[Attach Sender's Name].
❒ To use the Return Receipt function, you must specify the sender. Note,
however, that the [Return Receipt] notification e-mail may not be transmit-
ted if the e-mail software of the recipient does not support Message Disposition Notification (MDN).
❒ When the Administrator's E-mail Address is automatically specified as a
sender, notification e-mail will not be sent even if [Return Receipt] is selected. For details about [Administrator's E-mail Address] and [Auto Specify Sender
Name], see General Settings Guide.
❒ If you press the {Check Modes} key before pressing the {Start} key, the ini-
tial scanner screen switches to the Check Modes screen. You can use the
Check Modes screen to check the settings such as destinations. For details,
see "Check Modes".
❒ To cancel scanning, press the {Clear / Stop} key or [Stop] on the display pan-
el.
❒ You can also store a scan file and simultaneously send it by e-mail. For de-
tails, see "Simultaneous Storage and Sending by E-mail".
15
Page 24

Sending Scan Files by E-mail
Reference
p.17 “Switching to the E-mail Screen”
p.101 “Various Scan Settings”
1
p.112 “Setting for Scanning Sides of Originals”
p.114 “Setting of Original Feed Type”
p.124 “Setting File Type and File Name”
p.18 “Specifying E-mail Destinations”
p.30 “Specifying the E-mail Message”
p.29 “Specifying the E-mail Subject”
p.26 “Specifying the E-mail Sender”
p.4 “Check Modes”
p.32 “Simultaneous Storage and Sending by E-mail”
16
Page 25
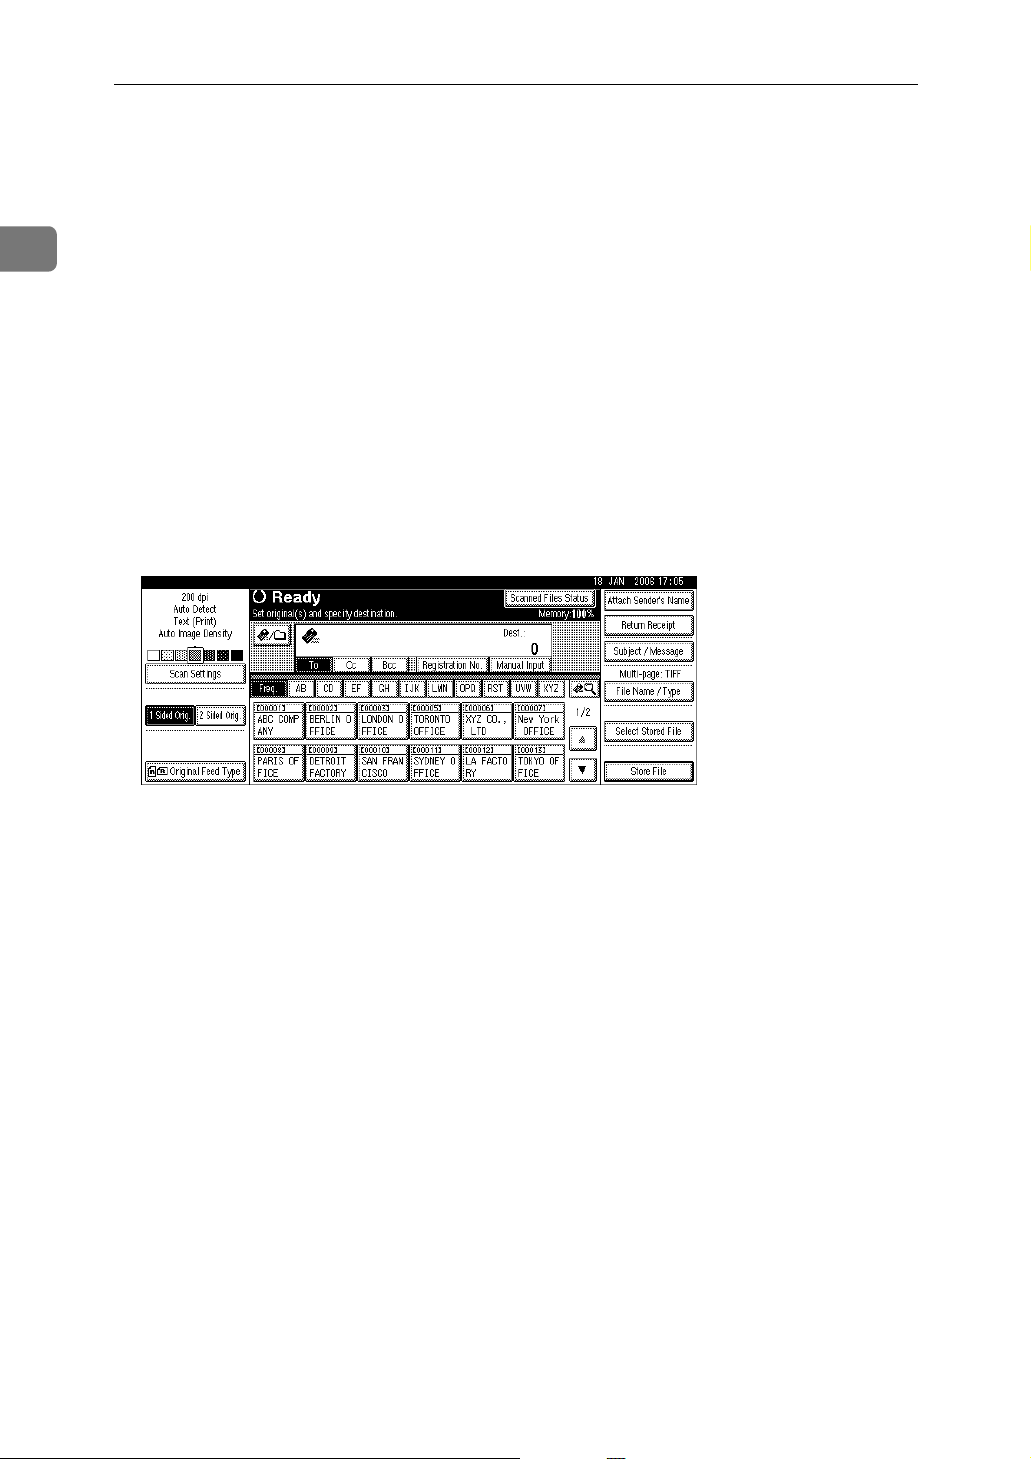
Switching to the E-mail Screen
Switching to the E-mail Screen
This section explains how to switch the screen to the E-mail screen.
If the Scan to Folder screen is being displayed, press [] to switch to the E-mail
screen.
If the network delivery scanner screen is being displayed, switch to the E-mail
screen as follows:
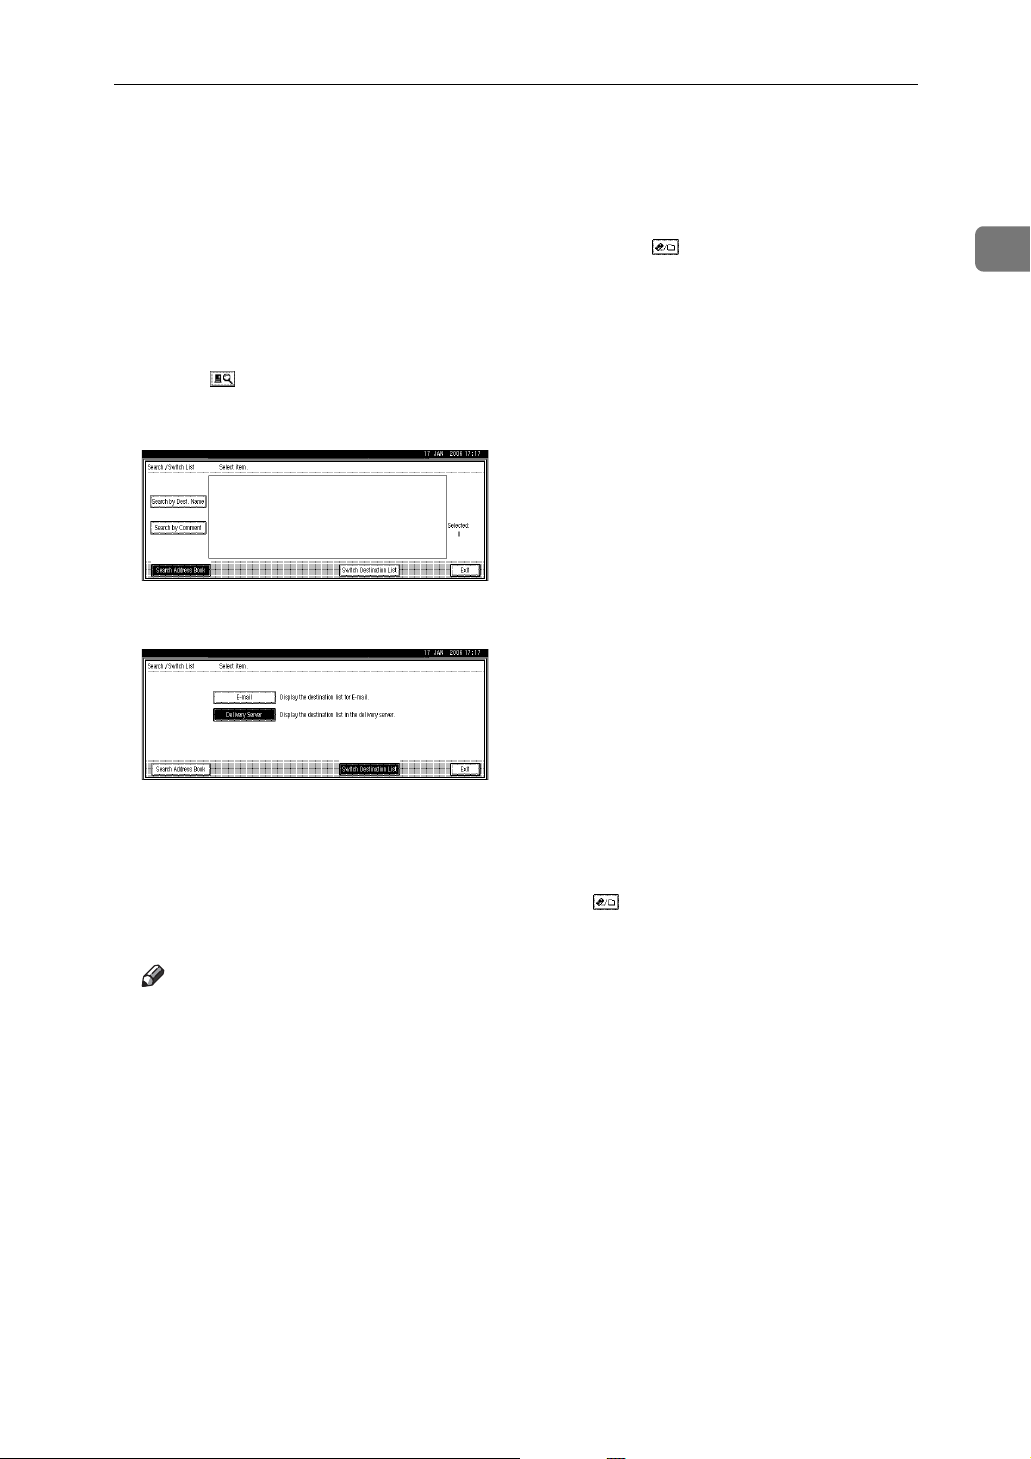
A Press [].
B Press [Switch Destination List].
C Press [E-mail].
1
D Press [Exit].
The e-mail screen or Scan to Folder screen appears.
E If the Scan to Folder screen appears, press [].
The E-mail screen appears.
Note
❒ You cannot switch from the network delivery scanner screen while deliv-
ery destinations are being specified. To clear the specified destination, display the destination in the destination field of the network delivery
scanner screen, and then press the {Clear / Stop} key.
17
Page 26

1
Sending Scan Files by E-mail
Specifying E-mail Destinations
This section explains how to specify e-mail destinations.
You can specify e-mail destinations by any of the following methods:
• Select the destination from the machine’s address book
• Enter the e-mail address directly
• Search the LDAP server for the destination and select it
Before you select destinations, make sure you have selected [To]. If necessary,
press [Cc] or [Bcc], and then select destinations.
Selecting the Destination from the Machine’s Address Book
This section explains how to select the destination from the machine’s address
book.
Important
❒ To use this function, you must register the destinations in [System Settings] in
advance. For details, see General Settings Guide.
You can use the following methods to select destinations registered in the machine's address book:
• Select a destination from the list
• Select a destination by entering the registration number
• Select a destination by searching the machine's address book
Note
❒ Depending on the security settings, certain destinations may not be displayed.
18
Page 27
Selecting a destination from the list
Select the destination from the destination list.
Specifying E-mail Destinations
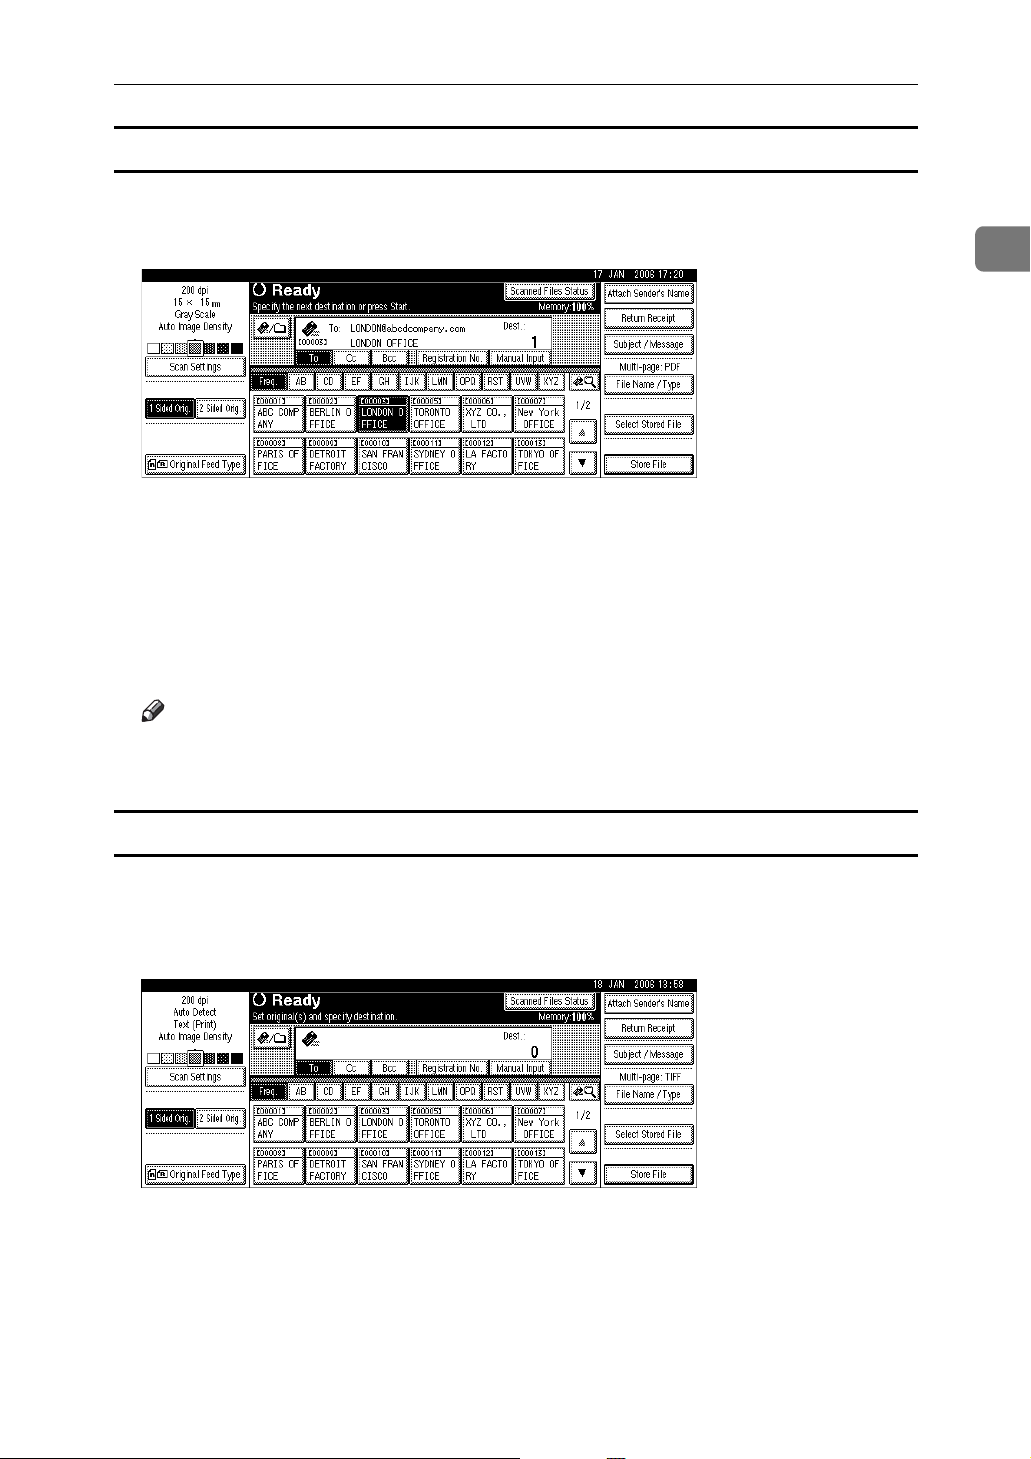
A In the destination list, press the key including the destination name.
The key of the selected destination is highlighted, and the destination appears
in the destination field at the top of the screen.
If the target destination does not appear, take one of the following steps:
• Display the destination by selecting its initial letter from the title
• Display the destination by pressing [U] or [T]
Note
❒ Depending on the security setting, some destinations may not appear in
the destination list.
1
Selecting destinations by entering the registration numbers
Select the destination from the machine’s address book using its registration
number.
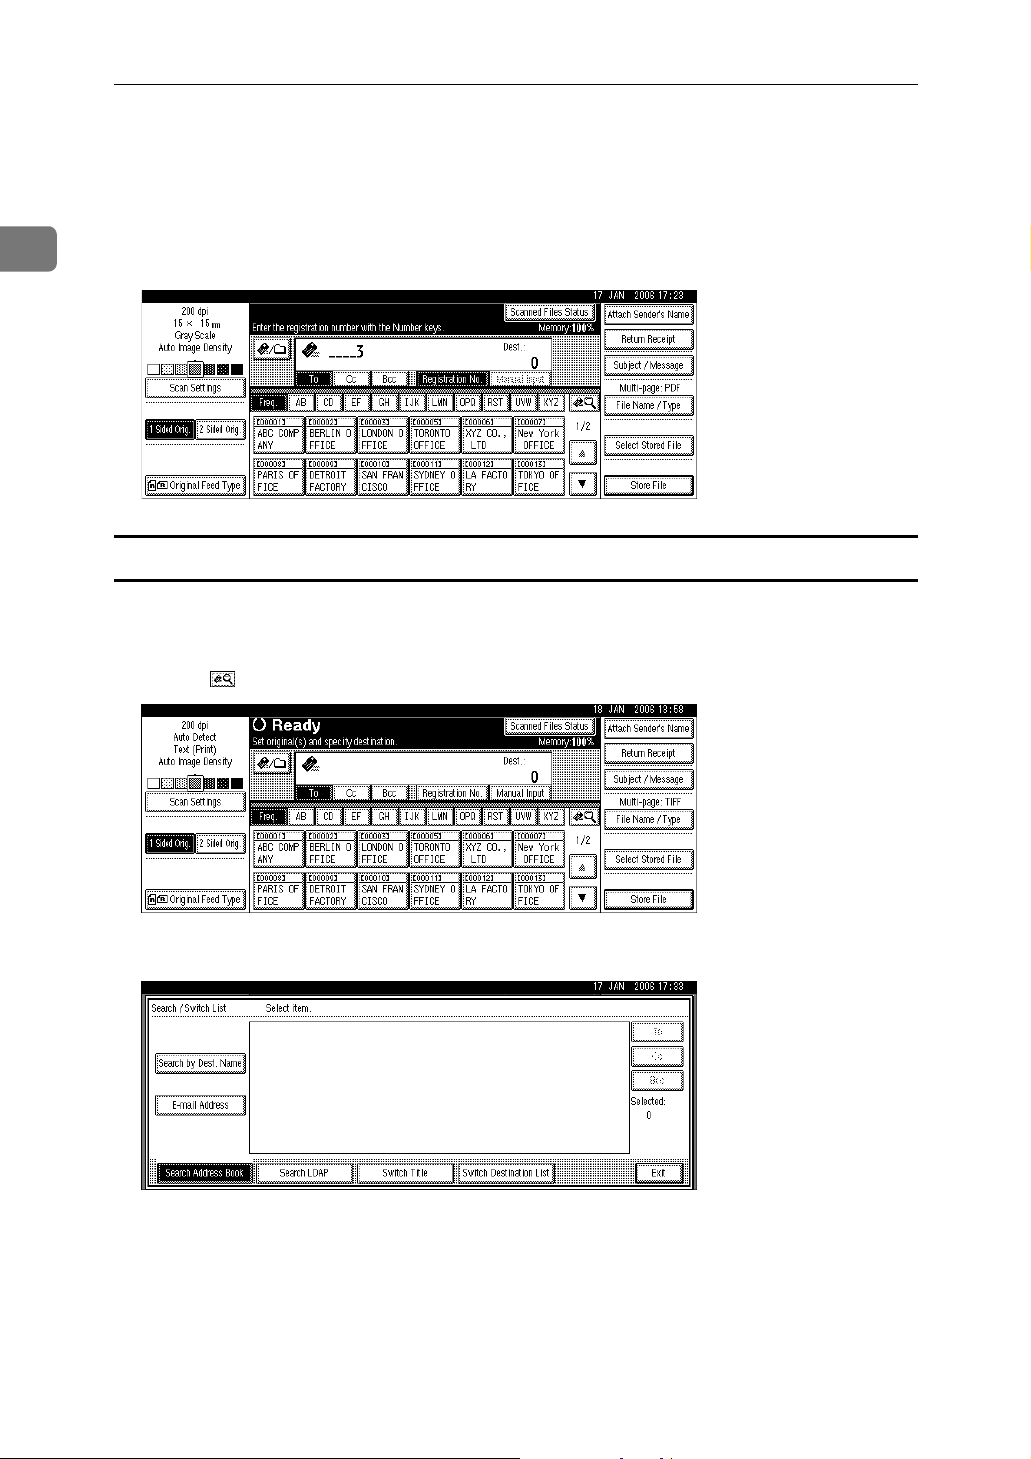
A Press [Registration No.].
19
Page 28
1
Sending Scan Files by E-mail
B Using the number keys, enter the five-digit registration number assigned
to the required destination folder.
If the entered number is less than five digits, press the {q} key after the last
number.
Example: To enter 00003 Press the {3}, and then press the {q} key.
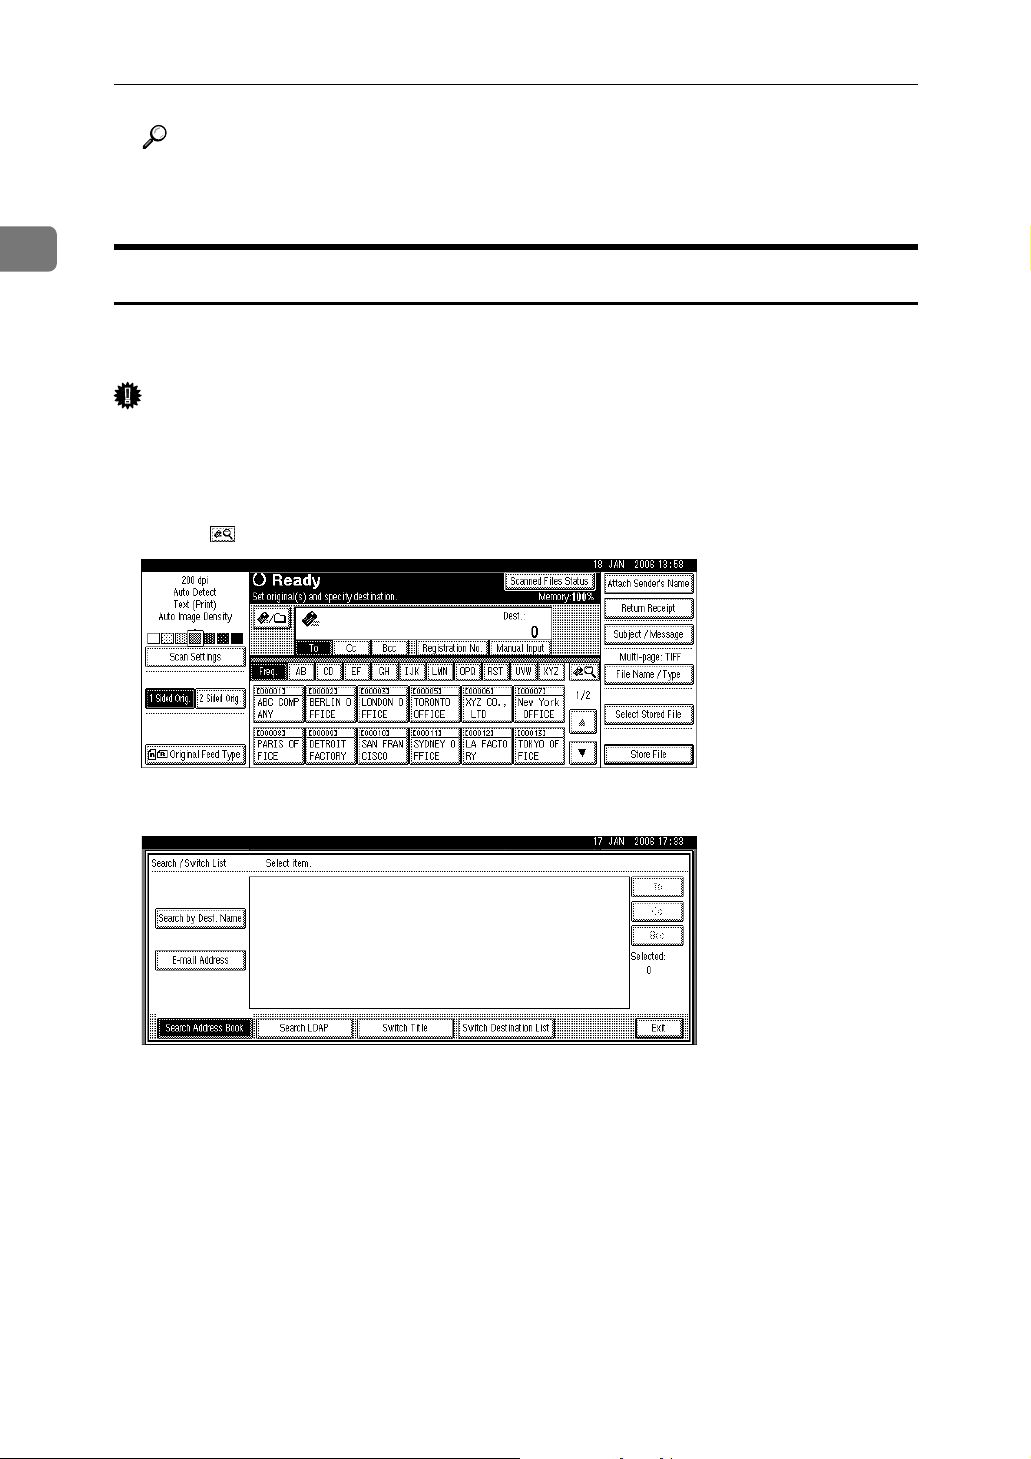
Searching the machine’s address book for the destination and selecting it
This section explains how to search the machine’s address book for the destination and select it.
A Press [].
B To search by destination name, press [Search by Dest. Name].
To search by e-mail address, press [E-mail Address].
The soft keyboard appears.
You can also search by combining [Search by Dest. Name] and [E-mail Address].
C Enter the beginning of the destination name.
To search by e-mail address, enter the beginning of the address.
20
Page 29
Specifying E-mail Destinations
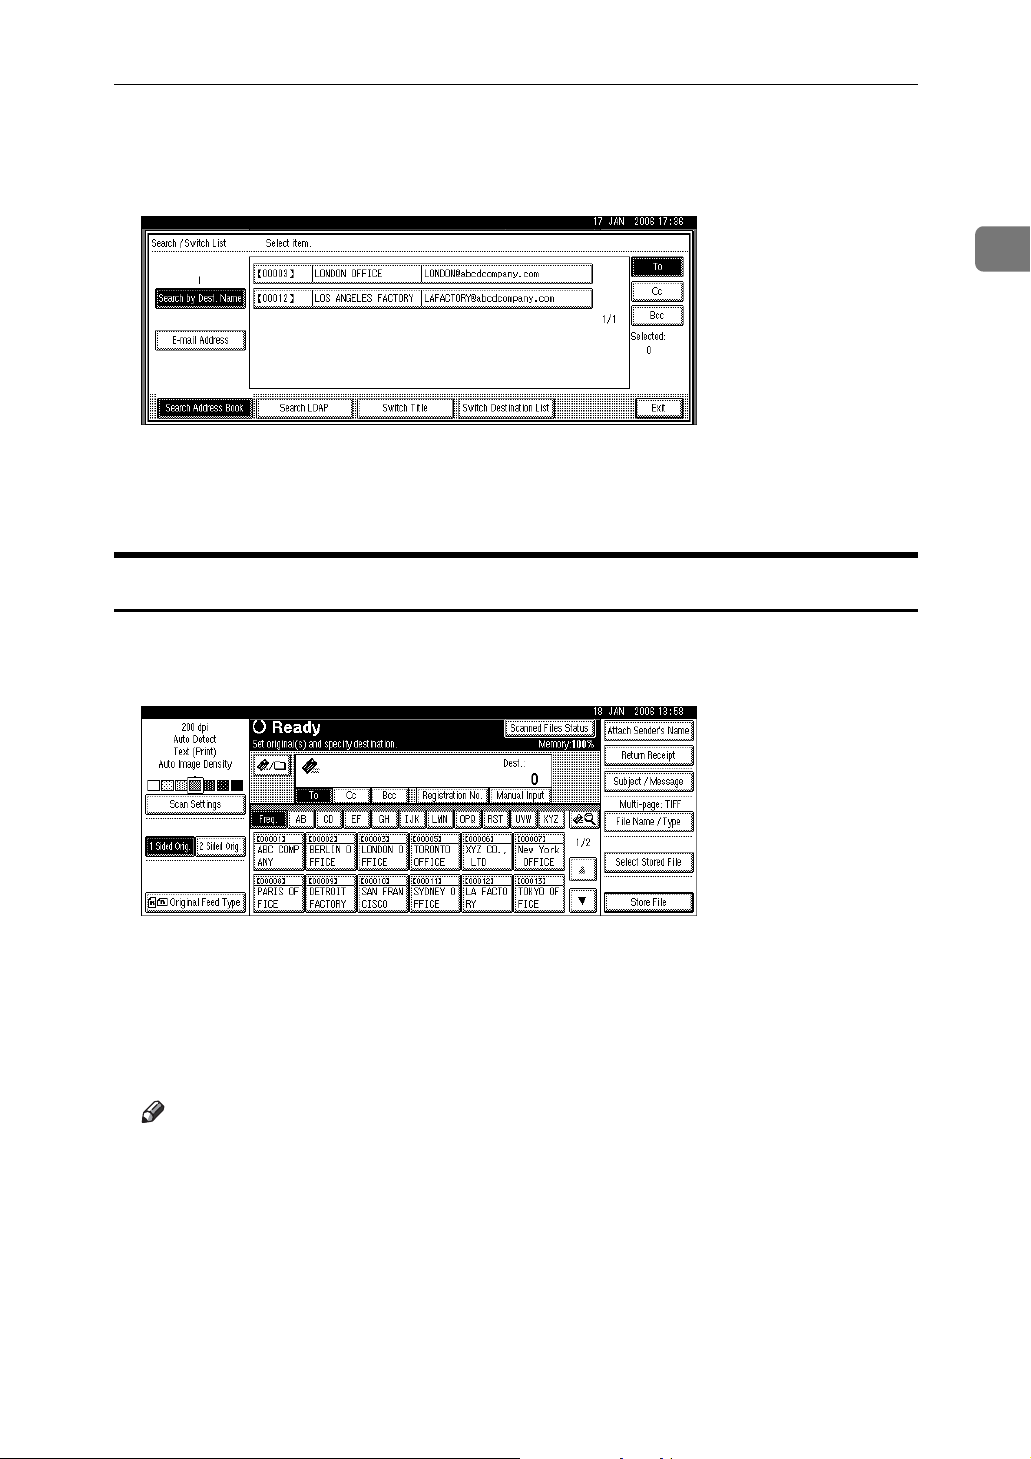
D Press [OK].
E Select a destination.
F Select [To], [Cc], or [Bcc].
G Press [Exit].
Entering an E-mail Address Manually
This section explains how to enter an e-mail address manually.
1
A Press [Manual Input].
The soft keyboard appears.
For information about how to enter characters, see About This Machine.
B Enter the e-mail address.
C Press [OK].
Note
❒ Depending on the security settings, [Manual Input] may not be displayed.
❒ For details about maximum number of characters that can be entered, see
"Sending E-mail".
❒ To change an entered e-mail address, press [Change].
❒ The e-mail address that is entered directly can be registered in the ma-
chine’s address book. For details, see "Registering a Directly-Entered Destination in the Address Book".
21
Page 30
1
Sending Scan Files by E-mail
Reference
p.143 “Sending E-mail”
p.25 “Registering a Directly-Entered Destination in the Address Book”
Selecting Destinations by Searching an LDAP Server
You can search the LDAP server for an address and then specify that address as
an e-mail destination.
Important
❒ This function requires an LDAP server to be running on the network.
❒ Under [System Settings], the server must be registered and [Use LDAP Server]
must be set to [On]. For details, see General Settings Guide.
A Press [].
B Press [Search LDAP].
C Press [Select Server].
D Select the LDAP server.
If authentication is required to access the selected server, the authentication
screen appears. To authenticate, enter the user name and password.
E Press [OK].
22
Page 31

Specifying E-mail Destinations
F Press [Advanced Search].
G Enter a character string related to the destination for a search condition
such as [Name], [E-mail Address], [Fax Number], [Company Name], or [Department
Name].
If you select a search condition setting, a soft keyboard appears. Enter a text
string according to the search criteria.
If you search by [Name], the LDAP server's settings determine whether the
search is by surname or first name. Consult your administrator.
1
The illustrated screen is an example. The items that actually appear on the
screen may differ.
H Press [Search Criteria] corresponding to each item, and then select criteria
from the list displayed.
I Press [OK].
J Select the destination.
K Select [To], [Cc], or [Bcc].
L Press [Exit].
23
Page 32

1
Sending Scan Files by E-mail
Note
❒ The [Name], [E-mail Address], [Fax Destination], [Company Name], and [Depart-
ment Name] search conditions that appear in [Advanced Search] are regis-
tered in the LDAP server.
❒ If you specified [Search Options] on [Program / Change / Delete LDAP Server] un-
der [System Settings], you can add a search condition for LDAP search on
the [Advanced Search] screen. For details, see General Settings Guide.
❒ By pressing [Detail], you can view details about the selected destinations.
❒ Up to 100 destinations can be displayed as search results.
❒ If an e-mail address returned by the LDAP server is too long, it will be im-
possible to specify it as the destination. For details about the number of
characters that can be specified, see "Sending E-mail".
❒ You can register multiple e-mail addresses in individual LDAP server ac-
counts. However, only one e-mail address will be displayed as the search
result. Usually, the address that was registered first on the LDAP server is
the address that is displayed.
❒ By pressing [Search Criteria], the following criteria appear:
• [Search Beginning Word]: The names which start with the entered character
or characters are targeted.
For example, to search for "ABC", enter "A".
• [Search End Word]: The names which end with the entered character or characters are targeted.
For example, to search for "ABC", enter "C".
• [Exact Match]: The names which correspond to an entered character or characters are targeted.
For example, to search for "ABC", enter "ABC".
• [Include One of Words]: The names which contain an entered character or
characters are targeted.
For example, to search for "ABC", enter "A", "B", or "C".
• [Exclude Words]: The names which do not contain an entered character or
characters are targeted.
For example, to search for "ABC", enter "D".
• [Fuzzy Search]: a vague search (The function of this vague search depends
on the system supported by the LDAP server.)
Reference
p.143 “Sending E-mail”
24
Page 33

Specifying E-mail Destinations
Registering a Directly-Entered Destination in the Address Book
This section explains how to register a directly-entered destination in the machine’s address book. You can also register a destination selected from the LDAP
server.
A In the destination field, display the destination you want to register.
B Press [ProgDest].
C Press [Names], and then specify the name and other information to be regis-
tered.
1
For details about specifying the information to be registered, see General Settings Guide.
D Press [OK].
Note
❒ Depending on the security setting, [ProgDest] may not appear. In such case,
you cannot complete the registration.
❒ To register in the machine’s address book a destination searched for and
selected from the LDAP server, display the destination, and then press
[ProgDest].
25
Page 34

1
Sending Scan Files by E-mail
Specifying the E-mail Sender
This section explains how to specify the e-mail sender.
To send e-mail, you must specify the name of the sender.
You can specify the e-mail sender by any of the following methods:
• Select the sender from the sender list
• Select the sender by entering the registration number
• Select the sender by searching the machine’s address book
Note
❒ Senders must be registered in advance under [System Settings]. For details, see
General Settings Guide.
❒ In [System Settings], you can specify the Administrator's E-mail Address as the
default sender name. This lets you send e-mail without specifying the sender.
For details, see General Settings Guide.
❒ Depending on the security setting, the logged-on user may be specified as the
sender.
❒ When a protection code has been set, a screen for entering the protection code
appears after selecting the sender. Enter the protection code, and then press
[OK]. If the protection code you entered is correct, the sender name is displayed.
Selecting a Sender from the List
This section explains how to select the sender from the machine’s sender list.
A Press [Attach Sender's Name].
26
Page 35

Specifying the E-mail Sender
B Select the sender.
C Press [OK].
Using a Registration Number to Specify a Sender Name
Select the sender using the registration numbers specified by users in the machine's address book.
A Press [Attach Sender's Name].
1
B Using the number keys, enter the five-digit registration number assigned
to the required destination folder.
If the entered number is less than five digits, press the {q} key after the last
number.
Example: To enter 00006
Press the {6} key, and then press the {q} key.
C Press [OK].
27
Page 36

1
Sending Scan Files by E-mail
Selecting the Sender by Searching the Machine’s Address Book
This section explains how to select the sender by searching the machine’s address book.
A Press [Attach Sender's Name].
B Press [].
C To search by user name, press [User (Dest.) Name].
To search by e-mail address, press [E-mail Address].
The soft keyboard appears.
You can also search by combining [User (Dest.) Name] and [E-mail Address].
D Enter the beginning of the sender’s name you want to search for.
To search by e-mail address, enter the beginning of the address.
E Press [OK].
F Select the sender.
G Press [Exit].
H Press [OK].
28
Page 37

Specifying the E-mail Subject
Specifying the E-mail Subject
This section explains how to specify the e-mail subject.
The procedure to specify the subject “[Urgent] New product appearance” is explained as an example here.
A Press [Subject / Message].
B Press [Attach Subject].
C Select the subject [Urgent].
1
D Press [Manual Input].
The soft keyboard appears.
E Enter the subject “New product appearance”.
F Press [OK] three times.
Note
❒ For details about entering the text, see About This Machine.
❒ For details about maximum number of characters that can be entered, see
"Sending E-mail".
Reference
p.143 “Sending E-mail”
29
Page 38

1
Sending Scan Files by E-mail
Specifying the E-mail Message
This section explains how to specify the e-mail message.
The message can be created in the following ways:
• Select the e-mail message from the list
• Enter the message directly
Selecting a Message from the List
You can select a message from the list.
Important
❒ The messages that can be selected from the list must be registered in [System
Settings] in advance. For details, see General Settings Guide.
A Press [Subject / Message].
B Press [E-mail Message].
C Select a message.
D Press [OK] twice.
30
Page 39

Manual Entry of a Message
You can enter the message manually.
Specifying the E-mail Message
A Press [Subject / Message].
B Press [E-mail Message].
C Press [Manual Input].
The soft keyboard appears.
D Enter the message.
E Press [OK] three times.
Note
❒ For details about entering the text, see About This Machine.
❒ For details about the maximum number of characters that can be entered,
see “Sending E-mail”.
1
Reference
p.143 “Sending E-mail”
31
Page 40

Sending Scan Files by E-mail
Simultaneous Storage and Sending by E-mail
This section explains how to store a file and simultaneously send it by e-mail.
1
A Press [Store File].
B Press [Send & Store].
C If necessary, specify the stored file's information, such as [User Name], [File
Name], and [Password].
For details, see "Specifying File Information for a Stored File".
D Press [OK].
E Specify the destination, make any other necessary settings, and then send
the e-mail.
For details about sending a file by e-mail, see "Basic Operation for Sending
Scan Files by E-mail".
32
Note
❒ Depending on the security setting, [Access Privileges] may appear instead
of [User Name]. For details about specifying [Access Privileges], consult your
administrator.
❒ You can resend stored files by e-mail. To resend stored files, select the files
on the screen for selecting stored files, and then send them. For details, see
"Sending a Stored File".
Reference
p.63 “Specifying File Information for a Stored File”
p.14 “Basic Operation for Sending Scan Files by E-mail”
p.71 “Sending a Stored File”
Page 41

Sending the URL by E-mail
Sending the URL by E-mail
This section explains how to send the URL of a scanned file by e-mail.
Use this function if network restrictions prevent you sending attachments by e-mail.
A In [Scanner Features], select [Send URL Link] under [Stored File E-mail Method].
For details about specifying the setting, see General Settings Guide.
B Return to the initial scanner screen, and then press [Store File] to select [Send
& Store].
To send the URL by e-mail, you must select [Send & Store].
C Press [OK].
D Specify the e-mail destination, make any other necessary settings, and then
send the e-mail.
For details about sending e-mail, see "Basic Operation for Sending Scan Files
by E-mail".
An e-mail similar to the following will be sent to the destination:
1
E In the e-mail destination, click the URL.
Web Image Monitor starts.
F View, delete, or download the file over the network using Web Image Monitor.
Note
❒ For details about Web Image Monitor functions and their settings, see Network
Guide.
❒ It is recommended that you use Web Image Monitor on the same network
environment.
❒ Depending on the environment, even if you click the URL in the file sent
by e-mail, the browser may not start and you may not be able to view the
file. If this happens, click the same URL again, or manually enter the URL
in the browser's address bar.
❒ To display details about the functions for managing stored files using Web Im-
age Monitor, click [Help] on the upper right of each Web browser's window.
❒ You can send the URL by e-mail and simultaneously send it by Scan to Folder.
In this case, the file is sent to the Scan to Folder destination, not the URL.
Reference
p.14 “Basic Operation for Sending Scan Files by E-mail”
33
Page 42

1
Sending Scan Files by E-mail
34
Page 43

2. Sending Scan Files by Scan to Folder
Using the Scan to Folder function, you can send scan files over the network to
shared folders, FTP server folders, or NetWare folders.
Before Sending Files by Scan to Folder
This section describes the preparations and procedure for sending files by Scan
to Folder.
Outline of Sending Scan Files by Scan to Folder
This section outlines the function for sending scan files by Scan to Folder.
Sending files to shared folders
1. This machine
You can send scan files to shared network folders. To send scan files to shared
network folders, use the SMB protocol.
ZZZ509S
2. Computer with a shared folder
To use this function, it is necessary to create a shared folder in advance. You can
specify a shared folder to save scan files.
3. Client computer
You can also browse scanned files saved
to a shared folder from a client computer.
35
Page 44

2
Sending Scan Files by Scan to Folder
Sending files to an FTP server
ZZZ510S
1. This machine
You can send scan files to FTP server
folders. To send scan files to FTP server
folders, use the FTP protocol.
2. FTP server
The FTP server is a server that provides
file transfer services among computers
on the same network. Transferred files
are stored on this server. It is essential to
have the FTP server inside the LAN/WAN
where this machine belongs. It is not possible to access an FTP server via a proxy
server.
3. Client computer
You can browse scanned files saved to an
FTP server from a client computer. You
need to have an FTP client program on
the computer to connect to an FTP server.
36
Page 45

Sending files to a NetWare server
Before Sending Files by Scan to Folder
2
ZZZ511S
1. This machine
You can send scan files to NetWare folders. To send scan files to NetWare folders, use the NCP protocol.
3. Client computer
To download files, a computer must be
running the NetWare client and be
logged onto the server.
2. NetWare Server
You can use this server to share files over
the network via NetWare. By sending image data to the server, files can be stored
on the server.
Preparation for Sending by Scan to Folder
This section describes the preparations and settings for sending scan files by
Scan to Folder.
Important
❒ Files can be sent to shared folders on client computers.
❒ Files can also be sent to FTP servers if any exist on the network.
❒ Files can also be sent to NetWare servers if any exist on the network.
A Connect the machine to the network.
Connect the machine to the network using an Ethernet cable or wireless LAN
(IEEE 802.11b).
37
Page 46

2
Sending Scan Files by Scan to Folder
B Make the necessary network settings in [System Settings].
If you have connected the machine to the network using an Ethernet cable,
make the following settings. For details, see General Settings Guide.
• Specify the machine’s IP address and subnet mask.
• Specify the gateway address.
•In [Effective Protocol], enable [TCP/IP].
• To send files to shared folders, enable [SMB] in [Effective Protocol]. To send
files to NetWare folders, enable [NetWare] in [Effective Protocol].
C If necessary, change settings in [Send Settings] under [Scanner Features].
Note
❒ To connect the machine to the network using a wireless LAN (IEEE 802.11B),
an extended wireless LAN board is required respectively. For details, see
Network Guide.
❒ Items to set up in [System Settings] vary depending on the network environ-
ment. For more information about network settings, see General Settings
Guide.
❒ For details about [Scanner Features], see General Settings Guide.
❒ Sending files using SMB is available only under a NetBIOS over TCP/IP
environment. Sending files using SMB is not available under a NetBEUI
environment.
❒ Even when settings made with the control panel, Web Image Monitor, Tel-
net, or other methods do not permit the use of SMB and FTP, sending files
is still possible.
Registering Destination Folders in the Address Book
You can register the addresses of frequently-used destination folders in the address book. Register the folder addresses in [Address Book Management] under
[Administrator Tools] from [System Settings]. These addresses can also be registered
as groups.
Note
❒ For details about registering the address of a destination folder in the address
book, see General Settings Guide.
❒ You can register entries in the address book using Web Image Monitor or
SmartDeviceMonitor for Admin. For details about installing SmartDeviceMonitor for Admin, see Network Guide. For details about registering addresses, see each application’s Help.
❒ Depending on the machine type, you may not be able to use the machine
when it is updating the address book using CSV files (retrieved using SmartDeviceMonitor for Admin) that contain user codes.
38
Page 47

Before Sending Files by Scan to Folder
Scan to Folder Screen
This section describes the screen layout when sending scan files by Scan to Folder.
The function items displayed serve as selector keys. You can select or specify an
item by pressing it. When you select or specify an item on the display panel, it is
highlighted like []. Keys that cannot be selected appear like [].
2
1. Destination field
The specified destination appears. If
more than one destination has been specified, press [UPrev.] or [TNext] to scroll
through the destinations.
2. [] E-mail / Scan to Folder
Press to switch between the Scan to Folder screen and E-mail screen
Also switch the screen when sending a
file simultaneously by both Scan to Folder and e-mail.
3. Scan to Folder icon ( )
Shows that the Scan to Folder screen is
displayed.
4. [Registration No.]
Press to specify a destination using a fivedigit registration number.
5. [Enter Destination]
To specify destinations not registered in
the address book, press this button to display the soft keyboard, and then enter the
address of the destination folder.
6. [File Name / Type]
Press to specify the names and formats of
the files you want to send.
7. [] Switch Destination
List/Search/Switch Title
Press to switch a destination in the delivery server list to a destination list of this
machine, to search for a destination.
8. Destination List
The list of destinations registered in the
machine appears.
If all of the destinations cannot be displayed, press [U] or [T] to switch the
screen.
Group destinations are denoted by this
symbol ( ).
39
Page 48

Sending Scan Files by Scan to Folder
Basic Operations When Using Scan to Folder
This section describes the basic operations involved in using Scan to Folder.
A Make sure that no previous settings remain.
If a previous setting remains, press the {Clear Modes} key.
2
B If the network delivery scanner screen or E-mail screen appears, switch to
the Scan to Folder screen.
For details, see "Switching to the Scan to Folder Screen".
C Place originals.
D If necessary, press [Scan Settings] to specify scanner settings such as scan
type, resolution, image density, or scan size.
For details, see "Various Scan Settings".
E If necessary, press [1 Sided Orig.] or [2 Sided Orig.] to scan one or both sides of
the originals.
For details, see "Setting for Scanning Sides of Originals".
F If necessary, press [Original Feed Type] to specify settings such as original ori-
entation.
For details, see "Setting of Original Feed Type".
G If necessary, press [File Name / Type] to specify settings such as file name and
file format.
For details, see "Setting File Type and File Name".
H Specify the destination.
You can specify multiple destinations.
For details, see "Specifying Scan to Folder Destinations".
I Press the {Start} key.
If you are scanning batches, place the next originals.
40
Page 49

Basic Operations When Using Scan to Folder
Note
❒ If you have selected more than one destination, you can press [UPrev.] or
[TNext] next to the destination field to scroll through the destinations.
❒ To cancel a selected destination, press [UPrev.] or [TNext] to display the
destination in the destination field, and then press the {Clear / Stop} key.
You can cancel a destination selected from the destination list by pressing
the selected destination again.
❒ If you press the {Check Modes} key before pressing the {Start} key, the ini-
tial scanner screen switches to the Check Modes screen. You can use the
Check Modes screen to check the settings such as destinations. For details,
see "Check Modes".
❒ To cancel scanning, press the {Clear / Stop} key or [Stop] on the display pan-
el.
❒ You can also store a file and simultaneously send it by Scan to Folder. For
details, see "Simultaneous Storage and Sending by Scan to Folder".
Reference
p.42 “Switching to the Scan to Folder Screen”
p.101 “Various Scan Settings”
p.112 “Setting for Scanning Sides of Originals”
p.114 “Setting of Original Feed Type”
2
p.124 “Setting File Type and File Name”
p.43 “Specifying Scan to Folder Destinations”
p.4 “Check Modes”
p.57 “Simultaneous Storage and Sending by Scan to Folder”
41
Page 50

2
Sending Scan Files by Scan to Folder
Switching to the Scan to Folder Screen
This section explains how to switch to the Scan to Folder screen.
If the E-mail screen is being displayed, press [] to switch to the Scan to Folder
screen.
If the network delivery scanner screen is being displayed, switch to the Scan to
Folder screen as follows:
A Press [].
B Press [Switch Destination List].
C Press [E-mail].
D Press [Exit].
The e-mail screen or the scan to folder screen appears.
E If the e-mail screen appears, press [].
The Scan to Folder screen appears.
Note
❒ You cannot switch from the network delivery scanner screen while deliv-
ery destinations are being specified. To clear the specified destination, display the destination in the destination field of the network delivery
scanner screen, and then press the {Clear / Stop} key.
42
Page 51

Specifying Scan to Folder Destinations
Specifying Scan to Folder Destinations
This section explains how to specify Scan to Folder destinations.
You can send a file by Scan to Folder by any of the following methods:
• Select a destination registered in the machine’s address book
• Send a file to a shared network folder
• Send a file to an FTP server
• Send a file to NetWare server
Selecting the Destination from the Machine’s Address Book
This section explains how to select the destination from the machine’s address
book.
Important
❒ To use this function, you must register the destinations in [System Settings] in
advance. For details, see General Settings Guide.
2
You can select a destination registered in the machine’s address book by any of
the following methods:
• Select the destination from the destination list
• Select the destination by entering its registration number
• Select the destination by searching the machine’s address book
Note
❒ If you have specified the protection code for accessing the address book, the
screen for entering the protection code appears.
❒ Depending on the security settings, certain destinations may not be displayed.
43
Page 52

2
Sending Scan Files by Scan to Folder
Selecting a destination registered in the destination list
Select the destination from the destination list.
A In the destination list, press the key including the destination name.
The key of the selected destination is highlighted, and the destination appears
in the destination field at the top of the screen.
If the target destination does not appear, take one of the following steps:
• Display the destination by selecting its initial letter from the title
• Display the destination by pressing [U] or [T]
Note
❒ Depending on the security setting, some destinations may not appear in
the destination list.
Selecting destinations by entering the registration numbers
Select the destination from the machine’s address book using its registration
number.
A Press [Registration No.].
B Enter the five-digit registration number that has been assigned to a desti-
nation folder using the number keys.
If the entered number is less than five digits, press the {q} key after the last
number.
Example: To enter 00004
Press the {4} key, and then press the {q} key.
44
Page 53

Specifying Scan to Folder Destinations
Searching the machine’s address book for the destination and selecting it
This section explains how to search the machine’s address book for the destination and select it.
A Press [].
B To search by destination name, press [Search by Dest. Name].
To search by path, press [Search by Folder Name].
2
The soft keyboard appears.
You can also search by combining [Search by Dest. Name] and [Search by Folder
Name].
C Enter the beginning of the destination name.
To search by path, enter the beginning of the folder path. If the folder path is
“\\volume\folder” then enter “\\volume\f”.
D Press [OK].
E Select the destination folder.
F Press [Exit].
45
Page 54

2
Sending Scan Files by Scan to Folder
Sending Files to a Shared Network Folder
This section explains how to specify the destination when sending files to a
shared network folder.
Important
❒ You must create a shared folder on the client computer in advance. You can
create the shared folder under Windows98/Me/2000/XP, WindowsNT4.0,
Windows Server 2003, and Mac OS X.
❒ Depending on the operating system of the client computer, access to the
shared folder may require authentication.
You can send a file to a shared folder over the network by any of the following
methods:
• Enter the path to the destination directly
• Specify the path by browsing the network for the destination
Entering the path to the destination manually
You can enter the path to the destination folder manually.
A Press [Enter Destination].
B Press [SMB].
C Press [Manual Input] on the right side of the path field.
The soft keyboard appears.
D Enter the path for the folder.
The following is an example of a path where the folder name is "user" and the
computer name is "desk01": \\desk01\user.
Instead of specifying the destination using its path, you can also use its IP address.
For details about maximum number of characters that can be entered, see
"Folder transmission".
E Press [OK].
46
Page 55

Specifying Scan to Folder Destinations
F Depending on the destination setting, enter the user name for logging on
to the client computer.
Press [Manual Input] on the right side of the user name field to display the soft
keyboard.
G Depending on the destination setting, enter the password for logging on to
the client computer.
Press [Manual Input] for [Password] to display the soft keyboard.
H Press [Connection Test].
A connection test is performed to check whether the specified shared folder
exists.
2
I Check the connection test result, and then press [Exit].
J Press [OK].
Note
❒ If authentication is required to access the folder, the login screen appears.
Enter the user name and password.
❒ If you change the protocol after entering the path name, user name, or pass-
word, a confirmation message appears.
❒ Computer and shared folder names containing more than 12 characters
cannot be displayed.
❒ To change the path for the folder that has been entered, press [Change] on
the left side of the destination field. Enter the correct path for the folder,
and then press [OK].
❒ The connection test may take time.
❒ You may not be able to press [Connection Test] right after pressing [Cancel]
during a connection test.
❒ Even if the connection test was successful, the machine may fail to transfer
the file if you do not have write privileges for the file or there is not enough
free hard disk space.
❒ You can register the path to the destination in the machine’s address book.
For details, see "Registering the Path to the Selected Destination in the Address Book".
47
Page 56

Sending Scan Files by Scan to Folder
Reference
p.144 “Folder transmission”
p.56 “Registering the Path to the Selected Destination in the Address
Book”
Specifying the path by browsing the network for destinations
2
You can browse computers on the network for the destination folder, and then
specify the path.
A Press [Enter Destination].
B Press [SMB].
C Press [Browse Network].
Domains or workgroups on the network appear.
D Select the domain or workgroup in which the destination folder is located.
E Select the client computer that has the destination folder.
48
If you cannot find the computer you are looking for, press [Up One Level] and
browse that level.
If authentication is required to access the selected computer, the authentication screen appears. To authenticate, enter the user name and password.
Page 57

Specifying Scan to Folder Destinations
F Select the destination folder.
When the selected folder has sub-folders, the sub-folders list appears.
If you cannot find the destination folder, press [Up One Level], and then search
for the folder at that level.
G Press [OK] twice.
Note
❒ If authentication is required to access the folder, the login screen appears.
Enter the user name and password.
❒ If you change the protocol after entering the path name, user name, or pass-
word, a confirmation message appears.
❒ Computer and shared folder names containing more than 12 characters
cannot be displayed.
❒ Up to 100 computers or shared folders can be displayed.
❒ The machine may fail to transfer the file if you do not have the write priv-
ileges for the shared folder or there is not enough free hard disk space.
❒ You can register the path to the destination in the machine’s address book.
For details, see "Registering the Path to the Selected Destination in the Address Book".
2
Reference
p.56 “Registering the Path to the Selected Destination in the Address
Book”
49
Page 58

2
Sending Scan Files by Scan to Folder
Sending Files to an FTP Server
This section explains how to specify destinations when sending files to an FTP server.
Entering the path to an FTP server manually
You can enter the path to an FTP server manually.
A Press [Enter Destination].
B Press [FTP].
C Press [Manual Input] on the right side of the server name field.
The soft keyboard appears.
D Enter a server name.
Instead of specifying the destination using its path, you can also use its IP address.
E Press [OK].
F Press [Manual Input] on the right side of the path field.
The soft keyboard appears.
G Enter the path for the folder.
The following is an example of a path where the folder name is "user" and the
subfolder name is "lib": user\lib.
H Press [OK].
50
For details about maximum number of characters that can be entered, see
"Folder transmission".
Page 59

Specifying Scan to Folder Destinations
I Enter the user name according to the setting at the destination.
Press [Manual Input] on the right side of the user name field to display the soft
keyboard.
J Enter the password according to the setting at the destination.
Press [Manual Input] for [Password] to display the soft keyboard.
K To change the port number which is set in [System Settings], press [Change]
on the right side of the port number field. Enter a port number using the
number keys, and then press the {q} key.
L Press [Connection Test].
A connection test is performed to check whether the specified folder exists.
M Check the connection test result, and then press [Exit].
N Press [OK].
Note
❒ If you change the protocol after entering the path name, user name, or pass-
word, a confirmation message appears.
❒ The connection test may take time.
❒ You may not be able to press [Connection Test] right after pressing [Cancel]
during a connection test.
❒ To change the path for the folder that has been entered, press [Change] on
the left side of the destination field. Enter the correct path for the folder,
and then press [OK].
❒ You can register the path to the destination in the machine’s address book.
For details, see "Registering the Path to the Selected Destination in the Address Book".
2
❒ The machine may fail to transfer the file if you do not have write privileges
for the folder or there is not enough free hard disk space.
Reference
p.144 “Folder transmission”
p.56 “Registering the Path to the Selected Destination in the Address
Book”
51
Page 60

2
Sending Scan Files by Scan to Folder
Sending Files to NetWare server
This section explains how to specify destinations when sending files to NetWare
server.
The NetWare folder of the destination can be specified in an NDS tree or on a
NetWare Bindery server, depending on the NetWare environment. Consult
your administrator.
You can send a file to NetWare server by any of the following methods:
• Enter the destination path of the NetWare server directly
• Specify the path by browsing to the destination on the NetWare server
Entering the destination path of the NetWare server directly
You can directly enter the destination folder path of the NetWare server.
A Press [Enter Destination].
B Press [NCP].
C Select the connection type.
Press [NDS] to specify a folder in the NDS tree.
Press [Bindery] to specify the folder on the NetWare Bindery server.
D Press [Manual Input] on the right side of the path field.
The soft keyboard appears.
52
Page 61

Specifying Scan to Folder Destinations
E Enter the path for the folder.
If you set the connection type to [NDS], the NDS tree name is "tree", the name
of the context including the volume is "context", the volume name is "volume", and the folder name is "folder", the path will be \\tree\volume.context\folder".
If you set the connection type to [Bindery], the NetWare Bindery server name
is "server", the volume name is "volume", and the folder name is "folder", the
path will be "\\server\volume\folder".
For details about maximum number of characters that can be entered, see
"Folder transmission".
F Press [OK].
G Enter the user name for logging on to the NDS tree or NetWare Bindery
server.
Press [Manual Input] on the right side of the user name field. The soft keyboard
appears.
If you press [NDS] for [Connection Type], enter the user name, and then enter
the name of the context containing the user object. If the user name is "user"
and the name of the Context is "context", the user name will be "user.context".
2
H If a password is specified for the logon user, enter it.
Press [Manual Input] for [Password] to display the soft keyboard.
I Press [Connection Test].
A connection test is performed to check whether the specified share folder exists.
J Check the connection test result, and then press [Exit].
K Press [OK].
Note
❒ If you change the protocol after entering the path name, user name, or
password, a confirmation message appears.
❒ To change the path for the folder that has been entered, press [Change] on
the left side of the destination field. Enter the correct path for the folder,
and then press [OK].
❒ You can connect only to folders that you have the read privileges for.
❒ The connection test may take time.
❒ You may not be able to press [Connection Test] right after pressing [Cancel]
during a connection test.
❒ Even if the connection test was successful, the machine may fail to transfer
the file if you do not have write privileges for the file or there is not enough
free hard disk space.
53
Page 62

2
Sending Scan Files by Scan to Folder
❒ You can register the path to the destination in the machine’s address book.
For details, see "Registering the Path to the Selected Destination in the Address Book".
Reference
p.144 “Folder transmission”
p.56 “Registering the Path to the Selected Destination in the Address
Book”
Specifying the path by browsing to the destination on NetWare server
Specify the path by browsing to the destination folder in an NDS tree or on a
NetWare Bindery server.
A Press [Enter Destination].
B Press [NCP].
C Select the connection type.
Press [NDS] to specify a folder in the NDS tree.
Press [Bindery] to specify a folder on the NetWare Bindery server.
D Press [Browse Network] on the right side of the path name field.
If you selected [NDS] under [Connection Type], the NDS tree list appears.
If you selected [Bindery] under [Connection Type], the NetWare Bindery server
list appears.
E Search for the destination folder in the NDS tree or NetWare Bindery serv-
er.
If you cannot find the destination folder, press [Up One Level], and then search
54
for the folder at that level.
Page 63

Specifying Scan to Folder Destinations
F Select the destination folder.
G Press [OK] twice.
Note
❒ If you change the protocol after entering the path name, user name, or
password, a confirmation message appears.
❒ Only folders that you have the read privileges for are displayed.
❒ If the language used for the NDS tree or by the NetWare Bindery server
differs from that used by the machine, file names in the NDS tree or on the
NetWare Bindery server might appear garbled.
❒ Up to 100 items can be displayed.
❒ If the selected NDS tree or NetWare Bindery server requires authentica-
tion, a login screen appears. Enter a user name and password for logging
on to the NDS tree or NetWare Bindery server. If you log on to the NDS
tree, enter a user name, and then enter the name of the context containing
the user object. If the user name is "user" and the name of the Context is
"context", the user name will be "user.context".
❒ The machine may fail to transfer the file if you do not have write privileges
for the folder or there is not enough free hard disk space.
❒ You can register the path to the destination in the machine’s address book.
For details, see "Registering the Path to the Selected Destination in the Address Book".
Reference
p.56 “Registering the Path to the Selected Destination in the Address
Book”
2
55
Page 64

2
Sending Scan Files by Scan to Folder
Registering the Path to the Selected Destination in the Address Book
This section explains how to register folder paths you have entered manually or
specified by browsing the network to the machine's address book.
A In the destination field, display the destination you want to register.
B Press [ProgDest].
C Press [Names], and then specify the name and other information to be regis-
tered.
D Press [OK].
56
For details about specifying the information to be registered, see General Settings Guide.
Note
❒ Depending on the security setting, [ProgDest] may not appear.
Page 65

Simultaneous Storage and Sending by Scan to Folder
Simultaneous Storage and Sending by
Scan to Folder
This section explains how to store a file and simultaneously send it by Scan to
Folder.
A Press [Store File].
B Press [Send & Store].
C If necessary, specify the stored file's information, such as [User Name], [File
Name], and [Password].
2
For details, see "Specifying File Information for a Stored File".
D Press [OK].
E
Specify the destination, make any other necessary settings, and then send the file.
For details about sending a file by Scan to Folder, see "Basic Operations When
Using Scan to Folder".
Note
❒ Depending on the security setting, [Access Privileges] may appear instead
of [User Name]. For details about specifying [Access Privileges], consult your
administrator.
❒ You can resend stored files by Scan to Folder. To resend stored files, select
the files on the screen for selecting stored files, and then send them. For details, see "Sending a Stored File".
57
Page 66

2
Sending Scan Files by Scan to Folder
Reference
p.63 “Specifying File Information for a Stored File”
p.40 “Basic Operations When Using Scan to Folder”
p.71 “Sending a Stored File”
58
Page 67

3. Storing Files Using the Scanner Function
Using the scanner function, you can store scan files in the machine and then send
the stored files by e-mail or Scan to Folder.
Before Storing Files
This section outlines file storage under the scanner function and provides related cautions.
Outline of File Storage under the Scanner Function
This section outlines storing files under the scanner function.
Important
❒ You can specify a password for each stored file. Files that are not password-
protected can be accessed by other users on the same local area network using
DeskTopBinder. It is recommended that you protect stored files from unauthorized access by specifying passwords.
❒ Scan file stored in the machine may be lost if some kind of failure occurs. We
advise against using the hard disk to store important files. The supplier shall
not be responsible for any damage that may result from the loss of files. For
long-term storage of files, we recommend the use of DeskTopBinder. For details, contact your local dealer.
1. This Machine
You can store scan files on the machine’s
hard disk. The stored files can be sent by
e-mail, Scan to Folder, or the network delivery scanner.
ZZZ512S
2. Client Computer
Using DeskTopBinder, you can, over the
network, view, copy, or delete files stored
in the machine. Using Web Image Monitor, you can, over the network, view,
download, or delete files stored in the machine. For details about DeskTopBinder
Lite, see DeskTopBinder Lite–related
manuals. For details about Web Image
Monitor, see Web Image Monitor Help.
59
Page 68

Storing Files Using the Scanner Function
Note
❒ Stored files will be deleted after a set period. For details about specifying the
period, see General Settings Guide.
❒ Files stored under the scanner function cannot be printed from the machine’s
control panel. Print the files from a client computer after receiving them on
the computer.
❒ You can also store a file and simultaneously send it. For details, see "Simulta-
neous Storage and Sending by E-mail", "Simultaneous Storage and Sending
by Scan to Folder", and "Simultaneous Storage and Delivery".
3
Reference
p.32 “Simultaneous Storage and Sending by E-mail”
p.57 “Simultaneous Storage and Sending by Scan to Folder”
p.94 “Simultaneous Storage and Delivery”
60
Page 69

Basic Operation for Storing Scan Files
Basic Operation for Storing Scan Files
This section describes the basic operation for storing scan files.
A Make sure that no previous settings remain.
If a previous setting remains, press the {Clear Modes} key.
B Place originals.
C If necessary, press [Scan Settings] to specify scanner settings such as scan
type, resolution, image density, or scan size.
For details, see "Various Scan Settings".
D If necessary, press [1 Sided Orig.] or [2 Sided Orig.] to scan one or both sides of
the originals.
For details, see "Setting for Scanning Sides of Originals".
E If necessary, press [Original Feed Type] to specify settings such as original ori-
entation.
For details, see "Setting of Original Feed Type".
3
F Press [Store File].
G Press [Store Only].
H If necessary, specify the stored file's information, such as [User Name], [File
Name], and [Password].
For details, see "Specifying File Information for a Stored File".
I Press [OK].
61
Page 70

3
Storing Files Using the Scanner Function
J Press the {Start} key.
If you are scanning batches, place the next originals.
Note
❒ Depending on the security setting, [Access Privileges] may appear instead
of [User Name]. For details about specifying [Access Privileges], consult your
administrator.
❒ By pressing [Send & Store], you can simultaneously store scan files and send
them. For details, see "Simultaneous Storage and Sending by E-mail", "Simultaneous Storage and Sending by Scan to Folder", and "Simultaneous
Storage and Delivery".
❒ If a destination or sender has been selected, you cannot press [Store Only].
❒ To cancel scanning, press the {Clear / Stop} key or press [Stop] on the display
panel.
Reference
p.101 “Various Scan Settings”
p.112 “Setting for Scanning Sides of Originals”
p.114 “Setting of Original Feed Type”
p.63 “Specifying File Information for a Stored File”
p.32 “Simultaneous Storage and Sending by E-mail”
p.57 “Simultaneous Storage and Sending by Scan to Folder”
p.94 “Simultaneous Storage and Delivery”
62
Page 71

Specifying File Information for a Stored File
Specifying File Information for a Stored File
You can specify information for a stored file, such as user name, file name, and
password.
By specifying information for a stored file, you can search for the file by user
name or file name, or protect the file with a password to prevent other people
from accessing the file.
Specifying a User Name
You can specify a user name for the stored file.
A Press [Store File].
3
The Store File screen appears.
B Press [User Name].
C Press the user name you want to specify.
The user names shown here are names that were registered on the [Adminis-
trator Tools] tab in [System Settings]. To specify a name not shown here, press
[Non-programmed Name], and then enter the user name.
D Press [OK] twice.
Note
❒ Depending on the security setting, [Access Privileges] may appear instead
of [User Name]. For details about specifying [Access Privileges], consult your
administrator.
63
Page 72

3
Storing Files Using the Scanner Function
Specifying a File Name
This section explains how to change the name of a stored file.
A stored file is allocated a name starting with "SCAN" followed by a 4-digit
number.
• Example: SCAN0001
You can change this file name.
A Press [Store File].
The Store File screen appears.
B Press [File Name].
The soft keyboard appears.
C Change the file name.
D Press [OK] twice.
Note
❒ For details about entering the text, see About This Machine.
64
Page 73

Specifying File Information for a Stored File
Specifying a Password
You can specify a password for the stored file.
Important
❒ Do not forget the password. If you forget it, consult the system administrator
of the machine.
By specifying a password, you can ensure that only the people who know the
password can view the file.
A Press [Store File].
3
The Store File screen appears
B Press [Password].
C Using the number keys, enter a four to eight-digit number.
D Press the {q} key.
To change the password, press [Change], and then enter a new one.
E For confirmation, enter the same number again.
F Press the {q} key.
To change the password, press [Change], and then enter a new one.
G Press [OK] twice.
65
Page 74

3
Storing Files Using the Scanner Function
Displaying the List of Stored Files
This section describes the list of stored files.
Using the list of stored files, you can delete stored files or change the file data.
List of Stored Files
This section describes how the list of stored files is displayed.
To display the list of stored files, press [Select Stored File] on the initial scanner
screen.
The function items displayed serve as selector keys. You can select or specify an
item by pressing it. When you select or specify an item on the display panel, it is
highlighted like []. Keys that cannot be selected appear like [].
❖ When displaying information on all stored files
❖ When displaying information of a selected stored file
66
Page 75

Displaying the List of Stored Files
1. Keys for searching for files
Press to switch to the screens for searching for a file by user name or file name, or
to the screen for displaying all files.
2. [Select File]/[Detail]
Press to switch between the stored file list
and the detailed information of the selected file.
3. Keys for sorting files
Press to sort the files using the selected
item. Select the same item once more for
a reverse sort. However, the files cannot
be sorted in reverse sending order.
4. Keys for changing file informa-
tion
Use for deleting the selected file or
changing the user name, file name, or
password.
Note
❒ Depending on the security setting, some files may not appear in the list.
❒ The files that are stored by functions other than the scanner can be displayed
by pressing the {Document Server} key.
❒ For files which are password protected, a key symbol( ) is shown on the left
side of the user name.
5. List of stored files
Displays the list of stored files.
If the file is not displayed, press [UPrev.]
or [TNext] to scroll through the list.
6. [Manage / Delete File]
Press to perform operations such as deleting stored files or changing file information.
7. [Send]
Press to send or deliver stored files. For
details, see “Sending Stored Files”.
8. Information for a selected stored
file
Press [Detail] to display the information
for a file after selecting the file from the
file list.
3
Reference
p.71 “Sending Stored Files”
67
Page 76

Storing Files Using the Scanner Function
Searching the List of Stored Files
You can search for files from the stored files using the user name or file name.
You can search the list of stored files by either of the following methods:
• Search by user name
• Search by file name
Searching by user name
3
You can search for a stored file by its user name.
A Press [Select Stored File].
B Press [Search by User Name].
C Select the user name to be used for the search.
The user names shown here are names that were registered on the [Adminis-
trator Tools] tab in [System Settings]. To change a user name not shown here,
press [Non-programmed Name], and then enter the user name.
D Press [OK].
The search begins, and then files belonging to the specified user appear.
68
Page 77

Displaying the List of Stored Files
Searching by file name
You can search for a stored file by its file name.
A Press [Select Stored File].
B Press [Search by File Name].
The soft keyboard appears.
C Enter the file name.
It is necessary to distinguish between uppercase and lowercase letters.
3
For information about how to enter characters, see About This Machine.
D Press [OK].
The search starts, and files whose name starts with the entered string appear.
69
Page 78

3
Storing Files Using the Scanner Function
Checking Stored Files from a Client Computer
This section explains how to check a stored file from the client computer.
Using DeskTopBinder Lite or Web Image Monitor, you can also display the files
stored in the machine on a client computer.
You can also check files stored under the copier, Document Server, and printer
functions.
Important
❒ To view stored files from a client computer, the IP address of the machine
must be specified.
Using Desk Top Binder Lite to Display Stored Files
The stored files are displayed and can be checked also on a client computer using
DeskTopBinder Lite.
You can also transfer the stored files to the client computer.
Note
❒ For details about DeskTopBinder, see the DeskTopBinder-related manuals.
❒ For details about installing DeskTopBinder Lite, see "Installing DeskTop-
Binder Lite from the Supplied CD-ROM".
Reference
p.81 “Installing DeskTopBinder Lite from the Supplied CD-ROM”
Using Web Image Monitor to Display Stored Files
The stored files are displayed and can be checked also on a client computer using
Web Image Monitor.
You can also download the stored files.
When you enter http:// (machine IP address)/ in the address bar of the Web
browser on a client computer, the top page of Web Image Monitor appears.
Note
❒ It is recommended that you use Web Image Monitor only within your local
area network.
❒ For details about displaying or downloading stored files using Web Image
Monitor, see Copy/ Document Server Reference.
❒ For details about making settings for using Web Image Monitor, see Network
Guide.
❒ For details about functions for managing stored files using Web Image Mon-
itor, click [Help] on the upper-right corner of the displayed screen.
70
Page 79

Sending a Stored File
Sending a Stored File
This section explains how to send a stored file.
Stored files can be sent by e-mail, Scan to Folder, or the network delivery scanner.
Note
❒ There are two methods of sending stored files. Settings made under [Scanner
Features] determine which method is used. For details, see General Settings
Guide.
• To send the URL by e-mail:
Under [Scanner Features], [Stored File E-mail Method], select [Send URL Link].
This method is useful when network restrictions prevent you sending attachments.
• To send an attached file by e-mail:
Under [Scanner Features], [Stored File E-mail Method], select [Send File].
Sending Stored Files
3
This section mainly explains how to select the files you want to send.
A Press [Select Stored File].
The list of stored files appears.
B Select the file you want to send.
You can select multiple files.
If you select multiple files, the files are sent in the selected order.
If you press [Display Selection], files you have selected are displayed in the order they will be sent.
C Press [OK].
71
Page 80

Storing Files Using the Scanner Function
D If necessary, switch to the e-mail, Scan to Folder, or network delivery scan-
ner screen.
For details about switching the screen, see "Switching to the E-mail Screen",
"Switching to the Scan to Folder Screen", or "Switching to the Network Delivery Scanner Screen".
E Specify the destination, make any other necessary settings.
For details about how to send a file by e-mail or Scan to Folder, or how to deliver a file, see "Basic Operation for Sending Files by E-mail", "Basic Operations When Using Scan to Folder", or "Basic Operation for Delivering Files".
3
F Press the {Start} key.
The stored file will be sent.
Note
❒ If you select a password-protected stored file, a screen for entering the
password appears. To select the file, enter the correct password, and then
press [OK].
❒ When the URL has been sent by e-mail, the recipient can check the stored
file by clicking that URL. For details, see "Sending the URL by E-mail".
Reference
p.17 “Switching to the E-mail Screen”
p.42 “Switching to the Scan to Folder Screen”
p.86 “Switching to the Network Delivery Scanner Screen”
p.14 “Basic Operation for Sending Scan Files by E-mail”
p.40 “Basic Operations When Using Scan to Folder”
p.83 “Basic Operation for Delivering Files”
p.33 “Sending the URL by E-mail”
72
Page 81

Managing Stored Files
Managing Stored Files
This section explains how to delete stored files and how to change the information for stored files.
Deleting a Stored File
This section explains how to delete a stored file.
A Press [Select Stored File].
The list of stored files appears.
B Press [Manage / Delete File].
3
C Select the file you want to delete.
If you select a password-protected stored file, a screen for entering the password appears. To select the file, enter the correct password, and then press
[OK].
D Press [Delete File].
A confirmation message about deleting the file appears.
E Press [Delete].
F Press [Exit].
Note
❒ You cannot delete files that are waiting to be sent.
73
Page 82

Storing Files Using the Scanner Function
❒ You can also delete files stored in the machine by accessing the machine
from a client computer using Web Image Monitor or DeskTopBinder. For
details about Web Image Monitor, see Web Image Monitor Help. For details about DeskTopBinder, see the manuals supplied with DeskTopBinder.
Changing Information for a Stored File
You can change information for a stored file, such as [User Name], [File Name], and
[Password].
3
Note
❒ Information for files waiting for being sent cannot be changed.
Changing a user name
You can change the user name for a stored file.
A Press [Select Stored File].
The list of stored files appears.
B Press [Manage / Delete File].
C Select the file containing the file information you want to change.
If you select a password-protected stored file, a screen for entering the password appears. To select the file, enter the correct password, and then press
[OK].
D Press [Change User Name].
74
Page 83

Managing Stored Files
E Specify a new user name.
The user names shown here are names that were registered on the [Adminis-
trator Tools] tab in [System Settings]. To change a user name not shown here,
press [Non-programmed Name], and then enter the user name.
F Press [OK].
G Make sure that the user name was changed as necessary, and press [Exit].
Note
❒ Using Web Image Monitor or DeskTopBinder, you can also change the
user name of a file stored in the machine from the client computer. For details about Web Image Monitor, see Web Image Monitor Help. For details
about DeskTopBinder, see the manuals supplied with DeskTopBinder.
❒ Depending on the security setting, [Change Acs. Priv.] may appear instead
of [Change User Name]. For details about specifying [Change Acs. Priv.], consult your administrator.
3
75
Page 84

3
Storing Files Using the Scanner Function
Changing a file name
You can change the file name of a stored file.
A Press [Select Stored File].
The list of stored files appears.
B Press [Manage / Delete File].
C Select the file containing the file information you want to change.
If you select a password-protected stored file, a screen for entering the password appears. To select the file, enter the correct password, and then press
[OK].
D Press [Change File Name].
E Change the file name.
For information about how to enter characters, see About This Machine.
F Press [OK].
G Make sure that the file information was changed as necessary, and press
[Exit].
Note
❒ Using Web Image Monitor or DeskTopBinder, you can also change the name
of a file stored in the machine from the client computer. For details about
Web Image Monitor, see Web Image Monitor Help. For details about DeskTopBinder, see the manuals supplied with DeskTopBinder.
76
Page 85

Managing Stored Files
Changing a password
Enter the password for accessing the stored file.
Important
❒ Be sure not to forget the password. If you forget it, consult the system admin-
istrator of the machine.
A Press [Select Stored File].
The list of stored files appears.
3
B Press [Manage / Delete File].
C Select the file containing the file information you want to change.
If you select a password-protected stored file, a screen for entering the password appears. To select the file, enter the correct password, and then press [OK].
D Press [Change Password].
E Using the number keys, enter a new four to eight-digit password.
F Press the {q} key.
To change the password, press [Change], and then enter a new one.
G For confirmation, enter the same number again.
H Press the {q} key.
To change the password, press [Change], and then enter a new one.
I Press [OK].
J Press [Exit].
77
Page 86

3
Storing Files Using the Scanner Function
Note
❒ Using Web Image Monitor or DeskTopBinder, you can also change the pass-
word of a file stored in the machine from the client computer. For details
about Web Image Monitor, see Web Image Monitor Help. For details about
DeskTopBinder, see the manuals supplied with DeskTopBinder.
78
Page 87

4. Delivering Scan Files
Using the ScanRouter delivery software, you can deliver by various methods
scan files produced by the machine.
Before Delivering Files
This section describes the necessary preparations and the procedure for using
the network delivery scanner.
Important
❒ To use the network delivery scanner function, you need a delivery server on
which the optional ScanRouter delivery software is installed. You must also
register destination and sender information on the delivery server.
Outline of Scan File Delivery
This section outlines the function for delivering files using the network delivery
scanner.
1. This machine
You can send scan files to the delivery
server.
2. Delivery server
Install the ScanRouter delivery software
on this computer to use it as the delivery
server.
After receiving a scan file, the delivery
server delivers the file according to the
setting specified for the destination. The
delivery settings are as follows:
• Storing the file in an in-tray
• Delivering the file by e-mail
ZZZ513S
• Storing the file in a selected folder
For details about the ScanRouter delivery
software, see the manuals supplied with
the ScanRouter delivery software.
3. Client Computer
How to check a file from the client computer depends on the delivery method.
For example, you can check a file by one
of the following methods:
• Use DeskTopBinder to view a file delivered to the in-tray
• Use e-mail software to receive e-mail
with an attached file
• Browse a folder for a stored file
79
Page 88

4
Delivering Scan Files
Preparing to Deliver a File
This section describes the preparations and settings for delivering scan files.
Important
❒ To use the network delivery scanner function, you need a delivery server on
which the optional ScanRouter delivery software is installed. For details
about the ScanRouter delivery software, see the manuals supplied with the
ScanRouter delivery software.
❒ To view files delivered to an in-tray, DeskTopBinder must be installed on the
client computer.
A Connect the machine to the network.
Connect the machine to the network using an Ethernet cable or wireless LAN
(IEEE 802.11b).
B Make the necessary network settings in [System Settings].
If you have connected the machine to the network using an Ethernet cable,
make the following settings. For details, see General Settings Guide.
• Specify the machine’s IP address and subnet mask
•In [Effective Protocol], enable [TCP/IP]
•Set [Delivery Option] to [On]
C If necessary, change settings in [Send Settings] under [Scanner Features].
D Using the ScanRouter delivery software, register this machine as an I/O de-
vice. In addition, specify register destinations and specify such settings as
the delivery type and sender.
For details, see the manuals supplied with the ScanRouter delivery software.
Note
❒ To connect the machine to the network using a wireless LAN (IEEE 802.11b),
an extended wireless LAN board is required respectively. For details, see Network Guide.
❒ Items to set up in [System Settings] vary depending on the network environ-
ment. For details about the network settings, see General Settings Guide.
❒ For details about installing DeskTopBinder Lite, see "Installing DeskTop-
Binder Lite from the Supplied CD-ROM".
Reference
p.81 “Installing DeskTopBinder Lite from the Supplied CD-ROM”
80
Page 89

Before Delivering Files
Installing DeskTopBinder Lite from the Supplied CD-ROM
This section explains how to install DeskTopBinder Lite on a client computer
from the supplied "Scanner Driver and Utilities" or "Scanner Driver/Font Manager and Utilities" CD-ROM.
To view or receive files delivered to the in-trays, you must install DeskTopBinder Lite on the client computer.
A Make sure Windows is running on the client computer, and then insert the
"Scanner Driver and Utilities" or "Scanner Driver/Font Manager and Utilities" CD-ROM into the CD-ROM drive.
The installer is automatically started.
B Click [DeskTopBinder Lite].
The [DeskTopBinder Lite Setup] dialog box appears.
For the subsequent installation steps, see the Setup Guide displayed from the
[DeskTopBinder Lite Setup] dialog box.
Note
❒ Before you start the installation, check the system requirements for Desk-
TopBinder Lite. For details, see "Software Supplied on CD-ROM".
❒ You can install the software using the auto-run program. For details about
the auto-run program, see "Auto-Run Program".
❒ If the installer does not start automatically, see “Auto-Run Program”.
Reference
p.140 “Software Supplied on CD-ROM”
p.140 “Auto-Run Program”
4
81
Page 90

4
Delivering Scan Files
Network Delivery Scanner Screen
This section describes the screen layout when using the network delivery scanner.
The function items displayed serve as selector keys. You can select or specify an
item by pressing it. When you select or specify an item on the display panel, it is
highlighted like []. Keys that cannot be selected appear like [].
1. Network delivery scanner icon
()
Indicates that the network delivery scanner screen is displayed.
2. Destination field
The selected destination is shown here. If
multiple destinations are selected, the
destinations are displayed in the order
they were selected by pressing [UPrev.] or
[TNext].
3. [Registration No.]
Select a destination by entering its Short
ID number (registered using the ScanRouter delivery software).
4. [Manual Input]
To send a file by e-mail via the delivery
server to a destination not registered in
the delivery server’s Destination List,
press this key to display the soft keyboard. Then use the soft keyboard to enter the e-mail address. For details about
how to send a file by e-mail via the delivery server, see the ScanRouter delivery
software manuals.
5. [Attach Sender's Name] [Return Re-
ceipt] [Attach Subject]
Specify the sender and subject when
sending a file by e-mail via the delivery
server. You can also select whether or not
to check if whether the file has been
opened at the destination.
6. [] Switch Destination
List/Search
Press to switch a destination list of this
machine to a destination in the delivery
server list, to search for a destination.
7. Destination list
The list of destinations registered in the
delivery server appears. If all of the destinations cannot be displayed, press [U] or
[T] to switch the screen. Group destinations are denoted by this symbol ( ).
82
Page 91

Basic Operation for Delivering Files
Basic Operation for Delivering Files
This section describes the basic operation for delivering scan files using the network delivery scanner.
Important
❒ You must register destinations and senders in advance using the ScanRouter
delivery software installed on the delivery server.
A Make sure that no previous settings remain.
If a previous setting remains, press the {Clear Modes} key.
B If the E-mail screen or Scan to Folder screen appears, switch to the network
delivery scanner screen.
For details, see "Switching to the Network Delivery Scanner Screen".
C Place originals.
D If necessary, press [Scan Settings] to specify scanner settings such as scan
type, resolution, image density, or scan size.
For details, see "Various Scan Settings".
4
E If necessary, press [1 Sided Orig.] or [2 Sided Orig.] to scan one or both sides of
the originals.
For details, see "Setting for Scanning Sides of Originals".
F If necessary, press [Original Feed Type] to specify settings such as original ori-
entation.
For details, see "Setting of Original Feed Type".
G Specify the destination.
You can specify multiple destinations.
For details, see "Specifying Delivery Destinations".
H If necessary, press [Attach Sender's Name] to specify the sender.
For details, see "Specifying the Sender".
83
Page 92

4
Delivering Scan Files
I If necessary, specify the e-mail subject.
For details, see "Specifying the Subject of the E-mail to Be Transmitted via the
Delivery Server".
J Press the {Start} key.
If you are scanning batches, place the next originals.
Note
❒ By pressing [Manual Input] on the network delivery scanner screen, you can
send a file by e-mail via the delivery server’s network. For details about entering the e-mail address directly, see "Entering an E-mail Address Manually".
❒ If you have selected more than one destination, press [UPrev.] or [TNext]
next to the destination field to scroll through the destinations.
❒ To cancel a selected destination, display the destination in the destination
field, and then press the {Clear / Stop} key. You can cancel a destination selected from the destination list by pressing the selected destination again.
❒ You can use the Return Receipt function when sending e-mail via delivery
server. An e-mail is sent to the sender selected in step
that the recipient has read his/her e-mail. To specify this setting, press [Re-
turn Receipt].
❒ To enable the Return Receipt function, you must specify the ScanRouter de-
livery software settings for sending e-mail by SMTP. For details about
specifying this setting, see the ScanRouter delivery software manual. Note,
however, that if the e-mail software used at the destination does not support Message Disposition Notification (MDN), e-mail notification that the
e-mail has been opened may not be sent.
❒ Register the sender’s e-mail address using the ScanRouter delivery soft-
ware in advance.
❒ If you press the {Check Modes} key before pressing the {Start} key, the ini-
tial scanner screen switches to the Check Modes screen. You can use the
Check Modes screen to check the settings such as destinations. For details,
see "Check Modes".
❒ To cancel scanning, press the {Clear / Stop} key or [Stop] on the display pan-
el.
❒ You can also store a scan file and simultaneously deliver it. For details, see
"Simultaneous Storage and Delivery".
, notifying him/her
H
84
Page 93

Basic Operation for Delivering Files
Reference
p.86 “Switching to the Network Delivery Scanner Screen”
p.101 “Various Scan Settings”
p.112 “Setting for Scanning Sides of Originals”
p.114 “Setting of Original Feed Type”
p.87 “Specifying Delivery Destinations”
p.90 “Specifying the Sender”
p.93 “Specifying the Subject of the E-mail to Be Transmitted via the Delivery Server”
p.21 “Entering an E-mail Address Manually”
p.4 “Check Modes”
p.94 “Simultaneous Storage and Delivery”
4
85
Page 94

4
Delivering Scan Files
Switching to the Network Delivery Scanner Screen
This section explains how to switch the screen to the network delivery scanner
screen.
If the E-mail screen or Scan to Folder screen is being displayed, switch to the network delivery scanner screen.
A Press [].
B Press [Switch Destination List].
C Press [Delivery Server].
D Press [Exit].
86
The network delivery scanner screen appears.
Note
❒ You cannot switch from the E-mail screen or Scan to Folder screen while
destinations or senders are being specified. To clear a specified destination,
display the destination in the destination field of the E-mail screen or Scan
to Folder screen, and then press the {Clear / Stop} key.
Page 95

Specifying Delivery Destinations
Specifying Delivery Destinations
This section explains how to specify delivery destinations.
Selecting Destinations Registered in the Destination List of the Delivery Server
This section explains how to select destinations registered in the delivery server’s Destination List.
You can select a delivery destination registered in Destination List of the delivery server by any of the following methods:
• Select the destination from the delivery destination list
• Select the destination by entering the registration number
• Select the destination by searching in the delivery server
Note
❒ Depending on the security settings, certain destinations may not be displayed.
4
Selecting a destination from the Destination List
From the destination list, select a destination.
A In the destination list, press the key including the destination name.
The selected destination is highlighted and also is displayed in the destination field at the top of the screen.
Destinations are registered in the delivery server under captions. The destination list is updated automatically.
If the target destination does not appear, take one of the following steps:
• Display the destination by selecting its initial letter from the title
• Display the destination by pressing [U] or [T]
Note
❒ Depending on the security setting, some destinations may not appear in
the destination list.
87
Page 96

4
Delivering Scan Files
Selecting destinations by entering their registration numbers
Select a destination by entering its Short ID number (registered using the ScanRouter delivery software). For details about how to set Short IDs, see the manuals supplied with the ScanRouter delivery software.
A Press [Registration No.].
B Using the number keys, enter the three-digit registration number, and then
press the {q} key.
You can also enter a registration number of fewer than three digits.
Example: To enter 009
Press the {9} key, and then press the {q} key.
Selecting destinations by searching the delivery server’s Destination List
In the delivery server’s Destination List, you can search for destinations and select them.
A Press [].
B Press [Search Address Book].
88
Page 97

Specifying Delivery Destinations
C To search by destination name, press [Search by Dest. Name].
To search by comment, press [Search by Comment].
The soft keyboard appears.
You can also search by combining [Search by Dest. Name] and [Search by Com-
ment].
D Enter the beginning of the destination name.
To search by comment, enter the beginning of the comment.
E Press [OK].
F Select the destination.
G Press [Exit].
4
89
Page 98

4
Delivering Scan Files
Specifying the Sender
This section explains how to specify the e-mail sender when sending a file by email via the delivery server.
The sender you specify appears in the subject line of e-mail.
You can specify the sender by any of the following methods:
• Select the sender from the sender list
• Select the sender by entering the registration number
• Select the sender by searching the delivery server’s Destination List
Selecting a Sender from the Sender List
This section explains how to select a sender from the sender list.
Destinations that are registered on the delivery server are displayed in the sender list.
A Press [Attach Sender's Name].
B Select the sender.
The selected sender and its registration number appear.
C Press [OK].
90
Page 99

Specifying the Sender
Selecting the Sender by Entering the Registration Number
Select a sender by entering its Short ID number (registered using the ScanRouter
delivery software). For details about how to set Short IDs, see the manuals supplied with the ScanRouter delivery software.
A Press [Attach Sender's Name].
B Using the number keys, enter the three-digit registration number assigned
to the required destination folder.
If the entered number is less than three digits, press the {q} key after the last
number.
Example: To enter 006
4
Press the {6} key, and then press the {q} key.
C Press [OK].
91
Page 100

4
Delivering Scan Files
Selecting a Sender by Searching the Delivery Server’s Destination List
This section explains how to select a sender by searching the delivery server’s
Destination List.
A Press [Attach Sender's Name].
B Press [].
C To search by destination name, press [User (Dest.) Name].
To search by comment, press [Search by Comment].
The soft keyboard appears.
You can also search by combining [User (Dest.) Name] and [Search by Comment].
D Enter the beginning of the sender's name.
To search by comment, enter the beginning of the comment.
E Press [OK].
F Select the sender.
G Press [Exit].
H Press [OK].
Note
❒ The Comment search function searches for destinations by comment infor-
mation, which is a registration item required by the ScanRouter delivery
software.
92
 Loading...