

Page 1

Operation Manual
For the safe use of your camera, be sure to read the Safety Precautions thoroughly before use.
Page 2

Using These Manuals
The two manuals included are for your Caplio 300G.
Please read this first:
Quick Start guide (printed manual)
This booklet is designed to help you enjoy your Caplio 300G
right away by providing quick explanations: "Getting Ready to
Shoot", "Shooting Images", "Viewing Images", and
"Connecting to Your PC."
Before using your camera, first read this manual.
Please read as needed:
Operation Manual (this manual).
This explains how to use all the functions of your Caplio 300G.
To get the most out of your Caplio 300G, please read it through once and refer to it whenever necessary.
Meaning of Symbols
The following symbols are used in this guide:
Important
This indicates important information
and restrictions.
Note
This indicates supplementary
explanations and useful tips on
camera operations.
Terms
This indicates an explanation of a
technical term.
Reference
This indicates page(s) relevant to a
particular function.
"p.xx" is used to refer you to pages in
this manual.
Page 3

Table of Contents
Using These Manuals ................................................2
Meaning of Symbols ..................................................2
Chapter 1 Using Your Camera
Section 1 Getting Started
Checking that everything is Packed........................... 6
Names of Parts ..........................................................7
How to Use the Mode Dial ......................................... 8
Inserting the Batteries................................................ 9
Using the Rechargeable Battery.............................. 10
Inserting the rechargeable battery.....................10
Removing the rechargeable battery ..................10
Using the AC Adaptor ..............................................11
Setting up the AC adaptor .................................11
Removing the AC adaptor................................. 12
Turning the Power On/Off ........................................13
To turn the camera On ......................................13
To turn the camera Off ...................................... 13
Setting the Date and Time .......................................14
Inserting the SD Memory Card ................................15
Inserting the SD Memory Card..........................15
Removing the SD Memory Card........................16
How to Use the LCD Monitor ...................................17
Screen Examples when Shooting Pictures........17
The Screen During Playback............................. 20
Switching the Screen Display............................ 21
Button Functions...................................................... 22
Screens....................................................................23
The Basics of the Shooting Menu/Playback Menu 27
The Basics of the Setup Screen........................ 28
Section 2 Basic Shooting
How to Hold the Camera..........................................30
How to Focus........................................................... 31
Shooting Still Images ............................................... 33
Check the Focus and Shoot ..............................33
(Half-press)........................................................33
Capture the Moment Shooting (Full-press) .......34
When the Subject is not Centered on Your Composition
(Focus Lock).......................................................35
Shooting with Scenery-Matching .............................36
Combination of Scene Mode and Function.............. 38
Shooting with Multi-Shot .......................................... 39
Making Multi-Shot Settings (CONT. MODE) ..... 40
Shooting with Multi-Shot.................................... 41
Shooting with S Multi-Shot ................................41
Shooting with M Multi-Shot................................ 41
Shooting Movies ......................................................42
Shooting with the Zoom ...........................................43
Shooting with the Digital Zoom ................................44
Shooting Close-ups (Macro Photo)..........................45
Section 3 Using Special Features for Improved Photography
Using the Flash........................................................ 47
Using the Self-Timer................................................ 49
Changing the Exposure (EXPOSURE COMP.)....... 50
Using Natural and Artificial Lighting
(WHITE BALANCE)............................................ 52
Choosing Picture Quality Mode/Image Size
(PIC QUALITY/SIZE).......................................... 55
About Picture Quality Mode .............................. 55
About Image Size.............................................. 55
Changing Picture Quality Mode/Image Size of a
Still Image..................................................... 56
Changing the Image Size of a Movie ................ 57
Manual Focus Shooting (FOCUS)........................... 58
Manual Focus Shooting .................................... 58
Shooting at a Fixed Distance ............................ 59
Changing the Light Metering (PHOTOMETRY)....... 60
Sensitivity Settings (ISO SETTING) ........................ 62
Changing the Edge Quality of Still Images
(SHARPNESS)................................................... 63
Shooting Consecutively with Different Exposures
(AUTO BRACKET)............................................. 64
Setting the Exposure Time (TIME EXPOSURE) ..... 66
Shooting Pictures Automatically at Set Intervals
(INTERVAL) ....................................................... 67
Inserting the Date into a Still Image (DATE IMPRINT). 69
Returning the Shooting Menu Settings to their Defaults
(RESTORE DEFAULTS).................................... 70
Displaying the Grid Guide on the LCD Monitor ....... 71
Changing Shading for Shooting Text (DENSITY).... 72
Section 4 Viewing Still Images and Movies
Viewing the Photo You Just Took............................ 74
Displaying an Enlarged View of the Still Image
Displayed...................................................... 75
Deleting the Displayed Still Image or Movie...... 76
Viewing a Still Image or Movie ................................ 77
Viewing Still Images Recorded on an SD Memory
Card.............................................................. 77
Viewing Still Images Recorded on Internal Memory78
Viewing Movies ................................................. 79
Viewing at a Glance................................................. 80
Enlarged Viewing..................................................... 81
Showing Photos in Order Automatically
(SLIDE SHOW) .................................................. 82
Viewing on a Television........................................... 83
Section 5 Deleting Still Images and Movies
Deleting Unwanted Still Images or Movies.............. 85
Deleting One Still Image ................................... 85
Deleting All Frames at Once ............................. 86
Page 4

Deleting Multiple Frames at Once .....................87
Write-protecting Your Images (PROTECT)..............88
Protecting the Displayed Still Image.................. 88
Protecting All Still Images..................................90
Protecting Multiple Still Images or Movies at Once 91
Copying the Contents of Internal Memory to a Memory
Card (COPY TO CARD)..................................... 92
Using a Printing Service (PRINT) ............................93
Setting DPOF for the Still Image Displayed.......93
Setting DPOF for All Still Images.......................94
Setting DPOF for Multiple Still Images ..............95
Section 6 Changing Camera Settings
Getting the SD Memory Card Ready for Use
(CARD FORMAT)............................................... 97
Formatting Internal Memory (IN FORMAT)..............98
Changing Power-Save Mode Settings
(POWER SAVE) .................................................99
Changing Auto Power-Off Settings
(AUTO POWER OFF) ......................................100
Beep at Recording (BEEP SOUND) ......................101
Changing File Name Settings (SEQUENTIAL NO.)102
Changing Image Confirmation Time
(LCD CONFIRM.) .............................................103
Adjusting the Brightness of the LCD Monitor
(LCD BRIGHTNESS)........................................ 104
Changing the Display Language (LANGUAGE) ....105
Changing the Playback Method for Viewing on TV
(VIDEO OUT MODE)........................................ 106
Chapter 2 Playing back Images on a Computer (Pictures/Movies)
Section 1 Downloading Images to a Computer
(For Windows)
Using the Software Provided .................................108
Software and OS Applicability Table ...............108
System Requirements............................................109
Preparing to Download Images to Your Computer 110
Installation.............................................................. 111
For Windows 98/98SE/Me/2000......................111
Uninstalling the Software.................................112
(For Windows 98/98SE/Me/2000) ................... 112
For Windows XP..............................................113
Uninstalling the Software.................................114
(For Windows XP) ........................................... 114
Installing Acrobat Reader....................................... 115
Connecting the Camera to a Computer .................116
Downloading Pictures to Your Computer............... 117
For Windows 98/98SE/Me/2000......................117
For Windows XP..............................................118
How to Use the RICOH Gate L.............................. 120
The RICOH Gate L Window ............................120
How to Use the Optional settings.................... 121
How to Use the Background Illustration Settings. 122
For Downloading Images Directly to Your Computer
from an SD Memory Card ................................ 123
Images in a PC Card....................................... 123
Section 2 Downloading Images to a Computer
(For Macintosh)
Using the Software Provided................................. 125
Software and OS Applicability Table............... 125
System Requirements ........................................... 126
Preparing to Download Images to Your Computer 127
Installation ............................................................. 128
For Mac OS 8.6 to 9.2.2.................................. 128
For Mac OS X 10.1.2 to 10.2 .......................... 129
Uninstalling the Software
(For Mac OS 8.6 to 9.2.2)........................... 130
Uninstalling the Software
(For Mac OS X 10.1.2 to 10.2).................... 130
Connecting the Camera to a Computer................. 131
Downloading Pictures to Your Computer .............. 132
For Mac OS 8.6 to 9.2.2.................................. 133
For Mac OS X 10.1.2 to 10.2 .......................... 134
The RICOH Gate L Window............................ 135
How to Use the Optional Settings ................... 136
Section 3 Displaying Thumbnail Images
(How to Use DU-10)
Starting and Exiting DU-10 .................................... 138
DU-10 Window................................................ 138
Exiting DU-10 .................................................. 138
Thumbnail Display Description.............................. 139
Switching the Ordering of Images ......................... 140
Changing the Display Size .................................... 141
Viewing Images in a slide show............................. 142
To View a slide show ...................................... 142
Using Auto slide show..................................... 143
How to Use the slide show Dialog Box ........... 143
Viewing Image Information.................................... 144
Using the File Menu ........................................ 144
Using the Shortcut Menu................................. 144
Displaying the Viewer Screen................................ 145
Viewer Screen................................................. 145
Appendices
A. Specifications................................................... 147
B. Optional Accessories ....................................... 149
C. Using the Accessory Shoe............................... 149
D. SD Memory Card Recording Capacities.......... 150
E. Using Your Camera Abroad............................. 150
F. Cautions on Use............................................... 151
G. Care and Storage ............................................ 152
H. Troubleshooting ............................................... 153
I. Error Messages ................................................. 159
J. About the Warranty and Servicing.................... 160
Ricoh Service Offices ............................................ 163
Page 5

Chapter 1 Using Your Camera
Section 1 Getting Started
This section explains how to get your camera ready, from taking it
out of the package to preparing to shoot.
Page 6

Chapter 1 / Section 1 Getting Started
Checking that everything is Packed
The following items should be included with the camera. Please make sure everything was packed.
Caplio 300G
Video Cable
AA Alkaline Batteries (2)
CD-ROM
The software and the operation manual
are included on this CD-ROM.
CD-ROM from Kodak
Contains the Kodak EasyShare
software.
USB Cable
Warranty Card
Neckstrap
Safety Precautions
Quick Start Guide
Attaching the neck strap to
the camera
So you don’t drop your camera,
attach the included neck strap.
Thread the tips of the neckstrap
through the camera's eyelets and
attach them as shown.
Optional Accessories
AC Adaptor (AC-4a)
Rechargeable Battery
(DB-43)
• Other products sold separately: PC Card Adaptor (FM-SD53)
Battery Charger
(BJ-2)
• In the unlikely event that something is missing or damaged, please contact the store where you purchased
the camera.
• After checking the contents of the warranty card, please keep it in a safe place.
6
Page 7

Chapter 1 / Section 1 Getting Started
Names of Parts
It is necessary to know these in order to understand the explanations in this manual. Check the
following.
TCamera
Front View
Rear View
Rear View
1. Shutter release button
2. Power button
3. Mode Dial
4. Flash
5. Accessory Shoe
6. AF Window
7. Viewfinder
8. Terminal Cover
9. Lens
10. USB Terminal
11. Video Out Terminal
1. Auto Focus Lamp
2. Viewfinder
3. Flash Lamp
4. (Delete)/ (Self-timer) Button
5. (Wide-angle)/ (Thumbnail Display) Button
6. (Telephoto)/ (Enlarged View) Button
7. / (Quick Review) Button
8. / (Flash) Button
9. Button
10. / (Macro)Button
11. Button
12. Button
13. Button
14. LCD Monitor
15. Eyelets
16. Battery/Card Cover
17. Tripod Screw Hole (underside)
Left Side, looking
from the front
Bottom
7
Page 8

Chapter 1 / Section 1 Getting Started
How to Use the Mode Dial
The Mode Dial is on the top of the camera.
The Mode Dial is used to select the desired mode and operation for shooting and playback (still image
viewing).
Turn the Mode Dial to the symbol of the
mode you want to use.
Mode Dial Symbols and Functions
Symbol Mode Name Function
Setup Mode Allows you to set and confirm camera settings.
Movie Mode Allows you to record movies.
Scene Mode Allows you to optimize the camera settings for six different scenes.
Shooting Mode Allows you to shoot still images.
Playback Mode Allows you to play back your movies and still images or delete them.
8
Page 9

Chapter 1 / Section 1 Getting Started
Inserting the Batteries
The following batteries can be used in the camera. Please choose which kind to use according to your needs.
Battery Type Feature
AA Alkaline Batteries (LR6)
(included)
Rechargeable Battery (DB43, DB-40)
(sold separately)
Nickel-Hydrogen Battery
(available in stores)
Below is an indication of the number of images you can take.
Battery Type Number of Shots Number of Shots (In the Synchro-Monitor Mode: see p.21)
AA Alkaline Batteries (LR6) approx. 50 approx. 60
Rechargeable Battery approx. 350 approx. 400
The number of shots is based on a temperature of 22 degrees celsius, shooting at 30–second intervals and one out of every
two being shot with the flash.
If you set the camera to the Power-Save mode, the number of shots you can take will increase.
In addition to the batteries, you can use the AC Adaptor (sold separately).
You can obtain them anywhere, so they are convenient for travel.
However, in a low-temperature environment the number of shots you can take will decrease. Warm
the batteries before use.
This is a lithium–ion battery. This is economical because you can recharge it using the battery charger
BJ-2 (sold separately) and use it over and over again. They last a long time, so they are convenient for
travel.
This is economical because you can recharge it and use it over and over again. Please use a
recharger available in stores.
Insert the batteries following these steps.
Turn the battery/card cover's knob toward
the mark to open the cover.
Insert the two batteries, making sure they are
facing the correct way.
When the batteries wear out
Just before the batteries wear out, is displayed on the LCD Monitor. When this happens, replace the
batteries with a fresh set.
Close the battery/card cover and turn the
knob toward the mark.
• Before opening or closing the cover, make sure that any contaminants adhering to the camera, such as water,
sand, or mud, are removed from it. Do not open and close the cover in a place where such contaminants can easily
get into the camera.
• Other batteries, such as manganese (R6) and Ni-Cd batteries cannot be used.
• Please remove the batteries to store the camera if you are not going to use it for long periods of time.
• The strength of alkaline batteries varies by brand and become weaker the longer it is from the time of manufacture.
Battery life for alkaline batteries is drastically reduced when cold.
• Nickel metal hydride batteries (available in stores) are not charged at the time of manufacture.Charge before use.
• The battery may become very hot immediately after operation. Turn the camera off and leave it to cool down
sufficiently before removing the battery.
9
Page 10

Chapter 1 / Section 1 Getting Started
Using the Rechargeable Battery
The DB-43 rechargeable battery (sold separately) is convenient for extended use because it can be
used over and over again.
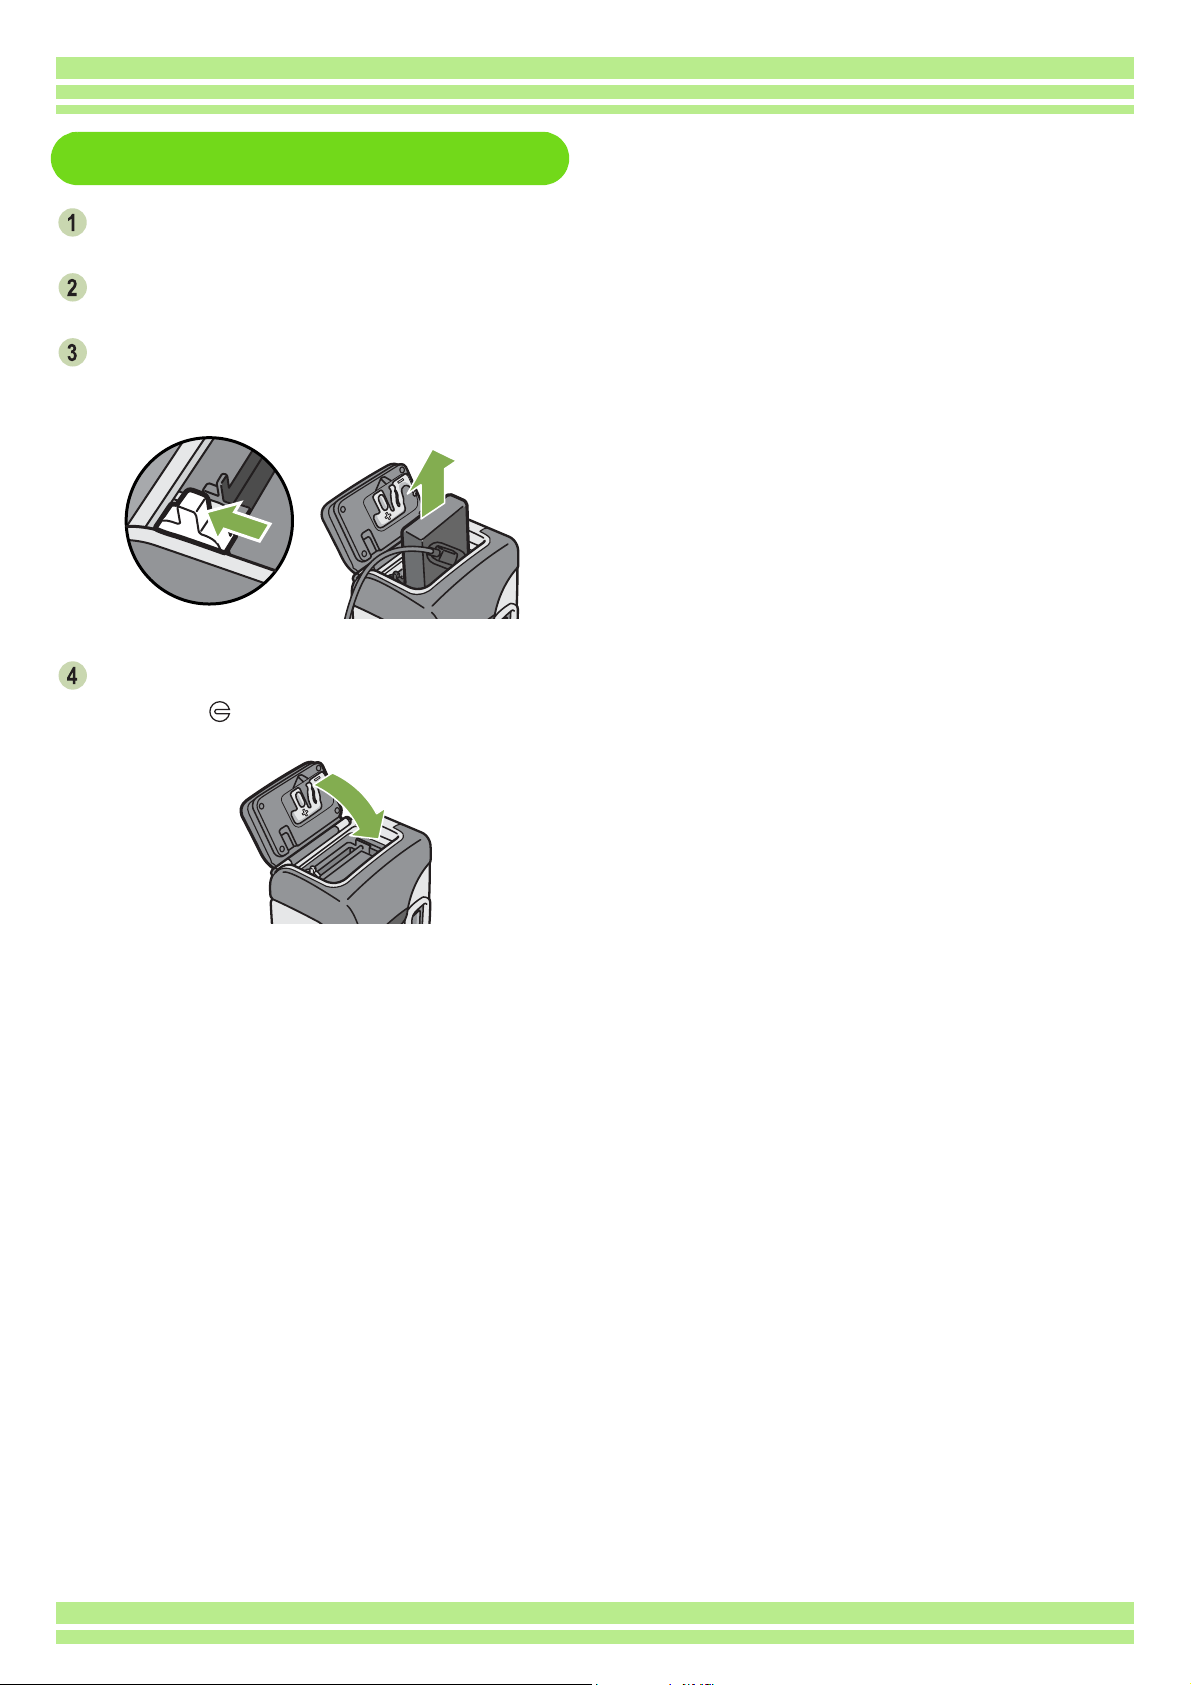
Inserting the rechargeable
battery
Make sure the power is off.
Turn the battery/card cover's knob toward the
mark to open the cover.
Insert the rechargeable battery.
Push the battery in firmly until it is automatically
locked into place with the yellow latch.
Label face
Removing the rechargeable
battery
Make sure the power is off.
Turn the battery/card cover's knob toward
mark to open the cover.
the
Release the yellow latch to remove the
battery.
Close the battery/card cover and turn the knob
toward the mark.
• Before opening or closing the cover, make sure that any contaminants adhering to the camera, such as
water, sand, or mud, are removed from it. Do not open and close the cover in a place where such
contaminants can easily get into the camera.
• Remove the batteries if you are not going to use the camera for a long period of time.
• The batteries may become hot after extended use. Touching the batteries immediately after use could result
in burns to your fingers.
• For recharging the battery, use battery charger BJ-2 (sold separately).
10
Close the battery/card cover and turn the knob
toward the mark.
Page 11

Chapter 1 / Section 1 Getting Started
Using the AC Adaptor
When shooting or viewing still images for a long time, or when connecting to your computer, use of the
AC Adaptor (sold separately) is recommended.
Battery for use with
the AC Adaptor
AC Adaptor
Setting up the AC adaptor
Make sure the power is off.
Turn the battery/card cover's knob toward the
mark to open the cover.
Insert the AC Adaptor Battery.
Push the battery in firmly until it is automatically
locked with the yellow latch.
Plug the power cord into an outlet.
• Be sure to firmly attach cables and plug in cords.
• When you are not using the camera, unplug the AC Adaptor from the camera and the power outlet.
• While in use, if you detach the AC Adaptor or unplug it from the outlet, data may be lost.
• The AC adaptor is used with the battery/card cover open. Do not attempt to close it.
11
Page 12
Removing the AC adaptor
Make sure the power is off.
Unplug the power plug from the outlet.
Release the yellow latch to remove the
battery.
Chapter 1 / Section 1 Getting Started
Close the battery/card cover and turn the knob
toward the mark.
12
Page 13

Turning the Power On/Off
The camera is switched between On and Off as follows.
Chapter 1 / Section 1 Getting Started
To turn the camera On
Press the power button
The flash lamp and auto-focus lamp will flash
altermately for several seconds.
To turn the camera Off
Auto Power-off
• If the camera goes unused for a set period of time, it will automatically turn itself off to save power. To use
the camera again, simply press the power switch.
At time of purchase, the Auto Power-off function is set to one minute.
• The Auto Power-off function does not work when connected to your computer.
To turn the camera Off
Press the power button
For how to change the Auto Power-off time, see p.100.
13
Page 14

Chapter 1 / Section 1 Getting Started
Setting the Date and Time
You can take still images with the time or date stamped onto the picture.
Immediately after purchasing the camera, the date and time settings will not be correct, so be sure to
set the date and time before using this feature.
To set the date and time, follow the steps below.
Buttons used here
Make sure the power is on and then turn the
Mode Dial to (Setup Mode).
The Setup screen is displayed on the LCD Monitor.
Set the year, month, date and time by
pressing .
If you hold down the buttons, you can increase/
decrease the value quickly.
In [FORMAT], choose the Date and Time
format.
Press the button to select [DATE
SETTINGS] and then press the button.
Check the display on the bottom of the
screen and then press the button.
Once you have set the date and time, the display
returns to the Setup screen.
If the batteries are removed for about two weeks, the date and time settings will be lost. These settings must be
made again.
14
Page 15

Chapter 1 / Section 1 Getting Started
Inserting the SD Memory Card
You can record the still images and movies you have taken on SD Memory Cards
(available in stores) or in the camera's internal memory.
Write-protecting your images
If you move the card's write-protection switch to LOCK, your still images cannot be
accidentally erased, and the memory card cannot be formatted. If you return the
switch to the former position, it is once again possible to erase images and format
the card.
It is recommended to switch to LOCK after recording important images.
The internal memory capacity is 8MB.
About where to record
When an SD Memory Card is not inserted, the camera records images in the internal memory; when an SD
Memory Card is inserted, it records images on the SD Memory Card.
When no memory card is loaded
Records to
internal
memory
Inserting the SD Memory Card
Turn the power off.
Turn the battery/card cover's knob toward
the mark to open the cover.
When an SD Memory Card is loaded
Records to
SD Memory
Card
Close the battery/card cover and turn the knob
toward the mark.
When inserting the SD Memory Card, take care
not to get any dirt on the card's metal parts.
Make sure the card is facing the right way
and then push the card all the way in until it
clicks
15
Page 16

Chapter 1 / Section 1 Getting Started
Removing the SD Memory Card
Make sure the power is off.
Turn the battery/card cover's knob toward
the mark to open the cover.
Press the card gently and release it.
The card pops out just a little.
Close the battery/card cover and turn the
knob toward the mark.
Gently take the card out of the camera.
16
Page 17

Chapter 1 / Section 1 Getting Started
How to Use the LCD Monitor
The LCD Monitor can be used to view the subject when you are shooting an image, as well as for
playing back movies and still images. Symbols and numbers indicating the camera's status and
settings are displayed on the screen of the LCD Monitor.
Screen Examples when Shooting Pictures
Still Image Mode Movie Mode
Symbol Display Contents Refer to
1.Flash
2.WHITE BALANCE (No Display)
Flash Off
Auto
Red-eye reduction
Forced Flash
Slow Synchro
AUTO
Daylight
Overcast
Tungsten light
Fluorescent light
One-push
Current flash mode. p.47
White Balance set value. p.52
17
Page 18

Still Image Mode Movie Mode
Symbol Display Contents Refer to
3.FOCUS (No Display)
AF(Auto-Focus)
MF(Manual Focus)
Chapter 1 / Section 1 Getting Started
Focus set value. p.58
Snapshot
(Infinite Telephoto)
4.Recording Destination Recording to internal memory. p.15
Recording to an SD Memory Card. p.15
5.Flash Mode Types Still Image Shooting Mode. p.33
Movie Mode. p.42
Multi-Shot Mode. p.39
S Multi-Shot Mode p.39
M Multi-Shot Mode p.39
PORTRAIT Mode. p.36
SPORTS Mode. p.36
LANDSCAPE Mode. p.36
NIGHTSCAPE Mode. p.36
TEXT Mode. p.36
HIGH SENSITIVITY Mode. p.36
6.INTERVAL Interval Interval Shooting. p.67
7.Camera Shake May be displayed while adjusting focus.
8.Picture Quality
Fine
Picture Quality setting. p.55
—
Normal
18
Page 19

Chapter 1 / Section 1 Getting Started
Still Image Mode Movie Mode
Symbol Display Contents Refer to
9.Remaining Number of
Still Images
(Value) Number of photos that can be taken with
the current settings.
10.Image Size (Setting Value) Image Size setting. p.55
11.ISO SETTING (Setting Value) ISO Speed set value. p.62
12.EXPOSURE COMP. (Setting Value) Exposure compensation set value. p.50
13.AUTO BRACKET AB Auto-Bracket Shooting. p.64
14.SHARPNESS SOFT Sharpness (edge quality) set value. p.63
(No display) Standard
SHARP
15.Date/Time Date Imprint mode. p.69
—
16.TIME EXPOSURE (Setting Value) Indicates exposure time. p.66
17.Battery
Insufficient Capacity
Remaining Battery Power.
—
18.Zoom Bar - Zoom status. p.43
19.PHOTOMETRY (No Display) Multi Light Metering Method. p.60
Center
Spot
20.Self-timer
After 10 Seconds
Self-Timer Shooting. p.49
After 2 Seconds
21.Macro Shooting Macro Shooting. p.45
22.Aperture Value - Aperture size.
23.Shutter Speed - Shutter speed.
24.Remaining Recording
Time
(Value) Length of time remaining for shooting with
the current settings.
25.Recording Time (Value) Amount of time recorded.
• When shooting in particularly bright places, it may not be possible to prevent overexposure. In this case, the
[!AE] symbol will be displayed.
• The LCD monitor may display messages to inform you of operational instructions or the camera status while
in use.
—
—
—
—
19
Page 20

Chapter 1 / Section 1 Getting Started
The Screen During Playback
Still Image Mode Movie Mode
Symbol Display Contents Refer to
1.PRINT DPOF specified. p.93
2.PROTECT Protected status. p.88
3.Playback data source Indicates playback from internal memory. p.78
Indicates playback from an SD Memory Card. p.77
4.Mode Types Still Image Mode. p.77
Movie Mode. p.79
5.Picture Quality
Fine
Picture Quality setting. p.55
Normal
6.Number of Playback
The number of the file being played back.
—
Files
7.Total number of files Total number of files recorded.
—
8.Image Size (Setting Value) Image size. p.55
9.Folder No - Number of the folder in which the file is saved.
10.File No - Number of the file being played back.
11.Shutter Speed - Shutter speed.
12.Aperture Value - Aperture size.
13.Battery
Insufficient
Remaining battery level. p.9
—
—
—
—
Capacity
14.Playback Time (Time) Movie playback time.
15.Indicator Elapsed time of movie playback.
—
—
• The LCD monitor may display messages to inform you of operational instructions or the camera status while
in use.
20
Page 21

Chapter 1 / Section 1 Getting Started
Switching the Screen Display
If you press , you can change the screen display mode, such as switching between display/no
display of symbols, etc.
TWhen Shooting
Grid Guide
Display Symbols
No Display
Display
button
ÅEIn the Synchro-Monitor Mode except with the following operations, the LCD Monitor is turned off (No Display). This is
a useful mode to reduce power consumption.
Half-press the shutter release button. The LCD Monitor is tuned on and you can confirm composition. After you
finish shooting with Full-Press, the LCD Monitor will automatically turn off.
Press the (Quick Review) button. You can view the photo you just took (see p.74). By pressing the
(Quick Review) button again, you can turn the LCD Monitor off.
Press the button.
The LCD Monitor Display is turned on and you can make various settings
for shooting (see p.27). By pressing the button again, you can turn
the LCD Monitor off.
Synchro-Monitor
Mode
• You cannot turn the LCD Monitor Display on/off by pressing (Self-timer), (Flash) or (Macro) buttons.
• Turning the LCD Monitor Display Off conserves battery life. In this case, shoot using just the Viewfinder.
When the No Display or Grid Guide Display is on, symbols will appear for a few seconds right after
you have pressed Self-timer, Flash or Macro button.
For how to display the grid guide, see p.71.
TWhen Playing Back
Display Symbols
No Display
button
21
Page 22

Chapter 1 / Section 1 Getting Started
Button Functions
The following table summarizes the functions of the camera's buttons.
Power Button, see p.13.
Mode Dial, see p.8.
Shutter Release Button, see p.30.
Button Shooting Mode Playback Mode Menu display
(Delete)/
(Self-timer) Button
( : Flash) Button
(: Macro) Button
( : Quick Review)
Button
Button
Button
(Wide-angle)/
(Thumbnail
Display) Button
(Telephoto)/
(Enlarged View)
Button
Button
Button
Button
If you press the button in
Shooting Mode, self-timer
mode is activated and you
can take photos using the
self-timer (see p.49).
Switches between Flash/
Flash Off and other Modes
(see p.47).
You can take close-ups
(see p.45).
The last still image you took
is displayed (see p.74).
If you press the button in
Shooting Mode, you can
shoot with the wide-angle
zoom (see p.43).
If you press the button in
Shooting Mode, you can
shoot with the telephoto
zoom (see p.43).
Switches the display of symbols on the LCD Monitor (see p.21).
This button is used for menu operations (see p.23) displayed on the LCD.
This button is used for setting the various shooting methods (see p.23), or
downloading still images onto your computer (see p.117, p.132).
If you press the button
during Playback Mode, you
can delete the still image or
movie that is displayed on
the LCD Monitor (see
p.85).
Displays the previous still
image or movie (see p.77).
Displays the next still
image or movie (see p.77).
Displays the still image (or
movie) on the right, left,
above or below in
Thumbnail Display mode.
(see p.80).
If you press the button in
Playback Mode, the LCD
Monitor display is split,
allowing you to see sets of
still images at one glance
(6 images at once) (see
p.80).
If you press the button in
Playback Mode, image is
displayed on the LCD
Monitor up to 3.4 times
larger (see p.81).
Moves the frame left,
right, up and down (see
p.27).
22
Page 23

Chapter 1 / Section 1 Getting Started
Screens
Default values set when you purchased your camera are surrounded by brackets [ ] in the selection
options.
TShooting Menu (Shooting Mode)
In Shooting Mode, display by pressing the button.
Setting Option Refer to
EXPOSURE COMP. -2.0 ~ +2.0 p.50
WHITE BALANCE
PIC QUALITY/SIZE F2048/N2048/F1280/[N1280]/N640 p.55
FOCUS [AF]/MF/SNAP/∞ p.58
CONT. MODE [OFF]/CONT/SCONT/MCONT p.39
PHOTOMETRY [MULTI]/CENTRE/SPOT p.60
ISO SETTING [AUTO]/ISO200/ISO400/ISO800 p.62
SHARPNESS SHARP/[NORMAL]/SOFT p.63
AUTO BRACKET ON/[OFF] p.64
TIME EXPOSURE [OFF]/1/2/4/8 seconds p.66
INTERVAL p.67
DATE IMPRINT [Off]/Date/Date and Time p.69
RESTORE DEFAULTS p.70
[ ] / (Daylight)/ (Overcast)/ (Tungsten light)/
(Fluorescent light)/ (One Push)
p.52
23
Page 24
Chapter 1 / Section 1 Getting Started
TShooting Menu (Movie Mode)
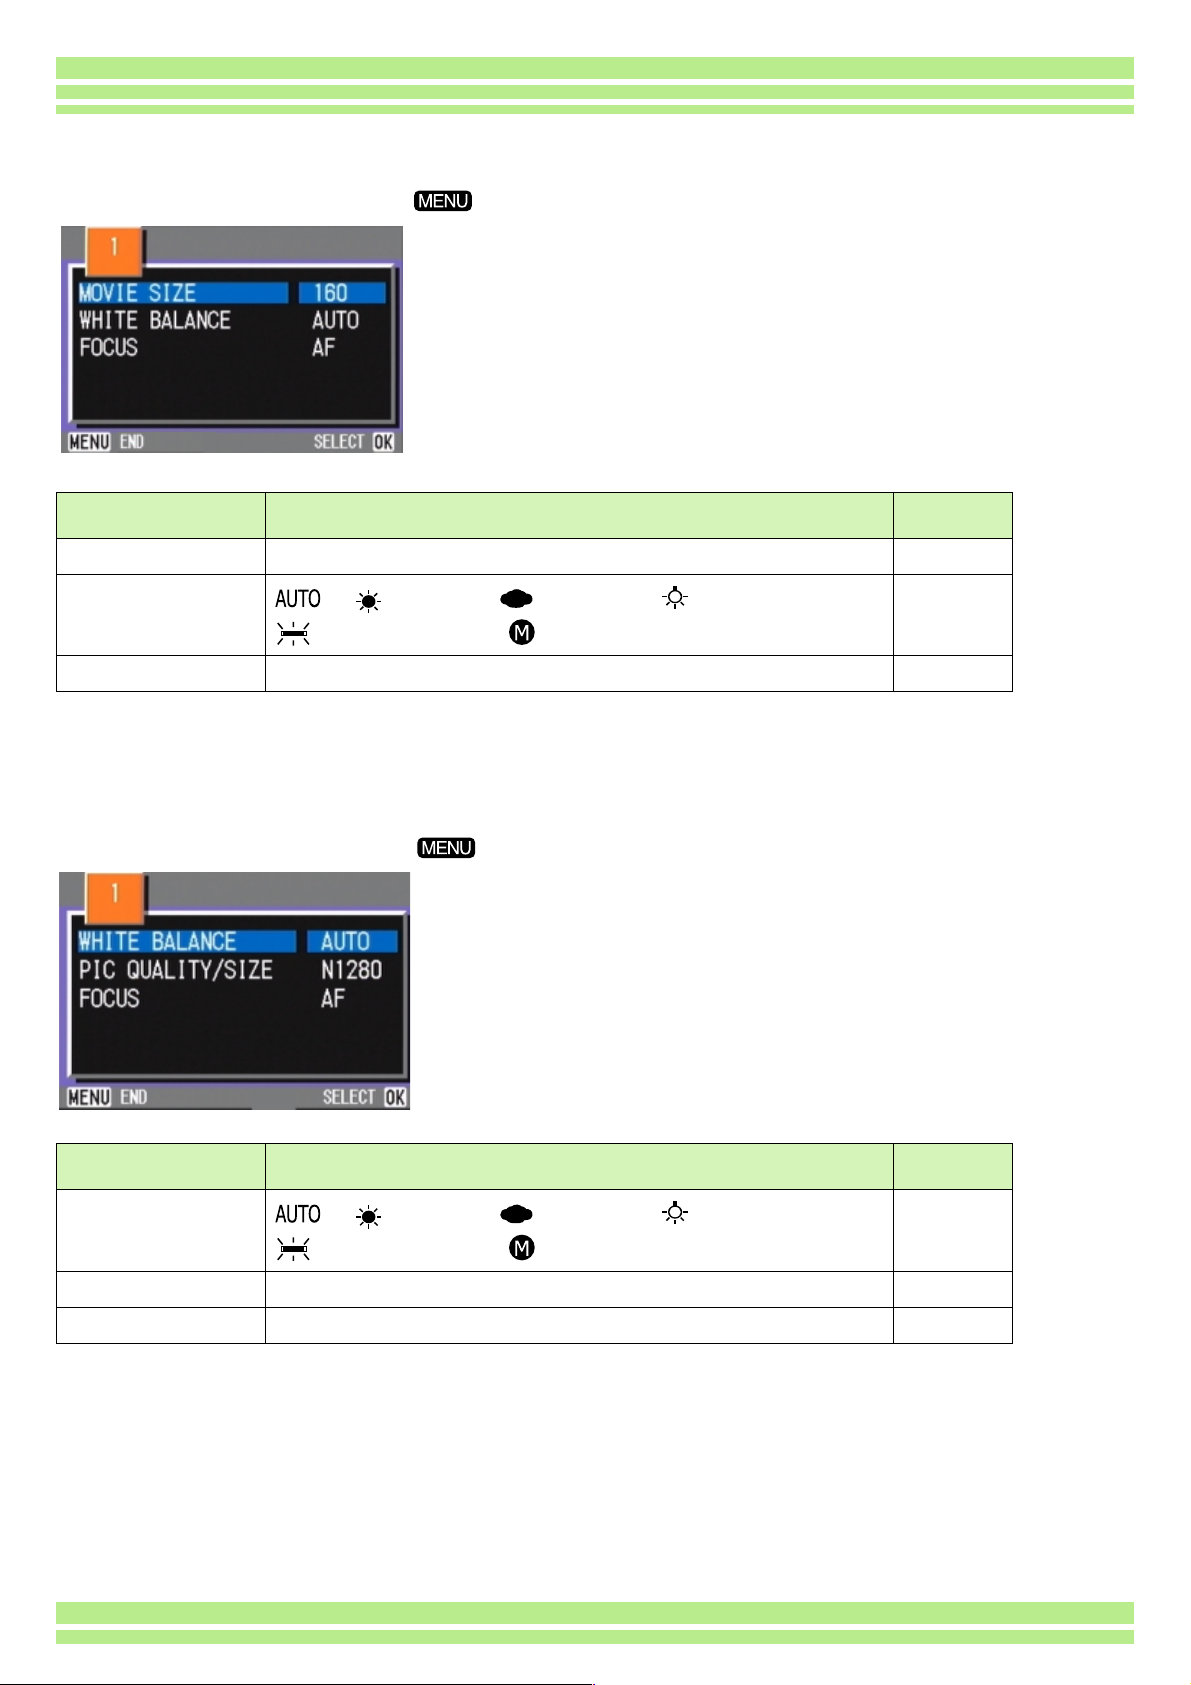
In Movie Mode, display by pressing the button.
Setting Option Refer to
MOVIE SIZE [320×240] / 160×120 p.42
WHITE BALANCE
FOCUS [AF]/MF/SNAP/∞ p.58
[ ] / (Daylight)/ (Overcast)/ (Tungsten light)/
(Fluorescent light)/ (One Push)
p.52
TShooting Menu (Scene Mode/except in Text Mode)
In Scene Mode, display by pressing the button.
Setting Option Refer to
WHITE BALANCE
PIC QUALITY/SIZE F2048/N2048/F1280/[N1280]/N640 p.55
FOCUS [AF]/SNAP/∞ (except the Landscape Mode) p.58
[ ] / (Daylight)/ (Overcast)/ (Tungsten light)/
(Fluorescent light)/ (One Push)
24
p.52
Page 25

Chapter 1 / Section 1 Getting Started
TShooting Menu (Text Mode)
In Text Mode, display by pressing the button.
Setting Option Refer to
DENSITY DEEP/[NORMAL]/LIGHT p.72
TPlayback Menu
In Playback Mode, display by pressing the button.
Setting Option Refer to
SLIDE SHOW ON/[OFF] p.82
PROTECT Select/Release 1 FILE/ Select/Release ALL FILES p.88
PRINT Select/Release 1 FILE/ Select/Release ALL FILES p.93
COPY TO CARD p.92
25
Page 26

Tscene-selection Screen (Scene Mode)
In Scene Mode, the screen is displayed when you select a scene.
Symbol Setting Content Refer to
PORTRAIT p.36
SPORTS p.36
LANDSCAPE p.36
NIGHTSCAPE p.36
Chapter 1 / Section 1 Getting Started
TEXT MODE p.36
HIGH SENSITIVITY p.36
TSetup Screen (Setup Mode)
This screen is displayed in Setup Mode.
Setting Option Refer to
CARD FORMAT p.97
IN FORMAT p.98
DATE SETTINGS p.14
POWER SAVE ON/[OFF] p.99
AUTO POWER OFF OFF/[1]/5/30 Minutes p.100
BEEP SOUND [ON]/OFF p.101
SEQUENTIAL NO. ON/[OFF] p.102
IMAGE CONFIRMATION TIME OFF/[1]/2/3 Seconds p.103
LCD BRIGHTNESS p.104
LANGUAGE JPN/[ENG]/FRE/GER/CHI p.105
VIDEO OUT MODE [NTSC]/PAL p.106
26
Page 27

The Basics of the Shooting
Menu/Playback Menu
Operation
Chapter 1 / Section 1 Getting Started
To display the menu:
To switch between menu screens
(Shooting Menu):
To select an item:
To select a setting value (shooting menu):
Turn the Mode Dial to (Shooting Mode) or (Playback Mode).
Press the button.
The menu appears. On the menu screen, you can move between screens by
pressing the
buttons and between items by pressing the buttons.
Press the buttons.
You can switch the menu screen from [1] to [3].
Press the buttons to select the desired item.
Press the button.
Press the buttons to select the desired item.
Press the button.
To implement a confirmation
screen (shooting menu):
To select an item you want to
implement (playback menu):
To return to the shooting screen/
playback screen:
• On the setting selection screen, the item with the orange T displayed is the current setting. Even if you
change the setting by moving the blue indicator, until you finalize the setting the orange indicator remains to
show what the previous setting was.
• The menu screen sequence is slightly different depending on the item for which the setting change is being
made. For a detailed explanation of each of the items, see Section 2 or Section 3.
Press the button to select [YES].
Press the button.
Press the buttons to select the item you want to implement.
Press the button.
Press the button.
27
Page 28

The Basics of the Setup Screen
Operation
Chapter 1 / Section 1 Getting Started
To display the Setup Screen:
To select an item:
To select a setting value:
When you have selected [EXECUTE]:
To close the Setup Screen:
Turn the Mode Dial to (Setup Mode).
The Setup Screen is displayed.
Press the buttons to select the desired item.
Press the buttons to select the desired item.
Press the button.
The following screen is displayed, so make the necessary
settings.
Switch the Mode Dial to another mode.
The sequence of operations is slightly different depending on the item for which the setting change is being
made. For a detailed explanation of each of the items, see Section 6 .
28
Page 29

Section 2 Basic Shooting
The basics of shooting are explained here, from how to hold your
camera to how to shoot still images and movies.
Page 30

Chapter 1 / Section 2 Basic Shooting
How to Hold the Camera
If the camera moves when you press the shutter release button, your still images might not come out
clearly (due to camera shake).
Hold the camera as below for best results.
Hold the camera with both hands and lightly
press both elbows against your body.
Put your finger on the shutter release button
• Be careful when you are shooting not to get a finger, your hair, or the strap in front of the lens or the flash.
• To prevent camera shake, hold the camera securely with both hands when you shoot or use a tripod.
Consider using a tripod to prevent camera shake in the following situations:
• When shooting in a dark place, if you do not use the flash or if you use the Slow Synchro mode.
• When you shoot with the zoom.
30
Page 31

Chapter 1 / Section 2 Basic Shooting
How to Focus
The area displayed on the LCD Monitor is shot as a still image or a movie. When adjusting focus,
press the shutter release button halfway (half-press).
To adjust focus, follow the steps below.
Point the lens toward the subject you want to
shoot.
Compose the picture on the LCD Monitor.
The focus is set at the center of the screen,
so use the screen to center your subject.
Half-press the shutter release button.
The f-stop (aperture size) and shutter speed are
displayed in the bottom part of the screen, and the
camera focuses.
Once the shot is in focus, the exposure and white
balance are fixed and the crosshair in the center of
the LCD Monitor turns green, as does the auto-focus
lamp in the lower left of the Viewfinder. Check one of
these to make sure the subject is in focus.
If the camera cannot automatically focus, the
crosshairs in the center of the LCD monitor turn red
and the auto-focus lamp in the lower left of the
viewfinder blinks in green.
Auto focus lamp
Crosshair
Color of
crosshairs
Before
focusing
Focused Green On (green)
Failed to focus Red Blink (green)
White Off
Auto focus lamp
When the grid appears, the crosshairs do not appear in the middle of the LCD monitor. With the auto focus
lamp, check that the shot is in focus.
31
Page 32

Chapter 1 / Section 2 Basic Shooting
If the subject is not centered on your composition, see p.35.
• There is another shooting method, which is to fully press the shutter once, without using the half-press
method. Full-press shooting is good for capturing the moment. However, you cannot check that your shot is in
focus while shooting. (see p.34)
• You can use the battery for a longer period of time by using the viewfinder and shooting in power-save mode
(see p.99). In this mode, however, you cannot check the focus on the LCD monitor. Instead, observe the auto
focus lamp (in the lower left of the viewfinder), which lights up in green when the shot is in focus.
• The range visible through the viewfinder and that being shot may deviate a little bit, depending on the
shooting distance. To check the focus or the shooting range accurately before shooting, please use the LCD
monitor.
32
Page 33

Chapter 1 / Section 2 Basic Shooting
Shooting Still Images
Use the Shooting Mode to take still images.
There are two methods of using the shutter release button, pressing the shutter in two stages (half-
press) and pressing it all the way down at once (full-press). When you use half-press, you can confirm
that your shot is in focus on the LCD Monitor. When you want to capture the moment, full-press is
• For how to shoot with Zoom, see p.43
• For how to shoot Close-ups, see p.45
Check the Focus and Shoot
(Half-press)
Buttons used here
Turn the Mode Dial to (Shooting Mode).
Compose your shot either by looking through
the Viewfinder or at the LCD Monitor.
Put the subject of your photo right in the
center and press the shutter release button
half-way.
The f-stop (aperture size) and shutter speed are
displayed in the bottom part of the screen, and the
camera focuses.
Once the shot is in focus, the exposure and white
balance are fixed and the crosshair in the center of
the LCD Monitor turns green, as does the auto-focus
lamp in the lower left of the Viewfinder. Check one of
these to make sure the subject is in focus.
Gently press the shutter release button all
the way.
The still image you have taken freezes for a moment
on the LCD Monitor and is recorded.
• When the image confirmation time is set to OFF, it is not displayed. See p.103.
33
Page 34

Chapter 1 / Section 2 Basic Shooting
Capture the Moment Shooting
(Full-press)
Buttons used here
Turn the Mode Dial to (Shooting Mode).
Put the subject of your photo right in the
center and press the shutter release button
all the way.
After the camera focuses automatically, the still image
is taken and recorded.
Compose your shot either by looking through
the Viewfinder or at the LCD Monitor.
• Certain subjects are hard to bring into focus:
It may be impossible to bring the following subjects into focus.
• Subjects lacking contrast (the sky, a white wall, the hood of a car, etc.)
• Flat two-dimensional objects with only horizontal lines and no significant protrusions
• Quickly moving objects
• Things in poorly lit places
• Areas with strong backlighting, or reflections
• Things that flicker, such as fluorescent lights
When you want to shoot subjects like this, first focus on an object the same distance as your subject and then
shoot. (see p.35)
• When shooting in focus-poor conditions, use the Half-Press method.
34
Page 35

Chapter 1 / Section 2 Basic Shooting
When the Subject is not Centered on Your Composition (Focus Lock)
When the subject of your composition is not centered, you can compose your picture after setting the
focus and then shoot. This method is called "Focus-Lock."
Buttons used here
Turn the Mode Dial to (Shooting Mode).
Put the subject of your photo right in the
center of the LCD Monitor or the Viewfinder
and press the shutter release button halfway.
The f-stop (aperture size) and shutter speed are
displayed in the bottom part of the screen, and the
camera focuses.
Once the shot is in focus, the exposure and white
balance are fixed and the crosshair in the center of
the LCD Monitor turns green, as does the auto-focus
lamp in the lower left of the Viewfinder. Check one of
these to make sure the subject is in focus.
With the shutter half-pressed, compose your
shot.
Gently press the shutter release button all
the way.
35
Page 36

Chapter 1 / Section 2 Basic Shooting
Shooting with Scenery-Matching
If you use the Scene Mode, you can select from among six types of shooting modes and shoot
automatically with optimal settings for the scene.
You can select a mode from the following six types, in Scene Mode.
PORTRAIT
This is best for taking pictures of people.
SPORTS
This is best for pictures of moving objects.
NIGHTSCAPE
Use when shooting night scenes.You can also shoot with
people in the frame.
TEXT MODE
This is best for black and white subjects like printed
documents. These still images are recorded as TIFF
format files.
LANDSCAPE
This is best for scenery with a lot of blue sky or greenery.
• You can set White Balance while in Scene Mode as well (see p.52), but it may not be possible to get the
effect that matches a scene.
• Manual focus cannot be used in Scene Mode.
• In Scene Mode, those pictures displayed in the background of the explanation screen are just for effect.
HIGH SENSITIVITY
This is best for taking pictures in dimly lit places.
36
Page 37

Chapter 1 / Section 2 Basic Shooting
To select a Scene Mode, follow the steps below.
Buttons used here
Turn the Mode Dial to (Scene Mode).
The scene–selection screen appears.
Press the buttons to select the mode
you want to use.
Press the button.
The camera switches to the Scene Mode shooting
screen and the symbol of the Mode you selected is
displayed in the top of the screen.
If you press the button, the scene-selection screen
is displayed and you can change the mode.
If you press button, the shooting menu
appears.
Press the shutter release button.
• If you switch the Mode Dial to (Shooting Mode), you can operate Shooting Mode as usual.
• If you return to Scene Mode again, the scene-selection screen as previously used is displayed.
• In Text Mode, image size cannot be set to 640 × 480 pixels. If a photo is taken with the 640 × 480 setting, the
size automatically becomes 1280 × 960 pixels.
• When you want to change PIC QUALITY/SIZE in PORTRAIT/SPORTS/LANDSCAPE/NIGHTSCAPE/HIGH
SENSITIVITY Modes, see p.55.
• To make changes to density in TEXT Mode, see p.72.
• To change the focus setting to manual or other, see p.58.
• To make changes to the White Balance settings, see p.52.
TIFF File
This is read "tiff" file. This is a file format for saving image data.
The file size is larger than with JPEG (jay-peg) format.
37
Page 38

Chapter 1 / Section 2 Basic Shooting
Combination of Scene Mode and Function
Depending on the Scene Mode, the way functions work may differ from when in normal shooting
mode. Refer to the table below.
Mode Name Flash Macro Shooting
PORTRAIT Initial setting: Flash Off Disabled
SPORTS Initial setting: Flash Off Disabled
LANDSCAPE Fixed on Flash Off Disabled
NIGHTSCAPE Forced flash is disabled Disabled
Initial setting: Auto
TEXT MODE Initial setting: Flash Off Enabled
HIGH SENSITIVITY Initial setting: Flash Off Enabled
38
Page 39

Chapter 1 / Section 2 Basic Shooting
Shooting with Multi-Shot
If you switch to Multi-Shot, you can shoot consecutive images.
This is convenient when you want to capture the moment.
There are three ways to shoot Multi-Shots, "CONT", "SCONT" and "MCONT".
CONT (Multi-Shot)
As long as you hold the shutter release button down,
pictures continue to be taken.
The still images are recorded one file each, just as in
normal shooting.
SCONT (S Multi-Shot)
Shoots a continuous stream of images. With just one fullpress of the shutter, you can take 16 consecutive shots at
1/7.5 of a second intervals (a span of about two seconds)..
The 16 still images are grouped together as a set and are
recorded as one image file.
MCONT (M Multi-Shot)
The camera memorizes the scene while you hold the
Shutter Release Button down, and once you release it the
previous two seconds of shots are recorded.
The 16 still images are grouped together as a set and are
recorded as one image file.
• The maximum number of images that can be shot in Multi-Shot mode depends on the image size and picture
quality settings as follows:
F2048 N2048 F1280 N1280 N640
35 6 6 9
• While shooting with Multi-Shot, the LCD Monitor display turns off. Compose your picture and secure it using
a tripod, or use the Viewfinder.
• The Picture Quality Mode and the Image Size Mode of SCONT and MCONT are F2048 or N2048.
39
Page 40

Chapter 1 / Section 2 Basic Shooting
Making Multi-Shot Settings
(CONT. MODE)
To make Multi-Shot settings, follow the steps
below.
Buttons used here
Press the buttons to select [CONT],
[SCONT], or [MCONT].
Press the button.
Press the button.
The Shooting Menu closes and the symbol is
displayed above the screen.
Turn the Mode Dial to (Shooting Mode).
Press the button.
The Shooting menu is displayed.
Select [CONT. MODE] and press the
button.
• When you want to return to normal, single-shot shooting, follow steps through , select [OFF] in step
, and press the button.
• The flash cannot be used.
40
Page 41

Chapter 1 / Section 2 Basic Shooting
Shooting with Multi-Shot
Buttons used here
Operation continued from the previous page:
Compose your picture, then press and hold
the shutter release button.
As long as you hold the shutter release button down,
pictures continue to be taken.
Shooting with M Multi-Shot
Buttons used here
Operation continued from the previous page:
Compose your picture, then press and hold
the shutter release button.
Storing to memory begins.
As soon as you release the shutter release
button, shooting stops.
Shooting with S Multi-Shot
Buttons used here
Release your finger from the shutter release
button.
The camera takes images in memory from two
seconds prior up to release of the shutter release
button.
If you release the shutter release button within
two seconds from the time you first pressed it,
the shots from the time you pressed the shutter
until you released it will be recorded (the
number of consecutive shots will be less than
16).
Operation continued from the previous page:
Compose your picture, then press the shutter
release button.
16 pictures are taken automatically.
41
Page 42

Chapter 1 / Section 2 Basic Shooting
Shooting Movies
You can shoot movies in Movie Mode.
You can select the image size, either 320 × 240, or 160 × 120 pixels.
The maximum shooting time of each is 30 seconds (320 × 240) and 120 seconds (160 × 120). Each
movie you shoot is recorded as one AVI file.
To shoot a movie, follow the steps below.
Buttons used here
Turn the Mode Dial to (Movie Mode).
• The flash cannot be used.
• While shooting movies, only Digital Zoom can be used.
• At the time you press the shutter release button in Step , the shot comes into focus and the
white balance is automatically fixed.
Press the shutter release button.
The camera starts recording.
Recording continues until you press the shutter
release button again.
Pressing the shutter release button again
stops recording.
• To change the image size for movies, see p.55.
• For how to use the zoom function, see p.43.
• For how to use the Digital Zoom, see p.44.
AVI File
This is read "A-V-I" file.
This is a file format used to save movie data.
42
Page 43

Chapter 1 / Section 2 Basic Shooting
Shooting with the Zoom
If you use the (Telephoto):T/ (Wide-angle):W buttons, you can alter the size of the subject in
your photo without having to change your distance from the subject. (Equivalent to a 35mm camera's
35 to 105mm zoom.)
By pressing the (Telephoto) button, the
subject you see in the LCD Monitor and the
Viewfinder becomes larger.
By pressing the (Wide-Angle) button, the
field in the LCD Monitor and the Viewfinder
becomes wider.
Telephoto Zoom
To shoot with the zoom, follow the steps below.
Buttons used here
Turn the Mode Dial to (Shooting Mode).
Compose your picture while viewing either
the LCD Monitor or the Viewfinder and zoom
by pressing either the button, or the
button.
A bar is displayed in the LCD Monitor indicating Zoom
status.
Wide-angle Zoom
Press the shutter release button.
43
Page 44

Chapter 1 / Section 2 Basic Shooting
Shooting with the Digital Zoom
The Digital Zoom function enlarges images by processing them. When you use the digital zoom,
pressing the (Telephoto) button enlarges the subject even more than the specified enlargement
ratio (optical zoom). (Maximum of 3.4 magnification.)
To shoot with the Digital Zoom, follow the steps
below.
Buttons used here
Turn the Mode Dial to (Shooting Mode).
Zoom in to the maximum by pressing the
button, while viewing through the LCD
Monitor.
A bar is displayed in the LCD Monitor indicating Zoom
status.
With the subject image enlarged to the end
of the T side (Telephoto) on the Zoom Bar,
release the button once and press
button again and hold down.
The digital zoom is activated and the subject becomes
larger.
Press the shutter release button.
• The more you enlarge with the digital zoom, the lower the picture quality becomes.
• When using the digital zoom, compose your shot on the LCD Monitor.
• If you use the Mode Dial to change modes, the digital zoom setting is lost.
• To release the digital zoom, press the (Wide-angle) button.
• Digital zoom cannot be used in TEXT MODE.
Optical Zoom
This function enlarges your subject by moving the lens, thus changing the focal length.
44
Page 45

Chapter 1 / Section 2 Basic Shooting
Shooting Close-ups (Macro Photo)
If you use the (Macro) button, you can get up close with the lens and take a photo (Macro Photo).
This is good for shooting flowers, insects and other small subjects, because you can get a close-up of
one centimeter (1/2 inch) from your subject.
To shoot close-ups, follow the steps below.
Buttons used here
Turn the Mode Dial to (Shooting Mode).
• When using the zoom, you can shoot close-ups up to the following distances.
In Wide-Angle (W): Closest 1cm
In Telephoto (T): Closest 16cm
• To get out of Macro Mode, press the (Macro) button again.
• During Macro Shooting, the Viewfinder cannot be used. Use the LCD Monitor.
Press the (Macro) button.
The Macro symbol is displayed on the left side of the
screen.
Press the shutter release button.
For how to use the Wide-angle Zoom, see p.43.
45
Page 46

Section 3 Using Special Features
for Improved Photography
This section describes how to change the various shooting-related
settings.
Page 47

Chapter 1 / Section 3 Using Special Features for Improved Photography
Using the Flash
If you press the (Flash) button, you can switch into Flash Mode (Flash, Flash Off, and other
settings). Switch settings according to time, conditions and your preference, and shoot your pictures.
The light of the flash can reach the following distances: in wide-angle, about 0.2 to 4.5 m, in telephoto,
approximately 0.16 to 2.5 m.
You can check your Flash Mode setting by the symbol displayed on the upper left of the LCD Monitor.
Flash Mode Types
Symbol Mode Name Description
Flash Off The flash will not fire. Use when shooting where the use of flash is
prohibited or when shooting with indoor lighting.
Auto When your subject is poorly lit or backlit, the flash fires automatically.
Red-eye reduction When shooting images of people, the red-eye phenomenon, in which
people's eyes appear red, is reduced.
Forced Flash The flash fires, whatever the light conditions are, when you shoot.
(Lit)
Use when there is backlighting when shooting outside in daylight.
Slow Synchro The flash fires with the shutter speed slowed.
(Unlit)
Use when shooting images of people against a nightscape.
To switch to Flash Mode, follow the steps below.
Buttons used here
Pressing the (Flash) button switches to
Flash Mode.
The flash starts recharging. While the flash is
charging, the LCD Monitor goes off and the flash lamp
blinks. Once charging is complete, the lamp remains
lit and it is possible to shoot.
Turn the Mode Dial to (Shooting Mode).
Alternatively, turn the Mode Dial to (Scene
Mode), and select a scene to have the camera ready.
47
Page 48

Chapter 1 / Section 3 Using Special Features for Improved Photography
Slow Synchronized
When you shoot pictures in dark places and want to capture background as well, use this mode, which slows
shutter speed and sets the flash to Flash Off.
Red-Eye
If you shoot with the flash ( ) in a dark place, people's eyes will appear red. This is called the "red-eye"
phenomenon.
• At purchase your camera is set to Flash Off.
• The settings are saved until you press the (Flash) button to change them.
• When shooting movies or in Multi-Shot mode, the setting becomes Flash Off.
• When the camera is set to Flash Off or Slow Synchro Mode, the shutter speed is slowed, so the camera is
subject to camera shake. Hold the camera firmly with both hands and shoot.
• When in LANDSCAPE of Scene Mode, the flash setting is fixed to Flash Off.
• When in NIGHTSCAPE of Scene Mode, Forced Flash cannot be selected. Also, the initial setting value is
Auto.
• If you press the flash button, even while the flash is charging, you can return to Flash Off mode. If you do this,
flash charging is cancelled.
48
Page 49

Chapter 1 / Section 3 Using Special Features for Improved Photography
Using the Self-Timer
You can set the Self-timer to shoot after either two or ten seconds. If the person who takes the photo
wants to be in the still image as well, it is convenient to use a setting of ten seconds; a setting of two
seconds is useful for preventing camera shake. Attach a tripod securely to the tripod mount on the
bottom of the camera.
To shoot with the Self-timer, follow the steps
below.
Buttons used here
Turn the Mode Dial to (Shooting Mode).
Press the (Self-timer) button.
The self-timer mode is switched on and the Self-timer
symbol is displayed.
The "10" to the right of the symbol indicates the
number of seconds. In this case, if you press the
shutter release button, the camera will shoot after 10
seconds.
Press the shutter release button.
The flash begins to blink and the Self-timer starts.
After about ten seconds the camera takes the picture.
About two seconds before it shoots, the time interval
between blinks begins to shorten and the audio tone
begins to beep.
After shooting, Self-timer mode switches off.
• Each press of the (Self-timer) button, it selects a function in the following sequence: 10 sec, 2 sec, Selftimer Off, 10 sec, 2 sec...
• Self-timer settings are released when the power is turned off.
• The focus is fixed when the shutter release button is pressed.
• Pressing the (Self-timer) button may clear the display on the LCD monitor in order to recharge the flash.
49
Page 50

Chapter 1 / Section 3 Using Special Features for Improved Photography
Changing the Exposure (EXPOSURE COMP.)
The exposure setting allows you to select brightness levels for your shots.
Normally, if your subject is centered, backlight compensation is automatically activated, and you can
shoot with correct exposure. However, in the following cases, or when you intentionally want to
change the exposure, you can change the exposure setting. Exposure can be specified in the range of
-2.0 and +2.0.
For Backlighting
When the background is particularly bright, the
subject will be dark (under-exposure).
When your subject is whitish
When you photograph a subject that is mainly
white, it will turn out entirely dark, with people
appearing dark, and white objects appearing
greyish.
When your subject is darkish
When you photograph a subject that is mainly
dark, it will turn out entirely bright (overexposure), with people appearing white, and
black objects appearing greyish. The same
happens when you take photos of people in a
spotlight.
50
Page 51

Chapter 1 / Section 3 Using Special Features for Improved Photography
To make changes to exposure settings
, follow the
steps below.
Buttons used here
Turn the Mode Dial to (Shooting Mode).
Press the button.
The Shooting menu appears.
Select [EXPOSURE COMP.] and then press
Press the buttons and specify a value.
Moving it to the - (minus) side makes darker. Moving it
to the + (plus) side makes it brighter.
Press the button.
Exposure Compensation settings are completed.
the button.
The Exposure Compensation bar appears.
Press the button.
The Shooting Menu closes and the setting value
appears in the right of the screen.
This setting will be used for shooting until you change it.
• At purchase your camera is set to 0.0. When it is set to 0.0, no value is displayed.
• Under backlighting conditions, if the subject is not centered in the shooting range, the camera does not
recognize backlighting conditions. Use EXPOSURE COMP.
51
Page 52

Chapter 1 / Section 3 Using Special Features for Improved Photography
Using Natural and Artificial Lighting (WHITE BALANCE)
With a normal camera, a white subject may not be reproduced as white depending on lighting
around the subject.
Digital cameras have a function called White Balance, which automatically adjusts white balance so
white subjects are reproduced as white. At purchase, the White Balance is set to "AUTO"; normally
you does not need to change the setting, but if the camera is having difficulty adjusting, please
change the setting.
Types of Modes you can Select
Symbol Mode Name Description
Auto Make adjustments automatically.
Daylight Select when shooting outdoors (Sunny) and White Balance fails to
adjust properly.
Overcast Select when shooting in cloudy weather or shade and the White
Balance fails to adjust properly.
Tungsten light Select when shooting under tungsten light and White Balance fails to
adjust properly.
Fluorescent light Select when shooting under fluorescent light and White Balance fails
to adjust properly.
One Push Manually set White Balance.
The following subjects may make it difficult for the camera to automatically adjust White Balance:
• Single colored subjects
• Subjects under multiple light sources
To make White Balance settings, follow the steps
below.
Buttons used here
Press the button.
The Shooting menu (or the Movie menu) appears.
Press the button to select [WHITE
BALANCE] and then press the button.
Turn the Mode Dial to (Shooting Mode).
When shooting in Scene Mode, set to (Scene
Mode) and select Shooting Mode.
When shooting movies, set to (Movie Mode).
52
Page 53

Chapter 1 / Section 3 Using Special Features for Improved Photography
TTTTIf you select // / /
Buttons used here
Press the buttons to select a mode.
Press the button.
White Balance settings are complete.
Press the button.
The Shooting Menu closes and the setting value is
displayed on the upper left of the screen.
This setting will be used for shooting until you change it.
• In Auto Mode, if the subject has limited white area, White Balance may not adjust properly. In this kind of
situation add a white object to the composition.
• If you have set the camera to Daylight, Overcast, Tungsten or Fluorescent, the flash is set to Flash Off.
53
Page 54

Chapter 1 / Section 3 Using Special Features for Improved Photography
TTTTIf you select (One Push)
Buttons used here
Press to select (One Push).
Point the camera at a piece of paper or
something white under the lighting conditions
for your picture.
Press the button.
White Balance is set.
Press the button.
White Balance settings are complete.
Press the button.
The Shooting Menu closes and the setting value is
displayed on the upper left of the screen.
This setting will be used for shooting until you change it.
If you press the button in step , the screen refreshes showing the White Balance settings made. If the
result is not as expected, repeat steps and to change the settings as many times as required.
54
Page 55

Chapter 1 / Section 3 Using Special Features for Improved Photography
Choosing Picture Quality Mode/Image Size (PIC QUALITY/SIZE)
The size of stored still image and movie files depends on picture quality and size settings.
About Picture Quality Mode
When still images and movies are saved as
image files, the image data is saved in a
compressed file.
Picture Quality Mode specifies the compression
ratio to use.
In Picture Quality Mode, there are two types, N
(Normal) and F (Fine).
Normal Mode
The compression ratio is high, resulting in a small file.
Normally, shooting is done in this mode.
Fine Mode
The compression ratio is low, resulting in a large file, but
the picture quality is better than in Normal Mode.
About Image Size
Image size relates to how large the image is. A
small image is best for sending via email and
using in home pages. When printing pictures,
choose the larger size to obtain better results.
• Picture quality settings cannot be made for
movies.
• Image sizes that can be set differ for still
images and movies.
Image Files
Files containing still images and movies are
called Image Files.
Saving
Recording data as a file on a medium such as
internal memory or SD Memory Card is called
"Saving". This is a term generally used in
computing when recording on floppy discs or a
hard drive.
55
Page 56

Chapter 1 / Section 3 Using Special Features for Improved Photography
Changing Picture Quality Mode/
Image Size of a Still Image
Combining Picture Quality Mode and Image
Size.
Size
2048×1536 1280×960 640×480
Mode
F (Fine) F2048 F1280
N (Normal) N2048 N1280 N640
Figures inside the bold frame indicate those shown on the
screen.
There is no Fine Mode for
For details, see p.150.
To make changes to Picture Quality Mode/Image
Size, follow the steps below.
Buttons used here
640×480.
Select [PIC QUALITY/SIZE] and then press
the button.
Press the buttons to select [PIC
QUALITY/SIZE].
Press the button.
Picture Quality/Image Size settings are completed.
Press the button.
The Shooting Menu closes and the setting value is
displayed on the upper-right of the screen.
Turn the Mode Dial to (Shooting Mode).
Alternatively, turn the Mode Dial to (Scene
Mode) and select a mode to prepare the camera.
This setting will be used for shooting until you change it.
Press the button.
The Shooting menu appears.
• At purchase your camera is set to N1280.
• In Scene Mode with Text Mode selected, the image size is automatically set to 1280.
56
Page 57

Chapter 1 / Section 3 Using Special Features for Improved Photography
Changing the Image Size of a
Movie
Image Quality Mode settings cannot be made for
movies.
Two Image sizes are available: 320 × 240, and
260 × 120 pixels.
• At purchase, your camera is set to 320 ×
240.
To make changes to Image Size, follow the steps
below.
Buttons used here
Select [MOVIE SIZE] and then press the
button.
Press the buttons to select Size.
Turn the Mode Dial to (Movie Mode).
Press the button.
The Shooting menu appears.
Press the button.
Movie Size settings are complete.
Press the button.
The Shooting Menu closes and the setting value is
displayed on the upper-right of the screen.
This setting will be used for shooting until you change it.
57
Page 58

Chapter 1 / Section 3 Using Special Features for Improved Photography
Manual Focus Shooting (FOCUS)
When Auto-Focus does not focus as desired, you can focus manually (Manual Focus). You can also
shoot with a fixed shooting distance. When using a fixed shooting distance, it can be set to either
Snapshot or Infinity (∞).
Manual Focus Shooting
Press the buttons to select [MF].
For Manual Focus Shooting, follow the steps
below.
Buttons used here
Press the button.
Focus settings are complete.
Turn the Mode Dial to (Shooting Mode).
When shooting movies, set to (Movie Mode).
Press the button.
The Shooting menu appears.
.
Select [FOCUS] and press the button.
Press the button.
The Shooting Menu closes and "MF" is displayed on
the upper part of the screen.
Press the buttons to focus the camera.
If you press the button, the focus moves closer.
If you press the button, the focus moves further
away.
Manual Focus is used for shooting until you change the
settings.
• At purchase your camera is set to AF (Auto-Focus).
• When using Manual Focus, if you press the
Monitor, which makes it easier to focus. However, it cannot be used for Interval Shooting.
• Manual focus cannot be used in Scene Mode.
• Quick Review (p.74) cannot be used in Manual Focus Mode.
button, you can enlarge the central part of the LCD
58
Page 59

Chapter 1 / Section 3 Using Special Features for Improved Photography
Shooting at a Fixed Distance
To shoot with the shooting distance fixed, follow
the steps below.
Buttons used here
Turn the Mode Dial to (Shooting Mode).
When shooting in Scene Mode, set to (Scene
Mode) then select a Shooting Mode.
Press the buttons to select [SNAP] or
[∞] (Infinity).
Press the button.
Focus settings are complete.
Press the button.
The Shooting Menu closes and the specified value is
displayed on the upper part of the screen.
When shooting movies, set to (Movie Mode).
Press the button.
The Shooting menu appears.
Select [FOCUS] and then press the
button.
• Selecting [SNAP] will fix the shooting distance to 2.5 meters.
• Selecting [
∞] will fix the shooting distance to infinity. This feature is useful to shoot a distant view.
This setting will be used for shooting until you change it.
59
Page 60

Chapter 1 / Section 3 Using Special Features for Improved Photography
Changing the Light Metering (PHOTOMETRY)
You can change the metering method (the range to use for metering) to determine the exposure
value. There are three Light Metering Methods available: MULTI, CENTRE, and SPOT.
MULTI (No Symbol)
The entire shooting range is divided into 256 partitions,
and subjected to photometry for overall decision.
At purchase, your camera is set to this method.
To select light metering method, follow the steps
below.
Buttons used here
CENTER( )
The light metering is determined by a measurement of the
whole, with the central part emphasized.
Use this when the brightness of the center and
surroundings are different.
SPOT( )
Light metering is determined by measuring only the central
part.
Use this setting when you want to use the brightness of
the center. It is useful if there is marked difference in
contrast or backlighting.
Turn the Mode Dial to (Shooting Mode).
Press the button.
The Shooting menu appears.
Press the buttons to switch between
displays as required.
60
Page 61

Chapter 1 / Section 3 Using Special Features for Improved Photography
Select [PHOTOMETRY] and then press the
button.
Press the buttons to select the desired
setting.
Press the button.
Light Metering Method setting is complete.
Press the button.
The Shooting Menu closes and the specified value is
displayed on the left side of the screen.
This setting will be used for shooting until you change it.
• At purchase, the setting is Multi.
61
Page 62

Chapter 1 / Section 3 Using Special Features for Improved Photography
Sensitivity Settings (ISO SETTING)
You can set the sensitivity (ISO SETTING) of your camera according to your preferences.
At purchase, the sensitivity is set to Auto. When you want it to be very sensitive, select from among
the following three settings: ISO200, ISO400, ISO800.
To set sensitivity, follow the steps below.
Buttons used here
Turn the Mode Dial to (Shooting Mode).
Press the button.
The Shooting menu appears.
Select [ISO SETTING] and then press the
button.
Press the buttons to select [ISO
SETTING].
Press the button.
ISO settings are completed.
Press the button.
The Shooting Menu closes and the setting value is
displayed on the right of the screen.
Press the buttons to switch between
displays as required.
This setting will be used for shooting until you change it.
• At purchase, the sensitivity is set to Auto.
• When shooting in a dark place without using the flash, raising the sensitivity enables you to give a subject
more brightness.
• If you increase the ISO Sensitivity, it becomes possible to shoot under low light conditions, but your pictures
may become grainy. The higher the ISO Sensitivity, the grainier your pictures are likely to become, so it is
necessary to exercise caution.
62
Page 63

Chapter 1 / Section 3 Using Special Features for Improved Photography
Changing the Edge Quality of Still Images (SHARPNESS)
You can change the definition of your still images to either sharp or soft.
At purchase, your camera is set to Normal.
To make changes to the sharpness of still
images, follow the steps below.
Buttons used here
Select [SHARPNESS] and then press the
button.
Press the buttons to select the desired
setting.
Turn the Mode Dial to (Shooting Mode).
Press the button.
The Shooting menu appears.
Press the buttons to switch between
displays as required.
Press the button.
Sharpness settings are complete.
Press the button.
The Shooting Menu closes and the setting value is
displayed on the right of the screen.
This setting will be used for shooting until you change it.
63
Page 64

Chapter 1 / Section 3 Using Special Features for Improved Photography
Shooting Consecutively with Different Exposures (AUTO BRACKET)
The Auto Bracketing function automatically shoots three consecutive shots, with the specified
exposure value as standard, at three exposure levels, at -0.5EV, +/-0, and +0.5EV.
At purchase, this feature is set to OFF.
To shoot with Auto Bracket, follow the steps
below.
Buttons used here
Select [AUTO BRACKET] and then press
the button.
Select [ON] and then press the button.
Turn the Mode Dial to (Shooting Mode).
Press the button.
The Shooting menu appears.
Press the buttons to switch between
displays as required.
Press the button.
The Shooting Menu closes and [AB] is displayed on
the left side of the screen.
64
Page 65

Chapter 1 / Section 3 Using Special Features for Improved Photography
Press the shutter release button.
Three consecutive shots are taken, with the specified
Exposure Compensation value as the standard,
at -0.5EV, +/-0, and +0.5EV.
After shooting, the three shots are displayed on the
LCD Monitor. They are from the left, -0.5EV, the
standard compensation value, and +0.5EV.
This setting will be used for shooting until you change it.
• For how to change the Exposure Compensation see p.50.
• For how to change the White Balance see p.52.
65
Page 66

Chapter 1 / Section 3 Using Special Features for Improved Photography
Setting the Exposure Time (TIME EXPOSURE)
If you set the camera to TIME EXPOSURE, when you shoot, the shutter stays open for the time
specified.
By setting an exposure time, you can capture the track of moving subjects such as fireworks and car
lights, when you shoot a night scene. You can select an exposure time of 1, 2, 4 or 8 seconds.
To set the exposure Time, follow the steps below.
Select [TIME EXPOSURE] and then press
Buttons used here
the button.
Turn the Mode Dial to (Shooting Mode).
Press the button.
The Shooting menu appears.
Press the buttons to switch between
displays as required.
Press the buttons to select Exposure Time.
Press the button.
Exposure Time settings are completed.
Press the button.
The Shooting Menu closes and the specified value is
displayed on the bottom of the screen.
This setting will be used for shooting until you change it.
• At purchase, the setting is OFF.
• When the camera is set to Exposure Time, the shutter speed is slowed, so the camera is subject to camera
shake. Hold the camera firmly with both hands when you shoot.
• If you set Exposure Time before shooting, the display on the LCD monitor remains cleared during shooting.
66
Page 67

Chapter 1 / Section 3 Using Special Features for Improved Photography
Shooting Pictures Automatically at Set Intervals (INTERVAL)
You can set the camera to automatically take pictures at fixed intervals. The interval between shots
You can set the shooting interval to 30 seconds to 3 hours in increments of 30 seconds.
For Interval Shooting, follow the steps below.
Buttons used here
Turn the Mode Dial to (Shooting Mode).
Press the button.
The Shooting menu appears.
Select [INTERVAL] and then press the
button.
Press the buttons to specify the length
of time.
Press the button to move to the minutes
setting, then use the button to set the
minutes.
Press the button to move to the seconds
setting, then press the buttons to set the
Press the buttons to switch between
seconds.
displays as required.
Press the button.
Interval Shooting settings are completed.
When Interval Shooting is on, even when Multi-Shot is set to [CONT], [MCONT], consecutive shooting is
automatically switched off.
67
Page 68

Chapter 1 / Section 3 Using Special Features for Improved Photography
Press the button.
The Shooting Menu closes and "Interval" is displayed
on the upper part of the screen.
Press the shutter release button.
A picture is taken every time the fixed interval
elapses.
To stop shooting, press the button.
Interval Shooting settings are cleared when the power is
turned off.
• In steps to , if you press and hold the buttons, you can quickly raise or lower the setting value.
• If you use batteries for power, you may exhaust the batteries. Using the AC Adaptor (sold separately) is
recommended.
• Even during Interval Shooting, if you press the shutter release button, the camera will shoot as usual.
However, Interval Shooting Mode is unaffected. After shooting, once the time specified in Interval Shooting
elapses, the next shot is taken.
• Depending on Picture Quality Mode and Flash Mode settings, the shooting interval may become longer than
the time set.
68
Page 69

Chapter 1 / Section 3 Using Special Features for Improved Photography
Inserting the Date into a Still Image (DATE IMPRINT)
You can stamp the date on the bottom right of your still images. You can choose to display the date in
one of two formats, Date (Y/M/D) or Date and Time (Y/M/D/H:M).
To enter the date or date and time, follow the
steps below.
Buttons used here
Turn the Mode Dial to (Shooting Mode).
Press the button.
The Shooting menu appears.
Press the button to select [DATE
IMPRINT] and then press the button.
Press the buttons to select the desired
setting.
Press the button.
The Date Imprint settings are completed.
Press the button.
The Shooting Menu closes and is displayed
on the bottom right of the screen.
Press the buttons to switch between
This setting will be used for shooting until you change it.
displays as required.
• If the date and time have not been set, DATE IMPRIMNT cannot be used. First make the date and time
settings.
• DATE IMPRINT cannot be used with movies.
• If you wish to add a Date Imprint when shooting in TEXT MODE (while in Shooting Mode), make the settings
as described above.
For how to set date and time, see p.14.
69
Page 70

Chapter 1 / Section 3 Using Special Features for Improved Photography
Returning the Shooting Menu Settings to their Defaults (RESTORE DEFAULTS)
You can restore the Shooting Menu defaults, returing the settings to what they were at the time of
purchase.
To restore the Shooting Menu to its initial
settings, follow the steps below.
Buttons used here
Turn the Mode Dial to (Shooting Mode).
Press the button.
The Shooting Menu appears.
Press the buttons to switch between
displays as required.
Select [RESTORE DEFAULTS] and then
press the button.
Press the button to select [YES].
Press the button.
The display indicates the camera is restoring the initial
settings; once it is finished, you return to the Mode
screen.
The default settings are maintained even when the camera is turned off, with the exceptions of Interval
Shooting and Auto Bracket settings.
70
Page 71

Chapter 1 / Section 3 Using Special Features for Improved Photography
Displaying the Grid Guide on the LCD Monitor
When you want to shoot an image evenly in the vertical or horizontal direction, it is convenient to
display the Grid Guide (calibration scale) and make your composition.
The Grid Guide is made of lines that divide the LCD Monitor screen into thirds both vertically and
horizontally. The Grid Guide is displayed only as an aid in shooting and is not part of the picture. With
the Grid Guide Display on, symbols (see p.20) will be displayed only for a few seconds right after
pressing Self-Timer, Flash or Macro buttons.
To display the Grid Guide, follow the steps
below.
Buttons used here
Turn the Mode Dial to (Shooting Mode).
Press the button.
The symbol display disappears.
Press the button.
The Grid Guide appears.
Every time you press the button, the view cycles in the sequence of No Display, Grid
Guide, LCD Monitor Off, Normal Symbol Display, No Display.
For how to switch the screen display, see p.21.
71
Page 72

Chapter 1 / Section 3 Using Special Features for Improved Photography
Changing Shading for Shooting Text (DENSITY)
When you are shooting text, you can change the DENSITY settings. You can select from DEEP,
NORMAL and LIGHT.
For information on how to shoot text, see p.36.
To make changes to the DENSITY, follow the
steps below.
Buttons used here
Turn the Mode Dial to (Scene Mode).
The scene-selection screen appears.
Press the button.
The Shooting menu appears.
Select [DENSITY] and then press the
button.
Press the buttons to select the desired
density setting.
Press the buttons to select the text
mode and then press the button.
At purchase, the density is set to Normal.
Press the button.
Density settings are complete.
Press the button.
The display returns to the shooting screen.
The value of the DENSITY settings will not be displayed.
This setting will be used for shooting until you change it.
72
Page 73

Section 4 Viewing Still Images and
Movies
You can display still images or movies on the LCD Monitor and
check them.
This section explains displaying still images and movies on the
LCD Monitor.
It is recommended you plug in the AC Adaptor whenever viewing
still images or movies on the LCD Monitor.
Page 74

Chapter 1 / Section 4 Viewing Still Images and Movies
Viewing the Photo You Just Took
Right after shooting a still image, if you want to see it immediately, you can display the shot in
Shooting Mode. This function is called Quick Review.
For movies, the first frame appears as a still image.
To display the still image you just took, follow the
steps below.
Buttons used here
• Once the power is turned off, the Quick Review function can no longer recall the most recently taken image.
• Quick Review cannot be used in Manual Focus Mode (p.58).
While still in the Shooting Mode, press the
(Quick Review) button.
The still image you just took is displayed on the LCD
Monitor.
Press (Quick Review) again and the
camera is ready to shoot.
74
Page 75

Chapter 1 / Section 4 Viewing Still Images and Movies
Displaying an Enlarged View of
the Still Image Displayed
The still image you displayed with the (Quick
Review) button can be displayed enlarged up to
3.4 times using the (Enlarged View) button.
To view still images in the enlarged display
mode, follow the steps below.
Buttons used here
Press the (Enlarged View) button.
The still image is enlarged. One part of the still image
is displayed on the LCD Monitor.
The enlargement ratio changes each time you press
the button.
Press the buttons to move to the part
you want to display.
To return to the original display, press the
(Thumbnail Display) button.
Movies cannot be displayed enlarged.
75
Page 76

Chapter 1 / Section 4 Viewing Still Images and Movies
Deleting the Displayed Still
Image or Movie
The movie or still image you displayed using the
(Quick Review) button can be deleted by
pressing the (DELETE) button.
To delete a still image or movie that is displayed,
follow the steps below.
Buttons used here
While using the Quick Review function, press
the (Delete) button.
Press the button to select [DELETE].
Press the button.
The display indicates that deleting is in process; once
finished, you return to the shooting screen.
For selecting and deleting still images and movies, see p.85.
76
Page 77

Chapter 1 / Section 4 Viewing Still Images and Movies
Viewing a Still Image or Movie
When you take a still image or movie, it is immediately stored in internal memory or on an SD Memory
Card. Still images and movies in internal memory or on an SD Memory Card can be displayed on the
LCD Monitor.
Viewing Still Images Recorded
on an SD Memory Card
To view still images, follow the steps below.
Buttons used here
Turn the Mode Dial to (Playback Mode).
The last still image taken is displayed.
For movies, the first frame is displayed as a still
image.
Move to the still image you want to view
using the buttons.
If you press the button, you can view the next still
image or movie.
If you press the button, you can view the previous
still image or movie.
If you press and hold either the or the button,
you can move quickly between images.
For information displayed on the screen during playback, see p.20
• Images are played back from the following recording media:
When no memory card is loaded
Plays back from
internal memory
When an SD Memory Card is loaded
77
Plays back from SD
Memory Card
Page 78

Viewing Still Images Recorded
on Internal Memory
To view still images recorded on internal
memory, follow the steps below.
If an SD Memory Card is loaded, turn off the
power, remove the SD Memory Card and
turn the power back on.
Turn the Mode Dial to (Playback Mode).
The last still image taken is displayed.
For movies, the first frame is displayed as a still
image.
Move to the still image you want to view
using the buttons.
If you press the button, you can view the next still
image or movie.
If you press the button, you can view the previous
still image or movie.
If you press and hold the buttons, you can move
quickly between images.
Chapter 1 / Section 4 Viewing Still Images and Movies
78
Page 79

Chapter 1 / Section 4 Viewing Still Images and Movies
Viewing Movies
To view movies, follow the steps below.
Buttons used here
Turn the Mode Dial to (Playback Mode).
The last still image taken is displayed.
For movies, the first frame is displayed as a still
image.
Move to the movie you want to see using the
buttons.
If you press the button, you can view the next still
image or movie.
If you press the button, you can view the previous
still image or movie.
Press the shutter release button.
Playback begins. The elapsed playback indicator or
the elapsed time is displayed on the LCD Monitor.
Fast Forward
Rewind
Pause/Playback Press the shutter release button.
Slow Playback
Slow Rewind
Next frame
Press the (telephoto) button
during play.
Press the (Wide-Angle)
button during play.
Go on pressing the
(telephoto) button during pause.
Go on pressing the (WideAngle) button during pause.
Press the (telephoto) button
during pause.
Movie Frames
Movies are made up of many frames which seem to move when displayed at high speed.
For information displayed on the screen during playback, see p.20.
79
Page 80

Chapter 1 / Section 4 Viewing Still Images and Movies
Viewing at a Glance
The LCD Monitor screen is split into six thumbnail images, allowing you to view your still images or
movies at one glance (Thumbnail Display). If you select a still image or movie you want to see from
Thumbnail Display Mode, you can view it normally with just the one shot displayed.
To view the Thumbnail Display and select the still
image for viewing, follow the steps below.
Buttons used here
Turn the Mode Dial to (Playback Mode).
The last still image taken is displayed.
Press the (Thumbnail Display) button.
The screen is split into six sections. Still images and
movies (the first frame) are displayed in a reduced
size.
Press the buttons to select the still
image or movie you want to display.
Press the (Enlarged View) button.
The still image or movie you selected is displayed.
For movies, the first frame is displayed as a still
image.
In Thumbnail Display mode, text files are displayed in blue.
For how to select and delete still images in the Thumbnail Display screen, see p.87.
For how to select and protect (protect from deleting) still images in the Thumbnail Display screen, see p.91.
For how to select still images and make Print Service settings in the Thumbnail Display screen, see p.95.
Thumbnail Display
A thumbnail display is a reduced display. This is a method commonly used for displaying many images at a
glance.
80
Page 81

Chapter 1 / Section 4 Viewing Still Images and Movies
Enlarged Viewing
When you are displaying a still image, if you press the (Enlarged View) button, you can display the
still image up to 3.4 times larger.
To view still images in Enlarged Display Mode,
follow the steps below.
Buttons used here
Turn the Mode Dial to (Playback Mode).
The last still image taken is displayed.
Display the still image you want to enlarge.
Press the (Enlarged View) button.
The still image is enlarged. One part of the still image
is displayed on the LCD Monitor.
Press the buttons to move to the part you
want to display.
To return to the original display, press the
(Thumbnail Display) button.
Movies cannot be displayed enlarged.
For how to display still images, see p.77.
81
Page 82

Chapter 1 / Section 4 Viewing Still Images and Movies
Showing Photos in Order Automatically (SLIDE SHOW)
You can show still images or movies recorded in internal memory or on an SD Memory Card
sequentially on the LCD Monitor. This function is called a slide show.
To view a slide show, follow the steps below.
Buttons used here
Turn the Mode Dial to (Playback Mode).
The last still image taken is displayed.
Press the button.
The Playback menu is displayed.
Confirm you are selecting [SLIDE SHOW]
and then press the button.
The slide show starts and the still images or movie
frames are shown in order.
If you want to stop the slide show in progress, press
any button on the camera.
Until stopped, the slide show will repeat itself.
• Still images are displayed for 3 seconds each.
• For movies, not just one frame, but the entire movie you shot is displayed.
82
Page 83

Chapter 1 / Section 4 Viewing Still Images and Movies
Viewing on a Television
You can also view the still images and movies you have taken on a TV screen. The camera displays
everything on the TV screen just as on its LCD Monitor.
To use your television for viewing, connect your camera to the television with the video cable that
came with your camera.
To view still images and/or movies on a
television, follow the steps below.
Buttons used here
Securely connect the video cable to the
Video In terminal on the television.
Make sure the power is off. Turn the camera
terminal cover's knob in the direction of the
arrow to open it.
Securely connect the video cable to the
Video Out terminal.
Set the television to "Video" mode. (Set the
input to "Video".)
For details, please refer to the operation manual for
the television.
Turn the camera's Mode Dial to
(Playback Mode).
Turn your camera on by pressing the power
button.
• If you connect the video cable to your video recorder's In terminal, you can record what you have shot onto
video.
• Your camera is set to NTSC playback format (used in Japan and other countries) for use with television
equipment, etc. If the equipment you want to connect to uses PAL format (used in Europe and elsewhere),
then switch your camera to PAL format in the Setup Menu before connecting.
• When the video cable is connected to the camera, the LCD Monitor display will go off.
83
Page 84

Section 5 Deleting Still Images and
Movies
One of the big advantages of digital cameras is that you can delete
unwanted still images and movies on the spot.
This section explains deleting still images and movies you have
taken.
For how to protect still images from accidental deletion, see p.88.
Page 85

Chapter 1 / Section 5 Deleting Still Images and Movies
Deleting Unwanted Still Images or Movies
You can easily delete still images and movies that have not come out right. The following are the three
ways to delete photos:
• One shot at a time
• All frames at once
• Select multiple frames and delete together
Still images and movies set to Protect cannot be deleted.
Still images or movies recorded on the following media are deleted.
When no memory card is loaded
When an SD Memory Card is loaded
Deletes from
internal memory
Deleting One Still Image
To delete a still image (or movie), follow the
steps below.
Buttons used here
Deletes from SD
Memory Card
Display the still image (or movie) you want to
delete.
Press the (Delete) button.
Press the button to select [DELETE
ONE].
Press the button.
The display indicates deleting is in process; once
finished, you return to the playback screen.
Turn the Mode Dial to (Playback Mode).
The last still image taken is displayed.
• For how to delete a still image displayed with the (Quick Review) button, see p.76.
• For how to display still images (or movies), see p.77.
85
Page 86

Chapter 1 / Section 5 Deleting Still Images and Movies
Deleting All Frames at Once
To delete all still images or movies, follow the
steps below.
Buttons used here
Turn the Mode Dial to (Playback Mode).
The last still image taken is displayed.
Press the (Delete) button.
Press the button to select [DELETE ALL]
and press the button.
A screen appears to confirm the deletion.
Press the button to select [YES].
• For how to display still images (or movies), see p.77.
• For how to protect still images (or movies), see p.88.
Press the button.
The display indicates deletion is in process; once
finished, you return to the playback screen.
86
Page 87

Chapter 1 / Section 5 Deleting Still Images and Movies
Deleting Multiple Frames at Once
To delete selected still images or movies all at
once, follow the steps below.
Buttons used here
Turn the Mode Dial to (Playback Mode).
The last still image taken is displayed.
Press the buttons to select the still
images or movies you want to delete.
Press the (Delete) button.
The trash symbol appears in the upper left of the still
image (or movie).
Repeat Steps and to select all the still
images you wish to delete.
If you selected an image by mistake, you can deselect
it by selecting the image and pressing the (Delete)
button again.
Press the button.
A screen appears to confirm deleting.
Press the (Thumbnail Display) button.
The screen is split into six sections. Still images and
movies (the first frame) are displayed in a reduced
size.
For details on thumbnail display, see p.80.
Press the button to select [YES].
Press the button.
The display indicates deleting is in process; once
finished, you return to the Thumbnail Display screen.
87
Page 88

Chapter 1 / Section 5 Deleting Still Images and Movies
Write-protecting Your Images (PROTECT)
You can protect still images and movies from being accidentally deleted.
There are 3 methods of making Protect settings:
• One shot at a time
• All frames at once
• Select multiple frames and protect together
Still images and movies that are protected cannot be deleted. However, when the memory is
formatted, it makes no difference whether files are protected or not: all are deleted.
Protecting the Displayed Still
Image
To protect a still image (or movie), follow the
steps below.
Buttons used here
Press the button.
The Playback menu is displayed.
Press button to select [PROTECT] and
then press the button.
Press the button to select [1 FILE].
Turn the Mode Dial to (Playback Mode).
The last still image taken is displayed.
Display the still image (or movie) you want to
protect.
88
Page 89

Chapter 1 / Section 5 Deleting Still Images and Movies
Press the button.
When set to Protect, the Protect symbol appears in
the upper left of the screen.
The procedure for releasing protection from one file at a time is the same as that for setting protection.
• For how to display still images (or movies), see p.77.
• To set/remove protection of all still images (or movies) at once, see p.90.
• To set/remove protection of selections made on the Thumbnail Display screen, see p.91.
89
Page 90

Chapter 1 / Section 5 Deleting Still Images and Movies
Protecting All Still Images
To protect all your still images (or movies), follow
the steps below.
Buttons used here
Turn the Mode Dial to (Playback Mode).
Press the button to select [ALL FILES].
Confirm you are choosing [SELECT] and
then press .
When set to Protect, the Protect symbol appears in
the upper left of the screen.
Press the button.
The Playback menu is displayed.
Press the button to select [PROTECT]
and then press the button.
• To remove protection from all your still images (or movies), select [CANCEL] in step .
• You can remove protection from all or multiple images (or movies) at once.
• To remove protection for one still image at a time, see p.88.
• To set/remove protection of selections made on the Thumbnail Display screen, see p.91.
90
Page 91

Chapter 1 / Section 5 Deleting Still Images and Movies
Protecting Multiple Still Images
or Movies at Once
To protect selected still images or movies all at
once, follow the steps below.
Buttons used here
Press the button to select [PROTECT]
and then press the button.
The Protect symbol appears in the upper left of the
first still image (or movie).
Press the buttons to select the still
image or movie you wish to Protect and
press the button.
The Protect symbol appears in the upper left of the
still image (or movie).
Turn the Mode Dial to (Playback Mode).
Press the (Thumbnail Display) button.
The screen is split into six sections. Still images and
movies (the first frame) are displayed in a reduced
size.
Press the buttons to select the still
image or movie you want to display.
Repeat Step to select all the still images
or movies you wish to protect.
Press the button.
The Playback menu appears.
If you selected an image by mistake, you can deselect
by selecting the image and pressing the button
again.
Press the button.
The display returns to the Thumbnail Display screen.
To remove protection from multiple still images (or movies), following the steps described above, select the still
images or movies you wish to release and implement.
• For details on thumbnail display, see p.80.
• To remove protection for one still image at a time, see p.88.
• To remove all protection at once, see p.90.
91
Page 92

Chapter 1 / Section 5 Deleting Still Images and Movies
Copying the Contents of Internal Memory to a Memory Card (COPY TO CARD)
You can copy all the movie and still image data stored in internal memory onto an SD Memory Card at
once.
To copy still images and movies from internal
memory to SD Memory Card, follow the steps
below.
Buttons used here
Turn your camera off by pressing the power
button.
Insert the SD Memory Card.
Turn the camera on.
Turn the Mode Dial to (Playback Mode).
Press the button.
The Playback menu appears.
Press the button to select [COPY TO
CARD].
Press the button.
The display indicates copying is in process; once
finished, you return to the playback screen.
• If the capacity of the SD Memory Card you are copying to is insufficient, a message will be displayed
indicating there is not enough capacity. To copy only the number of shots that will fit into the available
capacity, select [YES] and then press the button. To cancel copying, select and then press the
[OK] button.
• It is not possible to copy from SD Memory Card to internal memory.
92
Page 93

Chapter 1 / Section 5 Deleting Still Images and Movies
Using a Printing Service (PRINT)
The still images recorded on SD Memory Card can be printed out if you take them to a shop that offers
a digital camera print service. To use a print service, it is necessary to make settings required for
printing. These settings are called DPOF (Dee-Pof) settings.
There are three methods of making DPOF settings:
• Set one shot at a time
• Set for All Still Images
• Select multiple shots and set together
Setting DPOF for the Still Image
Displayed
To make DPOF settings for one still image,
follow the steps below.
Buttons used here
Press the button to select [1 FILE].
Press the button.
Once the DPOF setting is made, the DPOF symbol
appears in the upper left of the screen.
Turn the Mode Dial to (Playback Mode).
Display the still image you want to specify.
Press the button.
The Playback menu is displayed.
Press button to select [PRINT] and then
press the button.
• Removing the DPOF setting for one photo
at a time is done in the same way as setting
it.
• You can specify one print per still image
with this function.
• To display a still image, see p.77.
• For how to release all DPOF settings at
once, see p.94.
93
Page 94

Chapter 1 / Section 5 Deleting Still Images and Movies
Setting DPOF for All Still Images
To apply DPOF settings to all your still images,
follow the steps below.
Buttons used here
Turn the Mode Dial to (Playback Mode).
Press the button to select [ALL FILES].
Confirm you are choosing [SELECT] and
then press .
Once the DPOF setting is made, the DPOF symbol
appears in the upper left of the screen.
Press the button.
The Playback menu appears.
Press button to select [PRINT] and press
the button.
• To remove the DPOF setting from all your still images, select [CANCEL] in step .
• You can remove all or multiple still image DPOF settings at once.
• To remove the DPOF setting for 1 still image at a time, see p.93.
• To remove the DPOF settings of selections made on the Thumbnail Display screen, see p.95.
94
Page 95

Chapter 1 / Section 5 Deleting Still Images and Movies
Setting DPOF for Multiple Still
Images
To make the DPOF setting for selected still
images all at once, follow the steps below.
Buttons used here
Turn the Mode Dial to (Playback Mode).
Press the button.
The Playback menu appears.
Press the button to select [PRINT] and
then press the button.
The DPOF symbol appears in the upper left of the first
still image.
Press the buttons to select the next
still image you wish to set to DPOF, and then
press the button.
The DPOF symbol appears in the upper left of the still
image.
Press the (Thumbnail Display) button.
The screen is split into six sections with the still
images displayed at a reduced size.
Press the buttons to select the first
still image for which you wish to make the
DPOF setting.
Repeat Step to select all the still images
for which you wish to make the DPOF
setting.
If you selected an image by mistake, you can deselect
it by selecting the image and pressing the
button again.
Press the button.
The display returns to the Thumbnail Display screen.
95
Page 96

Section 6
This section explains how to make changes to the camera's
settings.
Changing Camera Settings
In this section, still images and movies will both be referred to as "images".
Page 97

Chapter 1 / Section 6 Changing Camera Settings
Getting the SD Memory Card Ready for Use (CARD FORMAT)
If the error message "This card cannot be used" is displayed, or if you have formatted the card with a
computer or some other device, it will be necessary to format the SD Memory Card prior to use.
If you format a card that still has images stored on it, these will be lost.
For how to format internal memory, see p.98.
To format a memory card, follow the steps below.
Buttons used here
Turn the Mode Dial to (Setup Mode).
The Setup Screen appears.
Select [CARD FORMAT] and then press the
Press the button to select [YES] and then
press the button.
Formatting commences. When it finishes the
SETUP screen returns.
If an SD Memory Card is not loaded, a message
will be displayed. After turning the power off,
load an SD Memory Card and repeat the
formatting process again.
button.
A screen appears to confirm formatting.
Write-protecting your images
If you move the card’s write-protection switch to
LOCK, your still images cannot be accidentally
erased and the memory card cannot be
formatted. If you return the switch to the former
position, it is once again possible to erase
images and format the card.
Formatting
Formatting is the process of preparing a card
so image data can be written on it. This is also
called initialization. In general, this term is
commonly used when a floppy disc or other
media is prepared for saving.
97
Page 98

Chapter 1 / Section 6 Changing Camera Settings
Formatting Internal Memory (IN FORMAT)
If the error message "Format the internal memory" is displayed, it will be necessary to format the
internal memory prior to use.
Formatting the internal memory clears all the images recorded in the memory. If you have images that you do
not want to clear from the memory, please contact the Ricoh Service offices (see p.163) prior to formatting the
internal memory.
To format the internal memory, follow the steps
below.
Buttons used here
Turn the Mode Dial to (Setup Mode).
The Setup Screen appears.
Press the button to select [YES] and
press the button.
Formatting commences. When it finishes, the SETUP
screen returns.
Select [IN FORMAT] and then press the
button.
A screen appears to confirm formatting.
98
Page 99

Chapter 1 / Section 6 Changing Camera Settings
O
O
Changing Power-Save Mode Settings (POWER SAVE)
You can reduce the power consumption of the LCD Monitor and extend the life of your batteries.
At the time of purchase, Power-Save Mode is set to [OFF].
Possible Settings
FF (Power Save Mode Inactivated) (Set at purchase)
N (Activate Power Save Mode)
To change the Power-Save Mode, follow the
steps below.
Turn the Mode Dial to (Setup Mode).
The Setup Screen appears.
Press the button to select [POWER
SAVE].
Press to select the desired setting.
This setting will be used until you change it.
If you have activated Power Save mode, power consumption will be less, but there are the following limitations.
• The display on the LCD Monitor will turn off. Press the (Quick Review) button or the button to turn
the LCD Monitor Display on, and then press them again to turn the display off. You cannot turn the LCD
Monitor Display on/off by pressing the (Self-timer), (Flash) or (Macro) buttons.
• Processing time may be slower.
• It works only in Shooting Mode. It does not work in Playback Mode.
99
Page 100

Chapter 1 / Section 6 Changing Camera Settings
O
5
3
Changing Auto Power-Off Settings (AUTO POWER OFF)
If you do not operate the camera for the set period of time, it will shut off automatically (Auto Poweroff) to conserve battery power.
At the time of purchase, Auto Power-Off is set to one minute, but you can change this setting.
Possible Settings
FF (The Auto Power-Off function does not work)
1 Minute (Default)
Minutes
0 Minutes
To change the Auto Power-Off setting, follow the
steps below.
Turn the Mode Dial to (Setup Mode).
The Setup Screen appears.
Press the button to select [AUTO POWER
OFF].
Press the buttons to select the desired
setting.
This setting will be used until you change it.
• When Auto Power-Off turns off the camera, just press the power button again to turn it on and resume use.
• The Auto Power-off function does not work when connected to a computer.
• When shooting with Interval Shooting, settings made here are not valid and Auto Power-Off does not work.
100
 Loading...