

Page 1
RICOH 126C-FLEX
TLS
This camera manual library is for reference and historical purposes, all rights reserved.
This page may not be sold or distributed without the expressed permission of the producer
This is the full text and images from the manual. This may take 3 full minutes for all images to appear.
If they do not all appear. Try clicking the browser "refresh" or "reload button" or right click on the image, choose "view image" then go back. It should now appear.
To print, try printing only 3 or 4 pages at a time.
If you find this manual useful, how about a donation of $3 to:
M. Butkus, 29 Lake Ave., High Bridge, NJ 08829
This will allow me to continue to buy new manuals and pay their shipping costs.
If you use Pay Pal, use the link below. Use the above address for a check, M.O. or cash.
Back to my main Chinon information page
This page is copyright by M. Butkus, NJ.
On-line camera manual library
It'll make you feel better, won't it?
Page 2
Features you'll like......
Drop in film loading; You'll take color slides, color or black and white prints with instant film loading ease—
cartridge eliminates complicated film threading.
Through-the-lens focusing and composing eliminates parallax—you see your exact picture before you take it.
Through-the-lens system CdS exposure meter measures light with high degree of accuracy, and controls
diaphragm to the optimum opening automatically. Also you can set f-stop manually.
Instant-return mirror automatically returns to viewing position the instance exposure is made—no viewfinder
"blackout" to delay picture taking.
Single-stroke film wind lever cocks shutter, counts exposure and prevents double exposures.
High speed f:2.8 interchangeable lens lets you shoot in broad range of lighting conditions. 100 mm telephoto and
35mm wide-angle lenses will increase your enjoyment. Convenient flash use: Both flashcube and normal flash gun
with or without connecting cord can be used.
Versatile shutter operates on 1/30 SEC. through 1/300 sec. & B.
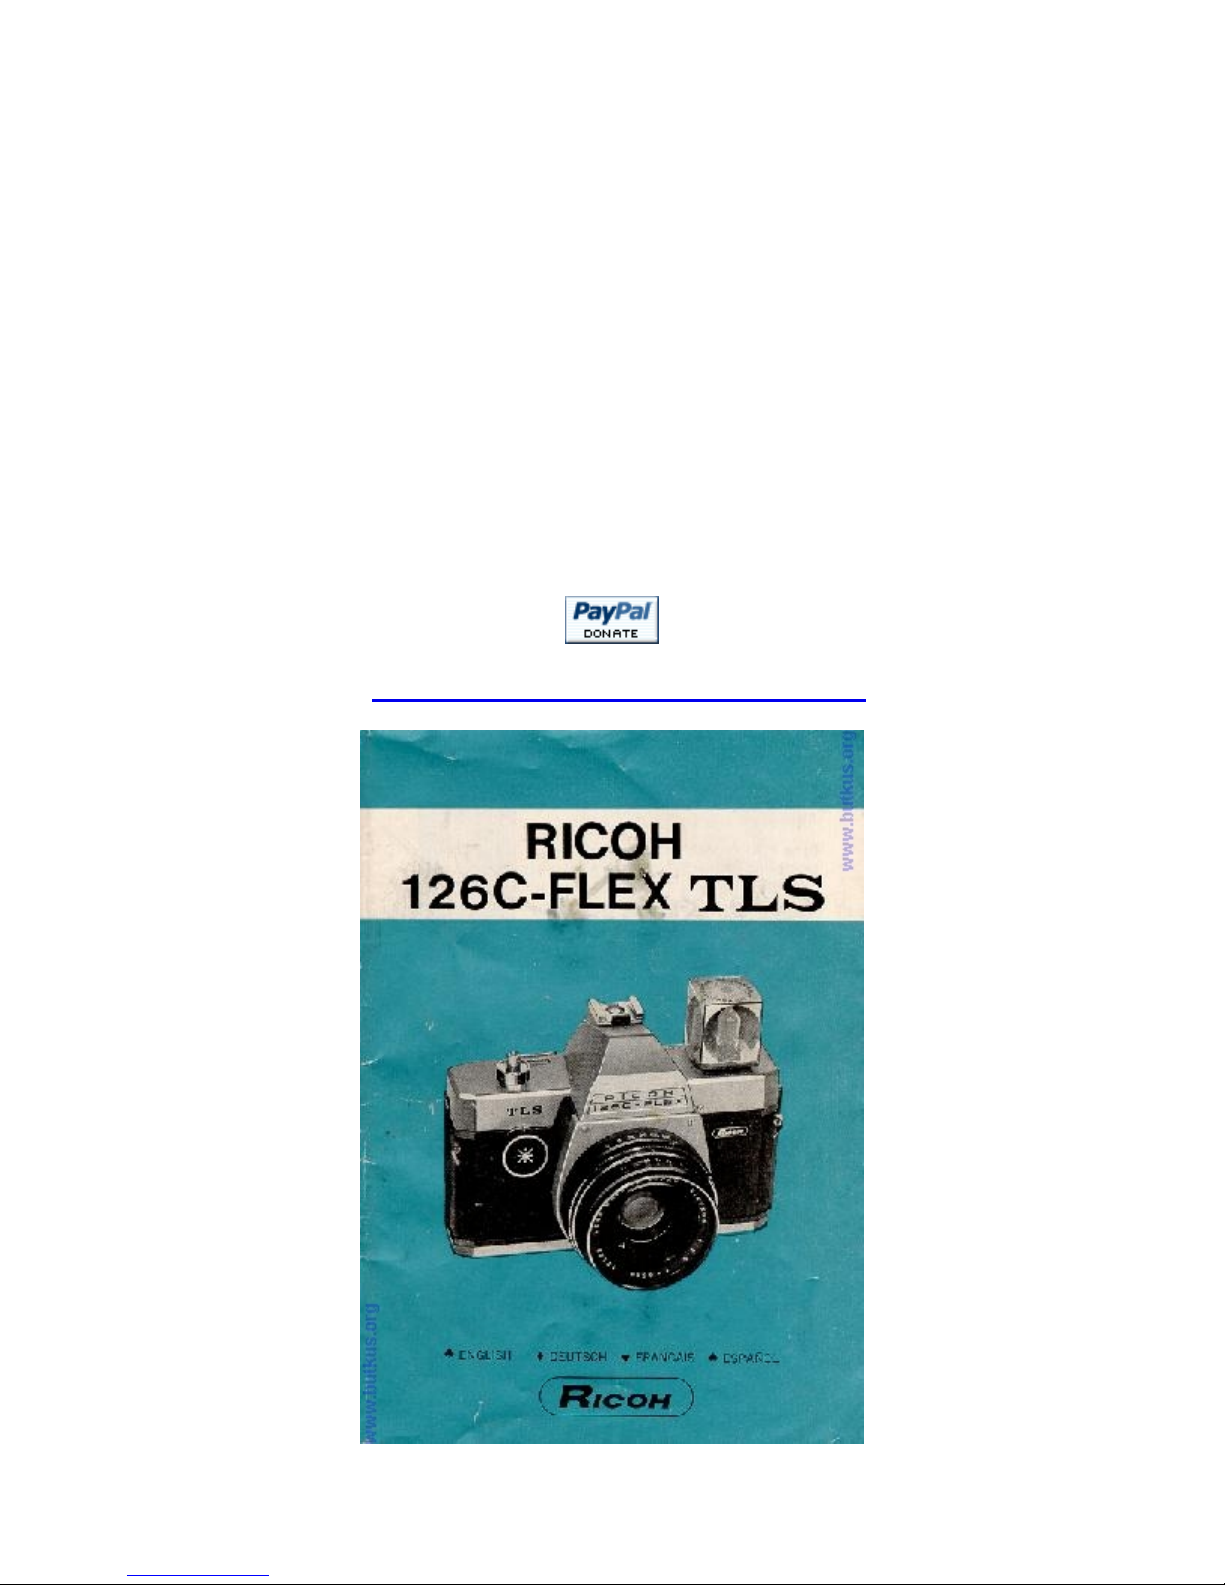
Know your camera
4www.butkus.org
A. Shutter Release Button
B. Auto/Manual Ring
C. Neckstrap Eyelet (2)
D. Shutter Speed Ring
E. Focusing Ring
F. Flashcube Socket
G. Accessory Shoe
H. Direct Contact
Page 3
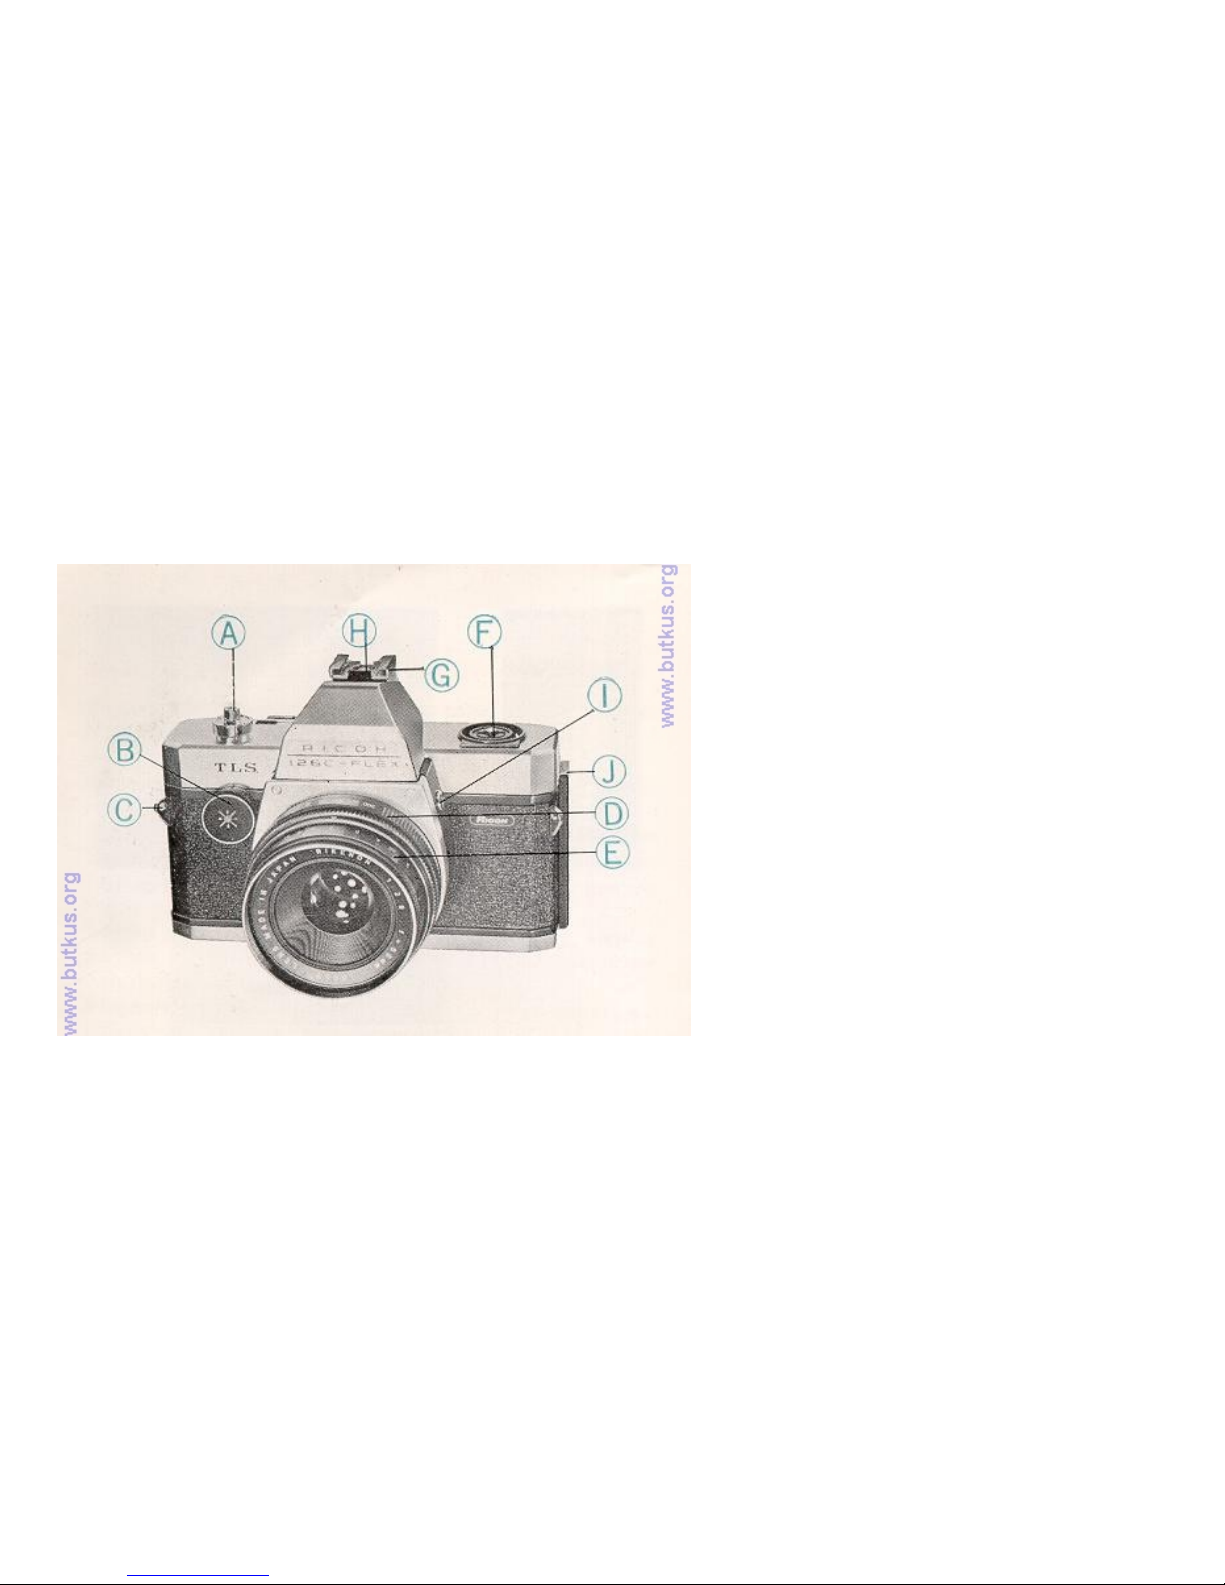
I. Flash Terminal
J. Back Cover Latch
4www.butkus.org
K. Viewfinder Eyepiece
L. Exposure Meter Window
M. Film Wind Lever
N. Film Window
O. Exposure Meter Battery Housing
P. Flash Battery Housing4www.butkus.org
Q. Tripod Screw
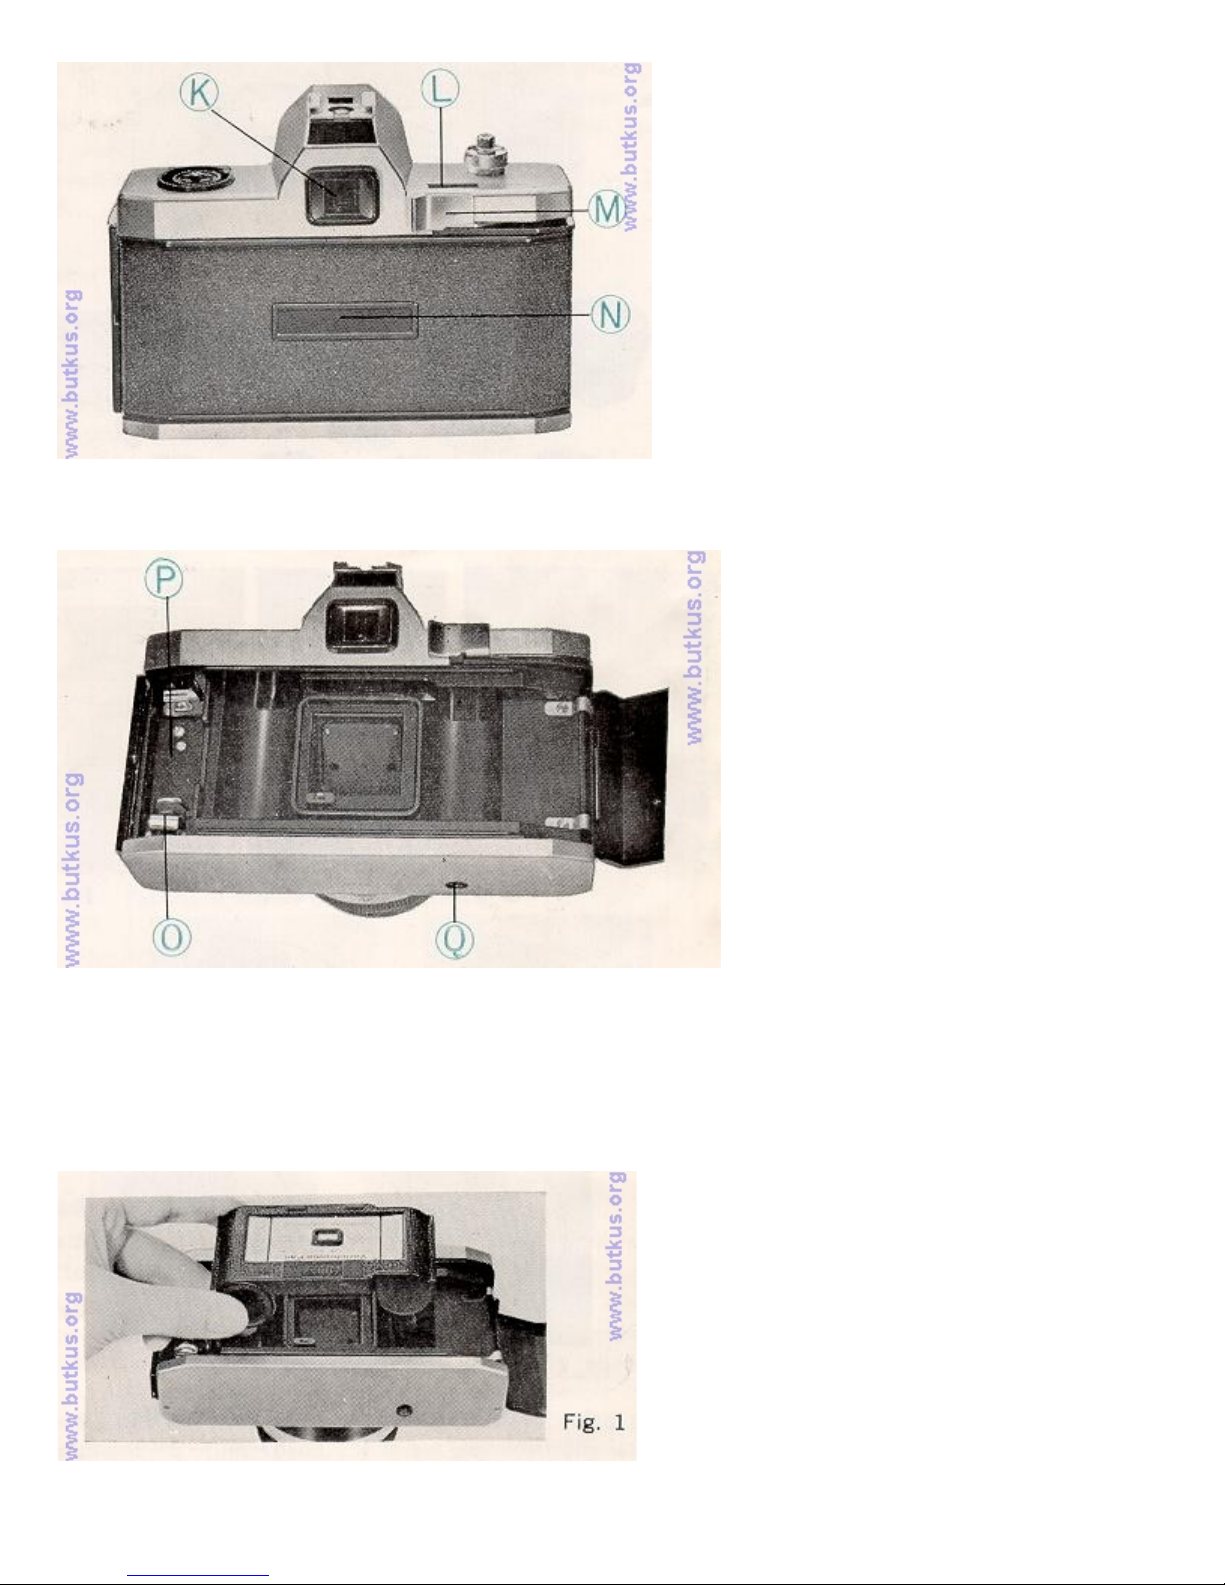
Loading your camera
Use No. 126 type film cartridge—color or black and white.
Pull Back Cover Latch (J) and swing open camera
back. Place film cartridge in camera upside down as
shown in Fig. 1. Close camera and press back cover to
snap it shut. Advance Film Wind Lever (M) until
number "1" appears in Film Window (N). You need
not to make any adjustment for film speed. It is set
automatically when film cartridge is seated in the
camera.
Page 4

Do not open camera back until all pictures have been taken and paper backing has been wound past Film
Window.
Correct exposure
Simply turn Shutter Speed Ring (D) until
the desired shutter speed number is set at
the red mark (Fig. 2). Be certain the Ring is
set at a click stop. "60" (1/60-second) is
recommended for subject not in motion.
Where motion exists, the faster shutter,
1/125 or 1/300,should be used. When set at
"B", the shutter will remain open as long as
the Shutter Release Button (A) is depressed.
For automatic Turn the Auto/Manual
Ring (B) until "A" comes at the black
marker (Fig. 3), And the Through-TheLens CdS exposure meter
automatically sets the f-stop always to
obtain correct amount of light. The fstop number at which your picture is
taken is shown in Exposure Meter
Window (L) on top of camera (Fig. 4).
When the amount of light is not proper, i.e. too much or too little, a Red warning
signal will appear at the left bottom corner in the View Finder, and the Shutter
Release Button is automatically locked, thus preventing improper exposure. Then
choose a different shutter speed, or use flash. (See page 5 for flash pictures). This Red
Warning Signal device does not function when Auto/Manual Ring is set to the manual
aperture position for intentional under- or over-exposed photography. The ThroughThe-Lens CdS exposure meter works on a 1.3 volt "mercury battery" (Mallory
RM675 or equivalent) and it will last for approximately one year. When inserting the
battery, make sure that (+) and ( - ) ends of the battery are facing the direction
illustrated in the Battery
Housing (O) (Fig. 5).
Page 5

Manual exposures
For special effects or other situations where you wish to set the lens manually, merely turn Auto/Manual Ring (B)
until the f stop you desire is aligned with the black indicator marker (Fig. 6).
Holding the camera
When you are ready to take the picture, hold the camera steady, and gently press Shutter Release Button (A) all the
way down.
Viewing and focusing
Look into Viewfinder Eyepiece (K) to compose
your picture and focus the lens. Rotate Focusing
Ring (E) until your subject becomes clear in the
micro-prism focusing screen (Fig. 7).
Since you are viewing through the taking lens
there is no parallax problem what you see in the
viewfinder will
appear in your picture. Even when you shoot close
ups there is no longer danger of accidental
cropping.
Changing the lens
Your camera is equipped with a 55 mm lens which is
the proper focal length for general-purpose picture
taking. You may also use Rikenon 100mm telephoto
or 35mm wide-angle lens.
To remove the lens for exchanging the lenses, continuously turn the lens counterclockwise until it comes off
(Fig. 8).
To insert the standard lens or telephoto or wide-angle lens, turn lens clockwise until the lens stops.
Page 6

Flash pictures
Insert a 15-volt flash battery in Flash Battery Housing (P) according to the (+) ( - ) illustration in the Housing (Fig.
9).
Using Flashcube
To take flash picture with flashcube, set Shutter Speed Ring (D) at " picture of flash bulb", and the shutter speed is
set automatic ally at 1/30sec., suitable for flash pictures. Then, turn Auto/Manual Ring (B) and select the proper fstop. The proper f-stop can be obtained by the following calculation.
F-stop divided by Guide No. 21 m (or 65 ft.) by Distance between camera and subject (in meters or ft.)
Set Auto/Manual Ring (B) to the nearest f-stop in accord ance with the value obtained by the above calculation.
Place flashcube in Flashcube Socket (F) so that 4 prongs in base of flashcube align with accommodating slots in
Flashcube Socket (F). Press flashcube gently into the socket until cube clicks into position (Fig. 10). When you
wind Film Wind Lever (M), flashcube automatic" ally rotates. If you have used some of the bulbs within the cube,
insert cube after Film Wind Lever (M) is wound, with usable bulb facing the subject -be sure to eject cube when
used bulb has reached "firing" position.
Using the normal flash bulbs
If you are using the normal flash or electronic flash,
mount the flash gun onto Accessory Shoe (G) of your
camera, and attach the connecting cord to Flash Terminal
(I) (Fig. 11). Your camera has a Direct Contact (H) built
into Accessory Shoe (G) and cordless type flash guns
may be used.4www.butkus.org
Page 7

Set both shutter speed and f-stop properly in the same manner as mentioned in "Using Flashcube". Any type of the
flash bulbs has its own guide number and you have to divide the guide number by the distance from the camera to
the subject in order to get the proper unstop value. When using the normal flash unit, set Shutter Speed Ring (D)
at '"flash bulb picture". If you are using the electronic flash unit, you can select any shutter speed ranging from
1/30 -1/300 sec., and "flash bulb picture " (1/30 sec.).
Do not use flashcube and flash gun simultaneously.
Unloading film
When the last picture has been taken, wind Film Wind Lever (M) until all of the paper backing is wound past Film
Window (N), and take out the film cartridge for processing.
Ricoh accessories
The following accessories are available for your Ricoh 126C Flex TLS Camera (Fig. 12):
Tele Rikenon 100mm f2.8 telephoto lens
Wide" " 35 mm f2.8 wide-angle lens
Ricoh 52mm screw-in filter, Y2, UV, 85A, Skylight
Ricohlite V 5-successive shots flash unit
Ricohtron II electronic flash unit
Ricoh Self timer
Camera TIPS and CARE......
* Read the instruction booklet carefully.
* Before you go on a trip or photograph a special event, try a practice roll of film.
* Keep fingers and neckstrap clear of lens.
* Protect camera from dust, dirt and rough handling—do not expose camera to excessively high temperatures.
* Do not attempt to repair your camera.
 Loading...