

Page 1
RS-130
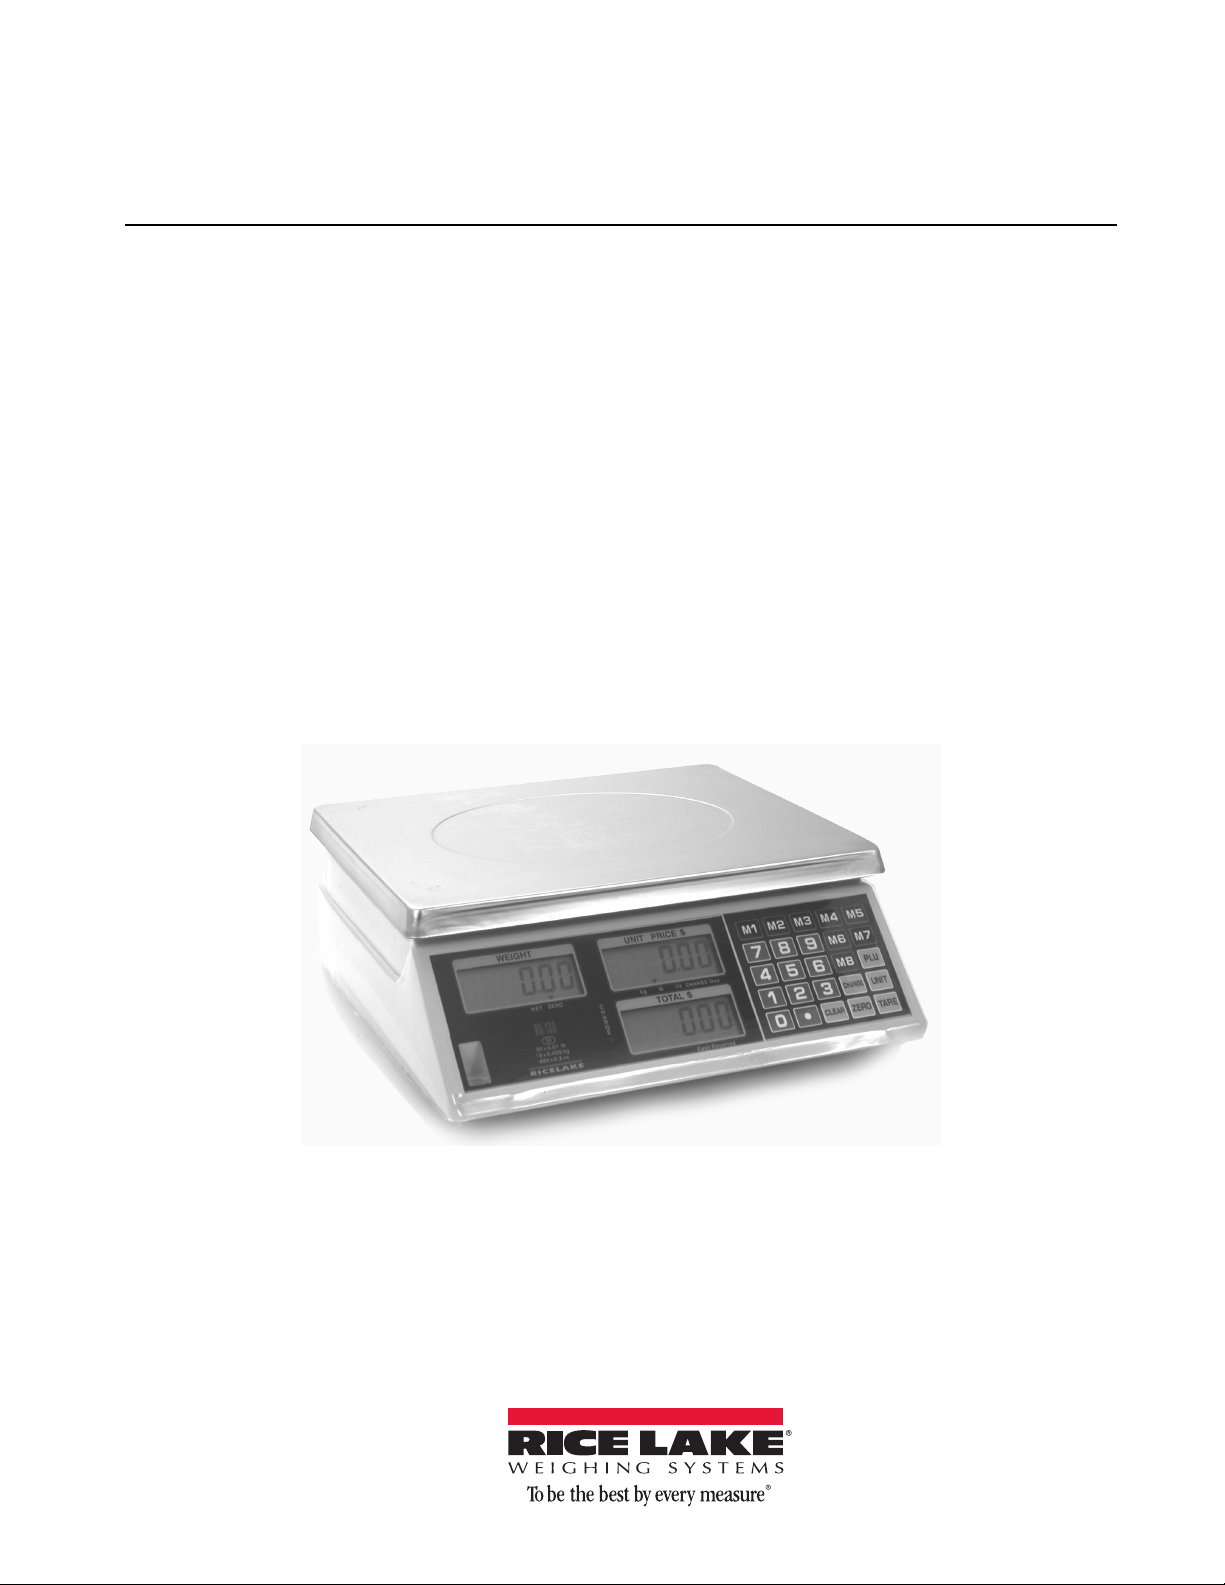
Price Computing Retail Scale
Version 2.0
Operation Manual
85772 Rev A
Page 2

Page 3

Contents
Technical training seminars are available through Rice Lake Weighing Systems.
Course descriptions and dates can be viewed at www.ricelake.com/training
or obtained by calling 715-234-9171 and asking for the training department.
About This Manual................................................................................................................................... 1
1.0 Introduction ................................................................................................................................. 1
1.1 Start-up Self Check . . . . . . . . . . . . . . . . . . . . . . . . . . . . . . . . . . . . . . . . . . . . . . . . . . . . . . . . . . . . . . 1
1.2 Power Supply . . . . . . . . . . . . . . . . . . . . . . . . . . . . . . . . . . . . . . . . . . . . . . . . . . . . . . . . . . . . . . . . . . . 1
1.3 Battery Recharging . . . . . . . . . . . . . . . . . . . . . . . . . . . . . . . . . . . . . . . . . . . . . . . . . . . . . . . . . . . . . . . 1
1.4 Setting the Auto-Off Feature . . . . . . . . . . . . . . . . . . . . . . . . . . . . . . . . . . . . . . . . . . . . . . . . . . . . . . . . 1
1.5 Safety. . . . . . . . . . . . . . . . . . . . . . . . . . . . . . . . . . . . . . . . . . . . . . . . . . . . . . . . . . . . . . . . . . . . . . . . . 2
2.0 RS-130 Retail Scale Calibration Instruction Sheet .................................................................... 3
2.1 Weight Calibration. . . . . . . . . . . . . . . . . . . . . . . . . . . . . . . . . . . . . . . . . . . . . . . . . . . . . . . . . . . . . . . . 3
2.2 Setting JP1 to the Enable/Disable Position . . . . . . . . . . . . . . . . . . . . . . . . . . . . . . . . . . . . . . . . . . . . . 3
3.0 Operation ..................................................................................................................................... 5
3.1 Display Windows and Annunciators . . . . . . . . . . . . . . . . . . . . . . . . . . . . . . . . . . . . . . . . . . . . . . . . . . 6
3.2 Error Messages. . . . . . . . . . . . . . . . . . . . . . . . . . . . . . . . . . . . . . . . . . . . . . . . . . . . . . . . . . . . . . . . . . 6
RS-130 Limited Warranty ............................................................................................................ 7
© Rice Lake Weighing Systems. All rights reserved. Printed in the United States of America.
Specifications subject to change without notice.
Version 2.0, Rev. A, November, 2014
Page 4

Rice Lake continually offers web-based video training on a growing selection
of product-related topics at no cost. Visit www.ricelake.com/webinars.
Page 5

About This Manual
Note
This manual contains operating procedures for the
RS-130 retail scale and provides you with all the
information necessary for setup and operation.
This manual is organized based on the procedures you
will likely fo
llow when setting up and using your
retail scale.
1.0 Introduction
The RS-130 retail scale offers practical solutions for a
full range of point-of-sale weighing and price
computing applications. Its compact design makes it
easy to transport and the customer display on the rear
of the
RS-130 offers extra convenience.
Standard features of the
• NTEP-certified Legal-for-Trade
• Measurement Canada approved
• Customer display on rear of unit
• Operates on 110 VAC or 6V internal battery
• Configurable for lb, kg or oz (oz not available
in
Canada)
• Calculates customer change
RS-130 include:
When using this manual, front panel keys are shown
BOLD characters.
in
Authorized distributors and their
employees can view or download this
manual from
the Rice Lake Weighing
Systems retail distributor site at
www.ricelakeretail.com.
1.3 Battery Recharging
The battery has 100+ hours of use before it needs
recharging. When the battery is low, the TOTAL $
display shows
Press the
After the initial warning of low battery, the scale has
approximately two to three hours of battery life left.
Every 30 minutes a beep sounds and TOTAL $ display
-LO-. If the battery is not charged, the TOTAL $
s
show
display shows
Turn the scale off and recharge the battery. Allow
eight to ten hours to fully charge. Table 1-1 describes
the meaning of the Charge LED colors.
-LO- and there is a continuous beep.
CLEAR key to remove -LO- and end the beep.
-OFF- and the scale beeps continuously.
1.1 Start-up Self Check
the RS-130 must charge for 24 hours prior to
operation. When you turn on the scale with the
OFF
switch, which is located on the bottom of the
ON/
scale, the main program provides the following
display check. The display turns on and shows the
total capacity in the WEIGHT display. Counts from
to nine in each display window, displays the total
one
capacity in the WEIGHT display again, and displays
0.00 for operation.
1.2 Power Supply
The RS-130 can use power supplied by either a plug-in
110VAC or the internal sealed, lead-acid rechargeable
battery with a life expectancy of five years under
normal use.
• AC - 110V/60Hz ±10% (battery recharging
ly)
on
• DC - 6V / 25mA; P=0.2W (max) 4Ah
LED Color Description
Red Initial connection
Orange Charging
Green Fully-charged
Table 1-1. Battery Charge LED’s
1.4 Setting the Auto-Off Feature
Work inside scale enclosure is not required.
1. Turn on the scale while pressing the CHANGE
key until 6.3 (version) shows in the WEIGHT
display (approximately three seconds).
2. Press and hold the
WEIGHT display shows SEtUP (approx. three
seconds).
3. Press the
USUAL.
4. Press the
3 key, WEIGHT display shows
2 key to enter the Auto-Off mode.
WEIGHT display shows
5. Use the
-OFF-.
CLEAR key to select -30-, -15-, -5-,
6. Press the CHANGE key to confirm setting.
Scale will automatically restart.
ZERO key until the
-OFF-.
Introduction 1
Page 6

1. 5 S a fe t y
Important
WARNING
WARNING
Safety Symbol Definitions:
Indicates a potentially hazardous situation that, if not avoided could result in death or serious injury,
and includes hazards that are exposed when guards are removed.
Indicates information about procedures that, if not observed, could result in damage to equipment or
corruption to and loss of data.
General Safety
Do not operate or work on this equipment unless you have read and understand the instructions and
warnings in this manual. Failure to follow the instructions or
or death. Contact any Rice Lake Weighing Systems dealer for replacement manuals. Proper care is
your responsibility.
Failure to heed may result in serious injury or death.
DO NOT allow minors (children) or inexperienced persons to operate this unit.
DO NOT operate without all shields and guards in place.
DO NOT jump on the scale.
DO NOT use for purposes other then weight taking.
DO NOT place fingers into slots or possible pinch points.
DO NOT use any load bearing component that is
DO NOT use this product if any of the
DO NOT exceed the rated load limit of the unit.
DO NOT make alterations or modifications to the unit.
DO NOT remove or obscure warning labels.
Keep hands, feet and loose clothing away from moving parts.
components are cracked.
worn beyond 5% of the original dimension.
heed the warnings could result in injury
2 RS-130 Operation Manual
Page 7

2.0 RS-130 Retail Scale Calibration Instruction Sheet
Warning
Note
Note
Procedures described require work inside the scale enclosure. These procedures are to be
performed by qualified service personnel only.
2.1 Weight Calibration
Follow the steps below to complete the calibration process.
1. Turn on power and press and hold the
PRICE $ display shows -3-. Release the CHANGE key
2. Press and hold the
3. Press the
ZERO key to enter calibration mode. WEIGHT display flashes CAL-1 and shows UNIT 1.
The WEIGHT display will not flash CAL-1 if jumper JP1 is in the disable position. See “Setting JP1 to the
Enable/Disable Position” on page 2. if the WEIGHT display will not flash CA
ZERO key until the WEIGHT display shows SEtUP.
4. Press the CLEAR key to select the weight unit (default is kg) to be used for calibration.
• Unit 1 - kg (annunciator
above kg lit in the UNIT PRICE $ display)
• Unit 2 - lb (annunciator above lb lit in the UNIT PRICE $ display)
• Unit 3 - oz (annunciator above oz lit in the UNI
5. Press the
CHANGE key to accept the weight unit. The WEIGHT display shows:
• 00.000 (kg)
• 000.00 (lb)
• 0000.0 (oz) - not available in Canada
6. Press the
• key to shift and the CLEAR key to modify the flashing digit. For example, If you use a 30lb
standard weight to calibrate; use the
set the digit to 030.00.
7. Press the
CHANGE key and wait for the WEIGHT display to show 000000 and the UNIT PRICE $ display to
show the internal offset value at (xxxxx.)
8. Place selected weight from step six on the platte
UNIT PRICE $ display shows the internal offset value at (
9. Wait for the span value to become stable,
flash good (twice), quickly remove the weight from the platter. After automatic restart, finish calibration.
10. Disable JP1 to maintain the NTEP approval. See “Setting JP1 to
CHANGE key until the WEIGHT display shows 6.3 and UNIT
L-1.
T PRICE $ display) - not available in Canada
• key to shift the flashing digit to 000.00 and use the CLEAR key to
r. WEIGHT display shows the internal span value and
xxxxx.)
then press the CHANGE key. Wait for the WEIGHT display to
the Enable/Disable position”.
2.2 Setting JP1 to the Enable/Disable Position
Follow the steps below to set jumper JP1 to the enable or disable position.
1. Remove platter and plastic in-use cover.
2. Remove lead-seal located in the center of the base.
3. Remove the 4 screws from the base of the scale.
4. Lift the cover away from the base toward the operator side.
Open slowly, cables are attached.
RS-130 Retail Scale Calibration Instruction Sheet 3
Page 8

JP1 Settings
Disable
Enable
JP1
Figure 2-1. Jumper JP1 Location
Sealing Pin
Follow the steps below to re-assemble the scale.
1. Place the cover on top of the base, ensure that the sealing pin is aligned with the sealing pin hole in the base.
2. Tighten the four screws into the base of the scale.
3. Replace the lead seal in the center of the base, over the sea
ling pin.
4. Replace the platter and plastic in-use cover.
4 RS-130 Operation Manual
Figure 2-2. Sealing Pin
Page 9

3.0 Operation
The following section describes the front panel keys, annunciators, and display functions (displayed in Figure
3-1 on page 6) of the
Off switch
Key Function/Description
M1 - M8
PLU
UNIT
TARE
KEYBOARD
TA
RE*
CHANGE
ZERO
CLEAR
•
* Feature available on SN B00551 or higher only
RS-130. Key functions are described in Table 3-1 below. To turn on the scale, toggle the On/
located on the bottom of the scale.
Eight direct PLU’s for saving different unit prices or figures. For example: to save 7.50 in
M8 setting,
the
1. Key in 750
2. Press and hold the
• Every time you press the
M8 key until the scale beeps (approximately three seconds)
M8 key the UNIT PRICE $ display shows 7.50
• To change the setting of one of the memory keys, follow the steps above.
Set up to 89 different indirect PLU’s. (10-99 allowed)
1. Key in the unit price
2. Press the
PLU key once
3. Enter the first digit of the PLU number, when entering the second digit hold the
button until the scale beeps (approximately three seconds)
• PLU is displayed in the
WEIGHT display
• To recall a PLU, press PLU and enter the number you want to recall.
• To change the PLU settings, key in the new unit price and follow steps 2 - 3.
This key selects the unit of measure (kg, lb or oz) in weighing mode.
1. Press the
UNIT key, WEIGHT display shows ch9-
2. Press: 1 to select kg, 2 to select lb or 3 to select oz (default is lb)
• The annunciator will flash above the selected unit
of measure in the
UNIT PRICE $ display.
• Oz not available in Canada
Acquire the net weight value of the object being weighed.
1. Place the package or container on the platter, the weight appears on the
WEIGHT display.
2. Press the
NET in the
In Gross mode, place item on scale.
1. Use the keyboard to enter the tare weight.
2. Press the
Example: with a tare of 61, the
Compute the amount of change to be given back to a customer for their purchase. For
example: when
Press the
(change due). The
Resets gross weight to zero.
Press the CLEAR key to erase the figure shown in the UNIT PRICE $ display.
Sets the decimal point.
TARE key, the WEIGHT display returns to zero. A cursor appears above
WEIGHT display.
TARE key.
WEIGHT display will show 0.61 NET
TOTAL $ shows 15.00 and you receive $20.00 from the customer;
CHANGE key and enter 2000. The UNIT PRICE $ display shows C 5.00
TOTAL $ display shows 20.00 (cash received).
Table 3-1. Function Keys
Operation 5
Page 10

Indicates scale
is in NET mode
Indicates scale
is at ZERO
Indicates weight
is in either lb, kg,
or oz (oz not
available in
Canada)
Status of battery charging
Red: initial charge
Orange: charging
Green: fully charged
Indicates the
amount of cash
received
Indicates the
amount of change
due
Key Function/Description
0 - 9 Numeric
Keys
Enter the numeric value required.
• Use the numeric keys to enter the price-per-unit, PLU number, cash received
Press and hold the 0 key to show the battery voltage in the
6.1 - 6.5 means the battery is fully-charged.
•
• Less than
• Press the
5.6 means the battery is in low-charge.
CLEAR key to return the display to normal operating mode.
Table 3-1. Function Keys
3.1 Display Windows and Annunciators
Display Window Description
WEIGHT
UNIT PRICE $
TOTAL $
Displays the weight of the object on the platter.
Displays the unit price of the object on the platter.
Displays the total amount owed (weight multiplied by unit price).
Table 3-2. Display Windows
WEIGHT display.
3.2 Error Messages
Table 3-3 describes error messages that may be shown on the RS-130 display.
WEIGHT display shows
WEIGHT display shows
TOTAL $ display shows
6 RS-130 Operation Manual
Figure 3-1. Front Display Annunciators
Display Description Corrective Action
"Err-1"
"Err-3"
"E"
IC93C66 data-loss or IC93C66 damaged/
fa
ulty
At power-up, the weight on the platter is
m
ore than 5% of the maximum capacity
The total price value is larger than 9999.99 Remove the measured object from the platter and
Table 3-3. Error Messages and Troubleshooting
Contact your nearest RLWS dealer
Remove the weight from the scale, or to under 5%
of capacity and restart the scale
pr
ess CLEAR to clear the unit price setting
Page 11

RS-130 Limited Warranty
Rice Lake Weighing Systems (RLWS) warrants that all RLWS equipment and systems properly installed by a
Distributor or Original Equipment Manufacturer (OEM) will operate per written specifications as confirmed by
the Distributor/OEM and accepted by RLWS. All systems and components are warranted against defects in
materials and workmanship for one year.
RLWS warrants that the equipment sold hereunder will conform to the current written specifications authorized
by RLWS. RLWS warrants the equipment against faulty workmanship and defective materials. If any equipment
fails to conform to these warranties, RLWS will, at its option, repair or replace such goods returned within the
warranty period subject to the following conditions:
• Upon discovery by Buyer of such nonconformity, RLWS will be given prompt written notice with a
detailed explanation of the alleged deficiencies.
• Individual electronic components returned to RLWS for warranty purposes must be packaged to prevent
electrostatic discharge (ESD) damage in shipment. Packaging requirements are listed in a publication,
“Protecting Your Components From Static Damage in Shipment,” available from RLWS Equipment
Return Department.
• Examination of such equipment by RLWS confirms that the nonconformity actually exists, and was not
caused by accident, misuse, neglect, alteration, improper installation, improper repair or improper
testing; RLWS shall be the sole judge of all alleged non-conformities.
• Such equipment has not been modified, altered, or changed by any person other than RLWS or its duly
authorized repair agent.
• RLWS will have a reasonable time to repair or replace the defective equipment. Buyer is responsible for
shipping charges both ways.
• In no event will RLWS be responsible for travel time or on-location repairs, including assembly or
disassembly of equipment, nor for repairs made by others.
THESE WARRANTIES EXCLUDE ALL OTHER WARRANTIES, EXPRESSED OR IMPLIED, INCLUDING
WITHOUT LIMITATION WARRANTIES OF MERCHANTABILITY OR FITNESS FOR A PARTICULAR
PURPOSE. NEITHER RLWS NOR DISTRIBUTOR WILL, IN ANY EVENT, BE LIABLE FOR INCIDENTAL OR
CONSEQUENTIAL DAMAGES.
RLWS AND BUYER AGREE THAT RLWS’S SOLE AND EXCLUSIVE LIABILTY HEREUNDER IS LIMITED
TO REPAIR OR REPLACEMENT OF SUCH GOODS. IN ACCEPTING THIS WARRANTY, THE BUYER
WAIVES ANY AND ALL OTHER CLAIMS TO WARRANTY.
SHOULD THE SELLER BE OTHER THAN RLWS, THE BUYER AGREES TO LOOK ONLY TO THE SELLER
FOR WARRANTY CLAIMS.
No terms, conditions, understanding, or agreements purporting to modify the terms of this warranty shall have
any legal effect unless made in writing and signed by a corporate officer of RLWS and the Buyer.
© Rice Lake Weighing Systems, Inc. Rice Lake, WI. All Rights Reserved.
RICE LAKE WEIGHING SYSTEMS • 230 WEST COLEMAN STREET • RICE LAKE, WISCONSIN 54868 USA
Operation 7
Page 12

Page 13

230 W. Coleman St. • Rice Lake, WI 54868 • USA
U.S. 800-472-6703 • Canada/Mexico 800-321-6703 • International 715-234-9171 • Europe +31 (0) 88 2349171
www.ricelake.com www.ricelake.mx www.ricelake.eu www.ricelake.co.in m.ricelake.com
© Rice Lake Weighing Systems PN 85772 Rev A 11/2014
 Loading...