

Page 1
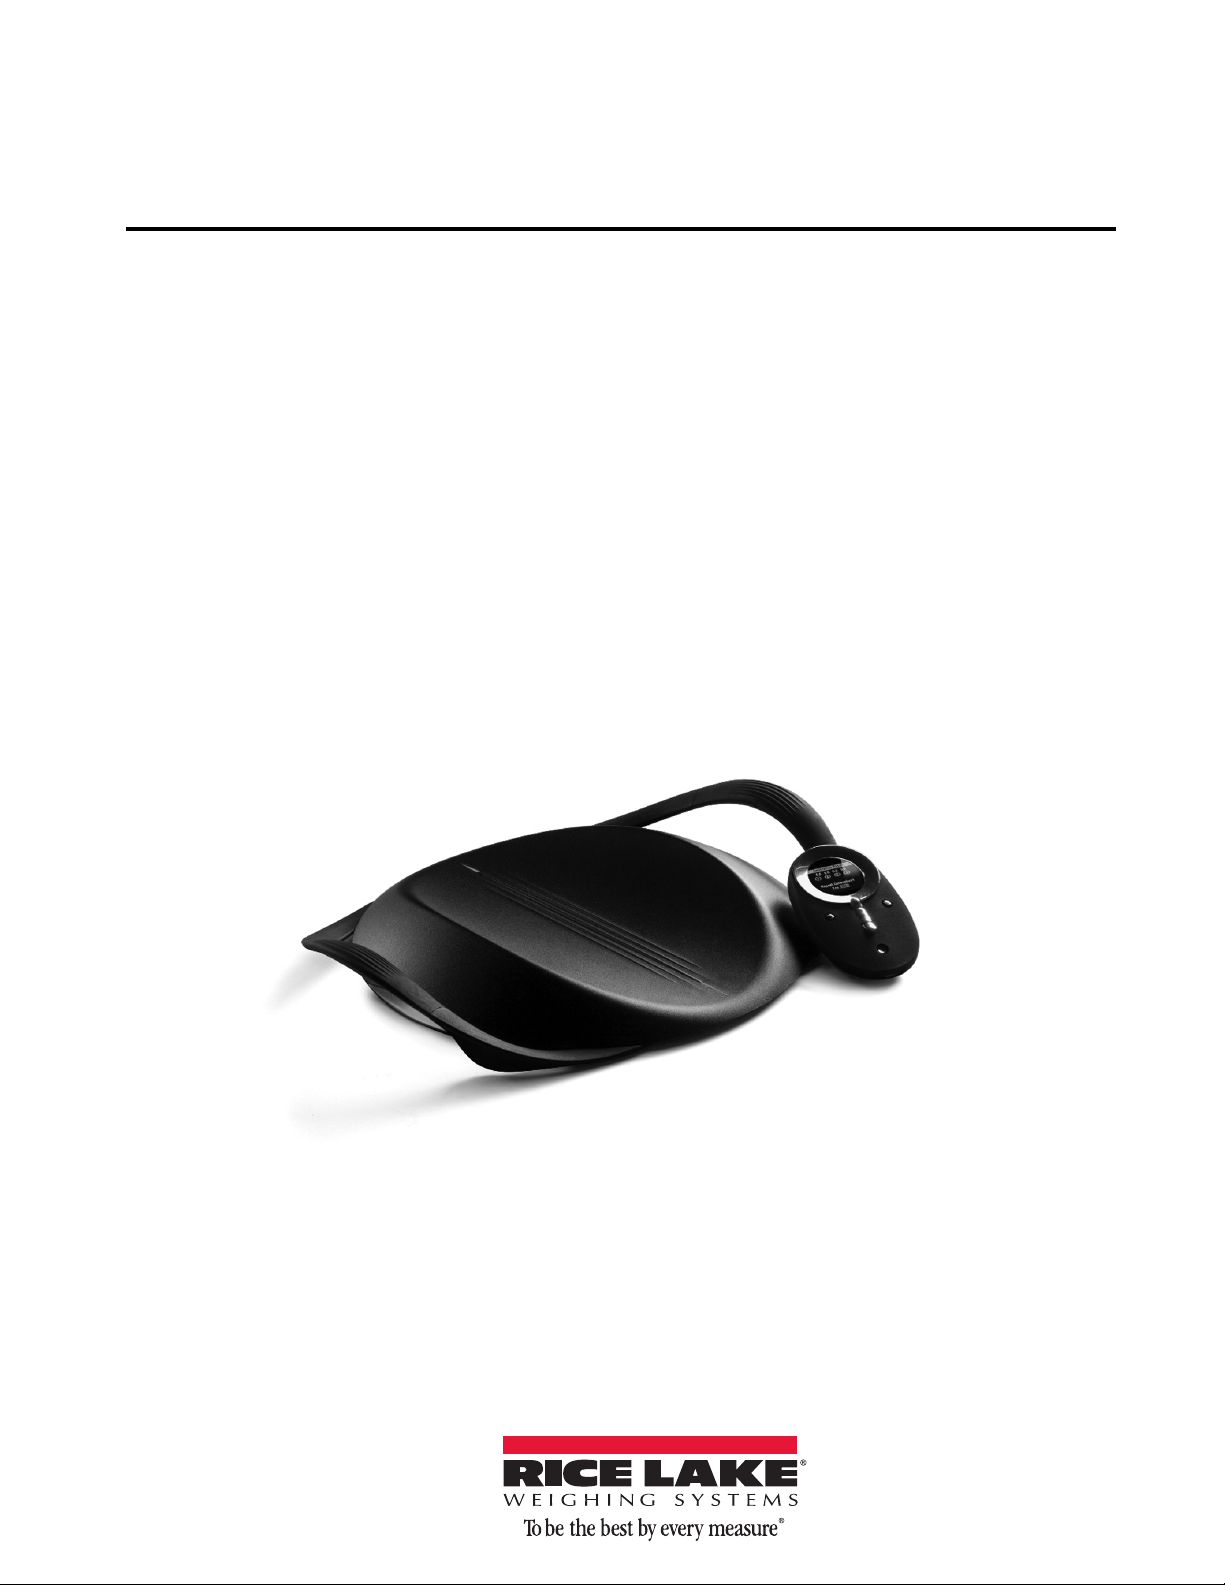
Wireless Wheelchair Scale
Model D300 Series
Version 1.0
Installation & Operation
Manual
161817
Page 2

Page 3

Contents
Technical training seminars are available through Rice Lake Weighing Systems.
Course descriptions and dates can be viewed at www.ricelake.com/training
or obtained by calling 715-234-9171 and asking for the training department.
1.0 Safety ........................................................................................................................................... 1
1.1 Safety Signals . . . . . . . . . . . . . . . . . . . . . . . . . . . . . . . . . . . . . . . . . . . . . . . . . . . . . . . . . . . . . . . . . . 1
1.2 Safety Precautions. . . . . . . . . . . . . . . . . . . . . . . . . . . . . . . . . . . . . . . . . . . . . . . . . . . . . . . . . . . . . . . 1
1.3 FCC/CE Notice . . . . . . . . . . . . . . . . . . . . . . . . . . . . . . . . . . . . . . . . . . . . . . . . . . . . . . . . . . . . . . . . . 2
2.0 Introduction.................................................................................................................................. 3
3.0 System Setup ............................................................................................................................... 3
3.1 Unpacking the Scale . . . . . . . . . . . . . . . . . . . . . . . . . . . . . . . . . . . . . . . . . . . . . . . . . . . . . . . . . . . . . 3
3.2 Repacklng . . . . . . . . . . . . . . . . . . . . . . . . . . . . . . . . . . . . . . . . . . . . . . . . . . . . . . . . . . . . . . . . . . . . 4
3.3 Handheld Controller Key Functions . . . . . . . . . . . . . . . . . . . . . . . . . . . . . . . . . . . . . . . . . . . . . . . . . . 4
4.0 Using the Scale............................................................................................................................ 5
4.1 Weigh Patient . . . . . . . . . . . . . . . . . . . . . . . . . . . . . . . . . . . . . . . . . . . . . . . . . . . . . . . . . . . . . . . . . . 5
4.2 Weigh Patient & Chair . . . . . . . . . . . . . . . . . . . . . . . . . . . . . . . . . . . . . . . . . . . . . . . . . . . . . . . . . . . . 6
4.2.1 Chair. . . . . . . . . . . . . . . . . . . . . . . . . . . . . . . . . . . . . . . . . . . . . . . . . . . . . . . . . . . . . . . . . . . . . . . . . . . 6
4.2.2 Patient + Chair . . . . . . . . . . . . . . . . . . . . . . . . . . . . . . . . . . . . . . . . . . . . . . . . . . . . . . . . . . . . . . . . . . . 7
4.3 Options Menu . . . . . . . . . . . . . . . . . . . . . . . . . . . . . . . . . . . . . . . . . . . . . . . . . . . . . . . . . . . . . . . . . . 8
4.3.1 Help . . . . . . . . . . . . . . . . . . . . . . . . . . . . . . . . . . . . . . . . . . . . . . . . . . . . . . . . . . . . . . . . . . . . . . . . . . . .8
4.3.2 Beep Preference. . . . . . . . . . . . . . . . . . . . . . . . . . . . . . . . . . . . . . . . . . . . . . . . . . . . . . . . . . . . . . . . . . 8
4.3.3 Date & Time . . . . . . . . . . . . . . . . . . . . . . . . . . . . . . . . . . . . . . . . . . . . . . . . . . . . . . . . . . . . . . . . . . . . . 8
4.3.4 Deep Setting. . . . . . . . . . . . . . . . . . . . . . . . . . . . . . . . . . . . . . . . . . . . . . . . . . . . . . . . . . . . . . . . . . . . . 8
5.0 Troubleshooting ........................................................................................................................... 9
6.0 D300 Series Limited Warranty................................................................................................... 10
© 2014 Rice Lake Weighing Systems. All rights reserved. Specifications subject to change without notice.
Rice Lake Weighing Systems is an ISO 9001 registered company.
Software revision 1.0, April 2014
i
Page 4

ii D300 Series Wireless Bed Scale Installation & Operation Manual
Rice Lake continually offers web-based video training on a growing selection
of product-related topics at no cost. Visit www.ricelake.com/webinars.
Page 5
About This Manual
Important
CAUTION
WARNING
WARNING
This manual can be viewed and downloaded from the Rice Lake Weighing Systems website at
www.ricelakehealth.com. Rice Lake Weighing Systems is an ISO 9001 registered company.
1.0 Safety
There are certain precautions that should be taken to prevent personal injury to the user and damage to your device.
Follow instructions for installation and usage. The manufacturer is not responsible for any damage or injury from
incorrect operation or manipulation by the user.
If any problem occurs during the operation, turn of
problem remains, contact Rice Lake Weighing Systems.
1.1 Safety Signals
Safety Signal Definitions:
Indicates a potentially hazardous situation that, if not avoided, could result in serious injury or
death.
Indicates a potentially hazardous si
injury.
Indicates information about procedures that, if not observed, could result in damage to
equipment
.
f the device first and follow the instructions in the manual. If the
tuation that, if not avoided, may result in minor or moderate
1.2 Safety Precautions
This device is designed and manufactured on the basis of the International Standard for Medical Equipment.
Do not operate or work on this equipment unless you have read and understand the safety
information and instructions
any Rice Lake Weighing Systems dealer for replacement manuals. Proper care is your
responsibility.
in the manual. Please follow these instructions carefully. Contact
General Safety
Failure to follow the instructions or heed these warnings could result in serious injury or death.
Inside of the device must be handled only by a qualified trained person. The customers must not touch or handle the
inside of this device under any circumstance. It may cause an electric shock or a flame out.
The following precautions must be observed for customer’s safety.
•This device has been adjusted to the optimal performance at the time of factory release.
Do not attempt to modify or adjust any preset controls or switches except those specified in this manual for operation.
•
If any modification is needed, ask your local distributor for service.
•If you have any trouble with this device, turn it off immediately and contact your local distributor for assistance.
•Avoid the following environments in using or storing this device.
°F
-Where the ambient temperature falls below 50
-Where the humidity falls below 30% or exceeds 75% for use.
-Where the humidity is over 95% for storage.
-Where this device is exposed to water stream or splashing water.
-Where this device is exposed to dust.
-Where this device is exposed to excessive shock or vibration.
-Where this device is exposed to direct sunlight.
or exceeds 95°F (10°C or exceeds 35°C) for use.
D300 Series Wireless Wheelchair Scale Installation & Operation Manual — Safety 1
Page 6

Important
CAUTION
•In case of using this device after a long period of non-use, it should be checked carefully before use.
•Observe general precautions on using electric devices and the things specified in this manual.
•The device must not be cleaned with lubricant or alcohol-based products. Plate electrode and coating can be peeled
off. Use a dry cloth or wet tissue.
In case of mechanical failure, please contact Rice Lake Weighing Systems.
This equipment has been tested and found to comply
60601-1-2:1994. These limits are desig
in a typical medical installation. This equipment generates, uses and can radiate radio frequency energy
and, if not installed and used in accordance with the instructions, may cause harmful interference to other devices in the
vicinity. However, there is no guarantee that interference will not occur in a particular installation. If this equipment does
cause harmful interference to other devices, which can be determined by turning the equipment off and on, the user is
encouraged to try to correct the interference by one or more of the following measures:
- Reorient or relocate the receiving device.
- Increase the separation between the equipment.
- Connect the equipment into an outlet on a circuit different f
- Consult the manufacturer or field service technician for help.
ned to provide reasonable protection against harmful interference
rom that to which the other device(s) are connected.
with the limits for medical devices to the IEC
1.3 FCC/CE Notice
Controller FCC ID: Y96141511
Scale Pads FCC ID: Y961415100
This device complies with Part 15 of the FCC rules. Operation is subject to the
1. This device may not cause harmful interference and
2. This device must accept any interference received, including interfe
operation.
This equipment has been tested and found to comply with the limits for a Class B di
of the FCC rules. These limits are designed to provide reasonable protections against harmful interference in a
residential installation. This equipment generates, uses and can radiate radio frequency energy and if not installed
and used in accordance with the instructions, may cause harmful interference to radio communications. However,
there is no guarantee that interference will not occur in a particular installation. If this equipment does cause
harmful interference to radio or television receptions, which can be determined by turning the equipment off and
on, the user is encouraged to try to correct the interference by one or more of the following measures:
• reorient or relocate the receiving antenna
• Increase the separation between the equipment and the receiver.
• Connect the equipment into an outlet on a circuit dif
ferent from that to which the receiver is connected.
• Consult the dealer or experienced radio/TV technician for help.
following two conditions:
rence that may cause undesired
gital device pursuant to Part 15
The user is cautioned that changes and modifications made to the e
quipment without approval of the manufacturer
could void the user’s authority to operate the equipment.
For technical assistance, call Rice Lake W
2 D300 Series Wireless Wheelchair Scale Installation & Operation Manual
eighing Systems at 1-800-472-6703.
Page 7

2.0 Introduction
The D300 Series wireless wheelchair scale provides home healthcare, skilled nursing facilities, and hospital
communities with a lightweight, portable and wireless alternative to the critical task of weighing wheelchair bound
patients. The wireless wheelchair scale is incredibly easy to set up and operate. The D300 Series comes in two
models:
• D300-8 — 800 lb (363 kg capacity)
• D300-12 — 1200 lb (544 kg) capacity
3.0 System Setup
3.1 Unpacking the Scale
Visually inspect the D300 Series scale to ensure all components are included and undamaged. Standard hardware
includes:
Item Description Quantity
Scale Pads
4
Handheld Controller and Rubber Glove for Controller
Roll on Mini Ramps
Lanyard
1 each
4
1
Table 3-1. D300 Component Parts
D300 Series Wireless Wheelchair Scale Installation & Operation Manual — Introduction 3
Page 8

Note
Important
Item Description Quantity
Wheel Stop
Table 3-1. D300 Component Parts
4
If any parts were damaged in shipment, notify Rice Lake Weighing Systems and the shipper immediately and keep
the original packaging material for inspection by the carrier’s representative. It is also helpful in the claim process
to take pictures of the condition of the packaging and damage.
After unpacking the scale, allow approximately 5-10 minutes for the scale to adjust to room
temperature.
3.2 Repacklng
If the D300 Series scale must be returned for modification or repair, it must be properly packed with sufficient
packing materials. Whenever possible, use the original carton when shipping the scale back.
Damage caused by improper packaging is not covered by the warranty.
3.3 Handheld Controller Key Functions
The following section explains the functions of the handheld controller.
Figure 3-1. Handheld Controller Key Functions
Key Function
Up/Down Arrow Used to toggle to through menu items.
Back Used to backspace on entries.
Power Turns the handheld unit on/off. When handheld u
Setup Menu This enters into Setup Menu.
OK Used to accept the value.
nit is turned on, will activate the scale pads.
Table 3-2. Key Functions
4 D300 Series Wireless Wheelchair Scale Installation & Operation Manual
Page 9

4.0 Using the Scale
Note
Important
Note
Wheel Stop
Mini Ramp
The D300 Series wireless wheelchair scale has two different modes available when using the scale.
• Weigh Patient
• Weigh Patient & Chair
4.1 Weigh Patient
This mode is an easy way to get a quick weight reading of a patient. Use the following steps to weigh a patient.
This mode includes the total weight of the patient and the wheelchair.
1. Place each scale pad on a solid, flat surface (tile, cement, hardwood).
2. To power up the controller, press and hold the green power button until the controller
(approximately two seconds). The controller will briefly display the company logo and version number,
then displays the main menu screen.
3. The scale pads must be zeroed out prior to weighing a patient.
4. Place the wheel stops on the scale pads.
5. Press the down arrow key and scroll down until
6.
Check and remove anything from the scale pads is displayed. Press Continue to continue to initiate the zero out
Zero Out Pads is highlighted and press OK.
function. When the controller is in process, the screen will go dim for approximately five seconds and
while the controller is zeroing out each pad, the scale pad will illuminate green.
f any of the four pad indicator lights are red or yellow in color, or if the controller indicates
I
COMM ERROR, TRY AGAIN, press the up arrow to highlight the Yes prompt. Press OK and repeat the
zeroing out process.
turns on
Make sure to zero out the scale each time the scale is moved.
7. After the controller completes the process, the display shows Zeroing Complete and will verify that all four
pad numbers on the controller display are indicated with green circles.
8. The controller will ask
display highlights
Repeat Zero Out. If all numbers are circled in green in the controller display, then the
NO. Press OK and the display returns back to the main menu screen.
9. Place the mini ramps onto the scale pad as shown in Figure 4-1.
Figure 4-1. Wheel Stop and Mini Ramp Attached to Scale Pad
10. Roll the wheelchair backwards onto the center of each pad.
D300 Series Wireless Wheelchair Scale Installation & Operation Manual — Using the Scale 5
Page 10

11. Set the brakes on the wheelchair and remove mini ramps prior to weighing.
Important
Note
Figure 4-2. Roll Wheelchair up Onto Scale Pads
For accurate weighments, mini ramps must be removed prior to weighing a patient.
12. Select
Weigh Patient from the main menu. The display will show Acquiring Data. During this time the display
screen will dim for approximately five seconds and the scale pads will be lit green. Patient weight will then
be displayed.
13. Press
14. Attach mini ramps back onto the sc
OK and the display will return back to the main menu. If there is a problem acquiring data, COMM
ERROR TRY AGAIN is displayed.
ale pads.
15. Remove patient off of scale pads.
4.2 Weigh Patient & Chair
This mode is used for weighing an individual in a wheelchair.
This mode includes the weight of the patient without the weight of the wheelchair.
There are two variations that can be done while in this mode:
•Chair
• Patient + Chair
4.2.1 Chair
The user can find the exact weight of the chair or it can be entered manually. When entering into Chair Weight
Chair will automatically be highlighted. Press OK and two menu items appear on the screen.
mode,
• Weigh Chair
• Enter Chair Weight
Weigh Chair
Weigh Chair will be highlighted when entering into this parameter.
6 D300 Series Wireless Wheelchair Scale Installation & Operation Manual
1. Prior to weighing the wheelchair, place the included whe
el stops and mini ramps onto the scale pad as
shown in Figure 4-1.
2. Roll the wheelchair backwards onto the center of each pad.
3. Set the brakes on the wheelchair and remove mini ramps
4. Press
OK to weigh just the chair. While the controller is in the process of weighing the chair, the display
prior to weighing.
will dim for approximately five seconds and the scale pads will lit green. Once complete the chair weight
results should be displayed. The display
Save? is shown. Press OK to save that weight and it will be saved
until the next use. If the user does not wish to save the chair weight, press the down arrow to highlight
and then press OK.
NO
Page 11

Note
Once the handheld controller is turned off, the chair weight is gone.
Important
5. Attach mini ramps back onto the scale pads.
6. Remove wheelchair off of scale pads.
Enter Chair Weight
To manually enter a chair weight, press the down arrow to highlight Enter Chair Weight.
1. Prior to manually entering the wheelchair w
eight, place the included wheel stops and mini ramps onto the
scale pad as shown in Figure 4-1.
2. Roll the wheelchair backwards onto the center of each pad.
3. Set the brakes on the wheelchair and remove mini ramps
4. Press
OK.
5. Press the up arrow or the down arrow to begin the numbers scrolling in
faster scrolling) until you get to the chairs’ correct weight and press
Correct? Yes should be highlighted and if the weight is correct, press OK. If the weight is not correct, press
the down arrow to highlight
NO and press OK. Repeat until correct.
prior to weighing.
5 lb increments (press and hold for
OK. The controller should read Is This
6. Attach mini ramps back onto the scale pads.
7. Remove wheelchair off of scale pads.
4.2.2 Patient + Chair
Use the down arrow to the highlighted Patient + Chair. Use the following steps to find the weight of the patient and
the chair.
1. Place each scale pad on a solid, flat surface
(tile, cement, hardwood).
2. Place the wheel stops on the scale pads.
3. Press the down arrow key and scroll down until
4.
Check and remove anything from the scale pads is displayed. Press continue to initiate the zero out function.
Zero Out Pads is highlighted and press OK.
(when the controller is in process the screen will go dim for approximately five seconds and while the
controller is zeroing out each pad, the scale pads will illuminate green.
If any of the four pad indicator lights are red or yellow in color, or if the controller indicates
COMM ERROR, TRY AGAIN, press the up arrow to highlight the Yes prompt. Press OK and repeat the
zeroing out process.
5. After the controller completes the process
, the display shows Zeroing Complete and will verify that all four
pad numbers on the controller display are indicated with green circles.
6. The controller will ask
Repeat Zero Out. If all numbers are circled in green in the controller display, then
highlight NO and then press OK and return back to the main menu screen.
7. Place mini ramps in front of each scale pad making sure the sc
8. Roll the wheelchair onto the sc
ale pads, as close to the center of the pad as possible and ensure brakes are
ale pads are placed behind the wheelchair.
on.
9. Assist patient into the chair.
10. Remove mini ramps prior to weighing the patient.
11. Press
Patient + Chair and the display will show Weighing. During this time the display screen will dim for
approximately five seconds and the scale pads will be lit green. Patient weight will then be displayed. The
display
not wish to save the weight, press the down arrow to highlight
Save? is shown. Press Yes to save that weight and will be saved until the next use. If the user does
NO and then press OK to return back to the
main menu.
12. Attach mini ramps back onto scale pads.
13. Remove wheelchair and patient of
f of scale pads.
D300 Series Wireless Wheelchair Scale Installation & Operation Manual — Using the Scale 7
Page 12

4.3 Options Menu
Setup/Options Button
There are several options available on the D300 Series wireless wheelchair scale. To access those options, press the
upper-right display button on the handheld controller.
Figure 4-3. Setup/Options Button Location
4.3.1 Help
This option includes basic written facts to help with setup and ease of use.
• Getting S
• Using Quick
tarted provides general information on how to get started using your scale.
Weight provides a quick weight reading with patient and chair without the ability to save to
the patient database.
eighing Patient + Chair provides a quick weight reading with patient and chair without the ability to
• W
save to the patient database.
• He
lpful Hints gives helpful way to achieve the best results and functionality.
4.3.2 Beep Preference
The D300 Series wireless wheelchair scale system is designed with beep alerts.
The controller is defaulted to
Lost Pad Connection can also be selected and will alert the user if there is an error or obstruction preventing clear
Never.
communication with the scale pads.
Additional beep preference settings are
available but because they are associated with patient database information,
are only available in the D300 Series service manual.
4.3.3 Date & Time
This option is for setting the current date and time. Use the following steps to set up date and time.
1. To enter the current year, use the up and down arrow
2. To enter the current month, use the up and down arrows on the controller to fin
press the
OK button.
3. To enter the current day, use the up and down arrows on
OK button.
4. To enter the current hour, use the up and down arrows on the controll
s to enter find the current year and press the OK button.
d the current month and
the controller to find the current date and press the
er until the correct hour appears then
press OK.
5. To enter the current minutes, use the up and down arrows on the controller until t
then press
4.3.4 Deep Setting
OK.
he correct minute appears,
This option is pass code protected for changing functionality in much more detail. Additional information on deep
settings are only available in the D300 Series service manual.
8 D300 Series Wireless Wheelchair Scale Installation & Operation Manual
Page 13

5.0 Troubleshooting
Use the following troubleshooting tips if the unit isn’t working properly.
• When scale pads are not found by the controller or will not turn on:
• Check batteries in each scale pad and the controller to ensure proper placement and connection.
• If the weight readings are inconsistent, check the flooring on which the pads are placed. The scale needs to
be used on level flooring, such as tile, cement, hardwood and clear of any debris.
• Make sure the mini ramps have been removed prior to weighing.
• If you have followed these directions and are still not getting the desired results, call (800) 472-6703 and
ask for technical support.
D300 Series Wireless Wheelchair Scale Installation & Operation Manual — Troubleshooting 9
Page 14

6.0 D300 Series Limited Warranty
Rice Lake Weighing Systems (RLWS) warrants that all RLWS equipment and systems properly installed by a
Distributor or Original Equipment Manufacturer (OEM) will operate per written specifications as confirmed by the
Distributor/OEM and accepted by RLWS. All systems and components are warranted against defects in materials
and workmanship for one year.
RLWS warrants that the equipment sold hereunder will conform to the current written specifications authorized by
RLWS. RLWS warrants the equipment against faulty workmanship and defective materials. If any equipment fails
to conform to these warranties, RLWS will, at its option, repair or replace such goods returned within the warranty
period subject to the following conditions:
• Upon discovery by Buyer of such nonconformity, RLWS will be given prompt written notice with a
detailed explanation of the alleged deficiencies.
• Individual electronic components returned to RLWS for warranty purposes must be packaged to
prevent electrostatic discharge (ESD) damage in shipment. Packaging requirements are listed in a
publication, Protecting Your Components From Static Damage in Shipment, available from RLWS
Equipment Return Department.
• Examination of such equipment by RLWS confirms that the nonconformity actually exists, and was
not caused by accident, misuse, neglect, alteration, improper installation, improper repair or improper
testing; RLWS shall be the sole judge of all alleged non-conformities.
• Such equipment has not been modified, altered, or changed by any person other than RLWS or its duly
authorized repair agents.
• RLWS will have a reasonable time to repair or replace the defective equipment. Buyer is responsible
for shipping charges both ways.
• In no event will RLWS be responsible for travel time or on-location repairs, including assembly or
disassembly of equipment, nor will RLWS be liable for the cost of any repairs made by others.
THESE WARRANTIES EXCLUDE ALL OTHER WARRANTIES, EXPRESSED OR IMPLIED, INCLUDING WITHOUT
LIMITATION WARRANTIES OF MERCHANTABILITY OR FITNESS FOR A PARTICULAR PURPOSE. NEITHER RLWS
NOR DISTRIBUTOR WILL, IN ANY EVENT, BE LIABLE FOR INCIDENTAL OR CONSEQUENTIAL DAMAGES.
RLWS AND BUYER AGREE THAT RLWS’S SOLE AND EXCLUSIVE LIABILITY HEREUNDER IS LIMITED TO REPAIR
OR REPLACEMENT OF SUCH GOODS. IN ACCEPTING THIS WARRANTY, THE BUYER WAIVES ANY AND ALL OTHER
CLAIMS TO WARRANTY.
SHOULD THE SELLER BE OTHER THAN RLWS, THE BUYER AGREES TO LOOK ONLY TO THE SELLER FOR
WARRANTY CLAIMS.
NO TERMS, CONDITIONS, UNDERSTANDING, OR AGREEMENTS PURPORTING TO MODIFY THE TERMS OF THIS
WARRANTY SHALL HAVE ANY LEGAL EFFECT UNLESS MADE IN WRITING AND SIGNED BY A CORPORATE
OFFICER OF RLWS AND THE BUYER.
© 2014 Rice Lake Weighing Systems, Inc. Rice Lake, WI USA. All Rights Reserved.
RICE LAKE WEIGHING SYSTEMS • 230 WEST COLEMAN STREET • RICE LAKE, WISCONSIN 54868 • USA
10 D300 Series Wireless Wheelchair Scale Installation & Operation Manual
Page 15

Page 16

230 W. Coleman St. Rice Lake, WI 54868 USA
U.S. 800-472-6703 Canada/Mexico 800-321-6703 International 715-234-9171 Europe +31 (0) 88 2349171
www.ricelake.com www.ricelake.mx www.ricelake.eu www.ricelake.co.in m.ricelake.com
PN 161817 04/2014
 Loading...