

Page 1

User’s Guide
To be the best by every measure
Version 2.1
115105
Page 2

Page 3

Technical training seminars are available through Rice Lake Weighing Systems.
Course descriptions and dates can be viewed at www.ricelake.com/training
or obtained by calling 715-234-9171 and asking for the training department.
Contents
About This Manual ................................................................................................................................... 1
1.0 Introduction.................................................................................................................................. 1
1.1 System Requirements . . . . . . . . . . . . . . . . . . . . . . . . . . . . . . . . . . . . . . . . . . . . . . . . . . . . . . . . . . . . 2
1.1.1 Web Browsers . . . . . . . . . . . . . . . . . . . . . . . . . . . . . . . . . . . . . . . . . . . . . . . . . . . . . . . . . . . . . . . . . . . 2
1.1.2 CRS-Link . . . . . . . . . . . . . . . . . . . . . . . . . . . . . . . . . . . . . . . . . . . . . . . . . . . . . . . . . . . . . . . . . . . . . . . 2
2.0 CRS Administration...................................................................................................................... 3
2.1 Common Administration Features . . . . . . . . . . . . . . . . . . . . . . . . . . . . . . . . . . . . . . . . . . . . . . . . . . . 3
2.1.1 The List View. . . . . . . . . . . . . . . . . . . . . . . . . . . . . . . . . . . . . . . . . . . . . . . . . . . . . . . . . . . . . . . . . . . . . 3
2.2 Configuring the System . . . . . . . . . . . . . . . . . . . . . . . . . . . . . . . . . . . . . . . . . . . . . . . . . . . . . . . . . . . 3
2.2.1 Units of Measure . . . . . . . . . . . . . . . . . . . . . . . . . . . . . . . . . . . . . . . . . . . . . . . . . . . . . . . . . . . . . . . . . . 3
2.2.2 NIST Info . . . . . . . . . . . . . . . . . . . . . . . . . . . . . . . . . . . . . . . . . . . . . . . . . . . . . . . . . . . . . . . . . . . . . . . . 4
2.2.3 Device Classes . . . . . . . . . . . . . . . . . . . . . . . . . . . . . . . . . . . . . . . . . . . . . . . . . . . . . . . . . . . . . . . . . . . 4
2.2.4 Weight Kits . . . . . . . . . . . . . . . . . . . . . . . . . . . . . . . . . . . . . . . . . . . . . . . . . . . . . . . . . . . . . . . . . . . . . . 4
2.2.5 Trucks. . . . . . . . . . . . . . . . . . . . . . . . . . . . . . . . . . . . . . . . . . . . . . . . . . . . . . . . . . . . . . . . . . . . . . . . . . 5
2.2.6 User Admin . . . . . . . . . . . . . . . . . . . . . . . . . . . . . . . . . . . . . . . . . . . . . . . . . . . . . . . . . . . . . . . . . . . . . . 5
2.2.7 Technicians. . . . . . . . . . . . . . . . . . . . . . . . . . . . . . . . . . . . . . . . . . . . . . . . . . . . . . . . . . . . . . . . . . . . . . 6
2.2.8 Final Accuracy. . . . . . . . . . . . . . . . . . . . . . . . . . . . . . . . . . . . . . . . . . . . . . . . . . . . . . . . . . . . . . . . . . . . 6
2.2.9 Final Environmental Conditions . . . . . . . . . . . . . . . . . . . . . . . . . . . . . . . . . . . . . . . . . . . . . . . . . . . . . . . 7
2.2.10 Final Results . . . . . . . . . . . . . . . . . . . . . . . . . . . . . . . . . . . . . . . . . . . . . . . . . . . . . . . . . . . . . . . . . . . . . 7
2.2.11 Device Types. . . . . . . . . . . . . . . . . . . . . . . . . . . . . . . . . . . . . . . . . . . . . . . . . . . . . . . . . . . . . . . . . . . . . 7
2.2.12 Locations (Optional - Multi Location Version). . . . . . . . . . . . . . . . . . . . . . . . . . . . . . . . . . . . . . . . . . . . . 7
2.2.13 Forms . . . . . . . . . . . . . . . . . . . . . . . . . . . . . . . . . . . . . . . . . . . . . . . . . . . . . . . . . . . . . . . . . . . . . . . . . . 8
2.2.14 Configuration. . . . . . . . . . . . . . . . . . . . . . . . . . . . . . . . . . . . . . . . . . . . . . . . . . . . . . . . . . . . . . . . . . . . . 8
2.2.15 Device Components . . . . . . . . . . . . . . . . . . . . . . . . . . . . . . . . . . . . . . . . . . . . . . . . . . . . . . . . . . . . . . . 8
2.2.16 Custom Device Fields . . . . . . . . . . . . . . . . . . . . . . . . . . . . . . . . . . . . . . . . . . . . . . . . . . . . . . . . . . . . . . 9
2.2.17 Custom Cert Fields . . . . . . . . . . . . . . . . . . . . . . . . . . . . . . . . . . . . . . . . . . . . . . . . . . . . . . . . . . . . . . . . 9
2.2.18 Data Cleaning . . . . . . . . . . . . . . . . . . . . . . . . . . . . . . . . . . . . . . . . . . . . . . . . . . . . . . . . . . . . . . . . . . . . 9
2.3 Adding Customer Data. . . . . . . . . . . . . . . . . . . . . . . . . . . . . . . . . . . . . . . . . . . . . . . . . . . . . . . . . . . . 9
2.3.1 Company Information . . . . . . . . . . . . . . . . . . . . . . . . . . . . . . . . . . . . . . . . . . . . . . . . . . . . . . . . . . . . . 10
2.3.2 Scale or Device Data. . . . . . . . . . . . . . . . . . . . . . . . . . . . . . . . . . . . . . . . . . . . . . . . . . . . . . . . . . . . . . 10
2.3.3 Adding Certificates . . . . . . . . . . . . . . . . . . . . . . . . . . . . . . . . . . . . . . . . . . . . . . . . . . . . . . . . . . . . . . . 10
2.3.4 Adding/Editing New Customer Users . . . . . . . . . . . . . . . . . . . . . . . . . . . . . . . . . . . . . . . . . . . . . . . . . 10
2.3.5 Deleting Users. . . . . . . . . . . . . . . . . . . . . . . . . . . . . . . . . . . . . . . . . . . . . . . . . . . . . . . . . . . . . . . . . . . 11
2.4 Managing PDA Data . . . . . . . . . . . . . . . . . . . . . . . . . . . . . . . . . . . . . . . . . . . . . . . . . . . . . . . . . . . . . 11
2.4.1 Generating PDA Files . . . . . . . . . . . . . . . . . . . . . . . . . . . . . . . . . . . . . . . . . . . . . . . . . . . . . . . . . . . . . 11
2.4.2 Importing PDA certificates. . . . . . . . . . . . . . . . . . . . . . . . . . . . . . . . . . . . . . . . . . . . . . . . . . . . . . . . . . 11
2.4.3 Editing Incoming certificates . . . . . . . . . . . . . . . . . . . . . . . . . . . . . . . . . . . . . . . . . . . . . . . . . . . . . . . . 11
3.0 Front-End Administration........................................................................................................... 12
3.1 Logging In . . . . . . . . . . . . . . . . . . . . . . . . . . . . . . . . . . . . . . . . . . . . . . . . . . . . . . . . . . . . . . . . . . . . 12
3.2 Company List . . . . . . . . . . . . . . . . . . . . . . . . . . . . . . . . . . . . . . . . . . . . . . . . . . . . . . . . . . . . . . . . . . 12
3.3 Add/Edit Company. . . . . . . . . . . . . . . . . . . . . . . . . . . . . . . . . . . . . . . . . . . . . . . . . . . . . . . . . . . . . . 12
3.4 Company Search . . . . . . . . . . . . . . . . . . . . . . . . . . . . . . . . . . . . . . . . . . . . . . . . . . . . . . . . . . . . . . . 12
3.5 Sorting the Company List . . . . . . . . . . . . . . . . . . . . . . . . . . . . . . . . . . . . . . . . . . . . . . . . . . . . . . . . . 12
© 2011 Rice Lake Weighing Systems. All rights reserved. Printed in the United States of America.
Specifications subject to change without notice.
Rice Lake Weighing Systems is an ISO 9001 registered company.
Version 2.1, January 2011
i
Page 4

Rice Lake continually offers web-based video training on a growing selection
of product-related topics at no cost. Visit www.ricelake.com/webinars.
3.6 Customer Data . . . . . . . . . . . . . . . . . . . . . . . . . . . . . . . . . . . . . . . . . . . . . . . . . . . . . . . . . . . . . . . . 13
3.6.1 The Scale List . . . . . . . . . . . . . . . . . . . . . . . . . . . . . . . . . . . . . . . . . . . . . . . . . . . . . . . . . . . . . . . . . . . 13
3.6.2 Customer User Management . . . . . . . . . . . . . . . . . . . . . . . . . . . . . . . . . . . . . . . . . . . . . . . . . . . . . . . 13
3.7 Batch Printing . . . . . . . . . . . . . . . . . . . . . . . . . . . . . . . . . . . . . . . . . . . . . . . . . . . . . . . . . . . . . . . . . 13
3.7.1 Selecting a Company . . . . . . . . . . . . . . . . . . . . . . . . . . . . . . . . . . . . . . . . . . . . . . . . . . . . . . . . . . . . . 13
3.7.2 Printing Certificates. . . . . . . . . . . . . . . . . . . . . . . . . . . . . . . . . . . . . . . . . . . . . . . . . . . . . . . . . . . . . . . 13
4.0 Customizing Front-End Administration...................................................................................... 14
4.1 Introduction to the Template Engine . . . . . . . . . . . . . . . . . . . . . . . . . . . . . . . . . . . . . . . . . . . . . . . . 14
4.2 The CRS Style Sheet . . . . . . . . . . . . . . . . . . . . . . . . . . . . . . . . . . . . . . . . . . . . . . . . . . . . . . . . . . . . 14
5.0 CRS-Link..................................................................................................................................... 15
5.1 Installing CRS-Link . . . . . . . . . . . . . . . . . . . . . . . . . . . . . . . . . . . . . . . . . . . . . . . . . . . . . . . . . . . . . 15
5.2 Configuring CRS-Link . . . . . . . . . . . . . . . . . . . . . . . . . . . . . . . . . . . . . . . . . . . . . . . . . . . . . . . . . . . 15
5.3 Downloading Data from the CRS Server . . . . . . . . . . . . . . . . . . . . . . . . . . . . . . . . . . . . . . . . . . . . . 15
5.4 Sending Data to the PDA. . . . . . . . . . . . . . . . . . . . . . . . . . . . . . . . . . . . . . . . . . . . . . . . . . . . . . . . . 15
5.5 Reading Data from the PocketCRS Device . . . . . . . . . . . . . . . . . . . . . . . . . . . . . . . . . . . . . . . . . . . 16
5.6 Uploading Data to CRS . . . . . . . . . . . . . . . . . . . . . . . . . . . . . . . . . . . . . . . . . . . . . . . . . . . . . . . . . . 16
6.0 Using PocketCRS ....................................................................................................................... 17
6.1 PocketCRS Screens . . . . . . . . . . . . . . . . . . . . . . . . . . . . . . . . . . . . . . . . . . . . . . . . . . . . . . . . . . . . 17
6.1.1 Startup Screen . . . . . . . . . . . . . . . . . . . . . . . . . . . . . . . . . . . . . . . . . . . . . . . . . . . . . . . . . . . . . . . . . . 17
6.1.2 Scale or Device List Screen . . . . . . . . . . . . . . . . . . . . . . . . . . . . . . . . . . . . . . . . . . . . . . . . . . . . . . . . 17
6.1.3 Shift Test Screen . . . . . . . . . . . . . . . . . . . . . . . . . . . . . . . . . . . . . . . . . . . . . . . . . . . . . . . . . . . . . . . . 17
6.1.4 Test Data Screen . . . . . . . . . . . . . . . . . . . . . . . . . . . . . . . . . . . . . . . . . . . . . . . . . . . . . . . . . . . . . . . . 17
6.1.5 Test Result Screen . . . . . . . . . . . . . . . . . . . . . . . . . . . . . . . . . . . . . . . . . . . . . . . . . . . . . . . . . . . . . . . 18
6.1.6 Weights Used . . . . . . . . . . . . . . . . . . . . . . . . . . . . . . . . . . . . . . . . . . . . . . . . . . . . . . . . . . . . . . . . . . . 18
6.1.7 Overall Results . . . . . . . . . . . . . . . . . . . . . . . . . . . . . . . . . . . . . . . . . . . . . . . . . . . . . . . . . . . . . . . . . . 18
6.1.8 Final Entry Screen. . . . . . . . . . . . . . . . . . . . . . . . . . . . . . . . . . . . . . . . . . . . . . . . . . . . . . . . . . . . . . . . 18
6.1.9 Scale or Device Calibration Complete . . . . . . . . . . . . . . . . . . . . . . . . . . . . . . . . . . . . . . . . . . . . . . . . . 18
6.2 Removing PocketCRS . . . . . . . . . . . . . . . . . . . . . . . . . . . . . . . . . . . . . . . . . . . . . . . . . . . . . . . . . . . 19
7.0 Frequently Asked Questions ...................................................................................................... 20
7.1 What are the certificate history functionality changes? . . . . . . . . . . . . . . . . . . . . . . . . . . . . . . . . . . . 20
7.2 How do I edit certificates? . . . . . . . . . . . . . . . . . . . . . . . . . . . . . . . . . . . . . . . . . . . . . . . . . . . . . . . . 20
7.3 What are the compatible Pocket PC devices? . . . . . . . . . . . . . . . . . . . . . . . . . . . . . . . . . . . . . . . . . 20
7.4 How do I view an added manufacturer?. . . . . . . . . . . . . . . . . . . . . . . . . . . . . . . . . . . . . . . . . . . . . . 20
7.5 How do I show only enabled weights on the PDA? . . . . . . . . . . . . . . . . . . . . . . . . . . . . . . . . . . . . . 20
7.6 Should I install PocketCRS on the device?. . . . . . . . . . . . . . . . . . . . . . . . . . . . . . . . . . . . . . . . . . . . 21
7.7 What are the differences between the cert delivery preferences? . . . . . . . . . . . . . . . . . . . . . . . . . . . 21
7.8 How do I get scale comments to show on the PDA for the technician to see? . . . . . . . . . . . . . . . . . 21
7.9 Why is nothing listed in the Last Cert column? . . . . . . . . . . . . . . . . . . . . . . . . . . . . . . . . . . . . . . . . . 21
7.10 How do I add another selection under the Equipment Condition? . . . . . . . . . . . . . . . . . . . . . . . . . 21
7.11 Why are my history certificates showing an incorrect unit of measure?. . . . . . . . . . . . . . . . . . . . . . 21
8.0 Appendix .................................................................................................................................... 22
8.1 Certificate of Calibration Samples . . . . . . . . . . . . . . . . . . . . . . . . . . . . . . . . . . . . . . . . . . . . . . . . . . 22
8.2 Balance Service Report . . . . . . . . . . . . . . . . . . . . . . . . . . . . . . . . . . . . . . . . . . . . . . . . . . . . . . . . . . 25
8.3 Certificate Delivery Preference Email Example . . . . . . . . . . . . . . . . . . . . . . . . . . . . . . . . . . . . . . . . . 26
8.4 Certificate Delivery Preference Download Example . . . . . . . . . . . . . . . . . . . . . . . . . . . . . . . . . . . . . 27
8.5 Certificate Delivery Preference Paper Copy Example . . . . . . . . . . . . . . . . . . . . . . . . . . . . . . . . . . . . 28
Software Warranty Statement ............................................................................................................... 29
ii Certificate Retrieval System User’s Guide
Page 5
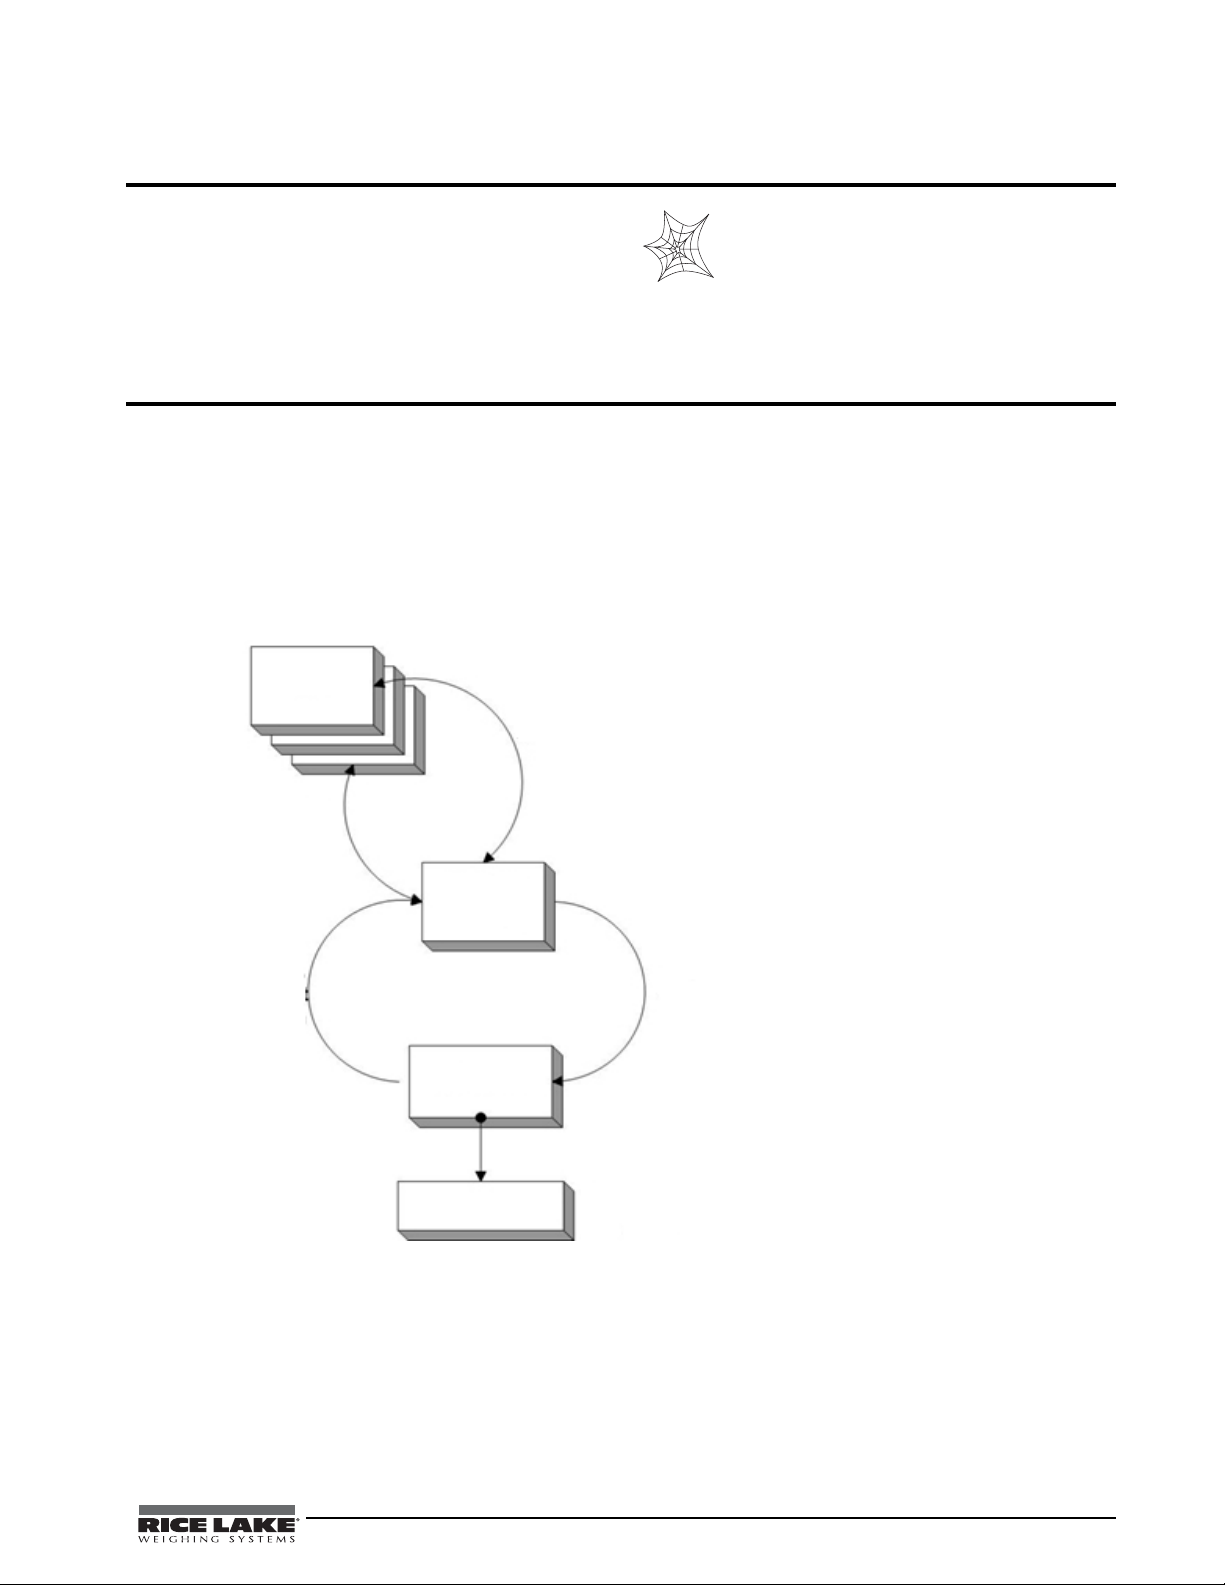
About This Manual
Calibration data is
recorded on the PDA by
the technician
Calibration data is moved
from the PDA to the scale
dealer’s workstation.
The data is uploaded to
the CRS server and
processed by the system.
Completed certs are made
available to the customer
for download.
PDA
CRS-Link
(Dealer
Workstation)
CRS Website
End Users
Completed
Data,
Te s t We i gh t
Information
Data,
Te s t We i gh t
Information
Completed
Certs
Completed
Certs
Certs
This manual is intended for use by scale or lab
technicians responsible for installing and using
certificate retrieval systems (CRS).
Authorized distributors and their employees
can view or download this manual from the
Rice Lake Weighing Systems distributor
www.ricelake.com.
site at
1.0 Introduction
Certificate Retrieval System (CRS) is a web-based documentation retrieval system that replaces the old
fashioned, time intensive, hands-on system of storing, finding, retrieving, and printing calibration certificates.
CRS enables your customers to retrieve and print their own calibration certificates in a secure, web-based
environment. Go to
CRS is designed to be the backbone of your certificate system, providing your company with an end-to-end
solution for recording calibration data, storing the data, and presenting the completed calibration certificates to
your customers. See Figure 1-1 for an overview of the CRS system.
www.CRScerts.com for the latest information.
Figure 1-1. CRS System Overview
Certificate Retrieval System User’s Guide - Introduction 1
Page 6

1.1 System Requirements
1.1.1 Web Browsers
The HTML produced by the CRS system is intended to be compliant with industry standards. Any non-standard
HTML rendered by the administration system or default template pack should be reported to
CRS.support@ricelake.com. Custom templates may not provide standardized HTML due to design restrictions
or customer requests. Whenever possible, CRS makes every attempt to produce HTML that is visually appealing,
functional in design, and compatible in all browsers.
When using the administration or the front-end section as an administrator, CRS recommends using Internet
Explorer 6 or 7. Mozilla 1.7 and Mozilla Firefox 1.0 have also been tested to work with these sections. The
system makes extensive use of advanced Dynamic HTML and JavaScript programming, so these features must
be enabled in your browser. Cookies are recommended but not required to use the administration sections.
Your customers may use any web browser, provided the browser supports the cascading style sheets Level 2
specification. The end user does not require cookies or JavaScript development, but cookies can enhance the
experience for your customers by allowing them to save their login information.
1. 1. 2 C R S -L i n k
CRS-Link is a Windows desktop application and uses very little memory or hard drive space. The desktop
computer must have an internet connection to download data from the CRS server, and must meet the following
minimum prerequisites:
• Windows 98 Second Edition
• Internet Explorer 6
• Microsoft ActiveSync 4.5
• Windows Mobile Device Center
• Microsoft® .NET Compact Framework 3.5 and Microsoft .NET Framework
NOTE: Newer computers already have this installed.
2 Certificate Retrieval System User’s Guide
Page 7

2.0 CRS Administration
There are a few key concepts to understand when
using a web-based application. A web-based
application allows users to access it from any internet
capable computer. With CRS this means it can be
accessed by any of your technicians, administrators or
customers from nearly any computer, wit hout the need
to load any special software locally (excluding the use
of the PDA application). However, web applications
work like web pages. This means that information is
only as recent as the last time the web page was
loaded. Leaving pages open for long periods of time
can be misleading so users are encouraged to finish
any data entry and save information in a timely
manner to avoid any problems.
Because it is a web application, CRS is also very
flexible and can be easily customized to fit in with
your website. Content of your choice can be added to
any and/or all of CRS web templates to provide
additional notes or links to your company resources.
2.1 Common Administration Features
2.1.1 The List View
The list view can be broken down into two areas:
records and the toolbar.
Records are the lines of information running in
columns and rows with the headers at the top of each
column. The list view can be sorted on any column
header. Just point to a column and click to sort.
The toolbar is comprised of a series of tasks. The Set
Items Per Page displays how many records are
displayed on each page. The Search box allows you to
search for any string within the information currently
in the list view and display the results. This filters out
unwanted entries and is particularly useful with data
spread across multiple pages. The Show All button
will reset the list view to its original starting point.
2.2 Configuring the System
In CRS there is some basic system and conf iguration
information that needs to be configured prior to initial
use. This includes information such as administrative
users, NIST numbers and weight kits. Such
information is necessary for smooth operation of your
certification system. For instance, you will need at
least one administrative user to be able to properly
maintain and control the system. Generally once you
have configured this information it shouldn't be
necessary to change it very often. Each section that
follows gives instructions on how to get your
certification system up and running.
To access the different pages, point to Admin on the
Navigation bar and select the page you want to work
with.
Figure 2-1. Admin Menu
2.2.1 Units of Measure
The Unit of Measure page contains all the units of
measure that will be used by the system.
Figure 2-2. Unit of Measure Page
To add a unit of measure,
1. Select Units of Measure under Admin on the
navigation bar.
2. Click Add Weight Unit button.
3. Enter the unit of measure.
4. Click Save Unit of Measure button.
Do this for all units of measure to be used.
Figure 2-3. Add a Unit of Measure Page Weight
Certificate Retrieval System User’s Guide - CRS Administration 3
Page 8
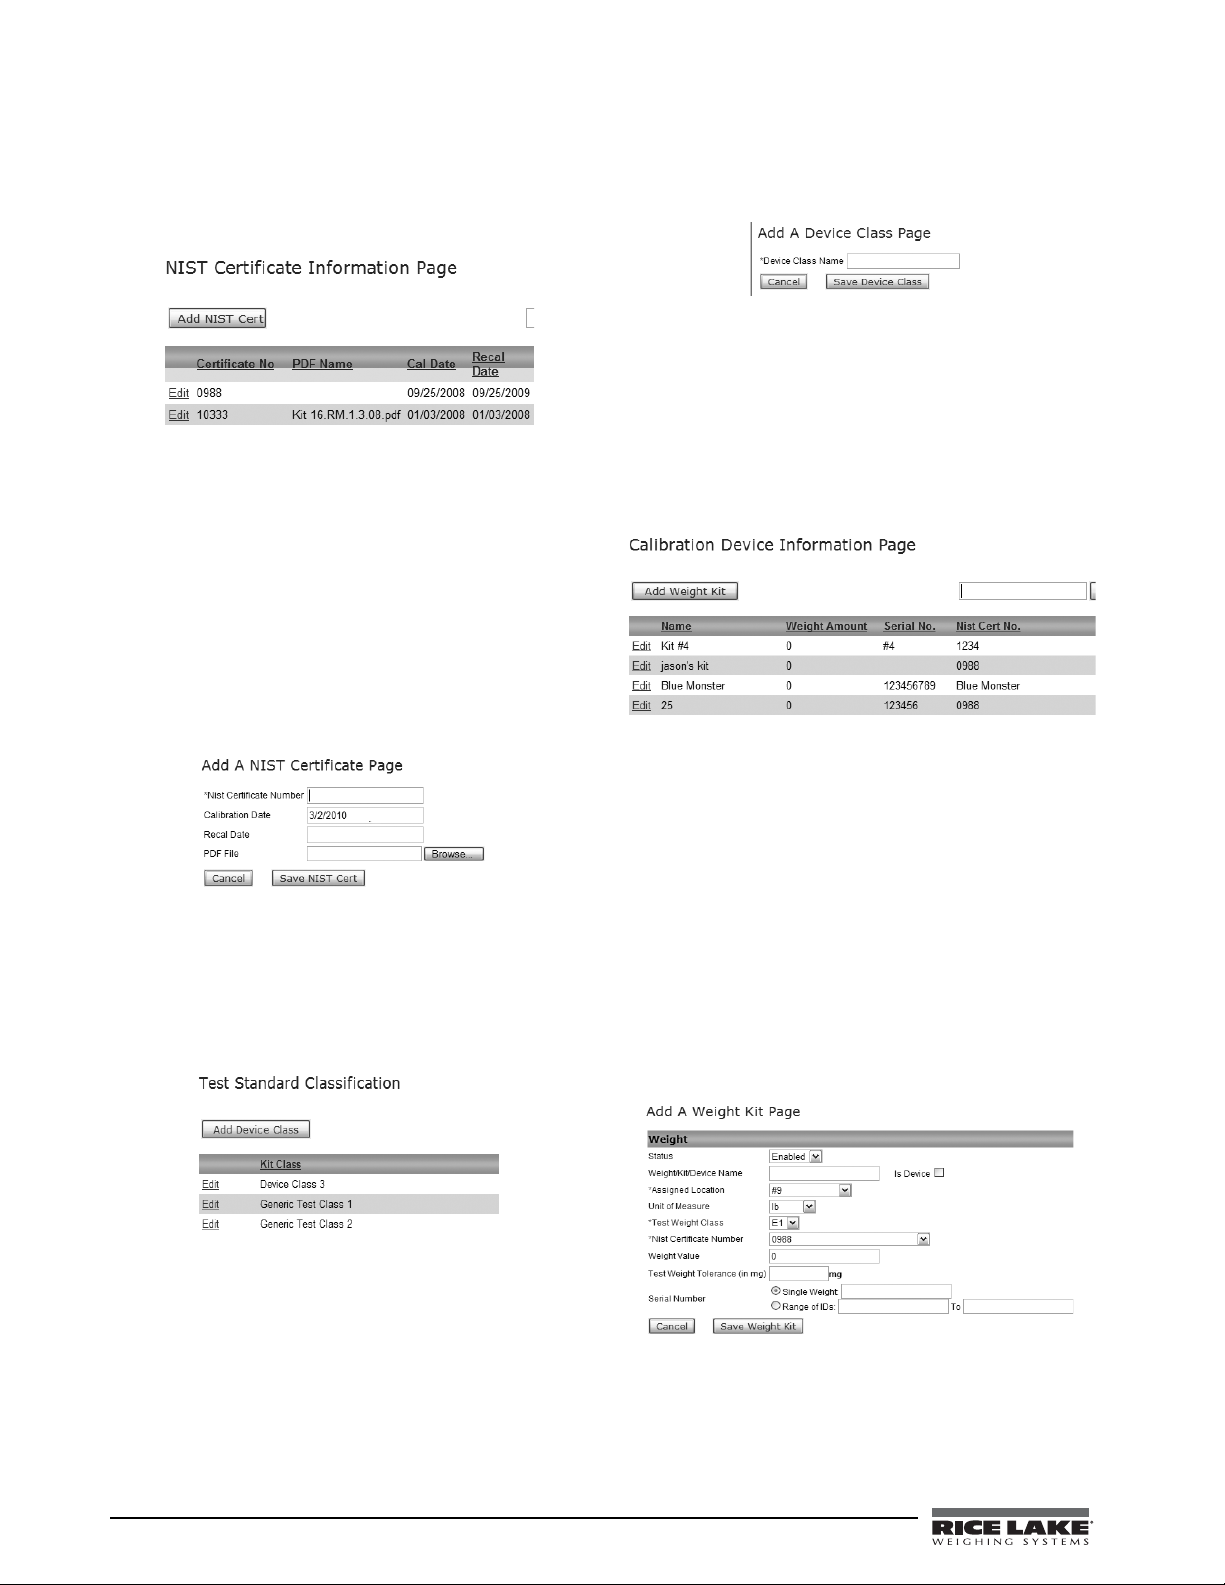
2.2.2 NIST Info
NIST numbers must be added to the system to help
identify weights for certification.
Figure 2-4. NIST Certificate Information Page
To add NIST certification,
1. Select NIST Info under Admin on the
navigation bar.
2. Click the Add NIST Cert button.
3. Enter the NIST Certificate Number,
Calibration Date and the Recal Date.
4. When finished click the Save NIST Cert
button.
NOTE: Saved NIST information cannot be edited.
Add each device class of the scale you will be testing
with the system.
Figure 2-7. Add a Device Class Page
2.2.4 Weight Kits
Weight Kits come in individual weights or kits
containing multiple weights. These weights are
certified and are used for certification. It is very
important that these weights be accurate and can be
traced back to a NIST number.
Figure 2-8. Weight Kit Information Page
Figure 2-5. Add a NIST Certificate Page
2.2.3 Device Classes
Device classes are used to setup the type of device
classes to be calibrated. Add each class you will be
using in the system.
Figure 2-6. Device Class Information Page
To add device class information,
1. Select Device Classes under Admin on the
navigation bar.
2. Click the Add Device Class button.
3. Enter the device class name.
4. When finished click the Save Device Class
button.
To add a single weight or a series of sequentially
numbered weights,
1. Select Weight Kits under Admin on the
navigation bar.
2. Click the Add Weight Kit button.
3. Enter in the information for the weight paying
particular attention to assigned truck, unit of
measure, weight value, NIST Number, and
weight serial number (or sequence of numbers
for a batch of weights).
4. When finished click the Save Weight Kit
button.
Figure 2-9. Add a Weight Kit Page
4 Certificate Retrieval System User’s Guide
Page 9
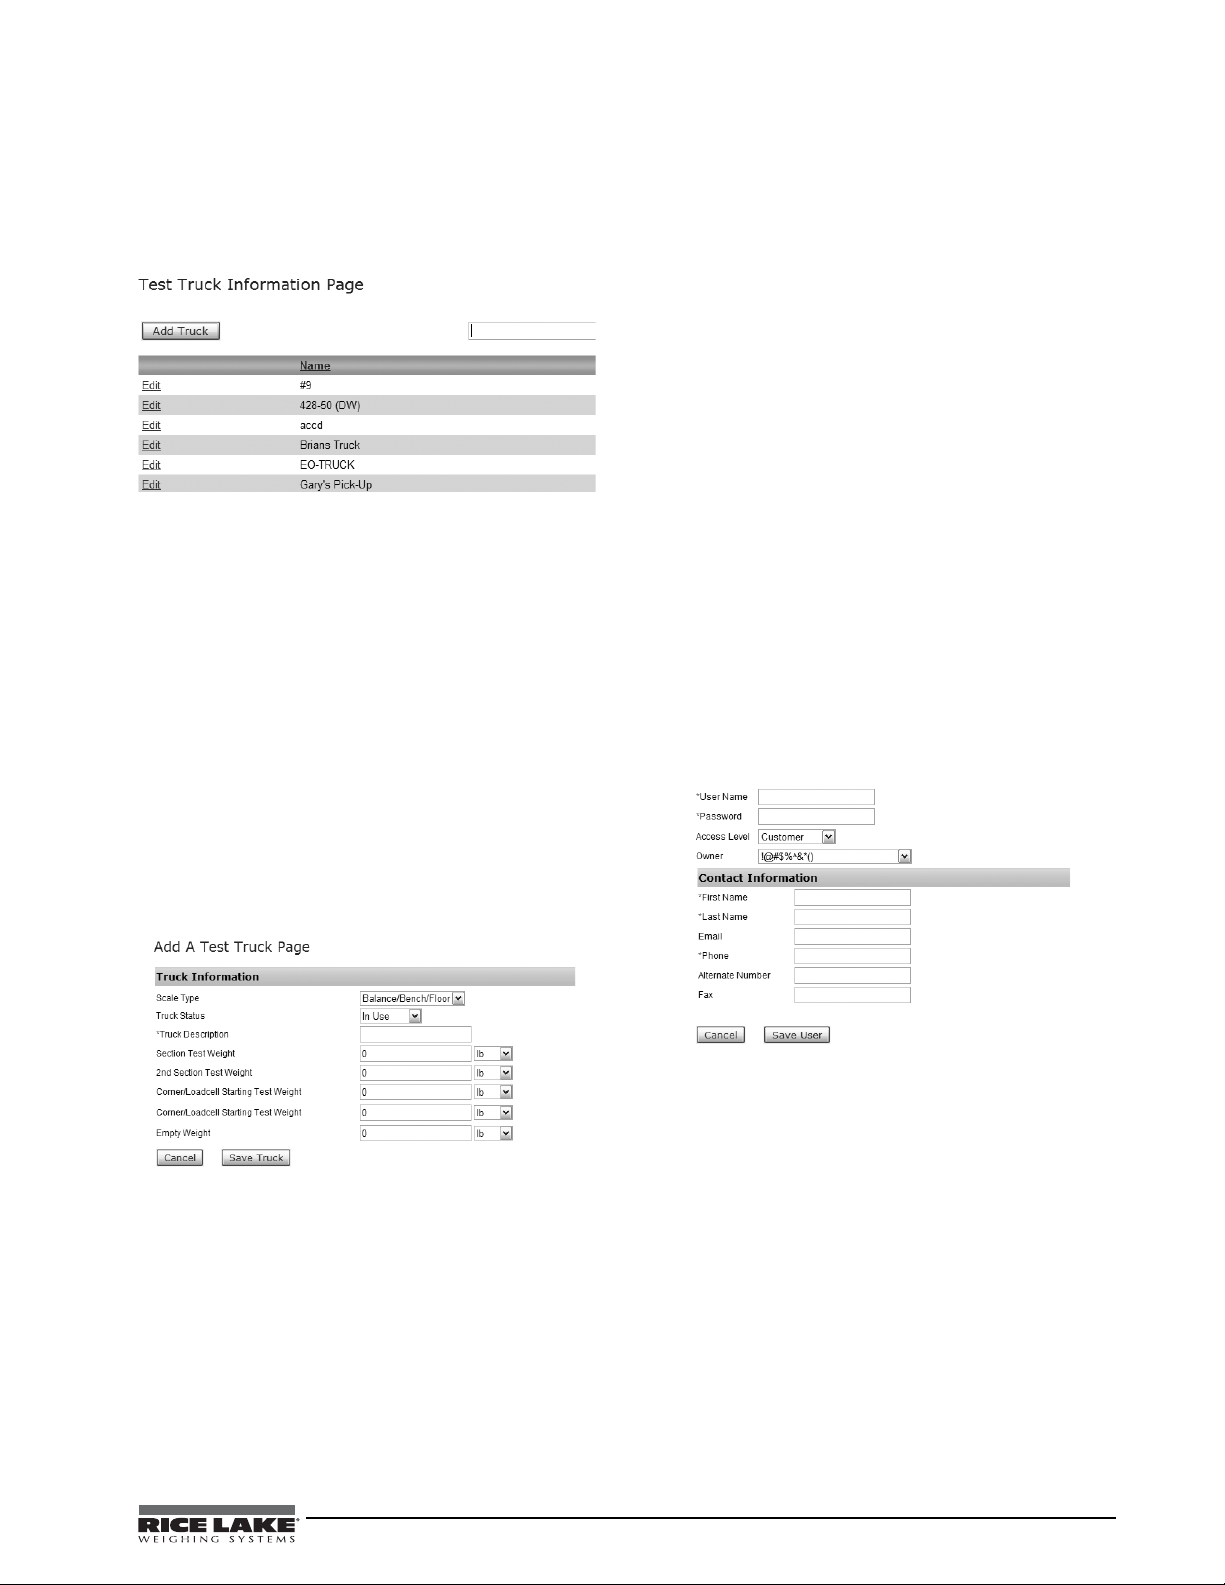
2.2.5 Trucks
Test trucks are added to the system to support the
truck scale module, but can also be used by the
industrial module to group test weights.
Figure 2-10. Test Truck Information Page
To add a test truck to the system,
1. Select Trucks under Admin on the navigation
bar.
2. Click the Add Truck button.
3. Enter a description for the truck, and if you
are using the truck scale module, enter default
weight drops for high-capacity scales.
If the truck being entered is only to be used
for industrial scales, the test weight can be left
blank.
4. When finished click the Save Truck button.
Once the truck has been added to the system, weight
kits and individual weights can be assigned to the
truck.
2.2.6 User Admin
An administrative user is one who has privileged
access to the system and is used for all backend
administration. You will need at least one
administrative user for backend/front-end
administration.
To add or edit administrative users,
1. Select User Admin under Admin on the
navigation bar.
2. Click the Add User button.
3. Enter user name and password.
NOTE: To increase the protection of your account, it
is recommended to use strong passwords when
accessing CRS.
A strong password is a password that is at
least eight characters long and uses characters
from three of the four following groups:
• Lowercase letters
• Uppercase letters
• Numbers (1,2,3)
• Symbols (@,$,&)
4. Enter contact information.
5. When finished click the Save User button.
Figure 2-11. Add a Test Truck Page
There is no traceability assigned to the truck. The
NIST traceability is still handled by individual
weights and kits. By assigning a weight to a truck, you
are providing a way to find the weight more easily on
the PDA. Motorized test carts should be added to the
system as a single weight.
Certificate Retrieval System User’s Guide - CRS Administration 5
Figure 2-12. Add New Admin User Form
If you are updating a user,
1. Select the user and point and click the Edit
hyperlink.
2. Change information as needed
3. When finished click the Update User button.
Page 10
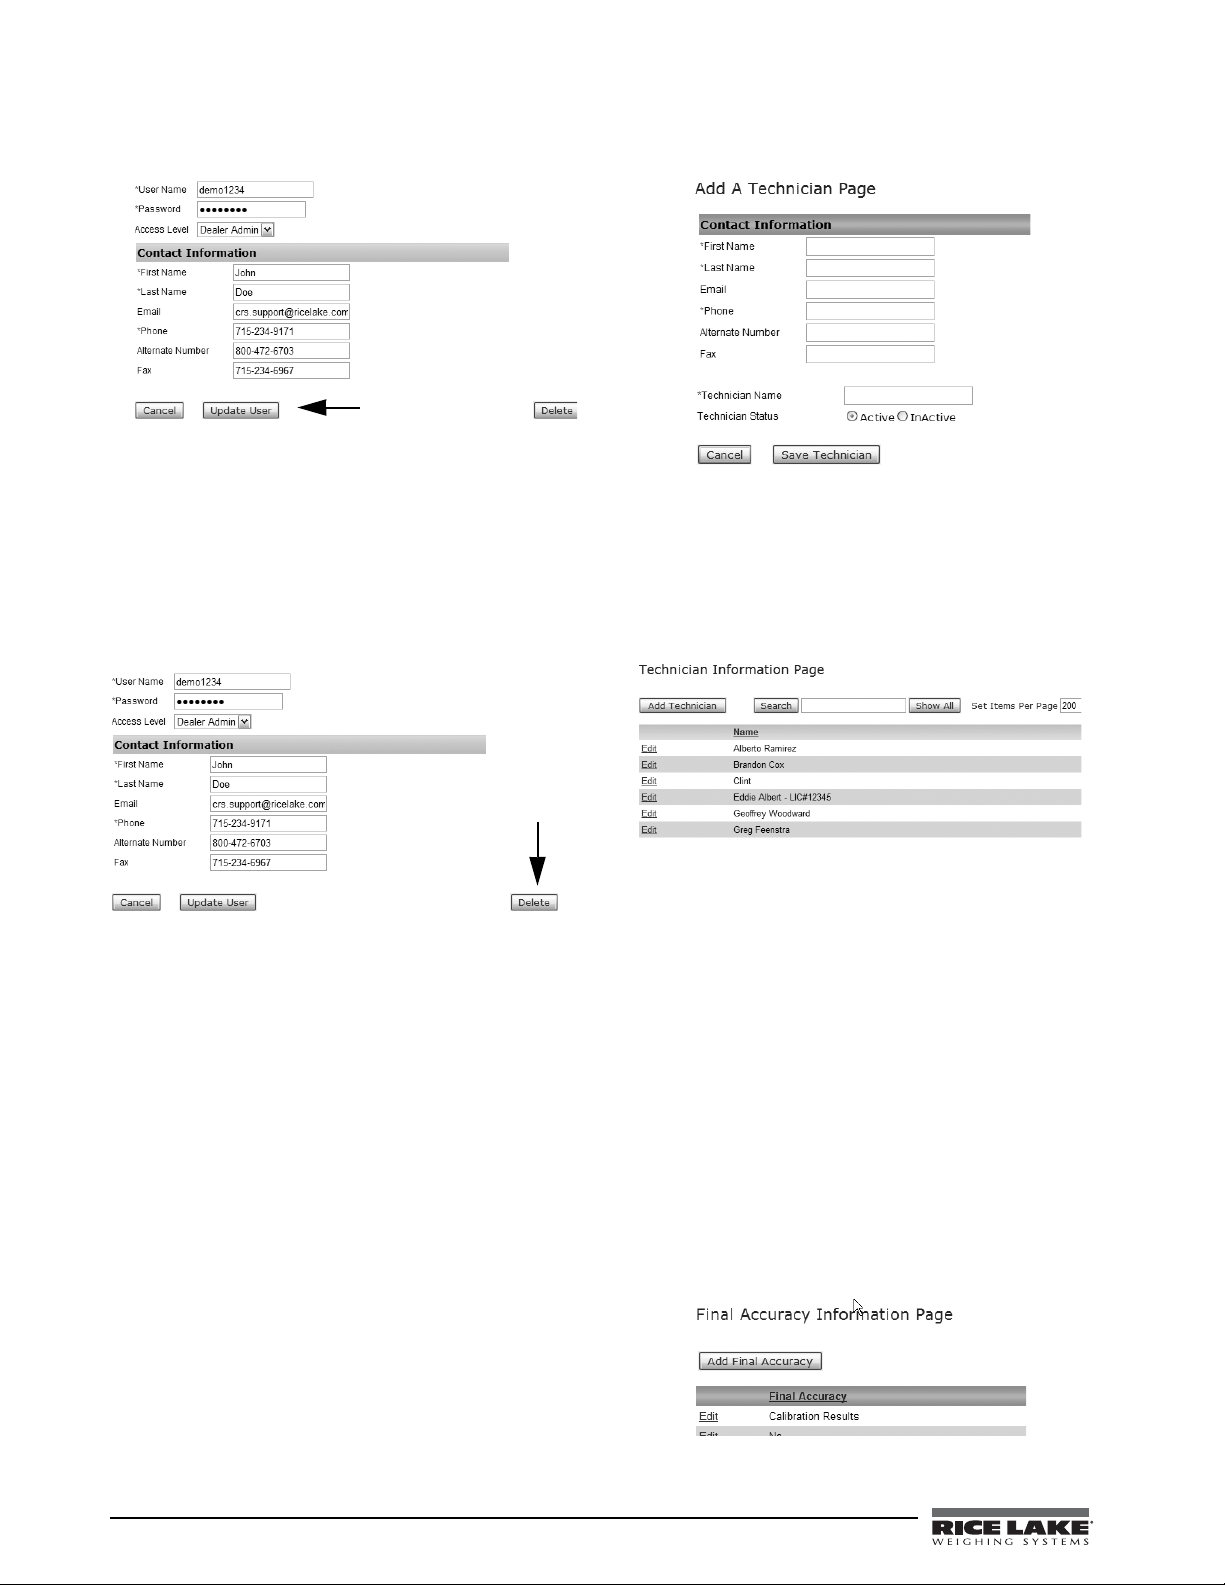
Figure 2-13. Update User
It may also become necessary to remove users when
they are no longer allowed access to the system. If you
are deleting a user,
1. Select the user and point and click the Edit
hyperlink.
2. Click the Delete button.
Figure 2-14. Delete User
2.2.7 Technicians
The CRS system needs to have technicians added to
the system so they will be downloaded to the PDA.
To add a technician,
1. Select Technicians under Admin on the
navigation bar.
2. Click the Add Technician button.
3. Enter contact information.
Select Active or Inactive for the Technician
Status.
4. When finished click the Save Technician
button.
Figure 2-15. Add a Technician Page
From this screen you can also edit existing
Technicians.
1. Select the technician and point and click the
Edit hyperlink.
Figure 2-16. Technician Information Page
2. Edit contact information.
3. When finished click the Update Technician
button
2.2.8 Final Accuracy
Information added on this page is noted on the
certificate. Final accuracy notes if the scale is within
the customers required accuracy. Default answers are:
Yes, No, or Calibration Results.
1. Select Final Accuracy under Admin on the
navigation bar.
2. Click the Add Final Accuracy button.
3. Enter final accuracy name.
4. When finished click the Save Final Accuracy
button.
6 Certificate Retrieval System User’s Guide
Figure 2-17. Final Accuracy Information Page
Page 11
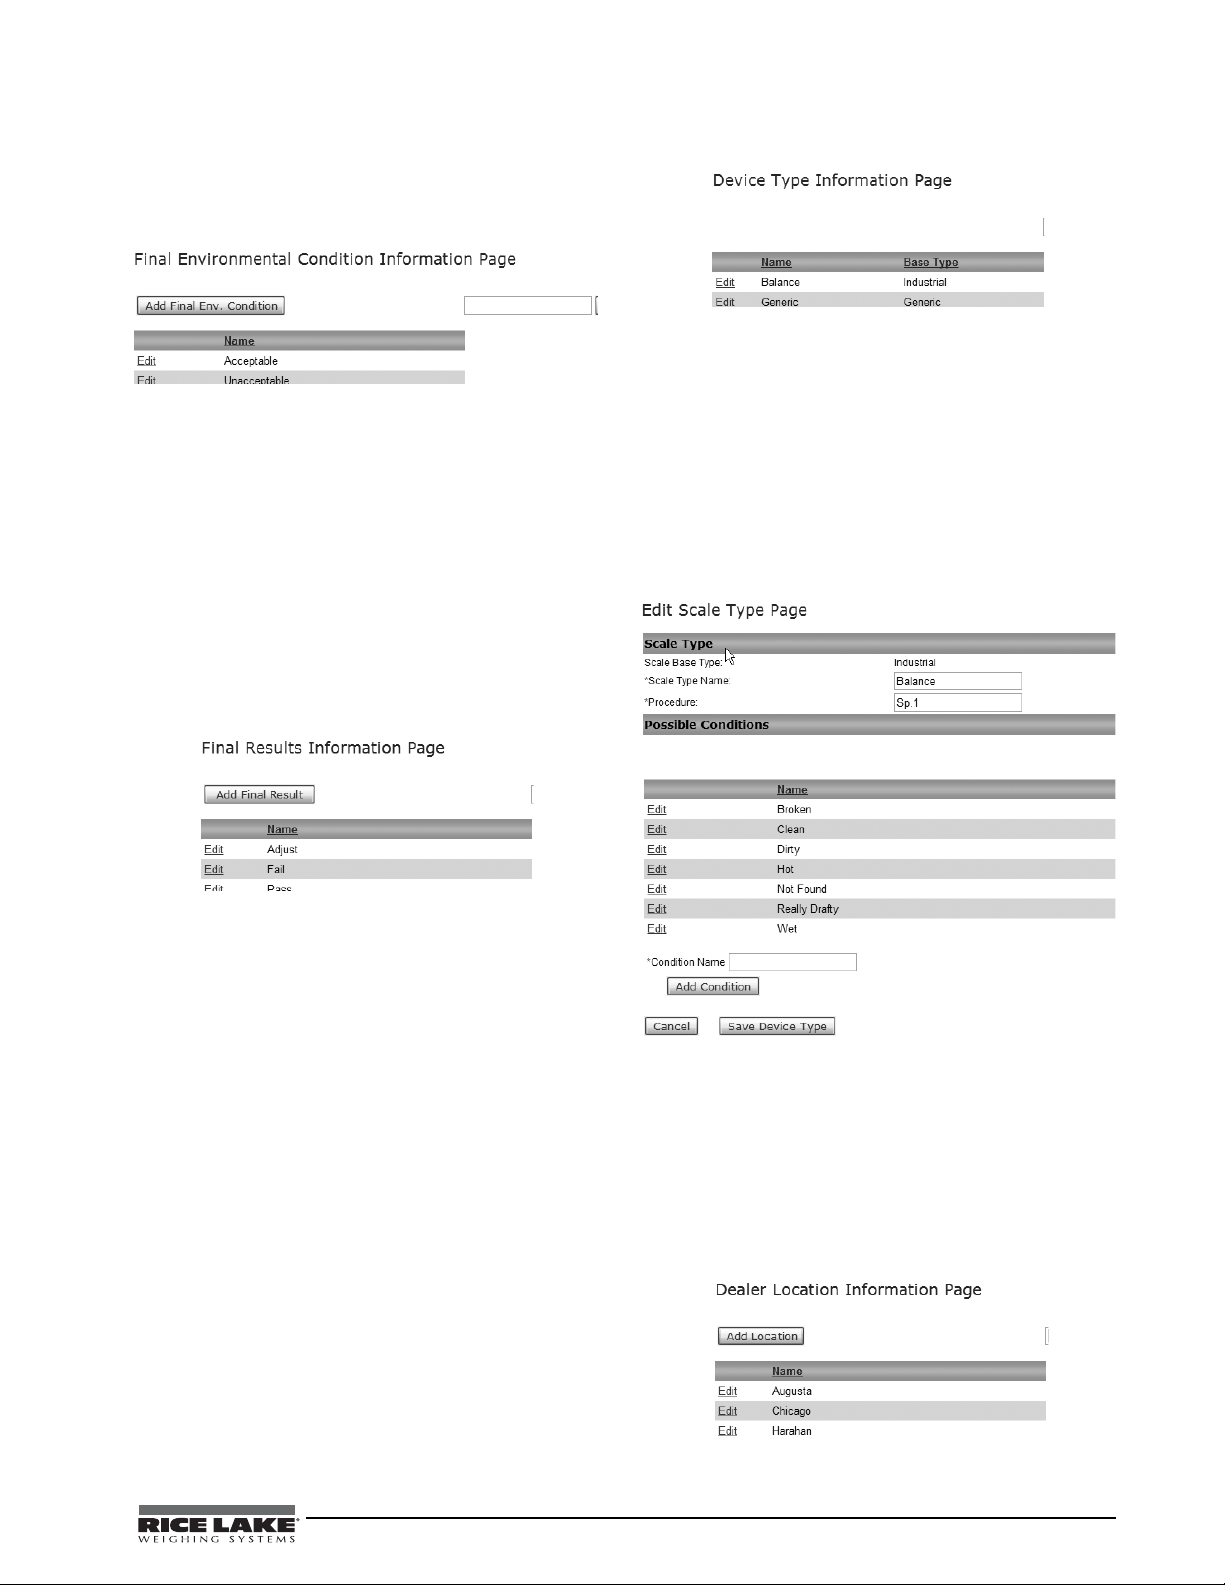
2.2.9 Final Environmental Conditions
This is section is used on the PDA for a selection of
available types of environmental conditions.
Figure 2-18. Final Environmental Condition Info Page
1. Select Final Env. Conditions under Admin
on the navigation bar.
2. Click the Add Final Env. Conditions button.
3. Enter final conditions name.
4. When finished click the Save Final Env.
Condition button.
2.2.10 Final Results
The final results page is used on the PDA for the
calibration result of the test. These results can be
customized to your business model or terms.
Figure 2-20. Device Type Information Page
To add scale conditions,
1. Select Device Types under Admin on the
navigation bar.
1. Select the scale type and point and click the
Edit hyperlink.
2. Enter condition name.
3. When finished click the Add Condition
button.
Figure 2-19. Final Results Information Page
To add other results,
1. Select Final Results under Admin on the
navigation bar.
2. Click the Add Final Result button.
3. Enter final results name as you want it to
display on PDA.
4. When finished click the Save Final Results
button.
2.2.11 Device Types
The device type information page has several different
device types:
• Balance
• Bench
•Floor
• Heavy Capacity
• Generic (with optional module)
Figure 2-21. Edit Device Type Page
Conditions you add for the different scale or device
types prompts the technician to note the condition of
the scale.
2.2.12 Locations (Optional - Multi Location Version)
CRS allows for multiple dealer locations so the scales
needing certification can be kept separate.
Figure 2-22. Dealer Location Information Page
Certificate Retrieval System User’s Guide - CRS Administration 7
Page 12

1. Select Locations under Admin on the
navigation bar.
2. Click the Add Location button.
3. Enter location name.
4. When finished click the Save Location
button.
Figure 2-23. Add a Dealer Location Page
2.2.13 Forms
The form page is the calibration form that will be used
for CRS. The forms designs are setup by CRS but this
allows for specific data to be entered on the forms.
See section 8.0 on page 22 for examples.
1. Select Forms under Admin on the navigation
bar.
2. Click the Add Form button.
3. Complete fields.
4. When finished click the Save Form button
Figure 2-25. Configuration Page
2.2.15 Device Components
Device components need to be added to the system
prior to setting up customer scales.
Figure 2-24. Add a Form Page
2.2.14 Configuration
This page provides various configuration options
relating to the CRS server and your CRS system.
1. Select Configuration under Admin on the
navigation bar.
2. Complete Configuration Page form
3. When finished click the Save Configuration
Settings button.
8 Certificate Retrieval System User’s Guide
Figure 2-26. Device Components Information Page
1. Select Device Components under Admin on
the navigation bar.
2. Click the Add Device Component button.
3. Select Manufacturer from drop down list.
4. Enter Model number.
5. When finished click the Save Component
button
Figure 2-27. Add a Scale Component Page
Page 13

2.2.16 Custom Device Fields
CRS allows for custom fields to be prompted on the
PDA. The custom field page allows for data to be
entered on PDA.
Figure 2-28. Custom Device Field Information Page
To add custom fields,
1. Select Custom Device Fields under Admin
on the navigation bar.
2. Click the Add Custom Device Field button.
3. Select Device Type from drop down list.
4. Enter custom device field name.
5. When finished click the Save Custom Device
Field button
Figure 2-29. Add a Custom Device Field Page
2.2.17 Custom Cert Fields
CRS allows for custom fields to be prompted at the
PDA. The custom field page allow for data to be
entered on PDA.
5. When finished click the Save Custom Cert
Field button
Figure 2-31. Add a Custom Cert Field Page
2.2.18 Data Cleaning
Choose the type of data to clean: Technicians or
Equipment Conditions.
To clean up technician data,
1. Select Data Cleaning under Admin on the
navigation bar.
2. Select Technicians from the drop down list.
3. Choose the item you wish to delete from the
drop down list.
4. Choose the item you wish to put in its place
from the drop down list.
5. Click Commit Change to save and continue.
To clean up equipment conditions,
1. Select Data Cleaning under Admin on the
navigation bar.
2. Select Equipment Conditions from the drop
down list.
3. Choose the scale type from the drop down
list.
4. Choose the item you wish to delete from the
drop down list.
5. Choose the item you wish to put in its place
from the drop down list.
6. Click Commit Change to save and continue.
Figure 2-30. Custom Cert Field Information Page
To add custom cert field,
1. Select Custom Cert Fields under Admin on
the navigation bar.
2. Click the Add Custom Cert Field button.
3. Select Scale or Device Type from drop down
list.
4. Enter custom certificate field name.
Figure 2-32. Data Cleaning Page
2.3 Adding Customer Data
To access customer data, select Customer on the
navigation bar.
Figure 2-33. Customer Page
Certificate Retrieval System User’s Guide - CRS Administration 9
Page 14

2.3.1 Company Information
Customer companies need their certifications to be at
their fingertips. As a result CRS maintains data on a
per company basis. This data includes scale data,
users and the certificates as well as basic company
information.
To create a new company,
1. Select Customer on the navigation bar.
2. Click the Add Customer button.
The Add a Company Page form appears.
3. Complete form. At a minimum you must
enter:
• Status (Enabled, Disabled, Pending)
• Company Name
•Address
• Contact Information (Name and Phone
Number)
• E-mail (Separate multiple addresses with
a comma and space (, ). Up to 300
characters can be entered.
• Service Location
The remaining data is optional. See Table 2-1
for an explanation of Certificate Delivery
Preferences.
4. When finished click the Save Customer
button
Email CRS will use the email address
provided in the company information
page to deliver an actual PDF copy of
the certificate.
Download CRS will use the email address
provided in the company information
page to send a link to have the
customer log on and download their
own certs. This option saves on email
inbox storage space.
Paper Copy CRS will use the email address for the
dealer (provided on the Dealer
Information Page), to email you a
reminder to print off their certs, and
mail them out.
None Default. No notification is sent.
Table 2-1. Cert Delivery Preferences
2.3.2 Scale or Device Data
To add a scale or device,
1. Select Customer on the navigation bar.
2. Select the company and point and click the
View hyperlink.
3. Click the Add Device button.
The Add a Device Page form appears.
4. Complete form. Items marked with an * are
required.
5. When finished click the Save Device button.
Editing is very similar to adding scales. To edit a
scale,
1. Select the scale and point and click the Edit
Device hyperlink.
2. Complete edits.
3. When finished click the Save Device button.
2.3.3 Adding Certificates
Certificates can also be added at this time. To add a
certificate,
1. Select Customer on the navigation bar.
2. Select the company and point and click the
View hyperlink.
3. Select the scale and point and click the Add
Cert hyperlink.
The Add a Certificate Page appears.
4. Complete form. Items marked with an * are
required.
5. When finished click the Save Certificate
button.
2.3.4 Adding/Editing New Customer Users
Once the basic information for a company is
configured, it is necessary to create a customer user.
This user is an account given to the company to allow
them access to their certificate data online. A
customer user is created like any other user with the
exception that they are also assigned to a particular
company.
While logged in as an administrative user in the
backend administration,
1. Expand the users heading and select the user
subheading.
The User’s Page appears.
2. Click the New button.
The Edit User Page appe ars. There are three
tabs of information; General, Groups and
Custom. The General information tab is
displayed first by default. Items marked with
an * are required. Make sure to select the
customer's company from the company drop
down list.
3. When finished entering all the general
information, select the Groups tab.
4. Select the Add User to Group button.
A popup window will appear with a list of
available groups in the system in it.
10 Certificate Retrieval System User’s Guide
Page 15

5. Select the Customer group and click the
W arning
W arning
Select button.
The popup will disappear and the
administrative group will now show in the
user's group list.
6. Click the Save button to save the new user.
Test the new user by logging in as the user you just
created. If the new user can log in successfully
through the front-end and can view the correct
company's information, then it is configured correctly .
It may be necessary to modify existing users if
mistakes are made or as information changes.
Fortunately, editing users and adding users is done
through the exact same interface. T o edit a user, on the
users page simply select the user you wish to edit and
click the Edit hyperlink.
If you change the username or password of a user it is
best to test the user by logging in as that user to ensure
the user has the proper access to the system.
2.3.5 Deleting Users
It may also become necessary to remove users when
they are no longer allowed access to the system. To do
this,
1. Expand the users heading and click the users
subheading.
2. Select the user you wish to delete and click
the Delete button.
The list view will refresh and the user will no
longer be available.
2.4 Managing PDA Data
The customer and scale data stored in your CRS
system must be transferred to your PDA for use by
technicians. To do this, you must generate PDA files
whenever you make changes to the data.
If this is not done, your PDA may
carry old and outdated data.
Figure 2-34. PDA Drop Down Menu
2.4.1 Generating PDA Files
To generate PDA files,
1. Select PDA Processing under PDA on the
navigation bar.
2. Point and click the Generate Files hyperlink.
Once the process is complete you will be taken to the
PDA processing screen where incoming cert data is
viewed. At this point the data is ready to be
downloaded by CRS-Link.
2.4.2 Importing PDA certificates
When CRS-Link uploads data to the CRS server, it
places the data in import files that are read by the
system.
To read incoming files,
1. Select PDA Processing under PDA on the
navigation bar.
2. Point and click the Read Incoming
hyperlink.
NOTE: Each file may contain one or more certificate
records. Once the data has been imported, the system
displays all the incoming certificate data.
Incoming certificate data is not available anywhere in
the system except the PDA Processing section. This
section serves as a holding area for new certificates
until they can be validated and approved by
administrators. The certificate data can also be edited
at this point to correct any data errors.
The Delete button in this section deletes the cert from
the PDA processing section and does not copy it to the
PDA. After clicking this button, any checked records
are completely destroyed.
2.4.3 Editing Incoming certificates
To edit incoming certificates,
1. Select Customer on the navigation bar.
2. Select the company and point and click the
View hyperlink.
3. Select the cert and point and click the View
Cert hyperlink.
The Certificate Information Page appears.
4. Select the certificate and point and click the
Edit hyperlink.
5. Complete changes.
6. When finished click the Save Certificate
button.
The certificate is not copied to the
live site when changed, it must still
be approved from the PDA
processing list.
You may also preview the completed certificate by
clicking the certificate ID from the list.
Certificate Retrieval System User’s Guide - CRS Administration 11
Page 16

3.0 Front-End Administration
There is a significant difference between what
information is available for manipulation between the
front-end and the backend of CRS. The backend
administrative panel is for general configuration of
CRS and entering of critical data. The front-end is for
day-to-day operations by the customers and data entry
personnel. This is why the front-end has a much
smaller number of functions. The interface between
what the user and the front-end administrative user
sees are nearly identical so you will be accustomed to
what the customer is experiencing in CRS.
The major difference between the front-end interface
and the backend interface is two parts of the interface.
The first of these is a simplified version of the list
view. This simplified view should be familiar to basic
users of the Internet and is simple and intuitive to use.
Items on this list view that lead to other views are
marked with hyperlinks. There is still the ability to
sort by any column and there is a search feature that
works the same as the one in the backend. The second
of these is the popup menu. Much like the toolbar in
the backend this popup menu changes to reflect the
actions available on the page you are viewing. This
keeps the interface from being cluttered with
unnecessary options. It is important to remember that
features may be disabled using the permission system.
For example, if the Add Company button is not
present when viewing the customer list, it is likely due
to the fact that the user logged in does not have
permission to that feature.
3.3 Add/Edit Company
To create a new company,
1. Click the New Company button.
The Company Information form appears.
2. Complete form. At a minimum you must
enter:
• Company Name
•Address
• Contact Information (Name and Phone
Number)
• E-mail (Separate multiple addresses with
a comma and space (, )
• Service Location
The remaining data is optional.
3. When finished click the Save Company
button
To edit a company,
1. Select the edit button next to the company
name in the customer list.
2. Make changes.
3. When finished click the Save Company
button.
If you have entered e-mail addresses for your
customer contacts, you can simply click the contacts
name to send the person an e-mail. The browser will
open the e-mail window using your defa ult e-mail
client.
3.1 Logging In
Logging onto the CRS front-end is the same for both
administrative users as it is for customers. However,
the results will be subtly different. The main
difference is what information and menu options are
available. By default logging in as an administrative
user brings you to the customer list, whereas a
customer user login automatically sees all available
scales for the customer for which the user is assigned.
Also, being logged in as a customer limits you to a
small number of functions and no popup menu.
3.2 Company List
Once logged in as an administrative user you will
immediately see the customer list. From this list, you
can perform a number of day-to-day data entry
functions quickly and easily. You can add new
companies, edit existing company data, search and
filter the list of companies and a variety of
non-company specific functions.
12 Certificate Retrieval System User’s Guide
3.4 Company Search
Performing searches in the front-end works almost
identically to the backend. You can search for any
string within any of the columns on any of the pages
of information currently in the list. It then displays
only the records from the results of your search. This
filters out unwanted entries and is particularly useful
with data spread across multiple pages. The Show All
button next to the search box will return the list view
back to its original starting point. As your customer
base grows this will become a very useful feature.
3.5 Sorting the Company List
Sorting records in the simplified list view works
nearly identical to the backend. Records of
information run in columns and rows with the headers
at the top of each column.
Page 17

3.6 Customer Data
3.6.1 The Scale List
Within the Customer list it is easy to view the list of
scales for the company. Simply click the company
name and the scales list will be displayed. From this
view it is possible to edit a variety of company
specific information. The dropdown box list of your
company names is used to switch to other companies
without having to return to the customer list.
To modify a scale in the list,
1. Select the scale ID and point and click the
Edit hyperlink.
2. Click the Add Cert button to add a cert for
the scale.
Clicking on the Scale ID will display the Scale or
Device Details page. The details page displays all the
data related to the scale or device as well as a list of all
certificates stored in the system for the scale. Clicking
on the edit hyperlink allows you to modify the
existing cert, or the delete button will enable you to
remove the cert permanently from the system.
3.6.2 Customer User Management
To create a new customer user,
1. Select a company to add/edit users.
2. Click on menu and select Users from the
popup menu.
The users page appears.
3. Click the New User button.
The Edit user screen appears.
4. Complete form. Items marked with an * are
required.
5. Set the status to Enabled.
The status determines if the user will be able
to login. If you wish to temporarily suspend
service to a customer, rather than delete the
user, you can disable their account. When you
wish to re-enable their access you can do so
without having to create a new user.
6. When finished click the Save button.
NOTE: For administrative or other users you will need to
use the back-end administration.
Test the new user by logging in as the user you just
created. If the new user can log in successfully
through the front-end and can view the correct
company's information, then it is configured correctly .
It may be necessary to modify existing users if
mistakes are made or as information changes.
Fortunately, editing users and adding users is done
through the exact same interface.
To edit a user,
1. Select the user’s name and point and click the
Edit hyperlink.
2. Complete form.
3. When finished click the Save button.
If it is not necessary to change the user's password,
leave the two password fields blank and the current
password will remain unchanged. If you change the
username or password of a user it is best to test the
user by logging in as that user to ensure the user has
the proper access to the system.
3.7 Batch Printing
Batch printing allows you to print a batch of certs.
This is only done for a selected company for a specific
date range.
3.7.1 Selecting a Company
T o select the company and certs you wish to include in
your print, select the company from the customer
dropdown list and the date range of certs you wish to
print. Then click the View List button. This will
display the certs to be printed.
3.7.2 Printing Certificates
To print certificates,
1. Click the Print Certs button.
This will display a new browser window with
the certs you selected.
2. Go to the File menu on this browser window
and select Print.
Your printer should print the view as seen. It
may be necessary to adjust the page setup
options to get the certs to print properly one to
a page.
To print a block of certs, click the page numbers that
are listed to the right of the view list button. Each page
number represents a block of 50 certificates. Click a
page number to open a new browser window listing
the block of certs in a print-ready format. Use your
browser's print button to create the hardcopies.
NOTE: There may be delays with this process. Do not
click print again or the back button in your browser.
Certificate Retrieval System User’s Guide - Front-End Administration 13
Page 18

4.0 Customizing Front-End Administration
The front-end of CRS can be customized to fit in with
your website. Most layout changes are affected by
changing the cascading style sheet page for CRS. CRS
uses templates for its pages and these templates may
also be modified to provide additional content.
However, care must be taken to not change any of the
CRS tags that tell the template engine how to handle
and display data.
4.1 Introduction to the Template Engine
A template is a page composed of HTML code and
special tags used to control the content of the web
application. The special tags are parsed by a template
engine and rendered into instructions to the main
language engine (in this case PHP) where the
documents are then turned into web pages. The net
result is that the content can be changed within these
templates without adversely affecting the actual
application. This allows you to customize CRS to fit
the needs of your company.
Customizing CRS templates requires an in-depth
understanding of advanced HTML layout, cascading
style sheets, and JavaScript. Experience using a
template engine is also a desired skill. Improper
template modifications can render your CRS system
inoperable and may require re-installation.
4.2 The CRS Style Sheet
CRS uses cascading style sheets for style elements to
control look and feel of the web application. This
single sheet's rules for layout, fonts, and colors are
applied to the whole site so it can blend in with your
existing web-site design to become a seamless part of
your web presence.
14 Certificate Retrieval System User’s Guide
Page 19

5.0 CRS-Link
Add button
CRS-Link is the Windows based application
responsible for loading scale data onto PocketCRS
devices and reading certificate data. The program also
downloads data from the CRS server, and uploads
completed certificate data.
5.1 Installing CRS-Link
Before installing the application, it is important to
have Microsoft ActiveSync 4.5 and Internet Explorer
6 installed on your computer. Microsoft ActiveSync
4.5 is available for download on Microsoft.com
Windows Phone Downloads site at http://
www.microsoft.com/windowsmobile/en-us/
downloads/default.mspx.
The installer will take several minutes to download,
and will run automatically when it has finished. Once
the installer begins, the process is identical to a
CD-based installation.
The installer will guide you through installing
CRS-Link and PocketCRS. It is recommended that
before the installation begins, you should not have
CRS-Link installed.
5.2 Configuring CRS-Link
To configure CRS-Link,
1. Click the Configure button.
The configuration dialog box is displayed.
2. Enter values for each field. The CRS Server,
Username, and Password fields are provided
by CRS, LLC when your account is activated.
Contact CRS if you don't know these values.
3. Enter how many days to keep this data in the
box below the checkbox.
The checkbox Keep Backup Copy is used to
have CRS-Link keep a copy of all uploaded
data.
4. Click the Save button to complete the setup.
Once the download is complete, a message box is
displayed indicating the success or failure of the
download.
If the system reports an error downloading, the
following causes may need to be resolved:
(401)
Authorization
Required
(404) File Not
Found
The CRS
Username and
Password have
not been
configured
properly.
The server could
not be found.
Table 5-1. Download Errors
Verify the
username and
password
supplied by
CRS are
correctly
entered in the
configuration
screen.
Verify the CRS
Server
information
supplied by
CRS has
entered in the
configuration
screen.
Any other errors reported by CRS-Link should be
handled by CRS technical support.
5.4 Sending Data to the PDA
Once the system data has been downloaded, the PDA
can be loaded in preparation of field work.
1. Click the Load PDA button.
2. The Company Data window appears, which
provides a list of companies:
5.3 Downloading Data from the CRS Server
In order to load the PDA with customer and scale
data, you must first download the data from the CRS
server.
To download the data,
1. Click the Download Data button.
The Downloading Data message appears and
the buttons will be disabled.
Figure 5-1. Company Data Window
Certificate Retrieval System User’s Guide - CRS-Link 15
Page 20

3. Select the customers to send to the PDA and
click the Add button.
The customer is moved to the bottom list. To
return the user to the top (and not include the
customer on the PDA) use the up arrow
button.
NOTE: The search box at the top can be used to filter the
company list to find the customers easier.
4. Click the Send to PDA button.
A warning is displayed, reminding you to
ensure the PDA is connected to the computer
and ready to communicate. (To verify this,
ensure the Microsoft ActiveSync icon is
displayed in the system tray.)
5. Click the OK button to begin the transfer.
A progress bar will be displayed indicating
the transfer status. When the data transfer is
complete, a message is shown indicate the
successful transfer. The PDA can then be
undocked from the cradle.
5.5 Reading Data from the PocketCRS Device
Before attempting to read data from the PocketCRS
PDA, verify the device is connected to computer and
ready to communicate. It is recommended to allow
Microsoft ActiveSync to complete its synchronization
process before reading CRS data.
Once the PDA is ready,
1. Click the Read PDA button.
A warning box is displayed reminding you to
ensure the PDA is ready to communicate.
2. Click the OK button to begin reading the
data.
A progress bar indicates the status of the
transfer. If data is available on the PDA, the
system will indicate how many certs are ready
for upload.
3. Click the OK button to complete the process.
5.6 Uploading Data to CRS
Before uploading data to the CRS server, ensure the
computer has access to the Internet.
1. Click the Upload Data button to begin the
transfer.
While the transfer is in progress, the main
window will display Uploading Data at the
bottom of the screen and the buttons will be
disabled. Once the upload is complete, the
system displays a message indicating the
success or failure of the transfer. Successfully
uploaded cert records are then archived if the
backup option is configured.
16 Certificate Retrieval System User’s Guide
Page 21

6.0 Using PocketCRS
PocketCRS is the PDA application used by
technicians to record calibration data while the
procedure is performed. PocketCRS is designed to
allow the technician to collect all data required by an
ISO certificate and store it on the PDA until it can be
connected to a computer to upload using CRS-Link.
When PocketCRS is started, a drop-down box listing
all customers installed on the PDA is available. When
a customer is selected, the scale inventory for that
customer is displayed.
To begin calibrating scales or devices,
1. Select a scale or device from the list
2. Click the New Test button.
The View Scale or Device button is used to
show properties for the selected item.
6.1 PocketCRS Screens
6.1.1 Startup Screen
This screen is displayed when PocketCRS is first
started. To begin using PocketCRS, you must select a
company from the dropdown box at the top of the
screen. Only the companies you have loaded onto the
PDA are displayed in the dropdown box.
6.1.2 Scale or Device List Screen
Once a company is selected from the company list, all
the scales located at the company are listed. The list
can be sorted by clicking on any of the column
headers. Click a column header a second time to
reverse the sort order.
The scale list is used to select a scale to calibrate.
1. Click the Scale ID to highlight a scale.
2. Click the New Test or Vi ew Scale button.
The New Test button is used to perform a calibration,
and the Vie w Sc a le button is used to display scale
information.
6.1.3 Shift Test Screen
This screen is the first step of the calibration process.
On this screen, select the results of the shift test:
• Pass: All corners or regions were within
tolerance
• Fail: At least one corner was out of tolerance
and could not be adjusted
• Adjust: At least one corner was adjusted
during the shift test
• N/A: The shift test is not applicable to this
scale
When the desired result is selected, click Next to
continue.
Figure 6-2. Shift Test Screen
6.1.4 Test Data Screen
The Test Da ta screen is used to record weight drop
results for the preload and final tests. The target
weight is displayed on the left, and the actual reading
is entered on the right. If the scale reading is a
non-numerical (error) value, click the Error
checkbox.
The keypad at the bottom is used to enter readings and
values must be entered within the scale's division in
order for the PDA to accept the entry.
When the correct value has been entered for the
weight drop, click Next. Each weight drop is
displayed until all weights have been entered.
Figure 6-1. Scale List Screen
Figure 6-3. Test Data Screen
Certificate Retrieval System User’s Guide - Using PocketCRS 17
Page 22

6.1.5 Test Result Screen
When the preload or final test readings have been
entered, this screen is displayed to select the pass/fail
result of the test. Each reading is displayed in the list
at the bottom, and the error is calculated.
Ensure the pass/fail reading is correct and click Next
to continue.
If the scale is within the customer's application
requirement, check the Within Customer's Accura cy
checkbox.
For scales or devices configured for basic
environmental conditions, a checkbox is displayed on
this screen for acceptable/unacceptable determination.
If advanced conditions are set, another screen will be
displayed to record environmental conditions.
Figure 6-4. Test Resu lt Screen
6.1.6 Weights Used
Once the preload and final tests are complete, the
weights used in the test must be selected. This screen
determines the traceability of the certification, and
care must be taken to select the right weights for the
test.
The left column lists the weight values and kits. Select
a value from this column to populate the center
column, which is displayed all weights in the system
of the selected value.
To assign weights to the certificate, highlight the
weights in the center column and click the right arrow
button. Weights are then added to the third column,
which should contain a list of all weights used on the
scale.
Figure 6-6. Overall Results
6.1.8 Final Entry Screen
This screen is the last step in the calibration process.
Select the technician from the dropdown or type the
technician's name in the box. Select the location of the
test.
The Service ID can be recorded in the box or left
blank, and comments regarding the test can be entered
in the box provided.
To complete the calibration process, click the Next
button.
Figure 6-5. Weights Used Screen
6.1.7 Overall Results
This screen is used to set the overall results for the
certification. Select P (Pass), F (Fail), or A (Adjust)
from the dropdown.
18 Certificate Retrieval System User’s Guide
Figure 6-7. Final Entry Screen
6.1.9 Scale or Device Calibration Complete
Following a successful calibration, a pop-up window
is displayed which indicates the calibration record has
been saved. This dialog also shows the next
calibration date for the scale. This is the date which
should be written on the scale calibration sticker.
Page 23

Click the OK button on the pop-up wi ndow to return
to the scale list and perform another calibration.
Figure 6-8. Scale Calibration Complete Screen
6.2 Removing PocketCRS
When CRS releases software updates for PocketCRS,
each PDA in use must be updated. To do this, perform
the following tasks:
1. Open Microsoft ActiveSync by
double-clicking the icon in the system tray.
2. Select Tools->Add/Remove Programs from
the ActiveSync Menu bar.
3. Highlight the PocketCRS Application by
clicking on it in the list of installed programs.
4. Click Remove.
5. If upgrading PocketCRS from CD-ROM,
simply click the PocketCRS Menu item from
the CD splash screen and install PocketCRS
as usual. If the update was obtained in another
manner, extract the files from the ZIP file to a
temporary directory and run setup.exe to
install PocketCRS.
Certificate Retrieval System User’s Guide - Using PocketCRS 19
Page 24

7.0 Frequently Asked Questions
7.1 What are the certificate history functionality changes?
• The certificate information page will only
display the most recent certificate version.
• The version column is removed from the
Certificate Information page.
• Generate New PDF is available again on the
certificate information page.
•A History hyperlink is available when logged
in as an administrative user. Clicking this link
will bring the user to the history page:
• History page displays all historical
certificates including the current version.
• Certificates can be viewed, no edits.
• Only the most current version of the
certificate information can be edited.
• Clicking the Delete hyperlink deletes the
current certificate data from the
crs_Certificate table. In addition, all of the
certificate history records in the
crs_CertificateHistory table will be marked as
deleted. They are not deleted from the table,
just marked as deleted.
7.2 How do I edit certificates?
There are two types of changes:
• Calibration Data
• Background Data
Calibration data is anything that could be entered on a
PDA.
To change calibration data,
1. Click Edit
2. Edit respective data.
3. Click Save.
To change background da ta (NIST info, etc),
1. Select All Certs under PDA on the navigation
bar.
2. Select the certificate and point and click the
Generate New PDF hyperlink.
3. Click the Refresh button in the browser.
4. Click the View Certificate hyperlink to view
certificate.
Past revisions can be viewed by clicking History
hyperlink.
NOTE: Customers can only view current certificate. Only
the dealer will have access to the history link.
7.3 What are the compatible Pocket PC devices?
PocketCRS will only run on Windows Mobile
devices. PocketCRS has been tested on devices
running Windows Mobile 5, 6.1 and 6.5. Specific
PDA models haven’t been tested so there may be
brand or model specific issues that haven’t been
reported to us.
Even if your PDA has Wi-Fi capability you cannot
upload the scales directly from the PDA to the server.
Currently you need to connect to ActiveSync /
CRS-Link to upload certs.
NOTE: Windows Mobile Device Center must be used for
synchronizing your PDA if your computer is running
Windows 7.
7.4 How do I view an added manufacturer?
The dealer must first add it as a scale component.
Device components need to be added to the system
prior to setting up customer scales.
1. Select Device Components under Admin on
the navigation bar.
2. Click the Add Device Component button.
3. Select Manufacturer from drop down list.
4. Enter Model number.
5. When finished click the Save Component
button.
Once they add the scale component, it will always be
available when adding a scale.
7.5 How do I show only enabled weights on the PDA?
If you disable your weights, you need to generate
PDA files. If you do not, they will still be sent to your
PDA.
To generate PDA files,
1. Select PDA Processing under PDA on the
navigation bar.
2. Point and click the Generate Files hyperlink.
Once the process is complete, you will be taken to the
PDA processing screen where incoming cert data is
viewed. At this point, the data is ready to be
downloaded by CRS-Link without the disabled
weights.
20 Certificate Retrieval System User’s Guide
Page 25

7.6 Should I install PocketCRS on the device?
It is recommend to install PocketCRS on the actual
device. This way if the flash memory card is removed
or damaged you can replace it and still run the
software without having to reinstall.
7.7 What are the differences between the cert delivery preferences?
When creating or editing a company there are four
options for certificate delivery. Use the table below to
select the best method.
Email CRS will use the email address
provided in the company information
page to deliver an actual PDF copy of
the certificate.
Download CRS will use the email address
provided in the company information
page to send a link to have the
customer log on and download their
own certs. This option saves on email
inbox storage space.
Paper Copy CRS will use the email address for the
dealer (provided on the Dealer
Information Page), to email you a
reminder to print off their certs, and
mail them out.
None Default. No notification is sent.
7.8 How do I get scale comments to show on the PDA for the technician to see?
To view comments,
1. Select the scale on the PDA.
2. At the bottom of the screen tap View Cert,
and then tap Previous Calibration.
3. On the lower left corner of the PDA screen,
tap View.
Comments is one of the sections that can be
viewed. This will require comments to have
been entered during the previous calibration.
4. To exit, tap OK at the top right corner of the
screen.
NOTE: You cannot flag comments to alert the technician.
7.9 Why is nothing listed in the Last Cert column?
This column is populated with the date that the scale
was last calibrated. If a scale has been calibrated but
not yet uploaded to the server, and All Scales or
Calibrated Scales is selected from the View menu,
then this column will be populated. In all other
situations it will be empty.
7.10 How do I add another selection under the Equipment Condition?
To add scale conditions,
1. Select Device Types under Admin on the
navigation bar.
2. Select the scale type and point and click the
Edit hyperlink.
3. Enter condition name.
4. When finished click the Add Condition
button.
7.11 Why are my history certificates showing an incorrect unit of measure?
After we changed the unit of measure from lb to kg on
a customer’s scale and we view the previous certs it
shows them in kg.
The reason is that there wasn’t any history for these
scales. So, upon viewing of the cert, it used today’s
data to generate. If that was the case, change the scale
back to lb, regenerating the historical certs, and then
change the scale to kg.
Certificate Retrieval System User’s Guide - Frequently Asked Questions 21
Page 26

8.0 Appendix
Form: CRS-T/001
Page 1 of 1
Customer:
Address:
City, State Zip:
Certificate ID:
ISO Number:
Date
Leanne Co
8400 E Riverside
Belvidere, ILLINOIS 61111
121212123L070711
ISO/IEC 17025 A2LA #2039.01
11/7/2007
Indicator Mfg.
Indicator Model
Indicator Serial
Test Interval
Base Mfg.
Base Model
Base Serial
Cal Date
Due Date
Procedure
Scale ID
Scale Class
Scale Status
Scale Location
Scale Range
Robinair
40153
1231345kj;
90 Days
N/A
N/A
N/A
11/7/2007
2/5/2008
QWI 5.5.1
123L
III/L
In Service
front
0 - 5000 g x 2 g
Base Dimensions RF RADIO
N/A
Class/Type
N/A
EQUIPMENT CONDITIONS
Water in Pit [Dry]
SECTION TEST
Section Test 1
Reading Error
Section Test 2
Reading Error
In Tolerance? [Yes] No In Tolerance? [Yes] No
INCREASING LOAD TEST
Preliminary Load Test
Section Test Wt. Reading Error
Final Load Test
Section Test Wt. Reading Error
In maintenance tolerance? [Yes] No In acceptance tolerance? [Yes] No
All tolerances calculated in conformance with Handbook 44 Table 6.
STRAIN TEST
Truck Weight Test Weight Total Strain Weight Indicated Weight Error
0 lb 0 lb 0 lb 0 lb 0 lb
TEST INFORMATION
Test Weight Classification: F
NIST Traceability Certificate Number: W04-55567
Standards Used: 1000 lb #2, 1000 lb #3, 1000 lb #4, 1000 lb #5, 1000 lb #6, 1000 lb #7, 1000 lb
#8, 1000 lb #1
Test Location: [Onsite] Offsite
Overall Result: [Pass] Fail Adjust Scale Not Found
Was the scale within customers required accuracy? [Yes] No
Environmental Conditions: [Acceptable] Unacceptable
Temperature: 45°F
Humidity: 70%
Pressure: 32
Comments / Notes: N/A
Technician: Alberto Ramirez
Inspections and adjustments have been performed in accordance to Allometrics work instruction 5-4WI03 in compliance with ISO/IEC 17025,
ANSI/NCSL Z540-1 and the principles of ISO 9001-2000. Reported measurements are within accredited scope of Allometrics Inc. This Calibration
Report may not be reproduced, except in full, without written consent from Allometrics Inc.
8.1 Certificate of Calibration Samples
22 Certificate Retrieval System User’s Guide
Page 27

Form: CRS-T/001
Page 1 of 1
Customer:
Address:
City, State Zip:
Certificate ID:
ISO Number:
Date
A - Z Materials
123 Main St.
Rockton, ILLINOIS 61072
12345004071511
ISO/IEC 17025 A2LA #2039.01
11/15/2007
Indicator Mfg.
Indicator Model
Indicator Serial
Test Interval
Base Mfg.
Base Model
Base Serial
Cal Date
Due Date
Procedure
Scale ID
Scale Class
Scale Status
Scale Location
Scale Range
GSE
465
200125
6 Months
Rice Lake
OTR
3Z4Q
11/15/2007
5/31/2008
QWI 5.5.1
004
III/L
In Service
Truck Scale
0 - 200000 lb x 20 lb
Base Dimensions
N/A
CLC
90000
Printer
Datamax M-4208
Remote Display
RLWS Laserlight 4"
EQUIPMENT CONDITIONS
Water in Pit [Dry]
SECTION TEST
Section Test 1
Reading Error
Section 1:
Section 1 Middle:
Section 2:
Section 2 Middle:
Section 3:
Section 3 Middle:
Section 4:
30000 lb
30000 lb
30020 lb
30040 lb
30060 lb
30080 lb
30100 lb
0
0
20
40
60
80
100
Section Test 2
Reading Error
Section 1:
Section 1 Middle:
Section 2:
Section 2 Middle:
Section 3:
Section 3 Middle:
Section 4:
30000 lb
30000 lb
30000 lb
30000 lb
30000 lb
30000 lb
30000 lb
0
0
0
0
0
0
0
In Tolerance? Yes [No] In Tolerance? [Yes] No
INCREASING LOAD TEST
Preliminary Load Test
Section Test Wt. Reading Error
Section 1
Section 1
Section 1
Section 1
Section 1
Section 1
Section 1
Section 1
5000 lb
10020 lb
15040 lb
20060 lb
15040 lb
20060 lb
25080 lb
30100 lb
5000 lb
10000 lb
15000 lb
20000 lb
15000 lb
20000 lb
25000 lb
30000 lb
0 lb
-20 lb
-40 lb
-60 lb
-40 lb
-60 lb
-80 lb
-100 lb
Final Load Test
Section Test Wt. Reading Error
Section 1
Section 1
Section 1
Section 1
Section 1
Section 1
Section 1
Section 1
5000 lb
10020 lb
15040 lb
20060 lb
15040 lb
20060 lb
25080 lb
30100 lb
5000 lb
10000 lb
15000 lb
20000 lb
15000 lb
20000 lb
25000 lb
30000 lb
0 lb
-20 lb
-40 lb
-60 lb
-40 lb
-60 lb
-80 lb
-100 lb
In maintenance tolerance? Yes [No] In acceptance tolerance? [Yes] No
All tolerances calculated in conformance with Handbook 44 Table 6.
STRAIN TEST
Truck Weight Test Weight Total Strain Weight Indicated Weight Error
45000 lb 30000 lb 75000 lb 75000 lb 0 lb
TEST INFORMATION
Test Weight Classification: F
NIST Traceability Certificate Number: W04-55567
Standards Used: 1000 lb #1, 2, 3, 4, 5, 6, 7, 8, 9, 10, 11, 12, 13, 14, 15, 16, 17, 18, 19, 20, 21, 22, 23,
24, 25, 26, 27, 28, 29, 30
Test Location: [Onsite] Offsite
Overall Result: Pass Fail [Adjust] Scale Not Found
Was the scale within customers required accuracy? [Yes] No
Environmental Conditions: [Acceptable] Unacceptable
Comments / Notes: Adjusted to correct errors.
Technician: Joe Blow
Inspections and adjustments have been performed in accordance to Allometrics work instruction 5-4WI03 in compliance with ISO/IEC 17025,
ANSI/NCSL Z540-1 and the principles of ISO 9001-2000. Reported measurements are within accredited scope of Allometrics Inc. This Calibration
Report may not be reproduced, except in full, without written consent from Allometrics Inc.
Certificate Retrieval System User’s Guide - Appendix 23
Page 28

Form: CRS-T-C/001
Page 1 of 1
Customer:
Address:
City, State Zip:
Certificate ID:
ISO Number:
Date
123 Chemical Co.
P.O. Box 123 123 First Ave.
Atlanta, GEORGIA 30042
6091211
ISO/IEC 17025 A2LA #2039.01
11/12/2009
Indicator Mfg.
Indicator Model
Indicator Serial
Test Interval
Base Mfg.
Base Model
Base Serial
Cal Date
Due Date
Procedure
Scale ID
Scale Class
Scale Status
Scale Location
Scale Range
N/A
Ind. Model
6
6 Years
N/A
N/A
N/A
11/12/2009
11/12/2015
Sp.1
6
III
In Service
6
0 - 100000 lb x 100 lb
Customer Scale ID
6
Test
N/A
17025 Compliant Test?yscale tolerance
100
Weight value
lbs
EQUIPMENT CONDITIONS
[Clean] Dirty Wet Really Drafty Hot Broken Not Found
All tolerances calculated in conformance with Handbook 44 Table 6.
LOAD TEST
Section Test Wt. Reading Error Reading Error
0 lb
5000 lb
7000 lb
10000 lb
0 lb
5000 lb
7000 lb
10000 lb
0 lb
0 lb
0 lb
0 lb
0 lb
5000 lb
7000 lb
10000 lb
0 lb
0 lb
0 lb
0 lb
As-Found As Left
SECTION TEST
Reading Error Reading Error
Weight: Weight: 1000 lb
In Tolerance? Y In Tolerance? Y
In Tolerance? N In Tolerance? Y
CORNER/LOADCELL TEST
As Found
Reading Error
As Left
Reading Error
In Tolerance? Yes [No] In Tolerance? Yes [No]
TEST INFORMATION
Test Weight Classification: N/A
Measurement Canada Traceability Certificate Number: N/A
Standards Used: N/A
Test Location: [Onsite] Offsite
Overall Result: [Pass] Fail Adjust Unit Not Found Within Customers Tol
Was the scale within customers required accuracy? [Yes] No Calibration Results
Environmental Conditions: [Acceptable] Unacceptable
Comments / Notes: N/A
Technician: Alberto Ramirez
Devices were calibrated with the certified test weights. Adjustments made to restore and/or maintain the accuracy of the device conform to the
tolerances established by NIST or Manufacturers Specifications. Best measurement of uncertainty calculated using a coverage factor of K=2. This
provides confidence level of 95%.
24 Certificate Retrieval System User’s Guide
Page 29

8.2 Balance Service Report
Form: Balance Sevice Report
Page 1 of 1
Customer:
Address:
City, State Zip:
Certificate ID:
ISO Number:
Date
123 Chemical Co.
P.O. Box 123 123 First Ave.
Atlanta, GEORGIA 30042
1231243124123092311
ISO/IEC 17025 A2LA #2039.01
11/23/2009
Indicator Mfg.
Indicator Model
Indicator Serial
Test Interval
Base Mfg.
Base Model
Base Serial
Cal Date
Due Date
Procedure
Scale ID
Scale Class
Scale Status
Scale Location
Scale Ranges
Sartorius
QC7DCE-S
1231231231231
30 Days
N/A
N/A
N/A
11/23/2009
12/23/2009
Sp.1
1231243124123
I
In Service
lab
0 - 1000 g x 0.00001 g
1001 - 2000 g x 0.00002 g
2001 - 3000 g x 0.003 g
3001 - 4000 g x 0.005 gCustomer Scale ID
xxx
Test
yes
17025 Compliant Test?
no
scale tolerance
yes
Weight value
yes
EQUIPMENT CONDITIONS
[Clean] Dirty Wet Really Drafty Hot Broken Not Found
As Found
Reading Error
Section 1
Section 2
Section 3
Section 4
500.00000 g
500.00000 g
500.00000 g
500.00000 g
0.00000
0.00000
0.00000
0.00000
As Left
Reading Error
Section 1
Section 2
Section 3
Section 4
500.00000 g
500.00000 g
500.00000 g
500.00000 g
0.00000
0.00000
0.00000
0.00000
Position Position
1 2
4 3
1
2
3
4
SHIFT TEST Shift Test Result: [Pass] Fail Adjust Not Applicable Shift Weight: 500.00000 g
All tolerances calculated in conformance with Handbook 44 Table 6.
LOAD TEST
Preliminary Load Test
Test Wt. Tolerance Reading Error
500.00000 g
1000.00000 g
2000.00000 g
3000.00000 g
4000.00000 g
500 - 500 g
1000 - 1000 g
2000 - 2000 g
2999.991 - 3000.009
3999.985 - 4000.015
500.00000 g
1000.00000 g
2000.00000 g
3000.00300 g
4000.00500 g
0.00000 g
0.00000 g
0.00000 g
0.00300 g
0.00500 g
Final Load Test
Test Wt. Tolerance Reading Error
500.00000 g
1000.00000 g
2000.00000 g
3000.00000 g
4000.00000 g
500 - 500 g
1000 - 1000 g
2000 - 2000 g
2999.997 - 3000.003
3999.995 - 4000.005
500.00000 g
1000.00000 g
2000.00000 g
3000.00000 g
4000.00000 g
0.00000 g
0.00000 g
0.00000 g
0.00000 g
0.00000 g
In maintenance tolerance? [Yes] No In acceptance tolerance? [Yes] No
TEST INFORMATION
Test Weight Classification: F
Measurement Canada Traceability Certificate Number: 10333 Cal Date: 1/3/2008 Recal Date: 1/3/2008
Standards Used: GRAM KIT
Test Location: [Onsite] Offsite
Overall Result: Pass Fail [Adjust] Unit Not Found Within Customers Tol
Was the scale within customers required accuracy? [Yes] No Calibration Results
Environmental Conditions: [Acceptable] Unacceptable
Comments / Notes: gtg
Technician: Brandon Cox
Uncertainty of Measurement j
Clean Photoeye y
Clean Infeed Roller y
Devices were calibrated with the certified test weights. Adjustments made to restore and/or maintain the accuracy of the device conform to the
tolerances established by NIST or Manufacturers Specifications. Best measurement of uncertainty calculated using a coverage factor of K=2. This
provides confidence level of 95%.
Certificate Retrieval System User’s Guide - Appendix 25
Page 30

8.3 Certificate Delivery Preference Email Example
1
From:
Sent:
Friday, October 15, 2010 11:01 AM
To:
Subject:
New Certificates have been approved.
Attachments:
Certificate5.pdf; Certificate6.pdf
Dear Company,
Thank you for the opportunity to service your scales. You are receiving this email because recently scale(s)
12345, 333444, Test 123, 654321, 125678, 1212121212 had a calibration performed. For your convenience, we
have attached a copy of the actual certificate(s).
Thank you again for your continued business. If there is anything else we can do for you, please let us know.
Best Regards,
Rice Lake Weighing Systems
230 West Coleman Street
Rice Lake, WI 54868
715-234-9171
26 Certificate Retrieval System User’s Guide
Page 31

8.4 Certificate Delivery Preference Download Example
1
From:
Sent:
Tuesday, October 12, 2010 2:09 PM
To:
Subject:
New Certificates have been approved.
Dear A - Z Materials,
Thank you for the opportunity to service your scales. Recently scale(s) 005, 001 had a calibration
performed. Calibration certificates are now available through our Certificate Retrieval System (CRS). Using
your web browser, you can access your certificates by going to
http://www.crscerts.com.
Once at the CRS web site, enter your login credentials. Inside the CRS web site you will be shown a list of
your scales. At this point you have the following options:
1.) Click the "Last Cert" link to view/print the current certificate for a scale.
2.) Click the "View Certificate" link to view a list of all certificates (current and previous) for a scale.
3.) Click the "Batch Print Certs" link to view/print a group of certificates based on a date range.
Thank you again for your continued business. If there is anything else we can do for you, please let us know.
Best Regards,
Rice Lake Weighing Systems
230 West Coleman Street
Rice Lake, WI 54868
715-234-9171
Certificate Retrieval System User’s Guide - Appendix 27
Page 32

8.5 Certificate Delivery Preference Paper Copy Example
1
From:
Sent:
Tuesday, October 12, 2010 2:09 PM
To:
Subject:
New Certificates have been approved.
Dear Rice Lake,
Newly approved calibration certificates are now available through the Certificate Retrieval System (CRS) for
RLWS Company.
This is a simple reminder that this customer would like a printed copy of their certificates mailed to them.
Thank you for using CRS. If there is anything else we can do for you, please let us know.
Best Regards,
The CRS Team
715.234.9171
crs.support@ricelake.com
28 Certificate Retrieval System User’s Guide
Page 33

Software Warranty Statement
Rice Lake Weighing Systems (RLWS) warrants that (a) the software will perform in accordance with the
accompanying printed materials for a period of ninety (90) days from the date of receipt. And (b) any hardware
accompanying the software will be free from defects in materials and workmanship under normal use and service
for a period of one (1) year from the date of receipt.
This Limited Warranty is void if failure of the software or hardware has resulted from accident, abuse,
misapplication, or incorrect customer specification. Any replacement software will be warranted for the
remainder of the original warranty period or thirty (30) days, whichever is longer.
If the software fails to conform to these warranties, RLWS will at its option, repair or replace such goods
returned within the warrant period subject to the following conditions:
Upon discovery by Buyer of such non-conformity, RLWS will be given prompt written no tice with a detailed
explanation of the alleged deficiencies.
Examination of software by RLWS confirms that the non-conformity actually exists, and was not caused by
accident, misuse, neglect, alteration, improper installation, improper repair, improper testing, or incorrect
customer specification. RLWS shall be the sole judge of all alleged non-conformities.
RLWS will have a reasonable time to repair or replace the software. Buyer is responsible for shipping charges
both ways.
In no event will RLWS be responsible for travel time or on-location repairs, including assembly or disassembly
of equipment. Nor will RLWS be liable for the cost of any repairs made by others.
THESE WARRANTIES EXCLUDE ALL OTHER WARRANTIES, EXPRESSED OR IMPLIED,
INCLUDING WITHOUT LIMITATION WARRANTIES OF MERCHANTABILITY OR FITNESS FOR A
PARTICULAR PURPOSE. NEITHER RLWS NOR DISTRIBUTOR WILL, IN ANY EVENT, BE LIABLE
FOR INCIDENTAL OR CONSEQUENTIAL DAMAGES.
RLWS AND BUYER AGREE THAT RLWS' SOLE AND EXCLUSIVE LIABILITY HEREUNDER IS
LIMITED TO REPAIR OR REPLACEMENT OF SUCH GOODS. IN ACCEPTING THIS WARRANTY, THE
BUYER WAIVES ANY AND ALL OTHER CLAIMS TO WARRANT.
SHOULD THE SELLER BE OTHER THAN RLWS, THE BUYER AGREES TO LOOK ONLY TO THE
SELLER FOR WARRANTY CLAIMS.
No terms, conditions, understanding or agreements purporting to modify the terms of this warranty shall have
any legal effect unless made in writing and signed by a corporate officer of RLWS and the Buyer.
© 2011 Rice Lake Weighing Systems, Inc. Rice Lake, WI USA. All Rights Reserved.
RICE LAKE WEIGHING SYSTEMS • 230 WEST COLEMAN STREET • RICE LAKE, WISCONSIN 54868 • USA
Certificate Retrieval System User’s Guide 29
Page 34

30 Certificate Retrieval System User’s Guide
Page 35

Page 36

PN 115105 01/11
 Loading...