

Ricatech RR3100 User Manual
1-,+-.-,0-+,-/,+-,,
44/-,, 48?=< 2;5>>97 3@:86<A

ESPAÑOL
65
ATENCIÓN AL CLIENTE
En caso de dudas o problemas con su producto Ricatech, contacte con el servicio de atención al cliente
de Ricatech. Para más información sobre el procedimiento completo, visite el sitio web de Ricatech en:
www.ricatech.com

ENGLISH
1
IMPORTANT SAFEGUARDS FOR AUDIO PRODUCTS
PLEASE READ CAREFULLY THE FOLLOWING IMPORTANT SAFEGUARDS THAT ARE APPLICABLE TO
YOUR EQUIPMENT.
1. Read Instructions - All the safety and operating instructions should be read before the
appliance is operated.
2. Retain Instructions - The safety and operating instructions should be retained for future
reference.
3. Heed Warnings - All warnings on the appliance and in the operating instructions should be
adhered to.
4. Follow Instructions - All operating and use instructions should be followed.
5. Water and Moisture - The appliance should not be used near
water-for example, near a bathtub, washbowl, kitchen sink, laundry tub,
in a wet basement, or near a swimming pool and the like.
6. Carts and Stands - The appliance should be used only with a cart or stand
that is recommended by the manufacturer.
6A.An appliance and cart combination should be moved with care. Quick stops, excessive force, and
uneven surfaces may cause the appliance and cart combination to overturn.
7. Wall or Ceiling Mounting - The appliance should be mounted to a wall or ceiling only as recommended
by the manufacturer.
8. Ventilation - The appliance should be situated so that its location or position does not interfere
with-its proper ventilation. For example, the appliance should not be situated on a bed, sofa, rug, or
similar surface that may block the ventilation openings; or, placed in a built-in installation, such as a
bookcase or cabinet that may impede the flow of air through the ventilation openings.
9. Heat - The appliance should be situated away from heat sources such as radiators, heat registers,
stoves, or other appliances (including amplifiers) that produce heat.
10.Power Sources - The appliance should be connected to a power supply only of the type described
in the operating instructions or as marked on the appliance.
11. Grounding or Polarization - Precautions should be taken so that the grounding or polarization means
of an appliance is not impeded.
12. Power - Cord Protection - Power-supply cords should be routed so that they are not likely to be walked
on or pinched by items placed upon or against them, paying particular attention to cords at plugs,
and the point where they exit from the appliance.
13.Cleaning - The appliance should be cleaned only as recommended by the manufacturer.
14.This product is designed for use with the antenna attached and should not be connected to any other
external antennas.
15.Non-use Periods - The power cord of the appliance should be unplugged from the outlet when left
unused for a long period of time.
16.Object and Liquid Entry - Care should be taken so objects do not fall and liquids are not spilled
into the enclosure through openings
17.Damage Requiring Service - The appliance should be serviced by qualified service personnel
when:
A. The power-supply cord of the plug has been damaged; or
B. Objects have fallen, or liquid has been spilled into the appliance; or
C. The appliance has been exposed to rain; or
D. The appliance does not appear to operate normally or exhibits a marked change
inperformance; or
E. The appliance has been dropped, or the enclosure damaged.
18. Servicing - The user should not attempt to service the appliance beyond that described in the
operating instructions. All other servicing should be referred to qualified service personnel.
ESPAÑOL
64
RESOLUCIÓN DE PROBLEMAS
No hay alimentación
1. Asegúrese de que la radio esté conectada correctamente.
2. Compruebe que el INDICADOR DE MODO DE ESPERA esté iluminado en rojo.
3. Si se enciende la luz roja, pulse POWER /
para encender la unidad.
No hay sonido
1. Asegúrese de que la función de silenciamiento esté desactivada.
2. Compruebe que el volumen esté subido pulsando VOLUME UP
/
en el mando a distancia.Nota:
El margen del volumen de algunas unidades comienza en el nivel 15 y finaliza en el nivel 40.
3. Asegúrese de que el interruptor INT./EXT. ubicado en la parte trasera de la radio esté ajustado en INT.
(A menos que esté utilizando los altavoces externos, en dicho caso debe estar ajustado en EXT. )
4. Asegúrese de que la alimentación esté activada.
No se reproduce el CD
1. Asegúrese de haber introducido el CD correctamente (el lado de la etiqueta mirando hacia arriba).
2. Compruebe que la superficie del CD está limpia.
3. Asegúrese de que el selector de función está ajustado en el modo CD.
USB - No se reproduce música al pulsar PLAY/PAUSE (USB).
1. Asegúrese de que la unidad Flash/dispositivo MP3 tenga almacenados archivos de música.
2. La unidad solo reproducirá dispositivos Flash de hasta 512 MB – 4 GB
3. Reinicie el dispositivo USB desactivando la unidad o cambiando de modo.
4. Compruebe si el(los) archivo(s) es(son) archivo(s) WMA. La unidad no reproduce el formato WMA,
únicamente el formato MP3.
El mando a distancia no funciona
1. Sustituya la batería.
2. Asegúrese de apuntar el mando a distancia hacia el sensor del mando a distancia durante el
funcionamiento.
3. Retire los obstáculos que haya entre la trayectoria del mando a distancia y la radio, de modo que la
señal del mando a distancia posea una trayectoria recta hasta la radio.
El plato no funciona
1. Compruebe que la fuente de alimentación de CA esté conectada.
2. Pulse POWER /
(en la parte delantera de la unidad o en el mando a distancia) para encender la
unidad. La luz del INDICADOR DEL MODO DE ESPERA debe estar apagada.
3. Asegúrese de que la unidad esté en el modo TOCADISCOS. Pruebe a mover el brazo del tocadiscos
hacia la derecha hasta que suene un clic.
No hay sonido proveniente de la unidad
1. La cubierta protectora blanca de la aguja no ha sido extraída
2. El volumen no está subido
El brazo del tocadiscos no se mueve
1. La brida negra debajo del brazo del tocadiscos no ha sido extraída.
2. El clip de retención del brazo del tocadiscos no ha sido liberado.
La unidad sigue apagándose por sí misma
1. Esta unidad cuenta con una FUNCIÓN DE AHORRO DE ENERGÍA: para cumplir con nuevas regulaciones,
si la unidad no se utiliza o no hay señal de salida durante 15 minutos, se apaga automáticamente por
sí misma.
2. Gire el interruptor de la ALIMENTACIÓN PRINCIPAL a OFF y, a continuación, póngalo de nuevo en
ON para volver a activar la unidad.
Marcas comerciales – tecnología de codificación de audio MPEG Layer-3 con licencia de Fraunhofer
IIS y Thomson.
ESPAÑOL
63
Borrar pistas MP3
El sistema puede borrar archivos MP3 previamente grabados o los archivos existentes.
1. En el modo de reproducción dispositivo USB o tarjeta SD, mantenga pulsado REC/ERASE /
durante 2 segundos.
La pista actualmente reproducida se detendrá y borrará.
ALTAVOCES EXTERNOS OPCIONALES
1. Con su nueva radio tendrá la opción de añadir altavoces externos.
2. Las tomas de altavoz para los altavoces externos se encuentran en la parte trasera de la radio.
Junto a las tomas de altavoz encontrará un interruptor con las letras Int./Ext. Al utilizar los altavoces externos, este interruptor
debe ser ajustado en la posición EXT. Hacerlo desactiva los altavoces internos de la radio y dirige la alimentación a los
altavoces externos.
3. Si decide no utilizar los altavoces externos, asegúrese de ajustar el interruptor a INT.
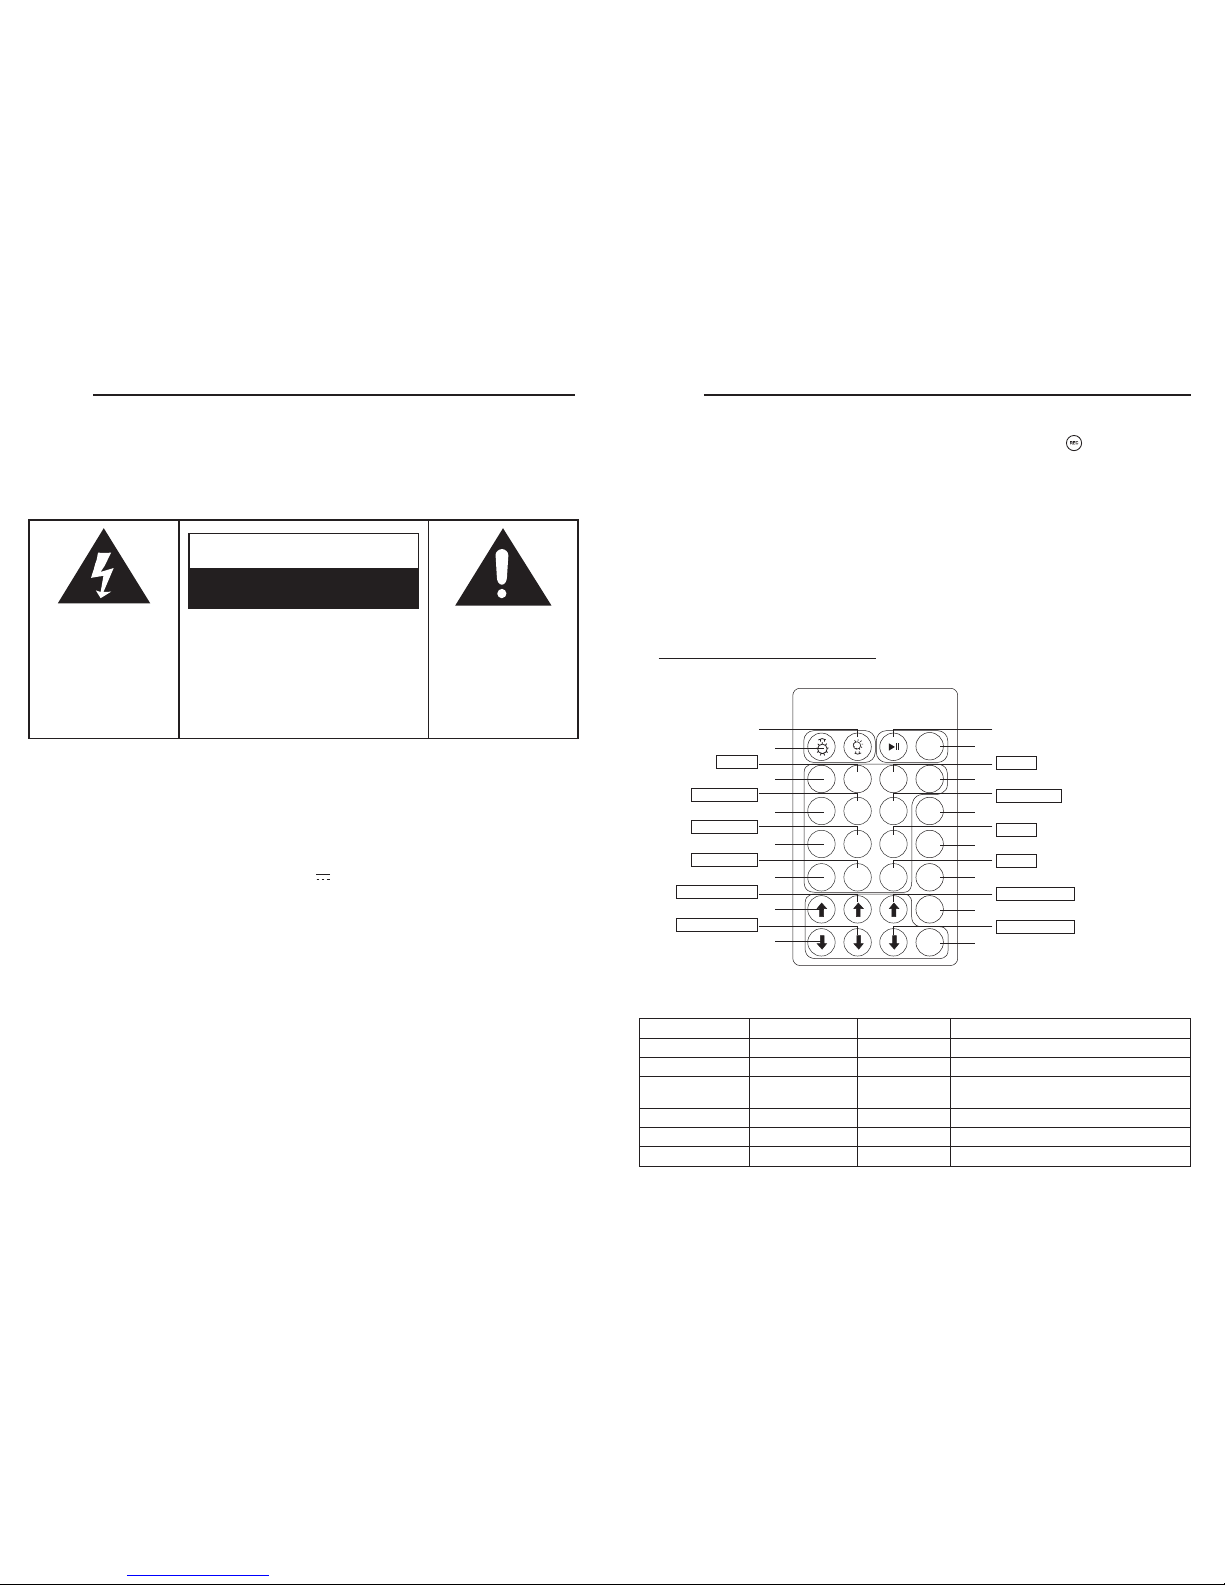
MANDOS A DISTANCIA - DESCRIPCIÓN DE LOS BOTONES
(Nota: Este aparato puede guardarse en uno de los paneles magnéticos delanteros de la carcasa, donde
así es indicado, siempre y cuando se haya instalado una batería de metal).
(2) CONTROL DE ILUMINACIÓN REMOTO
Ejecutar/Pausa
AZUL (B)
AZUL OSCURO
MARRÓN
ROSA
Aumentar AZUL
Disminuir AZUL DIY (ajuste de color por el usuario)
SUAVE: 3 cambios de color lento - ajustable
DESVANECIMIENTO: 7 cambios de color lento - ajustable
ESTROBOSCÓPICO: Aparición y
desvanecimiento de color - ajustable
7 cambios de color rápido
Atenuador (mantener pulsado + 5 segundos)
BLANCO (W)
FUNCIÓN DE CONTROL DE LA ILUMINACIÓN LED
Para controlar la iluminación LED utilice el mando a distancia por infrarrojos, el cual dispone de 28 botones. La función de
cada botón se describe en la siguiente tabla:
Brillo + (8 en total)
ROJO (R)
NARANJA
AMARILLO OSCURO
AMARILLO
Aumentar ROJO
Disminuir ROJO
Brillo - (8 en total)
VERDE (G)
VERDE CLARO
AZUL
AZUL CLARO
Aumentar VERDE
Disminuir VERDE
R G B W
FLASH
STROBE
FADE
SMOOTH
DIY
Brillo + (8 en total)
rojo
Naranja
Amarillo oscuro
amarillo
Aumentar rojo
Disminuir rojo
Brillo – (8 en total)
verde
Verde claro
Cian estático
Azul claro
Aumentar verde
Disminuir verde
DIY (ajuste de color por el usuario)
3 cambios de color lento
7 cam bio s de d esva necim ient o de colo r - aj usta ble
Ap ari ció n y desv ane cim ient o d e co lor - aj us tabl e
7 cambios de color rápido
Reproducción/Pausa
Azul
Azul oscuro
Marrón
Rosa
Aumentar azul
Disminuir azul
Atenuador
blanco
2
CAUTION: TO REDUCE
THE RISK OF ELECTRIC
SHOCK, DO NOT REMOVE
COVER (OR BACK). NO
USER - SERVICEABLE
PARTS INSIDE. REFER
SERVICING TO QUALIFIED
SERVICE PERSONNEL.
The lighting flash with
arrowhead symbol, within
an equilateral triangle, is
intended to alert user to
the presence of uninsulated
"dangerous voltage" within
the product's enclosure
that may be of sufficient
magnitude to constitute
risk of electric shock
to persons.
The exclamation point
within an equilateral
triangle is intended to
alert user to the
presence of important
operating and
maintenance (servicing)
instruction in the
literature accompanying
the appliance.
RISK OF ELECTRIC SHOCK
DO NOT OPEN
CAUTION
WARNING:
TO PREVENT FIRE OR SHOCK HAZARD, DO NOT EXPOSE THIS APPLIANCE TO
RAIN OR MOISTURE. DO NOT REMOVE COVER. PILOT LAMPS SOLDERED IN
PLACE. NO USER SERVICEABLE PARTS INSIDE. REFER SERVICING TO QUALIFIED
SERVICE PERSONNEL.
Specification
Frequency Range : FM 87.5 - 108 MHz
USB Port 2.0 : Full Speed 512MB - 4GB
(Support FAT16, FAT32)
Antennas : External FM antenna wire
Power Source : DC15V
6A
Speaker Size : 6 1/2" Dynamic type x 2
Speaker Ohm : 4 Ohm
Speaker Watt : 40W
Speaker Size : 2 1/2" Tweeter type x2
Speaker Ohm : 8 Ohm
Speaker Watt : 10W
Power Output : 12W x 2
*DESIGN AND SPECIFICATIONS SUBJECT TO CHANGE WITHOUT NOTICE.
ENGLISH
ENGLISH
3
LIGHT
PRESET +
PRESET –
STAND BY
INDICATOR
SENSOR
REC/
ERASE
FUNCTION
USB
PORT
PLAY/PAUSE
STOP
CD OPEN/CLOSE
REPEAT/ST
CD DOOR
DOWN / F.R.
TIMER
PROGRAM
SD
CARD
VOLUME
UP/DOWN
KNOB
LCD
DISPLAY
POWER
UP/ F.F.
SPEAKER
EARPHONE
JACK
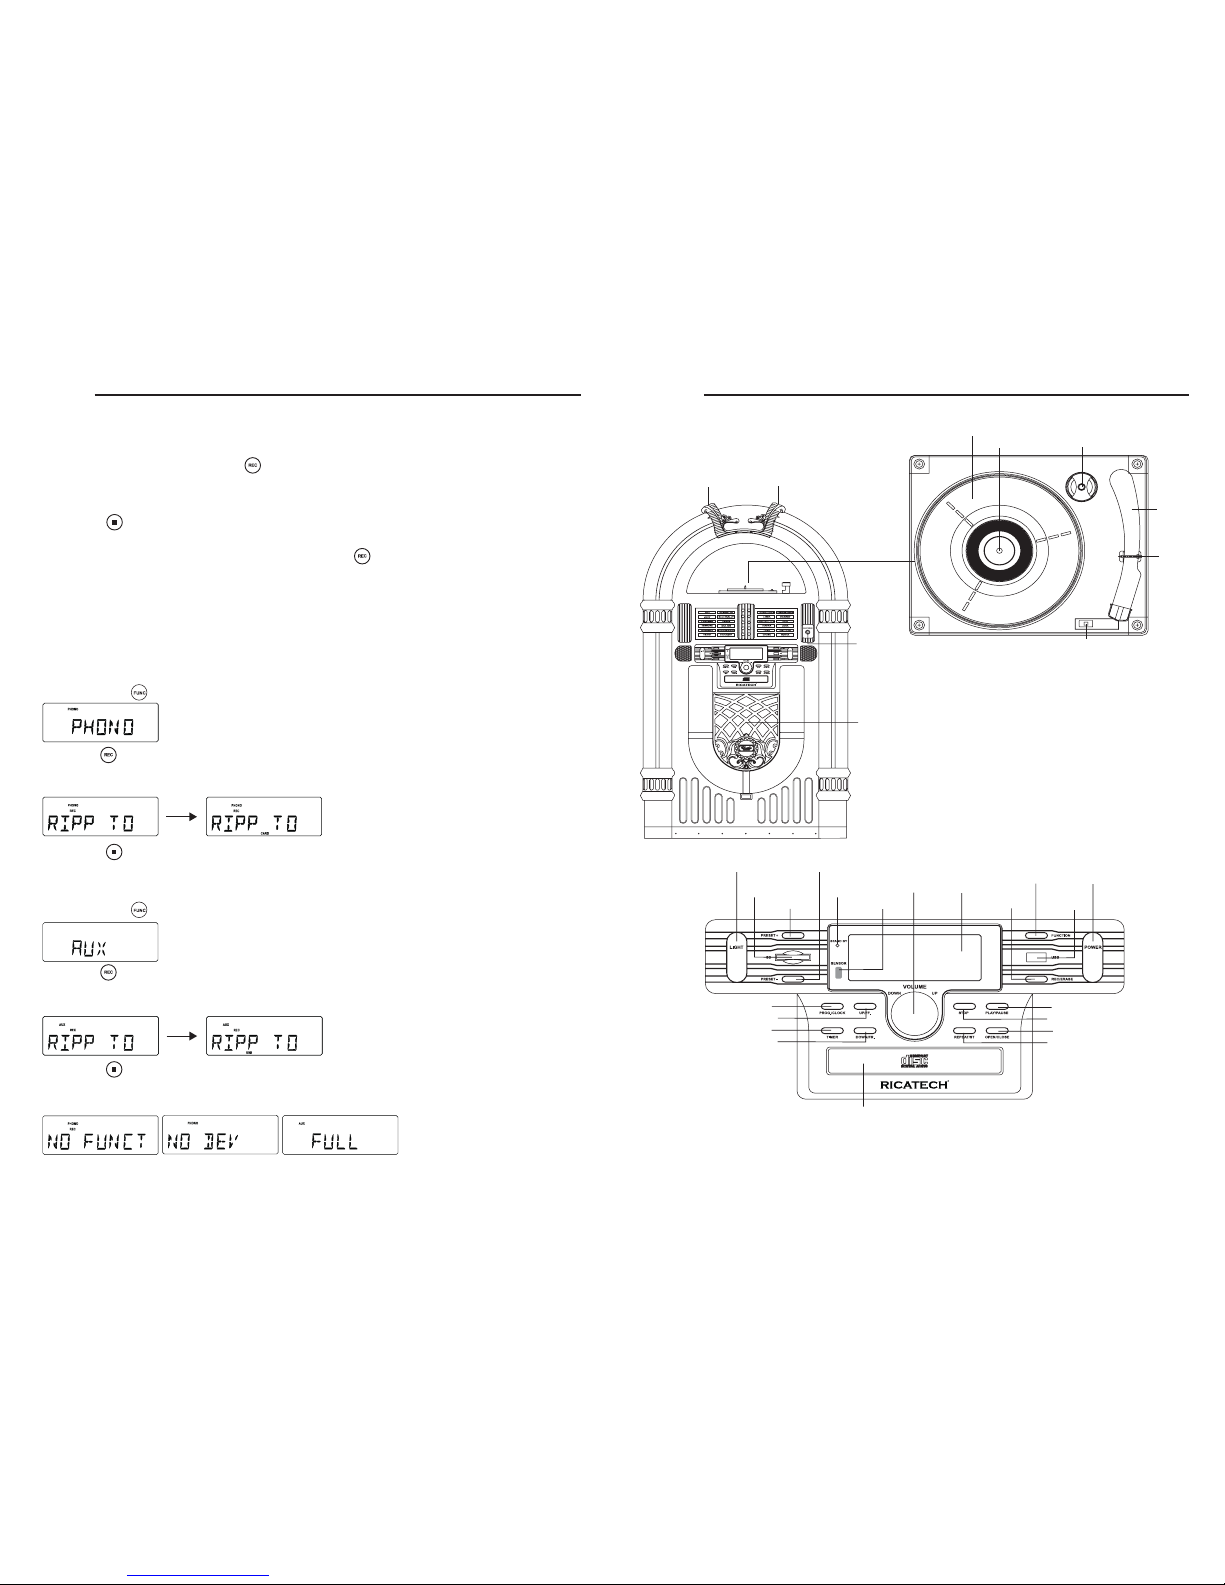
33 45 78
TONE
ARM
TONE
ARM
REST
TURNTABLE
SPINDLE
ADAPTER FOR
45 RPM RECORDS
SPEED CONTROL SWITCH
( 33 1/3 , 45 , 78 RPM)
CONTROL LOCATORS
VOLUME DOWN VOLUME UP
ESPAÑOL
62
GRABACIÓN
De CD a SD/USB
El sistema es capaz de convertir la totalidad de disco CD en formato MP3 y copiarlo en el dispositivo de almacenamiento
masivo USB o en la tarjeta SD. Igualmente, puede copiar una sola pista MP3 de y desde el dispositivo USB/tarjeta SD.
1. En el modo reproducción de CD, pulse REC /
para empezar a copiar en el dispositivo USB/tarjeta SD (predeterminado
en USB si ambos dispositivos son detectados). La reproducción se detendrá y retrocederá al inicio de la pista actual. El
sistema escaneará los contenidos del dispositivo USB/tarjeta SD y creará una carpeta en la cual guardará la pista MP3.
Reanude la reproducción del CD e inicie la copia. El icono del dispositivo objetivo correspondiente, "USB" / "CARD",
comenzará a parpadear.
2. Pulse STOP /
para salir del modo copia de CD.
Copia de MP3
1. En el modo de reproducción CD-MP3, USB o tarjeta SD, pulse REC / para iniciar la copia de archivos MP3 desde el
CD al dispositivo USB/tarjeta SD, o desde el dispositivo USB a la tarjeta SD o viceversa. La reproducción se detendrá y
el sistema escaneará los contenidos del dispositivo USB/tarjeta SD y creará una carpeta en la cual guardará la pista MP3.
2. el icono "REC" será visualizado
3. El mensaje COPY 01 será visualizado. El porcentaje proporcional copiado aparecerá en el número decimal.
4. El icono del dispositivo objetivo "USB" o "CARD" comenzará a parpadear. El número decimal aumentará a partir de 01
al comenzar la copia MP3. El proceso se detendrá una vez alcance 100
5. El archivo MP3 actual será reproducido desde el principio
De Tocadiscos a SD/USB
El sistema puede convertir las señales de audio de la entrada TOCADISCOS a formato MP3 y guardarlas en un dispositivo
de almacenamiento masivo USB o tarjeta SD (USB es el ajuste predeterminado si se detectan ambos dispositivos)
1. Pulse FUNCTION /
para ajustar la unidad al modo TOCADISCOS.
2. Pulse REC /
para iniciar la copia. El sistema escaneará los contenidos del dispositivo USB/tarjeta SD y creará una
carpeta en la cual guardará las pistas MP3.
3. El icono "REC" y el mensaje "RIPP TO" serán visualizados y el icono "PHONO" comenzará a parpadear.
4. El icono del dispositivo objetivo, "USB" o "CARD", comenzará a parpadear al comenzar la copia.
5. Pulse STOP /
para salir del modo copia TOCADISCOS
De AUX a SD/USB
El sistema puede convertir las señales de audio de la entrada AUX a formato MP3 y guardarlas en un dispositivo de
almacenamiento masivo USB o tarjeta SD (USB es el ajuste predeterminado si se detectan ambos dispositivos).
1. Pulse FUNCTION / una o más veces para seleccionar AUX.
2. Pulse REC /
para iniciar la copia. El sistema escaneará los contenidos del dispositivo USB/tarjeta SD y creará una
carpeta en la cual guardará la pista MP3.
3. El icono "REC" y el mensaje "RIPP TO" serán visualizados y el icono "AUX" comenzará a parpadear.
4. El icono del dispositivo objetivo, "USB" o *CARD", comenzará a parpadear al comenzar la copia.
5. Pulse STOP /
para salir del modo copia AUX
Nota: El mensaje "NO FUNCT" será visualizado al pulsar cualquier tecla durante el proceso de copia AUX. El mensaje
"NO DEV" será visualizado si no se detecta ningún dispositivo USB o tarjeta SD. El mensaje "FULL" será visualizado si
no hay suficiente memoria en el dispositivo objetivo.

ESPAÑOL
61
FUNCIONAMIENTO DE LA TOMA PARA AURICULARES
Escuchar a través de auriculares/cascos (no incluidos)
REPRODUCTOR DE CD
Reproducción de un CD
1. Pulse FUNCTION /
para ajustar la unidad en el modo CD.
2. Pulse CD OPEN / CLOSE /
para abrir el compartimento para CD
3. Introduzca un disco con la parte impresa hacia arriba. Pulse CD OPEN / CLOSE /
. una vez más para cerrar el
compartimento. READ es visualizado mientras el reproductor de CD escanea los contenidos de un disco.
4. La pista núm. 1 será reproducida automáticamente una vez finalizada la lectura de los contenidos del disco CD.
5. Pulse
FF / o FB / una vez o repetidamente hasta que el número de pista deseado aparezca en pantalla.
6. Pulse STOP / para detener la reproducción.
Reproducción de un disco CD-MP3
1. Introduzca el disco con formato CD-MP3. Vuelva a pulsar CD OPEN / CLOSE / para cerrar el compartimento.
READ es visualizado mientras el reproductor de CD escanea los contenidos de un disco.
2. La pista núm. 1 de la carpeta raíz (Carpeta 1) será reproducida automáticamente una vez finalizada la lectura de los
contenidos del disco CD-MP3.
3. Pulse
FF /
o FB / una vez o repetidamente hasta que el número de pista deseado aparezca en pantalla.
4. Pulse PRESET + / o PRESET – / para seleccionar el álbum deseado.
5. Pulse STOP / para detener la reproducción.
PROGRAMACIÓN DE PISTAS
Puede almacenar hasta un máximo de 20 pistas en la secuencia deseada.
1. En la posición de parada, pulse PROGRAM /
para iniciar la programación.
El icono "MEMORY" y P0-01 empezarán a parpadear.
2. Pulse
FF / o FB /
una vez o repetidamente hasta que el número de la pista
deseada sea visualizado en la pantalla. Para MP3:
Pulse PRESET + /
o PRESET – /
para seleccionar el álbum deseado.
3. Pulse PROGRAM / para confirmar. La pantalla mostrará el núm. de pista almacenado
y la siguiente posición de almacenamiento.
4. Repita los pasos 2-3 para seleccionar y guardar todas las pistas deseadas.
FULL será visualizado si intenta programar más de 20 pistas
5. Pulse PLAY/PAUSE / para reproducir el programa.
Borrar el programa
Puede borrar los contenidos de la memoria mediante los siguientes modos:
- una vez en la posición de parada, dos durante la reproducción;
-PulsePOWER /
- Seleccione otra fuente de sonido
- Abra la bandeja de CD
Se desactiva el sonido de todos los altavoces
ENGLISH
4
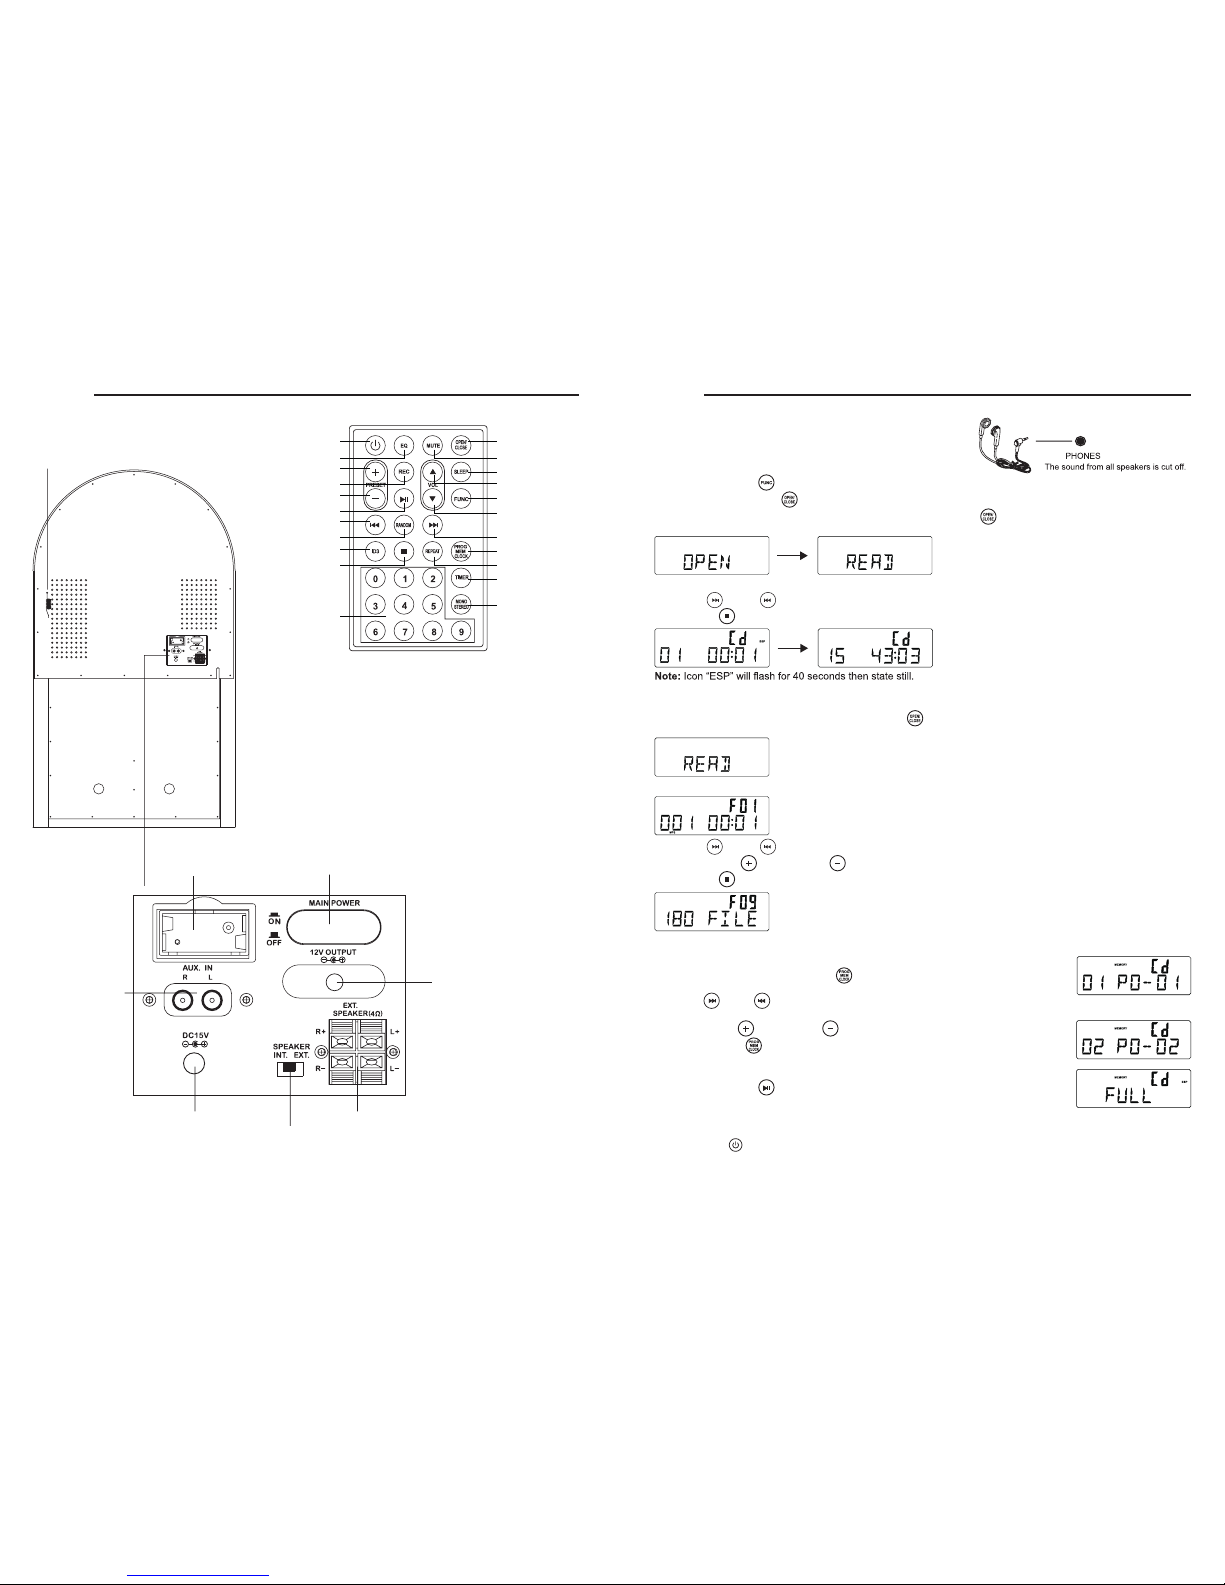
CONTROL LOCATORS
AUX IN JACK
MAIN POWER
EXTERNAL
SPEAKER JACK
SPEAKER
INT. / EXT.
SWITCH
DC INPUT JACK
BATTERY BACKUP
12V OUTPUT JACK
EXTERNAL
ANTENNA
POWER / STAND BY
EQ
PRESET +
PRESET -
PLAY / PAUSE
SKIP BACKWARD -
RANDOM
ID3
STOP
MONO/STEREO
TIMER
PROGRAM
SKIP FORWARD / +
VOLUME -
FUNCTION
VOLUME +
SLEEP
MUTE
CD OPEN / CLOSE
REC
REPEAT
0-9
ENGLISH
5
POWER SOURCE
1. unwind the AC power cord at the back of unit and connect it to power adaptor AC inlet.
2. The power adaptor dc cord connect to main unit of the
DC INPUT JACK
.
3. Connect the AC power cord to the wall socket.
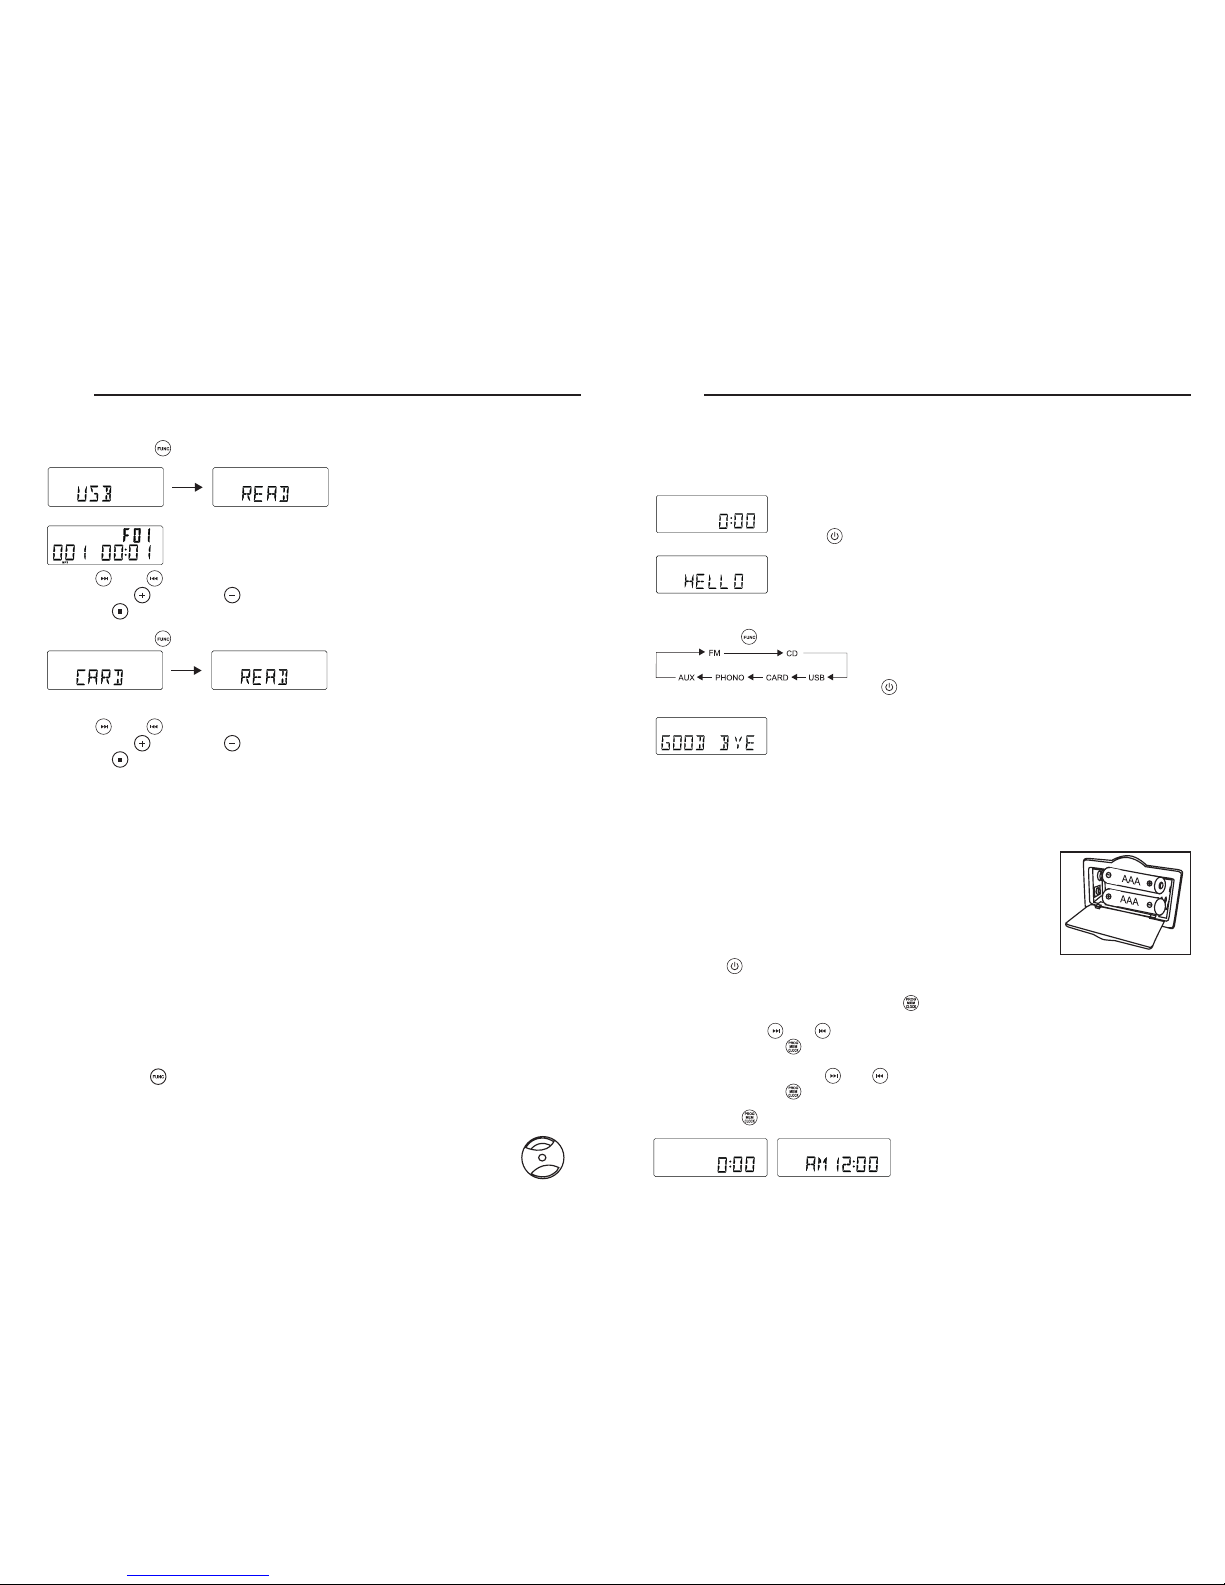
POWER UP YOUR UNIT
This system switches to Standby mode automatically and LCD would shown as below
To switch the unit on, press POWER /
LCD backlight will be turned on.
STANDBY LED is turned off and displayed as below.
BASIC OPERATION
Function select
1. Press FUNCTION / to select among:
2. When the set is on, press POWER /
to switch the unit off. LCD backlight will be turned off and shown message“GOOD
BYE” for 2 seconds, then the STANDBY LED is turned on.
Note: In the standby mode, the tone, sound settings, tuner presets and the volume level (up to a maximum volume
level of 30) will be stored in the unit’s memory.
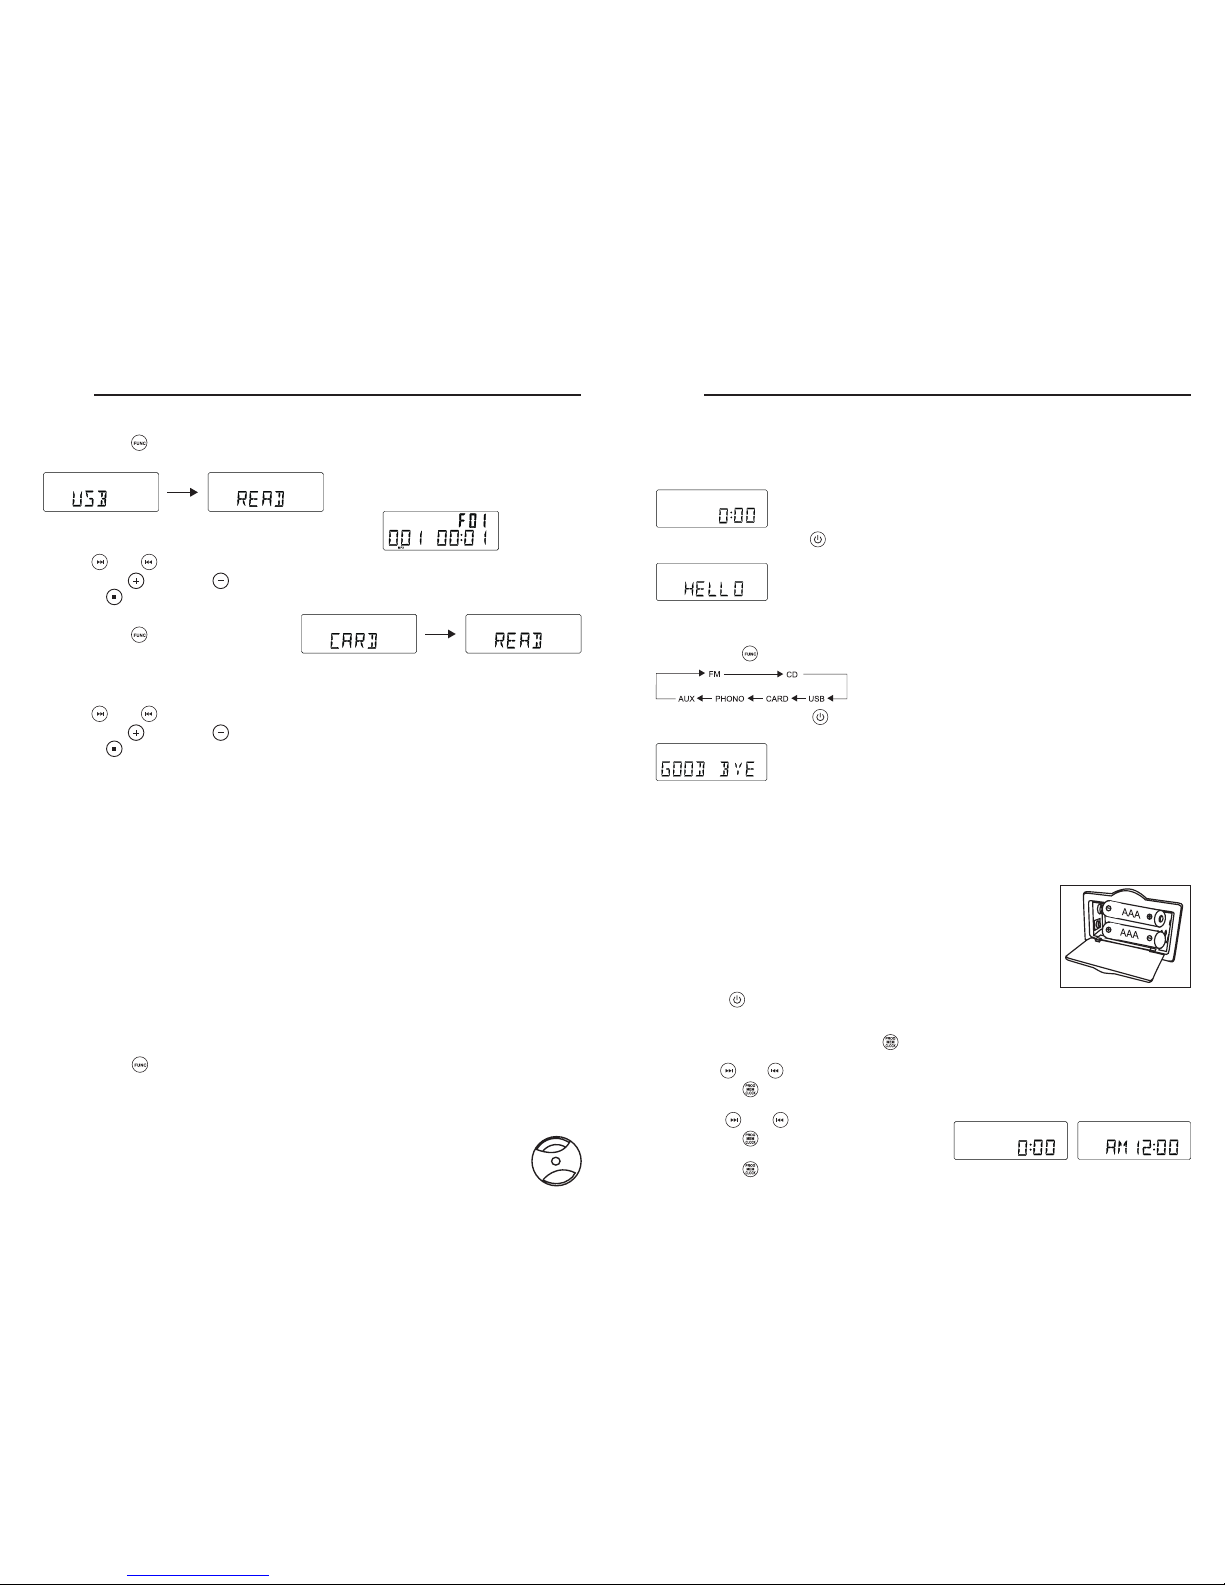
BATTERY BACK UP
The battery backup system to maintain your clock and alarm settings during a power outage. In the event of a power outage,
the battery backup will save your time and alarm settings until power is restored. To utilize the battery backup, you must
install two AAA batteries. The battery backup will not operate unless batteries are installed. To install batteries, follow the
instructions below.
1 Remove the Battery Compartment cover from the back of the unit.
2 Install two new AAA batteries in the correct position as shown inside the battery cover.
3 Reinstall the Battery Compartment cover.
NOTE:
Do not use different batteries
Do not mix old and new batteries
Setting the clock
After connecting the system to power supply, set the clock first.
1. Press POWER /
to switch the unit to Standby mode
- The display shows the time
- “0:00” flashes by default if you have not set the clock
2 In the Standby mode, press and hold PROGRAM /
over 1 second.
- The hours digit starts flashing.
3. Press the FF /
o FB / repeatedly to set the hours.
4. Press PROGRAM /
again to confirm.
The minutes digit starts flashing
5. Hold down FF /
o FB / repeatedly to set the minutes.
6. Press PROGRAM /
again to confirm.
The minutes digit stop flashing, the clock begins to run.
7. Press PROGRAM /
to select between 12 and 24 hours, shown as below
USB Y FUNCIONAMIENTO DE LA TARJETA SD
Funcionamiento del dispositivo USB:
1. Pulse FUNCTION /
para ajustar la unidad al modo USB.
2. Enchufe el dispositivo de almacenamiento masivo USB. READ es visualizado mientras el sistema escanea los contenidos
del dispositivo USB.
3. La pista núm. 1 de la carpeta raíz (Carpeta 1) será reproducida
automáticamente una vez finalizada la lectura de los contenidos
del dispositivo USB.
4. Pulse
FF / o FB /
una vez o repetidamente hasta que el número de pista deseado sea visualizado en pantalla.
5. Pulse PRESET + /
o
PRESET – / para seleccionar el álbum deseado.
6. Pulse STOP /
para detener la reproducción.
Funcionamiento de la tarjeta SD:
1. Pulse FUNCTION / para ajustar la unidad
en el modo TARJETA.
2. Introduzca la tarjeta SD en la ranura para tarjetas. "READ" es visualizado mientras el sistema escanea los contenidos de
la tarjeta SD.
3. La pista núm. 1 de la carpeta raíz (Carpeta 1) será reproducida automáticamente una vez finalizada la lectura de los
contenidos de la tarjeta SD.
4. Pulse
FF / o FB /
una vez o repetidamente hasta que el número de pista deseado sea visualizado en pantalla.
5. Pulse PRESET + /
o
PRESET – / para seleccionar el álbum deseado.
6. Pulse STOP /
para detener la reproducción.
Observaciones:
1) El conector USB no es compatible con la conexión de un cable de extensión USB.
2) Esta unidad no ha sido diseñada para establecer comunicación directa con un ordenador.
3) No hay garantía de que todos los dispositivos de memoria USB y tarjetas SD funcionen en este sistema de audio
IMPORTANTE:
No desconecte el dispositivo USB durante el modo USB, ya que podría dañar el dispositivo externo o sus archivos.
Por favor, desactive primero el equipo o pulse otro modo antes de desconectar de forma segura el dispositivo USB.
Especificaciones del dispositivo USB:
Interfaz
- USB 2.0 Alta velocidad, HOST (no compatible con USB HUB) Memoria flash correspondiente
- Compatible con Audio MPEG 1, 2, 2.5
- Compatible con Layer 1, 2, 3
- Compatible con tasa de bits: 128 – 320 Kbps
- Subcarpetas anidadas: 8 niveles
- Número de pista/títulos máx. 999
- Compatible con la etiqueta ID3 V2.0
PLATO
PREPARACIONES PARA EL USO DEL PLATO
1. Retire la brida negra desenroscándola y deslícela suavemente fuera del BRAZO DEL TOCADISCOS.
2. Retire la cubierta protectora blanca de la aguja tirando con delicadeza hacia la parte delantera de la unidad.
3. Libere el BRAZO DEL TOCADISCOS del clip de retención empujándolo suavemente hacia la derecha. Esto liberará el
brazo de su SOPORTE. Bloquee de nuevo el clip de retención cuando transporte la unidad a otra ubicación.
FUNCIONAMIENTO DEL PLATO
1. Pulse FUNCTION /
para ajustar la unidad al modo TOCADISCOS.
2. Ajuste el SELECTOR DE CONTROL DE VELOCIDAD a la velocidad adecuada (33 1/3, 45 o 78 rpm) para el disco
seleccionado.
3. Tire del BRAZO DEL TOCADISCOS ligeramente hacia la derecha hasta oír un "clic" para activar el plato.
4. Sitúe el brazo del tocadiscos sobre el disco y bájelo en el punto de inicio deseado.
5. Al finalizar el disco, el BRAZO DEL TOCADISCOS se parará automáticamente. Deberá resituarlo en el SOPORTE DEL
BRAZO TOCADISCOS manualmente.
ACCESORIOS SUMINISTRADOS: Adaptador para discos de 45 rpm
(si fuese necesario)
Para reproducir un disco de 45 rpm, extraiga el adaptador colocando el pulgar y el dedo índice en los huecos
y tirando de él hacia arriba. A continuación, colóquelo en el EJE. Ahora puede colocar el disco en el plato.
ESPAÑOL
60
ESPAÑOL
59
RADIO
Sintonizador FM
1. Pulse FUNCTION / para ajustar la unidad al modo FM.
2. Sintonización automática – Mantenga pulsado
FF / o FB /
hasta que la frecuencia comience a sintonizar
automáticamente la radio a una emisora con la suficiente recepción. Si una emisora es recibida en estéreo, (ST) será
visualizado. Si fuese necesario, repita el paso 3 hasta encontrar la emisora deseada.
3. Sintonización manual – Pulse brevemente
FF /
o FB /
y repita hasta encontrar una emisora.
Programación de emisoras de radio
Puede almacenar hasta un máximo de 40 emisoras de radio (FM y AM) en la memoria, manual o automáticamente
(almacenamiento automático)
1. Sintonice la emisora deseada
2. Pulse PROGRAM /
para activar la programación. El icono "MEMORY" y P01 comenzarán a parpadear.
3. Pulse PRESET + /
o PRESET – / para asignar un número de 1 a 20 emisoras.
4. Pulse PROGRAM /
para confirmar. La pantalla muestra el número de banda preajustada y la frecuencia de la estación
preajustada.
5. Repita los pasos 1 a 4 para guardar otras emisoras para escuchar una emisora preajustada.
Pulse PRESET + /
o PRESET – / una o más veces hasta que la emisora preajustada deseada sea visualizada.
Para escuchar una emisora preajustada
Pulse PRESET + / o PRESET – / una o más veces hasta que la emisora preajustada deseada sea visualizada.
La programación automática de emisoras de radio programará presintonías a partir del número 1 en adelante de forma
automática. Las presintonías antiguas serán eliminadas.
1. Mantenga pulsado el botón PROGRAM /
hasta que aparezca Auto
- El icono "memory" comenzará a parpadear
- Las emisoras disponibles son programadas
- Una vez almacenadas todas las emisoras, la última emisora preajustada será reproducida
ANTENA
Antena: para la recepción FM, la unidad dispone de un CABLE DE ANTENA FM. Mueva el cable hasta que la recepción
sea nítida y sin interferencias.
ECUALIZADOR
Pulse EQ / en el mando a distancia para seleccionar el modo de ecualizador deseado.
Existen disponibles 5 modos de ecualizador preajustados:
ENGLISH
6
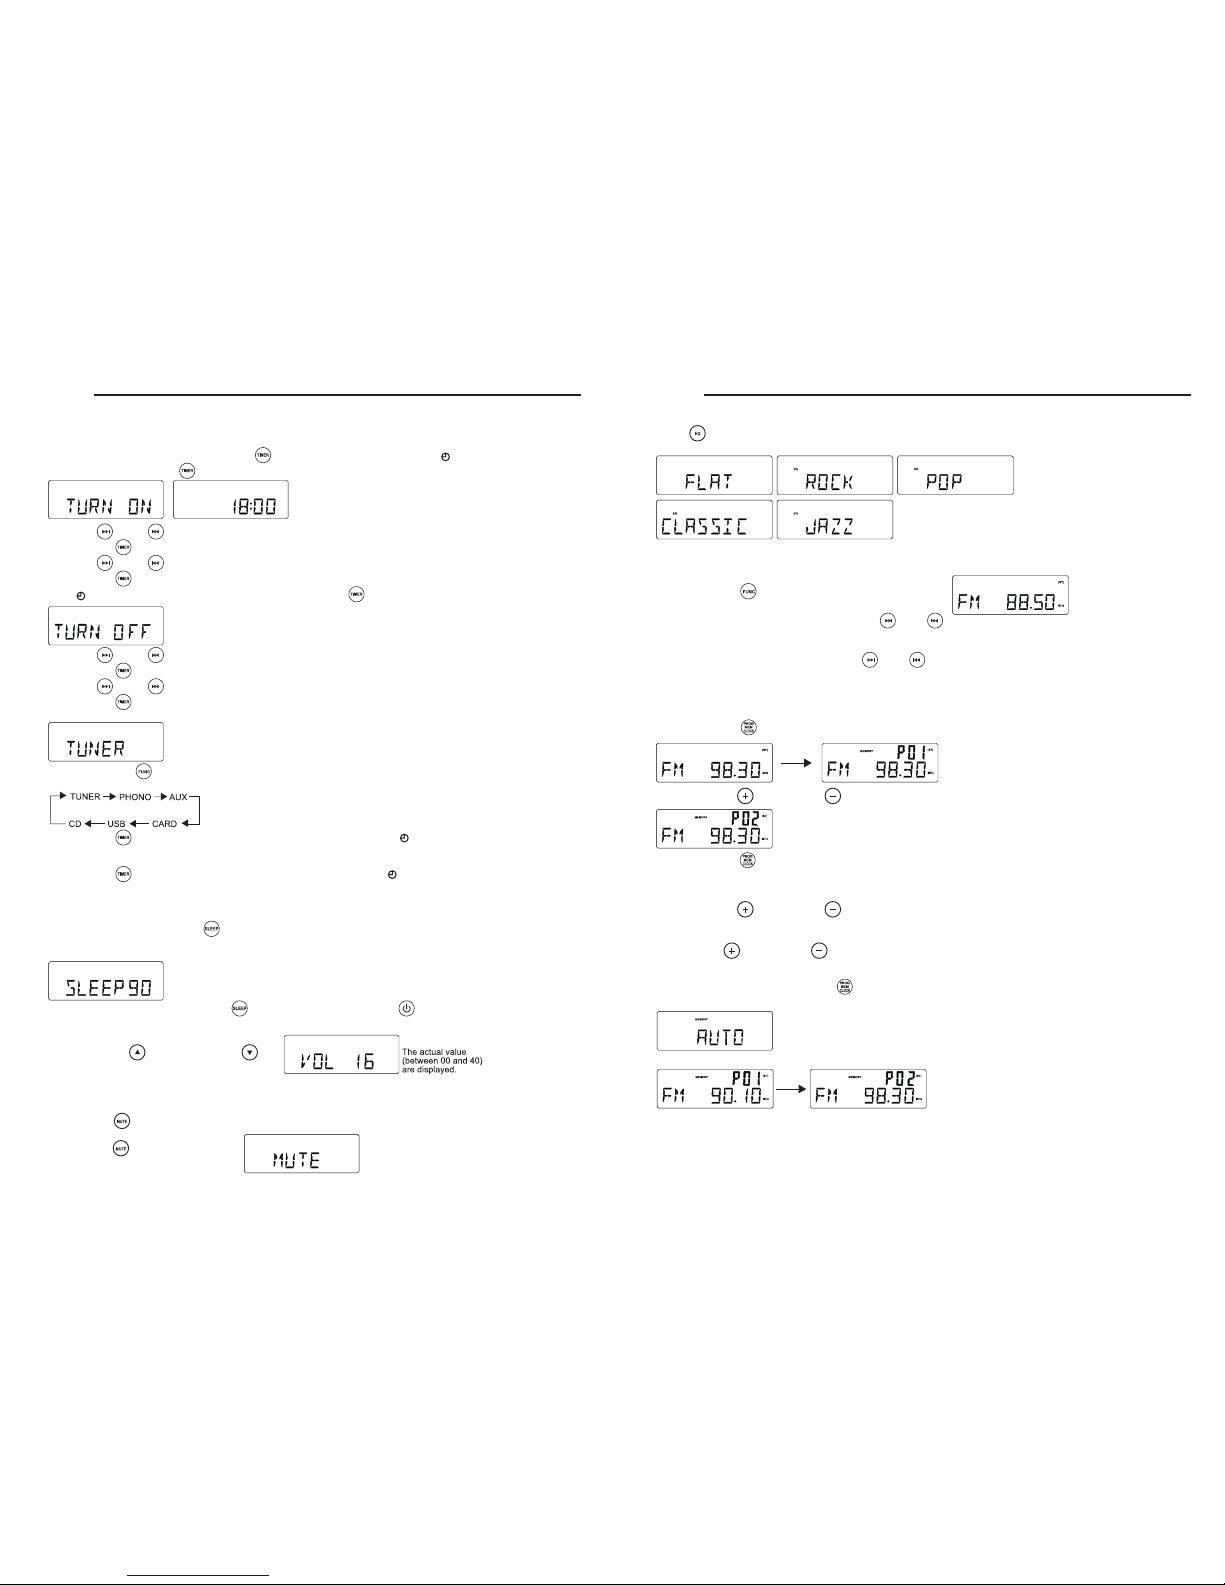
Setting the timer
The unit can be used as an alarm clock, whereby the selected source (CD, TUNER, USB, SD CARD OR PHONO) to start
playback at a preset time. Make sure the clock is set before using the timer.
1. In the standby mode, press and hold TIMER /
on the remote over 1 second, icon " " and message” TURN ON”
start flashing. Press TIMER /
again on the remote to begin the “SYSTEM POWER ON” timer setting.
2. Press FF /
or FB / repeatedly to set hours.
3. Press TIMER /
on the remote to enter minutes setting mode.
4. Press FF /
or FB / repeatedly to set minutes.
5. Press TIMER /
on the remote again to begin “SYSTEM POWER OFF” timer setting.
Icon "
" and message “TURN OFF” start flashing. Press TIMER / on the remote again to begin timer setting.
6. Press FF /
or FB / repeatedly to set hours.
7. Press TIMER /
on the remote to enter minutes setting mode.
8. Press FF /
or FB / repeatedly to set minutes.
9. Press TIMER /
on the remote again to begin setting the source from wake up.
Default at TUNER mode. Message TUNER start flashing.
10. Press FUNCTION /
to select wake up source.
The unit will be waked up from last tuned station if TUNER mode is selected.
11. Press TIMER /
on the remote again to complete timer on/off setting. Icon " " will keep display on LCD if timer is
set.
Note: The wake up sound level will be increased gently to preset volume level.
12. Press TIMER /
on the remote control to turn on/off the timer. The icon " " will be on/off respectively.
SLEEP
You can set a certain period of time after which the set will switch to standby.
On the remote control, press SLEEP /
repeatedly to select the desired time period options (in minutes):
- Display shows in sequence: SLEEP 90, 80, 70, 60, 50, 40, 30, 20, 10
- Display shows the selected option briefly and returns to its previous status.
To deactivate the sleep timer, press SLEEP /
again to “00 “ or Press POWER / to switch the unit into standby mode.
Volume control
Press VOLUME UP / / VOLUME DOWN /
on the remote control to adjust the volume.
MUTE
You can temporarily switch off the sound without switching off the unit.
1. Press MUTE /
on the remote control to switch off the sound, playback continues without sound.
2. To switch on the sound , you can:
- press MUTE /
again;
- adjust the volume controls;
- change source
ENGLISH
7
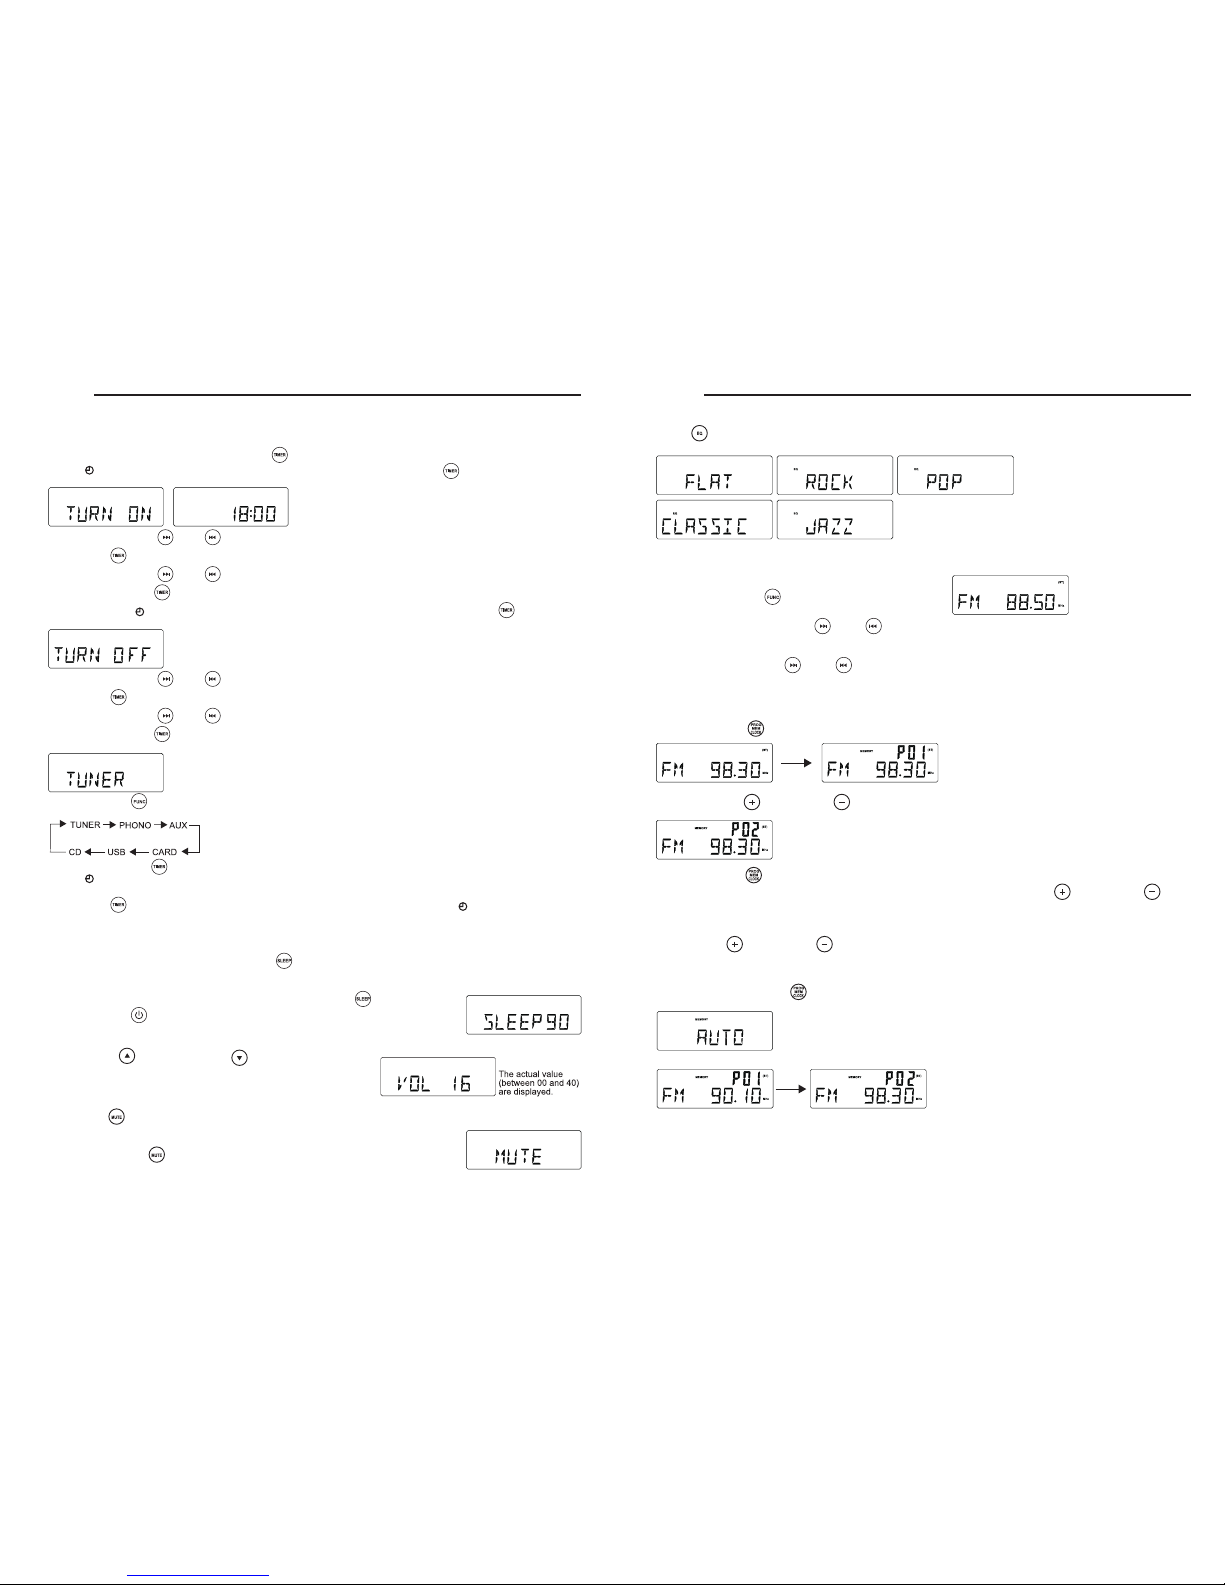
RADIO
FM Tuning
1. Press the FUNCTION / to set the unit to FM mode.
2. Auto Tuning – Press and hold FF /
or FB / until frequency begins to scroll the radio automatically tunes to a
station with sufficient reception. If a station in received in stereo, (ST) is shown. Repeat step 3 if necessary until you
find the desired station.
3. Manual Tuning – Press FF /
or FB / briefly and repeatedly until found a station.
Programming radio stations
You can store up to a total of 40 radio stations (FM and AM) in the memory, manually or automatically (Autostore)
1. Tune to your desired station
2. Press PROGRAM /
to activate programming, icon “ MEMORY” and P01 will start flashing.
3. Press PRESET + /
or PRESET – / to allocate a number from 1 to 20 stations.
4. Press PROGRAM /
to confirm, display shows the preset number waveband and the frequency of the preset station.
5. Repeat steps 1-4 to store other stations to listen to a preset station. Press PRESET + /
or PRESET – / once
or more until the desired preset station in displayed.
To listen to a preset station
Press PRESET + / or PRESET – / once or more until the desired preset station in displayed.
Automatic programming radio stations Automatic programming will station preset 1, from this preset number upwards,
former programmed tuner stations will be erased.
EQ
Press EQ / on the remote control to select desired EQ mode.
5 modes preset EQ:
1. Press and hold PROGRAM / button until Auto appears
- Icon “ memory” will start flashing
- Available stations are programmed
- After all stations are stored, the last preset station will then be played
ANTENNA
Antenna: for FM reception, the unit is provided with a FM WIRE ANTENNA, move the wire until the reception is clear
and with no interferences.
Ajuste del temporizador
La unidad puede ser utilizada como reloj de alarma, mediante el cual la fuente seleccionada (CD, SINTONIZADOR, USB,
TARJETA SD O TOCADISCOS) iniciará la reproducción a la hora preajustada. Asegúrese de que el reloj esté ajustado antes
de utilizar el temporizador.
1. En el modo de espera, mantenga pulsado TIMER /
en el mando a distancia durante aproximadamente 1 segundo.
El icono
" "
y el mensaje "TURN ON" comenzarán a parpadear. Vuelva a pulsar TIMER / en el mando a distancia
para comenzar el ajuste del temporizador "CONEXIÓN DEL SISTEMA".
2. Pulse repetidamente
FF / o FB /
para ajustar las horas.
3. Pulse TIMER /
en el mando a distancia para introducir el modo de ajuste de los minutos.
4. Pulse repetidamente
FF / o FB /
para ajustar los minutos.
5. Vuelva a pulsar TIMER /
en el mando a distancia para comenzar el ajuste del temporizador "DESCONEXIÓN DEL
SISTEMA".El icono
" "
y el mensaje "TURN OFF" comenzarán a parpadear. Vuelva a pulsar TIMER / en el mando
a distancia para comenzar el ajuste del temporizador.
6. Pulse repetidamente
FF / o FB /
para ajustar las horas.
7. Pulse TIMER /
en el mando a distancia para entrar en el modo de ajuste de los minutos.
8. Pulse repetidamente
FF / o FB /
para ajustar los minutos.
9. Vuelva a pulsar TIMER /
en el mando a distancia para comenzar el ajuste de la fuente a utilizar para despertarse.
Predeterminado en el modo SINTONIZADOR. El mensaje TUNER comenzará a parpadear.
10.Pulse FUNCTION /
para seleccionar la fuente a utilizar para despertarse.
La unidad se encenderá en la última emisora sintonizada si seleccionó el modo SINTONIZADOR.
11.Vuelva a pulsar TIMER /
en el mando a distancia para completar el ajuste de activación/desactivación del temporizador.
El icono
" "
permanecerá en la pantalla LCD si el temporizador es ajustado.
Nota: El nivel del sonido al encenderse aumentará suavemente hasta el nivel del volumen preajustado.
12.Pulse TIMER /
en el mando a distancia para activar/desactivar el temporizador. El icono
" "
se activará/desactivará
respectivamente.
SUSPENSIÓN
Puede establecer un cierto período de tiempo después del cual el equipo entrará en el modo de espera.
En el mando a distancia, pulse repetidamente SLEEP
/
para seleccionar las opciones del período de tiempo deseado
(en minutos): La visualización aparece en secuencia: SUSPENSIÓN 90, 80, 70, 60, 50, 40, 30, 20, 10
- La visualización muestra brevemente la opción seleccionada y regresa a su estado anterior.
Para desactivar el temporizador de suspensión, vuelva a pulsar SLEEP /
hasta seleccionar
"00" o pulse POWER
/
para que la unidad entre en el modo de espera.
Control de volumen
Pulse VOLUME UP
/ VOLUME DOWN /
en el mando
a distancia para ajustar el volumen.
SILENCIAMIENTO
Puede desactivar temporalmente el sonido sin desactivar la unidad.
1. Pulse MUTE /
en el mando a distancia para desactivar el sonido y
continuar la reproducción sin sonido.
2. Para activar el sonido, puede:
- volver a pulsar MUTE /
; - ajustar los controles del volumen; - cambiar la fuente.
ESPAÑOL
58
57
FUENTE DE ALIMENTACIÓN
1. desenrolle el cable de alimentación de CA ubicado en la parte trasera de la unidad y conéctelo a la entrada de CA del
adaptador de alimentación.
2. El cable de CC del adaptador de alimentación se conecta a la unidad principal mediante la TOMA DE ENTRADA DE CC.
3. Conecte el cable de alimentación de CA a la toma de corriente de la pared.
ALIMENTACIÓN DE LA UNIDAD
Este sistema entra automáticamente en el modo de espera y la pantalla LCD debe mostrar lo siguiente
Para encender la unidad, pulse POWER /
; la retroiluminación de la pantalla LCD se encenderá.
El LED MODO DE ESPERA se apaga y se visualiza lo siguiente.
FUNCIONAMIENTO BÁSICO
Selección de función
1. Pulse FUNCTION
/
para seleccionar entre:
2. Cuando el equipo esté encendido, pulse POWER
/
para apagar la unidad. La retroiluminación de la pantalla LCD se
apagará y mostrará el mensaje "GOOD BYE" durante 2 segundos, a continuación el LED MODO DE ESPERA se
encenderá.
Nota: En el modo de espera, el tono, los ajustes del sonido, las presintonías y el nivel del volumen (hasta un nivel de
volumen máximo de 30) serán almacenados en la memoria de la unidad.
BATERÍA AUXILIAR
El sistema de batería auxiliar mantiene sus ajustes de reloj y alarma durante un corte en la alimentación eléctrica. En caso
de un corte en la alimentación eléctrica, la batería auxiliar guardará sus ajustes de hora y alarma hasta que se restaure la
alimentación. Para utilizar la batería auxiliar, deberá instalar dos pilas AAA. La batería auxiliar no funcionará a no ser que
las pilas se encuentren instaladas. Para instalar las pilas, siga el procedimiento que se describe a continuación.
1 Quite la tapa del compartimento de las pilas en la parte trasera de la unidad.
2 Instale dos pilas AAA nuevas en la posición correcta, tal y como se muestra
en el interior de la tapa de las pilas.
3 Vuelva a colocar la tapa del compartimento de las pilas.
NOTA:
No use pilas diferentes
No mezcle pilas usadas y nuevas
Ajuste del reloj
Después de conectar el sistema a un suministro de alimentación, ajuste primero el reloj.
1. Pulse POWER
/
para que la unidad entre en el modo de espera
- La pantalla muestra la hora
- "0:00" parpadeará de forma predeterminada si no ha ajustado el reloj
2 En el modo de espera, mantenga pulsado PROGRAM /
durante aproximadamente 1 segundo.
- El dígito de las horas comenzará a parpadear.
3. Pulse repetidamente
FF / o FB /
para ajustar las horas.
4. Vuelva a pulsar PROGRAM /
para confirmar.
El dígito de los minutos comenzará a parpadear
5. Mantenga pulsado repetidamente
FF / o FB /
para ajustar los minutos.
6. Vuelva a pulsar PROGRAM /
para confirmar.
El dígito de los minutos deja de parpadear y el reloj comienza a funcionar.
7. Pulse PROGRAM / para seleccionar entre el formato de 12 y 24 horas, tal y como se muestra a continuación.
ESPAÑOL
USB & SD-CARD OPERATION
USB operation:
1. Press the FUNCTION / to set the unit to USB mode.
2. Plug-in USB mass storage device. READ is displayed as the system scans the contents of USB device.
3. Track no. 1 of root folder (Folder 1) will be playback automatically after finish reading USB device contents.
4. Press FF /
or FB / once or repeatedly until the desired track number appears in display.
5. Press PRESET + /
or PRESET – / to select desired album.
6. Press STOP /
to stop playback.
SD-Card operation:
1. Press the FUNCTION / to set the unit to CARD mode.
2. Insert SD-Card into the card slot. “READ” is displayed as the system scans the contents of SD card.
3. Track no. 1 of root folder (Folder 1) will be playback automatically after finish reading SD card contents.
4. Press FF /
or FB / once or repeatedly until the desired track number appears in display.
5. Press PRESET + /
or PRESET – / to select desired album.
6. Press STOP /
to stop playback.
Remarks:
1) USB connector does not support connection with USB extension cable .
2) This unit is not designed for communication with computer directly.
3) It is not guarantee that all USB memory devices and SD cards will work on this audio system
IMPORTANT:
Do not disconnect the USB device during USB mode, as this may damage the external device or its files. Please power
off first or press another Mode before safely disconnecting the USB device.
USB Specification:
Interface
- USB 2.0 Full speed, HOST (USB HUB is not supported) Corresponding Flash memory
- Compatible with MPEG Audio 1, 2, 2.5
- Compatible with Layer 1, 2, 3
- Compatible with Bit rate: 128 – 320 Kbps
- Subfolder nest : 8 levels
- Number of track / titles max 999
- Support ID3 tag V2.0
TURNTABLE
PREPARING TO USE THE TURNTABLE
1. Remove black tie-wrap by untwisting and gently sliding out from TONE ARM .
2. Remove white protective needle cover by gently pulling towards front of unit.
3. Release TONE ARM and hold-down clip by gently pushing to the right. This will unlock tone arm from its ARM REST.
Re-lock the hold-down clip when moving the unit to another location.
TURNTABLE OPERATION
1. Press the FUNCTION /
to set the unit to PHONO mode.
2. Set the SPEED CONTROL SWITCH to the correct speed (33 1/3, 45 or 78 rpm) for the selected record.
3. Pull the TONE ARM slightly to the right side until hear the "click" sound to activate the turntable.
4. Move the tone arm over the record and lower it to the point you want the record to start.
5. At the end of the record, the TONE ARM will stop automatically. You must return it to the TONE ARM REST by hand.
ACCESSORY SUPPLIED: Adaptor for 45 rpm records
(if required)
To play a 45 rpm record, remove the adaptor by placing thumb & forefinger in recesses
and pulling it upwards. Then placing it on the SPINDLE. The record can then be placed on the turntable.
ENGLISH
8
ENGLISH
9
EARPHONE JACK OPERATION
Listening through Earphones / Headphones (not included)
CD PLAYER
Playing a CD
1. Press the FUNCTION / to set the unit to CD mode.
2. Press CD OPEN / CLOSE /
to open the CD compartment
3. Insert a disc with the printed side facing up. Press CD OPEN / CLOSE /
. again to close the compartment, READ
is displayed as the CD player scans the contents of a disc.
4. Track no. 1 will be playback automatically after finish the reading CD disc contents.
5. Press FF /
or FB / once or repeatedly until the desired track number appears in display.
6. Press STOP /
to stop playback.
CD-MP3 disc playback
1. Insert CD-MP3 format disc. Press CD OPEN / CLOSE / again to close the compartment. READ is displayed as the
CD player scans the contents of a disc.
2. Track no. 1 of root folder (Folder 1) will be playback automatically after finish reading CD-MP3 disc contents.
3. Press FF /
or FB / once or repeatedly until the desired track number appears in display.
4. Press PRESET + /
or PRESET – / to select desired album.
5. Press STOP /
to stop playback.
PROGRAMMING TRACKS
You may store up to 20 tracks in the desired sequence.
1. In the stop position, press PROGRAM /
to start programming.
Icon “MEMORY” and P0-01 start flashing.
2. Press FF /
or FB / once or repeatedly until the desired track
number appears in the display. For MP3:
press PRESET + /
or PRESET – / to select the desired album.
3. Press PROGRAM /
to confirm, display shown stored track no. and next store position.
4. Repeat step 2-3 to select and store all desired tracks. FULL is displayed if you attempt to
program more than 20 tracks
5. Press PLAY/PAUSE /
to play the program.
Erasing the program
You can erase the contents of the memory by:
- once if in stop position, twice during playback;
- Press POWER /
- Select another sound source
- Open the CD door
ESPAÑOL
56
LOCALIZADOR DE CONTROLES
TOMA DE ENTRADA
DE LÍNEA AUXILIAR
ALIMENTACIÓN PRINCIPAL
TOMA DEL
INTERRUPTOR DEL
TOMA DE ENTRADA
BATERÍA AUXILIAR
TOMA DE SALIDA DE 12 V
ANTENA EXTERNA
ALIMENTACIÓN/MODO
ECUALIZADOR
RESTAURACIÓN
PREAJUSTE
REPRODUCCIÓN/PAUSA
SALTO HACIA ATRÁS -
ALEATORIO
ID3
PARADA
MONO/ESTÉREO
TEMPORIZADOR
PROGRAMA
SALTO HACIA
DELANTE/+
VOLUMEN -
FUNCIÓN
VOLUMEN +
SUSPENSIÓN
SILENCIAMIENT
ABRIR/CERRAR CD
GRABACIÓN
REPETIR
0-9
 Loading...