


PR85 Recorder 80's Radio Cassette
4 BANDS RADIO CASSETTE USB/SD MP3 PLAYER |
FM |
88 |
|
|
91 |
95 |
|
101 |
|
106 |
|
108 |
|||
AM |
530 |
|
650 |
850 |
|
1100 |
|
1300 |
|
1600 |
|||||
|
|
|
|
|
|
|
|
||||||||
|
|
|
|
|
0 |
1 |
2 |
3 |
4 |
5 |
6 |
7 |
8 |
9 |
10 |
|
|
|
|
SW1 |
2.3 |
|
3.6 |
|
5.5 |
|
7.6 |
|
9.3 |
|
10 |
|
|
|
|
Sw2 |
10 |
|
11.5 |
|
15.0 |
|
7.8 |
|
21 |
|
22 |
AUTO STOP SYSTEM |
|
|
|
|
|
|
|
|
|
|
|
|
|||
PLAY/PAUSE |
REPEAT |
REW |
F.F |
|
|
|
|
|
|
|
|
|
|
|
|
PLAY |
USB SD |
|
|
|
|
|
|
|
|
|
|
|
|
|
|
INDICATOR |
|
|
|
|
|
|
|
|
|
|
|
|
|
|
|
GB USER MANUAL |
NL GEBRUIKERSHANDLEIDING |
FR MODE D'EMPLOI |
DE BEDIENUNGSANLEITUNG |
ES MANUAL DE INSTRUCCIONES |

IMPORTANT SAFEGUARDS FOR AUDIO PRODUCTS
PLEASE READ CAREFULLY THE FOLLOWING IMPORTANT SAFEGUARDS THAT ARE APPLICABLE TO YOUR EQUIPMENT.
1.Read Instructions - All the safety and operating instructions should be read before the appliance is operated.
2.Retain Instructions - The safety and operating instructions should be retained for future reference.
3.Heed Warnings - All warnings on the appliance and in the operating instructions should be adhered to.
4.Follow Instructions - All operating and use instructions should be followed.
5.Water and Moisture - The appliance should not be used near water-for example, near a bathtub, washbowl, kitchen sink, laundry tub, in a wet basement, or near a swimming pooland the like.
6.Carts and Stands - The appliance should be used only with a cart or stan that is recommendedby the manufacturer.
An appliance and cart combination should be moved with care. Quick stops, excessive force, and uneven surfaces may cause the appliance and cart combination to overturn.
7.Wall or Ceiling Mounting - The appliance should be mounted to a wall or ceiling only as recom mended by the manufacturer.
8.Ventilation - The appliance should be situated so that its location or position does not interfere with-its proper ventilation .For example, the appliance should not be situated on a bed, sofa, rug, or similar surface that may block the ventilation penings; or, placed in a built-in installation, such as a bookcase or cabinet that may impede the flow of air through the ventilation openings.
9.Heat - The appliance should be situated away from heat sources such as radiators, heat registers,
stoves,or other appliances (including amplifiers) that produce heat.
10.Power Sources - The appliance should be connected to a power supply only of the type described in the operating instructions or as marked on the appliance.
11.Grounding or Polarization - Precautions should be taken so that the grounding or polarization means of an appliance is not impeded.
12.Power - Cord Protection - Power-supply cords should be routed so that they are not likely to be walked on or pinched by items placed upon or against them, paying particular attention to cords at plugs, and the point where they exit from the appliance.
13.Cleaning - The appliance should be cleaned only as recommended by the manufacturer. 14.This product is designed for use with the antenna attached and should not be connected to any
other external antennas.
15.Non-use Periods - The power cord of the appliance should be unplugged from the outlet when left unused for a long period of time.
16.Object and Liquid Entry - Care should be taken so objects do not fall and liquids are not spilled into the enclosure through openings
17.Damage Requiring Service - The appliance should be serviced by qualified service personnel when:
A.The power-supply cord of the plug has been damaged;or
B.Objects have fallen, or liquid has been spilled into the appliance;or
C.The appliance has been exposed to rain;or
D.The appliance does not appear to operate normally or exhibits a marked change inperformance;
or
E.The appliance has been dropped, or the enclosure damaged.
18.Servicing - The user should not attempt to service the appliance beyond that described in the operating instructions. All other servicing should be referred to qualified service personnel.
GB-1

WARNING:
TO PREVENT FIRE OR SHOCK HAZARD, DO NOT EXPOSE THIS APPLIANCE TO RAIN OR MOISTURE. DO NOT REMOVE COVER. PILOT LAMPS SOLDERED IN PLACE. NO USER SERVICEABLE PARTS INSIDE. REFER SERVICING TO QUALIFIED SERVICE PERSONNEL.
|
|
|
CAUTION |
|
|
|
|
|
|
|
|
||
|
|
RISK OF ELECTRIC SHOCK DO |
|
|
||
|
|
|
|
|||
|
|
NOT OPEN |
|
|
||
The lighting flash with |
|
|
|
|
The exclamation point within |
|
CAUTION: TO REDUCE THE RISK |
||||||
arrowhead within the triangle |
the triangle is a warning sign |
|||||
is a warning sign alerting |
OF ELECTRIC SHOCK, DO NOT |
alerting you of important |
||||
you of "dangerous voltage" |
REMOVE COVER (OR BACK). NO |
instructions accompanying the |
||||
inside the product . |
USER – |
SERVICEABLE PARTS |
product. |
|||
|
INSIDE. |
REFER SERVICING TO |
|
|||
|
QUALIFIED SERVICE PERSONNEL. |
|
||||
|
|
|
|
|
|
|
SPECIFICATIONS:
Frequency |
:FM:88-108MHz |
|
: AM:530-1600KHz |
|
:SW1:2.3-10MHz |
|
:SW2:10-22MHz |
Power Consump on |
:13Wa |
|
AC~220V/50Hz or 6V(UM-1X4PCS) |
1.Do not install this equipment in a confined or building-in space such as a book case or similar unit, and remain a well ventilation conditions at open site. The ventilation should not be impeded by covering the ventilation openings with items such as newspaper, table-cloths, curtains etc.
2.WARNING To reduce the risk of fire or electric shock, do not expose this apparatus to rain or moisture. The apparatus shall not be exposed to dripping or splashing and that objects filled with liquids, such as vases, shall not be placed on apparatus.
3.WARNING: The battery (battery or batteries or battery pack) shall not be exposed to excessive heat such as sunshine, fire or the like.
4.WARNING: The mains plug is used as disconnect device, the disconnect device shall remain readily operable
5.No naked flame sources, such as lighted candles, should be placed on the apparatus.
6.Attention should be drawn to environmental aspects of battery disposal.
CURRENT 65mA POWER 13W
Radio Operation
1.Select required band (FM/AM/SW1-SW2) with BAND selector.
2.Turn to required station by rotating the TUNING Control.
3.The built-in AM antenna and the antenna are directional. When receiving FM or SW1-SW2 broadcast, pull out the telescopic antenna in full length; the strongest reception can be achieved by rotating the set or antenna.
4.Adjust VOLUME control to your listening preference.
5.Set the Function Selector SLEEP position, Press PLAY Button. The radio will be automatically
Turn off when the tape reaches the end.
6. To turn off the radio, set the function selector to TAPE button. Or unplug the plug. Listening with Headphones(not included)
For private listening, you can use headphones with the unit .Connect the headphones(not included)to the Headphones jack at the side of the unit .The sound from the speakers is automatically turned off when headphones are connected to the unit.
Play Back Operation
Cassette play
1.Set the Function selector to the TAPE position
2.Press the STOP/ELECT button to open the cassette door. Insert the cassette to the open side faces up. Close the cassette door.
3.Use the following buttons and controls for cassette play:
PRESS |
TO |
|
|
PLAY |
Begin cassette play |
|
|
F.FWD |
Rapidly advance the tape |
|
|
REWIND |
Rapidly rewind the tape . |
|
|
STOP |
Stop play or release the F.FWD and REW buttons |
|
|
Auto Stop Feature |
Tape plays automatically stop when the end is reached . |
|
|
PAUSE |
Stop tape play or record. The use of the PAUSE button dose not |
|
disturb the setting for either play or record . |
|
Caution this function should be used for temporary stop during tape |
|
which is recording .Press PAUSE again to resume play . |
|
|
VOLUME Control |
Adjust the volume. Slide the control to the right to increase the |
|
volume slide the control to the left to decrease the volume . |
|
|
Recording from the Built-in
 Microphone
1.Set the Function Selector to the TAPE position.
2. Insert a blank cassette into the tape compartment.
3.Push down the Record and Play Button. The recording process start. All sound detected by the microphone will be recorded until the STOP or PAUSE button is pressed, or until the tape reaches the end.

Directly Recording from the In-In Radio
1.Set the Function Selector to the RADIO position.
2.Turn in the radio station you want to record.
3.Insert a blank cassette into the tape compartment.
4.Press the Record button, Play button will be pressed automatically and recording starts.
5.Direct recording will continue until the STOP or PAUSE button is pressed, or until the tape reaches the end.
Care and Maintenance
TO ensure optimum performance from your unit, keep the tape inside clean. To clean the tape path, open the cassette door. Moisten a cotton swab with isopropyl alcohol or special tape head cleaning fluid. Remove any excess alcohol front the swab. Clean the tape head, capstan and pinch roller. Avoid scratching the head surface. To clean the unit housing, use a soft damp cloth. After cleaning, wipe the unit surface with a dry cloth.
Caution: Never use chemicals such as benzene or paint thinner for cleaning; otherwise, the case may be deformed or discolored.
Keep magnets and metallic objects away from the tape head. If the bead becomes magnetized, noise will increase and the tone will deteriorate possible damage from battery corrosion.
Troubleshooting
Check The Following Guide For Problem Resolution
SYMPTOM |
CAUSE |
SOLUTION |
|
|
|
|
|
Tape fails to |
Head of weak batteries AC cord not |
Replace battery |
|
move |
|
connect properly. |
Check AC cord connection |
|
|
Function Selector not set properly |
Set function selector to position |
|
|
Defective tape |
Try another tape |
|
|
|
|
Sound fades |
Dead or weak batteries |
Replace battery |
|
or |
is |
Headphones not connected properly |
Check headphone connection |
unsteady |
Tape mechanism dirty |
Clean the head, pinch roller and capstan |
|
|
|
Defective tape |
Try another tape |
|
|
|
|
Poor |
radio |
Station not tuned |
Use TUNING control to adjust, extend |
reception |
|
telescopic ANTENNA for FM/SW1-SW2 |
|
|
|
|
reception, rotate the unit for AM reception. |
|
|
|
|
 4
4
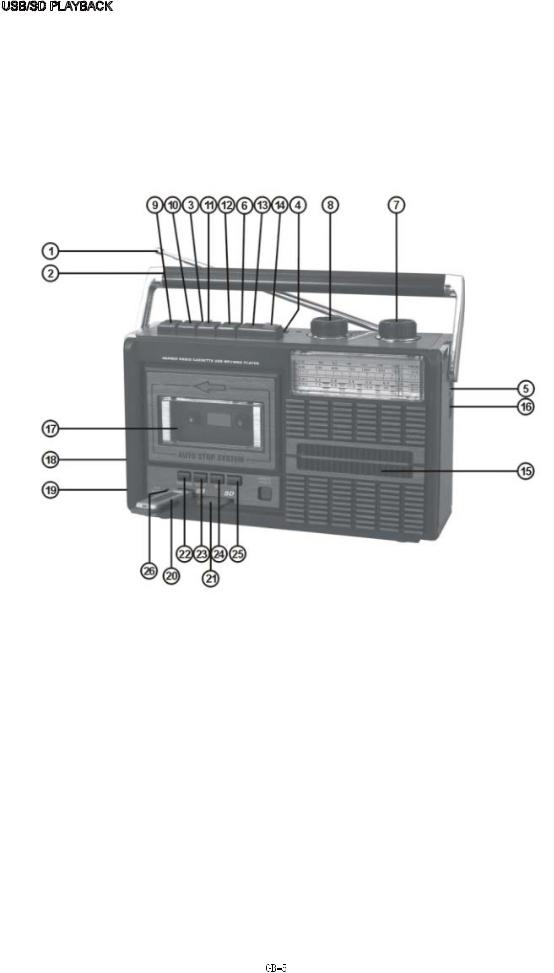
USB/SD PLAYBACK
1.TURN ON THE POWER
2.SET THE FUNCTION SELECTOR TO USB/SD
3.INSERT A USB FLASH DRIVE (OR A SD CARD) WITH MP 3 FORMAT MUSIC, THE UNIT WILL PLAY AUTOMATICALLY. PRESS PAUSE/PLAY BUTTON TO HOLD
THE PLAYBACK, PRESS IT AGAIN TO CONTINUE THE PLAYBACK. PRESS REPEAT BUTTON TO REPEAT THE PLAYING SONG. PRESS REW BUTTON TO SELECT THE PREVIOUS SONG AND F.F BUTTON TO THE NEXT SONG.
1.TELESCOPE ANTENNA
2.HANDLE
3.TAPE & RADIO USB SWITCH
4.BAND SELECTOR
5.EXTERNAL EARPHONE JACK 6.MIC
7.TUNING KNOB
8.VOLUME CONTROL KNOB
9.PAUSE BUTTON (BACK)
10.STOP BUTTON
11.FAST FORWARD BUTTON
12.REW BUTTON
13.PLAY BACK BUTTON 14. REC BUTTON 15.LOUD SPEAKER

16.DC JACK
17. CASSETTE COMPARTMENT 18.AC SOCKET
19.BATTERY COMPARTMENT 20.USB PORT
21.SD SLOT
22.USB/SD PLAY/PAUSE BUTTON 23.USB/SD REPEAT BUTTON 24.USB/SD REW BUTTON 25.USB/SD FAST FORWARD BUTTON 26.MP3 INDIC ATOR
Sources of Power
AC Operation
1.Before connecting the unit to an AC Outlet, check that the operating VOLTAGE of the unit is identical with the VOLTAGE of your Local Power Supply.
2.Connect the supplied AC Power Cord to the AC Socket at the side of unit.
3.The Battery will be automatically disconnected, when The AC Power Cord is plugged
into the socket.
Battery Operation
Unplug the AC cord from AC jack. This unit requires UM1X4(not included), open battery compartment cover. insert the batteries in the battery compartment at the downside of the unit, being careful of position according to the notes. Close the battery compartment cover.
Battery Precautions
1.Maintain correct polarity(+and-) when installing battery.
2.Take out batteries when the unit will not be used for a long time.
CUSTOMER SUPPORT
You can contact the Ricatech customer service when you have a question or a problem with your Ricatech product. For full procedure or contact information please visit the website of Ricatech at: www.ricatech.com

BELANGRIJKE VOORZORGSMAATREGELEN VOOR AUDIOPRODUCTEN
LEES DE VOLGENDE BELANGRIJKE VOORZORGSMAATREGELEN DIE VAN TOEPASSING ZIJN OP UW APPARATUUR AANDACHTIG DOOR.
1.Lees instructies - Alle veiligheidsen bedieningsinstructies dienen te worden gelezen alvorens het apparaat te gebruiken.
2.Bewaar instructies - De veiligheidsen bedieningsinstructies dienen te worden bewaard voor toekomstige referentie.
3.Gehoorzaam waarschuwingen - Alle waarschuwingen op het apparaat en in de bedieningsinstructies dienen opgevolgd te worden.
4.Volg instructies - Alle bedieningsen gebruiksinstructies dienen te worden opgevolgd.
5.Water en Vocht - Het apparaat dient niet te worden gebruikt
in de buurt van water-bijvoorbeeld, in de buurt van een badkuip, wasbasin of keuken
wasbak,wastobbe, in een vochtige kelder, of in de buurt van een zwembad en dergelijke.
6.Karretjes en standaards - Het apparaat mag alleen gebruikt worden met een karretje of standaard aanbevolen door de fabrikant.
Een combinatie van apparaat en karretje moet voorzichtig worden verplaatst. Plotseling stoppen, buitengewoon veel kracht en ongelijkmatige oppervlakken kunnen ervoor zorgen dat de combinatie van het apparaat en karretje omslaat.
7.Wandof plafondmontage - Het apparaat mag alleen aan een wand of plafond worden gemonteerd zoals aanbevolen door de fabrikant.
8.Ventilatie - Het apparaat moet op zodanige wijze geplaatst worden dat de locatie of positie niet interfereert met correcte ventilatie. Bijvoorbeeld, het apparaat mag niet op een bed, bank, tapijt of een vergelijkbaar oppervlak geplaatst worden dat de ventilatie-openingen kan blokkeren; deze mag ook niet in een ingebouwde installatie geplaatst worden zoals een boekenkast of kabinet die de luchtstroom door de ventilatie-openingen mogelijk kunnen onderbreken.
9.Warmte - Het apparaat dient te worden gesitueerd uit de buurt van warmtebronnen, zoals radiatoren,
verwarmingsroosters, fornuizen of andere apparaten (inclusief versterkers) die warmte produceren. 10.Voedingsbronnen - Het apparaat dient alleen te worden aangesloten op een voedingsbron van het
type dat wordt beschreven in de bedieningsinstructies of zoals aangegeven op het apparaat.
11. Aarden of polarisatie - Er dienen voorzorgsmaatregelen te worden genomen zodat de aardingsof polarisatiemiddelen van het apparaat niet worden belemmerd.
12.Vermogen - Kabelbescherming - Stroomtoevoerkabels dienen zodanig gelegd te worden dat er niet overheen gelopen wordt of dat ze beklemd raken door voorwerpen die er bovenop of tegenaan geplaatst worden, besteed extra aandacht aan snoeren bij stopcontacten en het punt waar ze het apparaat verlaten.
13.Schoonmaken - Het apparaat dient alleen te worden schoongemaakt zoals aanbevolen door de fabrikant.
14.Dit product is ontworpen voor gebruik met de bevestigde antenne en mag niet worden verbonden met andere externe antennes.
15.Periodes van geen gebruik - Het netsnoer van het apparaat dient uit het stopcontact te worden gehaald wanneer het apparaat een lange tijd niet wordt gebruikt.
16.Objecten en vloeistoffen - Let op dat er door de openingen geen objecten of gemorste vloeistof in de behuizing vallen
17.Schade die onderhoud vereist - Het apparaat dient te worden onderhouden door gekwalificeerd onderhoud personeel als:
A. Het netsnoer van de stekker is beschadigd; of |
|
B. Objecten zijn gevallen in, of vloeistof is gemorst in het apparaat; of |
|
C. Het apparaat is blootgesteld aan regen; of |
|
D. Het apparaat lijkt niet normaal te werken of vertoont een opvallende verandering |
in de |
werking; of |
|
E. Het apparaat is gevallen of de behuizing is beschadigd. |
|
18.Onderhoud - De gebruiker mag niet proberen het apparaat te onderhouden anders dan beschreven in de bedieningsinstructies. Alle andere onderhoudswerkzaamheden dienen te worden overgelaten aan gekwalificeerd onderhoudspersoneel.

WAARSCHUWING:
OM BRAND OF GEVAAR VAN EEN ELEKTRISCHE SCHOK TE VOORKOMEN, MAG HET APPARAAT NIET WORDEN BLOOTGESTELD AAN REGEN OF VOCHT. VERWIJDER HET DEKSEL NIET. CONTROLELAMPJES VASTGESOLDEERD OP HUN PLAATS. GEEN DE GEBRUIKER TE ONDERHOUDEN ONDERDELEN AAN DE BINNENKANT. LAAT ONDERHOUD OVER AAN GEKWALIFICEERD ONDERHOUDSPERSONEEL.
De Bliksemschicht en pijl in een driehoek is een waarschuwing die “gevaarlijke spanning” binnen het product aan u bekend maakt.
LET
 OP
OP
RISICO
OP ELEKTRISCHE SCHOK
LET OP: OM HET RISICO OP ELEKTRISCHE SCHOKKEN TE VERMINDEREN VERWIJDERT U DE KLEP (OF ACHTERKANT) NIET. GEEN ONDERDELEN VOOR GEBRUIKERSONDERHOUD BINNEN IN. LAAT ONDERHOUD OVER AAN GECERTIFICEERD ONDERHOUDSPERSONEEL.
Het uitroepteken in de driehoek is een waarschuwing die belangrijke
instruc es van het product ann u bekend maakt.
SPECIFICATIES:
Frequentie |
: FM:88-108MHz |
:AM:530-1600KHz
:SW1:2.3-10MHz
:SW2:10-22MHz
Vermogensgebruik |
: 13 Watt |
|
|
|
-antenne telescopisch |
Vermogensbron |
: AC~220V/50Hz or 6V(UM-1X4PCS) batterijen |
|
|
|
1 x 8 Watt |
|
|
|

1.Installeer dit apparaat niet in een afgesloten of ingebouwde ruimte zoals een boekenkast of een vergelijkbare ruimte en zorg voor een goede ven la
la e. De ven
 la
la e mag niet gehinderd worden door de ven
 la
la e-openingen te bedekken met voorwerpen zoals kranten, tafelkleden, gordijnen, enz.
2.WAARSCHUWING: Om het gevaar voor brand of een elektrische schok te verkleinen, dient het apparaat niet te worden blootgesteld aan regen of vocht. Het apparaat dient niet te worden blootgesteld aan druppels of spe ers en voorwerpen gevuld met vloeisto en, zoals vazen, mogen niet op het apparaat worden geplaatst.
3.WAARSCHUWING: De ba erij (ba
 erij of ba
 erijen of accu) dient niet te worden blootgesteld aan overma
 ge hi
ge hi e zoals zonneschijn, vuur of dergelijke.
4.WAARSCHUWING: De hoofdstekker wordt als uitschakelingsapparaat gebruikt, het uitschakelingsapparaat dient gemakkelijk bereikbaar te zijn
5.Er dienen geen open vlambronnen, zoals brandende kaarsen, op het apparaat geplaatst te worden.
6.Neem de milieu-aspecten van het weggooien van ba erijen in acht.
STROOM 65 mA VERMOGEN 13 W
Bediening van de Radio
1.Selecteer de vereiste band (FM/AM/SW1-SW2) met de BAND-keuzeknop.
2.Schakel naar het gewenste sta on door te draaien aan de TUNING-knop.
3.De ingebouwde AM-antenne en de antenne zijn rich gsgevoelig. Trek de telescopische antenne volledig uit bij het ontvangen van FMof SW1-SW2-uitzendingen; het sterkste ontvangst kan worden behaald door te draaien aan de apparatuur of antenne.
4.Stel de VOLUME-knop bij naar uw luistervoorkeur.
5.Stel de Func ekeuzeknop SLEEP-posi
 e in en druk op de PLAY-knop. De radio wordt automa
 sch uitgeschakeld als de casse
 e afgelopen is.
6.


Luisteren met Hoofdtelefoon (niet inbegrepen)
U kunt de hoofdtelefoon met de eenheid gebruiken voor het luisteren in afzondering. Verbind de hoofdtelefoon (niet inbegrepen) met de Hoofdtelefoonaanslui g aan de zijde van de eenheid. Het speakergeluid wordt automa
 sch uitgeschakeld wanneer er een hoofdtelefoon op de eenheid aangesloten wordt.
Terugspeelwerking
Casse e afspelen
1.Stel de Func ekeuzeknop in op de TAPE-posi
 e
e
2.Druk op de STOP/ELECT-knop om de casse eklep te openen. Plaats de casse
 e zodat de open zijde omhoog wijst. Sluit de casse
 eklep.
3.Gebruik de volgende knoppen en toetsen voor het afspelen van de casse e:
e:
DRUK IN |
OM |
PLAY |
Te beginnen met afspelen van de cassette |
F.FWD |
De cassette snel vooruit te spoelen. |
REWIND |
De cassette snel terug te spoelen. |
STOP |
Het afspelen te stoppen of de F.FWDen |
|
REW-knoppen te stoppen. |
Auto Stop Feature |
Cassettes stoppen automatisch met afspelen als de |
|
cassette is afgelopen. |
PAUSE |
Stop het afspelen of opnemen. Het gebruik van de |
|
PAUSE-knop verstoort de instelling van afspelen of |
|
opnemen niet. |
|
Let op: deze functie dient gebruikt te worden voor het |
|
tijdelijk stoppen tijdens het opnemen. Druk opnieuw |
|
op PAUSE om het afspelen te hervatten. |
VOLUME-knop |
Pas het volume aan. Draai de knop naar rechts om |
|
het volume te verhogen en naar links om het volume |
|
te verlagen. |
Opnemen met de Ingebouwde Microfoon
1.Stel de Func ekeuzeknop in op de TAPE-posi
 e.
e.
2.Plaats een lege casse e in het casse
 evak.
evak.
3.Druk de Opnameen Afspelen-knop in. Het opnameproces begint. Al het geluid dat wordt opgevangen door de microfoon wordt opgenomen tot er op de STOPof PAUSE-knop wordt gedrukt, of totdat de casse e afgelopen is.
Direct Opnemen van de In-In Radio
1.Stel de Func ekeuzeknop in op de RADIO-posi
 e.
e.
2.Schakel naar het radiosta on dat u wenst op te nemen.
3.Plaats een lege casse e in het casse
 evak.
evak.
4.Druk op de Opname-knop, de Afspelen-knop wordt automa sch ingedrukt en het opnemen begint.
5.Het direct opnemen zal doorgaan totdat er op de STOPof PAUSE-knop wordt gedrukt, of totdat de casse e afgelopen is.
 Loading...