

Ricatech RR3000 Retro Classic User Manual
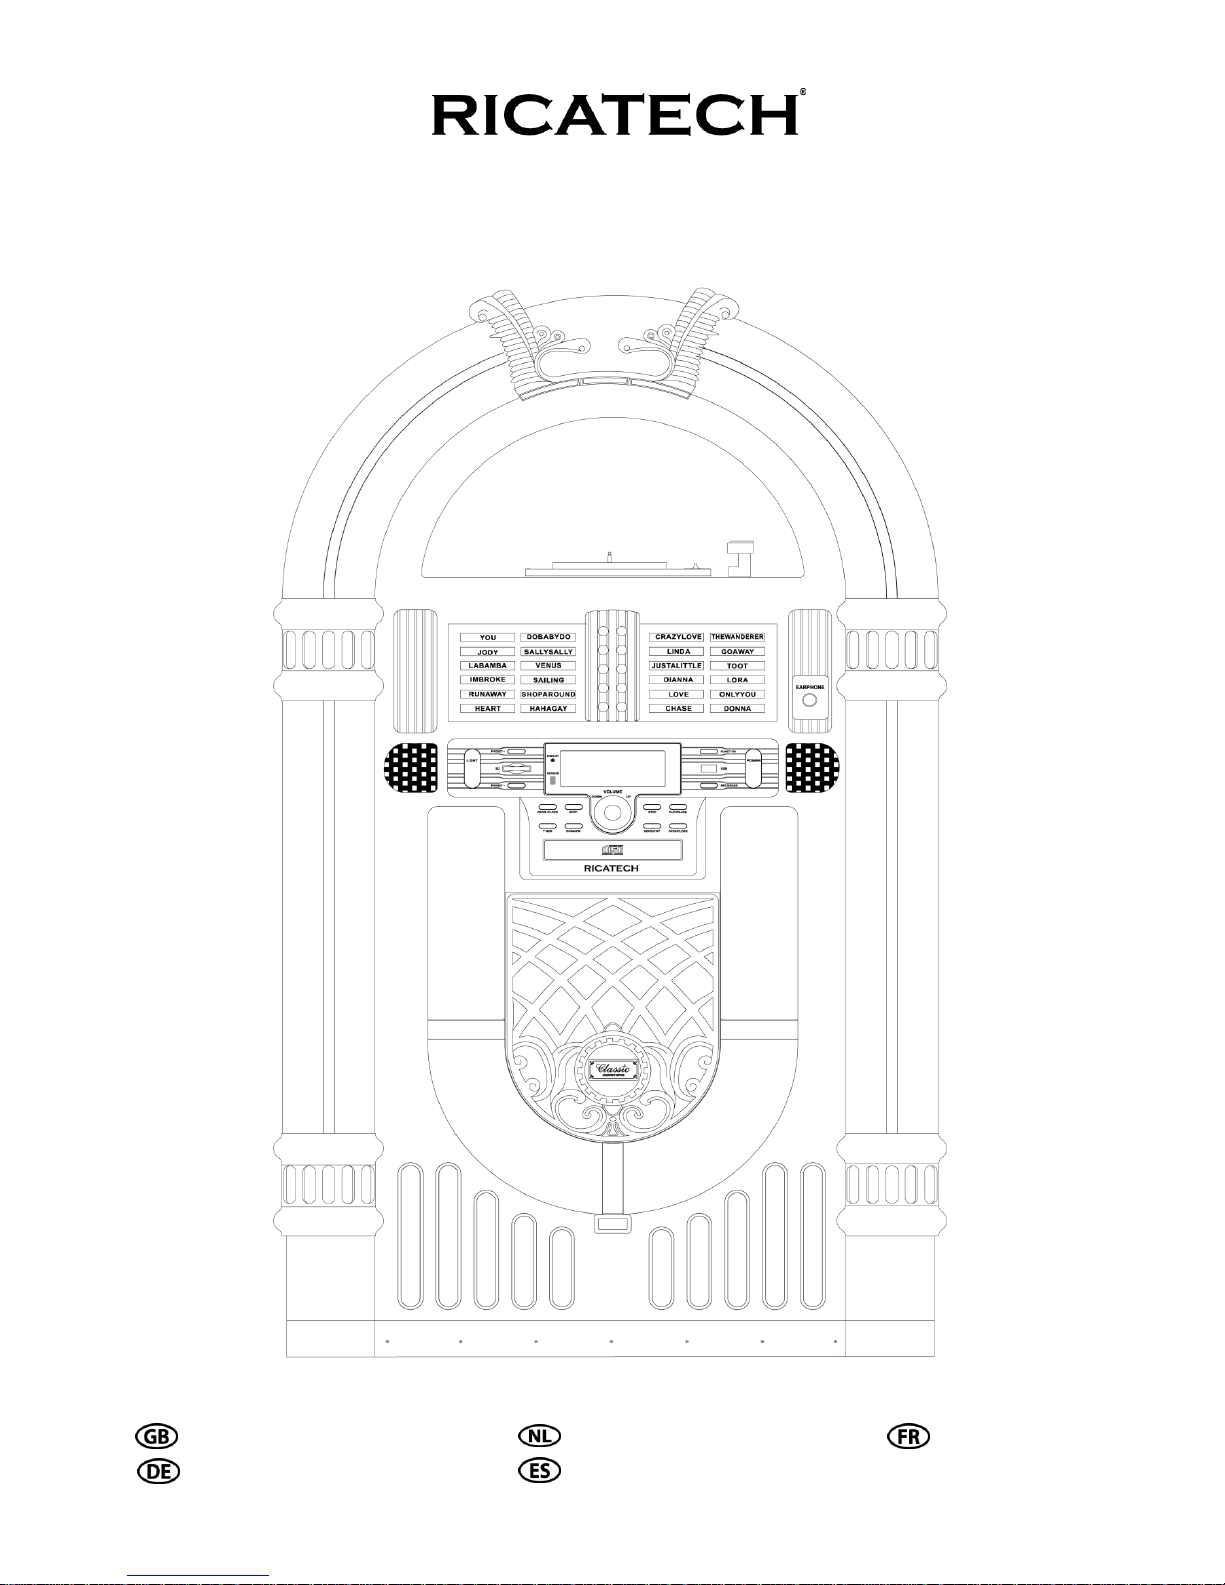
RR3000 Retro Classic Jukebox
USER MANUAL GEBRUIKERSHANDLEIDING MODE D’EMPLOI
BEDIENUNGSANLEITUNG AL DE USUARIO

WARNING:
TO PREVENT FIRE OR SHOCK HAZARD, DO NOT EXPOSE THIS APPLIANCE TO RAIN OR
MOISTURE. DO NOT REMOVE COVER. PILOT LAMPS SOLDERED IN PLACE. NO USER
SERVICEABLE PARTS INSIDE. REFER SERVICING TO QUALIFIED SERVICE PERSONNEL.
Specification
Frequency Range : FM 87.5 - 108 MHz
USB Port 2.0 : Full Speed 512MB - 4GB
(Support FAT16, FAT32)
Antennas : External FM antenna wire
Power Source : DC15V 8A
Speaker Size : 6 1/2‖ Dynamic type x 2
Speaker Ohm : 4 Ohm
Speaker Watt : 40W
Speaker Size : 2 1/2‖ Tweeter type x2
Speaker Ohm : 8 Ohm
Speaker Watt : 10W
Power Output : 12W x 2
*DESIGN AND SPECIFICATIONS SUBJECT TO CHANGE WITHOUT NOTICE.
The lighting flash with arrowhead symbol,
within an equilateral triangle, is intended to
alert user to the presence of uninsulated
"dangerous voltage" within the product's
enclosure that may be of sufficient
magnitude to constitute risk of electric shock
to persons.
CAUTION
RISK OF ELECTRIC
SHOCK DO NOT
OPEN
CAUTION: TO REDUCE THE RISK OF
ELECTRIC SHOCK, DO NOT REMOVE
COVER (OR BACK). NO USER –
SERVICEABLE PARTS INSIDE.
REFER SERVICING TO QUALIFIED
SERVICE PERSONNEL.
The exclamation point within an equilateral
triangle is intended to alert user to the
presence of important operating and
maintenance (servicing) instruction in the
literature accompanying the appliance.

USER MANUAL
IMPORTANT SAFEGUARDS FOR AUDIO PRODUCTS
PLEASE READ CAREFULLY THE FOLLOWING IMPORTANT SAFEGUARDS THAT
ARE APPLICABLE TO YOUR EQUIPMENT.
1. Read Instructions - All the safety and operating instructions should be read before the appliance is operated.
2. Retain Instructions - The safety and operating instructions should be retained for future reference.
3. Heed Warnings - All warnings on the appliance and in the operating instructions should be adhered to.
4. Follow Instructions - All operating and use instructions should be followed.
5. Water and Moisture - The appliance should not be used
near water-for example, near a bathtub,washbowl,kitcken
sink,laundry tub, in a wet basement, or near a swimming
pool and the like.
6. Carts and Stands - The appliance should be used only with a
cart or stand that is recommended by the manufacturer.
6A.An appliance and cart combination should be moved with care. Quick stops,
excessive force, and uneven surfaces may cause the appliance and cart combination to overturn.
7. Wall or Ceiling Mounting - The appliance should be mounted to a wall or ceiling only as recommended by
the manufacturer.
8. Ventilation - The appliance should be situated so that its location or position does not interfere
with-its proper ventilation.For example, the appliance should not be situated on a bed, sofa, rug,or
similar surface that may block the ventilation openings; or, placed in a built-in installation, such as a
bookcase or cabinet that may impede the flow of air through the ventilation openings.
9. Heat - The appliance should be situated away from heat sources such as radiators,heat registers,
stoves,or other appliances (including amplifiers) that produce heat.
10.Power Sources - The appliance should be connected to a power supply only of the type described in the
operating instructions or as marked on the appliance.
11.Grounding or Polarization - Precautions should be taken so that the grounding or polarization means of an
appliance is not impeded.
12.Power - Cord Protection - Power-supply cords should be routed so that they are not likely to be walked on or
pinched by items placed upon or against them, paying particular attention to cords at plugs, and the point where they
exit from the appliance.
13.Cleaning - The appliance should be cleaned only as recommended by the manufacturer.
14.Antenna-This product is designed for use with the antenna attached and should not be connected to any other
external antennas.
15.Non-use Periods - The power cord of the appliance should be unplugged from the outlet when left unused for a
long period of time.
16.Object and Liquid Entry - Care should be taken so objects do not fall and liquids are not spilled into the
enclosure through openings
17.Damage Requiring Service - The appliance should be serviced by qualified service personnel when:
A. The power-supply cord of the plug has been damaged;or
B. Objects have fallen, or liquid has been spilled into the appliance;or
C. The appliance has been exposed to rain;or
D. The appliance does not appear to operate normally or exhibits a marked change inperformance; or
E. The appliance has been dropped, or the enclosure damaged.
18.Servicing - The user should not attempt to service the appliance beyond that described in the operating
instructions.All other servicing should be referred to qualified service personnel.
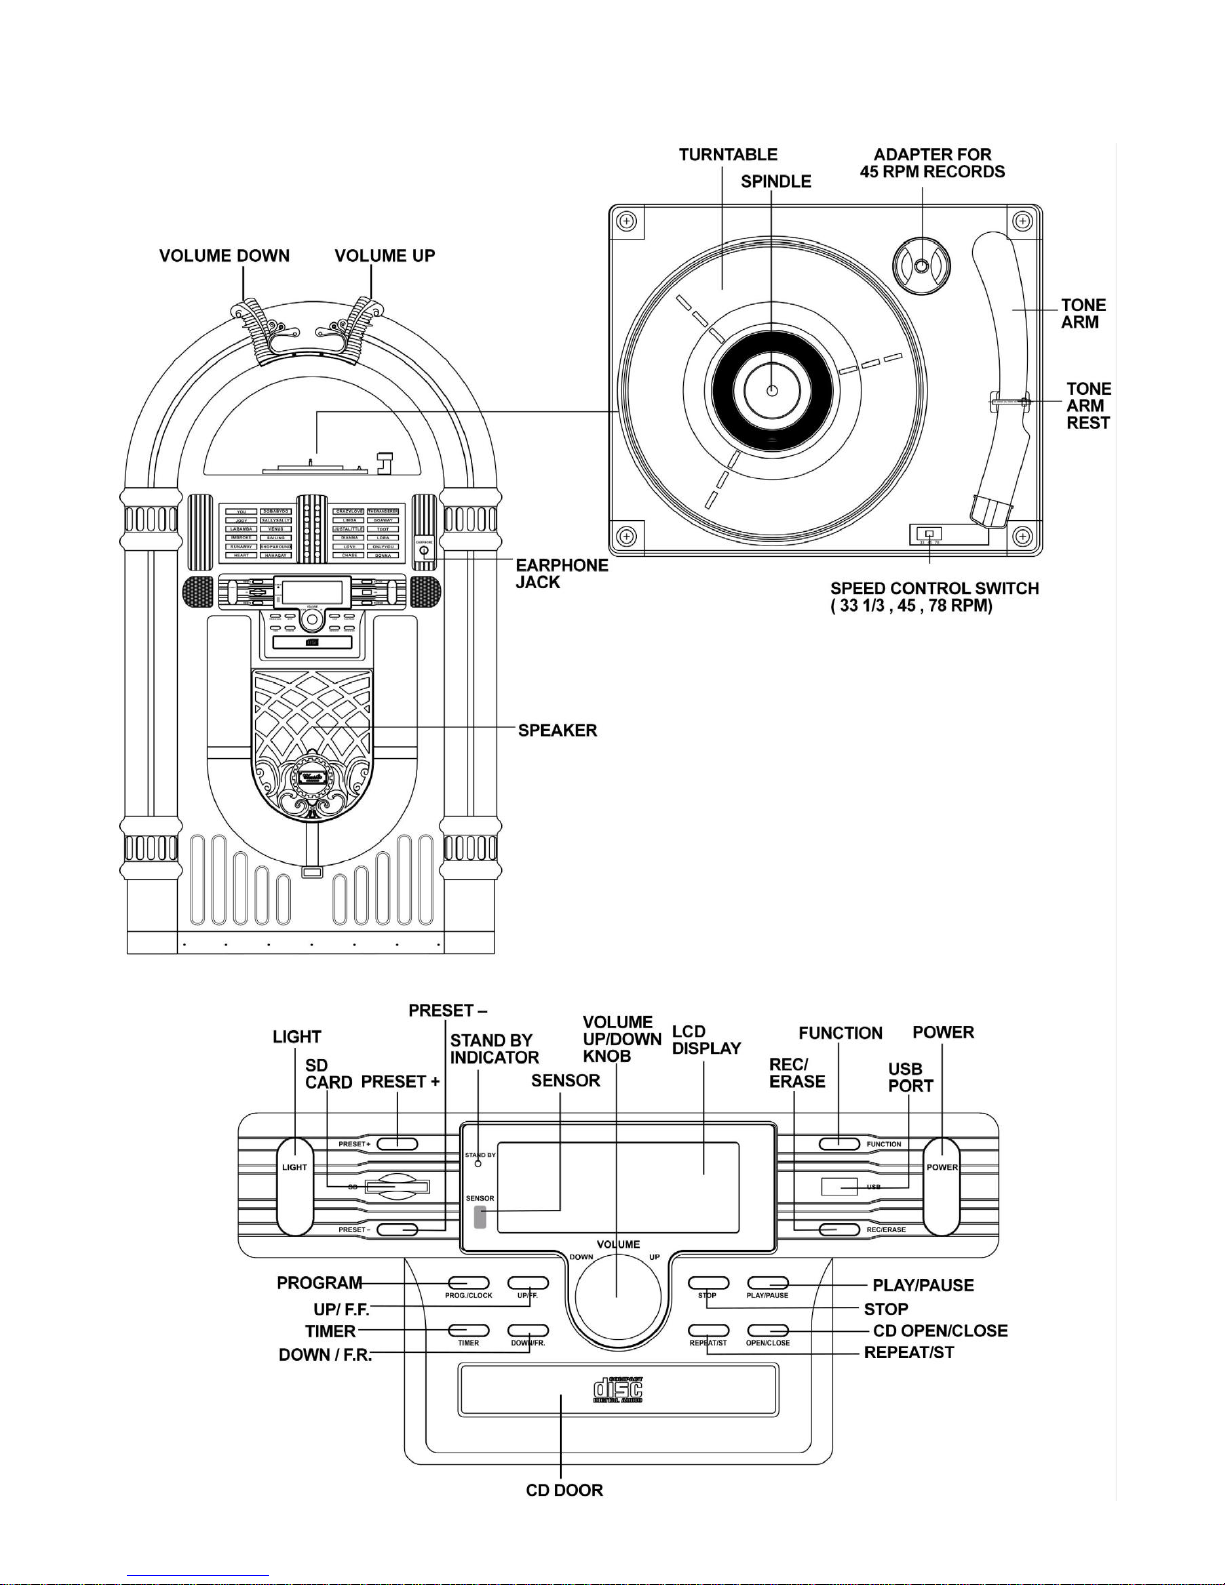
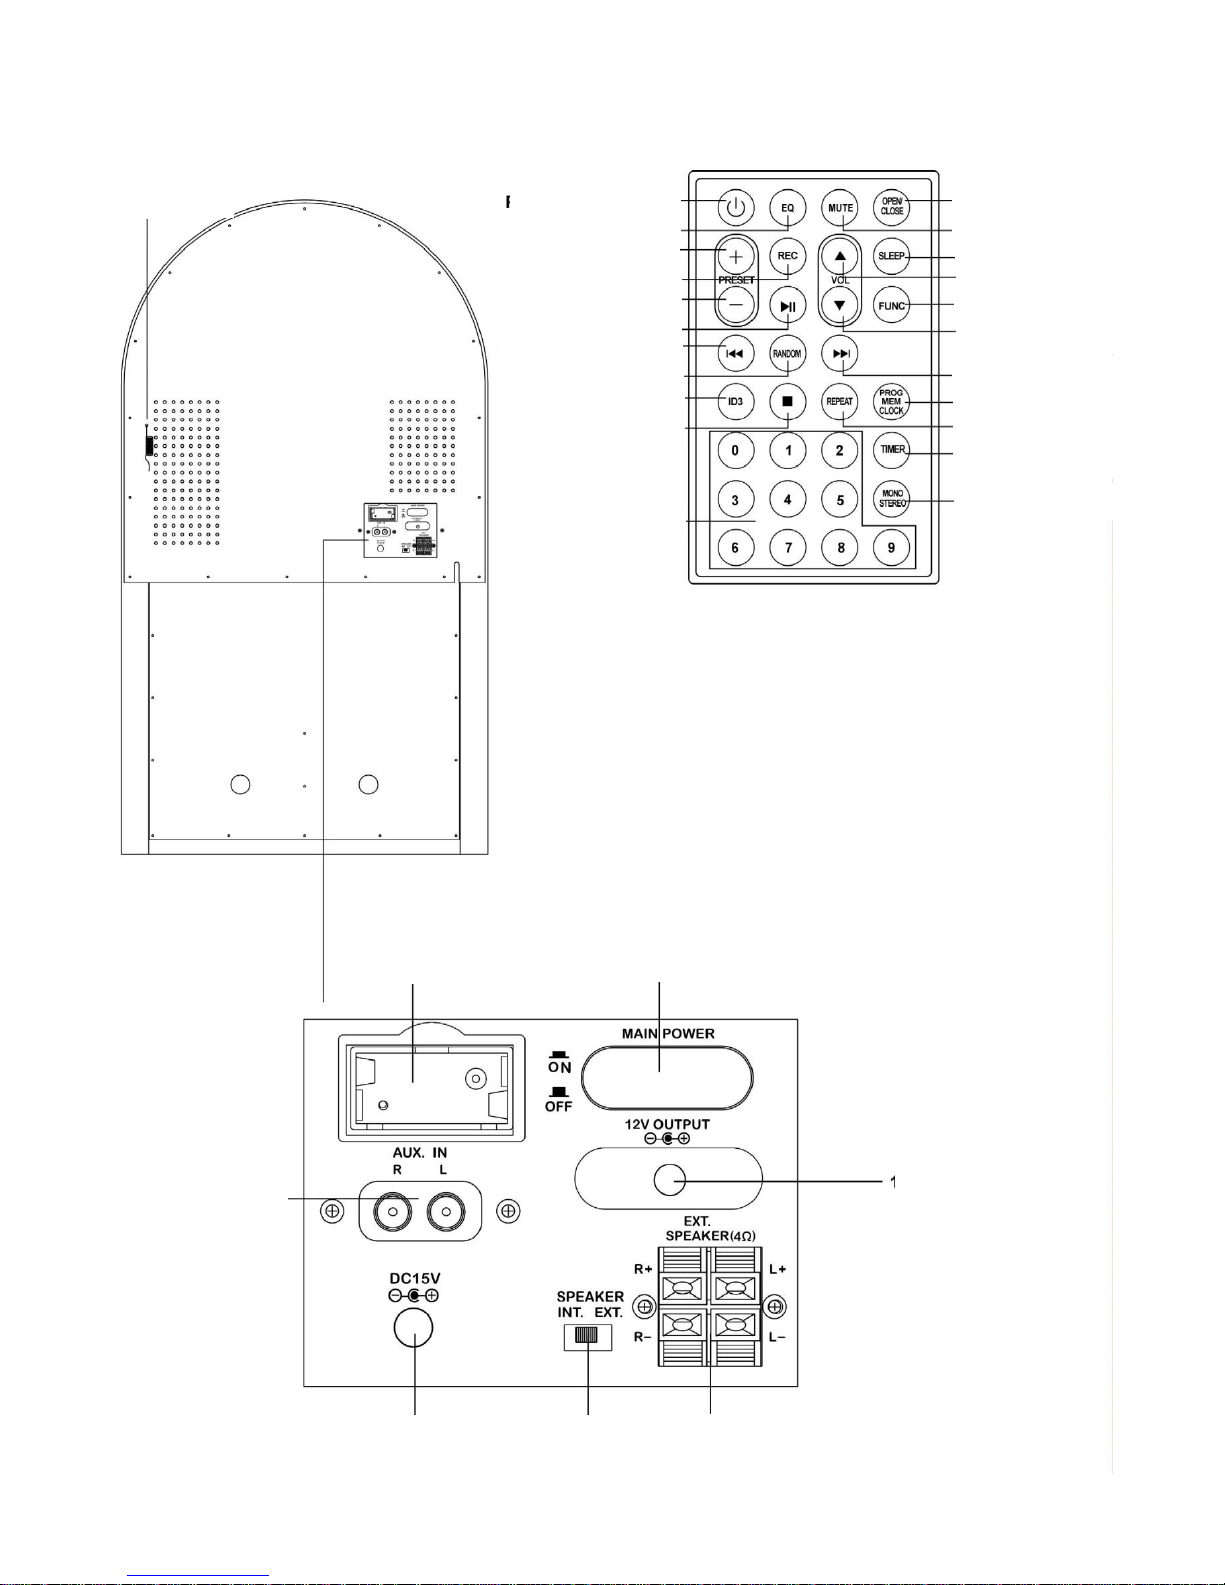
CONTROL LOCATOR

CONTROL LOCATORS
POWER SOURCE
1. unwind the AC power cord at the back of unit and connect it to power adaptor AC inlet.
2. The power adaptor dc cord connect to main unit of the DC INPUT JACK.
3. Connect the AC power cord to the wall socket.
POWER UP YOUR UNIT
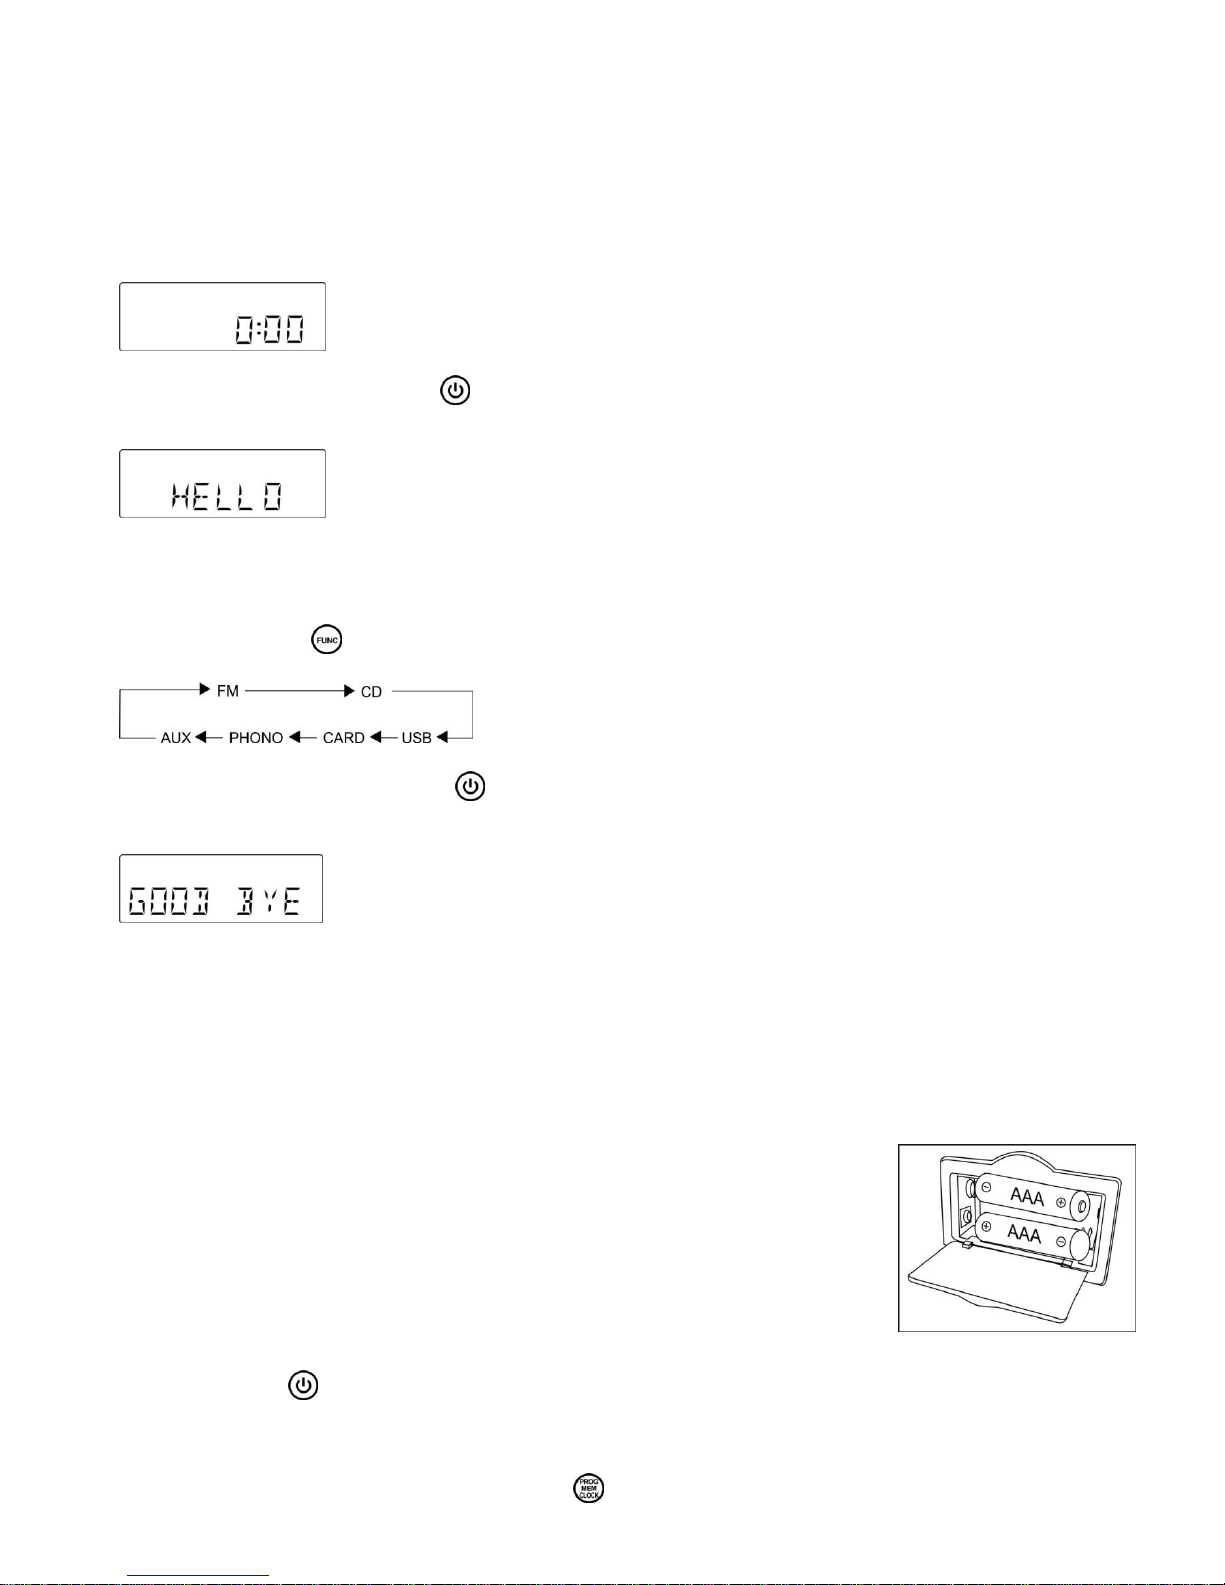
This system switches to Standby mode automatically and LCD would shown as below
To switch the unit on, press POWER / LCD backlight will be turned on.
STANDBY LED is turned off and displayed as below.
BASIC OPERATION
Function select
1. Press FUNCTION / to select among:
2. When the set is on, press POWER / to switch the unit off. LCD backlight will be turned off and shown
message―GOOD BYE‖ for 2 seconds, then the STANDBY LED is turned on.
Note: In the standby mode, the tone, sound settings, tuner presets and the volume level (up to a maximum volume
level of 30) will be stored in the unit’s memory.
BATTERY BACK UP
The battery backup system to maintain your clock and alarm settings during a power outage. In the event of a power
outage, the battery backup will save your time and alarm settings until power is restored. To utilize the battery backup, you
must install two AAA batteries. The battery backup will not operate unless batteries are installed. To install batteries, follow
the instructions below.
1 Remove the Battery Compartment cover from the back of the unit.
2 Install two new AAA batteries in the correct position as shown inside the battery cover.
3 Reinstall the Battery Compartment cover.
NOTE:
Do not use different batteries
Do not mix old and new batteries
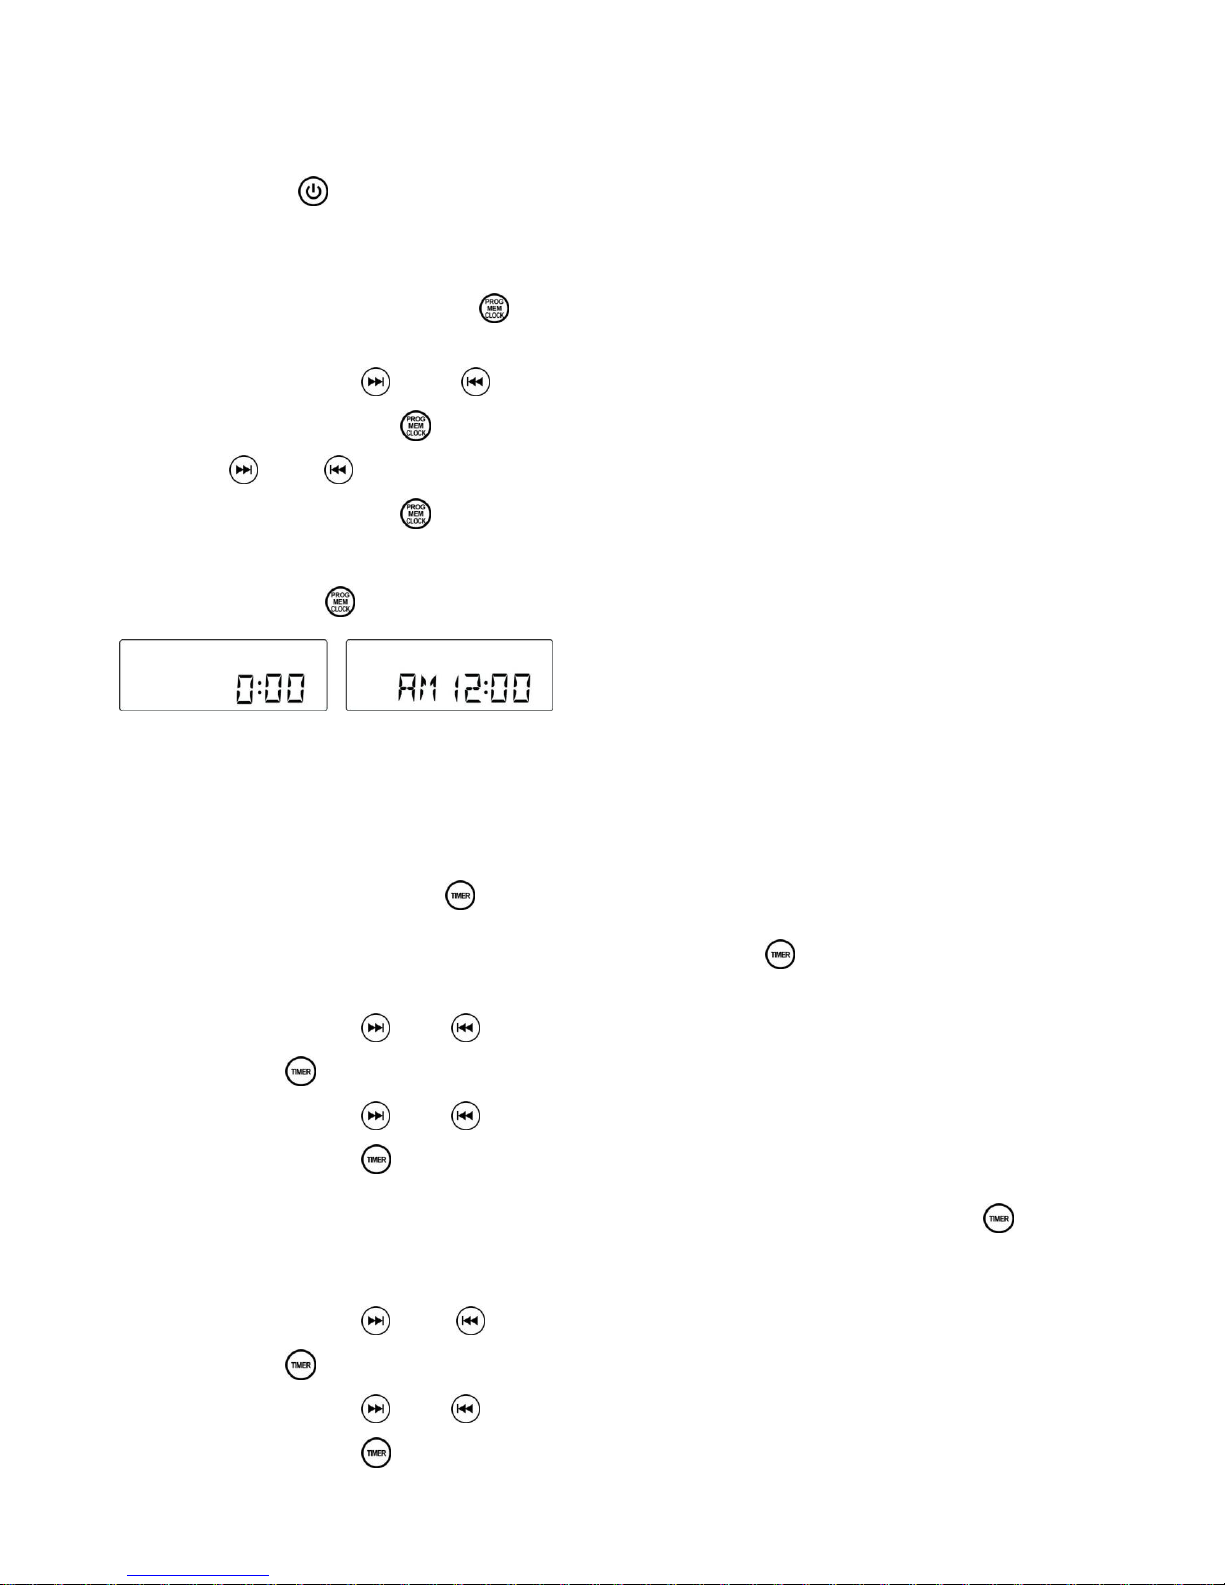
Setting the clock
After connecting the system to power supply, set the clock first.
1. Press POWER / to switch the unit to Standby mode
- The display shows the time
- ―0:00‖ flashes by default if you have not set the clock
2 In the Standby mode, press and hold PROGRAM / over 1 second.
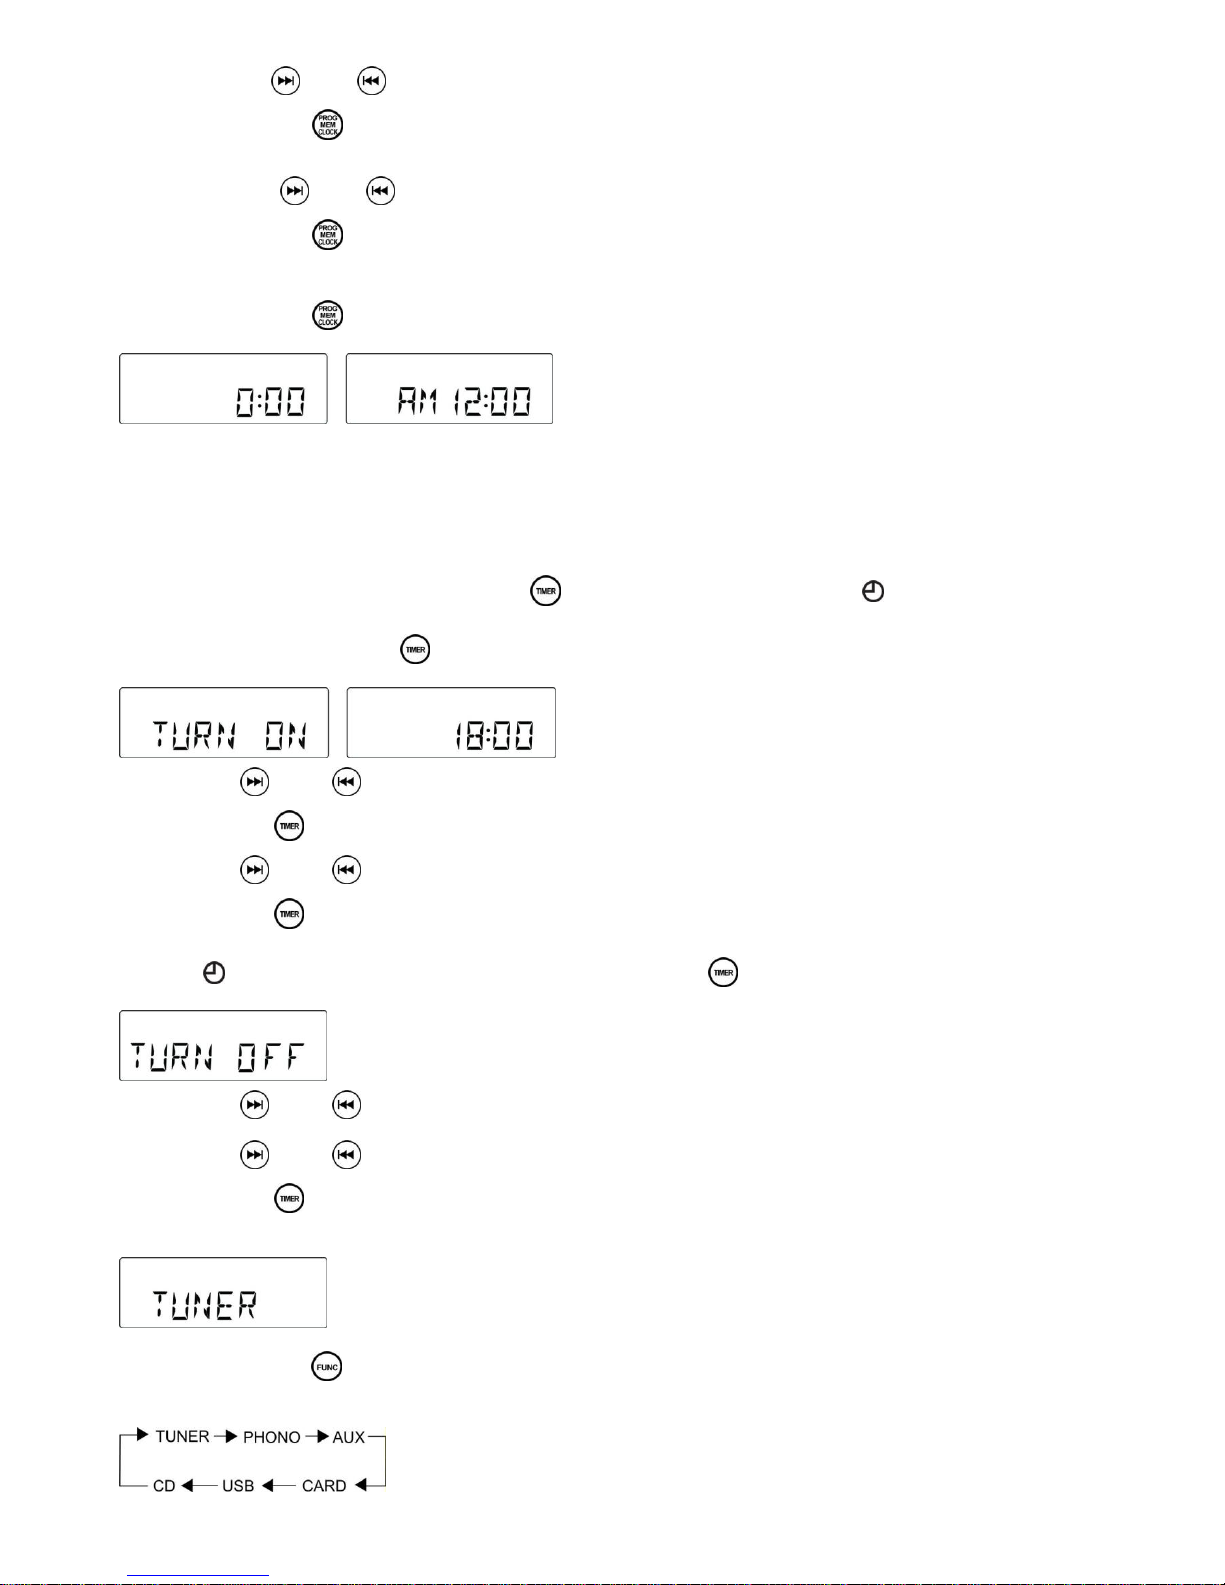
- The hours digit starts flashing.
3. Press the FF / o FB / repeatedly to set the hours.
4. Press PROGRAM / again to confirm.
The minutes digit starts flashing
5. Hold down FF / o FB / repeatedly to set the minutes.
6. Press PROGRAM / again to confirm.
The minutes digit stop flashing, the clock begins to run.
7. Press PROGRAM / to select between 12 and 24 hours, shown as below
Setting the timer
The unit can be used as an alarm clock, whereby the selected source (CD, TUNER, USB, SD CARD OR PHONO) to start
playback at a preset time. Make sure the clock is set before using the timer.
1. In the standby mode, press and hold TIMER / on the remote over 1 second, icon " " and message‖ TURN ON‖
start flashing. Press TIMER / again on the remote to begin the ―SYSTEM POWER ON‖ timer setting.
2. Press FF / or FB / repeatedly to set hours.
3. Press TIMER / on the remote to enter minutes setting mode.
4. Press FF / or FB / repeatedly to set minutes.
5. Press TIMER / on the remote again to begin ―SYSTEM POWER OFF‖ timer setting.
Icon " " and message ―TURN OFF‖ start flashing. Press TIMER / on the remote again to begin timer setting.
6. Press FF / or FB / repeatedly to set hours.
7. Press TIMER / * on the remote to enter minutes setting mode.
8. Press FF / or FB / repeatedly to set minutes.
9. Press TIMER / on the remote again to begin setting the source from wake up.
Default at TUNER mode. Message TUNER start flashing.
10. Press FUNCTION / to select wake up source.
The unit will be waked up from last tuned station if TUNER mode is selected.
11. Press TIMER / on the remote again to complete timer on/off setting. Icon " " will keep display on LCD if timer is
set.
Note: The wake up sound level will be increased gently to preset volume level.
12. Press TIMER / on the remote control to turn on/off the timer. The icon " " will be on/off respectively.
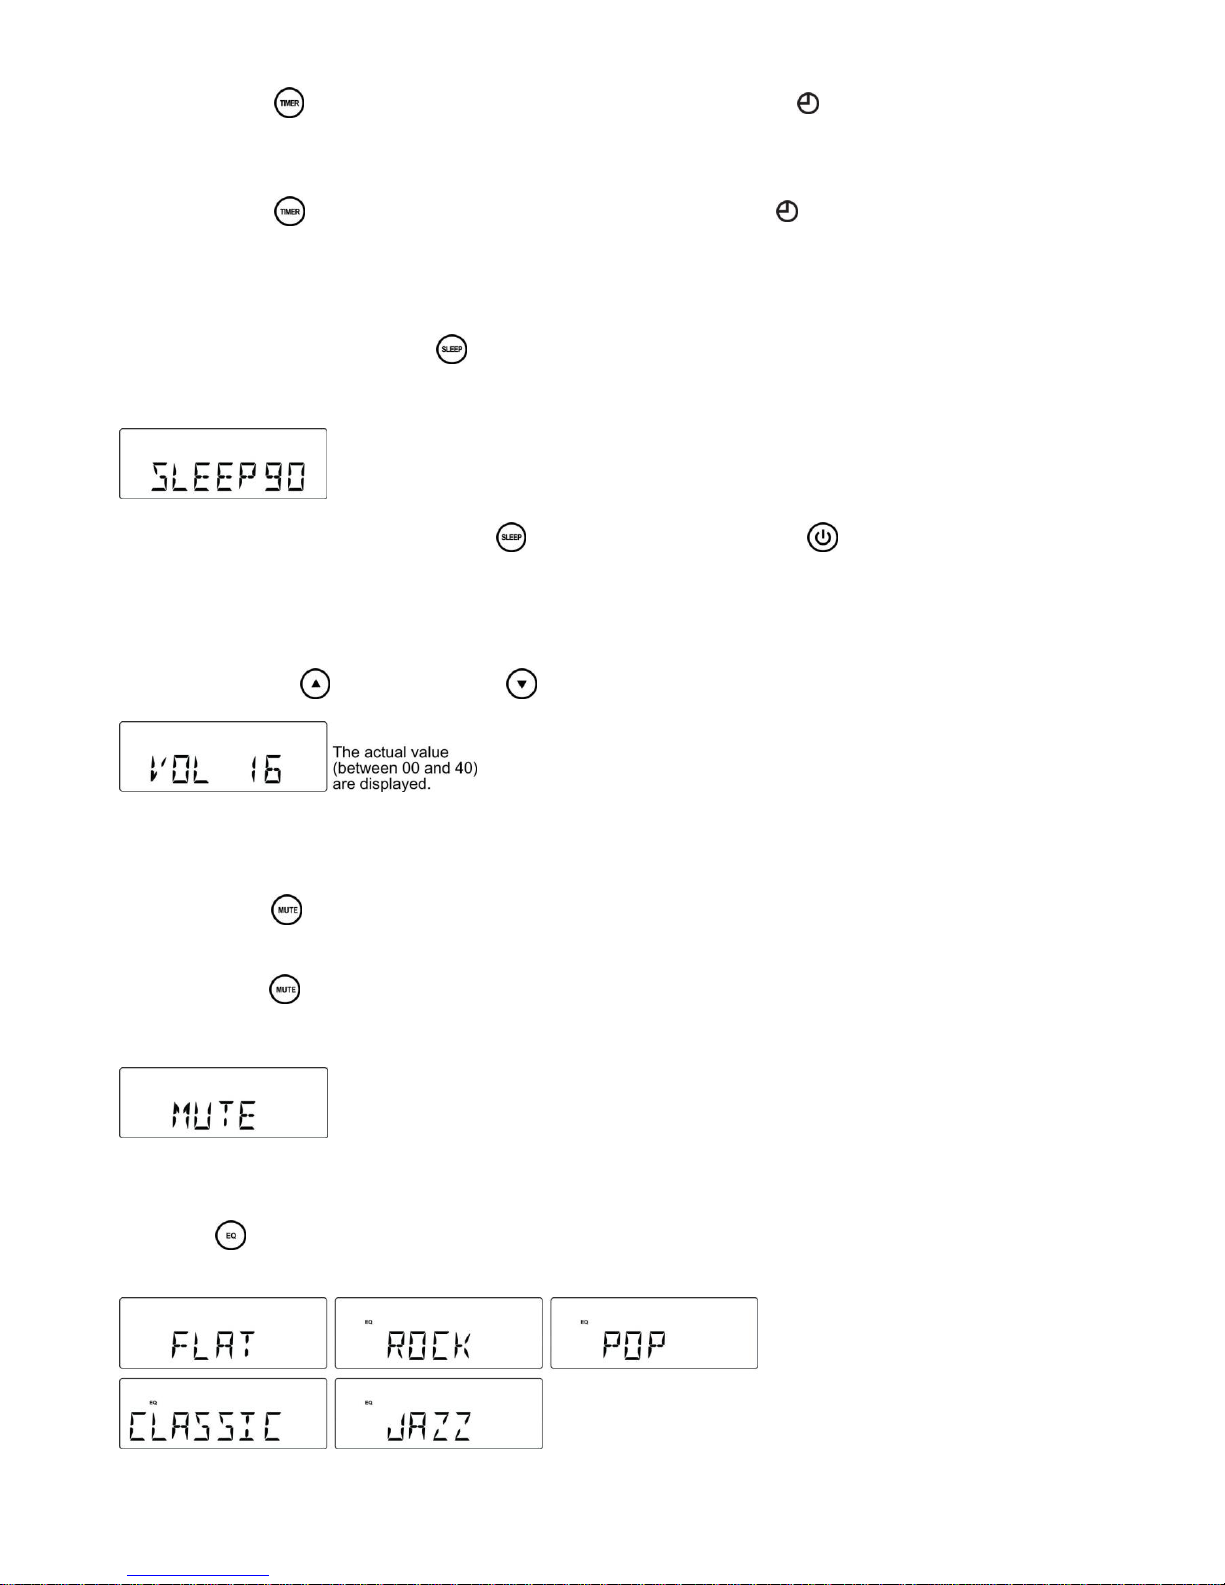
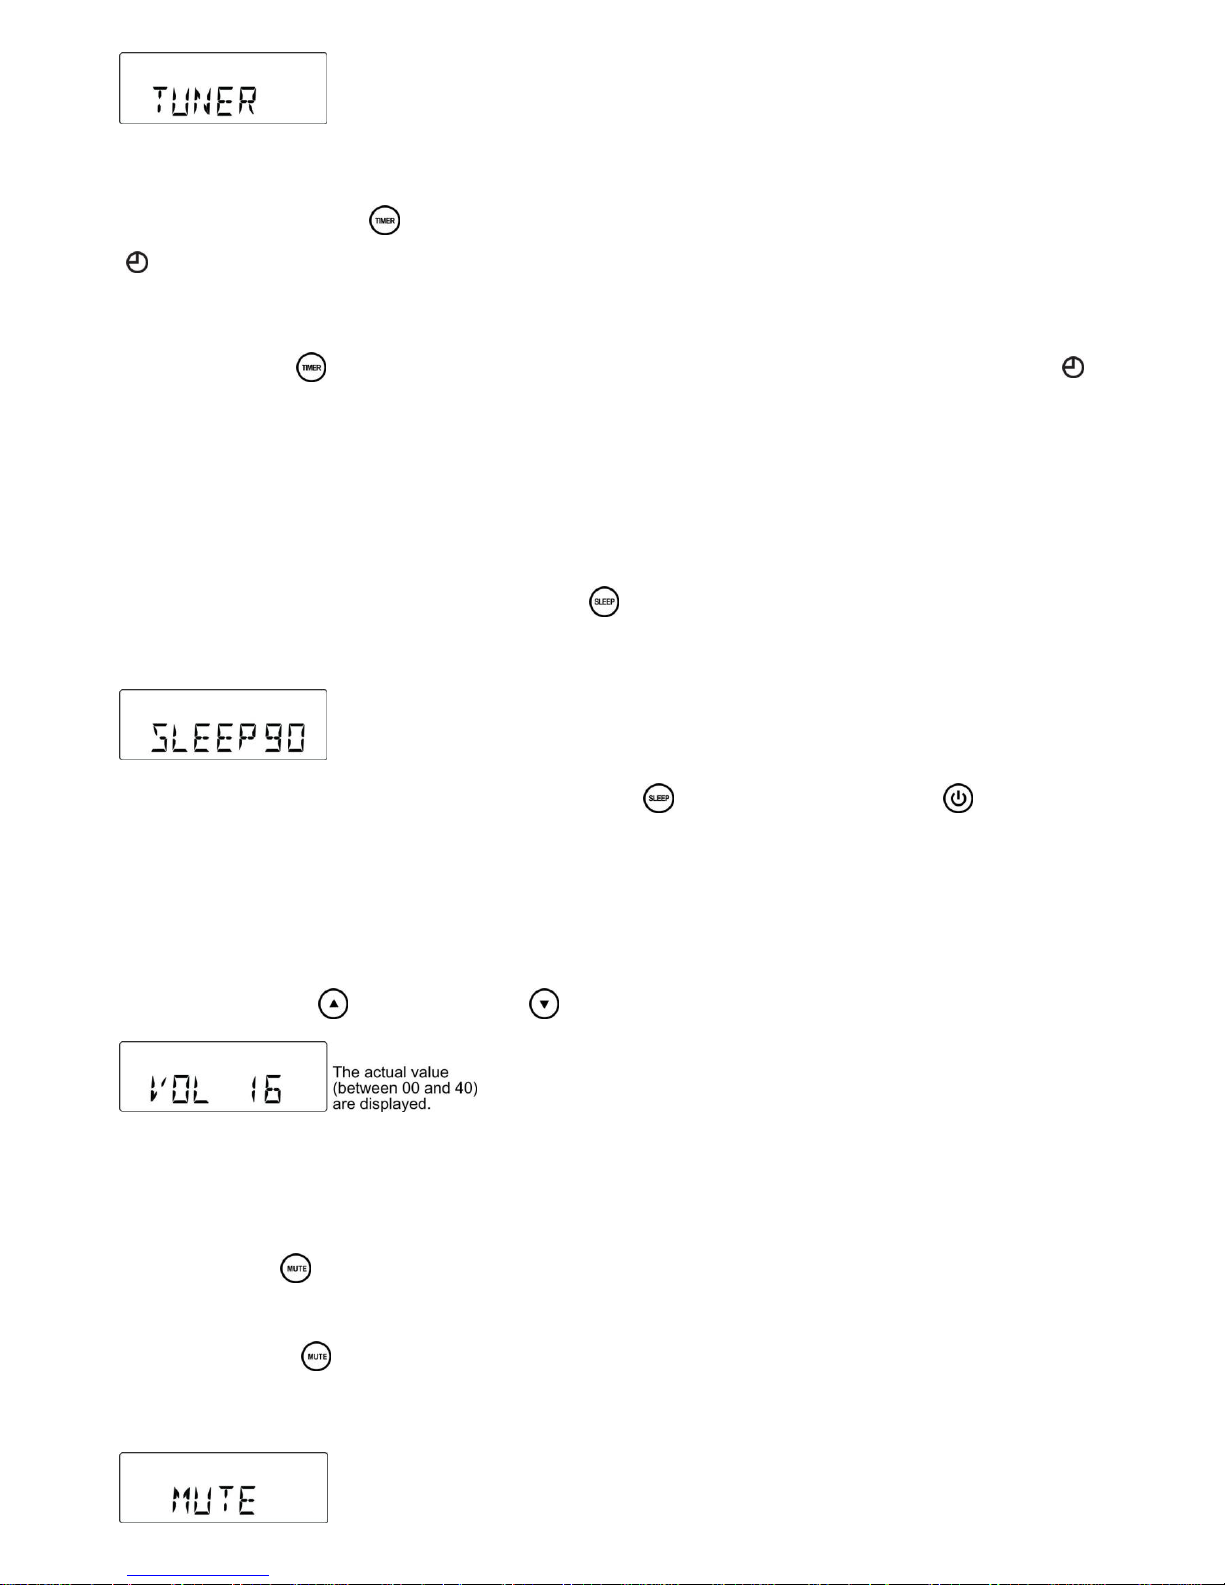
SLEEP
You can set a certain period of time after which the set will switch to standby.
On the remote control, press SLEEP / repeatedly to select the desired time period options (in minutes):
- Display shows in sequence: SLEEP 90, 80, 70, 60, 50, 40, 30, 20, 10
- Display shows the selected option briefly and returns to its previous status.
To deactivate the sleep timer, press SLEEP / again to ―00 ― or Press POWER / to switch the unit into standby
mode.
Volume control
Press VOLUME UP / / VOLUME DOWN / on the remote control to adjust the volume.
MUTE
You can temporarily switch off the sound without switching off the unit.
1. Press MUTE / on the remote control to switch off the sound, playback continues without sound.
2. To switch on the sound , you can:
- press MUTE / again;
- adjust the volume controls;
- change source
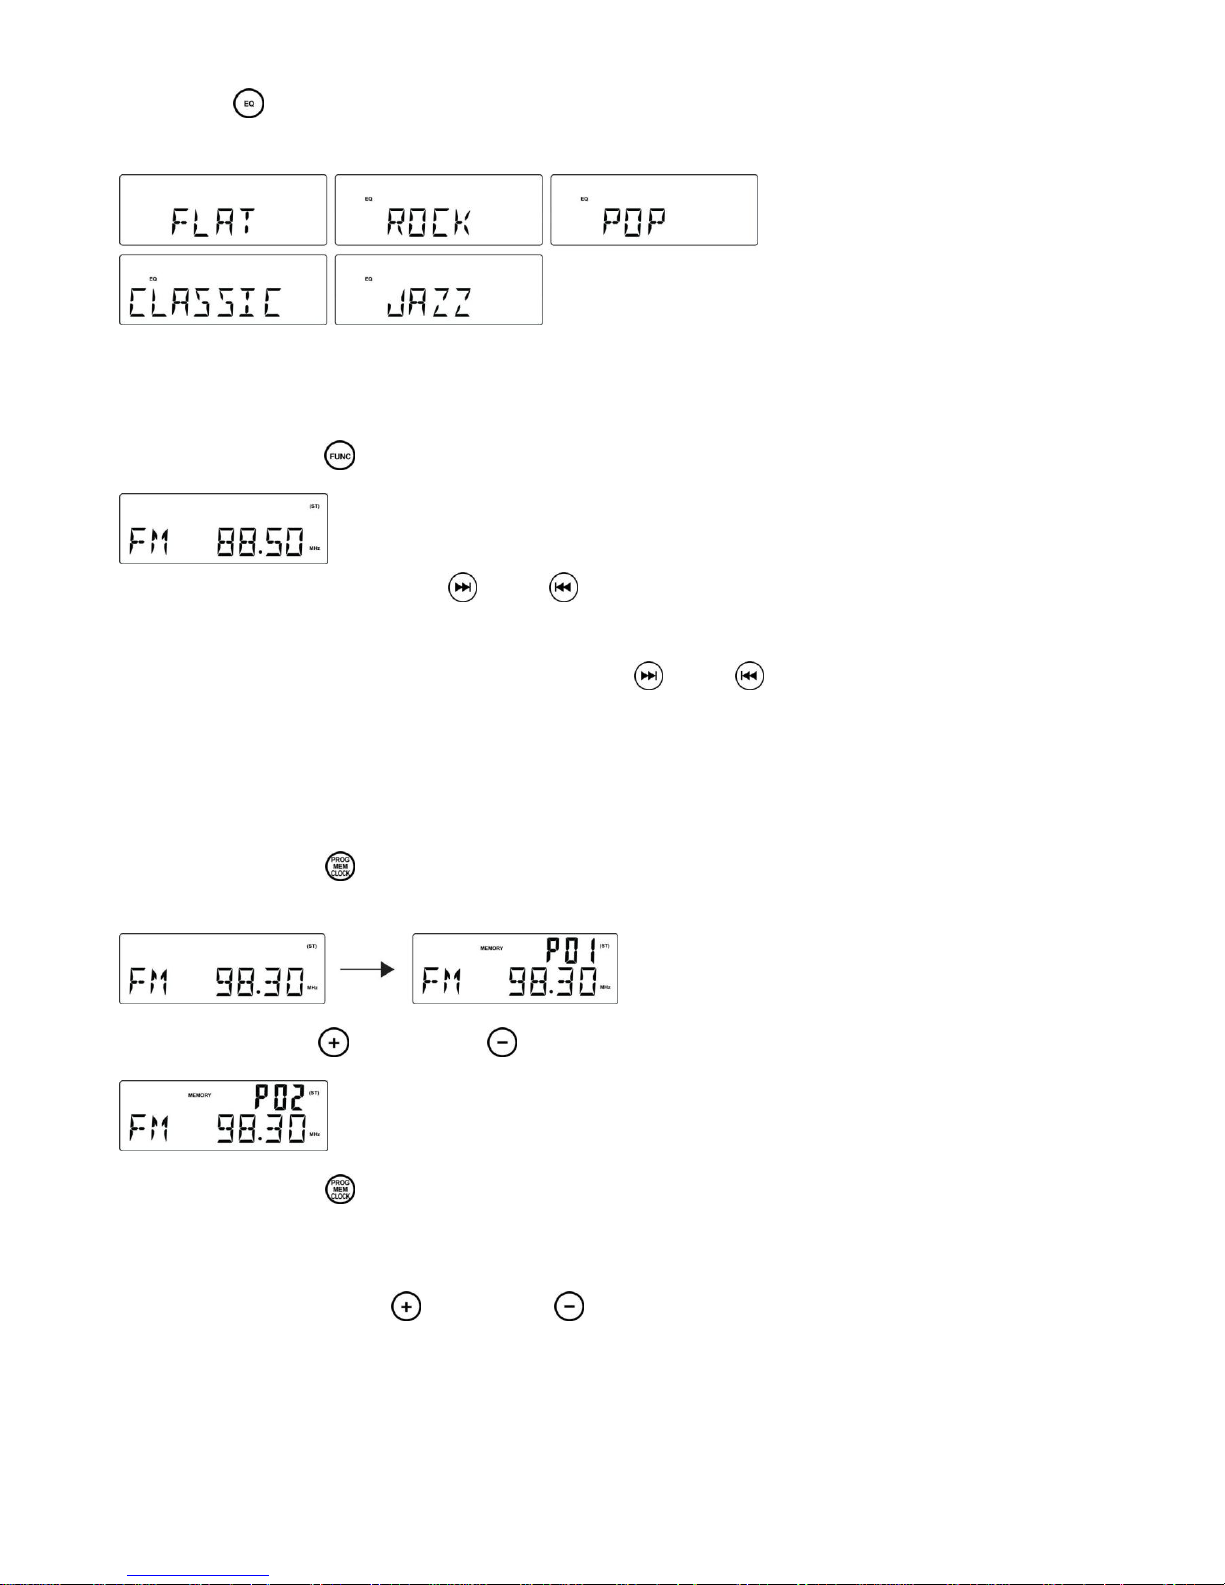
EQ
Press EQ / on the remote control to select desired EQ mode.
5 modes preset EQ:
RADIO
FM Tuning
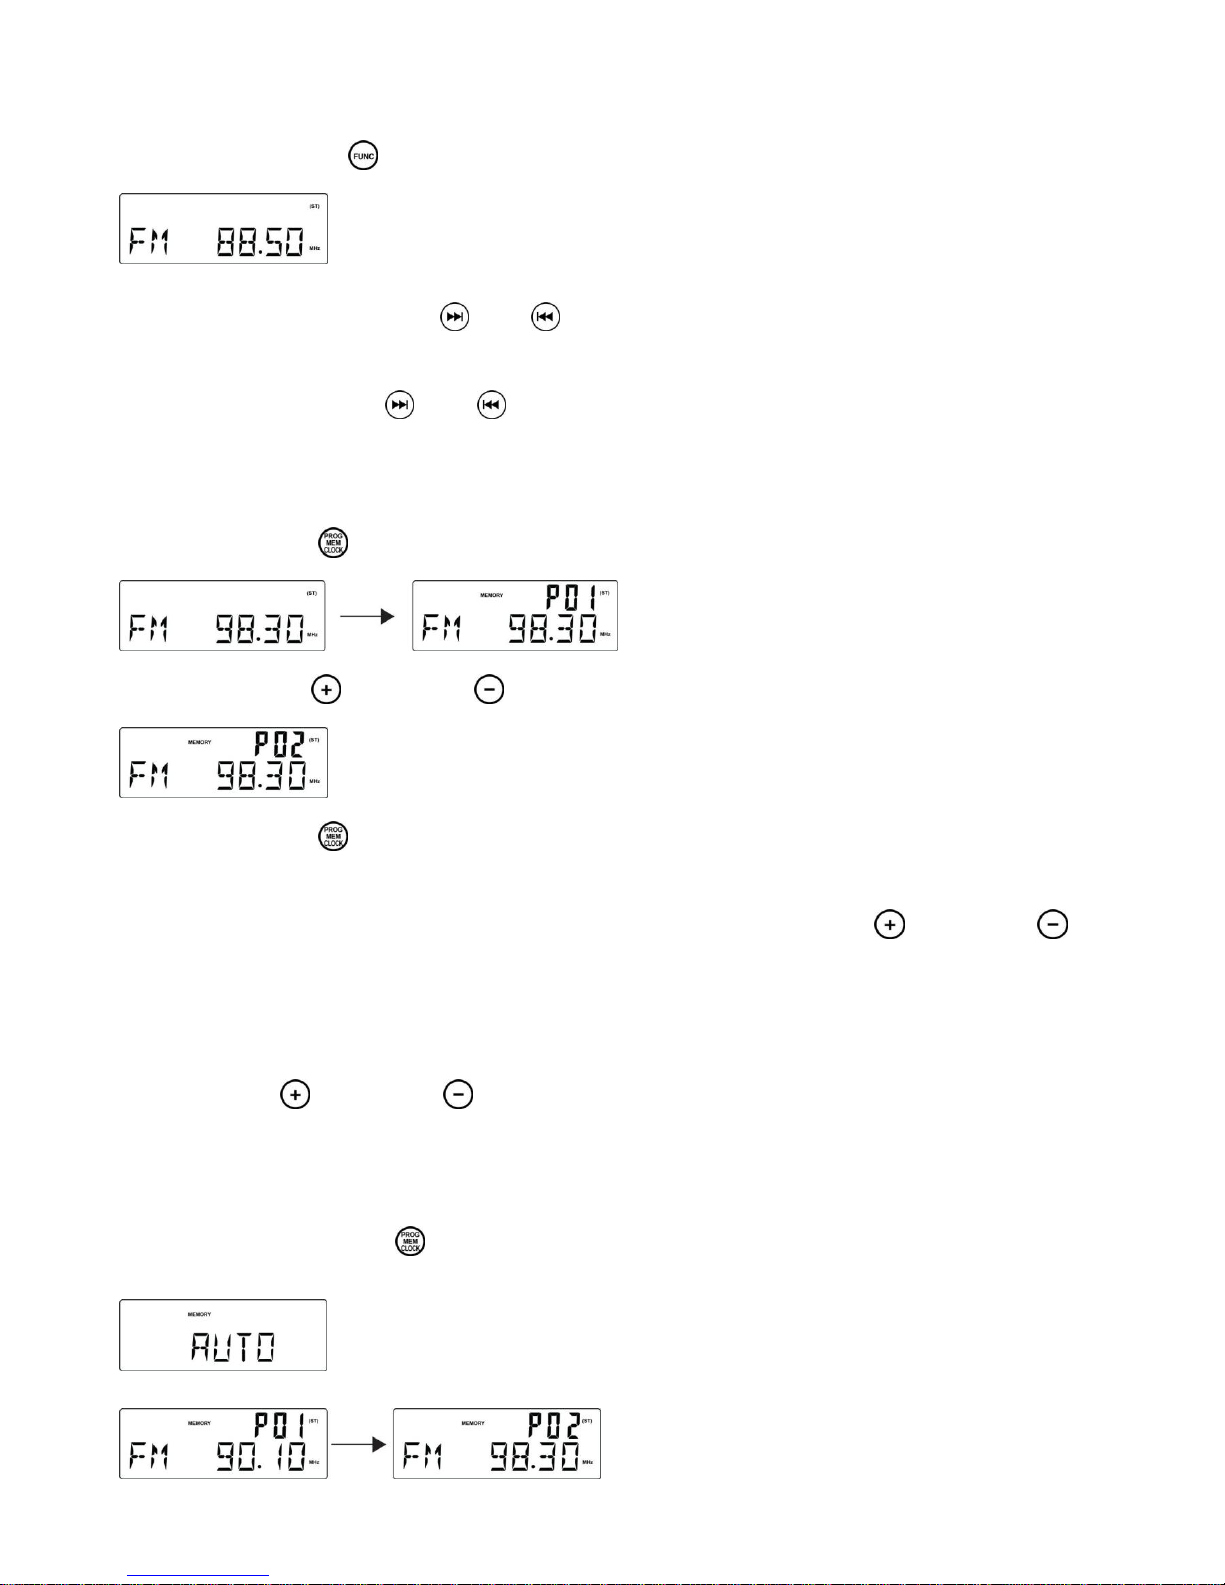
1. Press the FUNCTION / to set the unit to FM mode.
2. Auto Tuning – Press and hold FF / or FB / until frequency begins to scroll the radio automatically tunes to a
station with sufficient reception. If a station in received in stereo, (ST) is shown. Repeat step 3 if necessary until you
find the desired station.
3. Manual Tuning – Press FF / or FB / briefly and repeatedly until found a station.
Programming radio stations
You can store up to a total of 40 radio stations (FM and AM) in the memory, manually or automatically (Autostore)
1. Tune to your desired station
2. Press PROGRAM / to activate programming, icon ― MEMORY‖ and P01 will start flashing.
3. Press PRESET + / or PRESET – / to allocate a number from 1 to 20 stations.
4. Press PROGRAM / to confirm, display shows the preset number waveband and the frequency of the preset
station.
5. Repeat steps 1-4 to store other stations to listen to a preset station. Press PRESET + / or PRESET – / once
or more until the desired preset station in displayed.
To listen to a preset station
Press PRESET + / or PRESET – / once or more until the desired preset station in displayed.
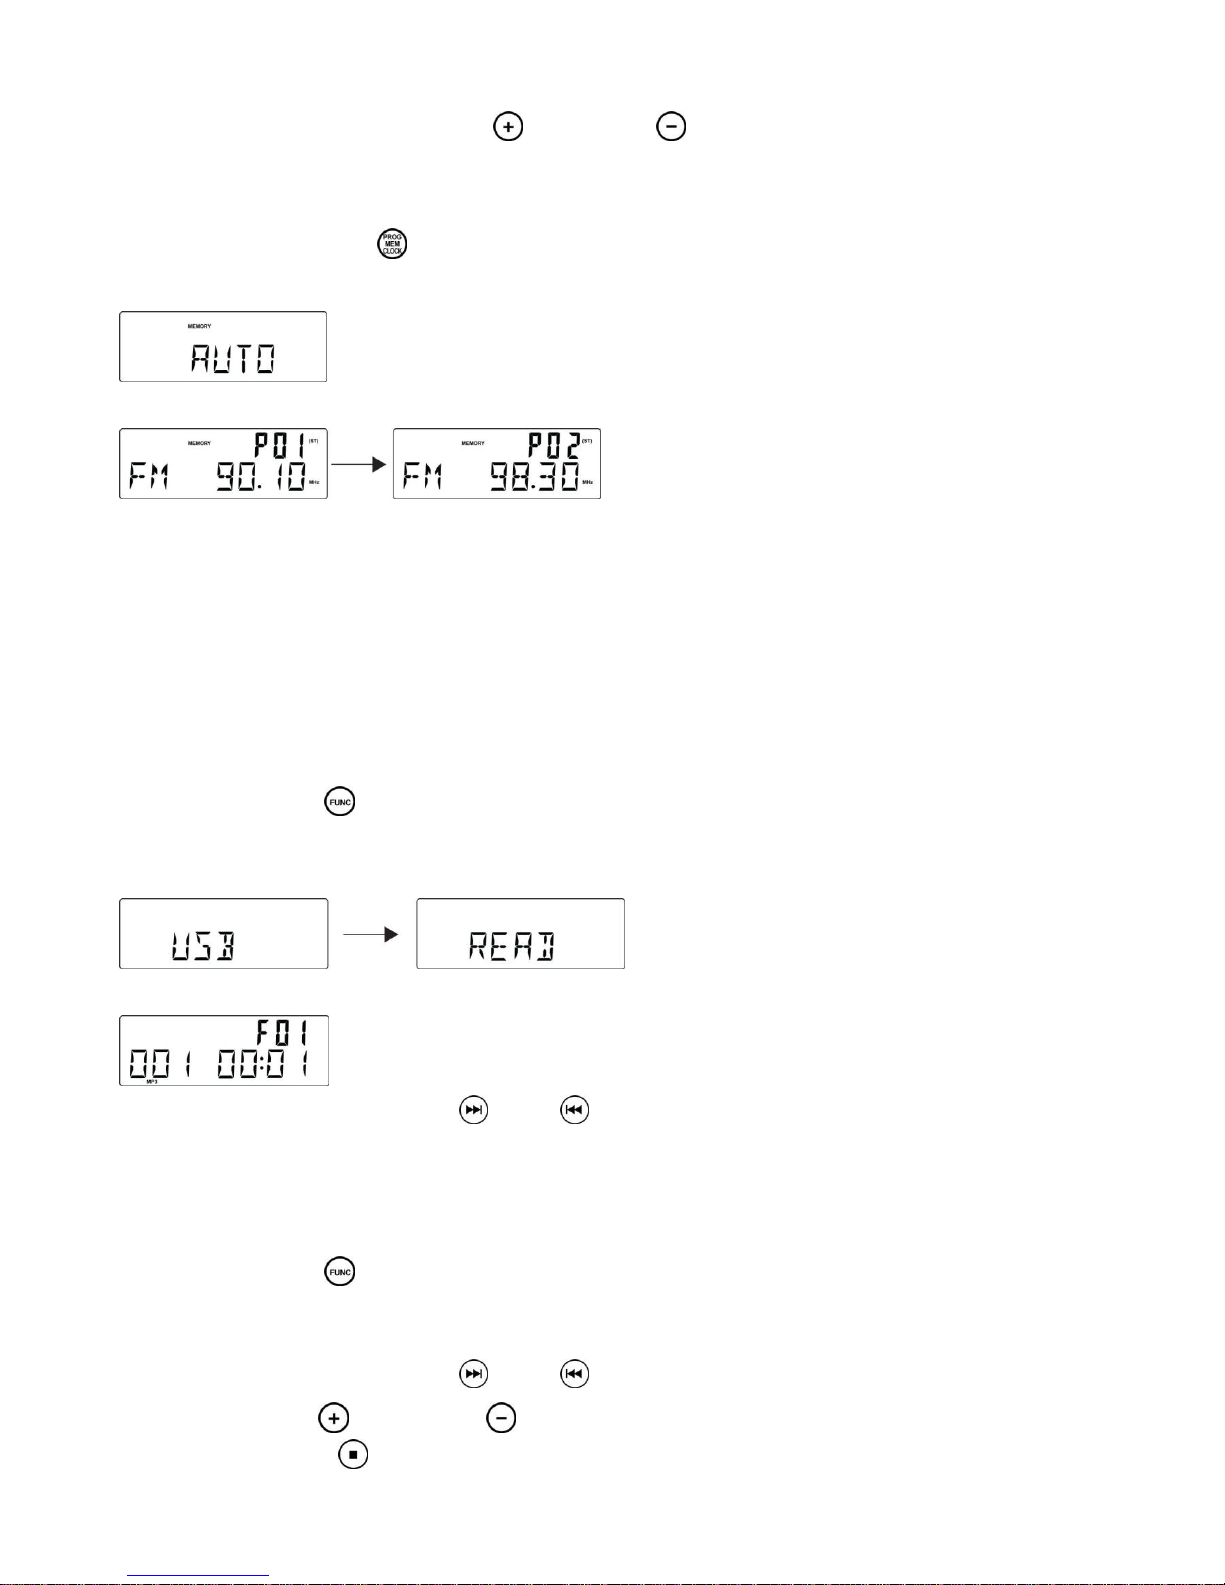
Automatic programming radio stations Automatic programming will station preset 1, from this preset number upwards,
former programmed tuner stations will be erased.
1. Press and hold PROGRAM / button until Auto appears
- Icon ― memory‖ will start flashing
- Available stations are programmed
- After all stations are stored, the last preset station will then be played
ANTENNA
Antenna: for FM reception, the unit is provided with a FM WIRE ANTENNA, move the wire until the reception is clear and
with no interferences.
USB & SD-CARD OPERATION
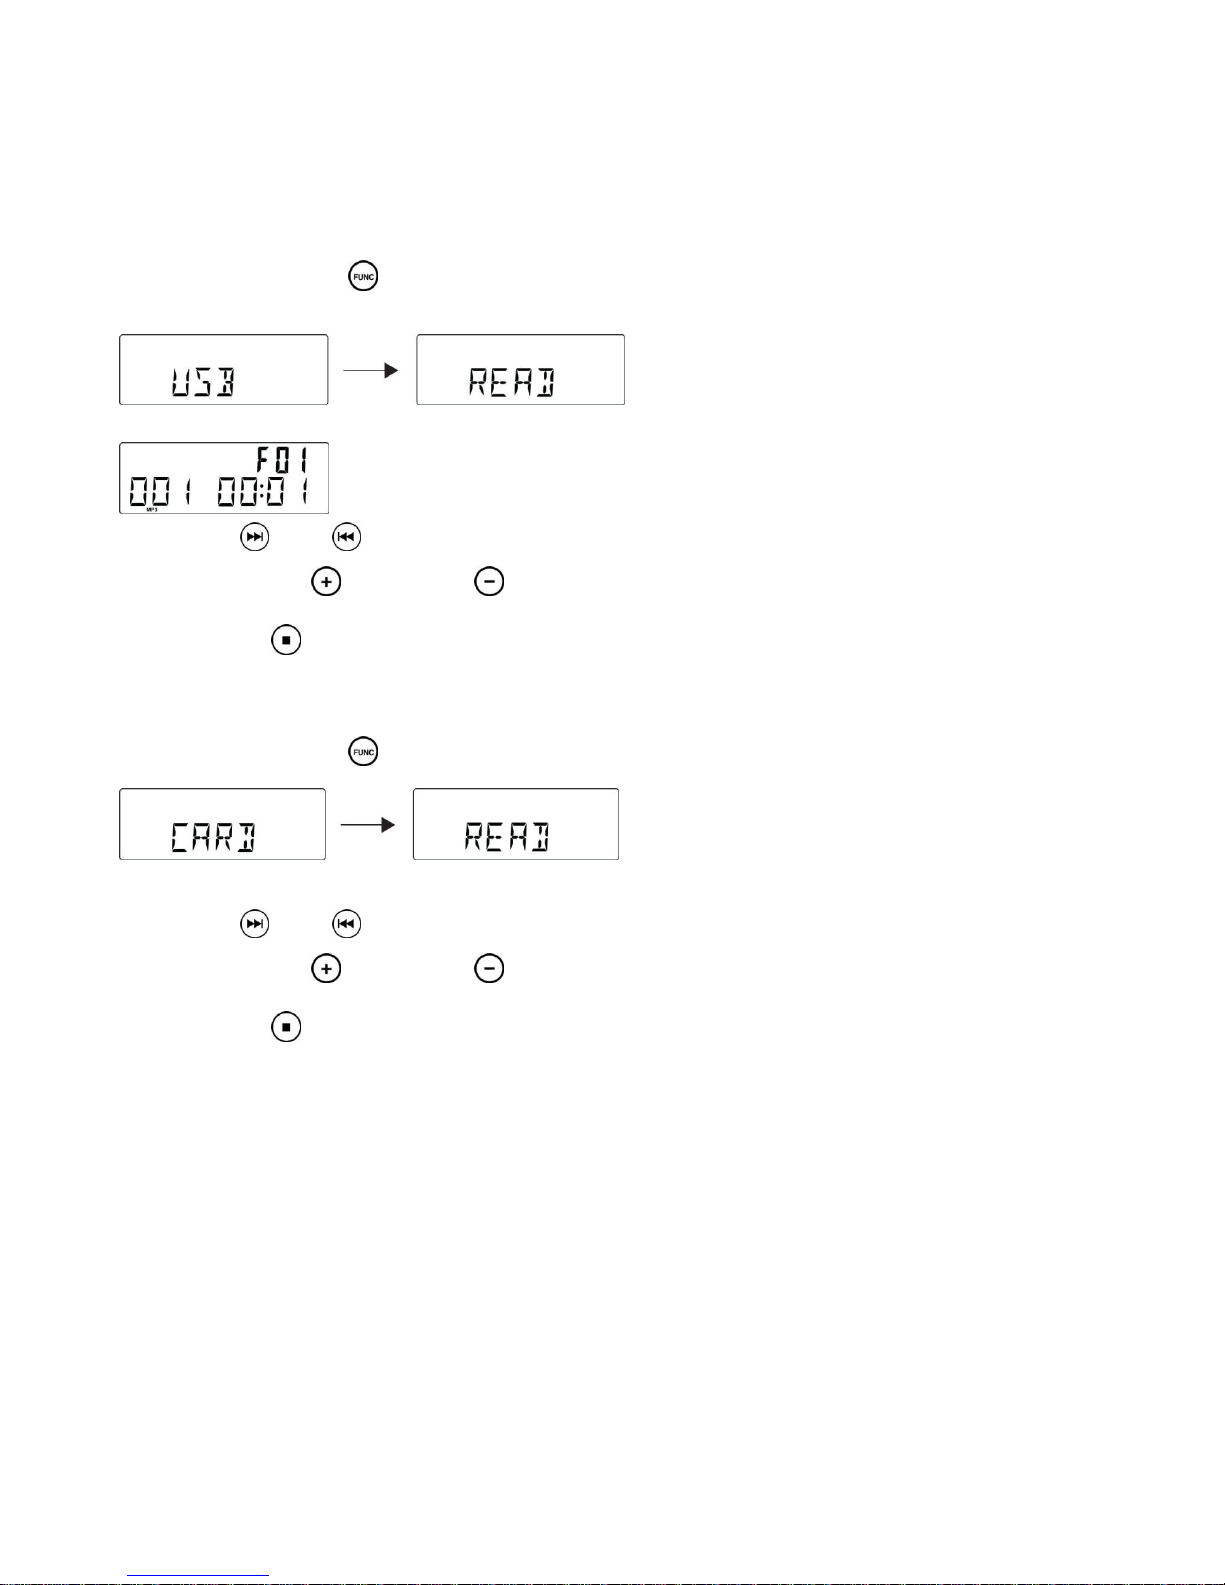
USB operation:
1. Press the FUNCTION / to set the unit to USB mode.
2. Plug-in USB mass storage device. READ is displayed as the system scans the contents of USB device.
3. Track no. 1 of root folder (Folder 1) will be playback automatically after finish reading USB device contents.
4. Press FF / or FB / once or repeatedly until the desired track number appears in display.
5. Press PRESET + / or PRESET – / to select desired album.
6. Press STOP / to stop playback.
SD-Card operation:
1. Press the FUNCTION / to set the unit to CARD mode.
2. Insert SD-Card into the card slot. ―READ‖ is displayed as the system scans the contents of SD card.
3. Track no. 1 of root folder (Folder 1) will be playback automatically after finish reading SD card contents.
4. Press FF / or FB / once or repeatedly until the desired track number appears in display.
5. Press PRESET + / or PRESET – / to select desired album.
6. Press STOP / to stop playback.
Remarks:
1) USB connector does not support connection with USB extension cable .
2) This unit is not designed for communication with computer directly.
3) It is not guarantee that all USB memory devices and SD cards will work on this audio system
IMPORTANT:
Do not disconnect the USB device during USB mode, as this may damage the external device or its files. Please power off
first or press another Mode before safely disconnecting the USB device.
USB Specification:
Interface
- USB 2.0 Full speed, HOST (USB HUB is not supported) Corresponding Flash memory
- Compatible with MPEG Audio 1, 2, 2.5
- Compatible with Layer 1, 2, 3
- Compatible with Bit rate: 128 – 320 Kbps
- Subfolder nest : 8 levels
- Number of track / titles max 999
- Support ID3 tag V2.0
TURNTABLE
PREPARING TO USE THE TURNTABLE
1. Remove black tie-wrap by untwisting and gently sliding out from TONE ARM .
2. Remove white protective needle cover by gently pulling towards front of unit.
3. Release TONE ARM and hold-down clip by gently pushing to the right. This will unlock tone arm from its ARM REST.
Re-lock the hold-down clip when moving the unit to another location.
TURNTABLE OPERATION
1. Press the FUNCTION / to set the unit to PHONO mode.
2. Set the SPEED CONTROL SWITCH to the correct speed (33 1/3, 45 or 78 rpm) for the selected record.
3. Pull the TONE ARM slightly to the right side until hear the "click" sound to activate the turntable.
4. Move the tone arm over the record and lower it to the point you want the record to start.
5. At the end of the record, the TONE ARM will stop automatically. You must return it to the TONE ARM REST by hand.
ACCESSORY SUPPLIED: Adaptor for 45 rpm records (if required)
To play a 45 rpm record, remove the adaptor by placing thumb & forefinger in recesses
and pulling it upwards. Then placing it on the SPINDLE. The record can then be placed on the turntable.
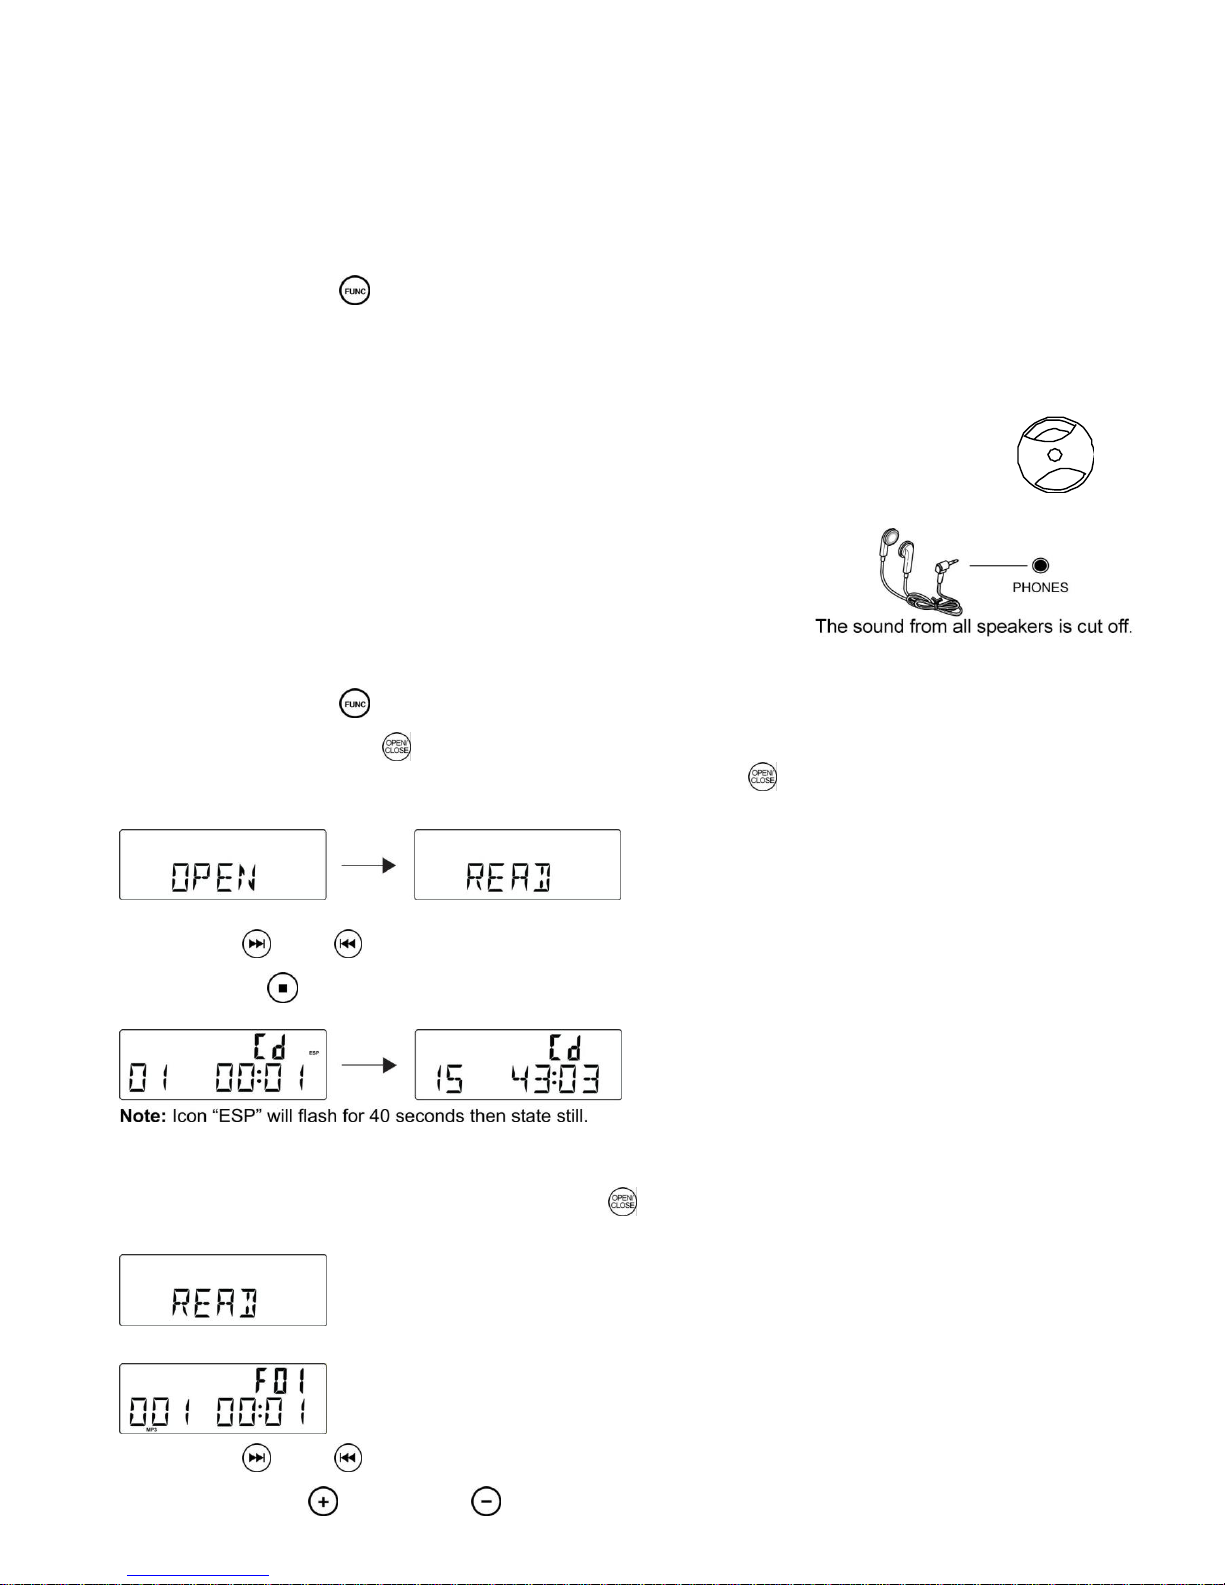
EARPHONE JACK OPERATION
Listening through Earphones / Headphones (not included)
CD PLAYER
Playing a CD
1. Press the FUNCTION / to set the unit to CD mode.
2. Press CD OPEN / CLOSE / to open the CD compartment
3. Insert a disc with the printed side facing up. Press CD OPEN / CLOSE / . again to close the compartment, READ
is displayed as the CD player scans the contents of a disc.
4. Track no. 1 will be playback automatically after finish the reading CD disc contents.
5. Press FF / or FB / once or repeatedly until the desired track number appears in display.
6. Press STOP / to stop playback.
CD-MP3 disc playback
1. Insert CD-MP3 format disc. Press CD OPEN / CLOSE / again to close the compartment. READ is displayed as the
CD player scans the contents of a disc.
2. Track no. 1 of root folder (Folder 1) will be playback automatically after finish reading CD-MP3 disc contents.
3. Press FF / or FB / once or repeatedly until the desired track number appears in display.
4. Press PRESET + / or PRESET – / to select desired album.
5. Press STOP / to stop playback.
PROGRAMMING TRACKS
You may store up to 20 tracks in the desired sequence.
1. In the stop position, press PROGRAM / to start programming.
Icon ―MEMORY‖ and P0-01 start flashing.
2. Press FF / or FB / once or repeatedly until the desired track
number appears in the display. For MP3:
press PRESET + / or PRESET – / to select the desired album.
3. Press PROGRAM / to confirm, display shown stored track no. and next store position.
4. Repeat step 2-3 to select and store all desired tracks. FULL is displayed if you attempt to
program more than 20 tracks
5. Press PLAY/PAUSE / to play the program.
Erasing the program
You can erase the contents of the memory by:
- once if in stop position, twice during playback;
- Press POWER /
- Select another sound source
- Open the CD door
RECORDING
From CD to SD/USB
The system is capable to convert whole CD disc to MP3 format and copy to USB mass storage device or SD card. And also
have the ability to copy one single MP3 track to and from on USB/SD card.
1. In CD playback mode, press REC / to start ripping to USB/SD card (default USB if both device are detected),
playback will be stopped and skipped back to the beginning of current track, system will scan the contents of USB/SD
card and create folder to store MP3 track. Resume CD playback and start ripping from the moment. The corresponding
target device icon ― USB ‖ / ― CARD ― start flashing.
2. Press STOP / to exit CD ripping.
MP3 copying
1. In CD-MP3, USB or SD card playback mode, press REC / to start MP3 copying from CD to USB/SD card, or USB
to SD card or vice versa. Playback will be stopped and system will scan the contents of USB/SD card and create
folder to store MP3 track.
2. icon ― REC displayed
3. Message COPY 01 will be displayed, the proportional copied percentage will be shown on the decimal number.
4. The target device icon ―USB‖ or ―CARD‖ start flashing, the decimal number will be increment from 01 as MP3 copying
starts, the process will stop as it reach 100
5. Current MP3 will be playback from beginning
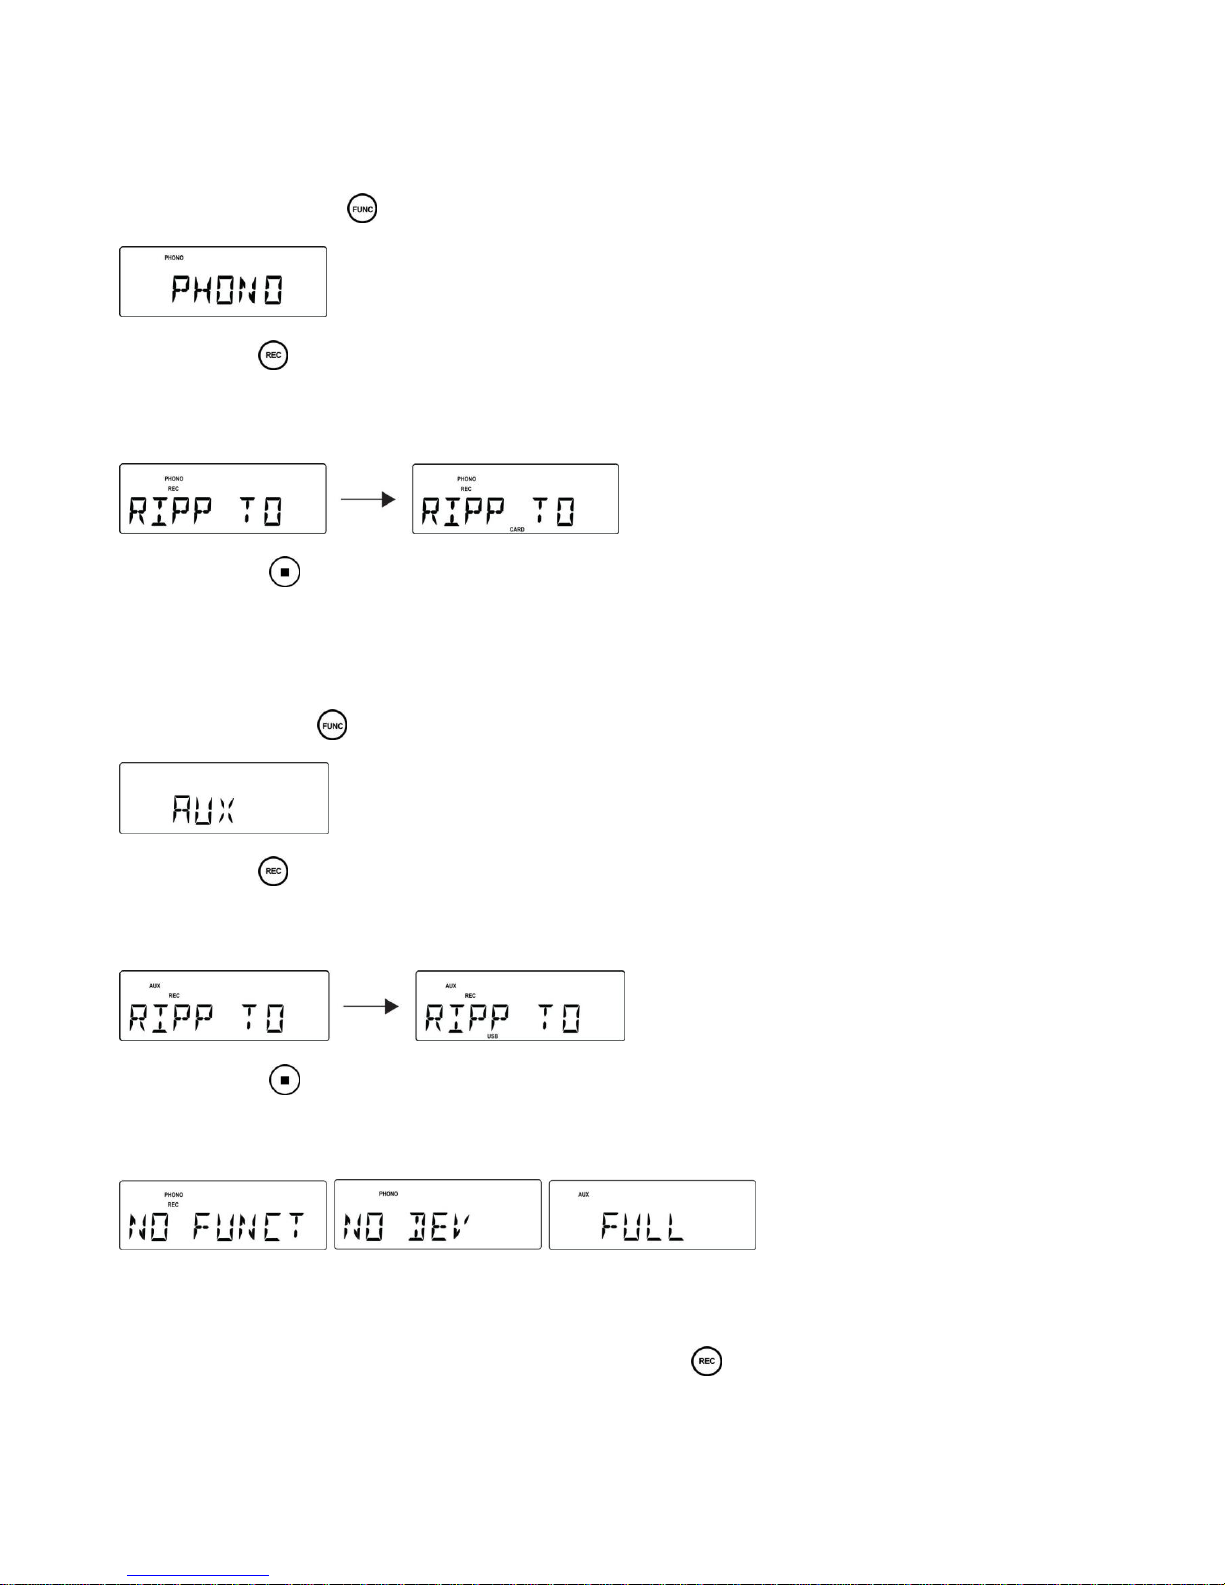
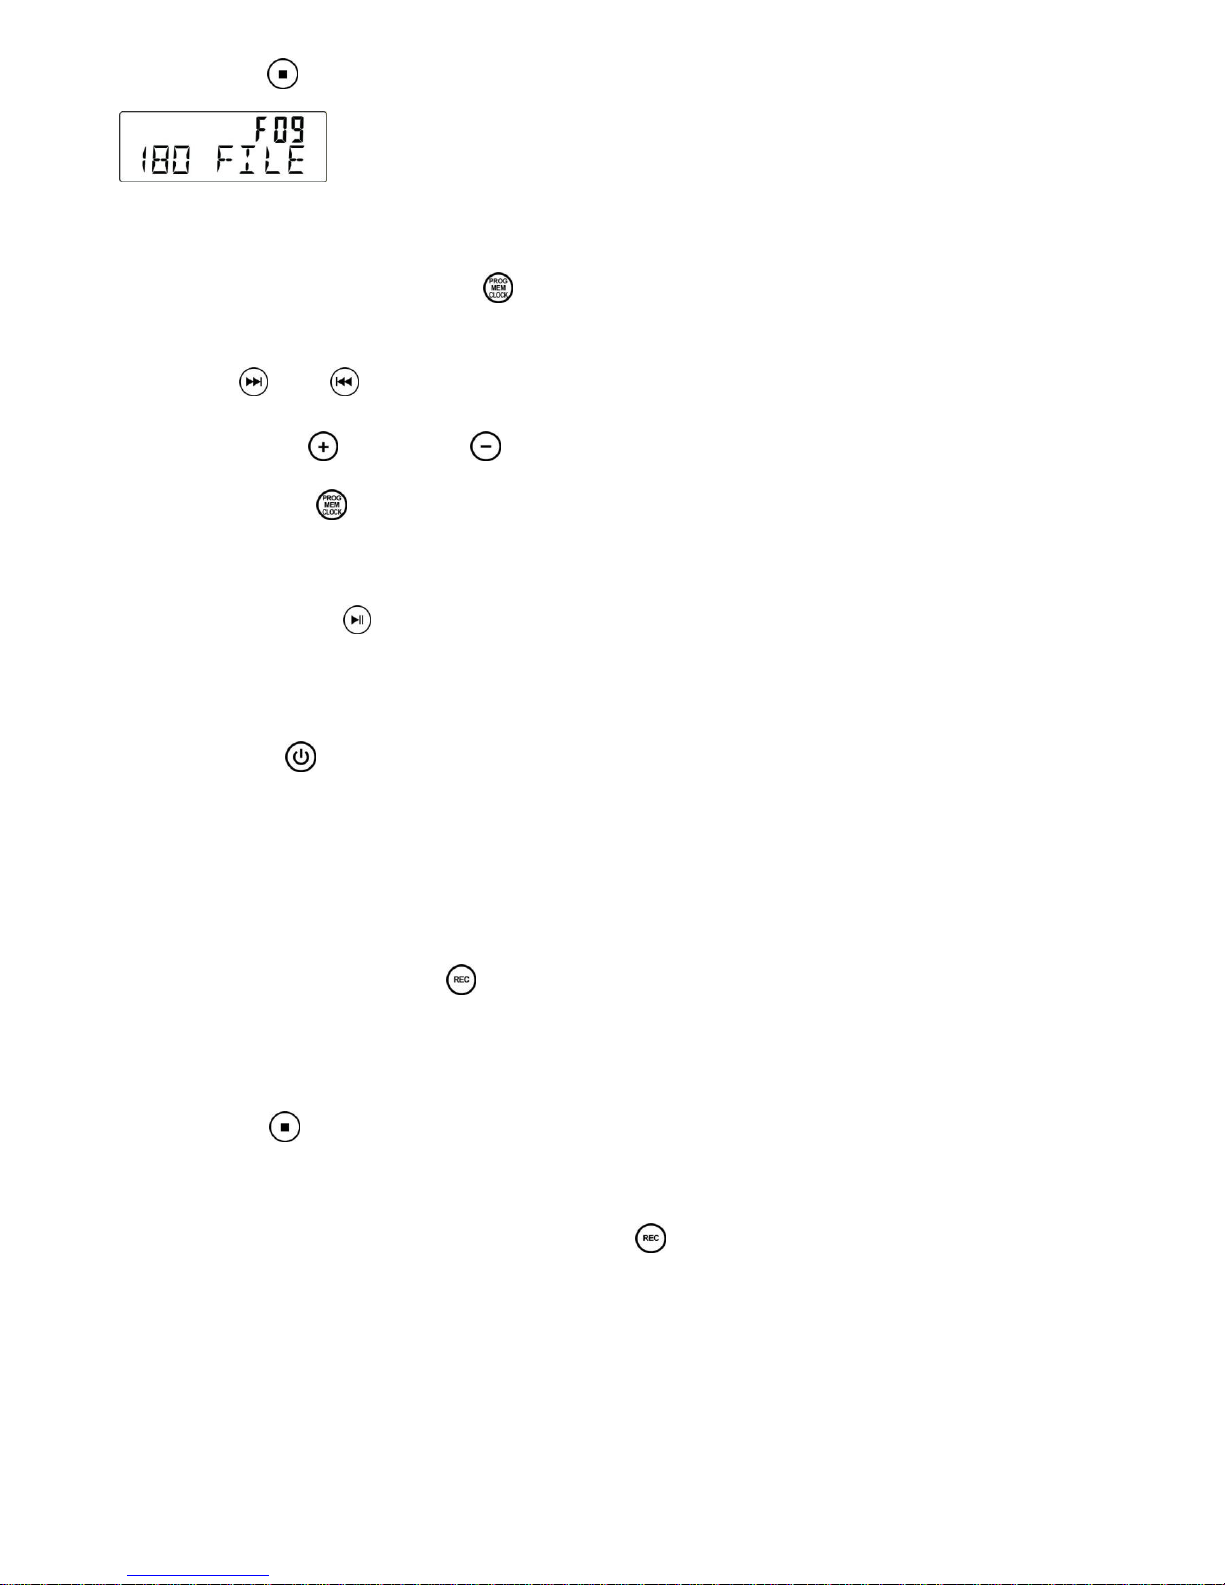
From Phono to SD / USB
The system is capable to convert audio signal from PHONO input to MP3 format and store in USB mass storage device or SD
card (default USB if both devices are detected)
1. Press the FUNCTION / to set the unit to PHONO mode.
2. Press REC / to start ripping, the system will scan the contents of USB/SD card and create folder to store MP3
tracks.
3. Icon ― REC ‖ and message ― RIPP TO‖ are displayed, icon ― PHONO ― start flashing.
4. The target device icon ― USB ‖ or ― CARD ‖ start flashing as ripping begins.
5. Press STOP / to exit PHONO ripping
From AUX to SD/USB
The system is capable to convert audio signal from AUX input to MP3 format and store in USB mass storage device or SD card
(default USB if both devices are detected).
1. Press FUNCTION / once or more to select AUX
2. Press REC / to start ripping, the system will scan the contents of USB / SD card and create folder to store
MP3 track.
3. Icon ―REC‖ and message ― RIPP TO ― are displayed, icon ― AUX ― start flashing.
4. The target device icon ― USB ― or ― CARD ― start flashing as ripping begins.
5. Press STOP / to exit AUX ripping
Note: The message ― NO FUNCT ― will be displayed if any key pressed during AUX ripping process. The message ―
NO DEV ― will be shown if neither USB or SD card not detected. The message ― FULL ― will be displayed if not enough
memory in target device.
Delete MP3 tracks
The system support deleting previous recorded MP3 or existing files.
1. In USB or SD card playback mode, press and hold REC/ERASE / for 2 seconds, current playback track is stopped
and will be deleted.
2. Message ― delete ― is displayed

OPTIONAL EXTERNAL SPEAKERS
1. With your new radio, you have the option of adding external speakers.
2. The speaker jacks for external speakers are located on the back of the radio.
Along with the speaker jacks is a switch labeled Int./Ext.
When using external speakers, this switch must be switched to the EXT. position. Doing this turns off the internal
speakers in the radio and redirects the power to the external speakers.
3. If you decide not to use the external speakers, be sure the switch is switch to INT.
REMOTE CONTROLS - BUTTON DESCRIPTION
(Note: This handset can be stored on one of the front magnetic panels of the cabinet, where indicated, provided
that a metal battery has been fitted).
(2) LIGHTING REMOTE CONTROL
LED LIGHTING CONTROL FUNCTION
To control the LED lighting use the Infra-red Remote Control handset, which has 28 buttons, the function of each button is
as in the table below:
Brightness+ (8 in all)
Brightness- (8 in all)
Run/Pause
Dimmer (Press and hold + 5 seconds)
RED (R)
GREEN (G)
BLUE (B)
WHITE (W)
ORANGE
LIGHT GREEN
DARK BLUE
7-colour fast colour change
DARK YELLOW
BLUE
BROWN
STROBE: Colour fade out & fade in -adjustable
YELLOW
LIGHT BLUE
PINK
FADE: 7-colour slow colour change -adjustable
Increase RED
Increase GREEN
Increase BLUE
SMOOTH: 3-colour slow colour change -adjustable
Decrease RED
Decrease GREEN
Decrease BLUE
DIY (adjustment of colour by the user)

TROUBLESHOOTING
There is no power
1. Make sure radio is plugged in correctly.
2. Look at the STAND BY INDICATOR and check to see if it is red.
3. If the red light is on, press the POWER / to turn the unit on.
There is no sound
1. Make sure the mute function is turned off.
2. Check that the volume is turned up by pressing VOLUME UP / on the remote.
Note: Volume range on some units start at level 15 and ends at level 40.
3. Make sure INT./EXT. switch on back of radio is switched to INT. (Unless you are using external
speakers, in which case it should be on EXT. )
4. Check to make sure power is turned on.
CD does not play
1. Check to make sure CD is inserted correctly (label side facing up).
2. Check to see that surface of CD is clean.
3. Make sure function switch is set to CD mode.
USB - There is no music playing when PLAY/PAUSE (USB) is pressed.
1. Make sure the MP3 device/Flash Drive has stored music files.
2. The unit will only play Flash Drives up to 512MB – 4GB
3. Reset USB by switching the unit Off or switching to another Mode.
4. Check if the file(s) is WMA file(s). The unit does not play WMA format, only MP3 format.
Remote not working
1. Replace battery.
2. Be sure to point the remote towards remote sensor when operating.
3. Remove obstacles in the path of the remote and radio so the remote signal has a straight path to the
radio.
Turntable will not work
1. Check it the AC Power source is connected.
2. Press the POWER /
(on front of unit or on RC) to turn the unit on, the STAND BY INDICATOR light
should be off.
3. Check that the unit is in PHONO Mode. Try moving the Tone Arm to the right until a click is heard.
No Sound is coming from the unit
1. The white protective needle cover has not been removed
2. The Volume is not turned up
The Tone Arm will not move
1. The black tie-wrap has not been removed from underneath Tone Arm.
2. Tone Arm hold down clip has not been released
Trademarks – MPEG Layer-3 audio coding technology licensed from Fraunhofer IIS and
Thomson

CUSTOMER SUPPORT
You can contact the Ricatech customer service when you have a question or a problem with your Ricatech
product. You can contact us by telephone and email.
Email
For customer support by email, please sent a email to support@ricatech.com Please make sure that
you mention the model number and serial number of the product, mention your name & address and
describe your question or problem clearly.
Telephone
For customer support by telephone, please dial +31(0)10-4626733. One of our service staff will be ready
to serve you. For full procedure please visit the website of Ricatech at: www.ricatech.com
WAARSCHUWING:
STEL DIT APPARAAT NIET BLOOT AAN REGEN OF VOCHT OM GEVAAR VOOR BRAND OF EEN ELEKTRISCHE
SCHOK TE VOORKOMEN. DE BEHUIZING NIET VERWIJDEREN. CONTROLELAMPJES ZIJN OP HET APPARAAT
GESOLDEERD. GEEN DOOR DE GEBRUIKER TE ONDERHOUDEN ONDERDELEN AAN DE BINNENKANT. LAAT
ONDERHOUD OVER AAN GEKWALIFICEERD ONDERHOUDSPERSONEEL.
Specificaties
Frequentiebereik : FM 87.5 - 108 MHz
USB Port 2.0 : Full Speed 512MB - 4GB
(Support FAT16, FAT32)
Antennes : Externe FM-draadantenne
Voedingsbron : DC15V 8A
Afmetingen luidspreker : 6 1/2‖ Dynamisch type x 2
Ohm luidspreker : 4 Ohm
Wattage luidspreker : 40W
Afmetingen luidspreker : 2 1/2‖ Tweeter type x2
Ohm luidspreker : 8 Ohm
Wattage luidspreker : 10W
Voedingsuitgang : 12W x 2
*SPECIFICATIES EN UITERLIJK KUNNEN WORDEN GEWIJZIGD ZONDER KENNISGEVING.
Het symbool van de bliksemflits met pijlkop, in
een gelijkzijdige driehoek, is bedoeld om de
gebruiker attent te maken op de aanwezigheid van
nietgeïsoleerde "gevaarlijke spanning" in de
behuizing van het product die zo hoog kan zijn dat
ze gevaar voor een elektrische schok
betekent voor personen.
CAUTION
GEVAAR VOOR
ELEKTRISCHE SCHOK,
NIET OPENEN
OPGELET: OM HET GEVAAR VOOR EEN
ELEKTRISCHE SCHOK TE VERMINDEREN,
BEHUIZING (OF ACHTERKANT) NIET
VERWIJDEREN. GEEN DOOR DE GEBRUIKER TE
ONDERHOUDEN ONDERDELEN AAN DE
BINNENKANT. LAAT ONDERHOUD OVER AAN
GEKWALIFICEERD ONDERHOUDS PERSONEEL.
Het uitroepteken in een gelijkzijdige driehoek is
bedoeld om de gebruiker attent te maken op de
aanwezigheid van een belangrijke instructie voor
bediening en onderhoud (service) in de
documentatie bij het apparaat.

Gebruikers handleiding
BELANGRIJKE VOORZORGSMAATREGELEN VOOR AUDIOPRODUCTEN
LEES AANDACHTIG DE VOLGENDE BELANGRIJKE VOORZORGSMAATREGELEN DIE VAN
TOEPASSING ZIJN OP UW APPARATUUR.
1. Instructies lezen - Alle veiligheids- en bedieningsinstructies moeten worden gelezen voordat het apparaat wordt gebruikt.
2. Instructies bewaren - De veiligheids- en bedieningsinstructies moeten worden bewaard voor raadpleging in de toekomst.
3. Aandacht besteden aan waarschuwingen - Alle waarschuwingen op het apparaat en in de bedieningsinstructies
moeten in acht worden genomen.
4. Instructies opvolgen - Alle bedienings- en gebruiksinstructies moeten worden opgevolgd.
5. Water en vocht - Het apparaat mag niet worden gebruikt in de buurt van water, bijvoorbeeld nabij een badkuip,
wasbak, gootsteen, wastobbe, in een vochtige kelder of nabij een zwembad en dergelijke.
6A. Karretjes en staanders - Het apparaat mag alleen worden gebruikt met een karretje of staander aanbevolen door de fabrikant.
6A. Een apparaat op een karretje moet voorzichtig worden verplaatst. Bruusk stoppen, overmatige kracht en oneffen
oppervlakken kunnen het karretje met apparaat doen omkantelen.
7. Wand- of plafondbevestiging - Het apparaat mag aan een wand of plafond alleen worden bevestigd volgens de
aanbevelingen van de fabrikant.
8. Ventilatie - De plaats en de stand van het apparaat mogen correcte ventilatie niet belemmeren. Het apparaat mag
bijvoorbeeld niet op een bed, sofa, vloerkleed of dergelijk oppervlak worden geplaatst aangezien de
ventilatieopeningen kunnen worden geblokkeerd; en evenmin in een ingebouwde installatie zoals een boekenrek of
kast aangezien de luchtstroom door de ventilatieopeningen kan worden belemmerd.
9. Warmte - Het apparaat moet verwijderd zijn van warmtebronnen zoals radiators, warmteregisters, kachels of andere
toestellen (inclusief versterkers) die warmte produceren.
10. Voedingsbronnen - Het apparaat mag alleen worden aangesloten op een voeding van het type beschreven in de
bedieningsinstructies of aangegeven op het apparaat.
11. Aarding of polarisatie - Er moeten voorzorgsmaatregelen worden genomen zodat de middelen voor aarding of
polarisatie van een apparaat niet worden belemmerd.
12. Voeding - Netsnoerbescherming – Netsnoeren moeten zodanig worden geleid dat de kans om erop te trappen of ze
te knellen met voorwerpen die erop of ertegen staan minimaal is, met bijzondere aandacht voor netsnoeren aan
stekkers en op de plaats waar ze het apparaat verlaten.
13. Reiniging - Het apparaat mag alleen worden gereinigd volgens de aanbevelingen van de fabrikant.
14. Dit product is ontworpen voor gebruik met de bevestigde antenne en mag niet worden aangesloten op andere
externe antennes.
15. Perioden van niet-gebruik - Het netsnoer van het apparaat moet uit het stopcontact worden getrokken wanneer het
apparaat lange tijd niet wordt gebruikt.
16. Voorwerpen en vloeistoffen in het apparaat - U dient voorzichtig te zijn dan er geen voorwerpen vallen of
vloeistoffen worden gemorst in de behuizing via openingen
17. Schade die onderhoud vereist - Het apparaat moet door gekwalificeerd onderhoudspersoneel worden
onderhouden wanneer:
A. Het netsnoer van de stekker beschadigd is; of
B. Voorwerpen zijn gevallen of vloeistoffen zijn gemorst in het apparaat; of
C. Het apparaat werd blootgesteld aan regen; of
D. Het apparaat niet normaal lijkt te werken of de prestaties opvallend zijn gewijzigd; of
E. Het apparaat is gevallen, of de behuizing beschadigd is.
18. Onderhoud - De gebruiker mag niet proberen onderhoud van het apparaat uit te voeren behalve het onderhoud beschreven in de
bedieningsinstructies. Alle andere onderhoudswerkzaamheden moeten
worden uitgevoerd door gekwalificeerd onderhoudspersoneel.
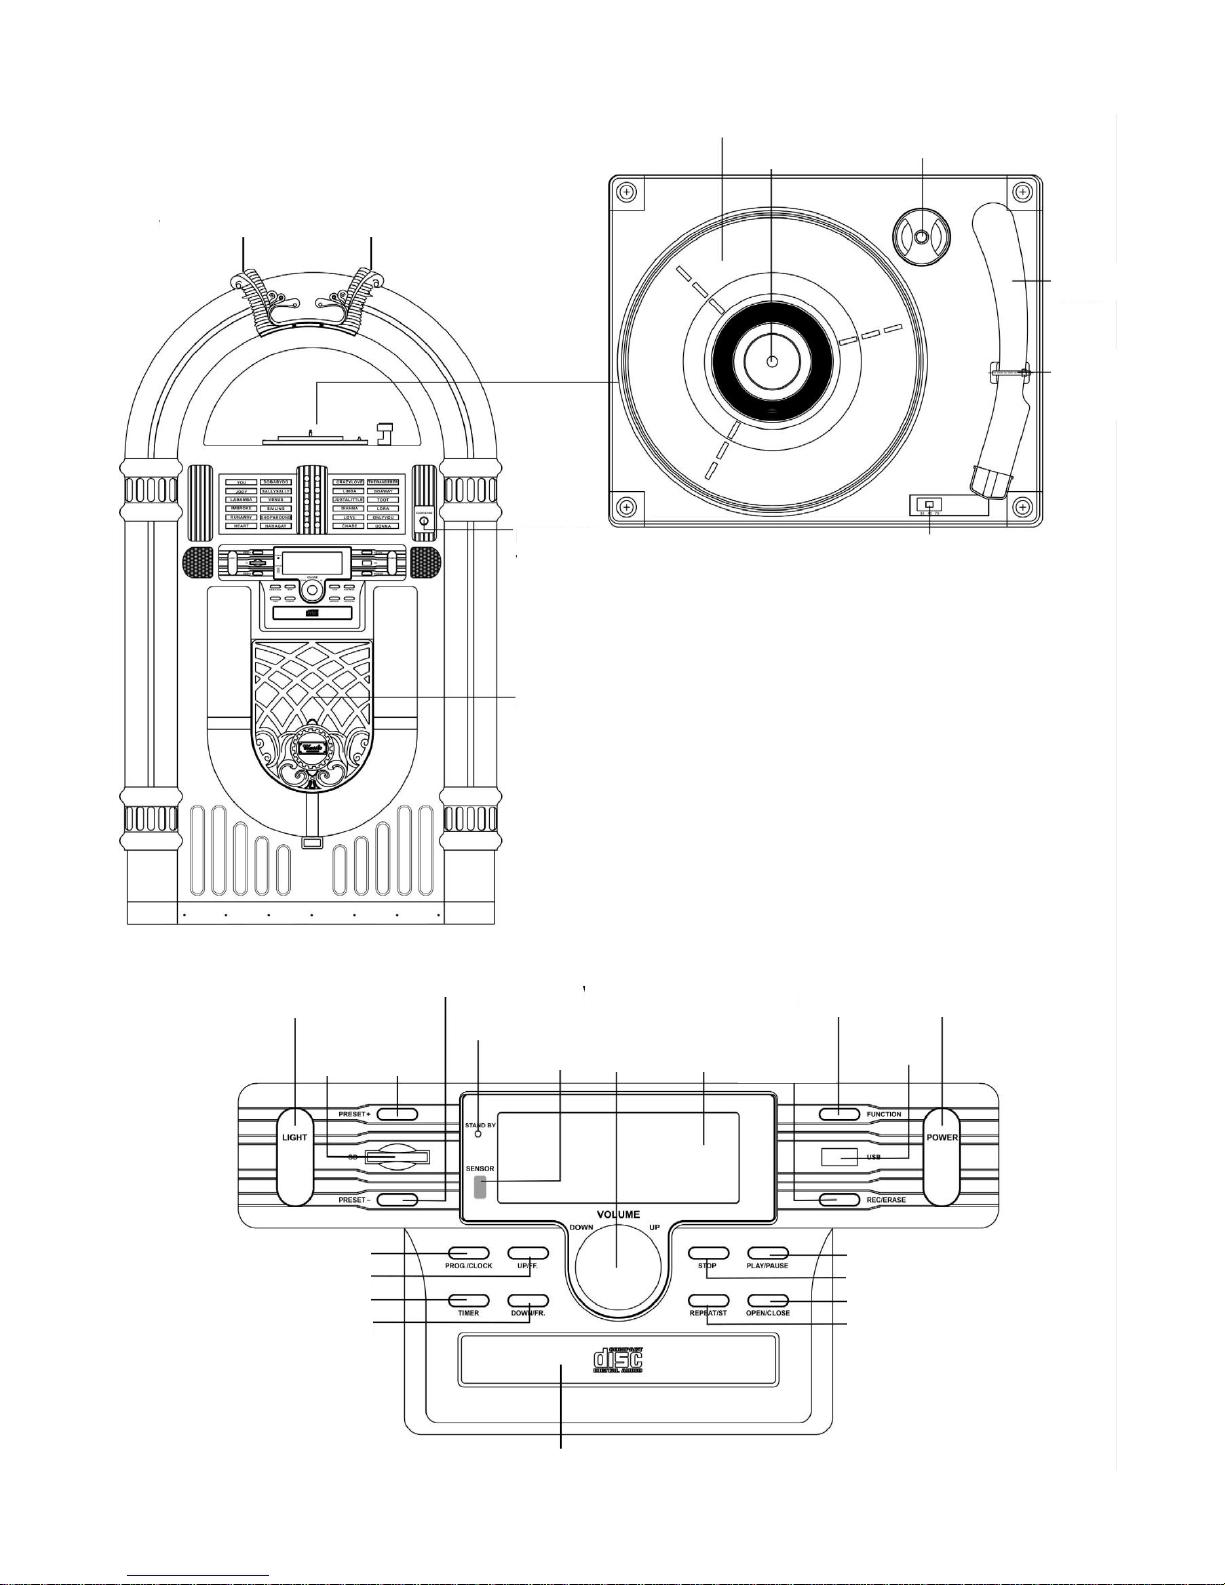
CONTROL LOCATOR
Volume -
Volume +
DRAAITAFEL
SPIL
ADAPTER VOOR 45-
TOERENPLATEN
TOONARM
TOONARM
STEUN
TOERENTALREGELAAR
(33 1/3, 45 ,78 toeren)
OORTELEFOONAANSLUITING
LUIDSPREKER
VERLICHTING
VOORINSTELLEN -
VOORINSTELLEN +
SD KAART
STAND-BYINDICATOR
SENSOR
VOLUME
OMHOOG/
OMLAAG-KNOP
LCD-SCHERM
OPNEMEN/
WISSEN
FUNCTIE
VOEDING
USBPOORT
PROGRAMMEREN
OMHOOG/VOORUITSPOELEN
TIMER
OMLAAG/TERUGSPOELEN
CD-DEUR
AFSPELEN/PAUZEREN
STOP/BAND
CD OPENEN/SLUITEN
HERHALEN/STEREO
CONTROL LOCATORS
EXTERNE ANTENNE
VOEDING / STAND-BY
EQ
VOORINSTELLEN +
OPNEMEN
VOORINSTELLEN -
AFSPELEN/PAUZEREN
TERUGSPOELEN
WILLEKEURIG
ID3
STOP
0-9
CD OPENEN /
SLUITEN
DEMPEN
SLUIMER
VOLUME+
FUNCTIE
VOLUME-
VOORUITSPOELEN / +
PROGRAMMEREN
HERHALEN
TIMER
MONO/STEREO
BACKUP VAN BATTERIJ
HOOFDSCHAKELAAR
VERLICHTING
SCHAKELAAR
AUX IN AANSLUITING
12 V-UITGANGSAANSLUITING
LUIDSPREKER
INT. / EXT.-
SCHAKELAAR
AANSLUITING VOOR EXTERNE LUIDSPREKER
POWER SOURCE
1. Maak de draad op het wisselstroomsnoer los
2. Sluit de voedingsadapter aan op het apparaat.
3. Sluit het netsnoer aan op de stopcontact.
UW APPARAAT INSCHAKELEN
Sluit het wisselstroomsnoer aan op het stopcontact. Dit systeem wordt automatisch in stand-bymodus gezet en het LCD
toont het onderstaande
Druk om het apparaat in te schakelen op POWER / , de LCD-achtergrondverlichting gaat aan. Het
STAND-BY-ledlampje gaat uit en het onderstaande wordt weergegeven.
Hoofdbediening
Functie selecteren
1. Druk op FUNCTION / om te kiezen tussen:
2. Wanneer het toestel ingeschakeld is, drukt u op POWER / om het apparaat uit te
schakelen. De LCD-achtergrondverlichting gaat uit en het bericht"GOOD BYE" wordt 2
seconden weergegeven, daarna gaat het STAND-BY-ledlampje aan.
Opmerking: In de stand-bymodus worden de toon- en geluidsinstellingen, voorinstellingen van de tuner en het
volumeniveau (tot een maximaal volumeniveau van 30) opgeslagen in het geheugen van het apparaat.
BACK-UP VAN BATTERIJ
Het back-upsysteem van de batterij bewaart uw klok- en wekkerinstellingen tijdens een stroomonderbreking. In geval van
een stroomonderbreking bewaart de back-up van de batterij uw tijd- en wekkerinstellingen tot de stroom wordt hersteld.
Om gebruik te maken van de batterijback-up moet u twee AAA-batterijen plaatsen. De back-up van de batterij werkt alleen
als batterijen zijn geplaatst. Voor het plaatsen van batterijen volgt u de onderstaande instructies.
1 Verwijder het deksel van het batterijvak op de achterzijde van het apparaat.
2 Plaats twee nieuwe AAA-batterijen in de juiste richting zoals getoond aan de binnenkant van het batterijdeksel.
3 Breng het deksel van het batterijvak weer aan.
OPMERKING:
Gebruik geen verschillende batterijen.
Gebruik geen oude en nieuwe batterijen samen
De klok instellen
Nadat u het systeem op de voeding hebt aangesloten, stelt u eerst de klok in.
1. Druk op POWER / om het apparaat in stand-bymodus te zetten
- Het display toont de tijd
- "0:00" knippert standaard als u de klok niet hebt ingesteld
2 Houd in de stand-bymodus PROGRAM / ingedrukt gedurende meer dan 1 seconde.
- Het cijfer van het uur begint te knipperen
3. Druk herhaaldelijk op FF / of FB / om het uur in te stellen.
4. Druk opnieuw op PROGRAM / om te bevestigen. Het cijfer van de minuten begint te knipperen
5. Houd FF / of FB / herhaaldelijk ingedrukt om de minuten in te stellen.
6. Druk opnieuw op PROGRAM / om te bevestigen.
Het cijfer van de minuten stopt met knipperen, de klok begint te lopen.
7. Druk op PROGRAM / om te kiezen tussen 12- en 24-uurweergave, zoals hieronder getoond
De timer instellen
Het apparaat kan als een wekker worden gebruikt, waarbij het afspelen van de geselecteerde bron (CD, TUNER, USB,
SD CARD OF PHONO) start op een vooringestelde tijd. Zorg dat de klok is ingesteld voordat u de timer gebruikt.
1. Houd in de stand-bymodus TIMER / op de afstandsbediening langer dan 1 seconde ingedrukt, het pictogram " "
en het bericht " TURN ON" beginnen te knipperen. Druk opnieuw op TIMER /
op de afstandsbediening om de
instelling van de timer "SYSTEEMVOEDING AAN" te starten.
2. Druk herhaaldelijk op FF / o FB / om het uur in te stellen.
3. Druk op TIMER / op de afstandsbediening om naar de modus voor instelling van minuten te gaan.
4. Druk herhaaldelijk op FF / o FB / om de minuten in te stellen.
5. Druk opnieuw op TIMER / op de afstandsbediening om de instelling van de timer "SYSTEEMVOEDING UIT" te
starten. Het pictogram " " en het bericht "TURN OFF" beginnen te knipperen. Druk opnieuw op TIMER / op de
afstandsbediening
om de instelling van de timer te starten.
6. Druk herhaaldelijk op FF / o FB / om het uur in te stellen.
7. Druk op TIMER / op de afstandsbediening om naar de modus voor instelling van minuten te gaan.
8. Druk herhaaldelijk op FF / o FB / om de minuten in te stellen.
9. Druk opnieuw op TIMER / op de afstandsbediening om de instelling van de bron voor het wekken te starten. De
TUNER-modus is standaard ingesteld. Het bericht TUNER begint te knipperen.
10. Druk op FUNCTION / om de bron voor het wekken te selecteren.
Het apparaat wordt ingeschakeld in de laatst afgestemde zender als de TUNER-modus is geselecteerd.
11. Druk opnieuw op TIMER / op de afstandsbediening om de instelling van timer aan/uit te voltooien. Het pictogram
" " blijft op het LCD staan als de timer is ingesteld.
Opmerking: het wekgeluidsniveau wordt langzaam verhoogd tot het vooringestelde volumeniveau.
12. Druk op TIMER / op de afstandsbediening om de instelling van timer aan/uit te voltooien. Het pictogram " " is
respectievelijk aan/uit.
SLUIMER
U kunt een bepaalde tijdsduur instellen waarna het toestel in stand-by wordt gezet.
Druk op de afstandsbediening herhaaldelijk op SLEEP / om de gewenste tijdsduuroptie (in minuten) te selecteren:
- Het display toont achtereenvolgens: SLEEP 90, 80, 70, 60, 50, 40, 30, 20, 10
- Het display toont kort de geselecteerde optie en keert terug naar de vorige status.
Om de sluimertimer te annuleren, drukt u opnieuw op SLEEP / tot "00 " of drukt u op POWER/ om het apparaat
in de stand-bymodus te zetten.
Volume control
Volumeregeling
Druk op VOLUME UP / / VOLUME DOWN / op de afstandsbediening om het volume te regelen.
DEMPEN
U kunt het geluid tijdelijk uitschakelen zonder het apparaat uit te schakelen.
1. Druk op MUTE / op de afstandsbediening om het geluid uit te schakelen, het afspelen gaat verder zonder geluid.
2. Om het geluid weer in te schakelen, kunt u:
- opnieuw op MUTE / drukken;
- de volumeregelknoppen bedienen;
- de bron wijzigen
EQ
Druk op EQ /
op de afstandsbediening om de gewenste EQ-modus te selecteren.
5 vooringestelde EQ-modi:
RADIO
Afstemmen op AM/FM
1. Druk op FUNCTION / om het apparaat in TUNER-modus te zetten.
2. Automatisch afstemmen - Houd FF / or FB / ingedrukt tot de frequentie begint te rollen, de radio stemt
automatisch af op een zender met voldoende goede ontvangst. Als een zender in stereo wordt ontvangen, wordt (ST)
getoond. Herhaal stap 3 indien nodig tot u de gewenste zender vindt.
3. Handmatig afstemmen – Druk kort en herhaaldelijk op FF / or FB / tot u een zender hebt gevonden.
Radiozenders programmeren
U kunt in totaal maximaal 40 radiozenders (FM en AM) in het geheugen opslaan, handmatig of automatisch (Autostore)
1. Stem af op de gewenste zender
2. Druk op PROGRAM / om het programmeren te activeren, het pictogram " MEMORY" en P01 beginnen te
knipperen.
3. Druk op PRESET + / or PRESET – / om een aantal van 1 tot 20 zenders toe te wijzen.
4. Druk op PROGRAM / om te bevestigen, het display toont de golfband van het vooringestelde nummer en de
frequentie van de vooringestelde zender.
5. Herhaal stappen 1-4 om andere zenders op te slaan om naar een vooringestelde zender te luisteren. Druk een of
meerdere keren op PRESET + / or PRESET – / tot de gewenste vooringestelde zender wordt weergegeven.
Naar een vooringestelde zender luisteren
Druk een of meerdere keren op PRESET + / or PRESET – / tot de gewenste vooringestelde zender wordt
weergegeven. Radiozenders automatisch programmeren Bij het automatisch programmeren worden zenders
vooringesteld, te beginnen met nummer 1, eerder geprogrammeerde radiozenders worden gewist.
1. Houd de knop PROGRAM / ingedrukt tot Auto verschijnt -
- Het pictogram " memory" begint te knipperen
- Beschikbare zenders worden geprogrammeerd
Nadat alle zenders zijn opgeslagen, wordt de laatst vooringestelde zender afgespeeld
ANTENNE
Antenne: voor FM-ontvangst is het apparaat uitgerust met een FM-DRAADANTENNE, verplaats de draad tot de
ontvangst zuiver en zonder storingen is.
USB & SD-KAART GEBRUIKEN
USB gebruiken :
1. Druk op FUNCTION / om het apparaat in USB-modus te zetten.
2. Sluit het USB-massaopslagapparaat aan. READ wordt weergegeven terwijl het systeem de inhoud van het USB
apparaat scant.
3. Track nr. 1 van de hoofdmap (Map 1) wordt automatisch afgespeeld nadat de inhoud van het USB-apparaat is gelezen.
4. Druk eenmaal of herhaaldelijk op FF / or FB / tot het gewenste tracknummer in het display verschijnt.
5. Druk op PRESET + / of PRESET – / om het gewenste album te selecteren.
6. Druk op STOP/BAND / om het afspelen te stoppen.
SD-kaart gebruiken:
1. Druk op FUNCTION / om het apparaat in CARD-modus te zetten.
2. Plaats de SD-kaart in de kaartsleuf. "READ" wordt weergegeven terwijl het systeem de inhoud van de SD-kaart scant.
3. Track nr. 1 van de hoofdmap (Map 1) wordt automatisch afgespeeld nadat de inhoud van de SD-kaart is gelezen.
4. Druk eenmaal of herhaaldelijk op FF / or FB / tot het gewenste tracknummer in het display verschijnt.
5. Druk op PRESET + / of PRESET – /
om het gewenste album te selecteren.
6. Druk op STOP/BAND /
om het afspelen te stoppen.
 Loading...